EMS Technologies Canada AH1 Aviation Handset User Manual XX XXXXX XXXXX XX
EMS Technologies Canada, Ltd. Aviation Handset XX XXXXX XXXXX XX
Exhibit D Users Manual per 2 1033 b3

OM - 23-15-85
© Honeywell International Inc. Do not copy without express permission of Honeywell.
Operator’s Manual
Aspire Aviation Handset

OPERATOR’S MANUAL
Page 2 OM - 23-15-85
3 Oct 2012
© Honeywell International Inc. Do not copy without express permission of Honeywell.
Honeywell-Confidential
THIS COPYRIGHTED WORK AND ALL INFORMATION ARE THE PROPERTY OF HONEYWELL
INTERNATIONAL INC., CONTAIN TRADE SECRETS AND MAY NOT, IN WHOLE OR IN PART, BE
USED, DUPLICATED, OR DISCLOSED FOR ANY PURPOSE WITHOUT PRIOR WRITTEN
PERMISSION OF HONEYWELL INTERNATIONAL INC. ALL RIGHTS RESERVED.
Honeywell Materials License Agreement
The documents and information contained herein ("the Materials") are the proprietary data of
Honeywell International Inc. and Honeywell Intellectual Properties Inc (collectively "Honeywell").
These Materials are provided for the exclusive use of Honeywell Service Centers; Honeywell-
authorized repair facilities; operators of Honeywell aerospace products subject to an applicable
product support agreement, their wholly owned-subsidiaries or a formally designated third party
service provider thereunder; and direct recipients of Materials from Honeywell's Aerospace
Technical Publication Distribution. The terms and conditions of this License Agreement govern
your use of these Materials, except to the extent that any terms and conditions of another
applicable agreement with Honeywell regarding the operation, maintenance, or repair of
Honeywell aerospace products conflict with the terms and conditions of this License Agreement,
in which case the terms and conditions of the other agreement will govern. However, this License
Agreement will govern in the event of a conflict between its terms and conditions and those of a
purchase order or acknowledgement.
1. License Grant - If you are a party to an applicable product support agreement, a Honeywell Service Center
agreement, or an authorized repair facility agreement, Honeywell hereby grants you a limited, non-exclusive license
to use these Materials to operate, maintain, or repair Honeywell aerospace products only in accordance with that
agreement.
If you are a direct recipient of these Materials from Honeywell's Aerospace Technical Publication Distribution and are
not a party to an agreement related to the operation, maintenance or repair of Honeywell aerospace products,
Honeywell hereby grants you a limited, non-exclusive license to use these Materials to maintain or repair the subject
Honeywell aerospace products only at the facility to which these Materials have been shipped ("the Licensed
Facility"). Transfer of the Materials to another facility owned by you is permitted only if the original Licensed Facility
retains no copies of the Materials and you provide prior written notice to Honeywell.
2. Rights In Materials - Honeywell retains all rights in these Materials and in any copies thereof that are not
expressly granted to you, including all rights in patents, copyrights, trademarks, and trade secrets. No license to use
any Honeywell trademarks or patents is granted under this License Agreement.
3. Confidentiality - You acknowledge that these Materials contain information that is confidential and proprietary to
Honeywell. You agree to take all reasonable efforts to maintain the confidentiality of these Materials.
4. Assignment And Transfer - This License Agreement may be assigned to a formally designated service designee
or transferred to a subsequent owner or operator of an aircraft containing the subject Honeywell aerospace products.
However, the recipient of any such assignment or transfer must assume all of your obligations under this License
Agreement. No assignment or transfer shall relieve any party of any obligation that such party then has hereunder.
5. Copies of Materials - Unless you have the express written permission of Honeywell, you may not make or permit
making of copies of the Materials. Notwithstanding the foregoing, you may make copies of only portions of the
Material for your internal use. You agree to return the Materials and any copies thereof to Honeywell upon the
request of Honeywell.
6. Term - This License Agreement is effective until terminated as set forth herein. This License Agreement will
terminate immediately, without notice from Honeywell, if you fail to comply with any provision of this License
Agreement or will terminate simultaneously with the termination or expiration of your applicable product support
agreement, authorized repair facility agreement, or your formal designation as a third party service provider. Upon
termination of this License Agreement, you will return these Materials to Honeywell without retaining any copies and
will have one of your authorized officers certify that all Materials have been returned with no copies retained.

OPERATOR’S MANUAL
OM - 23-15-85 Page 3
3 Oct 2012
© Honeywell International Inc. Do not copy without express permission of Honeywell.
7. Remedies - Honeywell reserves the right to pursue all available remedies and damages resulting from a breach
of this License Agreement.
8. Limitation of Liability - Honeywell does not make any representation regarding the use or sufficiency of the
Materials. THERE ARE NO OTHER WARRANTIES, WHETHER WRITTEN OR ORAL, EXPRESS, IMPLIED OR
STATUTORY, INCLUDING, BUT NOT LIMITED TO, (i) WARRANTIES ARISING FROM COURSE OF
PERFORMANCE, DEALING, USAGE, OR TRADE, WHICH ARE HEREBY EXPRESSLY DISCLAIMED, OR (ii)
WARRANTIES AGAINST INFRINGEMENT OF INTELLECTUAL PROPERTY RIGHTS OF THIRD PARTIES, EVEN
IF HONEYWELL HAS BEEN ADVISED OF ANY SUCH INFRINGEMENT. IN NO EVENT WILL HONEYWELL BE
LIABLE FOR ANY INCIDENTAL DAMAGES, CONSEQUENTIAL DAMAGES, SPECIAL DAMAGES, INDIRECT
DAMAGES, LOSS OF PROFITS, LOSS OF REVENUES, OR LOSS OF USE, EVEN IF INFORMED OF THE
POSSIBILITY OF SUCH DAMAGES. TO THE EXTENT PERMITTED BY APPLICABLE LAW, THESE LIMITATIONS
AND EXCLUSIONS WILL APPLY REGARDLESS OF WHETHER LIABILITY ARISES FROM BREACH OF
CONTRACT, WARRANTY, TORT (INCLUDING BUT NOT LIMITED TO NEGLIGENCE), BY OPERATION OF LAW,
OR OTHERWISE.
9. Controlling Law - This License shall be governed and construed in accordance with the laws of the State of New
York without regard to the conflicts of laws provisions thereof. This license sets forth the entire agreement between
you and Honeywell and may only be modified by a writing duly executed by the duly authorized representatives of
the parties.
Safety Advisory
WARNING: BEFORE THE MATERIALS CALLED OUT IN THIS PUBLICATION ARE USED, KNOW THE
HANDLING, STORAGE AND DISPOSAL PRECAUTIONS RECOMMENDED BY THE
MANUFACTURER OR SUPPLIER. FAILURE TO OBEY THE MANUFACTURERS’ OR SUPPLIERS’
RECOMMENDATIONS CAN RESULT IN PERSONAL INJURY OR DISEASE.
This publication describes physical and chemical processes which can make it necessary to use
chemicals, solvents, paints, and other commercially available materials. The user of this publication
must get the Material Safety Data Sheets (OSHA Form 174 or equivalent) from the manufacturers or
suppliers of the materials to be used. The user must know the manufacturer/ supplier data and obey the
procedures, recommendations, warnings and cautions set forth for the safe use, handling, storage, and
disposal of the materials.
Warranty/Liability Advisory
WARNING: HONEYWELL ASSUMES NO RESPONSIBILITY FOR ANY HONEYWELL EQUIPMENT
WHICH IS NOT MAINTAINED AND/OR REPAIRED IN ACCORDANCE WITH HONEYWELL’S
PUBLISHED INSTRUCTIONS AND/OR HONEYWELL’S FAA/SFAR 36 REPAIR AUTHORIZATION.
NEITHER DOES HONEYWELL ASSUME RESPONSIBILITY FOR SPECIAL TOOLS AND TEST
EQUIPMENT FABRICATED BY COMPANIES OTHER THAN HONEYWELL.
WARNING: INCORRECTLY REPAIRED COMPONENTS CAN AFFECT AIRWORTHINESS OR
DECREASE THE LIFE OF THE COMPONENTS. INCORRECTLY FABRICATED SPECIAL TOOLING
OR TEST EQUIPMENT CAN RESULT IN DAMAGE TO THE PRODUCT COMPONENTS OR GIVE
UNSATISFACTORY RESULTS.
FCC Warning Statements
This device complies with part 15 of the FCC Rules. Operation is subject to the following two conditions:
(1) This device may not cause harmful interference, and (2) this device must accept any interference
received, including interference that may cause undesired operation.

OPERATOR’S MANUAL
Page 4 OM - 23-15-85
3 Oct 2012
© Honeywell International Inc. Do not copy without express permission of Honeywell.
Copyright - Notice
Copyright 2012, Honeywell International Inc. All rights reserved.
Honeywell is a registered trademark of Honeywell International Inc.
All other marks are owned by their respective companies.

OPERATOR’S MANUAL
OM - 23-15-85 Page 5
3 Oct 2012
© Honeywell International Inc. Do not copy without express permission of Honeywell.
Revision History and Instructions
MANUAL Aspire Aviation Handset Operator’s Manual
Revision 0
Summary This is a new release.

OPERATOR’S MANUAL
Page 6 OM - 23-15-85
3 Oct 2012
© Honeywell International Inc. Do not copy without express permission of Honeywell.
Record of Revisions
Rev. No. Date Issued
0 Nov, 2012

OPERATOR’S MANUAL
OM - 23-15-85 Page 7
3 Oct 2012
© Honeywell International Inc. Do not copy without express permission of Honeywell.
Table of Contents
Section Page
1 About this Manual ........................................................................................................... 9
1.1 Scope ........................................................................................................................... 9
1.2 Part Numbers ............................................................................................................... 9
1.3 Organization ................................................................................................................. 9
1.4 Acronyms ..................................................................................................................... 9
1.5 About the Aviation Handset Within the Aspire System .............................................. 10
1.6 Product Support Services .......................................................................................... 10
2 Getting to Know Your Phone........................................................................................ 11
2.1 Use of the Touch Screen ........................................................................................... 12
2.2 Use of the Hard Keys ................................................................................................. 13
2.3 Getting to Know the Home Screen ............................................................................ 13
2.4 Handset Operational Status ....................................................................................... 14
3 Operation of the Handset.............................................................................................. 15
3.1 Turn the Handset On/Off ............................................................................................ 15
3.2 Navigating the Handset Screens ............................................................................... 15
3.3 Make a Call ................................................................................................................ 18
3.4 Receive a Call ............................................................................................................ 19
3.5 End a Call ................................................................................................................... 19
3.6 Select a Network ........................................................................................................ 20
3.7 Opening and Switching Applications .......................................................................... 21
3.8 Working with the Menus Key ..................................................................................... 21
3.9 Use of the Keyboard .................................................................................................. 21
3.10 Check of the Handset Operational Status.................................................................. 23
3.11 Connect to a Computer Through a USB .................................................................... 24
3.12 Add a Contact Information from Call History ............................................................. 24
3.13 Power Off the Handset ............................................................................................... 25
3.14 Clear the Call Log ...................................................................................................... 26
3.15 Administrator Password ............................................................................................. 26
3.16 About Phone Screen .................................................................................................. 27
3.17 Edit or Create a New Access Point ............................................................................ 28
3.18 Connecting to WiFi Networks ..................................................................................... 28
3.19 Connecting to Bluetooth Devices ............................................................................... 28
3.20 Turn Bluetooth On/Off ................................................................................................ 28
3.21 SIP Services ............................................................................................................... 28
3.22 Keyboard Settings ...................................................................................................... 29
3.23 SD Card ..................................................................................................................... 29
3.24 Date and Time ............................................................................................................ 29

OPERATOR’S MANUAL
Page 8 OM - 23-15-85
3 Oct 2012
© Honeywell International Inc. Do not copy without express permission of Honeywell.
List of Figures
Figure Page
Figure 1 Aspire System Diagram ........................................................................................... 10
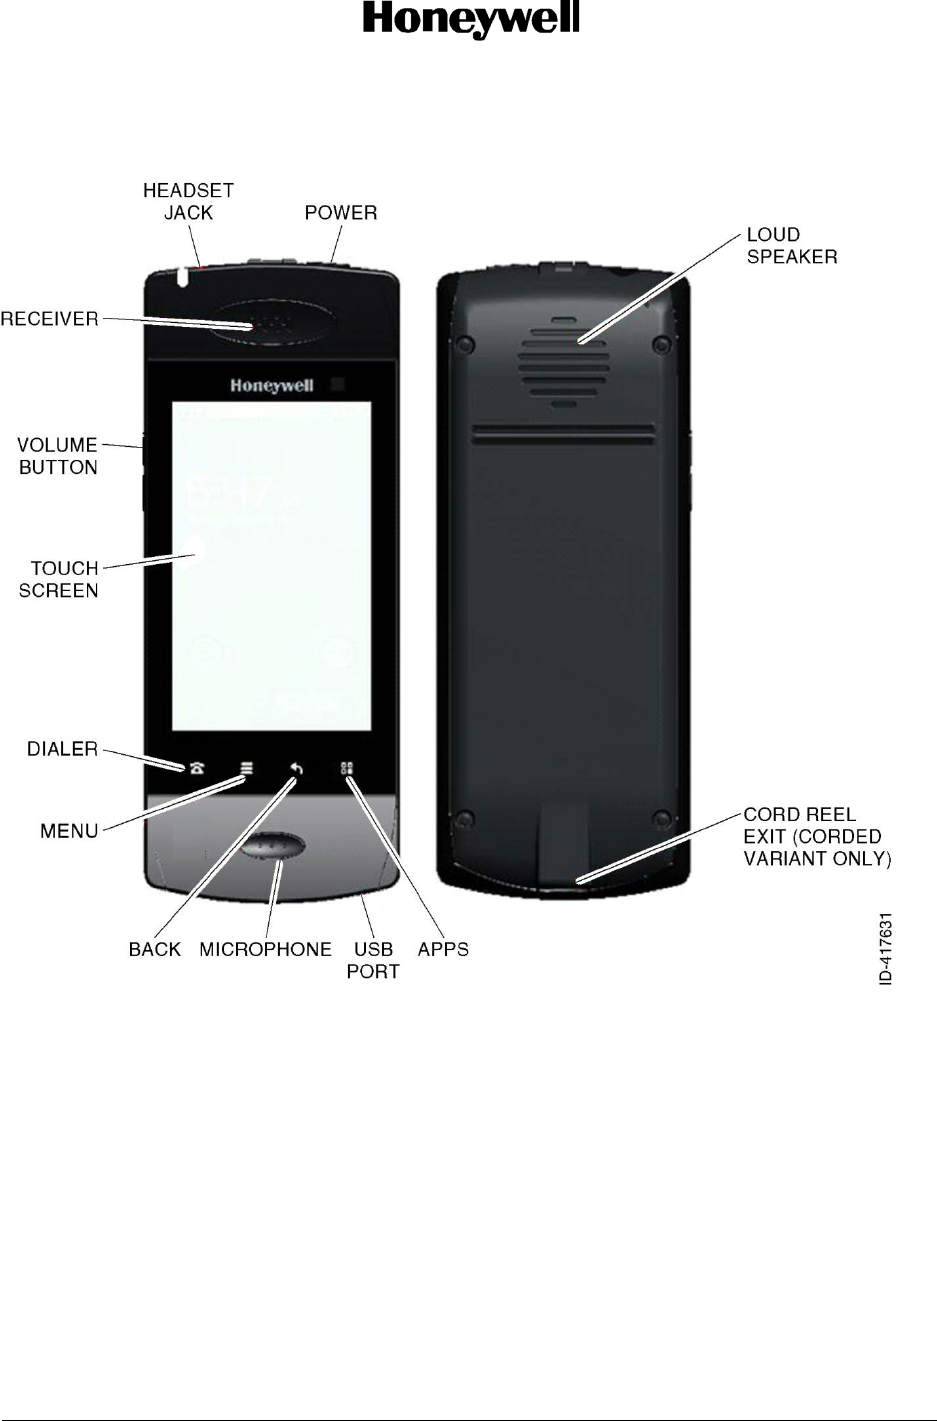
Figure 2 Aspire Aviation Handset .......................................................................................... 11
Figure 3 Handset Status Bar Details ..................................................................................... 14
Figure 4 Unlock Screen ......................................................................................................... 15
Figure 5 Dialer Screen ........................................................................................................... 16
Figure 6 Call History Screen .................................................................................................. 16
Figure 7 Contacts Screen ...................................................................................................... 17
Figure 8 Application Home Screen ........................................................................................ 17
Figure 9 On Call Screen ........................................................................................................ 18
Figure 10 Incoming Call Screen ............................................................................................ 19
Figure 11 Call Ended Screen ................................................................................................. 20
Figure 12 Manage Connection Screen .................................................................................. 20
Figure 13 Options Menu ........................................................................................................ 21
Figure 14 Onscreen Keyboard ............................................................................................... 22
Figure 15 Alpha Keyboard ..................................................................................................... 22
Figure 16 Numeric Keyboard ................................................................................................. 23
Figure 17 Advanced Settings ................................................................................................. 23
Figure 18 Virtual Keyboard Screen ........................................................................................ 24
Figure 19 Contacts Updated Screen ..................................................................................... 25
Figure 20 Power off the Handset ........................................................................................... 25
Figure 21 Clear Call Log Screen............................................................................................ 26
Figure 22 Administrator Password Screen ............................................................................ 26
Figure 23 About Phone Screen.............................................................................................. 27
Figure 24 Ethernet Settings ................................................................................................... 28
Figure 25 Keyboard Settings ................................................................................................. 29
Figure 26 Date and Time Settings ......................................................................................... 29
List of Tables
Table Page
Table 1 List of Acronyms ......................................................................................................... 9
Table 2 Handset Hard Keys Description ................................................................................ 13

OPERATOR’S MANUAL
OM - 23-15-85 Page 9
3 Oct 2012
© Honeywell International Inc. Do not copy without express permission of Honeywell.
1 About this Manual
This manual provides information about the operation of the Aspire Aviation Handsets and their
associated cradle assemblies.
1.1 Scope
This manual includes information about operating the Aspire Aviation Handsets.
For information about wiring, installation, configuration, and setup of the handsets, refer to System
Description, Installation, and Maintenance Manual 23-15-86.
1.2 Part Numbers
This manual applies to these Aspire Aviation Handset components:
• 1492-K-0111—kit, handset, corded, drop-in
• 1492-K-0112—kit, handset, cordless, drop-in
• 1492-K-0121—kit, handset, corded, flush mount
• 1492-K-0122—kit, handset, cordless, flush mount
1.3 Organization
This manual includes these sections:
• Getting to Know Your Phone—General information about the Aspire Aviation Handset
• Handset Operation—Information on how to operate the Aspire Aviation Handset
• Handset Specifications
1.4 Acronyms
Table 1 List of Acronyms
ACRONYM DEFINITION
EDR Enhanced data rate
IC Integrated circuit
ID Identification
LPDDR Low power double data rate
NDU Network distribution unit
PIN Personal identification number
PMIC Power management integrated circuit
SD Secure digital
SDRAM Synchronous dynamic random access memory
SIP Session initiation protocol
USB Universal serial bus
OPERATOR’S MANUAL
Page 10 OM - 23-15-85
3 Oct 2012
© Honeywell International Inc. Do not copy without express permission of Honeywell.
1.5 About the Aviation Handset Within the Aspire System
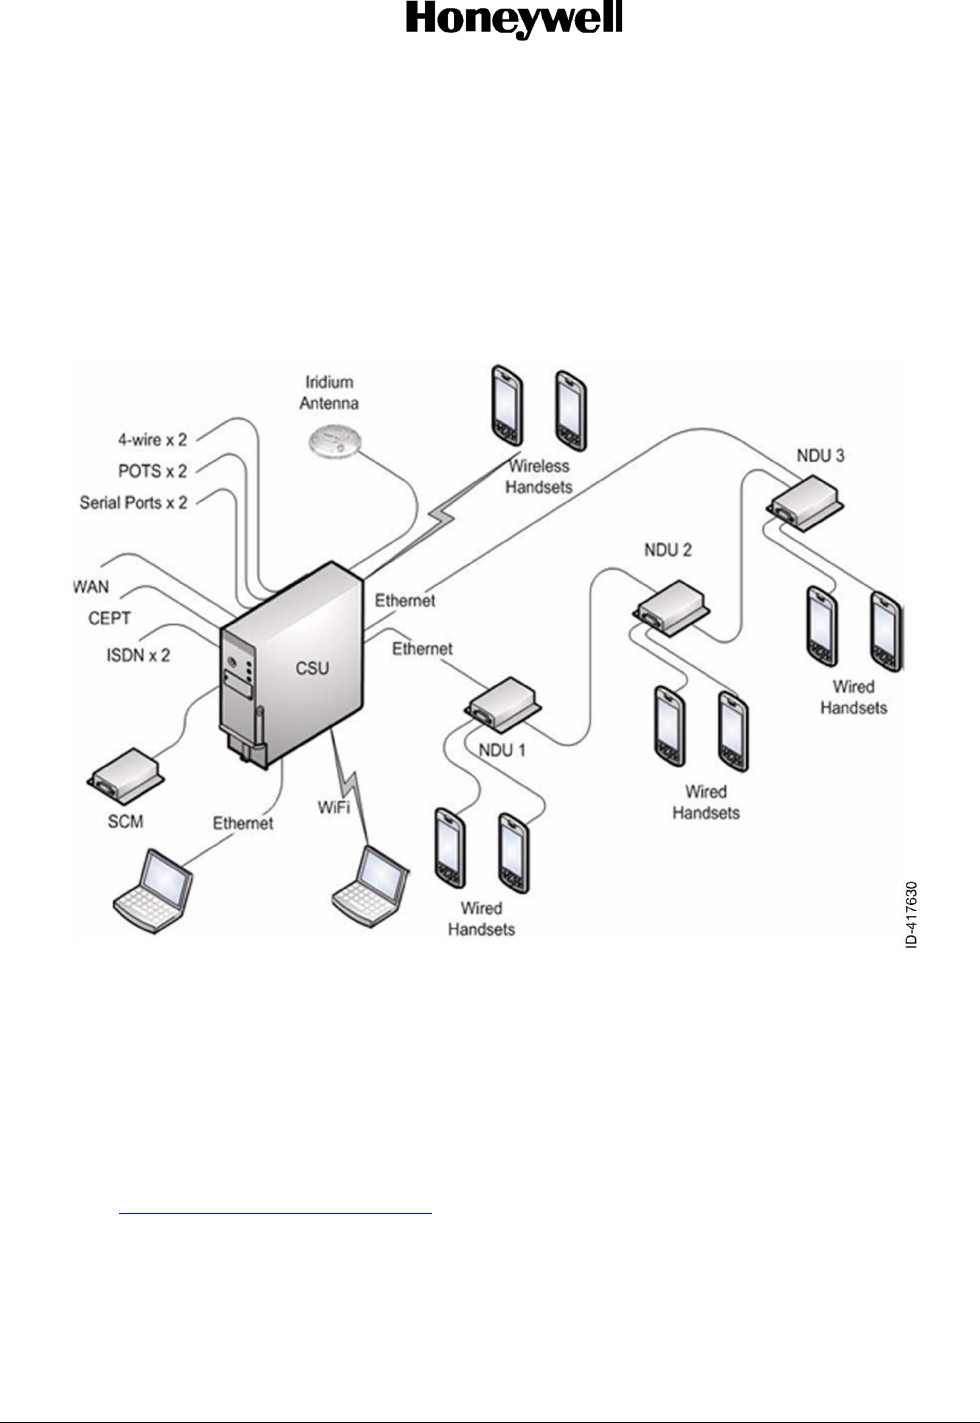
The Aspire Aviation Handset connects to the Iridium satellite network through the Aspire system and
provides data and voice services to the aircraft cabin. You can install the Aspire system with two
antennas—a single-element or dual-element antenna.
The single-element antenna provides two channels on the Iridium network. The dual-element antenna
provides two channels and short-burst data service on the Iridium network.
Network distribution units (NDU)s extend the network of the Aspire system. NDUs can be installed in
series, and each NDU can provide services for two or three wired handsets in the aircraft cabin.
Figure 1 Aspire System Diagram
1.6 Product Support Services
For questions about equipment, services, and repair and overhaul, contact Honeywell Inc.
Honeywell, Inc.
400 Maple Grove Road
Ottawa, Ontario
K2V 1B8, CANADA
Email: AeroTechSupport@Honeywell.com
Phone:
1. 1-800-601-3099 (U.S. and Canada) option 5, then option 3 (calls are routed to an on-call
Product Support specialist after regular business hours).
2. 1-602-365-3099 (International) option 5, then option 3.

OPERATOR’S MANUAL
Page 12 OM - 23-15-85
3 Oct 2012
© Honeywell International Inc. Do not copy without express permission of Honeywell.
2.1 Use of the Touch Screen
Use a finger to control the Android features on the Aspire Aviation Handset. Your finger can manipulate
the application icons, buttons (hard keys at the bottom of the screen), menu items, and the onscreen
keyboard as follows:
• Touch: To act on items on the screen, such as application and settings icons, to type letters
and symbols using the onscreen keyboard, or to push onscreen buttons, they simply need to be
touched by a finger.
• Touch and hold: An item on the screen may be held by touching it and not lifting the finger
until an action occurs. For example, to open a menu for customizing the home screen, an
empty area on the home screen is touched and held until the menu opens.
• Drag: An item may be dragged by touching and holding for a moment and then, without lifting
the finger, moving the finger across the screen until the target position is reached.
• Swipe or slide: To swipe or slide, move a finger across the surface of the screen, without
pausing (so as not to drag an item instead). For example, slide the screen up or down to scroll
a list, and in some calendar views one may swipe across the screen to change the range of
time visible.
• Double-tap: Tapping twice quickly on a webpage, map, or other screen to zoom. For example,
double-tap a section of a webpage in the browser to zoom that section to fit the width of the
screen. Double-tapping after pinching to zoom in some applications, such as browser, changes
a column of text to fit the width of the screen.
Rotate the screen: On most screens, the orientation of the screen rotates with the phone as it is turned
from upright to its side and back again.
OPERATOR’S MANUAL
OM - 23-15-85 Page 13
3 Oct 2012
© Honeywell International Inc. Do not copy without express permission of Honeywell.
2.2 Use of the Hard Keys
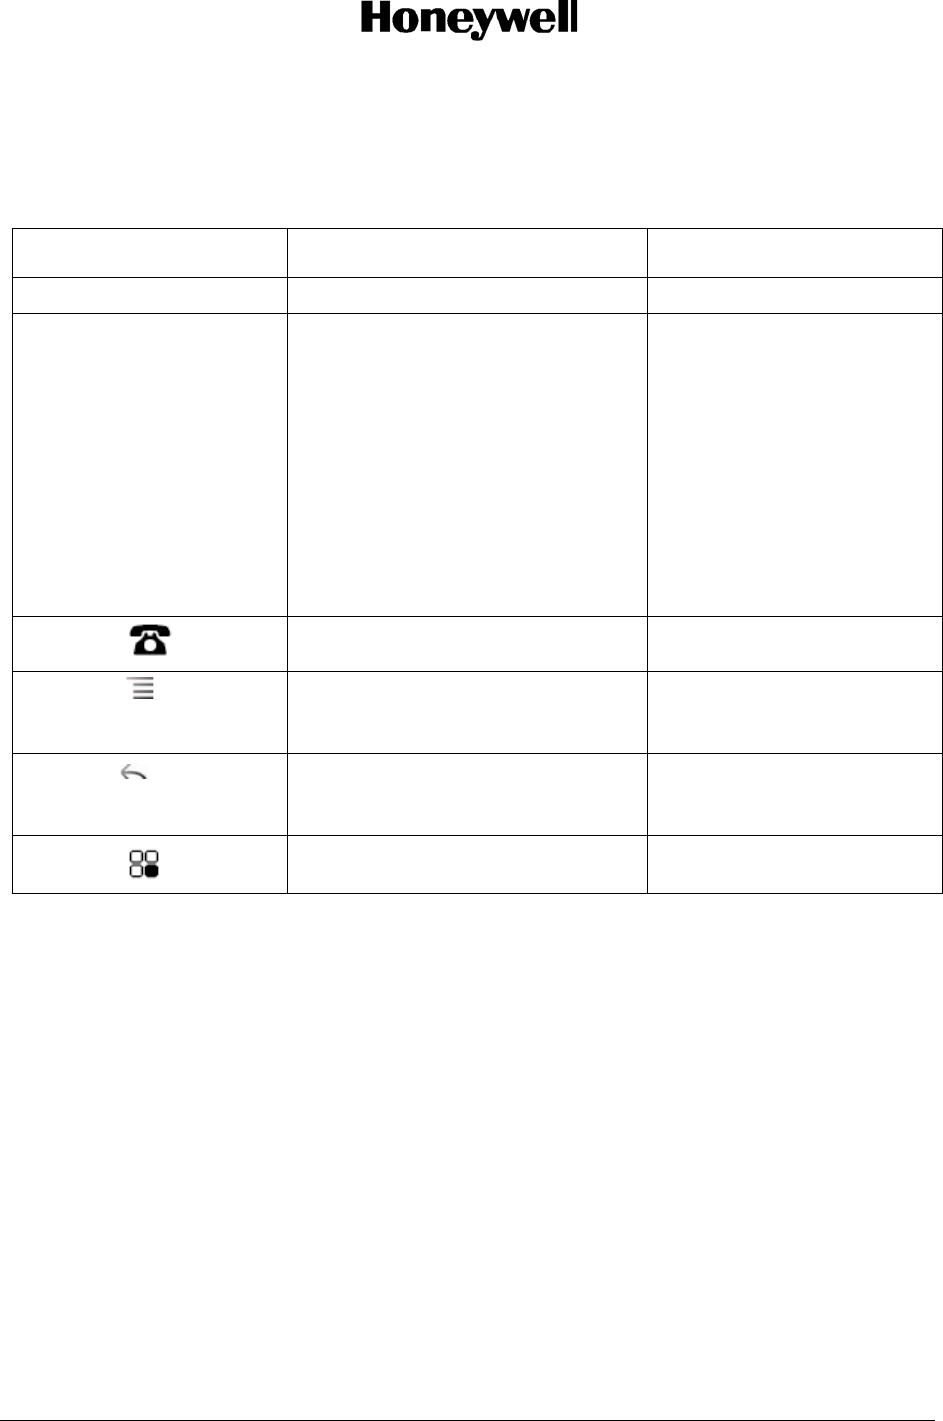
The handset’s physical buttons (Hard Keys) offer a variety of functions and shortcuts. The primary
buttons are described in Table 2.
Table 2 Handset Hard Keys Description
Button Push Push and Hold
Power Turns off the screen.
Volume Up /
Down
When a call is in progress,
increases or decreases the call
volume. When the phone is
ringing, silences the ringer.
On the Home screen when no
call is in progress, increases or
decreases the ringtone volume,
or sets the phone to be silent or
to vibrate instead of ringing.
In other applications, controls
the volume of music, spoken
directions, and other audio.
Quickly increases the
ringtone volume to
maximum or minimum.
Dialer Open the Dialer screen.
Menu Opens a menu with items that
affect the current screen or
application.
Back Opens the previous screen. If
the onscreen keyboard is open,
closes the keyboard.
Apps Open the Apps screen.
2.3 Getting to Know the Home Screen
The Home screen is the starting point to access all the functions and features on the handset. The Home
screen displays application icons, widgets, shortcuts, and operational status, such as Battery charge,
Time and Date, WiFi, Service access, etc.
OPERATOR’S MANUAL
Page 14 OM - 23-15-85
3 Oct 2012
© Honeywell International Inc. Do not copy without express permission of Honeywell.
2.4 Handset Operational Status
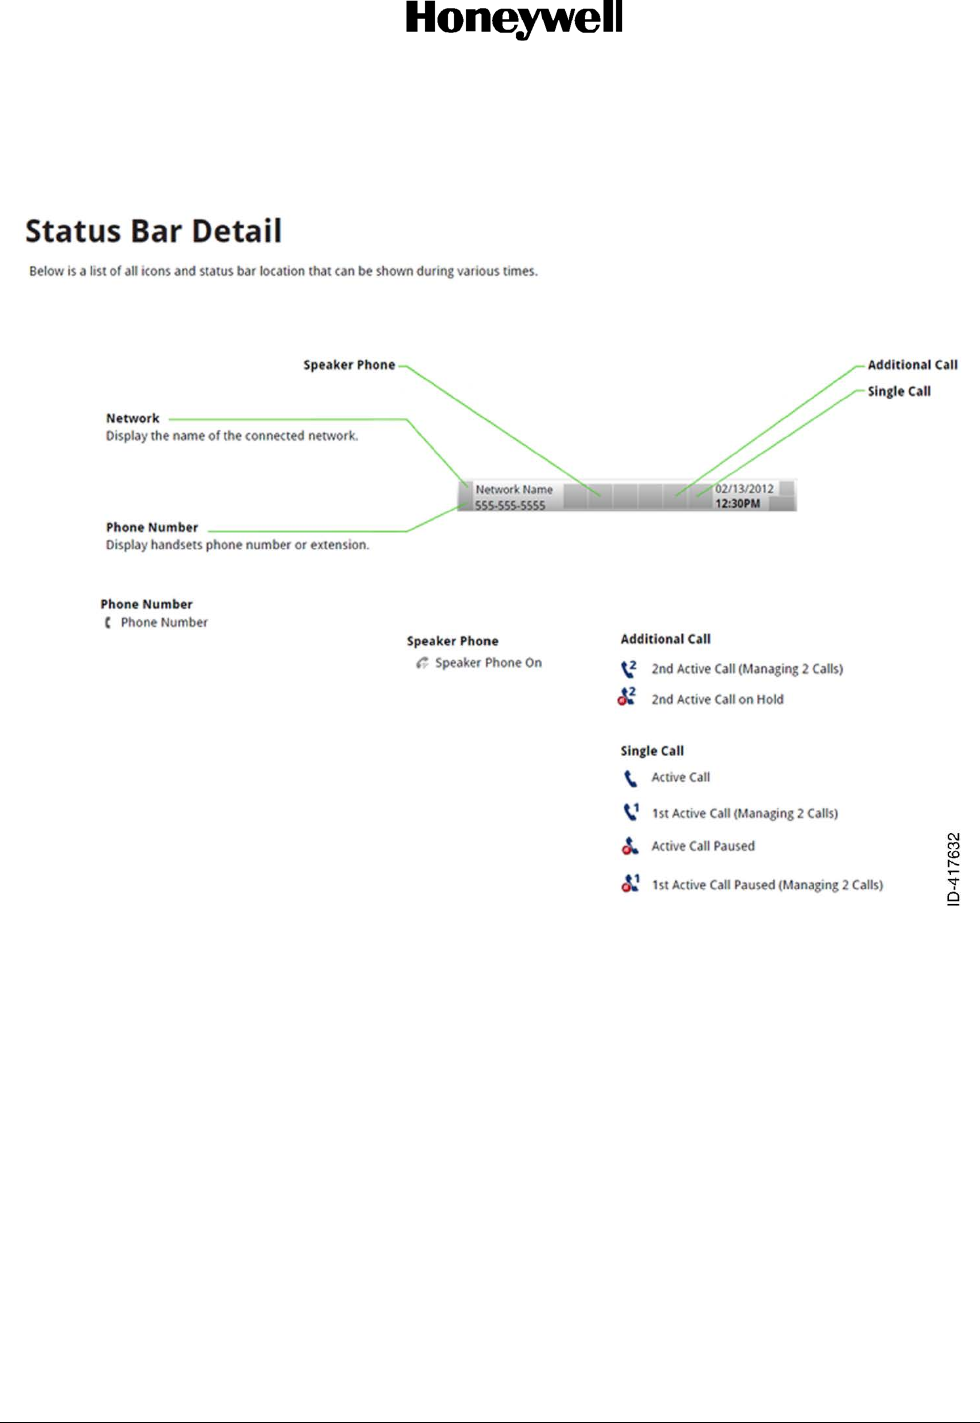
The handset Operational Status is represented by the group of icons that show at the top of every
screen. Figure 3 describes the status bar information.
Figure 3 Handset Status Bar Details
OPERATOR’S MANUAL
OM - 23-15-85 Page 15
3 Oct 2012
© Honeywell International Inc. Do not copy without express permission of Honeywell.
3 Operation of the Handset
3.1 Turn the Handset On/Off
Use the power button to turn the handset on or off.
To turn the handset on:
1. Push and hold the Power button (on the top of the handset) for a few seconds until the screen
lights.
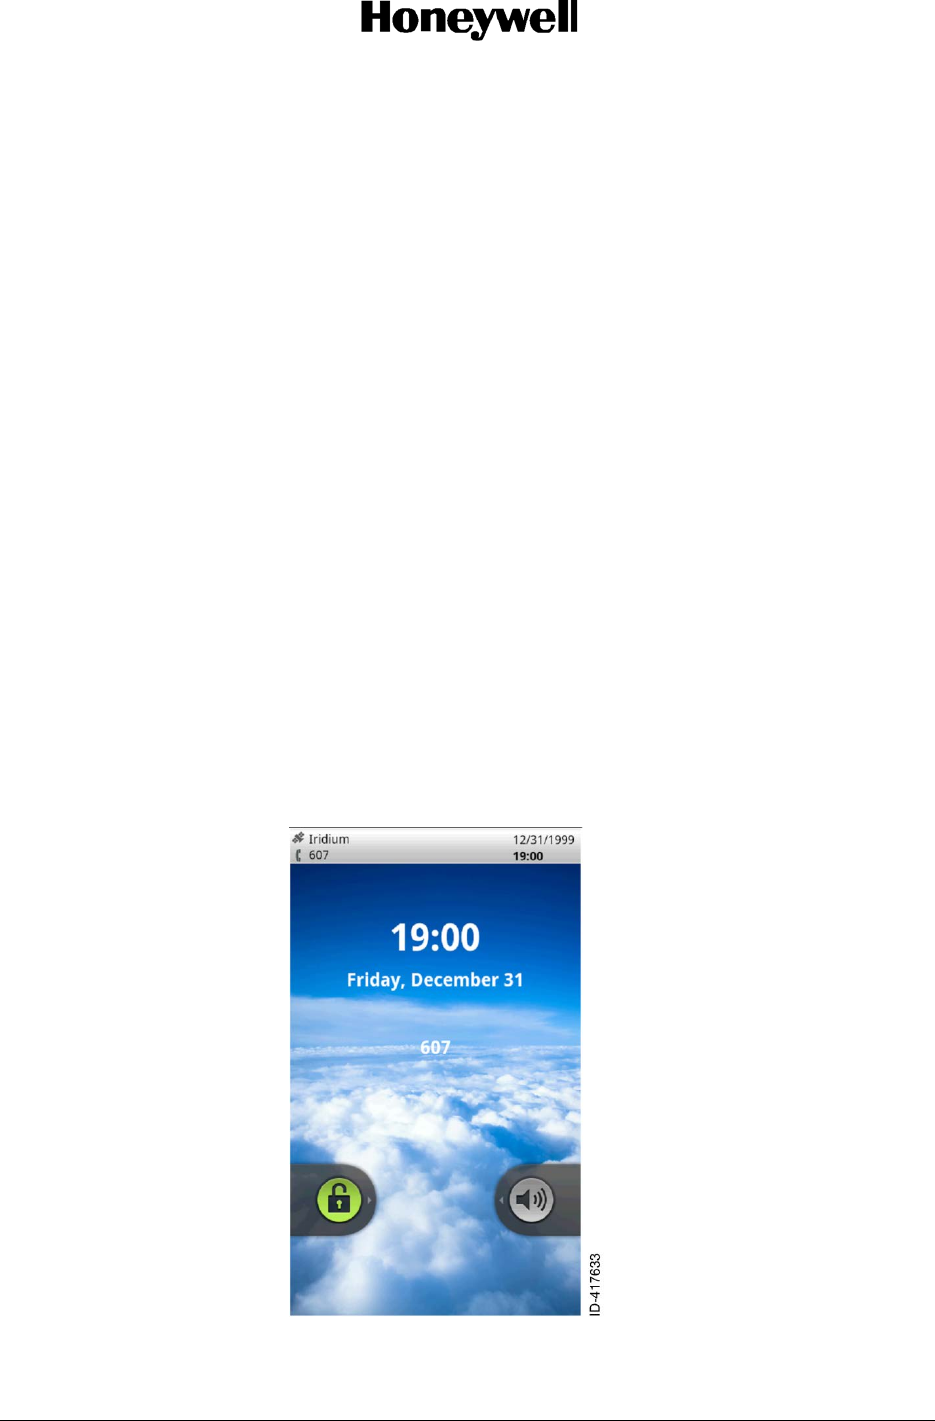
The unlock screen appears.
2. To unlock the screen, slide the green Unlock button to the right.
The dial pad screen appears. Use the dial pad to make calls. For more information on how to
make calls, refer to Section 3.3 Make a Call on page 18.
To turn the handset off:
1. Push and hold the Power button until a menu opens.
2. Touch Power off in the menu.
3. Touch OK when asked to confirm the handset turn off.
3.2 Navigating the Handset Screens
Use the touch screen and hard keys to navigate through the handset screens and applications once the
handset is powered on and unlocked.
To navigate through the handset screens:
1. To unlock the handset, slide the green Unlock button to the right.
Figure 4 Unlock Screen
OPERATOR’S MANUAL
Page 16 OM - 23-15-85
3 Oct 2012
© Honeywell International Inc. Do not copy without express permission of Honeywell.
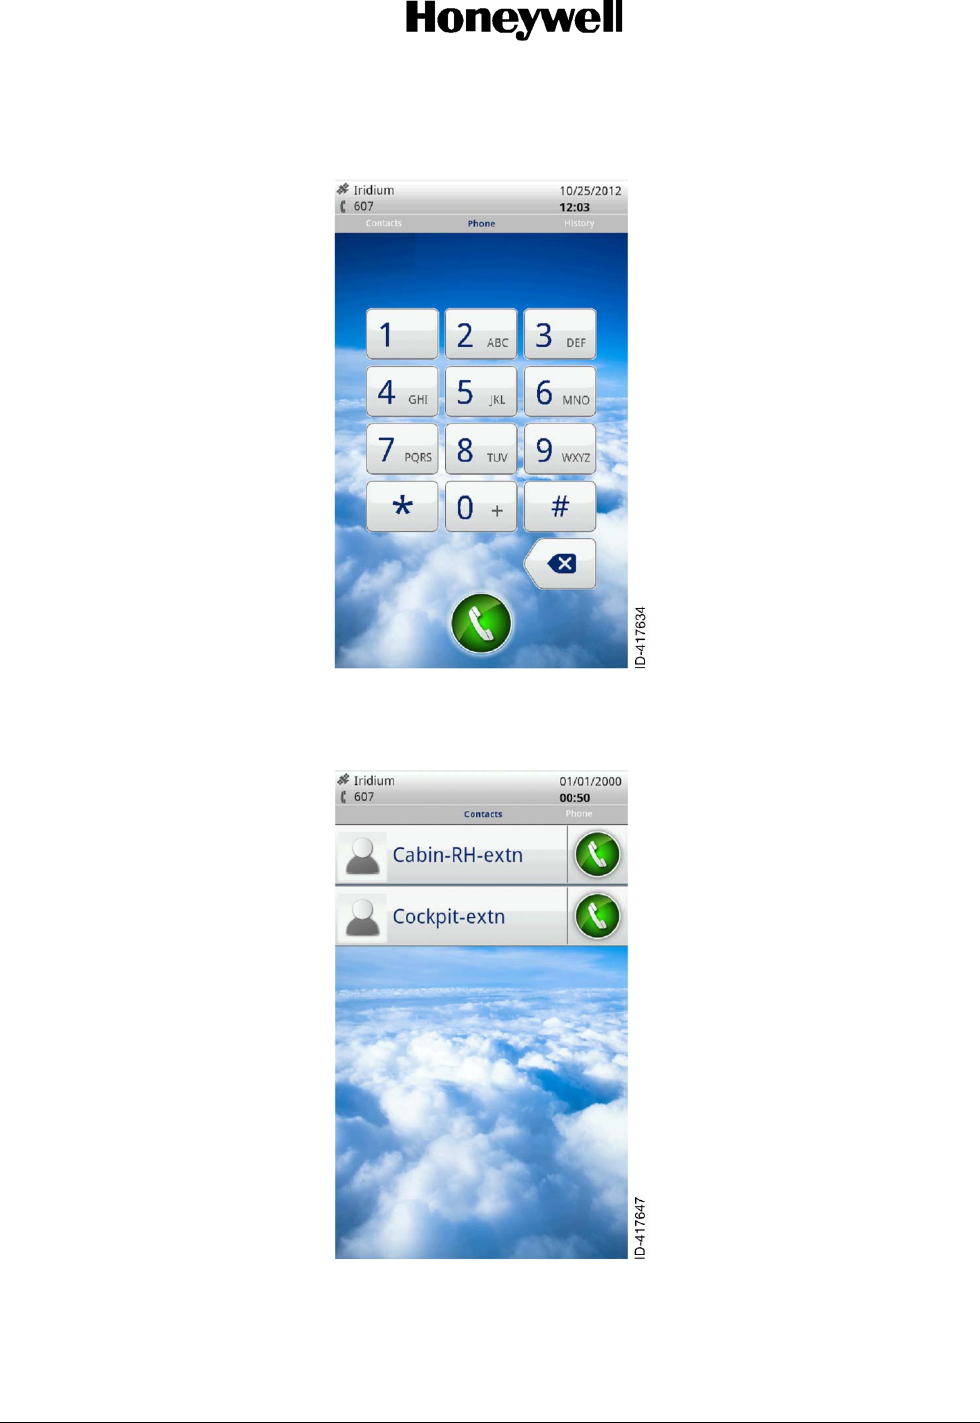
The Dialer screen appears.
Figure 5 Dialer Screen
2. Slide the Dialer screen to the left to open the call History screen.
Figure 6 Call History Screen
OPERATOR’S MANUAL
OM - 23-15-85 Page 17
3 Oct 2012
© Honeywell International Inc. Do not copy without express permission of Honeywell.
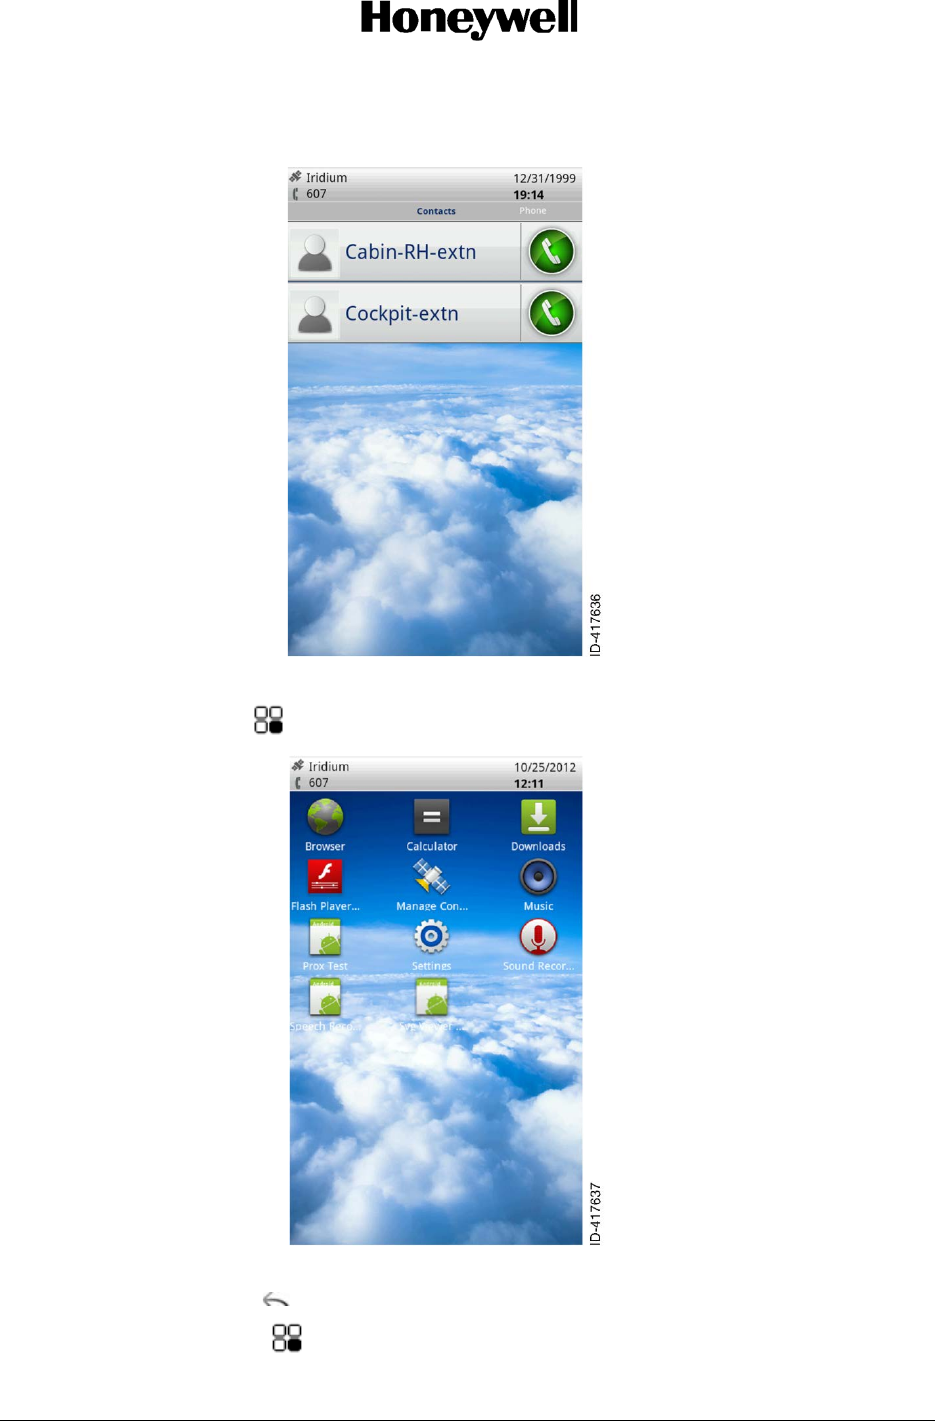
3. Slide the Dialer screen to the right to open the Contacts screen.
Figure 7 Contacts Screen
4. Push the Apps key to open the application home screen.
Figure 8 Application Home Screen
5. Push the Back button to return to the previous screen from any of the application screens.
6. Push the Apps button to return to the applications home screen.
OPERATOR’S MANUAL
Page 18 OM - 23-15-85
3 Oct 2012
© Honeywell International Inc. Do not copy without express permission of Honeywell.
7. Push the Dialer button to switch from any of the applications to the dialer screen.
3.3 Make a Call
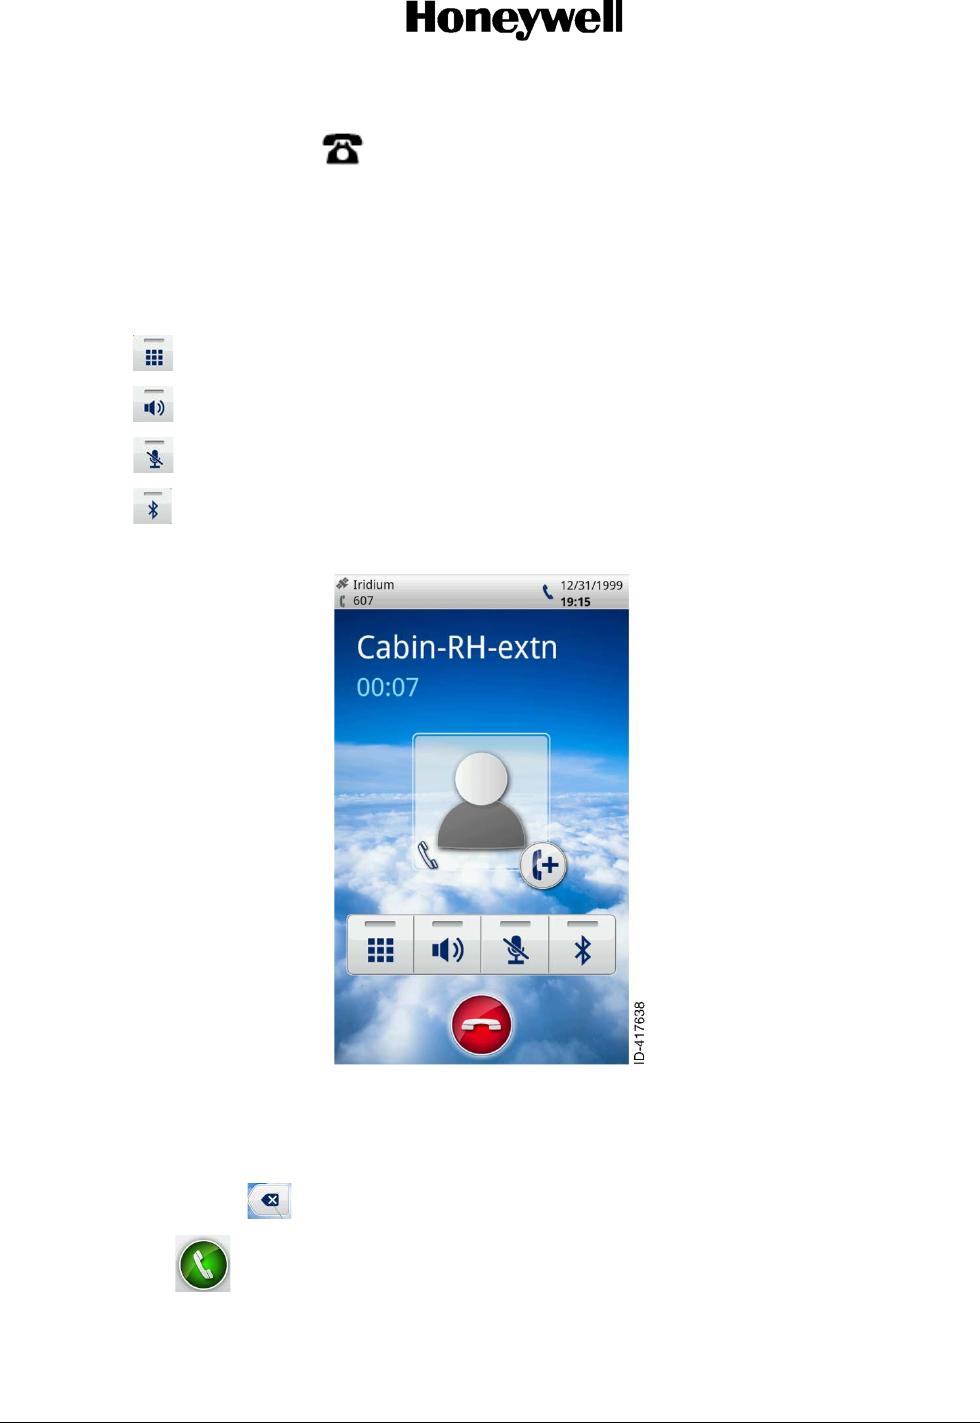
The details of the called party and the elapsed call time show on the on call screen while a call is in
progress.
When a call is in progress, touch the applicable icon on the on call screen to:
• Transfer to the dialer screen to add another call to a call conference.
• Turn the speaker phone on or off.
• Mute the call.
• Turn Bluetooth on or off.
Figure 9 On Call Screen
3.3.1 Make a Call from the Dialer Screen
1. On the Dialer screen, use the keyboard and enter the number to call. To delete an incorrect
number, touch .
2. Touch to place the call.
OPERATOR’S MANUAL
OM - 23-15-85 Page 19
3 Oct 2012
© Honeywell International Inc. Do not copy without express permission of Honeywell.
3.3.2 Make a Call from the Call History or Contacts Screen
1. Slide the Dialer screen to the left to open the call History screen, or to the right to open the
Contacts screen.
2. Touch next to the number to call.
3.4 Receive a Call
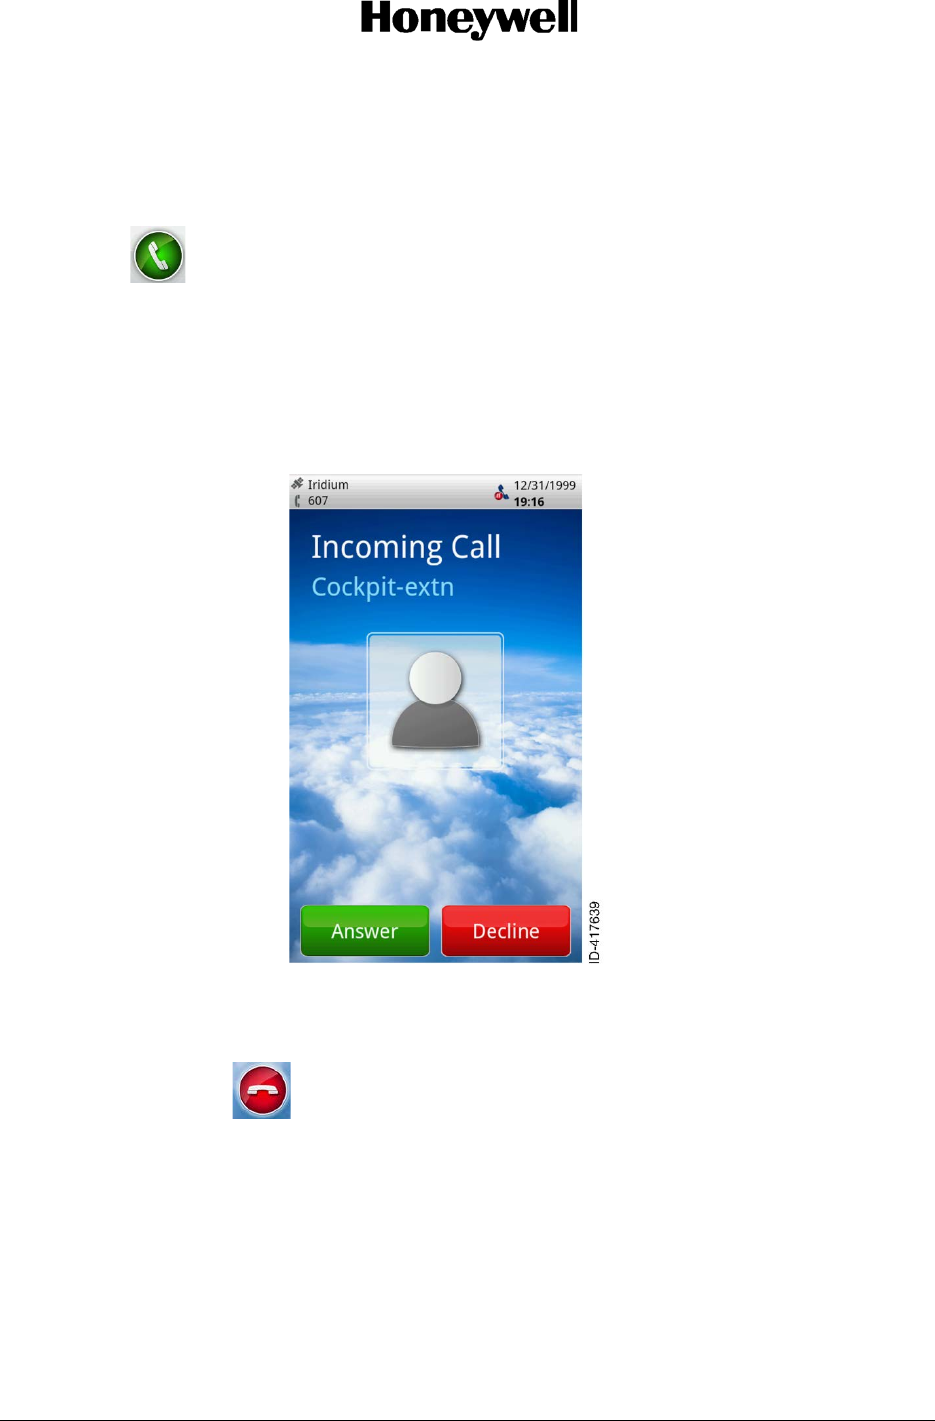
When an incoming call is observed on the handset, touch Answer to accept the call, or Decline to
ignore the call. The Incoming Call screen displays the caller number or the caller ID (name) during the
incoming call notification.
Figure 10 Incoming Call Screen
3.5 End a Call
1. To end a call, touch .
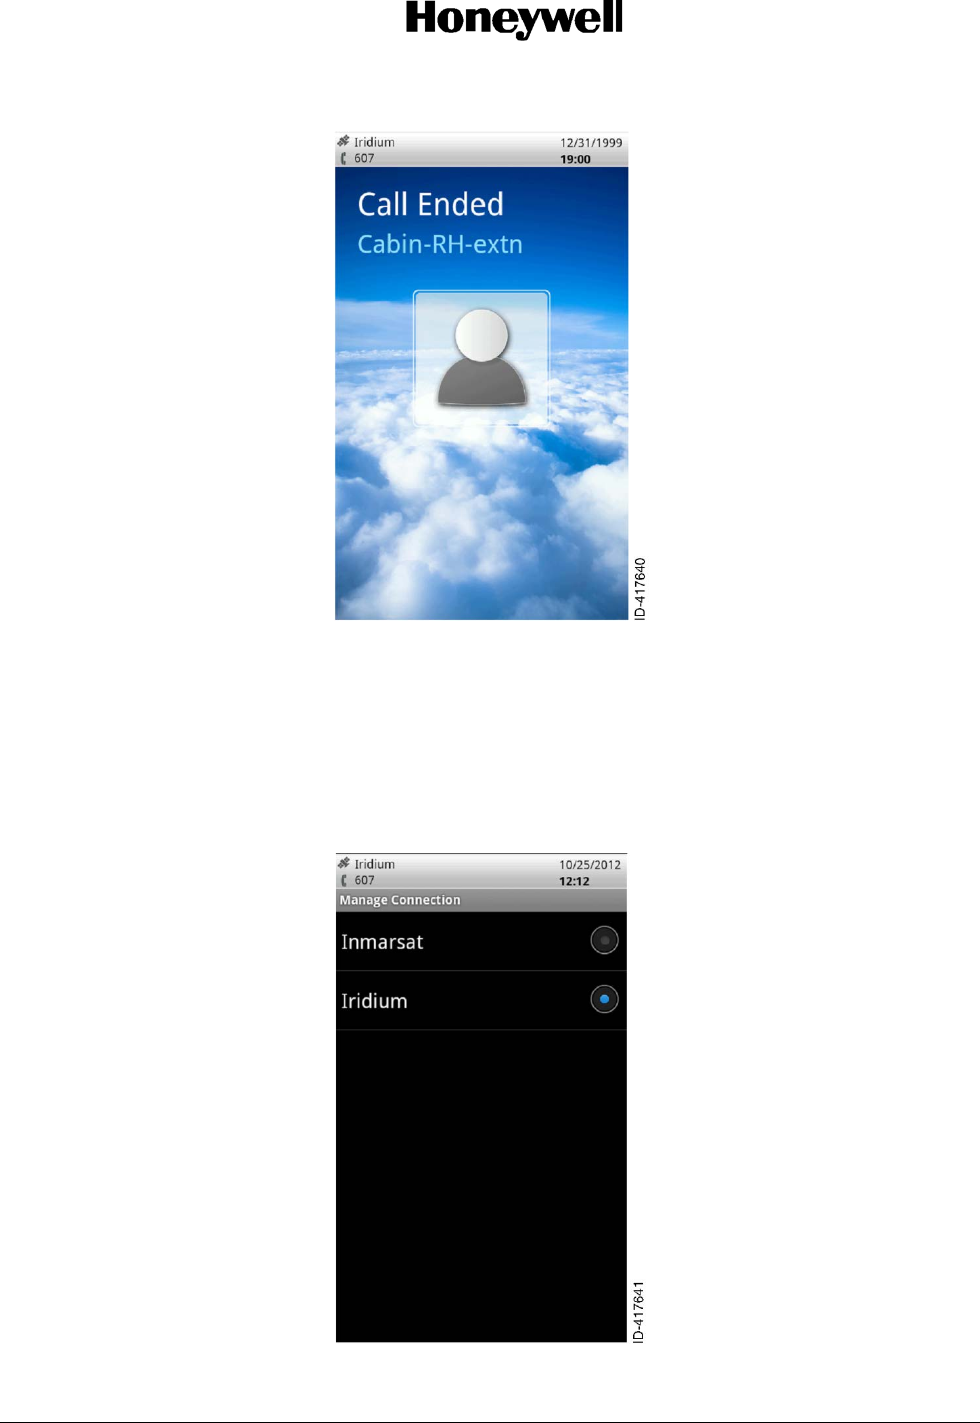
When a call is ended, the Call Ended screen is displayed.
OPERATOR’S MANUAL
Page 20 OM - 23-15-85
3 Oct 2012
© Honeywell International Inc. Do not copy without express permission of Honeywell.
Figure 11 Call Ended Screen
3.6 Select a Network
The Aspire Aviation Handset can override the default network configured for the aircraft's satellite
communication system. The available networks depend on the satellite communication equipment on
the aircraft. The override enables users to select lower cost services or services with bandwidth
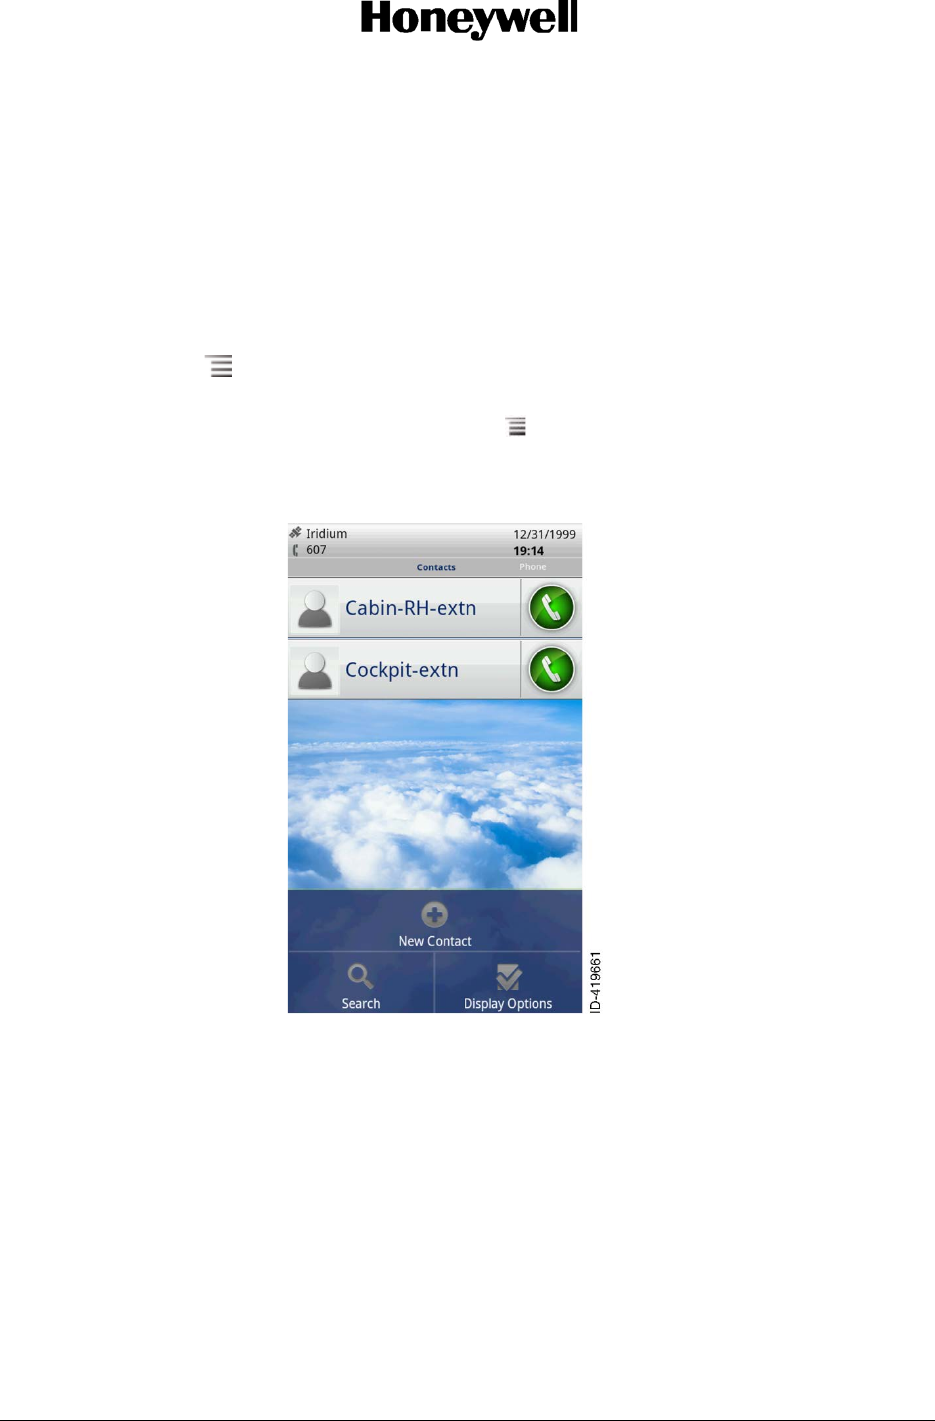
appropriate for their applications. To select a network on the applications home screen, select the
Manage Connection application and choose a network connection as shown in Figure 12.
Figure 12 Manage Connection Screen
OPERATOR’S MANUAL
OM - 23-15-85 Page 21
3 Oct 2012
© Honeywell International Inc. Do not copy without express permission of Honeywell.
3.7 Opening and Switching Applications
The applications home screen has icons for all of the applications on the phone. When an application
icon is selected, it launches the selected application. Once an application is launched, it remains active
until it is exited. Select the applications home button to switch back to the applications home screen and
launch another application, without closing the previous application.
3.8 Working with the Menus Key
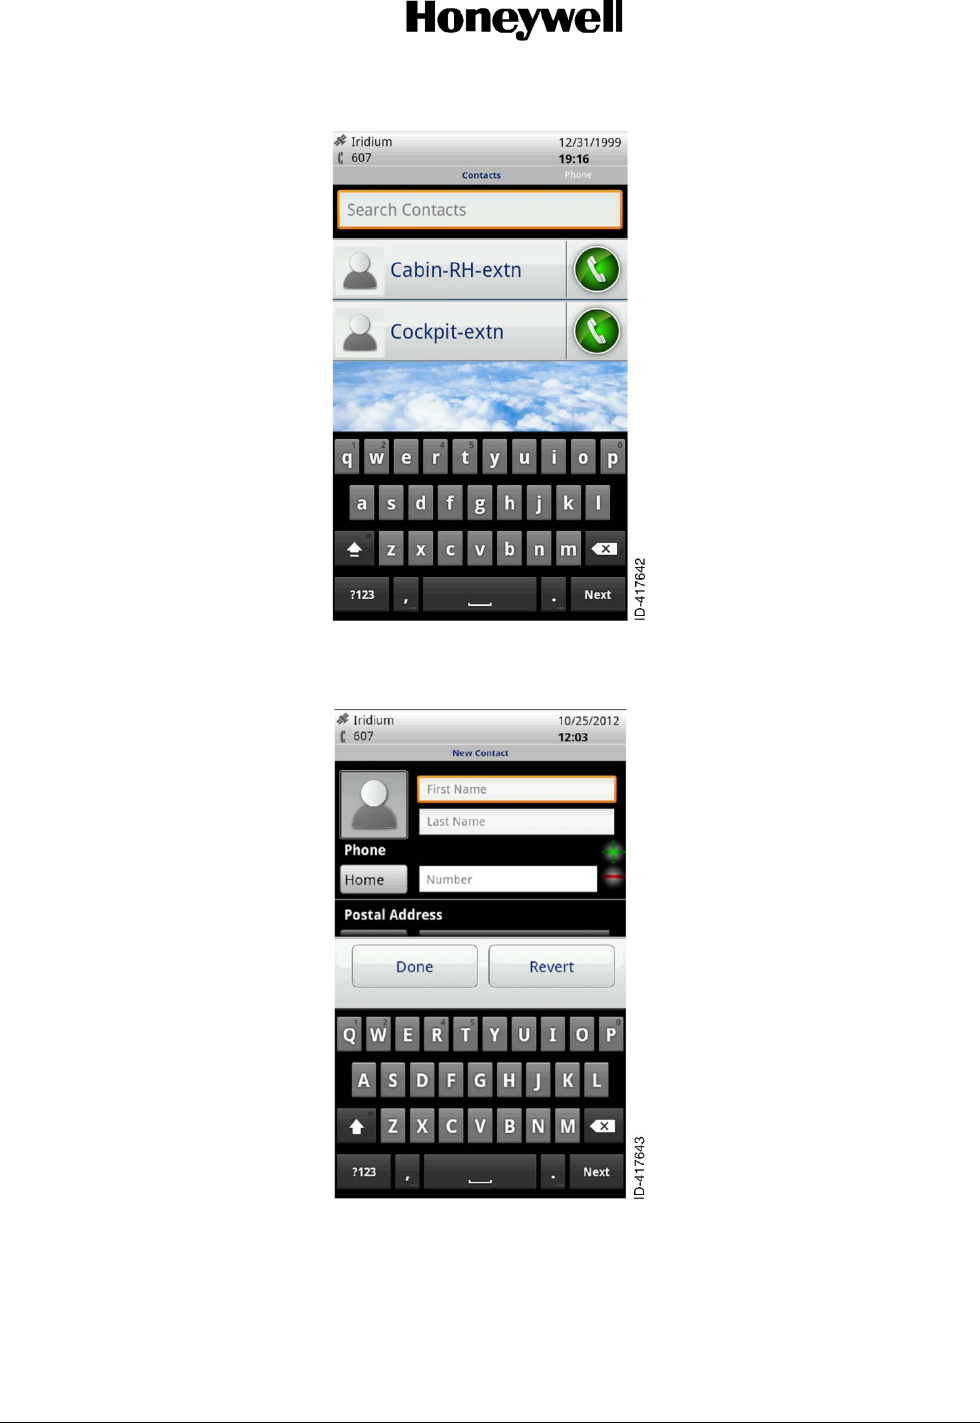
Push the Menu key to open an options menu that lists the activities or actions that apply to the
current screen or application.
All screens may not have an options menu; if Menu is pushed on a screen that has no options
menu, nothing happens.
Figure 13 shows an example options menu.
Figure 13 Options Menu
3.9 Use of the Keyboard
Enter alphanumeric data using the onscreen keyboard. Some applications open the keyboard
automatically. In others, a data entry field has to be touched in order to keyboard. For example, as
shown in Figure 14, touch the Search Contacts area and then use the keyboard to enter the contact to
be searched.
OPERATOR’S MANUAL
Page 22 OM - 23-15-85
3 Oct 2012
© Honeywell International Inc. Do not copy without express permission of Honeywell.
Figure 14 Onscreen Keyboard
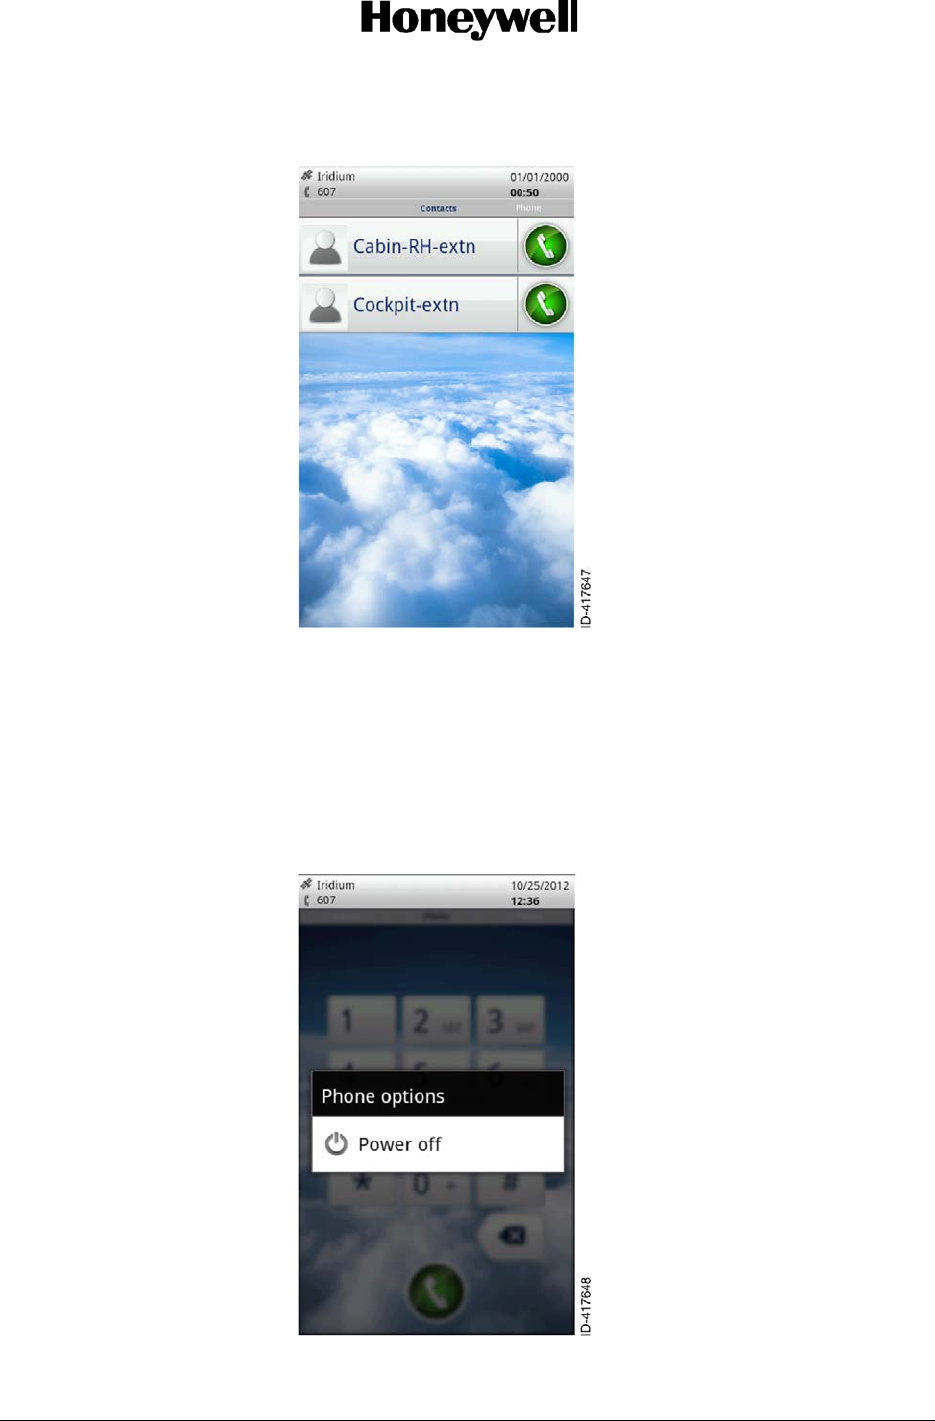
Some fields open the alpha keyboard, as shown in Figure 15.
Figure 15 Alpha Keyboard
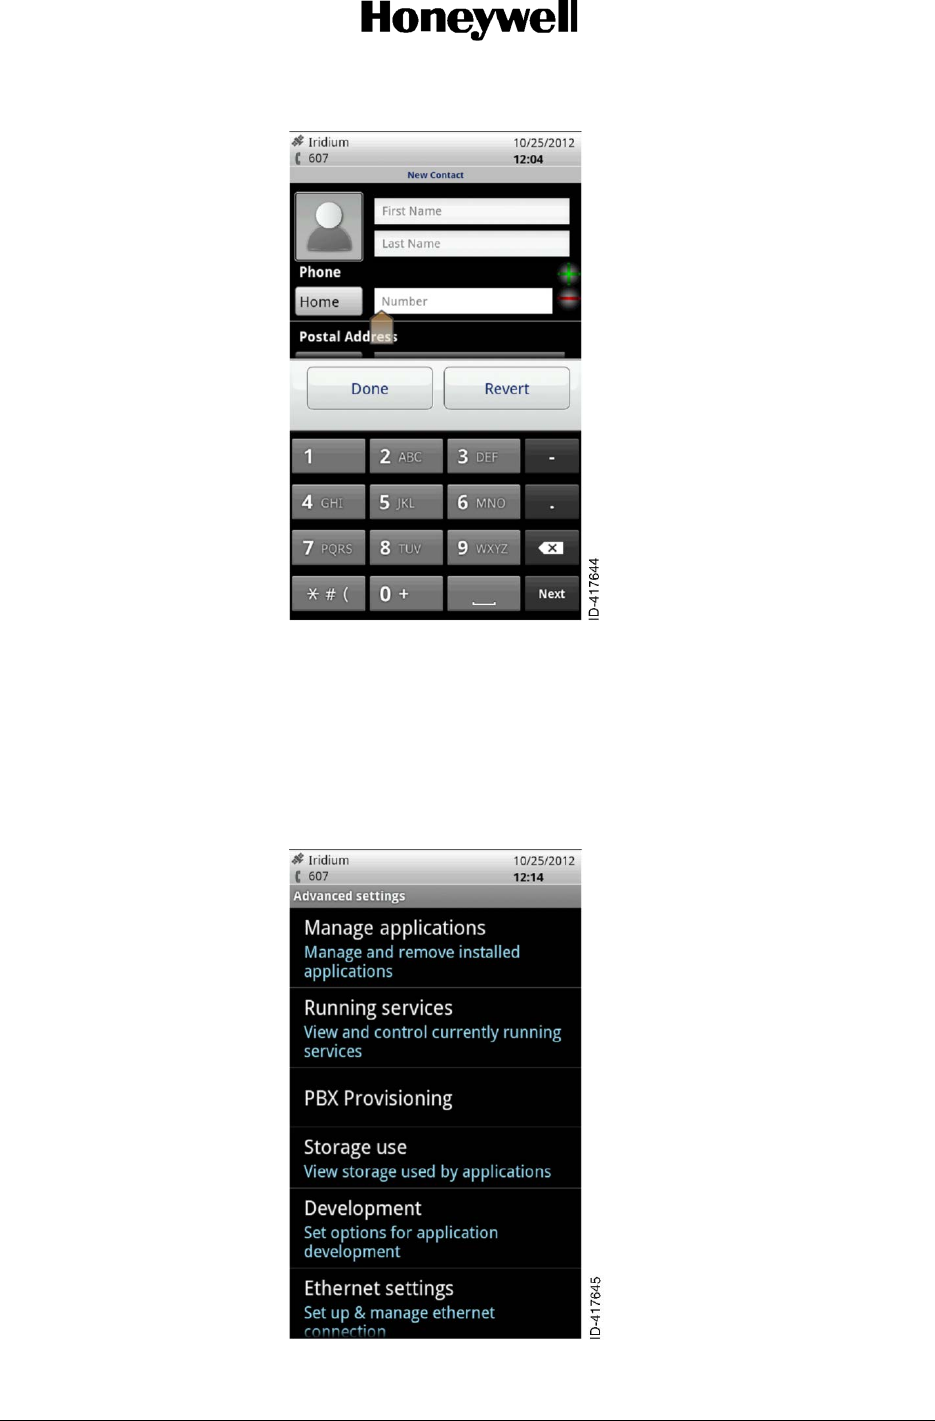
Other fields open the numeric keyboard, as shown in Figure 16.
OPERATOR’S MANUAL
OM - 23-15-85 Page 23
3 Oct 2012
© Honeywell International Inc. Do not copy without express permission of Honeywell.
Figure 16 Numeric Keyboard
3.10 Check of the Handset Operational Status
To view the handset operational status:
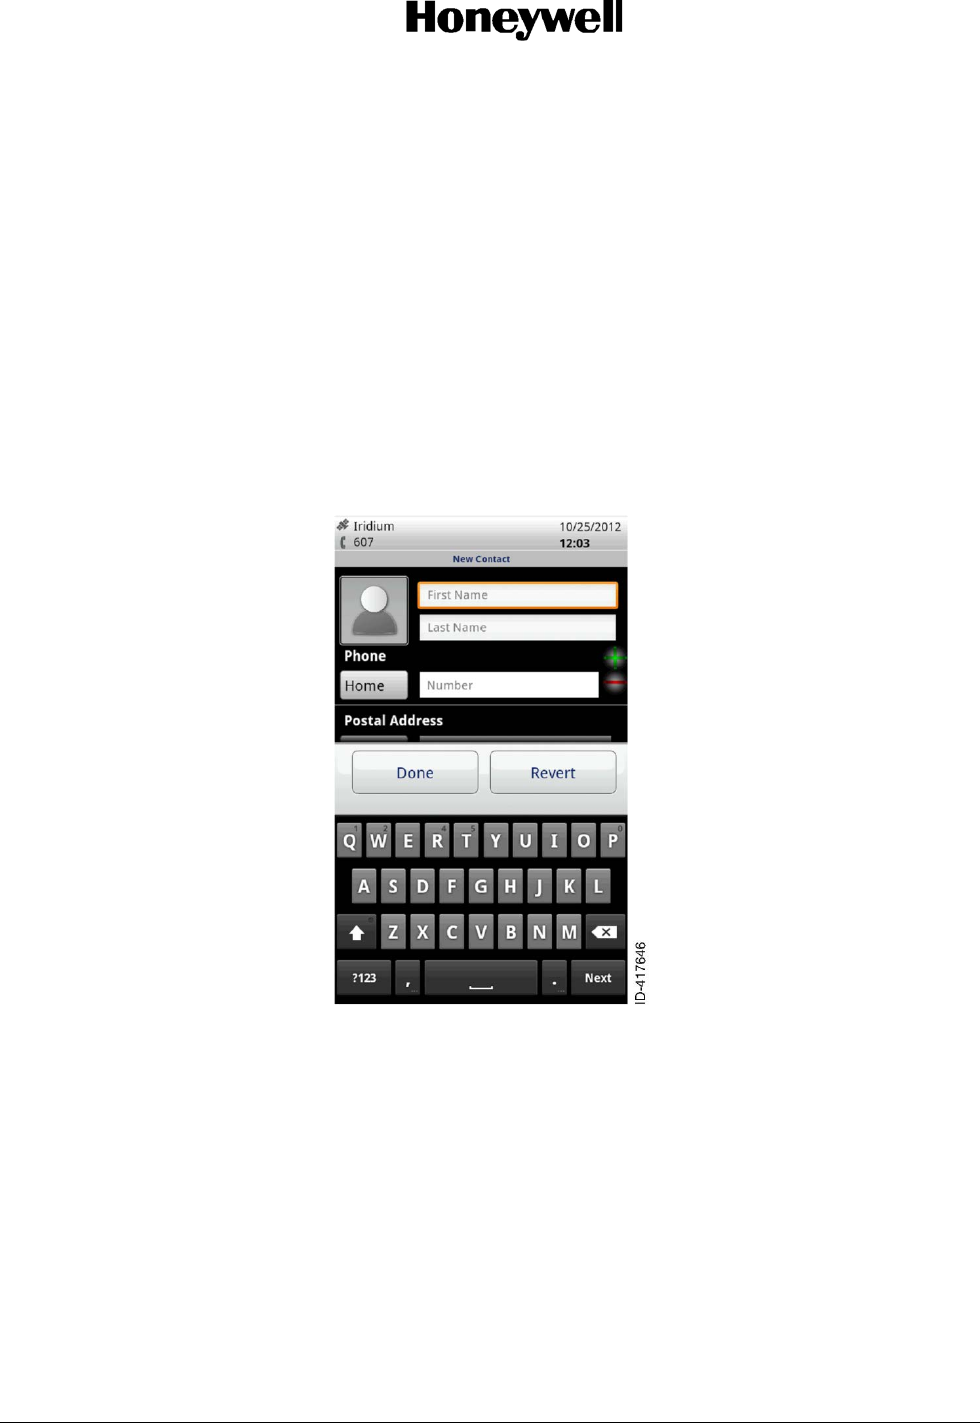
1. On the applications home screen, touch the Settings icon, and then touch Advanced.
2. Enter the PIN and touch Continue. The Advanced settings screen lists the full set of handset
operational settings.
Figure 17 Advanced Settings
OPERATOR’S MANUAL
Page 24 OM - 23-15-85
3 Oct 2012
© Honeywell International Inc. Do not copy without express permission of Honeywell.
3.11 Connect to a Computer Through a USB
Connect the Aspire handset to a computer through a Micro-B USB cable, to transfer music, pictures,
and other files between the phone and the computer.
3.12 Add a Contact Information from Call History
The Call History screen provides information about the dialed, received, and missed call numbers.
To save a new contact from the Call History screen:
1. Slide the Dialer screen to the left to open the call history screen.
2. Touch the number to be added as a contact.
3. Touch Add to Contacts.
4. Touch the cursor in a field and use the alphanumeric keyboard to enter the details.
Figure 18 Virtual Keyboard Screen
OPERATOR’S MANUAL
OM - 23-15-85 Page 25
3 Oct 2012
© Honeywell International Inc. Do not copy without express permission of Honeywell.
The contacts screen gets updated with the new contact.
Figure 19 Contacts Updated Screen
3.13 Power Off the Handset
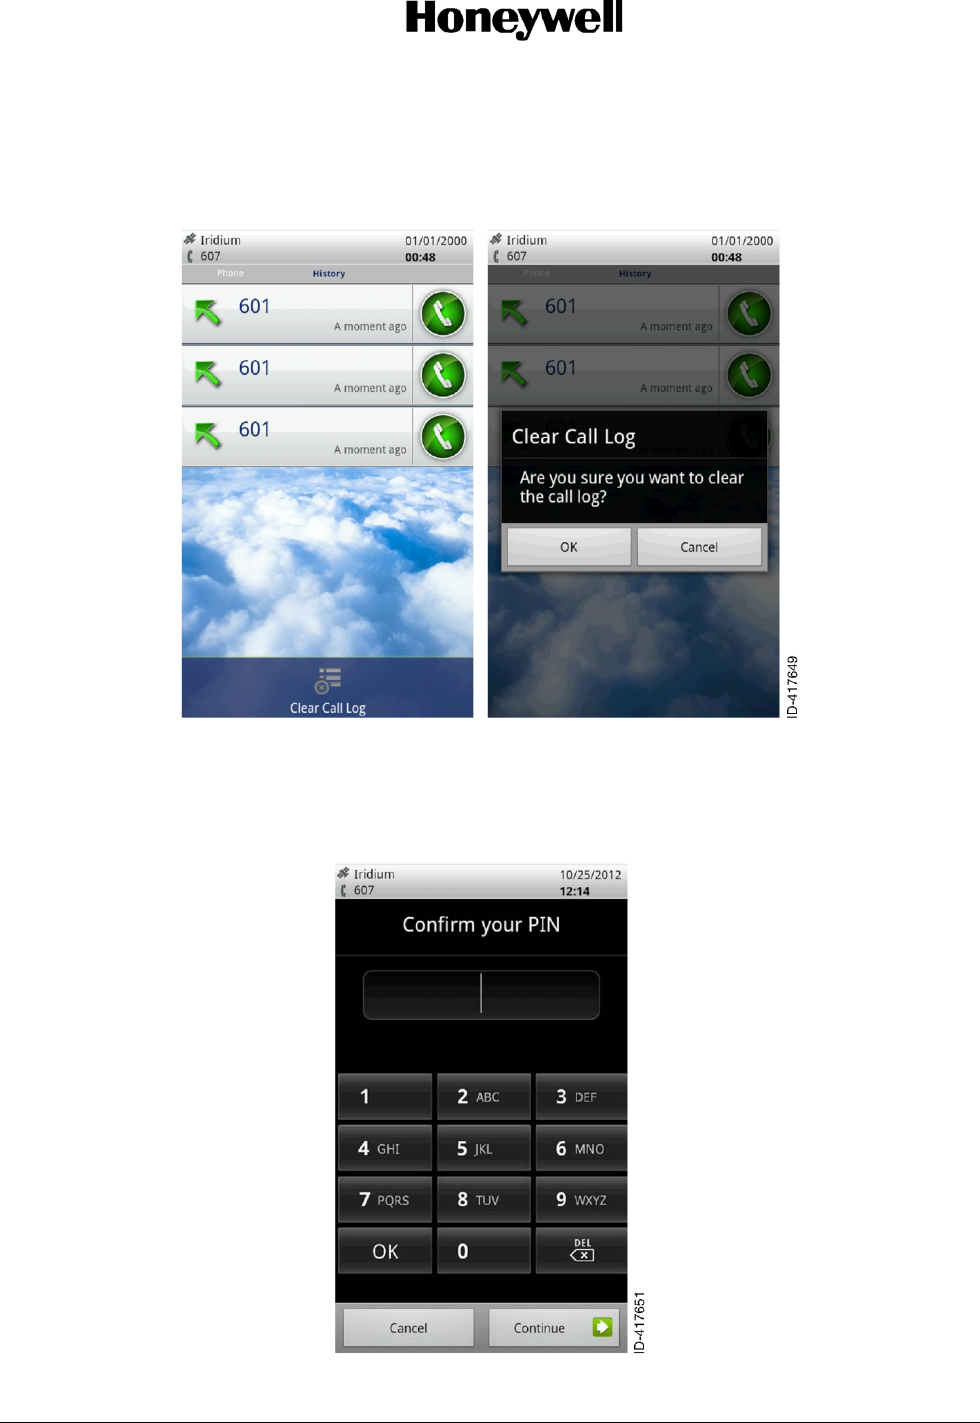
To power off the handset:
1. Push and hold the Power button (on the top of the handset) for a few seconds.
2. Touch Power off.
3. Touch OK to confirm power off.
Figure 20 Power off the Handset
OPERATOR’S MANUAL
Page 26 OM - 23-15-85
3 Oct 2012
© Honeywell International Inc. Do not copy without express permission of Honeywell.
3.14 Clear the Call Log
The call History screen gives the details about the received, dialed, and the missed call numbers. Push
the Clear Call Log to delete the call history, as shown in Figure 21.
Figure 21 Clear Call Log Screen
3.15 Administrator Password
For security reasons, the handset settings are password protected. Only administrators have access
rights to the settings options.
Figure 22 Administrator Password Screen
OPERATOR’S MANUAL
OM - 23-15-85 Page 27
3 Oct 2012
© Honeywell International Inc. Do not copy without express permission of Honeywell.
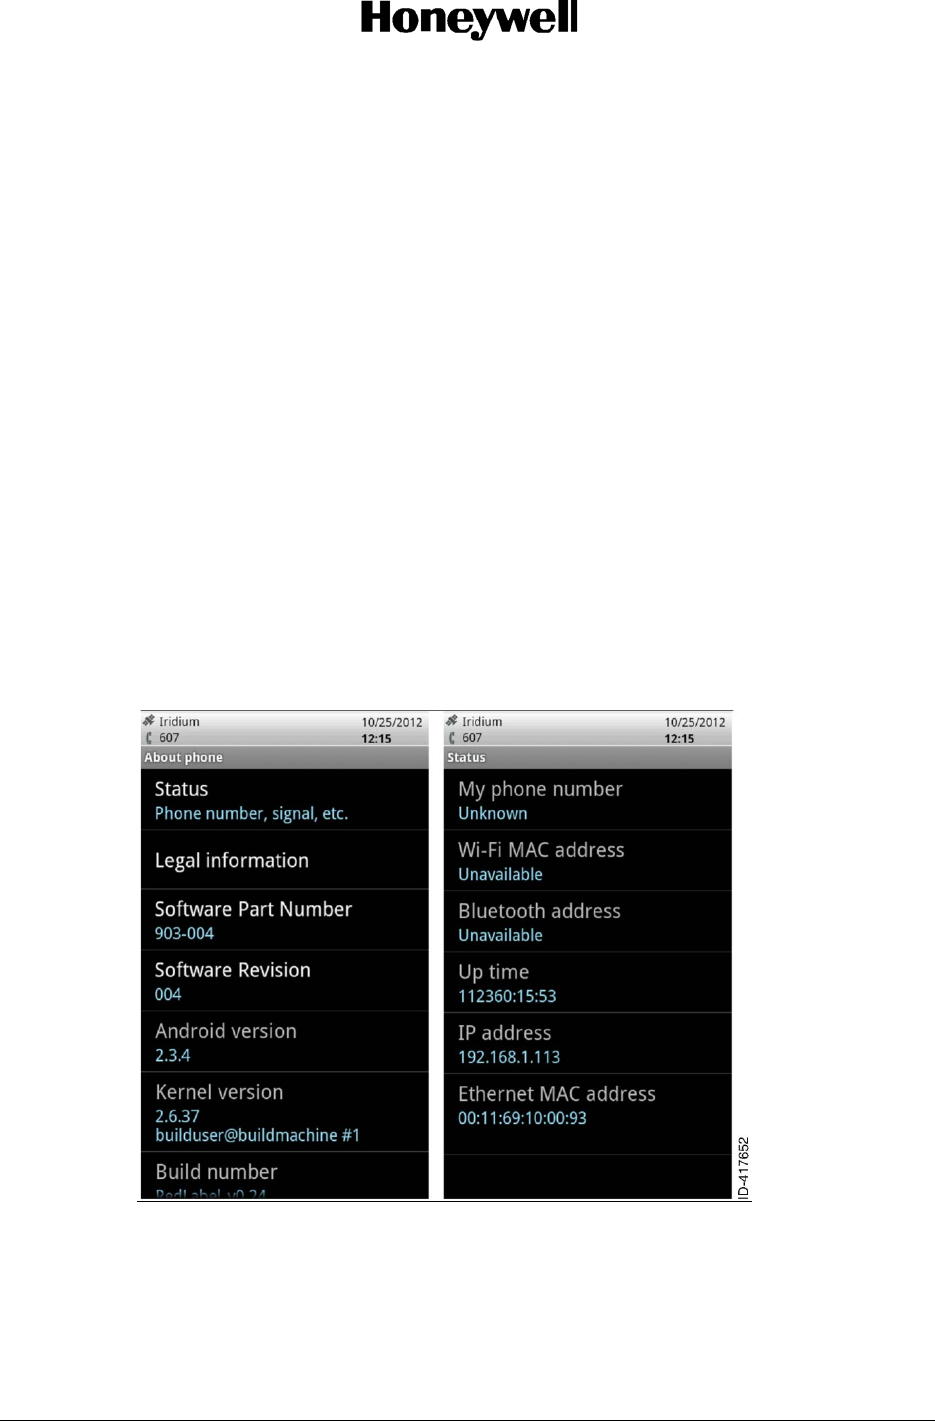
3.16 About Phone Screen
View information about the handset on the About phone screen, as shown in Figure 23. The following
information is available:
• Status
• Legal information
• Software Part Number
• Software Revision
• Android version
• Kernel version
• Build number
The Status information includes:
• Phone number assigned
• Other network or interface addresses
• Up time
• IP address
• Ethernet MAC address
Figure 23 About Phone Screen
For example, to check the handset battery status (charging, discharging) and level (as a percentage of fully
charged), touch About phone, and then touch Status.
OPERATOR’S MANUAL
Page 28 OM - 23-15-85
3 Oct 2012
© Honeywell International Inc. Do not copy without express permission of Honeywell.
3.17 Edit or Create a New Access Point
Not supported in this release.
3.18 Connecting to WiFi Networks
Not supported in this release.
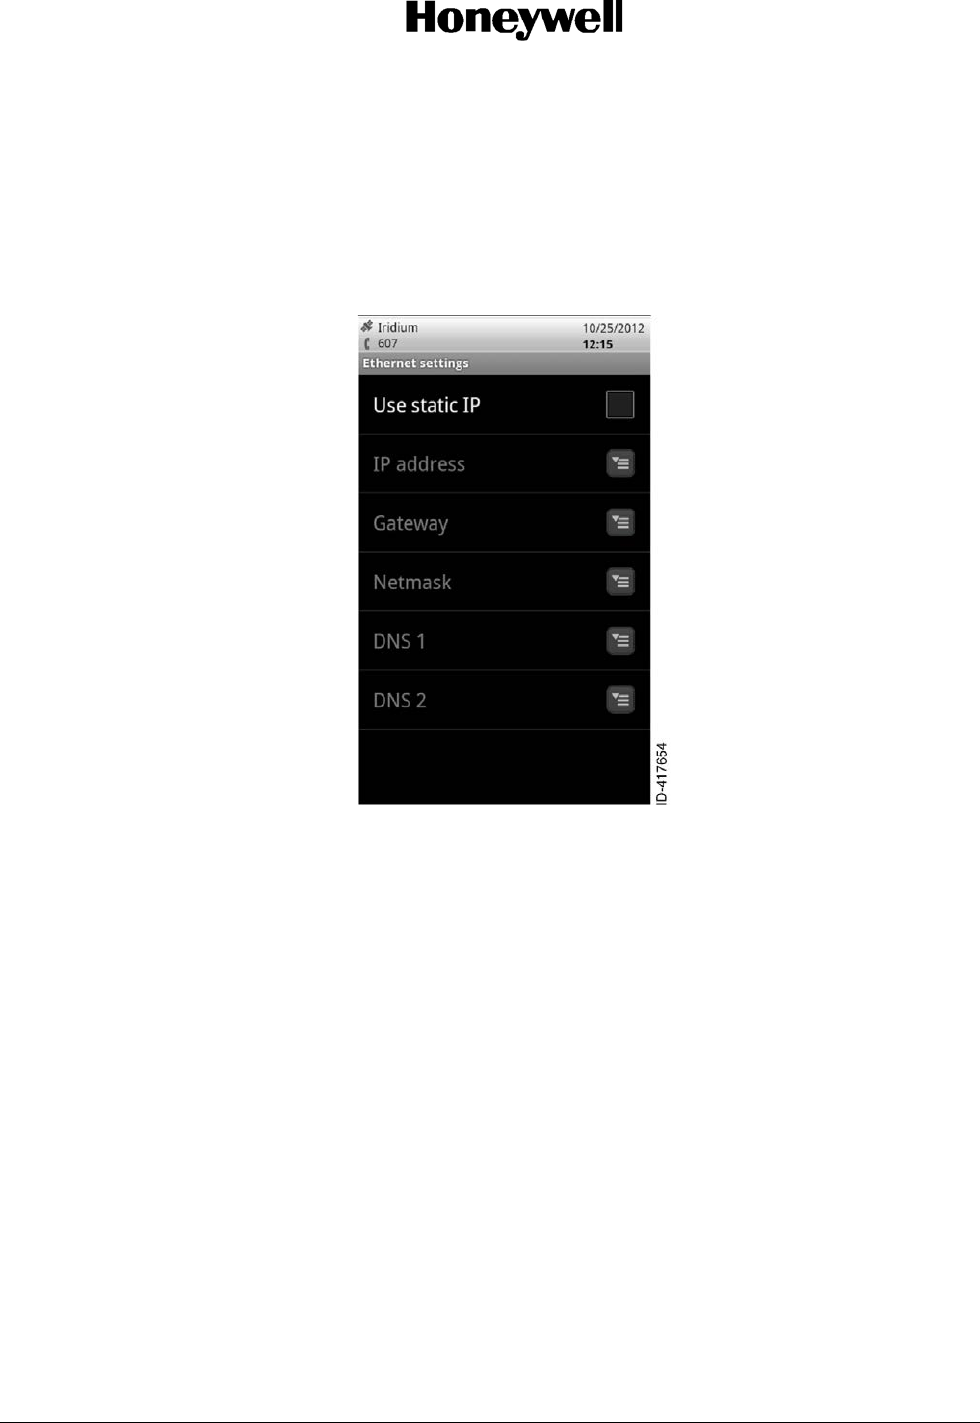
Figure 24 Ethernet Settings
3.19 Connecting to Bluetooth Devices
Not supported in this release.
3.20 Turn Bluetooth On/Off
Not supported in this release.
3.21 SIP Services
Not supported in this release.
OPERATOR’S MANUAL
OM - 23-15-85 Page 29
3 Oct 2012
© Honeywell International Inc. Do not copy without express permission of Honeywell.
3.22 Keyboard Settings
Not supported in this release.
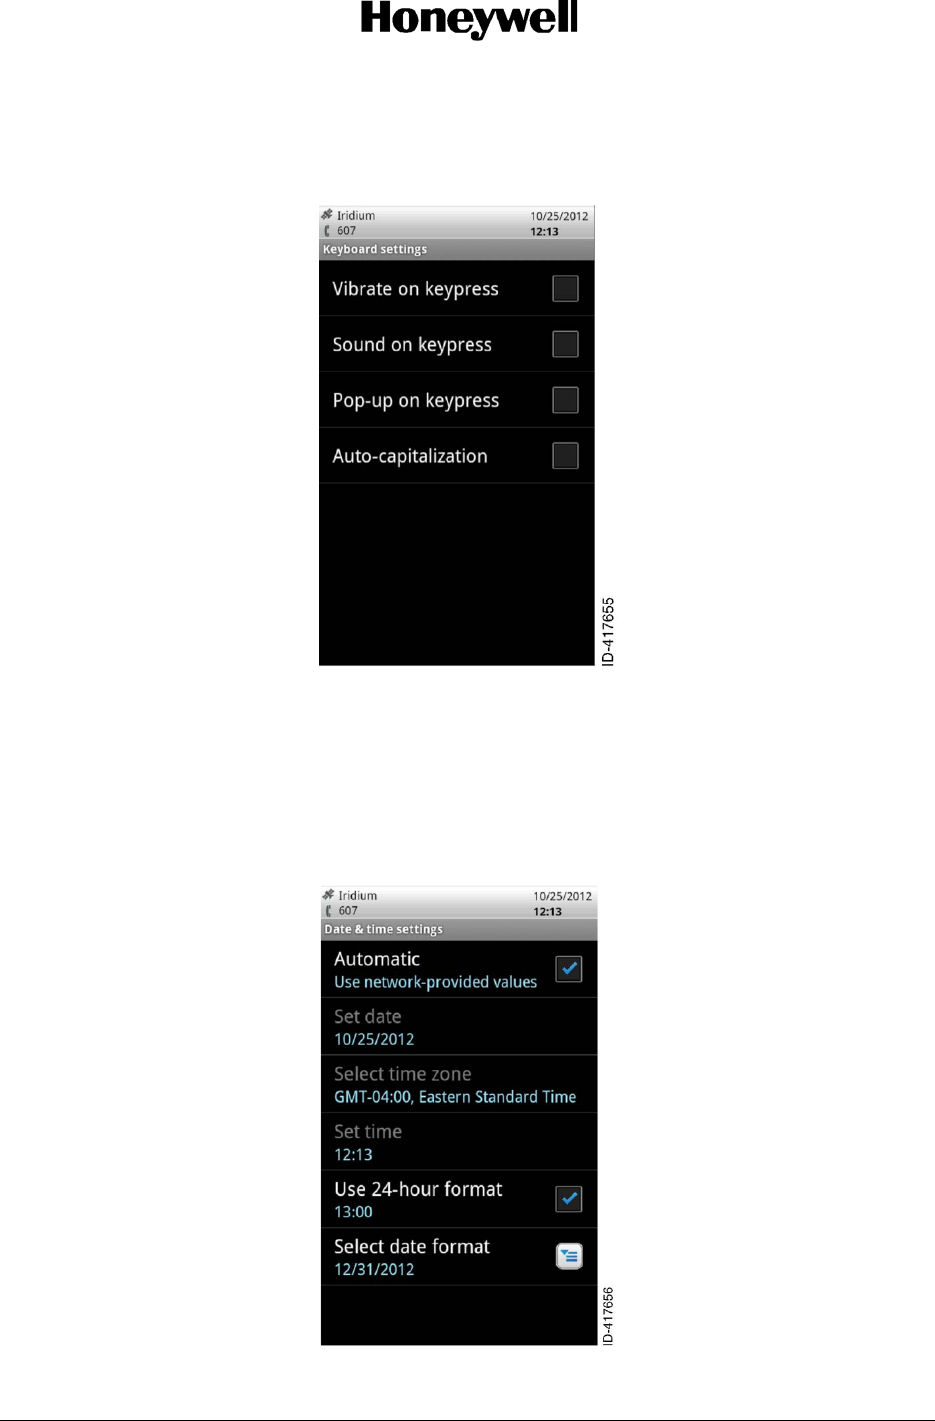
Figure 25 Keyboard Settings
3.23 SD Card
Not supported in this release.
3.24 Date and Time
Not supported in this release.
Figure 26 Date and Time Settings
