ENTERMEDIA EX19DD MAGICSING KARAOKE (MAIN STATION) User Manual CN Manual ET19KV CS2 VER100
ENTERTECH CO., LTD. MAGICSING KARAOKE (MAIN STATION) CN Manual ET19KV CS2 VER100
UserManual.wiki
>
ENTERMEDIA
>
EX19DD User Manual
Users Manual
Navigation menu
Upload a User Manual
Namespaces
Wiki Guide
HTML
PDF
Info
Views
User Manual
Discussion / Help
Navigation
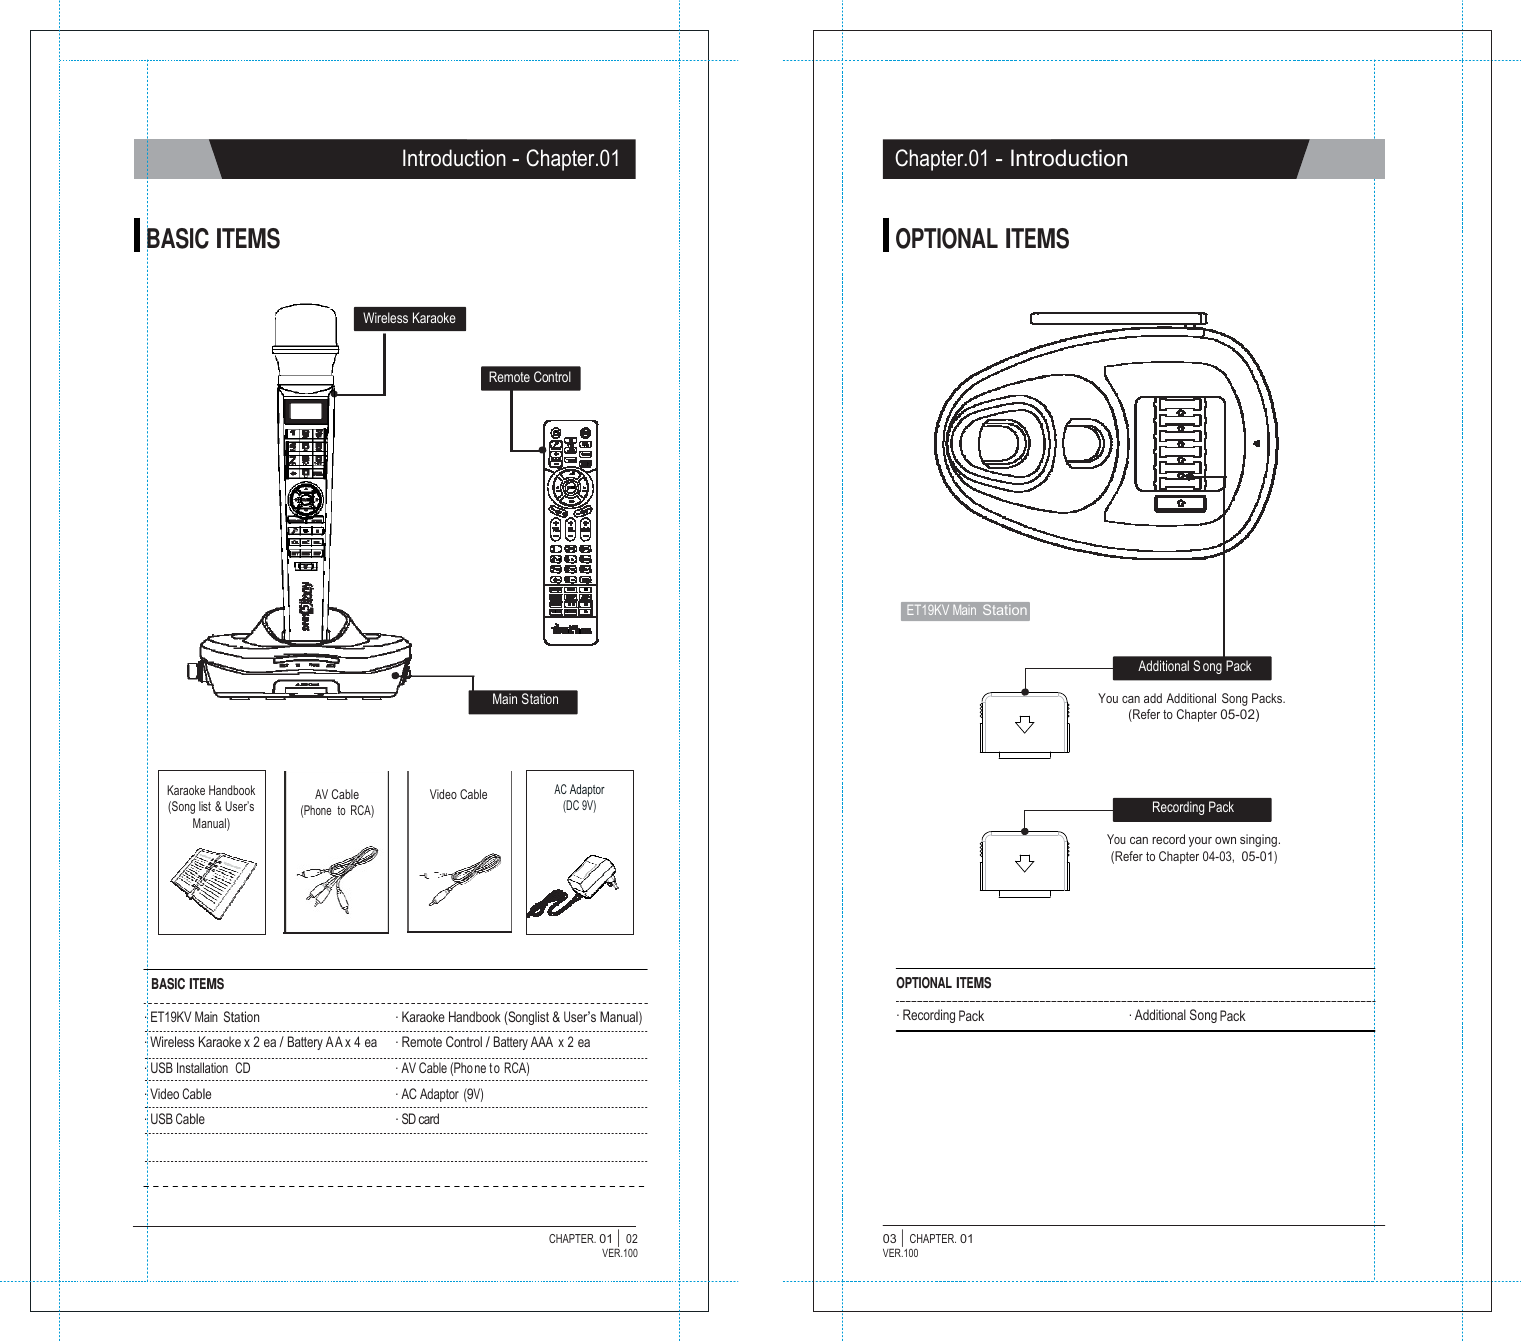
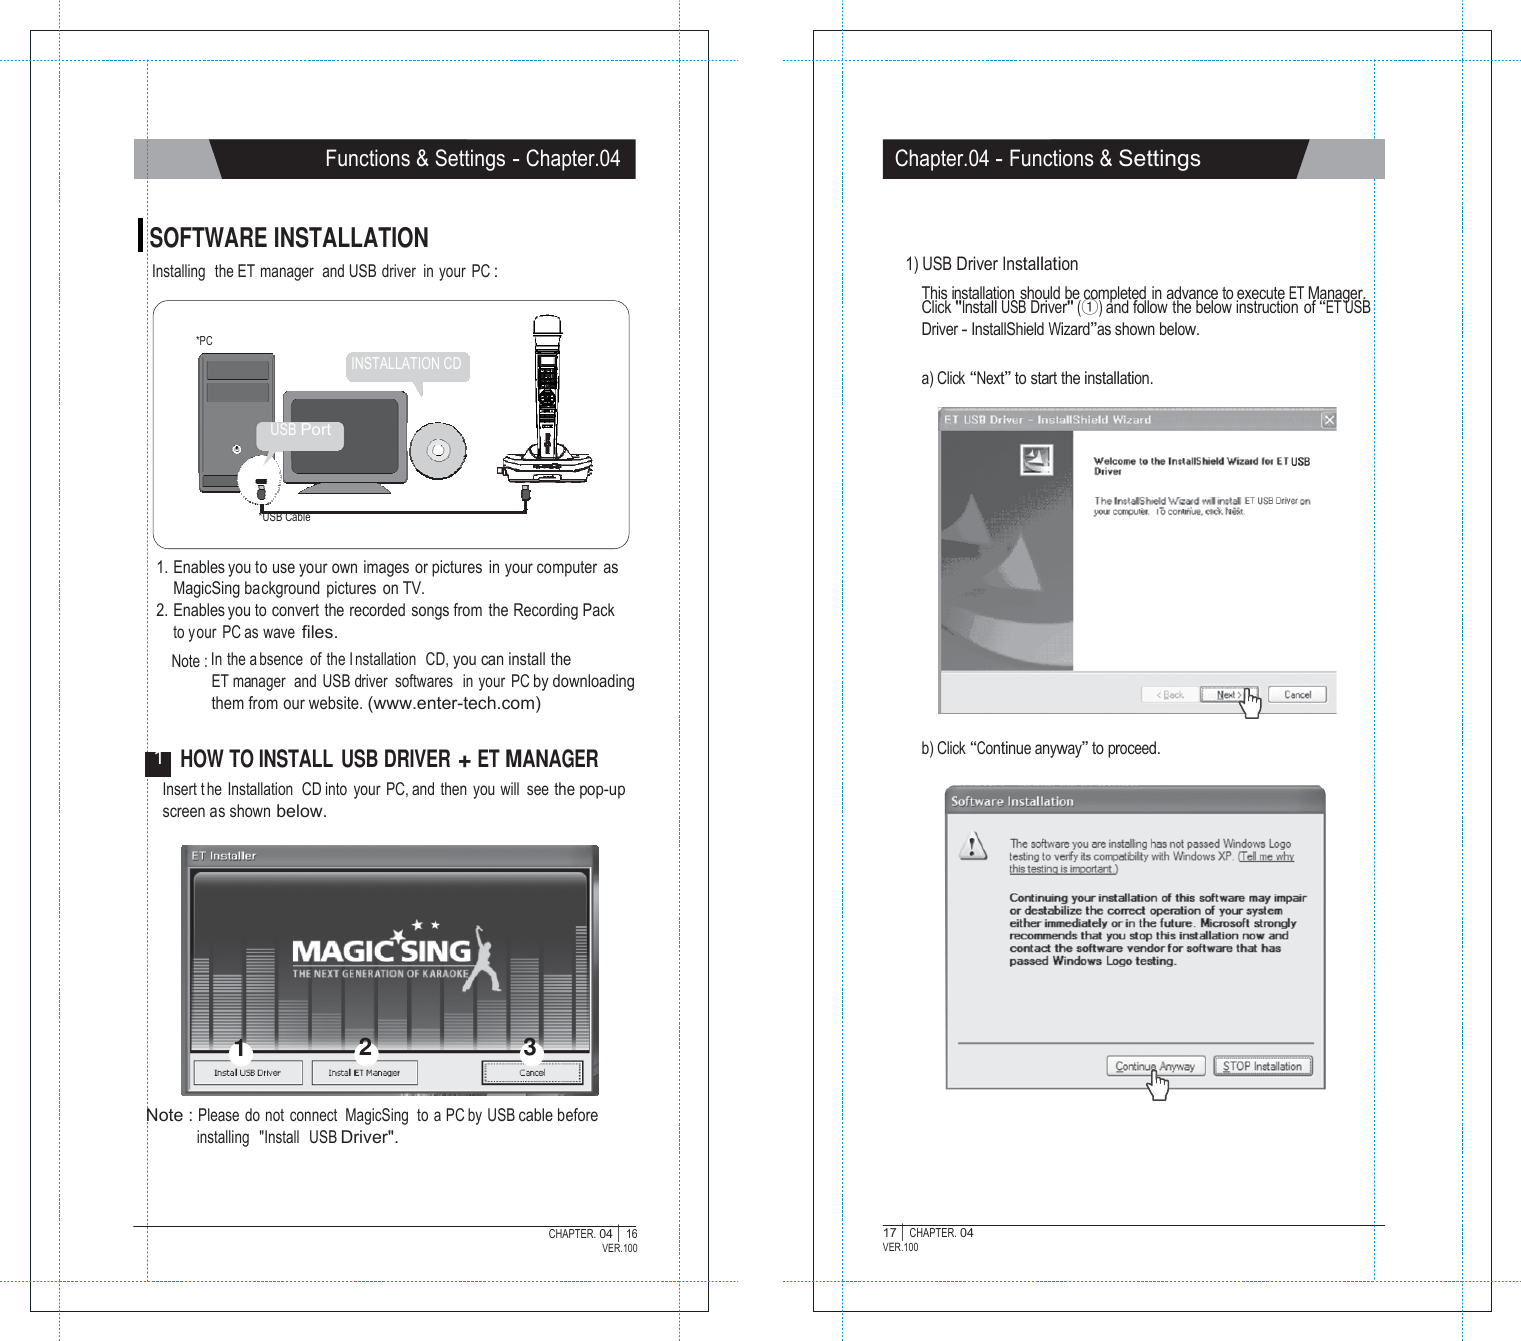
![C O N T E N T S Chapter 01. Introduction SSppeecciiffiiccaattiioonnss 000111---000111 BBaassiicc IItteemmss 000111---000222 Optional Items 000111---000333 Chapter 02. How to Set up Your MAGICSING HHooww ttoo CCoonnnneecctt ttoo aa TTVV 000222---000111 HHooww ttoo CCoonnnneecctt ttoo aa TTVV && SStteerreeoo ((SSoouunndd SSyysstteemm)) 0022--0011 How to Change the background video using other video sources 000222---000222 How to Convert [PAL] or [NTSC] mode of TV 000222---000222 Chapter 03. Product Guide ET19KV Main St ation & Wired Mic 0033--0011 ET19KV Wireless Karaoke Key Buttons 0033--0022 ET19KV Remote Control 000333---000777 Chapter 04. Functions and Settings KARAOKE - Song Search 000444---000111 - Recording 000444---000333 - MY-MIC 0044--0055 - User's Contents 044-06 - Theme 0044--0077 - Jump 000444---000777 - Vocal Assist (Multiplex) 0044--0088 - Musical Notation 000444---000888 - User Background (SD card) 000444---000999 HOW TO SING 000444---111000 MOVIE 000444---111111 GAME 000444---111222 CONFIGURATION MENU 000444---111444 SOFTWARE INSTALLATION 000444---111666 ET MANAGER 0044--2233 Chapter 05. Optional Items Recording Pack 000555---000111 Additional Song Pack 000555---000222 Chapter 06. Additional Information Precaution 000666---000111 Troubleshooting 000666---000222 User Manual | ET19KVVER.100 Chapter.01 - Introduction SPECIFICATIONS ET19KV MAIN STATION · Model No. · Sound Engine · Wireless Mic. Bandwidth · Dimension / Weight · Power Consumption · Audio Output · Video Output · External Video Input · Resolution · USB(Slave only) · Operating Temperature · Power Supply ET19KV CT-500(SEIP-II) 2403 ~ 2477 MHz 137(W) x 203(H) x 60(L)mm / 322g During the Stand-By : 17mA / 153mW During the Playing - JPEG MODE : 300mA / 2.7W - MOVING MODE : 540mA / 4.86W Stereo Line Out(Full scale Output) - TV Mode : 2Vrms - AMP Mode : 3.5Vrms Format : NTSC or PAL 1Vp-p @ 75 Ohm Load Composite1Vp-p @ 75 Ohm Load NTSC : 720 x 480(interlace) / PAL : 720 x 576(interlace) USB2.0(HI Speed), USB1.1Support 0°C ~ 60°C AC Adaptor(DC 9V/1A) WIRELESS KARAOKE · Model No. · RF Frequency · Battery · Dimensions · Weight · Wattage · Operating Temperature · Effective Distance EX19DD 2403~ 2477 MHz 1.5V (AA) x 2 EA 43.5(W) x 43.5(L) x 259(H) mm 170g ( without the batteries ) 70mA / 210mW 0°C ~ 60°C Up to 10m unobstructed distance CHAPTER. 01 | 01 VER.100](https://usermanual.wiki/ENTERMEDIA/EX19DD/User-Guide-1194063-Page-3.png)
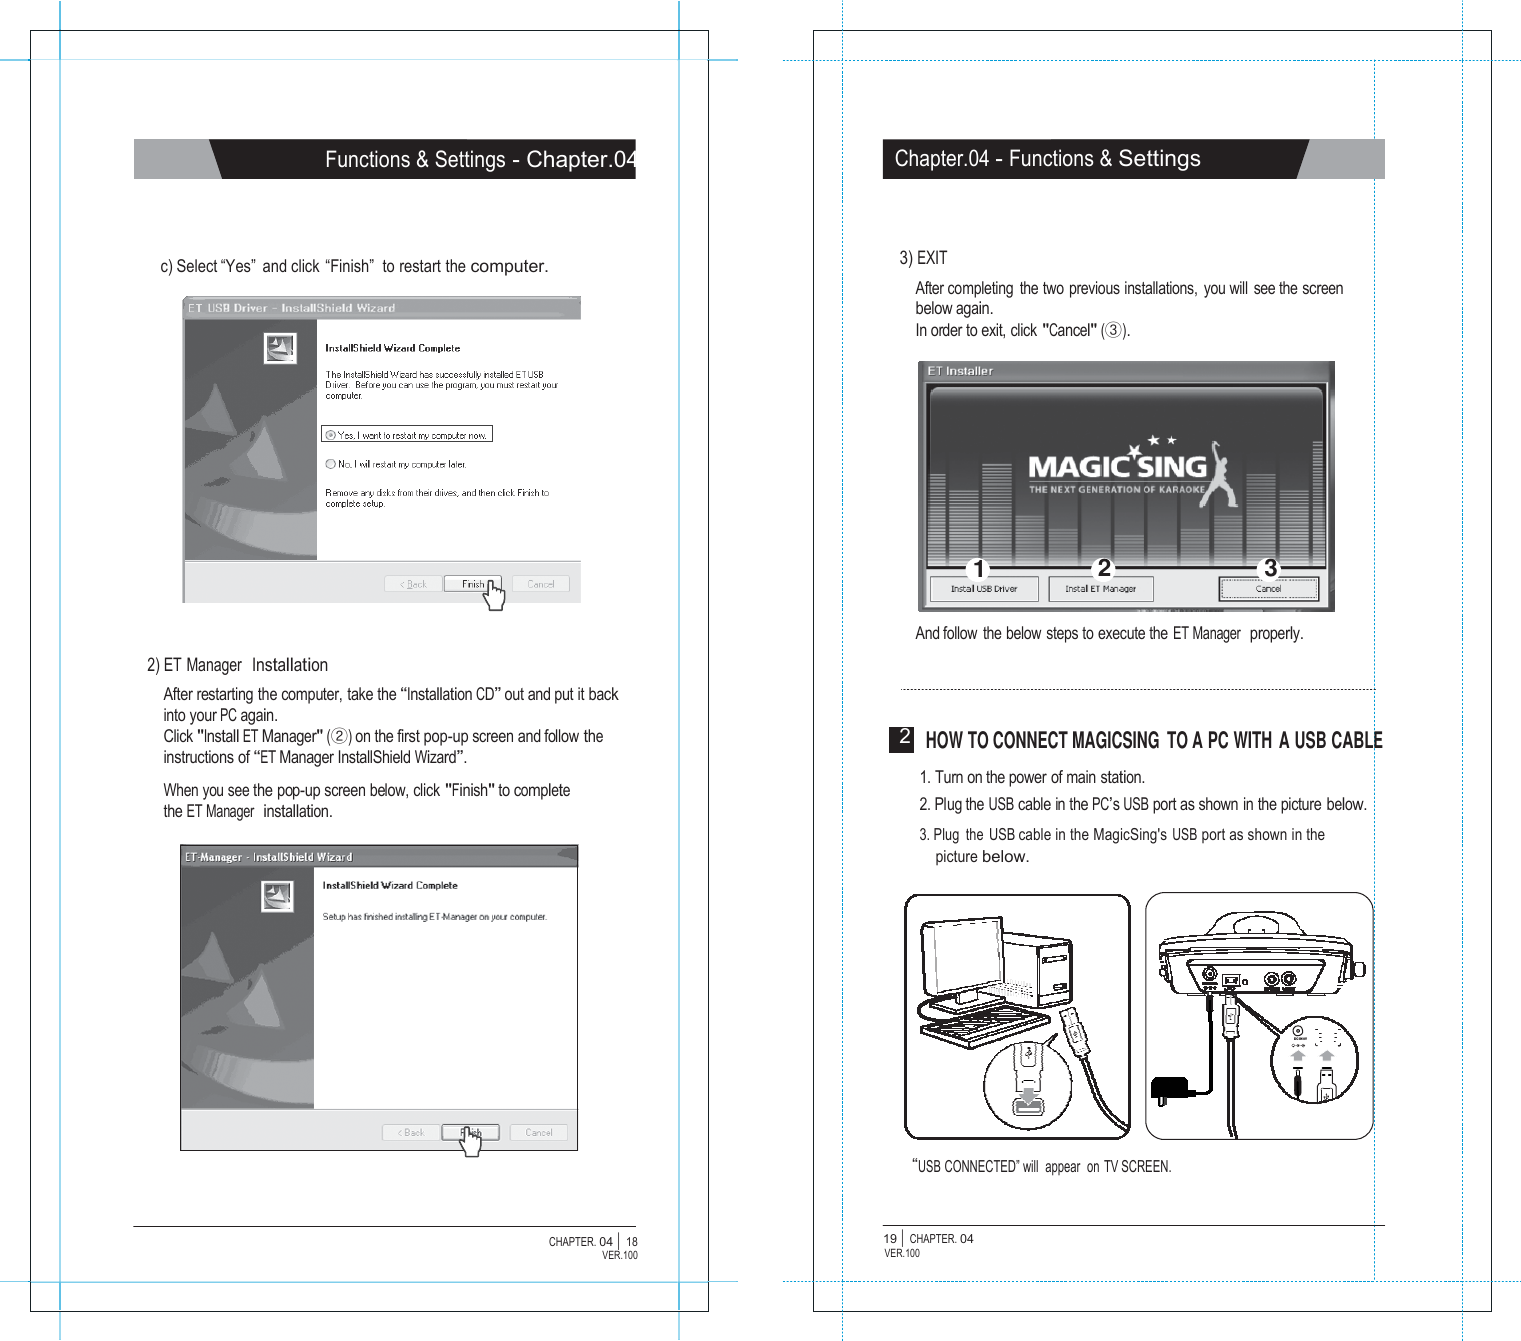
![How to Set up Your MAGICSING - Chapter.02 Chapter.02 - How to Set up Your MAGICSING HOW TO CONNECT TO A TV ET19KV Main Station Television HOW TO CHANGE THE BACKGROUND VIDEO USING OTHER VIDEO SOURCES Television ET19KV Main Station External Device AUDIO L / R & VIDEO OUT INPUT PORT I AUDIO L / R & VIDEO IN AV CABLE (RCA) 1. Connect the Audio / Video cable to the RCA jack terminal on your TV, as shown above. If there are only two RCA jack terminals on your TV (mono TV), connect the yellow jack (male) to the yellow RCA jack terminal and connect the white jack (male) to the other RCA jack terminal of your TV. ※Please turn off the function “Automatic Volume Levelling” (AVL / AVC) on your television set. HOW TO CONNECT TO A TV & STEREO (SOUND SYSTEM) VIDEO IN OUTPUT PORT | VIDEO OUT 1. Connect the video cable to the VIDEO OUT jack terminal on other optional video sources (VCD, DVD,VIDEO). 2. Connect the other side of the video cable to the VIDEO IN jack terminal of MAGICSING. 3. Press [MODE+0+1] on either the mic or the remote control to use other video sources as background video by selecting "EXT.VIDEO INPUT" on the “configuration menu”. ET19KV Main Station Television Stereo ( Sound System ) HOW TO CONVERT [PAL] OR [NTSC] MODE OF TV 1. To convert to PAL mode, t urn of f the mic first. Press and hold button [8] on the mic, and then press the [POWER] button using another finger until the word “PAL” appears on the TV screen. (Do not release button [8] and the [POWER] button until the word “PAL” appears on the TV screen.) INPUT PORT I VIDEO AUDIO L / R 2. To convert to NTSC mode, turn off the mic first. Press and hold button [9] on the mic, and then press the [POWER] button using another finger until the word “NTSC” appears on the TV screen. (Do not release button [9] and the [POWER] button until the word “NTSC” appears on the TV screen.) 1. Connect the yellow jack to the yellow RCA terminal on your TV. Connect the red and white jack to jack terminals on your stereo (sound system). You might need an extension cable if your stereo (sound system) is placed far away from your TV. CHAPTER. 02 | 01 VER.100 02 | CHAPTER. 02 VER.100](https://usermanual.wiki/ENTERMEDIA/EX19DD/User-Guide-1194063-Page-5.png)
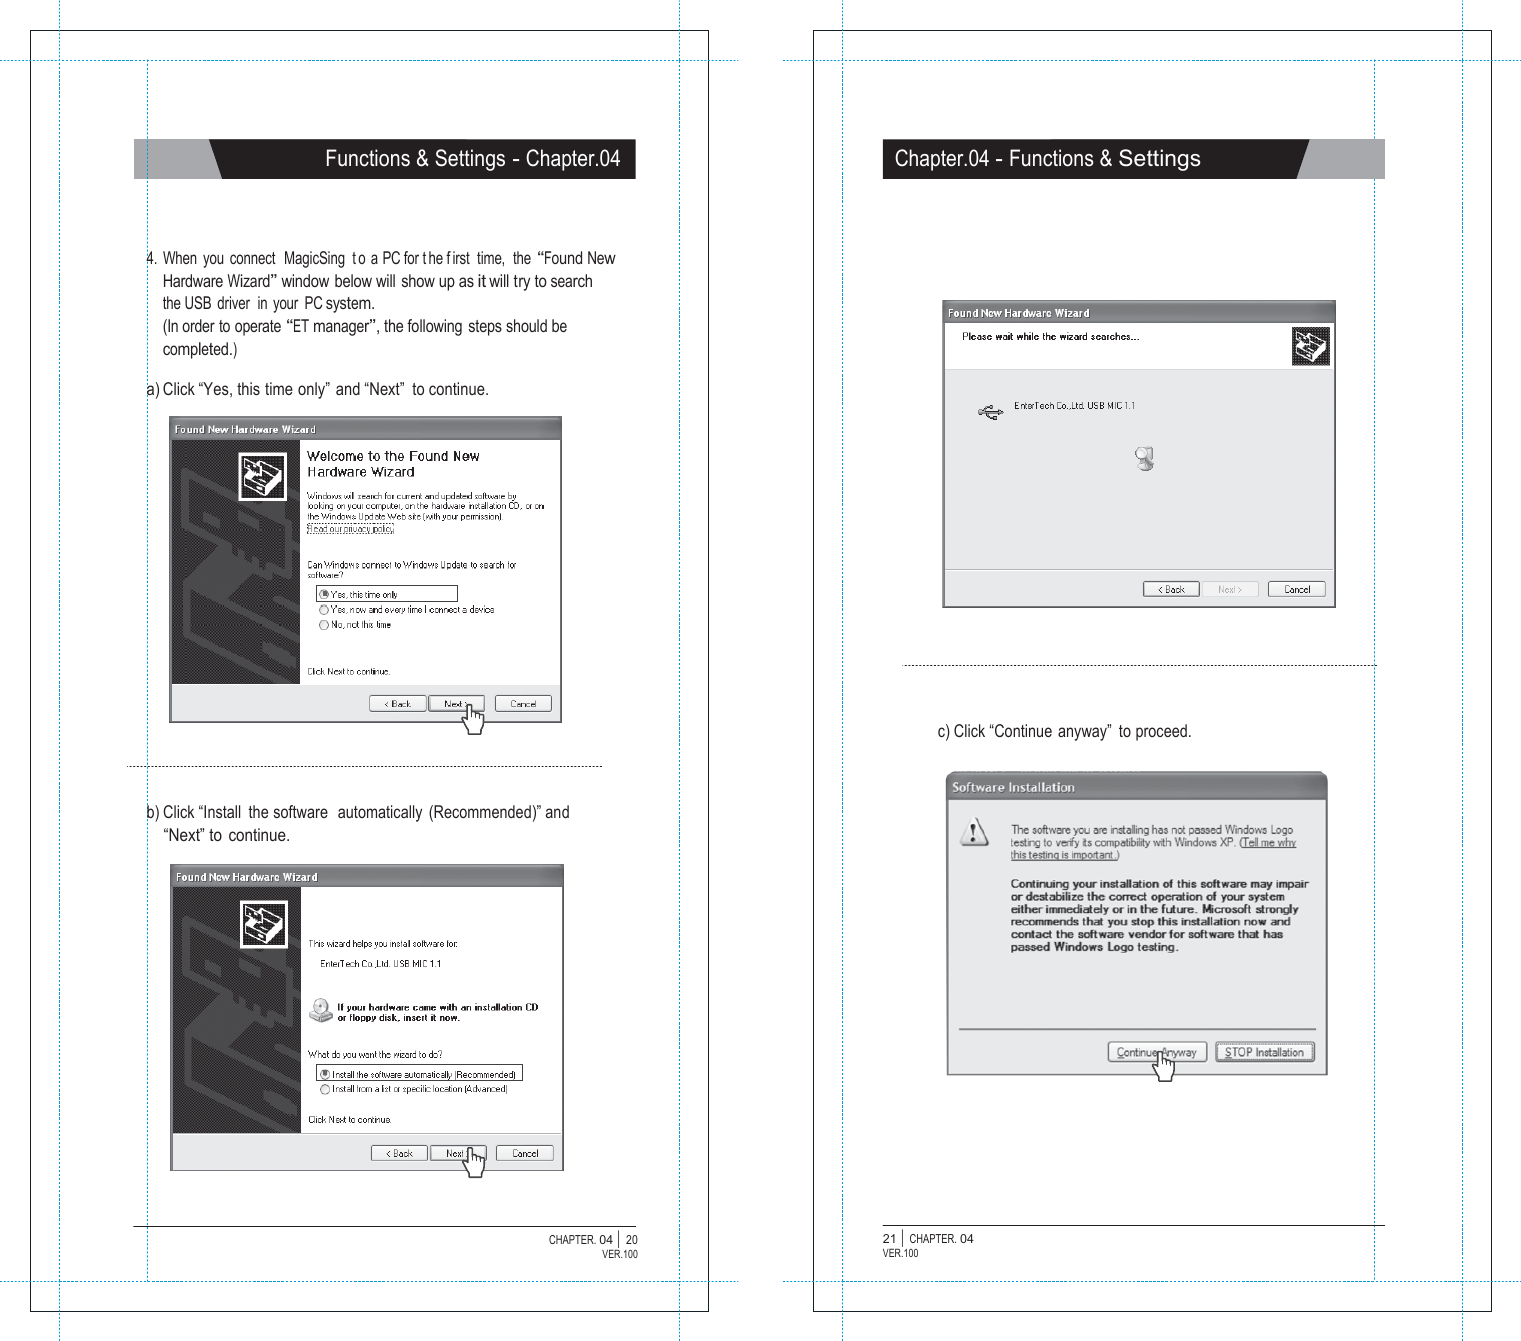
![ON POWER Product Gui de - Chapter.03 Chapter.03 - Product Guid e ET19KV MAIN STATION ET19KV WIRELESS KARAOKE KEY BUTTONS ET19KV Main Station DC IN USB P ORT Number button 2 LCD Display 1 SONG PACK COVER POWER ON / OFF SWITCH ANTENA A Cancel Button 3 Play / Stop Button 6 Search Button 7 MY-MIC Button 9 Vocal Assist Butt on 10 Volume Button 12 Echo Button 15 Reservation Button 4 Navigation Button 5 MODE Button 18 Pause Button 11 MIC Button 13 Melody Button 14 Record Button 17 POWER INDICATOR A POWER ON / OFF SWITCH B CCC WIRELESS MIC INDICATOR SD CARD SLOT Key Button Power Button 16 8 1. LCD DISPLAY 2. NUMBER BUTTON - Turns on or off the main station. B POWER INDICATOR - A green light indicates that the ET19KV is turned on and ready for use. - A red light indicates that the ET19KV is in the standby mode. Press the power button on the remote control or turn off the power button on the main station and turn it on again. - No light indicates that the power button on the main station is in the off position. Please turn it on. C WIRELESS MIC INDICATORS - A blue light indicates that the wireless mic is connected to the main station. 3. CANCEL BUTTON - Press this button to erase one by one what you input or to cancel some function you chose. 4. RESERVATION BUTTON RES - Please select a song and press [RES] to reserve the song (The song number will be displayed on the screen under the “Reserved” menu.) - Press [MODE] twice to exit the reservation list and go back to the on-screen list by pressing [▼], [▲]. - In case you want to delete a reserved song, select that song in the “reserved” list and press [RES] again. - You can reserve up to 100 songs, but only 4 songs with their respective numbers will appear on a blue bar on the upper portion of the screen. CHAPTER. 03 | 01 VER.100 02 | CHAPTER. 03 VER.100](https://usermanual.wiki/ENTERMEDIA/EX19DD/User-Guide-1194063-Page-6.png)
![Product Gui de - Chapter.03 Chapter.03 - Product Guid e 5. NAVIGATION BUTTONS - Press these buttons to choose different modes, different songs and so on by scrolling up/down and left/right. 6. PLAY / STOP BUTTON - Press [▶/■] once to play the selected song. 11. PAUSE BUTTON II - Press this button to pause the song you are singing. - After pressing this button, you can also enjoy the "How to Sing" function by using the navigation buttons. 12. VOLUME BUTTON - Press [▶/■] again to stop playing the song. 7. SEARCH BUTTON VOL - When you press [VOL], two different sub volume control menus appear on the TV screen ① Music(press once) ② Multiplex(Press two times). SEARCH - Pressing [SEARCH] will prompt you to different modes of choosing a song. 13. MIC BUTTON - You can also search a song from the on-screen list by pressing [▼], [▲] or inputting characters. (Refer to Chapter.04-01) 8. POWER BUTTON - Turns on or off the mic. MIC - Press [MIC] to adjust t he volume of the main mi c then press [▼], [▲] to decrease / increase the volume. - This setting will remain until the product is reset or the values are changed by users. Press [POWER] slightly to turn it on. 14. MELODY BUTTON Press [POWER] for 3 seconds to turn it off. - When there is no input signal within 10 minutes, the power will be turned off automatically. MEL - Press this button, and then use the navigation but tons t o adjust the melody levels of a song. 9. MY-MIC BUTTON 15. ECHO BUTTON - This function enables you to save your own customized settings over the song you chose. - While singing a song, adjust settings such as the volume, melody, ECHO - Press this button and then use the navigation but tons t o adjust the ECHO levels of a song. echo, etc., press [ ] on the mic to save the settings. 16. KEY BUTTON - To see the stored [MY-MIC] song list, press [ ] again. - Press [▼], [▲] to select the song you wish to sing again with the adjusted set tings. Press [▶/■] to play the song and press [RES] to delete it from the list. - The lists containing the customized settings will be retained even after turning off the ET19KV. KEY - Press [KEY] and then press [▼], [▲] to decrease / increase the pitch level while singing a song. The T V screen wi ll display the range of keys ( -7 ~ 8 ) with the default value [0] on the key bar at the upper part of the screen. - At the end of the song or when you press [▶/■] to stop the song, this setting will return to the initial default value [0]. 10. VOCAL ASSIST BUTTON - Press this button to see the list of vocal assist. (Refer to Chapter.04-08) - While singing a song, you can activate or deactivate vocal assist function by pressing this button repeatedly. CHAPTER. 03 | 03 VER.100 04 | CHAPTER. 03 VER.100](https://usermanual.wiki/ENTERMEDIA/EX19DD/User-Guide-1194063-Page-7.png)
![Product Gui de - Chapter.03 Chapter.03 - Product Guid e 17. RECORD BUTTON *MODE Function REC - Choose / select a song first before recording. - Press [MODE + REC] to start recording. - Press [▶/■] to stop recording. - Press [REC] to start the playback of the song. [MODE]+[1] [MODE]+[2] VOLUME (3 Different Sub Volume Control Menus Appear) ① Music volume control 0~15 / ② Melody volume control 0~15 ③ Vocal Assist volume control 0~15 TEMPO (Adjusts the Tempo of a Song) The range of the tempo adjustment is between -7 ~ 8, and you can select a tempo at which you want to play the song by selecting a value from this scope. 18. MODE BUTTON [MODE]+[3] KEY (Adjusts the Level of the Pitch) MODE - You can see the function menu bar on the upper screen by pressing [ MODE]. First, find a function you want to use by pressing [▼], [▲], and then press [▶/■] to prompt you to the sub-menu. Press [▼], [▲] then [▶/■] to choose an option. - [MODE] is used in conjunction with other buttons to access secondary functions. [MODE]+[4] [MODE]+[5] [MODE]+[6] [MODE]+[7] [MODE]+[8] [MODE]+[9] [MODE]+[0] The range of the pitch adjustment is between -7 ~ 8, and you can select the pitch level. SEARCH (Song Sear ch Function) Look for your favorite song. EFFECT (Musical Effects) : 4 Different Sub Menus Appear ① Mic E cho volume co ntrol 0~15 ② Instrument : You can change the me lody instrument by using [▼], [▲], [◀],[▶] to one of the 8 instrumental sounds while singing a song. ③ Voice change : Mic voice alteration function that can change your voice either to female voice or to male voice. ④ Vocal a ssist ON / OFF PLAYING (Technical Effects) : 5 Different Sub Menus Appear ① Jump : Skips the prelude or interlude ② Continuous Playback : If you wish to continue playing songs in sequential order, s elect a starting song and press MODE → 6 → 2 (for example, if you select song number 241, play the song, and then press MODE → 6 → 2). ③ Random Play : MagicSing randomly chooses a song for you. ④ Pause : A song pauses. Press [▶/■] to continue playing. ⑤ Selected S ection Re peat : Repeats a certain section in a song. ※ Press [MODE + 6 + 5] to set the starting point and [MODE + 6 + 5] again to set the ending point. Pressing [MODE + 6 + 5] 3rd time turns off this function. ※ This "selected repeat function" is not available for the prelude and interlude sections of a song USER'S CONT ENTS ① USER'S JPEG / ② MP3 REC & PLAY ① Record / ② Playback (Playing the recorded song) SPECIAL EFFECT : 5 Different Sub Menus Appear ① Musical No tation (Key Note Guide) / ② My-Mic / ③ Theme : Background Themes (9 background them es to choose fro m) and Scoreboard (Records your scores at the end of each song) / ④ Silence : Silent mode (you can choose from “level 1”, “level 2”, and “off”) / ⑤ Lyrics ON / OFF CONFIG. (Configuration) CHAPTER. 03 | 05 VER.100 06 | CHAPTER. 03 VER.100](https://usermanual.wiki/ENTERMEDIA/EX19DD/User-Guide-1194063-Page-8.png)
![TER. 04 Product Gui de - Chapter.03 Chapter.04 - Functions & Settings ET19KV REMOTE CONTROL KARAOKE 1 POWER :POWER ON/OFF. 1 6 2 VOCAL ASSIST SETTING :Vocal Assist O N / OFF 1 SONG SEARCH 2 3 3 MY-MIC :MY-MIC. 4 4 BACKGROUND CHANGE :Changes backgrounds. 5 THEME :Selecting background image. 5 6 SHORTCUT :Guides directly to some modes. 7 NAVIGATION :Muilt-function guide buttons. 8 7 8 PLAY / STOP :Plays & Stops a song or function. 9 KEY :Adjusts the song key. 10 TEMPO :Adjusts the song tempo. 11 VOLUME :Adjusts the volume. Ⅰ. Entering the Song Search Mode - Press [SEARCH] or [MODE+4] on the remote control to enter the Song Search Screen. 9 10 12 MELODY :Adjusts the melody level. 11 12 13 13 ECHO :Adjusts the echo level. 14 0~9 :Arabic numbers. 15 :Cancel. 14 15 16 16 RES :Reserves and cancels a reservation. 17 SEARCH :Song search. 18 MODE :Functions. 19 II :Pause. 20 RANDOM :Random song select. II. Buttons for the song search mode on the remote control - [SEARCH] : Press [SEARCH] repeatedly to select one of these three modes below. 1) Searching by Title : You can search for a song by typing some letters or num bers or special characters of the song title. (Refer to “IV. How to Search a Song”on the next page, chapter 04-02) 17 18 MODE 19 21 REPEAT :Section repeat. special characters of the singer’s name. (R efer to “IV. How to Search a Song” on the next 20 21 22 23 24 27 25 26 23 SCORE :Changes the level of difficulty. 24 M/F :Converts voice to man’s or woman’s 25 VOICE :Changes the voice. 26 SILENCE :Silence mode. 27 REC :Recording & Playback. 3) Exit Mode : Neither the “title” icon nor the “singer” icon will be highlighted on the screen. - [← ] : Press this button to erase characters. - [MODE] : Pressing this button repeatedly while keying in characters toggles you to either the letters, numbers or special characters. CHAPTER. 03 | 07 VER.100 01 | CHAP VER.100](https://usermanual.wiki/ENTERMEDIA/EX19DD/User-Guide-1194063-Page-9.png)
![CHAPTER. 04 | Functions & Settings - Chapter.04 Chapter.04 - Functions & Settings Ⅲ. Exiting the “Song Search” mode - After entering the “song search” mode, search a song using [▼], [▲], [◀], [▶] and play the song by pressing [▶/■] or reserve the song by pressing [RES]. - After entering the “song search” mode, set it to the "exit mode" by pressing [SEARCH] and end the search by pressing any number button. (If there are reserved songs, the list containing those reserved songs will be displayed on the screen.) Ⅳ. How to Search a Song After entering the song s earch screen, press [MODE] to set one of the three input methods below. ① Input letters [1] [2] A → B → C [3] D → E → F [ 4] G → H → I [5] J → K → L [6] M → N → O [ 7] P → Q → R → S [8] T → U → V [9] W → X → Y → Z [ 0] SPACE ② Input numbers [1] → 1 [ 2] → 2 [ 3] → 3 [ 4] → 4 [ 5] → 5 [6] → 6 [ 7] → 7 [ 8] → 8 [ 9] → 9 [ 0] → 0 ③ Input special characters [1] . → , → : → ; [2] ‘ → “ → ` [3] _ → = → ~ [4] + → - → * → / [5] ! → # → $ → % [6] & → ? → @ [7] ^ → ₩ → | [8 ] ( → ) → < → > [9] [ → ] [0] SPACE (The search function disregards spaces. E.g. : If you want to search a song whose title is “A DONDE VOY,” you only have to enter “AD” without spac e between characters to execute the search.) - Press the [0] ~ [9] buttons to input characters. - Examples To enter "TOU" : Press [8] once → [6] three times → [8] two times To enter "ABC" : Press [2] once → [2] two times → [2] three times 2 RECORDING Use this function to record your singing(VOICE with the MUSIC) and to playback your recorded singing performance. 1. RECORDING TO THE MEMORY IN THE MAIN STATION In case of no SD card and/or Recording Pack on the main station, follow the procedure below. How to Use: 1) Select a song. ① 2) Press [ ] the remote control to start recording ( ① ). 3) To stop : Press [▶/■]. 4) To do playback : ② Press [▶] on the remote control ( ② ). 5) To stop t he pl ayback : Press [▶/■]. ※ A song recorded less than two seconds will not be recorded. ※ You can record a song of up to five minutes long. [approximately f or 1(one) song] 2. RECORDING TO AN SD CARD AND/OR RECORDING PACK You can record your own singing into an SD card or a Recording Pack. If both the SD card and Recording Pack inserted at the same time, you need t o decide which one to u se. ( The recording pack looks exactly the same as an additional song pack but contains no songs and its data is replaceable.) How to Use: 1) Insert an SD card or Recording Pack before turing on the main station. 2) Select a song. 3) Press [ ] under the "RECORD" section on the remote control to start recording 4) To stop, press [▶/■]. 5) To see the list of the recorded songs, press [▶] the remote control. 6) To play back the song, choose a recorded song first by pressing [▼], [▲], [◀], [▶] on the remote control. After selecting the song the song, press [▶/■] on the remote control. 7) To stop t he playback, press [▶/■]. 8) To delete a recorded song, choose the song and press [RES]. 02 VER.100 03 | CHAPTER. 04 VER.100](https://usermanual.wiki/ENTERMEDIA/EX19DD/User-Guide-1194063-Page-10.png)
![Functions & Settings - Chapter.04 Chapter.04 - Functions & Settings ※ You can’t record your singing to an SD card when MOVING PICTURES are playing.While an SD card or Recording Pack is being used, your singing cannot be recorded on the main station memory. ※ When an Additional Song Pack is used on the main station, songs recorded from the Additional Song Pack can be played or deleted too. ※ You cannot record your singing performance in the middle of the song. Therefore, even if you press [ ● ] on the remote control while singing a song, the song stops, restarts, and then the recording takes place. ※ Settings such as tempo or key should be set in advance as these cannot be changed while the song is being recorded. Also, during the recording, certain functions such as continuous play or pause are not available. ※ Recording time 1. Recording Pack : About 18 0 minutes (NAND 1Gb) 2. SD card : About 60 Hours (2GB) (In case there is no files on the SD card) 3 MY-MIC This function enables you to save your own customized settings over the song you chose such as the volume of music, melody, microphone, echo effect, and vocal assist as well as the tempo, key setting. You can recall these settings when you select and sing the song again. 1. SAVING ADJUSTED SETTINGS - While singing a song, adjust settings such as the volume of music, melody and so the way you want to customize the song, and then press [♥] while the song is still playing on the remote control. - The song with the adjusted settings will be saved in the [MY-MIC] song list. (If the same song is already in the list, the song will be updated with new settings.) - The lists containing the customized settings will be retained even after turning off the ET19KV. 2. SELECTING & PLAYING A SONG - Press [♥] to see the MY-MIC] song list while not playing any song. - Select the song from the list and press [▶/■] to play the song with the stored settings. 3. DELETING A SONG - Press [♥] while selecting a song to see the stored list of MY-MIC songs. - Press [▼], [▲], [◀], [▶] to select the song you want to delete, and press [RES] to delete it . CHAPTER. 04 | 04 VER.100 05 | CHAPTER. 04 VER.100](https://usermanual.wiki/ENTERMEDIA/EX19DD/User-Guide-1194063-Page-11.png)
![Functions & Settings - Chapter.04 Chapter.04 - Functions & Settings 4 USER'S CONTENTS Users can play their own contents (MP3 and Picture) they saved in an SD card. Press [MODE + 7] to explore. 1. USER'S JPEG Play & Enjoy your own picture through TV. - Before put ting JPEG files i nto an SD card, the files have to be converted by ET-MANAGER. (Refer to the "USER BACKGROUND" section) - Insert the SD card into ET19KV. - Select this function for your pictures to be shown on the screen. - To move pictures forward and backward, press [◀] or [▶]. - To exit, press [ ] or [RES]. 2. MP3 Play & Enjoy MP3 files through TV. (No need to convert any MP3 files and to use any music player.) - Move the downloaded MP3 files into the "MP3" folder on the SD card from your PC. - Insert the SD card into ET19KV. - When you select this function, a MP3 list will appear on the screen. - Select a song from the list and press [▶/■] to play the song. - Follow the direction of "Control Bar" shown on the screen. - To exit, press [ ] or [RES]. 5 THEME (BACKGROUND THEME AND SCOREBOARD) 1. THIS FUNCTION CAN ONLY BE SET BEFORE CHOOSING A SONG - Press [MODE + 9 + 3] or [THEME] on the remote control for this function. 2. TO FINISH THIS FUNCTION, PRESS [RES] 3. BACKGROUND THEME - You can select any theme from a set of nine different themes as screen background. - Press number buttons [1] ~ [9] or [▼], [▲], [◀], [▶] to set the theme you want. [1] Love [2] Party [3] Summer [4] Nature [5] Carnival [6] Sports [7] City [8] Country [9] Tour Once a background theme is set, only the pictures related to the selected theme will be shown on the screen. 4. SCOREBOARD - The scoreboard shows the corresponding song numbers and the scores of the songs that you have played. (Only 7 songs will be displayed on the screen.) 6 JUMP (PRELUDE / INTERLUDE SKIP) - You can use the [JUMP] function only during the prelude or the interlude of a song. - Press [JUMP] on the remote control to skip the prelude or the interlude pa rt of a song. CHAPTER. 04 | 06 VER.100 07 | CHAPTER. 04 VER.100](https://usermanual.wiki/ENTERMEDIA/EX19DD/User-Guide-1194063-Page-12.png)
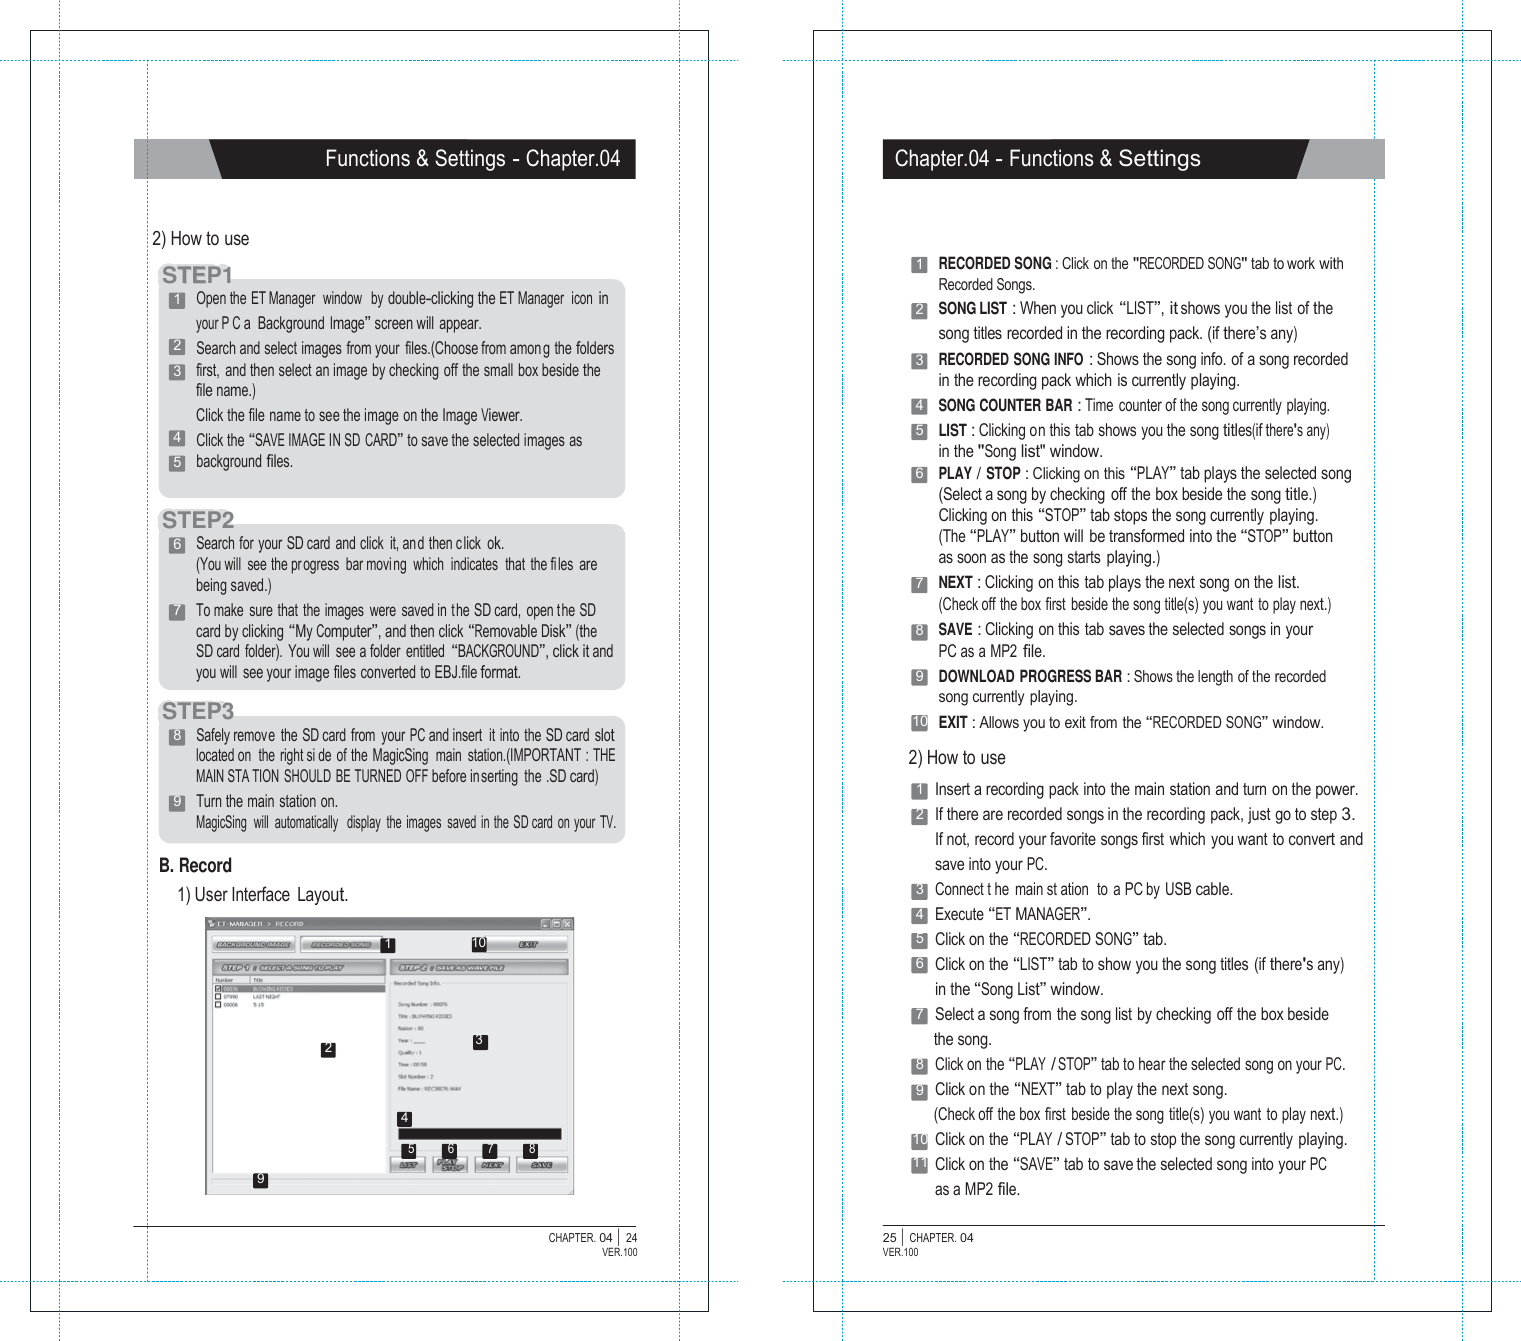
![Functions & Settings - Chapter.04 Chapter.04 - Functions & Settings 7 VOCAL ASSIST (MULTIPLEX) The song comes up with a professional singer's voice with the music. This feature is available only songs indicated "Vocal Assist" on the TV screen and song book. 1. VOCAL ASSIST [ ON ] - If you wish to activate this function, press the [ ] on remote control or [MODE + 5 + 4] to turn it ON, while singing a multiplex song. - The voice will fade out when you sing a song and if you stop singing, the voice will fade in. 2. VOCAL ASSIST [ OFF ] - If you wish to deactivate this function, press [ ] or [MODE + 5 + 4] to turn it OFF, while si nging a multiplex song, which enables you to sing along with the singer's voice. - If you do not want to hear any voice of the vocal assist at all, press [-] button of [Vocal Assist] on the remote control, and then the volume bar will appear on the upper part of the TV screen. Then press [-] until it reaches “0”. 3. VOLUME ADJUSTMENT - Press Vocal Assist [-], [+] on the remote control to adjust the volume of the vocal assist until it reaches a desired level. 8 MUSICAL NOTATION (KEY NOTE GUIDE) 9 USER BACKGROUND(SD CARD) 1. BACKGROUND IMAGES - If you have background images in a folder named "BACKGROUND" on your SD card, you can display them on the TV screen when you select "USER'S JPEG" mode. 2. HOW TO USE - Install “ET-MANAGER” on your c omputer using the CD provided with the mic. - Execute “ET-MANAGER”. - Change the format of image files that you have by selecting “BACKGROUND IMAGE”. - When changing the image file format, these files are stored in a designated folder with the format of “*.ebj”. - Move the converted image files into the “BACKGROUND” folder on the SD card, and insert the SD card into the slot of the main station. ※If the SD card drive is designated as “E : \”, and the converted image file is “image.ebj”, move the “image.ebj” into the “E:\BACKGROUND” folder. ※Image file formats that you can convert into ".ebj" format include Bitmap file (*.bmp), JPEG file (*.jpg, *.jpeg), TIF file (*.tif, *.tiff), and GIF file (*.gif). ※For the detail information, refer to "ET-MANAGER"section. (Chapter.04-17) 1. Press [MODE + 9 + 1] on the mic to see the song list containing only the songs with this note guide function. (This function is available only for the songs in the list.) 2. Choose a song from the list and play the song. After that, press [MODE + 9 + 1] on the mic to choose one of the three settings which are “Normal”, “Easy”, and “OFF”. A. Normal : Displays the musical notes on the upper part of the screen with the original key of the song. B. Easy : Displays the musical notes on the upper part of the screen with the basic “C” key. C. OFF : Does not display any musical notes. ※ A musical notation appears on the upper part of the screen as soon as a song starts. ※ This g ives the user an idea of the) key/pitch of the song he/she is about to sing. CHAPTER. 04 | 08 VER.100 09 | CHAPTER. 04 VER.100](https://usermanual.wiki/ENTERMEDIA/EX19DD/User-Guide-1194063-Page-13.png)
![Functions & Settings - Chapter.04 Chapter.04 - Functions & Settings HOW TO SING This function is for users to keep practicing a particular part of a song they want by moving the part of the song forward and backward. Users also can find any particular parts of a song with its play time as well. 1. PURPOSE - When you want to repeat some part of the song over and over to practice. - When you want to move to some part of song without wating. - When you want memorize some part of song. - When you want go backward to repeat singing. 2. HOW TO USE 1) Press [ II ] while singing. 2) Press [▼], [▲], [◀], [ ▶] to show lyrics 3) Press [▼], [▲] to go forward or backward. 4) Press [▶/■] to play. 5) Press [ II ] again if you want to repeat the part and follow the same procedure from 2) above. ※Does not support any vocal assist on this mode. MOVIE This mode is for users to enjoy music videos, moving pictures and their own contents downloaded from the internet such as MTV, movies, TV shows. 1. HOW TO USE 1) Press the [MOVIE] button located on the bottom par t of the remote control. 2) When the list of movies is shown, press the [▼], [▲] buttons to navigate through movie files, and then select the movie file you want to play. 3) Press [▶/■] to play or stop. 4) Press [◀◀], [▶▶] to move it faster (Pressing once : x2 faster, twice : x4 faster, three times : x8 faster and four times : x20 faster) and then press [▶/■] to play. 5) Press [▼], [▲] to select another movie file you want to play. 6) Press [ + ], [ - ] under the [VOLUME] section on the remote control to adjust the volume. 7) ZOOM : Press [ 0 ] HELP : Press [MODE] ※ If the capacity of a movie file is too big due to its high definition, some delay on its video and sound may occur. ※ ET19KV supports an SD memory card up to 8GB. CHAPTER. 04 | 10 VER.100 11 | CHAPTER. 04 VER.100](https://usermanual.wiki/ENTERMEDIA/EX19DD/User-Guide-1194063-Page-14.png)
![Functions & Settings - Chapter.04 Chapter.04 - Functions & Settings GAME When you select a game, its instructions will be displayed on the TV screen before the game starts. 1. SINGING CONTEST - This contest will be held between team A and team B. Each teamrespectively se lects three songs at random and sings them by turns. A team getting a higher score will be the winner. This game will be started by pushing any button on the mic except the power button. Have fun!! 2. SONG QUIZ - Please listen carefully to the music and select a correct song title. If your answer is incorrect, one heart [1 point] will be reduced. There is also a bonus question in every five questions from which you get one heart [1 point] if your answer to that bonus question is correct. Please select one of the levels below by pressing the corresponding no. button on the mic to start the game. 3. IQ200 This game is to test player’s memory power. 1 or 2 player can play this game. Players have to memorize the keyboard number and press same key. 7. TEN-TEN Each player gets 5 cards and will have 10 seconds to make 20 or 10 in sum by adding number of 3 cards. Remaining 2 cards determines the winner. Add 2 remaining cards and only last digit number is the player’s number. Higher number wins the game. But if remaining 2 cards numbers are same. It is higher card than last digit single number (0,0) is the highest ranking number. Ranking of number Highest-------------------------------------------------------------Lowest (0,0) (9,9) (8,8) (7,7) (6,6) (5,5) (4,4) (3,3) (2,2) (1,1) X9 X8 X7 X6 X5 X4 X3 X2 X1 ※ EXAMPLE Player 1 7 8 5 6 1 7+8+5 =20 6+1 = 7 player 1’s number 7 Player 2 0 1 9 3 8 0+1+9=10 3+8 = 11 Player 2’s number 1 Player 3 4. BINGO 1 - Game 1 : Randomly showing numbers from 1 to 99. - To restart the game press [MODE] button. 8 3 9 7 7 8+3+9=20 Player 4 1 8 1 0 0 1+8+1=10 7, 7 same number Player 3’s number (7,7) 0, 0 same number Player 4’s number (0,0) - To exit, press [ ] or [RES] button. 5. BINGO 2 - Game 2 : 1~4 players can play at the same time. Players have to find a set of numbers from 1 to 9 to win and refer to the instructions on the screen. - To restart the game press [MODE] button. - To exit, press [ ] or [RES] button. 1st place : Player 4, 2nd place : Player 3, 3th place : Player 1, 4th place : Player 2 8. Black Jack This game’s rule is same as basic Blackjack rule. Goal of this game is making 21 with several numbers of player’s card. 6. DART - This game is called “Dart Game”. - Players throw darts to the target through their sound. - If a player makes a higher or louder sound, the dart will go further and faster and vice versa. CHAPTER. 04 | 12 VER.100 13 | CHAPTER. 04 VER.100](https://usermanual.wiki/ENTERMEDIA/EX19DD/User-Guide-1194063-Page-15.png)
![Functions & Settings - Chapter.04 Chapter.04 - Functions & Settings CONFIGURATION MENU 1. Press [MODE]+[0] to enter the configuration menu. 2. Press [MODE] to exit the configuration. [1] S elect a function using [▼], [▲] or press the corresponding number on the left side of the function. To select a sub-option, press the corresponding number on the left side again or press [▶/■]. [2] Select a function by pressing [▼], [▲]. And then press [0] to change its option, and press [▼], [▲] to select sub-options. (Press [▶/■] to exit a sub-option.) 3. CONFIGURATION OPTIONS [1] SELECTING BACKGROUNDS : Users can select one of the four types of background images as below. 1) MA GICSING JPEG : Showing built in JPEG image files as a background. 2) EXT-VIDEO INPUT : Showing external videos as a background. 3) MO VING PICTURE : Showing moving pictures (video files) from a SD card. 4) USER'S JPEG : Showing the user’s JPEG files from an SD card. [2] OUTPUT MODE : Sets the output mode to TV or AMP. [3] LYRICS BAR : ON (A blue bar behind l yrics ap pears) / OFF. (The blue bar disappears) [4] MIC V.C. : Changes your voice either to a female’s or male’s. (The “OFF” mode means to go back to your own voice) 2) Real Time Score : Shows your score throughout the whole song your are currently singing if you turn this function on. 3) Song Countdown : Sets the countdown (4, 3, 2, 1) display ON/OFF. 4) Lyrics Line : Selects th e number of lyric li nes shown on the TV screen (2 lines, 3 lines, Auto). 5) Lyrics Position : Sets the position of lyrics on the screen. (Center, Left-Right, All Mixed) 6) Language : Selects the language for the system. 4. ADVANCED CONFIGURATION Press [5] in the config. menu to enter the advanced config. 1) Score Check ● BEGINNER : This level only evaluates your tempo when you sing a song. ● AMATEURE : This level evaluates both tempo and pitch when you sing a song. Singing in suitable chord is accepted. ● PROFESSIONAL : This level evaluates both tempo and pitch based on the original Song’s key and tempo. ● OFF : Turns off(hides) score check function when you sing a song. ※This setting remains until the product is reset or the values are changed by users. CHAPTER. 04 | 14 VER.100 15 | CHAPTER. 04 VER.100](https://usermanual.wiki/ENTERMEDIA/EX19DD/User-Guide-1194063-Page-16.png)
![MMaaggiiccSSiinngg Optional Items - Chapter.05 Chapter.05 - Optional Items RECORDING PACK You can record your own singing into the Recordng Pack. ADDITIONAL SONG PACK You can add more of your favorite songs to MagicSing. How to Insert an Additional Song Pack First, turn OFF the power. This is very important to turn off the main station before removing or inserting a song pack. main station Clip Lock ● Turn off the power of the main station ● Pull up the clip lock on the back cover of the main station, according to the direction of the arrow, then remove the back cover. Turn off MagicSing : MagicSing should be turned off first. ● Make sure the arrow on the song pack is pointing left when you insert the song pack. (6 additional song packs can be inserted.) Insert the Recording Pack into one of the slots in the back of the main station according to the direction of the arrow. Turn on the power of main station then select a song number and press [ ● ] under the “record” section on the remote control. To stop the recording, press [ ● ] again on the remote control or you can also press [▶/■]. To play back the recorded songs, press [▶] under the “record” section on the remote control, and your recorded songs will be listed on the screen. Select a song using [▼/▲], then press [▶/■] . To stop the playback, press [▶/■] again. To delete the recorded s ongs, press [RES] on the highlighted songs. SONG LIST INSERTION ● After the song pack is inserted, close the back cover. ● Turn on the power of main station. You cannot record your singing performance in the internal memory of main station while you are recording it in the recording pack. You cannot record your singing performance in the middle of a song. If you press [ ● ] in the middle of the song, the song stops, restarts, and then recording takes place. The Tempo, Jump and Key functions w ill no t work when you are playing back the recorded songs. Press down both the top and the bottom metal tabs of the binder simultaneously to open the binder rings. Insert the new song list between the binder rings. Close the binder rings. CHAPTER. 05 | 01 VER.100 02 | CHAPTER. 05 VER.100](https://usermanual.wiki/ENTERMEDIA/EX19DD/User-Guide-1194063-Page-22.png)
![Additional Information - Chapter.06 Chapter.06 - Additional Information PRECAUTION TROUBLESHOOTING In case of problems, please check the following recommendations before Use the adaptor that comes with MagicSing only. There are many adaptors that are plug-compatible with MagicSing, but have different electrical specifications. T hese adaptors would work only for a short period of time but would very soon damage MagicSing. USE THE RECOMMENDED ACCESSORIES ONLY (DC 9V / 1A) Do not drop MagicSing. Any external or internal damage due to dropping is not covered under warranty. Do not insert or remove song packs while MagicSing is turned on. Do not store MagicSing in direct sunlight, in a high temperature, or highly humid. Do not use strong chemicals to clean MagicSing, as these chemicals may damage the unit. Keep MagicSing awa y from pet s and small children. Do not pr ess the LED / LCD part. Never use a sharp object on the keypad. In case MagicSing was stored in a high-temperature setting, allow sufficient time for it to cool down before using it. Do not immerse MagicSing in water or splash water on it. Water damage is not covered by the warranty. Do not disassemble the parts of the MagicSing. This will void the warranty. contacting the service center. If MagicSing doesn’t power up ET19KV MAIN STATION Make sure the adaptor is correctly plugged into the power outlet. Check that the male plug is properly inserted into the female jack. WIRELESS KARAOKE Check if the battery ty pe is AA. If the battery is low, M agicSing m ay not work properly. If the user's voice cannot be heard Press the V OL button and check the vo lume of the w ireless karaoke. If the TV does not show pictures or emit sound Make sure all the AV connectors are properly connected according to the correct colors. Check if the TV is in the v ideo mode. If the video does not show properly (converting PAL or NSC mode) To convert to PAL mode, turn of f a wireless mic fi rst. Press and hold button “8” on the wireless mic, and then press “POWER” button using another finger until the word “PAL” appears on the TV screen. (Do not release button “8” and the “POWER” button until the word “PAL” appears on the TV screen.) To convert to NTSC mode, turn off a wireless mic fi rst. Press and hold button “9” on the wireless mic, and then press the “POWER” button using another finger until the word “NTSC” appears on the TV screen. (Do not release button “9” and the “POWER” button until the word “NTSC” appears on the T V screen .) If there is any doubt about the product’s performance Turn off a wireless mic first, and then press and ho ld the “0” button on the wireless mic, and press the [POWER] button using another finger until the words “USER RESET” appear on the T V screen. (Do not releas e the “0” button and the [POWER] button until the words “USER RESE¢pear on t he TV screen) When the wireless karaoke needs to be repaired, the main station should be included and returned to your nearest service center. Do not plug MagicSing in if it is wet. Immediately contact the service center. If any solid object or liquid gets inside MagicSing, unplug it and have it checked by our service center. To contact our nearest service center in your area, please visit our website. "www.enter-tech.com" CHAPTER. 06 | 01 VER.100 02 | CHAPTER. 06 VER.100](https://usermanual.wiki/ENTERMEDIA/EX19DD/User-Guide-1194063-Page-23.png)