ESPRESSIF SYSTEMS ESP32PICOKIT Wi-Fi & Bluetooth Development Board User Manual ESP32 PICO KIT User Guide EN
ESPRESSIF SYSTEMS (SHANGHAI) PTE LTD Wi-Fi & Bluetooth Development Board ESP32 PICO KIT User Guide EN
Users Manual

!
Version 1.0
Copyright © 2017
ESP32-PICO-KIT
User Guide

About This Guide
This user guide shows how to get started with the ESP32-PICO-KIT mini development
board.
Release Notes
Date
Version
Release notes
2017.11
V1.0
First release.

Table of Contents
1. ESP-PICO-KIT Overview!1"........................................................................................................
1.1. ESP-PICO-KIT!1"............................................................................................................................
1.2. Functional Description!2"...............................................................................................................
2. Get Started on ESP32-PICO-KIT!3"............................................................................................
2.1. Preparation!3".................................................................................................................................
2.2. Standard Setup of Toolchain for Linux!3".......................................................................................
2.2.1. Install Prerequisites!3".......................................................................................................
2.2.2. Toolchain Setup!3"............................................................................................................
2.3. Get ESP-IDF!4"...............................................................................................................................
2.4. Set up Path to ESP-IDF!4".............................................................................................................
3. Start a Project with ESP32-PICO-KIT!5".....................................................................................
4. Connect!6"..................................................................................................................................
5. Configure!7"................................................................................................................................
6. Build and Flash!8".......................................................................................................................
6.1. Build and Flash!8"..........................................................................................................................
6.2. Monitor!9.......................................................................................................................................

!
1. ESP-PICO-KIT Overview
1. ESP-PICO-KIT Overview
1.1. ESP-PICO-KIT
ESP32-PICO-KIT is a mini development board based on the ESP32-PICO-D4 SIP module.
All the IO signals and system power on ESP32-PICO-D4 are led out through two rows of
20 pads populated with standard 0.1" pitch header pins. Developers can connect the
board to other circuit modules according to their needs. The development board integrates
a USB-UART Bridge circuit, allowing the developers to connect the development board to
a PC's USB port for downloads and debugging.
At the core of this development board is the ESP32-PICO-D4, a System-in-Package (SIP)
module with complete Wi-Fi and Bluetooth functionalities. ESP32-PICO-D4 integrates
several peripheral components seamlessly in one single package, that otherwise would
need to be installed separately. This includes a crystal oscillator, 4 MB flash, filter capacitors
and RF matching links in. This greatly reduces quantity and costs of additional
components, subsequent assembly and testing cost, as well as overall product complexity.
With its ultra-small size, robust performance and low-energy consumption, ESP32-PICO-
D4 is well suited for any space-limited or battery-operated applications, such as wearable
electronics, medical equipment, sensors and other IoT products.
!
Espressif
!/121
2017.11

!
1. ESP-PICO-KIT Overview
1.2. Functional Description
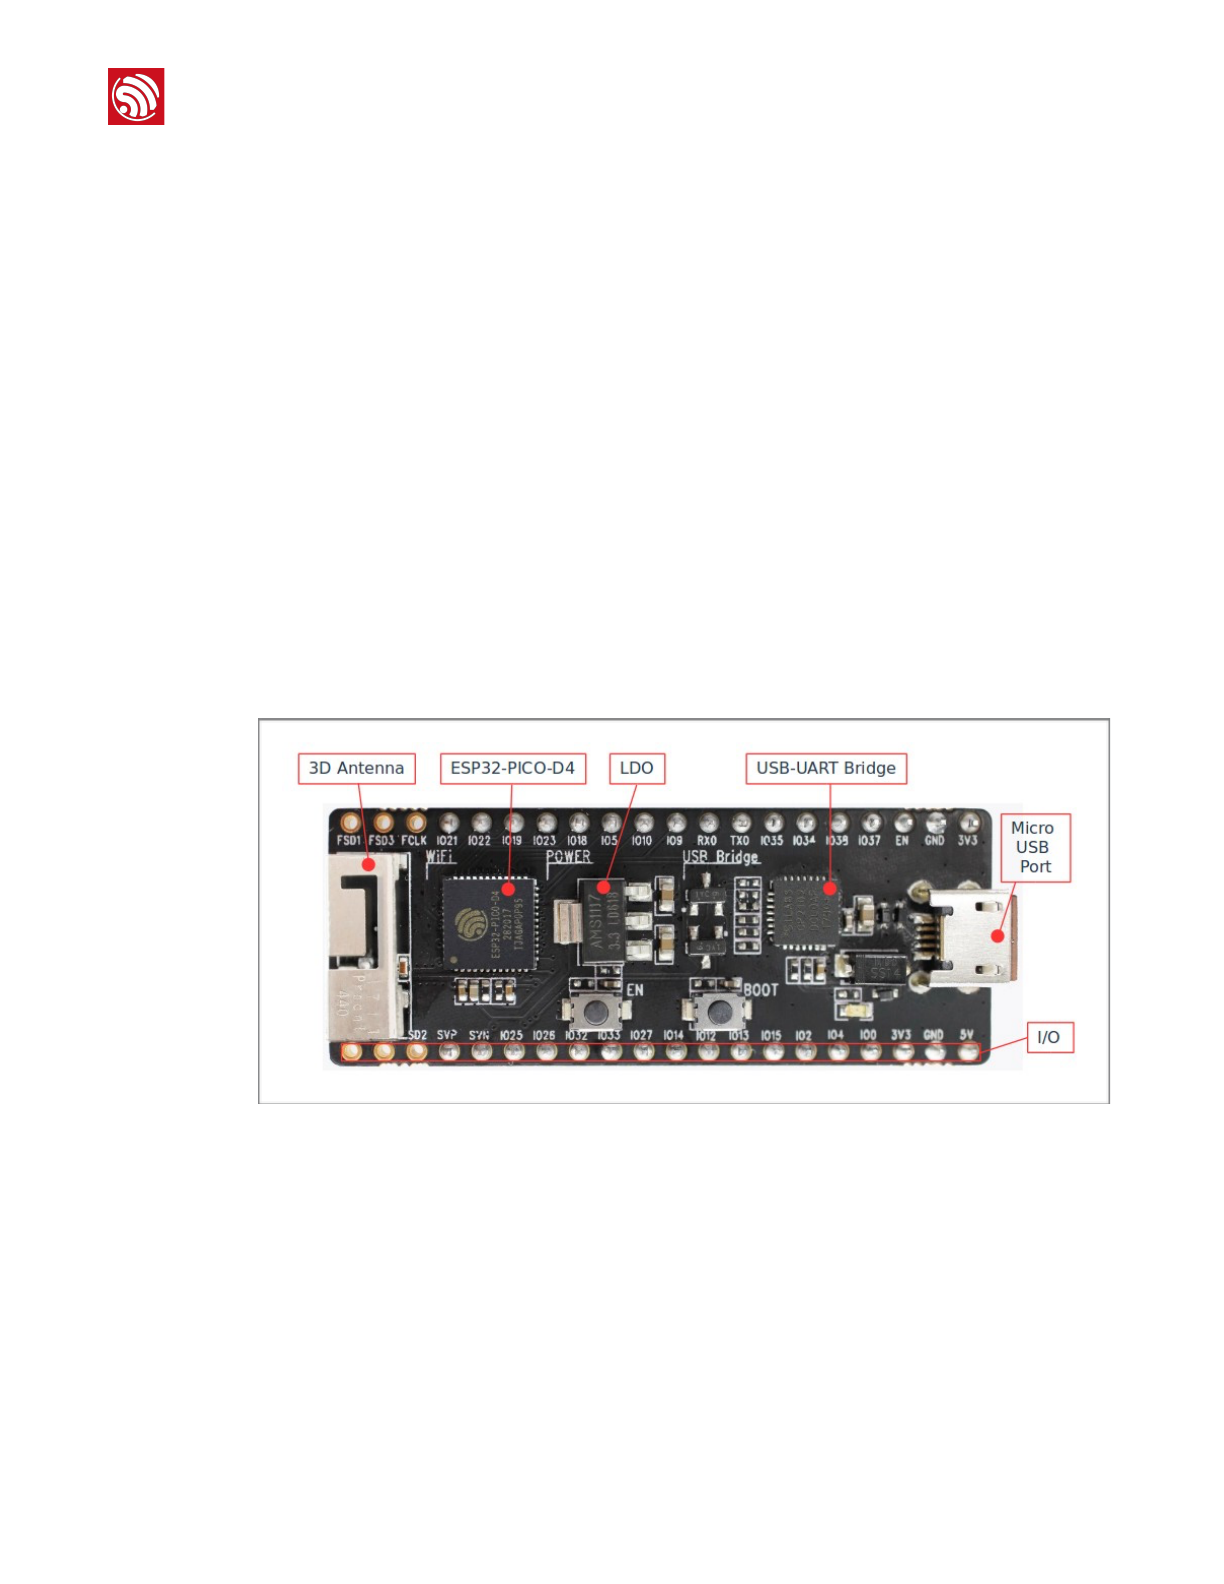
The following list and figure below describe key components, interfaces and controls of
ESP32-PICO-KIT board.
•ESP32-PICO-D4: Standard ESP32-PICO-D4 module soldered to the ESP32-PICO-
KIT board. The complete system of the ESP32 chip has been integrated into the SIP
module, requiring only external filter capacitors and pull-up resistors for EN signals to
function properly.
•USB-UART Bridge:
•I/O: All the pins on ESP32-PICO-D4 are broken out to the pin headers on the board.
Users can program ESP32 to enable multiple functions such as PWM, ADC, DAC,
I2C, I2S, SPI, etc.
•Micro USB Port: USB interface. It functions as the power supply for the board and
the communication interface between PC and ESP32-PICO-KIT.
•EN Button: Reset button; pressing this button resets the system.
•BOOT Button: Holding down the Boot button and pressing the EN button initiates the
firmware download mode. Then user can download firmware through the serial port.
!
Figure 1-2. ESP32-PICO-KIT Board Layout
Espressif
!/122
2017.11

!
2. Get Started on ESP32-PICO-KIT
2. Get Started on ESP32-PICO-
KIT
2.1. Preparation
To develop applications for ESP32-PICO-KIT you need:
•1 × ESP32-PICO-KIT mini development board
•1 × USB A / Micro USB B cable
•1 × PC loaded with Windows, Linux or Mac OS
2.2. Standard Setup of Toolchain for Linux
The quickest way to start development with ESP32-PICO-KIT is by installing a prebuilt
toolchain. Pick up your OS below and follow provided instructions.
2.2.1. Install Prerequisites
To compile with ESP-IDF you need to get the following packages:
•CentOS 7:
sudoyuminstallgitwgetmakencurses-develflexbisongperfpythonpyserial
•Ubuntu and Debian:
sudoapt-getinstallgitwgetmakelibncurses-devflexbisongperfpythonpython-serial
•Arch:
sudopacman-S--neededgccgitmakencursesflexbisongperfpython2-pyserial
2.2.2. Toolchain Setup
ESP32 toolchain for Linux is available for download from Espressif website:
•for 64-bit Linux:
https://dl.espressif.com/dl/xtensa-esp32-elf-linux64-1.22.0-61-gab8375a-5.2.0.tar.gz
•for 32-bit Linux:
https://dl.espressif.com/dl/xtensa-esp32-elf-linux32-1.22.0-61-gab8375a-5.2.0.tar.gz
Download this file, then extract it in ~/esp directory
mkdir-p~/esp
cd~/esp
tar-xzf~/Downloads/xtensa-esp32-elf-linux64-1.22.0-61-gab8375a-5.2.0.tar.gz
Espressif
!/123
2017.11

!
2. Get Started on ESP32-PICO-KIT
The toolchain will be extracted into ~/esp/xtensa-esp32-elf/ directory.
To use it, you will need to update your ``PATH`` environment variable in ~/.bash_profile file.
To make xtensa-esp32-elf` available for all terminal sessions, add the following line to your
~/.bash_profile file:
exportPATH=$PATH:$HOME/esp/xtensa-esp32-elf/bin
Alternatively, you may create an alias for the above command. This way you can get the
toolchain only when you need it. To do this, add different line to your ~/.bash_profile file:
aliasget_esp32="exportPATH=$PATH:$HOME/esp/xtensa-esp32-elf/bin"
Then when you need the toolchain you can type get_esp32 on the command line and the
toolchain will be added to your PATH.
2.3. Get ESP-IDF
Once you have the toolchain (that contains programs to compile and build the application)
installed, you also need ESP32 specific API / libraries. They are provided by Espressif in
ESP-IDF repository. To get it, open terminal, navigate to the directory you want to put ESP-
IDF, and clone it using gitclone command:
cd~/esp
gitclone--recursivehttps://github.com/espressif/esp-idf.git
ESP-IDF will be downloaded into ~/esp/esp-idf.
2.4. Set up Path to ESP-IDF
The toolchain programs access ESP-IDF using IDF_PATH environment variable. This
variable should be set up on your PC, otherwise projects will not build. Setting may be
done manually, each time PC is restarted. Another option is to set up it permanently by
defining IDF_PATH in user profile. To do so, follow instructions specific to :ref:`Windows
<add-idf_path-to-profile-windows>`, :ref:`Linux and MacOS <add-idf_path-to-profile-
linux-macos>` in section :doc:`add-idf_path-to-profile`.!
📖 Note:
•While cloning submodules on Windows platform, the gitclone command may print some output starting
':notavalididentifier.... This is a known issue but the git clone still succeeds without any
problems.
•Do not miss the --recursive option. If you have already cloned ESP-IDF without this option, run another
command to get all the submodules:
cd~/esp/esp-idf
gitsubmoduleupdate--init
Espressif
!/124
2017.11

!
3. Start a Project with ESP32-PICO-KIT
3. Start a Project with ESP32-
PICO-KIT
Now you are ready to prepare your application for ESP32-PICO-KIT. To start off quickly, we
will use :example:`get-started/hello_world project from :idf:`examples` directory in IDF.
Copy :example:`get-started/hello_world` to ~/esp directory:
cd~/esp
cp-r$IDF_PATH/examples/get-started/hello_world.
You can also find a range of example projects under the :idf:`examples` directory in ESP-
IDF. These example project directories can be copied in the same way as presented above,
to begin your own projects.
📖 Note:
The ESP-IDF build system does not support spaces in paths to ESP-IDF or to projects.
Espressif
!/125
2017.11

!
4. Connect
4. Connect
You are almost there. To be able to proceed further, connect ESP32 board to PC, check
under what serial port the board is visible and verify if serial communication works. If you
are not sure how to do it, check instructions in section :doc:`establish-serial-connection`.
Note the port number, as it will be required in the next step.!
Espressif
!/126
2017.11

!
4. Configure
5. Configure
Being in terminal window, go to directory of hello_world application by typing cd~/esp/
hello_world. Then start project configuration utility menuconfig:
cd~/esp/hello_world
makemenuconfig
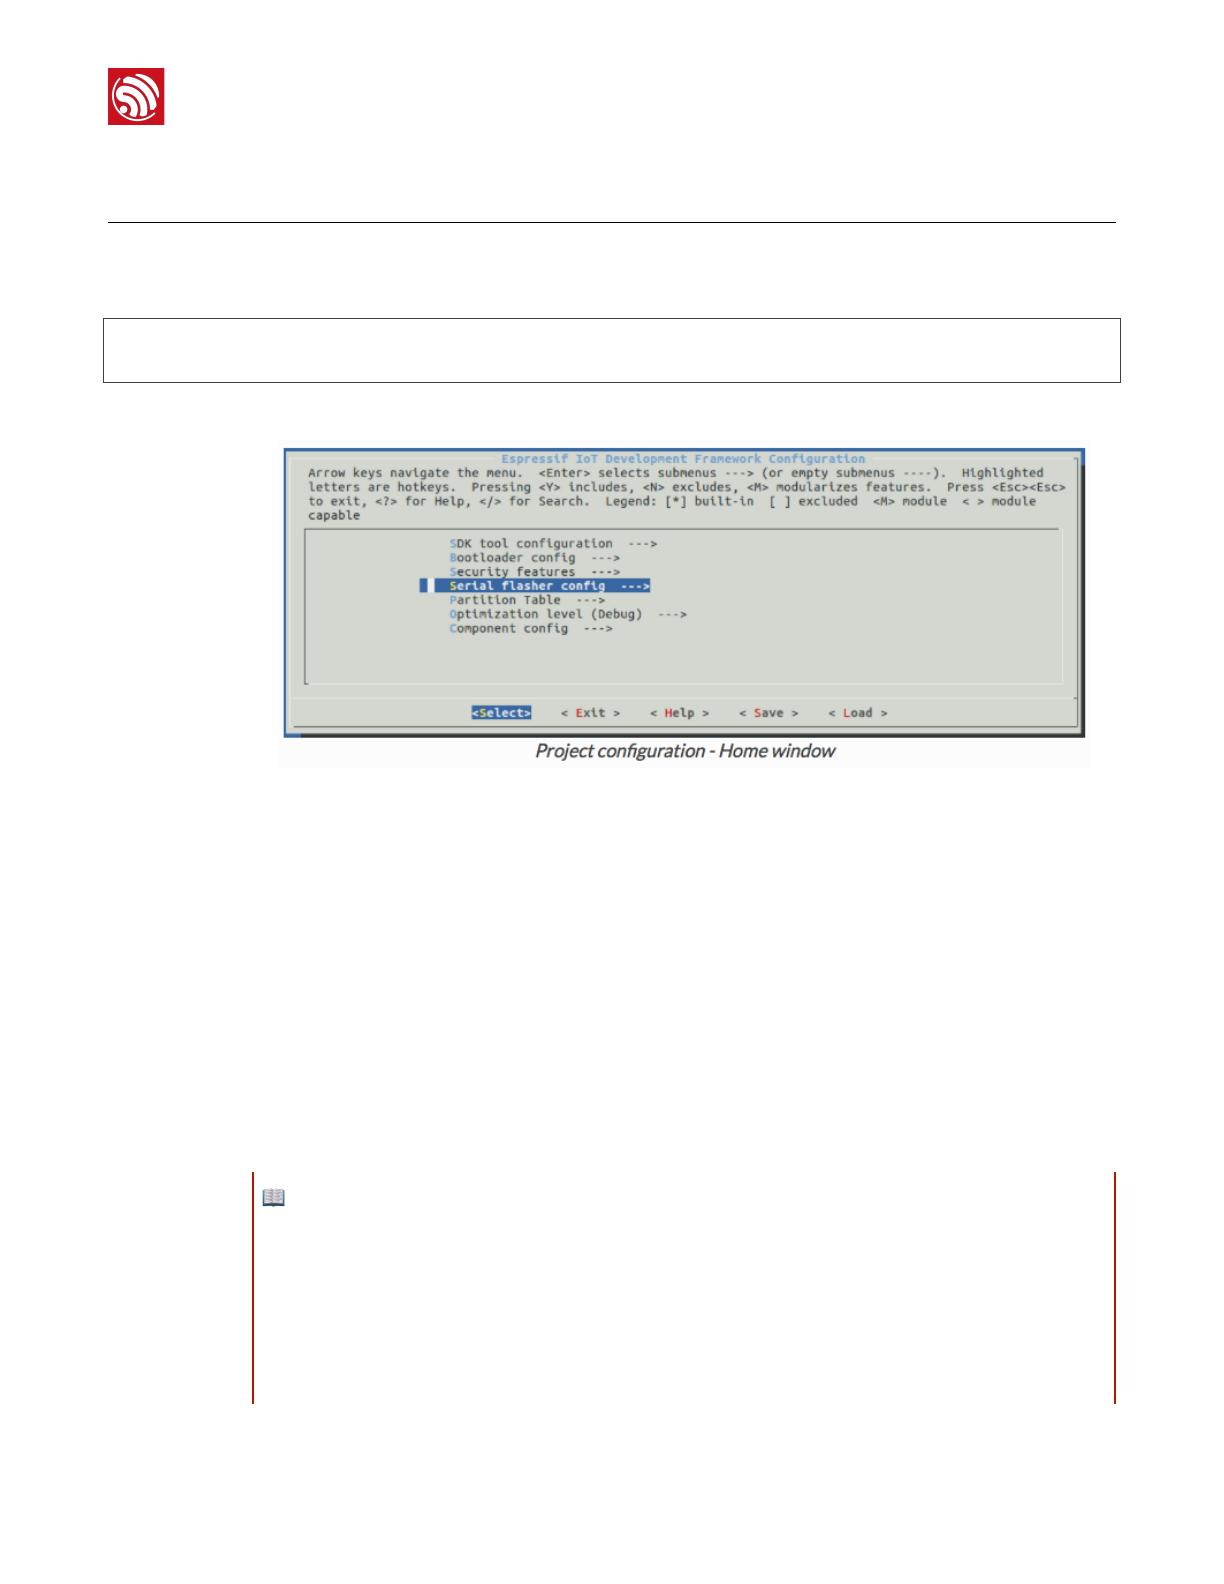
If previous steps have been done correctly, the following menu will be displayed:
!
In the menu, navigate to Serial flasher config > Default serial port to configure the serial
port, where project will be loaded to. Confirm selection by pressing enter, save
configuration by selecting < Save > and then exit application by selecting < Exit >.
Here are couple of tips on navigation and use of menuconfig:
•Use up & down arrow keys to navigate the menu.
•Use Enter key to go into a submenu, Escape key to go out or to exit.
•Type ? to see a help screen. Enter key exits the help screen.
•Use Space key, or Y and N keys to enable (Yes) and disable (No) configuration items
with checkboxes “[*]“.
•Pressing ? while highlighting a configuration item displays help about that item.
•Type / to search the configuration items.
📖 Notes:
•On Windows, serial ports have names like COM1. On MacOS, they start with /dev/cu.. On Linux, they
start with /dev/tty. (See :doc:`establish-serial-connection` for full details.)
•If you are Arch Linux user, navigate to SDK tool configuration and change the name of Python 2
interpreter from python to python2.
•Most ESP32 development boards have a 40 MHz crystal installed. However, some boards use a 26 MHz
crystal. If your board uses a 26MHz crystal, or you get garbage output from serial port after code upload,
adjust the :ref:`CONFIG_ESP32_XTAL_FREQ_SEL` option in menuconfig.
Espressif
!/127
2017.11

!
5. Build and Flash
6. Build and Flash
6.1. Build and Flash
Now you can build and flash the application. Run:
makeflash
This will compile the application and all the ESP-IDF components, generate bootloader,
partition table, and application binaries, and flash these binaries to your ESP32 board.
esptool.pyv2.0-beta2
Flashingbinariestoserialport/dev/ttyUSB0(appatoffset0x10000)...
esptool.pyv2.0-beta2
Connecting........___
Uploadingstub...
Runningstub...
Stubrunning...
Changingbaudrateto921600
Changed.
AttachingSPIflash...
Configuringflashsize...
Auto-detectedFlashsize:4MB
Flashparamssetto0x0220
Compressed11616bytesto6695...
Wrote11616bytes(6695compressed)at0x00001000in0.1seconds(effective920.5kbit/s)...
Hashofdataverified.
Compressed408096bytesto171625...
Wrote408096bytes(171625compressed)at0x00010000in3.9seconds(effective847.3kbit/
s)...
Hashofdataverified.
Compressed3072bytesto82...
Wrote3072bytes(82compressed)at0x00008000in0.0seconds(effective8297.4kbit/s)...
Hashofdataverified.
Leaving...
Hardresetting...
Espressif
!/128
2017.11

!
5. Build and Flash
If there are no issues, at the end of build process, you should see messages describing
progress of loading process. Finally, the end module will be reset and “hello_world”
application will start.
If you'd like to use the Eclipse IDE instead of running make, check out the :doc:`Eclipse
guide <eclipse-setup>`.
6.2. Monitor
To see if “hello_world” application is indeed running, type makemonitor. This command is
launching :doc:`IDF Monitor <idf-monitor>` application:
$makemonitor
MONITOR
---idf_monitoron/dev/ttyUSB0115200---
---Quit:Ctrl+]|Menu:Ctrl+T|Help:Ctrl+TfollowedbyCtrl+H---
etsJun8201600:22:57
rst:0x1(POWERON_RESET),boot:0x13(SPI_FAST_FLASH_BOOT)
etsJun8201600:22:57
...
Several lines below, after start up and diagnostic log, you should see “Hello world!” printed
out by the application.
...
Helloworld!
Restartingin10seconds...
I(211)cpu_start:StartingscheduleronAPPCPU.
Restartingin9seconds...
Restartingin8seconds...
Restartingin7seconds...
To exit monitor use shortcut Ctrl+]. To execute makeflash and makemonitor in one shoot
type makeflashmonitor. Check section :doc:`IDF Monitor <idf-monitor>` for handy
shortcuts and more details on using this application.
That's all what you need to get started with ESP32!
Now you are ready to try some other :idf:`examples`, or go right to developing your own
applications.
Espressif
!/129
2017.11

Disclaimer and Copyright Notice
Information in this document, including URL references, is subject to change without
notice.
THIS DOCUMENT IS PROVIDED AS IS WITH NO WARRANTIES WHATSOEVER,
INCLUDING ANY WARRANTY OF MERCHANTABILITY, NON-INFRINGEMENT, FITNESS
FOR ANY PARTICULAR PURPOSE, OR ANY WARRANTY OTHERWISE ARISING OUT
OF ANY PROPOSAL, SPECIFICATION OR SAMPLE.
All liability, including liability for infringement of any proprietary rights, relating to use of
information in this document is disclaimed. No licenses express or implied, by estoppel or
otherwise, to any intellectual property rights are granted herein.
The Wi-Fi Alliance Member logo is a trademark of the Wi-Fi Alliance. The Bluetooth logo is
a registered trademark of Bluetooth SIG.
All trade names, trademarks and registered trademarks mentioned in this document are
property of their respective owners, and are hereby acknowledged.
Copyright © 2017 Espressif Inc. All rights reserved.
Espressif IOT Team"
www.espressif.com
FCC Statement
Any Changes or modifications not expressly approved by the party responsible for compliance could void
the user’s authority to operate the equipment.
This device complies with part 15 of the FCC Rules. Operation is subject to the following two conditions:
(1) This device may not cause harmful interference, and
(2) This device must accept any interference received, including interference that may cause undesired
operation.
FCC Radiation Exposure Statement:
This equipment complies with FCC radiation exposure limits set forth for an uncontrolled
environment .This equipment should be installed and operated with minimum distance 20cm between
the radiator& your body.
Note: This equipment has been tested and found to comply with the limits for a Class B digital device,
pursuant to part 15 of the FCC Rules. These limits are designed to provide reasonable protection against
harmful interference in a residential installation. This equipment generates, uses and can radiate radio
frequency energy and, if not installed and used in accordance with the instructions, may cause harmful
interference to radio communications. However, there is no guarantee that interference will not occur in a
particular installation. If this equipment does cause harmful interference to radio or television reception, which
can be determined by turning the equipment off and on, the user is encouraged to try to correct the
interference by one or more of the following measures:
—Reorient or relocate the receiving antenna.
—Increase the separation between the equipment and receiver.
—Connect the equipment into an outlet on a circuit different from that to which the receiver is connected.—Co
—Consult the dealer or an experienced radio/TV technician for help.
FCC Label Instructions
The outside of final products that contains this module device must display a label referring to the enclosed
module. This exterior label can use wording such as: “Contains Transmitter Module
FCC ID:2AC7Z-ESP32PICOKIT" or “Contains FCC ID:2AC7Z-ESP32PICOKIT” Any similar wording that
expresses the same meaning may be used.