EUTRONSEC S p A AAA USB KEY CRYPTO IDENTITY User Manual
EUTRONSEC S.p.A. USB KEY CRYPTO IDENTITY Users Manual
Users Manual
© Copyright 2006 by Eutron Infosecurity S.r.l. – Italy – 24048 Treviolo BG Via Gandhi, 12
© 2006 Eutron Infosecurity S.r.l. All rights reserved
The names of the other products mentioned are trademarks of their respective owners.
This hardware key is in compliance with the following test specification:
CEI EN 61000-4-2; CEI EN 61000-4-3; CISPR22
as required by :
CEI EN 61000-6-1, CEI EN 61000-6-2, CEI EN 61000-6-3, CEI EN 61000-6-4
which are specified for the following test:
• “ESD Immunity test”
• “Radiated radio-frequency and electromagnetic field immunity test”
• “Radiated Emission Verification”
In compliance with the “Essential Requisites” for the EMC Directive 89/336/EEC.
FCC ID: TFC-AAA
EUTRON Infosecurity S.r.l.
CryptoIdentity(1)
Supply: 5V DC
Absorption: 20 mA
This device complies with Part 15 of the FCC Rules. Operation is subject to the following two conditions: (1)
this device may not cause harmful interference, and (2) this device must accept any interference received,
including interference that may cause undesired operation.
IMPORTANT REMARKS
Due to the limited space on the product shell, all FCC certification references are on this technical manual.
Changes or modifications not expressly approved by the party responsible for compliance could void the user’s
authority to operate the equipment.
CONFORMITY APPROVAL TO EN60529 (IP67)
This hardware key is in compliance with essential evaluation elements for the conformity approval to EN 60529 (IP67)
concerning safety (EN 60529:1991-10 + EN 60529 corr:1993-05 + EN 60529/A1:2000-02) as required by LVD
directive.
1 The models subjected to this mark are the following: CryptoIdentity 5, CryptoIdentity ITSEC and CryptoIdentity FIPS.

CryptoIdentity User Guide – Index
INDEX
1 INTRODUCTION TO CRYPTOIDENTITY AND CRYPTOKIT..........................................5
1. 1 WHAT IS CRYPTOIDENTITY...............................................................................................5
1. 1. 2 CRYPTOIDENTITY MODELS.......................................................................................6
1. 1. 3 CRYPTOIDENTITY DEFAULT PINs............................................................................7
1. 1. 4 CRYPTOIDENTITY DEFAULT CONFIGURATION...................................................8
1. 1. 5 CRYPTOIDENTITY REQUIREMENTS ......................................................................10
1. 2 WHAT IS CRYPTOKIT.........................................................................................................10
1. 2. 1 CRYPTOKIT REQUIREMENTS ..................................................................................10
2. GETTING STARTED WITH CRYPTOIDENTITY...........................................................11
2. 1 INSTALLING AND MAINTAINING CRYPTOKIT ...........................................................11
2. 1. 1 INSTALLING CRYPTOKIT .........................................................................................11
2. 1. 2 MAINTAINING AND REPAIRING CRYPTOKIT......................................................16
2. 1. 3 UNINSTALLING CRYPTOKIT....................................................................................18
3 WORKING WITH CRYPTOIDENTITY UTILITIES..........................................................19
3. 1 ARGENIE...............................................................................................................................19
3. 2 PASSWORD CHANGE UTILITY ........................................................................................21
3. 3 INIT TOKEN..........................................................................................................................22
3. 4 IMPORTPKCS12....................................................................................................................26
3. 5 TOKEN SERIAL NUMBER..................................................................................................28
4. MANAGING DIGITAL CERTIFICATES WITH CRYPTOIDENTITY ..............................29
4. 1 STORING CERTIFICATES INTO CRYPTOIDENTITY ....................................................29
4. 1. 1 CERTIFICATES ISSUED BY CAs ...............................................................................29
4. 1. 1. 1 VERISIGN..............................................................................................................29
4. 1. 1. 2 THAWTE................................................................................................................33
4. 1. 2 CERTIFICATES IMPORTED FROM FILE..................................................................34
4. 1. 2. 1 IMPORTING THROUGH NETSCAPE.................................................................35
4. 1. 2. 2 IMPORTING THROUGH IMPORTPKCS12........................................................38
4. 2 VIEWING DIGITAL CERTIFICATES.................................................................................38
4. 2. 1 VIEWING CERTIFICATES THROUGH MICROSOFT CERTIFICATES STORE ...38
4. 2. 2 VIEWING CERTIFICATES THROUGH ARGENIE UTILITY ..................................41
4. 3 SUGGESTED POLICY FOR BACKUP OF DIGITAL CREDENTIALS ............................42
4. 3. 1 HOW TO BACKUP DIGITAL CREDENTIALS..........................................................42
5. WORKING WITH CRYPTOIDENTITY AND APPLICATIONS ......................................48
5. 1 MAIL CLIENTS.....................................................................................................................48
5. 1. 1 OUTLOOK EXPRESS 5.x / 6........................................................................................48
5. 1. 1. 1 OUTLOOK EXPRESS CONFIGURATIONS.......................................................48
5. 1. 1. 2 SECURE EMAIL-S WITH OUTLOOK EXPRESS ..............................................51
5. 1. 2 MICROSOFT OUTLOOK 2000 ....................................................................................59
5. 1. 2. 1 OUTLOOK EXPRESS CONFIGURATIONS.......................................................59
5. 1. 2. 2 SECURE EMAIL-S WITH MICROSOFT OUTLOOK 2000 ...............................63
5. 1. 3 NETSCAPE MESSENGER 4. 7.....................................................................................69
5. 1. 3. 1 NETSCAPE MESSENGER 4. 7 CONFIGURATIONS ........................................69

CryptoIdentity User Guide – Index
5. 1. 3. 2 SECURE EMAIL-S WITH NETSCAPE MESSENGER 4. 7................................72
5. 2 MICROSOFT VPN.................................................................................................................77
5. 3 MICROSOFT SMARTCARD LOGON.................................................................................77
5. 4 PKI PRODUCTS ....................................................................................................................77
5. 4. 1 ENTRUST.......................................................................................................................77
6. DEVELOPING APPLICATIONS INTEGRATED WITH CRYPTOIDENTITY .................80
6. 1 MICROSOFT CAPI................................................................................................................80
6. 2 PKCS#11 STANDARD..........................................................................................................81
7. FREQUENTLY ASKED QUESTIONS AND TROUBLESHOOTING.............................82
APPENDIX ........................................................................................................................86
EUTRON INFOSECURITY CUSTOMER SERVICE .................................................................86
CryptoIdentity User Guide – 1. Introduction to CryptoIdentity and CryptoKit
1 INTRODUCTION TO CRYPTOIDENTITY AND CRYPTOKIT
This chapter provides an introduction to CryptoIdentity and CryptoKit.
For updated information and news about the CryptoIdentity USB token you
could also visit: www.cryptoidentity.eutron.com
1. 1 WHAT IS CRYPTOIDENTITY
CryptoIdentity is an USB token, the size of a door-key, which includes a cryptographic chip
and combines both the functions of a smartcard and its reader.
One of the major advantages of the CryptoIdentity is that, to access the digital credentials
or protected objects stored into it, no reader is needed.
It is possible to store into the CryptoIdentity digital certificates, cryptographic keys or data
and have them protected in the same way they would have been stored in an equivalent
cryptographic smartcard.
You can use the CryptoIdentity to achieve strong authentication in the following scenarios:
Virtual Private Networks (Microsoft VPN, CheckPoint, Cisco, Avaya, SSH Sentinel,
etc.).
User identification for remote banking, possibly using digital signatures for non-
repudiation.
Controlled access to restricted Internet sites.
Performing secure B2B transactions.
E-commerce, sale of services over the Internet authentication and encryption.
Windows 2000 and Windows XP logon through Microsoft standard “smart card” logon
mechanisms.
Windows XP native support for IEEE 802.1X (wireless network) authentication using
USB tokens.
PKI enabled infrastructures (Novell, Entrust, Computer Associates, Entrust, etc.)
The major features of CryptoIdentity are:
Easy of use for the clients: just connect it into the USB port to access digital
certificates or protected data.
Easily integrated with commons applications via PKCS#11 (for example Netscape,
Mozilla) and MS CSP (for example Internet Explorer, Outlook Express).
CryptoIdentity User Guide – 1. Introduction to CryptoIdentity and CryptoKit
Easily integrated with the applications compatible with PKCS#11 and MS CAPI
(CryptoIdentity SDK includes libraries and examples).
Strong cryptographic capabilities:
- ATMEL AT903232C - 6464C Cryptographic processors
- RSA key generation on token up to 2048 bit.
- Encrypt/decrypt operations with RSA keys up to 2048 bit.
- Digital signature and verification.
- Hardware random number generator.
- 32KB - 64KB EEPROM memory
(2048 bit RSA and 64KB EEPROM are available only to the 2048 model).
1. 1. 2 CRYPTOIDENTITY MODELS
CryptoIdentity is available in different models, depending on the size of the RSA keys
supported and internal memory.
In this guide the term "CryptoIdentity" is used to indicate a generic
CryptoIdentity model. A specific model is specified when operations or
steps described in this guide require a specific version of the tokens.
The CryptoIdentity models are:
CryptoIdentity (also known as CryptoIdentity4)
The first USB cryptographic model manufactured by Eutron Infosecurity, this model is now
in the process of being placed out of production. By the way, drivers and middleware in the
CryptoKit package ensure support for it.
CryptoIdentity5
The successor of CryptoIdentity4, this model provides the following features:
RSA keys up to 1024 bit.
EEPROM memory 32KB.
Fast data transfers between the token and the host machine (up to 64 Kbps).
New waterproof casing
Bi-color led.
Full PC/SC driver. CryptoIdentity5 drivers support the full PC/SC standard in Win98,
ME, NT4, W2K, and XP. PC/SC lite support (www.linuxnet.com) is available for
Linux.
Microsoft digital signature on driver. The latest CryptoIdentity driver has been
digitally signed and certified by Microsoft for the use in W2K, XP and 2003.
CryptoIdentity User Guide – 1. Introduction to CryptoIdentity and CryptoKit
CryptoIdentity 2048
In addition to all the features of CryptoIdentity5, this model supports:
RSA keys up to 2048 bit
EEPROM memory 64KB
Additional CryptoIdentity models (ITSEC I-P-FIPS), are also available.
Please note that this guide and CryptoKit applies ONLY to the
CryptoIdentity4, CryptoIdentity 5 & 2048 models. For details about the
ITSEC models, please visit www.cryptoidentity.eutron.com.
1. 1. 3 CRYPTOIDENTITY DEFAULT PINs
Each CryptoIdentity is protected by a PIN and a Security Officer PIN.
The CryptoIdentity PIN is automatically required every time a private key or a private
object stored into the CryptoIdentity is going to be accessed. For example, the PIN is
required to sign or decrypt a message using a private key stored into the token.
The applications accessing the CryptoIdentity private area must specify in
the source code the CryptoIdentity PIN value when running PKCS#11 or
CAPI functions, otherwise the end-users are asked to enter the PIN when
running the application.
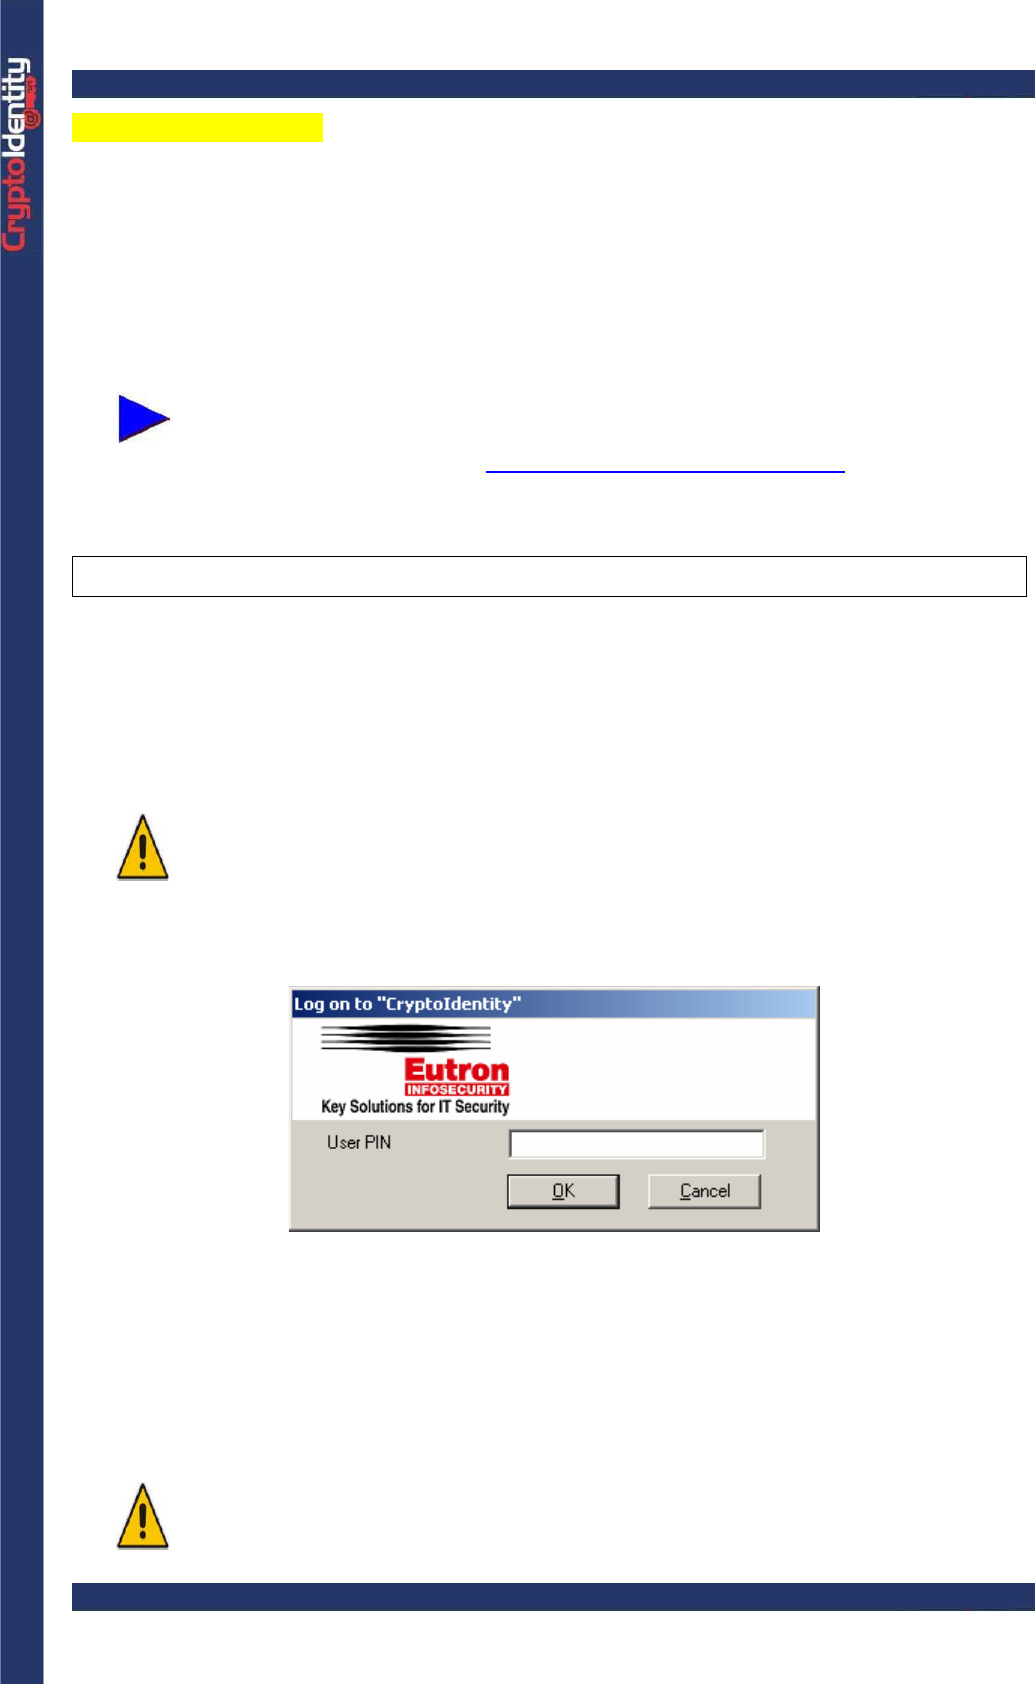
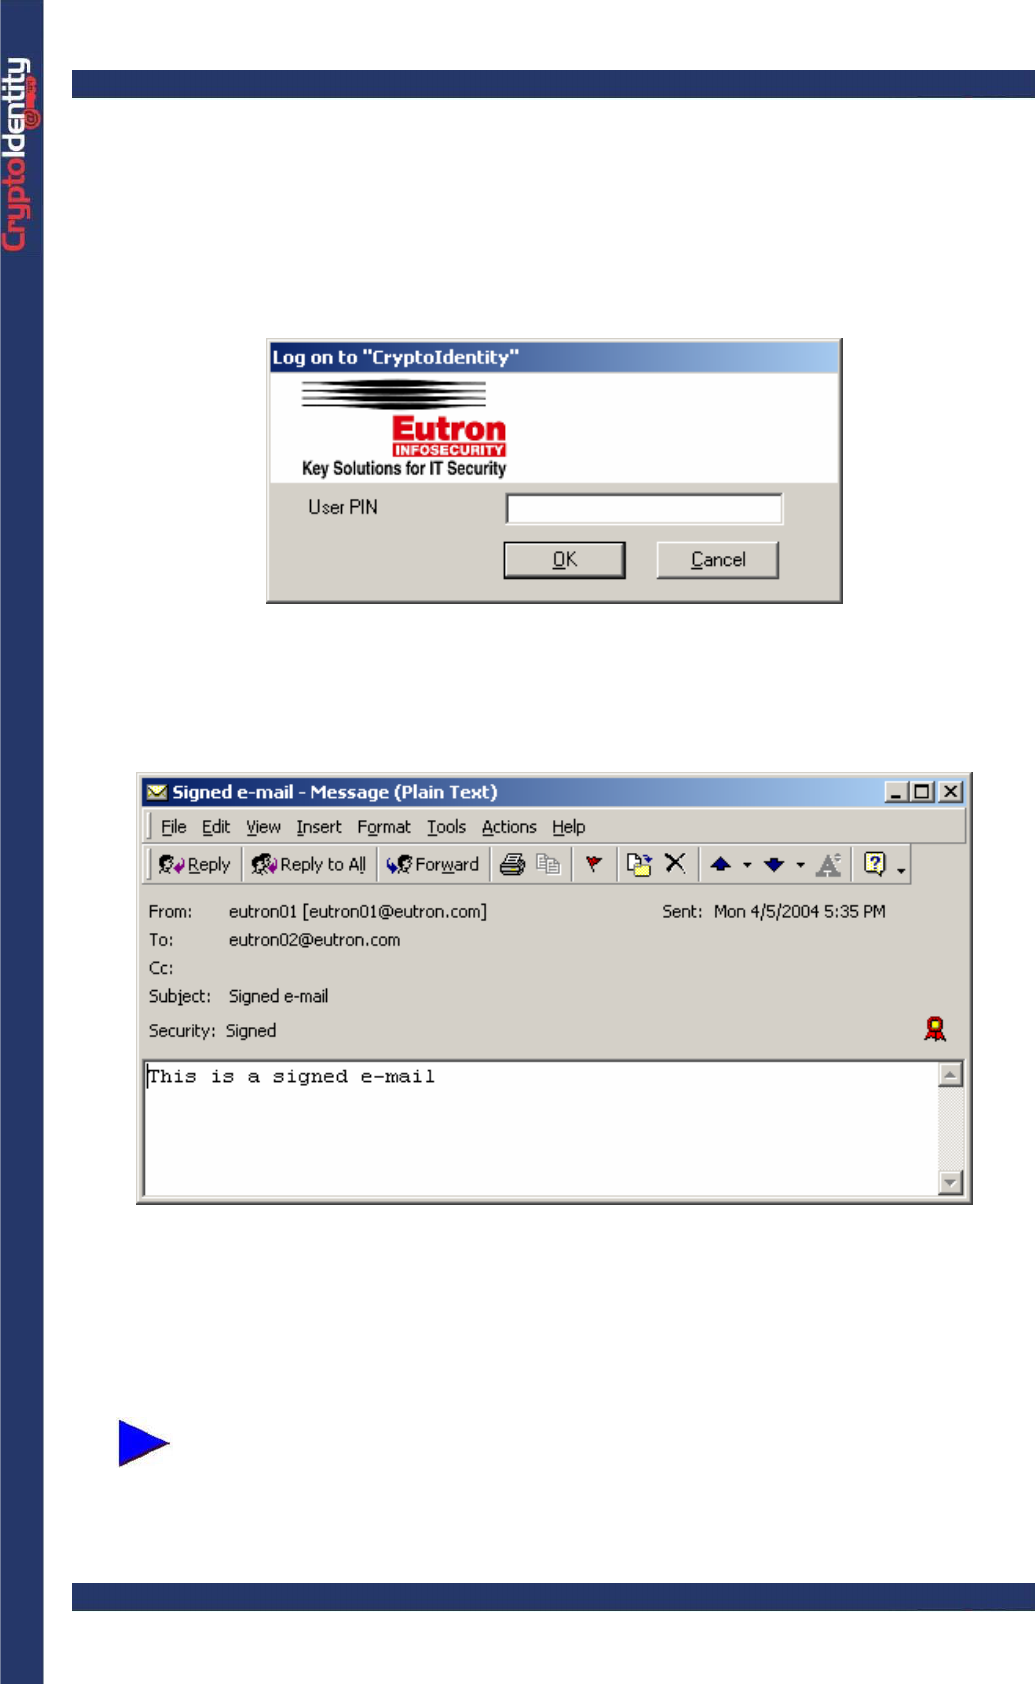
A window appears every time the CryptoIdentity PIN is required:
The PIN is required also during private key generation (for example during a digital
certificate enroll).
The Security Officer PIN is mainly used to allow the CryptoIdentity USB token
initialization. Before starting the initialization process (refer to section “3.3 InitToken”) the
Security Officer PIN is required.
.
Do NOT forget the Security Officer PIN, because this prevents to initialize
the CryptoIdentity token.
CryptoIdentity User Guide – 1. Introduction to CryptoIdentity and CryptoKit
For security reasons, if a wrong CryptoIdentity PIN is inserted consequently
for 12 times, the CryptoIdentity PIN is LOCKED.
If a wrong Security Officer PIN is inserted consequently for 6 times, the
Security Officer PIN is LOCKED and NO MORE USABLE.
It is possible to customize the counter of wrong attempts before the PIN and
Security Officer PIN are locked. To do so, refer to section "1.1.4
CryptoIdentity default configuration.
If you need CryptoIdentity tokens which already have this customization
according to your needs, please contact Eutron Infosecurity Sales
Department at info@eutron.com
Each CryptoIdentity has already been initialized during the manufacturing process. The
manufacturing initialization process set into the CryptoIdentity USB token a standard PIN
and Security Officer PIN.
Therefore there is no need to initialize a CryptoIdentity before starting to use it.
The default PIN set during manufacturing process is : “12345678”.
The default Security Officer PIN set during manufacturing process is "11111111" (8 times
"1").
For security reasons, it is strongly suggested to change the default PIN
before using the CryptoIdentity token. Please refer to section "3.2
Password Change Utility" to change the PIN. If you wish to change the
Security Officer PIN, please refer to section "3.3 InitToken".
You can change the CryptoIdentity PIN and Security Officer PIN also
through the AR Genie utility. For details refer to section "3.1 AR Genie".
If you need CryptoIdentity tokens with different default PINs, please contact
Eutron Infosecurity Sales Department at info@eutron.com and require this
customization.
1. 1. 4 CRYPTOIDENTITY DEFAULT CONFIGURATION
Since normal operations with CryptoIdentity require preliminary configuration (PIN
expiration period, min PIN length, max PIN length, number of PIN and SO PIN attempts,
max number of RSA private keys), these parameters are supplied as default value during
the CryptoIdentity Initialization process.
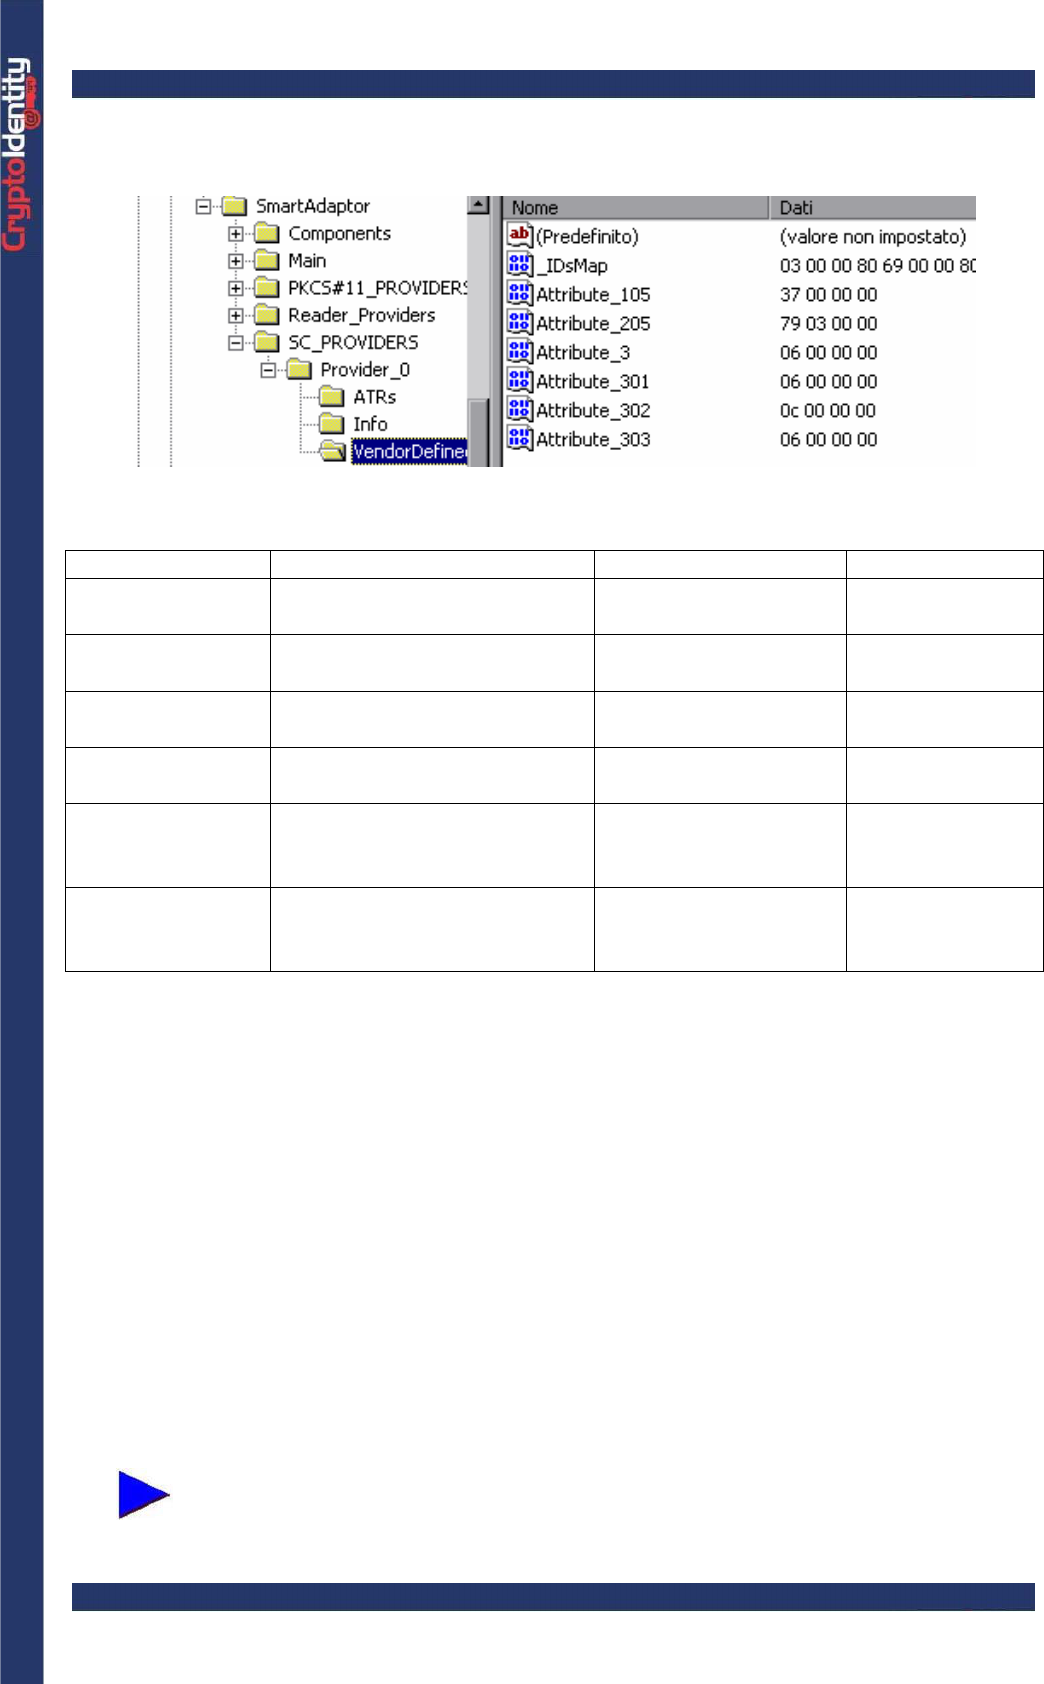
The initialization process sets into CryptoIdentity the parameters read from the following
Windows registry key:
HKEY_LOCAL_MACHINE\Software\ARL\SmartAdaptor\SC_PROVIDERS\Provider_0\
VendorDefined
CryptoIdentity User Guide – 1. Introduction to CryptoIdentity and CryptoKit
The parameters ("Attribute_(XX)") stored in this key are set into the CryptoIdentity by the
initialization process:
In details:
Parameter Explanation Name registry value Default value
Max PIN length Maximum PIN size
(alphanumeric characters) Attribute_105 37 (Hex) - 55
(dec)
PIN expiration Number of days before the
PIN expires Attribute_205 379 (hex) - 889
(dec)
Min PIN length Minimum PIN size
(alphanumeric characters) Attribute_3 6 (Hex) - 6 (dec)
Max RSA private
keys Maximum number of RSA
private keys into the token Attribute_301 6 (Hex) - 6 (dec)
PIN attempts Number of sequential wrong
attempts before the PIN
locks
Attribute_302 0c (Hex) - 12
(dec)
SO PIN attempts Number of sequential wrong
attempts before the Security
Officer PIN locks
Attribute_303 6 (Hex) - 6 (dec)
It is possible to customize all these CryptoIdentity parameters. The customization must be
done before the CryptoIdentity initialization. To do so:
• Edit the previous registry values according to your needs. For example, to change the
CryptoIdentity “Max PIN length” parameter, edit the “Attribute_105” registry value and set
the desired length.
• Reboot the machine.
• After the reboot, initialize the CryptoIdentity through Init Token or AR Genie utility. For
details about the initialization process, refer to section "3.3 Init Token" or "3.1 AR Genie".
• The initialization process will configure the CryptoIdentity according to the desired
configuration. Regarding the previous example, a new “Max PIN length” parameter will be
set into the token.
In next chapters, this guide will provide examples and instructions related to
CryptoIdentity default configuration.
CryptoIdentity User Guide – 1. Introduction to CryptoIdentity and CryptoKit
1. 1. 5 CRYPTOIDENTITY REQUIREMENTS
These are the CryptoIdentity requirements:
CryptoKit properly installed (refer to sections “1.2.1 CryptoKit requirements” and “2.1.1
Installing CryptoKit ”)
A free USB port
USB protocol enabled in the BIOS settings
USB 1.1 or 2.0
1. 2 WHAT IS CRYPTOKIT
CryptoKit provides the basic software to work with the CryptoIdentity token. It installs the
CryptoIdentity USB token drivers, some useful utilities, the SDK package and the
middleware to allow software applications such as Internet browsers, e-mail clients and
other developed applications to take advantage of the CryptoIdentity cryptographic
functionalities.
For further details about the CryptoKit installation, refer to section "2.1.1 Installing
CryptoKit".
1. 2. 1 CRYPTOKIT REQUIREMENTS
CryptoKit supports these Operating Systems:
• Microsoft Windows 98 SE
• Microsoft Windows ME
• Microsoft Windows NT 4.0 (SP6 or higher). Note: Windows NT 4.0 machines
embedding an OHCI controller (see www.usb.org) are not supported.
• Microsoft Windows 2000 Server\Professional (SP4 or higher)
• Microsoft Windows XP (SP1 or higher)
• Microsoft Windows 2003 Standard\Enterprise
Windows NT 4.0, 2000, 2003 and XP requires administrative privileges
during setup process.
• Linux. Please enquire our sales department at info@eutron.com for information about
the Linux port.
Some Microsoft Outlook and Internet Explorer versions outside the USA
only support low-level cryptography (40 bit symmetric encryption). These
versions will not allow CryptoKit to use 128 bit Cryptography. In order to
fully utilise the cryptographic power of CryptoKit please make sure to
install the security updates for Outlook/IE, which are available at Microsoft's
web site.
CryptoIdentity User Guide – 2. Getting Started with CryptoIdentity
2. GETTING STARTED WITH CRYPTOIDENTITY
This chapter explains how to install CryptoKit and the CryptoIdentity drivers.
2. 1 INSTALLING AND MAINTAINING CRYPTOKIT
Before using the CryptoIdentity token for any purpose, it is mandatory to install CryptoKit.
Next section will guide you through the process.
Refer to section "1.2 What is CryptoKit" for details about CryptoKit.
2. 1. 1 INSTALLING CRYPTOKIT
Before installing CryptoKit, check the system to verify if it matches the minimum system
requirements. Refer to section "1.2.1 CryptoKit requirements" for details.
It is possible to force CryptoKit setup to install automatically only the
desired components by editing the file "Ck_setup.ini" located in the setup
folder. For further details, send an email to Eutron Infosecurity at
helpdesk@eutron.com
CryptoKit setup is also available in .msi format. It allows, for example, to
install CryptoKit through Active Directory deployment. For further details,
send an email to Eutron Infosecurity at helpdesk@eutron.com
Before proceeding to install CryptoKit please read carefully these notes:
To install properly the software, do not plug the CryptoIdentity USB token
into the USB port before installing CryptoKit.
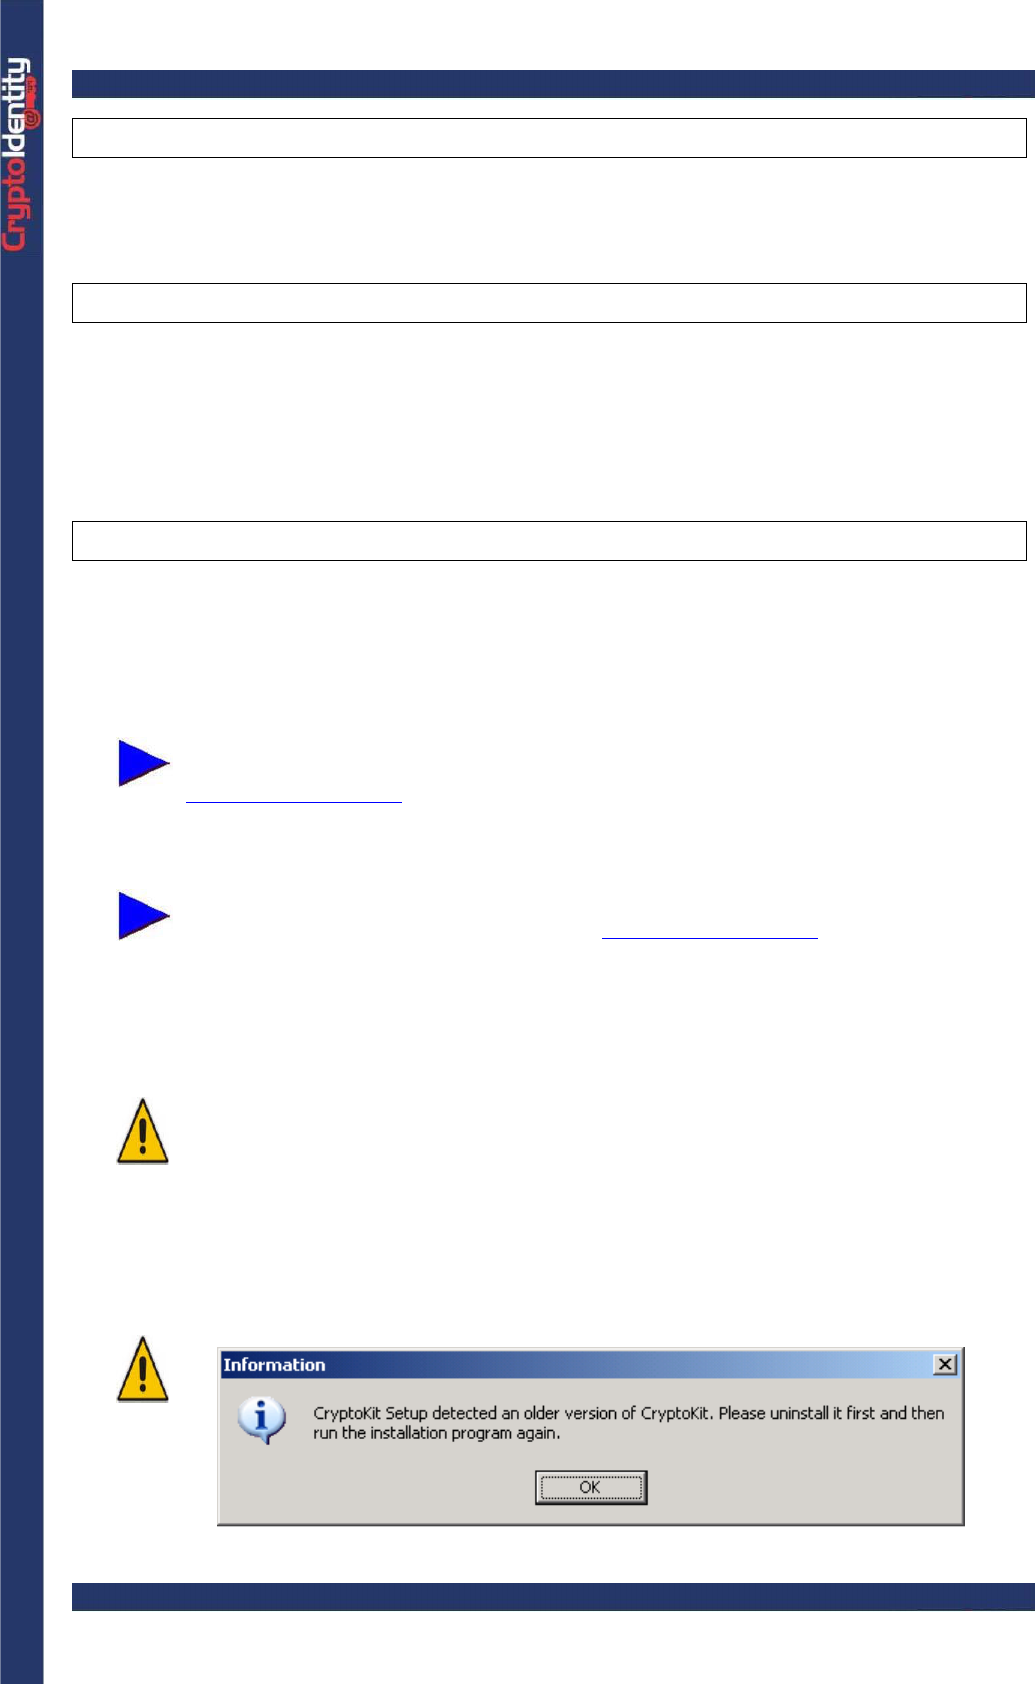
If an older CryptoKit version was previously installed it is mandatory to
uninstall it. Remove it by Add-Remove programs from the Windows
control panel. A message box appears during the CryptoKit installation if an
older CryptoKit release has been detected on the system:
CryptoIdentity User Guide – 2. Getting Started with CryptoIdentity
To install the CryptoKit (standard installation):
• Insert the original CryptoKit CD-ROM.
• Run CryptoIdentity-setup.exe from the root directory on the Installation CD.
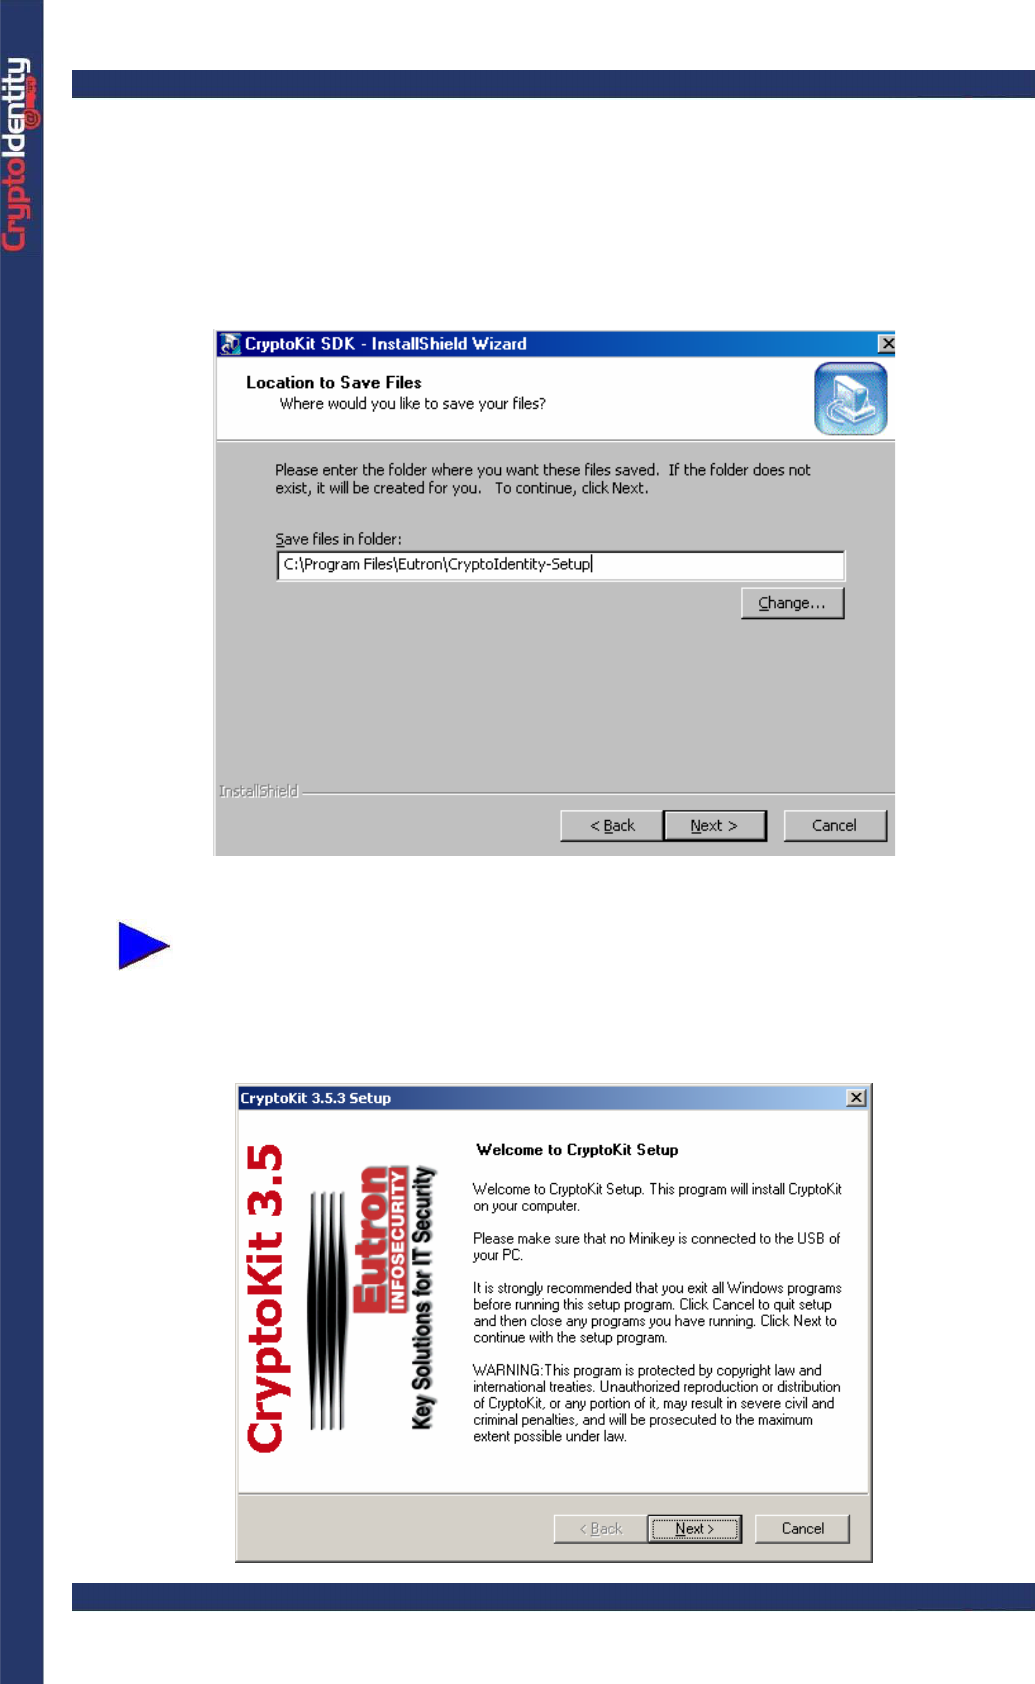
• The installation process needs to extract into a folder the files used by the setup.
Choose a folder (recommended is "C:\<Program Files>\Eutron\CryptoIdentity-Setup"
The process automatically adds on the hard-disk the folder specified. If the
same folder was already created during a previous installation, the setup
process asks to overwrite it. From this folder it is possible to run CryptoKit
setup for future installations or maintenance without using the original CD.
• Then, the setup starts automatically:
CryptoIdentity User Guide – 2. Getting Started with CryptoIdentity
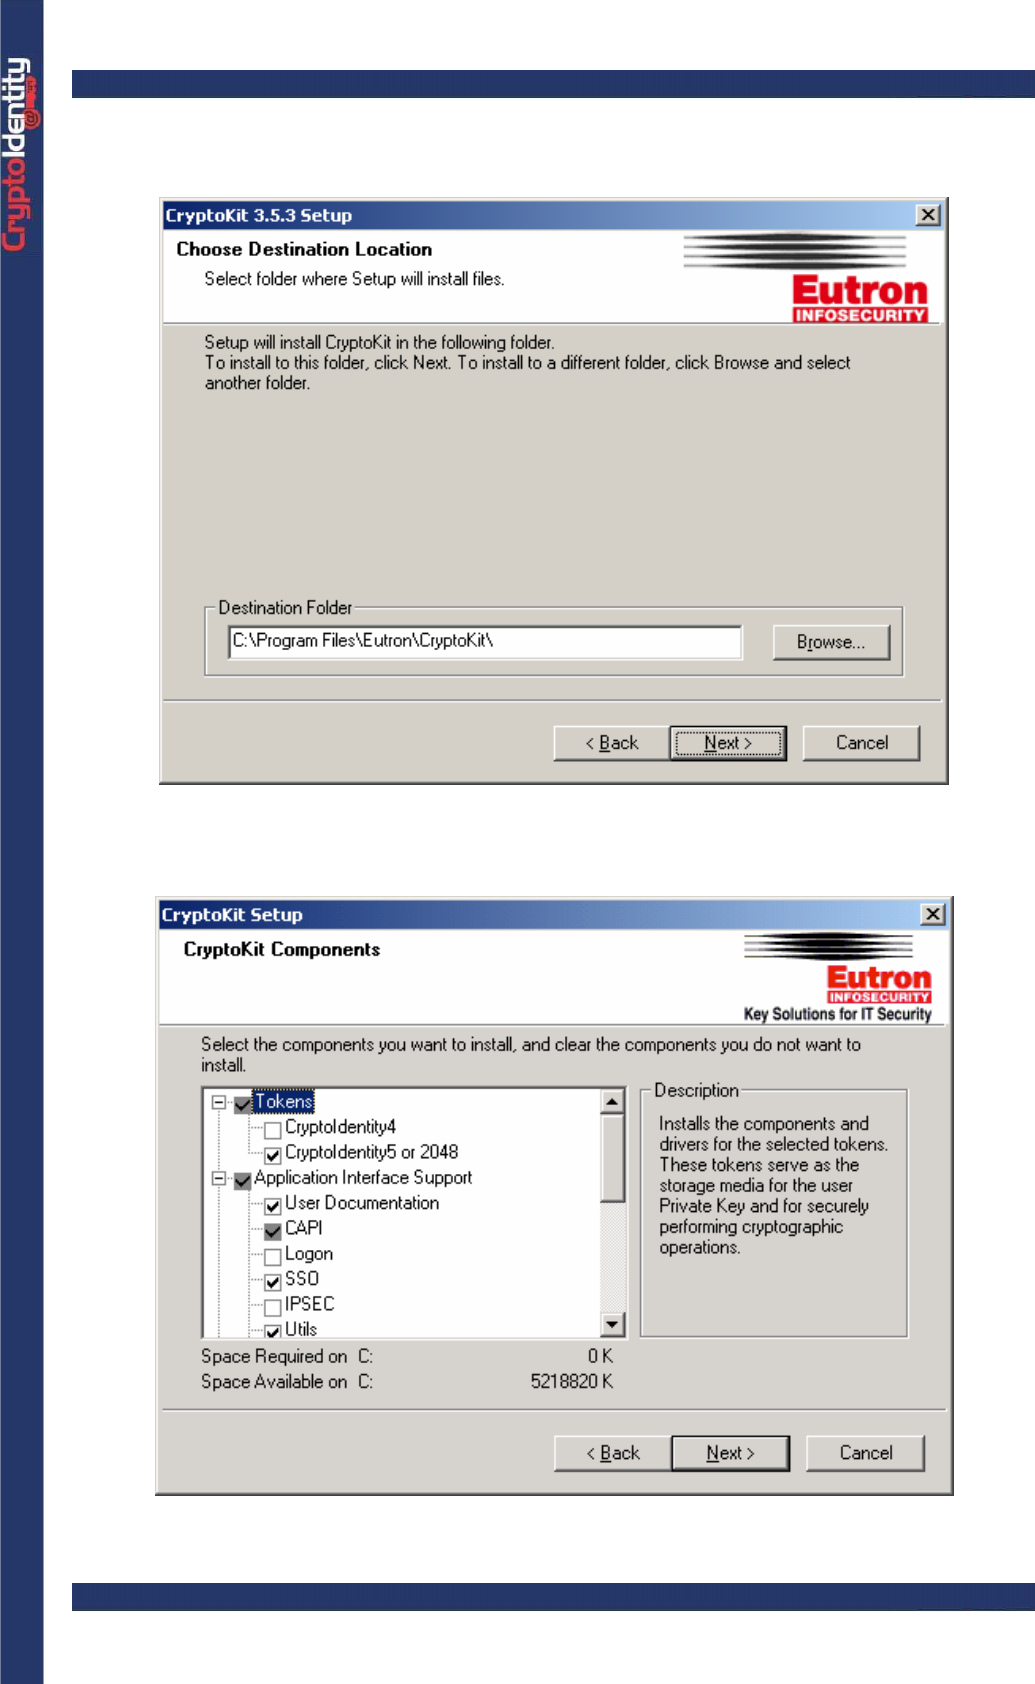
• Choose a Destination Folder. The default location is C:\Program Files\Eutron\CryptoKit.
• Next, select the CryptoKit Components to install:

CryptoIdentity User Guide – 2. Getting Started with CryptoIdentity
Here is a brief description about the available components:
Tokens
It Installs the CryptoIdentity drivers.
CryptoIdentity4 : installs the CryptoIdentity4 driver (optional, select it only if is
used the CryptoIdentity4 model)
CryptoIdentity5 or 2048: installs the CryptoIdentity USB token driver (mandatory,
select it if the CryptoIdentity5 or 2048 model are used).
Application Interface Support
It installs the additional software required to use the CryptoIdentity USB token with
applications.
User Documentation: adds into the "< CRYPTOKIT INSTALL DIR >\doc" folder
this guide ("CryptoIdentity User Guide v2.1.pdf"), the guide related to Microsoft
smartcard logon infrastructure and CryptoIdentity (file " CryptoIdentityLogon.pdf") and
the guide related to Microsoft VPN and CryptoIdentity (file "CK_VPN_PPTP.pdf") -
(we strongly suggest to select it)
CAPI: enables CAPI applications, for example Microsoft Outlook or Internet
Explorer, to use CryptoKit as their cryptographic engine - (you must select it).
Logon: adds the smartcard logon feature into the local system in order to allow
Microsoft smartcard logon process to authenticate through CryptoIdentity - (optional,
available only on Microsoft Win 2000/XP/2003 machines).
SSO: enables Single Sign On feature. SSO feature caches securely the
CryptoIdentity PIN value to prevent several PIN requests by applications - (optional).
IPSEC: enables Win 2000 IPSEC filters using CryptoIdentity - (optional).
Utils: installs the following CryptoIdentity utilities - (we suggest to select it)
ARGenie: to make several operations on the token (refer to section “3.2.1
ARGenie”)
Password Change Utility : to change the CryptoIdentity PIN (refer to section
“3.2.2 Password Change Utility”).
InitToken: to initialize the CryptoIdentity token or change the Security Officer
PIN (refer to section "3.3 Init Token”).
ImportPKCS12 : to import into the CryptoIdentity token certificates stored in
a .pfx or .p12 files (refer to section “3.2.4 ImportPKCS12”).
Token Serial Number: to obtain the CryptoIdentity serial number (refer to
section “3.2.5 Serial Number”).
CryptoIdentity User Guide – 2. Getting Started with CryptoIdentity
Netscape: enables Netscape to use CryptoKit as cryptographic engine by adding the
CryptoKit security module (optional, select it only if Netscape is used).
• Select the desired components and click Next.
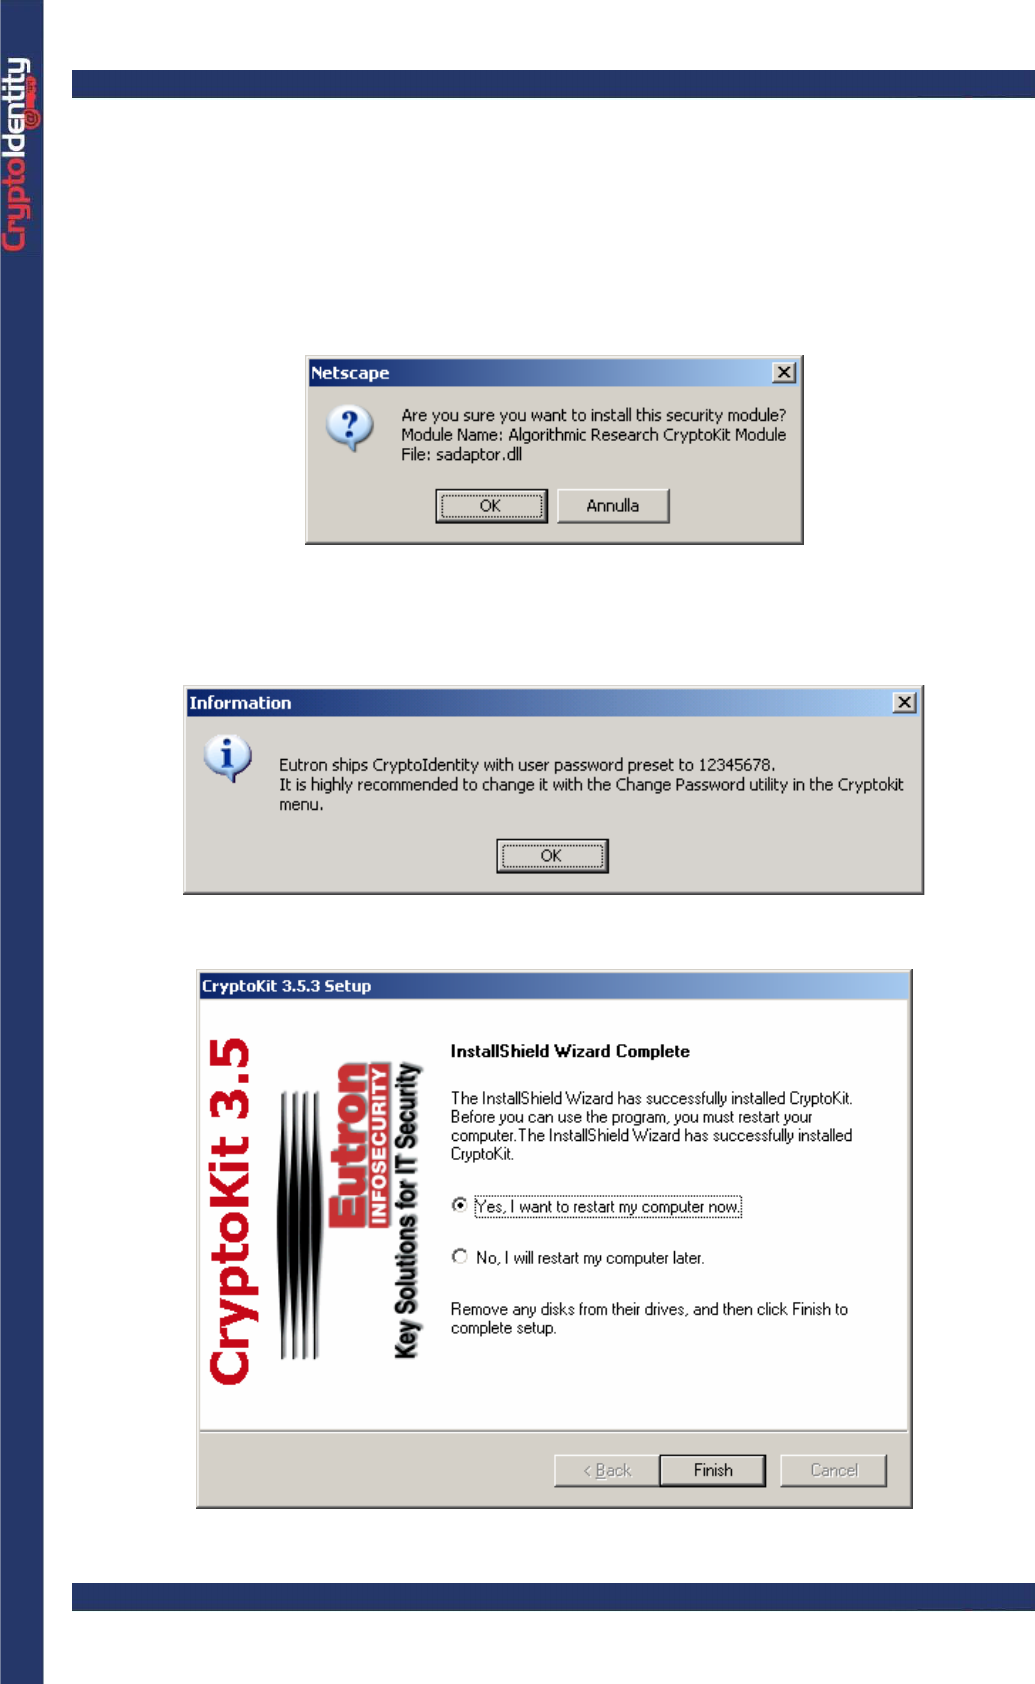
• If the Netscape option is selected, the Netscape browser opens automatically to display
the following window (from Netscape 4.79):
• Press OK to add the CryptoKit security module and close the browser to proceed.
• The following screenshot appears to remind the CryptoIdentity default PIN (refer to
section “1.1.3 CryptoIdentity default PINs”) :
• At the end of the installation a reboot\restart may be required. If required, click
Finish and reboot the system.
CryptoIdentity User Guide – 2. Getting Started with CryptoIdentity
• After the restart (if required), the CryptoKit installation must be completed by plugging
a CryptoIdentity into an USB port. If the installation process did not ask to reboot the
system, the CryptoIdentity must be plugged into an USB port at the end of the CryptoKit
setup.
The first time a CryptoIdentity is plugged after the CryptoKit setup, the
CryptoIdentity driver installation procedure will start and complete
automatically.
• It is now possible to access the CryptoKit shortcuts, from Start->Programs->Eutron
CryptoKit.
2. 1. 2 MAINTAINING AND REPAIRING CRYPTOKIT
It is possible to maintain the components installed by a previous CryptoKit installation.
For example, it is possible to remove or add a component (drivers, utilities, libraries, etc.).
Windows NT, 2000, 2003 and XP require administrative privileges to
maintain or repair CryptoKit.
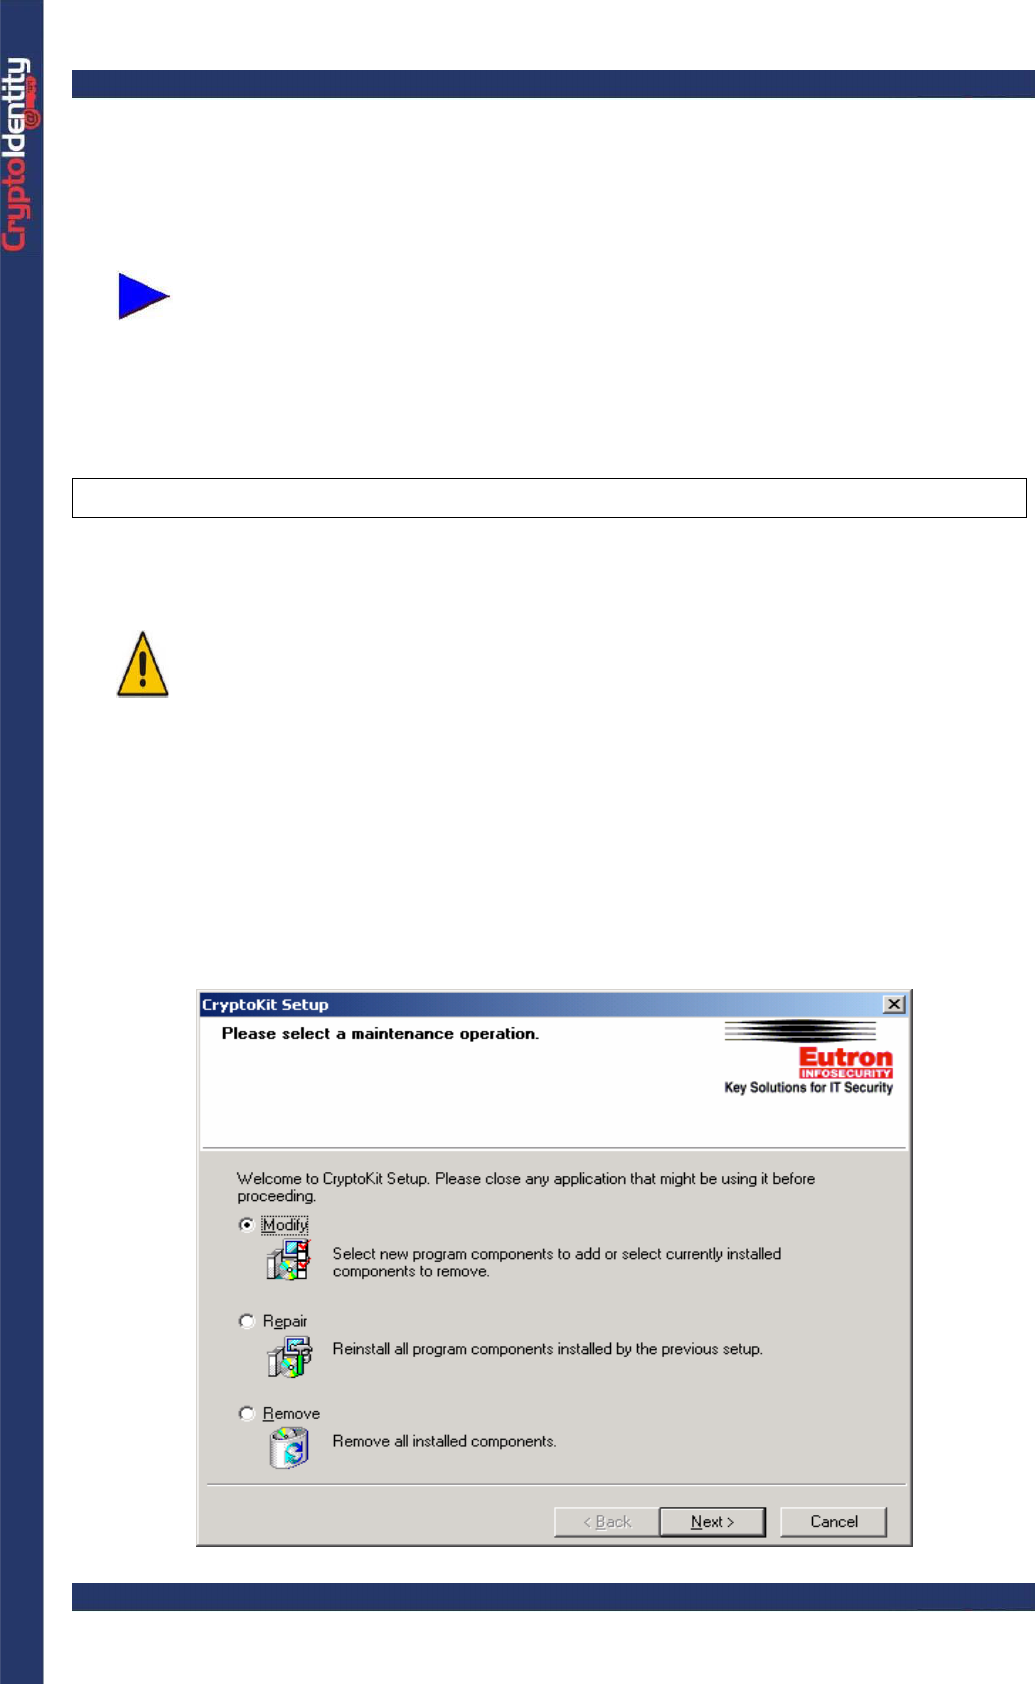
To maintain CryptoKit:
• Remove CryptoIdentity from the USB port.
• Run the uninstallation procedure (Start-> Programs-> Eutron CryptoKit-> Add
Remove CryptoKit Components) or use the Add-Remove programs->CryptoKit in the
Windows control panel.
• When requested, select the "Modify" option:
CryptoIdentity User Guide – 2. Getting Started with CryptoIdentity
• Click Next, select or de-select components to install/uninstall, and complete the
process.
• At the end of the process a reboot\restart may be required. If required, reboot the
system.
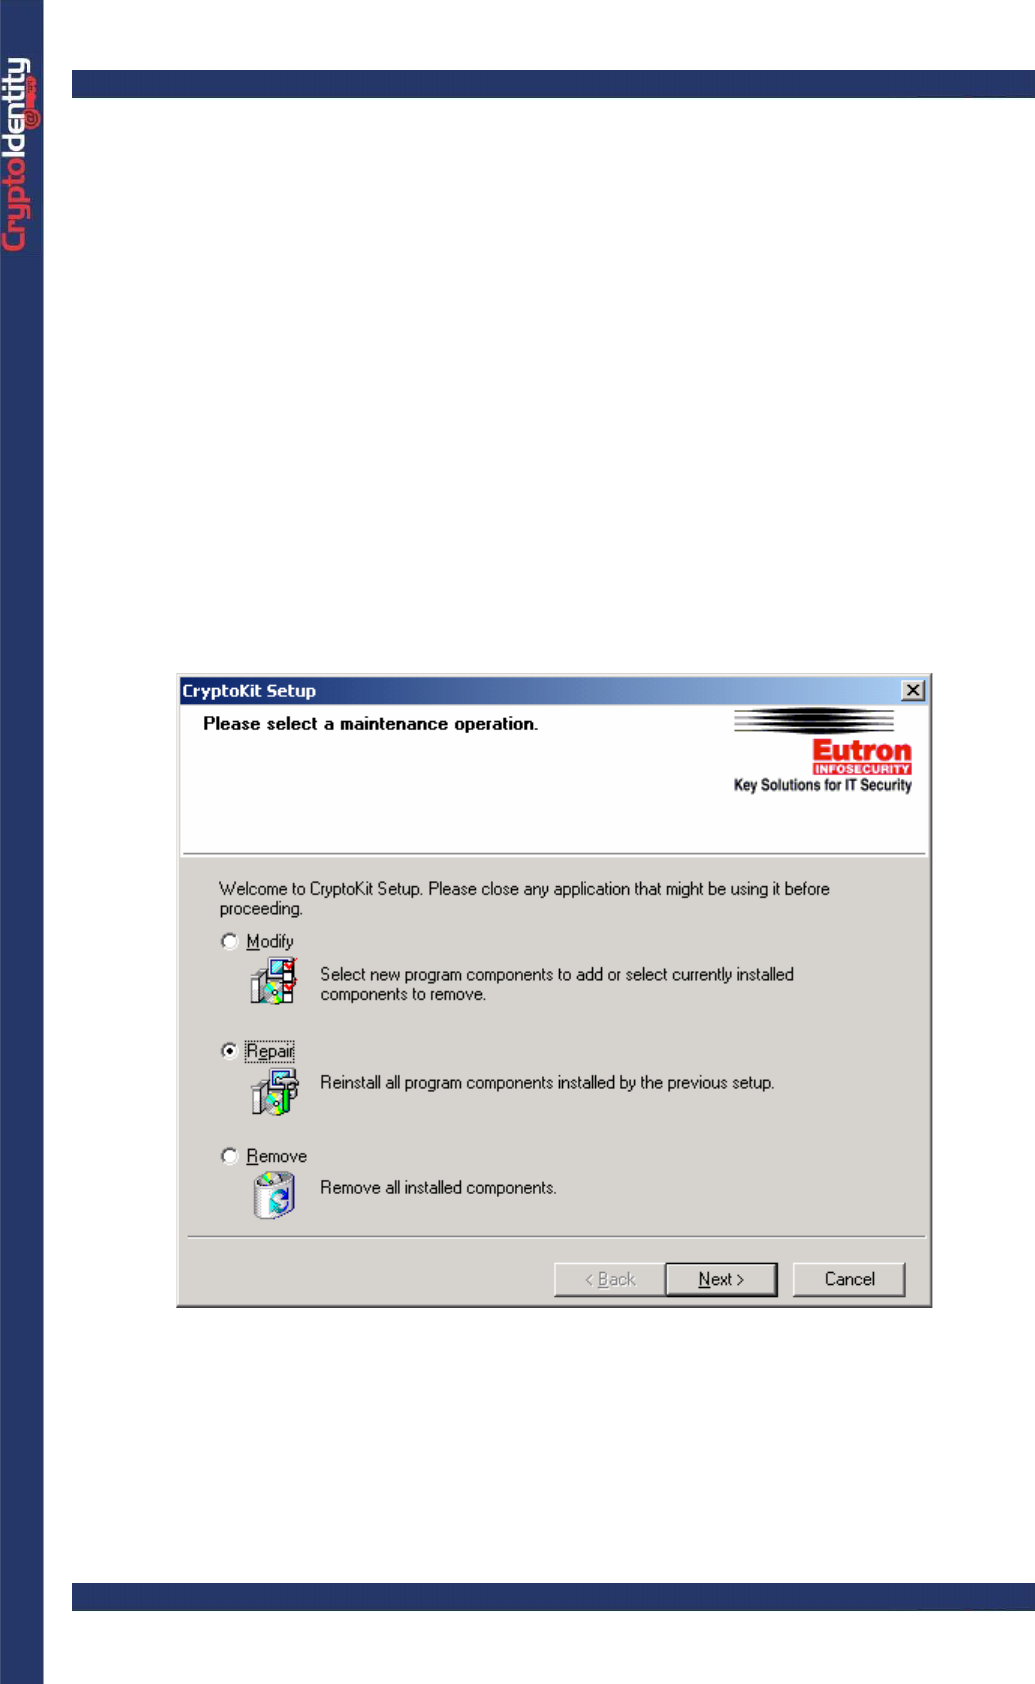
It is also possible to repair a CryptoKit installation, if troubles are encountered during the
usage of the installed components.
To repair a previous CryptoKit installation:
• Remove the CryptoIdentity token from the USB port.
• Run the uninstallation procedure (Start-> Programs-> Eutron CryptoKit-> Add
Remove CryptoKit Components) or use the Add-Remove programs->CryptoKit in the
Windows control panel.
• When requested, select the "Repair" option:
• The "Repair" process re-installs all currently installed components to repair them.
• At the end of the process a reboot\restart may be required. If required, reboot the
system.
CryptoIdentity User Guide – 2. Getting Started with CryptoIdentity
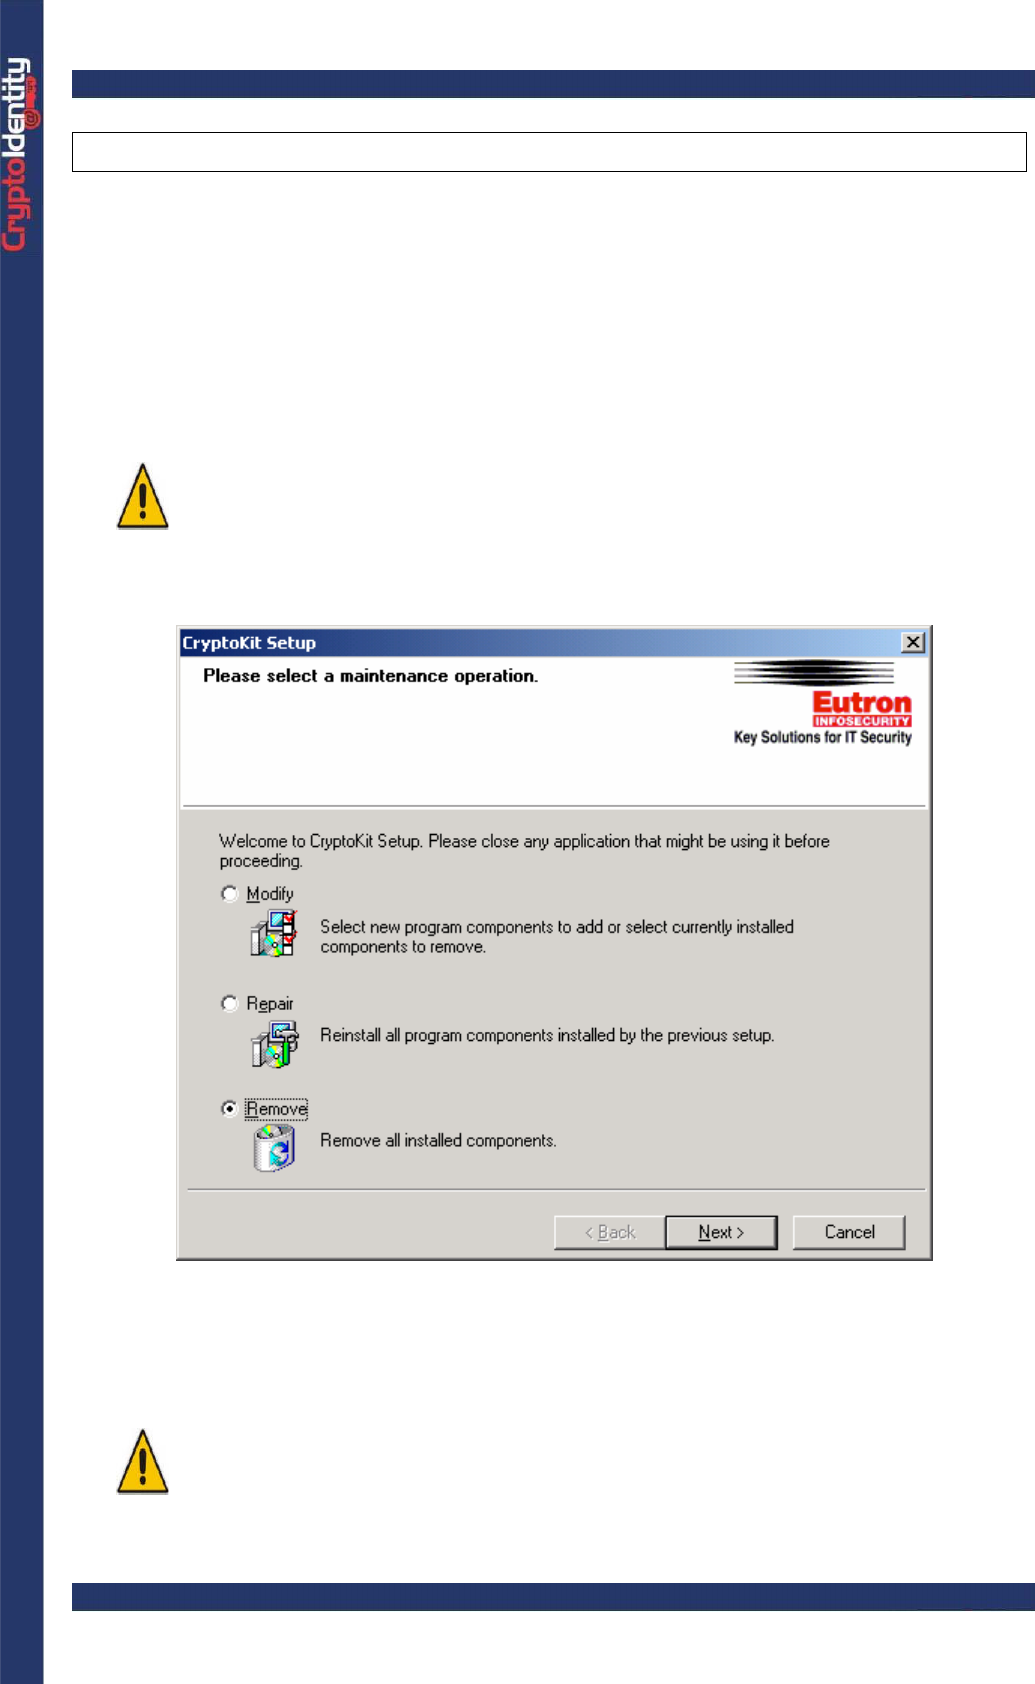
2. 1. 3 UNINSTALLING CRYPTOKIT
If you wish to uninstall CryptoKit:
• Remove the CryptoIdentity token from the USB port.
• Run the uninstallation procedure (Start-> Programs-> Eutron CryptoKit-> Add
Remove CryptoKit Components) or use the Add-Remove programs->CryptoKit in the
Windows control panel.
Windows NT, 2000, 2003 and XP require administrative privileges to
uninstall CryptoKit.
• When requested, select the "Remove" option:
• At the end of the uninstallation procedure, close all running applications and reboot the
PC.
Do NOT uninstall CryptoKit if you still have installed applications such as
Microsoft Smartcard logon or others which take advantage of the
CryptoIdentity functionalities. This might cause these applications to stop
working properly.

CryptoIdentity User Guide – 3. Working with CryptoIdentity Utilies
3 WORKING WITH CRYPTOIDENTITY UTILITIES
CryptoKit provides some utilities to work with the CryptoIdentity token. The next sections
explain in details their usage.
3. 1 ARGENIE
CryptoKit provides this utility to perform several operations with CryptoIdentity.
It is possible to run the AR Genie utility in standard or advanced mode.
Standard mode:
• Run the program AR Genie from Windows Start Menu (Start-> Programs-> Eutron
CryptoKit).
The following is the AR Genie main window:
• Make sure a CryptoIdentity USB token is plugged into an USB port and from the
"Action" menu, select the operation you want to apply to the token.
• Each AR Genie feature is explained in the AR Genie help. To open the AR Genie Help,
select the menu Help->Contents. Refer to the AR Genie help for all the information about
the AR Genie utility.
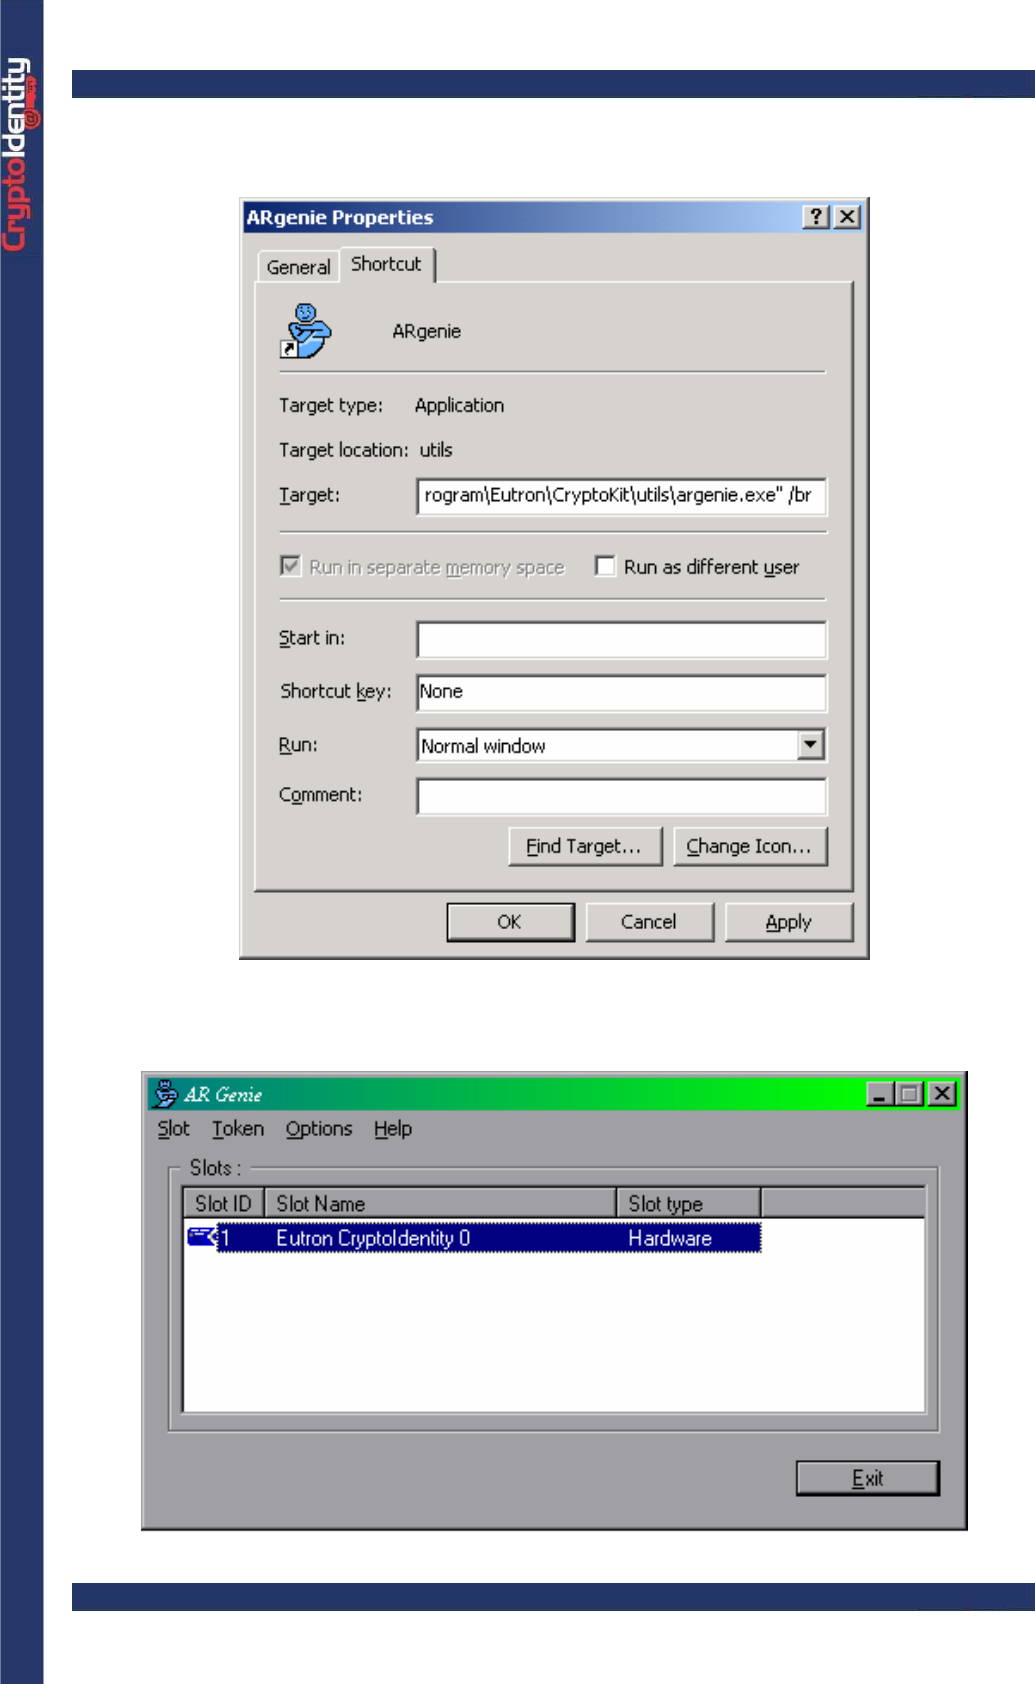
Advanced mode:
• Create a shortcut to the AR Genie utility (right click->Create shortcut on the AR Genie
icon located in Start-> Programs-> Eutron CryptoKit).
CryptoIdentity User Guide – 3. Working with CryptoIdentity Utilies
• In the AR Genie shortcut properties, add to the "Target" field the "/br" parameter. The
complete Target must be the following:
• Run the AR Genie utility from the new shortcut:
CryptoIdentity User Guide – 3. Working with CryptoIdentity Utilies
The AR Genie utility in advanced mode provides these additional features:
Slot menu
- Get Information: provides general information about the CryptoIdentity token
plugged.
- Refresh List: refresh the "slots" list.
Token menu
- View objects: allows to view the public objects stored into the CryptoIdentity USB
token. Logging in to the token (by inserting the CryptoIdentity PIN from the Token-
>Login menu) it is also possible to view the private objects stored into
CryptoIdentity.
Options menu
- Logs: enables the automatic generation of the logging files.
- Programs: allows to insert the CryptoIdentity label during initialization process
and to enforce PIN request before viewing the objects stored into the token.
- Advanced: provides several information and options about CryptoIdentity and
related Reader.
• Each other AR Genie feature is explained in the AR Genie help. To open the AR Genie
Help, select the menu Help->Contents. Please refer to the AR Genie help for further
information about the AR Genie utility.
3. 2 PASSWORD CHANGE UTILITY
CryptoKit provides this utility to change the PIN of your CryptoIdentity.
• To use it, run the program Password Change Utility from Windows Start Menu (Start-
> Programs-> Eutron CryptoKit).
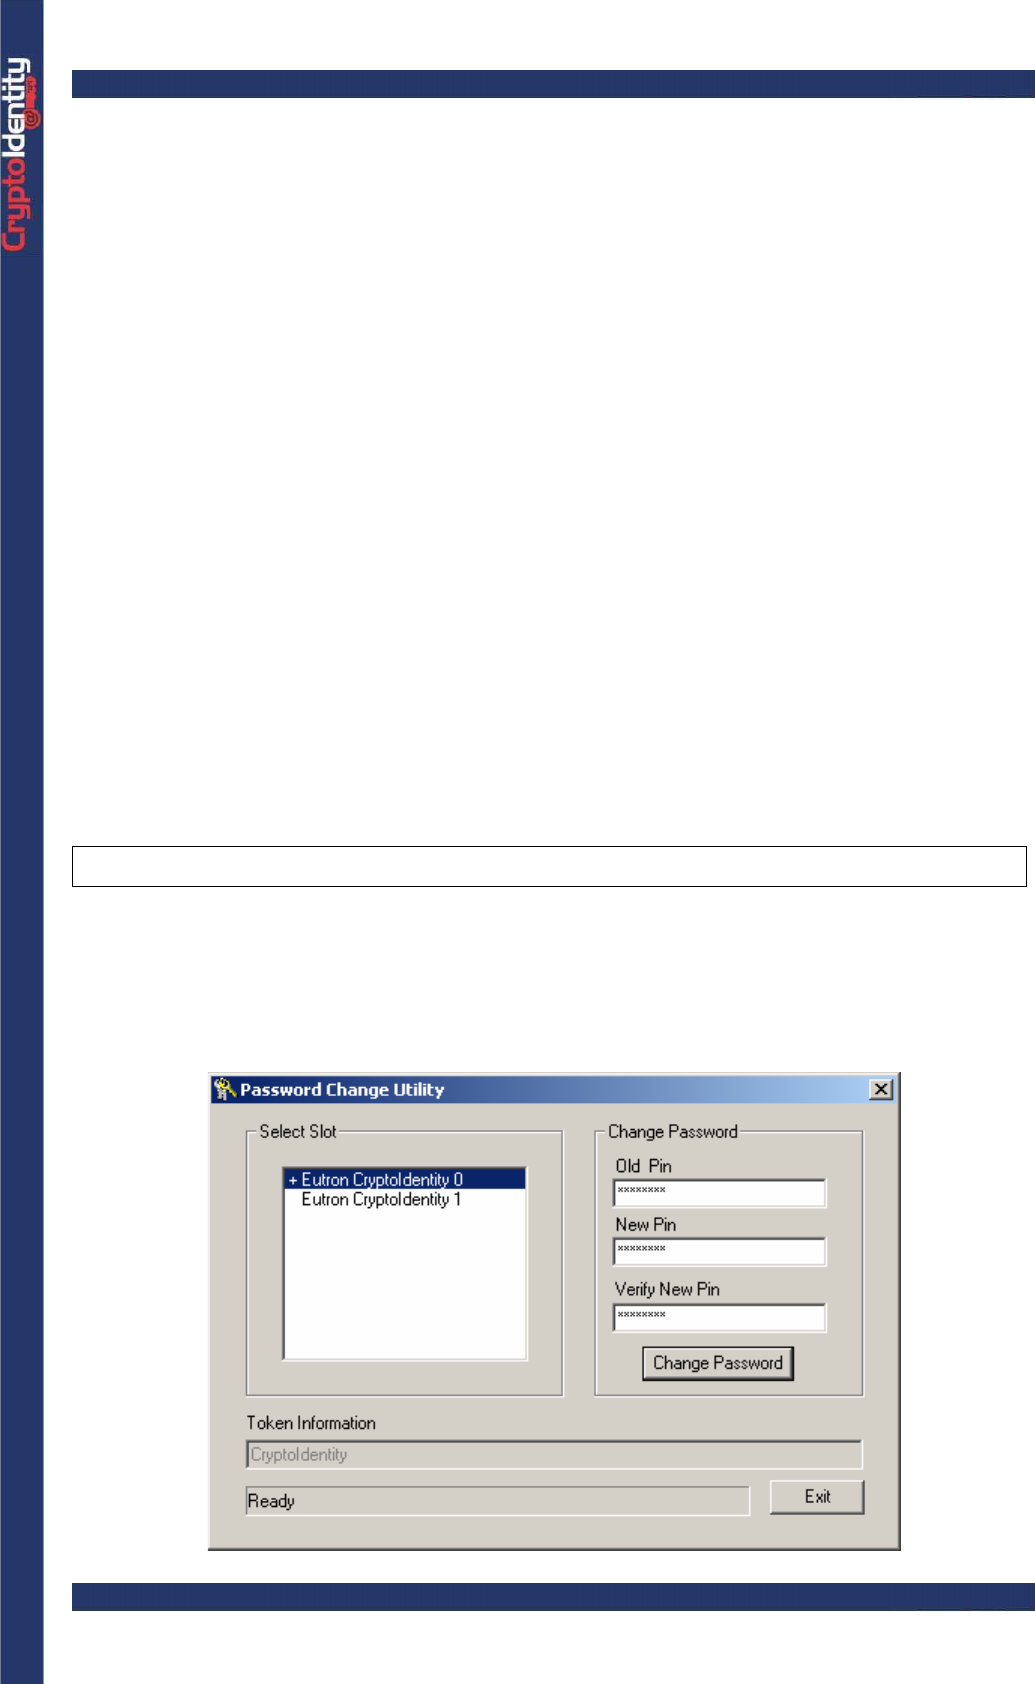
The following is the Password Change Utility main window:
CryptoIdentity User Guide – 3. Working with CryptoIdentity Utilies
When a CryptoIdentity USB token is plugged, the symbol “+” appears near
the slot description.
To change the PIN of the CryptoIdentity USB token:
• Select the slot where the token is plugged.
• Insert the current PIN in the Old Pin field.
If this is the first time that the CryptoIdentity PIN is about to be changed,
insert as Old Pin the PIN “12345678” according to section "1.1.3
CryptoIdentity default PINs".
• Insert the new value to assign in the New Pin field and confirm it in the Verify New Pin
field.
• Press Change Password.
If the Old Pin is correct and the Verify New Value is the same of New Pin, the change is
carried on and a confirmation panel appears.
For security reasons, if a wrong CryptoIdentity PIN is inserted consequently
for 12 times, the CryptoIdentity PIN is LOCKED.
3. 3 INIT TOKEN
This utility allows to initialize the CryptoIdentity token or change its Security Officer PIN.
• Run Init Token from Windows menu (Start-> Programs-> Eutron CryptoKit).
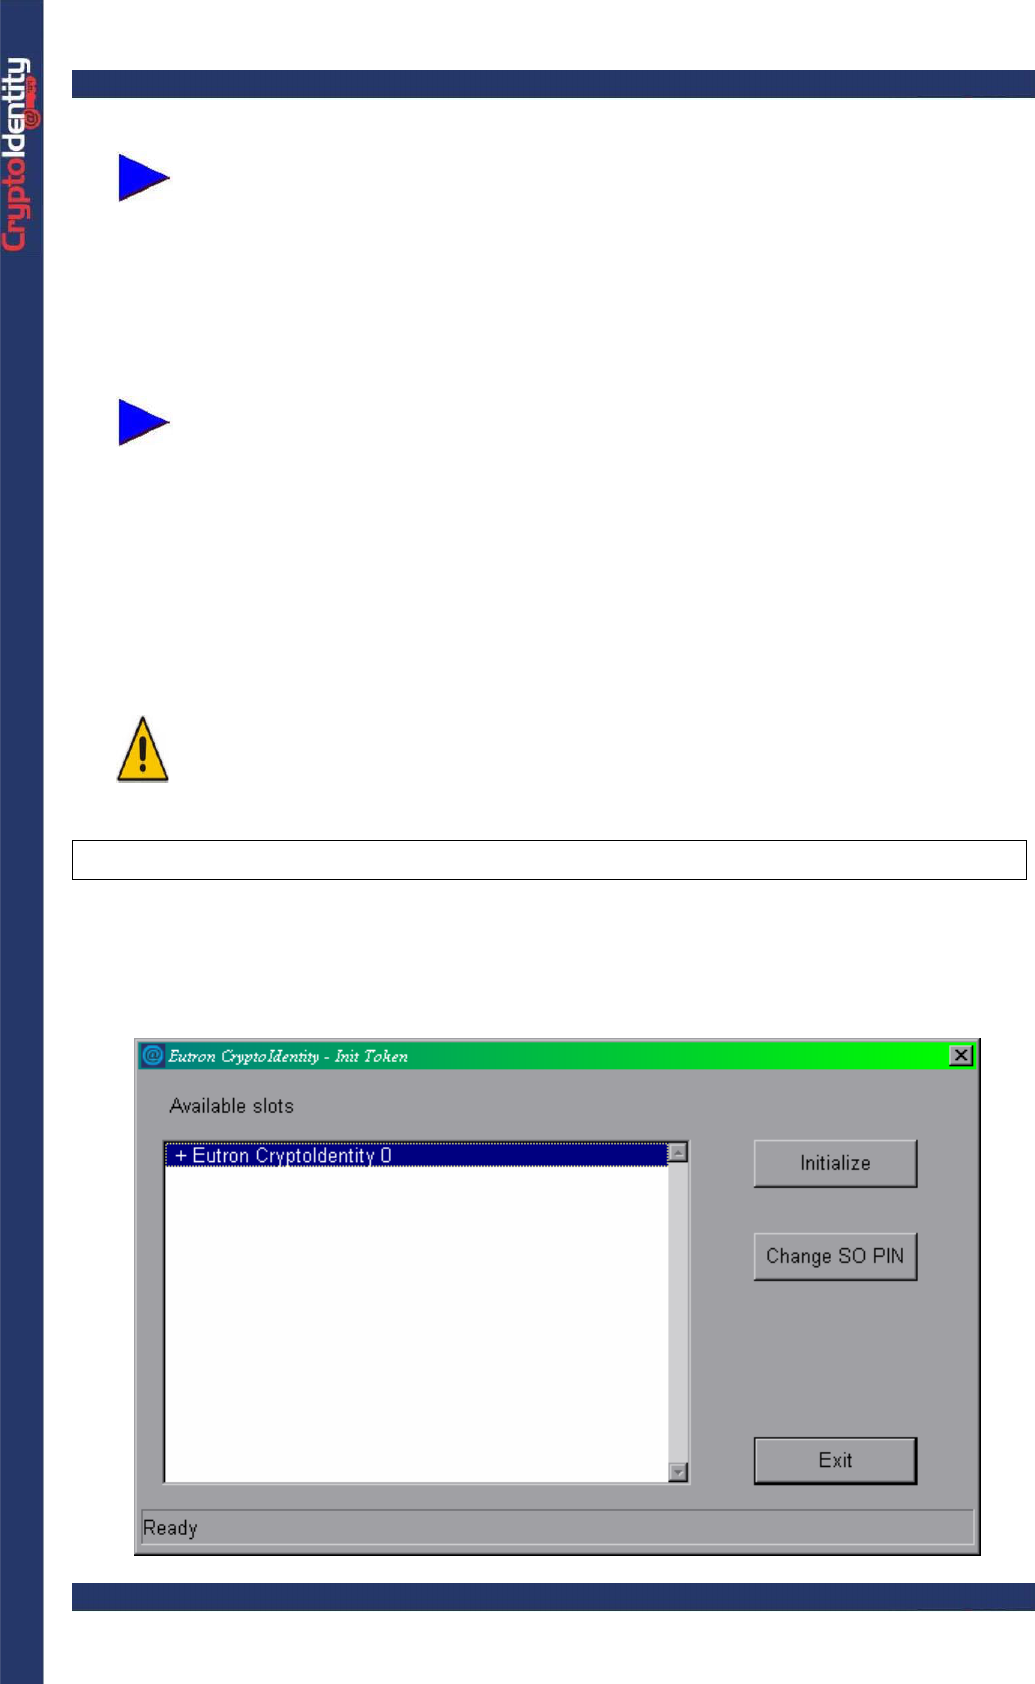
The following is the InitToken main window:
CryptoIdentity User Guide – 3. Working with CryptoIdentity Utilies
• Choose whether initialize the CryptoIdentity (Initialize button) or change the Security
Officer PIN (Change SO PIN button)
To initialize the CryptoIdentity token:
• To start the initialization procedure, choose the USB port where the CryptoIdentity
token to be initialized is inserted.
When a CryptoIdentity token is plugged, the symbol “+” appears near the
slot description.
• Press the button Initialize.
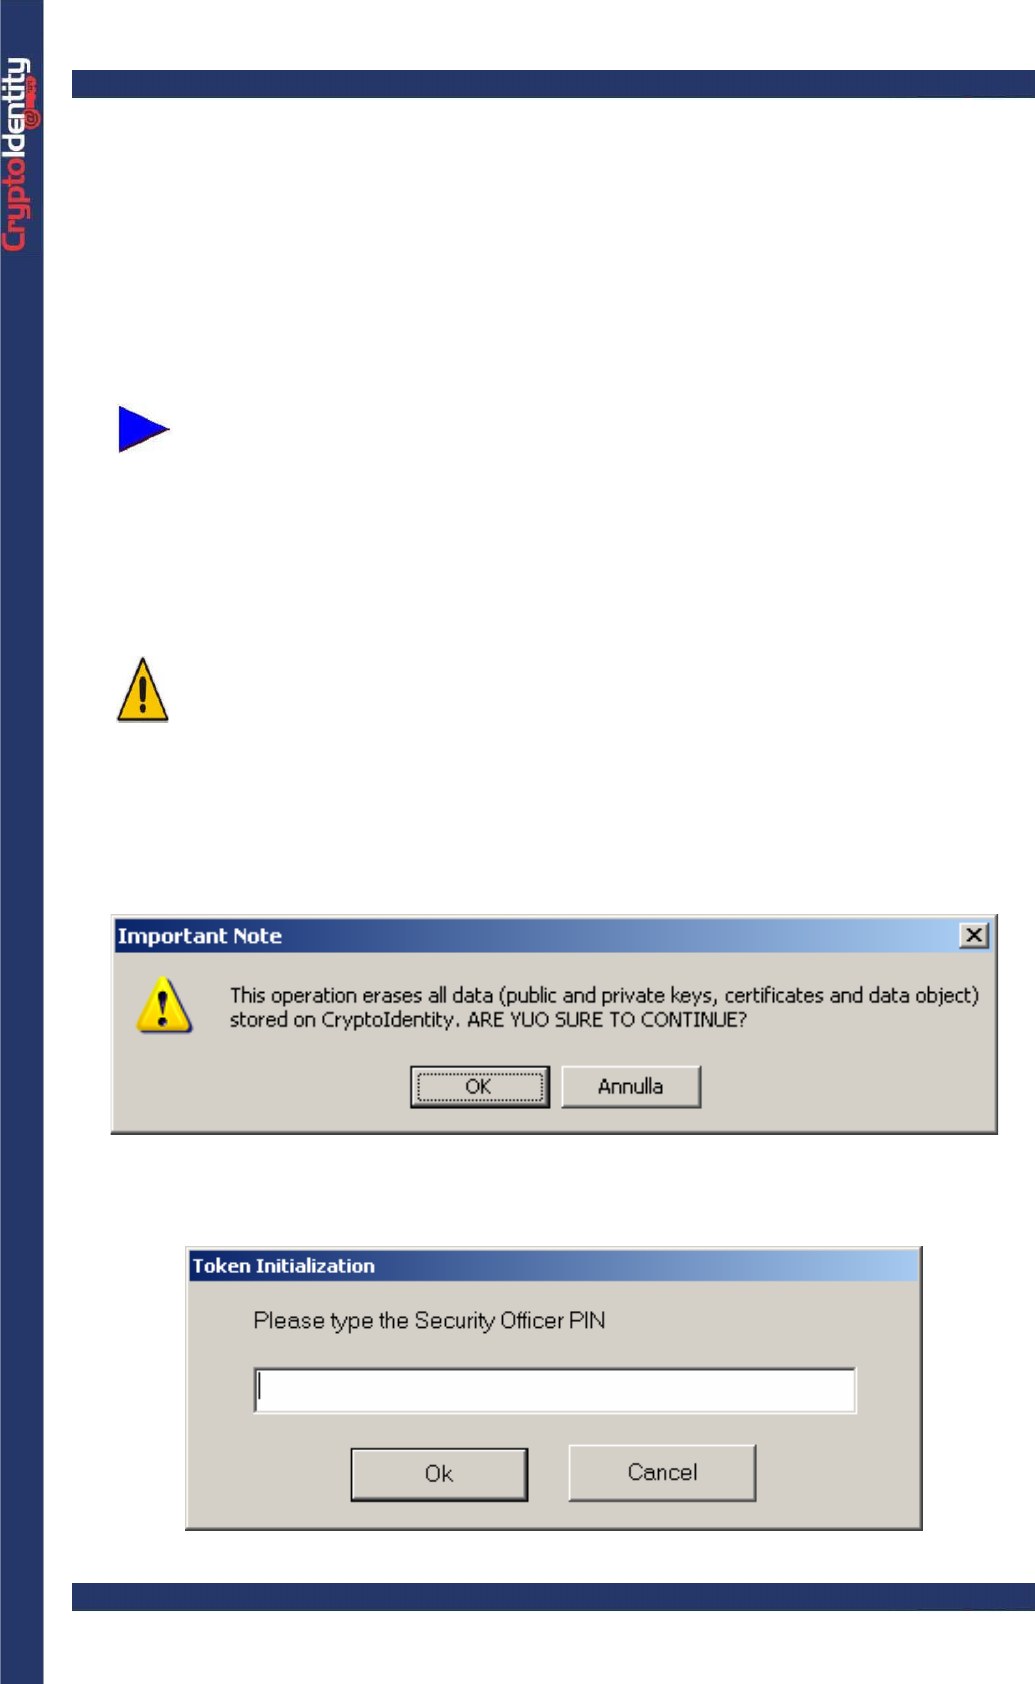
The initialization process erases all data, cryptographic keys and
certificates stored into the CryptoIdentity USB token. If data were
encrypted using a key stored into the CryptoIdentity USB token, it will
NOT be possible to decrypt that data anymore.
To backup credentials and cryptographic keys refer to chapter "4.3
Suggested policy for backup of digital credentials".
• A message box pops up to remind the “destructive” nature of this operation; press OK
only if token re-initialization is needed:
• The Security Officer PIN is required:
CryptoIdentity User Guide – 3. Working with CryptoIdentity Utilies
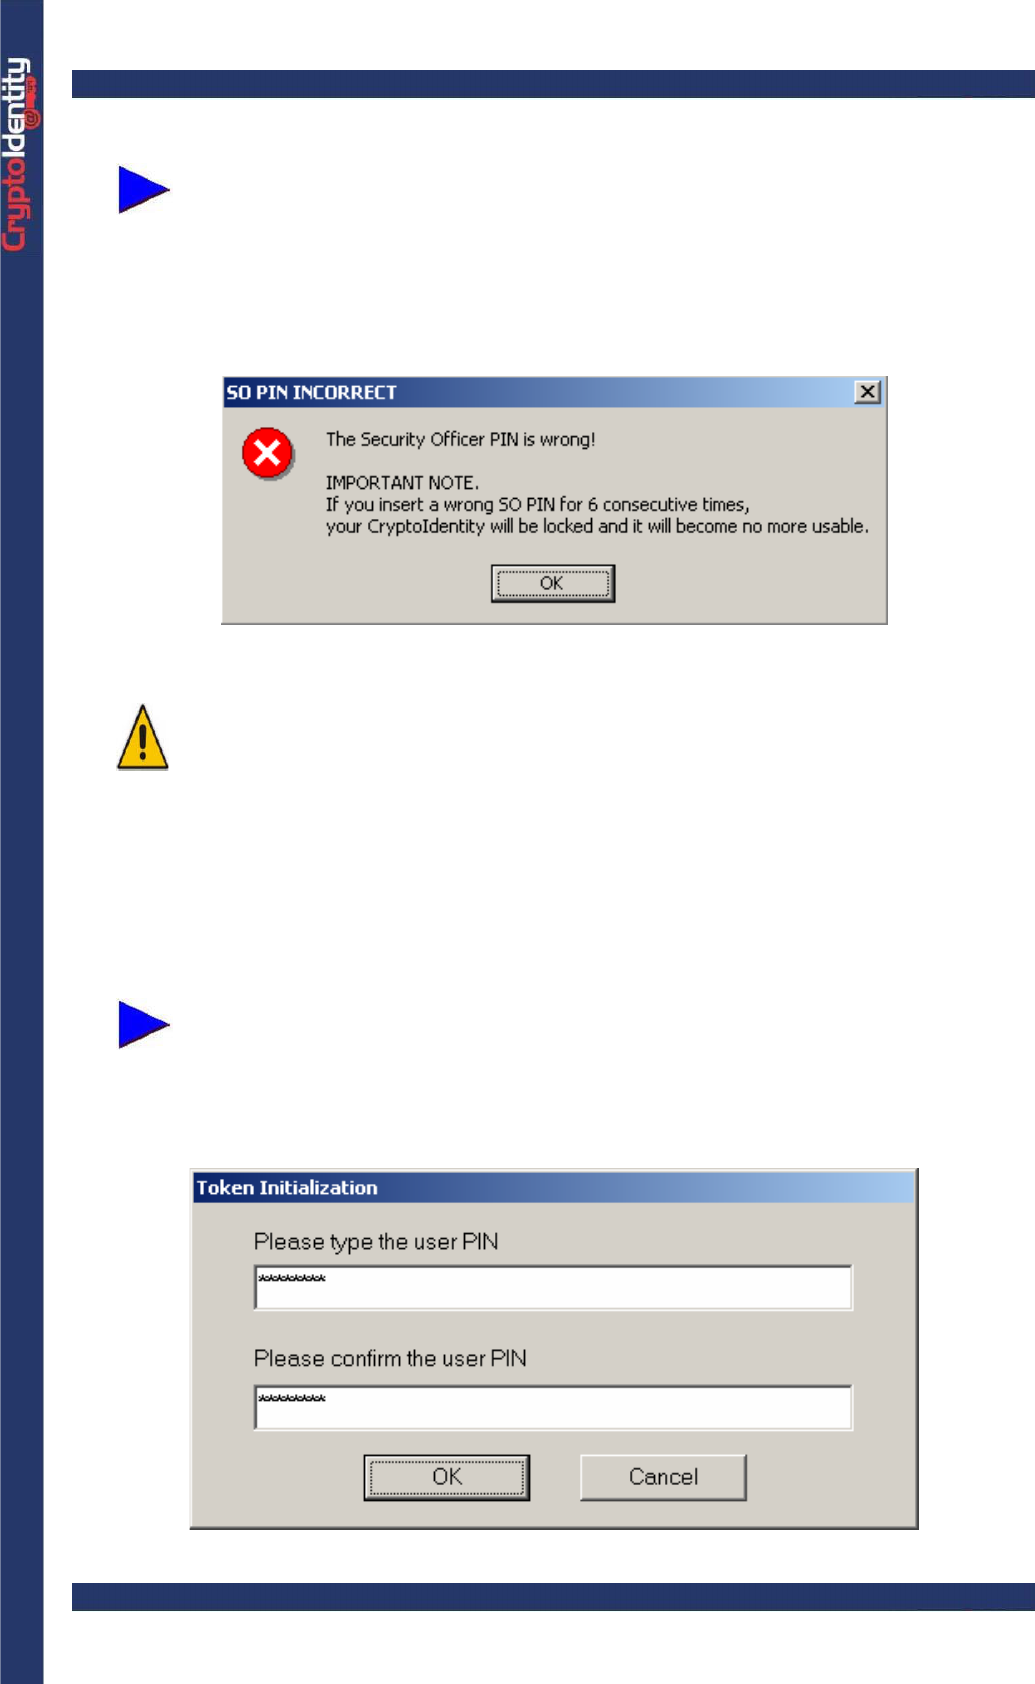
To perform the token initialization the Security Officer PIN is required.
If this is the first time that the CryptoIdentity USB token is about to be
initialized and the Security Officer PIN was not changed previously, insert
as Security Officer PIN the value “11111111” (refer to section "1.1.3
CryptoIdentity default PINs".
• A message box appears if a wrong Security Officer PIN is inserted:
For security reasons, If a wrong Security Officer PIN is inserted
consequently for 6 times, the Security Officer PIN is LOCKED and NO
MORE USABLE.
• The last step is to set the new user PIN.
Before inserting the user PIN be aware that:
it should be at least 6 characters long;
Maximum size is 54 characters
it may be alphanumeric;
It is case-insensitive.
CryptoIdentity User Guide – 3. Working with CryptoIdentity Utilies
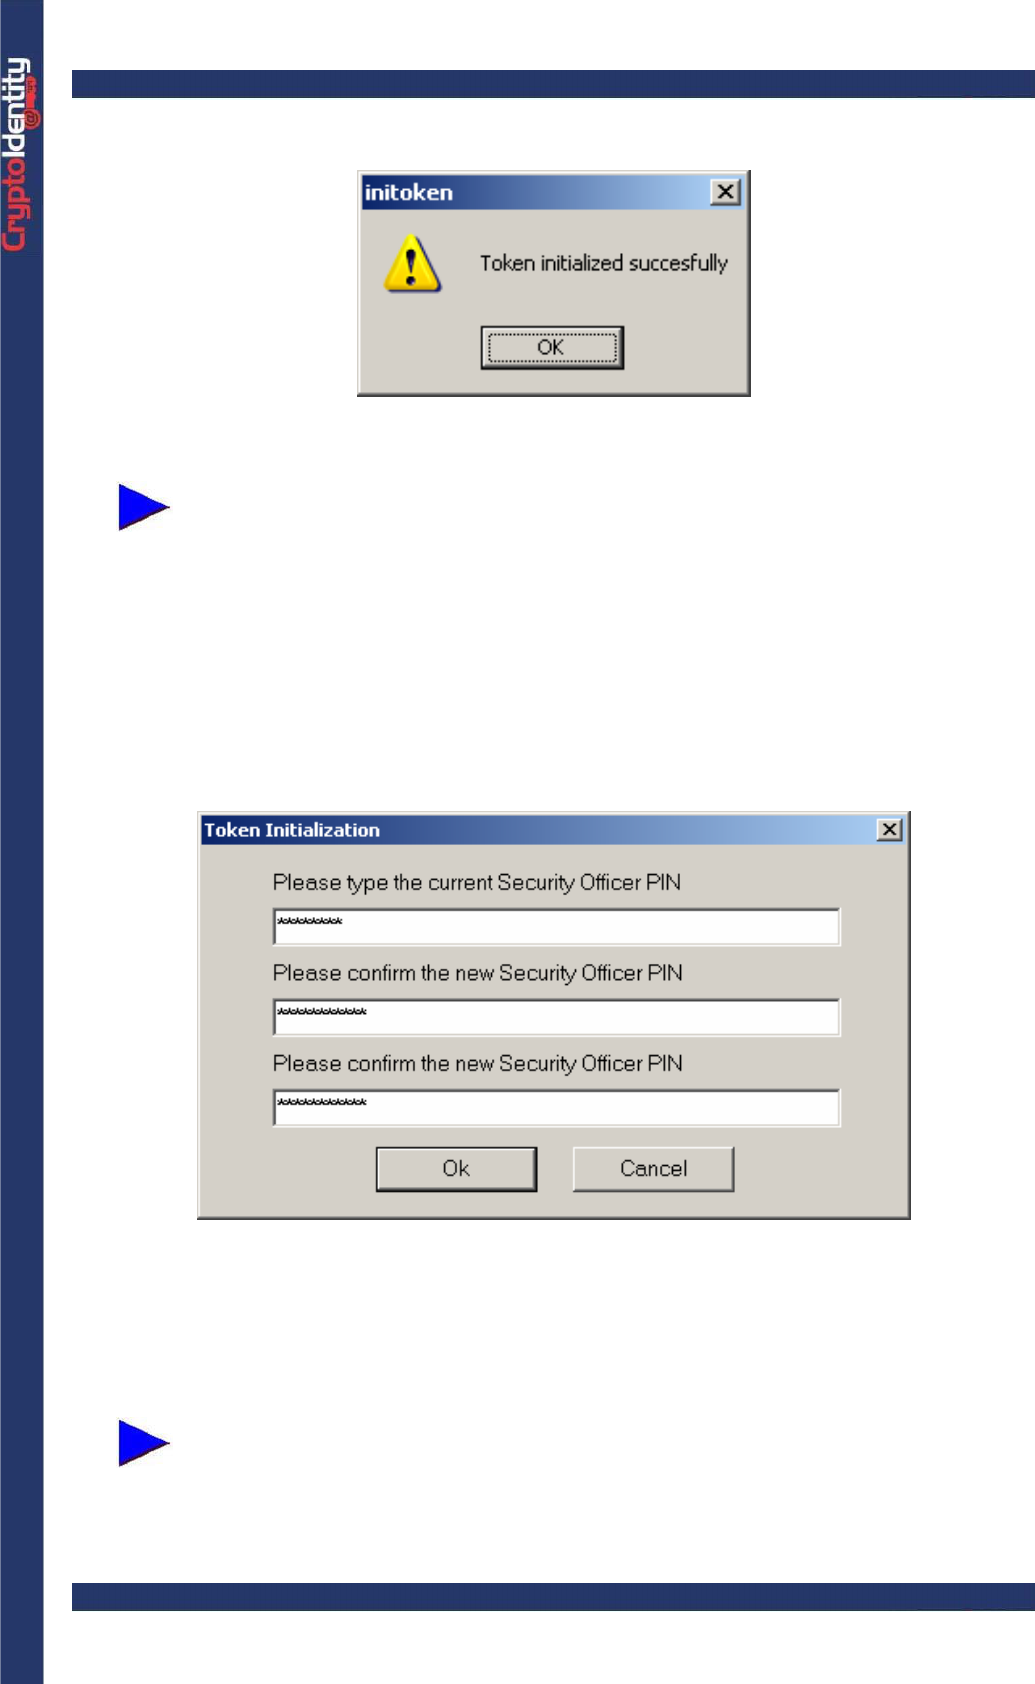
• Wait while the initialization process runs; at the end a window pops up:
The initialization process sets into CryptoIdentity the default configuration.
To customize the CryptoIdentity configuration, refer to section "1.1.4
CryptoIdentity default configuration "
To change the CryptoIdentity Security Officer PIN:
• Choose the USB port where the CryptoIdentity is plugged, and press Change SO PIN
button:
• In the first edit box enter the current Security Officer PIN, in the second and third one
enter the new value to assign (it must be confirmed in the third edit text field) and press
OK. If no error occurs, the Security Officer PIN is changed successfully.
If this is the first time that the Security Officer PIN is about to be changed,
insert as current Security Officer PIN the value “11111111” (refer to
section "1.1.3 CryptoIdentity default PINs").
CryptoIdentity User Guide – 3. Working with CryptoIdentity Utilies
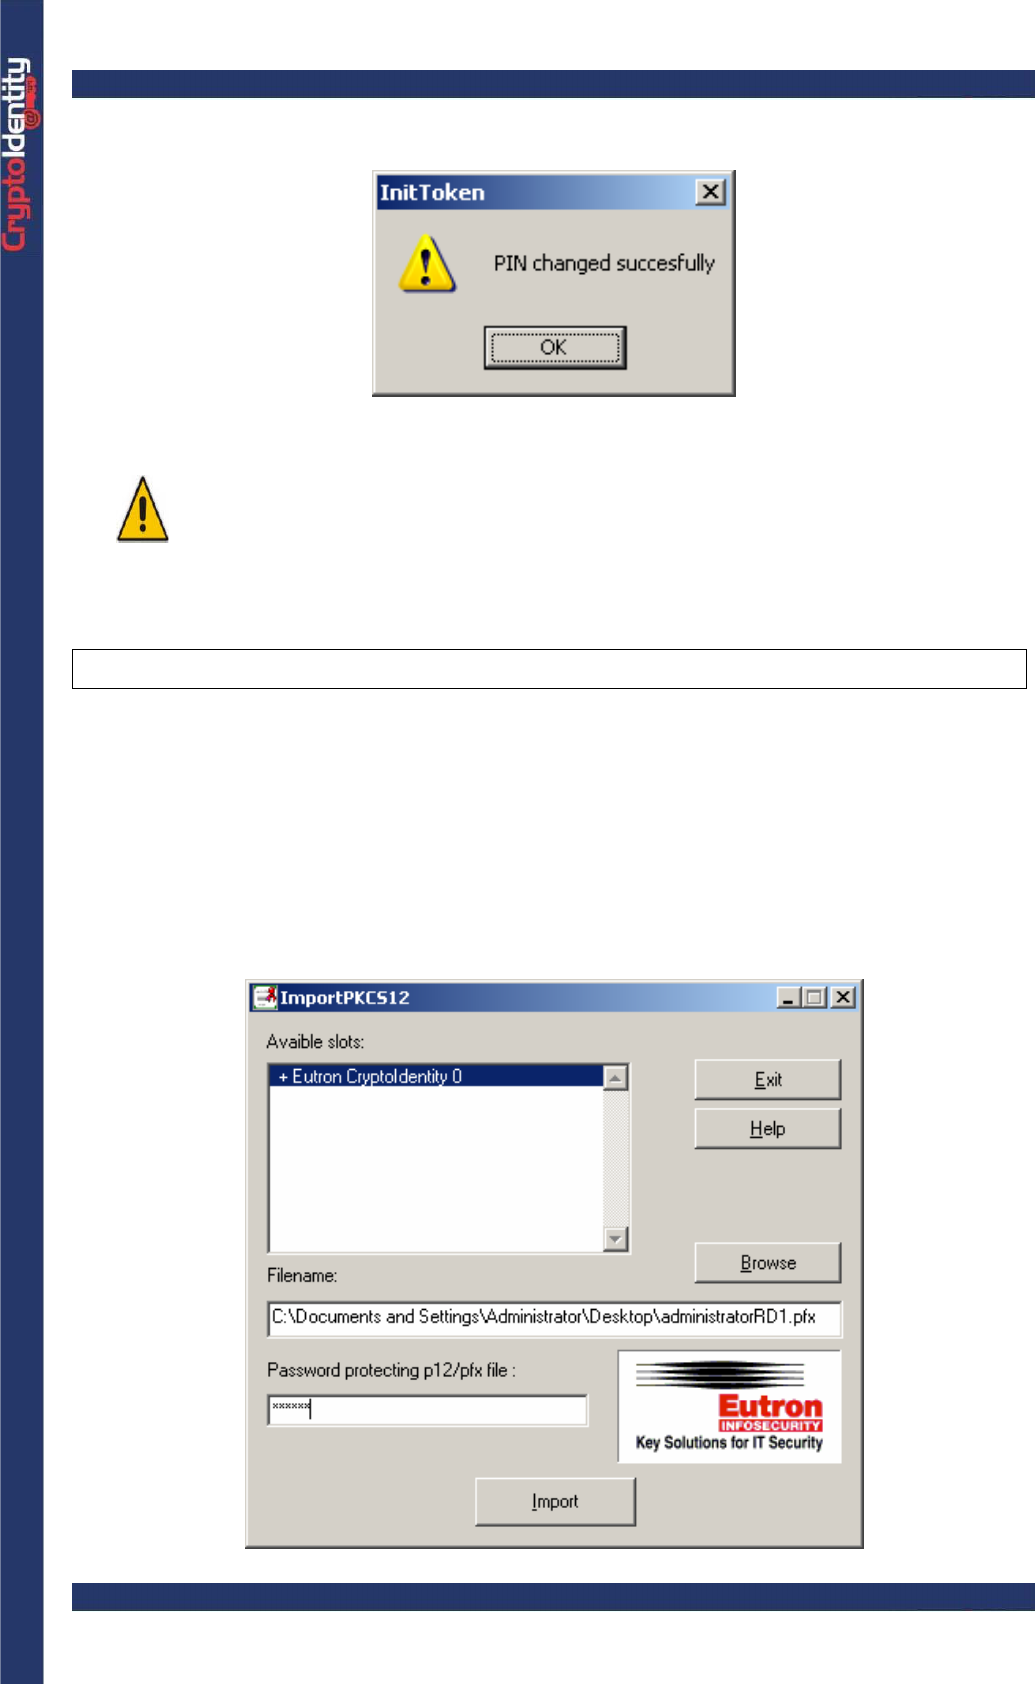
• A message confirms that the Security Officer PIN has been successfully changed:
For security reasons, If a wrong Security Officer PIN is inserted
consequently for 6 times, the Security Officer PIN is LOCKED and NO
MORE USABLE.
3. 4 IMPORTPKCS12
CryptoKit provides the ImportPKCS12 utility.
ImporPKCS12 can import a certificate stored in a PKCS#12 standard file (*.p12 or *.pfx)
into the CryptoIdentity USB token.
• Run ImportPKCS12 utility from Windows menu (Start-> Programs-> Eutron
CryptoKit.)
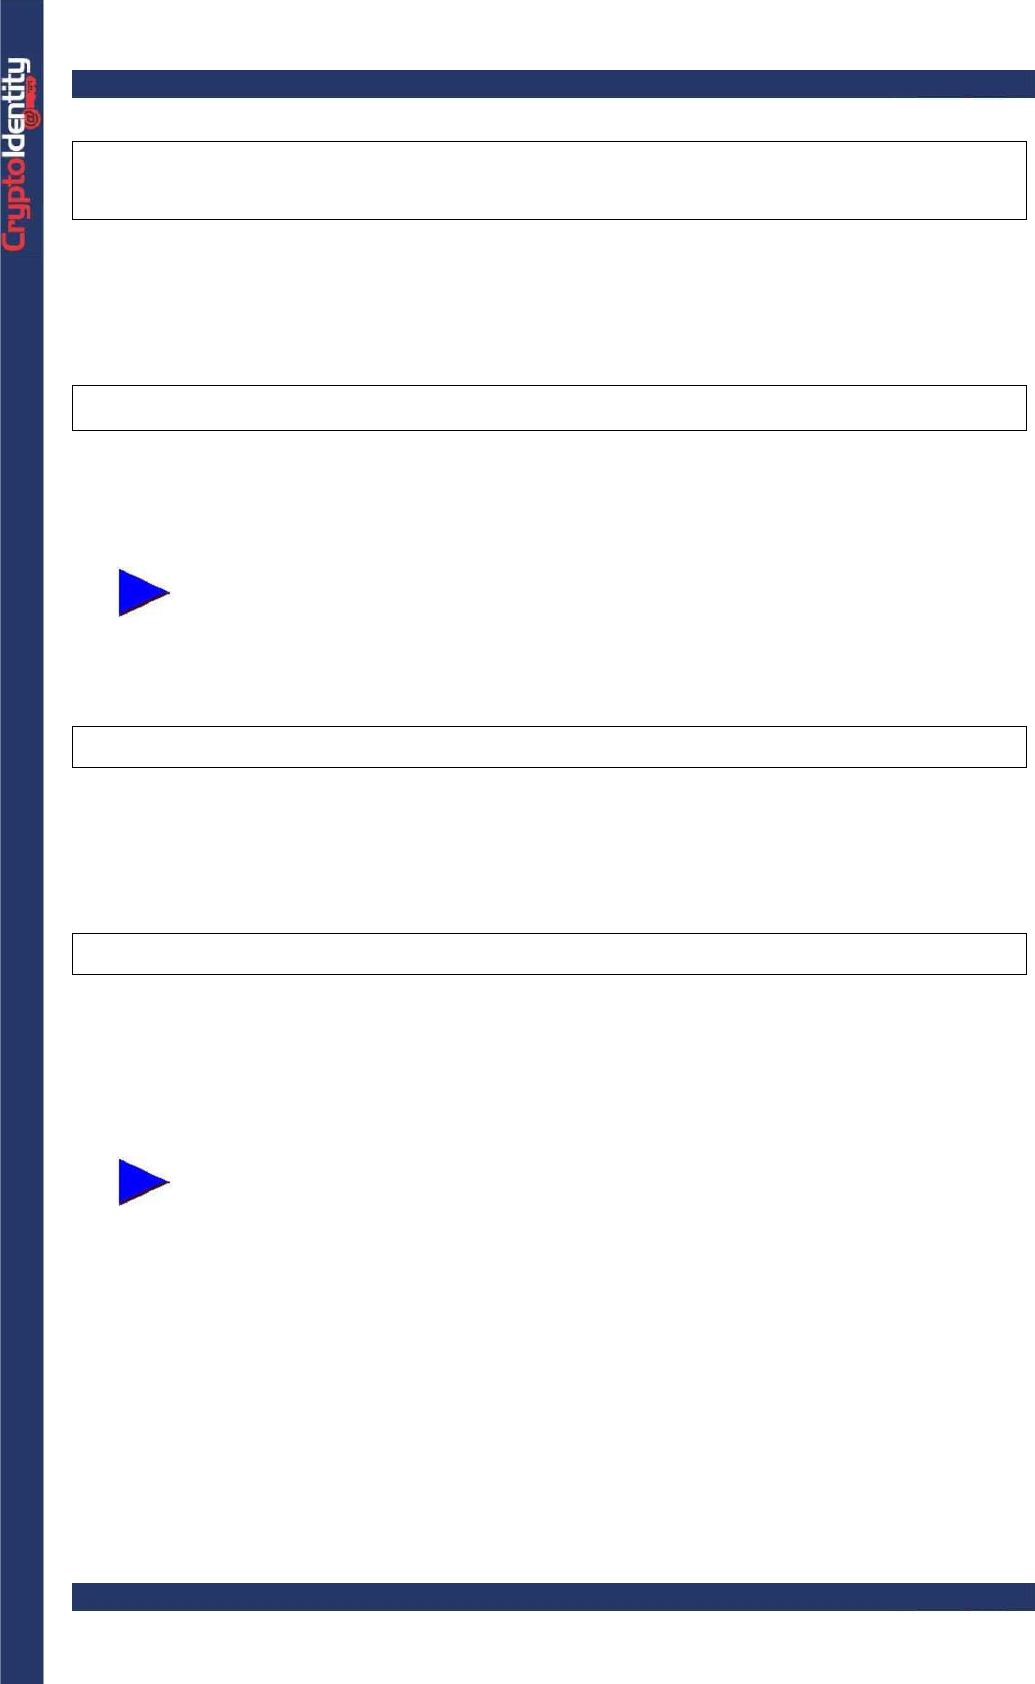
The following is the ImportPKCS12 main window:
CryptoIdentity User Guide – 3. Working with CryptoIdentity Utilies
When a CryptoIdentity is plugged, the symbol “+” appears near the slot
description.
• Select the slot where the token is plugged.
• Click Browse and select a valid .pfx or .p12 file
• Insert the password protecting the .pfx or .p12 file selected
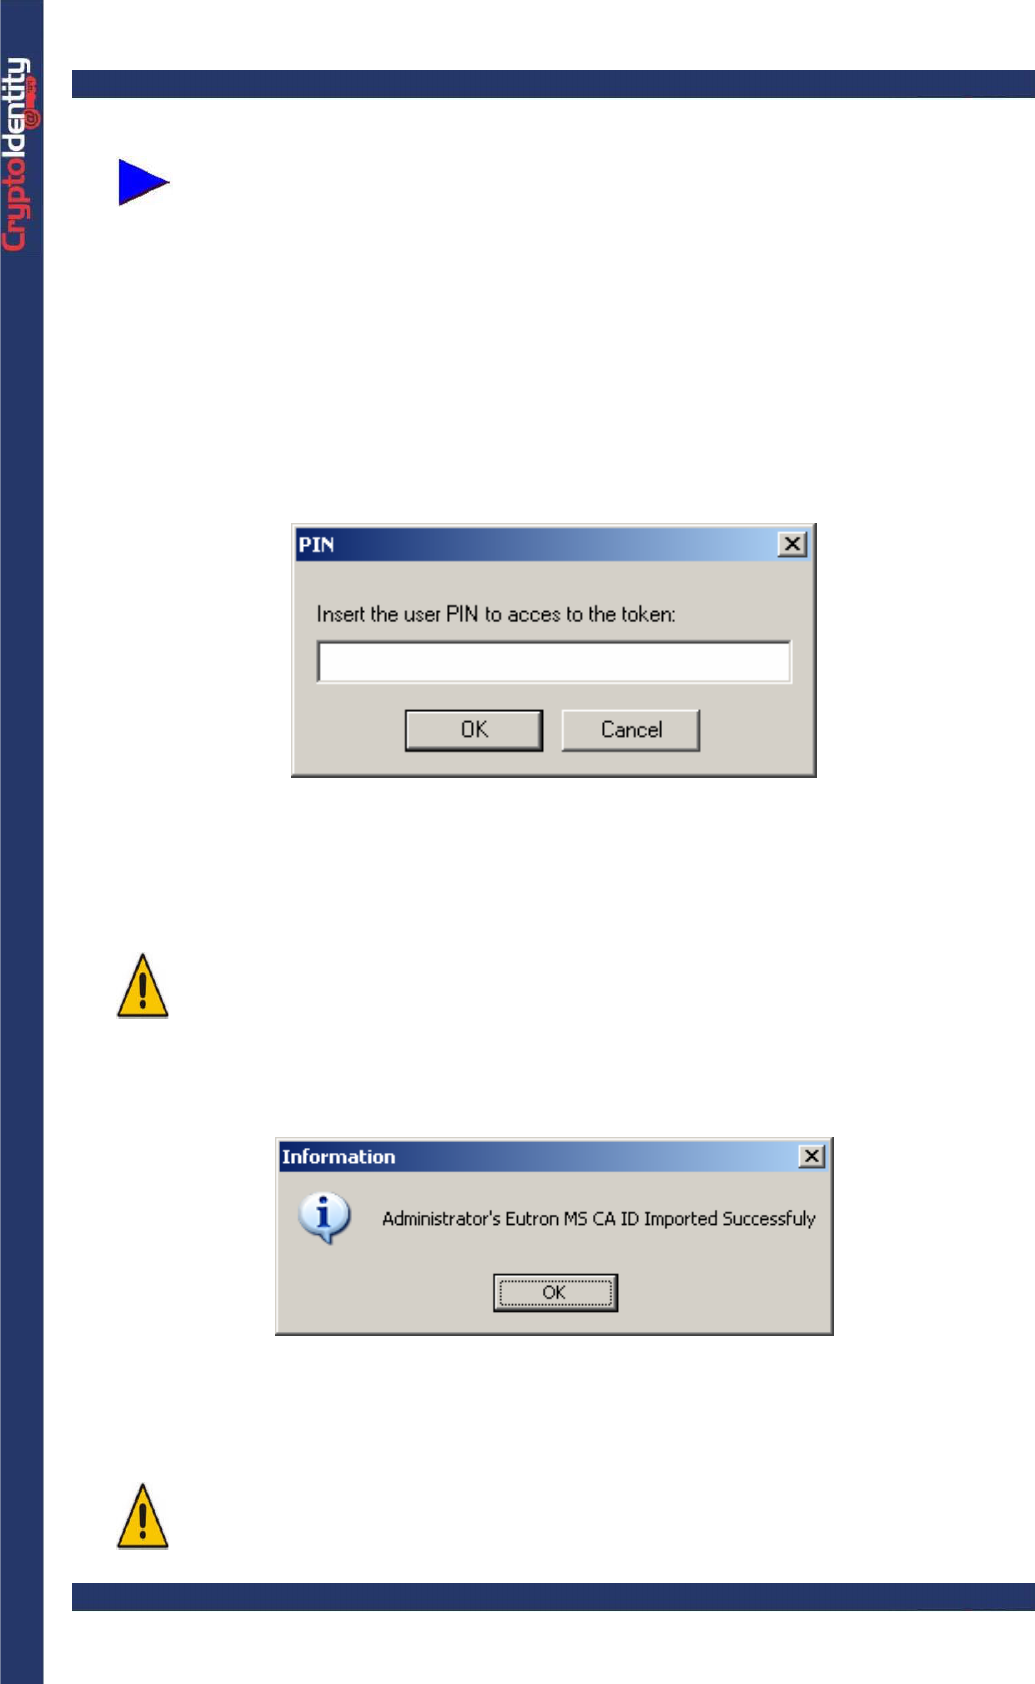
• Press Import and insert the token PIN:
• If the PIN and the other parameters specified are correct, the .p12/.pfx certificate and
associated keys are imported into the CryptoIdentity USB token (otherwise an error is
returned).
For security reasons, if a wrong CryptoIdentity PIN is inserted consequently
for 6 times, the CryptoIdentity PIN is LOCKED.
• When the process is completed, a dialog box appears:
• CryptoIdentity now stores securely the imported certificate and cryptographic keys;
cryptographic operations requiring access to the private key will be executed on board.
When a certificate is imported into CryptoIdentity with ImportPKCS12, the
private key that is created is NOT exportable.
CryptoIdentity User Guide – 3. Working with CryptoIdentity Utilies
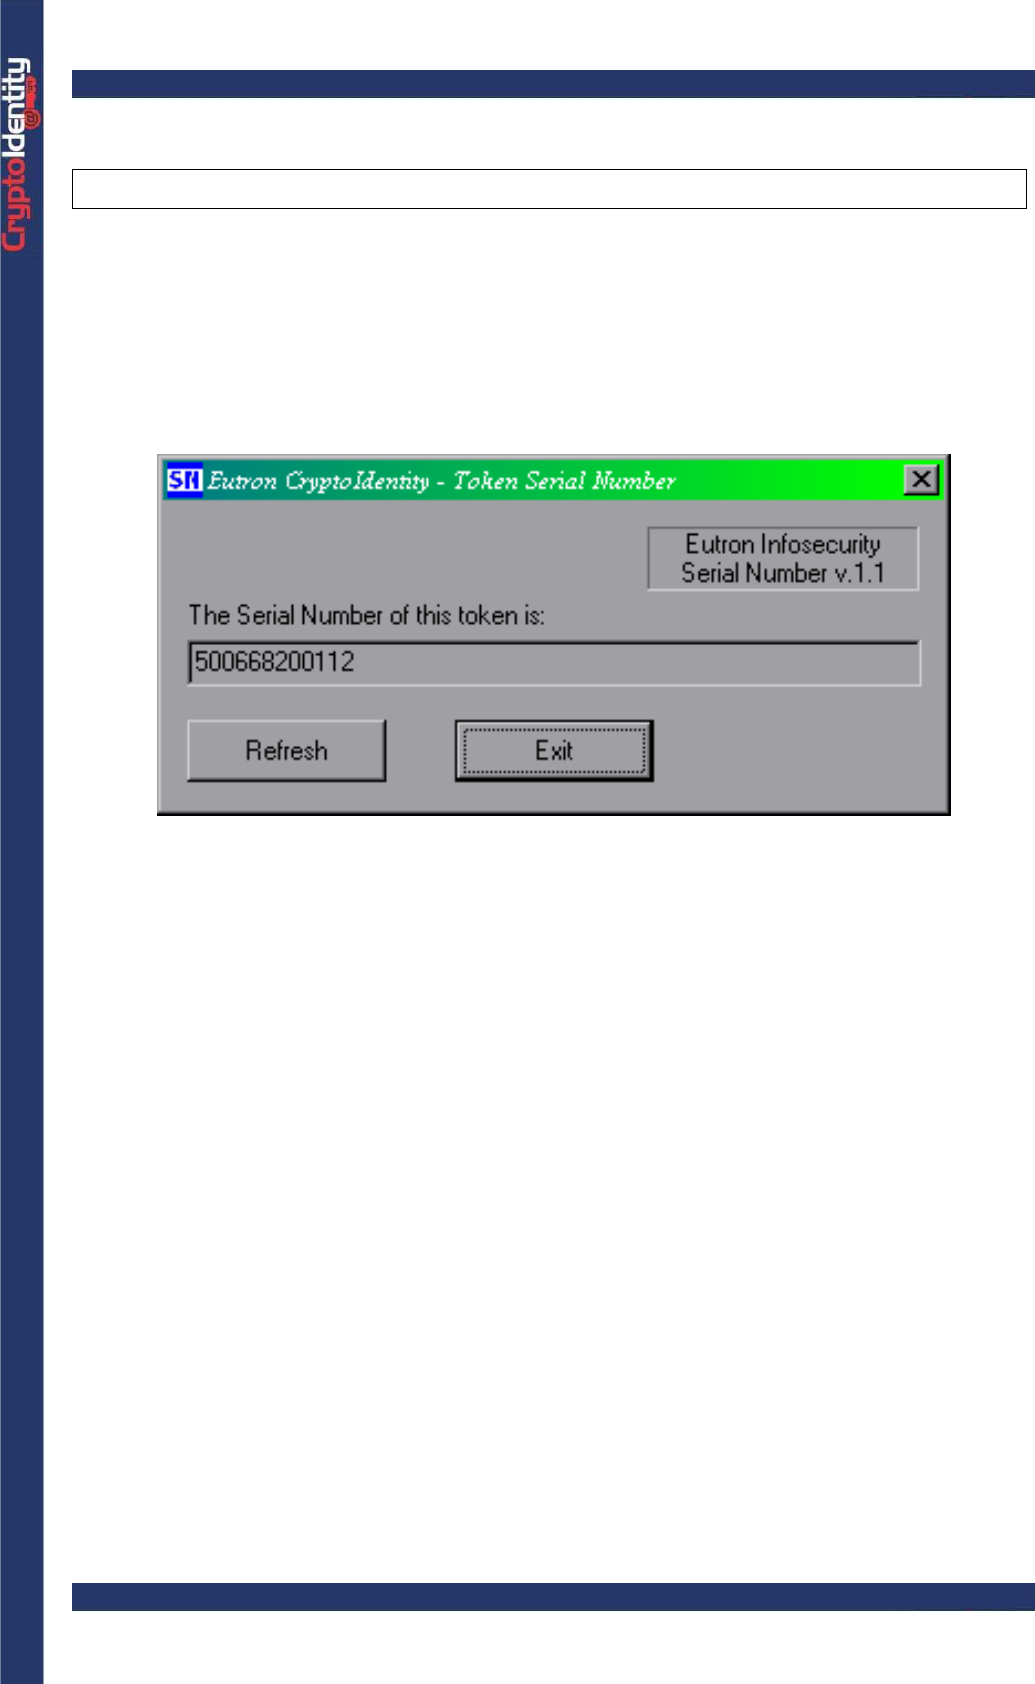
3. 5 TOKEN SERIAL NUMBER
This utility shows the CryptoIdentity serial number.
• To use it, run the program Token Serial Number from Windows Start Menu (Start->
Programs-> Eutron CryptoKit).
The following is the Token Serial Number main window, including the serial number of a
CryptoIdentity:
CryptoIdentity User Guide – 4. Managing Digital Certificates with CryptoIdentity
4. MANAGING DIGITAL CERTIFICATES WITH
CRYPTOIDENTITY
This chapter explains how to manage Digital Certificates with the CryptoIdentity token.
4. 1 STORING CERTIFICATES INTO CRYPTOIDENTITY
There are different ways to store a digital certificate into a CryptoIdentity USB token; the
following is a non-exhaustive list:
• through Certification Authority such as Microsoft CA (refer to the Microsoft smartcard
logon and CryptoIdentity guide - file "CryptoIdentityLogon.pdf "), Verisign (refer to section
"4.1.2.1 Verisign"), Thawte (refer to section "4.1.3.1 Thawte"), etc.
• through ImportPKCS12 utility (refer to section "2.2.5 ImportPKCS12" and "4.1.3
Certificates imported from file")
4. 1. 1 CERTIFICATES ISSUED BY CAs
In order to send secure e-mail (signed and encrypted), to authenticate to a VPN or a LAN,
or for any other purpose where digital credentials are essential, a digital certificate (or
certified digital ID) is needed.
Verisign and Thawte are two companies that provide the service of issuing digital
certificates through Internet. The following two sections detail the procedures to follow in
order to obtain a free certificate. It is also possible to buy a 1-year certificate.
The Verisign and Thawte procedures for issuing certificates might change
in the future. The steps described in the next sections, however, should
help during these procedures.
4. 1. 1. 1 VERISIGN
To obtain a Digital Certificate from Verisign CA and store it into a CryptoIdentity token,
follow carefully these instructions.
• Plug the CryptoIdentity into an USB port, go to the Verisign web site
(www.verisign.com) and select the procedure to generate a digital ID for personal e-mail.
CryptoIdentity User Guide – 4. Managing Digital Certificates with CryptoIdentity
To reach the Verisign Enrollment Page directly :
(if Internet Explorer is used) https://digitalid.verisign.com/client/class1MS.htm
(if Netscape is used) https://digitalid.verisign.com/client/class1Netscape.htm
If you reached the Enrollment Page from a previous link, jump to
"Complete enrollment form" sub-step.
• Click on the Products and Services top menu, then select Digital ID for secure
email from the Products and services by name area under Security products &
services menu (at the bottom of the page).
• In the next page select "Free digital ID Trial" to get a trial certificate. It is also possible
to buy a certificate. This offers some additional feature.
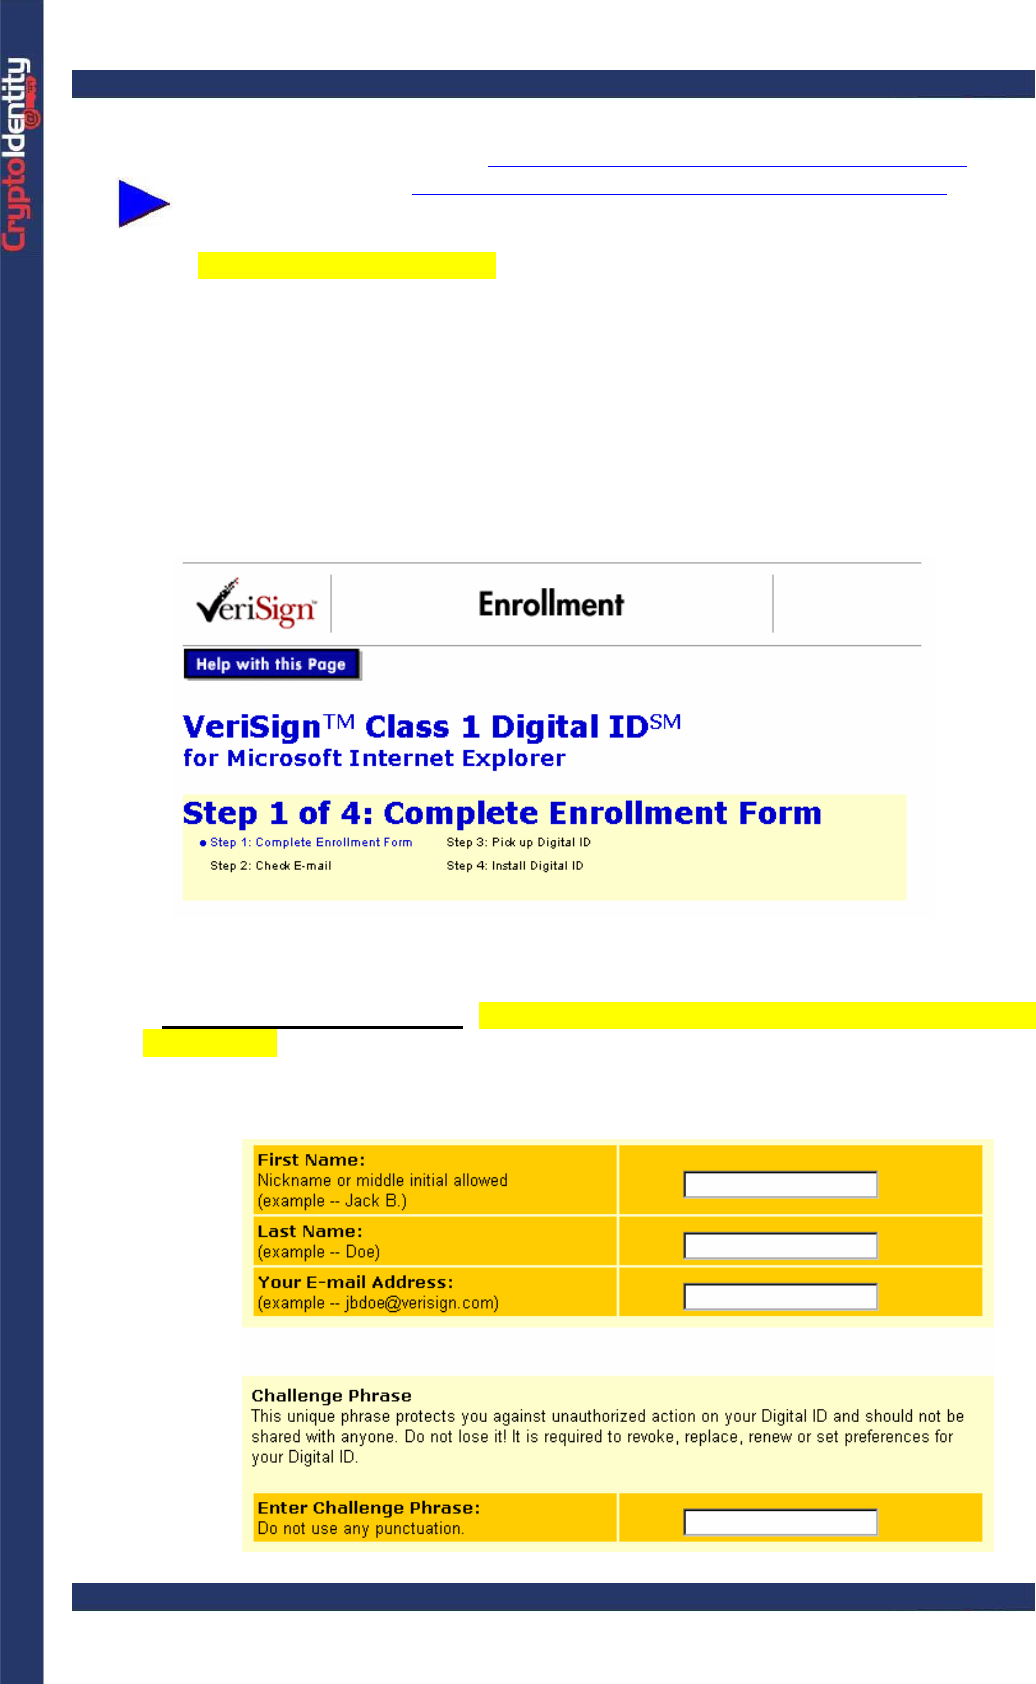
• Scroll down the page and click on Enroll Now. This should be the Enrollment Page:
• There are four sub-steps to go through:
Complete enrollment form (start from here if the page has been reached from a
previous link)
-Scroll down the page and fill-in the form with Name, Last Name and the email
address.
CryptoIdentity User Guide – 4. Managing Digital Certificates with CryptoIdentity
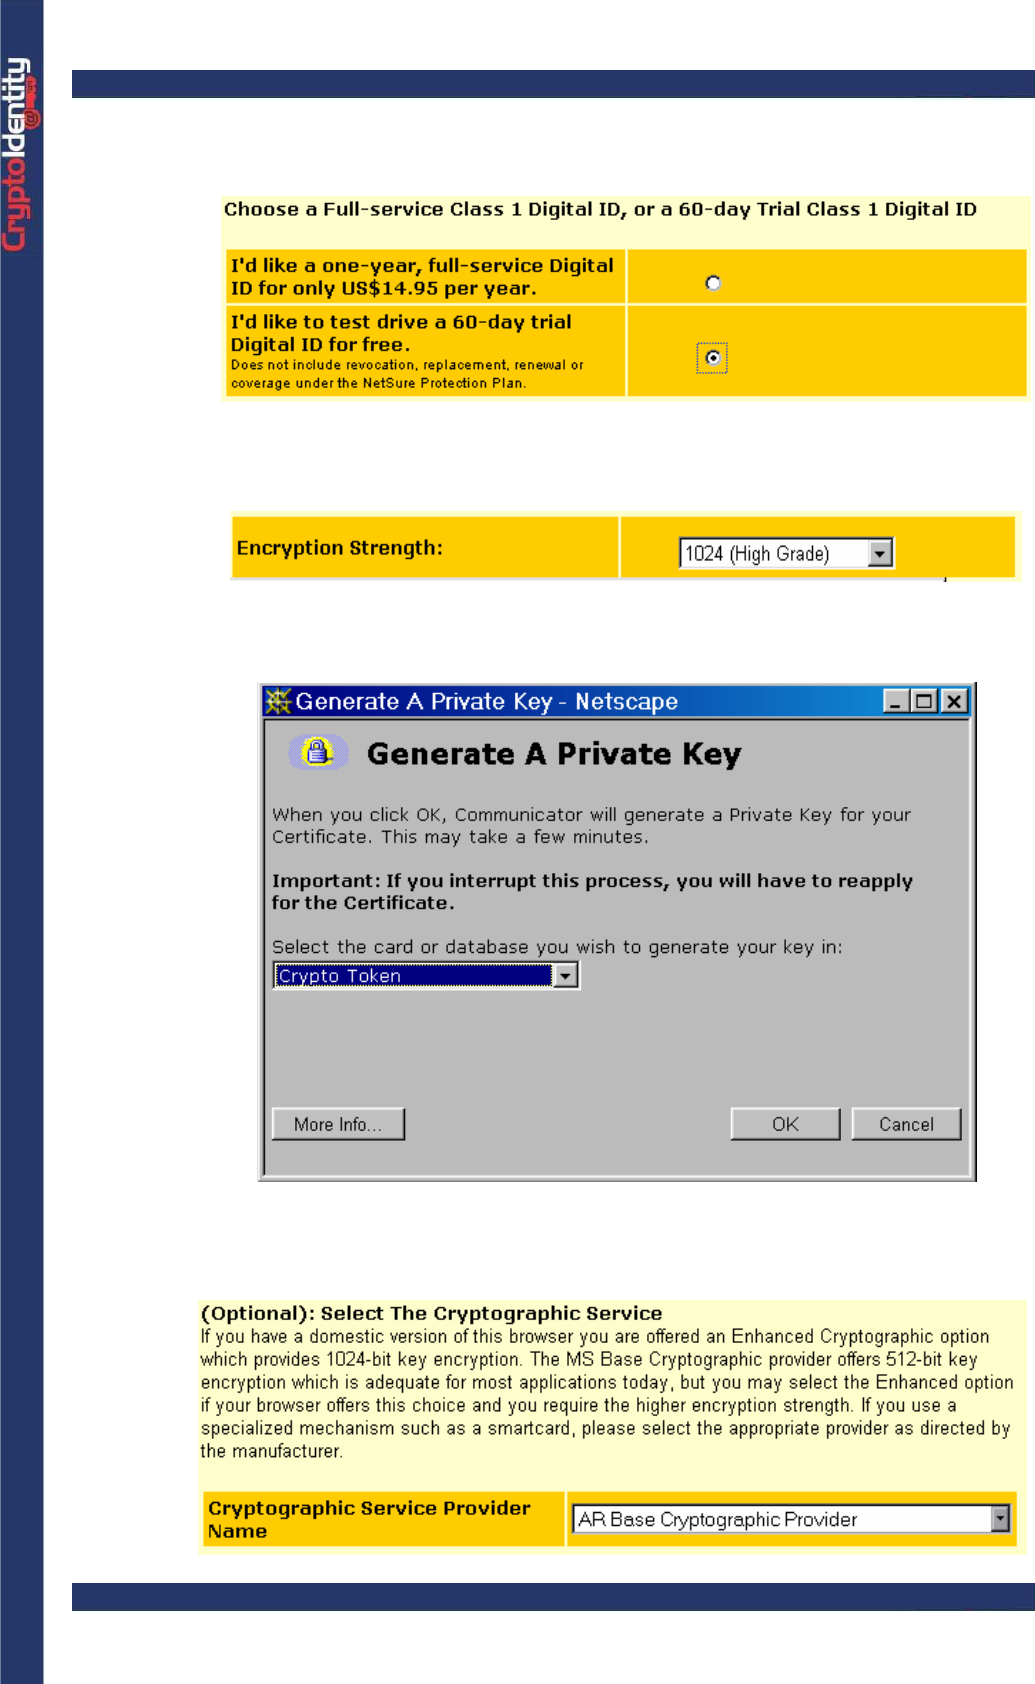
-Make sure to select 60 day Trial Class Digital ID:
-Then follow the instructions regarding the browser used:
-For Netscape: confirm the security strength is 1024 and submit the form.
-At this stage Netscape asks where to generate the private key. Select the
CryptoIdentity token, click OK, and then insert the CryptoIdentity PIN.
-For MS Internet Explorer: choose AR Base Cryptographic Provider as
Cryptographic Service Provider name:
CryptoIdentity User Guide – 4. Managing Digital Certificates with CryptoIdentity
Check e-mail
-An email is sent few minutes after the enrollment form has been filled out and
submitted/ accepted; this e-mail contains the instruction for the next steps and
a unique Personal Identifier Number, copy that number on the clipboard.
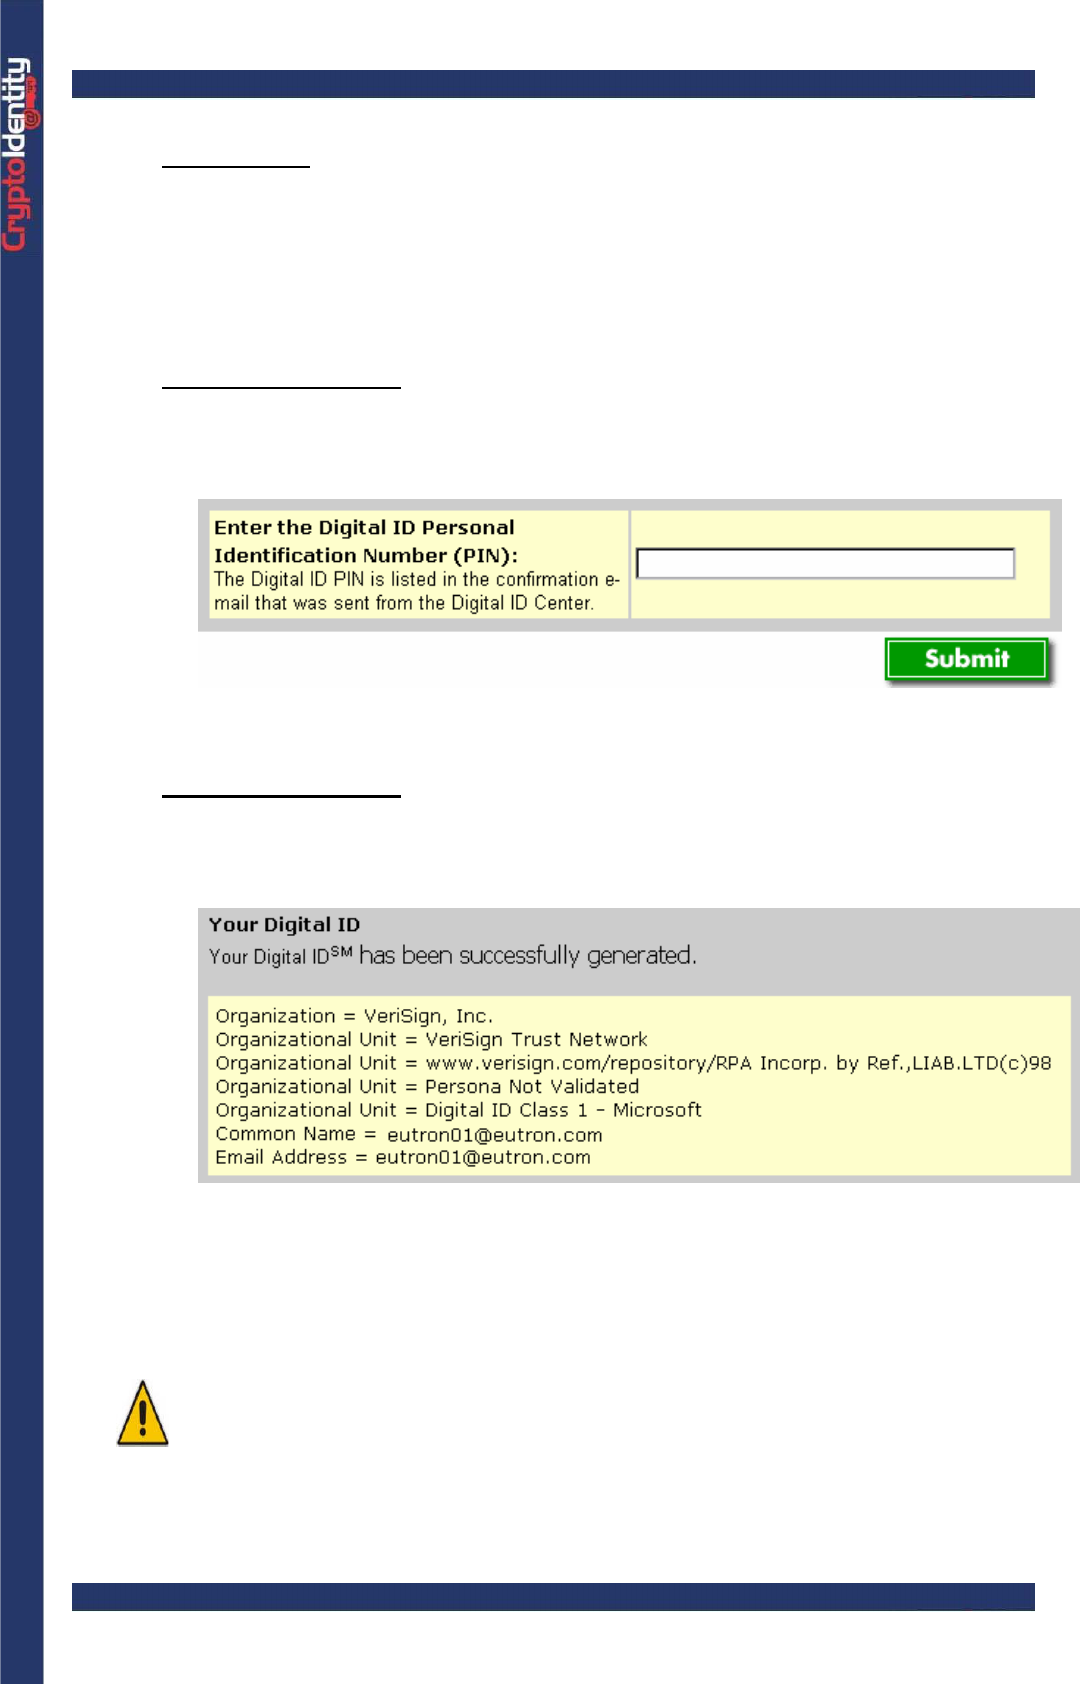
Pick up the Digital ID
-Go to the URL address included in the email, paste in the proper field the
Personal Identifier Number described in step 2, and click submit.
Install your Digital ID
-Click the Install button, and the digital ID is installed (it means that your
certificate is loaded into the CryptoIdentity token).
• Now manage the digital certificate for the desired purposes. See section "4.2 Viewing
Certificates" to view the certificate details.
it is mandatory to complete the whole process using the same machine
and the same browser

CryptoIdentity User Guide – 4. Managing Digital Certificates with CryptoIdentity
4. 1. 1. 2 THAWTE
To obtain a Digital Certificate from the Thawte CA and store it into CryptoIdentity, follow
these instructions carefully.
• Plug a CryptoIdentity token into an USB port and then go to Thawte web site
(www.thawte.com).
• Select "Products" and click "Personal Email Certificates" from the loaded page.
• Click "Join".
• There are four sub-steps to go through:
Enrollment
-Terms and condition of Personal Certification: read them and select Next
at the bottom of the page to continue.
-Personal Cert System Enrollment: fill out the form and select Next.
-Core Identification information: fill out the form (make sure to not miss-type
the e-mail address) and select Next.
-Personal Preferences: set the personal preferences and select Next.
-Personal Certification Password: read carefully this page and select the
password. Click Next.
-Set Password Questions And Contact Telephone Number: fill out the
form and select Next.
-Please Confirm Enrollment Information: select Next if the profile is
correct.
Respond to the e-mail Ping
-Check the e-mail: an email is sent few minutes after the Enrollment. This e-
mail explains the instructions for the next steps and two numbers (Ping and
Probe).
-Follow the link included in the e-mail.
-Enter the Probe and the Ping and select Next.
-Thawte Username Successfully Created: now click Next or go to
www.thawte.com/cgi/personal/contents.exe
Pick up your Digital ID
-Enter username and password.
-Select the software and click to request the X.509 Format Certificates.
-Select Next and specify the browser used.
-Click Next.
-Select the e-mail and click on Next.
-Select Next.
-Select Accept Default Extension.
CryptoIdentity User Guide – 4. Managing Digital Certificates with CryptoIdentity
-Choose "AR Base Cryptographic Provider" as CSP. This is very
important, otherwise the certificate is not stored into the CryptoIdentity token.
Make sure the CryptoIdentity USB token is plugged in. Select Next.
-Type the CryptoIdentity PIN in the window that pops up. Wait while the
CryptoIdentity USB token generates the unique private key.
-At the end of the process, select Certificate Manager.
Install the Digital ID
-Click the certificate from the Valid Certificate List.
-Check the certificate summary and select Fetch And Install Certificate.
-Make sure the CryptoIdentity USB token is plugged in, click on Install
your cert. The certificate will be stored securely into the CryptoIdentity token.
• Now manage the certificate for the desired purposes. See section "4.2 Viewing
Certificates" to see the certificate details through the operating system certificates list.
Additional notes:
It is mandatory to complete the whole process using the same machine
and the same browser. The previous steps refer to enrollment with
Microsoft Internet Explorer.
4. 1. 2 CERTIFICATES IMPORTED FROM FILE
It is possible to import into the CryptoIdentity token digital certificates saved in a standard
pkcs#12 format (files with .p12 or .pfx extension). The file to be imported must contain
the private key associated to the digital certificate included.
The PKCS#12 is the standard which describes the transfer syntax for personal identity
information, including private keys and certificates.
To import the digital certificates into the CryptoIdentity token you can use, for example,
Netscape or PKCS12Import utility.
Next sections explain how to do so with Netscape and PKCS12Import utility.
It is possible to generate a digital certificate and related keys outside the
token, for example in a file, save it in .p12 or .pfx format (including the
private key) and then import it into the CryptoIdentity token
This procedure is suggested to keep a backup of the digital credentials. For
further details refer to sections "4.3 Suggested policy for backup of digital
credentials" and "4.3.1 How to backup digital credentials".
CryptoIdentity User Guide – 4. Managing Digital Certificates with CryptoIdentity
4. 1. 2. 1 IMPORTING THROUGH NETSCAPE
Using Netscape 4.x is possible to import certificates saved in PKCS#12 format into the
CryptoIdentity token.
Proceed with the following steps:
• Plug CryptoIdentity into an USB port.
• Launch Netscape Navigator.
• Click on the Security button on the Navigation Toolbar (or from the menu bar select
Communicator-> Tools-> Security Info).
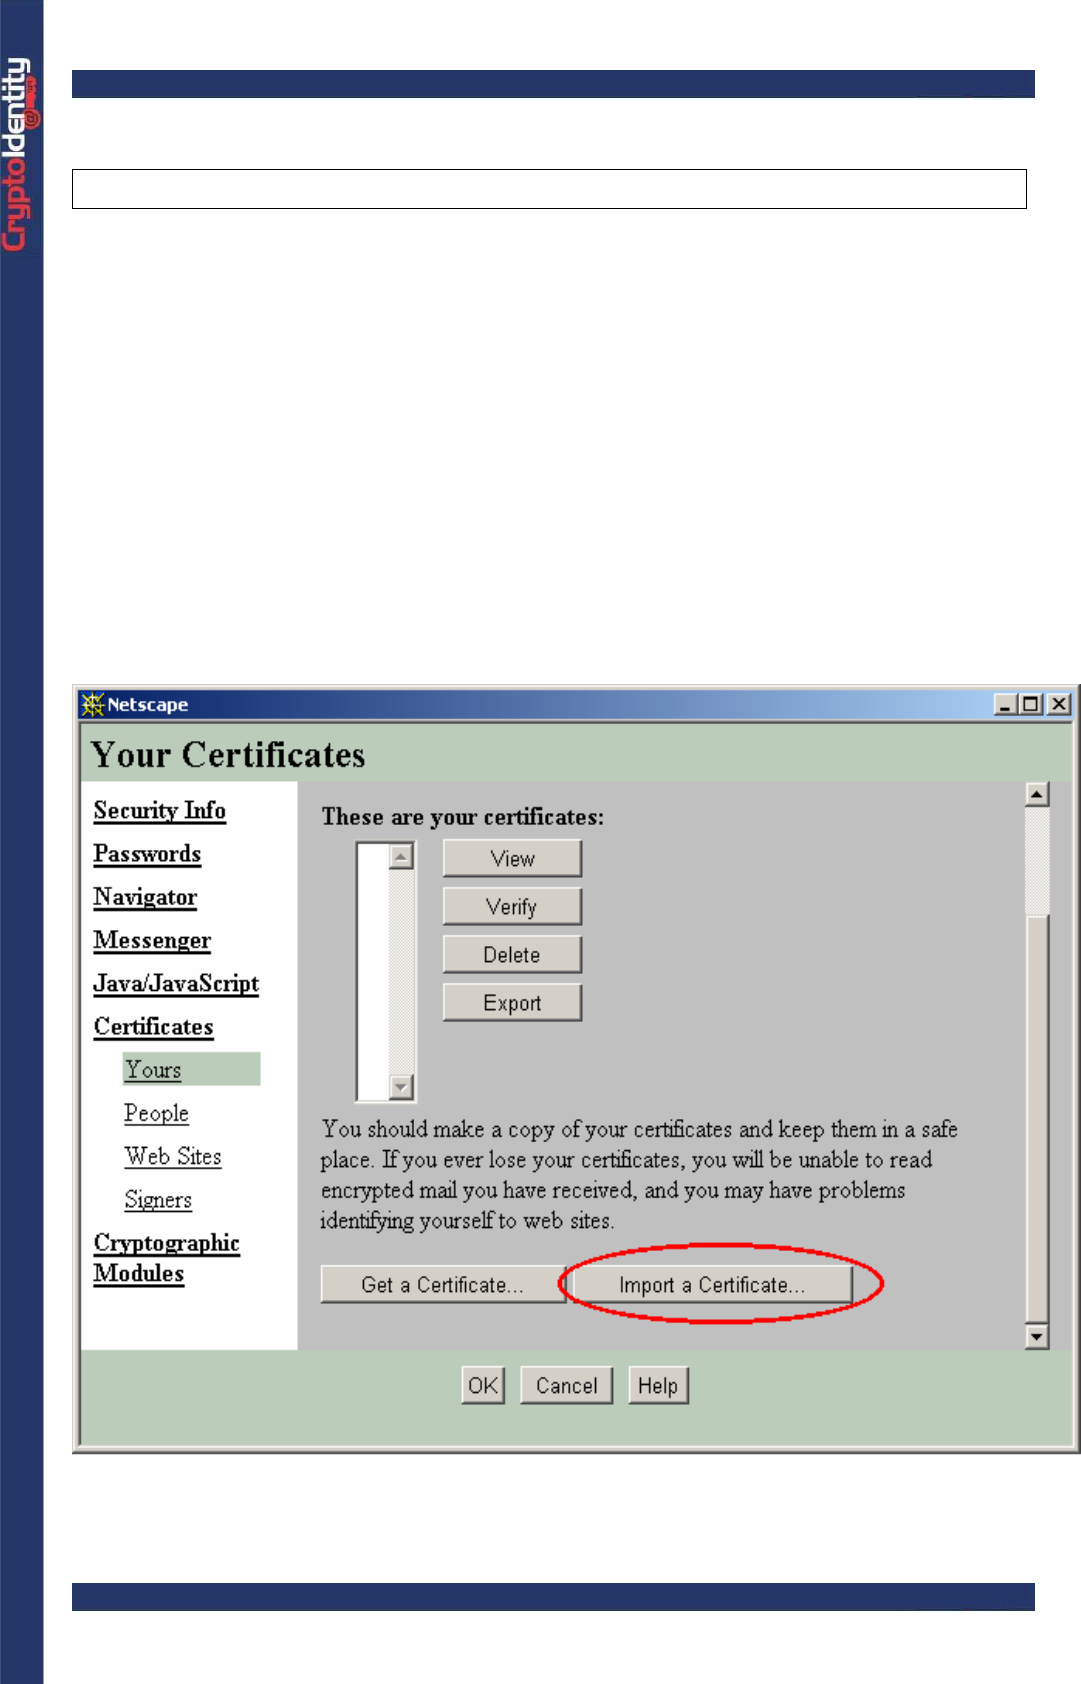
• Go to Yours under Certificates and press Import a Certificate button:
CryptoIdentity User Guide – 4. Managing Digital Certificates with CryptoIdentity
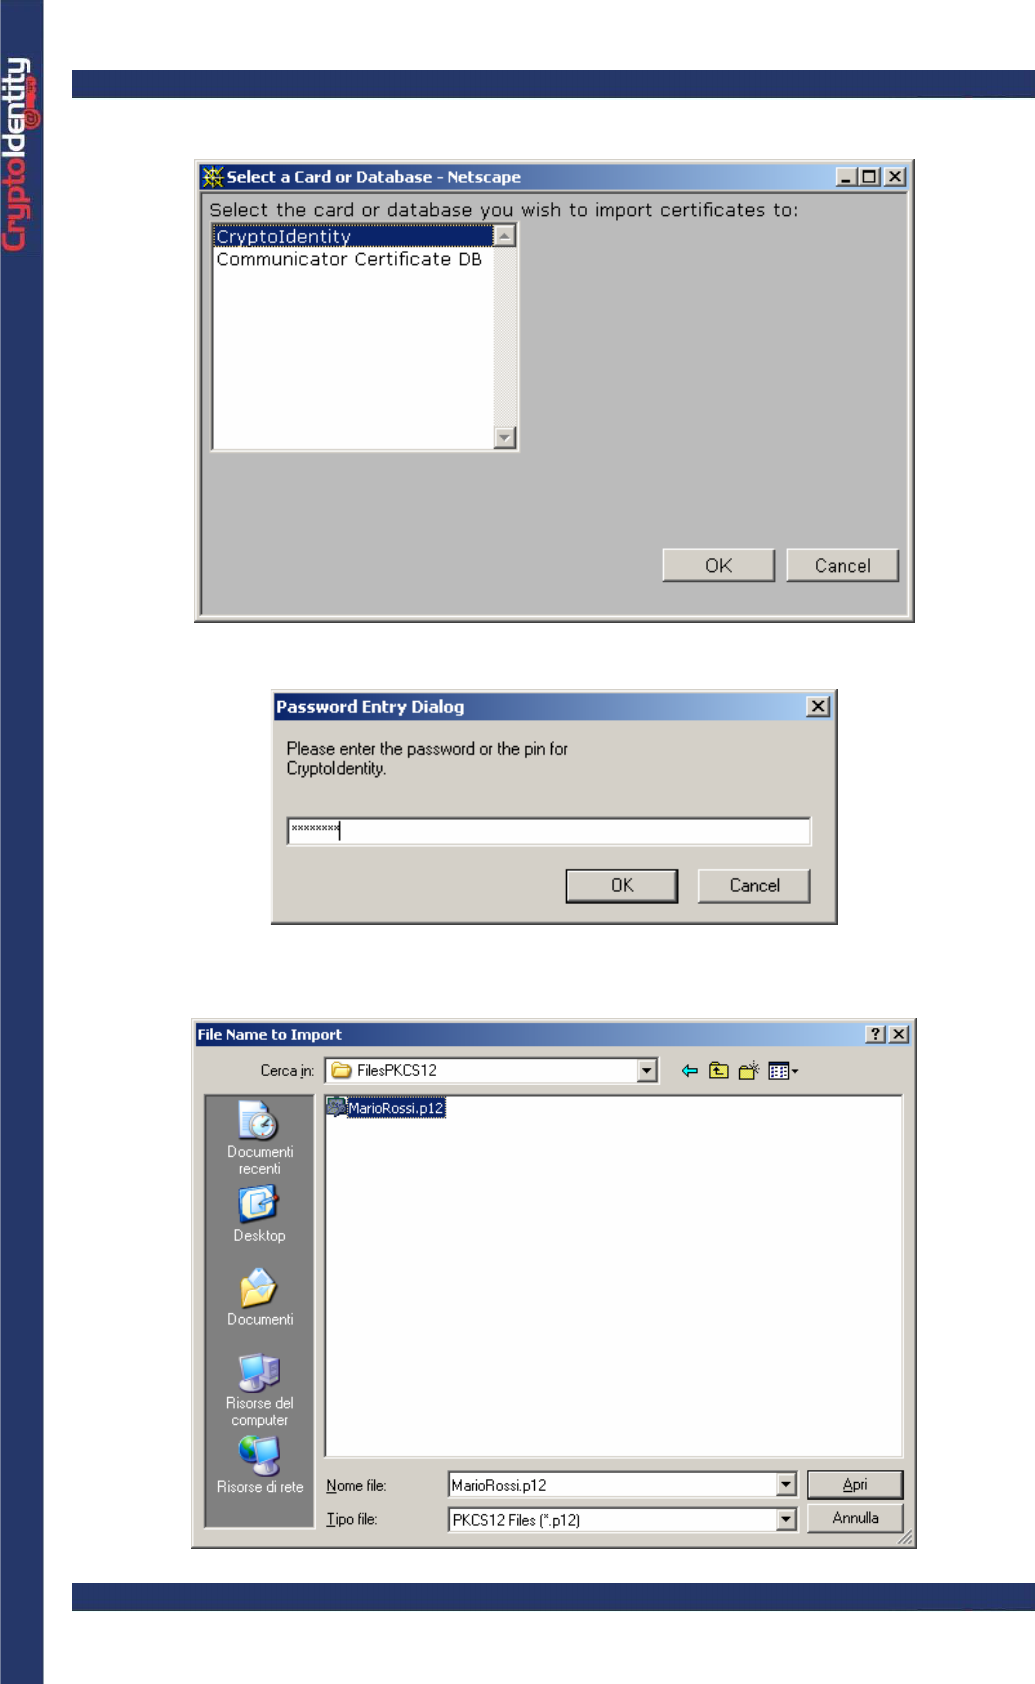
Select the CryptoIdentity token. Press OK.
• Insert the CryptoIdentity PIN and press OK.
• Select the file where the .p12 or .p12 file certificate is stored. To view the .pfx file list
change Files of type: to All Files (*.*).
CryptoIdentity User Guide – 4. Managing Digital Certificates with CryptoIdentity
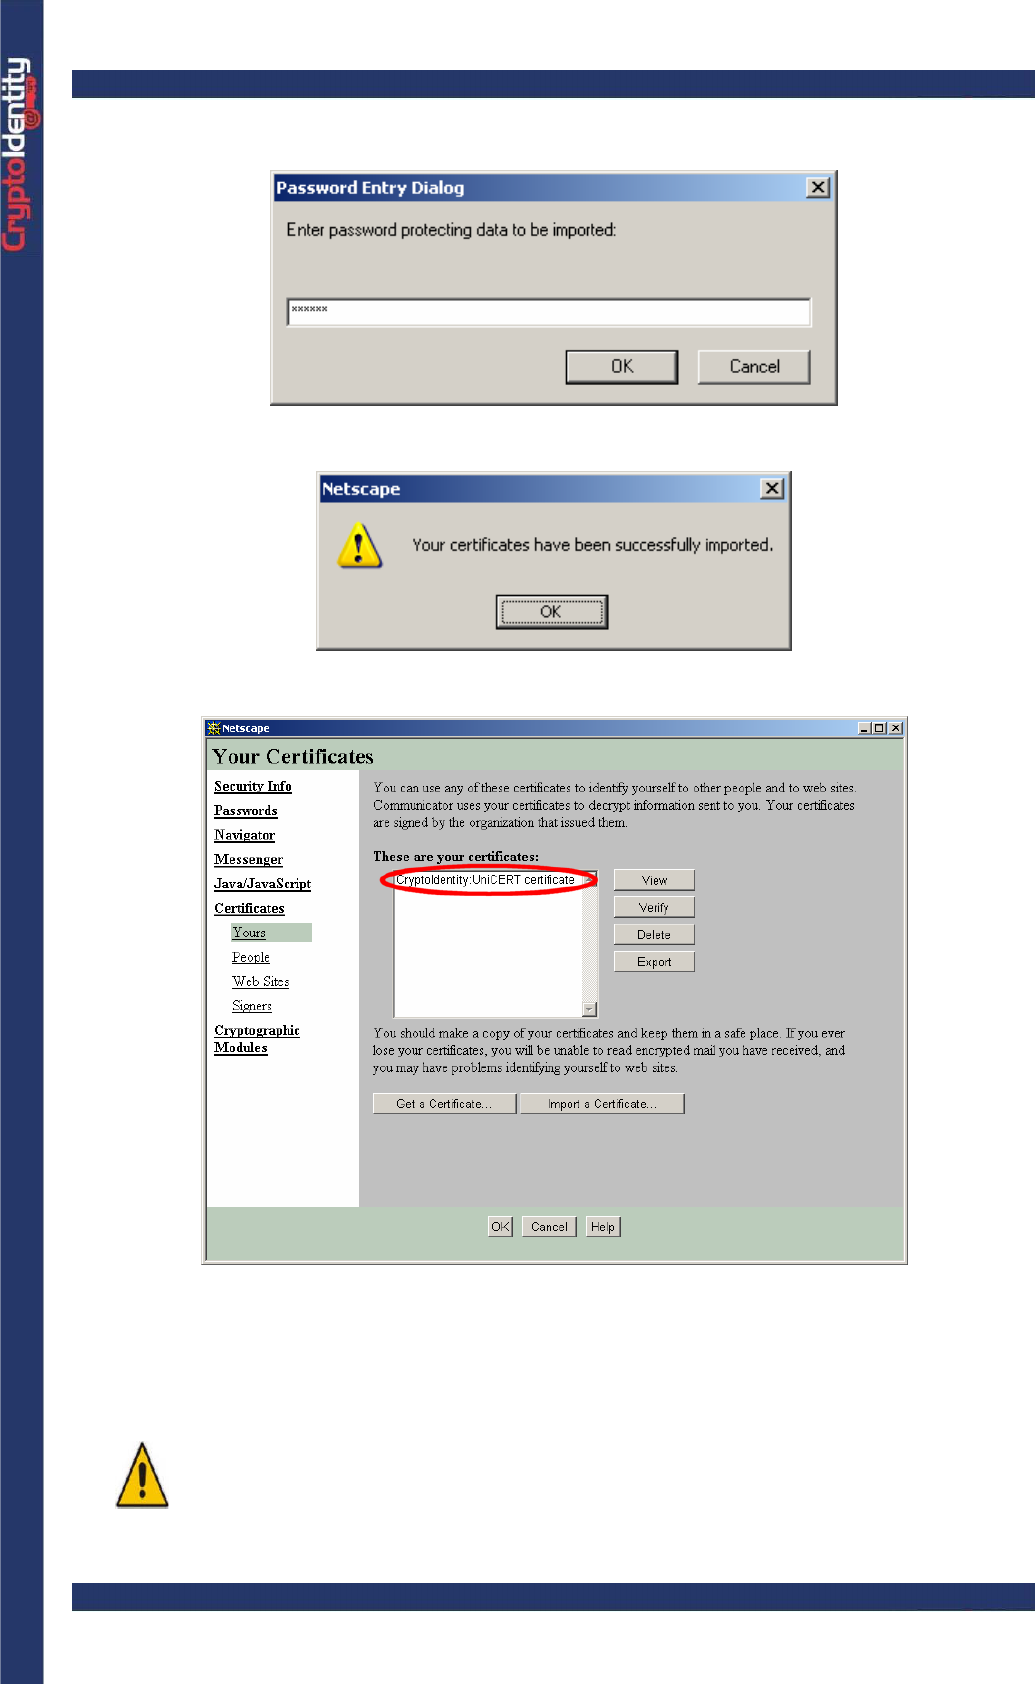
• Press Open. A mask like this should pop up. Insert the password protecting the file:
• A confirm message pops up.
• To see the certificate choose Yours under Certificates in Security Info screen.
• Now manage the imported certificate stored into CryptoIdentity for the desired
purposes with Netscape.
To use the imported certificate also with Microsoft applications such as
Outlook Express or Internet Explorer, the token must be "standardized"
through the AR Genie utility. For details about AR Genie utility and the
standardize process, please refer to section 3.1 AR Genie and to AR Genie
Help.

CryptoIdentity User Guide – 4. Managing Digital Certificates with CryptoIdentity
4. 1. 2. 2 IMPORTING THROUGH IMPORTPKCS12
To import a certificate from a .p12 or .pfx file, please refer to section "3.4 ImportPKCS12".
4. 2 VIEWING DIGITAL CERTIFICATES
Once there is a certificate stored into the CryptoIdentity token, it is possible to view it
through the Microsoft System Certificates Store or the AR Genie utility.
Next sections explain the detailed instructions.
4. 2. 1 VIEWING CERTIFICATES THROUGH MICROSOFT
CERTIFICATES STORE
To view the certificates and related details stored into a CryptoIdentity token:
• Right click on the Internet Explorer icon on the computer’s desktop, select
Properties and Content Tab. The following Window appears:
CryptoIdentity User Guide – 4. Managing Digital Certificates with CryptoIdentity
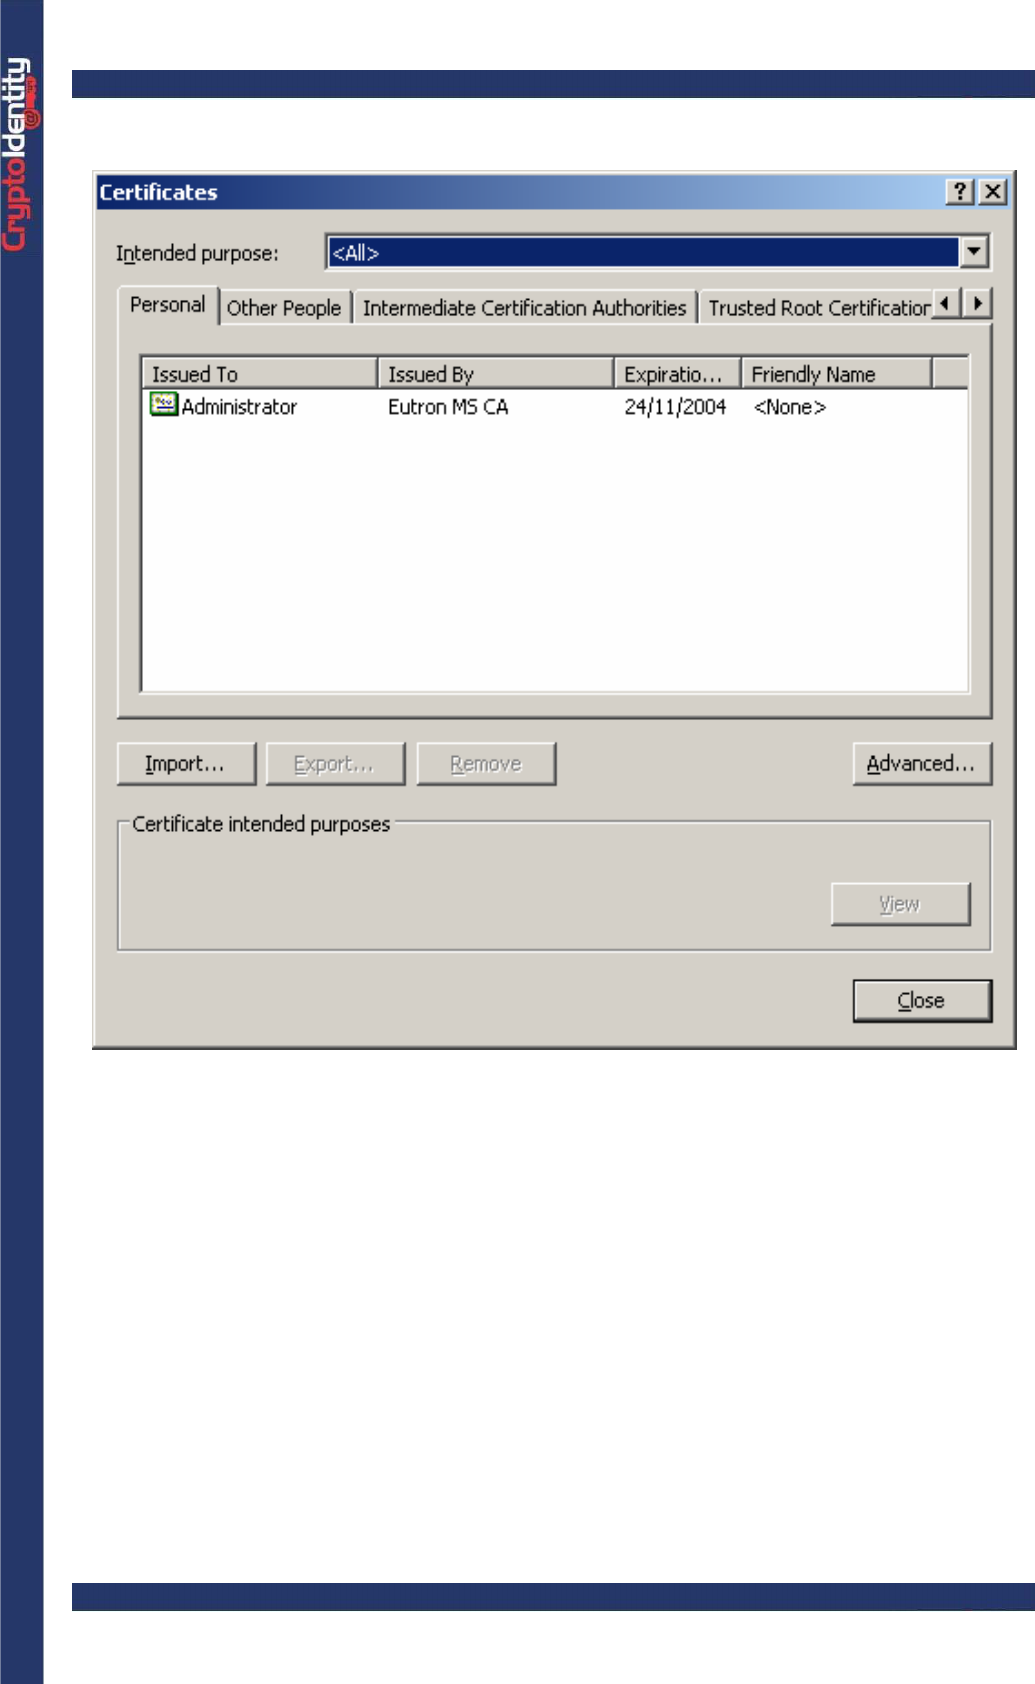
• Click on the Certificates button, the Certificates store appears :
• From the Personal Tab is possible to view all the certificates (both the certificates
stored into the CryptoIdentity token and the certificates present in the system certificate
store).
• From the certificates list, select a certificate stored into the token and then click View to
see its details.
CryptoIdentity User Guide – 4. Managing Digital Certificates with CryptoIdentity
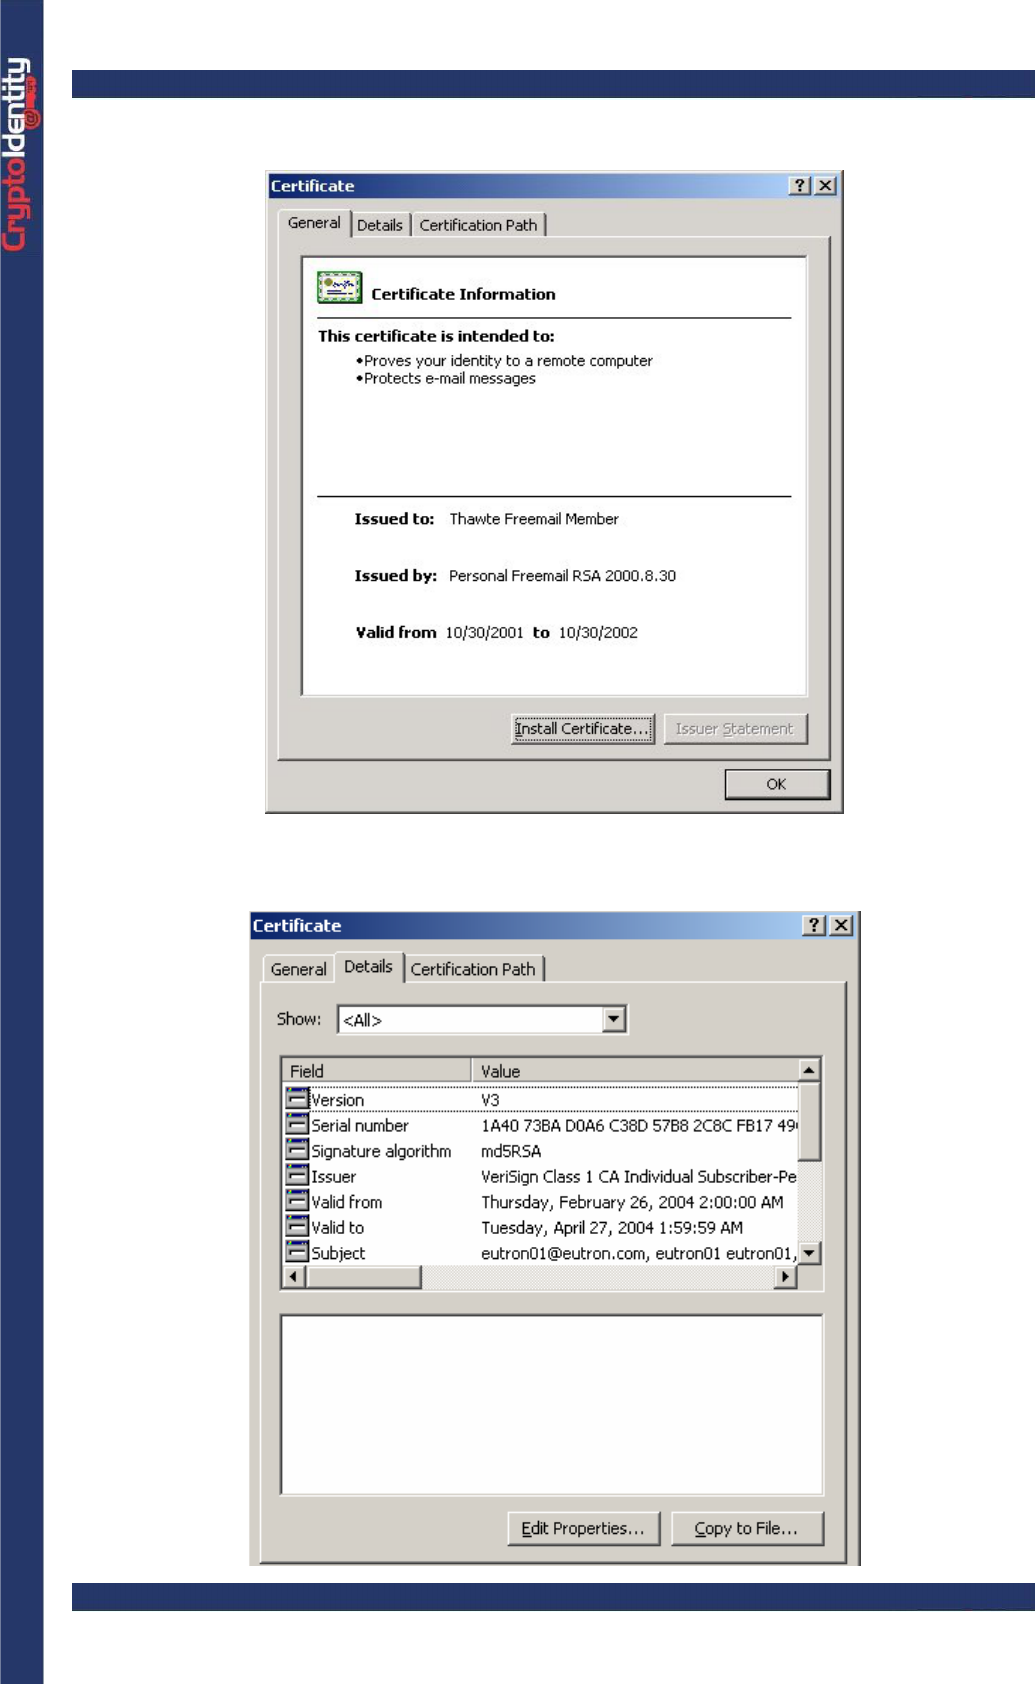
• The certificate details window is displayed as follows:
• Clicking on the Details tab is possible to see all the certificate details (Serial Number,
Issuer, Expiration date, e-mail associated, etc.):
CryptoIdentity User Guide – 4. Managing Digital Certificates with CryptoIdentity
If a certificate stored into a CryptoIdentity is properly displayed in the
system certificates list, it is available for the use with common Microsoft
Applications and any other software compliant with the Microsoft Crypto
API/CSP mechanism (e.g., Cisco VPN client).
Further more, PKCS#11 applications (i.e. Netscape) will be able to work
with the certificate.
If a certificate stored into a CryptoIdentity is not properly displayed in the
system certificates list, it is NOT available for the use with common
Microsoft Applications and any other software compliant with the Microsoft
Crypto API/CSP mechanism.
Check if the correct process has been followed during the store of the
certificate (refer to section "4.1 Storing Digital Certificates into
CryptoIdentity").
Viceversa, the certificate could be available to PKCS#11 applications (i.e.
Netsca
p
e
)
.
4. 2. 2 VIEWING CERTIFICATES THROUGH ARGENIE
UTILITY
To view the certificates and related details stored into a CryptoIdentity token:
• Run the program AR Genie in advanced mode (refer to section "3.1 ARGenie")
• Make sure a CryptoIdentity token is plugged into an USB port and select the "Token-
>View Objects" menu (or double-click the CryptoIdentity present in the Slot List.)
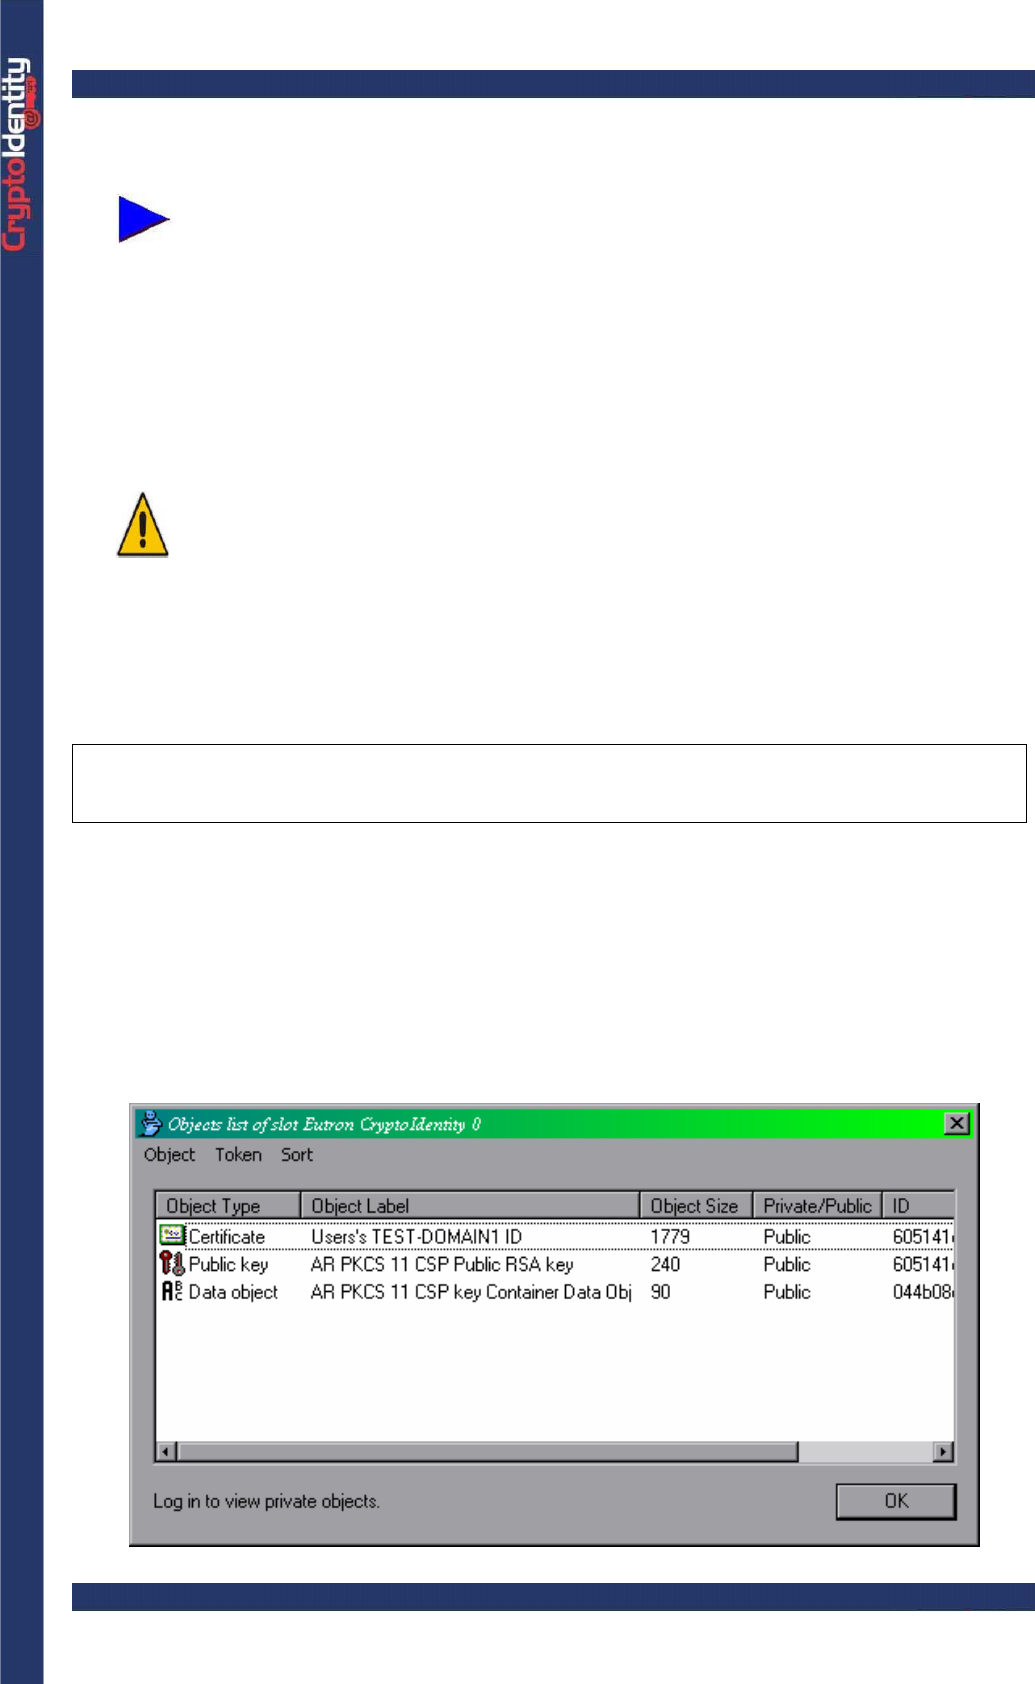
• The following window appears:
CryptoIdentity User Guide – 4. Managing Digital Certificates with CryptoIdentity
• The window contains a list of the digital certificates and other public keys and objects
stored into the CryptoIdentity. To see also the private objects, login to the token (select
Token->Login menu and insert the CryptoIdentity PIN).
• To see the details of an object, just double-click it or select the Objects-> View menu.
• You can sort the object list by object Size, Type, Label, ID, Private.
4. 3 SUGGESTED POLICY FOR BACKUP OF DIGITAL
CREDENTIALS
If you are about to use the CryptoIdentity token for day-by-day professional activity—
protecting email, accessing corporate network, signing documents, etc.—it is essential that
the digital credentials used are properly backed up.
More specifically, if for any reason an encryption certificate and associated private key
becomes inaccessible (or the CryptoIdentity containing the certificate is lost), it will not be
possible to decrypt documents and emails previously encrypted with it.
To prevent this, make sure a backup exists on some secure media for your private keys
(and certificates).
For example, generate first of all the keys and certificate outside of the token and copy
them on a CDROM (or floppies) to be kept in a safe place (locker). Then, gain the
portability and security of storing the credentials into the CryptoIdentity by importing them
into it. You can use ImportPKCS12 utility, for example, to import the certificates and
cryptographic keys.
4. 3. 1 HOW TO BACKUP DIGITAL CREDENTIALS
To backup the digital credentials, generate and save the digital certificate in the Microsoft
Certificate System Store and then export it to a file. Then, import the certificate into the
CryptoIdentity.
Next steps describes the complete process to obtain a certificate from Verisign CA, save it
in a file (including associated cryptographic keys) and then import it into the CryptoIdentity.
You can apply the same process also for certificates issued by other CAs.
Follow these steps:
• Follow carefully the instructions explained in the section "4.1.2.1 Verisign" to obtain a
certificate from Verisign CA.
CryptoIdentity User Guide – 4. Managing Digital Certificates with CryptoIdentity
In the Verisign "Complete Enroll Form" page, DO NOT chose the "AR
Base Cryptographic provider" as "CSP". To generate a certificate into the
Microsoft System Store instead of into the CryptoIdentity token, select
"Microsoft Base Cryptographic Provider v 1.0" as"CSP" :
• Complete the procedure as described in the section "4.1.2.1 Verisign" to obtain your
digital certificate (check e-mail ,pick-up digital ID, install digital ID).
When enrolling from other Cas, follow the proper enrollment procedure.
Just remember to specify "Microsoft Base Cryptographic Provider v 1.0"
as"CSP" to put the issued certificate into the Certificate System Store.
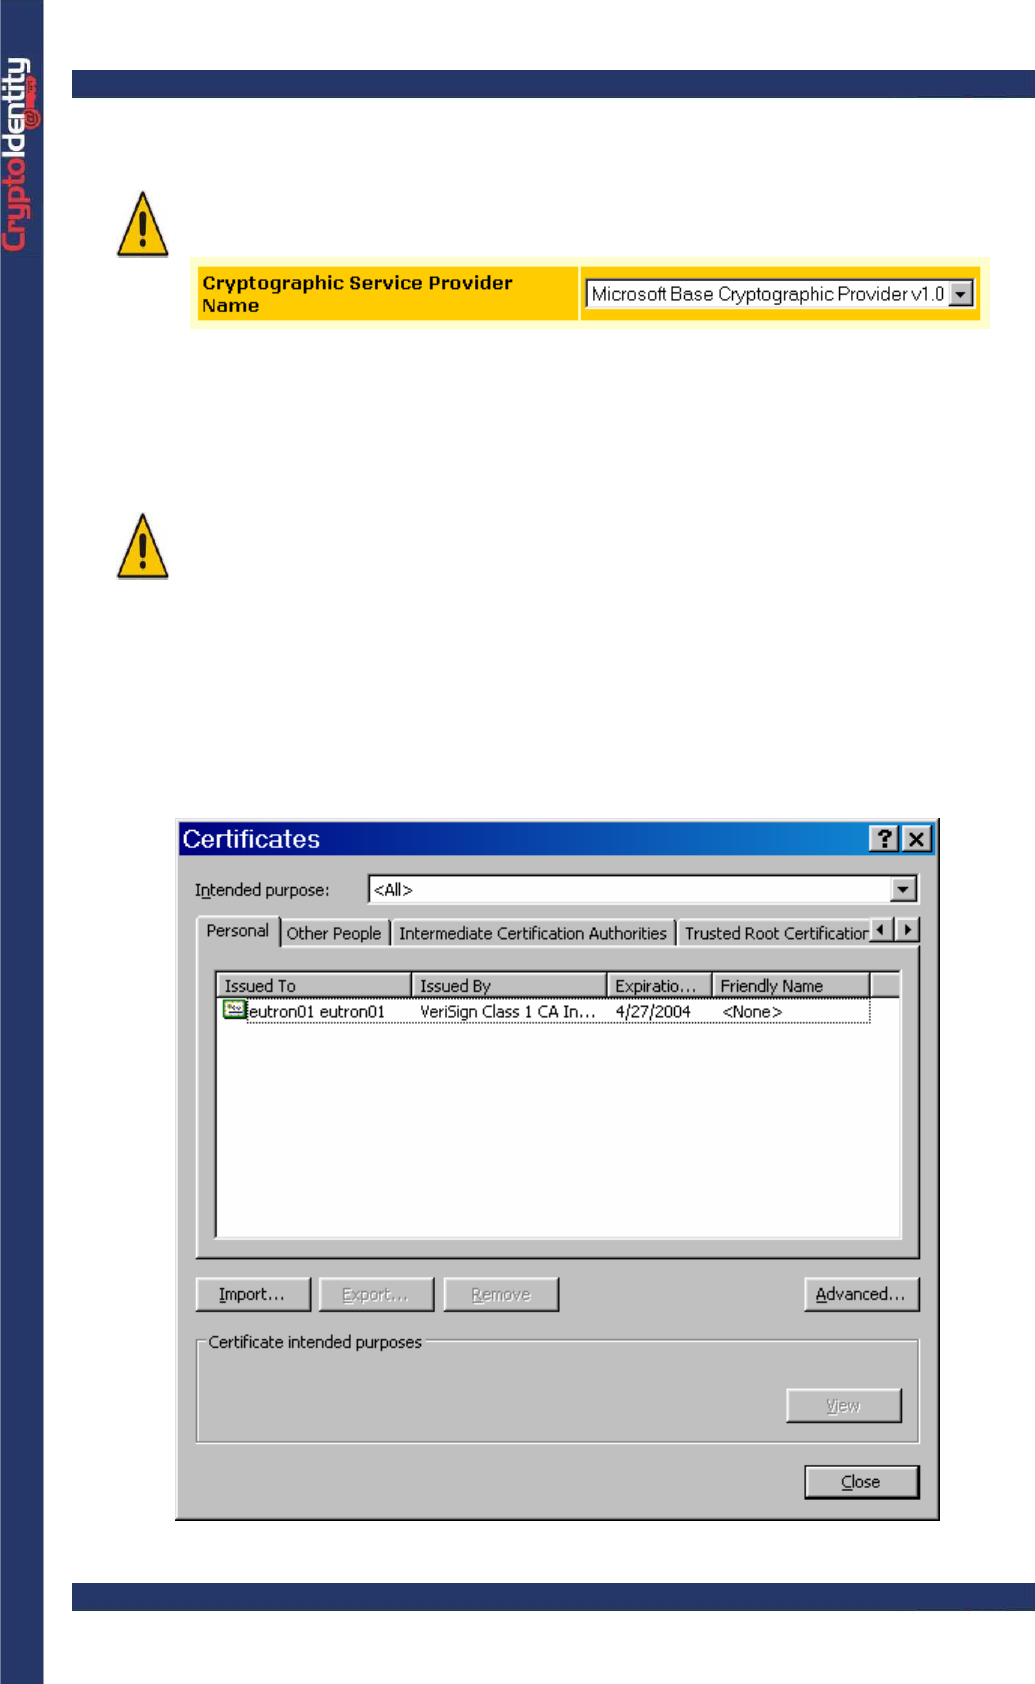
• Once the digital certificate is installed in the Microsoft System Store, export it by saving
it into a .pfx/.p12 file. To do this, access the Certificates System Store by right-clicking the
Internet Explorer icon on the computer’s desktop, select Properties and Content Tab.
• Click on the Certificates button, the Certificates store appears:
-
CryptoIdentity User Guide – 4. Managing Digital Certificates with CryptoIdentity
• The digital certificate that has just been issued into the Certificate System Store should
be present in the Certificates list. In the example, the "Eutron01" certificate issued from
Verisign CA is present.
• Select the certificate and press the Export button.
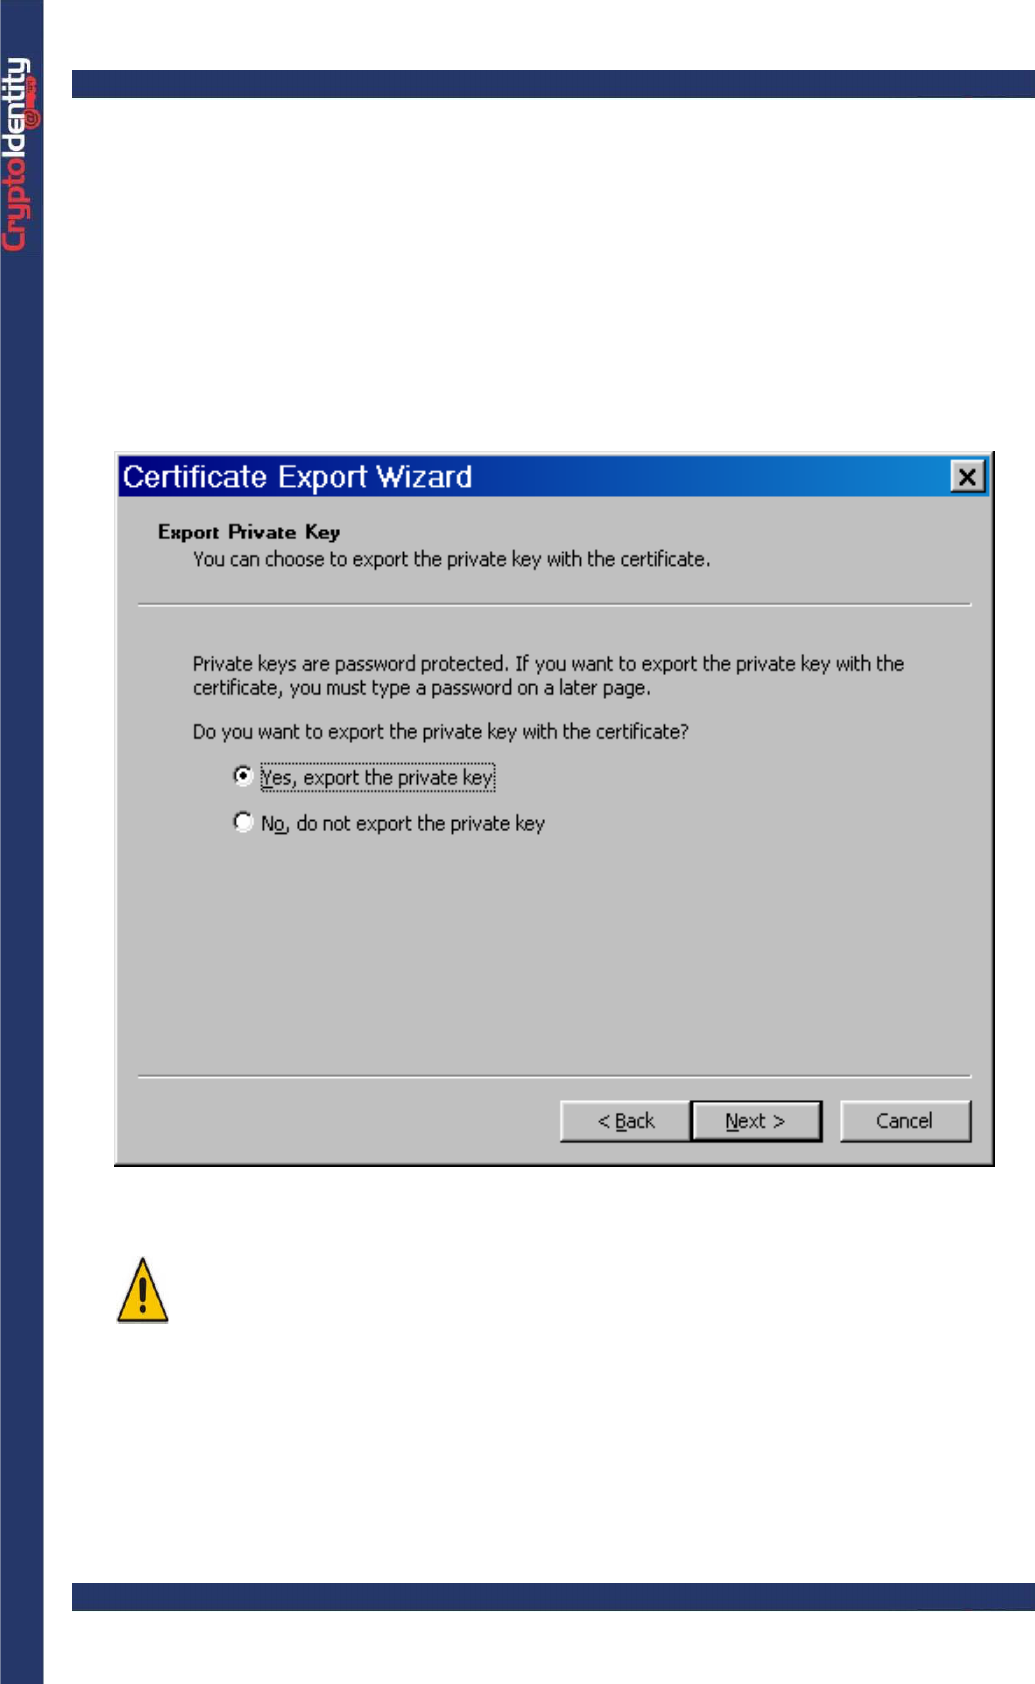
• The "Certification Export Wizard" window appears. Click Next.
• Select the "Yes, export the private key" option:
If the private key associated to a digital certificate is not exported into the
PKCS#12 file, it is not possible to use that digital certificate for normal
usa
g
e with Cr
yp
toIdentit
y
after the im
p
ortin
g
p
rocess.
CryptoIdentity User Guide – 4. Managing Digital Certificates with CryptoIdentity
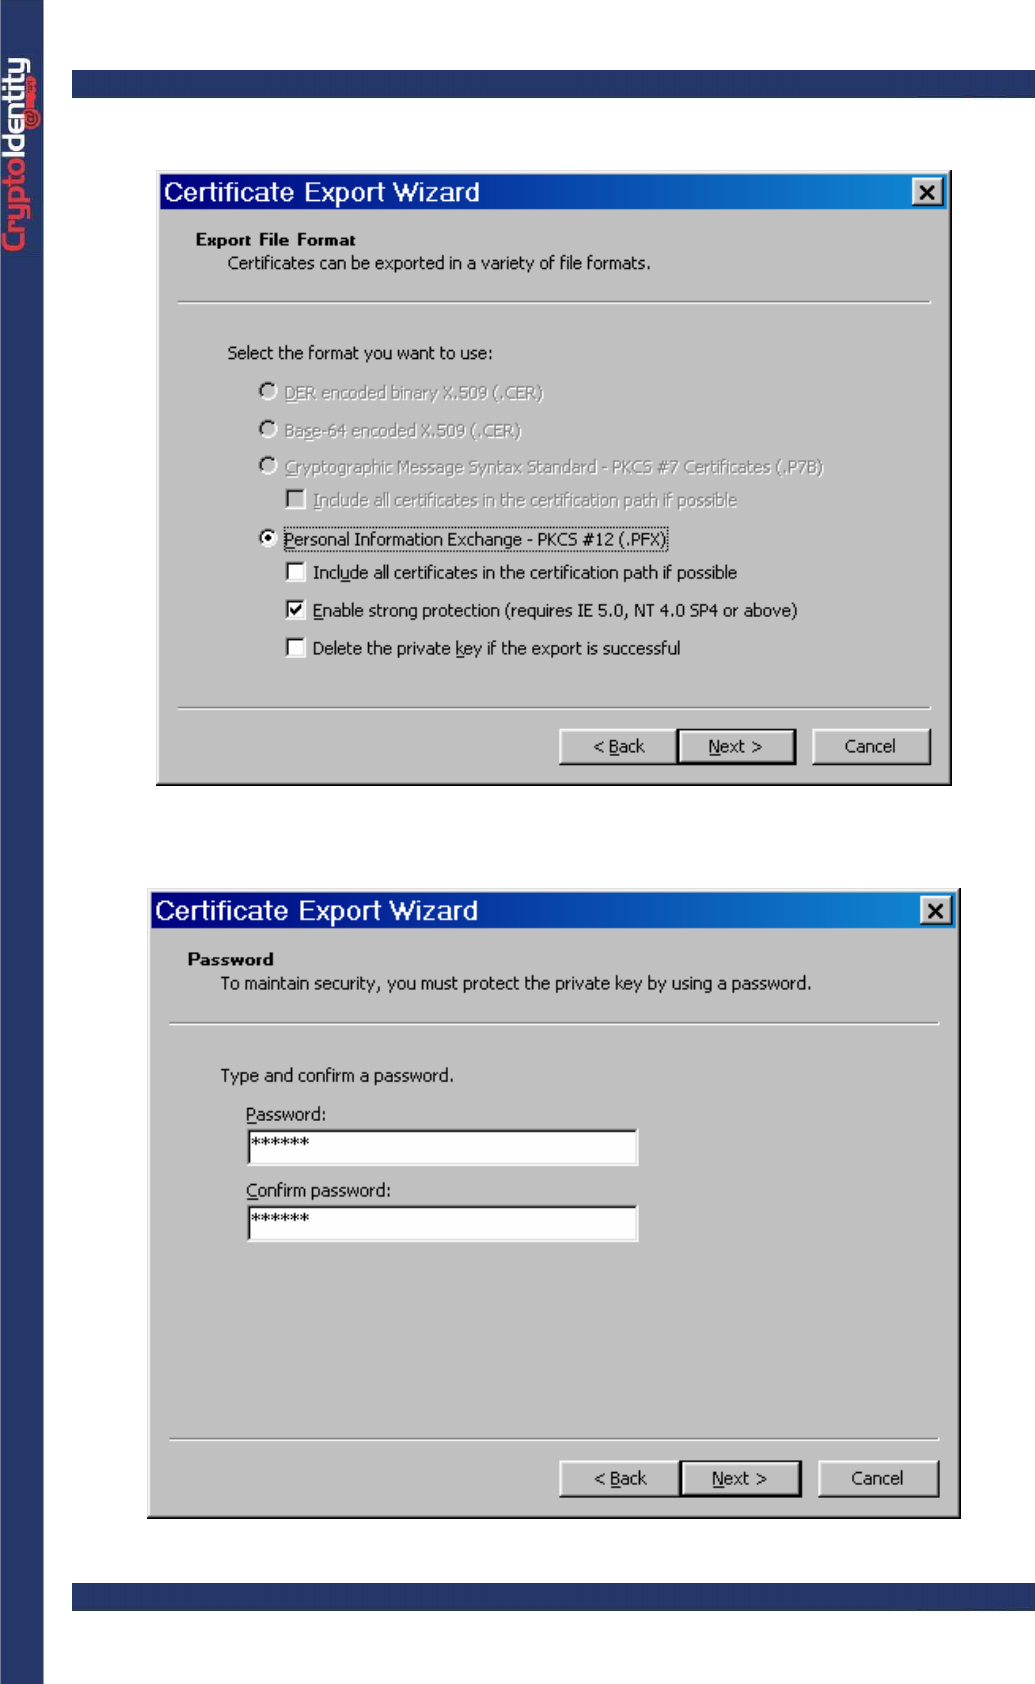
• Select the PKCS#12 format to create a .pfx or .p12 file.
• Set a password to protect your digital credentials and private key.
CryptoIdentity User Guide – 4. Managing Digital Certificates with CryptoIdentity
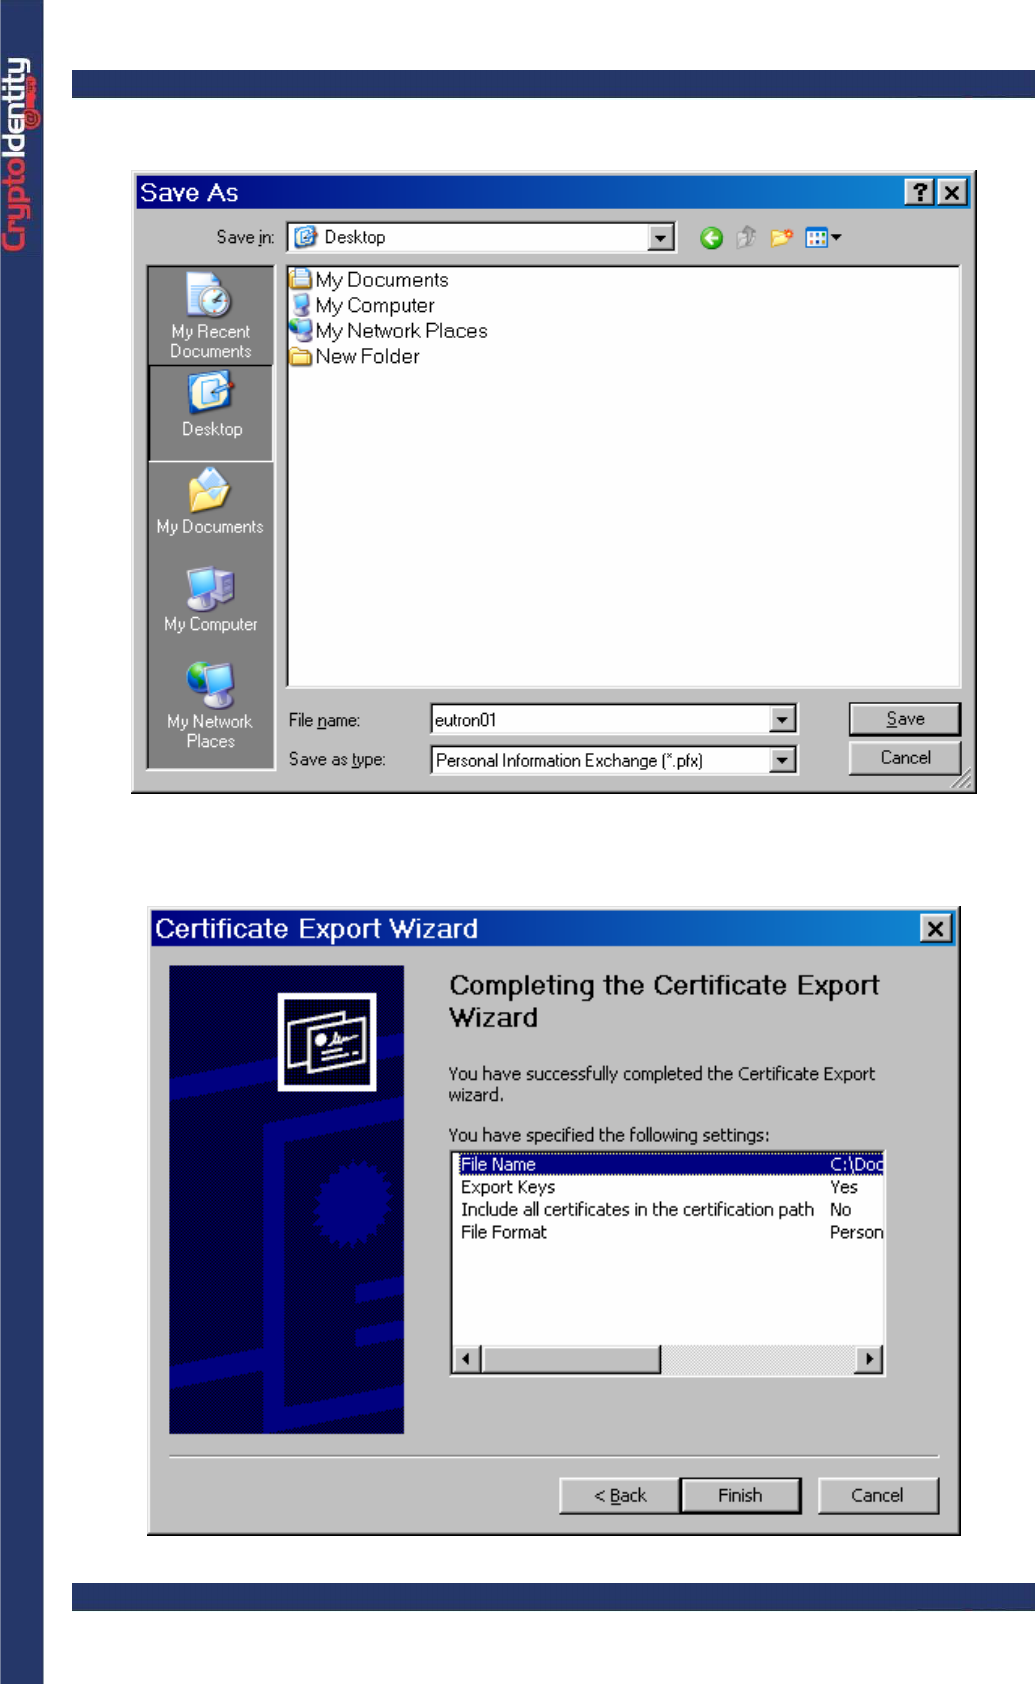
• Set the name of the .pfx or .p12 file that is about to be created.
• A summary appears. Click Finish to complete the Exporting process.
CryptoIdentity User Guide – 4. Managing Digital Certificates with CryptoIdentity
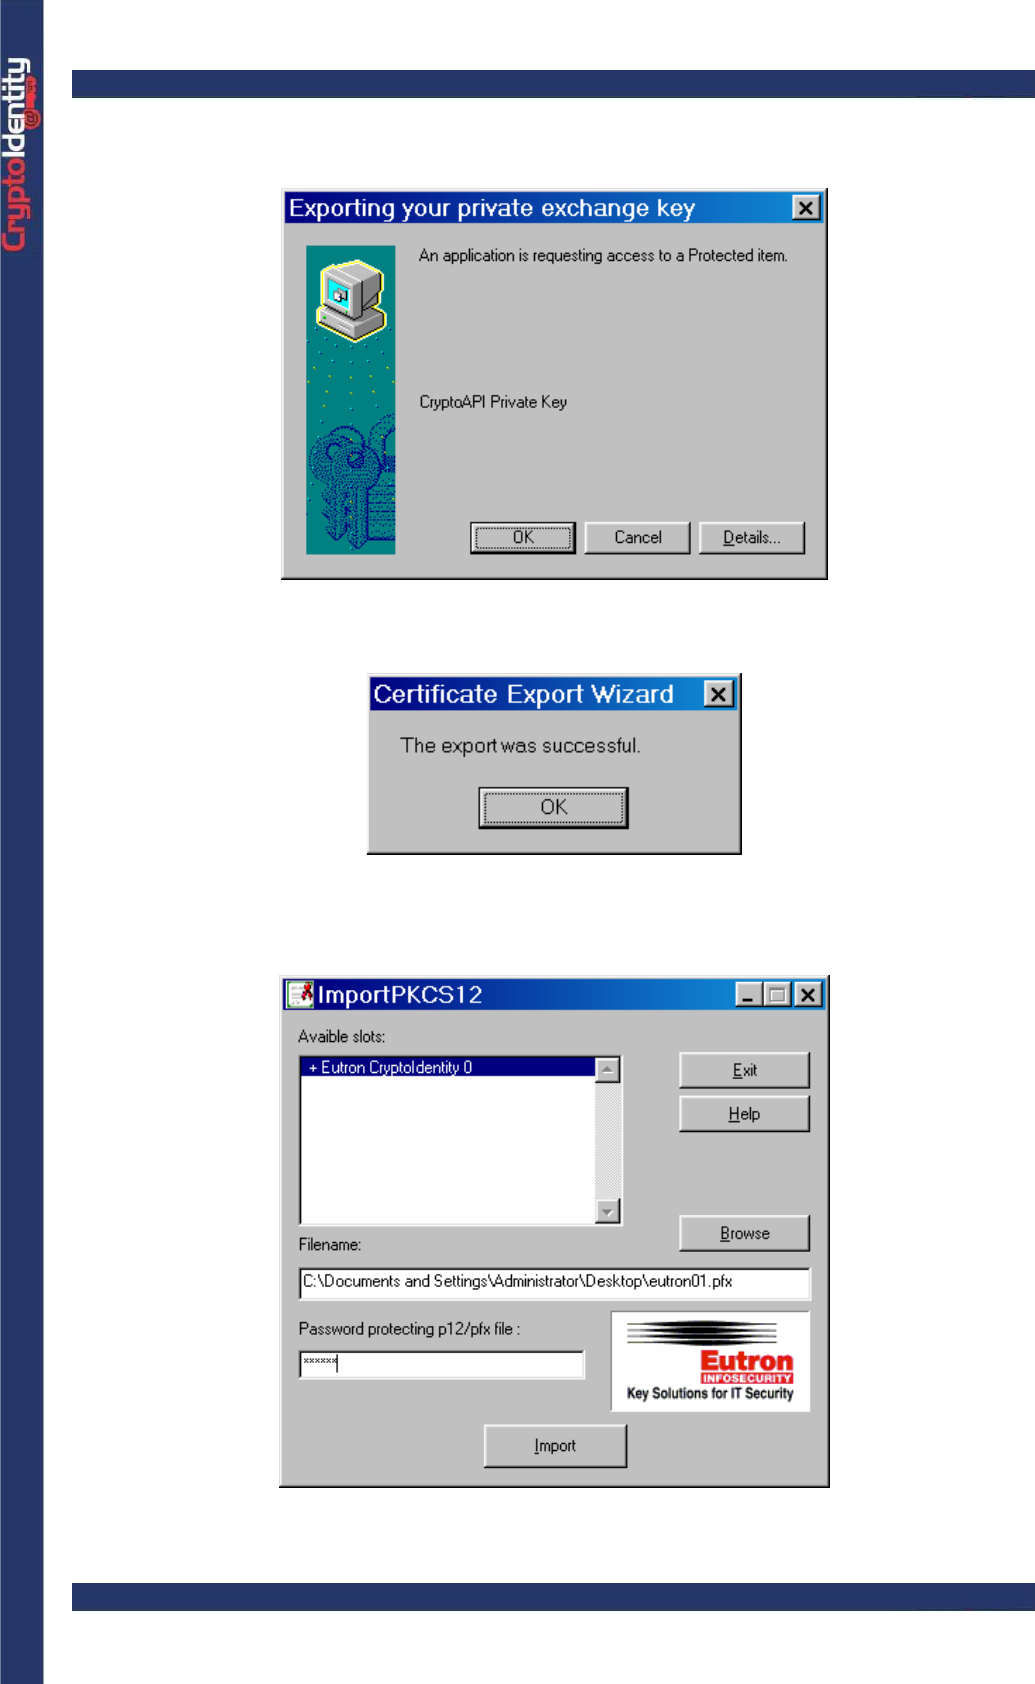
• A warning message appears to inform that the private key associated to the digital
certificate is about to be exported. Click OK.
• A confirmation message appears. The .p12 or .pfx file is created and contains the
backup of digital credentials (including the private key).
• It is now possible to import the PKCS#12 file created into the CryptoIdentity token. In
the example is used the PKCS12Import utility for the importing process. See sections
"4.1.3 Certificates imported from file" and "3.4 ImportPKCS12" for detailed instructions.
• Put the backed up digital credentials (file .p12 / .pfx) into a security media.
CryptoIdentity User Guide – 5. Working with CryptoIdentity and Applications
5. WORKING WITH CRYPTOIDENTITY AND
APPLICATIONS
This chapter provides detailed instructions on how to use CryptoIdentity with e-mail clients
and PKI software (Entrust).
5. 1 MAIL CLIENTS
Next sections explain the detailed instructions to configure Outlook Express, Microsoft
Outlook and Netscape Messenger to send\receive secure e-mails.
Once properly configured for secure e-mails, it is possible through the most
common e-mail clients to digitally sign and encrypt the emails using digital
certificates and related cryptographic keys stored into CryptoIdentity.
5. 1. 1 OUTLOOK EXPRESS 5.x / 6
Next sections explain the detailed instructions to configure Outlook Express to
send\receive secure e-mails using the CryptoIdentity token.
5. 1. 1. 1 OUTLOOK EXPRESS CONFIGURATIONS
To enable secure e-mails with Outlook Express follow these steps:
• Obtain a digital certificate and store it into CryptoIdentity. Refer to section "4.1 Storing
certificates into CryptoIdentity" for detailed instructions.
The digital certificate must be issued to the account (e-mail address) to be
used for secure e-mails.
Configure Outlook Express following these steps:
• Plug the CryptoIdentity containing the digital credentials into an USB port.
• Make sure the certificate stored into the CryptoIdentity is available into the System
Certificate Store. Refer to section "4.2.1 Viewing Certificates through Microsoft certificates
store" for detailed instructions.
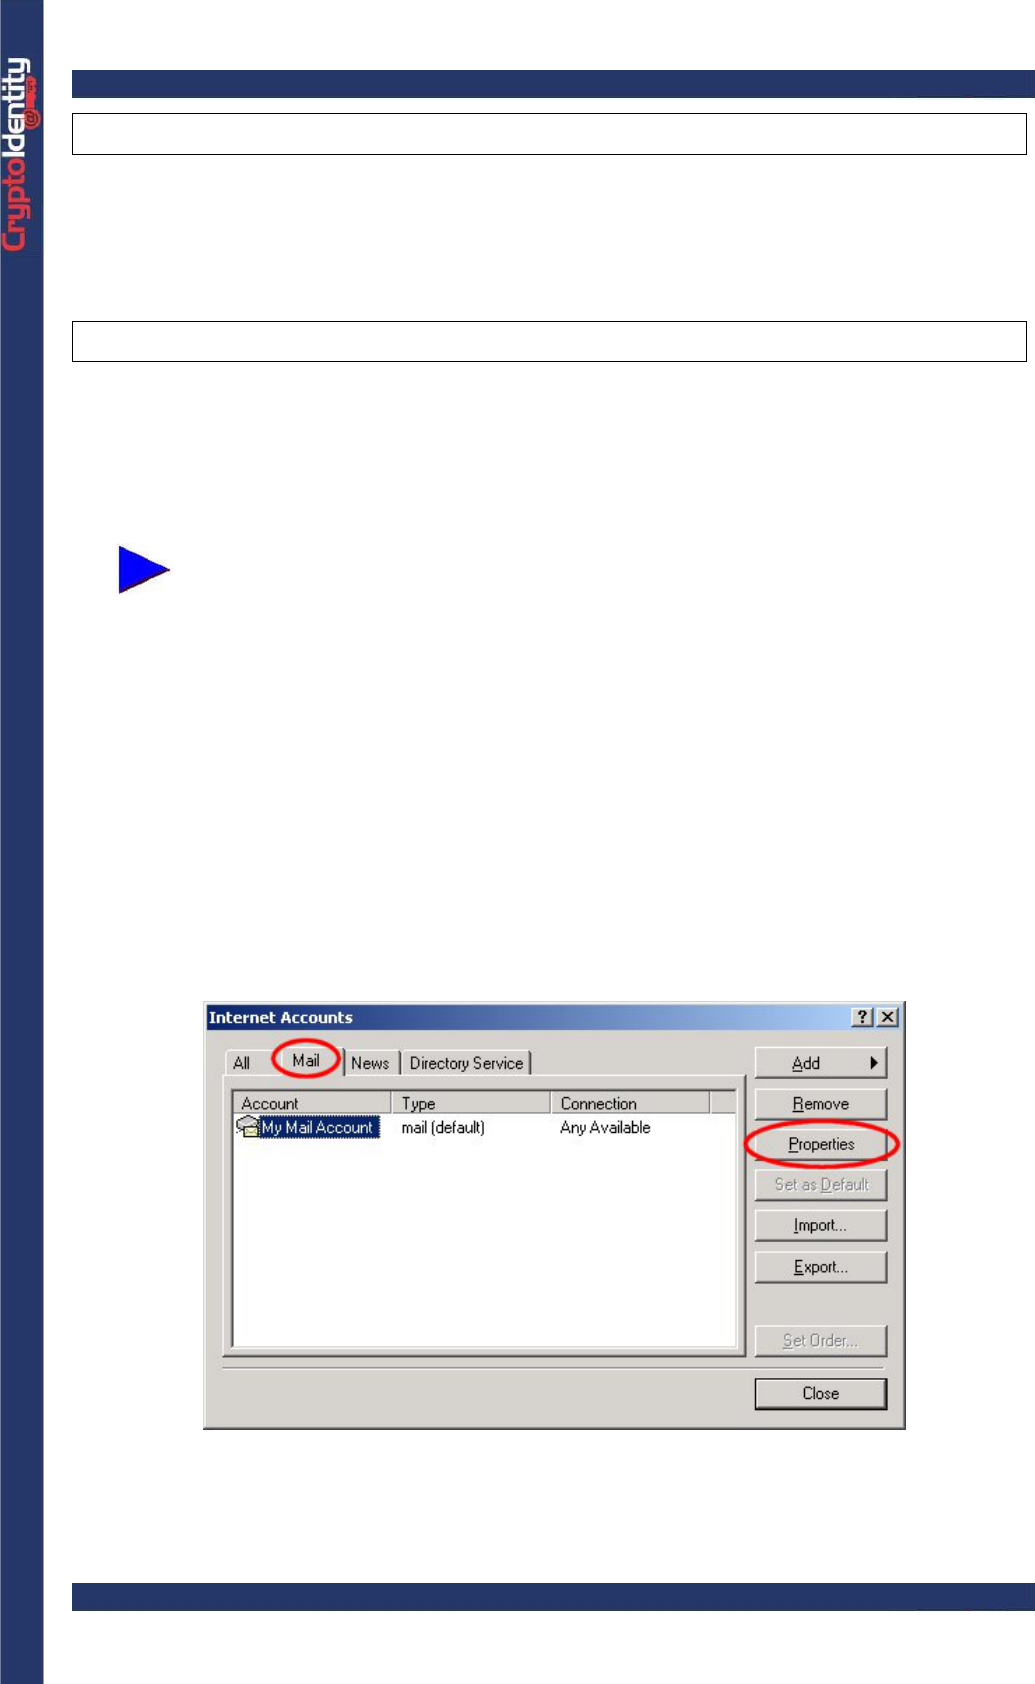
• Run Outlook Express and select the Tools->Accounts menu.
CryptoIdentity User Guide – 5. Working with CryptoIdentity and Applications
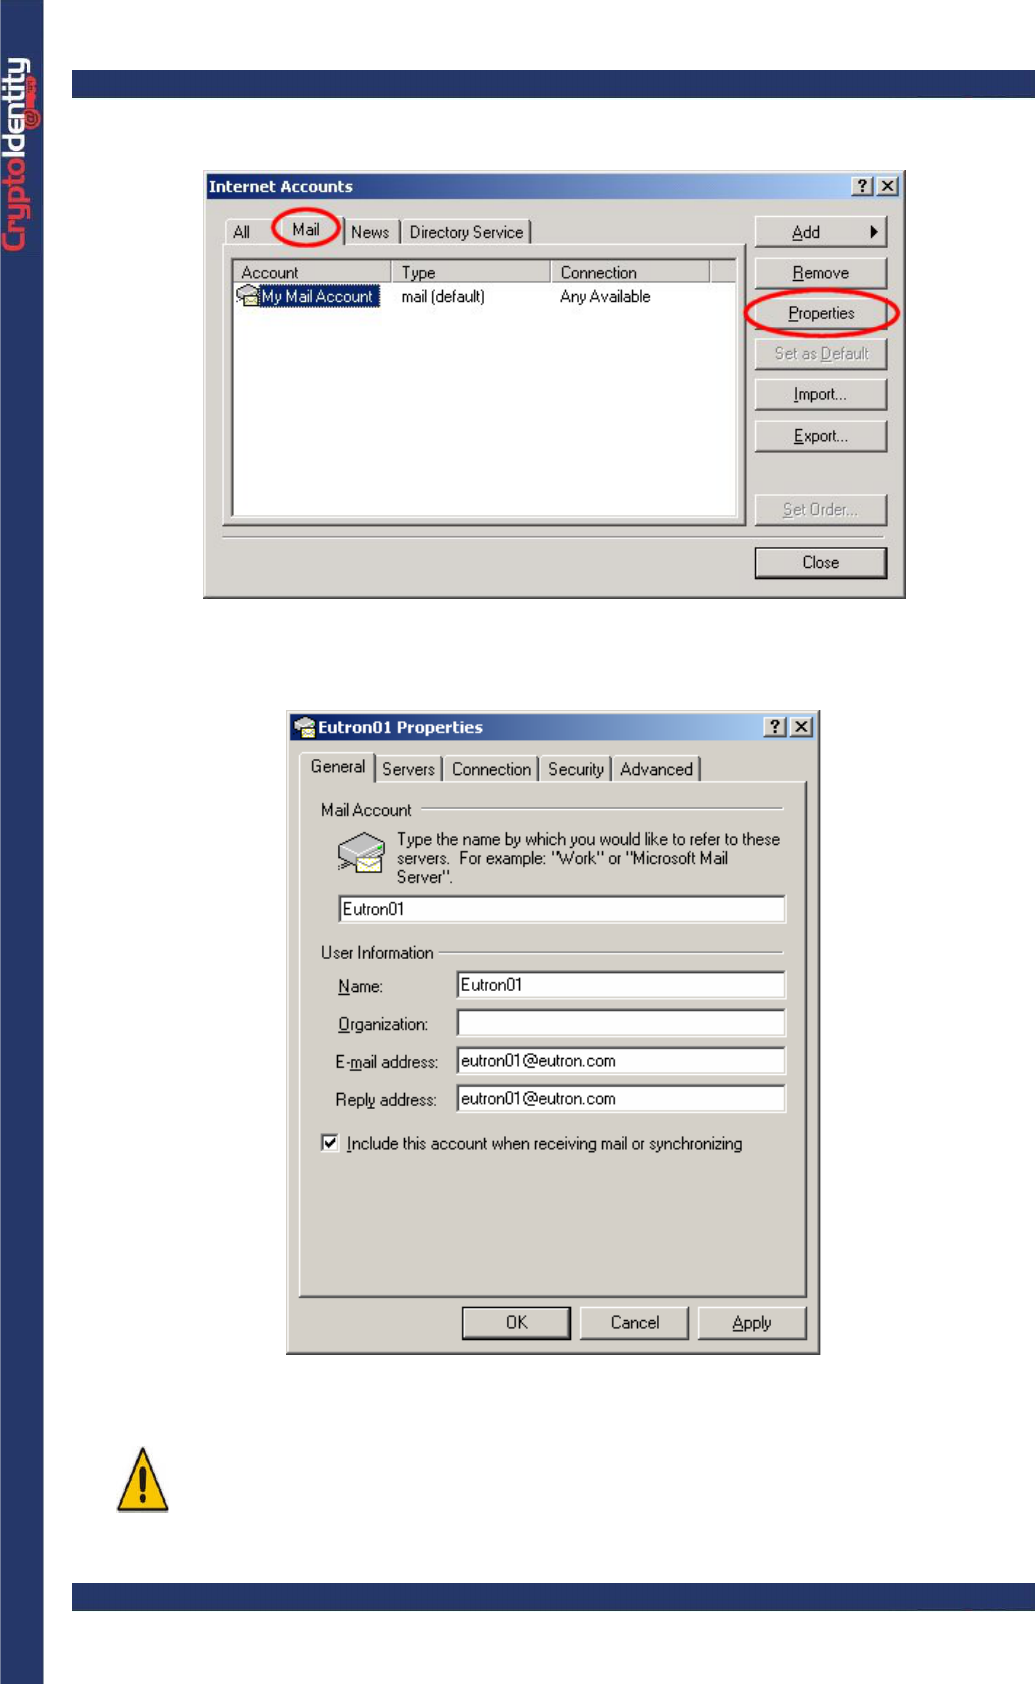
• Select the Mail tab from the Internet Accounts screen.
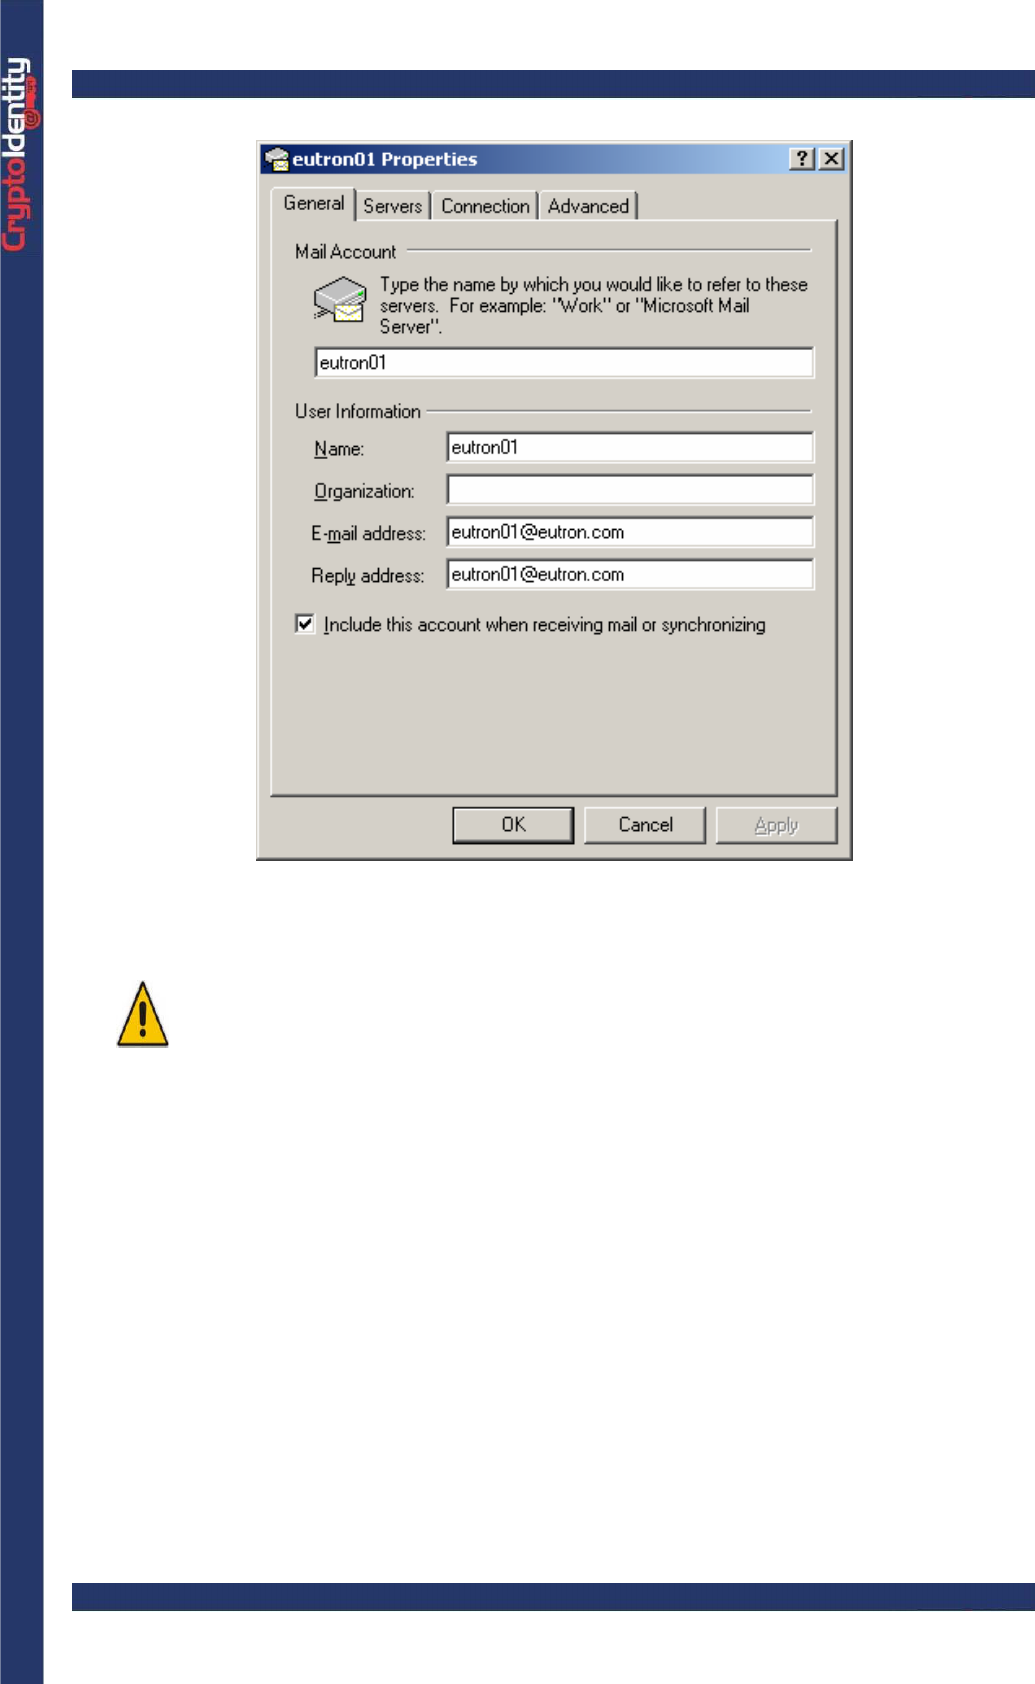
• Select the e-mail account to be used for secure e-mails and press the Properties
button. The properties screen for the selected mail account is displayed.
Make sure to fill the "E-mail address" and "Reply address" fields with the e-
mail address for which the certificate has been issued.
You can obtain the e-mail address associated to the certificate by viewing
the certificate details. Refer to section "4.2.1 Viewing Certificates through
Microsoft certificates store" for detailed instructions.
CryptoIdentity User Guide – 5. Working with CryptoIdentity and Applications
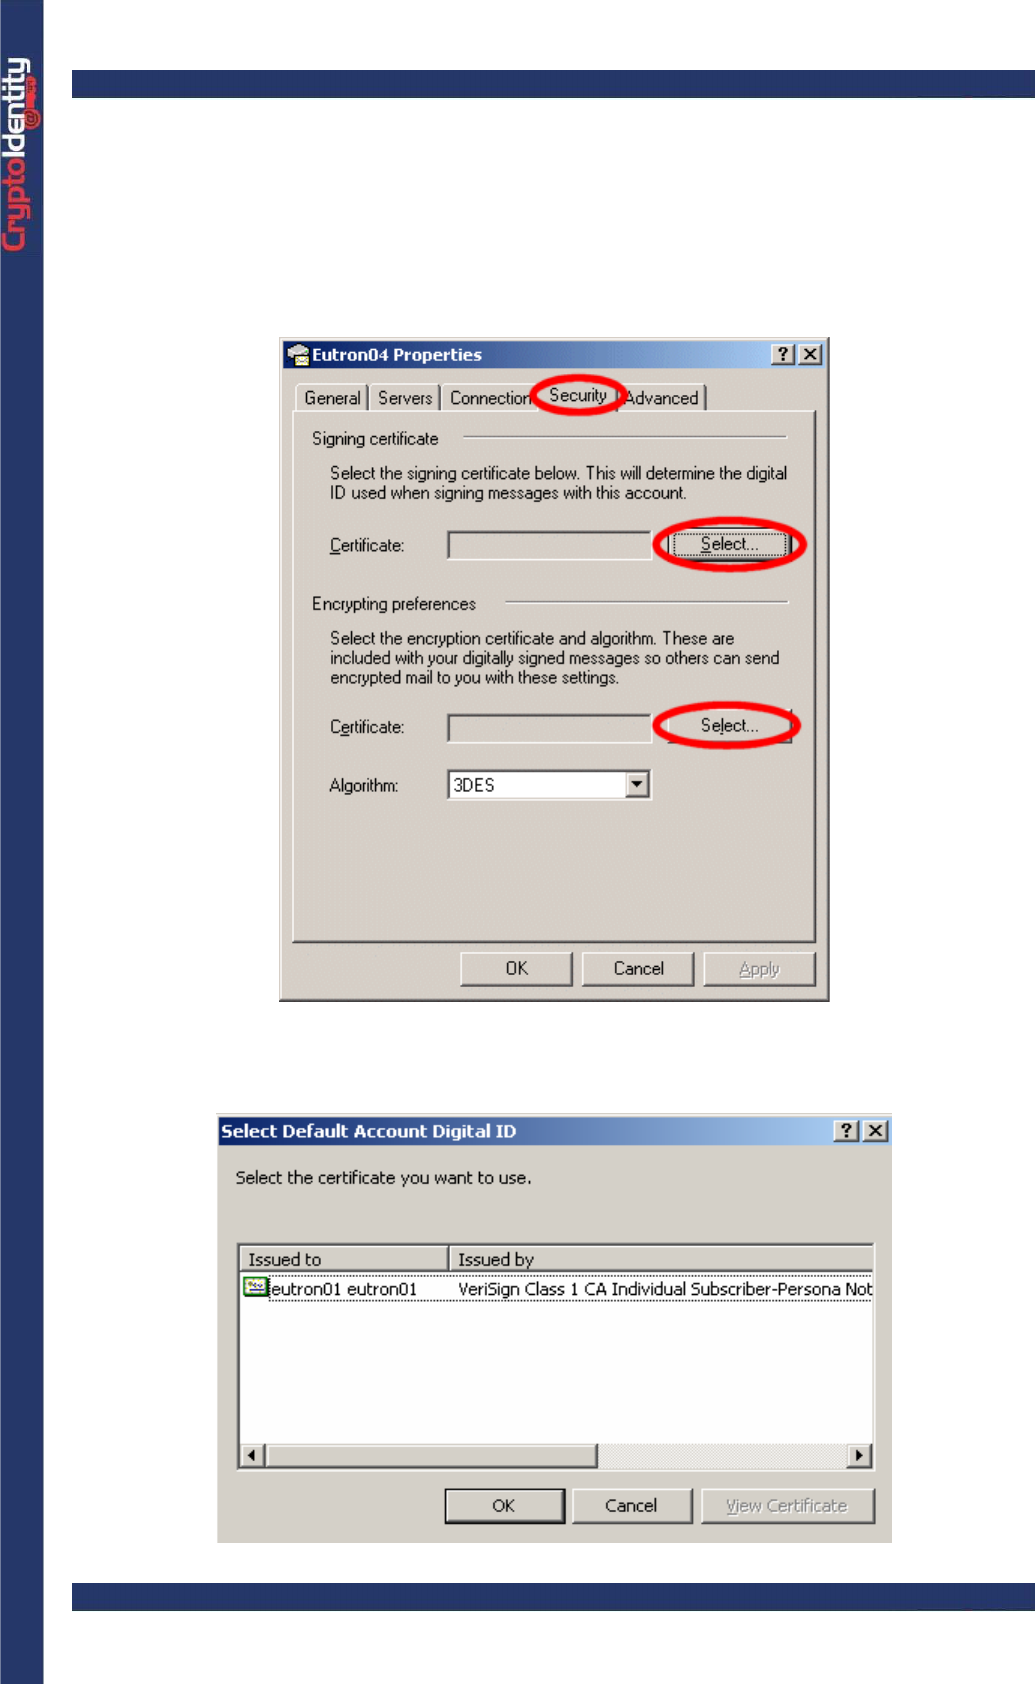
• Select the Security tab from the account properties screen.
• Select the digital certificate issued to the current account (e-mail address) to allow
Outlook Express to digitally sign the e-mails. Press the Select button in the Signing
Certificate section. Outlook Express lists all the certificates issued to the current account,
including the certificates stored into CryptoIdentity.
• Highlight the certificate and press OK.
CryptoIdentity User Guide – 5. Working with CryptoIdentity and Applications
If no digital certificates appear in the list, it means that no certificates issued
to the current account are found in the System Certificate Store. Make sure
that during the certificate enrollment, the e-mail address of the current
account has been specified.
• Repeat the process to select an Encryption Certificate if necessary. This allows other
users to encrypt e-mails they send to you.
• Choose an Encryption Algorithm from the drop down box.
• Press OK to commit the new settings.
More information is available in the Outlook Express Help. View "Sending
Secure Messages" under the "Creating and Sending Mail Messages" topic.
5. 1. 1. 2 SECURE EMAIL-S WITH OUTLOOK EXPRESS
In order to send\receive secure e-mails with Outlook Express, follow carefully the
instructions below.
To digitally sign the e-mails:
• Configure the Outlook Express account as explained in the section "5.1.1.1 Outlook
Express configurations".
• Require a personal certificate for the account used and store it into CryptoIdentity
token. Refer to section "4.1 Storing certificates into CryptoIdentity " for detailed
instructions.
• Plug the CryptoIdentity containing the digital credentials used for digital signatures into
a free USB port.
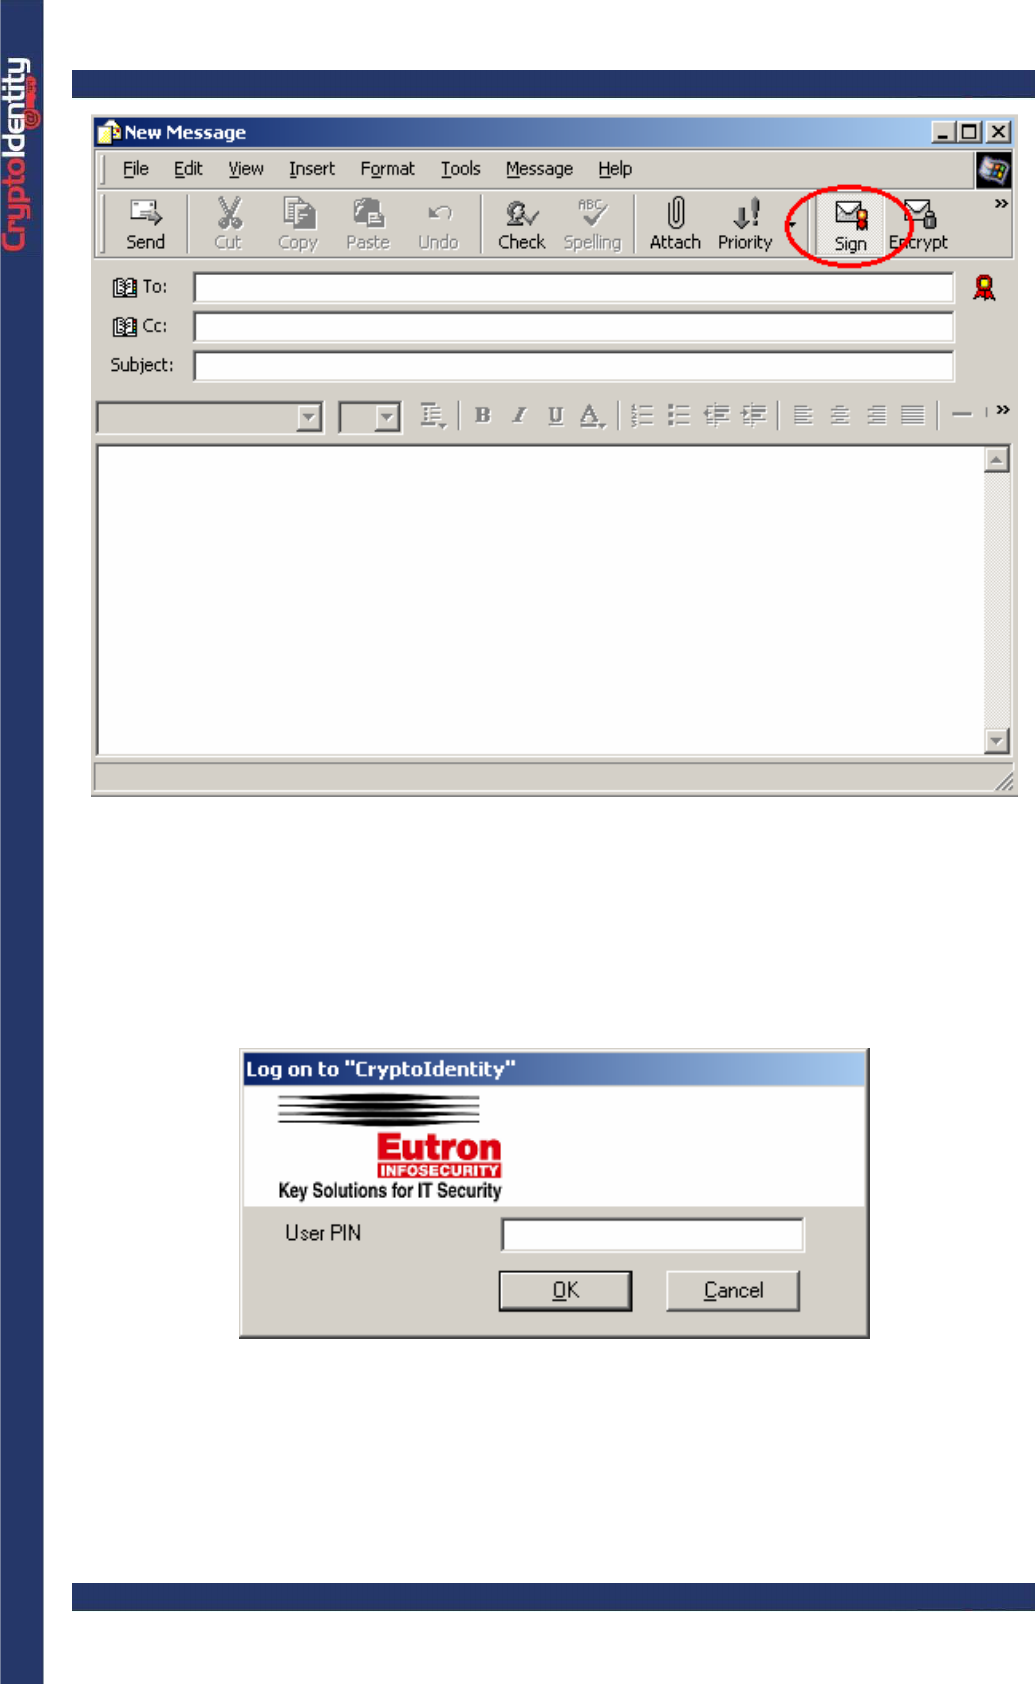
• Create a new message (select New Mail from the main windows)
• In the New Message Window, select the Sign option.
CryptoIdentity User Guide – 5. Working with CryptoIdentity and Applications
• Fill the recipient e-mail address and the subject fields and compose the message as
usually. Then click Send.
• Outlook Express automatically signs the e-mail using the digital certificate stored into
the CryptoIdentity. The CryptoIdentity PIN is required before the signed e-mail is sent:
CryptoIdentity User Guide – 5. Working with CryptoIdentity and Applications
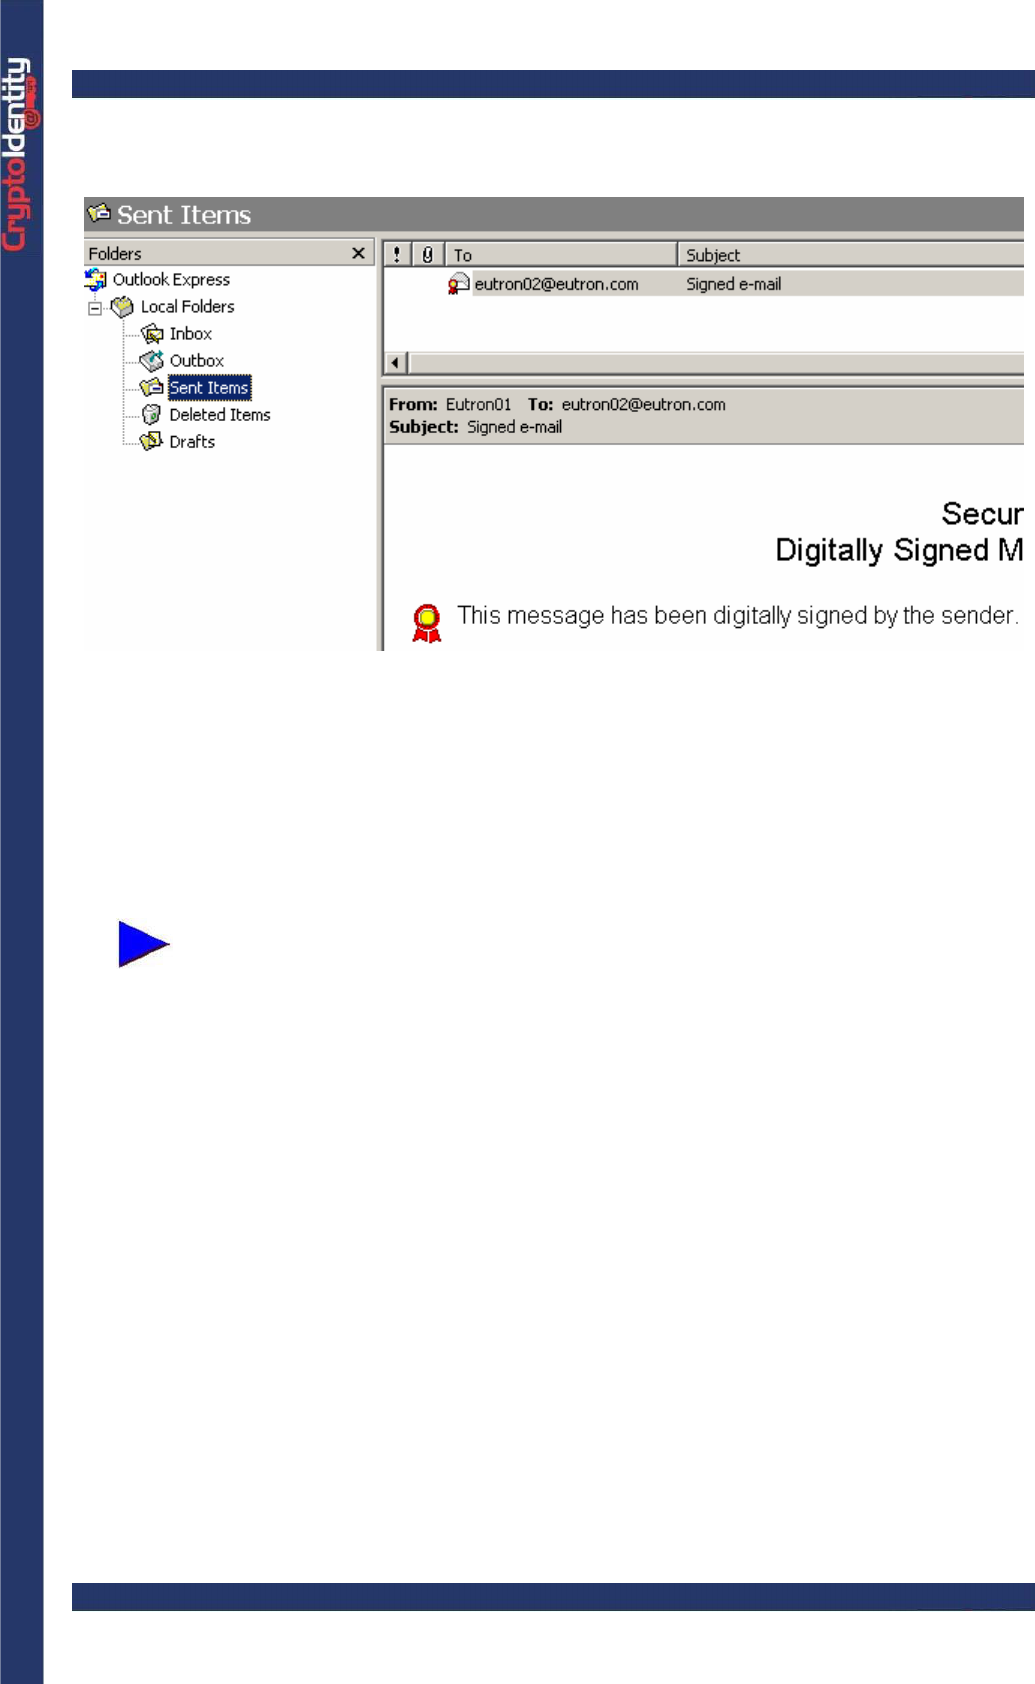
• Open the Sent Items list, the e-mail appears with a red ribbon. This means it has been
digitally signed:
To encrypt the e-mails:
• Obtain the digital certificates of the recipients for which you want to encrypt the e-mails.
Each certificate must be added into the Outlook Express address book.
Once a digital certificate is contained into the personal address book and it
is properly associated to a contact, it is possible to send encrypted e-mails
to the contact.
• There are two ways to obtain the digital credentials of a recipient and store them into
the address book:
By mailing or transferring on diskette the certificate file. Ask the recipient to provide
his digital credentials included in a file, and then import it into the address book.
-In the Contacts address book, find the recipient (if it does not exist, create a
new contact).
-Open the contact and click the Digital Ids tab
-Select the e-mail address to link the certificate from the Select an e-mail
address drop-down list.
-Click Import.
-Browse for the certificate file to import.
-Click Open.
-If the e-mail address within the certificate does not match the e-mail address
of the contact, an error message is displayed.
CryptoIdentity User Guide – 5. Working with CryptoIdentity and Applications
By receiving a signed e-mail from the recipient. Signing an e-mail usually appends
the digital certificate to the e-mail message.
-When a digitally signed e-mail is received and opened through Outlook
Express (from version 5 on), a new contact (the e-mail sender) and the
associated digital credentials are automatically added into the address book.
-If an earlier version of Outlook Express is used, open the signed e-mail and
right click the mouse button on the sender. Select Add to Address Book to
add a contact including the certificate into the address book.
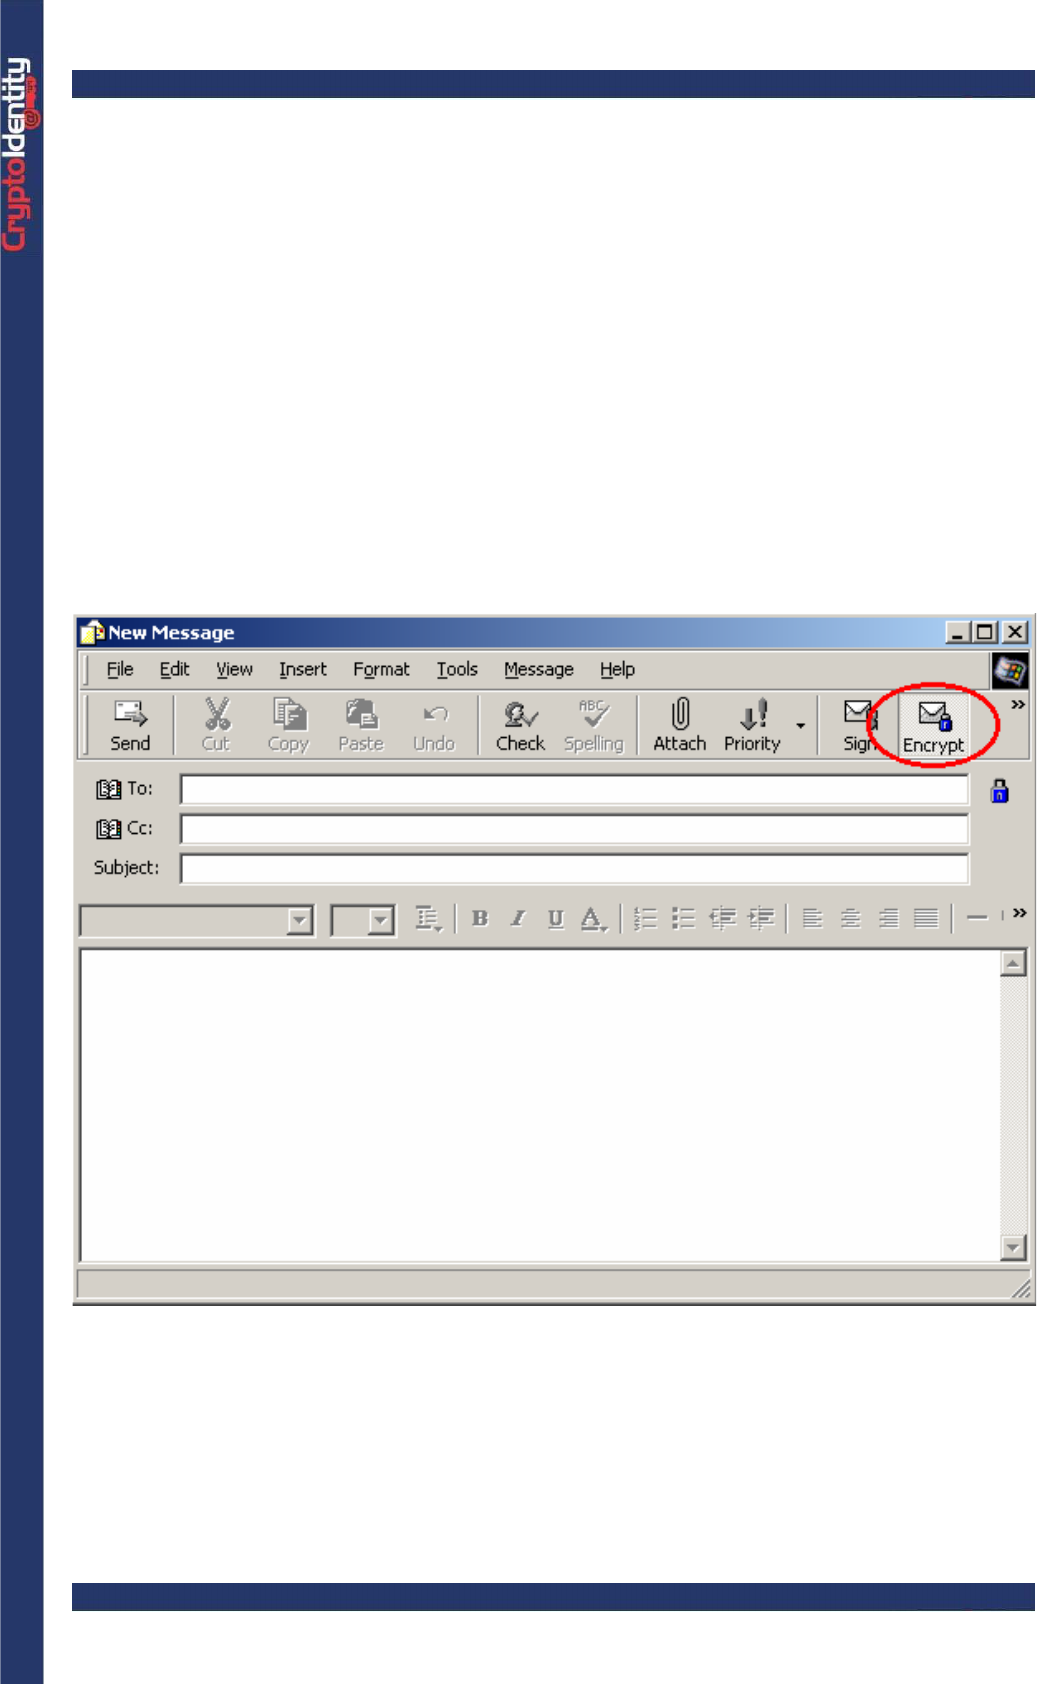
• Create a new message (select New Mail from the main windows)
• In the New Message Window, select the Encrypt option. A blue padlock is displayed
when an e-mail is encrypted.
CryptoIdentity User Guide – 5. Working with CryptoIdentity and Applications
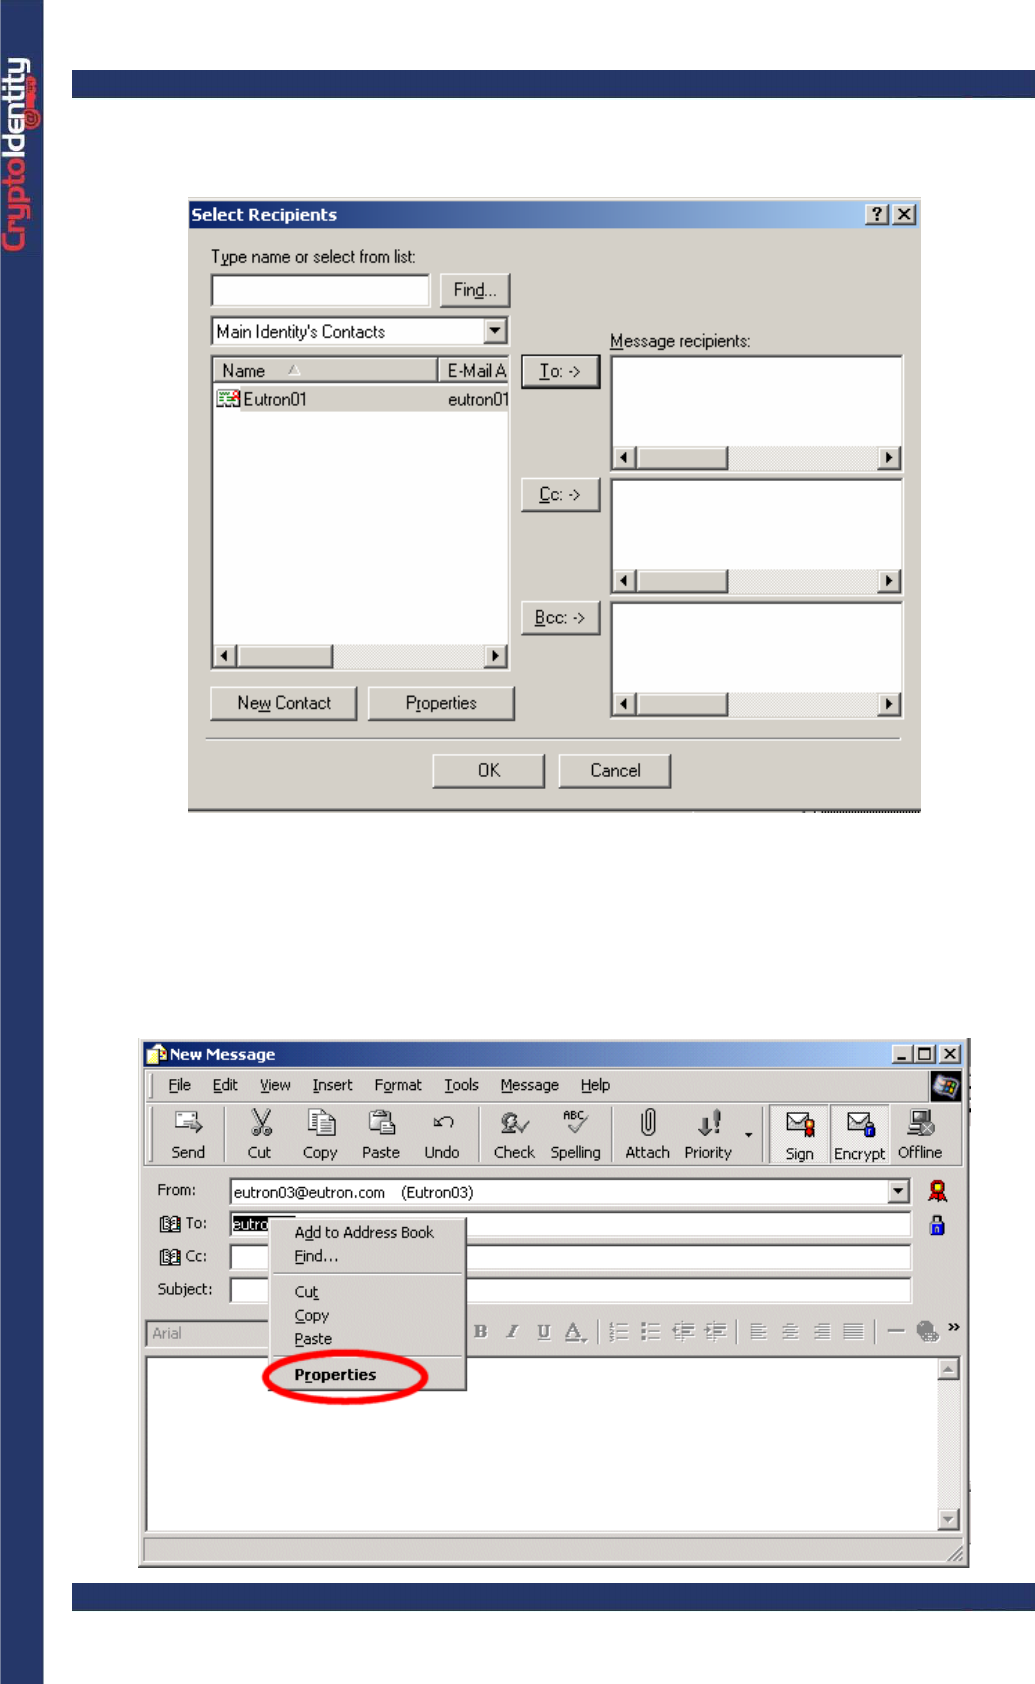
• Press To:-> and select a recipient from the list. The recipients that have associated a
Digital ID can be identified by a red ribbon in the address book:
• Double click the recipient or click To: ->.
• Click OK to add the recipient to the new e-mail message.
• To make sure that the contact has associated a digital certificate, right click on the
recipient in the To-> field and select Properties.
CryptoIdentity User Guide – 5. Working with CryptoIdentity and Applications
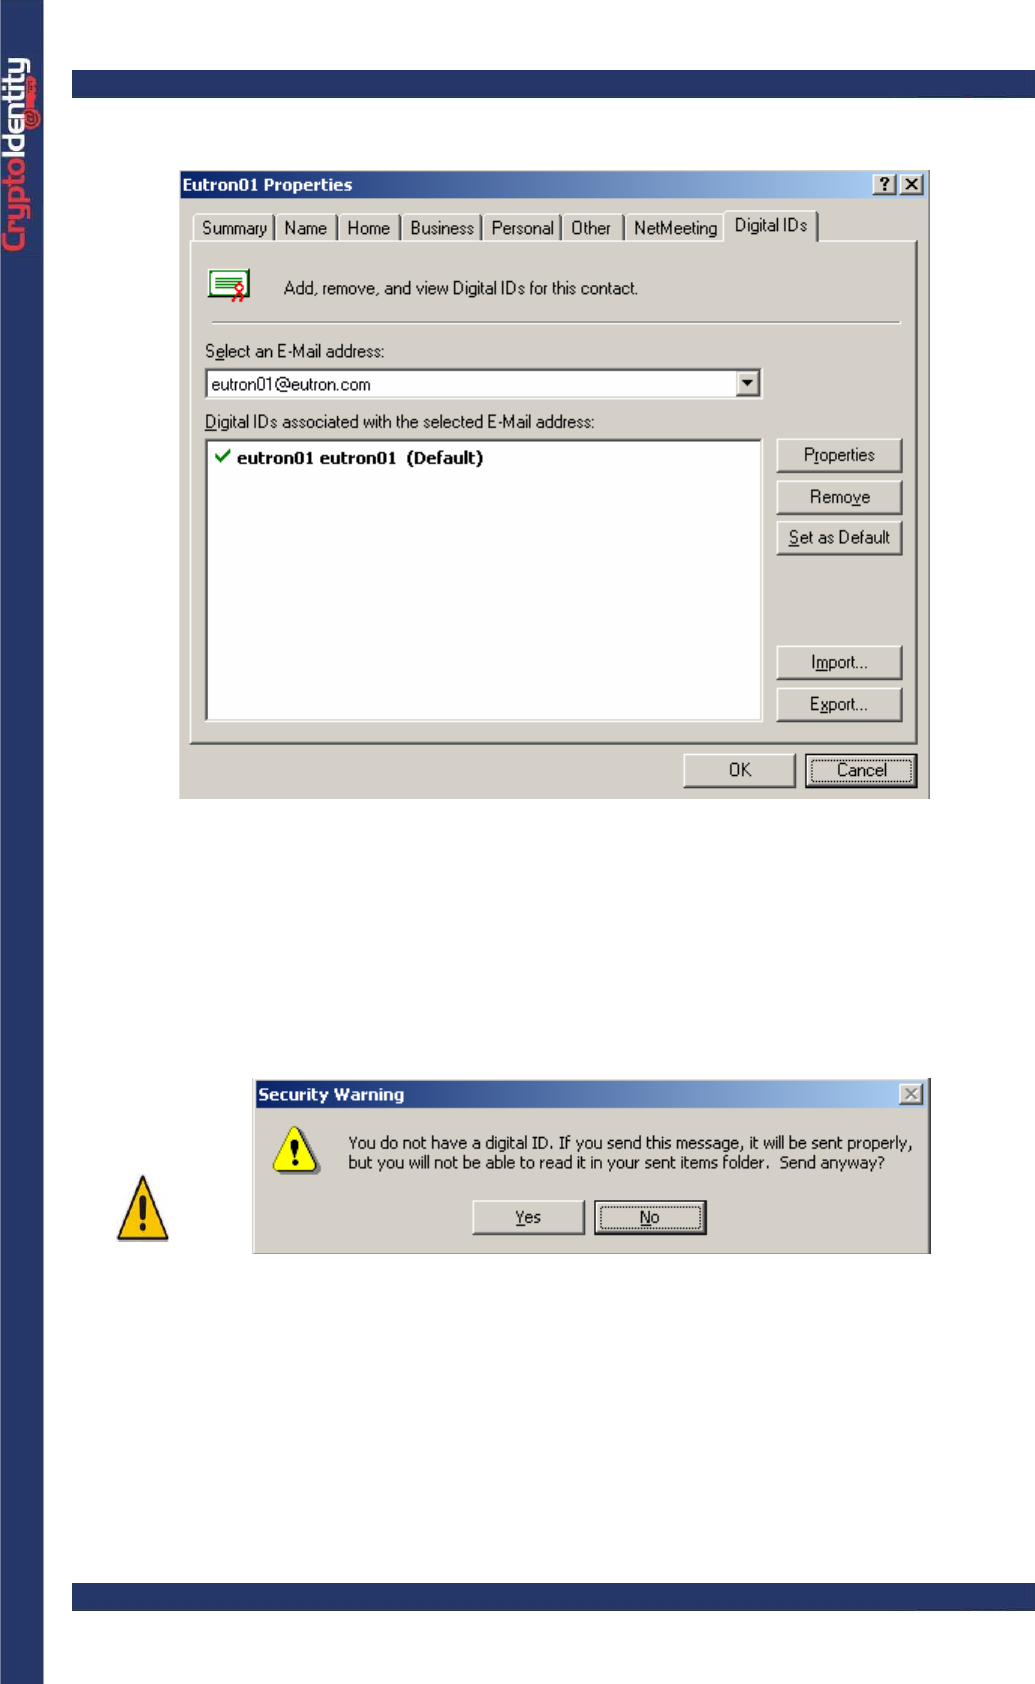
• Click the Digital IDs tab. The certificate associated to the contact is showed:
• Click Send to send the encrypted e-mail to the recipient.
If no CryptoIdentity containing the sender digital credentials is plugged into
an USB port, a message appears to advise that it will not be possible (for
the sender) to decrypt the message anymore and to access it in the Sent
items list. This is because the encryption is automatically performed using
only the recipient digital credentials.
Viceversa, if a CryptoIdentity containing the sender digital credentials is
plugged into an USB port, for the sender it will be possible to decrypt the
message and access it in the Sent Items list. This because the encryption
is automatically performed including the recipient and the sender digital
credentials.
In any case, the recipient will decrypt the message using his own digital
credentials.
CryptoIdentity User Guide – 5. Working with CryptoIdentity and Applications
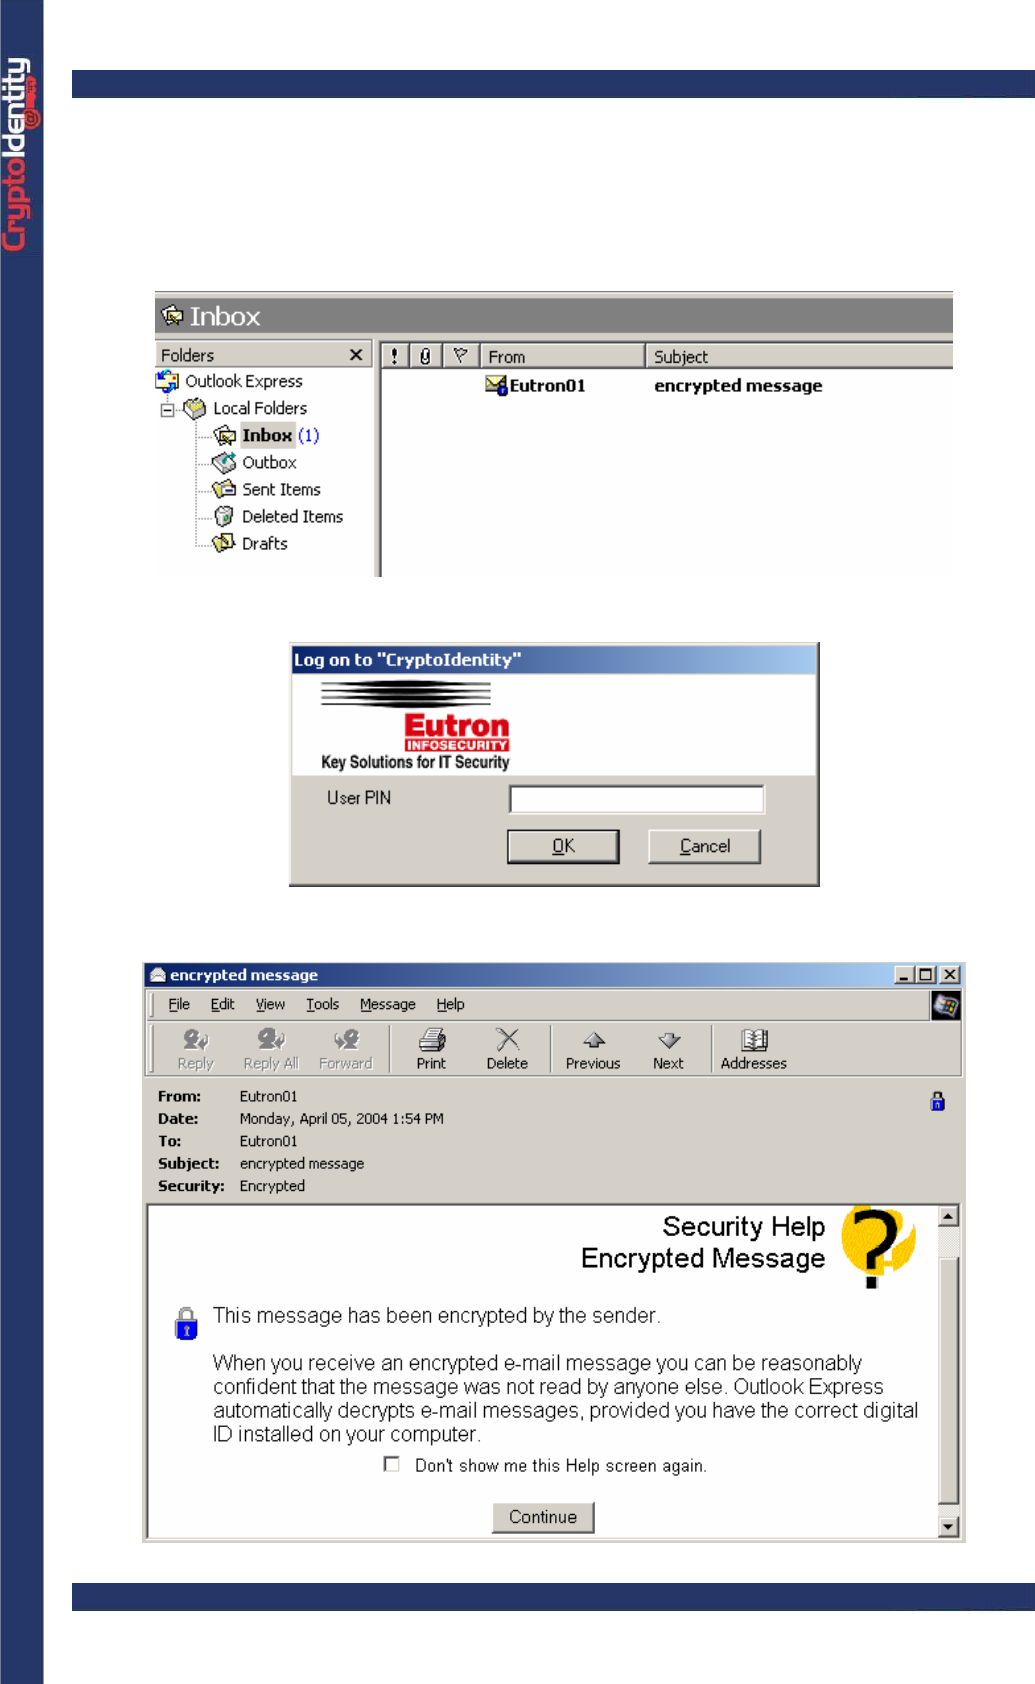
To open an encrypted e-mail:
• Plug the CryptoIdentity containing the valid digital credentials to decrypt the message.
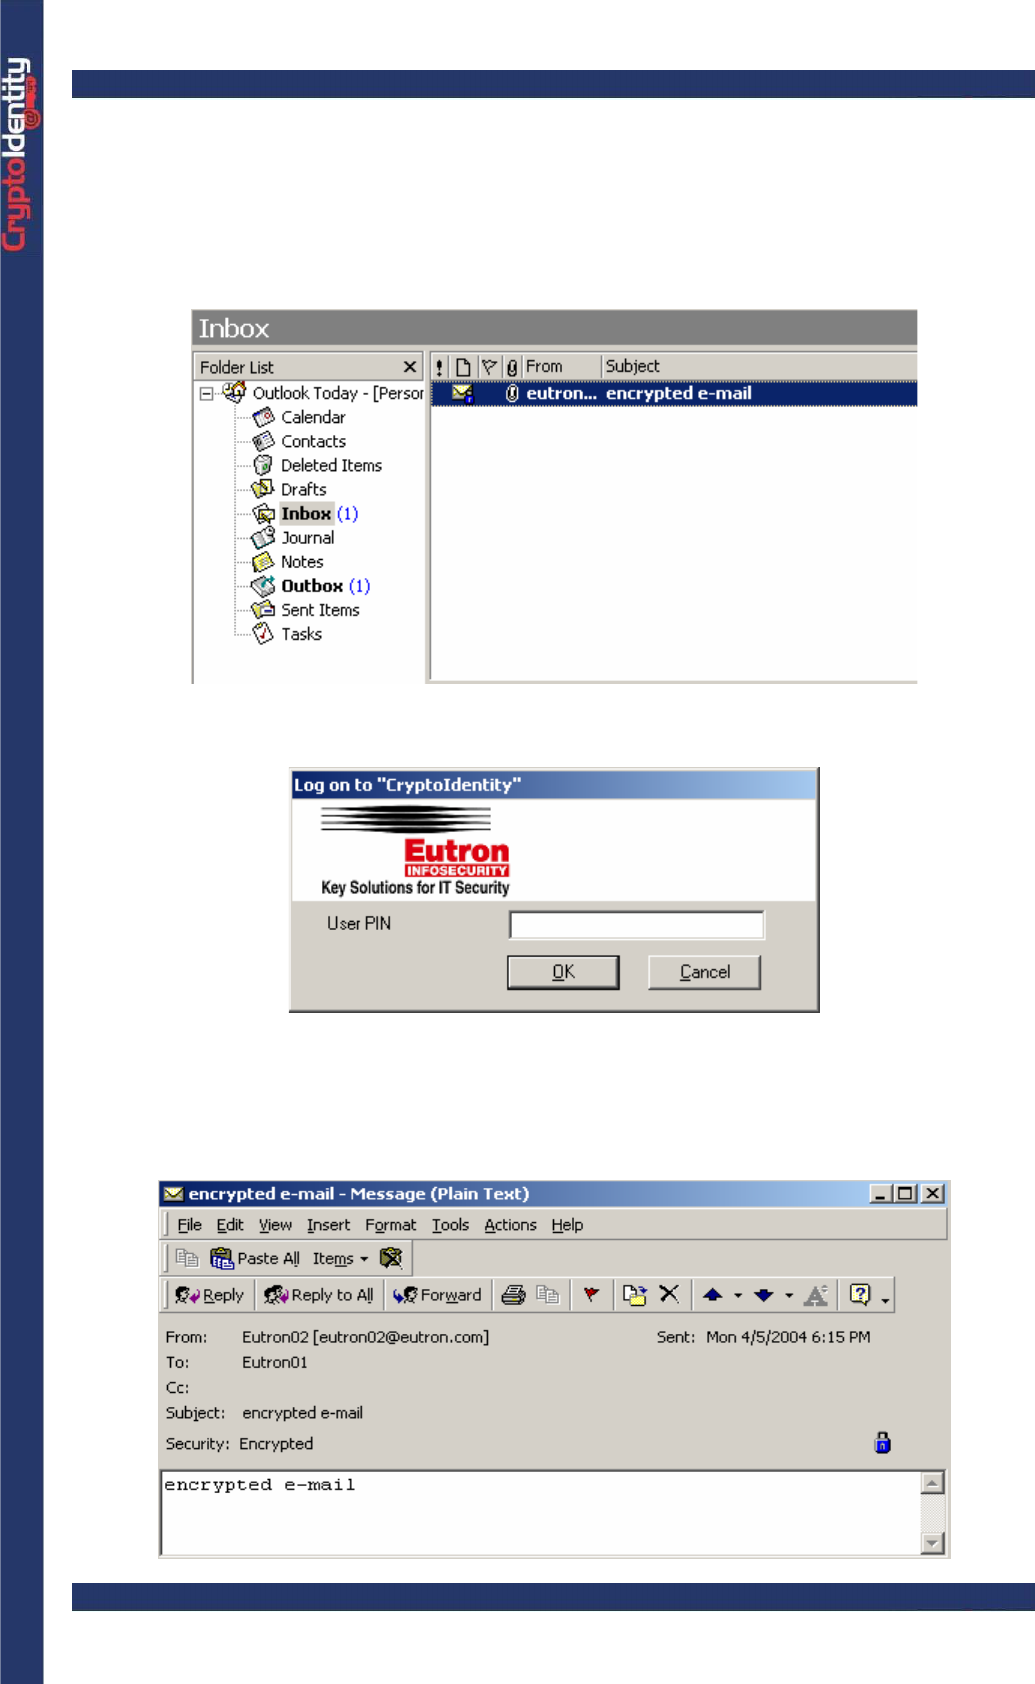
• Click on an encrypted e-mail to open it. The encrypted e-mails are recognized by a
blue padlock:
• To decrypt and open the email, the CryptoIdentity PIN is required. Insert it to proceed:
• A preview reminds that the message was encrypted. Click Continue:
CryptoIdentity User Guide – 5. Working with CryptoIdentity and Applications
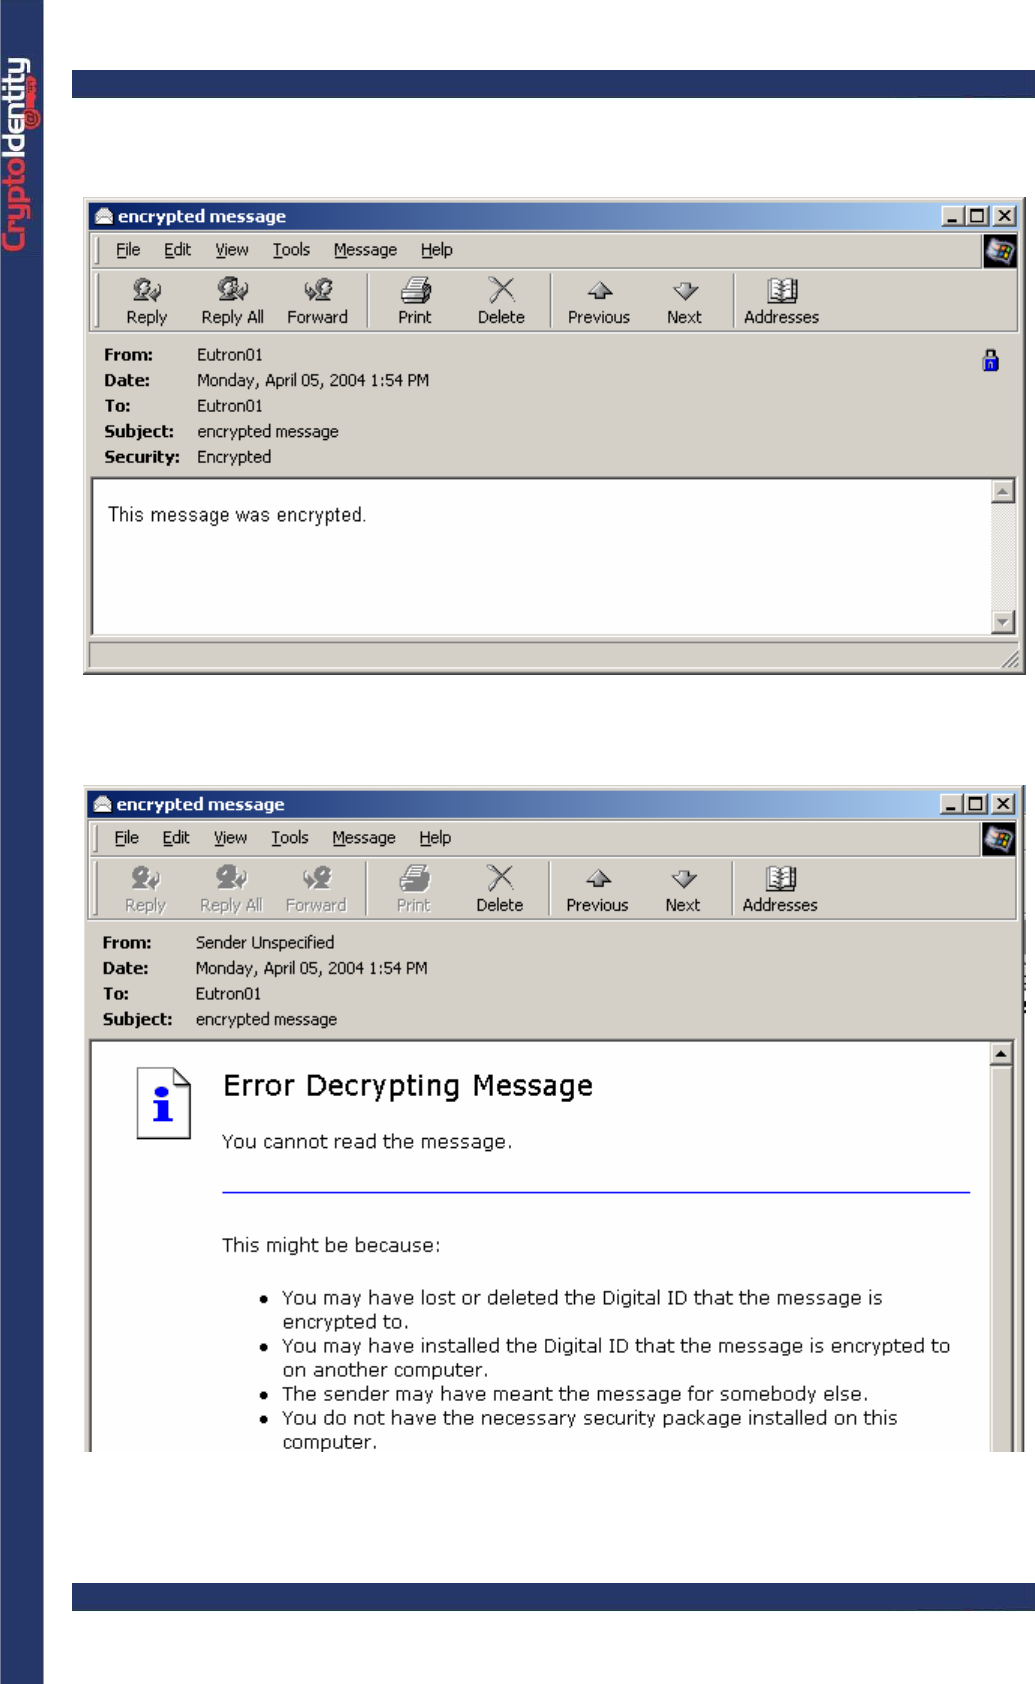
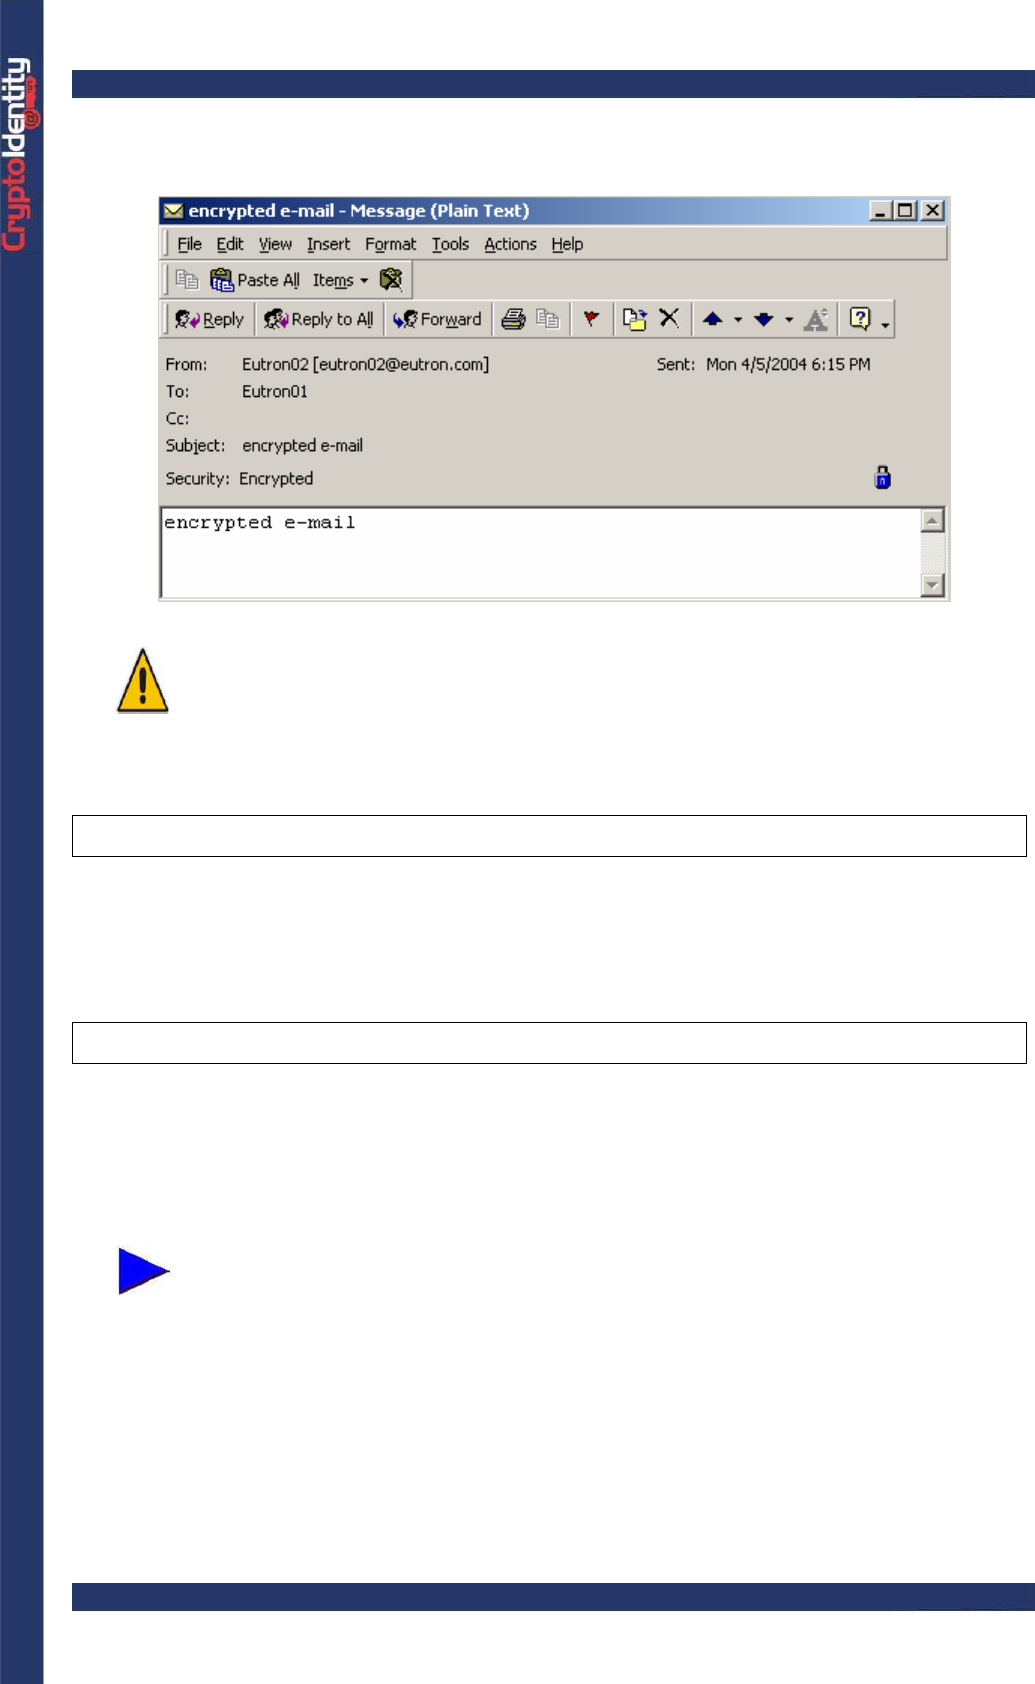
• The e-mail is automatically decrypted using the digital credentials stored into the
CryptoIdentity token and it opens as usually:
Trying to open an encrypted e-mail without inserting the CryptoIdentity where the proper
digital credentials are stored, an error appears:
CryptoIdentity User Guide – 5. Working with CryptoIdentity and Applications
5. 1. 2 MICROSOFT OUTLOOK 2000
Next sections explain the detailed instructions to configure Microsoft Outlook 2000 to
send\receive secure e-mails using the CryptoIdentity token.
5. 1. 2. 1 OUTLOOK EXPRESS CONFIGURATIONS
To enable secure e-mails with Microsoft Outlook 2000 follow these steps:
• Obtain a digital certificate and store it into CryptoIdentity. Refer to section "4.1 Storing
certificates into CryptoIdentity" for detailed instructions.
The digital certificate must be issued to the account (e-mail address) to be
used for secure e-mails.
Configure Microsoft Outlook 2000 following these steps:
• Plug the CryptoIdentity containing the digital credentials into an USB port.
• Make sure the certificate stored into the CryptoIdentity is available into the System
Certificate Store. Refer to section "4.2.1 Viewing Certificates through Microsoft certificates
store" for detailed instructions.
• Run Microsoft Outlook 2000 and select the Tools->Accounts menu.
• Select the Mail tab from the Internet Accounts screen.
• Select the e-mail account to be used for secure e-mails and press the Properties
button. The properties screen for the selected mail account is displayed.
CryptoIdentity User Guide – 5. Working with CryptoIdentity and Applications
Make sure to fill the "E-mail address" and "Reply address" fields with the e-
mail address for which the certificate has been issued.
You can obtain the e-mail address associated to the certificate by viewing
the certificate details. Refer to section "4.2.1 Viewing Certificates through
Microsoft certificates store" for detailed instructions.
• Set the account settings and press OK. Return to the Microsoft Outlook 2000 main
menu.
• From the Microsoft Outlook bar, expand the Tools menu and select the Options menu.
• Select the Security tab.

CryptoIdentity User Guide – 5. Working with CryptoIdentity and Applications
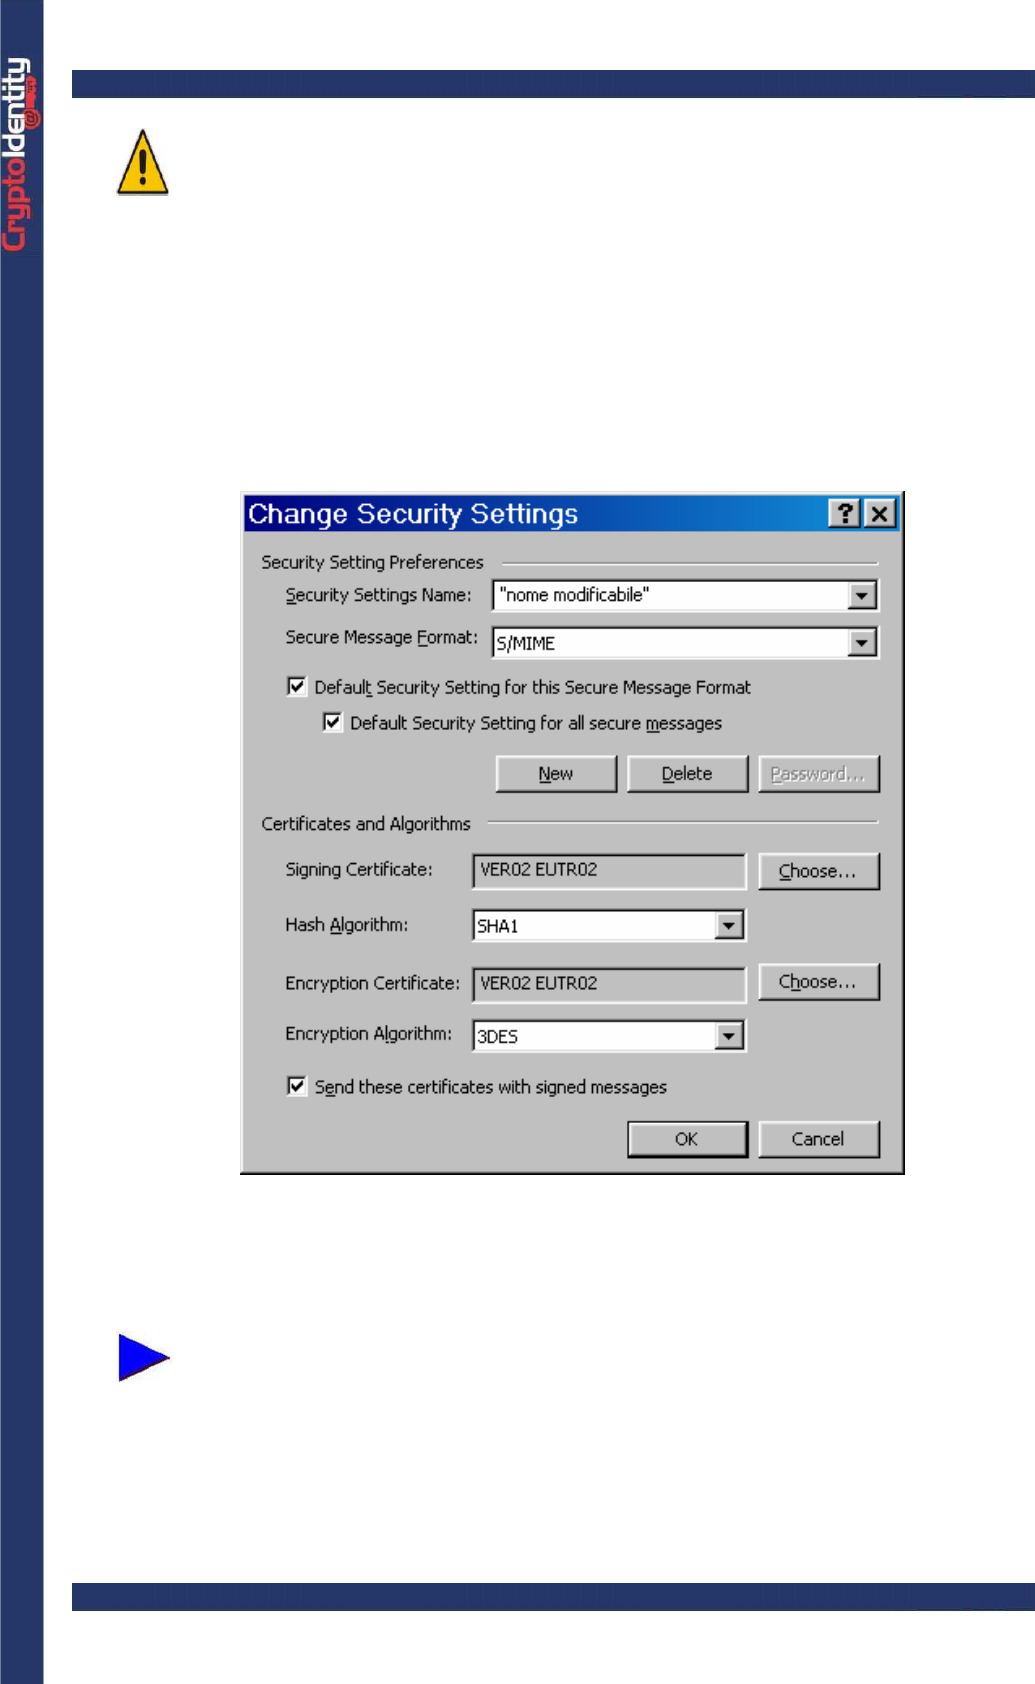
• Click the Settings button. The Change Security Settings window appears:
• To select the certificate to be used for digitally signing e-mails, press the Choose
button in the Signing Certificate section. Microsoft Outlook 2000 lists all the certificates
issued to the current account, including the certificates stored into CryptoIdentity.
• Highlight the certificate issued to the current account and press OK.
CryptoIdentity User Guide – 5. Working with CryptoIdentity and Applications
Make sure to select the digital certificate stored into CryptoIdentity that was
issued for the mail account to be used for secure e-mails.
• Repeat the process to select an Encryption Certificate if necessary. This allows other
users to encrypt e-mails they send to you.
• Choose an Encryption Algorithm from the drop down box.
• Fill in the Security Setting Preferences section according to your needs and select
the “Send these certificates with signed message” option.
• Press OK to confirm the new settings.
More information is available in the Microsoft Outlook 2000 Help. View, for
example, "Using security features" under the "Using Internet Only Features"
topic.
CryptoIdentity User Guide – 5. Working with CryptoIdentity and Applications
5. 1. 2. 2 SECURE EMAIL-S WITH MICROSOFT OUTLOOK
2000
In order to send\receive secure e-mails with Microsoft Outlook 2000, follow carefully the
instructions below.
To digitally sign the e-mails:
• Configure the Microsoft Outlook 2000 account as explained in the section "5.1.2.1
Microsoft Outlook 2000 configurations".
• Require a personal certificate for the account used and store it into CryptoIdentity
token. Refer to section "4.1 Storing certificates into CryptoIdentity " for detailed
instructions.
• Plug the CryptoIdentity containing the digital credentials used for digital signatures into
a free USB port.
• Create a new message (select New->Mail Message from the main menu)
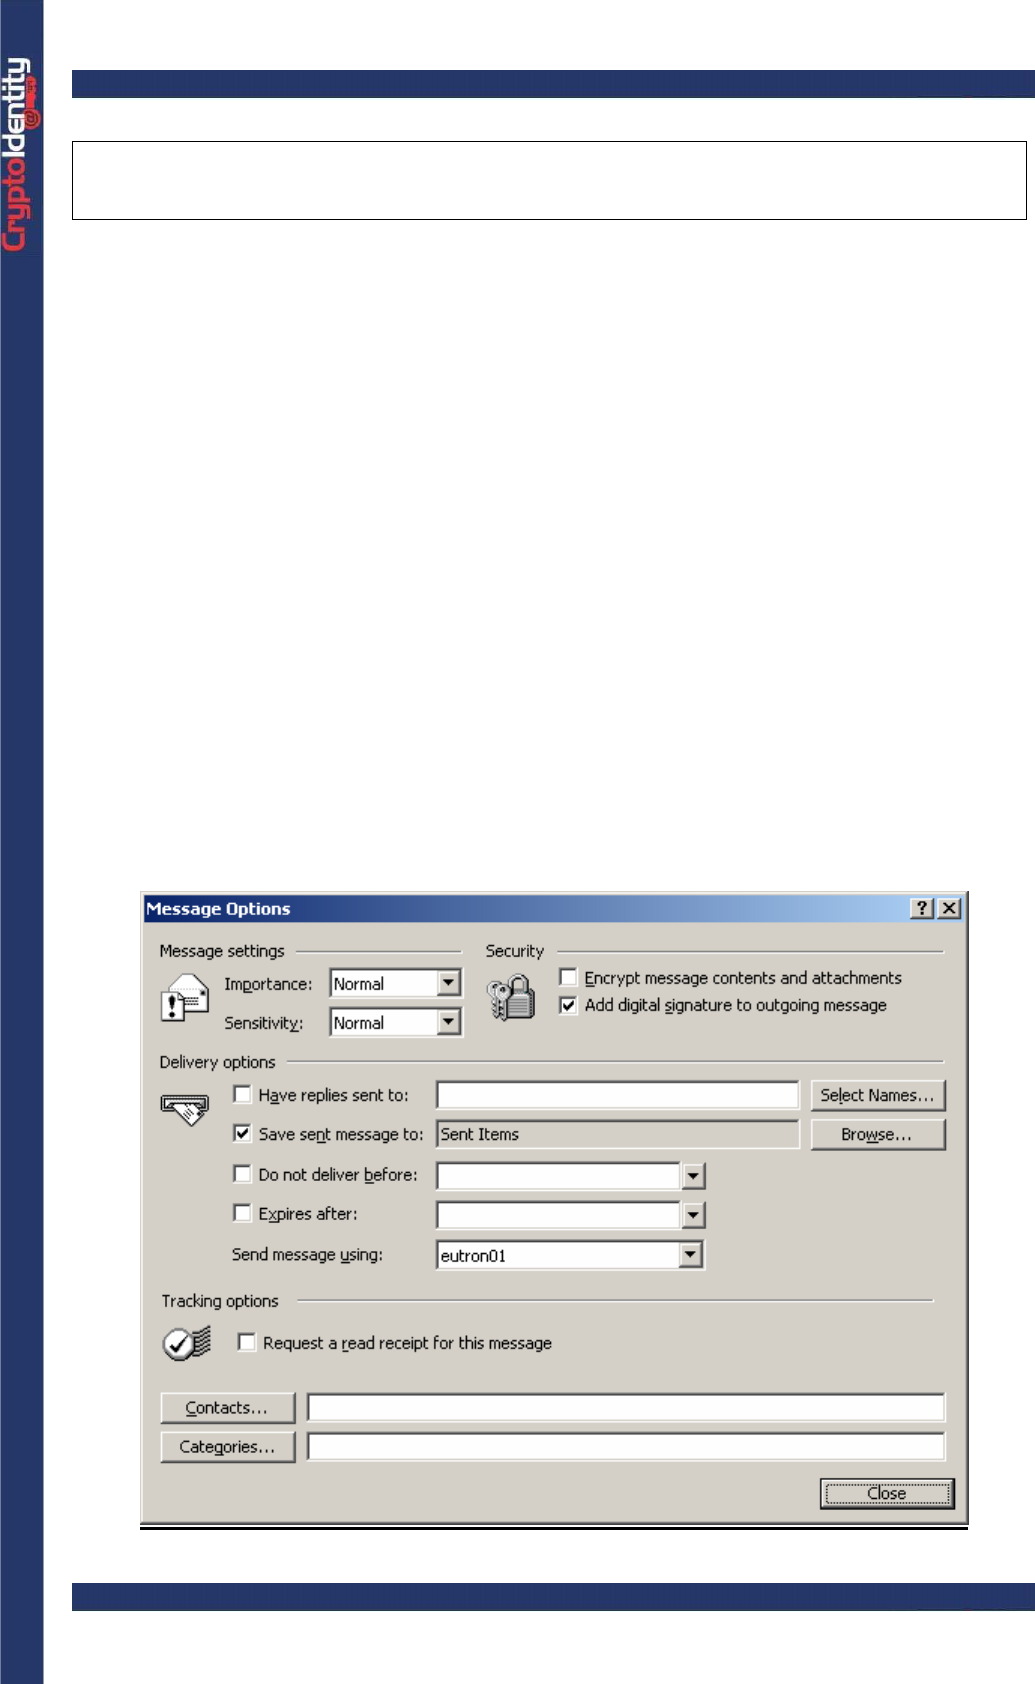
• Click the Options button
• In the Message Options windows, mark the Add digital signature to outgoing
message option.
CryptoIdentity User Guide – 5. Working with CryptoIdentity and Applications
• Click Close to confirm the new settings.
• In the message window, fill in the recipient e-mail address and the subject fields and
compose the message as usually. Then click Send.
• Microsoft Outlook2000 automatically signs the e-mail using the digital certificate stored
into the CryptoIdentity. The CryptoIdentity PIN is required before the signed e-mail is sent:
• Wait while the e-mail is digitally signed.
• From the Sent Items list, open the e-mail that has just been sent. It appears with a red
ribbon. This means it has been digitally signed:
To encrypt the e-mails:
• Obtain the digital certificates of the recipients for which you want to encrypt the e-mails.
Each certificate must be added into the Microsoft Outlook 2000 address book.
Once a digital certificate is contained into the personal address book and it
is properly associated to a contact, it is possible to send encrypted e-mails
to the contact.
CryptoIdentity User Guide – 5. Working with CryptoIdentity and Applications
• There are two ways to obtain the digital credentials of a recipient and store them into
the address book:
By mailing or transferring on diskette the certificate file. Ask the recipient to provide
his digital credentials included in a file, and then import then into the address book.
-In the Contacts address book, find out the recipient (if it does not exist, create
a new contact).
-Open the contact and click the Digital Ids tab
-Select the e-mail address to link the certificate from the Select an e-mail
address drop-down list.
-Click Import.
-Browse for the certificate file to import.
-Click Open.
-If the e-mail address within the certificate does not match the e-mail address
of the contact, an error message is displayed.
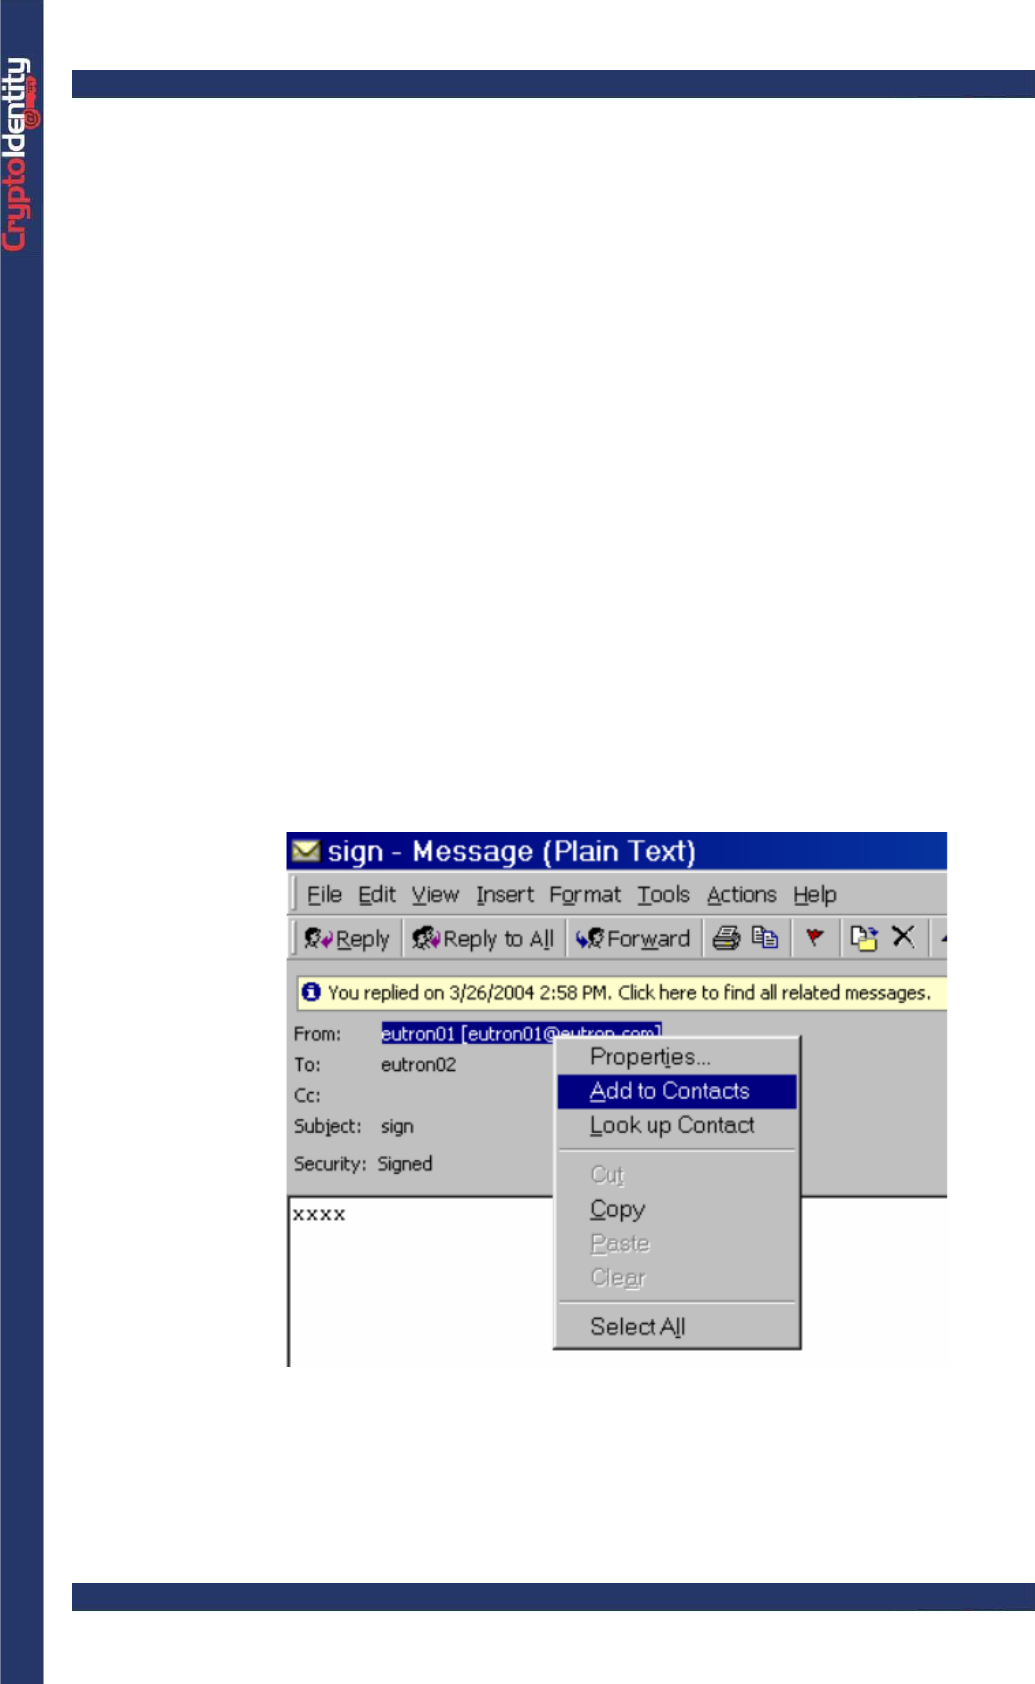
By receiving a signed e-mail from the recipient. Signing an e-mail usually appends
the digital certificate to the e-mail message.
-Open the signed e-mail and right click the mouse button on the sender. Select
Add to Contacts to add a contact including the certificate into the address
book.
• Create a new message (select New->Mail Message from the main window).
CryptoIdentity User Guide – 5. Working with CryptoIdentity and Applications
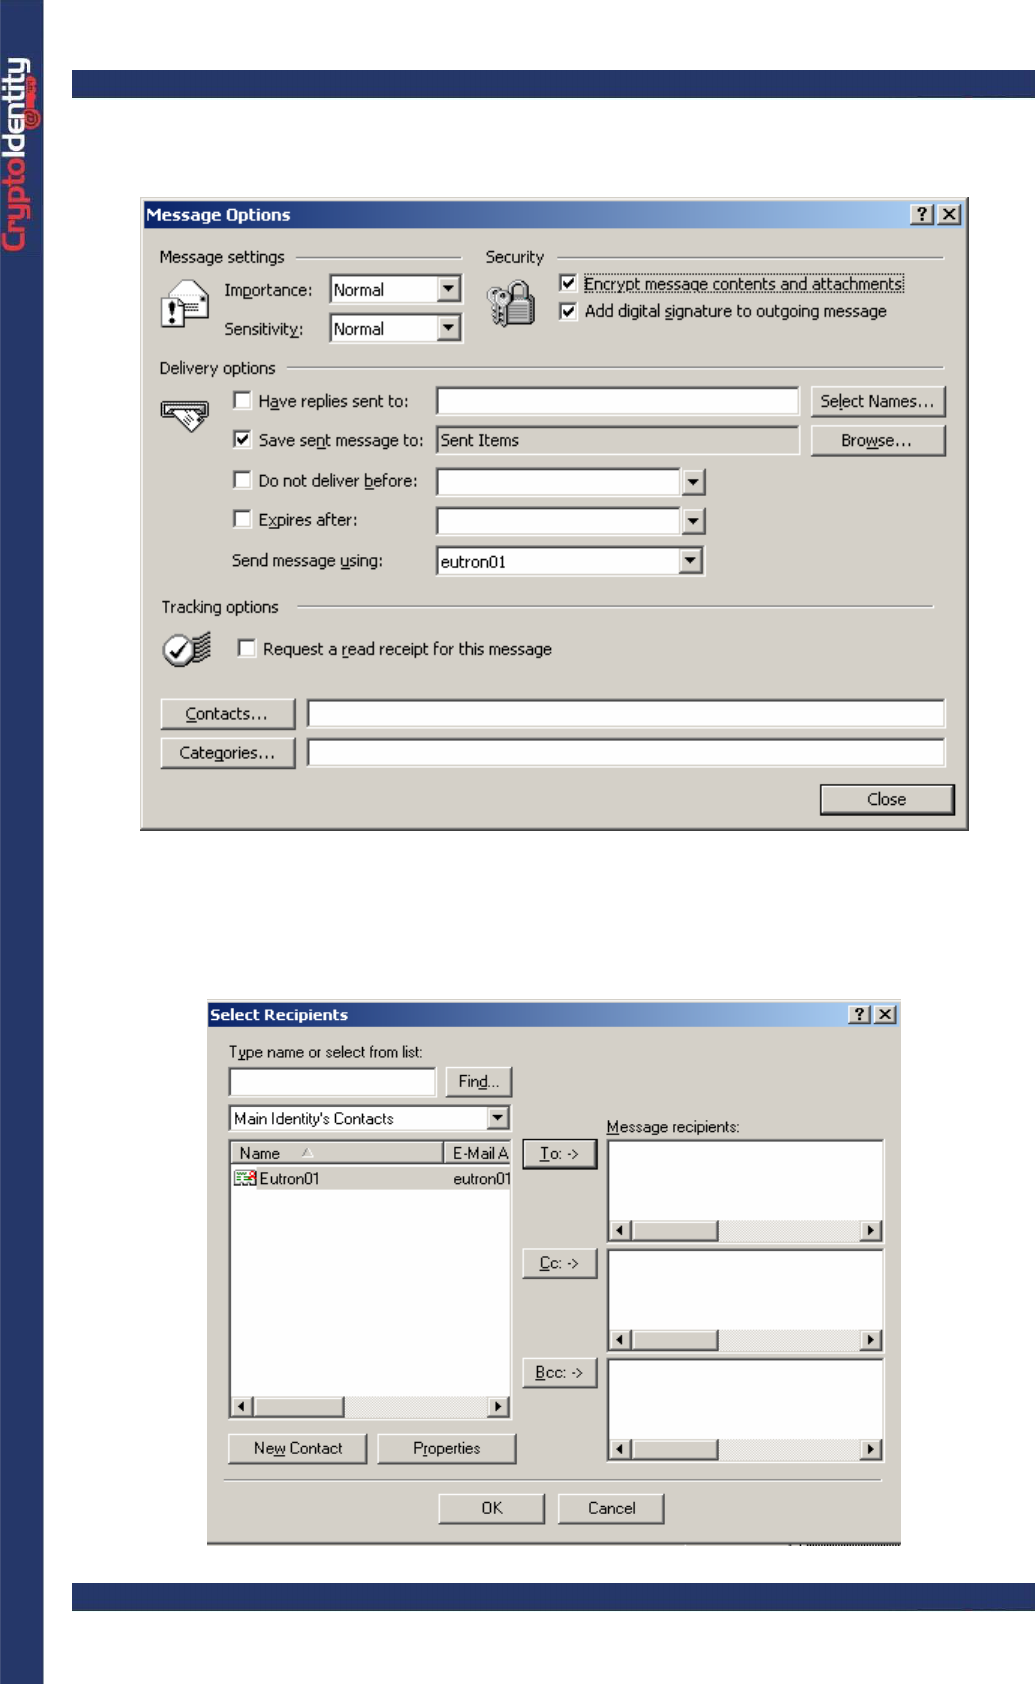
• In the Message Options windows, mark the Encrypt message contents and
attachments option.
• Click Close to confirm the new settings.
• In the message window, press To:-> and select a recipient from the list. The recipients
that have associated a Digital ID can be identified by a red ribbon in the address book:
CryptoIdentity User Guide – 5. Working with CryptoIdentity and Applications
• Double click the recipient or click To: ->.
• Click OK to add the recipient to the new e-mail message.
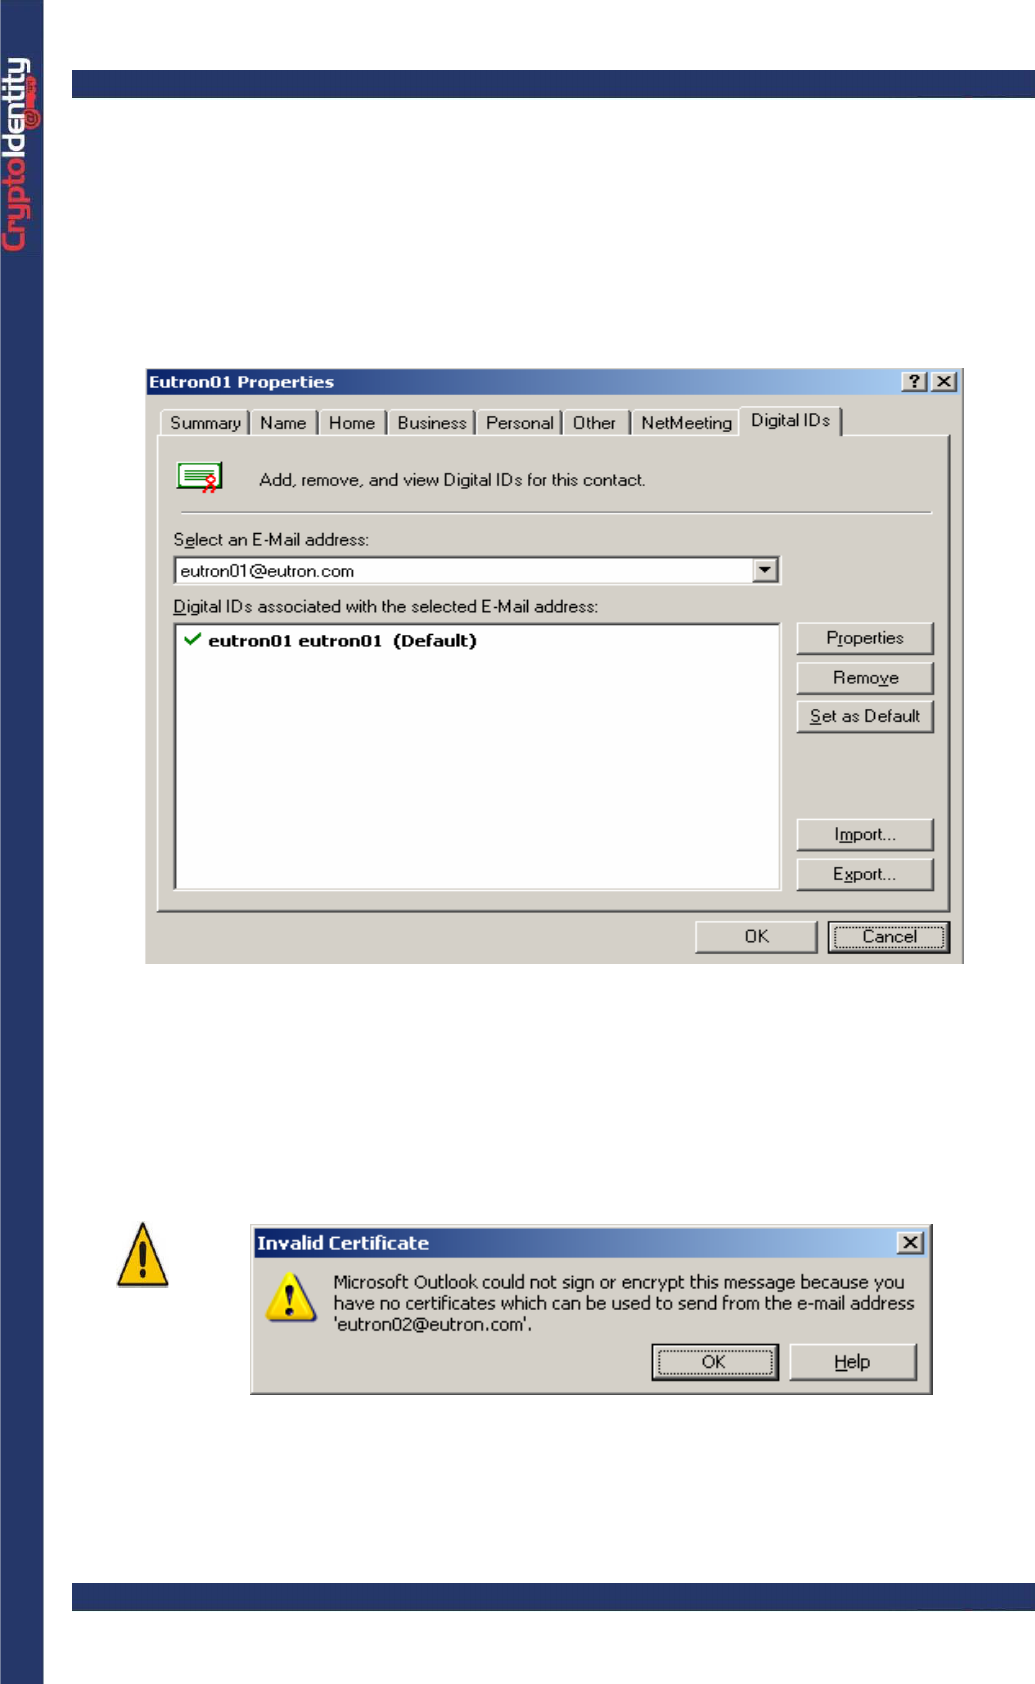
• To make sure that the contact has associated a digital certificate, right click on the
recipient in the To-> field and select Properties.
• Click the Digital IDs tab. The certificate associated to the contact is showed:
• Click Send to send the encrypted e-mail to the recipient.
If no CryptoIdentity containing the sender digital credentials is plugged into
an USB port, a message appears to advise that it is impossible to encrypt
the email. This because Microsoft Outlook 2000 needs both the sender and
the recipient digital credentials to perform the encryption.
.
CryptoIdentity User Guide – 5. Working with CryptoIdentity and Applications
To open an encrypted e-mail:
• Plug the CryptoIdentity containing the valid digital credentials to decrypt the message.
• Click on an encrypted e-mail to open it. The encrypted e-mails are recognized by a
blue padlock:
• To decrypt and open the email, the CryptoIdentity PIN is required. Insert it to proceed:
• A preview reminds that the message was encrypted. Click Continue:
• The e-mail is automatically decrypted using the digital credentials stored into the
CryptoIdentity token:
CryptoIdentity User Guide – 5. Working with CryptoIdentity and Applications
Trying to open an encrypted e-mail without inserting the CryptoIdentity where the proper
digital credentials are stored, an error appears:
Microsoft Outlook 2000 does not allow to reply Encrypted to a Signed e-
mail. To do that you need to create a new Encrypted e-mail addressed to
that specific contact.
5. 1. 3 NETSCAPE MESSENGER 4. 7
Next sections explain the detailed instructions to configure Netscape Messenger 4.7 to
send\receive secure e-mails using the CryptoIdentity token.
5. 1. 3. 1 NETSCAPE MESSENGER 4. 7 CONFIGURATIONS
To enable secure e-mails with Netscape Messenger 4.7 follow these steps:
• Obtain a digital certificate and store it into CryptoIdentity. Refer to section "4.1 Storing
certificates into CryptoIdentity" for detailed instructions.
The digital certificate must be issued to the Identity (e-mail address) to be
used for secure e-mails.
• Plug the CryptoIdentity containing the digital credentials into an USB port.
• Open Netscape Messenger and check if the CryptoKit security module is properly
installed. To check it, select the menu Communicator->Tools->Security Info.
• The CryptoIdentity PIN might be required to access the Security Info panel. Insert it to
proceed.
CryptoIdentity User Guide – 5. Working with CryptoIdentity and Applications
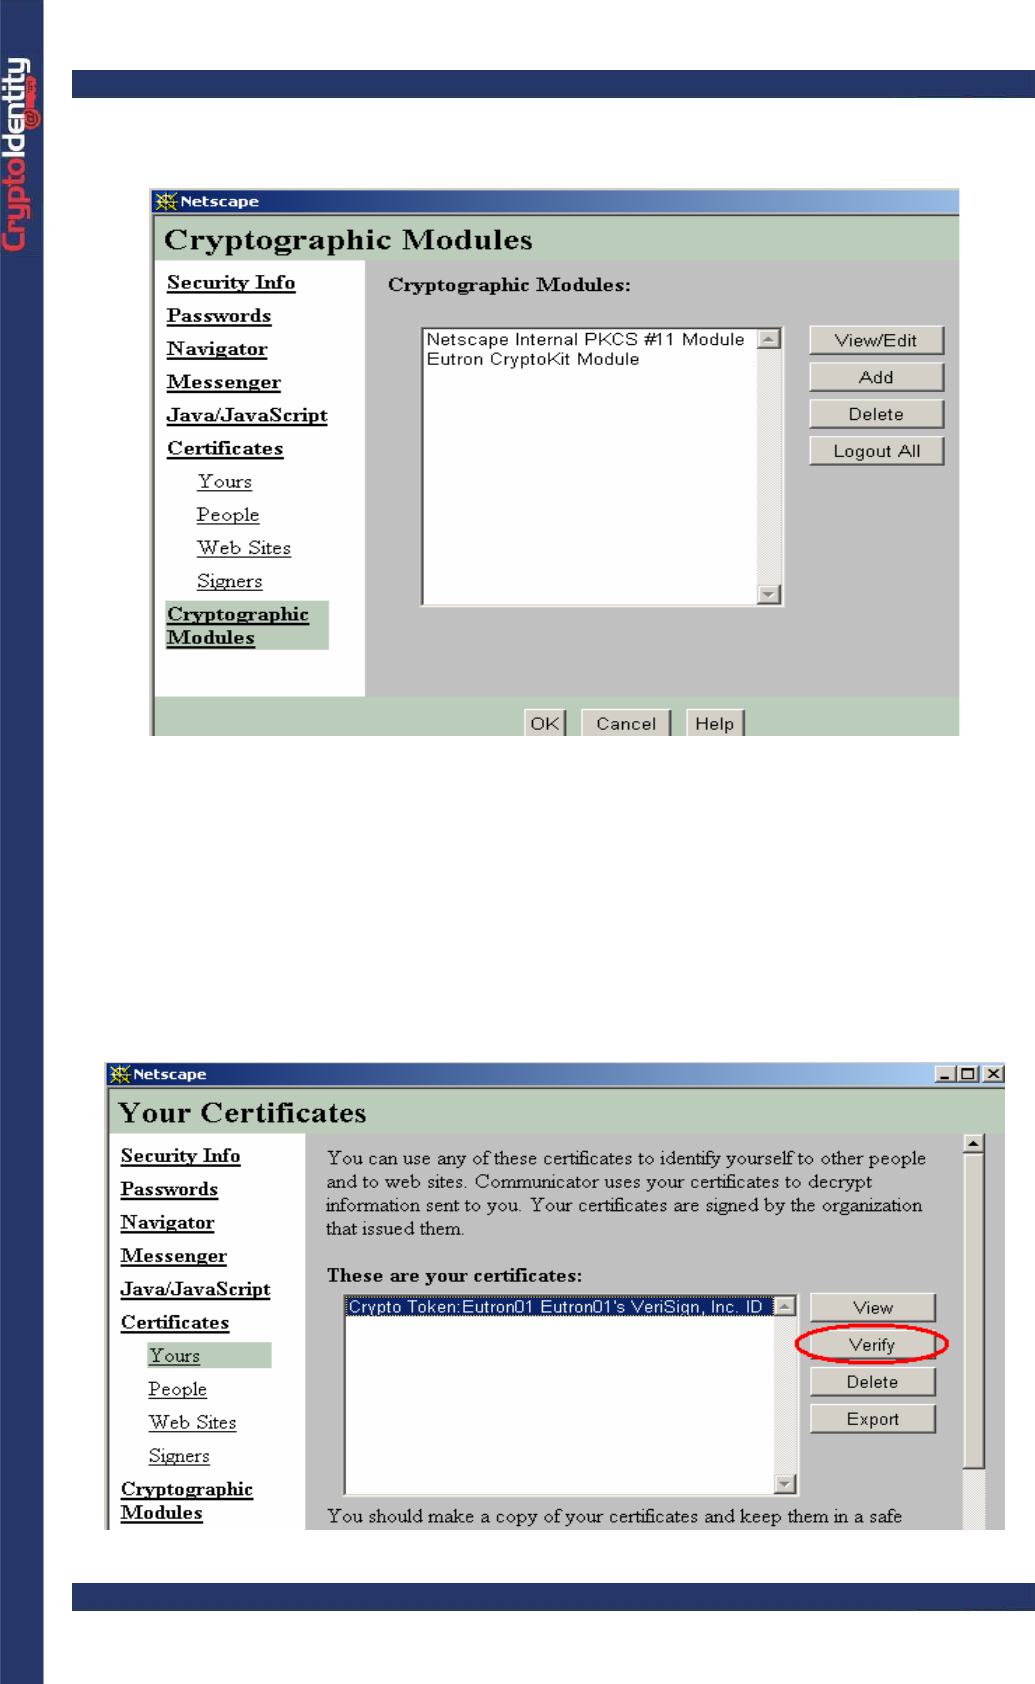
• In the Security Info Panel, open the Cryptographic modules section and verify if the
CryptoKit module is present:
• If the CryptoKit security module is not installed, it is possible to add it by installing or
maintaining the CryptoKit. When selecting the CryptoKit components to install, select the
"Netscape" option. The CryptoKit security module will be automatically installed. For
details refer to sections "2.1 Installing CryptoKit" and "2.1.2 Maintaining CryptoKit".
• Check if the certificate stored into CryptoIdentity is properly recognized by Netscape
Messenger. To do so, select the Certificate->Yours section. The list of the available
certificates appears.
• Highlight the certificate and verify if it is available for digital signatures. To do so, click
the Verify button located in the right side of the window.
CryptoIdentity User Guide – 5. Working with CryptoIdentity and Applications
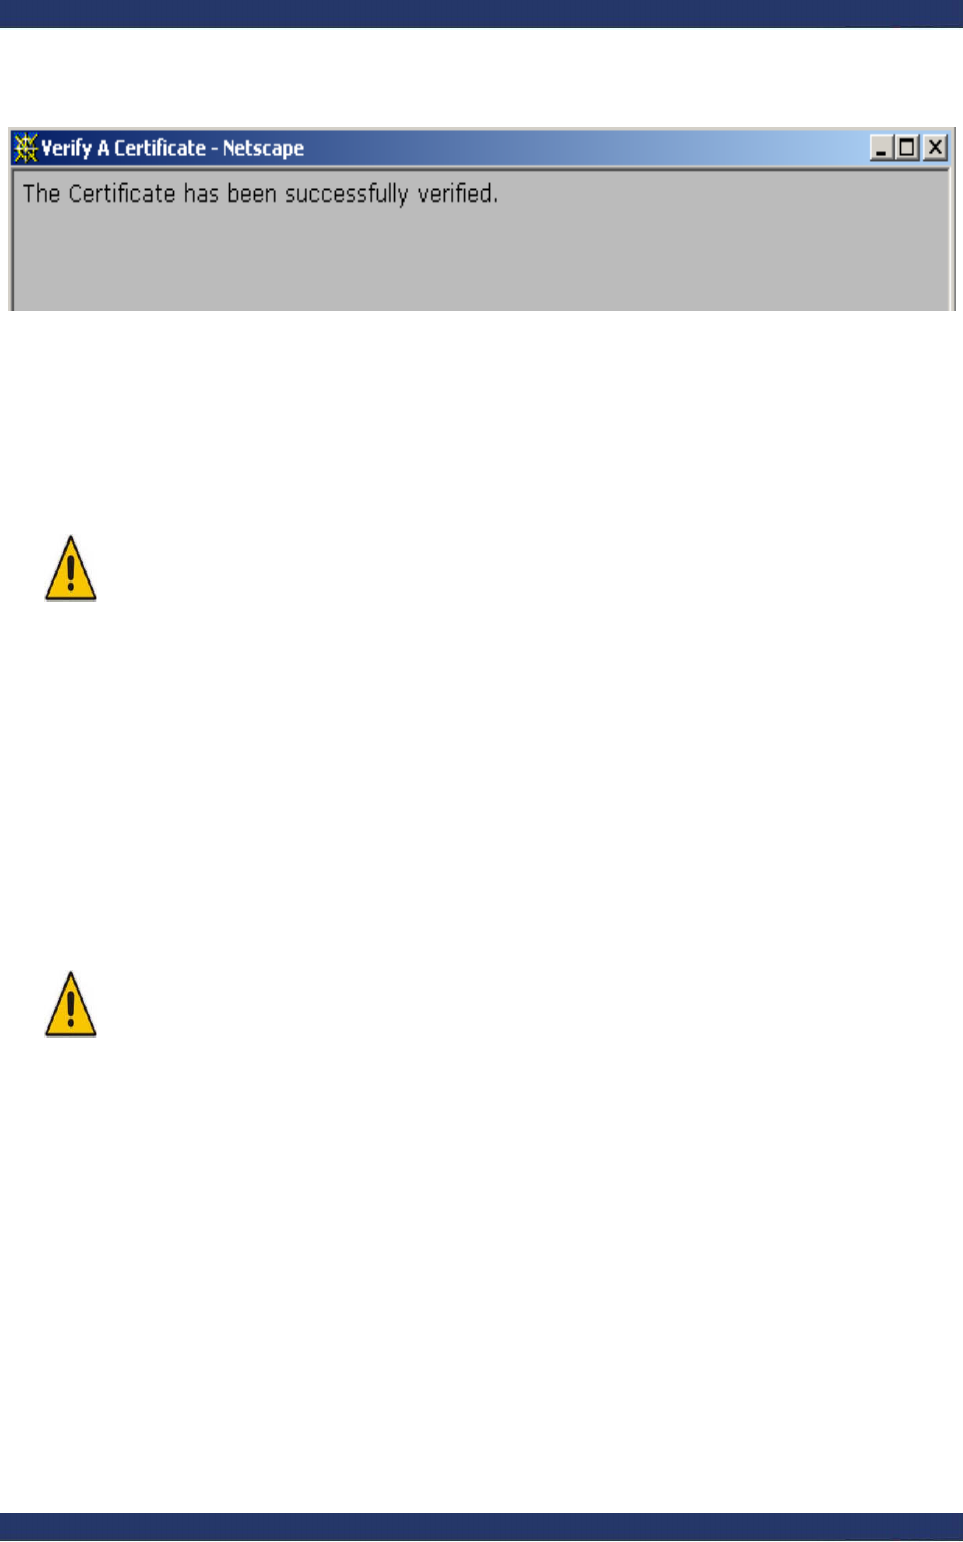
• If the certificate and related Certificate Signer's Certificate (which is the certificate of
the Certification Authority who issued it) are available, this message appears:
• If the certificate stored into CryptoIdentity or the related Certificate Signer are not
available, an error appears.
Using Netscape Messenger 4.7 it is possible to digitally sign the e-mails
only on the machine where the certificate was issued, or on other machines
where the Certificate Signer's Certificate is already present. To check if the
Certificate Signer's Certifcate is present, open the Certificate->Signers
section in the Security Info Panel.
For further details, consult the Netscape Messenger help.
Configure Netscape Messenger following these steps:
• Run Netscape Messenger and select the Edit->Preferences menu.
• Select the Identity section. Fill the Your Name, E-Mail address and Reply-to-
address fields with the proper values.
•
Make sure to fill the "Your Name" and "Reply to..." fields with the e-mail
address for which the certificate has been issued.
• Select the Server section and complete the Identity configurations.
• Click OK to commit the new settings.
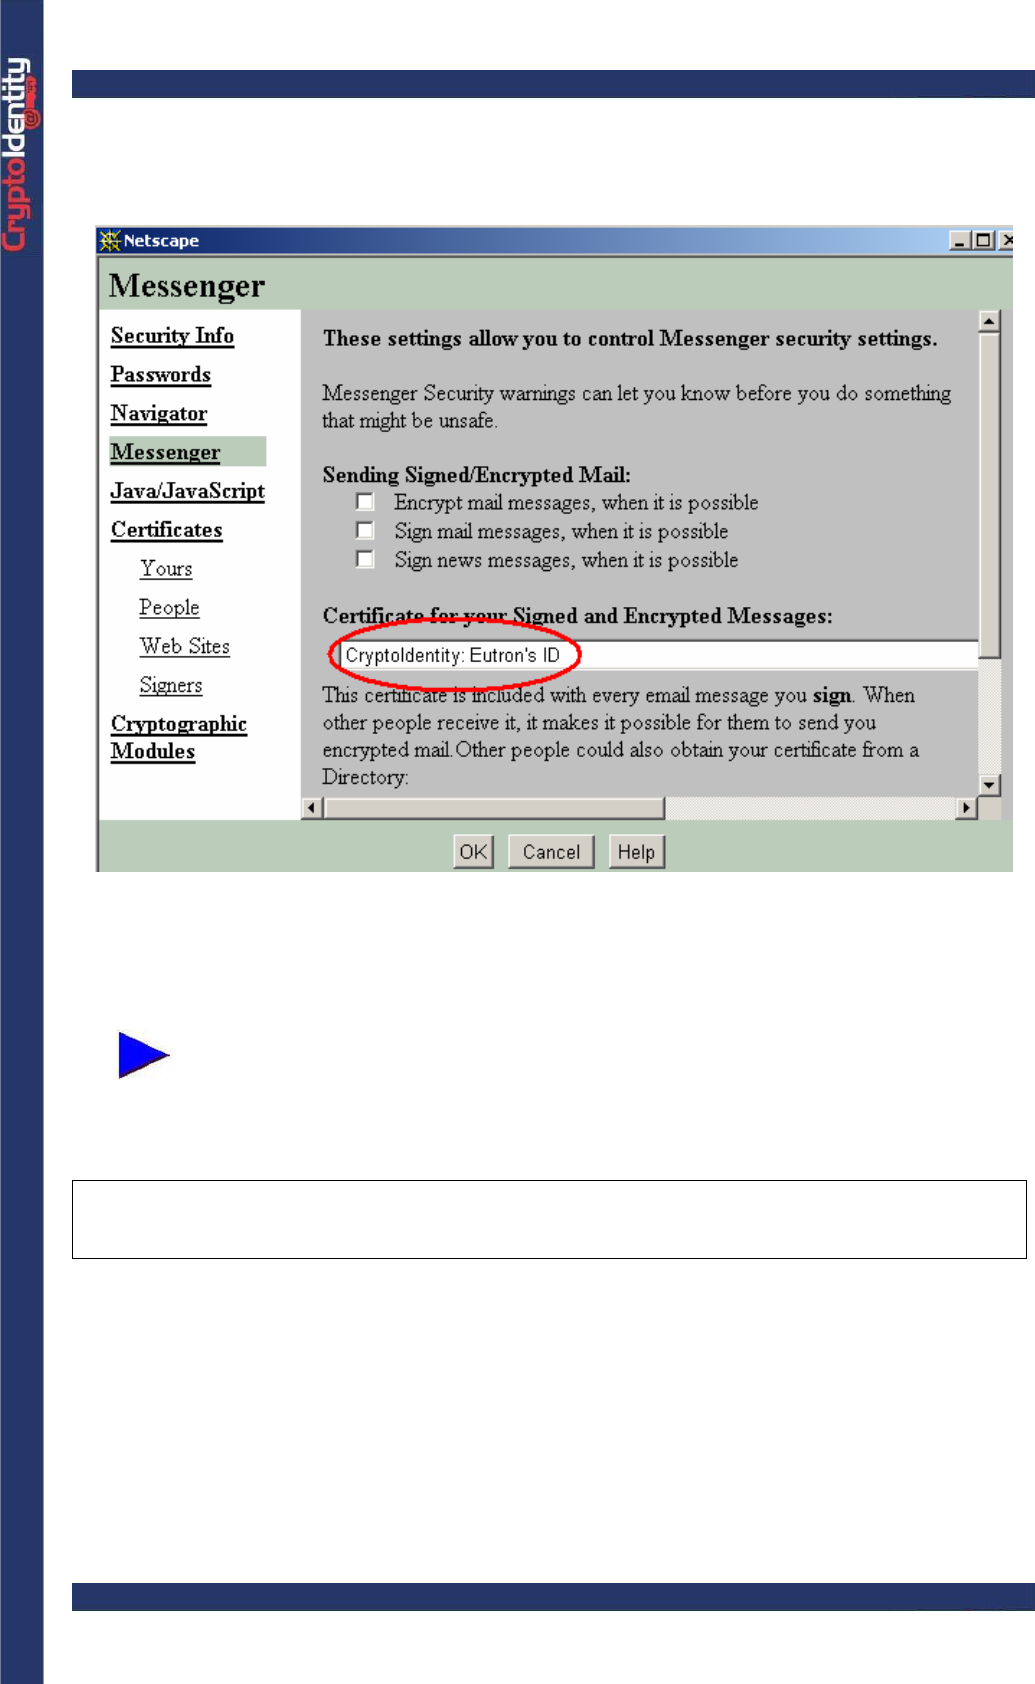
CryptoIdentity User Guide – 5. Working with CryptoIdentity and Applications
• Select the menu Communicator->Tools->Security Info and open the Messenger
section. Select the digital certificate stored into CryptoIdentity to be used to digitally sign
the e-mails:
• Click OK to confirm the new settings.
More information is available in the Netscape Messenger Help. Open it and
view the "Security" topic.
5. 1. 3. 2 SECURE EMAIL-S WITH NETSCAPE
MESSENGER 4. 7
In order to send\receive secure e-mails with Netscape Messenger, follow carefully the
instructions below.
To digitally sign the e-mails:
• Configure the Netscape Messenger Identity as explained in the section "5.1.3.1
Netscape Messenger 4.7 configurations".
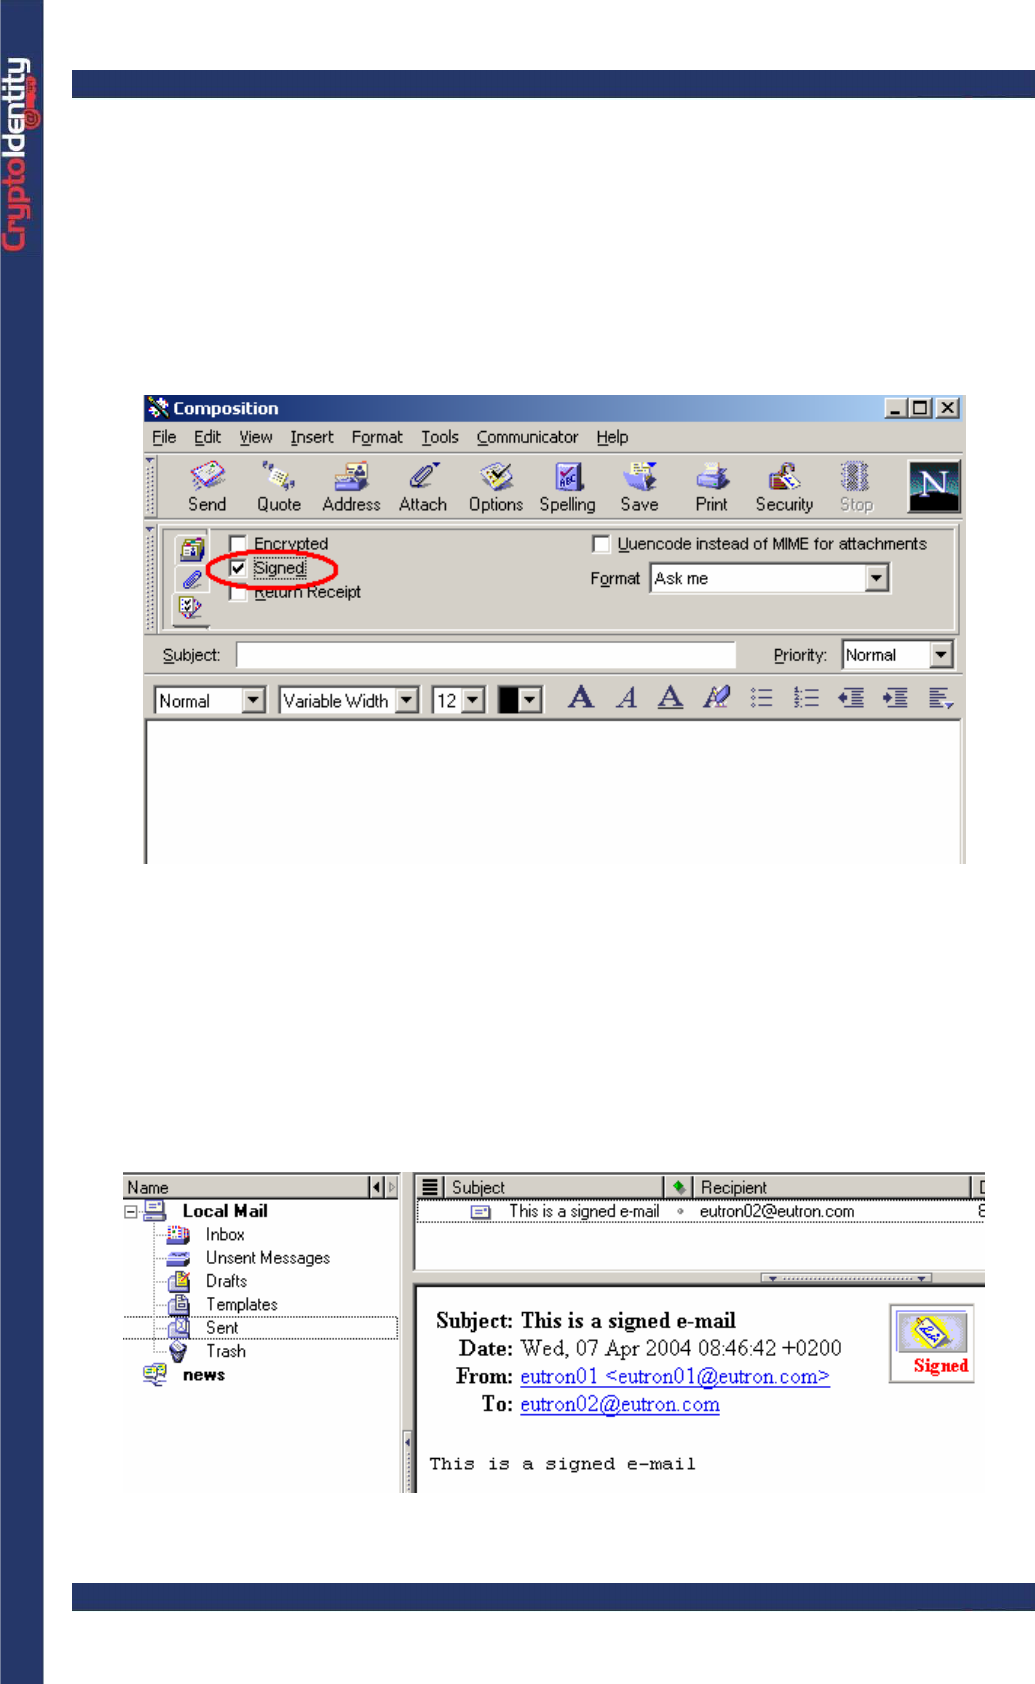
CryptoIdentity User Guide – 5. Working with CryptoIdentity and Applications
• Require a personal certificate for the Identity used and store it into CryptoIdentity token.
Refer to section "4.1 Storing certificates into CryptoIdentity " for detailed instructions.
• Plug the CryptoIdentity containing the digital credentials used for digital sign into a free
USB port.
• Create a new message (select New Msg from the main windows)
• In the Composition Window, press the Options button and select the Signed option:
• Fill in the recipient e-mail address and the subject fields and compose the message as
usual. Then click Send.
• Netscape Messenger automatically signs the e-mail through the digital credentials
stored into the CryptoIdentity.
• Open the Sent Items list, the e-mail appears including the Signed mark. This means it
has been digitally signed:
• Click the Signed symbol to get information about the digital signature.
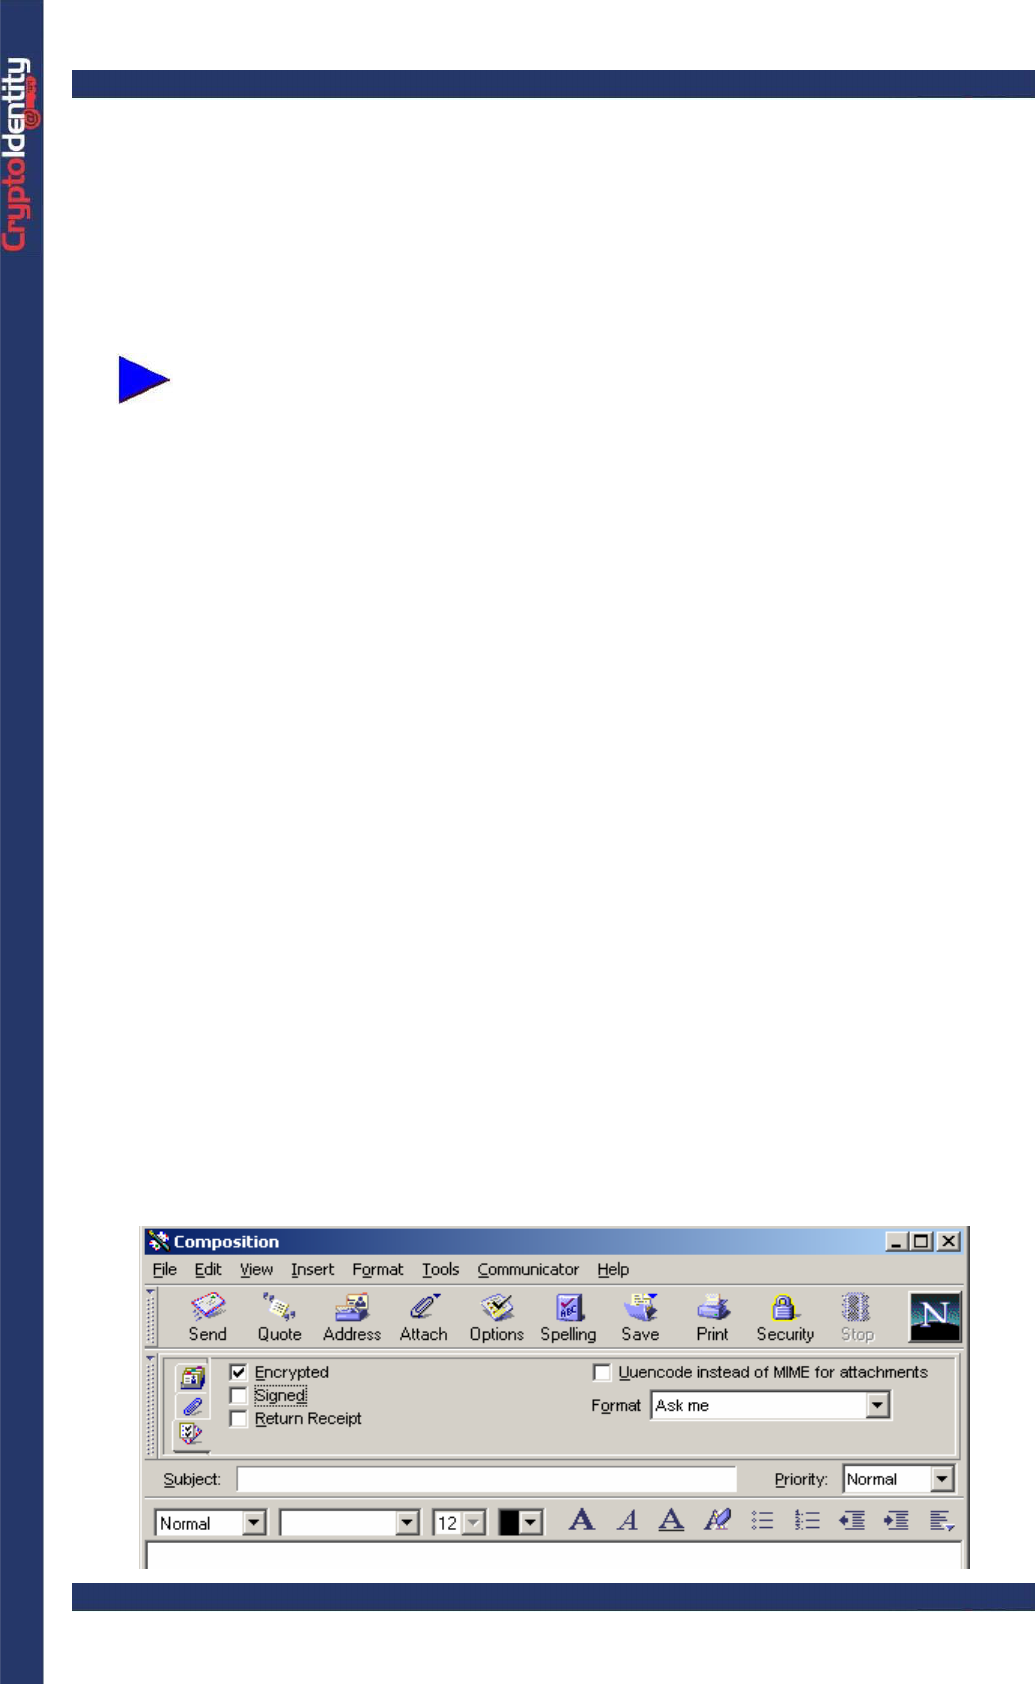
CryptoIdentity User Guide – 5. Working with CryptoIdentity and Applications
To encrypt the e-mails:
• Obtain the digital credentials of the recipients for which you want to encrypt the e-mails.
Each certificate must be added into the Netscape Messenger Other People's Certificates
panel. To open the Other People's Certificates panel, Open the Security Info-
>Certificates->People section.
Once a digital certificate is contained into the Other People's Certificates
panel, it is possible to send encrypted e-mails addressed to the certificate
owner.
• There are two ways to obtain the digital credentials of a recipient and store them into
the Other People's Certificates panel:
By using Network Directory.
-To import a certificate of other people from Network Directory click on
Security info-> Other People’s Certificates->Search Directory button. From
the Network Directory it is possible to obtain the digital certificates of people
who has sent them to the directory.
-To send a certificate to the Network Directory, in order to make it available to
other people for encryption, click on Security Info->Messenger->Send
Certificate to Directory button. To learn more about Network Directory refer
to Netscape Messenger Help.
By receiving a signed e-mail from the recipient. Signing an e-mail usually appends
the digital certificate to the e-mail message.
-When a digitally signed e-mail is received and opened through Netscape
Messenger, the digital credentials are automatically added into the Other
People's Certificates panel.
• Create a new message (select New Msg from the main menu)
• In the Composition window, click the Options button and select the Encrypted
option:
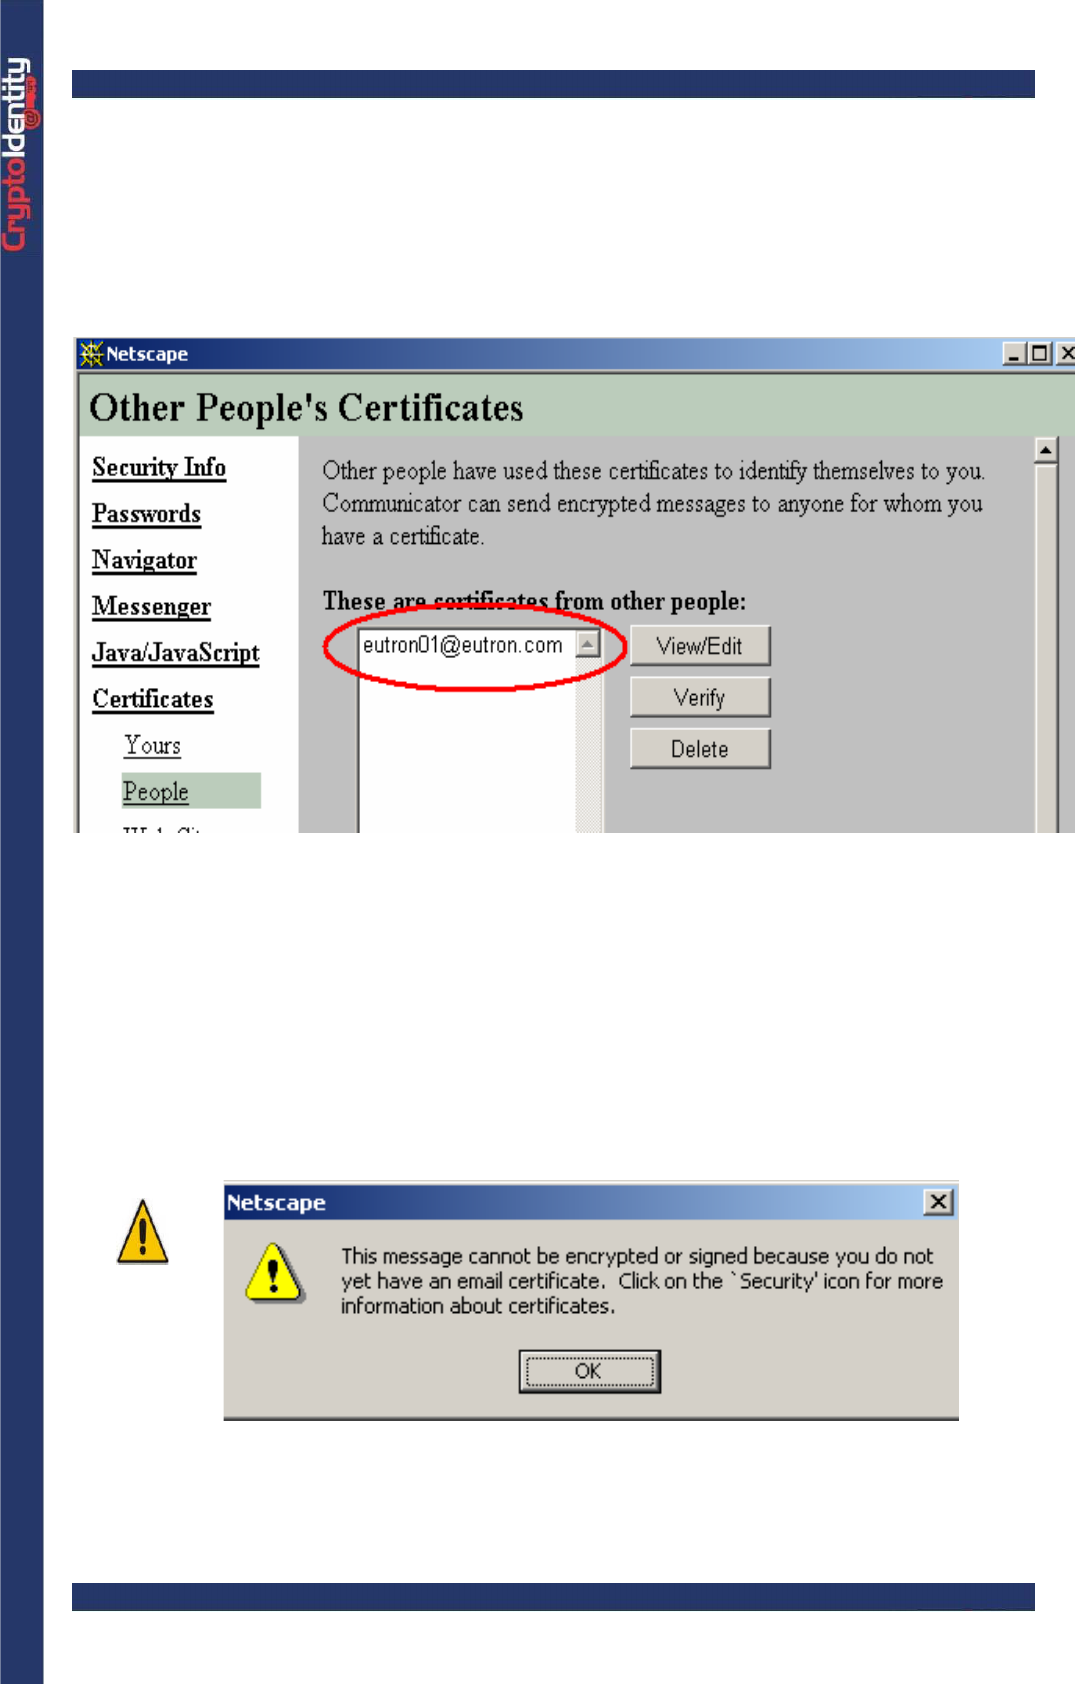
CryptoIdentity User Guide – 5. Working with CryptoIdentity and Applications
• Fill in the recipient e-mail address and the subject fields and compose the message as
usually.
• Make sure that the recipient digital credentials are available to perform the encryption.
To do this, click the Security button and open the Certificates->People section. Check
the Other People's Certificates list to verify if the recipient certificate to be used for
encryption is present :
• Close the Other People's Certificate panel.
• Click Send to send the encrypted e-mail to the recipient.
If no CryptoIdentity containing the sender digital credentials are plugged
into an USB port, a message appears to advise that it is impossible to
encrypt the email. This because Netscape Messenger needs both the
sender and the recipient digital credentials to perform the encryption.
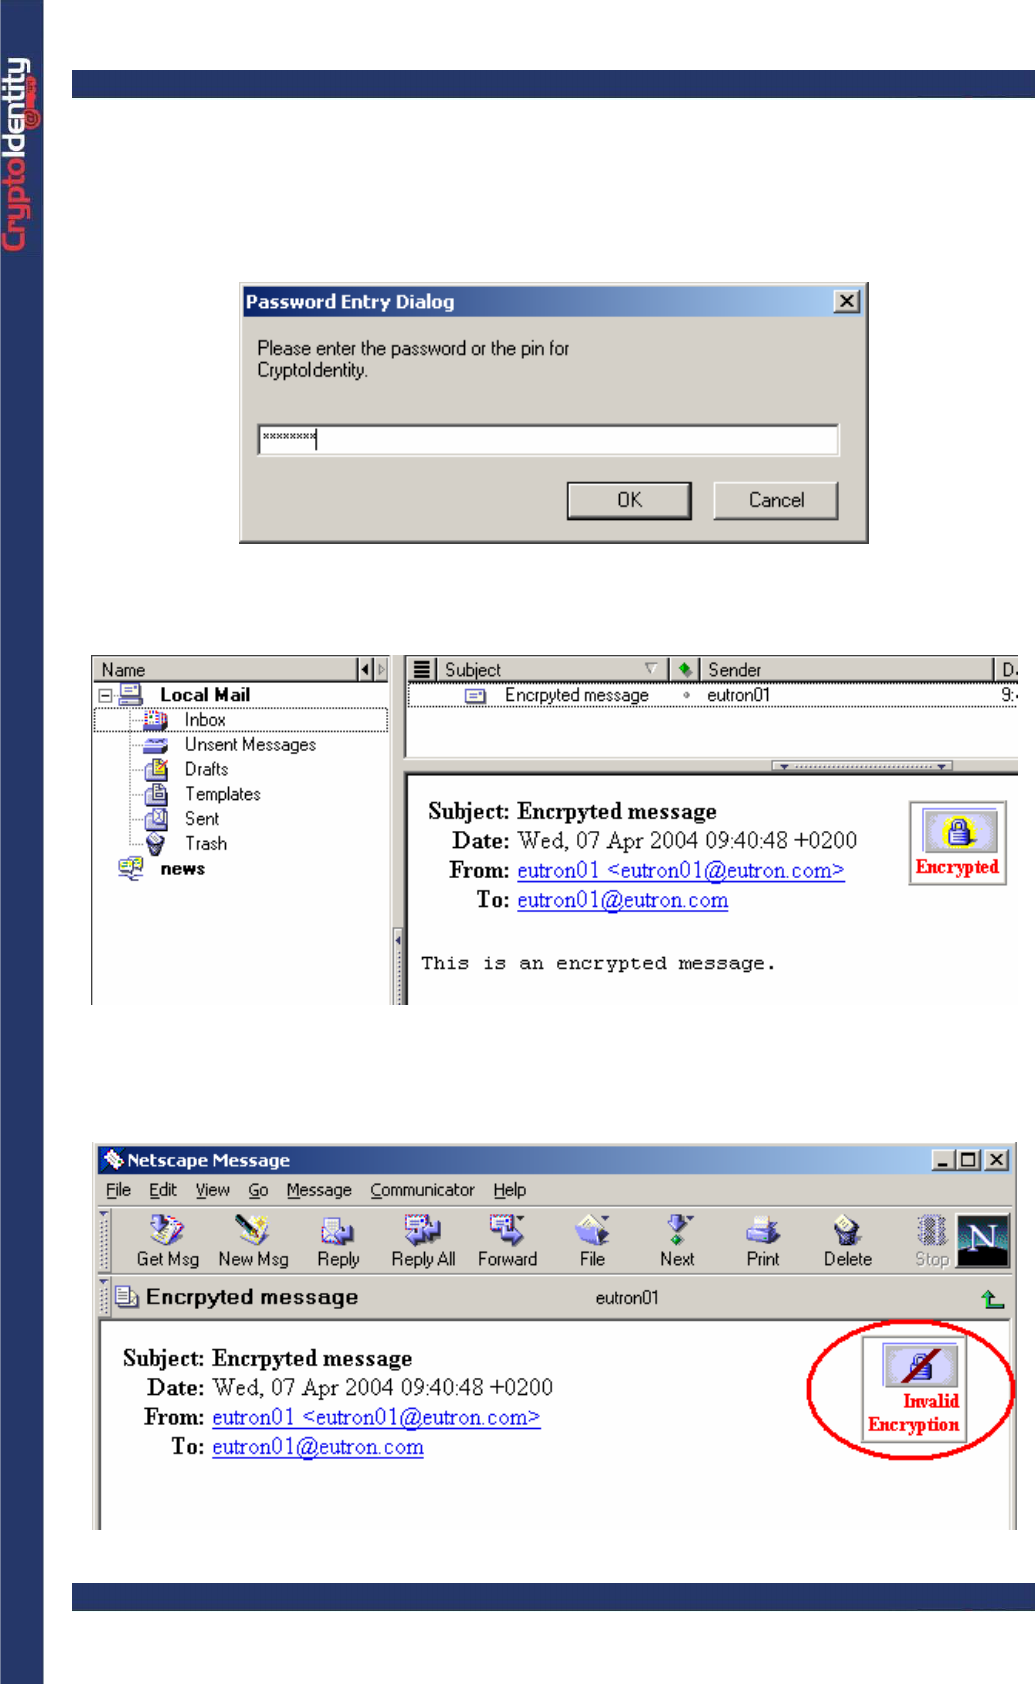
CryptoIdentity User Guide – 5. Working with CryptoIdentity and Applications
To open an encrypted e-mail:
• Plug the CryptoIdentity containing the valid digital credentials to decrypt the message.
• Click on an encrypted e-mail to open it. The CryptoIdentity PIN is required. Insert it to
proceed:
• The e-mail is automatically decrypted using the digital credentials stored into the
CryptoIdentity token. It is marked with the Encrypted icon:
Trying to open an encrypted e-mail without inserting the CryptoIdentity where the proper
digital credentials are stored, an error appears:
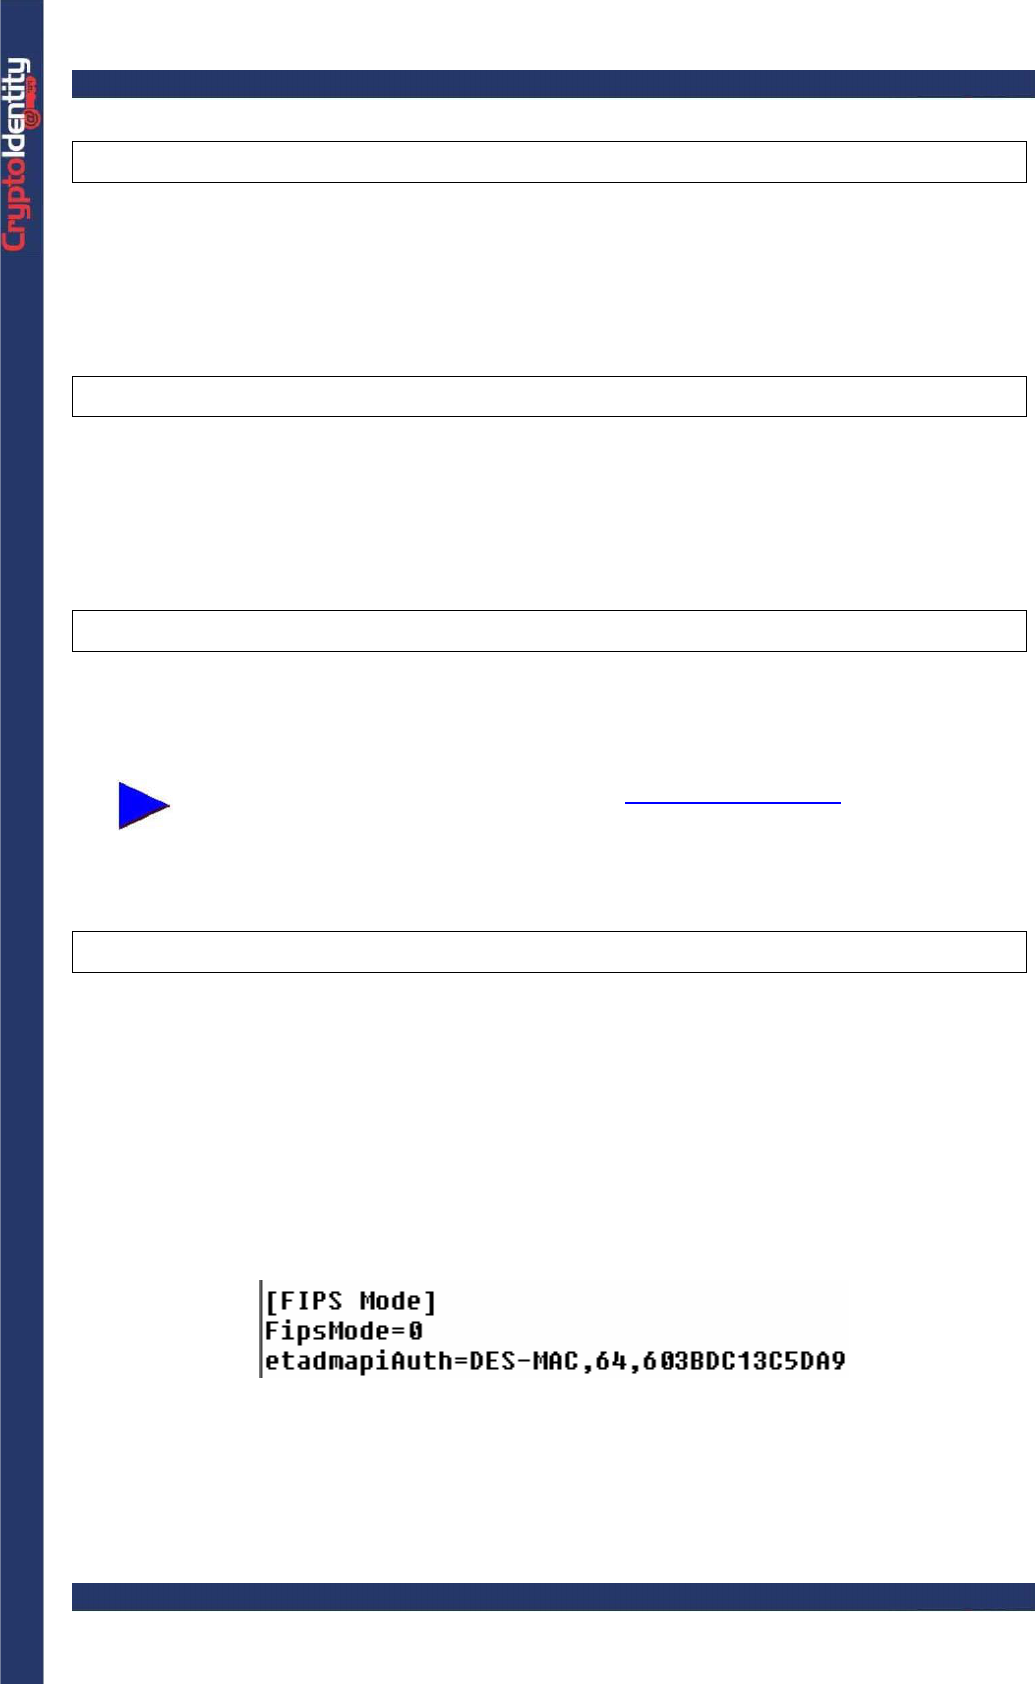
CryptoIdentity User Guide – 5. Working with CryptoIdentity and Applications
5. 2 MICROSOFT VPN
To authenticate to a Microsoft VPN using digital credentials stored into a CryptoIdentity
token, please refer to the "Microsoft VPN PPTP with CryptoKit" guide (file
"CK_VPN_PPTP.pdf") located in the "<CRYPTOKIT INSTALL DIR>\doc" folder.
5. 3 MICROSOFT SMARTCARD LOGON
To authenticate to a LAN through Microsoft Smartcard logon and CryptoIdentity, please
refer to the "CryptoIdentity for Windows 2000/XP Token Logon" guide (file
"CryptoIdentityLogon.pdf") located in the "<CRYPTOKIT INSTALL DIR>\doc" folder.
5. 4 PKI PRODUCTS
CryptoIdentity support several PKI infrastructures. Next section explains the instructions to
configure Entrust.
For other PKIs, please send an e-mail to helpdesk@eutron.com to obtain help
for configurations.
5. 4. 1 ENTRUST
To allow Entrust to take advantage of the CryptoIdentity functionalities, follow carefully the
following instructions.
• Install the Entrust client on the machine and choose to NOT create a new profile.
• Reboot the machine and enter Windows.
• Search on your hard-drive the "entrust.ini" file. It includes the Entrust parameters. Edit
it, and set the [FIPS MODE]->FipsMode parameter to 0:
• Install CryptoKit. If CryptoKit was already installed, it is possible to maintain it. During
CryptoKit setup, choose the "Entrust" option in the components to install:
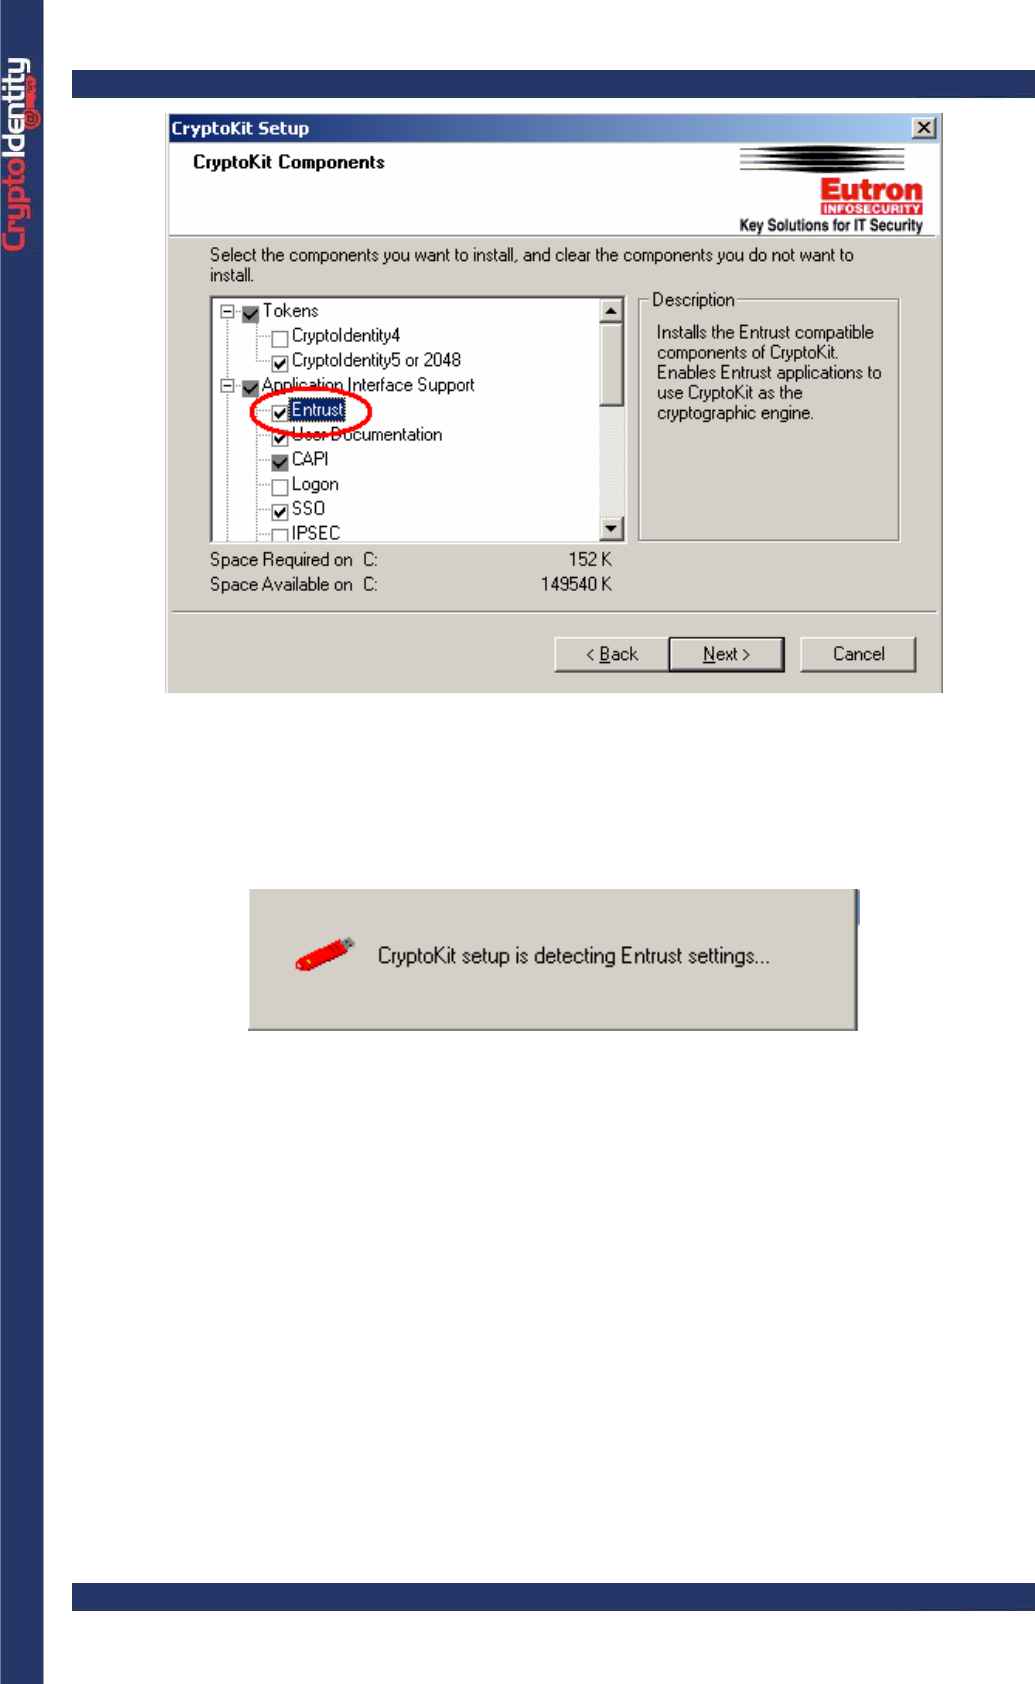
CryptoIdentity User Guide – 5. Working with CryptoIdentity and Applications
• Entrust will be automatically adjusted to work with CryptoIdentity. For details regarding
the CryptoKit installation refer to sections "2.1 Installing CryptoKit" and "2.1.2 Maintaining
CryptoKit".
• The process could takes some minutes:
• At the end, reboot the machine
• Log in to Windows.
• Insert a CryptoIdentity into a free USB port.
• It is now possible to Create or Recover an Entrust profile and to store it into the
CryptoIdentity.
• Start the procedure to Create or Recover an Entrust Profile from the Entrust client.
• Insert the Reference Number and the Authorization code released from the Entrust Ca,
and click Next.
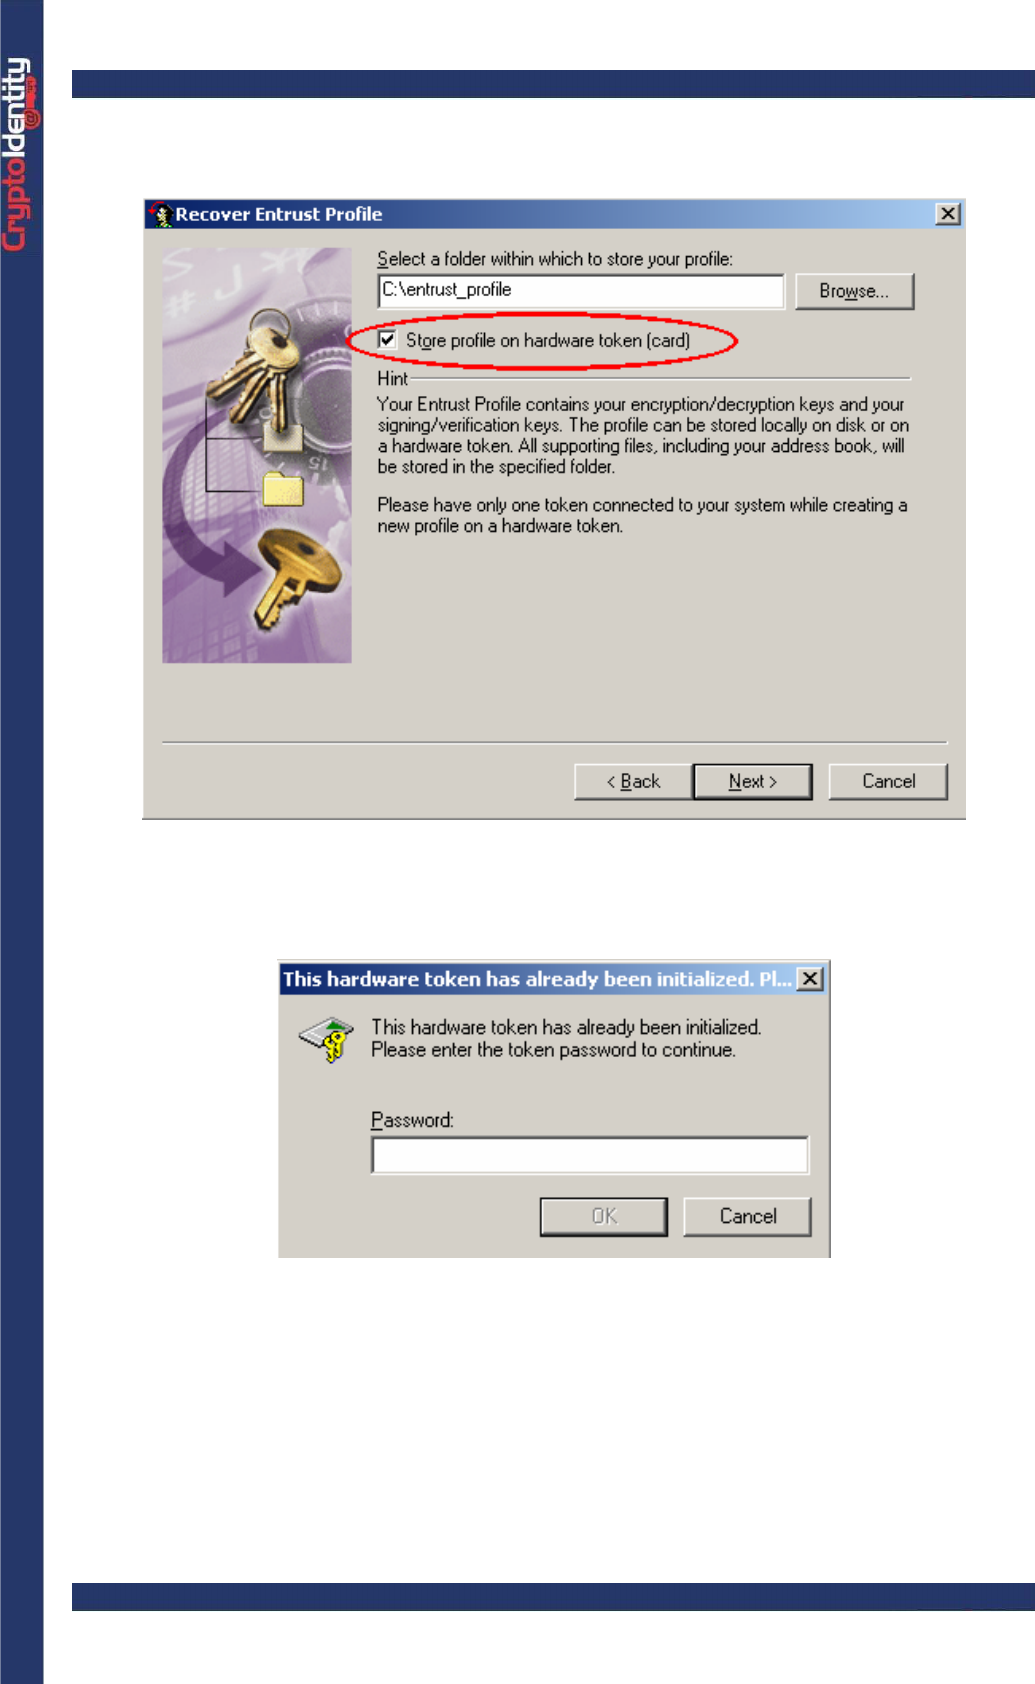
CryptoIdentity User Guide – 5. Working with CryptoIdentity and Applications
• When requested, select the Store profile on hardware token (card) option. Selecting
it, the profile will be stored into CryptoIdentity.
• Insert a Profile name, and click Next in the next windows to start the profile
creation\recover. The CryptoIdentity PIN is required, insert it to proceed:
• Wait while Entrust stores the profile into the CryptoIdentity token.
• At the end of the process, it will be possible to use the profile stored into CryptoIdentity
to perform the Entrust features (Login, sign, encrypt, etc.)

CryptoIdentity User Guide – 6. Developing Applications integrated with CryptoIdentity
6. DEVELOPING APPLICATIONS INTEGRATED WITH
CRYPTOIDENTITY
The Microsoft CAPI and PKCS#11 standard allow to create an application that takes
advantage of the CryptoIdentity cryptographic functions.
More information is available in the "AR CryptoKit Developer's Guide ver 3.6"
(file " Ckit_360.pdf ").
The next sections introduce the PKCS#11 standard and Microsoft CAPI.
6. 1 MICROSOFT CAPI
The Microsoft Cryptographic Application Programming Interface (CAPI) standard supports
the development of applications that include functions such as secure certificate, key and
data storage, authentication, encryption, signature and verification.
The benefits of using CryptoAPI are significant because the developer can take advantage
of the cryptographic features integrated into the Windows platform without having to know
cryptography or how a particular cryptographic algorithm works. For example, a properly
programmed USB token CSP would use an existing CSP (such as Microsoft Base
Provider) to perform all public- and symmetric-key operations and use the token itself to
perform all private-key operations.
CAPI is used for certificate and key management by Microsoft products, such as Internet
Explorer, Outlook and Outlook Express.
CryptoIdentity fully supports the Microsoft CAPI standard.
Visual Basic programmers should consult Microsoft MSDN and search for CAPICOM.
CAPICOM is a COM client that performs cryptographic functions using Microsoft ActiveX
and COM objects.
Here is a brief excerption from MS documentation:
“CAPICOM is a Microsoft® ActiveX® control that provides a COM interface to Microsoft
CryptoAPI. It exposes a select set of CryptoAPI functions to enable application developers
to easily incorporate digital signing and encryption functionality into their applications.
Because it uses COM, application developers can access this functionality in a number of
programming environments such as Microsoft® Visual Basic®, Visual Basic Script, Active
Server Pages,
Microsoft® JScript®, C++, and others. CAPICOM is packaged as an ActiveX control,
allowing Web developers to utilize it in Web based applications as well.”
More information is available at:
www.microsoft.com/security/default.asp
http://msdn.microsoft.com/library/en-us/dnsecure/html/intcapicom.asp

CryptoIdentity User Guide – 6. Developing Applications integrated with CryptoIdentity
6. 2 PKCS#11 STANDARD
The PKCS#11 (or Cryptoki) standard specifies an application programming interface (API)
for devices such as CryptoIdentity, which hold cryptographic information and may perform
cryptographic functions.
Cryptoki, pronounced crypto-key and short for cryptographic token interface, follows a
simple object-based approach, addressing the goals of technology independence (any
kind of device) and resource sharing (multiple applications accessing multiple devices),
presenting to applications a common, logical view of the device called a cryptographic
token.
Applications based on PKCS #11 include Netscape, Baltimore UniCERT Token Manager,
and Entrust/PKI.
The reference documentation for the PKCS#11 API is available at:
http://www.rsasecurity.com/rsalabs/pkcs/pkcs-11/
To adopt PKCS#11 for integrating CryptoIdentity into an application, it is strongly
suggested to download and study carefully the PKCS#11 standard.
Several examples regarding PKCS#11 and CryptoIdentity can be found in
the "Samples" subfolder located into the CryptoKit installation folder.
CryptoIdentity User Guide – 7. Frequently Asked Questions and Troubleshooting
7. FREQUENTLY ASKED QUESTIONS AND
TROUBLESHOOTING
This chapter provides CryptoIdentity general troubleshooting and FAQ.
To access the updated CryptoIdentity FAQ section you can visit
:http://www.eutroninfosecurity.com/pub/CryptoIdentity/FAQ
1. I have lost the CryptoIdentity PIN, or the CryptoIdentity PIN is locked. What can I
do?
The solution is to re-initialize the CryptoIdentity, in order to set a new PIN. It is possible to
initialize CryptoIdentity through the Init Token or ARGenie utilities. The CryptoIdentity
Security Officer PIN is required for the initialization process. Refer to sections "3.3 Init
Token" and "3.1 ARGenie" for detailed instructions.
The initialization process erases all certificates, digital credentials and
cryptographic keys stored into CryptoIdentity.
2. I have lost the CryptoIdentity Security Officer PIN, or the CryptoIdentity Security
Officer PIN is locked. What can I do?
For security reasons, it is not possible to restore or change the Security Officer PIN if the
current Security Officer PIN is lost or locked. It will not be possible to perform on the token
operations for which the Security Officer PIN is required (for example, the initialization
process).
Viceversa, you will be able to use the CryptoIdentity to perform standard cryptographic
operations for which the PIN is required (digital sign, encryption, certificates enroll, etc.).
3. I can not use CryptoIdentity. I am not able to perform any cryptographic
operation with it because a generic error appears.
Make sure your CryptoIdentity is properly initialized. For example, try to obtain its serial
number through the Token Serial Number utility or change its PIN through the Password
Change Utility (refer to sections "3.5 Token Serial Number" and "3.2 Password Change
Utility"). If errors appear during these tests, the token should be initialized. It is possible to
initialize it through the Init Token or ARGenie utilities. Refer to sections "3.3 Init Token"
and "3.1 ARGenie" for detailed instructions.
4. Trying to Initialize the CryptoIdentity through Init Token or ARGenie utility, an
error like the following appears:
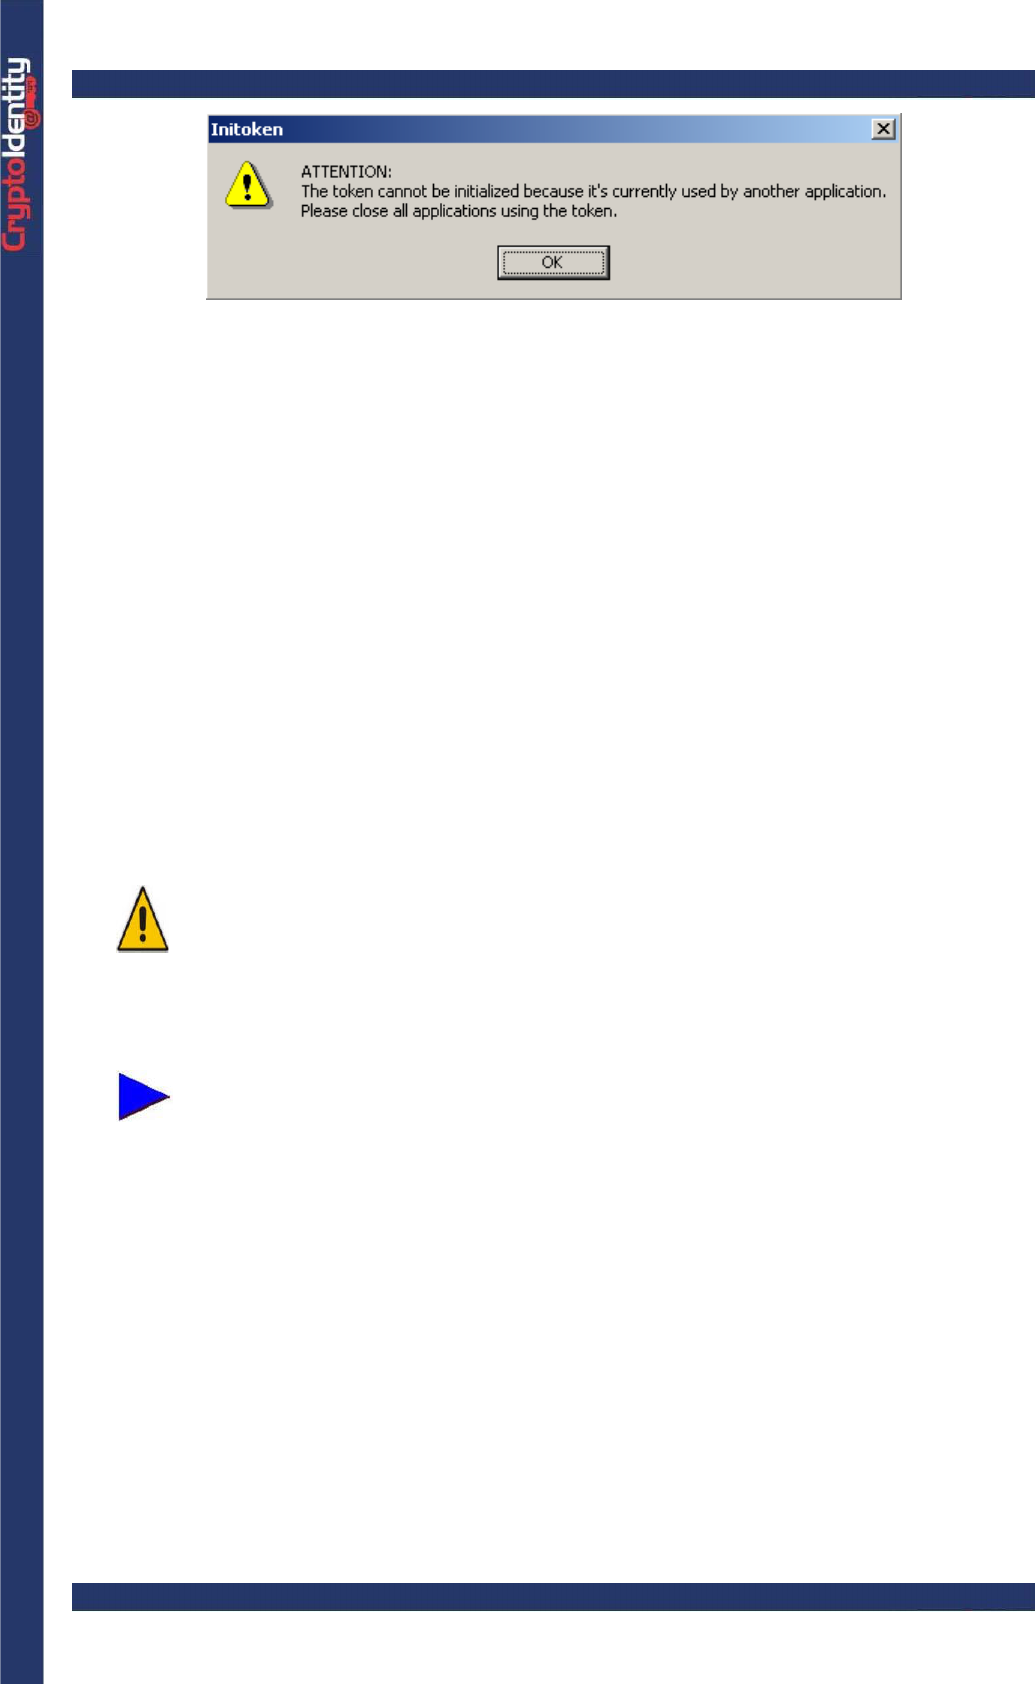
CryptoIdentity User Guide – 7. Frequently Asked Questions and Troubleshooting
Probably, there is an active process which accesses the CryptoIdentity, and this causes
the problem. For example, if the Microsoft Smartcard logon mechanism is enabled, the
CryptoIdentity is not available for the initialization because already in use by Smartcard
logon related processes.
To solve the problem, you may try to unplug the CryptoIdentity and re-plug it into the USB
port. This should close automatically all the sessions opened by applications accessing
CryptoIdentity. Then, you can try to start a new Initialization process.
5. I want to delete a certificate or an object stored into CryptoIdentity. How can I do
it?
First, import a value into the Windows registry. To do so, access the "Utils\Advanced"
subfolder located in the CryptoKit installation folder and import the
"arGenieParams(xx).reg". Then run the ARGenie utility in "advanced" mode (for
instructions refer to section "3.1 ArGenie"). Access the CryptoIdentity objects list, right-
click on an object and select the "Delete" option.
Make sure to NOT delete an object or keys used to perform cryptographic
operations. For example, if data were encrypted using a deleted key stored
into the CryptoIdentity USB token, it will NOT be possible to decrypt that
data anymore. Please DO NOT delete an object unless you really know it
needs to be deleted.
The importing of the registry value must be repeated for each user that
want to delete objects on the CryptoIdentity. Logon to Windows with the
credentials of each user for which to enable the deleting of objects and
im
p
ort the " arGenieParams
(
xx
)
.re
g
" file .
6. I have lost the Security Officer PIN, then I can not initialize the CryptoIdentity
anymore. But I want to delete certificates and object stored into CryptoIdentity.
How can I proceed?
See the previous FAQ (number 5). The Security Officer PIN is not required.
7. I want to export a digital certificate from CryptoIdentity. How do I do it?
The digital certificate's private key must be set to "exportable" during the key generation. If
the key is exportable, access the System Store Certificates by right-clicking the Internet
Explorer icon on the computer’s desktop, then select Properties->Content->Certificates

CryptoIdentity User Guide – 7. Frequently Asked Questions and Troubleshooting
button. You can export the certificate stored into CryptoIdentity in the same way you export
a certificate stored into the System Store.
An example of how to export a certificate from the System Store is described in section
"4.3.1 How to backup digital credentials" (start from the "Select the certificate and press
the Export button.." step).
8. I have installed an application which supports Microsoft CAPI or PKCS#11 to
work with cryptographic devices. How can I enable it to work with
CryptoIdentity?
If the application supports Microsoft CryptoAPI, define "AR Base Cryptographic Provider"
as "CSP" in the application settings.
If the application supports the PKCS#11 standard, define "sadaptor.dll" as the PKCS#11
library in the application settings.
9. I have installed an application (running on a CITRIX server) which supports
Microsoft CAPI or PKCS#11 to work with cryptographic devices. How can I
enable it to work with CryptoIdentity?
CryptoKit components must be installed on the Citrix server. On each client who runs the
application, install only the CryptoIdentity drivers. Then, on the CITRIX server configure
the application to work with CryptoIdentity (see FAQ number 8).
To install only the CryptoIdentity drivers, download the setup from:
http://www.eutroninfosecurity.com/pub/CryptoIdentity/1.0.9.1/
10. Is it possible to enable Smartcard Logon through CryptoIdentity on a Citrix
server?
This feature has been added starting from 3.7 CryptoKit release.
11. I have installed an application (running on a Terminal server machine) which
supports Microsoft CAPI or PKCS#11 to work with cryptographic devices. How
can I enable it to work with CryptoIdentity?
It is possible to configure it only if Terminal Server services are running on a Windows
2003 server machine. The client machines must have installed W2K, XP or 2003.
CryptoKit components must be installed on the Windows 2003 Terminal Server machine.
On each client (W2K/XP/2003) who runs the application, install only the CryptoIdentity
drivers. Then, on the Win 2003 Terminal Server machine configure the application to work
with CryptoIdentity (see FAQ number 8).
To install only the CryptoIdentity drivers, download the setup from:
http://www.eutroninfosecurity.com/pub/CryptoIdentity/1.0.9.1/

CryptoIdentity User Guide – 7. Frequently Asked Questions and Troubleshooting
12. Is it possible to enable Smartcard Logon through CryptoIdentity on a Terminal
Server machine?
Yes, it is possible if Terminal Server services are running on a Windows 2003 server
machine. The client machines must have installed W2K, XP or 2003.
In any other case, it is not possible because the smartcard support is not provided by the
operating system.
13. Is it possible to authenticate through CryptoIdentity on a Windows XP machine
using Remote Desktop?
Yes, it is possible. CryptoKit components must be installed on the Windows XP machine
that will be accessed through Remote Desktop. On each client who connects to the Win
XP machine, installs only the CryptoIdentity drivers.
CryptoIdentity User Guide – Appendix
APPENDIX
EUTRON INFOSECURITY CUSTOMER SERVICE
Eutron Infosecurity offers a free technical support.
If you need technical assistance, do not hesitate to contact Eutron Infosecurity
Customer Service at:
e-mail: helpdesk@eutron.com
Telephone: +39 035697055 (14.00 - 17.00 CET, from Monday to Friday)
For other information, please contact:
Internet site : http://www.eutron.com/
Email : info@eutron.com
Telephone : +39 035 697080
Fax : +39 035 697092