EUTRONSEC S p A AAI USB SMART KEY User Manual SmartKeyUserManual
EUTRONSEC S.p.A. USB SMART KEY SmartKeyUserManual
Users Manual
1
SmartKey
User Manual v11.7

2
© Copyright 2007 Eutronsec Spa - Via Gandhi, 12 - 24048 Treviolo (BG) – Italy. All rights reserved.
The names of the other products mentioned are trademarks of their respective owners.
This hardware key is in compliance with the following test specification:
EN 61000-4-2; EN 61000-4-3; CISPR22
as required by:
EN 61000-6-1, EN 61000-6-2, EN 61000-6-3, EN 61000-6-4
which are specified for the following test:
“ESD Immunity test”
“Radiated radio-frequency and electromagnetic field immunity test”
“Radiated Emission Verification”
in compliance with the “Essential Requisites” for the EMC Directive 89/336/EEC & 2004/108/EEC
CONFORMITY APPROVAL TO EN60529 (IP67)
This hardware key is in compliance with essential evaluation elements for the conformity approval to EN 60529 (IP67)
concerning safety (EN 60529:1991-10 + EN 60529 corr:1993-05 + EN 60529/A1:2000-02) as required by LVD directive.
FCC ID: TFC-AAI
Eutronsec Spa
SmartKey 4
Supply: 5V DC
Absorption: 30 mA
This device complies with Part 15 of the FCC Rules. Operation is subject to the following two conditions: (1) this device
may not cause harmful interference, and (2) this device must accept any interference received, including interference
that may cause undesired operation.
NOTE: This equipment has been tested and found to comply with the limits for a Class B digital device, pursuant to Part
15 of the FCC Rules. These limits are designed to provide reasonable protection against harmful interference in a
residential installation. This equipment generates, uses and can radiate radio
frequency energy and, if not installed and used in accordance with the instructions, may cause harmful interference to
radio communications. However, there is no guarantee that interference will not occur in a particular installation. If this
equipment does cause harmful interference to radio or television reception,
which can be determined by turning the equipment off and on, the user is encouraged to try to correct the interference
by one or more of the following measures:
- Reorient or relocate the receiving antenna.
- Increase the separation between the equipment and receiver.
- Connect the equipment into an outlet on a circuit different from that to which the receiver is connected.
- Consult the dealer or an experienced radio/TV technician for help.
Caution: changes or modifications not expressly approved by the party responsible for compliance could void the user's
authority to operate the equipment.
IMPORTANT REMARKS
Due to the limited space on the product shell, all FCC certification references are on this technical manual.

3
Index
1
INTRODUCTION ....................................................................................................................................................8
1.1
O
BJECTIVES OF THE MANUAL
................................................................................................................................8
1.2
T
O WHOM THE MANUAL IS ADDRESSED
.................................................................................................................8
1.3
H
OW TO CONTACT
E
UTRONSEC
.............................................................................................................................8
2
WHY SHOULD I PROTECT SOFTWARE?........................................................................................................9
2.1
T
HE MENACE OF PIRACY INCREASES THE NEED FOR PROTECTION
..........................................................................9
2.2
C
OMMERCIAL REASONS FOR PROTECTING SOFTWARE
...........................................................................................9
2.3
P
IRACY
? R
UINOUS TO THE SOFTWARE INDUSTRY
..................................................................................................9
2.4
A
HISTORY OF SOFTWARE PROTECTION SYSTEMS
................................................................................................ 10
2.5
E
UTRONSEC PAVES THE WAY FOR A NEW SOFTWARE PROTECTION ERA
............................................................... 10
3
INTRODUCING SMARTKEY.............................................................................................................................11
3.1
W
HO NEEDS
S
MART
K
EY
? ................................................................................................................................... 12
3.2
W
HAT ARE
S
MART
K
EY
'
S CHARACTERISTICS
? ..................................................................................................... 12
3.3
H
OW DOES
S
MART
K
EY WORK
?........................................................................................................................... 13
3.4
H
OW MUCH TIME IS NEEDED TO PROTECT A PROGRAM
? ...................................................................................... 13
3.5
W
HAT IS
S
MART
K
EY
'
S DEGREE OF SECURITY
?.................................................................................................... 13
3.6
P
ROGRAMS FOR
S
MART
K
EY
................................................................................................................................ 14
3.7
S
MART
K
EY FOR
L
INUX AND
M
AC
OS X............................................................................................................. 14
3.8
G
ETTING
S
TARTED
.............................................................................................................................................. 14
3.8.1
Installation................................................................................................................................................ 14
4
SMARTKEY MODELS.........................................................................................................................................15
4.1
FX....................................................................................................................................................................... 15
4.2
PR....................................................................................................................................................................... 15
4.3
EP ....................................................................................................................................................................... 15
4.4
SP & XM............................................................................................................................................................16
4.5
NET.................................................................................................................................................................... 16
4.6
A
COMPARISON OF
S
MART
K
EY MODELS
............................................................................................................. 17
4.7
W
HICH
S
MART
K
EY TO USE
? ............................................................................................................................... 17
5
PROTECTING A PROGRAM WITH SMARTKEY .........................................................................................19
5.1
M
ANUAL PROTECTION
......................................................................................................................................... 19
5.2
A
UTOMATIC PROTECTION
.................................................................................................................................... 19
5.3
S
HOULD
I
USE MANUAL OR AUTOMATIC PROTECTION
? ....................................................................................... 20
6
PROTECTION IN A LOCAL NETWORK.........................................................................................................21
6.1
A
UTOMATIC PROTECTION ON A LOCAL NETWORK
............................................................................................... 21
6.2
M
ANUAL PROTECTION ON A LOCAL NETWORK
.................................................................................................... 21
6.3
P
ROTECTING SEVERAL PROGRAMS WITH
S
MART
K
EY
.......................................................................................... 21
4
7
SMARTKEY'S INTERNAL STRUCTURE ........................................................................................................22
7.1
I
D
-C
ODE REGISTER
:
THE PERSONAL CODE
........................................................................................................... 22
7.2
L
ABEL REGISTER
:
THE IDENTIFICATION AND ACCESS LABEL
............................................................................... 22
7.3
P
ASSWORD REGISTER
:
THE DATA ACCESS DONGLE
.............................................................................................. 22
7.4
S
ECURE
D
ATA REGISTER
:
THE DATA OF THE NON
-
VOLATILE MEMORY
................................................................ 23
7.5
F
AIL
C
OUNTER REGISTER
:
THE INCORRECT ACCESSES ALARMS
.......................................................................... 23
8
AUTOMATIC PROTECTION.............................................................................................................................24
8.1
A
UTOMATIC PROTECTION WITH
GSS .................................................................................................................. 24
8.2
P
ROTECTION OF
W
INDOWS PLATFORMS WITH
GSS............................................................................................. 25
8.3
GSS:
THE COMMON OPTIONS
............................................................................................................................... 25
8.3.1
Control of dongle presence....................................................................................................................... 25
8.3.2
Programming Error Messages..................................................................................................................25
8.3.3
Encryption of executable code ..................................................................................................................25
8.3.4
Parameter-based protection .....................................................................................................................26
8.3.5
Message displayed in absence of the dongle (key).................................................................................... 26
8.3.6
Limitation of number of executions and licenses ...................................................................................... 26
8.3.7
Automatic cryptography of data files........................................................................................................26
8.3.8
Protection of programs on a network .......................................................................................................26
8.3.9
Protecting files executable in series..........................................................................................................26
8.4
R
APID IMPLEMENTATION OF THE PROGRAM
'
S PROTECTION
................................................................................. 27
9
MANUAL PROTECTION.....................................................................................................................................28
9.1
E
XECUTION METHOD OF
S
MART
K
EY COMMANDS
............................................................................................... 28
9.2
L
OCATING MODE
................................................................................................................................................. 29
9.2.1
Parameter transfer....................................................................................................................................30
9.3
S
CRAMBLING MODE
............................................................................................................................................ 30
9.3.1
Parameter transfer....................................................................................................................................30
9.4
R
EADING MODE
................................................................................................................................................... 31
9.4.1
Parameter transfer....................................................................................................................................31
9.5
W
RITING MODE
................................................................................................................................................... 32
9.5.1
Parameter transfer....................................................................................................................................32
9.6
B
LOCK
R
EADING MODE
....................................................................................................................................... 33
9.6.1
Parameter transfer....................................................................................................................................33
9.7
B
LOCK
W
RITING MODE
....................................................................................................................................... 33
9.7.1
Parameter transfer....................................................................................................................................34
9.8
F
IXING MODE
...................................................................................................................................................... 34
9.8.1
Parameter transfer....................................................................................................................................35
9.9
E
NCRYPTING MODE
............................................................................................................................................. 35
9.9.1
Parameter transfer....................................................................................................................................36
9.9.2
Definition of the algorithm........................................................................................................................36
9.9.3
Example .................................................................................................................................................... 37
5
9.10
P
ROGRAMMING MODE
.................................................................................................................................... 37
9.10.1
Parameter transfer....................................................................................................................................38
9.11
C
OMPARING MODE
......................................................................................................................................... 38
9.11.1
Parameter transfer....................................................................................................................................39
9.12
M
ODEL READING MODE
.................................................................................................................................. 39
9.12.1
Parameter transfer....................................................................................................................................40
9.13
S
ERIAL NUMBER READING MODE
.................................................................................................................... 40
9.14
E
XT MODEL READING MODE
........................................................................................................................... 41
9.15
F
IX READING MODE
........................................................................................................................................ 41
9.16
F
AIL COUNTER READING MODE
...................................................................................................................... 42
9.17
AES
MODE
..................................................................................................................................................... 42
9.17.1
Authentication........................................................................................................................................... 42
9.17.2
Utilization ................................................................................................................................................. 43
9.18
AES
SET MODE
............................................................................................................................................... 43
9.19
AES
SCRAMBLE MODE
................................................................................................................................... 43
9.20
E
RRORS
.......................................................................................................................................................... 44
9.21
S
OME SUGGESTIONS ON USING
S
MART
K
EY
'
S FUNCTIONS
............................................................................... 44
10
PROGRAM PROTECTION TECHNIQUES AND EXAMPLES............................................................... 45
10.1
G
ENERAL GUIDELINES
.................................................................................................................................... 45
10.1.1
Check the dongle in different points of your program. ............................................................................. 45
10.1.2
Extensive use of the Scrambling operation............................................................................................... 45
10.1.3
Hiding Label and Password......................................................................................................................46
10.1.4
Use the .OBJ version of the drivers ..........................................................................................................46
10.1.5
CheckSum of your Executable files and of the DLLs ................................................................................ 46
10.1.6
Do not stop execution immediately if the dongle is not found................................................................... 46
10.1.7
Encrypt the required data with the Scrambling operation........................................................................ 47
10.2
G
UIDELINES FOR THE
M
EMORY
...................................................................................................................... 47
10.2.1
Control the Memory's functionality ..........................................................................................................47
10.2.2
Store the data required by the Memory.....................................................................................................47
10.3
E
XAMPLES OF IMPLEMENTATION
.................................................................................................................... 48
10.3.1
Example 1 – Basic Use .............................................................................................................................48
10.3.2
Example 2 – Basic use of Scrambling.......................................................................................................48
10.3.3
Example 3/4 – Storing and using a C function in the SmartKey memory ................................................. 49
10.3.4
Example 5 – Control of the DLL checksum ..............................................................................................51
10.3.5
Example 6 – Hiding Label and Password information............................................................................. 52
10.3.6
Example 7 – Scrambling confidential data...............................................................................................53
10.3.7
Example 8/9–Generating and using a large Scrambling table ................................................................. 53
10.3.8
Example 10 – Code encrypting.................................................................................................................56
10.3.9
Example 11 – AES authentication............................................................................................................. 56
11
MANUAL PROTECTION IN A NETWORK...............................................................................................60
6
11.1
O
PEN MODE
.................................................................................................................................................... 60
11.2
A
CCESS MODE
................................................................................................................................................ 60
11.3
U
SER NUMBER MODE
...................................................................................................................................... 61
11.4
C
LOSE MODE
.................................................................................................................................................. 61
11.5
C
LOSE MODE ON TIMEOUT
.............................................................................................................................. 61
11.6
E
RRORS
.......................................................................................................................................................... 62
11.7
S
TANDALONE OR
M
ULTILAN DRIVERS
?.......................................................................................................... 62
12
PROTECTING SEVERAL PROGRAMS WITH SMARTKEY................................................................. 63
12.1
O
PERATING METHODS
.................................................................................................................................... 63
12.2
P
ROGRAMMING THE NUMBER OF LICENSES AND EXECUTIONS
........................................................................ 63
12.3
M
AP AUTOMATIC PROTECTION
....................................................................................................................... 64
12.4
M
AP MANUAL PROTECTION
............................................................................................................................ 64
12.4.1
Open mode Map: an example ...................................................................................................................65
13
INSTALLING SMARTKEY...........................................................................................................................66
13.1
W
ARNINGS ON INSTALLATION
........................................................................................................................ 66
13.2
O
PTIONS OF
S
MART
K
EY
D
RIVER
I
NSTALLER
(SDI)........................................................................................ 66
13.3
T
HE
SDI
LIBRARY
.......................................................................................................................................... 67
13.4
I
NSTALLATION OF
S
MART
K
EY IN
L
INUX
........................................................................................................ 68
13.4.1
Linux user level usb .................................................................................................................................. 68
13.4.2
Linux user level lpt.................................................................................................................................... 68
13.4.3
Linux kernel level......................................................................................................................................68
13.4.4
Using APIs for Linux ................................................................................................................................ 69
13.5
I
NSTALLATION OF
S
MART
K
EY IN
M
AC
OS X................................................................................................. 69
13.5.1
Using APIs for Mac OS X......................................................................................................................... 69
14
INSTALLING SMARTKEY ON A NETWORK..........................................................................................70
14.1
TCPIP
PROTOCOL
.......................................................................................................................................... 70
14.2
IPX
PROTOCOL
............................................................................................................................................... 71
14.3
ANP
PROTOCOL
............................................................................................................................................. 71
14.4
I
NSTALLATION FOR
W
INDOWS
....................................................................................................................... 71
14.5
I
NSTALLATION OF
N
OVELL SERVER WITH
IPX
PROTOCOL
.............................................................................. 72
14.6
I
NSTALLATION OF
N
OVELL SERVER WITH
TCPIP
PROTOCOL
......................................................................... 72
14.7
I
NSTALLATION FOR
L
INUX AND
M
AC
OS X ...................................................................................................73
15
SMARTKEY CONFIGURATION CENTRAL (SCC) .................................................................................74
15.1
C
ONFIGURATION OF THE SERVER
.................................................................................................................... 74
15.2
C
ONFIGURATION OF CLIENT
........................................................................................................................... 75
15.2.1
Selection and configuration phases ..........................................................................................................76
16
SMARTKEY PROGRAMMING CENTRAL (SPC) .................................................................................... 78
16.1
I
DENTIFICATION PANEL
.................................................................................................................................. 78
16.2
I
NFO PANEL
.................................................................................................................................................... 78
7
16.3
R
ESET
D
EFAULT PANEL
.................................................................................................................................. 79
16.4
M
AP PANEL
.................................................................................................................................................... 80
16.5
S
CRAMBLING PANEL
....................................................................................................................................... 81
16.6
C
ONTENTS PANEL
........................................................................................................................................... 82
16.7
F
IXING PANEL
................................................................................................................................................. 83
16.8
P
ROGRAMMING PANEL
................................................................................................................................... 83
16.9
D
IAGNOSTIC PANEL
........................................................................................................................................ 85
16.10
R
EPORT PANEL
............................................................................................................................................... 86
17
TECHNICAL SPECIFICATIONS.................................................................................................................88
17.1
W
ARNINGS
..................................................................................................................................................... 88
17.2
F
UNCTIONALITY
............................................................................................................................................. 88
17.3
S
MART
K
EY
2 P
ARALLEL
................................................................................................................................ 88
17.4
S
MART
K
EY
2 USB.........................................................................................................................................88
17.5
S
MART
K
EY
3/4 USB...................................................................................................................................... 88

8
1 Introduction
1.1 Objectives of the manual
The purpose of this manual is to provide a full overview of SmartKey's application environments and of the product's
operational potential in general.
This manual deals with the following subjects:
• the importance of protecting software.
• SmartKey's use methods for manual protection.
• the use methods for automatic protection: this manual deals exhaustively with the techniques and instruments for
automatic protection of software and data.
• the different application situations and the protection implementation methods within the sphere of local networks.
1.2 To whom the manual is addressed
Consultation of this manual is useful for those:
• who are dealing with software protection technique for the first time, and seek a full overview of the state-of-the-art
and practical effective instructions.
• requiring the traditional techniques of manual protection, but at the same time, seeking secure, versatile instruments
for automatic protection of software and data.
• who need to control the authorisation and execution of software: in fact, with only a few operations and using the
instruments supplied with the Developer Kit, the Eutronsec technology can be used to build sophisticated
mechanisms for controlling licenses and execution parameters, simply by using a SmartKey NET dongle.
1.3 How to contact Eutronsec
The best way to contact Eutronsec about SmartKey is to send an e-mail message to the helpdesk
helpdesk@eutronsec.it.
You can also telephone the Assistance Service at number 035697055 or send a fax to number 035697092.
For all types of commercial contacts, phone 035697080 or send an e-mail message to this address:
info@eutronsec.it.

9
2 Why should I protect software?
Illegal duplication of programs is a very widespread practice: it is very simple, cheap and does not require complex,
costly equipment. The methods used to prevent or at least, make copying difficult, have not proved effective, as they
could be overcome in a few months or even a few days. SmartKey approaches the problem in a different way: copying
is not prevented, but use of the program by an unauthorized person.
2.1 The menace of piracy increases the need for protection
In a world dominated by technology, software has become very important. The development of software calls for
enormous resource in terms of time, work, and money. That is why software has become the intellectual property of the
developer or of the company producing it. But this right of the developers is often breached, almost always causing
serious economic losses. Consequently, there is a need to protect software.
Companies need to control their intellectual properties to protect themselves against IT pirates, who alter and distribute
software to users without a license and registration. Moreover, loss of profits due to piracy has a chain-reaction
resulting in lower economic return for developers, employees and all who work in the Information Technology sector.
This puts a question mark on the availability of further funds for research and development, for paying qualified
developers, and, even for marketing for new products.
Another reason why piracy has become so widespread is because the falsification of this type of intellectual property
makes it possible to produce perfect, functional copies. This is in addition to large profits through the illicit sale of
software.
While the levels of piracy differ from county to country, the Business Software Alliance (BSA) announced that, in
2005, about 40% of software used in the world originated from piracy. This led, that year, to a loss of more than 10
million dollars in assets. BSA estimated that in 2005, 25% of software in the United Sates was obtained through piracy.
Permissive laws and lack of political commitment in developing countries to prevent piracy have only worsened the
problem.
2.2 Commercial reasons for protecting software
Piracy has put software developers on the defensive. In their market plans, managers take into consideration the loss of
profits due to piracy. In view of the alarming losses, the commercial reasons for creating a solution to protect software
have drawn the attention of an increasing number of the sector's operators.
An idea is taking shape in the community of developers: there could be a good balance between the costs of
implementing software protection and the benefits thus obtained. Furthermore, to convince managers about the
economic advantages of software protection, developers must consider the following factors:
• The percentage of software pirated in one's own market niche, if one operates in such a niche. (If the
percentage is very high, one risks losing that niche).
• The percentage of software pirated in the countries where one intends to sell software.
• Considering the first two factors, is it necessary and useful to add a protection facility to one's application?
2.3 Piracy? Ruinous to the software industry
Information Technology piracy has endangered the very concept of intellectual property. In brief, IT piracy is the
practice of copying and using a software product without permission of the proprietor or developer. The idea that use
and duplication of proprietary software is illegal has only recently began to spread among users, although many still
show a general disinterest in treating software as intellectual property with its own value.
IT piracy occurs in different ways. We shall explain a few cases of this below:
• Theft of software: buying a single license and loading the software on several computers, in breach of the
contract clauses.
• Upload and download: providing unauthorized copies of the software to users connected by modem to a
provider or to the Internet.
• Forging of Software: unlawfully duplicating software and selling it as if it were new.
• OEM unbundling: selling what was originally stand-alone software, while pretending it is an integral part of
one's own hardware.
10
• Hard disk loading: unlawful installation on the hard-disk of personal computers, often as an incentive for end-
users to buy hardware from a particular hardware dealer.
• Hire: sale of unauthorized software for temporary use, as if one were hiring a video-cassette.
There are also different types of IT pirates:
• Resellers selling hardware with illegally preinstalled software.
• Companies using unauthorized copies of software for internal use.
• Persons obtaining profits by forging software
• Any person who makes an illegal copy of another person's program.
2.4 A history of software protection systems
In the seventies, most software was proprietary, designed for use in a specific commercial environment, and operating
on mainframe systems. Therefore, piracy did not exist. As soon as computers changed from mainframe architecture to
client/server architecture, installing software on one's own workstation became standard practice, and the concept of
distribution and license was thus born.
The 80s saw a rapid spread of personal computers leading to the creation of a large-scale pirate underground network
for illegal distribution of software. This made it necessary to protect software. The 90s saw piracy take a further step
ahead thanks to the Internet, which opened up new channels for unlawful distribution. New technologies, such as CD
writers, made illegal software duplication and distribution even easier, thus contributing to further growth of piracy.
The battle to topple piracy began in the 80s. Software protection mechanisms were used in the DOS environment, such
as special disk formatting using functions, which were not, part the operating system itself (additional tracks, non-
formatted tracks, disk sector exchanges, modification of disk rotations peed, etc.), of the magnetic support was altered.
Other protection systems also spread around: such as, inhibiting copies with the standard DOS commands (and,
therefore, the back-up copies too). When the software protection technologies improved, hardware security systems
began to be integrated with license management programs.
As the need for protection grew, techniques were developed to make software and programs ever more secure. In spite
of this, piracy backers still survive, and grow causing huge economic damage. The on-going growth of technology is
one of the main factors that makes piracy possible. The possible illegal gains are its motivating factor. It does not seem
that piracy will stop in the short-term. All this increases the need for a software protection solution.
2.5 Eutronsec paves the way for a new software protection era
Eutronsec has created an innovative technology that differs from the traditional protection model. Eutronsec's solution
effectively resists piracy and the globally widespread cracking methods. Software protection strategy has shifted its
attention from "protection of the copy" to a more realistic "control of software execution". The prevention of IT piracy
goes beyond mere inhibition of an abusive copy. It has evolved to limiting use of software to one copy at a time.
The SmartKey dongle for protecting software is designed mainly for the requirements of this type of security. By using
leading-edge anti-hacking mechanisms, SmartKey is the hardware protection system that offers the best solutions for
software sellers.
SmartKey is a small electronic device, which can be fitted in the parallel or USB connector of any computer. Each
dongle has a unique personalized digital ‘fingerprint’, which can be recognized by the software it protects.
Encryption is the heart of this software protection technology. Through use of a combination of algorithms and
encrypting dongles, SmartKey resists the most advanced breaching attempts by pirates. SmartKey also overcomes the
disadvantages of normal anti-copy protection because it enables the user to make back-up copies of his/her own
protected program.

11
3 Introducing SmartKey
Just imagine being able to limit the execution of any PC program, so that you can decide on which and how many
computers your software can be executed. SmartKey is a software protection dongle, i.e. a hardware device that
performs this very function, with the aim of preventing illegal diffusion of the software. The program that is protected
by a call to the system, controls if SmartKey is present on the computer or on the SmartKey server computer, in the case
of a 'networked' configuration. If the dongle is not present, the program shuts down. The call to the system usually
occurs when the program has been commanded to execute, but can occur several times or when the programmer
considers it most appropriate.
SmartKey is available in two versions:
• SmartKey Parallel: SmartKey is connected to the computer via the parallel port
• SmartKey USB: SmartKey is connected to the computer via the USB port.
Both models are small and compact, less than matchbox size. Using SmartKey Parallel does not prevent you from using
the parallel port for the printer. In fact, you can connect, other SmartKey Parallels to SmartKey Parallel, or a printer
cable or the cable of any other device using the parallel port. Several SmartKey USBs can be connected to the system by
using the USB hub. Using SmartKey neither slows down the system nor creates hardware or software conflicts with
other devices and programs. SmartKey Parallel must be fitted in the parallel port and connected to the other devices
before switching on the computer. Instead, SmartKey USB can be fitted and removed also while the computer is in
operation.
In terms of programs, the two types of SmartKey are used in the same way: a program protected by a SmartKey Parallel
can also be used with a SmartKey USB and vice-versa without making any modifications to the software. Hardware
management of the two types of SmartKey is wholly assigned to the drivers supplied.
The SmartKeys area available in five different models, distinguished by their functions:
• SmartKey FX (Fixed) With fixed security algorithms and codes
• SmartKey PR (Programmable) With programmable safety codes, and internal memory
• SmartKey EP (Extended Protection) Like PR, with extended security performance
• SmartKey SP (Super Protection) Like EP, with more memory and user-programmable security algorithms.
• SmartKey XM (Extended Memory) Like SP, with more memory.
• SmartKey NET (Network) For networked programs.
SmartKey SP and XM are the version offering the greatest degree of security. SmartKey NET also makes it possible to
protect programs installed on several computers connected by a network. It is the most expensive, but a single dongle is
sufficient to protect the programs in a network of computers.
SmartKey is compatible with Linux, Mac OS X and all Microsoft DOS and Windows operating systems. Eutronsec
supplies both the drivers and the libraries for these operating systems. However, SmartKey Parallel is not supported by
Mac OS X and SmartKey USB cannot be used with operating systems that do not support the USB port, with the
exception of Windows NT. The drivers supplied by Eutronsec enable use of SmartKey USB with Windows NT.
SmartKey USB is also available in DL (Driver Less) model that does not require any additional driver installation for its
usage.
The libraries supplied by Eutronsec make it possible to write protected programs in Windows, Linux and Mac OS X.
For Microsoft operating systems, programs with a graphic interface are available, that facilitate the installation,
configuration and use of SmartKey. By using the Global Security System (GSS), you can automatically protect a
program without any particular IT knowledge and without having the programs source code.
GSS is not available for use with Linux and Mac OS X and, therefore, manual protection only is possible with these two
operating systems.
The following tables summarize the support supplied for operating systems Windows, Linux, and Mac OS X.

12
Operating system Support
Utilities Automatic
protection Parallel
SmartKey SmartKey
USB SmartKey
USB DL
(Driver Less)
Windows i386 Yes Yes Yes Yes Yes
Windows x64 Yes No Yes Yes Yes
Linux i386 No No Yes Yes Yes
Mac OS X Intel/PowerPC No No No Yes Yes
Table 1 Software available
3.1 Who needs SmartKey?
SmartKey is mainly aimed at software houses, because they need to protect their software against diffusion and illegal
copies.
However, SmartKey is needed not only by software developers: end-users such as company managers, information
systems managers, and sales managers can obtain great benefits from its technology. With GSS technology, programs
can be protected without knowing the source code.
• Software-houses use SmartKey to prevent software piracy and the illegal spreading of their programs. Only
users with the dongle can activate execution of protected programs.
• Sales managers use SmartKey to provide potential customers with fully operational copies of the programs,
without the risk, however, of operational copies being made. By using SmartKey, they can even monitor the
number of executions performed by the programs.
• Company managers and information system managers use SmartKey to prevent civil and criminal
responsibilities for the theft of software by employees. With SmartKey, the site-licenses agreements for the
purchased software are safeguarded against users' temptations.
• IT lab managers of schools and universities use SmartKey to prevent responsibility for abusive copies of
software by students. Software for school use is purchased at special conditions and, heavy penalties are
imposed when the programs are used outside the school.
End-users do not have to worry about how to use SmartKey: all they have to do is to insert the dongle in the parallel
port or USB port and forget about it. SmartKey protects programs, while being completely transparent to the user.
3.2 What are SmartKey's characteristics?
SmartKey is based on the use of electronic chips, dedicated microprocessors and algorithms that implement security
functions.
• High security: cloning via hardware is impossible thanks to the implementation of dongle questioning
algorithms (scrambling).
• Installation on parallel port: SmartKey Parallel installs on the parallel port of any personal computer.
• Installation on USB port: SmartKey USB installs on the parallel port of any personal computer with at least
one USB port.
• Algorithmic interrogation: SmartKey has an algorithmic interrogation mechanisms used to both protect the
software and to encrypt confidential data.
• Personalized codes: every SmartKey is individually personalized with a factory fitted internal code, which
differs for each user.
• Code programming capability: SmartKey has additional codes programmable by the user. No special
programming devices are necessary, just the supplied software utilities.
• Internal memory up to 8192 bytes of non-volatile memory for reading and writing, and over 16+16 access
code bytes are available inside SmartKey
• Standalone and network use: models are available for protecting both standalone software and programs on a
local network.
13
• Protection of executable programs: the Global Security System (GSS) technology makes it possible to protect
programs in executable format even without provision of source codes.
• Interfacing with software: SmartKey can be used with leading development environments and operating
systems, including DOS, Windows 3.1, Windows98, Windows ME, Windows NT, Windows 2000, Windows
XP, Windows 2003, Windows Vista, Linux, Mac OS X, Novell, and AutoCAD.
• Power supply: it neither uses internal batteries nor does it need an external power supply.
• Compact: The outer dimensions are highly compact and also suitable for programs such as notebook and
laptop.
• Stackability (for SmartKey Parallels only): Several SmartKey Parallel dongles can be stacked on the same
parallel port, by means of a daisy chain connection. This characteristic was not implemented on the SmartKey
USB, because the USB protocol itself makes it possible to daisy-chain connect several devices by means of the
USB HUB.
• Transparency (for SmartKey Parallel only): SmartKey Parallel does not does not prevent use of the parallel
port for other purposes, because it permits bypassing. The dongle can be connected - in daisy-chain manner -
to the printer or to most of the numerous peripheral devices using the parallel port (network adapter, SCSI
adapter, portable hard-disk, other protection dongles, etc). The only constraint is that SmartKey Parallel and
the devices connected to it must be installed before switching on the computer.
3.3 How does SmartKey work?
This is the use principle of SmartKey: fitting the dongle in the PC's parallel of USB port, and control of the dongle's
presence by the protected software. Each dongle is characterized by the unique 'digital credentials', personalized for
every user, which are recognized by the software and enable correct operation.
Immediately after the program starts, or in other strategic points, the software verifies if SmartKey is present on the
PC's port. If the verification proves negative, the program stops its execution. If, instead, the dongle is present, the
program continues its execution correctly, and, if necessary, runs further controls on the dongle's parameters.
An internal non-volatile memory enables implementation of selective protection criteria or individual personalization of
the installed dongles, for example, so that the serial number of the program to be protected matches the contents of the
dongle. SmartKey can be used for special marketing strategies such as granting of demo packages, hire of software for
specified periods, measurement of software usage, control of subsequent versions, etc.
SmartKey is a sure, flexible software protection dongle, designed for transparent fitting on the computer's parallel or
USB port. Every SmartKey dongle has unique, customizable codes, so that every software house is able to implement
its own original, secure protection systems.
3.4 How much time is needed to protect a program?
SmartKey's flexibility makes it possible to define various levels of protection. They use the dongle's resources in a
different way and require longer or shorter implementation time.
• A few minutes: thanks to the supplied Global Security System (GSS) program, you can directly protect your
executable file in a short time, without any action on the source codes. In fact, the entire protection process
(i.e. prepare the personalized codes, program them on the dongle, select the program and protect it) can be run
in only a few minutes.
• A few hours: this is the most common case. You don't have much time, but don't worry: a few hours are
enough to implement the dongle's main security functions to create a personalized protection scheme, using the
supplied software drivers and obtaining a program with an extremely high level of protection.
• A few days: in just a few days, you can write an almost inviolable software by fully exploiting SmartKey's
characteristics and adapting them to your own security requirements.
3.5 What is SmartKey's degree of security?
SmartKey is state-of-the-art in terms of software security. The use of microprocessors and sophisticated encrypting
algorithms makes dongle cloning virtually impossible.
Whether you decide to protect the programs with the supplied functions or by using the GSS automatic utility,
SmartKey provides a high degree of security.
14
As concerns GSS, this program does not just protect your other programs, but encrypts the software, using the values of
the registers stored in SmartKey as a coding dongle. When the program protected by GSS is commanded into execution
mode, it instantly decodes itself using the registers in SmartKey. Without SmartKey, the program will never be
decoded.
3.6 Programs for SmartKey
SmartKey is supplied with the following support software:
• GSS, Global Security System, a utility for rapid, direct protection of executable files without any modification
to the program's sources.
• SPC, SmartKey Programming Central, a utility for programming and personalizing the dongles with the user's
own security codes.
• SDI, Smart Driver Installation, a utility for installing drivers both manually and automatically.
• SCC, SmartKey Programming Central, a utility for configuring the servers and clients of a SmartKey network.
• Interfacing drivers for different programming languages and for diverse operating systems.
In addition to these tools, programs written for the leading development environments (Visual C, Borland C, AutoCad,
…) are supplied to learn how to use the functions of the libraries supplied.
The programs described in this paragraph are available only for the Windows environment.
3.7 SmartKey for Linux and Mac OS X.
SmartKey can be used also with operating systems Linux and Mac OS X, but subject to some limitations when
compared to the Windows operating system.
On Linux environment SmartKey can only be used for standalone with manual protection. On Mac OS X environment
SmartKey can be used for standalone and multilan with manual protection.
SmartKey installation for Linux and Mac OS X is explained in chapter 13.
On Linux environment is supported the SmartKey Parallel, SmartKey 2 USB, SmartKey 3 USB and the SmartKey DL.
On Mac OS X environment is supported the SmartKey 3 USB and the SmartKey DL.
3.8 Getting Started
SmartKey's ease of use and its development kit will help you to start using the system quickly.
3.8.1 Installation
The installation of the programs for using SmartKey and its drivers is in two stages.
• Installation of programs SmartKey Control Central (SCC), SmartKey Driver Installation (SDI), SmartKey
Global Security System (GSS), SmartKey Programming Central (SPC) and installation of the development kit.
• Installation of the drivers for SmartKey USB, for SmartKey Parallel and for Global Security System. (only the
Global Security System program requires its own drivers.)
When the installation CD-ROM is inserted in the reader, the program installation procedure starts automatically. To
finish it, you just have to specify the directory for installing the programs if you do no wish to use the default directory.
After the programs are installed, start program SmartKey Driver Installation (SDI) and select the driver to be installed.
To automatically protect an executable file, install the driver of SmartKey (USB or Parallel) and of GSS. To install
SmartKey Parallel, the SmartKey must be connected to the computer and to the printer, if any, before the computer is
switched on. To install SmartKey USB, make sure you install it after the drivers. To check if the drivers were correctly
installed, use the SmartKey Program Central program. If the SmartKey is fitted and if the drivers were correctly
installed, this SmartKey must appear in the list of SmartKeys present on the computer.

15
4 SmartKey models
The software protection requirements include both simple programs for low-cost packages and costly sophisticated
programs requiring maximum security and flexibility. There's a cost-effective SmartKey model for every situation.
All models have been implemented to ensure high-to-low compatibility: if a program operates with a SmartKey, it will
surely also operate with a more complex one. For example, a program written for SmartKey FX will operate with all
other SmartKeys.
This chapter provides a detailed description of the characteristics of the SmartKey models, and the selection criteria for
using the one most suited to your needs.
4.1 FX
SmartKey FX is the simplest, low-cost model. It makes use of a protection mechanism based on the assignment of a
unique, personal internal identification code: Identification Code or Id-Code.
Protection is algorithmic (thus without a fixed response) and uses encrypted coding operations, which refer to the
internal code. The Id-Code is used as the main parameter for coding. A set of data is sent and is returned suitably
encrypted in a different way according to the Id-Code.
Dongle presence can thus be verified by comparing the returned data-item with the expected one. If the two data-items
coincide, program execution continues normally, but if they do not, execution can be stopped.
• Algorithmic protection based on a unique, personal code (Id-Code)
• Algorithmic protection based on a 20 customizable security codes using the AES cryptographic algorithm for
SmartKey USB 3
4.2 PR
SmartKey PR is the model conceived for the most versatile programs where every single package must be personalized,
e.g. in program serialization operations.
In fact, SmartKey PR, in addition to having the same algorithmic protection mechanism as SmartKey KX, can also be
programmed. The dongle contains a 64/128 byte memory register for both reading and writing. This can be accessed
only by sending two access codes entitled Label and Password (each has 16 bytes). The data stored in the dongle are
defined as Secure Data, because only the person who knows the password can read or write them.
The Label and Password codes, with a length of 16 bytes, can be programmed from the software, without the need for
external programming devices. This means that the dongle can be programmed for each different program to be
protected. Stored data can be dynamically varied by the protected program, thus enabling highly sophisticated
applications, such as use of the data themselves as access counters.
SmartKey PR uses a 'double-lock' protection mechanism: security is guaranteed by the unique ID-Code fixed in the
factory, by the password, and by the programmed data known to the software house only.
• Algorithmic protection based on a unique, personal code (Id-Code)
• Algorithmic protection based on a 20 customizable security codes using the AES cryptographic algorithm for
SmartKey USB 3
• Additional 16-byte programmable security codes (Label and Password)
• 64-byte of internal programmable memory (Secure Data). 128 for SmartKey USB DL (Driver Less)
• Optional limitation of the number of executions of the program to be protected.
4.3 EP
SmartKey EP expands the security characteristics of the previous models and is the model suitable for high security
applications, such as control of access to databanks, and confidential programs.
In addition to having the same protection mechanisms of SmartKey PR, SmartKey EP enables detection of attempted
accesses with an incorrect password. A specific internal counter (Fail Counter) reports the number of 'break-in' attempts
to enable the lawful user to take any action - via software - for defending the data or programs.
16
SmartKey EP 's second special characteristic is the option for freezing passwords and data after they are programmed:
This means one can irreversibly fix the codes and data programmed in the dongle by the software-house. Any
subsequent manipulation of the dongle for fraudulent purposes is prevented, e.g. to modify one's access rights to
databanks or the operational limits of the supplied software.
• Algorithmic protection based on a unique, personal code (Id-Code)
• Algorithmic protection based on a 20 customizable security codes using the AES cryptographic algorithm for
SmartKey USB 3
• Additional 16-byte programmable security codes (Label and Password)
• 64-byte of internal programmable memory (Secure Data). 128 for SmartKey USB DL (Driver Less)
• Counter of fraudulent access attempts (Fail Counter)
• Freezing of programmed data.
• Optional limitation of the number of executions of the program to be protected.
4.4 SP & XM
SmartKey SP and XM are the most sophisticated models of the SmartKey family. They are suitable for top-security
applications, for expensive programs and for at-risk environments, where there is a very high probability of
disseminating illegal copies.
SmartKey SP is a development of SmartKey EP, extending its internal memory (Secure Data) from 64 bytes to 416/896.
SmartKey XM extends the memory to 8192 bytes.
But the unique characteristic of SmartKey SP and XM is the Encryption function, which enables the definition of user-
programmable security algorithms. A software house can therefore personalize the dongle not only via the Secure Data
field (extended to 416/896 bytes), but can also program its own personal security algorithm in addition to the standard
algorithm guaranteed by the Id-Code.
• Algorithmic protection based on a unique, personal code (Id-Code)
• Algorithmic protection based on a 20 customizable security codes using the AES cryptographic algorithm for
SmartKey USB 3
• Additional 16 byte programmable security codes (Label and Password)
• 416 byte of internal programmable memory. 896 for SmartKey USB 3, 8192 for SmartKey XM (Secure Data)
• Counter of fraudulent access attempts (Fail Counter)
• Freezing of programmed data.
• User-programmable Security algorithms
• Optional limitation of the number of executions of the program to be protected.
4.5 NET
SmartKey NET is the model for programs on a local network. SmartKey NET is designed to:
• Protect the software written for local networks from the abusive copy
• Enable control of the number of users who may simultaneously use the protected program.
The protection requires a single SmartKey NET dongle installed on any computer of the network.
SmartKey NET is capable of managing several networked users. The maximum number of users can be programmed on
the dongle itself. One can define the number of users enabled to use the same software package.
• Algorithmic protection based on a unique, personal code (Id-Code)
• Algorithmic protection based on a 20 customizable security codes using the AES cryptographic algorithm for
SmartKey USB 3
• Additional 16-byte programmable security codes (Label and Password)
• 416-byte of internal programmable memory (Secure Data)

17
• Counter of fraudulent access attempts (Fail Counter)
• Freezing of programmed data.
• User-programmable Security algorithms
• Protection of programs on a local network by means of just one protection dongle.
• The number of users simultaneously enabled to use the protected program and the number of its executions is
all programmable.
4.6 A comparison of SmartKey models
If we compare SmartKey to a safe, this will help us to better understand the difference between the various SmartKeys.
The FX model is similar to a safe requiring a particular physical dongle to be opened: safes of different owners have
different dongles, and, likewise, the FX dongles of different users have different Id-Codes.
Instead, the PR model resembles a more sophisticated safe: you need a physical dongle to open it, but you also have to
set a special combination on an appropriate knob (two turns to the left, three to the right, etc.). Likewise, the PR dongle
has an Id-Code (the physical device) and a Password (the combination). Both the safe and the PR model have a
programmable combination - only if you know the Password, can you verify its Secure Data (i.e. access the contents of
the safe).
The EP model is a variation of the PR dongle, and in our analogy, it corresponds to a safe with a lock (Id-Code) and a
combination (Password). Furthermore, an internal device counts the number of incorrect set combinations (Fail
Counter). In addition to that, a mechanism, available on request, prevents anyone fraudulently changing the set
combination.
The SP has 416 bytes (896 for USB 3 model) instead of 64 bytes (it is a larger safe) and the user-programmable
security algorithm is similar to a special dongle, whose shape can be defined at will.
The XM has 8192 bytes of memory.
Finally, the NET dongle has the same security mechanisms as the SP dongle, but is suitable for personal computer
networked programs.
Here is a table summarizing the characteristics of the SmartKey models:
SmartKey Network IdCode/
AES Password Memory Fail
Counter
Programmable
algorithms
FX No Yes No No No No
PR No Yes Yes 64/128 byte No No
EP No Yes Yes 64/128 byte Yes No
SP No Yes Yes 416/896 byte Yes Yes
XM No Yes Yes 8192 byte Yes Yes
NET Yes Yes Yes 416 byte Yes Yes
Table 2 SmartKey models summary table
4.7 Which SmartKey to use?
It is not easy to answer this question, because there are very many both technical and economic reasons involved in
steering selection to one model rather than to another. Only case-by-case examination can define the problem, while
taking into account variables such as:
• The cost of the package
• The environment where the protected software is located
• The geographic area where the product is diffused
• The time available to implement the protection

18
In this connection, it is well to remember that protecting software entails problems and decisions similar to those of
theft insurance policies (" For what sum should I insure?", "What additional guarantees should I include in the insurance
package?", "What is the probability of theft?").
Here are some general considerations providing pointers to choosing an appropriate SmartKey model.
SmartKey FX is simple, rapidly implemented, and low-cost. It is suitable for protecting low-cost or packaged programs,
where there is no need to distinguish the different programs and the different software versions from each other. Bear in
mind that, in this case, the algorithmic protection mechanism is based on a unique personalized code assigned in the
factory (Id-Code), which can no longer be modified. Therefore, all the FX dongles of a single user have the same code.
SmartKey PR is, instead, the most cost-effective model, because, in addition to the unique Id-Code, it has an internal
memory, which can only be accessed through reserved, programmable codes. A software house can therefore program
each dongle according to its specific requirements. Each dongle can therefore be prepared for protecting a particular
program or a defined set of modules of the same program. The following can be written in the dongle: a serial number,
the customer's name or code, a date or any other information useful for the implemented protection mechanism. This
dongle is suitable for protecting most medium-cost software, because it offers high security at a reasonable price.
SmartKey EP is recommended for protecting costly programs, with the intent of discouraging not only attempts to copy
the software, but also attempts to 'break into' the protection mechanism itself, i.e. cracking the dongle or altering its
contents.
SmartKey SP and XM are required if your protection system needs a high capacity for storing the data inside the dongle.
With its user-programmable algorithm, it is suitable for the more sophisticated programs, ensuring a very high level of
security. To use it, more time and skills are required compared to the simpler models.
SmartKey NET is a must for local network programs, to avoid installing a dongle for every user.

19
5 Protecting a program with SmartKey
To protect a program with SmartKey, you have to implement execution control, i.e. modify the program so that its
execution depends on the presence of a dongle to protect the software.
SmartKey has two methods for implementing protection:
• Manual protection by intervening on the sources of the original program and using software drivers
• Automatic protection by intervening directly on the executable file of the original program
5.1 Manual protection
Manual protection means that the programmer has to intervene on the source of the program to be protected, to add the
functions supplied by Eutronsec. These functions enable interfacing between the program and SmartKey via its drivers
(from now on we shall use the term “Application Programming Interface” or API when referring to the set of all these
functions).
This is the appropriate software protection method, which makes it possible to independently define one's own
protection strategy (how many calls to make in order to verify presence of the dongle, in which points of the program
and when to make them, which actions to take if the dongle is absent, etc.).
Although this method calls for considerable effort by the programmer, if you have the sources of the programs to be
protected, manual protection is the mechanism allowing for maximum flexibility and security.
The atomic functions of API are explained in chapter 9. However, a simplistic use of API is not sufficient to guarantee
that the programs protected with SmartKey reach an adequate level of security. One should also make use of the
protection techniques described in chapter 10, which suggest powerful protection strategies. We strongly advise you to
read chapter 10: even a small, apparently harmless structuring of the code may frustrate all the protection work if it
contains security-critical elements. Here is a simple example: the password must not be saved in non-encrypted form on
the hard disk or must not be transmitted non-encrypted between server and client.
APIs are available Linux, Mac OS X and Windows and have an identical syntax for all three operating systems. This
speeds up and simplifies porting of the code portions for protecting your program from one operating system to another.
5.2 Automatic protection
Automatic protection means the possibility of fully automating the procedure for protecting an executable file without
having to manually intervene on the structure of the original program, thus relieving the programmer from what is
sometimes a difficult job.
The Global Security System (GSS) proprietary technology is used to this end. It implements the automatic protection by
transforming a program so that it cannot operate without the presence of a suitable protection dongle.
By using the supplied GSS software, you don't have to worry either about modifying the program you wish to protect, or
possessing the source: starting from the original file in executable format, a second executable file is generated. It
performs the same functions as the original file, providing the correct SmartKey is inserted in the system.
GSS operates in an extremely sophisticated manner, because it does not just add the call to SmartKey to the program
being protected. It also actually encrypts the original program. The encrypting can be decrypted if the program is
executed in the presence of the correct SmartKey.
When the program treated with GSS is commanded to execute, it immediately decrypts itself automatically. The
program cannot be decrypted without SmartKey. The encrypting operation does no slow down execution of the
protected program.
It is virtually impossible to analyze a file encrypted by GSS, because the software's reverse engineering has no
significance until it is decoded in run-time. All the messages in text format in the original executable file (e.g.
containing the name of the software house, the customer's name, serial number, the value of some constants) are also
transformed into a sequence of indecipherable characters, thus preventing alterations by the utilities that act directly on
the hard-disk sectors.
The automatic protection performed by GSS also makes use of a set of optional mechanisms that make it possible to
solve the specific requirements of every applicative situation, e.g. periodic control of dongle presence.
A detailed description of how to automatically protect a program by using GSS can be found in chapter 8.

20
The GSS version is available for Windows only, and, therefore, only Windows programs can be automatically
protected.
5.3 Should I use manual or automatic protection?
Before you begin the software protection operation, you must define the technique to be used. What are the differences
between automatic protecting and personalized protection? The answer is provided briefly in the following table:
Type of
protection Time
required Is IT knowledge
required? Are the
program's
source codes
necessary?
Security
Manual Hours Yes Yes Very high
Automatic Minutes No No High
Table 3 Type of protection to use
Manual protection is preferable when you have the sources, because, thanks to its flexibility, it helps introduce a very
high level of security. Some initial implementation effort is required, which, however, enables you to implement
personalized protection strategies.
Automatic protection is a secure, fast solution. When you have to protect a DOS or Windows program, this technique
enables you to solve situations such as:
• Sources unavailable: the typical case of software distributors not protected by dongles in the country of origin.
• Limited time for implementing the protection.
• Programs written in uncommon programming languages, and, therefore, without the relevant software drivers
for manual protection.

21
6 Protection in a local network
When several computers are connected in a local network, the network software can be protected in one of the
following ways:
• Fit a standalone protective dongle (FX, PR, EP, SP, XM) on each of the computers enabled to execute the
program. In this case, there is no need for any modification of the software, which is already protected for the
standalone mode.
• Fit only one NET type protective dongle with the relevant SmartKey server software.
SmartKey NET is an extension of the SP model. It has all the latter's main characteristics, and some additional
characteristics, enabling protection by using a single dongle installed on any computer on the network or on a non-
dedicated server.
The software supplied with the dongle enables each computer on the network to interrogate the only SmartKey NET
dongle. There is, therefore, no need to use as many dongles as the number of work stations on the network.
With the proprietary Map technology – Multi Application Protection, SmartKey NET also:
• Protects several different programs operating on a network (up to 116),
• Restricts, for each protected program, the maximum number of users who may simultaneously use the
program, in order to keep the use licenses under control. For example, PROG1 can be enabled for 12 licenses,
PROG2 for 27, PROG3 for an unlimited number of licenses, etc…
• Restricts the number of executions of each of the protected programs. This can be useful if you wish to create
demo versions of the software or if you want to adopt a software hire policy, allowing the user a set number of
executions.
6.1 Automatic protection on a local network
In addition to protecting programs operating in standalone mode, GSS can also protect networked programs.
Use of the protected program is absolutely transparent to the end-user. The latter may use both a local dongle and a
network dongle: GSS initially searches the dongle on the local ports and, if the search fails, it continues by attempting to
communicate with a network dongle.
6.2 Manual protection on a local network
The great popularity of local networks calls of a simple, intuitive approach for interfacing toward the dongle. SmartKey
makes use of Multilan technology, which enables software developers to protect programs with a single driver
independent of the operating environment, in either standalone or network mode.
• MultiLan is a single driver, for both standalone and networked programs
• MultiLan automatically identifies the type of network.
The end-user just has to install SmartKey NET dongle on the server in the case of a Novell network or on any Client PC,
if the network is not Novell. If the program is locally executed, the driver automatically searches for the dongle
(SmartKey FX, PR, EP, SP, XM) on the parallel port of the local PC.
6.3 Protecting several programs with SmartKey
In the Lan environment, one SmartKey NET only need be used to protect several software programs. The technology
used is named Map – Multi Application Protection and makes it possible to:
• Protect more than one program in a standalone environment or on a network. In the case of a local network,
one can also define a different number of enabled licenses for each protected program.
• Limit the number of executions of each of the protected programs. This can be useful if you have to create
demo versions of the software or adopt a software hire policy. When the number of executions preset on the
counter (reduced at every program start) expire, the program is not allowed to start any more.

22
7 SmartKey's internal structure
The structure of SmartKey dongles entails the use of some internal registers, each with a particular protection function:
• Id-Code register
• Label register (16 bytes)
• Password register (16 bytes)
• Secure Data register (64 / 128 / 416 / 896 / 8192 bytes)
• Fail Counter register (2 bytes)
7.1 Id-Code register: the personal code
Id-Code is a register programmed in the factory as each dongle is tested, and cannot be modified any more. Every
SmartKey user has a different Identification Code, and the total number of possible codes is 2
32
(equal to about
4,000,000,000).
Id-Code is present in all SmartKey models and ensures that the dongles of different users are securely different from
each other. In fact, it assigns a unique personal code to every owner of the protection dongles.
For reasons of security, the identification code indicated in the Id-Code register is not directly legible, but its value
influences the result of the algorithmic interrogation of the dongle. Different users have different Id-Codes and,
therefore, the relevant dongles provide different answers to the algorithmic interrogation by the protected software.
7.2 Label register: the identification and access label
The Label register contains one of the two codes for accessing the dongle and its function is to identify the correct
dongle for the particular program being executed. In fact, the label is an electronic identification label inside the dongle.
The function of the Label register is particularly important when several SmartKey Parallel dongles are stacked in a
daisy chain on the same parallel port. In fact, in this case, the Label is a kind of address, enabling the protected software
to interrogate the correct dongle. To check the presence of the searched for dongle, the protected software sends the
value of the Label to the parallel port: only the dongle with the coinciding Label will provide an answer.
It is therefore important to assign a different Label to each of your application programs, so that several SmartKey
dongles can be installed simultaneously.
The Label register measures16 bytes (2
128
combinations, equal to 3 10
38
). As the number of combinations is
enormous, it would be impossible for two different software-houses to decide to assign the same Label to their
programs.
By using the programmable dongles (PR, EP, SP, XM and NET), the Label can be programmed off-line with the SPC
utility, by selecting the programming mode, or on-line by means of the supplied software drivers.
For FX dongles, the Label register is fixed and coincides with the Id-Code.
FX Non-programmable Label Id-Code
PR EP SP XM NET Programmable Label 16 bytes
Table 4 Table of SmartKeys with non-programmable and programmable Label
7.3 Password register: the data access dongle
The Password register is extremely important in the protection mechanism, because only if you know how it was
programmed, can you access the data contained in the dongle's non-volatile memory. Similarly to the combination of a
safe, knowing the correct Password will open the dongle and thus provide access to the safe's contents.
The Password register, which measures 16 bytes, can be programmed with the SPC utility, by selecting the
programming mode.
One can never directly read the contents of the Password set in the dongle: access to the Password is possible only in
writing mode during programming.

23
The Password can also be re-programmed, even if you do not know the previous one. In this case, however, the
contents of the data memory (Secure Data) are automatically reset.
7.4 Secure Data register: the data of the non-volatile memory
The Secure Data register is a non-volatile memory inside the dongle, which can be accessed only if you know the
Password. If you control the contents of the register, you are shown if an attempted 'break-in' is concerned, or lawful
installation of the software.
Model Memory
FX Parallel/USB 0
PR, EP Parallel/USB 64
PR, EP USB Driver Less 128
SP Parallel 416
SP USB 896
XM USB 8192
NET Parallel/USB 416
Table 5 SmartKey memory size
The Secure Data intervene in different ways in the protection mechanism, but mainly through an operation that
compares the expected contents with the contents effectively read by the dongle: the result of the comparison enables
you to decide whether or not to continue execution of the program.
In the case of the SP, XM and NET dongles, the register is also used for storing the user-programmable security
algorithm. Lastly, with the NET network dongle, some bytes are used to define the maximum number of simultaneous
users of the protected program and any limitation of the total number of executions. The license management register
requires 2 bytes for enabling the service, and 3 bytes for each protected program.
The Secure Data can be read or written from software providing the correct Password is first transferred.
If the Password is incorrect, the reading operations do not get the content of the Secure Data, but a pseudo-random
series of bits. Writing operations with an incorrect Password have no effect, in order not to alter the valid content of
programmed data.
7.5 Fail Counter register: the incorrect accesses alarms
The Fail Counter register, available in the EP, SP, XM and NET dongles only, enables automatic counting of the
number of incorrect access attempts to the dongle.
Whenever a read or write access with an incorrect Password is attempted, the content of the register is automatically
increased by one.
This is therefore a counter that is automatically incremented for reading only, and indicates 'break-in' attempts by a
search of the Password. For reasons of security, the counter cannot be reset by any of the dongle's writing or
programming functions.
Counting is in the range from 0 to 10,000. The register is read during a READING MODE, subject to knowledge of the
Password. If the Password is incorrect, the returned number is randomly generated.
The software to be protected can use the register for verifying any unlawful access attempts. For example, if the dongle
is used to permit access to the databanks or confidential data, the software can permanently disable it by altering the
content of the Secure Data, after a programmed number of incorrect access attempts (including non-consecutive
attempts).
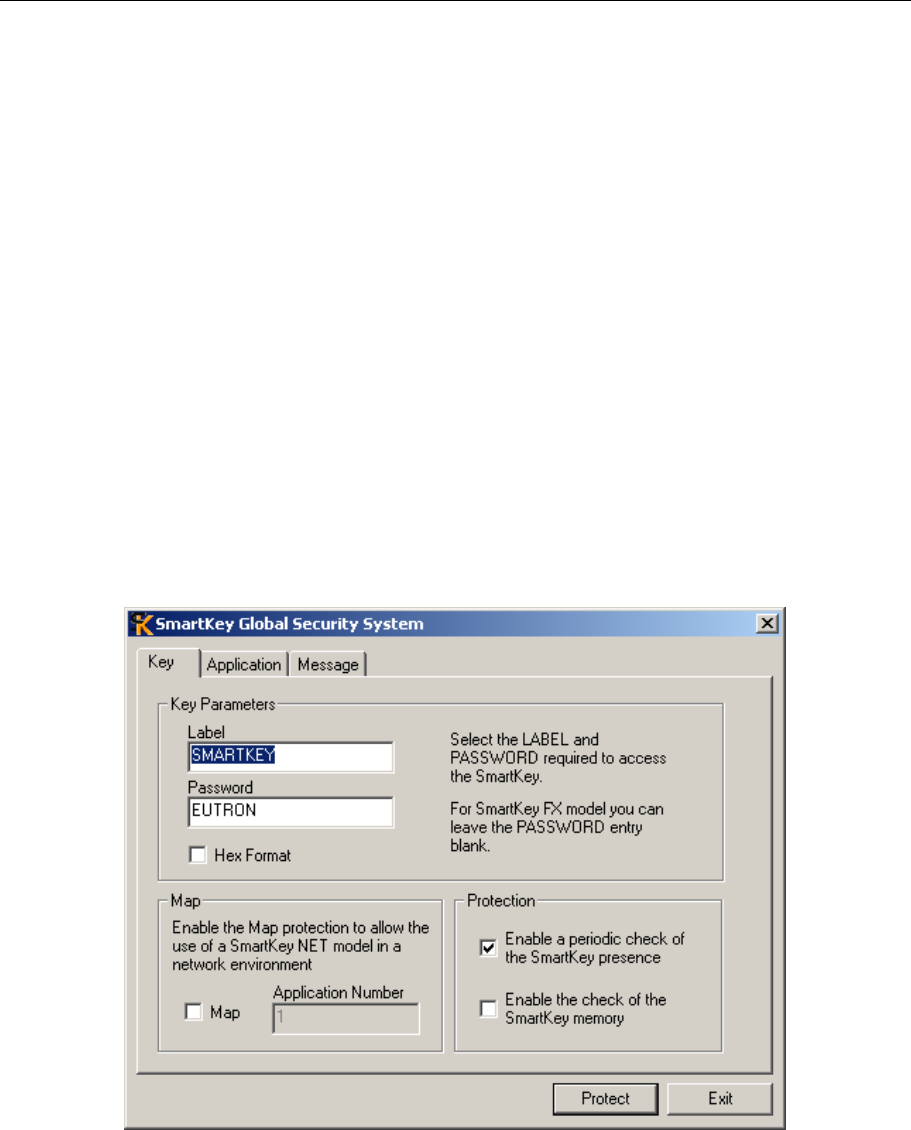
24
8 Automatic protection
The Global Security System (GSS) program protects the program automatically without having to write any code lines
and without having the program's source files. Starting from the program's executable file, GSS generates a protected
program. The protected program obtained in this way has the same functions as the original one, but can operate solely
with the SmartKey for which it was generated, and with the SmartKeys with the same configuration as the generated
program.
GSS offers a further degree of security: the encrypting of the executable file of the new program. Thanks to
sophisticated encrypting algorithms, it is extremely difficult to obtain the original program from the protected one. So
GSS offers two independent protection mechanisms:
• program shut-down if the SmartKey dongle is not present
• encrypting of the data contained in the new executable file
GSS also makes it possible to encrypt all the files managed by the application software. This ensures a further level of
security.
Thanks to GSS, SmartKey offers other advantages. It can be used to effectively limit the number of executions when
programs are distributed for demo purposes. When the set limit is reached, the software disables itself. Furthermore,
protecting various programs in the Lan environment is now a simple matter, thanks to SmartKey. The maximum
number of licenses for the protected program can also be set.
All SmartKey models are compatible with GSS. In the case of SmartKey FX, protection is based only on the
Identification Code. For the other models, the protection is based also on other elements such as Password and Secure
Data.
Figure 1 shows the GSS panel, which is used for inputting all data required to crate the protected program. All the fields
to be input are explained in the paragraphs of this chapter.
Figure 1 GSS Interface
8.1 Automatic protection with GSS
SmartKey's protection makes use of GSS technology, which is supplied with a package of GSS.EXE utilities, supplied
together with the SmartKey Kit. Here is a summary list of some of the advantages offered by this utility:
• Automatic protection of executable files
25
• Optional encryption of data files associated with the protected programs
• Protection based on Label, Password and Memory
• Periodic control of SmartKey presence
• Selection of the message to be displayed
8.2 Protection of Windows platforms with GSS
Global Security System can protect all executable files created for the following platforms: Windows 9x, Windows ME,
Windows NT, Windows 2000, Windows XP, Windows 2003, Windows Vista and later programs.
To start the protected Windows programs, the following run-time modules must be present in the same executable
directory: MODW9X.EXE and MODWNT.EXE as well as device GSSDRV10.VXD. These files are automatically
created by the GSS utility into the destination folder during the protection process. With Windows NT, Windows 2000,
Windows XP, Windows 2003 and Windows Vista the driver of the GSS device specific for these operating systems
must also be installed. To correctly install the device's driver, the user must possess the administration rights.
The SmartKey driver and the GSS device can be installed manually with the SDI utility or automatically, by integrating
the SDI library with your installation procedure.
For more specific, updated information on using the product, please consult the file README.TXT to be found in the
developer kit.
8.3 GSS: the common options
The different versions of GSS have a single user interface. This protects the integrity of the object code of the protected
programs. It is particularly useful when, in attempting to alter a part of the code or of the numeric parameters or text
strings, a hacker fraudulently modifies the object code.
Even the smallest of changes, even if only one bit is concerned, is detected by GSS, which displays a warning message
at program start and immediately stops the program. GSS also provides the possibility of entering a text that is shown if
the dongle is absent, or if the program file is corrupted.
8.3.1 Control of dongle presence
SmartKey users can often send commands for maintaining a list of dongle presences by using the Periodic Check
option. This list guarantees users that the dongle is present during the entire execution of the protected program.
The "Enable a periodic check of the SmartKey presence" option also prevents the users removing the dongle after a
program has been started. In the absence of the dongle, the appliance would continue operating, because no request to
control dongle presence would be sent.
Furthermore, periodic control of dongle presence instead of continuous control helps starting numerous copies of the
same program. This is because, in the absence of continuous control, one can first start the protected program and then
remove the dongle for a given time, in order to start copies of the same program.
8.3.2 Programming Error Messages
SmartKey enables users to personalize the error messages that are displayed in special conditions. By using this
function, one can define the error messages to one's liking. These are the conditions for which one can program error
messages:
• SmartKey dongle not present
• Program code changed
The list of programmable messages depends on both the SmartKey model and the Configuration character of the
Protection. The GSS utility also suggests some default messages for each of the error situations listed above.
8.3.3 Encryption of executable code
The GSS by default fully encrypts the original file, so that the new executable file is wholly encrypted. This defends the
program against hacker attacks, because it is virtually impossible to disassemble the original program by using the
executable file generated by GSS.
Any protection strategy without encryption techniques offers a rather low level of protection. Cryptography is reversible
only if the SmartKey used for cryptography is connected to the computer. If the SmartKey is missing, the cryptography
is irreversible.

26
In the case of Windows-based programs, cryptography makes it possible to avoid exporting and unlawful copying of
one's resources. This is necessary, because there are many Windows-based programs that allow extraction of their
resources (icons, cursors, dialogues, menus, bitmaps, toolbars, etc.) and also the copying and reuse of such resources.
8.3.4 Parameter-based protection
SmartKey users can use a protection based on a multiplicity of parameters in addition to that offered by cryptography.
This ensures that the protected program operates only when the dongle being used is the same as the one originally used
for creating the file. This is because each dongle has a unique set of parameters including Id-Code, Label, Password and
Memory.
However, parameter-based protection is an option that can be easily disabled, except for the Label. Use of the Label is
obligatory. When a protected program is operating and the dongle's optional parameters are disabled, only the Label is
controlled, while the other parameters are overlooked. With a good combination of labels only, the program is
successfully executed.
8.3.5 Message displayed in absence of the dongle (key)
If the protected program is activated in the absence of the relevant SmartKey, it stops and the following default message
is shown: No Key.
This message is not fixed. In common with messages associated with other functions, the GSS.EXE utility makes it
possible to also replace the standard message with a personalized one.
8.3.6 Limitation of number of executions and licenses
Use of SmartKey is not limited just to programs protected against unauthorized accesses. SmartKey also enables you to
set the number of executions and licenses permitted for the protected program. This function is particularly useful for
issuing demo versions of a program. It provides users with the possibility of limited use of the program. When the set
number of executions is reached, the program stops operating.
Moreover, the possibility of limiting the number of licenses guarantees that the program is used inline with the licenses
policy. This function is available with the SmartKey NET version.
8.3.7 Automatic cryptography of data files
To make a program completely safe against unauthorized accesses, not only must one protect the executable program,
but also all the relevant data/databases (.DBF, .DAT, etc.) associated with it. Thanks to GSS technology, SmartKey now
lets you do all this.
When a data string is sent to the dongle, the pre-programmed algorithm is used to encrypt it. The GSS utility is used
mainly for this purpose. When it is being started, the encrypted program automatically decrypts the encrypted files.
When not in use, these files are again encrypted.
8.3.8 Protection of programs on a network
In addition to protecting programs operating in standalone mode, SmartKey also provides security for programs based
on a Local Area Network. As a protected program is used in an absolutely transparent way for the end-user, both a local
and a network dongle can be used. The GSS technology first searches for the device on the local ports. If it does not find
a dongle, it begins to communicate with a Lan device.
SmartKey NET was developed in particular with this in mind. The software supplied with the dongle enables networked
computers to send the request to a single SmartKey NET. Consequently, there is no longer any need to use as many
dongles as the number of stations connected to the network.
8.3.9 Protecting files executable in series
It may sometimes be necessary to automatically protect several executable files, in a single operation. In this situation,
GSSLINE.EXE, which is the DOS line command version of the GSS.EXE utility, is very useful.
This is the syntax for executing GSSLINE:
gssline CFG_FILE EXE_FILE [DATA_FILE...] DESTINATION_DIR
CFG_FILE The configuration file.
EXE_FILE or DATA_FILE The name of the .EXE or data file to be protected.
DESTINATION_DIR The path where the final protected .EXE file is located.
Table 6
When typing in the command line, the following must be considered:
27
• The path of the protected file (DESTINATION_DIR) to be produced by GSSLINE, must differ from the path
where the original file (EXE_FILE|DATA_FILE) is located.
• Clearly indicate the extension of each file (.CFG and .EXE).
8.4 Rapid implementation of the program's protection
In this chapter, we have up to now deal, in detail, with automatic protection of software. We shall now describe a set of
key steps for rapidly implementing your program's application.
• Insert the Label and Password of your SmartKey and activate the protection based on Memory.
• If using SmartKey NET, the Map protection can be activated to control your program's licenses and executions.
• Select the Program file.
• Select an Icon file, if it exists.
• Select the possible data files referring to your program.
• Select the destination where your wish to save the protected file. We advise you to change the folder to avoid
overwriting the original file.
• Change the Error Message (if you wish) according to the error situation.

28
9 Manual protection
Manual protection is based on the use of the functions of the library of the development kit supplied by Eutronsec. The
functions for SmartKey or API are implemented both as static libraries and as dynamic libraries (DLL, in the case of
Windows). From a functional point of view, there is no difference between the two types of library. The dynamic
libraries offer a lower degree of security because an expert hacker could understand when the protected program uses
the dynamic library. This danger is cut down with static libraries because the link occurs when the executable file is
generated.
Use of the APIs and implementation of powerful protection techniques make it possible to protect your work also
against the menace of expert IT pirates with refined analysis instruments. It is very important to know these techniques,
because a hacker could overcome the security systems through a banal weak point of the code. For example, the
possibility of obtaining the Label or Password by analyzing the executable file must be absolutely avoided. The chapter
10 illustrates and gives examples of some of these protection techniques and is an essential addition to the current
chapter.
The software drivers make it possible to activate a set of commands, each of which implements one of the following
security operating modes:
• Locating mode: detects if the dongle is present, and on which parallel or USB port.
• Scrambling mode: algorithmically verifies if the Id-Code is correct.
• Reading mode: reads the Secure Data.
• Block Reading mode: reads the Secure Data in blocks.
• Writing mode: writes the Secure Data.
• Block Writing mode: writes the Secure Data in blocks.
• Fixing mode: fixes the contents of the dongle so that they can no longer be modified.
• Encryption mode: activates the coding algorithm programmed by the user.
• Programming mode: reprograms the contents of the dongle.
• AES mode: algorithmically authenticates the SmartKey.
The Eutronsec development kit contains the smartdem program that uses some of the commands explained in the
following paragraphs. The program is the console type, and was written in C. It can be compiled with any C compiler in
the following environments: Linux, Mac OS X 10.x and Windows.
The source code contained in smartdem.c is the same for all the operating systems, but the compiling mode is different.
This is why smartdem.c is located in the following directory:
• Sdk\Manual_Protection\Standalone_Windows_Libraries_And_Examples\GenericWin32Obj\, compilation with
static linkage designed for the Windows environment.
• Sdk\Manual_Protection\Others\, compilation designed for the Linux and Mac OS X 10.x environments.
9.1 Execution method of SmartKey commands
The execution method for SmartKey commands occurs through the exchange of a data field between the program and
the SmartKey driver. The data field has a fixed format and contains all information necessary for executing the
command and any result. It is defined as a structure (or record) with the following fields:
struct smartkey {
word lpt;
word command;
byte label[16];
byte password[16];
byte data[64];
word fail_counter;
word status;
byte ext_data[352];
}

29
Use of each field can vary according to the executed command, but is generally as follows.
lpt Parallel or USB port identifier where the SmartKey dongle is located
command Code of the command to be executed
label The SmartKey's LABEL: The label is necessary for all commands.
password The SmartKey's PASSWORD. The PASSWORD is necessary for all commands requiring
access to SmartKey's memory
data The contents of SmartKey's memory and a generic buffer for operations requiring exchange of
data
fail_counter Counter of failed accesses to SmartKey.
status Result of the execution of the command. Value 0 indicates that the command was correctly
executed.
ext_data Content of SmartKey's extended memory.
It should be considered that, although some fields have the same name as the dongle's physical registers, they are
different entities. For example, the content of SmartKey's memory is actually present in the structure's data field only
during READING and WRITING operations. For example, during the SCRAMBLING operation, the data field
contains the data for scrambling between PC and SmartKey. The SCRAMBLING function uses the data field only as a
variable in support of its own operations, and does not modify the content of SmartKey's memory.
To execute a command:
• State a structure type variable with SmartKey fields.
• Fill the variable's fields with the values requested by the command.
In particular, the command field must be set to include the command to be executed, and all other fields
required for executing the command itself.
• Call up the function defined in the SmartKey driver, passing the structure variable as the subject. The name of
the function and the structure's passing method depend on the development environment being used. The
function is generally called msclink () and the variable is passed according to address and not value.
• From the status field, read the result of the command and every other output value.
The SDK SmartKey contains examples of the main development environments. Refer to the LEGGIMI.TXT file of
each example for more details on how to use the SmartKey driver in that specific environment.
If you wish to use a development environment differing from the environments explicitly supported, you can, in any
event, make direct use of the available libraries, if the language being used is able to import static (in format .OBJ/.LIB)
or dynamic (in format .DLL) external libraries.
9.2 Locating mode
The LOCATING mode searches the SmartKey with a label pre-fixed on all the ports of the system, whether
parallel or USB, and enables the protected software to detect on which of these ports the dongle is fitted.
The result of the LOCATING operation is the identifier of the port on which the dongle is installed. This identifier must
be used for subsequent operations on the dongle. You cannot make assumption on this value, it may change depending
on the SmartKey model, driver version, operating system installed and PC configuration. You must only get it in the
LPT field after the LOCATING command and use it in all the other commands until the application end.
Use of the LOCATING function makes the protected software independent of the parallel/USB port on which the user
installs the dongle.
After the LOCATING command the LPT field is filled with the identifier of the port on which the dongle is present.
Remember that with the FX dongles, the Label cannot be programmed and coincides with the Id-Code, whereas by
using the programmable dongles, the Label can be programmed with any sequence of 16 bytes. In both cases, the
LOCATING mode is fully operational
The exchange of information is organized like this:
Models ALL
Input COMMAND ‘L’

30
LABEL Label
Output LPT Port
STATUS Status
==0 SmartKey dongle found
!=0 SmartKey dongle not found
Table 7 Parameters for the LOCATING MODE command
9.2.1 Parameter transfer
Parameters to be transferred to execute a LOCATING operation, including search on all parallel and USB ports, for a
dongle with a Label named "SMARTKEY".
COMMAND 4C 00 Locating ("L")
LABEL 53 4D 41 52 54 4B 45 59
00 00 00 00 00 00 00 00
Label ("SMARTKEY")
Table 8 Exchange of information for the LOCATING MODE command
If a dongle containing the passed Label is present on a port, the LPT field will count its identifier.
9.3 Scrambling mode
The SCRAMBLING mode supported by all SmartKey dongle models, is based on individual customization for every
client of the Id-Code register. Its function is to algorithmically discover if the Id-Code is correct.
The Identification Code contained in the Id-Code register is used as the fundamental parameter of a mathematical
coding function (SCRAMBLING): a set of data are sent, processed and returned appropriately encrypted in a unique
manner for every Id-Code. Dongle presence can therefore be verified by comparing the processed datum to the expected
one.
Dongles with different Id-Codes use different codes and, therefore, input data being equal, the returned data will be
different. This means that a table comparing sent data (Original Data) and returned data (Scrambled Data) can be
associated with every different Id-Code.
The algorithm used is high security non-linear.
The exchange of information is organized like this:
Models ALL
Input COMMAND ‘S’
LPT Port
LABEL Label
DATA[0..7] Original data (8 bytes)
Output DATA[0..7] Scrambled data (8 bytes)
STATUS Status
==0 Success
!=0 Error
Table 9 Parameters for the SCRAMBLING MODE command.
If a LOCATING operation had been effected, the correct value is automatically assigned to the LPT field. This means
that the programmer does not have to assign a value to that field.
The SCRAMBLING function does not change the contents of the Secure Data, but uses the Data software parameter as
a variable in support of the exchange of Original and Scrambled Data.
9.3.1 Parameter transfer
Parameters to be transferred to execute a SCRAMBLING operation, including search for the dongle on the LPT1
parallel port:

31
LPT 01 00 Port
COMMAND 53 00 Scrambling ("S")
LABEL 53 4D 41 52 54 4B 45 59
00 00 00 00 00 00 00 00
Label ("SMARTKEY")
DATA XX XX XX XX XX XX XX XX Data to be scrambled (8 bytes)
Table 10 Exchange of information for the SCRAMBLING command
At the end of the operation, the first 8 bytes of the Data field are replaced by the Scrambled Data that depend on both
the sent Original Data and on the dongle's Id-Code.
In this case, the LPT field must be initialized according to the port concerned. This operation can be voided, by using
the LOCATING command for automatic search of all the ports installed on the computer.
9.4 Reading mode
The programmable models of the SmartKey family (PR, EP, SP, XM, NET) are equipped with a protection system based
on selective writing and reading access to the Secure Data register, by a Password programmable on the software.
Every software-house can therefore personally encode the dongles in its possession merely by using the supplied utility
software, and without the need for any external programming devices. The administration of the access codes and of the
contents of the non-volatile memory is managed directly by the software-house, which thus become the unique holder
of the personalization codes.
As concerns reading, the READING function enables access to the Data and ExtData fields to verify their contents and
compare them to the expected contents. Knowledge of Label and Password is necessary.
The READING_MODE command allow the access of the first 416 bytes of memory. If the dongle has more than 416
bytes of memory, you must use the BLOCK_READING command to completely access it.
For the EP, SP, XM and NET models, the value of the FAIL COUNTER register is also available in reading mode.
The exchange of information is organized like this:
Models PR, EP, SP, XM, NET
Input COMMAND ‘R’
LPT Port
LABEL Label
PASSWORD Password
Output DATA Read data
EXT_DATA Read extended data (for models with more than 64 bytes of memory)
FAIL_CTR Fail Counter (for models EP, SP, XM and NET only)
STATUS Status
==0 Success
!=0 Error
Table 11 READING MODE command parameters
If the Password passed to the dongle is incorrect, Secure Data and Fail Counter are pseudo-randomly generated.
9.4.1 Parameter transfer
Parameters be transferred to execute a READING operation on a dongle present on the on the LPT1 parallel port:
LPT 01 00 Port
COMMAND 52 00 Reading ("R")
LABEL 53 4D 41 52 54 4B 45 59
00 00 00 00 00 00 00 00
Label ("SMARTKEY")

32
PASSWORD 45 55 54 52 4F 4E 00 00
00 00 00 00 00 00 00 00
Password ("EUTRON")
Table 12 Exchange of information for the READING MODE command
If the dongle found on the indicated port, with correct Label and Password values, the Data field will count the first 64
bytes of the read Secure Data, and in the case of dongles SP, XM and NET , the ExpData field will count the remaining
352 bytes.
9.5 Writing mode
If the Password is known, the Secure Data can be written in the same way specified for reading. The WRITING
function modifies on-line the contents of the Secure Data.
The WRITING_MODE command allow the access of the first 416 bytes of memory. If the dongle has more than 416
bytes of memory, you must use the BLOCK_WRITING command to completely access it.
The exchange of information is organized like this:
Models PR, EP, SP, XM, NET
Input COMMAND ‘W’
LPT Port
LABEL Label
PASSWORD Password
DATA Data to be written
EXT_DATA Extended data to be written (for models SP, XM and NET only)
Output STATUS Status
==0 Success
!=0 Error
Table 13 WRITING MODE command parameters
If the password passed to the dongle is incorrect, the data present in the Secure Data register are not changed.
9.5.1 Parameter transfer
Parameters needing to be transferred to execute a WRITING operation on a dongle fitted on the on the LPT1 parallel
port:
LPT 01 00 Port
COMMAND 57 00 Reading ("W")
LABEL 53 4D 41 52 54 4B 45 59
00 00 00 00 00 00 00 00
Label ("SMARTKEY")
PASSWORD 45 55 54 52 4F 4E 00 00
00 00 00 00 00 00 00 00
Password ("EUTRON")
DATA XX XX XX XX XX XX XX XX
…
Data
EXT_DATA XX XX XX XX XX XX XX XX
…
Ext Data
Table 14 Exchange of information for the WRITING MODE command
If the dongle is found on the indicated port and if the Label and Password values are correct, the Data field (and
possibly the ExtData field if the dongle as enough memory) will be transferred to the dongle's Secure Data
With the dongle present but with an incorrect Password, the Secure Data will not be modified.

33
9.6 Block Reading mode
The BLOCK READING mode enables reading portions of the Secure Data, for example, one, two or a few words rather
than the entire field. This saves a few fractions of a second compared to full reading with the READING MODE.
The BLOCK_READING command is the only reading command which gives access to all the dongle memory.
The exchange of information is organized like this:
Models PR, EP, SP, XM, NET
Input COMMAND ‘BR’
LPT Port
LABEL Label
PASSWORD Password
DATA[0,1] Pointer at the first word to be read (from 0 to 31 for models with 64 bytes of
memory, from 0 to 63 for 128 bytes, from 0 to 207 for 416 bytes, from 0 to 447
for 896 bytes) (2 bytes)
DATA[2,3] Number of words to be read (from 1 to 16) (2 bytes)
Output DATA[4,…] Values to be read in the area indicated by the two previous parameters (2 - 32
bytes)
STATUS Status
==0 Success
!=0 Error
Table 15 BLOCK READING command parameters
If the Password passed to the dongle is incorrect, Secure Data and Fail Counter are pseudo-randomly generated.
9.6.1 Parameter transfer
Parameters to be transferred to execute a BLOCK READING operation on a dongle present on the LPT1 parallel port.
15 words must be read (000F hex equal to 30 bytes) starting from the twelfth word (address 11 = 000B hex).
Remember that, in the parameter transfer structure, the first two bytes of the Data field are reserved for the address of
the first word to be read, and the subsequent two bytes contain the number of words to be read. The read data block will
be contained from in the fifth byte onward, at the end of the operation.
LPT 01 00 Port
COMMAND 52 42 Block Reading ("BR")
LABEL 53 4D 41 52 54 4B 45 59
00 00 00 00 00 00 00 00
Label ("SMARTKEY")
PASSWORD 45 55 54 52 4F 4E 00 00
00 00 00 00 00 00 00 00
Password("EUTRON")
DATA 0B 00 0F 00 Address and Number of Words
Table 16 Exchange of information for the BLOCK READING command
9.7 Block Writing mode
The BLOCK WRITING function makes it possible to write portions of Secure Data, e.g. one, two or a few words rather
than the whole field. This saves a few fractions of a second compared to complete writing with the WRITING MODE.
The BLOCK_WRITING command is the only writing command which gives access to all the dongle memory.
The exchange of information is organized like this:
Models PR, EP, SP, XM, NET
Input COMMAND ‘BW’

34
LPT Port
LABEL Label
PASSWORD Password
DATA[0,1] Pointer at the first word to be written (from 0 to 31 for models with 64 bytes of
memory, from 0 to 63 for 128 bytes, from 0 to 207 for 416 bytes, from 0 to 447
for 896 bytes) (2 bytes)
DATA[2,3] Number of words to be written (from 1 to 16) (2 bytes)
DATA[4,…] Values to be written in the area indicated by the two previous parameters (2 - 32
bytes)
Output STATUS Status
==0 Success
!=0 Error
Table 17 BLOCK WRITING MODE command parameters
If the Password passed to the dongle is incorrect, the data present in the Secure Data register are not changed.
9.7.1 Parameter transfer
Parameters to be transferred to execute a BLOCK WRITING operation on a dongle present on the LPT1 parallel port.
10 words must be written (000A hex equal to 20 bytes) starting from the first word (address 0 = 0000 hex).
Remember that, in the parameter transfer structure, the first two bytes of the Data field are reserved for the address of
the first word to be written, and the subsequent two bytes contain the number of words. The bytes to be written are
contained from in the fifth byte onward.
LPT 01 00 Port
COMMAND 46 00 Fixing Mode ("F")
LABEL 53 4D 41 52 54 4B 45 59
00 00 00 00 00 00 00 00
Label ("SMARTKEY")
PASSWORD 45 55 54 52 4F 4E 00 00
00 00 00 00 00 00 00 00
Password ("EUTRON")
DATA 0B 00 0F 00 XX XX XX XX
XX XX XX XX XX XX XX XX
XX XX XX XX XX XX XX XX
Address, Number of Words, and Data
Table 18 Exchange of information for the BLOCK WRITING MODE command
9.8 Fixing mode
Fixing data means preventing further programming of the Label, Password and Secure Data registers. In practice,
previously programmed data can be frozen. After the FIXING mode has been executed, SmartKey's contents can no
longer be changed in any way. The data fixing mode, together with the Fail Counter Register is available only on
models EP, SP, XM and NET.
The possibility of fixing data enables a software-house to generate totally personalized, no longer alterable dongles.
Attempts to change the contents are therefore discouraged, e.g. to vary access priority to databanks or to enable non
specified software modules.
The fixing operation should not be performed in testing, otherwise you would no longer be able to re-program the
dongle.
We therefore recommend that the possibility of fixing the contents programmed in the dongle should only be evaluated
during the final stage of implementing the protection. Important: bear in mind that the additional functions involving
memory writing will not be available.
This command cannot be executed from lan, it works only with a local connection with the SmartKey.

35
The exchange of information is organized like this:
Models EP, SP, XM, NET
Input COMMAND ‘F’
LPT Port
LABEL Label
PASSWORD Password
DATA Data contained in the dongle
EXP_DATA Extended data contained in the dongle (for models SP, XM and NET only).
Output STATUS Status
==0 Success
!=0 Error
Table 19 FIXING MODE command parameters
Memory fixing is executed only if the sent parameters - Label, Password and Secure Data - coincide with the
contents of the respective registers.
9.8.1 Parameter transfer
Parameters to be transferred to execute a FIXING operation with dongle on the LPT1 parallel port, including sending of
Label, Password and Data, and comparison with the expected contents (respectively "SMARTKEY", "EUTRON" and
"SECURITY DATA"). If the parameters coincide, they are fixed.
LPT 01 00 Port
COMMAND 46 00 Fixing Mode("F")
LABEL 53 4D 41 52 54 4B 45 59
00 00 00 00 00 00 00 00
Label ("SMARTKEY")
PASSWORD 45 55 54 52 4F 4E 00 00
00 00 00 00 00 00 00 00
Password ("EUTRON")
DATA 53 45 43 55 52 49 54 59
20 44 41 54 41 00 00 00
00 00 00 00 00 00 00 00
00 00 00 00 00 00 00 00
00 00 00 00 00 00 00 00
00 00 00 00 00 00 00 00
00 00 00 00 00 00 00 00
Data (“SECURITY DATA”)
EXP_DATA 00 00 00 00 00 00 00 00
…
Exp Data
Table 20 Exchange of information for the FIXING MODE command
9.9 Encrypting mode
The security functions of the SmartKey dongles are increased in the most evolved models, SP, XM and NET, thanks to
the ENCRYPTING mode. This is an algorithmic interrogation mode conceptually similar to the SCRAMBLING
operation, but in which the security algorithm is not fixed but is programmable.
The user can define his own security algorithms, using a series of logical operators. Exactly a in the SCRAMBLING
mode, the algorithm operates on the first 8 bytes of the Secure Data (Original Data) field, and the result of processing is
again a set of 8 bytes overlapping the original data (Encrypted Data).

36
Contrary to the SCRAMBLING mode, the algorithm is programmed in the dongle with SmartKey's ENCRYPTING
function and occupies the Expanded Secure Data register, in reverse order, starting from the last byte of the field.
The ENCRYPTING mode is certainly the most versatile and secure function of the SmartKey dongles. However, this is
also the most complex function calling for a good knowledge of logical operators. We therefore advise you to first
implement the other modes, which guarantee a very high level of security. Think of the ENCRYPTING function as an
arm for use in situations with a very high probability of attack by technologically wise hackers.
Use of the ENCRYPTING function entails comparing the Encrypted Data obtained from the dongle, to the data
calculated inside the software, applying the algorithm to the Original Data.
If the comparison proves successful, one can be certain that one's dongle is fitted on the PC, and, therefore, execution of
the program can continue.
The ENCRYPTING function does not alter the contents of the Secure Data, but uses the software Data parameter as a
variable for supporting the exchange of Original and Encrypted Data.
The exchange of information is organized like this:
Models SP, XM, NET
Input COMMAND ‘E’
LPT Port
LABEL Label
PASSWORD Password
DATA[0..7] Original data (8 bytes)
Output DATA[0..7] Encrypted data (8 bytes)
STATUS Status
==0 Success
!=0 Error
Table 21 ENCRYPTING MODE command parameters
The algorithm is stored in the Expanded Secure Data field, in reverse direction starting from the last byte of that field.
You should check that the algorithm is located in that field, to avoid accidentally overwriting it during a WRITING
operation.
9.9.1 Parameter transfer
Parameters to be transferred to execute an ENCRYPTING operation, with the dongle on the LPT1 parallel port:
LPT 01 00 Port
COMMAND 45 00 Encrypting ("E")
LABEL 53 4D 41 52 54 4B 45 59
00 00 00 00 00 00 00 00
Label ("SMARTKEY")
PASSWORD 45 55 54 52 4F 4E 00 00
00 00 00 00 00 00 00 00
Password ("EUTRON")
DATA XX XX XX XX XX XX XX XX Data to encrypt (8 byte)
Table 22 Exchange of information for the ENCRYPTING MODE command
At the end of the operation, the first 8 bytes of the Data field are replaced by the Encrypted Data, which depend on both
the Original Data and on the algorithm previously programmed in the dongle.
9.9.2 Definition of the algorithm
The logical operators which can be used to build your own security algorithm are as follows:
OPERATOR DEFINITION SYMBOL
Left Rotate Rotate to the left <

37
Right Rotate Rotate to the right >
NOT Logical negation ~
AND Logical product &
OR Logical sum |
XOR Exclusive logical sum ^
Add Module 256 sum +
Move Shift M
Assign Assignment A
End End of processing E
Table 23 Table of logical operators
The operands on which the operators can act are each of the 8 bytes of the Original Data and two temporary variables
named X and Y.
OPERAND DEFINITION
N n bytes of the Original Data (1 ≤ n ≤8)
X Temporary variable X
Y Temporary variable Y
Table 24 Table of operands
9.9.3 Example
Here is an example of a user-programmable algorithm:
^ 1 2 X & X 6 7 ~ 4 4 E
This is the meaning:
1. Executes the exclusive sum (^ / XOR) of the first byte of the Secure Data field with the second and
assigns the result to temporary variable X.
2. Executes the logical product (& / AND) of variable X with the sixth byte of the Secure Data field and
assigns the result to the seventh byte.
3. Effects the negation (~ / NOT) of the fourth byte of the Secure Data field.
Let's see how the algorithm acts on the following values of the Original Data:
byte 1 byte 2 byte 3 byte 4 byte 5 byte 6 byte 7 byte 8
A3 45 C7 83 34 33 43 40
1. A3 XOR 45 = E6 X
2. X AND 33 = 22 byte 7
3. NOT 83 = 7C byte 4
At the end of the ENCRYPTING operation, the 8 bytes will consequently be transformed into the following Encrypted
Data:
byte 1 byte 2 byte 3 byte 4 byte 5 byte 6 byte 7 byte 8
A3 45 C7 7C 34 33 22 40
9.10 Programming mode
The PROGRAMMING is used for fully re-programming the dongle and, in particular, the Label and Password registers
(remember that the WRITING and READING functions are able to manipulate only the Secure Data field).

38
The PROGRAMMING facility allows you to set up your own program dedicated to preconfiguring the dongles, usually
connected to a database, in order to associated the content of each dongle with a customers and/or products list.
To program new Labels and Passwords, you do not have to know the previous Password (whereas you must know the
current Label), because the operation automatically resets the set Secure Data field (it is filled with 00 hex). For
obvious reasons linked to security, the Fail Counter is not reset.
If you have forgotten to value of the current Label during the tests, you can return to the default situation with the SPC
utility.
The PROGRAMMING mode is necessary for off-line programming of the dongle. We therefore advise you not to use it
on-line in the software to be protected, both for reasons of safety and to prevent a programming error from activating
the function on a different SmartKey in the system. Furthermore, it is normally sufficient to act on the dongle with the
READING and WRITING functions that limit their action to the Secure Data field.
This command cannot be executed from lan, it works only with a local connection with the SmartKey.
The exchange of information is organized like this:
Models PR, EP, SP, XM NET
Input COMMAND ‘P’
LPT Port
LABEL New Label
PASSWORD New Password
DATA[0..15] Current label (16 bytes)
Output STATUS Status
==0 Success
!=0 Error
Table 25 PROGRAMMING MODE command parameters
9.10.1 Parameter transfer
Parameters needing to be transferred to execute a PROGRAMMING operation, with access to the dongle on the LPT1
parallel port, and programming of Label and Password. Let's suppose that the LABEL saved before the operation was
"LABELOLD":
LPT 01 00 Port
COMMAND 50 00 Programming("P")
LABEL 53 4D 41 52 54 4B 45 59
00 00 00 00 00 00 00 00
Label ("SMARTKEY")
PASSWORD 45 55 54 52 4F 4E 00 00
00 00 00 00 00 00 00 00
Password ("EUTRON")
DATA 4C 41 42 45 4C 4F 4C 44
00 00 00 00 00 00 00 00
Current Label (“LABELOLD”)
Table 26 Exchange of information for the PROGRAMMING MODE command
If the dongle is found on the indicated port, the Label and Password values are transferred to the dongle, whereas the
Secure Data in the dongle are automatically reset. The current LABEL uses the first 16 bytes of the Data field, which
are normally used for transferring Secure Data.
9.11 Comparing mode
The COMPARING mode was introduced to simplify use of the dongles and to help those addressing software
protection technique for the first time.

39
This is the simplest mechanism for using the stand-alone programmable SmartKeys dongles, i.e. models PR, EP, SP
and XM. It enables automatic verification, on all the system's ports, of the presence of a protection dongle with Label,
Password and Secure Data assigned, to find out if the dongle is present and on which door.
COMPARING mode is therefore an extension of the LOCATING MODE, valid for programmable dongles only. It can
be useful in programs where verification of dongle presence is sufficient, without the need to update the contents by
means of Secure Data rewriting operations.
The exchange of information is organized like this:
Models PR, EP, SP, XM
Input COMMAND ‘C’
LABEL Label
PASSWORD Password
DATA Data
Output FAIL_CTR Fail Counter
STATUS Status
>=0 Success, number of the port where the dongle is located.
<0 Error
Table 27 COMPARING MODE command parameters
The Status indicates if the operation was successful, returning the port number or a value of less than 0 in case of an
error.
9.11.1 Parameter transfer
Parameters to be transferred to execute a COMPARING operation, including search for the dongle on all parallel ports
present:
COMMAND 50 00 Comparing ("C")
LABEL 53 4D 41 52 54 4B 45 59
00 00 00 00 00 00 00 00
Label ("SMARTKEY")
PASSWORD 45 55 54 52 4F 4E 00 00
00 00 00 00 00 00 00 00
Password ("EUTRON")
DATA 53 45 43 55 52 49 54 59
20 44 41 54 41 00 00 00
00 00 00 00 00 00 00 00
00 00 00 00 00 00 00 00
00 00 00 00 00 00 00 00
00 00 00 00 00 00 00 00
00 00 00 00 00 00 00 00
00 00 00 00 00 00 00 00
Data("SECURITY DATA")
Table 28 Exchange of information for the COMPARING MODE command
If the dongle is found on any of the ports present on the system, and with correct Label, Password and Secure Data
values, the status variable will have a value of 1,2 or 3 at the end of the operation, according to the LPT.
9.12 Model reading mode
The MODEL READING function enables one to identify the installed SmartKey model (FX, PR, EP, SP, XM, NET).
This is an accessory function, which, for example, can be used to activate a different type of behavior for software
packages operating in both standalone and network versions.
The exchange of information is organized like this:

40
Models ALL
Input COMMAND ‘M’
LPT Port
LABEL Label
Output DATA[0] SmartKey model
= '1', FX
= '2', PR
= '3', EP
= '9', SP
= 'A', NET
= 'D', XM
DATA[1] Memory available on the dongle
= '0', 0 bytes
= '1', 64 bytes
= '2', 128 bytes
= '3', 416 bytes
= '4', 896 bytes
= '8', 8192 bytes
STATUS Status
==0 Success
!=0 Error
Table 29 MODEL READING MODE command parameters
9.12.1 Parameter transfer
Parameters to be transferred to execute a MODEL READING operation, with access to the dongle on the LPT1 parallel
port.
LPT 01 00 Port
COMMAND 4D 00 Model Reading ("M")
LABEL 53 4D 41 52 54 4B 45 59
00 00 00 00 00 00 00 00
Label ("SMARTKEY")
Table 30 Exchange of information for the MODEL READING MODE command
If the dongle is found on the indicated port, the dongle model is available on the first byte of the Secure Data field.
9.13 Serial number reading mode
This command reads the SmartKey's SerialNumber. The SerialNumber is a 32-bit number unique for every SmartKey.
The exchange of information is organized like this:
Models ALL
Input COMMAND ‘N’
LPT Port
LABEL Label
Output DATA[0,1,2,3] Serial Number

41
STATUS Status
==0 Success
!=0 Error
Table 31 SERIAL NUMBER READING MODE command parameters
9.14 Ext model reading mode
This command reads the extended information on the SmartKey dongle.
The exchange of information is organized like this:
Models ALL
Input COMMAND ‘H’
LPT Port
LABEL Label
Output DATA[0] Mode
= '1', FX
= '2', PR
= '3', EP
= '9', SP
= 'A', NET
= 'D', XM
DATA[1] Memory available on the dongle
= '0', 0 bytes
= '1', 64 bytes
= '2', 128 bytes
= '3', 416 bytes
= '4', 896 bytes
= '8', 8192 bytes
DATA[2] Hardware model
= 2, Parallel
= 3, USB
= 4, USB DL (Driver Less)
DATA[3] Functionalities (bit mask)
= 0, no special command available
= 1, AES commands available
STATUS Status
==0 Success
!=0 Error
Table 32 EXT MODEL READING MODE command parameters
9.15 Fix reading mode
Reads the value of the Fix register.
The exchange of information is organized like this:

42
Models EP, SP, XM, NET
Input COMMAND ‘X’
LPT Port
LABEL Label
PASSWORD Password
Output DATA[0] = 1, SmartKey Fixed
= 0, SmartKey not Fixed
STATUS Status
==0 Success
!=0 Error
Table 33 FIX READING MODE command parameters
9.16 Fail counter reading mode
Reads the value of the Fail Counter register. This is the same value obtained with the READING_MODE command.
With this command, you can obtain the register's value without reading all the memory.
The exchange of information is organized like this:
Models EP, SP, XM, NET
Input COMMAND ‘A’
LPT Port
LABEL Label
PASSWORD Password
Output FAIL_COUNTER Fail Counter value
STATUS Status
==0 Success
!=0 Error
Table 34 FAIL COUNTER READING MODE command parameters
9.17 AES mode
The AES mode, supported by all SmartKey 3 models, is based on user customization of twenty security codes. Its
function is to algorithmically discover if SmartKey is present.
These commands allow a new authentication way using the AES 128 bit algorithm, as alternative to the
SCRAMBLING command, without the need of using a big scrambling table of known input/output scrambling pairs.
9.17.1 Authentication
To identify the SmartKey dongle, the application generates a pseudo-random number and sends it to the dongle.
The dongle executes the XOR operation of the number sent by the application and then it replies by encrypting the
serial number previously stored
RESULT = AES_ENCRYPT( RAND XOR SERIAL )
The application is so ready to decrypt the result and to get the serial number by executing the XOR operation with the
pseudo-random number
SERIAL = AES_DECRYPT( RESULT ) XOR RAND
If the serial number is valid the application assumes that the token is present.
• by using a pseudo-random value it is sure that the dongle answers differently each time and so the same answer
can not be used twice

43
• the cryptography utilization allows only at the application to correctly interpret the serial number
• the application can verify the serial exactness by setting beforehand part of this number equal to a fixed value.
Example: having a 16 byte serial, 8 of these 16 bytes can be set to '0' for all the serial numbers. If these 8 bytes
are equal to '0' after the decryption, the application is sure that the answer received from the key is really valid.
This check assures that the program is talking with a real dongle and not with a fake one, assuming that an
eventual trick does not have the correct encryption key.
9.17.2 Utilization
In order to use the new commands, the application to be protected should use the standalone or multilan (only with the
LOCAL protocol) driver that provides the common SmartKey interface and the new AES authentication commands.
According to the challenge-response protocol structure, the application must contain the AES 128 bit algorithm and a
pseudo-random numbers generator in order to implement the communication with the SmartKey. It is important to
underline that this implementation must be included into the application and not into the SmartKey driver because
moving the authenticity from the application to the SmartKey driver, the application might work even with a fake
driver.
The application code should also include some protection methods in order to hide the cryptographic key used by the
authentication process.
9.18 AES set mode
This command sets 20 different 16-byte cryptographic keys for the AES algorithm and the 16 byte serial number. The
cryptographic keys and the serial number, once written on the SmartKey, can’t be extracted or overwritten any longer
even if you run the command again. In other words, this command can be executed only once.
WARNING! the AES keys can be set ONLY ONE TIME!
This command cannot be executed from lan, it works only with a local connection with the SmartKey.
The exchange of information is organized like this:
Model Only USB SmartKey 3
Input COMMAND ‘G’
LPT SmartKey port
LABEL SmartKey Label
EXTDATA[0-15] Serial number to be set
EXTDATA[16-31] First AES key
…
EXTDATA[320-335] Twentieth AES key
Output None
Table 35 AES SET MODE command parameters
9.19 AES scramble mode
This command executes the authentication operation. The SmartKey works on a pseudo-random value chosen by the
application and gets back a value that is recognized by the application and allows it to verify the SmartKey presence
based on the communication protocol previously described.
The exchange of information is organized like this:
Model Only USB SmartKey 3
Input COMMAND ‘O’
LPT SmartKey port
LABEL SmartKey Label
DATA[0-15] Pseudo-random values to use

44
DATA[16] AES Key to use. The first key has index 0. The last key has index 19.
Output DATA[0-15] Protocol result.
Table 36 AES SCRAMBLE MODE command parameters
9.20 Errors
After a command, in the status entry in the communication may assume one of the following values:
Nome Valore Descrizione
ST_OK 0 Operation completed with success.
ST_NONE_KEY -1 Device not found. This error is due by:
• SmartKey not correctly inserted in the Parallel or USB
port.
• Drivers not correctly installed.
• Wrong LABEL used.
ST_SYNT_ERR -2 Syntax error in the command. This error is due by:
• One of the arguments of the command is invalid.
• The command is not support by the specific model of
SmartKey used. For example you are trying to read the
memory of a SmartKey without memory.
• The command is prohibited in the current SmartKey
state. For example you are trying to write the memory
in a SmartKey with the memory Fixing flag set.
ST_LABEL_FAILED -3 Wrong LABEL used. Depending on the command or on the
SmartKey model it may be returned this error or the
ST_NONE_KEY error.
ST_PW_DATA_FAILED -4 Wrong PASSWORD used.
ST_HW_FAILURE -20 An integrity check on the hardware device is failed.
9.21 Some suggestions on using SmartKey's functions
Combined use of the listed functions enables you to set up protection criteria providing high security and flexibility.
However, we should make some minimum suggestions to ensure secure implementation of the protection.
• Always use the LOCATING Mode to detect dongle presence. This will help you make the program
independent of the parallel port where the SmartKey dongle is installed
• Use the SCRAMBLING mode, in different points of the program, with values different from those of the
Original Data: if the result of subsequent comparisons with the Scrambled Data is positive, you will be sure
that a dongle with your Id-Code is installed on the PC.
• If you are using programmable dongles, run a READING operation in different points of the program: you will
be able to compare the read values with the expected values, and ensure that the software being run is really
authorized thanks to the special programming of the installed SmartKey dongle.
• Always remember that a security system has the same degree of vulnerability as its weakest component.
The chapter 10 introduces some further suggestions for secure implementation of the protection.

45
10 Program protection techniques and examples
By using the SmartKey protection dongles, you have put in place a powerful deterrent against attempts to abusively
duplicate software. However, remember that a principle typical of all security systems applies to the software protection
battle too.
A security system has the same degree of vulnerability as its weakest component
Consequently, a great deal of attention must be focused not only on the type of protection but also on the protection's
software implementation methods.
In other words, using a protection dongle without accurately implementing it in the software means stopping medium-
shrewd hackers (people doing it for a hobby, occasional users, university students looking for a personal challenge,
etc.), but not criminal-commercial organizations, which may have the time, economic resources and skills to copy
software or obtain confidential data.
We therefore thought it useful to provide a list below of some techniques and useful suggestions. The choice of
techniques to use depends on individual programs, on the cost and level of confidentiality of the software and/or of the
protected data.
In general, to make life hard for potential software pirates, bear in mind the following suggestions and comments:
• Use more than one of the protection techniques indicated below.
• Distribute the protection measures along the whole program.
• If one of the protection measures is eliminated, the remaining measures should ensure that the program seems
to be working correctly for a certain time, after which it stops randomly in terms of time and method.
Lastly, remember that the psychological aspect is very important: the aggressor can never be sure that s/he has disabled
all the protection mechanisms. Whenever he thinks he has found one, the protected software will make another problem
emerge later on (even hours or days later!), and the hacker will probably be so frustrated, that he will give up attacking.
To protect your program, you should consider the typical attacks, and try to repel at least these most common cases,
which are:
• Reverse engineering of the program and removal of any call to SmartKey API
• Using a High Level (User Level) emulator able to intercept and record any SmartKey API call and simulate the
behavior of SmartKey API. These emulators potentially know the semantics of the API calls and can emulate
SmartKey, but with one exception: the Scrambling operation.
• Using a Low Level (Kernel or Hardware) emulator able to intercept and record physical communications on a
Parallel or USB port and simulate SmartKey's physical behavior. These emulators usually totally ignore the
communications semantics.
The following guidelines will considerably increase protection against these attacks.
10.1 General guidelines
The following guidelines apply to all SmartKey models.
10.1.1 Check the dongle in different points of your program.
The program should not control presence of SmartKey in only one point of the execution. SmartKey control should be
duplicated in various points of the program. The Locate/Open operation can be executed at start only, but the
Scrambling operation should be executed in many other points.
10.1.2 Extensive use of the Scrambling operation
The Scrambling operation should be used to control the presence of a real token SmartKey.
The control must be performed by first calculating a set of input pairs and output strings of the Scrambling operation.
When the operation has been started, some couples must be compared with the result of the same operation on the
current SmartKey.
During execution, you must select the couple to be controlled, using a combination of both random and deterministic
elements. For example, the choice should depend on: a random value, the system's current time, your program's point of
execution, and any other variable that could differ from one program to the other.
46
Example
Let's suppose that you have identified three important points of the execution, where you wish to control presence of
SmartKey: start of program, the saving function and the print function. Moreover, you want control to be performed on
a monthly basis, to obtain 12 different time inputs. Lastly, you want 100 different random controls.
Therefore, this table is necessary: 3 x 12 x 100 = 3600 couples.
10.1.3 Hiding Label and Password
The Label and Password strings should not be stored as a simple text in your program. Otherwise, a simple analysis of
the resulting binaries could reveal these information items.
The following could be a good approach: generate a random string and calculate the XOR of the original information
and its random value. This original information cold be re-built during execution using another XOR with the original
random string and the previous result.
These information items can be stored in many points of your program and can be compared during its execution.
Example
With these pre-calculation steps:
LABEL = “SMARTKEY”
RANDOM = “01234567”
CRYPT = LABEL XOR RANDOM
You can do the following in your source:
CRYPT = “????????” (previously computed)
RANDOM = “01234567”
LABEL = CRYPT XOR RANDOM
SmartKeyCheckWithLabel(LABEL)
10.1.4 Use the .OBJ version of the drivers
If available, it is always better to prefer the .OBJ version of the driver instead of the DLL version.
The .DLL driver exposes a simple, known inputting point. With this input point, monitoring and filtering all driver calls
executed by your program becomes a simple matter.
That is why it is very important to use the Scrambling operation correctly to check if a real token is present.
10.1.5 CheckSum of your Executable files and of the DLLs
The CRC/CheckSum of your program and the DLLs can be calculated and controlled. This is a very important phase if
you wish to use one of SmartKey's .DLL drivers. In this way, you will be certain that your program is using the original
DLL and not a false version.
You should avoid using a too well known CRC algorithm. For example, the CRC32 of a file can be modified with an
arbitrary value, changing only 3/4 of the file's bytes. A 'home-made' algorithm or a strong HASH encrypting function
such as MD5 is certainly better.
10.1.6 Do not stop execution immediately if the dongle is not found
If SmartKey's behavior is negative, correct behavior is not to stop program execution suddenly, but to delay its end on
another region of your code. This will avoid exposing the dongle control point.
Example
This example uses the KeyPresent variable to store the result of the SmartKey control. Important: the variable is
accessible only when dongle presence is detected. This partly prevents use of the debugging option that is able to
control any access to a variable.
variable KeyPresent = False;
DoSomething();
if (SmartKeyPresent())
KeyPresent = True;
DoSomethingOther();
If (KeyPresent == False)
47
Abort();
All accesses to the KeyPresent variable must be executed on different levels of the function calls.
10.1.7 Encrypt the required data with the Scrambling operation
Some values required for correct execution of your operation can be encrypted with the Scrambling operation. The
Scrambling operation is only a one-way function. Nevertheless, it can be used for encrypting data by using the XOR
operator. You just have to select an initialization value, saved in your program, as an input of Scrambling. You can
encrypt and decrypt your data with an XOR with a Scrambling output.
Example
With these pre-calculation steps:
DATA0 = “FIRSTDATA”
DATA1 = “OTHERDATA”
SEED = “01234567”
MASK = Scramble(SEED)
CYPHER0 = MASK XOR DATA0
MASK = Scramble(MASK)
CYPHER1 = MASK XOR DATA1
…
you can do the following in your source:
CYPHER0 = “????????” (previously computed)
CYPHER1 = “????????” (previously computed)
SEED = “01234567”
MASK = Scramble(SEED)
DATA0 = MASK XOR CIPHER0
MASK = Scramble(MASK)
DATA1 = MASK XOR CIPHER1
…
10.2 Guidelines for the Memory
The following guidelines apply to all SmartKey models with a memory.
10.2.1 Control the Memory's functionality
A step against possible use of the Hardware and Kernel Driver emulators is to test the functionality of SmartKey's
memory. Just write a random value in the memory cell and read it. If the values differ, you are faced with a SmartKey
emulator.
This trick works because emulators operate at a very low level and generally ignore the semantics of the operation, but
are able to record the communication only.
Moreover, the User Level emulators that intercept the SmartKey API calls can easily simulate the memory's
functionality. Only the Scrambling operation, as previously described, is viable for use against these emulators.
10.2.2 Store the data required by the Memory
A typical approach entails saving some known values on SmartKey and controlling them to check the presence of
SmartKey. This approach is an easy prey for attacks, because a correct copy of these values must be stored in your
program, and it is relatively simple to remove these controls.
On the contrary, some values needed for executing your program correctly can be stored in SmartKey's memory. You
can indirectly verify their validity, by using them and expecting some errors. You do not have to compare them to a
correct copy.
Example
There are usually various constant values in a Windows program. There are no limits to choosing these values. One can
use anything that can easily be converted into bytes.
Some typical examples:
• All numeric constants.
• All the contents of your tables.
• Any Windows constant/variable: dialog IDs, string IDs, message codes, and constant functions subjects
48
• Names of data files, DLL.
• Names of functions called on the other DLLs.
10.3 Examples of implementation
This chapter contains some examples of C implementation of the guidelines we have described. Furthermore, they can
be found in the archive:
SmartKeyProtectionGuidelinesExample.zip
.
In all the examples, we suppose that you are working with a SmartKey Demo with Label “SMARTKEY” and Password
“EUTRON” as default.
10.3.1 Example 1 – Basic Use
This example shows the basic use of SmartKey. The purpose of the program is to initialize the variables for SmartKey
and check if the dongle is actually present. The example MUST NOT BE USED IN A REAL PROGRAM, because the
label and password are included in the code without using any protection technique and one could trace them by
analyzing the executable file.
#include "skeylink.h"
#include <stdio.h>
#include <stdlib.h>
#include <string.h>
int main() {
KEY_NET k;
memset(&k,0,sizeof(k));
strncpy(k.label,"SMARTKEY",LABEL_LENGTH);
strncpy(k.password,"EUTRON",PASSWORD_LENGTH);
/* Open */
k.net_command = NET_KEY_OPEN;
smartlink(&k); /* Chiamata a sistema */
if (k.status != ST_OK) {
printf("Error in NET_KEY_OPEN\n");
exit(EXIT_FAILURE);
}
/* Close */
k.net_command = NET_KEY_CLOSE;
smartlink(&k);
if (k.status != ST_OK) {
printf("Error in NET_KEY_CLOSE\n");
exit(EXIT_FAILURE);
}
return EXIT_SUCCESS;
}
10.3.2 Example 2 – Basic use of Scrambling
This example shows the basic use of the scrambling operation. This example too MUST NOT BE USED IN A REAL
PROGRAM, because the values included in the code are not protected.
#include "skeylink.h"
#include <stdio.h>
#include <stdlib.h>
#include <string.h>
/* Scrambling input/output */
unsigned char scrambling_in[SCRAMBLE_LENGTH] = { 0x45, 0x34, 0x67, 0x23, 0xa5,
0x8f, 0x2c, 0x6d };
49
unsigned char scrambling_out[SCRAMBLE_LENGTH] = { 0x98, 0xab, 0x22, 0x24, 0xbb,
0xe6, 0x61, 0x8f };
int main() {
KEY_NET k;
/* Scrambling */
k.net_command = NET_KEY_ACCESS;
k.command = SCRAMBLING_MODE;
memcpy(k.data,scrambling_in,SCRAMBLE_LENGTH);
smartlink(&k);
if (k.status != ST_OK) {
printf("Error in SCRAMBLING_MODE\n");
exit(EXIT_FAILURE);
}
if (memcmp(k.data,scrambling_out,SCRAMBLE_LENGTH)!=0) {
printf("Wrong SCRAMBLING\n");
exit(EXIT_FAILURE);
}
printf("Scramble ok\n");
}
10.3.3 Example 3/4 – Storing and using a C function in the SmartKey memory
This example shows how to store and use a binary code of a C function in SmartKey's memory. There are some
limitations:
• The function's dimensions must be smaller than or equal to those of the SmartKey memory.
• External functions cannot be called directly, but they can be called indirectly by passing a function pointer as the
argument.
• External variables cannot be used directly, but they can be used indirectly by passing a pointer as the argument.
• Your project must be connected to the option /FIXED to avoid a new location in your code.
Storing the function
This example stores function
my_func()
in SmartKey's memory.
#include "skeylink.h"
#include <stdio.h>
#include <stdlib.h>
#include <string.h>
/* Function type */
typedef int my_func_t(int m, int n);
/* Buffer used to store the function */
char my_func_data[DATA_LENGTH + EXTENDED_DATA_LENGTH];
/* Function */
static int my_func(int m, int n) {
return m * n;
}
/* Marker of the end of the function */
static int my_func_end(void) {
return 0;
}
int main() {
KEY_NET k;
unsigned size;
50
/* Preventive use of the functions to prevent collateral effects through
optimisation of the compiler.*/
my_func(1,1);
my_func_end();
/* Compute the function size */
size = (char*)my_func_end - (char*)my_func;
printf("Function size %d\n", size);
if (size > DATA_LENGTH + EXTENDED_DATA_LENGTH) {
printf("Function size %d too big\n", size);
exit(EXIT_FAILURE);
}
/* Copy of function on the dongle*/
if (size > DATA_LENGTH) {
memcpy(k.data,((char*)my_func),DATA_LENGTH);
memcpy(k.ext_data,((char*)my_func) + DATA_LENGTH, size -
DATA_LENGTH);
} else {
memcpy(k.data,((char*)my_func),size);
}
/* Write on SmartKey */
k.net_command = NET_KEY_ACCESS;
k.command = WRITING_MODE;
smartlink(&k);
if (k.status != ST_OK) {
printf("Error in WRITING_MODE\n");
exit(EXIT_FAILURE);
}
printf("Function written on the key\n");
/* Close */
k.net_command = NET_KEY_CLOSE;
smartlink(&k);
if (k.status != ST_OK) {
printf("Error in NET_KEY_CLOSE\n");
exit(EXIT_FAILURE);
}
return EXIT_SUCCESS;
}
Use of the function
This example reads the
my_func()
function of SmartKey's memory and executes it.
#include "skeylink.h"
#include <stdio.h>
#include <stdlib.h>
#include <string.h>
/* Function type */
typedef int my_func_t(int m, int n);
/* Buffer used for storing the function */
char my_func_data[DATA_LENGTH + EXTENDED_DATA_LENGTH];
int main() {
KEY_NET k;
51
/* Read the function */
k.net_command = NET_KEY_ACCESS;
k.command = READING_MODE;
smartlink(&k);
if (k.status != ST_OK) {
printf("Error in READING_MODE\n");
exit(EXIT_FAILURE);
}
/* Copy data in buffer */
memcpy(my_func_data,k.data,DATA_LENGTH);
memcpy(my_func_data + DATA_LENGTH,k.ext_data,EXTENDED_DATA_LENGTH);
/* If the function pointer */
my_func_ptr = (my_func_t*)my_func_data;
/* Calls function */
result = my_func_ptr(2,3);
if (result != 6) {
printf("Error in function result\n");
exit(EXIT_FAILURE);
}
printf("Result of the stored function %d\n",result);
/* Close */
k.net_command = NET_KEY_CLOSE;
smartlink(&k);
if (k.status != ST_OK) {
printf("Error in NET_KEY_CLOSE\n");
exit(EXIT_FAILURE);
}
return EXIT_SUCCESS;
}
10.3.4 Example 5 – Control of the DLL checksum
This example shows how to calculate and control a simple checksum of the SMARTLINK.DLL file
#include <stdio.h>
#include <stdlib.h>
#include <string.h>
int main() {
FILE* f;
int c;
unsigned checksum;
/* Initialize the checksum */
checksum = 0;
/* Compute the checksum of the DLL */
f = fopen("skeylink.dll","rb");
if (!f) {
printf("Error opening the DLL\n");
exit(EXIT_FAILURE);
}
c = fgetc(f);
while (c != EOF) {
checksum += c;
c = fgetc(f);
}
fclose(f);
52
printf("DLL checksum %08X\n",checksum);
if (checksum != 0x007ffcf1) {
printf("Error invalid checksum\n");
exit(EXIT_FAILURE);
}
return EXIT_SUCCESS;
}
10.3.5 Example 6 – Hiding Label and Password information
This example shows how to hide the Label and Password information, by using a simple masking algorithm. This
algorithm must be used to prevent the possibility of discovering the Label and Password from the executable file, thus
frustrating all SmartKey's protections.
#include "skeylink.h"
#include <stdio.h>
#include <stdlib.h>
#include <string.h>
/* Hidden values */
static unsigned char hidden_label[LABEL_LENGTH] = {
0x09, 0x2f, 0x2d, 0x2a, 0xd2, 0xdd, 0xed, 0xe5,
0xd2, 0xea, 0x04, 0x20, 0x3e, 0x5e, 0x80, 0xa4
};
static unsigned char hidden_password[PASSWORD_LENGTH] = {
0xe0, 0x91, 0xb1, 0x5a, 0x62, 0x1a, 0x7d, 0xa8,
0xd5, 0x04, 0x35, 0x68, 0x9d, 0xd4, 0x0d, 0x48
};
int main() {
KEY_NET k;
unsigned i;
memset(&k,0,sizeof(k));
/* Calcola la label e la password corrette */
for(i=0;i<LABEL_LENGTH;++i)
k.label[i] = hidden_label[i] ^ (i*(i+0x7)+0x5a);
for(i=0;i<PASSWORD_LENGTH;++i)
k.password[i] = hidden_password[i] ^ (i*(i+0x1e)+0xa5);
/* Open */
k.net_command = NET_KEY_OPEN;
smartlink(&k);
if (k.status != ST_OK) {
printf("Error in NET_KEY_OPEN\n");
exit(EXIT_FAILURE);
}
printf("Net password %d\n",k.net_password);
/* Close */
k.net_command = NET_KEY_CLOSE;
smartlink(&k);
if (k.status != ST_OK) {
printf("Error in NET_KEY_CLOSE\n");
exit(EXIT_FAILURE);
}
53
return EXIT_SUCCESS;
}
10.3.6 Example 7 – Scrambling confidential data
This example shows how to hide confidential data with the Scrambling operation.
In the example the pi value is stored as follows:
#include "skeylink.h"
#include <stdio.h>
#include <stdlib.h>
#include <string.h>
#include <math.h>
/* Scrambled data */
unsigned char scrambled_data[SCRAMBLE_LENGTH] = {
0x0c, 0xd8, 0xb3, 0xf6, 0x57, 0x6f, 0x4d, 0xe5
};
/* Scrambled input */
unsigned char scrambling_in[SCRAMBLE_LENGTH] = {
0x45, 0x34, 0x67, 0x23, 0xa5, 0x8f, 0x2c, 0x6d
};
int main() {
KEY_NET k;
unsigned i;
double pi;
/* Scrambling */
k.net_command = NET_KEY_ACCESS;
k.command = SCRAMBLING_MODE;
memcpy(k.data,scrambling_in,SCRAMBLE_LENGTH);
smartlink(&k);
if (k.status != ST_OK) {
printf("Error in SCRAMBLING_MODE\n");
exit(EXIT_FAILURE);
}
for(i=0;i<sizeof(pi);++i)
((unsigned char*)&pi)[i] = k.data[i] ^ scrambled_data[i];
printf("Pi greco is %g\n",pi);
/* Close */
k.net_command = NET_KEY_CLOSE;
smartlink(&k);
if (k.status != ST_OK) {
printf("Error in NET_KEY_CLOSE\n");
exit(EXIT_FAILURE);
}
return EXIT_SUCCESS;
}
10.3.7 Example 8/9–Generating and using a large Scrambling table
This example shows how to generate and use a large scrambling table. The input values of the scrambling operation are
calculated during execution, using the index as the initialization of a simple random function.
Generating the “table.h” file
This example generates the
table.h file
#include "skeylink.h"
#include <stdio.h>
54
#include <stdlib.h>
#include <string.h>
#include <time.h>
#define SCRAMBLE_MAX 1024
void scramble_in(unsigned char* dst, unsigned src) {
unsigned i;
for(i=0;i<SCRAMBLE_LENGTH;++i)
dst[i] = (((src + 0x5a) >> i) * (i + 0x13)) ^ 0x3e;
}
int main() {
KEY_NET k;
unsigned i;
FILE* f;
srand(time(0));
f = fopen("table.h","wt");
if (!f) {
printf("Error opening the file table.h\n");
exit(EXIT_FAILURE);
}
fprintf(f,"void scramble_in(unsigned char* dst, unsigned src) {\n");
fprintf(f,"\tunsigned i;\n");
fprintf(f,"\tfor(i=0;i<SCRAMBLE_LENGTH;++i)\n");
fprintf(f,"\t\tdst[i] = (((src + 0x5a) >> i) * (i + 0x13)) ^ 0x3e;\n");
fprintf(f,"}\n\n");
fprintf(f,"#define SCRAMBLE_MAX %d\n\n",SCRAMBLE_MAX);
fprintf(f,"unsigned char SCRAMBLE[SCRAMBLE_MAX][SCRAMBLE_LENGTH] = {\n");
for(i=0;i<SCRAMBLE_MAX;++i) {
unsigned j;
k.net_command = NET_KEY_ACCESS;
k.command = SCRAMBLING_MODE;
scramble_in(k.data,i);
smartlink(&k);
if (k.status != ST_OK) {
printf("Error in SCRAMBLING_MODE\n");
exit(EXIT_FAILURE);
}
fprintf(f,"{ ");
for(j=0;j<SCRAMBLE_LENGTH;++j) {
unsigned v = k.data[j];
if (j)
fprintf(f,", ");
fprintf(f,"0x%02x",v);
}
fprintf(f," }");
if (i+1!=SCRAMBLE_MAX)
fprintf(f,",");
fprintf(f,"\n");
}
fprintf(f,"};\n");
fclose(f);
printf("Scrambling table written\n");
55
/* Close */
k.net_command = NET_KEY_CLOSE;
smartlink(&k);
if (k.status != ST_OK) {
printf("Error in NET_KEY_CLOSE\n");
exit(EXIT_FAILURE);
}
return EXIT_SUCCESS;
}
Using the Scrambling table
This example uses the generated file to control the presence of the SmartKey dongle.
#include "skeylink.h"
#include <stdio.h>
#include <stdlib.h>
#include <string.h>
#include <time.h>
#include "table.h"
/* Return a random index in the table */
unsigned get_scrambling_index(void) {
time_t t;
struct tm* ptm;
unsigned i;
time(&t);
ptm = localtime(&t);
i = (rand() % (SCRAMBLE_MAX / 31)) * 31;
i += ptm->tm_mday;
i = i % SCRAMBLE_MAX;
return i;
}
int main() {
KEY_NET k;
unsigned i;
/* Initialized the random number generator */
srand(time(0));
/* Get the random index in the table */
i = get_scrambling_index();
printf("Scramble index %d\n",i);
/* Do the scrambling */
k.net_command = NET_KEY_ACCESS;
k.command = SCRAMBLING_MODE;
scramble_in(k.data,i);
smartlink(&k);
if (k.status != ST_OK) {
printf("Error in SCRAMBLING_MODE\n");
exit(EXIT_FAILURE);
}
/* Check the scramble */
if (memcmp(k.data,SCRAMBLE[i],SCRAMBLE_LENGTH)!=0) {
56
printf("Wrong SCRAMBLING\n");
exit(EXIT_FAILURE);
}
printf("Scramble ok\n");
/* Close */
k.net_command = NET_KEY_CLOSE;
smartlink(&k);
if (k.status != ST_OK) {
printf("Error in NET_KEY_CLOSE\n");
exit(EXIT_FAILURE);
}
return EXIT_SUCCESS;
}
The “table.h” generated file
This is the
table.h generated file
void scramble_in(unsigned char* dst, unsigned src) {
unsigned i;
for(i=0;i<SCRAMBLE_LENGTH;++i)
dst[i] = (((src + 0x5a) >> i) * (i + 0x13)) ^ 0x3e;
}
#define SCRAMBLE_MAX 1024
unsigned char SCRAMBLE[SCRAMBLE_MAX][SCRAMBLE_LENGTH] = {
{ 0xa2, 0x43, 0x2d, 0xdc, 0xf0, 0x49, 0x4b, 0x5c },
{ 0x00, 0x24, 0x9f, 0x6e, 0x51, 0x10, 0x9c, 0x1a },
…stripped…
{ 0x10, 0x0f, 0x5e, 0x8e, 0x5b, 0x44, 0x67, 0x11 },
{ 0xcd, 0x0a, 0x74, 0xed, 0x78, 0xc0, 0x0a, 0x97 }
};
10.3.8 Example 10 – Code encrypting
Furthermore, SmartKey can be used to encrypt the code of your executable files or of the dynamic libraries (DLL), if
these are developed in Visual C. A full, extensive example can be found in the archive:
SmartKeyEncryptionGuidelinesExample.zip. For further details, consult files README.txt (English) and
LEGGIMI.txt (Italian) in .zip.
10.3.9 Example 11 – AES authentication
The following are two examples to set AES keys and use them.
Setkey
This example sets the AES keys. WARNING! the AES keys can be set ONLY ONE TIME!
#include "skeydrv.h"
#include <stdlib.h>
#include <stdio.h>
#include <windows.h>
/* Serial */
unsigned char serial[16] = {
0x39, 0x9d, 0x81, 0xd0, 0x6f, 0x78, 0x94, 0x41, 0xec, 0xfe, 0x71, 0xa1, 0x21,
0xd4, 0xe1, 0x6d,
};
/* 20 AES keys */
unsigned char aeskey[16*20] = {
0x27, 0xe1, 0x4e, 0xf4, 0x82, 0x3a, 0x1d, 0xa2, 0xbd, 0xee, 0xc7, 0xd2, 0x50,
0xe1, 0x37, 0x66,
…stripped…
57
0x57, 0x4b, 0x21, 0x94, 0x82, 0x38, 0x68, 0xf8, 0xf8, 0x54, 0x38, 0xa1, 0x6d,
0x05, 0x70, 0x39,
};
int main() {
SKEY_DATA key;
printf("SmartKey AES example\n");
memset(&key, 0, sizeof(key));
strncpy(key.label, "SMARTKEY", LABEL_LENGTH);
key.command = LOCATING_MODE;
msclink(&key);
if (key.status != 0) {
MessageBox(NULL, "SmartKey not found", "Error", MB_ICONERROR |
MB_SYSTEMMODAL);
exit(1);
}
key.command = EXT_MODEL_READING_MODE;
msclink(&key);
if (key.status != 0) {
MessageBox(NULL, "SmartKey not found", "Error", MB_ICONERROR |
MB_SYSTEMMODAL);
exit(1);
}
if ((key.data[3] & 0x1) == 0) {
MessageBox(NULL, "This SmartKey model doesn't support AES commands",
"Error", MB_ICONERROR | MB_SYSTEMMODAL);
exit(1);
}
if (MessageBox(NULL, "Set the AES keys ? The operation cannot be undone
!", "Warning", MB_YESNO | MB_ICONWARNING | MB_SYSTEMMODAL) != IDYES) {
exit(1);
}
memcpy(key.ext_data, serial, 16);
memcpy(key.ext_data + 16, aeskey, 16*20);
key.command = AES_SET_MODE;
msclink(&key);
if (key.status != 0) {
MessageBox(NULL, "Error setting the AES keys and serial.\n\rPlease
note that you can set them ONLY ONE TIME!", "Error", MB_ICONERROR |
MB_SYSTEMMODAL);
exit(1);
}
MessageBox(NULL, "AES keys setup correctly", "Information",
MB_ICONINFORMATION | MB_SYSTEMMODAL);
return 0;
}
Usekey
This example uses the AES keys.
#include "skeydrv.h"
#include "aes.h"
#include <stdlib.h>
58
#include <stdio.h>
#include <time.h>
#include <windows.h>
/* Serial */
unsigned char serial[16] = {
0x39, 0x9d, 0x81, 0xd0, 0x6f, 0x78, 0x94, 0x41, 0xec, 0xfe, 0x71, 0xa1, 0x21,
0xd4, 0xe1, 0x6d,
};
/* 20 AES keys */
unsigned char aeskey[16*20] = {
0x27, 0xe1, 0x4e, 0xf4, 0x82, 0x3a, 0x1d, 0xa2, 0xbd, 0xee, 0xc7, 0xd2, 0x50,
0xe1, 0x37, 0x66,
…stripped…
0x57, 0x4b, 0x21, 0x94, 0x82, 0x38, 0x68, 0xf8, 0xf8, 0x54, 0x38, 0xa1, 0x6d,
0x05, 0x70, 0x39,
};
int main() {
SKEY_DATA key;
aes_context aes;
unsigned key_index;
unsigned char result_buffer[16];
unsigned char random_buffer[16];
unsigned i;
printf("SmartKey AES example\n");
/* initialize the random number generator */
srand(time(0));
memset(&key, 0, sizeof(key));
strncpy(key.label, "SMARTKEY", LABEL_LENGTH);
key.command = LOCATING_MODE;
msclink(&key);
if (key.status != 0) {
MessageBox(NULL, "SmartKey not found", "Error", MB_ICONERROR |
MB_SYSTEMMODAL);
exit(1);
}
key.command = EXT_MODEL_READING_MODE;
msclink(&key);
if (key.status != 0) {
MessageBox(NULL, "SmartKey not found", "Error", MB_ICONERROR |
MB_SYSTEMMODAL);
exit(1);
}
if ((key.data[3] & 0x1) == 0) {
MessageBox(NULL, "This SmartKey model doesn't support AES commands",
"Error", MB_ICONERROR | MB_SYSTEMMODAL);
exit(1);
}
/* set the random value */
for(i=0;i<16;++i)
random_buffer[i] = rand() % 256;
/* set the key number */
key_index = rand() % 20;
memcpy(key.data, random_buffer, 16);
59
key.data[16] = key_index;
key.command = AES_SCRAMBLE_MODE;
msclink(&key);
if (key.status != 0) {
MessageBox(NULL, "Error using the AES key", "Error", MB_ICONERROR |
MB_SYSTEMMODAL);
exit(1);
}
aes_set_key(aes, aeskey + key_index*16, 16);
aes_decrypt(aes, key.data, result_buffer);
for(i=0;i<16;++i)
result_buffer[i] ^= random_buffer[i];
if (memcmp(result_buffer, serial, 16) != 0) {
MessageBox(NULL, "Wrong serial", "Error", MB_ICONERROR |
MB_SYSTEMMODAL);
exit(1);
}
MessageBox(NULL, "Correct serial", "Information", MB_ICONINFORMATION |
MB_SYSTEMMODAL);
return 0;
}

60
11 Manual protection in a network
SmartKey NET supports the standard commands of the SP model and a set of commands slaved to the network: OPEN,
ACCESS, CLOSE and USER NUMBER.
All the functions explained in the following paragraphs were used in the Windows program smartdem.c, which is
located in directory Sdk\Manual_Protection\Client_Windows_Libraries_And_Examples\GenericWin32Dll e
Sdk\Manual_Protection\Client_Windows_Libraries_And_Examples\GenericWin32Obj. The program can be compiled
with any C compiler.
11.1 Open mode
The OPEN Mode is employed by the user to activate communication with SmartKey. The OPEN operation must be
carried out before all operations for accessing the dongle's memory.
The OPEN command generates a special password, named Net Password, which must be used in all the subsequent
commands.
In the first byte of the Data field is reported the type of the protocol used in the connection. If you want to prevent the
use of the LOCAL protocol, you can check this byte. Generally this is useful to force the use of the SmartKey server
for license management.
To use this command with the Map protection you must also specify the Map code in the Data field as described in the
Map chapter.
The exchange of information is organized like this:
Models NET
Input NET_COMMAND ‘O’
LABEL Label
PASSWORD Password
Output NET_PASS Net Password
DATA[0] Protocol type used:
= 0, LOCAL
= 1, IPX
= 2, ANP
= 3, TCPIP
STATUS Status
==0 Success
!=0 Error
Table 37 Exchange of information for OPEN MODE
11.2 Access mode
The ACCESS mode enables actual access to the dongle. It is selected with the Label, which must always be passed
before carrying out any standard dongle interrogation operation. This mode requires the NET-Password, which
identifies the Client requesting access and the Label identifying the dongle to which access is required.
The exchange of information is organized like this:
Models NET
Input NET_COMMAND ‘A’
NET_PASS Net Password
COMMAND SmartKey Command

61
…
Output …
STATUS Status
==0 Success
!=0 Error
Table 38 Exchange of information for ACCESS MODE
Apart from this, the same methods - already analyzed for manual protection with a standalone program - apply.
11.3 User number mode
This command is used to obtain the number of users connected to the dongle specified in the Label field.
This command works only if a net protocol is used and not with the LOCAL protocol. If used with the LOCAL protocol
the error –2 (SYNT_ERR) is returned.
To use this command with the Map protection you must also specify the Map application code in the Data field as
described in the Map chapter.
The exchange of information is organized like this:
Models NET
Input NET_COMMAND ‘A’
NET_PASS Net Password
COMMAND ‘U’
Output STATUS Status
>=0 Number of connected users
<0 Error
Table 39 Exchange of information for USER NUMBER MODE
11.4 Close mode
The CLOSE mode is used for 'closing' (LOGOUT request) of communication to SmartKey by the program connected
by means of a previous OPEN call.
If, due to an error in the application software, the program ends without first executing a CLOSE operation of the open
dongle, there may be problems linked to the time-out management of the Client. Such problems sometimes require
booting the computer. The opening and closing operation must be carefully observed in order not to uselessly prevent
other users from employing the key.
The exchange of information is organized like this:
Models NET
Input NET_COMMAND ‘C’
NET_PASS Net Password
Output STATUS Status
==0 Success
!=0 Error
Table 40 Exchange of information for CLOSE MODE
11.5 Close mode on timeout
To prevent use of licenses if the program is terminated incorrectly (e.g. because the PC was switched off, or the
<CTRL><ALT><DEL> command was given), a transparent refresh function for timeout is implemented. This is
actually the automatic disconnection of users who have not used the CLOSE mode correctly. The timeout control

62
function is completely transparent to user and developer alike, and is managed by the dongle's software drivers. There
is therefore no need to carry out periodic dongle access operations to ensure timeout is refreshed.
11.6 Errors
In addition of the errors returned with the Standalone driver, the status entry may assume one of the following
values:
Nome Valore Descrizione
ST_NET_ERROR -5 Generic error on the Lan communication.
ST_USER_ERROR -8 Maximum number of user and license reached.
ST_EXEC_ERROR -16 Maximum number of execution reached.
ST_NET_PWD_ERR -9 Wrong netpassword specified.
ST_INIT_ERROR -11 Generic error in the library initialization.
ST_TOO_MANY_OPEN_KEY -14 Maximum number of open connection reached.
ST_NET_CONF_ERROR -21 Generic error in the library configuration.
ST_NET_ANP_INIT_ERROR -22 Generic error in the initialization of the protocol ANP.
ST_NET_TCPIP_INIT_ERROR -23 Generic error in the initialization of the protocol TCPIP.
ST_NET_NOVELL_INIT_ERROR
-24 Generic error in the initialization of the protocol Novell.
ST_NET_LOCAL_INIT_ERROR -25 Generic error in the initialization of the protocol Local.
ST_NET_KEY_NOT_MAP -26 Attempt to open a MAP connection without using a MAP configured
device.
11.7 Standalone or Multilan drivers?
Use of drivers for standalone programs was described in the chapter on manual protection. The Multilan technology
was instead discussed in the current chapter. This technology enables use of drivers for both standalone and networked
environments. Here are a few hints on which of the two types of drivers the following should be used:
• Programs which are certainly standalone only: use a standalone type driver, because the dimension is
smaller (about half of the relevant MultiLan driver, as it does not include support of the network).
• Standalone and network programs: user a MultiLan type driver, because it makes the program independent
of the operating mode (standalone or network).

63
12 Protecting several programs with SmartKey
In the Lan environment, you can use a single SmartKey NET to protect several software programs. The technology used
is named Map – Multi Application Protection and enables you to:
• Protect more than one program in a standalone or network environment. For local networks, a different
number of enabled licenses can be defined for each protected program.
• Limit the number of executions of each of the protected programs. This feature can be useful for creating
demo versions of the software or for adopting a software hiring policy. When the number of executions preset
on a counter expires (quantity reduced at every program start-up), the program is not allowed to start any more.
12.1 Operating methods
Implementing Map entails only a few small differences compared to the operating methods we have described, i.e.:
• Optional limitation of the number of executions and, in the case of SmartKey NET, programming the number
of licenses for each individual program.
• A different calling method to the management driver as regards OPEN mode and USER NUMBER mode
operations.
12.2 Programming the number of licenses and executions
The maximum number of programs that can be protected by the same dongle is 116. The maximum number of
executions for each program is in the range from 1 to 65,535. Value -1 disables this control and, therefore, there is no
limit to the number of executions.
The number of licenses and executions for each program can be set by writing the value in the first bytes of the Secure
Data field, and possibly, in the Extended Data field of the dongle, following the scheme below:
Offset Value Meaning
0 ‘M’ (4D hex) Map identification fixed code
1 ‘A’ (41 hex) Map identification fixed code
2 0 - 50 Maximum number of users for program 1
3-4 0 - 65535 Maximum number of executions for program 1
5 0 - 50 Maximum number of users for program 2
6-7 0 - 65535 Maximum number of executions for program 2
8 0 - 50 Maximum number of users for program 3
9-10 0 - 65535 Maximum number of executions for program 3
… …
62 0 - 50 Maximum number of users for program 20
63-0 (ext_data) 0 - 65535 Maximum number of executions for program 20
1 (ext_data) 0 - 50 Maximum number of users for program 21
2-3 (ext_data) 0 - 65535 Maximum number of executions for program 21
… …
285 (ext_data) 0 - 50 Maximum number of users for program 116
287-288 (ext_data) 0 - 65535 Maximum number of executions for program 116
… …
Table 41 Settings for licenses management
For example, if you wish to protect 3 different programs with the following quantities of licenses and executions:

64
• First program: 23 licenses, unlimited executions.
• Second program: 4 licenses, 4000 executions.
• Third program: 12 licenses, 100 executions.
The dongle memory must be set as follows:
Offset Value Meaning
0 ‘M’ (4D hex) Map identification fixed code
1 ‘A’ (41 hex) Map identification fixed code
2 23 (17 hex) Maximum 23 users for program 1
3-4 65535 (FFFF hex) Unlimited number of program executions
5 4 (04 hex) Maximum 4 users for program 2
6-7 4000 (0FA0 hex) Limitation active for 400 executions
8 12 (0C hex) Maximum 12 users for program 3
9-10 100 (64 hex) Limitation active for 100 executions
… …
Table 42 Program protection setting
12.3 Map automatic protection
If automatic protection via the GSS utility is performed with a network dongle, a specific push-button makes it possible
to associate a code with each program. This code will be used to trace the number of licenses for which the program is
enabled, and any limitation to the number of program executions (see chapter 8).
12.4 Map manual protection
As one can protect several programs, as regards the Open and User Number commands only, you must specify which
program is being referred to (program identified by a number from 1 to 116). To this end, during the transfer of
parameters referring to each of the two commands, the Data field of the relevant data structure must be initialized as
follows:
Offset Value Meaning
0 ‘M’ (4D hex) Map identification fixed code
1 ‘A’ (41 hex) Map identification fixed code
2 1 - 116 Program reference number
Table 43 Open/User Number Mode setting
For the Open command the exchange of information is organized like this:
Models NET
Input NET_COMMAND ‘O’
LABEL Label
PASSWORD Password
DATA[0] ‘M’ (4D hex)
DATA[1] ‘A’ (41 hex)
DATA[2] 1 – 116, Program reference number of the license to use
Output NET_PASS Net Password
DATA[0] Protocol type used:
= 0, LOCAL

65
= 1, IPX
= 2, ANP
= 3, TCPIP
STATUS Status
==0 Success
!=0 Error
Table 44 Exchange of information for OPEN MODE with Map
In the first byte of the Data field is reported the type of the protocol used in the connection. If you want to prevent the
use of the Local protocol, you can check this byte. Generally this is useful to force the use of the SmartKey server for
license management.
Please note that if the Open is not done in Map mode, the SmartKey is opened without the license check allowing any
number of applications to run.
For the User Number command the exchange of information is organized like this:
Models NET
Input NET_COMMAND ‘A’
NET_PASS Net Password
COMMAND ‘U’
DATA[0] ‘M’ (4D hex)
DATA[1] ‘A’ (41 hex)
DATA[2] 1 – 116, Program reference number of which you want to know the number of
licenses in use
Output STATUS Status
>=0 Number of licenses in use
<0 Error
Table 45 Exchange of information for USER NUMBER MODE with Map
12.4.1 Open mode Map: an example
Parameters that have to be transferred to execute an OPEN operation, using Map multiple protection on a network
dongle; opening of program 2 is requested. If the dongle was programmed as in the previous programming table, not
more than 4 simultaneous users may use the program.
NET_COMMAND 4F 00 Open ("O")
LABEL 53 4D 41 52 54 4B 45 59
00 00 00 00 00 00 00 00
Label ("SMARTKEY")
PASSWORD 45 55 54 52 4F 4E 00 00
00 00 00 00 00 00 00 00
Password ("EUTRON")
DATA 4D 41 02 Map, 2
nd
program
Table 46 Example of Open mode Map setting

66
13 Installing SmartKey
The installation of the SmartKey drivers is executed by application SmartKey Driver Installer (SDI). SDI makes it
possible to install and uninstall all the drivers needed for correct operation of SmartKey: the drivers for SmartKey
Parallel, those for SmartKey USB and those for Global Security System (GSS), the automatic protection program.
Note that if you are using a SmartKey USB DL (Driver Less) no driver installation is required.
Moreover, you can integrate the SmartKey installation procedures in the installation package of your own program.
This is possible thanks to the libraries supplied in the development kit provided by Eutronsec. The functions can be
integrated with leading software products that generate distribution packages such as InstallShield.
13.1 Warnings on installation
SmartKey USB can be fitted and removed while the computer is operating (as specified by the USB standard). SmartKey
Parallel must be fitted before the computer is switched on, and the printer must be connected in the daisy-chain manner.
Otherwise, both SmartKey Parallel and the printer may not operate correctly.
13.2 Options of SmartKey Driver Installer (SDI)
SDI provides three options for the three types of installation and unistallation: SmartKey Parallel, SmartKey USB and
Global Security System. Figure 2 shows the graphic interface for SmartKey USB that is the same as the one for
SmartKey Parallel and Global Security System.
Figure 2 SDI's graphic interface for SmartKey USB
SDI's graphic interface provides three options:
• Install: install the drivers of the selected type
• Uninstall: uninstall the drivers of the selected type
• Remove: uninstall the drivers without controlling any dependencies.
If the installation was unsuccessful, SDI opens a pop-up panel showing details of the failed operations and the error
number of the operating system.
Figure 3 shows an example of a pop-up due to failed installation.
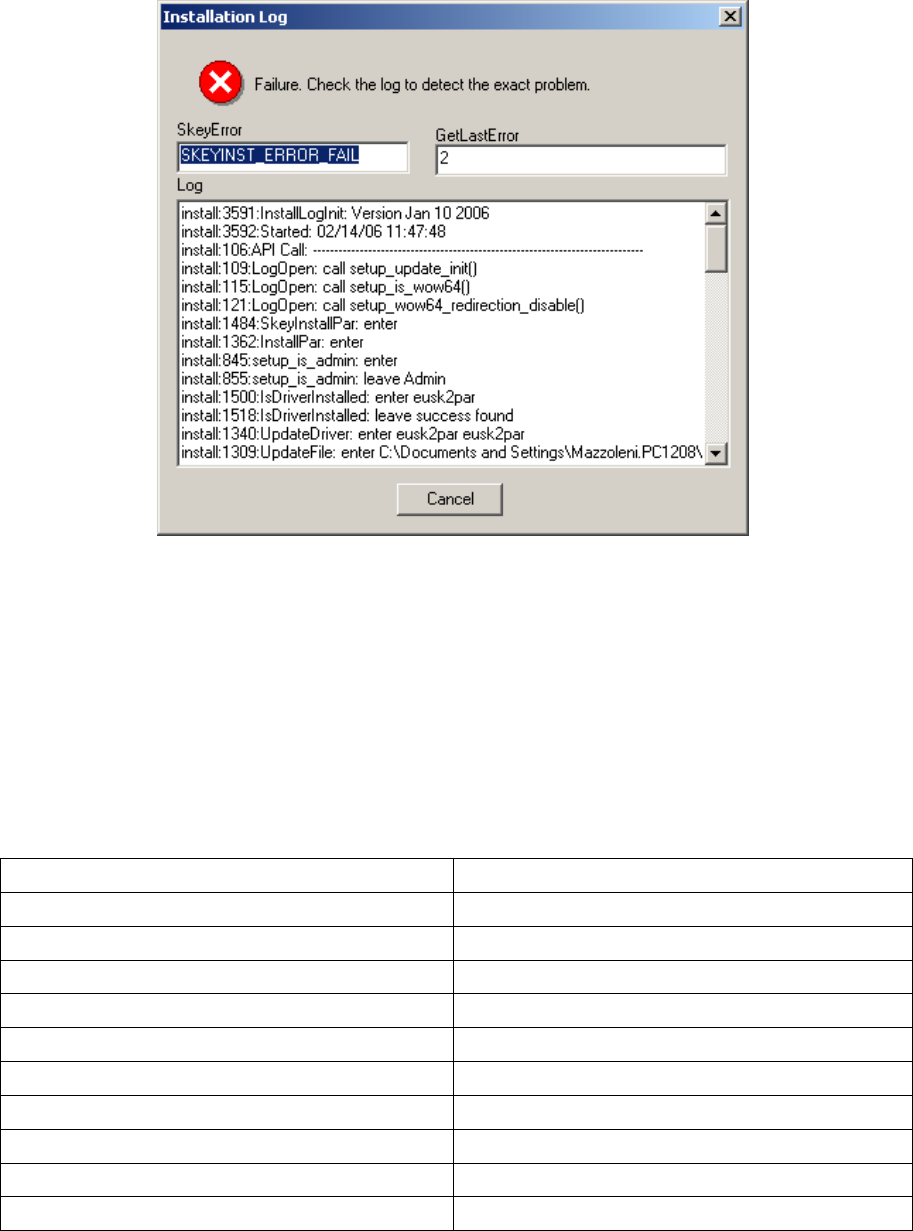
67
Figure 3 Pop-up log and error number of operating system
Normally, only the Install and Uninstall functions need be used. The Eliminate function must be used only if problems
occur in executing other functions. The Eliminate function removes all reference to the system's SmartKey drivers, thus
making it possible to recover all the error conditions that may occur during installation of a driver. When using
Eliminate, the system must always be rebooted.
13.3 The SDI library
The functions used for the SDI program are contained in the skeyinst.dll library, provided in the development kit
supplied by Eutronsec. Specifically, the prototypes of the functions are contained in skeyinst.h and the functions in
skeyinst.dll. The library can be used both for writing programs and for writing installation set-up scripts. The
development kit contains some examples of scripts for InstallShield.
These are the library functions:
SkeyInstallUSB Installs the drivers for SmartKey USB
SkeyInstallPar Installs the drivers for SmartKey Parallel
SkeyInstallGSS2 Installs the drivers for Global Security System
SkeyUnInstallUSB Uninstalls the drivers for SmartKey USB
SkeyUnInstallPar Uninstalls the drivers for SmartKey Parallel
SkeyUnInstallGSS2 Uninstalls the drivers for Global Security System
SkeyForceUnInstallUSB Forces removal of drivers for SmartKey USB
SkeyForceUnInstallPar Forces removal of drivers for SmartKey Parallel
SkeyForceUnInstallGSS2 Forces removal of drivers for Global Security System
SkeyLogFile Activates writing of a log file for all performed operations.
SkeyGetLastError Returns last code error.
Installation functions SkeyInstallUSB, SkeyInstallPar and SkeyInstallGSS2 automatically control the status of the
drivers before executing the installation.

68
To create installation and uninstallation scripts, we strongly urge you not to use functions SkeyForceUnInstallUSB,
SkeyForceUnInstallPar and SkeyForceUnInstallGSS2. These functions were implemented only for solving abnormal
situations, and not for normal use.
We advise you to use the SkeyLogFile function, because, thanks to the log file, one can understand where the
installation script or program is inhibited.
The functions can generate the following error codes:
SKEYINST_OK The operation was correctly terminated.
SKEYINST_ERROR_WAIT The operation was not performed, because, at that time,
the operating system was installing another component.
In this case, the user must be asked to finish all other
current installation processes and then re-try the
operation.
SKEYINST_WARNING_MUST_REBOOT The operation was correctly terminated, but the system
must be rebooted to complete the operation.
SKEYINST_WARNING_MUST_INSERT The operation was correctly terminated, but the USB
device must be fitted to complete the operation.
SKEYINST_ERROR_FAIL The operation failed due to an operating system error.
In this case, more detailed information can be obtained
from the log file.
13.4 Installation of SmartKey in Linux
On Linux there are three package for the installation and the use of the SmartKey:
•
user level usb – package smartkey-linux-user-usb.tar.gz
•
user level lpt – package smartkey-linux-user-lpt.tar.gz
•
kernel level – package smartkey-linux-2.4.tar.gz and smartkey-linux-2.6.tar.gz
The user level packages are kernel and distribution independent instead the kernel level package is kernel and
distribution dependent therefore is preferable to use the user level package if possible.
13.4.1 Linux user level usb
The user level package doesn’t require the installation of the driver but it’s available an object file to statically compile
with the application to communicate with the SmartKey device. This package only supports the SmartKey 3 USB and
the SmartKey DL dongle.
13.4.2 Linux user level lpt
The user level package doesn’t require the installation of the driver but it’s available an object file to statically compile
with the application to communicate with the SmartKey device. This package only supports the SmartKey Parallel
device.
13.4.3 Linux kernel level
The kernel level package includes the SmartKey kernel driver for a list of the precompiled kernel and distribution Linux
environment. This package only supports the SmartKey Parallel, the SmartKey 2 USB and the SmartKey 3 USB device.
The installation of drives in Linux calls for the following requirements:
• must have root privileges
• must know the kernel version used and the version of the GCC compiler used for compiling the kernel. These
pieces of information can be obtained with command cat /proc/version.
These are the installation operations:
• In CD-ROM directory Sdk\Manual_Protection\Others search for the file containing the module for
the kernel installed and compiled with the same compiler used for the kernel (in the packages smartkey-
linux-2.4.tar.gz and smartkey-linux-2.6.tar.gz). If the list does not contain the file for the
versions you use, you can request it from Eutronsec' service department
• unzip the selected file
69
• using the root privileges, start the skinstall program located in the directory that was just created. The
program copies the module in the current directory and configures the system so that the module is
downloaded to the memory when SmartKey is used for the first time.
To uninstall the driver, you must start the skuninstall program, as ever with the root privileges.
It's possible to use the tree package together to support the required devices; read the README file enclosed to the
package for further information.
13.4.4 Using APIs for Linux
The API prototypes are in the clink.h header file. The APIs were compiled in the object file to statically link. The
dynamic link cannot be done. Read the README file enclosed to the package for further information.
13.5 Installation of SmartKey in Mac OS X
On Mac OS X are supported the SmartKey 3 USB and the SmartKey DL.
It’s not required to install the driver to access the SmartKey device; it’s available a static library and a dynamic library
to access the SmartKey device. For dynamic library installation is available a package for the automatic installation.
It’s supported applications for the Mac OS X PPC and Universal applications (Mac OS X PPC and Mac OS X Intel).
The package to use is a Mac OS X disk image (smartkey-sdk-macosx.dmg) in CD-ROM directory
Sdk\Manual_Protection\Others.
13.5.1 Using APIs for Mac OS X
The API prototypes are in the clink.h headers file for the standalone interface and skeylink.h header file for the
multilan interface. The APIs are available with the static library for static link and the framework for the dynamic link.
Read the README file enclosed to the package for further information.

70
14 Installing SmartKey on a network
SmartKey NET can be used with any type of local network, thanks to the supplied support software. In particular, the
software is designed for two different types of network:
• Network: Novell Netware 3.x, 4.x, 5.x, 6.x. In this case SmartKey NET is located on the server of the network
on which the appropriate SmartKey NLM (Novell Loadable Module) driver must be loaded.
• Non Novell Netware. Irrespective of the type of server and network, SmartKey NET can be used by connecting
it to any of the PCs on the network.
Furthermore, you can choose from the following communication protocols:
• TCPIP: Standard protocol for data transmission between computers
• IPX: Protocol normally used in Novell networks.
• ANP: Data transmission protocol via shared files. We advise you to use this protocol when neither TCPIP nor
IPX can be used. ANP is still available only to guarantee compatibility with old DOS programs.
According to the selected protocol, it will be possible to use the dongle remotely on PCs with the following operating
systems, and according to the following scheme:
SmartKey Client IPX TCPIP ANP
DOS
Windows 3.x
Windows 9x/NT/2000/XP/2003/Vista
Mac OS X Intel/PowerPC
Table 47 Protocols supported by SmartKeys installed on client computers
The dongle will, instead, be physically installed on a PC to be named KeyServer. The KeyServer could be the network
server or a generic Client PC. The server can use one of the following operating systems according to the protocol used:
SmartKey Server IPX TCPIP ANP
DOS
Windows 3.x
Windows 9x NT/2000/XP/2003/Vista
Novell 3.x/4.x
Novell 5.x/6.x
Linux i386 2.4.x/2.6.x
Mac OS X Intel/PowerPC
Table 48 Table of protocols supported by SmartKey installed on server computer
14.1 TCPIP protocol
The TCP/IP protocol can be used on any network that supports it, not including Novell 3.x/4.x networks.
The protocol does not put any constraints on the choice of the SmartKey server, which can be either a network server or
a generic client server.
To use the protocol:
• Find out the network address of the PC on which the SmartKey dongle and server will be installed.
• Check if the SmartKey server PC can be reached by all the other PCs through the network.
• Find a free TCP/UDP port, to be used for the communication. The port' s number must be in the range from
1024 and 49151 to avoid conflict with other protocols: 13527 for example.

71
• Install and correctly configure both the sever and the SmartKey clients for using the TCPIP protocol,
specifying the SmartKey server's address and the TCPIP port to be used.
If possible, it is always best to use the TCPIP protocol in preference to the other protocols.
14.2 IPX protocol
The IPX protocol can only be used on Novell networks and, for this protocol, the SmartKey server must also be the
network server.
No special operations are necessary for using the protocol. All that is required is:
• Install and correctly configure both the server and the SmartKey clients for using the Novell IPX protocol
14.3 ANP protocol
The ANP protocol (Algorithmic Network Protection) exploits the presence of filesystems shared for communication
between client and server. The only condition for its operation, is the locking file support by the shared filesystem.
The ANP protocol is therefore the most general one, in view of the common availability of shared filesystems in all
types of networks and operating systems. On the contrary, use of files makes the protocol inefficient compared to
TCPIP and IPX. We advise you to use this protocol only when TCPIP or IPX cannot be used. ANP is still available but
only to ensure compatibility with the old DOS programs.
The protocol does not put a constraint on the choice of the SmartKey server, which can either be the network server or
any client.
To use the protocol:
• Find a network disk shared by all the client PCs (it can be the disk on which the network program normally
operates), N for example:
• On the identified network disk, create a work directory for the SmartKey server program. The name of the
directory is arbitrary, for example:
MD N:\ANP
• Make this directory accessible for reading and writing to all the network's computer that will want to use the
protected program. All computers must be able to create and modify files inside this directory. If you are not
sure of this possibility, before taking the subsequent steps, try to copy some files inside this directory from all
the client computers that will use the protected program.
• Install and correctly configure both the server and the SmartKey clients for using the ANP protocol and the
shared directory that was created.
On some network operating systems, the locking facility is not automatically enabled for files at time of installation:
refer to the documentation for details on the availability and activation of file locking.
The full name of the shared directory used for the ANP protocol may have different values among the KeyServer and
the client PCs. The parameter which passed when the server program was loaded identifies the shared directory, as it is
seen by KeyServer, which is not necessarily seen in the same way and with the same name by the client PCs. In fact, the
KeyServer might see the shared directory as C:\MYDIR, whereas the client PCs might see this very directory as
F:\MYDIR . In this case, the configuration for the SmartKey server should be C:\MYDIR, whereas the configuration for
the SmartKey client should be F:\MYDIR.
14.4 Installation for Windows
The best way to install and configure the server and the clients in Windows is to use the SmartKey Configuration
Central application described in the chapter 14.7.
To install and configure the server you can also use the command line utility askeyadd available in the directory
Sdk\Manual_Protection\Server_Programs\Service_Windows for the service and
Sdk\Manual_Protection\Server_Programs\Executable_Windows for the executable version of the
server. To configure the clients you can also use the command line utility cskeycfg available in the directory
Sdk\Manual_Protection\Client_Windows_Libraries_And_Examples\CSkeyCfg. For more details
please refer at the included documentation in the same directories.
72
14.5 Installation of Novell server with IPX protocol
The IPX server for Novell can be used on a Novell Netware network 3.x/4.x/5.x/6.x.
This is the installation procedure:
• Connect the SmartKey NET dongle on any parallel port of the network server.
• Carry out a login operation as a SUPERVISOR user from any client computer of the network. If, for security
reason, you do not have the password to access as a SUPERVISOR user, contact your network administrator
and ask him to install the software.
• Copy the NSKEYSRV.NLM program, supplied with the dongle, in the SYSTEM directory of the SYS volume
of the server. This is an .NLM file (Netware Loadable Module) that must remain in the server's memory.
Example:
COPY A:\NSKEYSRV.NLM X:\SYSTEM
• From the server console, edit file AUTOEXEC.NCF with command
LOAD EDIT AUTOEXEC.NCF
or through the system's utility
LOAD INSTALL
• Add the following at the bottom of the instruction file for loading the NLM module:
LOAD NSKEYSRV
and save the modifications by exiting the editor. In this way, the NLM module will be automatically loaded in
the memory whenever the server is powered up.
• When executing this NLM module for the first time, to avoid powering down and powering up the server, type
the following command on the console:
LOAD NSKEYSRV
After the NLM module has been loaded, a screen is activated, reserved for showing statistics on the use of the
SmartKey dongles. The name of the NLM also appears on this screen, as declared to all Client stations.
In the LOAD instruction for loading the server, one can specify some parameters for configuring it:
-t=<TIMEOUT> Specifies the time-out in seconds for the protocol.
If this parameter is not specified, a 10 second timeout is
activated. If value 0 is specified, timeout is disabled.
Remember that, for correct use of the dongle in the Novell Netware environment, the IPX protocol must be of the 3.10
or later versions. If it is not, ask your Novell dealer for a free update.
14.6 Installation of Novell server with TCPIP protocol
The TCPIP server for Novell can be used on a Novell Netware 5.x e 6.x system.
This is the installation procedure:
Connect the SmartKey dongle on any parallel port of the network server.
Carry out a login operation as a SUPERVISOR user from any client computer of the network. If, for security reason,
you do not have the password to access as a SUPERVISOR user, contact your network administrator and ask him to
install the software.
Copy the NSKTCPIP.NLM program, supplied with the dongle, in the SYSTEM directory of the SYS volume of the
server. This is an .NLM file (Netware Loadable Module) that must remain in the server's memory.

73
COPY A:\NSKTCPIP.NLM X:\SYSTEM
From the server console, edit file AUTOEXEC.NCF with the following command
LOAD EDIT AUTOEXEC.NCF
or through system utility
LOAD INSTALL
Add the NLM module loading instruction at the bottom of the file:
LOAD NSKTCPIP –p:<PORT>
and save the modifications by exiting the editor. In this way, the NLM module will be automatically loaded in the
memory whenever the server is powered up.
On the <PORT> string, replace the number of the TCPIP port to be used.
Make sure that the NSPDNS.NLM module supplied with the system is loaded. If it is not, input automatic loading of
this module in file AUTOEXEC.NCF.
When executing this NLM module for the first time, to avoid powering down and powering up the server, type the
following command on the console:
LOAD NSKTCPIP –p:<PORT>
After the NLM module has been loaded, a screen is activated, reserved for showing statistics on the use of the
SmartKey dongles. The name of the NLM also appears on this screen, as declared to all Client stations.
In the LOAD instructions for loading the server, one can specify some parameters for configuring it:
-p:<PORT> Specifies the listening port for the TCPIP Protocol
-t:<TIMEOUT> Specifies the time-out in seconds for the protocol. If it is
not specified, no time-out is activated.
14.7 Installation for Linux and Mac OS X
To install the SmartKey server on Linux and Mac OS X use the relative package, expand it and with root right run
./skinstall command. To uninstall the SmartKey server run ./skuninstall command.
Read the README file enclosed in the package for further information.
Package Descrizione
smartkey-server-linux.tar.gz Server SmartKey for Linux
smartkey-server-macosx.tar.gz Server SmartKey for Mac OS X PowerPC/Intel
Tabella 49 SmartKey Server for Linux and Mac OS X
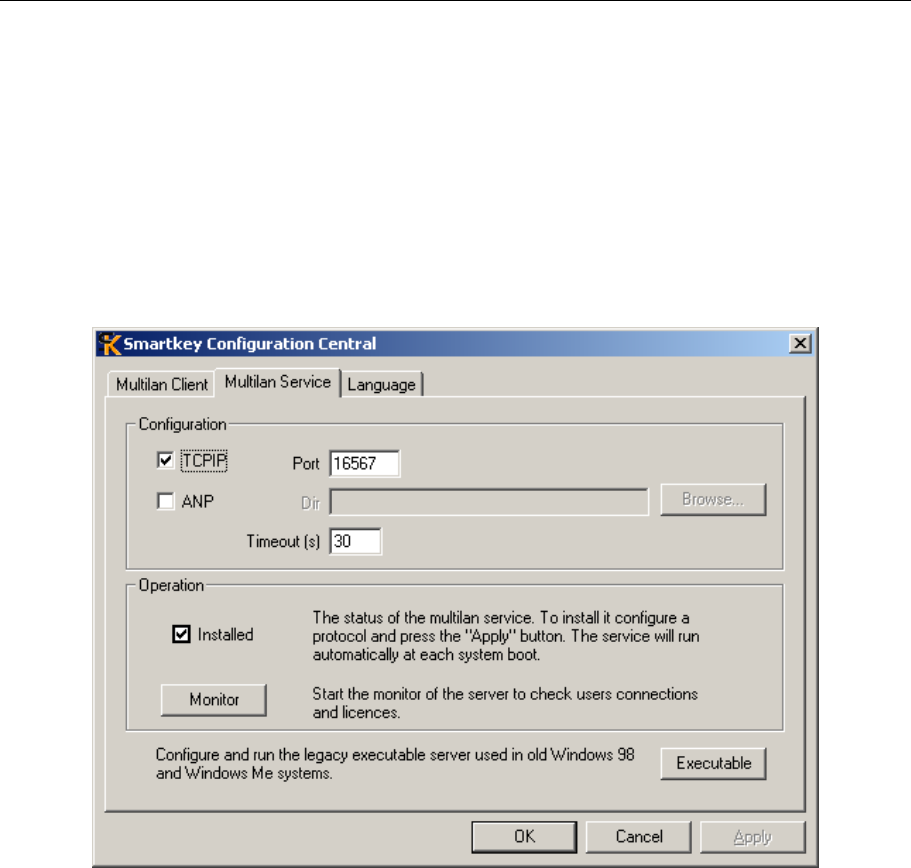
74
15 SmartKey Configuration Central (SCC)
SmartKey Configuration Central (SCC) is a program with a graphic interface that facilitates configuring the server
where SmartKey NET is located, and the client where the program to be protected is located. SCC operates in the
Windows environment and enables configuration of client and server on networks with ANP, TCPIP and IPX protocols
for the Novell network.
15.1 Configuration of the server
Configuring a server for the SmartKeys means configuring a program which effects in-background data exchange with
the protected program located on a client. Data can be exchanged through the TCPIP protocol, or through the exchange
of files located in a common directory (ANP protocol). The Smartkey server is available in two versions: service or
executable program. The service version is started automatically during the boot stage.and it is compatible only with
Windows NT, Windows 2000, Windows XP, Windows 2003 and Windows Vista.
Figura 4 SmartKey Configuration Central: service configuration
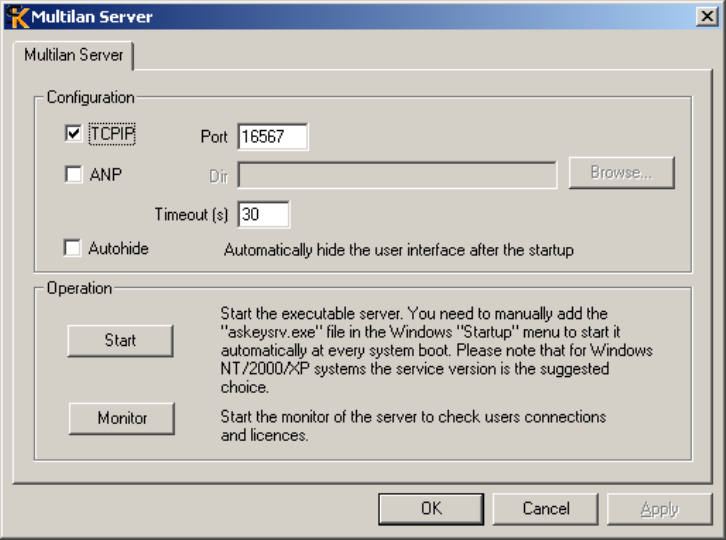
75
Figura 5 SmartKey Configuration Central: server configuration
Figure Figura 5 shows the SCC panels used for the configuration of the Smartkey server. To configure the service
version set the protocol you want to use and press Apply. The Smartkey service will be automatically installed and
started. The service will also start automatically at each system reboot.
For the Executable version set the protocol you want to use and press Apply. Then press Start to run the Executable
Server. You can add the file askeysrv.exe into the Windows Programs-Startup menu to force the automatic
execution of the Executable Server.
These are the options available for the configuration:
• TCPIP: enables the TCPIP protocol.
• TCPIP Port: number of the port (TCP) used for the TCPIP protocol.
• ANP: enables the ANP protocol.
• ANP Dir: directory used by the ANP protocol for exchanging files.
• Timeout: timeout in seconds before a non-replying client is disconnected and its license is released. This is
very useful in case of network troubles.
• Autohide: automatically closes the Executable Server's window after the start.
• Monitor: starts the server Monitor used to check available licences and client connections.
15.2 Configuration of client
The computer on which the program operates can be configured through the Multilan Client window of SCC The
central table lists all the protocols on which the protected program has to search the SmartKey. Figure 6 shows an
example where the client was configured so that the Windows programs search the SmartKey on computer
187.11.10.74, port 16567, and among SmartKeys installed on local ports.
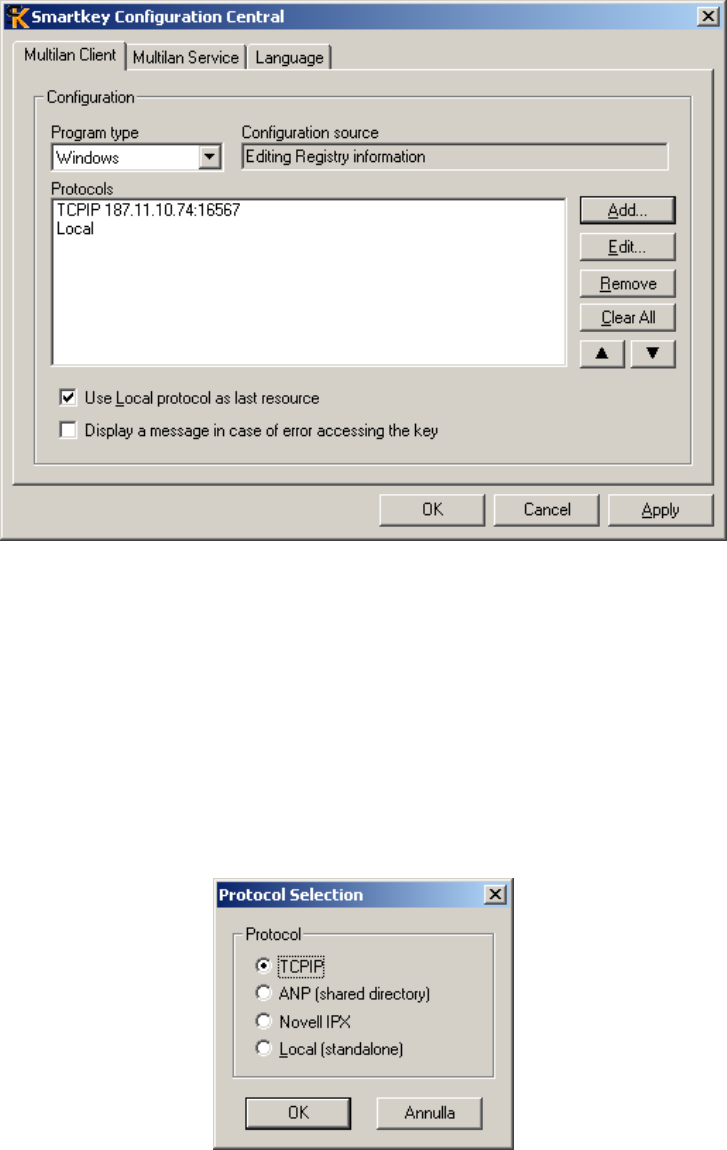
76
Figure 6 SmartKey Configuration Central: client mode
The Multilan Client window provides the following options:
• Program type: enables selection of the type of program to be protected: Windows, Windows 3.1 (16 bits) and
DOS (16 bits).
• Use Local protocol…: if enabled, it always searches the SmartKey in local protocol even if this protocol is not
explicitly input.
• Display a message…: if enabled, it shows - in a window - all the errors occurring during communication with
the SmartKey. This option is very useful for identifying communication problems.
15.2.1 Selection and configuration phases
When the Add key is pressed, a window as in figure 7 is shown, where one can choose one of the three types of
protocols available.
Figure 7 Protocol selection panel
If you choose the Novell Ipx or Local protocol, no further parameters need be input. If you choose the ANP protocol,
the ANP Protocol window is opened as shown in figure 8 and you have to input the name of the shared directory to be
used for communication between server and client. If you choose the TCPIP protocol, the TCPIP Protocol window is
opened as shown in figure 9 and you have to input the server's symbolic or numeric name and its port.
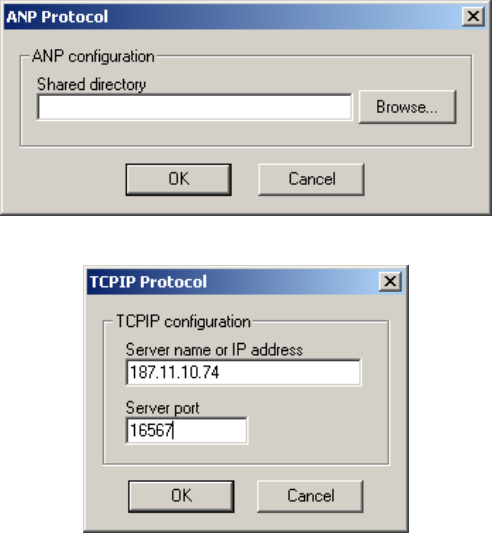
77
Figure 8 Panel for configuring the ANP protocol
Figure 9 Panel for configuring the TCPIP protocol
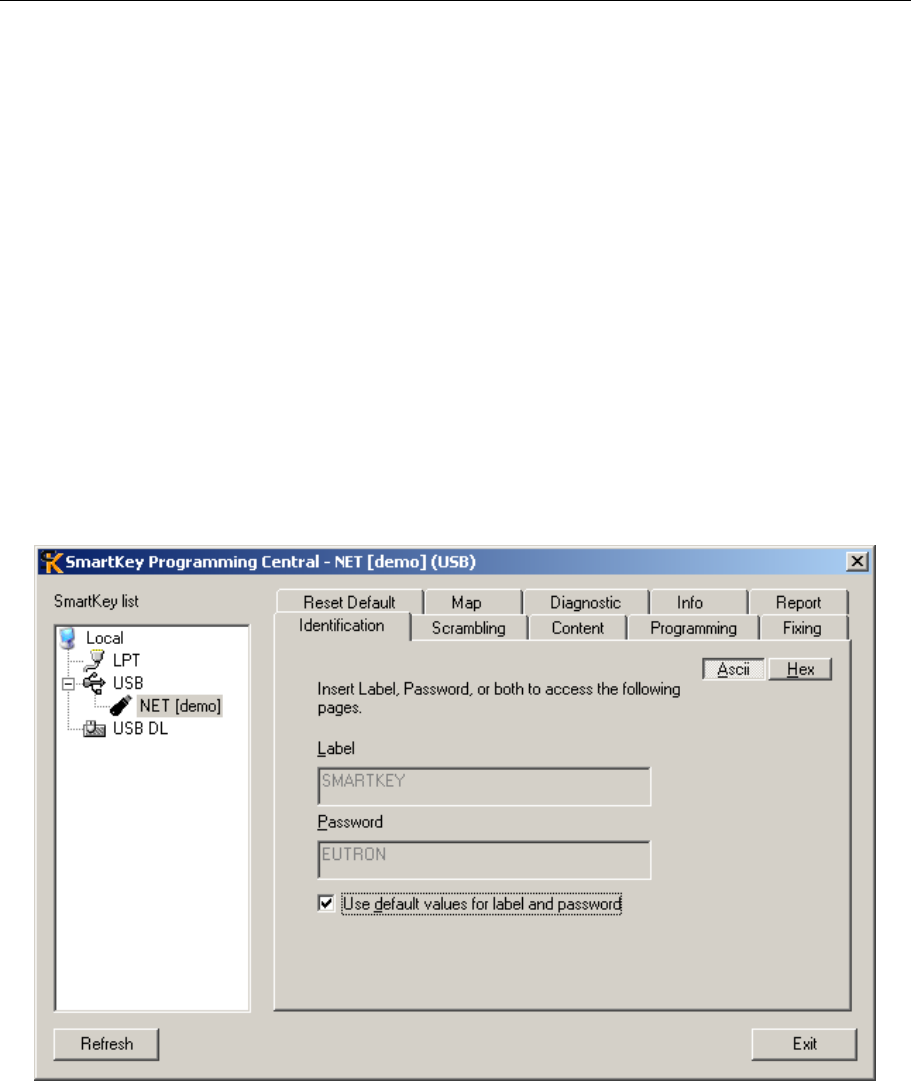
78
16 SmartKey Programming Central (SPC)
SmartKey Programming Central (SPC) can program SmartKey, i.e. input the data that determine the SmartKey's
configuration. The number of fields to be set varies according to the SmartKey model.
SPC makes it possible also to read the SmartKey configuration, modify it, save it on a file, restore it from a file and,
lastly, to write it on the SmartKey. The SPC window has two parts, as shown in Figure 10. The left part is for selecting
the SmartKey list you wish to configure. The right part is used for selecting one of the 10 panels for SmartKey
configuration.
If your SmartKey is not displayed, you can update the list with the Update push-button. If your SmartKey is still not
shown, this means that the system has not recognized it and the installation of the drivers must, therefore, be checked.
If the selected SmartKey is Fixed and, therefore, non-writable, the following panels are not shown: Programming,
Fixing, Contents and Reset Default. The first panel to use is Identification. It enables identification of the SmartKey and
access to the other panels. After identification, access to the panels is no longer subject to any constraint.
16.1 Identification panel
The SmartKey is identified by selecting the Identification panel and inputting the Label and Password values. The
values can be written either in text format or in hexadecimal format. You can select the two options with push-buttons
ASCII and Hex. If you are using a SmartKey, which still has the default values, you can avoid inputting these values by
selecting the Use default values option. The default values are: Label = SMARTKEY and Password = EUTRON.
Figure 10 shows an example of a computer containing a NET type SmartKey, whose drivers were correctly installed,
and with the Identification panel selected.
Figure 10 SmartKey identification panel
16.2 Info panel
If you select the Info panel, some information about SmartKey is displayed.
The following values are shown:
• Model: type of SmartKey
• Device: type of device used by SmartKey (USB or parallel)
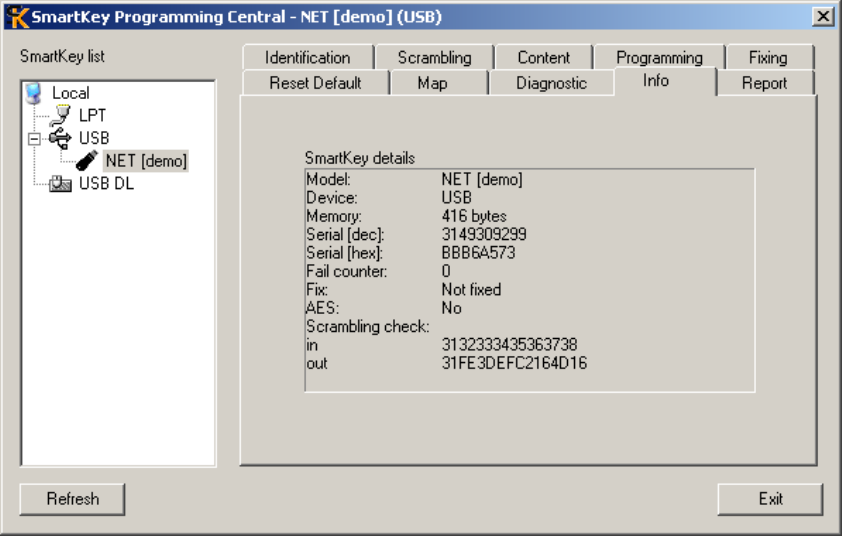
79
• Memory: the size of SmartKey 's programmable memory
• Serial (dec): serial number in decimal format
• Serial (Hex): serial number in hexadecimal format
• Fail counter: the number of times that somebody has input either the incorrect label or the incorrect password.
• Fix: indicates if the configuration can be modified
o Fixed: cannot be modified
o Not Fixed: can be modified
• Scrambling: shows an example of scrambling: In is the input value and Out is the output value. The two values
(In and Out) unmistakably identify the dongle, because scrambling depends on the dongle's Id-Code.
Figure 11 shows an info panel for a NET type USB SmartKey.
Figure 11 SmartKey Info panel
16.3 Reset Default panel
The Reset Default panel makes it possible to reset the default values and SmartKey's memory. To do this, just press the
Reset Default push-button. However, Reset Default functions only if the SmartKey is not Fixed, i.e. if it is still
rewritable. These are the default values:
• Label: SMARTKEY
• Password: EUTRON
• Contents of memory: all the cells contain value “\0” (00 Hex).
• SmartKey fixing flag: not Fixed
Figure 12 shows the Reset Default panel of a NET type USB SmartKey.
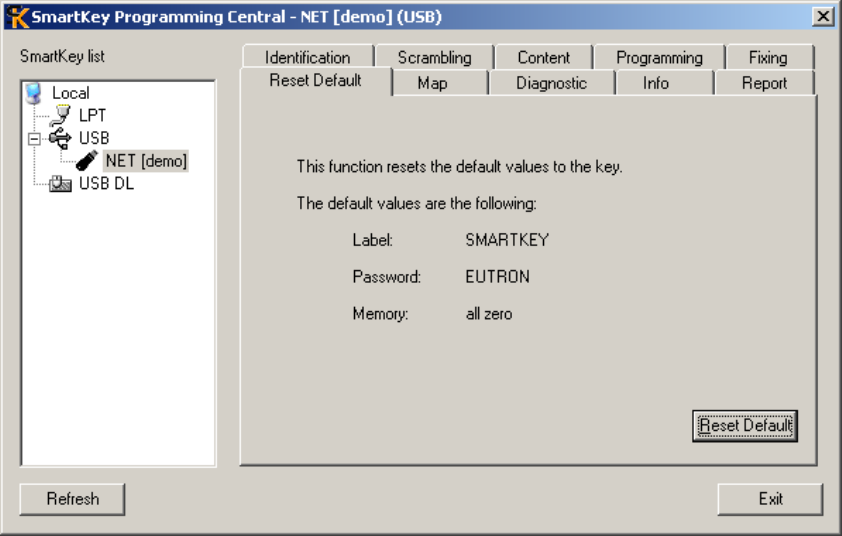
80
Figure 12 Reset Default panel of SmartKey
16.4 Map panel
The Map panel is used to associate, with each program, the number of possible executions and licenses.
Figure 13 shows an example of a Map panel used for the configuration of a NET type SmartKey.
The panel has a table with three columns:
• Program No., the program's identification number,
• No. of executions; maximum number of executions
• No. of licenses, maximum number of licenses, i.e. the maximum number of users who can simultaneously use
the program.
If the SmartKey is not of the NET type, there are only two columns: Program No. and No. of executions.Two types of
configurations can be done with the Map panel: One for managing the number of executions and the other for managing
the number of licenses, if using a SmartKey NET. We shall now describe the operations to carry out for the two
configurations:
SmartKey configuration for managing the number of executions
• In the No. of executions column, input the maximum number of executions on the line referring to the
program. The value can vary from “-1” to “65,535”. Value "-1" is interpreted by SmartKey as "Unlimited
executions":
• Do not type any value in the No. of licenses column. This column is displayed only if you are configuring a
SmartKey NET.
• After dealing with all the programs, press the Write push-button to write the configuration values on
SmartKey.
SmartKey configuration for managing the number of licenses (For SmartKey NET only)
• In the No. of executions column, input value "-1" on the line referring to the program.
• In the No. of licenses column, input the number of licenses on the relevant line. The number can vary from “0”
to “50”.
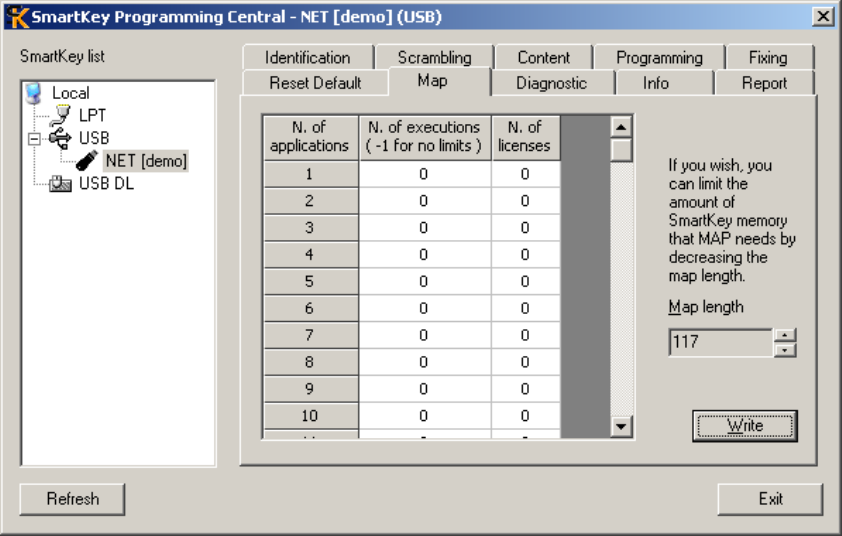
81
• After dealing with all the programs, press the Write push-button to write the configuration values on
SmartKey.
Figure 13 Map panel of a NET type USB SmartKey
The data required for configuring with Map are input in the SmartKey memory and, therefore, the number of programs
that can be protected depends on memory capacity. Two bytes are required to enable the Map service, and three bytes
for each program to be protected. When using the Map protection, it is best not to write SmartKey memory by using
other programs, because you would risk overwriting memory cells assigned to Map. The memory cells used are
sequential starting from cell 00. If you wish to use the free memory cells, remember that the first useful cell is number
(+2(3* number of protected programs)).
Here are two simple examples:
• You wish to execute program 1 only 5 times:
Program No. 1
No. of executions: 5
No. of licenses: no value (Leave the 0 default value)
• You wish have program 1 executed by a maximum of 10 personnel simultaneously:
Program No.: 1
No. of executions: -1
No. of licenses 10
(The last example applies to SmartKey NET only).
16.5 Scrambling panel
The Scrambling panel is used for displaying the output of the scrambling algorithm for known input data values. Both
input and output data can be displayed in ASCII or hexadecimal format. You can select with the ASCII and Hex push
buttons. This function is useful for programmers who wish to input scrambling functions in their own code. Figure 14
shows the Scrambling panel with data displayed in ASCII format.
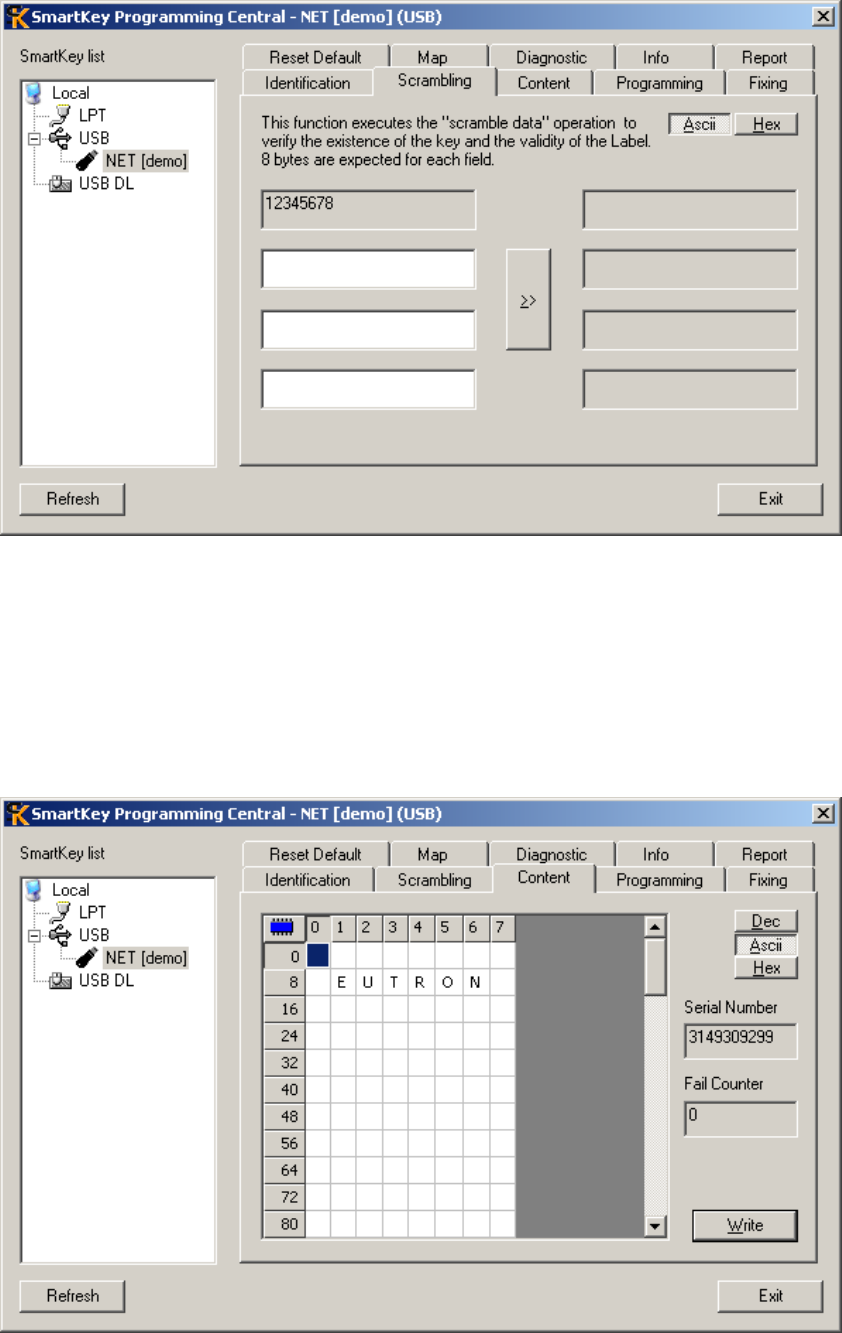
82
Figure 14 Scrambling panel of a NET type USB SmartKey
16.6 Contents panel
The Contents panel is used for reading and writing SmartKey's internal memory. The values can be displayed in
decimal forma, by selecting the Dec key, or in ASCII format, by selecting the ASCII key, or in hexadecimal format, by
selecting the Hex key. The values to be input should be written directly in the table in the middle. Each cell of the table
corresponds to one of SmartKey's memory cells. The values can be written in SmartKey after pressing the Write key.
The panel can also show the SmartKey's serial number and the number of failed accesses. Figure 15 shows a Contents
panel with values shown in text format. The cell number is determined by the sum of the number in the left column and
the number at the top. For example, value "E" is in cell 9 (8 + 1), and value "U" in cell 10 (8 + 2).
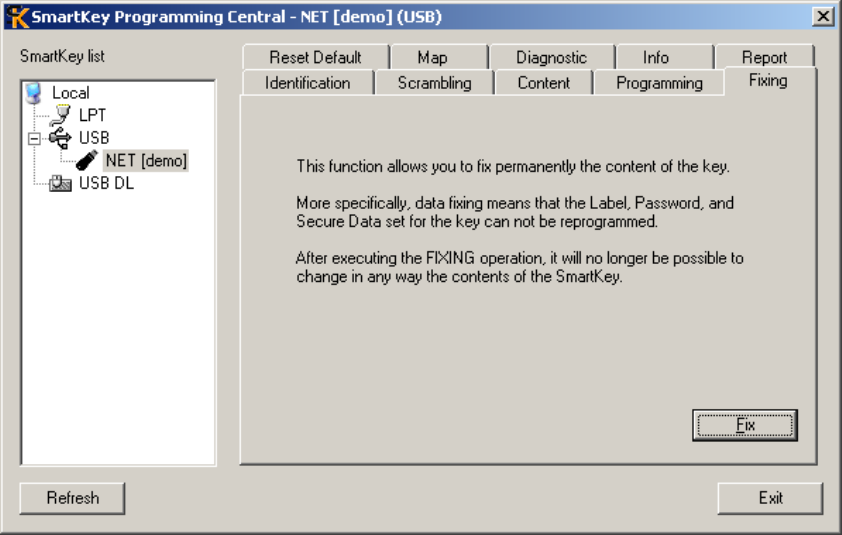
83
Figure 15 Contents panel of a NET type USB SmartKey
ATTENTION: Access to the SmartKey memory is direct and without a filter. We advise you not to input data in the
memory if you wish to use SmartKey to limit the number of multi-user licenses or the number of maximum executions
of a program, because you would run the risk of writing over memory cells needed for these two types of service.
16.7 Fixing panel
The Fixing panel makes SmartKey non-rewritable. If you press the Fix push-button, the Label and Password registers
and the data memory become non-modifiable. The Fix operation is irreversible. Figure 16 shows and example of the
Fixing panel.
Figure 16 Fixing panel of a NET type USB SmartKey
16.8 Programming panel
The Programming panel is designed for managing files containing SmartKey's configuration. Programming is used for
creating a new configuration, saving it on a file, restoring a saved configuration on a file, modifying it and saving it
again on a file and, lastly, writing the selected configuration on SmartKey. The different configurations are catalogued
according to the name of the client to which the SmartKey is assigned. In fact, every saved configuration must be
associated with the client who will use the SmartKey. Figure 17 shows an example of a NET type USB SmartKey in
which the configuration assigned to the “INFO” client was selected. (the file was selected by clicking a mouse over the
file). The central panel of Programming shows the possible configurations that can be written in SmartKey. Each
configuration corresponds to a file opened with the Open key.
Functions of the panel push buttons:
• Open: Opens a file containing the configuration and inserts it to the list in the central table. (figure 17 shows
three configurations, with the configuration selected for the INFO client)
• Save: Saves the selected configuration in a file.
• New: Creates a new configuration. By selecting the push-button, the Client Data panel (figure 18) is opened
with all its fields empty.
• Modify: Modifies the selected configuration. By selecting the push-button, the Client Data panel (figure 18) is
opened, containing all the configuration's values.
• Delete: eliminates the selected configuration from the table.

84
• Write: writes the selected configuration in the SmartKey. (In the case of figure 17 the configuration for client
INFO is written). If the FIX value of the configuration is 1, the writing is irreversible (in case of error,
SmartKey can no longer be used). If it is 0, the SmartKey values can be modified (writing irreversibility
increases the degree of security).
Figure 17 Programming panel of a NET type USB SmartKey
Figure 18 shows the Client Data field. The panel is used for writing the configuration's data. The configuration fields
are as follows:
• Client's' name: the name of the client to whom the SmartKey is assigned
• Label: SmartKey's label
• Password: Password of the dongle
• Data: The memory cells are shown in the data table.
• Fix after writing: If you select this option, the writing of the configuration on the SmartKey becomes indelible.
The selection of the option can also be seen on the central table of the configuration panel. If FIX is 1, this
means that the option Fix after writing was selected. If it is on 0, this means that the option was not selected.
The values of Client's name, Label and Password can be displayed in ASCII or hexadecimal format, by selecting push
buttons ASCII and Hex. The Data values can be displayed in decimal, ASCII or hexadecimal format, by selecting push
buttons Dec, ASCII and Hex.
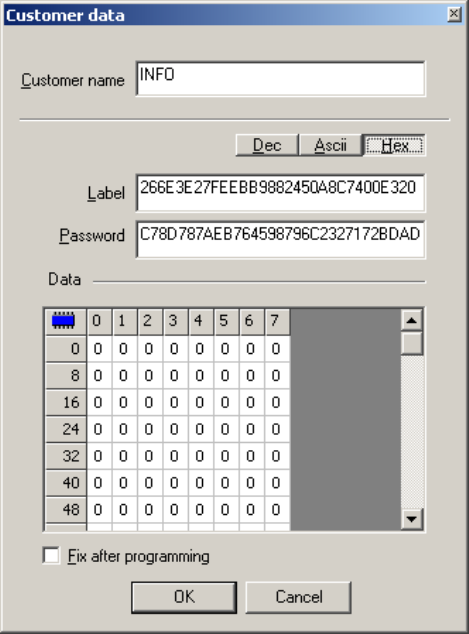
85
Figure 18 Client Data panel The panel for writing the configuration
16.9 Diagnostic panel
By using SPC, you can analyze SmartKey's entire memory, performing reading and writing cycles to diagnose if
SmartKey is correctly installed and operating. Figure 19 shows the Diagnostics panel for a SmartKey NET. Three
reading and writing cycles were selected on this panel. Reading and writing are selected with the Writing Test and
Reading Test options. The number of cycles is set with Number of cycles. The Execute key starts the diagnostics
process, and the Interrupt key ends the process before due time.
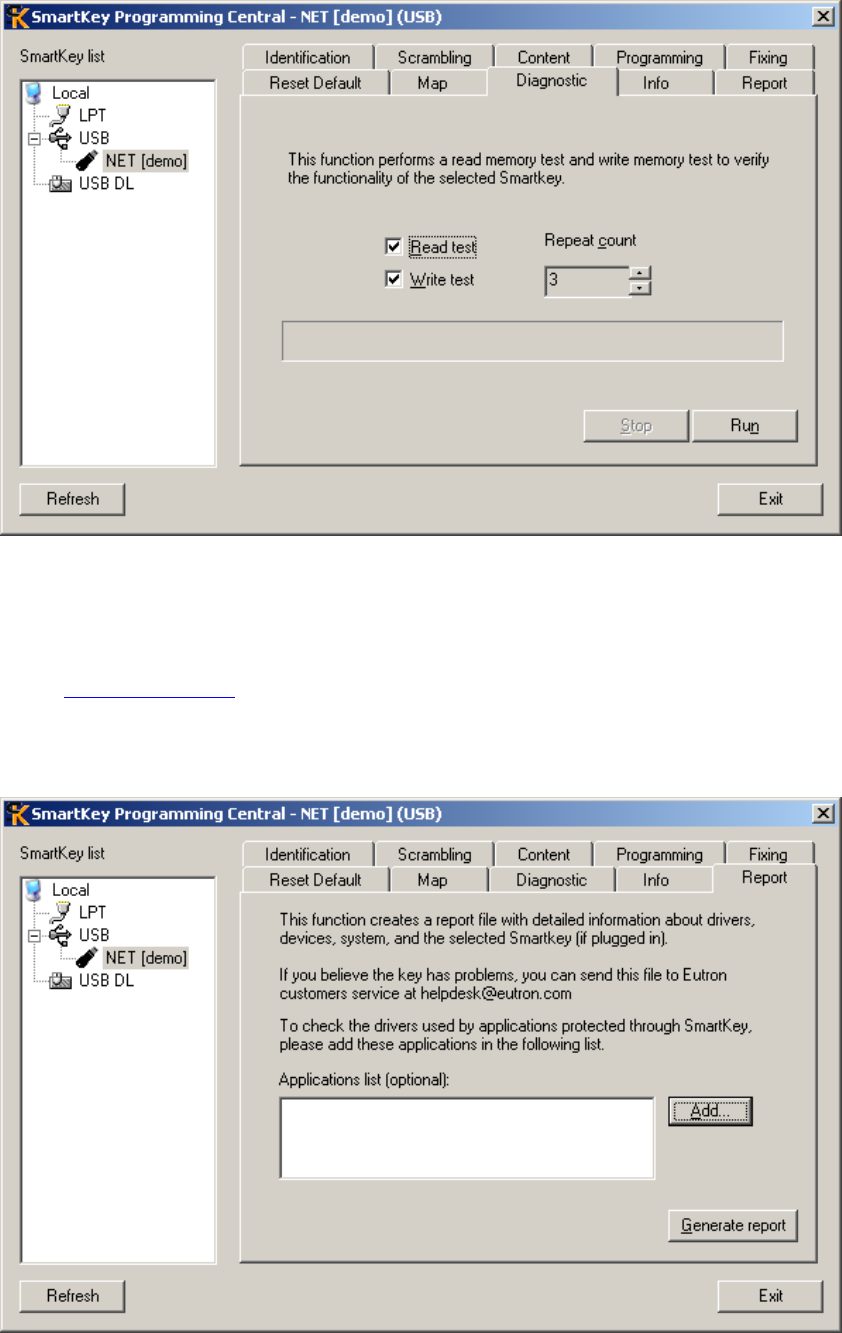
86
Figure 19 Diagnostic panel. Panel for diagnosing the SmartKey
16.10 Report panel
The Report panel is used for running tests on SmartKey's drivers, the devices, the system and SmartKey itself, and it
generates a report file. The report file - a normal text file - can then be sent to the Eutronsec's customer servicing
department (helpdesk@eutronsec.it) to obtain a detailed explanation about the causes of the problem and information on
how to solve it. To generate a more detailed report, you may attach a list of programs that use (should use) the non-
operating SmartKey. The Add key adds the names of the programs to the list. The Generate report key starts the
analysis and writing procedures on the report file. Figure Figure 1 shows the Report panel for a SmartKey NET where
programs were not input in the list of programs.
87
Figure 20 Report panel. The panel generates report files.

88
17 Technical specifications
17.1 Warnings
• Fit SmartKey Parallel between the PC and the printer when both are OFF.
• SmartKey is sensitive to electrostatic charges. Do not touch the pins of the SmartKey connectors.
• Do not expose SmartKey to high temperatures or high temperature ranges.
• Any electrical faults on the computer or on its peripheral units, may irreversibly damage SmartKey.
• Do not fit SmartKey in the 25-pole serial port: the voltages could change the contents of SmartKey and
damage it.
17.2 Functionality
Protection mechanism: algorithmic and by password
Access codes: fixed or programmable 16+16 bytes
Storable data: 64/128/416/896/8192 bytes
Access attempts detection
Facility for freezing stored data
17.3 SmartKey 2 Parallel
Number of writing operations: 100,000 (typical)
Data storage. 10 years (typical)
Dongle dimensions: 48 x 52 x 15 mm
Interconnection: Centronics standard parallel port
Connector on computer side: D-type 25-pole male
Connector on printer side: D-type 25-pole female
Power supply: self-powered from parallel port
Expected MTBF: 2,800,000 hours
Operating temperature: 0 - +70 ºC (32 - 158ºF)
Humidity: 20-80% relative humidity
17.4 SmartKey 2 USB
Number of writing operations: 100,000 (typical)
Data storage. 10 years (typical)
Interconnection: USB 1.1 LowSpeed
Connector: USB Male Type A
Power supply: self-powered from USB port
Expected MTBF: 2,000,000 hours
Temperature: 0 - +70°C (32 - 158ºF)
Humidity: 20-80% relative humidity
17.5 SmartKey 3/4 USB
Number of writing operations: 100,000 (typical)
Data storage. 10 years (typical)
89
Interconnection: USB 2.0 LowSpeed
Connector: USB Male Type A
Power supply: self-powered from USB port
Expected MTBF: 3,000,000 hours
Temperature: -20 - +80°C
Humidity: 20-95% relative humidity