EZMAX EZMP-4200P MP3 Player User Manual EZMP 4200 Manual English
EZMAX Co.,Ltd. MP3 Player EZMP 4200 Manual English
EZMAX >
User Manual
Copyright © 2005 EZMAX. All rights reserved.
Advance permission of EZMAX is required to use User’s Guide, photos,
the related documents and software of the product. Any violation may
follow the legal measures.
The contents of the User’s Guide are subject to change without prior
notice for further improvement of the product.
EZMAX
http://www.ezmax.co.kr
1
Table of Contents
Before Use
Product & Accessories ............................. 2
PC System Requirements ....................... 3
Safety Precautions .................................. 4
Features .................................................. 5
Designation of Parts
Front/Rear View of the Product ................ 7
Side View of the Product ......................... 8
Function Icons in Display .......................... 9
Preparation
Installing USB Driver ................................10
Connecting Player to PC ........................12
Manually Installing USB Driver .................13
Using Removable Disk .............................16
Disconnecting USB Cable ........................19
Upgrading Firmware.................................21
Installing LDB Manager ..........................23
Using LDB Manager ...............................24
Basic Functions
Basic Operation ......................................29
Power On/Off .........................................32
Playback Music File ................................33
Using Navigation .................................. 36
Voice Recording/Listening .................... 37
MP3 Encoding/Listening ................... 38
Listening to FM Radio .......................... 41
Recording/Playback FM Radio ............. 45
Function Menu
Menu Setting ........................................ 46
Music File Playback ............................. 47
Managing File .................................... 48
Detailed Menu Setting .......................... 51
Playback Mode Setting ........................ 52
Sound Setting ...................................... 53
Display Setting ..................................... 55
Timer Setting ....................................... 57
Encoding Setting .................................. 59
Setting ................................................. 60
Others
About Battery ....................................... 63
HOLD Setting Method .......................... 64
Troubleshooting ................................... 65
Specifications ....................................... 67
Service (A/S) ........................................ 68
Warranty .............................................. 69
2
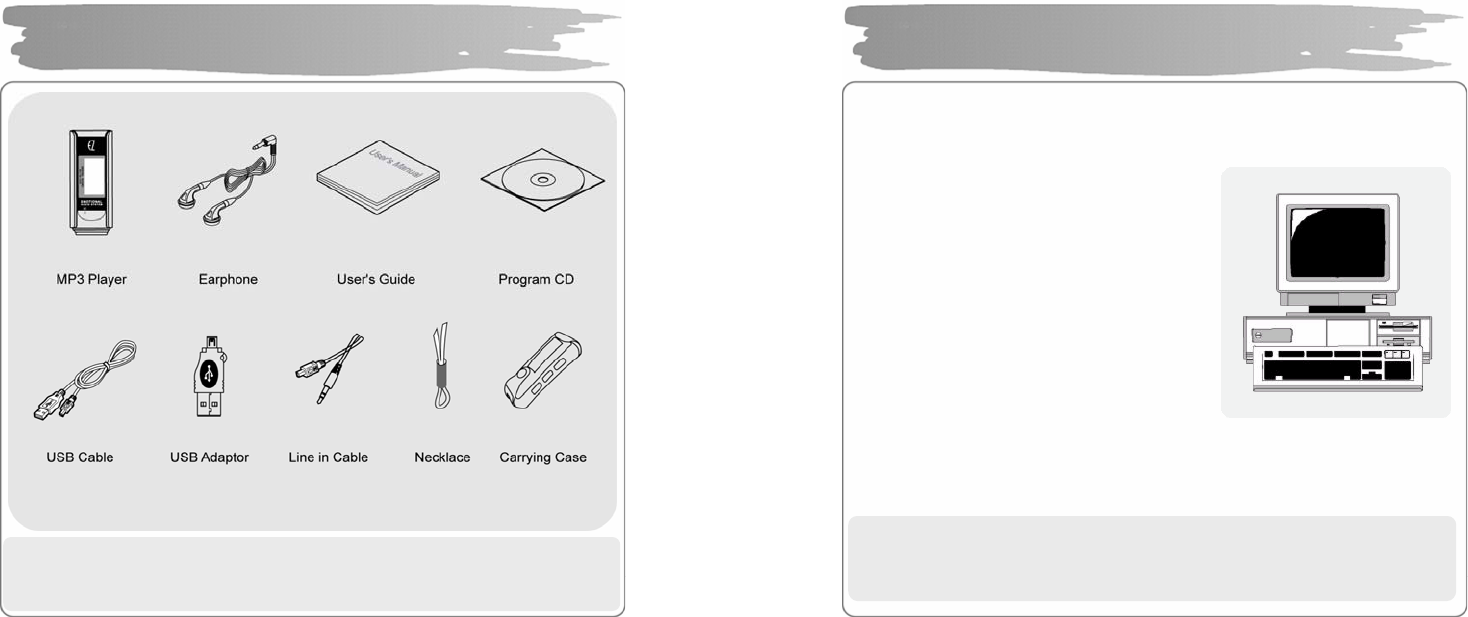
!N OTE: Accessories are subject to change without a prior notice for further
improvements in of this product.
Products & Accessories
3
Basic requirements should be satisfied to use this player on yo ur PC.
Make sure to c heck the following recommendatio ns before its use:
Pentium 200MHZ or above
Windows 98SE / ME / 2000 / XP
(Windows 98SE - Install Drive r)
Mac OS 9.0 / 10.0
USB Port (2.0 supported)
(Requires PC with a capacity of more than
PentiumⅢ 1GHZ. Couldn’t be supported
depending on a mainboard. Isn’t supported
without Service Pack 1 under Windo ws XP.)
CD-ROM Drive
Hard Disc Space 20MB or above
(an additional capacity may be required to save the music files.)
64MB RAM or above
!N OTE: Memory spaces available may be less than those indicated above since
the firmware uses some portions of the memory available to your PC for
the operation by its s ystem.
PC System Requirements

4
Listening Cautions…
The output of the product guarantees the best sounds at i ts proper volume. As
listening with a volume set at a high position for a long time may damage your
sense of hearing, make sure to listen to the music at a proper volume.
Avoid Strong Impact or Vibration
Be careful in handling the product and its accessories since their falling on the floor
or giving an impact on them may result in their serious damages.
Storage
Avoid the places exposed to heat, humidity or magnetic field
Cleaning
Wiping the player with chemicals may result in discolorations or damages on its
surface.
Wipe out the p layer with a soft cloth.
Using the Battery…
If you do not use the P layer for a long time, do not inser t a battery in the Player.
!N OTE: Never try to dissemble, repair or remode l it.
Safety Precautions
5
Multi-Codec Player
Multi-codec player supporting MP3, WMA, ASF(audio), OGG, WAV format.
FM Transmitter Function(My FM Station)
If you select the embedded FM Transmitter mode, you can e njoy a high se nsitivity
of music wireless through device with FM radio(ex. Car audio, home audio, ordinary
FM radio).
High Quality 3D Sound, MEX (Magic EXpander)
Experience a profound sound due to an introduction of MEX which allows you to
feel 3D expansion effects with richness while keeping the original and stable sound
of the player. 3D Sound MEX is a new 3D effect that does not make you feel tired
even if you liste n to it for a lo ng time .
EL Display
With its introduction of Blue/Yellow 2 Color EL Screen Graphic Display, the player
can command more luxurious and fancy images.
Firmware Upgrade
Upgrade Firmware to add/change/improve functions and performance of the Playe r.
Always enjoy the music with its latest version of performance.
Voice Recording
A function of high quality voice recording allows a clear recording for conferences
and lectures.
Features
6
FM Radio
Conveniently enjoy the FM radio with a variety of functions such as the
manual/automa tic frequency search, automatic tune to the radio station, and the
station p reset.
Easy Navigation
Tree structure allows you to manage and search a specific song more conve niently.
Lyric Display(LDB)
You can easily edit, save a nd display the lyrics of a song in 3 lines on the large
display.
6 Preset Equalizer
You can produce your own sound quality with the 5-band User EQ and 5
recommend EQs including Normal, Classic, Pop, Rock a nd Ja zz.
Removable Disk Device
You can freely upload and download files without a separate manager program
since the player is recognized as a removable disk when it is connected to the PC.
Direct Encoding
You can record an external sound you hear through LINE-IN port of the player, as
from FM radio broadcasting.
Features
7
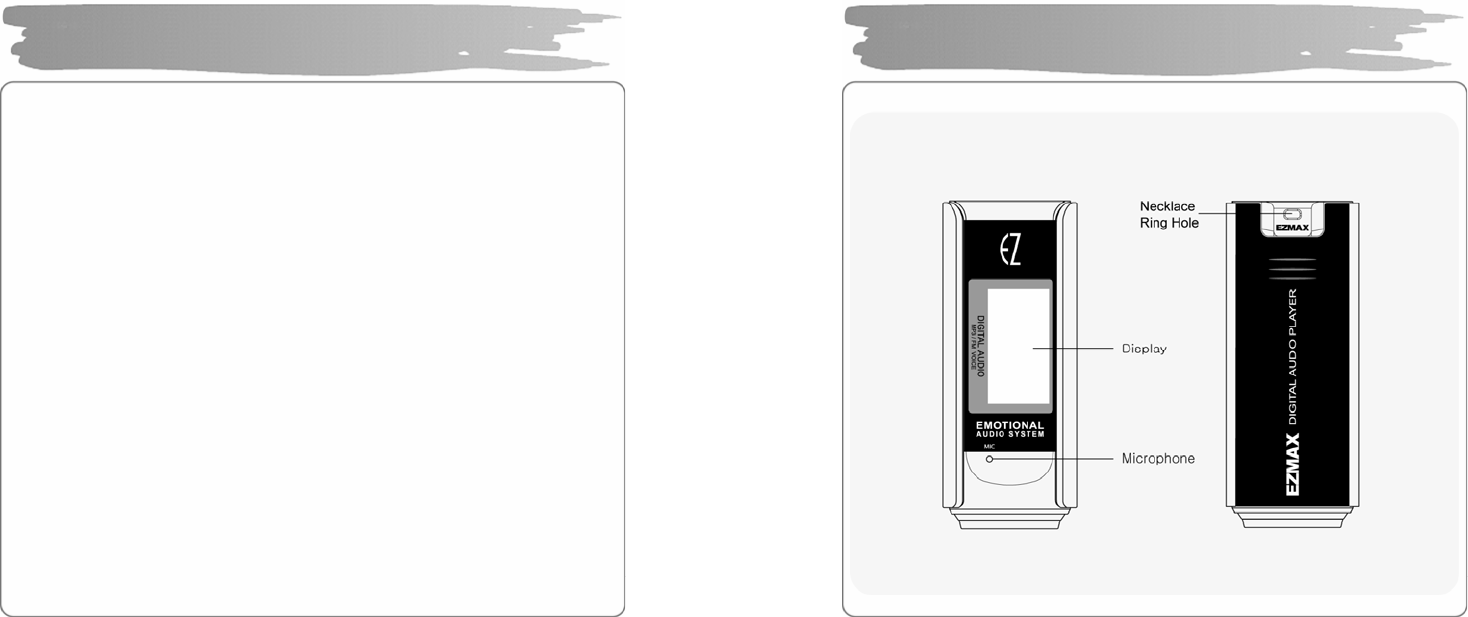
Front/Rear View of the Product
8
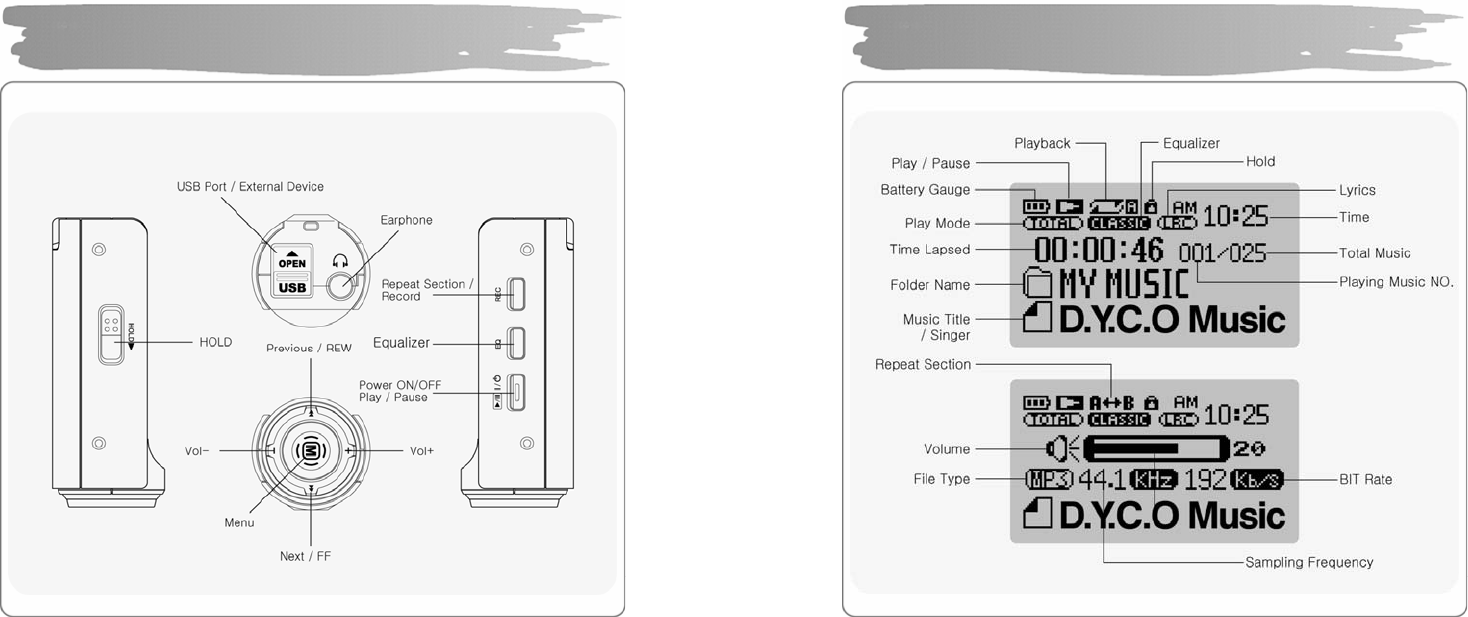
Side View of the Product
9
Function Icons in Display
10
Make sure to install the USB driver before connecting it to the PC.
When there appears “Add New Ha rdware Wizard”, press the “Cancel” button and
install Upgrade Manager.
If you install Upgrade Manager, the USB driver will be a utomatically installed.
► The driver is recognized without installation of a separate program under
Windows ME, 2000, XP, but make sure to install it if Firmware Upgrade is
required.
► If Upgrade Manager is no t installed under Windows 98 SE, the player ca nnot be
recognized as a removable disk. Make sure to install Upgrade Manager.
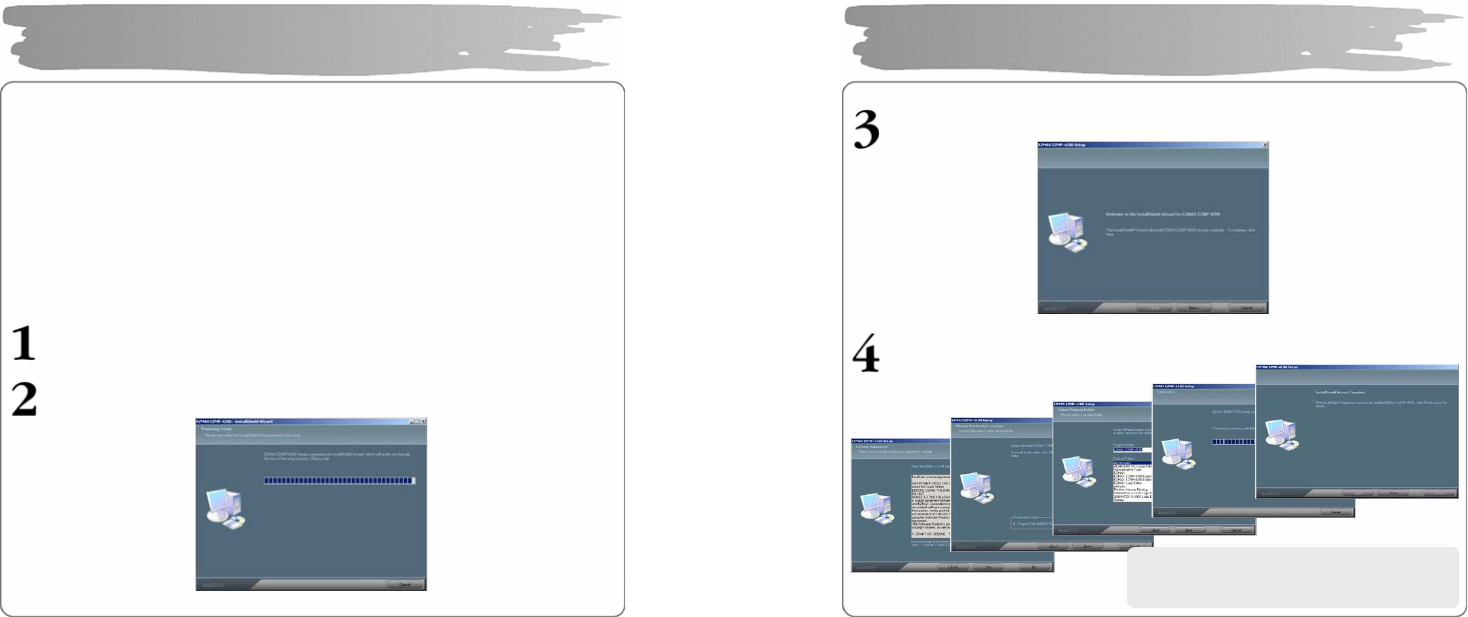
Insert Installatio n CD into CD -ROM Drive a nd the n click setup.e xe in t he
folder of Upgrade Manager.
.
The installation will start.
Installing USB Driver
11
Click “Ne xt”.
Click ‘Next’ or ‘Yes” in subsequent windows.
Installing USB Driver
When the installation has been done,
connect it to the PC as shown in the next
p
a
g
e.
12
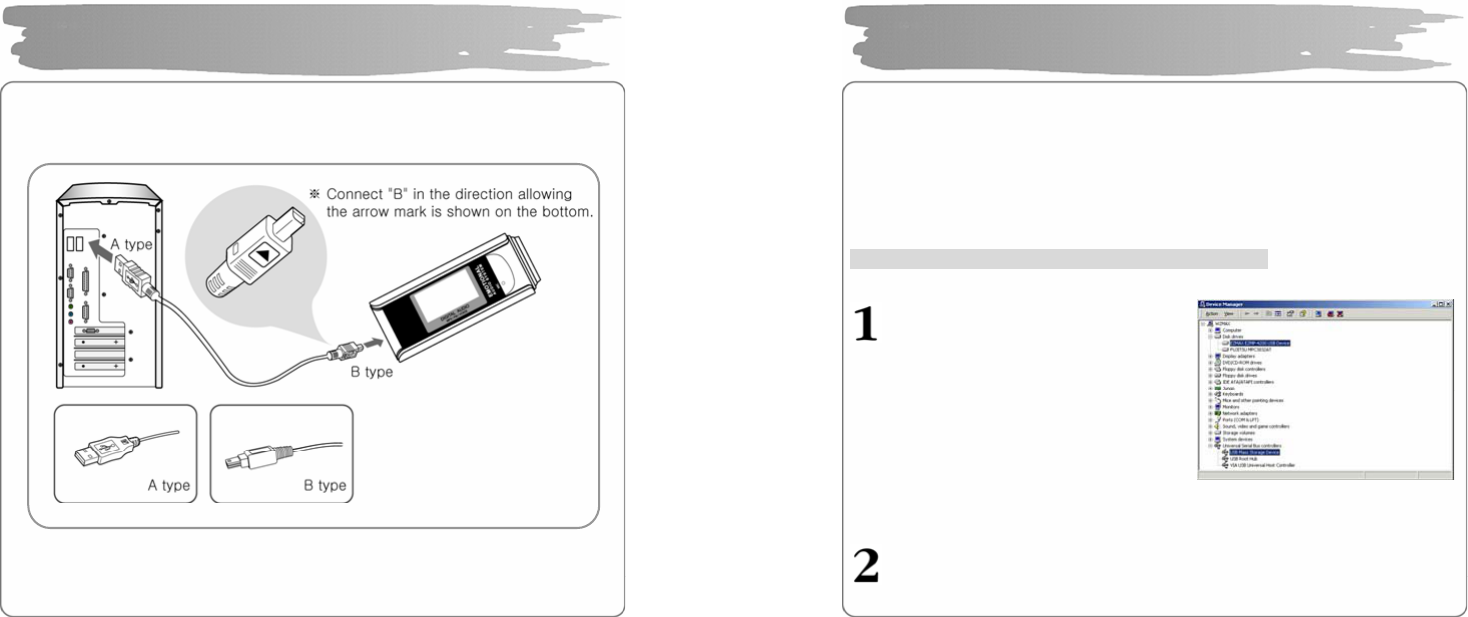
To download music files (MP3/WMA/ASF/OGG) from the PC, use USB cable
to connect the MP3 Player to the USB port of the PC.
(Make sure to use only USB cable supplied with the MP3 Player.)
Connect ‘A’ of the cable to the USB port on the part of the PC.
Open the cover of the USB port on the part of the player and connect
‘B’(a smaller part) of the cable to the USB port.
Connecting Player to PC
13
Install the USB driver in the following way when it is not recognized as a
removable disk.
If there doesn’t appear “EZMAX EZMP-4200 USB Device" in “Disk Drive” of Device
Manager or “USB Mass Storage Device”(Except Window 98SE) in Universal Serial
Bus Controller, or if there does a ye llow exclamation mark or “Unknown Device”, the
driver has not been p roperly installed. In this case, manually install the driver.
If an error has occurred while installing USB driver
Check Device Manager.
▪Windows 98SE/ME
Control Panel→System →Device Manager
▪Windows 2000 (Professiona l )
Control Panel→System →Har dw are
→Device Manager
▪Windows XP (Professional )
Control Panel→Performance and
Mainten ance→System
→Har dw are →Device Manager
Check whether there are any device with a exclamation mark or question
mark(unknown device or USB device) in Device Manager.
Manually Installing USB
14
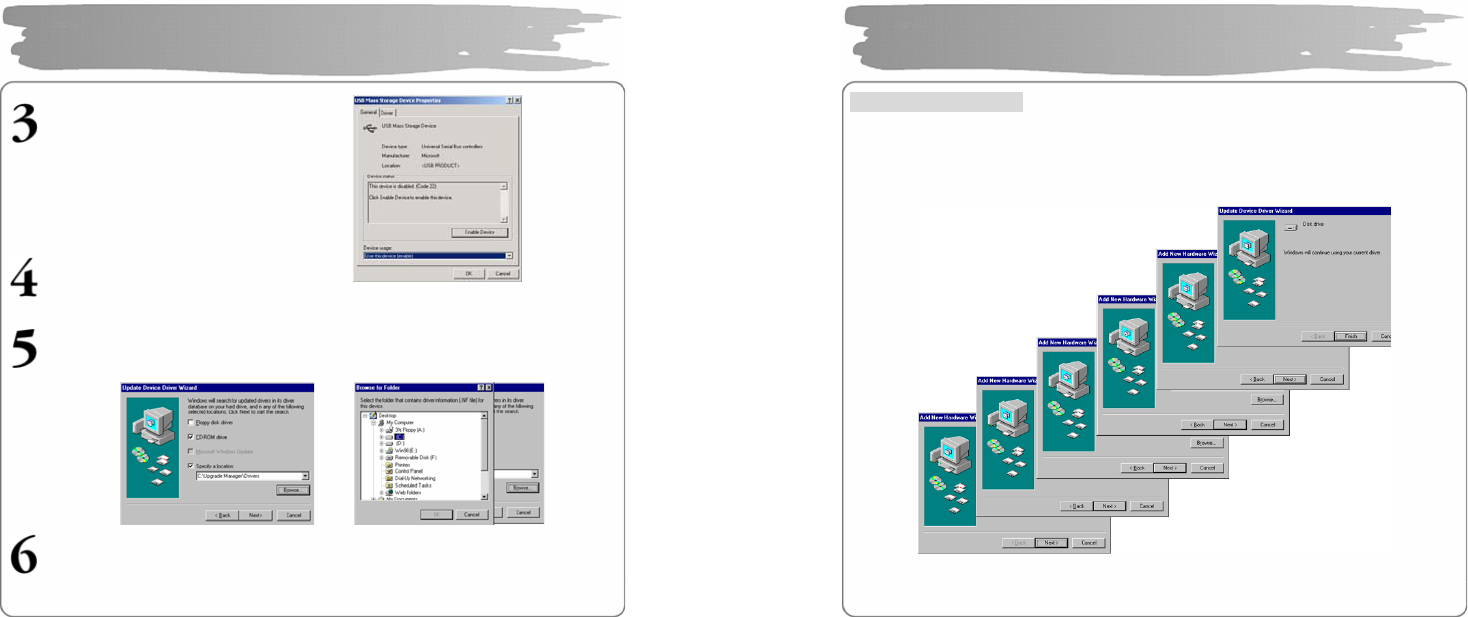
Double click the device with a
exclamation or q uestion mark.
Press “Install Driver Again”..
Click ‘Next’ in the subsequent windows. When sea rching driver files as shown
below, click the “Browse” to select C:\Winnt\Inf or C:\Windows\Inf and press
“OK”.
Press “Next”: in the s ubsequent windows to complete the installation of the
USB driver.
Manually Installing USB
15
For Windows 98SE
Click ‘Next’ in the subsequent windows.
Designate the path for searching the driver file to \Upgrade Manager\Drivers of
CD Drive.
Make sure to restart your system after installation is completed.
Manually Installing USB (Win 98SE)
16
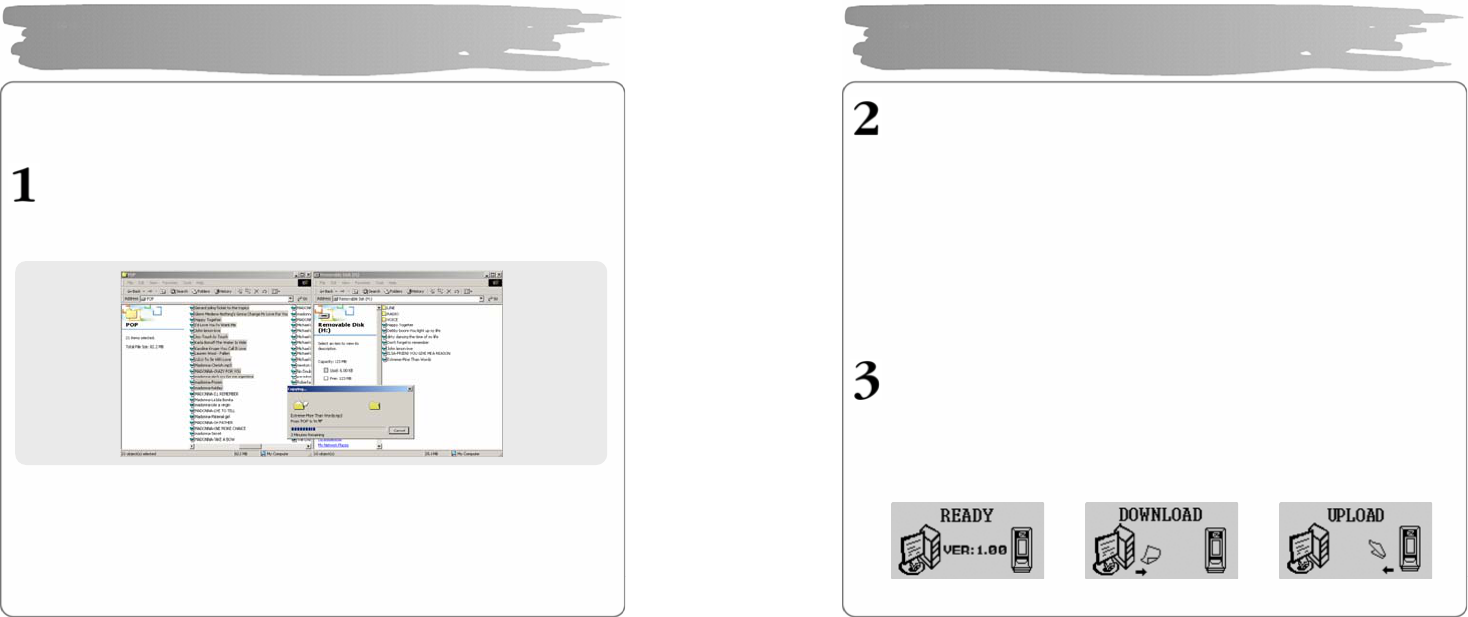
Since the player is detected as a removable disk on the part of PC, you ca n easily
upload, download, or delete music files or folders in Windows Explorer without a
separate manager program.
Copying files to Player(Download)
1) When you connec t the p layer to the USB cable, it is recognized as a
removable disk in Windows Explo rer.
2) Click the removable disk to enter into a memory area of the player.
3) Run one more Windows explorer.
4) Select the file to save,
① Drag and drop it to the removable disk.
② Or, right-click to select Copy. Designate the removable disk and right-
click to select Paste.
5) Then, there will appear a file tra nsfers window, indicating that the file is
being copied to the removable disk.
Using Removable Disk
17
Export File(Upload)
1) Connecting the USB cable to the Player allows the Player to be
recognized as a removable disk in the Windows Explorer.
2) Select the removable disk to have access to the memory area of
the Player.
3) Run one more Windows Explorer.
4) Select a file you want to export from the removable disk, and
then:
① Drag & drop to the disk to which you want to export.
② Or right-click the mouse to select Copy, and select a folder
to which you want to export, and then right-click the mouse
to select Paste.
You can add or delete a folder in the Windows Explorer.
When you download a music file to the player, wait until there appears Ready
on the display as shown be low. If you disconnect the USB cable during
DOWNLOAD or UPLOAD, the file may no t be properly downloaded. Check
the display(READY) and then disconnect the cable.
READY Status DOWNLOAD UPLOAD
Using Removable Disk
18
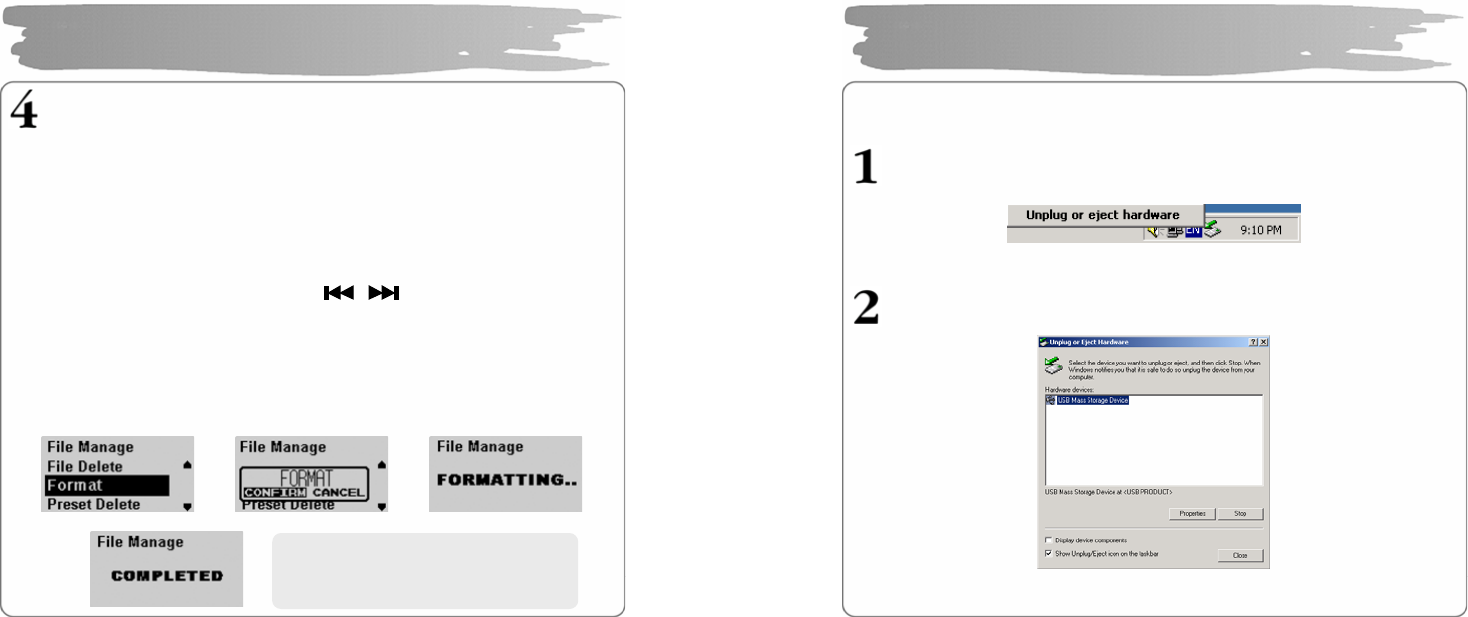
Format Player
1) Formatting in the Windows
① Select the removable disk, and then right-click the mouse to
select Format(Select “FAT” as a file system).
② Click Start. (If you remove the USB cable while formatting, the
player could be damaged. Be sure to remove it after the
formatting has been done.)
2) Formatting in the Player
① Press the MENU button to enter i nto the menu mode.
② Select the File Manager with button and then p ress the
MEMU button to ente r into File Manage menu.
③ Select Format menu with VOL +/- button and then press the MENU
button.
④ After selecting “Confirm”, press the MENU button one more to start
formatting .
Using Removable Disk
Î Î
Î
※
Be careful since formatting wi ll
delete all contents permanently.
19
After completing file transfer, disconnect the USB cable in the following way.
Right-click the removab le hardware icon on the taskbar of the desktop ,
and then select “Remove Hardware Safely”.
After selecting the device to disconnect, click “Stop” .
Disconnecting USB Cable
20
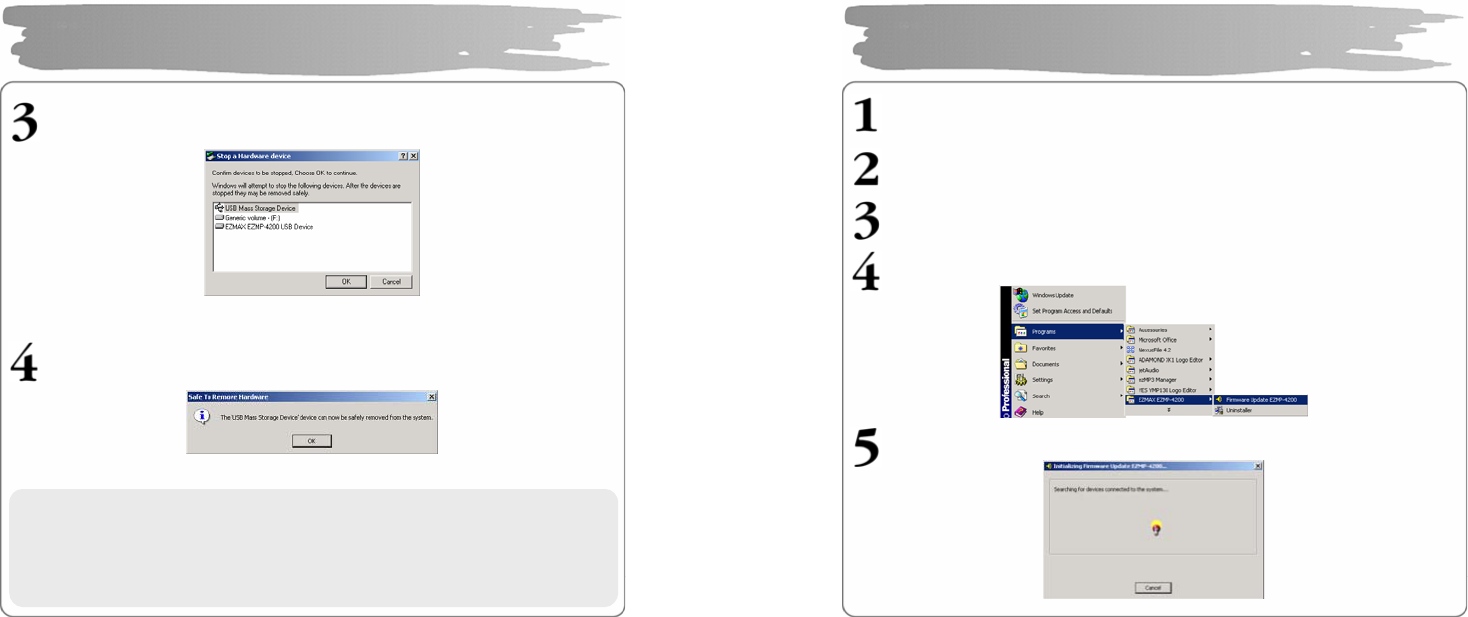
Click “OK” to confirm the device to stop.
Click “OK” to remove USB cable.
Disconnecting USB Cable
※ Abnormally disconnecting the USB cable may result in damages or a
failure to the player.
The order of music files that appears when you select a removable
disk in Windows Explorer has nothing to do with the actual
sequence in accordance with the playback.
21
Download the latest version of firmware at o ur website (www.ezmax.co.kr)
and unzip it (unzipped to 4 files.)
Copy the unzipped latest firm ware files i nto
C:\Program Files\EZMAX\EZMP-4200 folder.
Connect the USB port in the status of Power-off so that the PC can recognize
the player.
Execute Firmware Upgrade manager program.
Wait for the device to search. Connect USB cable.
Upgrading Firmware
22
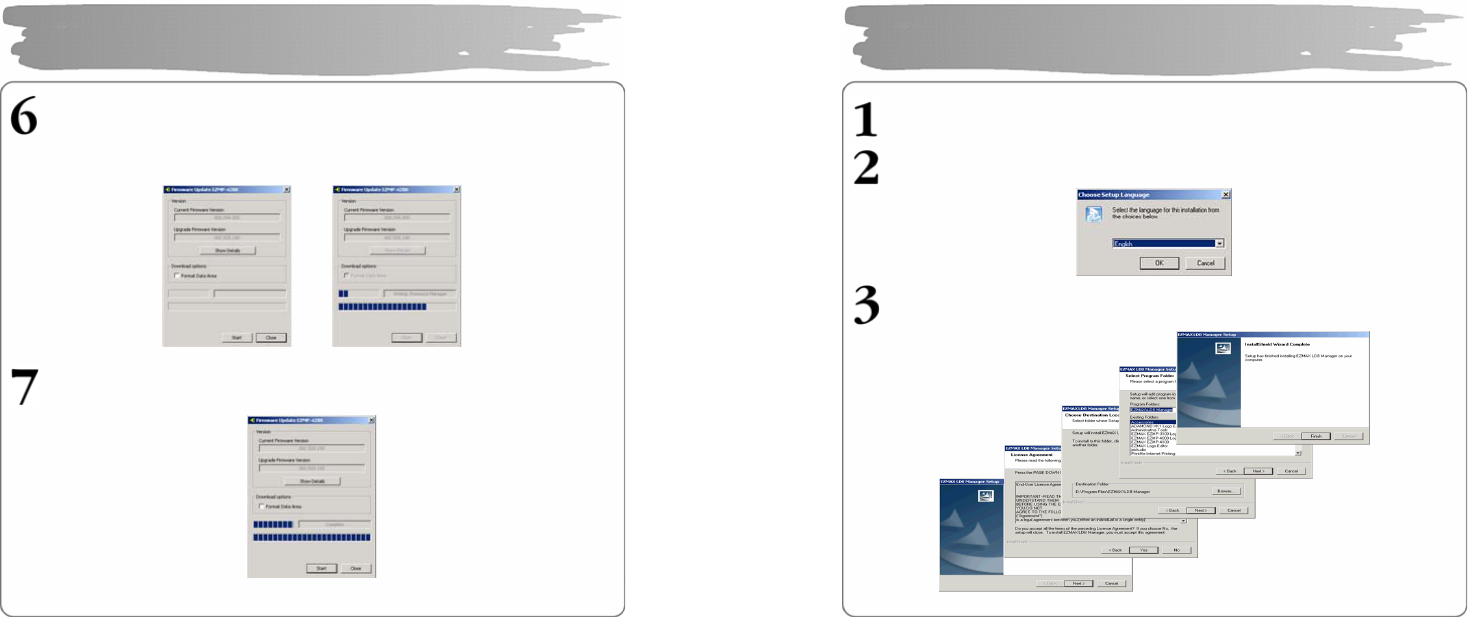
Click ”Start” to proceed Firmware Upgrade. Select “Data Area Formatti ng”
to delete all the files in the sys tem.
Disconnecting t he USB cable during Firmware Upgrade may result in mal-
functions of the player or the PC.
When the firmware upgrade has been completed, click “Close” and remove
the USB cable(Refer to Disconnecting USB Cable).
Upgrading Firmware
23
Insert the Instal lation CD into CD-ROM Drive and click setup.e xe in the folde r
of LDB Manage r.
Select a language to use.
Click “Ne xt’ or ‘Yes” in the subsequent windows.
Installing LDB Manager
24
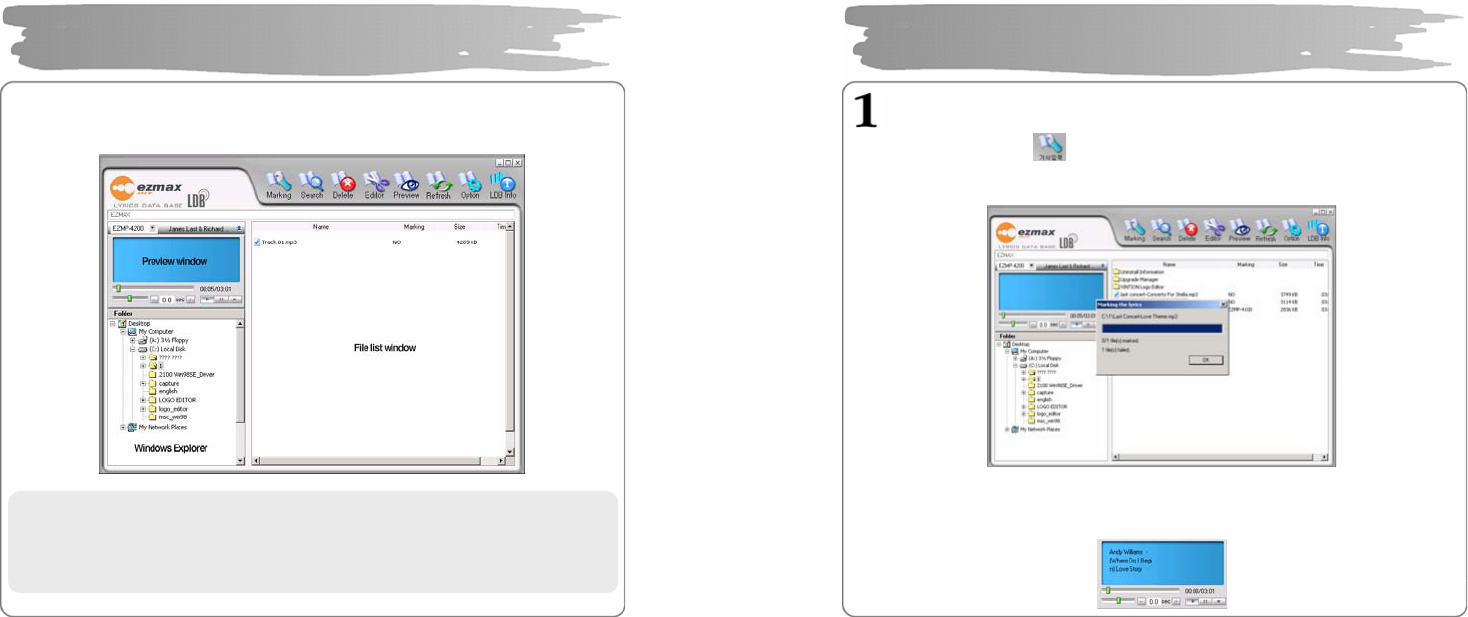
LDB Manager is a program that automatically e nters the lyrics in MP3 music files
and can be used without connecting the p layer to PC.
Using LDB Manager
▪The Internet should be available so that it can get information about a
lyric from the lyric server.
▪Lyrics are not marked for the VBR file since time information does not
match.
25
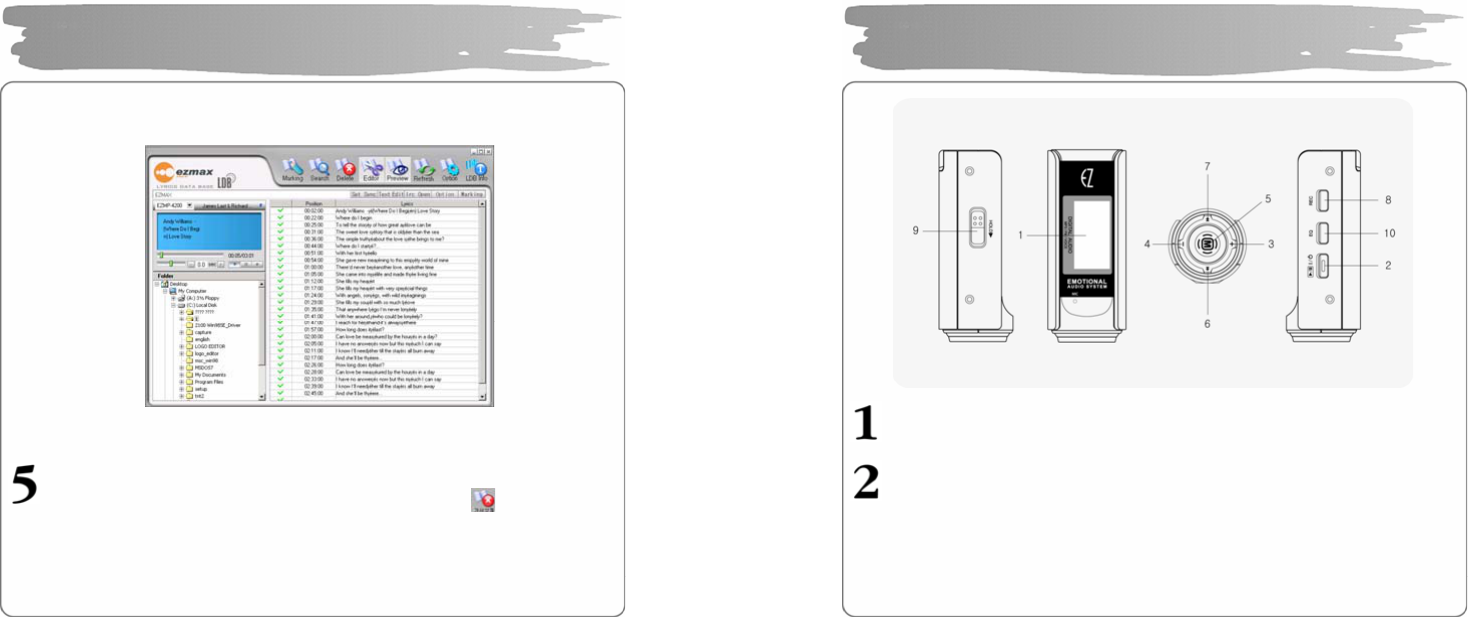
Enter Lyrics(Auto Search)
① Select the MP 3 file to e nter the lyrics in the file list window, and press
“Enter Lyri cs” on the top menu.
② The lyric se rver searches for informa tion about the lyrics according to
information about the relevant files to automatically enter the lyrics.
③ After the lyrics ha ve been entered in, you can check the lyric marking
information i s displayed in the file list window.
④ Play back in the pre view window to check information about the lyrics.
Using LDB Manager
26
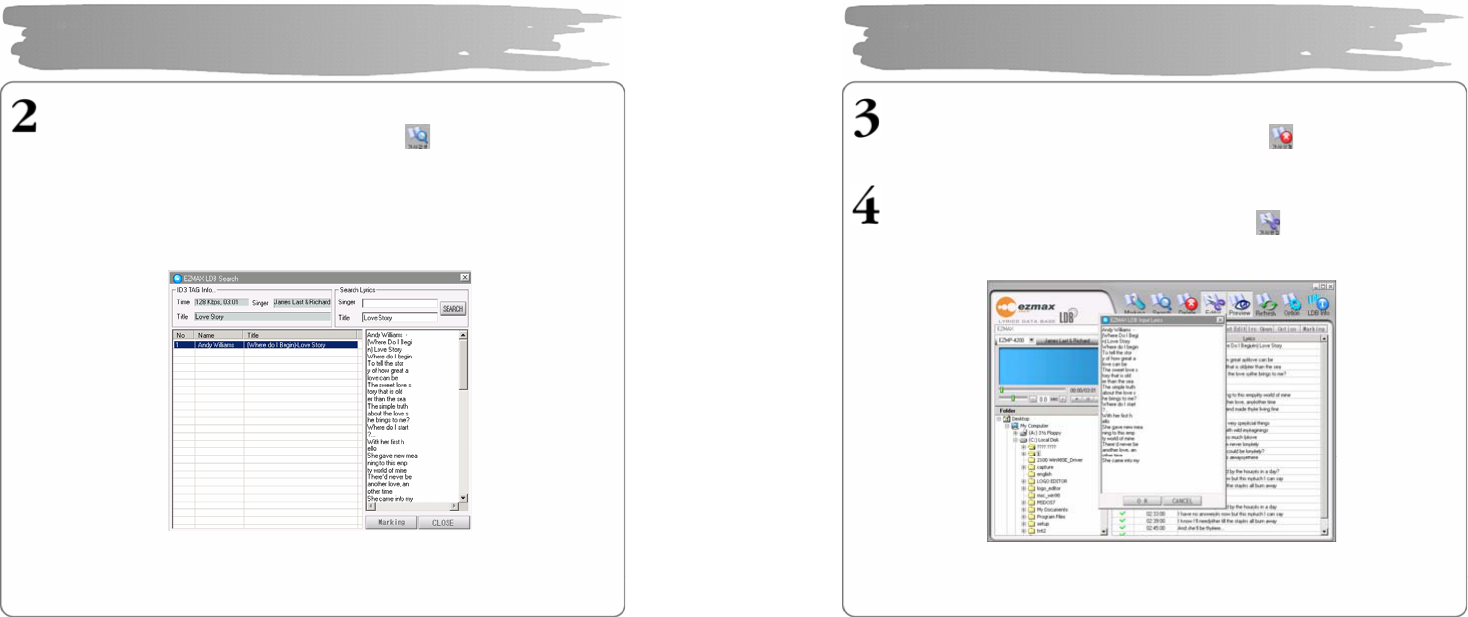
Enter Lyrics (Manual Search)
① Select the file to enter the lyrics and click the button on the top menu.
② Enter the name of singer or title of song to search for in E nter & Search
Lyric window and press the Search button.
③ The songs matching the time information, singer information and title will
be displayed.
Click the MP3 file to check the lyrics to e nter i n the rig ht window.
④ Press the Lyrics Marking button on the right bottom of the LDB searc h
window to complete enteri ng the lyrics.
Using LDB Manager
27
Delete Lyrics
Select the MP3 file to delete lyrics and press the button to delete their
information.
Manually Enter Lyrics
① Select the file to enter the lyrics a nd press the button o n the top menu.
② Press Text Editor, enter the lyrics you want and then click OK.
Using LDB Manager
28
③ Press Playback in the preview window and press the SYNC setting b utton at
the point where there should appear one line of lyrics editing window.
④ When SYNC setting has been completed, press the Lyrics Marking window.
Modify Lyrics
① Select the MP3 file to modify lyrics and then press the button.
② Double click the area to modify lyrics so that you ca n modify the lyrics or
time.
Using LDB Manager
29
Display
- Displays the operating status of the product..
PLAY
- Press short to turn the power ON.
- When listening to the music or the recorded file, press short to
pause the music, and then do so again to resume the music.
- When listening to the FM radio broadcasting, press short to save
the current station to the PRESET.
- In any mode, press and hold to turn the power OFF.
Basic Operation

30
VOL +
- Each press on the button will increase the volume step by step.
(can be adjusted in 0-30 le vels..)
VOL –
- Each press on the button will decrease the volume step by step.
MENU
- P ress s hort to enter into the menu screen.
- Press a nd hold to enter into the na vigation screen.
- Press short to select the relevant item on the menu screen.
- When listening to a music or a recorded file, press short to move to the next
music while keep pressing to fast move within the current played file.
- Press it short to move to the next menu screen.
- Pres it short in FM radio mode to increase the radio frequenc y step by step,
and press and hold to automatically search for the next broadcasting station.
- Press it to move to the next PRESET number in the FM PRESET mode.
- When listening to a music or a recorded file, press short to move to the
previous music while keep pressing to fast mo ve within the current played
file.
- On the MENU screen, press short to move to the previo us me nu item.
Basic Operation
31
- When listening to the FM radio, press short to move to the
previous frequency while keep pressing to automatically search for
the previous station.
- In the PRESET mode, press short to move to the next PRESET
number.
REC/A-B
- During the playback, press short to specify the section ‘A’ and do
so again to specify the section ‘B’ for the Repeat Section. And
then another pressing short will cancel the Repeat Section.
- When listening to the FM radio, press and hold to record the radio
station.
- Press and ho ld in the FM Radio mode to start FM broadcasting recording,
and press and hold it again to complete recording.
HOLD
- In the HOLD status, operation of all buttons are locked down.
- If you press any button while it is in the HOLD status and the player is being
played , it displays the message “HOLD”, sticking to its previous status.
- If you press any button while it is in the HOLD status and the player is turned
off, it displays the message “HOLD ”, sticking to its power-off status.
EQ
- You can orderly search for the effect of each EQ including tha t of 3D.
- Press in FM Radio mode to execute AUTO PRESET and to search for a
radio frequency automatically.
Basic Operation
32
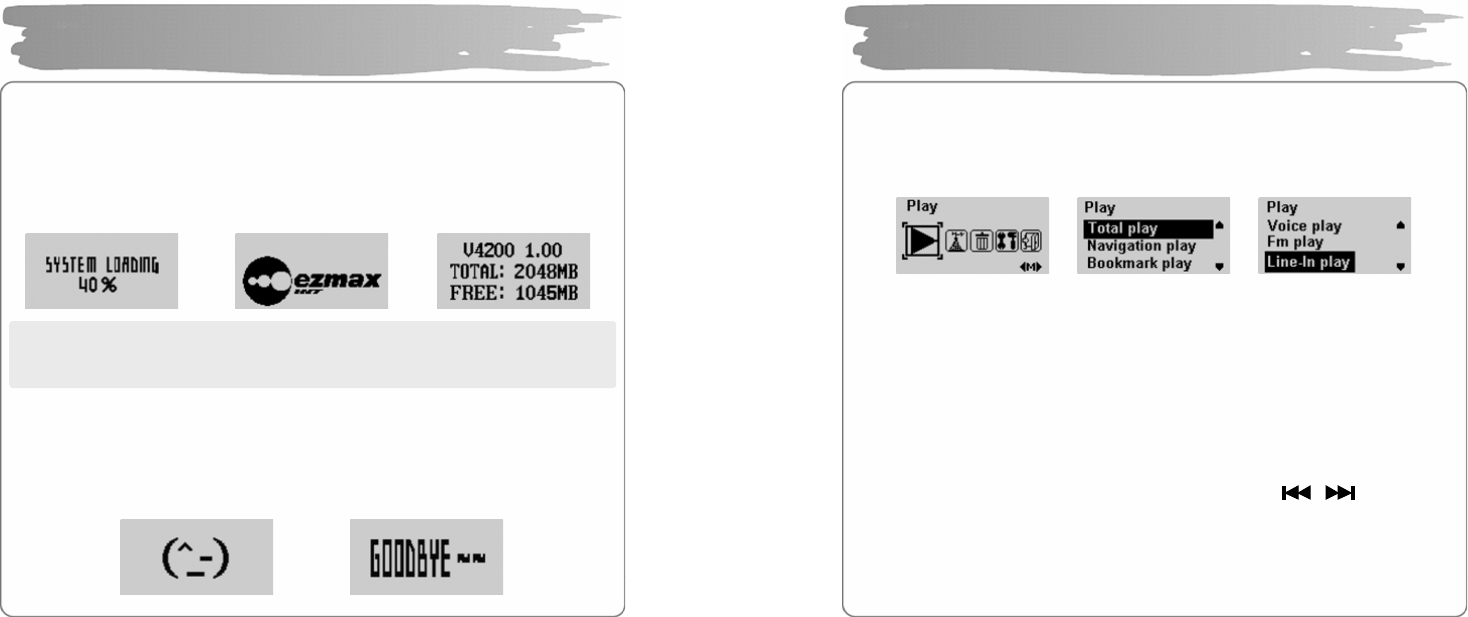
Power ON
Press PLAY short to turn the power ON, and there will appear the logo on
the display, followed by which there appears a version of firmware, a
total memory and the memory available to the Player.
!NOTE: A total of memory an initial booting shows may be less than its
default memory since some part of it is used to drive the system by
the firmware.
Power Off
Press and hold PLAY to turn the power OFF while the logo GOODBYE is displayed .
If you press PLAY during the playback, it will enter into its pause. It will be
automatically released in the time you set in advance if you do not press any button.
Î Î
Power ON/OF
Î
33
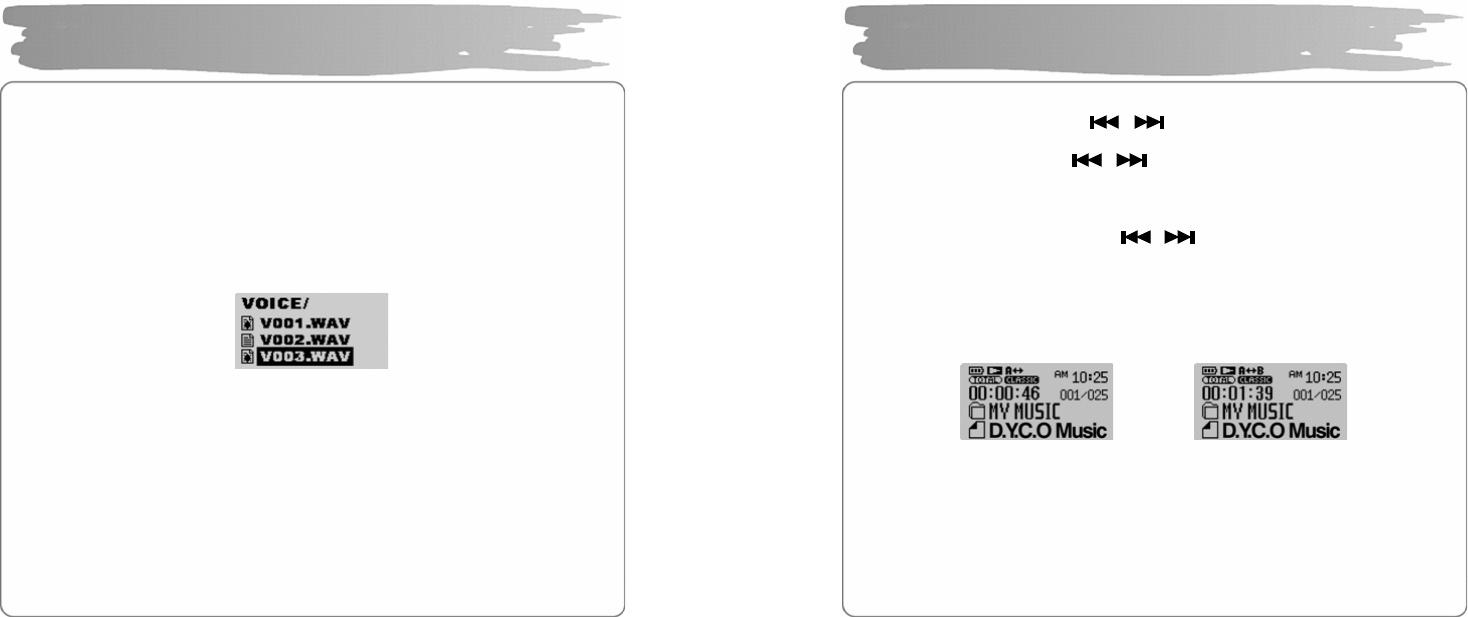
◎ You can p lay back a music file or files recorded in the player in the PLAY menu.
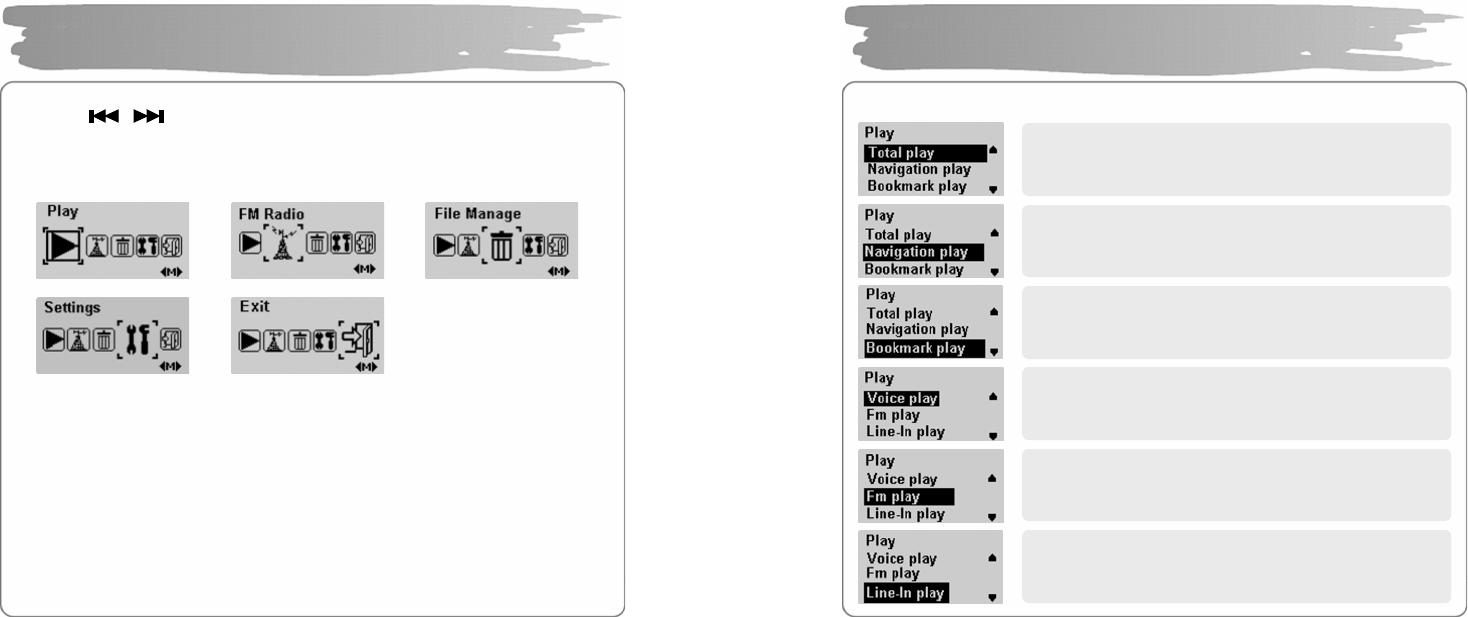
Press MENU short to move to the menu mode. Select the PLAY menu and
press MENU again to move to the me nu.
You can select TOTAL P LAY, NAVIGATION PLAY, B OOKMARK
PLAY, VOICE PLAY, FM PLAY, LINE-IN PLAY using VOL+/- button.
Press MENU to enter into a rele vant playback mood.
(1) TOTAL PLAY
- TOTAL PLAY plays back all music files in the memory.
(2) NAVIGATION PLAY)
- Press MENU to enter into NAVIGATION PLAY where you can see all the folde rs
and music files in the memory.
- Select the folder or file yo u want to play back using the butto n.
- Press PLAY to pla y back the folder or file you have selected.
Playback Music File
34
(3) BOOKMARK PLAY
- Press MENU to enter into BOOKMARK PLAY where you can see the bookmark
files.
- Press PLAY to pla y back BOOKMARK files alone.
▪How to Set BOOKMARK
- While listening to music or in the pause status, press and hold MENU to enter
into the NAVIGATION mode.
- Select the file for BOOKMARK and press MENU s hort to bookmark it. Another
pressing it short to release the bookmark.
(4) VOICE PLAY
- Plays back voice-recording files.
(5) FM PLAY
- Plays back files in which FM radio broadcasting is recorded.
(6) LINE-IN PLAY
- Plays back all files with L INE-IN encoded.
Playback Music File
35
Searching For File
During the playback, press the button to play back the previous/next
file.
In the pa use status, press the button to mo ve to the previous/ne xt file.
( If a function o f Study is set, it moves i n accordance with the time you have set.)
Searching for Part
During the playback, press and hold button to quickly move to the area
you want. Release it to play back normally.
Setting Repetition Section
During the playback o f music/recorded files, press REC/A-B on the beginning of the
section you wa nt to listen to repeatedly.
Press REC/A-B again on the ending of the sectio n.
The section will be repeatedly played back.
Press REC/A-B again to release the sectional repetition.
Adjusting Volume
Press the VOL +/- button short to adjust by 1 level, and press and hold it to adjust
continuously. The volume can be adjusted from 0 to 30 levels.
Playback Music File
Î
36
Use the functio n of Navigation to easily search for the file you want.
Press and hold MENU to move to the Navigation mode.
Select the folde r or file you wa nt to play back.
▪ button : move to a upper folder
▪ button : move to a lower folder
▪VOL+/- button : move to a file or a folder in the same folder
▪MENU button : move to a lower folder in the case of folder
set BOOKMARK in the case of file
Press PLAY to play back a se lected file.
Using Navigation
Î
※ Press and ho ld MENU in the Navigation mode to release.
( click ME N U button )
37
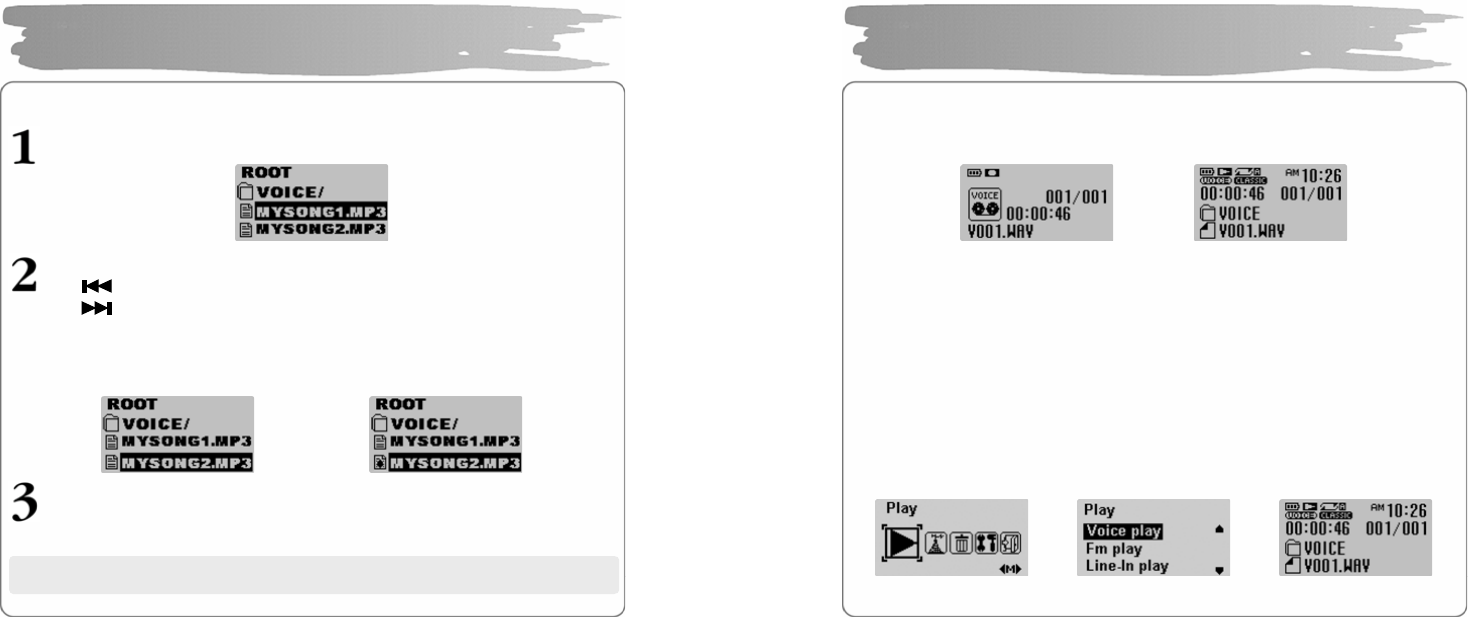
Recording Voice
During the playback or in the pause status , press and hold REC to record voice.
Press it again to stop recording.
Press PLAY to listen to the voice file you have just recorded.
▪It will be recorded in an order of V001, V002, … and saved in the VOICE
folder as WAV file after its recording.
▪Voice recording will not work if it is in the FM RADIO mode or if the line-In
cable is not connected.
▪Voice recording will automatically stop if the memory is full.
Listening to Voice Recording File
In the PLAY menu, select the VOICE PLAY using the VOL+/- button and press
PLAY to play back the voice recording file.
Voice Recording/Listening
Î
Î Î
38
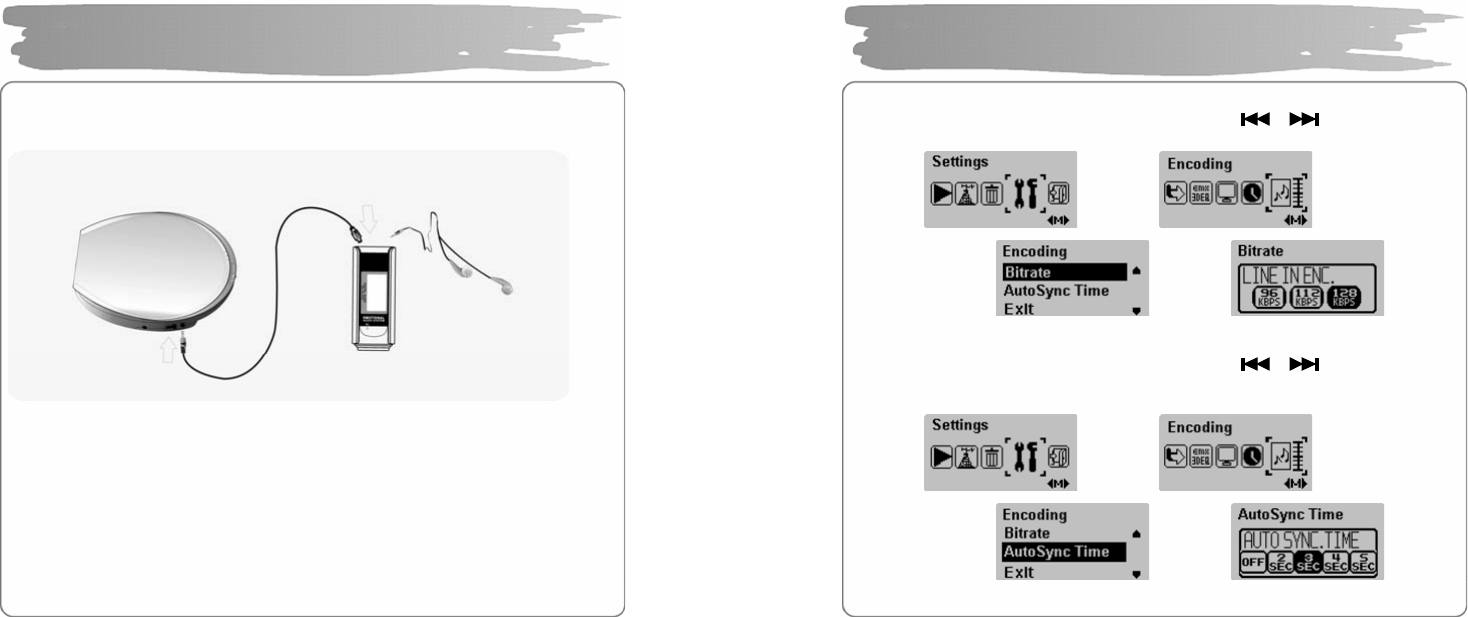
One jack of the line-i n shall be connected to the output port of an external acoustic
unit, a nd the other jack(USB port) to the USB line-in port of the
player.
▪Do not listen to FM during the recording from an external device since it
may cause a noise.
▪If you want to record from a home audio device, our line-in cable may not
work, and you need to separately purchase a line-in cable.
▪Encoding may not be performed if the line-In cable has not been
connected.
▪Encoding after setting the volume of an external audio device properly.
Too high or low volume may deteriorate the encoding sound quality.
MP3 Encoding/Listening
39
Bit Rate Setting
In the MENU mode, use the MENU b utton and button to select
SETTINGS → ENCODING → BITRATE and se lect one of 96/112/128kbps.
Auto Sync. Setting
In the MENU mode, use the MENU b utton and button to select
SETTINGS → ENCODING → AUTOSYNC TIME and select one of OFF/2/3/4/5
SEC.
MP3 Encoding/Listening
Î
Î Î
Î
Î Î
40
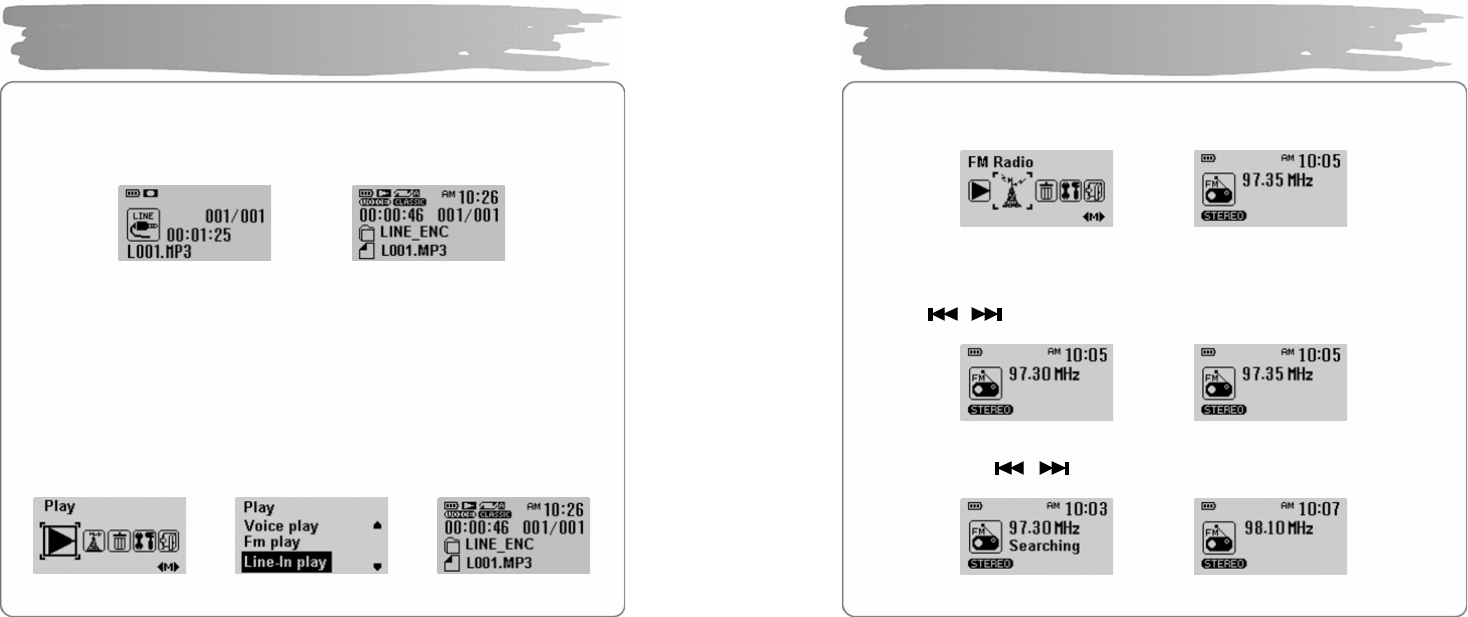
Encoding
When the music for encoding is played back from an external device, press and
hold the REC button on the part of the player to start encoding.
Press and hold it again to stop encoding.
▪It will be recorded in an order of L001, L002, L003,… and saved in the
folder of L INE_ENC as MP3 file after its recording.
▪Encoding stops if you disconnect the line-in cable.
▪Encoding may not work if there isn’t sufficient in the battery gauge.
Listening to Encoded Music File
In the PLAY menu, use the VOL+/- button to select LINE-IN PLAY and then press
the PLAY button to play back encoded files.
MP3 Encoding/Listening
Î
Î Î
41
In the MENU mode, select FM RADIO menu and press the MENU button to move
to FM RADIO mode.
▪MONO/STEREO will be automatically selected.
Manual Tune In
Press the butto n short to increase/decrease the frequency.
Auto Tune In
Press and hold the butto n to tune in the frequency recei ved.
Listening to FM Radio
Î
Î
Î
42
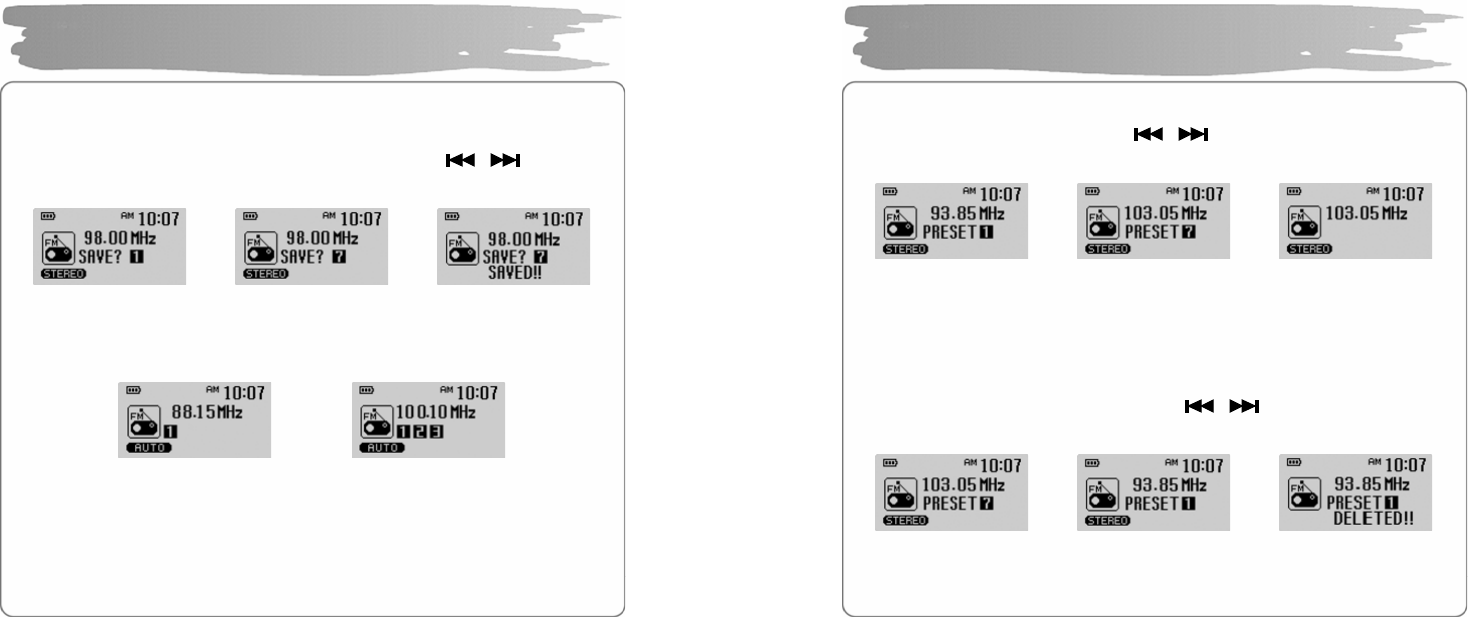
Manually Save Frequency
After finding the frequency you wa nt, press and hold the MENU button to display
the freq ue nc y sa vi ng screen .
Select the freq uency saving number you want using the button and
press the MENU butto n.
Automatically Save Frequency
Press and hold the EQ butto n to sa ve the frequency that is recei ved f rom the first.
▪Up to 20 frequency can be saved.
▪The broadcasting status may not be smooth in the weak current area with
weak reception sensitivity.
▪Ear phone ring works as a FM radio antenna. Make sure to connect the
earphone to the earphone jack when searching for the frequency.
Listening to FM Radio
Î Î
Î
43
Search for Saved Frequency(PRESET mode)
Press the PLAY butto n to display the PRESET sc reen.
Move to the frequenc y you want using butto n.
Press it again to hide the PRESET screen.
▪PRESET MODE : it saves the frequencies in advance so that yo u don’t have to
search for frequency whenever you listen to FM radio.
▪If there is no freq uency saved, “NO PRESET NUMBER!” will be displayed.
Delete Saved Frequency One by One
In the PRESET mode, press and hold the button to search for the
frequency to de lete, a nd then press and ho ld the MENU b utton.
Listening to FM Radio
Î Î
Î Î
44
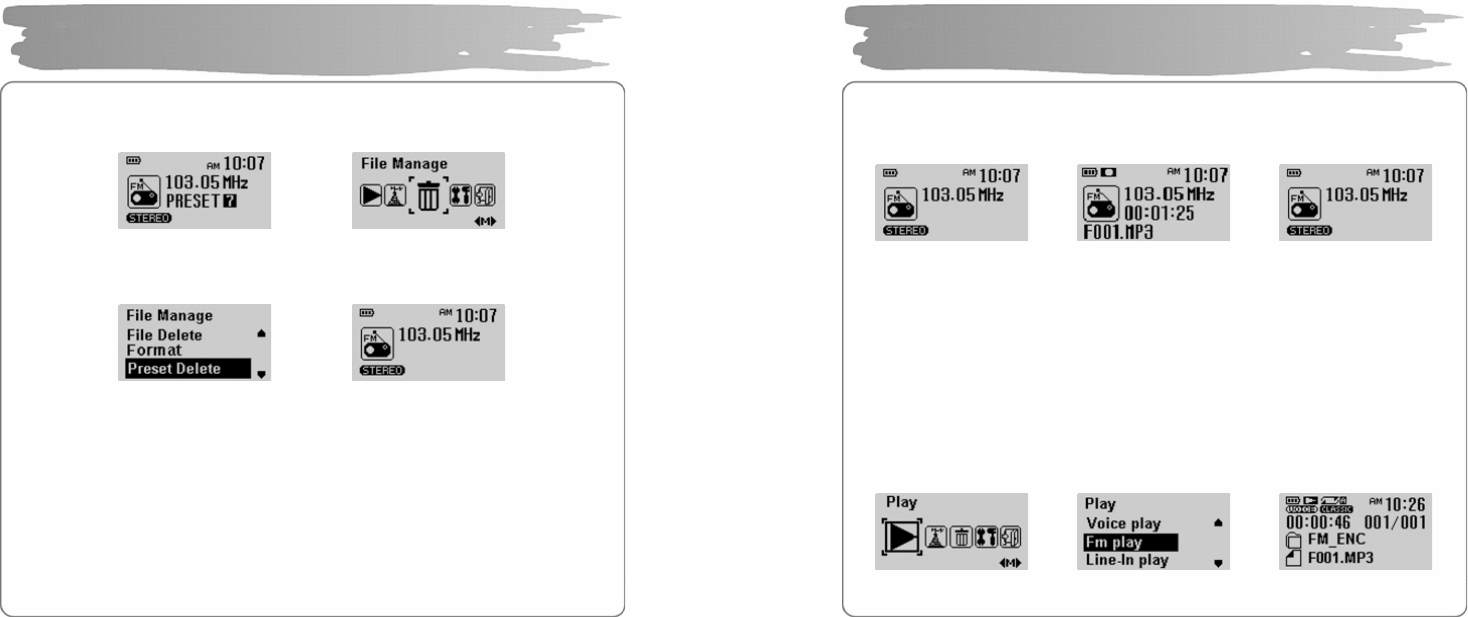
Deleting All Saved Frequencies
In the MENU mode, select F ILE MANAGE and p ress the MENU button.
Use the VOL+/- butto n to select the PRESET DELETE, and then press the MENU
button again to delete all the freque ncies saved.
▪If all freque ncies saved are deleted, a nd when you press the PLAY button,
“NO PRESET NUMBER!” is displayed , not moved to the PRESET mode.
Listening to FM Radio
Î
Î
45
Recording FM Radio
During the FM receiving, press and hold the REC button to start FM radio
broadcasting.
Press the REC button again to stop FM radio recording.
▪It will be recorded in the order of F001, F002, F003,… and saved in the
folder of FM_ENC as MP3 file after its recording.
▪Encoding may not work if there isn’t sufficient in the battery gauge.
Listening to Recorded FM Radio Broadcasting
In the PLAY menu, use the VOL+/-button to se lect FM PLAY, and then press the
PLAY button to play back the recorded FM radio broadcasting.
Recording/Playback FM Radio
Î Î
Î Î
46
Press the MENU button sho rt to move to t he MENU mode.
Press the button to move MENU item and press the MENU button
short to select the menu you want.
Press and hold MENU button again to release MENU mode.
▪Play : Select the MUSIC playback mode
▪FM Radio : Listen to FM radio
▪File Manage : Use such functions, as deleting or formatting a file, or
deleting the preset
▪Settings : Set the detailed settings
▪Exit : Exit the menu
Menu Setting
47
In the MENU mode, select the PLAY menu
Music File Playback
Plays back all the music files in the memory.
Easily searches for an d plays back a file or a fo lder.
Plays back bookmarked files alone.
Plays back voice-recording file alone.
Plays back only the files in which FM radio
broadcasting is recorded.
Plays back files encoded fro m an external device.
48
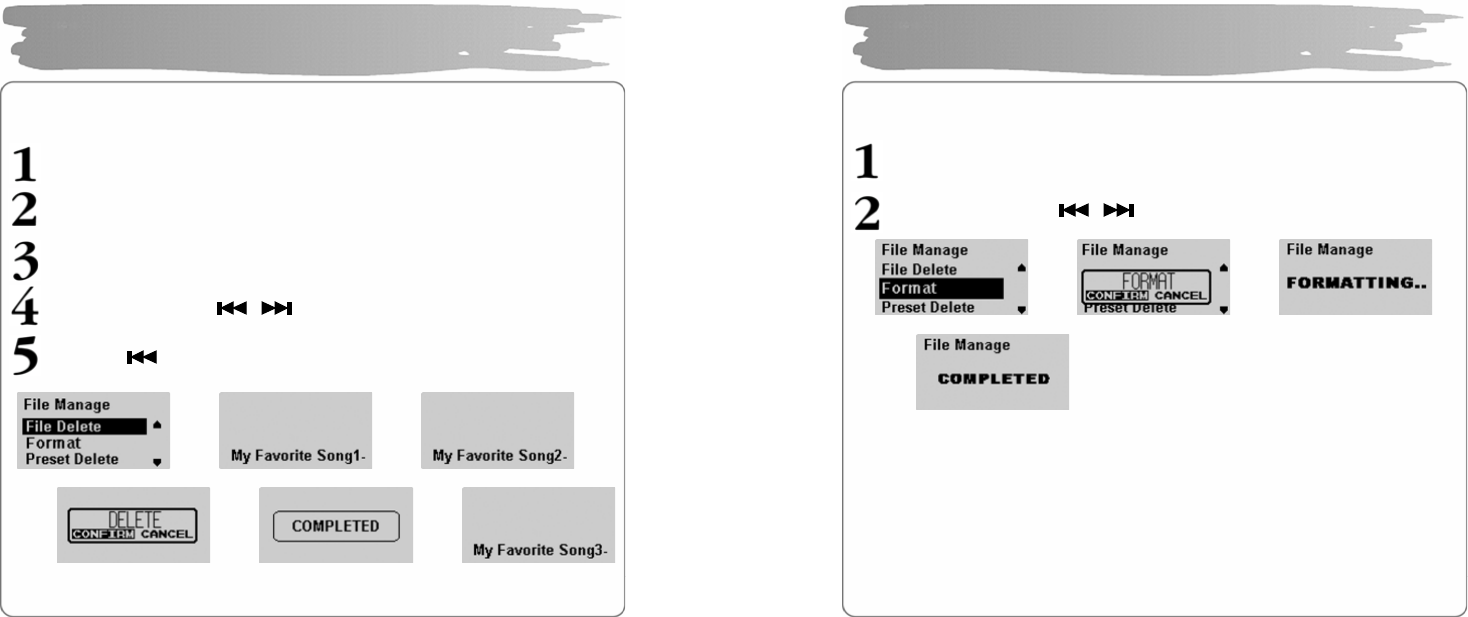
Deleting File
In the File Manage menu, select File Delete and press the MENU button.
Use the VOL+/- button to select the file to delete.
Press the MENU butto n.
Select CONFIR M with button a nd the n press the MENU b utton.
Press the button to mo ve to the FILE MANAGE menu.
Managing File
Î Î
Î Î Î
49
Formatting
In the File Manage menu, select the Format and press the MENU button.
Select CONFIR M with button and press the MENU button.
▪Be careful since formatting will delete all files.
▪If you format in the menu, it may take long to complete.
Managing File
Î Î
Î
50
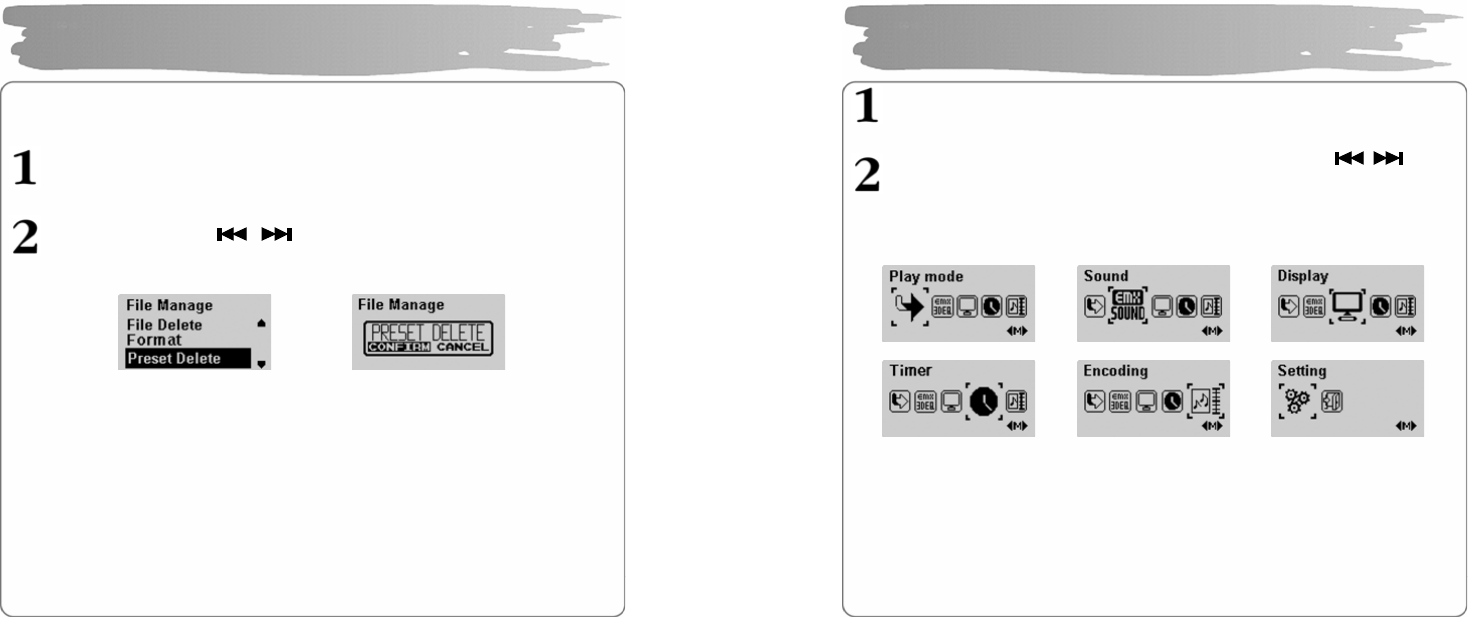
Deleting Saved FM Radio Frequency
In the File Manage menu, select Preset Delete, and then press the MENU
button.
Select CONFIR M with button, and press the MENU button.
Managing File
Î
51
In the MENU mode, select the Setti ngs.
Select the detailed menu tha t you want to move using the button
and then press the MENU button.
▪Press the VOL+ button to move to an upper menu.
Detailed Menu Setting
52
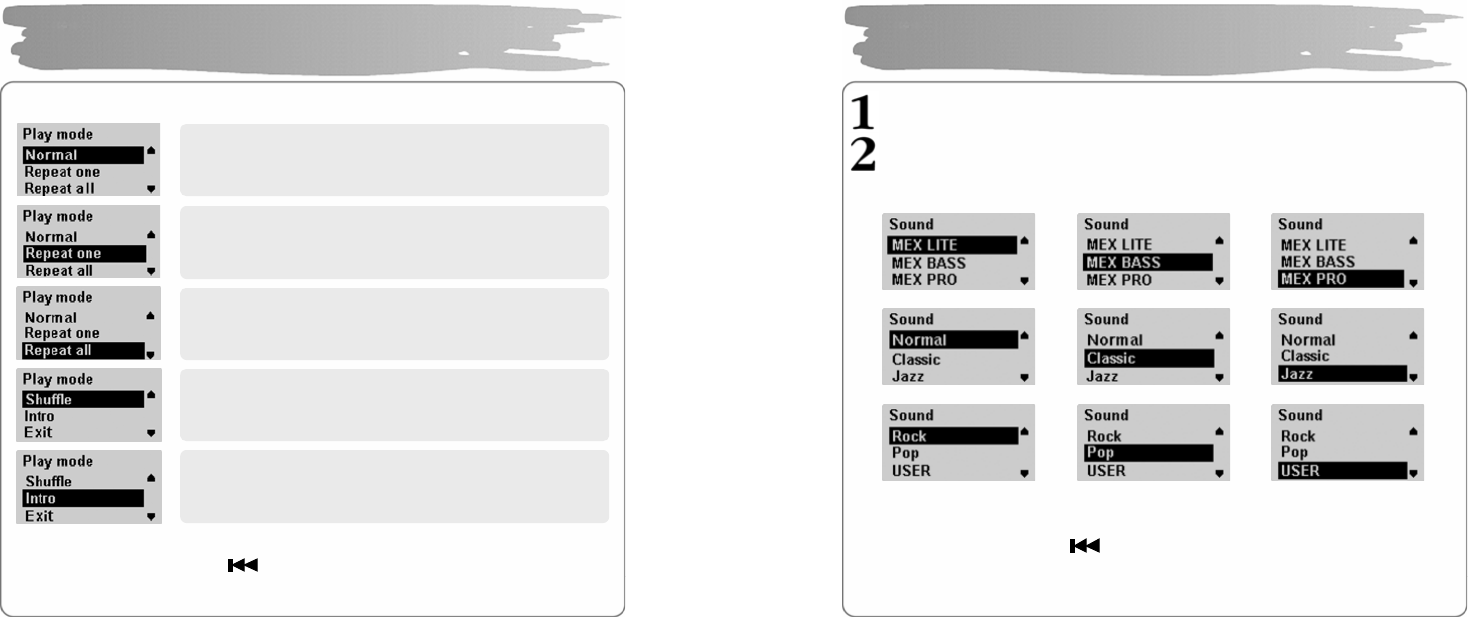
Select the Play Mode in the Settings.
▪Select Exit or press the button to move to an upper menu.
Playback Mode Setting
Plays back all the songs in order only once
Plays back only selected songs re peatedly.
Plays back all the songs repeatedly in order.
Ran domly plays back a ll the songs in the memory
repeatedly
Plays all the songs in the memory for 10 seconds
from the beginning in order, and moves to the next
song.
53
In the SE TTINGS me nu, select SOUND.
Select the sound mode you want with the VOL+/- button, and then press the
MENU button.
▪Select Exit or press the button to move to an upper menu.
Sound Setting
54
◎ A user can adjust up to 8 levels for eac h frequency dependi ng on its 5 areas.
◎ MEX is a term referring to 3 dimension s tereo sound effect developed at
EMERSIS, consisting of detailed functions such as L ITE, BASS and PRO.
► LITE : gives a light and wide stereo image.
► BASS : gives a profound sound with reinforcement of low so und range.
► PRO : gives a rich and stable low sound range of feeling with stable and
wide stereo images.
▪Select a proper volume since the sound will be louder at MEX.
▪It can be supported only if sampling frequency refers to 32Khz, 44.1Khz, 48Khz.
▪The function of MAX is not set for the voice-recording WAV file.
Sound Setting
Use button to move horizontally and
–VOL, VOL+ butto n to move vertically.
55
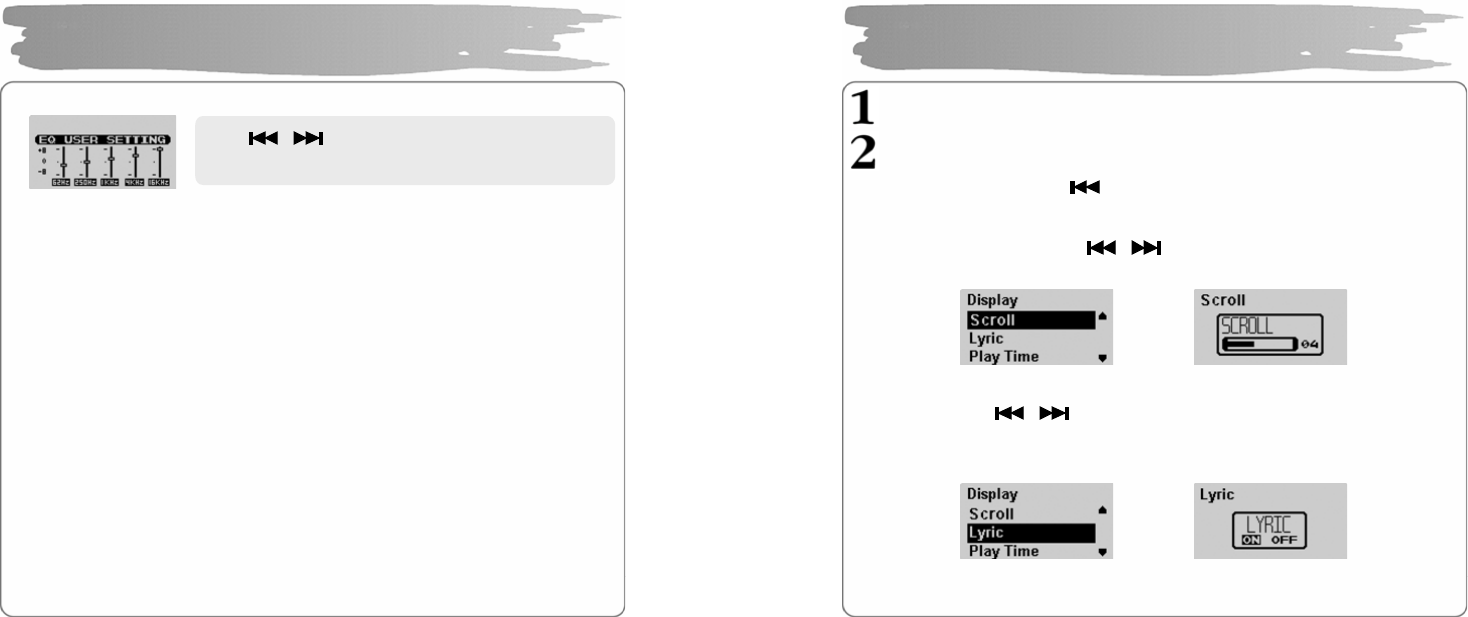
Select the DISP LAY i n the SETTINGS.
Select the detai led setting with VOL+/- button and press the MENU b utton.
▪Select Exit or press the button to move to upper menu.
Adjusting Scroll Speed
Select the scroll speed with the button. Scroll speed at which song title
flows ca n be se t from 0 to 10.
Lyrics Support Setting
Select On, Off with button.
ON : displays the lyrics of a song in 3 lines when music is played back.
OFF: does not display the screen even if lyrics are saved.
▪Refer to 3.8 Using LDB Manager to save lyrics in a music file.
Display Setting
Î
Î
56
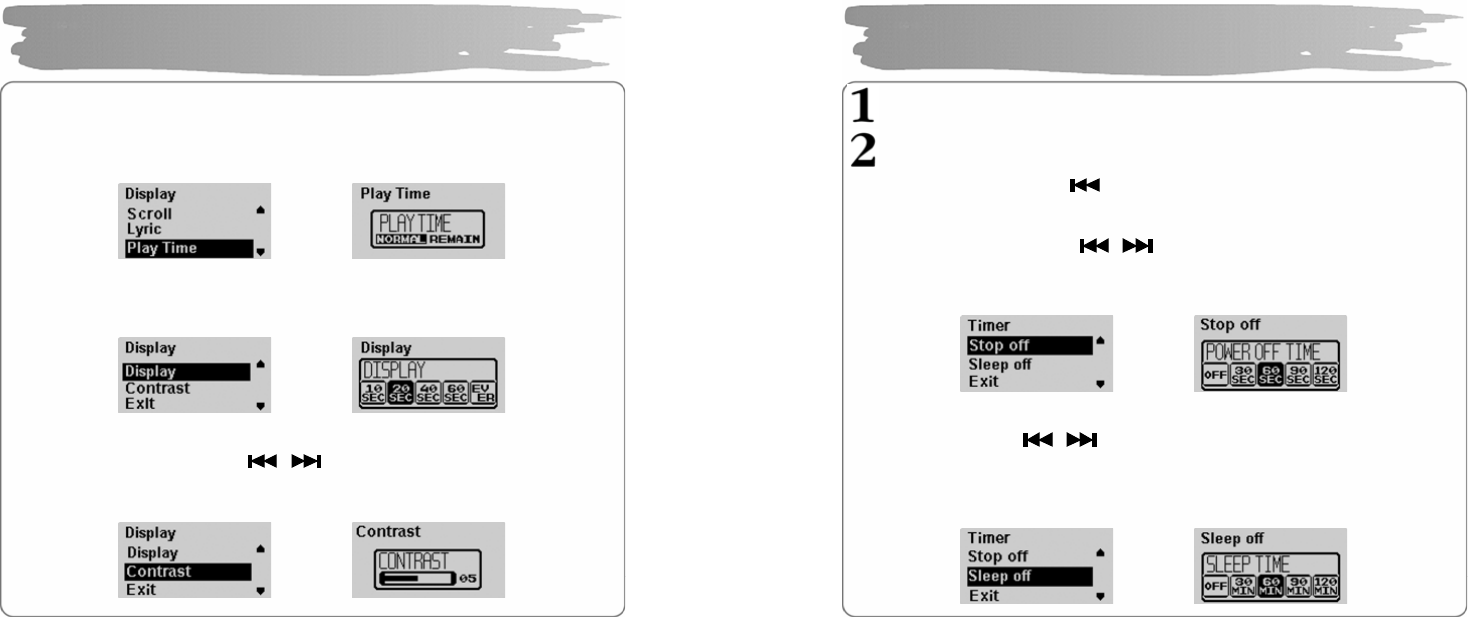
Play Time Setting
Set the time that there appears on the display with the VOL+/- button.
NORMAL TIME : di splays the current playback time.
REMAIN TIME : displays t he remaining playback time.
Display-out Time Setting
Sets the time when the display is automatically turned off a fter the last time yo u
push a b utton.
Adjusting Contrast
Set the display contrast with the button.
The contrast ca n be set from 0 to 10.
The bigger the number, the brighter the display.
Display Setting
Î
Î
Î
57
Select Timer in the Settings.
Select the detailed items with VOL+/- button and then press the MENU button.
▪Select Exit or press the button to move to upper menu.
Power-Off Time Setting
Set the power-off time with t he butto n.
30, 60, 90, 120 seconds are available. But for a separate pushing of butto n after it
have stopped, the power will automatically turn off after the time you set.
▪If you set it to OFF, power will not automatically turn off.
Sleep Time Setting
Set the sleep time with button.
30, 60, 90, 120 seconds are available. But for a separate pushing of button after it
have stopped, the power will automatically turn off after the time you set.
▪If you set it to OFF, the power will not automatically turn off.
Timer Setting
Î
Î
58
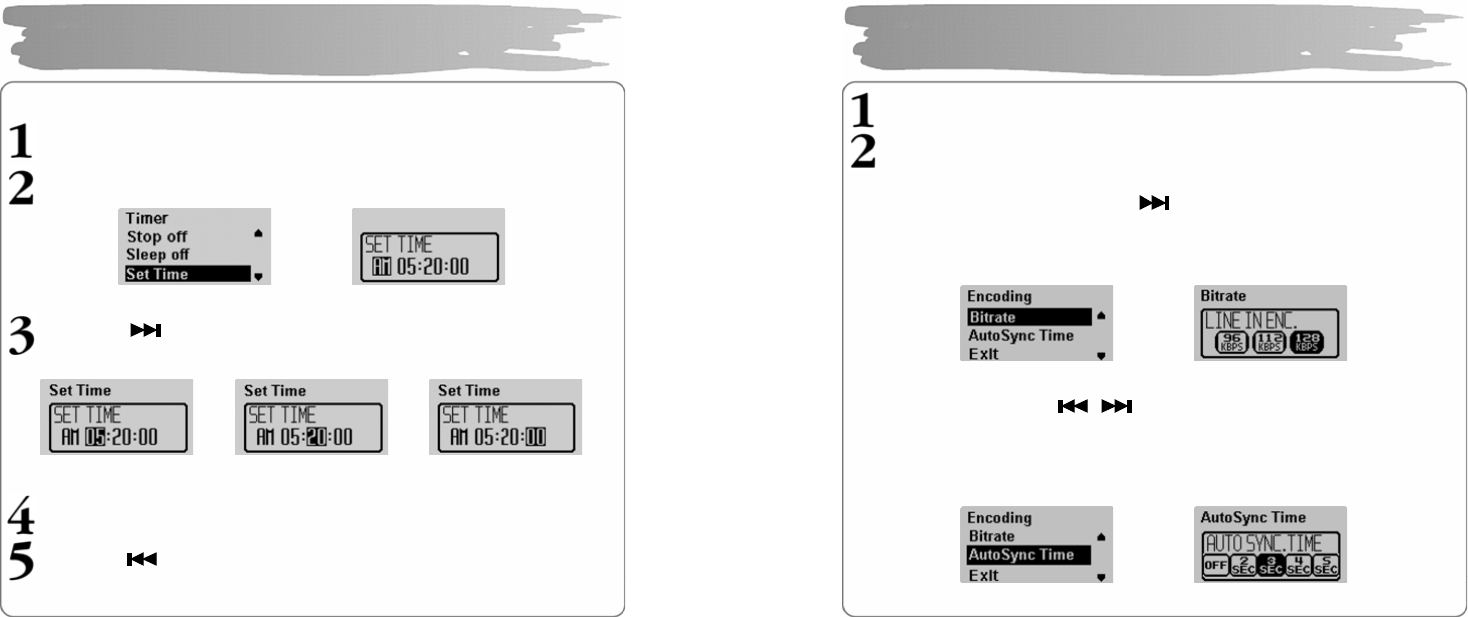
Current Time Setting
Press the MENU butto n to display the time setting screen.
Set the AM/PM usi ng V OL+/- button.
Press the butto n to move to the ti me yo u want and set the hour /
mi nutes / seconds with VOL+/- button.
Press the MENU butto n to co mplete time se tting.
Press the button to move to an upper menu.
Timer Setting
Î
59
In the Settings, select the Encoding.
Select the detailed setting with VOL+/- button and press the MENU button.
Bit Rate Setting
Set the encoding bit rate you want with button.
If you set the bit rate low, it can be recorded for a longer time while the sound
quality will be deteriorated. If you set it high, the sound quality will get better while
the recording time wil l be sho rtened.
Auto Sync Time Setting
Set the AutoSync Time with b utton.
AutoSync is a functio n to separate and save a MP3 file if the re is no sound during
the time set i n MP3 e ncoding .
If you set it to OFF, e ncoding will not stop even if there is no sound between songs
recorded in MP3 encoding, but it is saved as one file.
Encoding Setting
Î
Î
60
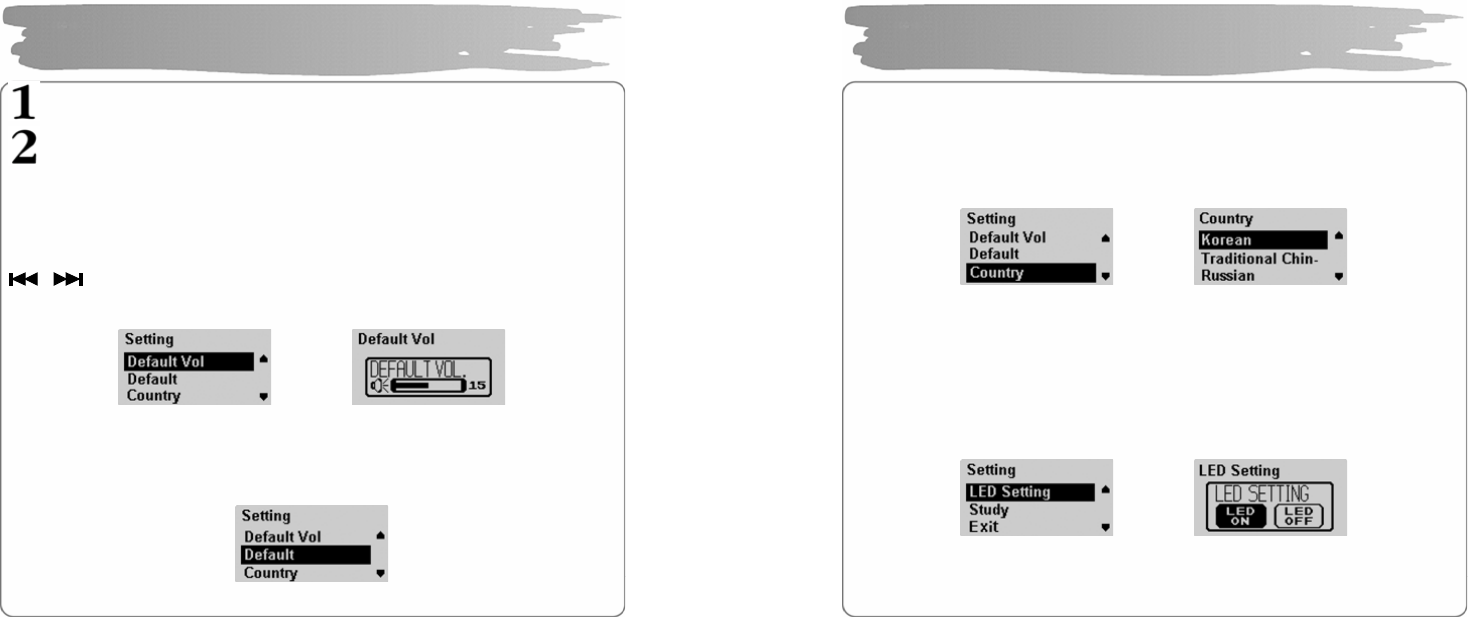
In the Settings, select the Mode Setting.
Select the detailed item with V OL+/- button and then press the MENU button.
DEFAULT VOLUME Setting
This function is to set the vo lume for the ti me when the power is turned on.
When you turn on, the volume value saved whe n you turned off last is higher tha n
the default volume, it will be the default vo lume. If it is lower than the default volume,
the volume saved when you turn off is set to default volume. Set proper volume with
button.
The default vo lume can be set from 0 to 30.
DEFAULT Value Setting
If it’s selected, all the settings concerning the volume and the play mode are
initialized to the default of the player.
Setting
Î
61
Country Setting
Set a la nguage of an applicable country.
Select a language you want with VOL+/- b utton.
If you set a language, the bandwidth of FM radio frequency of the applicable
country will be changed too.
LED Setting
Set LED so that it can continue to be turned on w hile the player is pla yed.
LED get turned on if you select LCD ON.
LED will flicker every 3 seco nds after LCD get turned off if you select LCD OFF.
▪If you set it to 0 second, STUDY function is not supported.
Setting
Î
Î
62
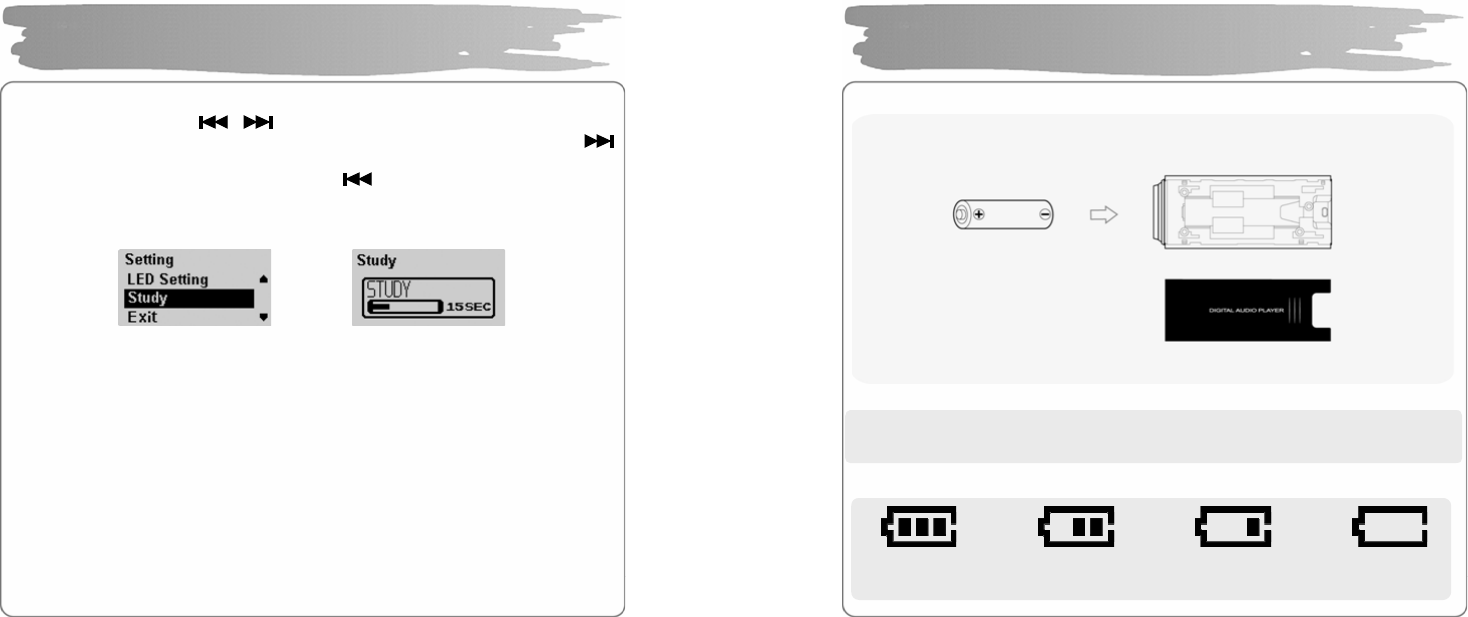
STUDY Function Setting
You can the time with the button.
15, 30, 45, 60 seconds are available. When the time is set and if you press t he
button during play, it will be played back from the time adding the time se t in the
current playback time. Whe n you press the button, it will be moved to the
ti me as much as the time se t in the current play b ack.
▪If you set it to 0 second, STUDY function is not supported.
Setting
Î
63
◎ How to Insert Battery
!N OTE: Make sure the polarity (+ and -) of the battery is correctly inserted.
◎ Battery Gauge
Full Gauge
Mid Gauge
Low Gauge
Zero Ga uge
About Battery

64
◎ If you use the func tion of hold, you can preve nt a mal-function by a button while
the player is pla yed d uring player opera tion, including an unnecessary
consumption of built-in battery.
To Set to HOLD Status
Push the HOLD switch on the side of the player at the direction of the arrow (HOLD).
The player is locked off with displayed shown after the display shows “HOLD”.
To Release Hold Status
Move the HOLD switch to the direction opposite to the arrow.
The hold status is released as there disappears on the DISPLAY.
HOLD Setting Method
65
◎ If you think the player fails, check the fo llowings:
Power may be not turned on.
•Check if the battery is properly inserted with correct polarity.
•Battery may be dead. Replace the battery.
•Check whether the HOLD switch of the player is set at ON.
(Set it to the direction opposite to the arrow(OFF) if it is set at ON.)
Unrecognizable characters may be shown in the display.
•Check if the language is properly set in the LANGUAGE menu.
•Since the ID3 Tag of a song may be incorrect, you should fix it using such an
audio player program as Winamp.
Radio station makes such a noise as “boooo~” or “Ssaaaa~”, or
its reception is bad.
•Change the direction of the Player and its earphone.
Please turn the power of the electric appliances OFF near the Player.
If the noise is reduced, use the Player away from them.
•As an earphone plays a role as an antenna to the player when listening
to the radio station, no earphone may cause a poor reception.
Troubleshooting

66
No sound or noise is heard during the playback.
•Check if the music file is stored in the memory.
•Check if an earphone is properly plugged in.
Or check if its jack is contaminated by foreign substances.
•Check if the volume is set to “0”.
•Damaged data makes noise or breaks off the sound from the MP3 and
WMA files. Replace it with other file to check if the data has been
damaged.
Cannot download files.
•Check if the USB cable is properly connected between the Player and
PC.
•Check if the USB driver is properly installed.
•Check if the memory is sufficient.
Buttons has been locked down.
•Check if the player is set at HOLD.
!NOTE: if the player stops due to an unexpected problem or the “End”
button does not operate at all, press “MENU” and “REC” at the
same time to turn off the player. Then, set the clock again.
Troubleshooting
67
Memory In-built memory 256MB / 512MB / 1GB / 2GB
DISPLAY 128x64 OLED Two Color ( Blue, Yellow)
MP3 Encoding MPEG 1/2/2.5 La yer3, WMA, ASF(Audio only),
OGG Q9
Compatible File Format 8 Kbps ~ 320 Kbps (WMA/ASF: 32 ~ 192 Kbps)
Frequency 20 Hz ~ 20 KHz
Headphone
Output 6 mW + 6 mW (16 ohm)
Audio
S/N Ratio > 90 dB
FM Frequency 87.5 MHz ~ 108 MHz
76.0MHz ~ 108MHz(JAPAN)
Headphone
Output 6 mW + 6 mW (16 ohm)
S/N Ratio > 65 dB
FM
Radio
Antenna Earphone Antenna
Language Multi-Language
USB USB 2.0 (High speed)
Maximum Playback Time Approx.17 hours (Company standard)
Distortion Rate < 0.1%
Size 28.0(¢) x 70.0(H) mm
Battery AAA size x 1
Weight 24g (W/O Battery)
* The specification and exterior of the product are subject to change
without a prior notice for further improvements of the player.
Specifications

68
Visit our website to c heck the latest piece of information, getting updated on a new
version of software for the player.
Website: www.ezmax.co.kr / www.ezoliver.com
Address: # 504, 5th Floor, Hanlim Human Power, 1-40, Ge umjeong-dong,
Gunpo-si, Gyeonggi-do, Korea.
Tel: +82-31-479-7180
Fax : +82-31-479-7188
e-mail : webmaster@ezmax.co.kr
!N OTE: If you want to receive A/S, visit our company i n perso n. You may send the
player by registered mail or by a delivery service). But, please note that
home delivery service is not available.
Service A/S
69
Warranty
We certify as fo llows:
1. This produc t has passed a strict quality control and inspection procedure.
2. You can receive free A/S’s for 1 year after the date of purchase of this
product(even if it is within a wa rranty period, we may charge for repairing
items that are not included i n free services.).
3. This warranty is valid in Korea alone.
4. Enclose this warranty whe n you request for a repair service.
5. Keep this warranty since it is not re-issued.
6. Contact the place where you purchased this product for any service, if a
failure has occurred.
Product Name
Model Name
Date of Purchase D/M/Y Warra nty Period Year
Place of Purchase Amount
Confirmatio n by Seller Won
Te l e p ho n e
Address
Name
Customer
TE L
Make sure to fill o ut the form w hen yo u purc hase this prod uct.
FCC Compliance Statements
Note: This equipment has been tested and found to comply with the limits for a
Class B digital device, pursuant to part 15 of the FCC Rules. These limits are
designed to provide reasonable protection against harmful interference in a
residential installation. This equipment generates, uses and can radiate radio
frequency energy and, if not installed and used in accordance with the
instructions, may cause harmful interference to radio communications.
However, there is no guarantee that interference will not occur in a particular
installation. If this equipment does cause harmful interference to radio or
television reception, which can be determined by turning the equipment off and
on, the user is encouraged to try to correct the interference by one or more of
the following measures:
• Reorient or relocate the receiving antenna
• Increase the separation between the equipment and receiver.
• Connect the equipment into an outlet on a circuit different from that to
which the receiver is connected.
• Consult the dealer or an experienced radio / TV technician for help.
Warning : Your are cautioned that any change or modifications to the equipment not
expressly approved by the party responsible for compliance could void your authority
to operate such equipment.