Eastech Electronics AND5061TAR DVD /CD Player w/AV Receiver (Wireless Sub Woofer) User Manual E61TAUD ENSP qx33
Eastech Electronics (Taiwan) Inc. DVD /CD Player w/AV Receiver (Wireless Sub Woofer) E61TAUD ENSP qx33
USERS MANUAL

•
BUS
cables
8 Pin: (WX1X6000-007) and
10 Pin: (WX1X6000-006)
• Foot x 2
(1VM421328)
•
Stand x 2
(Silver:
1VM422542
)
(Black:
1VM422733
)
• FM wire
antenna
(
WX1E9000-081)
• AM loop
antenna
(
UANTAMALH002)
Precautions
Functions
SetupAV ReceiverInformation
Owner’s Manual
Please read before using this system.
DVD/CD Player with AV Receiver
HT6051F / HT6051FB
INSTRUCCIONES EN
ESPAÑOL INCLUIDAS.
If you need additional operating assistance after
reading this owner’s manual, please call
TOLL FREE : 1-800-968-3429
or visit our web site at
http://www.SylvaniaConsumerElectronics.com
Table of Contents
•
Remote control with
two AA batteries
(Silver: NB140UD)
(Black: NB144UD)
• Audio/Video cables
(WPZ0102TM015/
WPZ0102LTE01/
WPZ0102CAB01)
• Owner’s Manual
(1VMN21407)
• AV Receiver
(Silver: X6000UD)
(Black: X6003UD)
• Speaker Unit
(Silver: USPUSPKHYE07)
(Black: USPUSPKHYE09)
Supplied Accessory
Owner's Manual
POWER
ROCK
POPS
CLASSIC
JAZZ
BASS
BOOST
VOLUME
Precautions
Laser Safety. . . . . . . . . . . . . . . . . . . . . . . . . . . . . . . . . . . . . . . . 2
■ IMPORTANT SAFEGUARDS . . . . . . . . . . . . . . . . . . . . . . . . . . . 3
Avoid the Hazards of Electrical Shock and Fire. . . . . . . . . . . . . . 4
Moisture Condensation Warning . . . . . . . . . . . . . . . . . . . . . . . . . 4
Installation Location . . . . . . . . . . . . . . . . . . . . . . . . . . . . . . . . . . 4
About Copyright . . . . . . . . . . . . . . . . . . . . . . . . . . . . . . . . . . . . . 4
Notice for Progressive Scan Outputs . . . . . . . . . . . . . . . . . . . . . 4
Symbols Used in This Manual . . . . . . . . . . . . . . . . . . . . . . . . . . 4
Maintenance . . . . . . . . . . . . . . . . . . . . . . . . . . . . . . . . . . . . . . . 4
■ About the Discs . . . . . . . . . . . . . . . . . . . . . . . . . . . . . . . . . . . . 5
Playable Discs . . . . . . . . . . . . . . . . . . . . . . . . . . . . . . . . . . . . . . 5
Unplayable Discs . . . . . . . . . . . . . . . . . . . . . . . . . . . . . . . . . . . . 5
Setup
■ Functional Overview. . . . . . . . . . . . . . . . . . . . . . . . . . . . . . . . . 6
Front / Rear Panel Controls . . . . . . . . . . . . . . . . . . . . . . . . . . . . 6
Setting the DVD/CD Player (the AV Receiver). . . . . . . . . . . . . . . 7
Speaker Setup . . . . . . . . . . . . . . . . . . . . . . . . . . . . . . . . . . . . . . 7
■ About the Remote Control . . . . . . . . . . . . . . . . . . . . . . . . . . . . 7
Installing the Batteries for the Remote Control . . . . . . . . . . . . . . 7
Remote Control Operation for the DVD/CD Player . . . . . . . . . . . 8
Remote Control Operation for the AV Receiver . . . . . . . . . . . . . . 8
■ Connections . . . . . . . . . . . . . . . . . . . . . . . . . . . . . . . . . . . . . . . 9
Connection to the AV Receiver and the Speaker Unit . . . . . . . . . 9
Connection to a TV. . . . . . . . . . . . . . . . . . . . . . . . . . . . . . . . . . 10
RF Modulator Connection
(If Your TV Does Not Have A/V Input Jacks.) . . . . . . . . . . . . . . 11
Functions
■ Playback . . . . . . . . . . . . . . . . . . . . . . . . . . . . . . . . . . . . . . . . . 12
■ MP3/WMA Playback . . . . . . . . . . . . . . . . . . . . . . . . . . . . . . . . 13
■ Search Function . . . . . . . . . . . . . . . . . . . . . . . . . . . . . . . . . . . 13
Using Track Search . . . . . . . . . . . . . . . . . . . . . . . . . . . . . . . . . 13
Using Title / Chapter Search. . . . . . . . . . . . . . . . . . . . . . . . . . . 13
Using Time Search. . . . . . . . . . . . . . . . . . . . . . . . . . . . . . . . . . 13
■ On-Screen Display . . . . . . . . . . . . . . . . . . . . . . . . . . . . . . . . . 14
■ Marker Setup. . . . . . . . . . . . . . . . . . . . . . . . . . . . . . . . . . . . . . 14
■ Repeat / Random / Programmed Playback . . . . . . . . . . . . . . 15
Repeat Playback . . . . . . . . . . . . . . . . . . . . . . . . . . . . . . . . . . . 15
Random Playback . . . . . . . . . . . . . . . . . . . . . . . . . . . . . . . . . . 15
Programmed Playback . . . . . . . . . . . . . . . . . . . . . . . . . . . . . . . 15
■ Special Settings . . . . . . . . . . . . . . . . . . . . . . . . . . . . . . . . . . . 16
Subtitle Language . . . . . . . . . . . . . . . . . . . . . . . . . . . . . . . . . . 16
Audio Language. . . . . . . . . . . . . . . . . . . . . . . . . . . . . . . . . . . . 16
Camera Angles . . . . . . . . . . . . . . . . . . . . . . . . . . . . . . . . . . . . 16
Black Level Setting. . . . . . . . . . . . . . . . . . . . . . . . . . . . . . . . . . 16
Stereo Sound Mode . . . . . . . . . . . . . . . . . . . . . . . . . . . . . . . . . 16
Dolby Pro Logic II. . . . . . . . . . . . . . . . . . . . . . . . . . . . . . . . . . . 16
■ DVD Setup. . . . . . . . . . . . . . . . . . . . . . . . . . . . . . . . . . . . . . . . 17
SETUP Menu. . . . . . . . . . . . . . . . . . . . . . . . . . . . . . . . . . . . . . 17
LANGUAGE Setting . . . . . . . . . . . . . . . . . . . . . . . . . . . . . . . . . 18
DISPLAY Setting . . . . . . . . . . . . . . . . . . . . . . . . . . . . . . . . . . . 18
AUDIO Setting . . . . . . . . . . . . . . . . . . . . . . . . . . . . . . . . . . . . . 19
PARENTAL Setting . . . . . . . . . . . . . . . . . . . . . . . . . . . . . . . . . . 20
OTHERS Setting . . . . . . . . . . . . . . . . . . . . . . . . . . . . . . . . . . . 20
AV Receiver
■ AM/FM Radio. . . . . . . . . . . . . . . . . . . . . . . . . . . . . . . . . . . . . . 21
To Connect AM/FM Antenna. . . . . . . . . . . . . . . . . . . . . . . . . . . 21
Preset Radio Stations. . . . . . . . . . . . . . . . . . . . . . . . . . . . . . . . 21
Selecting Radio Stations . . . . . . . . . . . . . . . . . . . . . . . . . . . . . 21
■ Sound Setting . . . . . . . . . . . . . . . . . . . . . . . . . . . . . . . . . . . . . 22
Digital Sound . . . . . . . . . . . . . . . . . . . . . . . . . . . . . . . . . . . . . . 22
Bass Boost. . . . . . . . . . . . . . . . . . . . . . . . . . . . . . . . . . . . . . . . 22
Surround Sound. . . . . . . . . . . . . . . . . . . . . . . . . . . . . . . . . . . . 22
Information
■ Specifications . . . . . . . . . . . . . . . . . . . . . . . . . . . . . . . . . . . . . 22
■ Troubleshooting Guide . . . . . . . . . . . . . . . . . . . . . . . . . . . . . . 23
■ Language Code List . . . . . . . . . . . . . . . . . . . . . . . . . . . . . . . . 24
■ Limited Warranty. . . . . . . . . . . . . . . . . . . . . . . . . . . . . . . . . . . 24
Español . . . . . . . . . . . . . . . . . . . . . . . . . . . . . . . . . . . . . . . . . .25
Quick Use Guide . . . . . . . . . . . . . . . . . . . . . . . . . . . . . . . . . .27
Español
E61TAUD_ENSP.qx33 2005.08.23 14:02 Page 1
–2–EN
Precautions
This unit employs a laser. Only a qualified service person should remove the cover or attempt to service this device, due to possible
eye injury.
CAUTION: USE OF CONTROLS OR ADJUSTMENTS OR PERFORMANCE OF PROCEDURES OTHER THAN THOSE SPECI-
FIED HEREIN MAY RESULT IN HAZARDOUS RADIATION EXPOSURE.
CAUTION: VISIBLE AND INVISIBLE LASER RADIATION WHEN OPEN AND INTERLOCK DEFEATED. DO NOT STARE INTO
BEAM.
LOCATION: INSIDE, NEAR THE DECK MECHANISM.
WARNING:TO REDUCE THE RISK OF FIRE OR ELECTRIC SHOCK, DO NOT EXPOSE THIS
APPLIANCE TO RAIN OR MOISTURE.
RADIO-TV INTERFERENCE
This equipment has been tested and found to comply with the limits for a Class B digital device, pursuant to Part
15 of the FCC Rules. These limits are designed to provide reasonable protection against harmful interference in
a residential installation. This equipment generates, uses, and can radiate radio frequency energy and, if not
installed and used in accordance with the instructions, may cause harmful interference to radio communications.
However, there is no guarantee that interference will not occur in a particular installation. If this equipment does
cause harmful interference to radio or television reception, which can be determined by turning the equipment off
and on, the user is encouraged to try to correct the interference by one or more of the following measures:
1) Reorient or relocate the receiving antenna.
2) Increase the separation between the equipment and receiver.
3) Connect the equipment into an outlet on a circuit different from that to which the receiver is connected.
4) Consult the dealer or an experienced radio/TV technician for help.
This Class B digital apparatus complies with Canadian ICES-003.
Cet appareil numérique de la classe B est conforme à la norme NMB-003 du Canada.
FCC WARNING- This equipment may generate or use radio frequency energy. Changes or modifications to
this equipment may cause harmful interference unless the modifications are expressly approved in the man-
ual. The user could lose the authority to operate this equipment if an unauthorized change or modification
is made.
CAUTION: TO PREVENT ELECTRIC SHOCK, MATCH WIDE BLADE OF PLUG TO WIDE SLOT, FULLY INSERT.
ATTENTION: POUR ÉVITER LES CHOC ÉLECTRIQUES, INTRODUIRE LA LAME LA PLUS LARGE DE LA
FICHE DANS LA BORNE CORRESPONDANTE DE LA PRISE ET POUSSER JUSQU’AU FOND.
A NOTE ABOUT RECYCLING
This product’s packaging materials are recyclable and can be reused. Please dispose of any materials in accordance with your
local recycling regulations.
Batteries should never be thrown away or incinerated but disposed of in accordance with your local regulations concerning
chemical wastes.
Precautions
Laser Safety
For Customer Use:
Read carefully the information located at the bottom of this unit and enter below the Serial No. Retain this information for
future reference.
Model No. _____________________
Serial No. _____________________
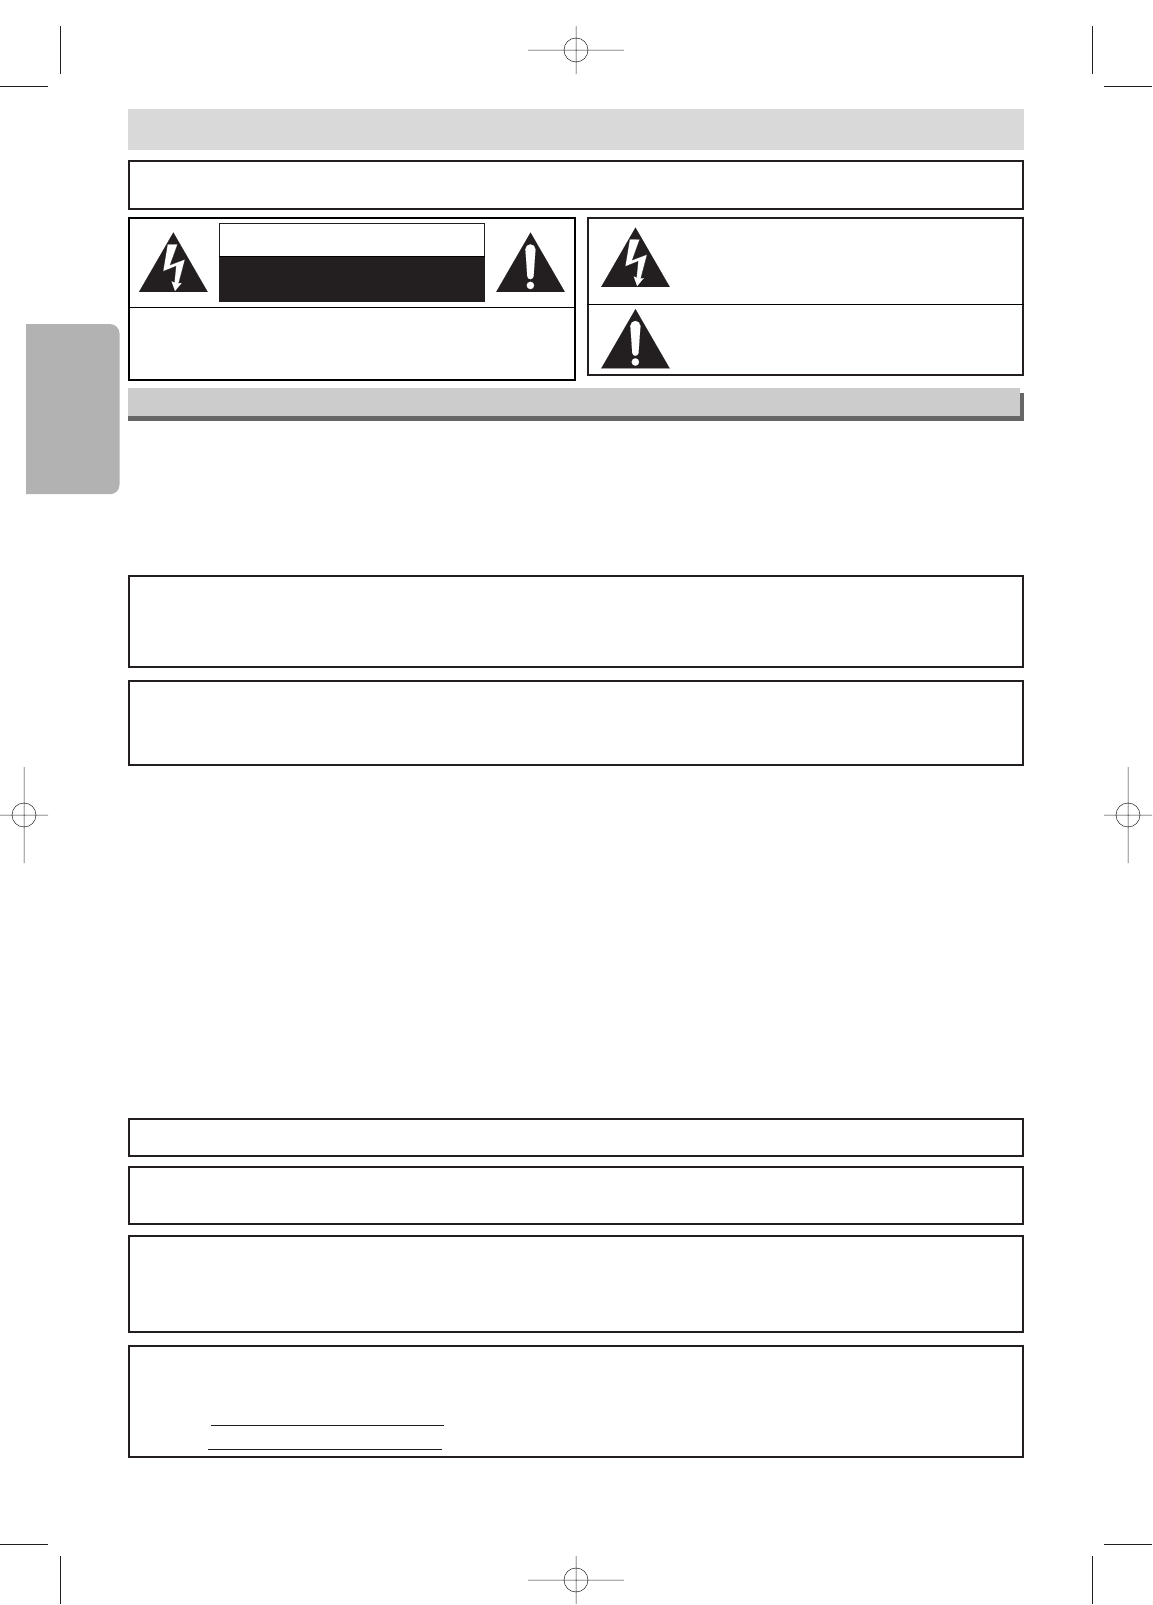
The lightning flash with arrowhead symbol, within an
equilateral triangle, is intended to alert the user to the
presence of uninsulated “dangerous voltage” within the
product’s enclosure that may be of sufficient magnitude
to constitute a risk of electric shock to persons.
The exclamation point within an equilateral triangle is
intended to alert the user to the presence of important
operating and maintenance (servicing) instructions in
the literature accompanying the appliance.
CAUTION:
TO REDUCE THE RISK OF ELECTRIC SHOCK, DO NOT REMOVE
COVER (OR BACK). NO USER SERVICEABLE PARTS INSIDE. REFER
SERVICING TO QUALIFIED SERVICE PERSONNEL.
CAUTION
RISK OF ELECTRIC SHOCK
DO NOT OPEN
RF Exposure Guidelines
The anntenna used for this transmitter must be installed to provide a separation distance of at least 20 cm from
all persons and must not be co-located or operating in conjunction with any other antenna or transmitter.
E61TAUD_ENSP.qx33 2005.08.23 14:02 Page 2
–4–EN
Precautions
Unauthorized copying, broadcasting, public performance
and lending of discs are prohibited.
This product incorporates copyright protection technology
that is protected by U.S. patents and other intellectual
property rights. Use of this copyright protection
technology must be authorized by Macrovision, and is
intended for home and other limited viewing uses only
unless otherwise authorized by Macrovision. Reverse
engineering or disassembly is prohibited.
The following symbols appear in some head-
ings in this manual.
:Description refers to playback of DVD-Video discs.
:Description refers to playback of Audio CDs.
:Description refers to playback of MP3 files.
:Description refers to playback of discs formatted
with WMA.
WMAWMA
WMA
MP3MP3
MP3
CDCD
CD
DVD-V
DVD-V
For safety and optimum performance of this unit:
• Do not place anything directly on top of the unit. Do
not place the unit directly on top of the TV.
• Shield it from direct sunlight and keep it away from
sources of intense heat. Avoid dusty or humid
places. Avoid places with insufficient ventilation for
proper heat dissipation. Avoid locations subject to
strong vibration or strong magnetic fields.
• Be sure to remove the disc and unplug the AC
power cord from the outlet before carrying the unit.
Installation Location
About Copyright
Symbols Used in This Manual
“WMA” (Windows Media Audio) is a new audio codec developed by Microsoft®in the United States of
America.
SERVICING
¡Please refer to relevant topics on the “Troubleshooting
Guide” on page 23 before returning the product.
¡If this unit becomes inoperative, do not try to correct
the problem by yourself. There are no user-service-
able parts inside. Turn off, unplug the power plug,
and please call our help line mentioned on the front
page to locate an Authorized Service Center.
CLEANING THE CABINET
¡Use a soft cloth slightly moistened with a mild deter-
gent solution. Do not use a solution containing alco-
hol, spirits, ammonia or abrasive.
CLEANING DISCS
¡When a disc becomes dirty, clean it with a cleaning
cloth. Wipe the disc from the center out. Do not wipe
in a circular motion.
¡Do not use solvents such as benzine, thinner, com-
mercially available cleaners, detergent, abrasive
cleaning agents or antistatic spray intended for ana-
log records.
CLEANING THE DISC LENS
¡
If this unit still does not perform properly although you refer
to the relevant sections and to “Troubleshooting Guide” in
this Owner’s Manual, the laser optical pickup unit may be
dirty. Consult your dealer or an Authorized Service Center
for inspection and cleaning of the laser optical pickup unit.
DISC HANDLING
¡When you handle a disc hold it by its edge and try not
to touch the surface of the disc.
¡Always store a disc in its protective case when it is
not used.
¡
If the disc’s peripheral edge is rough, rub it with pen or
pencil stem in order to fine the rough completely. If not,
the disc may not be inserted correctly, or the plastic frag-
ments may stick on the disc and cause skips of playback.
Maintenance
Consumers should note that not all high definition
television sets are fully compatible with this product and
may cause artifacts to be displayed in the picture. In case
of picture problems with 525 progressive scan output, it is
recommended that the user switch the connection to the
‘standard definition’ output. If there are questions
regarding your TV set compatibility with this 525p DVD
player, please contact our customer service center.
Notice for Progressive Scan Outputs
Avoid the Hazards of Electrical Shock and Fire
• Do not handle the power cord with wet hands.
• Do not pull on the power cord when disconnecting it
from AC wall outlet. Grasp it by the plug.
• If, by accident, water is spilled on this unit, unplug
the power cord immediately and take the unit to our
Authorized Service Center for servicing.
Moisture Condensation Warning
Moisture condensation may occur inside the unit
when it is moved from a cold place to a warm place,
or after heating a cold room or under conditions of
high humidity. Do not use this unit at least for 2 hours
until its inside gets dry.
Manufactured under license from Dolby Laboratories.
“Dolby”, “Pro Logic II” and the double-D symbol are trademarks of Dolby Laboratories.
Make your contribution to the environment!!!
• Used up batteries do not belong in the dust
bin.
• You can dispose of them at a collection
point for used up batteries or special waste.
Contact your council for details.
E61TAUD_ENSP.qx33 2005.08.23 14:02 Page 4
1VMN21407 / E61TAUD / E61TBUD ★★★★
✄
Printed in China
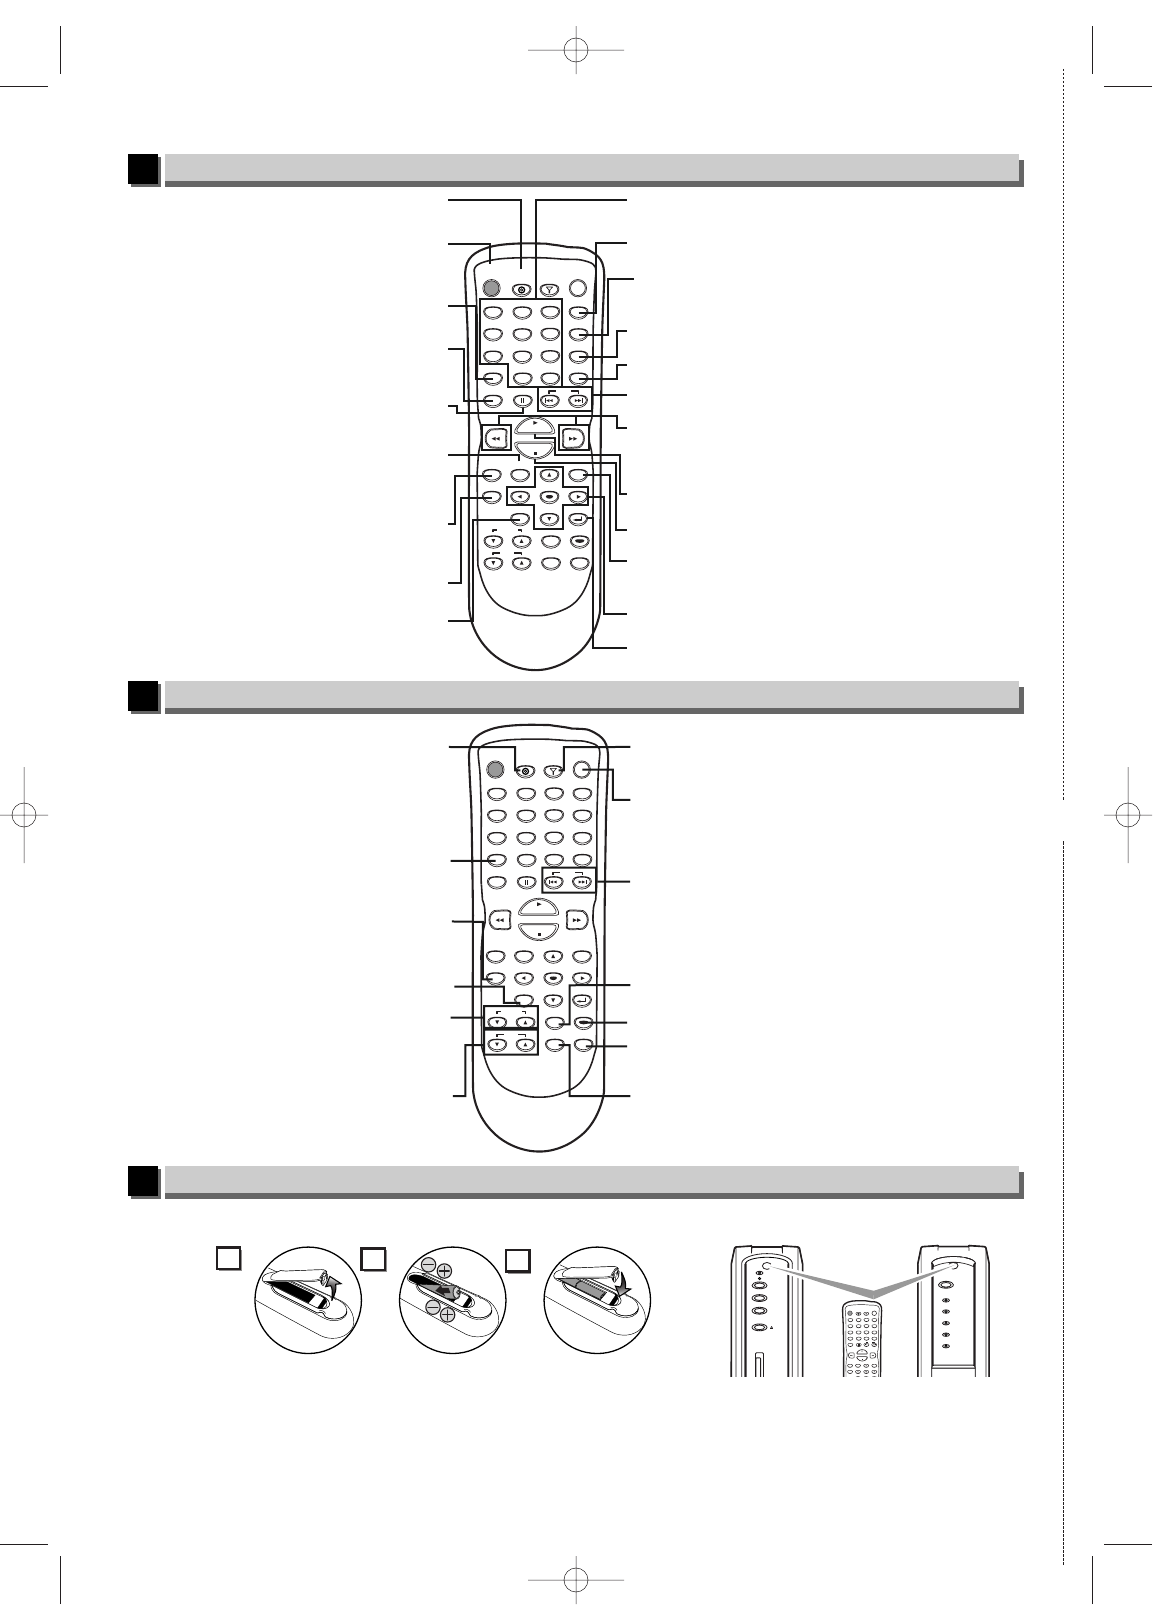
Remote Control operation for the DVD/CD Player
6
Remote Control operation for the AV Receiver
7
Installing the Batteries for the Remote Control
8
DISPLAY
AUDIO
SUBTITLE
ANGLE
DVD POWER
CLEAR
SEARCH
MODE
PAUSE
MODE
TOP MENU
REPEAT/BAND
MENU
ENTER
SETUP
RETURN
SKIP
AMP POWER
DVD TUNER
123
456
789
0+10
PLAY
STOP
SURROUNDBASS BOOST
MUTE SOUND
TUNING
VOL.
SKIP H / G buttons
To skip chapters (DVD) or tracks (CD/MP3/WMA).
ENTER / K / L / s / B buttons
To move the cursor and determine its position.
STOP C button
To stop playback.
FWD g / REV h buttons
To search forward / backward through a disc.
To begin slow forward / reverse playback
during the pause mode. (DVD)
DVD button
To activate the AV Receiver and
the remote control in DVD mode.
DISPLAY button
To display the current disc mode.
AUDIO button
To select audio languages on a disc. (DVD)
To select STEREO, L-ch or R-ch. (CD)
SUBTITLE button
To select subtitles on a disc. (DVD)
ANGLE button
To select camera angles on a disc. (DVD)
RETURN button
To return to the previous operation in menu.
MENU button
To call up the Menu on a disc. (DVD)
To call up the file list. (MP3/WMA)
SETUP button
To call up the DVD setup menu.
(DVD)
DVD POWER button
To turn the
DVD/CD Player
on or off.
To activate the AV Receiver and
the remote control in DVD mode.
CLEAR button
To clear the markers (DVD/CD) and numbers entered incorrectly.
To remove status number in program input. (CD/MP3/WMA)
PAUSE k button
To pause disc playback.
To advance playback one frame at a time. (DVD)
PLAY B button
To begin disc playback.
TOP MENU button
To call up the Top Menu on a disc. (DVD)
To return to the top file of the highest hierarchy
in the program and file list. (MP3/WMA)
NUMBER buttons
To select chapter or title directly. (DVD)
To select track directly. (CD/MP3/WMA)
SEARCH MODE button
To search chapter, title or time. (DVD)
To set or search the markers (DVD/CD) and time (CD).
To search track. (CD/MP3/WMA)
REPEAT/BAND button
To play a chapter or title repeatedly. (DVD)
To play a track or disc repeatedly. (CD)
To play a track, group or disc repeatedly. (MP3/WMA)
MODE button
To set rapid play off /x1.3 /x0.8 and black level on/off. (DVD)
To set
Dolby Pro Logic II on/off.
To arrange the playing order or play randomly. (CD/MP3/WMA)
DISPLAY
AUDIO
SUBTITLE
ANGLE
DVD POWER
CLEAR
SEARCH
MODE
PAUSE
MODE
TOP MENU
REPEAT/BAND
MENU
ENTER
SETUP
RETURN
SKIP
AMP POWER
DVD TUNER
123
456
789
0+10
PLAY
STOP
SURROUNDBASS BOOST
MUTE SOUND
TUNING
VOL.
TUNER button
To activate the AV Receiver and
the remote control in Tuner mode.
AMP POWER button
To turn the AV Receiver on or off.
BASS BOOST button
To turn BASS BOOST on or off.
SURROUND button
To turn SURROUND Sound on or off.
SOUND button
To select Digital Sound.
MUTE button
To mute the sound.
SKIP H / G buttons
To select preset radio stations.
To select preset number in
Preset Radio Stations.
DVD button
To activate the AV Receiver and
the remote control in DVD mode.
CLEAR button
To delete preset radio station
in Preset Radio Stations.
SETUP button
Press and hold to enter channel
preset mode for radio stations.
REPEAT/BAND button
To select FM or AM in Tuner mode.
TUNING buttons
To increase or decrease the frequency.
Hold 2 seconds to seek radio stations.
VOL. buttons
To adjust the volume.
Keep in mind the following when using the remote control:
• Make sure that there is no obstacle between the remote control and the remote sensor on the player (the receiver).
• The maximum operable ranges from the player (the receiver) are as follows.
- Beeline:approx. 23 feet (7m) - Either side of the center:approx. 16 feet (5m) within 30°
- Above:approx. 16 feet (5m) within 15° - Below:approx. 10 feet (3m) within 30°
2
13
PROGRESSIVE
POWER
C STOP
EJECT
B
PLAY
PROGRESSIVE
POWER
ROCK
POPS
CLASSIC
JAZZ
BASS
BOOST
DISPLAY
AUDIO
SUBTITLE
ANGLE
DVD POWER
CLEAR
SEARCH
MODE
PAUSE
MODE
TOP MENU
REPEAT/BAND
MENU
ENTER
SETUP
RETURN
SKIP
AMP POWER
DVD TUNER
123
456
789
0+10
PLAY
STOP
Install two AA batteries (supplied) matching the polarity indicated inside battery compartment of the remote control.
E61TAUD_ENSP.qx33 2005.08.23 14:03 Page 28