EasyN Technology EASYNCAM12V IP Camera User Manual
Shenzhen EasyN Technology Co.,Ltd IP Camera
User Manual

We never stop trying!
- 2 -
1 Welcome.........................................................................................................................................3
1.1 Features...............................................................................................................................3
1.2 Packing List.........................................................................................................................4
1.3 Product views......................................................................................................................5
1.3.1 Front view ................................................................................................................5
1.3.2 Rear panel ................................................................................................................5
1.4 PC System Requiements .....................................................................................................6
1.5 Hardware Instruction...........................................................................................................6
1.6 Software installation ...........................................................................................................6
2 Software operation.........................................................................................................................8
2.1 IP Camera Finder ................................................................................................................8
2.2 Camera Login in IE (LAN)...............................................................................................13
2.3 Camera Icon Functions .....................................................................................................16
2.4Setting Details....................................................................................................................17
2.4.1 Multi-Device Settings ............................................................................................18
2.4.2 Network Settings ..................................................................................................19
2.4.3Wireless LAN Settings ..........................................................................................20
2.4.4DDNS Service Settings...........................................................................................21
2.4.5 Mail and FTP Service.............................................................................................21
2.4.6Alarm Service Settings:...........................................................................................22
3 Mobile View.................................................................................................................................24
3.1 Smart phone Access ..........................................................................................................25
3.2 Java Phone Access ............................................................................................................27
3.3 3G mobile phone platform access.....................................................................................29
3.4 IPhone app for EasyN IP Camera......................................................................................32
3.4.1 Features..................................................................................................................32
3.4.2 Operations and functions demostration..................................................................32
4 How to view the camera in outside network................................................................................34
4.1 Using a router to access the Internet .................................................................................34
5.2 Static IP user......................................................................................................................36
5.3 How to use other DDNS ...................................................................................................37
5. Intelligent Video Alarm System..................................................................................................38
5.1Registration and Login.......................................................................................................39
5.2Add equipments .................................................................................................................40
5.3 Download and run Active X..............................................................................................41
5.4 Monitor video viewing......................................................................................................43
5.5Snapshoot at appointed time ..............................................................................................45
5.6 Alarm setting.....................................................................................................................46
5.6.1 Alarm time slot setting ...........................................................................................47
5.6.2snapshoot at appointed time ....................................................................................47
6 FAQ..............................................................................................................................................48
7 Warranty Card..............................................................................................................................51

We never stop trying!
- 3 -
1 Welcome
IP Camera is a new generation product combined with analog camera & IP video
technology. Despite all functions which analog cameras have, IP camera can compress and
encrypt video and audio signal then through internet send them to remote terminals with its
built-in processor and web server. Via its IP address, users can use standard PC IE browser to
visit IP camera, real time monitor targets, manage and store video or image. PT control also is
available through network.
Being a new member of camera family, IP camera shares the same operation functions
with the analog camera, such as, auto white balance, auto shutter speed, AGC, auto backlight
compensation etc. On the other hand, IP camera supports remote access through internet and
multi-user visit. Some IP cameras are able to extend to both analog and digital signal.
F series IP camera‘s core is 32Bit RSIC. It adopts standard M-JPEG compression format.
The camera sensor is CMOS which supports auto white balance and backlight balance,
support IE, cell phone browser, centralized monitor interface management. In general, as its
function of audio simplex & duplex, infrared, wired, wireless, local storage, it has hundreds of
products, to meet requirements of various kinds of users.
1.1 Features
Powerful high-speed video protocol processor
MJPEG video compression
Wireless(Wifi 802.11B/G,WEP,WPA,WPA2)optional
IR night vision 15m
Support two-way audio function
High-sensitivity CMOS sensor
Resolution:640 x 480(VGA), 320 x 240(QVGA)
Video Frame Rate:25fps(QVGA), 15fps(VGA)
Minimum Illumination: 0.1 Lux/F1.2
Supporting up to 4 users online simultaneously
Supporting image snapshot and video record
Support image flip ,mirror
Brightness and Contrast adjustable
Built-in 10M/100M auto MDI/MDIX Ethernet interface
Light Frequency:50Hz, 60Hz or Outdoor
Multi-level users management and passwords definition
Built-in Web server, supports remotely viewing and/or management the camera form a
standard Web browser on any computer which can trhough internet.

We never stop trying!
- 4 -
Supporting Dynamic IP (DDNS) ,Built-in Free DDNS
Giving alarm in cause of motion detection, sending photo to email or FTP, record videos on pc
when alarms.
Supporting multiple network protocols: TCP/IP、HTTP、ICMP、DHCP、FTP、SMTP、PPPoE
etc.
Support mobile surveillance like Smart phone,3G phone,IPhone,PDA,etc.
Free 16ch or 64ch software clients support.
Ten languages (English, Simplified Chinese, Traditional Chinese, Spanish, French etc.)
support
Support Firefox browser
Reset button available if lost password
1.2 Packing List
Untie the pack and check the items contained against the following list;
Wireless IP Camera 1
Wi-Fi Antenna 1
DC Power Supply 1
CD 1 (User Manual﹑software)
Qualified Certificate 1
Mounting Bracket 1
Srews 2
NOTE:Contact us immediately in the case of any damaged or short of contents.
We never stop trying!
- 5 -
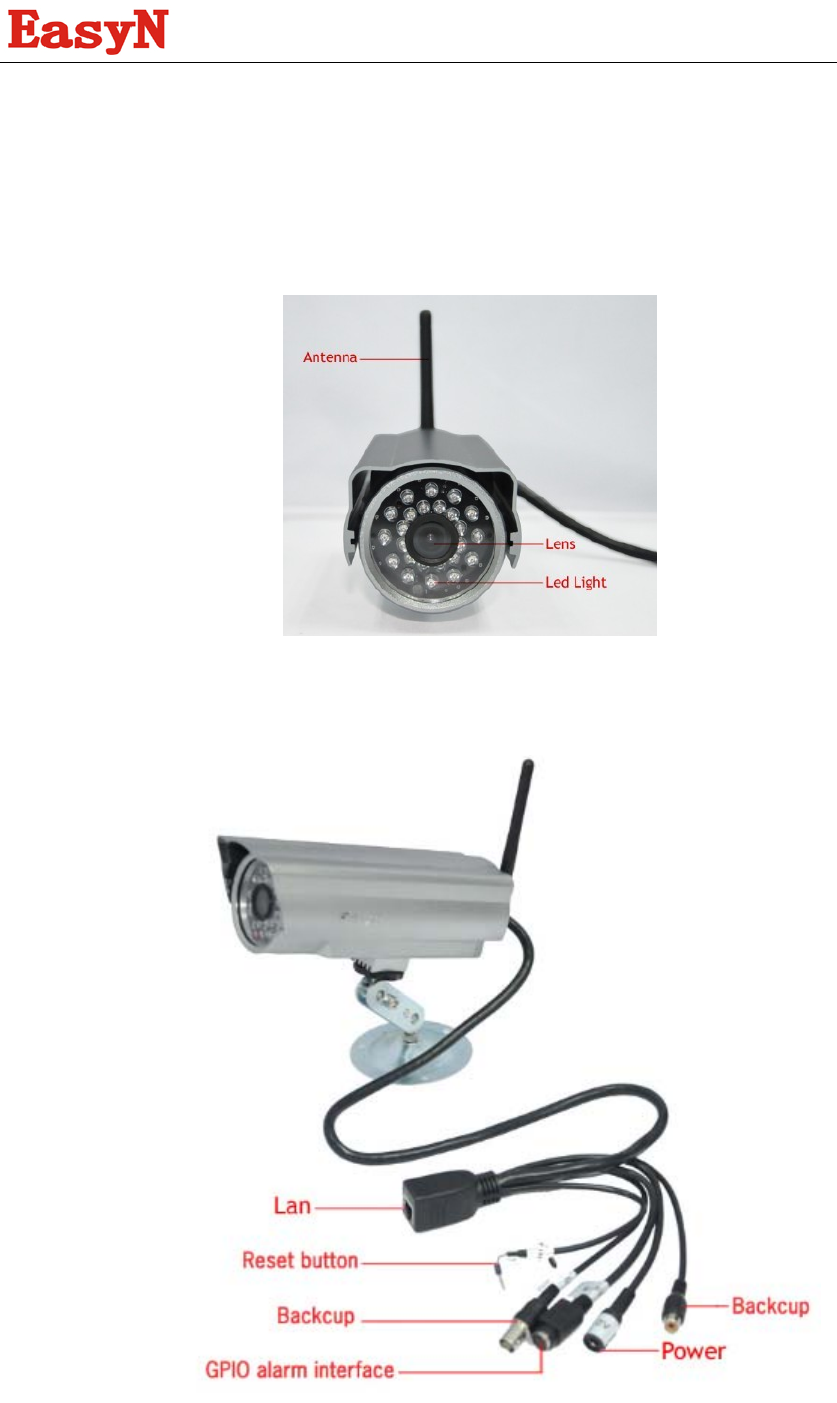
1.3 Product views
1.3.1 Front view
1.3.2 Interface view

We never stop trying!
- 6 -
1.4 PC System Requiements
Minimum Hardware Configuration
CPU: Pentium 1.6 GHz
Memory: 256MB
Audio card: need audio monitor, two way talkback essential
Hard Disk : if need to record video image,no less than 40G
Operation System: 32 bit simple/ English Windows2000、Windows XP、
Windows2003、Windows Vista & 64 bit simple Chinese/English Windows2003、
Windows XP、Windows Vista etc.
Software environment
IE 5.0 or above version
DirectX8.0 or above version
TCP/IP network protocol
1.5 Hardware Instruction
Follow the steps below to set up your camera hardware.Make sure to follow each step
Carefully to ensure that the camera operates properly
1) Plug the network cable into the camera and then into your Cable/DSL router.
2) Plug the power adapter into the camera and then into the power outlet.
1.6 Software installation
Software installation is the key to the successful use of this product.
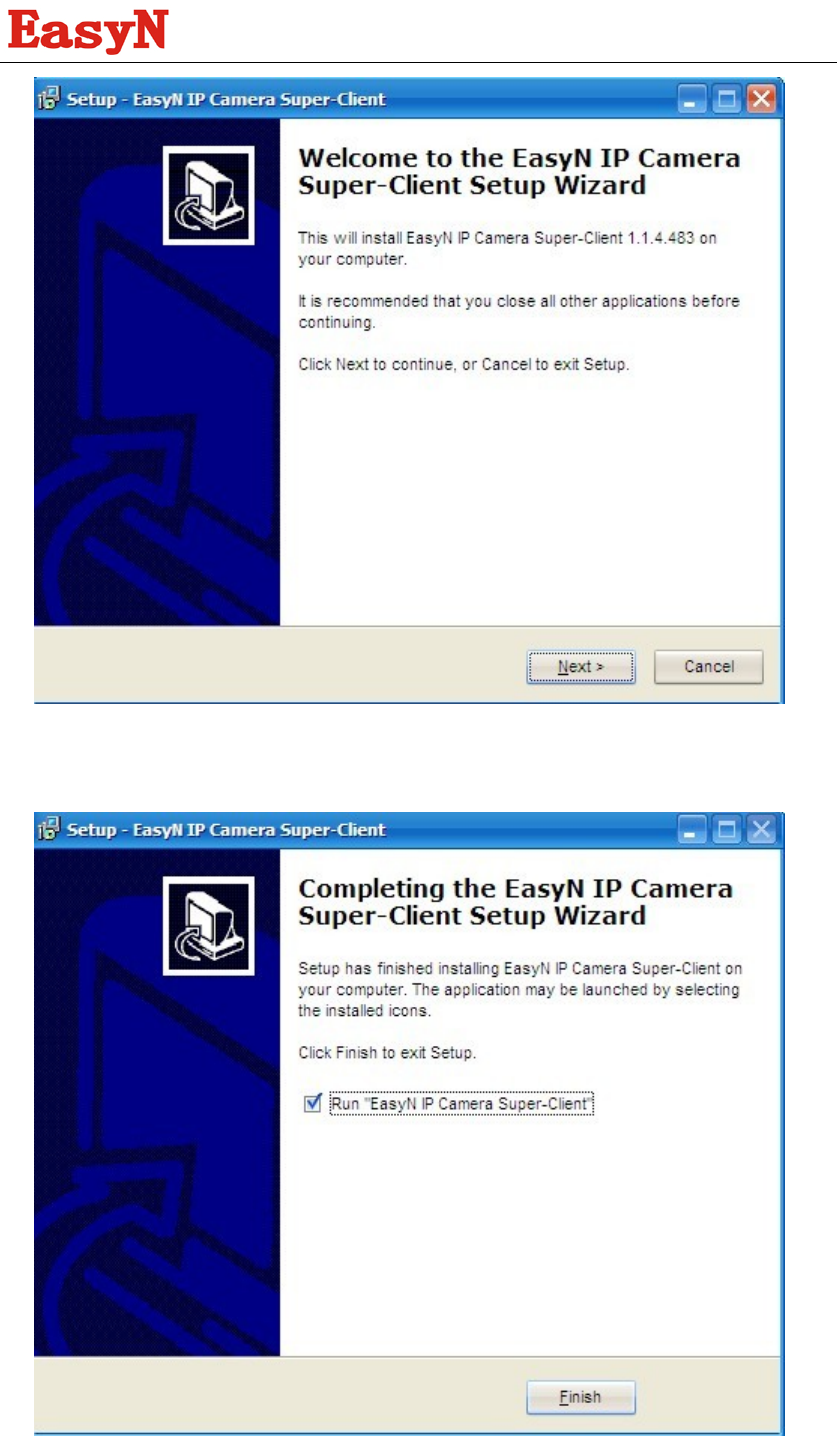
1 Open the CD,find the software as instruction;
2 Double click Integrated Surveillance Center and install the software as
instruction.
We never stop trying!
- 7 -
3 Only click Next,you will complete the software installation.

We never stop trying!
- 8 -
From the computer desktop you can find an icon appears
on the Desktop automatically.
NOTE:Before installing and using the product, please read the following precautions
carefully and make sure they are fully understood.
Use only the power adapter attached with the product .Use of unauthorized power
adapter may cause damages to your IP Camera.
Do not touch the lens of the IP Camera at will .The optimum focus range has been set
before the IP Camera is delivered out of the factory. If you turn the lens,it may cause
incorrect focus and vague images.
Do not turn the Pan/Tilt by force for it may cause damage to intemal components of
the Pan/Tilt.
IP Camera terminal shall be installed in an indoor environment.
2 Software operation
2.1 IP Camera Finder
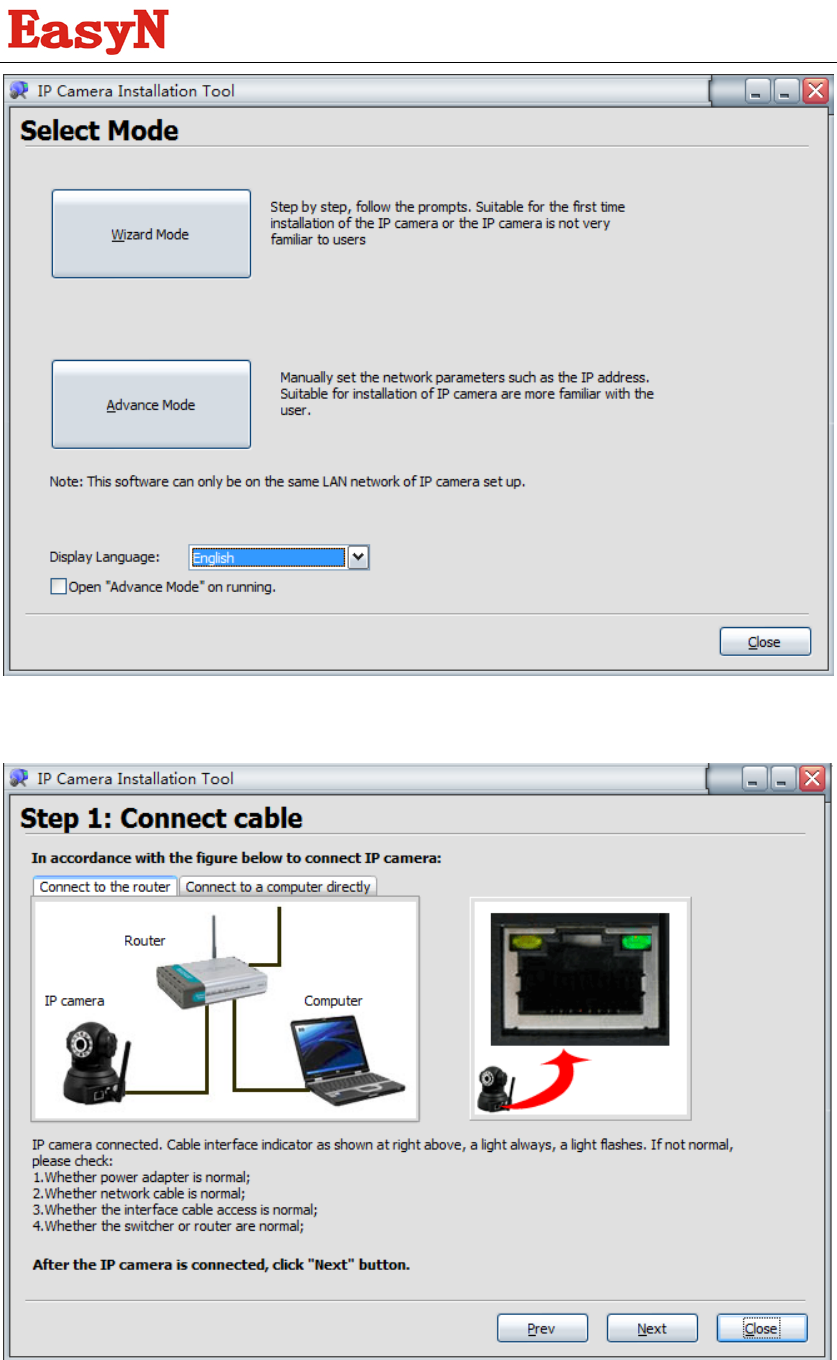
When the Device has been mounted properly, you can double click the Icon “EasyN IP
Camera
Finder” and a dialog box will pop up.
We never stop trying!
- 9 -
Wizard Mode(if you not familiar the settings pls chose this mode):
Select ‘Connect to the router’or ‘Connect to a computer directly’ according to your
requirments,then click ‘Next’.
We never stop trying!
- 10 -
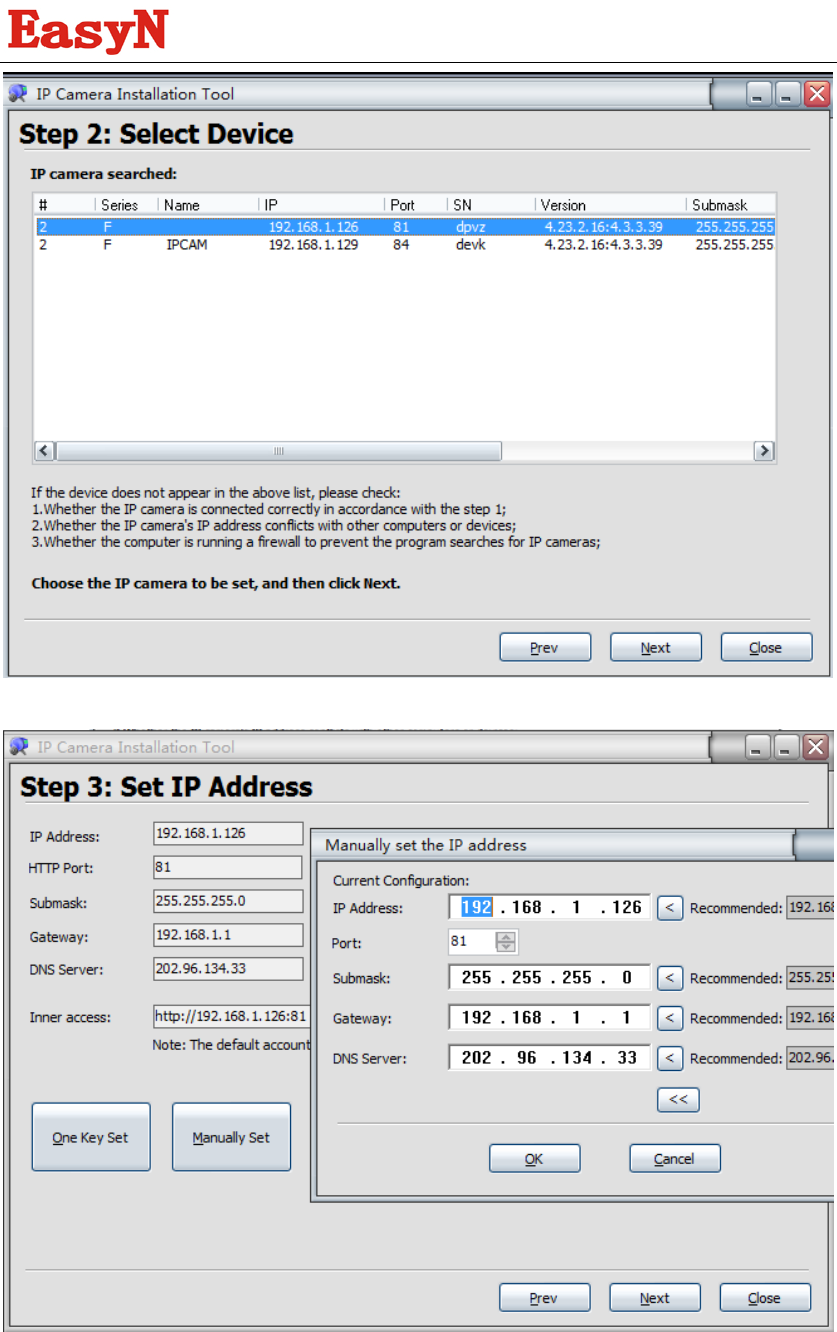
Select the right device then Click ‘Next ‘
You can use One key Set or Manually set,here we recommend ‘One Key Set’ if you
are not familiar with the setting, click ‘next’ after Set IP Address(Note: You have to
wait for 40 seconds to restart the device after setting Ip address)
We never stop trying!
- 11 -
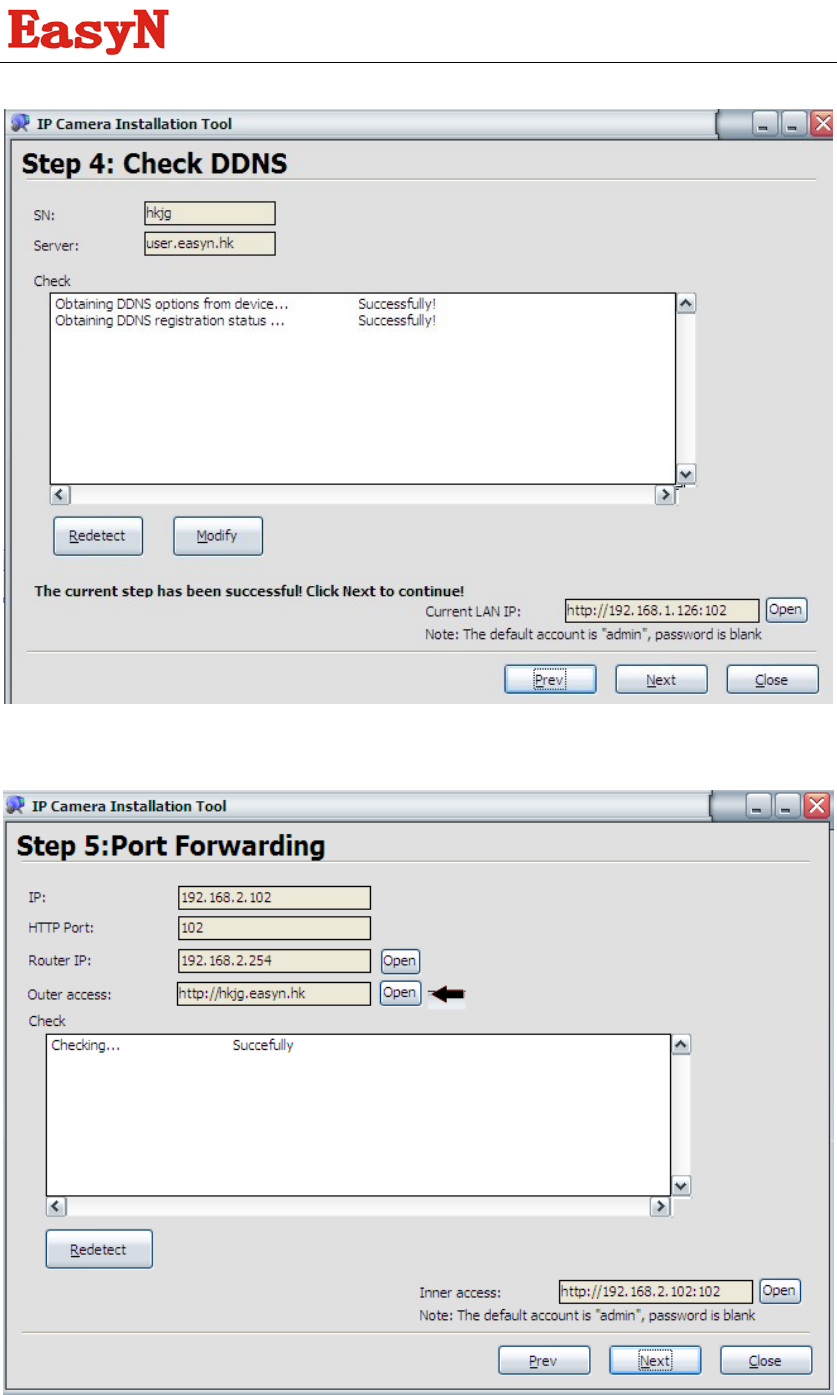
Click ‘Next’
We never stop trying!
- 12 -
Here you have finished the setting,click’open’ to login the ip camera.
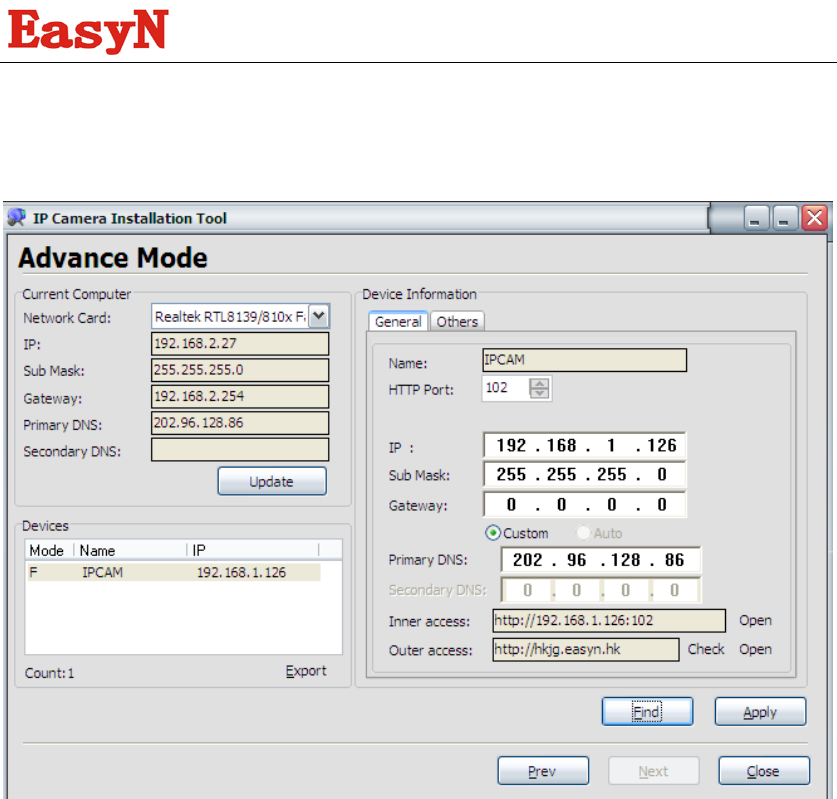
Advanced Mode (if you are already familiar with the settings pls chose this mode):
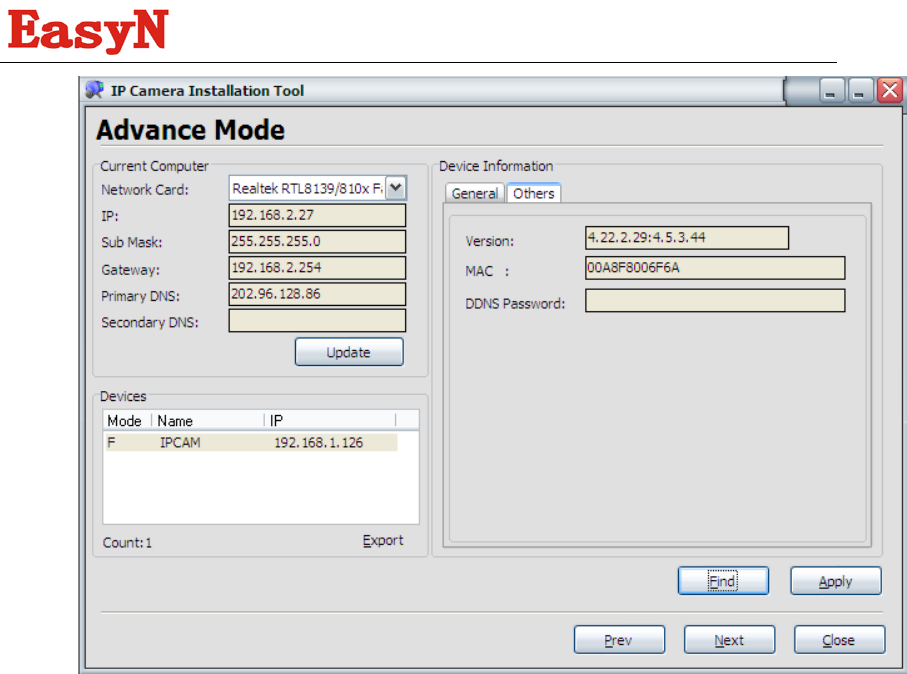
z Basic Properties
There are some device informations in the Basic Properties ,such as Device
MAC,System Firmware Version, Web UI Version.
We never stop trying!
- 13 -
Note: The software searches IP Servers automatically over LAN.
1 .The ip camera and the pc should be in the same LAN
2 To install more than one cameras in the LAN,all of the cameras port and IP
address can not be same.
3. pls make sure the camera ip address is in the same subnet as the gateway
(i,e .the first three sections are the same)
4.Mask: The default subnet mask of the equipment is :255.255.255.0
5.Gateway: Make sure it is in the same subnet with PC IP address .Default
Gateway address is 192.168.1.1
6.DNS: IP address of IPS network provider.
7.Port:LAN port assigned for the equipment, usually 81-10000
8.User & Password : Default administrator username/password: admin/No
password
2.2 Camera Login in IE (LAN)
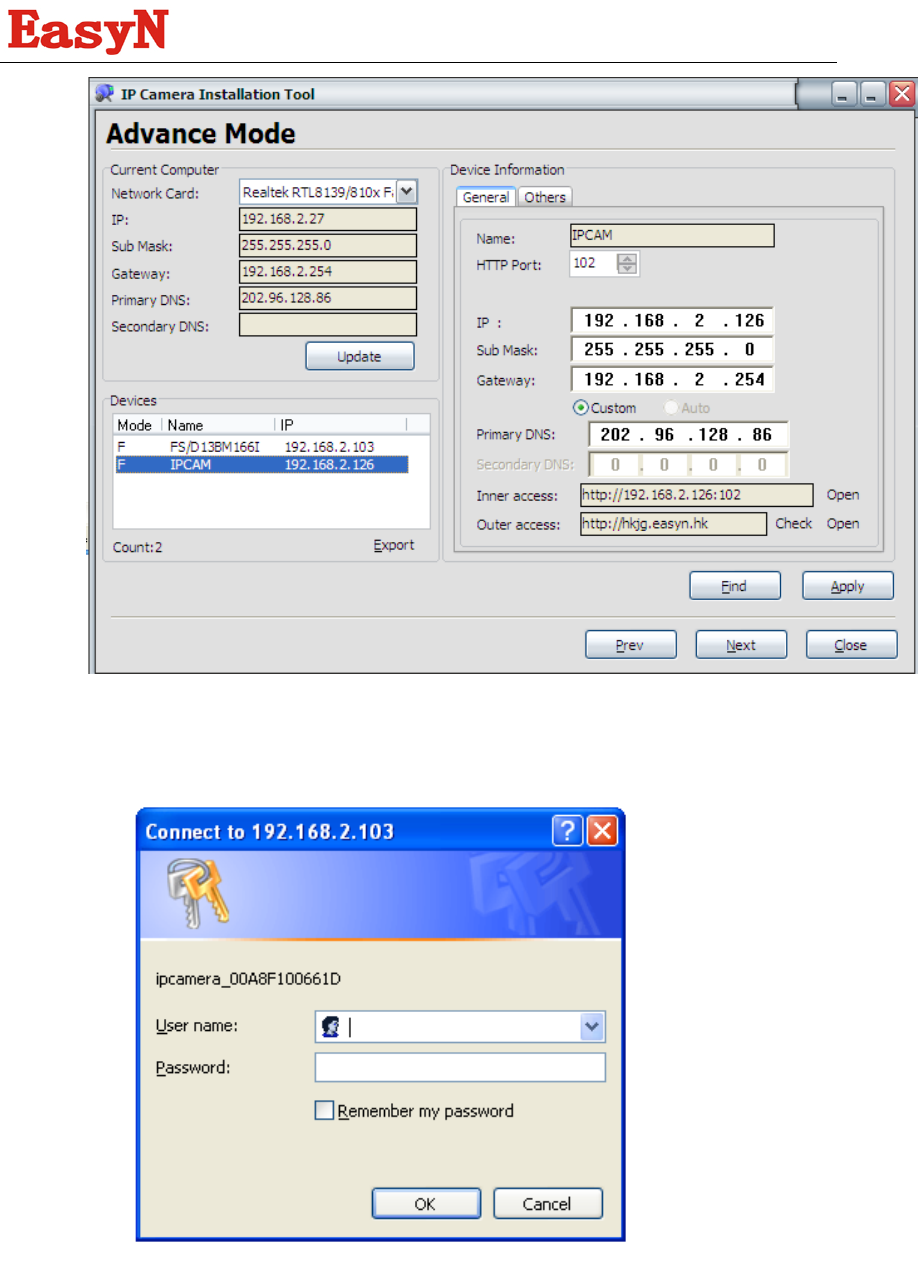
You can access the camera through IP Camera Tool or IE directly.
1) Click the inner access: “open”
We never stop trying!
- 14 -
2)
3) To access the camera ,start your web browser and type in the camera’s IP
address,Such as http://192.168.2.126:102
The Camera Login page pop-up.
Enter your account and password on the login page as shown above
Administrator’s username is: admin and no password.
We never stop trying!
- 15 -
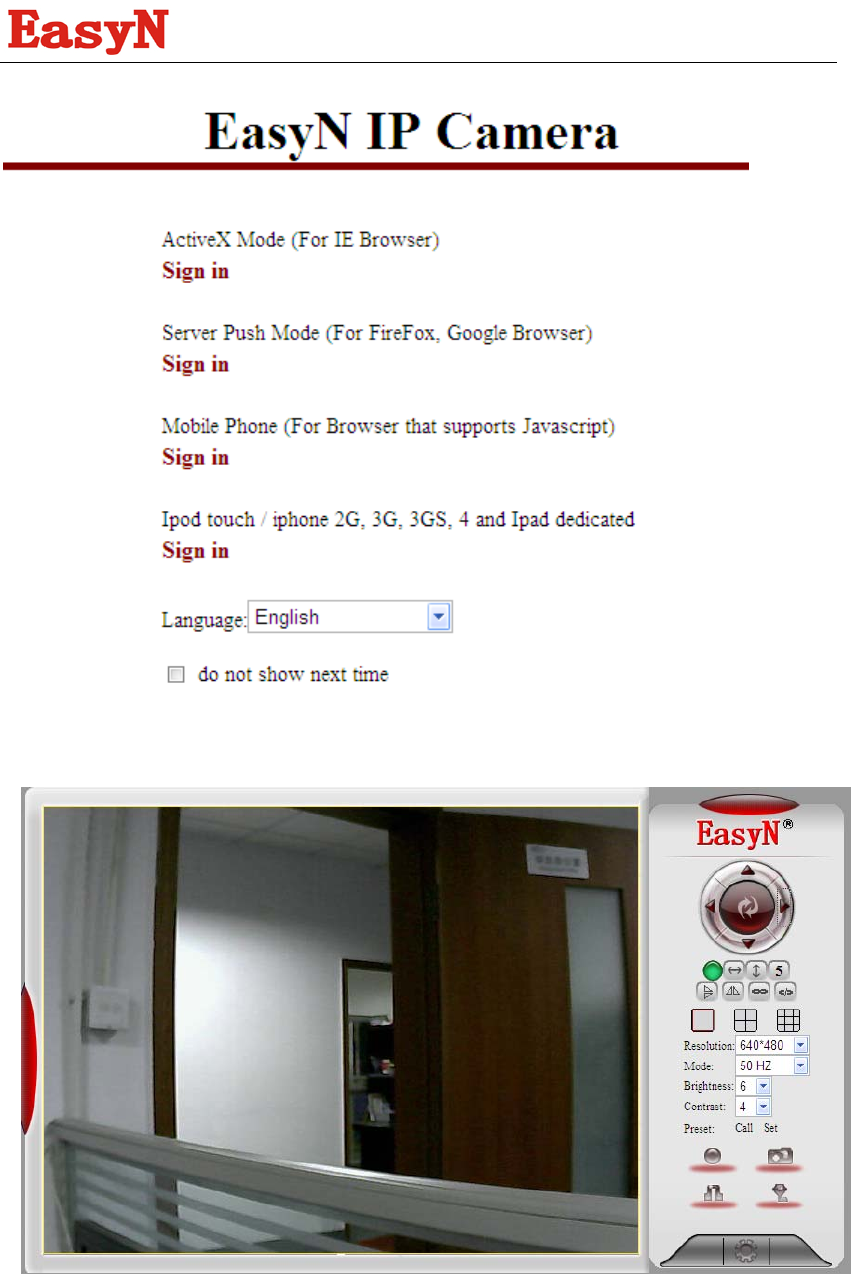
Please Sign in with ActiveX Mode(for IE)
Note: Before IE monitoring through web, it is necessary to install a ActiveX.
We never stop trying!
- 16 -
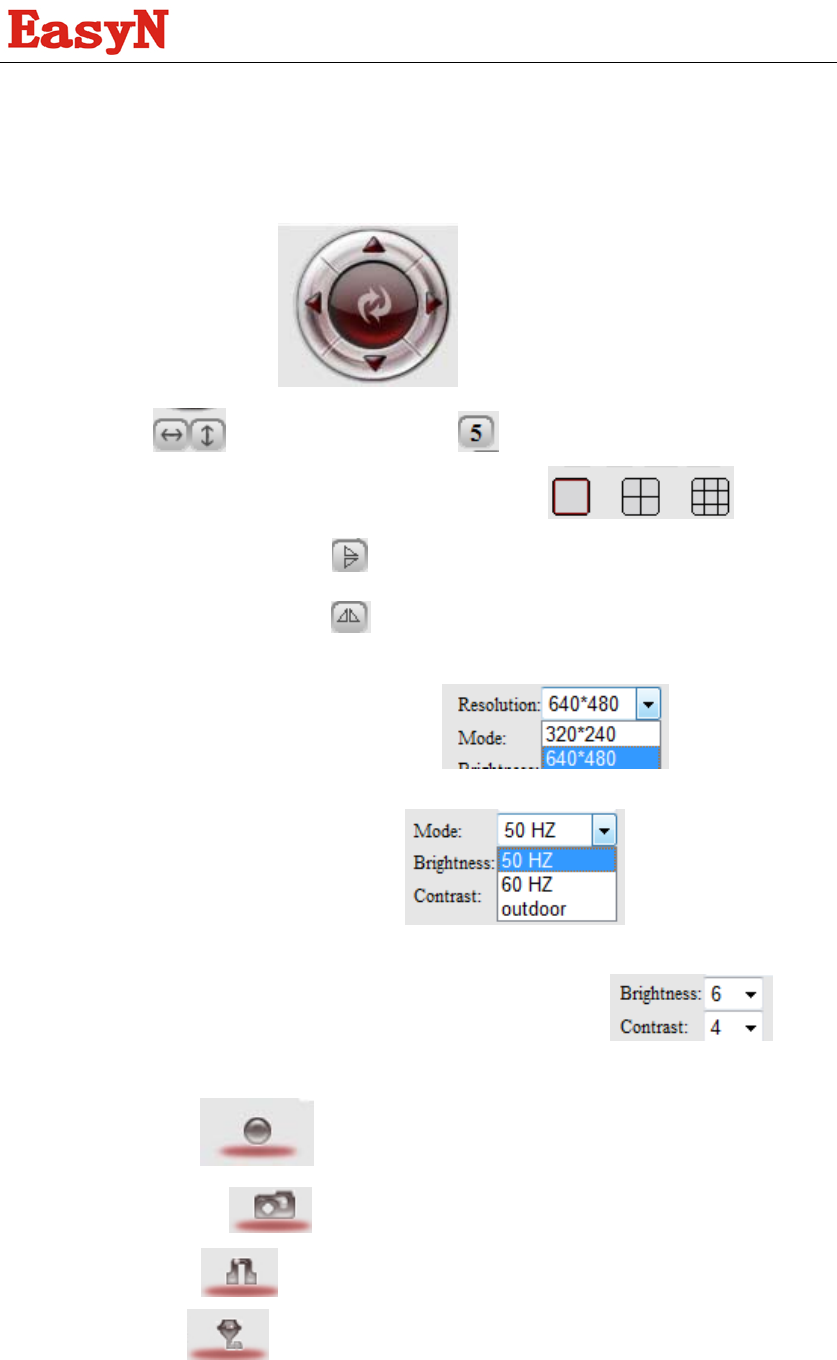
2.3 Camera Icon Functions
Rotate the cameras(pan/title)
Auto Pan/Titlt Adjust Pan/Tilt Speed:
If you want to detect 4 or 9 views, need to click this icon
Flip: To see the flip image.
Mirror: To see the mirror image.
Resolutions: can chose 320*240 or 640*480
Mode: can chose 50HZ ,60HZ or outdoor
Brightness and Contrast:can set the brightness and contrast
Record:Click icon to record videos
Snapshot: Click icon to snap the picture.
AUDIO: Click icon Camera MIC open, Local Voice input
TALK: Click icon Camera Speaker open, Remote Voice Output
We never stop trying!
- 17 -
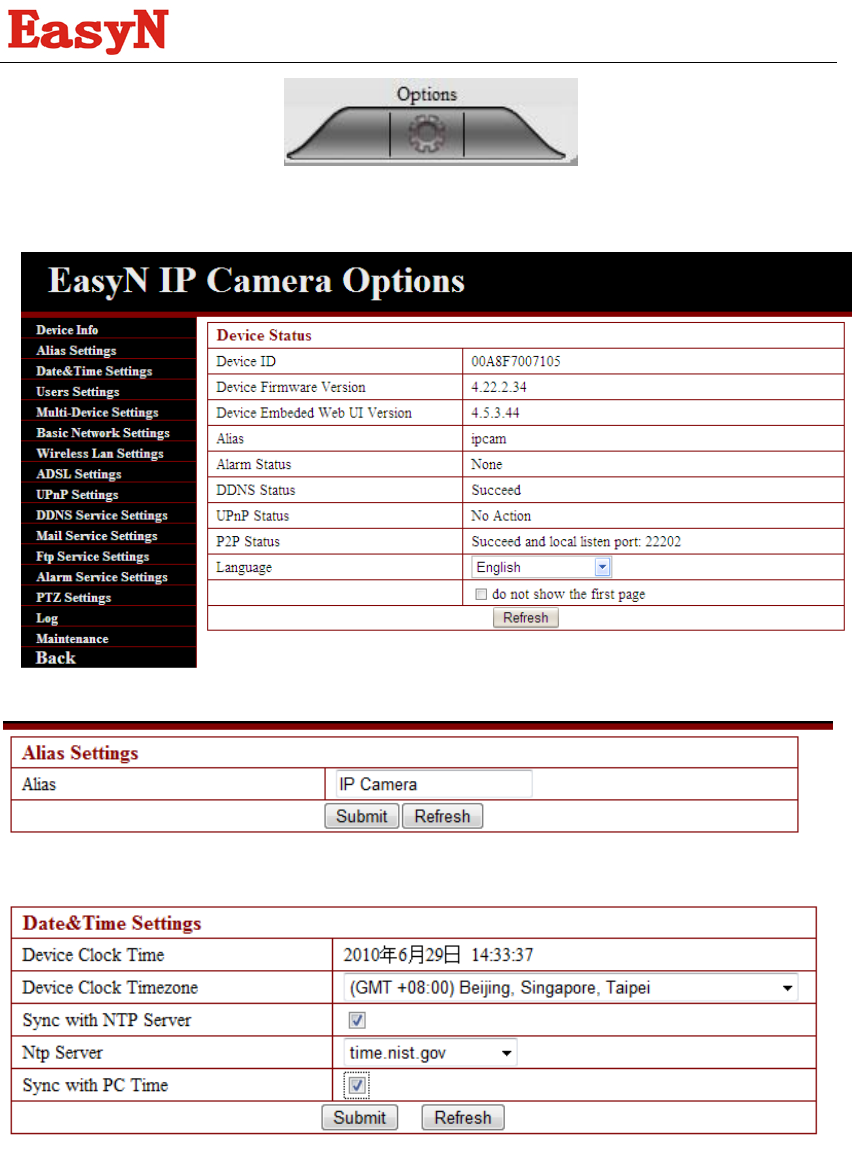
2.4Setting Details
Alias Settings: You can Input the new name as you like.
Data&Time Settings: Data&Time Settings page.
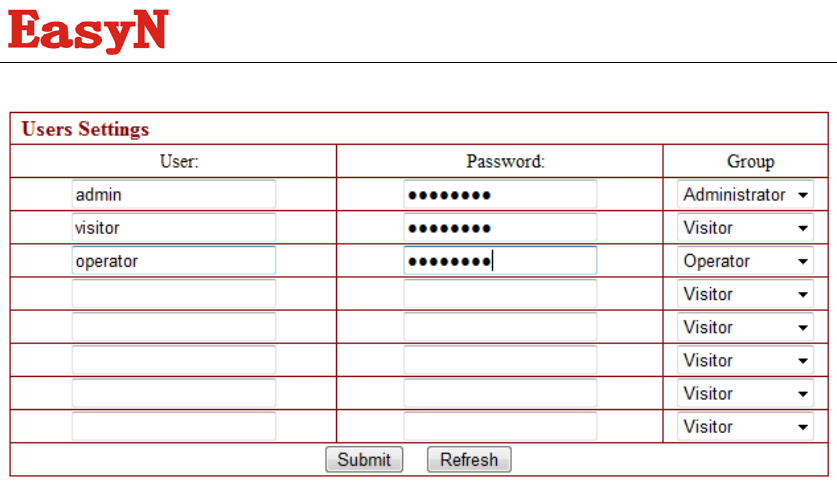
Users Settings: Eight accounts are acceptable for this system.Here the eight users can
Configure their user names and password as administrator ,Operator or Visitor.
Administrator: You can setup the advanced configurations of the IP Camera.
Visitor: In this mode ,you can only view.
Operator: You can control the direction of IP Camera and set some parameter.
We never stop trying!
- 18 -
2.4.1 Multi-Device Settings
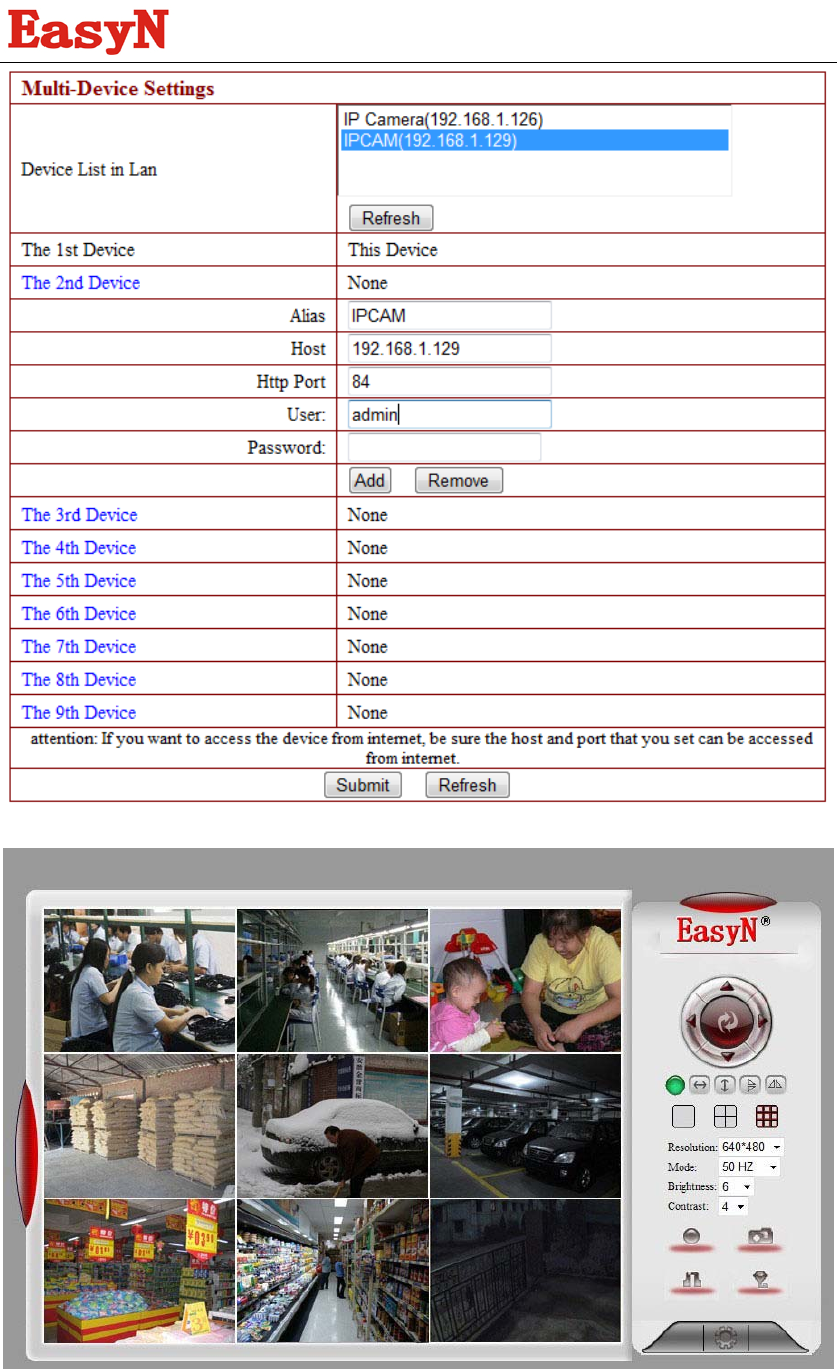
Use multiple cameras in LAN
In the Multi-Device Settings page, you can see all devices searched in LAN. You can add
more cameras list in LAN for monitoring
We never stop trying!
- 19 -
2.4.2 Network Settings
We never stop trying!
- 20 -
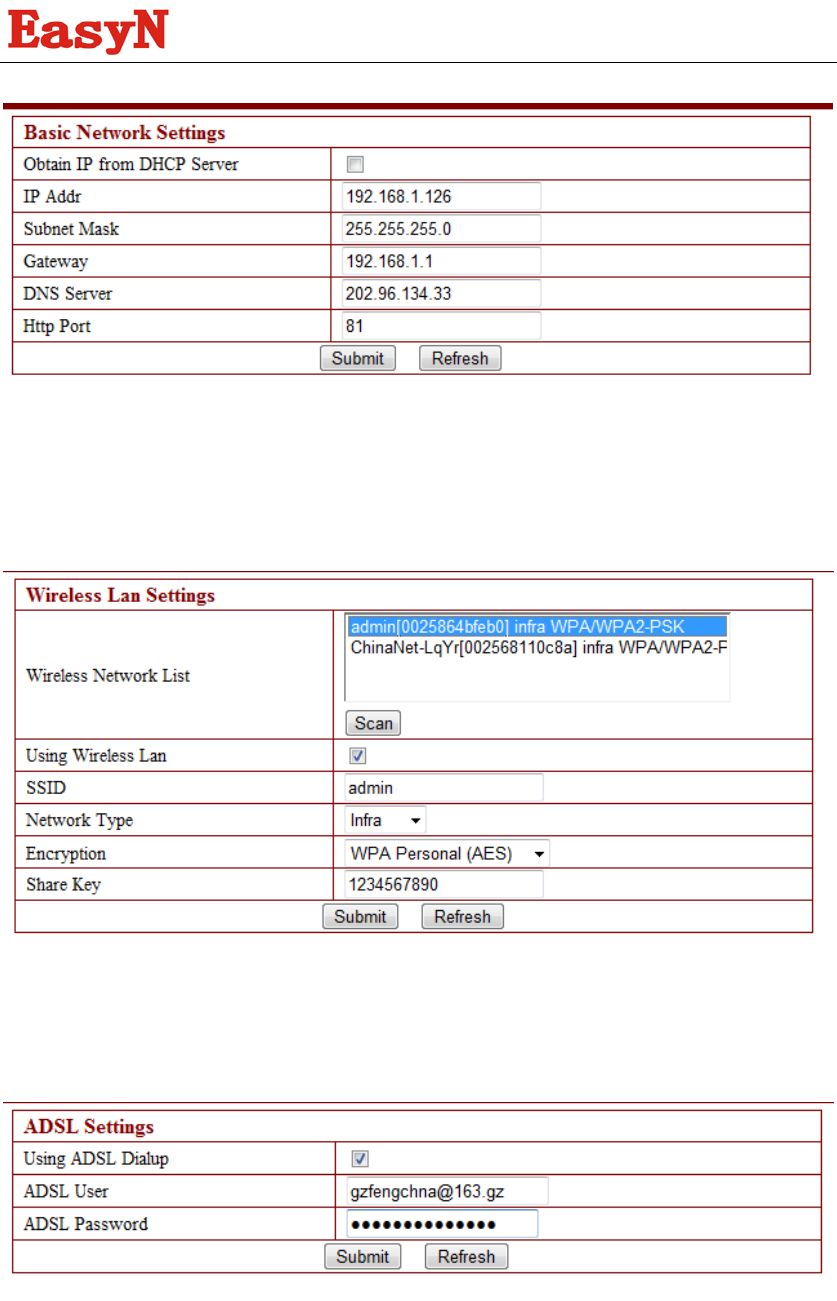
About http port, In most cases, you can leave this value as however numbers
2.4.3Wireless LAN Settings
Click the Scan button (at least two times),select your wifi SSID, and write in your wifi’s
password.
ADSL Settings ( pls don’t use it ,if you use routers)
When connected to the Internet through ADSL directly ,you can enter the ADSL username
and password obtained from ISP.
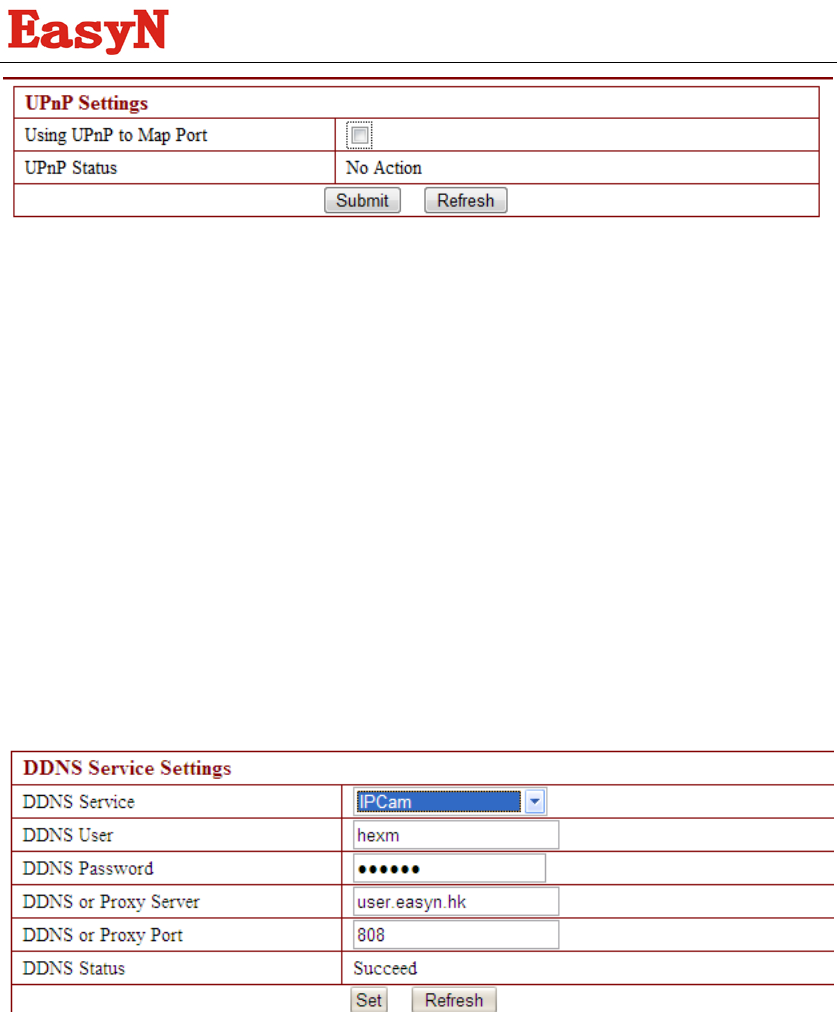
Upnp Settings: If you have done the port forwarding in the routers, you need not care
about it.
We never stop trying!
- 21 -
2.4.4DDNS Service Settings
DDNS Service: The system support protocols from some DDNS providers,and our own
ddns ( built-in)..
User and Password: the user name and password used when applying for the domain
name .(if use our Built-in ddns, and you can find the ddns user and password from the
label of ip camera)
DDNS or Proxy Server: If you access the DDNS host through a proxy, you should input
the Proxy IP.(if use our Built-in ddns,it’s should be user.easyn.hk)
DDNS or Proxy Port: Proxy Port.(if use our Built-in ddns, the port should be 808 or 80)
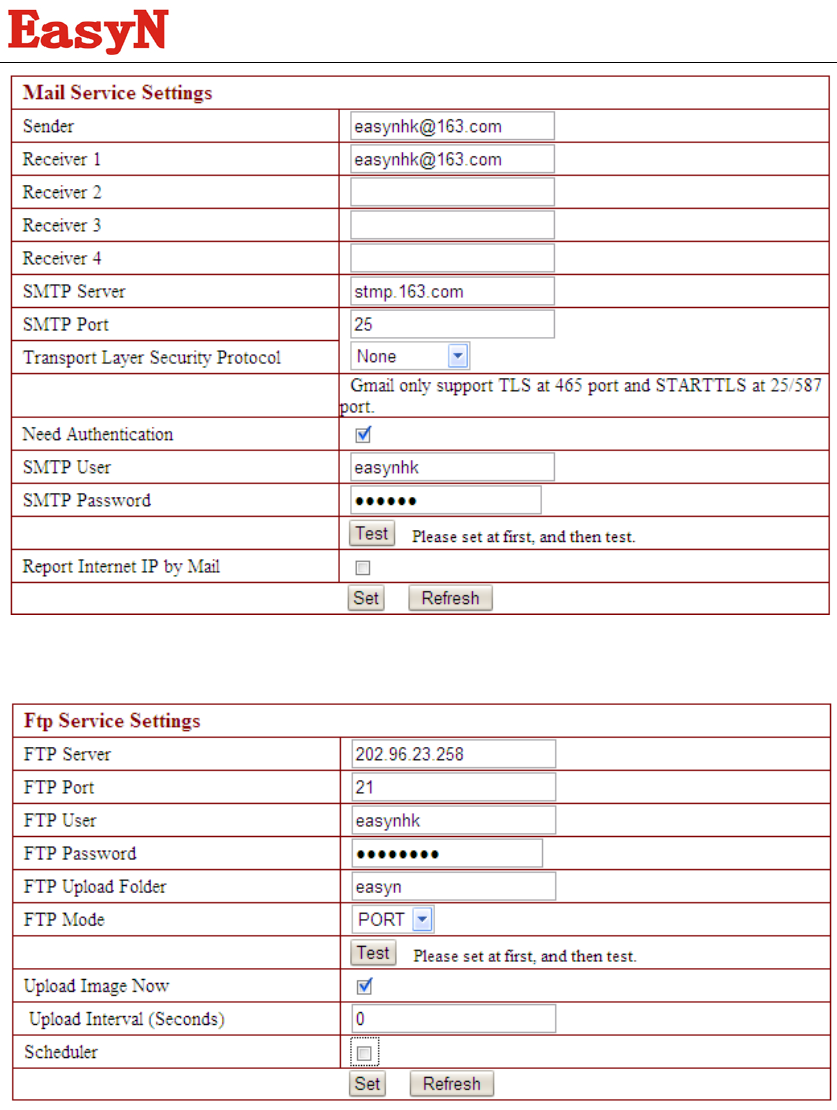
2.4.5 Mail and FTP Service
Configure the E-mail box to receive and send mails. The E-mail box is used for receiving
the images sent after alarm and the system IP address after successful dial-up.
We never stop trying!
- 22 -
Settings the FTP Service:
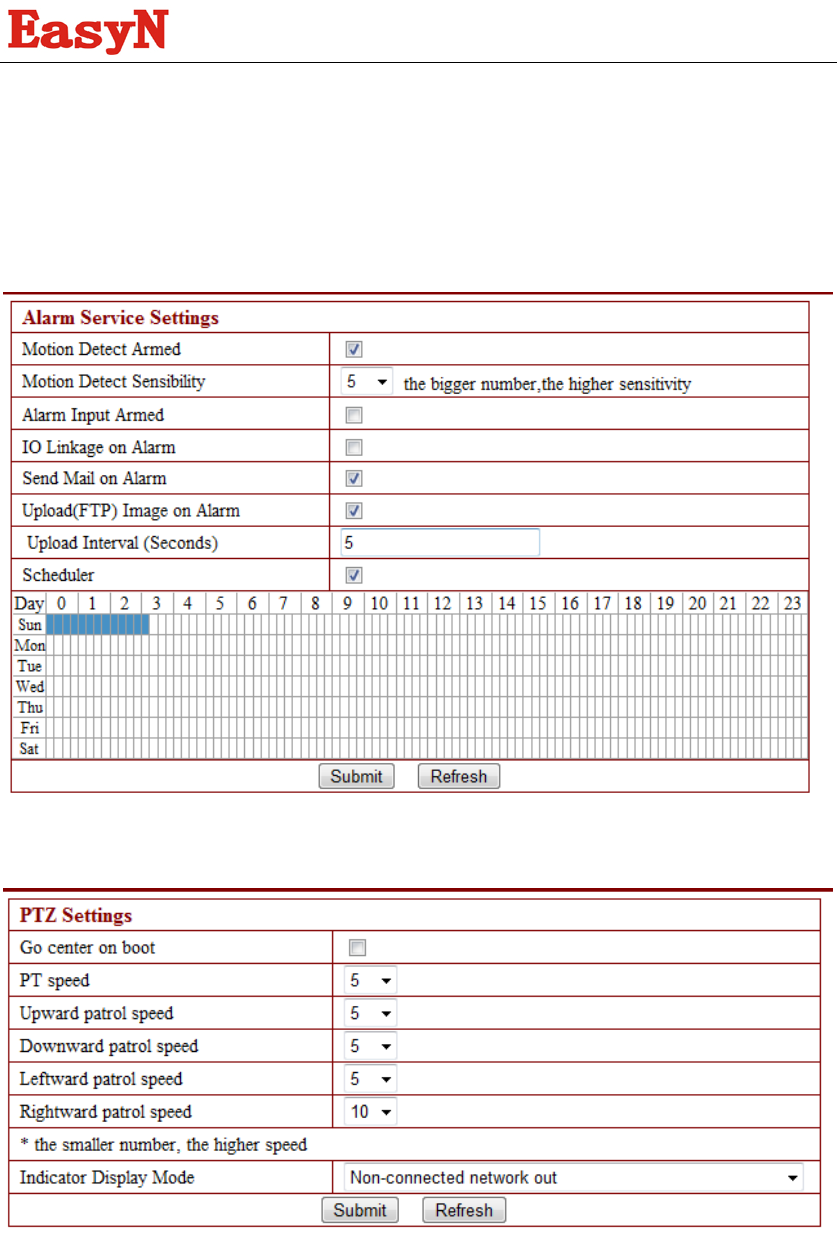
2.4.6Alarm Service Settings:
Enter Alarm Service Settings page to configure Motion Detection function.
Scheduler
We never stop trying!
- 23 -
You can set the exact time when the alarms will be open on.
Send Mail on Alarm
Sent picture and mail inform to customer’s e-mail after alarmed. (firstly you should finish
the Mail Service Settings.)
REC automatically and save to PC
When you enable motion detect and open the camera monitoring page on the PC. If there
is an alarm triggered, REC will start automatically for several seconds and save to the PC.
PTZ Settings,(here you can set the speed of pan/tilt)
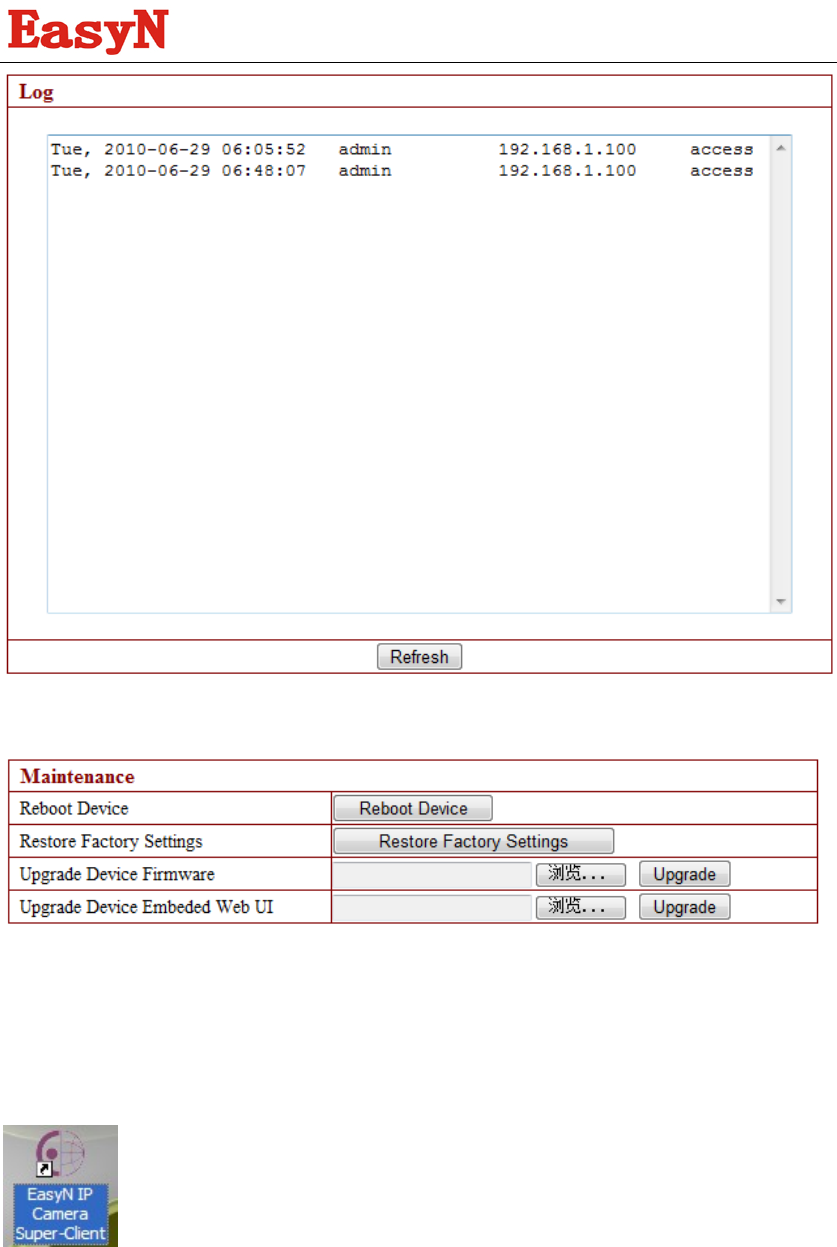
Log
We never stop trying!
- 24 -
Maintenance:
Upgrade Device Firmware: Upgrade Device Firmware and device embeded web UI
software in This page.
Restore Factory Settings: Restore factory settings of the device.
Reboot Device:Reboot the device.
Back: Back to Monitoring Mode.
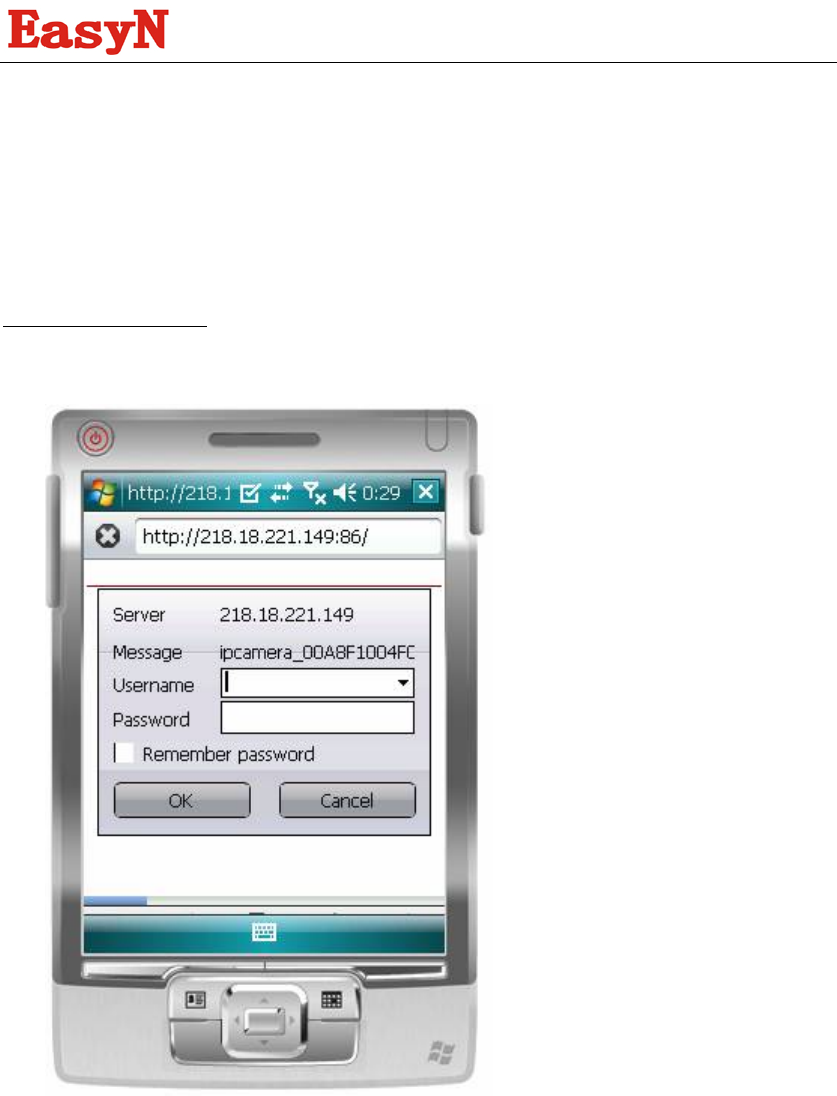
3 Mobile View
First of all, the mobile phone must open the internet access function.
We never stop trying!
- 25 -
3.1 Smart phone Access
The smart phones are the mobile phones with operating system, such as Windows
Mobile and Symbian. Due to its powerful function, the web page browser of such
phones usually supports Javascript. That’s why it can visit the dynamic pages of the
IP camera through web page browser.
First of all, the mobile phone must open internet access function.
Use the browser on the phone to visit the address of the IP camera, e.g.
http://demo.easyn.cn (“demo” is the Serial No. Each device has only one Serial No)
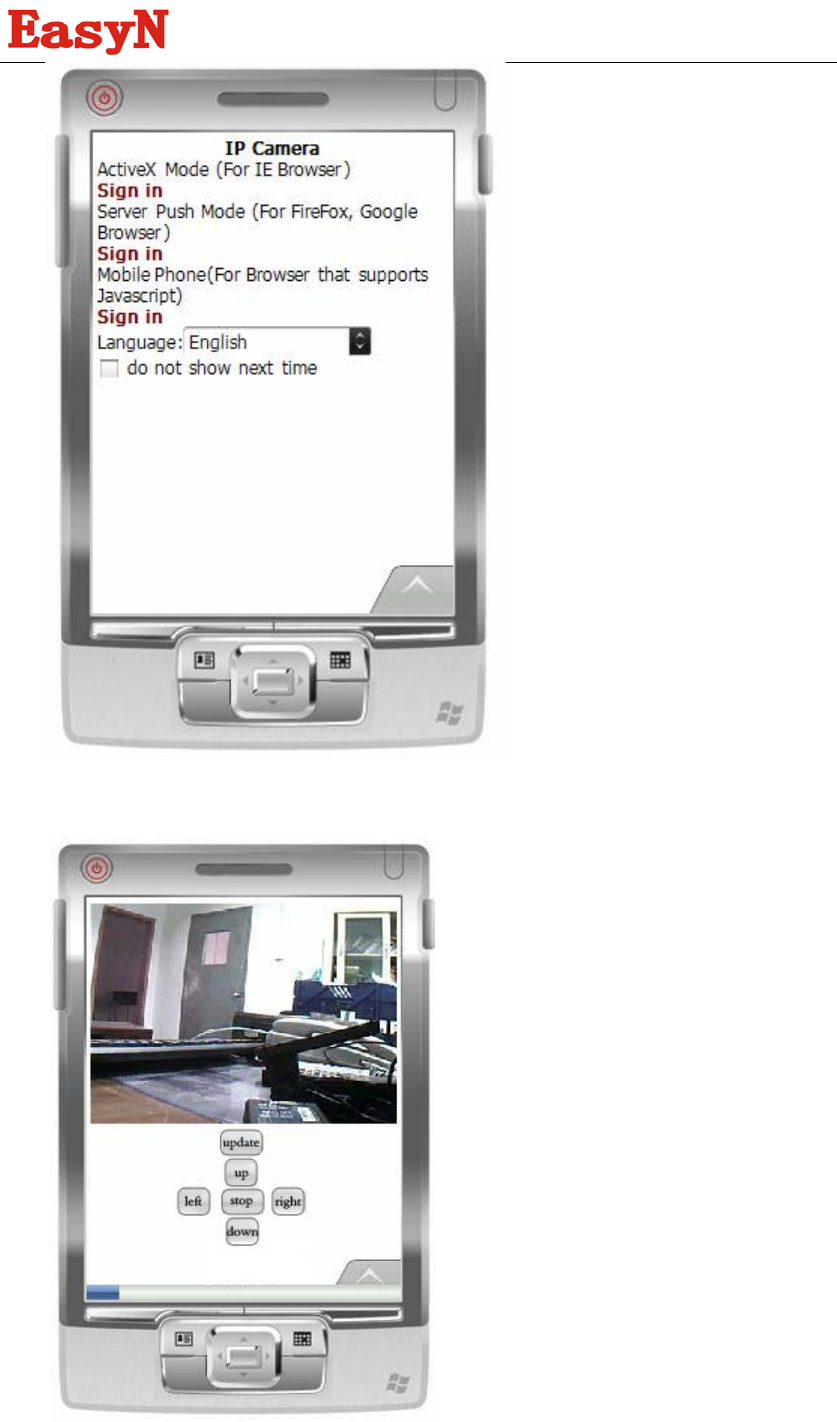
Next, taking the Opera mini 4 Version on Windows Mobile as an example, we are
going to introduce the whole procedure.Enter access address http://demo.easyn.cn in
the browser address bar, the following interface will appear:
2. Input the Username and Passoword of the device, and the following interface will
appear. There are three log-in options. Click on the third “Sign in” and use Mobile Phone
mode.
Language is used to select the display language.
Do not show next time: When this option is selected, this interface will not appear
when you log in next time. It will directly skip to the monitor image..
We never stop trying!
- 26 -
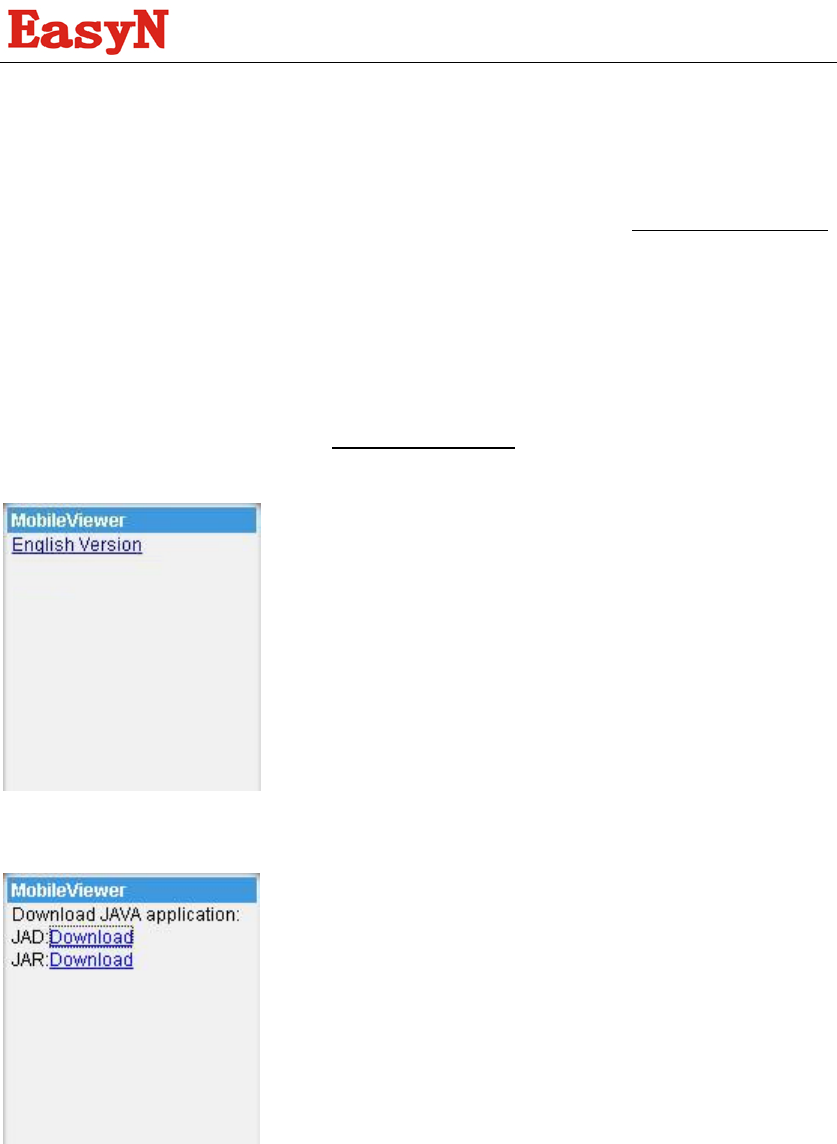
Description for the monitor image:
We never stop trying!
- 27 -
Instruction for the Key Function:
Update: it is used to refresh the page. If the monitor piture is kept still, you may press
this key to update the page.
Up, down, left, and right: They are used to rotate the camera P/T. The camera without
P/T does not have these keys.
Stop: Stop to rotate the camera P/T
The Download address of the mobile browser Opera mini: http://mini.opera.com.
Download the Opera mini browser according to the mobile model.
3.2 Java Phone Access
Firstly you need to open Internet function on your phone. Next install the mobile
phone software. There are two ways for the installation:
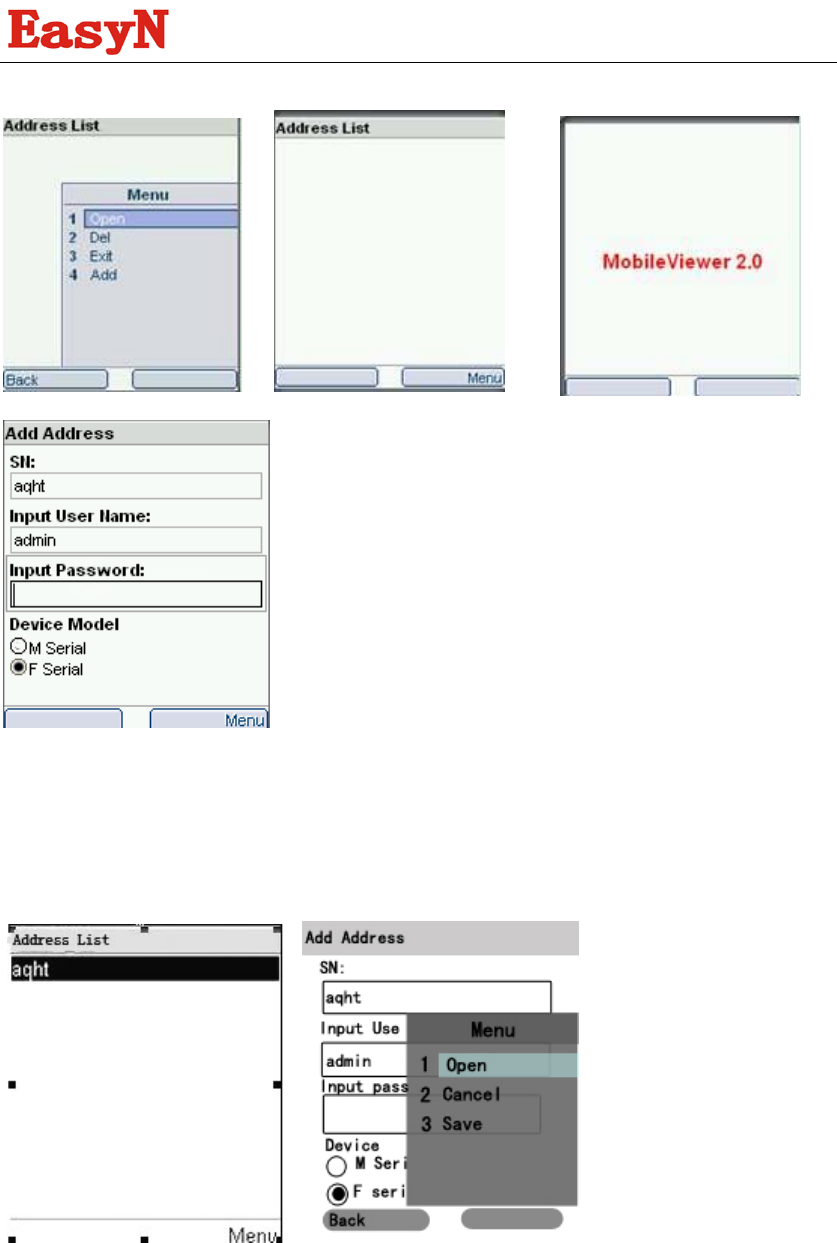
1. Access to the download website http://mob.easyn.cn through the phone
When the phone gets access to the website, the following interface will appear
Select the language version you required, such as English Version, then the following interface
willl appear:
JAD and JAR documents are available to be installed. Usually JAD document is OK. If
JAD document fails to be installed after downloaded, please try to download JAR
document.
2. Download JAVA Program through Computer
Download the document through computer
English version:http://mob.easyn.cn/en/MobileView.zip
Chinese version:http://mob.easyn.cn/cn/MobileView.zip
Put the file into the phone when the downloaded file is decompressed. Install the program
on the phone.
The following is the use instructions
We never stop trying!
- 28 -
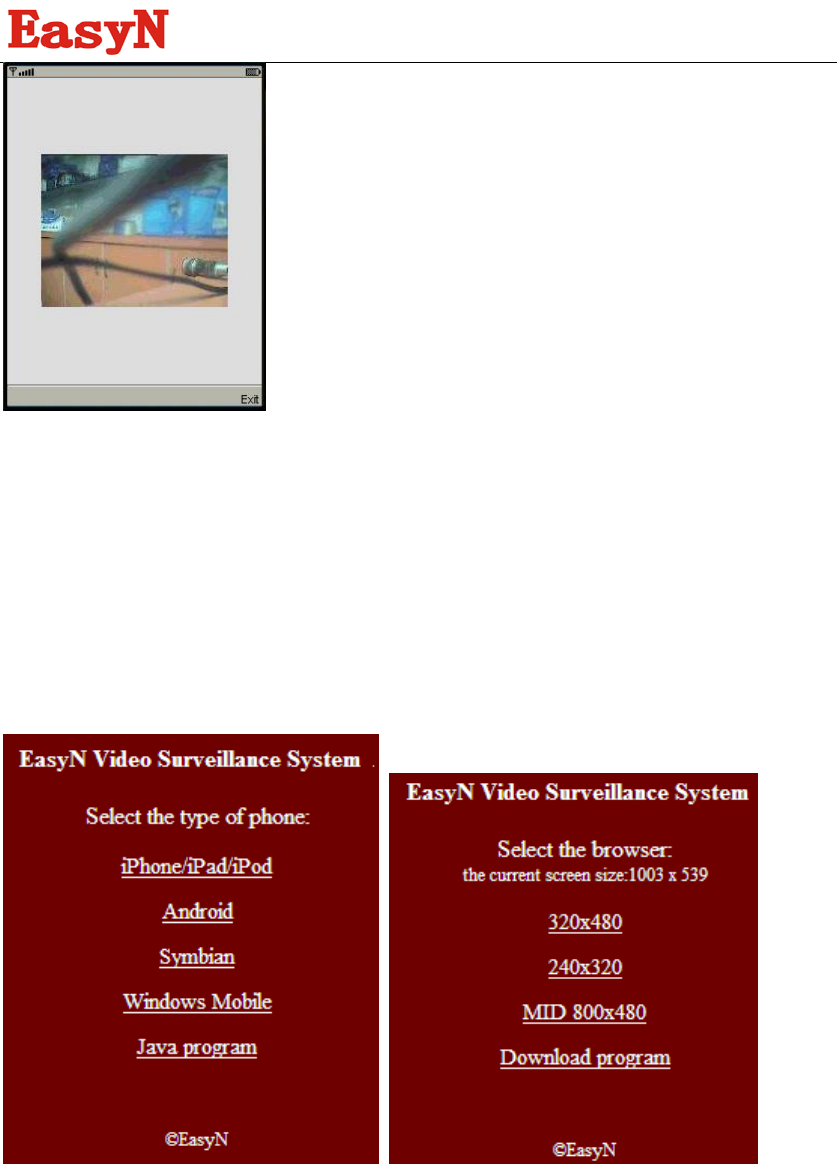
Run MobileView on the phone, and then the following interface will appear: (different
phones may have different interfaces)
Select “add” to add the equipment to be visited, the following interface will appear:
Input the device access address/Serial No: Input the camera Serial No or access address.
For example, if the camera Serial No is “abcd”, input “abcd”.
Input Username: Input the access account of the device.
Input the Password: Input the access password of the device.
Device Model: Select according to the device model. Select F for this series.
After you have inputted all the information required, if you want to add them into the save
list for next visit, select “Save”; if not, select “Open”to visit it directly.
Click “Open”, and the following interface will appear. You will see the live picture through
it.
We never stop trying!
- 29 -
During the viewing process, users can control P/T upward by press cell phone keyboard.
2 is to upward, 8 downward, 4 & 6 leftward & rightward. Users can also directly use
direction key to control.
3.3 3G mobile phone platform access
First open ‘3g.easyn.hk’ via your 3G mobile phone browser.
Take Antroid operating system for example.
1.Select Android and screen size
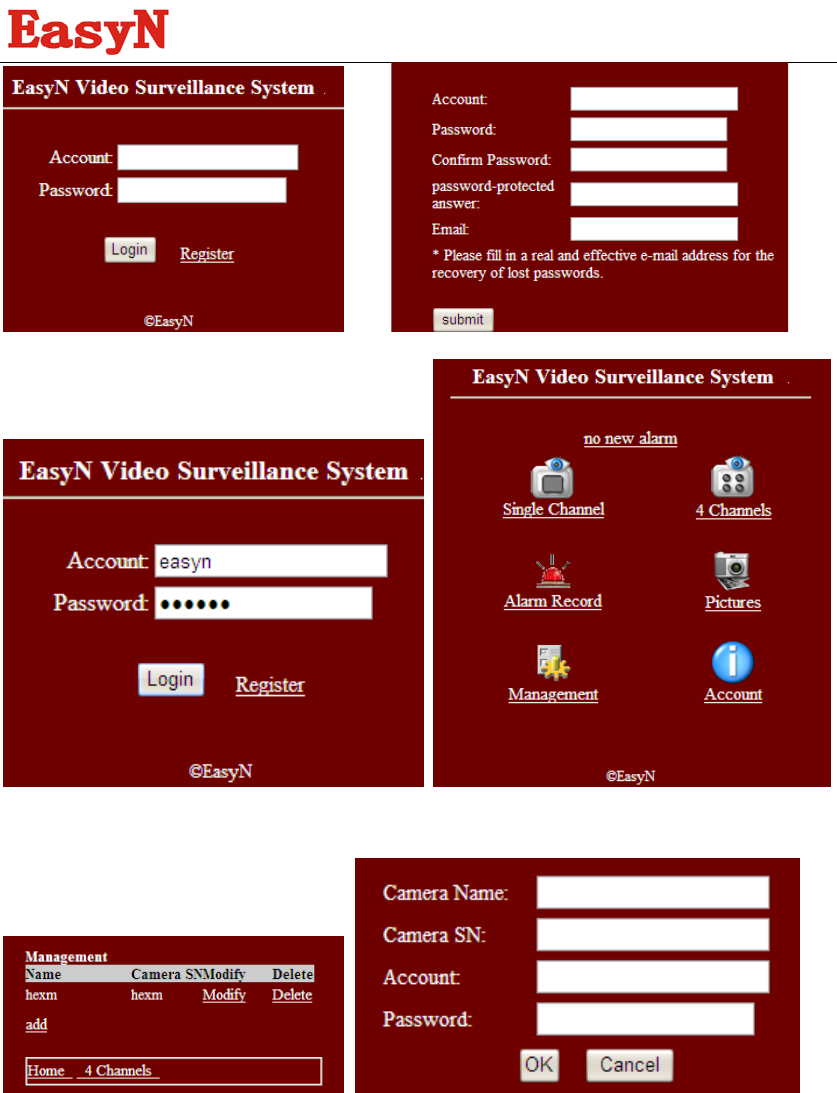
We never stop trying!
- 30 -
2.Click Register to get a account.
3.After you finished registering, use your account to login.
Click ‘Management’ to add a ip camera,as below:
4.Click add, fill the Camera Name( define as you like), Camera SN( on the label of the
device),Account( default account is admin), Password(default password is None),click ok
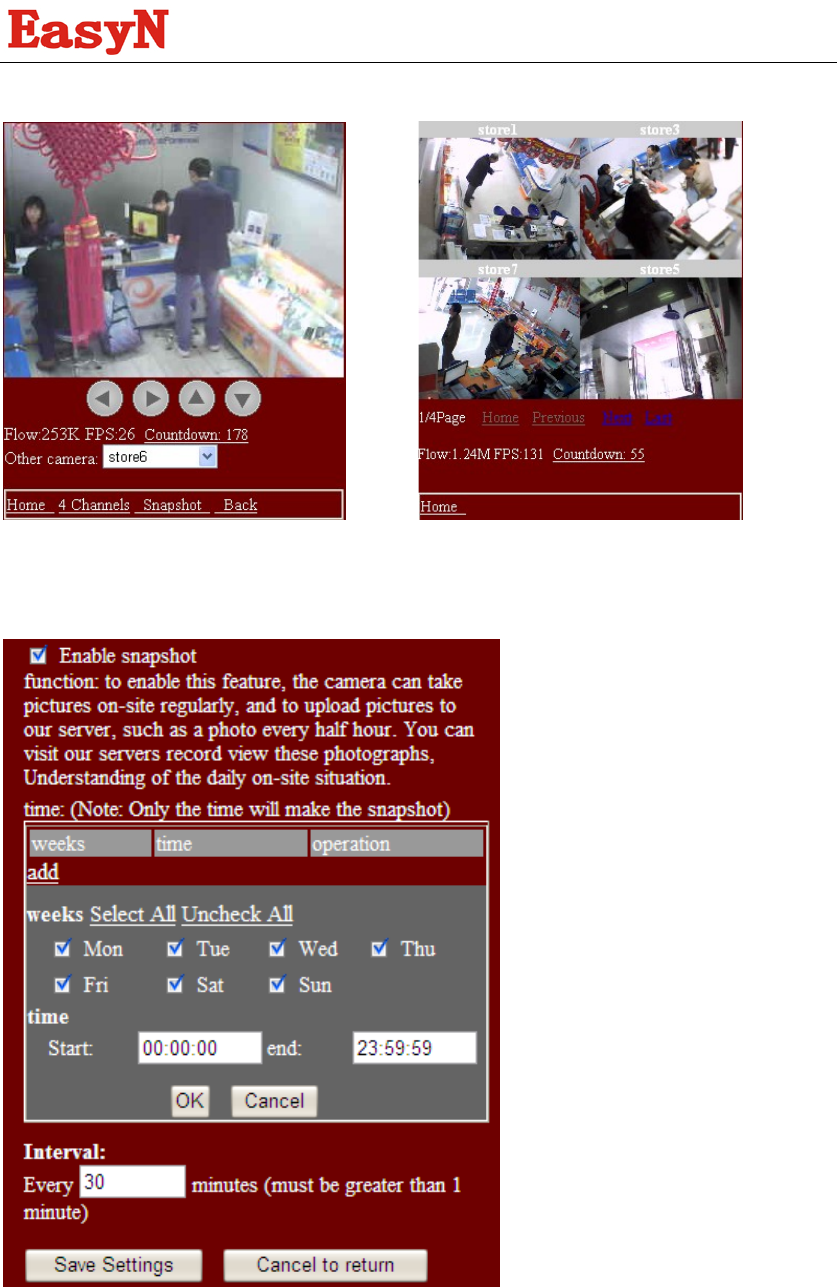
to finish, you can view the camera via single Channel or 4 Channels(add more than 4
cameras),as below:
We never stop trying!
- 31 -
Single Channel 4 Channels
Note:For single channel view ,you can control the ip camera from 4
directions(up,down,right,left)
5. Snapshot setting
click management---Modify----settings---ok
Enable snapshot and set the interval as above.

We never stop trying!
- 32 -
3.4 IPhone app for EasyN IP Camera
With this app you can remotely view and control your EasyN IP camera from your iPad,
iPhone or iPod Touch. From wherever you are!
3.4.1 Features
- Control the cameras in all 8 directions (if supported by the camera)
- Zoom in and out on the image by pinching (even when your camera doesn't support
zoom)
- Fullscreen by rotating the device to a landscape position
- Fullscreen controls
- Swipe in fullscreen view to select another camera, this only work when not zoomed in
(double tap to zoom to 100%)
- Take snapshots and save it to your camera roll
- Adjust brightness/contrast
- Mirror and flip is taken into account (so the controls will still work intuitively, even when
the camera is mounted to a ceiling for example)
- Adjust brightness and contrast
- Multiple camera support (up to 144 cameras)
-Mosaic view for showing 4 cameras (in landscape) and 6 cameras (in portrait)
simultaneously
-Swipe in mosaic view to view more other cameras
- Possibility to lock PTZ controls and/or rotation
- iOS 4 tested and supported
- Taking full advantage of retina display on iPhone 4
3.4.2 Operations and functions demostration
Before you use the app, you can download the app at:
http://itunes.apple.com/us/app/easyn-ip-control/id391442892?mt=8
1. After finishing installing the app on your IPhone, open the app, click ‘Configure’ button,
select ‘+’ to add a IP camera ,the picture will shown as below:

We never stop trying!
- 33 -
Camera name: define it as you like
Camera server: For inner access, input IP address the ip camera, For outer access,input
our built-in domain name (on the label of device) e.g hjey.easyn.hk.How to fill the port,you
can refer to chapter 4.1.1)
Account settings: input user name and password( same as IE browser view)
After filling all the information, click ‘save’ button on the top right corner to finish.
You can add more cameras as the above.
2. Click’ Mosaic’ button for Mosaic view (if multiple cameras added)
Showing 4 cameras (in landscape) and 6 cameras (in portrait) simultaneously
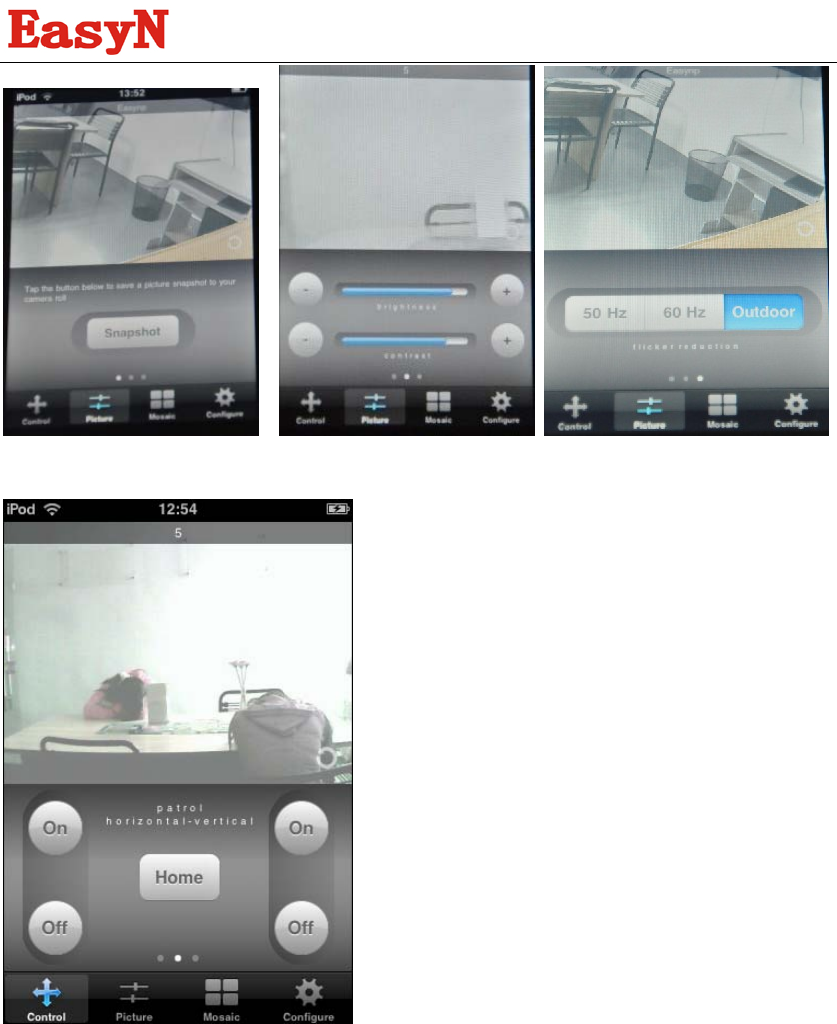
3. Click ‘Picture’ button. Here you can :
1) Take a snap shot and the picure will auto-save to your IPhone
2) Adjust the brightness and contrast of the picture
3) Select the mode as your requirements: 50HZ、60HZ、Outdoor
We never stop trying!
- 34 -
4. Click ‘control’ button .Here you can set horizontal or vertical patrol for the IP Camera
with pan/tilt.
4 How to view the camera in outside
network
4.1 Using a router to access the Internet
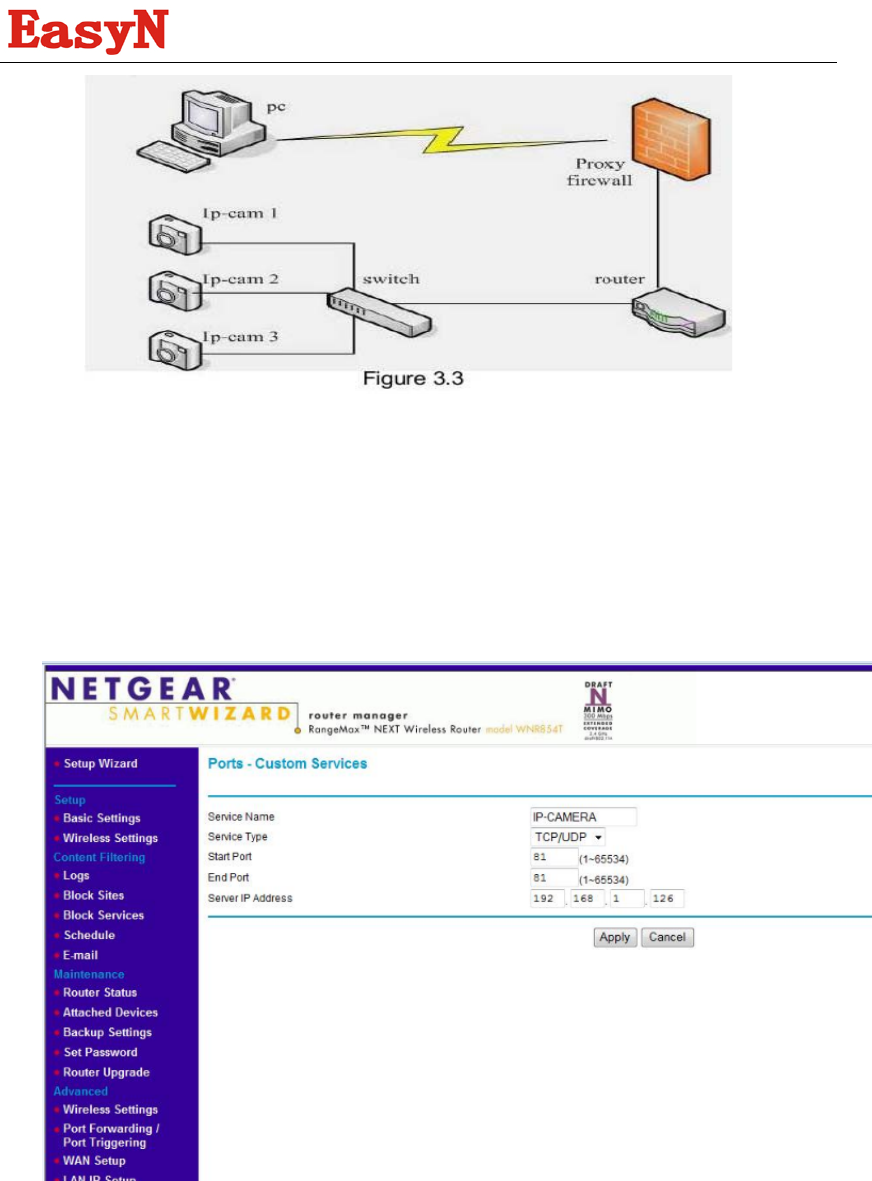
Using a router to access the Internet by shared ADSL If a router is set for dial-up
Internet access, it is not required to set ADSL dial-up account and password on the IP
Camera.
We never stop trying!
- 35 -
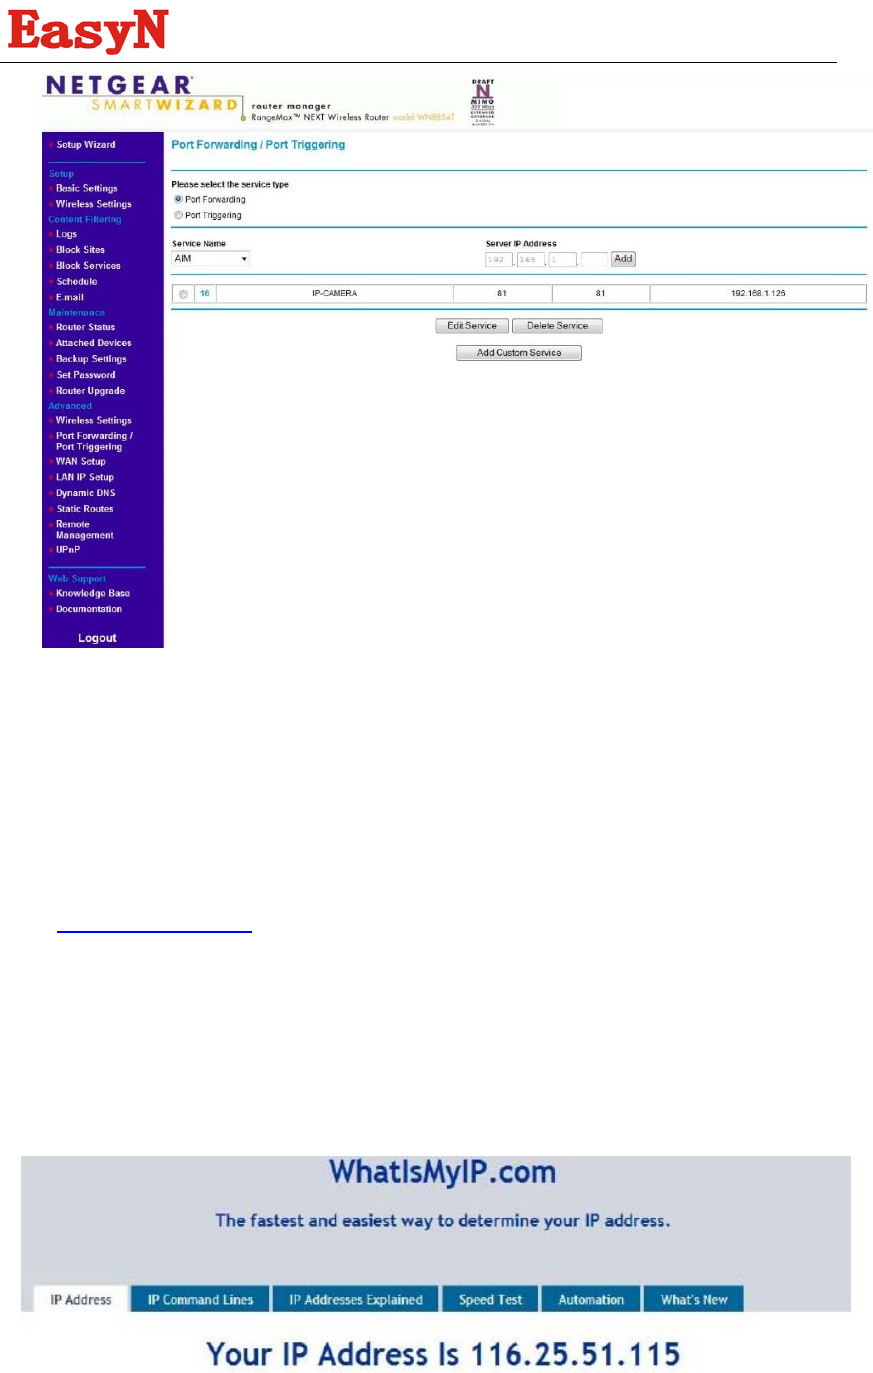
5.1.1 Do port forwarding in your routers:
We never stop trying!
- 36 -
1) Pls make sure the Server IP Address,start port and end port be same with your
camera’s.
2) Enter IP Camera Finder to set the basic configuration,
3) Login the Camera homepage as Administration.
4) Enter DDNS Settings Page and enable DDNS service. Click <Submit> and the
device will reboot
5) You can access the Camera from Internet by domain name( like:
http://demo.easyn.hk )
5.2 Static IP user
Static IP user is not need to use DDNS for remote access. When finished the setting of
the IP Camera in LAN, and port forwarding in the routers,you can access the Camera
directly from Internet by the WAN IP. You can obtain the WAN IP by two ways.
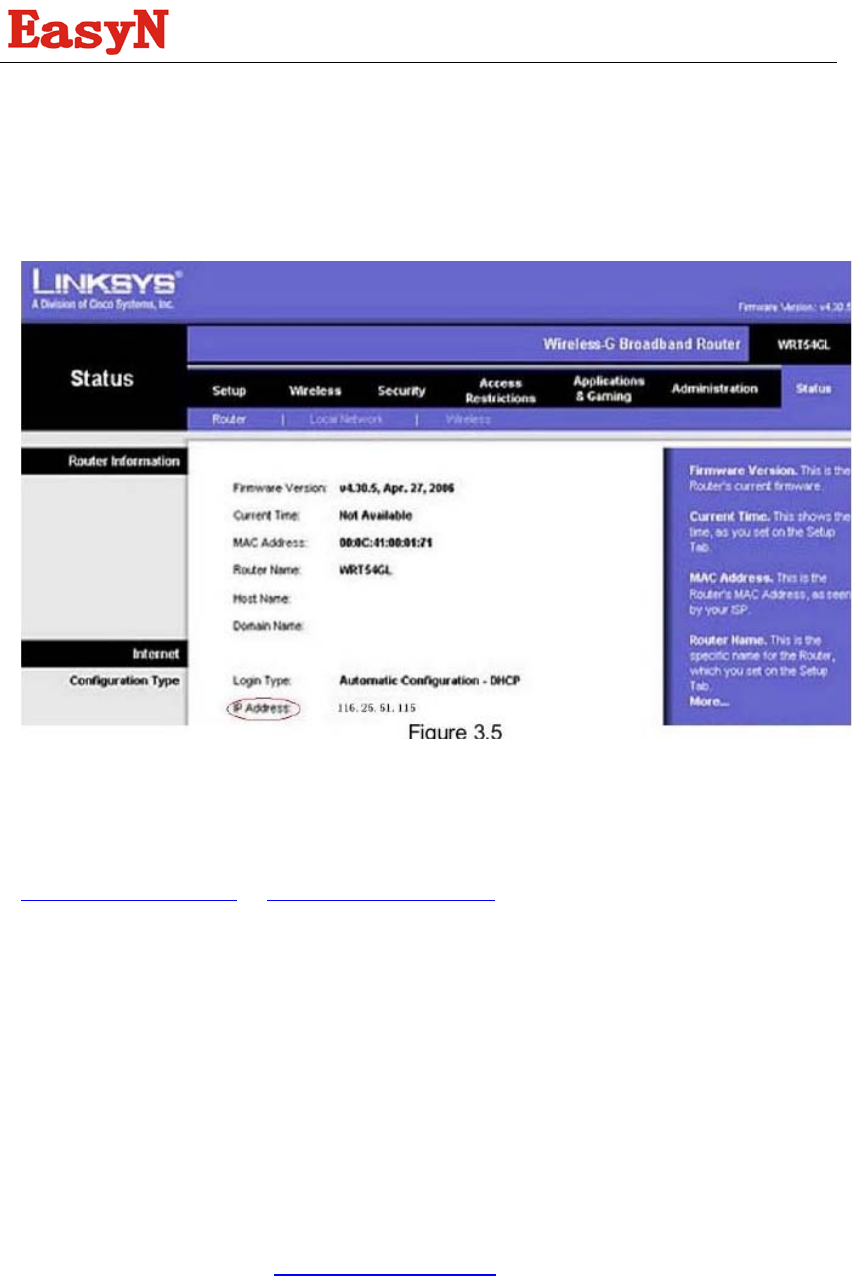
Obtain the WAN IP address from the router
We never stop trying!
- 37 -
Take the WRT54G router of LINKSYS for example,
1) Obtain the IP address of the router (LAN gateway address), user name and
password for logon to the router from the network administrator,
2) Enter the LAN IP address of the router; Open the Status page to find out the WAN
address of the router. In this example, the address is 116.25.51.115.
Access the IP Camera from the Internet
User can access the IP Camera from the Internet, by enter WAN IP address + port
number in the IE to access different IP Cameras. For example,
Http://116.25.51.115:81 or Http://116.25.51.115:812
5.3 How to use other DDNS
For each ADSL reconnection, ISP will re-assign a new IP address for the IP Camera to
facilitate the access. DDNS( Dynamic Domain Name Server) can map the dynamic IP
address of an IP Camera to a fixed domain name. Therefore, we can access the IP
Camera by the fixed domain name whether the IP address changes or not. The IP
address is not necessary when you using the DDNS via the domain name to find your
network.
1) Go to the website which Provides free domain name, register and apply a free
domain name. such as http://www.dyndns.com/
2) Login the Camera homepage as Administration and enter “DDNS Service
Settings” page input the name, password and Host . Then click<SUBMIT> and
reboot Device.
3) Re-login the Camera homepage and enter “DDNS Service Settings” page to check
the DDNS Status is DynDns Succeed or not.

We never stop trying!
- 38 -
4) You only need to enter the domain name(domain name+Port number http://
easynhk.kicks-ass.net:81/ ) in the IE address bar, the browser will visit the IP
Camera.
If multiple IP Camera are connected to the same router, enter DDNS dynamic domain
+port number (for example, http:// easynhk.vicp.net:85/ ) in the address bar of the IE to
access different IP Cameras .
5. Intelligent Video Alarm System
The web link: http://app.easyn.hk/html/en/
Intelligent Video Alarm System is a software with centralized management and
powerful function and enable extending,the software supports all series products
of EasyN.The following take managing Fseries product for example.
To compare with managing on web page,the intelligent system can not only support
browser viewing and multi-ch viewing,but also support much characteristic function.
z Access by web browser,no need client-software
z Centralized management for lots of ipcam
z Real time monitoring with multi-ch
z Support snapshooting at appointed time
z Send alarm message to mobile phone and snapshoot when alarming
z Support mobile phone real time monitoring and access alarm records
z Support to check status of ipcam by message
z Support reading logbook
z Support secondary users
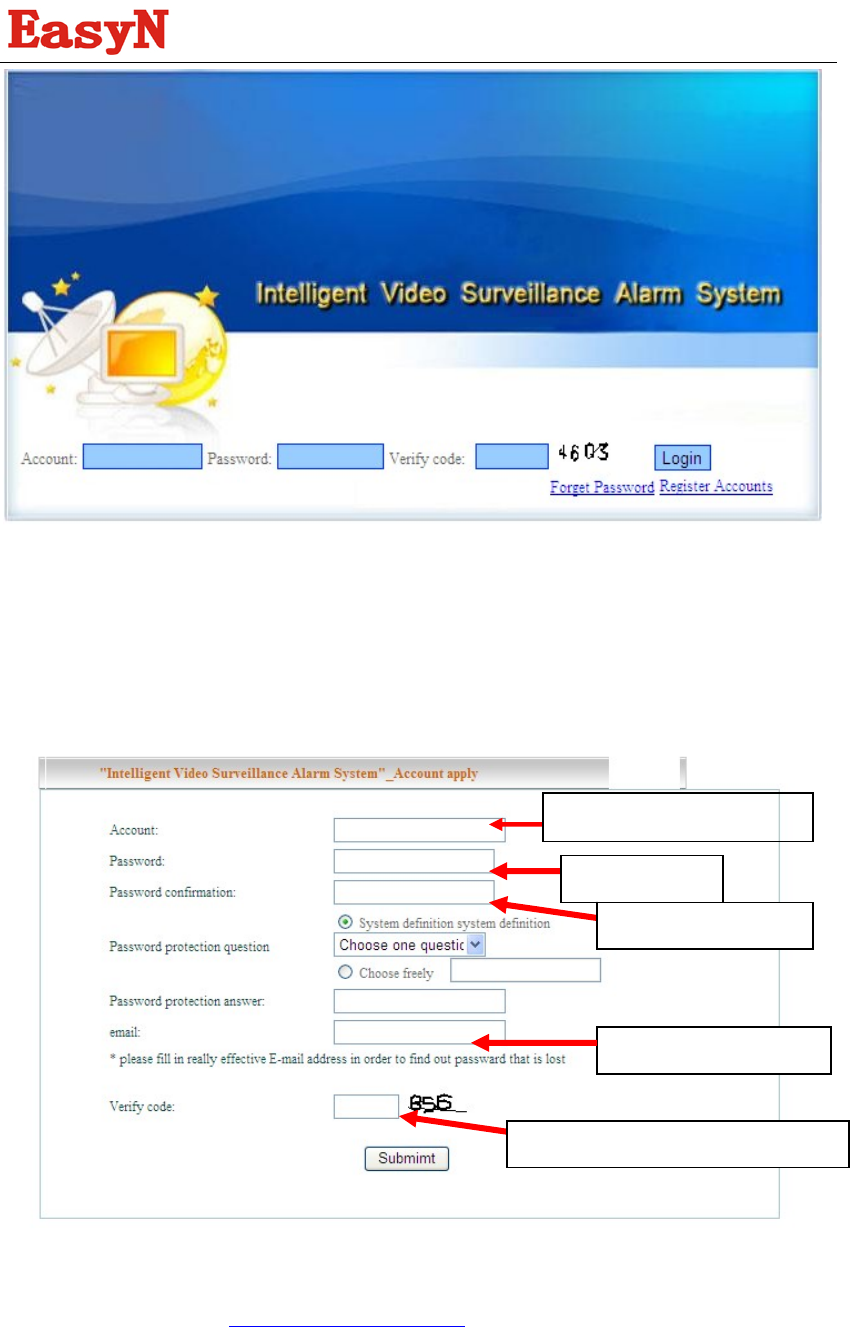
When the first time to use the Intelligent Video Alarm System,need running playing
Active X for the system.When access the page,it will notice to run the Active X
if need,after running with the instruction,the viewing function will be OK.
Detailed help,to consult online help file after accessing the page.
We never stop trying!
- 39 -
5.1Registration and Login
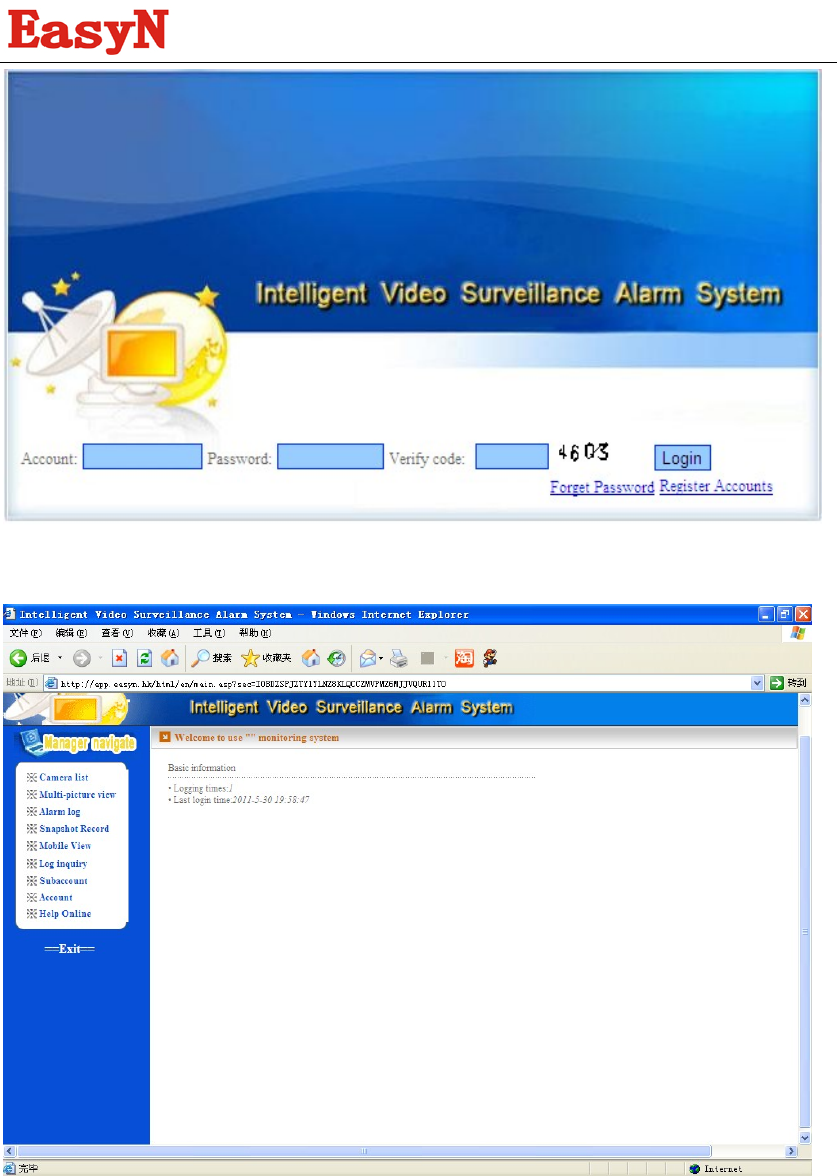
Registration
The following picture for registration:
z Login
Run browser,then put in http://app.easyn.hk/html/en/ then press Enter button on keybord,then
displaying the following page:
Put in user name as you like
Set password
Confirm password
Put in registration email
Put in verify code displayed behind
We never stop trying!
- 40 -
Put in user name and password then press Login button,access the main page,here will show the
times about login and time about the nearly login,as the following picture:
5.2Add equipments
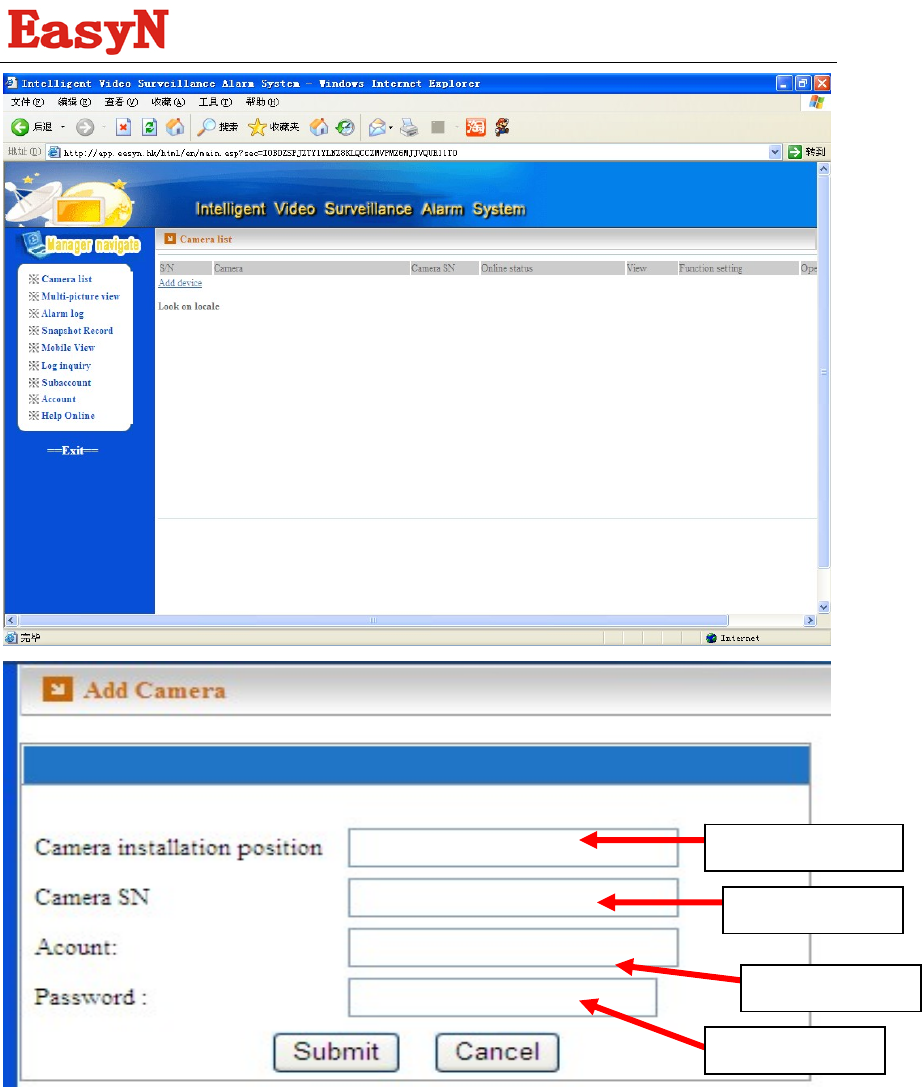
As the following picture,press Camera list to choose ipcam to add on;
We never stop trying!
- 41 -
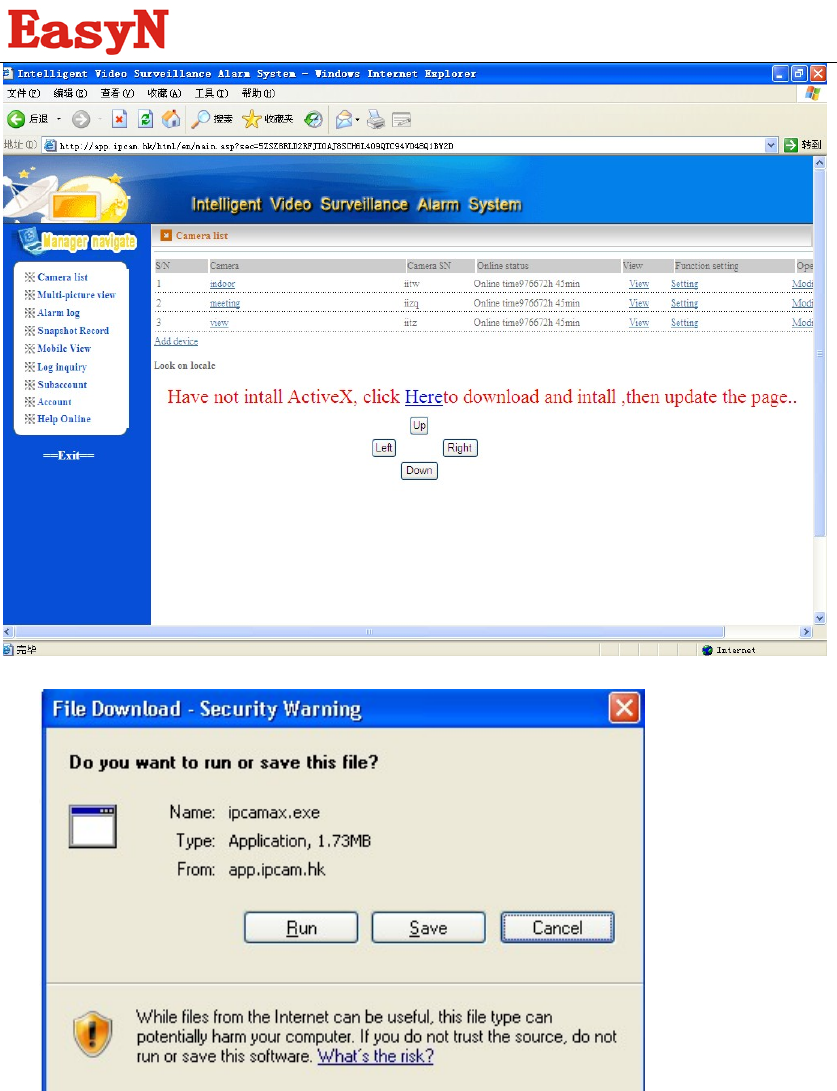
5.3 Download and run Active X
If it is the first time to access the page,please run the Active X before playing video,the means as
below:
(1) access cameras list page
click camera list button then displaying as the following picture:
Define as you like
Inner ddns name
Put in user name
Put in password
We never stop trying!
- 42 -
Press mouse left button on “Here” to download the Active X,display following picture:
Click “run” button then starting download,
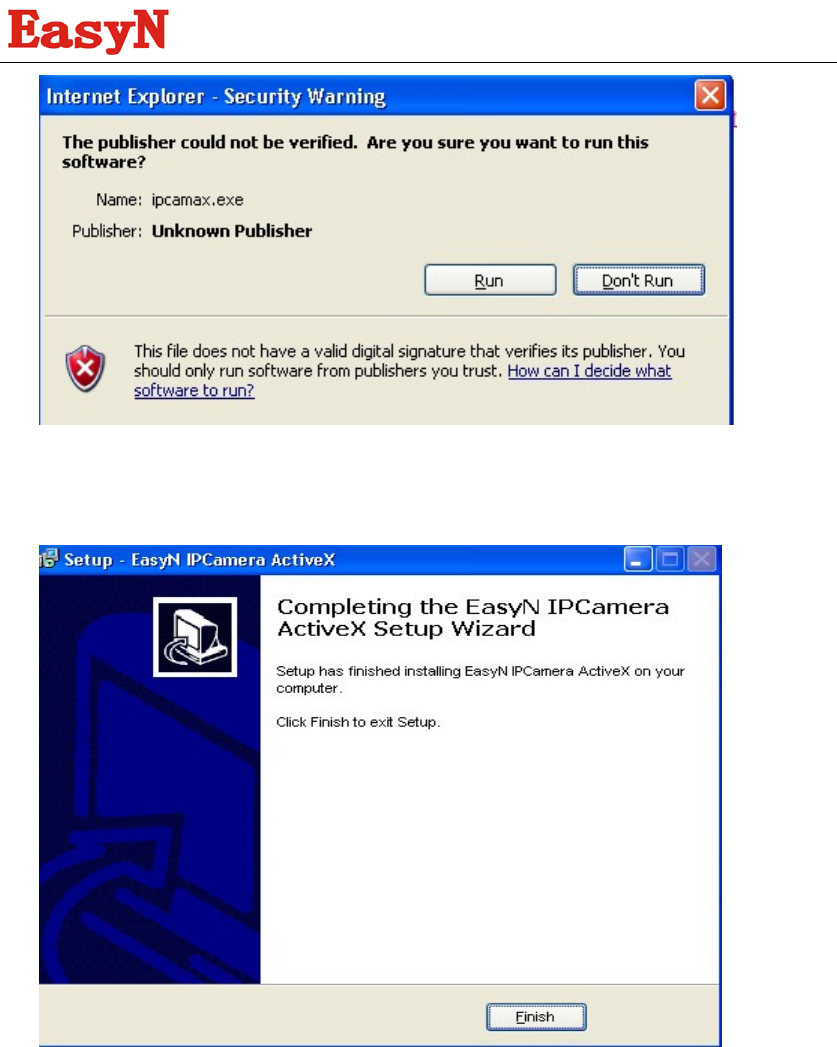
After download,display a dialog for asking to set up,as following picture:
We never stop trying!
- 43 -
Click run button,(if the pc has a firewall or other protect software,it will ask for permission,pls
permit).
Click the next button,dialog as following:
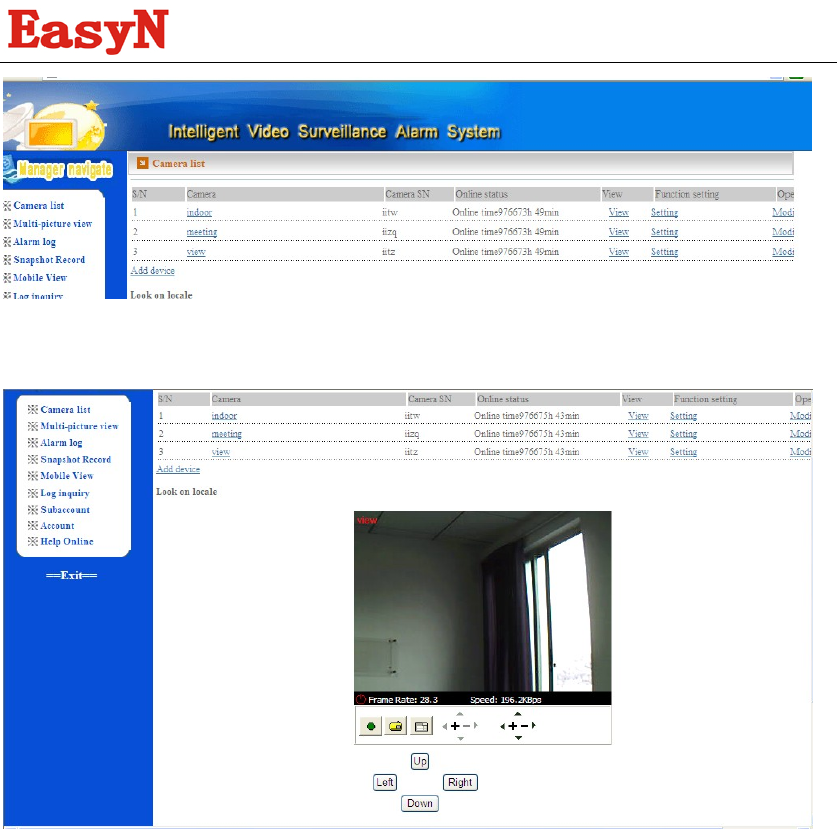
5.4 Monitor video viewing
Click camera list button on left menu,the network video equipments will display as a list,as
following picture:
We never stop trying!
- 44 -
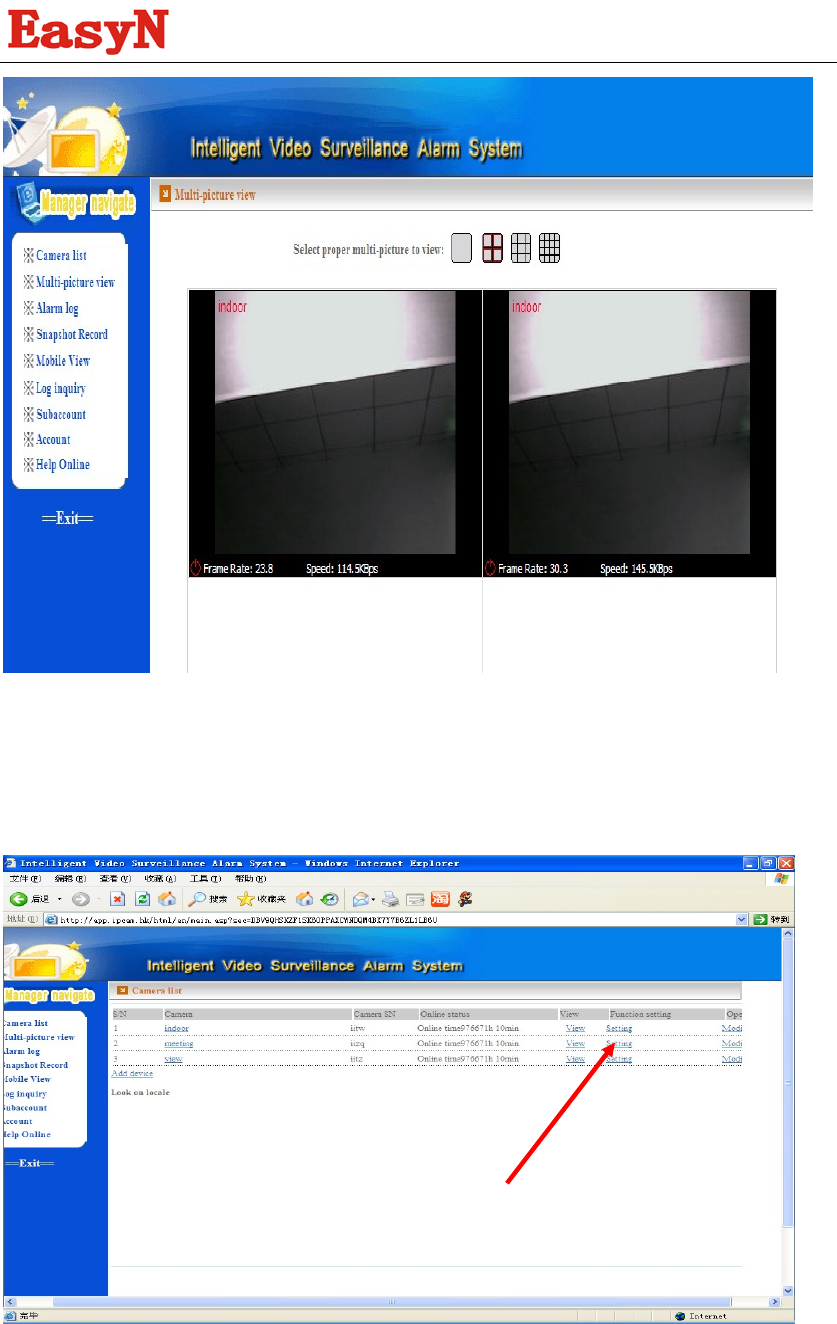
Click the “View” button,the live video will display,as the following picture:
Click the “ multi-picture view” buttom on the left menu,access multi-ch viewing page,as the
following picture”
We never stop trying!
- 45 -
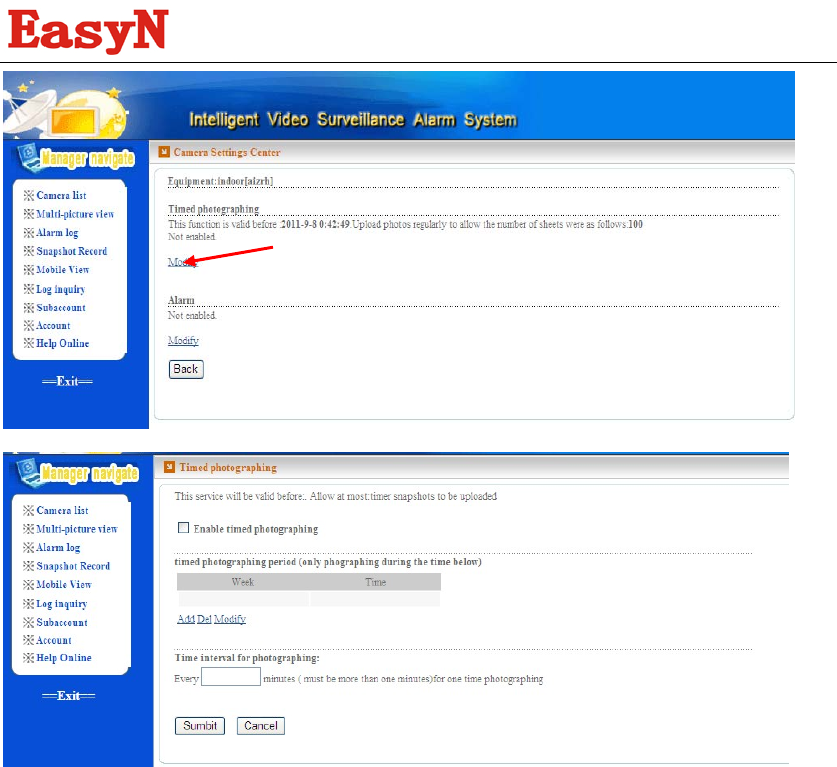
5.5Snapshoot at appointed time
Click camera list button on left menu,select “setting” button the camera you want to get the
snapshot,as the following picture:
Click “modify” button,as the following picture:
We never stop trying!
- 46 -
Here can set the snapshot appointed time and how many pictures to upload.
After setting,click “” buttom to save the settings.
Click the “” button on the menu on the right of the page,select the equipment,the picture uploaded
to the server at appointed time could be viewed.
Select a picture,double click,the picture becomes larger.
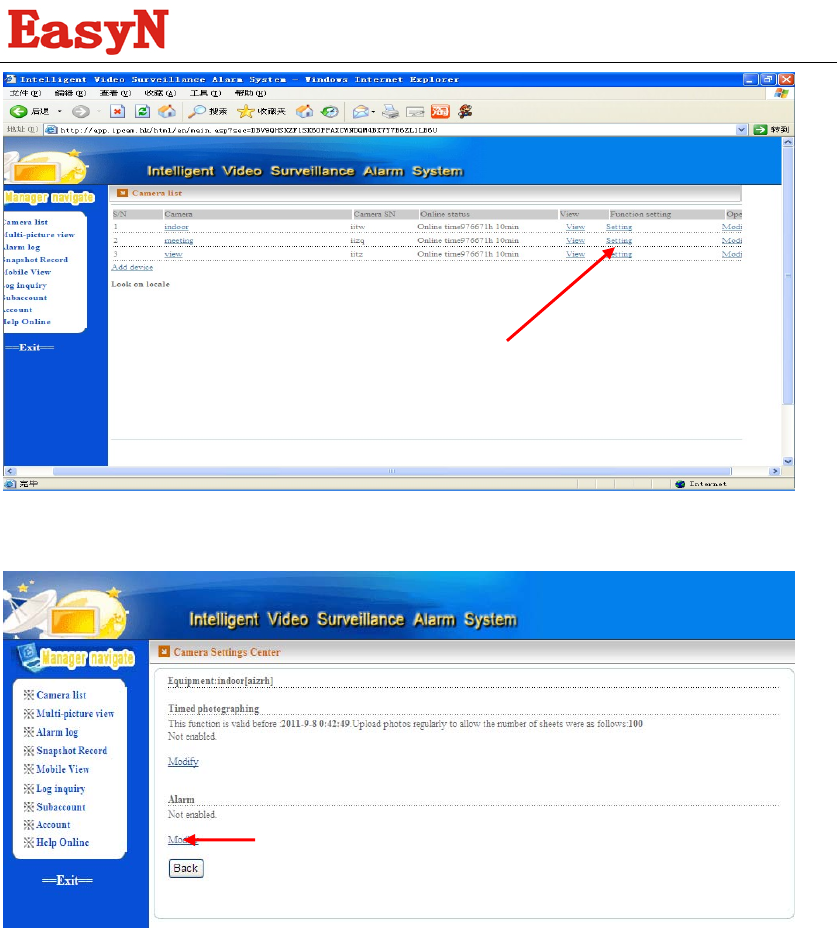
5.6 Alarm setting
Here the alarm function can set the alarm time slot,snapshoot after alarming and message
notices,etc.As the following picture:
We never stop trying!
- 47 -
Click “setting”,access the alarm snapshoot setting page,as the following picture:
5.6.1 Alarm time slot setting
Only at the alarm time slot the alarm system could make alarming action.
Support function for select weeken,appoint time,induce alarm setting and alarm actions.
Such as the following picture:
5.6.2snapshoot at appointed time
Support setting time slot for snapshoot,snapshooting with an interval time.
For appointed time snapshooting,need select the option as the following picture,also can set the
interval time for snapshoot.

We never stop trying!
- 48 -
Set the time slot
6 FAQ
Note: Any quesetions you would meet, please check Network connections firstly.
Check the working status revealed by the indicators on the network server, hub, exchange
and network card. If abnormal, check the network connections.
1. I have forgotten the administrator username and/or password.
To reset the administrator username and password, Press and hold down the RESET
BUTTON fur 7 seconds. Release the power button and the username and password will
be reset back to the factory default administrator username and password.
Default administrator username: admin
Default administrator password: No password
2.IP Address cojfiguration
Check whether IP address of the IP Ccamera server shares the same subnet as your
work station: Click My Computer >Control Panel> Network & Dial-up Connections > LAN
> Attributes >Internet Protocols (TCP/IP), and check IP Address and Subnet Mask. Make
sure they are in the same subnet when configuring IP Camera IP address manually.
Unable to access IP Camera via web browser
3. Network Configuration
Double Check to ensure that your HTTP server software is configured and running
properly. If you’re running any firewall software, make sure it’s allowing inbound
connections to port 80, Also, if you happen to be using a cable/DSL router, make sure
you’ve set up port forwarding properly. ( consult your router’s documentation for more
information ). If none of these seem to be the problem, it’s documentation for more
information ). If none of these seem to be the problem, it’s also possible that your ISP
isblocking inbound connections to port 80-many IPSS have done this because of internet
worms such as Code Red, If this is the case, you’ll have to setup your HTTP server on an
alternate port (such as 8080).
We never stop trying!
- 49 -
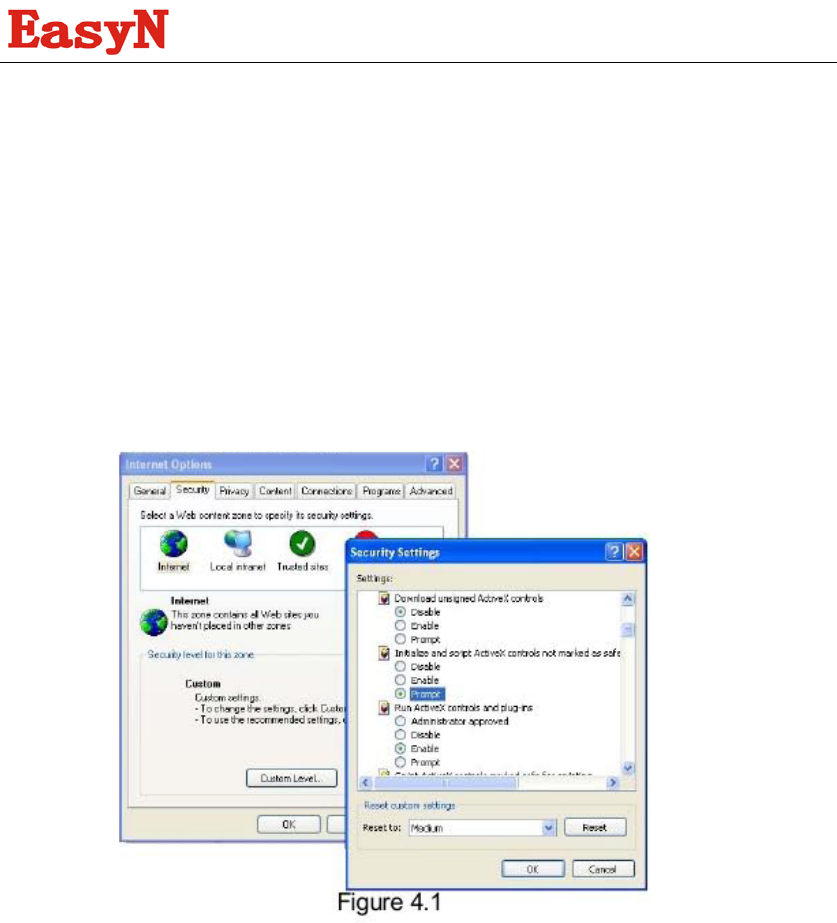
4.No pictures Problems with ActiveX Controller
If Internet Explorer is used as WEB Browser, download ActiveX controller and set the
safety property of IE in the PC when you view it first time:
“IE” browser > “Tool” > “Internet Proper” > “Security”> “Custom Level” > “ActiveX control
and Plug-ins” three options of front should be set to be “Enable”, The ActiceX programs
read by the computer will be stored, as follows:
Enable: Download unsigned ActiveX controls
Enable: Initialize and script ActiveX controls not marked as safe
Enable: Run ActiveX controls and plu-ins
5.Problems with network bandwidth
The image frame rate is subjected to the following factors: 1, network bandwidth; 2, PC
performance, network environment and display preference setting (brightness, theme,
etc); 3, the number of visitors (Too many visitors will slow down the image frame rate.): 4,
choice of switch or hub (Use a switch for multiple IP Camera Servers rather than a HUB,).
We never stop trying!
- 50 -
FCC warning statement
This equipment has been tested and found to comply with the limits for a Class B digital device, pursuant
to part 15 of the FCC Rules. These limits are designed to provide reasonable protection against harmful
interference in a residential installation. This equipment generates, uses and can radiate radio frequency
energy and, if not installed and used in accordance with the instructions, may cause harmful interference
to radio communications. However, there is no guarantee that interference will not occur in a particular
installation. If this equipment does cause harmful interference to radio or television reception, which can
be determined by turning the equipment off and on, the user is encouraged to try to correct the
interference by one or more of the following measures:
• Reorient or relocate the receiving antenna.
• Increase the separation between the equipment and receiver.
• Connect the equipment into an outlet on a circuit different from that to which the receiver is connected.
• Consult the dealer or an experienced radio/TV technician for help.
This device complies with part 15 of the FCC Rules. Operation is subject to the following two conditions:
(1) This device may not cause harmful interference, and (2) this device must accept any interference
received, including interference that may cause undesired operation.
Caution: Any changes or modifications to this device not explicitly approved by manufacturer could void
your authority to operate this equipment.

We never stop trying!
- 51 -
7 Warranty Card
Manufacturing Date: Product Specification:
Inspector:
Version number :
Product Model
Sale Dates
User Company
User name
Customer Address
Contact Number
Maintain Date Failure Conditions Results of
Maintenance
Remark:
Note: please fill the card and offer it with products if guarantee of repair

Ver.: MFEE1103A
www.easyntech.com