Echostar Technologies 301LM LIGHTSWITCH COVER MODULE User Manual Manual
Echostar Technologies LLC LIGHTSWITCH COVER MODULE Manual
Manual

LIGHT SWITCH
QUICK START GUIDE
Copyright © 2014. EchoStar Technologies L.L.C., Englewood, Colorado
80112. All rights reserved. EchoStar is a registered trademark of
EchoStar Technologies L.L.C. Other products, brands, and companies
mentioned are the Trademarks of their respective owner(s). This
product is designed in the United States and manufactured in Mexico.
p/n 204886
REGULATORY INFORMATION
FEDERAL COMMUNICATIONS COMMISSION NOTIFICATION
This device complies with Part 15 of the FCC Rules. Operation is subject to the
following two conditions:
(1) this device may not cause harmful interference, and
(2) this device must accept any interference received, including
interference that may cause undesired operation.
This equipment has been tested and found to comply with the limits for a Class
B digital device, pursuant to Part 15 of the FCC Rules. These limits are designed
to provide reasonable protection against harmful interference in a residential
installation. This equipment generates, uses and can radiate radio frequency
energy and, if not installed and used in accordance with the instructions, may
cause harmful interference to radio communications. However, there is no
guarantee that interference will not occur in a particular installation. If this
equipment does cause harmful interference to radio or television reception, which
can be determined by turning the equipment off and on, the user is encouraged to
try to correct the interference by one or more of the following measures:
• Reorient or relocate the receiving antenna.
• Increase the separation between the equipment and receiver.
• Connect the equipment into an outlet on a circuit different from that to
which the receiver is connected.
• Consult the dealer or an experienced radio/TV technician for help.
If none of the remedies stops the radio interference, you should contact a licensed
radio/television technician, your satellite dealer, or call the Customer Service Center at
1-800-333-DISH (3474), for assistance.
Product must be installed at least 20 cm (~8 inches) from typical person locations
per FCC RF exposure regulations.
Do not make changes or modifications to this equipment. This could void the user’s
authority to operate the equipment.
This Limited Warranty is a legal document. Keep it in a safe place. Remember to retain
your Bill of Sale for warranty service! Any items returned without a copy of the Proof of
Purchase will be considered out of warranty.
This warranty extends only to the original user (“you,” “your”) of the EchoStar device and is limited
to the purchase price of the device. EchoStar Technologies L.L.C. and its afliated companies
(“EchoStar,” “we,” “our,” “us”) warrant this device against defects in materials or workmanship as
follows.
For one year from the original date of purchase, if we nd the device is defective subject to the limits
of this warranty, we will replace the device at no charge for parts or labor. We warrant any such work
done against defects in materials or workmanship for the remaining part of the original warranty
period.
This warranty does not cover installation of the EchoStar System; consumer instruction; physical set
up or adjustment of any consumer electronic equipment; remote control batteries; signal reception
problems; loss of use of the equipment; unused programming charges due to equipment malfunction;
cosmetic damage; damage due to lightning, electrical or telephone line surges, re, ood, or other acts
of Nature; accident; misuse; abuse; repair or alteration by other than our factory service; negligence;
commercial or institutional use; improper or neglected maintenance; equipment sold AS IS or WITH
ALL FAULTS; equipment removal or reinstallation; shipping damage if the equipment was not packed
and shipped in the manner we prescribe; nor equipment purchased, serviced, or operated outside the
contiguous United States of America.
REPLACEMENT AS PROVIDED UNDER THIS WARRANTY IS YOUR EXCLUSIVE REMEDY. WE
SHALL NOT BE HELD LIABLE FOR ANY INCIDENTAL OR CONSEQUENTIAL DAMAGES FOR
BREACH OF ANY EXPRESSED OR IMPLIED WARRANTY ON THIS DEVICE, NOR FOR ANY
INCIDENTAL OR CONSEQUENTIAL DAMAGE RESULTING FROM THE USE OF, OR INABILITY TO
USE, THIS DEVICE. SOME STATES MAY LIMIT OR EXCLUDE THE FOREGOING LIMITATION, SO
THE ABOVE EXCLUSION OR LIMITTION MAY NOT APPLY TO YOU. EXCEPT TO THE EXTENT
PROHIBITED BY APPLICABLE LAW, UNDER NO CIRCUMSTANCES SHALL OUR LIABILITY, IF
ANY, EXCEED THE PURCHASE PRICE PAID FOR THIS DEVICE. ANY IMPLIED WARRANTY OF
MERCHANTABILITY OR FITNESS FOR A PARTICULAR PURPOSE ON THIS DEVICE IS LIMITED
IN DURATION TO THE DURATION OF THIS WARRANTY. SOME STATES DO NOT ALLOW
LIMITATIONS ON HOW LONG A STATUTORY OR IMPLIED WARRANTY LASTS, SO THE ABOVE
LIMITATION MAY NOT APPLY TO YOU. WE RESERVE THE RIGHT TO REFUSE TO HONOR
THIS WARRANTY IF WE DETERMINE ANY OF THE ABOVE EXCEPTIONS TO HAVE CAUSED
THIS DEVICE NOT TO HAVE PERFORMED PROPERLY. THIS WARRANTY SHALL BE VOID IF
ANY FACTORY-APPLIED IDENTIFICATION MARK, INCLUDING BUT NOT LIMITED TO SERIAL
OR CONDITIONAL ACCESS NUMBERS, HAS BEEN ALTERED OR REMOVED. THIS WARRANTY
SHALL ALSO BE VOID IF THE DEVICE HAS BEEN OPENED BY AN UNAUTHORIZED PERSON
(with the exception of opening the battery cover).
LIMITED WARRANTY

WELCOME
Thank you for buying the Light Switch. The Light Switch allows you to control a light switch from the convenience of your receiver and TV.
Please follow these instructions to install your new Light Switch.
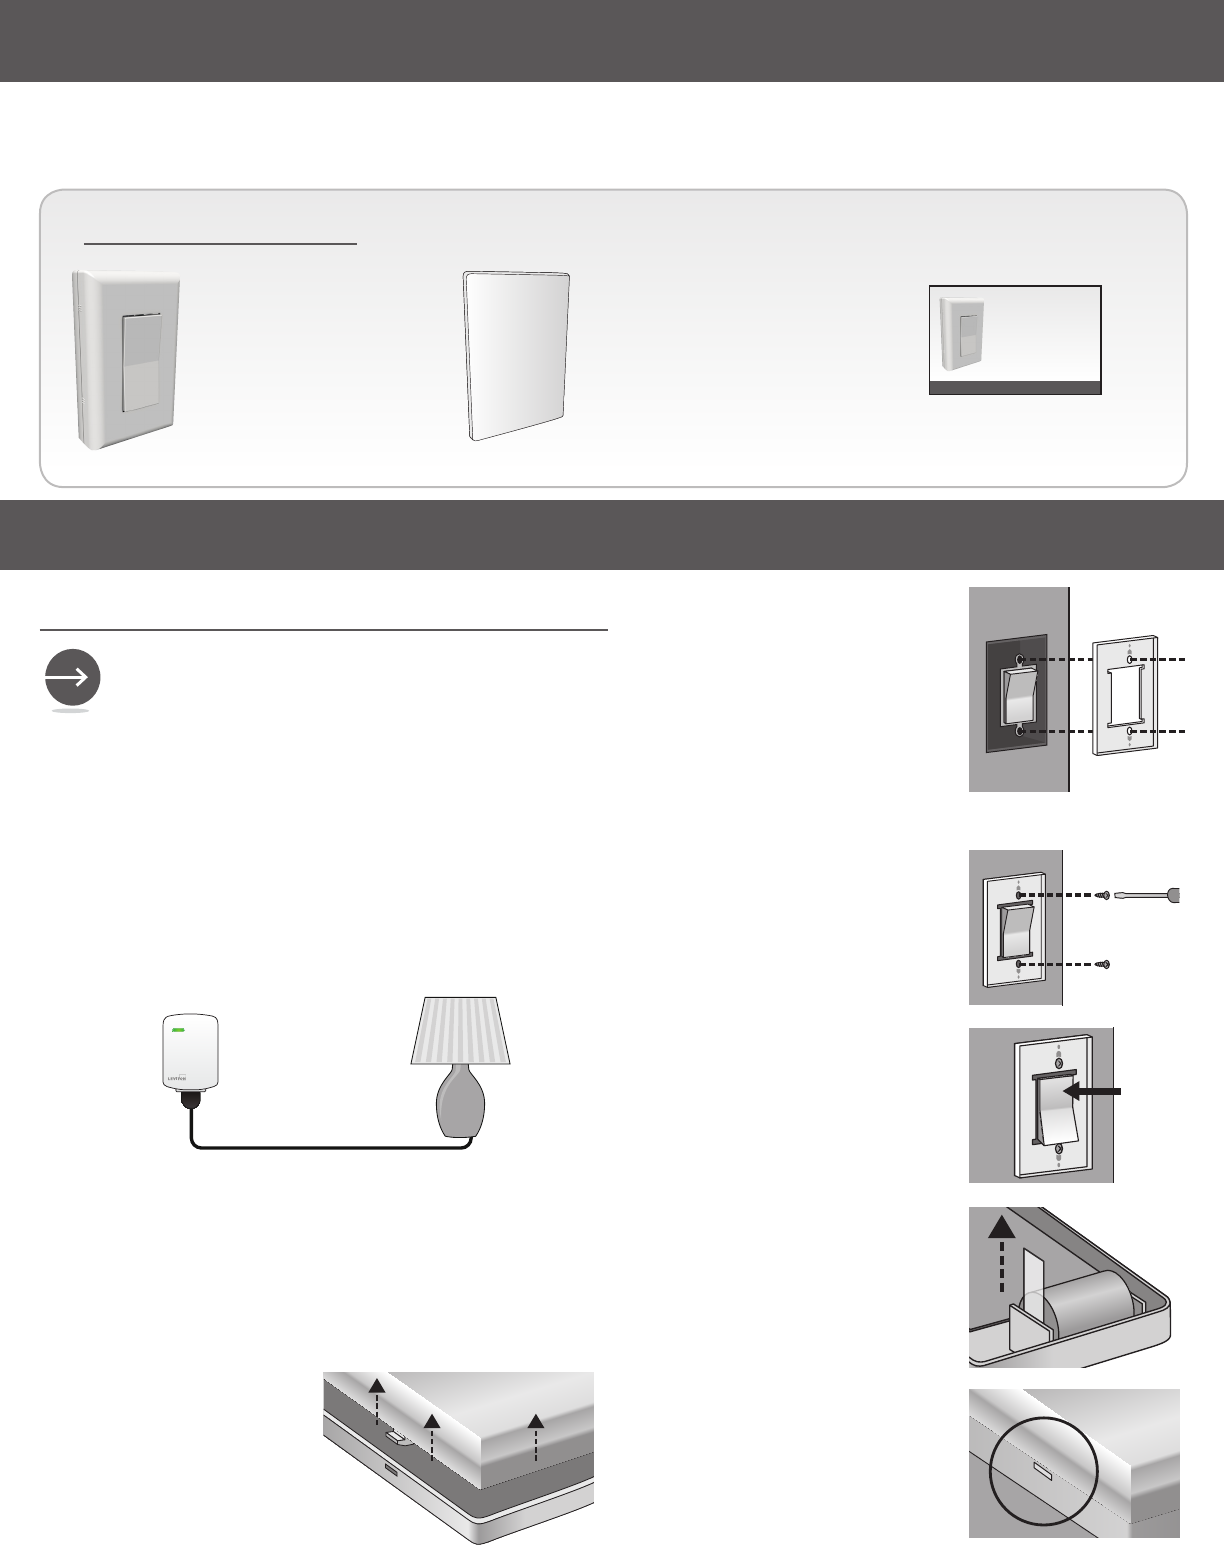
PACKAGE CONTENTS:
Light
Switch
Two-sided
Mounting Adhesive
Quick Start Guide
USING YOUR LIGHT SWITCH
SETUP AND INSTALLATION 5
4
If you want to leave the Light Switch on a table, make
sure the original light switch is in the on position. Follow
the instructions on your home automation receiver to
complete setup.
If you want to install the Light Switch over your current
light switch, continue with these instructions.
Line the back plate of the
Light Switch up with the
screw holes, ensuring the
that back plate is properly
positioned with the UP
printed on the back plate
facing up. For a rocker-
style light switch, trim the
back plate as needed.
6Insert the two screws and
tighten with a screwdriver.
Snap the Light Switch
cover on the back plate on
the wall using the tabs,
ensuring it is secure.
9
2Plug a light switch module (provided separately) into a
switched outlet and plug the lamp into it.
The Light Switch turns on and/or off any device plugged into a
switched outlet. The device must receive power from a separately
installed light switch module.
1Decide whether you want the Light Switch on the wall
where the current switch is located or if you would like it
on a table somewhere else in the room.
3
Remove the Light Switch
cover. Press on the side
tabs to remove the back
plate from the Light
Switch.
7Put the Light Switch in the
on position.
8Pull the plastic tab that is
over the battery contacts.
LIGHT SWITCH
QUICK START GUIDE
ON