Ecolab 92053000 NEXA Touch Free Dispenser Beacon User Manual 72126038 Manual Coverx
Ecolab Inc. NEXA Touch Free Dispenser Beacon 72126038 Manual Coverx
Ecolab >
Manual

3998 FAU Blvd., Suite 310, Boca Raton, FL 33431, Phone: 561-961-5585
Certification Exhibit
FCC ID: Z9O-92053000
IC: 10060A-92053000
FCC Rule Part: 15.209, 15.249, 15.231
ISED Canada’s Radio Standards Specification: RSS-210
TÜV SÜD Project Number: 72126038
Manufacturer: Ecolab, Inc.
Model: 92053000
Manual

9205-3000 (FAS1548)
Nexa™ Touch Free Dispenser Beacon User’s Guide
???Revision A

9205-3000 (FAS1548) Nexa™ Touch Free Dispenser Beacon User’s Guide
Ecolab, Inc.
Ecolab P/N
Revision
Date
Drawing Number
Page
9205-3000
??
03/03/17
???
2 of 14
Table of Contents
Abstract........................................................................................................................................................................................ 3
Revision History ........................................................................................................................................................................... 3
REVISION LEVEL ........................................................................................................................................................................... 3
Reference Documents ................................................................................................................................................................. 3
Terms, Acronyms and Abbreviations ........................................................................................................................................... 3
1.1 Hardware Components .............................................................................................................................................. 4
1.2 Proprietary Wireless Network .................................................................................................................................... 4
1.3 Dashboard and Offsite Server .................................................................................................................................... 5
1. Nexa Touch Free Dispenser Beacon Overview .................................................................................................................... 6
2. Touch Free Dispenser Beacon Set Up .................................................................................................................................. 6
2.1 Installing Batteries ...................................................................................................................................................... 6
2.2 Adjusting Communication Range ............................................................................................................................... 7
2.3 Installing the Touch Free Dispenser Beacon in a Nexa™ Touch Free Dispenser ........................................................ 8
2.4 Confirming FCC / ISED Compliance............................................................................................................................. 9
2.5 Removal of the Touch Free Dispenser Beacon from a Nexa™ Touch Free Dispenser. ............................................. 10
3. How the Touch Free Dispenser Beacon (TDB) Works. ....................................................................................................... 10
3.1 Interaction with a Healthcare Worker’s Badge ........................................................................................................ 10
3.2 Interaction with a Hub ............................................................................................................................................. 10
4. Dispenser Beacon Status Information ............................................................................................................................... 11
4.1 Yellow LED – Successful Communication Between HCW Badge and Dispenser Beacon. ........................................ 11
4.2 When an Empty Bottle is Removed and a New Bottle is Installed ........................................................................... 11
5. Touch Free Dispenser Beacon (TDB) Care and Maintenance ............................................................................................ 11
5.1 Handling ................................................................................................................................................................... 11
5.2 Cleaning .................................................................................................................................................................... 11
5.3 Battery Replacement ................................................................................................................................................ 11
Appendix A - Certification and Safety Approvals ....................................................................................................................... 13
Appendix B - Warranty .............................................................................................................................................................. 14
Figures
Figure 1. ENCOMPASS HH COMPLIANCE MONITORING SYSTEM Overview ................................................................................ 5
Figure 2. Battery door tab location .............................................................................................................................................. 6
Figure 3. Nexa Touch Free Dispenser Beacon (Front View) Range Buttons ................................................................................ 7
Figure 4. TDB Installation into Nexa™ Touch Free Dispenser ...................................................................................................... 8
Figure 5. Placement of FCC / ISED Label ...................................................................................................................................... 9
9205-3000 (FAS1548) Nexa™ Touch Free Dispenser Beacon User’s Guide
Ecolab, Inc.
Ecolab P/N
Revision
Date
Drawing Number
Page
9205-3000
??
03/03/17
???
3 of 14
Abstract
This document describes basic setup, function, use and maintenance of the 92053000 (FAS1548) NEXA™ Touch Free Beacon
Module.
Revision History
Ecolab Research Center
Eagan, MN 55121
TITLE: NEXA TOUCHFREE DISPENSER
PRODUCTION ASSEMBLY AND
TESTING REQUIREMENTS
REVISION LEVEL
REV
DESCRIPTION
EC NO.
DATE
DWN
CHKD
APP
A
Initial Release
-
3/3/17
CAL
-
-
Reference Documents
Badge States Handout
Badge User Manual
World Health Organization “Your 5 Moments for Hand Hygiene”,
http://www.who.int/gpsc/5may/background/5moments/en
Terms, Acronyms and Abbreviations
Factory Default
A setting or parameter that is programmed with an initial default value by the manufacturer but that
may be modified by the healthcare facility.
HCW
Healthcare Worker
LED
Light Emitting Diode
Patient Contact
Having physical contact with a patient, their immediate surroundings or being in close proximity to
an Ecolab Encompass Hand Hygiene Compliance Monitoring System equipped patient bed.
Patient Zone
The area around a patient bed that is detectable by an Encompass HH CMS Badge. Being inside the
patient zone will be considered patient contact.
Encompass HH
CMS
Ecolab Encompass Hand Hygiene Compliance Monitoring System
WHO
World Health Organization
TDB
Touch Free Dispenser Beacon

9205-3000 (FAS1548) Nexa™ Touch Free Dispenser Beacon User’s Guide
Ecolab, Inc.
Ecolab P/N
Revision
Date
Drawing Number
Page
9205-3000
??
03/03/17
???
4 of 14
The ENCOMPASS HAND HYGIENE COMPLIANCE MONITORING SYSTEM (Encompass HH CMS) is a state of the art wireless hand
hygiene reminder system, designed to enable best practices for proper hand hygiene in a healthcare facility. Multiple studies
from organizations like the World Health Organization (WHO) and the Centers for Disease Control (CDC) have repeatedly
demonstrated that proper hand hygiene leads directly to improved infection control and a reduction in Healthcare Associated
Infections (HAI). The ENCOMPASS HH CMS is a cost-effective, energy efficient, robust and easily installed system for coaching
healthcare workers (HCWs) to always wash or sanitize their hands before and after patient contact. The system can be divided
into three parts, hardware components, the proprietary wireless network and the Dashboard web-based application.
1.1 Hardware Components
The ENCOMPASS HAND HYGIENE COMPLIANCE MONITORING SYSTEM is built on individual components or devices that
work in concert to deliver real-time individual hand hygiene status to HCWs and near real-time statistics for both onsite
and offsite monitoring of current and historical hand hygiene compliance data. Currently, the wireless components of
the ENCOMPASS HAND HYGIENE COMPLIANCE MONITORING SYSTEM are the HCW Badge, the Dispenser Beacons and
the Bed Beacon.
1.1.1 Healthcare Worker Badge
The Badge is a wireless device worn by the HCW to provide real-time notification of the HCW’s current hand hygiene
status. Notification is provided by both visual and audible alerts. The Badge is responsible for determining,
maintaining and transmitting the current hand hygiene status of the HCW to other ENCOMPASS HH CMS components.
1.1.2 Dispenser Beacon
The Dispenser Beacon is attached to or embedded within a soap or sanitizer dispenser. Its function is to communicate
with the Badge worn by the HCW when the dispenser is activated (dispense event), collect dispense event data from
that Badge and then transmit the collected data to a network where it will ultimately be sent to an offsite server for
processing and archiving.
1.1.3 Bed Beacon
The Bed Beacon is mounted to a patient bed. Its function is to communicate with the Badge worn by the HCW, when
the HCW comes in close proximity to the patient bed (bed event), collect bed event data from that Badge, and then
transmit the collected data to a network where it will ultimately be sent to an offsite server for processing and
archiving.
1.2 Proprietary Wireless Network
Encompass HH CMS utilizes a proprietary wireless mesh network to transport event data collected by Dispenser Beacons
and Bed Beacons to the offsite server for processing and archiving. The proprietary wireless network is composed of two
types of devices: Hubs and a Gateway.
1.2.1 Hubs
Hubs are installed throughout a healthcare facility and communicate with nearby Bed Beacons and Dispenser Beacons.
When an event is generated by a Beacon, it broadcasts the event data to the nearest Hub. The Hub then receives the
event data and rebroadcasts it to the Gateway (if it is in range) or to the next nearest Hub with the data being passed
from Hub to Hub until it reaches the Gateway.
1.2.2 Gateway
The Gateway receives event data generated by Dispenser Beacons or Bed Beacons directly, if they are in range, or
from Hubs which act as repeaters. The Gateway then transmits the event data to an offsite server via cellular modem,
for processing and archiving.
9205-3000 (FAS1548) Nexa™ Touch Free Dispenser Beacon User’s Guide
Ecolab, Inc.
Ecolab P/N
Revision
Date
Drawing Number
Page
9205-3000
??
03/03/17
???
5 of 14
1.3 Dashboard and Offsite Server
The Dashboard is a web-based application running on a designated offsite server. It is responsible for collecting,
processing and archiving onsite Dispenser Beacon and Bed Beacon event data sent by the onsite Gateway. The Dashboard
provides a user interface which allows access to hand hygiene data, statistics and reports compiled from event data
originating at the healthcare facility.
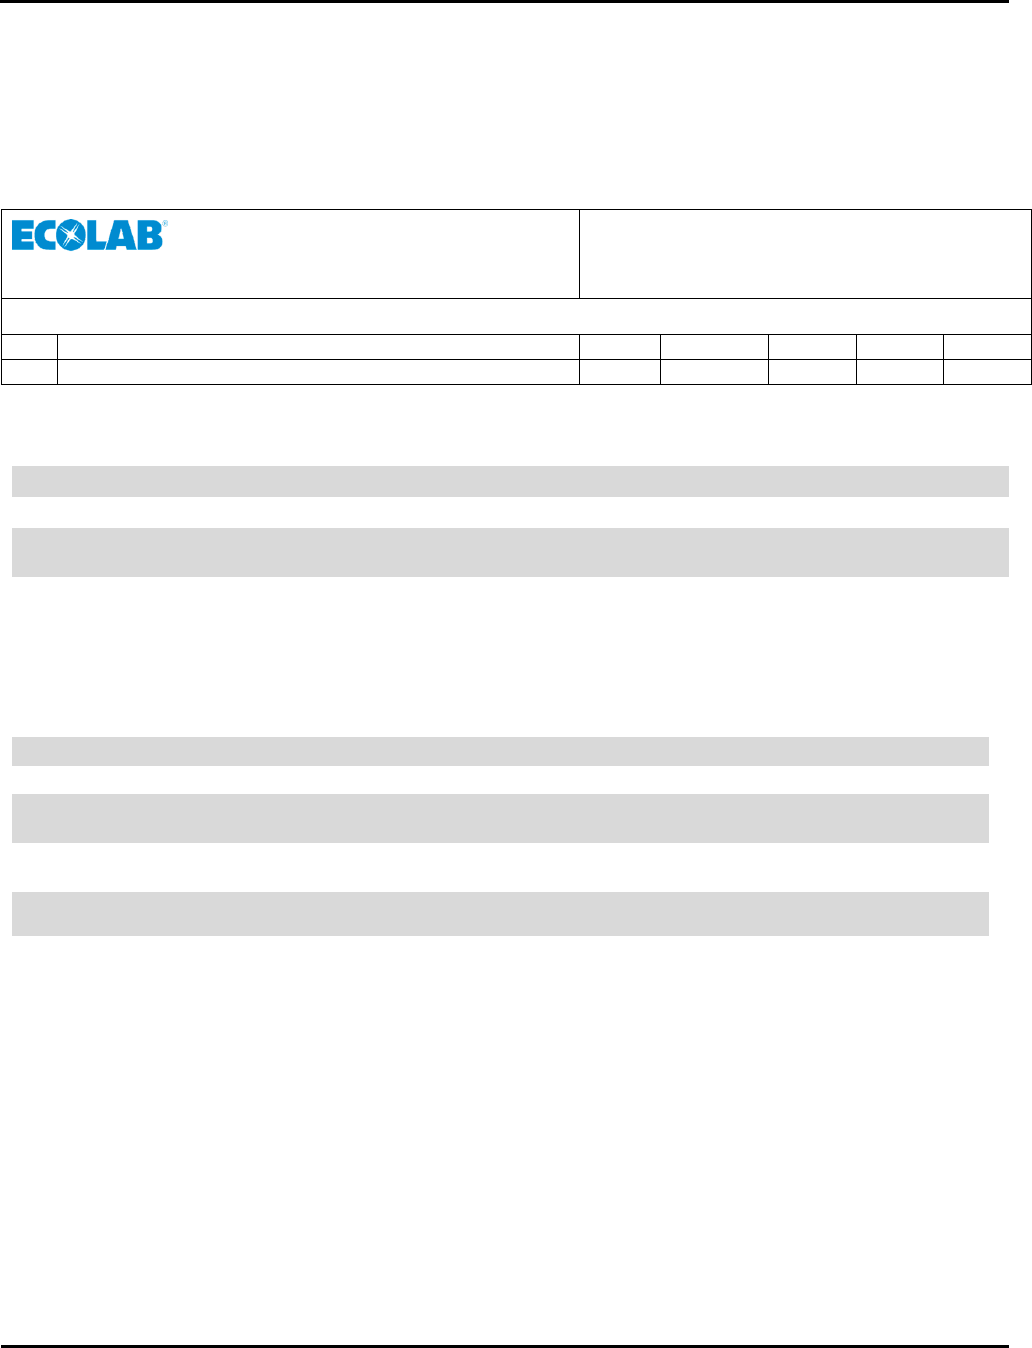
Figure 1. ENCOMPASS HH COMPLIANCE MONITORING SYSTEM Overview
Nexa™
Dispenser
Beacon
Touchfree
Dispenser Beacon
FAS1548
Manual
Dispenser Beacon
FAS1540
9205-3000 (FAS1548) Nexa™ Touch Free Dispenser Beacon User’s Guide
Ecolab, Inc.
Ecolab P/N
Revision
Date
Drawing Number
Page
9205-3000
??
03/03/17
???
6 of 14
1. Nexa Touch Free Dispenser Beacon Overview
The Nexa Touch Free Dispenser Beacon (part number 9205-3000) is an integral component of the Encompass HH CMS. When
the Encompass HH CMS is installed, Healthcare facilities determine which dispensers they wish to have monitored, and a
beacon is installed in those dispensers. Each Dispenser Beacon has a unique identification address that is associated to a
specific physical location during the install process.
The Dispenser Beacon communicates with the Healthcare Worker Badges to obtain Badge ID and Status information during
a dispense event. The dispense event communication sets the HCW Badge’s status to “Green” or “State 0” and then both
the dispenser and the HCW badge ID information is transmitted by the dispenser beacon to the nearest Hub, along with the
time and date of the event, to be relayed to the offsite server for data compilation. Once the information exchange between
the Dispenser Beacon and the HCW Badge is complete, the dispenser LED will light up Yellow to indicate that the HCW has
been credited with the dispense event.
2. Touch Free Dispenser Beacon Set Up
2.1 Installing Batteries
Each Touch Free Dispenser Beacon (TDB) requires 2 AAA alkaline batteries for operation. These must be installed prior to
initial installation of the TDB in the dispenser. The door to the TDB battery compartment can be found on the left side of
the device.
To install batteries prior to initial installation, complete the following steps:
1. Remove the battery compartment door by gently pulling back on the ridged tab and lifting away from the TDB.
2. Once the battery compartment door has been removed, install two (2) AAA alkaline batteries, aligning the
positive (+) and negative (-) terminals of the batteries with the corresponding signs displayed within the battery
compartment (Ecolab recommends that only Duracell® Coppertop batteries be used to power the TDB).
3. Once the batteries have been installed, replace the battery compartment door and make sure that it is firmly in
place before installation in the dispenser.
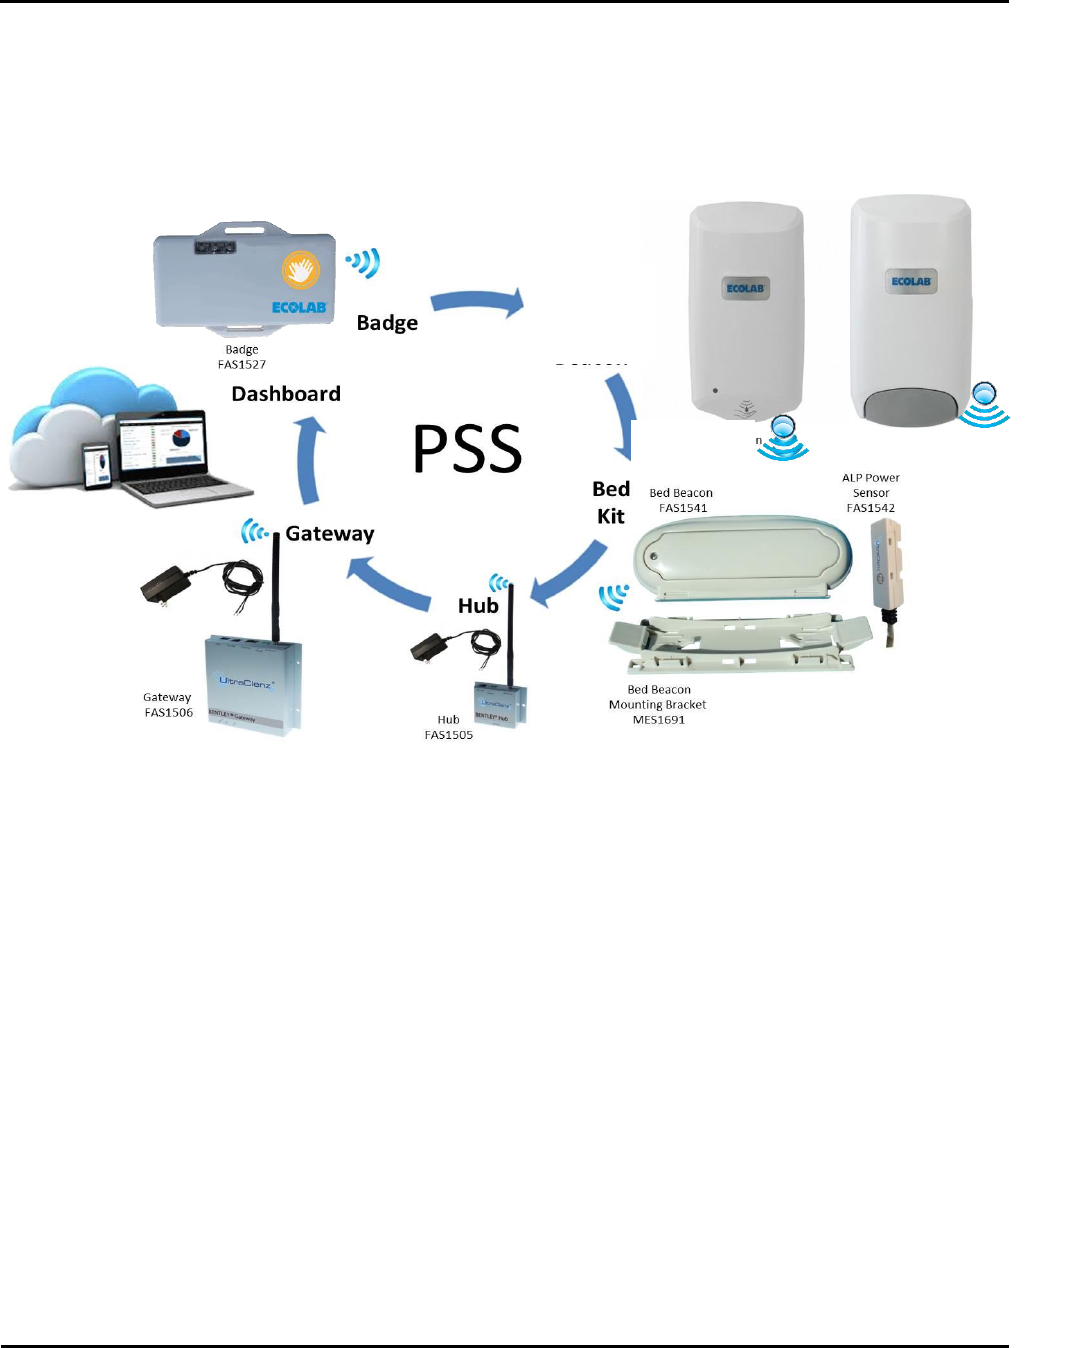
Figure 2. Battery door tab location
Battery
door tab
9205-3000 (FAS1548) Nexa™ Touch Free Dispenser Beacon User’s Guide
Ecolab, Inc.
Ecolab P/N
Revision
Date
Drawing Number
Page
9205-3000
??
03/03/17
???
7 of 14
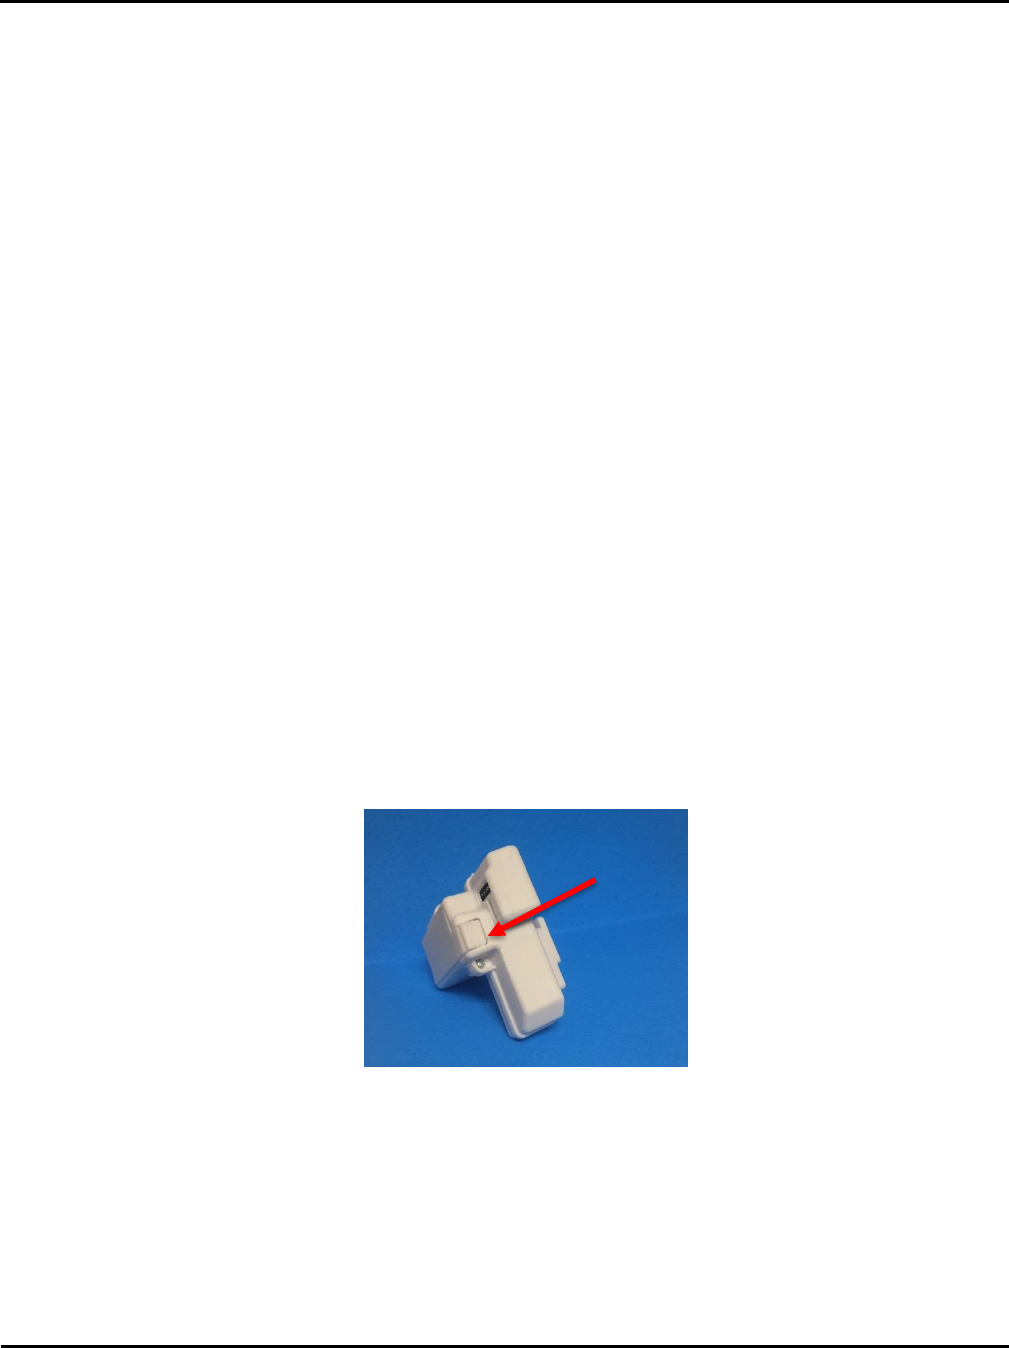
2.2 Adjusting Communication Range
The range buttons (see Figure 3) are used to increase or decrease the communication distance (range) between the TDB
and HCW Badge. The range buttons are accessed via ports near the battery door of the TDB. Use a non-electrically
conductive (not metal) instrument, such as a tooth pick, to gently press the buttons. When a button has been pressed,
the LED will flash. The increase range button is marked with a “+” sign next to the access port. The decrease range button
is marked with a “-” sign next to the access port.
To increase the communication range, do the following:
1. Press and release the “+” range button. The LED will flash Yellow one (1) time for each push of the switch until
the maximum range has been reached. The LED will flash Yellow two (2) times when at the maximum range.
2. Repeat step 1 until the desired range has been reached.
To decrease the communication range, do the following:
1. Press and release the “-“ range button. The LED will flash Yellow one (1) time for each push of the switch until
the maximum range has been reached. The LED will flash Yellow two (2) times when at the minimum range.
2. Repeat step 1 until the desired range has been reached.
To set the range to the factory default, press and hold both the “+” and “-“ range buttons until the LED flashes Yellow four
(4) times.
Figure 3. Nexa Touch Free Dispenser Beacon (Front View) Range Buttons
Range
buttons
9205-3000 (FAS1548) Nexa™ Touch Free Dispenser Beacon User’s Guide
Ecolab, Inc.
Ecolab P/N
Revision
Date
Drawing Number
Page
9205-3000
??
03/03/17
???
8 of 14
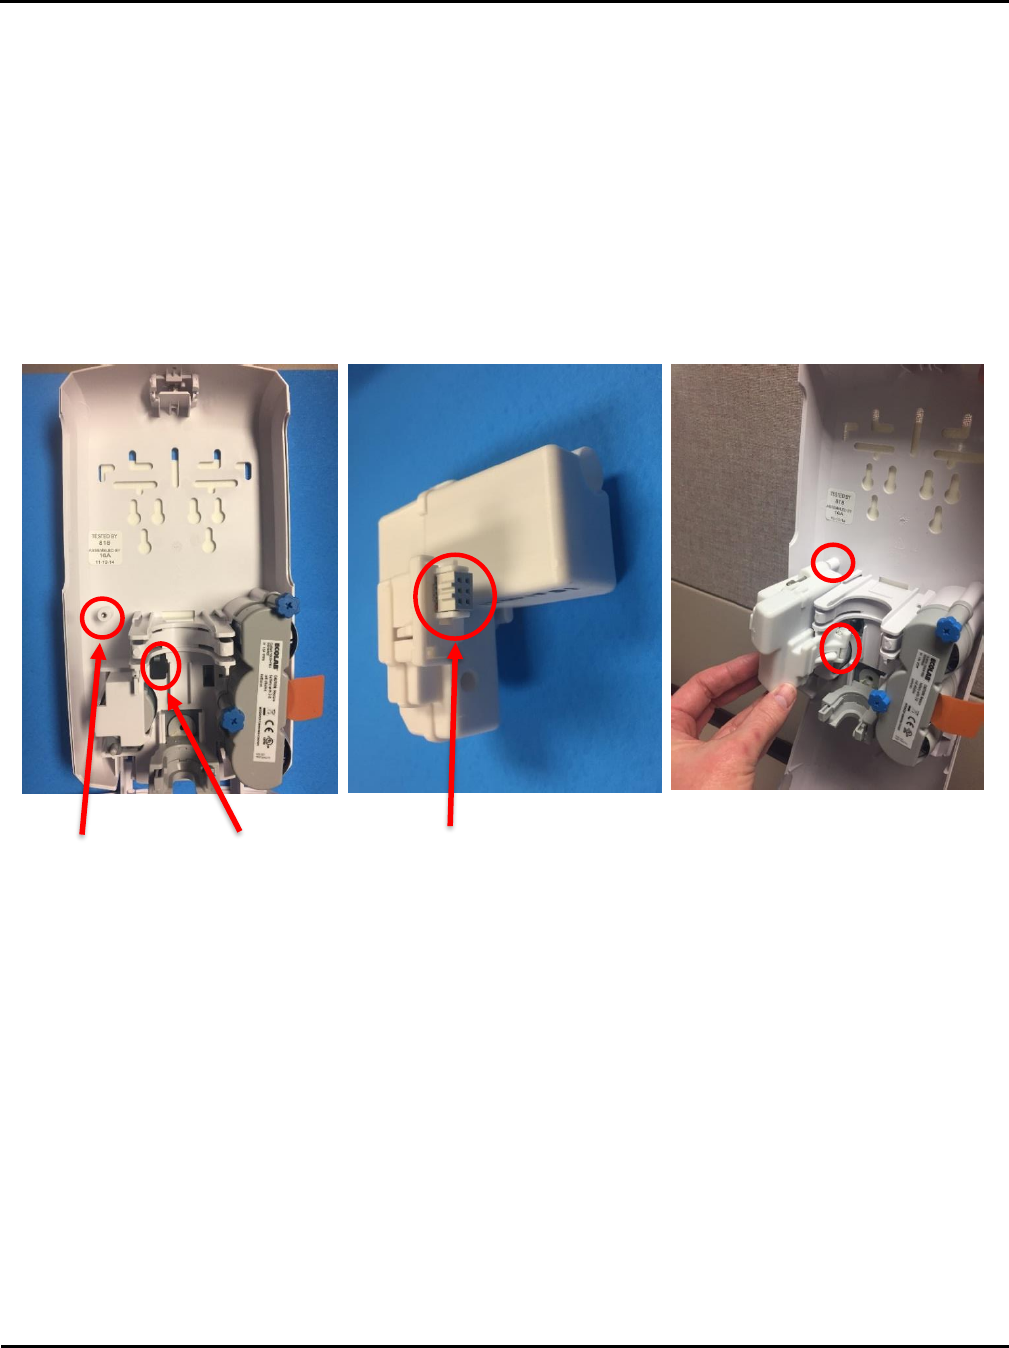
2.3 Installing the Touch Free Dispenser Beacon in a Nexa™ Touch Free Dispenser
The Nexa TDB can only be used in the large (“Classic”) version of the Nexa Touch Free Dispenser.
In order to install the beacon follow these steps:
(1) Open the dispenser by depressing the top latch button.
(2) Remove product bottle (if any) from the dispenser and set aside.
(3) Remove the rubber communication port cover in the back of the dispenser (see figure 4) and discard.
(4) Align the TDB plug with the communication port, and the housing’s captive screw with the screw boss in
the back of the dispenser (see figure 4).
(5) Gently but firmly insert the TDB plug into the communication port, until it is firmly seated in the port.
(6) Tighten the captive screw finger tight into the boss.
(7) Replace the product bottle within the dispenser.
(8) Close the dispenser.
Figure 4. TDB Installation into Nexa™ Touch Free Dispenser
Communication
Port Cover
TDB
Plug
Installation: alignment of
TBD with dispenser boss
and communication port
Screw
Boss
9205-3000 (FAS1548) Nexa™ Touch Free Dispenser Beacon User’s Guide
Ecolab, Inc.
Ecolab P/N
Revision
Date
Drawing Number
Page
9205-3000
??
03/03/17
???
9 of 14
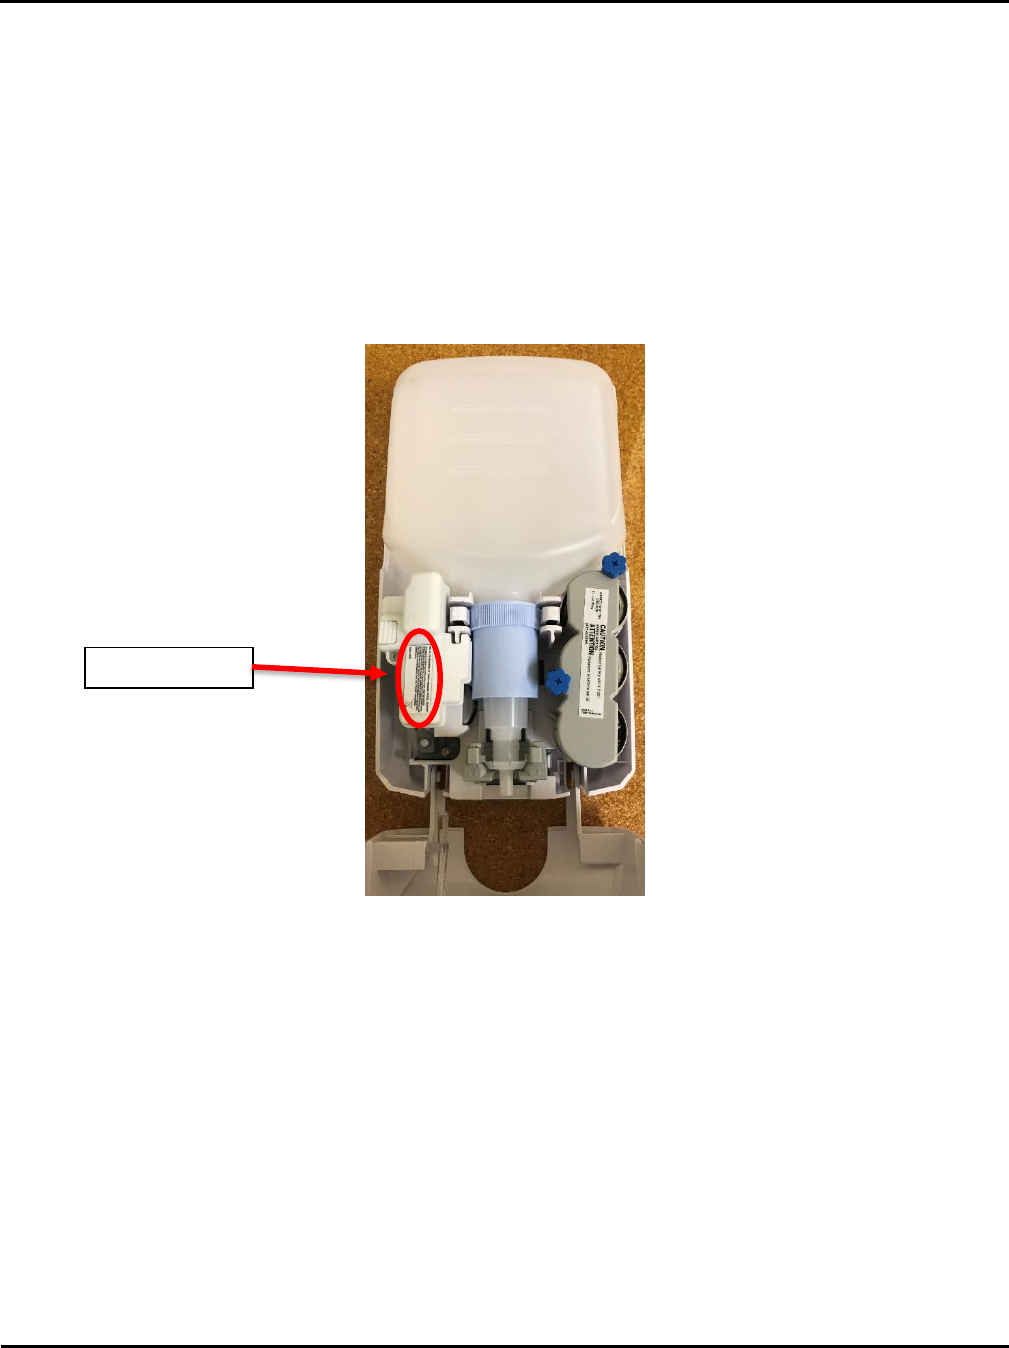
2.4 Confirming FCC / ISED Compliance
Verify that the FCC / ISED compliance label is present and that its meaning is understood.
Figure 5. Placement of FCC / ISED Label
FCC / ISED Label

9205-3000 (FAS1548) Nexa™ Touch Free Dispenser Beacon User’s Guide
Ecolab, Inc.
Ecolab P/N
Revision
Date
Drawing Number
Page
9205-3000
??
03/03/17
???
10 of 14
2.5 Removal of the Touch Free Dispenser Beacon from a Nexa™ Touch Free Dispenser.
To remove the beacon, follow these steps:
(1) Open the dispenser by depressing the top latch button.
(2) Remove product bottle (if any) from the dispenser and set aside
(3) Unscrew the captive screw from the boss, to release the beacon and allow it to be removed.
(4) Gently grasp and pull on the TDB to disengage the TDB plug from the communication port.
3. How the Touch Free Dispenser Beacon (TDB) Works.
The Encompass HH CMS TDB is a wireless device that detects and communicates with Encompass HH CMS HCW badges and
Hubs. The TDB communicates with a HCW badge based on its proximity to the device. When the HCW dispenses soap or
sanitizer by placing their hand under the dispenser, a proximity bubble is created around the dispenser. The proximity bubble
wakes up the HCW Badge and begins the information exchange between the devices. The dispenser then communicates
time, date, badge status and ID information (the dispenser ID and badge ID) to a Hub, which relays it on to the remote server.
3.1 Interaction with a Healthcare Worker’s Badge
When the touch free dispenser dispenses product, the attached Encompass HH CMS TDB will momentarily create a
proximity bubble around itself and the dispenser. If the Badge worn by the HCW activating the dispenser is within the
proximity bubble, the Badge will communicate with the TDB and then will change to the proper hand hygiene status level.
If the Badge is not within the proximity bubble, it will not communicate with the TDB nor will its hand hygiene status level
change. This will result in the HCW not receiving credit for using the dispenser.
The default range of the TDB’s proximity bubble is about 24 inches in all directions but the range can be adjusted if
necessary. It is important for the HCW to wear their Badge in a location that insures it is within the TDB’s proximity bubble
whenever a dispenser is activated. It is also important that only one Badge is within the proximity bubble when a
dispenser is activated. If more than one Badge is within the proximity bubble, the TDB may unintentionally communicate
with the wrong Badge (i.e., a Badge belonging to a HCW that did not activate the dispenser). If this happens, the wrong
Badge will change its hand hygiene status level and the wrong HCW will receive credit for using the dispenser.
The Nexa Touch Free dispenser is equipped with a user feedback LED (gold light). This LED is in the same spot as the
battery indicator light, but is a different color (yellow). The feedback LED will only flash when the TDB has successfully
communicated with a Badge. The LED flash will occur during or immediately after dispenser activation. If the LED does
not flash, the Badge may not have been within the proximity bubble or there was an error in communications. If this
occurs, the HCW should move closer to the dispenser and activate it again.
Please take the following steps to insure proper Badge communications and correct HCW credit when using a dispenser.
1. Verify that the Badge is being worn in a location that will be within a TDB’s 24-inch proximity bubble.
2. Before activating a dispenser, verify that other HCWs are not within the TDB’s 24-inch proximity bubble. If there
are other HCWs near the dispenser, kindly ask them to move away before activating.
3. Verify that the dispenser’s yellow LED flashed when the dispenser was activated. If the LED did not flash, move
closer to the dispenser and activate it again.
3.2 Interaction with a Hub
All TDBs are equipped with a longer range radio that allows them to transmit information to the Encompass HH CMS Hubs.
The TDB will transmit to the Hub that is closest to it or from which it gets the strongest signal. At time of system install,
it is verified that all TDBs are in range of at least one Hub.
When the Nexa touch free dispenser dispenses product, the TDB is activated, will create a proximity bubble and search
for HCW badges. If the user is wearing a badge, the Badge’s HH status will be updated by the TDB. The TDB will then

9205-3000 (FAS1548) Nexa™ Touch Free Dispenser Beacon User’s Guide
Ecolab, Inc.
Ecolab P/N
Revision
Date
Drawing Number
Page
9205-3000
??
03/03/17
???
11 of 14
transmit the Badge’s HH status (both just prior to and immediately after the dispense) to the Hub. The TDB will also
transmit the time, date and location of the event, along with the battery status of the HCW badge and the TDB. If the
user is not wearing a badge, or is not within the proximity bubble, the time, date and dispenser ID for the product dispense
event will be relayed to the hub as a “non-badged dispense”.
In addition to communication of dispense event data, all TDBs proactively send their ID and battery status information to
a Hub on an approximately hourly basis. If communication to a Hub is lost, all TDBs have the capability to store up to 512
events in their on board memory.
4. Dispenser Beacon Status Information
The Dispenser Beacon proactively sends its battery level and status information to a Hub at least once per hour, or when
product is dispensed. This information can be accessed through the Dashboard, to generate a report showing Dispenser
Beacons with low battery level. If communication to a Hub is temporarily lost, each TDB has the capability to store up to 512
events. If this number of events is exceeded before communication to the Hub is restored, the oldest events will be
overwritten, thus resulting in some loss of data.
4.1 Yellow LED – Successful Communication Between HCW Badge and Dispenser Beacon.
The Yellow LED which flashes once during or immediately after a dispense event, indicates that the HCW badge
information has successfully been communicated to the Dispenser Beacon. The Dispenser Beacon will then send this
information to a Hub for relay on to a Gateway, and eventually to the offsite server for compilation and archiving.
4.2 When an Empty Bottle is Removed and a New Bottle is Installed
The Yellow LED will flash twice when the empty bottle is removed, and the Yellow LED will flash once when a new bottle
is installed.
5. Touch Free Dispenser Beacon (TDB) Care and Maintenance
5.1 Handling
The TDB is an electronic device and should be handled with care. Like other electronic devices such as a cell phone, the
TDB must be protected from extreme heat, cold and moisture. Avoid handling the TDB with wet hands or exposing it to
water. Dropping or tossing the TDB can result in damage to the internal electronics.
5.2 Cleaning
Under normal conditions of use, the TDB should not require cleaning. On the infrequent occasions where the TDB might
become soiled, it should be cleaned by wiping with a soft cloth. The cloth may be dry or slightly damp but not wet. Only
the exterior of the TDB may be cleaned. Do not attempt to clean any interior surface of the TDB, as this can damage the
circuitry. Do not use abrasive cleaners or spray cleaning products.
5.3 Battery Replacement
Typical Dispenser Beacon battery life is about 1 year but this may vary depending on use. When a Dispenser Beacon’s
battery is dead it will no longer communicate with other Encompass HH CMS devices. The Encompass HH CMS Dashboard
software also monitors the battery level of each TDB. It will send an email alert to a designated maintenance person,
assigned by the healthcare facility, when a TDB’s batteries are low (20% or less remaining battery capacity). The
maintenance person should replace the batteries as soon as possible to prevent loss of data.
5.3.1 Supplies
The following supplies are required to replace the Touch Free Dispenser Beacon’s battery:

9205-3000 (FAS1548) Nexa™ Touch Free Dispenser Beacon User’s Guide
Ecolab, Inc.
Ecolab P/N
Revision
Date
Drawing Number
Page
9205-3000
??
03/03/17
???
12 of 14
1. Two (2) alkaline AAA Duracell® Coppertop Batteries
5.3.2 Battery Replacement Steps
The following steps describe how to remove the TDB from the Nexa Touch Free Dispenser, and replace the batteries:
1. Open the dispenser by depressing the top latch button.
2. Remove product bottle (if any) from the dispenser and set aside.
3. Unscrew the retained screw from the boss, to release the beacon and allow it to be removed.
4. Gently grasp and pull on the TDB to disengage the TDB plug from the communication port.
5. Holding the TDB so that battery compartment door is facing up, remove the battery compartment door by
gently pulling back on the battery door tab.
6. Once the battery compartment door has been removed, install two (2) AAA alkaline batteries, aligning the
positive (+) and negative (-) terminals of the batteries with the corresponding signs displayed within the
battery compartment (Ecolab recommends that only Duracell® Coppertop batteries be used to power the
module.)
7. Once the batteries have been installed, replace the battery compartment door and make sure that it is firmly
in place before replacing the TDB in the dispenser.
8. To replace the TDB in the Nexa Touch Free Dispenser, align the TDB plug with the communication port, and
the housing’s captive screw with the screw boss in the back of the dispenser (see figure 4).
9. Gently but firmly insert the TDB plug into the communication port, until it is firmly seated in the port.
10. Tighten the captive screw finger tight into the boss.
11. Replace the product bottle within the dispenser.
12. Close the dispenser.
13. Dispose of the old batteries. Check with the healthcare facility for the proper disposal procedure.

9205-3000 (FAS1548) Nexa™ Touch Free Dispenser Beacon User’s Guide
Ecolab, Inc.
Ecolab P/N
Revision
Date
Drawing Number
Page
9205-3000
??
03/03/17
???
13 of 14
Appendix A - Certification and Safety Approvals
FCC Statement
NOTE: This equipment has been tested and found to comply with the limits for a Class B digital device, pursuant to Part 15 of the FCC
Rules. These limits are designed to provide reasonable protection against harmful interference in a residential installation. This
equipment generates, uses, and can radiate radio frequency energy and, if not installed and used in accordance with the instructions,
may cause harmful interference to radio communications. However, there is no guarantee that interference will not occur in a
particular installation. If this equipment causes harmful interference to radio or television reception, which can be determined by
turning the equipment off and on, the user is encouraged to try and correct the interference by one or more of the following measures:
• Reorient or relocate the receiving antenna.
• Increase the separation between the equipment and receiver
• Connect the equipment into an outlet on a circuit different from that to which the receiver is connected.
• Consult the dealer or an experienced radio/TV technician for help.
WARNING: Changes or modifications not expressly approved by Ecolab could void the user’s authority to operate the equipment.
Industry Canada
Under Industry Canada regulations, this radio transmitter may only operate using an antenna of a type and maximum (or lesser) gain
approved for the transmitter by Industry Canada. To reduce potential radio interference to other users, the antenna type and its gain
should be so chosen that the equivalent isotropically radiated power (e.i.r.p.) is not more than that necessary for successful
communication.
Conformément à la réglementation d'Industrie Canada, le présent émetteur radio peut fonctionner avec une antenne d'un type et d'un
gain maximal (ou inférieur) approuvé pour l'émetteur par Industrie Canada. Dans le but de réduire les risques de brouillage
radioélectrique à l'intention des autres utilisateurs, il faut choisir le type d'antenne et son gain de sorte que la puissance isotrope
rayonnée équivalente (p.i.r.e.) ne dépasse pas l'intensité nécessaire à l'établissement d'une communication satisfaisante.
This device complies with Industry Canada license-exempt RSS standard(s). Operation is subject to the following two conditions: (1) this
device may not cause interference, and (2) this device must accept any interference, including interference that may cause undesired
operation of the device.
Le présent appareil est conforme aux CNR d'Industrie Canada applicables aux appareils radio exempts de licence. L'exploitation est
autorisée aux deux conditions suivantes: (1) l'appareil ne doit pas produire de brouillage, et (2) l'utilisateur de l'appareil doit accepter
tout brouillage radioélectrique subi, même si le brouillage est susceptible d'en compromettre le fonctionnement.
This radio transmitter (IC: 10060A-92053000) has been approved by Industry Canada to operate with the antenna types listed below
with the maximum permissible gain and required antenna impedance for each antenna type indicated. Antenna types not included in
this list, having a gain greater than the maximum gain indicated for that type, are strictly prohibited for use with this device.
Le présent émetteur radio (IC: 10060A-92053000) a été approuvé par Industrie Canada pour fonctionner avec les
types d'antenne énumérés ci-dessous et ayant un gain admissible maximal et l'impédance requise pour chaque type d'antenne. Les
types d'antenne non inclus dans cette liste, ou dont le gain est supérieur au gain maximal indiqué, sont strictement interdits pour
l'exploitation de l'émetteur.
Magnetic Loop Antenna
Printed-F antenna, 6.3 dBi
Helical antenna, 1.9 dBi

9205-3000 (FAS1548) Nexa™ Touch Free Dispenser Beacon User’s Guide
Ecolab, Inc.
Ecolab P/N
Revision
Date
Drawing Number
Page
9205-3000
??
03/03/17
???
14 of 14
Appendix B - Warranty
This device is warranted against defective materials and workmanship for two years from the date of purchase.
Equipment covered by this warranty will be repaired or replaced in the United States and Canada, WITHOUT CHARGE, except for shipping
and handling, by our Factory Service Center.
When returning equipment for warranty service, you must first call your distributor’s Warranty Service Department for your Return
Merchandise Authorization Number (RMA). The RMA must be on your return label and the shipping charges must be pre-paid and a copy
of your receipt must be enclosed. Equipment should be returned to Ecolab Customer Service, 1201 Jupiter Park Drive, Jupiter, FL 33458.
This warranty covers all defects incurred from normal use of the equipment and does not apply in the following cases:
a. Loss or damage to the equipment due to abuse, mishandling, accident or failure to follow installation or use instructions.
b. If the equipment is defective as a result of leaking batteries.
c. If the equipment has been serviced or modified by someone other than our authorized agents.
THE AFOREMENTIONED IS IN LIEU OF ALL WARRANTIES, EXPRESSED OR IMPLIED, INCLUDING BUT NOT LIMITED TO, ANY WARRANTY OF
MERCHANTABILITY OR OF FITNESS FOR ANY PARTICULAR PURPOSE. IN NO EVENT SHALL THE VENDOR BE LIABLE FOR CONSEQUENTIAL,
INCIDENTAL, INDIRECT OR SPECIAL DAMAGES OR LIABILITY, TRANSPORTATION, INSTALLATION OR SUBSTITUTION COSTS, DELAYS, OR FOR
ANY OTHER DAMAGES, COSTS, OR EXPENSES INCURRED, IRRESPECTIVE OF HOW THEY OCCUR. THIS WARRANTY SHALL NOT EXTEND TO
ANY OTHER PERSON OTHER THAN THE ORIGINAL PUCHASER OF THIS EQUIPMENT OR THE PERSON FOR WHOM IT WAS PURCHASED AS A
GIFT.
This warranty gives you specific legal rights, and you may also have other rights, which may vary from state to state. This warranty is given
with respect to equipment purchased in the United States.