Edimax Technology Co 9530151106 Entry Level 802.11n Wireless Internet Camera User Manual IC 3015Wn V1 0x
Edimax Technology Co Ltd Entry Level 802.11n Wireless Internet Camera IC 3015Wn V1 0x
Users Manual
SOHOInternetCamera
UserManual
‐ CONTENTS‐
ChapterIIntroduction..........................................................................................................5
1.1HighlightsofyournewNetworkIPCamera....................................................5
1.2SafetyInstructions...........................................................................................6
1.3PackagingContents.........................................................................................7
1.4InstallIPCamera............................................................................................10
ChapterIIUsingNetworkIPCamerabyWebInterface.....................................................12
2.1NetworkSetup...............................................................................................................12
2.2ConnecttoIPCamera’sWebUserInterfaceandInstallActiveXPlugin(forIEbrowser
only).....................................................................................................................................15
2.3ViewingLiveVideo.........................................................................................................20
ChapterIIISetupIPCamera....................................................................................................23
3‐1Basic/NetworkSettings...............................................................................................24
3‐2Wireless.........................................................................................................................27
3‐3DynamicDNS.................................................................................................................32
3‐4Date&Time...................................................................................................................34
3‐5Users..............................................................................................................................36
3‐6UPnP..............................................................................................................................39
3‐7Bonjour..........................................................................................................................40
ChapterVIVideoConfiguration...........................................................................................41
4‐1VideoSettings................................................................................................................41
4‐2ImageAppearance........................................................................................................43
ChapterVEventsConfiguration...........................................................................................44
5‐1MotionDetectionSetup................................................................................................44
5‐1‐1DetectionRegion....................................................................................................46
5‐1‐2FTP..........................................................................................................................49
5‐1‐3SMTP......................................................................................................................51
ChapterVISystemConfiguration.........................................................................................54
6‐1‘Basic’Settings...............................................................................................................54
6‐1‘Advanced’Settings.......................................................................................................56
ChapterVIISystemStatus....................................................................................................58
7‐1SystemInformation.......................................................................................................58
7‐2SystemLog.....................................................................................................................60
ChapterVIIIAdvancedOperations..........................................................................................62
8.1ApplyforfreeDYNDNSaccount....................................................................................62
ChapterIXWindowsSurveillanceUtility..............................................................................69
9‐1InstallingIPCameraAdministrationSoftware..............................................................69
9‐2UsingIPcamerasurveillancesoftware.........................................................................81
9‐3ConfigureIPcamerasurveillancesoftware...................................................................84
9‐3‐1Configurecameras.................................................................................................84
9‐3‐1‐1‘Camera’tab............................................................................85
9‐3‐1‐2ScheduleRecording.................................................................87
9‐3‐1‐3Audio.......................................................................................90
9‐3‐1‐4MotionRecord.........................................................................91
9‐3‐2GeneralSettings.....................................................................................................93
9‐3‐2‐1‘General’tab............................................................................93
9‐3‐2‐2‘E‐MailSetting’tab..................................................................95
9‐3‐2‐3Security....................................................................................97
9‐3‐2‐4About.......................................................................................99
9‐4ChangeDisplayLayout................................................................................................100
9‐5Full‐screenmode.........................................................................................................103
9‐6Scan.............................................................................................................................104
9‐7Zoom‐in/Zoom‐out....................................................................................................105
9‐8PTZ...............................................................................................................................106
9‐9Snapshot......................................................................................................................107
9‐10Recording..................................................................................................................108
9‐11VideoPlayback..........................................................................................................109
ChapterXAppendix............................................................................................................110
10.1Troubleshooting........................................................................................................110
10.2Specification..............................................................................................................111
ChapterIIntroduction
1.1 HighlightsofyournewNetworkIPCamera
CongratulatesonpurchasingthistinynetworkIPCamera!Itstinysize
maximizesportabilityandeasesinstallation;youcaneasilyinstallthe
camerainmostplaceswhereyouneedvideosurveillance.Ifthere’sno
EthernetcableavailableattheplaceyouwishtoinstallthisIPcamera,
youcanusebuilt‐inwirelessnetworktoconnecttoyournetwork,and
savesthecostofcabling.
OtherhighlightsofthisnetworkIPCamerainclude:
z Compactsizeandlightweightdesign,installsanywhere.
z Mountingholelocatedatcamera’sback,compatiblewithmostof
cameratripods.
z Wirelessnetworkwithdatasecurity(encryption),securesdata
transferovertheair.
z Fixed‐focuslens,workswithmostofenvironments.
1.2 SafetyInstructions
Pleaseobeythesafetyinstructionslistedbelowwhenyou’reusingthis
NetworkIPCamera,oryouwouldharmthiscameraand/oryourself!
Also,thewarrantywillbecomevoidifyoudisobeythesesafety
instructions.
z ThisNetworkIPCameraissophisticatedelectronicdevice;donot
dropitfromhighplaces.
z DonotplacethisIPCameraathot/humidplaces,andavoiddirect
sunlight.
z ThisIPCameraisnotatoy;keepitoutfromthereachofchildren.
z DonotinsertanyaccessoriesofthisIPCameraintoyourbody.
z IfyouwanttousethisIPCameraatanyplacethatmaybespilledby
waterordirt,asecureandwater‐proofcamerahousingisrequired.
z DonotpullanycordthatisconnectedtothisIPCamerabyforce.
z IPCamerawillbecomehotafterlongtimeofuse.Refrainfromtouch
IPCamerawithhand,orcoverthisIPcamerawithpaperorcloth.
z IftheIPCamerafallsintowaterwhenpowered,donotattemptto
retrieveitbackbyyourself!Findaqualifiedelectrictechnicianfor
help.
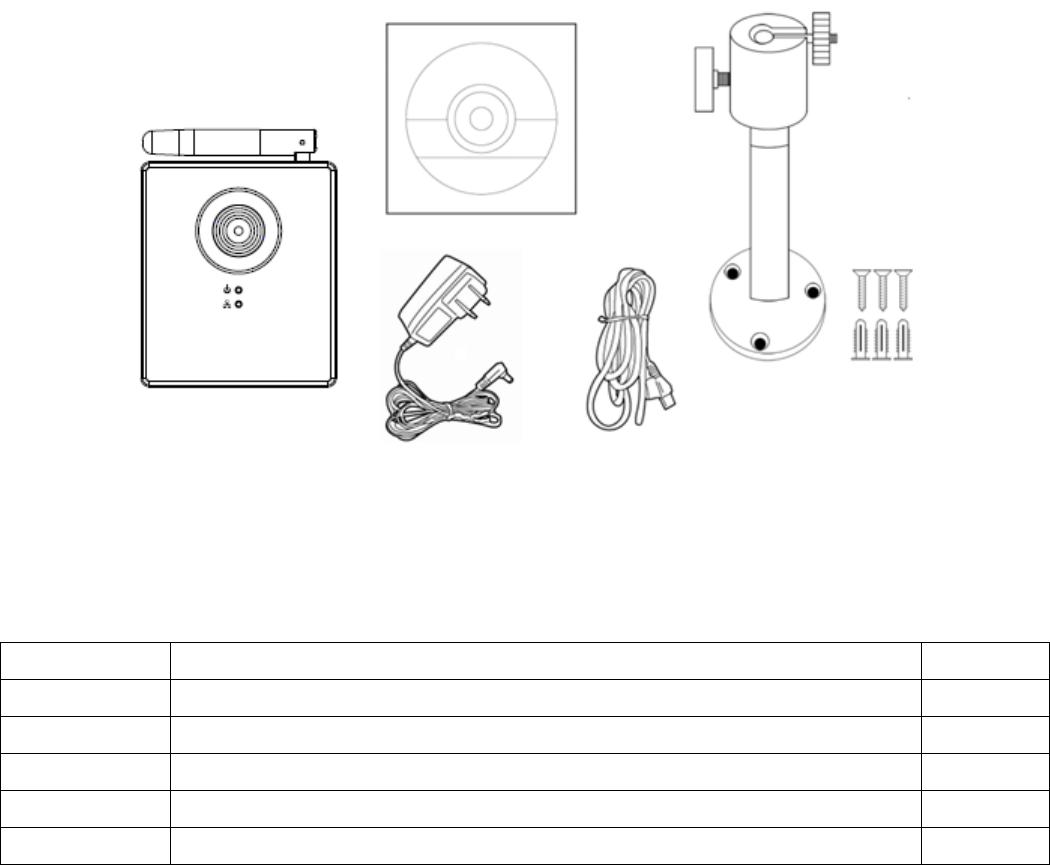
1.3 PackagingContents
PleasecheckthecontentsofyournewNetworkIPCamerawhenyou
unpackthepackage.Ifanyitemismissing,pleasecontactyourdealerof
purchaseforhelp.
ItemNo.DescriptionQuantity
1NetworkIPCamera1
2ACpoweradapter1
3Ethernetcable1
4UsermanualWindowsUtilityCDROM1
5Quickinstallationguide1
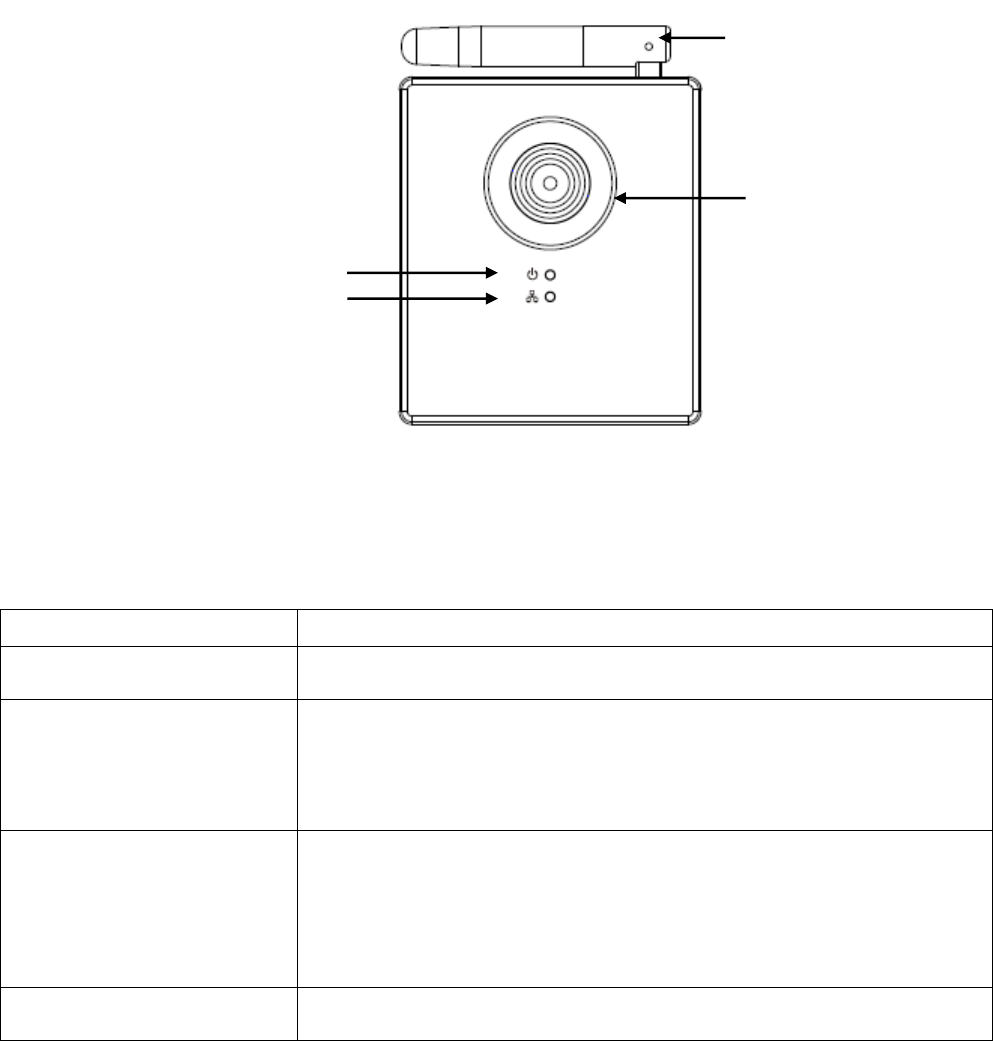
FamiliarwithyournewNetworkIPCamera
[Front]
ItemDescription
1‐LensIPCamera’slens.Pleasekeepthelenscleananddonot
touchbyfinger.
2‐POWERLEDPOWERLEDwilllightwhentheIPcameraispoweredon,
andwillflashwhenresettingIPcamera’ssettings.
(LEDlightcanbeswitchedoffevenIPcameraispowered
onwhennecessaryforsecurityreasons)
3‐NetworkLEDEthernetLEDwilllightwhenIPcameraisconnectedto
Ethernetnetwork,anditwillflashfastwhentransferring
data(ItwillflashslowwhenusingWPS).
(LEDlightcanbeswitchedoffevenIPcameraispowered
onwhennecessaryforsecurityreasons)
4‐AntennaWirelessantenna.Pleasekeeptheantennaperpendicular
tothegroundforbestsignalreception.
Power/WPSLED
LAN/WiFiLED
Lens
Antenna

[Back]
ItemDescription
1‐TripodconnectorThismountingholeiscompatiblewithmostofcamera
tripodorcamerastand,soyoucanfixthecameraata
secureplace.
2‐LANConnectstoyourlocal areanetwork.
3‐5VDCConnectsto5VDCpoweradapter.
4‐WPS/RESETWhentheIPcamera isnotfunctioningproperly,youcan
pressresetbuttontoresettheIPcamera.Youcanalso
pressandholdthisbuttonformorethan10secondsto
clearallsettingsofIPcamera,includeadministrator
password.
LANport
TripodConnector
WPS/ResetPOWER
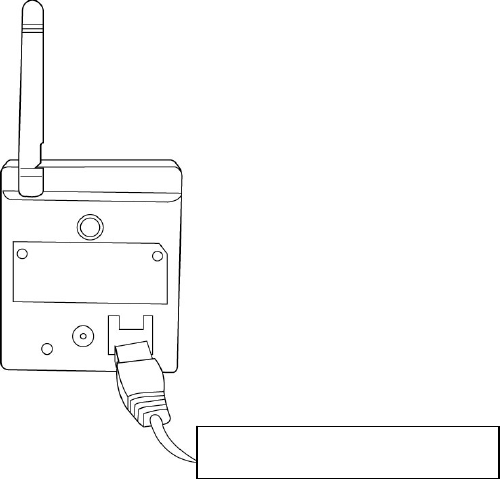
1.4 InstallIPCamera
PleasefollowthefollowinginstructionstosetupyournewIPcamera.
1. SecuretheIPCameratothetripodorcamerastandbymountinghole.
IfyouwanttoplacetheIPcameraondesk,pleasemakesureitwill
notfalldownbyaccident.
2. ConnectEthernetcabletoLANport.Forfirst‐timeinstallationyou’ll
needEthernetcabletodoconfiguration;IfthisIPcamerais
configuredtousewirelessnetwork,youcanskipthisstep.
3. PlugDCpoweradaptertopoweroutletonthewall.
ConnectEthernetnetcable
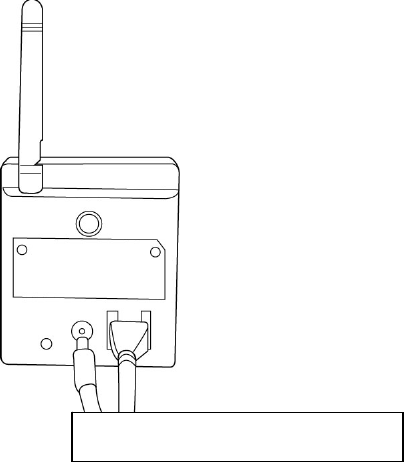
4. ConnectDCpowercabletoIPCamera’sDCpowerconnector.
Ifeverything’sok,youshouldseethePOWERLEDlightup(andEthernet
LED,ifEthernetcableisinserted).Ifnot,pleaserecheckeverystepand
tryagain,oraskyourdealerofpurchaseforhelp.
PleasenoteifyouconfiguredIPcameratoswitchLEDlightsoff,two
LEDlightswon’tlight.
ConnectDCpowercabletoDCJack
ChapterIIUsingNetworkIPCamerabyWebInterface
2.1NetworkSetup
ThisIPcamera’sdefaultIPaddressis192.168.2.3,andyoumustusea
computerthatuses192.168.2.xIPaddresstoconnecttoit.
Pleasefollowthefollowinginstructionstosetupyourcomputer’sIP
address:
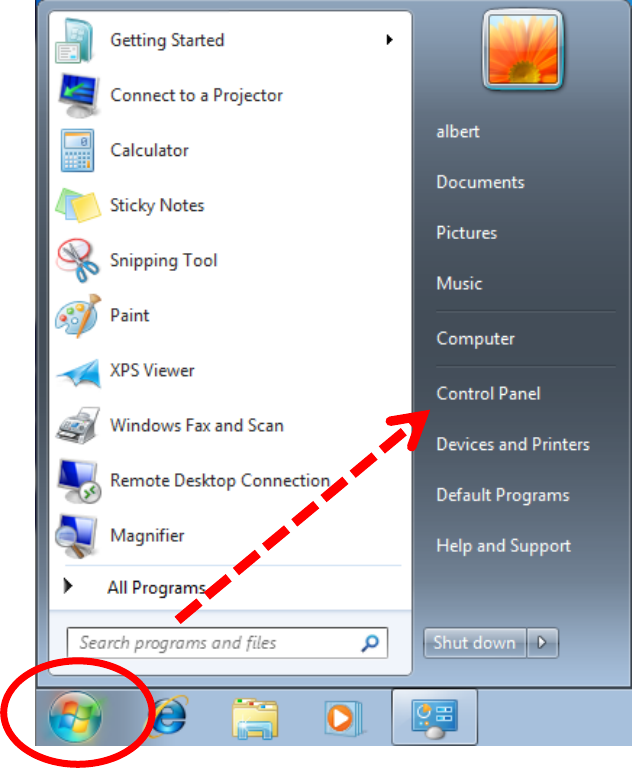
1. Pleaseclick‘Start’buttonandthenclick‘ControlPanel’.
2. Click‘Viewnetworkstatusandtasks’under‘NetworkandInternet’
3. Ifyoudidn’tsee‘NetworkandInternet’incontrolpanel,pleaselook
for‘NetworkandSharingCenter’iconanddouble‐clickit.
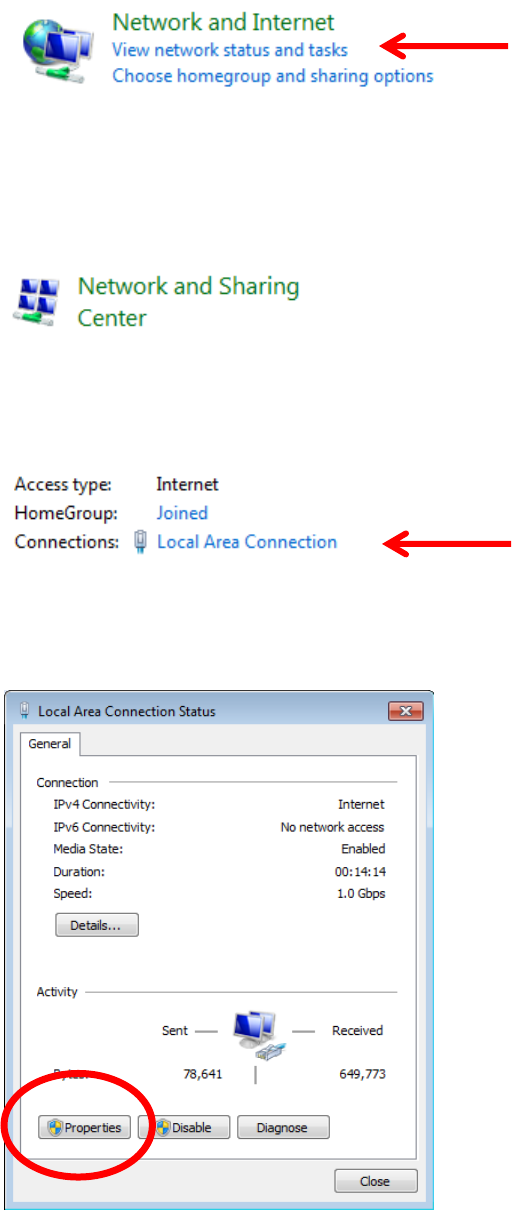
4. Click‘LocalAreaConnection’
5. Click‘Properties’
6. Click‘InternetProtocolVersion4(TCP/IPv4),andthenclick
‘Properties’
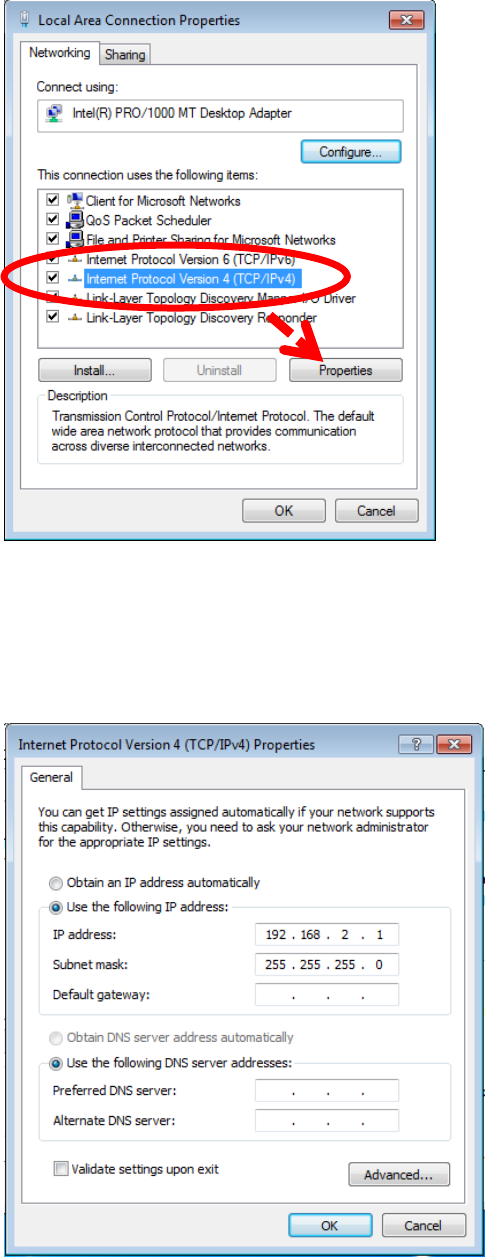
7. Click‘UsethefollowingIPaddress’,andtheninput‘192.168.2.1’in‘IP
address’and‘255.255.255.0’inSubnetmask’,justlikeshownonthe
left.Click‘OK’whenfinish,andcloseallopenwindowsyouopened
2.2ConnecttoIPCamera’sWebUserInterfaceandInstall
ActiveXPlugin(forIEbrowseronly)
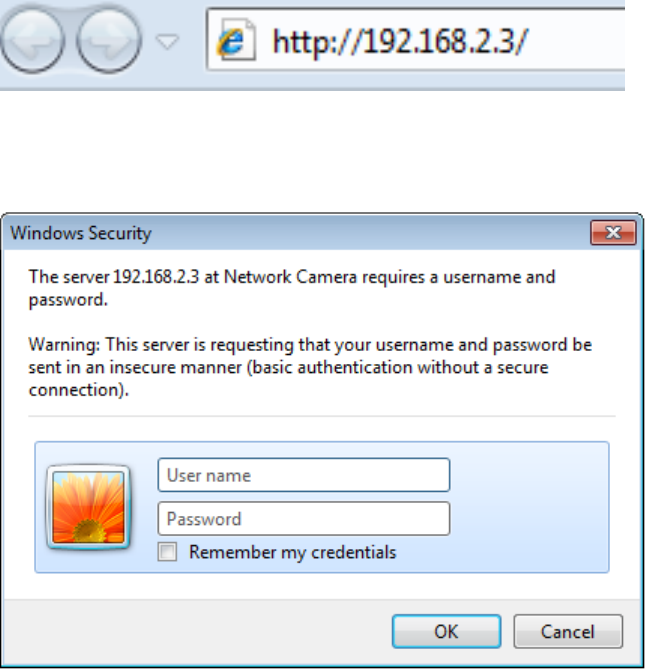
Forfirst‐timeinstallation,youcanconnecttoIPcamerabyInternet
ExplorerwebbrowserbyenteringitsdefaultIPaddress:192.168.2.3in
addressbar:
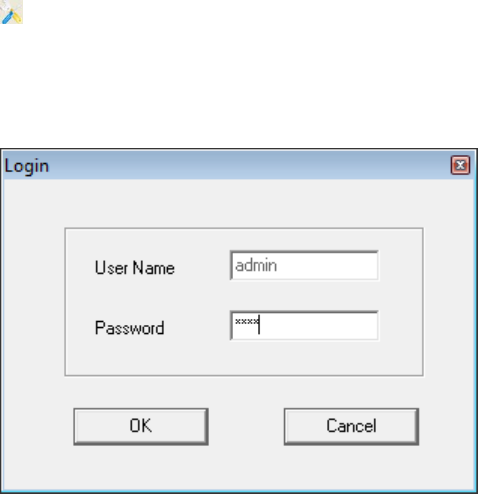
Theuseloginscreenwillappearwhenyougetconnected:
IPCamera’sadministratorusernameis‘admin’(lowercase)and
passwordis‘1234’bydefault.Click‘OK’buttonorpress‘ENTER’keyon
yourkeyboardwhenyoufinishenteringusernameandpassword.
WhenyouconnecttoIPCameraforthefirsttime,you’llseethe
followingmessage:
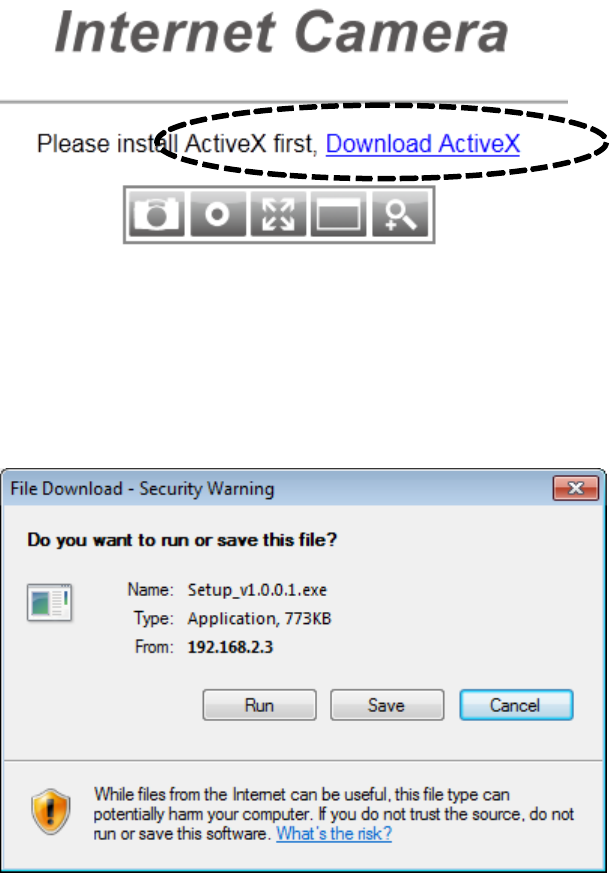
ThismessagepromptsyouthatyouneedtoinstallActiveXpluginbefore
youcanseethevideofromIPCamera.Click‘DownloadActiveX’linkto
installActiveXplugin:
Click‘Run’tostartinstallation.Afterfewseconds,you’llseethis
message:
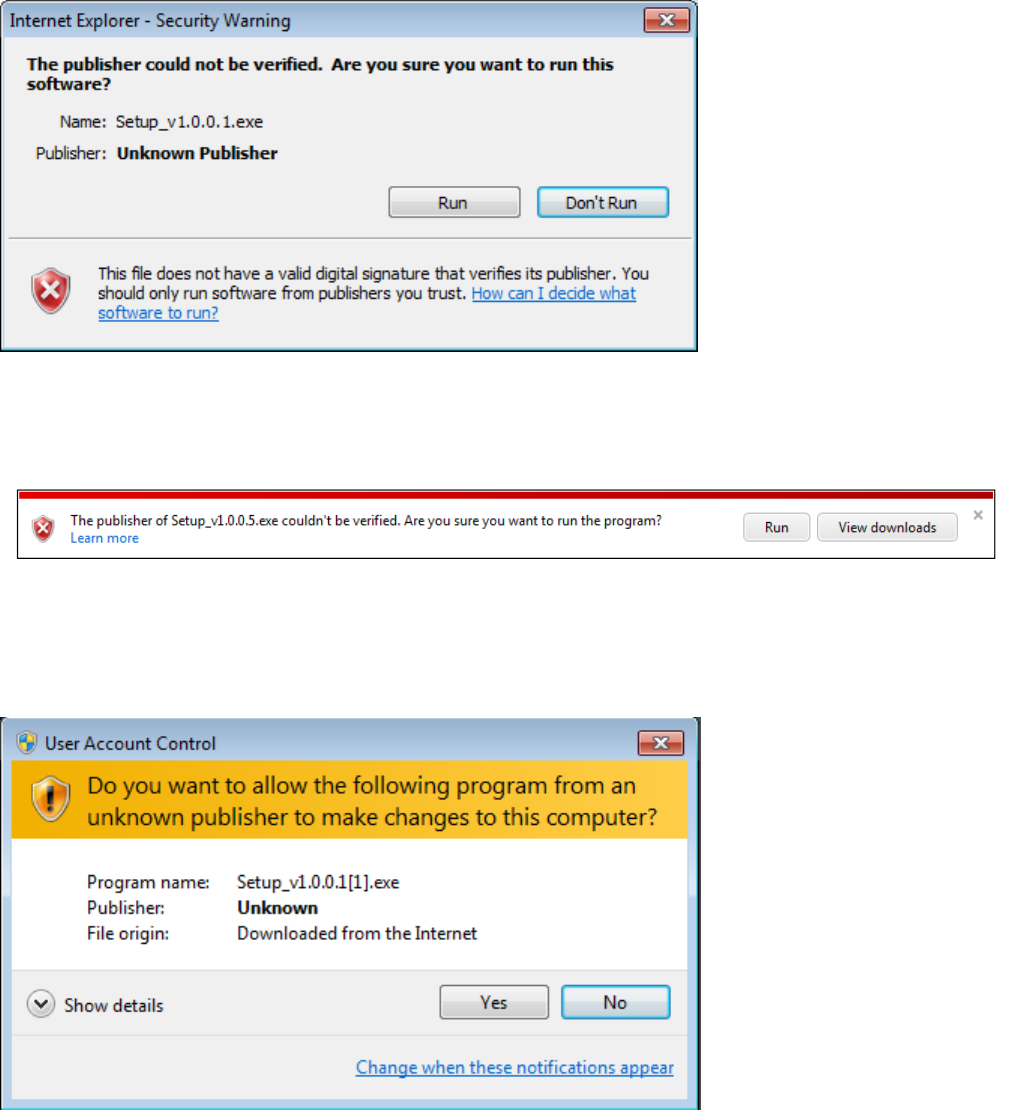
ForIE9:ThemessagewillappearatthebottomofInternetExplorer:
Click‘Run’tobegininstallation.YoumayseeUAC(UserAccountControl)
messageafteryouclick‘Run’button:
Click‘Yes’tocontinue.Installationprocedurewillbegin:
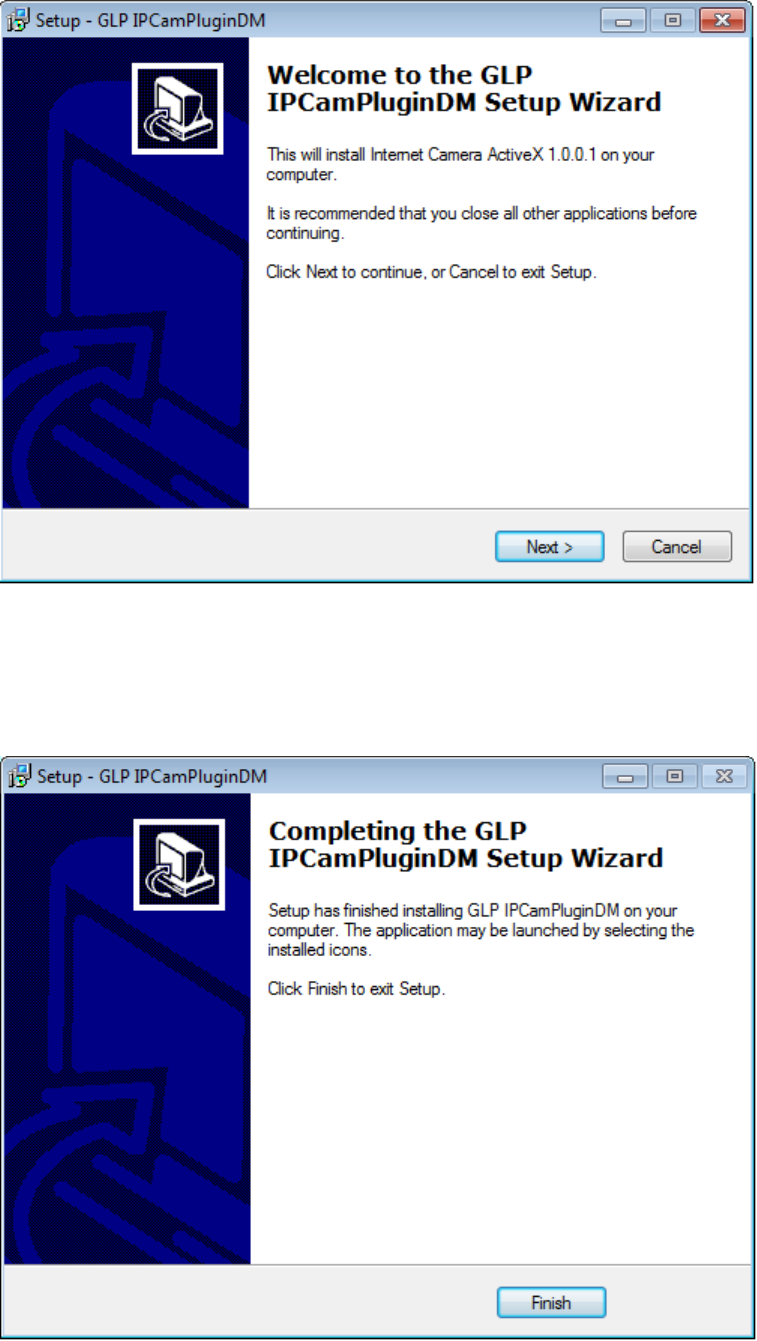
Click‘Next’and‘Install’whenyou’repromptedtoinstallActiveXcontrol.
Whenyouseethismessage,installationiscomplete:

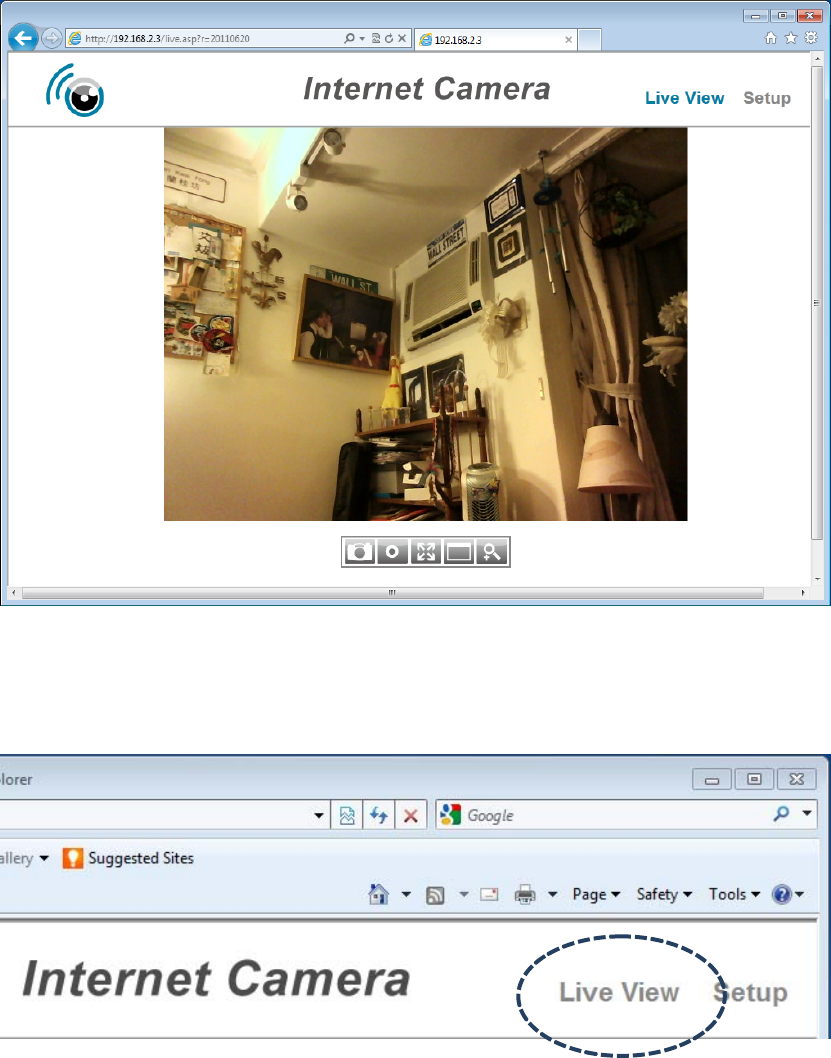
Click‘Finish’toclosethewindow.Now,gobacktowebbrowserwindow
andloginagain,youshouldbeabletoseecamera’simage:
2.3ViewingLiveVideo
ToviewthelivevideofromIPcamera,pleaselogontoIPcamera’sweb
interfaceasdescribedinlastchapter,andyoucanseelivevideoview:
Whenyou’reinothersetuppagesofIPcamera,youcanclick‘LiveView’
linklocatedattheupper‐rightcornerofIPcamera’swebinterface:
Therearealsosomefunctionsyoucanuseincamera’sliveviewpage:
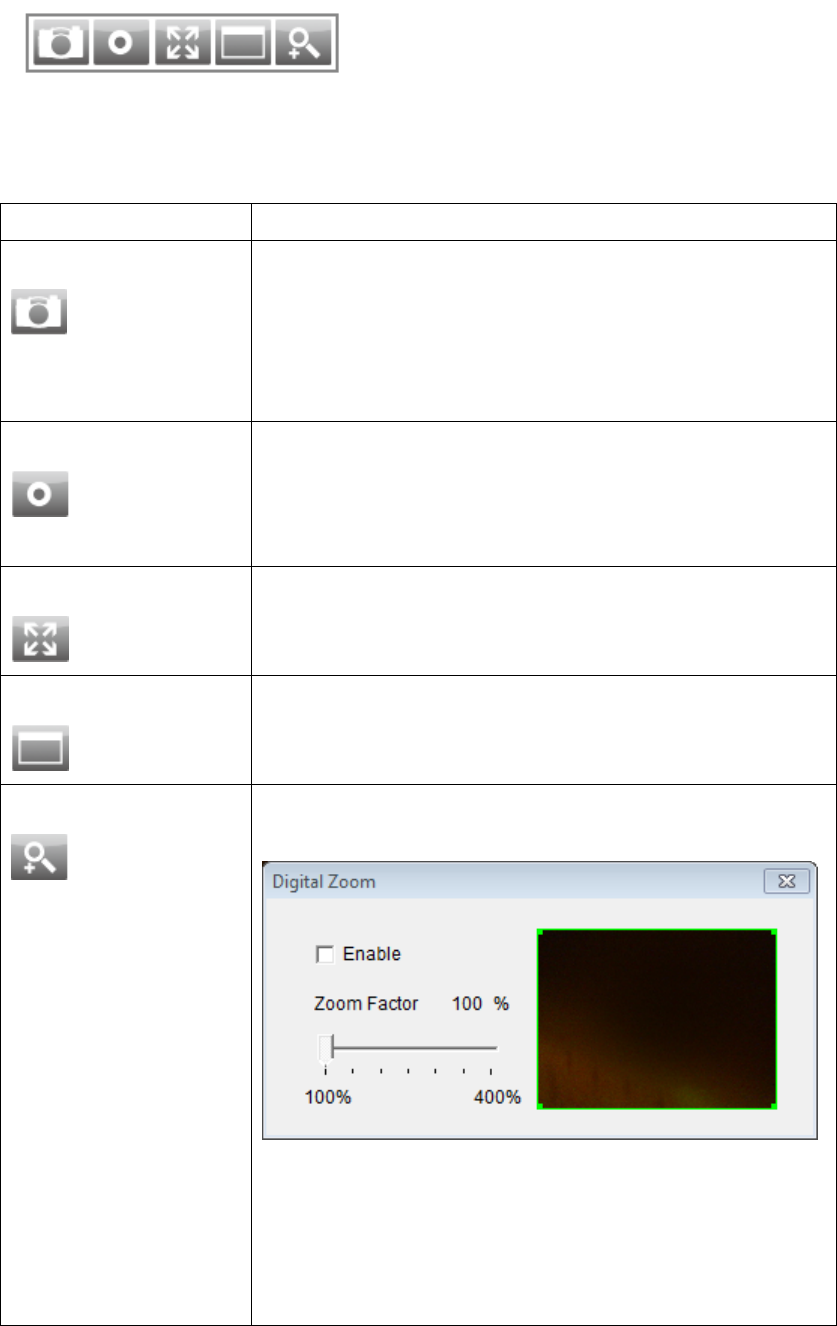
Thedescriptionsoftheseitemsarelistedbelow:
ItemDescription
Snapshot
Takeasnapshot(saveapicture)ofcurrentlive
view.Clickthefolderfield(‘c:\’bydefault)and
you’llbepromptedtoselectafolderinyour
computer,andclick‘Getsnapshot’buttontosave
apicture.
Record
Startrecordingvideo.Clickthefolderfield(‘c:\’
bydefault)andyou’llbepromptedtoselecta
folderinyourcomputer,andclick‘Start
recording’buttontostartrecording.
Fittowindow
Clickthisbuttonandtheliveviewareawilladjust
accordingtothesizeofwebbrowser
automatically.
FullScreen
Clickthisbuttonandtheliveviewwillexpand
andfitthesizeofyourcomputermonitor.Press
‘Esc’keyonyourkeyboardtoresume.
DigitalZoom
Clickthisbuttonandanewwindowwillpopup:
Check‘Enable’boxtoenabledigitalzoom
(enlargevideosoyoucanseeobjectsindetail).
Dragtheslidebarfrom100%(noenlargement)
to400%toenlargetheimage.Thelevelof
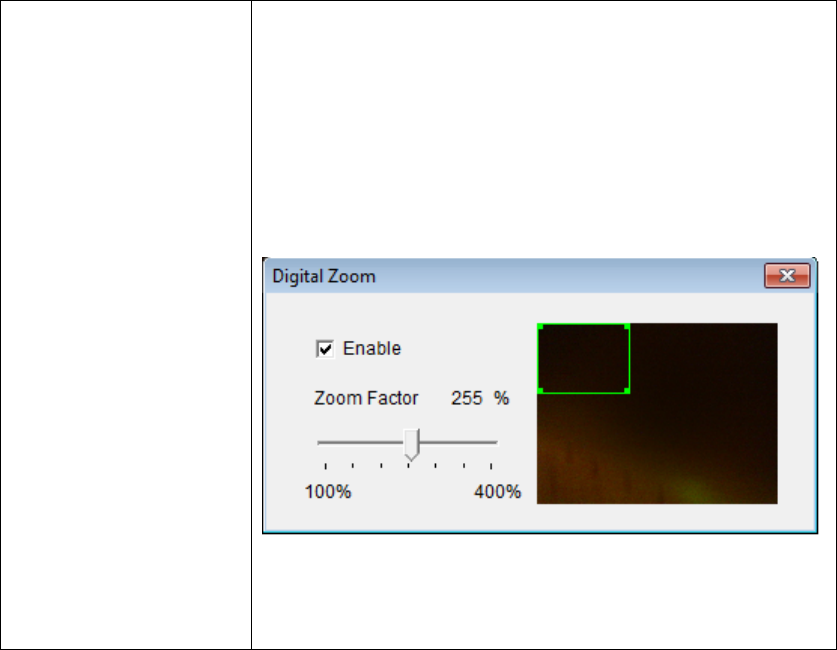
enlargementwillbedisplayedin‘ZoomFactor’
field.
Whenyou’reenlargingimage(i.e.ZoomFactor>
100%),agreenrectangularwillappearinthe
imagearea:
Dragthegreenrectangulartomovetheposition
ofenlargedareainimage.
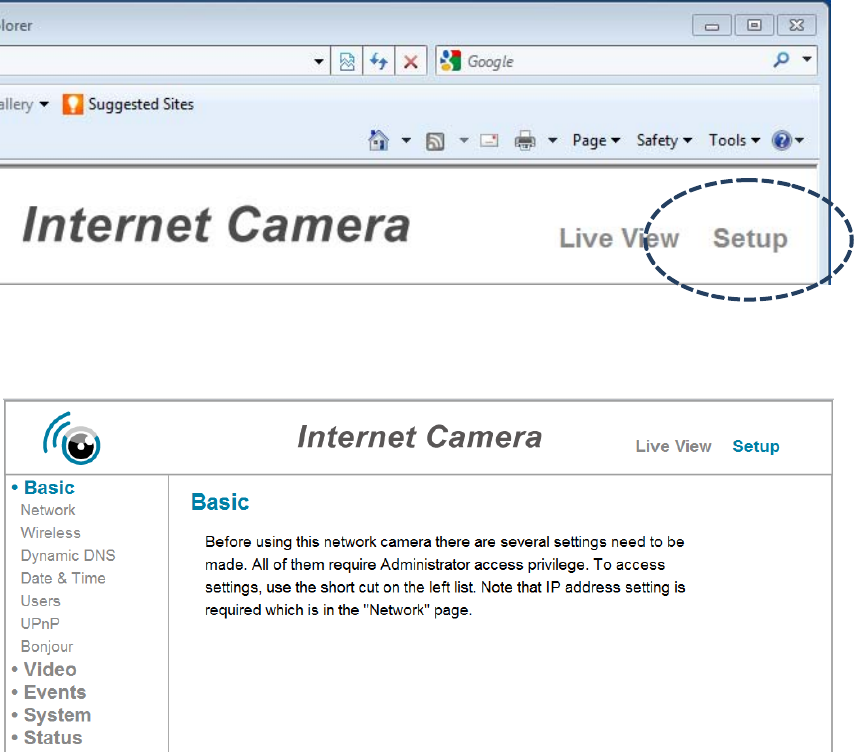
ChapterIIISetupIPCamera
TosetuptheIPcamera,pleaselogontoIPcamera’swebinterfaceand
click‘Setup’linkontheupper‐rightcorner:
Thesetupmenuwillappear:
Therearefivesetupcategories:Basic,Video,Events,System,andStatus,
whicharelocatedattheleftofwebinterface.Whenyouclickonthelink
ofeverycategory,itwillexpandandshowsub‐menu.
Pleaserefertofollowingchaptersfordetailedinstructions.
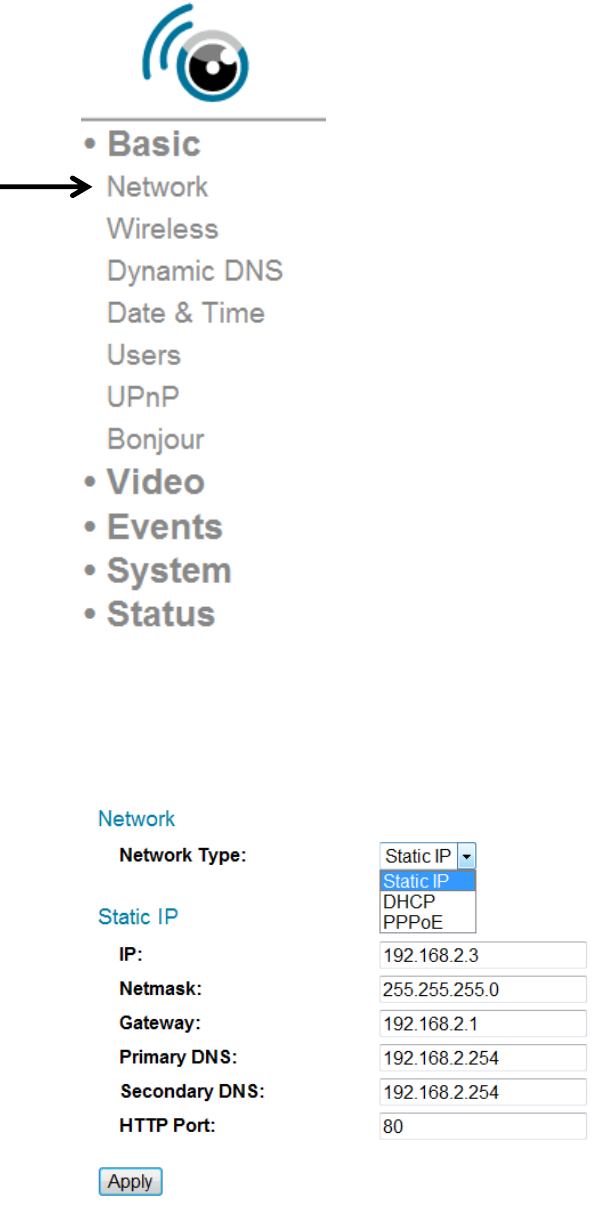
31Basic/NetworkSettings
Inthismenu,youcansetupEthernetnetworksettings.
(NOTWirelessNetwork!)
Thedescriptionsoftheseitemsarelistedbelow:
ItemDescription
NetworkTypeSelectthetypeofEthernetconnection:StaticIP,DHCP,
andPPPoE.Pleaseselectonefromdropdownmenu,if
you’renotsure,pleaseconsultyournetwork
administratororISP.
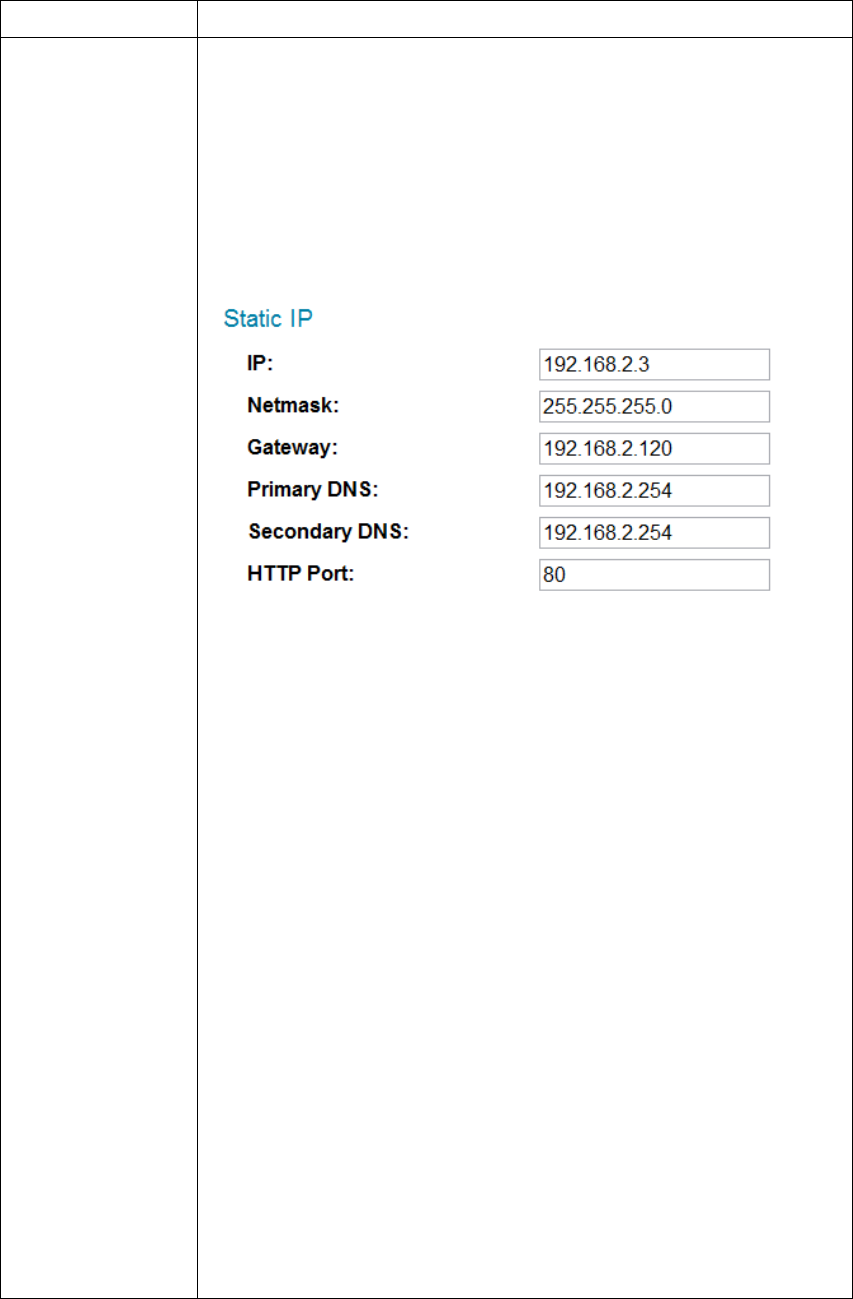
StaticIP:
IP:PleaseassignanIPaddresstothisIPcamera.
Netmask:PleaseinputthenetmaskofIPaddress.
Gateway:Pleaseinputthegatewayaddressofyour
network.
PrimaryDNS:InputtheIPaddressofDNSserver.
SecondaryDNS:InputtheIPaddressofsecondary
(backup)DNS.Youcanleavethisfieldblankifno
secondaryDNSisavailable.
HTTPport:Thedefaultwebportnumberis80,if
youwanttochangeit,youcaninputitfrom1024~
65535inthisfield.WhenyouconnecttothisIP
cameranexttime,youhavetoaddacolonandport
numberafterIPcamera’sIPaddress.Forexample,
ifthecamera’sIPaddressis192.168.2.3andHTTP
portnumberis82,youhavetoinput
‘http://192.168.2.3:82’inwebbrowser’saddress
bar.
DHCP:IPcamerawillobtainIPaddressfromDHCP
serveronyourlocalareanetworkautomatically.
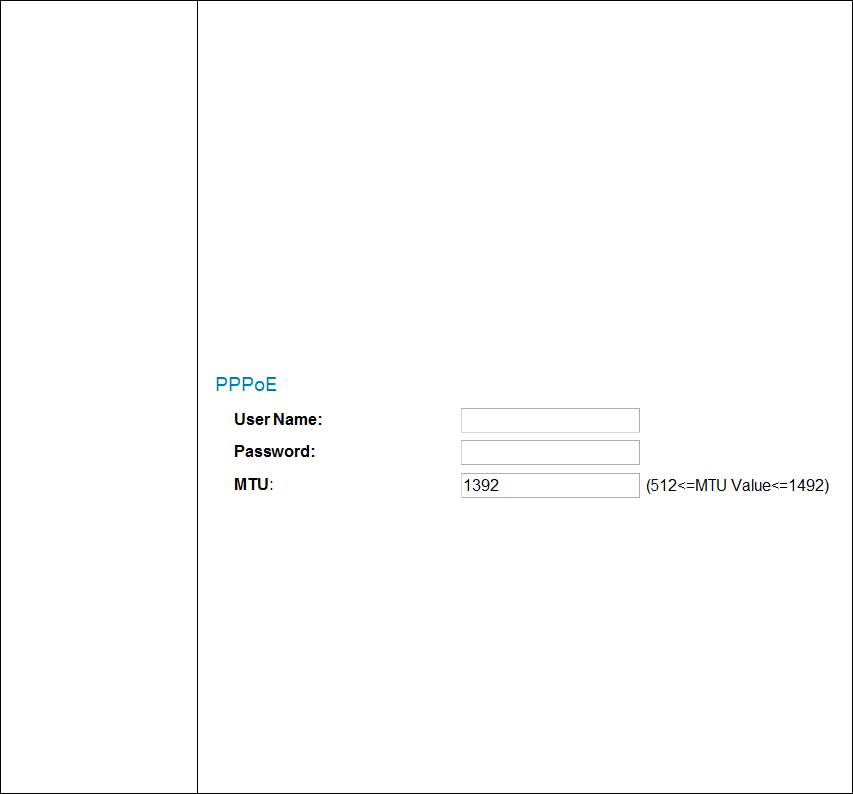
PPPoE:IPcamerawillconnecttonetworkbyPPPoE.
PleaseinputPPPoEusernameandpassword,andinput
MTUvaluewhenrequired.
Pleasenote:Insomecasesyoucanimprovenetwork
efficiencyorcorrectconnectionproblembysettinga
newMTUvalue,however,Inmostcasesyoudon’thave
tochangeMTUsetting.
Click‘App ly ’buttontosavechangesyoumade.
32Wireless
Youcanestablishwirelessconnectionstoothernetworkdevicessuchas
networkAP.
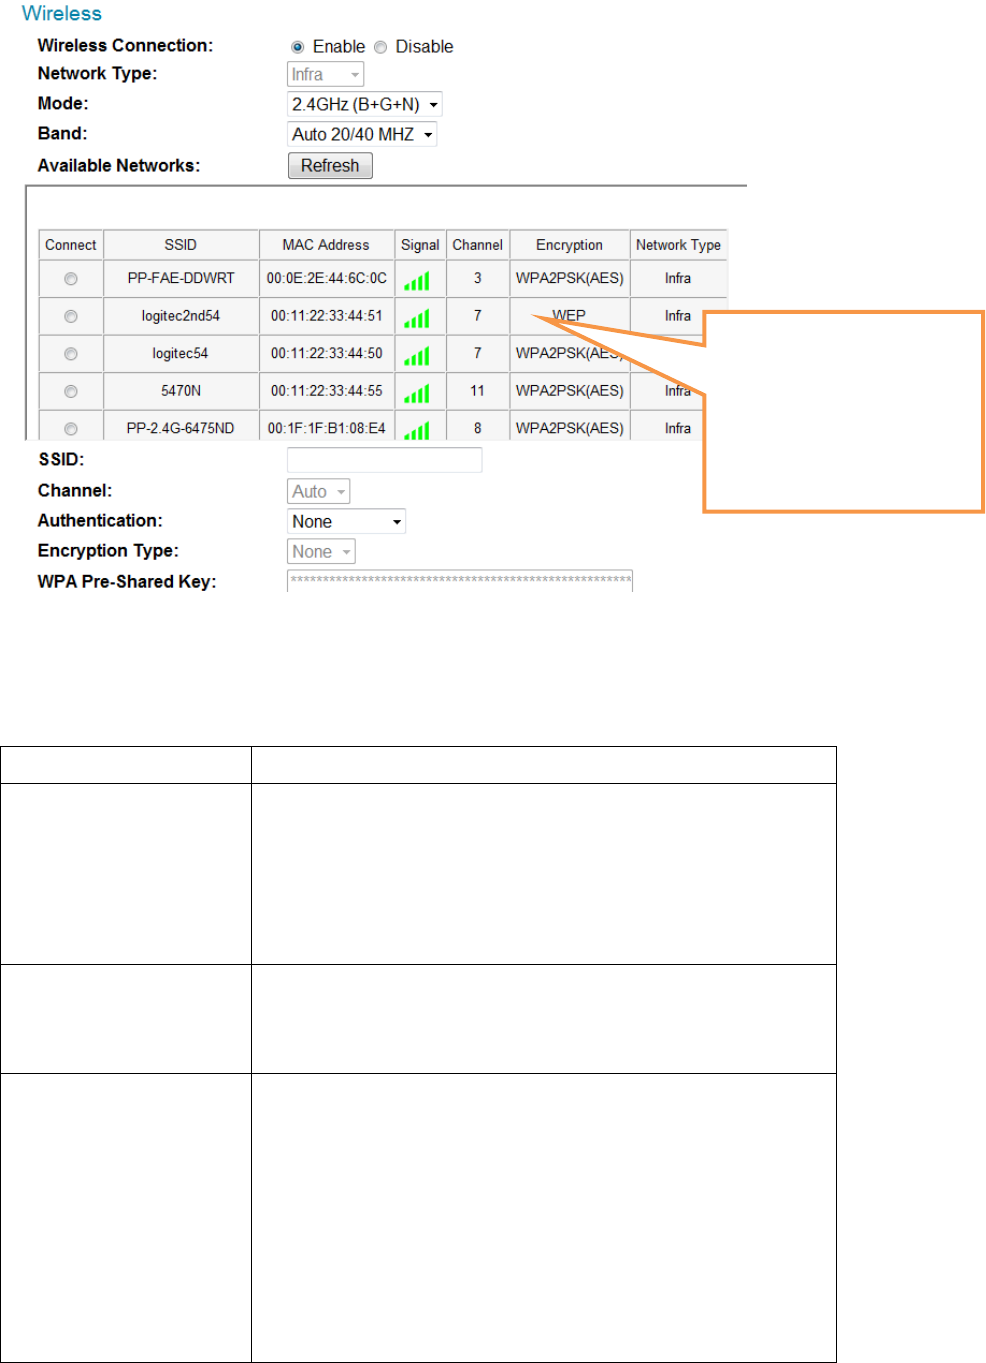
Thedescriptionsoftheseitemsarelistedbelow:
ItemDescription
Wireless
Connection
Youcanenableordisablewirelessfunctionality
here.
Pleasenote:Youcanswitchwirelessnetworkoff,
butyoucan’tswitchwiredEthernetoff.
NetworkType Selectthetypeofnetworkyouwishtoconnect:
Infra(infrastructure:wirelessaccesspoint)orAd
Hoc(pointtopointwirelessconnection).
ModeSelectthewirelessoperatingmode:
B(802.11b,maximum11mbps)
G(802.11g,maximum54mbps)
N(802.11n,maximum150mbps).
Youcanselectmixedmode(2.4GHzB+G+N)soIP
camerawillworkwithallkindsofwireless
Whenyouenterthis
page,IPcamerawillscan
forwirelessdevices
nearbyautomatically
anddisplaythemhere.

network.IfyouselectB,G,orNonly,thenIP
camerawillbeabletocommunicatewith
wirelessnetworkofsameoperatingmodeonly.
BandSelectwirelessband:20MHzonlyor20/40MHz
autoswitch.It’srecommendedtoselect‘Auto
20/40MHz’.
AvailableNetworksIPcamerawilllistallnearbynetworksandtheir
parameterinthisfield.Ifthenetworkyouwishto
connectdoesnotappearhear,click‘Refresh’to
rescanagain.Youcanclick‘Refresh’buttonfor
manytimesuntilthenetworkyouwishto
connectappearinthelist.
Ifyouwishtoconnecttoaspecificnetwork,
selecttheradiobuttonofthenetworkyouwish
toconnect(under‘Connect’field),andthe
network’sconnectionparameterwillappearin
thefieldsbelow.
Tips:Ifyoucan’tseethenetworkyouwishto
connectafteryouclick‘Refresh’buttonformany
times,pleasemoveIPcameraclosertothe
network’saccesspoint).
SSIDInputnetwork’sSSID(accesspoint’swireless
name)here,orselectonenetworkfromnetwork
listabove.
Ifhenetworkyouwishtoconnectisa‘hidden’
network(SSIDishiddentothepublic),youhave
toinputSSIDmanually.
ChannelSelectwirelesschannelnumber.Use‘Auto’to
selectchannelautomatically.
AuthenticationSelectauthenticationtype:
None:noencryption
WEP:useWEPencryption

WPA‐PSK:UseWPAwithPSKencryption.
WPA2‐PSK:UseWPA2withPSKencryption.
Theauthenticationtypeyouselectedheremust
beidenticalwiththesettingofaccesspoint.
EncryptionTypeSelectwirelessencryptiontype.Thisoptionwill
varydependsontheauthenticationtypeofthe
networkyouwishtoconnect.
Theencryptiontypeyouselectedheremustbe
identicalwiththesettingofaccesspoint.
WPAPre‐sharedKeyInputWPApre‐sharedkeyhere,mustbeidentical
withthesettingofaccesspoint.
(Thisfieldisnotavailablewhenauthentication
typeisnoneorWEP).
WEPKeyFormatSelectWEPkey’sformat:HexorASCII.
Thissettingmustbeidenticalwiththesettingof
thenetworkyouwishtoconnect.
WEPKeylengthSelectWEPkey’slength:64or128‐bit.
Thissettingmustbeidenticalwiththesettingof
thenetworkyouwishtoconnect.
WEPKeyInputWEPkeyhere.
Thissettingmustbeidenticalwiththesettingof
thenetworkyouwishtoconnect.
YoucanalsosetupencryptedwirelessconnectionbyWPS(Wi‐Fi
ProtectedSetup):

Thedescriptionsoftheseitemsarelistedbelow:
ItemDescription
SelfPinCodeDisplaysthe8‐digitpincodeofthisIPcamera.
Writethisnumberdownandyou’llneedthis
numbersogetconnectedwithother
WPS‐enablednetworkdeviceswhenrequested.
ConfigureviaPush
Button
Click‘StartPBC’buttontostartPBC‐styleWPS
pairingsequence:Clickthisbutton,andpush
WPSbuttonoftheaccesspoint(orclicka
softwarebuttoninaccesspoint’sconfiguration
webpage).
YoumustpressWPSbuttonofthewireless
deviceyouwishtoconnectwithin120seconds.
Configurevia
PinCode
Click‘StartPIN’tostartPIN‐styleWPSpairing
sequence.YouhavetoinputWPSregistrar’sSSID
in‘RegistrarSSID’fieldfirst.
Click‘App ly ’buttontosavechangesyoumade.
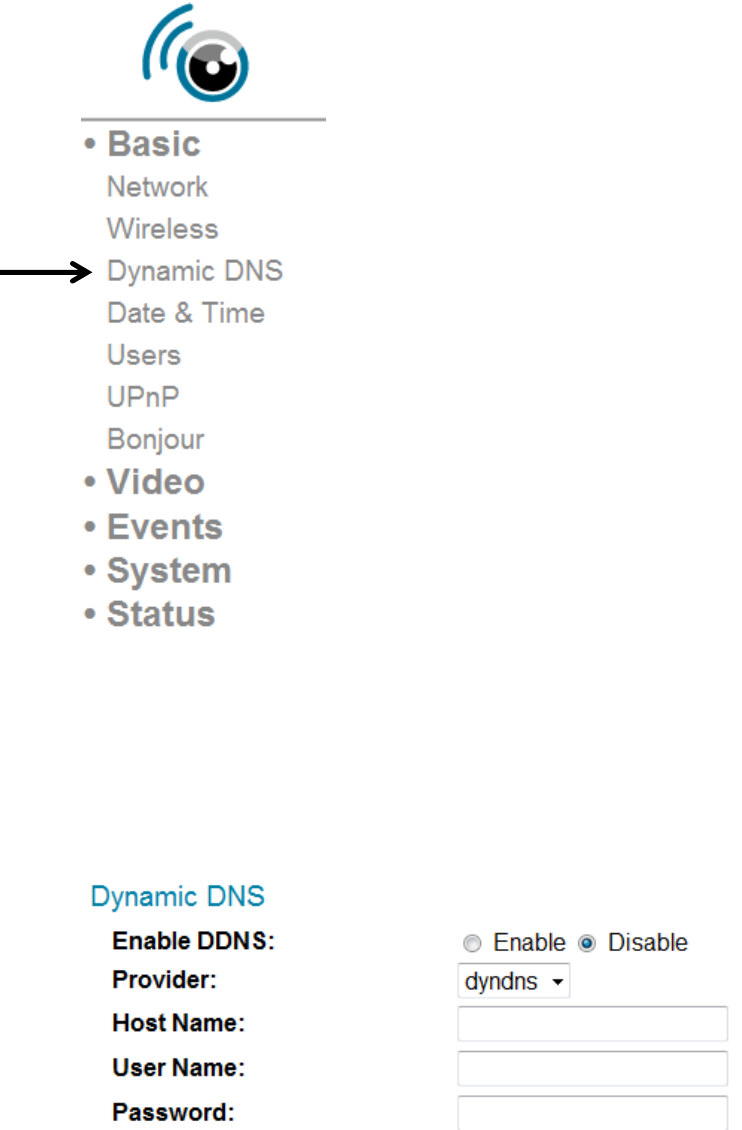
33DynamicDNS
IfyourInternetserviceproviderdidn’tissueyouafixedIPaddress,you
canusethisfunctiontoreportyourcurrentIPaddresstodynamicDNS
serviceprovider,soyoucanlocateyourIPcamerawithouthavingafixed
IPaddress.
Thedescriptionsoftheseitemsarelistedbelow:

ItemDescription
EnableDDNSSelect‘Enable’toenableDDNSfunctionality,
orselect‘Disable’todisableDDNSfunctionality.
ProviderSelectDynamicDNSserviceprovideryou’reusing
fromdropdownmenu.
HostNameInputthehostnameyouregisteredwithDDNS
serviceprovider.
UserNameInputtheusernameyouregisteredwithDDNS
serviceprovider.
PasswordInputthepasswordyouregisteredwithDDNS
serviceprovider.
Click‘App ly ’buttontosavechangesyoumade.
TIPS:Youcanregisterfree(orpaid)dynamicDNSservicefromfollowing
website:
Dyndns:www.dyndns.org
RefertoChapterVIIIforDDNSapplication.
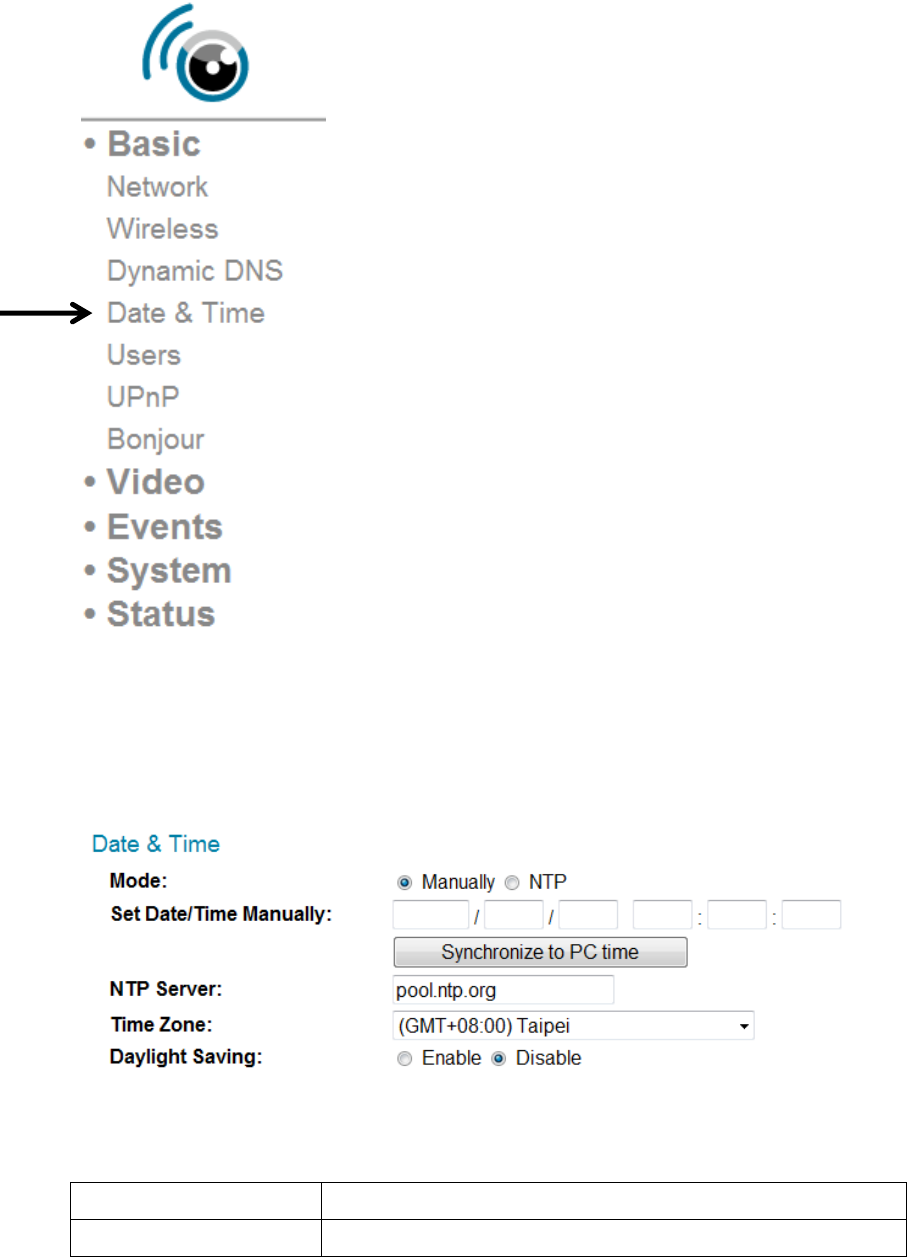
34Date&Time
YoucansetupIPcamera’ssystemdateandtimehere.Maintaininga
correctsystemtimeisveryessentialwhenyouneedtoreplayrecorded
video.
Thedescriptionsoftheseitemsarelistedbelow:
ItemDescription
ModeSelectdate×etupmode:

Manually:Settimemanually.
NTP:UseNTP(NetworkTimeProtocol)tosetup
dateandtimeautomaticallyvianetwork.Ifyou
haveInternetconnectionorthere’saNTPserver
onyourlocalnetwork,youcanselectthis
functiontohelpyoutokeepIPcamera’sdateand
timecorrect.
SetDate/Time
Manually
Thereare6fieldsforyoutoinputcurrentdate/
time.Theformatis:
YYYY/MM/DDHH:MM:SS
SynchronizetoPC
time
Clickthisbuttonthefilldate/timefieldwith
yourcomputer’sdateandtime.
NTPServerInputNTPserver’shostnameorIPaddress.
TimeZoneSelectthetimezoneoftheplaceyoulivefrom
dropdownmenu.
DaylightSavingIftheareayouliveusesdaylightsaving,select
‘Enable’,orselect‘Disable’whendaylightsaving
isnotused.
Click‘App ly ’buttontosavechangesyoumade.
35Users
Besidesdefaultsystemoperatoraccount‘administrator’,youcanadd
additionaloperatoraccountoruseraccounthere:
Operatoraccountscanperformallfunctionalitiesanddoconfigurations
ofthisIPcamera,whileguestaccountscanviewimageonly.

Thedescriptionsoftheseitemsarelistedbelow:
ItemDescription
UserListListsallexistingoperators/usershere.Tomodify
anoperator/user’ssetting,clickhis/hername
herefirst.
UserNameInputuser’snamehere.
PasswordInputuser’spasswordhere.
Confirmpassword Inputuser’spasswordhereagainfor
confirmation.
AuthoritySelectthisuser’sprivilege:
Operatorcanviewvideoandgotosetuppageto
changevideosetting.
Guestcanviewvideoonly.
AddClickthisbuttontoaddanewuserwithsettings
above.
ModifyClickthisbuttontosavechangesofanexisting
user.
Remove Clickthisbuttontoremoveauser.Youmust
selectauserin‘UserList’fieldfirst.
AnonymousLoginSelect‘Enable’toenableanonymoususerto
loginthisIPcameraandviewimage.This
functionisusefulwhenyouwanttoestablisha
remotevideoserverwhichwelcomeseveryone

toviewthevideo.
Ifyouonlywanttoallowregisteredusertologin,
select‘Disable’.
Click‘App ly ’buttontosavechangesyoumade.
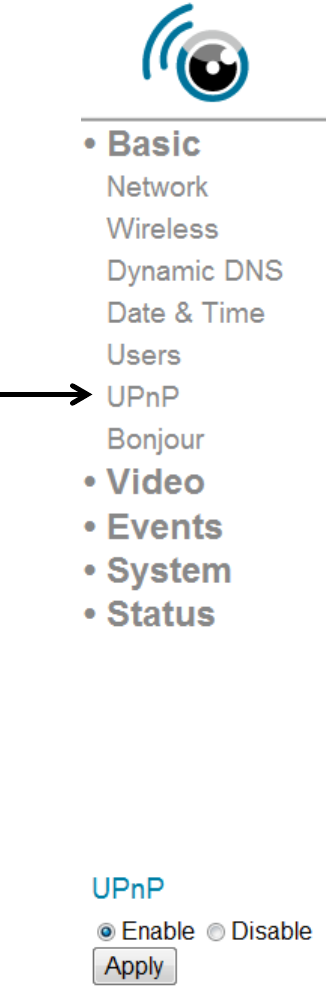
36UPnP
Whenyouenablethisfunction,WindowscomputerscandiscoverthisIP
camerafromwindowsnetworkneighbordirectly,andyoudon’thaveto
knowthisIPcamera’sIPaddressinadvance(Thisonlyworksonlocal
areanetwork).
Select‘Enable’toenablethisfunction,orselect‘Disable’toprevent
usersonlocalareanetworktodiscoverthisIPcamera.
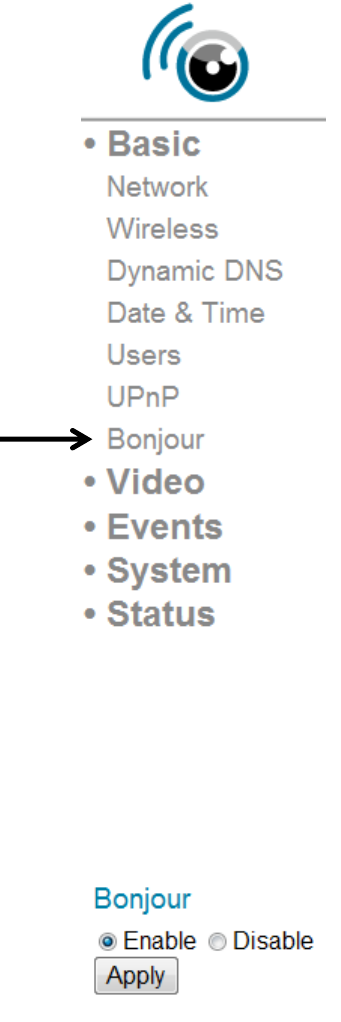
37Bonjour
Whenyouenablethisfunction,Macintoshcomputerscandiscoverthis
IPcamerafromsafariwebbrowserdirectly,andyoudon’thavetoknow
thisIPcamera’sIPaddressinadvance(Thisonlyworksonlocalarea
network).
Select‘Enable’toenablethisfunction,orselect‘Disable’toprevent
usersonlocalareanetworktodiscoverthisIPcamerabysafaribrowser.
Tips:Bonjourfunctionmustbeenabledinsafaribrowserfirst.

ChapterVIVideoConfiguration
Invideoconfigurationsetuppage,youcanchangetheresolutionand
framerate,soyoucandecidethevideoqualitybythebandwidthyou
have.
41VideoSettings
Youcanchangeresolutionandframeratesettingshere.
Thedescriptionsoftheseitemsarelistedbelow:
ItemDescription
ResolutionChangevideoresolutionfromdropdownlist.
Availableresolutionsare:
SXVGA(1280x960)
VGA(640x480)
QVGA(320x240)
Higherresolutionprovidesmodevideodetails,

butrequiresmorebandwidth.
MAX.FramerateSelectthemaximumvideoframerate.Higher
framerateprovidesmorefluentvideo,butalso
requiresmorebandwidth.
Pleasenote:Whentheenvironmentisdark,this
IPcamerawillautomaticallyadjustframerate
toalowersettingtoprovidebettervideo
qualitybyusingalongerexposuretime.
PowerfrequencySelecttheACutilitypower’sfrequency(50or
60Hz).Thiswillhelpreducetheflickerofvideo
whenthere’scertainkindoflamp.
Ifyoudon’tknowthefrequencyofpoweryou’re
using,youcanconsultyourutilitypower
company.
Click‘App ly ’buttontosavechangesyoumade.
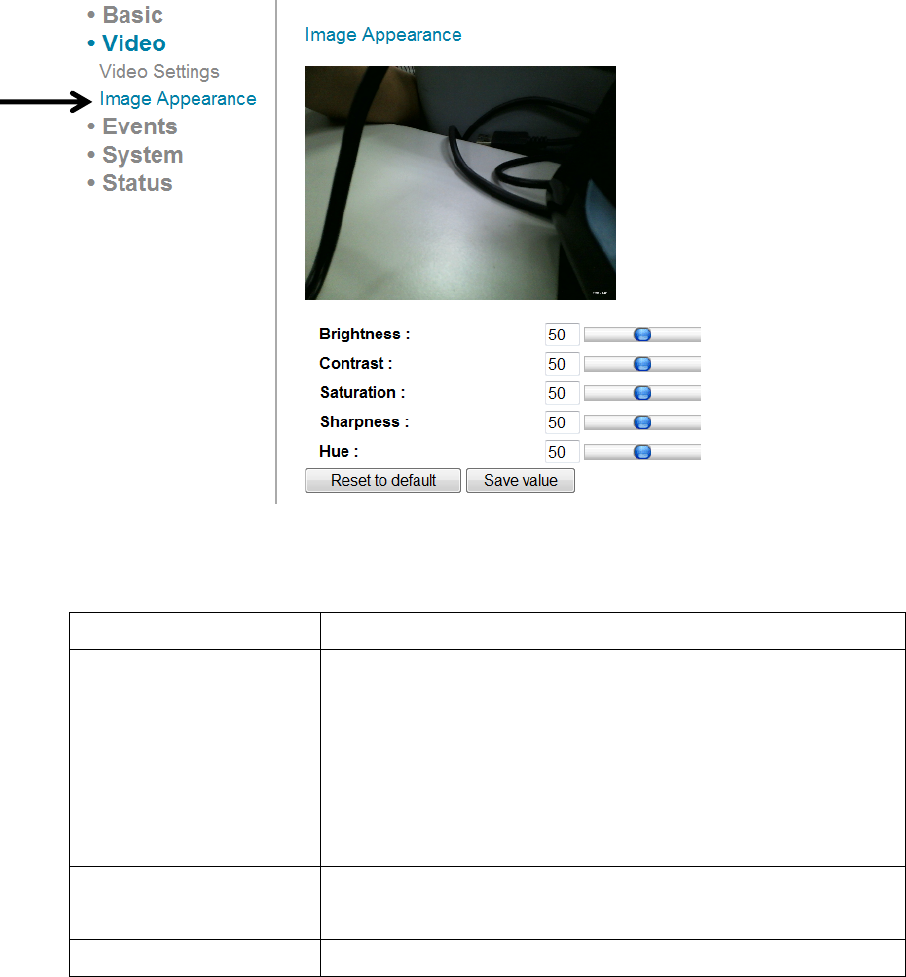
42ImageAppearance
Youcanchangevideoappearancesettingshere.
Thedescriptionsoftheseitemsarelistedbelow:
ItemDescription
Brightness/
Contrast/
Saturation/
Sharpness/
Hue
Changevideo’sappearance.Ifyouthinkyou
don’tlikethevideoasitappears,youcanchange
theseparameters.
Dragtheblueleverbymousetochangethe
value.
ResettodefaultClickthisbuttontoresetallsettingsbackto
defaultvalue(50).
SavevalueSavechangesyoumade.
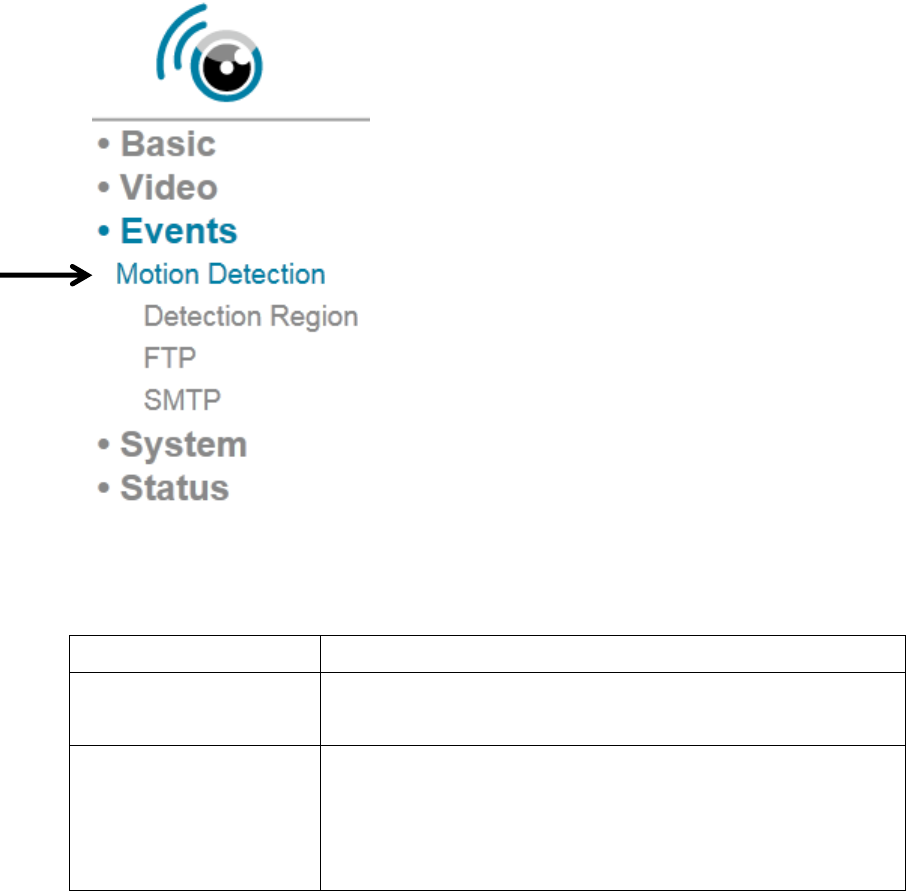
ChapterVEventsConfiguration
ThisIPcameraiscapabletodetectmotions.Youcanusethisfunctionto
usethisIPcameraasasecurityalarmandsendtheimagetoyouby
E‐MailoruploadtoFTPserverwhenthere’smotion.
51MotionDetectionSetup
Youcanenableordisablemotiondetectionsettingshere.
Thedescriptionsoftheseitemsarelistedbelow:
ItemDescription
MotionDetection
enable
Select‘Enable’toenablemotiondetection
function,or‘Disable’todisableit.
MotionDetection
Interval
SelectthetimeintervalthisIPcameradetects
motion.
Todetectminormotions,selectashortertime;

toignoreminormotions,selectalongertime.
Sendsnapshotto
E‐Mail
Select‘Enable’tosendasnapshotpictureto
designatedemailrecipient;select‘Disable’to
disablethisfunction.
Sendsnapshotto
FTP
Select‘Enable’touploadasnapshotpictureto
designatedFTPserver;select‘Disable’todisable
thisfunction.
Click‘App ly ’buttontosavechangesyoumade.
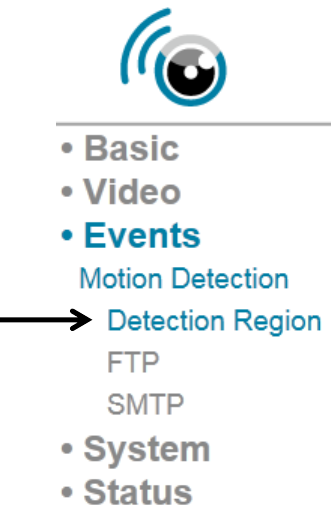
511DetectionRegion
YoucansetuptheareainvideowhereIPcamerashoulddetectchanges
invideo(motion).Motionsoutsideofdetectionregionwillbeignoredby
IPcamera,andIPcamerawilldonothingwhenamotionisdetected
outsideofdetectionregion.Thiswillhelpyoutominimizethechanceof
falsealarm.
Whenyouselectthissetuppage,you’llseethefollowingsetuppage:
(Thesetuppage’svideoviewwindowisintentionallysettoblacksoyou
cansee3motiondetectionregionsclearly).
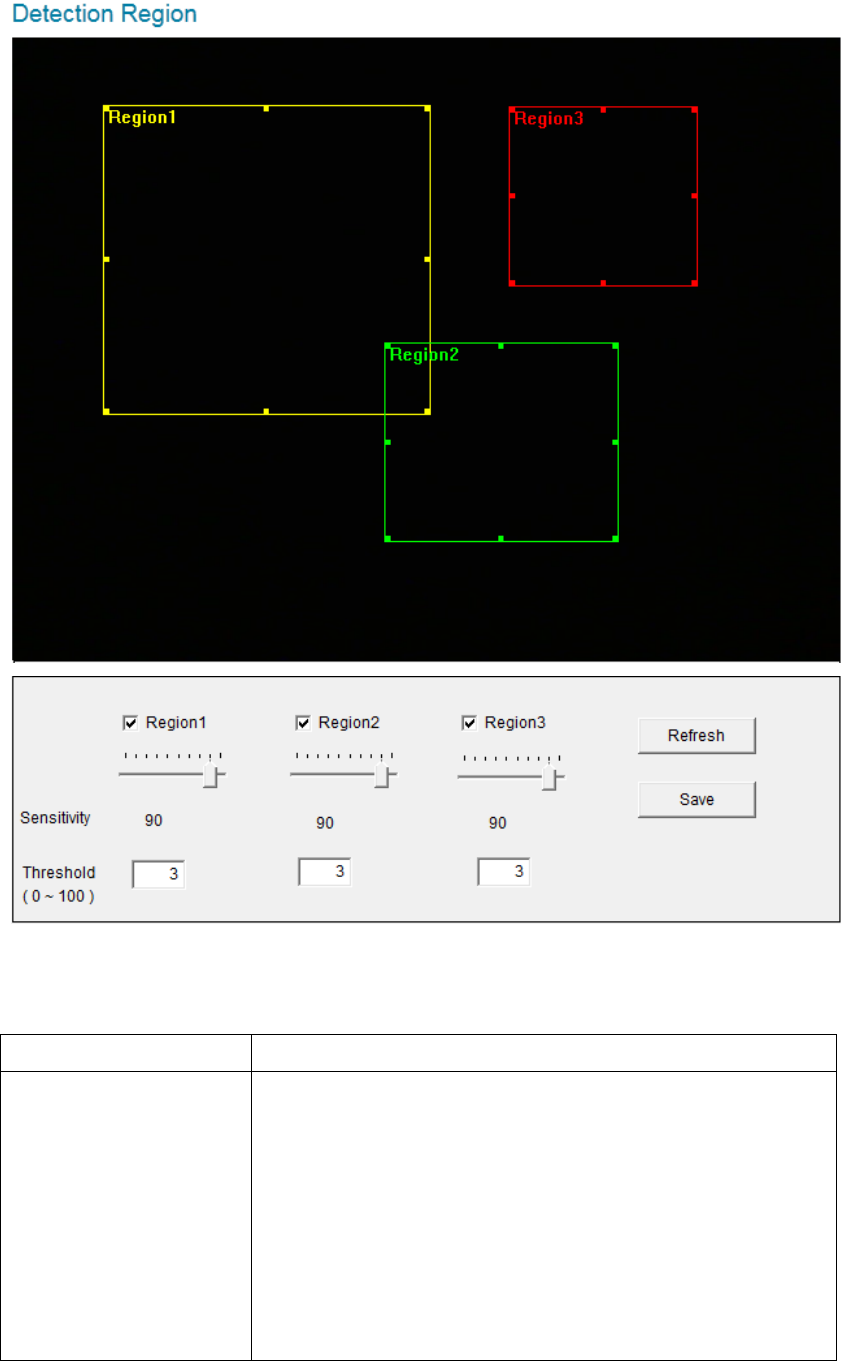
Thedescriptionsoftheseitemsarelistedbelow:
ItemDescription
Region1/
Region2/
Region3
Checktheboxtoenablethismotiondetection
area.Arectanglewillappearonthevideoview
whenit’schecked(enabled).
Tochangethesizeofmotiondetectionarea:
Pointthemousetotheupper‐left,upper‐right,
lower‐left,lower‐rightcornerofmotion

detectionrectangle,anddragthemouse.
Movemotiondetectionarea:
Putthemousewithinthemotiondetectionarea,
anddragthemouse.
SensitivityChangethesensitivityofmotiondetection.Setto
ahighervalue(right)andIPcamerawilltrigger
thealarmwhenthere’reonlysmallchangesin
video.IfyoufoundthatIPcamerasendsE‐mail
oruploadspicturetoFTPtoofrequently,and
there’snothinghappeninthesnapshotvideo,
youcansettoalowervalue.
ThresholdSetthemotiondetectionthresholdhere(input
number0to100).AhighervaluerepresentsIP
camerawillonlytriggeralarmwhentheobjectin
motiondetectionareaisreallybig.
RefreshRefreshthereferencepicture.
SaveSavechangesyoumadeinthispage.
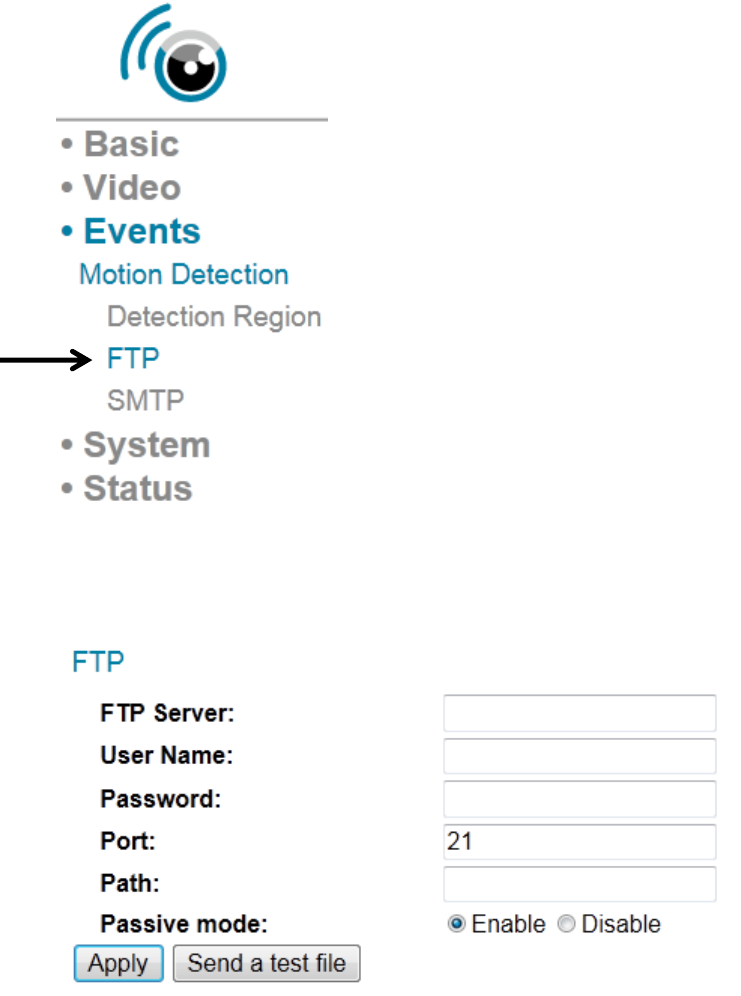
512FTP
YoucanuploadasnapshotpicturewhenmotiondetectedbythisIP
camera.
Whenyouselectthissetuppage,you’llseethefollowingsetuppage:
Thedescriptionsoftheseitemsarelistedbelow:

ItemDescription
FTPServerInputtheIPaddressorhostnameoftheFTP
server.
UserNameInputtheusernamerequiredbyFTPserver.
PasswordInputthepasswordofFTPserver.
PortInputtheportnumberofFTPserver,thisshould
anintegerbetween1to65535.
Pleasedon’tchangethisvalueuntilinstructedby
FTPserver’sadministrator.
PathInputthepath(folder)youwishtosavesnapshot
fileonFTPserver.Ifyoudon’twanttospecify
folder,youcanleavethisfieldblank,and
snapshotfileswillbesavedinthedefaultfolder
whenloggedontoFTPserver.
PassivemodeDefaultsettingis‘Enable’(usepassivemode).If
theFTPserveryou’regoingtousedoesnot
supportpassivemode(usingactivemode),select
‘Disable’here.
Click‘App ly ’buttontosavechangesyoumade.Youcanalsoclick‘Senda
testfile’buttontouploadatestfiletoFTPserver,andamessageboxwill
appeartoindicateiftheFTPuploadissuccessful,soyoucanexamineif
theparametersyousetinthispagearecorrect.
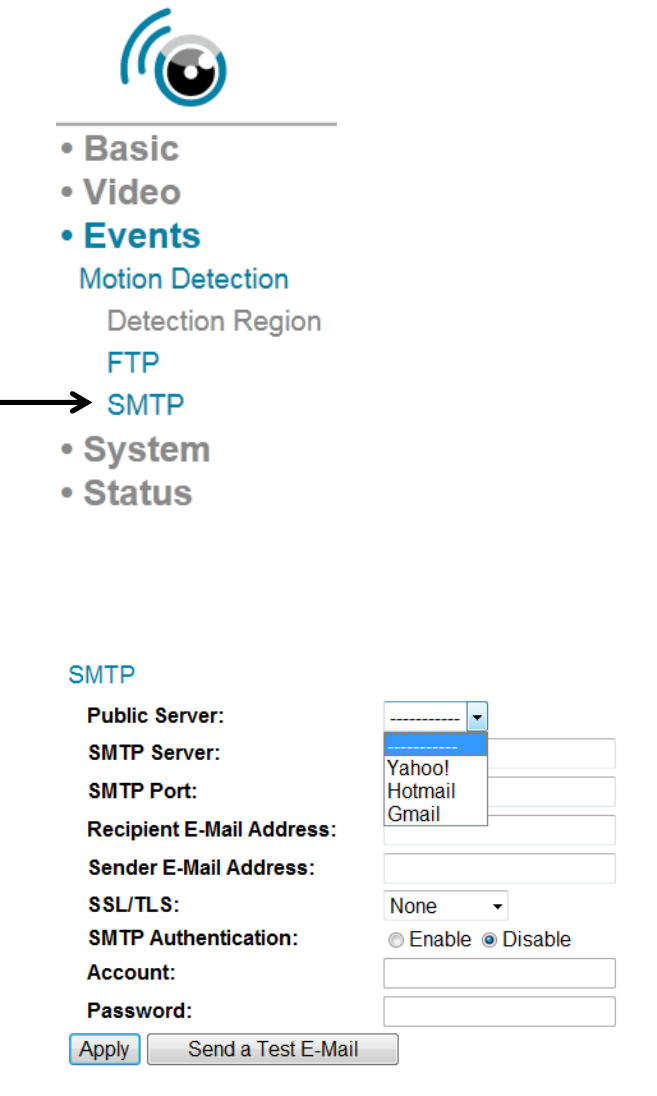
513SMTP
YoucansendasnapshotpicturebyE‐Mailwhenmotiondetectedbythis
IPcamera.
Whenyouselectthissetuppage,you’llseethefollowingsetuppage:

Thedescriptionsoftheseitemsarelistedbelow:
ItemDescription
PublicServerIfyou’reusingHotmail,Yahoomail,orGoogle
mail,selectappropriateitemfromdropdown
menu,andIPcamerawillfilltheSMTPserver
addressandportnumberforyouautomatically.
SMTPServerInputthehostnameorIPaddressofSMTP
server.SMTPserverisusuallyprovidedbyyour
ISP.
SMTPPortInputtheSMTPportnumberhere.MostofSMTP
serversuseportnumber‘25’,whilesomeSMTP
serversusesencryptedconnectionandport
numberis‘465’.Consultmailserver
administratorwhenindoubt.
RecipientE‐Mail
Address
InputE‐mailrecipient(receiver)’sE‐mailaddress
here.
SenderE‐Mail
Address
InputanE‐Mailaddresshere,whichwillbeused
byE‐Mailsender’saddress.Thiswillhelpyouto
identifytheE‐MailsentbythisIPcamera,and
willhelpyoutopreventproblemscausedby
anti‐spamsoftware.
SSL/TLSSelect‘SSLorTLS’whenyourSMTPserver
requiresencryption.
Whenindoubt,consultyourSMTPserver
administrator.
SMTP
Authentication
Select‘Enable’whenyourSMTPserverrequires
authentication.
Whenindoubt,consultyourSMTPserver
administrator.
AccountInputSMTPaccountwhenyourSMTPserver
requiresauthentication.
PasswordInputthepasswordusedforSMTPserver
authentication.
Click‘App ly ’buttontosavechangesyoumade.Youcanalsoclick‘Senda
testE‐mail’buttontosendatestE‐mailtoSMTPserver,andamessage
boxwillappeartoindicateiftheE‐mailsendissuccessful,soyoucan
examineiftheparametersyousetinthispagearecorrect.
ChapterVISystemConfiguration
Youcanconfigurethebasicsystemsettingsinthissetuppage,orbackup
/restoresystemconfigurations.
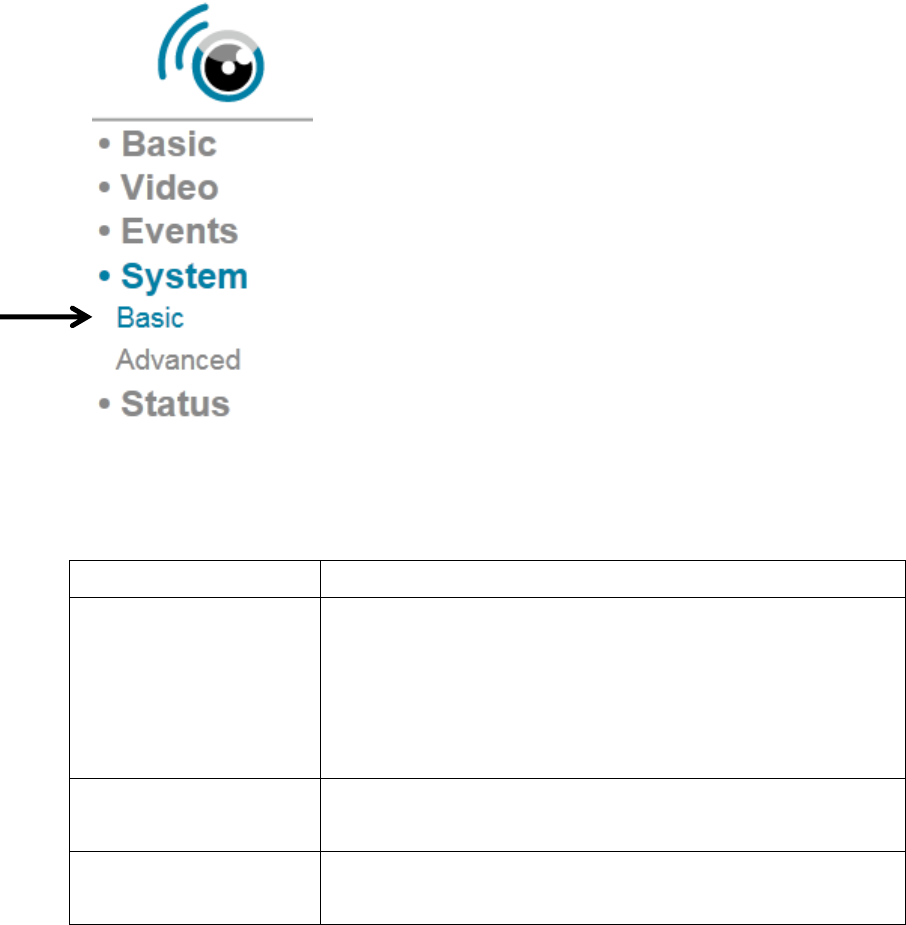
61‘Basic’Settings
Youcansetthecamera’snameandpasswordhere.Youcanalsochange
thebehaviorofLEDlights.
Thedescriptionsoftheseitemsarelistedbelow:
ItemDescription
IPCameraNameSetthenameofIPcamera.It’srecommendedto
useameaningfulnamewhichcandescribethe
locationwheretheIPcameraisinstalled.Thiswill
helpyoutoidentifyIPcamerawhenyouhave
morethanoneIPcameras.
Administrator
Password
Inputadministrator’snewpasswordhereifyou
wanttochangeit.
ConfirmPasswordInputadministrator’snewpasswordhereagain
forconfirmation.

LEDIndicationForsecurityreasons,youcandisabletheLED
lightsinfrontofIPcamerabyselect‘off’here,so
otherpeoplecan’tidentifyiftheIPcamerais
workingbythem.
Click‘App ly ’buttontosavechangesyoumade.
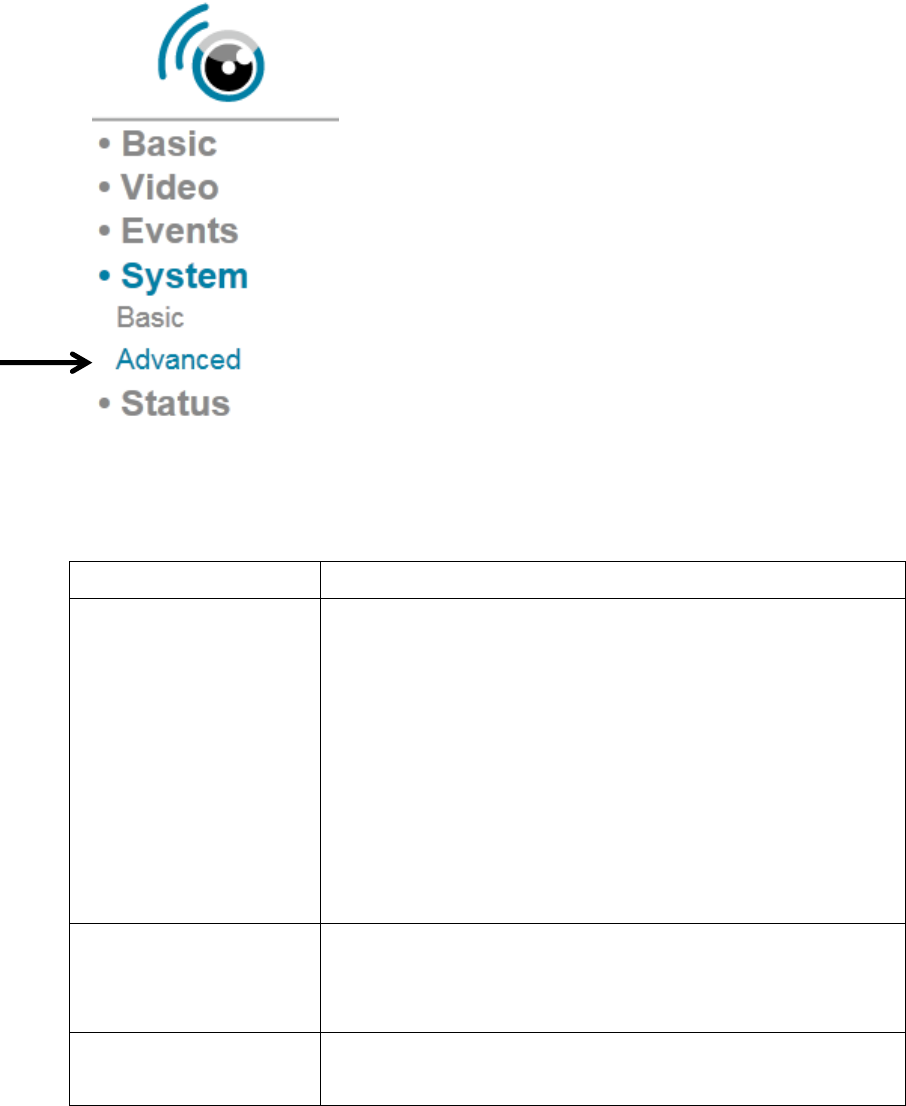
61‘Adva nc e d’ Settings
YoucansaveorrestoreIPcamera’sconfigurationfilehere.Youcanalso
reboottheIPcameraremotelyhere.
Thedescriptionsoftheseitemsarelistedbelow:
ItemDescription
FirmwareFilenameYoucanimprovethefunctionalityofthisIP
camerabyuploadingnewfirmwarefilewhen
available.
Pleasedownloadnewfirmwarefilefromour
website,andsaveittoyourcomputer’shard
disk.Then,click‘Browse’buttontoselectthefile
onyourharddisk,andclick‘Ap pl y ’buttonto
uploadthefirmwaretoIPcamera.
BackupConfigClick‘Appl y ’buttontodownloadcurrent
configurationasafileandsaveitonyour
computer’sharddrive.
RestoreConfigClick‘Browse’buttontoselectapreviously‐saved
configurationfileonyourcomputer’sharddrive,

andthenclick‘A ppl y ’touploadtheconfiguration
file.
RebootNowClickthisbuttontorebootIPcamera.This
functionisusefulwhenyouthinkIPcamerais
notworkingproperly.
ResettodefaultResettheIPcamera’ssettingbacktodefault
value.Thereare2options:
1) KeepNetworkSetting:Resetallsettingsback
todefaultvalue,exceptnetworksettings.You
canstillusethesameIPaddresstoconnectto
theIPcamera.
2) FactoryDefault:Resetallsettings,include
networksettings.PleasereconnecttoIP
camerabyitsdefaultIPaddress:192.168.2.3
Click‘App ly ’toreset.Youcanpressandhold
‘WPS/Reset’buttonformorethan10seconds
toresetIPcamera’ssettingtodefaultvalue.
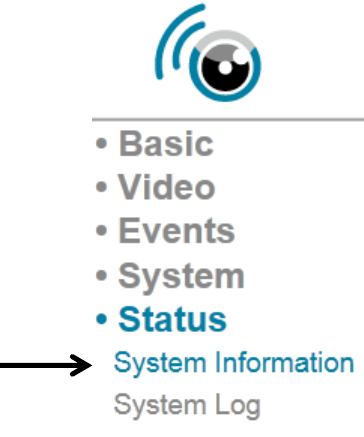
ChapterVIISystemStatus
YoucanviewthestatusofthisIPcamera,whichishelpfulwhenyou
needtododetailedconfiguration,ordebug.
71SystemInformation
Youcanseesystem‐wideinformationofthisIPcamerahere.
Asysteminformationsummarypagewillappearlikethis:
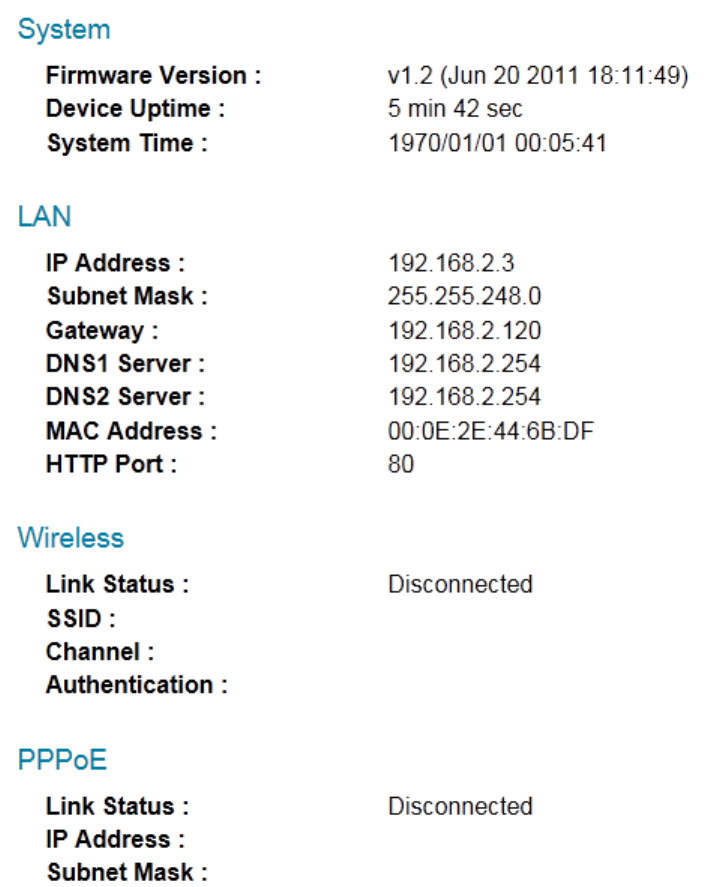
72SystemLog
TheIPcamera’susageandactionswillbedisplayedhere.
Thesystemlogwillappearhere,youcanusescrollbartoviewlogs,with
someadjustableparameters:
Thedescriptionsoftheseitemsarelistedbelow:
ItemDescription
LogLevelSelecttheloglevelfromdropdownlist.Select0
andtheIPcamerawillonlylogveryimportant
information,orselect4tologeverything.
RemoteLogThisIPcameracansendloginformationtoa
remoteserverforarchive.Select‘Enable’to
enablethisfunction.

ThisIPcamerasupportssysloglogserver.
RemoteLogServerInputtheIPaddressorhostnameoflogserver
youwishtouse.
Click‘App ly ’buttontosavechangesyoumade.

ChapterVIIIAdvancedOperations
Inthischapter,you’lllearnhowtoapplyafreeDYNDNSaccounttouse
withthisIPcamerawhenyoudon’thaveafixedIPaddress,andviewthe
videoofthisIPcameraonyouriPhone.
8.1ApplyforfreeDYNDNSaccount
IfyourISPissuesyouwithanIPaddresswhichisnotfixed,pleasefollow
thefollowinginstructionstoapplyforafreeDYNDNSaccounttogeta
hostnamewhichisdynamicallymappedtoyourcurrentIPaddress.
1. Launchyourwebbrowserandnavigatetohttp://www.dyndns.org
2. Click‘SignIn’button(locatedatupper‐rightcornerofdyndns.org’s
webpage)
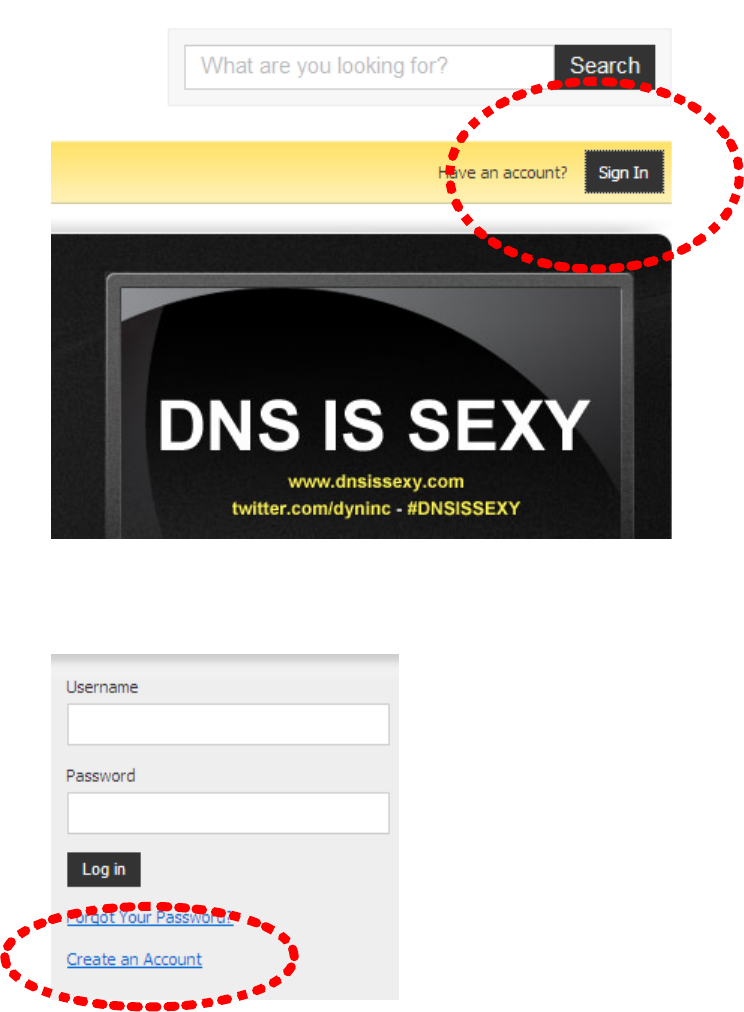
3. Click‘CreateanAccount’inpop‐upmenu.
4. Fillallfieldsappearinthismenu,andclick‘CreateAccount’buttonto
createanewaccount.You’llbepromptediftheaccountyouselected
isnotavailable.
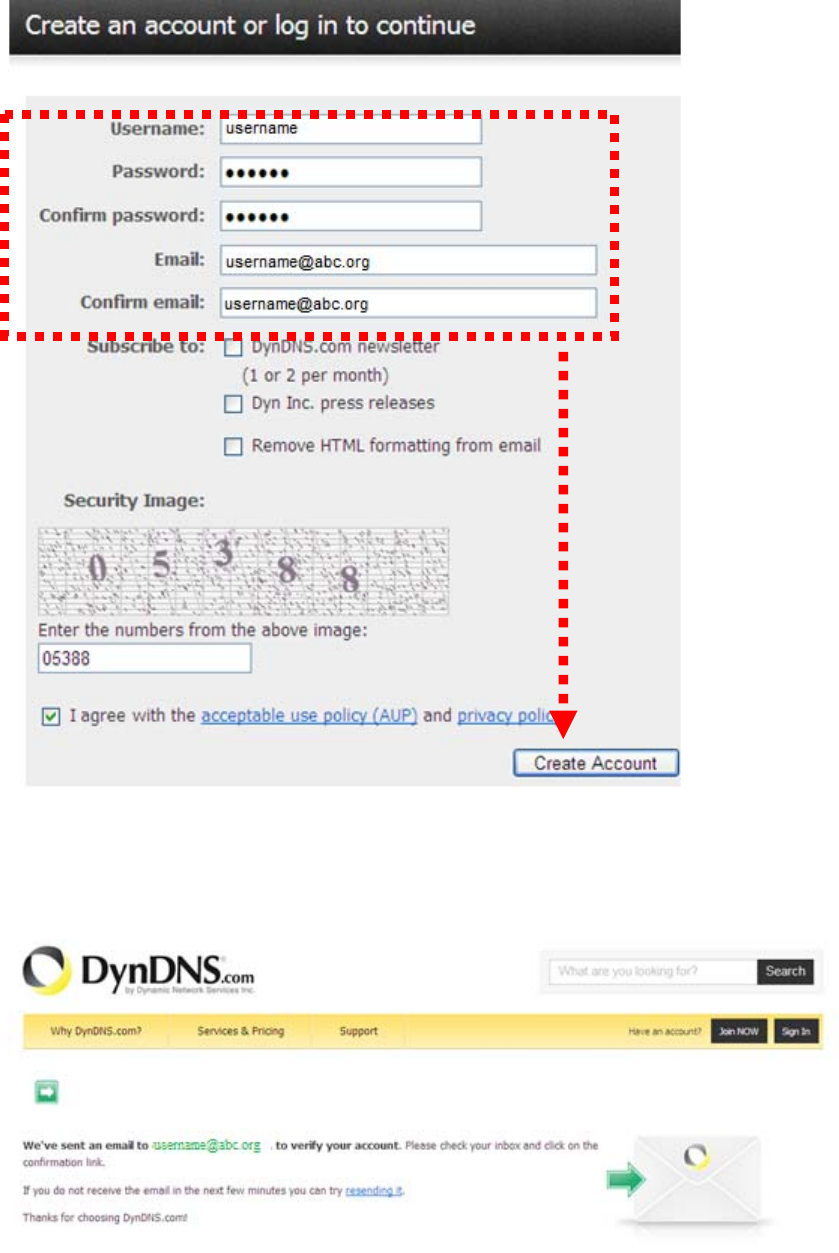
5. Whenyouseethisimage,you’llreceiveane‐mailconfirmationatthe
e‐mailboxyouregisteredwithdyndns.org.

6. Checkyoure‐mailboxandyoushouldbeabletogetconfirmation
e‐mail.Clickthelinktoconnecttodyndns.orgwebsiteandcomplete
registrationprocedure.Ifyoudidn’tgetthemail,pleasere‐checkthe
e‐mailaddress,orclick‘resendingit’linkinlaststep.
Also,ifnothinghappenafteryouclickthelink,pleasecopythelink
textandpasteitinwebbrowser’saddressbar.
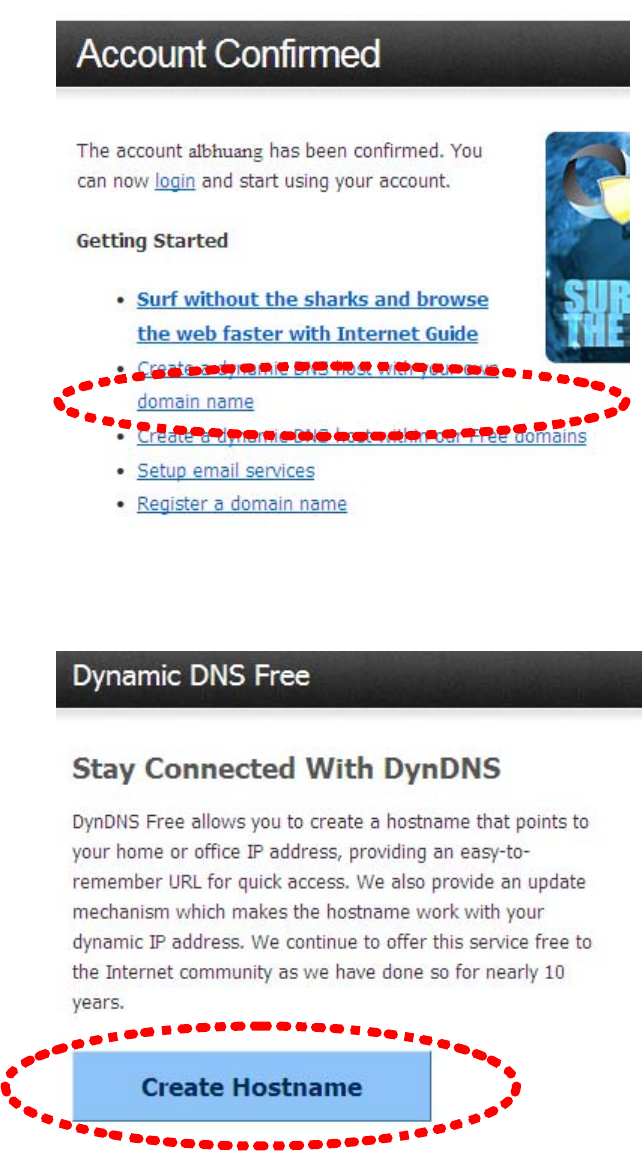
7. Whenyousee‘AccountConfirmed’webpage,indicatesyour
dyndns.orgaccounthasbeenconfirmedandactivated.Nowyoucan
click‘CreateadynamicDNShostwithinourFreedomains’linkto
continue.
8. Click‘CreateHostname’button.
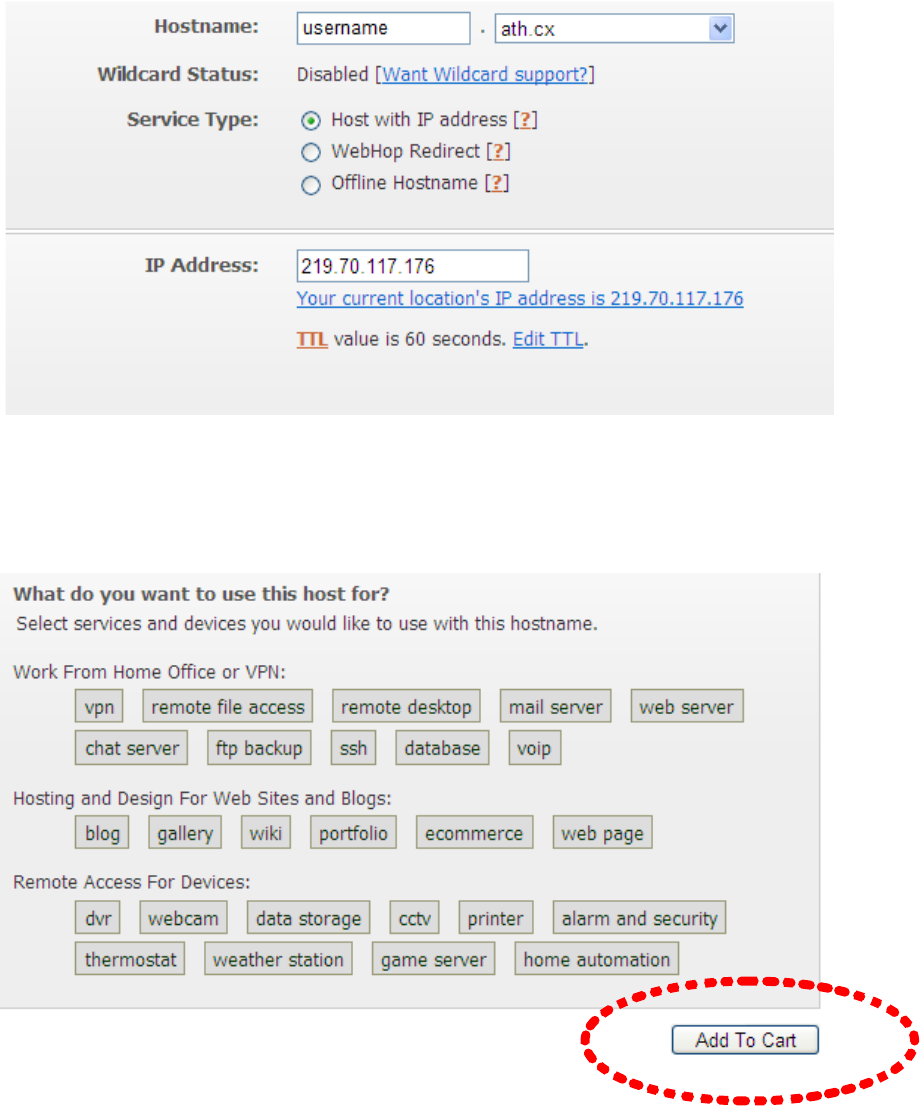
9. Inthispage:
Inputthehostnameofyourchoicein‘Hostname’field,
Selectadomainnameindropdownmenu,
Select‘HostwithIPaddress’for‘ServiceType’,
InputcurrentIPaddressin‘IPAddress’field(orclickthelinkbelowto
usedetectedIPaddresstofillthisfield’.
10. Click‘Addtocart’continue.

11. Click‘Next’tocontinue.
12. Click‘ActivateServices’tocontinue.
13. Whenyouseethismessage,indicatesyourfreedyndns.orghostname
mappingservicehasbeenactivated.Youcangotochapter2‐2‐3to
useyourdyndns.orgusername,password,andhostname+domain
nametolocateyourIPcameraonInternetevenyou’reusingdynamic
IPaddress!
ChapterIXWindowsSurveillanceUtility
BesidesusingwebbrowsertooperatethisIPcamera,youcanalsouse
windowsutilitytousethisIPcamera,whichprovidesfasteraccesstoall
functionsofthisIPcamera.
9‐1InstallingIPCameraAdministrationSoftware
Therearetwofilesinthesurveillancesoftware’sfolder:
Setup_Admin_xxxandSetup_Viewer_xxx(xxxisversionnumberandwill
bedifferentastheversionnumberchanges).Pleaseinstall
Administrationsoftwarefirst.Youcanuseadministrationsoftwareto
locateandadministerIPcamerasonyourlocalareanetwork.
PleasenotethatyoustillhavetoconfigureremoteIPcameras(i.e.IP
camerasonInternet)manually.
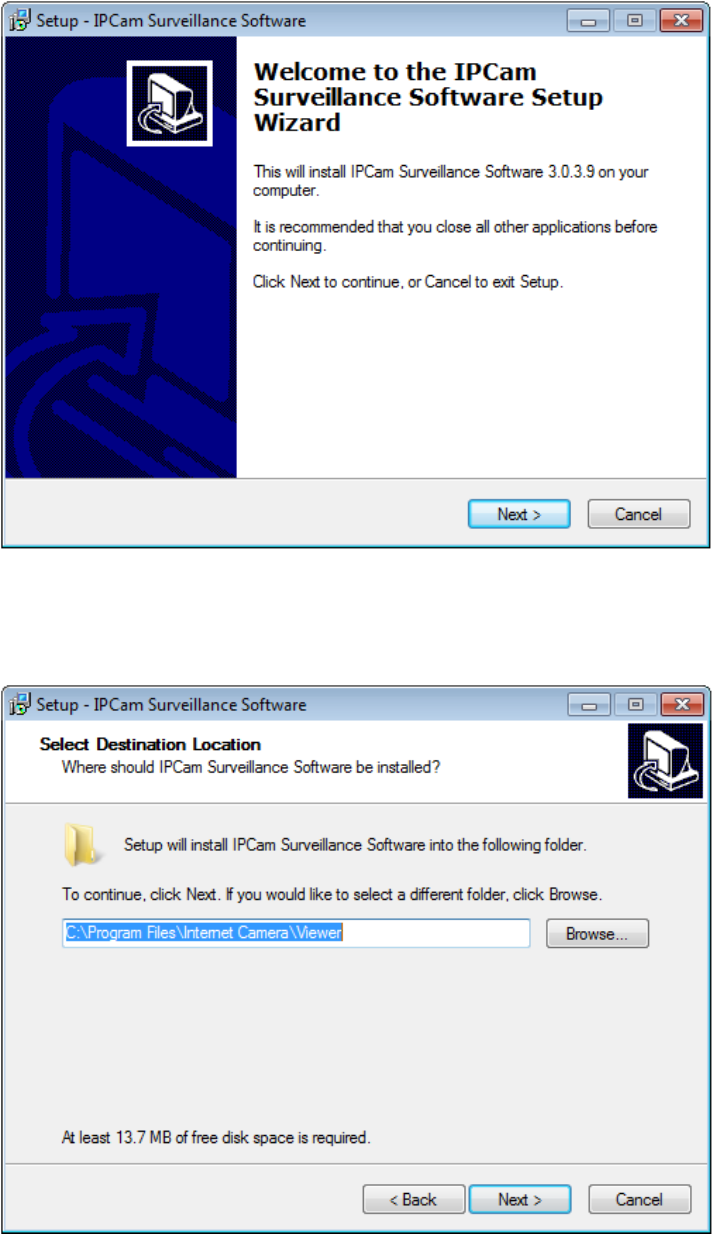
1.DoubleclicktheSetup_Admin_xxxfilelocatedin‘xxx’folderin
suppliedCD‐ROM,whenthefollowingwindowappears,click‘Next’.
2.Youcanspecifythedestinationfolderofsoftwareinstallation,youcan
justusethedefaultfolder,andclick‘Next’tocontinue.
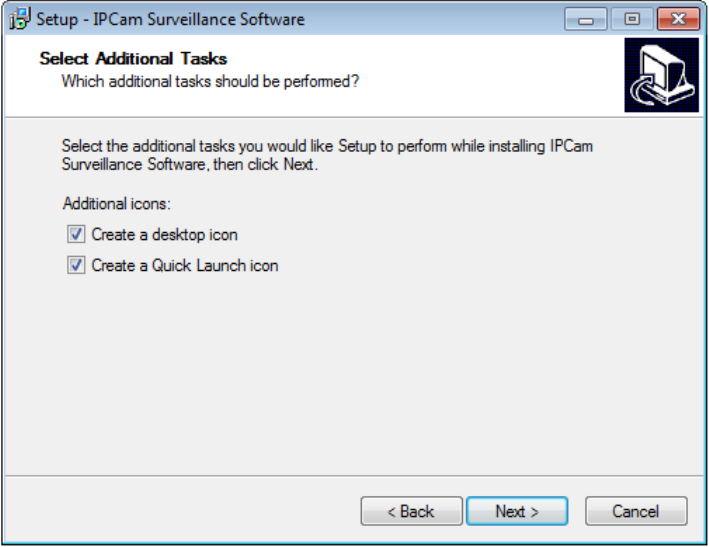
3.Ifyouneedinstallationprogramtocreateadesktopiconoraquick
launchiconforyou,clickallitemsyouneedhere,thanclick‘Next’to
continue.
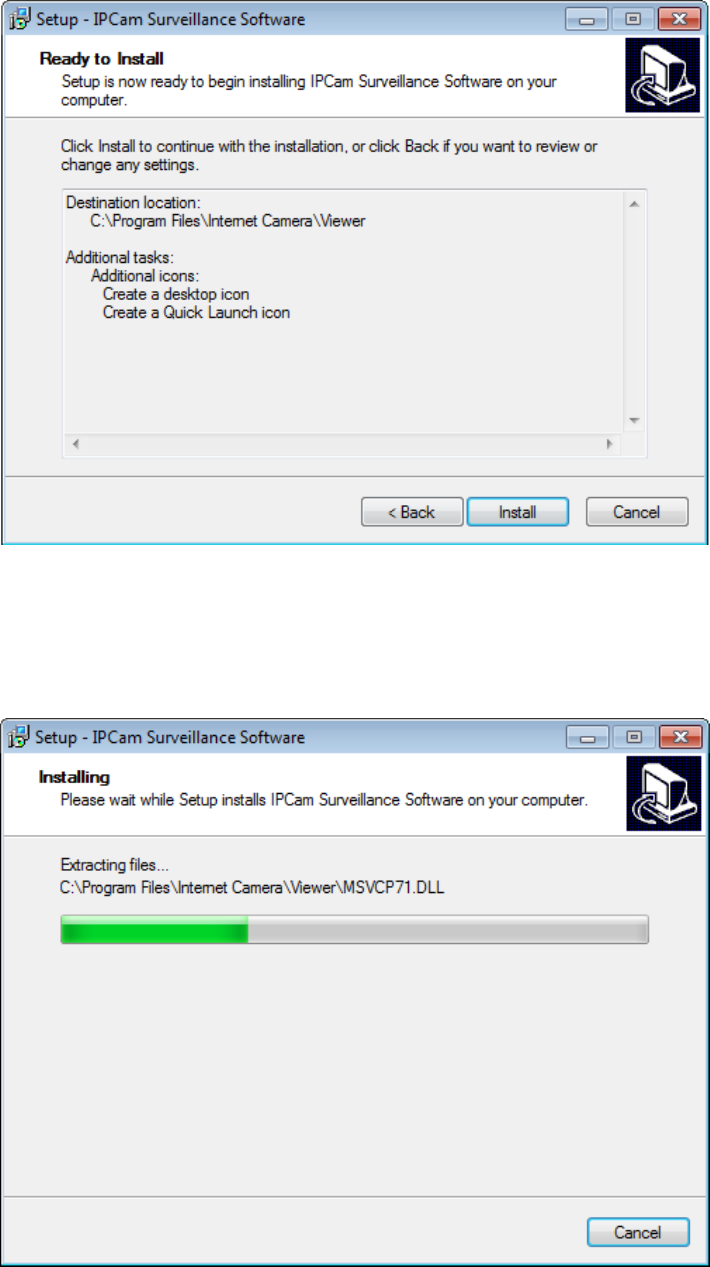
4.Herelistsalloptionsyouchoseinprevioussteps,ifeverything’s
correct,click‘Install’tostartinstallingprocedure,orclick‘Back’togo
backtoprevioussteptomodifyinstallingsettings.
5.Theinstallingprocedurewilltakesometime,pleasebepatient.
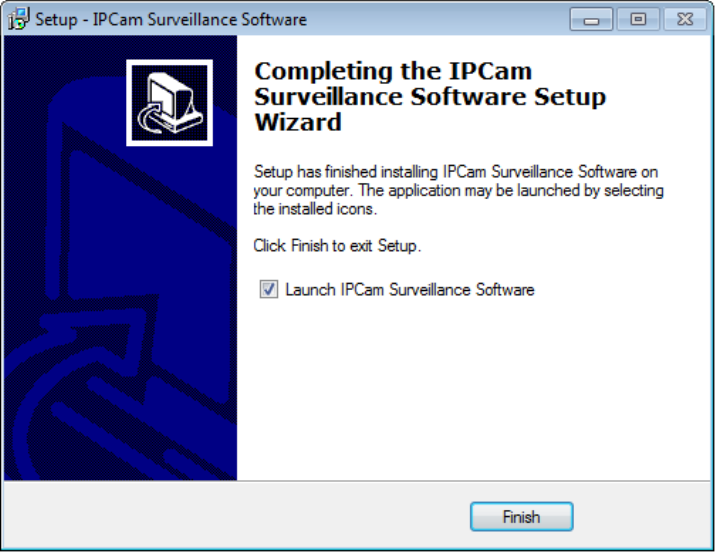
6.Whenyouseethiswindow,itmeansthesoftwareinstallingprocedure
iscomplete.Pleaseclick‘Finish’tofinishtheprocedure(IPcamera
surveillancesoftwarewillstartafteryouclick‘Finish’button,ifyouwant
tostartitlater,uncheck‘LaunchIPCamSurveillanceSoftware’box).
1. Aftersoftwareislaunched,youcanclickbuttontosearchforIP
camerasonyourlocalareanetwork.
8.Whenone(ormore)IPcamera(s)isfound:
youcanclickbuttontoconnecttoIPcamerabywebbrowser,orclick
buttontoconfigureitssetting.You’llbepromptedtoinputIP
camera’sadministratorusernameandpasswordifyouwishtoconfigure
it:
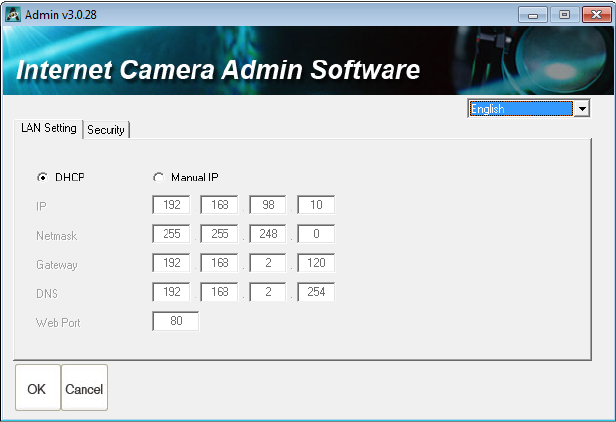
Therearetwosettingpages.
LANSetting:
YoucanconfigureIPcamera’sIPaddresssettinginthispage.Youcan
eitheruse‘DHCP’(IPcamerawillacquireIPaddressfromDHCPserveron
yourlocalareanetworkautomatically),or‘ManualIP’(youhavetoinput
IPaddressmanually).
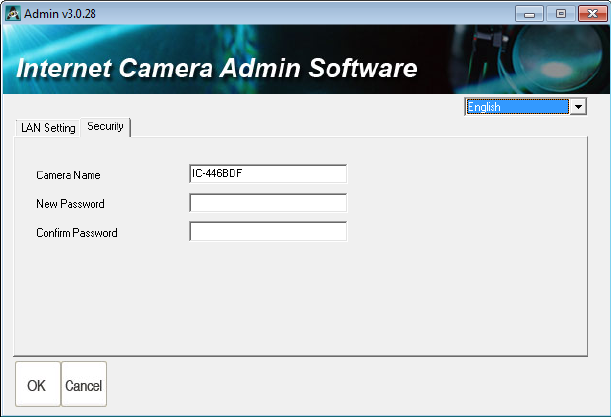
Security:
YoucanchangeIPcamera’sname,andchangeitsadministrator
passwordherebyinputtingnewpasswordinboth‘NewPassword’and
‘ConfirmPassword’field.
9.2InstallVideoViewer
1.Double‐clickSetup_Viewer_xxxfiletostartinstallation.
2.Click‘Next’tocontinue.
3.Youcanunchecktheboxeshereifyoudon’twanttocreatedesktop/
quicklaunchicon,andclick‘Next’tocontinue.
4.Pleasecheckifeverything’scorrecthere.Ifyouwanttochangeany
setting,click‘Back’togobacktopreviouspage,orclick‘Install’tostart
installation.
5.Installationproceduretakesfewsecondstofewminutestocomplete,
pleasebepatient.
6.Installationiscompletewhenyouseethismessage.Youcanclick
‘Finish’tofinishinstallationprocedureandlaunchutility,orunckeck
‘LaunchIPCamSurveillanceSoftware’boxbeforeyouclick‘Finish’button
ifyoudon’twanttolaunchsoftwareafterinstallationiscomplete.
9‐2UsingIPcamerasurveillancesoftware
Youcanclick‘IPCamSurveillanceSoftware’iconfromdesktop,quick
launchbar,orstartmenutostarttheIPcamerasurveillancesoftware.
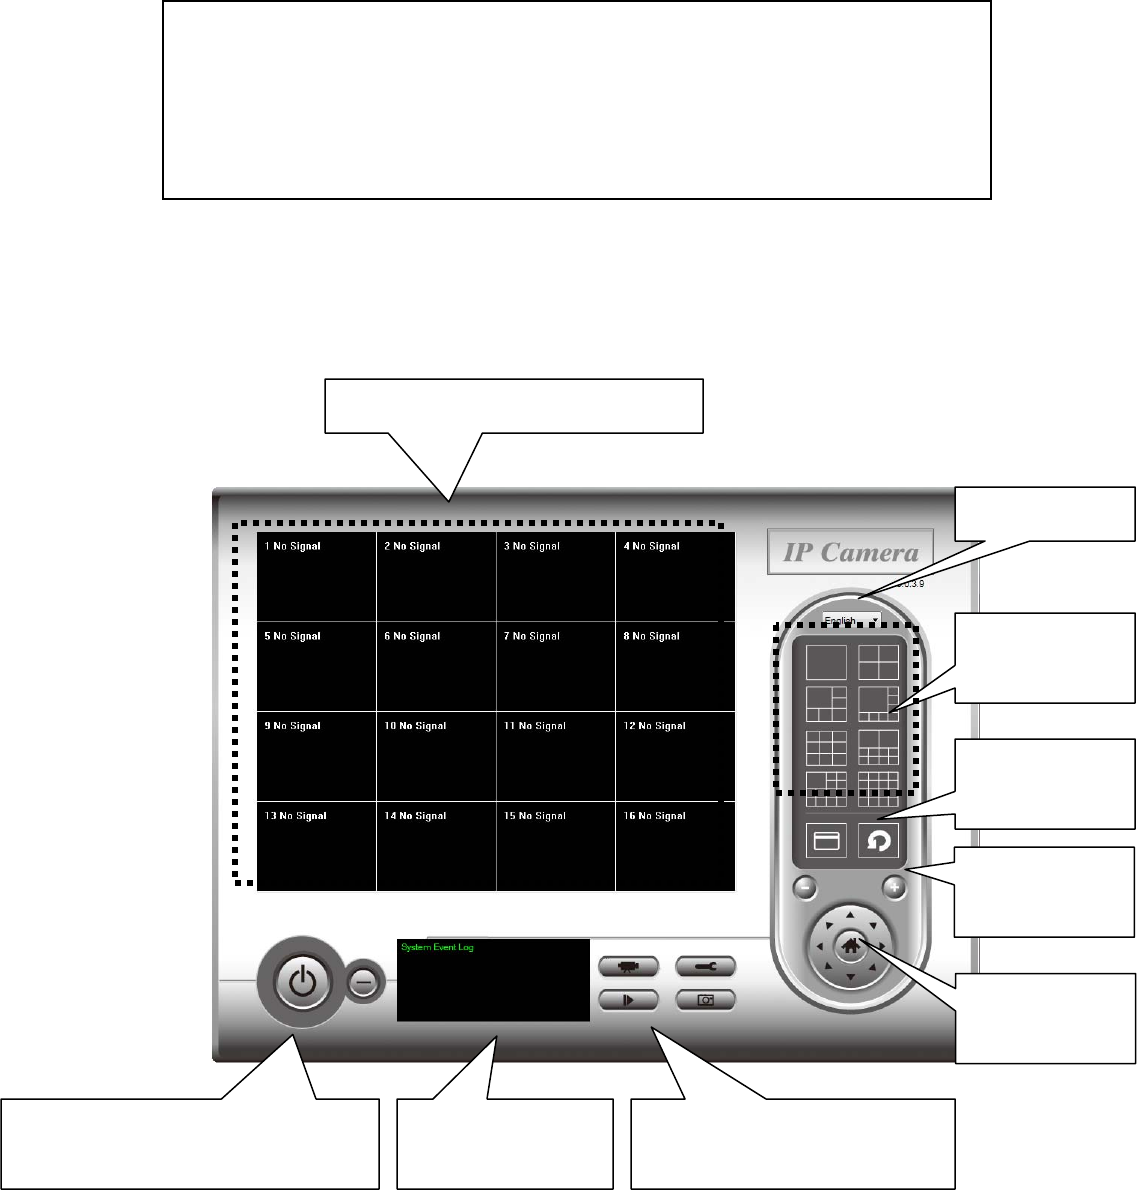
HerearedescriptionsforallcomponentsofIPcamerasurveillance
software:
Before you start:
IP camera surveillance software will only work when your monitor’s
resolution is ‘1024 x 768’. Please change the resolution before you
use IP camera surveillance software, or it won’t start.
Language
Display
layout
Fullscreen/
Scan
ZoomOut/
ZoomIn
PTZControl/
Home
Recording/Systemconfigure
Playback/Snapshot
Closewindow(stopsurveillance)/
Minimizewindow
Videodisplayingarea
Messagedisplay
box
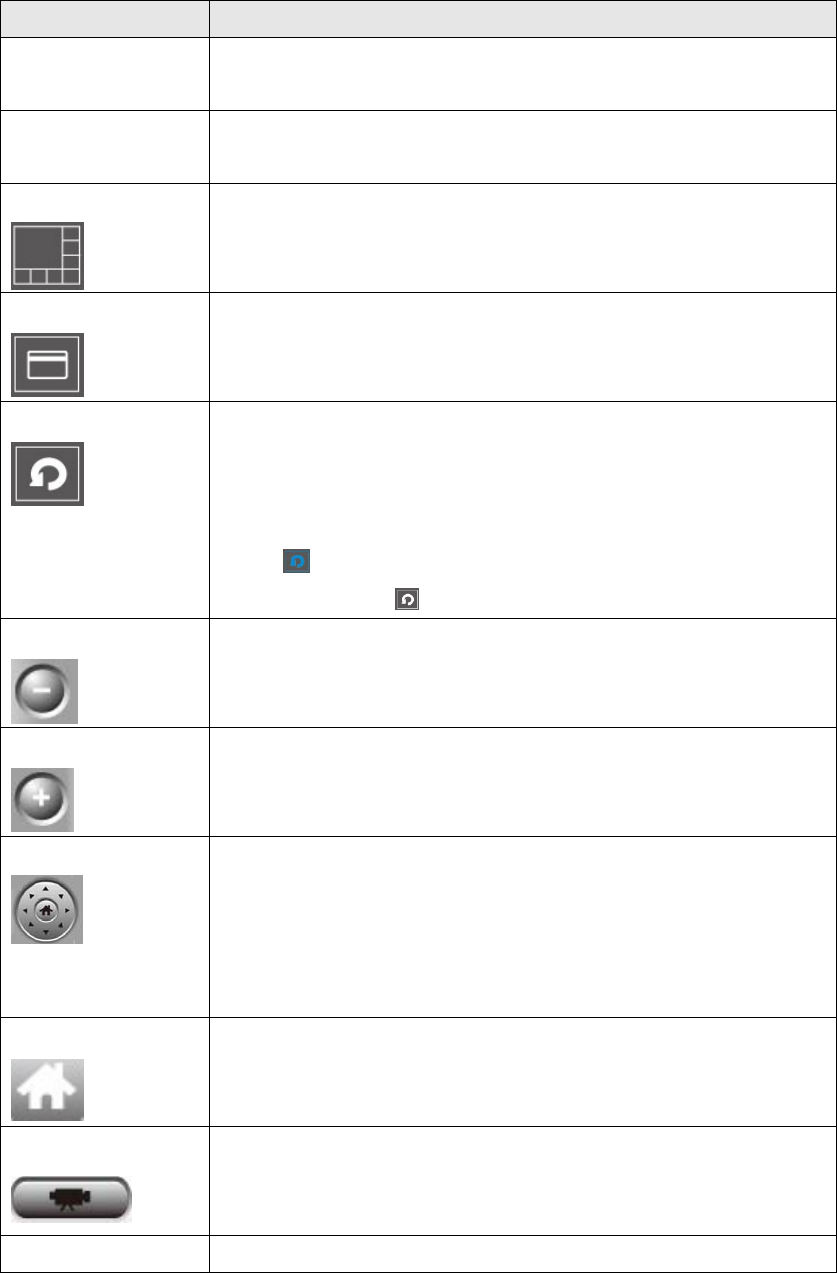
Youcanputthemousecursoronacertaincomponentandseeitsbutton
name,andhere’redetaileddescriptionsofallbuttons:
ItemDescription
Videodisplaying
area
Theimageofallconnectedcameraswillbedisplayed
here.
LanguageSelectalanguagefromthisdropdownmenuto
changedisplaylanguage.
Displaylayout
Changecameraimagedisplaylayout(Clickalayout
icontochangecameradisplaylayout).Thereare8
kindsofavailabledisplaylayouts.
Fullscreen
Clickthisbuttontoswitchtofullscreenmode(only
displayallcamera’simage),press‘ESC’keytoquit
fullscreenmode.
Scan
ClickthisbuttonandtheIPcamerasurveillance
softwarewillswitchdisplayingtheimageofall
connectedcameraautomatically.Clickthisbutton
oncetoactivatescanfunction(scaniconwillbecome
blue),clickagaintostopscanning(scaniconwill
becomewhite).
Zoomout
Zoom‐out(Toseemoreobjects).
Thisfunctionisonlyavailableforsupportedcameras.
ZoomIn
Zoom‐in(Tooseemoredetails).
Thisfunctionisonlyavailableforsupportedcameras.
PTZcontrol
Thereare8directionsinPTZcontrolring.Ifthe
camerayouconnectsupportPTZ,youcanusePTZ
controlringtochangethedirectionthatcamera
pointsto.
Thisfunctionisonlyavailableforsupportedcameras.
Home
Clickthisbuttontoreturnthecamerato‘Home’
(default)position.
Thisfunctionisonlyavailableforsupportedcameras.
Recording
Startvideorecording.
ConfigureSoftware/cameraconfiguration.
Playback
Playbackarecordedvideofile.
Snapshot
Takeasnapshotofcurrentcamera.
Messagedisplay Displaysallsystemmessageslikecamerais
disconnectedetc.
Closewindow
(stop
surveillance)
TerminatesIPcamerasurveillancesoftware.
Minimize
window
MinimizesIPcamerasurveillancesoftwarewindow.
Videodisplaying
area
Displaystheimageofallcamerasbythedisplay
layoutyouselected.
9‐3ConfigureIPcamerasurveillancesoftware
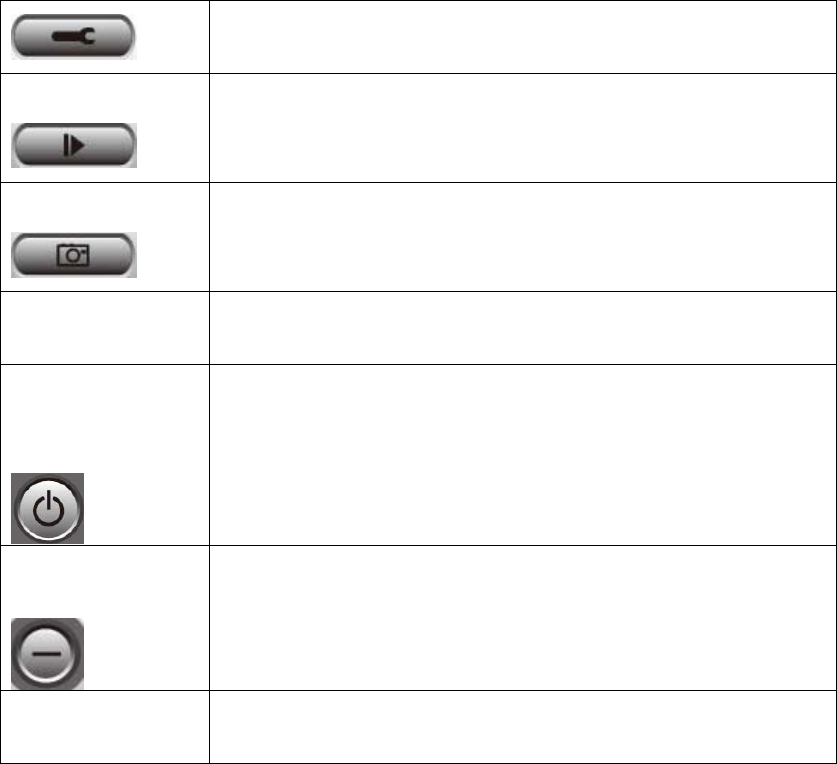
9‐3‐1Configurecameras
BeforeyouusethisIPcamerasurveillancesoftware,youmustconfigure
thecamera(s)youwishtoconnect.Pleaseclick‘Systemconfigure’button
andapopupmenuwillappear:
Pleaseselect‘ConfigureCameras’toconfigurecameras:
Note: If you’re prompted by a windows security alert which asks you if
you want to block ‘IPCamViewer’ program, please click ‘Unblock’
button, of IP camera surveillance software will not be able to function
correctly.
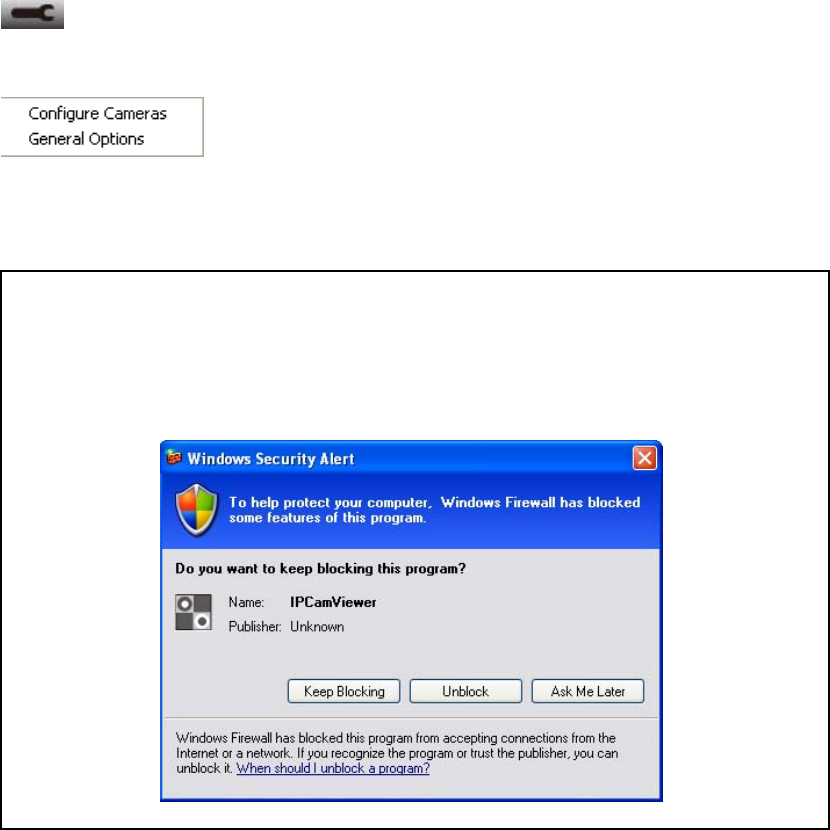
9‐3‐1‐1‘Camera’tab
Inthistabyoucanconfigureallcamerasyouwishtoconnect.Upto16
camerascanbeconnectedsimultaneously:
Herearethedescriptionsofallsettingitems:
ItemDescription
ChannelSelectthechannelnumberyouwishtoset.
CameraSearchAllcamerasfoundonyourlocalnetworkwillbe
displayedin‘CameraSearch’box.
SelectSelectacameralistedin‘CameraSearch’box,and
click‘Select’buttontofillallparametersofselected
cameraineverycameraconfigurationfields.
RefreshRescanallcamerasonyourlocalnetwork.Ifyou
didn’tseethecamerayouexpectedin‘Camera
Search’box,ornewcamerashasbeenjoinedtoyour
localnetworkafterlastscan.
Name*Inputthenameofcamerahere.Defaultvalueisthe
first6bytesofcamera’sMACaddress,youcan
changethenameofcamerasoyoucanremember

thecamera’slocationofpurposeeasily.
ModelDisplaysthemodelofselectedcamera,thisfieldcan
notbechanged.
IP*InputtheIPaddressofcamera.
Username*Inputtheusernameofcamera.
WebPort*Inputthewebportofthecamera.Bydefaultit’s‘80’.
PasswordInputthepasswordofcamera.Defaultvalueis
‘1234’.Youshouldchangethepasswordifyou
changedthepasswordofselectedcamera.
VideoFormat** Selectthevideoencodingformatofthiscamera
(MJPEGorMPEG4).
ResetClearallfieldsin‘CameraConfiguration’section.
OKSavesettingsinthistab.
CancelDiscardallsettingsinthistab.
*:It’srecommendedtouse‘Select’buttontofillthecontentofthisfield.
**:Onlyavailableforcamerassupportthisfunction.
Afteryou’vesetallchannelsyouwishtoset,click‘OK’tosavesettings,
andifeverything’scorrect,you’llseethecamera’simageinIPcamera
surveillancesoftware’smainmenu:
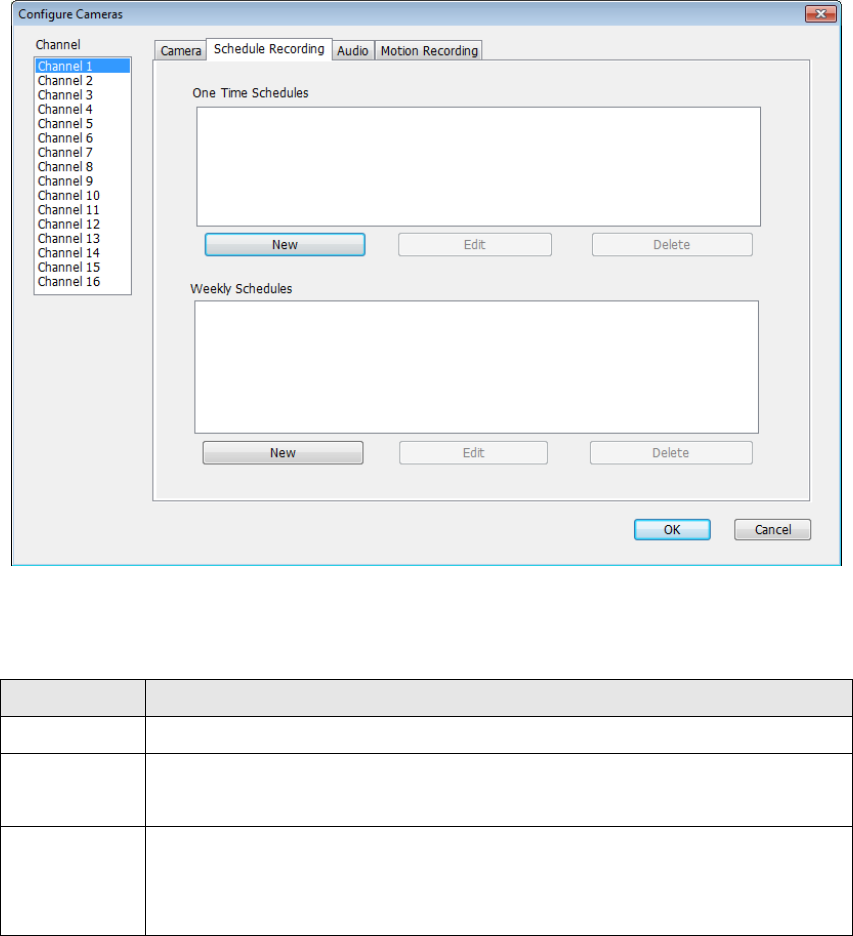
9‐3‐1‐2ScheduleRecording
Inthistab,youcansetupscheduledvideorecording,soyoucanrecord
thevideocapturedbyallcamerasyouhavebyapre‐definedschedule.
Herearethedescriptionsofallsettingitems:
ItemDescription
ChannelSelectthechannelnumberyouwishtoset.
OneTime
Schedules
Youcanspecifytheone‐timescheduleforselectedcamera;
thisschedulewillbeexecutedonceonly.
New
(OneTime
Schedules)
Clickthisbuttonandanewwindowwillappear:
Pleasespecifythetimedurationofthisone‐timeschedule
(thedateandtimeof‘From’and‘To’),thenclick‘OK’to
savesettings.
Pleasenoteyoumustsetaschedulethatwillbehappened
inthefuture,youcannotsetascheduleinthepast.
EditYoucanmodifyascheduledrecordingitem.Selecta
schedulein‘OneTimeSchedules’list,andclick‘Edit’button
toeditthestartandendtimeofthisschedule.
DeleteDeleteaselectedscheduleitem.
New
(Weekly
Schedules)
Clickthisbuttonandanewwindowwillappear:
Youcandefinerecordingschedulethatwillbeexecutedat
thespecifiedtimeofcertainweekday(s)inaweek.Please
checkallweekdaysthatapplies,andsetthestarttimein
‘From’field.Youcansetthedurationofvideorecordingin

‘Period’field(formatisHH:MM:SS),andtheendtimewill
becalculatedautomaticallyanddisplayedin‘To’field.You
canalsoclick‘AllTimeRecord’buttontodefinearecording
schedulethatwillbeexecutedeveryweekday,from
12:00:00AMto11:59:59PM.
Click‘OK’tosavechanges.
EditYoucanmodifyascheduledrecordingitem.Selecta
schedulein‘OneTimeSchedules’list,andclick‘Edit’button
toeditthestartandendtimeofthisschedule.
DeleteDeleteaselectedscheduleitem.
OKSavesettingsinthistab.
CancelDiscardallsettingsinthistab.
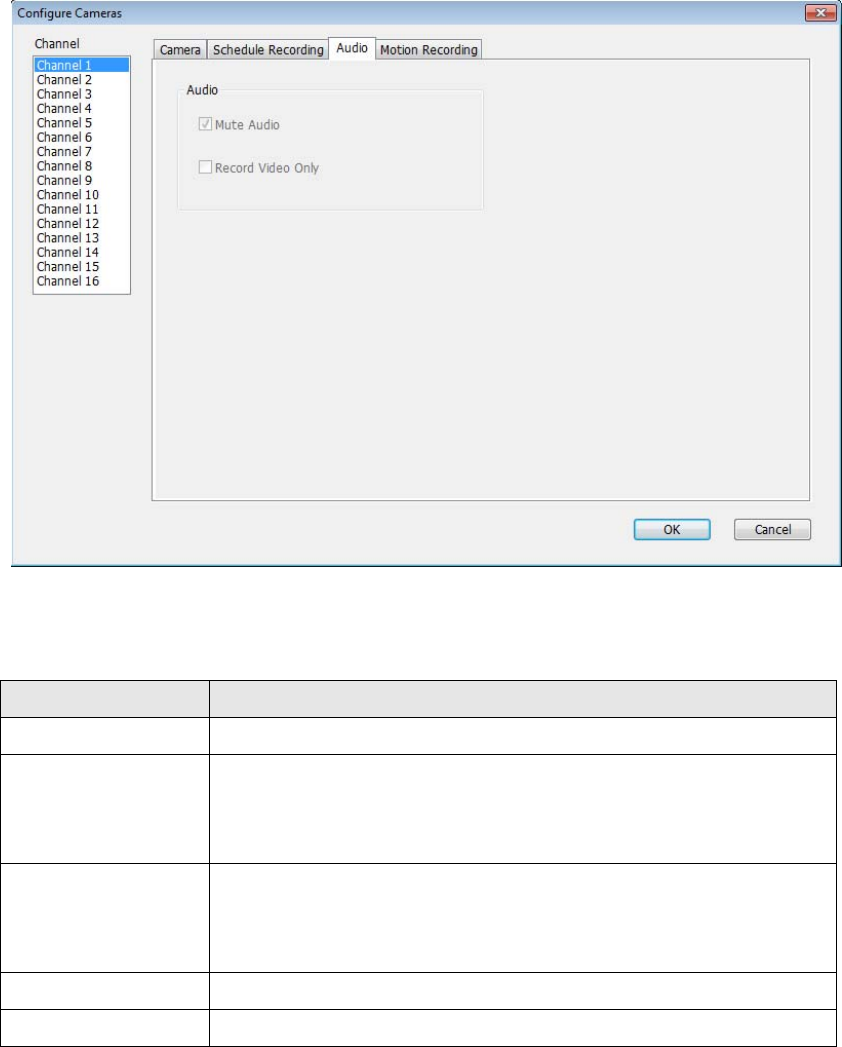
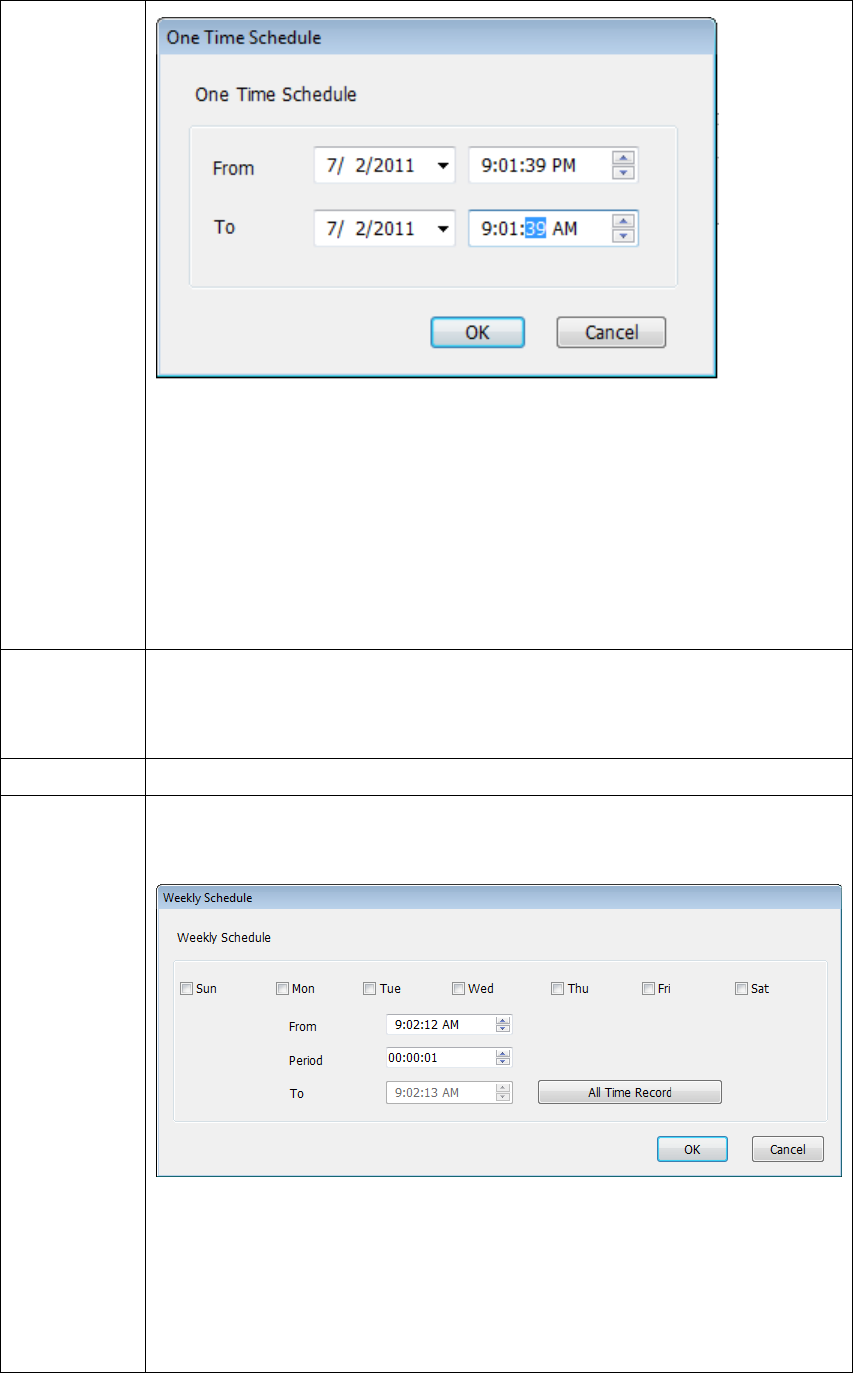
9‐3‐1‐3Audio
Forcamerasthatsupportaudio,youcanusethistabtodecideifyou
wishtoheartheaudiocapturedbyselectedcamera.
Herearethedescriptionsofallsettingitems:
ItemDescription
ChannelSelectthechannelnumberyouwishtoset.
MuteAudioCheckthisboxandtheIPcamerasurveillance
softwarewillnotplaytheaudiocapturedbythis
camera.
RecordVideo
Only
CheckthisboxandtheIPcamerasurveillance
softwarewillnotrecordtheaudiocapturedbythis
camera.
OKSavesettingsinthistab.
CancelDiscardallsettingsinthistab.
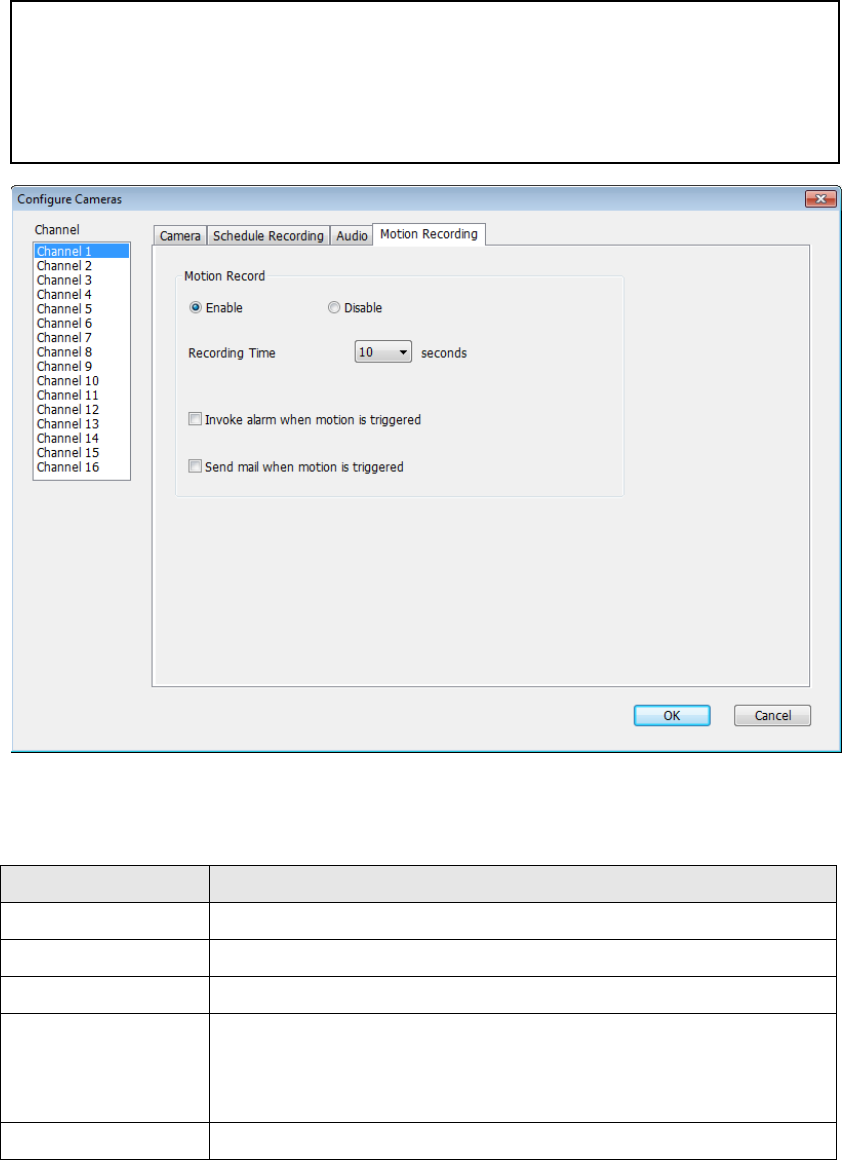
9‐3‐1‐4MotionRecord
Withthisfunctionactivated,onlymotionscapturedbythecamerawill
berecorded,soyoudon’thavetowasteharddiskstoragespaceon
imagesyoudon’tneedtopayattentionto.
Herearethedescriptionsofallsettingitems:
ItemDescription
ChannelSelectthechannelnumberyouwishtoset.
EnableEnablemotionrecordfunction.
DisableDisablemotionrecordfunction.
RecordingTimeSelectthetimedurationthatcamerawillrecord
whenamotionhasbeendetectedfromdropdown
menuinseconds.
InvokealarmSendanalarmwhenamotionhasbeendetectedby
WARNING: For applications that security is highly concerned, it’s not
recommended to use this function since some tiny changes you may
need to know may not be able to trigger the camera and the camera
will not start recording.

whenmotionis
triggered
thecamera.
Sendmailwhen
motionis
triggered
Sendanemailtoapre‐definedaddresswhena
motionhasbeendetectedbythecamera.
OKSavesettingsinthistab.
CancelDiscardallsettingsinthistab.
9‐3‐2GeneralSettings
Youcansetsystem‐widesettingsofthisIPcamerasurveillancesoftware
inthismenu.
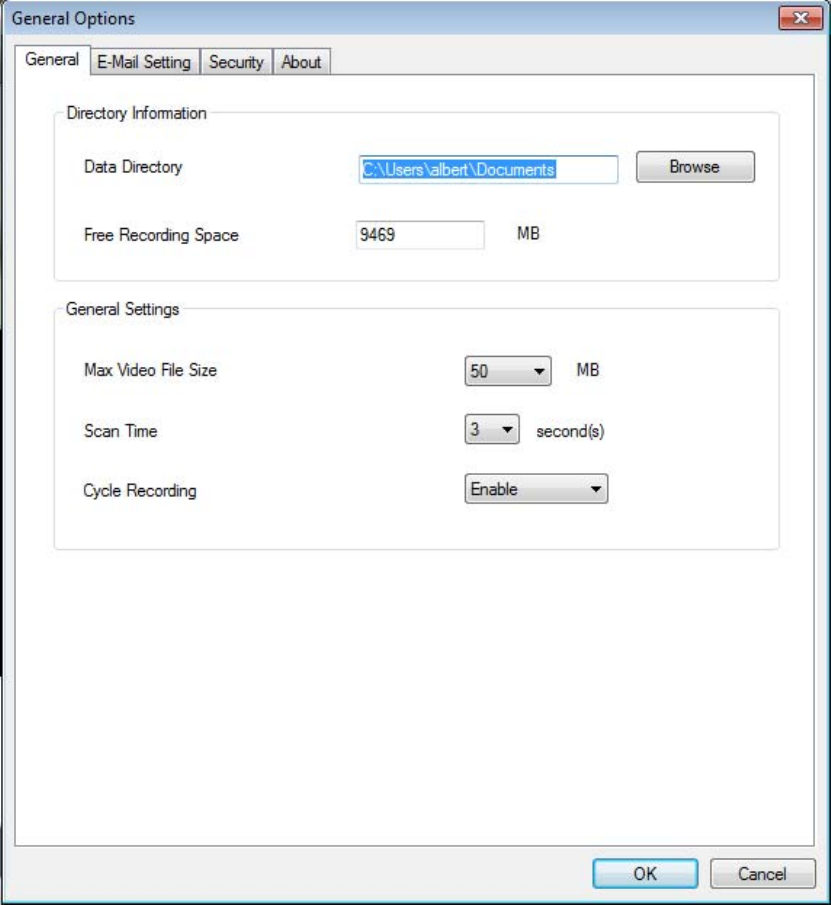
9‐3‐2‐1‘General’tab
Allgeneralsettingslikefilestoragedirectoryandrecordingspacescanbe
sethere.
Herearethedescriptionsofallsettingitems:

ItemDescription
DataDirectorySetthedirectory(folder)youwishtostorethe
recordedvideoandcapturedimage.Youcanclick
‘Browse’buttontopickadirectoryinyourharddisk.
FreeRecording
Space
Displaysremainingstoragespace.
MaxVideoFile
Size
Definesthemaximumfilesizeofeveryvideofile.
Whenthesizeoffileexceedsthisvalue,IPcamera
surveillancesoftwarewillopenanotherfiletorecord
thevideo.
ScanTimeDefinethetimeperiodtopausebetweenevery
cameraswitchwhenyouactivate‘Scan’function.
CycleRecordingYoucandecidethebehaviorwhenharddiskspaceis
full:
Disable:Donotoverwriterecordedvideofiles.
Enable:Overwriterecordedvideofiles.
OKSavesettingsinthistab.
CancelDiscardallsettingsinthistab.

9‐3‐2‐2‘E‐MailSetting’tab
Ifyouwanttousemotiondetectionfunctionandwishtogetanemail
thatcontainstheimagecapturedbythecamera,pleasesetupyouremail
relatedparametersherefirst.
Herearethedescriptionsofallsettingitems:
ItemDescription
E‐MailSubjectSpecifythesubjectofsendingemail.
RecipientE‐MailHerelistsallemailaddressesyouset.

Address
NewClickthisbuttonandyou’llbepromptedtoinputthe
emailaddress.Click‘OK’tosavechanges.
EditSelectanemailaddressfrom‘RecipientE‐Mail
Address’box,andclick‘Edit’toedittheemail
address.
DeleteDeleteselectedemailaddress.
SenderE‐Mail
Address
Specifytheemailaddressofemailsender.
SMTPServerSpecifytheIPaddressorhostnameoftheSMTP
serveryouwishtouse.FormostofISPstheywill
onlyallowitssubscribertousetheirSMTPserver,if
youdon’tknowwhichSMTPserveryoushoulduse,
pleaserefertothesettingofyouremailsoftwareor
askyourISP/networkadministrator.
SMTPportSpecifytheportnumberoftheSMTPserveryou
wishtousehere.Bydefault(andthesettingofmost
ofSMTPservers)it’s‘25’.
SMTPAuthSelect‘Enable’ifyourSMTPserverrequires
authentication,select‘Disable’ifit’snotrequired.If
youdon’tknowifyourSMTPserverrequires
authentication,pleaserefertothesettingofyour
emailsoftwareoraskyourISP/network
administrator.
SMTPAccountInputtheSMTPaccount(username)ofyourSMTP
serverhere.Inmostcases,it’sthesamewithyour
POP3username(theoneyouusedtoreceiveemail).
Pleaserefertothesettingofyouremailsoftwareor
askyourISP/networkadministratorifyou’renot
sureaboutthis.
SMTPPasswordInputtheSMTPpasswordofyourSMTPserverhere.
Inmostcases,it’sthesamewithyourPOP3
password(theoneyouusedtoreceiveemail).Please
refertothesettingofyouremailsoftwareorask
yourISP/networkadministratorifyou’renotsure
aboutthis.
OKSavesettingsinthistab.
CancelDiscardallsettingsinthistab.
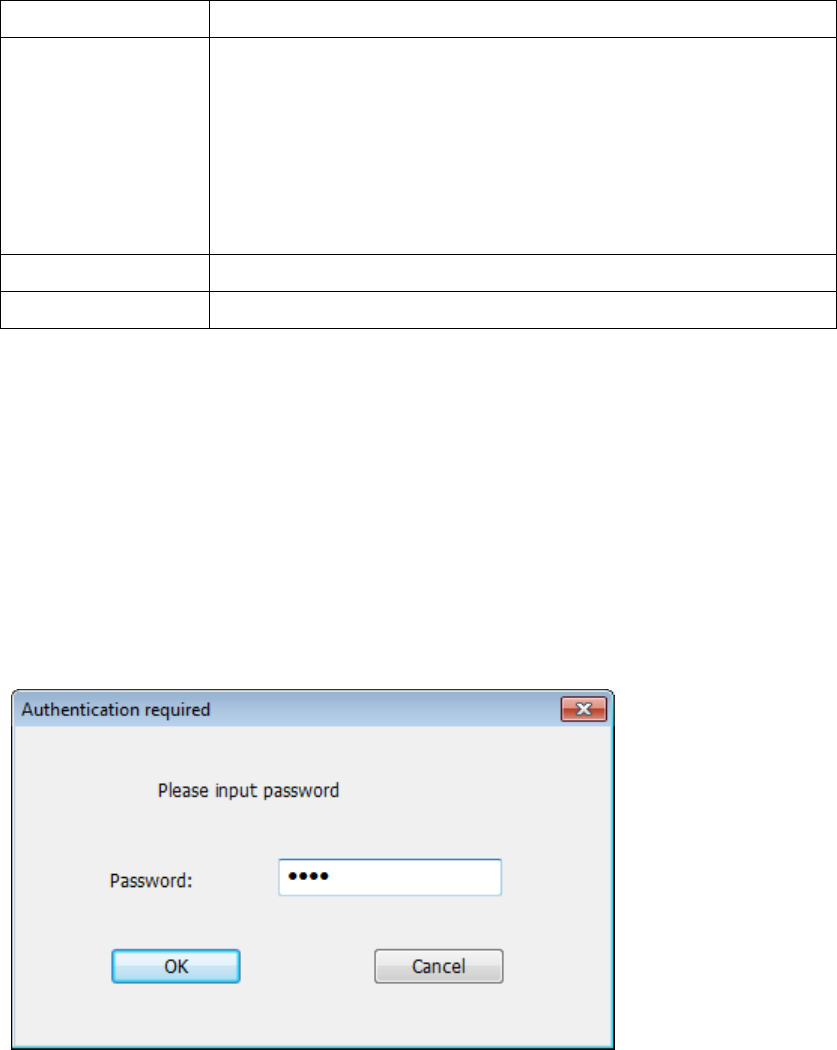
9‐3‐2‐3Security
Ifyoudon’twantotherpeopletoaccessthisIPcamerasurveillance
software,youcansetapasswordtoprotectit.
You’llneedtoinputthepasswordeverytimeyouwishtousethisIP
camerasurveillancesoftware:
Tosetpassword,pleaseuse‘Security’tabin‘GeneralOptions’menu:
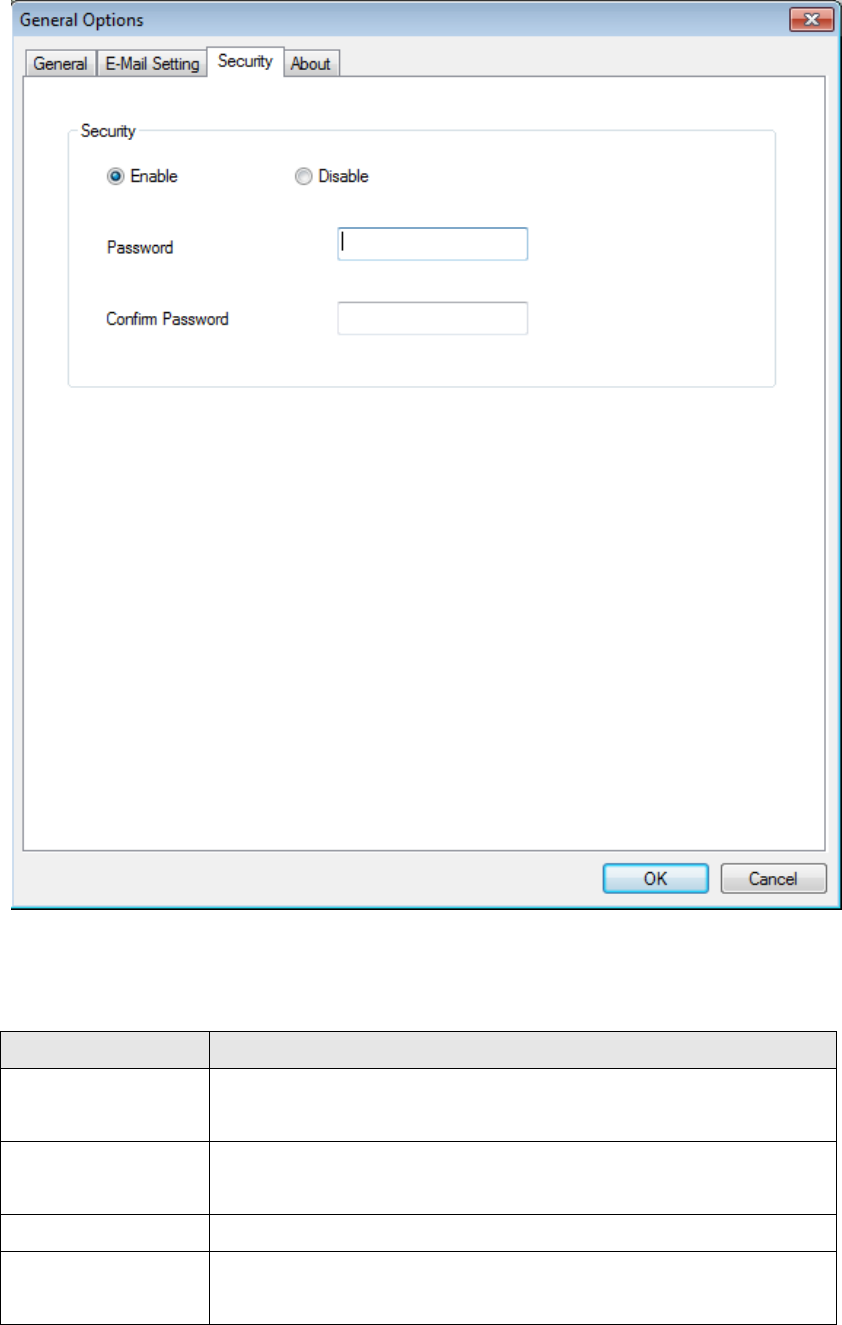
Herearethedescriptionsofallsettingitems:
ItemDescription
EnableRequirespasswordauthenticationwhenthis
softwarestarts.
DisablePasswordauthenticationisnotrequiredwhenthis
softwarestarts.
PasswordInputthepasswordyouwishtousehere.
Confirm
Password
Inputthepasswordyouwishtousehereagain.
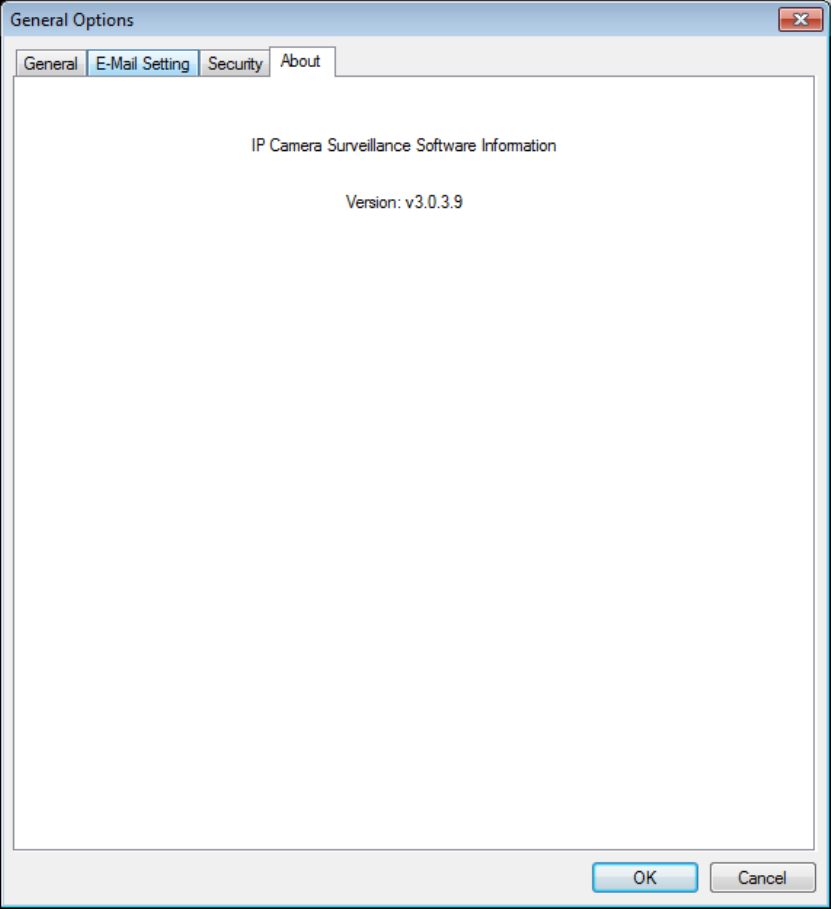
9‐3‐2‐4About
ThistabshowstheversionnumberoftheIPcamerasurveillance
softwareyou’reusing.

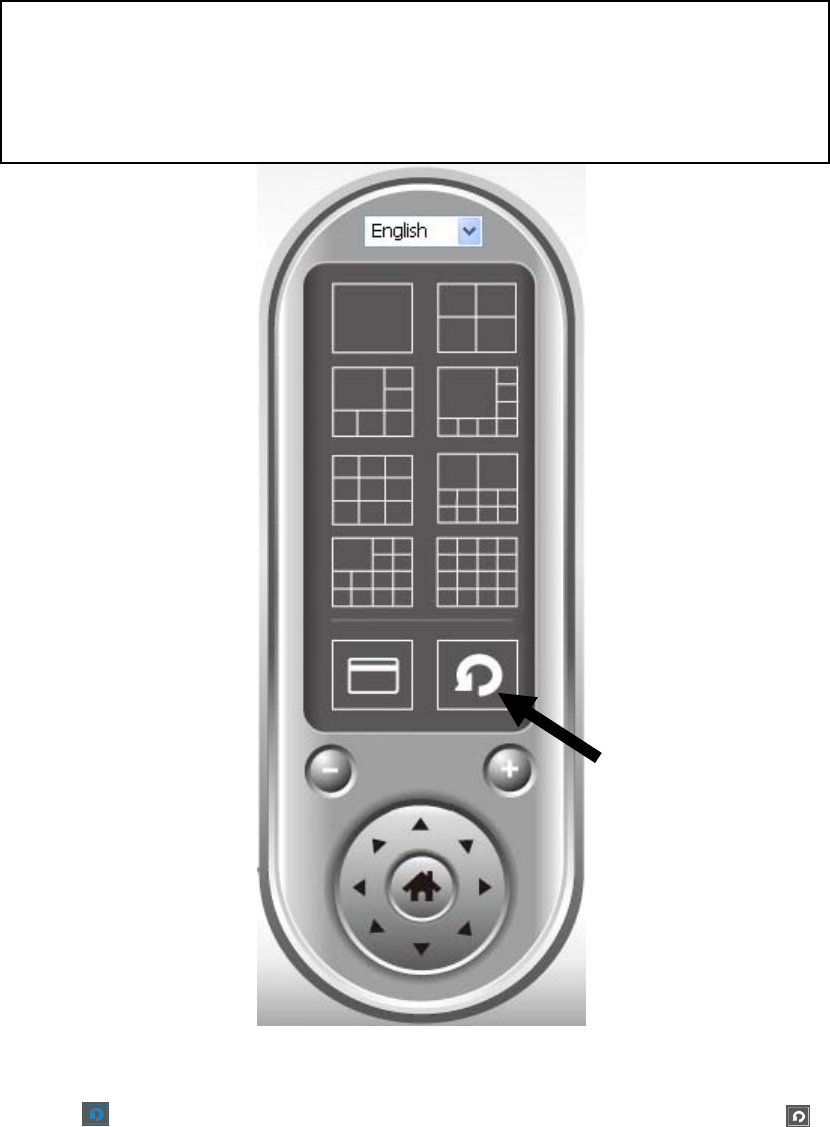
9‐4ChangeDisplayLayout
ThisIPcamerasurveillancesoftwareprovides8kindsofdisplaylayout:
Everylayoutdisplaysdifferentnumberofcameraandcamera
arrangement,youcanclicktheiconthatpresentsaspecifickindof
layout,andthevideodisplayingareawillchangeaccordingly.
Layoutstyle1:1
Cameraonly
Displaysthevideoof1cameraonly.
Layoutstyle2:4
Cameras
Displaysthevideoofupto4cameras.

Layoutstyle3:6
Cameras
Displaysthevideoofupto6cameras.
Layoutstyle4:8
Cameras
Displaysthevideoofupto8cameras.
Layoutstyle5:9
Cameras
Displaysthevideoofupto9cameras.
Layoutstyle6:
10Cameras
Displaysthevideoofupto10cameras.

Layoutstyle7:
13Cameras
Displaysthevideoofupto13cameras.
Layoutstyle8:
16Cameras
Displaysthevideoofupto16cameras.

9‐5Full‐screenmode
Ifyouwanttouseallavailablespacesonyourmonitortodisplay
surveillanceimage,youcanclick‘FullScreen’buttontoswitchdisplay
modetofull‐screenmode.
Toexitfull‐screenmode,press‘ESC’key.
9‐6Scan
Ifyouhavemorethanonecameraconfigured,andyouwishtoswitch
thedisplayingimagebetweencameras,youcanclick‘Scan’buttonto
switchbetweenallconfiguredcameras.
Click‘Scan’buttononcetoactivatescanfunction(scaniconwillbecome
blue),clickagaintostopscanning(scaniconwillbecomewhite).
NOTE: If a camera is configured but disconnected, it will still be
displayed in a scan sequence (you’ll see nothing and you’ll see
‘Disconnected’ text displayed at the upper-left corner of display
image).
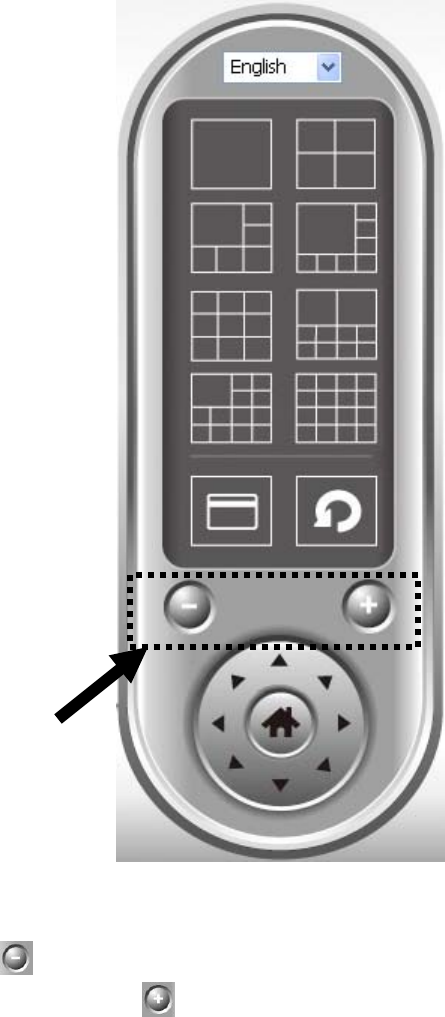
9‐7Zoom‐in/Zoom‐out
Forcamerasthatsupportzoom‐in/zoom‐outfunction,youcanusethis
functiontoseemoreobjectsthatfallinthescopeofcamera’sview,or
enlargetheimagesizeofacertainobjecttoseeitsdetail.
Pleaseselectacamerainvideodisplayingareabyclickingonitsimage,
thenclickbuttontoseemoreobjectsthatfallinthescopeof
camera’sview,orclicktoenlargetheimagesizeofacertainobject
toseeitsdetail(Beforezoom‐in,youmayneedtousePTZbuttons‐
describedinnextsection)tofindanobjectyouwishtoseeitsdetail).

9‐8PTZ
Forcamerasthatsupportpan‐tiltfunction,youcanchangetheposition
thatcamerapointsto,toseedifferentplacesthatfallinthescopeof
camera’sview.
Pleaseselectacamerainvideodisplayingareabyclickingonitsimage,
andthenclickthedirectionsyouwishthecameratomoveto(total8
directionsavailable).Click‘Home’button()toreturntocamera’s
home(default)position.

9‐9Snapshot
Youcantakeasnapshotofselectedcameraandsaveitto‘Snapshot’
sub‐folderofpre‐defineddatadirectory.
Clicksnapshotbuttononcetotakeasnapshot;youcantakeasmuch
snapshotasyouwantbeforeharddiskisfull.

9‐10Recording
Youcanstartvideorecordingofselectedcameramanuallybyclicking
‘StartRecording’button:
Whenrecordingstarts,you’llseeamessagedisplayedinmessage
displayingboxlike‘1/110:00:00,Camera2StartManual’,whichmeans
camera1startsrecordingmanuallyon1/1at10:00:00.
Tostoprecording,click‘StartRecording’buttonagain,andyou’llseea
messagedisplayedinmessagedisplayingboxlike‘1/110:00:00,Camera
2StopManual’.
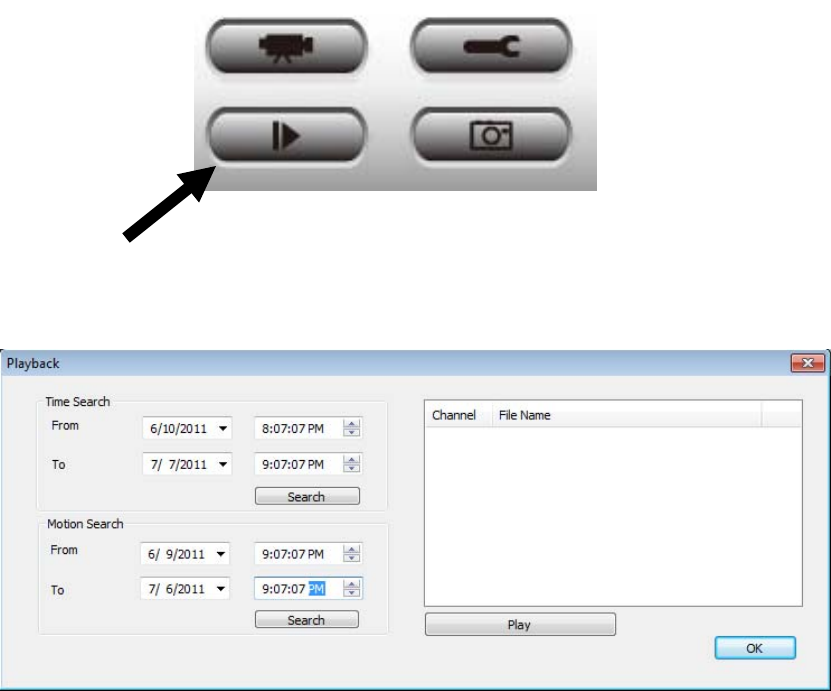
9‐11VideoPlayback
Youcanplaybackallrecordedvideobyclickingthisbutton.
Anewwindowwillappear:
Youhavetosearchthevideofilebeforeyoucanplayit.Therearetwo
kindsofvideosearch:TimeSearch(searchallvideosfilethatfallsina
specificperiodoftime)andMotionSearch(searchallvideosrecordedby
motiondetectionfunctionandfallsinaspecificperiodoftime).
Pleasedefinethestartandenddate/timeofthetimeperiodyouwish
tosearch,andthenclick‘Search’button(of‘TimeSearch’of‘Motion’
Search’).Allfoundvideoswillbedisplayed,selectthevideoyouwishto
playandclick‘Play’buttontoplayback.

ChapterXAppendix
10.1Troubleshooting
Pleasedon’tpanicwhenyoufoundthisIPCameraisnotworking
properly.BeforeyousendthisIPCamerabacktous,youcandosome
simplecheckstosaveyourtime:
ProblemdescriptionPossiblesolution(s)
Can’tconnecttoIPCamera1) PleasechecktheIPaddressofIPCameraagain.
2) Pleasemakesurethenetworkcableiscorrectlyconnected
toyourlocalareanetwork.
3) PleasemakesurepowercableiscorrectlyconnectedtoIP
Camera.
4) PleasemakesureIPCameraisswitchedon(theLEDlights
onIPCamerawilllightup),ifLEDlightsarenotswitched
offbyconfigurationmenu(System‐>Basic‐>LEDlight).
NoIPCamerafound1) ‘Autosearch’functiononlyworksonIPCameraslocated
onlocalareanetwork.
Noimage1) IftheplacewhereIPcameraisinstalledistoodark,tryto
addsomelightswhenpossible.
2) Checkifthere’sanythingcoveringthelens.

10.2Specification
HardwareSpecification
ProductEntry‐level802.11nwirelessInternetcamera
CPUMIPS
Wireless802.11n(1T1R)
DSPImagebackendIC
Flash4MB
RAM32MB
ImagesensorMegapixelCMOSsenso
LensFixedfocus(F/N2.8)
LAN10/100MUTPx1
ACAdapter5VDC,1A
Dimenion80x65x27(mm)
Temperature0o~40oc
Humidity10~90%,non‐condensing
CertificationFCCClassB,CEMark
CompressionM‐JPEG
Framerate30@VGA/QVGA,10‐15@HD
WirelesssecurityWEP/WPA/WPS
UserlevelAdmin/Operator/Guest
Supportedweb
browser
IE/Safari/Firefox/Chrome/Opera
SupportedOSXP/Vista/Win7
SupportedtooliPhone/ipad/androidphone/androidpadon
browser
SuppliedSoftware
z IPCamAdministrationUtility
z IPCamSurveillanceUtility
Federal Communication Commission
Interference Statement
FCC Part 15
This equipment has been tested and found to comply with the limits for a Class B
digital device, pursuant to Part 15 of FCC Rules. These limits are designed to provide
reasonable protection against harmful interference in a residential installation. This
equipment generates, uses, and can radiate radio frequency energy and, if not installed
and used in accordance with the instructions, may cause harmful interference to radio
communications. However, there is no guarantee that interference will not occur in a
particular installation. If this equipment does cause harmful interference to radio or
television reception, which can be determined by turning the equipment off and on,
the user is encouraged to try to correct the interference by one or more of the
following measures:
1. Reorient or relocate the receiving antenna.
2. Increase the separation between the equipment and receiver.
3. Connect the equipment into an outlet on a circuit different from that to
which the receiver is connected.
4. Consult the dealer or an experienced radio technician for help.
FCC Caution
This device complies with Part 15 of the FCC Rules. Operation is subject to the
following two conditions: (1) this device may not cause harmful interference, and (2)
this device must accept any interference received, including interference that may
cause undesired operation.
Any changes or modifications not expressly approved by the party responsible for
compliance could void the authority to operate equipment.
For product available in the USA/Canada market, only channel 1~11 can be
operated. Selection of other channels is not possible.
This equipment complies with FCC radiation exposure limits set forth for an uncontrolled
environment. This equipment should be installed and operated with minimum distance 20cm
between the radiator & your body.