Edimax Technology Co 9574791704 AC1300 DBDC Ceiling-mount AP User Manual 1
Edimax Technology Co Ltd AC1300 DBDC Ceiling-mount AP 1
Contents
- 1. User Manual
- 2. User Manual-1
- 3. User Manual-2
- 4. User Manual-3
User Manual-1

AC1300DBDCCeiling‐mountAP
CAP1300,Office1‐2‐3,Office+1,Office+3,OfficeWiFi
System,OfficeWiFiSystem+1.
UserManual
04‐2015/v1.1
CONTENTS
OVERVIEW:IMPORTANT..............................................................................1
I.ProductInformation....................................................................................................................................... 2
I‐1.PackageContents..................................................................................................................2
I‐2.SystemRequirements...........................................................................................................2
I‐3.HardwareOverview..............................................................................................................3
I‐4.LEDStatus.............................................................................................................................4
I‐5.Reset.....................................................................................................................................5
I‐6.SafetyInformation................................................................................................................6
II.HardwareInstallation..............................................................................7
II‐1.ConnectingtheaccesspointtoarouterorPoEswitch......................................................7
II‐2.Mountingtheaccesspointtoaceiling...............................................................................8
II‐3.T‐RailMount.....................................................................................................................11
APMode
III.QuickSetup...........................................................................................13
III‐1.InitialSetup.........................................................................................................................13
III‐2.BasicSettings......................................................................................................................15
IV.BrowserBasedConfigurationInterface.................................................19
IV‐1.Information.......................................................................................................................21
IV‐1‐1.SystemInformation..........................................................................................................21
IV‐1‐2.WirelessClients.................................................................................................................24
IV‐1‐3.WirelessMonitor..............................................................................................................25
IV‐1‐4.Log.....................................................................................................................................26
IV‐2.NetworkSettings...............................................................................................................28
IV‐2‐1.LAN‐SideIPAddress..........................................................................................................28
IV‐2‐2.LANPort............................................................................................................................30
IV‐2‐3.VLAN..................................................................................................................................31
IV‐3.WirelessSettings...............................................................................................................32
IV‐3‐1.2.4GHz11bgn....................................................................................................................32
IV‐3‐1‐1.Basic............................................................................................................................33
IV‐3‐1‐2.Advanced....................................................................................................................36
IV‐3‐1‐3.Security.......................................................................................................................38
IV‐3‐1‐3‐1.NoAuthentication.....................................................................................................39
IV‐3‐1‐3‐2.WEP...........................................................................................................................40
IV‐3‐1‐3‐3.IEEE802.1x/EAP.........................................................................................................40
IV‐3‐1‐3‐4.WPA‐PSK...................................................................................................................40
IV‐3‐1‐3‐5.WPA‐EAP...................................................................................................................41
IV‐3‐1‐3‐6.AdditionalAuthentication.........................................................................................41
IV‐3‐1‐4.WDS.............................................................................................................................43
IV‐3‐1‐5.Schedule......................................................................................................................45
IV‐3‐2.WPS.....................................................................................................................................46
IV‐3‐3.RADIUS................................................................................................................................48
IV‐3‐3‐1.RADIUSSettings..........................................................................................................50
IV‐3‐3‐2.InternalServer............................................................................................................51
IV‐3‐3‐3.RADIUSAccounts........................................................................................................53
IV‐3‐4.MACFilter.........................................................................................................................55
IV‐3‐5.WMM..................................................................................................................................57
IV‐4.Management.....................................................................................................................59
IV‐4‐1.Admin................................................................................................................................59
IV‐4‐2.DateandTime...................................................................................................................62
IV‐4‐3.SyslogServer.....................................................................................................................64
IV‐4‐4.PingTest............................................................................................................................65
IV‐4‐5.I’mHere.............................................................................................................................66
IV‐4‐6.OperationMode...............................................................................................................67
IV‐5.Advanced..........................................................................................................................68
IV‐5‐1.LEDSettings.......................................................................................................................68
IV‐5‐2.UpdateFirmware..............................................................................................................69
IV‐5‐3.Save/RestoreSettings.......................................................................................................70
IV‐5‐4.FactoryDefault..................................................................................................................72
IV‐5‐5.Reboot...............................................................................................................................73
EdimaxProNMS
I.ProductInformation.............................................................................74
II.QuickSetup...........................................................................................75
III.SoftwareLayout....................................................................................81
IV.Features................................................................................................88
IV‐1.LOGIN,LOGOUT&RESTART...............................................................................................88
IV‐2.DASHBOARD........................................................................................................................90
IV‐2‐1.SystemInformation............................................................................................................91
IV‐2‐2.DevicesInformation............................................................................................................91
IV‐2‐3.ManagedAP........................................................................................................................92
IV‐2‐4.ManagedAPGroup.............................................................................................................93
IV‐2‐5.ActiveClients.......................................................................................................................94
IV‐3.ZONEPLAN..........................................................................................................................95
IV‐4.NMSMONITOR...................................................................................................................97
IV‐4‐1.AccessPoint........................................................................................................................97
IV‐4‐1‐1.ManagedAP................................................................................................................97
IV‐4‐1‐2.ManagedAPGroup.....................................................................................................99
IV‐4‐2.WLAN................................................................................................................................101
IV‐4‐2‐1.ActiveWLAN.............................................................................................................101
IV‐4‐2‐2.ActiveWLANGroup..................................................................................................102
IV‐4‐3.Clients................................................................................................................................102
IV‐4‐3‐1.ActiveClients.............................................................................................................102
IV‐4‐4.RogueDevices...................................................................................................................103
IV‐4‐5.Information.......................................................................................................................104
IV‐4‐5‐1.AllEvents/Activities..................................................................................................104
IV‐4‐5‐2.Monitoring................................................................................................................105
IV‐5.NMSSettings.....................................................................................................................106
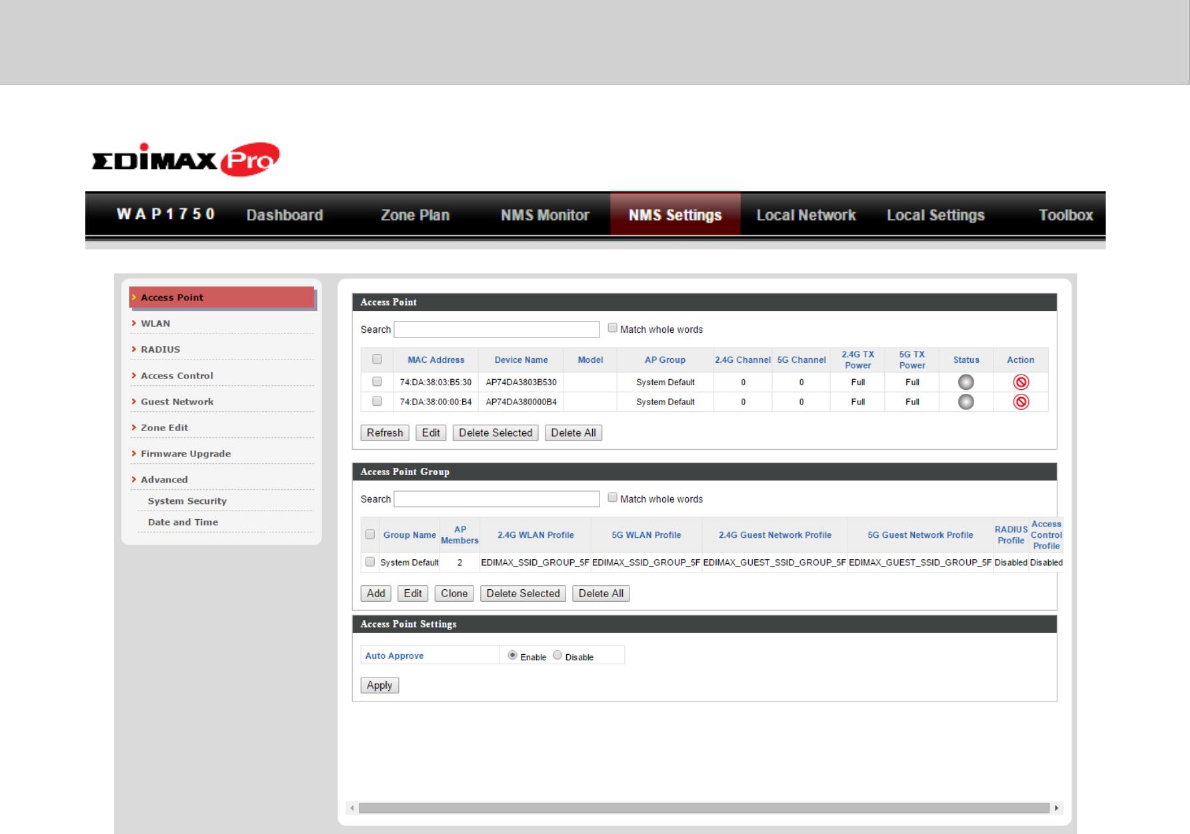
IV‐5‐1.AccessPoint......................................................................................................................106
IV‐5‐2.WLAN................................................................................................................................117
IV‐5‐3.RADIUS..............................................................................................................................121
IV‐5‐4.AccessControl...................................................................................................................127
IV‐5‐5.GuestNetwork..................................................................................................................130
IV‐5‐6.ZoneEdit...........................................................................................................................134
IV‐5‐7.FirmwareUpgrade............................................................................................................136
IV‐5‐8.Advanced..........................................................................................................................137
IV‐5‐8‐1.SystemSecurity.........................................................................................................137
IV‐5‐8‐2.Date&Time..............................................................................................................137
IV‐6.LocalNetwork...................................................................................................................139
IV‐6‐1.NetworkSettings...............................................................................................................139
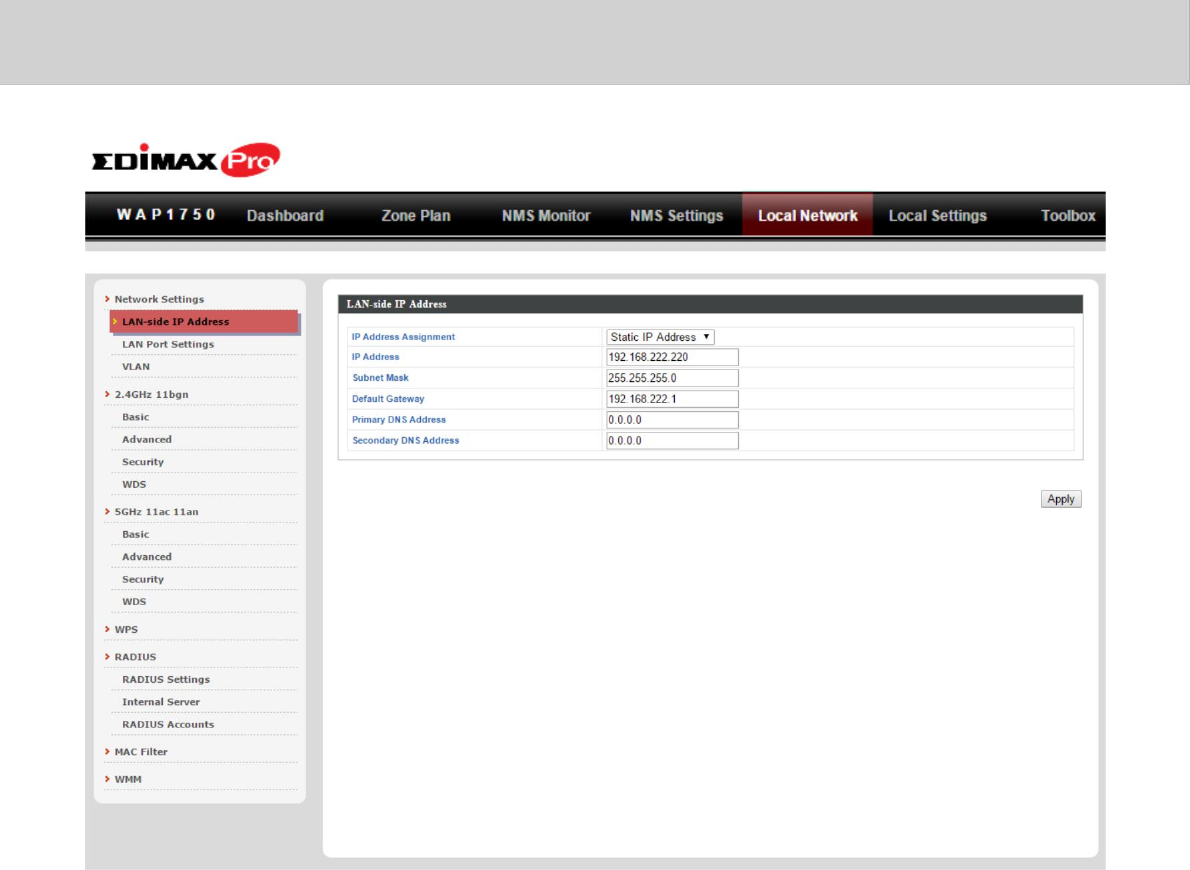
IV‐6‐1‐1.LAN‐SideIPAddress..................................................................................................139
IV‐6‐1‐2.LANPortSettings......................................................................................................142
IV‐6‐1‐3.VLAN..........................................................................................................................143
IV‐6‐2.2.4GHz11bgn....................................................................................................................144
IV‐6‐2‐1.Basic..........................................................................................................................144
IV‐6‐2‐2.Advanced..................................................................................................................146
IV‐6‐2‐3.Security.....................................................................................................................148
IV‐6‐2‐3‐1.NoAuthentication...................................................................................................149
IV‐6‐2‐3‐2.WEP.........................................................................................................................149
IV‐6‐2‐3‐3.IEEE802.1x/EAP.......................................................................................................150
IV‐6‐2‐3‐4.WPA‐PSK.................................................................................................................150
IV‐6‐2‐3‐5.WPA‐EAP.................................................................................................................150
IV‐6‐2‐3‐6.AdditionalAuthentication.......................................................................................151
IV‐6‐2‐4.WDS...........................................................................................................................152
IV‐6‐3.5GHz11ac11an..............................................................................................................154
IV‐6‐3‐1.Basic..........................................................................................................................154
IV‐6‐3‐2.Advanced..................................................................................................................156
IV‐6‐3‐3.Security.....................................................................................................................158
IV‐6‐3‐4.WDS...........................................................................................................................160
IV‐6‐4.WPS...................................................................................................................................162
IV‐6‐5.RADIUS..............................................................................................................................163
IV‐6‐5‐1.RADIUSSettings........................................................................................................164
IV‐6‐5‐2.InternalServer..........................................................................................................165
IV‐6‐5‐3.RADIUSAccounts......................................................................................................167
IV‐6‐6.MACFilter.........................................................................................................................169
IV‐6‐7.WMM................................................................................................................................171
IV‐7.LocalSettings....................................................................................................................173
IV‐7‐1.OperationMode...............................................................................................................173
IV‐7‐2.NetworkSettings...............................................................................................................173
IV‐7‐2‐1.SystemInformation..................................................................................................173
IV‐7‐2‐2.WirelessClients.........................................................................................................176
IV‐7‐2‐3.WirelessMonitor......................................................................................................177
IV‐7‐2‐4.Log.............................................................................................................................178
IV‐7‐3.Management.....................................................................................................................180
IV‐7‐3‐1.Admin......................................................................................................................180
IV‐7‐3‐2.DateandTime.........................................................................................................182
IV‐7‐3‐3.SyslogServer...........................................................................................................183
IV‐7‐3‐4.I’mHere...................................................................................................................184
IV‐7‐4.Advanced..........................................................................................................................185
IV‐7‐4‐1.LEDSettings...............................................................................................................185
IV‐7‐4‐2.UpdateFirmware....................................................................................................185
IV‐7‐4‐3.Save/RestoreSettings.............................................................................................187
IV‐7‐4‐4.FactoryDefault........................................................................................................188
IV‐7‐4‐5.Reboot.....................................................................................................................188
IV‐8.Toolbox.............................................................................................................................189
IV‐8‐1.NetworkConnectivity.....................................................................................................189
IV‐8‐1‐1.Ping..........................................................................................................................189
IV‐8‐1‐2.TraceRoute.............................................................................................................189
V.Appendix.............................................................................................190
V‐1.ConfiguringyourIPaddress............................................................................................190
V‐1‐1.WindowsXP....................................................................................................................191
V‐1‐2.WindowsVista................................................................................................................193
V‐1‐3.Windows7......................................................................................................................195
V‐1‐4.Windows8......................................................................................................................199
V‐1‐5.Mac.................................................................................................................................203
V.BestPractice........................................................................................205
VI‐1.HowtoCreateandLinkWLAN&AccessPointGroups..................................................205
OVERVIEW
Youraccesspointcanfunctioninthreedifferentmodes.
ThedefaultmodeforyouraccesspointisAPmode.
APmodeisaregularaccesspointforuseinyourwirelessnetwork.
APControllermodeactsasthedesignatedmasterofanAParray(group
oflinkedaccesspoints).
ManagedAPmodeactsasa“slave”APwithintheAParray(controlledby
theAPController“master”).
InAPControllermodetheuserinterfacewillswitchtoEdimaxProNMS.
Thisusermanualissplitintotwoparts:APmode(blue)andEdimaxPro
NMS(grey).
1
I.ProductInformation
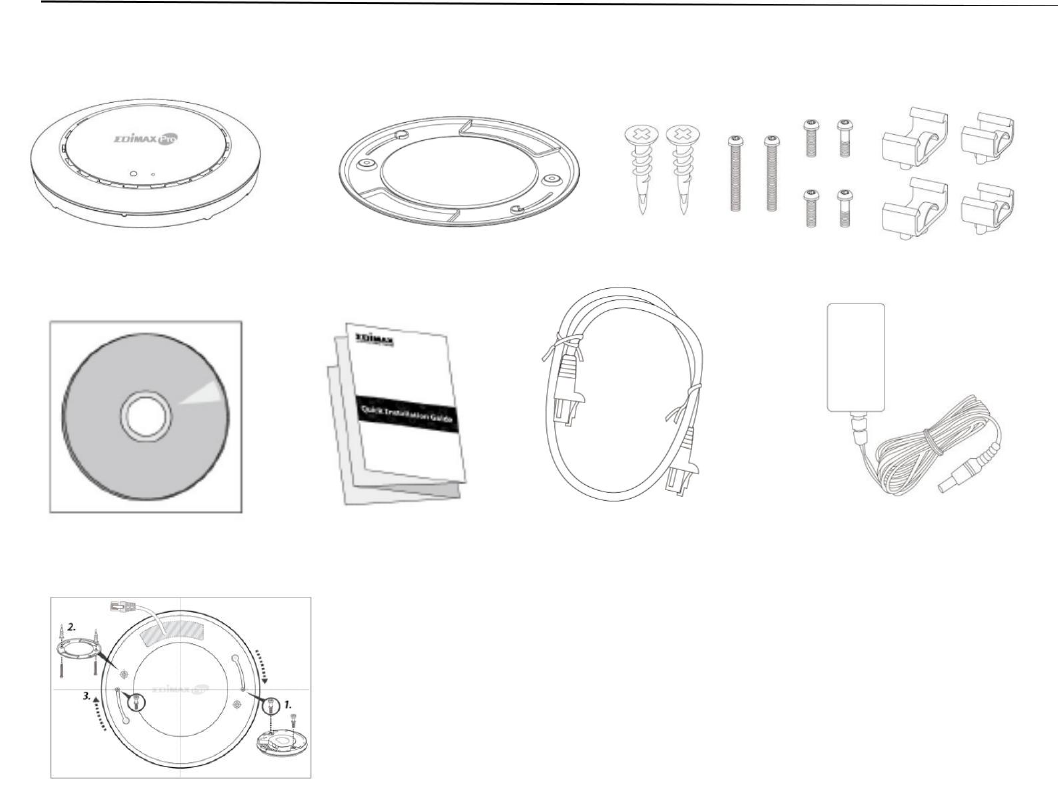
I‐1.PackageContents
1 2 3
4 5 6 7
8
1.
CAP1300AccessPoint4. CD
2.
CeilingMountBracket5. QuickInstallationGuide
3.
T‐RailMountingKit&6. EthernetCable
Screws7. PowerAdapter
8.
CeilingMountScrewTemplate
I‐2.SystemRequirements
‐ Existingcable/DSLmodem&router
‐ Computerwithwebbrowserforaccesspointconfiguration
2
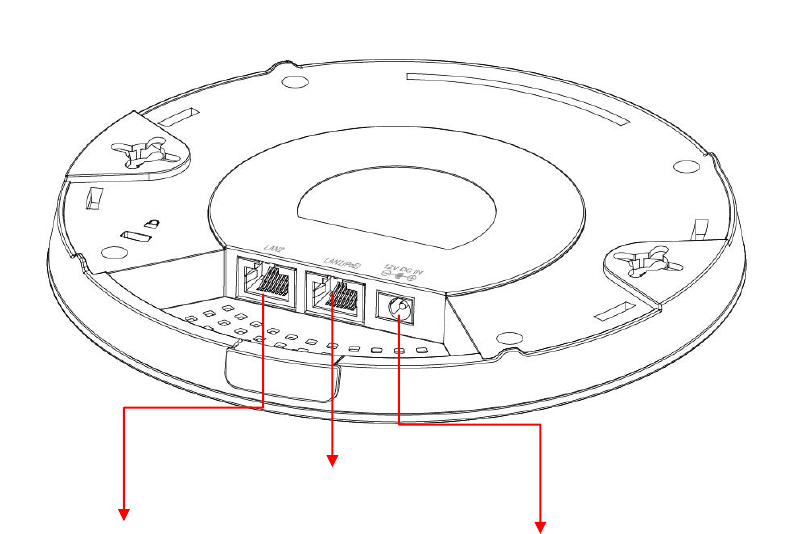
I‐3.HardwareOverview
3
Ethernet Port (PoE)
Power Jack (DC IN)
Ethernet Port

I‐4.LEDStatus
LEDColor LEDStatusDescription
Blue OnTheaccesspointison.
LongFlashing Upgradingfirmware.
ShortFlashing Resettingtofactorydefaults.
Amber
OnStartingup.
Flashing
Error.
Off
Off
Theaccesspointisoff.
4
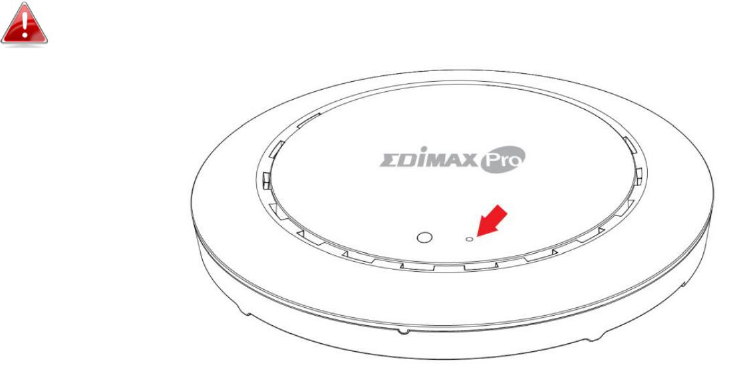
I‐5.Reset
Ifyouexperienceproblemswithyouraccesspoint,youcanresetthe
devicebacktoitsfactorysettings.Thisresetsallsettingsbacktodefault.
1.Pressandholdtheresetbuttonontheaccesspointforatleast10
seconds.
Youmayneedtouseapinorsimilarsharpobjecttopushthe
resetbutton.
2.Waitfortheaccesspointtorestart.Theaccesspointisreadyforsetupwhen
theLEDisblue.
5
I‐6.SafetyInformation
Inordertoensurethesafeoperationofthedeviceanditsusers,please
readandactinaccordancewiththefollowingsafetyinstructions.
1. Theaccesspointisdesignedforindooruseonly;donotplacetheaccess
pointoutdoors.
2. Donotplacetheaccesspointinornearhot/humidplaces,suchasa
kitchenorbathroom.
3. Donotpullanyconnectedcablewithforce;carefullydisconnectitfrom
theaccesspoint.
4. Handletheaccesspointwithcare.Accidentaldamagewillvoid
thewarrantyoftheaccesspoint.
5. Thedevicecontainssmallpartswhichareadangertosmallchildren
under3yearsold.Pleasekeeptheaccesspointoutofreachofchildren.
6. Donotplacetheaccesspointonpaper,cloth,orotherflammablematerials.
Theaccesspointmaybecomehotduringuse.
7. Therearenouser‐serviceablepartsinsidetheaccesspoint.Ifyou
experienceproblemswiththeaccesspoint,pleasecontactyourdealer
ofpurchaseandaskforhelp.
8. Theaccesspointisanelectricaldeviceandassuch,ifitbecomeswetfor
anyreason,donotattempttotouchitwithoutswitchingthepower
supplyoff.Contactanexperiencedelectricaltechnicianforfurtherhelp.
9. Ifyousmellburningorseesmokecomingfromtheaccesspointorpower
adapter,thendisconnecttheaccesspointandpoweradapterimmediately,
asfarasitissafelypossibletodoso.Callyourdealerofpurchaseforhelp.
6
II.HardwareInstallation
WhenusingtheaccesspointinAPmodeitisrecommendedto
configuresomebasicsettingsasshowninIII.QuickSetupbefore
hardwareinstallation.
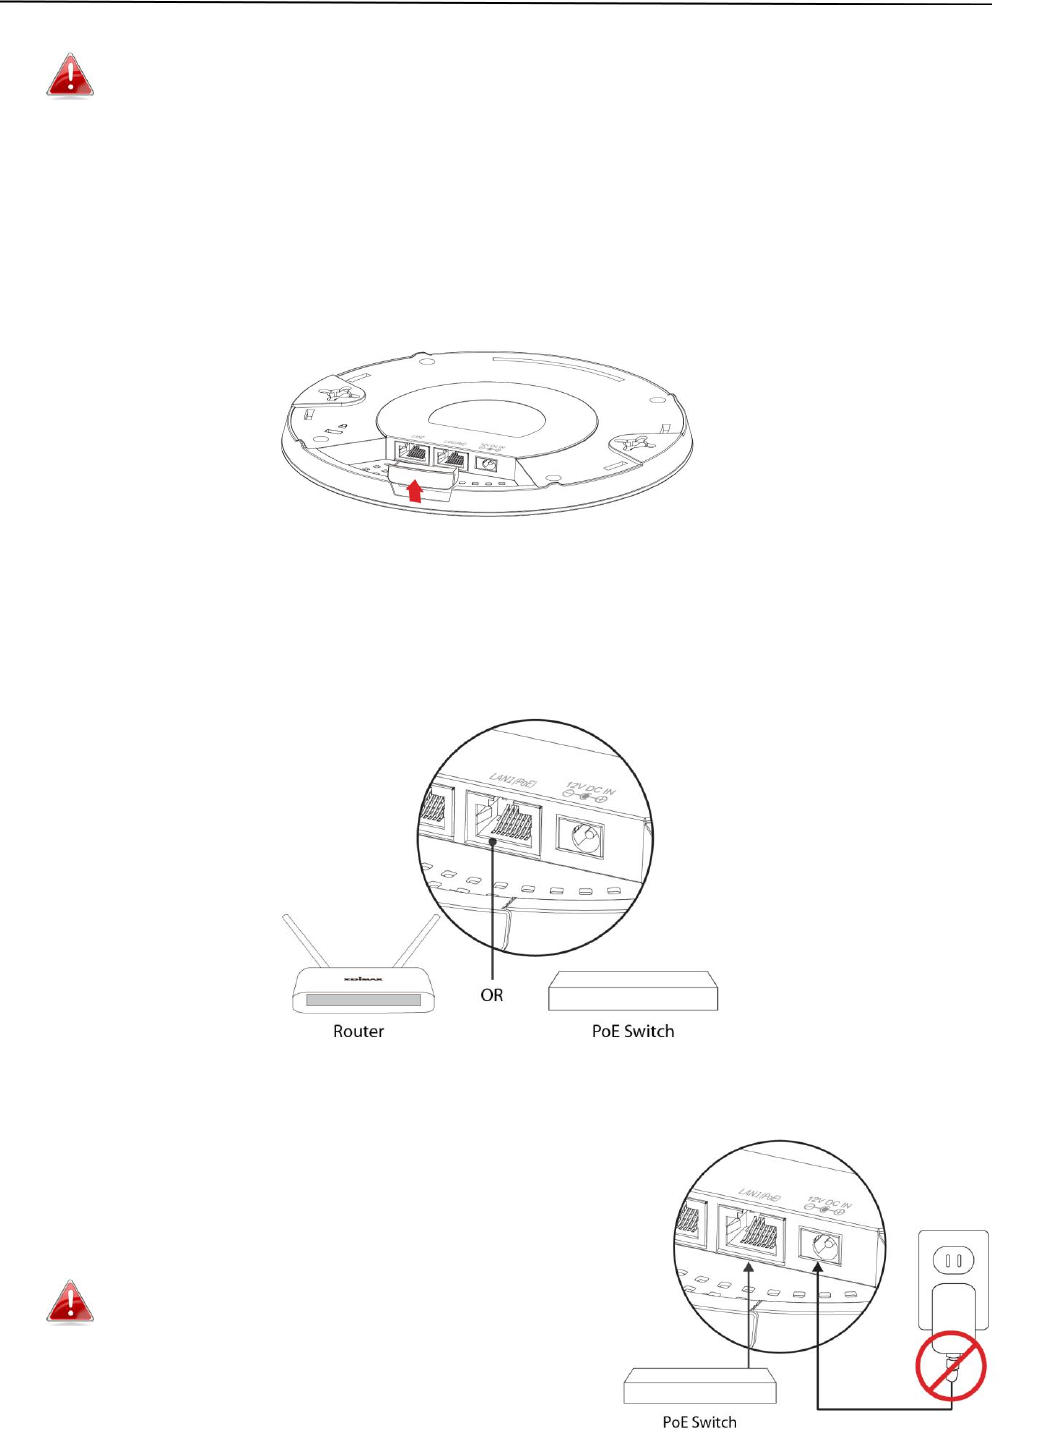
II‐1. ConnectingtheaccesspointtoarouterorPoEswitch
1.Ifyouneedto,removethecapfromtheundersideoftheaccesspoint.This
createsextraspaceforyourcablestopassthrough.
2.ConnectarouterorPoEswitchtotheaccesspoint’sLANportusingan
Ethernetcable.
3.Ifyouareusingarouter,thenconnect
thepoweradaptertotheaccesspoint’s
12VDCportandplugthepoweradapter
intoapowersupply.
Donotusethepoweradapter
ifyouareusingaPoEswitch.
7
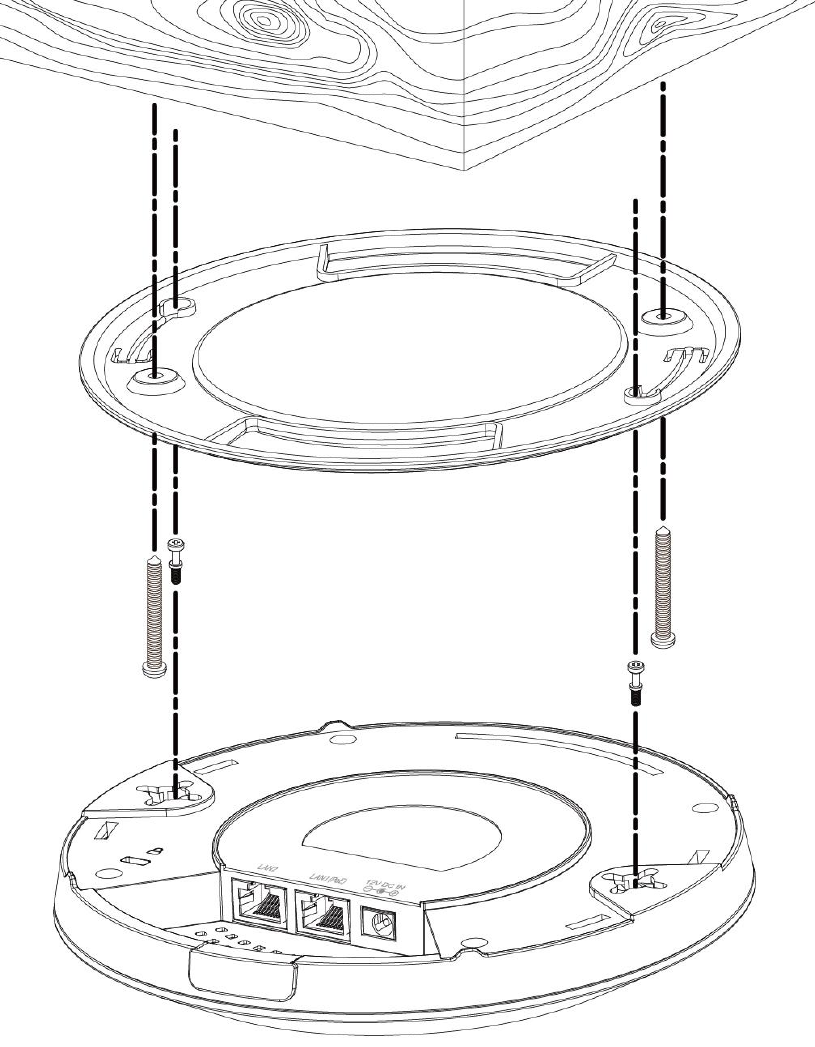
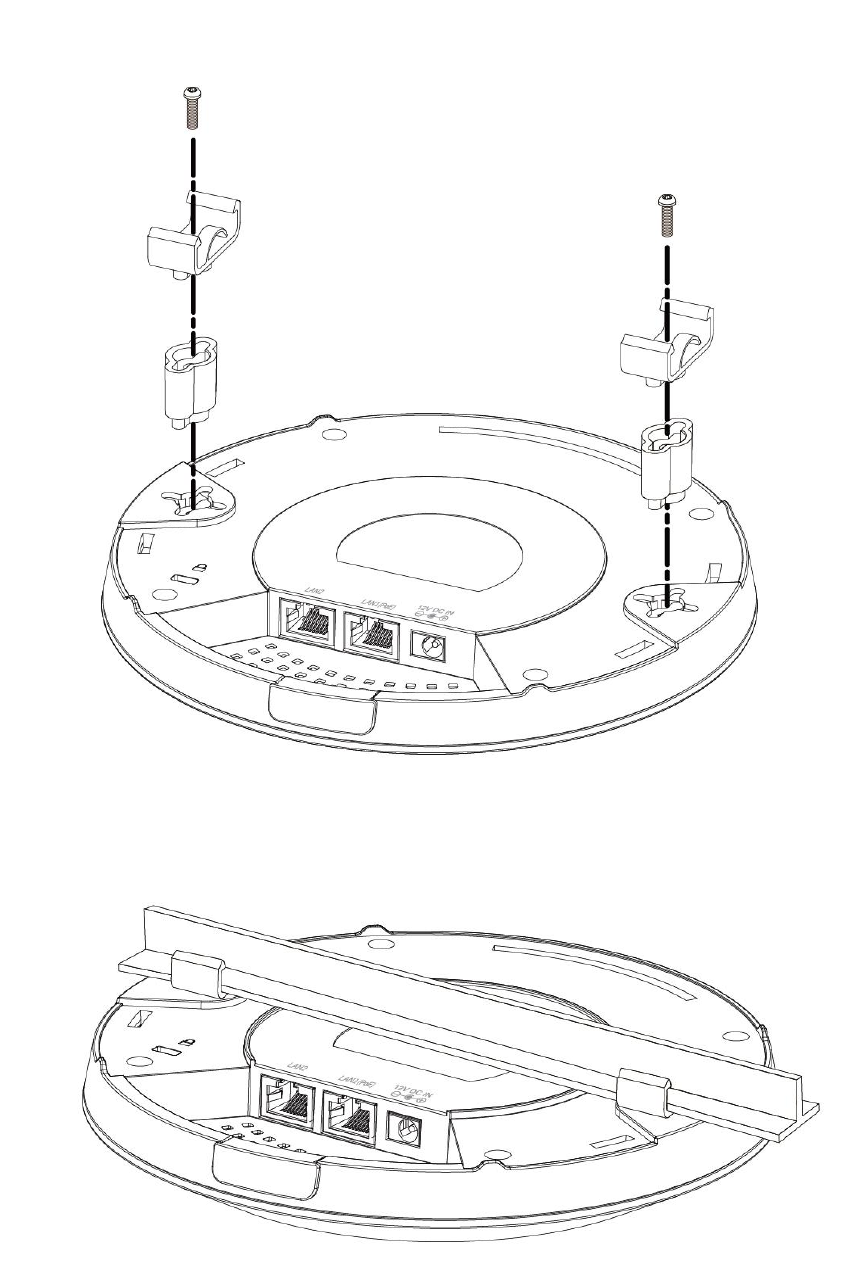
II‐2. Mountingtheaccesspointtoaceiling
Tomounttheaccesspointtoaceiling,pleasefollowtheinstructions
belowandrefertodiagramA&B.
ForWoodenCeilings(refertodiagramA):
1.Placetheceilingmountbrackettoaceilinginyourdesiredlocationandinsert
screwiiithroughholei(x2)andtightentofixthebracketinplace.
2.Whentheceilingbracketisinplace,insetscrewivintoholev(x2)onthe
accesspoint.
3.Fixtheaccesspointtotheceilingbracketbyinsertingtheattachedscrews
iv intoholeviandtwistingtheaccesspoint.
4. Locktheaccesspointfirmlyintoplacewhenbytwistingittoalignscrews
iv withthegroovesintheceilingmount.
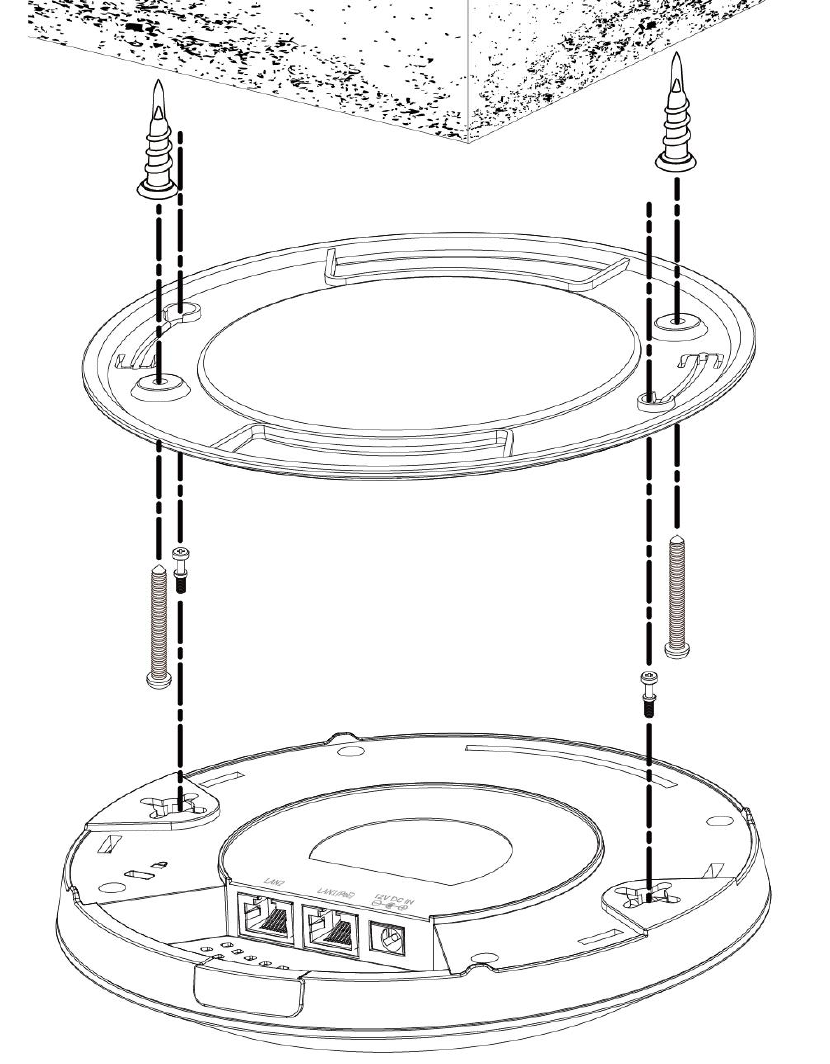
ForOtherCeilings(refertodiagramB):
1.Placetheceilingmountbrackettoaceilinginyourdesiredlocationand
Insertscrewiithroughholei(x2)andtightentofixthebracketinplace,as
showninA.
2.Insertscrewiiithroughholeiandintotherearofscrewiiandtightento
provideadditionalstrength.
3.Whentheceilingbracketisinplace,insertscrewivintoholev(x2)ontheaccess
point.
5.Fixtheaccesspointtotheceilingbracketbyinsertingtheattachedscrews
ivintoholeviandtwistingtheaccesspoint.
6. Locktheaccesspointfirmlyintoplacebytwistingittoalignscrewsivwiththe
groovesintheceilingmount.
8
A
ii
i
iii
9
B
10
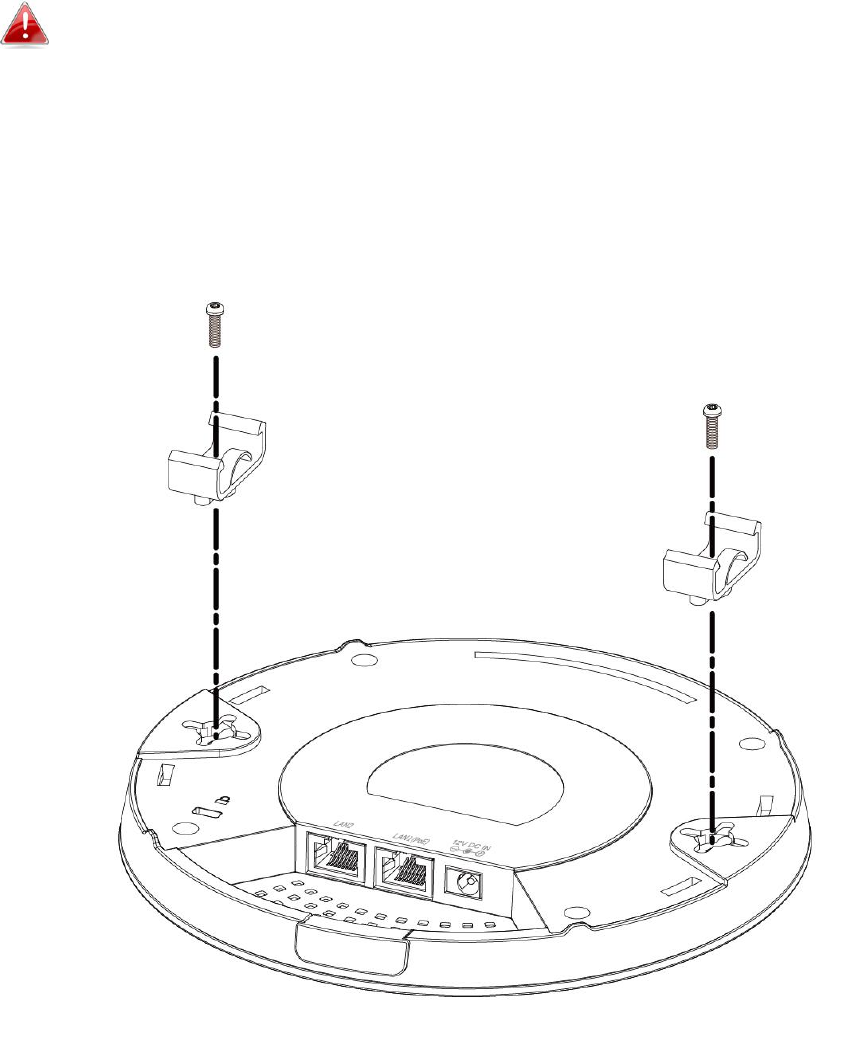
II‐3. T‐RailMount
TomounttheaccesspointtoaT‐Rail,pleasefollowtheinstructions
belowandrefertodiagramC,D&E.
1.SelectthecorrectsizeT‐Railbracketfromthetwosizeswhichare
includedinthepackagecontents.
2.AttachtheT‐Railbracketitoholeiiusingscrewiii(x2)asshowninC.
IfyouneedmorespacebetweentheaccesspointandtheT‐Rail,
thenadditionallyusebracketivbetweenbracketiandholeii(x2),
andusethelongerscrews(x2)includedinthepackagecontents.
3.CliptheaccesspointontoyourT‐RailusingthenowattachedT‐Rail
bracket.
11
12
APMode
III. QuickSetup
Youraccesspointcanbeupandrunninginjustafewminutes.Thisquick
installationguidewillhelptosetupyouraccesspointinitsdefaultAPmode
andconfigureitsbasicsettings.ForuseaManagedAPwithinanAParray
nosettingsarenecessary.ConfigurationscanbemadefromyourController
AP(refertoEdimaxProNMS).
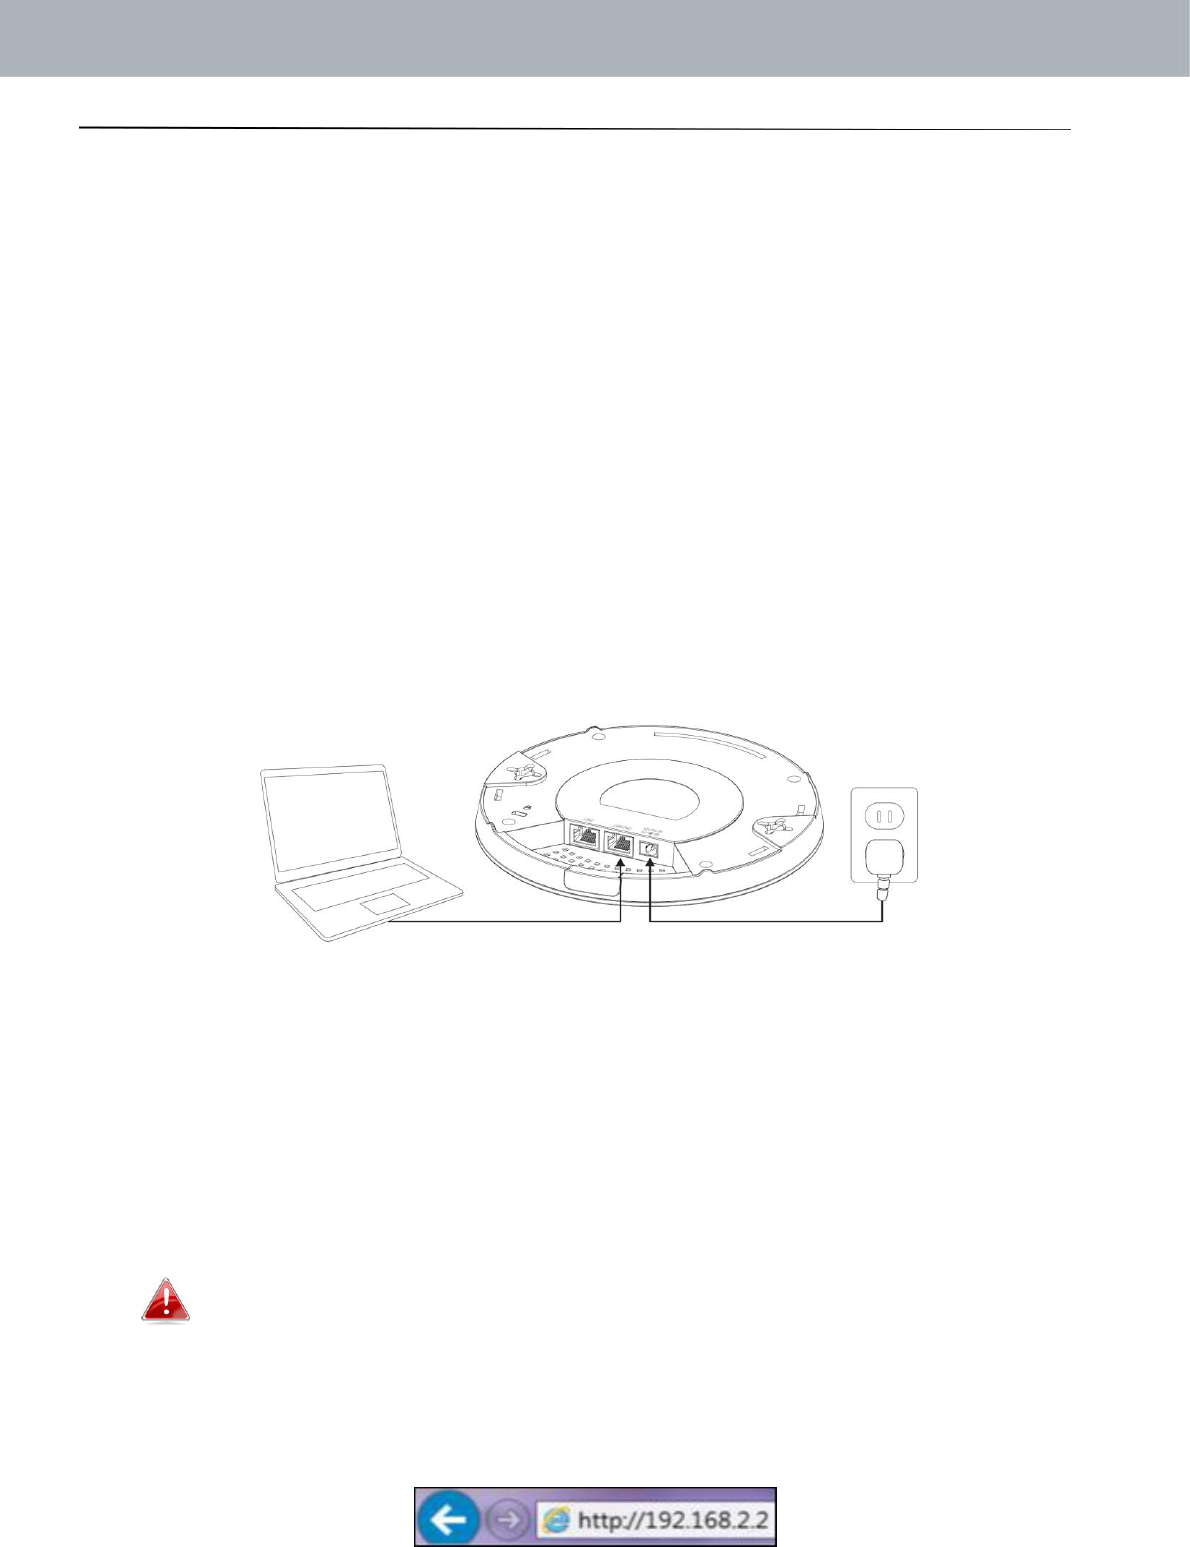
III‐1. InitialSetup
1.ConnecttheaccesspointtoacomputerviaEthernetcable.
2.Connectthepoweradaptertotheaccesspoint’s12VDCportandplugthepower
adapterintoapowersupplyusingtheincludedcable.
3.Pleasewaitamomentfortheaccesspointtostartup.Theaccesspointisready
whentheLEDisblue.
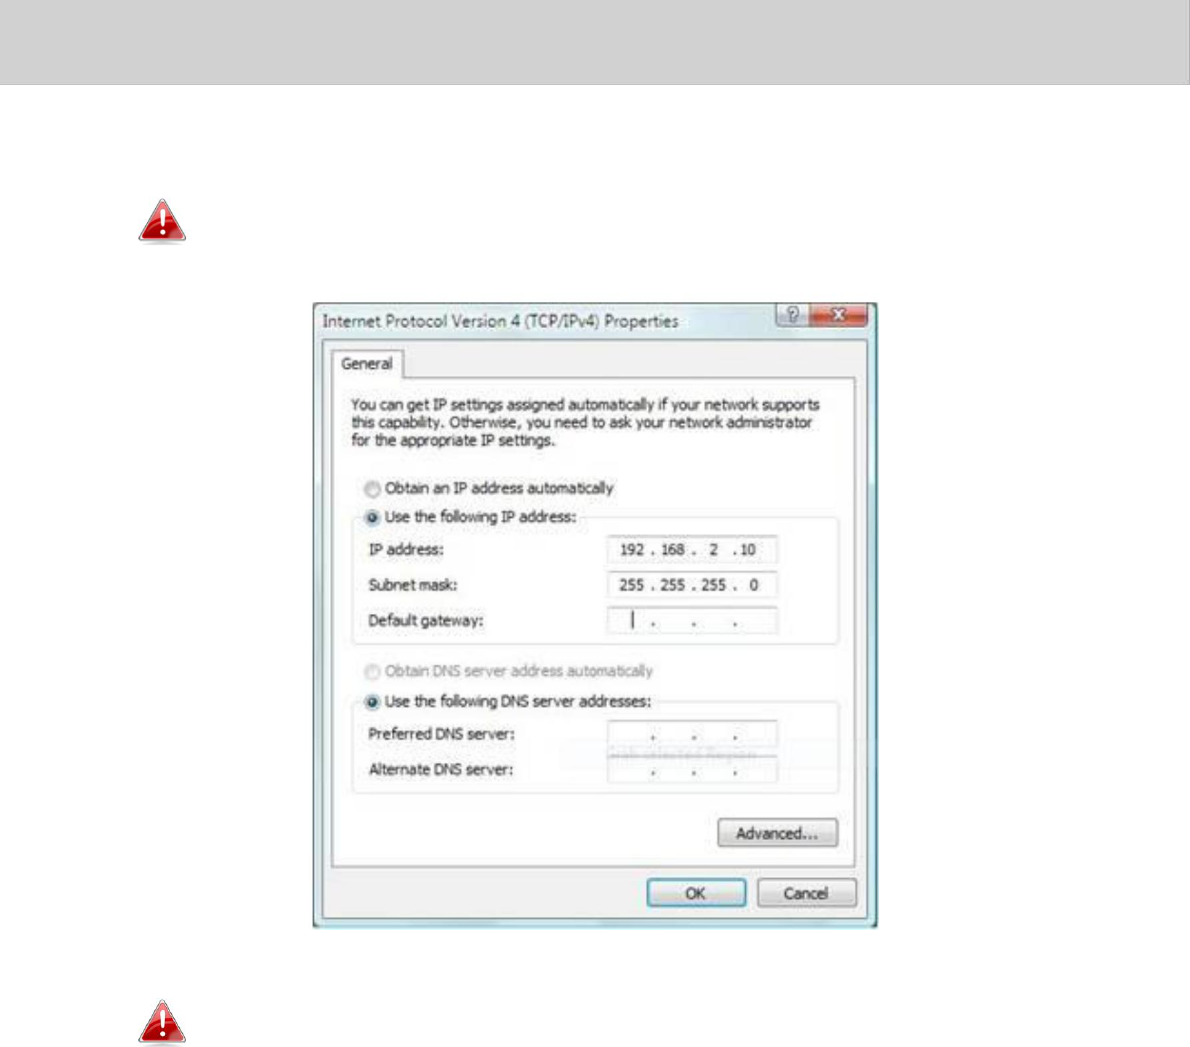
4.Setyourcomputer’sIPaddressto192.168.2.xwherexisanumberinthe
range3–100.Ifyouareunsurehowtodothis,pleaserefertotheuser
manualformoreinformation.
Pleaseensuretherearenootheractivenetworkconnectionson
yourcomputer(disconnectWi‐FiconnectionsandEthernet
cables).
5.Entertheaccesspoint’sdefaultIPaddress192.168.2.2intotheURLbarofa
webbrowser.
13
APMode
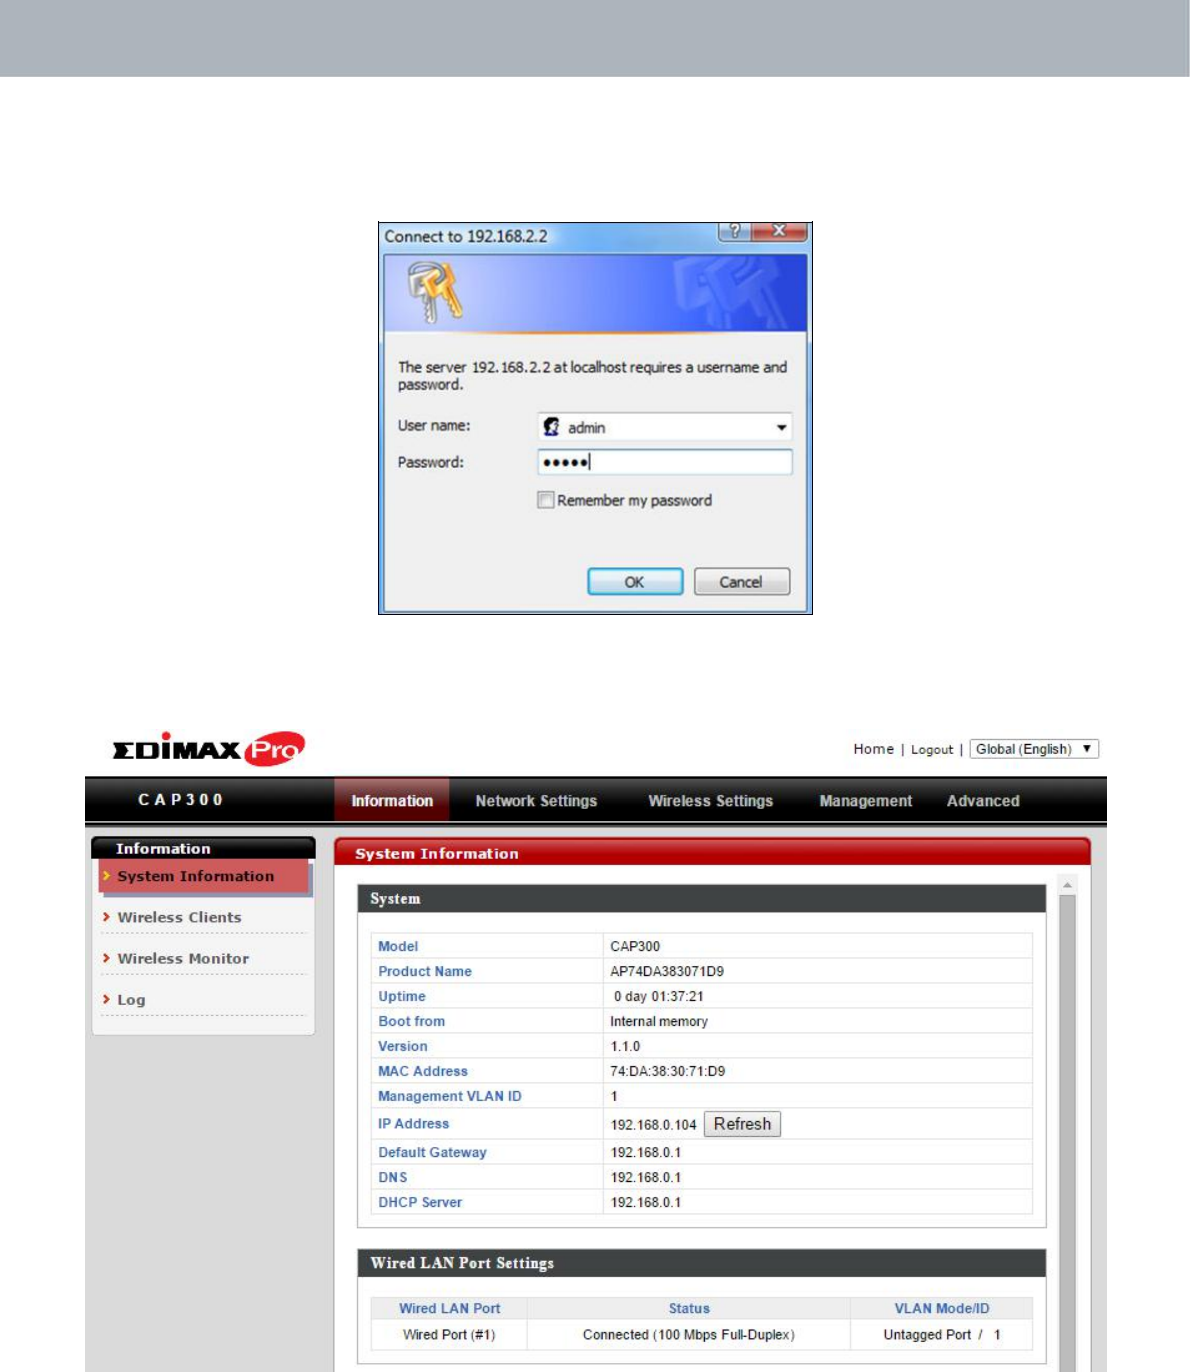
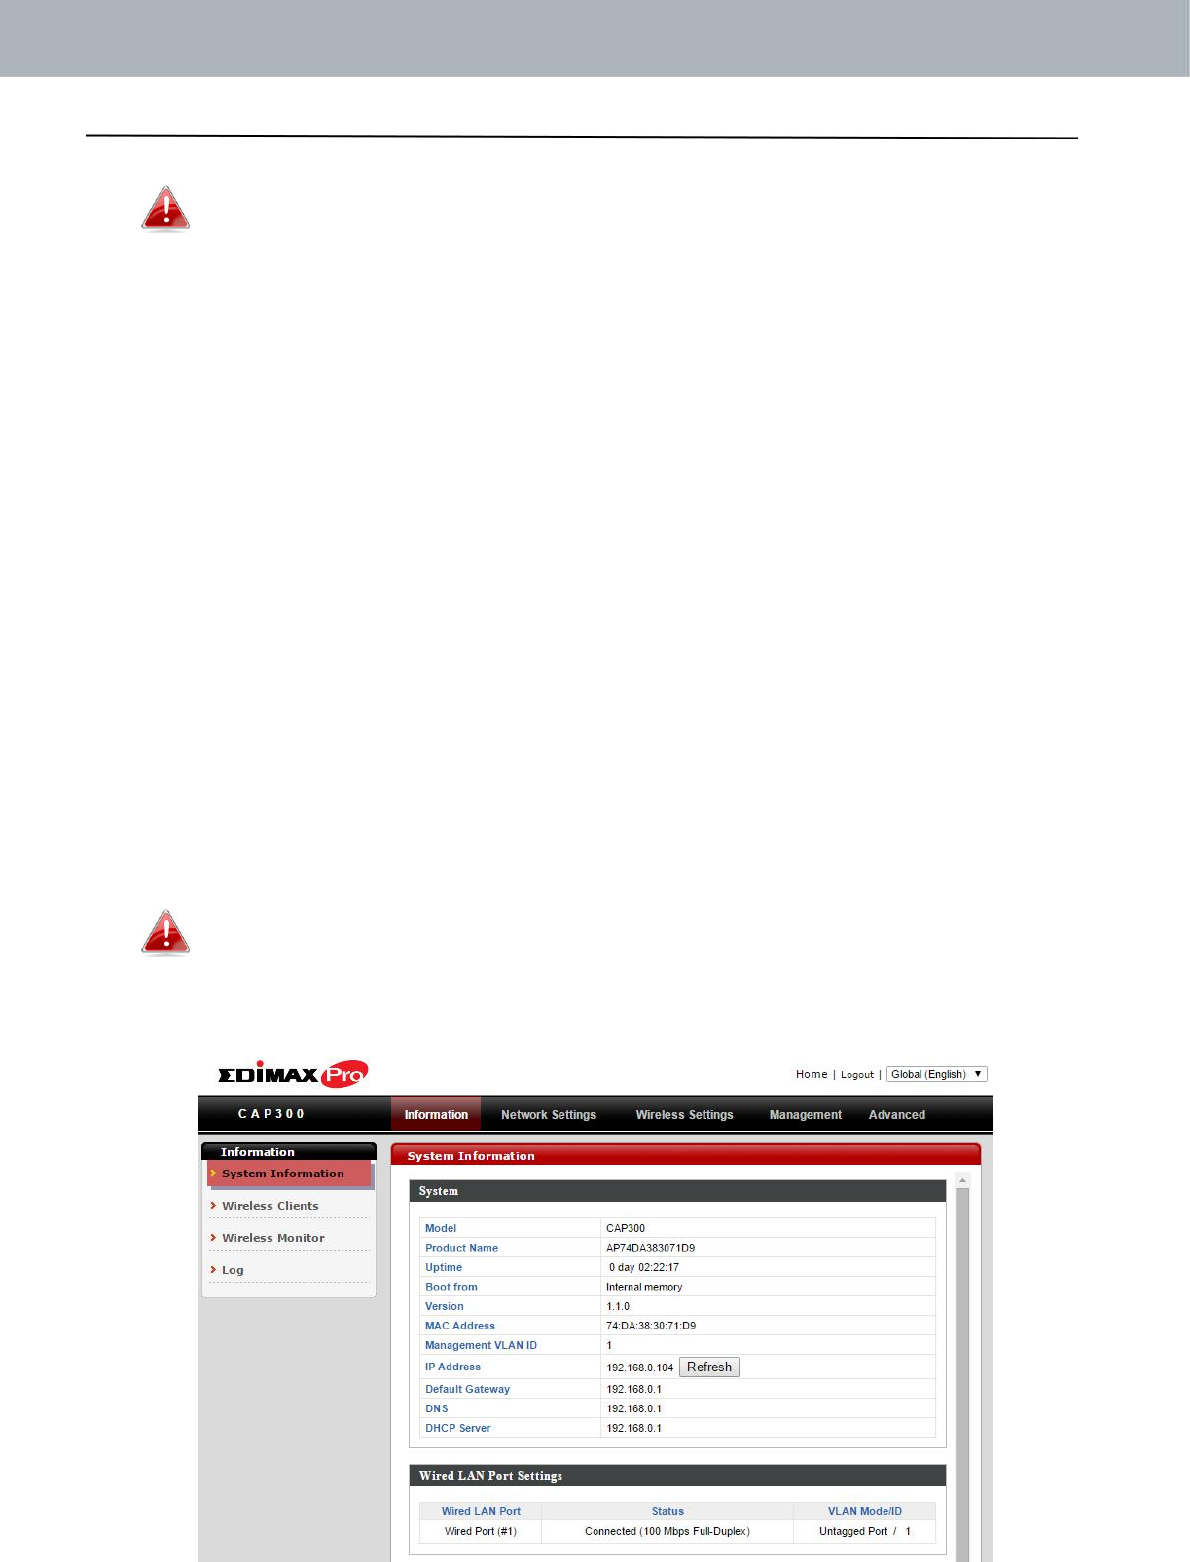
6.Youwillbepromptedforausernameandpassword.Enterthedefault
username“admin”andthedefaultpassword“1234”.
7.Youwillarrivethe“SystemInformation”screenshownbelow.
8.Next,pleasefollowtheinstructionsbelowinII‐2.BasicSettingsto
configuretheaccesspoint’sbasicsettings.
14
APMode
Formoreadvancedconfigurations,pleaserefertoIV.
BrowserBasedConfigurationInterface.
III‐2. BasicSettings
Theinstructionsbelowwillhelpyoutoconfigurethefollowingbasic
settingsoftheaccesspoint:
‐ LANIPAddress
‐ 2.4GHzSSID&Security
‐ AdministratorName&Password
‐ Time&Date
Itisrecommendedyouconfigurethesesettingsbeforeusingthe
accesspoint.
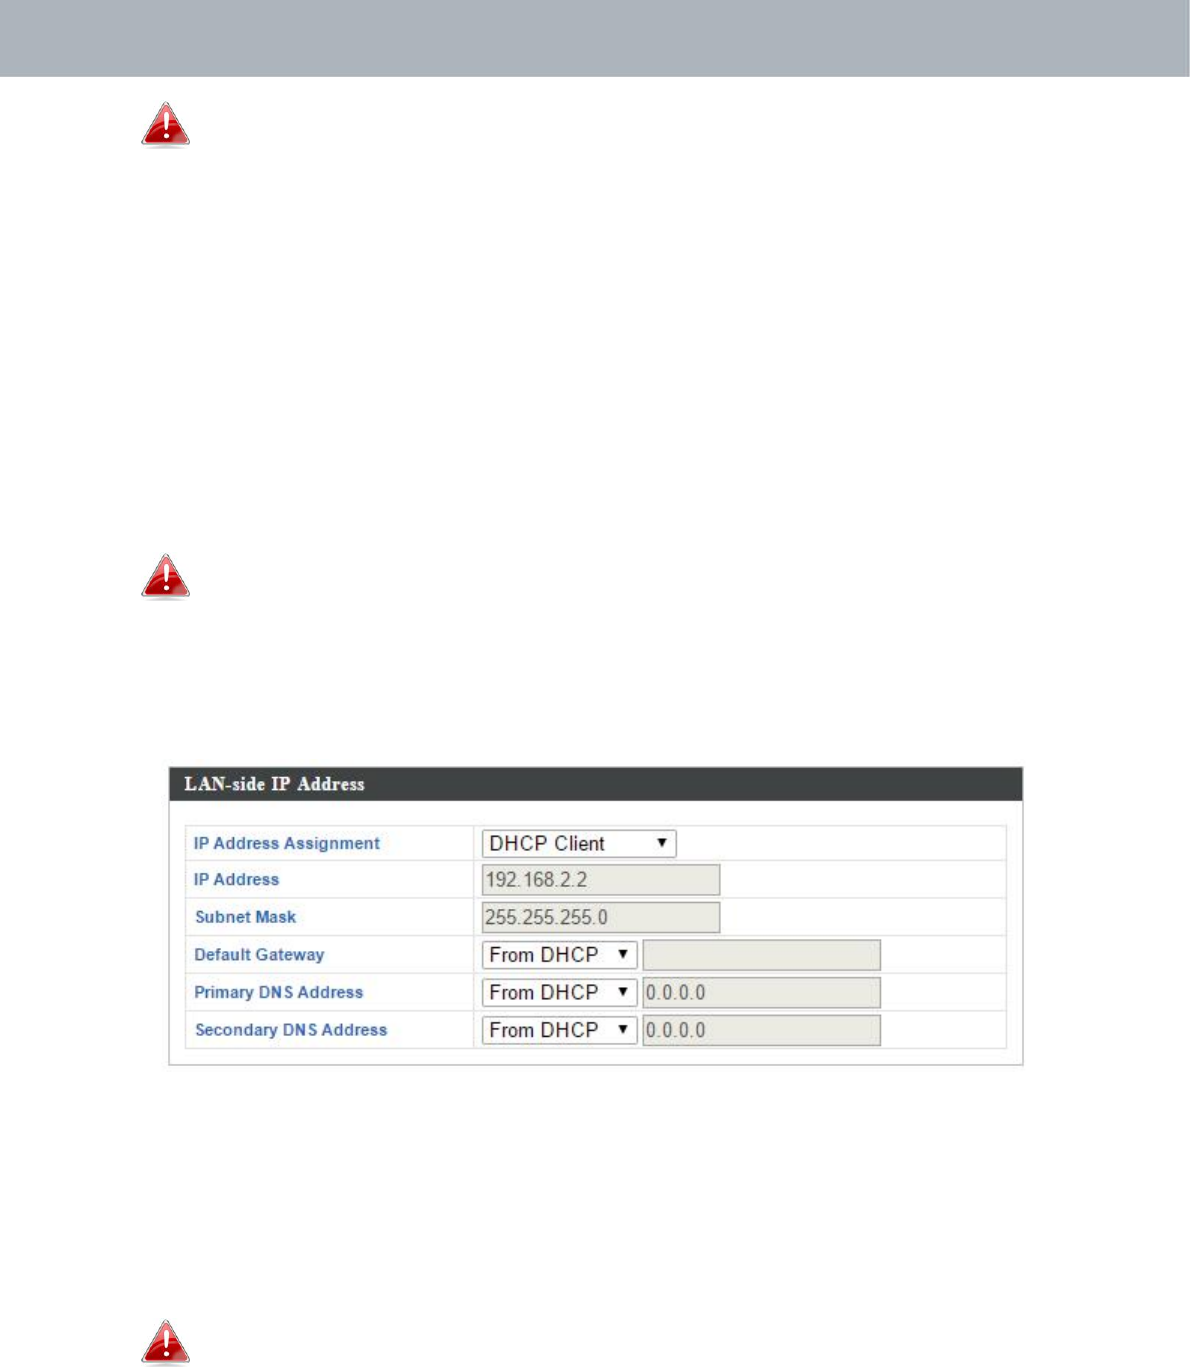
1.Tochangetheaccesspoint’sLANIPaddress,goto“NetworkSettings”>“LAN‐
sideIPAddress”andyouwillseethescreenbelow.
2.EntertheIPaddresssettingsyouwishtouseforyouraccesspoint.Youcan
useadynamic(DHCP)orstaticIPaddress,dependingonyournetwork
environment.Click“Apply”tosavethechangesandwaitafewmomentsfor
theaccesspointtoreload.
Whenyouchangeyouraccesspoint’sIPaddress,youneedtouse
thenewIPaddresstoaccessthebrowserbasedconfiguration
interfaceinsteadofthedefaultIP192.168.2.2.
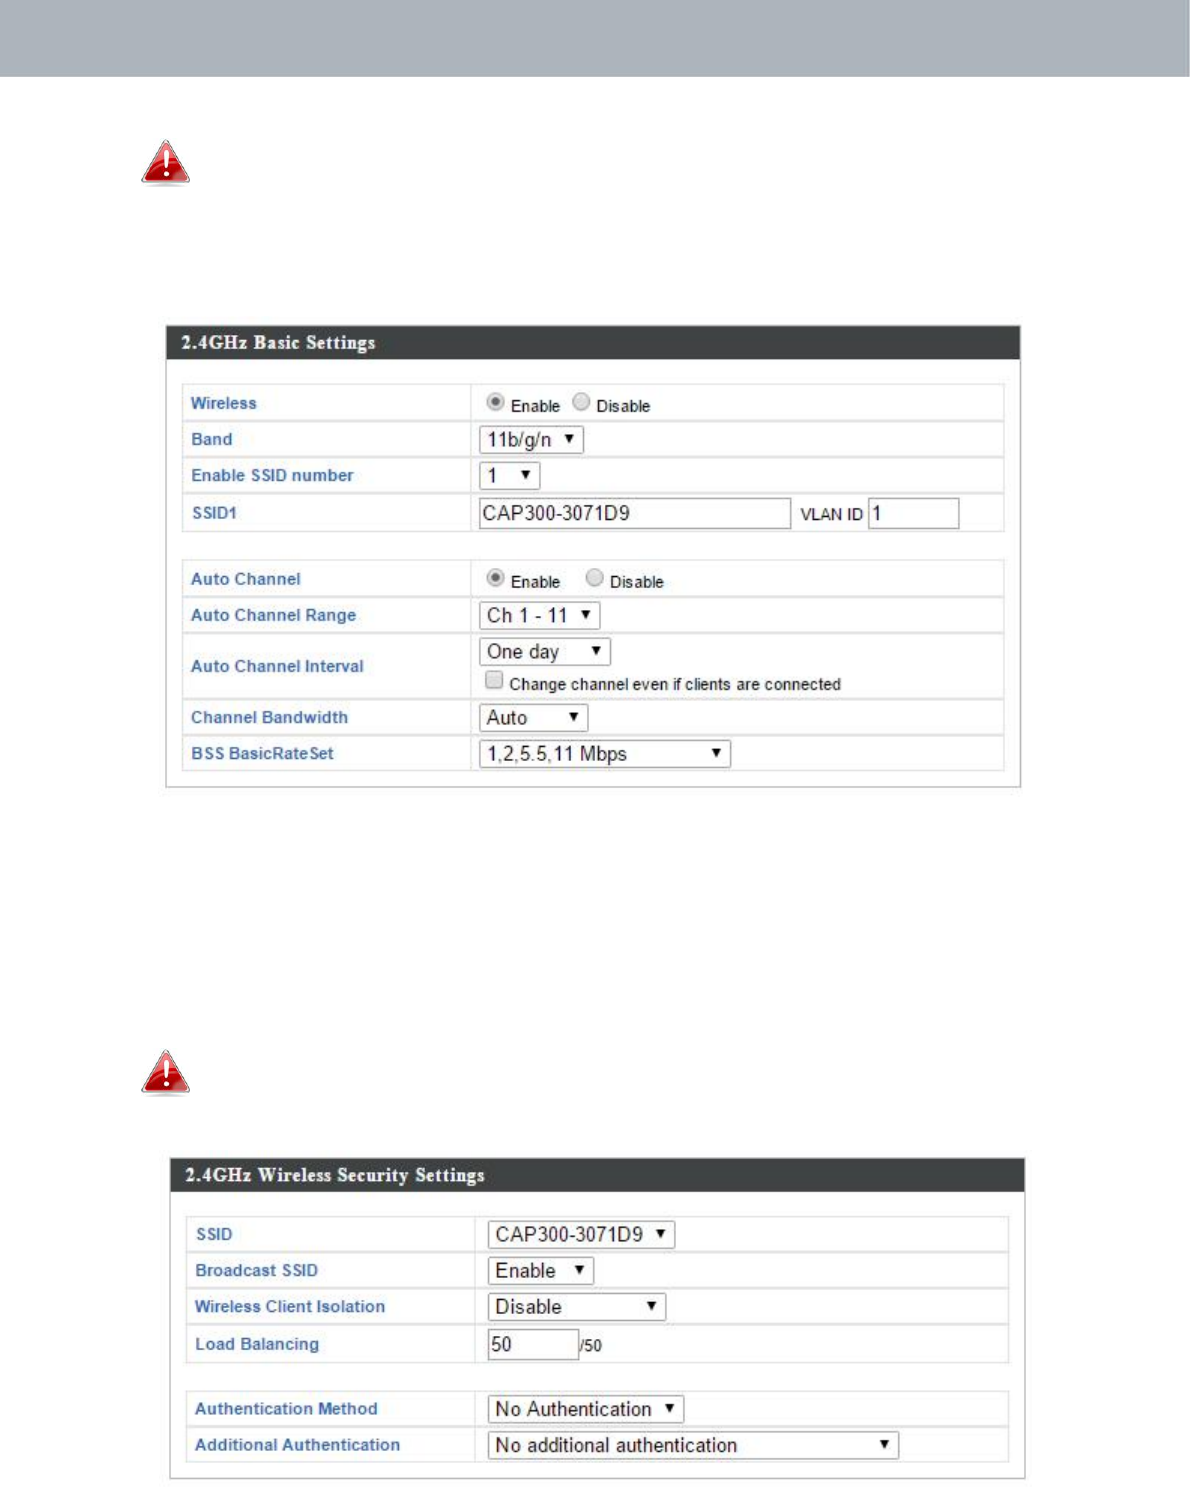
3.TochangetheSSIDofyouraccesspoint’s2.4GHzwirelessnetwork(s),go
to“WirelessSetting”>“2.4GHz11bgn”>“Basic”.EnterthenewSSIDfor
your2.4GHzwirelessnetworkinthe“SSID1”fieldandclick“Apply”.
15
APMode
Toutilizemultiple2.4GHzSSIDs,openthedropdownmenu
labelled“EnableSSIDnumber”andselecthowmanySSIDsyou
require.ThenenteranewSSIDinthecorrespondingnumbered
fieldsbelow,beforeclicking“Apply”.
4.Toconfigurethesecurityofyouraccesspoint’s2.4GHzwirelessnetwork(s),
goto“WirelessSetting”>“2.4GHz11bgn”>“Security”.Selectan
“AuthenticationMethod”andentera“Pre‐sharedKey”or“EncryptionKey”
dependingonyourchoice,thenclick“Apply”.
IfusingmultipleSSIDs,specifywhichSSIDtoconfigureusingthe
“SSID”dropdownmenu.
16

APMode
5.Tochangetheadministratornameandpasswordforthebrowserbased
configurationinterface,goto“Management”>“Admin”.
6.Completethe“AdministratorName”and“AdministratorPassword”fieldsand
click“Apply”.
7.Tosetthecorrecttimeforyouraccesspoint,goto“Management”>“Date
andTime”.
8.Setthecorrecttimeandtimezoneforyouraccesspointusingthedrop
downmenus.TheaccesspointalsosupportsNTP(NetworkTimeProtocol)so
alternativelyyoucanenterthehostnameorIPaddressofatimeserver.
Click“Apply”whenyouarefinished.
17

APMode
Youcanusethe“AcquireCurrentTimefromyourPC”buttonif
youwishtosettheaccesspointtothesametimeasyourPC.
9.Thebasicsettingsofyouraccesspointarenowconfigured.Pleasereferto
II. HardwareInstallationforguidanceonconnectingyouraccesspointto
arouterorPoEswitch.
18
APMode
IV. BrowserBasedConfigurationInterface
InManagedAPmodesomefunctionsofthebrowserbased
configurationinterfacearedisabled.PleaseuseEdimaxPro
NMSonyourControllerAPtoconfigureyourManagedAP(s).
Thebrowser‐basedconfigurationinterfaceenablesyoutoconfigurethe
accesspoint’sadvancedfeatures.TheCAP1300featuresarangeof
advancedfunctionssuchasMACfiltering,MACRADIUSauthentication,
VLANconfigurations,upto32SSIDsandmanymore.Toaccessthebrowser
basedconfigurationinterface:
1.ConnectacomputertoyouraccesspointusinganEthernetcable.
2.Enteryouraccesspoint’sIPaddressintheURLbarofawebbrowser.Theaccess
point’sdefaultIPaddressis192.168.2.2.
3.Youwillbepromptedforausernameandpassword.Thedefaultusername
is“admin”andthedefaultpasswordis“1234”,thoughitwasrecommended
thatyouchangethepasswordduringsetup(seeIII‐2.BasicSettings).
Ifyoucannotrememberyourpassword,resettheaccesspoint
backtoitsfactorydefaultsettings.RefertoI‐5.Reset
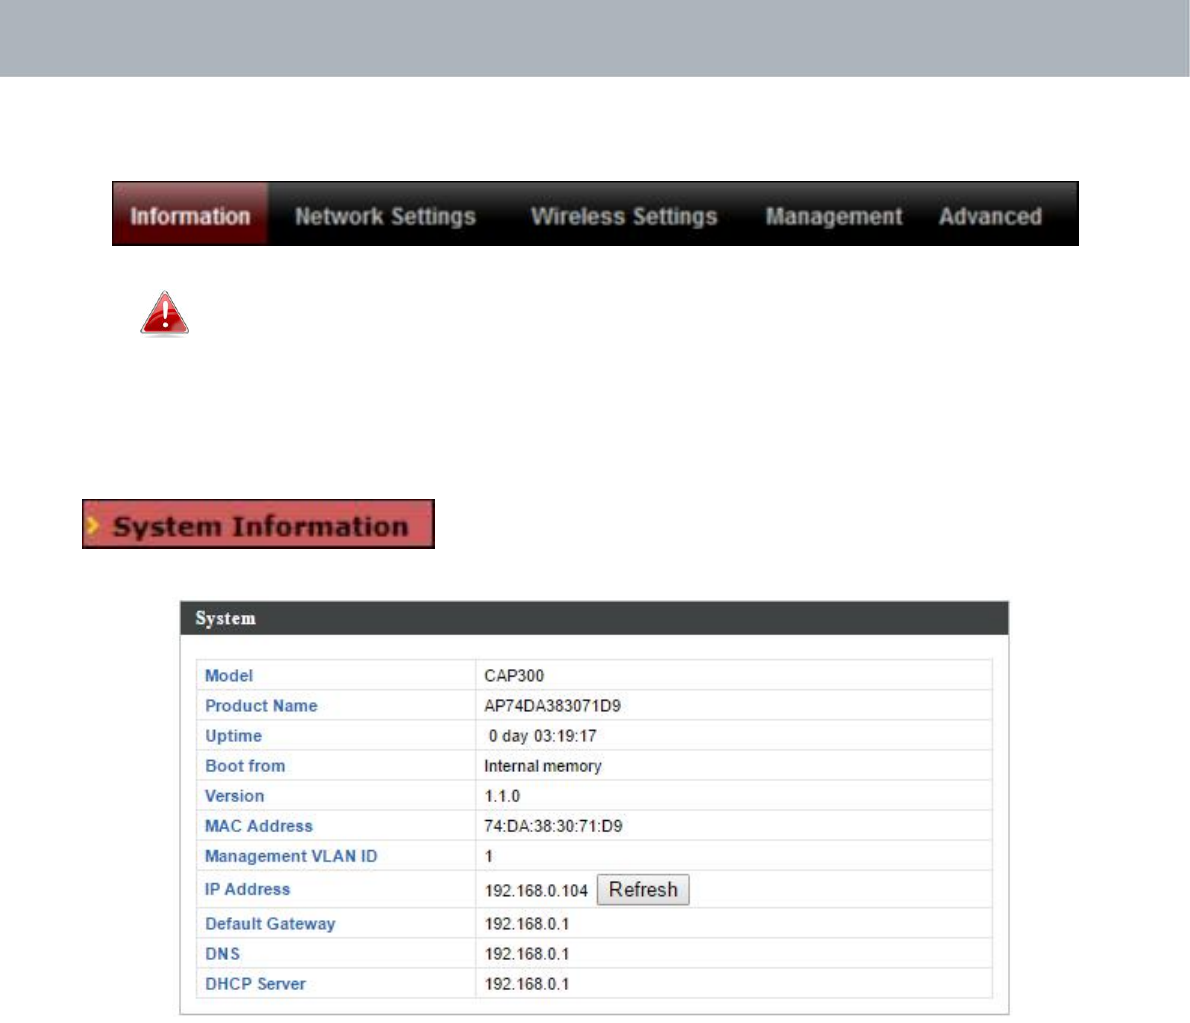
4.Youwillarriveatthe“SystemInformation”screenshownbelow.
19
APMode
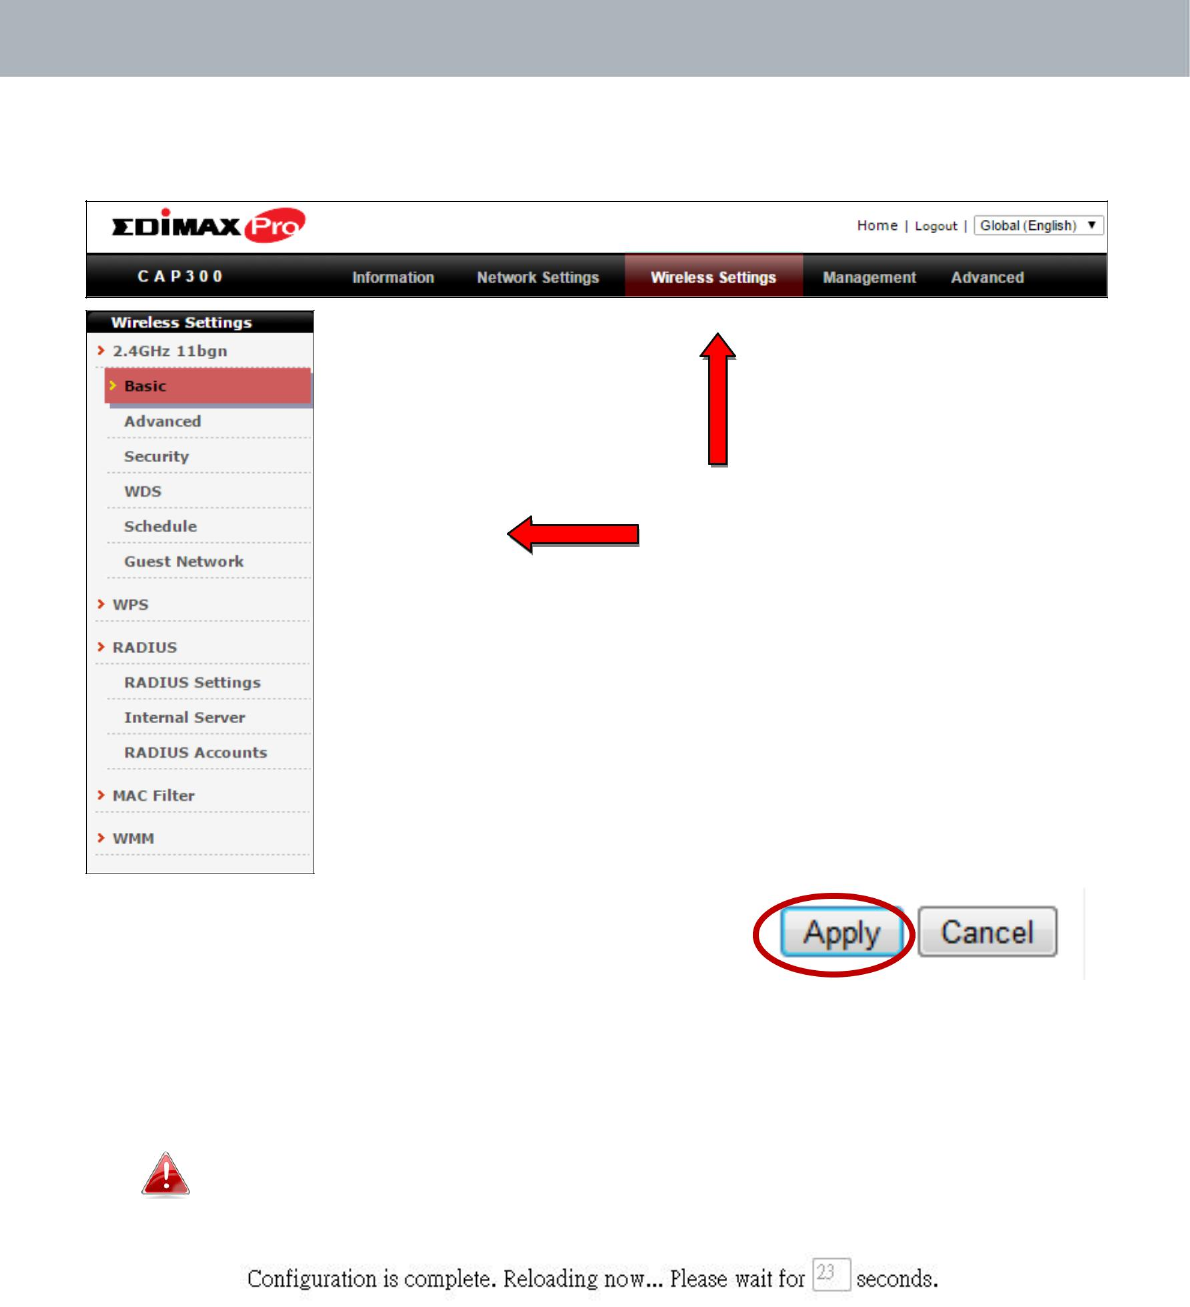
5.Usethemenuacrossthetopanddowntheleftsidetonavigate.
6.Click“Apply”tosavechangesandreloadtheaccesspoint,or“Cancel”tocancel
changes.
Pleasewaitafewsecondsfortheaccesspointtoreloadafter
you“Apply”changes,asshownbelow.
7.Pleaserefertothefollowingchaptersforfulldescriptionsofthebrowserbased
configurationinterfacefeatures.
20
APMode
IV‐1. Information
Screenshotsdisplayedareexamples.Theinformationshownon
yourscreenwillvarydependingonyourconfiguration.
IV‐1‐1. SystemInformation
The“SystemInformation”pagedisplaysbasic
systeminformationabouttheaccesspoint.
21
APMode
System
Model Displaysthemodelnumberoftheaccess
point.
ProductName Displaystheproductnameforreference,
whichconsistsof“AP”plustheMACaddress.
Uptime Displaysthetotaltimesincethedevicewas
turnedon.
BootFrom Displaysinformationforthebooted
hardware,bootedfromeitherUSBorinternal
memory.
Version Displaysthefirmwareversion.
MACAddress Displaystheaccesspoint’sMACaddress.
ManagementVLAN DisplaysthemanagementVLANID.
ID
IPAddress DisplaystheIPaddressofthisdevice.Click
“Refresh”toupdatethisvalue.
Default DisplaystheIPaddressofthedefault
Gateway gateway.
DNS IPaddressofDNS(DomainNameServer)
DHCPServer IPaddressofDHCPServer.
22

APMode
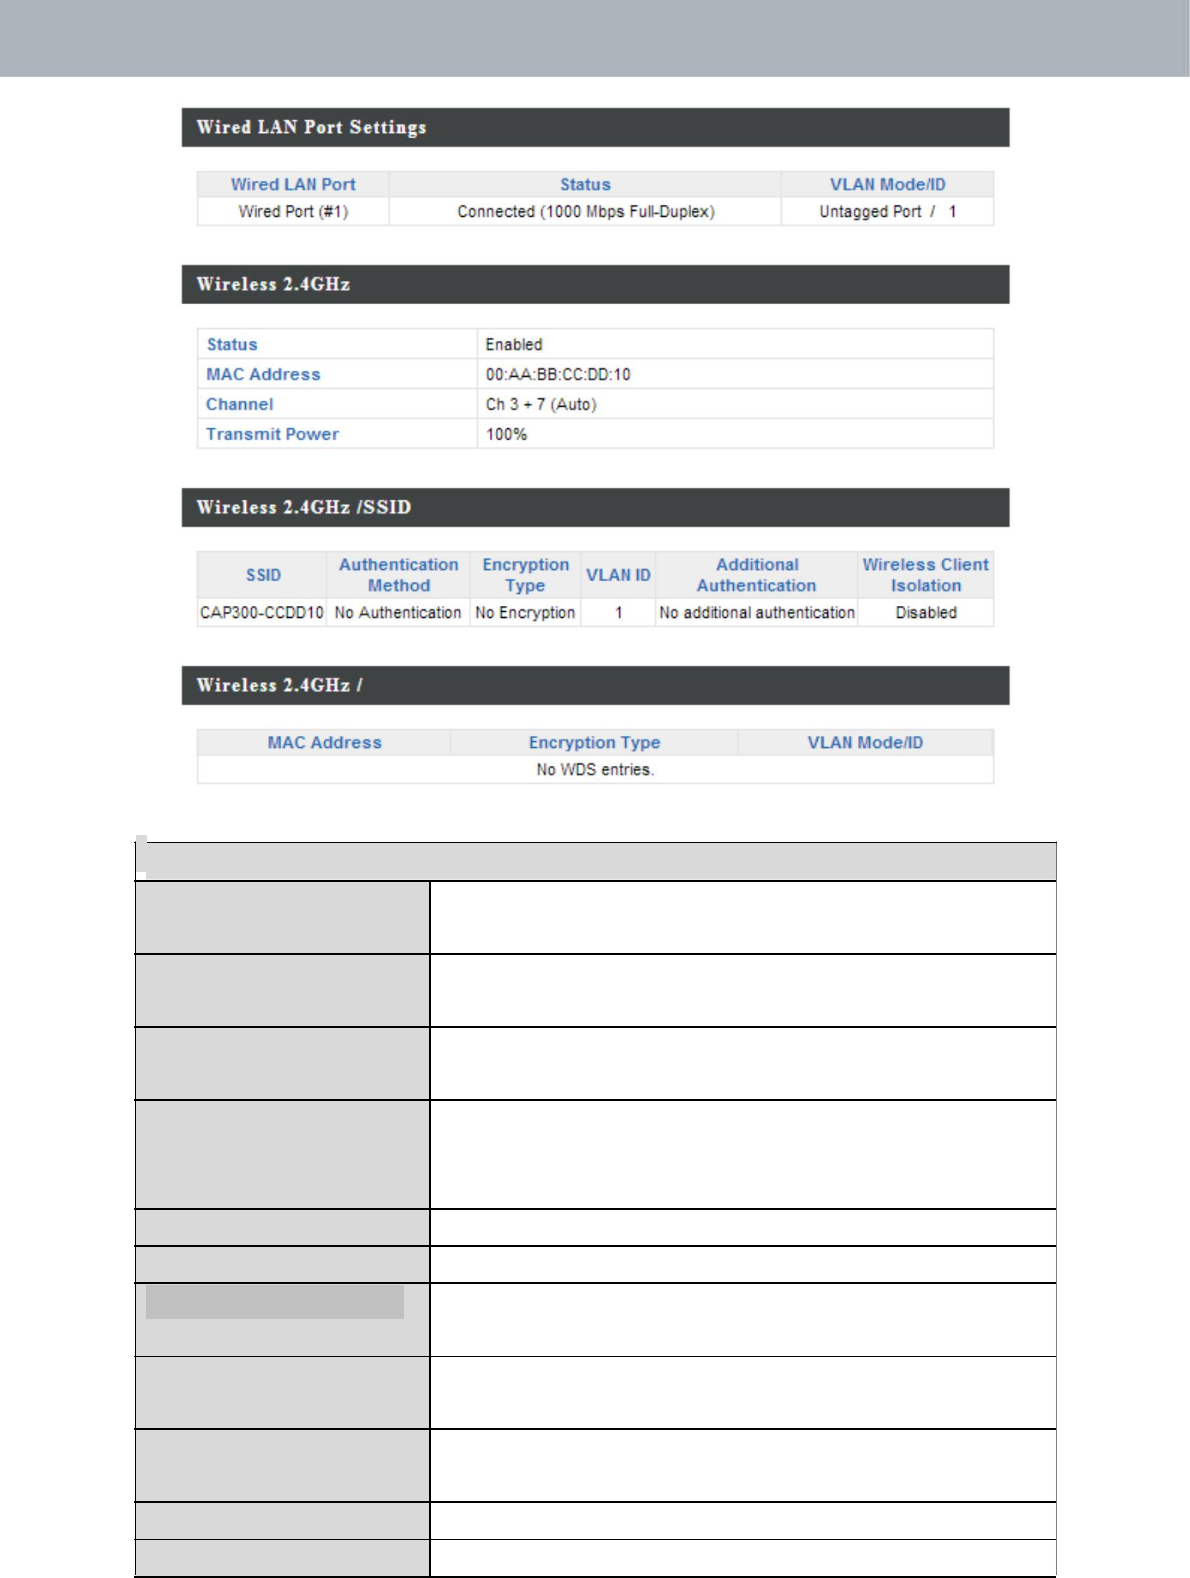
WiredLANPortSettings
WiredLANPort Specifieswhich LANport(1or2).
Status DisplaysthestatusofthespecifiedLANport
(connectedordisconnected).
VLANMode/ID DisplaystheVLANmode(taggedoruntagged)
andVLANIDforthespecifiedLANport.See
IV‐2‐3.VLAN
Wireless2.4GHz
Status Displaysthestatusofthe2.4GHzwireless
(enabledordisabled).
MACAddress Displaystheaccesspoint’sMACaddress.
Channel Displaysthechannelnumberthespecified
wirelessfrequencyisusingforbroadcast.
TransmitPower Displaysthewirelessradiotransmitpower
levelasapercentage.
Wireless2.4GHZ/SSID
SSID DisplaystheSSIDname(s)for2.4GHzwireless.
Authentication Displaystheauthenticationmethodforthe
Method specifiedSSID.SeeIV‐3.WirelessSettings
EncryptionType Displaystheencryptiontypeforthespecified
SSID.SeeIV‐3.WirelessSettings
VLANID DisplaystheVLANIDforthespecifiedSSID.
SeeIV‐2‐3.VLAN
Additional Displaystheadditionalauthenticationtype for
Authentication thespecifiedSSID.SeeIV‐3.WirelessSettings
WirelessClient Displayswhetherwirelessclientisolationisin
Isolation useforthespecifiedSSID.SeeIV‐2‐3.VLAN
Wireless2.4GHZ/WDSStatus
MACAddress Displaysthepeeraccesspoint’sMACaddress.
EncryptionType Displaystheencryptiontypeforthespecified
WDS.SeeIV‐3‐1‐4.WDS
VLANMode/ID DisplaystheVLANIDforthespecifiedWDS.
SeeIV‐3‐1‐4.WDS
Refresh Clicktorefreshallinformation.
23
APMode
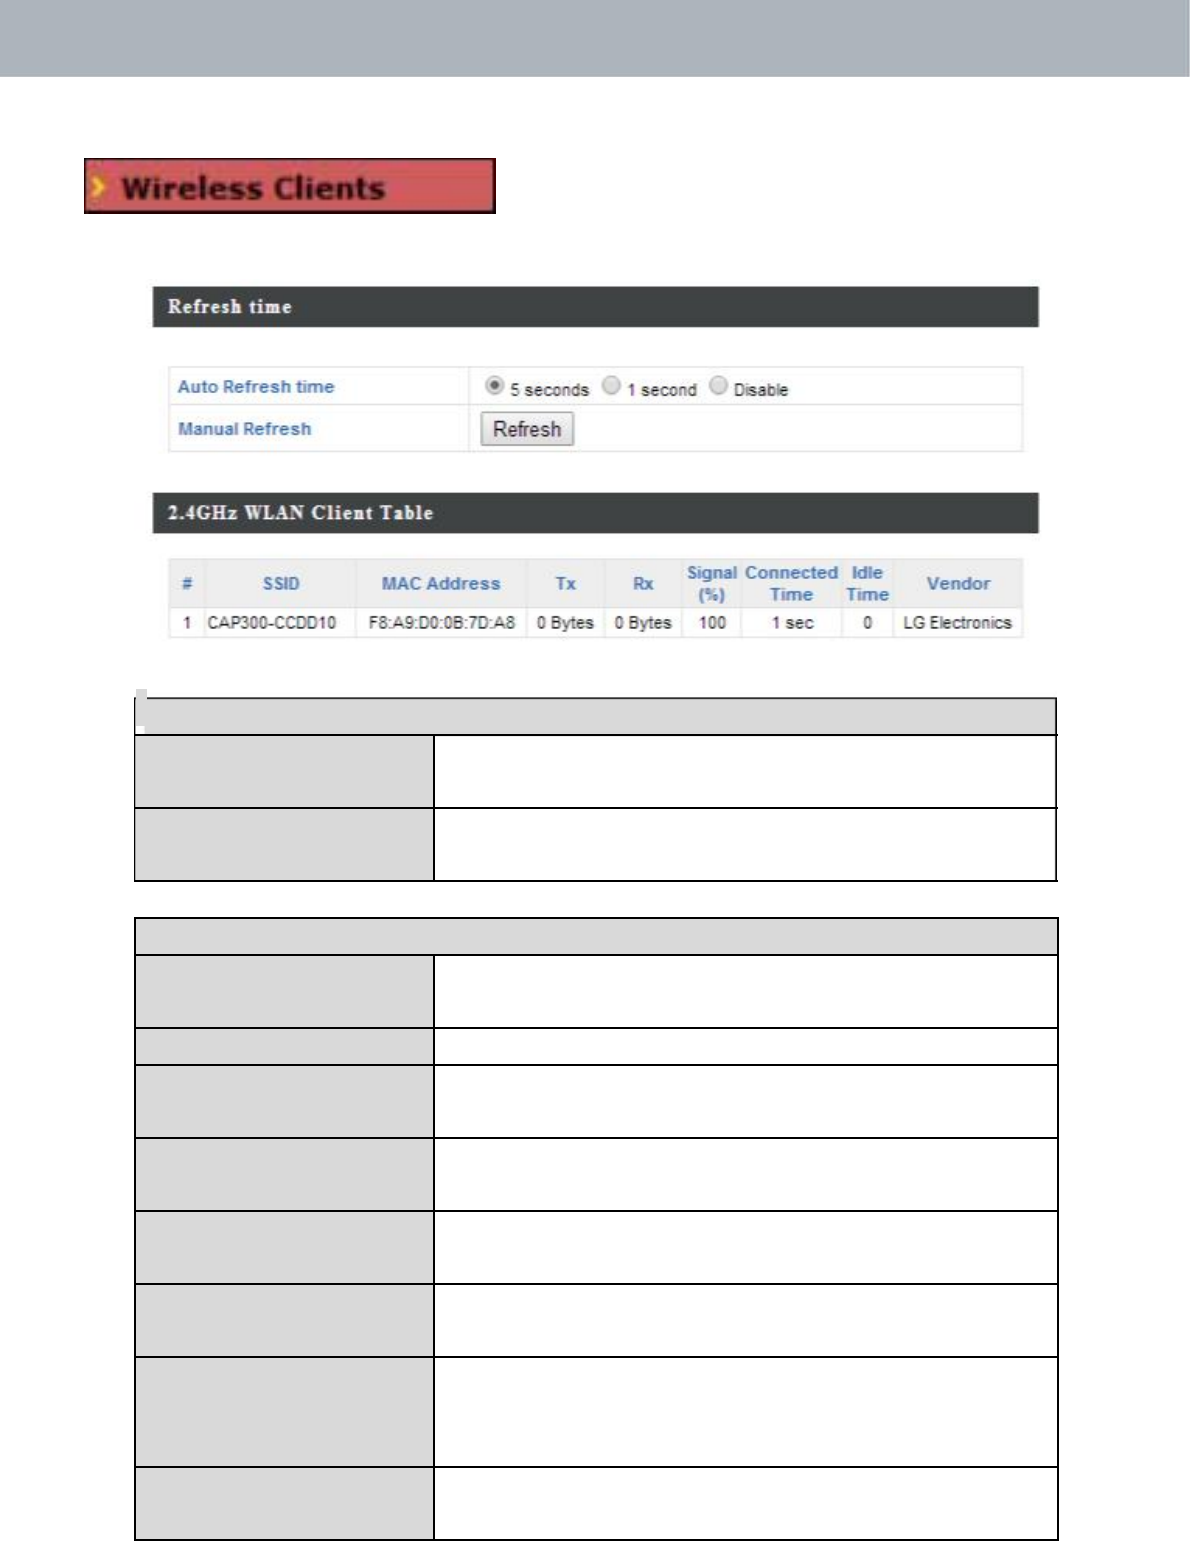
IV‐1‐2. WirelessClients
The“WirelessClients”pagedisplays
informationaboutallwirelessclients
connectedtotheaccesspointonthe2.4GHzfrequency.
Refreshtime
AutoRefreshTime Selectatimeintervalfortheclienttablelistto
automaticallyrefresh.
ManualRefresh Clickrefreshtomanuallyrefreshtheclient
table.
2.4GHzWLANClientTable
SSID DisplaystheSSIDwhichtheclientis
connectedto.
MACAddress Displays theMACaddressoftheclient.
Tx Displaysthetotaldatapacketstransmittedby
thespecifiedclient.
Rx Displaysthetotaldatapacketsreceivedby
thespecifiedclient.
Signal(%) Displaysthewirelesssignalstrengthforthe
specifiedclient.
ConnectedTime Displaysthetotaltimethewirelessclienthas
beenconnectedtotheaccesspoint.
IdleTime Clientidletimeisthetimeforwhichtheclient
hasnottransmittedanydatapacketsi.e.is
idle.
Vendor Thevendoroftheclient’swirelessadapteris
displayedhere.
24
APMode
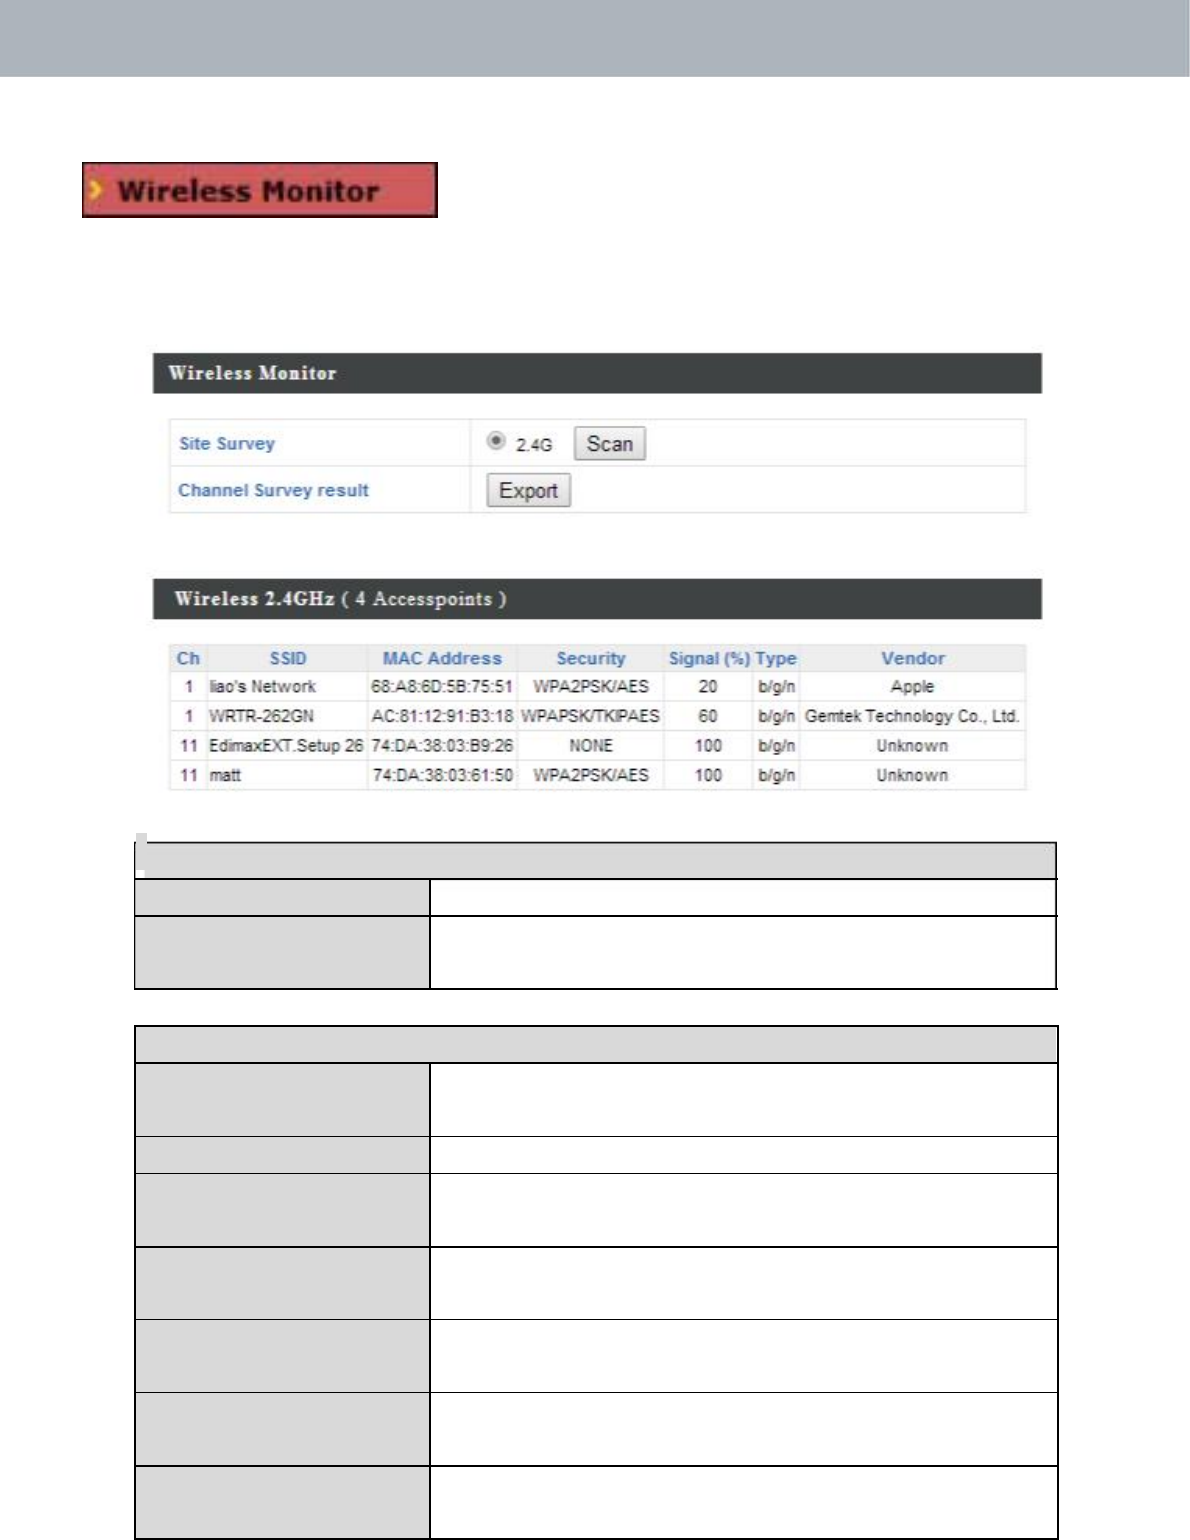
IV‐1‐3. WirelessMonitor
WirelessMonitorisatoolbuiltintotheaccess
pointtoscanandmonitorthesurrounding
wirelessenvironment.Selectafrequencyandclick“Scan”todisplayalist
ofallSSIDswithinrangealongwithrelevantdetailsforeachSSID.
WirelessMonitor
SiteSurvey Click“Scan”tobeginthesurvey.
ChannelSurvey Afterascaniscomplete,click“Export”tosave
Result theresultstolocalstorage.
SiteSurveyResults
Ch Displaysthechannelnumberusedbythe
specifiedSSID.
SSID DisplaystheSSIDidentifiedbythescan.
MACAddress DisplaystheMACaddressofthewireless
router/accesspointforthespecifiedSSID.
Security Displaystheauthentication/encryptiontype
ofthespecifiedSSID.
Signal(%) Displaysthecurrentsignalstrengthofthe
SSID.
Type Displaysthe802.11wirelessnetworking
standard(s)ofthespecifiedSSID.
Vendor Displaysthevendorofthewireless
router/accesspointforthespecifiedSSID.
25
APMode
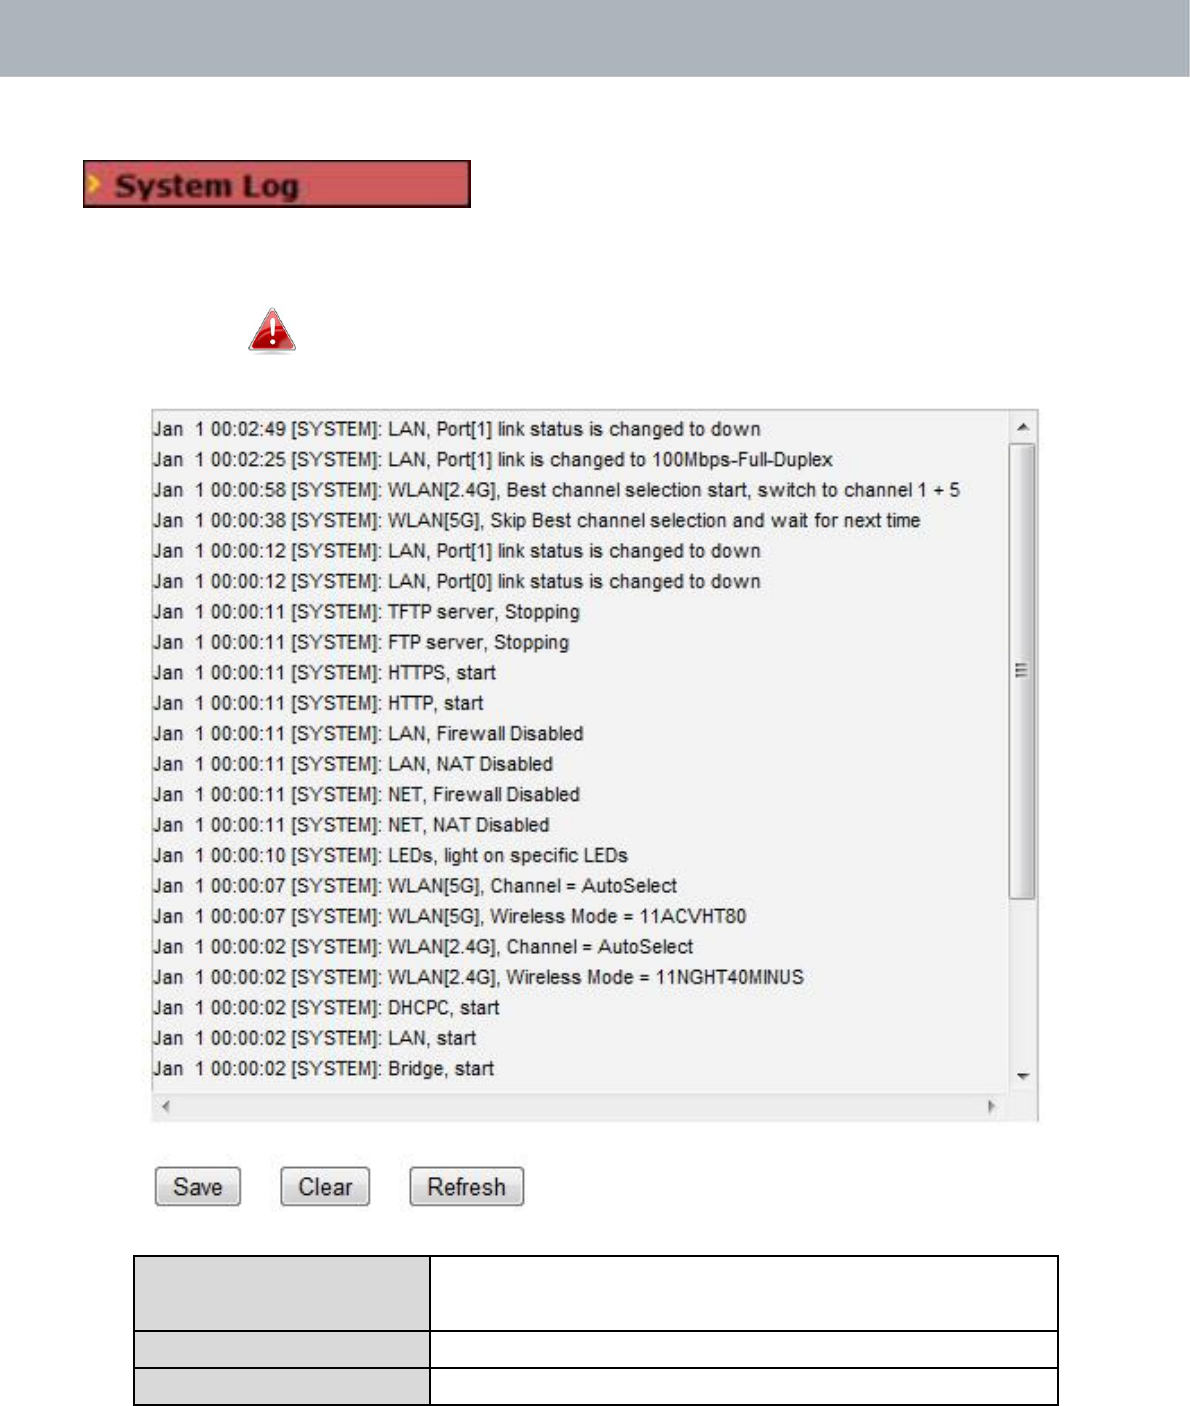
IV‐1‐4. Log
Thesystemlogdisplayssystemoperation
informationsuchasuptimeandconnection
processes.Thisinformationisusefulfornetworkadministrators.
Whenthelogisfull,oldentriesareoverwritten.
SaveClicktosavethelogasafileonyourlocal
computer.
ClearClearalllogentries.
RefreshRefreshthecurrent log.
26

APMode
Thefollowinginformation/eventsarerecordedbythelog:
USB
Mount&unmount
WirelessClientConnected&
disconnectedKeyexchange
success&fail
Authentication
Authenticationfailorsuccessful.
Association
Successorfail
WPS
M1‐M8messages
WPSsuccess
ChangeSettings
SystemBoot
Displayscurrentmodelname
NTPClient
WiredLink
LANPortlinkstatusandspeedstatus
ProxyARP
ProxyARPmodulestart&stop
Bridge
Bridgestart&stop.
SNMP
SNMPserverstart&stop.
HTTP
HTTPstart&stop.
HTTPS
HTTPSstart&stop.
SSH
SSH‐clientserverstart&stop.
Telnet
Telnet‐clientserverstartorstop.
WLAN(2.4G)
WLAN(2.4G]channelstatusandcountry/regionstatus
27
APMode
IV‐2. NetworkSettings
Screenshotsdisplayedareexamples.Theinformationshown
onyourscreenwillvarydependingonyourconfiguration.
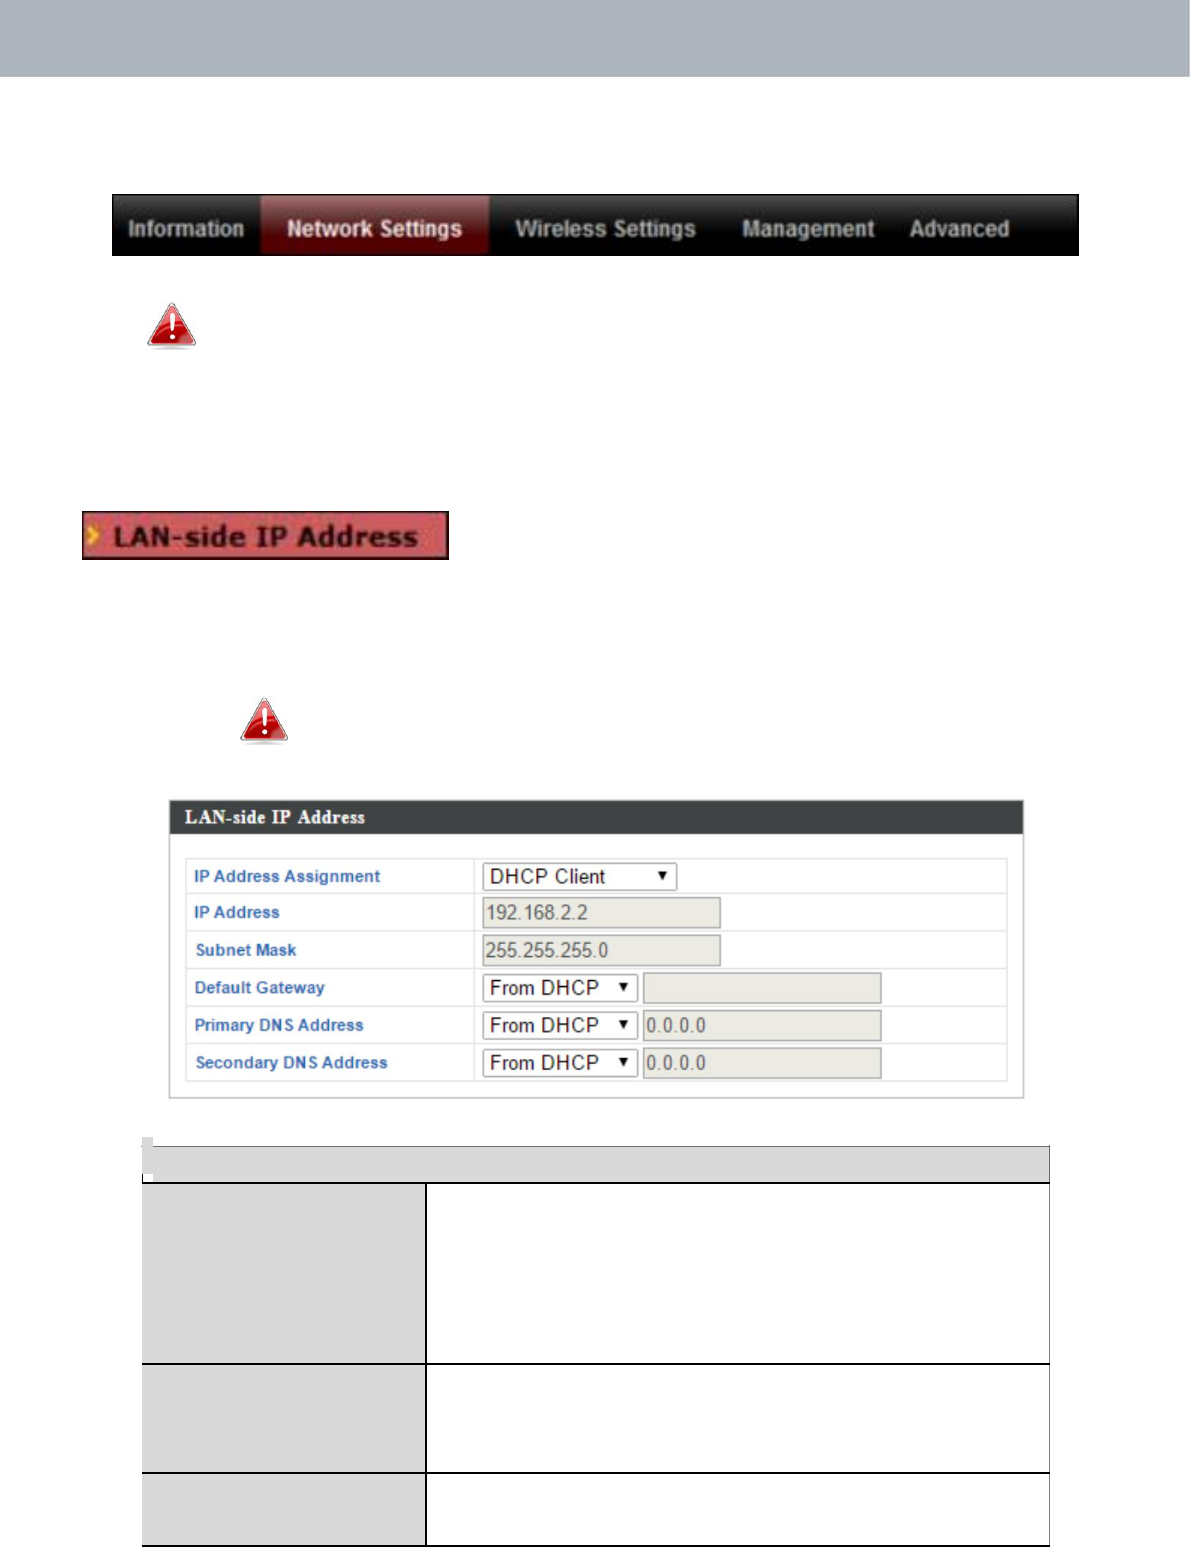
IV‐2‐1. LAN‐SideIPAddress
The“LAN‐sideIPaddress”pageallowsyouto
configureyouraccesspointonyourLocalArea
Network(LAN).YoucanenabletheaccesspointtodynamicallyreceiveanIP
addressfromyourrouter’sDHCPserveroryoucanspecifyastaticIP
addressforyouraccesspoint,aswellasconfigureDNSservers.
Theaccesspoint’sdefaultIPaddressis192.168.2.2.
LAN‐sideIPAddress
IPAddress Select“DHCPClient”foryouraccesspointto
Assignment beassignedadynamicIPaddressfromyour
router’sDHCPserver,orselect“StaticIP”to
manuallyspecifyastatic/fixedIPaddressfor
youraccesspoint(below).
IPAddress SpecifytheIPaddresshere.ThisIPaddress
willbeassignedtoyouraccesspointandwill
replacethedefaultIPaddress.
SubnetMask Specifyasubnetmask.Thedefaultvalueis
255.255.255.0
28

APMode
DefaultGatewayForDHCPusers,select“FromDHCP”toget
defaultgatewayfromyourDHCPserveror
“User‐Defined”toenteragatewaymanually.
ForstaticIPusers,thedefaultvalueisblank.
DHCPuserscanselecttogetDNSservers’IPaddressfromDHCPor
manuallyenteravalue.ForstaticIPusers,thedefaultvalueisblank.
PrimaryAddressDHCPuserscanselect“FromDHCP”toget
primaryDNSserver’sIPaddressfromDHCPor
“User‐Defined”tomanuallyenteravalue.For
staticIPusers,thedefaultvalueisblank.
SecondaryAddressUserscanmanuallyenteravaluewhenDNS
server’sprimaryaddressissetto
“User‐Defined”.
29
APMode
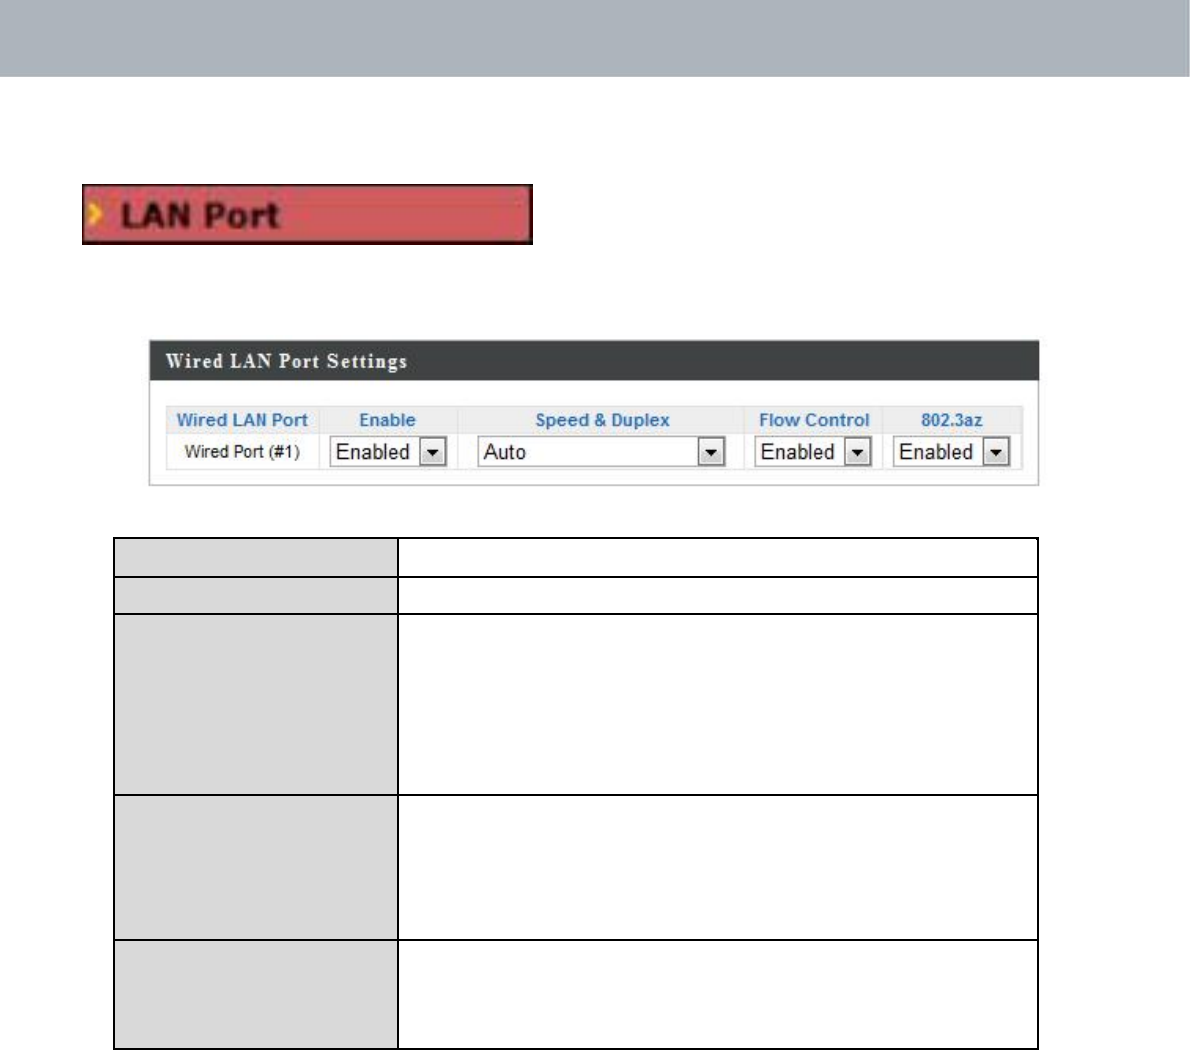
IV‐2‐2. LANPort
The“LANPort”pageallowsyouto
configurethesettingsforyouraccess
point’stwowiredLAN(Ethernet)ports.
WiredLANPortIdentifiesLANport1or2.
EnableEnable/disablespecifiedLANport.
Speed&DuplexSelectaspeed&duplextypeforspecifiedLAN
port,orusethe“Auto”value.LANportscan
operateupto1000Mbpsandfull‐duplex
enablessimultaneousdatapackets
transfer/receive.
FlowControlEnable/disableflowcontrol.Flowcontrolcan
pausenewsessionrequestuntilcurrentdata
processingiscomplete,inordertoavoid
deviceoverloadsunderheavytraffic.
802.3azEnable/disable802.3az.802.3azisanEnergy
EfficientEthernetfeaturewhichdisables
unusedinterfacestoreducepowerusage.
30
APMode
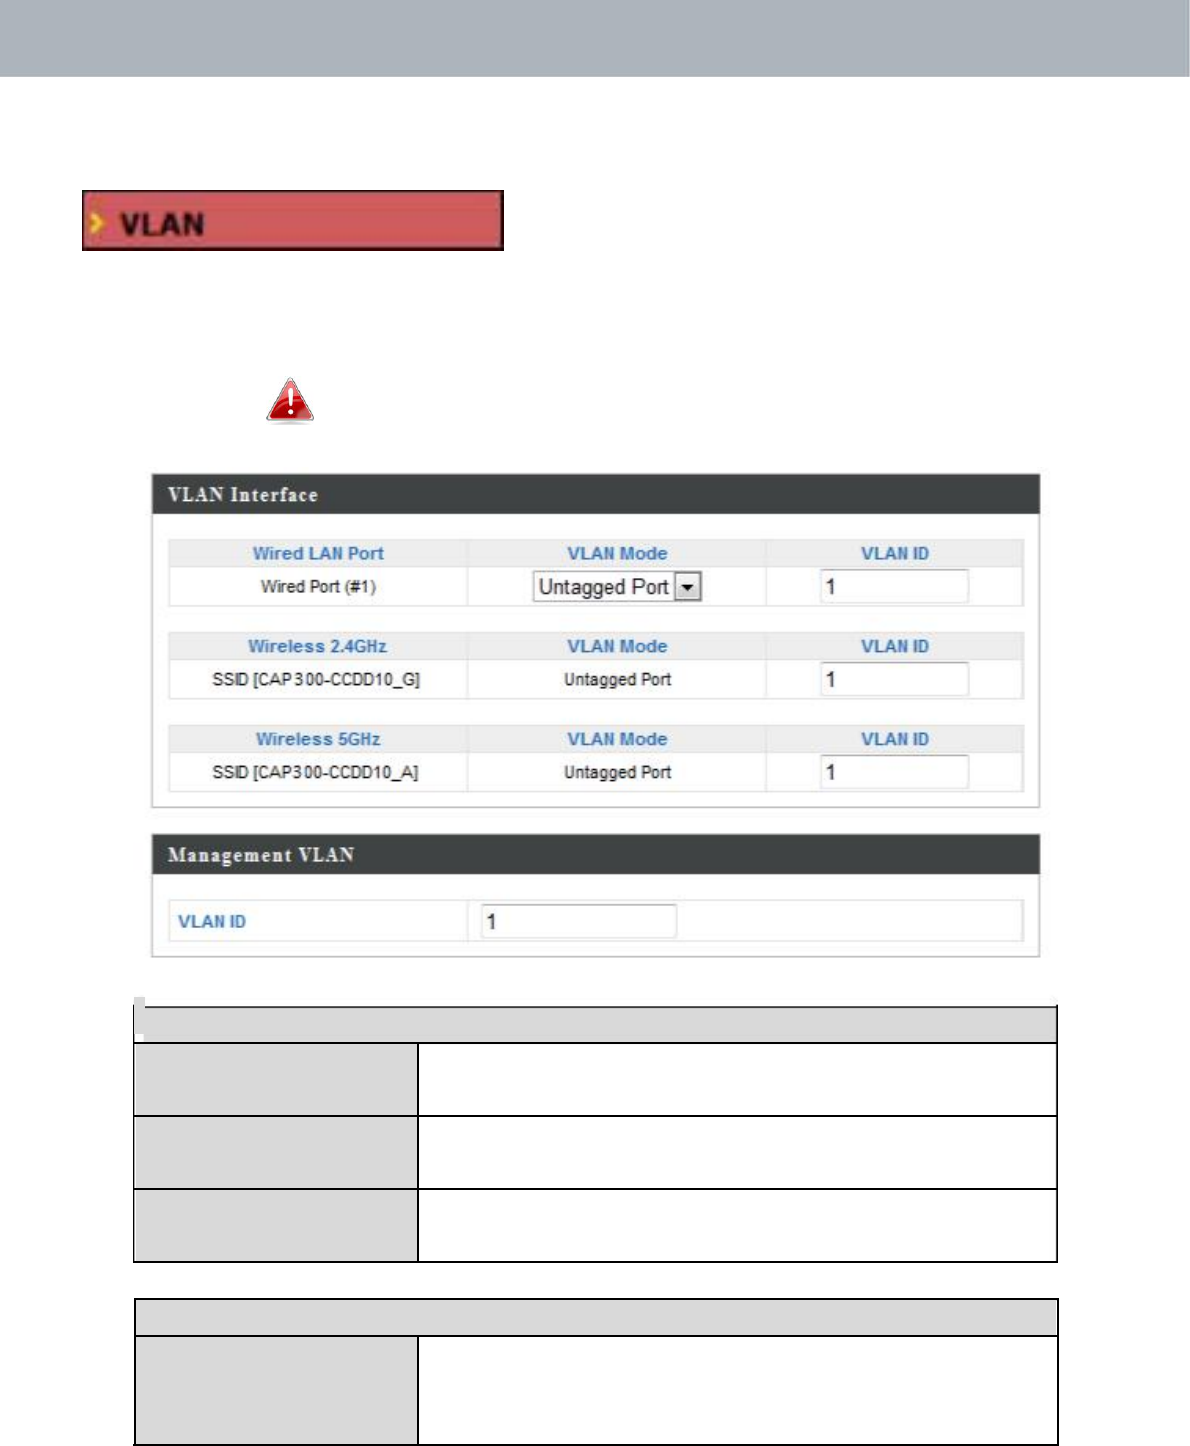
IV‐2‐3. VLAN
The“VLAN”(VirtualLocalAreaNetwork)
enablesyoutoconfigureVLANsettings.A
VLANisalocalareanetworkwhichmaps
workstationsvirtuallyinsteadofphysicallyandallowsyoutogroup
togetherorisolateusersfromeachother.VLANIDs1–4095aresupported.
VLANIDsintherange1–4095aresupported.
VLANInterface
WiredLANIdentifiesLANport1or2andwirelessSSIDs.
Port/Wireless
VLANModeSelect“TaggedPort”or“UntaggedPort”for
specifiedLANinterface.
VLANIDSetaVLANIDforspecifiedinterface,if
“UntaggedPort”isselected.
ManagementVLAN
VLANIDSpecifytheVLANIDofthemanagementVLAN.
OnlythehostsbelongingtothesameVLANcan
managethedevice.
31
APMode
IV‐3. WirelessSettings
Screenshotsdisplayedareexamples.Theinformationshown
onyourscreenwillvarydependingonyourconfiguration.
IV‐3‐1. 2.4GHz11bgn
The“2.4GHz11bgn”menuallowsyoutoview
andconfigureinformationforyouraccess
point’s2.4GHzwirelessnetworkacrossfive
categories:Basic,Advanced,Security,WDS&Schedule.
32
APMode
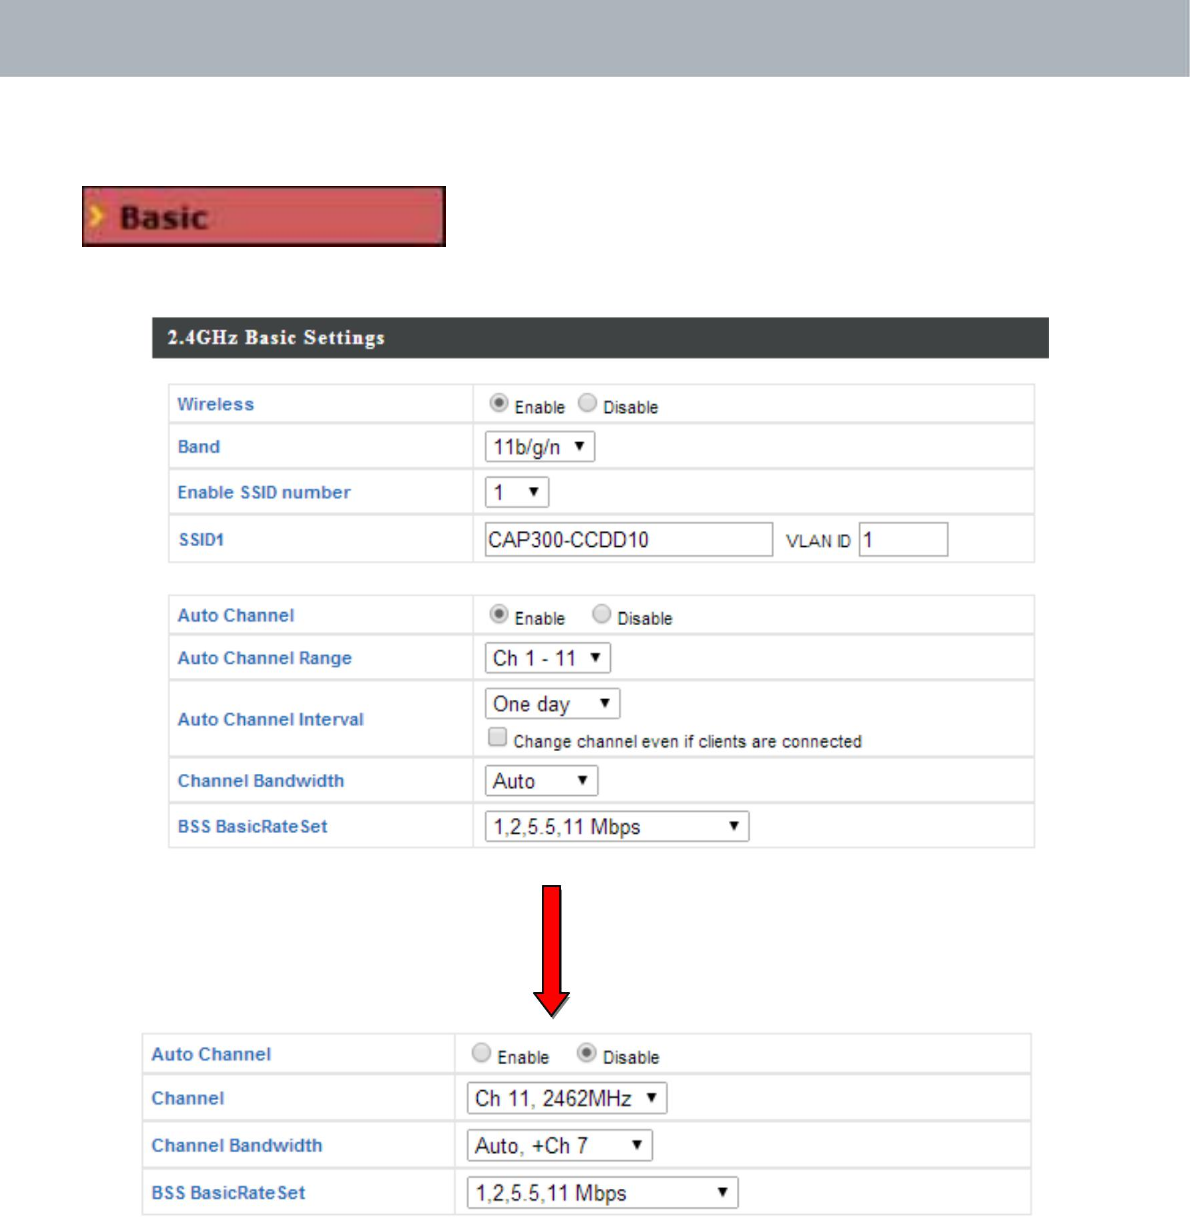
IV‐3‐1‐1. Basic
The“Basic”screendisplaysbasicsettingsfor
youraccesspoint’s2.4GHzWi‐Finetwork(s).
33

APMode
WirelessEnableordisabletheaccesspoint’s2.4GHz
wirelessradio.Whendisabled,no2.4GHz
SSIDswillbeactive.
BandSelectthewirelessstandardusedforthe
accesspoint.Combinationsof802.11b,
802.11g&802.11ncanbeselected.
EnableSSID
NumberSelecthowmanySSIDstoenableforthe
2.4GHzfrequencyfromthedropdownmenu.
Amaximumof16canbeenabled.
SSID# EntertheSSIDnameforthespecifiedSSID(up
to16).TheSSIDcanconsistofany
combinationofupto32alphanumeric
characters.
VLANIDSpecifyaVLANIDforeachSSID.
AutoChannelEnable/disableautochannelselection.Auto
channelselectionwillautomaticallysetthe
wirelesschannelfortheaccesspoint’s2.4GHz
frequencybasedonavailabilityandpotential
interference.Whendisabled,selectachannel
manuallyasshowninthenexttable.
AutoChannelRangeSelectarangefromwhichtheautochannel
setting(above)willchooseachannel.
AutoChannelSpecifyafrequencyforhowoftentheauto
Intervalchannelsettingwillcheck/reassignthe
wirelesschannel.Check/uncheckthe“Change
channelevenifclientsareconnected”box
accordingtoyourpreference.
ChannelBandwidthSetthechannelbandwidth:20MHz(lower
performancebutlessinterference),40MHz
(higherperformancebutpotentiallyhigher
interference)orAuto(automaticallyselect
basedoninterferencelevel).
BSSBasicRateSetSetaBasicServiceSet(BSS)rate:thisisa
seriesofratestocontrolcommunication
framesforwirelessclients.
34

APMode
Whenautochannelisdisabled,selectawirelesschannelmanually:
ChannelSelectawirelesschannelfrom1
–
11.
ChannelBandwidthSetthechannelbandwidth:20MHz(lower
performancebutlessinterference),40MHz
(higherperformancebutpotentiallyhigher
interference)orAuto(automaticallyselect
basedoninterferencelevel).
BSSBasicRateSetSetaBasicServiceSet(BSS)rate:thisisa
seriesofratestocontrolcommunication
framesforwirelessclients.
35
APMode
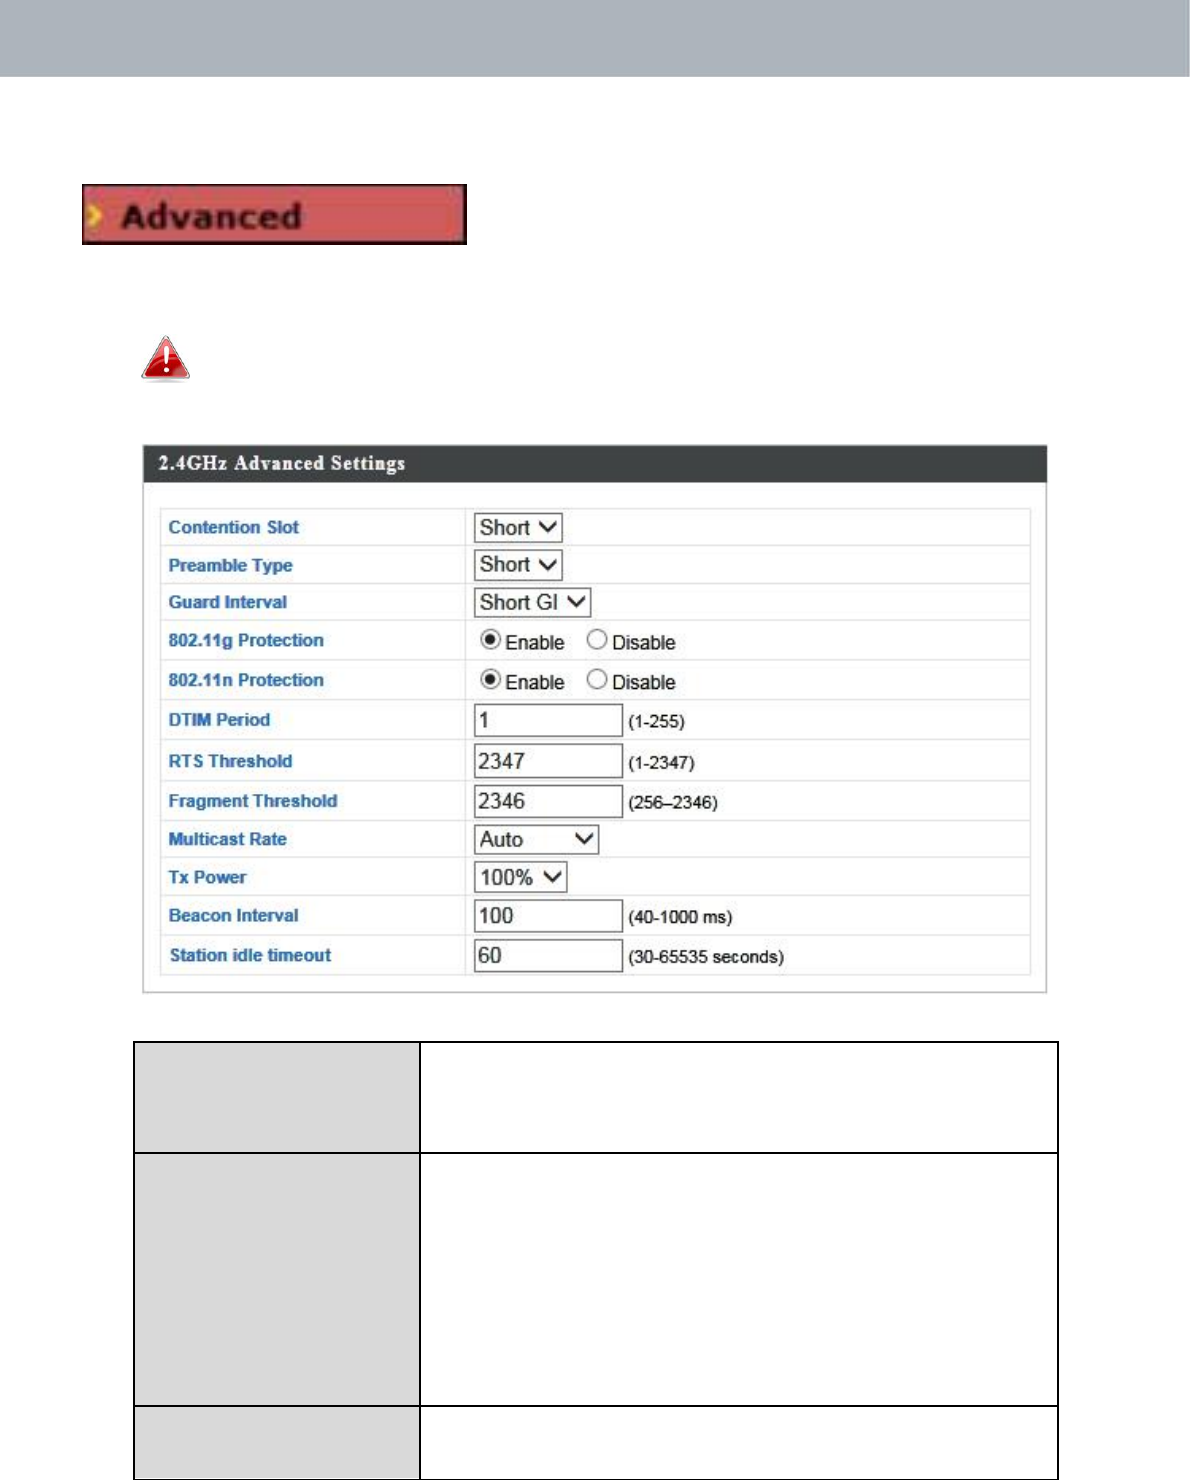
IV‐3‐1‐2. Advanced
Thesesettingsareforexperiencedusersonly.
Pleasedonotchangeanyofthevaluesonthis
pageunlessyouarealreadyfamiliarwiththesefunctions.
Changingthesesettingscanadverselyaffecttheperformanceof
youraccesspoint.
ContentionSlot Select“Short”or“Long”
–
thisvalueisusedfor
contentionwindowsinWMM(seeIV‐3‐6.
WMM).
PreambleTypeSetthewirelessradiopreambletype.The
preambletypein802.11 basedwireless
communicationdefinesthelengthoftheCRC
(CyclicRedundancyCheck)blockfor
communicationbetweentheaccesspointand
roamingwirelessadapters.Thedefaultvalueis
“ShortPreamble”.
GuardIntervalSettheguardinterval.Ashorterintervalcan
improveperformance.
36

APMode
802.11gProtectionEnable/disable802.11gprotection,which
increasesreliabilitybutreducesbandwidth
(clientswillsendRequesttoSend(RTS)to
accesspoint,andaccesspointwillbroadcast
CleartoSend(CTS),beforeapacketissent
fromclient.)
802.11nProtectionEnable/disable802.11nprotection,which
increasesreliabilitybutreducesbandwidth
(clientswillsendRequesttoSend(RTS)to
accesspoint,andaccesspointwillbroadcast
CleartoSend(CTS),beforeapacketissent
fromclient.)
DTIMPeriodSettheDTIM(deliverytrafficindication
message)periodvalueofthewirelessradio.
Thedefaultvalueis1.
RTSThresholdSettheRTSthresholdofthewirelessradio.The
defaultvalueis2347.
FragmentSetthefragmentthresholdofthewireless
Thresholdradio.Thedefaultvalueis2346.
MulticastRateSetthetransferrateformulticastpacketsor
usethe“Auto”setting.
TxPowerSetthepoweroutputofthewirelessradio.You
maynotrequire100%outputpower.Settinga
lowerpoweroutputcanenhancesecuritysince
potentiallymalicious/unknownusersindistant
areaswillnotbeabletoaccessyoursignal.
BeaconInterval Setthebeaconintervalofthewirelessradio.
Thedefaultvalueis100.
StationidleSettheintervalforkeepalivemessagesfrom
timeouttheaccesspointtoawirelessclienttoverifyif
thestationisstillalive/active.
37
APMode
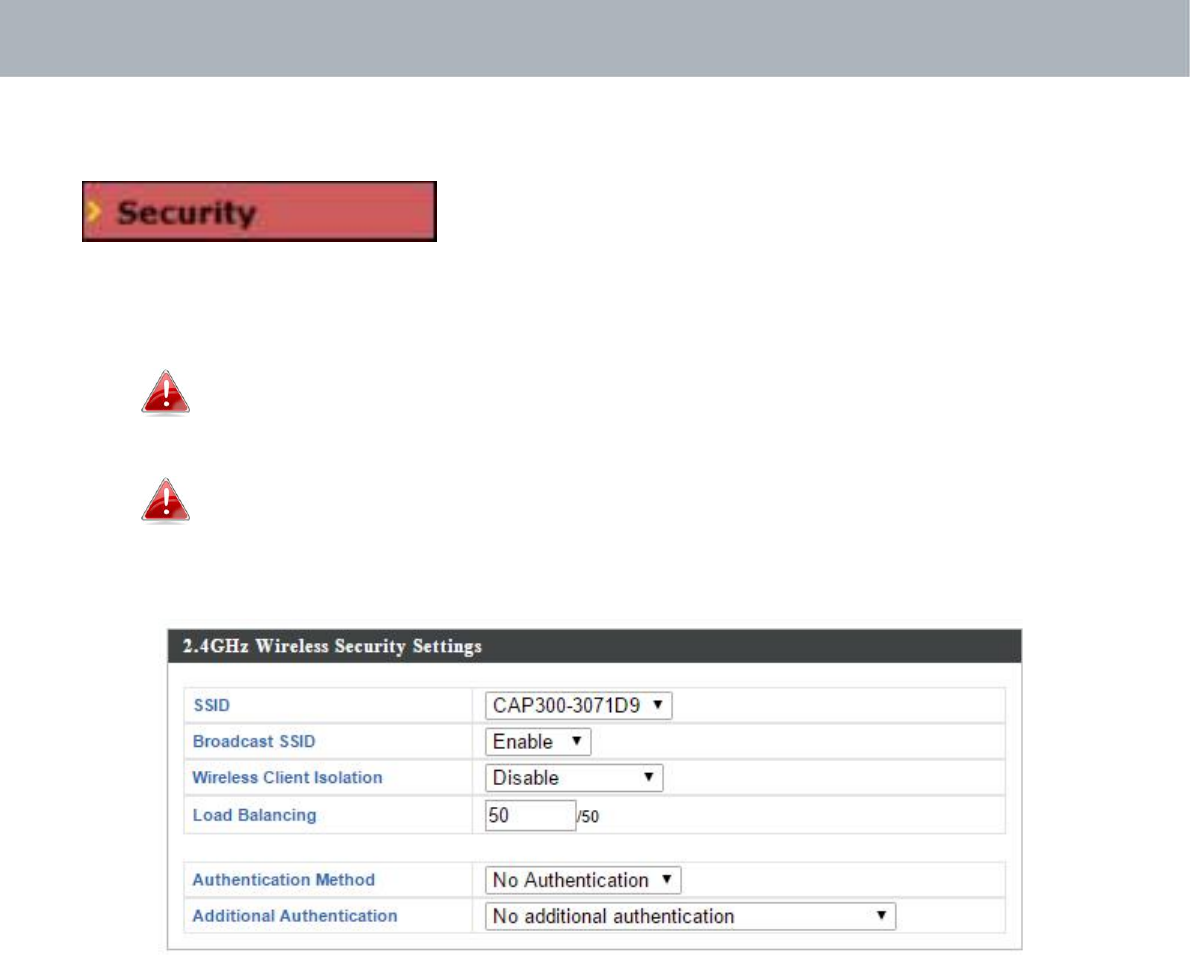
IV‐3‐1‐3. Security
Theaccesspointprovidesvarioussecurity
options(wirelessdataencryption).Whendatais
encrypted,informationtransmittedwirelesslycannotbereadbyanyone
whodoesnotknowthecorrectencryptionkey.
It’sessentialtoconfigurewirelesssecurityinordertoprevent
unauthorisedaccesstoyournetwork.
Selecthard‐to‐guesspasswordswhichincludecombinationsof
numbers,lettersandsymbols,andchangeyourpassword
regularly.
38

APMode
SSIDSelectionSelectwhichSSIDtoconfiguresecuritysettings
for.
BroadcastSSIDEnableordisableSSIDbroadcast.When
enabled,theSSIDwillbevisibletoclientsasan
availableWi‐Finetwork.Whendisabled,the
SSIDwillnotbevisibleasanavailableWi‐Fi
networktoclients
–
clientsmustmanually
entertheSSIDinordertoconnect.Ahidden
(disabled)SSIDistypicallymoresecurethana
visible(enabled)SSID.
WirelessClientEnableordisablewirelessclientisolation.
IsolationWirelessclientisolationpreventsclients
connectedtotheaccesspointfrom
communicatingwitheachotherandimproves
security.Typically,thisfunctionisusefulfor
corporateenvironmentsorpublichotspots
andcanpreventbruteforceattacksonclients’
usernamesandpasswords.
LoadBalancingLoadbalancinglimitsthenumberofwireless
clientsconnectedtoanSSID.Setaload
balancingvalue(maximum50).
AuthenticationSelectanauthenticationmethodfromthedrop
Methoddownmenuandrefertotheinformation
belowappropriateforyourmethod.
AdditionalSelectanadditionalauthenticationmethod
Authenticationfromthedropdownmenuandrefertothe
informationbelow(IV‐3‐1‐3‐6.)appropriatefor
yourmethod.
IV‐3‐1‐3‐1.NoAuthentication
Authenticationisdisabledandnopassword/keyisrequiredtoconnectto
theaccesspoint.
Disablingwirelessauthenticationisnotrecommended.When
disabled,anybodywithinrangecanconnecttoyourdevice’sSSID.
39

APMode
IV‐3‐1‐3‐2.WEP
WEP(WiredEquivalentPrivacy)isabasicencryptiontype.Fora
higherlevelofsecurityconsiderusingWPAencryption.
KeyLengthSelect64‐bitor128‐bit.128‐bitismoresecure
than64‐bitandisrecommended.
KeyTypeChoosefrom“ASCII”(anyalphanumerical
character0‐9,a‐zandA‐Z)or“Hex”(any
charactersfrom0‐9,a‐fandA‐F).
DefaultKeySelectwhichencryptionkey(1
–
4below)isthe
defaultkey.Forsecuritypurposes,youcanset
uptofourkeys(below)andchangewhichis
thedefaultkey.
EncryptionKey1
–
Enteryourencryptionkey/passwordaccording
4totheformatyouselectedabove.
IV‐3‐1‐3‐3.IEEE802.1x/EAP
KeyLengthSelect64‐bitor128‐bit.128‐bitismoresecure
than64‐bitandisrecommended.
IV‐3‐1‐3‐4.WPA‐PSK
WPA‐PSKisasecurewirelessencryptiontypewithstrongdata
protectionanduserauthentication,utilizing128‐bitencryptionkeys.
WPAType SelectfromWPA/WPA2MixedMode‐PSK,
WPA2orWPAonly.WPA2issaferthanWPA
only,butnotsupportedbyallwirelessclients.
Pleasemakesureyourwirelessclientsupports
yourselection.
Encryption Select“TKIP/AESMixedMode”or“AES”
encryptiontype.
KeyRenewal Specifyafrequencyforkeyrenewalin
Interval minutes.
Pre‐SharedKey Choosefrom“Passphrase”(8
–
63
Type alphanumericcharacters)or“Hex”(upto64
40
APMode
charactersfrom0‐9,a‐fandA‐F).
Pre‐SharedKeyPleaseenterasecuritykey/passwordaccording
totheformatyouselectedabove.
IV‐3‐1‐3‐5.WPA‐EAP
WPATypeSelectfromWPA/WPA2MixedMode‐EAP,
WPA2‐EAPorWPA‐EAP.
EncryptionTypeSelect“TKIP/AESMixedMode”or“AES”
encryptiontype.
KeyRenewalSpecifyafrequencyforkeyrenewalin
Intervalminutes.
WPA‐EAPmustbedisabledtouseMAC‐RADIUSauthentication.
IV‐3‐1‐3‐6.AdditionalAuthentication
Additionalwirelessauthenticationmethodscanalsobeused:
WPSmustbedisabledtouseadditionalauthentication.SeeIV‐3‐3.
forWPSsettings.
MACAddressFilter
RestrictwirelessclientsaccessbasedonMACaddressspecifiedinthe
MACfiltertable.
SeeIV‐3‐5.MACFiltertoconfigureMACfiltering.
MACFilter&MAC‐RADIUSAuthentication
RestrictwirelessclientsaccessusingbothoftheaboveMACfiltering
&RADIUSauthenticationmethods.
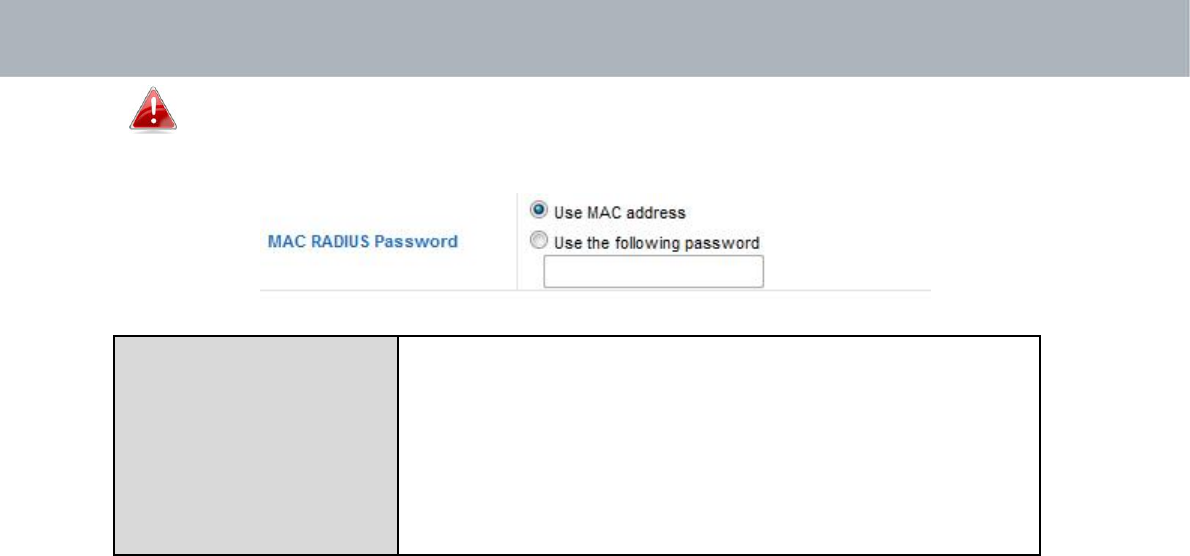
MAC‐RADIUSAuthentication
RestrictwirelessclientsaccessbasedonMACaddressviaaRADIUSserver,
orpasswordauthenticationviaaRADIUSserver.
SeeIV‐3‐4.RADIUStoconfigureRADIUSservers.
41
APMode
WPSmustbedisabledtouseMAC‐RADIUSauthentication.See
IV‐3‐3.forWPSsettings.
MACRADIUSSelectwhethertouseMACaddressor
PasswordpasswordauthenticationviaRADIUSserver.If
youselect“Usethefollowingpassword”,enter
thepasswordinthefieldbelow.Thepassword
shouldmatchthe“SharedSecret”usedin
IV‐3‐4.RADIUS.
42
APMode
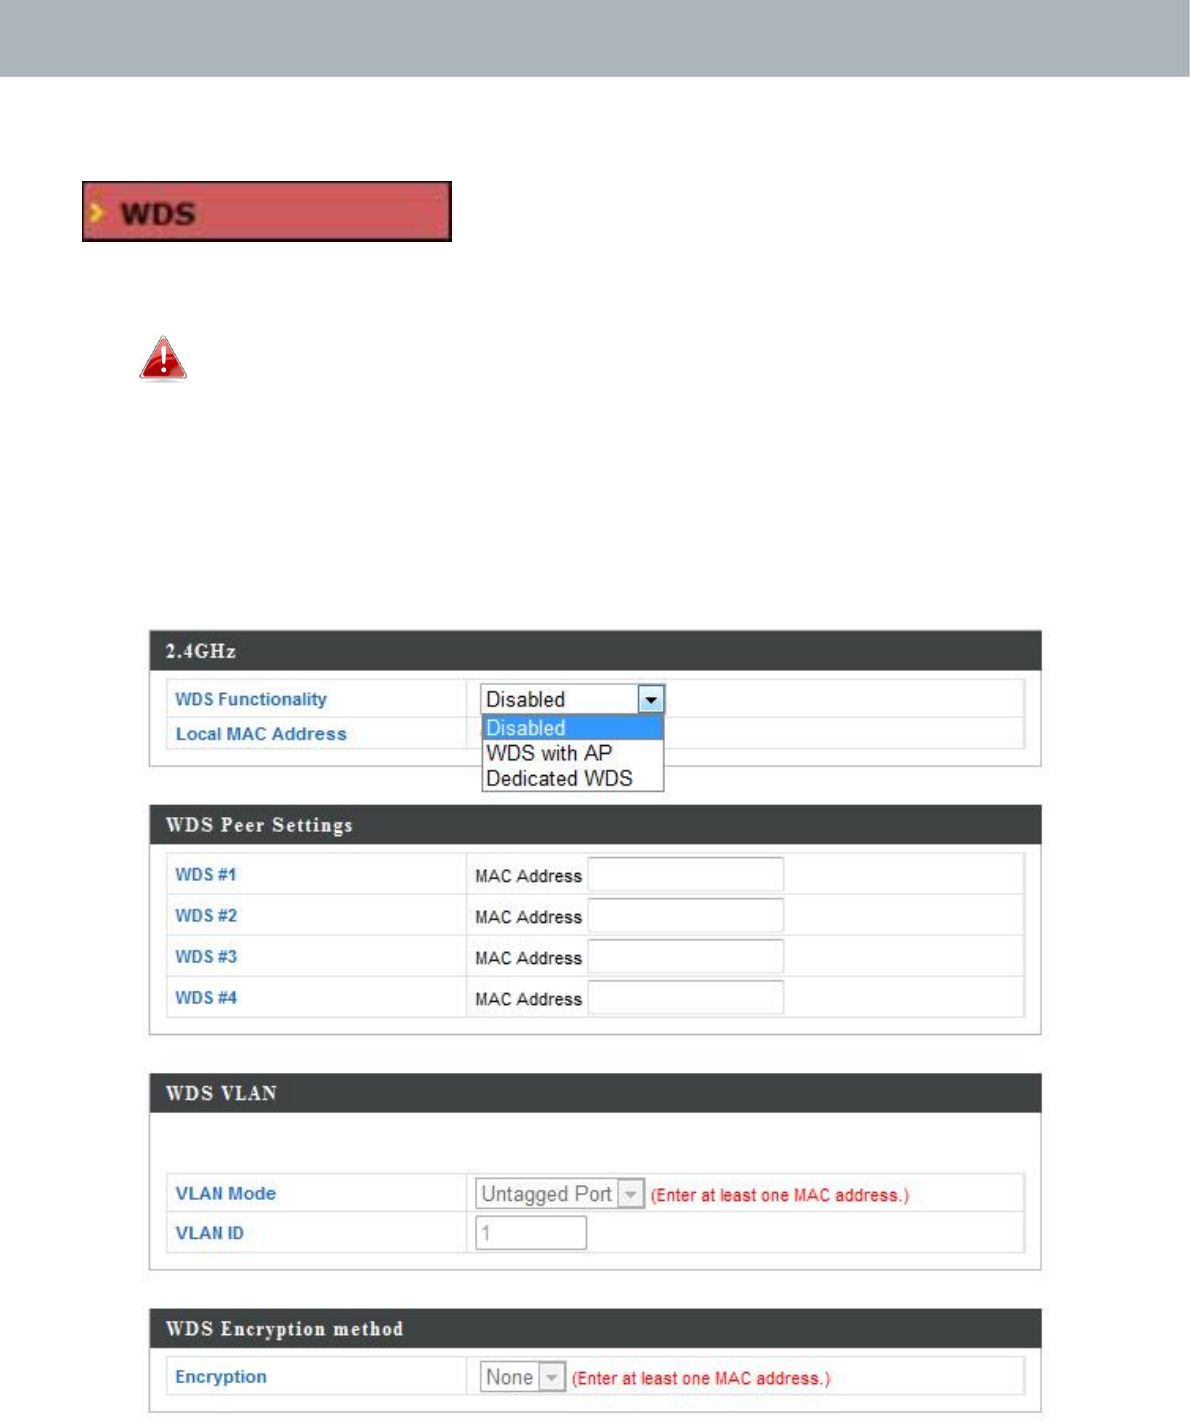
IV‐3‐1‐4. WDS
WirelessDistributionSystem(WDS)can
bridge/repeataccesspointstogetherinan
extendednetwork.WDSsettingscanbeconfiguredasshownbelow.
WhenusingWDS,configuretheIPaddressofeachaccesspoint
tobeinthesamesubnetandensurethereisonlyoneactive
DHCPserveramongconnectedaccesspoints,preferablyonthe
WANside.
WDSmustbeconfiguredoneachaccesspoint,usingcorrectMACaddresses.
Allaccesspointsshouldusethesamewirelesschannelandencryption
method.
43

APMode
2.4GHz
WDSFunctionalitySelect“WDSwithAP”touseWDSwithaccess
pointor“WDSDedicatedMode”touseWDS
andalsoblockcommunicationwithregular
wirelessclients.WhenWDSisused,each
accesspointshouldbeconfiguredwith
correspondingMACaddresses,wireless
channelandwirelessencryptionmethod.
LocalMACAddressDisplaystheMACaddressofyouraccesspoint.
WDSPeerSettings
WDS#Enter theMACaddressforuptofourother
WDSdevicesyouwishtoconnect.
WDSVLAN
VLANModeSpecifytheWDSVLANmodeto“Untagged
Port”or“TaggedPort”.
VLANIDSpecifytheWDSVLANIDwhen“Untagged
Port”isselectedabove.
WDSEncryptionmethod
EncryptionSelectwhethertouse“None”or“AES”encryptionand
enterapre‐sharedkeyforAESconsistingof8‐
63alphanumericcharacters.
44
APMode
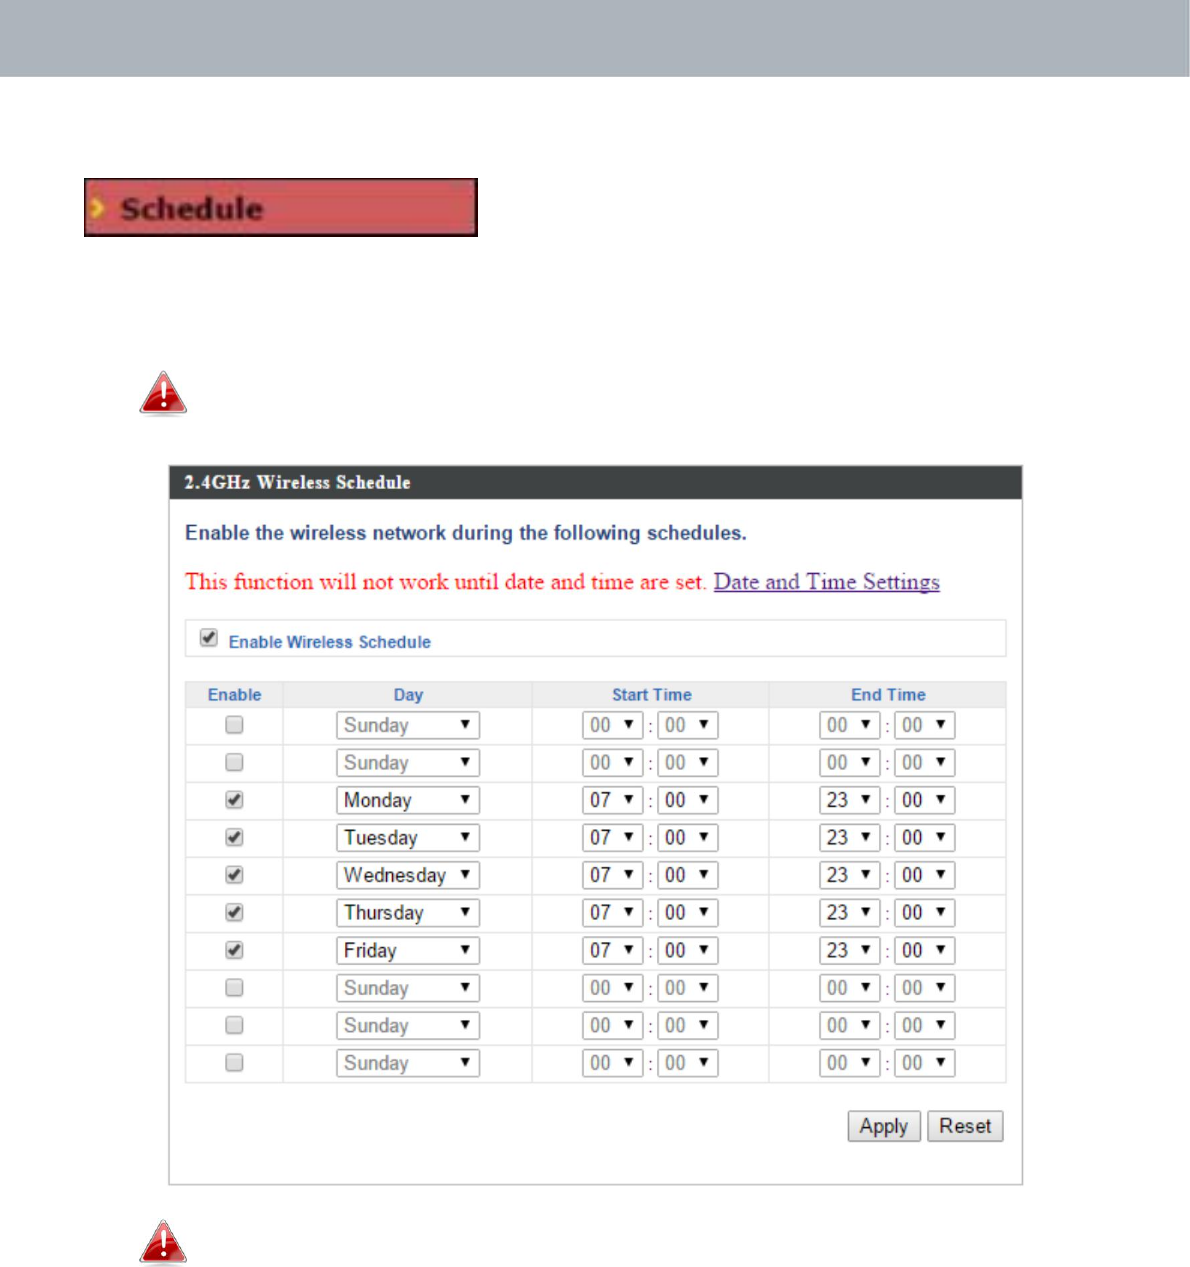
IV‐3‐1‐5.Schedule
Theschedulefeatureallowsyoutoautomate
thewirelessnetworkforspecifiedtimes.
Check/uncheckthebox“EnableWirelessSchedule”toenable/disable
thewirelessschedulingfunction.
Theaccesspoint’stimeanddatesettingsmustbesetinorder
tousethisfunction.
Wirelessschedulingcansaveenergyandincreasethesecurityof
yournetwork.
1.Usethe“Enable”checkboxestoselectschedule(s).
2.Specifyaday,starttimeandendtimeforthescheduleusingthedrop‐
downmenus.
3.Click“Apply”tosavetheschedulesor“Reset”toresetallvaluesbacktodefault.
45
APMode
IV‐3‐2.WPS
Wi‐FiProtectedSetupisasimpleway
toestablishconnectionsbetweenWPS
compatibledevices.WPScanbeactivatedoncompatibledevicesbypushing
aWPSbuttononthedeviceorfromwithinthedevice’s
firmware/configurationinterface(knownasPBCor“PushButton
Configuration”).WhenWPSisactivatedinthecorrectmannerandatthe
correcttimefortwocompatibledevices,theywillautomaticallyconnect.
“PINcodeWPS”isavariationofPBCwhichincludestheadditionaluseofa
PINcodebetweenthetwodevicesforverification.
Pleaserefertomanufacturer’sinstructionsforyourotherWPS
device.
46

APMode
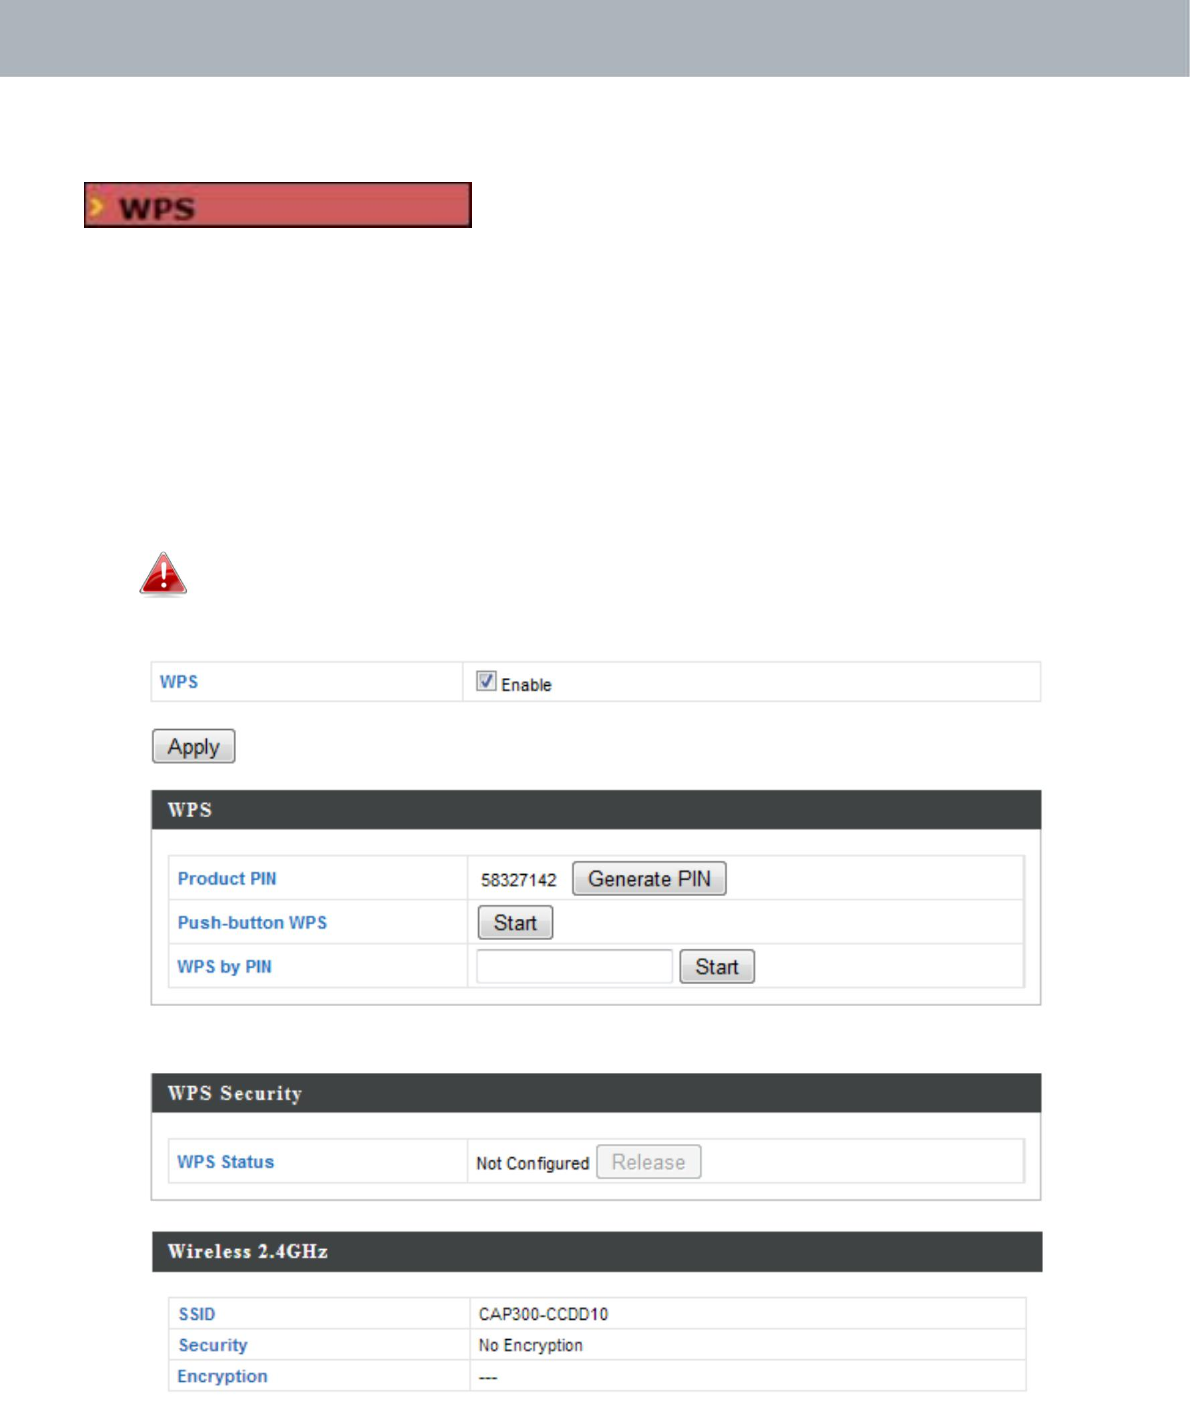
WPSCheck/uncheckthisboxtoenable/disableWPS
functionality.WPSmustbedisabledwhen
usingMAC‐RADIUSauthentication(see
IV‐3‐1‐3‐6&IV‐3‐4).
WPS
ProductPINDisplaystheWPSPINcodeofthedevice,used
forPINcodeWPS.Youwillberequiredtoenter
thisPINcodeintoanotherWPSdeviceforPIN
codeWPS.Click“GeneratePIN”togeneratea
newWPSPINcode.
Push‐ButtonWPS Click“Start”toactivateWPSontheaccess
pointforapproximately2minutes.Thishasthe
sameeffectasphysicallypushingtheaccess
point’sWPSbutton.
WPSbyPINEnterthePINcodeofanotherWPSdeviceand
click“Start”toattempttoestablishaWPS
connectionforapproximately2minutes.
WPSSecurity
WPSStatusWPSsecuritystatusisdisplayedhere.Click
“Release”tocleartheexistingstatus.
Wireless2.4GHz
SSIDDisplaystheSSIDname(s)forthespecified
frequency.
SecurityDisplaysthesecurityforthespecifiedSSID.
EncryptionDisplaystheencryptiontypeforthespecified
SSID.SeeIV‐3.WirelessSettings
47
APMode
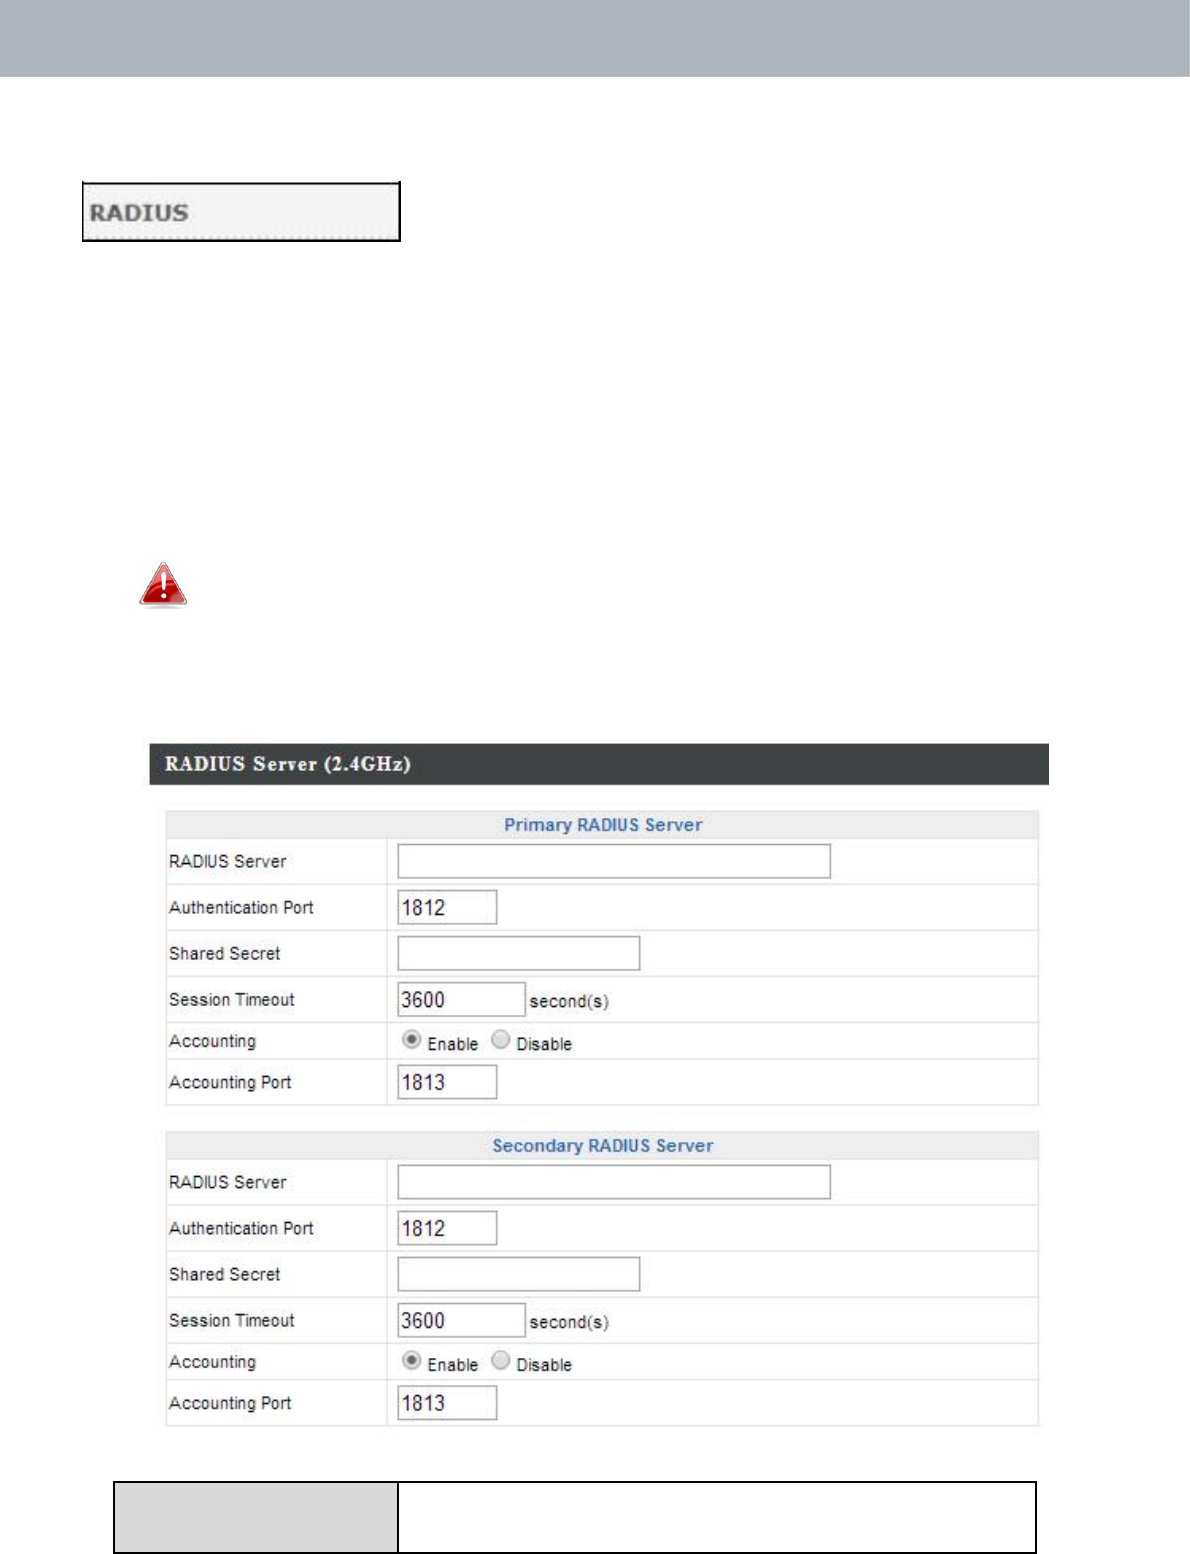
IV‐3‐3. RADIUS
TheRADIUSmenuallowsyoutoconfigurethe
accesspoint’sexternalRADIUSserversettings.
ARADIUSserverprovidesuser‐basedauthenticationtoimprovesecurity
andofferwirelessclientcontrol–userscanbeauthenticatedbeforegaining
accesstoanetwork.
Theaccesspointcanutilizebothaprimaryandsecondary(backup)
externalRADIUSserver.
TouseRADIUSservers,goto“WirelessSettings”
“Security”and
select“MACRADIUSAuthentication”
“AdditionalAuthentication”
andselect“MACRADIUSAuthentication”(seeIV‐3‐1‐3.&IV‐3‐2‐3).
RADIUSServer EntertheRADIUSserverhostIPaddress.
48

APMode
AuthenticationSettheUDPportusedintheauthentication
PortprotocoloftheRADIUSserver.Valuemustbe
between1
–
65535.
SharedSecretEnterasharedsecret/passwordbetween1
–
99charactersinlength.Thisshouldmatchthe
“MAC‐RADIUS”passwordusedinIV‐3‐1‐3‐6or
IV‐3‐2‐3.
SessionTimeoutSetadurationofsessiontimeoutinseconds
between0
–
86400.
AccountingEnableordisableRADIUSaccounting.
AccountingPortWhenaccountingisenabled(above),setthe
UDPportusedintheaccountingprotocolof
theRADIUSserver.Valuemustbebetween1
–
65535.
49

APMode
IV‐3‐3‐1. RADIUSSettings
ConfiguretheRADIUSserversettingsfor
2.4GHz.Eachfrequencycanuseaninternalor
externalRADIUSserver.
RADIUSType Select“Internal”tousetheaccesspoint’s
built‐inRADIUSserveror“external”tousean
externalRADIUSserver.
RADIUSServer EntertheRADIUSserverhostIPaddress.
Authentication SettheUDPportusedintheauthentication
Port protocoloftheRADIUSserver.Valuemustbe
between1
–
65535.
50
APMode
SharedSecretEnterasharedsecret/passwordbetween1
–
99charactersinlength.Thisshouldmatchthe
“MAC‐RADIUS”passwordusedinIV‐3‐1‐3‐6or
IV‐3‐2‐3.
SessionTimeoutSetadurationofsessiontimeoutinseconds
between0
–
86400.
AccountingEnableordisableRADIUSaccounting.
AccountingPortWhenaccountingisenabled(above),setthe
UDPportusedintheaccountingprotocolof
theRADIUSserver.Valuemustbebetween1
–
65535.
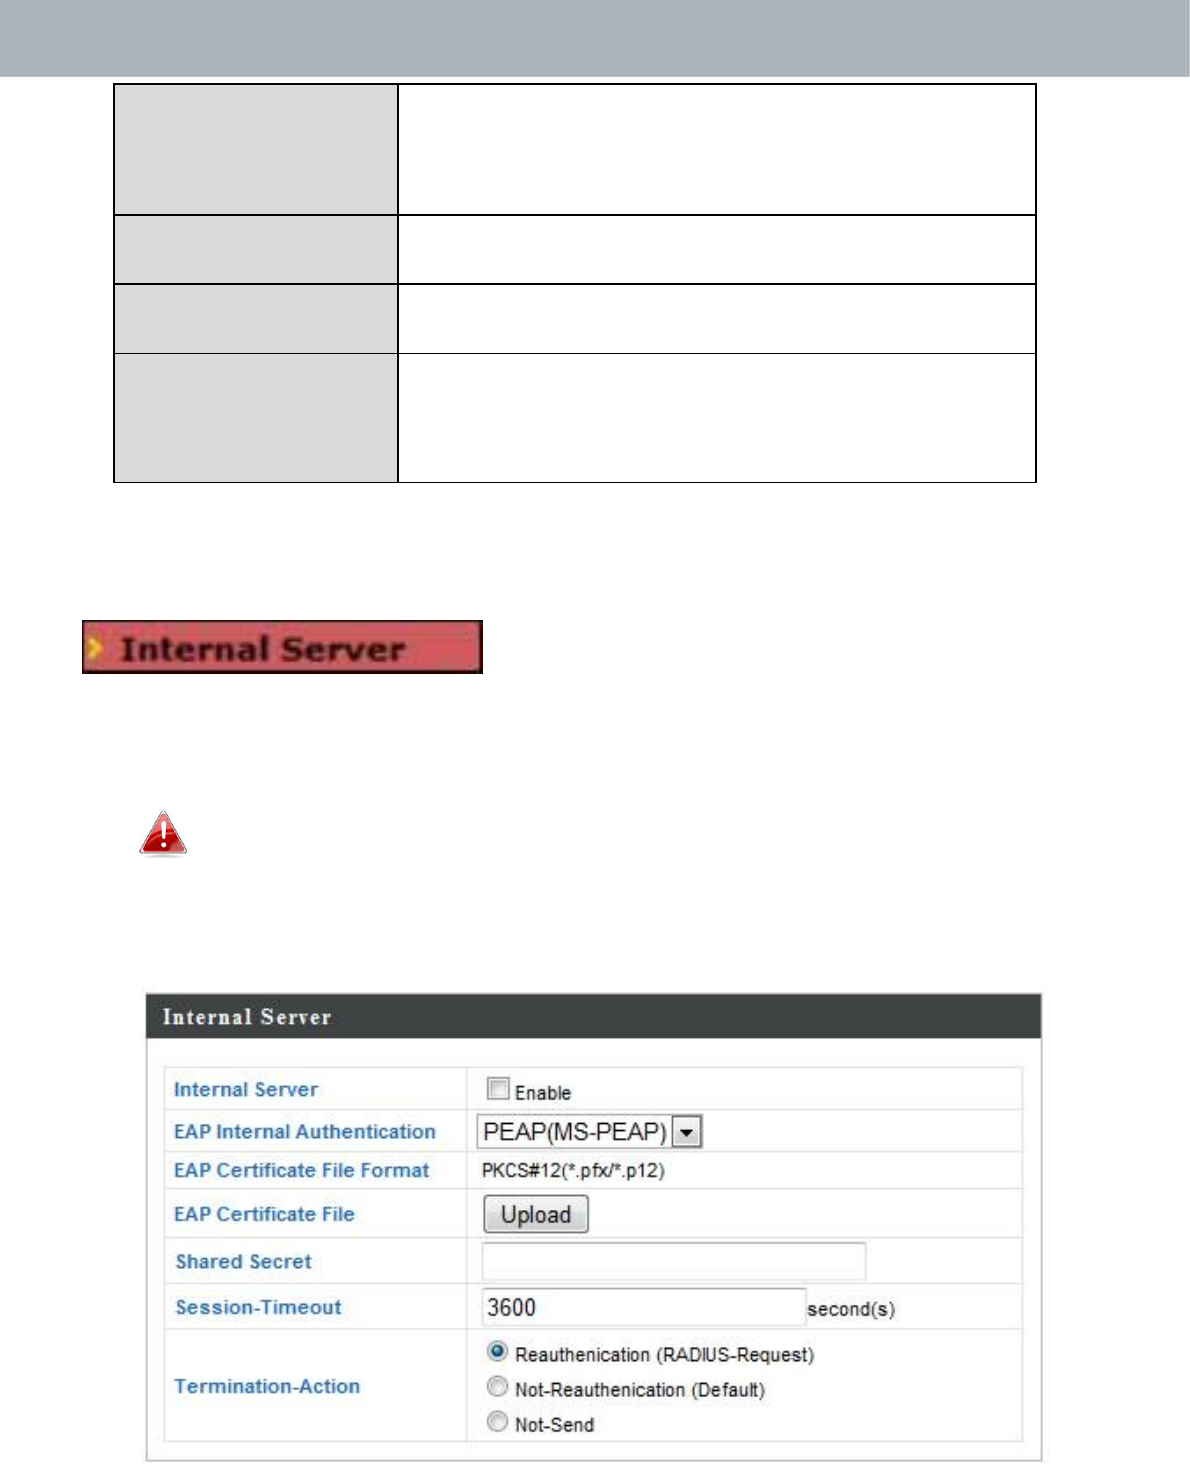
IV‐3‐3‐2. InternalServer
Theaccesspointfeaturesabuilt‐inRADIUS
serverwhichcanbeconfiguredasshown
belowusedwhen“Internal”isselectedfor“RADIUSType”inthe
“WirelessSettings”“RADIUS”“RADIUSSettings”menu.
TouseRADIUSservers,goto“WirelessSettings”
“Security”and
select“MACRADIUSAuthentication”
“AdditionalAuthentication”
andselect“MACRADIUSAuthentication”(seeIV‐3‐1‐3.&IV‐3‐2‐3).
51

APMode
InternalServerCheck/unchecktoenable/disabletheaccess
point’sinternalRADIUSserver.
EAPInternalSelectEAPinternalauthenticationtypefrom
Authenticationthedropdownmenu.
EAPCertificateFileDisplaystheEAPcertificatefileformat:
FormatPCK#12(*.pfx/*.p12)
EAPCertificateFileClick“Upload”toopenanewwindowand
selectthelocationofanEAPcertificatefileto
use.Ifnocertificatefileisuploaded,the
internalRADIUSserverwilluseaself‐made
certificate.
SharedSecretEnterasharedsecret/passwordforuse
betweentheinternalRADIUSserverand
RADIUSclient.Thesharedsecretshouldbe1
–
99charactersinlength.Thisshouldmatchthe
“MAC‐RADIUS”passwordusedinIV‐3‐1‐3‐6or
IV‐3‐2‐3.
SessionTimeout Setadurationofsessiontimeoutinseconds
between0
–
86400.
TerminationActionSelectatermination‐actionattribute:
“Reauthentication”sendsaRADIUSrequestto
theaccesspoint,“Not‐Reathentication”sends
adefaulttermination‐actionattributetothe
accesspoint,“Not‐Send”no
termination‐actionattributeissenttothe
accesspoint.
52
APMode
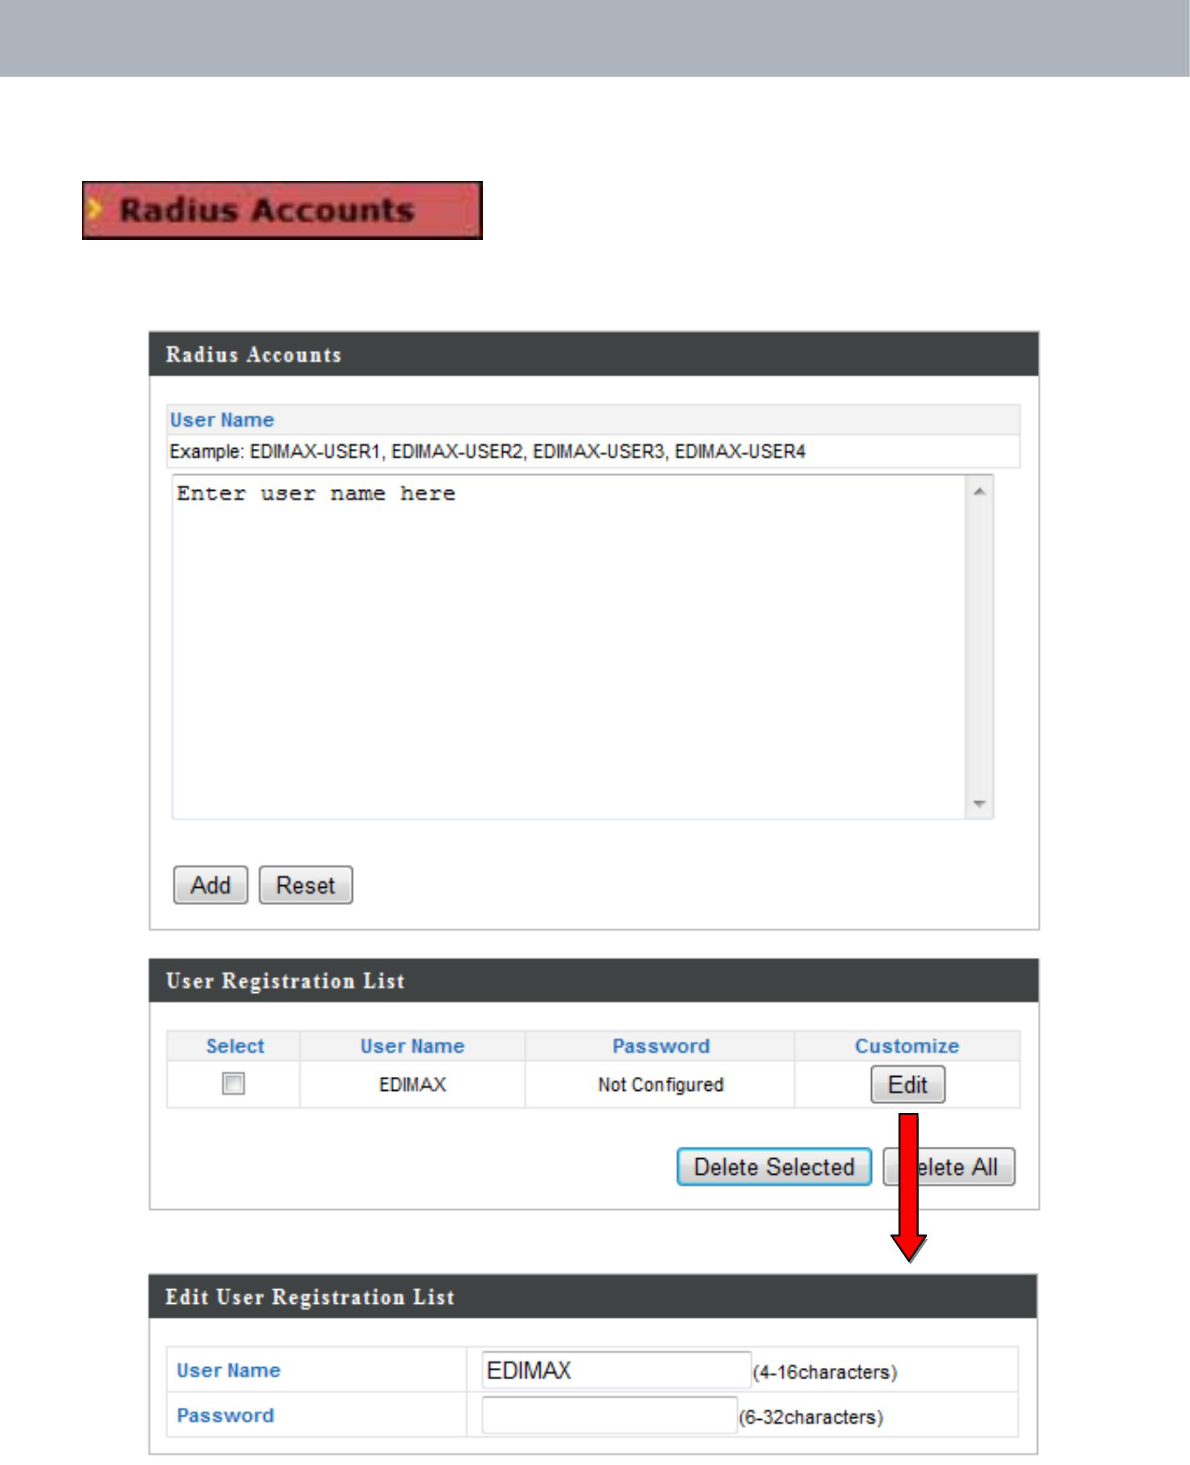
IV‐3‐3‐3. RADIUSAccounts
TheinternalRADIUSservercanauthenticate
upto256useraccounts.The“RADIUS
Accounts”pageallowsyoutoconfigureandmanageusers.
53

APMode
UserNameEntertheusernameshere,separatedby
commas.
AddClick“Add”toaddtheusertotheuser
registrationlist.
ResetCleartextfromtheusernamebox.
SelectChecktheboxtoselectauser.
UserNameDisplaystheusername.
PasswordDisplaysifspecifiedusernamehasapassword
(configured)ornot(notconfigured).
CustomizeClick“Edit”toopenanewfieldtoset/edita
passwordforthespecifiedusername(below).
DeleteSelected Deleteselecteduserfromtheuserregistration
list.
DeleteAllDeleteallusersfromtheuserregistrationlist.
EditUserRegistrationList
UserNameExistingusernameisdisplayedhereandcan
beeditedaccordingtoyourpreference.
PasswordEnteroreditapasswordforthespecifieduser.
54
APMode
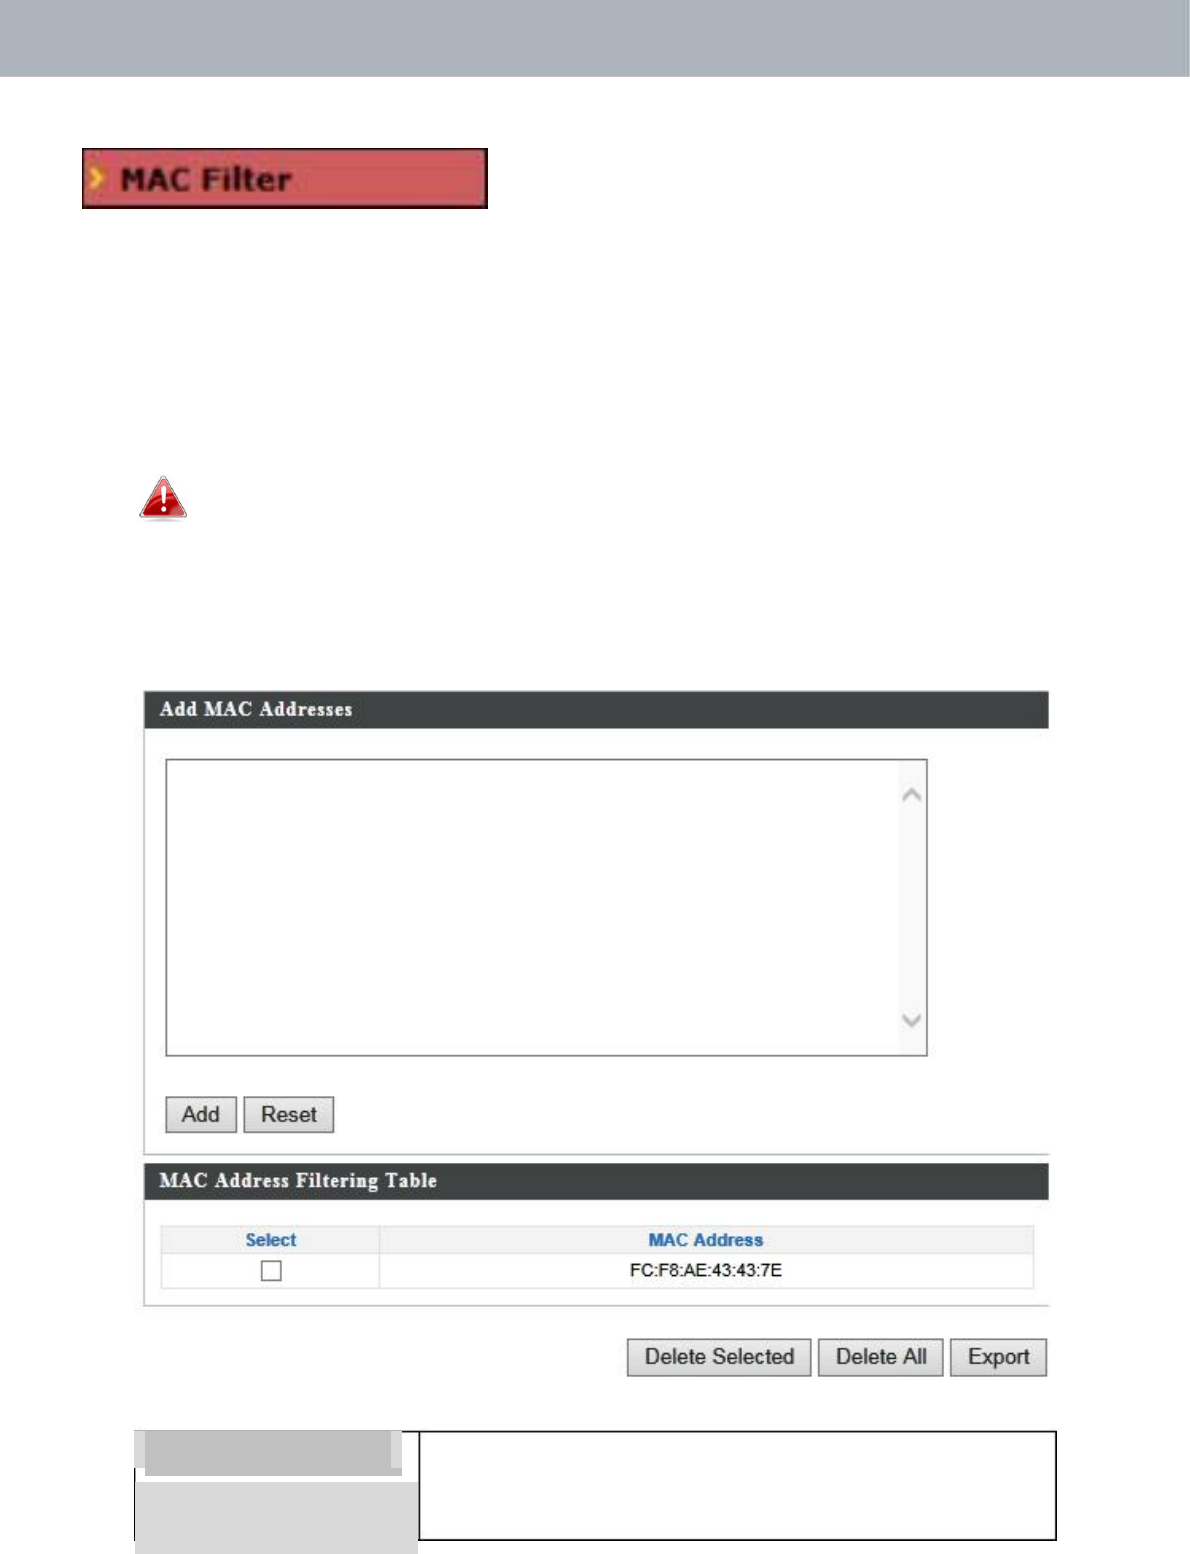
IV‐3‐4. MACFilter
Macfilteringisasecurityfeaturethatcan
helptopreventunauthorizedusersfrom
connectingtoyouraccesspoint.
Thisfunctionallowsyoutodefinealistofnetworkdevicespermittedto
connecttotheaccesspoint.Devicesareeachidentifiedbytheirunique
MACaddress.IfadevicewhichisnotonthelistofpermittedMAC
addressesattemptstoconnecttotheaccesspoint,itwillbedenied.
ToenableMACfiltering,goto“WirelessSettings”
“2.4G
Hz11bgn”
“Security”
“AdditionalAuthentication”andselect“MAC
Filter”(seeIV‐3‐1‐3).
TheMACaddressfilteringtableisdisplayedbelow:
AddMACAddressEnteraMACaddressofcomputerornetwork
devicemanuallye.g.‘aa‐bb‐cc‐dd‐ee‐ff’or
entermultipleMACaddressesseparatedwith
55

APMode
commas,e.g.
‘aa‐bb‐cc‐dd‐ee‐ff,aa‐bb‐cc‐dd‐ee‐gg’
AddClick“Add”toaddtheMACaddresstothe
MACaddressfilteringtable.
ResetClearallfields.
MACaddressentrieswillbelistedinthe“MACAddressFilteringTable”.
Selectanentryusingthe“Select”checkbox.
SelectDeleteselectedorallentriesfromthetable.
MACAddressTheMACaddressislistedhere.
DeleteSelectedDeletetheselectedMACaddressfromthe
list.
DeleteAllDeleteallentriesfromtheMACaddress
filteringtable.
ExportClick“Export”tosaveacopyoftheMAC
filteringtable.Anewwindowwillpopupfor
youtoselectalocationtosavethefile.
56
APMode
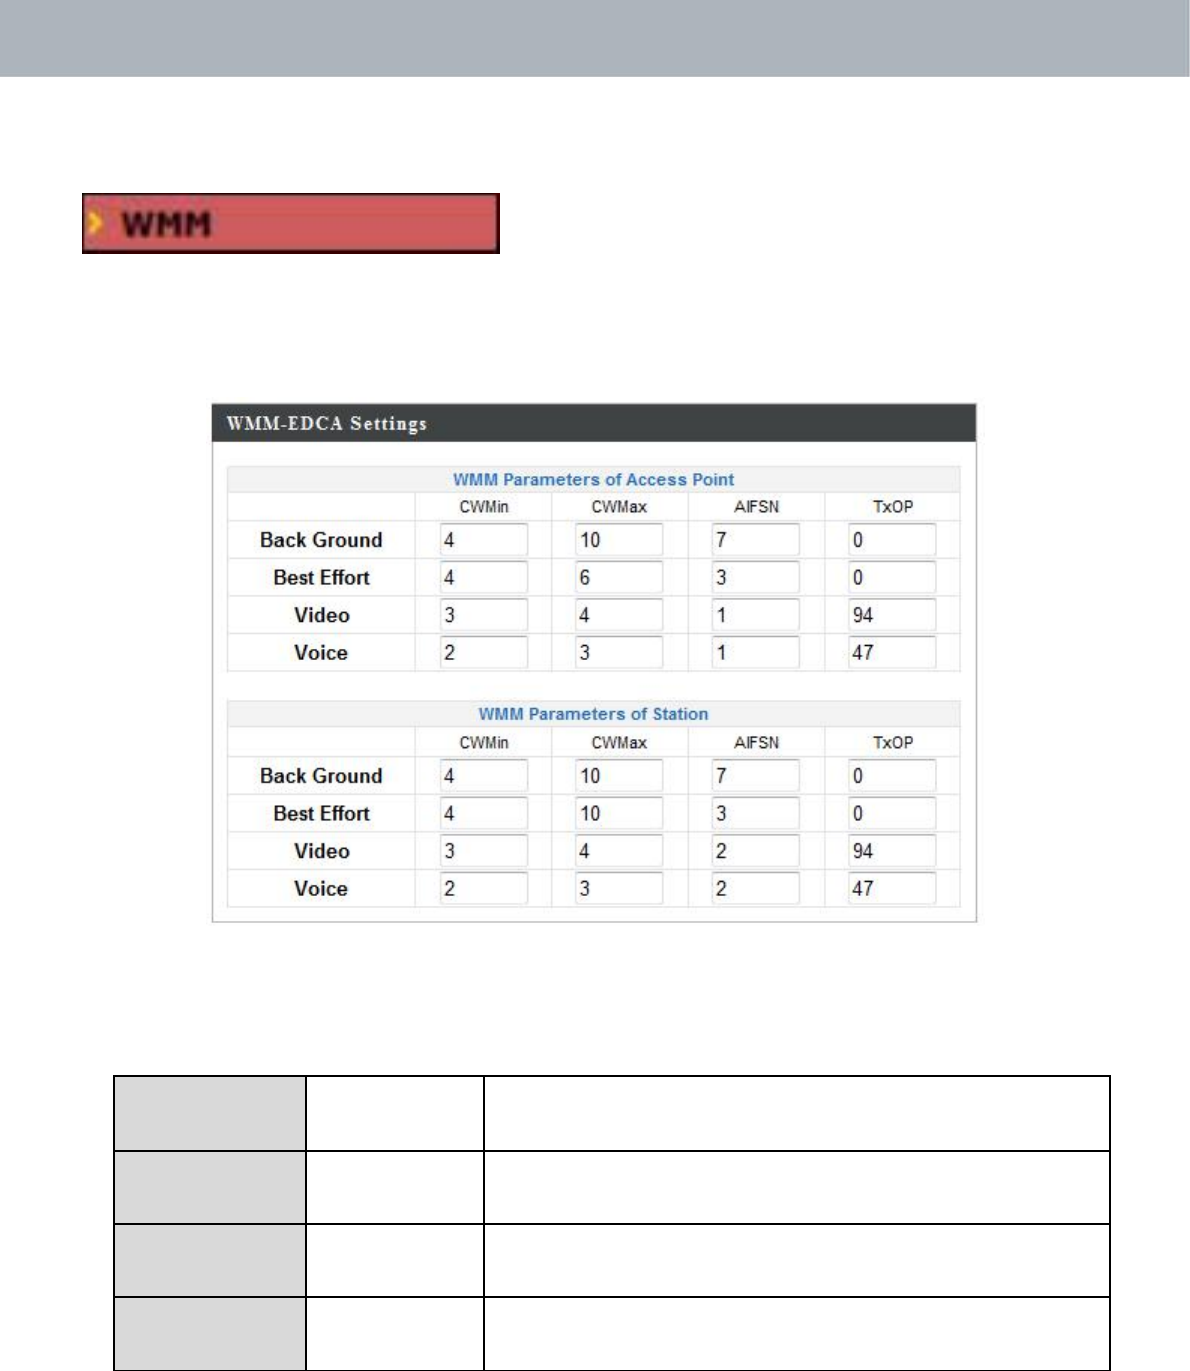
IV‐3‐5.WMM
Wi‐FiMultimedia(WMM)isaWi‐FiAlliance
interoperabilitycertificationbasedonthe
IEEE802.11estandard,whichprovides
QualityofService(QoS)featurestoIEE802.11networks.WMMprioritizes
trafficaccordingtofourcategories:background,besteffort,videoandvoice.
ConfiguringWMMconsistsofadjustingparametersonqueuesfordifferent
categoriesofwirelesstraffic.Trafficissenttothefollowingqueues:
BackgroundLow Highthroughput,nontimesensitivebulk
Prioritydatae.g.FTP
BestEffortMediumTraditionalIPdata,mediumthroughputand
Prioritydelay.
VideoHigh Timesensitivevideodatawithminimum
Prioritytimedelay.
VoiceHigh TimesensitivedatasuchasVoIPand
Prioritystreamingmediawithminimumtimedelay.
Queuesautomaticallyprovideminimumtransmissiondelaysforvideo,voice,
multimediaandcriticalapplications.Thevaluescanfurtherbeadjusted
manually:
57

APMode
CWMinMinimumContentionWindow(milliseconds):
Thisvalueisinputtotheinitialrandom
backoffwaittimealgorithmforretryofadata
frametransmission.Thebackoffwaittimewill
begeneratedbetween0andthisvalue.Ifthe
frameisnotsent,therandombackoffvalueis
doubleduntilthevaluereachesthenumber
definedbyCWMax(below).TheCWMinvalue
mustbelowerthantheCWMaxvalue.The
contentionwindowschemehelpstoavoid
framecollisionsanddeterminepriorityof
frametransmission.Ashorterwindowhasa
higherprobability(priority)oftransmission.
CWMaxMaximumContentionWindow(milliseconds):
Thisvalueistheupperlimittorandom
backoffvaluedoubling(seeabove).
AIFSNArbitrationInter‐FrameSpace(milliseconds):
Specifiesadditionaltimebetweenwhena
channelgoesidleandtheAP/clientsends
dataframes.TrafficwithalowerAIFSNvalue
hasahigherpriority.
TxOPTransmissionOpportunity(milliseconds):The
maximumintervaloftimeanAP/clientcan
transmit.This makeschannelaccessmore
efficientlyprioritized.Avalueof0meansonly
oneframepertransmission.Agreatervalue
effectshigherpriority.
58

APMode
IV‐4. Management
Screenshotsdisplayedareexamples.Theinformationshown
onyourscreenwillvarydependingonyourconfiguration.
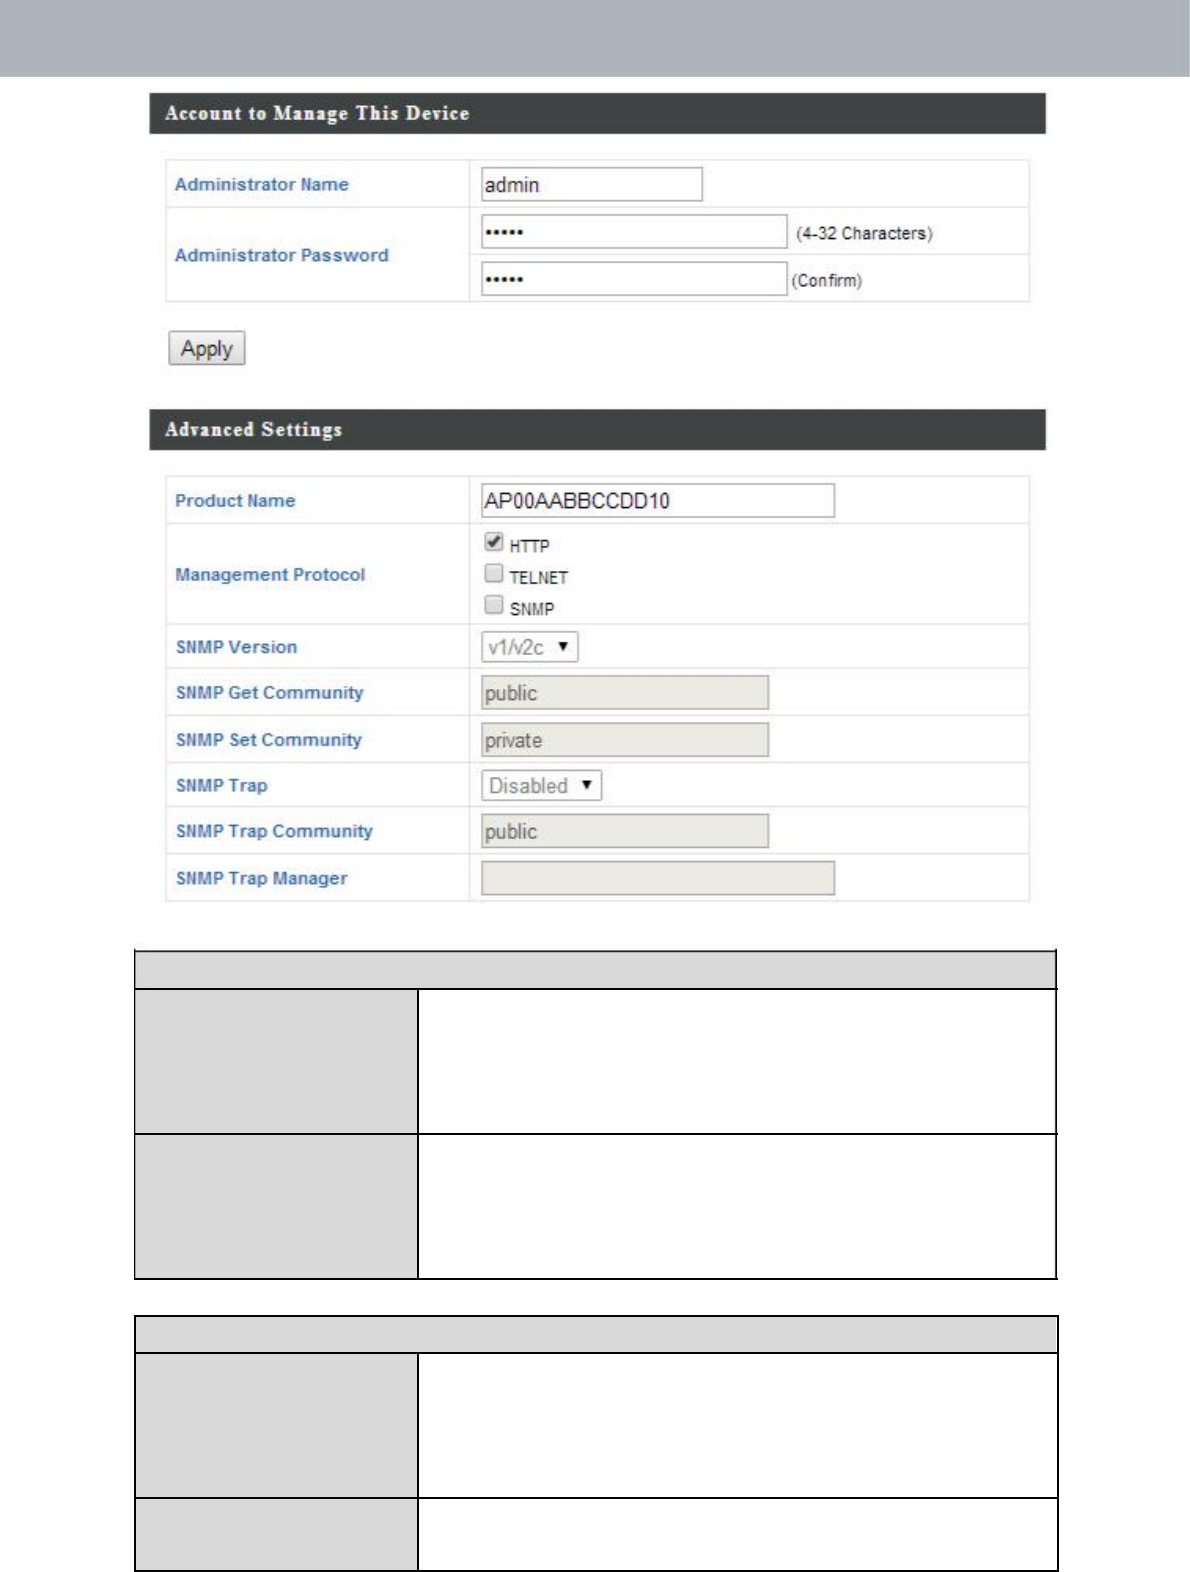
IV‐4‐1. Admin
Youcanchangethepasswordusedtologinto
thebrowser‐basedconfigurationinterfacehere.
Itisadvisedtodosoforsecuritypurposes.
Ifyouchangetheadministratorpassword,pleasemakea
noteofthenewpassword.Intheeventthatyouforgetthis
passwordandareunabletologintothebrowserbased
configurationinterface,seeI‐5.Resetforhowtoresetthe
accesspoint.
59
APMode
AccounttoManageThisDevice
AdministratorSettheaccesspoint’sadministratorname.
NameThisisusedtologintothebrowserbased
configurationinterfaceandmustbebetween
4‐16alphanumericcharacters(casesensitive).
AdministratorSettheaccesspoint’sadministratorpassword.
PasswordThisisusedtologintothebrowserbased
configurationinterfaceandmustbebetween
4‐32alphanumericcharacters(casesensitive).
AdvancedSettings
ProductNameEdittheproductnameaccordingtoyour
preferenceconsistingof1‐32alphanumeric
characters.Thisnameisusedforreference
purposes.
ManagementCheck/unchecktheboxestoenable/disable
Protocolspecifiedmanagementinterfaces(seebelow).
60

APMode
WhenSNMPisenabled,completetheSNMP
fieldsbelow.
SNMPVersionSelectSNMPversionappropriateforyour
SNMPmanager.
SNMPGetEnteranSNMPGetCommunitynamefor
CommunityverificationwiththeSNMPmanagerfor
SNMP‐GETrequests.
SNMPSetEnteranSNMPSetCommunitynamefor
CommunityverificationwiththeSNMPmanagerfor
SNMP‐SETrequests.
SNMPTrapEnableordisableSNMPTraptonotifySNMP
managerofnetworkerrors.
SNMPTrapEnteranSNMPTrapCommunitynamefor
CommunityverificationwiththeSNMPmanagerfor
SNMP‐TRAPrequests.
SNMPTrapSpecifytheIPaddressorsevername(2‐128
Manageralphanumericcharacters)oftheSNMP
manager.
HTTP
InternetbrowserHTTPprotocolmanagementinterface
TELNET
Clientterminalwithtelnetprotocolmanagementinterface
SNMP
SimpleNetworkManagementProtocol.SNMPv1,v2&v3protocolsupported.
SNMPv2canbeusedwithcommunitybasedauthentication.SNMPv3uses
user‐basedsecuritymodel(USM)architecture.
61
APMode
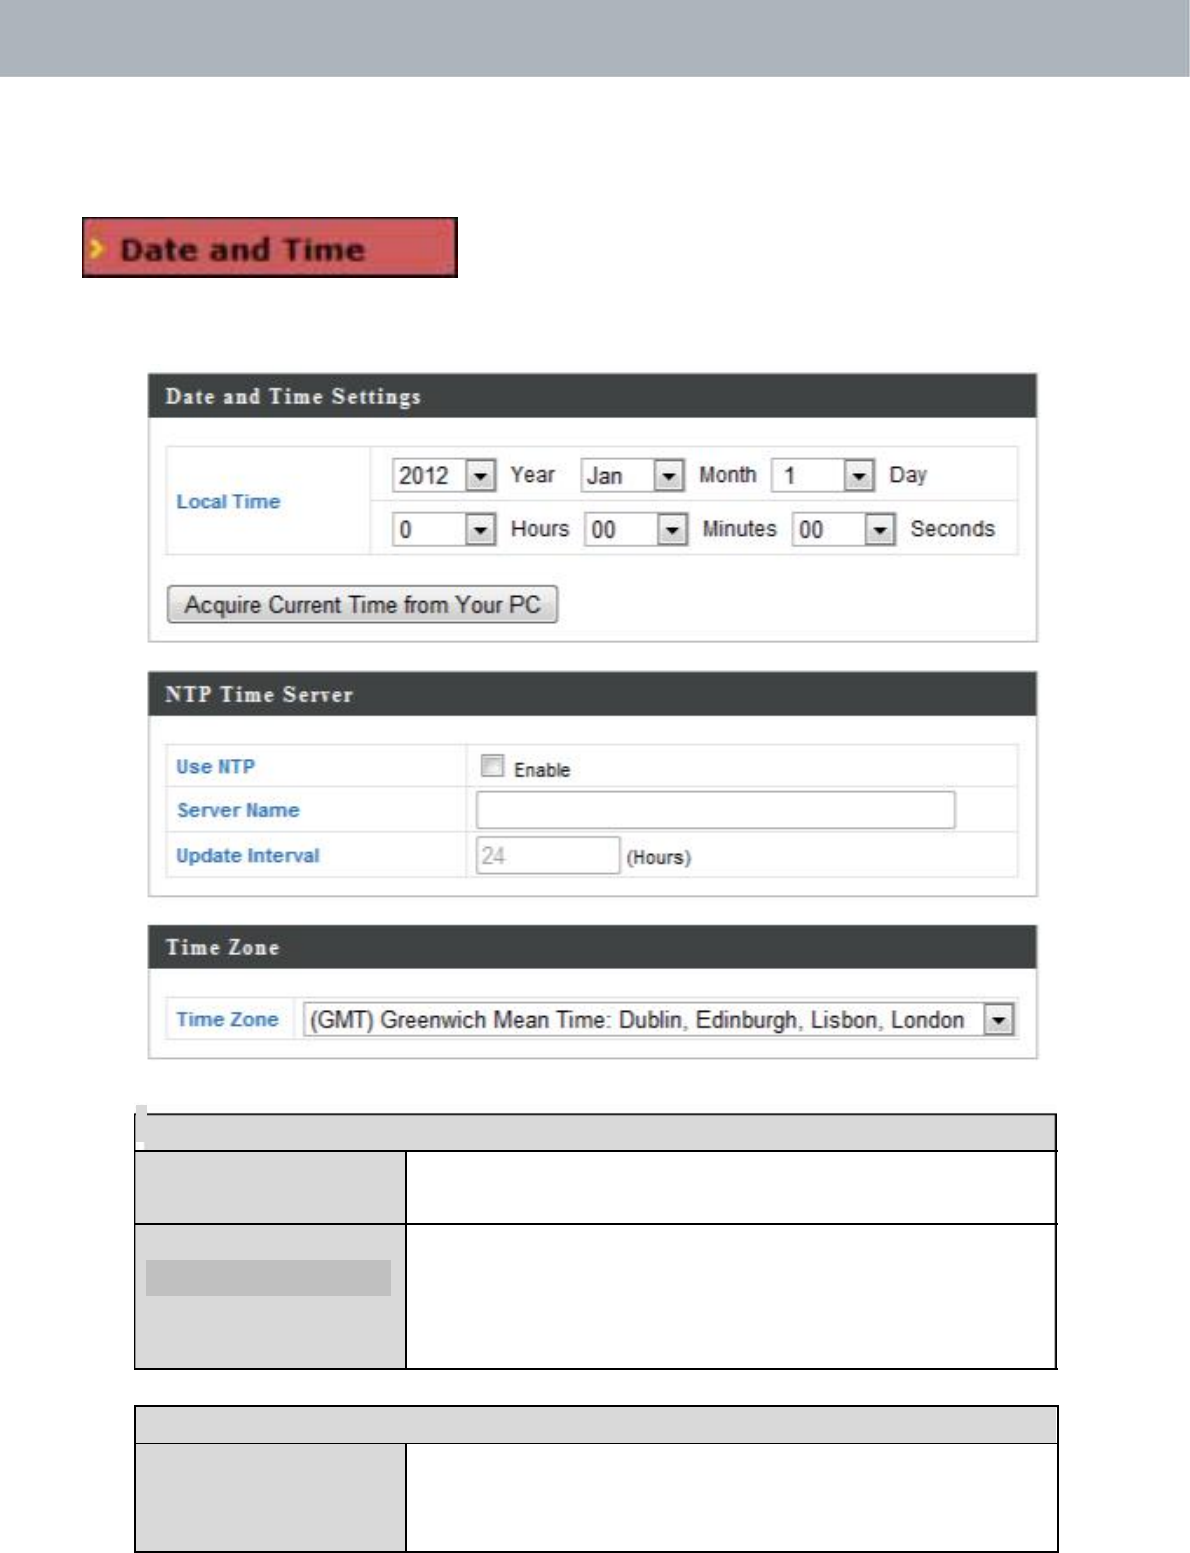
IV‐4‐2. DateandTime
Youcanconfigurethetimezonesettingsofyour
accesspointhere.Thedateandtimeofthe
devicecanbeconfiguredmanuallyorcanbesynchronizedwithatimeserver.
DateandTimeSettings
LocalTime Settheaccesspoint’sdateandtimemanually
usingthedropdownmenus.
AcquireCurrent Click“AcquireCurrentTimefromYourPC”to
TimefromyourPC
entertherequiredvaluesautomatically
accordingtoyourcomputer’scurrenttimeand
date.
NTPTimeServer
UseNTP TheaccesspointalsosupportsNTP(Network
TimeProtocol)forautomatictimeanddate
setup.
62

APMode
ServerNameEnterthehostnameorIPaddressofthetime
serverifyouwish.
UpdateInterval Specifyafrequency(inhours)fortheaccess
pointtoupdate/synchronizewiththeNTP
server.
TimeZone
TimeZoneSelectthetimezone ofyourcountry/region.If
yourcountry/regionisnotlisted,pleaseselect
anothercountry/regionwhosetimezoneisthe
sameasyours.
63
APMode
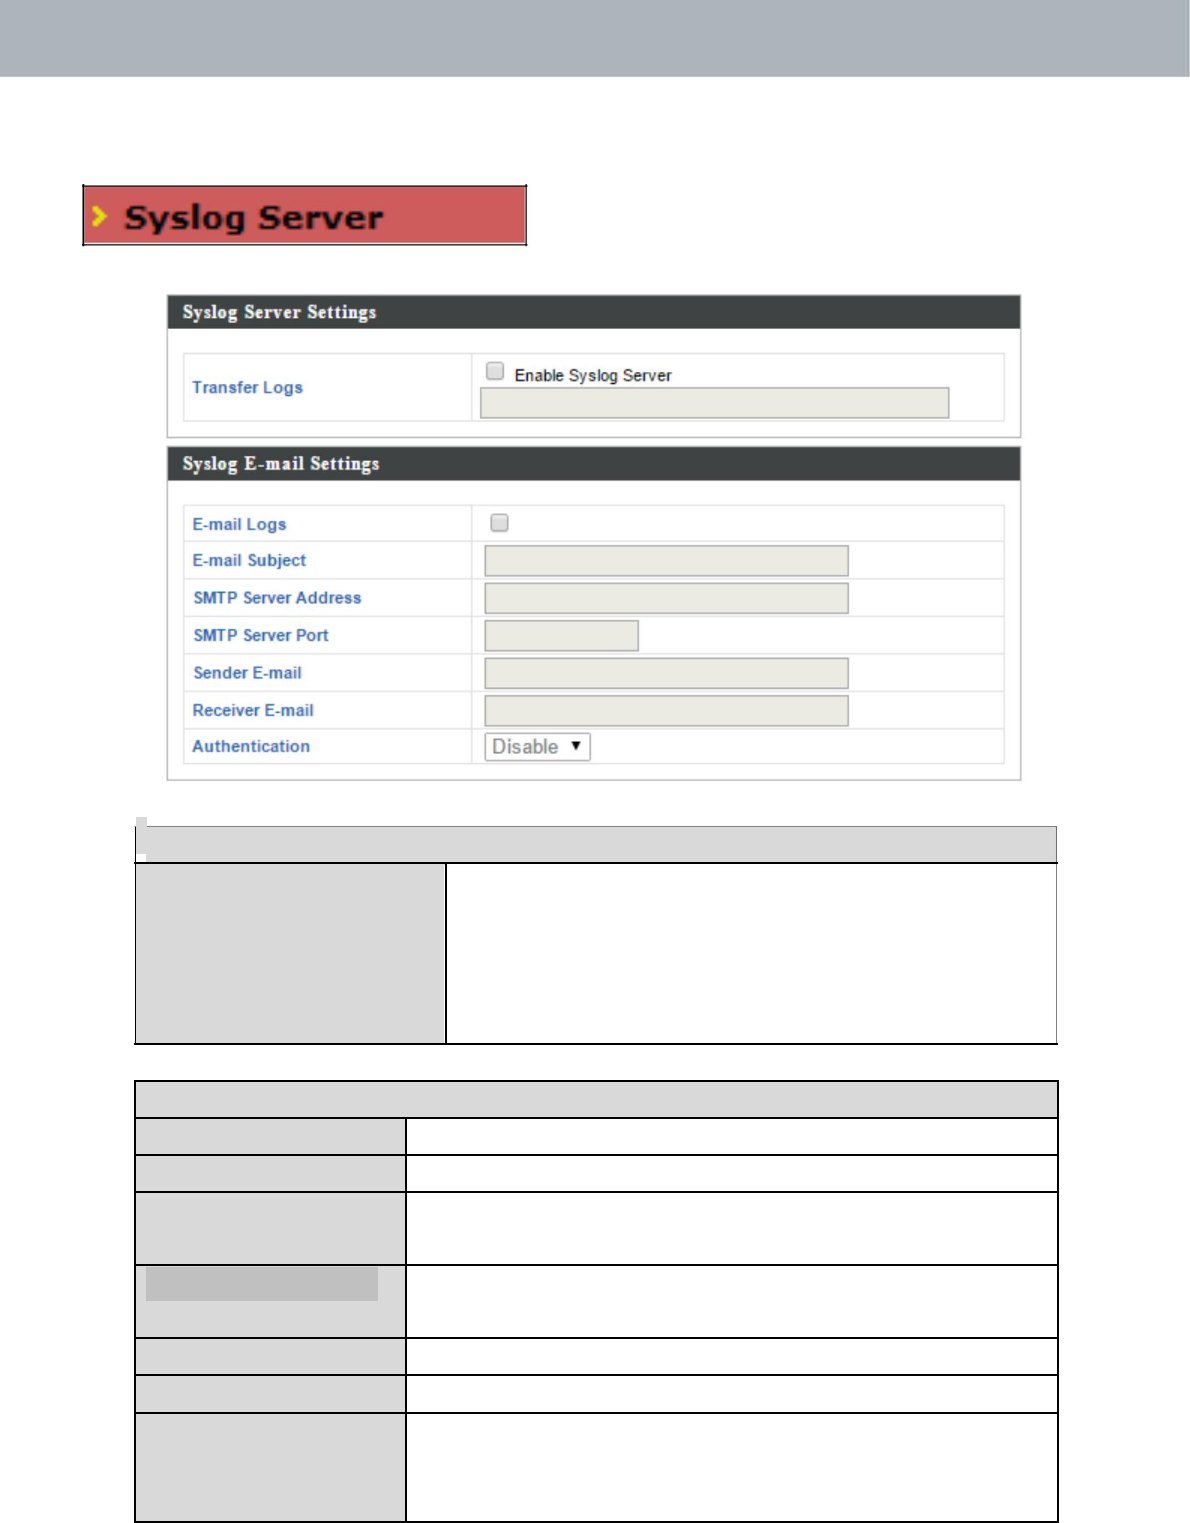
IV‐4‐3. SyslogServer
Thesystemlogcanbesenttoaserveror
toattachedUSBstorage.
SyslogServerSettings
TransferLogs Check/unchecktheboxtoenable/disablethe
useofasyslogserver,andenterahost
name,domainorIPaddressfortheserver,
consistingofupto128alphanumeric
characters.
SyslogE‐mailSettings
E‐mailLogs Checktheboxtoenable/disablee‐maillogs.
E‐mailSubject Specifythesubjectlineoflogemails.
SMTPServer SpecifytheSMTPserveraddressusedtosend
Address logemails.
SMTPServerPort SpecifytheSMTPserverportusedtosendlog
emails.
SenderE‐mail Specifythesenderemailaddress.
ReceiverE‐mail Specifytheemailtoreceivelogemails.
Authentication Disableorselectauthenticationtype:SSLorTLS.
WhenusingSSLorTLS,entertheusernameand
password.
64
APMode
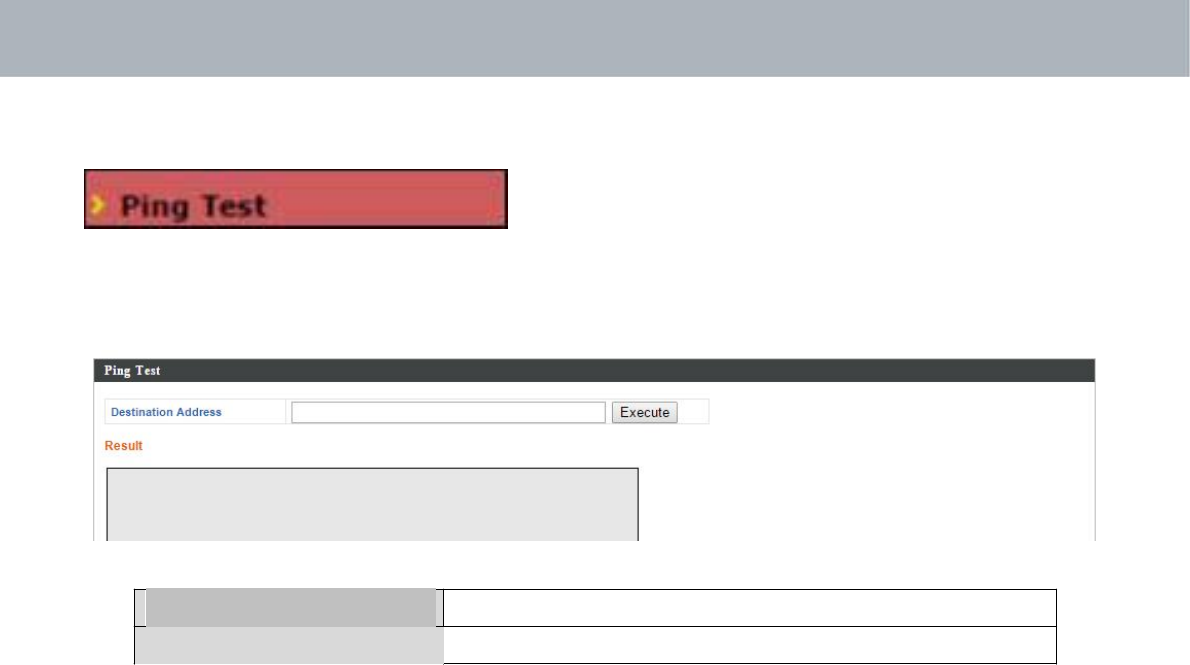
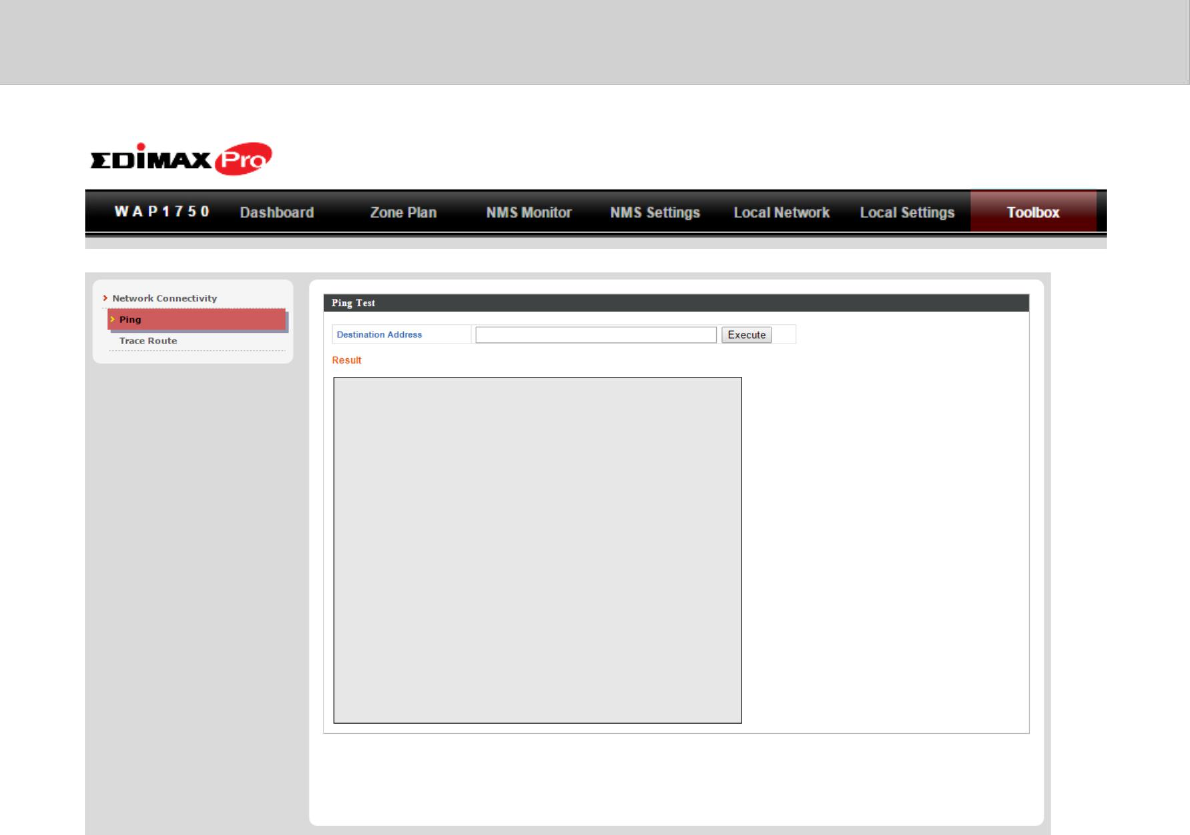
IV‐4‐4. PingTest
Theaccesspointincludesabuilt‐inping
testfunction.Pingisacomputer
networkadministrationutilityusedtotestwhetheraparticularhostis
reachableacrossanIPnetworkandtomeasuretheround‐triptimefor
sentmessages.
DestinationAddressEntertheaddressofthehost.
Execute
Clickexecutetopingthehost.
65
APMode
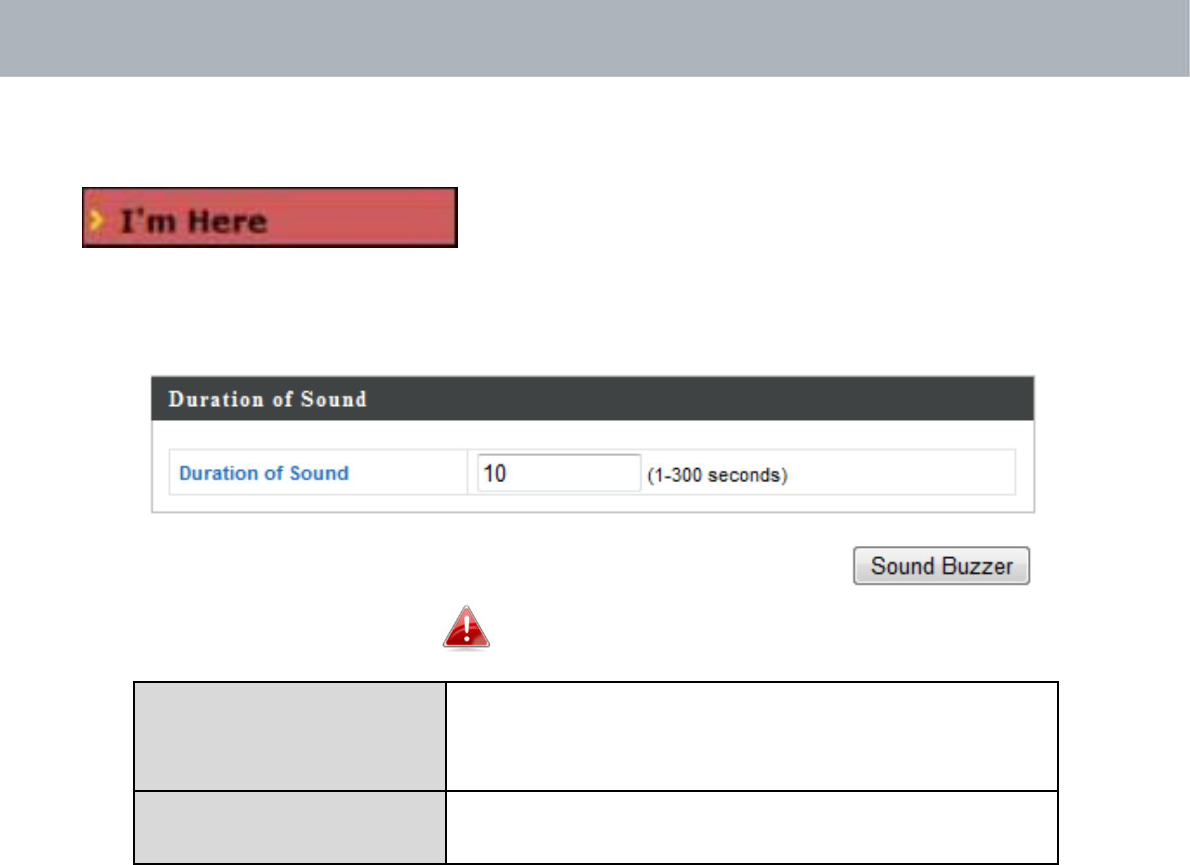
IV‐4‐5. I’mHere
Theaccesspointfeaturesabuilt‐inbuzzer
whichcansoundoncommandusingthe“I’m
Here”page.Thisisusefulfornetworkadministratorsandengineers
workingincomplexnetworkenvironmentstolocatetheaccesspoint.
Thebuzzerisloud!
DurationofSoundSetthedurationforwhichthebuzzerwill
soundwhenthe“SoundBuzzer”buttonis
clicked.
SoundBuzzerActivatethebuzzersoundfortheabove
specifieddurationoftime.
66
APMode
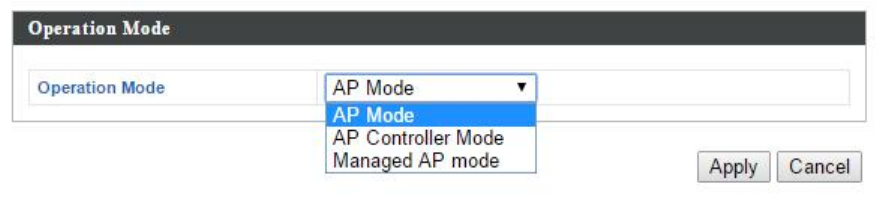
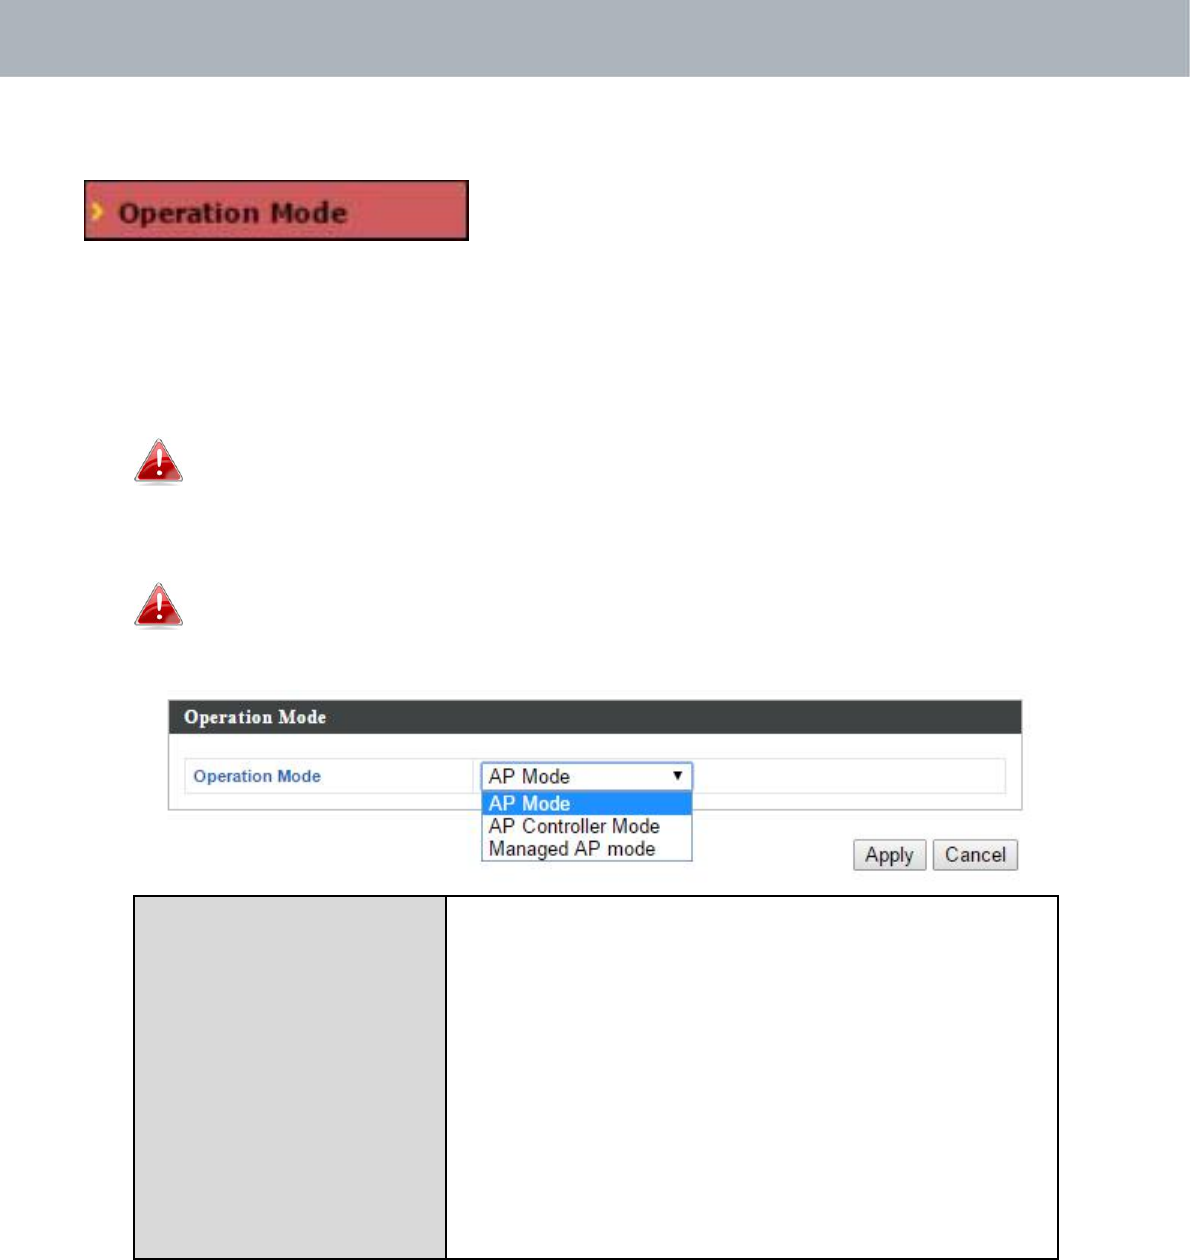
IV‐4‐6. OperationMode
Theaccesspointcanfunctioninthreedifferent
modes.Settheoperationmodeoftheaccess
pointhere.APmodeisastandaloneaccesspoint,APcontrollermodeactsas
thedesignatedmasteroftheAParray,andManagedAPmodeactsasa
slaveAPwithintheAParray.ReferbacktoOverviewandEdimaxProNMSI.
ProductInformationformorehelp.
InManagedAPmodesomefunctionsoftheaccesspointwillbe
disabledinthisuserinterfaceandmustbesetusingEdimaxPro
NMSontheAPController.
InAPControllerModetheaccesspointwillswitchtotheEdimax
ProNMSuserinterface.
OperationMode APModeisastandardaccesspointina
wirelessnetwork.
APControllerModeisthemasterofanAP
arrayandcontrolsallothermanagedAPs
(below)usingEdimaxProNMS.
ManagedAPmodeisanAPwhichispartof
theAParrayandismanagedbythe
ControllerAP.
67
APMode
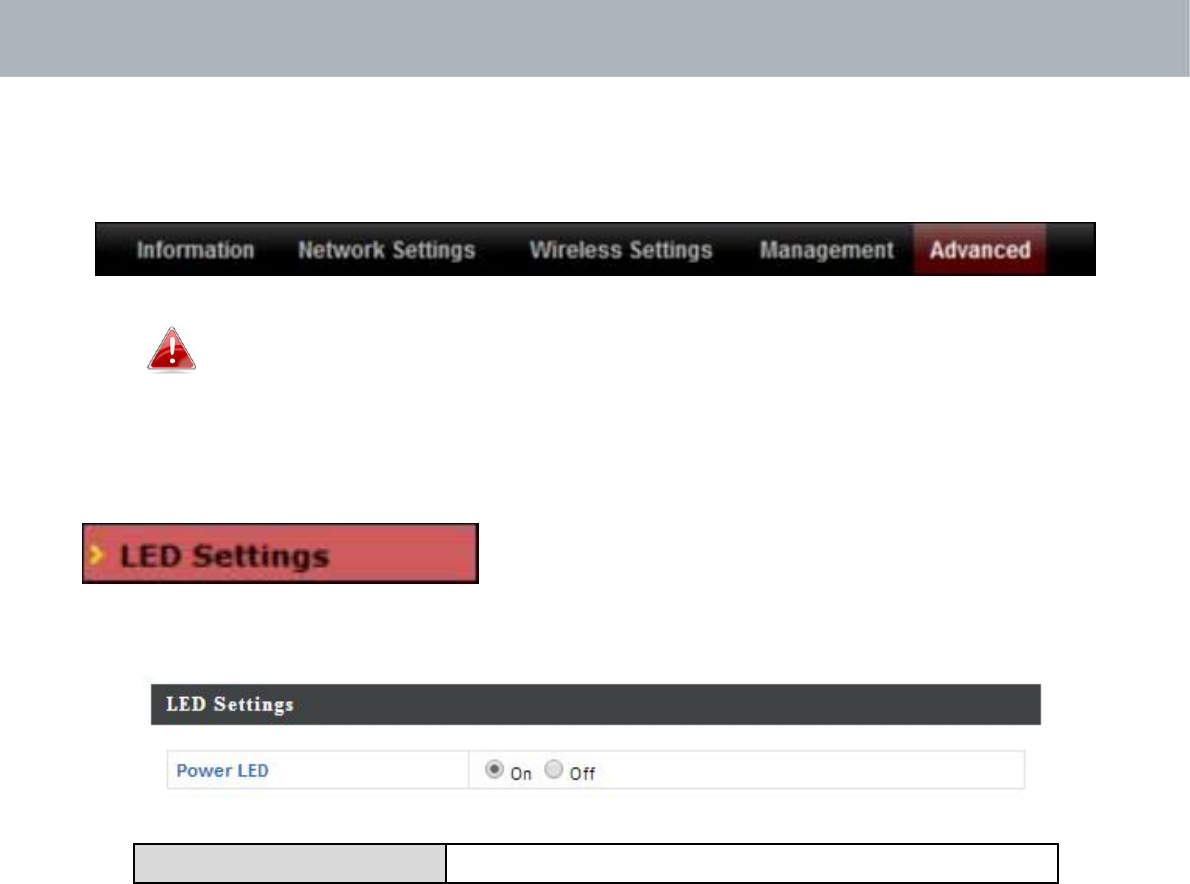
IV‐5. Advanced
Screenshotsdisplayedareexamples.Theinformationshown
onyourscreenwillvarydependingonyourconfiguration.
IV‐5‐1. LEDSettings
Theaccesspoint’sLEDscanbemanually
enabledordisabledaccordingtoyour
preference.
PowerLEDSelectonoroff.
68
APMode
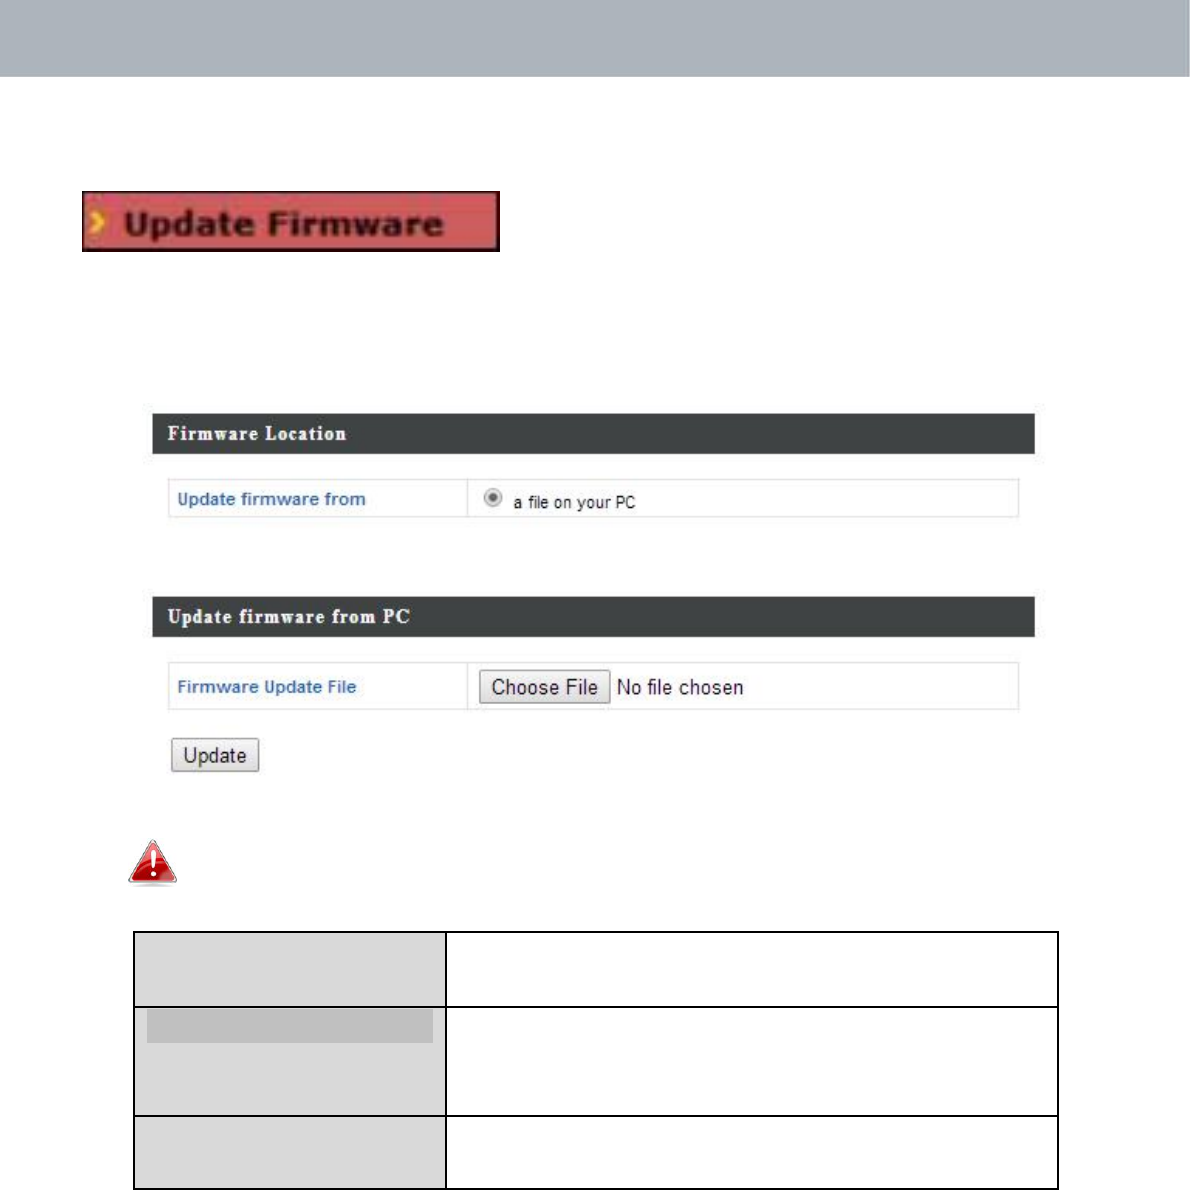
IV‐5‐2. UpdateFirmware
The“Firmware”pageallowsyoutoupdate
thesystemfirmwaretoamorerecent
version.Updatedfirmwareversionsoften
offerincreasedperformanceandsecurity,aswellasbugfixes.You
candownloadthelatestfirmwarefromtheEdimaxwebsite.
Donotswitchoffordisconnecttheaccesspointduringa
firmwareupgrade,asthiscoulddamagethedevice.
UpdateFirmwareSelect“afileonyourPC”touploadfirmware
Fromfromyourlocalcomputer.
FirmwareUpdateFileClick“ChooseFile”toopenanewwindowto
locateandselectthefirmwarefileinyour
computer.
UpdateClick“Update”touploadthespecified
firmwarefiletoyouraccesspoint.
69
APMode
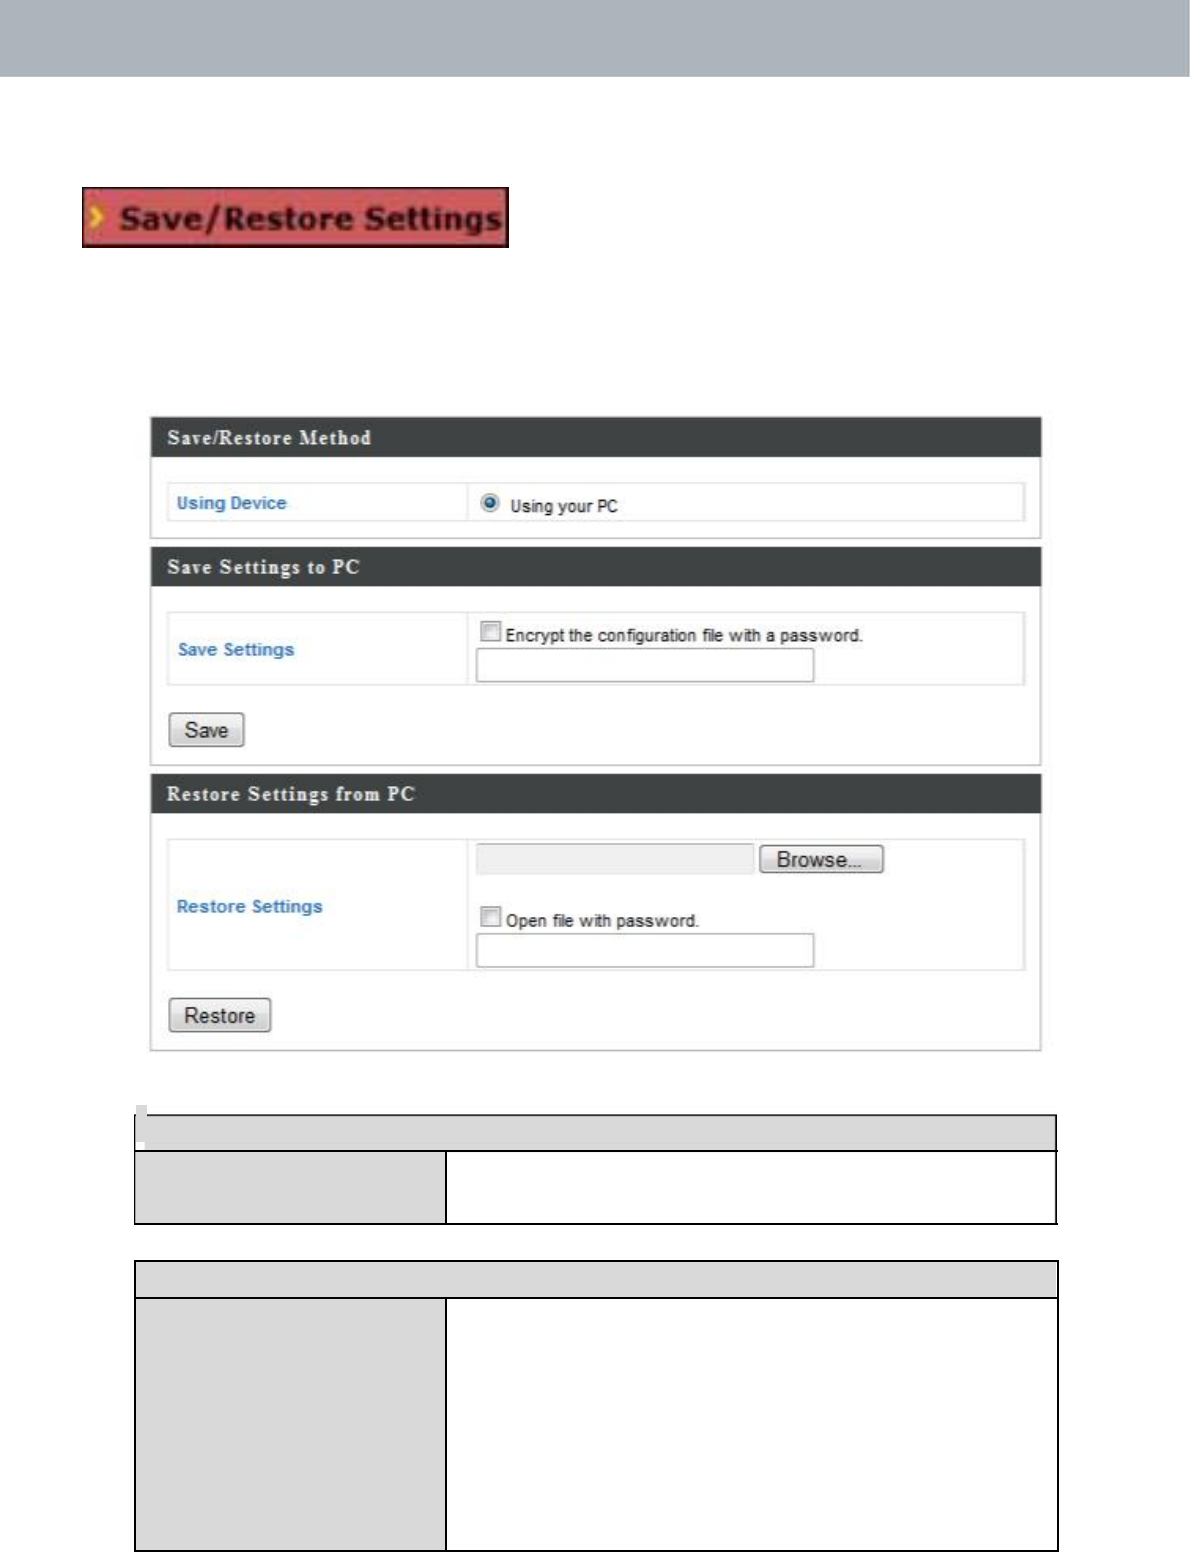
IV‐5‐3. Save/RestoreSettings
Theaccesspoint’s“Save/RestoreSettings”
pageenablesyoutosave/backuptheaccess
point’scurrentsettingsasafiletoyourlocalcomputeroraUSBdevice
attachedtotheaccesspoint,andrestoretheaccesspointtopreviously
savedsettings.
Save/RestoreSettings
UsingDevice Select“UsingyourPC”tosavetheaccess
point’ssettingstoyourlocalcomputer.
SaveSettingstoPC
SaveSettings Click“Save”tosavesettingsandanew
windowwillopentospecifyalocationto
savethesettingsfile.Youcanalsocheckthe
“Encrypttheconfigurationfilewitha
password”boxandenterapasswordto
protectthefileinthefieldunderneath,ifyou
wish.
70

APMode
RestoreSettingsfromPC
RestoreSettings Clickthebrowsebuttontofindapreviously
savedsettingsfileonyourcomputer,then
click“Restore”toreplaceyourcurrent
settings.Ifyoursettingsfileisencryptedwith
apassword,checkthe“Openfilewith
password”boxandenterthepasswordin
thefieldunderneath.
71
APMode
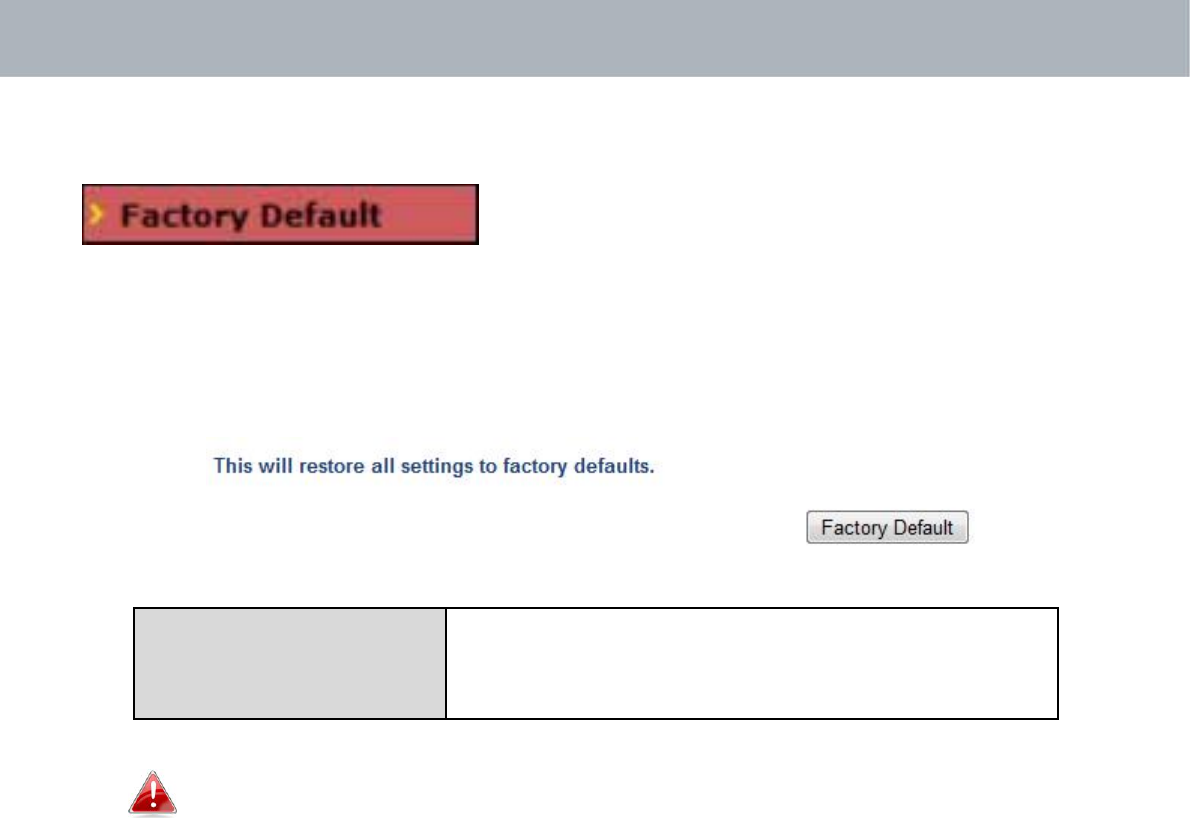
IV‐5‐4. FactoryDefault
Iftheaccesspointmalfunctionsorisnot
responding,thenitisrecommendedthatyou
rebootthedevice(seeIV‐5.5)orresetthedevicebacktoitsfactorydefault
settings.Youcanresettheaccesspointbacktoitsdefaultsettingsusingthis
featureifthelocationoftheaccesspointisnotconvenienttoaccessthe
resetbutton.
FactoryDefault Click“FactoryDefault”torestoresettingsto
thefactorydefault.Apop‐upwindowwill
appearandaskyoutoconfirm.
Afterresettingtofactorydefaults,pleasewaitfortheaccess
pointtoresetandrestart.
72
APMode
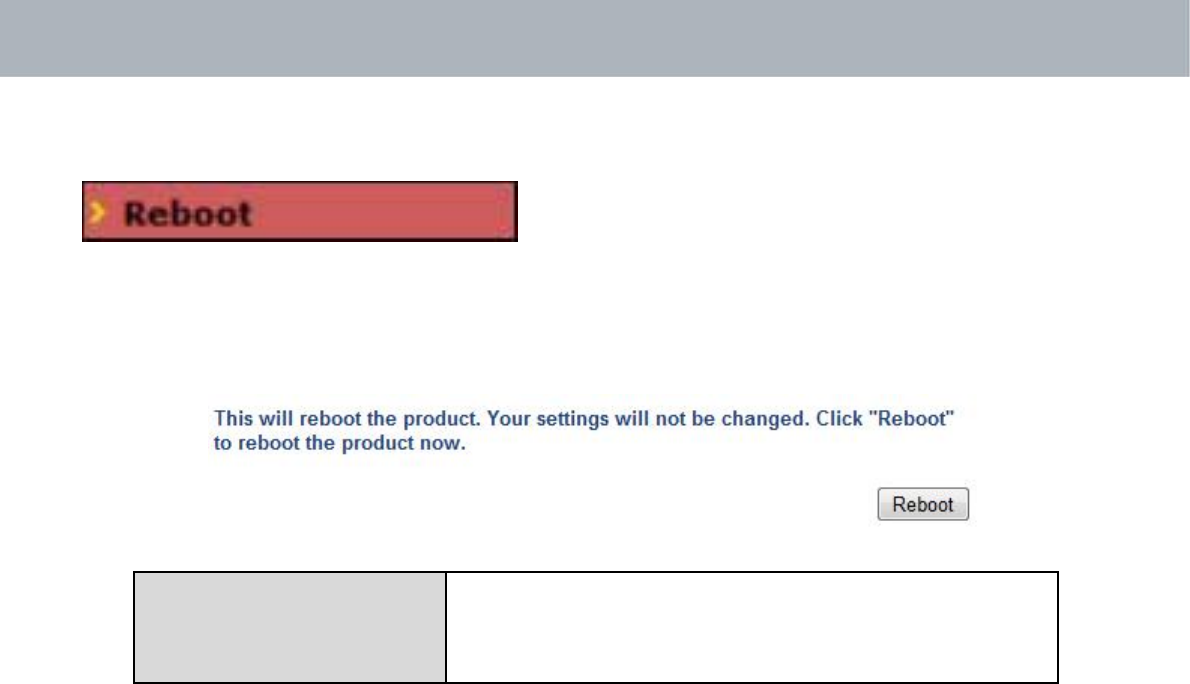
IV‐5‐5. Reboot
Iftheaccesspointmalfunctionsorisnot
responding,thenitisrecommendedthat
yourebootthedeviceorresettheaccesspointbacktoitsfactory
defaultsettings(seeIV‐5‐4).Youcanreboottheaccesspointremotely
usingthisfeature.
RebootClick“Reboot”torebootthedevice.A
countdownwillindicatetheprogressofthe
reboot.
73
EdimaxProNMS
I.ProductInformation
EdimaxProNetworkManagementSuite(NMS)supportsthecentral
managementofagroupofaccesspoints,otherwiseknownasanAPArray.
NMScanbeinstalledononeaccesspointandsupportupto8EdimaxPro
accesspointswithnoadditionalwirelesscontrollerrequired,reducing
costsandfacilitatingefficientremoteAPmanagement.
Accesspointscanbedeployedandconfiguredaccordingtorequirements,
creatingapowerfulnetworkarchitecturewhichcanbeeasilymanagedand
expandedinthefuture,withaneasytouseinterfaceandafullrangeof
functionality–idealforsmallandmid‐sizedofficeenvironments.Asecure
WLANcanbedeployedandadministeredfromasinglepoint,minimizing
costandcomplexity.
74
EdimaxProNMS
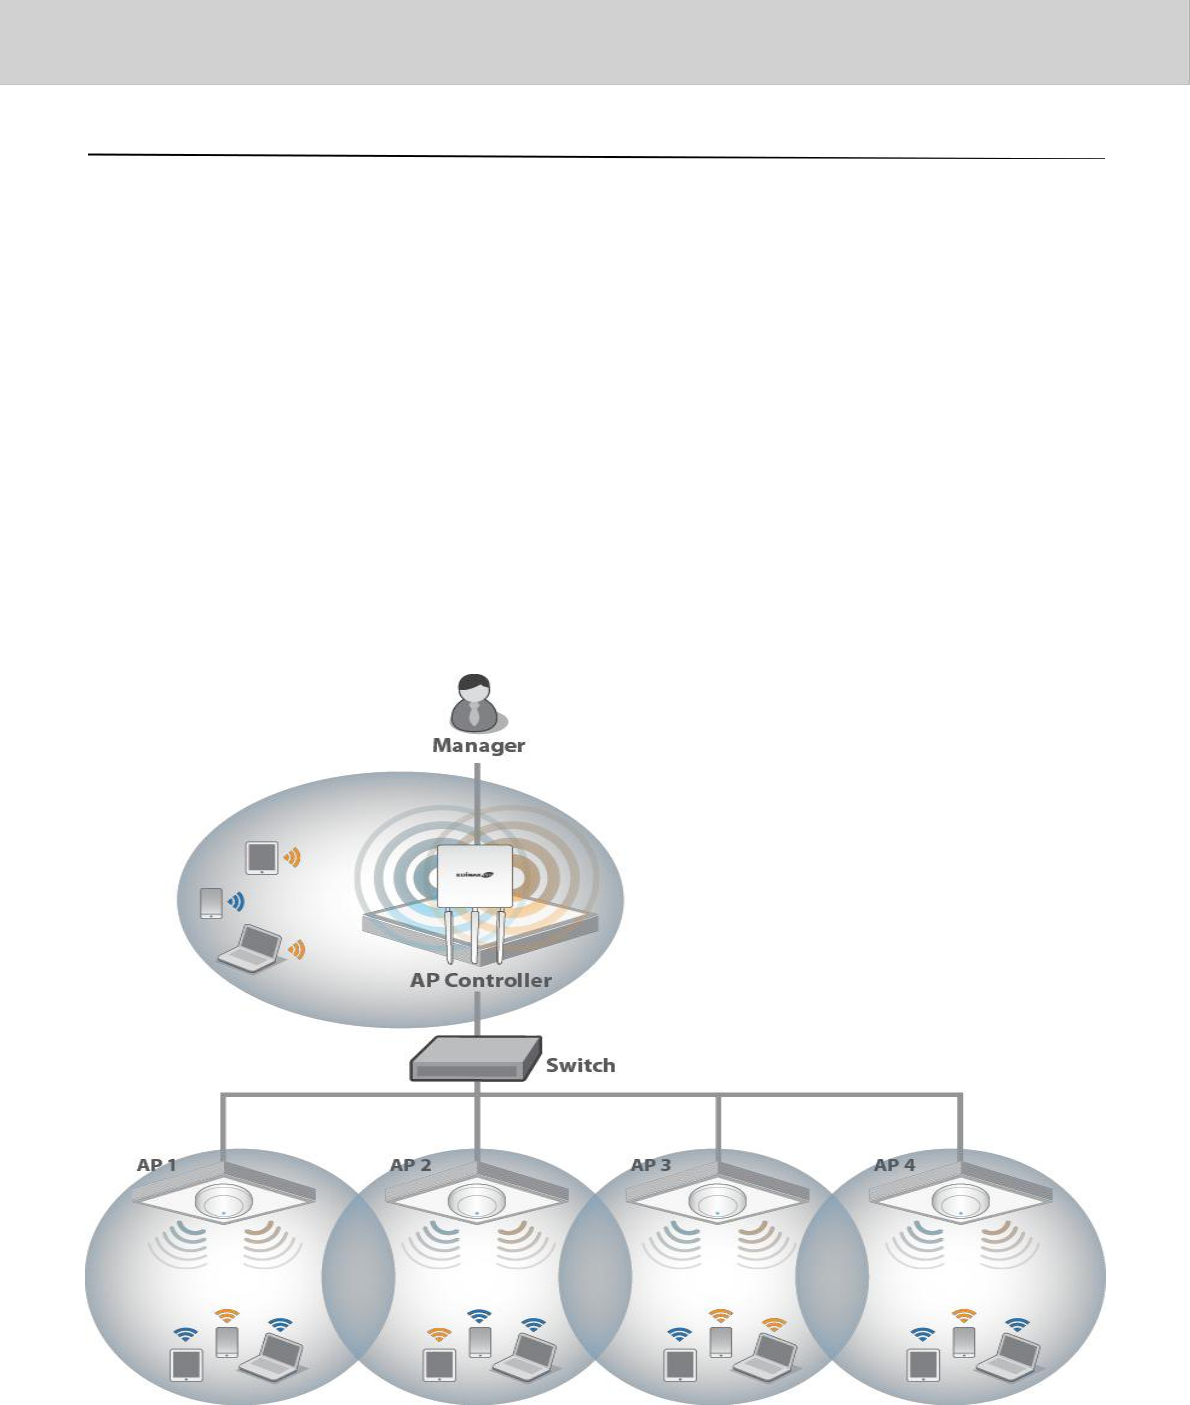
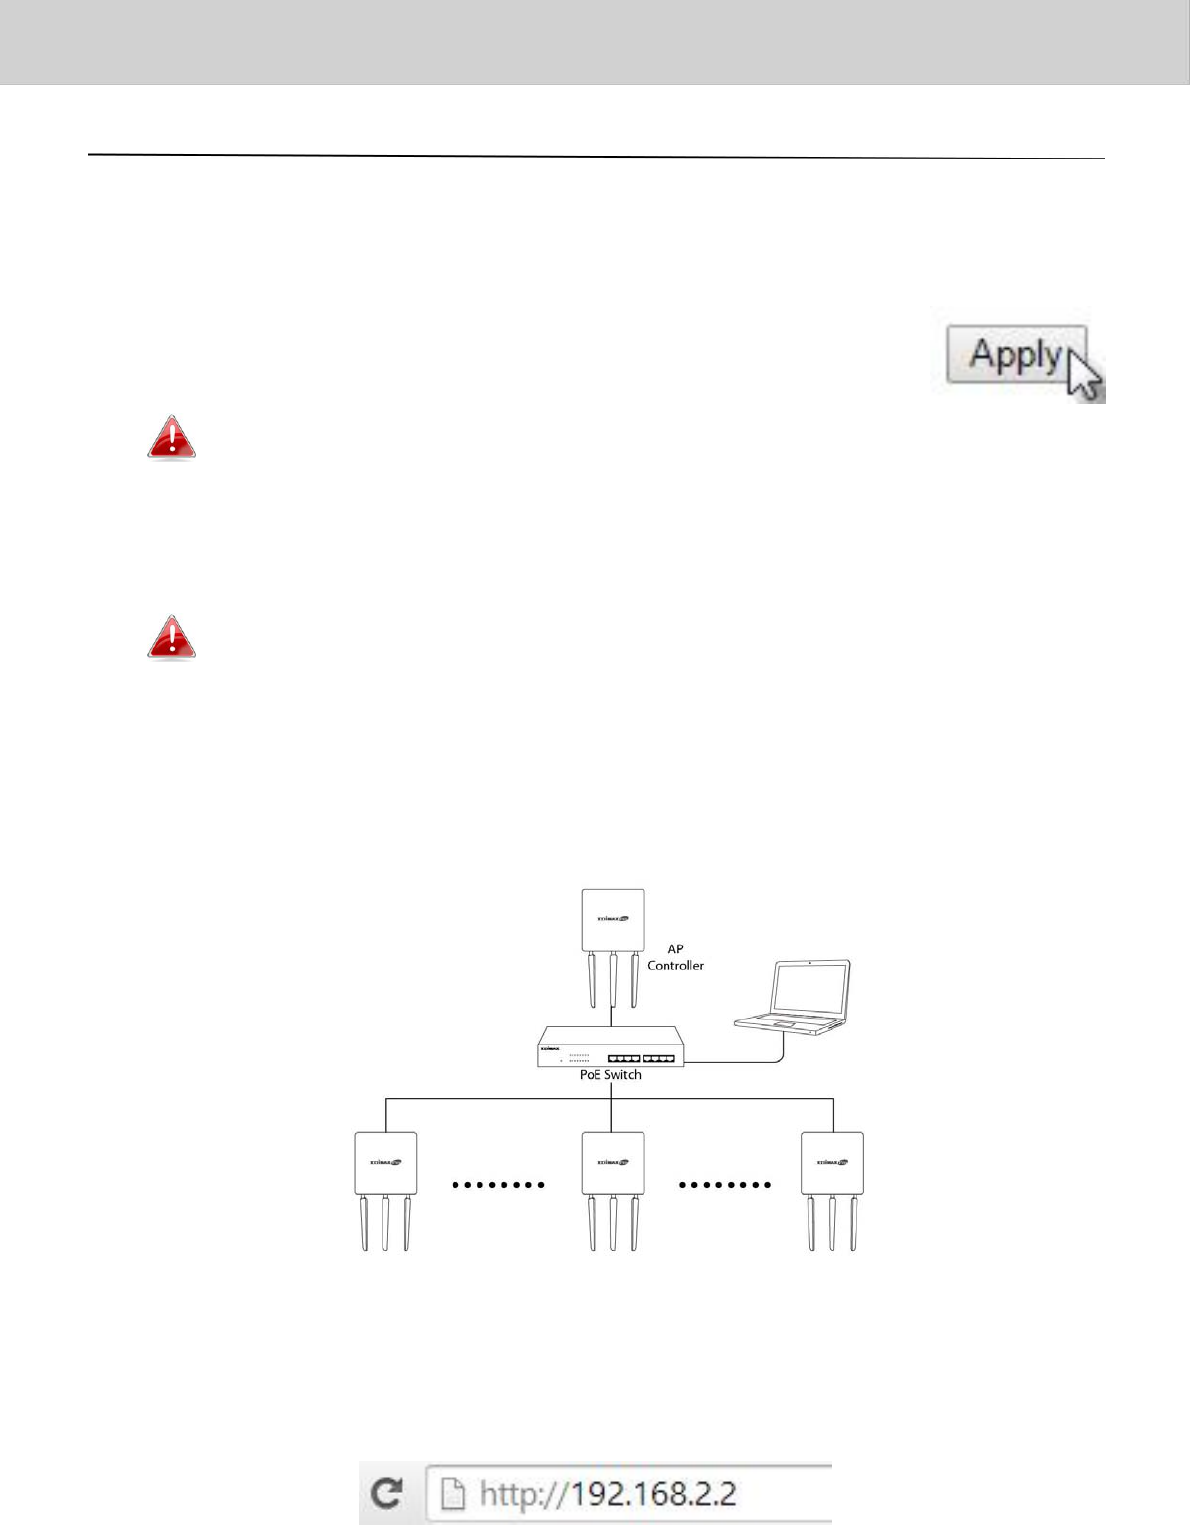
II.QuickSetup
EdimaxProNMSissimpletosetup.Anoverviewofthesystemis
shownbelow:
OneAP(accesspoint)isdesignatedastheAPController(master)and
otherconnectedEdimaxProAPsareautomaticallydesignatedasManaged
APs(slaves).UsingEdimaxProNMSyoucanmonitor,configureand
manageallManagedAPs(upto8)fromthesingleAPController.
75
EdimaxProNMS
Followthestepsbelow:
EnsureyouhavethelatestfirmwarefromtheEdimaxwebsitefor
yourEdimaxProproducts.
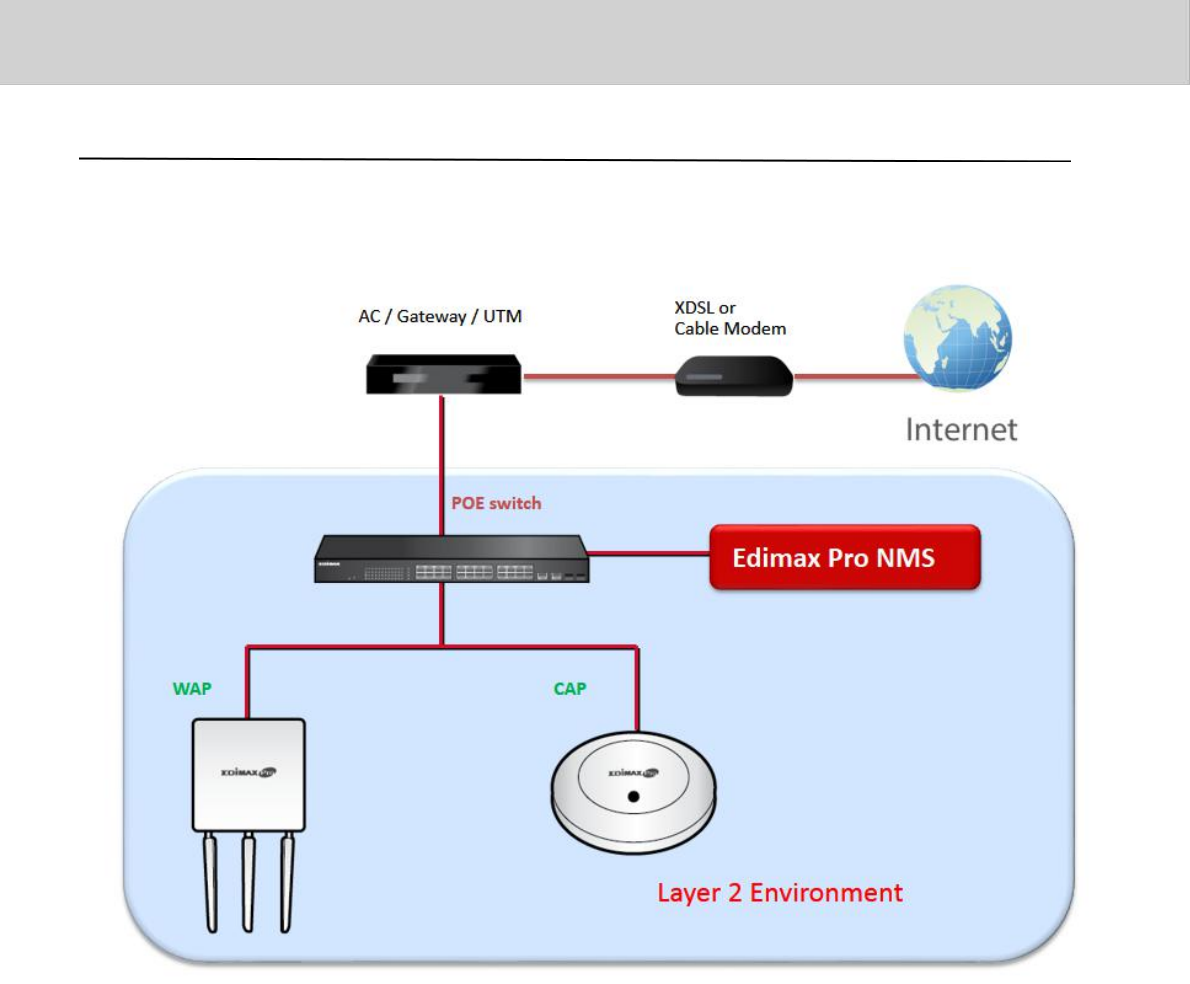
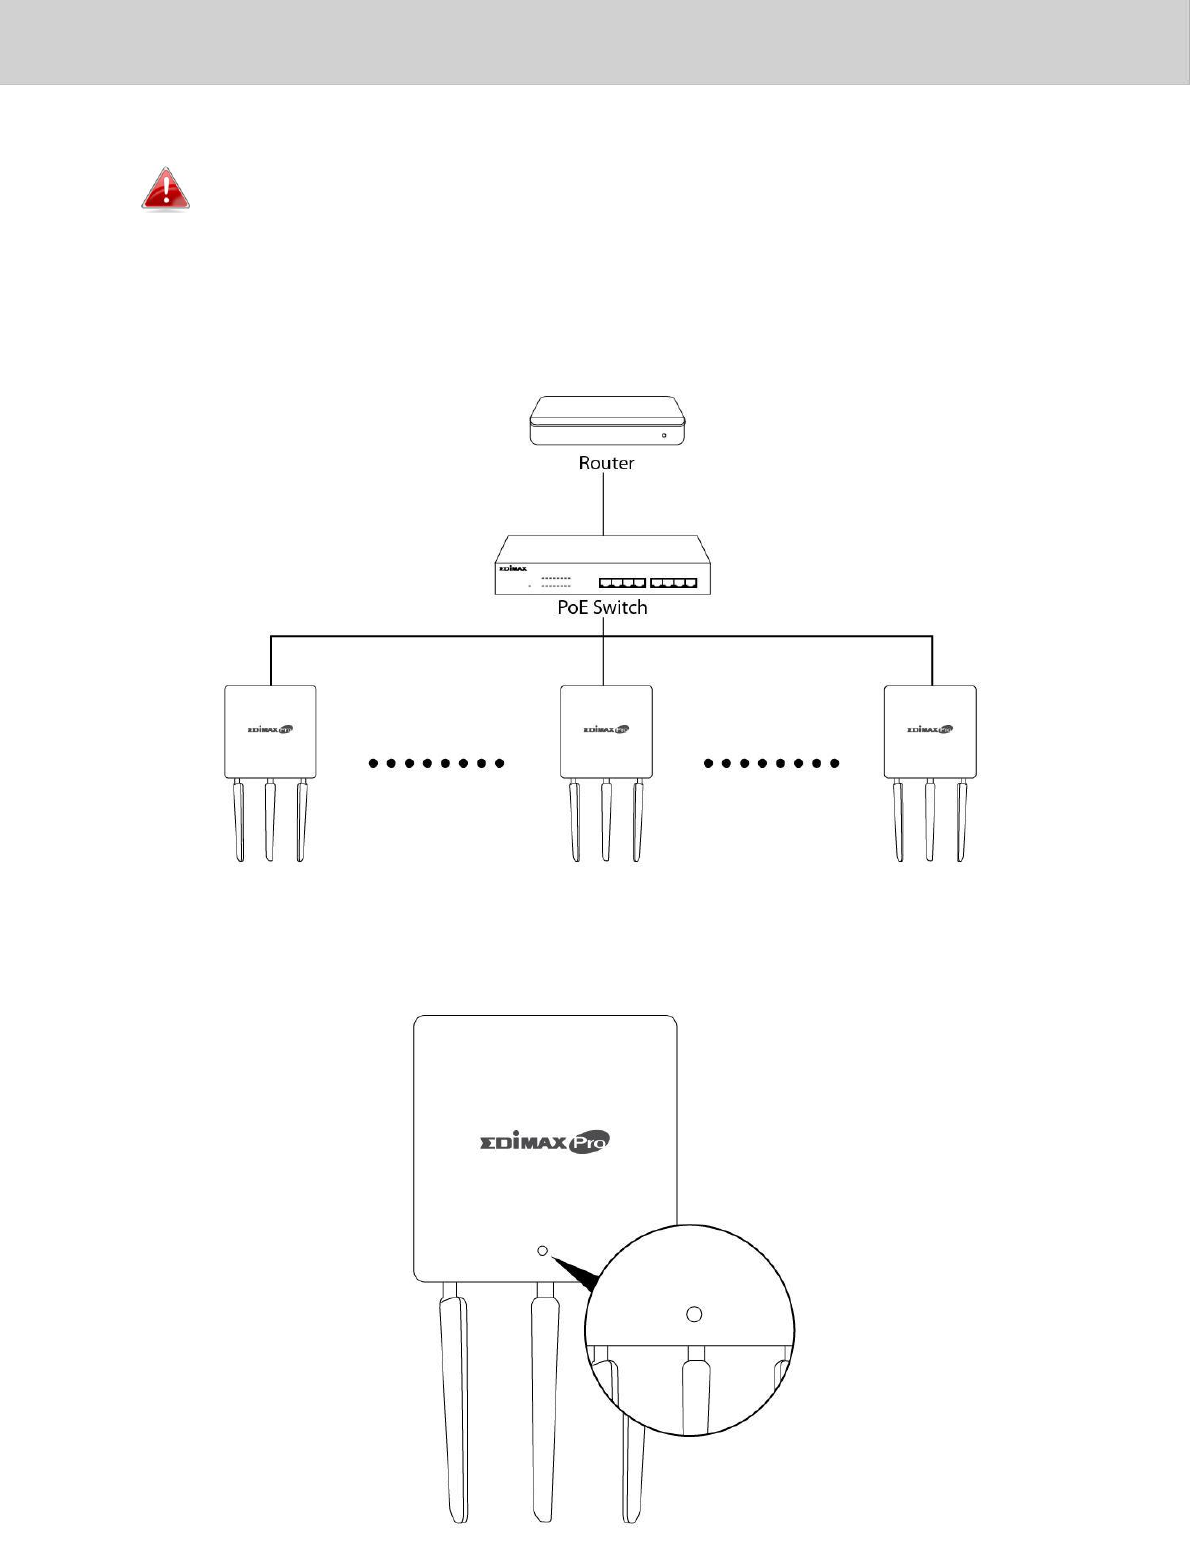
1.ConnectallAPstoanEthernetorPoEswitchwhichisconnectedtoa
gateway/router.
2.EnsureallAPsarepoweredonandcheckLEDs.
76
EdimaxProNMS
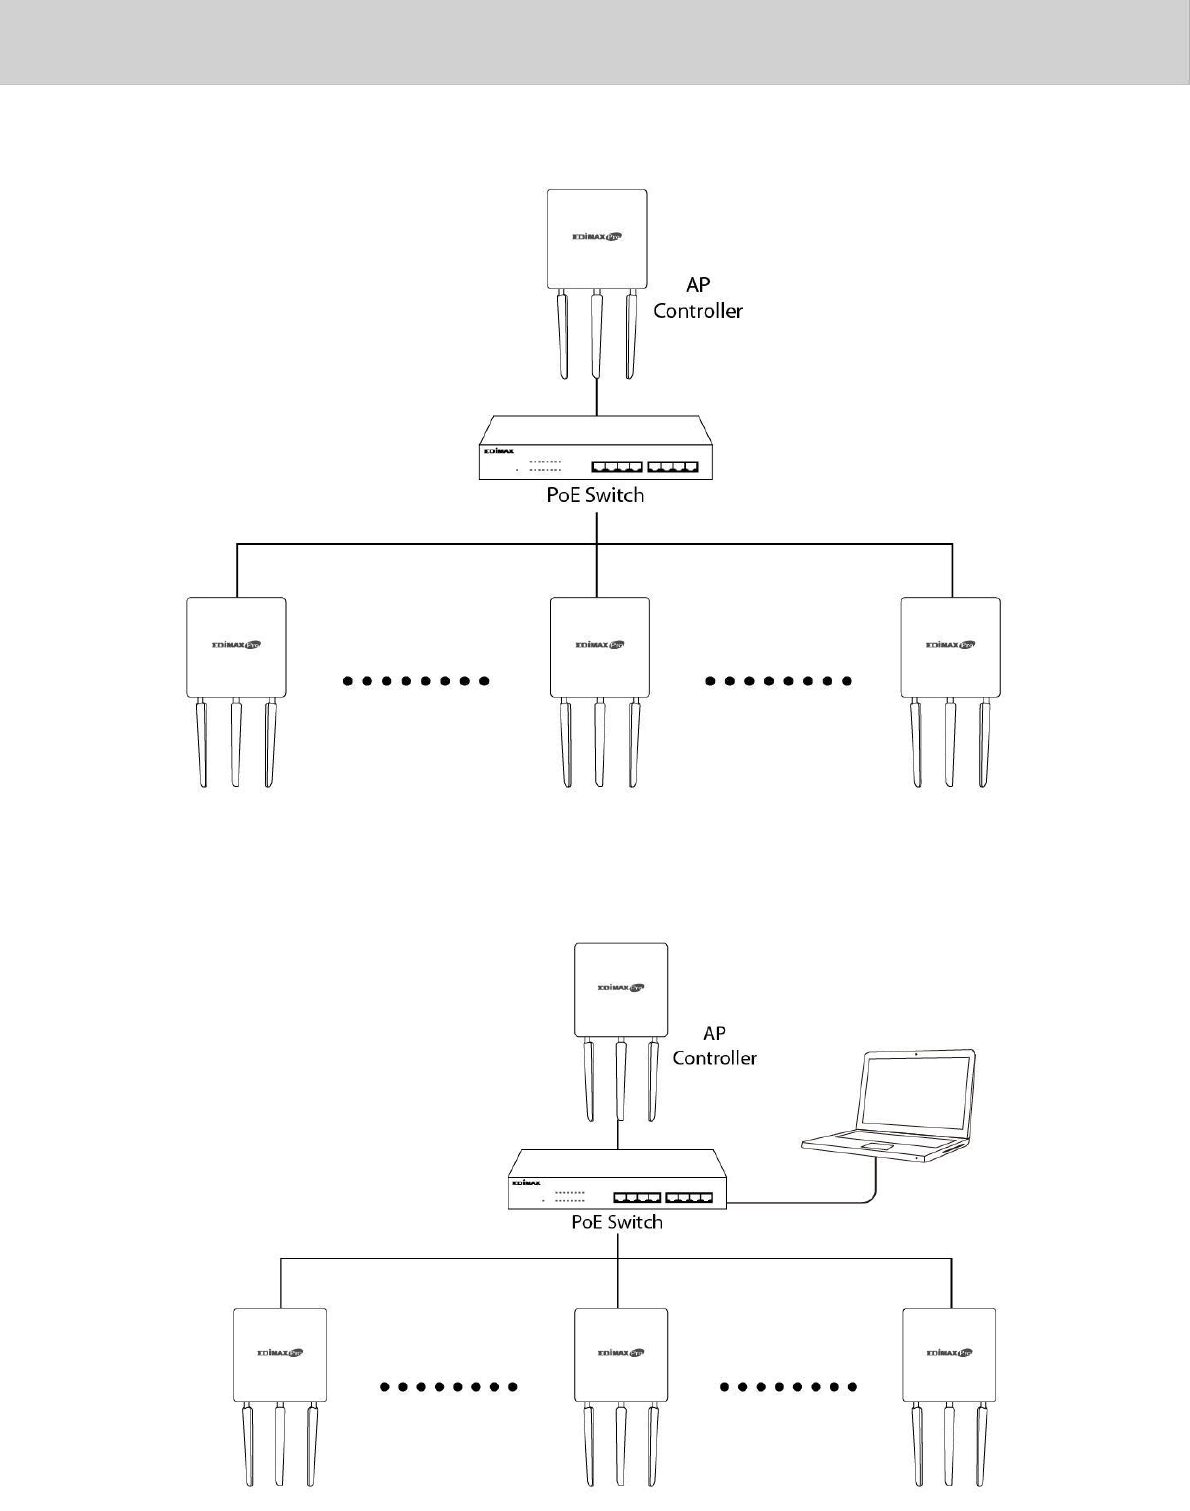
3.DesignateoneAPastheAPControllerwhichwillmanageallother
connectedAPs(upto8).
4.ConnectacomputertothedesignatedAPControllerusinganEthernetcable.
77
EdimaxProNMS
5.OpenawebbrowserandentertheAPController’sIPaddressinthe
addressfield.ThedefaultIPaddressis192.168.2.2
Yourcomputer’sIPaddressmustbeinthesamesubnetastheAP
Controller.RefertoV‐1.ConfiguringyourIPAddressforhelp.
IfyouchangedtheAPController’sIPaddress,orifyour
gateway/routerusesaDHCPserver,ensureyouenterthecorrect
IPaddress.Refertoyourgateway/router’ssettings.
6.Entertheusername&passwordtologin.Thedefaultusername&
passwordareadmin&1234.
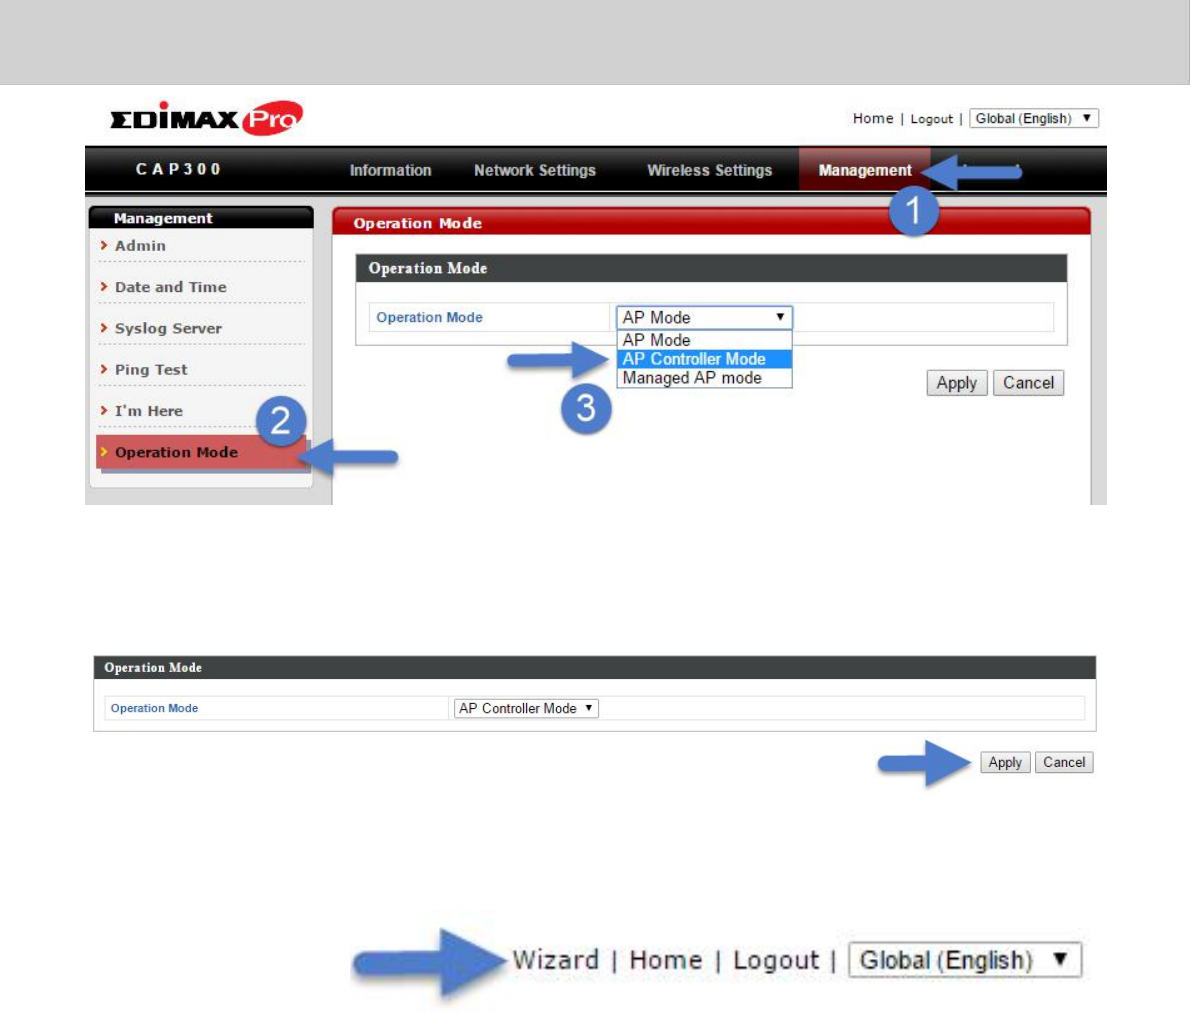
7.YouwillarriveattheEdimaxProNMSDashboard.Goto“Management”
“OperationMode”andselect“APControllerMode”fromthedropdown
menu.
78
EdimaxProNMS
8.Click“Apply”tosavethesettings.
9.EdimaxProNMSincludesawizardtoquicklysetuptheSSID&securityfor
ManagedAPs.Click“Wizard”inthetoprightcornertobegin.
10. Followtheinstructionson‐screentocompleteSteps1,2&3andclick
“Finish”tosavethesettings.
79

EdimaxProNMS
IfanyofyourManagedAPsarenotfoundduringStep2AP
Discovery,resettheManagedAPtoitsfactorydefaultsettings.
11. YourAPController&ManagedAPsshouldbefullyfunctional.Usethe
topmenutonavigatearoundEdimaxProNMS.
UseDashboard,ZonePlan,NMSMonitor&NMSSettingsto
configureManagedAPs.
UseLocalNetwork&LocalSettingstoconfigureyourAPController.
80
EdimaxProNMS
III.SoftwareLayout
Thetopmenufeatures7panels:Dashboard,ZonePlan,NMSMonitor,
NMSSettings,LocalNetwork,LocalSettings&Toolbox.
Dashboard
TheDashboardpaneldisplaysanoverviewofyournetworkandkeysystem
information,withquicklinkstoaccessconfigurationoptionsforManaged
APsandManagedAPgroups.Eachpanelcanberefreshed,collapsedor
movedaccordingtoyourpreference.
81
EdimaxProNMS
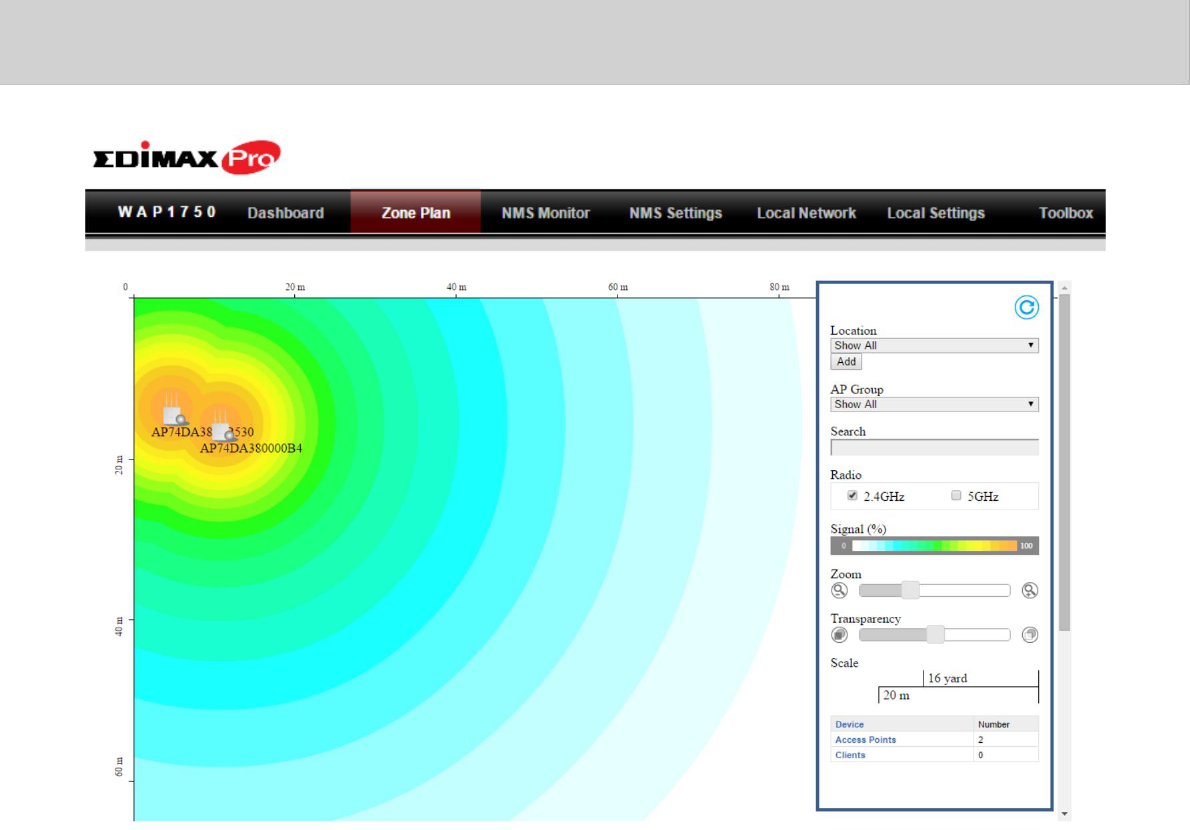
ZonePlan
ZonePlandisplaysacustomizablelivemapofManagedAPsforavisual
representationofyournetworkcoverage.EachAPiconcanbemovedaround
themap,andabackgroundimagecanbeuploadedforuser‐definedlocation
profilesusingNMSSettingsZoneEdit.Optionscanbeconfiguredusing
themenuontherightsideandsignalstrengthisdisplayedforeachAP.
82

EdimaxProNMS
NMSMonitor
TheNMSMonitorpanelprovidesmoredetailedmonitoring
informationabouttheAPArraythanfoundontheDashboard,grouped
accordingtocategoriesinthemenudowntheleftside.
83
EdimaxProNMS
NMSSettings
NMSSettingsprovidesextensiveconfigurationoptionsfortheAPArray.
Youcanmanageeachaccesspoint,assignaccesspointsintogroups,
manageWLAN,RADIUS&guestnetworksettingsaswellasupgrade
firmwareacrossmultipleaccesspoints.TheZonePlancanalsobe
configuredusing“ZoneEdit”.
84
EdimaxProNMS
LocalNetwork
LocalNetworksettingsareforyourAPController.YoucanconfiguretheIP
addressandDHCPserveroftheAPControllerinadditionto2.4GHz&5Ghz
Wi‐Fiandsecurity,withWPS,RADIUSserver,MACfilteringandWMM
settingsalsoavailable.
85

EdimaxProNMS
LocalSettings
LocalSettingsareforyourAPController.Youcansettheoperationmode
andviewnetworksettings(clientsandlogs)specificallyfortheAPController,
aswellasothermanagementsettingssuchasdate/time,adminaccounts,
firmwareandreset.
86
EdimaxProNMS
Toolbox
TheToolboxpanelprovidesanetworkdiagnostictools:pingandtraceroute.
87
EdimaxProNMS
IV.Features
DescriptionsofthefunctionsofeachmainpanelDashboard,ZonePlan,NMS
Monitor,NMSSettings,LocalNetwork,LocalSettings&Toolboxcanbe
foundbelow.WhenusingEdimaxNMS,click“Apply”tosavechanges:
Screenshotsdisplayedareexamples.Theinformationshown
onyourscreenwillvarydependingonyourconfiguration.
IV‐1.LOGIN,LOGOUT&RESTART
ItisrecommendedthatyoulogintotheAPControllertomake
configurationstoManagedAPs.
LOGIN
1. ConnectacomputertothedesignatedAPControllerusingan
Ethernetcable:
2. OpenawebbrowserandentertheAPController’sIPaddressin
theaddressfield.ThedefaultIPaddressis192.168.2.2
88
EdimaxProNMS
Yourcomputer’sIPaddressmustbeinthesamesubnetastheAP
Controller.RefertoV‐1.ConfiguringyourIPAddressformorehelp.
IfyouchangedtheAPController’sIPaddress,orifyour
gateway/routerusesaDHCPserver,ensureyouenterthecorrect
IPaddress.Refertoyourgateway/router’ssettings.
IfusingaDHCPserveronthenetwork,itisadvisedtouseyour
DHCPserver’ssettingstoassigntheAPControllerastaticIP
address.
3. Entertheusername&passwordtologin.Thedefaultusername
&passwordareadmin&1234.
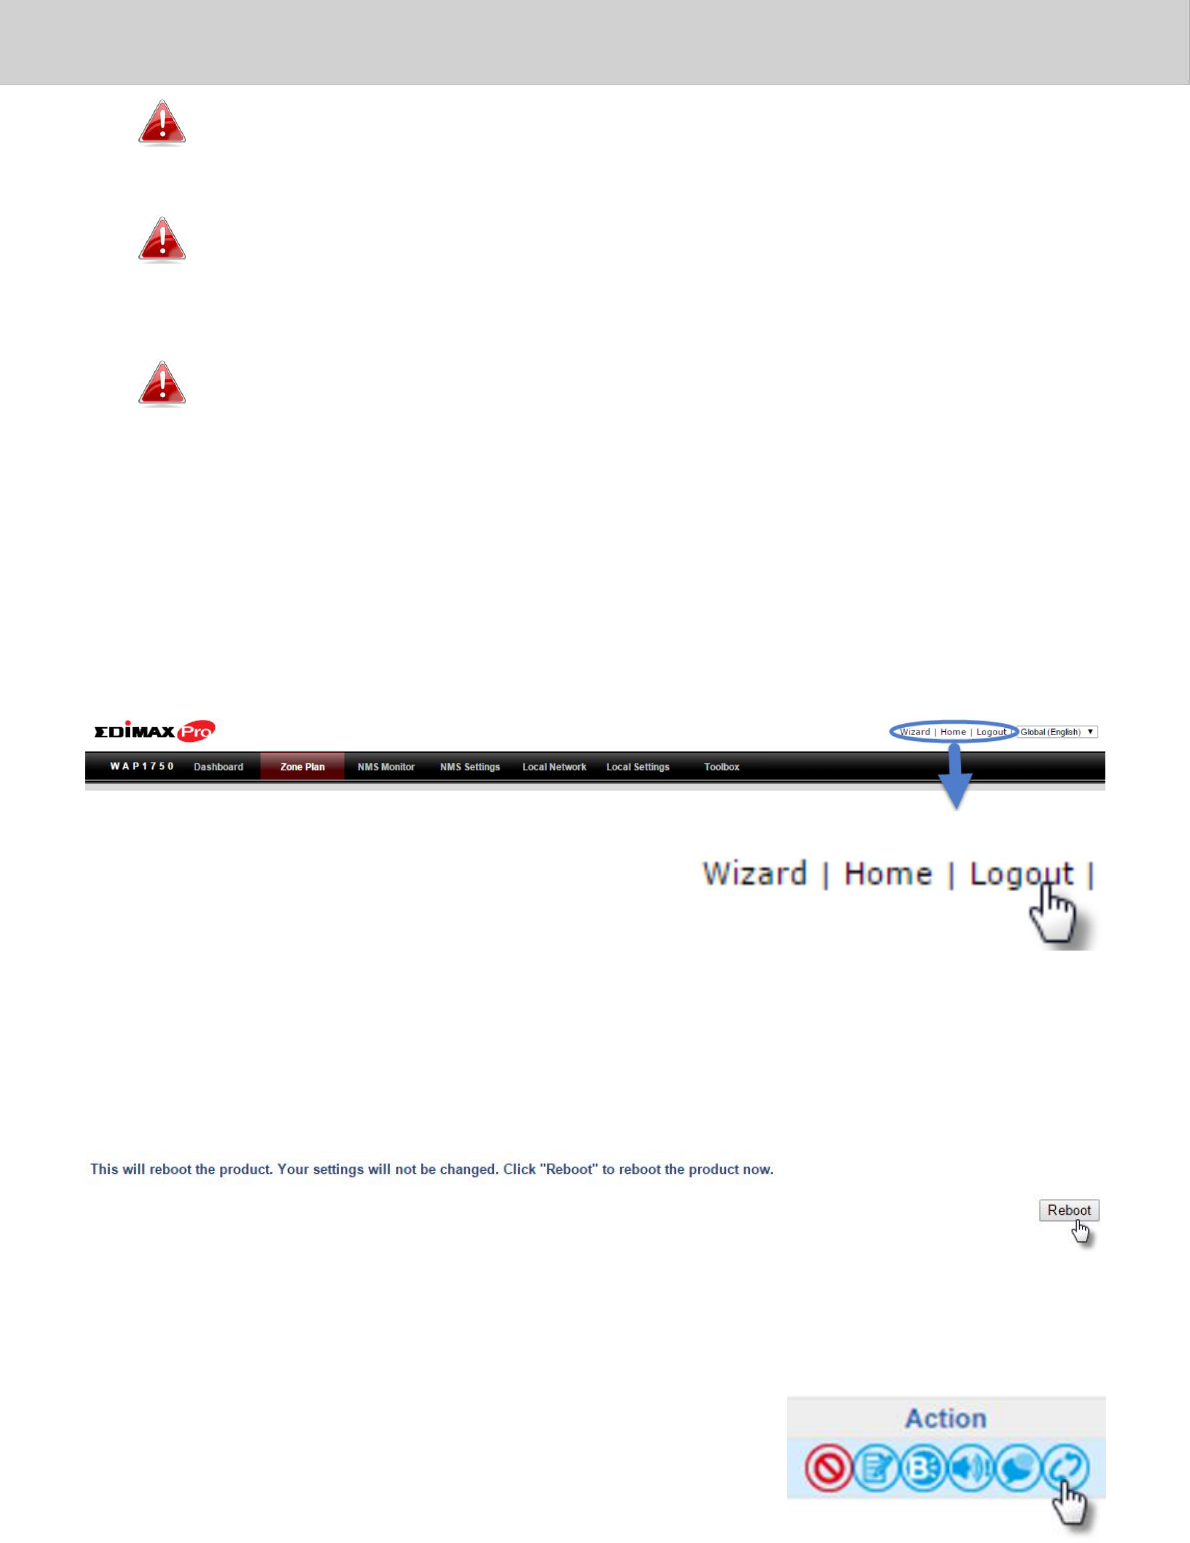
LOGOUT
TologoutfromEdimaxNMS,click“Logout”inthetoprightcorner:
RESTART
YoucanrestartyourAPControlleroranyManagedAPusingEdimaxNMS.To
restartyourAPControllergotoLocalSettingsAdvancedRebootandclick
“Reboot”.
TorestartManagedAPsclicktheRestarticonforthespecifiedAPonthe
Dashboard:
89

EdimaxProNMS
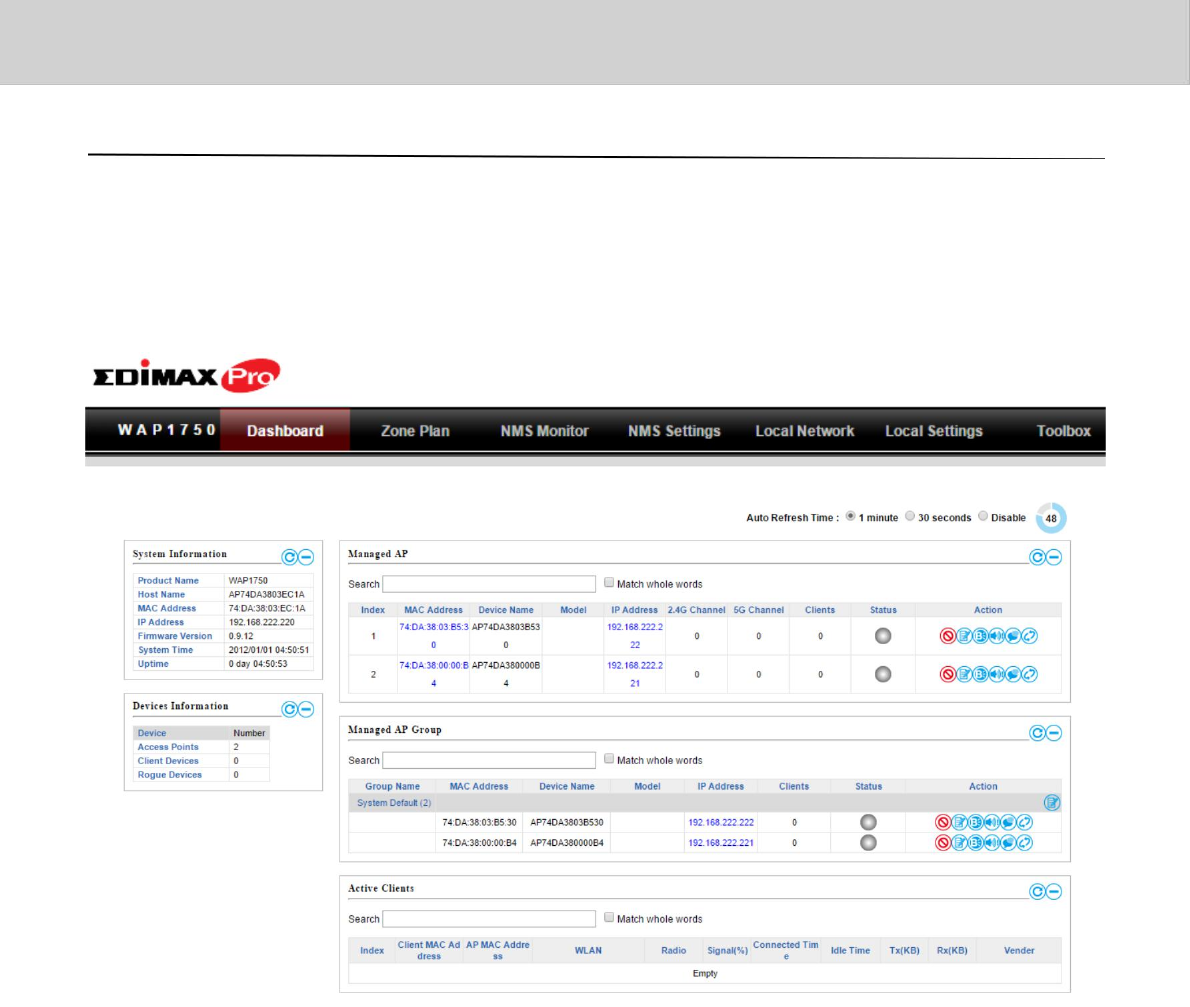
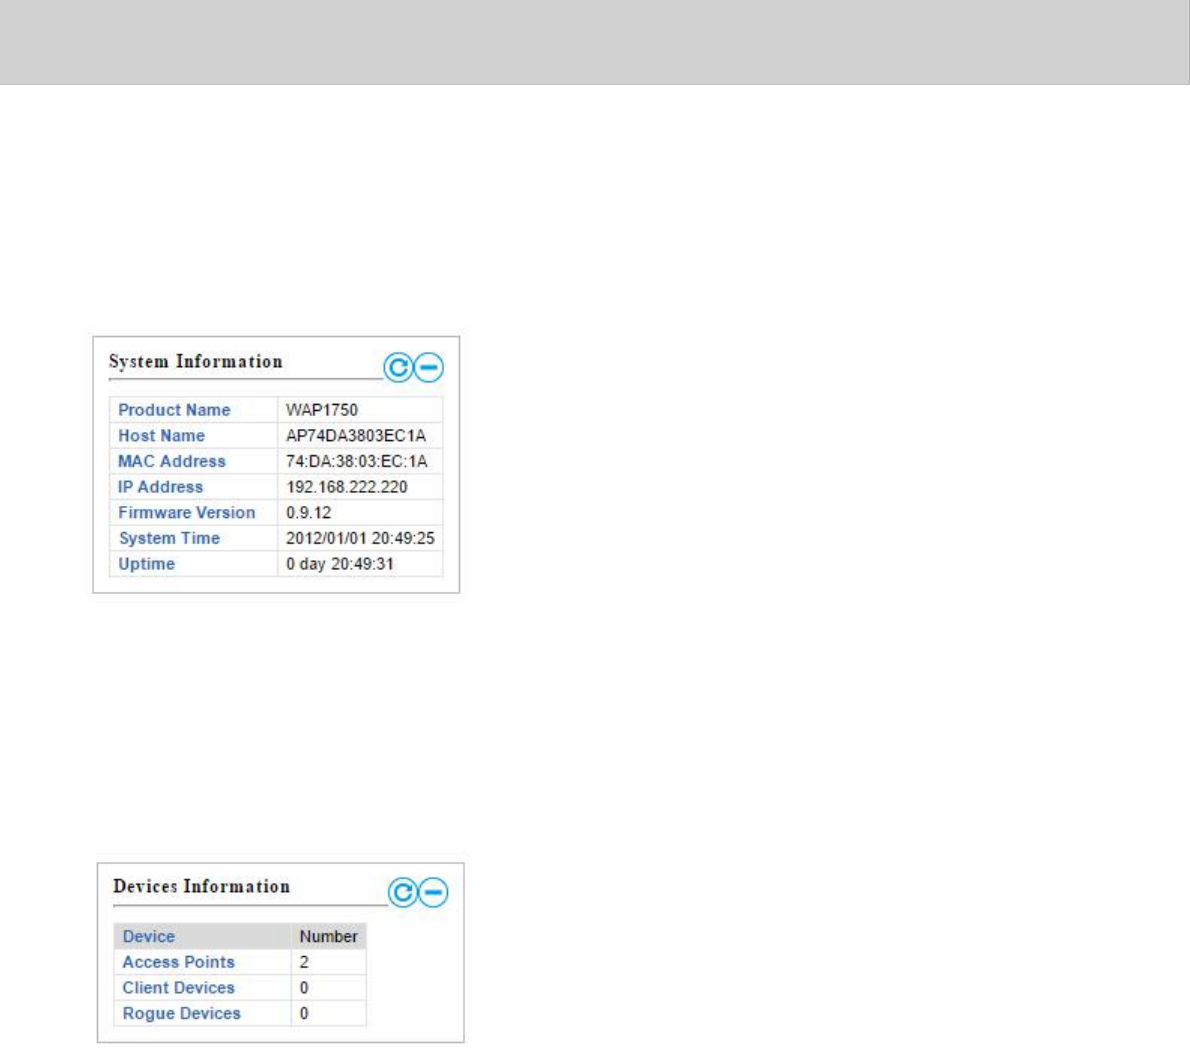
IV‐2.DASHBOARD
ThedashboarddisplaysanoverviewofyourAParray:
Usetheblueiconsabovetorefreshorcollapseeachpanelinthedashboard.
Clickanddragtomoveapaneltosuityourpreference.Youcansetthe
dashboardtoauto‐refreshevery1minute,30secondsordisableauto‐refresh:
90
EdimaxProNMS
IV‐2‐1.SystemInformation
SystemInformationdisplaysinformationabouttheAPController:
ProductName(model),HostName,MACAddress,IPAddress,Firmware
Version,SystemTimeandUptime(timetheaccesspointhasbeenon).
IV‐2‐2.DevicesInformation
DevicesInformationisasummaryofthenumberofalldevicesinthelocal
network:AccessPoints,ClientsConnected,andRogue(unidentified)Devices.
91
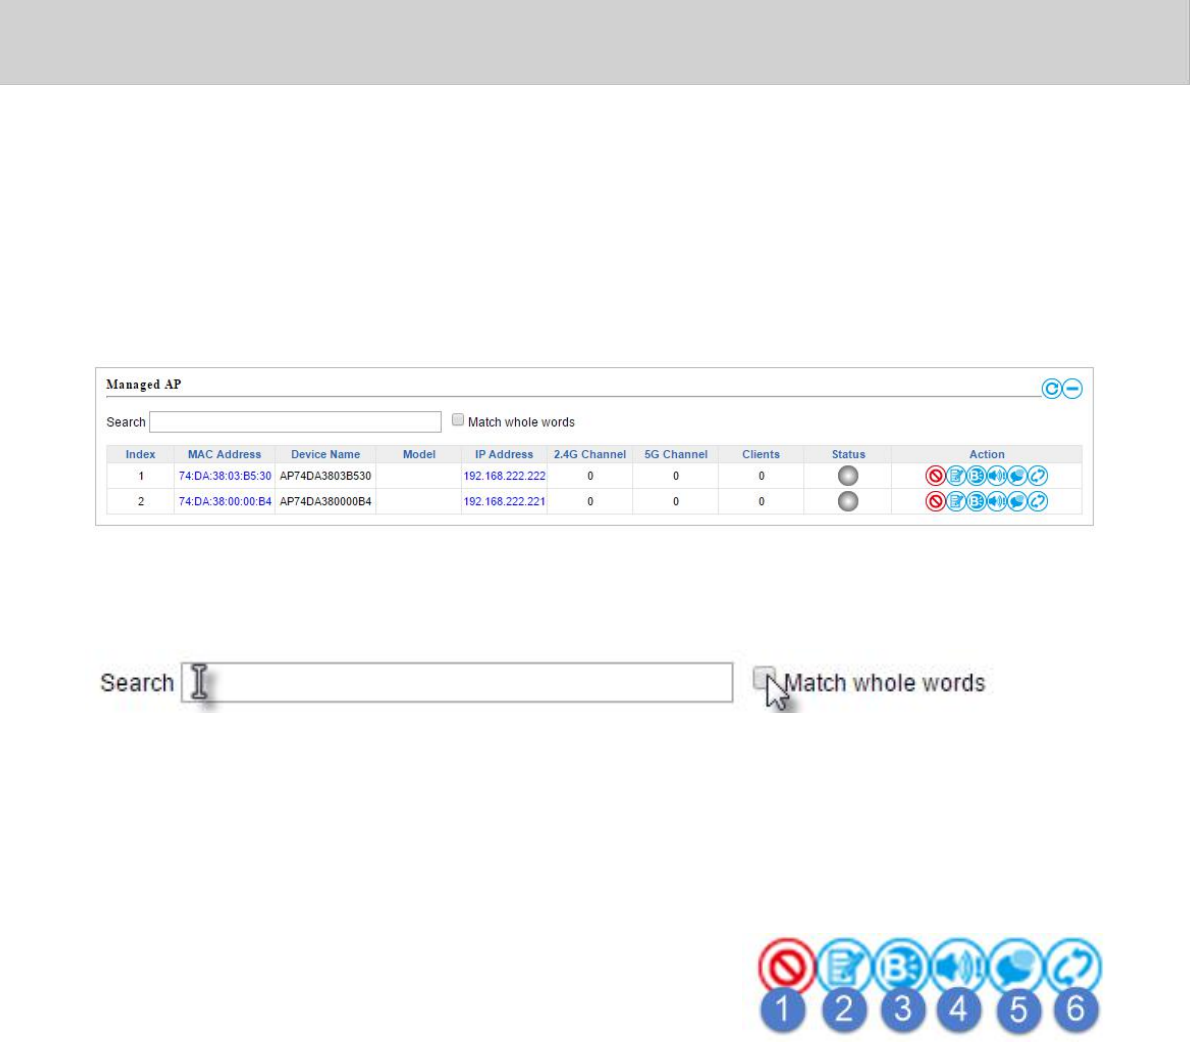
EdimaxProNMS
IV‐2‐3.ManagedAP
ManagedAPdisplaysinformationabouteachManagedAPinthelocal
network:Index(referencenumber),MACAddress,DeviceName,Model,IP
Address,2.4GHz&5GHzWirelessChannelNumber,No.ofClientsconnected
toeachaccesspoint,andStatus(connected,connectingordisconnected).
ThesearchfunctioncanbeusedtolocateaspecificManagedAP.Typein
thesearchboxandthelistwillupdate:
TheStatusicondisplaysgrey(disconnected),yellow(connecting)or
green(connected)foreachManagedAP.
EachManagedAPhas“Action”iconswiththefollowingfunctions:
1. Disallow
RemovetheManagedAPfromtheAParrayanddisableconnectivity.
2. Edit
EditvarioussettingsfortheManagedAP(refertoIV‐5‐1.AccessPoint).
3. BlinkLED
TheManagedAP’sLEDwillflashtemporarilytohelpidentify&locate
accesspoints.
4. Buzzer
TheManagedAP’sbuzzerwillsoundtemporarilytohelpidentify&
locateaccesspoints.
92
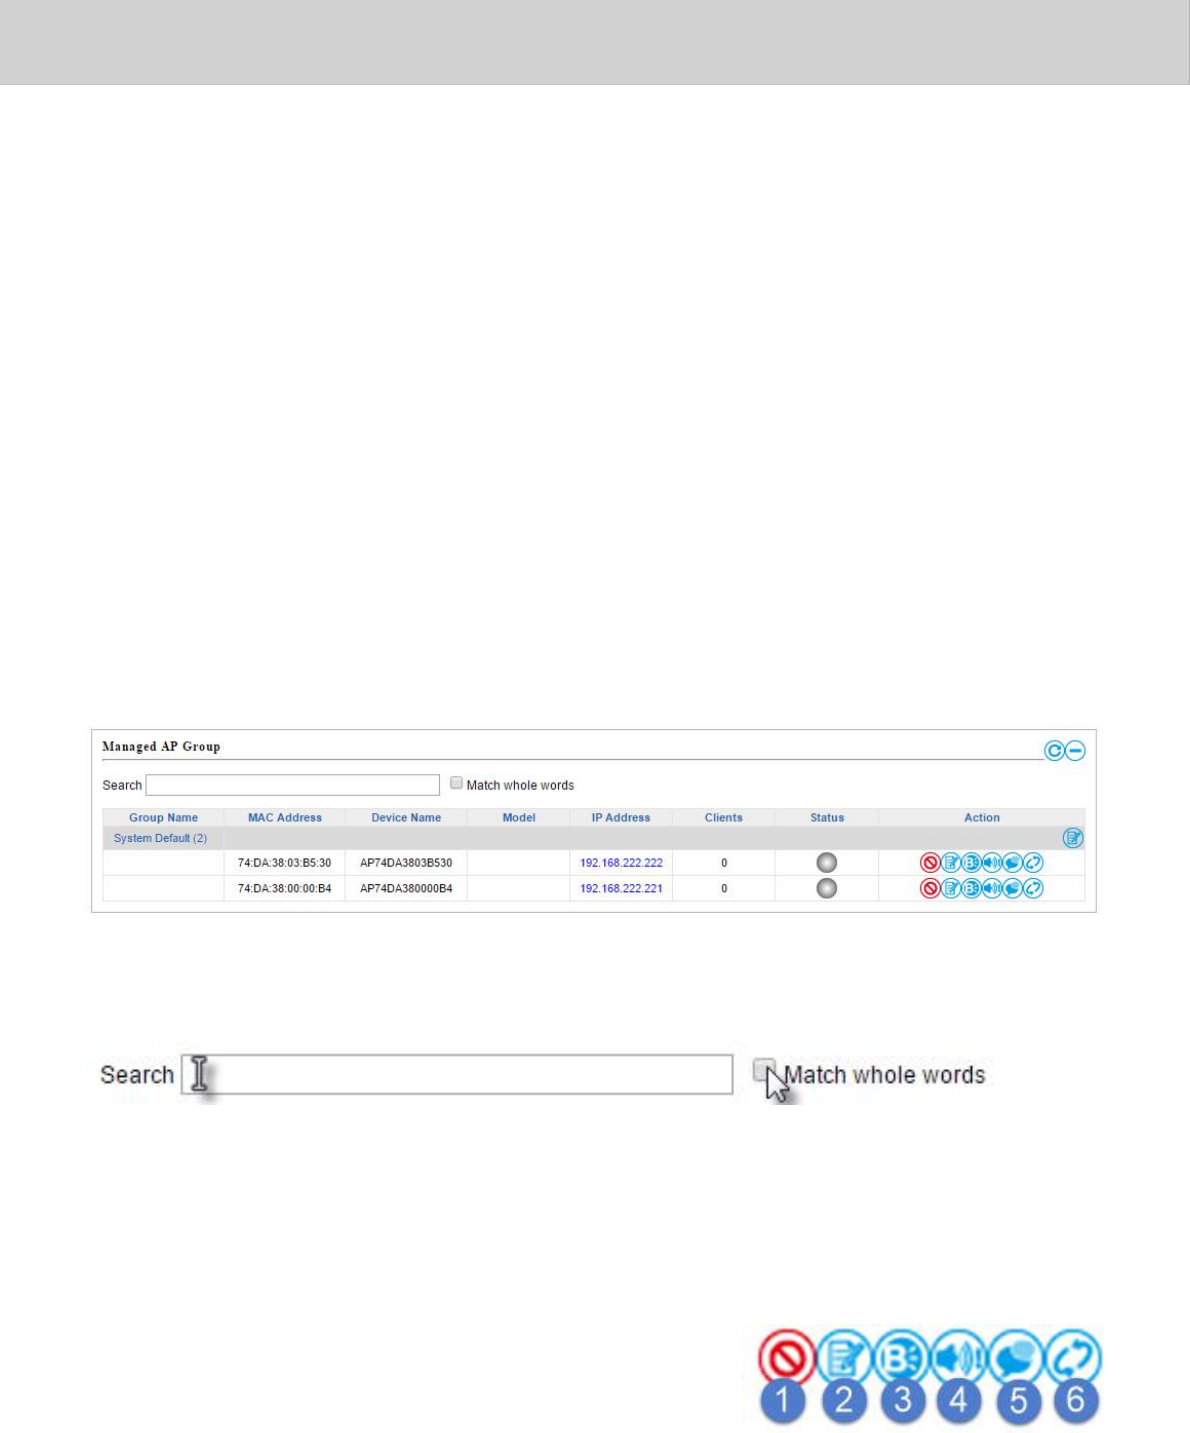
EdimaxProNMS
5. NetworkConnectivity
Gotothe“NetworkConnectivity”paneltoperformapingortraceroute.
6. Restart
RestartstheManagedAP.
IV‐2‐4.ManagedAPGroup
ManagedAPscanbegroupedaccordingtoyourrequirements.ManagedAP
GroupdisplaysinformationabouteachManagedAPgroupinthelocalnetwork:
GroupName,MACAddress,DeviceName,Model,IPAddress,2.4GHz
& 5GHzWirelessChannelNumber,No.ofClientsconnectedtoeach
accesspoint,andStatus(connectedordisconnected).
ToeditManagedAPGroupsgotoNMSSettingsAccessPoint(refertoIV‐5‐1.
AccessPoint).
ThesearchfunctioncanbeusedtolocateaspecificManagedAPGroup.
Typeinthesearchboxandthelistwillupdate:
TheStatusicondisplaysgrey(disconnected),yellow(connecting)or
green(connected)foreachindividualManagedAP.
EachManagedAPhas“Action”iconswiththefollowingfunctions:
1. Disallow
RemovetheManagedAPfromtheAParrayanddisableconnectivity.
93
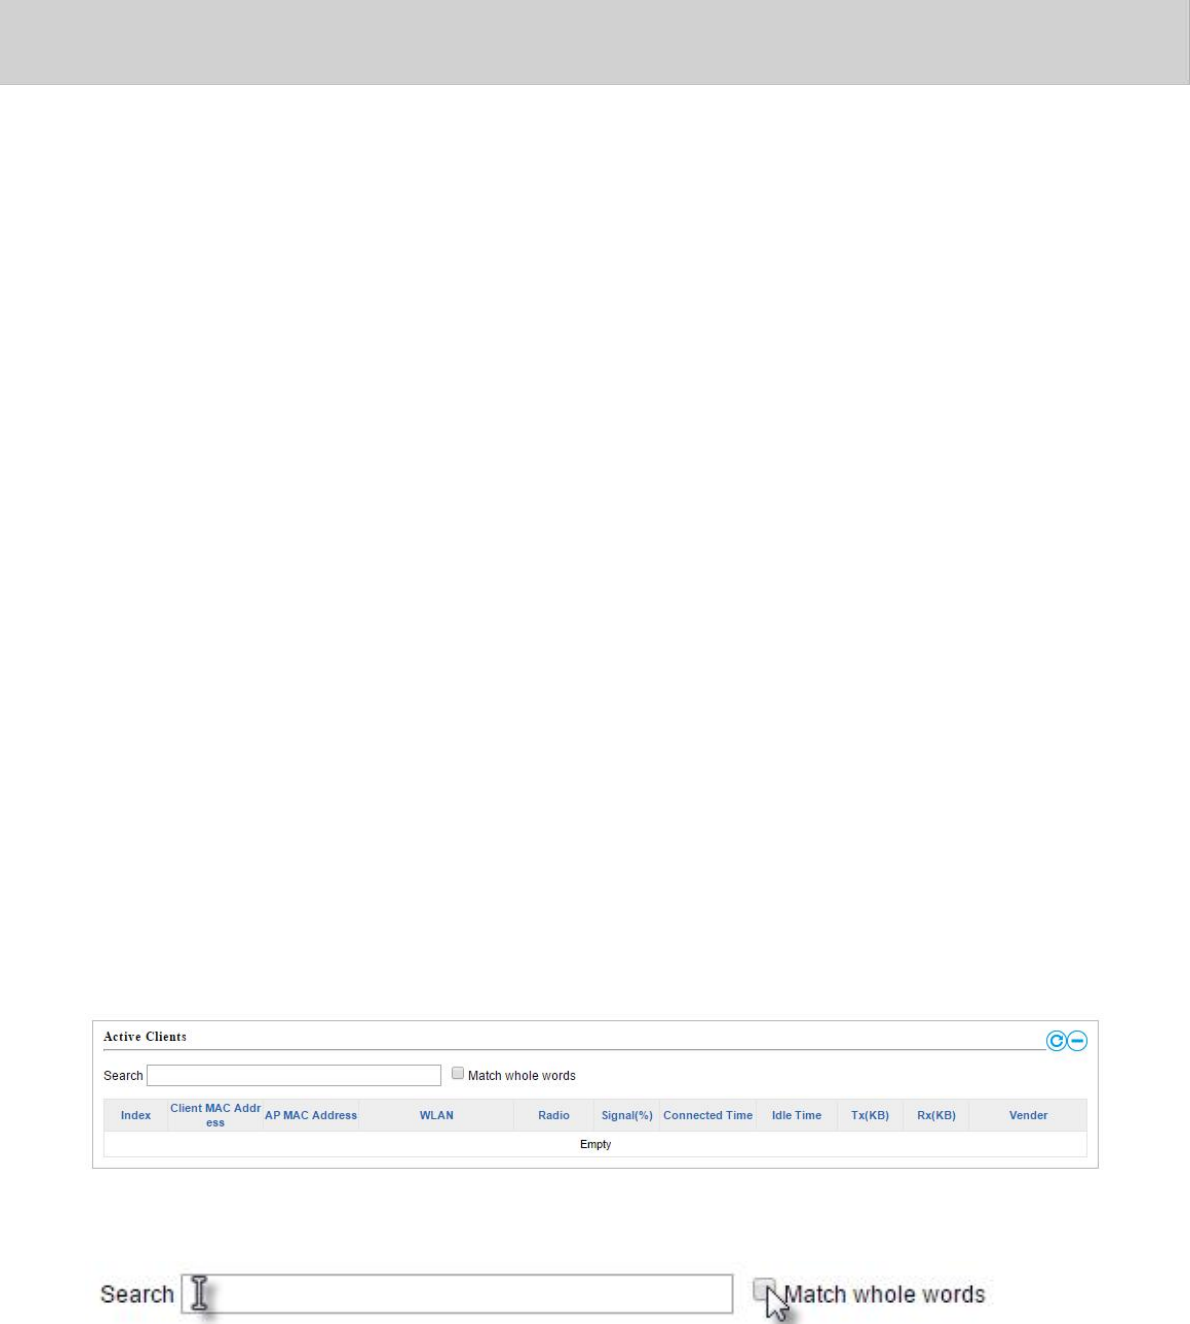
EdimaxProNMS
2. Edit
EditvarioussettingsfortheManagedAP(refertoIV‐5‐1.AccessPoint)
3. BlinkLED
TheManagedAP’sLEDwillflashtemporarilytohelpidentify&
locateaccesspoints.
4. Buzzer
TheManagedAP’sbuzzerwillsoundtemporarilytohelpidentify&
locateaccesspoints.
5. NetworkConnectivity
Gotothe“NetworkConnectivity”paneltoperformapingortraceroute.
6. Restart
RestartstheManagedAP.
IV‐2‐5.ActiveClients
ActiveClientsdisplaysinformationabouteachclientinthelocalnetwork:
Index(referencenumber),ClientMACAddress,DeviceName,Model,IP
Address,2.4GHz&5GHzWirelessChannelNumber,No.ofClients
connectedtoeachaccesspoint,andStatus(onoroff).
Thesearchfunctioncanbeusedtolocateaspecificclient.Typeinthe
searchboxandthelistwillupdate:
94