Edimax Technology Co 9591101419 Internet Camera User Manual IC 9110W 20150306
Edimax Technology Co Ltd Internet Camera IC 9110W 20150306
user manual

IC‐9110W
UserManual
11‐2014/v1.0

2
Copyright@EdimaxTechnologyCo.,Ltd.allrightsreserved.Nopartofthispublication
maybereproduced,transmitted,transcribed,storedinaretrievalsystem,ortranslated
intoanylanguageorcomputerlanguage,inanyformorbyanymeans,electronic,
mechanical,magnetic,optical,chemical,manualorotherwise,withoutthepriorwritten
permissionfromEdimaxTechnologyCo.,Ltd.
EdimaxTechnologyCo.,Ltd.makesnorepresentationsorwarranties,either
expressedorimplied,withrespecttothecontentshereofandspecificallydisclaimsany
warranties,merchantability,orfitnessforanyparticularpurpose.Anysoftwaredescribed
inthismanualissoldorlicensedasis.Shouldtheprogramsprovedefectivefollowing
theirpurchase,thebuyer(andnotthiscompany,itsdistributor,oritsdealer)assumes
theentirecostofallnecessaryservicing,repair,andanyincidentalorconsequential
damagesresultingfromanydefectinthesoftware.EdimaxTechnologyCo.,Ltd.reserves
therighttorevisethispublicationandtomakechangesfromtimetotimeinthecontents
hereofwithouttheobligationtonotifyanypersonofsuchrevisionorchanges.
Theproductyouhavepurchasedandthesetupscreenmayappearslightlydifferent
fromthoseshowninthisQIG.Formoreinformationaboutthisproduct,pleasereferto
theusermanualontheCD‐ROM.Thesoftwareandspecificationsaresubjecttochange
withoutnotice.Pleasevisitourwebsitewww.edimax.comforupdates.Allbrandand
productnamesmentionedinthismanualaretrademarksand/orregisteredtrademarks
oftheirrespectiveholders.
EdimaxTechnologyCo.,Ltd.
Add:No.3,Wu‐Chuan3rdRd.,Wu‐KuIndustrialPark,NewTaipeiCity,Taiwan
Tel:+886‐2‐77396888
Email:sales@edimax.com.tw
NoticeAccordingtoGNUGeneralPublicLicenseVersion2
CertainEdimaxproductsincludesoftwarecodedevelopedbythirdparties,softwarecodeissubjectto
theGNUGeneralPublicLicense("GPL")orGNULesserGeneralPublicLicense("LGPL").Pleaseseethe
GNU(www.gnu.org)andLPGL(www.gnu.org)Websitestoviewthetermsofeachlicense.
TheGPLCodeandLGPLCodeusedinEdimaxproductsaredistributedwithoutanywarrantyandare
subjecttothecopyrightsoftheirauthors.Fordetails,seetheGPLCodeandLGPLCodelicenses.You
candownloadthefirmware‐filesathttp://www.edimax.comunder"Download"page.
3
I.ProductInformation...............................................................................5
I‐1.PackageContents....................................................................................................................5
I‐2.SystemRequirements.............................................................................................................6
I‐3.LEDStatus...............................................................................................................................7
I‐4.ProductLabel..........................................................................................................................8
I‐5.Reset.......................................................................................................................................9
II.CameraSetup.......................................................................................10
II‐1.EdiViewIIApp......................................................................................................................12
II‐2.EdiViewFinder......................................................................................................................16
II‐2‐1.Windows...............................................................................................................................16
II‐2‐2.Mac.......................................................................................................................................22
II‐2‐3.UsingEdiViewFinder............................................................................................................25
II‐3.WPS(Wi‐FiProtectedSetup)................................................................................................27
III.OutdoorInstallation.............................................................................28
IV.Web‐BasedManagementInterface......................................................34
IV‐1.Basic......................................................................................................................................38
IV‐1‐1.Network................................................................................................................................39
IV‐1‐2.Wireless.................................................................................................................................41
IV‐1‐2‐1.Smartphone...........................................................................................................................42
IV‐1‐2‐2.Computer...............................................................................................................................45
IV‐1‐2‐3.WPS........................................................................................................................................46
IV‐1‐3.DynamicDNS.........................................................................................................................47
IV‐1‐4.RTSP......................................................................................................................................48
IV‐1‐5.Date&Time..........................................................................................................................49
IV‐1‐6.Users.....................................................................................................................................50
IV‐1‐7.UPnP......................................................................................................................................52
IV‐1‐8.Bonjour.................................................................................................................................53
IV‐2.Video.....................................................................................................................................54
IV‐2‐1.VideoSettings.......................................................................................................................55
IV‐2‐2.ImageAppearance................................................................................................................57
IV‐2‐3.NightVision...........................................................................................................................58
IV‐3.Events....................................................................................................................................59
IV‐3‐1.MotionDetection..................................................................................................................59
IV‐3‐1‐1.MotionDetection..................................................................................................................59
IV‐3‐1‐2.DetectionRegion...................................................................................................................62
IV‐3‐1‐3.ScheduleSettings...................................................................................................................64
IV‐3‐2.Notification...........................................................................................................................66
4
IV‐3‐2‐1.MailSettings..........................................................................................................................66
IV‐3‐2‐2.FTP.........................................................................................................................................68
IV‐3‐2‐3.Push.......................................................................................................................................69
IV‐4.StorageSettings....................................................................................................................70
IV‐4‐1.StorageDirectory..................................................................................................................70
IV‐4‐2.ScheduleSettings..................................................................................................................71
IV‐4‐3.NASSettings..........................................................................................................................72
IV‐4‐4.SDCardSettings....................................................................................................................73
IV‐4‐5.FileManagement..................................................................................................................74
IV‐5.System...................................................................................................................................76
IV‐5‐1.Basic......................................................................................................................................76
IV‐5‐2.Advanced..............................................................................................................................77
IV‐5‐3.CloudService.........................................................................................................................79
IV‐6.Status....................................................................................................................................80
IV‐6‐1.SystemInformation..............................................................................................................81
IV‐6‐2.SystemLog............................................................................................................................82
V.Myedimax.com.....................................................................................83
VI.16ChannelViewerforWindows...........................................................86
VI‐1.Installation............................................................................................................................86
VI‐2.Usingthe16ChannelViewer................................................................................................90
VI‐3.Configuringthe16ChannelViewer......................................................................................93
VI‐3‐1.AddCamera/CameraConfiguration.....................................................................................93
VI‐3‐1‐1.Camera...................................................................................................................................94
VI‐3‐1‐2.ScheduledRecording.............................................................................................................96
VI‐3‐1‐3.Audio......................................................................................................................................99
VI‐3‐1‐4.MotionRecording................................................................................................................100
VI‐3‐2.GeneralOptions..................................................................................................................102
VI‐3‐2‐1.General................................................................................................................................102
VI‐3‐2‐2.EmailSettings......................................................................................................................104
VI‐3‐2‐3.Security................................................................................................................................106
VI‐3‐2‐4.About...................................................................................................................................108
VI‐4.ChangingtheDisplayLayout...............................................................................................109
VI‐5.FullScreenMode................................................................................................................112
VI‐6.Scan.....................................................................................................................................113
VI‐7.ZoomIn/Out.......................................................................................................................114
VI‐8.Pan&Tilt.............................................................................................................................115
VI‐9.Snapshot.............................................................................................................................116
VI‐10.Recording............................................................................................................................117
VI‐11.VideoPlayback....................................................................................................................118
5
I. ProductInformation
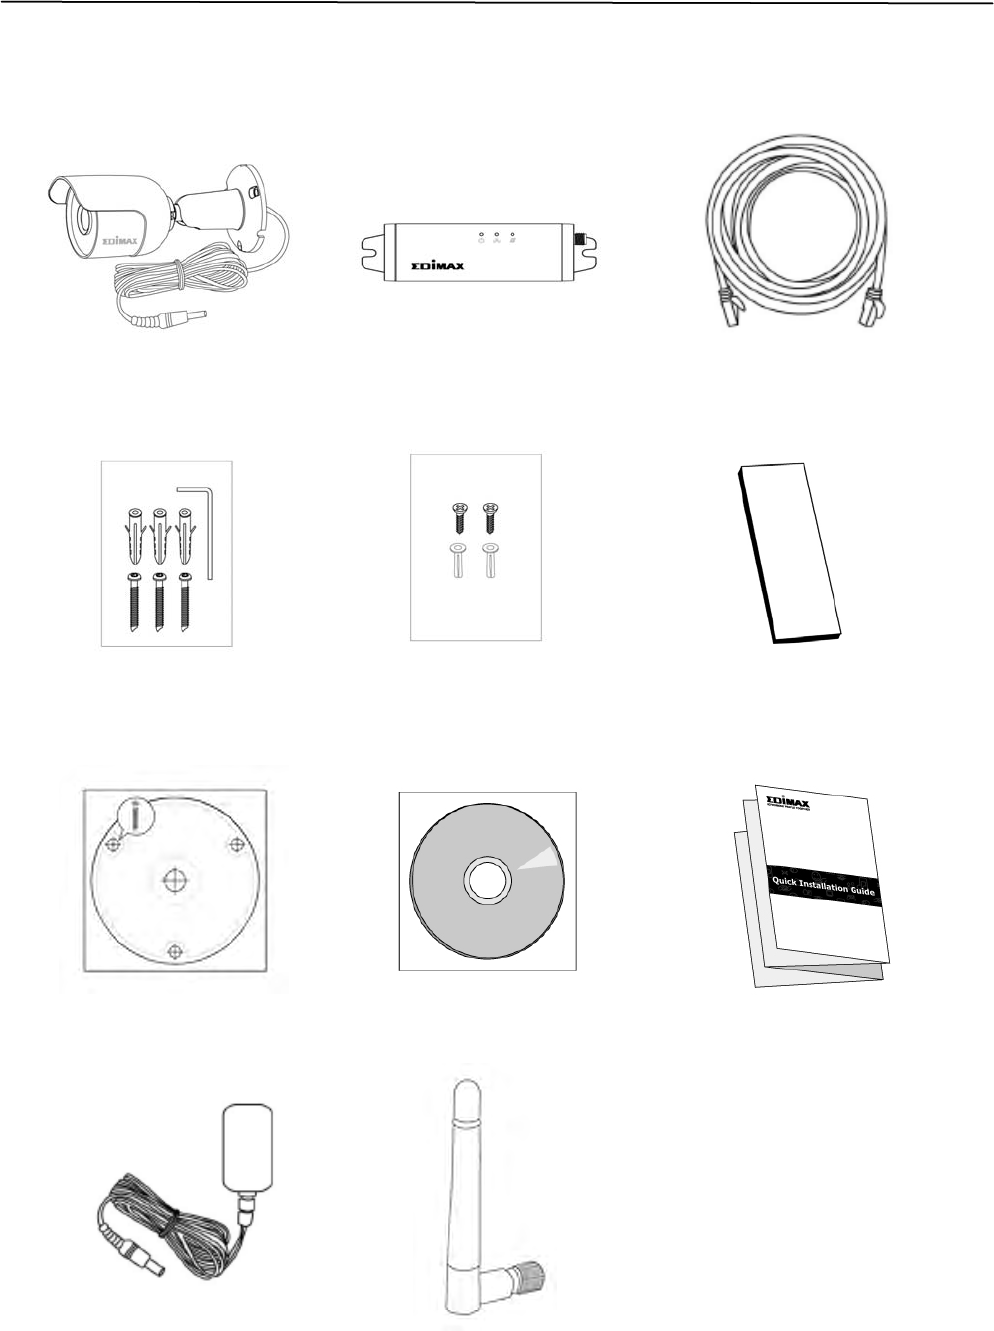
I‐1.PackageContents
EthernetCable
QuickInstallationGuide
PowerAdapter
CD‐ROM
OutdoorImageUnit
AdhesivePad
WallTemplate
OutdoorImageUnitScrewsIndoorMainUnitScrews
IndoorMainUnit
Antenna
OutdoorImageUnit
6
I‐2. SystemRequirements
‐ IntelPentium42.4GHz(aboveorsimilar)
‐ VGAcard(1024*768orabove)
‐ CD‐ROMDrive
‐ Atleast128MBharddiskspace(256MBrecommended)
‐ Windows2000,XP,Vista,7or8
‐ Webbrowser(InternetExplorer7.0,Firefox3.6,Chrome10,Opera11,
Safari5orabove)

7
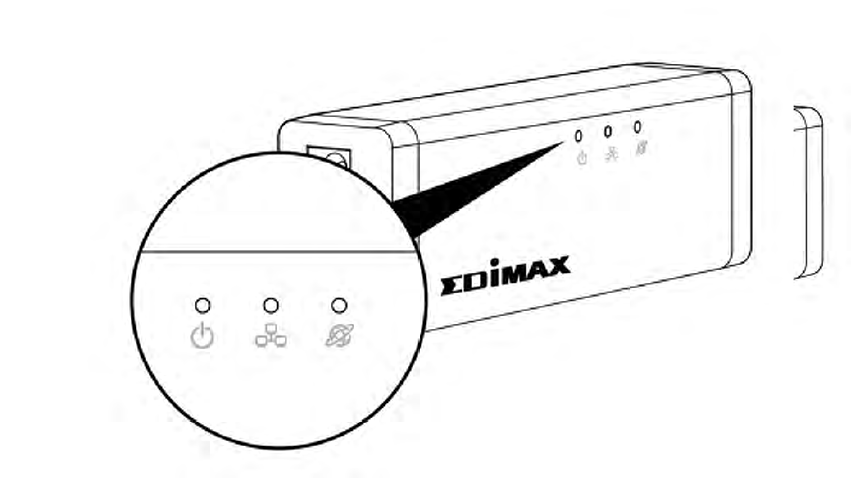
I‐3. LEDStatus
LEDLEDColor LEDStatusDescription
PowerGreen
OnNetworkcameraisonand
connectedtocloudserver.
QuickFlashingNetworkcameraisrestarting.
SlowFlashing(1x
persecond)
Networkcameraisstartingup OR
networkcameraisnotconnected
tocloudserver.
LANGreen
OnNetworkcameraisconnectedto
thelocalnetwork.
QuickFlashingLANactivity(transferringdata).
SlowFlashing(1x
persecond) WPSisactive.
InternetOrange
OnConnectedtoInternet.
SlowFlashing(1x
persecond) NotconnectedtoInternet.

8
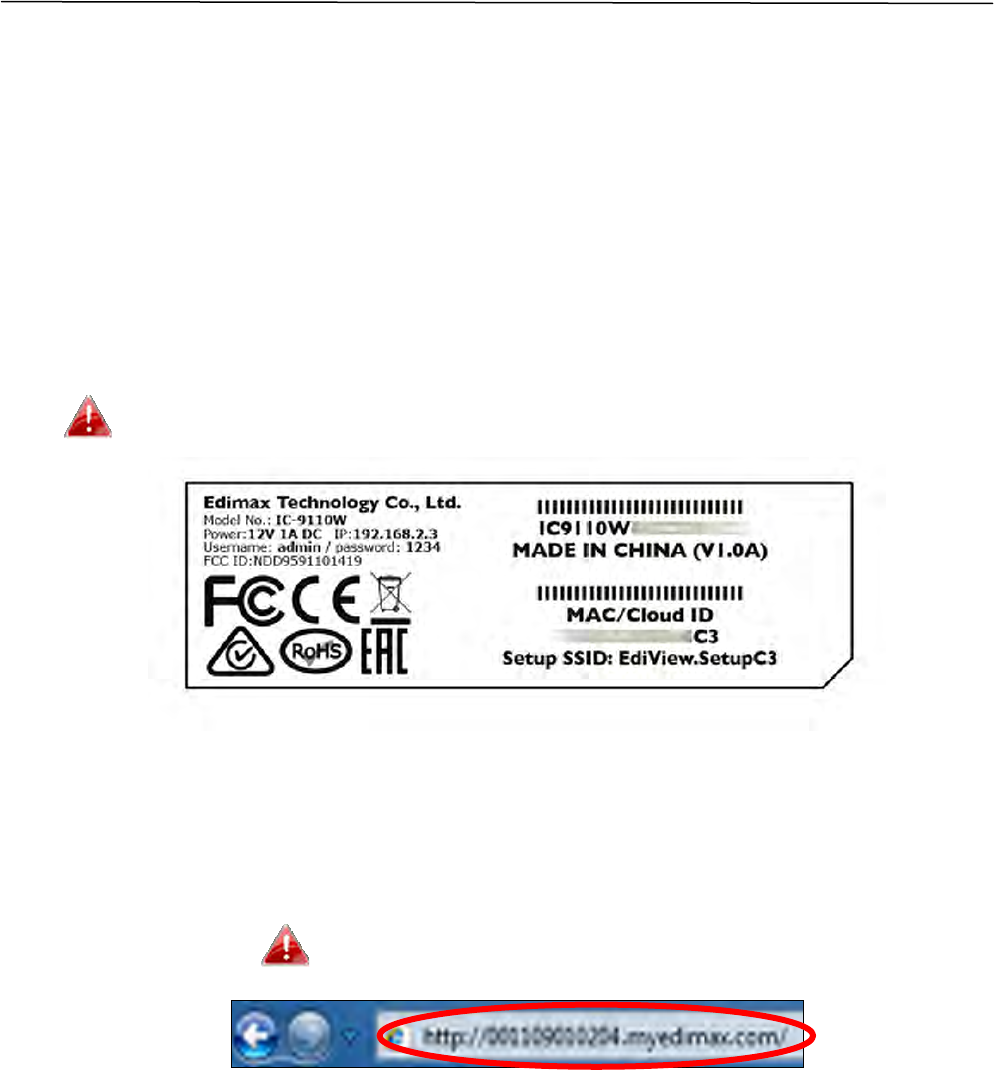
I‐4. ProductLabel
TheproductlabellocatedontheindoormainunitdisplaystheMACaddress,
cloudIDandsetupSSIDofyournetworkcamera.
TheMACaddressandcloudIDarethesameforeasyreference.
ThecloudIDallowsyoutoviewalivestreamfromyournetworkcamera
remotely(fromanyInternetconnection)asdescribedlaterinV.
Myedimax.com.

9
I‐5. Reset
Ifyouexperienceproblemswithyournetworkcamera,youcanresetthe
camerabacktoitsfactorydefaultsettings.Thisresetsallsettingsbackto
default.
1. PressandholdtheWPS/Resetbuttonfoundonthebackpanelforatleast
10seconds.
2. ReleasethebuttonwhenthegreenpowerLEDisflashingquickly.
3. Waitforthenetworkcameratorestart.Thecameraisreadywhenthe
greenpowerLEDisflashingslowly.
Aftersetup,thegreenpowerLEDwilldisplayontoindicatea
successfulconnectiontothecloudserver.
10
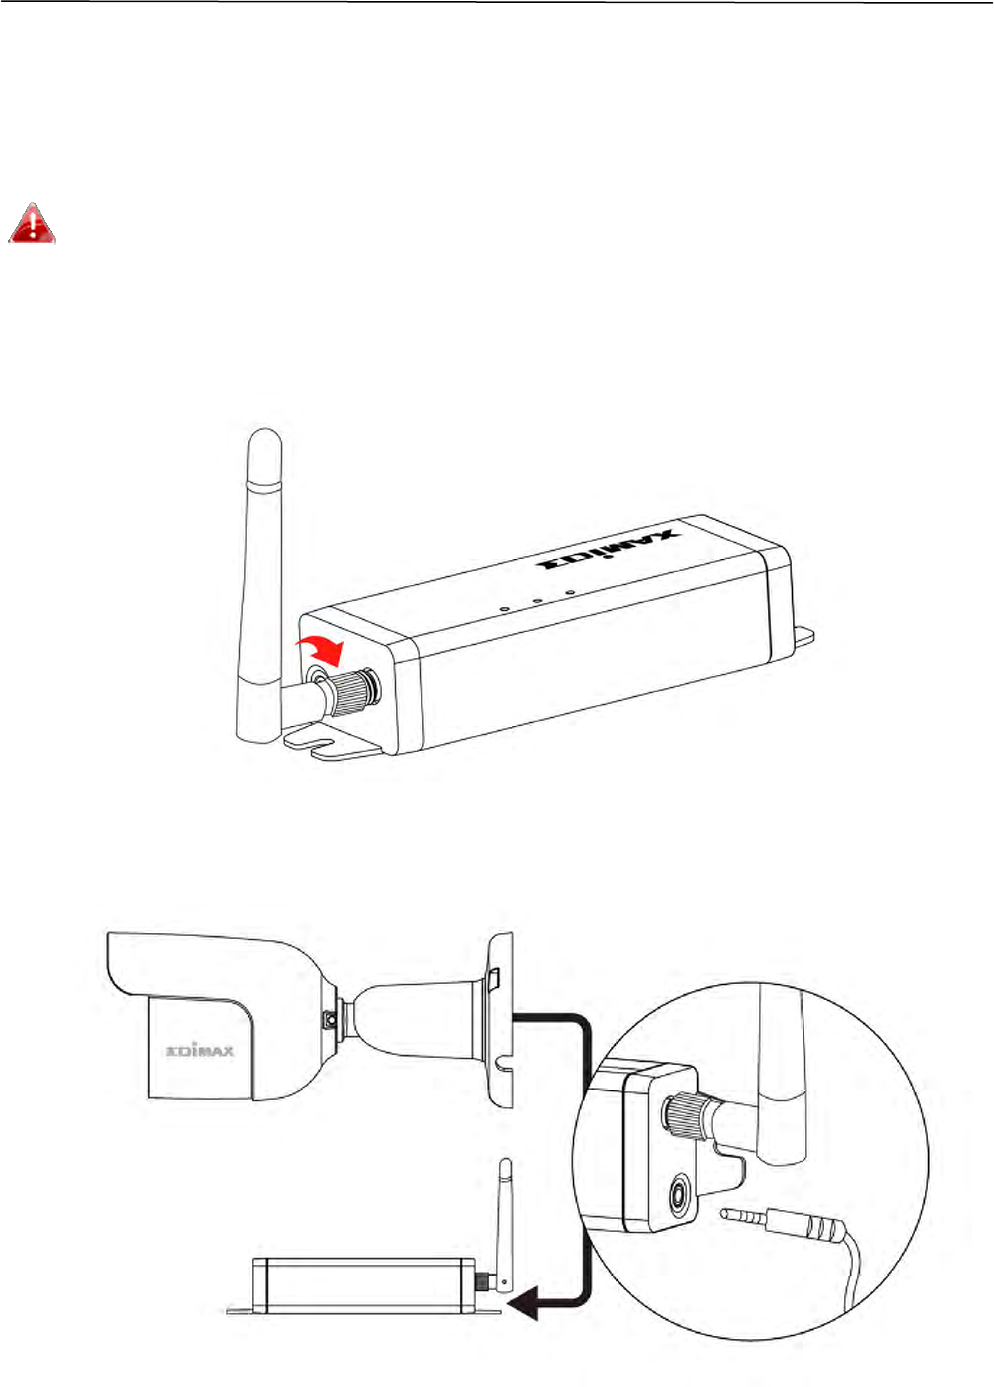
II. CameraSetup
Itisrecommendedthatyousetupyournetworkcameraasshownbelowand
establishaworkingconnectionbeforeyouinstallthecameratoitsoutdoor
location.
Yournetworkcamera’suniqueSSIDisdisplayedontheproductlabelon
theproduct’sindoormainunitandconsitsof“EdiView.Setup**”where**
arethelasttwocharactersofyourcamera’suniqueMACaddress.
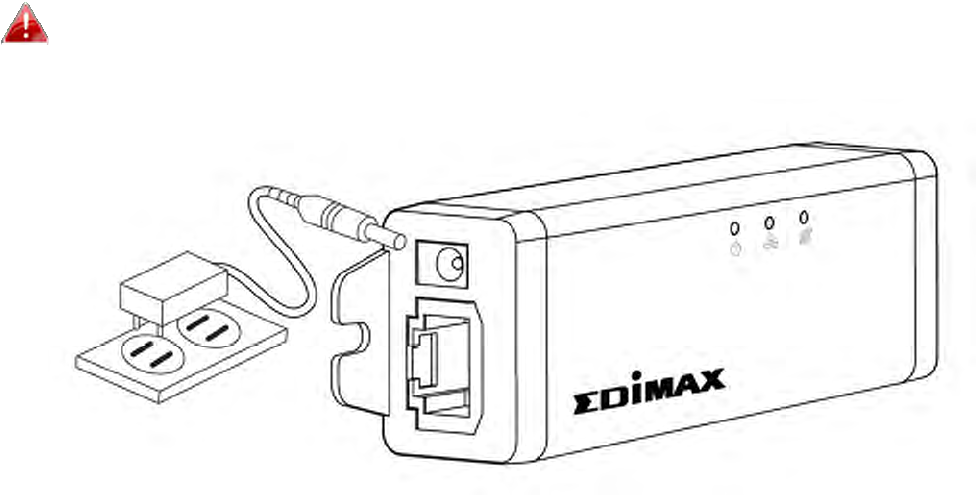
1. Screwontheincludedantennatotheproduct’sindoormainunit.
2. Connecttheoutdoorimageunitcabletotheindoormainunit.
11
3. Connectthepoweradaptertotheindoormainunitandtoapowersupply.
4. Waitamomentforthecameratopoweron.ThegreenpowerLEDwill
flashslowlywhenit’sready.
Nowyouneedtoconnectyournetworkcameratoyournetwork.Thereare
threeeasyways:
A. WiththefreeEdiViewIIapponAndroidoriPhone:III‐1.EdiViewIIApp.
B. UsingacomputerandEdiViewFinder:III‐2.EdiViewFinder.
C. UsingWPS(Wi‐FiProtectedSetup),asimplemethodtoconnectyour
cameratoyourwirelessnetwork.RefertoIII‐4.WPS.
Afterconnectingyourcameratoyournetworkusingoneofthemethods
above,youcanviewyourcamera’sliveimageorconfigureitssettings:
Localnetwork:
A. Usingthewebbasedmanagementinterface(seeIV.WebBased
ManagementInterface.).
B. Usingthe16channelviewersoftware(seeVI.16ChannelViewer
Software).
Remotely(fromanyInternetconnection):
A. Usingthecamera’scloudID(seeV.Myedimax.com).
B. UsingtheEdiViewIIapp.
FollowtheinstructionsinOutdoorInstallationifyouneedhelpinstallingyour
cameraoutside.

12
II‐1. EdiViewIIApp
UsethefreeEdiViewIIsmartphoneapptosetupyourcamera’sWi‐Fiand
monitoryourcameraremotelyfromanyInternetconnection.
1. Useasmartphoneortablettosearch,downloadandinstalltheEdiViewII
appfromGooglePlayortheAppleAppStore.
2. ForiOSusers,gotoyouriPhone’sWi‐Fisettingsandconnecttoyour
networkcamera’sSSID,beforeopeningtheEdiViewIIapp.Continueto
Step4.
13
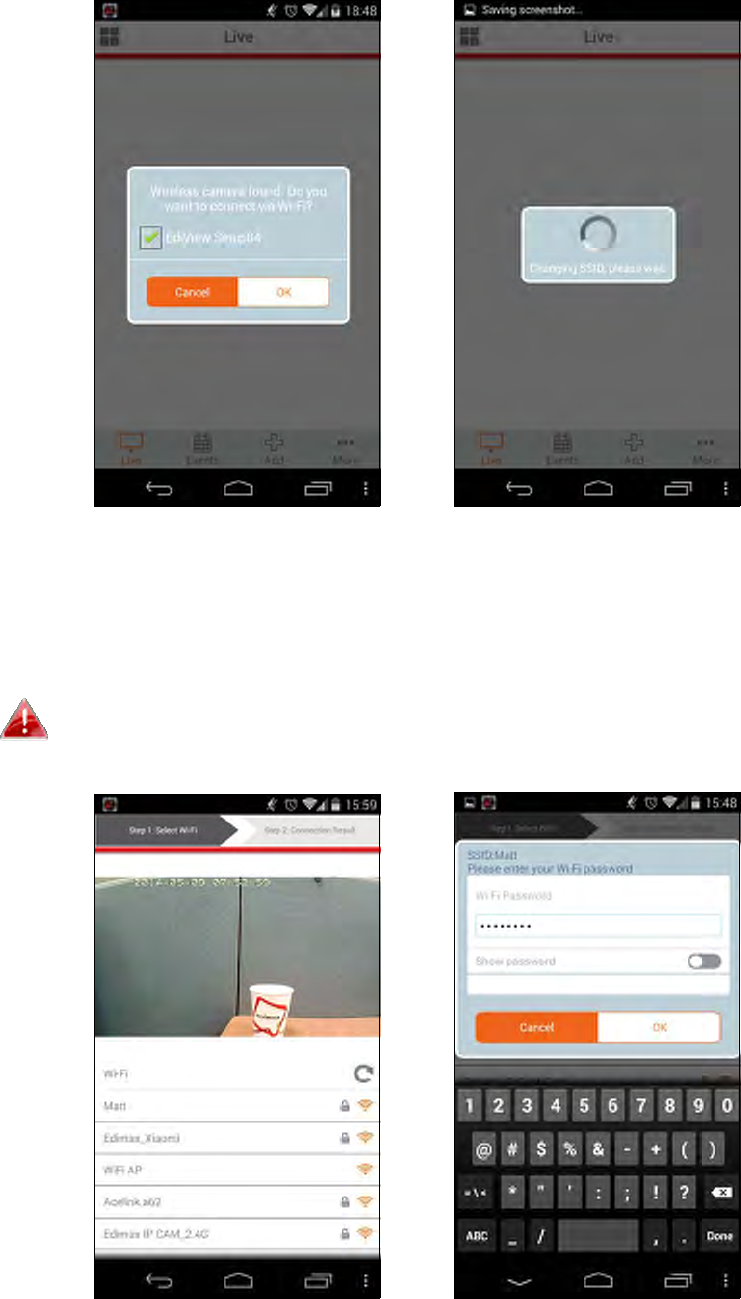
3. AndroidusersensureyourAndroiddevice’sWi‐Fiisswitchedon,andopen
theEdiViewIIapp.Selectyournetworkcameraandclick“OK”tocontinue.
4. Android&iOSusersselectyourWi‐Finetworkfromthelistandthenenter
yourWi‐Fipassword,beforeclicking“OK”.
Ifpromptedtoallowpushnotifications,pleaseselect“Yes”.
14
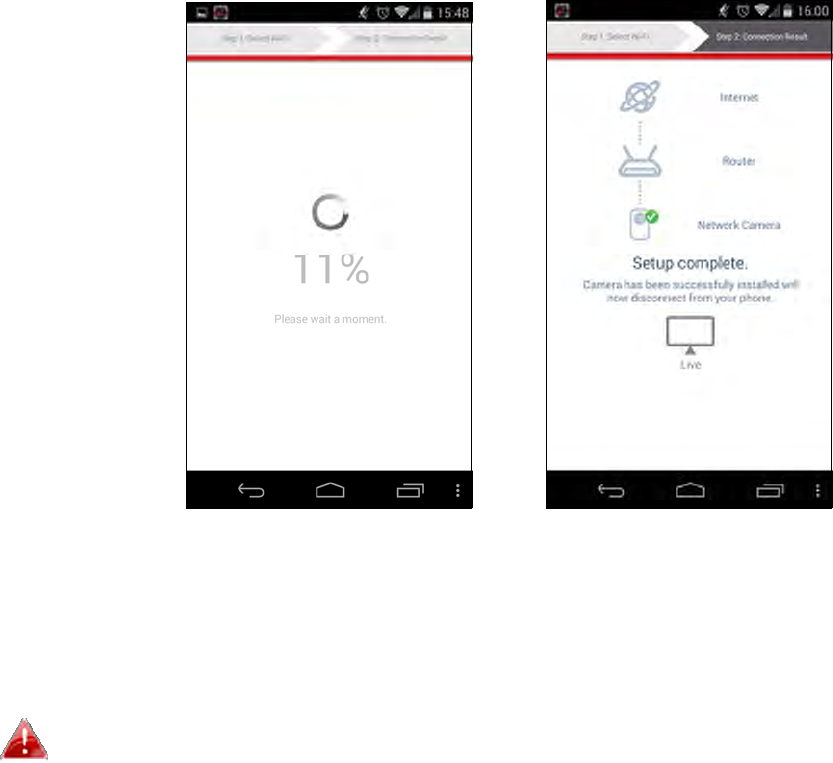
5. PleasewaitamomentwhileyourcameraconnectstoyourWi‐Fi.When
youseethe“Setupcomplete”screen,clickthe“Live”icontocontinueor
waitforafewsecondstocontinueautomatically.
6. Setupiscomplete.Thecamera’sgreenpowerLEDshoulddisplayon.You
shouldseealivestreamfromyournetworkcamerawhichyoucanview
anytimeyouareconnectedtotheInternet.
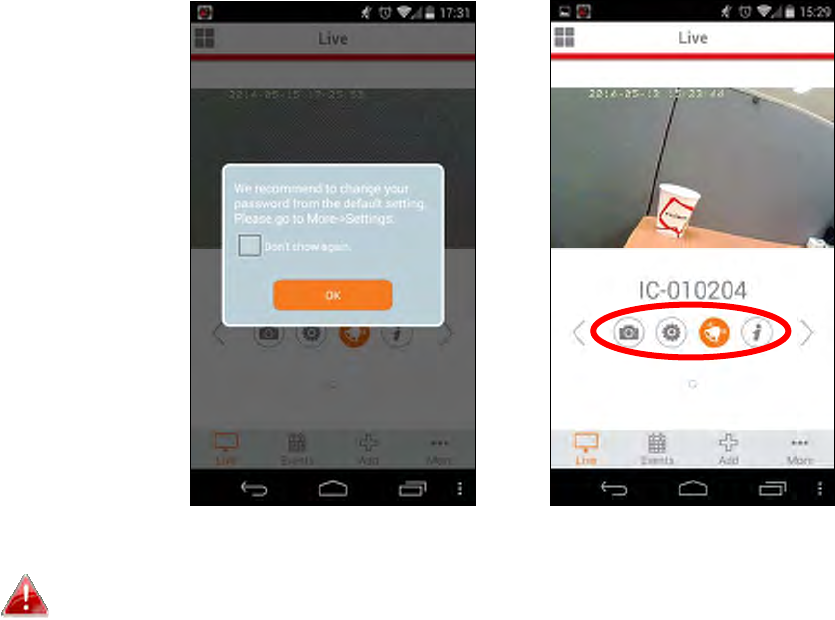
Itisrecommendedthatyouchangeyourcamera’spassword.Goto
“More”inthebottomrightcornerandselect“Settings”.
15
Youcanconfigureyourcamera’ssettingsandfunctionsusingtheicons
belowtheliveimage.
16
II‐2. EdiViewFinder
Ensureyourcomputerisconnectedtothesamerouterasthe
networkcamerausinganEthernetcable.
II‐2‐1. Windows
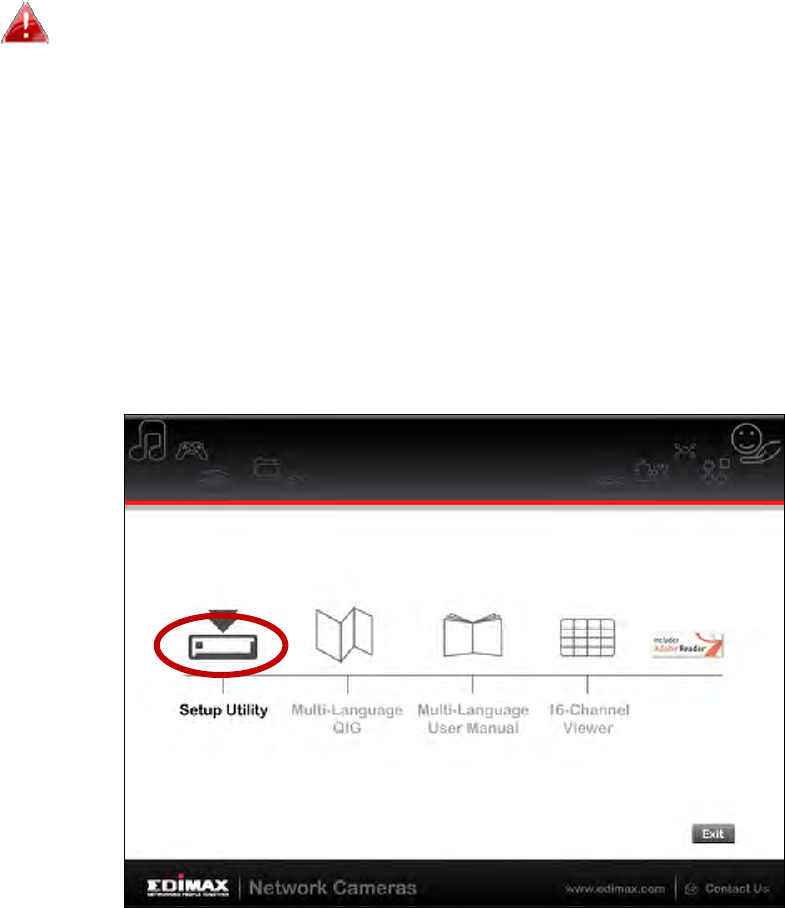
1. InserttheincludedCDintoyourCD‐ROMdriveandifthesetuputilitydoes
notautomaticallyopen,pleaselocateandopenthe“Autorun.exe”filein
the“Autorun”folder.
2. Click“SetupUtility”toinstalltheEdiViewFindersoftwareutility.
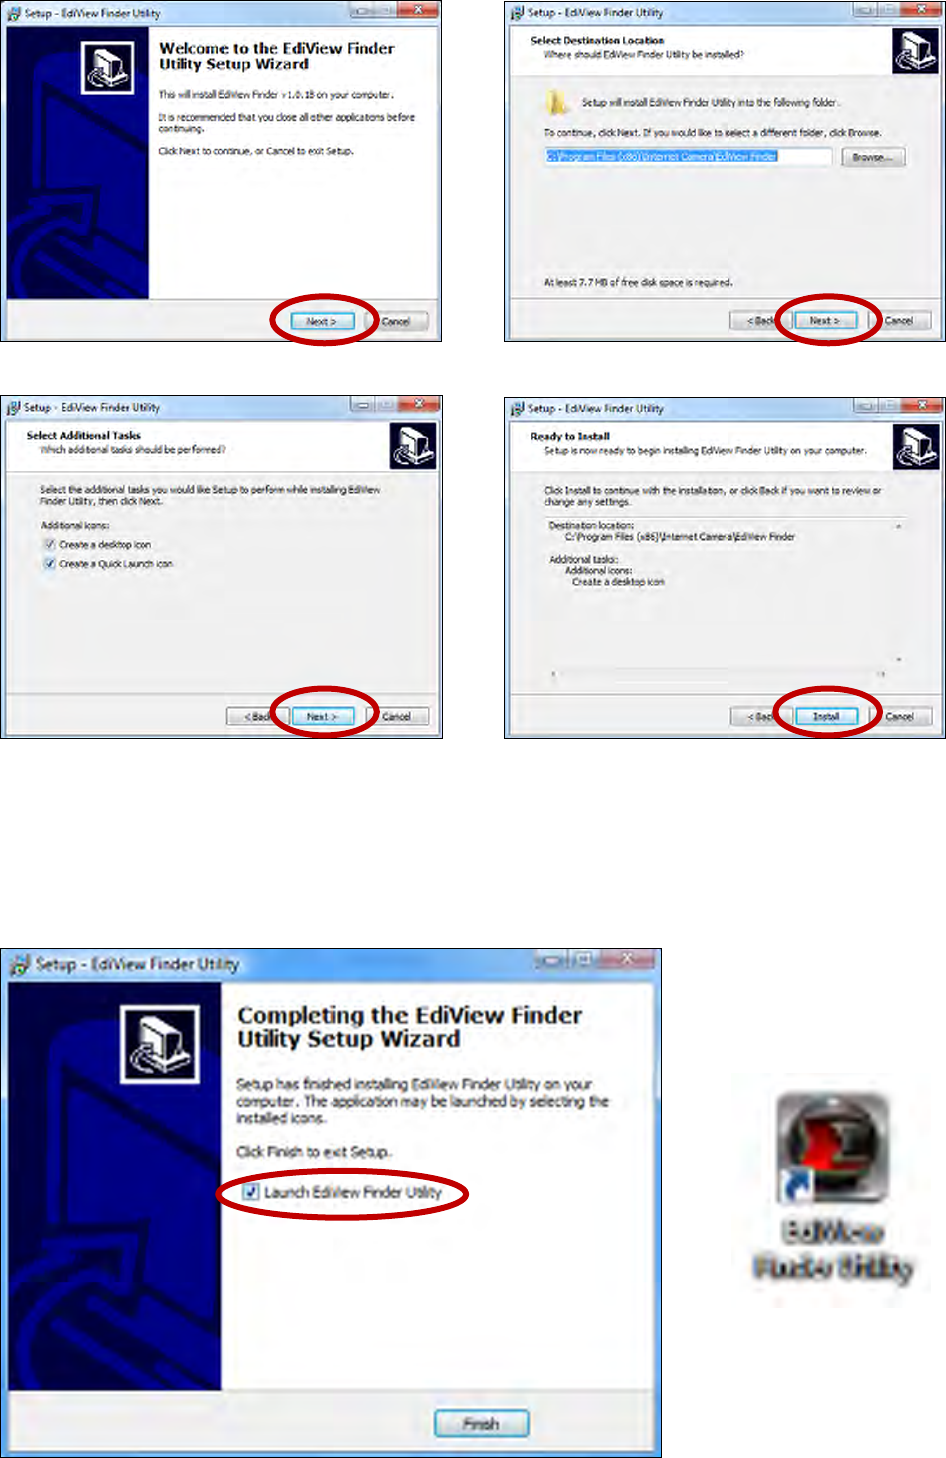
3. Click“Next”andfollowtheon‐screeninstructionstoinstalltheEdiView
Findersoftwareutility.
17
4. Wheninstallationiscomplete,select“LaunchEdiViewFinderUtility”
beforeclicking“Finish”.Ordoubleclickthe”EdiViewFinderUtility”iconon
yourdesktoptolaunchEdiViewFinder.
18
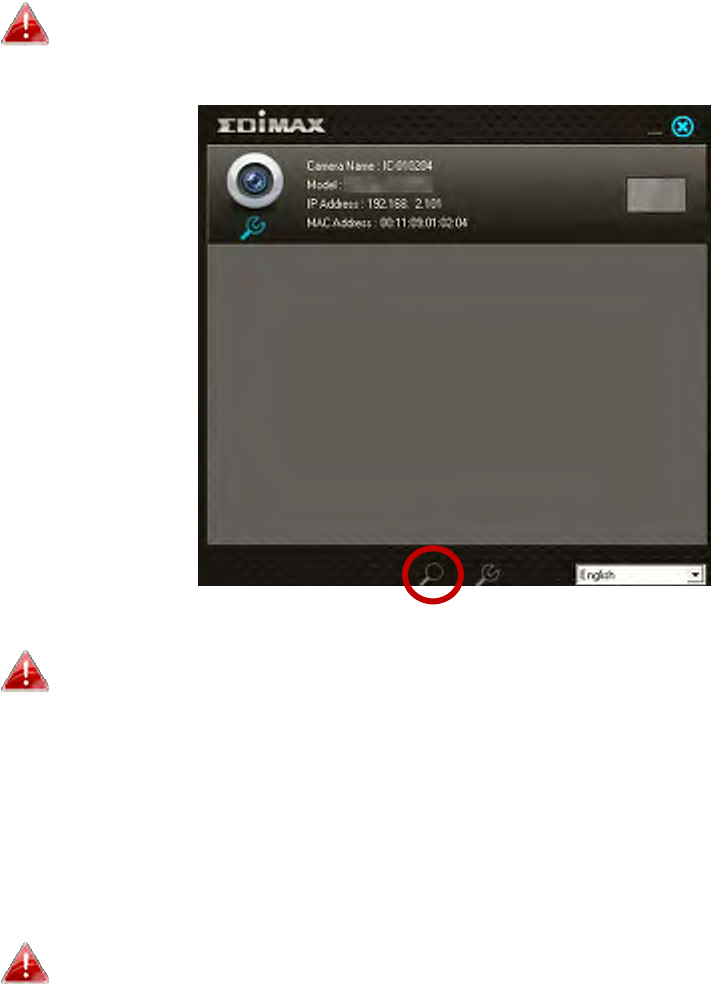
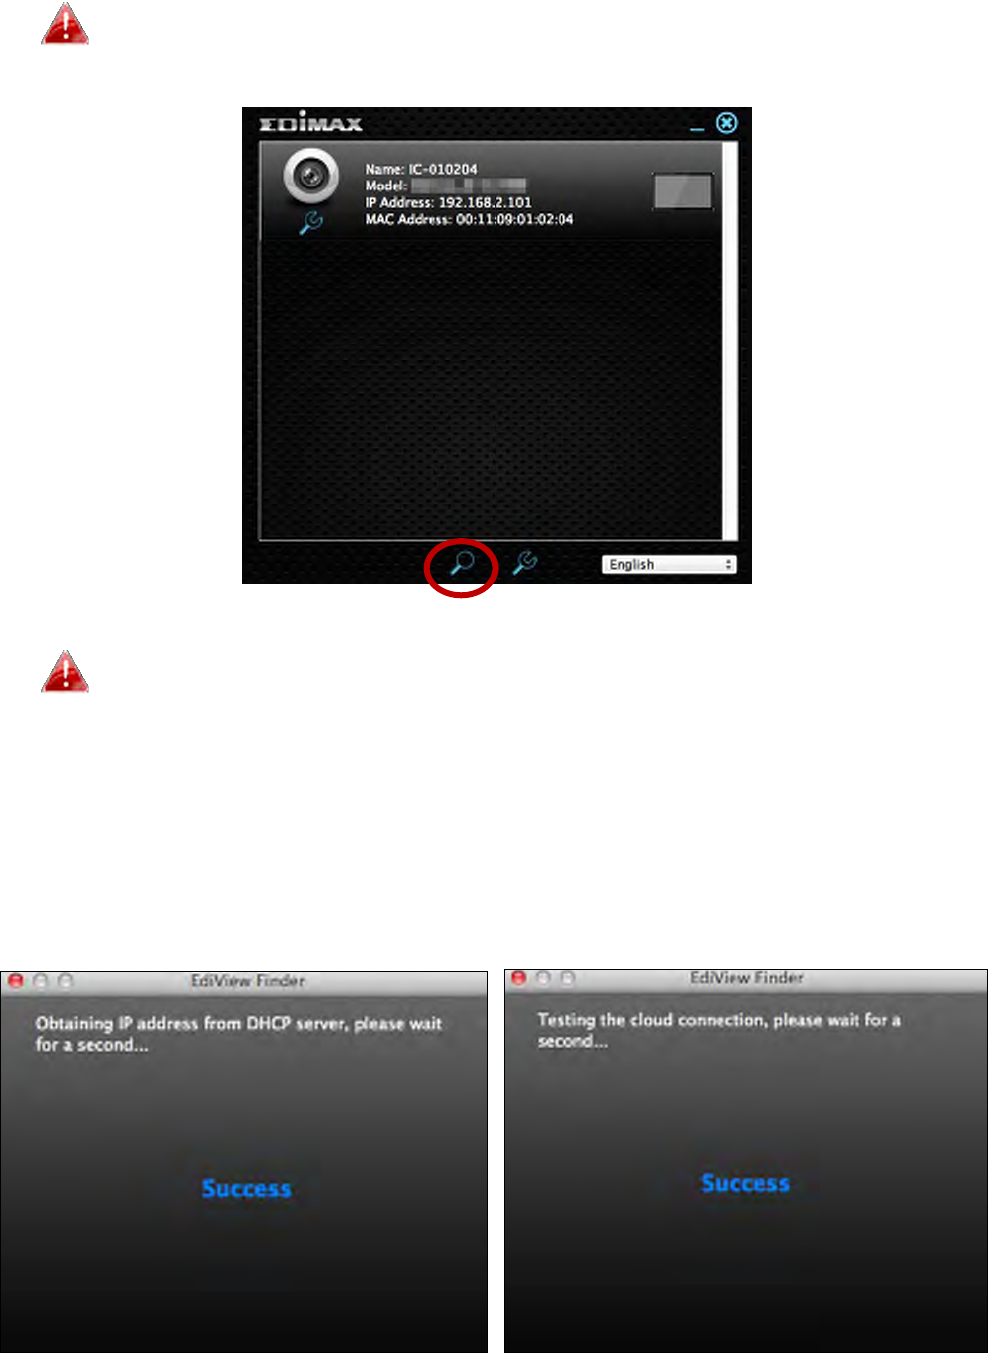
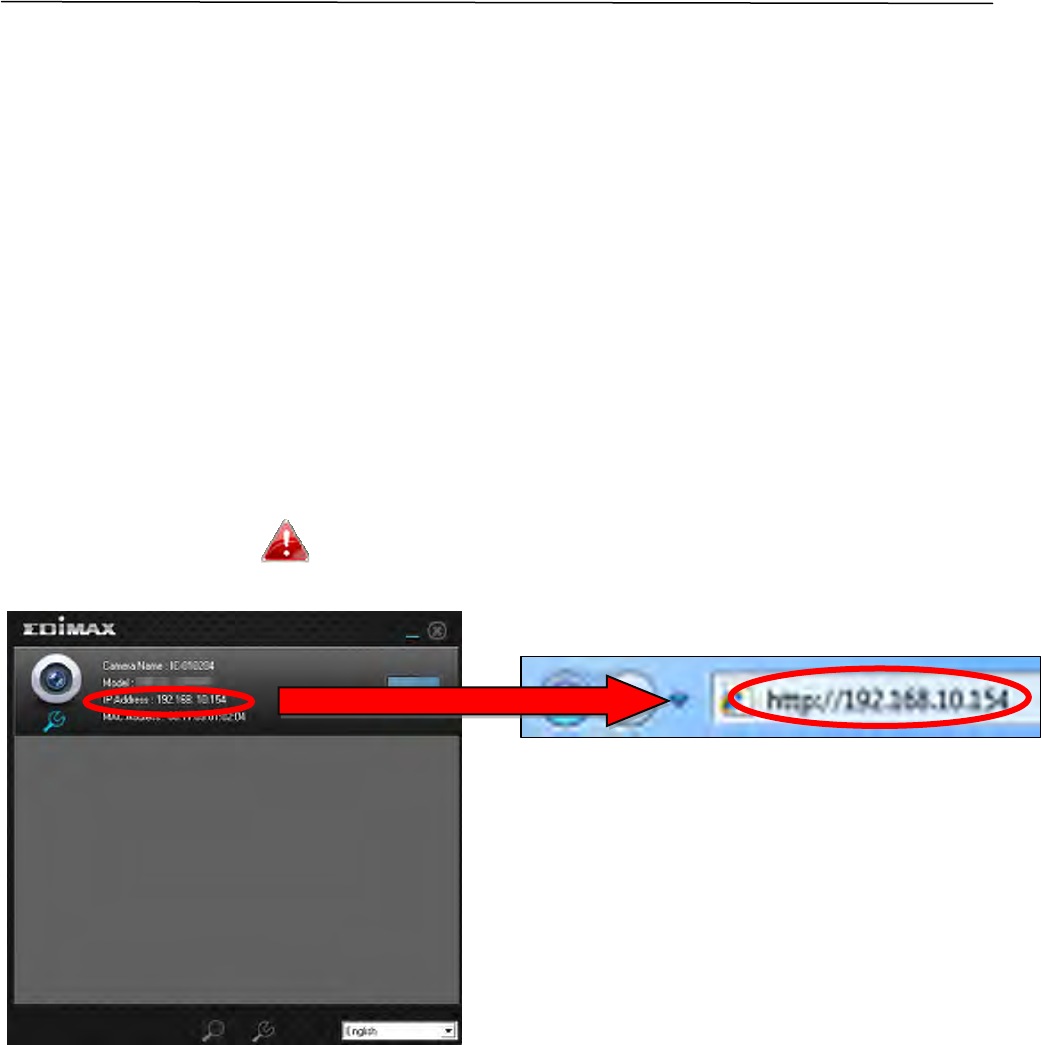
5. EdiViewFinderwilllistallcamerasonyourlocalnetwork,alongwitheach
camera’sname,model,IPaddressandMACaddress.
Clickthesearchicontorefreshthelistifyourcameraisnot
displayed.
Thenetworkcamera’sIPaddressisdisplayedonthisscreen.After
setup,youcanenterthisIPaddressintotheURLbarofaweb
browseronthesamelocalnetworktoaccessyournetwork
camera’sweb‐basedconfigurationinterface.
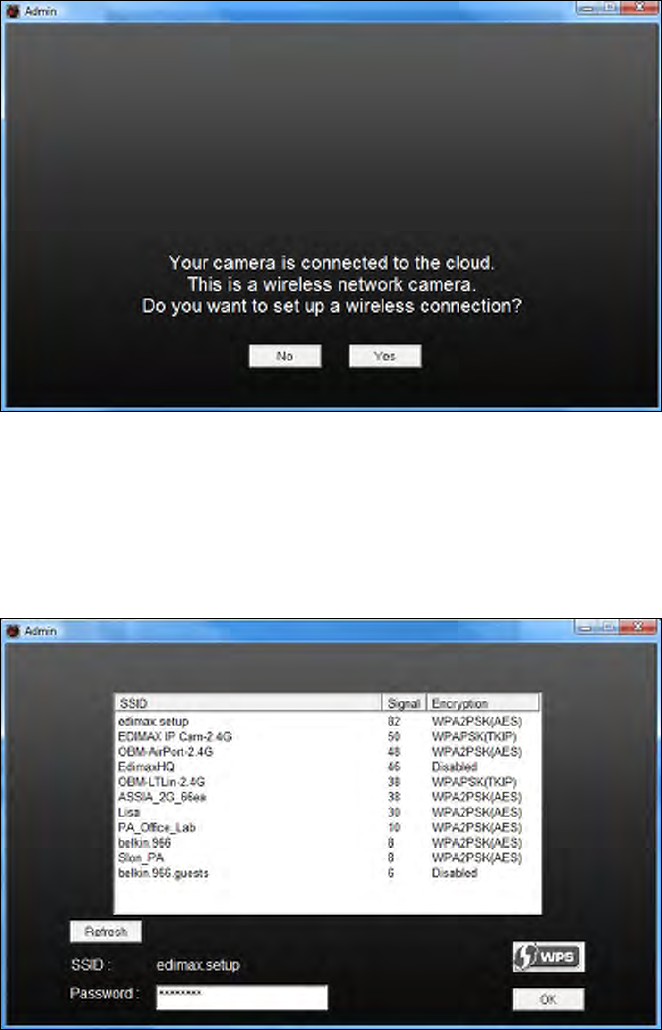
6. Doubleclickyourcameraandthenchoose“Yes”or“No”ifyouwishtoset
upawirelessconnection.Ifyouchoose“No”pleasegotostep10.
TheIC9110Wisawirelesscamera,youcanchoose“Yes”tosetup
yourwirelessconnection.
19
7. Selectyourwirelessnetworkfromthelistandenterthecorrectpassword
inthe“Password”field,beforeclicking“OK”.Thisisthewirelessnetwork
whichyourcamerawillconnectto.
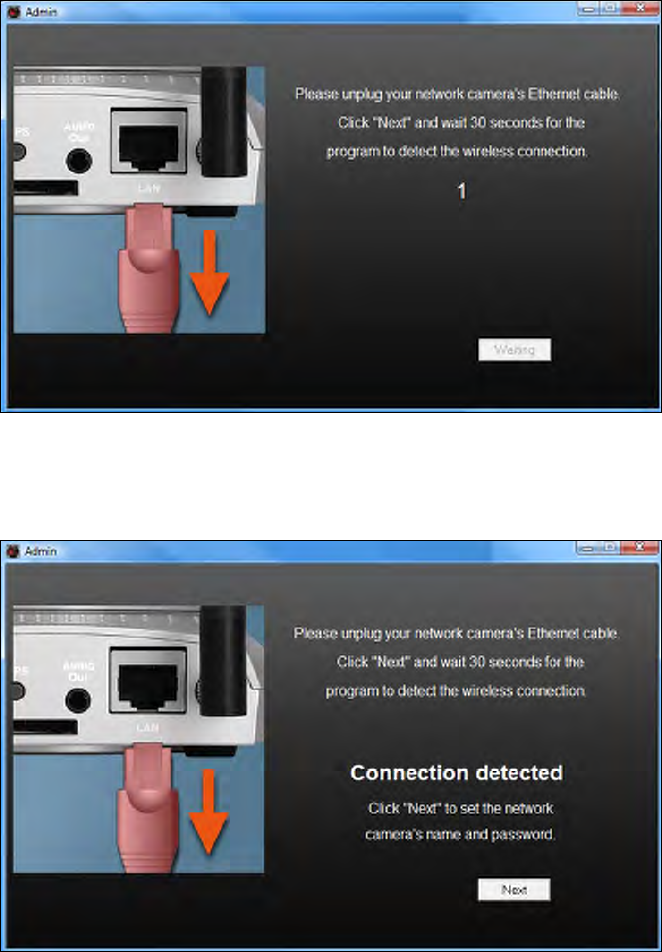
8. UnplugtheEthernetcablefromyournetworkcameraandclick“Next”.
Pleasewaitamomentforthecameratodetecttheconnection.
20
9. Whentheconnectionisdetectedasshownbelow,pleaseclick“Next”.
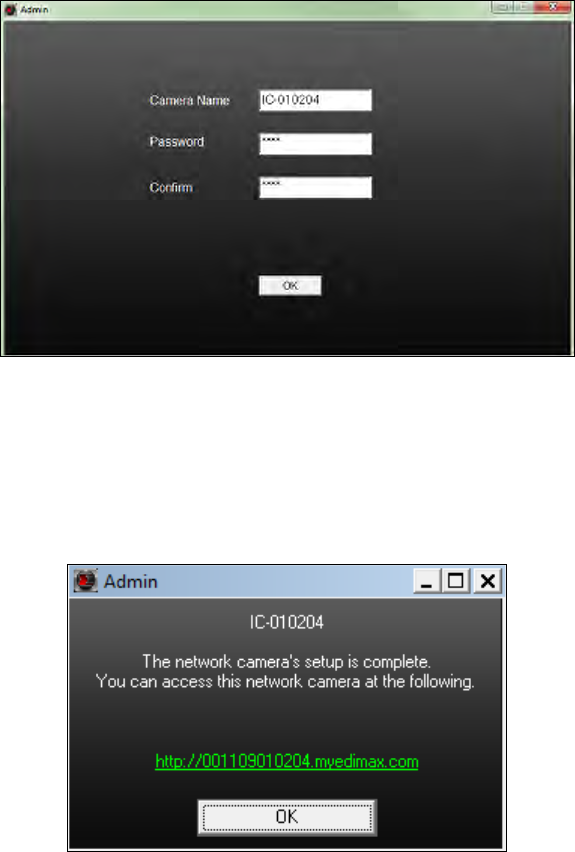
10. Enteranameandpasswordforyourcamera.Thepasswordwillbe
usedlatertologintoyourcameraremotelyviaitscloudID,webinterface
orviatheEdiViewIIsmartphoneapp.Click“OK”tocontinue.
21
11. Thenextscreenwillindicatethatsetupiscomplete.Thecamerais
operationalandreadyforuse.Click“OK”orclicktheURLandapreview
windowshowingalivestreamfromyourcameramayopen.

22
II‐2‐2. Mac
EdiViewFinderforMacwillnotsetupyournetworkcamera’s
wirelessconnection.Afterthischapter,pleasecontinuetoIV‐1‐2.
Wirelesstosetupthecamera’swirelessconnection.
1. InserttheincludedCDintoyourCD‐ROMdriveandbrowsetothe“Mac”
folder.
2. Copythe“EdiViewFinder”filetoyourdesktopanddoubleclicktheiconto
openEdiViewFinder.
EdiViewFinderisalsoavailablefordownloadfrom
theEdimaxwebsite:
http://www.edimax.com/EdiViewFinder.htm
23
3. EdiViewFinderwilllistallcamerasonyourlocalnetwork,alongwitheach
camera’sname,model,IPaddressandMACaddress.
Clickthesearchicontorefreshthelistifyourcameraisnot
displayed.
Thenetworkcamera’sIPaddressisdisplayedonthisscreen.After
setup,youcanenterthisIPaddressintotheURLbarofaweb
browseronthesamelocalnetworktoaccessyournetwork
camera’sweb‐basedconfigurationinterface.
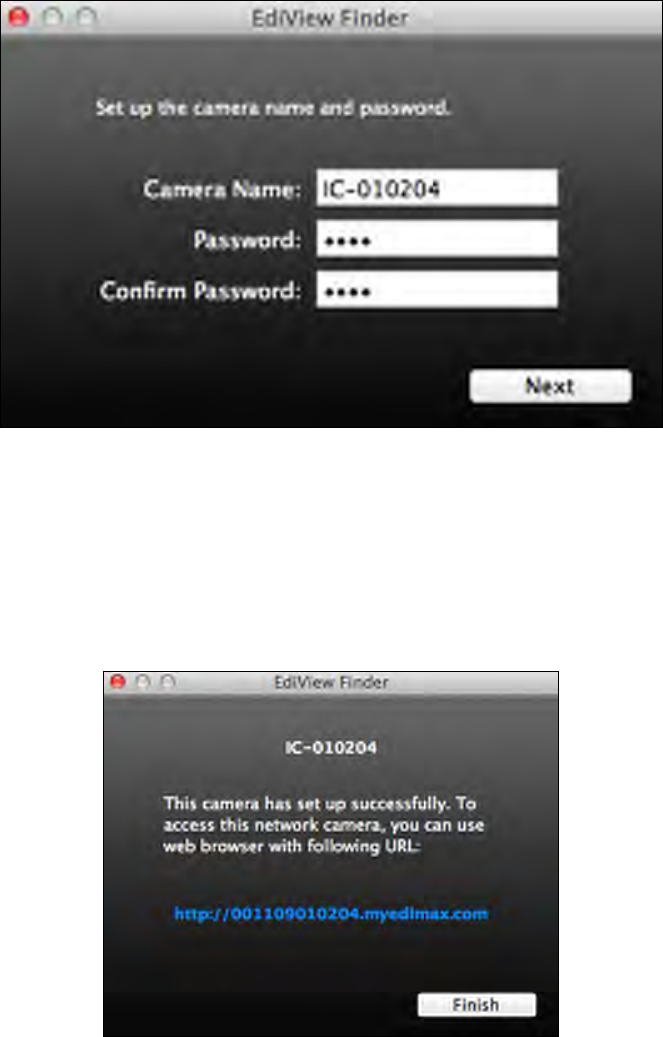
4. Doubleclickyournetworkcameraandwaitamomentforthenetwork
cameratoobtainanIPaddressandtestthecloudconnection.EdiView
shoulddisplay“Success”asshownbelow.
24
5. Enteranameandpasswordforyourcamera.Thepasswordwillbeused
latertologintoyourcameraremotelyviaitscloudID,webinterfaceorvia
theEdiViewIIsmartphoneapp.Click“Next”tocontinue.
6. Thenextscreenwillindicatethatsetupiscomplete.Thecamerais
operationalandreadytobeconfiguredforawirelessconnection.Click
“Finish”andapreviewwindowshowingalivestreamfromyourcamera
mayopen.
7. Tosetupyournetworkcamera’swirelessconnection,pleasefollowIV‐1‐2.
Wireless.
25
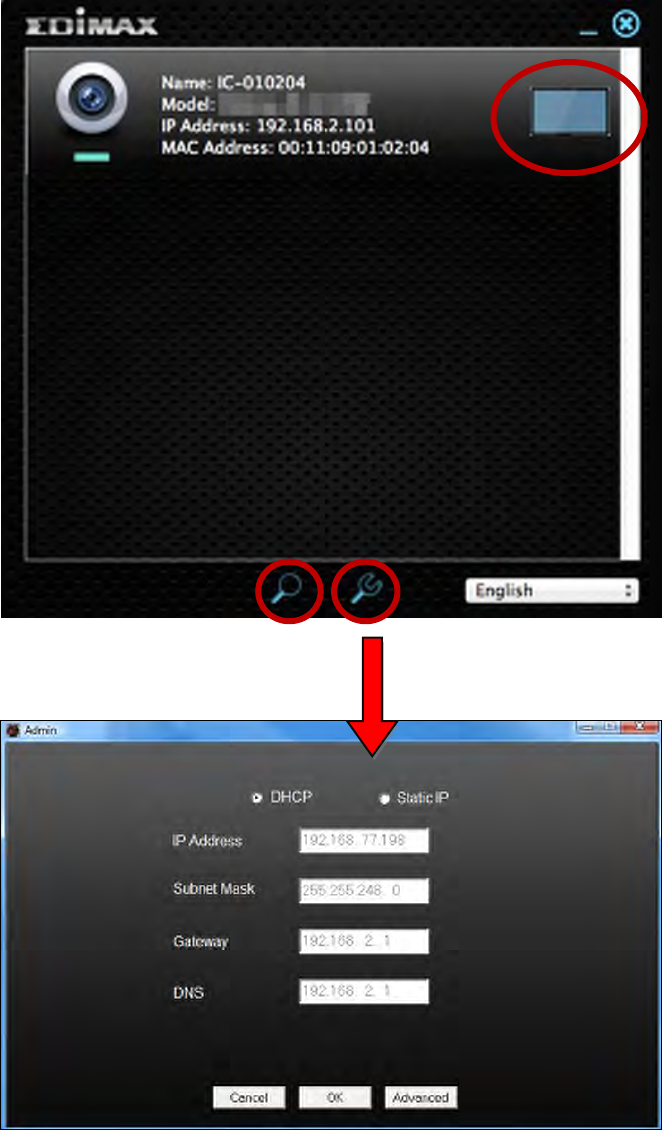
II‐2‐3. UsingEdiViewFinder
YoucanalsouseEdiViewFindertofindyournetworkcamera’sIPaddress,
viewalivestream,ormodifythenetworkcamera’sIPaddress.Doubleclick
theTViconontherightsidetoviewalivestreaminapop‐upwindow,orclick
thewrenchicontoopenanewwindowwiththenetworkcamera’sIPaddress
settings:

26
EdiViewFinderwilllocateyournetworkcameraaslongasyou
areonthesamelocalnetwork.StaticIPuserswhomaybeusinga
differentIPaddresssubnettothenetworkcamerashouldstillbe
abletolocatethenetworkcamerawithEdiViewFinder.Ifyou
encounterdifficulties,itisrecommendedthatyouuseaDHCP
server–thoughyoucanmanuallysetthenetworkcamera’sIP
addressusingEdiViewFinder(above)orusingtheweb‐based
configurationinterface(seeIV‐1‐1.Network)ifyouneed.
27
II‐3. WPS(Wi‐FiProtectedSetup)
TheWPSbuttonisaquickandeasyalternativetoestablishasecurewireless
connectionbetweenyournetworkcameraandyourwirelessrouter/access
point.
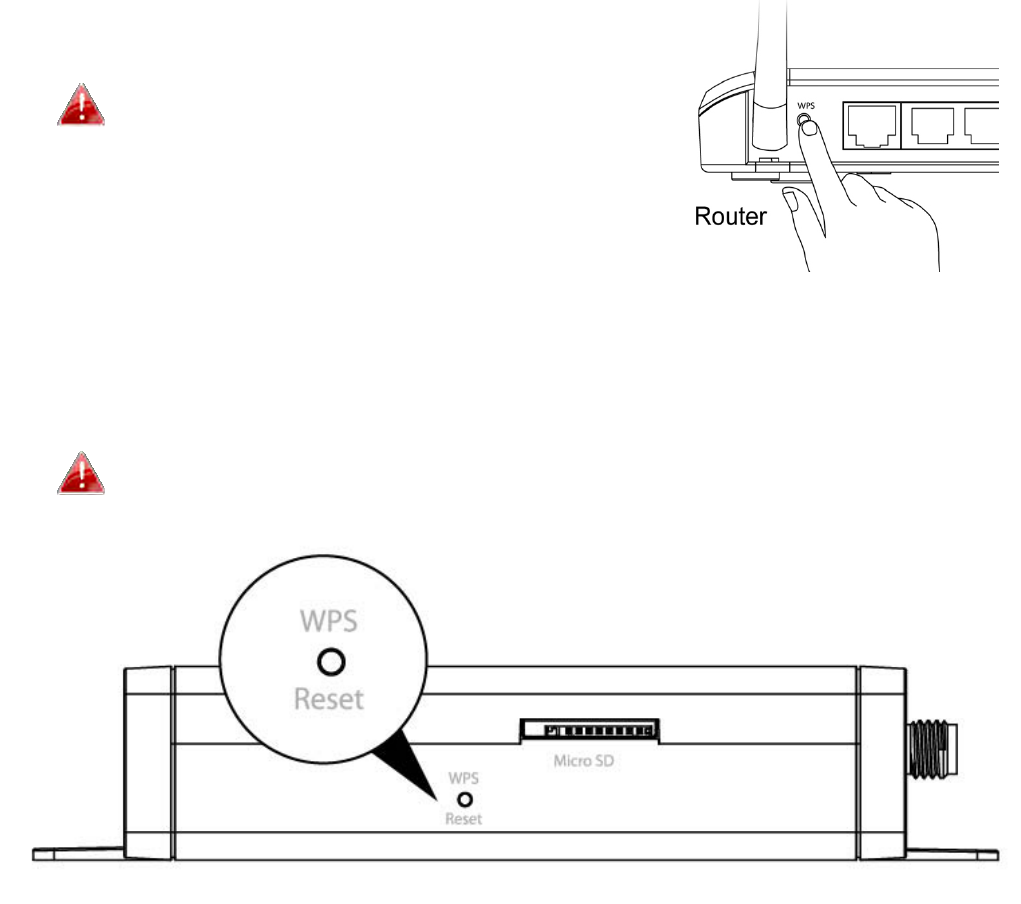
1. PressandholdtheWPSbuttononyourwirelessrouter/accesspointfor
thecorrectlengthoftimetoactivateitsWPS.
Pleasechecktheinstructionsforyour
wirelessrouter/accesspointforhowlong
youneedtoholddownitsWPSbuttonto
activateWPS.
2. Withintwominutes,presstheWPS/Resetbuttononthenetworkcamera
for2–5secondstoactivateWPS.ThegreenLANLEDwillflashslowlyto
indicatethatWPSisactive.
TakecarenottoholdtheWPS/Resetbuttontoolongandreset
yournetworkcamera.
3. Thedeviceswillestablishasecurewirelessconnection.ThegreenLANLED
willflashquicklytoindicateasuccessfulWPSconnection.
28
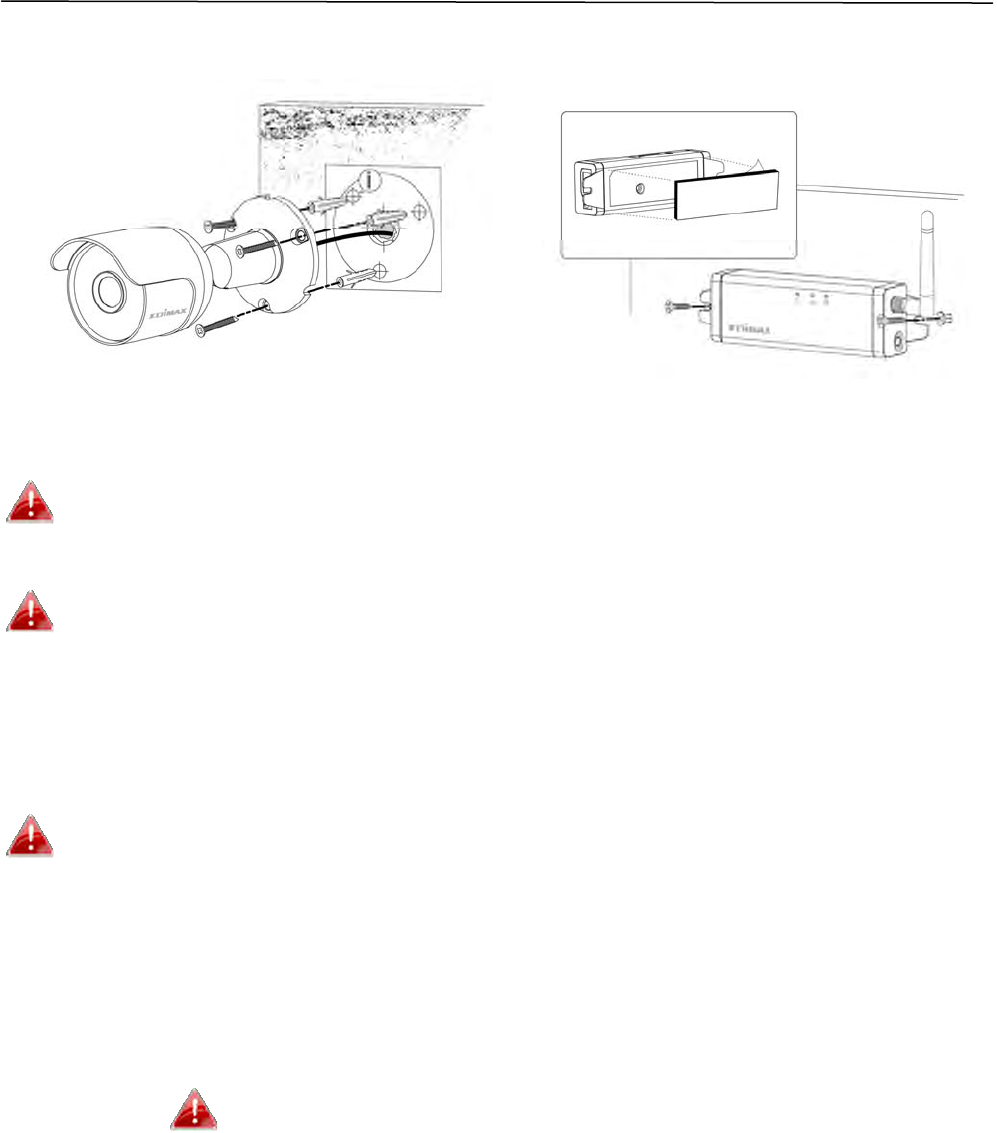
III. OutdoorInstallation
Recommendedinstallation:
Theinstructionsbelowareaguide–ifyouareunsurepleaseseek
professionalassistance.
Disconnecttheoutdoorimageunitfromtheindoormainunitandremove
theindoormainunitantennaandpowercablebeforeoutdoorinstallation.
1. Establishthebestrespectivelocationsforthecamera’soutdoorand
indoormainunit.
Itisrecommendedthatthelocationoftheoutdoorimageunitisalsothe
pointwherethecablewillenterproperty,sothatthecablecanbe
coveredbytheoutdoorimageunit.
2. Usetheincludedwalltemplatetodrillholesofsufficientdiameterinyour
exteriorwalltoenabletheoutdoorimageunittobesecurelyscrewedinto
place.
Apowerdrillwithmasonrybitisrecommended.
29
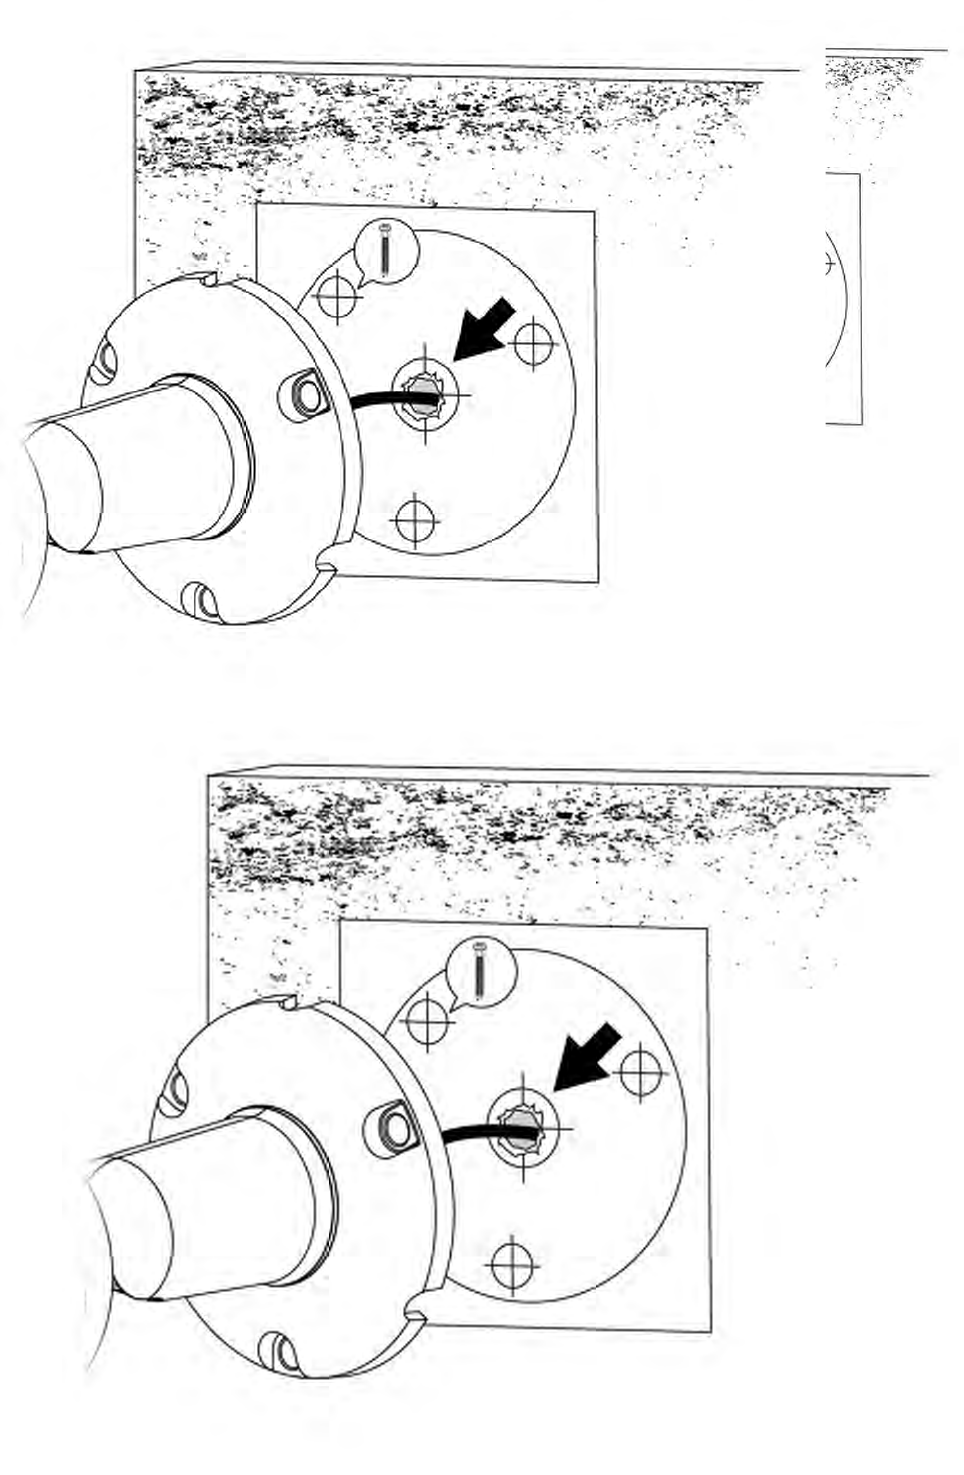
3. Drillanadditionalholethroughtotheinteriorofthebuildingwideenough
fortheoutdoorimageunitcable.
30
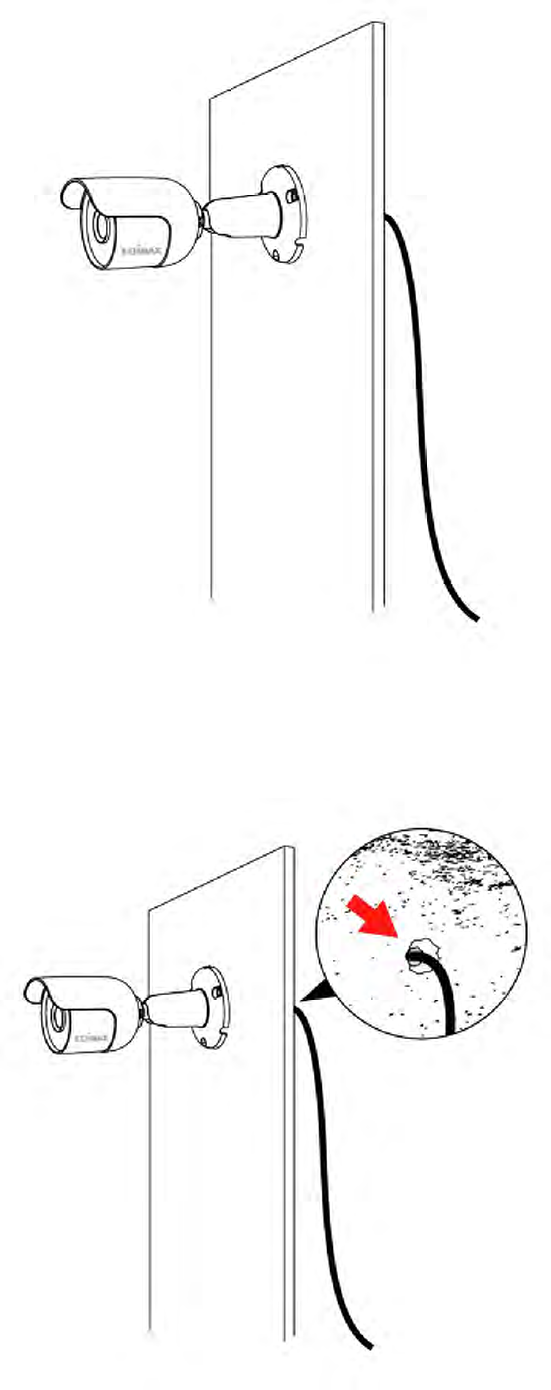
4. Runthecableattachedtotheoutdoorimageunitthroughtheholefrom
theoutsidetotheinterior.
5. Useasealanttosealthegapsaroundthecableandscrewtheoutdoor
imageunitintoplace.
31
Siliconebasedsealantisrecommended.Ifyourcableholewillnotbe
behindtheoutdoorimageunit,aplasticbushelisalsorecommended.
6. Usetheincludedscrewstoscrewtheoutdoorimageunitsecurelyinto
place
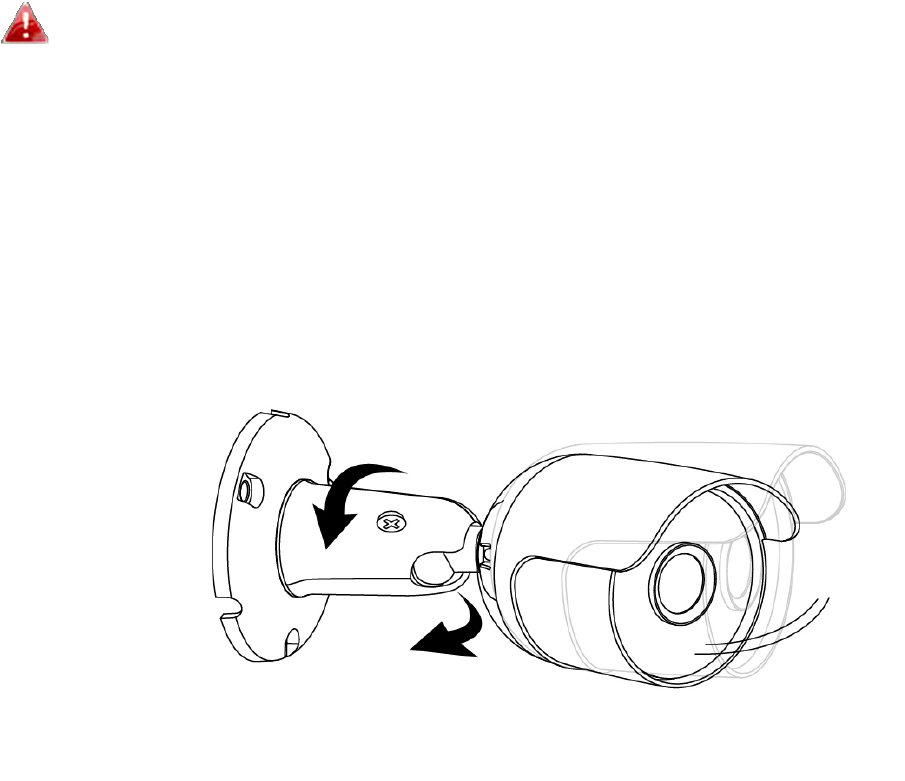
7. Adjusttheangleofthecameralensontheoutdoorimageunittoyour
preferencebyloosening&tighteningthescrew.
8. Usetheincludedadherentpadtoattachtheindoormainunittoyour
interiorwall,ordrillholesinyourinteriorwallandusetheincludedscrews
toscrewitfirmlyintoplace.

32
9. Reconnecttheantennaandoutdoorimageunitcabletotheindoormain
unit.
33
10. Reconnecttheindoormainunitpowersupply.
Usecableclamps(notincluded)tofixloosecablestothewallsaccording
toyourpreference.
11. YoucanuseanEthernetcableinsteadofWi‐Fitoconnecttheindoor
mainunittoyourrouter/accesspointformorestableperformanceifyou
prefer.
34
IV. Web‐BasedManagementInterface
Whenyouareusingthesamelocalnetworkasyourcamera,youcanusethe
web‐basedmanagementinterfacetovieworconfigurethecamera.
Youcanaccesstheweb‐basedmanagementinterfacewithawebbrowseron
asmartphoneorcomputer.Forsmartphoneusers,theappearanceofthe
interfacewillvaryslightlytothatwhichisdisplayedhere,thoughthemenu
functionswhicharedescribedlaterfromIV‐1.Basiconwardsareessentially
thesame.
1. Enterthenetworkcamera’sIPaddressintotheURLbarofawebbrowser.
Thecamera’sIPaddresscanbefoundbyopeningEdiViewFinder,as
displayedbelow:
InternetExplorerisrecommended.
35
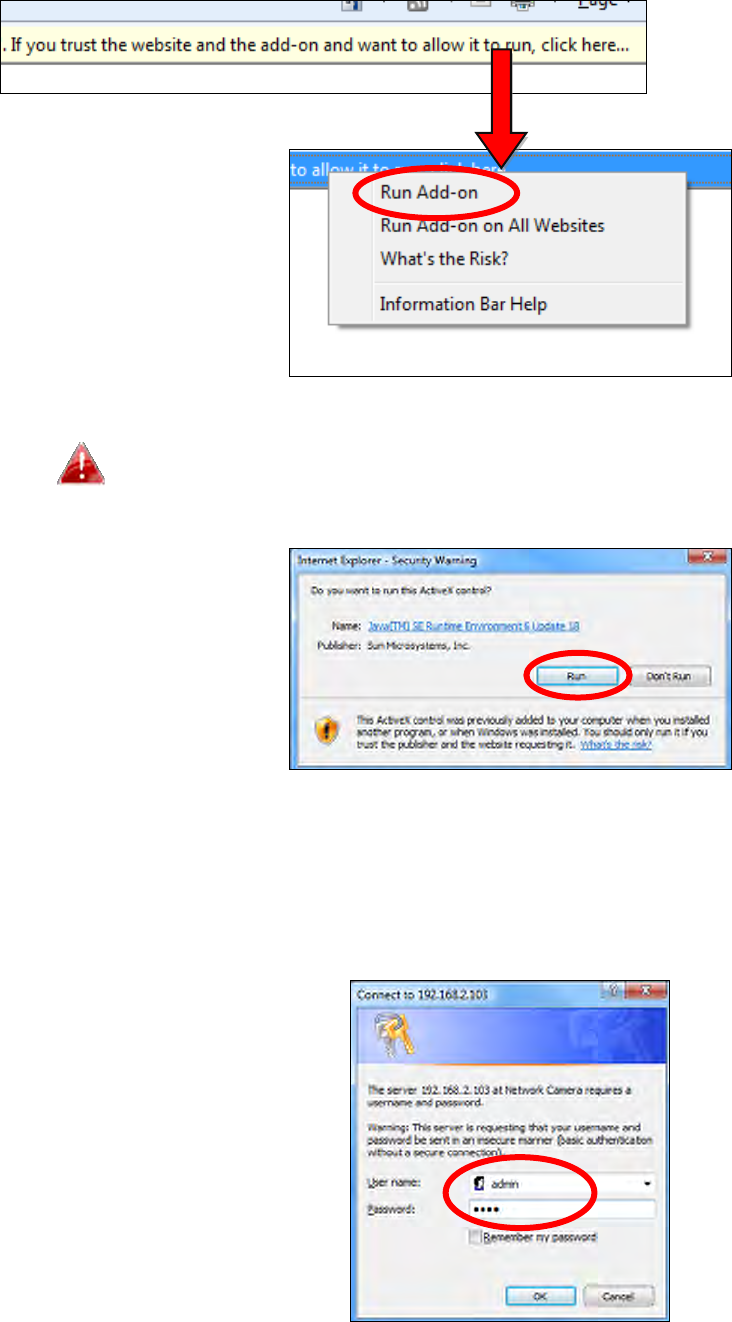
2. YoumaybepromptedtoallowaJavaadd‐ontorun.Pleaseclickthe
messagewhereitsays“clickhere”andthenclick“RunAdd‐on”.
Ifanyothersecuritywarnings/promptsappear,pleaseselect
“Run”or“Allow”orsimilar,dependingonyourbrowser.
3. Entertheusernameandpasswordforyournetworkcamera(default
username:admindefaultpassword:1234).Thenetworkcamera’sweb‐
basedmanagementinterfacewillthenbedisplayedinyourbrowser.
36
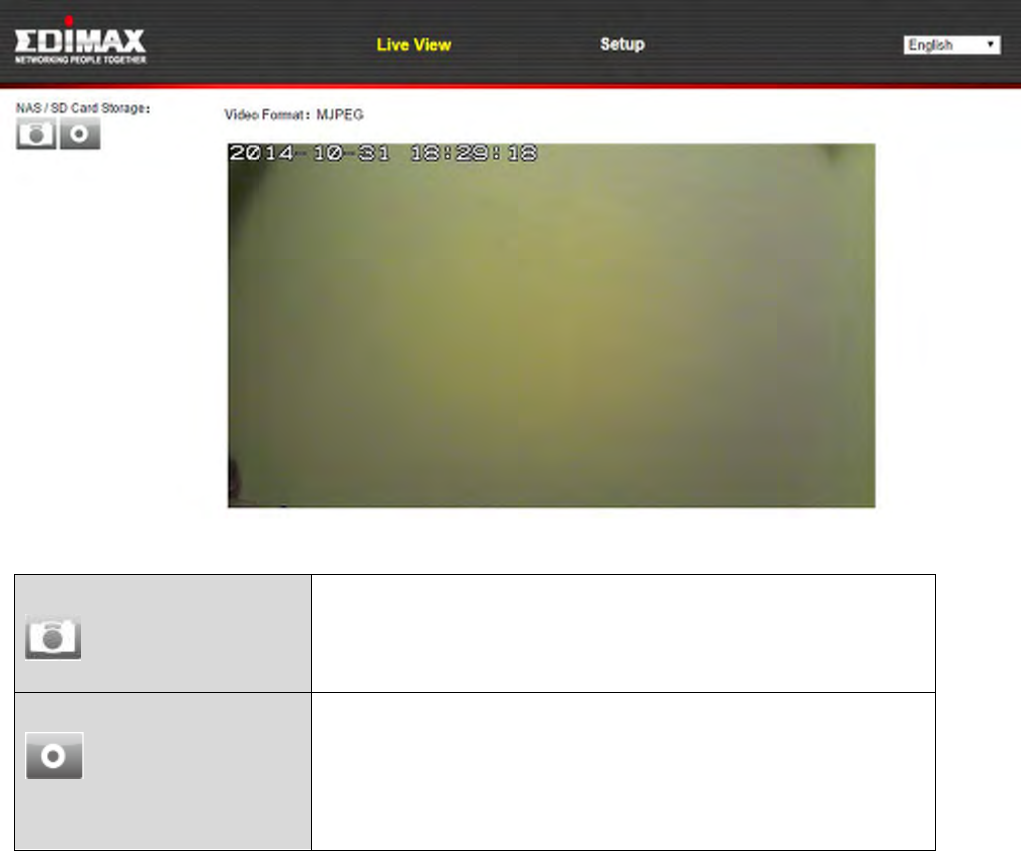
4. Forcomputerusers,the“LiveView”screenwillbedisplayed,asshown
below.Ontheliveviewscreenyoucanseealivestreamfromyourcamera
andusetheiconsontheleftside.
Snapshot
Saveasnapshot(image)ofthe network
camera’scurrentview.Youwillbeprompted
toselectalocationtosavetheimage.
Record
Record video.You willbepromptedtoselect
alocationtosavetherecording.Theiconwill
displaybluewhilerecording,clicktheicon
againtostoprecording.
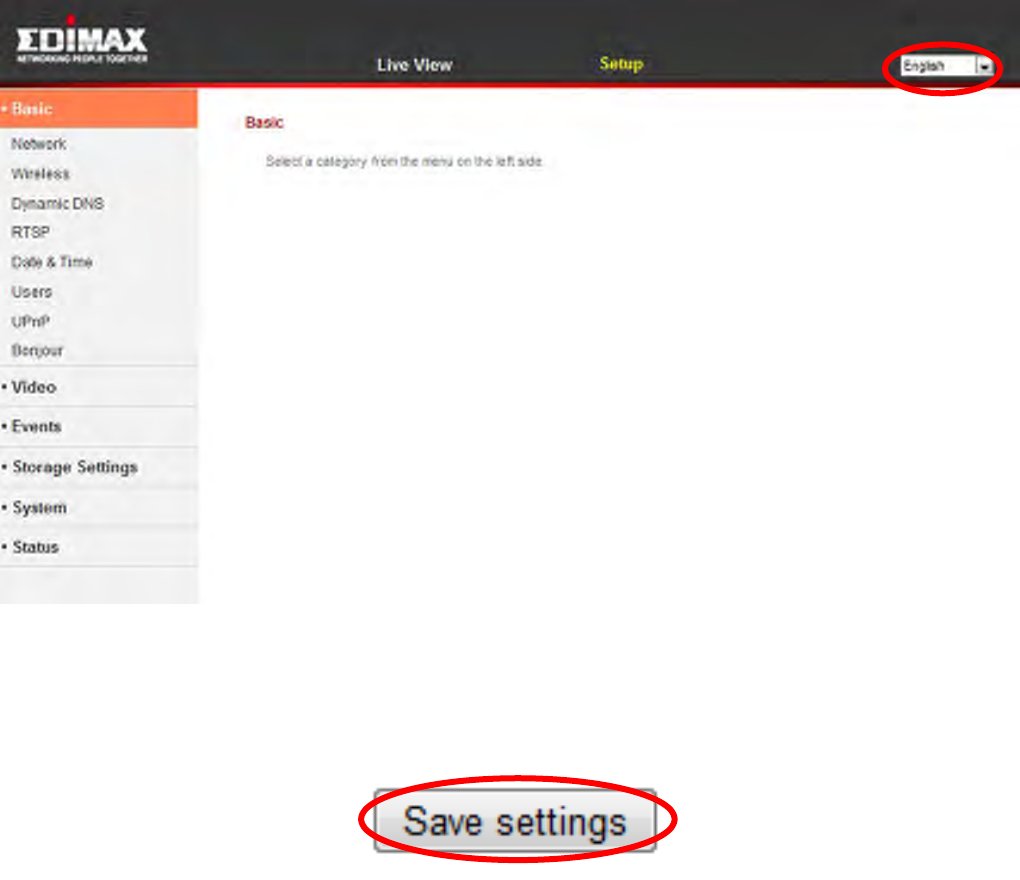
5. Select“Setup”atthetopcenterandusethemenudowntheleftsideto
navigatetothenetworkcamera’svarioussettings.Eachmenuitemis
describedinthefollowingchapters.
37
6. Aftermakinganychanges,click“SaveSettings”tosavethesettingsand
bringthechangesintoeffect.
38
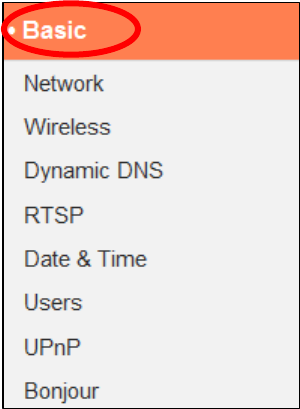
IV‐1. Basic
The“Basic”menuopensasubmenuwitheight
categoriesofsettingsforyournetworkcamera’sbasic
operation.Selectacategoryandrefertothe
appropriatechapter.
39
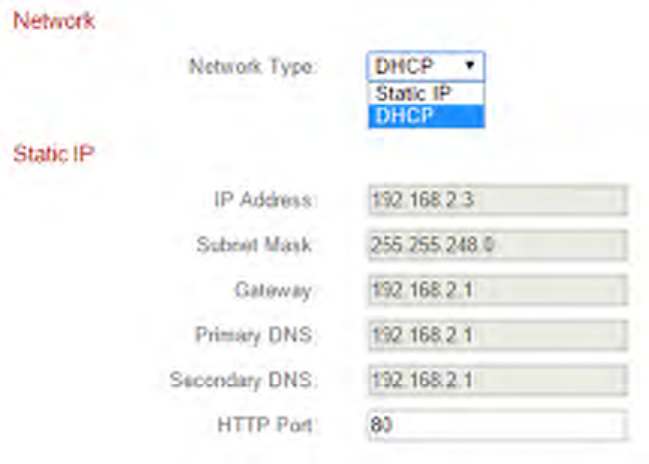
IV‐1‐1. Network
Networksettingsaredisplayedonthispage,asshownbelow.Youcan
configureyournetworkcameratodynamicallyreceivealocalIPaddressfrom
yourrouter’sDHCPserveroryoucanspecifyalocalstaticIPaddressforyour
networkcamera.Additionally,advanceduserscanconfigurethecamerausing
PPPoE.

40
NetworkTypeSelect“DHCP”toautomaticallyassignanIP
addresstoyournetworkcamerafromyour
routeror“StaticIP”tomanuallysetastaticIP
address usingthefieldsbelow.
IPAddressStaticIPusersspecifyanIPaddresshere,
whichwillbetheIPaddressofyournetwork
camera.
SubnetMaskEnterthesubnetmaskoftheIPaddress.
GatewayEnterthegatewayaddressofyournetwork.
PrimaryDNSEntertheIPaddressofyourprimaryDNS
server.
SecondaryDNSEntertheIPaddressofyoursecondaryDNS
server(optional).
HTTPPortYoucanedittheHTTPportnumbertoany
valuebetween1024–65535.Thedefault
valueis80.

41
IV‐1‐2. Wireless
Thewirelesspageallowsyoutoconfiguresettingsforyournetworkcamera’s
wirelessconnection.ForWindowsusers,yourwirelessconnectionshould
havebeensetupalreadyusingEdiViewFinder,thoughyoucanstillusethis
pagetorevisethesettingsifyouneed.
MacusersneedtoconfigurethesesettingsmanuallysinceEdiViewFinderon
Macwillnotsetupyourcamera’swirelessconnection.Aquickguidetosetup
yournetworkcamera’swirelessconnectionusingasmartphoneora
computerisincludedbelow.
Macuserssettingtheirnetworkcamera’swirelessconnectionfor
thefirsttimepleaseensureyournetworkcameraisconnectedto
yourrouter/accesspoint/switchviaEthernetcable.
Youcanalsousethe“wireless”pageforWi‐FiProtectedSetup(WPS):to
eitheractivatepush‐buttonWPS(thesameeffectasphysicallypushingthe
hardwareWPSbuttonbuiltintothecamera),orPINcodeWPS(usingaPIN
codeforverificationbetweenthetwowirelessdevicesforadditionalsecurity.)
42
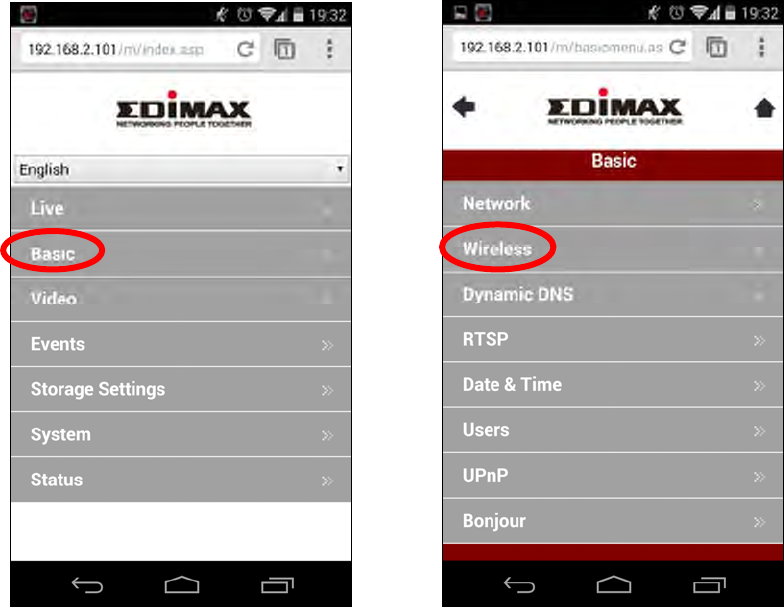
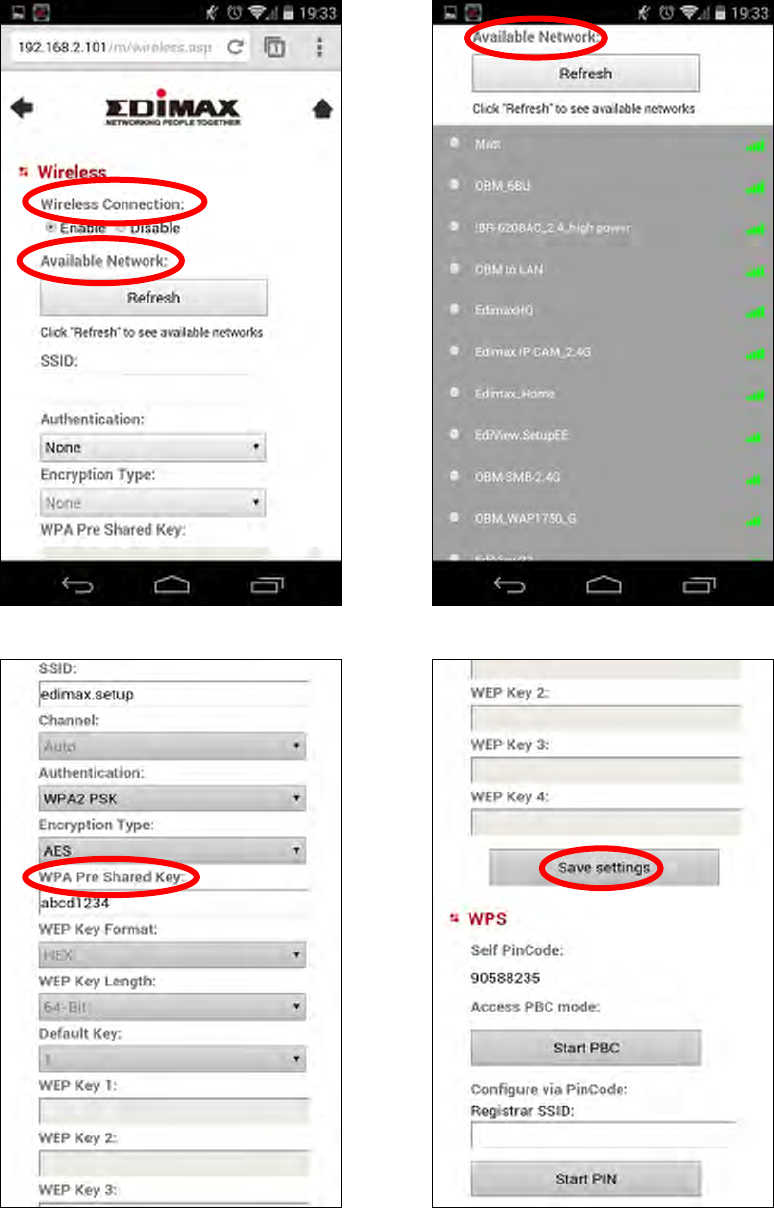
IV‐1‐2‐1. Smartphone
1. Select“Basic”fromthemenuontheleftsideandthenselect“Wireless”.
2. ConfigurethewirelesssettingsA–Eshowninthetablebelow:
43
A
B
C
D
E

44
3. Afterthesettingsaresaved,removetheEthernetcablefromyournetwork
camera.YourcamerashouldnowbeconnectedtoyourWi‐Fi.
AWirelessConnectionSelect“Enable”toenablethewirelessconnection.
BAvailableNetwork(1)Click“Refresh”to displayallavailableWi‐Fi
networks.
CAvailableNetwork(2)SelectyourWi‐Finetworkfromthelist.Thisisthe
wirelessnetworkwhichyourcamerawillconnectto.
DWPAPreSharedKeyEnteryourWi‐Fipassword.
ESaveSettingsClick“SaveSettings”tosaveyoursettings.

45
IV‐1‐2‐2. Computer
1. ConfigurethewirelesssettingsA–Eshowninthetablebelow:
2. Afterthesettingsaresaved,removetheEthernetcablefromyour
networkcamera.YourcamerashouldnowbeconnectedtoyourWi‐Fi.
AWirelessConnectionSelect“Enable”toenablethewirelessconnection.
BAvailableNetworkClick“Refresh”todisplayallavailableWi‐Fi
networks.
CConnectedSelectyourWi‐Finetworkfromthelist.Thisisthe
wirelessnetworkwhichyourcamerawillconnectto.
DWPAPreSharedKeyEnteryourWi‐Fipassword.
ESaveSettingsClick“SaveSettings”tosaveyoursettings.
A
C
D
E
B
46
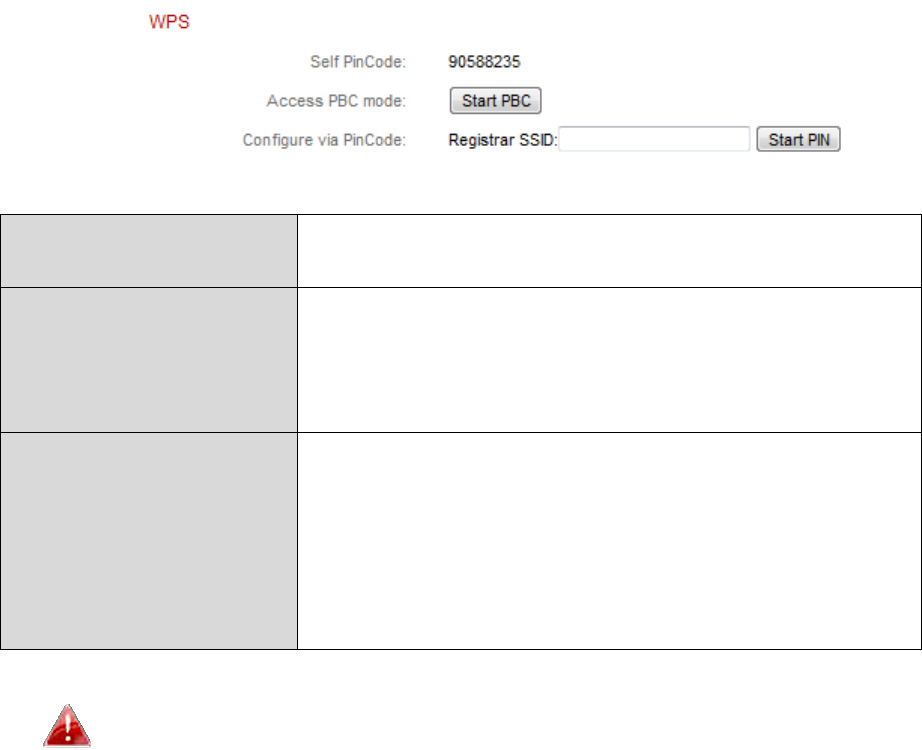
IV‐1‐2‐3. WPS
WPS(Wi‐FiProtectedSetup)isaquickandeasywaytosetupwireless
connectionsbetweencompatibledevices.Usethe“StartPBC”or“StartPIN”
buttontoactivateWPSonyournetworkcamera.Yournetworkcamera’sWPS
PINcodeisalsolistednextto“SelfPinCode”.
SelfPinCodeYournetworkcamera’sWPSPINcodeislisted
here.
AccessPBCModeClick“StartPBC”toactivatepush‐buttonWPS
onyournetworkcamera.Thishasthesame
effectasphysicallypushingthebuilt‐in
hardwareWPSbutton.
Configurevia
PinCode
EntertheSSIDyouwishtoconnecttoand
click“StartPIN”toactivatePINcodeWPS.
Youwillthenneedtoenterthenetwork
camera’s“SelfPinCode”intoyourwireless
router’swebU.I.andactivateyourrouter’s
PINcodeWPS.
Pleaserefertoyourwirelessrouter’sinstructionsforhelp
accessingitsweb‐basedinterfaceandactivatingWPS.
47
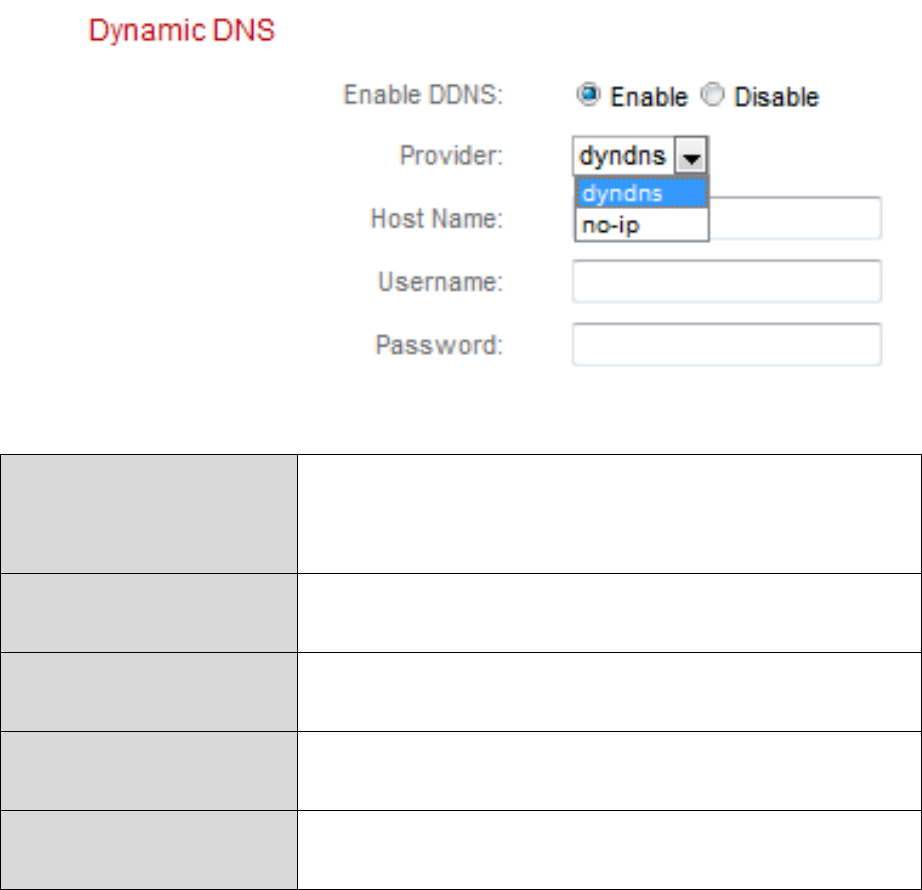
IV‐1‐3. DynamicDNS
DynamicDNS(DDNS)isaservicewhichprovidesahostname‐to‐IPservicefor
dynamicIPusers.IfyourInternetserviceproviderdidn’tissueafixedIP
address,youcanuseathird‐partydynamicDNSprovidertomapyourcurrent
IPaddresstoafixedIPaddress.SeveralfreeorpaidDDNSservicesare
availableonline,pleaseusetheinformationprovidedbyyourDDNSprovider
toconfigurethesettingsonthispage.
EnableDDNSSelect“Enable” toenableDDNSfunctionality,
orselect“Disable”todisableDDNS
functionality.
ProviderSelectyourdynamicDNSserviceprovider
fromthedropdownmenu.
HostNameEnterthehostnameyouregisteredwiththe
DDNSserviceprovider.
UserNameEntertheusernameyouregisteredwiththe
DDNSserviceprovider.
PasswordEnterthepasswordyouregisteredwiththe
DDNSserviceprovider.
48
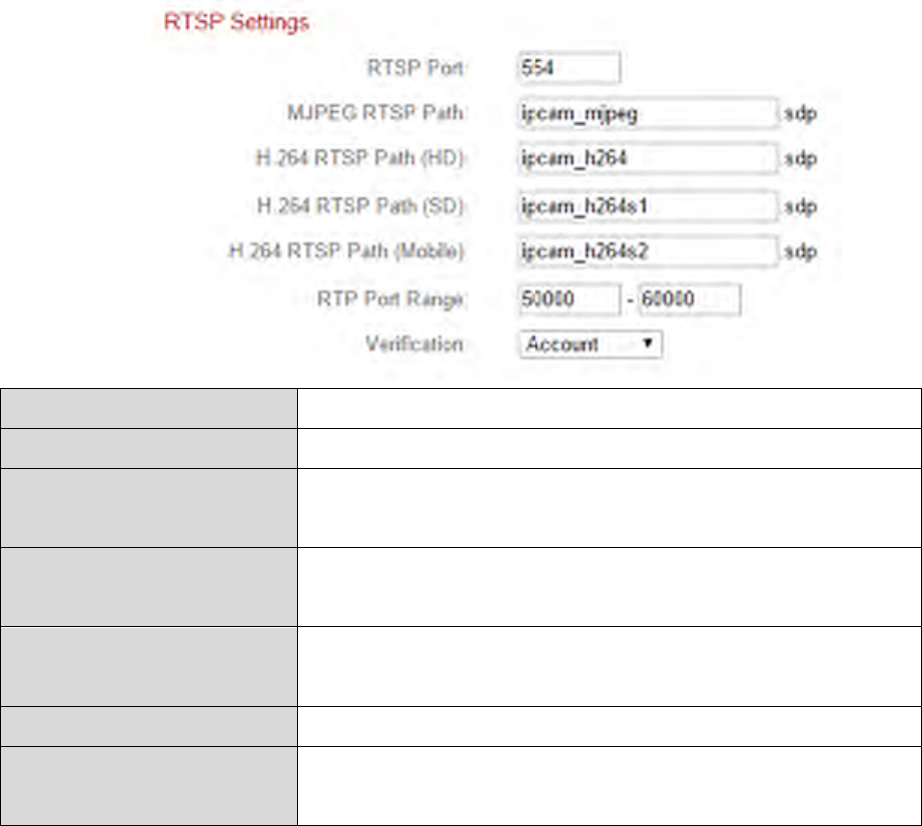
IV‐1‐4. RTSP
RealTimeStreamingProtocol(RTSP)enablesthenetworkcameratobeused
withastreamingmediaserver.EntertherequiredRTSPsettings.
RTSPPortEntertheRTSPport.
MJPEGRTSPPathEntertheMJPEGRTSPpath.
H.264RTSPPath
(HD)
EntertheH.264HighDefinition(HD)RTSP
path.
H.264RTSPPath
(SD)
EntertheH.264StandardDefinition(SD)RTSP
path.
H.264RTSPPath
(Mobile)
EntertheH.264HighDefinitionMobileRTSP
path.
RTPPortRangeEntertheRTPportrange.
VerificationSelectaverificationtypefromthedropdown
menu.
49
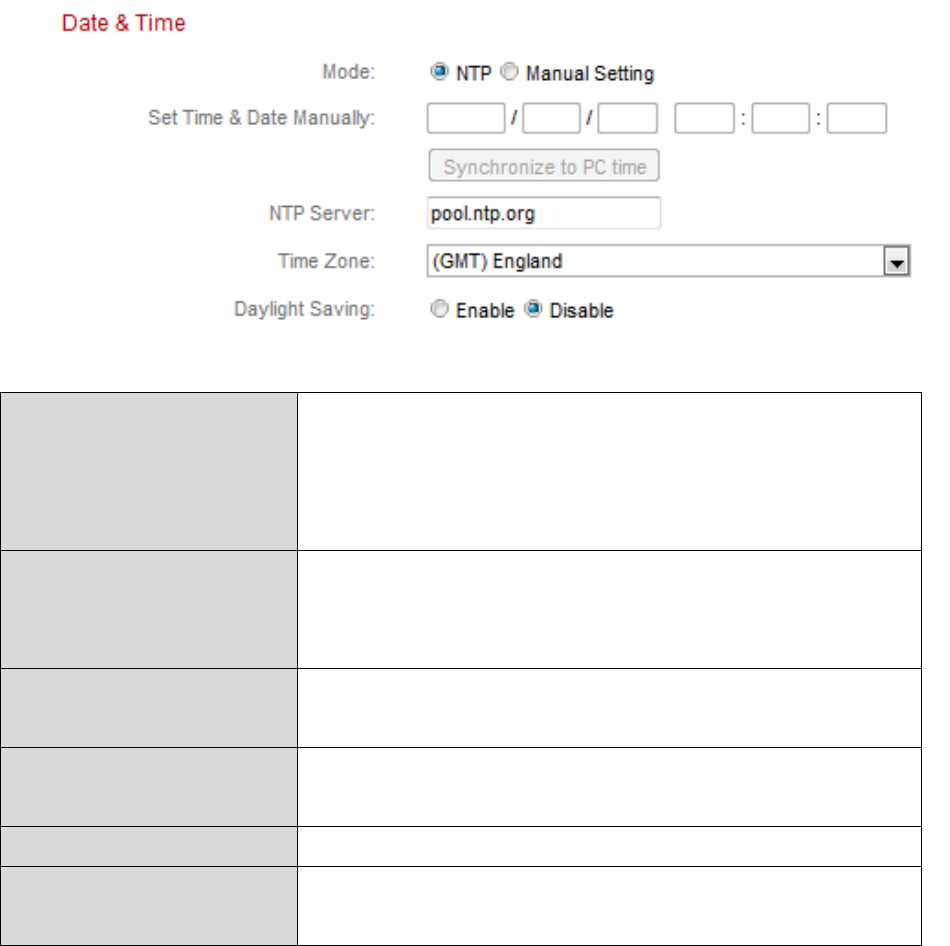
IV‐1‐5. Date&Time
Youcansetandadjustthenetworkcamera’ssystemtimeanddateonthis
page.Maintainingacorrectsystemtimeisparticularlyimportantforrecorded
videoorganization/playback.
ModeSelect”NTP”or“ManualSetting”.NTP
(NetworkTimeProtocol)cansetandmaintain
thetimeanddateautomaticallyviaanNTP
serveronthelocalnetwork,ifavailable.
SetTime&Date
Manually
Formanualsettingmode,enterthecorrect
timeanddateinthefollowingformat:
YYYY/MM/DDHH:MM:SS
SynchronizetoPC
time
Clickhere to automaticallyenterthesame
timeanddateasyourcomputer.
NTPServerForNTPmode,entertheNTPserver’s
hostnameorIPaddress.
TimeZoneSelectthecorrecttimezone.
DaylightSavingEnableordisabledaylightsavingaccording
yourlocaltimezone.
50
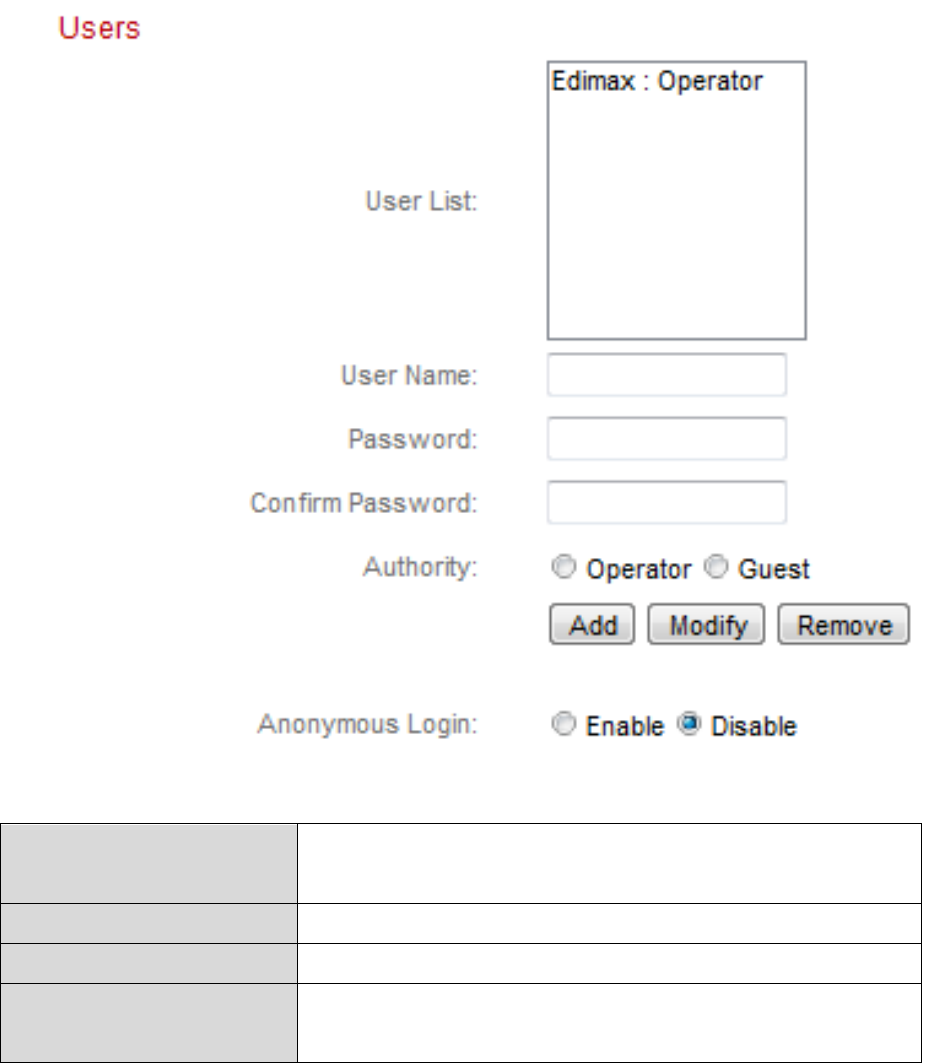
IV‐1‐6. Users
Inadditiontothedefaultadministratoraccount,youcanconfigureseveral
differentloginaccountsforthenetworkcamera,withtwodifferentlevelsof
access–operatorandguest.
Operatoraccountscanconfigureallfunctionsofthenetworkcamerainthe
samewayastheadministratoraccount,whileguestaccountscanonlyview
thecamera’simage.
UserListExisting usersarelistedhere.Selectauser
heretomodifythesettings.
UserNameInputuser’snamehere.
PasswordInputuser’spasswordhere.
ConfirmpasswordInputuser’spasswordhereagainfor
confirmation.

51
AuthoritySelectthe user’sauthority:
Operatorscanviewvideoandconfigureall
settings,whileguestscanonlyviewvideo.
AddAddanewuser.
ModifySavethechangesto anexisting,selecteduser.
Remove Removeselecteduser.
AnonymousLoginEnableordisableanonymous login.
Anonymousloginallowsanyonetologinto
thenetworkcameraandviewimages.This
functionisusefulifyouwanttosetupa
remotevideoserver.

52
IV‐1‐7. UPnP
Universalplug‐and‐play(UPnP)isasetofnetworkingprotocolswhichenables
networkdevicestocommunicateandautomaticallyestablishworking
configurationswitheachother.Whenenabled,Windowscomputerscan
automaticallydiscoverthenetworkcameraonthelocalareanetwork.The
networkcameraalsosupportsIGD.
Enable/DisableEnableordisableUPnP.
IGDEnable(UPnP
PortForward)
EnableordisableInternetGatewayDevice
(IGD).
IGDConfiguration
(ExternalPort)
Selectfully‐automatedorsemi‐automated
IGD.
ExternalHTTPPort EnteranexternalHTTPport.
ExternalRTSPPort EnteranexternalRTSPport.

53
IV‐1‐8. Bonjour
BonjourisafeatureofMaccomputerswhichallowsSafariwebbrowserto
discoverdevicesandservicesonthelocalnetworkandprovideaquick
shortcutforaccess.Whenenabled,Safariusersonthelocalnetworkcanfind
ashortcuttothenetworkcameraunderSafari’s“Bonjour”menu.Select
“Enable”or“Disable”.
54
IV‐2. Video
The“Video”menuconsistsofthreecategoriesfor
configuringthenetworkcamera’svideosettings.
Selectanitemfromthesubmenuandrefertothe
appropriatefollowingchapter.

55
IV‐2‐1. VideoSettings
The“VideoSettings”pageenablesyoutomodifythenetworkcamera’s
resolutionandframeratesettingsfordifferentprofiles:HD,SD,Small(mobile)
&MJPEG.
H264ResolutionSelectaH264videoresolutionfromthe
dropdownmenu.Ahigherresolutionprovides
moredetailedvideobutrequiresmore
bandwidth.

56
N
ote:Motiondetectioncannotbeusedwhen
“HD”resolutionisselected.
H264MaximumBit
Rate
Selectamaximumbitrate forH264videos
fromthedropdownmenu.Ahigherbitrate
providesmoredetailedvideobutrequires
morebandwidth.Thebitrateisaccurate
±20%.
MJPEGResolution SelectaMJPEGvideoresolutionfromthe
dropdownmenu.Ahigherresolutionprovides
moredetailedvideobutrequiresmore
bandwidth.
MaximumFrame
rate
Selectthemaximumvideoframerate.A
higherframerateprovidessmoothervideo,
butalsorequiresmorebandwidth.
Note:Indarkenvironments,thenetwork
camerawillautomaticallylowertheframe
ratetoprovideabettervideoquality,by
usingalongerexposuretime.
MJPEGQualitySelectaqualitylevelforMJPEGvideosfrom
thedropdownmenu.Higherqualityrequires
morebandwidth.
PowerfrequencyAdjustthepowerfrequencyto 50Hzor60Hz
frequencydependingonyourlocalregion,in
ordertoreduceflicker/improveplaybackin
yourvideos.
RotateImageRotatethecamera’simagebythespecified
angle.
OSDSetthenetworkcamera’son‐screendisplay
(OSD)consistingoftime&datetoonoroff
foralllivevideoandvideorecordings.
57
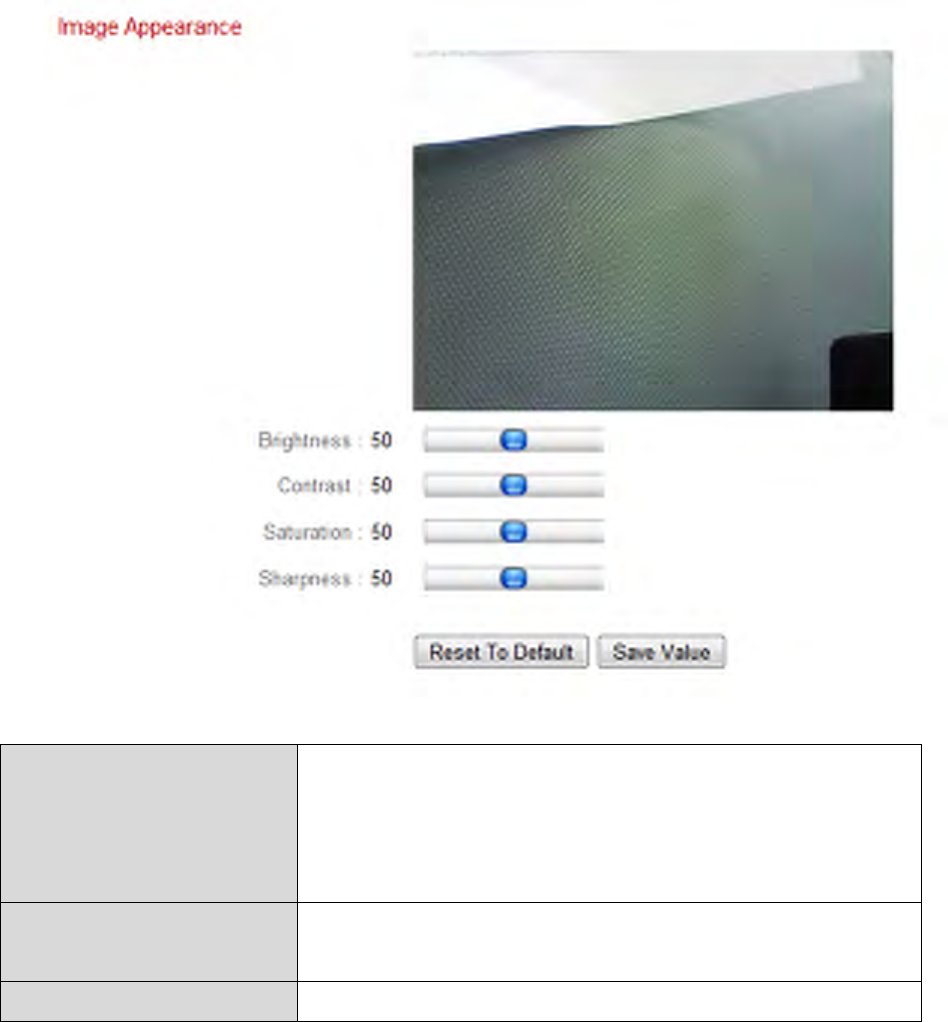
IV‐2‐2. ImageAppearance
The“ImageAppearance”pageallowsyoutoadjustvariousparameters
relatingtothenetworkcamera’simageappearanceusingtheslidersshown
below.
Brightness/
Contrast/
Saturation/
Sharpness/
Clickanddragthebluelever tochangethe
valueaccordingtoyourpreferenceforeach
category.
ResettodefaultClicktoresetallsettingsbacktothedefault
valueof50.
SavevalueSavechanges.

58
IV‐2‐3. NightVision
Night‐visionallowsyournetworkcameratocaptureimagesindark
environmentsbyusinginfra‐redLEDs.Auto‐switchwilldetectlightlevelsin
yournetworkcamera’senvironmentandautomaticallyswitchtonight‐vision
inlowlight.Select“Enable”or“Disable”fornight‐visionauto‐switch.
59
IV‐3. Events
Selectanitemfromthe“Events”menuandreferto
theappropriatefollowingchapter.Youcanconfigure
settingsformotiondetection,scheduling,SMTPand
FTP.
IV‐3‐1. MotionDetection
IV‐3‐1‐1. MotionDetection
Thenetworkcamerafeaturesamotiondetectionfunctionandvariousoptions
for(motiondetection)eventsnotification.Whenmotionisdetected,itis
definedasan“event”andthecamerawillrecordforaspecifiedlengthoftime.
Youcansetthecameratosendthisrecordingasanotificationviaemailor
FTP,and/ortolocalstoragesuchasaNASorMicroSDcardinsidethecamera.
Youcanalsosetthecameratosendapushnotificationforeacheventtoa
smartphonewithEdiViewIIinstalled.Youcanviewa10secondrecordingof
theevent,whichisautomaticallystoredinthenetworkcamera’smemory,
fromtheapp’s“Events”menu.
Recordingsstoredautomaticallyinthenetworkcameraare
limitedto10secondsandonlyalimitedquantitycanbestored.
Theserecordingsareseparatefromanyrecordingssavedtolocal
storageorsentviaemail/FTP,andwillbeoverwrittenasnew
recordingsarecreated.
60

61
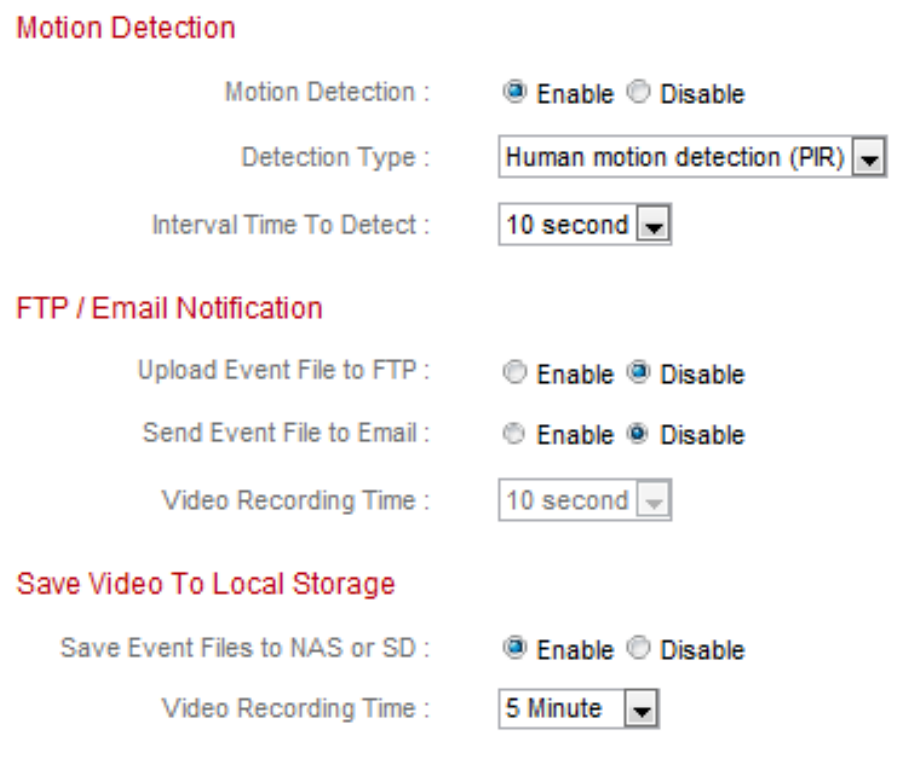
MotionDetectionEnableordisablethemotiondetection
functionofyournetworkcamera.
IntervalTimeTo
Detect
Aftermotionisdetected,thenetworkcamera
willnotdetectmotionagainforthislengthof
time.Forexample,usingan“IntervalTimeTo
Detect”of20secondsmeansthatafter
motionisdetected,thecamerawillnot
detectanyfurthermotionfor20seconds.
Thenafter20seconds,thecamerawilldetect
motionagain.
UploadEventFileto
FTP
Avideorecordingofadetectedeventcanbe
senttoadesignatedFTPserver.Select
“Enable”or“Disable”forthisfunction.When
enabled,youneedtoconfiguretheFTPserver
informationonthe“FTP”pageofthe“Events
Notification”menu.
SendEventFileto
Email
Avideorecordingofadetectedeventcanbe
senttoadesignatedemailrecipient.Select
“Enable”or“Disable”forthisfunction.When
enabled,youneedtoconfiguretheSMTP
serverinformationonthe“SMTP”pageofthe
“EventsNotification”menu.
VideoRecording
Time
SpecifythelengthoftimefortheemailorFTP
videorecordinghere.
SaveEventFilesto
NASorSD
Enableordisablethecamera’sfunctionto
savevideofilestoNASorMicroSDcard.
Whenenabled,youneedtoconfigurethe
settingsinthe“StorageSettings”menu.
VideoRecording
Time
SpecifythelengthoftimefortheNASor
MicroSDvideorecordinghere.
62
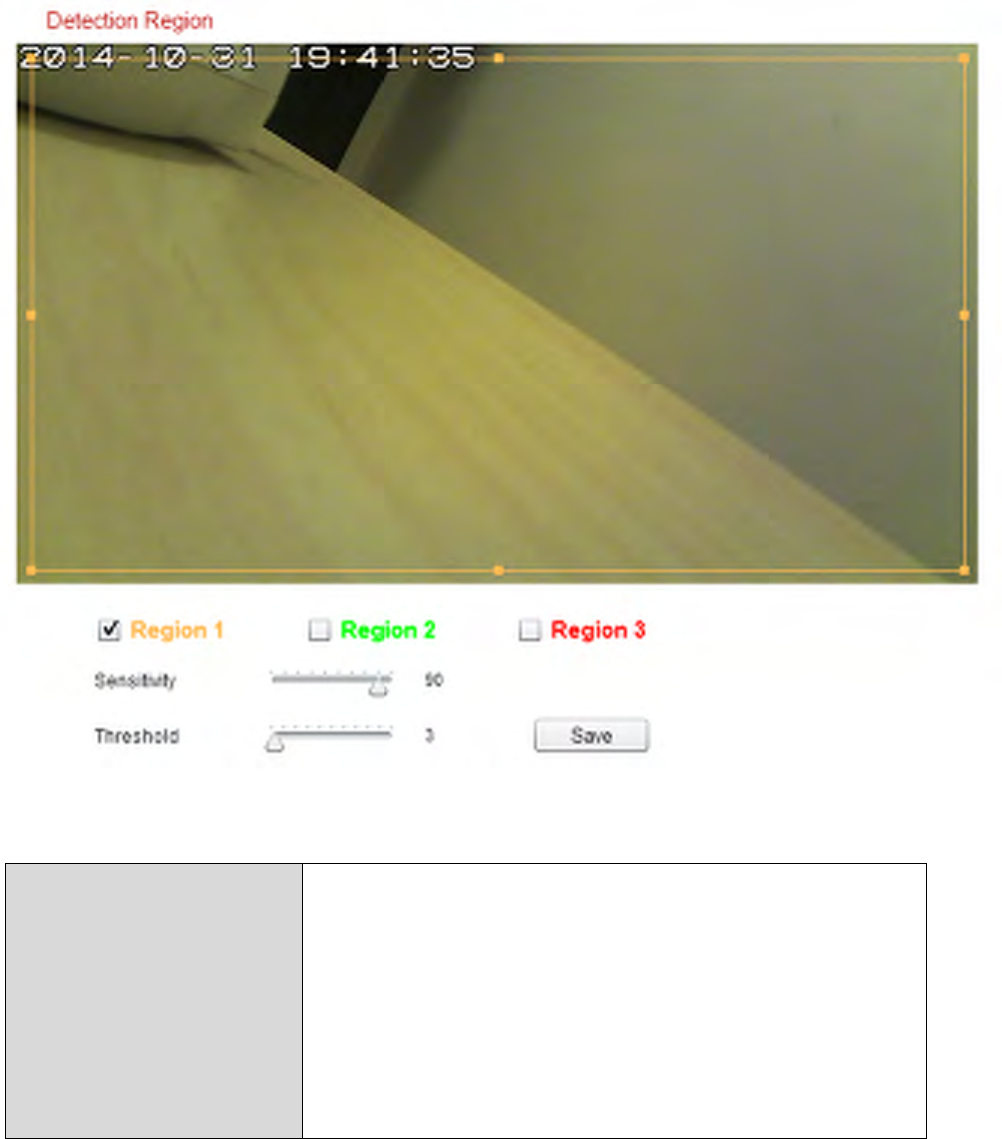
IV‐3‐1‐2. DetectionRegion
Whenusingthenetworkcamera’smotiondetectionfunction,youcanspecify
theareainthevideowherethenetworkcamerashouldbesensitiveto
motion.Motionoutsideofthedetectionregionwillbeignoredbythe
networkcamera.Thisisusefultoavoidfalsealarms.
Region1/
Region2/
Region3
Checktheboxtoenableuptothreemotion
detectionregions.Acolor‐codedrectangle
willappearonthevideoviewforeach
enabledregion.Adjustthesizeandposition
ofeachboxaccordingtoyourpreferenceby
clickinganddragginginsidethebox(move)or
ontheedges(resize).

63
SensitivityAdjustthesensitivitylevelofmotion
detectionforeachregion.Ahighervaluewill
triggerthealarmforminormotioninthe
videoandvice‐versa.Youcanreducethe
sensitivitylevelifyoureceiveunnecessary
eventnotifications.
ThresholdAdjustthemotiondetectionthresholdlevel
foreachregion.Ahighervaluewilltriggerthe
alarmforlargeobjectsinthevideo,alower
valuewilltriggerthealarmforsmaller
objects.
SaveSaveyoursettings.
64
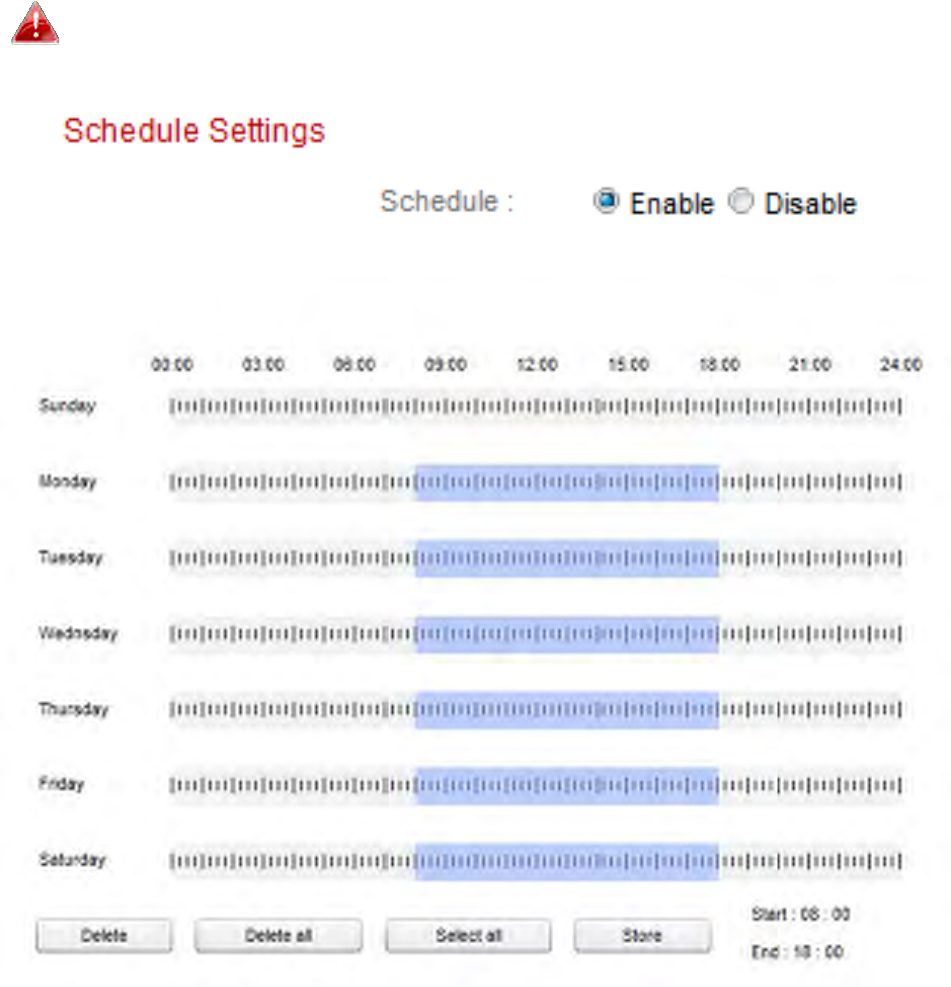
IV‐3‐1‐3. ScheduleSettings
Thenetworkcamera’smotiondetectionfunctioncanbescheduledtobe
activeon/atspecifiedtimesanddays.Select“Enable”toenablethisfeature
andthendefinewhichtimesthenetworkcamera’smotiondetectionwillbe
activeusingthetablebelow.
Foreachday,clickanddragacrossthetimelineonthetimeswhichyouwant
motiondetectiontobeactive.Ablueboxindicatesascheduledrecording.In
theexamplebelow,motiondetectionisscheduledfor8am–6pmMondayto
Saturday.
Bydefault,theschedulemaybefull.Deleteexistingentriesif
necessary.Forscheduledrecording,seeStorageSettings
ScheduleSettings.

65
DeleteDeletetheselectedbluerecordingblockon
thetimeline.
DeleteAllDelete allbluerecordingblocksonthe
timeline.
SelectAllSelectallbluerecordingblocks.
StoreStoretherecordingsettingsonthetimeline.
66
IV‐3‐2. Notification
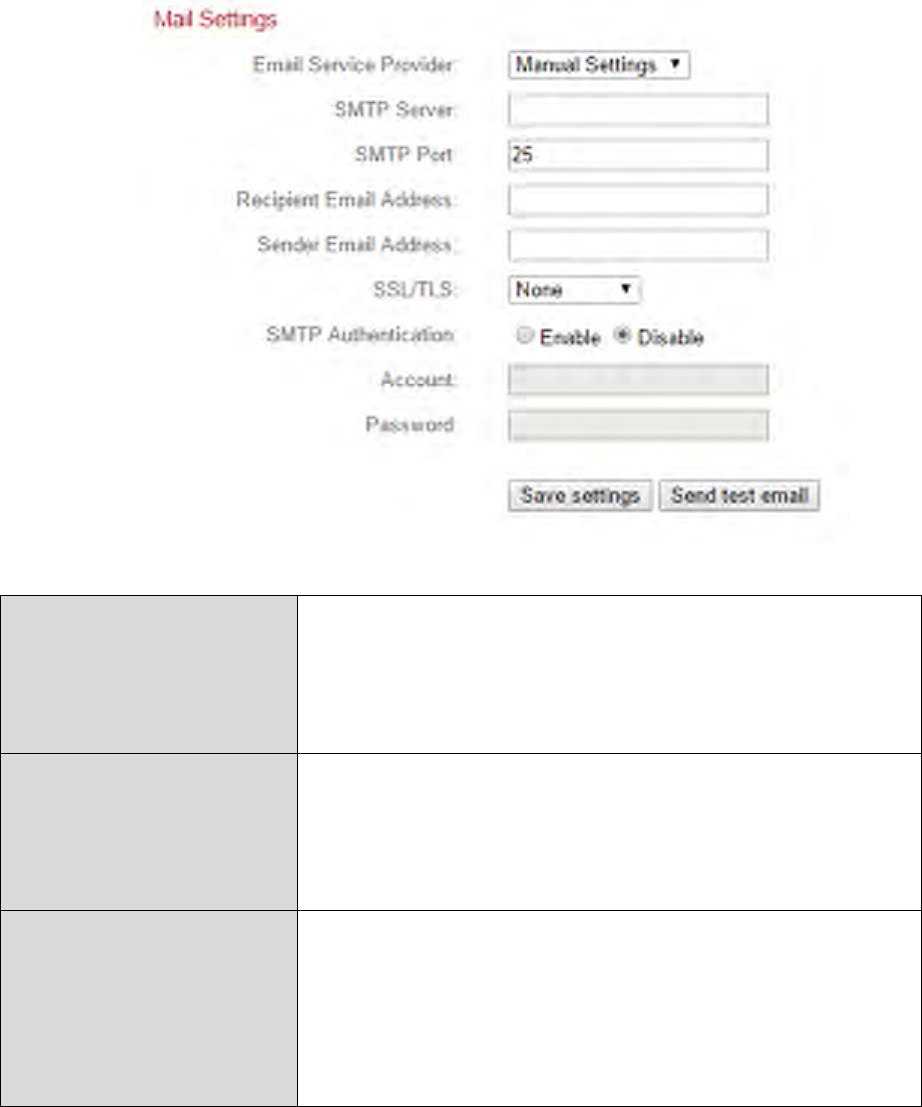
IV‐3‐2‐1. MailSettings
Recordingsofevents(motionorsounddetected)canbesenttoadesignated
emailrecipient.Thisfunctionmustbeenabledin“MotionDetection”or
“SoundDetection”settingsinthe“Events”menu.Entertherequired
informationaboutyoursenderandrecipientemailaccountsasshownbelow.
EmailService
Provider
Select“ManualSettings”toenterthe
informationmanuallyorselectacommon
emailprovidertoentersomeofthe
informationautomatically.
SMTPServerInputthehostnameorIPaddressofthe
SMTPserverfortheemailsender.This
informationcanbeprovidedbyyouremail
serviceprovider.
SMTPPortInputtheSMTPportnumberfortheemail
sender.MostSMTPserversuseportnumber
25,whilesomeSMTPserversuseencrypted
connectionswithaportnumberof465.This
informationcanbeprovidedbyyouremail

67
serviceprovider.
RecipientE‐Mail
Address
Entertheemail recipient’semailaddress
here.
SenderE‐Mail
Address
Enterthesender’semailaddresshereto
avoidspamfilterissues.
SSL/TLSSelect‘SSLorTLS’ whenyourSMTPserver
requiresencryption.
Consultyourmailserveradministratorwhen
indoubt.
SMTP
Authentication
Select‘Enable’ whenyourSMTPserver
requiresauthentication.Thisinformationcan
beprovidedbyyouremailserviceprovider.
AccountInputtheSMTPaccountnamewhenyour
SMTPserverrequiresauthentication.This
informationcanbeprovidedbyyouremail
serviceprovider.
PasswordInputthepasswordusedforSMTPserver
authentication.
SendTestEmailClickheretosendatestemailwiththe
currentsettings.
68
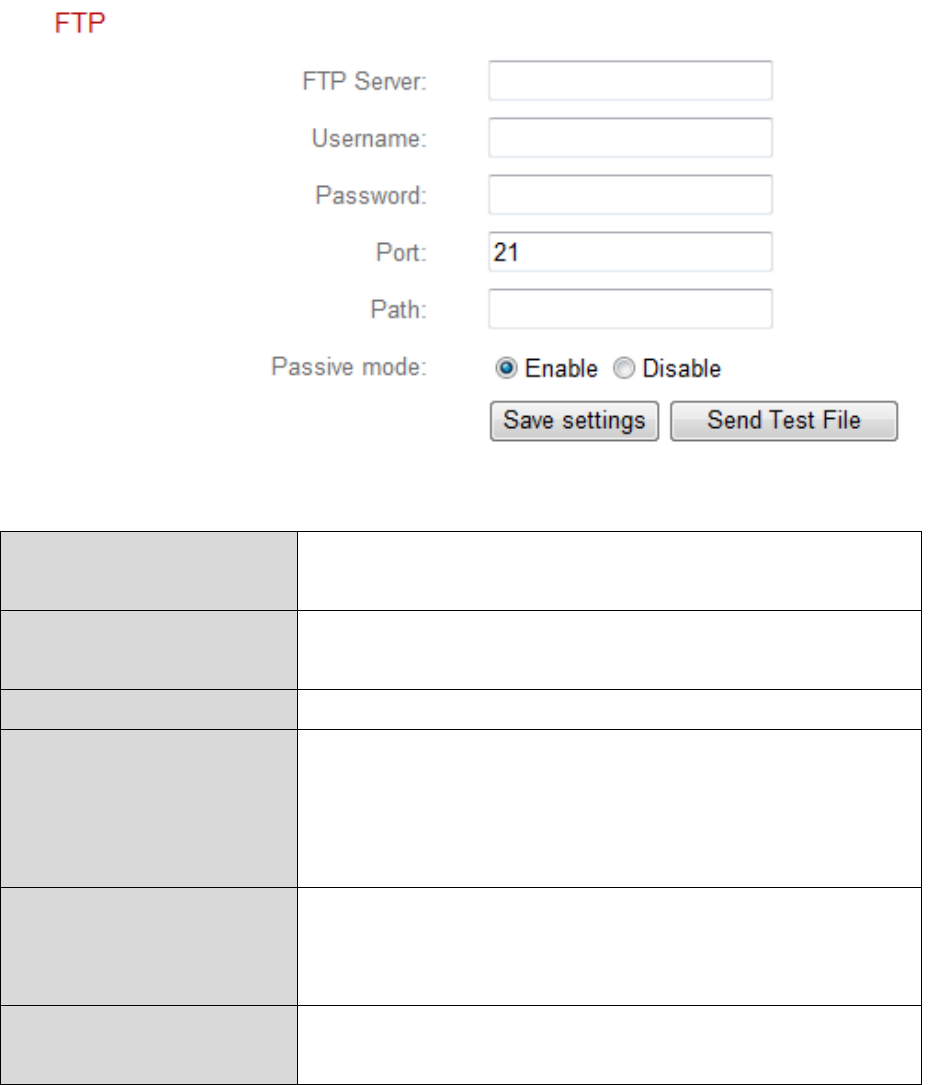
IV‐3‐2‐2. FTP
Recordingsofevents(motionorsounddetected)canbesenttoadesignated
FTPserver.Thisfunctionmustbeenabledin“MotionDetection”or“Sound
Detection”settingsinthe“Events”menu.Entertherequiredinformation
aboutyourFTPserverasshownbelow.
FTPServerEntertheIPaddressorhostnameoftheFTP
server.
UserNameEntertheusernamerequiredbytheFTP
server.
PasswordEnterthepasswordoftheFTPserver.
PortEntertheportnumberoftheFTPserver.This
valueshouldbeanintegerbetween1and
65535.Pleasedon’tchangethisvalueunless
advisedbytheFTPserver’sadministrator.
PathEntera path(folder)tosavefilesontheFTP
server.Ifblank,fileswillbesavedintheFTP
server’sdefaultrootfolder.
PassivemodeEnableordisablepassivemodeaccordingto
yourFTPserver.
69
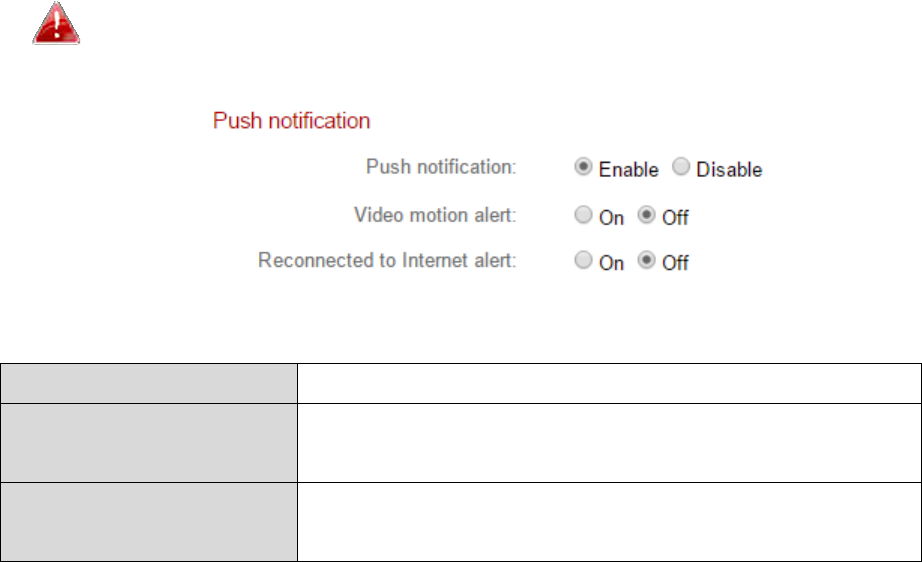
IV‐3‐2‐3. Push
Thenetworkcameracansendpushnotificationstoyoursmartphoneifyou
havetheEdiViewIIappinstalled.Pushnotificationscanbesentbasedon
motiondetectionandsounddetectionevents,andalsowhenyourcamera
reconnectstotheInternetafteradisconnection.
Reconnectionalertsaresentwhenthecameraactually
reconnectstotheInternet,notwhenadisconnectionoccurs.
PushnotificationEnableordisablepushnotifications.
Video/Human
motionalert
Switchpushnotificationsformotion
detectioneventsonoroff.
Reconnectedto
Internetalert
SwitchpushnotificationsforInternet
reconnectiononoroff.
70
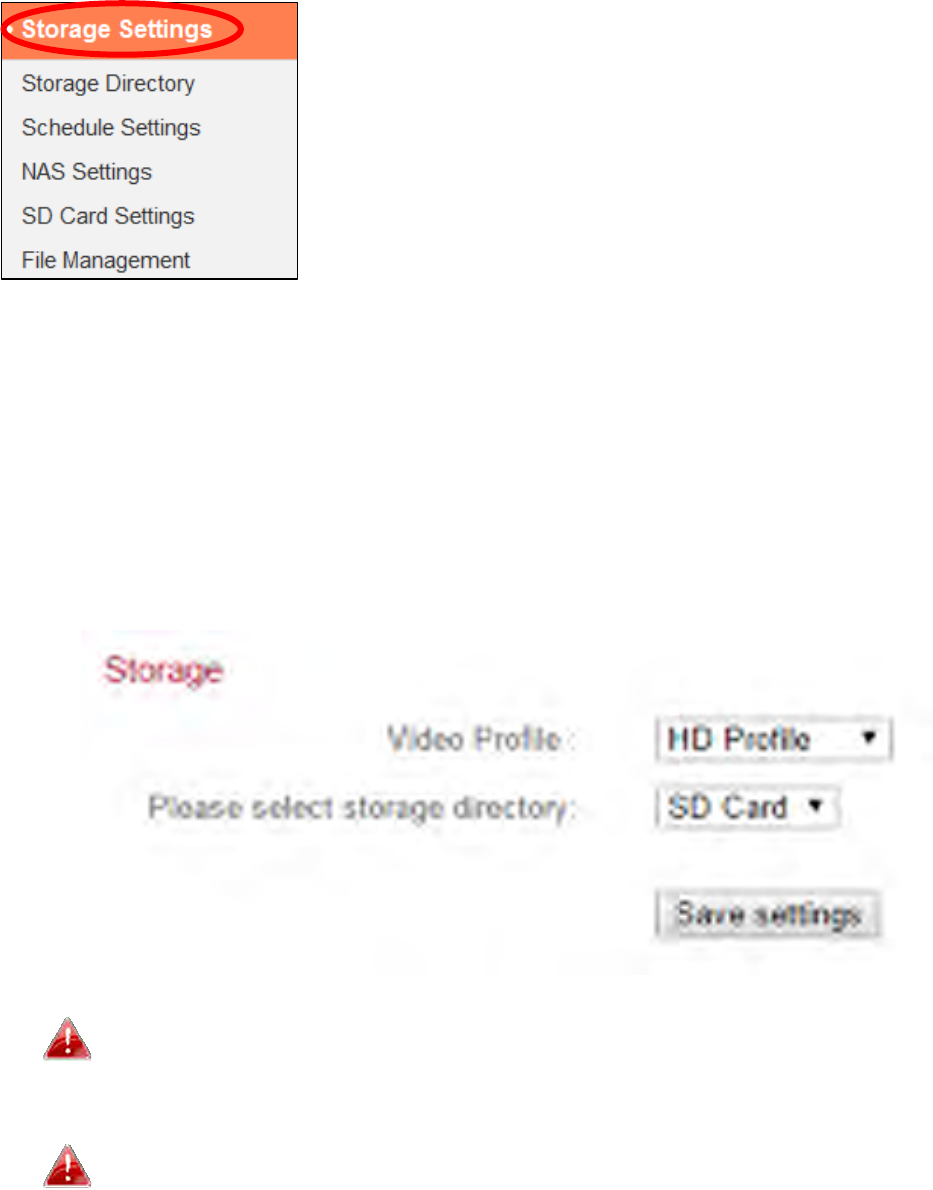
IV‐4. StorageSettings
The“StorageSettings”menuenablesyouto
configurethesettingsforlocalstorageofmotionor
sounddetectionevents/recordings.Youcanalso
configurescheduledrecording.
IV‐4‐1. StorageDirectory
Thenetworkcameracanstorerecordingsofmotiondetectioneventstolocal
storage:NASorMicroSD.
Selectavideoprofilefortherecordings(HD,SDorSmall)andselectyour
storagelocationandclick“Savesettings”.
AMicroSDcardmustbeinstalledinthenetworkcameratouse
thisfunction.
ConfigurethesettingsforyourNASorMicroSDcardinthe“NAS
Settings”or“SDCardSettings”menurespectively.
71
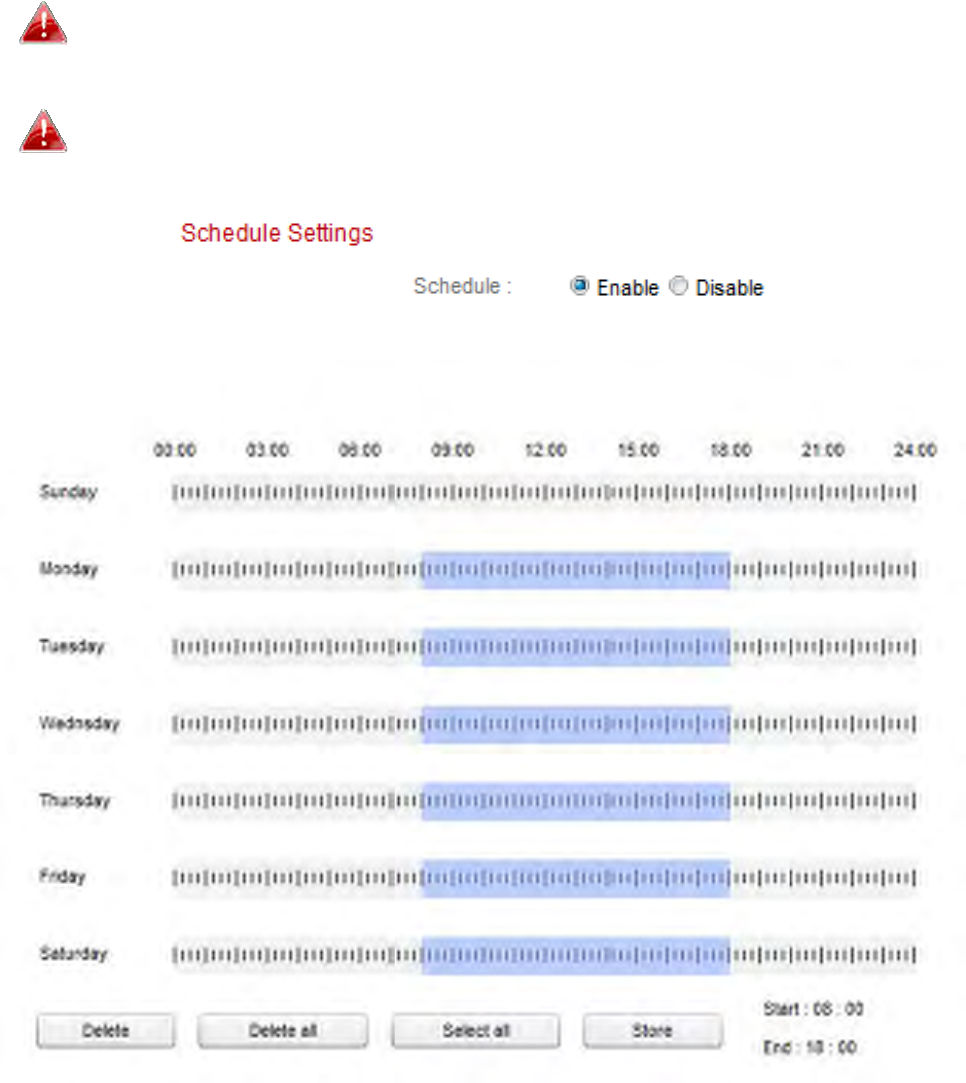
IV‐4‐2. ScheduleSettings
Thenetworkcameracanbescheduledtorecordautomaticallyat/onspecified
timesanddays.Select“Enable”toenablethisfeatureandthendefineat
whichtimesthenetworkcamerawillrecordusingthetablebelow.
Foreachday,clickanddragacrossthetimelineonthetimeswhichyouwant
torecord.Ablueboxindicatesascheduledrecording.Intheexamplebelow,
recordingisscheduledfor8am–6pmMondaytoSaturday.
Bydefault,theschedulemaybefull.Deleteexistingentriesif
necessary.
Tosetthelimitforindividualfilesizesforscheduledrecording,go
toStorageSettings
NASSettingsorSDCardSettingsdepending
onyourstoragelocation.
72
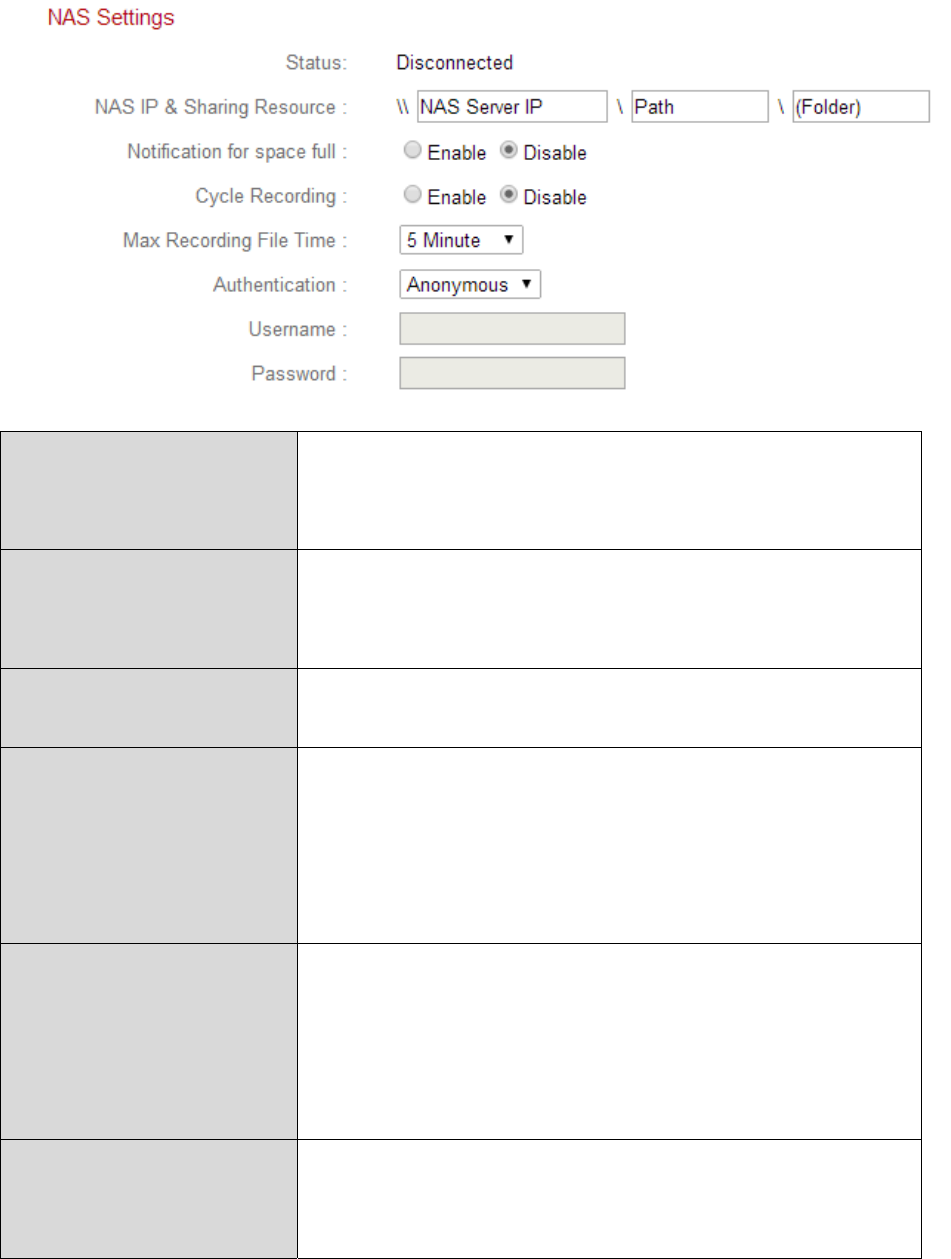
IV‐4‐3. NASSettings
IfusingaNASserverforlocalstorage,configurethesettingsonthispage
accordingtoyourNAS.
StatusDisplaysthestatus(connectedor
disconnected)ofyournetworkcameraand
NASserver.
NASIP&Sharing
Resource
EnterthelocalIPaddressofyourNASandthe
pathofasharedfoldertostoreyournetwork
camera’srecordings.
Notificationfor
spacefull
Enableordisableemailnotificationswhen
yourstoragespaceisfull.
CycleRecordingEnableordisablecyclerecording.When
enabled,cyclerecordingwilloverwritethe
earliestrecordingswhenthestoragespace
becomesfull.Whendisabled,recordingwill
stopwhenstorageisfull.
MaxRecordingFile
Time
Setthemaximumrecordingtimeforeachfile.
Thisappliestoscheduledrecordingsonly.For
motionorsounddetectionrecordingfile
times,referto“EventsMotion/Sound
Detection”.
AuthenticationSelect“Account”andentertheusernameand
passwordinthefieldsbelowifyourNAS
serverrequiresauthentication.Select
73
“Anonymous”ifnoauthenticationisrequired.
UsernameEntertheusernameif“Account”isselected
above.
PasswordEnterthepasswordif“Account”isselected
above.
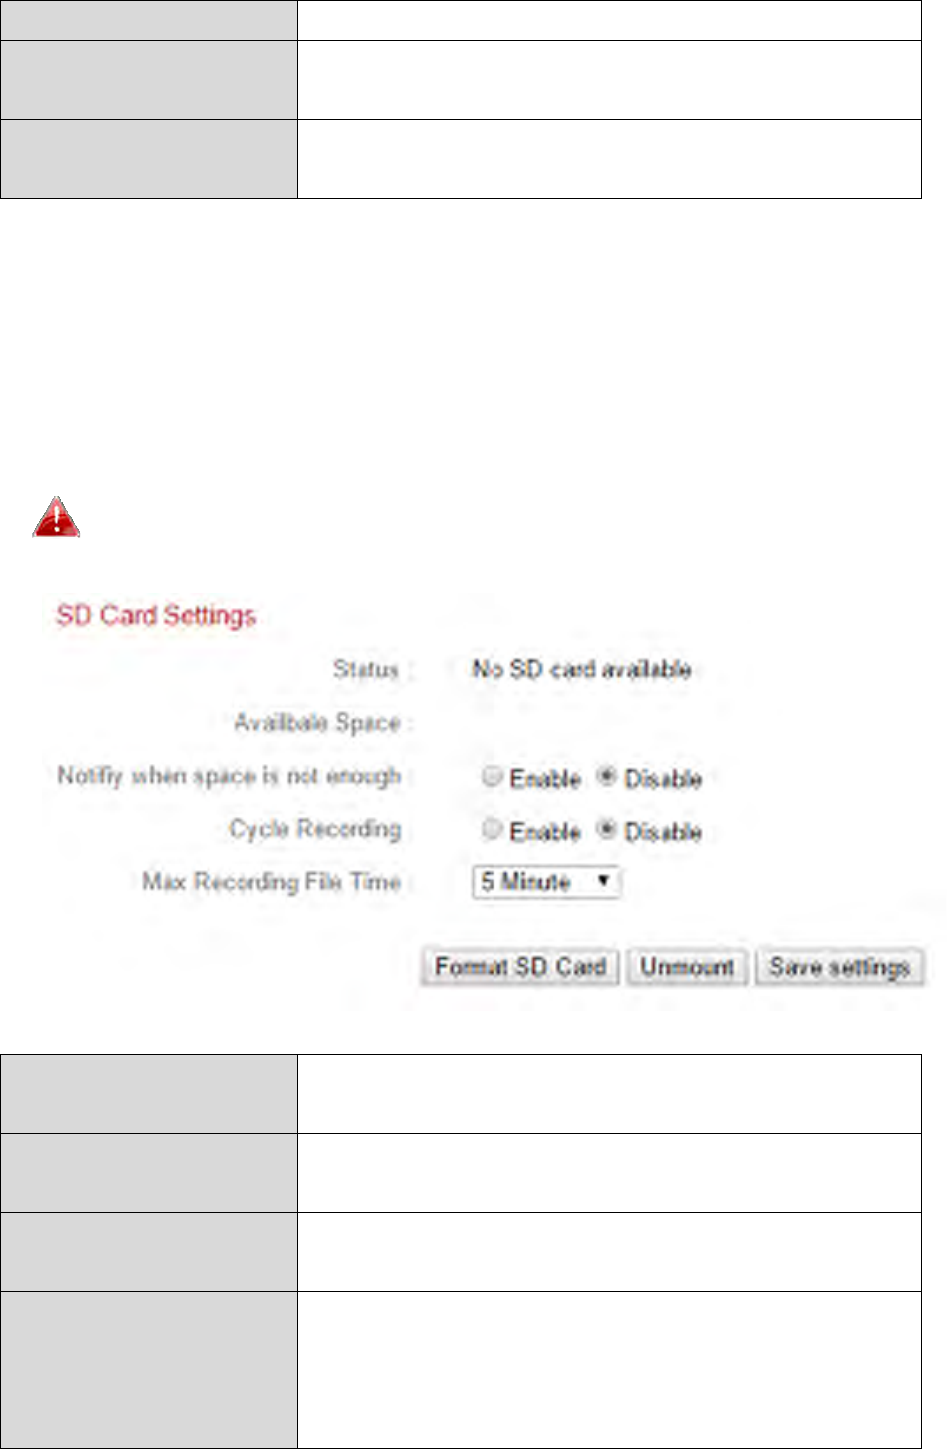
IV‐4‐4. SDCardSettings
The“Basic”menuenablesyoutosetthecamera’snameandadministrator
password,aswellasswitchtheLED(s)on/offaccordingtoyourpreference.
UnmountyourMicroSDcardusingthe“Unmount”buttonbefore
removingthecardfromyournetworkcamera.
StatusDisplaystheMicroSDcardstatusofyour
networkcamera:availableorunavailable.
AvailableSpaceDisplaystheavailablespaceontheMicroSD
cardinyournetworkcamera.
Notifywhenspaceis
notenough
Enableordisableemailnotificationswhen
yourstoragespaceisfull.
CycleRecordingEnableordisablecyclerecording.When
enabled,cyclerecordingwilloverwritethe
earliestrecordingswhenthestoragespace
becomesfull.Whendisabled,recordingwill
74
stopwhenstorageisfull.
MaxRecordingFile
Time
Setthemaximumrecordingtimeforeachfile.
Thisappliestoscheduledrecordingsonly.For
motionorsounddetectionrecordingfile
times,referto“EventsMotion/Sound
Detection”.
FormatSDCardClicktoformatyourMicroSDcard.Thiswill
erasealldataonyourMicroSDcard.
UnmountClicktounmountyourMicroSDcardfromthe
networkcamera.Thisisrecommendedbefore
removingtheMicroSDcardfromthecamera.
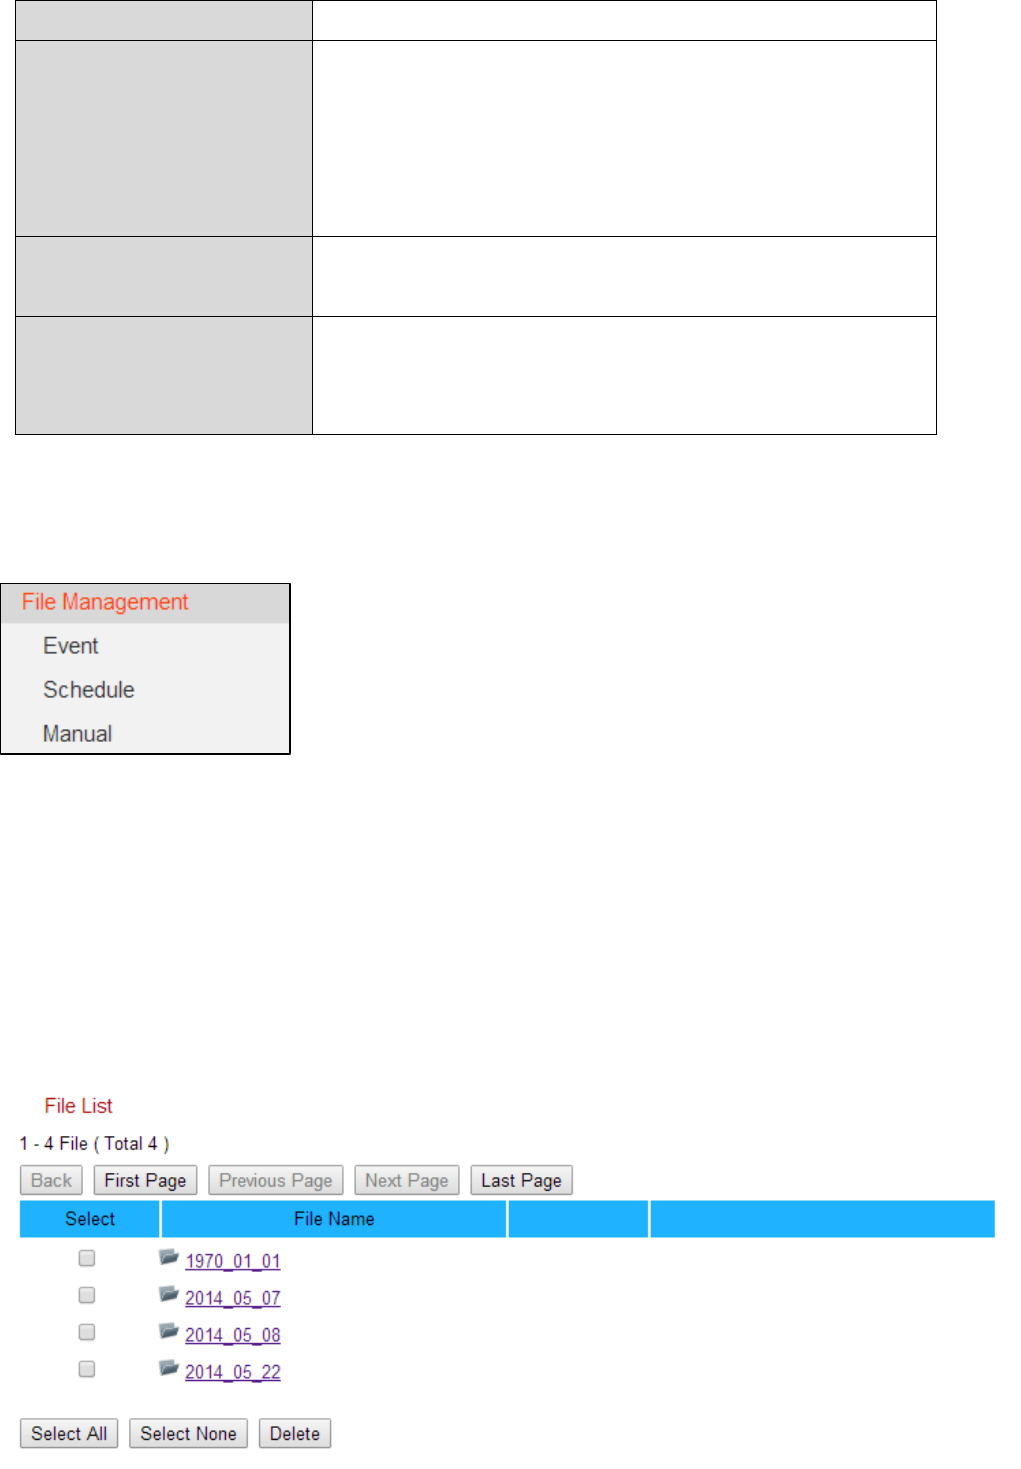
IV‐4‐5. FileManagement
Thefilemanagementtoolenablesyoutobrowse,
downloadanddeleterecordingfilesonyourMicroSD
card.Filesaregroupedaccordingtothefollowing
categories:
Event: Recordingsorimagesfrommotiondetectioneventsare
displayedhere.
Schedule: Recordingsfromscheduledrecordingaredisplayedhere.
Manual: Manualrecordingsaredisplayedhere.
SelectEvent,ScheduleorManualandusethefilebrowsertonavigate.Folders
areorganizedbydate,andthengroupedchronologicallybeginningwith001.
Individualfilenamesconsistofthedateandtimeoftherecording.

75
BackGobacktothepreviouspageinthefile
browser.
FirstPageGobacktothefirstpageinthefilebrowser.
PreviousPageGobacktothepreviouspageinthefile
browser.
NextPageGotothenextpageinthefilebrowser.
LastPageGotothelastpageinthefilebrowser.
SelectAllSelectallfilesorfoldersvisibleinthefile
browser.
SelectNoneDeselectallselectedfilesorfolders.
DeleteDeleteselectedfilesorfolders.
76
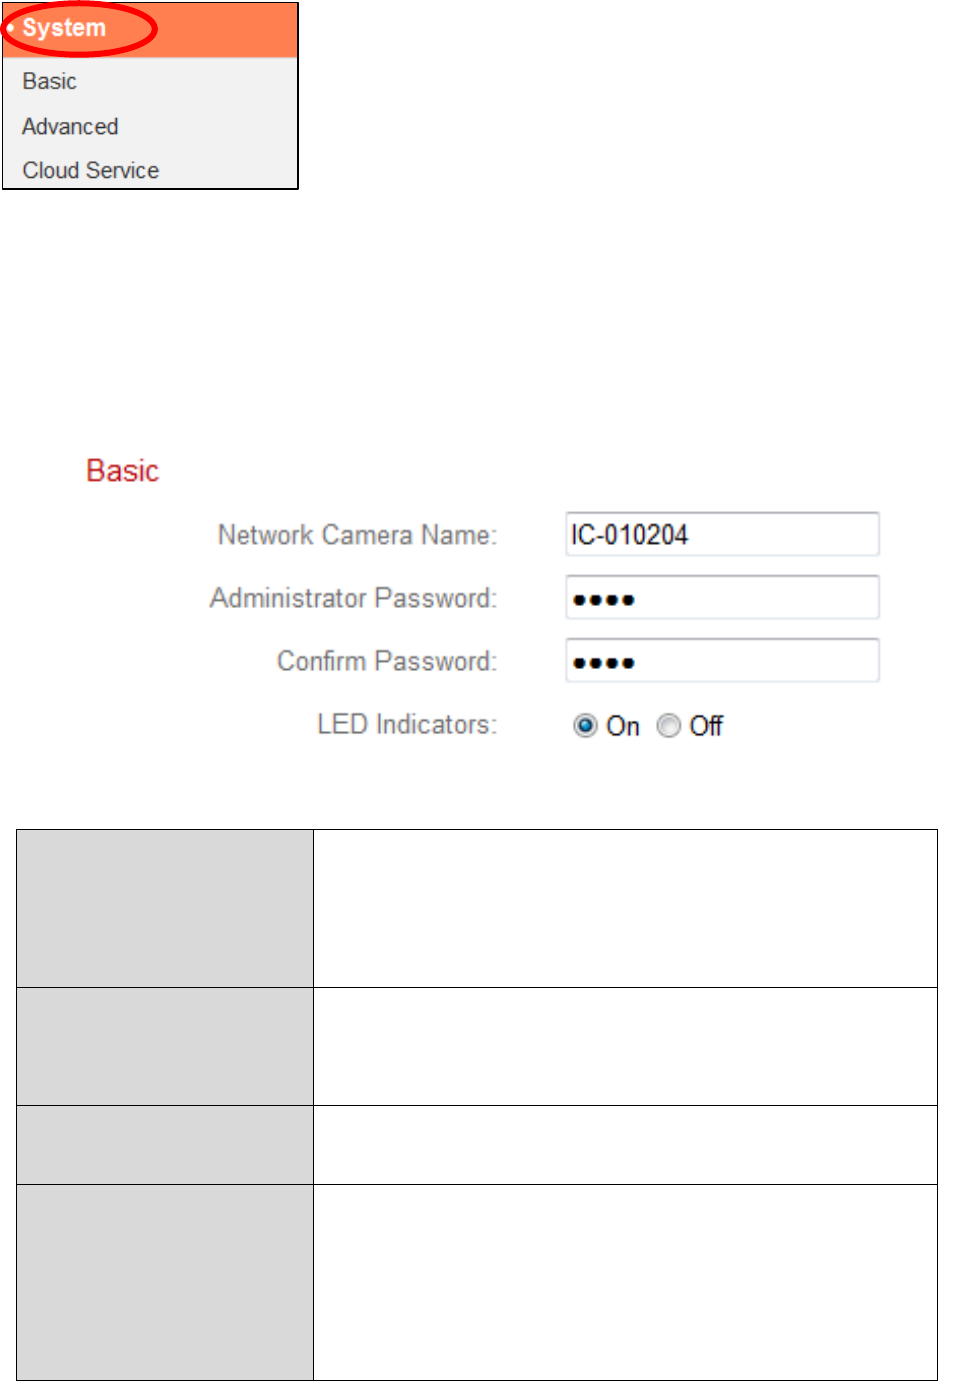
IV‐5. System
The“System”menuconsistsofthreecategories,
“Basic”,“Advanced”and“CloudService”.Selecta
categoryandfollowtheappropriatechapterformore
information.
IV‐5‐1. Basic
The“Basic”menuenablesyoutosetthecamera’snameandadministrator
password,aswellasswitchtheLED(s)on/offaccordingtoyourpreference.
NetworkCamera
Name
Setthenameofthenetworkcamerafor
reference/identificationpurposes.Thisis
especiallyusefulwhenmanagingmultiple
networkcameras.
Administrator
Password
Enteryourdesiredadministratorpassword
here.Thisisthepasswordusedtologintothe
camerawiththe“admin”account.
ConfirmPassword Confirmyourdesiredadministratorpassword
here.
LEDIndicatorsSelect“On”or“Off”toswitchthenetwork
camera’sLED(s)onoroff.Switchingoffthe
LEDscanbeapowersavingmeasureorcan
beforsecuritypurposes,sothatanybody
whocanseethenetworkcameraisunaware
77
ifthecameraisactive.
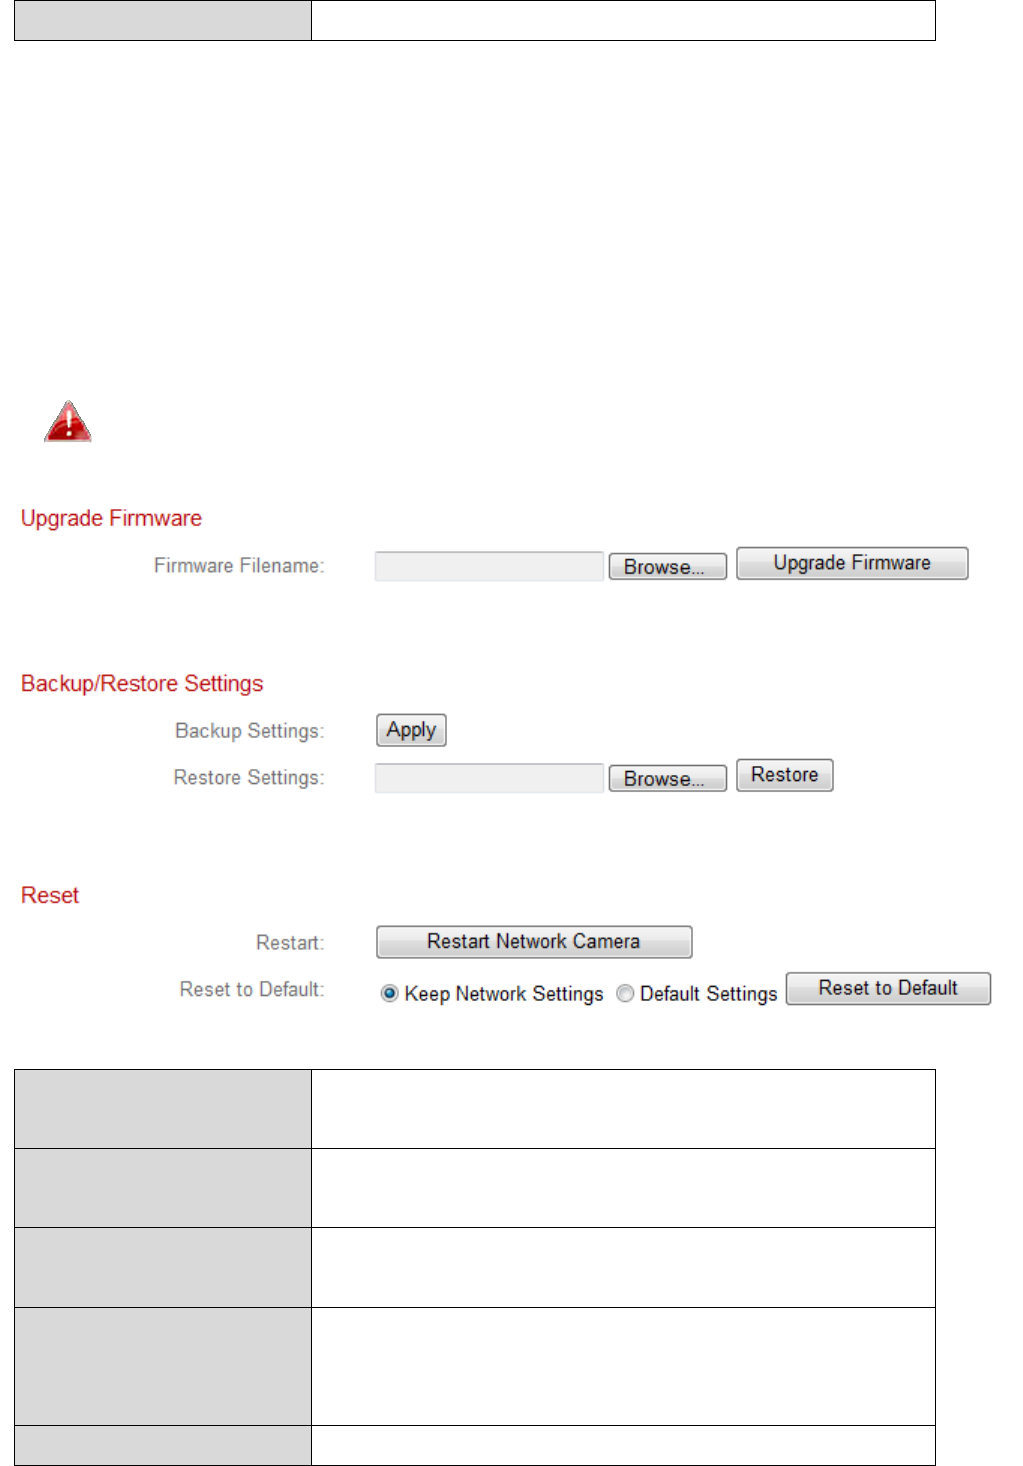
IV‐5‐2. Advanced
The“Advanced”pageallowsyoutoupgradethenetworkcamera’sfirmware,
backuporrestorethenetworkcamera’ssettings,andresetorrestartthe
networkcamera.PleasechecktheEdimaxwebsiteforthelatestfirmwarefor
yournetworkcamera.
Donotswitchoffordisconnectthedeviceduringafirmware
upgrade,asthiscoulddamagethedevice.
FirmwareFilename Click“Browse”tolocatethefirmwarefileon
yourcomputer.
UpgradeFirmware Clicktoupgradethefirmwaretoyour
selectedfile.
BackupSettingsClick“Apply” tosavethecurrentsettingson
yourcomputerasconfig.binfile.
RestoreSettingsClick“Browse” tofindapreviouslysaved
config.binfileandthenclick“Upload”to
replaceyourcurrentsettings.
RestartClick“RestartNetworkCamera”torestartthe

78
networkcamera.Pleasewaitacoupleof
minutesfornetworkcameratobootupafter
arestart.Restartingwillnotaffectthe
camera’scurrentconfiguration.
ResettodefaultSelect“KeepNetworkSettings”or“Default
Settings”andthenclick“ResettoDefault”.
Whenthecameraresets,“KeepNetwork
Settings”willresetallsettingsbutkeepthe
currentnetworksettings.Thenetwork
camera’sIPaddresswillremainthesame.
“DefaultSettings”willresetallofthe
camera’ssettings,includingnetworksettings,
backtothefactorydefaultstatus.

79
IV‐5‐3. CloudService
EdimaxPlug&Viewisafunctiontoallowyoutoviewyournetworkcamera
remotelyviaacloudserver(seeV.Myedimax.com).Youcanenableordisable
thisfeaturehere.
80
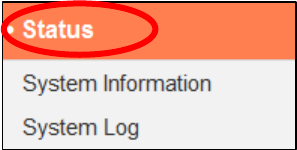
IV‐6. Status
The“Status”menuprovidesimportantinformation
aboutthestatusofthenetworkcamera.This
informationisusefulfortroubleshootingpurposesor
fornetworkconfiguration.
81
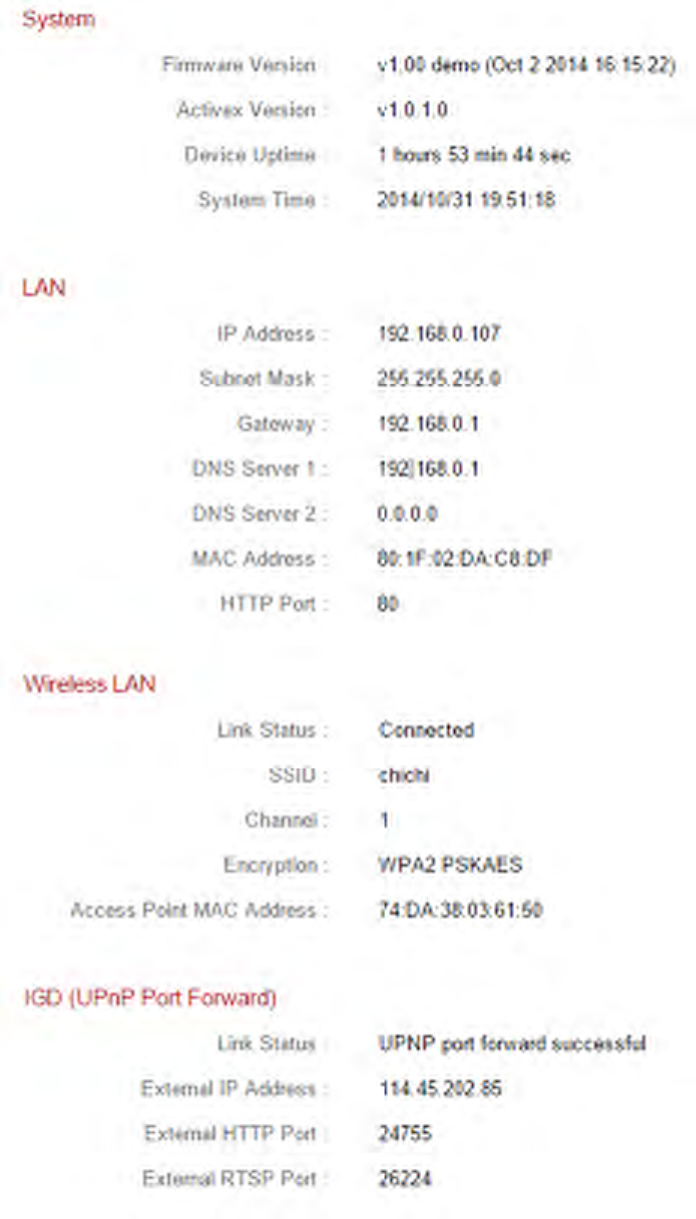
IV‐6‐1. SystemInformation
Asummaryofsystem‐wideinformationaboutthenetworkcamerais
displayedonthispage,displayedunderfourcategories:System,LAN,Wireless
LANandIGD(UPnPPortForward).
82
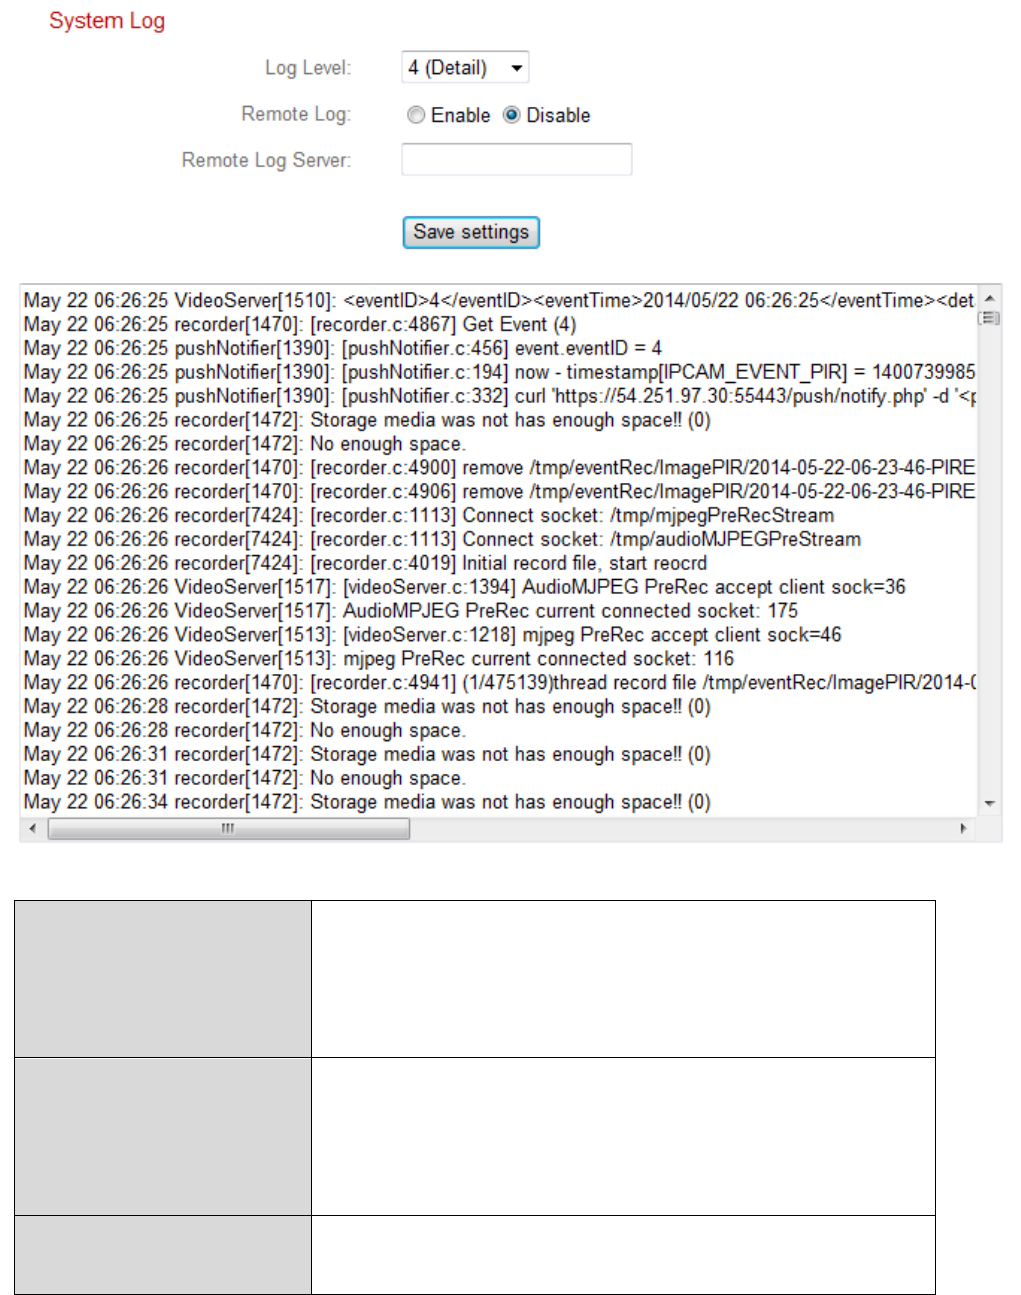
IV‐6‐2. SystemLog
Asystemlogprovidesinformationaboutthenetworkcamera’susageand
actions.Thesystemlogcanalsobesenttoaremoteserverforarchiving.
LogLevelSelectalevelofdetailforthelogfromthe
dropdownlist,from0‐4.0(minimum)will
onlylogcriticalinformation,while4
(maximum)willlogeverything.
RemoteLogEnableordisablethenetworkcamera’s
remotelogfunction,tosendthelogtoa
remoteserverforarchiving.Thenetwork
camerasupportssysloglogservers.
RemoteLogServer EntertheIPaddressorhostnameofthelog
serveryouwishtouse.
83
V. Myedimax.com
Youcanuseyournetworkcamera’sMyedimax.comcloudIDtomonitoryour
cameraremotelyusingawebbrowserfromanyInternetconnection.The
networkcamera’sgreenpowerLEDmustdisplayontoindicateasuccessful
cloudconnection,inorderforthisfunctiontowork.
1. Identifyyournetworkcamera’scloudID.ThecloudIDisdisplayedin
EdiViewFinder(seeII‐2.EdiViewFinder)andontheproductlabelonthe
backofthenetworkcamera(seeI‐4.ProductLabel).
ThecloudIDisastringof12charactersconsistingofnumbers0–
9andlettersA–Fwhichisuniquetoyournetworkcamera.
2. EntercloudID.myedimax.comintotheURLbarofawebbrowser.
Forexample,ifyourcloudIDis001109010204thenenter
001109010204.myedimax.comintoyourwebbrowser.
InternetExplorerisrecommended.
3. YoumaybepromptedtoallowaJavaadd‐ontorun.Pleaseclickthe
messagewhereitsays“clickhere”andthenclick“RunAdd‐on”.
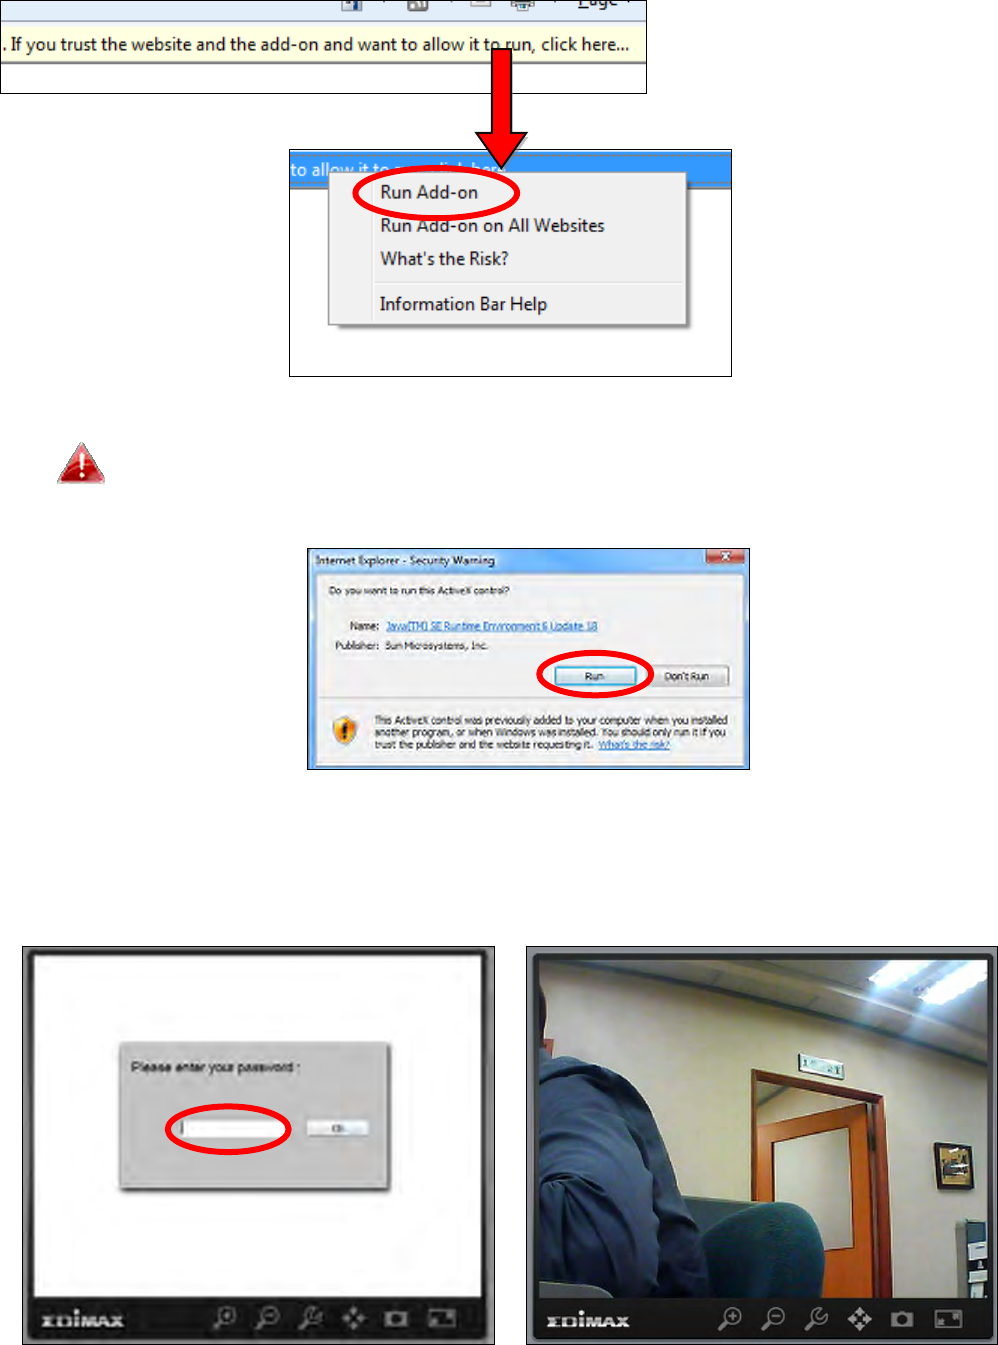
84
Ifanyothersecuritywarnings/promptsappear,pleaseselect
“Run”or“Allow”orsimilar,dependingonyourbrowser.
4. Enteryourcamera’spassword(defaultpassword:1234)andclick“OK”to
seealivestreamfromyournetworkcamera.
85
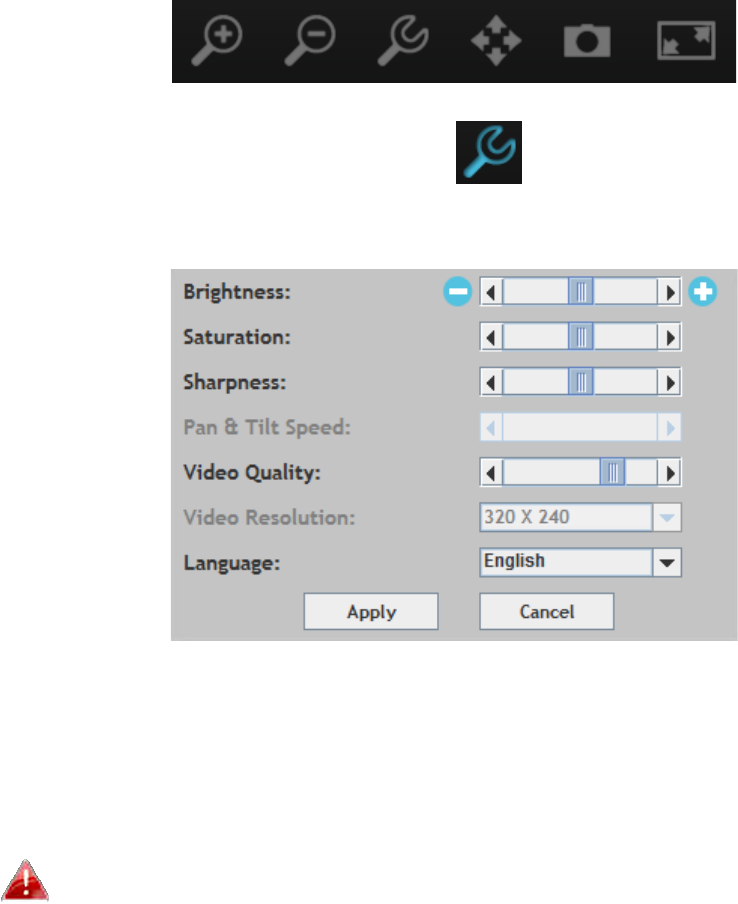
5. Thenetworkcameracanbeoperatedandconfiguredusingtheiconsinthe
toolbarlocatedbelowtheimage.
Toconfigurethenetworkcamera,clicktoshowtheconfigurationmenu
window:
6. Usetheslidercontrolstochangetheimagebrightness,saturation,
sharpness,videoqualityandpan&tiltspeed.Usethedropdownliststo
changethevideoresolutionandoperatinglanguage,andclick“Apply”
whenfinished.
Functionalityofmyedimax.commayvaryaccordingtoversion.
86
VI. 16ChannelViewerforWindows
Theincluded16channelviewingsoftwareprovidespowerfulaccesstoyour
networkcamera’sfunctions,alongwiththecapabilitytoviewandmanageup
to16networkcamerasimultaneously.
VI‐1. Installation
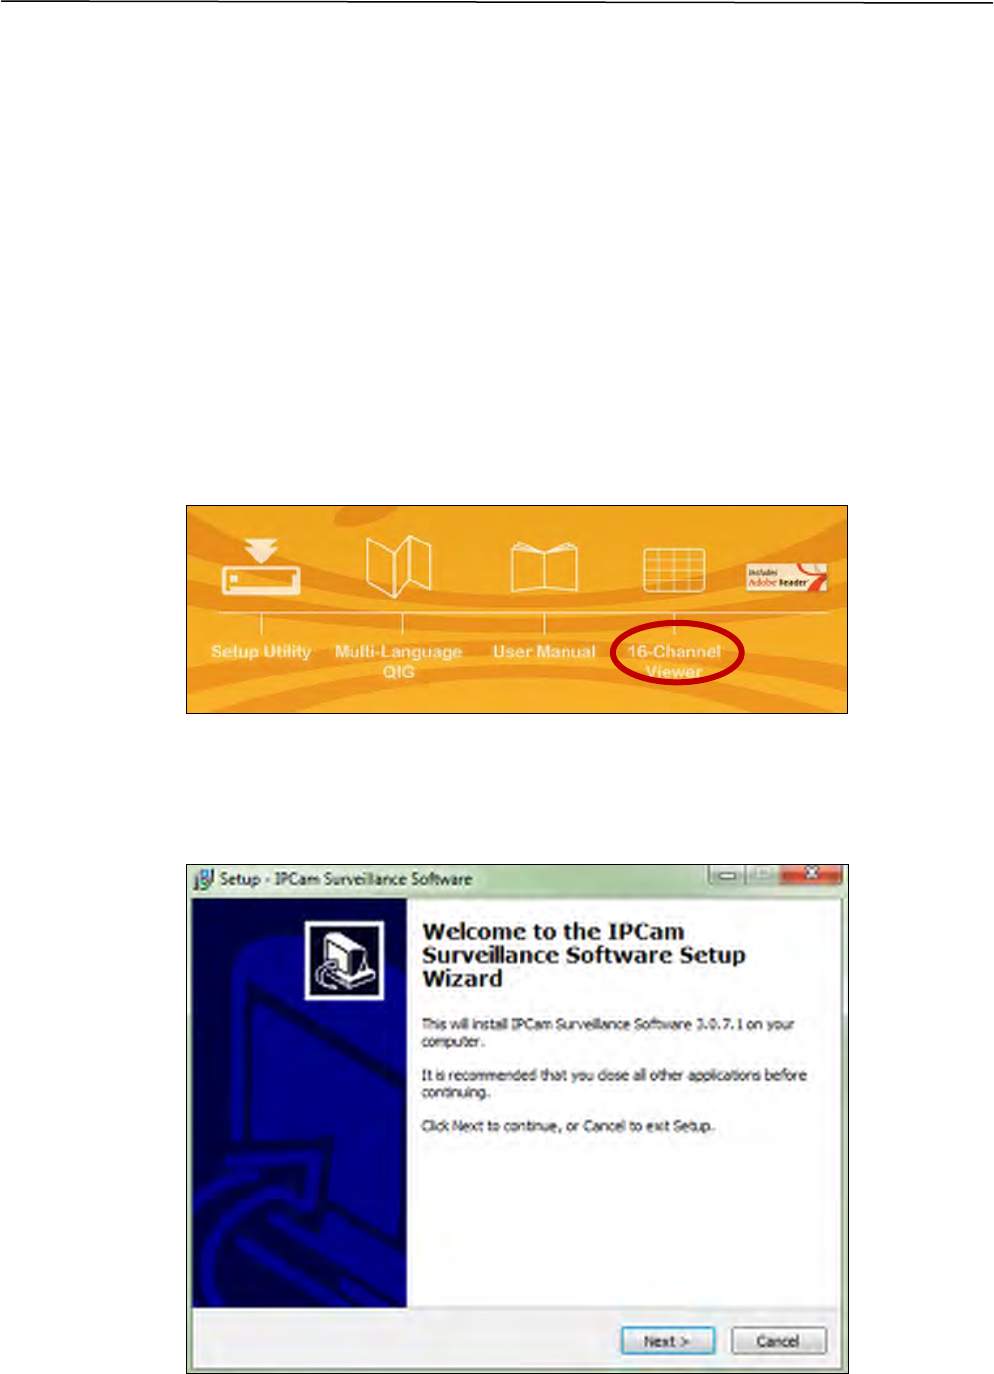
1. InserttheincludedCDintoyourCD‐ROMdriveandifthesetuputilitydoes
notautomaticallyopen,pleaselocateandopenthe“Autorun.exe”filein
the“Autorun”folder.
2. Click“16ChannelViewer”toinstalltheEdiViewFindersoftwareutility.
3. Click“Next”andfollowtheon‐screeninstructionstoinstallthe16channel
viewersoftware.
87
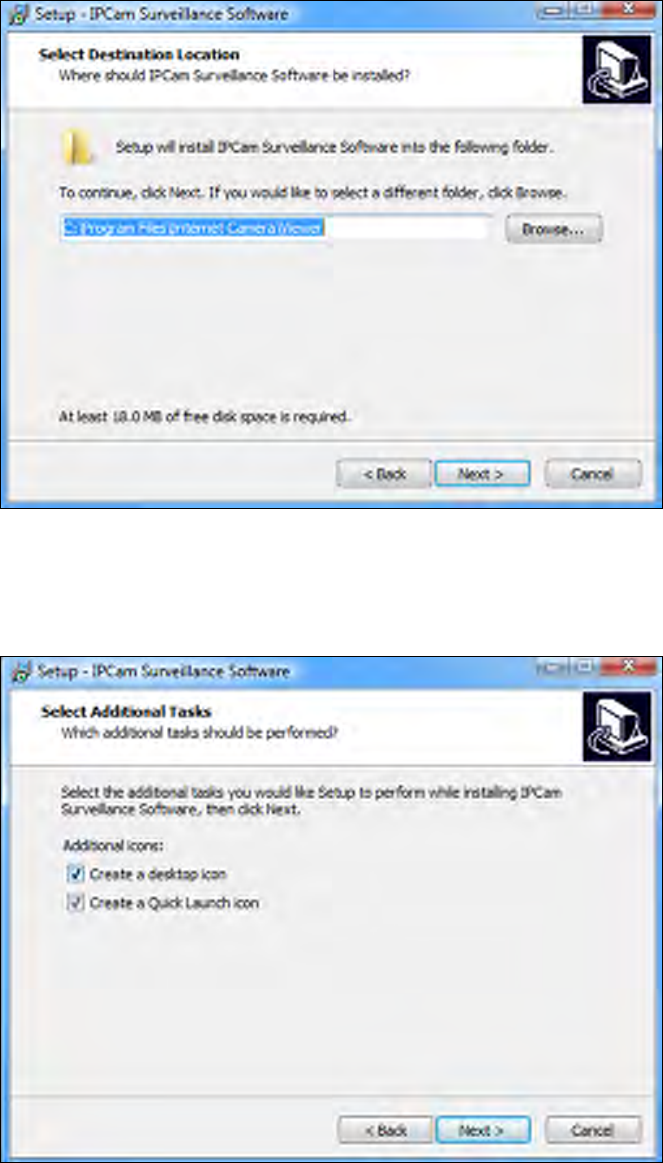
4. Checktheinstallationlocationandclick‘Next’tocontinue.
5. Click“Next”tocontinue.
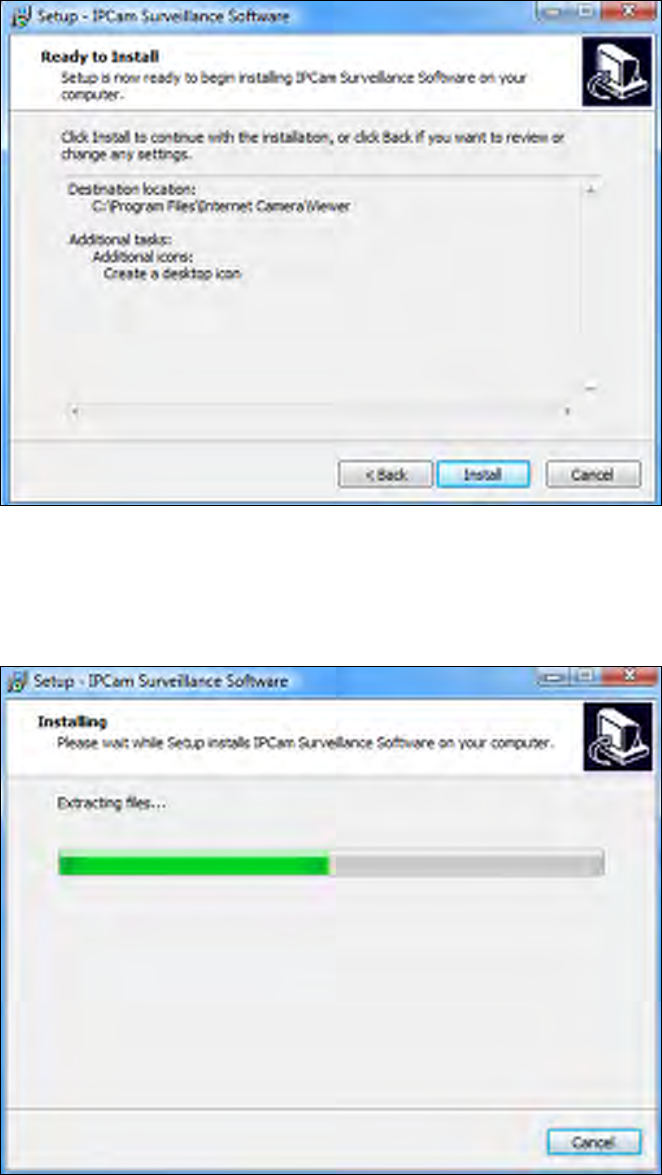
6. Asummaryofyourinstallationwillbedisplayed.Pleasecheckeverythingis
correctandclick“Install”tobegintheinstallation.
88
7. Pleasewaitamomentfortheinstallationtocomplete.
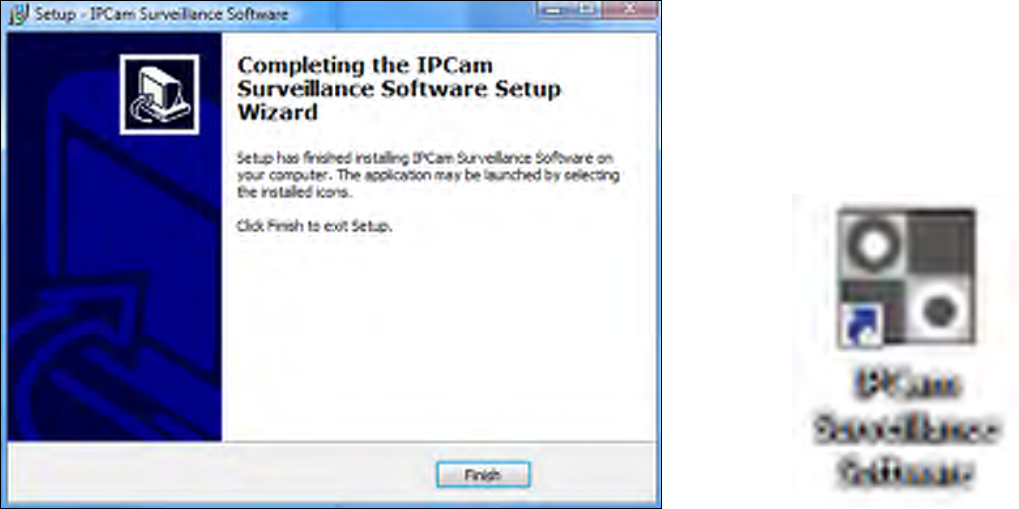
8. Click“Finish”andthendoubleclickthe“IPCamSurveillanceSoftware”icon
onyourdesktoptoopenthesoftware.
89
90
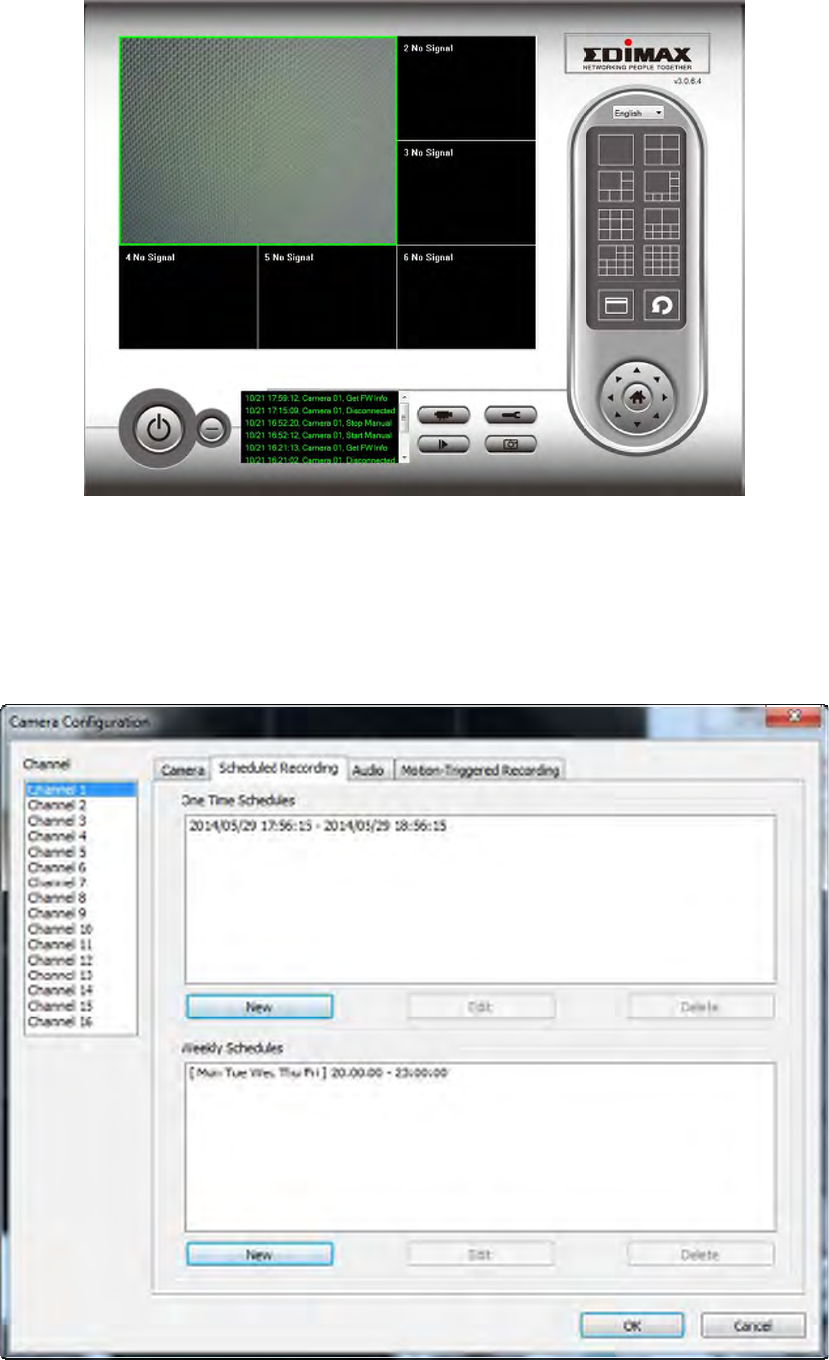
VI‐2. Usingthe16ChannelViewer
Yourmonitor’sresolutionmustbe“1024x768”forthe16channel
viewertoworkproperly.Pleasesetyourmonitor’sresolutionto
“1024x768”.
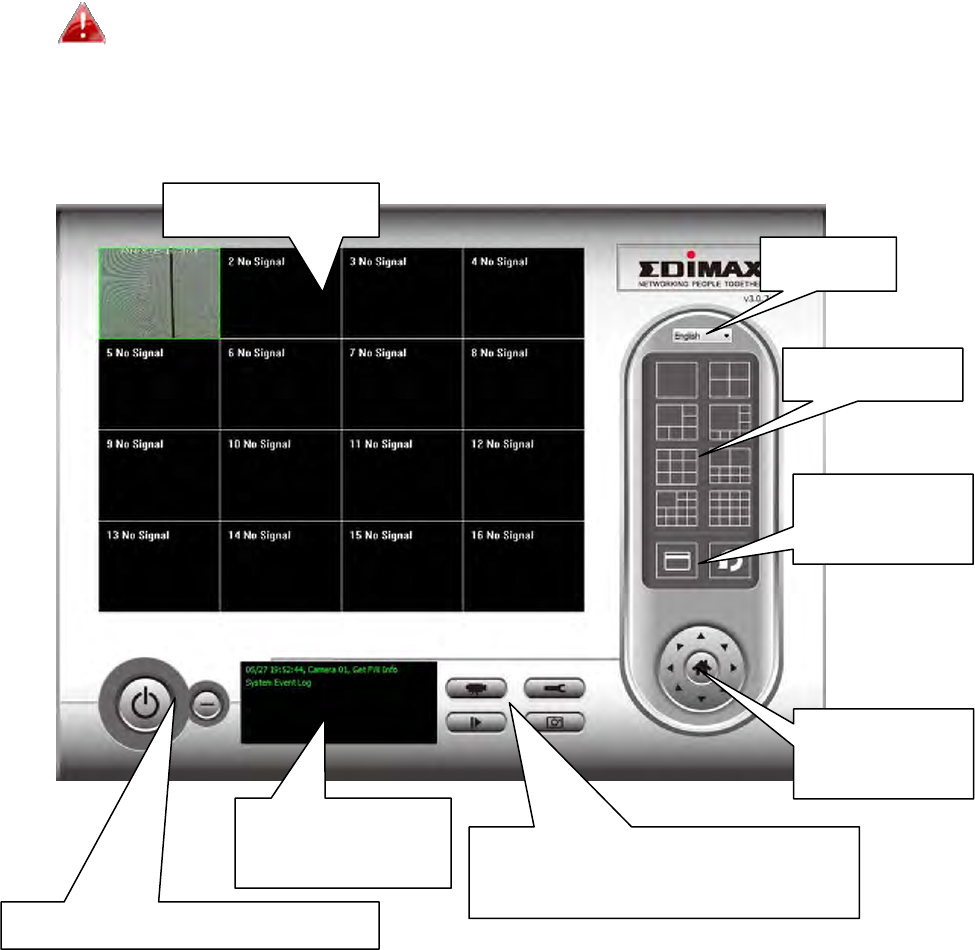
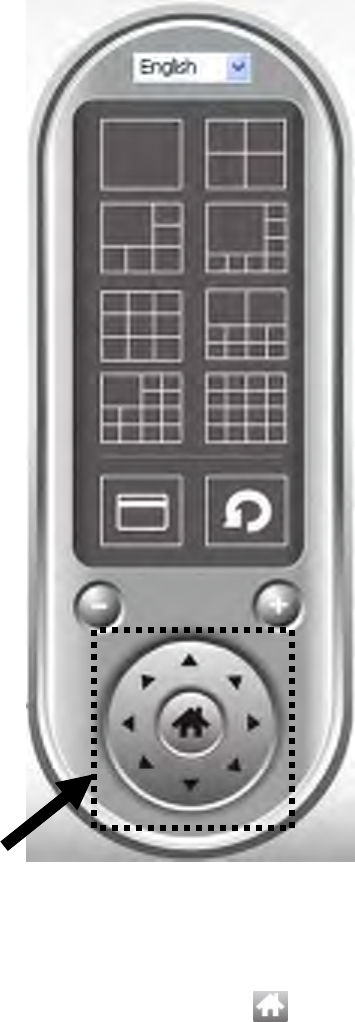
Themainscreenofthe16channelviewerisdescribedbelow:
Language
DisplayLayout
Fullscreen&
Scan
PTZControl&
Home
Recording&SystemConfiguration
Playback&Snapshot
CloseProgram&MinimizeWindow
Videodisplayarea
MessageDisplay
Box
91
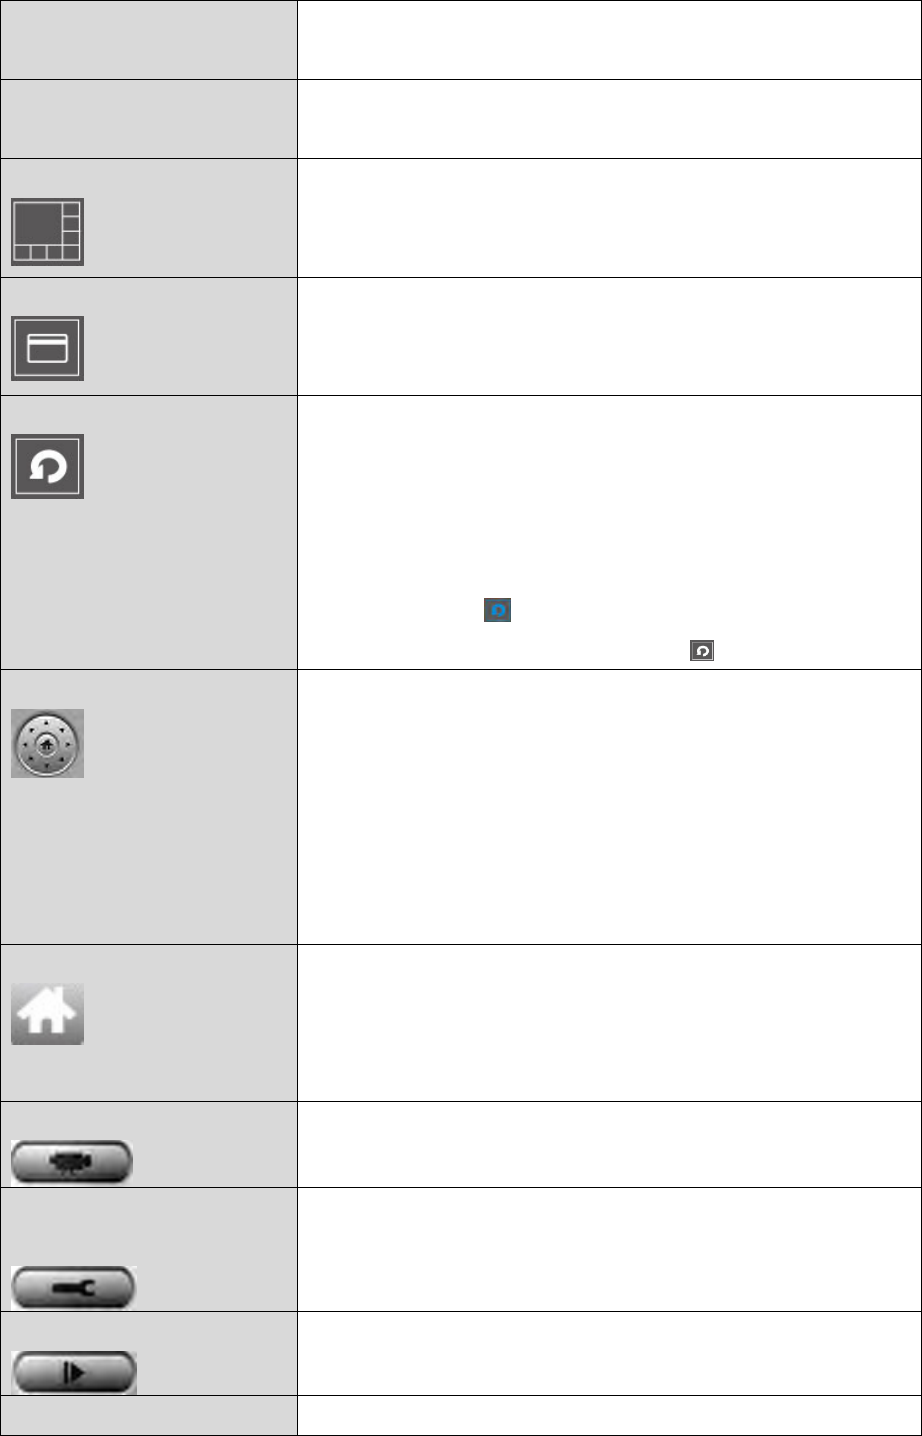
Videodisplayarea Aliveimageofupto16 connectedcameras
willbedisplayedinthisarea.
LanguageSelectalanguagefromthisdropdownmenu
tochangethedisplaylanguage.
Displaylayout
Changecameraimagedisplaylayout(clicka
layouticontochangecameradisplaylayout).
Thereare8kindsofdisplaylayoutsavailable.
Fullscreen
Clickthisbuttontoswitchtofullscreenmode
(onlydisplayallcamera’simage),press“ESC”
keytoquitfullscreenmode.
Scan
Clickthisbuttonandthenetworkcamera
surveillancesoftwarewillswitchthroughthe
imagesofallconnectedcamera
automatically.Clickthisbuttononceto
activatethescanfunction(scaniconwill
becomeblue),clickagaintostopscanning
(scaniconwillbecomewhite).
PTZcontrol
Thereare8directionsin the PanTiltZoom
(PTZ)controlring.Ifthecamerayouconnect
tosupportsPTZ,youcanusethePTZcontrol
ringtochangethedirectionthatthecamera
faces.
Thisfunctionisonlyavailableforsupported
cameras.
Home
Clickthisbuttontoreturnthecamerato
“Home”(default)position.
Thisfunctionisonlyavailableforsupported
cameras.
Recording
Startvideorecording.
System
Configuration
Cameraconfigurationandgeneraloptions.
Playback
Playbackarecordedvideofile. Anew
windowwillopentolocaterecordedfiles.
SnapshotTakeasnapshotofcurrentthecameraimage.

92
MessagedisplayDisplaysallsystemmessages.
Closewindow(stop
surveillance)
Terminatesnetworkcamera surveillance
software.
Minimizewindow
Minimizesnetworkcamera surveillance
softwarewindow.
93
VI‐3. Configuringthe16ChannelViewer
VI‐3‐1. AddCamera/CameraConfiguration
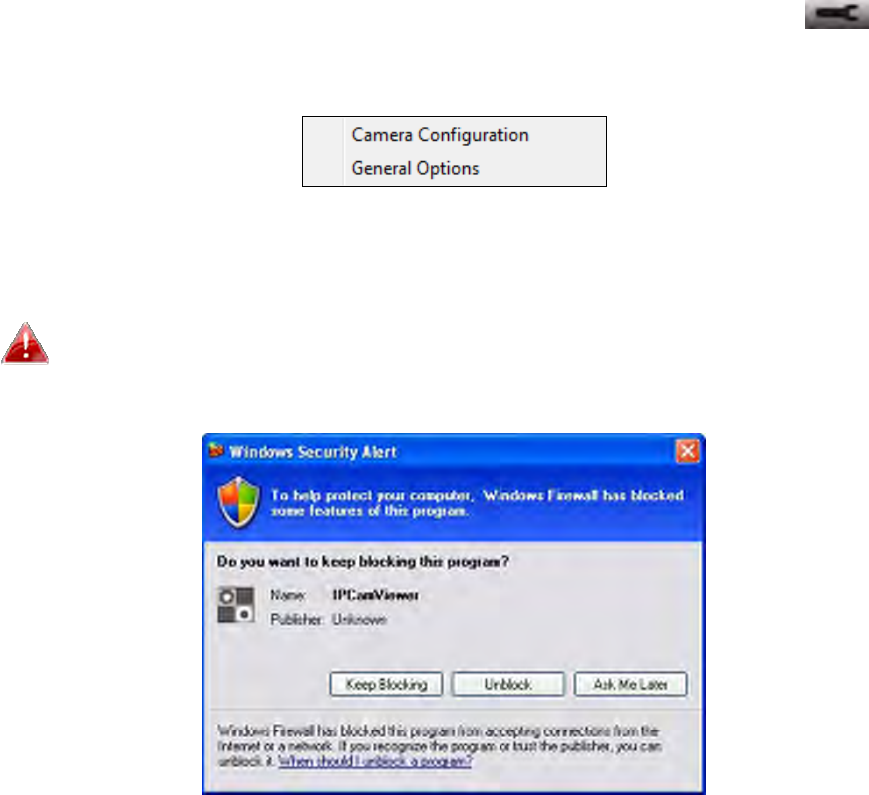
Inordertousethe16channelviewersoftware,youmustconfigure/addeach
camera(s)thatyouwishtoconnect.Pleaseclickthewrenchicon()anda
popupmenuwillappear:
Pleaseselect“CameraConfiguration”toconfigure/addcameras:
Pleaseselect“Unblock”ifyouarepromptedbyWindowsSecurity
Alertthat“IPCamViewer”hasbeenblocked,orsimilar.
94
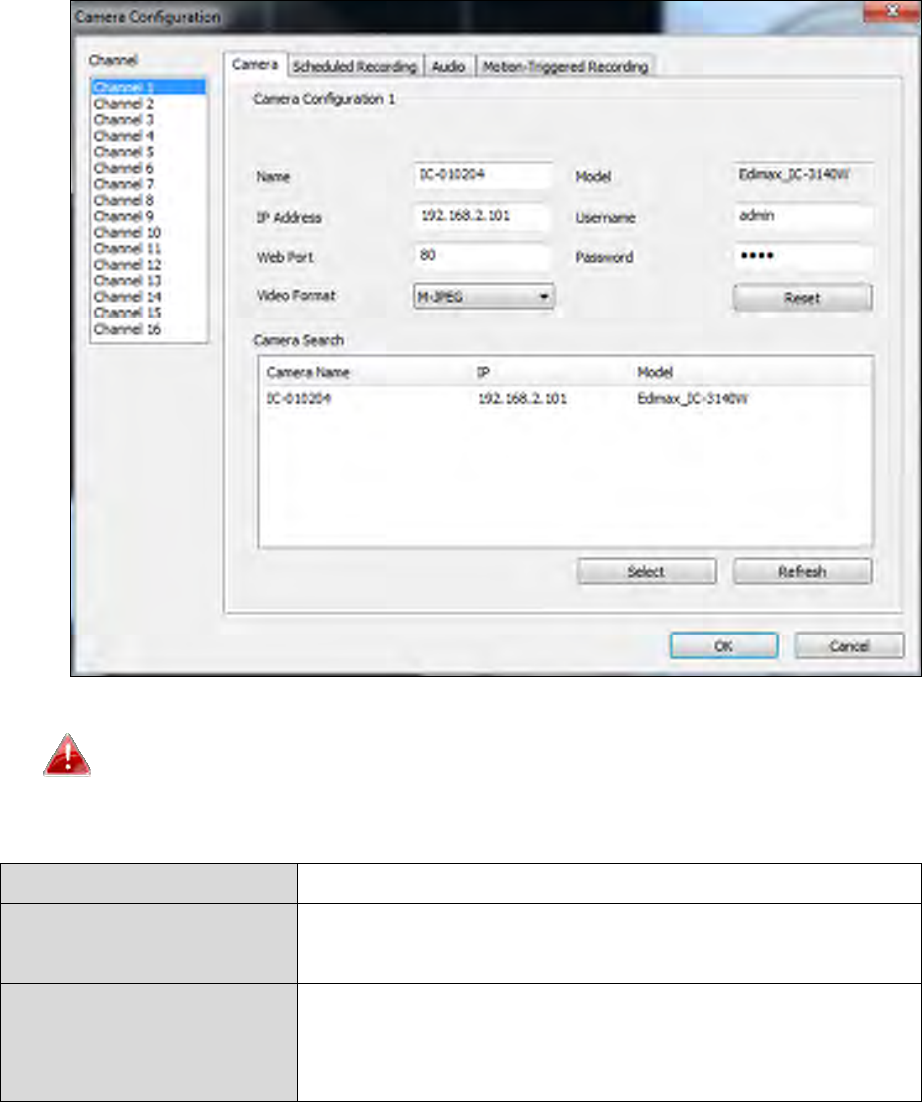
VI‐3‐1‐1. Camera
Inthe“CameraConfiguration”tabyoucanaddandconfigureallthecameras
youwishtoconnecttotheviewersoftware.Toconnectacameratothe
viewersoftware,youneedtoentertherequiredinformationinthe“Camera
Configuration”box.Youcandothisautomaticallybyselectingyourcamera
listedinthe“CameraSearch”boxandclicking“Select”(recommended)oryou
canentertheinformationmanually.
Alloftheinformationrequiredtoaddyournetworkcameracan
becompletedautomaticallybyselectingyourcameralistedinthe
“CameraSearch”boxandclicking“Select”.
ChannelSelectthechannelnumberyouwishtouse.
CameraSearchAllcamerasfoundonyourlocalnetworkwill
bedisplayedinthe“CameraSearch”box.
SelectSelectacameralistedinthe“CameraSearch”
box,andclickthe“Select”buttonto
automaticallyentertherequiredinformation

95
toconnecttheselectedcamerainthe
“CameraConfiguration”box.
RefreshRefresh thelistof camerasonyourlocal
network.
NameEnterareferencenamefor thecamerahere.
Thedefaultnameisthefirst6charactersof
thecamera’sMACaddress.Thecameraname
canbeusedtoeasilyidentifyitslocationfor
example.
ModelDisplaysthemodeloftheselectedcamera.
IPAddressInputtheIPaddressofthecamera.
UsernameInputtheusernameofthecamera.
WebPortInputthewebportofthecamera.Thedefault
valueis“80”.
PasswordInputthepasswordofthecamera.The
defaultpasswordis“1234”.Ifyouchanged
thepasswordoftheselectedcamera,enter
thenewpassword.
VideoFormat**Selectthevideoencodingformatofthis
camera(MJPEGorH.264).
ResetClearallfieldsinthe‘CameraConfiguration’
section.
**Onlyavailableforcameraswhichsupportthisfunction.
Click“OK”tosavethesettingsandyournetworkcamera’simagewillbe
displayedinyourselectedchannelonthe16channelviewer’smainscreen:
96
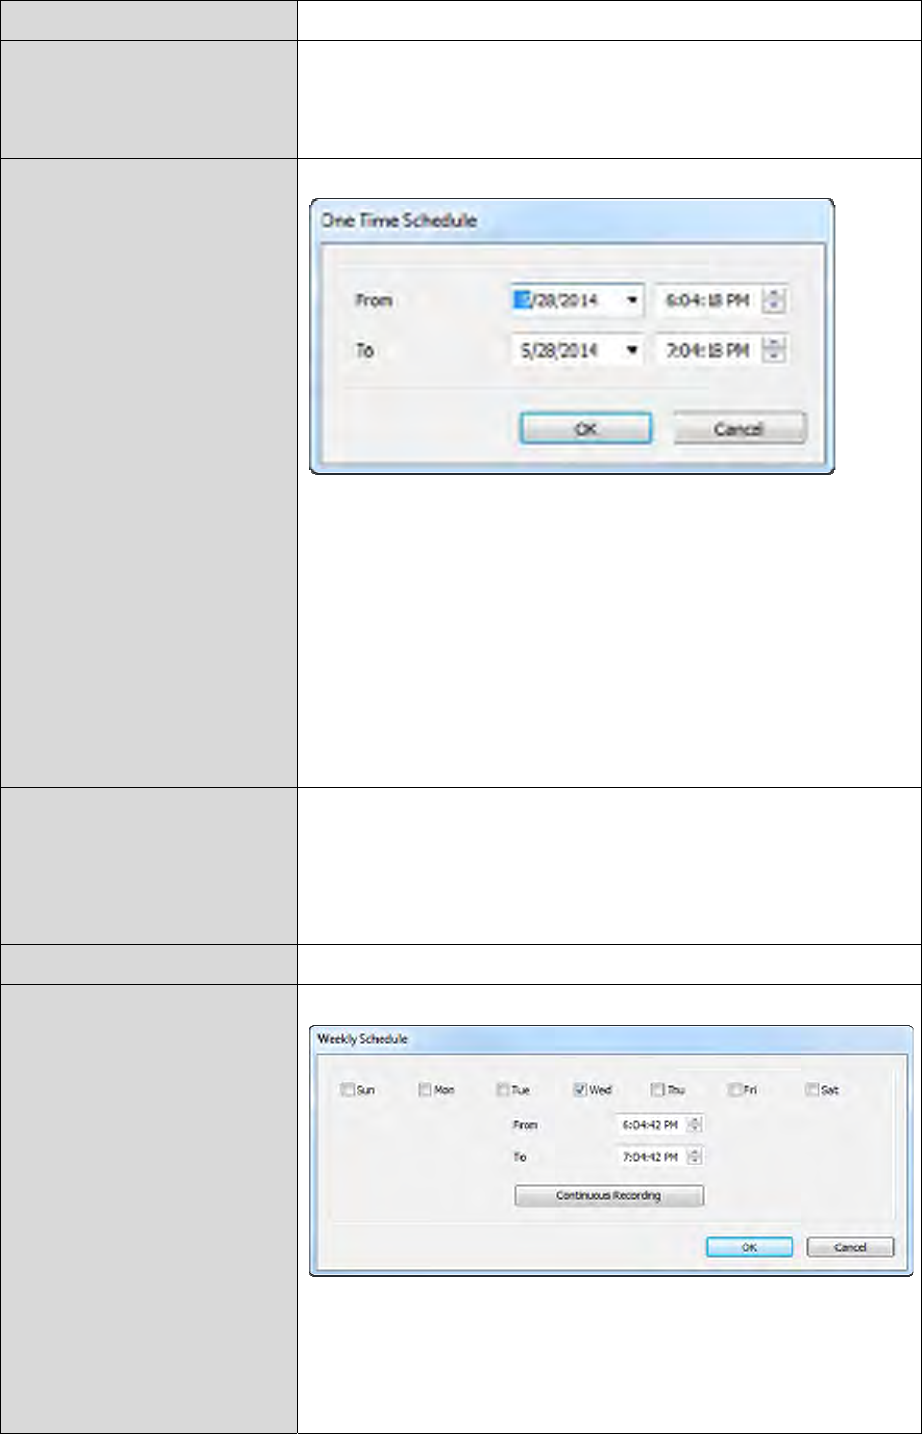
VI‐3‐1‐2. ScheduledRecording
Youcanscheduleyournetworkcamera(s)torecordautomaticallyaccording
toweeklyschedules,orunique“one‐time”schedules.
97
ChannelSelectthechannelnumberyouwishtoset.
OneTimeSchedulesYoucanspecifytheone‐timeschedulefora
selectedcamera;thisschedulewillbe
executedonceonly.
New
(OneTime
Schedules)
Pleasespecifythetimedurationofthisone‐
timeschedule(thedateandtimeof‘From’
and‘To’),thenclick‘OK’tosavesettings.
Pleasenoteyoumustsetaschedulethatwill
happeninthefuture,youcannotseta
scheduleinthepast.
EditYoucanmodifyascheduledrecordingitem.
Selectaschedulein‘OneTimeSchedules’list,
andclickthe‘Edit’buttontoeditthestartand
endtimeofthisschedule.
DeleteDeleteaselectedscheduleitem.
New
(WeeklySchedules)
Youcandefineaweeklyrecordingschedule
forspecifiedtimesanddays.Checkthedays
toincludeintheschedule,andsetthedaily

98
startandfinishtimeinthe“From”and“To”
fields(formatHH:MM:SS).The“Continuous
Recording”buttonwillsetthescheduleto
recordeverydayfrom12:00:00AMto
11:59:59PMi.e.continuously.
EditYoucanmodifyascheduledrecordingitem.
Selectascheduleinthe‘OneTimeSchedules’
list,andclickthe‘Edit’buttontoeditthestart
andendtimeofthisschedule.
DeleteDeleteaselectedscheduleitem.
99
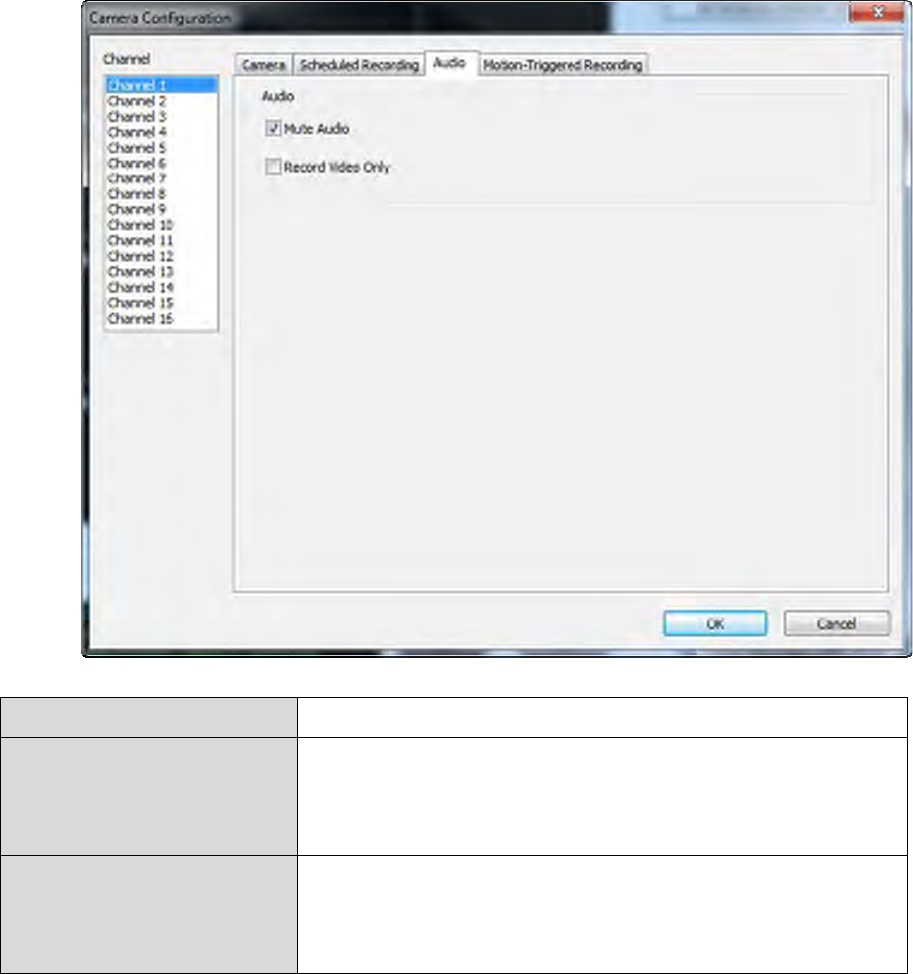
VI‐3‐1‐3. Audio
Forcamerasthatsupportaudio,youcanusethistabtodecideifyouwishto
heartheaudiocapturedbytheselectedcamera.
ChannelSelectthechannelnumberyouwishtoset.
MuteAudioCheckthisboxandthenetworkcamera
surveillancesoftwarewillnotplaytheaudio
capturedbythiscamera.
RecordVideoOnly Checkthisboxandthenetworkcamera
surveillancesoftwarewillnotrecordthe
audiocapturedbythiscamera.

100
VI‐3‐1‐4. MotionRecording
Thenetworkcamerafeaturesamotiondetectionfunctionandvariousoptions
for(motiondetection)eventsnotification.Onthispageyoucanenableor
disablemotiondetectionandsetthecameratosendanemailortriggeran
alarmwhenmotionisdetected.
Pleasenotthatwhenusingthecameraforsecuritypurposes,itis
importanttomonitorthecamera’sstreamevenwhenusing
motiondetection.Motiondetectionmaynotbe100%accurate.
ChannelSelectthechannelnumberyouwishtoset.
EnableEnablemotionrecordfunction.
DisableDisablemotionrecordfunction.
VideoLengthSelectthetimedurationfromthedropdown
menu,inseconds,thatthecamerawillrecord
whenamotionhasbeendetected.
Invokealarmwhen
motionistriggered
Sendanalarmwhenamotionhasbeen
detectedbythecamera.

101
Sendemailwhen
motionistriggered
Sendanemailtoapre‐definedaddresswhen
amotionhasbeendetectedbythecamera.
102
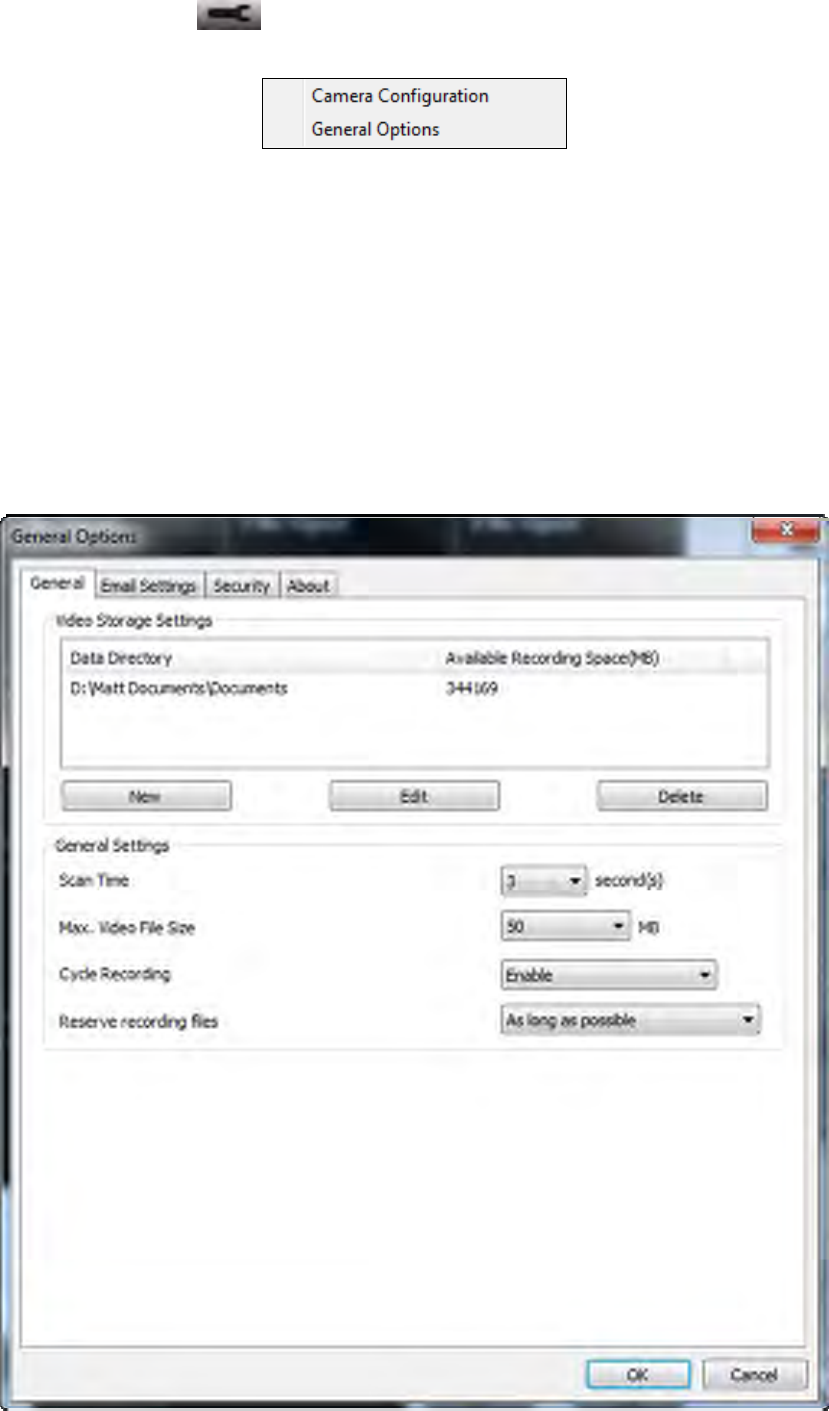
VI‐3‐2. GeneralOptions
Clickthewrenchicon()andapopupmenuwillappear:
Whenyouselect“GeneralOptions”,pleaserefertotheappropriatefollowing
chapter:
VI‐3‐2‐1. General
Allgeneralsettingssuchasthefilestoragedirectoryandrecordingspacescan
besethere.

103
VideoStorage
Settings
Usethe“New”,“Edit”and“Delete”buttons
tosetthedirectoryforlocalvideostorage.
Availablespaceinthespecifieddirectorywill
bedisplayed.
ScanTimeDefinethetimeperiodtopausebetween
everycameraswitchwhenyouactivatethe
‘Scan’function.
MaxVideoFileSize Setthemaximumfilesizeofeveryvideofile.
Whenthesizeofthefileexceedsthisvalue,
thenetworkcamerasurveillancesoftwarewill
openanotherfiletorecordthevideo.
CycleRecordingEnableordisablecyclerecording.When
enabled,cyclerecordingwilloverwritethe
earliestrecordingswhenthestoragespace
becomesfull.Whendisabled,recordingwill
stopwhenstorageisfull.
104
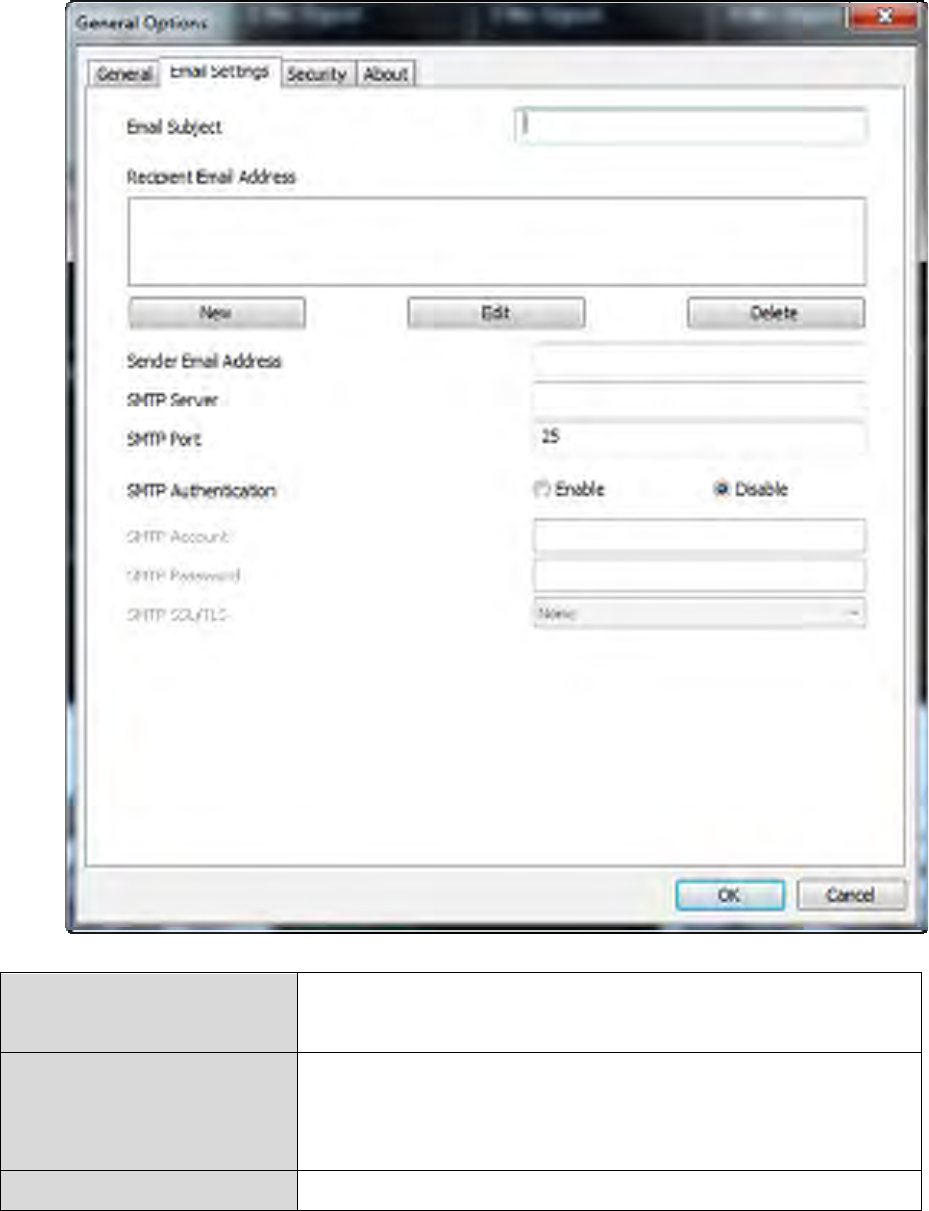
VI‐3‐2‐2. EmailSettings
Ifyousetyournetworkcameratosendemailnotificationsformotion
detectionevents(seeVI‐3‐1‐4.MotionDetection),youneedtoconfigure
youremailsettingshere.
E‐MailSubjectSpecifythesubjectoftheemailnotification
youwillreceive.
RecipientE‐Mail
Address
Usethe“New”,“Edit”and“Delete”buttons
toentertheemailaddressfortherecipient(s)
oftheemailnotification.
SenderE‐MailSpecifytheemailaddresswhichwillsendthe

105
Addressnotificationemail.
SMTPServerSpecifytheIPaddressorhostnameofthe
SMTPserverforthesenderemail.YourISP
canprovidethisinformationifyouare
unsure.
SMTPportSpecifytheportnumberoftheSMTPserver
youwishtousehere.Thedefaultvalueis25.
SMTP
Authentication
EnableordisableSMTPauthentication.Ifyou
areunsure,checkwithyourISP.
SMTPAccountIfusingSMTPauthentication(above),then
entertheSMTPaccount(username)ofyour
SMTPserverhere.Inmostcases,it’sthesame
asyourPOP3username(theoneyouuseto
receiveemail).ContactyourISPifyouare
unsure.
SMTPPasswordEntertheSMTPpasswordofyourSMTP
serverhere.Inmostcases,it’sthesameas
yourPOP3password(theoneyouuseto
receiveemail).ContactyourISPifyouare
unsure.
106
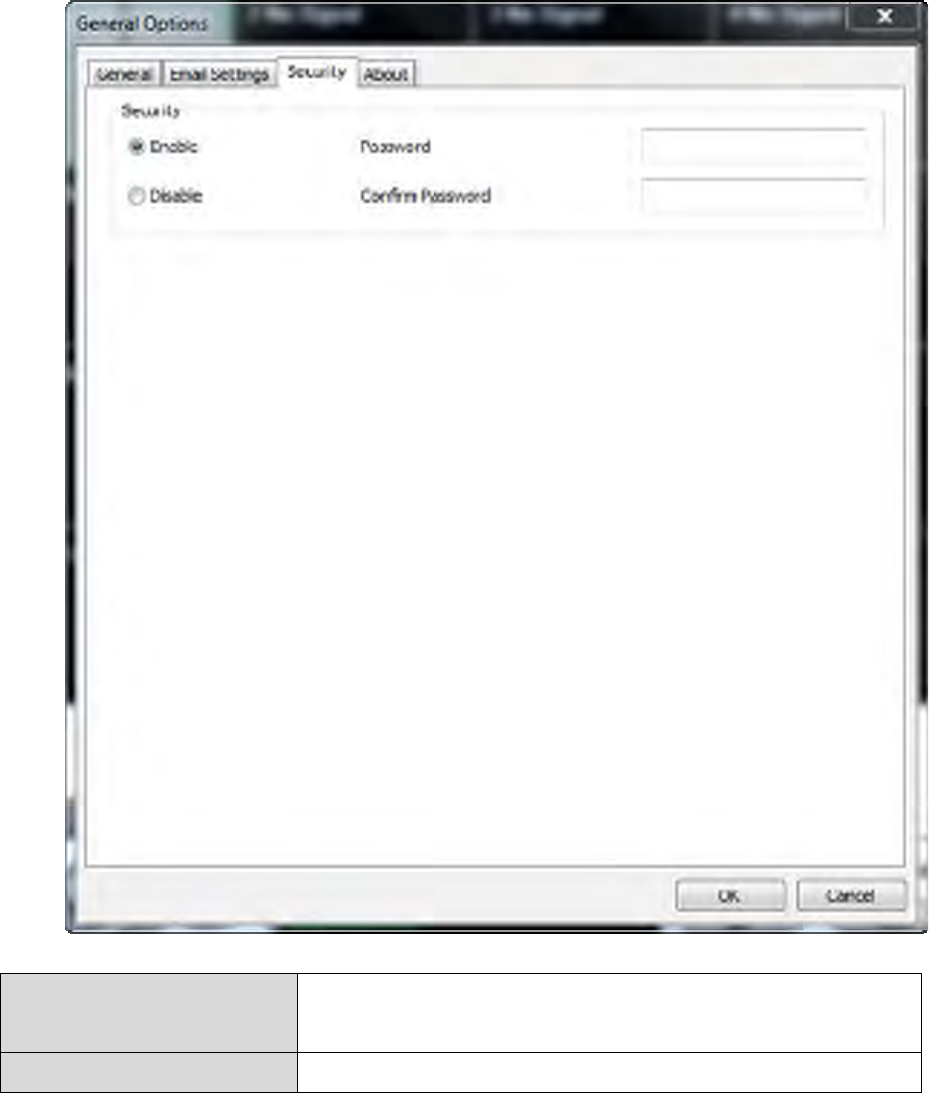
VI‐3‐2‐3. Security
Youcansetapasswordtoprotectthe16channelviewersoftware.When
enabled,thepasswordwillberequiredeachtimetoopenthe16channel
viewersoftware.
Tosetthepassword,pleaseusethe‘Security’tabinthe‘GeneralOptions’
menu:
EnableWhenenabled,thepasswordisrequiredto
openthe16channelviewersoftware.
DisableNopasswordisrequiredwhendisabled.
107
PasswordEnterthepasswordyouwishtousehere.
ConfirmPassword Enterthepasswordyouwishtousehere
again.
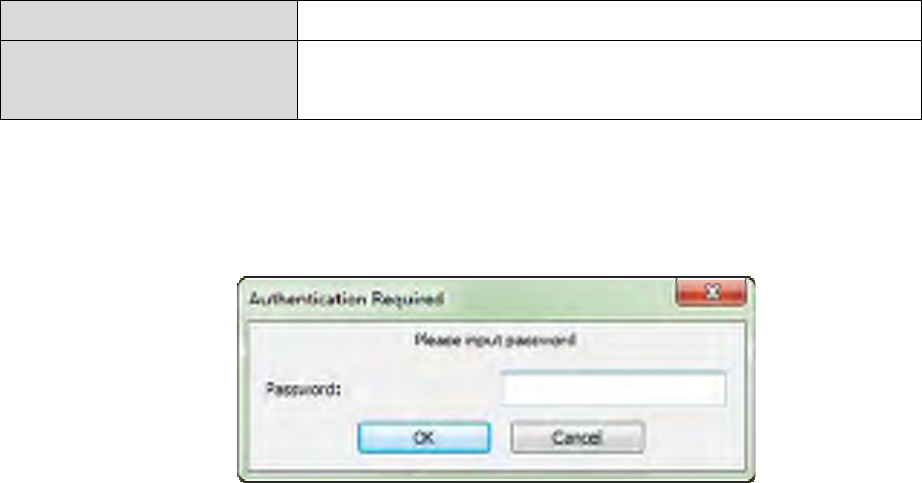
Whenyouopenthe16channelviewersoftware,youwillbepromptedto
enterthepassword:
108
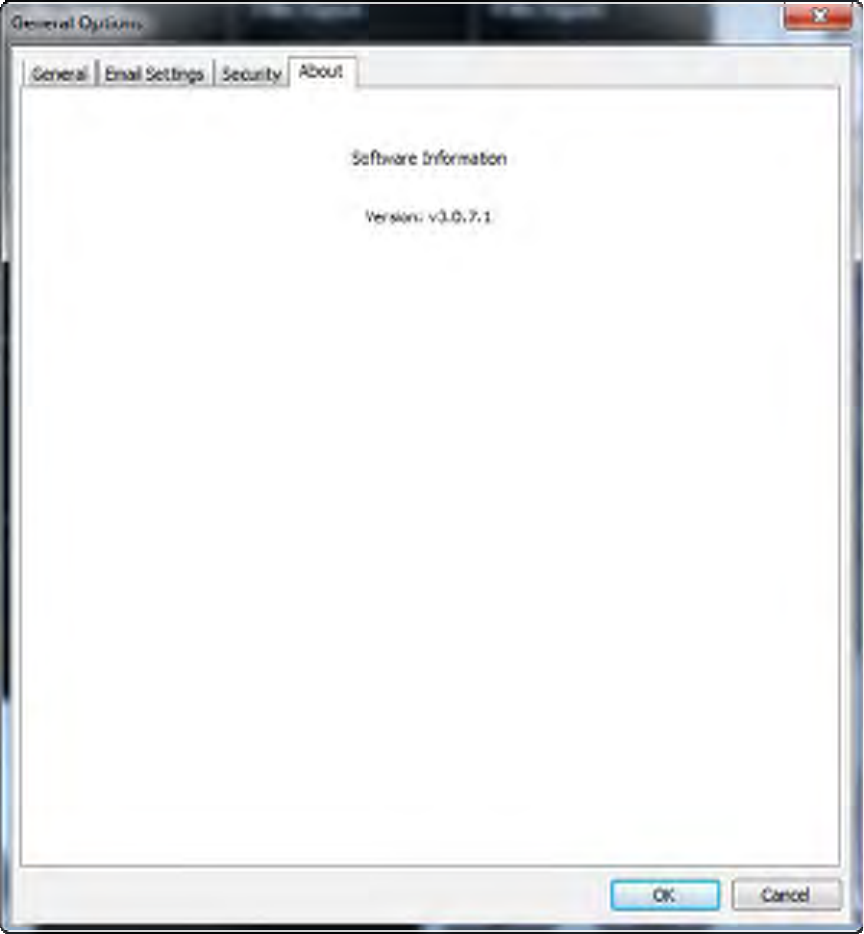
VI‐3‐2‐4. About
The“About”tabdisplaysthesoftwareversionnumber.
109
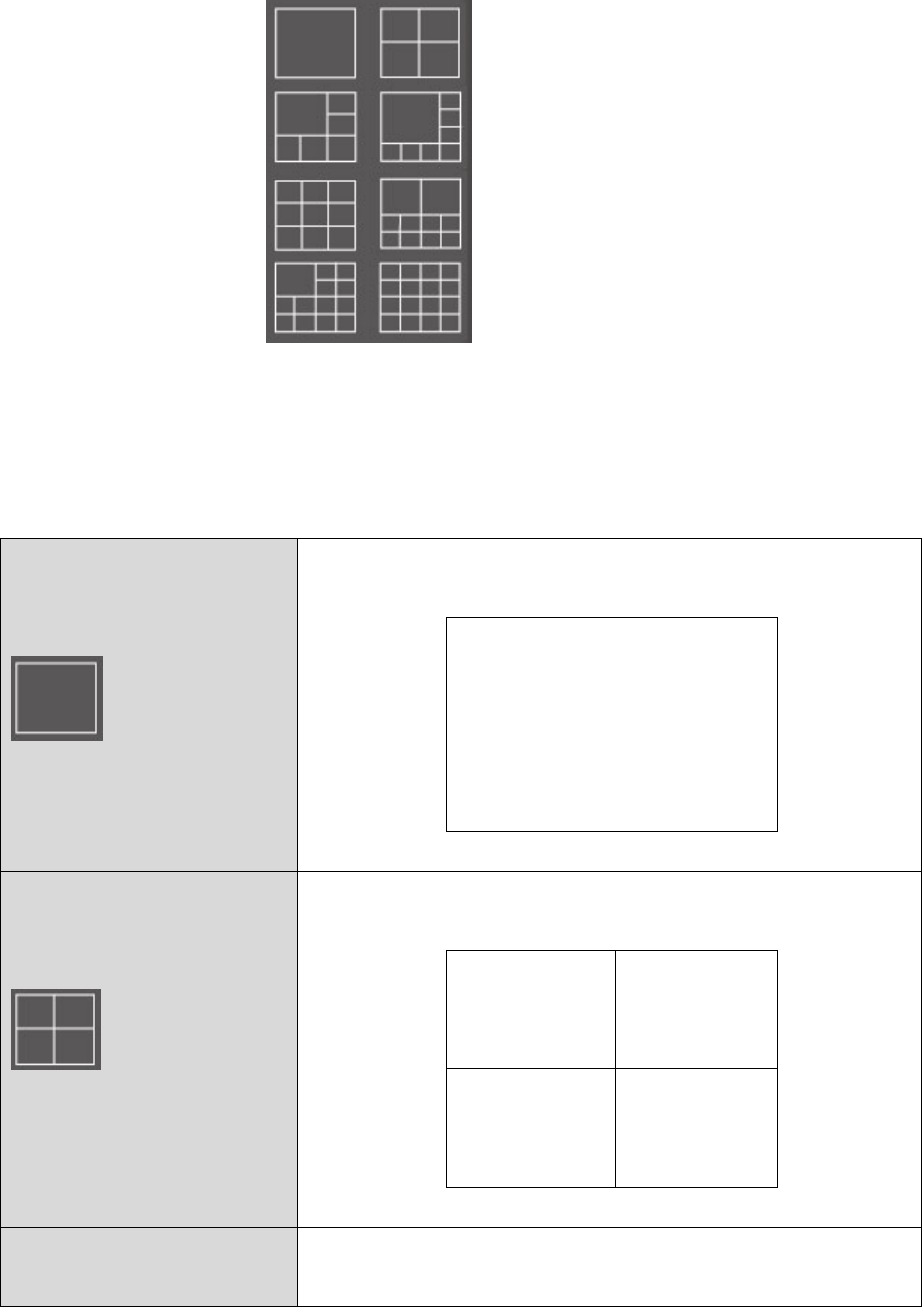
VI‐4. ChangingtheDisplayLayout
Thisnetworkcamerasurveillancesoftwareprovideseightdisplaylayouts:
Eachlayoutdisplaysadifferentnumberofcamerasindifferentarrangements.
Clicktheiconwhichrepresentsyourpreferredlayoutandthevideodisplay
areawillchangeaccordingly.
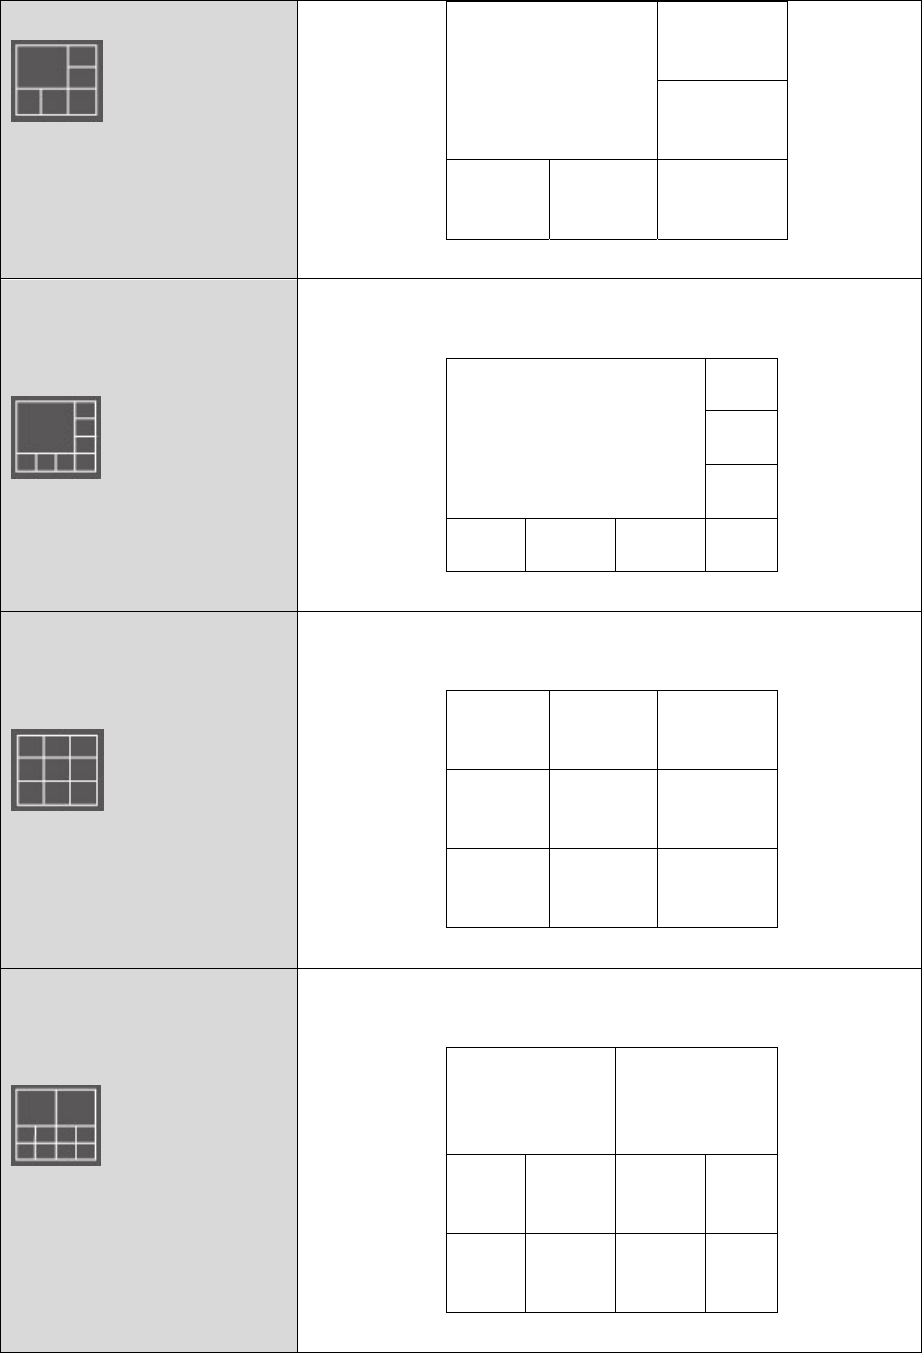
Layoutstyle1:1
Cameraonly
Displaysthevideoof1cameraonly.
Layoutstyle2:4
Cameras
Displaysthevideoofupto4cameras.
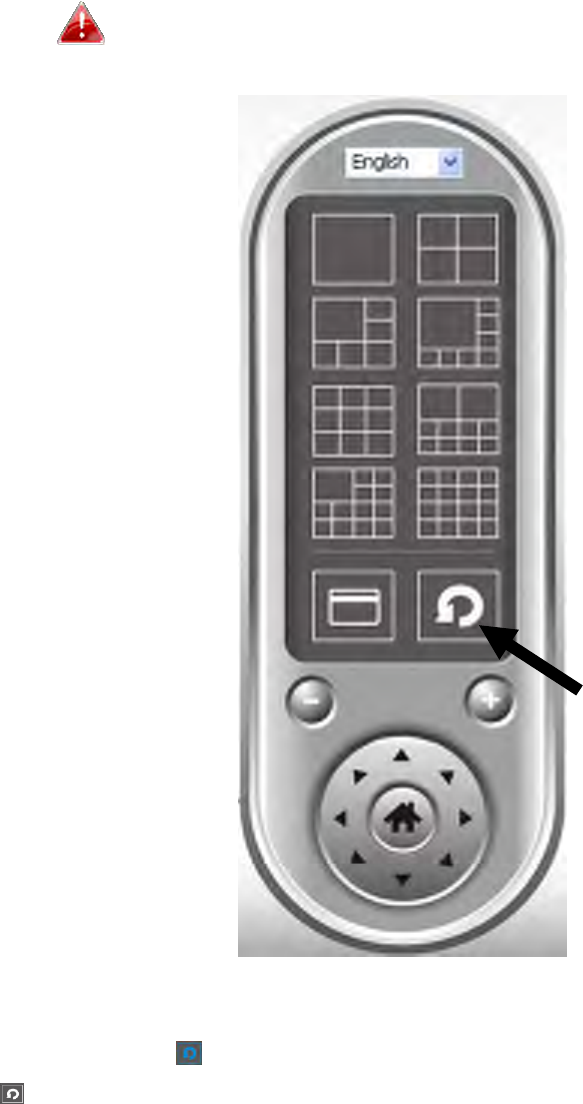
Layoutstyle3:6
Cameras
Displaysthevideoofupto6cameras.
110
Layoutstyle4:8
Cameras
Displaysthevideoofupto8cameras.
Layoutstyle5:9
Cameras
Displaysthevideoofupto9cameras.
Layoutstyle6:10
Cameras
Displaysthevideoofupto10cameras.

111
Layoutstyle7:13
Cameras
Displaysthevideoofupto13cameras.
Layoutstyle8:16
Cameras
Displaysthevideoofupto16cameras.

112
VI‐5. FullScreenMode
Clickthe‘FullScreen’buttontoswitchthedisplaymodetofull‐screenmode.
Thisusesallavailablespaceonyourmonitortodisplaythesurveillanceimage.
Pressthe“ESC”keytoexitfull‐screenmode.
113
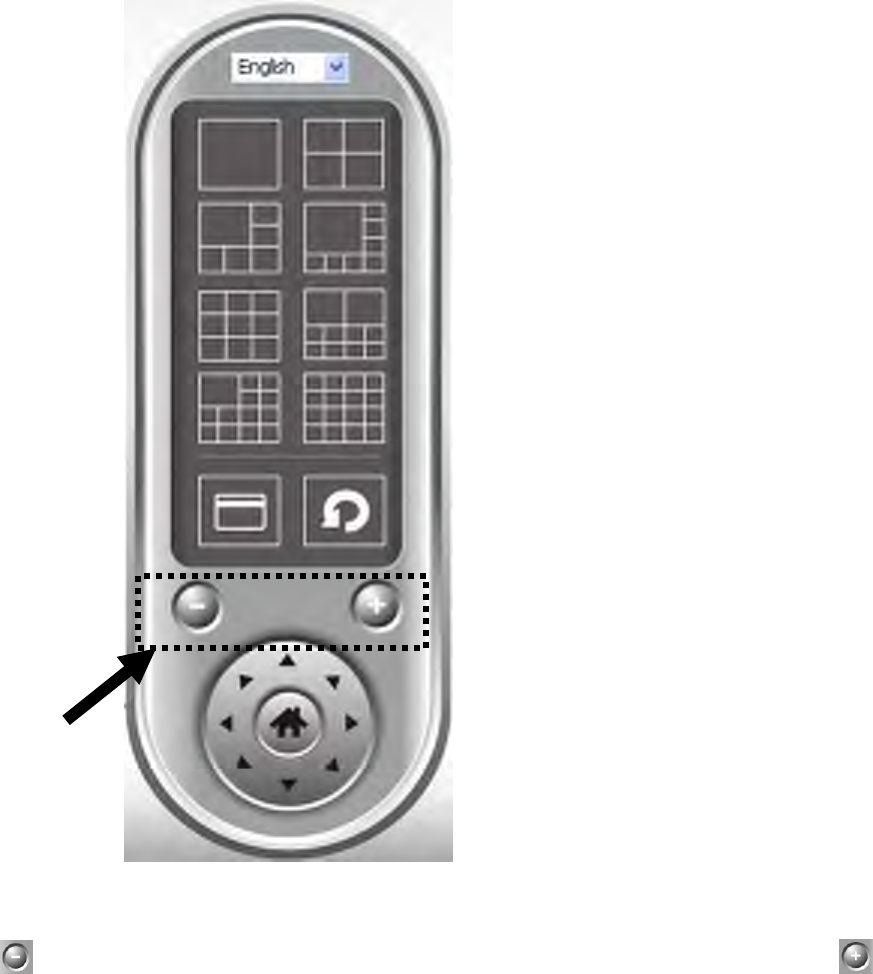
VI‐6. Scan
Ifyouhavemorethanonecameraconfigured,the“Scan”buttonwillswitch
thedisplaybetweencameras.
“Disconnected”willbedisplayedintheimagewindowwhena
configuredcameraisdisconnected.
Clickthe‘Scan’buttononcetoactivatethescanfunction(thescaniconwill
becomeblue),clickagaintostopscanning(thescaniconwillbecomewhite
).
114
VI‐7. ZoomIn/Out
Forcameraswhichsupportthezoom‐in/zoom‐outfunction,youcanusethis
functiontoenlargeorreducetheimagesizeaccordingtoyourrequirements
e.g.toseeacertainobjectingreaterdetail.
Pleaseselectacamerainthevideodisplayareabyclickingonitsimage,then
clickthebuttontoseemoreobjectswithinthecamera’sview,orclick
toenlargetheimagesizeofacertainobjecttoseeitinmoredetail(before
zoomingin,youmayneedtousethePTZbuttons‐describedinthenext
section‐tofindtheobjectyouwishtoseeindetail).
115
VI‐8. Pan&Tilt
Forcameraswhichsupportpan&tiltfunctions,youcanadjustthedirection
thenetworkcameraisfacing.
Pleaseselectacamerainthevideodisplayareabyclickingonitsimage,and
thenclickthedirectionsyouwishthecameratomoveto(total8directions
available).Clickthe‘Home’button()toreturntothecamera’shome
(default)position.
116
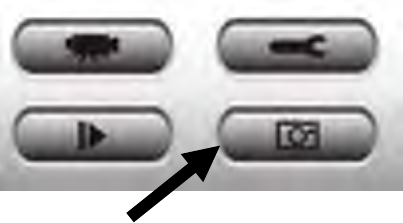
VI‐9. Snapshot
Youcantakeasnapshotofaselectedcameraandsaveittoa‘Snapshot’sub‐
folderinapre‐defineddatadirectory.
Clickthesnapshotbuttononcetotakeasnapshot;youcantakeasmany
snapshotsasyouwantuntiltheharddiskisfull.

117
VI‐10. Recording
Youcanstartvideorecordingaselectedcamera’simagebyclickingthe‘Start
Recording’button:
Whenrecordingstarts,you’llseeamessagedisplayedinthemessagedisplay
box,suchas‘1/110:00:00,Camera2StartManual’,whichmeanscamera2
startedrecordingmanuallyon1/1at10:00:00.
Tostoprecording,clickthe‘StartRecording’buttonagain,andyou’llseea
messagedisplayedinthemessagedisplayboxsuchas‘1/110:00:00,Camera
2StopManual’.
118
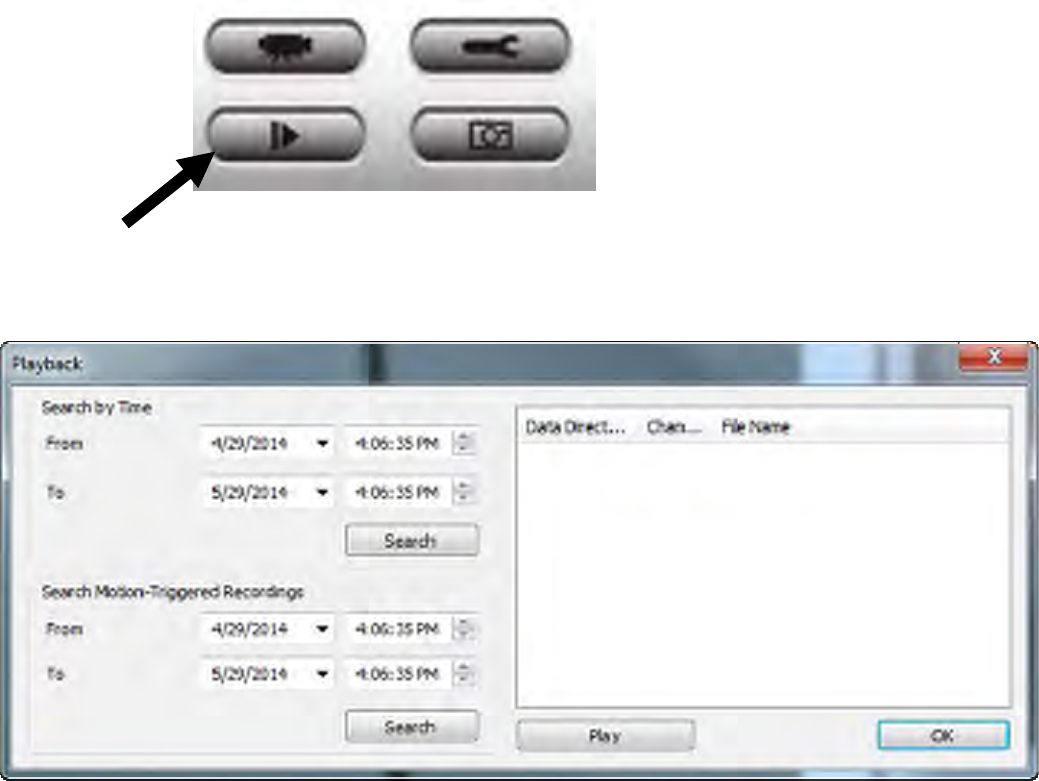
VI‐11. VideoPlayback
Youcanplaybackallrecordedvideobyclickingthisbutton.
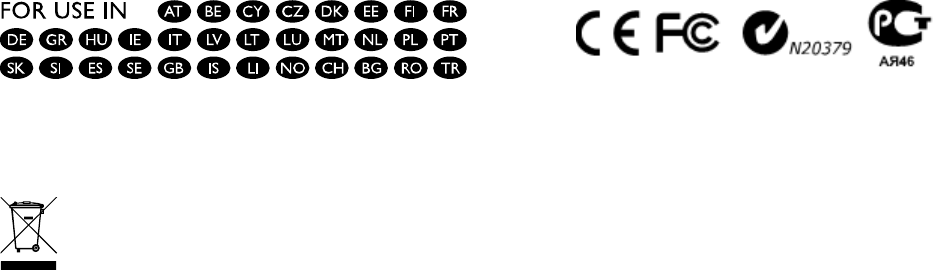
Anewwindowwillappear:
Youhavetosearchthevideofilebeforeyoucanplayit.Therearetwokindsof
videosearch:TimeSearch(searchallvideosfilethatfallwithinaspecific
periodoftime)andMotionSearch(searchallvideosrecordedbythemotion
detectionfunctionandfallwithinaspecificperiodoftime).
Pleasedefinethestartandenddate/timeofthetimeperiodyouwishto
search,andthenclickthe‘Search’button(under‘TimeSearch’or‘Motion
Search’).Allfoundvideoswillbedisplayed,selectthevideoyouwishtoplay
andclickthe‘Play’buttontoplayback.
119
FederalCommunicationCommissionInterferenceStatement
ThisequipmenthasbeentestedandfoundtocomplywiththelimitsforaClassBdigitaldevice,pursuanttoPart
15ofFCCRules.Theselimitsaredesignedtoprovidereasonableprotectionagainstharmfulinterferenceina
residentialinstallation.Thisequipmentgenerates,uses,andcanradiateradiofrequencyenergyand,ifnot
installedandusedinaccordancewiththeinstructions,maycauseharmfulinterferencetoradiocommunications.
However,thereisnoguaranteethatinterferencewillnotoccurinaparticularinstallation.Ifthisequipmentdoes
causeharmfulinterferencetoradioortelevisionreception,whichcanbedeterminedbyturningtheequipment
offandon,theuserisencouragedtotrytocorrecttheinterferencebyoneormoreofthefollowingmeasures:
1.Reorientorrelocatethereceivingantenna.
2.Increasetheseparationbetweentheequipmentandreceiver.
3.Connecttheequipmentintoanoutletonacircuitdifferentfromthattowhichthereceiverisconnected.
4.Consultthedealeroranexperiencedradiotechnicianforhelp.
FCCCaution
Thisdeviceanditsantennamustnotbeco‐locatedoroperatinginconjunctionwithanyotherantennaor
transmitter.ThisdevicecomplieswithPart15oftheFCCRules.Operationissubjecttothefollowingtwo
conditions:(1)thisdevicemaynotcauseharmfulinterference,and(2)thisdevicemustacceptanyinterference
received,includinginterferencethatmaycauseundesiredoperation.Anychangesormodificationsnotexpressly
approvedbythepartyresponsibleforcompliancecouldvoidtheauthoritytooperateequipment.
FederalCommunicationsCommission(FCC)RadiationExposureStatement
ThisequipmentcomplieswithFCCradiationexposurelimitssetforthforanuncontrolledenvironment.This
equipmentshouldbeinstalledandoperatedwithminimumdistance20cmbetweentheradiator&yourbody.
Thistransmitterisrestrictedforusewiththespecificantennatestedintheapplicationforcertification.The
antenna(s)usedforthistransmittermustnotbeco‐locatedoroperatinginconjunctionwithanyotherantennaor
transmitter.
ForproductavailableintheUSA/Canadamarket,onlychannel1~11canbeoperated.Selectionofotherchannels
isnotpossible.
R&TTEComplianceStatement
ThisequipmentcomplieswithalltherequirementsofDIRECTIVE1999/5/ECOFTHEEUROPEANPARLIAMENTAND
THECOUNCILofMarch9,1999onradioequipmentandtelecommunicationterminalequipmentandthemutual
recognitionoftheirconformity(R&TTE).TheR&TTEDirectiverepealsandreplacesinthedirective98/13/EEC
(TelecommunicationsTerminalEquipmentandSatelliteEarthStationEquipment)AsofApril8,2000.
Safety
Thisequipmentisdesignedwiththeutmostcareforthesafetyofthosewhoinstallanduseit.However,special
attentionmustbepaidtothedangersofelectricshockandstaticelectricitywhenworkingwithelectrical
equipment.Allguidelinesofthisandofthecomputermanufacturemustthereforebeallowedatalltimesto
ensurethesafeuseoftheequipment.
EUCountriesIntendedforUse
TheETSIversionofthisdeviceisintendedforhomeandofficeuseinAustria,Belgium,Bulgaria,Cyprus,Czech,
Denmark,Estonia,Finland,France,Germany,Greece,Hungary,Ireland,Italy,Latvia,Lithuania,Luxembourg,Malta,
Netherlands,Poland,Portugal,Romania,Slovakia,Slovenia,Spain,Sweden,Turkey,andUnitedKingdom.TheETSI
versionofthisdeviceisalsoauthorizedforuseinEFTAmemberstates:Iceland,Liechtenstein,Norway,and
Switzerland.
EUCountriesNotIntendedforUse
None
120
EUDeclarationofConformity
English:Thisequipmentisincompliancewiththeessentialrequirementsandotherrelevant
provisionsofDirective2004/108/EC,2006/95/EC,2009/125/EC.
French:Cetéquipementestconformeauxexigencesessentiellesetautresdispositionsdela
directive2004/108/EC,2006/95/EC,2009/125/EC
Czechian:Totozařízeníjevsouladusezákladnímipožadavkyaostatnímipříslušnýmiustanoveními
směrnic2004/108/EC,2006/95/EC,2009/125/EC.
Polish:Urządzeniejestzgodnezogólnymiwymaganiamiorazszczególnymiwarunkami
określonymiDyrektywąUE2004/108/EC,2006/95/EC,2009/125/EC
Romanian: Acestechipamentesteînconformitatecucerinţeleesenţialeşialteprevederirelevanteale
Directivei2004/108/EC,2006/95/EC,2009/125/EC.
Russian:ЭтооборудованиесоответствуетосновнымтребованиямиположениямДирективы
2004/108/EC,2006/95/EC,2009/125/EC.
Magyar:Ezaberendezésmegfelelazalapvetőkövetelményeknekésmásvonatkozóirányelveknek
2004/108/EC,2006/95/EC,2009/125/EC
Türkçe: Bucihaz2004/108/EC,2006/95/EC,2009/125/ECdirektiflerizorunluisteklervediğer
hükümlerleileuyumludur.
Ukrainian: Обладнаннявідповідаєвимогаміумовамдирективи2004/108/EC,2006/95/EC,
2009/125/EC.
Slovakian: Totozariadeniespĺňazákladnépožiadavkyaďalšiepríslušnéustanoveniasmerníc
2004/108/EC,2006/95/EC,2009/125/EC.
German:DiesesGeräterfülltdieVoraussetzungengemäßdenRichtlinien2004/108/EC,2006/95/EC,
2009/125/EC.
Spanish: ElpresenteequipocumplelosrequisitosesencialesdelaDirectiva2004/108/EC,
2006/95/EC,2009/125/EC.
Italian: Questoapparecchioèconformeairequisitiessenzialieallealtredisposizioniapplicabili
dellaDirettiva2004/108/EC,2006/95/EC,2009/125/EC.
Dutch: Ditapparaatvoldoetaandeessentiëleeisenenanderevantoepassingzijndebepalingen
vanrichtlijn2004/108/EC,2006/95/EC,2009/125/EC.
Portugese:EsteequipamentocumpreosrequesitosessênciaisdaDirectiva2004/108/EC,2006/95/EC,
2009/125/EC
Norwegian:DetteutstyreterisamsvarmeddeviktigstekraveneogandrerelevanteregleriDirektiv
2004/108/EC,2006/95/EC,2009/125/EC.
Swedish: Dennautrustningäriöverensstämmelsemeddeväsentligakravenochövrigarelevanta
bestämmelseridirektiv2004/108/EC,2006/95/EC,2009/125/EC.
Danish: Detteudstyrerioverensstemmelsemeddevæsentligstekravogandrerelevante
forordningeridirektiv2004/108/EC,2006/95/EC,2009/125/EC.
Finnish:Tämälaitetäyttäädirektiivien2004/108/EC,2006/95/EC,2009/125/EColeelliset
vaatimuksetjamuutasiaankuuluvatmääräykset.
‐‐‐‐‐‐‐‐‐‐‐‐‐‐‐‐‐‐‐‐‐‐‐‐‐‐‐‐‐‐‐‐‐‐‐‐‐‐‐‐‐‐‐‐‐‐‐‐‐‐‐‐‐‐‐‐‐‐‐‐‐‐‐‐‐‐‐‐‐‐‐‐‐‐‐‐‐‐‐‐‐‐‐‐‐‐‐‐‐‐‐‐‐‐‐‐‐‐‐‐‐‐‐‐‐‐‐‐‐‐‐‐‐‐‐‐‐‐‐
WEEEDirective&ProductDisposal
Attheendofitsserviceablelife,thisproductshouldnotbetreatedashouseholdorgeneralwaste.It
shouldbehandedovertotheapplicablecollectionpointfortherecyclingofelectricalandelectronic
equipment,orreturnedtothesupplierfordisposal.
121
NoticeAccordingtoGNUGeneralPublicLicenseVersion2
ThisproductincludessoftwarethatissubjecttotheGNUGeneralPublicLicenseversion2.Theprogramisfreesoftwareand
distributedwithoutanywarrantyoftheauthor.Weoffer,validforatleastthreeyears,togiveyou,forachargenomore
thanthecostsofphysicallyperformingsourcedistribution,acompletemachine‐readablecopyofthecorrespondingsource
code.
DasProduktbeinhaltetSoftware,diedenBedingungenderGNU/GPL‐Version2unterliegt.DasProgrammisteinesog.„Free
Software“,derAutorstelltdasProgrammohneirgendeineGewährleistungenzurVerfügung.WirbietenIhnenfüreinen
ZeitraumvondreiJahrenan,einevollständigemaschinenlesbareKopiedesQuelltextesderProgrammezurVerfügungzu
stellen–zunichthöherenKostenalsdenen,diedurchdenphysikalischenKopiervorganganfallen.
GNUGENERALPUBLICLICENSE
Version2,June1991
Copyright(C)1989,1991FreeSoftwareFoundation,Inc.51FranklinStreet,FifthFloor,Boston,MA02110‐1301,USA
Everyoneispermittedtocopyanddistributeverbatimcopiesofthislicensedocument,butchangingitisnotallowed.
Preamble
Thelicensesformostsoftwarearedesignedtotakeawayyourfreedomtoshareandchangeit.Bycontrast,theGNUGeneral
PublicLicenseisintendedtoguaranteeyourfreedomtoshareandchangefreesoftware‐‐tomakesurethesoftwareisfree
forallitsusers.ThisGeneralPublicLicenseappliestomostoftheFreeSoftwareFoundation’ssoftwareandtoanyother
programwhoseauthorscommittousingit.(SomeotherFreeSoftwareFoundationsoftwareiscoveredbytheGNULesser
GeneralPublicLicenseinstead.)Youcanapplyittoyourprograms,too.
Whenwespeakoffreesoftware,wearereferringtofreedom,notprice.OurGeneralPublicLicensesaredesignedtomake
surethatyouhavethefreedomtodistributecopiesoffreesoftware(andchargeforthisserviceifyouwish),thatyoureceive
sourcecodeorcangetitifyouwantit,thatyoucanchangethesoftwareorusepiecesofitinnewfreeprograms;andthat
youknowyoucandothesethings.
Toprotectyourrights,weneedtomakerestrictionsthatforbidanyonetodenyyoutheserightsortoaskyoutosurrender
therights.Theserestrictionstranslatetocertainresponsibilitiesforyouifyoudistributecopiesofthesoftware,orifyou
modifyit.
Forexample,ifyoudistributecopiesofsuchaprogram,whethergratisorforafee,youmustgivetherecipientsalltherights
thatyouhave.Youmustmakesurethatthey,too,receiveorcangetthesourcecode.Andyoumustshowthemtheseterms
sotheyknowtheirrights.
Weprotectyourrightswithtwosteps:(1)copyrightthesoftware,and(2)offeryouthislicensewhichgivesyoulegal
permissiontocopy,distributeand/ormodifythesoftware.
Also,foreachauthor’sprotectionandours,wewanttomakecertainthateveryoneunderstandsthatthereisnowarrantyfor
thisfreesoftware.Ifthesoftwareismodifiedbysomeoneelseandpassedon,wewantitsrecipientstoknowthatwhatthey
haveisnottheoriginal,sothatanyproblemsintroducedbyotherswillnotreflectontheoriginalauthors’reputations.
Finally,anyfreeprogramisthreatenedconstantlybysoftwarepatents.Wewishtoavoidthedangerthatredistributorsofa
freeprogramwillindividuallyobtainpatentlicenses,ineffectmakingtheprogramproprietary.Topreventthis,wehave
madeitclearthatanypatentmustbelicensedforeveryone’sfreeuseornotlicensedatall.
Theprecisetermsandconditionsforcopying,distributionandmodificationfollow.
TERMSANDCONDITIONSFORCOPYING,DISTRIBUTIONANDMODIFICATION
0.ThisLicenseappliestoanyprogramorotherworkwhichcontainsanoticeplacedbythecopyrightholdersayingitmaybe
distributedunderthetermsofthisGeneralPublicLicense.The‘“Program’“,below,referstoanysuchprogramorwork,anda
‘“workbasedontheProgram’“meanseithertheProgramoranyderivativeworkundercopyrightlaw:thatistosay,awork
containingtheProgramoraportionofit,eitherverbatimorwithmodificationsand/ortranslatedintoanotherlanguage.
(Hereinafter,translationisincludedwithoutlimitationintheterm‘“modification’“.)Eachlicenseeisaddressedas‘“you’“.
Activitiesotherthancopying,distributionandmodificationarenotcoveredbythisLicense;theyareoutsideitsscope.The
actofrunningtheProgramisnotrestricted,andtheoutputfromtheProgramiscoveredonlyifitscontentsconstitutea
workbasedontheProgram(independentofhavingbeenmadebyrunningtheProgram).Whetherthatistruedependson
whattheProgramdoes.
122
1.YoumaycopyanddistributeverbatimcopiesoftheProgram’ssourcecodeasyoureceiveit,inanymedium,providedthat
youconspicuouslyandappropriatelypublishoneachcopyanappropriatecopyrightnoticeanddisclaimerofwarranty;keep
intactallthenoticesthatrefertothisLicenseandtotheabsenceofanywarranty;andgiveanyotherrecipientsofthe
ProgramacopyofthisLicensealongwiththeProgram.
Youmaychargeafeeforthephysicalactoftransferringacopy,andyoumayatyouroptionofferwarrantyprotectionin
exchangeforafee.
2.YoumaymodifyyourcopyorcopiesoftheProgramoranyportionofit,thusformingaworkbasedontheProgram,and
copyanddistributesuchmodificationsorworkunderthetermsofSection1above,providedthatyoualsomeetallofthese
conditions:
a) Youmustcausethemodifiedfilestocarryprominentnoticesstatingthatyouchangedthefilesandthedateofany
change.
b) Youmustcauseanyworkthatyoudistributeorpublish,thatinwholeorinpartcontainsorisderivedfromthe
Programoranypartthereof,tobelicensedasawholeatnochargetoallthirdpartiesunderthetermsofthis
License.
c) Ifthemodifiedprogramnormallyreadscommandsinteractivelywhenrun,youmustcauseit,whenstartedrunning
forsuchinteractiveuseinthemostordinaryway,toprintordisplayanannouncementincludinganappropriate
copyrightnoticeandanoticethatthereisnowarranty(orelse,sayingthatyouprovideawarranty)andthatusers
mayredistributetheprogramundertheseconditions,andtellingtheuserhowtoviewacopyofthisLicense.
(Exception:iftheProgramitselfisinteractivebutdoesnotnormallyprintsuchanannouncement,yourworkbased
ontheProgramisnotrequiredtoprintanannouncement.)
Theserequirementsapplytothemodifiedworkasawhole.Ifidentifiablesectionsofthatworkarenotderivedfromthe
Program,andcanbereasonablyconsideredindependentandseparateworksinthemselves,thenthisLicense,anditsterms,
donotapplytothosesectionswhenyoudistributethemasseparateworks.Butwhenyoudistributethesamesectionsas
partofawholewhichisaworkbasedontheProgram,thedistributionofthewholemustbeonthetermsofthisLicense,
whosepermissionsforotherlicenseesextendtotheentirewhole,andthustoeachandeverypartregardlessofwhowroteit.
Thus,itisnottheintentofthissectiontoclaimrightsorcontestyourrightstoworkwrittenentirelybyyou;rather,theintent
istoexercisetherighttocontrolthedistributionofderivativeorcollectiveworksbasedontheProgram.
Inaddition,mereaggregationofanotherworknotbasedontheProgramwiththeProgram(orwithaworkbasedonthe
Program)onavolumeofastorageordistributionmediumdoesnotbringtheotherworkunderthescopeofthisLicense.
3.YoumaycopyanddistributetheProgram(oraworkbasedonit,underSection2)inobjectcodeorexecutableformunder
thetermsofSections1and2aboveprovidedthatyoualsodooneofthefollowing:
a) Accompanyitwiththecompletecorrespondingmachine‐readablesourcecode,whichmustbedistributedunderthe
termsofSections1and2aboveonamediumcustomarilyusedforsoftwareinterchange;or,
b) Accompanyitwithawrittenoffer,validforatleastthreeyears,togiveanythirdparty,forachargenomorethan
yourcostofphysicallyperformingsourcedistribution,acompletemachine‐readablecopyofthecorresponding
sourcecode,tobedistributedunderthetermsofSections1and2aboveonamediumcustomarilyusedfor
softwareinterchange;or,
c) Accompanyitwiththeinformationyoureceivedastotheoffertodistributecorrespondingsourcecode.(This
alternativeisallowedonlyfornoncommercialdistributionandonlyifyoureceivedtheprograminobjectcodeor
executableformwithsuchanoffer,inaccordwithSubsectionbabove.)
Thesourcecodeforaworkmeansthepreferredformoftheworkformakingmodificationstoit.Foranexecutablework,
completesourcecodemeansallthesourcecodeforallmodulesitcontains,plusanyassociatedinterfacedefinitionfiles,plus
thescriptsusedtocontrolcompilationandinstallationoftheexecutable.However,asaspecialexception,thesourcecode
distributedneednotincludeanythingthatisnormallydistributed(ineithersourceorbinaryform)withthemajor
components(compiler,kernel,andsoon)oftheoperatingsystemonwhichtheexecutableruns,unlessthatcomponent
itselfaccompaniestheexecutable.
Ifdistributionofexecutableorobjectcodeismadebyofferingaccesstocopyfromadesignatedplace,thenoffering
equivalentaccesstocopythesourcecodefromthesameplacecountsasdistributionofthesourcecode,eventhoughthird
partiesarenotcompelledtocopythesourcealongwiththeobjectcode.
4.Youmaynotcopy,modify,sublicense,ordistributetheProgramexceptasexpresslyprovidedunderthisLicense.Any
attemptotherwisetocopy,modify,sublicenseordistributetheProgramisvoid,andwillautomaticallyterminateyourrights
underthisLicense.However,partieswhohavereceivedcopies,orrights,fromyouunderthisLicensewillnothavetheir
licensesterminatedsolongassuchpartiesremaininfullcompliance.
5.YouarenotrequiredtoacceptthisLicense,sinceyouhavenotsignedit.However,nothingelsegrantsyoupermissionto
modifyordistributetheProgramoritsderivativeworks.TheseactionsareprohibitedbylawifyoudonotacceptthisLicense.
123
Therefore,bymodifyingordistributingtheProgram(oranyworkbasedontheProgram),youindicateyouracceptanceof
thisLicensetodoso,andallitstermsandconditionsforcopying,distributingormodifyingtheProgramorworksbasedonit.
6.EachtimeyouredistributetheProgram(oranyworkbasedontheProgram),therecipientautomaticallyreceivesalicense
fromtheoriginallicensortocopy,distributeormodifytheProgramsubjecttothesetermsandconditions.Youmaynot
imposeanyfurtherrestrictionsontherecipients’exerciseoftherightsgrantedherein.Youarenotresponsibleforenforcing
compliancebythirdpartiestothisLicense.
7.If,asaconsequenceofacourtjudgmentorallegationofpatentinfringementorforanyotherreason(notlimitedtopatent
issues),conditionsareimposedonyou(whetherbycourtorder,agreementorotherwise)thatcontradicttheconditionsof
thisLicense,theydonotexcuseyoufromtheconditionsofthisLicense.Ifyoucannotdistributesoastosatisfy
simultaneouslyyourobligationsunderthisLicenseandanyotherpertinentobligations,thenasaconsequenceyoumaynot
distributetheProgramatall.Forexample,ifapatentlicensewouldnotpermitroyalty‐freeredistributionoftheProgramby
allthosewhoreceivecopiesdirectlyorindirectlythroughyou,thentheonlywayyoucouldsatisfybothitandthisLicense
wouldbetorefrainentirelyfromdistributionoftheProgram.
Ifanyportionofthissectionisheldinvalidorunenforceableunderanyparticularcircumstance,thebalanceofthesectionis
intendedtoapplyandthesectionasawholeisintendedtoapplyinothercircumstances.
Itisnotthepurposeofthissectiontoinduceyoutoinfringeanypatentsorotherpropertyrightclaimsortocontestvalidity
ofanysuchclaims;thissectionhasthesolepurposeofprotectingtheintegrityofthefreesoftwaredistributionsystem,
whichisimplementedbypubliclicensepractices.Manypeoplehavemadegenerouscontributionstothewiderangeof
softwaredistributedthroughthatsysteminrelianceonconsistentapplicationofthatsystem;itisuptotheauthor/donorto
decideifheorsheiswillingtodistributesoftwarethroughanyothersystemandalicenseecannotimposethatchoice.
ThissectionisintendedtomakethoroughlyclearwhatisbelievedtobeaconsequenceoftherestofthisLicense.
8.Ifthedistributionand/oruseoftheProgramisrestrictedincertaincountrieseitherbypatentsorbycopyrightedinterfaces,
theoriginalcopyrightholderwhoplacestheProgramunderthisLicensemayaddanexplicitgeographicaldistribution
limitationexcludingthosecountries,sothatdistributionispermittedonlyinoramongcountriesnotthusexcluded.Insuch
case,thisLicenseincorporatesthelimitationasifwritteninthebodyofthisLicense.
9.TheFreeSoftwareFoundationmaypublishrevisedand/ornewversionsoftheGeneralPublicLicensefromtimetotime.
Suchnewversionswillbesimilarinspirittothepresentversion,butmaydifferindetailtoaddressnewproblemsor
concerns.
Eachversionisgivenadistinguishingversionnumber.IftheProgramspecifiesaversionnumberofthisLicensewhichapplies
toitand‘“anylaterversion’“,youhavetheoptionoffollowingthetermsandconditionseitherofthatversionorofanylater
versionpublishedbytheFreeSoftwareFoundation.IftheProgramdoesnotspecifyaversionnumberofthisLicense,you
maychooseanyversioneverpublishedbytheFreeSoftwareFoundation.
10.IfyouwishtoincorporatepartsoftheProgramintootherfreeprogramswhosedistributionconditionsaredifferent,
writetotheauthortoaskforpermission.ForsoftwarewhichiscopyrightedbytheFreeSoftwareFoundation,writetothe
FreeSoftwareFoundation;wesometimesmakeexceptionsforthis.Ourdecisionwillbeguidedbythetwogoalsof
preservingthefreestatusofallderivativesofourfreesoftwareandofpromotingthesharingandreuseofsoftwaregenerally.
NOWARRANTY
11.BECAUSETHEPROGRAMISLICENSEDFREEOFCHARGE,THEREISNOWARRANTYFORTHEPROGRAM,TOTHEEXTENT
PERMITTEDBYAPPLICABLELAW.EXCEPTWHENOTHERWISESTATEDINWRITINGTHECOPYRIGHTHOLDERSAND/OROTHER
PARTIESPROVIDETHEPROGRAM‘“ASIS’“WITHOUTWARRANTYOFANYKIND,EITHEREXPRESSEDORIMPLIED,INCLUDING,
BUTNOTLIMITEDTO,THEIMPLIEDWARRANTIESOFMERCHANTABILITYANDFITNESSFORAPARTICULARPURPOSE.THE
ENTIRERISKASTOTHEQUALITYANDPERFORMANCEOFTHEPROGRAMISWITHYOU.SHOULDTHEPROGRAMPROVE
DEFECTIVE,YOUASSUMETHECOSTOFALLNECESSARYSERVICING,REPAIRORCORRECTION.
12.INNOEVENTUNLESSREQUIREDBYAPPLICABLELAWORAGREEDTOINWRITINGWILLANYCOPYRIGHTHOLDER,ORANY
OTHERPARTYWHOMAYMODIFYAND/ORREDISTRIBUTETHEPROGRAMASPERMITTEDABOVE,BELIABLETOYOUFOR
DAMAGES,INCLUDINGANYGENERAL,SPECIAL,INCIDENTALORCONSEQUENTIALDAMAGESARISINGOUTOFTHEUSEOR
INABILITYTOUSETHEPROGRAM(INCLUDINGBUTNOTLIMITEDTOLOSSOFDATAORDATABEINGRENDEREDINACCURATE
ORLOSSESSUSTAINEDBYYOUORTHIRDPARTIESORAFAILUREOFTHEPROGRAMTOOPERATEWITHANYOTHER
PROGRAMS),EVENIFSUCHHOLDEROROTHERPARTYHASBEENADVISEDOFTHEPOSSIBILITYOFSUCHDAMAGES.

124