Eizo Nanao Computer Monitor Ev2316W Users Manual FlexScan EV2316W/EV2336W/EV2416W/EV2436W User's
EV2316W to the manual 145e7dca-fbd2-47a2-b127-aee739bc6cd2
2015-02-06
: Eizo Eizo-Eizo-Nanao-Computer-Monitor-Ev2316W-Users-Manual-538711 eizo-eizo-nanao-computer-monitor-ev2316w-users-manual-538711 eizo pdf
Open the PDF directly: View PDF ![]() .
.
Page Count: 85
- FlexScan EV2316W/EV2336W/EV2416W/EV2436W User's Manual
- Cover
- Notice for this monitor
- CONTENTS
- Chapter 1 Introduction
- Chapter 2 Adjusting Screens
- Chapter 3 Setting Monitor
- 3-1. Adjusting Volume
- 3-2. Selecting sound source while using the DisplayPort signal input
- 3-3. Compensating viewing angle deficiency (EV2316W / EV2416W only)
- 3-4. Enabling / Disabling DDC/CI communication
- 3-5. Locking Operation Buttons
- 3-6. Setting Orientation
- 3-7. Showing and hiding the EIZO logo
- 3-8. Changing Setting Menu Display Position
- 3-9. Setting Language
- 3-10. Resetting the Monitor to the Default Settings
- Chapter 4 Power Saving Functions
- Chapter 5 Troubleshooting
- Chapter 6 Reference
- Appendix
Important
Please read PRECAUTIONS, this User’s Manual, and the Setup Guide
(separate volume) carefully to familiarize yourself with safe and
effective usage.
• Please refer to the Setup Guide for basic information ranging from
connection of the monitor to a PC to using the monitor.
• The latest User’s Manual is available for download from our web site:
http://www.eizo.com
Cover
2
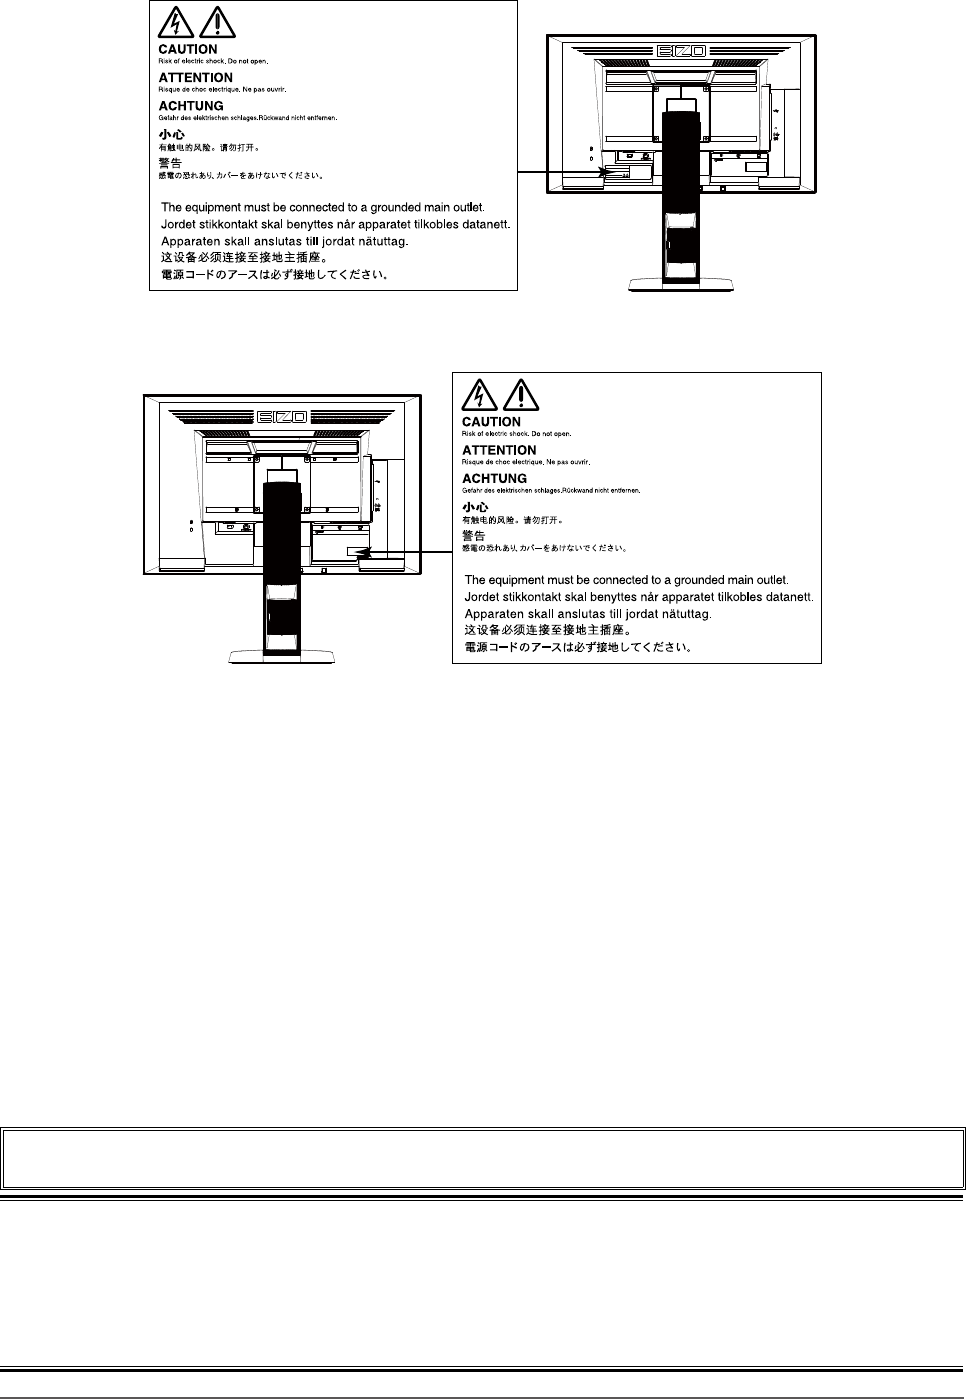
Location of Caution Statement
EV2316W / EV2336W (Ex.FlexStand2)
EV2416W / EV2436W (Ex.FlexStand2)
This product has been adjusted specically for use in the region to which it was originally shipped. If operated
outside this region, the product may not perform as stated in the specications.
No part of this manual may be reproduced, stored in a retrieval system, or transmitted, in any form or by any means,
electronic, mechanical, or otherwise, without the prior written permission of EIZO Corporation.
EIZO Corporation is under no obligation to hold any submitted material or information condential unless prior
arrangements are made pursuant to EIZO Corporation’s receipt of said information. Although every effort has been
made to ensure that this manual provides up-to-date information, please note that EIZO monitor specications are
subject to change without notice.

3
Noticeforthismonitor
Notice for this monitor
This product is suited to general purposes like creating documents, viewing multimedia content.
This product has been adjusted specically for use in the region to which it was originally shipped. If the product is
used outside the region, it may not operate as specied in the specications.
This product may not be covered by warranty for uses other than those described in this manual.
The specications noted in this manual are only applicable when the following are used:
· Power cords provided with the product
· Signal cables specied by us
Only use optional products manufactured or specied by us with this product.
It takes about 30 minutes for the performance of electrical parts to stabilize. Please wait 30 minutes or more after the
monitor power has been turned on, and then adjust the monitor.
Monitors should be set to a lower brightness to reduce changes in luminosity caused by long-term use and maintain a
stable display.
When the screen image is changed after displaying the same image for extended periods of time, an afterimage may
appear. Use the screen saver or power save function to avoid displaying the same image for extended periods of time.
Periodic cleaning is recommended to keep the monitor looking new and to prolong its operation lifetime (refer to
“Cleaning” (page 4)).
The LCD panel is manufactured using high-precision technology. Although, missing pixels or lit pixels may appear on
the LCD panel, this is not a malfunction. Percentage of effective dots: 99.9994% or higher.
The backlight of the LCD panel has a xed lifetime. When the screen becomes dark or begins to icker, please contact
your local EIZO representative.
Do not press on the panel or edge of the frame strongly, as this may result in display malfunctions, such as interference
patterns, etc. If pressure is continually applied to the panel, it may deteriorate or damage your panel. (If the pressure
marks remain on the panel, leave the monitor with a black or white screen. The symptom may disappear.)
Do not scratch or press on the panel with any sharp objects, as this may result in damage to the panel. Do not attempt
to brush with tissues as this may scratch the panel.
When the monitor is cold and brought into a room or the room temperature goes up quickly, dew condensation may
occur on the interior and exterior surfaces of the monitor. In that case, do not turn the monitor on. Instead wait until
the dew condensation disappears, otherwise it may cause some damage to the monitor.

4Noticeforthismonitor
Cleaning
Attention
• Chemicals such as alcohol and antiseptic solution may cause gloss variation, tarnishing, and fading of the cabinet or panel,
and also quality deterioration of the image.
• Never use any thinner, benzene, wax, and abrasive cleaner, which may damage the cabinet or panel.
Note
• The optional ScreenCleaner is recommended for cleaning the cabinet and panel surface.
If necessary, the stains on the cabinet and panel surface can be removed by moistening part of a soft cloth with
water.
To use the monitor comfortably
• An excessively dark or bright screen may affect your eyes. Adjust the brightness of the monitor according to
the environmental conditions.
• Staring at the monitor for a long time tires your eyes. Take a 10-minute rest every hour.
5
CONTENTS
CONTENTS
Cover ...................................................................... 1
Notice for this monitor ......................................... 3
Cleaning .................................................................... 4
To use the monitor comfortably ............................. 4
CONTENTS ............................................................. 5
Chapter 1 Introduction ....................................... 7
1-1. Features ......................................................... 7
1-2. Controls and Functions ............................... 9
●Front................................................................ 9
●Rear................................................................10
1-3. EIZO LCD Utility Disk...................................11
●Diskcontentsandsoftwareoverview............11
●Touse“ScreenManagerProforLCD
(DDC/CI)/EIZOScreenSlicer”......................11
1-4. Basic Operations and Functions ...............12
●BasicoperationoftheSettingmenu..............12
●Functions........................................................13
Chapter 2 Adjusting Screens .......................... 14
2-1. Compatible Resolutions .............................14
●EV2316W.......................................................14
●EV2336W.......................................................15
●EV2416W........................................................16
●EV2436W.......................................................17
2-2. Setting the Resolution ................................18
●Windows8/Windows7.................................18
●WindowsVista................................................18
●WindowsXP...................................................18
●MacOSX.......................................................18
2-3. Adjusting Color ............................................19
●Toselectthedisplaymode
(FineContrastMode)......................................19
●Toperformadvancedadjustments............... 20
●Adjustablesettingsineachmode................. 20
●Toadjustbrightness...................................... 20
●Toadjustcontrast...........................................21
●Toadjustcolortemperature...........................21
●Toadjustgamma.......................................... 22
●Toadjustthecolorsaturation........................ 22
●Toadjusthue................................................. 23
●Tosetoverdriveintensity(EV2336W/
EV2436Wonly)............................................. 23
●Toadjustgain.................................................24
2-4. Screen Adjustment ..................................... 25
●DigitalSignalInput........................................ 25
●AnalogSignalInput....................................... 25
2-5. Screen Size Changing ................................ 29
●ScreenSizeChanging.................................. 29
●Toadjustbrightnessofnon-displayarea...... 30
Chapter 3 Setting Monitor ............................... 31
3-1. Adjusting Volume.........................................31
3-2. Selecting sound source while using the
DisplayPort signal input..............................31
3-3. Compensating viewing angle deciency
(EV2316W / EV2416W only) ........................ 32
3-4. Enabling / Disabling DDC/CI
communication .......................................... 32
3-5. Locking Operation Buttons ....................... 33
3-6. Setting Orientation ..................................... 33
3-7. Showing and hiding the EIZO logo ........... 33
3-8. Changing Setting Menu Display Position 34
3-9. Setting Language ........................................ 34
3-10. Resetting the Monitor to the Default
Settings ........................................................ 35
●Toresetthecoloradjustments...................... 35
●Toreset“EcoViewSenseSettings”.............. 35
●Toresetalladjustmentstothedefault
settings.......................................................... 35
Chapter 4 Power Saving Functions ................ 36
4-1. Setting Power Saving ................................. 36
●Monitor.......................................................... 36
●AudioOutput..................................................37
4-2. Setting Power Indicator ...............................37
4-3. Enabling / Disabling Automatic
Brightness Adjustment ..............................37
●AutoEcoView.................................................37
●EcoViewOptimizer2..................................... 38
4-4. Setting the power saving mode when a
person leaves the monitor ......................... 38
4-5. Checking the power saving level .............. 40
4-6. Enabling / Disabling Auto Power-OFF ...... 40
Chapter 5 Troubleshooting .............................. 41
5-1. No picture .....................................................41
5-2. Imaging problems (for both digital and
analog) .......................................................... 42
5-3. Imaging problems (for digital only) .......... 43
5-4. Imaging problems (for analog only) ......... 43
5-5. Other problems ........................................... 44
Chapter 6 Reference ........................................46
6-1. Attaching the Optional Arm ....................... 46
6-2. Detaching / Attaching the TriStand2
Stand Base ....................................................47
6-3. Attaching / Detaching the TriStand2
Cable Holder ................................................ 49
6-4. Connecting Multiple PCs ............................51

6CONTENTS
●Toswitchamonginputsignals.......................51
●Tosetinputsignalselection...........................52
6-5. Making Use of USB (Universal Serial
Bus) ............................................................... 52
●RequiredSystemEnvironment......................52
●ConnectionProcedure(SetupofUSB
Function)........................................................ 53
6-6. Displaying Monitor Information ................ 53
6-7. Specications ............................................. 54
●EV2316W...................................................... 54
●EV2336W...................................................... 55
●EV2416W....................................................... 57
●EV2436W...................................................... 58
●MainDefaultSettings.................................... 60
●OutsideDimensions...................................... 60
●Accessories................................................... 62
6-8. Preset Timing .............................................. 63
●EV2316W...................................................... 63
●EV2336W...................................................... 63
●EV2416W....................................................... 64
●EV2436W...................................................... 64
6-9. Glossary ....................................................... 65
Appendix .............................................................. 67
Trademark ............................................................... 67
License .................................................................... 67
ENERGY STAR ........................................................ 68
TCO .......................................................................... 68
FCC Declaration of Conformity ............................ 69
Hinweise zur Auswahl des richtigen
Schwenkarms für Ihren Monitor ............................70
Hinweis zur Ergonomie : ........................................70
LIMITED WARRANTY ..............................................71
Recycling Information ........................................... 80
China Measures for RoHS Compliance in
ChinaRoHS .............................................................. 84

7
Chapter1Introduction
Chapter 1 Introduction
Thank you very much for choosing an EIZO color LCD monitor.
1-1. Features
• 23.0″ wide format LCD (EV2316W / EV2336W)
• 24.1″ wide format LCD (EV2416W / EV2436W)
• Supports a resolution of 1920 × 1080 (EV2316W / EV2336W)
• Supports a resolution of 1920 × 1200 (EV2416W / EV2436W)
• IPS panel with 89˚ horizontal and vertical viewing angles (EV2336W / EV2436W only)
• Applicable to DisplayPort (applicable to 8 bit)*1
The DisplayPort input receives both an image signal and an audio signal via a single DisplayPort cable.
*1 When transmitting an audio signal using the DisplayPort cable, the graphics board must be compatible with audio
output (see “6-7. Specications” (page 54)).
• The FineContrast function allows the user to select the display mode optimum to the displayed image.
- The Paper mode reproduces a printed paper effect on the monitor.
See “To select the display mode (FineContrast Mode)” (page 19).
• The software “ScreenManager Pro for LCD (DDC/CI)” to adjust the screen using the mouse and keyboard is
included
See “1-3. EIZO LCD Utility Disk” (page 11).
- EyeCare Filter
Texture of the paper is reproduced by displaying a translucent image in the foreground of the desktop.
By using this function with the Paper mode, the screen looks more like paper.
See “To select the display mode (FineContrast Mode)” (page 19).
• Supports the power management software “EIZO EcoView NET”
For more information, refer to our web site (http://www.eizo.com).
• Power saving function
Suppressing the power consumption*2 reduces the carbon dioxide emissions. This product is equipped with power saving
function.
- 0 W power consumption when the main power is off
Equipped with main power switch.
When the monitor is not required, the power supply can be shut off using the main power switch.
- Auto EcoView
The ambient light sensor on the front side of the monitor detects the environmental brightness to adjust the screen
brightness automatically and comfortably. Excessively high brightness may increase power consumption and cause
unwanted environmental effects. It may also lead to fatigue of your eyes. Use the Auto EcoView to reduce the
brightness.
See “Auto EcoView” (page 37).
- EcoView Optimizer 2
The monitor automatically adjusts the screen brightness according to the white level of the input signal. This
function can reduce the power consumption while maintaining the brightness specied by the input signal.
See “EcoView Optimizer 2” (page 38).
- EcoView Sense
The sensor on the front side of the monitor detects the movement of a person. When a person moves away from the
monitor, the monitor shifts to the power saving mode automatically and does not display the images on the screen.
Therefore, the function reduces the power consumption. The sensitivity and time until the power saving mode is
activated can be set according to the monitor usage environment and movement of the user.
See “4-4. Setting the power saving mode when a person leaves the monitor” (page 38).

8Chapter1Introduction
*2 Reference values:
EV2316W
Maximum power consumption: 43 W (Brightness Max., when a USB device is connected, speaker working, at
default settings)
Standard power consumption: 14 W (Brightness 120 cd/m2, when no USB device is connected, speaker not working,
at default settings)
EV2336W
Maximum power consumption: 40 W (Brightness Max., when a USB device is connected, speaker working, at
default settings)
Standard power consumption: 14 W (100VAC, Brightness 120 cd/m2, when no USB device is connected, speaker not
working, at default settings)
Standard power consumption: 15 W (200VAC, Brightness 120 cd/m2, when no USB device is connected, speaker not
working, at default settings)
EV2416W
Maximum power consumption: 40 W (Brightness Max., when a USB device is connected, speaker working, at
default settings)
Standard power consumption: 11 W (Brightness 120 cd/m2, when no USB device is connected, speaker not working,
at default settings)
EV2436W
Maximum power consumption: 60 W (Brightness Max., when a USB device is connected, speaker working, at
default settings)
Standard power consumption: 19 W (Brightness 120 cd/m2, when no USB device is connected, speaker not working,
at default settings)
• Up View (EV2316W / EV2416W only)
The viewing angle is adjusted so that the screen looks like a front view when the screen is looked up.
See “3-3. Compensating viewing angle deciency (EV2316W / EV2416W only)” (page 32).
• Supports portrait and landscape formats (FlexStand2 only)
• Displays HDCP (High-bandwidth Digital Protection) protected contents.
Note
• This monitor supports the portrait display. This function allows you to change the orientation of the Setting menu when
using the monitor screen in vertical display position (see “3-6. Setting Orientation” (page 33)).
• When using the monitor screen in a portrait position, the graphics board supporting portrait display is required. When
placing the monitor in a portrait position, the settings of your graphics board need to be changed. Refer to the User’s
Manual of the graphics board for details.

9
Chapter1Introduction
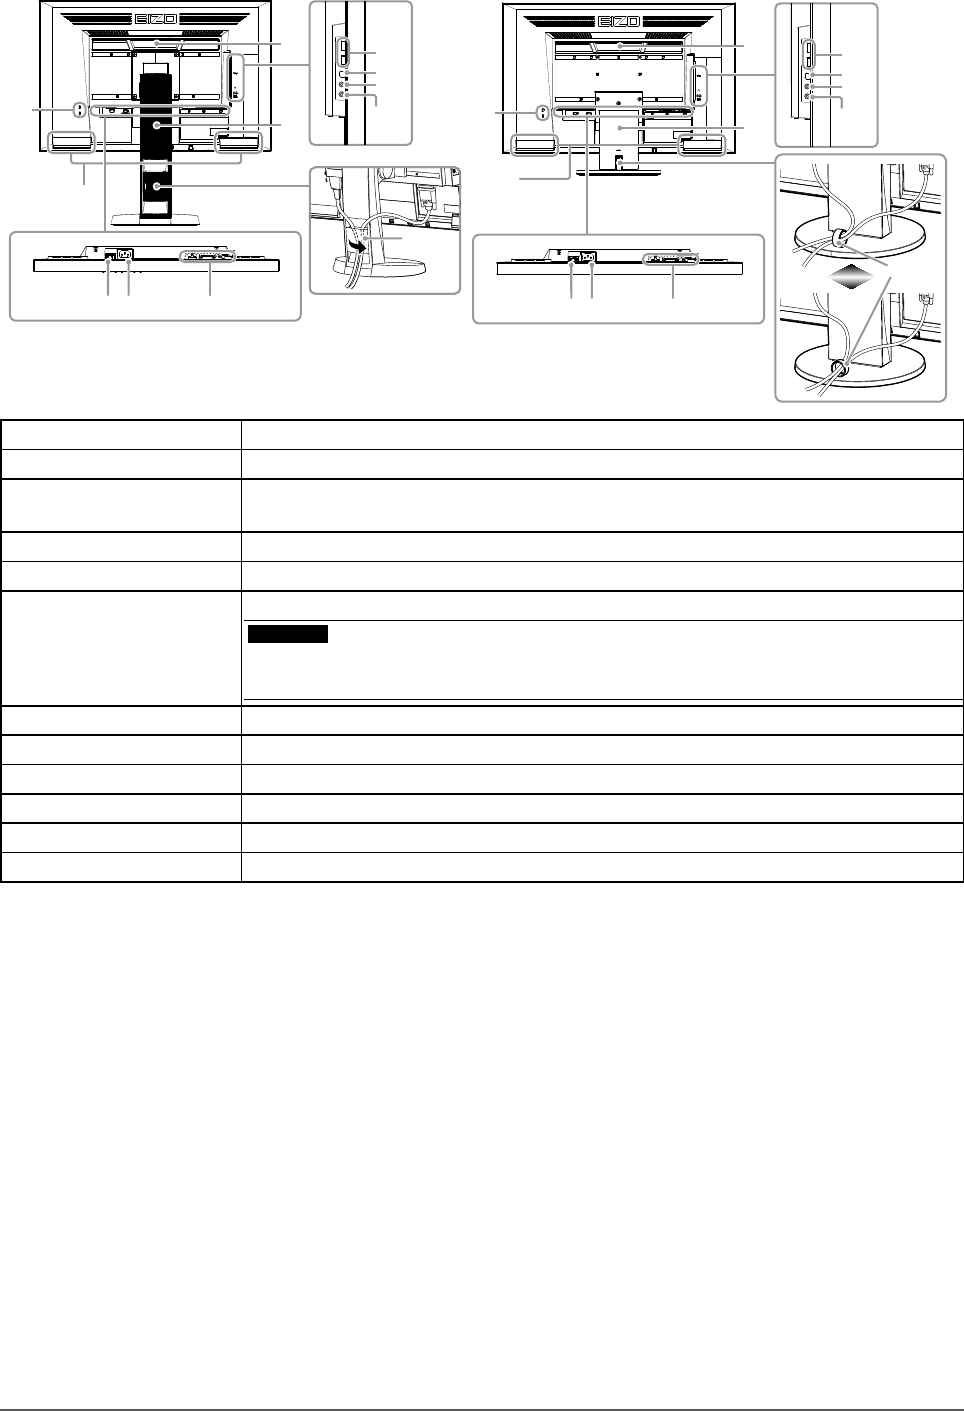
1-2. Controls and Functions
●Front
6 7 8 9521 3 4 6 7 8 9521 3 4 6 7 8 9521 3 4
Settingmenu*1 Settingmenu*1
FlexStand2 TriStand2
1. EcoView Sense sensor Detectsthemovementofapersoninfrontofthemonitor(EcoViewSensefunction(page
38)).
2. Ambient light sensor Detectsambientbrightness(AutoEcoViewfunction(page37)).
3. button Displaysthesettingmenuofthepowersavingfunction(AutoEcoView(page37)and
EcoViewOptimizer2(page38))andEcoViewSense(page38).
4. button Switchesinputsignalsfordisplay(page51).
5. button ChangestheFineContrastmode(page19).
6. button DisplaystheSettingmenu,determinesanitemonthemenuscreen,andsavesvalues
adjusted(page12).
7. , button*2
• Providesthemenuselectionaswellastheadjustmentandsettingofafunction.
• button:Displaysthevolumeadjustmentmenu(page31).
button:DisplaystheBrightnessadjustmentmenu(page20).
8. button Turnsthepoweronoroff.
9. Power indicator
Indicatesthemonitor’soperationstatus.
Blue: Operating
Orange: Powersavingmode
OFF: Mainpower/Poweroff
*1 See “1-4. Basic Operations and Functions” (page 12) for how to use.
*2 In this User’s Manual, the button may be hereafter simply displayed as , and the button as .
10 Chapter1Introduction
●Rear
13 16
15
14
13 16
15
14
21
20
19
18
17
20
19
18
17
1011 12
21
1011 12
FlexStand2
*3
TriStand2
10. Main power switch Turnsthemainpoweronoroff.
11. Power connector Connectsthepowercord.
12. Input signal connector Left:DisplayPortconnector/Center:DVI-Dconnector/Right:D-Submini15-pin
connector
13. Security lock slot ComplieswithKensington’sMicroSaversecuritysystem.
14. Speaker Outputsaudiosource.
15. Handle
Handleusedfortransportation
Attention
• Firmly grasp and hold the monitor by the bottom while grabbing the handle, and carefully
convey the monitor so as not to drop it.
16. Stand*4 Adjuststheheightandangle(tiltandswivel)ofthemonitor.
17. USB port (DOWN) ConnectsaperipheralUSBdevice.
18. USB port (UP) ConnectstheUSBcableforusingtheUSBHubfunction(page52).
19. Headphone jack Connectstheheadphones.
20. Stereo mini jack Connectsthestereominijackcable(commerciallyavailableproduct).
21. Cable holder Coversthemonitorcables.
*3 See “6-3. Attaching / Detaching the TriStand2 Cable Holder” (page 49) for how to attach the cable holder.
*4 An optional arm (or an optional stand) can be attached by removing the stand (see “6-1. Attaching the Optional Arm” (page 46)).
11
Chapter1Introduction
1-3. EIZO LCD Utility Disk
An “EIZO LCD Utility Disk” (CD-ROM) is supplied with this product. The following table shows the disk contents
and the overview of the software programs.
●Disk contents and software overview
The disk includes software programs for adjustment, and User’s Manual. Refer to Readme.txt le on the disk
for software startup procedures or le access procedures.
Item Overview Windows Macintosh
Screenadjustmentpatternles Usedwhenadjustingtheimageofanalog
signalinputmanually. √ √
ScreenManagerProforLCD
(DDC/CI)
Softwareforadjustingthescreenusingthe
mouseandkeyboard. √ -
EIZOScreenSlicer Softwarethatdividesascreenandlaysout
multiplewindowsefciently. √ -
User’sManualofthismonitor(PDFle) √ √
Readme.txtle √ √
●To use “ScreenManager Pro for LCD (DDC/CI) / EIZO ScreenSlicer”
For the installation and use of “ScreenManager Pro for LCD (DDC/CI) / EIZO SceenSlicer”, refer to the
respective User’s Manual on the disk.
12 Chapter1Introduction
1-4. Basic Operations and Functions
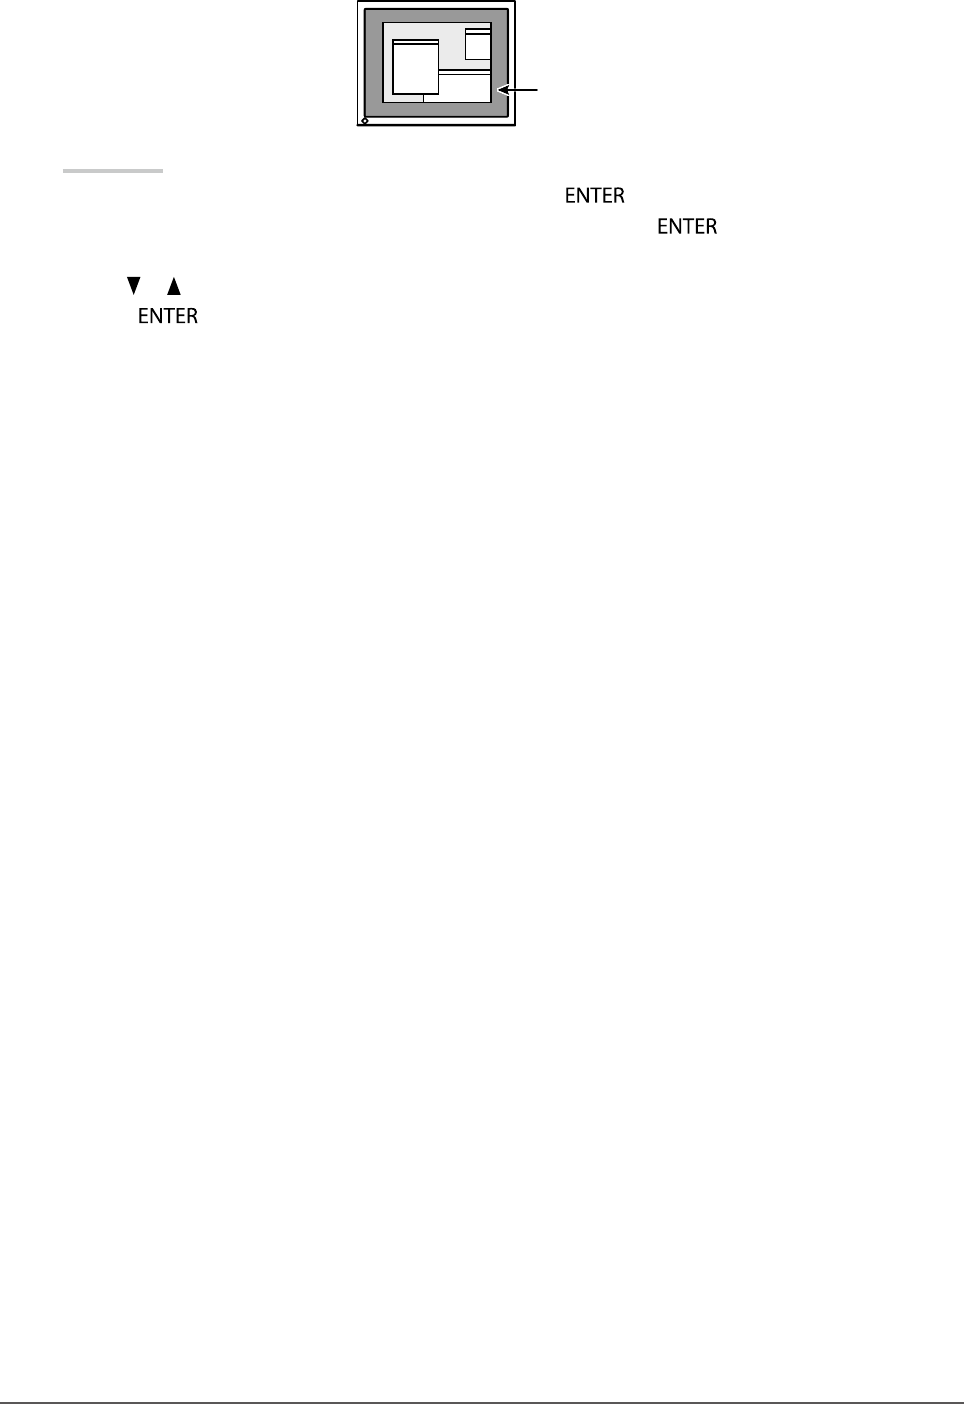
●Basic operation of the Setting menu
1. Displaying the Setting menu
1. Press . The Setting menu appears.
2.
Adjusting / Setting
1. Choose a menu to adjust / set with , , and then press . The Sub menu appears.
2. Choose an item to adjust / set with , , and then press . The adjustment / setting menu appears.
3. Adjust / set the selected item with , , and then press .
3.
Exiting
1. Choose “Return” from the Sub menu and press . The Setting menu appears.
2. Choose “Exit” from the Main menu and press . The Setting menu quits.
Note
• The Setting menu can also be exited by pressing twice quickly.
13
Chapter1Introduction
●Functions
The following table shows the Setting menu and setting items of each menu.
Main menu Setting Reference
Color*1 Brightness “2-3.AdjustingColor”(page19)
Contrast
Temperature
Gamma
AdvancedSettings Saturation
Hue
Overdrive*2
Gain
ColorReset “Toresetthecoloradjustments”(page35)
Screen ScreenSize “ScreenSizeChanging”(page29)
Smoothing “2-4.ScreenAdjustment”(page25)
AnalogAdjustment*3 AutoScreenAdjust
AutoRangeAdjust
Clock
Phase
Hor.Position
Ver.Position
Sound Source “3-2.Selectingsoundsourcewhileusing
theDisplayPortsignalinput”(page31)
PowerSave “AudioOutput”(page37)
PowerManager PowerSave “4-1.SettingPowerSaving”(page36)
EcoTimer “4-6.Enabling/DisablingAutoPower-
OFF”(page40)
MonitorSettings UpView*4 “3-3.Compensatingviewingangle
deciency(EV2316W/EV2416Wonly)”
(page32)
InputSignal “Tosetinputsignalselection”(page52)
PowerIndicator “4-2.SettingPowerIndicator”(page37)
Language “3-9.SettingLanguage”(page34)
DDC/CI “3-4.Enabling/DisablingDDC/CI
communication”(page32)
BorderIntensity “Toadjustbrightnessofnon-displayarea”
(page30)
MenuSettings Orientation “3-6.SettingOrientation”(page33)
Logo “3-7.ShowingandhidingtheEIZOlogo”
(page33)
MenuPosition “3-8.ChangingSettingMenuDisplay
Position”(page34)
Reset “Toresetalladjustmentstothedefault
settings”(page35)
Information “6-6.DisplayingMonitorInformation”
(page53)
*1 The adjustment / settings available on the “Color” menu depend on the selected Color mode. The above table shows
the sub menus when the User1 or User2 mode is selected.
*2 EV2336W / EV2436W only
*3 These functions can be adjusted with analog input.
*4 EV2316W / EV2416W only

14 Chapter2AdjustingScreens
Chapter 2 Adjusting Screens
2-1. Compatible Resolutions
The monitor supports the following resolutions.
●EV2316W
Analog Input (D-Sub)
Resolution Applicable Signals Vertical Scan
Frequency Dot Clock
640×480 VGA 60Hz
148.5MHz
(Max.)
800×600 VESA 60Hz
1024×768 VESA 60Hz
1280×720 CEA-861 60Hz
1280×960 VESA 60Hz
1280×1024 VESA 60Hz
1680×1050 VESACVT,VESACVTRB 60Hz
1920×1080*1 CEA-861 60Hz
Digital Input (DVI-D)
Resolution Applicable Signals Vertical Scan
Frequency Dot Clock
640×480 VGA 60Hz
148.5MHz
(Max.)
800×600 VESA 60Hz
1024×768 VESA 60Hz
1280×720 CEA-861 60Hz
1280×960 VESA 60Hz
1280×1024 VESA 60Hz
1680×1050 VESACVT,VESACVTRB 60Hz
1920×1080*1 CEA-861 60Hz
Digital Input (DisplayPort)
Resolution Applicable Signals Vertical Scan
Frequency Dot Clock
640×480 VGA,CEA-861 60Hz
148.5MHz
(Max.)
720×480(4:3) CEA-861 60Hz
720×480(16:9) CEA-861 60Hz
800×600 VESA 60Hz
1024×768 VESA 60Hz
1280×720 CEA-861 60Hz
1280×960 VESA 60Hz
1280×1024 VESA 60Hz
1680×1050 VESACVT,VESACVTRB 60Hz
1920×1080*1 CEA-861 60Hz
ThegraphicsboardshouldcomplywiththeVESAstandardandCEA-861standard.
*1 Recommended resolution
15
Chapter2AdjustingScreens
●EV2336W
Analog Input (D-Sub)
Resolution Applicable Signals Vertical Scan
Frequency Dot Clock
640×480 VGA,VESA ~75Hz
148.5MHz
(Max.)
720×400 VGATEXT 70Hz
800×600 VESA ~75Hz
1024×768 VESA ~75Hz
1280×720 CEA-861 60Hz
1280×960 VESA 60Hz
1280×1024 VESA ~75Hz
1680×1050 VESACVT,VESACVTRB 60Hz
1920×1080*1 CEA-861 60Hz
Digital Input (DVI-D)
Resolution Applicable Signals Vertical Scan
Frequency Dot Clock
640×480 VGA 60Hz
148.5MHz
(Max.)
720×400 VGATEXT 70Hz
800×600 VESA 60Hz
1024×768 VESA 60Hz
1280×720 CEA-861 60Hz
1280×960 VESA 60Hz
1280×1024 VESA 60Hz
1680×1050 VESACVT,VESACVTRB 60Hz
1920×1080*1 CEA-861 60Hz
Digital Input (DisplayPort)
Resolution Applicable Signals Vertical Scan
Frequency Dot Clock
640×480 VGA,CEA-861 60Hz
148.5MHz
(Max.)
720×400 VGATEXT 70Hz
720×480(4:3) CEA-861 60Hz
720×480(16:9) CEA-861 60Hz
800×600 VESA 60Hz
1024×768 VESA 60Hz
1280×720 CEA-861 60Hz
1280×960 VESA 60Hz
1280×1024 VESA 60Hz
1680×1050 VESACVT,VESACVTRB 60Hz
1920×1080*1 CEA-861 60Hz
ThegraphicsboardshouldcomplywiththeVESAstandardandCEA-861standard.
*1 Recommended resolution

16 Chapter2AdjustingScreens
●EV2416W
Analog Input (D-Sub)
Resolution Applicable Signals Vertical Scan
Frequency Dot Clock
640×480 VGA 60Hz
193.3MHz
(Max.)
800×600 VESA 60Hz
1024×768 VESA 60Hz
1280×720*1 CEA-861 60Hz
1280×960 VESA 60Hz
1280×1024 VESA 60Hz
1600×1200 VESA 60Hz
1680×1050 VESACVT,VESACVTRB 60Hz
1920×1200*2 VESACVT,VESACVTRB 60Hz
Digital Input (DVI-D)
Resolution Applicable Signals Vertical Scan
Frequency Dot Clock
640×480 VGA 60Hz
162MHz
(Max.)
800×600 VESA 60Hz
1024×768 VESA 60Hz
1280×720*1 CEA-861 60Hz
1280×960 VESA 60Hz
1280×1024 VESA 60Hz
1600×1200 VESA 60Hz
1680×1050 VESACVT,VESACVTRB 60Hz
1920×1200*2 VESACVTRB 60Hz
Digital Input (DisplayPort)
Resolution Applicable Signals Vertical Scan
Frequency Dot Clock
640×480 VGA,CEA-861 60Hz
162MHz
(Max.)
720×480(4:3) CEA-861 60Hz
720×480(16:9) CEA-861 60Hz
800×600 VESA 60Hz
1024×768 VESA 60Hz
1280×720*1 CEA-861 60Hz
1280×960 VESA 60Hz
1280×1024 VESA 60Hz
1600×1200 VESA 60Hz
1680×1050 VESACVT,VESACVTRB 60Hz
1920×1200*2 VESACVTRB 60Hz
ThegraphicsboardshouldcomplywiththeVESAstandardandCEA-861standard.
*1 For this resolution, the “Screen Size” setting is “Full Screen” (see “2-5. Screen Size Changing” (page 29)).
*2 Recommended resolution
17
Chapter2AdjustingScreens
●EV2436W
Analog Input (D-Sub)
Resolution Applicable Signals Vertical Scan
Frequency Dot Clock
640×480 VGA,VESA ~75Hz
193.3MHz
(Max.)
720×400 VGATEXT 70Hz
800×600 VESA ~75Hz
1024×768 VESA ~75Hz
1280×720 CEA-861 60Hz
1280×960 VESA 60Hz
1280×1024 VESA ~75Hz
1600×1200 VESA 60Hz
1680×1050 VESACVT,VESACVTRB 60Hz
1920×1200*1 VESACVT,VESACVTRB 60Hz
Digital Input (DVI-D)
Resolution Applicable Signals Vertical Scan
Frequency Dot Clock
640×480 VGA 60Hz
162MHz
(Max.)
720×400 VGATEXT 70Hz
800×600 VESA 60Hz
1024×768 VESA 60Hz
1280×720 CEA-861 60Hz
1280×960 VESA 60Hz
1280×1024 VESA 60Hz
1600×1200 VESA 60Hz
1680×1050 VESACVT,VESACVTRB 60Hz
1920×1200*1 VESACVTRB 60Hz
Digital Input (DisplayPort)
Resolution Applicable Signals Vertical Scan
Frequency Dot Clock
640×480 VGA,CEA-861 60Hz
162MHz
(Max.)
720×400 VGATEXT 70Hz
720×480(4:3) CEA-861 60Hz
720×480(16:9) CEA-861 60Hz
800×600 VESA 60Hz
1024×768 VESA 60Hz
1280×720 CEA-861 60Hz
1280×960 VESA 60Hz
1280×1024 VESA 60Hz
1600×1200 VESA 60Hz
1680×1050 VESACVT,VESACVTRB 60Hz
1920×1200*1 VESACVTRB 60Hz
ThegraphicsboardshouldcomplywiththeVESAstandardandCEA-861standard.
*1 Recommended resolution

18 Chapter2AdjustingScreens
2-2. Setting the Resolution
When you connect the monitor to the PC and nd that the resolution is improper, or when you want to change the
resolution, follow the procedure below.
●Windows 8 / Windows 7
1. For Windows 8, click the “Desktop” tile on the Start Screen to display the desktop.
2. Right-click the mouse anywhere on the desktop except for icons.
3. From the displayed menu, click “Screen resolution”.
4. On the “Screen Resolution” dialog box, select the monitor.
5. Click “Resolution” to select the desired resolution.
6. Click the “OK” button.
7. When a conrmation dialog box is displayed, click “Keep changes”.
●Windows Vista
1. Right-click the mouse anywhere on the desktop except for icons.
2. From the displayed menu, click “Personalize”.
3. On the “Personalization” window, click “Display Settings”.
4. On the “Display Settings” dialog box, select the “Monitor” tab and select desired resolution in the
“Resolution” eld.
5. Click the “OK” button.
6. When a conrmation dialog box is displayed, click “Yes”.
●Windows XP
1. Right-click the mouse anywhere on the desktop except for icons.
2. From the displayed menu, click “Properties”.
3. When the “Display Properties” dialog box is displayed, click the “Settings” tab and select desired resolution
for “Screen resolution” under “Display”.
4. Click the “OK” button to close the dialog box.
●Mac OS X
1. Select “System Preferences” from the Apple menu.
2. When the “System Preferences” dialog box is displayed, click “Displays” for “Hardware”.
3. On the displayed dialog box, select the “Display” tab and select desired resolution in the “Resolutions” eld.
4. Your selection will be reected immediately. When you are satised with the selected resolution, close the
window.
19
Chapter2AdjustingScreens
2-3. Adjusting Color
●To select the display mode (FineContrast Mode)
This function allows easy selection of a desired mode according to monitor application.
Display Modes
Mode Purpose
User1 Selectthistodeneadesiredsetofparametersettings.
User2
sRGB SuitableforcolormatchingwithsRGBcompatibleperipherals.
Paper Producesaprintedpapereffect.Suitablefordisplayingimagesfrommediasuchasbooks
anddocuments.
Movie Suitableforplayingbackanimatedimages.
Themodemenu
appears.
Procedure
1. Press .
The mode menu appears at the bottom left of the screen.
2. The mode among the list is highlighted in turn each time is pressed.
You can switch the mode with or while the mode menu is displayed.
→User1←→User2←→sRGB←→Paper←→Movie←
Note
• The Setting menu and the Mode menu cannot be displayed at the same time.
• “ScreenManager Pro for LCD (DDC/CI)” allows you to select the FineContrast mode automatically according to the
application used (see “Chapter 3 Auto FineContrast” in the “ScreenManager Pro for LCD (DDC/CI)” User’s Manual).

20 Chapter2AdjustingScreens
●To perform advanced adjustments
The “Color” menu of the Setting menu allows you to set and save the independent color adjustment for each
mode.
Attention
• It takes about 30 minutes for the performance of electrical parts to stabilize. Please wait 30 minutes or more after the
monitor power has been turned on, and then adjust the monitor.
• Perform the range adjustment rst when adjusting color for analog signals (see “To adjust color gradation automatically”
(page 28)).
• The same image may be seen in different colors on multiple monitors due to their monitor-specic characteristics. Make
ne color adjustment visually when matching colors on multiple monitors.
Note
• Using the “ScreenManager Pro for LCD (DDC/CI)” allows you to perform the color adjustment by using the mouse and
keyboard of your PC. (Refer to “Chapter 4 Color Adjustment” in the User’s Manual for “ScreenManager Pro for LCD
(DDC/CI)”.)
●Adjustable settings in each mode
The adjustable settings depend on the mode. (Non-adjustable or non-settable function cannot be selected.)
√: Adjustable -: Not adjustable
Function FineContrast Mode
User1 User2 sRGB Paper Movie
Brightness √ √ √ √ √
Contrast √ √ - - √
Temperature √ √ - √ √
Gamma √ √ - - -
AdvancedSettings Saturation √ √ - - √
Hue √ √ - - √
Overdrive*1 √ √ - - -
Gain √ √ - - -
ColorReset √ √ √ √ √
*1 EV2336W / EV2436W only
●To adjust brightness
The screen brightness is adjusted by changing the brightness of the backlight (light source from the LCD back
panel).
Adjustable range
0 to 100
Procedure
1. Press .
2. Use or for adjustment.
3. Press to exit.
Note
• If you feel that the image is too dark even if the brightness is set to 100, adjust the contrast.
• Alternatively, you can use “Brightness” under “Color” in the Adjustment menu to adjust it.
• To adjust the screen brightness automatically and comfortably, see “4-3. Enabling / Disabling Automatic Brightness
Adjustment” (page 37).
21
Chapter2AdjustingScreens
●To adjust contrast
The brightness of the screen is adjusted by varying the video signal level.
Adjustable range
0 to 100
Procedure
1. Choose “Color” in the Setting menu, and press .
2. Choose “Contrast” in the “Color” menu, and press .
The “Contrast” menu appears.
3. Use or for adjustment.
4. Press to exit.
Note
• In the contrast of 50, every color gradation is displayed.
• When adjusting the monitor, it is recommended to perform the brightness adjustment which may not lose the gradation
characteristics, prior to the contrast adjustment.
• Perform the contrast adjustment in the following cases.
- When you feel the image is too dark even if the brightness is set to 100 (Set the contrast to higher than 50.)
●To adjust color temperature
Color temperature can be adjusted.
The color temperature is normally used to express the hue of “White” and / or “Black” by a numerical value.
The value is expressed in degrees “K” (Kelvin).
The screen becomes reddish at a low color temperature, and bluish at a high color temperature, like the ame
temperature. A gain preset value is set for each color temperature setting value.
Adjustable range
Off, 4000 K-10000 K (specied by every 500 K unit, including 9300 K)
Procedure
1. Choose “Color” in the Setting menu, and press .
2. Choose “Temperature” in the “Color” menu, and press .
The “Temperature” menu appears.
3. Use or for adjustment.
4. Press to exit.
Note
• The value shown in “K” is available only as reference.
• “Gain” allows you to perform more advanced adjustment (see “To adjust gain” (page 24)).
• If you set to “Off”, the image is displayed in the preset color of the monitor (Gain: 100 for each RGB).
• When gain is changed, the color temperature is changed to “Off”.
22 Chapter2AdjustingScreens
●To adjust gamma
Gamma can be adjusted. The brightness of the monitor varies depending on the input signal, however, the
variation rate is not proportional to the input signal. To keep the balance between the input signal and the
brightness of the monitor is called as “Gamma correction”.
Adjustable range
1.8, 2.0, 2.2
Procedure
1. Choose “Color” in the Setting menu, and press .
2. Choose “Gamma” in the “Color” menu, and press .
The “Gamma” menu appears.
3. Use or for adjustment.
4. Press to exit.
Note
• If “Paper” is selected in the FineContrast mode, the gamma value is displayed for “Paper”. The setting “Paper” is
specially meant to get the displayed image look like it is printed on paper.
●To adjust the color saturation
This function allows you to adjust color saturation.
Adjustable range
-50 to 50
Procedure
1. Choose “Color” in the Setting menu, and press .
2. Choose “Advanced Settings” in the “Color” menu, and press .
3. Choose “Saturation” in the “Advanced Settings” menu, and press .
The “Saturation” menu appears.
4. Use or for adjustment.
5. Press to exit.
Attention
• Using this function may make some color gradations unavailable for display.
Note
• The minimum value (-50) changes the screen to monochrome.

23
Chapter2AdjustingScreens
●To adjust hue
This function allows you to adjust hue.
Adjustable range
-50 to 50
Procedure
1. Choose “Color” in the Setting menu, and press .
2. Choose “Advanced Settings” in the “Color” menu, and press .
3. Choose “Hue” in the “Advanced Settings” menu, and press .
The “Hue” menu appears.
4. Use or for adjustment.
5. Press to exit.
Attention
• Using this function may make some color gradations unavailable for display.
●To set overdrive intensity (EV2336W / EV2436W only)
This function allows you to set overdrive intensity based on the use of the monitor. You can reduce Image lags
by setting it to “Enhanced” when displaying animated images.
Adjustable range
Enhanced, Standard, Off
Procedure
1. Choose “Color” in the Setting menu, and press .
2. Choose “Advanced Settings” in the “Color” menu, and press .
3. Choose “Overdrive” in the “Advanced Settings” menu, and press .
The “Overdrive” menu appears.
4. Use or for adjustment.
5. Press to exit.
Attention
• The overdrive function is disabled in the following cases:
- The vertical scan frequency of input signals is more than 60 Hz
- Select “Normal” during “Screen Size” (excluding the case that display resolution is 1920 × 1080 (EV2336W) or 1920
× 1200 (EV2436W)).
24 Chapter2AdjustingScreens
●To adjust gain
The brightness of each color component red, green, and blue is called “Gain”. You can change the hue of
“white” by adjusting gain.
Adjustable range
0 to 100
Procedure
1. Choose “Color” in the Setting menu, and press .
2. Choose “Advanced Settings” in the “Color” menu, and press .
3. Choose “Gain” in the “Advanced Settings” menu, and press .
The “Gain” menu appears.
4. Adjust gain with or for each of red, green, and blue.
5. Press to exit.
Attention
• Using this function may make some color gradations unavailable for display.
Note
• The value of gain changes with that of color temperature.
• When gain is changed, the color temperature is changed to “Off”.
25
Chapter2AdjustingScreens
2-4. Screen Adjustment
●Digital Signal Input
When digital signals are input, images are displayed correctly based on the preset data of the monitor, but if
characters and / or lines appear blurred, go to “To modify blurred characters / lines” (page 28).
When performing more advanced adjustment, see “2-3. Adjusting Color” (page 19) and subsequent pages.
●Analog Signal Input
Attention
• It takes about 30 minutes for the performance of electrical parts to stabilize. Please wait 30 minutes or more after the
monitor power has been turned on, and then adjust the monitor.
• The Self Adjust (automatic screen adjustment) function does not work for the images under the resolution of 800 × 600
(SVGA).
• The self adjustment (or automatic screen adjustment) function works correctly when an image is fully displayed over the
Windows or Macintosh display area. They do not work properly in the cases below:
- When an image is displayed only on a part of the screen (command prompt window, for example)
- When a black background (wallpaper, etc.) is in use
Also, these functions cannot work properly in some graphic boards.
The monitor screen adjustment is used to suppress ickering of the screen or adjust screen position and screen
size correctly according to the PC to be used.
Note
• The Self Adjust function works when all of the following conditions are satised:
- When a signal is input into the monitor for the rst time or when a resolution or vertical / horizontal scan frequency
not used before is set
If the screen is not displayed correctly even after performing the Self Adjust operation, adjust the screen
according to the procedures on the following pages to use the monitor comfortably.
Setting Procedures
1. Perform the auto adjustment.
● To adjust ickering, screen position, and screen size automatically
Procedure
1. Choose “Screen” in the Setting menu, and press .
2. Choose “Analog Adjustment” in the “Screen” menu, and press .
3. Choose “Auto Screen Adjust” in the “Analog Adjustment” menu, and press .
4. Select “Yes” with or , and press .
Flickering, screen position, and screen size are corrected by the auto-adjustment function.
Ifthescreenisnotdisplayedcorrectlyevenafterperformingtheautoadjustment,performadjustments
accordingtothefollowingprocedure.Ifthescreenisdisplayedcorrectly,goto“5.Adjustingcolorgradation.”
(page28).

26 Chapter2AdjustingScreens
2.
Prepare to use analog screen adjustment patterns.
Load the “EIZO LCD Utility Disk” to your PC, and then open the “Screen adjustment pattern les”.
Note
• For details and instructions on opening the “Screen adjustment pattern les”, refer to the Readme.txt le.
3.
Perform the auto adjustment again with the analog screen adjustment pattern
displayed.
● To adjust ickering, screen position, and screen size automatically
Procedure
1. Display Pattern 1 in full screen on the monitor using the “Screen adjustment pattern les”.
2. Choose “Screen” in the Setting menu, and press .
3. Choose “Analog Adjustment” in the “Screen” menu, and press .
4. Choose “Auto Screen Adjust” in the “Analog Adjustment” menu, and press .
5. Select “Yes” with or , and press .
Flickering, screen position, and screen size are corrected by the auto-adjustment function.
Ifthescreenisnotdisplayedcorrectlyevenafterperformingtheautoadjustment,performadjustments
accordingtothefollowingprocedure.Ifthescreenisdisplayedcorrectly,goto“5.Adjustingcolorgradation.”
(page28).
4.
Choose “Screen” from the Setting menu to perform advanced adjustments.
Adjust the clock, phase and position, in this order.
● To eliminate vertical bars
Procedure
1. Choose “Analog Adjustment” in the “Screen” menu, and press .
2. Choose “Clock” in the “Analog Adjustment” menu, and press .
The “Clock” menu appears.
3. Adjust the clock with or to eliminate vertical bars.
Press or slowly so as not to miss the adjustment point.
4. Press to exit.
When blurring, ickering or bars appear on the screen after adjustment, proceed to “To remove ickering or blurring ”.

27
Chapter2AdjustingScreens
● To remove ickering or blurring
Procedure
1. Choose “Analog Adjustment” in the “Screen” menu, and press .
2. Choose “Phase” in the “Analog Adjustment” menu, and press .
The “Phase” menu appears.
3. Adjust the phase with or to minimize ickering or blurring.
4. Press to exit.
When vertical bars appear on the screen after adjustment, go back to “To eliminate vertical bars ”.
(Clock → Phase → Position)
Attention
• Flickering or blurring may not be eliminated depending on your PC or graphics board.
● To correct the screen position
Note
• Since the number of pixels and the pixel positions are xed on the LCD monitor, only one position is provided to display
images correctly. The position adjustment is made to shift an image to the correct position.
Procedure
1. Choose “Analog Adjustment” in the “Screen” menu, and press .
2. Choose “Hor.Position” or “Ver.Position” from the “Analog Adjustment” menu, and press .
The “Hor. Position” or “Ver. Position” menu appears.
3. Adjust the position with or .
4. Press to exit.
5. Close Pattern 1.
28 Chapter2AdjustingScreens
5.
Adjusting color gradation.
● To adjust color gradation automatically
Every color gradation (0 to 255) can be displayed by adjusting the signal output level.
Procedure
1. Display Pattern 2 in full screen on the monitor using the “Screen adjustment pattern les”.
2. Choose “Screen” in the Setting menu, and press .
3. Choose “Analog Adjustment” in the “Screen” menu, and press .
4. Choose “Auto Range Adjust” in the “Analog Adjustment” menu, and press .
5. Select “Yes” with or , and press .
The output range is set automatically.
6. Close Pattern 2.
6.
Modify blurred characters or lines.
● To modify blurred characters / lines
When an image is displayed with a resolution other than recommended, the characters or lines of the
displayed image may blur.
Attention
• Smoothing setting may not be required depending on the display resolution. (You cannot choose the smoothing icon.)
Adjustable range
1 to 5
Procedure
1. Choose “Screen” in the Setting menu, and press .
2. Choose “Smoothing” in the “Screen” menu, and press .
The “Smoothing” menu appears.
3. Use or for adjustment.
4. Press to exit.
29
Chapter2AdjustingScreens
2-5. Screen Size Changing
●Screen Size Changing
The image with the resolution other than the recommended resolution is displayed in full screen automatically.
You can change the screen size by using the “Screen Size” function.
Setting Function
FullScreen Displaysanimageinfullscreen.Imagesaredistortedinsomecasesbecausethevertical
rateisnotequaltothehorizontalrate.
Enlarged Displaysanimageinfullscreen.Insomecases,ablankhorizontalorverticalborder
appearstoequalizetheverticalrateandthehorizontalrate.
Normal*1 Displaysimageswiththespeciedresolution.
*1 EV2336W / EV2436W only
Example: Image size 1024 × 768
FullScreen Enlarged Normal
EV2316W: (1920×1080) (1440×1080) (-)
EV2336W: (1920×1080) (1440×1080) (1024×768)
EV2416W: (1920×1200) (1600×1200) (-)
EV2436W: (1920×1200) (1600×1200) (1024×768)
Procedure
1. Choose “Screen” in the Setting menu, and press .
2. Choose “Screen Size” in the “Screen” menu, and press .
The “Screen Size” menu appears.
3. Select “Full Screen”, “Enlarged”, or “Normal” with or .
4. Press to exit.
Attention
• Selecting “Normal” may make some color gradations unavailable for display.
• When a 1280 × 720 resolution image is displayed on the EV2416W, the screen size is “Full Screen”.
30 Chapter2AdjustingScreens
●To adjust brightness of non-display area
A border (black area with no image) around the image appears in the “Normal” or “Enlarged” mode.
Border
Procedure
1. Choose “Monitor Settings” in the Setting menu, and press .
2. Choose “Border Intensity” in the “Monitor Settings” menu, and press .
The “Border Intensity” menu appears.
3. Use or for adjustment.
4. Press to exit.
31
Chapter3SettingMonitor
Chapter 3 Setting Monitor
3-1. Adjusting Volume
This function allows you to adjust the volume.
Adjustable range
0 to 30
Procedure
1. Press .
2. Use or for adjustment.
3. Press to exit.
Note
• The volume for the speakers and the headphone can be set individually.
3-2. Selecting sound source while using the DisplayPort
signal input
This function allows you to switch sound source during DisplayPort signal input. You can select the Stereo Mini
Jack or DisplayPort.
Procedure
1. Choose “Sound” in the Setting menu, and press .
2. Choose “Source” in the “Sound” menu, and press .
The “Source” menu appears.
3. Select “Stereo Mini Jack” or “DisplayPort” with or .
4. Press to exit.
Note
• This function is available with DisplayPort signal input.

32 Chapter3SettingMonitor
3-3. Compensating viewing angle deciency (EV2316W
/ EV2416W only)
When the screen is to be viewed from below, the viewing angle can be compensated for so the screen looks as if it
is being seen from directly ahead.
-40˚
-20˚
Off
Adjustable range
-40˚, -20˚, Off
Procedure
1. Choose “Monitor Settings” in the Setting menu, and press .
2. Choose “Up View” in the “Monitor Settings” menu, and press .
The “Up View” menu appears.
3. Select “-40˚”, “-20˚”, or “Off” with or .
4. Press to exit.
Attention
• The setting is turned “Off” in the following cases:
- “Orientation” of the Setting menu is set to “Portrait”.
- “sRGB” is selected from the FineContrast mode.
• Depending on the viewing angle, switching the setting may make the screen less visible.
3-4. Enabling / Disabling DDC/CI communication
This function allows you to enable / disable the DDC/CI communication (see “6-9. Glossary” (page 65)).
Procedure
1. Choose “Monitor Settings” in the Setting menu, and press .
2. Choose “DDC/CI” in the “Monitor Settings” menu, and press .
The “DDC/CI” menu appears.
3. Select “On” or “Off” with or .
4. Press to exit.
Note
• The DisplayPort input of this monitor does not support DDC/CI communication.
33
Chapter3SettingMonitor
3-5. Locking Operation Buttons
This function allows you to lock the settings to prevent them being changed.
Procedure
1. Press to turn off the monitor.
2. Hold down while pressing to turn on the monitor.
The Lock / Unlock setting is toggled by performing the operation in step 2.
Note
• The following operations are available even if the buttons are locked:
- Turning on or off the monitor with the Power button
3-6. Setting Orientation
This function allows you to change the orientation of the Setting menu when using the monitor screen in vertical
display position.
Procedure
1. Choose “Monitor Settings” in the Setting menu, and press .
2. Choose “Menu Settings” in the “Monitor Settings” menu, and press .
3. Choose “Orientation” in the “Menu Settings” menu, and press .
The “Orientation” menu appears.
4. Select “Landscape” or “Portrait” with or .
5. Press to exit.
6. When selecting “Portrait”, turn the monitor screen 90˚ in clockwise direction.
Attention
• Be sure that the cables are correctly connected.
• Be sure to turn the monitor screen after pulling up the screen to the uppermost position of the stand and setting the
screen tilted upward.
Note
• For using the monitor with “Portrait” position, the graphics board supporting portrait display is required. When placing
the monitor in a “Portrait” position, settings of your graphics board need to be changed. Refer to the User’s Manual of
the graphics board for details.
3-7. Showing and hiding the EIZO logo
When the monitor is turned on, the EIZO logo appears on the screen. You can choose to show or hide the display of
the EIZO logo.
Procedure
1. Choose “Monitor Settings” in the Setting menu, and press .
2. Choose “Menu Settings” in the “Monitor Settings” menu, and press .
3. Choose “Logo” in the “Menu Settings” menu, and press .
The “Logo” menu appears.
4. Select “On” or “Off” with or .
5. Press to exit.

34 Chapter3SettingMonitor
3-8. Changing Setting Menu Display Position
You can change the display position of the Setting menu.
Procedure
1. Choose “Monitor Settings” in the Setting menu, and press .
2. Choose “Menu Settings” in the “Monitor Settings” menu, and press .
3. Choose “Menu Position” in the “Menu Settings” menu, and press .
The “Menu Position” menu appears.
4. Choose the position with or .
5. Press to exit.
3-9. Setting Language
This function allows you to select a language for the Setting menu or messages.
Selectable languages
English, German, French, Spanish, Italian, Swedish, Japanese, Simplied Chinese, Traditional Chinese
Procedure
1. Choose “Monitor Settings” in the Setting menu, and press .
2. Choose “Language” in the “Monitor Settings” menu, and press .
The “Language” menu appears.
3. Choose a language with or .
4. Press to exit.
35
Chapter3SettingMonitor
3-10. Resetting the Monitor to the Default Settings
The setting values are reset to the default settings.
Attention
• After resetting, you cannot undo the operation.
Note
• Regarding the default setting, see “Main Default Settings” (page 60).
●To reset the color adjustments
This function only resets the color adjustments for the currently selected mode to the default settings.
Procedure
1. Choose “Color” in the Setting menu, and press .
2. Choose “Color Reset” in the “Color” menu, and press .
3. Select “Yes” with or .
4. Press .
The color adjustments revert to the default settings.
●To reset “EcoView Sense Settings”
This function resets adjustments for “EcoView Sense Settings” to the default settings.
Procedure
1. Press .
2. Choose “EcoView Sense Settings” in the “EcoView Menu”, and press .
3. Choose “Reset” in the “EcoView Sense Settings”, and press .
4. Select “Yes” with or .
5. Press .
The “EcoView Sense Settings” adjustments revert to the default settings.
Note
• “EcoView Sense Settings” can be changed and reset only when “EcoView Sense” is set to “On” (see “4-4. Setting the
power saving mode when a person leaves the monitor” (page 38)).
●To reset all adjustments to the default settings
This function resets all adjustments to the default settings.
Procedure
1. Choose “Monitor Settings” in the Setting menu, and press .
2. Choose “Reset” in the “Monitor Settings” menu, and press .
3. Select “Yes” with or .
4. Press .
All adjustments revert to the default settings.

36 Chapter4PowerSavingFunctions
Chapter 4 Power Saving Functions
4-1. Setting Power Saving
●Monitor
This function allows you to set the monitor into the power saving mode according to the PC status. When the
monitor has shifted to the power saving mode, the images on the screen are not displayed.
Attention
• Turning off the main power switch or unplugging the power cord completely shuts off power supply to the monitor.
• When the monitor is in power saving mode, devices connected to the USB downstream port will still work. Therefore,
power consumption of the monitor varies with connected devices even in the power saving mode.
• Power consumption varies even when the stereo mini jack cable is connected.
Note
• The monitor changes to the power saving mode about 15 seconds after the signal input ceases to be detected.
Procedure
1. Choose “PowerManager” in the Setting menu, and press .
2. Choose “Power Save” in the “PowerManager” menu, and press .
The “Power Save” menu appears.
3. Select “On” or “Off” with or .
4. Press to exit.
Power Saving System
Analog Signal Input
This monitor complies with the VESA DPM standard.
PC Monitor Power Indicator
On Operating Blue
Powersaving
mode
STAND-BY
SUSPENDED
OFF
Powersavingmode Orange
PowerOff Powersavingmode Orange
Digital Signal Input
• DVI
This monitor complies with the DVI DMPM standard.
• DisplayPort
This monitor complies with the DisplayPort Standard V1.1a.
PC Monitor Power Indicator
On Operating Blue
Powersavingmode Powersavingmode Orange
PowerOff Powersavingmode Orange
Exiting the power saving mode
If the monitor receives input, it automatically exits the power saving mode and returns to the normal display
mode.
37
Chapter4PowerSavingFunctions
●Audio Output
This monitor allows you to turn off the audio output from the speakers / headphone at the power saving mode.
Procedure
1. Choose “Sound” in the Setting menu, and press .
2. Choose “Power Save” in the “Sound” menu, and press .
The “Power Save” menu appears.
3. Select “Sound On” or “Sound Off” with or .
4. Press to exit.
4-2. Setting Power Indicator
This function allows you to set the power indicator (blue) ON / OFF in the monitor ON condition.
Procedure
1. Choose “Monitor Settings” in the Setting menu, and press .
2. Choose “Power Indicator” in the “Monitor Settings” menu, and press .
The “Power Indicator” menu appears.
3. Select “On” or “Off” with or .
4. Press to exit.
4-3. Enabling / Disabling Automatic Brightness
Adjustment
●Auto EcoView
The ambient light sensor on the front side of the monitor detects the environmental brightness to adjust the
screen brightness automatically and comfortably by using the Auto EcoView function.
Attention
• Be careful not to block the ambient light sensor on the lower side of the monitor when using the Auto EcoView function.
Procedure
1. Press .
2. Choose “Auto EcoView” in the “EcoView Menu” menu, and press .
The “Auto EcoView” menu appears.
3. Select “High”, “Standard”, or “Off” with or .
4. Press to exit.
Note
• As “Brightness” in the Setting menu is changed, the auto adjustment range for Auto EcoView is also changed.
• Set to “High” if you feel a little brighter with “Standard” setting status.
38 Chapter4PowerSavingFunctions
●EcoView Optimizer 2
Using the EcoView Optimizer 2 function automatically adjusts the screen brightness according to the white
level of the input signal. This function can reduce the power consumption while maintaining the brightness
specied by the input signal.
Procedure
1. Press .
2. Choose “EcoView Optimizer 2” in the “EcoView Menu” menu, and press .
The “EcoView Optimizer 2” menu appears.
3. Select “On” or “Off” with or .
4. Press to exit.
Note
• When “Movie” is selected from the FineContrast mode, the setting is turned “Off”.
• When the EcoView Optimizer 2 function is “On”, the appearance of pale color may change. If that bothers you, set this
function to “Off”.
4-4. Setting the power saving mode when a person
leaves the monitor
The sensor on the front side of the monitor detects the movement of a person by using the EcoView Sense function.
When a person moves away from the monitor, it shifts to the power saving mode automatically and does not display
the images on the screen to reduce the power consumption. When a person comes near the monitor again, it
recovers from the power saving mode and displays the images. The sensitivity and time until the power saving
mode is activated can be set according to the monitor usage environment and movement of the user.
Note
• At the time of shifting to power saving mode, the message that indicates shifting is displayed.
Procedure
1. Press .
2. Choose “EcoView Sense” in the “EcoView Menu”, and press .
The “EcoView Sense” menu appears.
3. Select “On” or “Off” with or .
4. Press to exit.
39
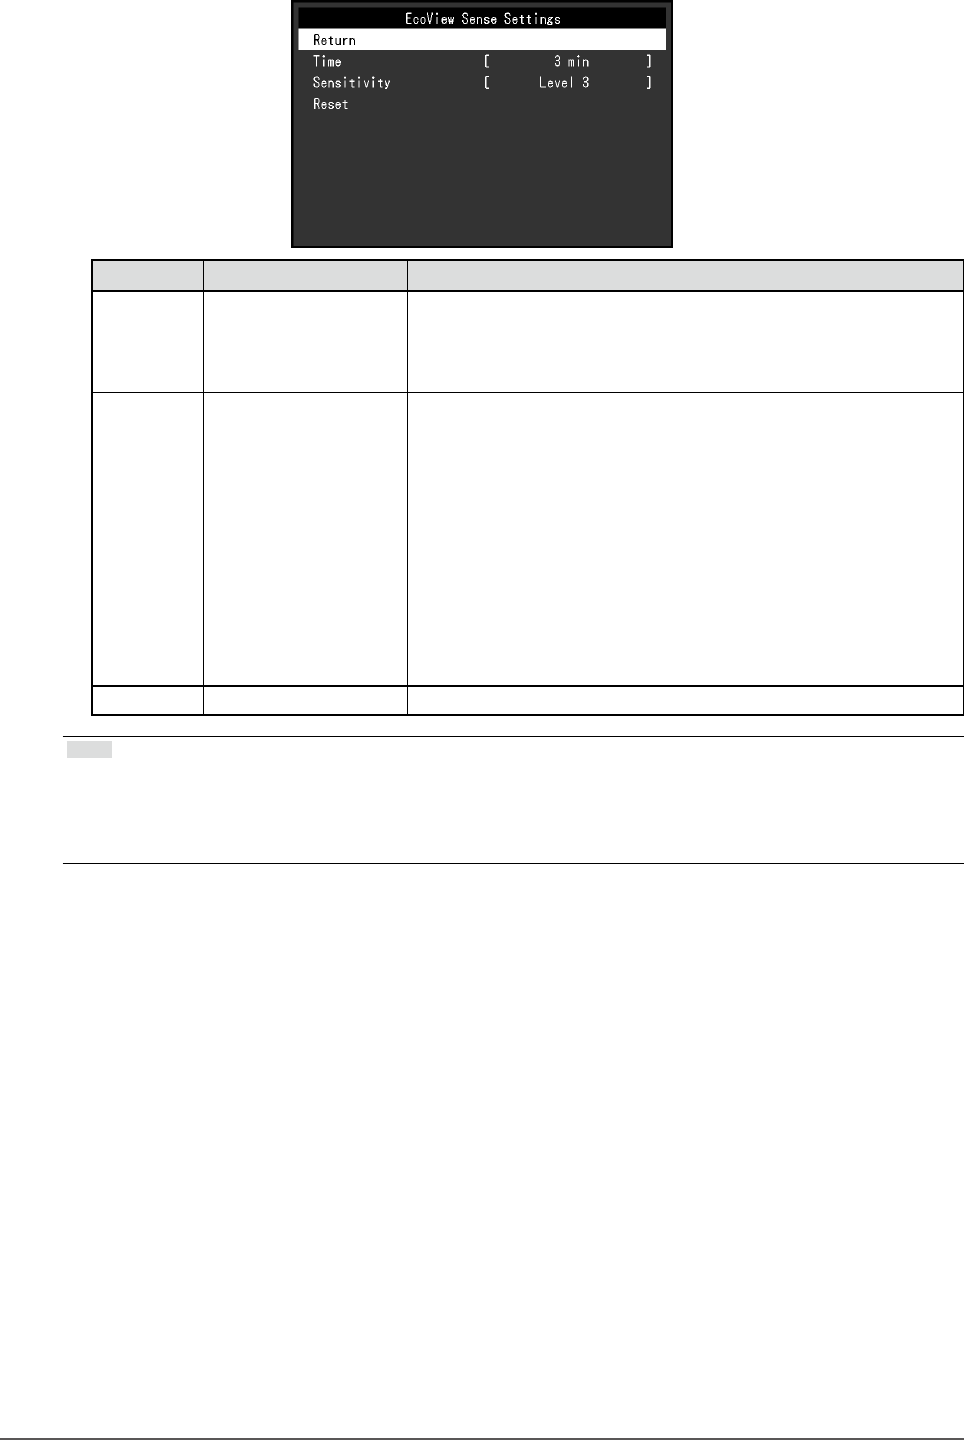
Chapter4PowerSavingFunctions
5. When “On” is selected, select “EcoView Sense Settings” for setting the details.
Item Setting Range Description
Time 5,30sec
1,3,5,10,15,30,45,
60min
Speciesthetimefromwhenapersonleavesthemonitoruntilthe
“NoPresencedetected”messageappears.Themonitorshiftsto
thepowersavingmodeabout20secondsafterthemessageis
displayed.
Sensitivity Level5
Level4
Level3
Level2
Level1
Whenthesettinglevelishigh(“Level5”atmaximum),evenminor
movementsofapersonaredetected,causingthemonitortoshift
tothepowersavingmodeonlyinfrequently.Ontheotherhand,
whenthesettinglevelislow(“Level1”atminimum),onlymajor
movementsofapersonaredetected,allowingthemonitortoshift
tothepowersavingmodefrequently.EcoViewSenseisactivated
whenthesensoronthefrontsideofthemonitordetectsthe
movementofheat.Therefore,thesensitivityshouldbechanged
dependingonthetypicaluser’sclothesorthetypicalroom
temperature.Ifthemonitorshiftstoorrecoversfromthepower
savingmodecontrarytoyourexpectations,trychangingthesetting
level.
Reset - Thisfunctionresetsalladjustmentstothedefaultsettings.
Note
• When the monitor is used in the “Portrait” direction, the detection sensitivity is lower than the “Landscape” direction.
Try increasing the sensitivity setting value when switching the mode to the power saving mode.
• To use the monitor comfortably, increase the sensitivity for high temperatures, which reduces the detection sensitivity,
and reduce the sensitivity for low temperatures, which increases the detection sensitivity.

40 Chapter4PowerSavingFunctions
4-5. Checking the power saving level
The EcoView menu allows you to check Power Reduction, CO2 Reduction, and Eco Performance Level. The more
indicators light up representing the Eco Performance Level, the higher the power saving level attained.
Example: EV2436W
Indicator
Procedure
1. Press .
The “EcoView Menu” menu appears.
Note
• Power reduction: the backlight’s reduction of power consumption as a result of the adjusted brightness value.
CO2 reduction: converted from the “Power reduction” value, this is an estimate of the quantity of CO2 emissions reduced
when using the monitor for 1 hour.
* The numeric value is a result of a calculation based on a default setting (0.000555 t -CO2/kWh) determined by a Japanese
ministerial ordinance (2006, Ministry of Economy, Trade and Industry, Ministry of Environment, civil code article 3) and
may differ depending on country and year.
4-6. Enabling / Disabling Auto Power-OFF
This function allows you to switch the setting to turn off the monitor automatically after a specied time has passed
in the power saving mode.
Adjustable range
Off, 0, 1, 2, 3, 5, 10, 15, 20, 25, 30, 45 min, 1, 2, 3, 4, 5 h
Procedure
1. Choose “PowerManager” in the Setting menu, and press .
2. Choose “Eco Timer” in the “PowerManager”, and press .
3. Select “Off” or time to turn off the monitor with or .
4. Press to exit.
41
Chapter5Troubleshooting
Chapter 5 Troubleshooting
If a problem still remains after applying the suggested remedies, contact your local EIZO representative.
5-1. No picture
Problem Possible cause and remedy
1. No picture
• Powerindicatordoesnotlight.
• Checkwhetherthepowercordisconnectedproperly.
• Turnthemainpowerswitchon.
• Press .
• Turnoffthemainpower,andthenturnitonagainafew
minuteslater.
• Powerindicatorislightingblue. • Increase“Brightness”,“Contrast”,or“Gain”intheSetting
menu(see“Toperformadvancedadjustments”(page20)).
• Powerindicatorislightingorange. • Switchtheinputsignalwith .
• Movethemouseorpressanykeyonthekeyboard.
• CheckwhetherthePCisturnedon.
• WhentheEcoViewSensefunctionis“On”,themonitor
mayhaveshiftedtothepowersavingmode.Comenear
tothemonitor.Ifthescreenisnotdisplayed,movethe
mouseorpressanykeyonthekeyboard.
• DependingonthePCandgraphicsboard,theinputsignal
isnotdetectedandthemonitordoesnotrecoverfrom
thepowersavingmode.Ifthescreenisnotdisplayed
evenaftermovingthemouseorpressinganykeyonthe
keyboard,turnthemonitoroffandonusingitspower
button.Whenthescreenisdisplayed,executethe
followingprocedure.Theproblemmaybeimproved.
1. Press toturnoffthemonitor.
2. Holddown whilepressing toturnonthe
monitor.
“x”isdisplayedonthemenutitleof“Information”ofthe
Settingmenu(see“6-6.DisplayingMonitorInformation”
(page53)).
3. RebootthePC.
Toreturntotheprevioussetting,performsteps1to3
again.
• Powerindicatorisashingorange. • ThedevicethatisconnectedusingDisplayPorthasa
problem.Solvetheproblem,turnoffthemonitor,andthen
turnitonagain.RefertotheUser’sManualoftheoutput
deviceforfurtherdetails.
42 Chapter5Troubleshooting
Problem Possible cause and remedy
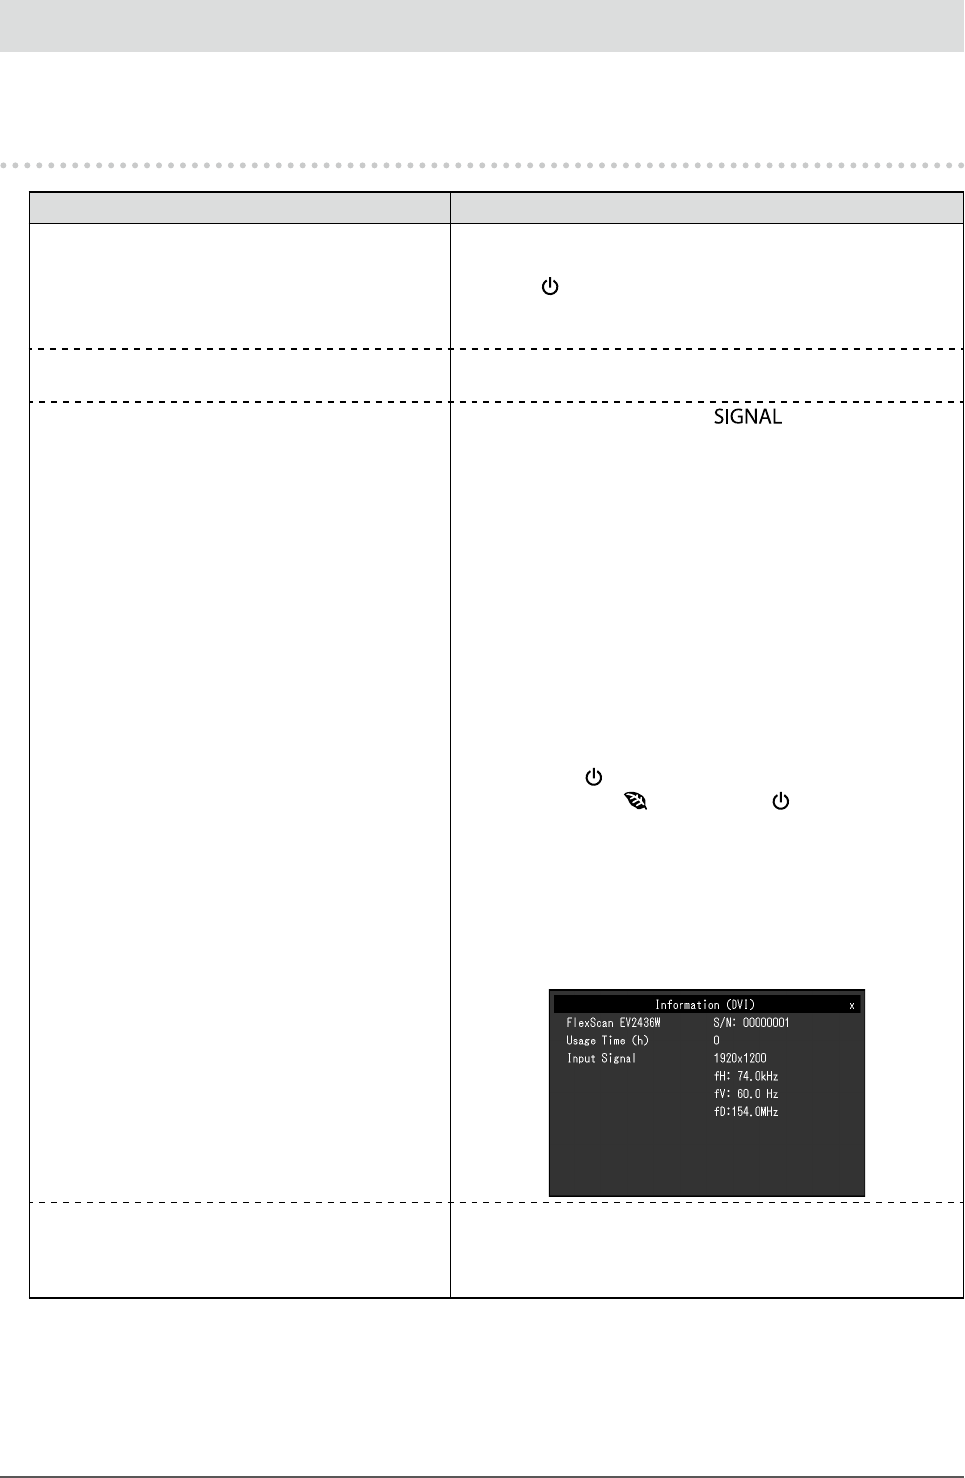
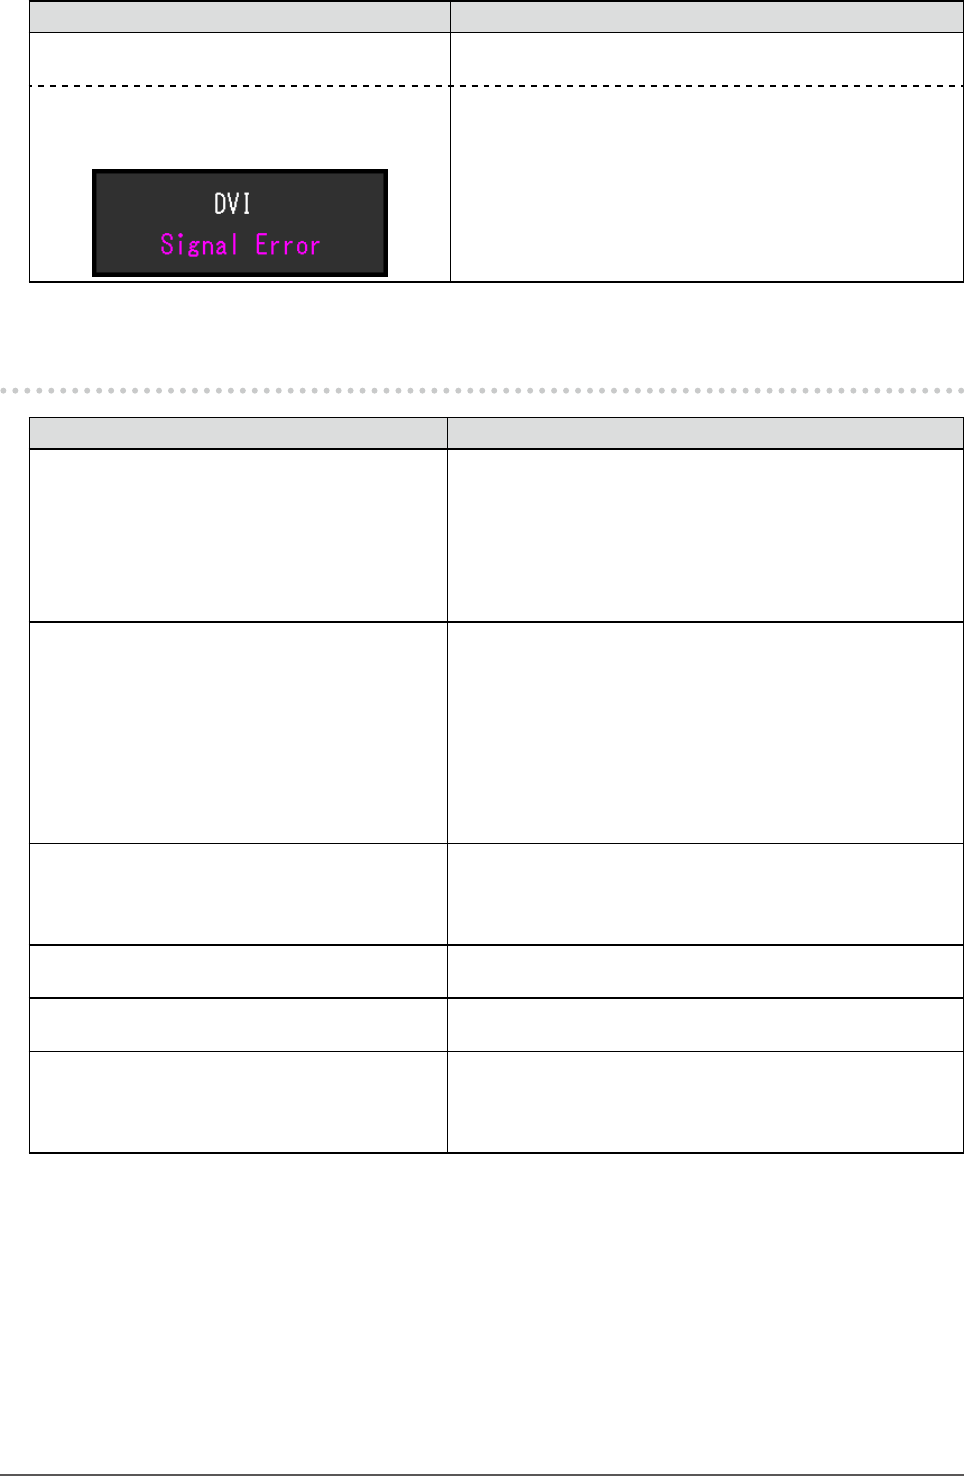
2. The message below appears. Thismessageappearswhenthesignalisnotinputcorrectly
evenwhenthemonitorfunctionsproperly.
• Themessageshowsthattheinputsignalis
outofthespeciedfrequencyrange.
Example:
• CheckwhetherthePCisconguredtomeettheresolution
andverticalscanfrequencyrequirementsofthemonitor
(see“2-1.CompatibleResolutions”(page14)).
• RebootthePC.
• Selectanappropriatesettingusingthegraphicsboard’s
utility.RefertotheUser’sManualofthegraphicsboard
fordetails.
5-2. Imaging problems (for both digital and analog)
Problem Possible cause and remedy
1. The screen is too bright or too dark. • Use“Brightness”or“Contrast”intheSettingmenuto
adjustit.(TheLCDmonitorbacklighthasalimitedlife
span.Whenthescreenbecomesdarkorbeginstoicker,
contactyourlocalEIZOrepresentative.)
• Ifthescreenistoobright,turnonAutoEcoView.The
monitordetectstheenvironmentalbrightnesstoadjustthe
screenbrightnessautomatically.
2. Characters are blurred. • CheckwhetherthePCisconguredtomeettheresolution
andverticalscanfrequencyrequirementsofthemonitor
(see“2-1.CompatibleResolutions”(page14)).
• Whenanimageisdisplayedwitharesolutionotherthan
recommended,thecharactersorlinesofthedisplayed
imagemayblur.Use“Smoothing”and“ScreenSize”inthe
Settingmenutoadjustthedisplay(see“Tomodifyblurred
characters/lines”(page28),and“ScreenSizeChanging”
(page29)).
3. Afterimages appear. • AfterimagesareparticulartoLCDmonitors.Avoid
displayingthesameimageforalongtime.
• Usethescreensaverorpowersavefunctiontoavoid
displayingthesameimageforextendedperiodsoftime.
4. Green / red / blue / white dots or defective
dots remain on the screen.
• ThisisduetoLCDpanelcharacteristicsandisnota
failure.
5. Interference patterns or pressure marks
remain on the screen.
• Leavethemonitorwithawhiteorblackscreen.The
symptommaydisappear.
6. Noise appears on the screen. • IntheSettingmenu,set“Overdrive”to“Off”(see“Toset
overdriveintensity(EV2336W/EV2436Wonly)”(page23)).
• WhenenteringtheHDCPsignals,thenormalimagesmay
notbedisplayedimmediately.
43
Chapter5Troubleshooting
5-3. Imaging problems (for digital only)
Problem Possible cause and remedy
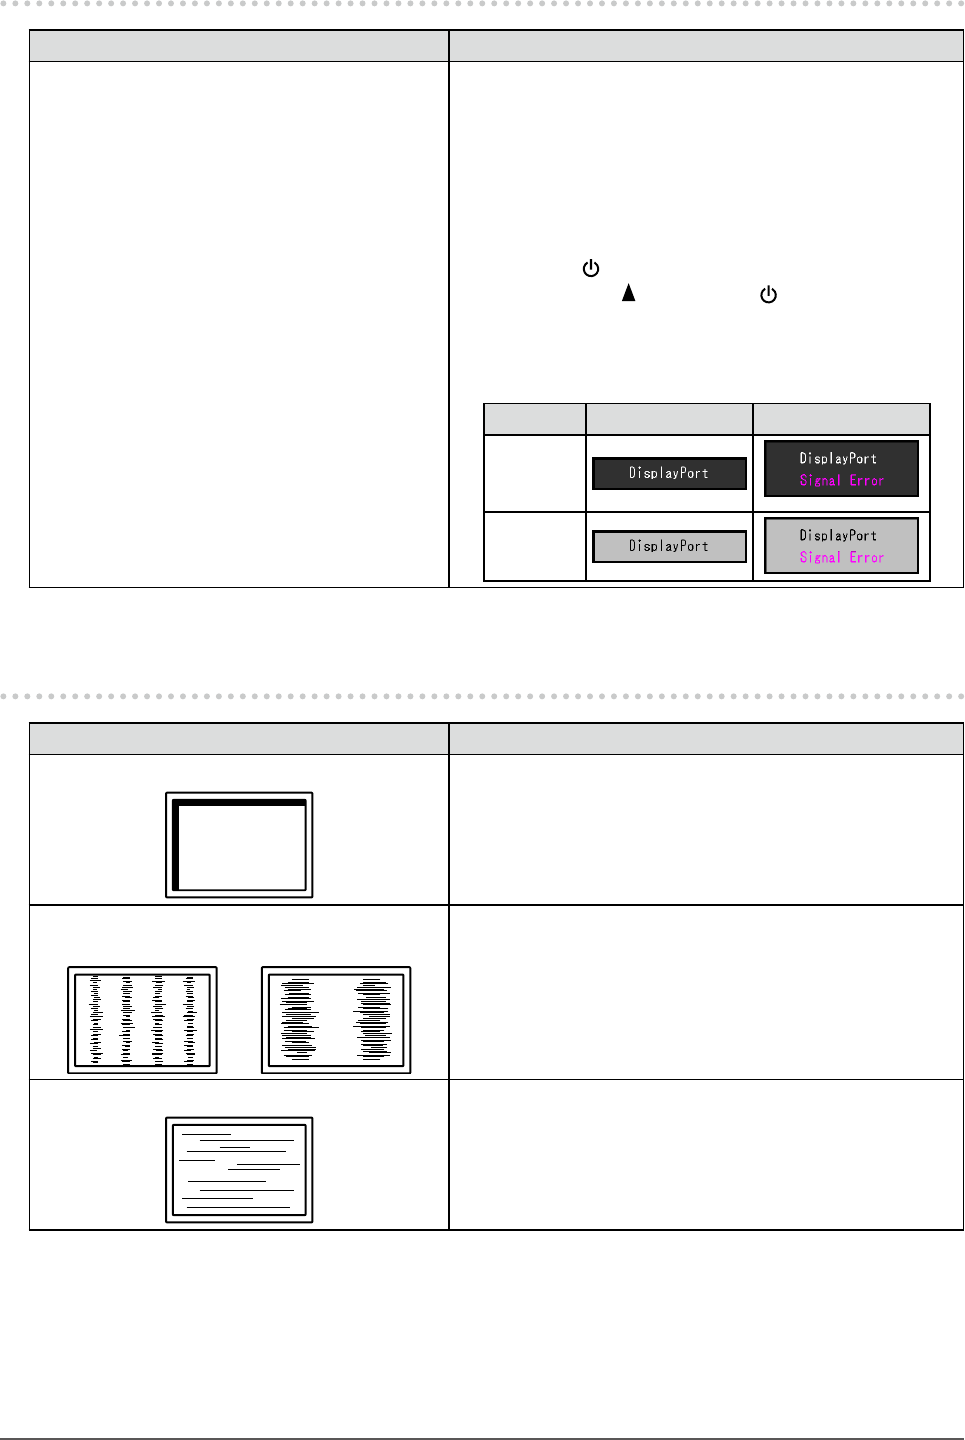
1. The monitor conguration is changed to
single under the multiple monitor congu-
ration (when DisplayPort is connected).
• WhentwomonitorsareconnectedtoonePCusing
DisplayPort,andthepowertooneofthemonitorsis
turnedoffwiththepowerbutton,thescreensettingmay
bechangedtothesinglemonitorconguration.Insucha
case,enablethe“DPHotPlug”functionwiththefollowing
procedures.Enablingthisfunctionmayincreasethe
powerconsumption.
1. Press toturnoffthemonitor.
2. Holddown whilepressing toturnonthemonitor.
Eachtimetheoperationenables/disablesthisfunction
alternatively.
Thecurrentsettingstatuscanbeidentiedbasedonthe
colorusedtodisplaytheinputportorsignalerror.
Setting Input port Signal Error
Disable
(default
setting)
Enable
5-4. Imaging problems (for analog only)
Problem Possible cause and remedy
1. Display position is incorrect. • Use“Position”intheSettingmenutocorrecttheimage
position(see“Tocorrectthescreenposition”(page27)).
• Iftheproblempersists,usethegraphicsboard’sutilityif
availabletochangethedisplayposition.
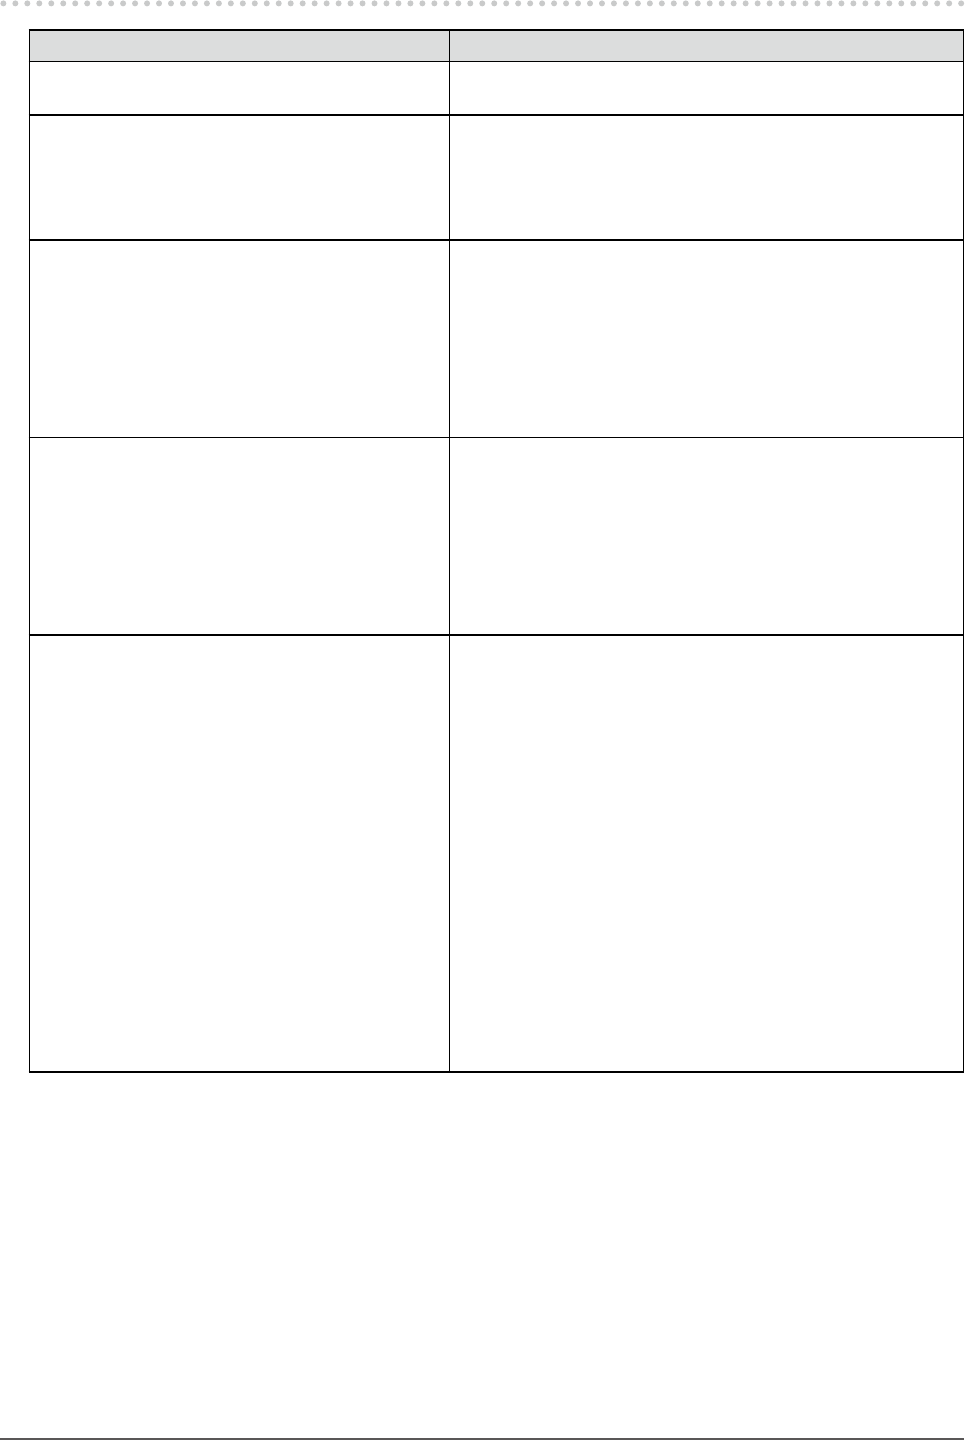
2. Vertical bars appear on the screen or a
part of the image is ickering.
• Use“Clock”intheSettingmenutoadjustit(see“To
eliminateverticalbars”(page26)).
3. Whole screen is ickering or blurring. • Use“Phase”intheSettingmenutoadjustit(see“To
removeickeringorblurring”(page27)).
44 Chapter5Troubleshooting
5-5. Other problems
Problem Possible cause and remedy
1. The Setting menu does not appear. • Checkwhethertheoperationlockfunctionisactive(see
“3-5.LockingOperationButtons”(page33)).
2. The “Smoothing” on the Setting menu
“Screen” cannot be selected.
• Youcannotchoose“smoothing”whenthescreenis
displayedinthefollowingresolutionsorsettings.
- Theresolutionis1920×1080(EV2316W/EV2336W)
- Theresolutionis1920×1200(EV2416W/EV2436W)
- ScreenSizeis“Normal”(EV2336W/EV2436Wonly)
3. The auto adjustment function does not
work.
• Thisfunctiondoesnotworkduringdigitalsignalinput.
• ThisfunctionisintendedforuseontheMacintoshand
onAT-compatiblePCrunningWindows.Itdoesnotwork
properlywhenanimageisdisplayedonlyonapartofthe
screen(commandpromptwindow,forexample)orwhena
blackbackground(wallpaper,etc.)isinuse.
• Thisfunctiondoesnotworkcorrectlywithsomegraphics
boards.
4. No audio output. • Checkwhetherthestereominijackcableisconnected
properly.
• Checkwhethervolumeissetto0.
• CheckthesettingofthePCandtheaudioplayback
software.
• DuringDisplayPortsignalinput,checkthe“Source”
setting(see“3-2.Selectingsoundsourcewhileusingthe
DisplayPortsignalinput”(page31)).
5. (When using EcoView Sense)
The images remain to be displayed when
you move away from the monitor. / The
images do not reappear when you come
near it.
• Checkthesettingenvironmentofthemonitor.Presence
Sensormaynotworkcorrectlyinthefollowing
environments.
- Themonitorislocatedinaplaceaffectedbywind.
- Thereissomeheatemittingdevicenearthemonitor.
- Thereissomeobstacleinfrontofthesensor.
• Checkwhetheranydirtonthesensor.Cleanthesensor
withasoftcloth.
• Checkwhetheryouareinfrontofthemonitor.The
EcoViewSensefunctionisactivatedwhenthesensoron
thefrontsideofthemonitordetectsthemovementofheat.
• Inthehightemperatureconditions,themonitormaynot
recoverfromthepowersavingmode.Ifthescreenisnot
displayedevenaftermovingthemouseorpressingany
keyonthekeyboard,turnthemonitoroffandonusingits
powerbutton.Whenthescreenisdisplayed,increasethe
detectionsensitivityvalue(see“4-4.Settingthepower
savingmodewhenapersonleavesthemonitor”(page38)).

45
Chapter5Troubleshooting
Problem Possible cause and remedy
6. USB devices connected to the monitor do
not work.
• CheckwhethertheUSBcableisconnectedcorrectly(see
“6-5.MakingUseofUSB(UniversalSerialBus)”(page52)).
• ChangetheUSBporttoanotherone.IfthePCor
peripheraldevicesworkscorrectlybychangingtheUSB
port,contactyourlocalEIZOrepresentative.(Refertothe
manualofthePCfordetails.)
• RebootthePC.
• IftheperipheraldevicesworkcorrectlywhenthePCand
peripheraldevicesareconnecteddirectly,pleasecontact
yourlocalEIZOrepresentative.
• CheckwhetherthePCandOSareUSBcompliant.(For
USBcomplianceoftherespectivedevices,consulttheir
manufacturers.)
• CheckthePC’sBIOSsettingforUSBwhenusing
Windows.(RefertothemanualofthePCfordetails.)

46 Chapter6Reference
Chapter 6 Reference
6-1. Attaching the Optional Arm
An optional arm (or an optional stand) can be attached by removing the stand section. Please refer to our web site
for the corresponding optional arm (or optional stand). http://www.eizo.com
Attention
• When attaching an arm or stand, follow the instructions of their User’s Manual.
• When using another manufacturer’s arm or stand, conrm the following in advance and select one conforming to the VESA
standard.
- Clearance between the screw holes: 100 mm × 100 mm
- Thickness of plate: 2.6 mm
- Strong enough to support weight of the monitor unit (except the stand) and attachments such as cables.
• When using another manufacturer’s arm or stand, use the screws as described below.
- FlexStand2: Screws xing the stand to the monitor
- TriStand2: Screws supplied with this product (M4 × 12 mm)
• When using an arm or stand, attach it to meet the following tilt angles of the monitor.
- Up 45˚, down 45˚ (horizontal display, and vertical display rotated 90 degrees clockwise)
• Connect the cables after attaching an arm or stand.
• Do not move the removed stand up and down. Doing so may result in injury or device damage.
• The monitor and arm or stand are heavy. Dropping them may result in injury or equipment damage.
• When setting the monitor to the portrait style, turn the monitor screen 90˚ in clockwise direction.
Procedure
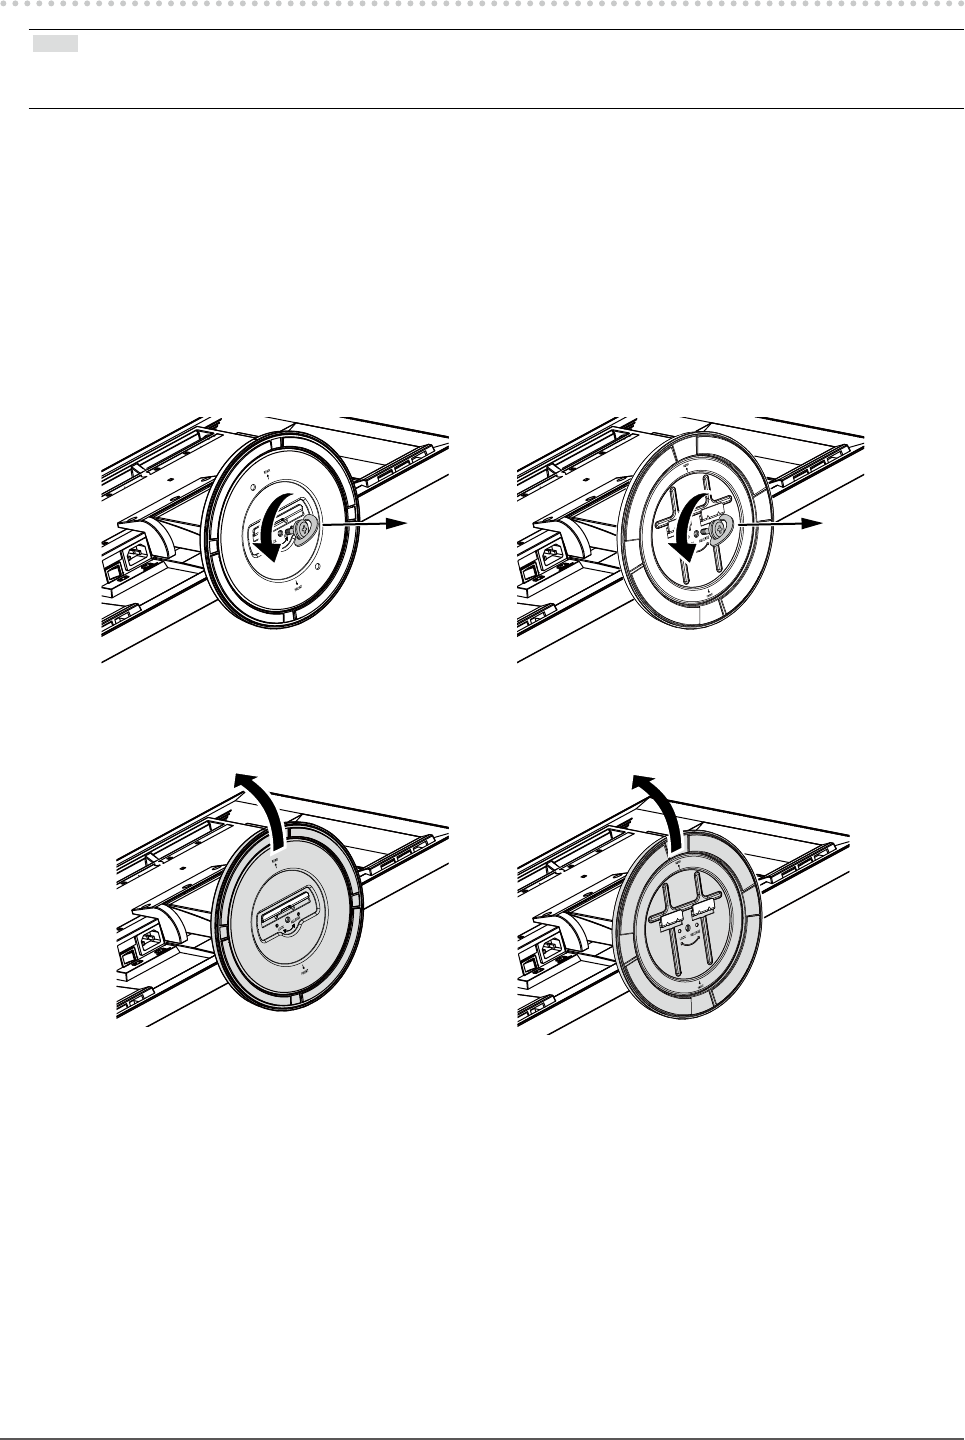
1. Lay the LCD monitor on a soft cloth spread over on a stable surface with the
panel surface facing down.
2.
Remove the stand.
Using a screwdriver, loosen the screws securing the unit and the stand (FlexStand2: four positions, TriStand2:
three positions).
3.
Attach the arm or stand to the monitor.
Secure the monitor to the arm or stand using the screws specied in the User’s Manual of the arm or stand.
47
Chapter6Reference
6-2. Detaching / Attaching the TriStand2 Stand Base
Note
• There are 2 types of shapes for the stand brace and the base mounting section (refer to the gures in the procedure). Check
the shape of the monitor you have purchased.
Detaching procedure
The Stand base that was attached during setup can be detached using the following procedures.
1. Lay the LCD monitor on a soft cloth spread over on a stable surface with the
panel surface facing down.
2.
Turn the xing screw for the Stand base in the “RELEASE” direction to detach
the base.
3.
Remove the Stand base while lifting it up.
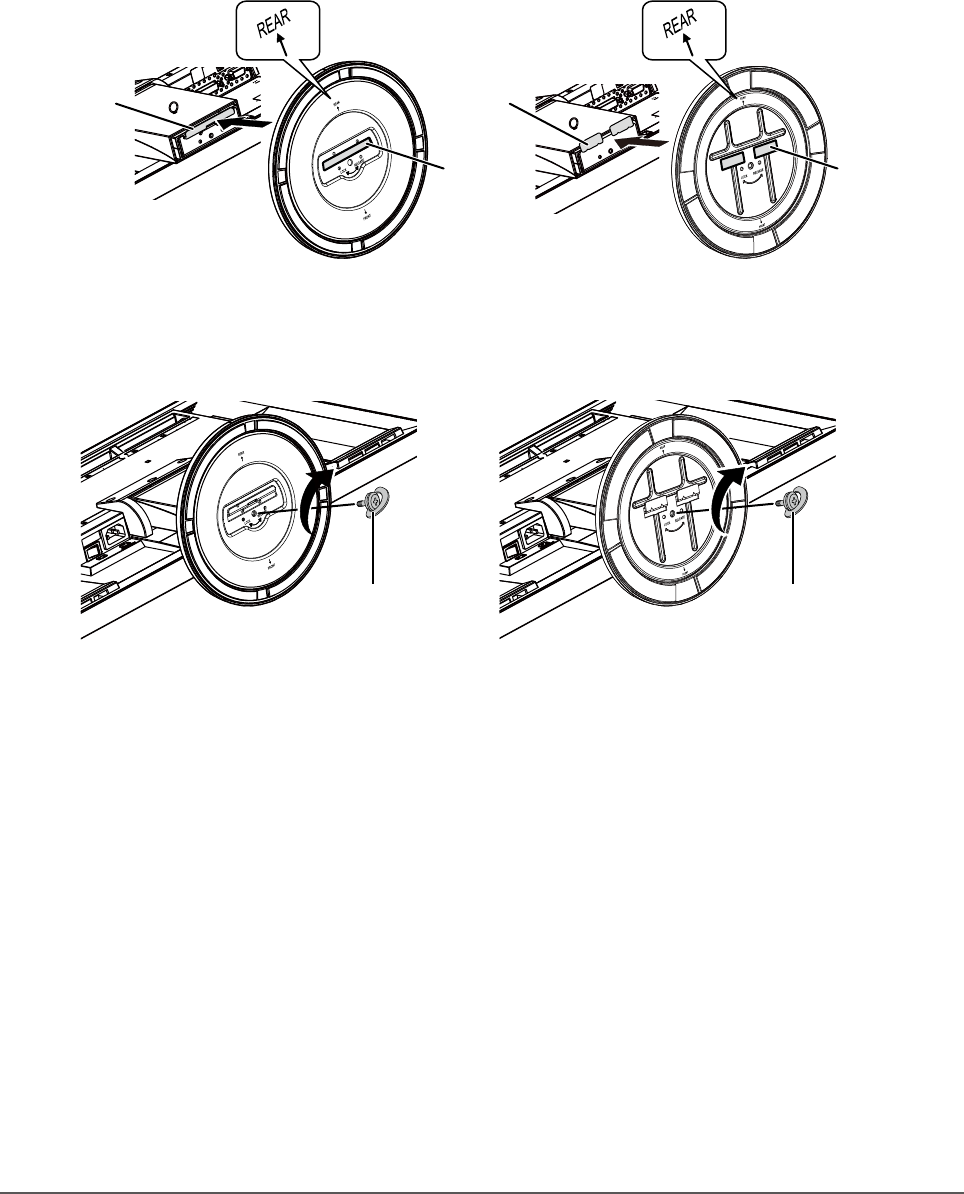
48 Chapter6Reference
Attaching procedure
The once removed the Stand base can be attached to the monitor again with the following procedures.
1. Lay the LCD monitor on a soft cloth spread over on a stable surface with the
panel surface facing down.
2.
Hold the Stand base with the “REAR” side facing upward, align the hole (a) of
the Stand base with the tab (b) at the bottom of the monitor, and snap the tab
into the hole.
a
b
a
b
3.
Turn the supplied screw in the “LOCK” direction to lock the Stand base.
Tighten the screw rmly to the end.
Tightenscrew,then
pressknobflat. Tightenscrew,then
pressknobflat.
4.
Place the monitor on a stable surface.
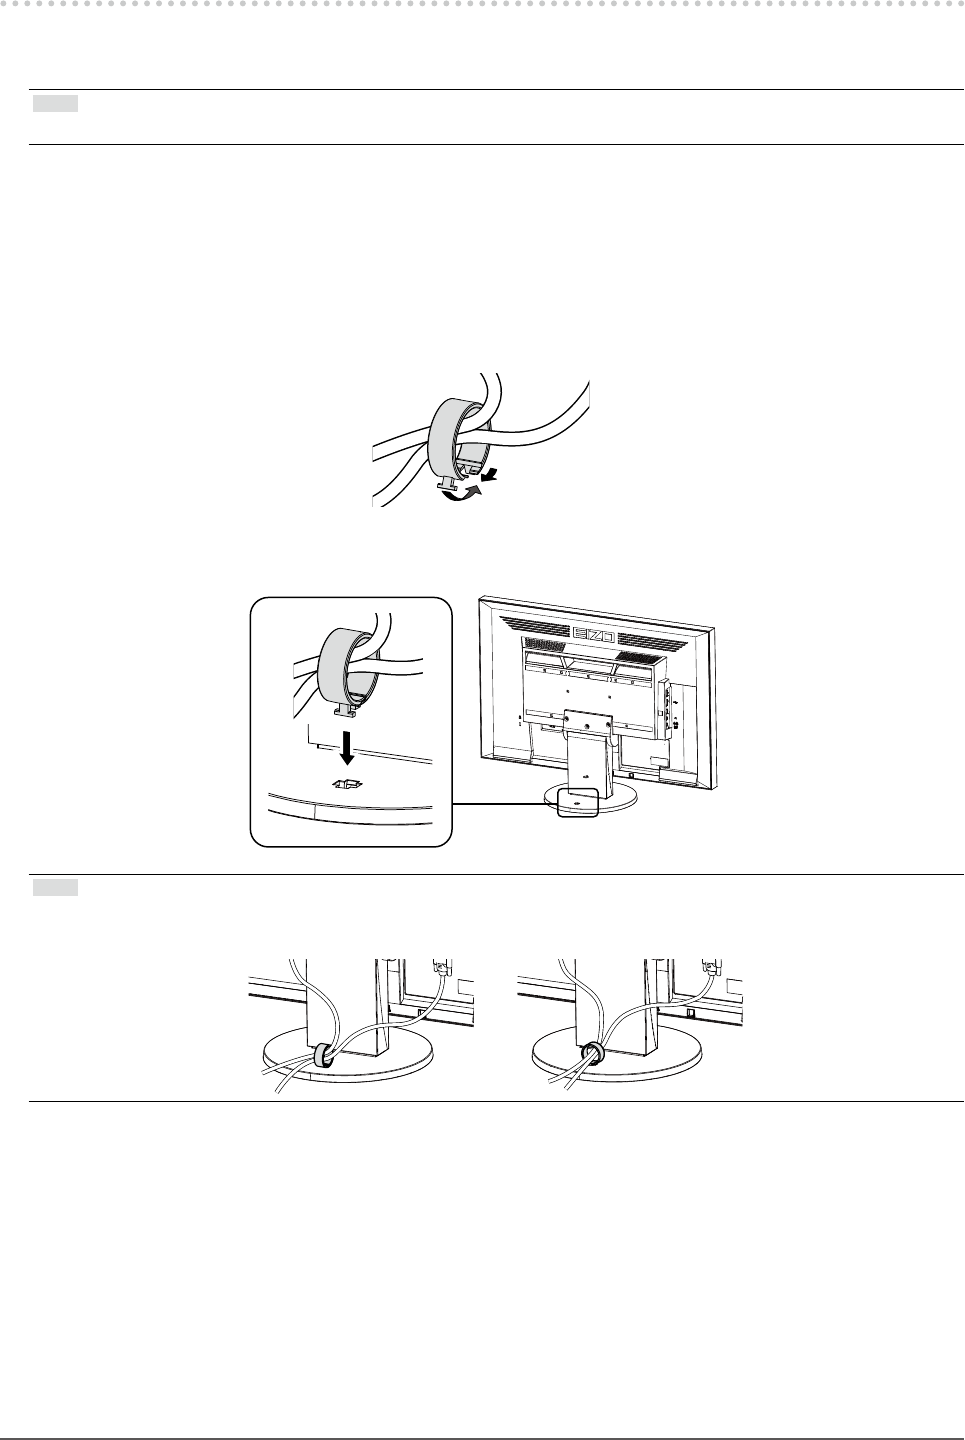
49
Chapter6Reference
6-3. Attaching / Detaching the TriStand2 Cable Holder
When you want to use the cable holder with TriStand2, follow the procedure below. The holder can also be
removed.
Note
• FlexStand2 is a set comprised of the stand and the cable holder.
Attaching procedure
1. Pass the cables through the cable holder.
2.
Shut the bottom of the cable holder.
3.
While holding the shut section, insert the cable holder into the Stand base.
Note
• The cable holder can be inserted either perpendicular or parallel to the base. Change the direction of the cable holder
according to the conditions of the cables.
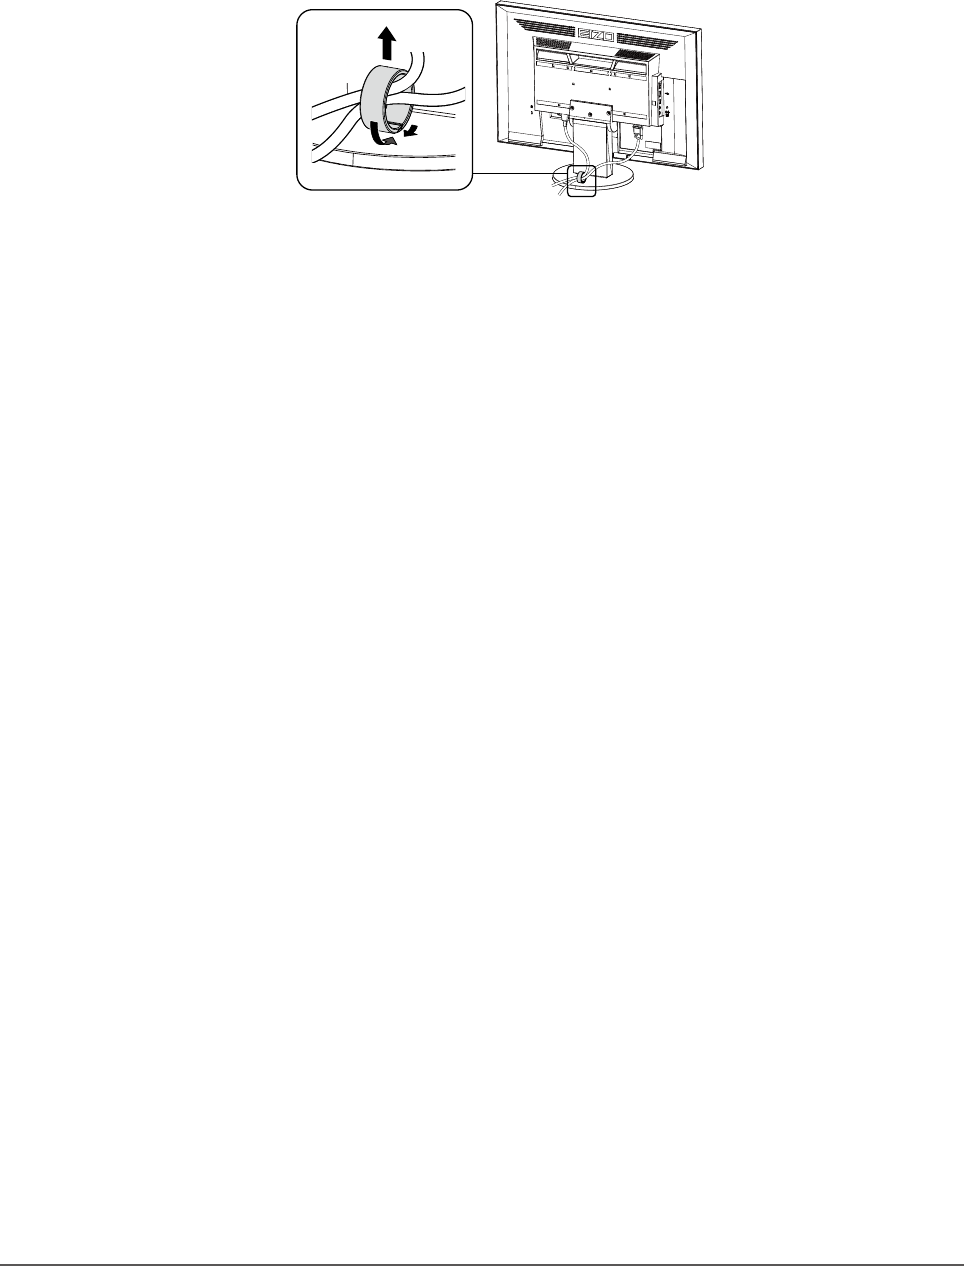
50 Chapter6Reference
Detaching procedure
1. Shut the bottom of the cable holder.
2.
While holding the shut section, lift the cable holder upward to remove it from
the Stand base.
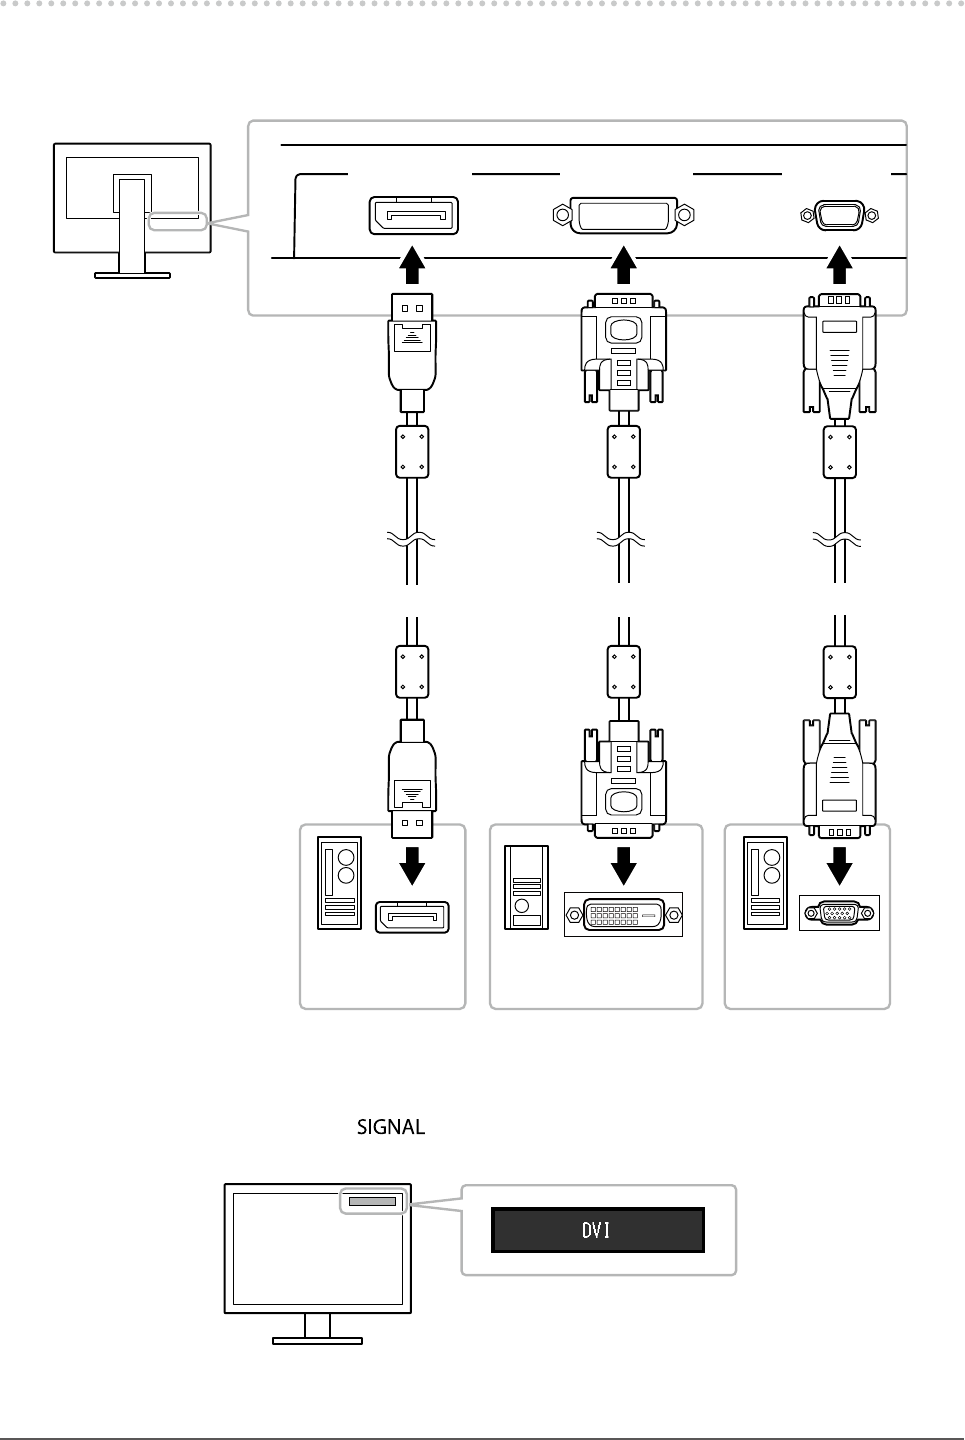
51
Chapter6Reference
6-4. Connecting Multiple PCs
The product has multiple connections to PCs and allows you to switch to one of the connections for display.
Connection examples
DVIconnector
Signalcable
(suppliedFD-C39)
Signalcable
(suppliedPP200)
DVI-Dconnector
Digital(DVI)Digital
(DisplayPort)
ToPC1 ToPC2
DisplayPort
connector
DisplayPort
connector
D-Sub
connector
Signalcable
(optionMD-C87)
Analog(D-Sub)
ToPC3
D-Submini15-pin
connector
●To switch among input signals
The input signal switches each time is pressed.
When the signal is switched, the active input port name appears at the top right corner of the screen.
52 Chapter6Reference
●To set input signal selection
Setting Function
Auto ThemonitorrecognizestheconnectorthroughwhichPCsignalsareinput.
WhenaPCisturnedofforentersthepowersavingmode,themonitorautomatically
displaysanothersignal.
Manual Themonitordisplaysthesignalfromtheselectedconnectordespitethesignalinput.Select
theinputsignalfordisplayusingthe operationbutton.
Procedure
1. Choose “Monitor Settings” from the Adjustment menu, and press .
2. Choose “Input Signal” from “Monitor Settings”, and press .
3. Select “Auto” or “Manual” with or .
4. Press to exit.
Note
• If you select “Auto”, the monitor enters the power saving mode after all the PCs have entered the power saving mode or
have been switched off.
6-5. Making Use of USB (Universal Serial Bus)
This monitor has a USB hub. It works as a USB hub when connected to a USB-compatible PC, allowing the
connection of peripheral USB devices.
●Required System Environment
• A PC equipped with a USB port
• Windows 2000 / XP / Vista / 7 / 8 or Mac OS 9.2.2 and Mac OS X 10.2 or later
• USB cable (commercially available product)
Attention
• This monitor may not work depending on PC, OS or peripheral devices to be used. For USB compatibility of peripheral
devices, contact their manufacturers.
• When the monitor is in power saving mode, devices connected to the USB downstream port will still work. Therefore,
power consumption of the monitor varies with connected devices even in the power saving mode.
• When the main power of the monitor is Off, a device connected to the USB downstream port will not operate.
53
Chapter6Reference
●Connection Procedure (Setup of USB Function)
1. Connect the monitor rst to a PC using the signal cable, and run the PC.
2. Connect the USB cable between the USB downstream port of the PC and the USB upstream port of the
monitor.
The USB hub function is set up automatically upon connection of the USB cable.
3. Connect the peripheral USB devices to the USB downstream port of the monitor.
USB
downstream
port
USB
upstream
port
6-6. Displaying Monitor Information
This function allows you to display the model name, serial number, usage time, resolution, and input signal.
Procedure
1. Choose “Information” in the Setting menu, and press .
The “Information” menu appears.
Attention
• When you turn on the monitor for the rst time, the usage time may be more than 0 due to a factory inspection.
54 Chapter6Reference
6-7. Specications
●EV2316W
LCDPanel Size 23.0-inch(580mm)
Type TFTcolorLCD,LEDbacklight
Surfacetreatment Anti-GlareHardCoating
Viewingangles Horizontal170˚,vertical160˚(CR≥10)
DotPitch 0.2655mm
ResponseTime Black-white-black:Approx.5ms
HorizontalScan
Frequency
Analog 31-68kHz
Digital DVI 31-68kHz
DisplayPort 31-68kHz
VerticalScan
Frequency
Analog 55-61Hz(non-interlace)
Digital DVI 59-61Hz(non-interlace)
DisplayPort 59-61Hz(non-interlace)
Resolution 1920Dots×1080Lines
Max.DotClock Analog 148.5MHz
Digital DVI 148.5MHz
DisplayPort 148.5MHz
Max.DisplayColor Approx.16.77millioncolors
DisplayArea(H×V) 509.7mm(20.1inch)×286.7mm(11.3inch)
PowerSupply 100-120VAC±10%,50/60Hz0.75A
200-240VAC±10%,50/60Hz0.45A
Power
Consumption
ScreenDisplayOn 43Worless
Powersavingmode 0.3Worless (withnoUSBconnections,“EcoViewSense”:“Off”,and
“Sound”-“PowerSave”:“SoundOff”)
PowerOff 0.3Worless
MainPowerOff 0W
InputSignalConnector D-Submini15-pin
DVI-Dconnector(ApplicabletoHDCP)
DisplayPort(StandardV1.1a,applicabletoHDCP)
ApplicableFormat(Audiosignal)
- 2chlinearPCM
(32kHz/44.1kHz/48kHz/88.2kHz/96kHz)
AnalogInputSignal(Sync) Separate,TTL,positive/negative
AnalogInputSignal(Video) Analog,Positive(0.7Vp-p/75Ω)
DigitalSignal(DVI)TransmissionSystem TMDS(SingleLink)
AudioOutput Speakeroutput:1.0W+1.0W(8Ω,THD+N:10%orless)
Headphoneoutput:2mW+2mW(32Ω,THD+N:3%orless)
LineInput Inputimpedance:44kΩ(typ.)
Inputlevel:2.0Vrms(Max.)
Plug&Play Analog/Digital(DVI-D):VESADDC2B/EDIDstructure1.3
Digital(DisplayPort):VESADisplayPort/EDIDstructure1.4
Dimensions
(Width)×
(Height)×
(Depth)
Mainunit(FlexStand2)
540mm(21.3inch)×360-513.5mm(14.2inch-20.2inch)×245.5mm
(9.7inch)
Mainunit(TriStand2) 540mm(21.3inch)×387.5-447.5mm(15.3inch-17.6inch)×200mm
(7.9inch)
Mainunit(without
stand)
540mm(21.3inch)×317.5mm(12.5inch)×56mm(2.2inch)
55
Chapter6Reference
Mass Mainunit(FlexStand2) Approx.5.7kg(12.6lbs.)
Mainunit(TriStand2) Approx.4.3kg(9.5lbs.)
Mainunit(without
stand)
Approx.3.1kg(6.8lbs.)
Movablerange FlexStand2 Tilt: 30˚Up,0˚Down
Swivel: 172˚Right,172˚Left
Adjustableheight: 195mm(7.7inch)(179mm(7.0inch)fortiltof
0˚)
Rotation: 90˚(Clockwise)
TriStand2 Tilt: 25˚Up,0˚Down
Swivel: 172˚Right,172˚Left
Adjustableheight: 60mm(2.36inch)
Environmental
Conditions
Temperature Operating: 5˚Cto35˚C(41˚Fto95˚F)
Transportation/
Storage:
-20˚Cto60˚C(-4˚Fto140˚F)
Humidity Operating: 20%to80%R.H.(nocondensation)
Transportation/
Storage:
10%to90%R.H.(nocondensation)
AirPressure Operating: 700to1,060hPa
Transportation/
Storage:
200to1,060hPa
USB Standard USBSpecicationRevision2.0
Port Upstreamport×1,Downstreamport×2
CommunicationSpeed 480Mbps(high),12Mbps(full),1.5Mbps(low)
Supplycurrent Downstream: Max.500mA/1port
●EV2336W
LCDPanel Size 23.0-inch(580mm)
Type TFTcolorLCD,LEDbacklight
Surfacetreatment Anti-GlareHardCoating
Viewingangles Horizontal178˚,vertical178˚(CR≥10)
DotPitch 0.2652mm
ResponseTime Black-white-black:Approx.16ms
Gray-to-gray:Approx.6ms(Overdrivesetting:Enhanced)
HorizontalScan
Frequency
Analog 31-81kHz
Digital DVI 31-68kHz
DisplayPort 31-68kHz
VerticalScan
Frequency
Analog 55-76Hz(non-interlace)
Digital DVI 59-61Hz(non-interlace)(VGATEXT:69-71Hz)
DisplayPort 59-61Hz(non-interlace)(VGATEXT:69-71Hz)
Resolution 1920Dots×1080Lines
Max.DotClock Analog 148.5MHz
Digital DVI 148.5MHz
DisplayPort 148.5MHz
Max.DisplayColor Approx.16.77millioncolors
DisplayArea(H×V) 509.1mm(20inch)×286.4mm(11.3inch)
PowerSupply 100-120VAC±10%,50/60Hz0.8A
200-240VAC±10%,50/60Hz0.5A
56 Chapter6Reference
Power
Consumption
ScreenDisplayOn 40Worless
Powersavingmode 0.3Worless (withnoUSBconnections,“EcoViewSense”:“Off”,and
“Sound”-“PowerSave”:“SoundOff”)
PowerOff 0.3Worless
MainPowerOff 0W
InputSignalConnector D-Submini15-pin
DVI-Dconnector(ApplicabletoHDCP)
DisplayPort(StandardV1.1a,applicabletoHDCP)
ApplicableFormat(Audiosignal)
- 2chlinearPCM
(32kHz/44.1kHz/48kHz/88.2kHz/96kHz)
AnalogInputSignal(Sync) Separate,TTL,positive/negative
AnalogInputSignal(Video) Analog,Positive(0.7Vp-p/75Ω)
DigitalSignal(DVI)TransmissionSystem TMDS(SingleLink)
AudioOutput Speakeroutput:1.0W+1.0W(8Ω,THD+N:10%orless)
Headphoneoutput:2mW+2mW(32Ω,THD+N:3%orless)
LineInput Inputimpedance:44kΩ(typ.)
Inputlevel:2.0Vrms(Max.)
Plug&Play Analog/Digital(DVI-D):VESADDC2B/EDIDstructure1.3
Digital(DisplayPort):VESADisplayPort/EDIDstructure1.4
Dimensions
(Width)×
(Height)×
(Depth)
Mainunit(FlexStand2)
540mm(21.3inch)×360-513.5mm(14.2inch-20.2inch)×245.5mm
(9.7inch)
Mainunit(TriStand2) 540mm(21.3inch)×387.5-447.5mm(15.3inch-17.6inch)×200mm
(7.9inch)
Mainunit(without
stand)
540mm(21.3inch)×317.5mm(12.5inch)×56mm(2.2inch)
Mass Mainunit(FlexStand2) Approx.6.3kg(13.9lbs.)
Mainunit(TriStand2) Approx.4.9kg(10.8lbs.)
Mainunit(without
stand)
Approx.3.7kg(8.2lbs.)
Movablerange FlexStand2 Tilt: 30˚Up,0˚Down
Swivel: 172˚Right,172˚Left
Adjustableheight: 195mm(7.7inch)(179mm(7.0inch)fortiltof
0˚)
Rotation: 90˚(Clockwise)
TriStand2 Tilt: 25˚Up,0˚Down
Swivel: 172˚Right,172˚Left
Adjustableheight: 60mm(2.36inch)
Environmental
Conditions
Temperature Operating: 5˚Cto35˚C(41˚Fto95˚F)
Transportation/
Storage:
-20˚Cto60˚C(-4˚Fto140˚F)
Humidity Operating: 20%to80%R.H.(nocondensation)
Transportation/
Storage:
10%to90%R.H.(nocondensation)
AirPressure Operating: 700to1,060hPa
Transportation/
Storage:
200to1,060hPa
USB Standard USBSpecicationRevision2.0
Port Upstreamport×1,Downstreamport×2
CommunicationSpeed 480Mbps(high),12Mbps(full),1.5Mbps(low)
Supplycurrent Downstream: Max.500mA/1port

57
Chapter6Reference
●EV2416W
LCDPanel Size 24.1-inch(610mm)
Type TFTcolorLCD,LEDbacklight
Surfacetreatment Anti-GlareHardCoating
Viewingangles Horizontal170˚,vertical160˚(CR≥10)
DotPitch 0.270mm
ResponseTime Black-white-black:Approx.5ms
HorizontalScan
Frequency
Analog 31-76kHz
Digital DVI 31-76kHz
DisplayPort 31-76kHz
VerticalScan
Frequency
Analog 55-61Hz(non-interlace)
Digital DVI 59-61Hz(non-interlace)
DisplayPort 59-61Hz(non-interlace)
Resolution 1920Dots×1200Lines
Max.DotClock Analog 193.3MHz
Digital DVI 162MHz
DisplayPort 162MHz
Max.DisplayColor Approx.16.77millioncolors
DisplayArea(H×V) 518.4mm×324.0mm(20.4inch×12.8inch)
PowerSupply 100-120VAC±10%,50/60Hz0.8A
200-240VAC±10%,50/60Hz0.5A
Power
Consumption
ScreenDisplayOn 40Worless
Powersavingmode 0.3Worless (withnoUSBconnections,“EcoViewSense”:“Off”,and
“Sound”-“PowerSave”:“SoundOff”)
PowerOff 0.3Worless
MainPowerOff 0W
InputSignalConnector D-Submini15-pin
DVI-Dconnector(ApplicabletoHDCP)
DisplayPort(StandardV1.1a,applicabletoHDCP)
ApplicableFormat(Audiosignal)
- 2chlinearPCM
(32kHz/44.1kHz/48kHz/88.2kHz/96kHz)
AnalogInputSignal(Sync) Separate,TTL,positive/negative
AnalogInputSignal(Video) Analog,Positive(0.7Vp-p/75Ω)
DigitalSignal(DVI)TransmissionSystem TMDS(SingleLink)
AudioOutput Speakeroutput:1.0W+1.0W(8Ω,THD+N:10%orless)
Headphoneoutput:2mW+2mW(32Ω,THD+N:3%orless)
LineInput Inputimpedance:44kΩ(typ.)
Inputlevel:2.0Vrms(Max.)
Plug&Play Analog/Digital(DVI-D):VESADDC2B/EDIDstructure1.3
Digital(DisplayPort):VESADisplayPort/EDIDstructure1.4
Dimensions
(Width)×
(Height)×
(Depth)
Mainunit(FlexStand2) 552.5mm(21.8inch)×376-534mm(14.8-21.0inch)×245.5mm(9.7
inch)
Mainunit(TriStand2) 552.5mm(21.8inch)×408-468mm(16.1-18.4inch)×200mm(7.9
inch)
Mainunit(without
stand)
552.5mm(21.8inch)×358mm(14.1inch)×57mm(2.24inch)
Mass Mainunit(FlexStand2) Approx.6.3kg(13.9lbs.)
Mainunit(TriStand2) Approx.4.9kg(10.8lbs.)
Mainunit(without
stand)
Approx.3.7kg(8.2lbs.)

58 Chapter6Reference
Movablerange FlexStand2 Tilt: 30˚Up,0˚Down
Swivel: 172˚Right,172˚Left
Adjustableheight: 195mm(7.7inch)(158mm(6.2inch)fortiltof
0˚)
Rotation: 90˚(Clockwise)
TriStand2 Tilt: 25˚Up,0˚Down
Swivel: 172˚Right,172˚Left
Adjustableheight: 60mm(2.36inch)
Environmental
Conditions
Temperature Operating: 5˚Cto35˚C(41˚Fto95˚F)
Transportation/
Storage:
-20˚Cto60˚C(-4˚Fto140˚F)
Humidity Operating: 20%to80%R.H.(nocondensation)
Transportation/
Storage:
10%to90%R.H.(nocondensation)
AirPressure Operating: 700to1,060hPa
Transportation/
Storage:
200to1,060hPa
USB Standard USBSpecicationRevision2.0
Port Upstreamport×1,Downstreamport×2
CommunicationSpeed 480Mbps(high),12Mbps(full),1.5Mbps(low)
Supplycurrent Downstream: Max.500mA/1port
●EV2436W
LCDPanel Size 24.1-inch(610mm)
Type TFTcolorLCD,LEDbacklight
Surfacetreatment Anti-GlareHardCoating
Viewingangles Horizontal178˚,vertical178˚(CR≥10)
DotPitch 0.270mm
ResponseTime Black-white-black:Approx.14ms
Gray-to-gray:Approx.6ms(Overdrivesetting:Enhanced)
HorizontalScan
Frequency
Analog 31-81kHz
Digital DVI 31-76kHz
DisplayPort 31-76kHz
VerticalScan
Frequency
Analog 55-76Hz(non-interlace)(WUXGA:-61Hz)
Digital DVI 59-61Hz(non-interlace)(VGATEXT:69-71Hz)
DisplayPort 59-61Hz(non-interlace)(VGATEXT:69-71Hz)
Resolution 1920Dots×1200Lines
Max.DotClock Analog 193.3MHz
Digital DVI 162MHz
DisplayPort 162MHz
Max.DisplayColor Approx.16.77millioncolors
DisplayArea(H×V) 518.4mm×324.0mm(20.4inch×12.8inch)
PowerSupply 100-120VAC±10%,50/60Hz1.0A
200-240VAC±10%,50/60Hz0.6A
Power
Consumption
ScreenDisplayOn 60Worless
Powersavingmode 0.3Worless (withnoUSBconnections,“EcoViewSense”:“Off”,and
“Sound”-“PowerSave”:“SoundOff”)
PowerOff 0.3Worless
MainPowerOff 0W
59
Chapter6Reference
InputSignalConnector D-Submini15-pin
DVI-Dconnector(ApplicabletoHDCP)
DisplayPort(StandardV1.1a,applicabletoHDCP)
ApplicableFormat(Audiosignal)
- 2chlinearPCM
(32kHz/44.1kHz/48kHz/88.2kHz/96kHz)
AnalogInputSignal(Sync) Separate,TTL,positive/negative
AnalogInputSignal(Video) Analog,Positive(0.7Vp-p/75Ω)
DigitalSignal(DVI)TransmissionSystem TMDS(SingleLink)
AudioOutput Speakeroutput:1.0W+1.0W(8Ω,THD+N:10%orless)
Headphoneoutput:2mW+2mW(32Ω,THD+N:3%orless)
LineInput Inputimpedance:44kΩ(typ.)
Inputlevel:2.0Vrms(Max.)
Plug&Play Analog/Digital(DVI-D):VESADDC2B/EDIDstructure1.3
Digital(DisplayPort):VESADisplayPort/EDIDstructure1.4
Dimensions
(Width)×
(Height)×
(Depth)
Mainunit(FlexStand2) 552.5mm(21.8inch)×376-534mm(14.8-21.0inch)×245.5mm(9.7
inch)
Mainunit(TriStand2) 552.5mm(21.8inch)×408-468mm(16.1-18.4inch)×200mm(7.9
inch)
Mainunit(without
stand)
552.5mm(21.8inch)×358mm(14.1inch)×57mm(2.24inch)
Mass Mainunit(FlexStand2) Approx.6.7kg(14.8lbs.)
Mainunit(TriStand2) Approx.5.3kg(11.7lbs.)
Mainunit(without
stand)
Approx.4.1kg(9lbs.)
Movablerange FlexStand2 Tilt: 30˚Up,0˚Down
Swivel: 172˚Right,172˚Left
Adjustableheight: 195mm(7.7inch)(158mm(6.2inch)fortiltof
0˚)
Rotation: 90˚(Clockwise)
TriStand2 Tilt: 25˚Up,0˚Down
Swivel: 172˚Right,172˚Left
Adjustableheight: 60mm(2.36inch)
Environmental
Conditions
Temperature Operating: 5˚Cto35˚C(41˚Fto95˚F)
Transportation/
Storage:
-20˚Cto60˚C(-4˚Fto140˚F)
Humidity Operating: 20%to80%R.H.(nocondensation)
Transportation/
Storage:
10%to90%R.H.(nocondensation)
AirPressure Operating: 700to1,060hPa
Transportation/
Storage:
200to1,060hPa
USB Standard USBSpecicationRevision2.0
Port Upstreamport×1,Downstreamport×2
CommunicationSpeed 480Mbps(high),12Mbps(full),1.5Mbps(low)
Supplycurrent Downstream: Max.500mA/1port
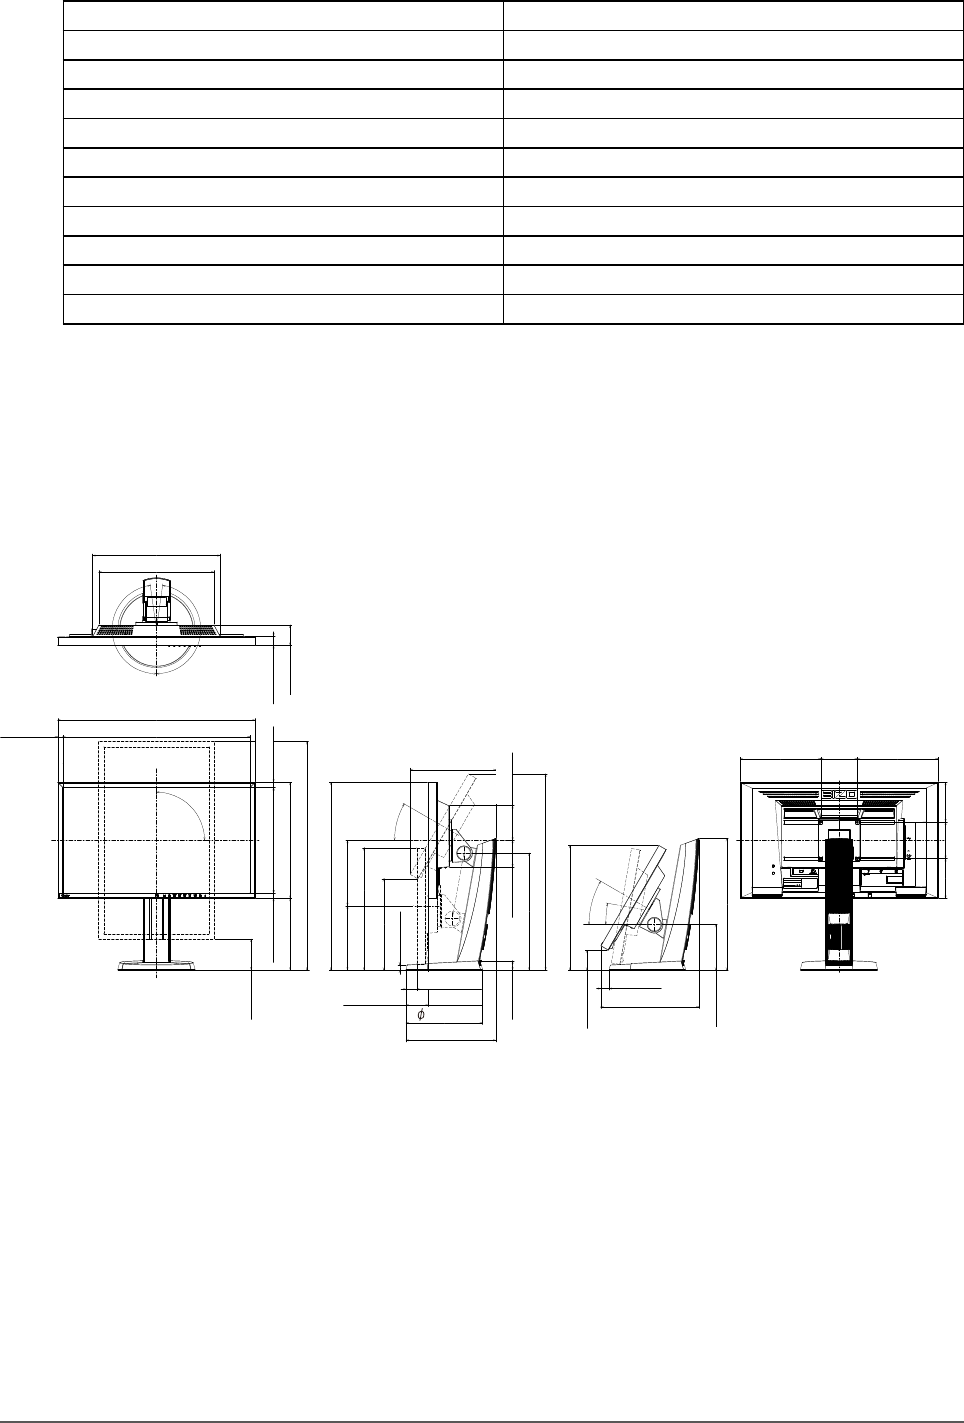
60 Chapter6Reference
●Main Default Settings
AutoEcoView Standard
EcoViewOptimizer2 On
EcoViewSense Off
FineContrastMode User1
ScreenSize FullScreen
Smoothing 3
PowerSave On
EcoTimer Off
Language English
MenuPosition Center
InputSignal Manual
●Outside Dimensions
EV2316W / EV2336W
FlexStand2
Unit:mm(inch)
320 (12.6)
PIVOT
90°
172°
172°
SWIVEL
30°
TILT
100 (3.9)
100 (3.9)
315 (12.4)
24.5 (0.96)
511.8 (20.1)
540 (21.3)
14.1 (0.56)
288.8 (11.4)14.4 (0.57) 317.5 (12.5)
108.7 (4.3)108.8 (4.3)
220 (8.7)220 (8.7)
625 (24.6)
176 (6.9) 179 (7.0)
85 (3.35)
73 (2.87)
26 (1.02)
15 (0.59)
349 (13.7)
56 (2.20)
234 (9.2)
537 (21.1)
513.5 (20.2)
196 (7.7)
245.5 (9.7)
125 (4.9)
30°
10°
360 (14.2)
54.5 (2.15) 342 (13.5)
268.5 (10.6)
23 (0.91)
334.5 (13.2)
249.5 (9.8)
209 (8.2)
28.5 (1.12)
60.5 (2.38)
14.3 (0.56)
95 (3.74)
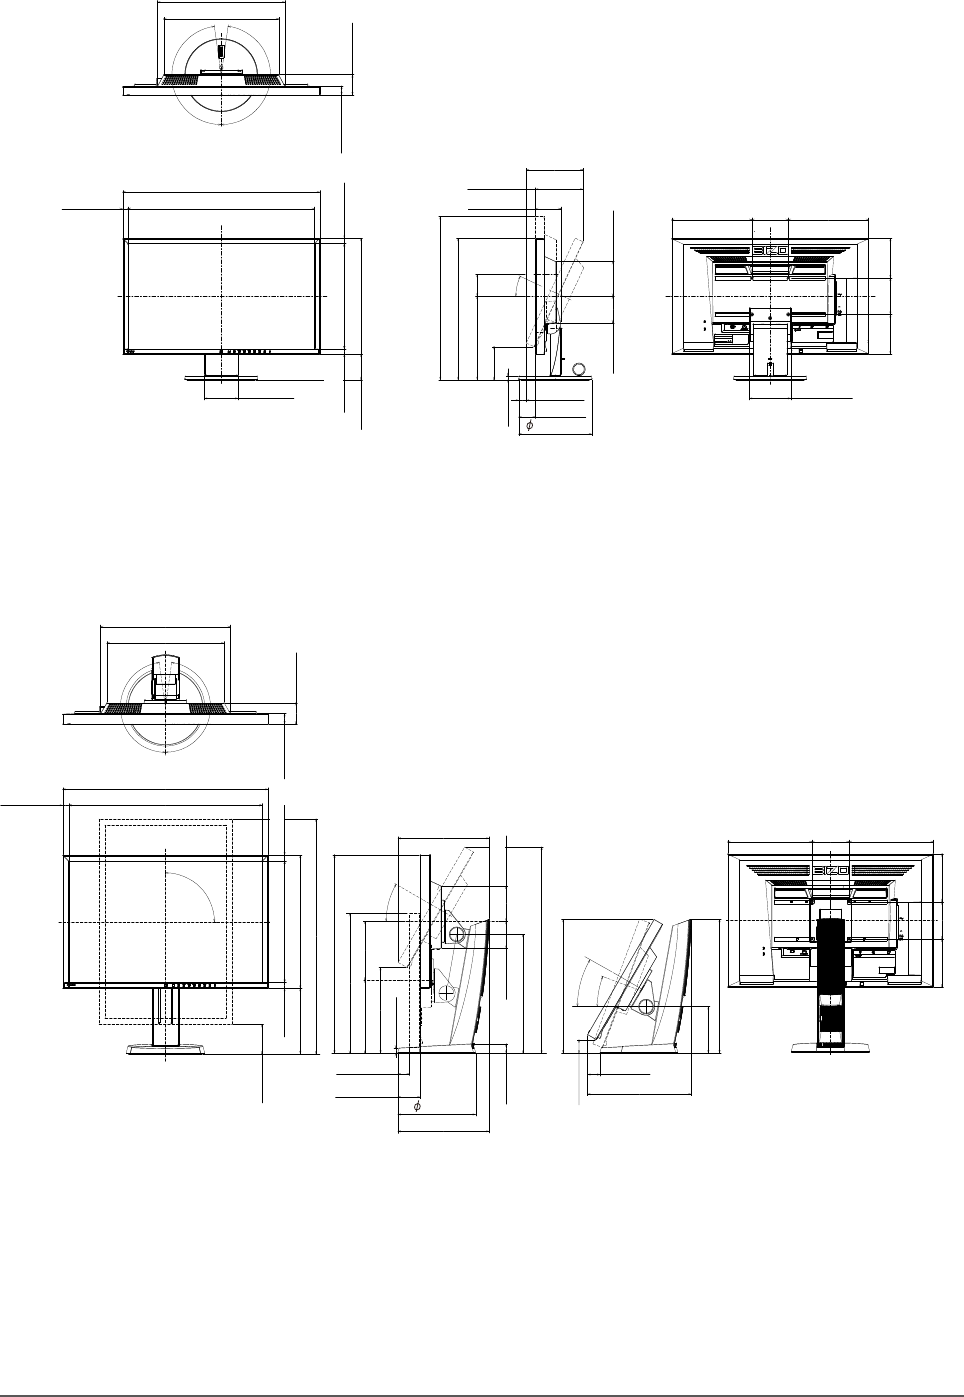
61
Chapter6Reference
TriStand2
Unit:mm(inch)
92.5 (3.64)
25°
113.5 (4.5)
100 (3.9)
172°
172°
SWIVEL
60 (2.36)
95 (3.74)
11 (0.43)
TILT
511.8 (20.1)
540 (21.3)
14.1 (0.56)
14.3 (0.56)
288.8 (11.4)
317.5 (12.5)
315 (12.4)
24.5 (0.96)
100 (3.9) 108.7 (4.3)
220 (8.7)220 (8.7)
108.8 (4.3)
229 (9.0)
73 (2.87)
70 (2.76)
349 (13.7)
56 (2.20)
447.5 (17.6)
90 (3.54)
20 (0.79)
46 (1.81)
387.5 (15.3)
155.5 (6.1)
200 (7.9)
14.4 (0.57)
130.5 (5.1)
69.5 (2.74)
EV2416W / EV2436W
FlexStand2
Unit:mm(inch)
16 (0.63)
631.5 (24.9)
552.5 (21.8)
520.4 (20.5)
16.05 (0.63)
358 (14.1)
326 (12.8)
320 (12.6)
197 (7.8) 376 (14.8)
PIVOT
90°
172°
172°
SWIVEL
158 (6.2)
534 (21.0)
30°
100 (3.9)
226.25 (8.9) 226.25 (8.9)
100 (3.9) 129 (5.1)129 (5.1)
176 (6.9)
TILT
16 (0.63) 28.5 (1.12) 57 (2.24)
315 (12.4)
349 (13.7)
59.5 (2.34)
245 (9.6)
555 (21.9)
31.5 (1.24)
73 (2.87)
245.5 (9.7)
79 (3.11)
26 (1.02)
15 (0.59)
231 (9.1)
209 (8.2)
20.5°
125 (4.9)
30°
360 (14.2)
360 (14.2)
279 (11.0)
34 (1.34)
36 (1.42)
95 (3.74)
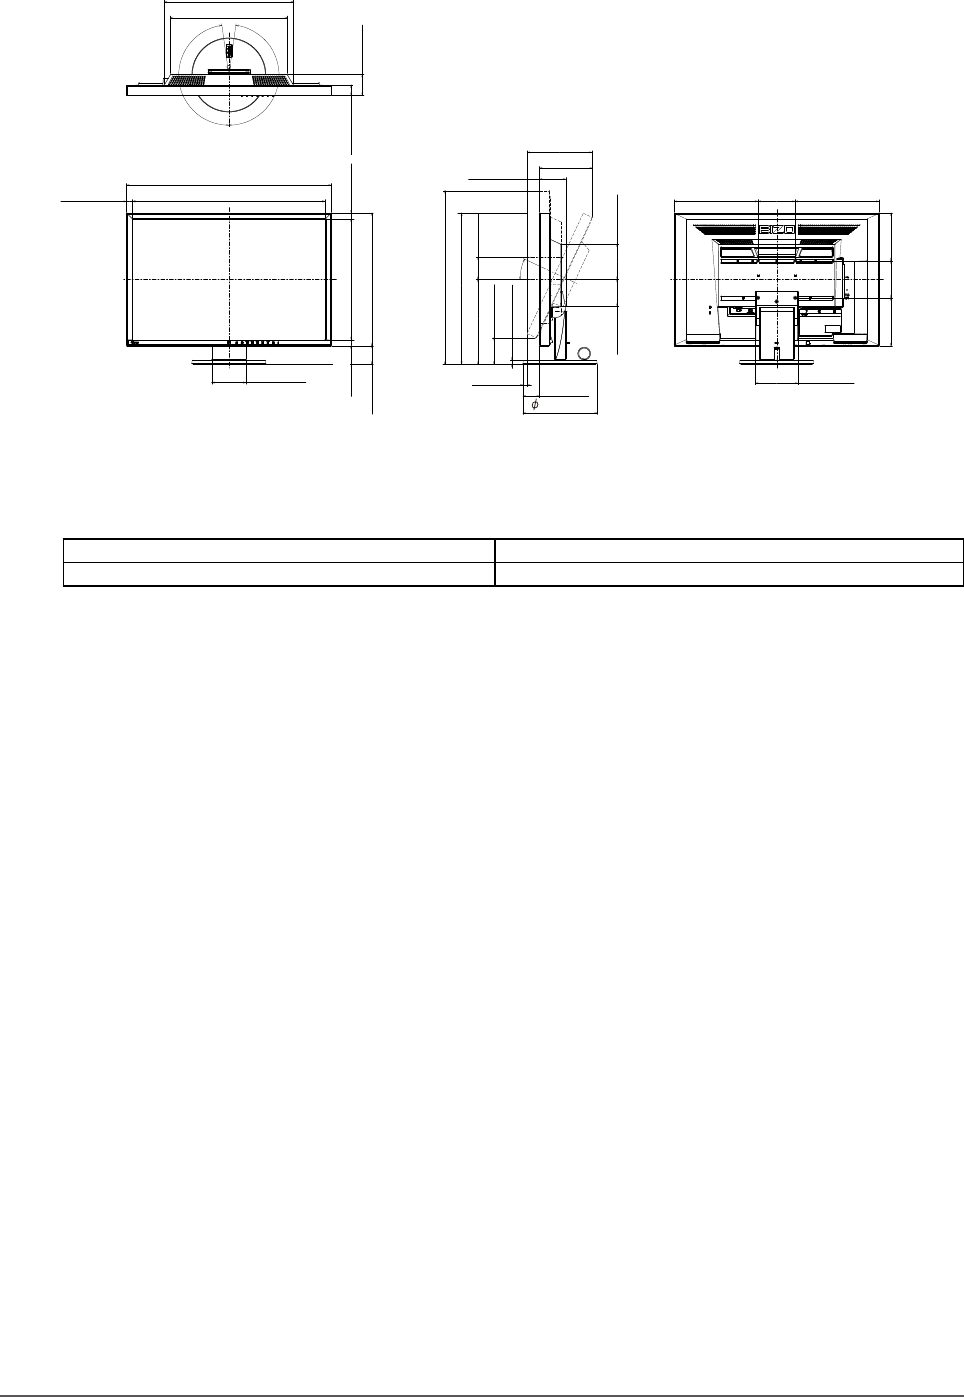
62 Chapter6Reference
TriStand2
Unit:mm(inch)
552.5 (21.8)
520.4 (20.5)
358 (14.1)
16 (0.63)
326 (12.8)
92.5 (3.64)
25°
113.5 (4.5)
100 (3.9)
100 (3.9)
16.05 (0.63)
172°
172°
SWIVEL
60 (2.36)
226.25 (8.9) 226.25 (8.9)
129 (5.1)129 (5.1)
95 (3.74)
11 (0.43)
TILT
229 (9.0)
315 (12.4)
349 (13.7)
70.5 (2.78) 142 (5.6)
176 (6.9)
45 (1.77)
408 (16.1)
468 (18.4)
28.5 (1.12) 57 (2.24)
73 (2.87)
11 (0.43)
71 (2.8)
50 (1.97)
200 (7.9)
16 (0.63)
●Accessories
Signalcable MD-C87
CleaningKit EIZO“ScreenCleaner”
For the latest information about the accessories, refer to our web site.
http://www.eizo.com
63
Chapter6Reference
6-8. Preset Timing
The following table shows factory preset analog signal timing.
Attention
• Display position may be deviated depending on the PC connected, which may require screen adjustment using Setting menu.
• If a signal other than those listed in the table is input, adjust the screen using the Setting menu. However, screen display may
still be incorrect even after the adjustment.
• When interlace signals are used, the screen cannot be displayed correctly even after screen adjustment using the Setting
menu.
●EV2316W
Resolution Applicable
Signals
Frequency Polarity
Dot Clock:
MHz
Horizontal:
kHz Vertical: Hz Horizontal Vertical
640×480 VGA 25.18 31.47 59.94 Negative Negative
800×600 VESA 40.00 37.88 60.32 Positive Positive
1024×768 VESA 65.00 48.36 60.00 Negative Negative
1280×720 CEA-861 74.25 45.00 60.00 Positive Positive
1280×960 VESA 108.00 60.00 60.00 Positive Positive
1280×1024 VESA 108.00 63.98 60.02 Positive Positive
1680×1050 VESACVT 146.25 65.29 59.95 Negative Positive
1680×1050 VESACVTRB 119.00 64.67 59.88 Positive Negative
1920×1080 CEA-861 148.50 67.50 60.00 Positive Positive
●EV2336W
Resolution Applicable
Signals
Frequency Polarity
Dot Clock:
MHz
Horizontal:
kHz Vertical: Hz Horizontal Vertical
640×480 VGA 25.18 31.47 59.94 Negative Negative
640×480 VESA 31.50 37.86 72.81 Negative Negative
640×480 VESA 31.50 37.50 75.00 Negative Negative
720×400 VGATEXT 28.32 31.47 70.09 Negative Positive
800×600 VESA 36.00 35.16 56.25 Positive Positive
800×600 VESA 40.00 37.88 60.32 Positive Positive
800×600 VESA 50.00 48.08 72.19 Positive Positive
800×600 VESA 49.50 46.88 75.00 Positive Positive
1024×768 VESA 65.00 48.36 60.00 Negative Negative
1024×768 VESA 75.00 56.48 70.07 Negative Negative
1024×768 VESA 78.75 60.02 75.03 Positive Positive
1280×720 CEA-861 74.25 45.00 60.00 Positive Positive
1280×960 VESA 108.00 60.00 60.00 Positive Positive
1280×1024 VESA 108.00 63.98 60.02 Positive Positive
1280×1024 VESA 135.00 79.98 75.03 Positive Positive
1680×1050 VESACVT 146.25 65.29 59.95 Negative Positive
1680×1050 VESACVTRB 119.00 64.67 59.88 Positive Negative
1920×1080 CEA-861 148.50 67.50 60.00 Positive Positive
64 Chapter6Reference
●EV2416W
Resolution Applicable
Signals
Frequency Polarity
Dot Clock:
MHz
Horizontal:
kHz Vertical: Hz Horizontal Vertical
640×480 VGA 25.18 31.47 59.94 Negative Negative
800×600 VESA 40.00 37.88 60.32 Positive Positive
1024×768 VESA 65.00 48.36 60.00 Negative Negative
1280×720 CEA-861 74.25 45.00 60.00 Positive Positive
1280×960 VESA 108.00 60.00 60.00 Positive Positive
1280×1024 VESA 108.00 63.98 60.02 Positive Positive
1600×1200 VESA 162.00 75.00 60.00 Positive Positive
1680×1050 VESACVT 146.25 65.29 59.95 Negative Positive
1680×1050 VESACVTRB 119.00 64.67 59.88 Positive Negative
1920×1200 VESACVT 193.25 74.56 59.89 Negative Positive
1920×1200 VESACVTRB 154.00 74.04 59.95 Positive Negative
●EV2436W
Resolution Applicable
Signals
Frequency Polarity
Dot Clock:
MHz
Horizontal:
kHz Vertical: Hz Horizontal Vertical
640×480 VGA 25.18 31.47 59.94 Negative Negative
640×480 VESA 31.50 37.86 72.81 Negative Negative
640×480 VESA 31.50 37.50 75.00 Negative Negative
720×400 VGATEXT 28.32 31.47 70.09 Negative Positive
800×600 VESA 36.00 35.16 56.25 Positive Positive
800×600 VESA 40.00 37.88 60.32 Positive Positive
800×600 VESA 50.00 48.08 72.19 Positive Positive
800×600 VESA 49.50 46.88 75.00 Positive Positive
1024×768 VESA 65.00 48.36 60.00 Negative Negative
1024×768 VESA 75.00 56.48 70.07 Negative Negative
1024×768 VESA 78.75 60.02 75.03 Positive Positive
1280×720 CEA-861 74.25 45.00 60.00 Positive Positive
1280×960 VESA 108.00 60.00 60.00 Positive Positive
1280×1024 VESA 108.00 63.98 60.02 Positive Positive
1280×1024 VESA 135.00 79.98 75.03 Positive Positive
1600×1200 VESA 162.00 75.00 60.00 Positive Positive
1680×1050 VESACVT 146.25 65.29 59.95 Negative Positive
1680×1050 VESACVTRB 119.00 64.67 59.88 Positive Negative
1920×1200 VESACVT 193.25 74.56 59.89 Negative Positive
1920×1200 VESACVTRB 154.00 74.04 59.95 Positive Negative

65
Chapter6Reference
6-9. Glossary
Clock
The analog signal input monitor needs to reproduce a clock of the same frequency as the dot clock of the
graphics system in use, when the analog signal is converted to a digital signal for image display. This is
called clock adjustment. If the clock pulse is not set correctly, some vertical bars appear on the screen.
DDC/CI (Display Data Channel / Command Interface)
VESA provides the standardization for the interactive communication of the setting information, etc.
between a PC and the monitor.
DisplayPort
DisplayPort is a next-generation digital AV interface that allows connection of the PC, audio, imaging
devices, etc. to the monitor. One cable can transfer sound with images.
DVI (Digital Visual Interface)
DVI is a digital interface standard. DVI allows direct transmission of the PC’s digital data without loss.
This adopts the TMDS transmission system and DVI connectors. There are two types of DVI connectors.
One is a DVI-D connector for digital signal input only. The other is a DVI-I connector for both digital and
analog signal inputs.
DVI DMPM (DVI Digital Monitor Power Management)
DVI DMPM is a digital interface power saving function. The “Monitor ON (operating mode)” and “Active
Off (power saving mode)” are indispensable for DVI DMPM as the monitor’s power mode.
Gain
This is used to adjust each color parameter for red, green and blue. An LCD monitor displays the color by
the light passing through the panel color lter. Red, green and blue are the three primary colors. All the
colors on the screen are displayed by combining these three colors. The color tone can be changed by
adjusting the light intensity (volume) passing through each color’s lter.
Gamma
Generally, the monitor brightness varies nonlinearly with the input signal level, which is called “Gamma
Characteristic”. A small gamma value produces a low-contrast image, while a large gamma value produces a
high-contrast image.
HDCP (High-bandwidth Digital Content Protection)
Digital signal coding system developed to copy-protect the digital contents, such as video, music, etc.
This helps to transmit the digital contents safely by coding the digital contents sent via the DVI or HDMI
connector on the output side and decoding them on the input side.
Any digital contents cannot be reproduced if both of the equipments on the output and input sides are not
applicable to HDCP system.

66 Chapter6Reference
Overdrive
This technology enhances response speed by increasing the potential difference at the time of motion of
liquid-crystal pixels, and it is used for liquid-crystal TV sets and others in general. It provides clear-cut
three-dimensional display with little afterimage, by improving response speed of the intermediate graduation
range that frequently appears in moving images.
Phase
Phase means the sampling timing to convert the analog input signal to a digital signal. Phase adjustment is
made to adjust the timing. It is recommended that phase adjustment be made after the clock is adjusted
correctly.
Range Adjustment
Range adjustment controls the signal output levels to display every color gradation. It is recommended that
range adjustment be made before color adjustment.
Resolution
The LCD panel consists of numerous pixels of specied size, which are illuminated to form images. This
monitor consists of horizontal 1920 pixels and 1080 vertical pixels (EV2316W / EV2336W), or horizontal
1920 pixels and 1200 vertical pixels (EV2416W / EV2436W). At a resolution of 1920 × 1080 (EV2316W /
EV2336W) or 1920 × 1200 (EV2416W / EV2436W), all pixels are illuminated as a full screen (1:1).
sRGB (Standard RGB)
International standard for color reproduction and color space among peripheral devices (such as monitors,
printers, digital cameras, scanners). As a form of simple color matching for the Internet, colors can be
displayed using tones close to those of the transmission and reception devices.
Temperature
Color temperature is a method to measure the white color tone, generally indicated in degrees Kelvin. The
screen becomes reddish at a low temperature, and bluish at a high temperature, like the ame temperature.
5000 K: Slightly reddish white
6500 K: White referred to as daylight-balanced color
9300 K: Slightly bluish white
TMDS (Transition Minimized Differential Signaling)
A signal transmission system for digital interface.
VESA DPM (Video Electronics Standards Association - Display Power
Management)
VESA specications achieve increased energy efciency for computer monitors. This involves
standardization of signals sent from the computer (graphics board).
DPM denes the status of signals transmitted between the computer and monitor.

67
Appendix
Appendix
Trademark
The DisplayPort Compliance Logo and VESA are registered trademarks of the Video Electronics Standards
Association.
Windows, Windows Vista, Windows Media, SQL Server, and Xbox 360 are registered trademarks of Microsoft
Corporation in the United States and other countries.
Apple, Mac, Macintosh, iMac, eMac, Mac OS, MacBook, PowerBook, ColorSync, QuickTime, and iBook are
registered trademarks of Apple Inc.
Acrobat, Adobe, Adobe AIR, and Photoshop are registered trademarks of Adobe Systems Incorporated in the
United States and other countries.
PowerPC is a registered trademark of International Business Machines Corporation.
Pentium is a registered trademark of Intel Corporation in the United States and other countries.
AMD Athlon and AMD Opteron are trademarks of Advanced Micro Devices, Inc.
GRACoL and IDEAlliance are registered trademarks of International Digital Enterprise Alliance.
ColorVision, ColorVision Spyder2 are registered trademarks of DataColor Holding AG.
Spyder3 is a trademark of DataColor Holding AG.
Eye-One, ColorMunki, and X-Rite are registered trademarks or trademarks of X-Rite Incorporated.
TouchWare is a trademark of 3M Touch Systems, Inc.
NextWindow is a registered trademark of NextWindow Ltd.
RealPlayer is a registered trademark of RealNetworks, Inc.
NEC is a registered trademark of NEC Corporation. PC-9801 and PC-9821 are trademarks of NEC Corporation.
PlayStation is a registered trademark of Sony Computer Entertainment Inc.
PSP and PS3 are trademarks of Sony Computer Entertainment Inc.
ENERGY STAR is a registered trademark of the United States Environmental Protection Agency in the United
States and other countries.
The terms HDMI and HDMI High-Denition Multimedia Interface, and the HDMI Logo are trademarks or
registered trademarks of HDMI Licensing, LLC in the United States and other countries.
Kensington and MicroSaver are trademarks of ACCO Brands Corporation.
EIZO, the EIZO Logo, ColorEdge, DuraVision, FlexScan, FORIS, RadiForce, RadiCS, RadiNET, Raptor, and
ScreenManager are registered trademarks of EIZO Corporation in Japan and other countries.
ColorNavigator, EIZO EasyPIX, EcoView NET, EIZO ScreenSlicer, i • Sound, Screen Administrator, and UniColor
Pro are trademarks of EIZO Corporation.
All other company and product names are trademarks or registered trademarks of their respective owners.
License
A round gothic bold bit map font designed by Ricoh is used for the characters displayed on this product.

68 Appendix
ENERGY STAR
As an ENERGY STAR Partner, EIZO Corporation has determined that this product meets the
ENERGY STAR guidelines for energy efciency.
TCO
This product has acquired the TCO standard that relates to the safety, ergonomics (EcoView Optimizer 2: Off),
environment and so forth of ofce equipment. For an overview of the TCO, refer to our web site.
http://www.eizo.com
69
Appendix
FCC Declaration of Conformity
For U.S.A. , Canada, etc. (rated 100-120 Vac) Only
FCC Declaration of Conformity
We, the Responsible Party EIZOInc.
5710WarlandDrive,Cypress,CA90630
Phone:(562)431-5011
declare that the product Tradename:EIZO
Model:FlexScanEV2316W/EV2336W/EV2416W/EV2436W
is in conformity with Part 15 of the FCC Rules. Operation of this product is subject to the following
two conditions: (1) this device may not cause harmful interference, and (2) this device must accept any
interference received, including interference that may cause undesired operation.
ThisequipmenthasbeentestedandfoundtocomplywiththelimitsforaClassBdigitaldevice,pursuant
toPart15oftheFCCRules.Theselimitsaredesignedtoprovidereasonableprotectionagainst
harmfulinterferenceinaresidentialinstallation.Thisequipmentgenerates,uses,andcanradiateradio
frequencyenergyand,ifnotinstalledandusedinaccordancewiththeinstructions,maycauseharmful
interferencetoradiocommunications.However,thereisnoguaranteethatinterferencewillnotoccurin
aparticularinstallation.Ifthisequipmentdoescauseharmfulinterferencetoradioortelevisionreception,
whichcanbedeterminedbyturningtheequipmentoffandon,theuserisencouragedtotrytocorrect
theinterferencebyoneormoreofthefollowingmeasures.
* Reorientorrelocatethereceivingantenna.
* Increasetheseparationbetweentheequipmentandreceiver.
* Connecttheequipmentintoanoutletonacircuitdifferentfromthattowhichthereceiverisconnected.
* Consultthedealeroranexperiencedradio/TVtechnicianforhelp.
Changesormodicationsnotexpresslyapprovedbythepartyresponsibleforcompliancecouldvoidthe
user’sauthoritytooperatetheequipment.
Note
UsetheattachedspeciedcablebeloworEIZOsignalcablewiththismonitorsoastokeepinterference
withinthelimitsofaClassBdigitaldevice.
- ACCord
- ShieldedSignalCable(enclosed)
Canadian Notice
ThisClassBdigitalapparatuscomplieswithCanadianICES-003.
CetappareilnumériquedeleclasseBestcomformeàlanormeNMB-003duCanada.

70 Appendix
Hinweise zur Auswahl des richtigen Schwenkarms für Ihren Monitor
Dieser Monitor ist für Bildschirmarbeitsplätze vorgesehen. Wenn nicht der zum Standardzubehör gehörige
Schwenkarm verwendet wird, muss statt dessen ein geeigneter anderer Schwenkarm installiert werden. Bei der
Auswahl des Schwenkarms sind die nachstehenden Hinweise zu berücksichtigen:
Der Standfuß muß den nachfolgenden Anforderungen entsprechen:
a) Der Standfuß muß eine ausreichende mechanische Stabilität zur Aufnahme des Gewichtes vom Bildschirmgerät
und des spezi zierten Zubehörs besitzen. Das Gewicht des Bildschirmgerätes und des Zubehörs sind in der
zugehörenden Bedienungsanleitung angegeben.
b) Die Befestigung des Standfusses muß derart erfolgen, daß die oberste Zeile der Bildschirmanzeige nicht höher
als die Augenhöhe eines Benutzers in sitzender Position ist.
c) Im Fall eines stehenden Benutzers muß die Befestigung des Bildschirmgerätes derart erfolgen, daß die Höhe der
Bildschirmmitte über dem Boden zwischen 135 – 150 cm beträgt.
d) Der Standfuß muß die Möglichkeit zur Neigung des Bildschirmgerätes besitzen (max. vorwärts: 5°, min. nach
hinten ≥ 5°).
e) Der Standfuß muß die Möglichkeit zur Drehung des Bildschirmgerätes besitzen (max. ±180°). Der maximale
Kraftaufwand dafür muß weniger als 100 N betragen.
f) Der Standfuß muß in der Stellung verharren, in die er manuell bewegt wurde.
g) Der Glanzgrad des Standfusses muß weniger als 20 Glanzeinheiten betragen (seidenmatt).
h) Der Standfuß mit Bildschirmgerät muß bei einer Neigung von bis zu 10° aus der normalen aufrechten Position
kippsicher sein.
Hinweis zur Ergonomie :
Dieser Monitor erfüllt die Anforderungen an die Ergonomie nach EK1-ITB2000 mit dem Videosignal, 1920×1080
(EV2316W / EV2336W) / 1920×1200 (EV2416W / EV2436W), Digital Eingang und mindestens 60,0 Hz
Bildwiederholfrequenz, non interlaced. Weiterhin wird aus ergonomischen Gründen empfohlen, die Grundfarbe
Blau nicht auf dunklem Untergrund zu verwenden (schlechte Erkennbarkeit, Augenbelastung bei zu geringem
Zeichenkontrast.)
Übermäßiger Schalldruck von Ohrhörern bzw. Kopfhörern kann einen Hörverlust bewirken.
Eine Einstellung des Equalizers auf Maximalwerte erhöht die Ausgangsspannung am Ohrhörer- bzw.
Kopfhörerausgang und damit auch den Schalldruckpegel.
„Maschinenlärminformations-Verordnung 3. GPSGV:
Der höchste Schalldruckpegel beträgt 70 dB(A) oder weniger gemäss EN ISO 7779“
[Begrenzung des maximalen Schalldruckpegels am Ohr]
Bildschirmgeräte: Größte Ausgangsspannung 150 mV

71
Appendix
LIMITED WARRANTY
LIMITED WARRANTY
EIZOCorporation(hereinafterreferredtoas“EIZO”)anddistributorsauthorizedbyEIZO(hereinafterreferredtoasthe
“Distributors
”)warrant,subjecttoandinaccordancewiththetermsofthislimitedwarranty(hereinafterreferredtoasthe
“Warranty”),totheoriginalpurchaser(hereinafterreferredtoasthe“Original Purchaser”)whopurchasedtheproduct
speciedinthisdocument(hereinafterreferredtoasthe“Product
”)fromEIZOorDistributors,thatEIZOandDistributors
shall,attheirsolediscretion,eitherrepairorreplacetheProductatnochargeiftheOriginalPurchaserbecomesaware
withintheWarrantyPeriod(denedbelow)thattheProductmalfunctionsorisdamagedinthecourseofnormaluseof
theProductinaccordancewiththedescriptionintheinstructionmanualattachedtotheProduct(hereinafterreferredto
asthe“User’s Manual”).
TheperiodofthisWarrantyislimitedto(i)five(5)yearsfromthedateofpurchaseoftheProduct;or,limitedtothe
expirationof(ii)30,000hoursofitsuseoftheProduct(hereinafterreferredtoasthe“Warranty Period”).EIZOand
DistributorsshallbearnoliabilityorobligationwithregardtotheProductinrelationtotheOriginalPurchaseroranythird
partiesotherthanasprovidedunderthisWarranty.
EIZOandDistributorswillceasetoholdorstoreanypartsoftheProductuponexpirationofseven(7)yearsafterthe
productionofsuchpartsisdiscontinued.Inrepairingthemonitor,EIZOandDistributorswilluserenewalpartswhich
complywithourQCstandards.
TheWarrantyisvalidonlyinthecountriesorterritorieswheretheDistributorsarelocated.TheWarrantydoesnotrestrict
anylegalrightsoftheOriginalPurchaser.
NotwithstandinganyotherprovisionofthisWarranty,EIZOandDistributorsshallhavenoobligationunderthisWarranty
whatsoeverinanyofthecasesassetforthbelow:
(a) AnydefectoftheProductcausedbyfreightdamage,modication,alteration,abuse,misuse,accident,incorrect
installation,disaster,faultymaintenanceand/orimproperrepairbythirdpartyotherthanEIZOandDistributors;
(b) AnyincompatibilityoftheProductduetopossibletechnicalinnovationsand/orregulations;
(c) Anydeteriorationofthesensor;
(d) AnydeteriorationofdisplayperformancecausedbythedeteriorationofexpendablepartssuchastheLCDpanel
and/orbacklight,etc.(e.g.changesinbrightness,changesinbrightnessuniformity,changesincolor,changesin
coloruniformity,defectsinpixelsincludingburntpixels,etc.);
(e) AnydefectoftheProductcausedbyexternalequipment;
(f) AnydefectoftheProductonwhichtheoriginalserialnumberhasbeenalteredorremoved;
(g) Anynormaldeteriorationoftheproduct,particularlythatofconsumables,accessories,and/orattachments(e.g.
buttons,rotatingparts,cables,User’sManual,etc.);and
(h) Anydeformation,discoloration,and/orwarpoftheexterioroftheproductincludingthatofthesurfaceoftheLCD
panel.
ToobtainserviceundertheWarranty,theOriginalPurchasermustdelivertheProduct,freightprepaid,initsoriginal
packageorotheradequatepackageaffordinganequaldegreeofprotection,assumingtheriskofdamageand/orloss
intransit,tothelocalDistributor.TheOriginalPurchasermustpresentproofofpurchaseoftheProductandthedateof
suchpurchasewhenrequestingservicesundertheWarranty.
TheWarrantyPeriodforanyreplacedand/orrepairedproductunderthisWarrantyshallexpireattheendoftheoriginal
WarrantyPeriod.
EIZOORDISTRIBUTORSARENOTRESPONSIBLEFORANYDAMAGETO,ORLOSSOF,DATAOROTHER
INFORMATIONSTOREDINANYMEDIAORANYPARTOFANYPRODUCTRETURNEDTOEIZOORDISTRIBUTORS
FORREPAIR.
EIZOANDDISTRIBUTORSMAKENOFURTHERWARRANTIES,EXPRESSEDORIMPLIED,WITHRESPECTTO
THEPRODUCTANDITSQUALITY,PERFORMANCE,MERCHANTABILITYORFITNESSFORANYPARTICULAR
USE.INNOEVENTSHALLEIZOORDISTRIBUTORSBELIABLEFORANYINCIDENTAL,INDIRECT,SPECIAL,
CONSEQUENTIALOROTHERDAMAGEWHATSOEVER(INCLUDING,WITHOUTLIMITATION,DAMAGESFOR
LOSSOFPROFIT,BUSINESSINTERRUPTION,LOSSOFBUSINESSINFORMATION,ORANYOTHERPECUNIARY
LOSS)ARISINGOUTOFTHEUSEORINABILITYTOUSETHEPRODUCTORINANYCONNECTIONWITHTHE
PRODUCT,WHETHERBASEDONCONTRACT,TORT,NEGLIGENCE,STRICTLIABILITYOROTHERWISE,EVEN
IFEIZOORDISTRIBUTORSHAVEBEENADVISEDOFTHEPOSSIBILITYOFSUCHDAMAGES.THISEXCLUSION
ALSOINCLUDESANYLIABILITYWHICHMAYARISEOUTOFTHIRDPARTYCLAIMSAGAINSTTHEORIGINAL
PURCHASER.THEESSENCEOFTHISPROVISIONISTOLIMITTHEPOTENTIALLIABILITYOFEIZOAND
DISTRIBUTORSARISINGOUTOFTHISLIMITEDWARRANTYAND/ORSALES.

72 Appendix
BEGRENZTE GARANTIE
EIZOCorporation(imWeiteren als„EIZO“bezeichnet)unddieVertragsimporteurevonEIZO(imWeiterenals
„Vertrieb(e)“bezeichnet)garantierendemursprünglichenKäufer(imWeiterenals„Erstkäufer“bezeichnet),derdasin
diesemDokumentvorgegebeneProdukt(imWeiterenals„Produkt
“bezeichnet)vonEIZOodereinemVertrieberworben
hat,gemäßdenBedingungendieserbeschränktenGarantie(imWeiterenals„Garantie“bezeichnet),dassEIZOund
derVertriebnacheigenemErmessendasProduktentwederkostenlosreparierenoderaustauschen,fallsderErstkäufer
innerhalbderGarantiefrist(weiteruntenfestgelegt)eineFehlfunktionbzw.BeschädigungdesProduktsfeststellt,
diewährenddesnormalenGebrauchsdesProduktsgemäßdenAnweisungendeszumLieferumfangdesProdukts
gehörendenBenutzerhandbuchs(imWeiterenals„Benutzerhandbuch“bezeichnet)aufgetretenist.
DieDauerderGarantieleistungbeträgt(i)fünf(5)JahreabdemErstverkaufsdatumdesProduktsoder(ii)30.000
BetriebsstundendesProdukts(imWeiterenals„Garantiefrist“bezeichnet).EIZOunddieVertriebeübernehmenüber
denRahmendieserGarantiehinaushinsichtlichdesProduktskeinerleiHaftungoderVerpichtungdemErstkäuferoder
Drittengegenüber.
EIZOunddieVertriebeverpichtensich,ErsatzteilefürdasProduktübereinenZeitraumvonsieben(7)Jahrennach
EinstellungderProduktionderErsatzteilezulagernbzw.anzubieten.EIZOundseineVertriebspartnerverpichtensich,
beieineretwaigenReparaturdesMonitorsausschließlichProduktegemäßdenEIZO-Qualitätssicherungsstandardszu
verwenden.
DieseGarantiegiltnurinLändernoderGebieten,indenensichVertriebebefinden.Diegesetzlichen
GewährleistungsrechtedesErstkäufersgegenüberdemVerkäuferwerdendurchdieseGarantienichtberührt.
EIZOunddieVertriebebesitzenimRahmendieserGarantiekeinerleiVerpichtungindenfolgendenFällen:
(a) Produktdefekte,dieaufFrachtschäden,Modifikation,Nachgestaltung,Missbrauch,Fehlbedienung,Unfälle,
unsachgemäßeInstallation,Naturkatastrophen,fehlerhafteWartungund/oderunsachgemäßeReparaturdurcheine
andereParteialsEIZOunddieVertriebezurückzuführensind.
(b) EineInkompatibilitätdesProduktsaufgrundvontechnischenNeuerungenund/oderneuenBestimmungen,die
nachdemKaufinKrafttreten.
(c) JeglicheVerschlechterungdesSensors.
(d) JeglicheVerschlechterungderBildschirmleistung,diedurchVerschleißteilewiedasLCD-Panelund/oderdie
Hintergrundbeleuchtungusw.hervorgerufenwerden(z.B.VeränderungenvonHelligkeitoderHelligkeitsverteilung,
VeränderungenvonFarbeoderFarbverteilung,PixeldefekteeinschließlichvondurchgebranntenPixelnusw.).
(e) Produktdefekte,diedurchexterneGeräteverursachtwerden.
(f) JeglicherDefekteinesProdukts,dessenursprünglicheSeriennummergeändertoderentferntwurde.
(g) NormaleAbnutzungdesProdukts,insbesonderevonVerbrauchsteilen,Zubehörteilenund/oderBeilagen(z.B.
Tasten,drehbareTeile,Kabel,Benutzerhandbuchusw.);sowie
(h) Verformungen,Verfärbungenund/oderVerziehungenamProduktäußeren,einschließlichderOberächedesLCD-
Panels.
BeiInanspruchnahmederGarantieleistungistderErstkäuferverpflichtet,dasProduktaufeigeneKostenund
inderOriginalverpackungbzw.eineranderengeeignetenVerpackung,dieeinengleichwertigenSchutzgegen
Transportschädenbietet,andenörtlichenVertriebzuübersenden,wobeiderErstkäuferdasTransportrisikogegenüber
Schädenund/oderVerlustträgt.ZumZeitpunktderInanspruchnahmederGarantieleistungmussderErstkäufereinen
Verkaufsbelegvorweisen,aufdemdasKaufdatumangegebenist.
DieGarantiefristfüreinimRahmendieserGarantieausgetauschtesund/oderrepariertesProdukterlischtnachAblauf
derursprünglichenGarantiefrist.
EIZOODERDIEEIZO-VERTRAGSIMPORTEUREHAFTENNICHTFÜRZERSTÖRTEDATENBESTÄNDEODERDIE
KOSTENDERWIEDERBESCHAFFUNGDIESERDATENBESTÄNDEAUFJEGLICHENDATENTRÄGERNODER
TEILENDESPRODUKTS,DIEIMRAHMENDERGARANTIEBEIEIZOODERDENEIZO-VERTRAGSIMPORTEUREN
ZURREPARATUREINGEREICHTWURDEN.
EIZOUNDDIEEIZO-VERTRAGSIMPORTEUREGEBENWEDEREXPLIZITENOCHIMPLIZITEGARANTIEN
INBEZUGAUFDIESESPRODUKTUNDSEINEQUALITÄT,LEISTUNG,VERKÄUFLICHKEITODEREIGNUNG
FÜREINENBESTIMMTENZWECK.AUFKEINENFALLSINDEIZOODERDIEEIZO-VERTRAGSIMPORTEURE
VERANTWORTLICHFÜRJEGLICHEZUFÄLLIGE,INDIREKTE,SPEZIELLE,FOLGE-ODERANDERESCHÄDEN
JEGLICHERART(EINSCHLIESSLICHOHNEJEDEBEGRENZUNGSCHÄDENBEZÜGLICHPROFITVERLUST,
GESCHÄFTSUNTERBRECHUNG,VERLUSTVONGESCHÄFTSINFORMATIONODERJEGLICHEANDEREN
FINANZIELLENEINBUSSEN),DIEDURCHDIEVERWENDUNGDESPRODUKTESODERDIEUNFÄHIGKEIT
ZURVERWENDUNGDESPRODUKTESODERINJEGLICHERBEZIEHUNGMITDEMPRODUKT,SEIES
BASIERENDAUFVERTRAG,SCHADENSERSATZ,NACHLAESSIGKEIT,STRIKTEHAFTPFLICHTODERANDEREN
FORDERUNGENENTSTEHEN,AUCHWENNEIZOUNDDIEEIZO-VERTRAGSIMPORTEUREIMVORAUSÜBER
DIEMÖGLICHKEITSOLCHERSCHÄDENINFORMIERTWURDEN.DIESERAUSSCHLUSSENTHÄLTAUCHJEDE
HAFTPFLICHT,DIEAUSFORDERUNGENDRITTERGEGENDENERSTKÄUFERENTSTEHENKANN.ZWECK
DIESERKLAUSELISTES,DIEHAFTUNGVONEIZOUNDDENVERTRIEBENGEGENÜBERFORDERUNGENZU
BEGRENZEN,DIEAUSDIESERBESCHRÄNKTENGARANTIEUND/ODERDEMVERKAUFENTSTEHENKÖNNEN.

73
Appendix
GARANTIE LIMITÉE
EIZOCorporation(ci-aprèsdénommé«EIZO »)etlesdistributeursautorisésparEIZO(ci-aprèsdénommés
«Distributeurs »),sousréserveetconformémentauxtermesdecettegarantielimitée(ci-aprèsdénommée
«Garantie »),garantissentàl’acheteurinitial(ci-aprèsdénommé«Acheteur initial »)duproduitspécifiédansla
présente(ci-aprèsdénommé«Produit »)achetéauprèsd’EIZOoudeDistributeursagréésEIZO,queEIZOetses
DistributeursaurontpouroptionderéparerouremplacergratuitementleProduitsil’Acheteurinitialconstate,pendantla
Périodedegarantie(dénieci-dessous),qu’ilyaundysfonctionnementouqueleProduitasubiundommagedansle
cadred’uneutilisationnormaleduProduitconformémentàladescriptiondumoded’emploiquiaccompagneleProduit
(ci-aprèsdénommé«Manuel d’utilisation »).
LapériodedecetteGarantieestlimitéeà(i)cinq(5)ansàpartirdeladated’achatduProduit;ou,limitéejusqu’à
l’expirationde(ii)30000heuresd’utilisationduProduit(ci-aprèsdénommée«Période de Garantie»).EIZOetses
DistributeursdéclinenttouteresponsabilitéouobligationconcernantceProduitfaceàl’Acheteurinitialouàtouteautre
personneàl’exceptiondecellesstipuléesdanslaprésenteGarantie.
EIZOetsesDistributeurscesserontdetenirouconserverenstocktoutepiècedeceProduitaprèsl’expirationde
lapériodedesept(7)anssuivantl’arrêtdelaproductiondetellespièces.Pourréparerlemoniteur,EIZOetses
distributeursutiliserontdespiècesderechangeconformesànosnormesdecontrôlequalité.
LaGarantieestvalableuniquementdanslespaysoulesterritoiresoùsetrouventlesDistributeurs.LaGarantienelimite
aucundesdroitsreconnusparlaloiàl’Acheteurinitial.
NonobstanttouteautreclausedecetteGarantie,EIZOetsesDistributeursn’aurontd’obligationdanslecadredecette
Garantiepouraucundescasénumérésci-dessous:
(a) ToutdéfautduProduitrésultantdedommagesoccasionnéslorsdutransport,d’unemodication,d’unealtération,
d’unabus,d’unemauvaiseutilisation,d’unaccident,d’uneinstallationincorrecte,d’undésastre,d’unentretienet/
oud’uneréparationincorrectseffectuésparunepersonneautrequeEIZOousesDistributeurs;
(b) TouteincompatibilitéduProduitrésultantd’améliorationstechniqueset/ouréglementationspossibles;
(c) Toutedétériorationducapteur;
(d) Toutedétériorationdesperformancesd’affichagecauséeparladétériorationdesélémentsconsommablestels
quelepanneauLCDet/oulerétroéclairage,etc.(parexempledeschangementsdeluminosité,deschangements
del’uniformitédelaluminosité,desmodicationsdecouleur,deschangementsdel’uniformitédescouleurs,des
défectuositésdepixelsycomprisdespixelsbrûlés,etc.);
(e) ToutdéfautduProduitcauséparunappareilexterne;
(f) Toutdéfautd’unProduitsurlequellenumérodesérieoriginalaétéaltéréousupprimé;
(g) ToutedétériorationnormaleduProduit,particulièrementcelledesconsommables,desaccessoireset/oudes
piècesreliéesauProduit(touches,élémentspivotants,câbles,Manueld’utilisationetc.),et
(h) Toutedéformation,décoloration,et/ougondolagedel’extérieurduProduit,ycompriscelledelasurfacedu
panneauLCD.
Pourbénécierd’unservicedanslecadredecetteGarantie,l’AcheteurinitialdoitrenvoyerleProduitportpayé,dans
sonemballaged’origineoutoutautreemballageappropriéoffrantundegrédeprotectionéquivalent,auDistributeurlocal,
etassumeralaresponsabilitédesdommageset/oupertepossibleslorsdutransport.L’Acheteurinitialdoitprésenterune
preuved’achatduProduitcomprenantsadated’achatpourbénécierdeceservicedanslecadredelaGarantie.
LaPériodedegarantiepourtoutProduitremplacéet/ouréparédanslecadredecetteGarantieexpireraàlandela
Périodedegarantieinitiale.
EIZOOUSESDISTRIBUTEURSNESAURAIENTÊTRETENUSRESPONSABLESDESDOMMAGESOUPERTESDE
DONNÉESOUD’AUTRESINFORMATIONSSTOCKÉESDANSUNMÉDIAQUELCONQUEOUUNEAUTREPARTIE
DUPRODUITRENVOYÉÀEIZOOUAUXDISTRIBUTEURSPOURRÉPARATION.
AUCUNEAUTREGARANTIE,EXPLICITEOUTACITE,N’ESTOFFERTEPAREIZOETSESDISTRIBUTEURS
CONCERNANTLEPRODUITETSESQUALITÉS,PERFORMANCES,QUALITÉMARCHANDEOUADAPTATION
ÀUNUSAGEPARTICULIER.ENAUCUNCAS,EIZOOUSESDISTRIBUTEURSNESERONTRESPONSABLES
DESDOMMAGESFORTUITS,INDIRECTS,SPÉCIAUX,INDUITS,OUDETOUTAUTREDOMMAGEQUEL
QU’ILSOIT(YCOMPRIS,SANSLIMITATION,LESDOMMAGESRÉSULTANTD’UNEPERTEDEPROFIT,D’UNE
INTERRUPTIOND’ACTIVITÉS,D’UNEPERTEDEDONNÉESCOMMERCIALES,OUDETOUTAUTREMANQUE
ÀGAGNER)RÉSULTANTDEL’UTILISATIONOUDEL’INCAPACITÉD’UTILISERLEPRODUITOUAYANTUN
RAPPORTQUELCONQUEAVECLEPRODUIT,QUECESOITSURLABASED’UNCONTRAT,D’UNTORT,D’UNE
NÉGLIGENCE,D’UNERESPONSABILITÉSTRICTEOUAUTRE,MÊMESIEIZOOUSESDISTRIBUTEURSONTÉTÉ
AVERTISDELAPOSSIBILITÉDETELSDOMMAGES.CETTELIMITATIONINCLUTAUSSITOUTERESPONSABILITÉ
QUIPOURRAITÊTRESOULEVÉELORSDESRÉCLAMATIONSD’UNTIERSCONTREL’ACHETEURINITIAL.
L’ESSENCEDECETTECLAUSEESTDELIMITERLARESPONSABILITÉPOTENTIELLEDEEIZOETDESES
DISTRIBUTEURSRÉSULTANTDECETTEGARANTIELIMITÉEET/OUDESVENTES.

74 Appendix
GARANTÍA LIMITADA
EIZOCorporation(enlosucesivo“EIZO”)ysusdistribuidoresautorizados(enlosucesivolos“Distribuidores
”),
conarregloydeconformidadconlostérminosdeestagarantíalimitada(enlosucesivola“Garantía”),garantizanal
compradororiginal(enlosucesivoel“Comprador original
”)quecompróelproductoespecicadoenestedocumento(en
losucesivoel“Producto”)aEIZOoasusDistribuidores,queEIZOysusDistribuidores,asupropiocriterio,repararán
osustituiránelProductodeformagratuitasielCompradororiginaldetectadentrodelperiododelaGarantía(indicado
posteriormente)queelProductonofuncionacorrectamenteoquesehaaveriadoduranteelusonormaldelmismode
acuerdoconlasindicacionesdelmanualdeinstruccionessuministradoconelProducto(enlosucesivoel“
Manual del
usuario”).
ElperíododevalidezdeestaGarantíaestálimitadoa(i)cinco(5)añosapartirdelafechadecompradelProductoo(ii)
a30.000horasdeusodelProducto(enadelantedesignadocomoel“Periodo de Garantía
”).EIZOysusDistribuidores
notendránningunaresponsabilidadniobligaciónconrespectoalProductoparaconelCompradororiginalniparacon
tercerosquenoseanlasestipuladasenlapresenteGarantía.
EIZOysusDistribuidoresnoestaránobligadosasuministrarcualquierrecambiodelProductounavezpasadossiete
(7)añosdesdequesedejedefabricarelmismo.Paralareparacióndelmonitor,EIZOylosdistribuidoresutilizarán
repuestosquecumplanconnuestrosestándaresdecontroldecalidad.
LaGarantíaesválidasóloenlospaísesyterritoriosdondeestánubicadoslosDistribuidores.LaGarantíanorestringe
ningúnderecholegaldelCompradororiginal.
ApesardelasestipulacionesdeestaGarantía,EIZOysusDistribuidoresnotendránobligaciónalgunabajoesta
Garantíaenningunodeloscasosexpuestosacontinuación:
(a) CualquierdefectodelProductocausadopordañoseneltransporte,modicación,alteración,abuso,usoincorrecto,
accidente,instalaciónincorrecta,desastre,mantenimientoincorrectoy/oreparaciónindebidarealizadaporun
terceroquenoseaEIZOosusDistribuidores.
(b) CualquierincompatibilidaddelProductodebidaaposiblesinnovacionestécnicasy/oreglamentaciones.
(c) Cualquierdeteriorodelsensor.
(d) Cualquierdeterioroenelrendimientodelavisualizacióncausadoporfallosenlaspiezasconsumiblescomoel
panelLCDy/ola"Backlight",etc.(p.ej.cambiosdebrillo,cambiosdeuniformidaddelbrillo,cambiosdecolor,
cambiosdeuniformidaddelcolor,defectosdepíxeles,incluyendopíxelesmuertos,etc.).
(e) CualquierdefectodelProductocausadoporunequipoexterno.
(f) CualquierdefectodelProductoenelquehayasidoalteradooborradoelnúmerodeserieoriginal.
(g) CualquierdeterioronormaldelProducto,yenparticulardelaspiezasconsumibles,accesoriosydemás(p.ej.
botones,piezasgiratorias,cables,Manualdelusuario,etc.).
(h) Cualquierdeformación,decoloracióny/oalabeodelexteriordelProductoincluidalasuperciedelpanelLCD.
ParaobtenerservicioenlostérminosdeestaGarantía,elProductodeberáserenviadoporelCompradororiginal,
asuDistribuidorlocal,coneltransportepreviamentepagado,enelembalajeoriginaluotroembalajeadecuadoque
ofrezcaelmismogradodeprotección,asumiendoelriesgodedañosy/opérdidadelProductoduranteeltransporte.El
CompradororiginaldeberápresentaruncomprobantedecompradelProductoenelquesereejelafechadecompra
delmismocuandolosoliciteelserviciodeGarantía.
ElPeriododegarantíaparacualquierProductoreemplazadoy/oreparadoenlostérminosdeestaGarantíaexpiraráal
vencerelPeriododegarantíaoriginal.
EIZOOLOSDISTRIBUIDORESAUTORIZADOSDEEIZONOSERESPONSABILIZANDENINGÚNDAÑOO
PÉRDIDAQUEPUEDANSUFRIRLOSDATOSUOTRAINFORMACIÓNALMACENADAENCUALQUIERMEDIOO
CUALQUIERPARTEDECUALQUIERPRODUCTODEVUELTOAEIZOOALOSDISTRIBUIDORESDEEIZOPARA
SUREPARACIÓN.
EIZOYLOSDISTRIBUIDORESAUTORIZADOSDEEIZONOOFRECENNINGUNAOTRAGARANTÍA,IMPLÍCITA
NIEXPLÍCITA,CONRESPECTOALPRODUCTOYASUCALIDAD,RENDIMIENTO,COMERCIABILIDADE
IDONEIDADPARACUALQUIERUSOENPARTICULAR.ENNINGÚNCASOSERÁNEIZOOLOSDISTRIBUIDORES
AUTORIZADOSDEEIZORESPONSABLESDENINGÚNDAÑOEMERGENTE,INDIRECTO,ESPECIAL,INHERENTE
OCUALQUIERAQUESEA(INCLUYENDO,SINLIMITACIÓN,DAÑOSPORLUCROCESANTE,INTERRUPCIÓN
DELAACTIVIDADCOMERCIAL,PÉRDIDADEINFORMACIÓNCOMERCIALOCUALQUIEROTRAPÉRDIDA
PECUNIARIA)QUESEDERIVEDELUSOOIMPOSIBILIDADDEUSODELPRODUCTOOENRELACIÓNCONEL
PRODUCTO,YASEABASADOENCONTRATO,PORAGRAVIO,NEGLIGENCIA,ESTRICTARESPONSABILIDAD
OCUALQUIERAQUESEA,AUNCUANDOSEHAYAADVERTIDOAEIZOOALOSDISTRIBUIDORESDEEIZO
DELAPOSIBILIDADDETALESDAÑOS.ESTAEXCLUSIÓNTAMBIÉNABARCACUALQUIERRESPONSABILIDAD
QUEPUEDADERIVARSEDERECLAMACIONESHECHASPORUNTERCEROCONTRAELCOMPRADOR
ORIGINAL.LAESENCIADEESTAESTIPULACIÓNESLIMITARLARESPONSABILIDADPOTENCIALDEEIZOYLOS
DISTRIBUIDORESQUEPUDIERADERIVARSEDEESTAGARANTÍALIMITADAY/OVENTAS.

75
Appendix
GARANZIA LIMITATA
EIZOCorporation(acuisifaràriferimentodaquiinpoicon“EIZO”)ediDistributoriautorizzatidaEIZO(acuisifarà
riferimentodaquiinpoicon“Distributori”)garantiscono,secondoiterminidiquestagaranzialimitata(acuisifarà
riferimentodaquiinpoicon“Garanzia”)all’acquirenteoriginale(acuisifaràriferimentodaquiinpoicon“
Acquirente
originale”)chehaacquistatoilprodottospecificatoinquestodocumento(acuisifaràriferimentodaquiinpoicon
“Prodotto”)daEIZOodaisuoiDistributori,cheEIZOeidistributori,alorodiscrezione,riparerannoosostituirannoil
Prodottosenzaaddebitosel’Acquirenteoriginaletrova,entroilperiododellaGaranzia(denitosotto),cheilProdotto
malfunzionaesièdanneggiatonelcorsodelsuonormaleutilizzoosservandoleindicazionidelmanualediistruzioni
allegatoalProdotto(acuisifaràriferimentodaquiinpoicon“Manuale utente”).
LapresenteGaranziaèlimitataa(i)cinque(5)anniapartiredalladatad'acquistodelProdottoo(ii)alloscaderedi
30.000ored'utilizzodelProdotto(acuisifaràriferimentodaquiinpoicon“Periodo di Garanzia”).EIZOeisuoi
DistributorinonsiassumonoalcunaresponsabilitàenonhannoalcunobbligoriguardoalProdottoversol'Acquirente
originaleoterzidiversidaquellirelativiaquestaGaranzia.
EIZOeisuoiDistributoricesserannoditenereodiconservarequalsiasiricambiodelProdottoalloscaderedisette
(7)annidopochelaproduzioneditaliricambièstataterminata.Perlariparazionedelmonitor,EIZOeiDistributori
utilizzerannopartidiricambioconformiainostristandarddicontrollodellaqualità.
LaGaranziaèvalidasoltantoneipaesidovecisonoiDistributoriEIZO.LaGaranzianonlimitaalcundirittolegale
dell’Acquirenteoriginale.
IndipendentementedaqualsiasialtracondizionediquestaGaranzia,EIZOeisuoiDistributorinonavrannoalcunobbligo
derivantedaquestaGaranziainognunodeicasielencatidiseguito:
(a) QualsiasidifettodelProdottocausatodadanniditrasporto,modiche,alterazioni,abusi,usiimpropri,incidenti,
installazioneerrata,calamità,manutenzioneerratae/oriparazioniimproprieeseguitedaterzepartichenonsiano
EIZOoisuoiDistributori.
(b) QualsiasiincompatibilitàdelProdottodovutaapossibiliinnovazionitecnichee/onormative.
(c) Qualsiasideterioramentodelsensore.
(d) Qualsiasideterioramentodelleprestazionidelloschermocausatodaldeterioramentodelleparticonsumabili,come
ilpannelloLCDe/olaretroilluminazione,ecc.(peresempio:icambiamentidiluminosità,cambiamentidiuniformità
dellaluminosità,icambiamentidicolore,icambiamentidiuniformitàdelcolore,idifettideipixel,inclusiipixel
bruciati,ecc.).
(e) QualsiasidifettodelProdottocausatodaapparecchiatureesterne.
(f) QualsiasidifettodelProdottoincuiilnumerodiserieoriginalesiastatoalteratoorimosso.
(g) QualsiasinormaledeterioramentodelProdotto,inparticolarmodonellesuepartidiconsumo,accessori,e/o
attacchi(peresempio:tasti,partirotanti,cavi,Manualedell’utente,ecc.).
(h) Qualsiasitipodideformazione,scolorimento,e/odiinvolucroesternodelProdottoinclusalasuperciedelpannello
LCD.
PerricevereassistenzatecnicaconquestaGaranzia,l’AcquirenteoriginaledeveinviareilProdotto,contrasporto
pre-pagato,nellasuaconfezioneoriginaleoaltraconfezioneadeguatachefornisceunlivelloanalogodiprotezione,
assumendosiilrischiodidannie/operditaintransito,alDistributorelocale.L’Acquirenteoriginaledevepresentarela
provadiacquistochestabilisceladatadiacquistodelProdottoquandorichiedeserviziosottoGaranzia.
IlPeriododigaranziaperqualsiasiProdottosostituitoe/oriparatosottoquestaGaranziascadeallanedelPeriododi
garanziaoriginale.
EIZOOISUOIDISTRIBUTORINONSONORESPONSABILIPERQUALSIASIDANNOOPERDITADIDATIOALTRE
INFORMAZIONIMEMORIZZATISUQUALSIASISUPPORTOOQUALSIASIPARTEDIQUALSIASIPRODOTTO
INVIATOAEIZOOISUOIDISTRIBUTORIPERRIPARAZIONI.
EIZOEISUOIDISTRIBUTORINONOFFRONOALCUNAGARANZIAADDIZIONALE,IMPLICITAOESPLICITA,
RIGUARDO IL PRODOTTO E LA SUA QUALITÀ, PRESTAZIONI, VENDIBILITÀ OAPPROPRIATEZZA PER
QUALSIASIUSOPARTICOLARE.INNESSUNCASOEIZOOIDISTRIBUTORIEIZOAUTORIZZATISARANNO
RESPONSABILIPERQUALSIASIDANNOACCIDENTALE,INDIRETTO,SPECIALE,CONSEGUENTEODI
QUALSIASIALTRANATURA(INCLUSI,SENZALIMITI,DANNIPERPERDITADIPROFITTI,INTERRUZIONEDELLE
ATTIVITÀ,PERDITADIINFORMAZIONID’AFFARIOQUALSIASIALTRAPERDITAPECUNIARIA)DERIVANTI
DALL’USOODALL’IMPOSSIBILITÀDIUSAREILPRODOTTOOINQUALSIASIRELAZIONEALPRODOTTO,
SIASUBASEDICONTRATTO,TORTO,NEGLIGENZA,STRETTARESPONSABILITÀOALTRIMENTI,ANCHE
SEEIZOOIDISTRIBUTORIEIZOAUTORIZZATISONOSTATIAVVERTITIDELLAPOSSIBILITÀDITALIDANNI.
QUESTAESCLUSIONEINCLUDEANCHEQUALSIASIRESPONSABILITÀCHEPOSSAINSORGEREDARECLAMI
DITERZICONTROL’ACQUIRENTEORIGINALE.L’ESSENZADIQUESTOPROVVEDIMENTOÈLIMITARELA
RESPONSABILITÀPOTENZIALEDIEIZOEDEIDISTRIBUTORIDERIVANTEDAQUESTAGARANZIALIMITATAE/O
DALLEVENDITE.

76 Appendix
BEGRÄNSAD GARANTI
EIZOCorporation(nedankallat“EIZO”)ochEIZOsauktoriseradedistributörer(nedankallade“Distributörer
”)garanterar
ienlighetmedvillkorenidennabegränsadegaranti(nedankallad“Garantin”)denursprungligeköparen(nedankallad
den“Ursprunglige köparen”)somköptedenidokumentetspeciceradeprodukten(nedankallad“Produkten
”)från
EIZOellerDistributörer,attEIZOellerDistributörerenligtegetgottnnandekostnadsfrittantingenrepareraellerbytaut
dendefektaProduktenomdenUrsprungligeköpareninomGarantiperioden(denierasnedan)upptäckerattProdukten
fungerarfelaktigtellerskadasundernormalanvändningavProduktenienlighetmedbeskrivningenibruksanvisningen
(nedankallad“Bruksanvisning”).
Giltighetsperiodenfördennagarantiärbegränsadtill(i)fem(5)årfråndatumetförProduktensinköpeller,omdetta
inträffartidigare,begränsattillutlöpandetav(ii)30000timmarsanvändningavProdukten(härikallad“Garantiperioden
”).
EIZOochDistributörerskainteundernågravillkorhanågotannatansvaränvadsomangesidennagarantigällande
ProduktenirelationtilldenUrsprungligeköparenellertredjepart.
EIZOochDistributörerkommerattupphöramedlagerhållningavProduktensdelareftersju(7)årefterattproduktionen
avdessadelarupphört.NätskärmenreparerasanvänderEIZOochdistributörerreservdelarsomuppfyllervåra
kvalitetsstandarder.
GarantinärendastgiltigideländerdärdetfinnsDistributörer.GarantinbegränsarintenågraavdenUrsprunglige
köparenslagstadgaderättigheter.
OavsettandravillkoridennagarantiskainteEIZODistributörerundernågravillkorhanågotansvarinågotavdefall
sombeskrivsnedan:
(a) NärnågonbristfällighethosProduktenkanhärledastillatthauppståttvidfrakt,modifiering,ändring,felaktigt
handhavande,olycka,felaktiginstallation,katastrof,felaktigtunderhålloch/ellerfelaktigreparationutfördavtredje
partannanänEIZOochDistributörer.
(b) AllaformeravinkompatibilitethosProduktenpågrundavmöjligatekniskainnovationeroch/ellerbestämmelser.
(c) Allaförsämringaravsensorn.
(d) AllaförsämringaravbildensprestandaberoendepåförbrukningsdelarsåsomLCD-paneloch/eller
bakgrundsbelysningetc.(t.ex.ändringariljusstyrka,jämnhetiljusstyrka,färg,färgjämnhet,defektapixlaroch/eller
fastlysandepixlaretc.).
(e) AlladefekterhosProduktensomorsakatsavexternutrustning.
(f) AlladefekterhosProduktenpåvilkendetursprungligaserienumretharändratselleravlägsnats.
(g) AllnormalförsämringavProdukten,specielltförbrukningsartiklar,tillbehöroch/elleryttredelar(t.ex.knappar,
roterandedelar,kablar,Bruksanvisningenetc.).
(h) Varjedeformation,missfärgningoch/ellerskevhetavProduktensyttreinklusiveytanpåLCD-panelen.
FöratterhållaserviceunderdennagarantimåstedenUrsprungligeköparen(medhänseendetillriskenförskada
och/ellerförlustundertransport)levereraProduktentillnärmasteDistributörmedförebetaldfrakt,idessursprungliga
förpackningellerannanfullgodförpackningsomgerlikvärdigtskydd.DenUrsprungligeköparenmåstekunnavisa
inköpsbevisförProduktensomklargörProduktensinköpsdatumvidbegäranavgarantiservice.
Garantiperiodenförallautbyttaoch/ellerrepareradeprodukterunderdennagarantiskallupphöravidutgångenavden
ursprungligaGarantiperioden.
EIZOELLERDISTRIBUTÖRERÄRINTEANSVARIGAFÖRNÅGONFORMAVSKADAELLERFÖRLUSTAVDATA
ELLERANNANINFORMATIONSOMHARLAGRATSINÅGONFORMAVMEDIAELLERANNANDELAVNÅGON
PRODUKTSOMHARRETURNERATSTILLEIZOELLERDISTRIBUTÖRERFÖRREPARATION.
EIZOOCHDISTRIBUTÖRERNAGARANTERARINGET,UTTRYCKLIGENELLERUNDERFÖRSTÅTT,VAD
BETRÄFFARPRODUKTENOCHDESSKVALITET,PRESTANDA,SÄLJBARHETELLERLÄMPLIGHETFÖRNÅGON
FORMAVSPECIELLANVÄNDNING.UNDERINGAOMSTÄNDIGHETERSKALLEIZOELLERDISTRIBUTÖRERNA
HÅLLASANSVARIGAFÖRNÅGRASOMHELSTUNDERORDNADE,INDIREKTA,SPECIELLA,DÄRAVFÖLJANDE
ELLERÖVRIGASKADOR(INKLUSIVE,UTANBEGRÄNSNINGTILL,SKADORFÖRFÖRLUSTAVINKOMST,
AVBRUTENAFFÄRSRÖRELSE,FÖRLUSTAVAFFÄRSINFORMATIONELLERANNANSÄRSKILDFÖRLUST)SOM
UPPSTÅTTSOMETTRESULTATAVANVÄNDNINGELLEROFÖRMÅGAATTANVÄNDAPRODUKTENELLERI
NÅGONFORMAVANSLUTNINGTILLPRODUKTERNA,VARESIGDETTAGRUNDASPÅKONTRAKT,ÅTALBAR
HANDLING,FÖRSUMLIGHET,ANSVARSSKYLDIGHETELLERANNAT,ÄVENOMEIZOELLERDISTRIBUTÖRERNA
HARINFORMERATSBETRÄFFANDEMÖJLIGHETATTSÅDANASKADORFÖRELIGGER.DETTAUNDANTAG
OMFATTARÄVENALLFORMAVANSVARSSKYLDIGHETSOMKANUPPSTÅGENOMENTREDJEPARTSANSPRÅK
GENTEMOTDENURSPRUNGLIGEKÖPAREN.GRUNDBESTÅNDSDELENIBESTÄMMELSENÄRATTBEGRÄNSA
DETEVENTUELLAANSVARSTAGANDETFÖREIZOOCHDISTRIBUTÖRERNASOMKANUPPSTÅGENOMDENNA
BEGRÄNSADEGARANTIOCH/ELLERFÖRSÄLJNING.

77
Appendix
ΠΕΡΙΟΡΙΣΜΕΝΗ ΕΓΓΥΗΣΗ
Η EIZO Corporation (στο εξής «EIZO») και οι διανομείς που εξουσιοδοτεί η EIZO (στο εξής «Διανομείς»)
παρέχουνεγγύηση,υποκείμενηκαισύμφωναμετουςόρουςτηςπαρούσαςπεριορισμένηςεγγύησης(στοεξής
«Εγγύηση»),στοναρχικόαγοραστή(στοεξής«Αρχικός Αγοραστής
»)οοποίοςαγόρασετοπροϊόνπουκαθορίζεταιστο
παρόνέγγραφο(στοεξής«Προϊόν»)απότηνEIZOήτουςΔιανομείς,ηοποίαεξασφαλίζειότιηEIZOκαιοιΔιανομείς,
σύμφωναμετηδιακριτήευχέρειάτους,είτεθαεπισκευάσουνείτεθααντικαταστήσουντοΠροϊόνχωρίςχρέωσηεάνο
ΑρχικόςΑγοραστήςαντιληφθείεντόςτηςΠεριόδουΕγγύησης(ορίζεταικατωτέρω)ότιτοΠροϊόνδυσλειτουργείήέχει
υποστείβλάβηκατάτηδιάρκειακανονικήςχρήσηςτουΠροϊόντοςσύμφωναμετηνπεριγραφήστοεγχειρίδιοχρήσηςπου
συνοδεύειτοΠροϊόν(στοεξής«Εγχειρίδιο Χρήστη»).
ΗπερίοδοςτηςπαρούσαςΕγγύησηςείναι(i)πέντε(5)έτηαπότηνημερομηνίααγοράςτουΠροϊόντος,ή,στηλήξητων
(ii)30.000ωρώνχρήσηςτουΠροϊόντος(στοεξής«Περίοδος Εγγύησης»).ΗEIZOκαιοιΔιανομείςδενφέρουνκαμία
ευθύνηήυποχρέωσηόσοναφοράτοΠροϊόνσεσχέσημετονΑρχικόΑγοραστήήοποιοδήποτετρίτομέρος,ούτεάλλη
ευθύνηδιαφορετικήαπόαυτήνπουπαρέχεταιστηνπαρούσαΕγγύηση.
ΗEIZOκαιοιΔιανομείςθαπαύσουνναδιατηρούνήνααποθηκεύουντυχόνεξαρτήματατουΠροϊόντοςκατόπιντηςλήξης
τωνεπτά(7)ετώνμετάτηδιακοπήτηςπαραγωγήςτέτοιωνεξαρτημάτων.Κατάτηνεπισκευήτηςοθόνης,ηEIZOκαιοι
ΔιανομείςθαχρησιμοποιήσουνανταλλακτικάεπισκευήςπουσυμμορφώνονταιμεταπρότυπάμαςγιατηΔιασφάλιση
Ποιότητας.
ΗΕγγύησηισχύειμόνοσεχώρεςήπεριοχέςόπουβρίσκονταιοιΔιανομείς.ΗΕγγύησηδενπεριορίζειοποιαδήποτε
νόμιμαδικαιώματατουΑρχικούΑγοραστή.
ΛαμβανομένηςυπόψηκάθεδιάταξηςτηςπαρούσαςΕγγύησης,ηEIZOκαιοιΔιανομείςδενθαέχουνκαμίααπολύτως
υποχρέωσησύμφωναμετηνπαρούσαΕγγύησησεοποιαδήποτεαπότιςπεριπτώσειςπουδιατυπώνονταικατωτέρω:
(α) ΤυχόνελάττωματουΠροϊόντοςπουπροκαλείταιαπόζημιάκατάτημεταφορά,τροποποίηση,αλλαγή,κατάχρηση,
λανθασμένηχρήση,ατύχημα,λανθασμένηεγκατάσταση,καταστροφή,εσφαλμένησυντήρησηή/καιλανθασμένη
επισκευήαπότρίτομέροςεκτόςτηςEIZOκαιτωνΔιανομέων,
(β) ΤυχόνασυμβατότητατουΠροϊόντοςλόγωπιθανώντεχνικώνκαινοτομιώνή/καικανονισμών,
(γ) Τυχόνεπιδείνωσητουαισθητήρα,
(δ) Τυχόνεπιδείνωσητηςαπόδοσηςοθόνηςπουπροκαλείταιαπότηφθοράαναλώσιμωνεξαρτημάτωνόπως
τηςοθόνηςLCDή/καιτουφωτόςυποβάθρου,κτλ.(π.χ.αλλαγέςστηφωτεινότητα,αλλαγέςστηνομοιομορφία
φωτεινότητας,αλλαγέςστοχρώμα,αλλαγέςστηνομοιομορφίαχρώματος,ελαττώματασεpixelπεριλαμβανομένων
τωνκαμένωνpixel,κτλ.),
(ε) ΤυχόνελάττωματουΠροϊόντοςπουπροκαλείταιαπόεξωτερικόεξοπλισμό,
(στ)ΤυχόνελάττωματουΠροϊόντοςστοοποίοέχειτροποποιηθείήαφαιρεθείογνήσιοςαριθμόςσειράς,
(ζ) Τυχόνφυσιολογικήφθοράτουπροϊόντος,ιδιαίτερααυτήςτωναναλώσιµων,τωναξεσουάρή/καιτων
προσαρτηµάτων(π.χ.κουµπιά,περιστρεφόµεναµέρη,καλώδια,ΕγχειρίδιοΧρήστη,κτλ.),και
(η) Τυχόν παραμόρφωση, αποχρωματισμό ή/και διαστρέβλωση του εξωτερικού μέρους του προϊόντος,
περιλαμβανομένηςτηςεπιφάνειαςτηςοθόνηςLCD.
ΟΑρχικόςΑγοραστήςγιαναδικαιούταιυπηρεσίεςεπισκευήςσύμφωναμετηνΕγγύηση,θαπρέπειναπαραδώσειτο
Προϊόν,μεπληρωμέναταμεταφορικάέξοδα,στηναρχικήτουσυσκευασίαήσεάλληεπαρκήσυσκευασίαμεισότιμο
βαθμόπροστασίας,αναλαμβάνονταςτονκίνδυνοβλάβηςή/καιαπώλειαςκατάτημεταφορά,στοντοπικόΔιανομέα.Ο
ΑρχικόςΑγοραστήςότανζητάυπηρεσίεςεπισκευήςσύμφωναμετηνΕγγύηση,θαπρέπειναπροσκομίζειτηναπόδειξη
αγοράςτουΠροϊόντοςκαιτηνημερομηνίατηςαγοράς.
ΗΠερίοδοςΕγγύησηςγιαοποιοδήποτεαντικατεστημένοή/καιεπισκευασμένοπροϊόνσύμφωναμετηνπαρούσα
ΕγγύησηλήγειστοτέλοςτηςαρχικήςΠεριόδουΕγγύησης.
ΗEIZOΉΟΙΔΙΑΝΟΜΕΙΣΔΕΝΕΥΘΥΝΟΝΤΑΙΓΙΑΟΠΟΙΑΔΗΠΟΤΕΒΛΑΒΗΉΑΠΩΛΕΙΑΔΕΔΟΜΕΝΩΝΉΑΛΛΩΝ
ΠΛΗΡΟΦΟΡΙΩΝΠΟΥΑΠΟΘΗΚΕΥΟΝΤΑΙΣΕΟΠΟΙΟΔΗΠΟΤΕΜΕΣΟΉΟΠΟΙΟΔΗΠΟΤΕΑΛΛΟΜΕΡΟΣΣΕ
ΟΠΟΙΟΔΗΠΟΤΕΠΡΟΪΟΝΠΟΥΕΠΙΣΤΡΕΦΕΤΑΙΣΤΗΝEIZOΉΣΕΔΙΑΝΟΜΕΑΓΙΑΕΠΙΣΚΕΥΗ.
ΗEIZOΚΑΙΟΙΔΙΑΝΟΜΕΙΣΔΕΝΠΑΡΕΧΟΥΝΚΑΜΙΑΠΕΡΑΙΤΕΡΩΕΓΓΥΗΣΗ,ΡΗΤΗΉΣΥΝΕΠΑΓΟΜΕΝΗ,ΟΣΟΝ
ΑΦΟΡΑΤΟΠΡΟΪΟΝΚΑΙΤΗΝΠΟΙΟΤΗΤΑ,ΤΗΝΑΠΟΔΟΣΗ,ΤΗΝΕΜΠΟΡΕΥΣΙΜΟΤΗΤΑΉΤΗΝΚΑΤΑΛΛΗΛΟΤΗΤΑ
ΤΟΥΓΙΑ ΟΠΟΙΑΔΗΠΟΤΕ ΣΥΓΚΕΚΡΙΜΕΝΗ ΧΡΗΣΗ.ΣΕ ΚΑΜΙΑ ΠΕΡΙΠΤΩΣΗ Η EIZO ΉΟΙΔΙΑΝΟΜΕΙΣΔΕΝ
ΘΑΕΥΘΥΝΟΝΤΑΙΓΙΑΚΑΜΙΑΑΠΟΛΥΤΩΣΤΥΧΑΙΑ,ΕΜΜΕΣΗ,ΕΙΔΙΚΗ,ΣΥΝΕΠΑΓΟΜΕΝΗΉΑΛΛΗΒΛΑΒΗ
(ΠΕΡΙΛΑΜΒΑΝΟΜΕΝΩΝ,ΜΕΤΑΞΥΑΛΛΩΝ,ΒΛΑΒΩΝΉΑΠΩΛΕΙΑΣΚΕΡΔΩΝ,ΔΙΑΚΟΠΗΣΕΠΙΧΕΙΡΗΜΑΤΙΚΩΝ
ΔΡΑΣΤΗΡΙΟΤΗΤΩΝ,ΑΠΩΛΕΙΑΣΕΠΙΧΕΙΡΗΜΑΤΙΚΩΝΠΛΗΡΟΦΟΡΙΩΝΉΤΥΧΟΝΑΛΛΗΣΧΡΗΜΑΤΙΚΗΣΑΠΩΛΕΙΑΣ)
ΠΟΥΠΡΟΚΥΠΤΕΙΑΠΟΤΗΧΡΗΣΗΉΤΗΝΑΝΙΚΑΝΟΤΗΤΑΧΡΗΣΗΣΤΟΥΠΡΟΪΟΝΤΟΣΉΤΥΧΟΝΑΛΛΗΣΣΥΝΔΕΣΗΣ
ΜΕΤΟΠΡΟΪΟΝ,ΕΙΤΕΒΑΣΙΖΕΤΑΙΣΕΣΥΜΒΟΛΑΙΟ,ΒΛΑΒΗ,ΑΜΕΛΕΙΑ,ΑΥΣΤΗΡΗΕΥΘΥΝΗΉΕΙΔΑΛΛΩΣ,ΑΚΟΜΗ
ΚΙΕΑΝΗEIZOΉΟΙΔΙΑΝΟΜΕΙΣΕΝΗΜΕΡΩΘΟΥΝΓΙΑΤΗΝΠΙΘΑΝΟΤΗΤΑΤΕΤΟΙΩΝΖΗΜΙΩΝ.ΗΕΞΑΙΡΕΣΗΑΥΤΗ
ΠΕΡΙΛΑΜΒΑΝΕΙΕΠΙΣΗΣΟΠΟΙΑΔΗΠΟΤΕΕΥΘΥΝΗΕΝΔΕΧΕΤΑΙΝΑΠΡΟΚΥΨΕΙΑΠΟΑΞΙΩΣΕΙΣΤΡΙΤΟΥΜΕΡΟΥΣ
ΚΑΤΑΤΟΥΑΡΧΙΚΟΥΑΓΟΡΑΣΤΗ.ΗΟΥΣΙΑΤΟΥΟΡΟΥΑΥΤΟΥΕΙΝΑΙΝΑΠΕΡΙΟΡΙΣΕΙΤΗΝΠΙΘΑΝΗΕΥΘΥΝΗΤΗΣ
EIZOΚΑΙΤΩΝΔΙΑΝΟΜΕΩΝΠΟΥΠΡΟΚΥΠΤΕΙΑΠΟΤΗΝΠΑΡΟΥΣΑΕΓΓΥΗΣΗΉ/ΚΑΙΤΙΣΠΩΛΗΣΕΙΣ.

78 Appendix
ОГРАНИЧЕННАЯ ГАРАНТИЯ
EIZOCorporation(называемаявдальнейшем“EIZO”)иавторизированныеEIZOдистрибуторы(называемыев
дальнейшем“Дистрибуторы
”)гарантируют,всоответствиисусловиямиипунктамиэтойограниченнойгарантии
(называемойвдальнейшем“Гарантия”),первичномупокупателю(называемомувдальнейшем“
Первоначальный
покупатель”),которыйприобрелуEIZOилиДистрибуторовпродукт,указанныйвэтомдокументе(называемый
вдальнейшем“Продукт”),чтоEIZOилиДистрибуторынасвоеусмотрениелибобесплатноотремонтируют,
либобесплатнозаменятПродукт,еслиПервоначальныйпокупательпризнаетвпределахГарантийногосрока
(определенногониже),чтоПродуктнеисправенилионповрежденпроцессенормальногоиспользованияпродукта
всоответствиисописаниемвинструкциипоэксплуатации,прилагаемойкПродукту(называемойвдальнейшем
“Руководство пользователя”).
Гарантийныйпериодограниченсроком(i)пять(5)летотдатыприобретенияПродуктаилиограниченсроком
(ii)30000часовиспользованияПродукта(называемыйвдальнейшем“Гарантийный период”).EIZOи
ДистрибуторыненесутникакойответственностиинеберутобязательствотносительноПродуктапоотношениюк
Первоначальномупокупателюилипоотношениюклюбымтретьимсторонам,кромеобязательств,оговоренныхв
этойГарантии.
EIZOиДистрибуторыпрекратятхранениеилискладированиелюбыхдеталейПродуктапоистечениисеми(7)
летпослепрекращенияпроизводстватакихдеталей.ВслучаеремонтамонитораEIZOиДистрибьюторыбудут
использоватьзапчасти,которыесоответствуютнашимстандартамQC(контролькачества).
Гарантия действительнатолько встранах илирегионах, где расположены Дистрибуторы. Гарантия не
ограничиваетникакиезаконныеправаПервоначальногопокупателя.
НесмотрянадругиеусловияэтойГарантииEIZOиДистрибуторыненесутникакихобязательствсогласноэтой
Гарантиивлюбомизперечисленныхнижеслучаев:
(а) ЛюбыедефектыПродукта,вызванныеповреждениямиприперевозке,модификацией,изменением,
неправильнымобращением, неправильнымиспользованием, авариями,неправильнойустановкой,
стихийнымибедствиями,неправильнымуходоми/илинеправильнымремонтомтретьейстороной,отличной
отEIZOилиДистрибуторов;
(б) ЛюбыенесовместимостиПродуктаиз-затехническихусовершенствованийи/илиизменениятехнических
норм;
(в) Любоеповреждениедатчика;
(г) Любыеухудшенияработыдисплея,вызванныеизнашиваниемневосстановимыхчастей,такихкак
панельЖКДи/илиподсветкаит.д.(например,изменениевяркости,изменениевравномерностияркости,
изменениевцветности,изменениевравномерностицветности,изменениевпикселах,включаявыгоревшие
пикселыит.д.);
(д) ЛюбыедефектыПродукта,вызванныевнешнимоборудованием;
(е) ЛюбыедефектыПродукта,прикоторыхоригинальныйсерийныйномербылизмененилиудален;
(ж) Любые естественные ухудшения продукта, в частности, вызванные износом расходных частей,
принадлежностейи/илиприспособлений(например,кнопок,вращающихсячастей,кабелей,Руководства
пользователяит.д.);и
(з) Любыедеформации, измененияцветаи/или короблениявнешней поверхностипродукта, включая
поверхностьпанелиЖКД.
ЧтобыполучитьтехническоеобслуживаниеврамкахГарантии,Первоначальныйпокупательдолжендоставить
ПродуктместномуДистрибутору,оплативперевозку,вегооригинальнойупаковкеиливдругойсоответствующей
упаковке,обеспечивающейравноценнуюстепеньзащиты,принимаявовниманиерискповрежденияи/илиутерюпри
транспортировке.ПризапросетехническогообслуживанияврамкахГарантииПервоначальныйпокупательдолжен
предоставитьсвидетельствопокупкипродуктаидатыпокупки.
Гарантийныйпериоддлялюбогозамененногои/илиотремонтированногопродуктаврамкахГарантииистекаетвконце
завершениясрокадействияоригинальногоГарантийногопериода.
EIZOИЛИДИСТРИБУТОРЫНЕНЕСУТОТВЕТСТВЕННОСТИЗАЛЮБЫЕПОВРЕЖДЕНИЯИЛИУТЕРЮДАННЫХИЛИ
ДРУГОЙИНФОРМАЦИИ,ХРАНЯЩИХСЯНАКАКИХ-ЛИБОНОСИТЕЛЯХИНФОРМАЦИИИЛИНАЛЮБЫХДРУГИХ
ЧАСТЯХПРОДУКТА,КОТОРЫЙВОЗВРАЩЕНEIZOИЛИДИСТРИБУТОРАМДЛЯРЕМОНТА.
EIZOИДИСТРИБУТОРЫНЕДАЮТНИКАКОЙДАЛЬНЕЙШЕЙГАРАНТИИ,ВЫРАЖЕННОЙИЛИПОДРАЗУМЕВАЕМОЙ,
ОТНОСИТЕЛЬНОПРОДУКТАИЕГОКАЧЕСТВА,ТЕХНИЧЕСКИХХАРАКТЕРИСТИК,ТОВАРНОСТИИЛИ
СООТВЕТСТВИЯДЛЯКАКОГО-ЛИБООПРЕДЕЛЕННОГОИСПОЛЬЗОВАНИЯ.НИПРИКАКИХУСЛОВИЯХEIZO
ИЛИДИСТРИБУТОРЫНЕНЕСУТОТВЕТСТВЕННОСТИЗАЛЮБОЙСЛУЧАЙНЫЙ,КОСВЕННЫЙ,СПЕЦИАЛЬНЫЙ,
ПОБОЧНЫЙИЛИИНОЙУЩЕРБ(ВКЛЮЧАЯ,БЕЗОГРАНИЧЕНИЙ,УЩЕРБИЗ-ЗАНЕПОЛУЧЕННОЙПРИБЫЛИ,
ПРЕРЫВАНИЯБИЗНЕСА,ПОТЕРИКОММЕРЧЕСКОЙИНФОРМАЦИИИЛИЛЮБЫЕДРУГИЕФИНАНСОВЫЕ
ПОТЕРИ),ВОЗНИКШИЙИЗ-ЗАИСПОЛЬЗОВАНИЯИЛИНЕВОЗМОЖНОСТИИСПОЛЬЗОВАТЬПРОДУКТИЛИВ
ЛЮБОЙДРУГОЙСВЯЗИСПРОДУКТОМ,ЛИБООСНОВАННЫЙНАКОНТРАКТНЫХОТНОШЕНИЯХ,ГРАЖДАНСКИХ
ПРАВОНАРУШЕНИЯХ,НЕБРЕЖНОСТИ,ПРИЧИНЕНИЯУЩЕРБАТРЕТЬЕЙСТОРОНЕИЛИЧЕМ-ЛИБОЕЩЕ,ДАЖЕ
ЕСЛИEIZOИЛИДИСТРИБУТОРЫБЫЛИУВЕДОМЛЕНЫОВОЗМОЖНОСТИТАКОГОУЩЕРБА.ЭТОИСКЛЮЧЕНИЕ
ТАКЖЕВКЛЮЧАЕТЛЮБЫЕОБЯЗАТЕЛЬСТВА,КОТОРЫЕМОГУТВОЗНИКНУТЬВРЕЗУЛЬТАТЕТРЕБОВАНИЙ
ТРЕТЬЕЙСТОРОНЫВОТНОШЕНИИПЕРВОНАЧАЛЬНОГО ПОКУПАТЕЛЯ.СУЩЕСТВОМЭТОГОПОЛОЖЕНИЯ
ЯВЛЯЕТСЯОГРАНИЧЕНИЕПОТЕНЦИАЛЬНОЙОТВЕТСТВЕННОСТИEIZOИДИСТРИБУТОРОВ,ВОЗНИКАЮЩЕЙИЗ-
ЗАЭТОЙОГРАНИЧЕННОЙГАРАНТИИИ/ИЛИПРОДАЖ.

79
Appendix
有限责任保证书
EIZOCorporation(以下简称 EIZO)和EIZO 授权的经销商(以下简称 经销商),接受并依照本有限责任保证书(以
下简称 保证书)之条款,向从 EIZO 和经销商购买本文中所规定产品(以下简称 产品)的原买方(以下称 原买方
)
提供保证 :
在保证期内(规定如下),如果原买方发现按本产品所附使用说明书(以下简称 用户手册)所述方式正常使
用本产品过程中,本产品出现故障或损坏,EIZO 和经销商根据其独自的判断免费修理或更换该产品。
本保证期限定为
(i)
自本产品购买之日起的五
(5)
年期间或限定为到达
(ii)
使用本产品 3万小时的期限
(以下简称保证期限)
。
EIZO和经销商将不向原买方或任何第三方承担本保证书所规定之外的与本产品有关的任何责任或义务。
本产品的任何部件停产七 (7) 年后,EIZO 和经销商将不再保留或保管任何这类部件。维修显示器时,EIZO 与经销商将使
用符合我方质量控制标准的替换零件。
本保证书仅对于设有经销商的国家或地区有效。本保证书并不限定原买方的任何法律权利。
无论本保证书的任何其他条款如何规定,对于任何下列情况之一,EIZO 和经销商将不承担本保证书规定责任 :
(a) 由于运输损害、改装、改动、滥用、误用、意外事故、错误安装、灾害、维护不善和 /或由除 EIZO 和经销商以外的
第三方进行不适当的修理造成本产品的任何故障。
(b) 由于可能发生的技术变更和 /或调整造成本产品的任何不兼容性。
(c) 传感器的任何劣化。
(d) 由于诸如液晶显示屏
(LCD)
和/或背灯等消耗品部件的老化造成的任何显示性能低劣
(如亮度变化、
亮度均一性变化
、
色彩变化、色彩均一性变化、如烧伤像素等像素缺陷)。
(e) 因外部设备造成本产品的任何故障。
(f) 因本产品的原序号被改变或消除造成本产品的任何故障。
(g) 本产品的任何正常老化,尤其是消耗品、附件和 /或附加装置(如按钮、旋转部件、电缆、用户手册等)、以及
(h) 本产品表面包括液晶显示屏(LCD)表面的任何变形、变色和 /翘曲。
为了获得本保证书规定的服务,原买方必须使用原包装或其他具有同等保护程度的适当包装将本产品运送到当地的经销商
,
并且预付运费,承担运输中的损坏和 /或损失的风险。要求提供本保证书规定的服务时,原买方必须提交购买本产品和标
明此购买日期的证明。
按本保证书规定进行了更换和 /或修理的任何产品的保证期限,将在原保证期限结束时终止。
在返回给 EIZO 和经销商进行修理后,任何产品的任何媒体或任何部件中储存的数据或其他信息发生任何损坏或损失,对
此EIZO 和经销商将不承担责任。
对于本产品及其质量、性能、可销售性以及对于特殊用途的适合性,EIZO 和经销商不提供其他任何明示或暗示的保证。因
使用本产品或无法使用本产品或因与本产品有任何关系(无论是否根据合同)而造成 :任何附带的、间接的、特殊的、随
之发生的或其他的损害(包括但不仅限于:
利润损失、
业务中断、
业务信息丢失或其他任何金钱损失)以及侵权行为、
过失
、
严格赔偿责任或其他责任,即使已经向 EIZO 和经销商提出了发生这些损害的可能性,对此 EIZO 和经销商概不承担责任
。
本免责条款还包括因第三方向原买方提出索赔而可能发生的任何责任。本条款的本质是限定由于本有限责任保证书和 /或
销售本产品所发生的 EIZO 和经销商的潜在责任。

80 Appendix
Recycling Information
Recycling Information
Thisproduct,whendisposedof,issupposedtobecollectedandrecycledaccordingtoyourcountry’s
legislationtoreduceenvironmentalburden.Whenyoudisposeofthisproduct,pleasecontactadistributoror
anafliateinyourcountry.
ThecontactaddresseesarelistedontheEIZOwebsitebelow.
http://www.eizo.com
ForrecyclinginformationforcustomersinSwitzerland,pleaserefertothefollowingwebsite.
http://www.swico.ch
Informationen zum Thema Recycling
DiesesProduktmussgemäßdenVorschriftenIhresLandeszurEntlastungderUmweltrecycletwerden.
WendenSiesichbeiderEntsorgungdiesesProduktsaneinenVerteilerodereineTochtergesellschaftin
IhremLand.
DieAdressenzurKontaktaufnahmesindaufderuntenangegebenenWebsitevonEIZOaufgeführt.
http://www.eizo.com
KundeninderSchweizentnehmenInformationenzumRecyclingderfolgendenWebsite:
http://www.swico.ch
Informations sur le recyclage
Ceproduitdoitêtrejetéauxpointsdecollecteprévusàceteffetetrecycléconformémentàlalégislationde
votrepays,anderéduirel’impactsurl’environnement.Lorsquevousjetezceproduit,veuillezcontacterun
distributeurouunesociétéafliéedevotrepays.
LesadressesdesdistributeurssontrépertoriéessurlesiteWebEIZOci-dessous.
http://www.eizo.com
PourlesclientsenSuisse,veuillezconsulterlesiteWebsuivantafind’obtenirdesinformationssurle
recyclage.
http://www.swico.ch
Información sobre reciclaje
Esteproductodebedesecharseyreciclarsesegúnlalegislacióndelpaísparareducirelimpacto
medioambiental.Cuandodeseedeshacersedeesteproducto,póngaseencontactoconundistribuidoro
unalialdesupaís.
EncontrarálasdireccionesdecontactoenelsitiowebdeEIZOqueseindicaacontinuación.
http://www.eizo.com
Informazioni sul riciclaggio
Perlosmaltimentoeilriciclaggiodelpresenteprodotto,attenersiallenormativevigentinelpropriopaeseper
ridurrel’impattoambientale.Perlosmaltimento,rivolgersiadundistributoreounafliatopresentinelproprio
paese.
GliindirizzisonoelencatinelsitoWebEIZOriportatodiseguito.
http://www.eizo.com
PerinformazionisulriciclaggiopericlientiinSvizzera,consultareilsitoWebriportatodiseguito.
http://www.swico.ch
Återvinningsinformation
Närdennaproduktkasserasskadenhanterasochåtervinnasenligtlandetsföreskrifterförattreducera
miljöpåverkan.Närdukasserarproduktenskadukontaktaendistributörellerrepresentantidittland.
KontaktadressernalistaspåEIZO-webbplatsennedan.
http://www.eizo.com

81
Appendix
Πληροφορίες ανακύκλωσης
Τοπροϊόναυτό,όταναπορρίπτεται,πρέπεινασυλλέγεταικαιναανακυκλώνεταισύμφωναμετηνομοθεσία
τηςχώραςσαςέτσιώστεναμηνεπιβαρύνειτοπεριβάλλον.Γιανααπορρίψετετοπροϊόν,επικοινωνήστεμε
έναναντιπρόσωποήμιαθυγατρικήεταιρείαστηχώρασας.
ΟιδιευθύνσειςεπικοινωνίαςαναγράφονταιστηντοποθεσίαwebτηςEIZOπαρακάτω.
http://www.eizo.com
Сведения по утилизации
По истечении срока службы данного продукта его следует принести на сборный пункт и
утилизироватьвсоответствиисдействующимипредписаниямиввашейстране,чтобыуменьшить
вредноевоздействиенаокружающуюсреду.Преждечемвыброситьданныйпродукт,обратитеськ
дистрибьюторуиливместноепредставительствокомпанииввашейстране.
Контактныеадресаможнонайтинавеб-узлеEIZO.
http://www.eizo.com
Informatie over recycling
Wanneeruditproductwiltweggooien,moethetuitmilieu-overwegingenwordenverzameldengerecycled
volgensdebetreffendewetgevingvanuwland.Wanneeruditproductwiltweggooien,moetucontact
opnemenmeteendistributeurofeenpartnerinuwland.
DecontactadressenwordenvermeldopdevolgendeEIZO-website.
http://www.eizo.com
Informação sobre reciclagem
Esteproduto,quandoodeitarfora,deveserrecolhidoerecicladodeacordocomalegislaçãodoseupaís
parareduzirapoluição.Quandodeitarforaesteproduto,contacteumdistribuidorouumalialnoseupaís.
OsendereçosdecontactoestãolistadosnowebsitedoEIZO,abaixo.
http://www.eizo.com
Oplysninger om genbrug
Detteproduktforventesvedbortskaffelseatbliveindsamletoggenbrugtioverensstemmelsemed
lovgivningeniditlandforatreducerebelastningenafmiljøet.Nårdubortskafferdenneprodukt,skaldu
kontakteendistributørellerettilknyttetselskabiditland.
AdressernepåkontaktpersonerneerangivetpåEIZO’swebstednedenfor.
http://www.eizo.com
Kierrätystä koskevia tietoja
Tuotetuleehävittääkierrättämällämaanlainsäädännönmukaisestiympäristönkuormittumisen
vähentämiseksi.Kunhävitättuotteen,otayhteyttäjälleenmyyjääntaitytäryhtiöönmaassasi.
YhteystiedotlöytyvätEIZOnInternet-sivustolta.
http://www.eizo.com
Wykorzystanie surowców wtórnych
Tenproduktpozużyciupowinienbyćzbieranyiprzetwarzanyzgodniezkrajowymiprzepisamidotyczącymi
ochronyśrodowiska.Wyrzucająctenprodukt,należyskontaktowaćsięzlokalnymdystrybutoremlub
partnerem.AdresykontaktowemożnaznaleźćwewskazanejponiżejwitrynieinternetowejrmyEIZO.
http://www.eizo.com

82 Appendix
Informace o recyklaci
Přilikvidaciproduktumusíbýtproduktvyzvednutarecyklovánpodlezákonůpříslušnézemě,aby
nedocházelokzatěžováníživotníhoprostředí.Zbavujete-liseproduktu,kontaktujtedistributoranebo
pobočkuvesvézemi.KontaktníadresyjsouuvedenynanásledujícíwebovéstráncespolečnostiEIZO.
http://www.eizo.com
Ringlussevõtu alane teave
Keskkonnakoormusevähendamisekstulekskasutatudtootedkokkukogudajavõttaringlussevastavaltteie
riigiseadustele.Kuikõrvaldatekäesolevatoote,võtkepalunühendustturustajavõiliaaligaomariigis.
KontaktisikudontoodudEIZOveebileheljärgmiselaadressil:
http://www.eizo.com
Újrahasznosítási információ
Jelenterméket,amikoreldobjuk,azilletőországtörvényeialapjánkellösszegyűjteniésújrahasznosítani,
hogycsökkentsükakörnyezetterhelését.Amikoreztaterméketeldobja,kérjüklépjenkapcsolatbaegy
országonbelüliforgalmazóvalvagytársvállalkozással.
AkapcsolatcímeiazEIZOalábbiweboldalántalálhatókfelsorolva:
http://www.eizo.com
Podatki o recikliranju
Obkoncuuporabeodsluženizdelekizročitenazbirnomestozarecikliranjevskladuzokoljevarstveno
zakonodajovašedržave.Prosimo,dasepriodstranjevanjuizdelkaobrnetenalokalnegadistributerjaali
podružnico.
KontaktninaslovisoobjavljeninaspodajnavedenihspletnihstranehEIZO:
http://www.eizo.com
Informácie o recyklácii
Prilikvidáciimusíbyťtentovýrobokrecyklovanývsúladeslegislatívouvašejkrajiny,abysaznížilozaťaženie
životnéhoprostredia.Keďsachcetezbaviťtohtovýrobku,kontaktujteprosímdistribútoraalebopobočkuvo
vašejkrajine.
ZoznamkontaktnýchadriesjeuvedenýnanasledovnejwebovejstránkermyEIZO:
http://www.eizo.com
Pārstrādes informācija
Utilizējotšoproduktu,tāsavākšanaunpārstrādeveicamaatbilstošijūsuvalstslikumdošanasprasībām
attiecībāuzslodzesuzvidisamazināšanu.Laiveiktušīproduktautilizāciju,sazinietiesarizplatītājuvai
pārstāvniecībujūsuvalstī.
KontaktadresesirnorādītaszemākminētajāEIZOtīmekļavietnē.
http://www.eizo.com
Informacija apie grąžinamąjį perdirbimą
Šalinant(išmetant)šiuosgaminiusjuosreikiasurinktiirperdirbtigrąžinamuojubūdupagaljūsųšaliesteisės
aktus,siekiantsumažintiaplinkosteršimą.Kaireikiaišmestišįgaminį,kreipkitėsįjūsųšalyjeveikiančią
gaminiųpardavimoatstovybęarbajoslialą.
KontaktiniaiadresatainurodytiEIZOinternetosvetainėje.
http://www.eizo.com

83
Appendix
Информация относно рециклиране
Приизхвърлянетонатозипродуктсепредлагасъбиранетоирециклиранетомусъобразнозаконитена
вашатастраназадасенамализамърсяванетонаоколнатасреда.Когатоискатедасеосвободитеот
тозипродукт,молясвържетесестърговскиямупредставителилисъссъответнитеорганиотговарящи
затовавъввашатастрана.
ДаннитезавръзкаснассаописанинаследнияИнтернетсайтнаEIZO:
http://www.eizo.com
Informaţie referitoare la reciclare
Acestprodus,cânddebarasat,trebuiecolectatşireciclatconformlegislaţieiţăriirspectivecasăreducem
sarcinamediului.Cândsedebaraseazădeacestprodus,vărugămsăcontactaţiundistribuitorsauunaliat
alţăriirespective.
AdreseledecontactlegăsiţipepaginadewebalEIZO:
http://www.eizo.com
Geri Dönüşüm Bilgisi
Buürünün,atılacağızaman,ülkenizinçevrekirliliğininazaltılmasıkonusundakimevzuatınagöretoplanması
veyenidendeğerlendirilmesigerekmektedir.Ürünüatacağınızzamanlütfenülkenizdekibirdistribütörveya
ilgilikuruluşlatemasageçiniz.
İrtibatadresleriaşağıdakiEIZOwebsitesindeverilmiştir.
http://www.eizo.com

84 Appendix
China Measures for RoHS Compliance in ChinaRoHS
关于电子信息产品污染控制标识
本标识根据「电子信息产品污染控制管理办法」,适用于在中华人民共和国销售的电子信息产品。标识中央的
数字为环保使用期限的年数。只要您遵守该产品相关的安全及使用注意事项,在自制造日起算的年限内,不会
产生对环境污染或人体及财产的影响。上述标识粘贴在机器背面。
•有毒有害物质或元素的名称及含量
部件名称 有毒有害物质或元素
铅
(Pb)
汞
(Hg)
镉
(Cd)
六价铬
(Cr(VI))
多溴联苯
(PBB)
多溴二苯醚
(PBDE)
印刷电路板 × ○ ○ ○ ○ ○
机箱 ○○○○○○
液晶显示器 × ○ ○ ○ ○ ○
其他 ×○○○○○
○ :表示该有毒有害物质在该部件所有均质材料中的含量均在 SJ/T 11363-2006 规定的限量要求以下。
× :表示该有毒有害物质至少在该部件的某一均质材料中的含量超出 SJ/T 11363-2006 规定的限量要求。
( 企业可在此处 , 根据实际情況对上表中打“×”的技术原因进行进一步说明 )

8th Edition-August, 2013
03V24034H1
(U.M-EV2416W)
Copyright © 2012-2013 EIZO Corporation All rights reserved.
