Electrolux Home ELU81A User Interface Control Panel with Transmitter User Manual Revised Owners Guide
Electrolux Home Products User Interface Control Panel with Transmitter Revised Owners Guide
Users Manual
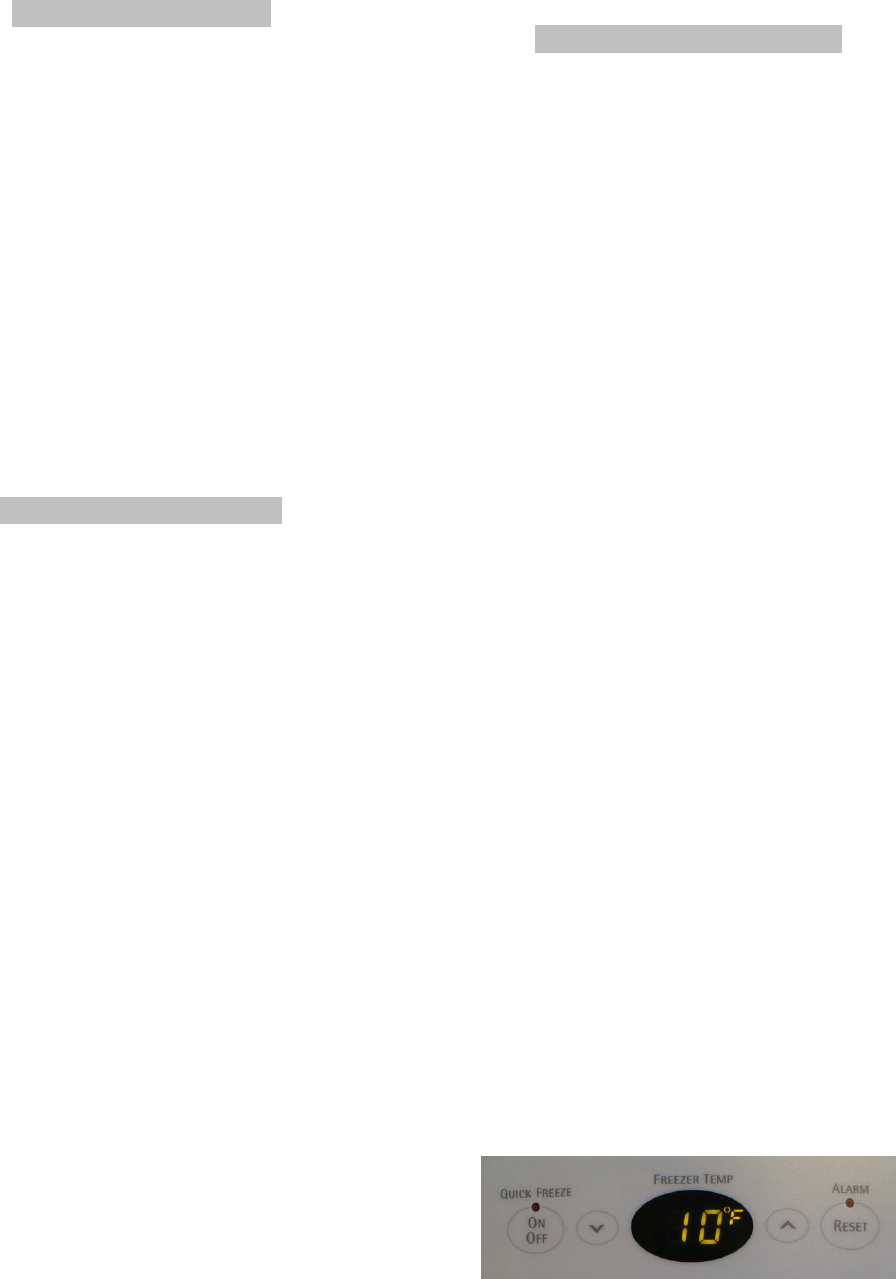
TABLE OF CONTENTS
TX FCC ID: ABMELU81A
Note: The user interface (Control Panel) and
receiver( Freezer Mate) have been tested and found
to comply with the limits for a Class B digital device,
pursuant to part 15 of the FCC Rules. These limits
are designed to provide reasonable protection against
harmful interference in a residential installation. This
equipment generates, uses, and can radiate radio
frequency energy and, if not installed and used in
accordance with the instructions may cause harmful
interference to radio communications. However,
there is no guarantee that interference will not occur
in a particular installation. If this equipment does
cause harmful interference to radio or television
reception, which can be determined by turning the
equipment off and on, the user is encouraged to try to
correct the interference by one or more of the
following measures:
- Reorient or relocate the receiving antenna.
- Increase the separation between the
equipment and receiver.
- Connect the equipment into an outlet on a
circuit different from that to which the
receiver is connected.
- Consult the dealer or an experienced
radio/TV technician for help.
Changes or modifications to the transmitter or
receiver not expressly approved by the party
responsible for compliance could void the user’s
authority to operate the equipment.
BATTERY INSTALLATION
This system requires the installation of a
standard 9-volt battery (not included). The
system will not function as intended, without the
battery being installed. Please locate the battery
holder as described in the following illustrations.
Remove cover(S), hook up the connector, slide
battery and excess wire into the compartment
and replace covers.
Figure: Battery Installation for Upright Style
Freezer.
Figure: Battery Installation for Chest Type
Freezer
Figure: User Interface (Control Panel).
TEMPERATURE CONTROL
TEMPERATURE SETTING:
The desired temperature inside the freezer can be set using
the UP (▲) and DOWN (▼) buttons on the user interface,
located on the door of the freezer. Press either the UP or
DOWN buttons once to display the current setting. You
may now use the UP and DOWN buttons to change the
temperature setting to one which suits your needs. The
range of settings is -10°F to 10°F( -24ºC to -12ºC ) (See
figure 1and 2). The display will return to showing the
temperature of the cabinet after five seconds of inactivity.
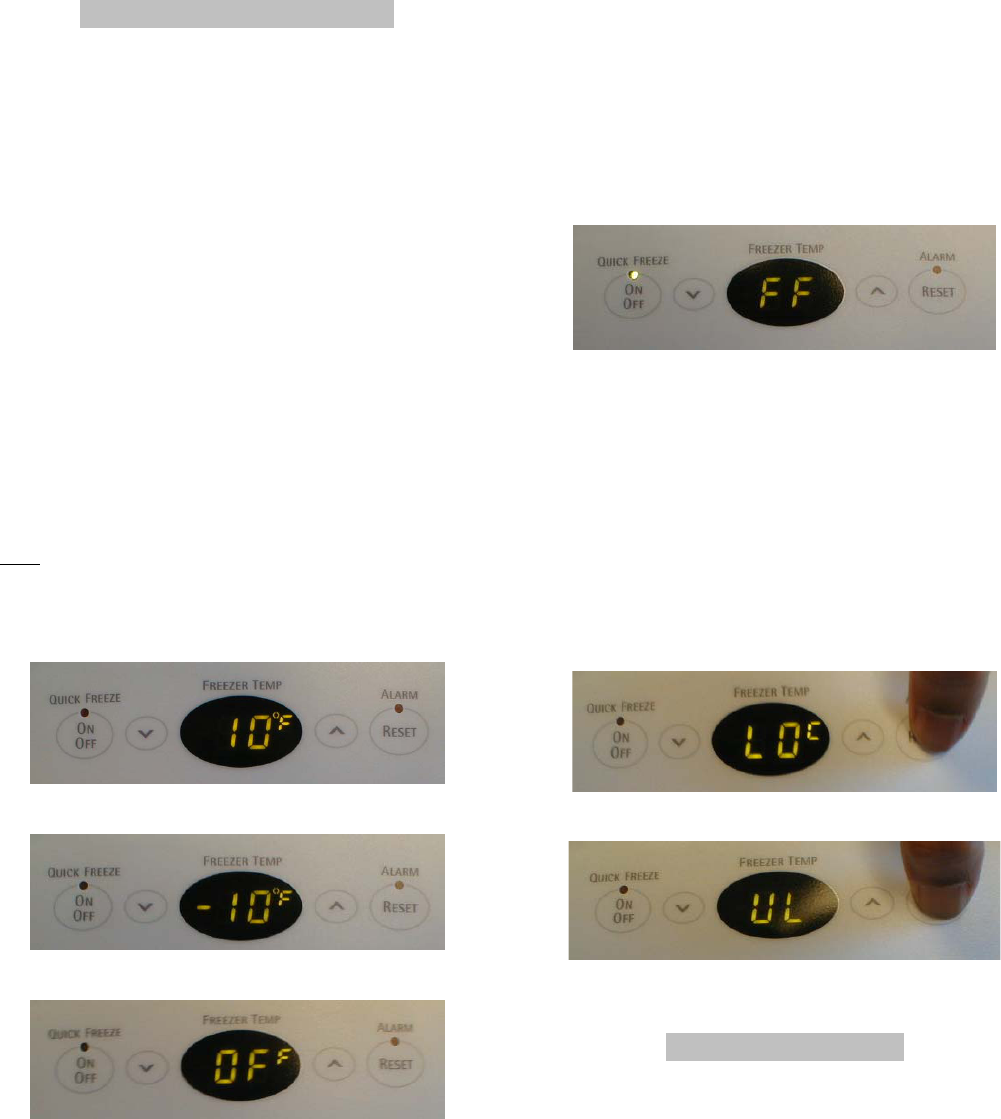
You may also turn off the freezer by pressing the UP
button when at temperature setting 10°F ( -12ºC) The
display will read “0FF” (figure 3). The freezer will not
cool anything while it is on “0FF” position.
Temperature Mode Change:
Temperature display can be changed from ºF to ºC to ºF by
pressing the ALARM RESET and DOWN arrow
simultaneously until it beeps. The display will change to
the other mode.
Note: The door light will continue to operate. The
freezer also still has electrical power and so should be
disconnected from the outlet before being cleaned or
moved.
Figure: 1
Figure: 2
Figure: 3
QUICK FREEZE:
Quick Freeze enables the compressor to run continuously
to help cool large quantities of warm (room temperature)
foods faster. Always cool down hot foods to room
temperature before placing it in the freezer. Use this
feature just prior to adding large quantities of unfrozen
foods (not to exceed 3 pounds per cubic foot of freezer
space). To activate the Quick Freeze feature, push the
QUICK FREEZE button. The buzzer will beep once and
the display will now read “FF” (Figure 4), indicating that
Quick Freeze has begun. For your convenience, Quick
Freeze will automatically turn off after a period of 72
hours and the freezer will return to the previous
temperature setting. You may deactivate Quick Freeze at
any time by pressing the QUICK FREEZE button. The
display will return to showing the current temperature
inside the freezer and the buzzer will beep once.
Figure: 4
DISPLAY LOCKOUT:
Press and hold the ALARM RESET key until the buzzer
beeps to activate or deactivate the Display Lockout feature
which prevents the user from accidentally changing the
temperature and quick freeze settings. The buzzer beeps
and “LOC” (Stands for LOCK, See figure 5) will be
displayed for 3 seconds indicating that it is locked. Once in
lockout when a key is pressed, the “LOC” will be
displayed for 3 seconds. When the lockout is deactivated,
“UL” (Stands for UNLOCK, See figure 6) will be
displayed for 1 second.
Figure: 5
Figure: 6
ALARM FUNCTIONS
TEMPERATURE ALARM:
If the cabinet temperature rises to a level above 23ºF
(-5ºC), a high temperature alarm will be activated. The
buzzer will beep every 5 seconds, the red alarm light will
glow and the display will flash. This will continue till the
problem is determined, corrected and temperature
once again drops to a level below 23ºF (-5ºC). You may
stop the buzzer by pressing the ALARM RESET button.
To also stop the display from flashing press the ALARM
RESET button again. Temperature Alarm will reactivate
itself upon reaching a safe temperature.
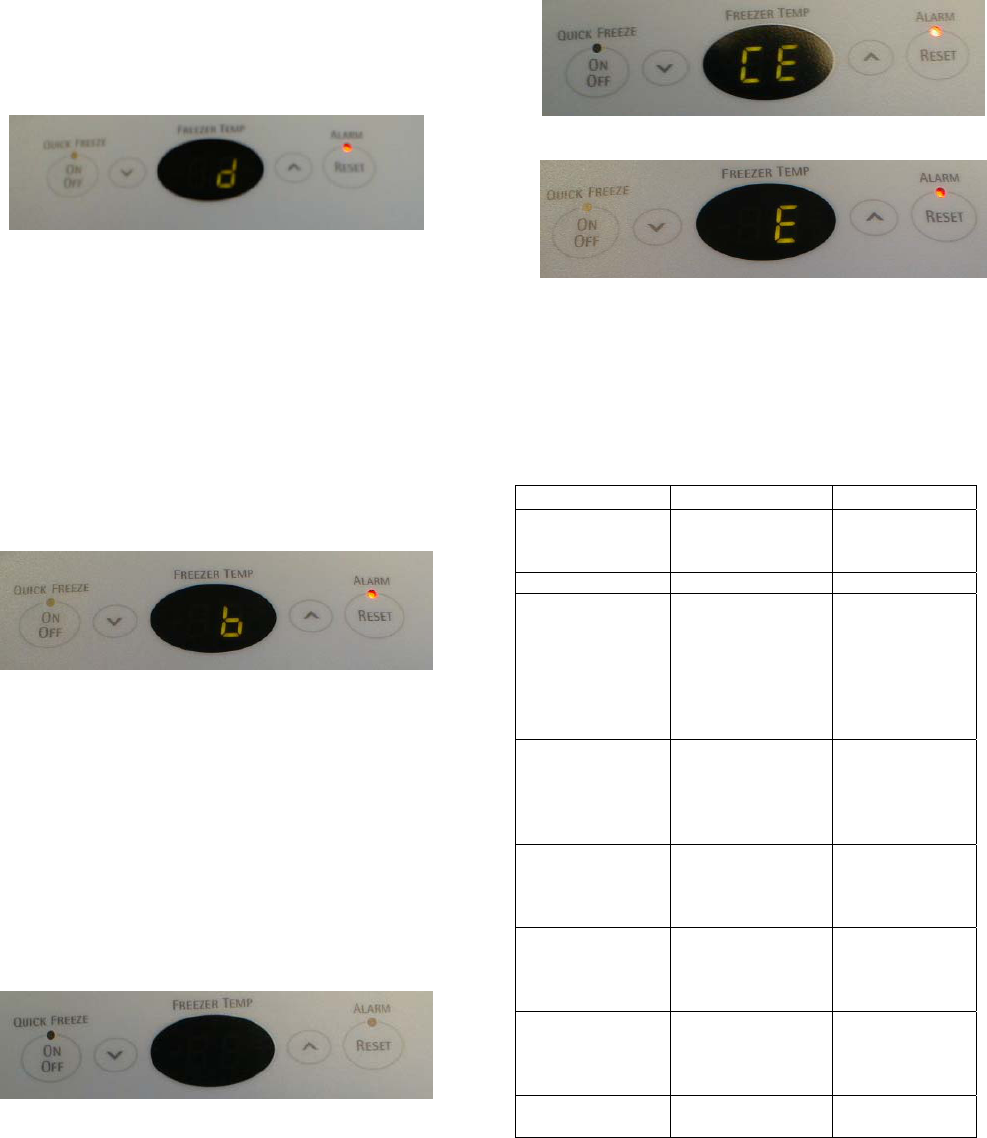
DOOR / LID AJAR ALARM:
The door/lid alarm will activate if it is ajar for more than
five minutes. The buzzer will beep every five seconds, the
red alarm light will glow and the display will alternate
between “d” (Stands for Door/Lid, See figure 7) and the
cabinet temperature. Press the ALARM RESET button to
turn the buzzer off. The display will keep flashing and the
red light will stay on. Close the door/lid of the freezer to
return it to normal operation.
Figure: 7
LOW / NO BATTERY ALARM:
The Low/No battery alarm will activate when the power
level of the battery becomes low. The display will alternate
between “b” (Stands for Battery, See figure 8) and the
cabinet temperature, the red alarm light will become
illuminated and the buzzer will beep every five seconds.
To stop the buzzer, press the “ALARM RESET” button.
The red alarm light will remain on and the display will
continue to flash until a new battery is installed. This same
alarm will activate if there is no battery installed.
Figure: 8
POWER FAILURE:
If power to the freezer is lost, the power loss alarm will
activate. The display will be off but the buzzer will beep
every ten seconds (See figure 9). To turn the buzzer off,
press the “ALARM RESET” button. The buzzer will also
turn off automatically when power is reconnected to the
freezer. The temperature alarm will activate if the
temperature of the cabinet rises to a level above 23ºF
during power failure. The red alarm light however will not
illuminate.
Figure: 9
SYSTEM ERROR ALARM:
The display will alternate between temperature and “CE”
(figure 10 & 11) or “E”. Call service repair to correct the
problem.
Figure: 10
Figure: 11
ALARM FUNCTION TABLE:
Note: Except during power loss, the red alarm light is
illuminated whenever there is an alarm status.
Display Status Function Response
Cabinet
temperature is
displayed.
Normal Operation None
“FF” is displayed. Quick Freeze None
Temperature
flashing on and
off. Buzzer beeps
every 5 seconds.
Freezer temp. too
high
Check power is
connected.
Contact service
technician. Press
ALARM
RESET to shut
off buzzer.
Alternating; “b”
and temperature.
Buzzer beeps
every 5 seconds.
Low/no battery Replace 9V
battery. Press
ALARM
RESET to stop
buzzer.
Alternating; “d”
and temperature.
Buzzer beeps
every 5 seconds.
Door ajar Close door.
Press ALARM
RESET to stop
buzzer.
Alternating; “E”
and temperature.
Buzzer beeps
every 5 seconds.
Operational error Contact service
technician.
Alternating “CE”
and temperature.
Buzzer beeps
every 5 seconds.
Operational error Contact service
technician.
Display off.
Buzzer beeps
Power failure Reconnect
power
every 10 seconds. connection.
Press ALARM
RESET to stop
buzzer.
FREEZER MATE
FREEZER MATE is a monitoring device for your freezer.
FREEZER MATE is able to receive freezer status
information wirelessly from your freezer. Contact your
Sears sales representative for more information on this
new and exciting device.
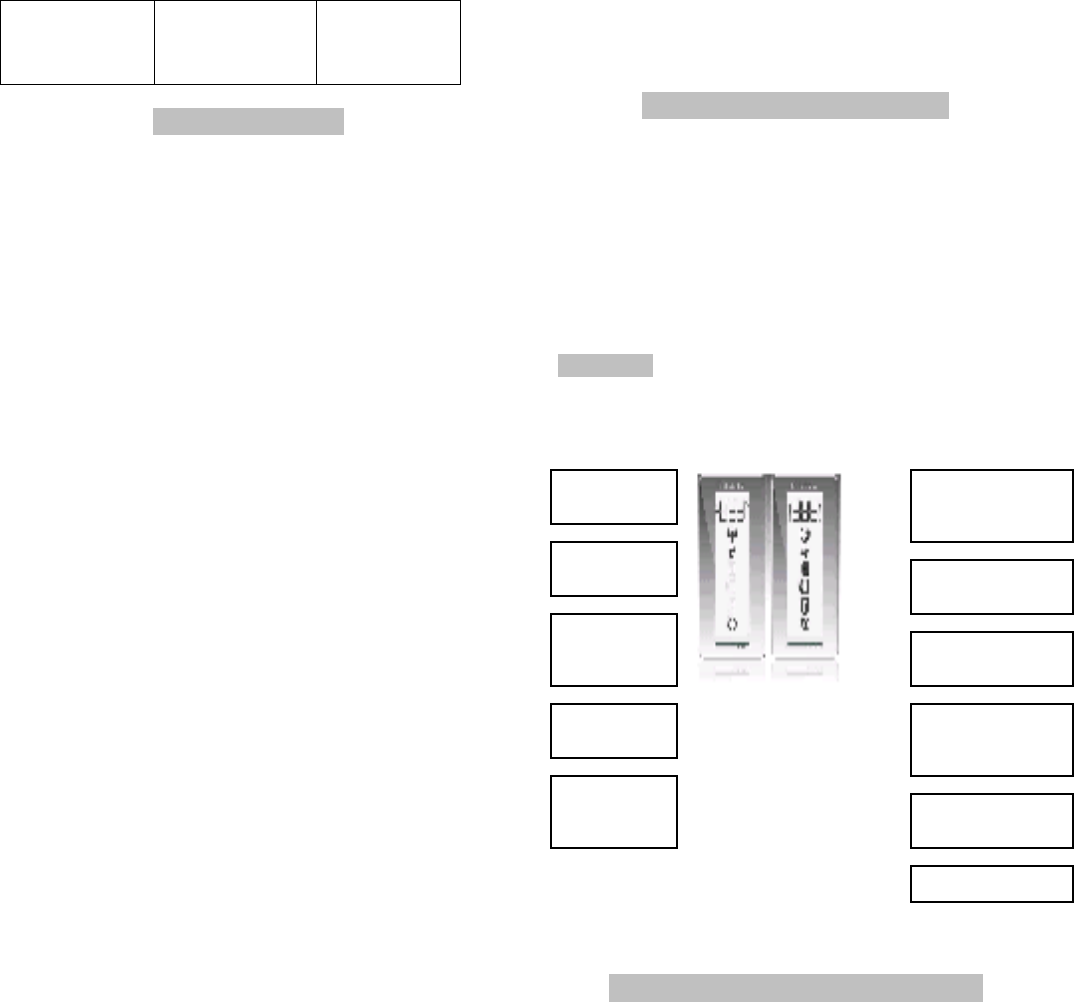
Figure: FREEZERMATE Front View
Figure: FREEZERMATE Back View
BATTERY INSTALLATION
This system requires the installation of two standard AA
size batteries (not included). To install the batteries,
remove the battery cover on the back of the device, install
the batteries and put the cover back on.
Note: Always use new batteries. Do not mix new
battery with old battery. Old battery can leak
chemicals that can destroy the unit.
! Warning: Please follow the proper procedure to
dispose of old batteries.
ICONS:
PAIRING WITH YOUR FREEZER
Pairing verifies that the FREEZER MATE is receiving
signals from the desired freezer. If you have more than one
freezer transmitting at the same time, this procedure
insures that the communication link is limited to the
desired freezer. Please follow the procedures below while
standing in the close proximity of the desired freezer.
1. Remove the 9 volt battery from the freezer.
2. Reinstall the batteries in the FREEZER MATE.
3. Within one minute, the FREEZER MATE should be
communicating. A steady on signal icon, current
temperature and blinking lo/no freezer battery icon will be
displayed. Once the icons described above are displayed,
the FREEZER MATE setup is complete. The FREEZER
MATE will not communicate with any other freezer. You
Minus Sign
Time Max
Temperature
and duration
display
Power to the
Freezer Icon
Low / No
battery on the
Freezer
Degree Scale
Hour
Signal
Low Battery on the
FREEZER MATE
Freezer Door Ajar
Quick Freeze On

can change the temperature setting or select quick freeze
on the freezer to further verify communication.
4. If you are not receiving the right signal, press and hold
the RESET button for five seconds. The FREEZER MATE
will beep and display the assigned number for the freezer.
Now press the C/F button located on the back of the
FREEZER MATE to release the current pairing. It will
automatically try to pair with the next freezer it receives a
signal from. Repeat the procedure until you pair with the
correct freezer.
5. If you are still having problems pairing with the correct
freezer, unplug your freezer from the power outlet for a
few seconds, plug it back on and repeat the above tasks.
SELECTING A LOCATION
Choose location for the Freezer and the FREEZER MATE
within 70 to 100 feet of each other. For example, place
your freezer in the garage or basement and the FREEZER
MATE in the kitchen. The construction of the building
might affect the transmission range. Try not to have a
concrete or metal structure in the direct path of those two
units. Since the location of the freezer is somewhat
stationary, please try several locations for the FREEZER
MATE to determine the best location. If the
communication link is lost, the signal icon will blink
within 3 minutes.
MODE OF OPERATION
Temperature display can be changed from ºF to ºC to ºF by
pressing the C/F button located on the back of the AidPad.
Use a pointy object such as tooth pick or a paper clip to
activate the button.
QUICK FREEZE:
The quick freeze icon stays on while the freezer is in quick
freeze.
ALARM FUNCTIONS
TEMPERATURE ALARM:
If the freezer temperature reaches over 23ºF (-5ºC) and the
condition exists for more then an hour, the FREEZER
MATE will activate the temperature alarm. The display
will alternate between the current temperature and the
duration of the condition and the buzzer will beep. Press
the RESET button to stop the buzzer but the display will
continue to flash until the problem at the freezer is
identified, corrected and the temperature drops below 23ºF
(-5ºC). If the temperature condition is caused by power
lost to the freezer or door ajar, the corresponding icon will
blink also.
SIGNAL LOST ALARM:
The Signal Icon will blink to indicate that the FREEZER
MATE is not communicating with the freezer. Check for
metal or concrete obstacle between the freezer and the
FREEZER MATE. Relocate the FREEZER MATE to a
suitable location where it receives signal again and the
Signal icon stops blinking.
POWER LOST ALARM:
If the freezer loses power, the freezer power icon will blink
and the buzzer will beep. Press the reset to stop the buzzer
but the icon will continue to blink until the power is
restored to the freezer. Reconnect your freezer to the
power to resolve the alarm condition.
LOW BATTERY ALARM ON FREEZER MATE:
If the battery on the FREEZER MATE is low on power,
the FREEZER MATE low battery icon will flash. Replace
the batteries (follow the battery installation instructions) on
the FREEZER MATE and follow the pairing procedure for
normal operation.
LOW BATTERY ON THE FREEZER ALARM:
If the battery on the freezer is low on power, the freezer
low battery icon will flash and the buzzer will beep. Press
the RESET button to stop the buzzer but the icon will
continue to flash until the problem is resolved. Replace the
9 volt battery on the freezer to resolve the problem.
GOOD HOUSEKEEPING PROCEDURE:
Always place the FREEZER MATE in dry and cool place.
Do not drop the unit. Do not submerge the unit under
water or any liquid. Do not modify or tamper with the
electronics. Modifying or tampering with the internal
circuitry will invalidate the FCC authorization to operate
it. If the unit is not operating properly, return it to store
you bought the unit from.