Electrolux Ede 77550W Users Manual
ede77550w 42086fc6-6cc1-46c1-95f5-a69a34ceaf3a Electrolux Clothes Dryer EDE 77550W User Guide |
2015-01-16
: Electrolux Electrolux-Ede-77550W-Users-Manual-245916 electrolux-ede-77550w-users-manual-245916 electrolux pdf
Open the PDF directly: View PDF ![]() .
.
Page Count: 36

user manual
buku petunjuk
Tumble Dryer
Tumble Dryer
EDE 77550W

Electrolux. Thinking of you.
Share more of our thinking at www.electrolux.com
Contents
Important safety information 2
Product description 4
Control Panel 4
Before first use 5
Sorting and preparing laundry 5
Programme chart 6
Daily use 8
Cleaning and maintenance 10
What to do if ... 11
Machine settings 12
Technical data 13
Installation 13
Environment 16
Service 17
Subject to change without notice
Important safety information
Important! In the interest of your safety
and to ensure the correct use, before
installing and first using the appliance,
read this user manual carefully,
including its hints and warnings. To
avoid unnecessary mistakes and
accidents, it is important to ensure that
all people using the appliance are
thoroughly familiar with its operation
and safety features. Save these
instructions and make sure that they
remain with the appliance if it is moved
or sold, so that everyone using it through
its life will be properly informed on
appliance use and safety.
General safety
• It is dangerous to alter the specifications or
attempt to modify this product in any way.
• This appliance is not intended for use by
persons (including children) with reduced
physical, sensory or lack of experience and
knowledge, unless they have been given
supervision or instruction concerning use
of the appliance by a person responsible
for their safety.
• Make sure that small pets do not climb into
the drum. To avoid this, please check into
the drum before using.
• Any objects such as coins, safety pins,
nails, screws, stones or any other hard,
sharp material can cause extensive dam-
age and must not be placed into the ma-
chine.
• In order to avoid danger of fires caused by
excessive drying, do not use appliance to
dry the following items: Cushions, quilts
and the like (these items accumulate heat).
• Items such as foam rubber (latex foam),
shower caps, waterproof textiles, rubber
backed articles and clothes or pillows fit-
ted with foam rubber pads should not be
dried in the tumble dryer.
• Always unplug the appliance after use,
clean and maintenance.
• Under no circumstances should you at-
tempt to repair the machine yourself. Re-
pairs carried out by inexperienced persons
may cause injury or serious malfunction-
ing. Contact your local Service Centre. Al-
ways insist on genuine spare parts.
• Items that have been soiled with substan-
ces such as cooking oil acetone, petrol,
kerosene, spot removers, turpentine, wax-
es and wax removers should be washed in
hot water with an extra amount of deter-
gent before being dried in the tumble dry-
er.
•Danger of explosion: Never tumble dry
items that have been in contact with in-
flammable solvents (petrol, methylated
spirits, dry cleaning fluid and the like). As
these substance are volatile, they could
cause an explosion. Only tumble dry items
washed with water.
•Risk of fire: items that have been spotted
or soaked with vegetable or cooking oil
constitute a fire hazard and should not be
placed in the tumble dryer.
• If you have washed your laundry with stain
remover you must execute an extra rinse
cycle before loading your tumble dryer.
2 electrolux

• Please make sure that no gas lighters or
matches have accidentally been left in
pockets of garments to be loaded into ap-
pliance
Warning! Never stop a tumble dry
before the end of the drying cycle
unless all items are quickly removed
and spread out so that the heat is
dissipated. Risk of fire!
•Risk of electric shock! Do not spray
down the appliance with jets of water.
• The final part of a tumble dryer cycle oc-
curs without heat (cool down cycle) to en-
sure that the items are left at a temperature
that ensures that items will not be dam-
aged.
• Ensure you have adequate ventilation in
the installation room to avoid the back flow
of gases into the room from appliances
burning other fuels, including open fires.
Installation
• This appliance is heavy. Care should be
taken when moving it.
• When unpacking the appliance, check that
it is not damaged. If in doubt, do not use it
and contact the Service Centre.
• All packing and transit bolts must be re-
moved before use. Serious damage can
occur to the product and to property if this
is not adhered to. See relevant section in
the user manual.
• Any electrical work required to install this
appliance should be carried out by a quali-
fied electrician or competent person.
• Care must be taken to ensure that the ap-
pliance does not stand on the electrical
supply cable.
• If the machine is situated on a carpeted
floor, please adjust the feet in order to al-
low air to circulate freely.
• After having installed the appliance, check
that it is not pressing or standing on its
electrical supply cable or/and inlet hose.
• If the tumble dryer is placed on top of a
washing machine, it is compulsory to use
the stacking kit (optional accessory).
Use
• This appliance is designed for domestic
use. It must not be used for purposes other
than those for which it was designed.
• Only wash fabrics which are designed to
be machine dried. Follow the instructions
on each garment label.
• Do not dry unwashed items in the tumble
dryer.
• Do not overload the appliance. See the
relevant section in the user manual.
• Clothes which are dripping wet should not
be placed in the dryer.
• Garments which have been in contact with
volatile petroleum products should not be
machine dried. If volatile cleaning fluids are
used, care should be taken to ensure that
the fluid is removed from the garment be-
fore placing in the machine.
• Never pull the power supply cable to re-
move the plug from the socket; always
take hold of the plug itself.
• Never use the tumble dryer if the power
supply cable, the control panel, the work-
ing surface or the base are damaged so
that the inside of the tumble dryer is ac-
cessible.
• Fabric softeners, or similar products
should be used as specified by the fabric
softener instructions.
•Caution - hot surface : Do not touch the
door light cover surface when the light is
switched on.
1)
• Hot surface: Do not touch the back
of the appliance while it is operating!
Child safety
• This machine is not intended for use by
young children or infirm persons without
supervision.
• Children often do not recognise the haz-
ards associated with electrical appliances.
Children should be supervised to ensure
that they do not play with the appliance.
• The packaging components (e.g. plastic
film, polystyrene) can be dangerous to chil-
dren - danger of suffocation! Keep them
out of children’s reach.
• Keep all detergents in a safe place out of
children’s reach.
• Make sure that children or pets do not
climb into the drum.
1) Only dryers equipped with internal drum light.
electrolux 3
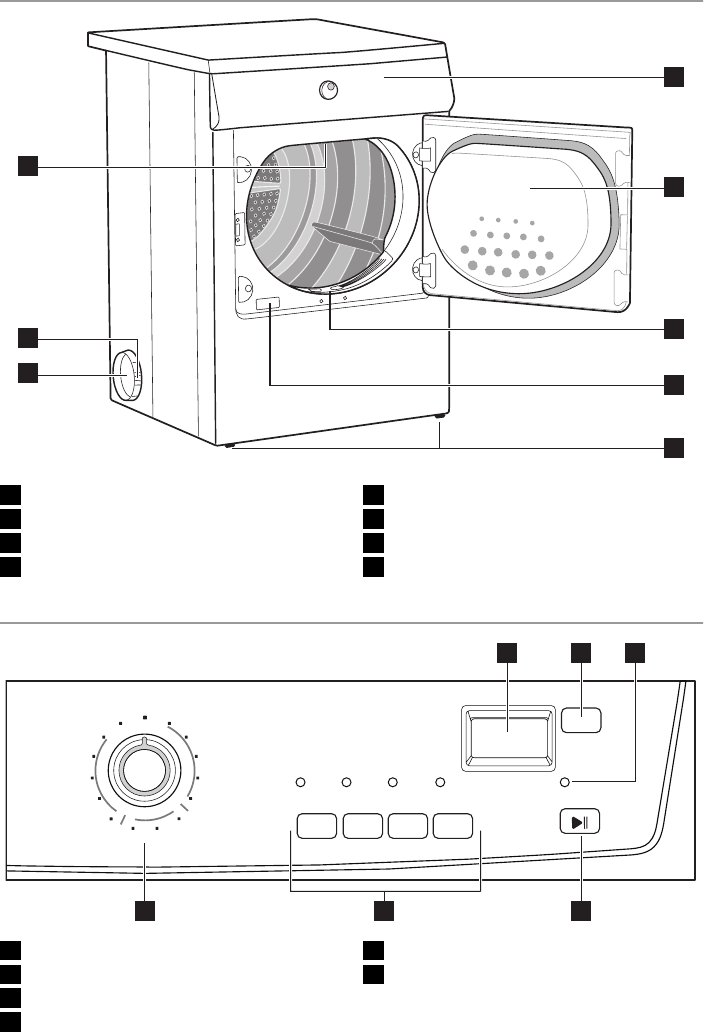
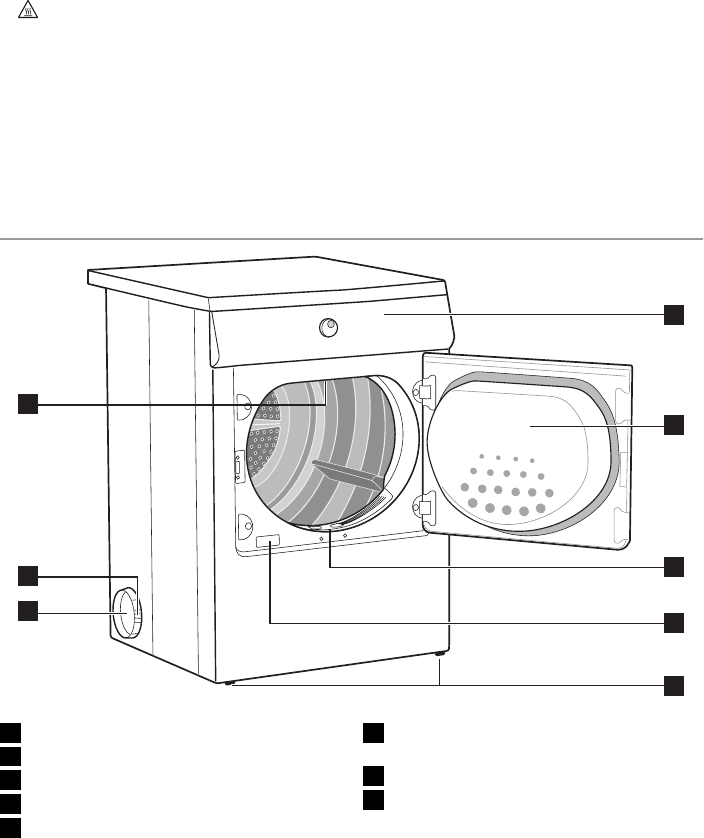
Product description
1
3
4
2
5
6
7
8
1Control panel
2Door
3Fluff filter
4Rating plate
5Adjustable feet
6Sideways vent outlets / back vent outlet
7Ring nut
8Lamp for inside light
Control Panel
6 5 4
2 31
1Programme knob and "O" (OFF) switch
2Function buttons
3START PAUSE button
4FILTER light
5DELAY START button
6Display
4 electrolux

What is shown in the display
SYMBOL DESCRIPTION
Time to end (time of time pro-
gramm, time of start delay)
SYMBOL DESCRIPTION
Child lock
Delay start
Drying phase
Cooling phase
Anticrease guard phase
Error, wrong selection
Before first use
In order to remove any residues which may
have been produced during production, wipe
the dryer drum with a damp cloth or carry out
a brief drying cycle (ca. 30 min.) with damp
cloths in the machine.
Sorting and preparing laundry
Sorting laundry
• Sort by fabric type:
– Cotton/linen for programmes in pro-
gramme group.
– Mixtures and synthetics for pro-
grammes in SYNTHETICS programme
group.
• Sort by care label: The care labels mean:
Drying in the tumble dryer possible in
principle
Drying at normal temperature
Drying at reduced temperature (press
DELICATE button!)
Drying in the tumble dryer not possible
Important! Do not place in the appliance any
wet laundry which is not specified on the care
label as being suitable for tumble-drying.
This appliance can be used for all wet laundry
items which are labelled as suitable for tum-
ble-drying.
• Do not dry new, coloured textiles together
with light-coloured laundry items. Textile
colours may bleed.
• Do not dry cotton jersey and knitwear with
the EXTRAprogramme. Items may shrink!
• Wool and wool-like textiles can be dried
using the WOOL CARE programme.
Preparing laundry
• To avoid laundry becoming tangled: close
zips, button up duvet covers and tie loose
ties or ribbons (e.g. of aprons).
• Empty pockets. Remove metal items (pa-
per clips, safety pins, etc).
• Turn items with double-layered fabrics in-
side out (e.g. with cotton-lined anoraks,
the cotton layer should be outermost).
These fabrics will then dry better.
Important! Do not overload the appliance.
Observe max. loading volume of 7 kg.
Laundry weights
Type of laun-
dry
Weight
Bathrobe 1200 g
Napkin 100 g
Quilt cover 700 g
Sheet 500 g
Pillow case 200 g
Tablecloth 250 g
Towelling tow-
el
200 g
Tea cloth 100 g
Night dress 200 g
Ladies' briefs 100 g
electrolux 5
Type of laun-
dry
Weight
Man's work
shirt
600 g
Man's work
shirt
200 g
Man's pyja-
mas
500 g
Type of laun-
dry
Weight
Blouse 100 g
Men's under-
pants
100 g
Programme chart
Programmes
max. load (weight when dry)
Additional functions/options Application/properties
Care mark
COTTONS
EXTRA 7 kg
DELICATE , LONG ANTI-
CREASE , BUZZER , DELAY
START
Thorough drying of thick or multi- lay-
ered fabrics, e.g. terry towelling
items, bathrobes.
COTTONS
STRONG 7 kg
DELICATE , LONG ANTI-
CREASE , BUZZER , DE-
LAY START
Thorough drying of thick or multi- lay-
ered fabrics, e.g. terry towelling
items, bathrobes.
COTTONS
1)
CUP-
BOARD
7 kg
DELICATE , LONG ANTI-
CREASE , BUZZER , DE-
LAY START
Thorough drying of fabrics of even
thicknesses, e.g. terry towelling
items, knitwear, towels.
COTTONS
DAMP 7 kg
DELICATE , LONG ANTI-
CREASE , BUZZER , DE-
LAY START
For thin textiles which are still to be
ironed, e.g. knitted items, cotton
shirts.
COTTONS
IRON DRY 7 kg
DELICATE , LONG ANTI-
CREASE , BUZZER , DE-
LAY START
For thin fabrics which are also to be
ironed, e.g. knitwear, cotton shirts.
SYN-
THETICS EX-
TRA
3 kg
DELICATE , LONG ANTI-
CREASE , BUZZER , DE-
LAY START
Thorough drying of thick or multi-lay-
ered fabrics, e.g. pullovers, bedding,
table linen.
2)
SYN-
THETICS
1)
CUPBOARD
3 kg
DELICATE , LONG ANTI-
CREASE , BUZZER , DELAY
START
For thin fabrics which are not ironed,
e.g. easy care shirts, table linen, ba-
by clothes, socks, lingerie with bones
or wires.
2)
6 electrolux
Programmes
max. load (weight when dry)
Additional functions/options Application/properties
Care mark
SYN-
THETICS
IRON DRY
3 kg
DELICATE , LONG ANTI-
CREASE , BUZZER , DELAY
START
For thin fabrics which are also to be
ironed, e.g. knitwear, cotton shirts.
2)
TIME 7 kg
DELICATE , LONG ANTI-
CREASE , BUZZER , DELAY
START , TIME
For further drying of individual items
of laundry.
MIX 3 kg
3)
DELICATE , LONG
ANTI-CREASE , BUZZER ,
DELAY START
For drying cotton and synthetic fab-
rics, uses low temperature.
EASY IRON
1 kg
(or 5
shirt
s)
3)
DELICATE , LONG
ANTI-CREASE , BUZZER ,
DELAY START
Special programme with anti-crease
mechanism for easy care textiles
such shirts and blouses; for minimum
ironing effort. The result depends on
the type and quality of textiles. (The
loading volume corresponds to ap-
prox. 5 to 7 shirts.) Recommenda-
tion: Place textiles in the dryer
straight after spinning. Once dried,
immediately remove textiles and
place on clothes hanger.
JEANS 7 kg
, DELICATE LONG ANTI-
CREASE , BUZZER , DELAY
START
For leisure clothing, such as jeans,
sweat-shirts, etc., of different mate-
rial thicknesses (e.g. at the neck,
cuffs and seams).
WOOL
CARE 1 kg DELICATE , , BUZ-
ZER , DELAY START
is special programme for briefly treat-
ing woollens with warm air after they
have been dried naturally, worn or
stored for long periods. Wool fibres
are aligned and the wool becomes
soft and snugly.
COOLING 7 kg BUZZER
Special programme, lasting around
10 minutes, for refreshing or gently
cleaning textiles with commercially
available dry cleaning sets. (Only use
those products which are declared
as suitable for the drier by the man-
ufacturer; please observe the manu-
facturer’s instructions for use.)
1) In accordance with IEC61121
electrolux 7
2) select option
3) Automatic
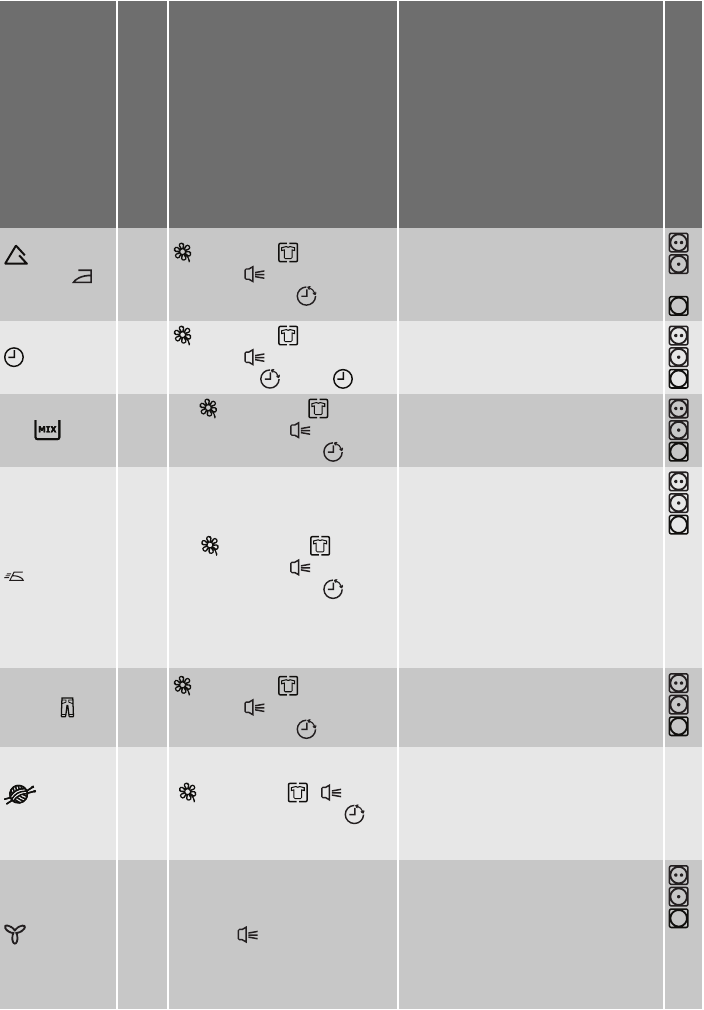
Daily use
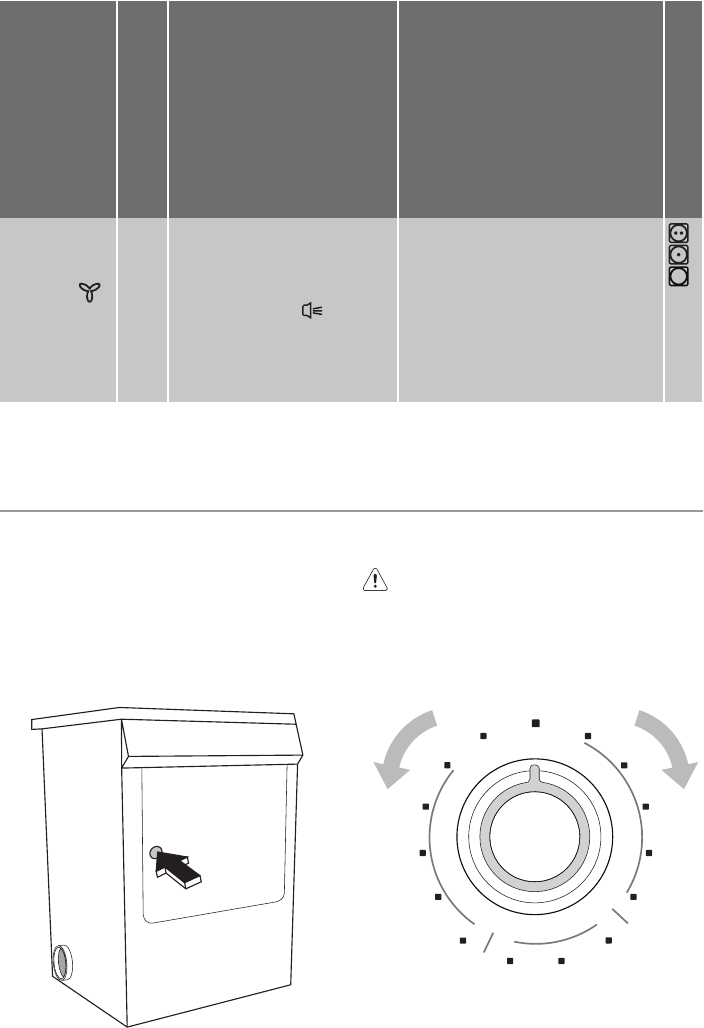
Switching machine on
Turn the programme selector to any pro-
gramme. The machine has been switched
on.
Door opening and laundry loading
1. Open loading door:
Push against the loading door (push
point)
2. Load your laundry (do not force it in).
Caution! Do not jam laundry in between
the loading door and rubber seal.
3. Close loading door securely. Lock must
audibly lock.
Selecting the programme
Use the programme selector to set the pro-
gramme you require. The estimated time to
end of the programme appears in the LCD in
h:mm format (hours:minutes).
during the cycle time elapses by steps of one
minute; less than 1 hour the leading zeros are
not shown (ex. “59”, “5”, “0”);
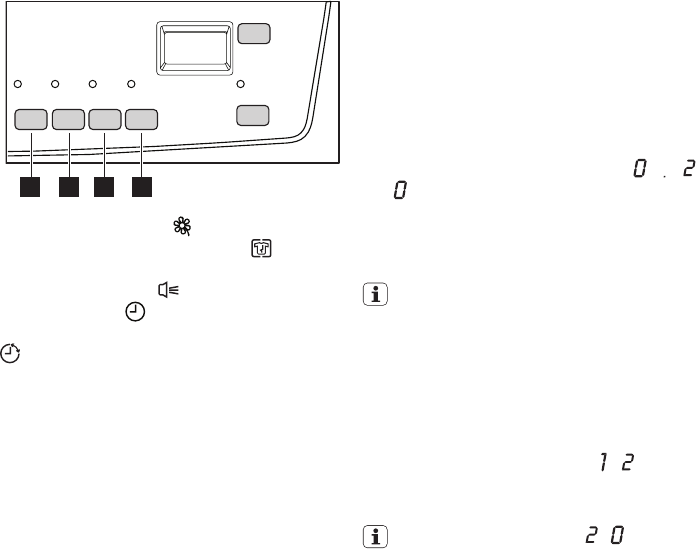
Selecting additional functions
You can choose from the additional func-
tions:
button 1 - DELICATE
button 2 - LONG ANTI-CREASE
button 3 - BUZZER
button 4- TIME
button 6- DELAY START
Delicate
Pressing this button allows drying to be per-
formed at a lower temperature, for delicate
items. The corresponding pilot light comes
on. This option can also be used for time
controlled drying.
Anticrease
A long anti-crease phase lengthen the anti-
crease phase (30 min.) at the end of the dry-
ing additionally by 60 minutes. The drum ro-
tates at intervals during this phase. This
keeps the laundry loose and free of creases.
Phase lasts in total 90 minutes. The laundry
can be removed at any time during the anti-
crease phase.
When the option is active, the light is on.
1 2 3 4
8 electrolux
Buzzer
When the drying cycle has finished, an inter-
mittent audible signal will sound. By depress-
ing button the acoustic signal is switched off
in the following cases:
• when selecting the programme
• when depressing the buttons
• when the programme selector dial is
turned to another position during the pro-
gramme or when you depress an option
button during the cycle
• at the end of the programme.
The corresponding light comes on.
Time
Use the TIME button to select the pro-
gramme duration after setting the TIME pro-
gramme. You can select a programme du-
ration from 20 min. to 3 hours in 10-minute
steps.
1. Turn the programme selector to the pro-
gramme.
2. Press the button repeatedly until the de-
sired programme duration is shown in the
display, e.g. for a pro-
gramme of 20 minutes.
If the programme duration is not selected,
the duration is automatically set to 10 mins.
Delay start
With the DELAY button, you can delay
the start of a programme by between 30
minutes (30') and a maximum of 20
hours (20h).
1. Select the programme and additional
functions.
2. Press the Delay button as many times as
necessary until the required time of the
delay appears on the display, e.g.
H if the programme is to be started in 12
hours.
If the display is showing H and
you press the button again, the time de-
lay will be cancelled. The display will
show 0 and then the duration of the se-
lected programme.
3. To activate the delay timer, press the
Start/Pause button. The amount of time
remaining until the programme is set to
start is continuously displayed (e.g. 15h,
14h, 13h, … 30' etc).
Setting child lock
The child lock can be set to prevent a pro-
gramme being accidentally started or a pro-
gramme in operation being accidentally
changed. The child lock function locks all
buttons and the programme knob. The child
lock can be activated or deactivated by hold-
ing down the BUZZER and TIME buttons si-
multaneously for 5 seconds.
– Before programme is started: Appli-
ance cannot be used
– After programme is started: Pro-
gramme in operation cannot be
changed
The icon appears in the display to indicate
that the child safety device is activated.
The child safety device is not deactivated
once the programme comes to an end.
If you want to set a new programme, you
must first deactivate the child safety device.
Starting the programme
Press the START / PAUSE button. The pro-
gramme is started.
The programme phase is shown in display by
appropriate icons. From left to the right, from
drying ,anticrease , to cooling .
Changing programme
To change a programme which has been se-
lected by mistake once the programme has
started, first turn the programme selector to
" O" (OFF) position. The programme is can-
celled.
The programme can no longer be
changed directly once the programme
has started. If nevertheless there is an
attempt to change the programme on
the programme knob or if an function
button (excluding the button) is pressed,
led above START/PAUSE button starts
flashing temporarily in yellow. The drying
programme is not however affected by
this (laundry protection).
Drying cycle complete / removing
laundry
Once the drying cycle is complete, display
shows a blinking " 0 ", under anti-crease
and filter icon appear dash. If the (Buzzer)
electrolux 9

button has been pressed, an acoustic signal
sounds intermittently for about one minute.
The drying cycles are automatically fol-
lowed by an anti-crease phase which
lasts around 30 minutes. The drum ro-
tates at intervals during this phase. This
keeps the laundry loose and free of crea-
ses. The laundry can be removed at any
time during the anti-crease phase. (The
laundry should be taken out towards the
end of the anti-crease phase at the latest
to prevent creases from forming.) If
(Long anticrease) function has been
selected, the anti-crease phase is
lengthened by 60 minutes.
1. Open door.
2. Remove laundry.
3. Remove filter after clothes has been re-
moved. Clean the filter.
Warning! Before You place the filter,
please check it there is nothing inside the
filter seat.
4. Turn the programme selector to "O"
(OFF) .
Important! Clean the filter after each drying
cycle.
5. Close the door.
Cleaning and maintenance
Warning! The tumble dryer is not to be
used if industrial chemicals have been
used for cleaning!
Cleaning fluff filter
The filter collect all the fluff which accumu-
lates during drying. To ensure that the dryer
works perfectly, the fluff filter must be
cleaned after every drying cycle.
The warning light FILTER , is on to remind
you this operation.
Caution! Never operate the dryer
without fluff filter or with damaged or
blocked fluff filter.
1.
Open loading door and remove laundry.
2. Remove the filter which is built into the
lower part of the loading aperture.
3.
Open the filter pressing the button,
among two slots on fingers. Clean the fil-
ter using dump hand or cloth. After a pe-
riod of time, a patina due to detergent
residue on laundry forms on the filters.
When this occurs, clean the filter with
warm water using a brush.
Close the filter and do not forget to put it
back.
Warning! Before You place the filter,
please check it there is nothing inside the
filter seat.
4. The filter can be positioned only to one
side. If position is wrong, the filter over-
hangs.
If the filter will not snap into place, the
loading door cannot be closed.
10 electrolux
Cleaning the door
Clean periodically the interior part of the door
to remove any fluff. Accurate cleaning en-
sures correct drying.
Cleaning the drum
Caution! Do not use abrasives or steel
wool to clean the drum.
Lime in the water or cleaning agents may
form a barely visible lining on the inside
of the drum. The degree to which the
laundry has been dried is then no longer
detected reliably. The laundry is damper
than expected when removed from the
dryer.
Use a standard domestic cleaner (e.g.
vinegar-based cleaner) to wipe down the
inside of the drum and drum ribs.
Clean operating screen and housing
Caution! Do not use furniture cleaners
or aggressive cleaning agents to clean
the machine.
Use a damp cloth to wipe down the op-
erating screen and housing.
What to do if ...
Troubleshooting by yourself
If, during operation, the error code E... plus
number or letter) appears on the LCD: Switch
the machine off and on again. Reset pro-
gramme. Press the START / PAUSE button
If the error is still displayed, please inform
your local Service Force Centre and quote
the error code.
Problem Possible cause Remedy
Dryer does not work.
Mains plug is not plugged in or
fuse is not working correctly.
Plug in at mains socket. Check
fuse in fuse box (domestic in-
stallation).
Loading door is open. Close loading door.
Have you pressed the START /
PAUSE button?
Press the START / PAUSE but-
ton again.
Drying results unsatisfactory.
Wrong programme selected.
Select a different programme
the next time you dry (see “Pro-
gramme chart” chapter).
Filter clogged. Clean filter.
Overloading of laundry. Observe recommended loading
volumes.
Ventilation slots covered up. Uncover ventilation slots.
Residue on inside surface of
drum or drum ribs.
Clean inside surface of drum
and drum ribs.
Conductance of water at instal-
lation site differs from standard
setting of machine.
Re-programme standard setting
for degree of drying (see ‘Pro-
gramming options’ chapter).
Loading door does not close. Filter not in place. Install filter into place.
When a button is pressed, Err
appears on the LCD.
Washing protection. After the
start of the programme, the op-
tion can no longer be set.
Turn the programme knob to
"O" (OFF) . Set the programme
again.
Drum light does not work.
Programme selector in "O"
(OFF) position.
Turn programme selector to any
programme.
Defective light bulb. Replace light bulb (see next sec-
tion).
electrolux 11
Displayed programme time
changes erratically or stays un-
changed for a long time.
Programme time is corrected
automatically depending on
type and volume of laundry and
level of dampness.
Automatic process; this is not a
machine fault.
Drying cycle ends shortly after
programme starts.
Not enough washing loaded or
washing loaded is too dry for se-
lected programme.
Select time programme or high-
er drying level (e.g. EXTRA in-
stead of CUPBOARD ).
Drying cycle lasts an unusually
long time. Note: After around 5
hours the drying cycle ends au-
tomatically.
Filter clogged. Clean filter.
Load volume too big. Reduce load volume.
Laundry insufficiently spun. Laundry must be adequately
spun.
Changing the bulb for interior lighting
Only use a special bulb which is designed
specially for dryers. The special bulb can be
obtained from your local Service Force cen-
tre.
Warning! When the appliance is
switched on, the interior lighting
switches itself off after 4 minutes when
the door is open.
Warning! Do not use standard bulbs!
These develop too much heat and may
damage the machine!
Warning! Before replacing the bulb,
disconnect the mains plug.
1. Unscrew cover above the bulb (this can
be found directly behind the loading aper-
ture, at the top; refer to “Description of
machine” section.)
2. Replace defective bulb.
3. Screw cover back down.
Check the correct positioning of o-ring gas-
ket before screwing back the door light cov-
er. Do not operate the dryer when missing o-
ring gasket on door light cover.
Warning! For safety reasons, the cover
must be screwed down tightly. If this is
not done, the dryer must not be
operated.
Machine settings
SIGNAL permanent off
1. Turn the programme selector to any pro-
gramme.
2. Press simultaneously the LONG ANTI-
CREASE and BUZZER buttons and hold
down for approx. 5 seconds.
3. The buzzer is by default always off. You
can use button to activate or deactivate
sound but machine does not memorize
your selection.
Water hardness
Water contains, a variable quantity of lime-
stone and mineral salts of which quantities
vary according to geographical locations
thus varying its conductivity values. Relevant
variations of the conductivity of the water
compared to those prefixed by the factory
could slightly influence the residual humidity
of the laundry at the end of the cycle. Your
dryer allows you to regulate the sensitivity of
the drying sensor based on conductivity val-
ues of the water.
1. Turn the programme selector to any pro-
gramme.
2. Press simultaneously the BUZZER and
START PAUSE buttons and hold down
for approx. 5 seconds. The current set-
ting is on the display: – low con-
ductivity <300 micro S/cm, –
medium conductivity 300-600 micro S/
cm, – high conductivity >600 mi-
cro S/cm
3. Press the START PAUSE button sequen-
tially until you set desired level.
4. To memorize setting press simultaneous-
ly the BUZZER and START PAUSE but-
tons or turn knob to "O" (OFF) position
12 electrolux
Technical data
Height x width x depth 85 x 60 x 58 cm
Drum volume 108 l
Depth with loading door open 109 cm
Height can be adjusted by 1.5 cm
Weight when empty approx. 32.5kg
Loading volume (depends on programme)
1)
max. 7 kg
Voltage 230 V
Required fuse 10 A
Total power 2200 W
Energy efficiency class C
Energy consumption (7 kg of cotton, pre-
drained at 1000 rpm)
2)
3.9 kWh
Average annual energy consumption 262.6kWh
Use Domestic
Permissible ambient temperature + 5°C to + 35°C
Consumption values
The consumption values have been established under standard conditions. They may de-
viate when the machine is operated in domestic circumstances.
Programme Energy consumption in kWh / average
drying time in min.
COTTONS CUPBOARD
2)
3.9 / 115 (7 kg load pre-drained at 1000
rpm)
COTTONS IRON
2)
3/ 85 (7 kg load pre-drained at 1000 rpm)
SYNTHETICS CUPBOARD
2)
1.18 / 35 (3 kg load pre-drained at 1200
rpm)
1) Different loading volume data may be needed in some countries as a result of different measuring
methods.
2) in accordance with EN 61121
Installation
Important! The appliance must be moved in
vertical position for transport.
Appliance positioning
• It is recommended that, for your conven-
ience, the machine is positioned close to
your washing machine.
• The tumble dryer must be installed in a
clean place, where dirt does not build up.
• Air must be able to circulate freely all round
the appliance. Do not obstruct the front
ventilation grille or the air intake grilles at
the back of the machine.
• To keep vibration and noise to a minimum
when the dryer is in use, it should be
placed on a firm, level surface.
• Once in its permanent operating position,
check that the dryer is absolutely level with
the aid of a spirit level. If it is not, raise or
lower the feet until it is.
• The feet must never be removed. Do not
restrict the floor clearance through deeply
carpets, strips of wood or similar. This
might cause heat built-up which would in-
terfere with the operation of the appliance.
electrolux 13
Important! The hot air emitted by the tumble
dryer can reach temperatures of up to 60°C.
The appliance must therefore not be installed
on floors which are not resistant to high
temperatures.
When operating the tumble dryer, the room
temperature must not be lower than +5°C
and higher than +35°C, as it may affect the
performance of the appliance.
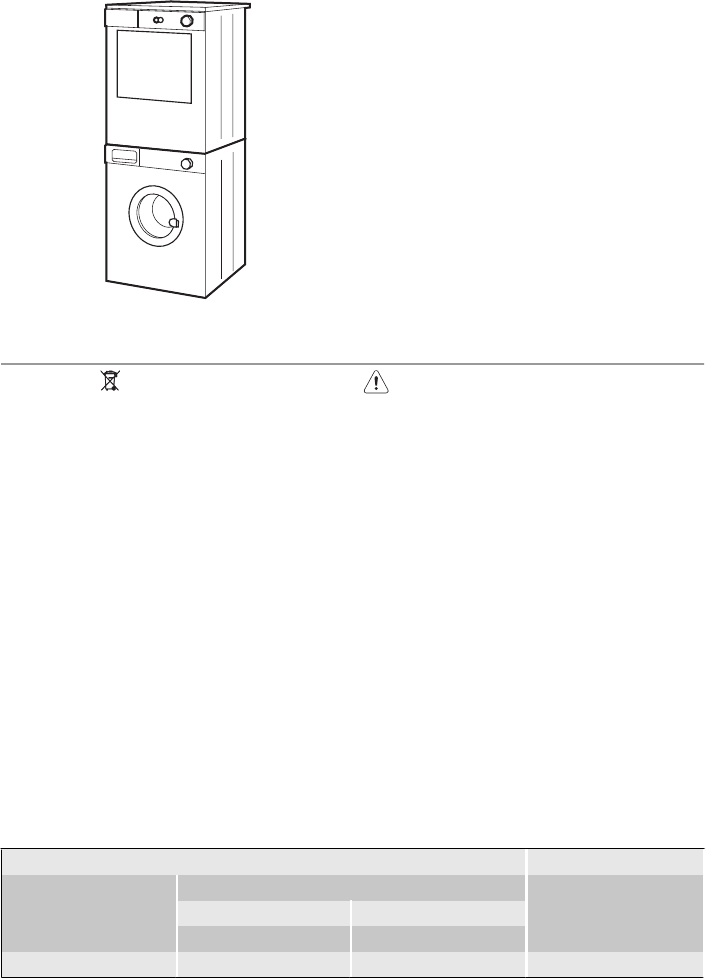
Warning! Should the appliance be
moved, it must be transported vertically.
Warning! The appliance must not be
installed behind the lockable door, a
sliding door or a door with a hinge on the
opposite side to that of the appliance.
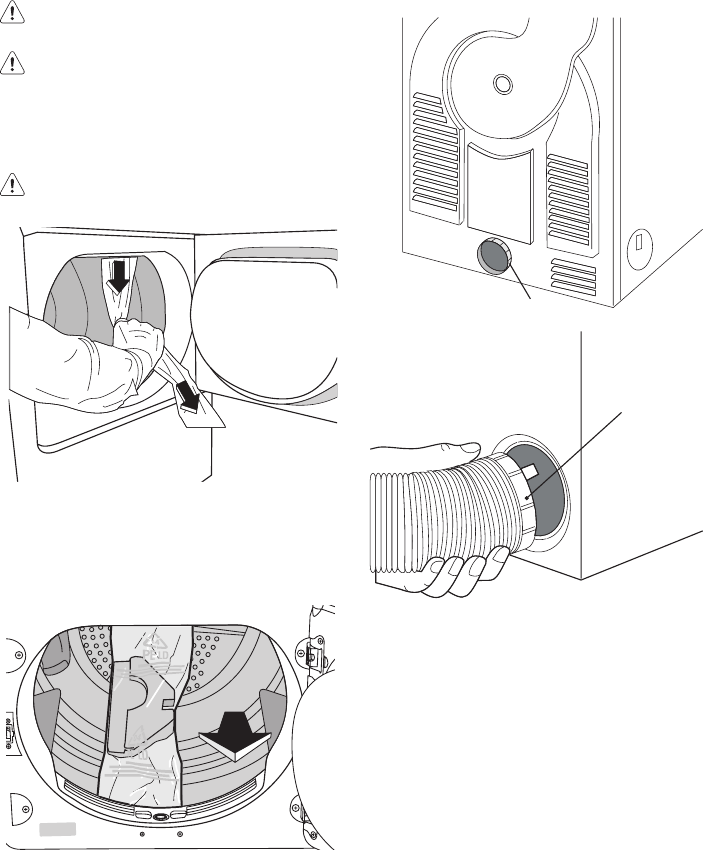
Removing transport safety packaging
Caution! Before use all parts of the
transport packaging must be removed.
1. Open loading door.
2. Pull off adhesive strips from inside ma-
chine on top of drum.
3. Remove foil hose and polystyrene padding
from the machine.
Fitting the vent hose
To simplify the installation, there is a choice
of vent outlets: one at the back, the others in
the left and right-hand side. Connect the
hose to whichever is the more convenient by
pulling the ring nut (A) from the vent outlet at
the back, screwing it on to the hose and
pushing it firmly back into place. The unused
vents should now be sealed with the special
snap covers provided.
If the hose is long and the room temperature
low, the moisture might condense to water
inside the hose. This is an unavoidable nat-
ural phenomenon. To prevent this water from
Iying in the hose or flowing back into the tum-
ble dryer, it is advisable to drill a small hole
(via. 3 mm) in the lowest point of the hose and
to place a small container below it. (See pic-
ture, point B).
A
A
14 electrolux
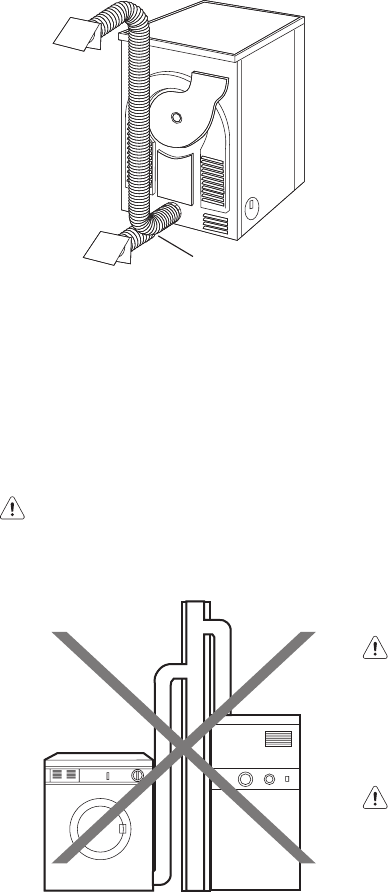
Once connected to the dryer, run the vent
hose to the desired outlet point, ensuring that
the run’s overall length is less than 2 m, and
that it contains no more than two bends. As
to the outlet itself, if you have decided on a
fixed wall/window grille, a good local build-
er’s merchant should be able to supply you
with the necessary fittings and installation
advice.
Warning! It is important not to connect
the vent hose to, for example, a cooker
hood, or a chimney or flue pipe designed
to carry the exhaust from a fuel burning
appliance.
Note that to avoid condensation problems, it
is essential that the dryer be fitted with the
flexible hose to carry its “exhaust” at least
beyond the kitchen units; preferable outside
the kitchen. In order to prevent the appliance
from overheating, it is important that the
B
steam exhaust is unobstructed. Therefore, in
case of a permanent hose fitted to an exterior
wall or ceiling, it must be ensured an exhaust
capacity of at least 150 m3/h. If the dryer is
fitted next to kitchen units, make sure that the
vent hose is not squashed. If the hose is par-
tially squashed, drying efficiency will be re-
duced, resulting in longer drying times and
higher energy consumption. If the hose is
completely squashed, the safety cut-outs
with which the machine is fitted may operate.
When operating the tumble dryer, the room
temperature must not be lower than +5°C
and higher than +35°C, as it may affect the
performance of the appliance.
Door reversal
To make it easier to load or unload the laun-
dry, the door can be reversed. The door must
only be reversed by an authorised service
engineer. Please contact your local Service
Force Centre. The engineer will carry out the
door reversal at your cost.
Electrical connection
Details on mains voltage, type of current and
the fuses required should be taken from the
type plate. The type plate is fitted near the
loading aperture (see “Product description”
chapter).
Connect the machine to an earthed
socket, in accordance with current wir-
ing regulations.
Warning! The manufacturer declines
any responsibility for damage or
injury through failure to comply with
the above safety precautions.
Should the appliance power supply
cable need to be replaced, this must
be carried out by our Service Center.
Warning! The plug must be
accessible after installing the
machine.
Special accessories
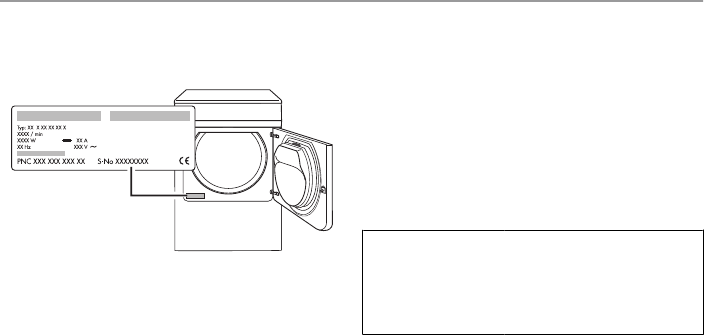
Stacking kit
electrolux 15
A special stacking kit is available through
your dealer, to enable the mounting of the
dyer on top of a front loading washing ma-
chine with cover’s depth between 48 and 60
cm. Read carefully the instructions supplied
with the kit.
Environment
The symbol on the product or on its
packaging indicates that this product may
not be treated as household waste. Instead
it should be taken to the appropriate
collection point for the recycling of electrical
and electronic equipment. By ensuring this
product is disposed of correctly, you will help
prevent potential negative consequences for
the environment and human health, which
could otherwise be caused by inappropriate
waste handling of this product. For more
detailed information about recycling of this
product, please contact your local council,
your household waste disposal service or the
shop where you purchased the product.
Packaging material
The packaging materials are environmentally
friendly and can be recycled. The plastic
components are identified by markings, e.g.
>PE<, >PS<, etc. Please dispose of the
packaging materials in the appropriate con-
tainer at the community waste disposal fa-
cilities.
Warning! When disposing of old
appliances, remove the mains cable and
dispose of together with the plug.
Remove the door hook and ensure it is
no longer lockable to prevent young
children being trapped inside.
Environmental tips
• In the dryer, laundry becomes fluffy and
soft. Fabric softeners are not therefore
needed when washing.
• Your dryer will function most economically
if you:
– always keep the ventilation slots on the
base of the dryer unobstructed;
– use the loading volumes specified in the
programme overview;
– clean the filter after each drying cycle;
– spin the laundry well before drying. Ex-
ample: Consumption data – depending
on spinning speed – for 7 kg of laundry,
dried using the COTTONS CUPBOARD
programme.
Pre-draining Drying cycle
Revolutions per minute Residual dampness Energy in kWh
in litres as a %
1000 4.20 60 3,9
1400 3.64 52 3,7
16 electrolux
Service
In the event of technical faults, please first
check whether you can remedy the problem
yourself with the help of the operating in-
structions - see chapter What to do if….
If you were not able to remedy the problem
yourself, please contact the Customer Care
Department or one of our service partners.
In order to be able to assist you quickly, we
require the following information:
– Model description
– Product number (PNC)
– Serial number (S No. is on rating plate stuck
to the product - to find it see chapter Product
description ))
– Type of fault
– Any error messages displayed by the ap-
pliance
So that you have the necessary reference
numbers from your appliance at hand, we
recommend that you write them in here:
Model descrip-
tion:
PNC:
S No:
electrolux 17

Electrolux. Thinking of you.
Berbagi pemikiran lebih lanjut di www.electrolux.com
Daftar Isi
Informasi penting tentang keselamatan
18
Deskripsi produk 20
Panel Kontrol 21
Sebelum menggunakan pertama kali 21
Memilah dan menyiapkan cucian 21
Diagram program 22
Penggunaan Sehari-hari 25
Pembersihan dan pemeliharaan 27
What to do if ... 28
Pengaturan mesin 30
Spesifikasi teknis 30
Pemasangan 31
Lingkungan 34
Servis 35
Dapat berubah tanpa pemberitahuan
Informasi penting tentang keselamatan
Penting Demi keselamatan Anda dan
untuk menjamin penggunaan yang
benar, sebelum memasang dan
menggunakan alat untuk pertama kali,
bacalah buku petunjuk ini secara
saksama, termasuk semua petunjuk dan
peringatannya. Untuk menghindari
kesalahan dan kecelakaan yang tidak
perlu, sangatlah penting untuk
memastikan bahwa semua orang yang
menggunakan alat ini betul-betul
memahami semua fitur pengoperasian
dan keselamatan. Simpanlah petunjuk
ini bersama alat jika alat ini dipindahkan
atau dijual, agar siapa pun yang
menggunakannya akan mengetahui
informasi mengenai cara menggunakan
alat dengan benar dan informasi tentang
keselamatan.
Keselamatan umum
• Mengubah spesifikasi atau berusaha un-
tuk mengubah produk ini dengan cara
apapun adalah hal yang berbahaya.
• Alat ini bukan untuk digunakan oleh orang
(termasuk anak kecil) yang memiliki keter-
batasan kemampuan secara fisik, indera,
atau tidak berpengalaman dan kurang me-
miliki pengetahuan, kecuali mereka yang
sudah mendapatkan pengarahan atau pe-
tunjuk mengenai penggunaannya oleh
orang yang bertanggung jawab atas ke-
selamatan mereka.
• Jangan sampai ada binatang peliharaan
kecil masuk ke dalam drum. Untuk meng-
hindari ini, periksa ke dalam drum sebelum
menggunakannya.
• Jangan memasukkan benda apapun se-
perti koin, peniti, paku, sekrup, batu atau
benda keras lainnya dan benda tajam ke
dalam mesin karena dapat menyebabkan
kerusakan parah.
• Untuk menghindari bahaya kebakaran
yang disebabkan oleh pengeringan yang
berlebihan, jangan gunakan alat untuk
mengeringkan benda-benda berikut ini:
Bantal kursi, selimut perca dan semacam-
nya (benda-benda ini menimbun panas).
• Benda-benda seperti karet busa (busa la-
teks), shower cap (penutup rambut saat
mandi), tekstil tahan air, benda berlapis
karet, pakaian atau bantal yang dipasangi
bantalan busa karet, tidak boleh dikering-
kan pada tumble dryer ini.
• Selalu mencabut kabel listrik alat setelah
menggunakan, membersihkan dan mela-
kukan perawatan.
• Dalam keadaan apapun, jangan berusaha
memperbaiki mesin oleh Anda sendiri.
Perbaikan yang dilakukan oleh orang yang
tidak berpengalaman dapat menyebabkan
cedera atau kerusakan parah. Hubungi
Pusat Servis setempat. Selalu gunakan
suku cadang asli.
• Benda-benda yang terkotori minyak go-
reng, aseton, bensin, minyak tanah, bahan
pembersih noda, turpentin, lilin dan bahan
penghilang lilin, harus dicuci mengguna-
kan air panas dengan deterjen yang lebih
18 electrolux

banyak sebelum dikeringkan pada tumble
dryer ini.
•Bahaya ledakan: Jangan sekali-kali
mengeringkan benda-benda yang sudah
terkena larutan yang mudah menyala (ben-
sin, spirit termetilasi, cairan pembersih ke-
ring dan semacamnya). Ketiga bahan ter-
sebut mudah meletup dan bisa menye-
babkan ledakan. Tumble dry hanya digu-
nakan untuk benda-benda yang dicuci de-
ngan air.
•Risiko kebakaran: benda-benda yang
ternoda atau terciprat minyak sayur atau
minyak goreng bisa menimbulkan bahaya
kebakaran dan jangan ditaruh di dalam
tumble dryer.
• Jika sudah mencuci cucian dengan peng-
hilang noda, Anda harus melakukan siklus
bilas ekstra sebelum menaruhnya di tum-
ble dryer.
• Pastikan bahwa benda-benda seperti pe-
mantik gas atau korek api tidak tertinggal
di dalam saku pakaian yang dimasukkan
ke dalam alat ini
Peringatan Jangan sekali-kali
menghentikan alat ini sebelum akhir
siklus pengeringan, kecuali jika se-
mua cucian segera dikeluarkan dan
ditebarkan agar panasnya hilang.
Risiko kebakaran!
•Risiko sengatan listrik! Jangan me-
nyemprot alat dengan semprotan jet air.
• Bagian akhir siklus pengeringan tumble
dryer terjadi tanpa panas (siklus penyeju-
kan) untuk memastikan bahwa cucian ber-
ada pada suhu yang tidak menyebabkan
kerusakan.
• Pastikan terdapat ventilasi yang memadai
di ruang pemasangan agar aliran gas dari
peralatan yang menggunakan bahan ba-
kar, termasuk api yang berkobar, tidak
berbalik mengalir ke dalam ruangan.
Pemasangan
• Mesin ini berat. Berhati-hatilah apabila me-
mindahkan mesin.
• Setelah membuka kemasan, periksalah
bahwa mesin tidak rusak. Jika ragu-ragu,
jangan menggunakan mesin, namun hu-
bungi Pusat Servis setempat.
• Semua baut kemasan dan baut sementara
harus dikeluarkan sebelum mesin ini digu-
nakan. Jika hal ini tidak dipatuhi, bisa ter-
jadi kerusakan parah pada produk dan
komponennya. Lihat bagian terkait di buku
petunjuk.
• Setiap pekerjaan kelistrikan yang diperlu-
kan untuk memasang mesin ini harus di-
lakukan oleh tukang listrik yang kompeten.
• Berhati-hatilah untuk menjamin bahwa
mesin tidak bertumpu pada kabel listrik.
• Jika mesin ditempatkan di lantai berkar-
pet, sesuaikan kaki-kaki mesin agar udara
dapat bergerak bebas.
• Setelah dipasang, periksa dan pastikan
mesin tidak menginjak kabel listriknya dan/
atau selang masukan air.
• Jika tumble dryer ditaruh di atas mesin cu-
ci, Anda harus menggunakan kit penum-
pukan (stacking kit) (aksesori opsional).
Penggunaan
• Mesin ini dirancang hanya untuk penggu-
naan rumah tangga. Mesin ini tidak boleh
digunakan untuk tujuan lain.
• Hanya mencuci bahan kain yang memang
dirancang untuk dikeringkan dengan me-
sin. Patuhi selalu petunjuk pada label pa-
kaian.
• Jangan mengeringkan benda-benda yang
belum dicuci pada tumble dryer.
• Jangan membebani mesin secara berlebi-
han. Lihat bagian terkait di buku petunjuk.
• Jangan menaruh pakaian yang masih ba-
sah kuyup dalam mesin pengering.
• Pakaian yang sudah terkena produk ba-
han bakar yang mudah menguap tidak bo-
leh dikeringkan dalam mesin. Jika meng-
gunakan cairan pembersih yang mudah
menguap, harap Anda pastikan bahwa
cairan sudah dihilangkan dari pakaian se-
belum dimasukkan ke dalam mesin.
• Jangan sekali-kali menarik kabel listrik un-
tuk melepaskan steker dari stopkontak;
melainkan, peganglah selalu stekernya.
• Jangan sekali-kali menggunakan tumble
dryer jika kabel listrik, panel kontrol, per-
mukaan atau alas kerja mesin rusak se-
hingga bagian dalam tumble dryer dapat
dijangkau.
• Pelembut bahan, atau produk serupa, ha-
rus digunakan sesuai petunjuknya.
electrolux 19
•Awas - permukaan panas : Jangan me-
nyentuh permukaan kap lampu pintu saat
lampu menyala.
2)
• Permukaan panas: Jangan menyen-
tuh bagian belakang mesin sewaktu mesin
sedang bekerja!
Keselamatan anak-anak
• Mesin ini bukan untuk digunakan oleh
anak kecil atau orang gugup tanpa peng-
awasan.
• Anak-anak sering tidak mengenal bahaya
yang terkait dengan peralatan listrik. Anak-
anak harus diawasi agar mereka tidak ber-
main dengan alat ini.
• Komponen pengemas (misalnya lapisan
plastik, polistiren) dapat berbahaya bagi
anak-anak - bahaya tercekik karena ku-
rang oksigen! Jauhkan benda-benda ter-
sebut dari jangkauan anak-anak.
• Simpanlah semua deterjen di tempat
aman dan jauh dari jangkauan anak-anak.
• Jangan sampai ada anak kecil atau bina-
tang peliharaan masuk ke dalam drum.
Deskripsi produk
1
3
4
2
5
6
7
8
1Panel kontrol
2Pintu
3Saringan bulu halus
4Pelat Rating
5Kaki yang dapat disetel
6Saluran keluaran ventilasi samping / sa-
luran keluaran ventilasi belakang
7Mur cincin
8Lampu untuk penerangan bagian dalam
2) Hanya mesin pengering yang diperlengkapi dengan lampu di bagian dalam drum.
20 electrolux

Panel Kontrol
6 5 4
2 31
1Kenop program dan saklar "O" (OFF)
2Tombol fungsi
3START/PAUSE Tombol MULAI/JEDA
4Lampu (SARINGAN)
5DELAY Tombol (TUNDA PELAKSANA-
AN)
6Layar tampilan
Pesan yang diperlihatkan pada layar
tampilan
SIMBOL DESKRIPSI
Waktu berakhir (mengatur
program waktu, waktu tnun-
da pelaksanaan)
Keselamatan anak-anak
Tunda Pelaksanaan
Fase pengeringan
Fase penyejukan
Fase penjagaan anti kusut
Kesalahan, pilihan keliru
Sebelum menggunakan pertama kali
Agar dapat membuang sisa-sisa produksi,
seka drum pengering dengan kain lembap
atau lakukan siklus pengeringan singkat ( 30
menit) dengan pakaian lembap di dalam me-
sin.
Memilah dan menyiapkan cucian
Memilah cucian
• Memilah menurut jenis kain:
– Katun/linen untuk program dalam grup
program COTTONS (KATUN )
– Bahan campuran dan sintetis untuk pro-
gram dalam grup program SYNTHE-
TICS (SINTETIS).
• Memilah menurut label perawatan: Label
perawatan artinya:
electrolux 21

Pada prinsipnya, mengeringkan dalam
pengering bertumpuk bisa dilakukan
Kering pada suhu normal
Kering pada suhu yang diturunkan (te-
kan tombol DELICATE (BAHAN HA-
LUS)!)
Mengeringkan dalam tumble dryer ti-
dak mungkin
Penting Jangan menaruh cucian basah di
dalam mesin yang pada label perawatannya
dijelaskan tidak sesuai untuk tumble-dry.
Alat ini hanya dapat digunakan untuk semua
cucian basah yang pada labelnya dinyatakan
sesuai untuk tumble-dry.
• Jangan mengeringkan bahan tekstil baru
berwarna bersama cucian berwarna te-
rang. Warna tekstil dapat luntur.
• Jangan mengeringkan jersey katun dan
bahan rajutan dengan program EXTRA
(EKSTRA KERING). Cucian dapat menyu-
sut!
• Bahan wol dan yang seperti wol dapat di-
keringkan dengan menggunakan program
WOOL CARE (PERAWATAN ).
Menyiapkan cucian
• Agar cucian tidak saling terbelit: tutup rits-
leting, kancingkan tutup seprai berlapis
dan ikat tali atau pita yang terlepas (mis.,
apron).
• Kosongkan isi saku. Keluarkan benda lo-
gam (jepitan kertas, peniti, dsb).
• Balikkan keluar bagian dalam bahan ber-
lapis ganda (mis. pada mantel lapis katun,
lapisan katun harus berada di paling luar).
Kain ini akan kering lebih baik.
Penting Jangan membebani mesin secara
berlebihan. Patuhi volume pengisian maks.
7 kg.
Berat cucian
Jenis Cucian Bobot
Kimono mandi 1.200 g
Serbet 100 g
Selimut kain
perca
700 g
Seprai 500 g
Sarung bantal 200 g
Taplak meja 250 g
Handuk kecil 200 g
Taplak kecil 100 g
Baju tidur wa-
nita
200 g
Celana dalam
wanita
100 g
Kemeja kerja
pria
600 g
Kemeja kerja
pria
200 g
Piyama pria 500 g
Blus 100 g
Celana dalam
pria
100 g
Diagram program
Program
beban maks. (berat kering)
Fungsi tambahan / opsi Aplikasi/properti
Tanda perawatan
COTTONS
(KATUN) EX-
TRA (EKS-
TRA KERING)
7 kg
DELICATE (BAHAN HA-
LUS) , LONG ANTICREASE
(ANTIKUSUT LAMA) , BUZZER
, DELAY (TUNDA PELAK-
SANAAN)
Pengeringan menyeluruh pada kain
tebal atau berlapis-lapis, misalnya,
bahan handuk, kimono kamar man-
di.
22 electrolux
Program
beban maks. (berat kering)
Fungsi tambahan / opsi Aplikasi/properti
Tanda perawatan
COTTONS
(KATUN)
STRONG
(SANGAT KE-
RING)
7 kg
DELICATE (BAHAN HA-
LUS) , LONG ANTICREASE
(ANTIKUSUT LAMA) , BUZZER
, DELAY (TUNDA PE-
LAKSANAAN)
Pengeringan menyeluruh pada kain
tebal atau berlapis-lapis, misalnya,
bahan handuk, kimono kamar man-
di.
COTTONS
(KATUN) CUP-
BOARD
1)
(SIMPAN KE-
RING)
7 kg
DELICATE (BAHAN HA-
LUS) , LONG ANTICREASE
(ANTIKUSUT LAMA) , BUZZER
, DELAY (TUNDA PE-
LAKSANAAN)
Pengeringan menyeluruh pada kain
yang tebalnya rata, misalnya bahan
handuk, rajutan, handuk.
COTTONS
(KATUN)
DAMP
(LEMBAP)
7 kg
DELICATE (BAHAN HA-
LUS) , LONG ANTICREASE
(ANTIKUSUT LAMA) , BUZZER
, DELAY (TUNDA PE-
LAKSANAAN)
Untuk bahan tipis yang masih harus
disetrika, misalnya rajutan atau ke-
meja katun.
COTTONS
(KATUN) IRON
(KERING
SETRIKA)
7 kg
DELICATE (BAHAN HA-
LUS) , LONG ANTICREASE
(ANTIKUSUT LAMA) , BUZZER
, DELAY (TUNDA PE-
LAKSANAAN)
Untuk bahan tipis yang juga harus di-
setrika, misalnya rajutan atau kemeja
katun.
SYNTHETICS
(SINTETIS)
EXTRA (EKS-
TRA KERING)
3 kg
DELICATE (BAHAN HA-
LUS) , LONG ANTICREASE
(ANTIKUSUT LAMA) , BUZZER
, DELAY (TUNDA PE-
LAKSANAAN)
Pengeringan menyeluruh pada kain
tebal atau berlapis-lapis, misalnya,
pullover, seprei, taplak meja.
2)
SYNTHETICS
(SINTETIS)
CUPBOARD
1)
(SIMPAN
KERING)
3 kg
DELICATE (BAHAN HA-
LUS) , LONG ANTICREASE
(ANTI-KUSUT LAMA) , BUZZER
, DELAY (TUNDA PELAK-
SANAAN)
Untuk kain tipis yang tidak disetrika,
misalnya kemeja mudah-perawatan,
taplak meja, baju bayi, kaos kaki, pa-
kaian dalam wanita yang berangka
atau berkawat.
2)
SYNTHETICS
(SINTETIS)
IRON (KE-
RING SETRI-
KA)
3 kg
DELICATE (BAHAN HA-
LUS) , LONG ANTICREASE
(ANTIKUSUT LAMA) , BUZZER
, DELAY (TUNDA PELAK-
SANAAN)
Untuk bahan tipis yang juga harus di-
setrika, misalnya rajutan atau kemeja
katun.
2)
electrolux 23

Program
beban maks. (berat kering)
Fungsi tambahan / opsi Aplikasi/properti
Tanda perawatan
TIME
(WAKTU) 7 kg
DELICATE (BAHAN HA-
LUS) , LONG ANTICREASE
(ANTI-KUSUT LAMA) , BUZZER
, DELAY (TUNDA PELAK-
SANAAN) , TIME
Untuk mengeringkan cucian lebih
lanjut, satu per satu.
MIX
(CAMPURAN) 3 kg
DELICATE
3)
(BAHAN HA-
LUS) LONG ANTICREASE
(ANTI-KUSUT LAMA) , BUZZER
, DELAY (TUNDA PELAK-
SANAAN)
Untuk mengeringkan bahan katun
dan sintetis, gunakan suhu rendah.
EASY IRON
(MUDAH
SETRIKA
PLUS)
1 kg
(atau
5 ke-
me-
ja)
DELICATE
3)
(BAHAN HA-
LUS) , LONG ANTICREASE
(ANTI-KUSUT LAMA) , BUZZER
, DELAY (TUNDA PELAK-
SANAAN)
Program khusus dengan mekanisme
anti-crease (anti kusut) untuk bahan
yang mudah perawatan, seperti ke-
meja dan blus; untuk penyetrikaan ri-
ngan. Hasilnya tergantung pada jenis
dan kualitas bahan. (Isi beban cucian
sama dengan kira-kira 5 hingga 7 ke-
meja.) Rekomendasi: Langsung ta-
ruh bahan ke dalam dryer setelah di-
peras. Setelah kering, langsung ke-
luarkan bahan dan taruh di gantu-
ngan pakaian.
JEANS 7 kg
DELICATE , LONG ANTI-
CREASE (ANTI-KUSUT LA-
MA) , BUZZER , DELAY
(TUNDA PELAKSANAAN)
Program khusus untuk pakaian san-
tai, seperti jeans, sweat-shirt, dsb.,
dari bahan yang tebalnya berbeda-
beda (mis., pada bagian leher, per-
gelangan dan lipatan).
WOOL CARE
(PERA-
WATAN )
1 kg
DELICATE (BAHAN HA-
LUS) , , BUZZER , DELAY
(TUNDA PELAKSANAAN)
WOOL CARE adalah program khu-
sus untuk perawatan singkat bahan
woldengan air hangat setelah dike-
ringkan secara normal, dipakai atau
disimpan cukup lama. Serat wol di-
sejajarkan dan bahan wol menjadi lu-
nak dan lembut.
24 electrolux
Program
beban maks. (berat kering)
Fungsi tambahan / opsi Aplikasi/properti
Tanda perawatan
COOLING
(PENYEJU-
KAN)
7 kg BUZZER
Program khusus, berlangsung seki-
tar 10 menit untuk menyegarkan
kembali atau mencuci bahan dengan
lembut pada setelan pencucian ke-
ring yang tersedia secara komersial.
(Hanya gunakan produk tersebut
yang dinyatakan sesuai untuk mesin
pengering oleh produsennya; harap
mematuhi petunjuk produsen meng-
enai penggunaannya.)
1) Sesuai dengan IEC61121
2) Pilih opsi DELICATE
3) Otomatis
Penggunaan Sehari-hari
Menghidupkan mesin
Putar kenop pemilih program ke program
apa saja. Mesin sudah dihidupkan.
Membuka pintu dan memasukkan
cucian
1. Buka pintu masuk cucian:
Dorong pada pintu masuk cucian (titik
dorong )
2. Masukkan cucian Anda (jangan mema-
sukkan dengan paksa).
Awas Jangan ada cucian yang me-
nyangkut di antara pintu masuk cucian
dan sekat karet.
3. Tutup rapat pintu masuk cucian. Bunyi
kunci harus terdengar.
Memilih program
Gunakan pemilih program untuk menetap-
kan program yang Anda perlukan. Waktu
electrolux 25
perkiraan akhir program akan muncul dalam
format LCD, h:mm (jam:menit).
selama siklus, waktu bergerak setiap satu
menit; kurang dari 1 jam, angka nol di awal
tidak akan ditampilkan (mis., "59", "5", "0");
Memilih fungsi tambahan
Anda dapat memilih dari fungsi tambahan:
tombol 1 - DELICATE (BAHAN HALUS)
tombol 2 - LONG ANTICREASE (ANTI-
KUSUT LAMA)
tombol 3 - BUZZER
tombol 4- TIME (WAKTU)
tombol 6- DELAY (TUNDA PELAKSANAAN)
DELICATE (Bahan Halus)
Dengan menekan tombol ini, pengeringan
dapat dilakukan pada suhu lebih rendah un-
tuk benda/bahan halus. Lampu pilot yang
bersangkutan menyala. Opsi/Pilihan ini juga
dapat digunakan untuk pengeringan yang di-
kendalikan waktu.
LONG ANTICREASE (Anti kusut)
Fase anti-kusut lama memperpanjang fase
anti-kusut (30 menit) pada akhir pengeringan
untuk menambah 60 menit lagi. Drum ber-
putar berselang-seling selama fase ini. Ini
menjaga agar cucian tidak melilit sehingga
bebas dari kekusutan. Fase ini berlangsung
90 menit. Cucian dapat dikeluarkan setiap
saat sewaktu fase anti kusut.
Saat opsi sedang aktif, lampu LONG ANTI-
CREASE menyala.
BUZZER
Setelah siklus pengeringan selesai, akan ter-
dengar bunyi sinyal secara selang-seling.
Dengan menekan tombol BUZZER sinyal
akustik dimatikan pada keadaan berikut ini:
• sewaktu memilih program
1 2 3 4
• sewaktu menekan tombol
• bila tombol pemilih program diputar ke po-
sisi lain sewaktu program sedang berjalan
atau bila Anda menekan tombol opsi/pili-
han sewaktu putaran siklus
• Di akhir program.
Lampu yang bersangkutan menyala.
TIME (Waktu)
Gunakan tombol Time (Waktu) untuk memilih
durasi program setelah mengatur program
TIME . Anda dapat memilih durasi program
dari 20 menit hingga 3 jam dalam rentang 10-
menit.
1. Putar tombol pemilih program ke pro-
gram TIME (Waktu).
2. Tekan tombol (Waktu) beberapa kali
sampai durasi program yang dikehendaki
diperlihatkan di layar, misalnya
untuk program 20 menit.
Jika durasi program tidak dipilih, durasi se-
cara otomatis disetel ke 10 menit.
DELAY (Tunda Pelaksanaan)
Dengan tombol DELAY (TUNDA PE-
LAKSANAAN) , Anda dapat menunda
pelaksanaan program antara 30 menit
(30') dan maksimum 20 jam (20h).
1. Pilih program dan fungsi tambahan.
2. Tekan tombol DELAY (TUNDA PELAK-
SANAAN) sebanyak yang diperlukan
sampai waktu tunda yang diperlukan
muncul di layar, misalnya. H jika
program akan dijalankan 12 jam kemudi-
an.
Jika layar menunjukkan H dan
Anda menekan lagi tombol, fungsi tunda
waktu akan dibatalkan. Layar akan me-
nampilkan 0 kemudian durasi program
yang dipilih.
3. Untuk mengaktifkan timer tunda, tekan
tombol START/PAUSE (Mulai/Jeda). Sisa
waktu sampai program siap untuk mulai
dijalankan, secara terus-menerus ditam-
pilkan (misalnya, 15h, 14h, 13h, … 30'
dsb).
Alat keselamatan untuk anak
Kunci pengaman/keselamatan untuk anak
dapat disetel untuk mencegah agar program
tidak dijalankan tanpa sengaja atau program
yang sedang berjalan, diubah tanpa sengaja.
26 electrolux
Alat keselamatan untuk anak akan mengunci
semua tombol dan kenop program. Alat ke-
selamatan untuk anak dapat diaktifkan atau
dinonaktifkan dengan menahan tombol
BUZZER and TIME (WAKTU) secara serem-
pak selama 5 detik.
– Sebelum program dijalankan: Alat ti-
dak dapat digunakan
– Setelah program dijalankan: Program
yang sedang berjalan tidak dapat di-
ubah
Ikon muncul di layar untuk menunjukkan
bahwa alat keselamatan untuk anak sudah
diaktifkan.
Alat keselamatan untuk anak tidak dinonak-
tifkan setelah program berakhir.
Jika Anda ingin menyetel program baru, An-
da harus menonaktifkan dulu alat keselama-
tan untuk anak.
Mulai menjalankan program
Tekan tombol START/PAUSE (MULAI/JE-
DA). Program dijalankan.
Fase program diperlihatkan di layar dengan
ikon yang sesuai. Dari kiri ke kanan, dari
pengeringan ,anti kusut , hingga pe-
nyejukan .
Mengubah program
Untuk mengubah program yang terlanjur di-
pilih karena kesalahan setelah program ber-
jalan, putar dulu pemilih program ke posisi "
O" (OFF) Program dibatalkan
Program tidak dapat lagi diubah secara
langsung setelah program berjalan. Na-
mun, jika berupaya untuk mengubah
program paa kenop program, atau jika
tombol fungsi (kecuali tombol BUZZER )
ditekan, lampu led di atas tombol
START/PAUSE mulai berkedip kuning
untuk sementara. Bagaimanapun, pro-
gram pengeringan tidak terpengaruh
oleh hal ini (perlindungan cucian).
Siklus pengeringan selesai /
mengeluarkan cucian
Setelah siklus pengeringan selesai, layar
memperlihatkan " 0 " yang berkedip-kedip,
di bawah saringan anti-kusut dan ikon sa-
ringan muncul sebentar. Jika tombol
BUZZER (Buzzer) sudah ditekan, terdengar
bunyi sinyal akustik selang-seling selama sa-
tu menit.
Siklus pengeringan secara otomatis dii-
kuti oleh fase anti kusut yang berlang-
sung sekitar 30 menit. Drum berputar
berselang-seling selama fase ini. Ini
menjaga agar cucian tidak melilit sehing-
ga bebas dari kekusutan. Cucian dapat
dikeluarkan setiap saat sewaktu fase an-
ti kusut. (Selambat-lambatnya, cucian
harus dikeluarkan menjelang akhir fase
anti-kusut untuk mencegah terjadinya
kekusutan.) Jika fungsi LONG ANTI-
CREASE (Anti-kusut lama) sudah
dipilih, fase anti-kusut diperpanjang 60
menit.
1. Buka pintu.
2. Keluarkan cucian.
3. Lepaskan saringan setelah pakaian dike-
luarkan. Bersihkan saringan.
Peringatan Sebelum menaruh sari-
ngannya, periksa dan pastikan tidak ada
apapun di dalam dudukan saringan.
4. Putar pemilih program ke "O" (OFF) .
Penting Bersihkan saringan setiap kali seu-
sai siklus pengeringan.
5. Tutup pintu.
Pembersihan dan pemeliharaan
Peringatan Tumble dryer tidak boleh
digunakan jika bahan kimia industri
sudah digunakan untuk membersihkan!
Bersihkan saringan kapas
Saringan mengumpulkan semua kapas yang
menimbun selama pengeringan. Untuk men-
jamin bahwa mesin pengering bekerja sem-
purna, saringan kapas harus dibersihkan se-
tiap kali seusai siklus pengeringan.
Lampu peringatan (SARINGAN) , menyala
untuk mengingatkan Anda mengenai peng-
operasian ini.
electrolux 27

Awas Jangan sekali-kali
mengoperasikan mesin pengering tanpa
saringan kapas, atau saringan kapas
yang rusak atau tersumbat.
1.
Buka pintu untuk memasukkan cucian,
lalu keluarkan cuciannya.
2. Lepaskan saringan yang dipasang pada
bagian bawah celah pengisian cucian.
3.
Buka saringan dengan menekan tombol
di antara dua celah, menggunakan jari.
Bersihkan saringan menggunakan ta-
ngan atau kain yang lembap. Setelah be-
berapa lama, kotoran kerak sisa deterjen
pada cucian terbentuk pada saringan. Bi-
la ini terjadi, bersihkan saringan dengan
air hangat dan sikat.
Tutup saringan, dan janga lupa untuk me-
masangnya kembali.
Peringatan Sebelum menaruh sari-
ngannya, periksa dan pastikan tidak ada
apapun di dalam dudukan saringan.
4. Saringan hanya dapat ditempatkan pada
satu sisi. Jika posisinya salah, saringan
akan menggantung.
Jika saringan tidak mau masuk ke dalam
tempatnya, pintu pengisian cucian tidak
dapat ditutup.
Membersihkan pintu
Bersihkan secara rutin bagian dalam pintu
untuk membuang sisa kapas. Pembersihan
yang cermat menjamin pengeringan yang te-
pat.
Membersihkan drum
Awas Jangan menggunakan pengerik
atau wol baja untuk membersihkan
drum.
Kapur dalam air atau bahan pembersih
cucian dapat membentuk garis yang
nyaris tidak terlihat pada bagian dalam
drum. Kadar kekeringan cucian selan-
jutnya tidak dapat terdeteksi secara aku-
rat. Cucian lebih lembap daripada yang
diperkirakan sewaktu dikeluarkan dari
mesin pengering.
Gunakan bahan pembersih biasa (misal-
nya, pembersih yang mengandung cu-
ka) untuk menyeka bagian dalam drum
dan rusuk-rusuk drum.
Bersihkan layar dan rangka mesin
Awas Jangan menggunakan pembersih
perabotan atau bahan pembersih yang
kuat untuk membersihkan mesin.
Gunakan kain lembap untuk menyeka
layar dan rangka mesin.
What to do if ...
Memecahkan masalah oleh Anda sendiri
Jika, sewaktu pengoperasian, kode kesala-
han E... (berikut angka atau huruf) muncul
pada layar LCD: Matikan mesin lalu hidupkan
lagi. Setel ulang program. Tekan tombol
START/PAUSE (MULAI / JEDA). Jika kesa-
lahan tetap ditampilkan, beritahukan kepada
Pusat Servis dan catat kode kesalahannya
button.
28 electrolux

Masalah Kemungkinan penyebabnya Perbaikan
Dryer tidak bekerja.
Steker listrik tidak dicolokkan
atau sekring tidak berfungsi de-
ngan benar.
Colokkan ke stopkontak listrik.
Cek sekring dalam kotak sekring
(instalasi rumah).
Pintu masuk cucian terbuka. Tutup pintu masukan cucian.
Sudahkah Anda menekan tom-
bol START/PAUSE (MULAI/JE-
DA)?
Tekan lagi tombol START/
PAUSE (MULAI/JEDA).
Hasil pengeringan tidak me-
muaskan.
Salah memilih program.
Pilih program yang berbeda jika
lain kali Anda mengeringkan (li-
hat bab "Diagram program").
Saringan tersumbat. Bersihkan saringan.
Beban cucian terlalu berlebihan. Patuhi volume beban yang dire-
komendasikan.
Celah ventilasi tertutup. Buka celah ventilasi.
Terdapat residu pada permuka-
an di bagian dalam drum atau
pada rusuk-rusuk drum.
Bersihkan permukaan di bagian
dalam drum dan rusuk-rusuk
drum.
Konduktan air pada tempat pe-
masangan berbeda dari setelan
standar mesin.
Program ulang pengaturan
standar untuk kadar pengeri-
ngan (lihat bab 'Opsi pemogra-
man').
Pintu masukan beban tidak ter-
tutup. Saringan tidak ada ditempatnya. Pasang saringan di tempatnya.
Setelah tombol ditekan, Err
muncul pada layar LCD.
Perlindungan pencucian. Sete-
lah program memulai, opsi tidak
bisa lagi disetel.
Putar kenop program ke "O"
(OFF) . Setel lagi programnya.
Lampu drum tidak berfungsi.
Pemilih program pada posisi "O"
(OFF).
Putar kenop pemilih program ke
program apa saja.
Bohlam lampu rusak. Ganti bohlam lampu (lihat bagi-
an berikutnya).
Tampilan waktu program beru-
bah-ubah secara kacau atau ti-
dak berubah untuk waktu lama.
Waktu program terkoreksi seca-
ra otomatis, tergantung jenis
dan volume cucian serta tingkat
kelembapan.
Proses otomatis; ini bukan ke-
rusakan mesin.
Siklus pengeringan berakhir tak
lama setelah program berjalan.
Beban cucian kurang banyak,
atau beban cucian terlalu kering
untuk program yang dipilih.
Pilih program waktu atau tingkat
pengeringan yang lebih tinggi
(mis. EXTRA(EKSTRA KERING) ,
bukan CUPBOARD (SIMPAN
KERING).
Siklus pengeringan berlangsung
sangat lama. Catatan: Setelah
sekitar 5 jam, siklus pengeringan
berhenti secara otomatis.
Saringan tersumbat. Bersihkan saringan.
Volume beban terlalu besar. Kurangi volume beban.
Cucian kurang lama diperas. Cucian harus diperas secara
memadai.
Mengganti bohlam lampu untuk
penerangan di bagian dalam
Hanya menggunakan bohlam lampu khusus
yang dirancang khusus untuk mesin peng-
ering. Bohlam lampu khusus dapat diperoleh
dari pusat Gugus Layanan setempat.
Peringatan Apabila mesin dihidupkan,
lampu bagian dalam akan mati sendiri
setelah 4 menit bila pintu terbuka.
electrolux 29
Peringatan Jangan gunakan bohlam
lampu standar! Bohlam standar dapat
menimbulkan panas yang berlebih dan
merusak mesin!
Peringatan Sebelum mengganti
bohlam lampu, cabut steker listriknya.
1. Lepaskan penutup di atas bohlam lampu
(ini ada di belakang bukaan pintu masuk
cucian, di bagian atas; rujuk ke bagian
"Deskripsi mesin".)
2. Mengganti bohlam yang rusak.
3. Buka sekrup penutup.
Periksa apakah gasket o-ring berada pada
posisi yang benar sebelum menyekrupkan
kembali penutup lampu pintu. Jangan meng-
gunakan mesin pengering bila tidak ada gas-
ket o-ring pada penutup lampu pintu.
Peringatan Demi keselamatan,
penutup harus disekrup dengan
kencang. Jika tidak dikencangkan,
jangan gunakan mesin pengering.
Pengaturan mesin
SINYAL mati selamanya
1. Putar kenop pemilih program ke program
apa saja.
2. Tekan secara serempak tombol LONG
ANTICREASE (ANTI-KUSUT LAMA) dan
BUZZER , tahan selama kira-kira 5 detik.
3. Secara default, buzzer selalu dinonaktif-
kan. Anda dapat menggunakan tombol
untuk mengaktifkan atau menonaktifkan
suara, tetapi mesin tidak akan mengingat
pilihan Anda.
Kesadahan air
Kandungan air, jumlah variabel batu kapur
dan garam mineral beragam menurut lokasi
geografis. Karena itu, nilai konduktivitasnya
pun beragam. Variasi konduktivitas air yang
relevan dibandingkan dengan yang sudah di-
tetapkan oleh pabrik dapat sedikit mempe-
ngaruhi kelembapan cucian yang tersisa di
akhir siklus. Pada mesin pengering ini Anda
dapat mengatur kepekaan sensor pengeri-
ngan berdasarkan nilai konduktivitas air.
1. Putar kenop pemilih program ke program
apa saja.
2. Tekan secara serempak tombol BUZZER
dan START/PAUSE (MULAI / JEDA), ta-
han selama kira-kira 5 detik. Pengaturan
saat ini ditampilkan di layar: –
konduktivitas rendah >300 micro S/cm,
– konduktivitas sedang 300-600
micro S/cm, – konduktivitas ren-
dah >600 micro S/cm
3. Tekan tombol START/PAUSE (MULAI /
JEDA) secara berturut-turut sampai Anda
menetapkan tingkat yang dikehendaki.
4. Untuk mengingat pengaturan, tekan se-
cara serempak tombol BUZZER dan
START/PAUSE (MULAI /JEDA) atau pu-
tar kenop ke posisi, atau putar kenop ke
posisi "O" (OFF)
Spesifikasi teknis
Tinggi x lebar x kedalaman 85 x 60 x 58 cm
Volume drum 108 l
Kedalaman dengan pintu muatan terbuka 109 cm
Tinggi dapat disetel sebanyak 1,5 cm
Berat saat kosong kira-kira 32,5kg
Volume beban cucian (tergantung pada pro-
gram)
1)
maks. 7 kg
Voltase 230 V
Sekring yang diperlukan 10 A
Total daya 2200 W
Kelas efisiensi energi C
30 electrolux
Pemakaian energi (7 kg katun, pra-kuras pa-
da 1000 rpm)
2)
3.9 kWh
Pemakaian energi tahunan rata-rata 262,6kWh
Penggunaan Suhu
Suhu lingkungan yang diizinkan + 5°C hingga + 35°C
Kadar pemakaian
Kadar pemakaian sudah diterapkan berdasarkan kondisi standar. Angka-angka ini bisa me-
nyimpang bila mesin dioperasikan di lingkungan rumah-tangga.
Program Pemakaian energi dalam kWh / waktu
pengeringan rata-rata dalam menit.
COTTONS (KATUN) CUPBOARD (KERING
LEMARI )
2)
3.9 / 115 (beban 7 kg pra-kuras pada 1000
rpm)
COTTONS (KATUN) IRON (KERING SETRI-
KA)
2)
3/ 85 (beban 7 kg pra-kuras pada 1000 rpm)
SYNTHETICS (SINTETIS) CUPBOARD (SIM-
PAN KERING)
2)
1.18 / 35 (beban 3 kg pra-kuras pada 1200
rpm)
1) Data volume muatan yang berbeda mungkin diperlukan di sejumlah negara akibat adanya metode
pengukuran yang berlainan.
2) sesuai dengan EN 61121
Pemasangan
Penting Alat harus dalam posisi tegak lurus
sewaktu dipindahkan untuk pengiriman.
Penempatan mesin
• Agar nyaman, sebaiknya mesin pengering
ditempatkan dekat dengan mesin cuci.
• Tumble dryer harus dipasang di tempat
yang bersih, di mana kotoran tidak akan
menimbun.
• Udara harus bisa bergerak bebas di seke-
liling mesin. Jangan menghalangi kisi ven-
tilasi depan atau kisi asupan udara di ba-
gian belakang mesin.
• Untuk menjaga agar getaran dan kebisi-
ngan pada tingkat minimum bila dryer se-
dang digunakan, tempatkanlah pada per-
mukaan yang kokoh dan datar.
• Setelah berada pada posisi pengoperasi-
an yang permanen, periksa apakah dryer
sudah benar-benar sejajar dengan tingkat
penunjangnya. Jika tidak, naikkan atau tu-
runkan kaki-kaki mesin hingga posisinya
sejajar.
• Jangan sekali-kali melepaskan kaki-kaki
mesin. Jangan menghalangi ruangan lan-
tai dengan tumpukan karpet, lembaran ka-
yu atau yang serupa. Ini bisa menyebab-
kan penumpukan panas yang akan meng-
ganggu pengoperasian mesin.
Penting Udara panas yang dikeluarkan oleh
tumble dryer bisa mencapai suhu hingga
60°C. Oleh sebab itu, jangan memasang
mesin pada lantai yang tidak tahan suhu
tinggi.
Bila mengoperasikan tumble dryer, suhu rua-
ngan tidak boleh lebih rendah dari +5°C atau
lebih tinggi dari +35°C, karena ini dapat
mempengaruhi kinerja mesin.
Peringatan Jika mesin dipindahkan,
mesin harus dipindahkan dalam posisi
tegak.
Peringatan Mesin tidak boleh dipasang
di balik pintu yang dapat dikunci, pintu
geser, pintu yang ada engselnya di sisi
yang berlawanan dari engsel mesin
tersebut.
Melepaskan kemasan pengaman
pengiriman
Awas Sebelum menggunakan semua
komponen, kemasan pengiriman harus
dilepaskan.
electrolux 31

1. Buka pintu masuk cucian.
2. Lepaskan pita rekat dari dalam mesin di
bagian atas drum.
3. Keluarkan selang foil dan bantalan polies-
tiren dari mesin.
Memasang selang ventilasi
Untuk memudahkan pemasangan, ada pili-
han saluran keluaran ventilasi: satu di bela-
kang, yang lainnya di samping kiri dan kanan.
Hubungkan selang ke bagian apa saja yang
paling mudah dijangkau dengan menarik mur
cincin (A) dari saluran ventilasi di bagian be-
lakang, menyekrupkannya ke selang dan
mendorongnya dengan mantap ke belakang
hingga masuk ke dalam tempatnya. Ventilasi
yang tidak digunakan, sekarang disegel de-
ngan penutup khusus yang disediakan.
Jika selangnya panjang dan suhu ruangan
rendah, mungkin air di dalam selang akan
mengembun. Ini memang fenomena alam
yang tidak bisa dihindari. Agar air tidak ber-
ada di dalam selang atau mengalir kembali
ke dalam tumble dryer, Anda disarankan un-
tuk membuat lubang kecil (dia. 3 mm) pada
titik terbawah selang dan menempatkan
mangkuk kecil di bawahnya. (Lihat gambar,
titik B).
A
A
32 electrolux
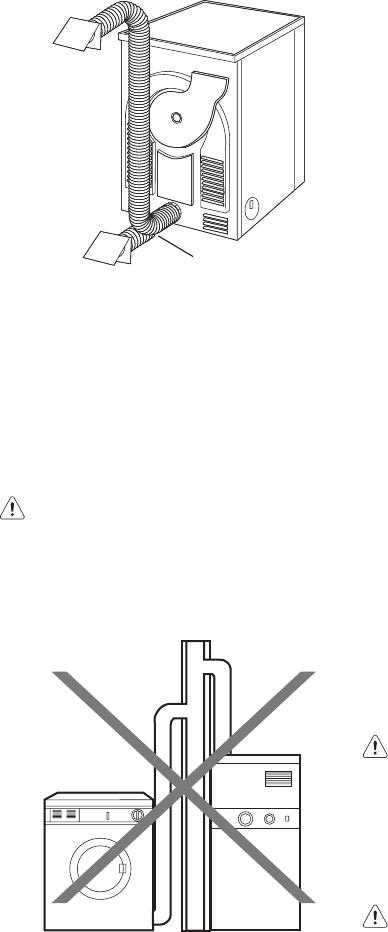
Setelah terhubung ke dryer, tarik selang ven-
tilasi ke titik saluran pembuangan yang dike-
hendaki, pastikan panjang selang tidak ku-
rang dari 2 m, dan tidak lebih dari dua leng-
kungan. Jika Anda memutuskan untuk me-
naruh saluran pembuangan pada dinding/ki-
si jendela, belilah perlengkapan pemasangan
yang diperlukan di toko bangunan dan min-
talah saran pemasangannya.
Peringatan Yang penting, jangan
menghubungkan selang ventilasi,
misalnya ke cooker hood (tudung oven),
atau ke cerobong asap atau saluran
bahan bakar yang dirancang untuk
saluran pembuangan dari alat yang
menggunakan bahan bakar.
Harap diperhatikan, bahwa untuk menghin-
dari masalah pengembunan, dryer harus di-
pasangi selang yang fleksibel untuk meng-
alirkan "pembuangannya", setidak-tidaknya
B
di luar unit dapur; sebaiknya di luar dapur.
Untuk mencegah mesin kepanasan, saluran
pembuangan uap tidak boleh terhalang.
Oleh sebab itu, jika selang permanen dipa-
sang ke dinding luar atau langit-langit, pasti-
kan bahwa kapasitas selang minimal 150
m3/h. Jika dryer dipasang di samping unit
dapur, pastikan bahwa selang ventilasi tidak
tertekan. Jika sebagian selang tertekan, efi-
siensi pengeringan akan berkurang, sehing-
ga waktu pengeringan jadi lebih lama dan
pemakaian energi lebih tinggi. Jika selang
tertekan seluruhnya, alat pemutus listrik un-
tuk pengamanan yang dipasang pada mesin
akan bekerja. Bila mengoperasikan tumble
dryer, suhu ruangan tidak boleh lebih rendah
dari +5°C atau lebih tinggi dari +35°C, karena
ini dapat mempengaruhi kinerja mesin.
Pembalikan pintu
Untuk lebih memudahkan pengisian atau
pengeluaran cucian, letak pintu mesin dapat
dibalik. Pintu hanya boleh dibalik oleh petu-
gas servis yang berwenang. Hubungi Pusat
Gugus Layanan setempat. Petugas akan
melakukan pembalikan pintu dan Anda dike-
nakan biaya.
Sambungan listrik
Rincian tentang tegangan listrik, jenis arus
dan sekring listrik yang diperlukan harus se-
suai dengan yang tertera pada pelat jenis.
Pelat jenis dipasang di dekat pembukaan
ruang masukan cucian (lihat bab "Deskripsi
produk").
Selalu hubungkan mesin ke stopkontak
yang dibumikan, sesuai dengan peratu-
ran jalinan kabel arus listrik.
Peringatan Produsen mesin ini tidak
bertanggung jawab atas kerusakan
atau cedera yang diakibatkan
kelalaian mematuhi aturan
keselamatan di atas.
Jika kabel listrik mesin harus digan-
ti, penggantian ini harus dilakukan
oleh Pusat Servis kami.
Peringatan Steker harus dapat
dijangkau setelah memasang
mesin.
Aksesori khusus
Kit penumpukan
electrolux 33
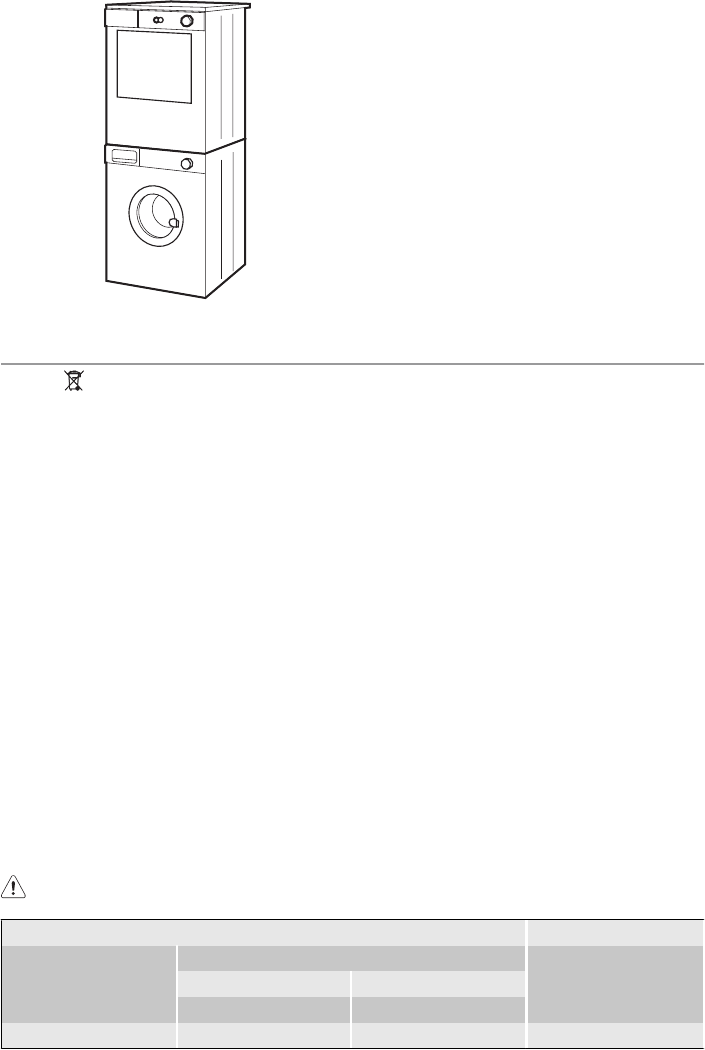
Kit penumpuk khusus tersedia melalui dealer
Anda. Dengan kit ini Anda dapat menempat-
kan dryer di atas mesin cuci front loading
(cucian dimasukkan dari pintu depan) de-
ngan tebal penutup antara 48 dan 60 cm.
Bacalah dengan saksama petunjuk yang di-
sertakan dengan kit.
Lingkungan
Simbol pada produk ini atau
kemasannya menandakan, bahwa produk ini
tidak boleh diperlakukan sebagai limbah
rumah tangga. Melainkan, produk ini harus
diserahkan ke tempat pengumpulan limbah
daur-ulang untuk perangkat listrik dan
elektronik. Dengan memastikan, bahwa
produk ini dibuang dengan cara yang benar,
Anda akan membantu mencegah timbulnya
konsekuensi negatif terhadap lingkungan
dan kesehatan manusia, yang bisa muncul
jika limbah produk ini tidak ditangani secara
benar. Untuk informasi lebih terperinci
mengenai pendaur-ulangan produk ini,
hubungi kantor pemda setempat, layanan
pembuangan limbah rumah tangga atau
toko tempat Anda membeli produk ini.
Bahan pengemas
Bahan pengemas ini ramah lingkungan dan
dapat didaur ulang. Komponen plastik dike-
nali dari penandaannya, mis. >PE<, >PS<,
dsb. Buanglah bahan kemasan di dalam wa-
dah yang sesuai di tempat pembuangan
sampah lingkungan.
Peringatan Apabila membuang
perabotan lama, lepaskan kabel listrik
dan buang bersama dengan steker.
Lepaskan engsel pintu dan pastikan
tidak lagi dapat dikunci untuk mencegah
anak kecil terperangkap di dalamnya.
Saran mengenai lingkungan
• Cucian yang ada di dalam mesin peng-
ering menjadi lunak dan lembut. Oleh se-
bab itu, bahan pelembut kain tidak diper-
lukan sewaktu mencuci.
• Mesin pengering ini akan berfungsi sangat
ekonomis jika Anda:
– selalu menjaga agar celah ventilasi pada
alas mesin ini tidak terhalang;
– patuhi volume beban cucian seperti
yang ditetapkan dalam tinjauan umum
program;
– bersihkan saringan setiap kali seusai
siklus pengeringan;
– memeras cucian sebelum pengeringan.
Contoh: Kadar pemakaian – tergantung
pada kecepatan perasan – untuk 7 kg
cucian yang dikeringkan menggunakan
program COTTONS (KATUN) CUP-
BOARD (SIMPAN KERING).
Pra-pengurasan Siklus Pengeringan
Putaran per menit Sisa kelembaban Energi dalam kWh
dalam liter dalam %
1000 4.20 60 3,9
1400 3.64 52 3,7
34 electrolux
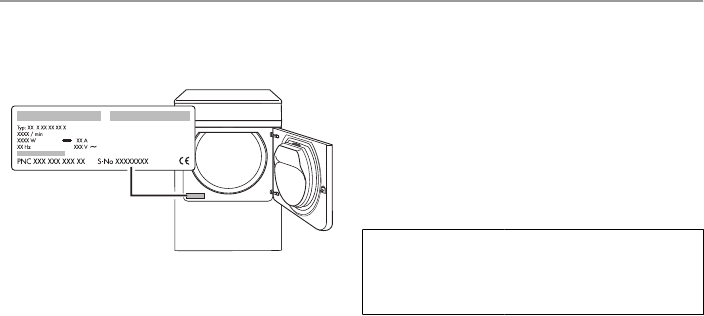
Servis
Jika terjadi kesalahan teknis, cek dulu apa-
kah Anda dapat memperbaiki masalahnya
dengan bantuan petunjuk pengoperasian -
lihat bab Apa yang dilakukan jika...
Jika Anda tidak dapat memperbaiki masa-
lahnya, silakan menghubungi Bagian Peduli
Pelanggan atau salah satu mitra servis kami.
Agar dapat membantu Anda dengan cepat,
kami memerlukan informasi berikut ini:
– Deskripsi model
– Nomor produk (PNC)
– Nomor seri (S No. Tercantum pada pelat
rating yang dilekatkan ke produk - untuk me-
nemukannya, lihat bab Deskripsi produk ))
– Jenis kerusakan
– Pesan error apa pun yang ditampilkan pada
mesin
Agar cepat memperoleh nomor referensi
yang diperlukan, kami sarankan agar Anda
mencatatnya di sini:
Deskripsi model:
PNC:
S No:
electrolux 35
136910040-01-042009
www.electrolux.com
www.electrolux.co.id
