Electronica Clarion de C V FZ105BT USB/MP3/WMA DIGITAL MEDIA RECEVIER User Manual FZ105BT ENG IM Y 141204
Electronica Clarion S.A. de C.V. USB/MP3/WMA DIGITAL MEDIA RECEVIER FZ105BT ENG IM Y 141204
User Manual
USB/MP3/WMA DIGITAL MEDIA
RECEVIER
Owner’s manual & Installation manual

English Owner’s Manual
FZ105BT
1
Contents
1. FEATURES......................................................................................................................2
2. PRECAUTIONS...............................................................................................................2
3. CAUTIONS ON HANDLING............................................................................................2
4. CONTROLS.....................................................................................................................3
Names of Buttons and Their Functions...........................................................................3
5. OPERATIONS..................................................................................................................5
Basic Operation...............................................................................................................5
System Menu...................................................................................................................6
Audio Menu......................................................................................................................6
Radio Operation...............................................................................................................7
USB Mode Operation.......................................................................................................8
iPod/iPhone Mode Operation...........................................................................................9
6. TROUBLESHOOTING....................................................................................................11
7. SPECIFICATIONS..........................................................................................................12
INSTALLATION AND WIRE CONNECTION......................................................................13
Aux Operation..................................................................................................................8
Bluetooth Operation.......................................................................................................10
FZ105BT
English Owner’s Manua
1. FEATURES.
Front USB Port
2
Front 3.5mm AUX Input
Bulit-in Bluetooth
50W x 4 Built-in Amplifier
Compatible with iPod / iPhone
MP3/WMA Compatible with ID3-TAG display
®
®
® ®
CLARION CORPORATION OF AMERICA
6200 GATEWAY DRIVE, CYPRESS, CALIFORNIA 90630, USA
MANUFACTURED:
SERIAL NO.
MANUFACTURER: SMX
U.S.A:
AM 530-1710kHz,
FM 87.9-107.9MHz
Europe:
AM 531-1602kHz,
FM 87.5-108.0MHz
Aisa:
AM 531-1620kHz,
FM 87.5-108.0MHz
Australia:
AM531-1620kHz,
FM 87.5-108.0MHz
12V GROUND
Blue/ Wire:Blue Wire for Amplifier Turn-ON and should
provide 12+ output when the radio is ON and in any source.
White White/
This device complies with Par t 15 of the FCC rules. Operation is subject to the
(1) this device may not cause harmful interference, and (2) this device must accept any interference
received, including interference that may cause undesired operation.
following two conditions:
:
IGNITION(ACC)
YELLOW
WIRE COLOR
VIOLET/BLACK
GREY/BLACK
GREEN/BLACK
WHITE/BLACK
VIOLET
BLACK
GREY
B4
B8
B7
B6
B5
RED
A6
A7
A8
B1
B2
A4
PIN
B3
ORANGE/WHITE
LEFT FRONT SPEAKER (-)
LEFT REAR SPEAKER (-)
RIGHT FRONT SPEAKER (-)
RIGHT REAR SPEAKER (-)
FUNCTION/LABEL
BATTERY(+)
GROUND
DIMMER
CLARION
GREEN
WHITE
RIGHT REAR SPEAKER (+)
RIGHT FRONT SPEAKER (+)
LEFT FRONT SPEAKER (+)
LEFT REAR SPEAKER (+)
FZ105BT
TURES
u
2. PRECAUTIONS.
TURES
3. CAUTIONS ON HANDLING
1. This unit
that trouble arises, never open the case, disassemble
the unit, or lubricate the parts.
has precision parts inside. Even in the event
Protect from high temperature. Expose to direct sunlight for an extended period of time can produce very high
temperature in your vehicle. Cool down the interior before starting the playback.
2. FCC STATEMENT
2.1. This device complies with Part 15 of the FCC Rules.
Operation is subject to the following two conditions:
(1) This device may not cause harmful interference.
(2)
Changes or modifications not expressly approved
by the party responsible for compliance could void
the user's authority to operate the equipment.
This device must accept any interference
received, including interference that may cause
undesired operation.
2.2.
This quipment has been tested and found to comply
with the limits for a Class B digital device, pursuant to
Part 15 of the FCC Rules. These limits are designed
to provide reasonable protection against harmful
interference in a residential installation.
This equipment generates uses and can radiate radio
frequency energy and, if not installed and used in
accordance with the instructions, may cause harmful
interference to radio communications. However, there
is no guarantee that interference will not occur in a
particular installation. If this equipment does cause
harmful interference to radio or television reception,
which can be determined by turning the equipment off
and on, the user is encouraged to try to correct the
interference by one or more of the following measures:
Reorient or relocate the receiving antenna.
Increase the separation between the equipment
and receiver.
Connect the equipment into an outlet on a circuit
different from that to which the receiver is connected.
Consult the dealer or an experienced radio/TV
technician for help.
Note:
IC Caution.
- English:
This device complies with Industry Canada licence-
exempt RSS standard(s). Operation is subject to the
following two conditions:
(1) This device may not cause interference, and
(2) This device must accept any interference, including
interference that may cause undesired operation of
the device.
- French:
Le présentappareilestconforme aux CNR d'Industrie
Canada applicables aux appareils radio exempts de
licence. L'exploitationestautorisée aux deux conditions
suivantes:
(1) l'appareil ne doit pas produire de brouillage, et
(2) l'utilisateur de l'appareildoit accepter tout brouilla-
geradioélectriquesubi, mêmesi le brouillageest
susceptible d'encompromettre le fonctionnement.
WARNING
For your safety, while boating, keep the volume to a level at which external
sounds can be heard.
2ABGY-FZ105BT
MADE IN CHINA
FCC ID:
IC: 12359A-FZ105BT
SOURCE
AS/PS
4. CONTROLS
English Owner’s Manual
FZ105BT
3
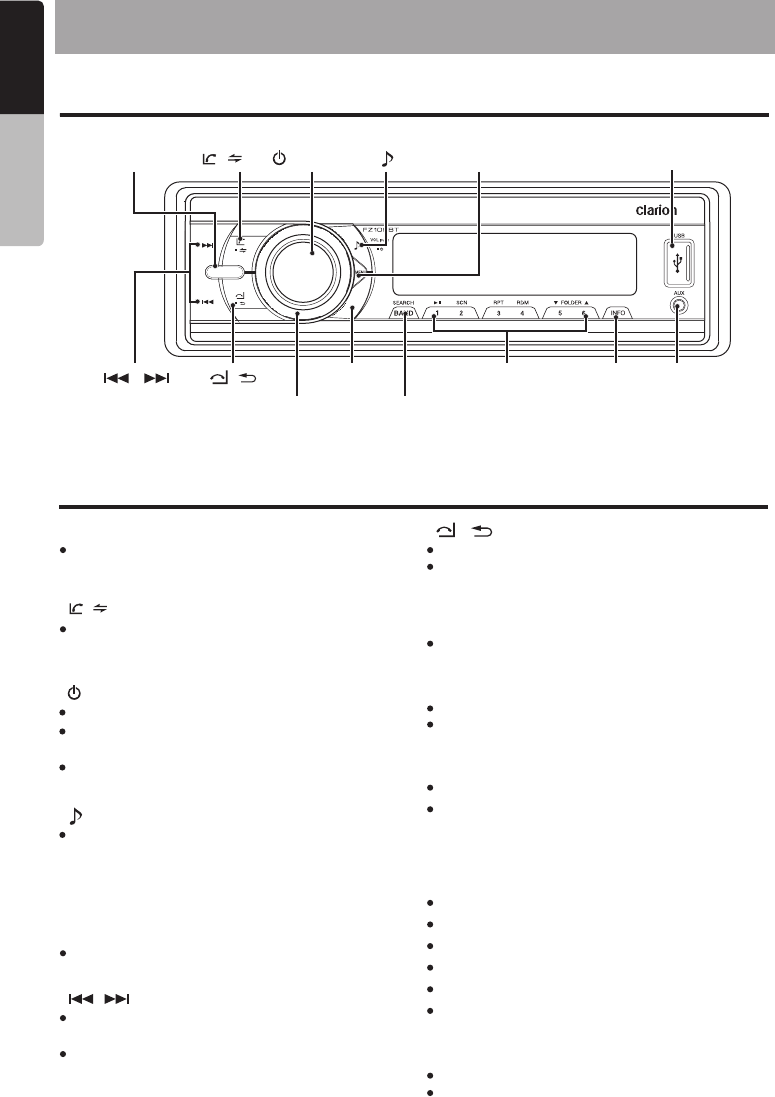
[ / ] Button [VOLUME] Button
[AS/PS] Button
[INFO] Button
[BAND/SEARCH] Button
[1~6] Buttons
[MENU] Button
[SOURCE] [MENU] USB Port
[ / MUTE] [ ]
[ / ] [ / ]
[VOLUME]
[AS/PS]
[BAND/SEARCH]
[1~6] [INFO] AUX Input
Operational Panel
Name of Buttons and their Functions
Press this button to turn power On or Off.
Press to adjust the sound effect setting:
EQ -> XBS(iXBass) -> BAS(bass) -> MID
(Middle) -> TRE(treble) -> BAL(balance)
-> FAD(fader) -> SUBW(Subwoofer)
Press this button to mute the audio output, press
it again to unmute the audio output.
Press to confirm the selection.
Press SOURCE button to toggle the audio
source
Terminate call
Press this button to quick return to previous
menu or mode.
Dial / Answer / Transfer call / Press and hold
to Redial Rotate to adjust the volume level.
Press access into the system menu mode.
Use these buttons for tuning up and down in
Tuner mode, USB mode.
Press and hold momentarily to Fast Forward/
Backward in USB mode.
3
3
[ / MUTE] Button
[ ] Button
[SOURCE] Button [ / ] Button
[ / ]
[ / ] Button
Scan play / Preset scan
Press and hold enter Auto memory store mode
Press to view the Clock
Press to change the display indication.
Press to select tuner band in Tuner mode.
[1] Button: Play / Pause / Preset station 1
[2] Button: Scan play / Preset station 2
[3] Button: Repeat play / Preset station 3
[4] Button: Random play / Preset station 4
[5] Button: Previous folder / Preset station 5
[6] Button: Next folder / Preset station 6
Press to activate the MP3 file searching mode,
then use the volume to select / search by file
number in USB mode.
4
FZ105BT
English
Notes for use of Optional Remote Control
Remote Control
1. Aim the remote control at the remote sensor
on the unit.
2. Remove the battery from the remote control
or insert a battery insulator if the battery has
not been used for a month or longer.
3. DO NOT store the remote control under direct
sunlight or in high temperature environment,
or it may not function properly.
4. Use “button shaped” lithium battery “CR2025”
(3V) only.
5. DO NOT subject battery to recharge,
disassemble,heat or dispose in fire or water.
6. Insert the battery in proper direction according
to the (+) and (-) polarities.
7. Store the battery in a place where children can
not reach to avoid the risk of accident.
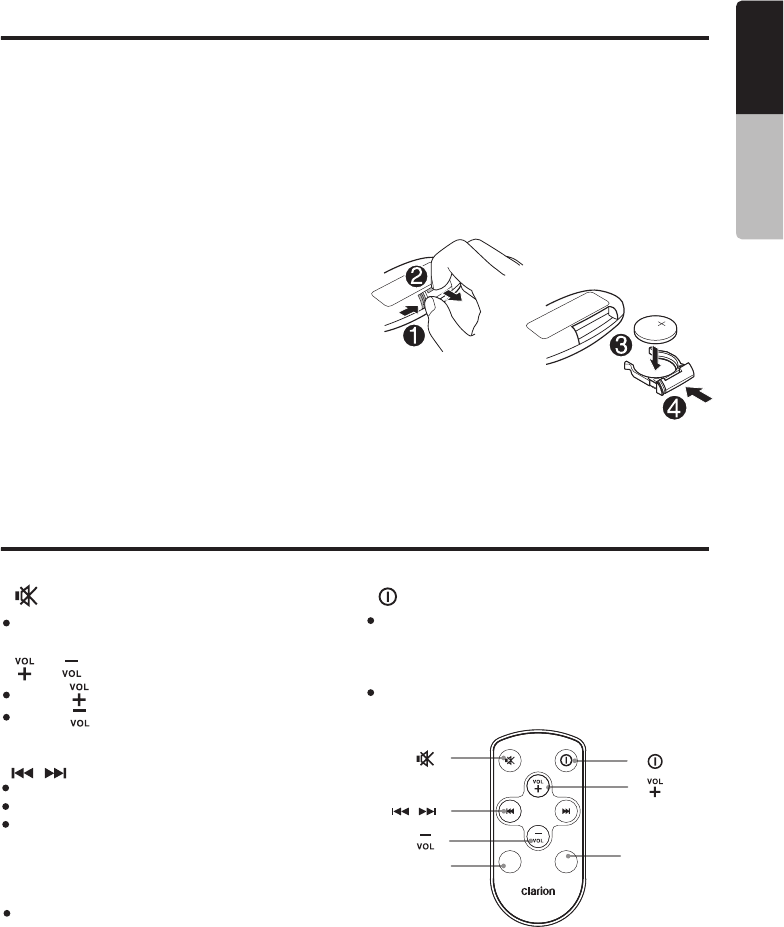
Insertion guide
Inserting the Battery
1. Slide remote control units rear cover in the
direction shown.
2. Insert battery (Cr2025) into insertion guides
with printed side (+) up.
3. Press battery into compartment as shown.
4. Replace and slide cover until it clicks into
place.
[ / ] Button
Preset station up/down
Previous / next track
Press and hold for Fast Forward / Backward
[ ] Button
[ ] [ ] Button
Mute or Unmute the audio output
Owner’s Manual
[ / ]
[SRC]
[ ]
[AUDIO]
[ ]
[ ]
[ ]
SRC AUDIO
[SRC] Button
[ ] Button
[AUDIO] Button
Toggle the audio source
Press the button to turn power on or off.
Press the button to enter the Audio Menu
mode.
Press button to increase the volume.
Press button to decrease the volume.
5. OPERATIONS
Basic Operation
CAUTION
When the unit is turned on, starting and
stopping the engine with its volume raised to
the maximum level it may cause hearing
damage. Be careful about adjusting the
volume.
Power On/Off
Setting The Clock
Selecting a mode
Adjusting the volume
Engine ON
position
Note: Be sure to read this chapter referring
the chapter “4.CONTROLS”
to
Note:
Start the engine before using this unit.
Be careful about using this unit for a long
time without running the engine. If you drain
the vehicle battery too far, you may not be
able to start the engine and this can reduce
the service life of the battery.
1. Start the engine. The power button / knob
illumination on the unit will light up.
2. Press the [ / MUTE ] button to turn
power On or Off .
the
1. Press the [SOURCE] button to display source
menu.
*External equipment not connected to this unit
is not displayed.
1. Rotating the [VOLUME] to increase/decrease
the volume.
The adjustable range of volume is o to 46.
Mute
Display System information
Press the [MUTE] button to turn the mute On and
Off.
press the [INFO] button on the front panel to
switch the display information, system time and
playing source.
1. Press [ MENU ] button to enter System Menu.
2. Press [ ] or [ ] button to select
the Clock.
3. Rotate the [ VOLUME ] knob to set clock,
rotating the [ VOLUME ] clockwise to adjust
the minutes and counterclockwise to adjust
the hours.
English Owner’s Manual
FZ105BT
5
System Menu
CLOCK
12/24H
LOCAL SEEKING
In any mode, press [ MENU ] button to enter
System Menu. Press [ ] or [ ] button
to select options, rotate the [ VOLUME ] knob
to adjust a value / option.
Rotate the [VOLUME] knob to set Clock,
rotating the [VOLUME] clockwise to adjust the
minutes and counterclockwise to adjust the hours.
Rotate the [VOLUME] knob to choose radio
Local or distant at RADIO mode.
LOCAL: Only stations with strong signal can
be received.
DX: Stations with strong and weak signals
can be received.
BEEP ON/OFF
Rotate the [VOLUME] knob to choose button
Beep sound On or Off.
Audio Menu
BAS (Bass Level)
TRE (Treble Level)
BAL (Balance)
Press [ ] button to enter sound effect setting
mode. Press [ ] or [ ] button to select
options, rotate the [ VOLUME ] knob to adjust
a value / option.
Rotate the [VOLUME] knob to adjust the desired
Bass level range from -7 to +7.
Rotate the [VOLUME] knob to adjust the desired
Treble level range from -7 to +7.
Rotate the [VOLUME] knob to adjust adjust the
Balance between the right and left speakers from
10R (full right) to 10L (full left).
FAD (Fader)
Rotate the [VOLUME] knob to adjust adjust the
Fader between the front and rear speakers from
10R (full rear) to 10F (full front).
Rotate the [ VOLUME ] knob to choose time
format: 12 or 24 hours.
DIMMER
Rotate the [ VOLUME ] konb to choose the
Dimmer On or Off.
ON: LCD dimmer is active when small light
of vehicle is turned ON.
OFF: LCD always maximum brightness
regardless of the vehicle small light.
TUNE AREA
Rotate the [VOLUME] knob to select suitable
country region:
U.S.A (United States)
LATIN (Latin America)
EUROPE (Eastern/Western Europe)
ASIA (Asia Pacific)
AUST (Australia)
DIS-CON / RE-CON
Disconnect / Re-connect currently connected mobile
phone.
Press the [MUTE] button to disconnect / Re-connect.
EQ (Preset Equalizer Setting)
Rotate the [VOLUME] knob to change EQ:
Flat->Jazz->Pop->Classic->Rock->News->
Urban->Rave->Movie->Techno->User
XBS On/Off
Rotate the [VOLUME] knob to turn On or Off the
X-BASS bosster function.
MIDDLE
Rotate the [VOLUME] knob to adjust the desired
Middle level range from -7 to +7.
SUBW On/Off
Rotate the [VOLUME] knob to select subwoofer
between ON and OFF
English Owner’s Manual
FZ104PA 6
Radio Operation
[ ] Tuning Up / [ ]
Tuning Down Buttons
Select Radio As Playing
Source
Selecting The Radio Band
1. Press the [ ] / [ ] button change
intervals step by step.
Press the [ SOURCE ] button to select the
RADIO mode.
Press the [ BAND / SEARCH ] button on the
front panel to select one Radio band among F1,
F2,F3 ,AM.
2. Press and hold the [ ] / [ ] button
to seek to the next strongest station.
Auto Store
Manual Store
Recall The Stored Stations
Local Seeking
when one expected radio station has been
detected, press and hold number button 1-6 to
store it in the memory.
Press one numeric button among 1 to 6 on the
front panel to select the corresponding stored
stations.
When LOCAL seeking is ON, only those radio
stations with strong radio signal could be
received.
To select LOCAL function, press the [ MENU ]
button on the front panel, then press the [ ]
/ [ ] button repeatedly until LOCAL or DX
display on the LCD, rotate the [VOLUME] knob
to select local or distant mode.
Only stations with sufficient signal strength will
be detected and stored in the memory.
Press the [AS/PS] button to start automatically
select six strong stations and store them into six
presets. The new stations replace any stations
already stored in the band.
English Owner’s Manual
FZ105BT
7
SOURCE
AS/PS
SOURCE
AS/PS
1. Press the [ ] button to advance to the
next track/song.
Press the [ ] button to go to previous
track/song.
This function allows you to select a folder containing
MP3/WMA files and start playing from the first track
in the folder.
Press the [ 5 / 6 ] button to select a folder.
During playback, pressing the [ INFO ] button will
automatically cycle through the following
information on the file being played on the LCD:
FOLDER NAME->FILE NAME->ALBUM->TITLE
->ARTIST
2. Press and Hold in the [ ] button to fast
forward through the track/song.
Press and Hold in the [ ] button to fast
backward through the track/song.
Connect
Selecting a Track
Folder Select
Display Function
Play / Pause
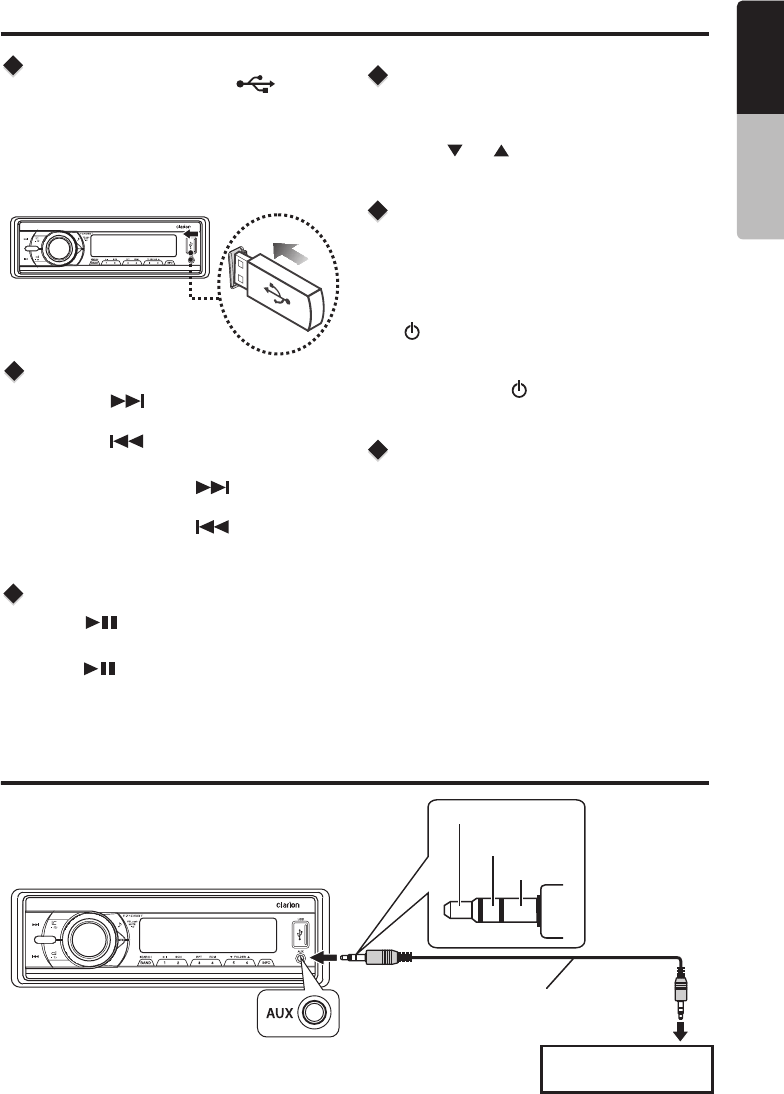
1. Slide the USB socket cover to right.
2. Insert the USB device into the USB socket.
The unit starts playing from the USB device.
3. To remove the USB device, you should first
select another source or turn off the power, in
order to avoid damaging the USB device.
Then take off the USB device.
Press the [ ] button to pause the track/song
that is currently playing.
Press the [ ] button to resume playing the
track/song that has been paused.
USB Mode Operation
AUX Mode Operation
2. Rotate the [ VOLUME ] knob to search
through all folders on the device then press
[ / MUTE ] to make your selection.
3. Rotate the [ VOLUME ] knob to select the
desired track within the previously selected
folder and press [ / MUTE ] to start playing.
Search Function
1. Press the [ BAND / SEARCH ] button on
front panel access the MP3 / WMA file search
mode.
Press the [ SOURCE ] button on the front panel
to select “AUX IN”.
AUX IN is just for audio content with 3.5mm Jack
connector plugged into audio-in socket on the
front panel.
Left Track
Right Track
Ground
Portable audio player,
etc..
3.5mm Cable (not included)
English Owner’s Manual
FZ104PA 8
SOURCE
AS/PS
iPod/iPhone Mode Operation
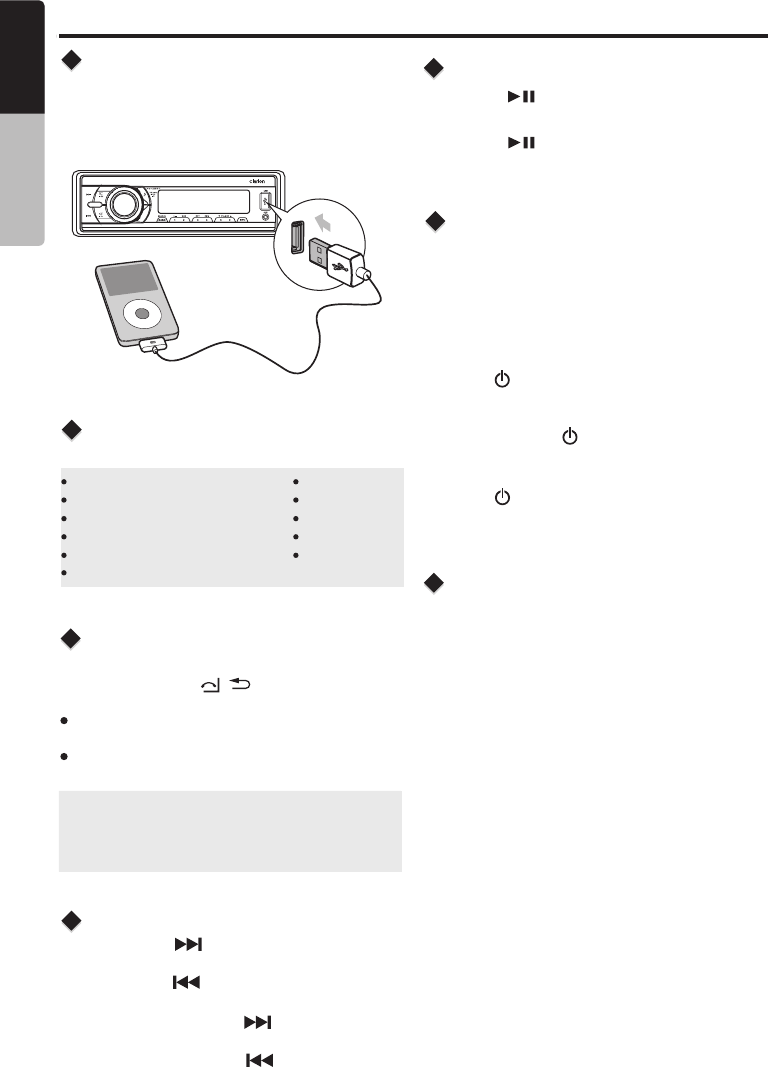
Connect
Compatible iPod/iPhone
Connect an iPod/iPhone to the USB socket on
front panel. When connecting a device, the unit
will read the files automatically. The track
information displays on the screen once playback
start.
You can connect the following iPod/iPhone:
iPod nano (6G)
iPod nano (7G)
iPod touch (4G)
iPod touch (5G)
iPhone 3GS
iPhone 4
iPhone 4S
iPhone 5
iPhone 5C
iPhone 5S
Minimum iOS 5.0 or higher
1. Press the [ ] button to advance to the
next track/song.
Press the [ ] button to go to previous
track/song.
2. Press and hold the [ ] button to fast
forward through the track/song.
Press and hold the [ ] button to fast
backward through the track/song.
Selecting a Track
Play / Pause
Press the [ ] button to pause the track/song
that is currently playing.
Press the [ ] button to resume playing the
track/song that has been paused.
2. Rotate the [ VOLUME ] knob to switch between
categories.
PLAYLISTS->ARTIST-> ALBUMS->
SONGS->COMPOSERS->AUDIOBOOK->
PODCASTS
3. Press [ /MUTE ] button to confirm the selecting.
4. When display the desired Playlist or Artist or Album
or Genres or Songs or Composers or Audiobook or
Podcasts, press [ /MUTE] button then the
music file will be displayed.
5. Rotate the [VOLUME] knob to select File.
6. Press [ /MUTE] button to confirm wanted file to
play.
GENRES->
iPod Menu Search
1. Press the [BA ND/SEARCH] button on front
panel access the iPod menu search mode.
FZ105BT
9
iPod/iPhone Control Music
Playback Mode
Press and hold the [ / ] button on front panel
to switch between the two control modes:
iPod control mode: Use the iPod/iPhone to
operates the music control.
Unit control mode: Use the head unit to
operates the music control.
Note:
Please make sure the iPod/iPhone cable is
connected correctly. And please only use
original iPod/iPhone cable.
During playback, pressing the [ INFO ] button will
automatically cycle through the following
information on the file being played on the LCD:
ALBUM -> SONGS -> ARTIST -> CLOCK
Display Function
English Owner’s Manual
Bluetooth Operation
Pairing the Bluetooth Device
Making a Call
Redial
Answering a Call
Call Transfer
You can dial number through the mobile phone.
1. Use the Mobile Phone to dial and make an outgoing
call.
2. Once completed the dialing [CALLING] is displayed
You can call last dialed number.
1. Press the [ / ] on front panel to redial.
2. Once completed the dialing [CALLING] is displayed
1. You can answer an incoming call by pressing
the button.
2. Press the [ / ] button to reject an incoming call.
[ / ]
You can switch Handsfree call and mobile phone call.
Press the [ / ] button during call.
1. From your Bluetooth enabled device, turn the
Bluetooth ON and search for Bluetooth devices.
2. When a list of available Bluetooth devices appear
on your Bluetooth device, select "CLARION".
3. "CONNECTED will appear on the display.
4. The unit will automatically enter the BT Audio
source and you can now start streaming audio
from your Bluetooth enabled device.
"
Note: If the mobile phone doesn't support SSP
(Simple Secure Pairing) Profile, please enter the
pass code of "0000".
Dis-connect / Re-Connect
1. Press and hold the [ MENU ] button to enter
System menu.
2. Press the [ / ] button until “DIS-CON”
or “RE-CON” is displayed.
3. Press [ /MUTE] button to confirm the selection.
Search Function
Note:
Playing order will depend on Bluetooth audio
player. When [ ] button is pressed, some
A2DP devices will restart the current track
depends on the duration of playback.
During music streaming playback “A2DP” will be
shown on the display. When A2DP and HFP
de vi c e i s d is con ne ct, “B LU E TO OTH
DISCONNECT” will be shown on the display
and return to previously selected audio source.
Some Bluetooth audio players may not have
play / pause synchronized with this unit. Please
make sure both device and main unit are in the
same play / pause status in BT MUSIC mode.
1. Press the [ ] button to advance to the
next track/song.
Press the [ ] button to go to previous
track/song.
2. Press and hold the [ ] button to fast
forward through the track/song.
Press and hold the [ ] button to fast
backward through the track/song.
Selecting a Track
Play / Pause
Press the [ ] button to pause the track/song
that is currently playing.
Press the [ ] button to resume playing the
track/song that has been paused.
ID3 Display
During music streaming playback, press [INFO] to
view the ID3 display information:
ALBUM -> SONGS -> ARTIST -> CLOCK
Audio Streaming Operations
What is audio streaming?
Audio streaming is a technique for transferring audio
data such that it can be processed as a steady and
continuous stream. Users can stream music from
their external audio player to their audio system
wirelessly and listen to the tracks through the boat’s
speakers. Please consult your nearest Clarion dealer
for more information on the product of wireless audio
streaming transmitter offered.
2. Rotate the [ VOLUME ] knob to switch between
categories.
PLAYLISTS->ARTIST-> ALBUMS->
SONGS->COMPOSERS->AUDIOBOOK->
PODCASTS
3. Press [ /MUTE ] button to confirm the selecting.
4. When display the desired Playlist or Artist or Album
or Genres or Songs or Composers or Audiobook or
Podcasts, press [ /MUTE] button then the
music file will be displayed.
5. Rotate the [VOLUME] knob to select File.
6. Press [ /MUTE] button to confirm wanted file to
play.
GENRES->
1. Press the [BA ND/SEARCH] button on front
panel access the search mode.
Note:
The search feature requi res the paired and
connect ed device that the minimum Bluet ooth
AVRCP1.4 be incor porat ed to function.
CAUTION
Please avoid operating your connected mobile
phone while audio streaming as this may cause
noise or sound choppy on the song playback.
Audio streaming may or may not resume after
telephone interrupt as this is dependent on
mobile phone.
English Owner’s Manual
FZ104PA 10
6. TROUBLESHOOTING
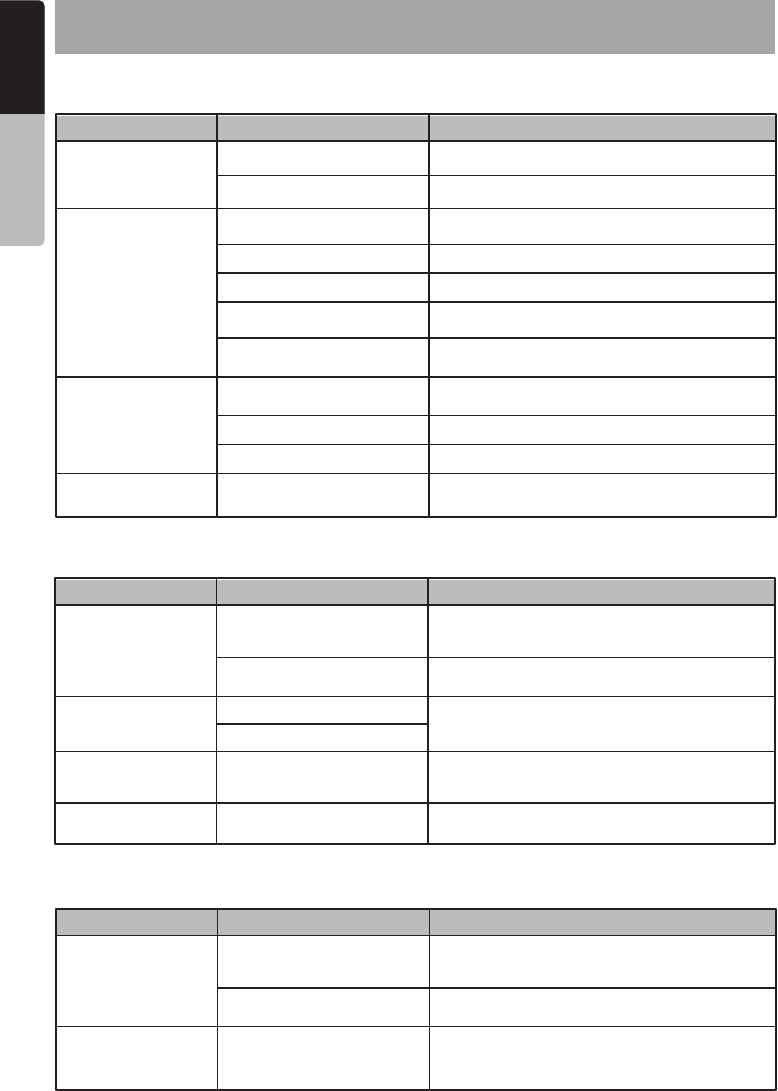
Problem Cause Measure
Unit can not power
on.
No/low audio output.
Poor sound quality
or distortion.
Unit resets itself
when engine is off.
Unit fuse blown.
Improper audio output
connection.
Incorrect connection between
ACC and Battery.
Volume set too low.
Speaker power rating does
not match unit.
Wrong connections.
Speaker is shorted.
Speakers damaged.
Heavily biased volume
balance.
Speaker wiring is in contact
with metal part of car.
Car battery fuse blown.
Replace with new fuse of correct rating.
Check wiring and correct.
Check the wiring and correct.
Increase volume level.
Replace speakers.
Check wiring and correct.
Check wiring and correct.
Replace with new fuse of correct rating.
GENERAL
Replace speakers.
Adjust the channel balance to center position.
Insulate all speaker wiring connections.
Problem Cause Measure
USB device cannot
be inserted.
USB device is not
recognized.
No sound heard with
the display “No File”
shown.
Sound skips or is
noisy.
The USB device is damaged.
No MP3/WMA file is stored in
the USB device.
MP3/WMA files are not
encoded properly.
The USB device has been
inserted with wrong
direction.
The USB connector is
broken.
Reversing the connection direction of the USB
device, try it again.
Replace with a new USB device.
USB
Disconnect the USB device and reconnect. If
the device is still not recognized, try replacing
with a different USB device.
Store these files properly in the USB device.
Use MP3/WMA files encoded properly.
Connectors are loose.
Problem Cause Measure
Cannot pair the
Bluetooth enabled
device with the
audio system.
The audio quality is
poor after connection
with a Bluetooth-
enabled device.
The Bluetooth reception is poor.
The device does not support
the profiles required for the
system.
The Bluetooth function of the
device is not enabled.
Use another device to connect.
Refer to the user manual of the device for how
to enable the function.
Bluetooth
Move the device closer to the audio system or
remove any obstacle between the device and
the system.
English Owner’s Manual
FZ105BT
11
7. SPECIFICATIONS
FM Tuner
Power Output:
20W × 4 Channels at 4 Ω
and 1% THD+N
Signal to Noise Ratio:
74dB (reference: LPF 1 W into 4 )
Frequency Range: 87.9 - 107.9MHz
Usable Sensitivity: Less than 10dB at S/N 30dB
Stereo Separation: >30dB(1kHz)
AM Tuner
Frequency Range: 530 -1710KHz
Usable Sensitivity: Less than 40dB
USB
MP3/WMA mode
USB Host: Host 1.1 compatibles 2.0
MP3 sampling rate: 32kHz, 44.1kHz, 48kHz
MP3 bit rate: 8~320kbps and varibale bit
rate
WMA bit rate: 8~320kbps
Logical format: ISO9660, Joliet
Number of file: Maximum 999
Max directory 10
depth:
Sorting Method: Tree sorting
Max File/Directory 64Byte
Name:
ID3 tag: V2.0 or later
General
Power Supply Voltage: 12V DC (10.8 to 15.6V),
Negative Ground
Fuse: 15A
Speaker Impedance: 4-8 ohms per channel
Note: Specifications and design are subject to
change without notice for further improvement.
Signal/noise ratio: >55dB
Power output: 50W x 4 channels
Aux-in level: ≥ 650mV
Bluetooth
Specification: Bluetooth Version. EDR
(Enhanced Data Rate)
Supported Profiles: A2DP (Advanced Audio
Distribution Profile)
AVRCP 1.4 (Audio/Video
Remote Control Profile)
SSP (Simple Secure Pairing)
Send/Receive Sensitivity: Class 2
English Owner’s Manual
FZ104PA 12
2.1+
INSTALLATION AND
CONNECTION
WIRE
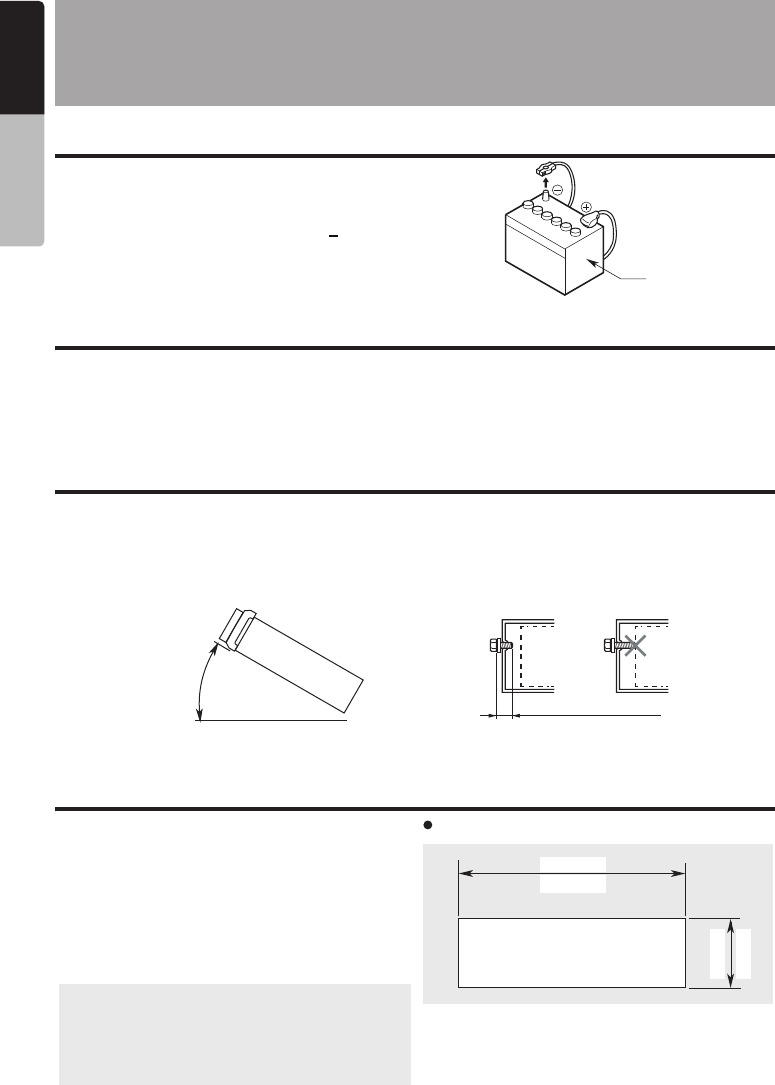
1. Before Starting
1. This set is exclusively for use in vehicles with
a negative ground 12 V power supply.
2. Read these instructions carefully.
3. Be sure to disconnect the battery “ ” terminal
before starting. This is to prevent short circuits
during installation. (Figure 1)
2. General Cautions
3. Cautions on Installation
4. Installation the Source Unit
Battery
Figure 1
1. Do not open the case. There are no user serviceable parts inside. If you drop anything into the unit
during installation, consult your dealer or an authorized Clarion service center.
2. Use a soft, dry cloth to clean the case. Never use a rough cloth, thinner, benzine, or alcohol etc.
For tough dirt, apply a little cold or warm water to a soft cloth and wipe off the dirt gently.
1. Prepare all articles necessary for installing the
source unit before starting.
o
2. Install the unit within 30 of the horizontal
plane. (Figure 2)
3. If you have to do any work on the car body,
such as drilling holes, consult your car dealer
beforehand.
1.
2.
3.
Place the mounting bracket into the instrument
panel, use a crewdriver to bend each stopper
of the mounting bracket inward, then secure the
stopper.
Wire as shown in Section 7) .
Insert the source unit into the mounting bracket
until it locks.
4. Take care of the top and bottom of the trim ring
and mount it so that all the hooks are locked.
o
Max 30
Chassis Chassis
Damage
Max. 6 mm (M5 screw)
Figure 2 Figure 3
4. Use the enclosed screws for installation. Using
other screws can cause damage. (Figure 3)
Note:
kits for proper installation. Consult your
Clarion dealer for details.
2. Fasten the front stopper securely to prevent
the source unit from coming loose.
1. Some car models require special mounting
(182 mm)
7-3/16"
2-1/8"
53 mm
Hole
Console opening dimensions
English Owner’s Manual
FZ105BT
13
Before installation,please make sure prope connections are conducted and the unit operates
normally. Improper connection may result in damage to the unit.
Use only accessories designed and manufactured for this unit and other unauthorized
accessories may result in damage to the unit.
Before installation, please fasten all power cables.
DO NOT install the unit in the place where close to hot area to prevent damage to electrical
components such as the laser head.
Install the unit horizontally. Installing the unit more than 30 degree vertically may result in worse
performance.
To prevent electric spark, connect the positive pole first and then the negative pole.
Notes of installation:
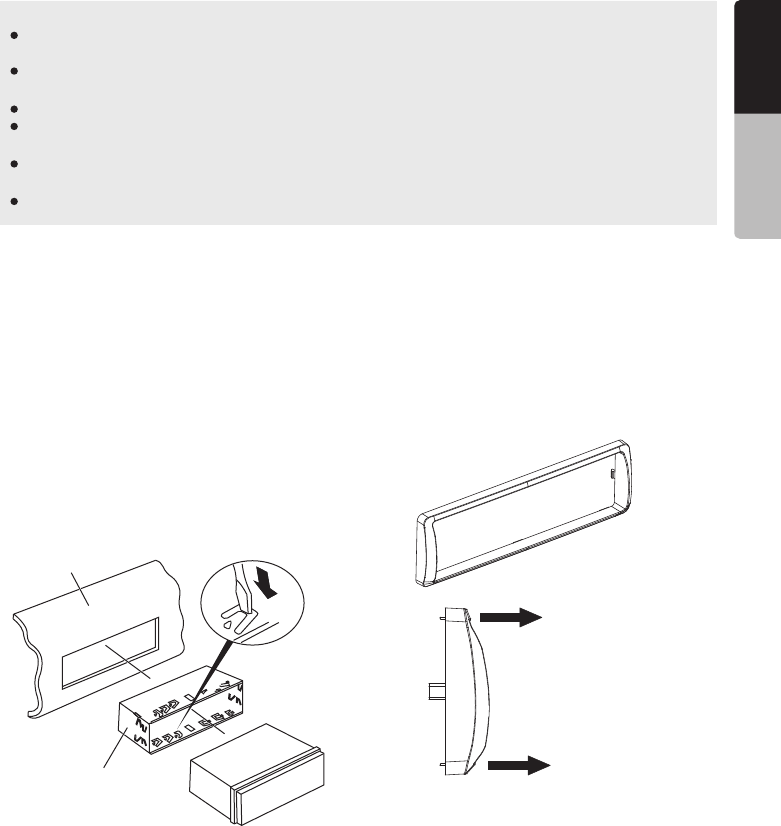
Unit installation
Dashboard
Mounting Bracket
Screwdriver
Trim ring installation
Attach the trim ring around the front panel.
care of the top and bottom of the trim ring and
mount it so that all the hooks are locked.
Take
Top
Bottom
1. Insert mounting bracket into dash board,
choose appropriate mounting tab according
to the gap width, bending the mounting tab
outwards with a screwdriver to fix the
mounting bracket in place.
2. Slide the unit into the bracket until you hear a
click sound.
English Owner’s Manual
FZ104PA 14
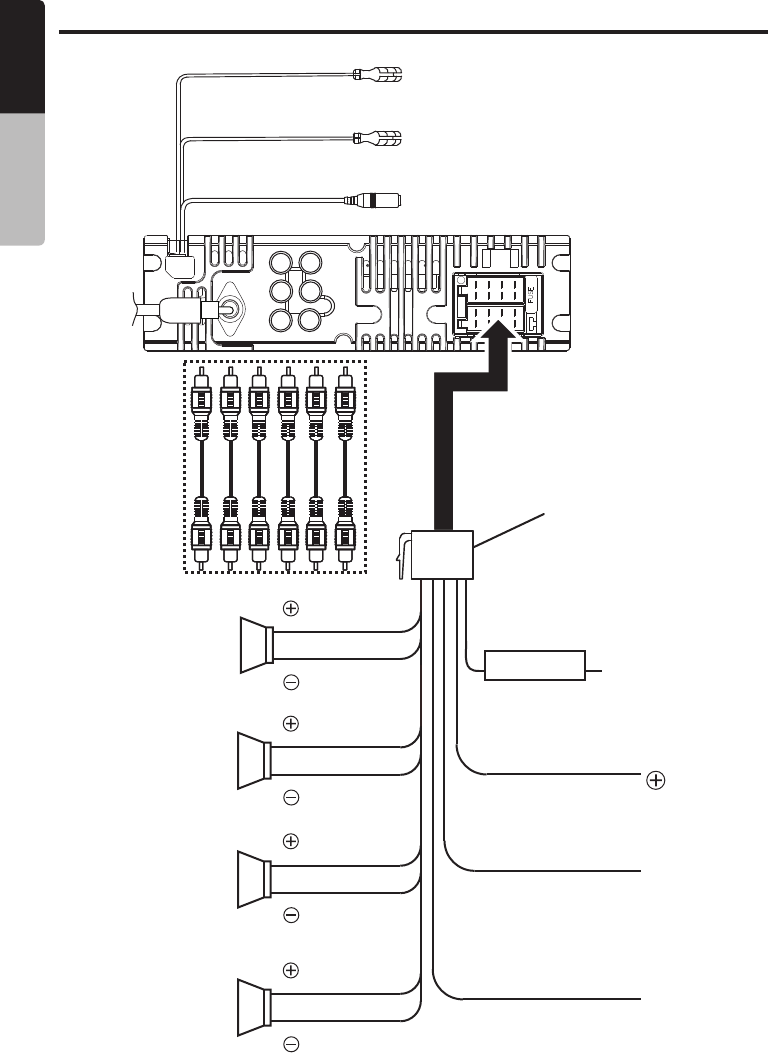
Blue
Power Antenna
Purple
OEM Steering Wheel
Gray
Gray/Black
White
White/Black
5. Wiring and Connections
Violet
Violet/Black
Green
Green/Black
White/Blue
System Remote
ISO Connector
Yellow wire
(Memory back-up lead)
Red wire
(Power lead)
Black wire (Ground lead)
Connect to vehicle chassis
ground
Connect directly
to battery
Accessory
12V
Front Right
Rear Right
Rear Left
Front Left
Fuse 15A
Orange/White wire
(Illumination lead)
Antenna
Jack
SUB
L
R
Rear
Audio
Output
Front
Audio
Output
SUB
Connect it to the power supply
terminal for illumination
English Owner’s Manual
FZ105BT
15

FZ105BT
12/2014
Clarion Corporation of America
All Rights Reserved. Copyright © 2014:
Printed in China
Clarion Corporation of America