Electronics Line 3000 EL2601-2 Security Transmitters User Manual EL 2601
Electronics Line 3000 Ltd. Security Transmitters EL 2601
Contents
- 1. Users Manual Model 2601
- 2. Users Manual Model 2602
Users Manual Model 2601

EL-2601
The EL-2601 is a magnetic door and window contact
designed for use with Electronics Line 3000’s supervised
wireless range of receivers.
Installation Instructions
1. To open the housing, insert a small screwdriver at the
bottom of the unit between the front and back cover
and twist the screwdriver to release the cover.
2. Remove the insulator separating the battery from the
contacts on the battery holder. When you apply power
and the Tamper switch is open, the EL-2601 enters Test
mode during which a transmission is sent every few
seconds. You can terminate Test mode by closing the
Tamper switch. Test mode is automatically terminated
after approximately five minutes. Note: Due to the
occurrence of voltage delay in lithium batteries that have
been in storage, the batteries may initially appear to be
dead. In this case, leave the unit in Test mode for a few
minutes until the battery voltage level is stabilized.
3. While the EL-2601 is in Test mode, set the receiver to
Registration mode and make sure that the EL-2601’s
LED lights up at least twice. After registration, close
the Tamper switch to terminate Test mode. The
receiver allocates a transmitter number to each
registered unit. Write this number and the number of
the zone on the sticker provided. Affix the sticker
inside the front cover for future reference.
4. Before permanently mounting the unit, test the transmitter from the exact mounting position. If necessary, relocate the
transmitter to a better position.
5. To remove the PCB, press the PCB release tab and carefully lift the board and slide the board away from the back cover.
Note: When handling the PCB, do not apply pressure on the antenna.
6. If connecting a wired contact loop, remove the Wired Loop jumper (JP1). Connect the terminal block as follows: 1 – Alarm;
2 – GND. For this purpose, a wiring knockout is provided in the back cover.
Note: The EL-2601 does not have EOL supervision of its loop wiring. Therefore, for UL Household
Burglary installations, the loop wiring may not exceed 3 feet (0.9m).
7. Mount the back cover using two screws and replace the PCB. Use ISO 7050 (ST3.5 x 22) or similar
countersunk screws so that the screw head will not touch the PCB – see Figure 2.
8. To open the magnet’s housing, insert a small screwdriver into one of the pry-off slots located at either end
of the magnet’s back cover and lift to separate from the front cover.
9. Mount the back cover of the magnet using two screws. Make sure that the guideline on the magnet
is correctly aligned with the guideline on the transmitter. Note: Do not install the magnet further
than 0.4” (1cm) from the transmitter.
10. Test the transmitter, making certain that the LED is lit when opening the door/window and again
when closing.
11. Close the front covers of the transmitter and the magnet.
Technical Specifications
Antenna: Built-in Internal Whip
Frequency: 418MHz FM
Power: 3.6V ½ AA Lithium Battery (Part No. BT5055)
Caution: Fire, explosion and severe burn hazard!
Do not recharge, disassemble or heat above 212°F (100°C).
Current Consumption: 25mA (transmission),10µA (standby)
Loop Input Voltage Range: 0-15VDC/AC (peak to peak)
RFI Immunity: 40V/m
Operating Temperature: 32-140°F (0 to 60°C)
Dimensions: 2.6”H X 1.2”W X 1”D (65 x 30 x 25mm)
FCC ID: RIYEL2601-2
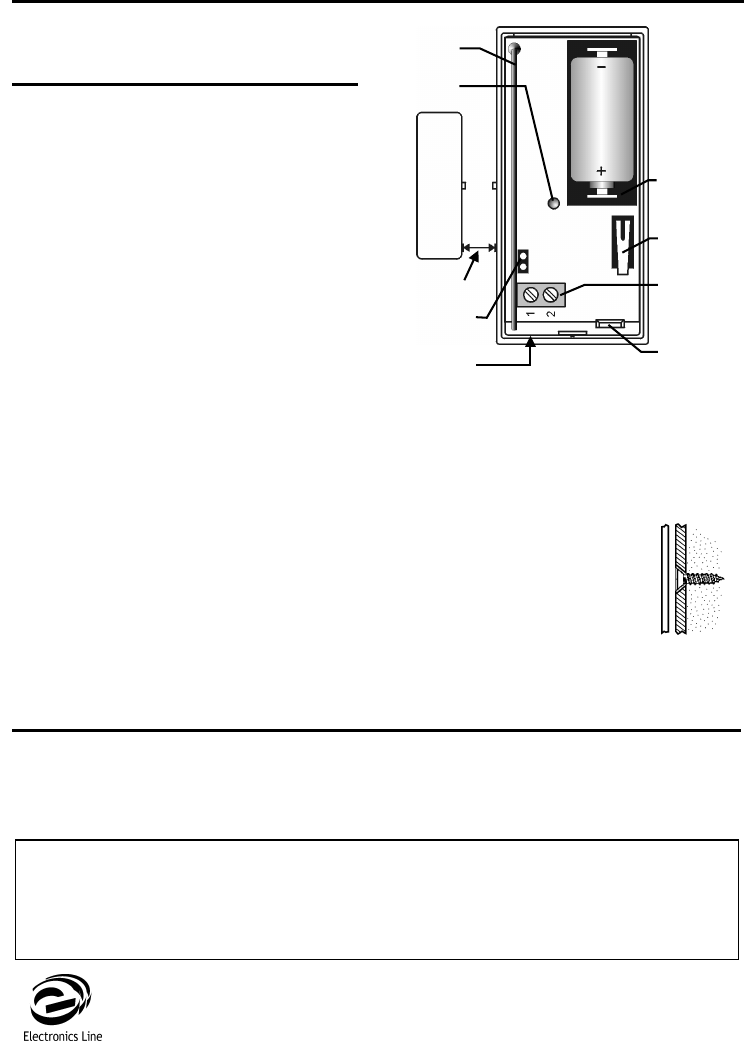
Figure 1: EL-2601 (cover off)
Electronics Line 3000 Ltd.: 2 Granit Street, Kiryat Arieh, POB 3253, Petah Tikvah 49130 Israel. Tel: (972-3) 918-1333, Fax: (972-3) 922-0831
USA: 5637 Arapahoe Avenue, Boulder, Colorado 80303. Tel: (800) 683-6835, Fax: (303) 938-8062
UK: Unit 7, Leviss Trading Estate, Station Road, Stechford, Birmingham B33 9AE. Tel: (44-121) 789-8111, Fax: (44-121) 789-8055
France: ZI-61, rue du Marché Rollay, 94500 Champigny-Sur-Marne. Tel: (33-1) 45.16.19.20, Fax: (33-1) 45.16.19.29
ZI0306A (10/03)
Figure 2: Mounting
Screw Position
PCB
HOUSING
A
ll data is subject to change without prior notice. In no event shall Electronics Line 3000 Ltd. (EL3K) be liable for an amount in excess of EL3K.’s original selling price o
f
this product, for any loss or damage whether direct, indirect, incidental, consequential or otherwise arising out of any failure of the product.
Note: This equipment has been tested and found to comply with the limits for a Class B digital device, pursuant to part 15 of the FCC Rules. These limits are
designed to provide reasonable protection against harmful interference in a residential installation. This equipment generates, uses and can radiate radio frequenc
y
energy and, if not installed and used in accordance with the instructions, may cause harmful interference to radio communications. However, there is no guarantee
that interference will not occur in a particular installation. If this equipment does cause harmful interference to radio or television reception, which can be determined
by turning the equipment off and on, the user is encouraged to try to correct the interference by one or more of the following measures:
1. Reorient or relocate the receiving antenna, 2. Increase the separation between the equipment and the receiver, 3. Connect the equipment into an outlet on a
circuit different from that to which the receiver is connected, 4. Consult the dealer or an experienced radio/TV technician for help.
Warning: Changes or modifications to this equipment not expressly approved by the party responsible for compliance (Electronics Line 3000 Ltd.) could void the
user’s authority to operate the equipment.
Tamper
Switch
LED
Indicato
r
Antenna
PCB
Release
Tab
Location
of wiring
knockou
t
0.4” max.
Magnet
Loop
Terminals
Battery
Holder
Wired Loop
Jumpe
r