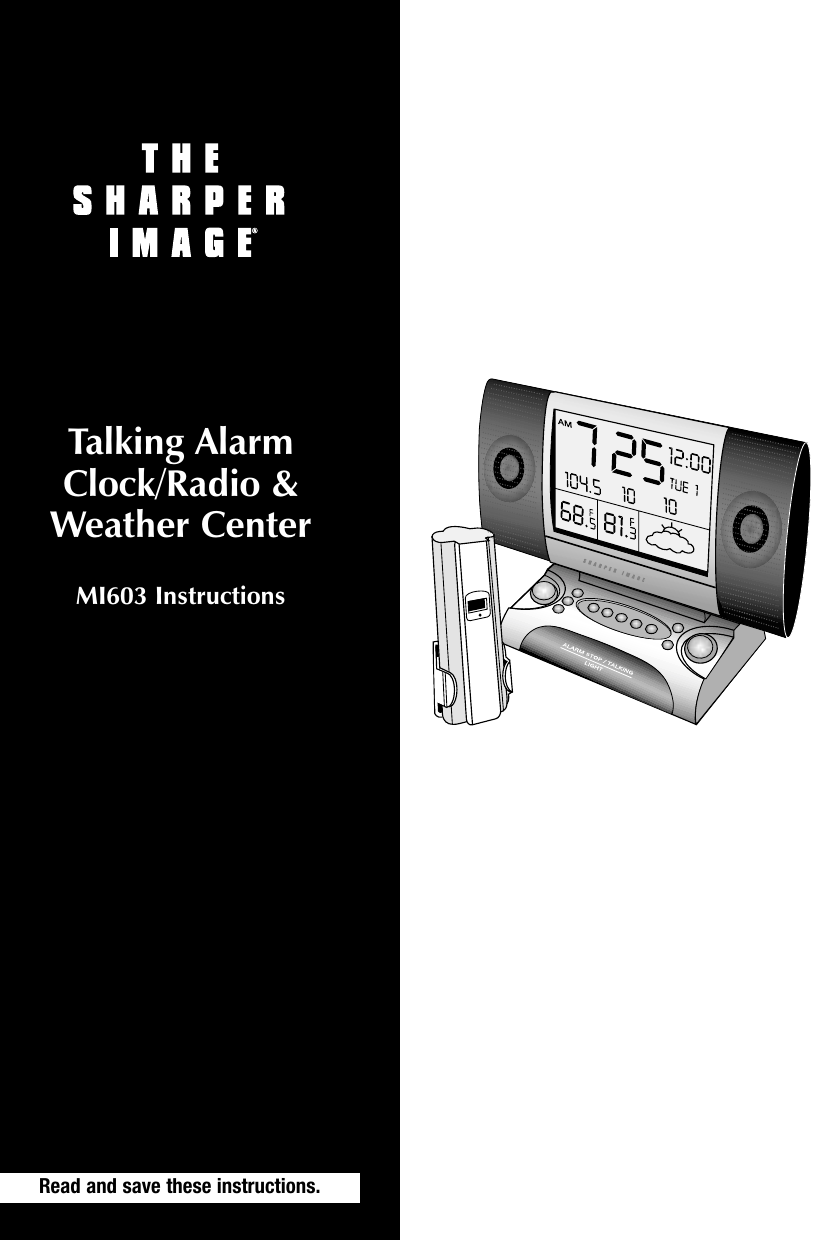
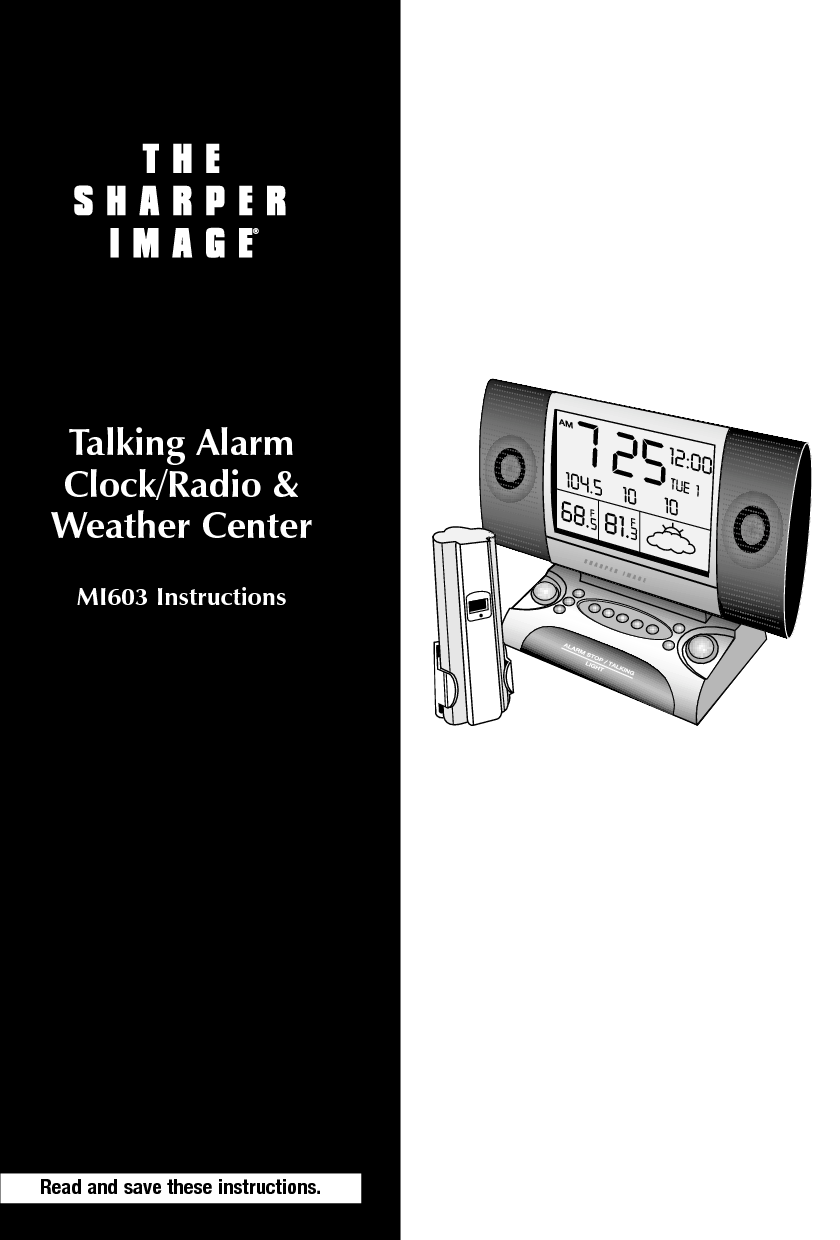
Electronics Tomorrow 740390623 Talking Alarm Clock Radio with Weather receiver User Manual MI603 IM 1203v1

Electronics Tomorrow Ltd. Talking Alarm Clock Radio with Weather receiver MI603 IM 1203v1

User Manual

Talking AlarmClock/Radio &Weather CenterMI603 InstructionsRead and save these instructions.
2
Call 1-800-344-4444 for 24-7 ordering and customer service,or go to  , our complete online store.Dear Sharper Image Customer,Thank you for your purchase of a Sharper Image product. We appreciate your business very much.Please accept my personal assurance of your complete satisfactionwith this product’s quality and performance. We offer generousreturn privileges and excellent warranties on all our products.For more than 25 years, The Sharper Image has shared the fun of discovering innovative products that make life better and moreenjoyable. We’ve been in business a long time because we are anexciting place to shop and — just as importantly — we strive todeliver great customer service that exceeds your expectations.Enjoy your purchase!Respectfully,Richard ThalheimerFounder, Chairman and Chief Executive Officer
4Warnings...........................................................................5Caution ........................................................................5Quick Start ........................................................................5Synchronization of Remote Unit & Main Unit .................................6Weather Forecast...............................................................7General Instructions ...............................................................8Location of Controls............................................................8Buttons Under Front Panel .....................................................8Buttons on the Base............................................................9Button on the Back ............................................................9Battery Installation .............................................................9Setting the Clock..............................................................10Setting the Alarm .............................................................10Setting the Calendar ..........................................................10Radio Operation..............................................................10Weather Forecast .............................................................12Weather Conditions ..........................................................12Indoor and Outdoor/Remote Temperature ...................................13Wireless Remote Temperature Transmission ..................................13Transmission Troubleshooting .................................................14Interference...................................................................14Reset Button ..................................................................14Voice-Memo Center ..........................................................15Talking Clock..................................................................15Alarm Functions ..............................................................16Temperature-Sensing Backlight ...............................................16General Troubleshooting......................................................17Statement of FCC/DHHS Compliance ...........................................18FCC Label Compliance Statement ...............................................18Warranty................................................................Back CoverTable of Contents
5Warning: Changes or modifications to this unit not expressly approved by themanufacturer will void the warranty.Caution1. Avoid exposing the wireless remote unit to extreme temperatures, water orsevere shock.2. Do not expose the main unit to conditions of excessive force, shock, dust,extreme temperature, direct sunlight or humidity. Any of these conditions mayshorten the life of the clock.3. Do not tamper with any of the internal components of the unit. This will voidthe warranty under the above conditions.4. Use only fresh batteries. Mixing old and new batteries may cause battery leakage.Quick Start1. The unit comes with a plug-in adapter and 6 AA batteries. The batteries arefor backup in case of a power outage. (This allows the unit to keep thetime and other functions, although when on battery backup, the unit func-tions only as a clock. The radio, voice message and wake-up features willnot operate.) To start the unit, install the batteries, then plug the main unitinto a wall outlet using the included 10.5V adapter. If the radio is not work-ing, check that the adapter has been plugged in properly.2. Insert 2 AA batteries into the battery compartment on the remote unit, ensuringproper polarities are observed. Once the batteries are installed, the temperatureappears on the remote unit’s LCD screen.3. Once both units — main and remote — are operating, the main unit showsthe outdoor temperature that appears on the remote unit. This occurs within a few minutes.4. After this occurs, place the remote unit in the desired outdoor location within100 feet of the main unit. This should be as close to the main unit as possible.Ensure that it is not in direct sunlight. If necessary, screw the included wall-mount bracket to a convenient outdoor location and place the remote unitinside the bracket. Note: For more details on synchronization, please refer to the section entitled,“Wireless Remote Temperature Transmission.”Warnings
65. A weather icon appears on the display showing the weather with one of fivedifferent icons from Sunny to Stormy. These icons project the next six hours of weather and weather trends. The weather center must be acclimated to the local area and altitude. This process takes 48 hours.Notes:• The first weather reading will not be accurate.• For more details on weather forecast icons and features, refer to the section entitled,“Weather Forecast.”6. To set the clock, slide the LOCK/ALMSET/TIMESET/CALENDAR switch to the TIMESET position. The clock time blinks. Press the HR/MONTH andMIN/DATE buttons until the desired time appears on the display. Slide theLOCK/ALMSET/TIMESET/CALENDAR switch to the LOCK position.7. To set the alarm time, slide the LOCK/ALMSET/TIMESET/CALENDAR switch to the ALMSET position. The alarm time blinks. Press the HR/MONTH andMIN/DATE buttons until the desired alarm time appears on the display. Slidethe LOCK/ALMSET/TIMESET/CALENDAR switch to the LOCK position. (See“Alarm Functions” section for more information.)8. To set the calendar, slide the LOCK/ALMSET/TIMESET/CALENDAR switch tothe CALENDAR position. The date blinks. Press the HR/MONTH and MIN/DATEbuttons until the current date appears on the display. Slide the LOCK/ALM-SET/TIMESET/CALENDAR switch to the LOCK position.Synchronization of Remote Unit & Main Unit1. After inserting the batteries into the main unit and remote unit, plug in themain unit using the 10.5V adapter. The LCD on the unit shows the indoor temperature and, within minutes, shows the outdoor temperature — the sametemperature that appears on the remote unit. If at least 10 minutes pass andthe outside temperature field displays “---,” ensure that there is a temperatureappearing on the remote unit. If a temperature does appear on the remoteunit, press the RE-SYNC button on the main unit and the RESET button on the remote unit. The temperature will appear within a few minutes.2. Once the units are in sync, place the remote unit in a desired outdoor locationwithin 100 feet of the main unit. Once you have located a place for the out-door unit, ensure that the main unit continues to show an outdoor tempera-ture. If it is not showing an outdoor temperature, the remote unit has beenplaced either too far away or in an area where there is interference blockingthe signal. The outdoor unit should be placed as close as possible to the mainunit with as little interference as possible (walls, appliances, computers, etc.Quick Start
7will reduce the range significantly). It is very important that the remote unit notbe placed in direct sunlight and should be protected from extreme weather.This allows you to receive an accurate outside temperature reading and weatherforecast.Note: For more details on synchronization, please refer to sections entitled,“Wireless Remote Temperature Transmission” or “Transmission Troubleshooting.” Weather ForecastThe main unit has a built-in barometer. The local weather forecast and weathertendency are predicted using the rate of change in atmospheric pressure basedupon a norm. When you first turn on the unit, it takes 48 hours for the unitto sense and calculate the norm or the middle pressure level. After this time,the unit shows weather tendencies due to an increase or decrease in the baromet-ric pressure. The icon on the unit shows what the weather tendency will be overthe next six hours.Weather tendency is indicated by and up or down forecast arrow. (See table below.)1. The up arrow  indicates a significant increase in atmospheric pressure.This normally means the weather is going to improve. 2. The down arrow  indicates a significant decrease in atmospheric pressure. This means the weather is going to get worse. Note: If the unit continually gives incorrect forecasts, it can be corrected byre-syncing the unit on a partly cloudy day. This allows the barometer to find theright barometric pressure level without being too high or low. 3. The forecast icon  without an arrow indicates a steady/insignificantchange of atmospheric pressure. This means the weather will remain unchanged.Synchronization of Remote Unit & Main Unit
8General InstructionsLocation of ControlsFront Panel Back PanelButtons on the Base ScreenButtons Under Front Panel1. RESET – Clears and resets the entire display.2. °C/°F  – Changes temperature display to either Celsius or Fahrenheit. 3. TEMP/MAX/MIN – Displays the maximum and minimum temperatures forinside and outside temperatures.4. CLEAR – Clears the maximum and minimum temperature data while the maxi-mum and minimum temperature is shown on the LCD.5. RE-SYNC – Resynchronizes the main unit with the remote unit.6. HR/MONTH – Changes the hours or months when setting the clock or calendar.7. MIN/DATE – Changes the minutes or day when setting the clock or calendar. CALENDAR ALARM TIME VOICEMEMO WEATHER FORECAST TIME INDOOR TEMP OUTDOOR TEMP FM/AMRADIO MEMORYREC PLAY ERASE BACKWARD FORWARD SLEEP MEMORYSET PRESET BANDAM/FM RADIOON/OFF ALARM STOP/TALKINGLIGHT TUNING UP VOLUME TUNING DOWN ANT. AC ADAPTER ADAPTER JACK BACKLIGHT  ADJUSTMENTAA BATTERY X 4BATTERY DOORMIC OFFVOICE/BEEP/12/24HR/YEAR LOCK/ALMSET/TIME SET/CALENDAR/MIN/DATE HR/MONTH RESET CLEAR TEMP/MAX/MIN ºC/ºFRE-SYNC ALUMINUM-CONESPEAKER
98. 12/24 HR/YEAR – Changes from 12-hour time to 24-hour time when settingclock or the year when setting the calendar.9. LOCK/ALM SET/TIME SET/CALENDAR – Allows you to switch from locked toalarm set to time set to calendar set.10.OFF/BEEP/VOICE – Switches the alarm sound from off to beep to voice.Buttons on the Base1. REC – Records voice messages.2. PLAY – Plays recorded messages. 3. ERASE – Erases recorded messages.4. < BACKWARD – Scans backward through recorded messages.5. > FORWARD – Scans forward through recorded messages.6. SLEEP – Automatically turns the radio off after a certain amount of time. Themaximum is 90 minutes.7. PRESET – Changes the preset stations.8. MEMORY SET – Stores station as a preset station.9. BAND/AM/FM – Changes between AM & FM band.10.RADIO ON-OFF  – Turns the radio on or off.11.TUNING ▼/▲– Tunes the radio station.12.VOLUME ▼/▲– Controls the volume of the radio and messages.13.ALARM STOP/TALKING/LIGHT – Stops alarm. It also announces the time, outsidetemperature and forecast. This button also activates the automatic temperature-sensing backlight while the unit is running on battery power.  Button on the Back• BACKLIGHT ADJUSTMENT – Adjusts the brightness of the LCD backlight.Battery InstallationMain UnitTo enable the automatic temperature-sensing backlight, plug the main unit intothe wall outlet using the included 10.5V adapter. In case of a power outage, insert 4 AA batteries into the battery compartment on the rear of the main unit, ensuringproper polarities are observed.Remote Transmitter Unit• Insert 2 AA batteries into the battery compartment on the remote unit, ensuringproper polarities are observed.Buttons Under Front Panel
101. Slide the LOCK/ALMSET/TIMESET/CALENDAR switch to the TIMESET position.The clock time blinks.2. To set the time, press the HR/MONTH and MIN/DATE buttons until thedesired time appears on the display.3. To change 12-hour time to 24-hour time, press the 12/24 HR/YEAR button.4. Slide the LOCK/ALMSET/TIMESET/CALENDAR switch to LOCK position.Setting the Alarm1. Slide the LOCK/ALMSET/TIMESET/CALENDAR switch to the ALMSET position.The alarm time blinks.2. To set the alarm time, press the HR/MONTH and MIN/DATE buttons until thedesired alarm time appears on the display.3. To change 12-hour time to 24-hour time, press the 12/24 HR/YEAR button.4. Slide the LOCK/ALMSET/TIMESET/CALENDAR switch to LOCK position. (See“Alarm Functions” section for more information.)Setting the CalendarThe calendar can be set to any date between January 01, 2002 and December 31, 2051.1. Slide the LOCK/ALMSET/TIMESET/CALENDAR switch to the CALENDARposition. The date blinks.2. To set the calendar, press the HR/MONTH and MIN/DATE buttons until thecurrent date appears on the display. 3. Press the 12/24 HR/YEAR button until the current year appears on the display.4. Slide the LOCK/ALMSET/TIMESET/CALENDAR switch to LOCK position.Radio OperationTuner1. For best reception, completely extend the antenna.2. To turn the radio on, press the RADIO ON/OFF button. The FM RADIO iconappears on the display screen.3. To select the desired band (AM or FM), press the BAND button until thedesired band icon appears on the display. 4. To manually tune to the desired station frequency, press the TUNING UP (▲)or TUNING DOWN (▼) button repeatedly until the desired frequency appearson the display.Setting the Clock
115. To automatically scan for stations with clear signals, press and hold the TUNINGUP (▲) or TUNING DOWN (▼) button until the tuner begins searching for astation. The tuner will automatically stop on the next clear station.Note: The tuner automatically transmits stations in stereo if that particular stationis sending a stereo signal. The STEREO icon appears on the display.Station Memory Presets1. To turn the radio on, press RADIO ON/OFF button. 2. To select the desired band, press the BAND AM/FM button.3. To store a radio station in one of the 15 AM and 15 FM preset positions, tunein the desired station.4. Press the MEMORY SET button. The preset number flashes.5. To select the desired memory location, press the PRESET button until thedesired preset position appears on the display.6. To confirm, press the MEMORY SET button again.7. To scroll through all of the preset radio stations, repeatedly press the PRESETbutton. The unit will cycle through all preset stations in order.Sleep TimerThe radio can be set to automatically turn off after a certain number of minutes(from 10 to 90).1. To set the sleep timer while the radio is on, press and hold the SLEEP buttonfor 2 seconds. The radio turns off temporarily. “90 MINS” flashes on the display.2. To select the duration of the sleep timer, press the SLEEP button repeatedlyuntil the desired length of time appears. The timer decreases in 10-minuteincrements between 90 and 10 minutes each time the SLEEP button ispressed. Two seconds after setting the desired length of time, the radio turnson again. The sleep timer is now set.Note:• To turn off the sleep timer, press the SLEEP button until “00” appears. The radiowill not turn off automatically.• The SLEEP mode only works when you manually turn on the radio.Radio Operation
12The main unit has a built-in barometer. The local weather forecast and weathertendency are predicted using the rate of change in atmospheric pressure basedupon a norm. When you first turn on the unit, it takes 48 hours for the unit tosense and calculate the norm or the middle pressure level. After this time, the unitshows weather tendencies, but increases or decreases in barometric pressure. Theicon on the unit shows what the weather tendency will be over the next six hours.Weather tendency is indicated by and up or down forecast arrow. (See table below.)1. The up arrow  indicates a significant increase in atmospheric pressure.This normally means the weather is going to improve. 2. The down arrow  indicates a significant decrease in atmospheric pressure. This means the weather is going to get worse. Note: If the unit is continually giving wrong forecasts, it can be corrected byre-syncing the unit on a partly cloudy day. This allows the barometer to find theright barometric pressure level without being too high or low. 3. The forecast icon  without an arrow indicates a steady/insignificantchange of atmospheric pressure. This means the weather will remain unchanged.Weather ConditionsThe current weather condition is displayed using one of five animated icons:Sunny, Partly Cloudy, Cloudy, Rainy or Stormy. (See table below.) The Stormy icononly appears when a sudden and serious drop in atmospheric pressure is detected.Weather Forecast
131. The indoor and outdoor temperatures can be displayed in either °F or °C. Toselect °F or °C, press the °C/°F button on the main unit or remote unit until thedesired display appears. The main unit converts the temperature if the remotetransmitter unit is set to a different temperature display. If the temperatureexceeds or falls below the unit’s range, the LCD shows either “HI” or “LO” inplace of the temperature.2. To display the recorded minimum and maximum indoor and outdoor temper-atures in succession, press the TEMP/MAX/MIN button on the main unitrepeatedly. The temperature display returns to the current temperature after 5 seconds or after hitting the TEMP/MAX/MIN button three times. To clear themaximum and minimum temperature data, press the CLEAR button while themaximum and minimum temperature is shown on the LCD. Wireless Remote Temperature TransmissionThe Transmission frequency is 433MHz. The outdoor transmission range is 100feet from the main unit. Obstacles, walls, etc. will reduce the transmission range.Once the main unit is plugged in or the batteries have been installed, it will startto receive signals for 10 minutes. Once batteries are placed in the remote unit, itwill start to transmit temperature data to the main unit every 3 minutes. Uponsuccessful reception, the remote/outdoor temperature will be shown in theremote temperature field on the LCD. The main unit automatically updates theremote reading in 3-minute intervals.Receiver Signal Indicator IconsThe following icons indicate the signal transmission status on the LCD:Indoor and Outdoor/Remote Temperature Readout
141. If the main unit does not receive signals within the first 10 minutes, a blank “--” appears in the OUT TEMP field on the LCD. If at any time during opera-tion a signal is not received after five consecutive intervals, blank “--” appears.The remote unit is either too far away or there is some interference betweenthe remote and the main unit. If this happens, bring the remote unit close tothe main unit and press the RE-SYNC button. The main unit will receive signalsfor 10 minutes. Move the remote unit to a new location closer to and in directline of the main unit.2. If the remote unit’s batteries are running low, a low battery icon appears in theOUT TEMP field. Replace the batteries.3. If the display unexpectedly goes blank, press the RE-SYNC button on the mainunit to force the main unit to receive a signal. If this does not work, check thefollowing:• The remote unit is still in place.• The batteries in both the remote unit and the main unit are still good.Replace if necessary.• The remote transmitter is within range and the path is clear of obstacles or other interference. (See “Interference” section.) Shorten the distance if necessary.InterferenceSignals from other household devices such as garage-entry controls, doorbells andhome security systems may interfere with the temperature-data transmission andmay cause temporary reception failure. This is normal and does not affect the general performance of the unit. The transmission and reception of the temperaturereading will resume once the interference has stopped.Reset ButtonPress the RESET button when either the main unit or remote transmitter unit isnot operating normally.Transmission Troubleshooting
15Up to eight personal messages can be stored in the voice-memo center. TheVoice-Memo field on the LCD shows “0” until a message is recorded.1. To record a message in the first memo position (or the next available position),press and hold the RECORD button. A beep sounds and “REC” appears on thedisplay. Speak in a normal voice 15 inches away from the microphone abovethe LCD. Messages can be a maximum of 6 seconds long. A double-beepsounds if your message reaches 6 seconds before you release the RECORDbutton.Note: If you do not hear a beep after pressing the RECORD button, turn up thevolume and re-record your message.2. Release the RECORD button when you are finished recording your message. Abeep sounds and the message number is shown on the display in the memo field.3. To record additional messages (up to eight), repeat steps 2 and 3. The messagenumber automatically increases in the memo field. If you try to record morethan eight messages, an “F” appears on the display to indicate the message centeris full.4. To play a recorded message, press the FORWARD or BACKWARD button untilthe desired memo number appears on the display. 5. Press the PLAY button. “PLAY” appears on the display. Note: If the radio is on, pressing the PLAY button momentarily turns off the radioto play the message. The radio turns back on after the message has played.6. To erase a recorded message, press the FORWARD or BACKWARD buttonuntil the desired memo number appears on the display. Press the ERASE button.The remaining messages will be renumbered.Talking ClockTo hear the current time, outdoor temperature and weather report, press theALARM STOP/TALKING/LIGHT button. If you press this button while the radio ison, the radio turns off temporarily. Once the update has been played, the radioautomatically resumes play.AVoice-Memo Center
16Voice AlarmThe voice alarm wakes you to the following sequence: 5 seconds of beeping, followed by “Good morning,” the current time, outdoor temperature, the weatherreport, any personal messages you have recorded and then the radio plays for onehour. If no outdoor temperature is recorded on the display, the alarm skips thisfunction. If there are no personal messages recorded, the alarm skips this feature.1. To select the voice alarm, slide the OFF/BEEP/VOICE switch to VOICE.2. To turn off the voice alarm once it has sounded, press the ALARM STOP/TALKING/LIGHT button.Beeping Alarm with SnoozeThe beeping alarm with snooze wakes you to one minute of beeping that repeatsevery five minutes until the alarm is turned off.1. To select the beeping alarm with snooze, slide the OFF/BEEP/VOICE switch to BEEP.2. To activate the snooze function after the alarm has sounded, you may eitherwait for the alarm to turn off after one minute or you may press the ALARMSTOP/TALKING/LIGHT button. In both instances the alarm repeats every fiveminutes until it is turned off.3. To turn off the snooze alarm, slide the OFF/BEEP/VOICE switch to OFF.Temperature-Sensing BacklightThe LCD backlight color is automatically determined by the recordedoutdoor/remote temperature. 1. Cold (blue colored backlight): Below 50°F/10°C.2. Normal (amber colored backlight): 50.1°F – 75°F/10.1°C – 23.9°C.3. Warm (red colored backlight): Above 75°F/24°C.• To enable the automatic temperature-sensing backlight to remain on at all times,plug the main unit into a wall outlet using the included adapter.• To activate the automatic temperature-sensing backlight while the unit is run-ning on battery power, press the ALARMSTOP/TALKING/LIGHT button. Thebacklit LCD turns on for 3 seconds.Alarm Functions
Problem: It is raining outside, but the unit’s forecast shows the sunny icon.Solution: The unit measures barometric pressure changes and gives forecastsbased on up or down trends over the next six hours, not what is going on at thatexact time. If the unit indicates it is sunny, but it is raining outside, this means theweather will improve over the next six hours.Problem: The weather icon has been incorrect for an extended period of time.Solution: The unit may have been set during a period of high or low barometricpressure, so the unit’s barometric point of reference is incorrect. Wait until a partlycloudy day and re-sync the remote unit with the main unit. (See “Synchronizationof Remote Unit & Main Unit” section.) The unit will acclimate to the correct levelof barometric pressure. Problem: The radio does not work.Solution: Make sure that the 10.5V adapter is properly connected to the unit andthe wall outlet.Problem: The main unit’s LCD panel is faint or hard to read. Solution: Adjust the tilt angle of the LCD and adjust the brightness of LCD back-light until the readout is clear from your viewpoint.Problem: The outdoor temperature reading is extremely high when the temperatureis actually much colder.Solution: The remote unit is sitting in direct sunlight. Move it to a shaded, protectedlocation.For additional questions, please call the manufacturer:1-800-526-0954General Troubleshooting17
This warranty covers any defects in materials or workmanship, with the exceptions stated below.How Long Coverage LastsThis warranty runs for 90 days from the date of original purchase.What Is Not CoveredThis warranty does not cover damage caused by misuse or use other than as intended and describedin the product instruction manual, or loss or damage to batteries or removable parts. What The Sharper Image Will DoThe Sharper Image will repair any defects in materials or workmanship. In the event repair is notpossible, The Sharper Image will either replace this product with one of similar features and price, or refund the full purchase price of the product, whichever you prefer.How to Obtain ServiceReturn the product and receipt, along with a brief explanation of the problem, to:T.S.I. - Returns Department2901-A West 60th StreetLittle Rock, AR 72209If you have questions, please feel free to contact our customer service representatives at 1-800-344-5555 or by email at care@sharperimage.com.This warranty gives you specific legal rights, and you may have other legal rights that vary from stateto state.Copyright 2003Sharper Image Corporation650 Davis St., San Francisco, CA 94111(415) 445-6000Shop online: WarrantyDue to continuing improvements, actual product may differ slightly from the product describedherein.V1 12/03

Navigation menu