Electronics Tomorrow A440110813 BLE Alarm Cube User Manual A440
Electronics Tomorrow Ltd. BLE Alarm Cube A440
UserManual.wiki
>
Electronics Tomorrow
>
A440110813 User Manual
User Manual
Navigation menu
Upload a User Manual
Namespaces
Wiki Guide
HTML
PDF
Info
Views
User Manual
Discussion / Help
Navigation
![Instruction Manual [For iPod, iPhone and iPad User]](https://usermanual.wiki/Electronics-Tomorrow/A440110813/User-Guide-2389985-Page-1.png)
![Pairing the Alarm Cube3.3 Tap “ Pair New Device” to search for nearby devices.3.4 Press and hold the [PAIR] button on the Alarm Cube device for 5 seconds. You can find that the flashing LED will turn from red to blue.3.5 The new Alarm Cube will be displayed on App and is ready for pairing. Tap the "New Alarm Cube" will start the pairing and connection process. Once the Alarm Cube is paired, it will start time and data synchronization.New Alarm Cube](https://usermanual.wiki/Electronics-Tomorrow/A440110813/User-Guide-2389985-Page-6.png)
![Setting the alarm time6. Setting the alarm time6.1 Tap [New Alarm] to create a new alarm or tap the existing alarm to modify.6.2 The alarm setting screen appears. You can edit and adjust different items on this screen, which include:i) Alarm Name: Tap to edit you preferred name to this alarm.ii) Time: Tap to adjust the time for this alarm.iii) Day of Week: Tap to select which day of week to enable the alarm. - If none is selected, it will be as a once alarm. - If all days are selected, it will be as a daily alarm. iv) Sound pattern: Tap to select which tone pattern (5 options plus one random pattern available) is applied to this alarm.Alarm Cube](https://usermanual.wiki/Electronics-Tomorrow/A440110813/User-Guide-2389985-Page-10.png)
![Setting the alarm timev) Alarm volume level: Tap to select the alarm sound volume level (three options: Low, Med and High).6.3 Complete the alarm setting.i) Tap [Done] to save the alarm setting and go back to main screen.ii) Tap [Cancel] to restore to the original alarm setting and go back to main screen.iii) Tap [Delete Alarm] to delete the current alarm and go back to main screen.](https://usermanual.wiki/Electronics-Tomorrow/A440110813/User-Guide-2389985-Page-11.png)
![Snooze operation7. Using the SNOOZE function7.1 When the alarm sounds, press the [Snooze] button to stop alarm and the snooze will repeat three time every 5 minutes.7.2 “Maximum Snooze” and “Snooze Duration” default value can be adjusted in the preference screen according to user own preference.](https://usermanual.wiki/Electronics-Tomorrow/A440110813/User-Guide-2389985-Page-12.png)
![To turn off the alarm8. To disable the alarm8.1 When the alarm sounds, press the [Snooze] button once or press [Alarm] to disable the alarm. 8.2 The alarm will sound for 1 minute and stop automatically. If Snooze Enabled setting is ON, the alarm will repeat every 5 minutes. You can press the [Snooze] button to interrupt the alarm momentarily, or can press [Alarm] button to turn off the alarm and stop the snooze function completely.8.3 User can tap the alarm time to disable the alarm completely ( Please make sure your app is paired with the device)Alarm Cube](https://usermanual.wiki/Electronics-Tomorrow/A440110813/User-Guide-2389985-Page-13.png)
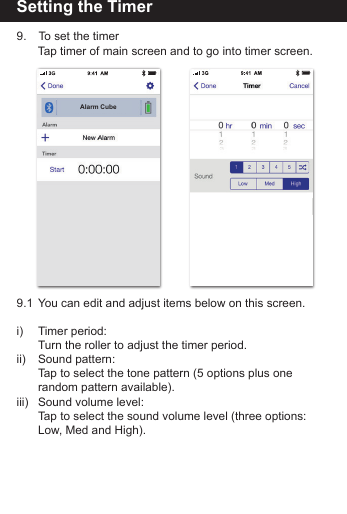
![Setting the timer9.2 Using the Timer In the Home screen, you can tap “Start” under Timer to start counting. Then you can tap “Stop” to stop the current timer and “Start” to re-continue the timer again. The timer can be reset by tapping the [Reset]. Alarm Cube Alarm Cube](https://usermanual.wiki/Electronics-Tomorrow/A440110813/User-Guide-2389985-Page-15.png)

![Preference11.2 Alarm Sound Duration: The alarm duration, which can be set to values from 1 to 15 minutes.11.3 Auto DST update: It will adjust Daylight Saving Time (DST) automatically based on your idevice time zone setting. The alarm clock will be automatically one hour ahead of Standard Time in summer time and will be back to the normal Standard Time when back to winter time, according to your idevice’s time zone.11.4 Device Version: The Alarm Cube firmware version is shown for reference. Tap [Done] to save the setting or Tap [Cancel] to restore the setting, and then go back to main screen.](https://usermanual.wiki/Electronics-Tomorrow/A440110813/User-Guide-2389985-Page-18.png)
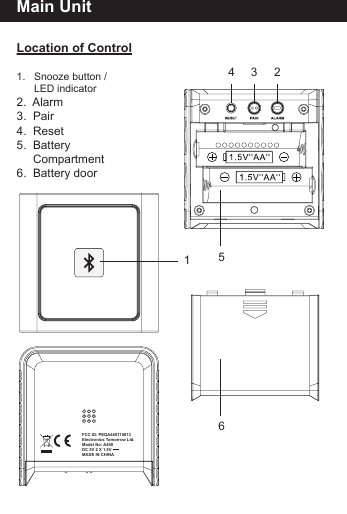
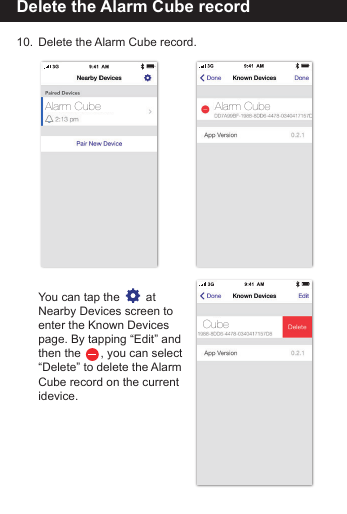
![Reset the Vibration Alarm12. Reset the Alarm CubeAfter reset, all data in the AlarmCube is deleted. And you needto press and hold the [PAIR]button again to re-pair the Alarm Cube. If it has been paired previously with the samei-device, you can select“Restore” to restore all settingand data or select “Erase” to start all from scratch.If the Alarm Cube is not workingproperly, press RESET buttonwith a pointed object, the LED flashes twice in (purple) color. Then the LED will flash once per6 seconds in red color.Alarm Cube](https://usermanual.wiki/Electronics-Tomorrow/A440110813/User-Guide-2389985-Page-19.png)