Electronics M80VW MID User Manual
Electronics Co.,Ltd MID Users Manual
manual

1
Dear Customer :
Firstly, we really appreciate we can provide our best service to you!
Please kindly read this instruction before you start using the product.
This Instruction manual can explain product basic feature, can help
you to well operate the product and understand all functions,
corresponding operation message, suggestion, and cautions.
Please also make sure Warranty card are attached with the product,
it stated all regulations or additional services providing. Please read it
carefully to avoid any un-necessary problems happen. You will find this
powerful product have many advance feature. You will enjoy much fun with
internet surfing and multi-media entertainment.
Notice :
The content of this instruction manual is correct when publishing. And
you may find minor difference with actual product, because we are always
keep improving on the product, includes hardware, software, features,
specification or outlook design.
Our company reserves the right to modify, change or improve the
product features, design or specification, etc without further notice!

2
Content 1
1Reminder……………………………………………………………4
2Technical Specification………………………………………………………5
3Outlook Preview
Outlook diagram……………………………………………………………6
TF Card Plug and Unplug……………………………………………7
Battery Charging………………………………………………………………7
Connection Adaptor……………………………………………………7
4First operation
Open MID ……………………………………………………………8
Power Off……………………………………………………………8
LCD lock Power Saving Mode…………………………………………………9
Main menu Description…………………………………………………9
Operation…………………………………………………………10
Main menu Interface………………………………………………………10
Menu window…………………………………………………………11
Application Menu…………………………………………………………11
Loading icon…………………………………………………………12
Wallpaper Setting…………………………………………………………14
USB Connection…………………………………………………………15
Reset…………………………………………………….……………15
5Internet Function
Internet Connection…………………………………………………………16
Internet start……………………………………………………………18
6Multi-Media Function
Music Playback……………………………………………………………20
Video Playback……………………………………………………………22
Picture Viewer……………………………………………………………24
7Basic Setting
Sound and Display………………………………………………………26
Security and Location…………………………………………………27
Application……………………………………………………………28
TF Card Loading and Storage…………………………………………28

3
Content 2
Date and Time……………………………………………………………29
Location and Text………………………………………………………29
Calibration……………………………………………………………30
About……………………………………………………………30
8Software Installation and Management
Software Installation……………………………………………………31
Source Management……………………………………………………32
9Applications
Google Time………………………………………………………33
Gmail……………………………………………………………33
Google Take……………………………………………………………34
Email……………………………………………………………34
Google Map……………………………………………………………35
Internet Browser…………………………………………………………35
Calculator……………………………………………………………36
Alarm and Time…………………………………………………………36
4
…Please do not disassemble the product personally, and avoid cleaning
the product with ethyl alcohol, thinner, or benzene. Please contact us if
any problem.
…Minimum 12hours charging for first three times charging.
…Please do not place the product in hot, wet or dusty environment.
Especially in summer, do not place it in a car with all windows closed.
…Avoid droping or clashing the product and not shake the TFT screen
voilently, or it may cause a damage or adnormal display to the screen.
…Please select a suitale volume and avoid loud sound while using
earphones. Please turn down the volume or stop using if you get a
roaring in your ears.
…For following situations, please charge the product:
AThe icon of the battery shows without power.
BSystem automatically shut down, and it turns off soon after restart.
(System will shut down automatically under the status of low battery.)
COperation key shows no reation.
Caution: Please charge your device by the provided adaptor, it will cause
damage if you use other adaptor.
…Please do not disconnect the device while formatting, downloading and
uploading, or it may cause application errors.
…System will scan and repair disc automatically when restarted after
illegal shutdown, and the interface will stay in the image of progress bar
for a while.
…We are not responsible for any memory erase loss caused by damage
or maintain the product, or other personal reasons.
…Do not use this product in the areas which prohibit use of electronic
devices, for example, on an airplane.
…Please do not use this product while driving or walking in the street, or it
might cause a car accident.
…USD can only used for data transmission.
…This device do not support waterproof function.
5
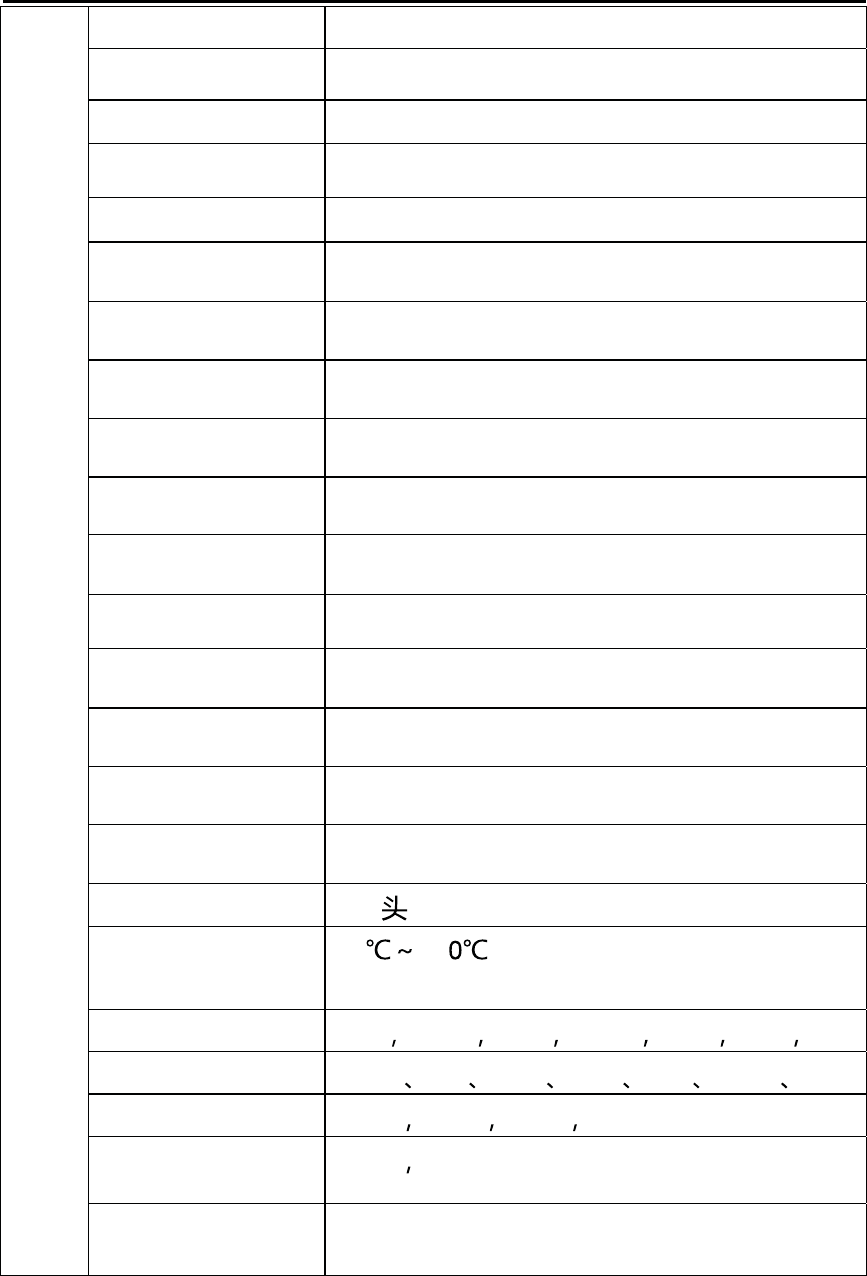
Technical Specification 1
CPU Processor 600MHZ DSP
Operation System Android 1.5
Internet Explorer Google Explorer
Harddisk 2GB-16GB
Build in Memory 128MB FLASH EPROM
Expansion Slot TF card
Display 8.0 TFT Resistive Color Touch Panel
Operation Touch Operation
Pixel 800x600
Input Method Touch Panel Soft Keyboard Input
Build-In Speaker 1 Watt Speaker x 2 (Left and Right)
Headphone Socket 3.5mm Plug (Adaptor)
USB USB 2.0
Battery Rechargable Li-Ion Battery 3750mAh
Product Dimension 203mm×152mm×14.7mm
Weight 0.487kg
Voltage USB 5.5V
Operating
Temperature
-10 +5
Music Format MP3 WMA APE FLAC AAC AC3 WAV
Video Format RMVB AVI MP4 3GP FLV WMV MOV
Picture Format JPEG BMP PNG TIEF
Email Gmail Email
MID
Map Google Map
6
Outlook Preview
This chapter introduce product outlook, includes buttons, sockets, etc…
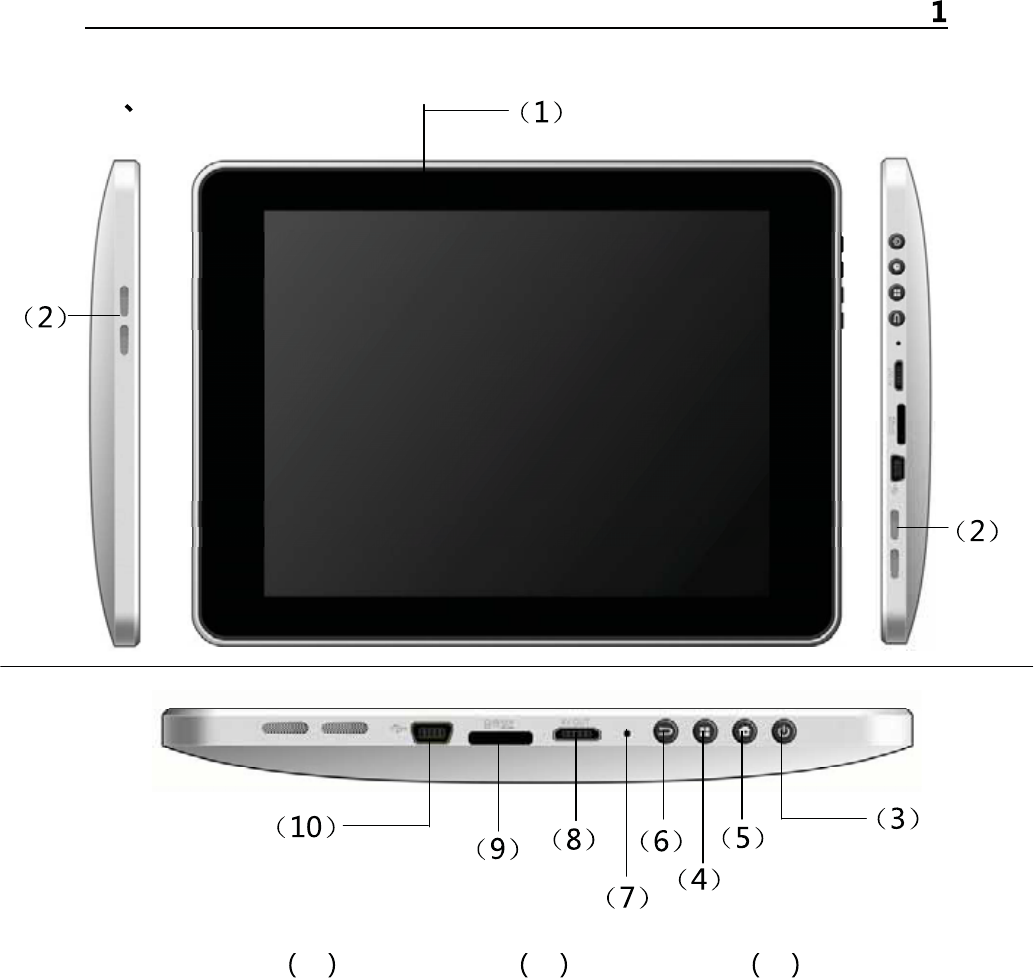
1-1 Outlook Diagram
(1)Touch Panel 2Speaker Hole 3Power Button 4Menu Button
(5)Main menu Button (6)Back Button (7)Reset Button
(8)Connection Socket (9)TF Card Slot (10)USB Socket
Remark :
(1) LCD is Touch Panel, can operate click and drag function, Please do not
use pen, pencil or other sharp tools to operate, it will damage LCD
Touch Panel.
(2) Please keep speaker hole clean, dust or others will block the sound.
7
Outlook Preview
(3) MID back have installed WIFI Antenna under the BLACK cover, please
DO NOT cover by Metal, it will affect the reception performance.
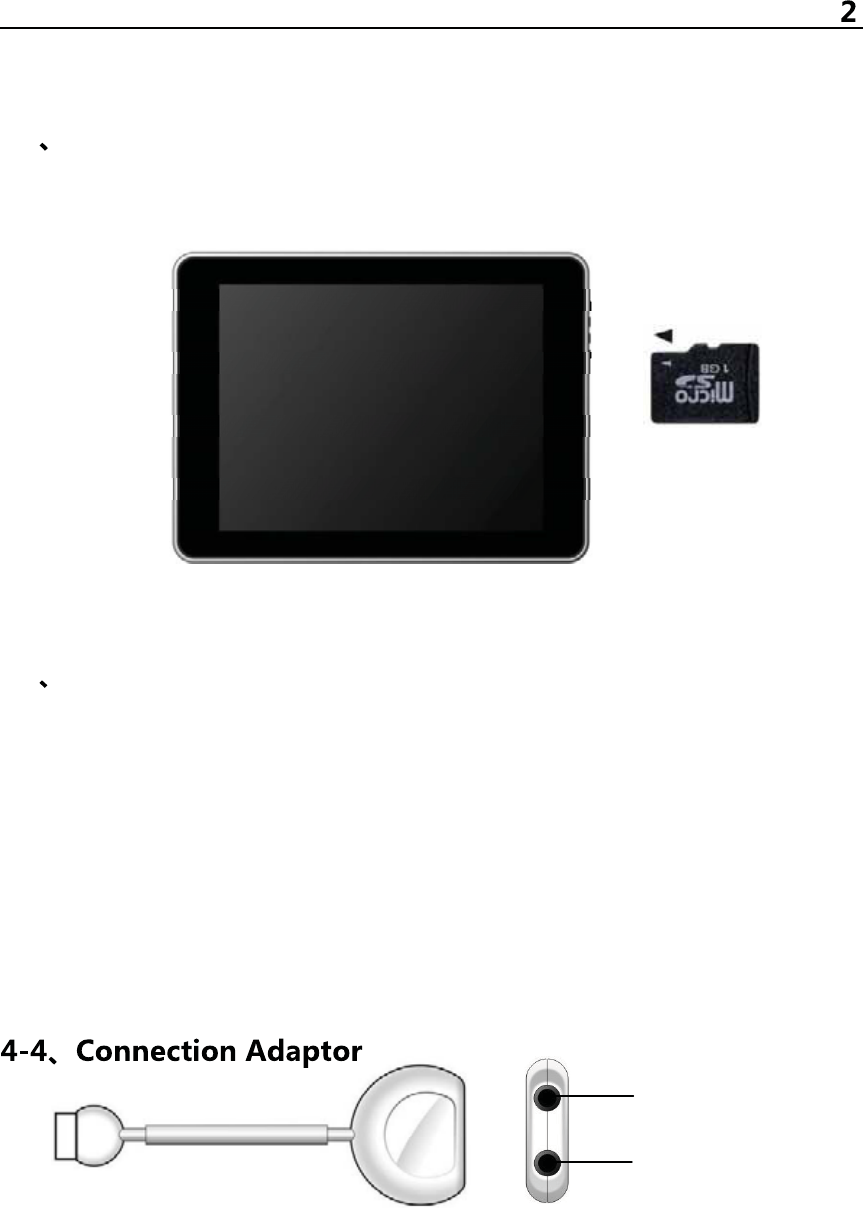
2-2 TF Card Plug and Unplug
Please see below diagram, please make sure the insert direction is same.
(Unplug TF Card, use thumb press the TF card and release, TF card will
pop out.)
Caution: DO NOT insert Non-TF card (Preventing dust or moisture, please
pack the TF card when not use.)
3-3 Battery Charging
The product charge by 5.5V , 2A Standard Voltage, plug in the power
adaptor into power socket and the USB plug connect to the device.
The device can only charge by supplied power adaptor, it will cause
dangerous and problems if use other power adaptor, DO NOT charge the
device under high moisture environment, DO NOT touch the power
adaptor when you are wet.
Make sure free ventilation near the device when charging. DO NOT cover
by paper or any other materials.
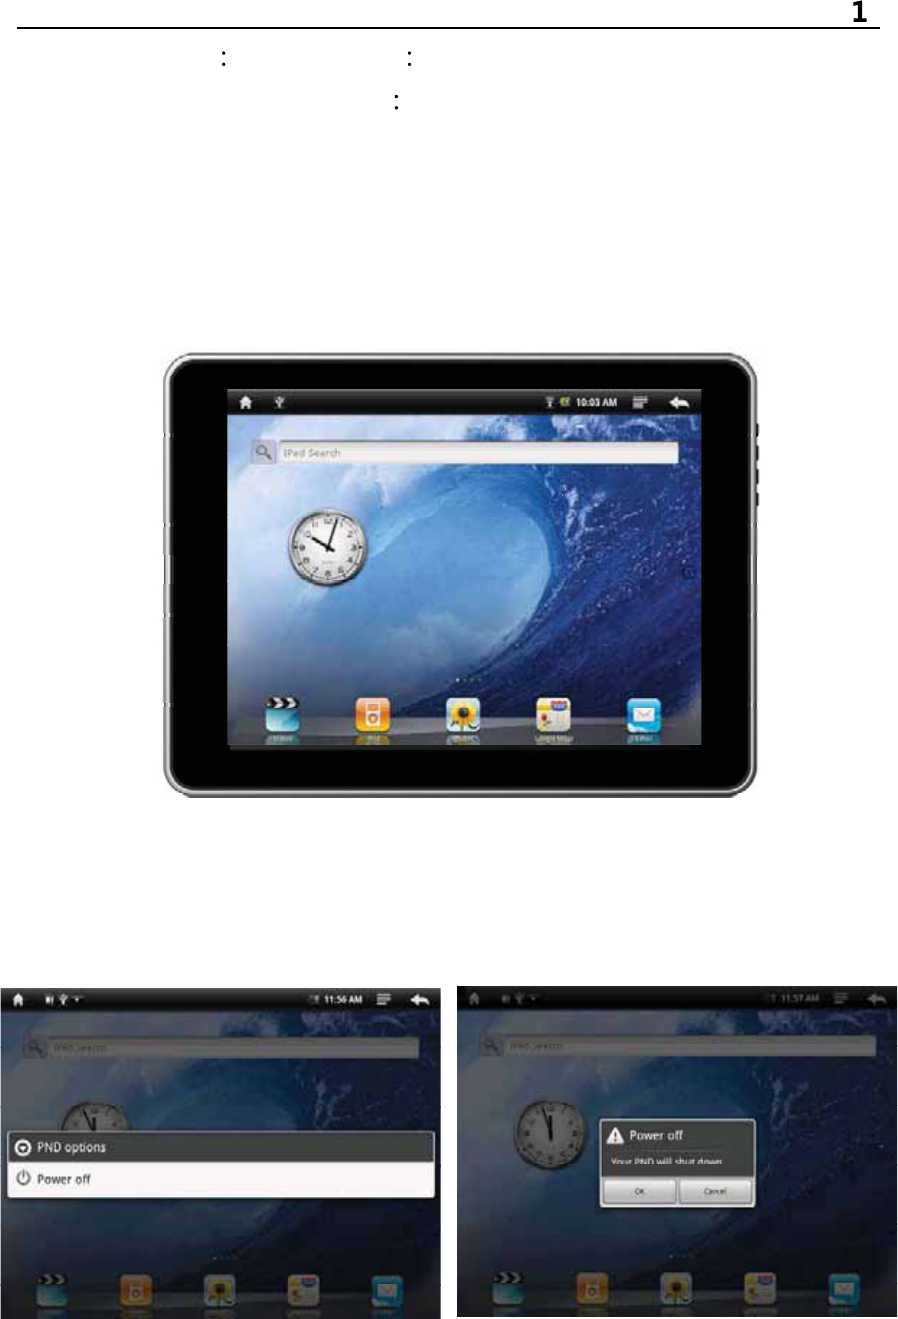
Plug in the Connection Adaptor to Device Connection Socket, then you
can plug in corresponding signal cable.
Head
p
hone Jack
A
VOUT Jack
8
First attempt
Button Definition -- Short press Pressing time less than 1.2 sec.
-- Long press Pressing time more than 3 sec.
Without specify mention in manual, means Short Press
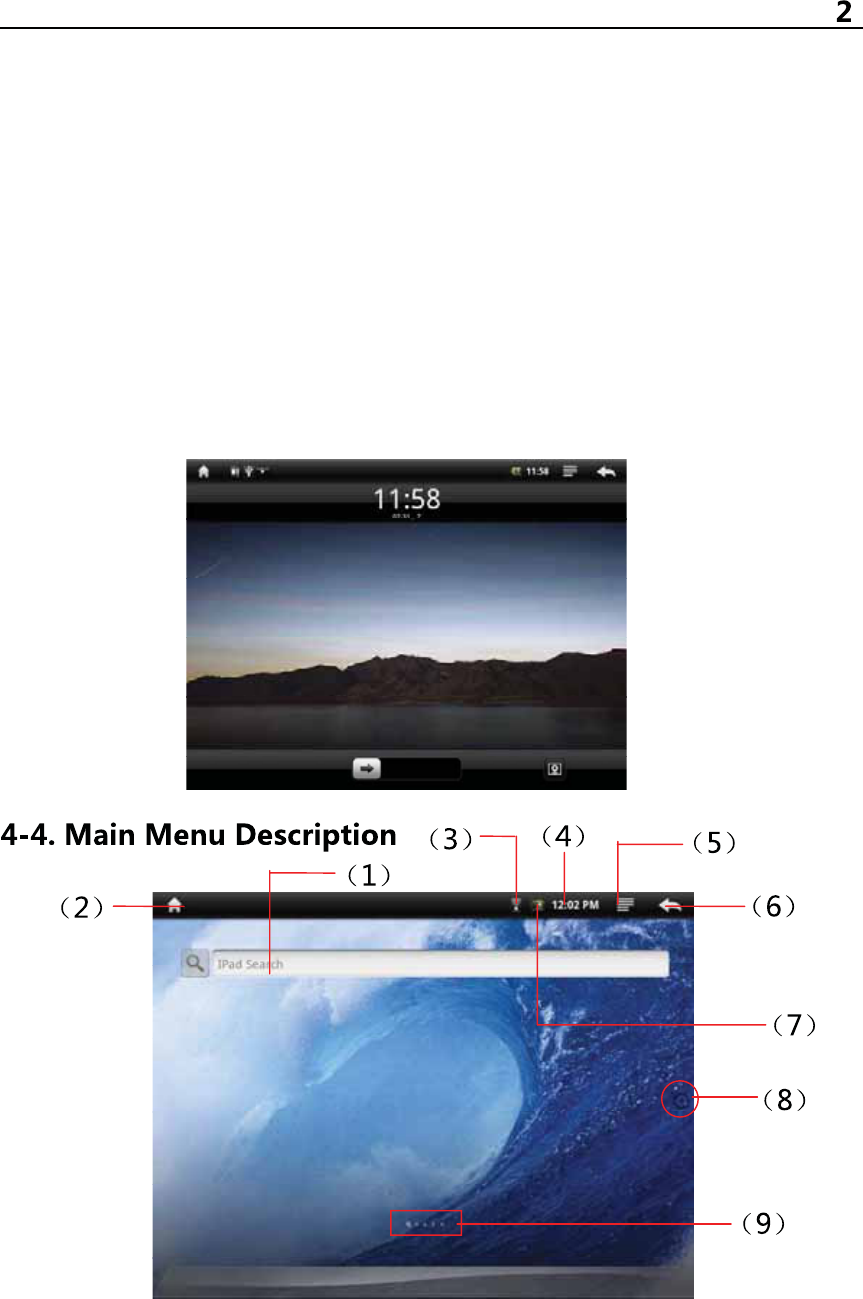
1-1. Open MID
1, Long Press the Power Button, MID will start, LCD display will the
opening screen and video, Key lock screen will appear after several
second, press “Menu” to un-lock and enter main menu, as diagram:
2, Click function button, you can start using the MID.
2-2. Power Off the MID
During MID is working, Long Press the Power Button, display will show
Power Off Interface.
9
First attempt
Click “Power Off” button, will pop up another dialog (top right picture),
Click “Normal” button, MID will shut down, several second later, device will
power off.
**** System will auto power off if the device is low battery
3-3. Key Lock Power Saving Mode
During device is working, press the power off button, MID will key lock and
screen lock power saving mode. MID is keep running but screen will turn
off.
Once you activate the display or press buttons, MID screen lock interface
will appear again, drag the arrow button, MID will resume normal mode.
10
First attempt
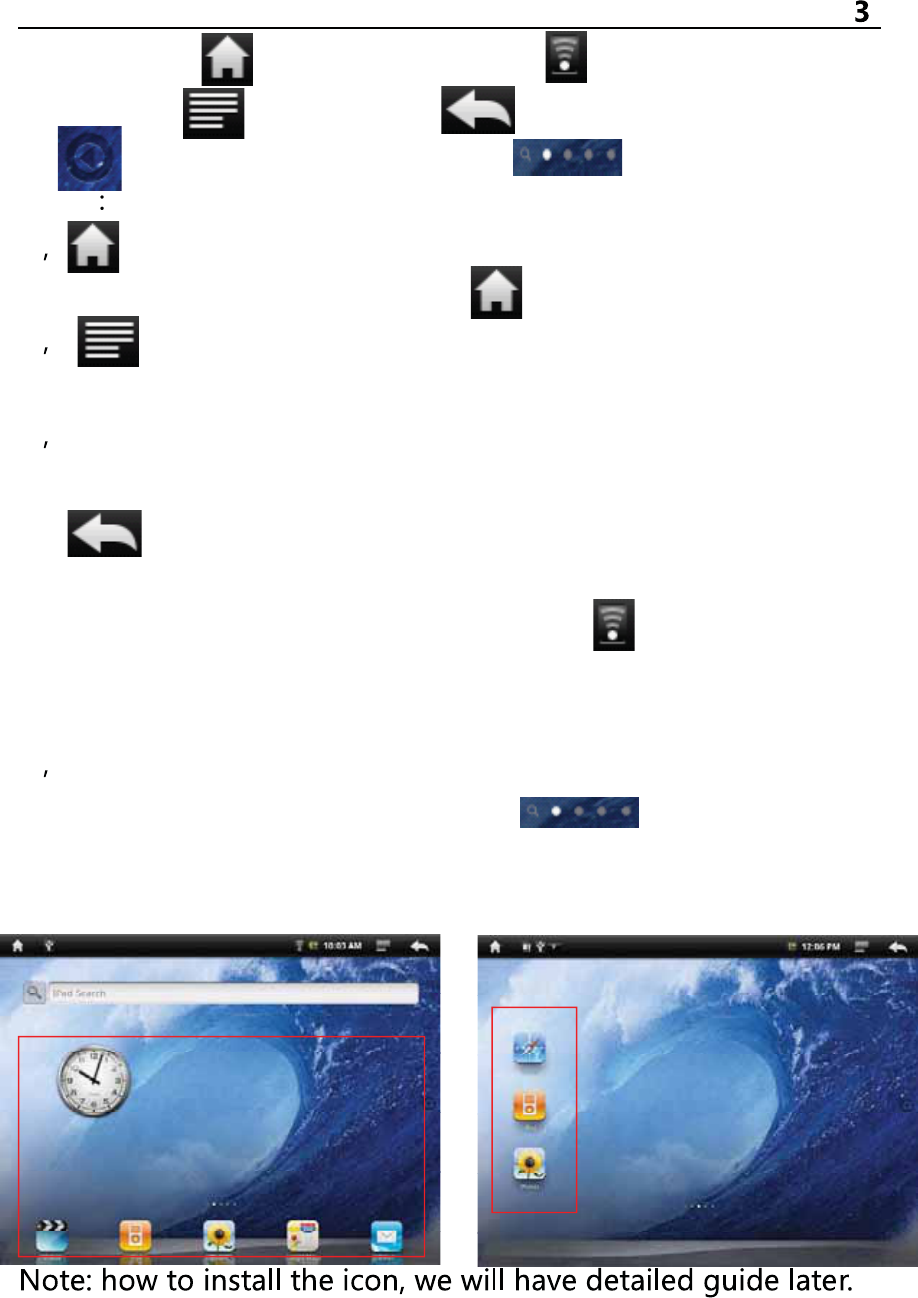
(1)Internet (2) Main menu button (3) Network icon
(4)Time (5) Menu button (6) Back (7)Battery icon
(8) Application Function button (9) MI-Switch icon
Guide
1“ Main menu button” is equal to “Main menu button” of the machine.
while in the application menu, clicking back to the main interface.
2“ Menu button” is equal to “Menu button” of the machine. During
standby and operating, clicking it to get the menu window.
3 While in charging, the Battery icon will be flashing and will become still
& green once full charged.
4, “ Back button” is equal to “Back button” of the machine. While in
the application menu, clicking it to back the front menu.
5, MID connects to the internet with the WIFI and will Show in the up
corner when connecting successfully.
5-5. The real operating
1In the main menu, you can switch the different main menu freely through
sliding left and right in the center of screen. icon will be changed
accordingly. MID has been set 5 main menu and you can install different
icons in each the main menu.
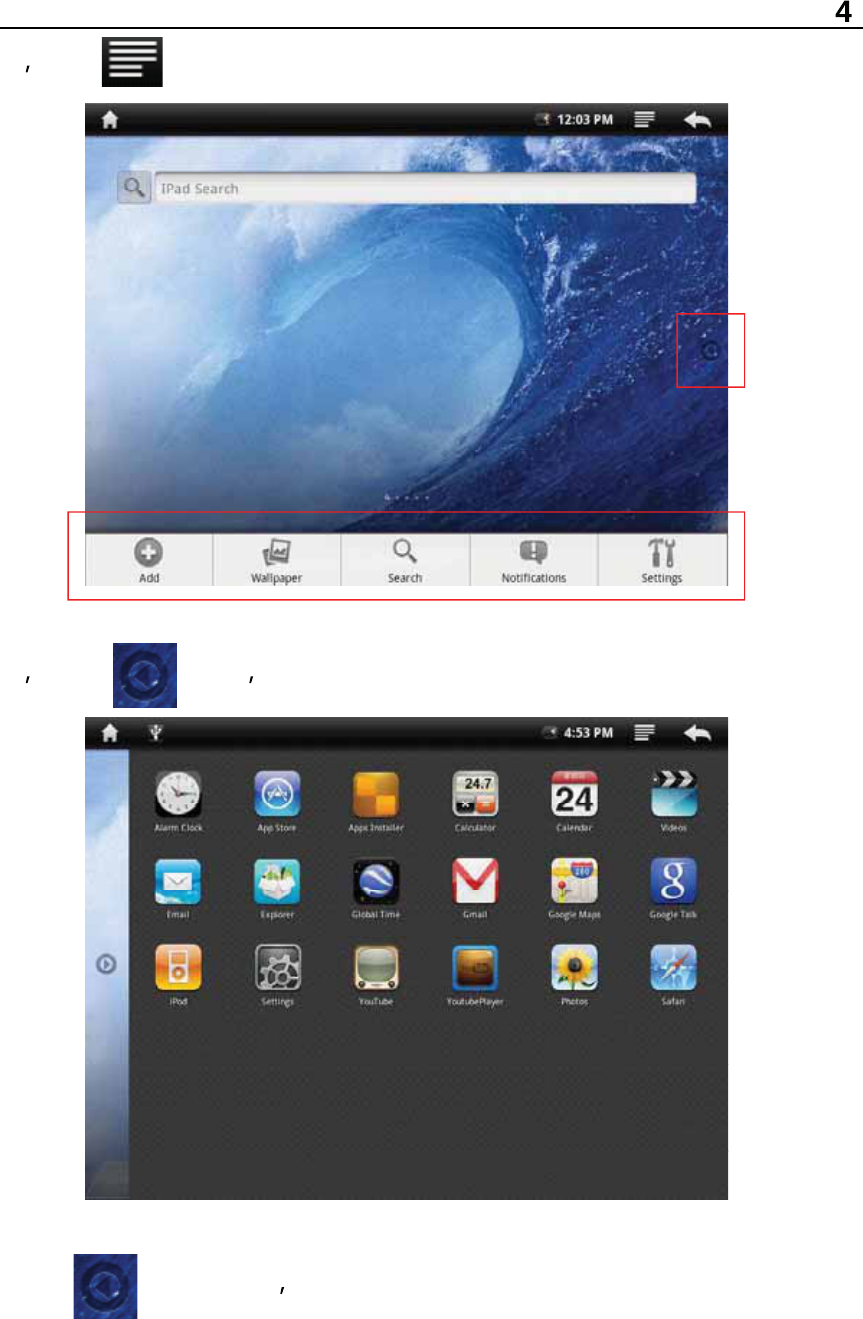
11
First attempt
2Click icon and the menu screen will be turned up from the bottom.
Tapping other part of the screen, the menu screen will disappear.
3Click icon MID will get the Application Menu as below.
Flapping the screen up and down, you can scan all application icon.
Click icon again the Application Menu will be hidden.
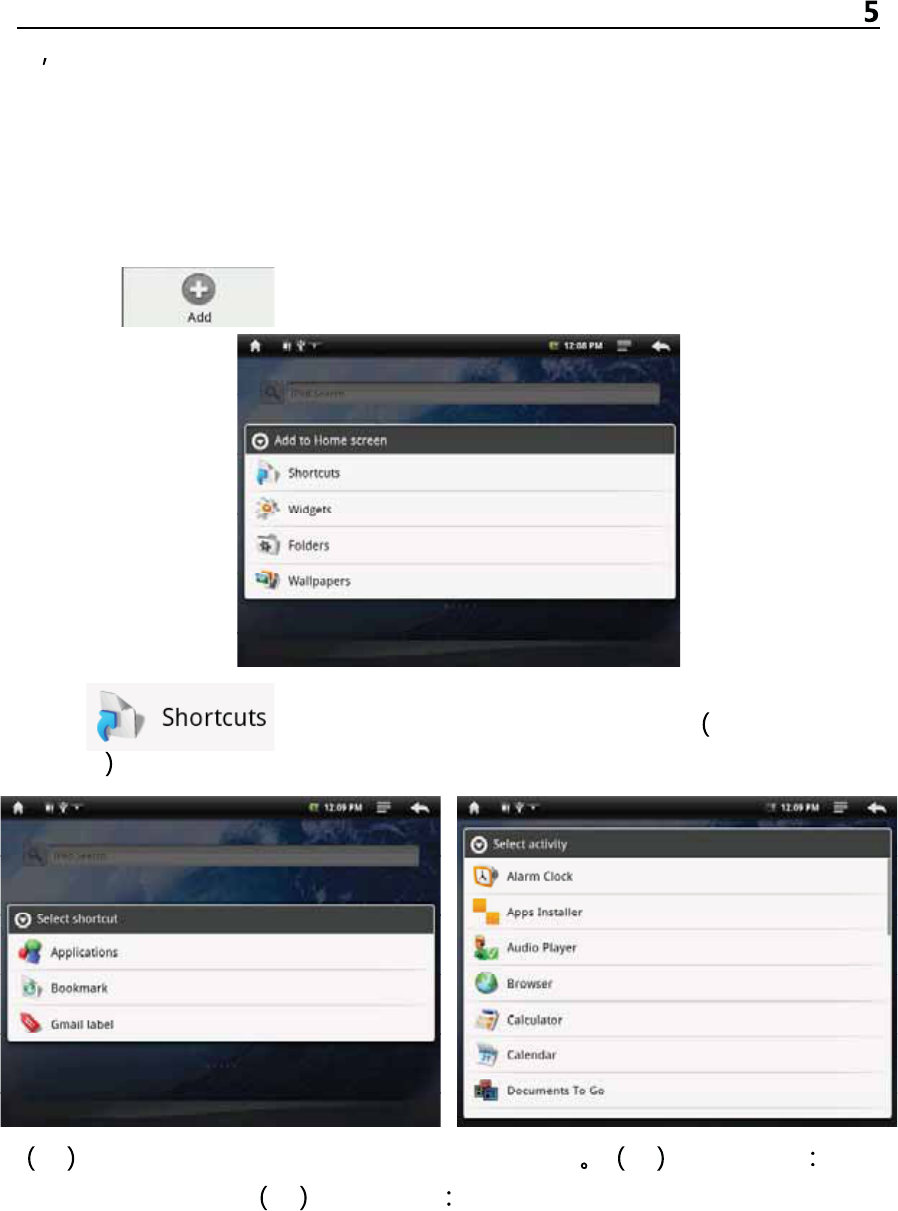
12
First attempt
4Add icons to the main menu.
To meet different requirements, user can add or delete any common
software icon freely in the main menu, and below will guide you how to do
it:
A. Press the icon long or pull it from the Application Menu to the main
menu.
B. Click icon of the menu window, MID will display the next
menu.
Click icon to enter into the next menu. see left-down
picture
1Applications: enter the Application software 2 Gmail label enter
the Gmail function. 3Bookmark enter the website.
Click ”Applications” to enter into the right-up menu.
Select and press icon from menu, the icon will add to the main menu.
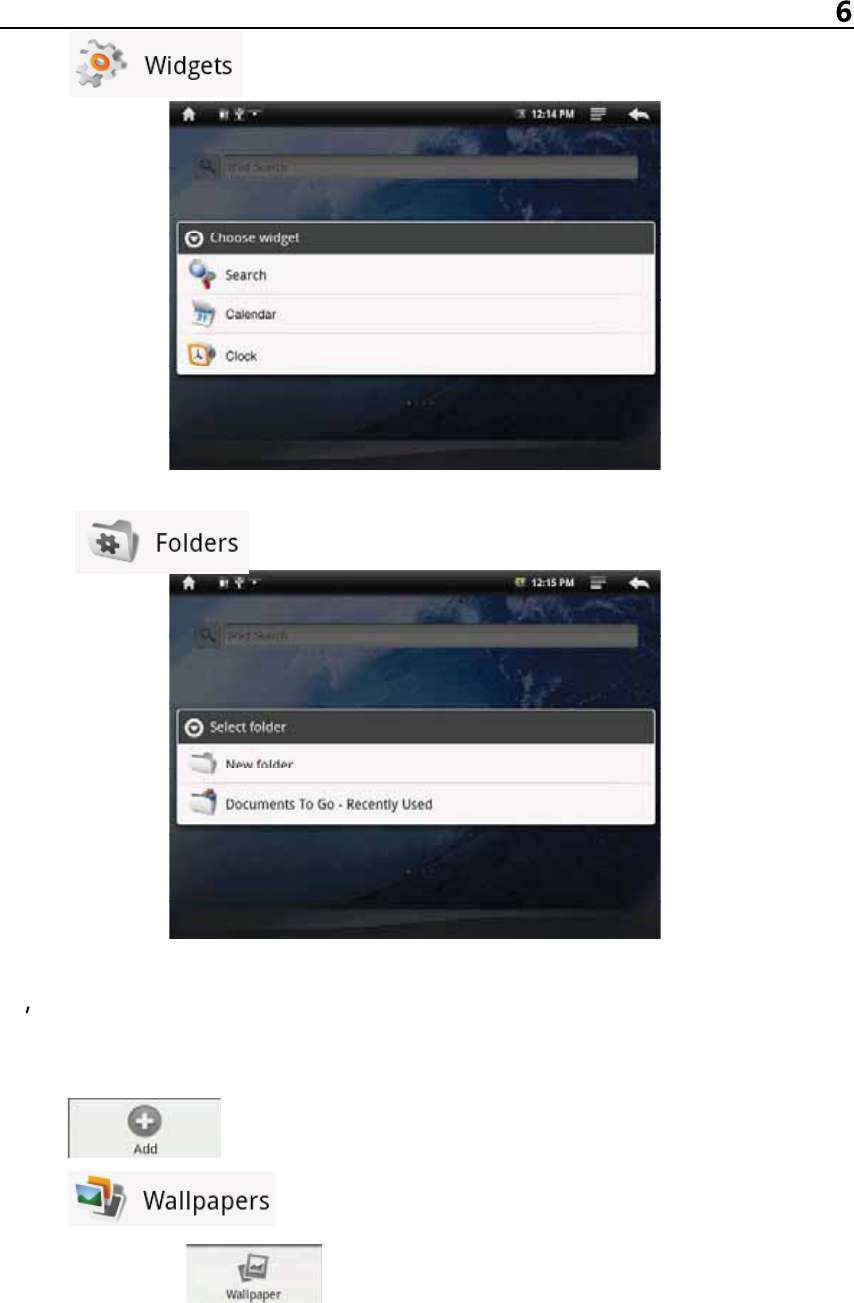
13
First attempt
Click icon to enter into the next menu.
Select and press icon from menu, the icon will add to the main menu.
Click icon to enter into the next menu.
Select and press icon from menu, the icon will add to the main menu.
5Switching the wallpaper
As personalized feature, user can set their favourate graph, photos as the
wallpaper.
Click icon of the menu window, MID will display the
left-down menu.
Click icon and go to it is sub-menu (see graph R+U ),
or click directly icon of the menu window.
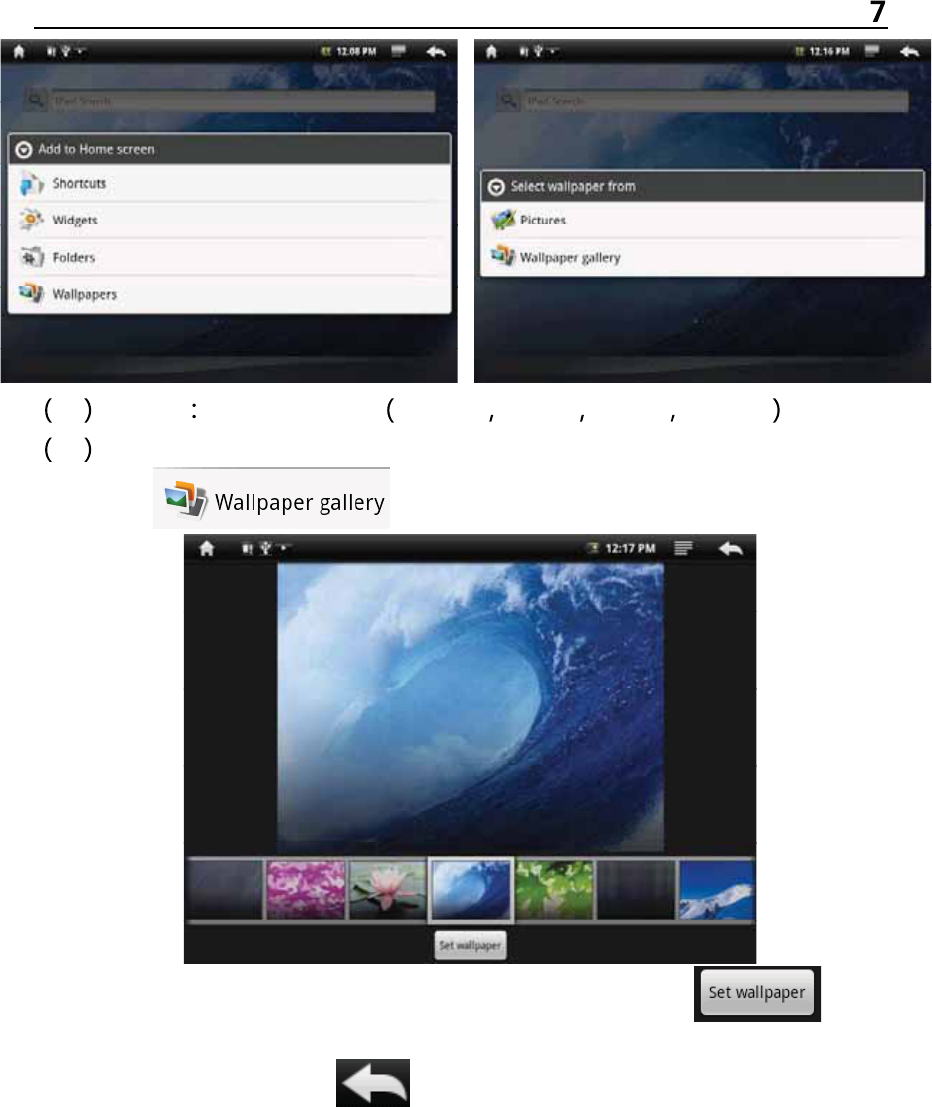
14
First attempt
1picture in the TF card. .JPEG .BMP .PNG .TIEF
2wallpaper gallery : build-in the machine.
Click the icon and enter the sub-menu.
Flapping the screen, select the best picture and click icon,
MID will go to the main menu and show the very wallpaper selected.
*** in the sub-menu, click , MID will close the sub and go back to
upper or last menu.
*** in the Home Screen, user can move shortcut icon according to his
personalized idea.
*** clicking the shotcuts icon from the main menu, the location of
application button is replaced with the wastebin; Then move the used icon
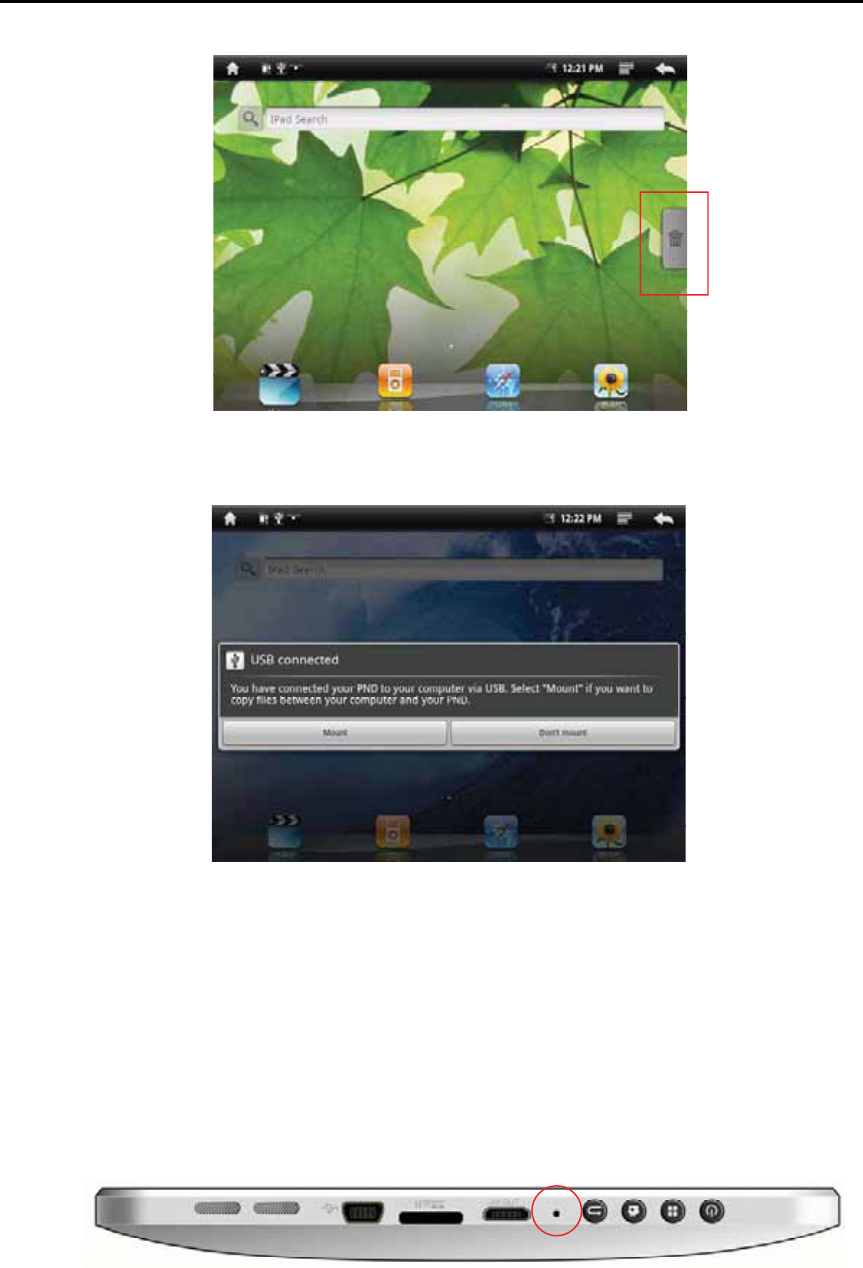
15
First attempt 8
to the wastebin and the icon will be deleted after with no more press.
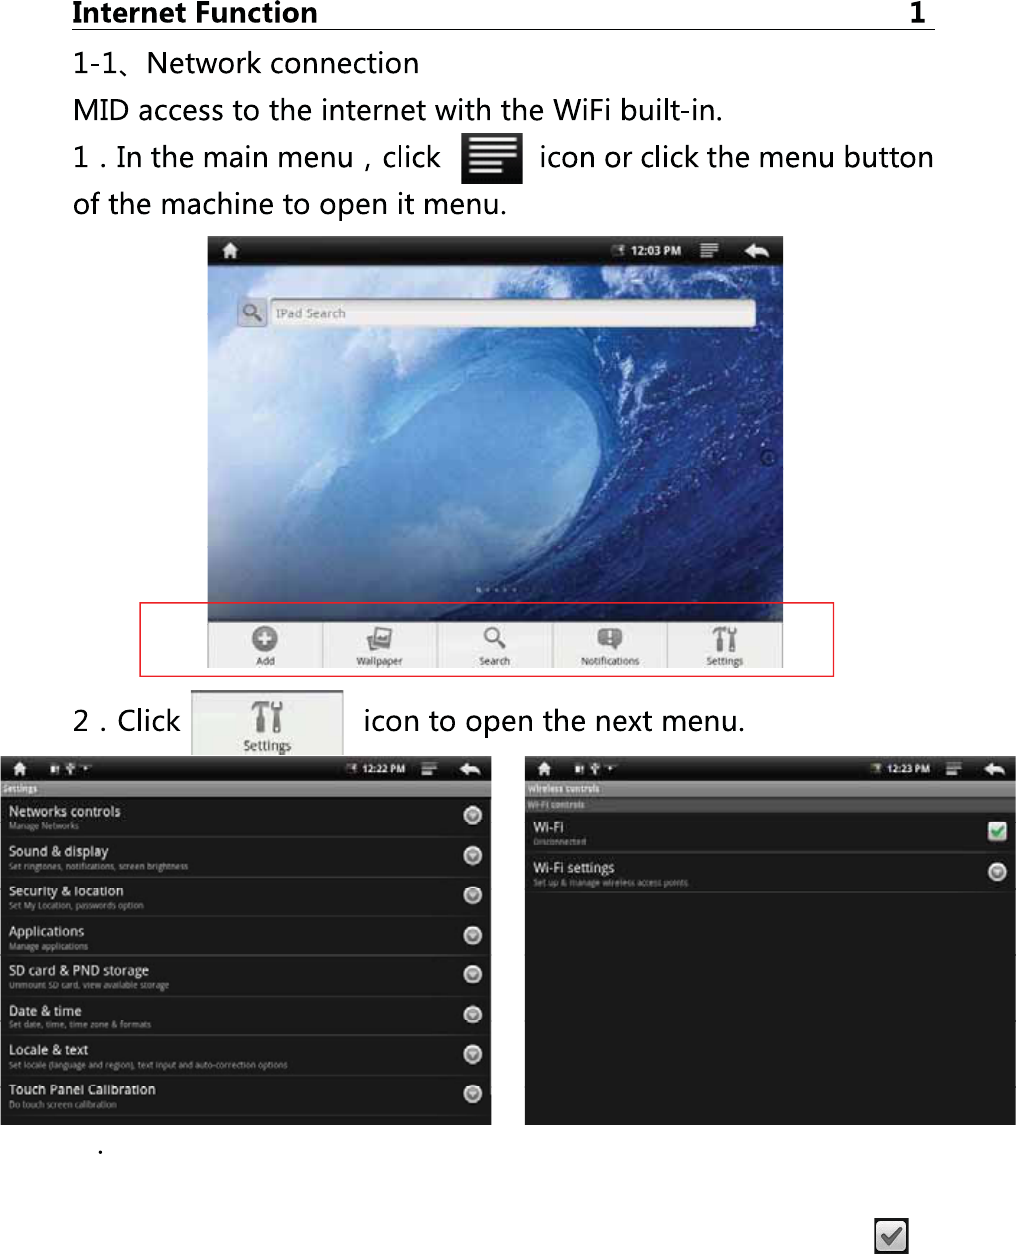
6-6. USB connection
When connect the MID to the PC with USB, user will meet below Menu.
Clicking “mount”, MID and PC can be operated synchronously. User can
find the content of the MID and Micro card, copy and
transmit.
*** But after being mounted, part applications of MID will be effected; some
of them will be unable to operate normally.
7-7. Reset
While crashed or run unwell, user can reset the MID. Please use stylus
and insert the nib to the reset hole.
16
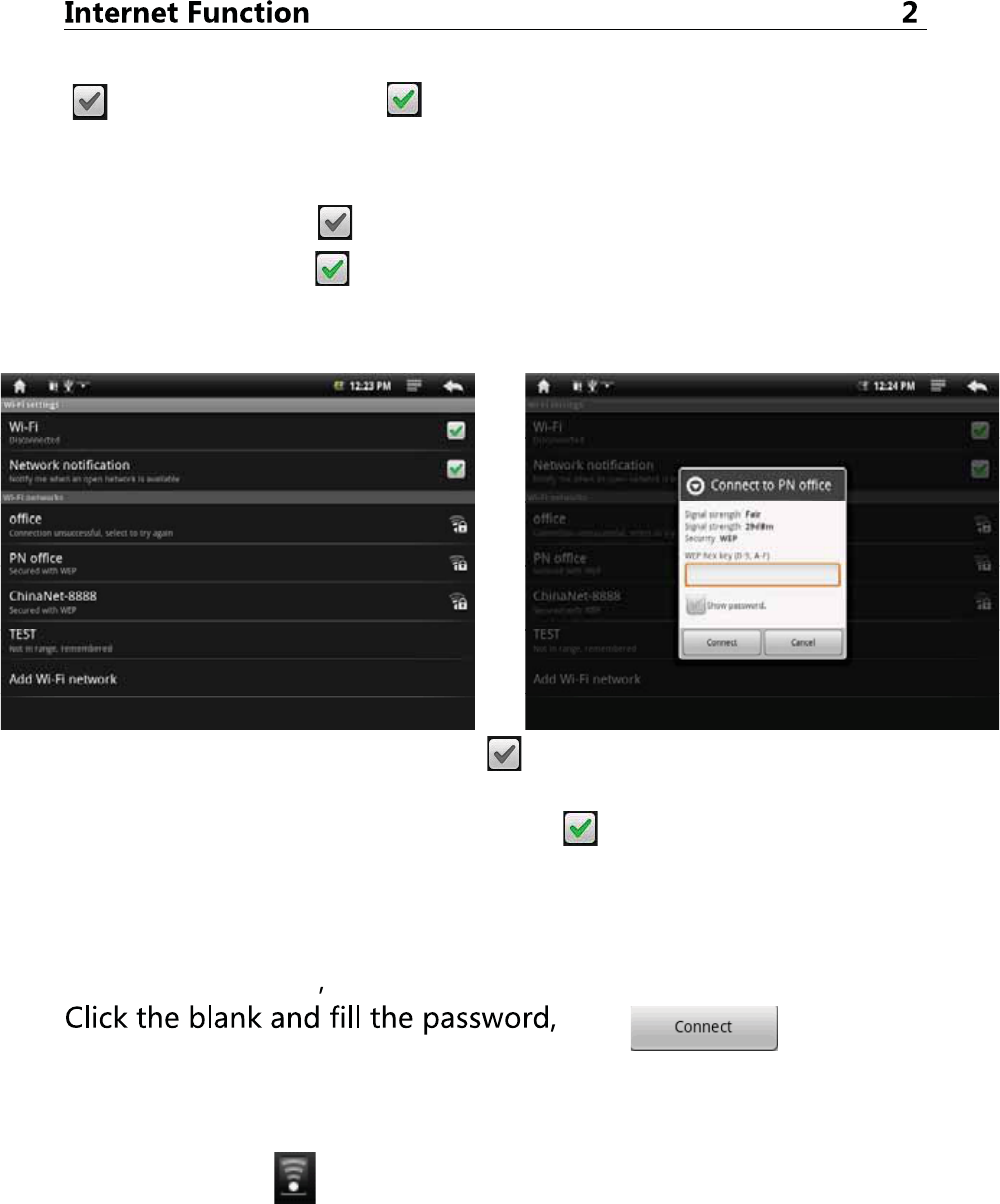
3Click the “Networks controls” to go to right-up menu.
(1)Wi-Fi: Turn on or Turn off WiFi.
when WiFi mentions “Turn on WiFi ” , and the icon in the right shows ,it
means WiFi is in the closed position.
17
Click WiFi , and the status mention that it is turning on … , and the icon
in the right side shows , it means that WiFi is in the open position.
Note: In the set-up of this device, other than the following additional
description
The right icon shows , it means that the option is in close position.
The right icon shows , it means that the option is in open position.
(2)Click “Wi-Fi settings” to enter into the next menu.
Network notice that the right icon is , it means that automatic scanning
is in the close position.
Click Network notice, the right icon shows , it means that scanner is in
the open position , the deive will seach automaticly and add the nearby
WiFi network which can be connected.
(3)Click one Network MID open the info menu (see the right-up picture).
click to connect.
After connectiong successful , the WiFi set-up icon will show have
connected to ……, it means that the device have connected to network
successfully, and icon will display on the top of the screen .
As to the WiFi router which have been connected before, this machine
will keep record automaticly, if you need to connect again in the future ,
18
you just need to turn on WiFi in the WiFi set-up , or choose this WiFi
router then connect it. When the status of WiFi set-up is open ( showing
turn off WiFi ), the machine will search the WiFi router automaticly and
then connect to it when the device is started up each time.
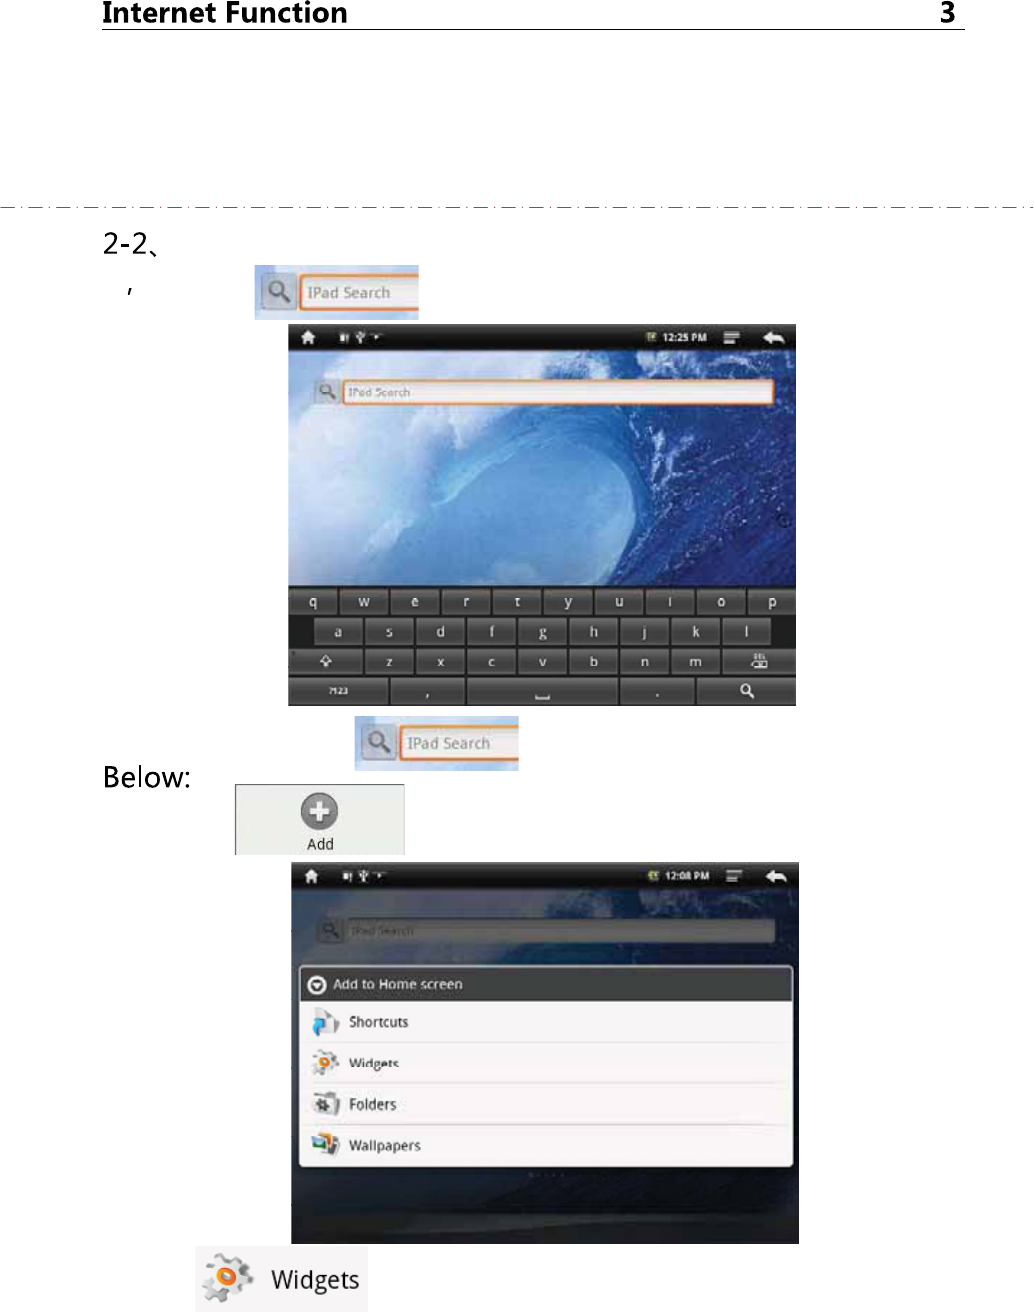
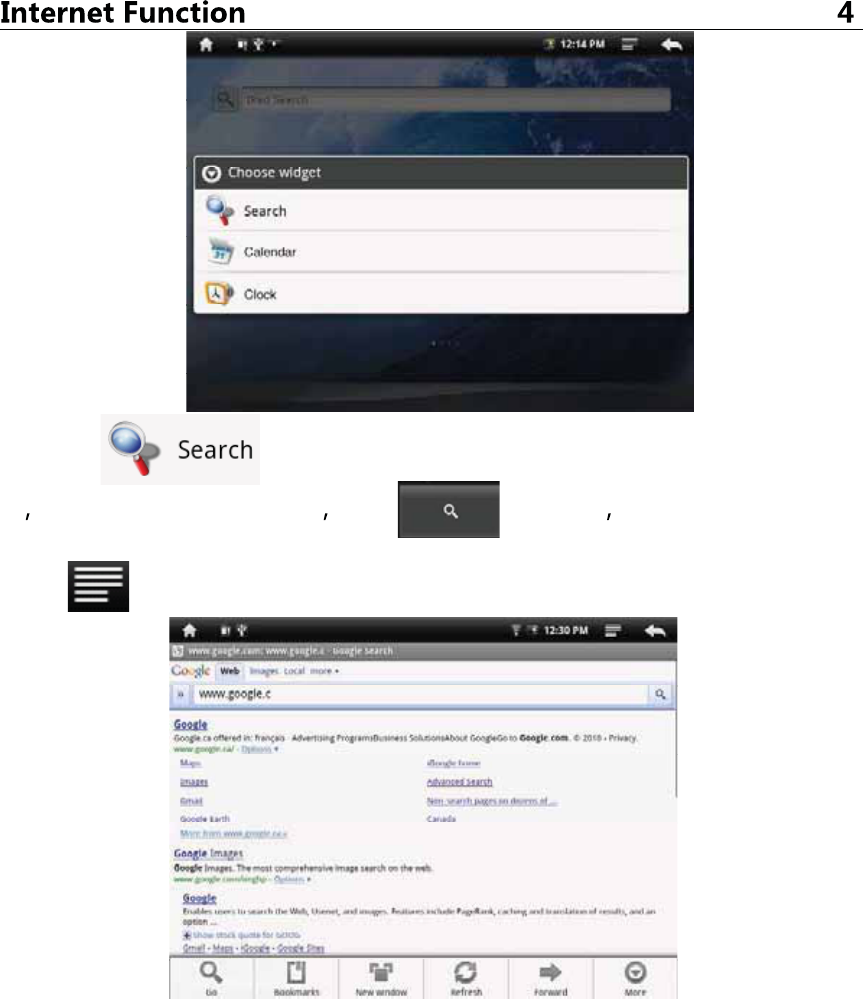
Internet sirfing
1Click the from the main menu to get the keyboard.
Note: if don’t see the icon in the screen, you can find on as
a. click the in the menu window to enter into the next menu.
b. click to open the next menu.
19
c. click icon to add it to the main menu.
2Input the Web address, click to open user can enjoy the
internet sirfing then.
Click or press the menu button in the machine to get the menu
window.
(1) Start: click and input the address.
(2) Bookmark: click and set the web address as bookmark.
(3) Window: click and minimize all opened web page.
(4) Refresh: refresh the very opened page.
(5) Next/Previous: move forward or backward.
(6) More: Click more setting.
20
Multi-Media Function
1-1 Music Playback
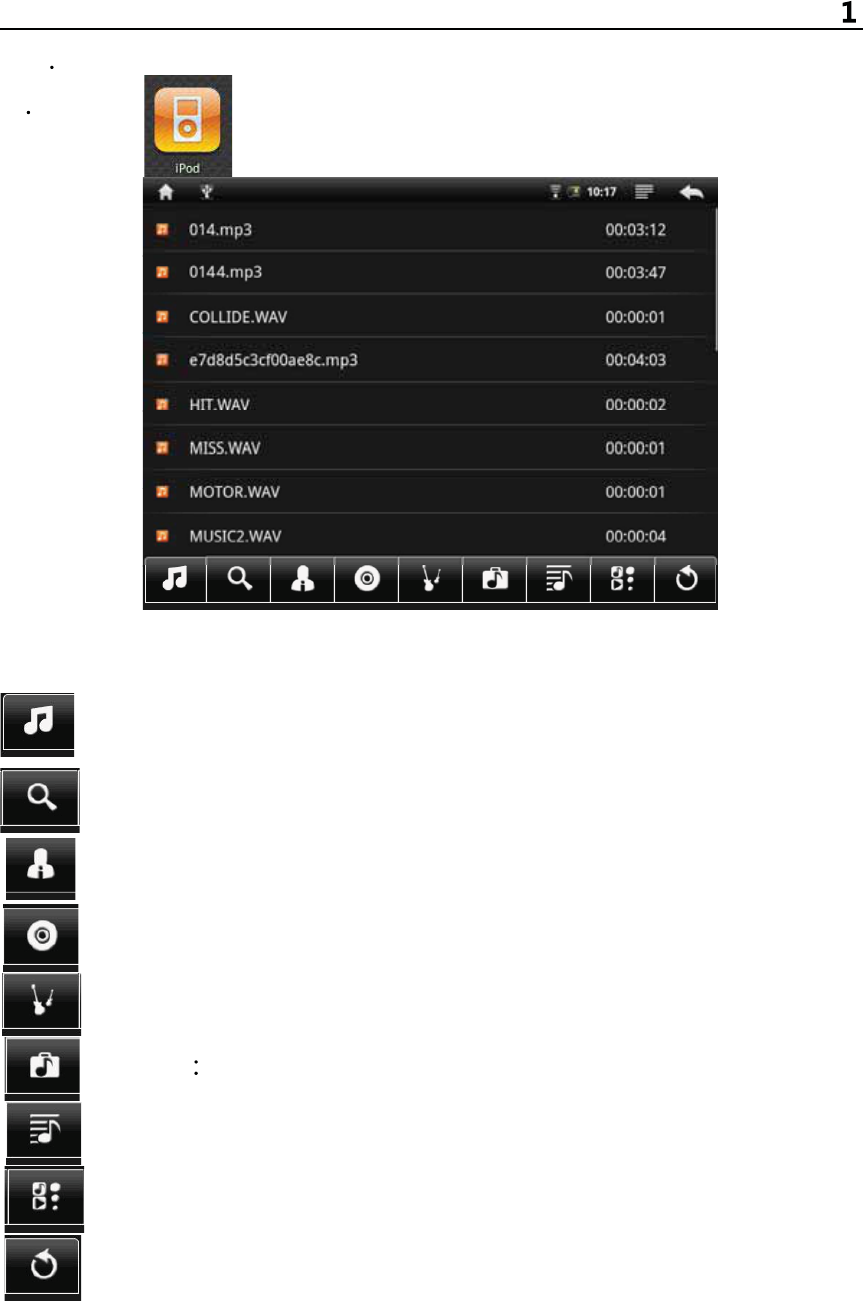
1Clicking icon of the applicant function menu to enter
into music list.
Music list is music player will automatically play the track list order.
The screen shown below browsing patterns and player information:
All Music: APAD the player will load all the music files there.
Search Music: Music names through search to find music files.
Artist: by artists Category music files.
Album: music files by album category.
Genre: genre classification of music files through.
Catalog catalog classification of music files through.
Playlist: The playlist classification load music files.
Folder: The folder, find the music file.
Back
21
Multi-Media Function
When the new music is copied to the MID equipment, the music library will
be updated automatically. If the file does not contain information on some
music labels in the music library will be its classified as Unknown
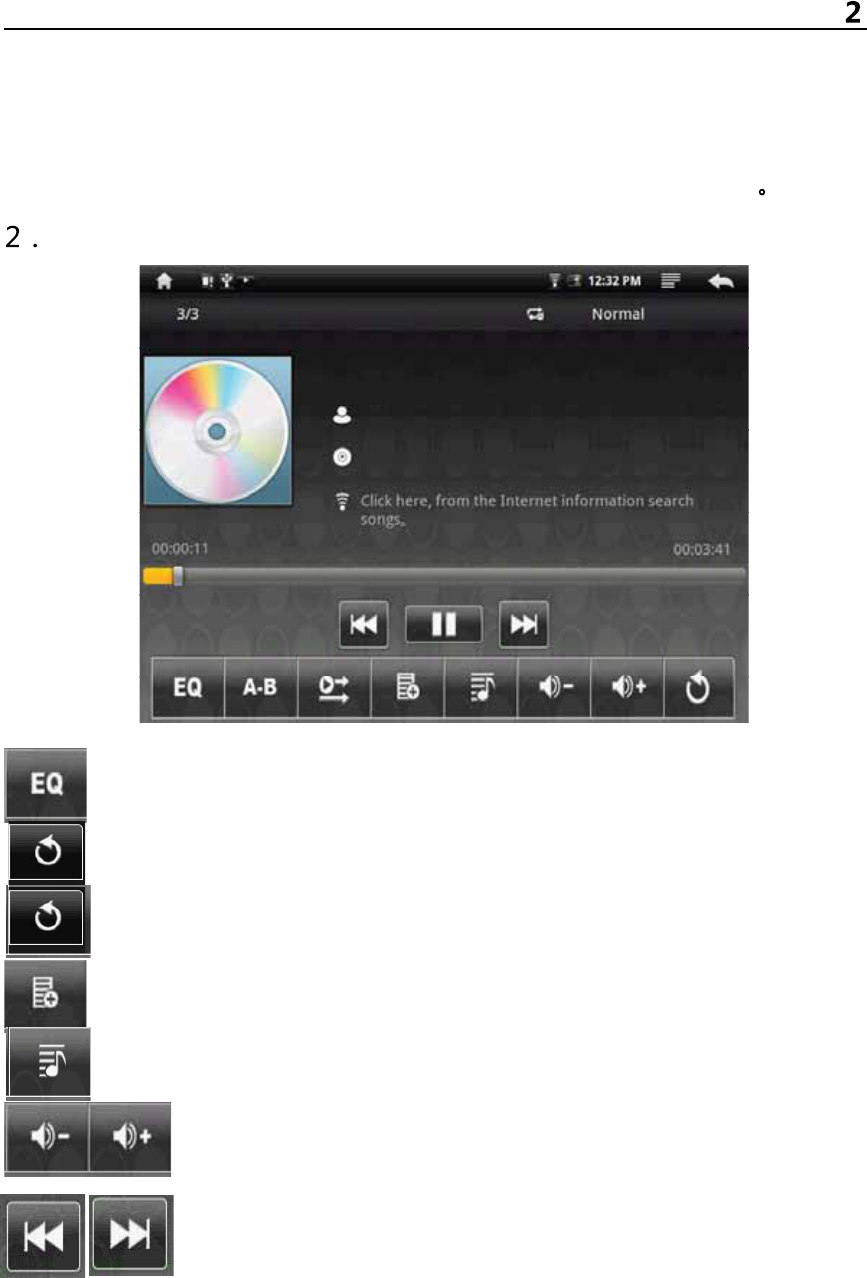
Click the music file into the player to play music.
Touch icon to Select Audio.
Touch icon to Select A-B segment repeat.
Touch icon to Select Play Mode.
Touch icon to open a playlist.
Touch icon to Show Lyrics.
Touch icon to adjust the volume.
Front or Next music, Press and hold the fast forward and
backward function of time to achieve.
22
Multi-Media Function
Touch the progress bar can go directly to track the location of the different
players; Use your fingers to drag the progress bar to track the cursor in the
location of another player.
If you leave the music track playing screen, it will remain playing in the
background. This allows you to browse the hard disk when listening to
music, view pictures or surf the Internet. To stop the playing track, can
touch the screen in the pause music icon, then tap the home screen icon.
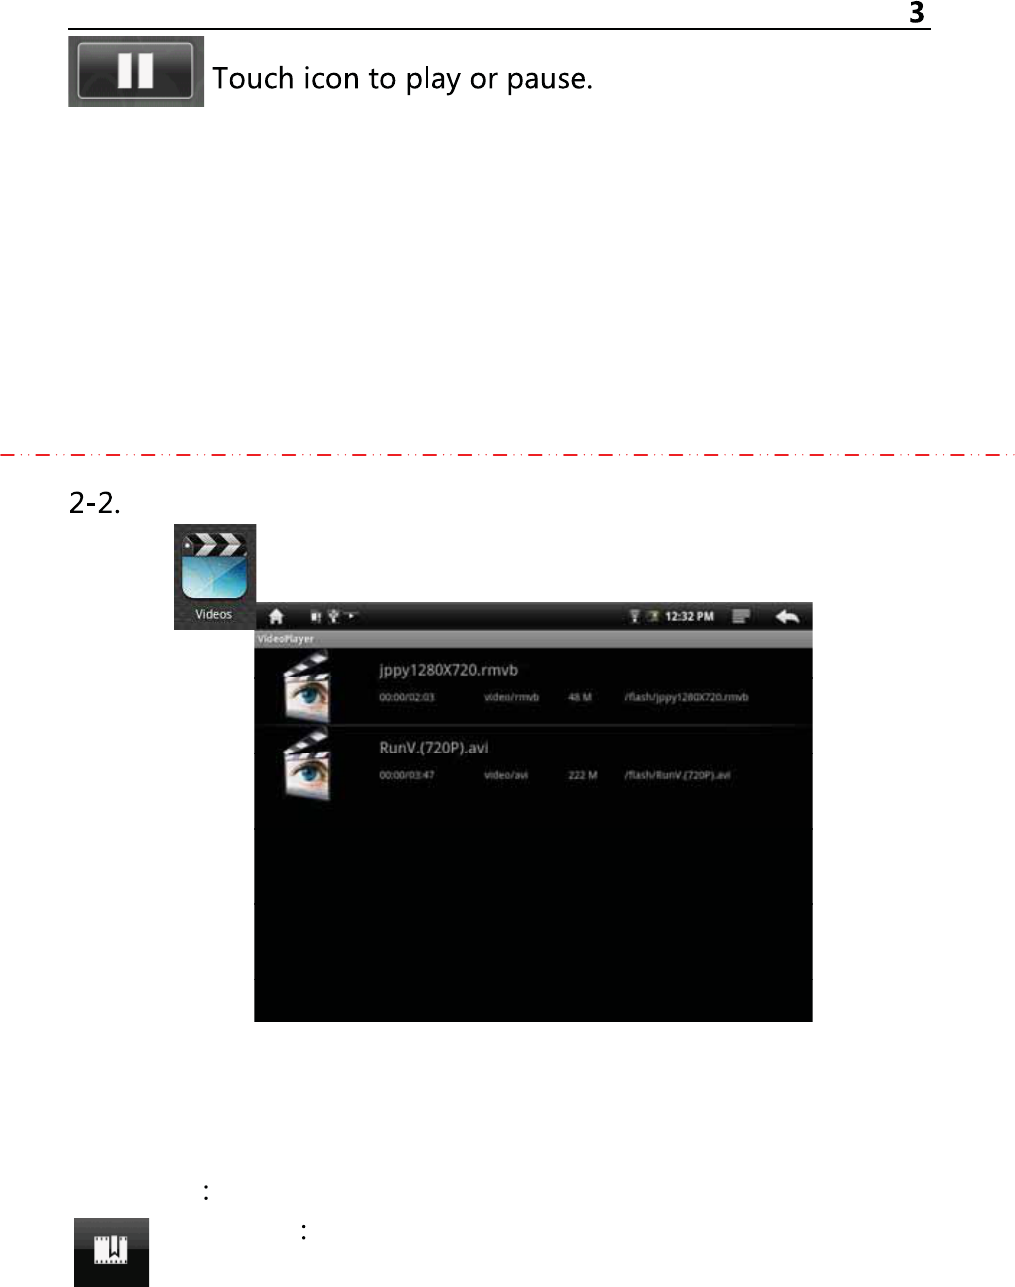
Video Playback
Clicking icon of the applicant function menu to enter into Video
list.
Video Player list will automatically load the MID all video files. In the video
list, click the video file MID will directly enter and play the video.
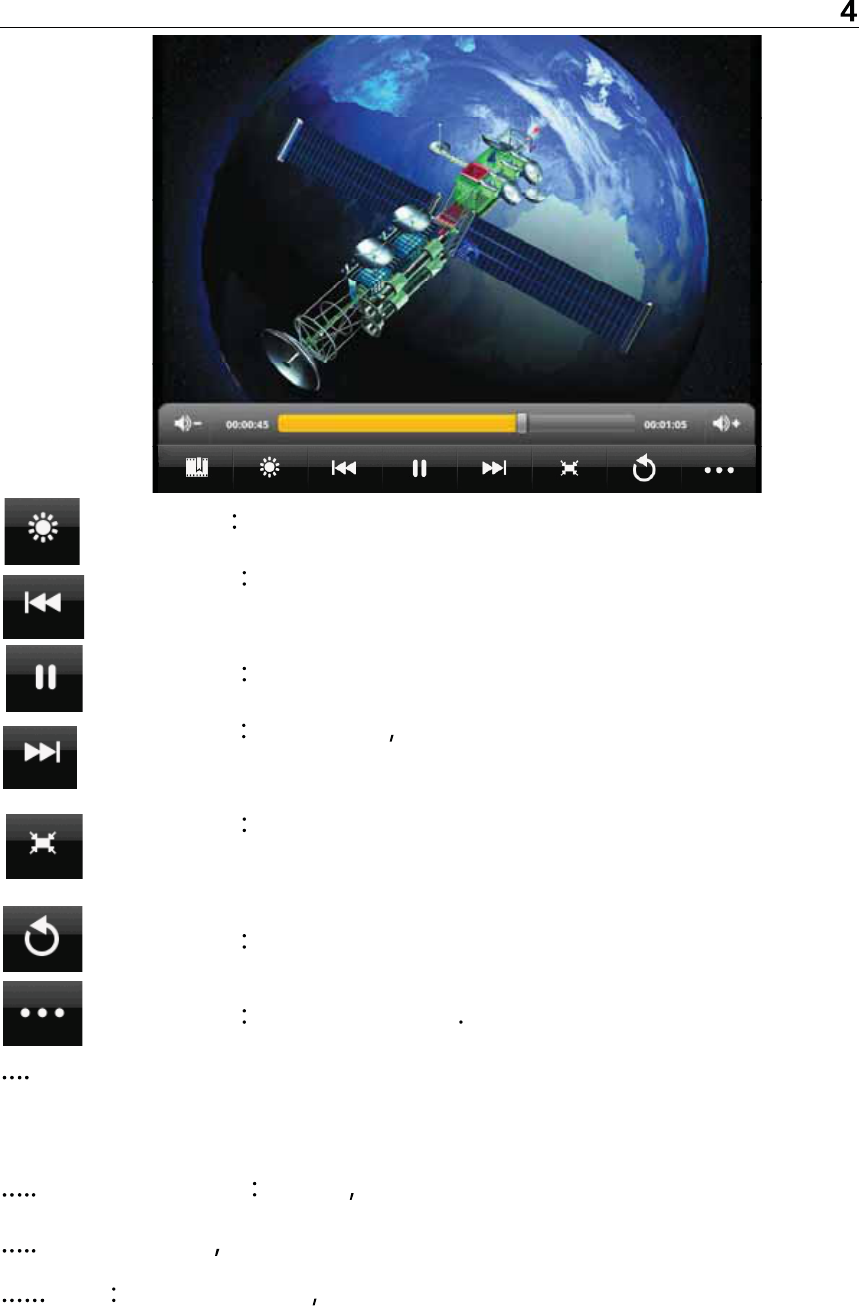
In video playback mode, press the touch screen to pop up video player
control bar
Touch icon Set bookmarks, settings each time after the success
of video playback from a bookmark Department.
23
Multi-Media Function
Touch icon Adjust video brightness.
Touch icon On a video, press and hold down rewind functions
when achieving.
Touch icon Play / Pause.
Touch icon Next video Press and hold the fast forward function
of time to achieve.
Touch icon Change the display mode (full screen, the original
size, 16:9,4:3),
Touch icon Back to the list menu.
Touch icon Pop-up submenu
Delete bookmark from scratch play: Click to delete bookmarks from
scratch, play, delete the bookmark.
Delete bookmark click it delete all setting bookmark.
Display mode Change the display mode.
Help Click the “help” Display features icons.
24
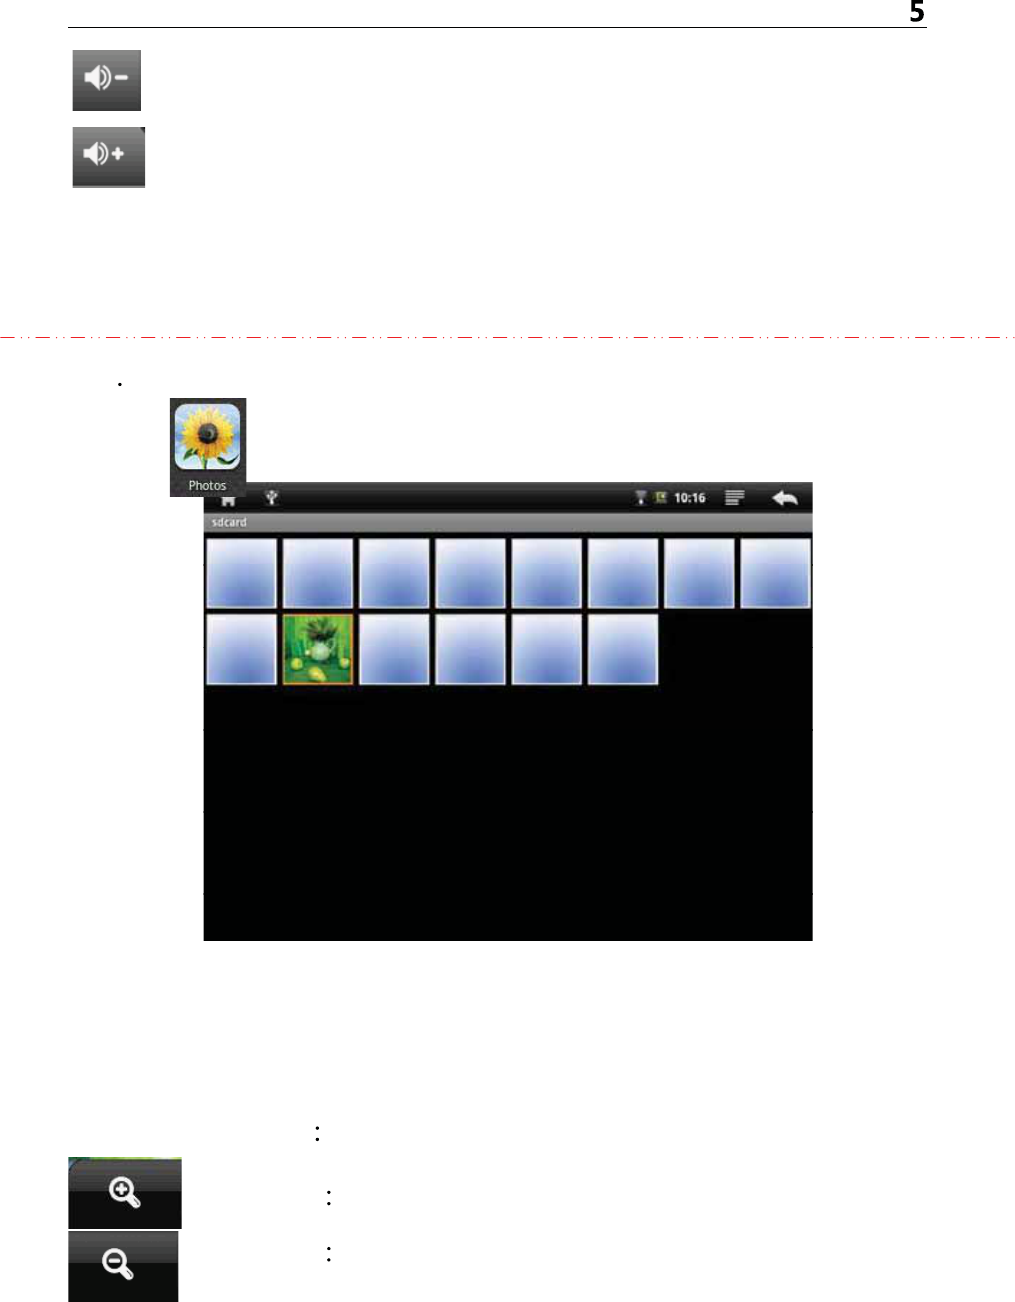
Multi-Media Function
Reduce the volume, press and hold, the volume decrease
continuously.
The volume, press and hold, the volume increased continuously.
Touch the progress bar can go directly to the video in different play
positions; use your fingers to drag the progress bar in the cursor to the
location of the video in another player.
3-3 Picture Viewer
Clicking icon of the applicant function menu to enter into Picture
list.
Picture list will automatically load the MID all picture files. In the picture list,
click the picture file MID will directly enter and play the picture.
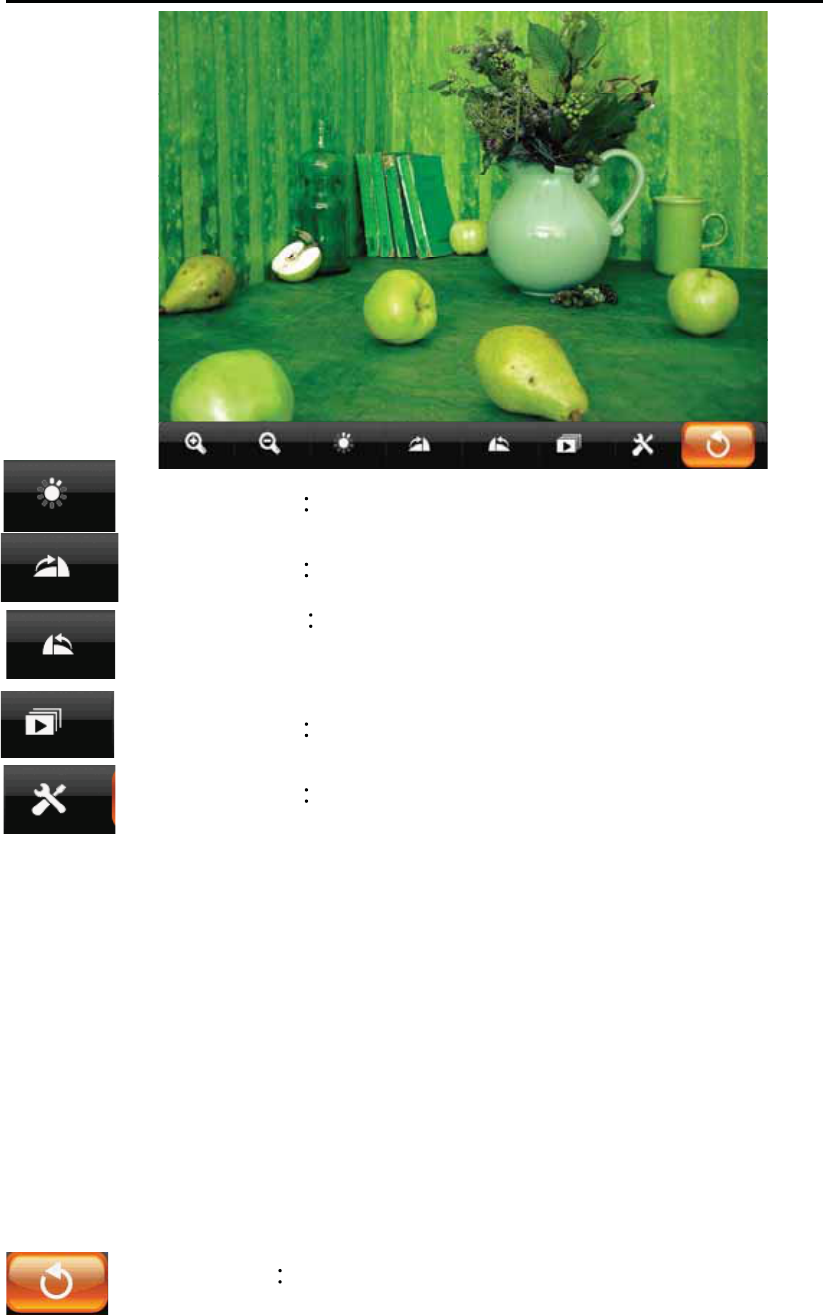
In the picture browsing mode, press the touch screen to pop-up picture
playback control bar
Touch icon Scaling the current picture.
Touch icon Scaled down the current picture.
25
Multi-Media Function 6
Touch icon Adjust picture brightness.
Touch icon Click the current image 90 ° clockwise rotation.
Touch icon Click the current image 90° counterclockwise
rotation.
Touch icon Picture Start Slide Show.
Touch icon Options pop-up submenu.
….. Settings: Photo Available setting options
(1) Full Screen: full screen image.
(2) Slide show interval: "2 seconds, 3 seconds, 4 seconds" three times to
choose from.
(3) Slide show settings: a fade in & fade out, horizontal movement, up and
down, random four alternative.
(4) Slide loop: Loop slideshow.
(5) Random show: Random display pictures.
….. Set as desktop background: the image as your desktop background.
Touch icon Back to the list menu.
26
Basic Setting
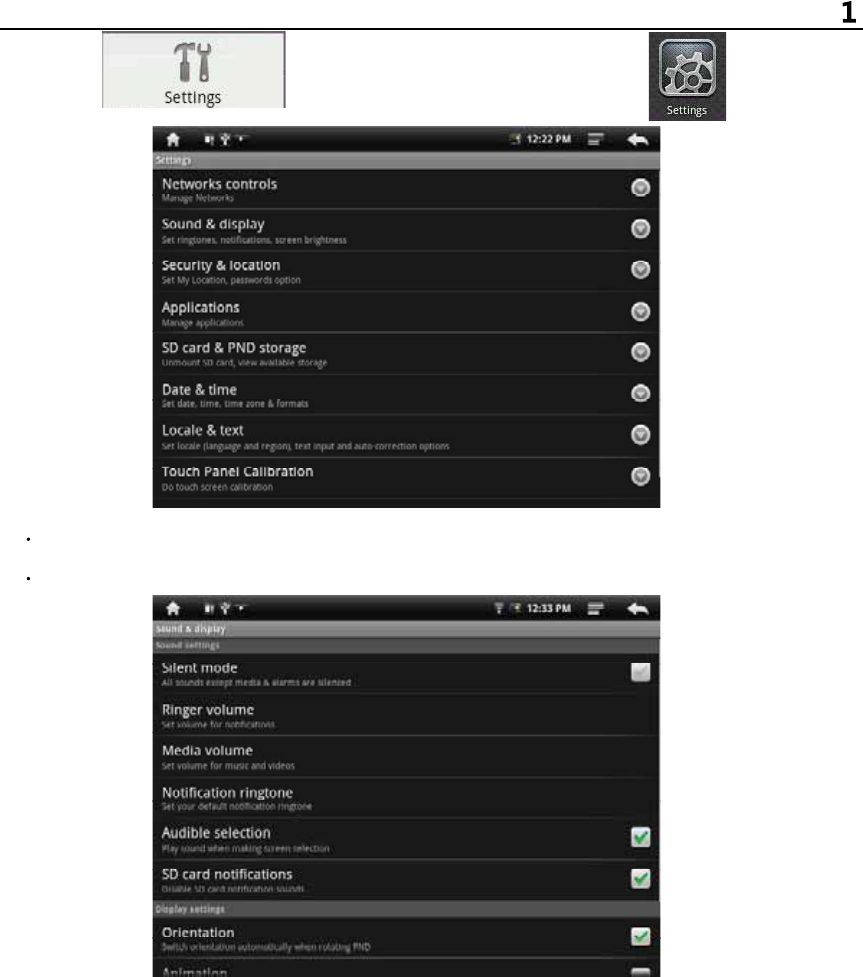
Clicking icon of the “Menu Window” or icon to
enter into setting menu.
1 Netwoks controls function describe seeing front section.
2 Opening Sound & display function menu.
• silent mode: All sound will become silent except for Media and alarm.
• Loudspeaker mode: you can use loudspeaker.
•The volume of ring: you can set up the volume of ring.
•The volume of media : Adjust the volume of media by clicking the move
point to right and left.
•Notification ringtone: set up the default notice tone.
•The choose of operative tone: there are sound when you choose the
screen.
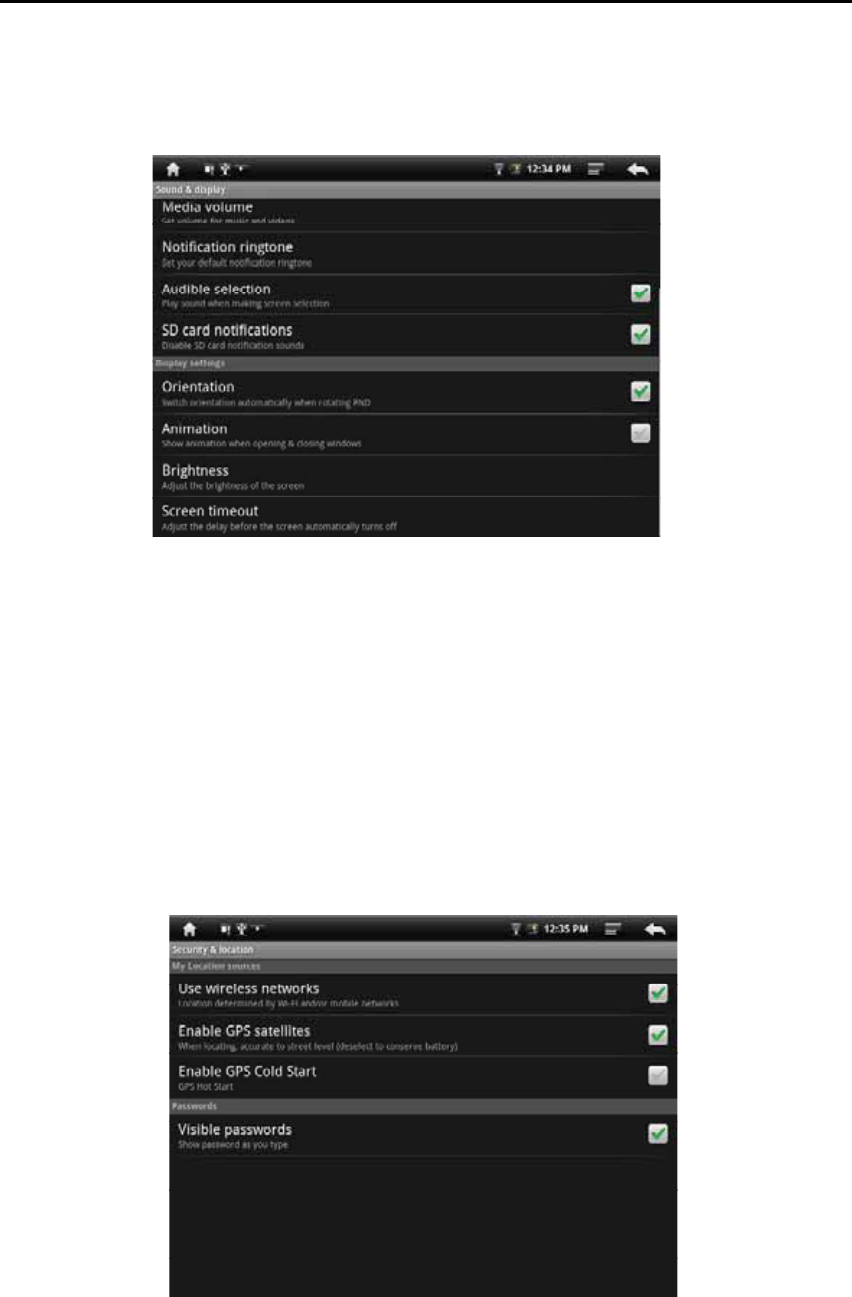
27
Basic Setting 2
• TF card notice: the volume of the prohibition of TF card.
Notes: The volume of ring , notice ring, operative sound operation , TF
card notice are used to cell phone system , in MID system , it will show
absent.
• Orientation : it will change the direction automaticly when you rotate the
MID.
•Animation: it will show cartoon when you open or close a window.
•Brightness: Adjust the brightness of screen by moving the point to left and
right.
•Screen timeout: before turn off the machine automaticly , it will adjust
to delay the turning off. There are 6 kind of time for your choose such as
15 seconds, 30 seconds,1 minute, 2 minutes, 10 minutes.
3. Safety and Location – to set up my location and password selections:
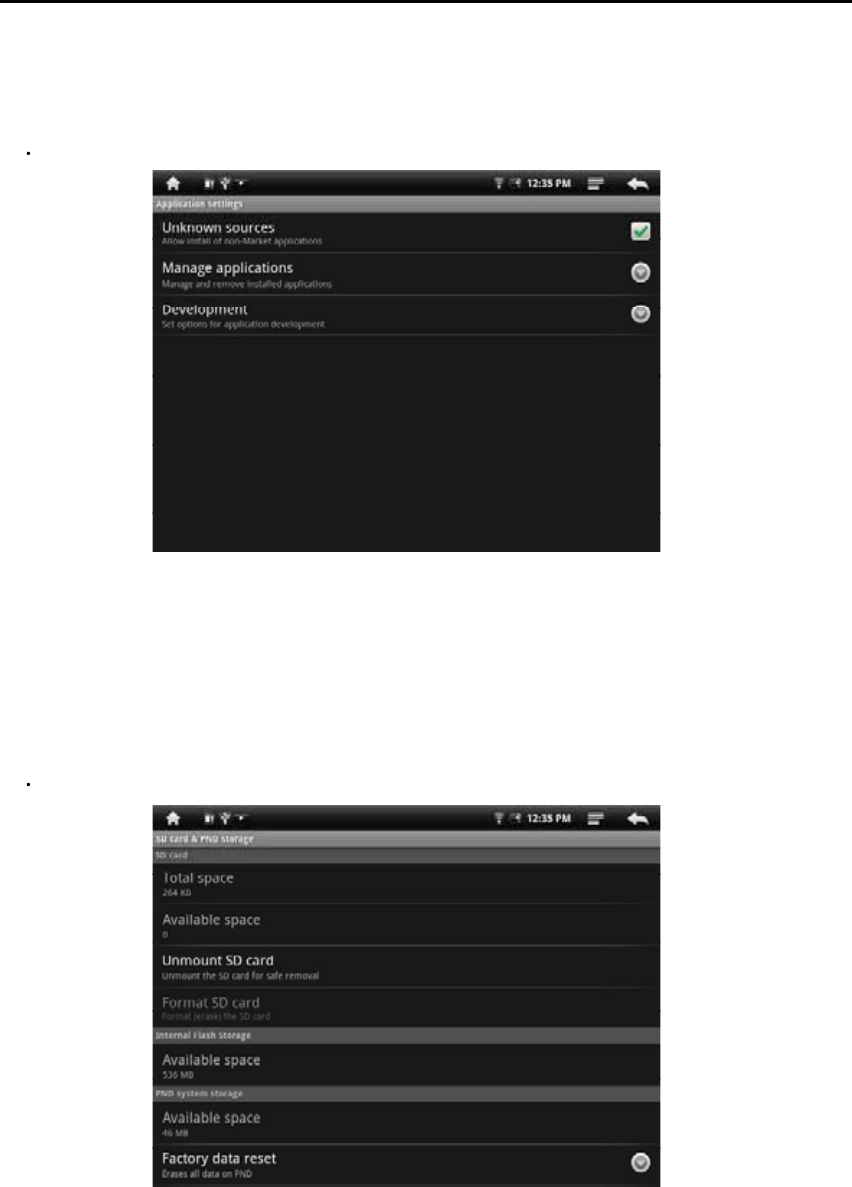
28
Basic Setting 3
•Use of wireless network: you can check the location of application by
using wireless network.
• Visible password: it will show your password when you typing them
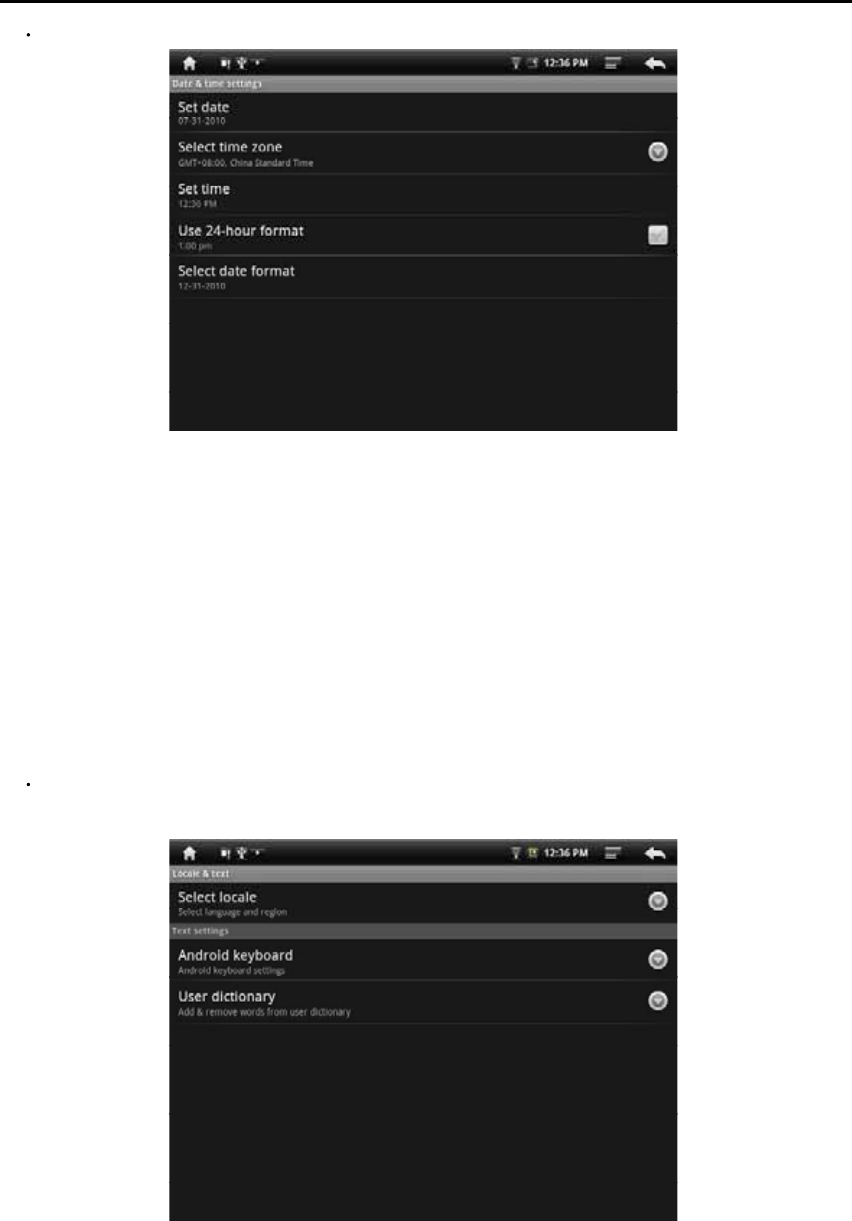
4Applications: manage application , set up shortcut directly.
• Unknown source: you can choose whether it is allowed to install
non-market applications.
• Quick start-up: set-up the keyboard shortcut in the running applications
• Manage applications: Managing and deleting the installed applications
• Explore: set up the explore option in the applications.
5TF card and MID Save: remove TF card to see the available memory
space.
Notes: please removing the TF card by the option delete the TF card
safely in case of damaging the device by remove it directly.
29
Basic Setting 4
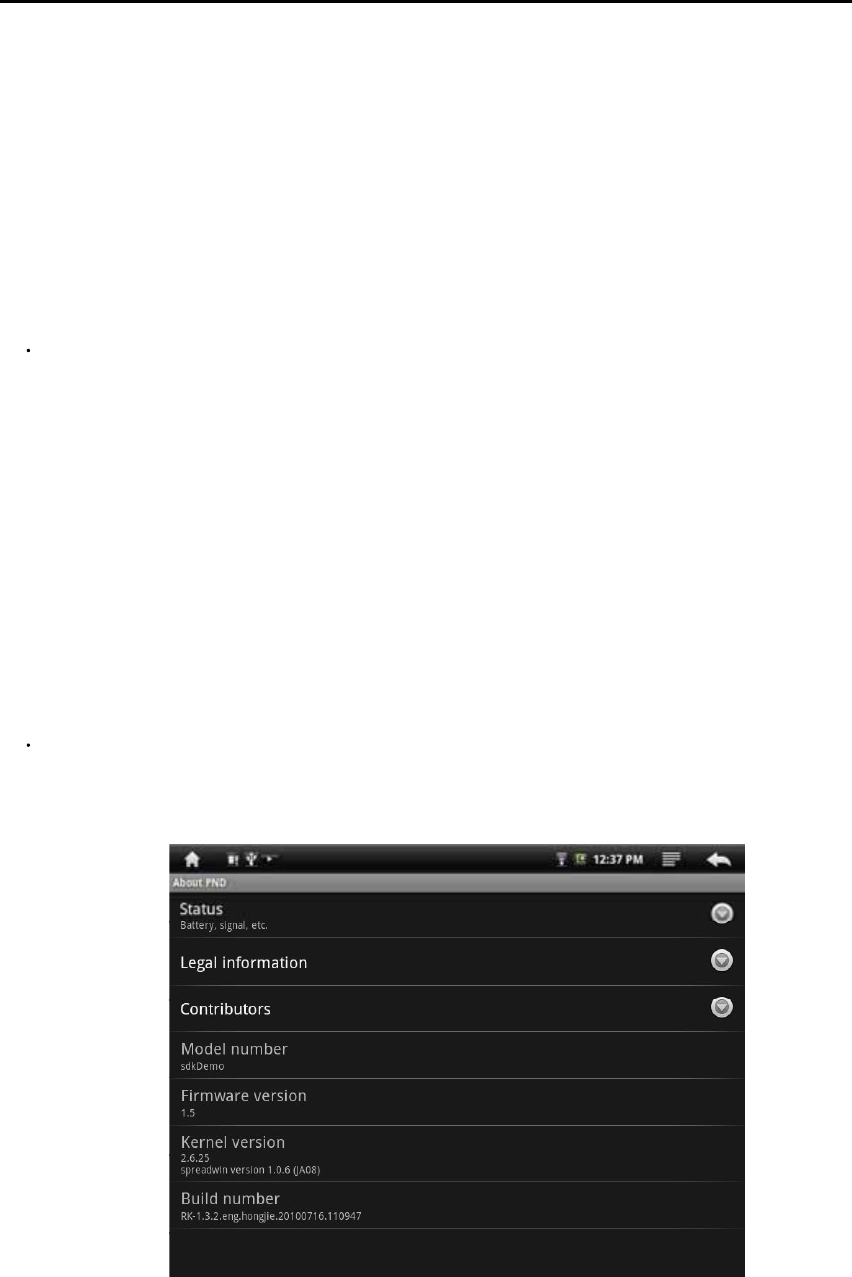
6Date and Time: Set up date , time , time zone and formality.
•Set up date and time: Enter into the interface of date settings to set up the
date.
• Select time zone : enter into the interface of choosing time zone to set up
the time zone.
• Set up time: Enter into the interface of time settings to set up the time.
• set up 24 hour formality : set up the formality of displaying time
•Select the formality of showing date: you can choose different formality to
show date.
7 Area and Text : Set up the option area ( language and are), text typing
and correct automaticly.
•Select area : 54 kinds of language for your choose
30
Basic Setting 5
• Android keyboard : Android keyboard settings
--make sound when click
-- Show capital letters automaticly
--Show suggestions: show the suggestive word and type it out
-- Auto-complete: complete space, point and insert focus words
automaticly.
• Dictionary of user : Add or delete words and sentences to the dictionary
of user.
8Calibrate
You can calibrate the touch screen if it is not responding accurately to your
Taps .
Tap and hold the centre of the target, the target moves to the position of
left-up. When again tap and hold the centre of the target, the target moves
the Next position of left-down.
The target moves to five position (Left-up' left-down' right-up' right-down'
Center) in order, forming a period. If nicetily tap and hold the target each
time, after a period, the target is Disappear, the device completes the
calibration process and backs to the Device Settings menu.
9About MID
You can look up the relative law information and the status of MID and the
edition of software.
31
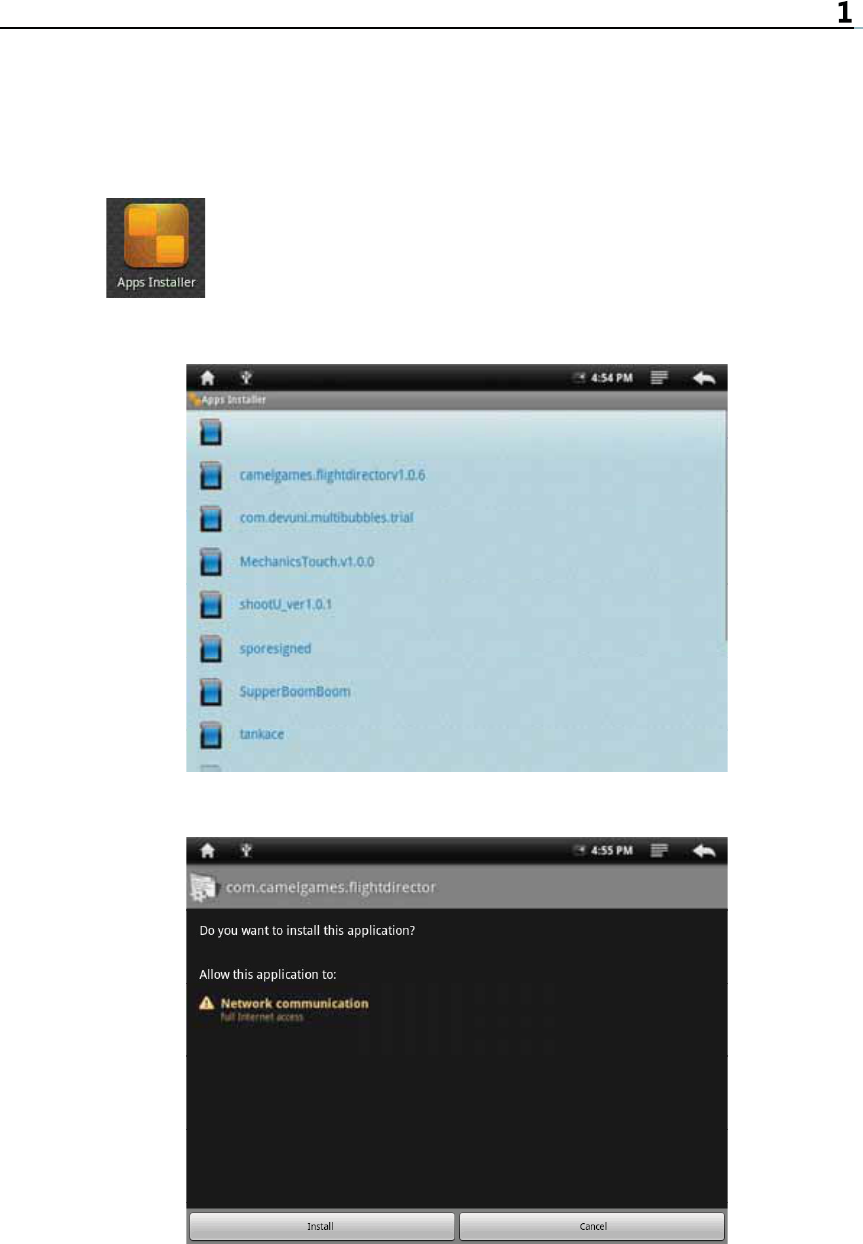
Software Installation and Management
This device support the third party’s applications on the basis of android
platform. Most of the applications can be downloaded from the website,
and copied into TF card.
1-1 Software Installation
Clicking icon of the “applicant function menu” to enter into
function menu.
MID open file lists. It includes all the installation program of the TF card.
Clicking the demand installation program, enter into the next menu.
Clicking “Install”, MID display the installation schedule.
32
Software Installation and Management 2
Operation is completed, click “Done” to end or click “open” to open this
function.
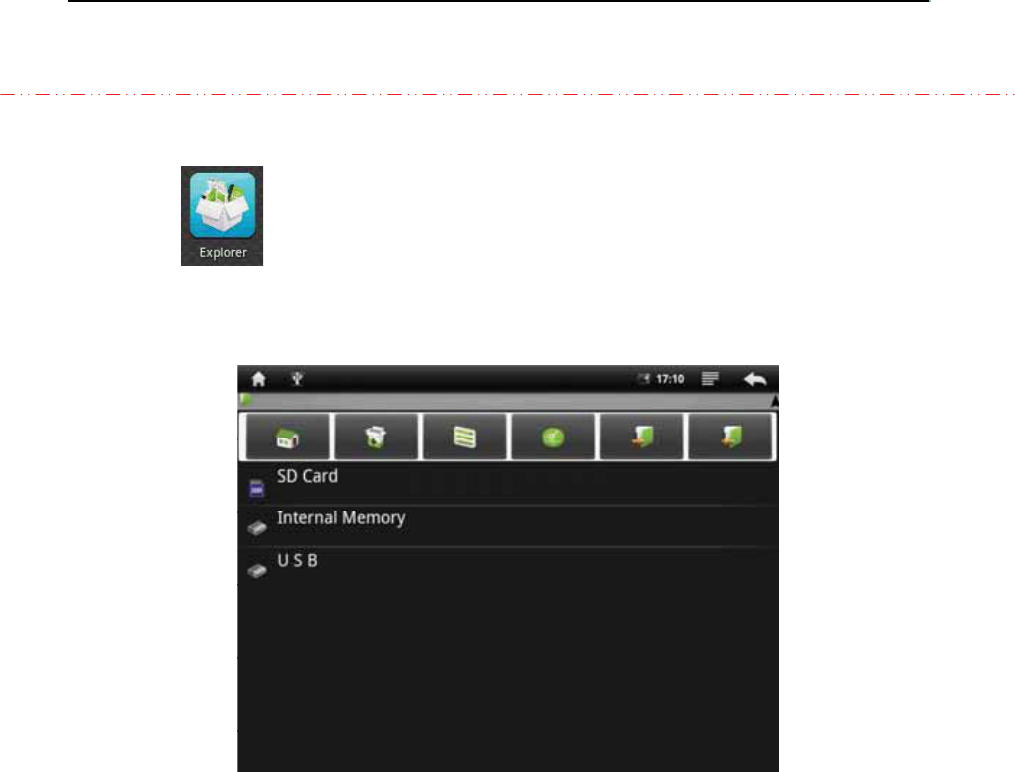
2-2 Source Management
Clicking icon of the “Applicant Function Menu” to enter into
Source Management menu, you can browse files of the machine and TF
card. You can copy, delete, move, rename file.
33
Applications
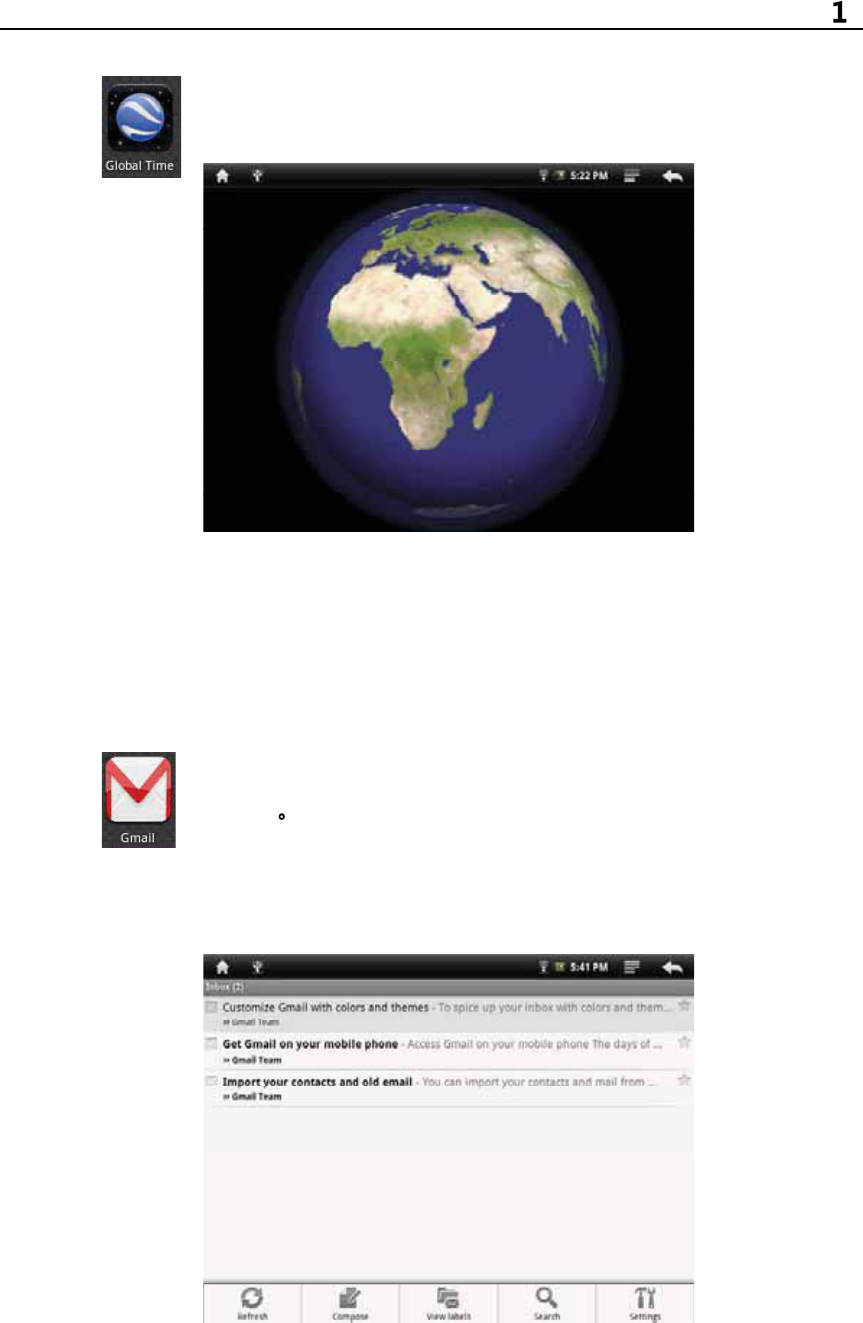
1-1. Google Time
Clicking icon of the “applicant function menu” to enter into Google
Time function.
Through Clicking screen, you can demand the sunlight status of each
world zone.
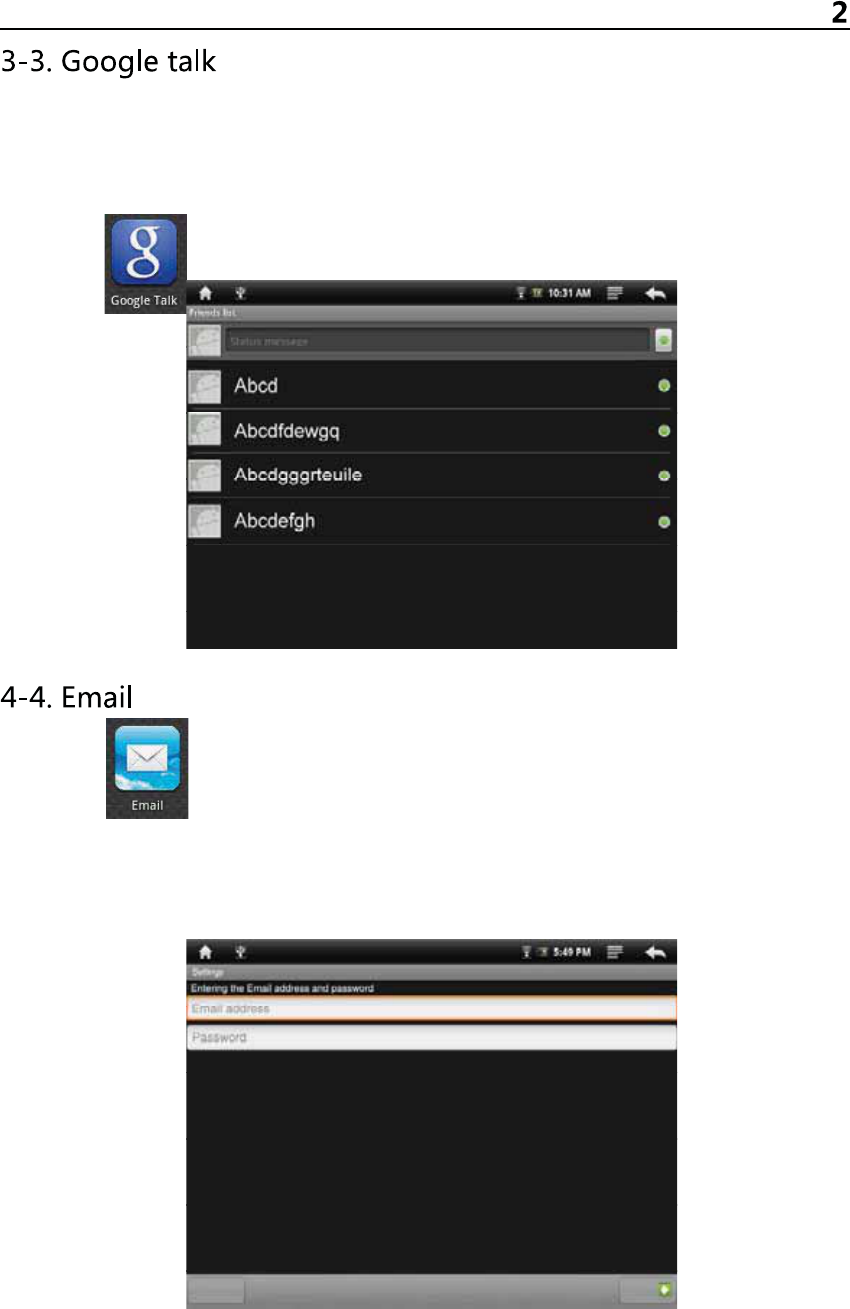
2-2. Gmail
Gmail is a mail service application for free of the Google, it can receiver
and send out mail.
Clicking icon of the “applicant function menu” to enter into Gmail
function
After creating/entering Gmail address, you can login and send or receive
Gmail messages.
34
Applications
Google talk is another killer applicant except Gmail, anyone login
Gmail with a desktop browser can contact you through Google talk.
Therefore, your Gtalk friends number will be more.
Clicking icon of the “applicant function menu” to enter into Google
Talk.
Clicking icon of the “applicant function menu” to enter into Email
function.
After entering the Email address and password, you can login and send or
receive Email messages.
35
Applications
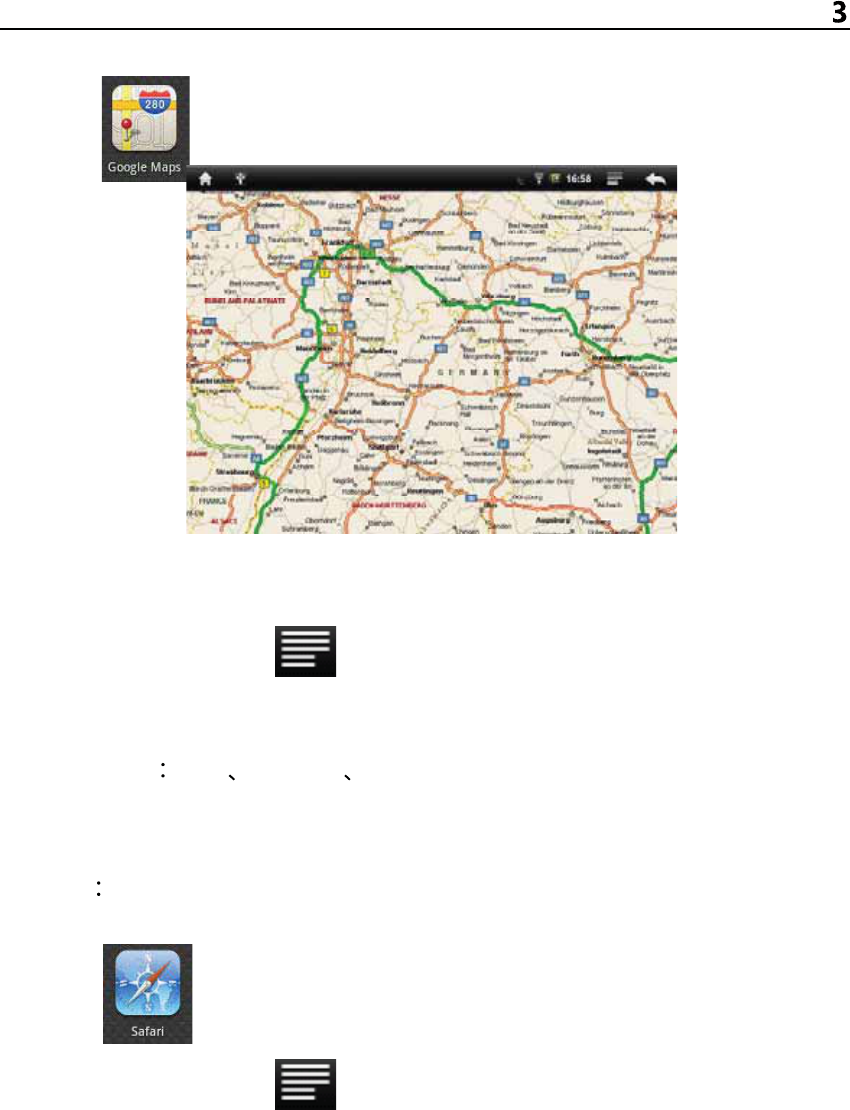
5-5. Google Map
Clicking icon of the “applicant function menu” to enter into Google
Map function to browse map.
-- Click the zoom icon in lower left corner of touch zoom in and out images.
-- drag touch screen, can move around the screen.
Under the status, click icon to shoot out it menu:
-- search: search maps by entering address.
-- Line: search driving directions by entering starting point and destination.
-- map mode map satellite traffic those models to choose from.
-- my position: through the “ my location” source settings to find out the
current location.
-- more more info about Google Map.
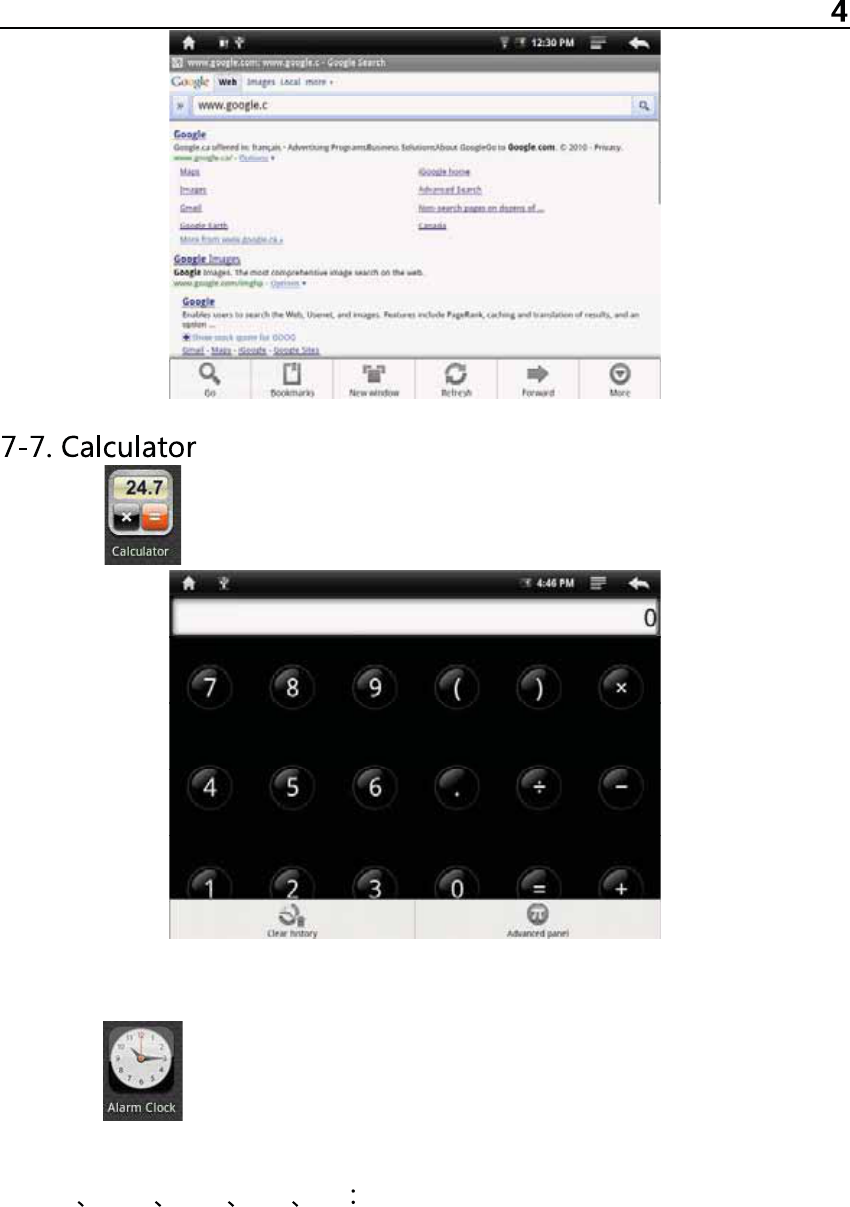
6-6. Internet Browser
Clicking icon of the “applicant function menu” to enter into Internet
browser to browse web page.
Under the status, click icon to shoot out it menu:
-- Go: enter website by inputting address.
-- Bookmark: add bookmark for the website.
-- New window: open new web page.
-- Refresh: refresh the current page.
-- Forward/Backward: go forward/ backward.
36
Applications
Clicking icon of the “applicant function menu” to enter into
Calculator menu.
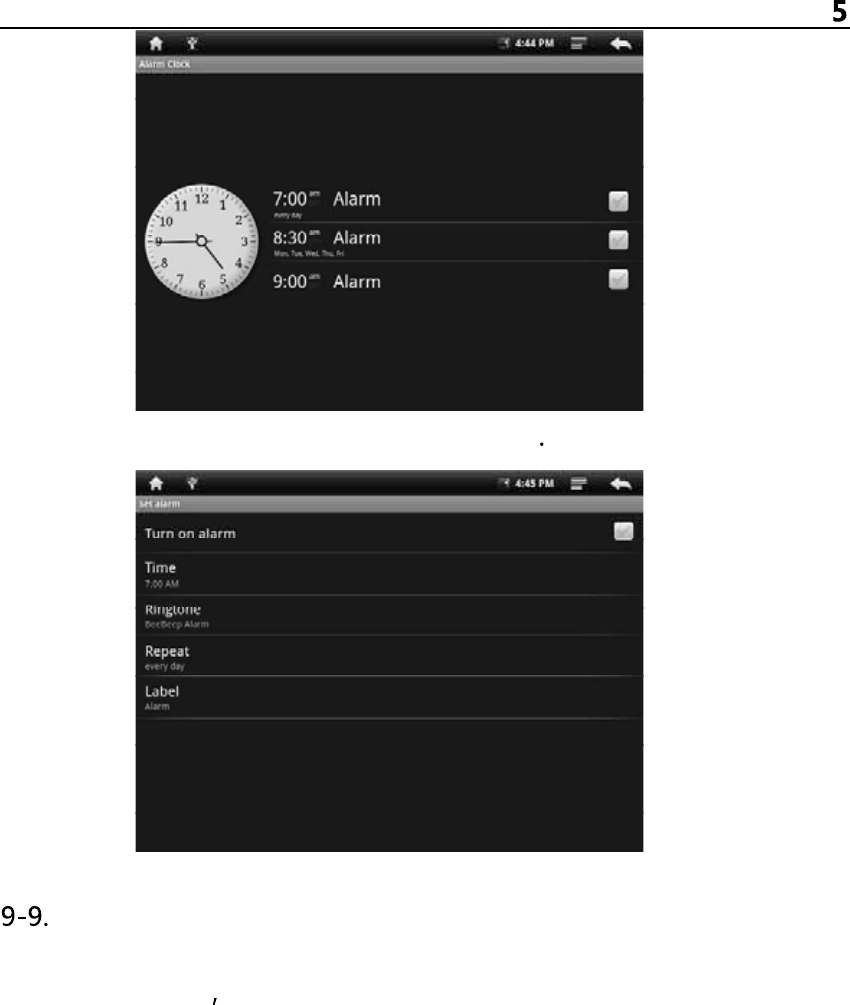
8-8. Alarm clock
Clicking icon of the “applicant function menu” to enter into
Alarm clock setting menu.
-- every day: set the alarm clock repeat rings at the same time every day.
-- Mon Tues Wed Thu Fri set the alarm clock repeat rings at the same
time every Mon-Fri.
-- None: set the alarm ring only once and no repeat.
37
Applications
Clicking each item to enter into it setting menu
Chat Tools
You can download chat tools from the website to setup.
For example: QQ MSN….
FCC RF Exposure requirements: The highest SAR value reported under this standard during
product certification for use next to the body is 0.272 W/kg.
This device complies with part 15 of the FCC rules. Operation is subject to the following two
conditions: (1) this device may not cause harmful interference, and (2) this device must accept any
interference received, including interference that may cause undesired operation.
NOTE: The manufacturer is not responsible for any radio or TV interference caused by
unauthorized modifications to this equipment. Such modifications could void the user’s authority
to operate the equipment.
NOTE: This equipment has been tested and found to comply with the limits for a Class B digital
device, pursuant to part 15 of the FCC Rules. These limits are designed to provide reasonable
protection against harmful interference in a residential installation. This equipment generates
uses and can radiate radio frequency energy and, if not installed and used in accordance with the
instructions, may cause harmful interference to radio communications. However, there is no
guarantee that interference will not occur in a particular installation. If this equipment does
cause harmful interference to radio or television reception, which can be determined by turning
the equipment off and on, the user is encouraged to try to correct the interference by one or more
of the following measures:
- Reorient or relocate the receiving antenna.
- Increase the separation between the equipment and receiver.
-Connect the equipment into an outlet on a circuit different from that to which the receiver is
connected.
-Consult the dealer or an experienced radio/TV technician for help