Elentec N4410 PORTABLE MULTIMEDIA PLAYER WITH BLUETOOTH User Manual users manual
Elentec Co.,Ltd. PORTABLE MULTIMEDIA PLAYER WITH BLUETOOTH users manual
UserManual.wiki
>
Elentec
>
N4410 User Manual
users manual
Navigation menu
Upload a User Manual
Namespaces
Wiki Guide
HTML
PDF
Info
Views
User Manual
Discussion / Help
Navigation


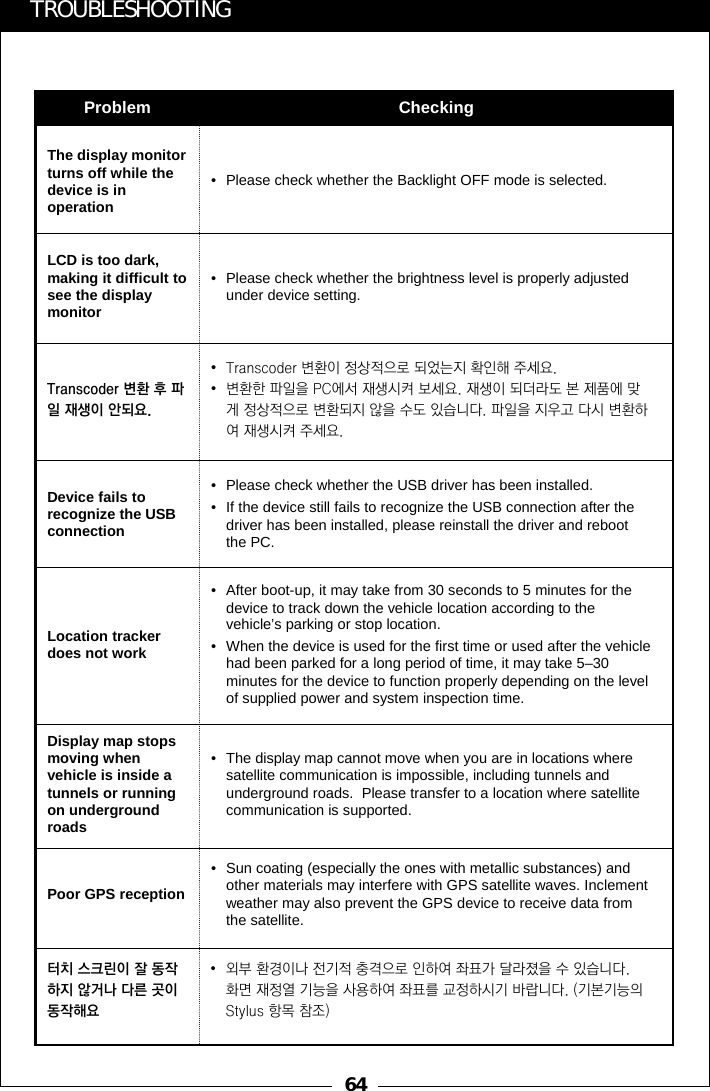
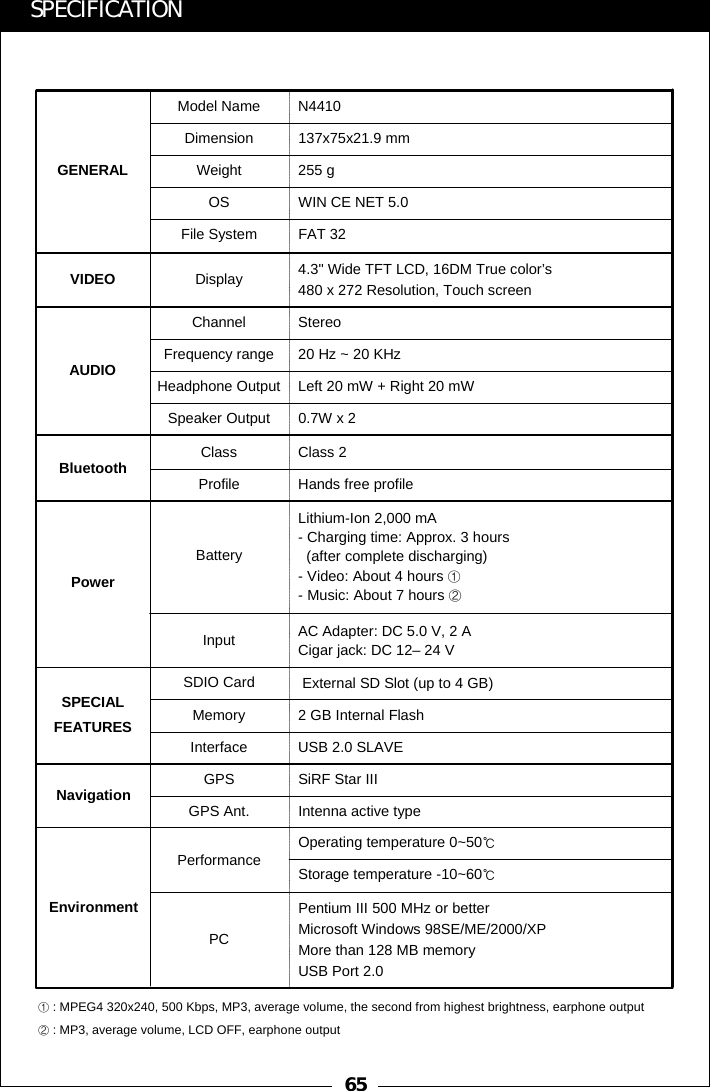
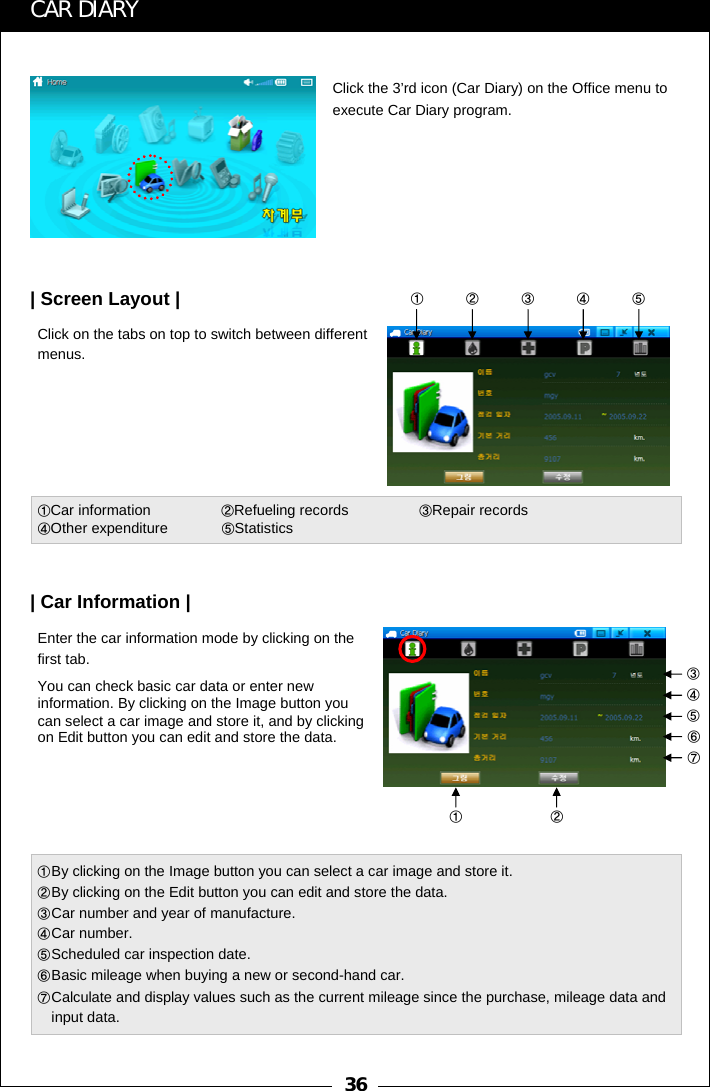
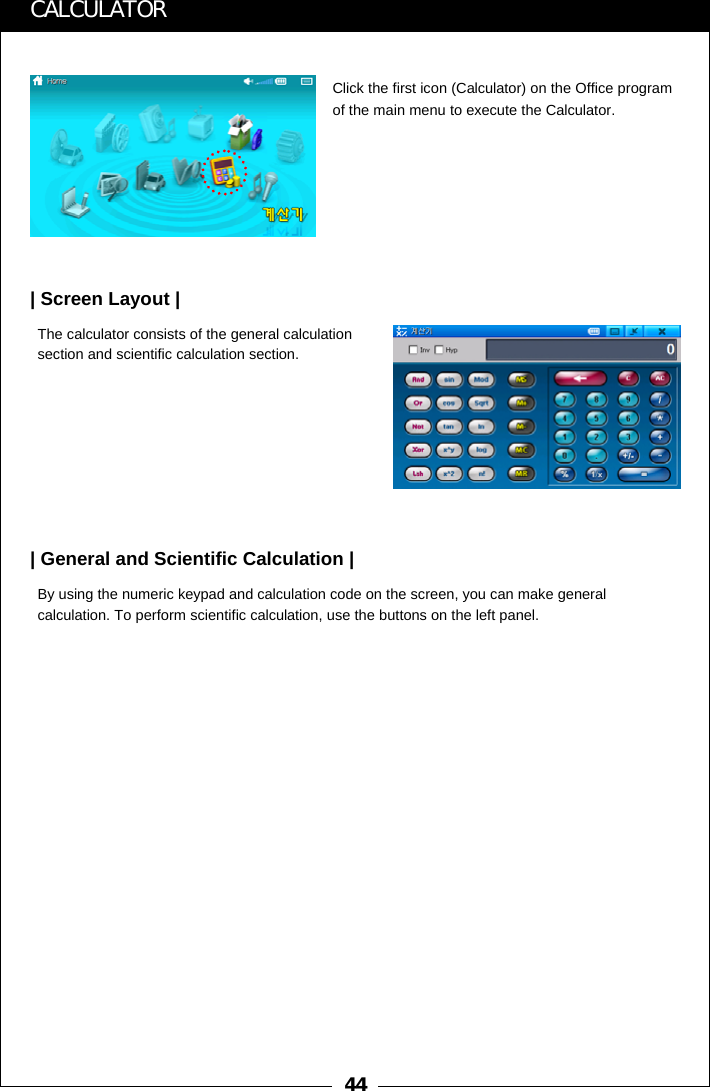
![17BEFORE STARTING| 제품 세워서 사용하기 |12345Caution1. Please do not pross the upper side of this device. The stylus pen may be damaged.2. Please keep away the stylus pen from the children to avoid puttiy it in their mouth.[A][B]Pull out a stylus pen from [A]Insert a stylus pen into [B] to stand this device.](https://usermanual.wiki/Elentec/N4410/User-Guide-795297-Page-17.png)


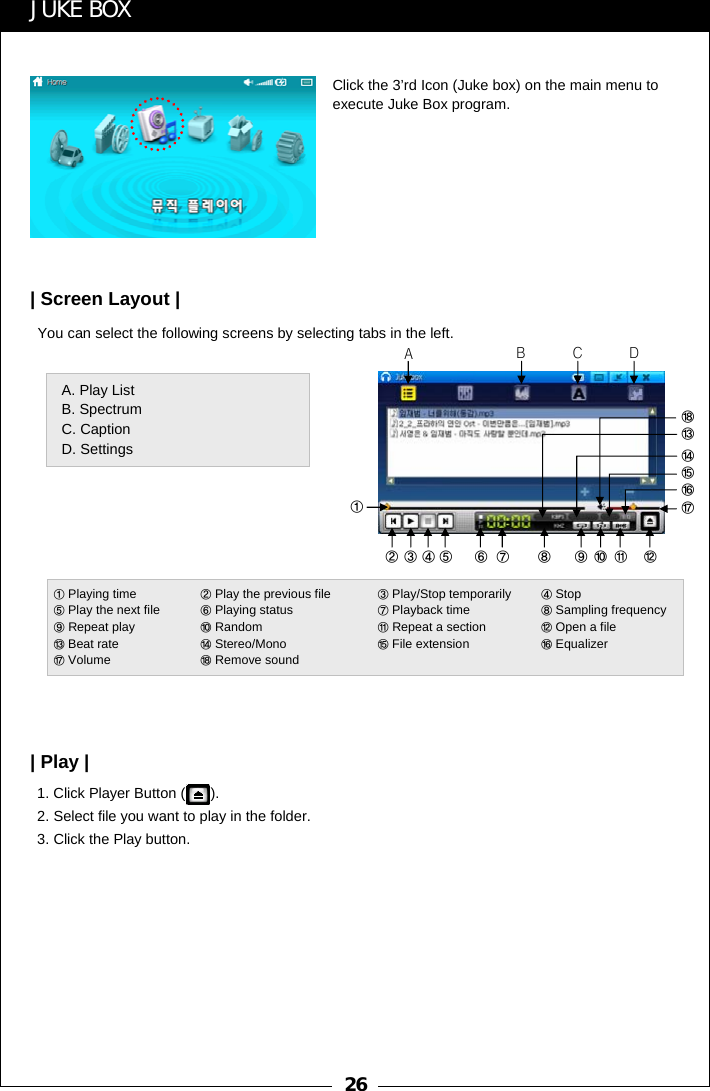
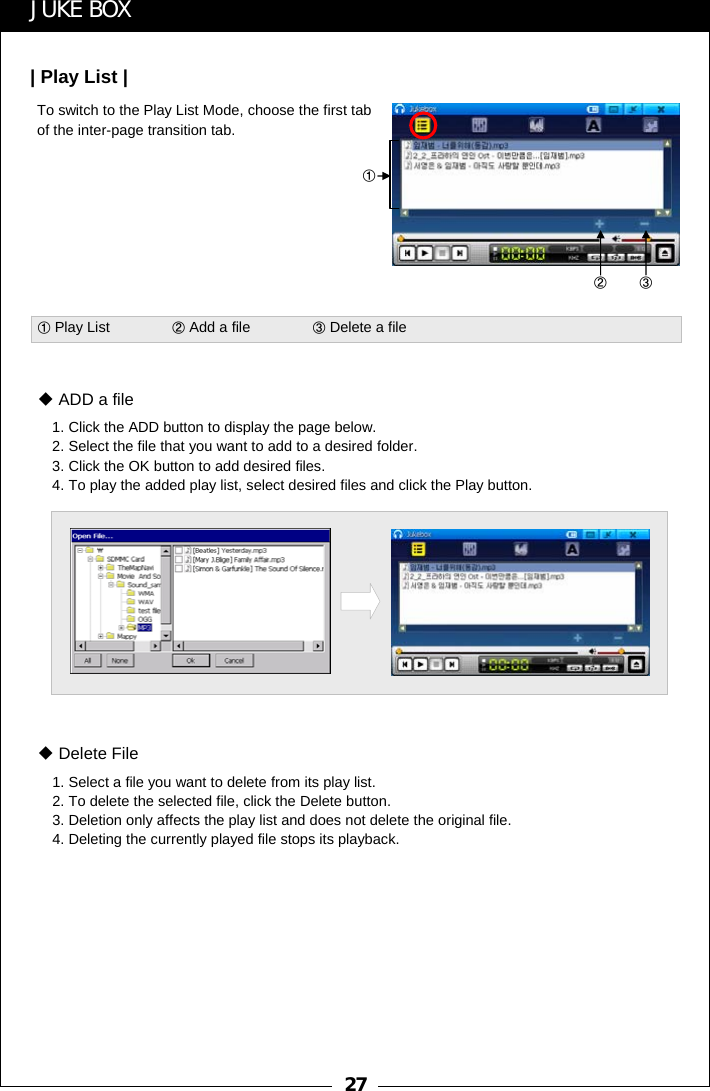
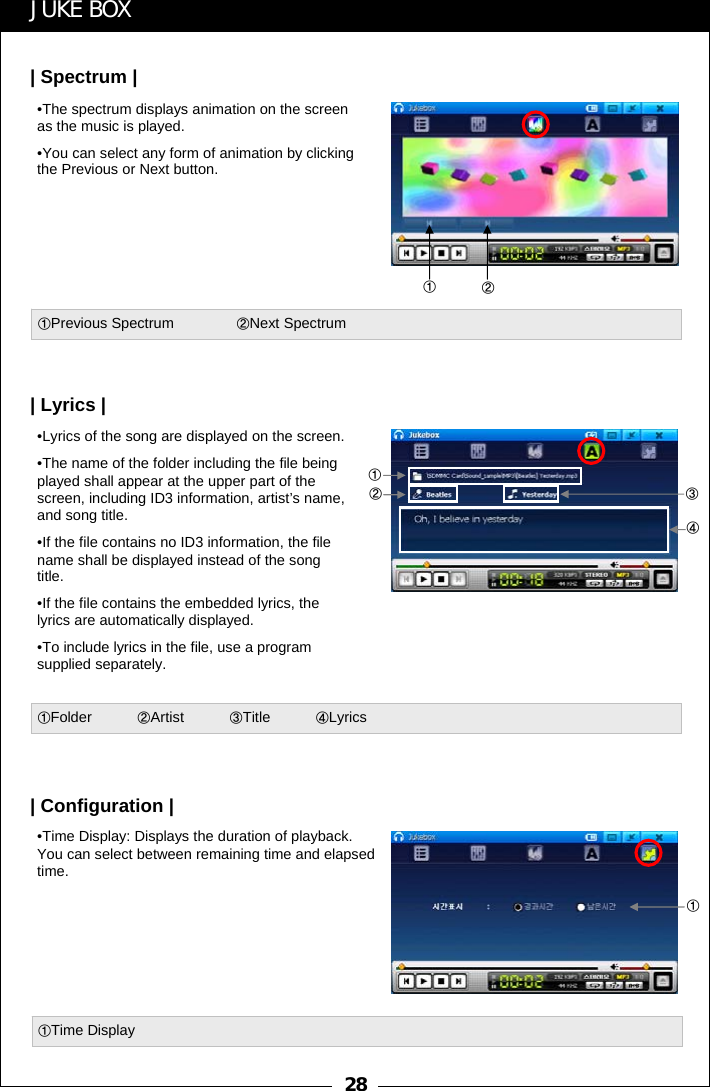
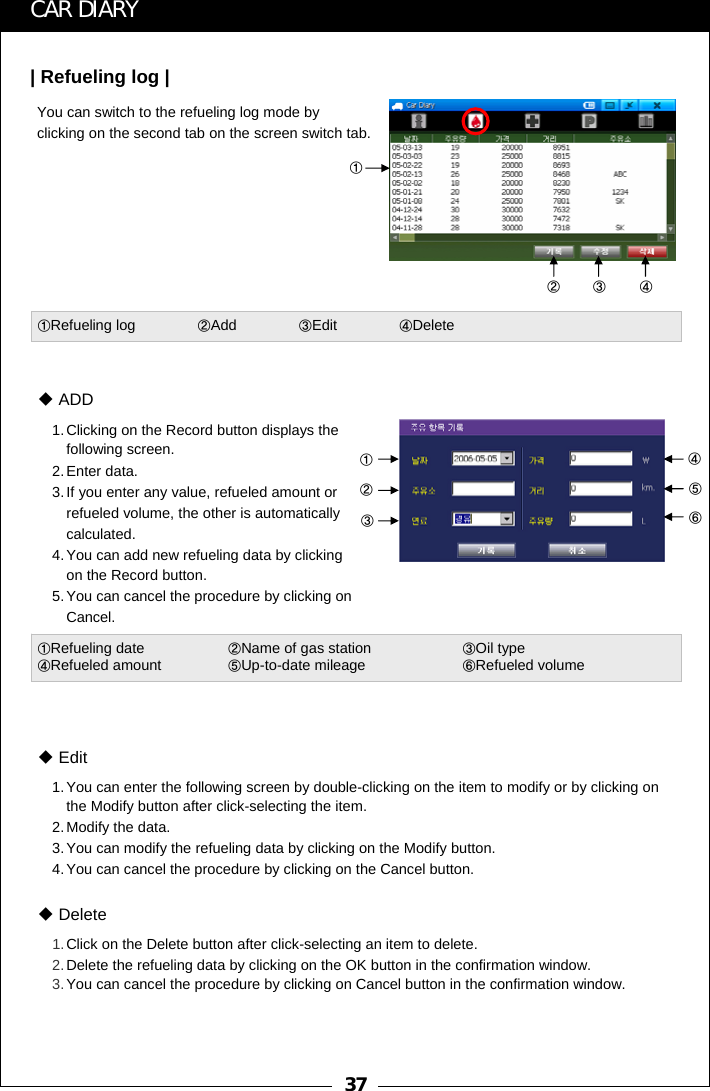
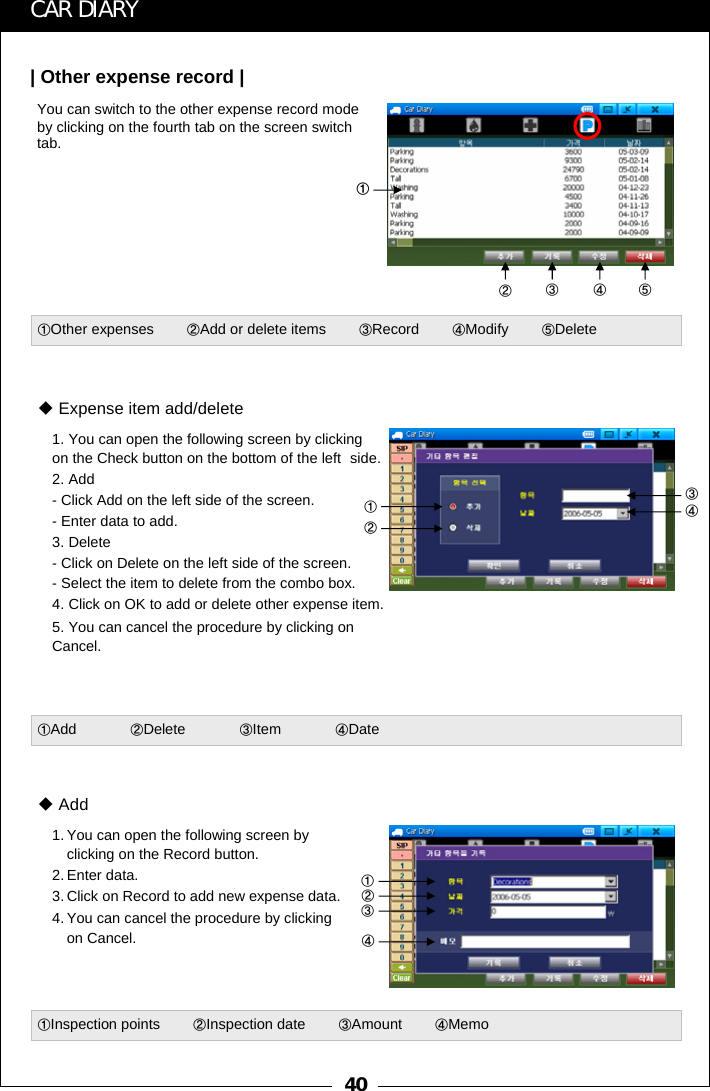
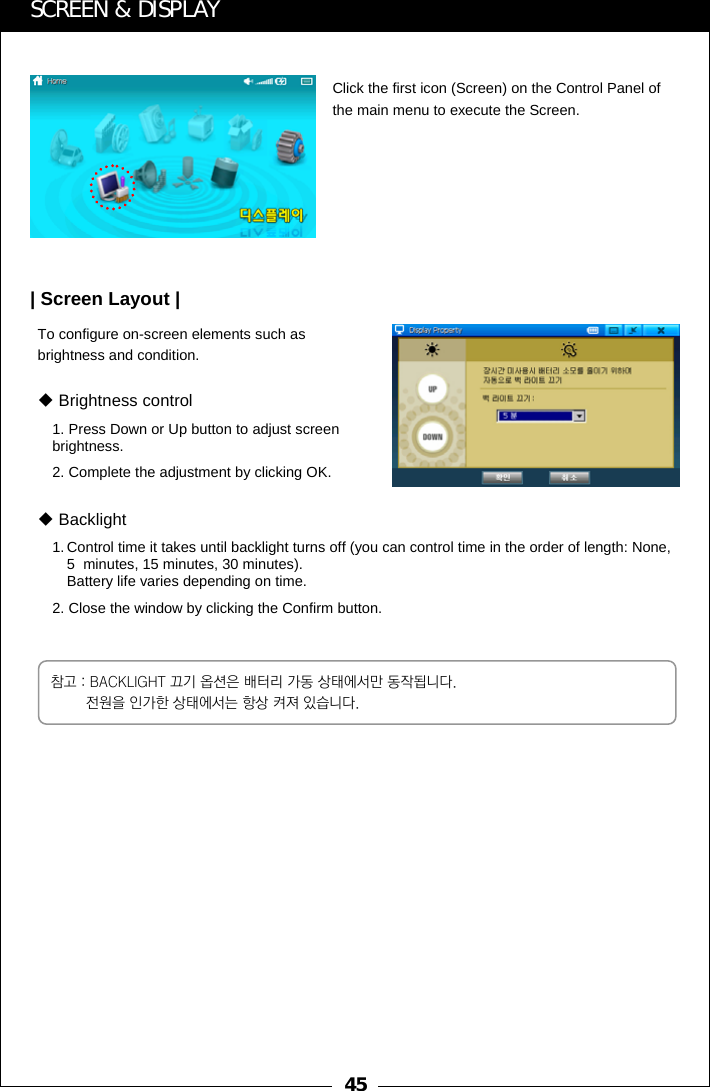
![23Open a dialogue window by clicking the [Open a File] button, select a file and then click Confirm to play a file.①②③④⑤ ⑥ ⑦ ⑧ ⑨⑩ ⑪⑫⑬Double-clicking the Playing Point window converts the screen into Title window.MOVIE PLAYERClick the 2’nd icon (Movie Player) on the main menu to execute the Movie Player program.| Basic screen || Opening a file |①Playing pointing bar②Play the previous file ③Play/Stop temporarily④Stop playing ⑤Play the next file⑥Playing status ⑦Display playing point⑧Playing time of a file ⑨Option⑩Open a list ⑪Open a file⑫Volume bar⑬Remove sound](https://usermanual.wiki/Elentec/N4410/User-Guide-795297-Page-23.png)
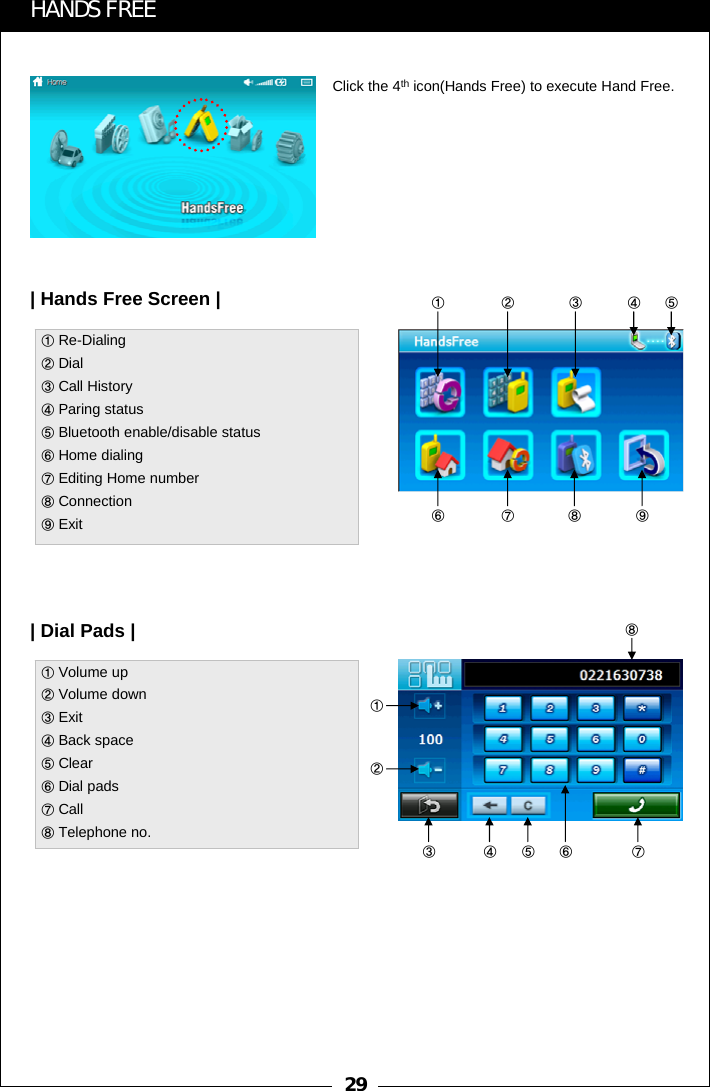
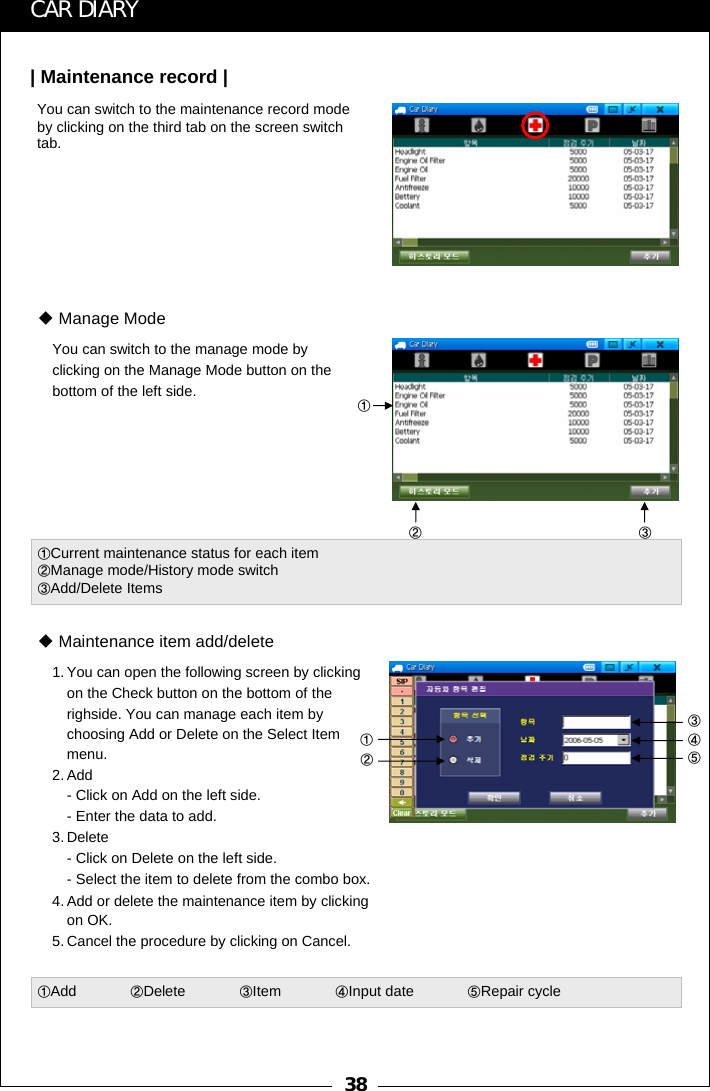
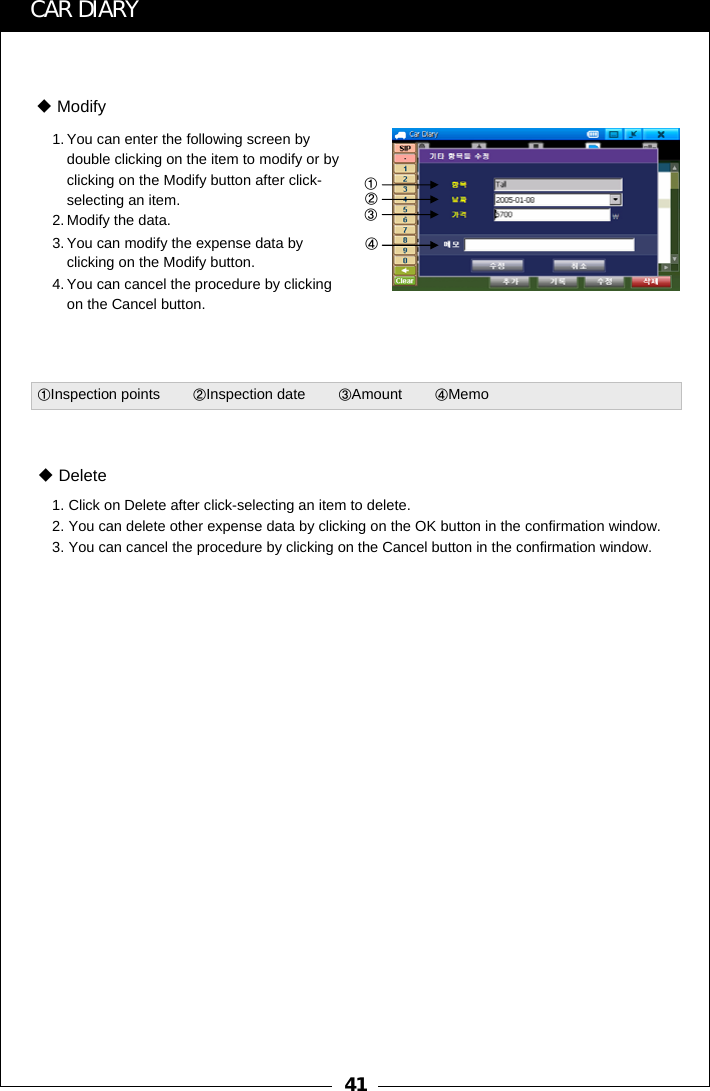
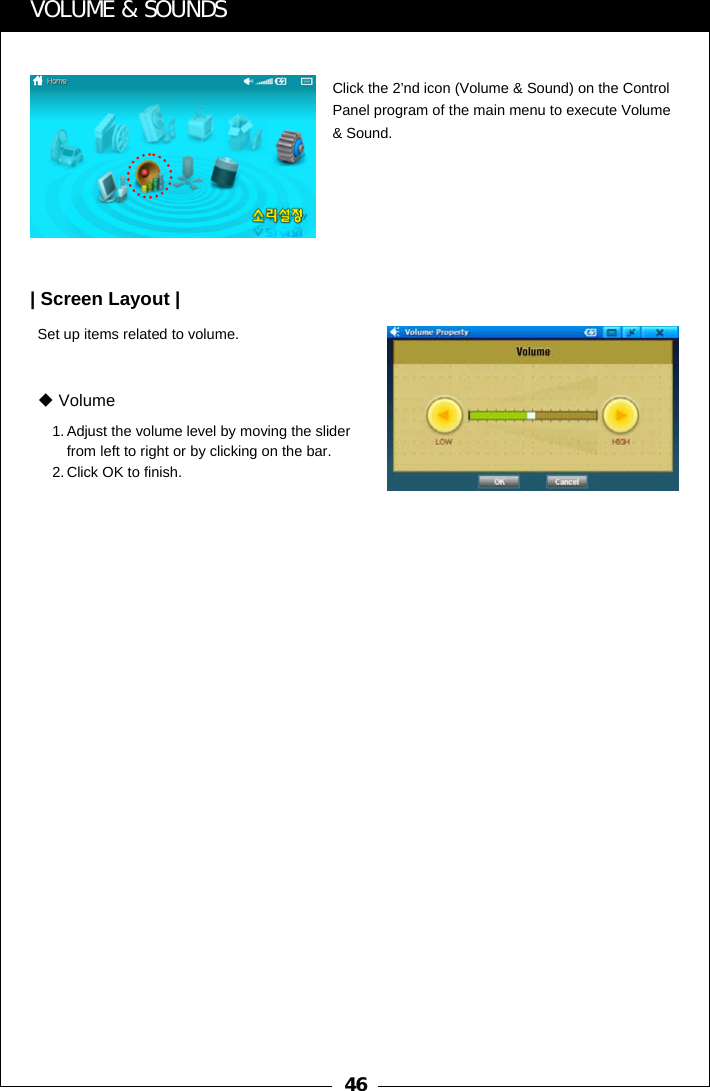
![31HANDS FREE| How to call |①Bluetooth enable②Bluetooth disable③Exit④Delete⑤Explore⑥Connect⑦Disconnect⑧Explored Bluetooth device list1. Input a telephone no. and click “Call” button on the Dial pads.2. Main menu appears in call connection sound.3. Click icon for the calling status screen to change the calling status or stop the call.4. If dial pad is needed for ARS on calling, please click “dial pad” on the calling status screen to pop up the dial pads. 5. To change the calling device from the Hands Free of this device to the mobile phone or diverse case, please click ④.6. On calling, if you do not want an opposite person to hear your side conversation, please click Mic mute.[Dial Pads][Main menu on calling]③ ④ ⑤ ⑦①②⑥[Calling status screen][Dial pads on calling]](https://usermanual.wiki/Elentec/N4410/User-Guide-795297-Page-31.png)
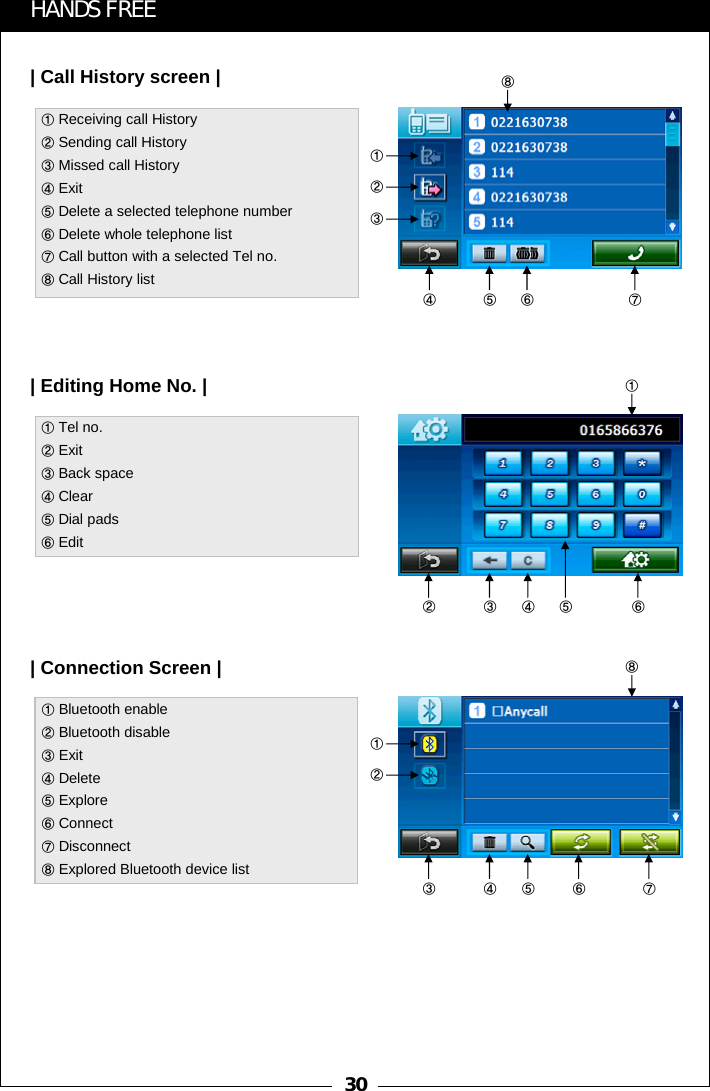
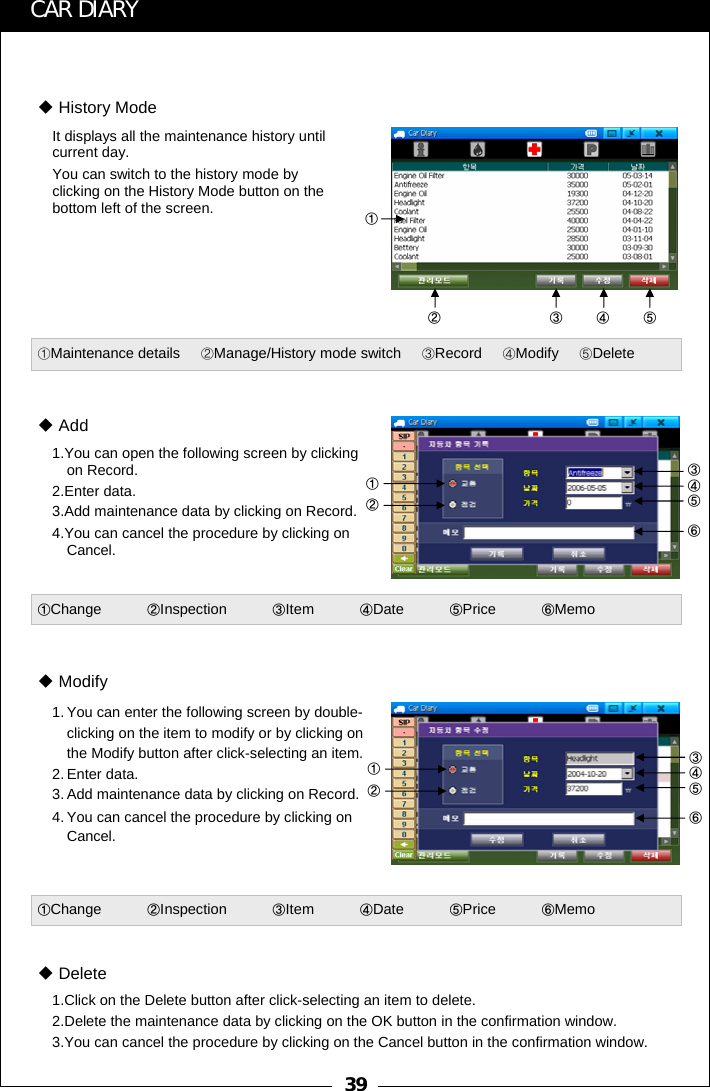
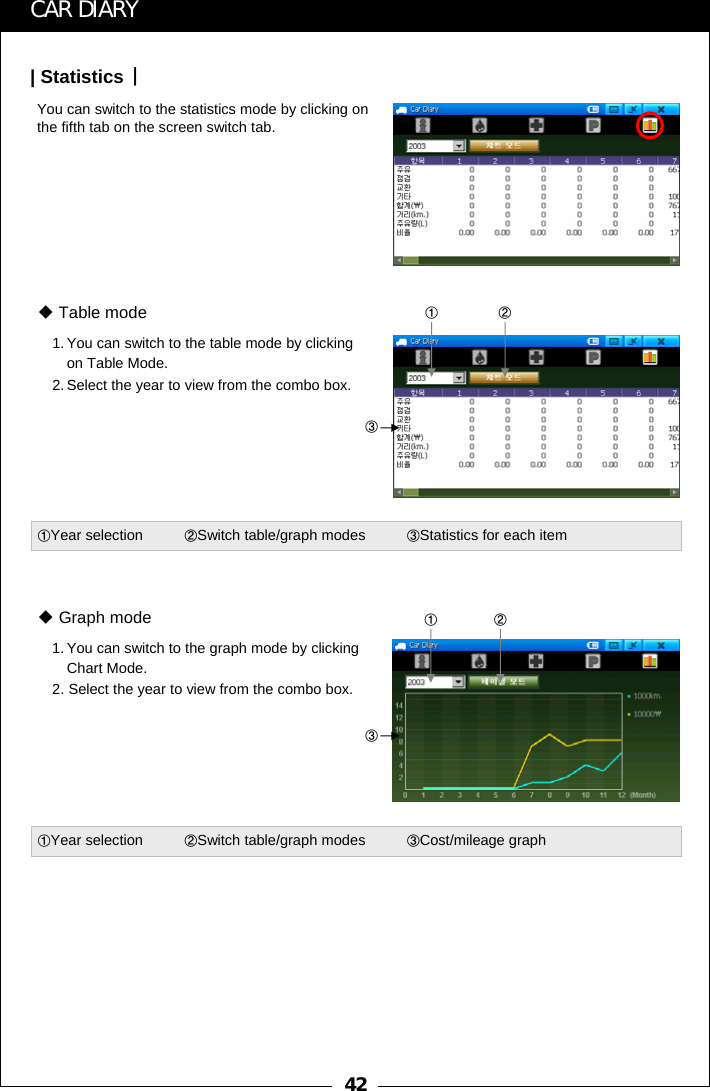
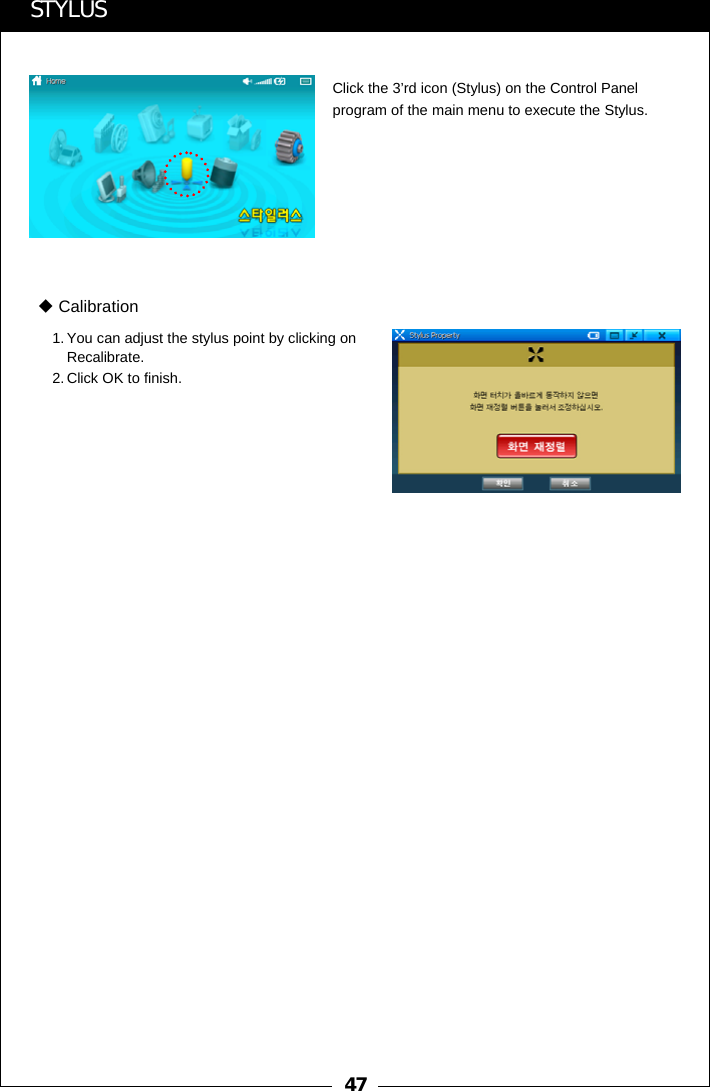
![32HANDS FREE| How to receive a call |①Change an opposite person on calling1. Receiving call screen automatically pops up on your device, when you receive a call.2. Click “Call” button to connect with a call. Or, click “Disconnection” button to refuse a call.3. If you click “call” button, the main menu automatically appears. 4. Click icon for the calling status screen to change the calling status or stop the call.5. In case that you receive another call on the line, please click icon to see the 2nd call status screen.At this time, if you want to change an opposite person, please click ①button. 6. To change the calling device from the HandsFreeof this device to the mobile phone or diverse case, please click “change the calling device” button. 7. On calling, if you do not want an opposite person to hear your side conversation, please click Mic mute.[Receiving call screen][Main menu on calling]①[2’nd call status screen][Calling status screen]](https://usermanual.wiki/Elentec/N4410/User-Guide-795297-Page-32.png)


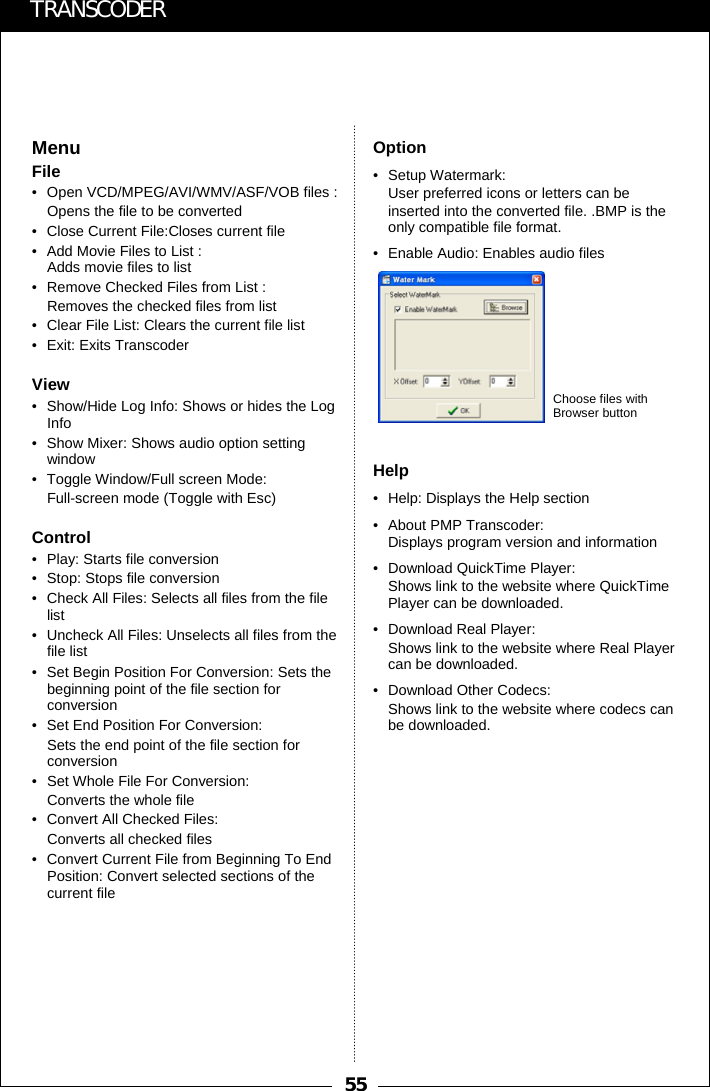
![52| Before using the Transcoder |Functions of Transcoder•Movies: Unsupported file types need to be converted.•Setting out Transcoder options: No optional settings required as files will be converted automatically upon import. •Check if the files are corrupted when errors occur. You can change image size by using [Image Resizing] button in the lower left part of the screen.•When performing first after program installation, connecting this product to the PC disables the security code and enables subsequent use.Files that can be converted•Recommended system requirements- Pentium3 1Ghz or faster- Memory 256 MB or larger- Microsoft DirectX-supported VGA - Sound card•OS- Microsoft Windows 98 - Microsoft Windows ME- Microsoft Windows 2000- Microsoft Windows XPRequired systemTRANSCODER•File Converter•DVD Player•DVD Converter•QuickTime(MOV/QT/MP4) Converter•Advanced DVD Converter•RealVideo Converter](https://usermanual.wiki/Elentec/N4410/User-Guide-795297-Page-52.png)
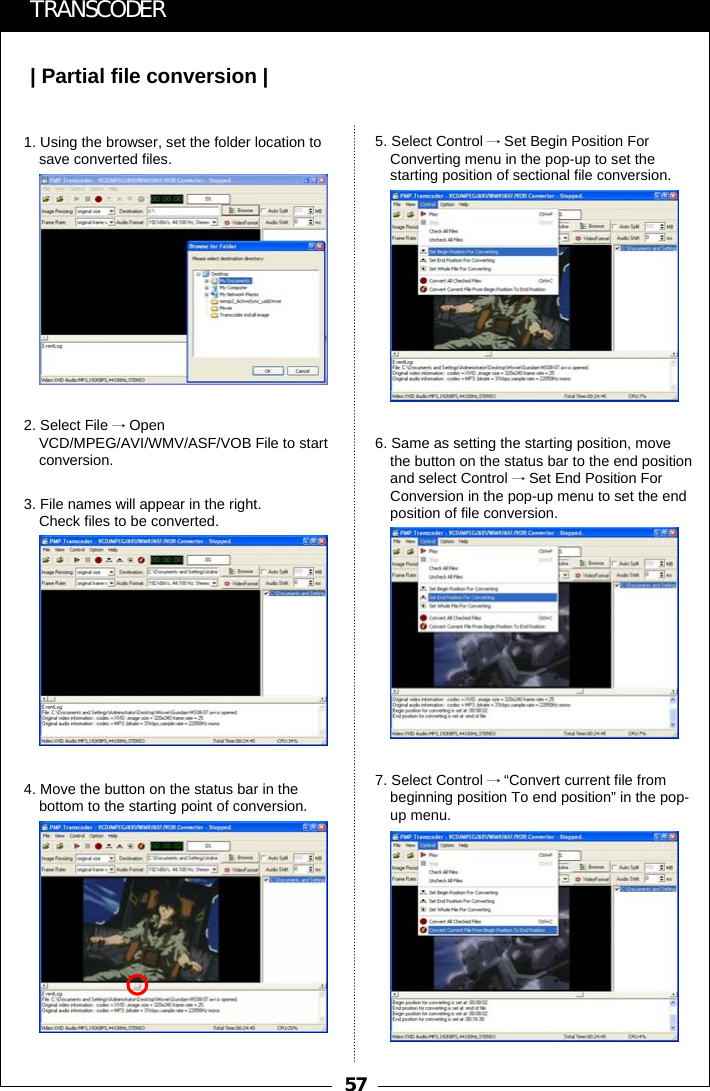
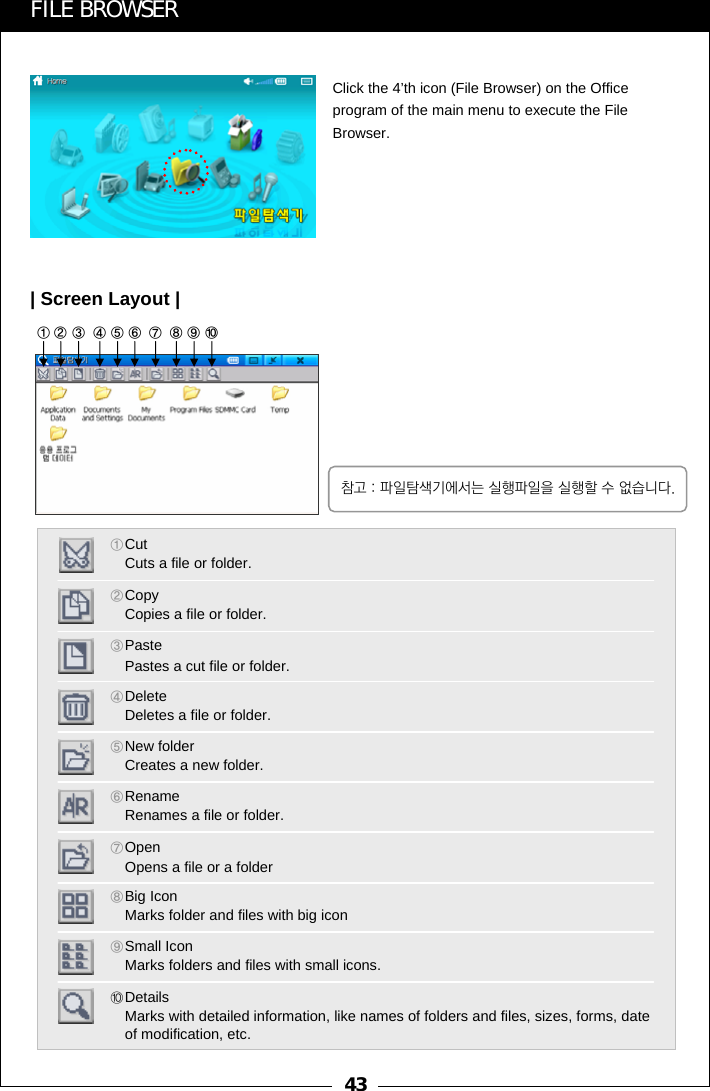
![54| Using the Transcoder |TRANSCODERTranscoder window1. File lists window: Displays currently opened files.2. Status bar: Show status for currently running command.3. Playing time and estimated file converting time: displays Playing time or estimated time for file converting.4. Play and converting status sign: Displays playback or file converting status.5. Assigning file size: Use when the converted file needs to be divided into sections. 6. Setting audio file synchronization: Use to match sound to the original audio file.Menu bar• Opening files to be converted sets options automatically.• Image Resizing: Select file size (limit the resolution under 640 x 480 for images whose resolution is 640 x 480 or over)• Destination: Locate converted file.• Frame Rate: Sets the frame rate.• Audio Format: Sets audio file sampling frequency and bit-rate.Defaults are 192 kBit/s, 44.100 Hz, stereo.• Video Format: Video option setting window (Automatic setup)Icons1.Open2.Close3.Play4.Stop5.Convert selected files6.Set starting point of the file section to be converted7.Set ending point of the file section to be converted8.Convert all current files9.Run section converting12 3456789Press [Start] in the lower left part then go to [Program(P)] →[PMP Transcoder] →[PMP Transcoder], or double-click PMP Transcodericon in background.345612](https://usermanual.wiki/Elentec/N4410/User-Guide-795297-Page-54.png)