Elster Solutions HHI02 Hand Held Interrogator User Manual UserGuide 52808T510 xx TIVRTCE
Elster Solutions, LLC Hand Held Interrogator UserGuide 52808T510 xx TIVRTCE
Users Manual

Copyright © 2001- 2006 AMCO Automated Systems
All Rights reserved
U
U
U
S
S
S
E
E
E
R
R
R
G
G
G
U
U
U
I
I
I
D
D
D
E
E
E
TRACE
®
T
Tr
ra
ac
ce
e
I
In
nt
te
er
rr
ro
og
ga
at
to
or
r
V
VR
RT
T
(
(T
TI
I
V
VR
RT
T)
)
f
fo
or
r
W
Wi
in
nd
do
ow
ws
s
C
CE
E

TRACE
INTERROGATOR
VRT
(CE)
O
PERATIONS
Trace Interrogator VRT (CE) - User Guide
AMCO Automated Systems P/N 52808T510 Rev. E, April 28, 2006
2
Introduction......................................................5
FCC Compliance ....................................................................... 5
System Requirements .....................................6
Hardware Requirements........................................................... 6
Software Requirements ............................................................ 6
Warnings.................................................................................... 6
TI VRT CE Operation................................................................. 6
Conventions .....................................................7
<Esc> ......................................................................................... 7
<Enter>....................................................................................... 7
<Up Arrow>, <Down Arrow>..................................................... 7
<Tab> ......................................................................................... 7
Message Box <Yes> <NO> ....................................................... 7
Stylus ......................................................................................... 7
TIV Screens ......................................................8
Splash screen............................................................................ 8
Main............................................................................................ 8
Route Selection......................................................................... 9
Communications....................................................................... 9
Data Entry................................................................................ 10
Exit TI VRT CE ......................................................................... 11
Account Navigation and Data Entry.............11
Navigation................................................................................ 11
<Esc>............................................................................................12
<Enter>.........................................................................................12
<Up Arrow>, <Down Arrow>.......................................................12
Jumps ...................................................................................... 12
Jump to Account Details ............................................................13
Jump to Beginning of Current Route.........................................13
Jump to End of Current Route ...................................................13
Jump to Specified Sequence Number .......................................13
Jump to the Next Route ..............................................................13
Jump to the Previous Route.......................................................13

TRACE
INTERROGATOR
VRT
(CE)
O
PERATIONS
Trace Interrogator VRT (CE) - User Guide
AMCO Automated Systems P/N 52808T510 Rev. E, April 28, 2006
3
Jump to Next Unread Account in the Current Route................13
Searches.................................................................................. 14
To perform a search....................................................................14
Information Displays............................................................... 15
Help / Available Commands Display..........................................15
Route Selection Display..............................................................15
Route Summary Display .............................................................16
Configuration Display .................................................................17
Updating Configuration of Handheld.........................................17
Account Details Display..............................................................18
Instruction Code Display ............................................................19
Location Code Display................................................................20
Messages Display........................................................................20
Error Log Display ........................................................................21
Trouble Code Display..................................................................21
Appointments ..............................................................................22
Data Entry Operations ............................................................ 23
Default Read of An Unread Account..........................................24
Manual Index Read......................................................................24
Clear Index Read .........................................................................25
Force Unattempted Account ......................................................25
Adding a Trouble Code...............................................................25
Adding / Editing a Text Message................................................26
Setting the Re-sequence Flag ....................................................27
Single RF Index Read..................................................................28
Multiple Parameter RF Read.......................................................29
Single History / TOU RF Read ....................................................32
General Index RF Read ...............................................................32
VersaProbe.............................................................................. 33
Jump to VersaProbe connection................................................33
VersaProbe Communication Modes..........................................33
Data Entry with VersaProbe .......................................................36
Read with VersaProbe.................................................................36
Transponder Installation ........................................................ 38
Change Out..................................................................................38
Data Entry with Installation ........................................................41
Using the Scanner.......................................................................44
Using the GPS .............................................................................44
Verification .............................................................................. 46
Data Entry with Verification........................................................46
Read with Transponder Verification ..........................................46

TRACE
INTERROGATOR
VRT
(CE)
O
PERATIONS
Trace Interrogator VRT (CE) - User Guide
AMCO Automated Systems P/N 52808T510 Rev. E, April 28, 2006
4
TI VRT CE Communication with Route
Manager VRT..................................................50
Establishing communications................................................ 50
Uploading Routes from RM VRT to TI VRT (CE) ................... 52
Downloading data From TI VRT (CE) to RM VRT .................. 53
Removing Route From TI VRT (CE) ....................................... 53
Updating Handheld files ......................................................... 53
Hot Keys..........................................................55
Configuration .................................................56
General..................................................................................... 56
VersaProbe.............................................................................. 57
Scanner & GPS........................................................................ 58
Troubleshooting.............................................59

TRACE
INTERROGATOR
VRT
(CE)
O
PERATIONS
Trace Interrogator VRT (CE) - User Guide
AMCO Automated Systems P/N 52808T510 Rev. E, April 28, 2006
5
Introduction
Copyright © 2001- 2006 AMCO Automated Systems.
All Rights Reserved
The contents of this document are the property of AMCO Automated
Systems and are copyrighted. All rights reserved. Any reproduction, in
whole or in part, is strictly prohibited. For additional information regarding
this document, please contact:
Customer Service
AMCO Automated Systems
208 South Rogers Lane
Raleigh, NC 27610
Phone: 800-786-2215
http://www.amcoas.com
The information contained herein has been carefully checked and is
believed to be accurate; however, no responsibility is assumed for
inaccuracies. AMCO Automated Systems reserves the right to make
changes without prior notice. This document is not covered by any
warranty either expressed or implied. Any correction, comments or
additions to the contents of this document should be directed to AMCO
Automated Systems at the above address.
TRACE, Universal RF Interface (RF), Mini Mobile Interrogator (MMI) and
ReadIt are also trademarks of AMCO Automated Systems. All rights
reserved.
MS-DOS, MS Windows, MS Windows CE and IBM are registered
trademarks of their respective owners.
FCC Compliance
The VRT HAND HELD Interrogator (HHI) has been type accepted by the Federal
Communications Commission under Part 90. Transmitter licensing is required by the
FCC. The VRT HAND HELD Interrogator (HHI) transmitter is currently licensed by
the FCC to operate at 451.355 MHz. FCC ID’s G8JHHI01, G8JHHI02.
Changes or modifications to this equipment not expressly approved by AMCO
Automated Systems could void the user's authority to operate this equipment.
This device complies with Part 15 of the FCC rules. Operation is subject to the
condition that this device does not cause harmful interference.
The TRACE transponder is governed by FCC Part 15 and requires no licensing.

TRACE
INTERROGATOR
VRT
(CE)
O
PERATIONS
Trace Interrogator VRT (CE) - User Guide
AMCO Automated Systems P/N 52808T510 Rev. E, April 28, 2006
6
System Requirements
Hardware Requirements
DAP 5240 or 5240X with AMCOAS integrated RF card
Software Requirements
Windows CE 4.20
Route Manager VRT 2.0 or later
TI VRT CE 1.1 or later
Warnings
Do not attempt to modify or edit any of the subsidiary tables or files
outside of the TI VRT (CE) / RM VRT environment without prior
authorization by AMCO Automated Systems technical service personnel.
Unauthorized manipulation of these files may void your software service
agreements.
Uploading from Route Manager VRT (RM VRT) will overwrite
Route/Account information on the Hand Held. It is the User’s responsibility
to download any data prior to uploading.
RF EXPOSURE
The antenna used for this transmitter must be installed to provide a
separation distance of at least 24 cm from all persons, and must not be
co-located or operating in conjunction with any other antenna or
transmitter.
TI VRT CE Operation
The screen shots shown in various illustrations may vary slightly from your
handheld’s display.

TRACE
INTERROGATOR
VRT
(CE)
O
PERATIONS
Trace Interrogator VRT (CE) - User Guide
AMCO Automated Systems P/N 52808T510 Rev. E, April 28, 2006
7
Conventions
All user interactions are via the handheld’s keyboard. TI VRT CE responds
to the keystrokes independent of platform. All letters are assumed to be
upper case. Function keys F1 – F4 are also used.
<Esc>
o Cancels operations
o Exits screens
<Enter>
o In menus/list boxes selects item
o In editable field submits entry
o When on an unread rf account, triggers an rf read.
o With Automove on and on a completed account, and moves to next
Account.
o In Details list box (History & TOU) initiates single interrogation of
highlighted item
<Up Arrow>, <Down Arrow>
These keys are used to navigate between accounts within the current
Route. When either the first or last account is reached an audible warning
will sound and the display will remain on the current account.
<Tab>
➜❙ Key is used to navigate between fields within the current screen
(messages, search, etc.).
Message Box <Yes> <NO>
The response to the message box can be:
o Touching the button <Yes> or <No> with stylus
o Clicking letter “Y” or “N” on the keyboard
o Moving to the desired button by using left/right arrow keys and
pressing Enter when the button is highlighted.
Stylus
In most cases it’s possible instead of moving to a specific location and
pressing ENTER just to touch it with a stylus.
TRACE
INTERROGATOR
VRT
(CE)
O
PERATIONS
Trace Interrogator VRT (CE) - User Guide
AMCO Automated Systems P/N 52808T510 Rev. E, April 28, 2006
8
TIV Screens
Splash screen
Main
TRACE
INTERROGATOR
VRT
(CE)
O
PERATIONS
Trace Interrogator VRT (CE) - User Guide
AMCO Automated Systems P/N 52808T510 Rev. E, April 28, 2006
9
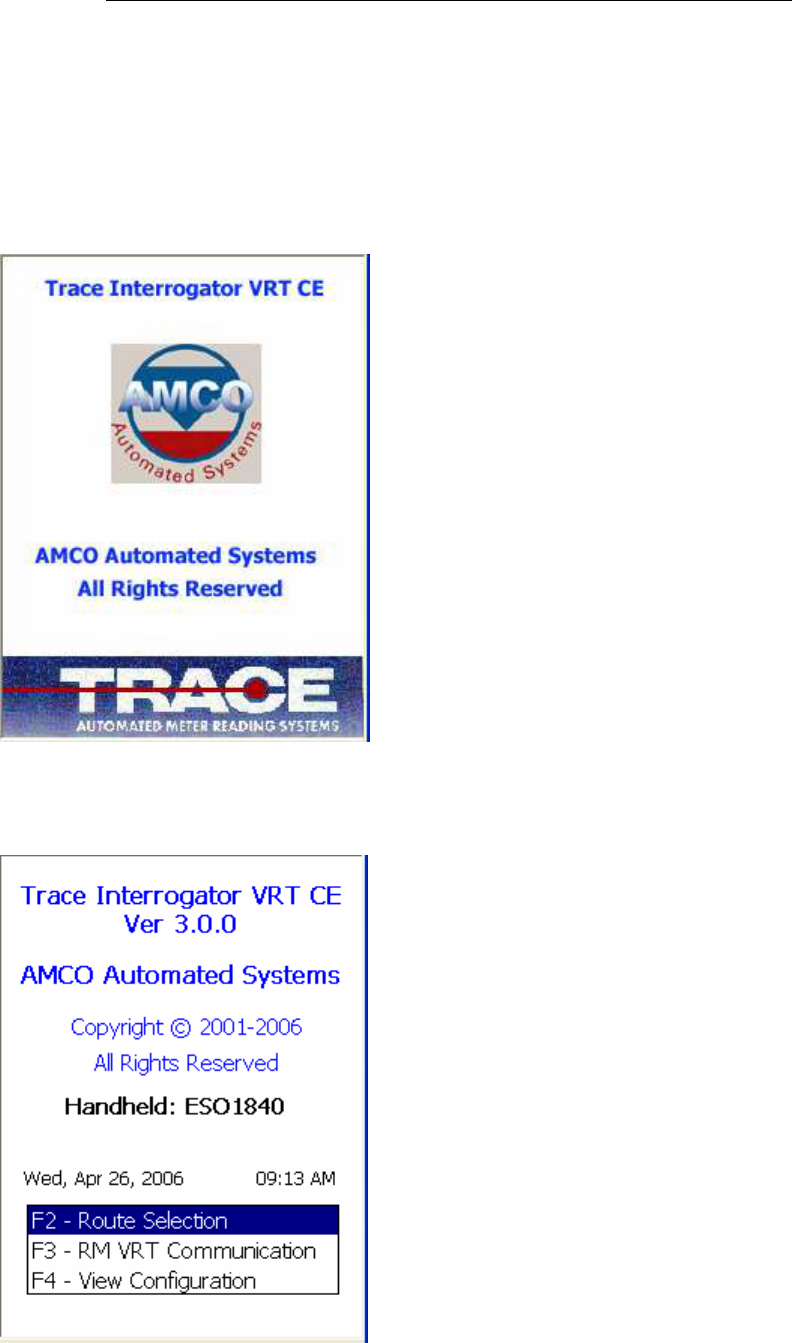
The main screen allows the selection of the following modes:
o Route Selection / Data Entry
o Communication (between RMVRT and device)
Route Selection
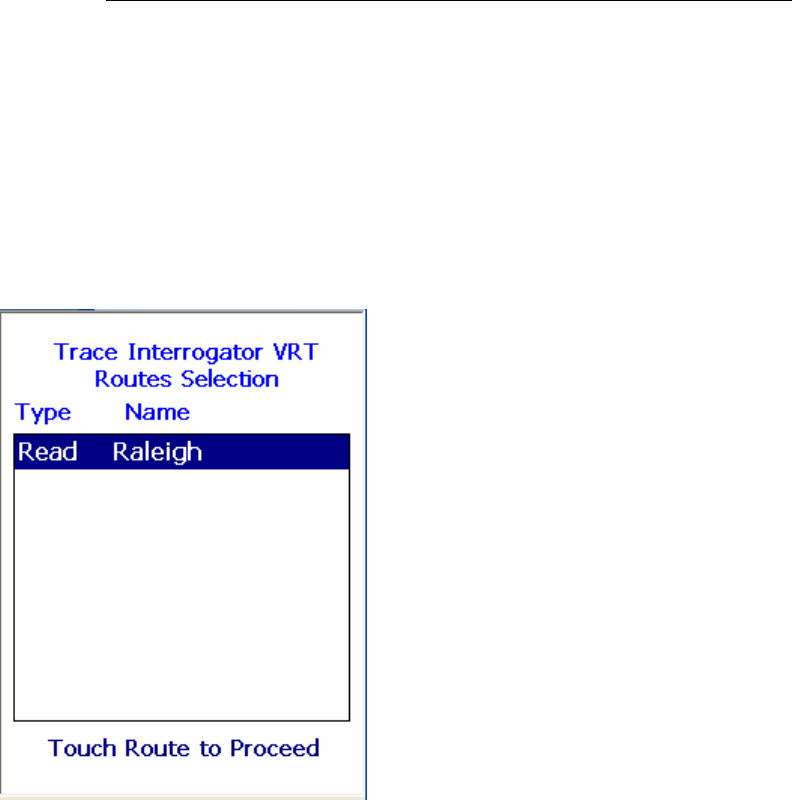
If Route Selection is selected, the list of routes loaded in the device is
displayed along with the Route type. To view/update Account information
for the chosen route highlight the route and press “Enter” or touch the
chosen route line on the screen.
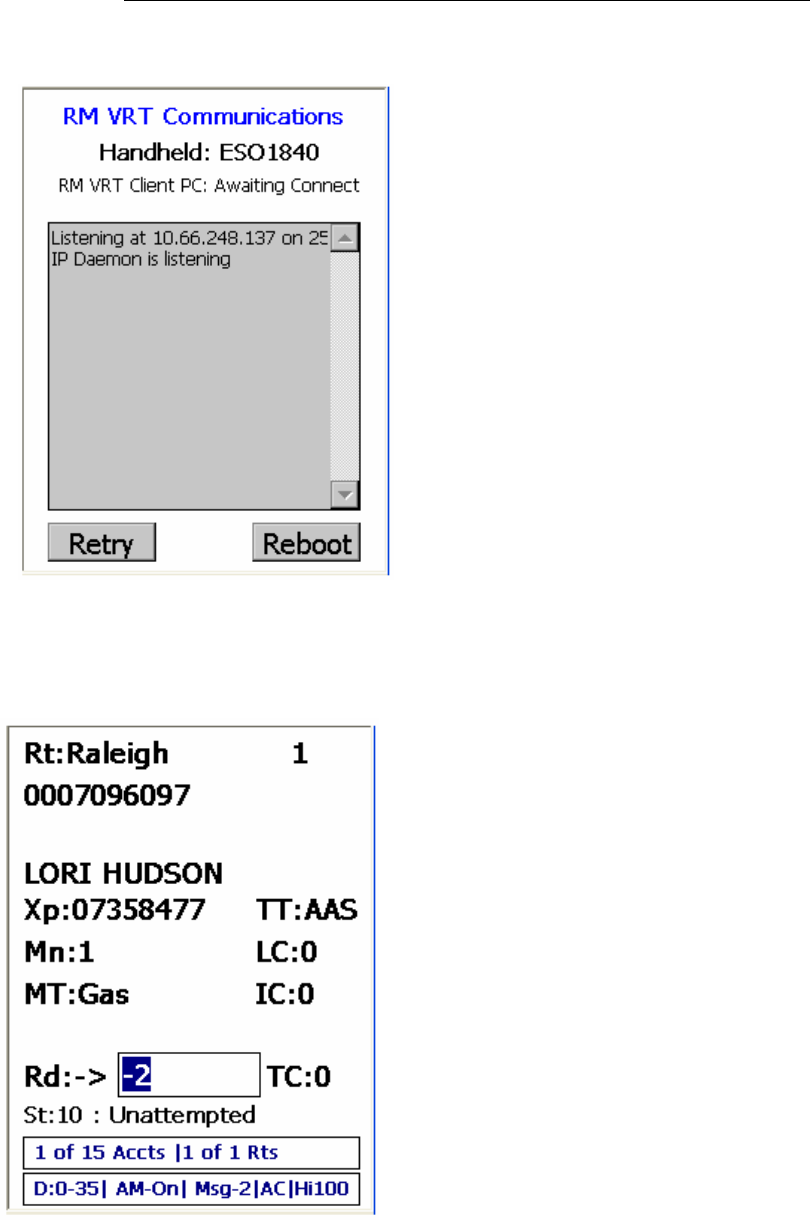
Communications
The Communications mode is used to exchange data files and other
information with Route Manager VRT. This selection, opens the specified
communications port, displays the communications screen and initiates
polling for incoming messages from RM VRT.
TRACE
INTERROGATOR
VRT
(CE)
O
PERATIONS
Trace Interrogator VRT (CE) - User Guide
AMCO Automated Systems P/N 52808T510 Rev. E, April 28, 2006
10
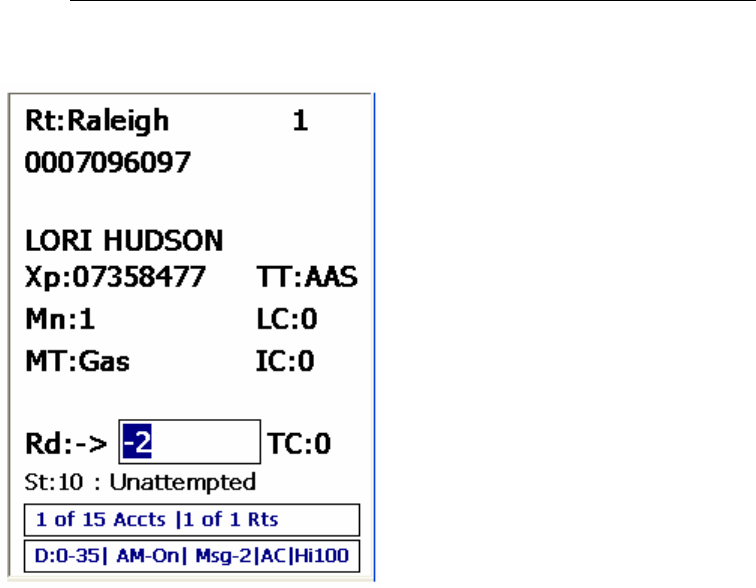
Data Entry
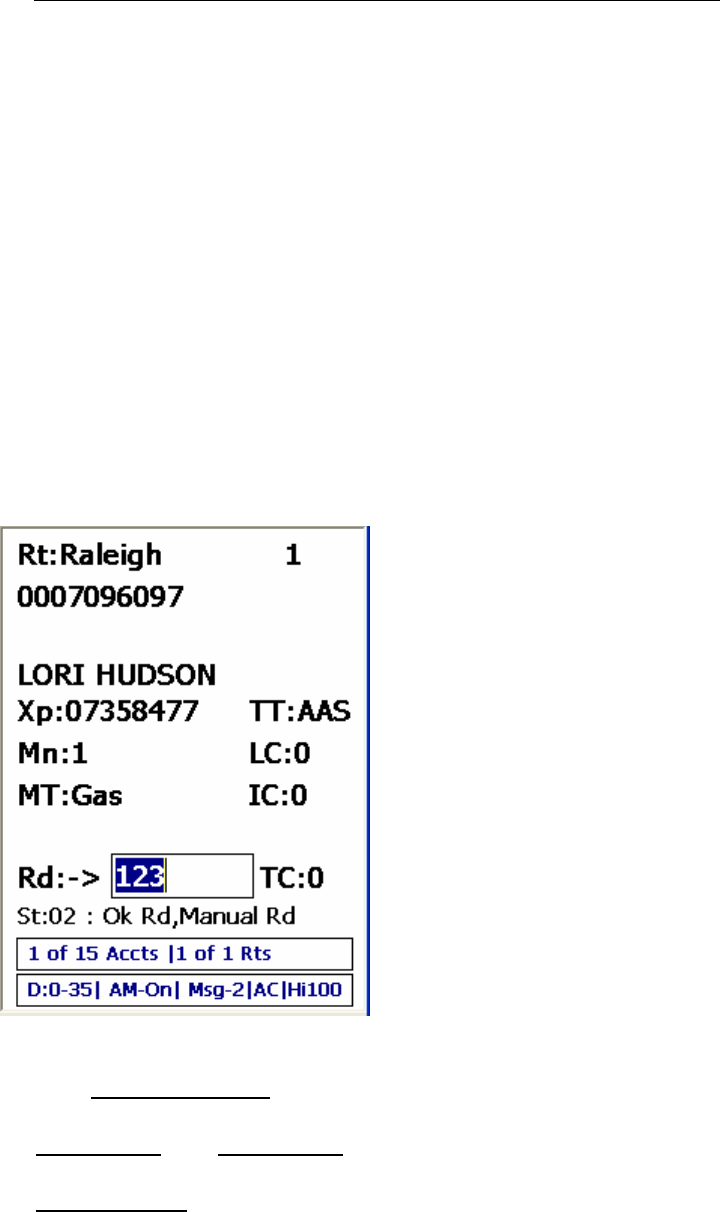
Rt: Route ID
Xp: Transponder Serial Number
TT: Transponder Type
Mn: Meter Number
LC: Location Code
MT: Meter Type
IC: Instruction Code
Rd: Index Read
: Direction of Data Entry
TC: Trouble Code
St: Account Status
D:0-35 Number of VRT details (requests)
available
AM-off/on AutoMove enabled
Msg-2 There are 2 messages in the
alarm category.
AC / BT : shows the type of power: AC
from cradle or BT from battery
Hi100% : shows that the battery is charged
at 100%
TRACE
INTERROGATOR
VRT
(CE)
O
PERATIONS
Trace Interrogator VRT (CE) - User Guide
AMCO Automated Systems P/N 52808T510 Rev. E, April 28, 2006
11
Exit TI VRT CE
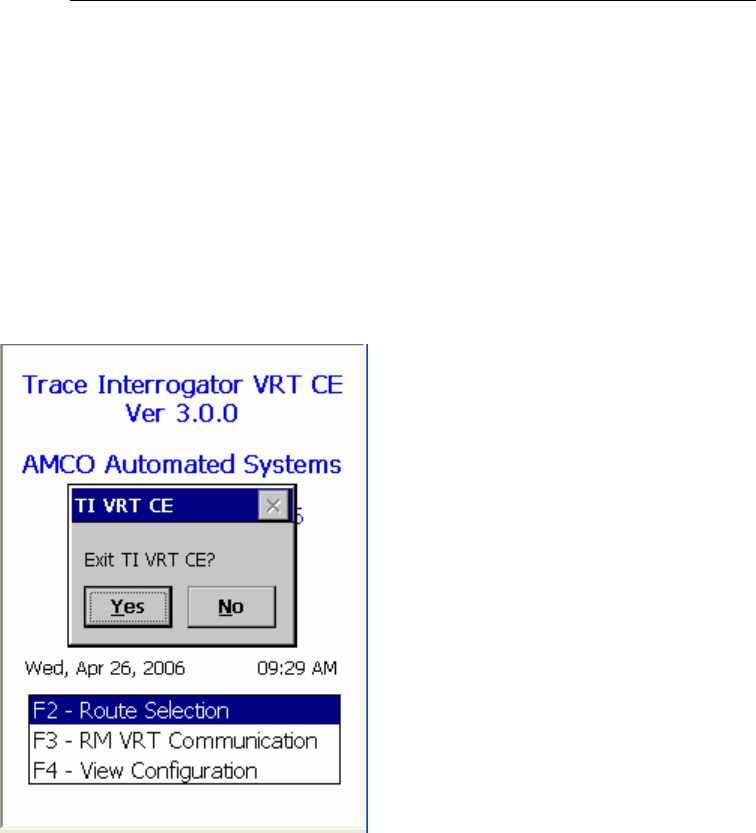
Pressing the <ESC> in the Main Menu will pop up a confirmation box.
Use the <TAB>, <Left Arrow>, or <Right Arrow> keys to select the
response.
• Touch “YES” button or click the “Y” key or click the <Enter> key
when the button is highlighted to accept the selection.
• Touch <No> button or click the “N” key or click the <Enter> key
when the button is highlighted to Cancel.
Account Navigation and Data Entry
Navigation
All user interactions are via the handheld’s keyboard or the Touch
Screen using a stylus. TI VRT (CE) responds to the keystrokes
independent of platform. All letters are assumed to be upper case.
Function keys F1 – F4 are also used.
TRACE
INTERROGATOR
VRT
(CE)
O
PERATIONS
Trace Interrogator VRT (CE) - User Guide
AMCO Automated Systems P/N 52808T510 Rev. E, April 28, 2006
12
<Esc>
o Cancels operations.
o Exits screens.
<Enter>
o In menus/list boxes selects item.
o In editable field submits entry.
o With Automove on, submits entry and moves to next Account.
o In Details list box (History & TOU) initiates single interrogation of
highlighted item.
o In Read box on Data Entry Screen, initiates RF interrogation of
current account.
<Up Arrow>, <Down Arrow>
These keys are used to navigate between accounts within the current
Route. When either the first or last account is reached an audible
warning will sound and the display will remain on the current account.
Jumps
Jumps are moving from the current account in the current route to
various other accounts and routes. Pressing the appropriate hot key
activates jumps. The X (Cancel Jump) Hot key is used to return to the
account displayed just prior to the jump except as noted.

TRACE
INTERROGATOR
VRT
(CE)
O
PERATIONS
Trace Interrogator VRT (CE) - User Guide
AMCO Automated Systems P/N 52808T510 Rev. E, April 28, 2006
13
Jump to Account Details
Hot Key: A
This is a jump to the account details screen of a selected account
on the data entry screen.
X has no effect.
<ESC> closes the popup.
Jump to Beginning of Current Route
Hot Key: B
This is a jump to the first account in the current route.
X Jumps to record displayed prior to the jump.
If pressed at the beginning of the route the bounds beep sounds
and the display remains on the current account.
Jump to End of Current Route
Hot Key: E
This is a jump to the Last account in the Current route.
X Jumps to record displayed prior to the jump.
If pressed at the end of the route the bounds beep sounds.
Jump to Specified Sequence Number
Hot Key: J
This is a jump to a specified sequence number in the current route.
After pressing the J hot key an entry window will pop up. Type the
sequence number in the box and press the <ENTER> key.
X Jumps to record displayed prior to the jump.
Jump to the Next Route
Hot Key: N
This is a jump to next route.
X has no effect.
If pressed on the Last route the bounds beep sounds and the
display remains on the current account.
Jump to the Previous Route
Hot Key: P
This is a jump to the first account in the previous route.
X has no effect.
If pressed on the first route the bounds beep sounds and the
display remains on the current account.
Jump to Next Unread Account in the Current Route
Hot Key: U
TRACE
INTERROGATOR
VRT
(CE)
O
PERATIONS
Trace Interrogator VRT (CE) - User Guide
AMCO Automated Systems P/N 52808T510 Rev. E, April 28, 2006
14
This is a jump to a next account with index read –2 and trouble
code 0 in the current route.
X Jumps to record displayed prior to the jump.
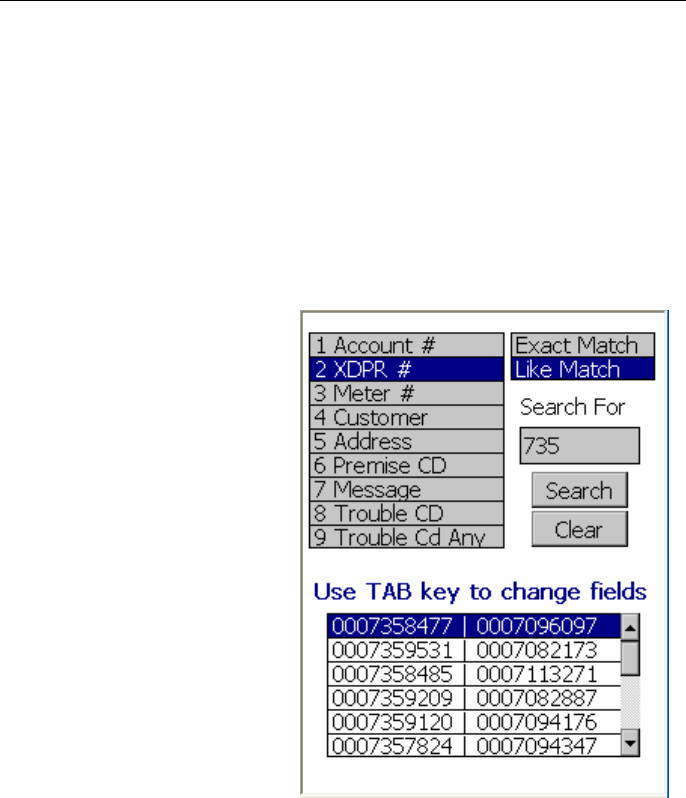
Searches
Hot Key: H search menu
Searches allow the user to jump to
any specified account in the current
Route. Currently the following
searches are available:
• Account number
• Transponder number
• Meter number
• Customer Name
• Customer address
• Premise code
• Specific trouble code
• Any trouble code
To perform a search
• Press the H key to bring up the search type display
• Select the type of search to perform using the <Up Arrow/Down
Arrow> keys or stylus.
• Use the <
➜❙
> key (Tab) or stylus to move between fields on the
screen
• Select whether exact match is wanted or the search performed by
partially submitted information is preferred (except for search for
accounts with trouble code).
• Fill the field with the desired information (except for search for
accounts with any trouble code).
• Click Search to begin the defined search or press ENTER while
Search button is being highlighted.
• Searches with only 1 account returned will jump directly to that
account.

TRACE
INTERROGATOR
VRT
(CE)
O
PERATIONS
Trace Interrogator VRT (CE) - User Guide
AMCO Automated Systems P/N 52808T510 Rev. E, April 28, 2006
15
• If there are multiple accounts satisfying the requested search then
the results list will present the following information
Account Number
Address
Select an item from the results list and press the <ENTER> key or
click with the stylus to jump to the account.
• Pressing the <ESC> key cancels the search.
• Press button <Clear> to clear the search and to start over.
X Jumps to record displayed prior to the jump.
Note: Transponder number for exact search has to be 8 digits.
Information Displays
Several informational displays are available to the user from the data
entry screen. Most of these take the form of a Pop-Up List Box over
the Data Entry screen. As usual the <ESC> key acts as the Cancel
button to exit back to Account Data Entry screen.
Help / Available Commands Display
Hot Key: F1
X has no effect.
• <Up Arrow> and <Down Arrow> keys select the desired hot key
from the list.
• <ENTER> initiates the command as if the hot key had been
pressed.
• Clicking the desired selection with a stylus initiates the
command.
• Pressing the shortcut letter on the keyboard performs the
shortcut.
• <ESC> closes the popup.
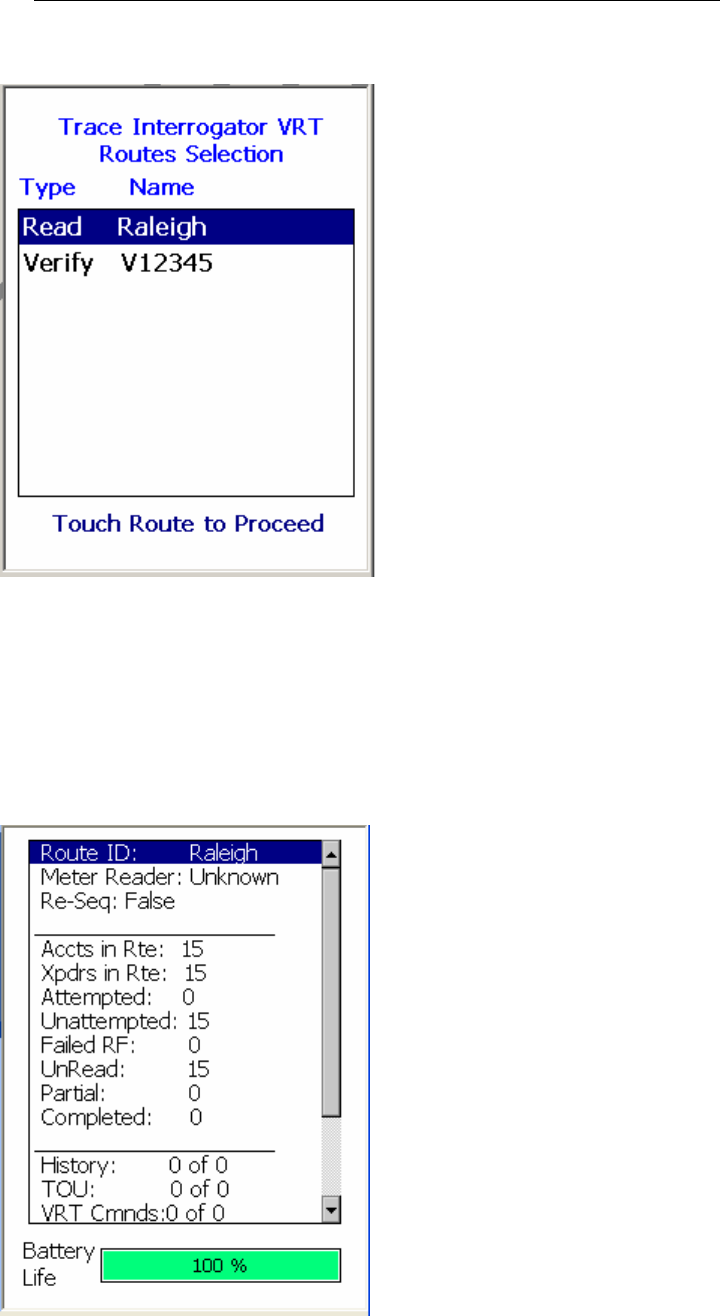
Route Selection Display
Hot Key: F2
X has no effect
• <Up Arrow> and <Down Arrow> keys select the desired Route
from the list.
• <Enter> jumps to the first account in the selected route.
• <ESC> closes the popup.
Note: Clicking the desired route with a stylus jumps to the first
account in the selected route
TRACE
INTERROGATOR
VRT
(CE)
O
PERATIONS
Trace Interrogator VRT (CE) - User Guide
AMCO Automated Systems P/N 52808T510 Rev. E, April 28, 2006
16
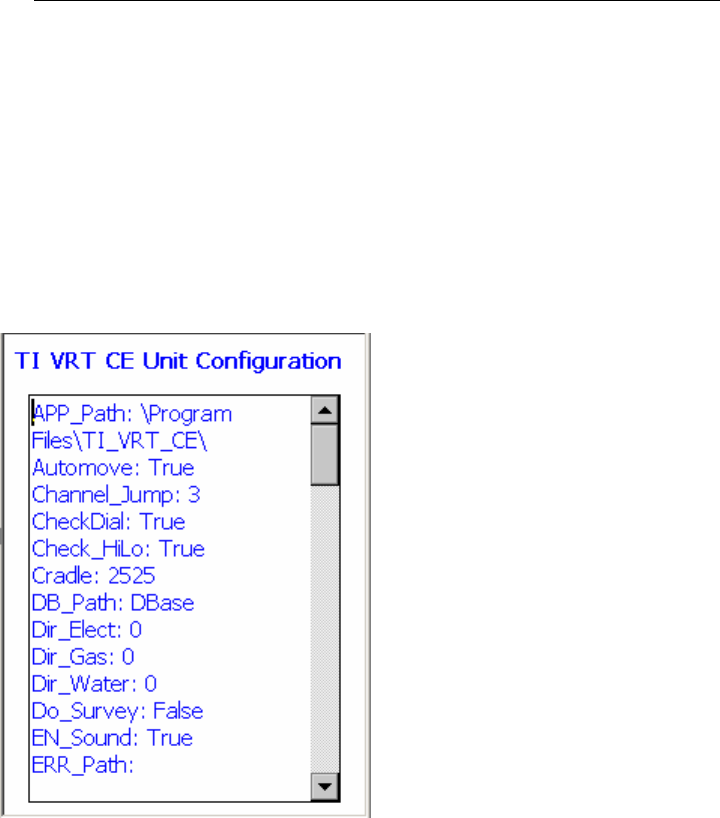
Route Summary Display
Hot Key: F3
X has no effect.
Use <Up Arrow> and <Down Arrow> or stylus to move within the
screen.
<ESC> closes the popup.
TRACE
INTERROGATOR
VRT
(CE)
O
PERATIONS
Trace Interrogator VRT (CE) - User Guide
AMCO Automated Systems P/N 52808T510 Rev. E, April 28, 2006
17
Configuration Display
Hot Key: F4
X has no effect.
Use <Up Arrow> and <Down Arrow> or stylus to move within the
screen.
Tab moves the cursor from the Meter Reader configuration items to
all the configuration items.
<ESC> closes the popup.
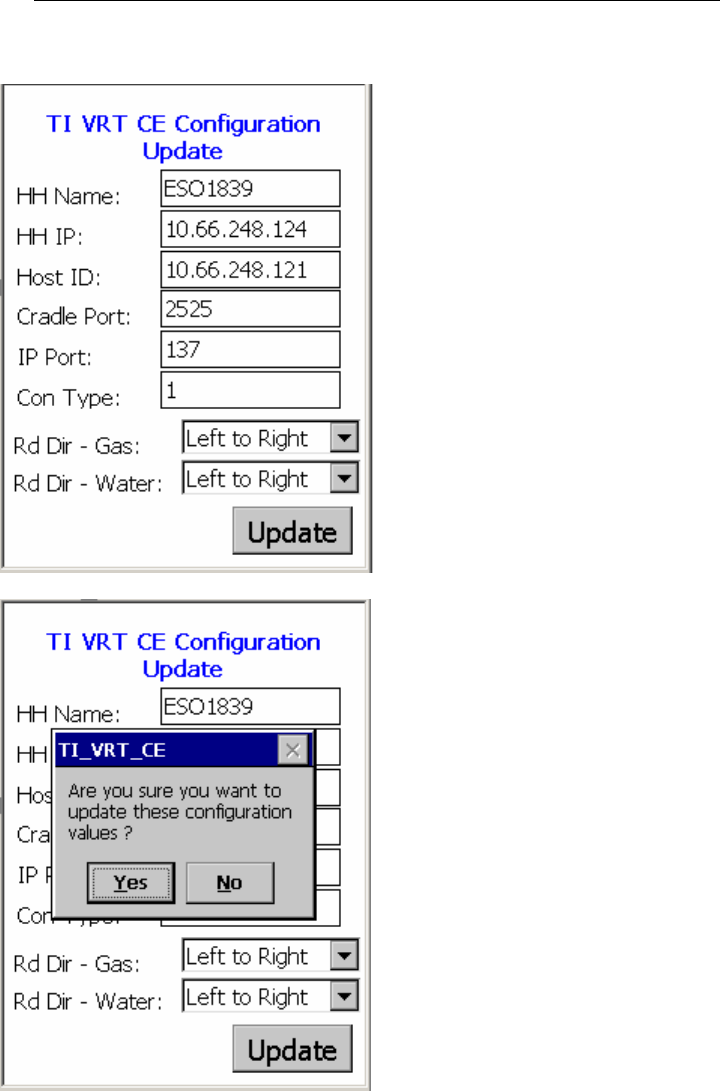
Updating Configuration of Handheld
Hot Key: F4 Twice
If the handheld device was previously used by another person or
used for the first time, you can update the configuration to enable
the handheld device to communicate with Route Manager VRT.
You can also change the read direction for manual reads. Once the
handheld is updated, you will be asked to confirm the changes on
configuration as seen below.
TRACE
INTERROGATOR
VRT
(CE)
O
PERATIONS
Trace Interrogator VRT (CE) - User Guide
AMCO Automated Systems P/N 52808T510 Rev. E, April 28, 2006
18
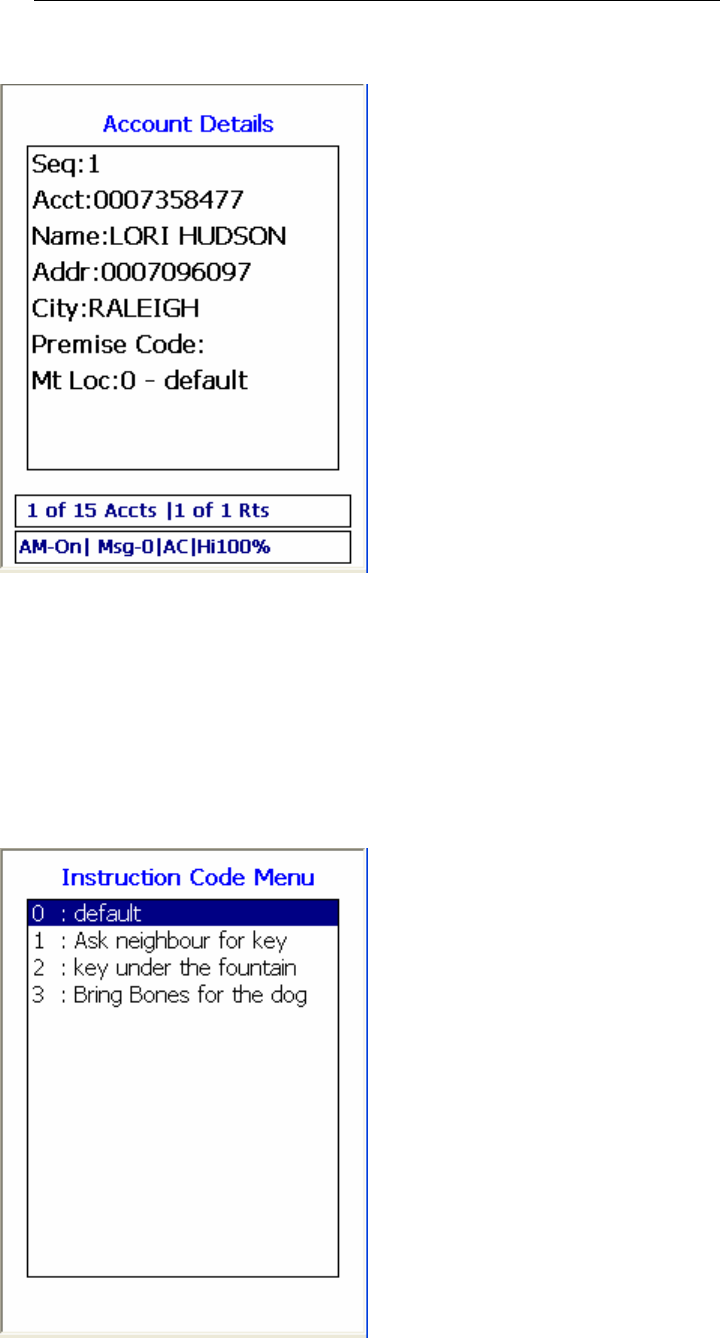
Account Details Display
Hot Key: A
<ESC> closes the popup.
A is used to display the account details of a selected account on
the data entry screen.
TRACE
INTERROGATOR
VRT
(CE)
O
PERATIONS
Trace Interrogator VRT (CE) - User Guide
AMCO Automated Systems P/N 52808T510 Rev. E, April 28, 2006
19
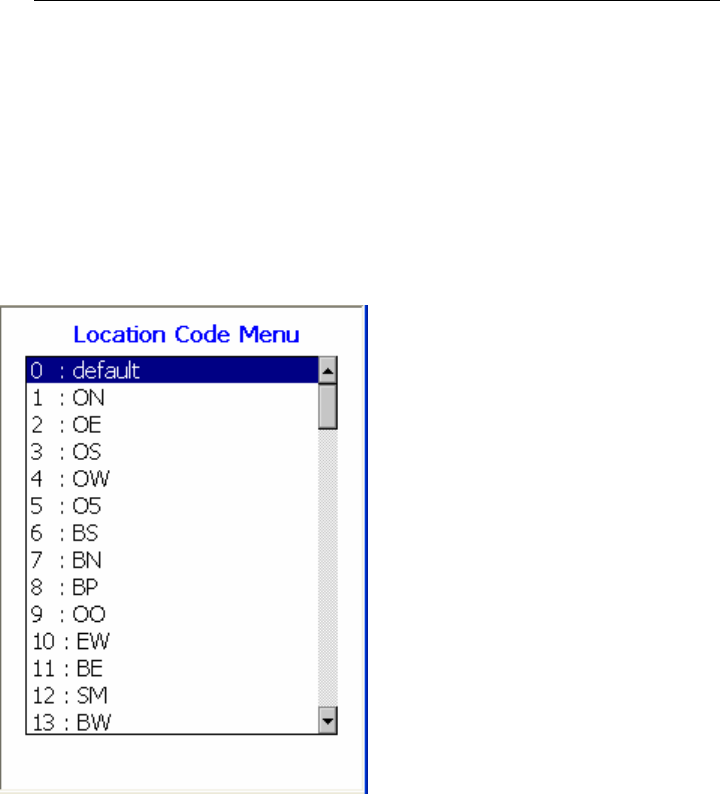
Instruction Code Display
Hot Key: I
<ESC> closes the popup.
Instruction codes are used to indicate instructions for Meter
Reader. Pressing I opens the list of available Instructions codes.
TRACE
INTERROGATOR
VRT
(CE)
O
PERATIONS
Trace Interrogator VRT (CE) - User Guide
AMCO Automated Systems P/N 52808T510 Rev. E, April 28, 2006
20
Location Code Display
Hot Key: L
<ESC> closes the popup.
Location codes are used to indicate Location of
Meters/Transponders. Pressing L opens the list of available
Location codes.
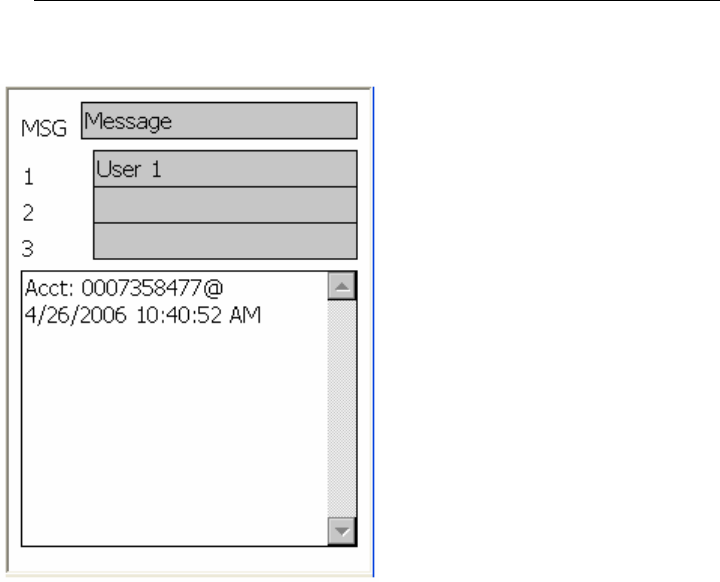
Messages Display
Hot Key: M
<ESC> closes the popup.
A 19-character message, 3 user messages of 20 characters each
can be entered for each account or edited using this option.
These messages can be sent from RM VRT. If “M” appears the
lower Information Bar of the data entry display, the account
contains one or more messages. If “!!” follow the message then one
of the messages contain alarm.
A free form note pad is also available here. A free form note pad is
NOT account specific but is common to all accounts and all routes.
TRACE
INTERROGATOR
VRT
(CE)
O
PERATIONS
Trace Interrogator VRT (CE) - User Guide
AMCO Automated Systems P/N 52808T510 Rev. E, April 28, 2006
21
It can be configured in RM VRT not to allow to edit messages.
An audible alarm can be set in RM VRT if one of the messages
contains alarm; if sound is disable a message box will pop up with
the warning.
Error Log Display
Hot Key: O
Use <Up Arrow> and <Down Arrow> or stylus to move within the
screen.
<ESC> closes the popup.
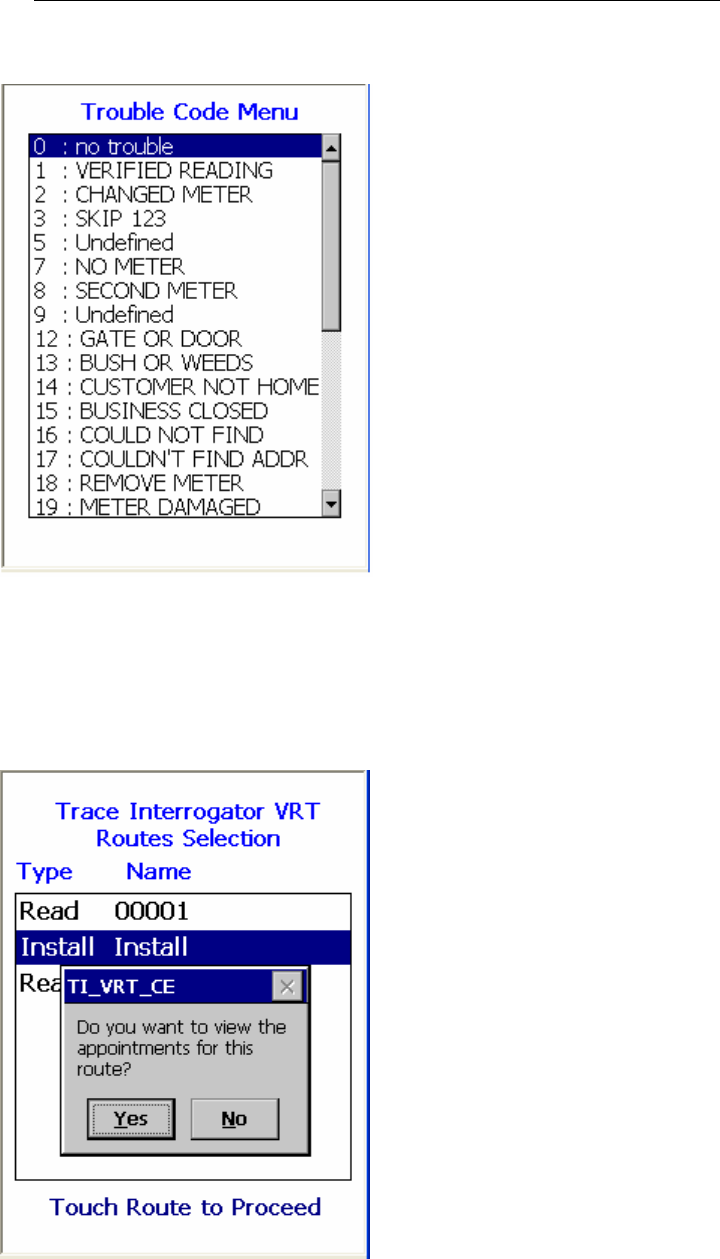
Trouble Code Display
Hot Key: T
<ESC> closes the popup.
Trouble codes are used to indicate problems with obtaining
readings. Pressing T opens the list of available trouble codes.
TRACE
INTERROGATOR
VRT
(CE)
O
PERATIONS
Trace Interrogator VRT (CE) - User Guide
AMCO Automated Systems P/N 52808T510 Rev. E, April 28, 2006
22
Appointments
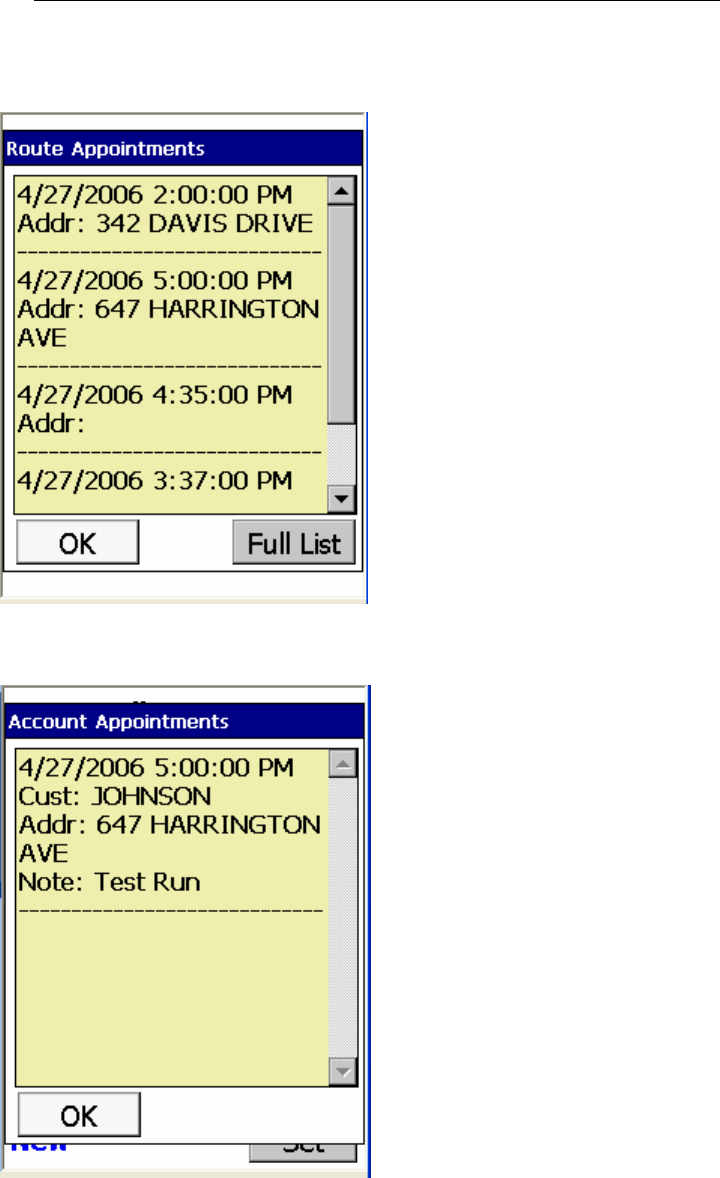
An appointment can be set for transponder installation, troubleshooting
etc. While selecting the routes, following message will be displayed on the
screen only if it has appointments set for selected route.
Click on Yes button to view list of today’s installation appointments for the
selected route. To view messages in details, click on Full List.
TRACE
INTERROGATOR
VRT
(CE)
O
PERATIONS
Trace Interrogator VRT (CE) - User Guide
AMCO Automated Systems P/N 52808T510 Rev. E, April 28, 2006
23
Detail appointment’s message will also be displayed as an “Account
Appointments” screen of particular account having appointment
Data Entry Operations
Index reads can be entered manually, singly by RF, as part of a
multiple parameter read of Index, History and TOU.
TRACE
INTERROGATOR
VRT
(CE)
O
PERATIONS
Trace Interrogator VRT (CE) - User Guide
AMCO Automated Systems P/N 52808T510 Rev. E, April 28, 2006
24
History and TOU reads can be performed either singly or as part of a
multiple parameter read of Index, History and TOU.
Default Read of An Unread Account
If the current read value is -2 and the transponder number is not
blank, then pressing the <ENTER> key will trigger an RF read of
the transponder.
Manual Index Read
Enter digits 0 - 9 and press the <ENTER> key.
The direction of manually reading a meter is shown by the arrow by
the reading and is dependant on the meter type.
The number entered will be checked against:
• The number of dials as reported in Route Manager for the
account. This option can be turned off/on in RM VRT.
• Upper Limit and Lower Limit for the account as reported in RM
VRT. This option can be turned off/on in RM VRT.
• Previous read for the account as reported in RM VRT. A Zero
(0) uploaded for the value to check turns this option off.
If the entered index read fails the verification above the message
will pop up asking if it needs to be recorded or cancelled. Choose
the option by selecting “OK” to record or “X” to cancel.

TRACE
INTERROGATOR
VRT
(CE)
O
PERATIONS
Trace Interrogator VRT (CE) - User Guide
AMCO Automated Systems P/N 52808T510 Rev. E, April 28, 2006
25
If the Automove option is ON, the display will show the next
account in the route. If the account is the last one in the current
route an audible alert will sound.
Clear Index Read
Hot Key: C
X has no effect
After pressing the “C” key the reading is cleared and the cursor is
positioned in the index read field waiting for the entry to overwrite
the previous reading.
Force Unattempted Account
Hot Key: F
X has no effect
If the account had manual reading, then after pressing the “F” key
the message box pops up verifying if it’s really desired to reset
account. Selecting “Yes” clears the reading and trouble code and
sets the account status to Unattempted. Selecting “No” has no
affect on the account.
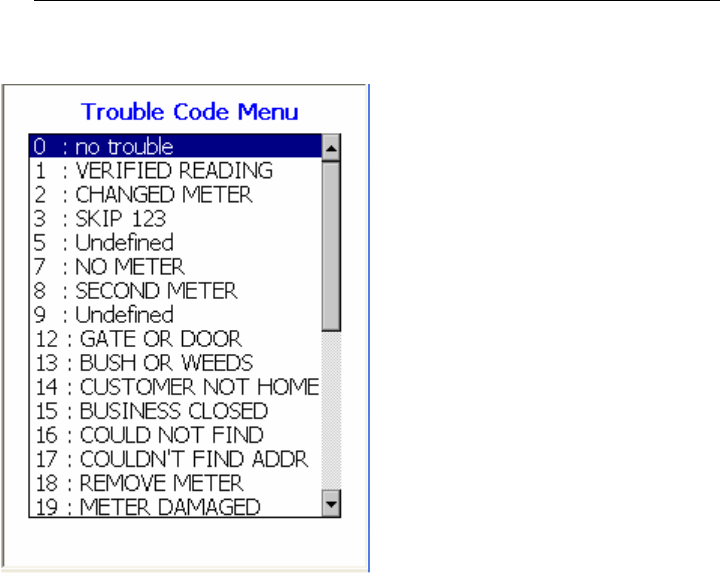
Adding a Trouble Code
Hot Key: T
X has no effect
Trouble codes are used to indicate problems with obtaining
readings. A code can be entered with or without entering a reading.
<Up Arrow> and <Down Arrow> keys select the desired Trouble
code from the list.
<ENTER> updates the account with the selected Trouble code.
<ESC> closes the popup.
P.S. Stylus selects the desired Trouble code from the list, updates
the account with the selected Trouble code and closes the popup.
TRACE
INTERROGATOR
VRT
(CE)
O
PERATIONS
Trace Interrogator VRT (CE) - User Guide
AMCO Automated Systems P/N 52808T510 Rev. E, April 28, 2006
26
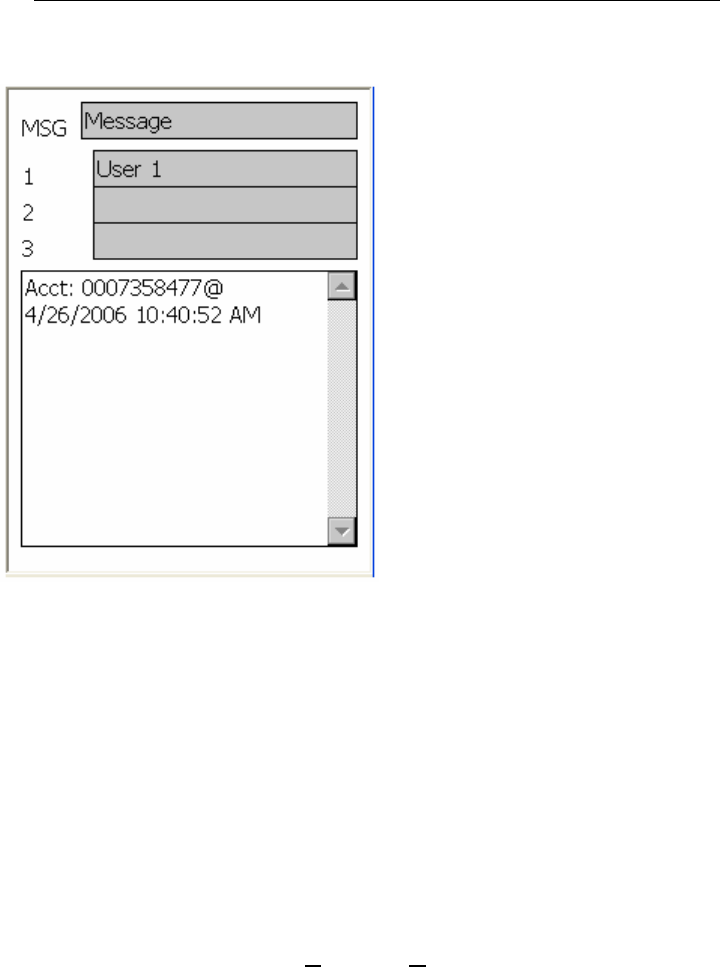
Adding / Editing a Text Message
Hot Key: M
X has no effect
A 19-character message, 3 user messages of 20 characters each
can be entered for each account or edited using this option. These
messages can be sent from RM VRT and changed depending on
the device configuration.
A free form note pad is also available here. Entry into the note pad
causes the account number and a time stamp to be added to any
already existing text. This option is NOT account specific and is
common to all accounts and routes. The text can be viewed from
any account in the device.
<TAB> or selecting message with a stylus moves the cursor to the
next message for editing. Messages can be allowed /disallowed to
be edited in the device configuration in Route Manager VRT.
<ESC> Asks if the changes to messages to be saved. Clicking
button <YES> with stylus or pressing key <Y> will save the
changes and close popup; pressing button <NO> or clicking key
<N> quit the popup without saving changes to messages.
TRACE
INTERROGATOR
VRT
(CE)
O
PERATIONS
Trace Interrogator VRT (CE) - User Guide
AMCO Automated Systems P/N 52808T510 Rev. E, April 28, 2006
27
Setting the Re-sequence Flag
Hot Key: Q
X has no effect
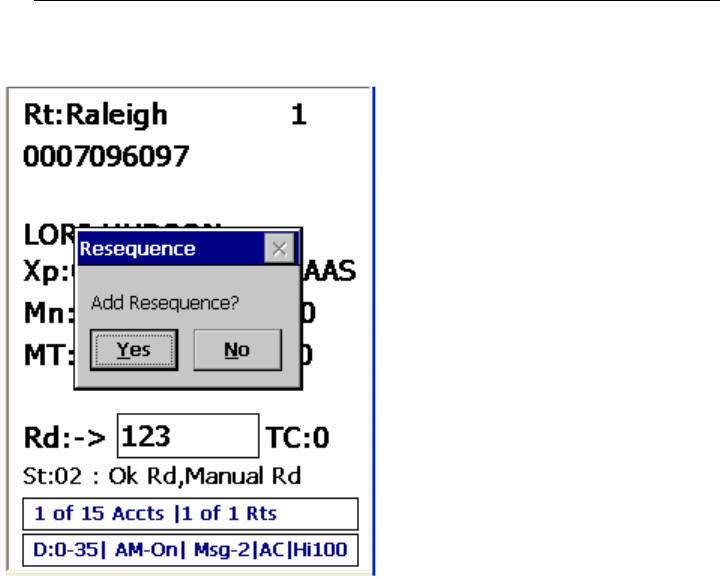
If account(s) is out of sequence in a route, setting the Re-sequence
flag marks the route for re-sequencing by date time stamp during
reading the route. The re-sequencing is going to be done in the
Billing system after uploading to RM VRT.
The message box will pop-up to verify if re-sequencing is desired.
Answer yes or no by:
o Touching the button <Yes> or <No>
o Clicking letter “Y” or “N” on the keyboard
o Moving to the desired button by using left/right arrow keys
and pressing Enter when the button is highlighted.
TRACE
INTERROGATOR
VRT
(CE)
O
PERATIONS
Trace Interrogator VRT (CE) - User Guide
AMCO Automated Systems P/N 52808T510 Rev. E, April 28, 2006
28
To remove Resequence request press Q again and select
appropriate answer to the pop up message (see above)
Single RF Index Read
Hot Key: S
X has no effect
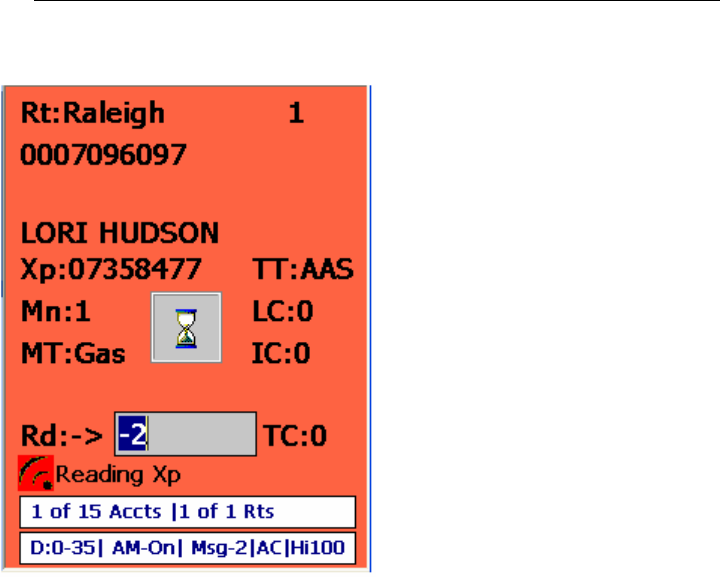
Single RF Index Read is used to get index read only.
After pressing the “S” key an RF interrogation will start. The user
will be able to watch status as “reading XP” with change in
background colors. Once the interrogation is completed the account
record will be updated.
TRACE
INTERROGATOR
VRT
(CE)
O
PERATIONS
Trace Interrogator VRT (CE) - User Guide
AMCO Automated Systems P/N 52808T510 Rev. E, April 28, 2006
29
Notes:
A success/fail sound will alert the meter reader about the result of
reading if the option “Enable sound “is ON.
If the Automove option is ON and the reading was successful, the
display will show the next account in the route. If the account is the
last one in the current route an audible alert will sound.
Multiple Parameter RF Read
Hot Key: R
X has no effect
Press the <ENTER> key to start the interrogation.
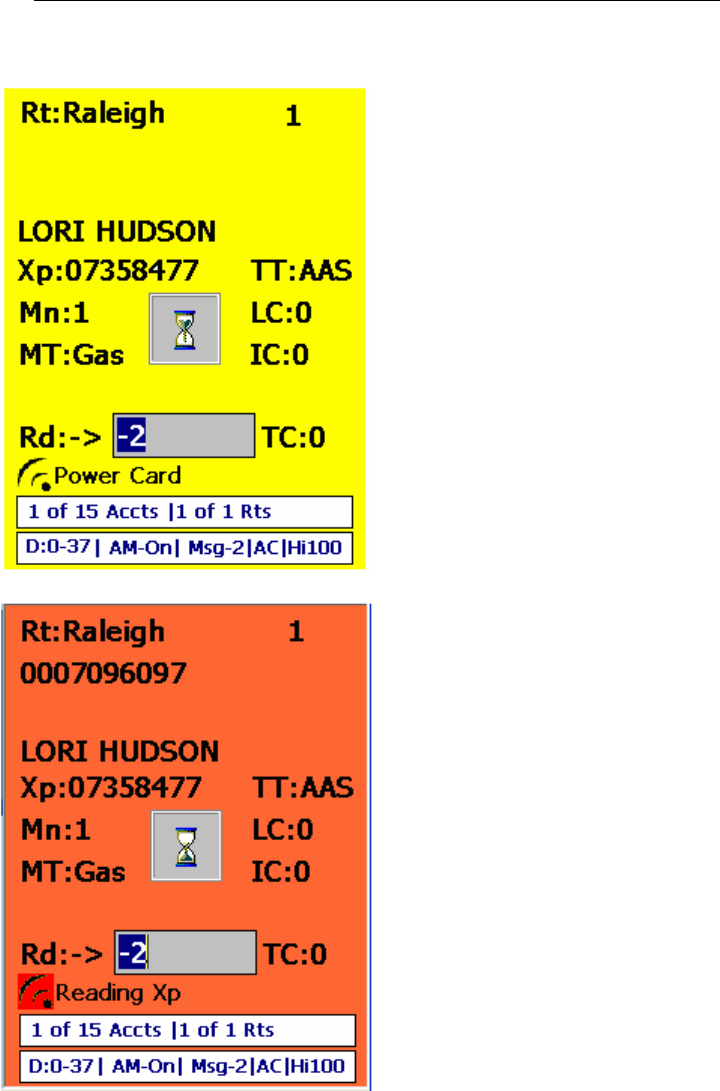
Multiple parameter RF read is used to get index read and all the
VRT requests.
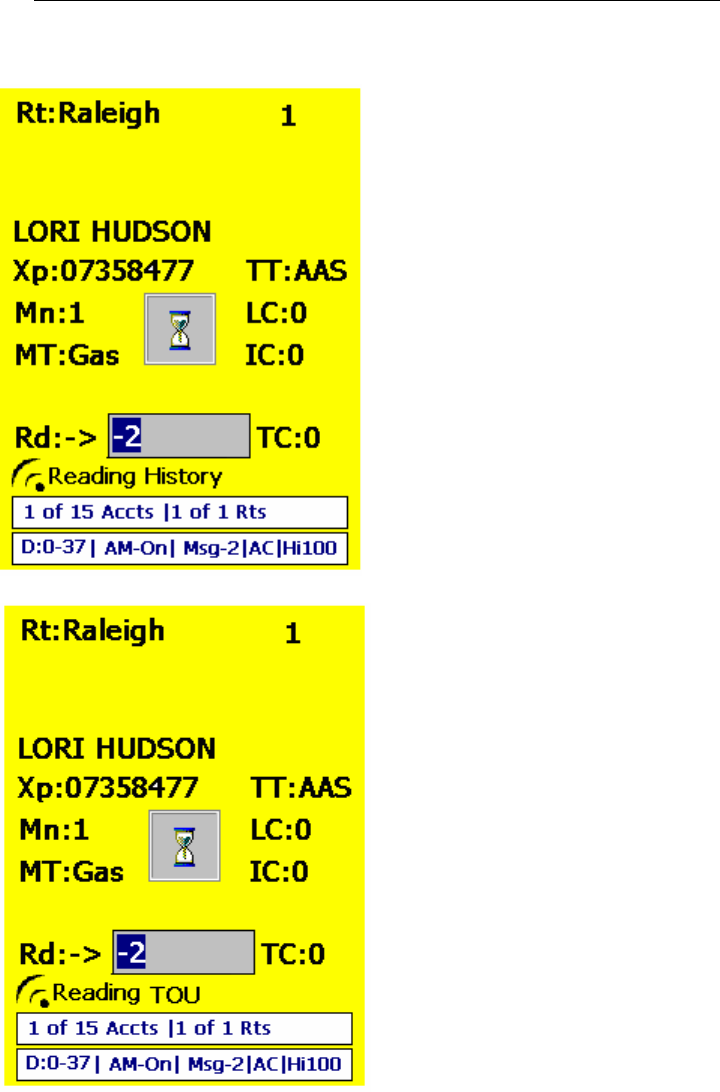
After pressing the “R” key or <ENTER> key an RF interrogation will
start for index read and for all the VRT commands in the account.
The user will be able to watch status as “reading XP”, ”Reading
History”, ”Reading TOU” with change in background colors as
follows. Once all the interrogations are completed the account
record will be updated.
TRACE
INTERROGATOR
VRT
(CE)
O
PERATIONS
Trace Interrogator VRT (CE) - User Guide
AMCO Automated Systems P/N 52808T510 Rev. E, April 28, 2006
30
TRACE
INTERROGATOR
VRT
(CE)
O
PERATIONS
Trace Interrogator VRT (CE) - User Guide
AMCO Automated Systems P/N 52808T510 Rev. E, April 28, 2006
31
Notes:
A success/fail sound will alert the meter readers about the result of
reading if the “Enable sound “option is on.
If the Automove option is ON and all the reading were successful,
the display will show the next account in the route. If the account is
the last one in the current route an audible alert will sound.
TRACE
INTERROGATOR
VRT
(CE)
O
PERATIONS
Trace Interrogator VRT (CE) - User Guide
AMCO Automated Systems P/N 52808T510 Rev. E, April 28, 2006
32
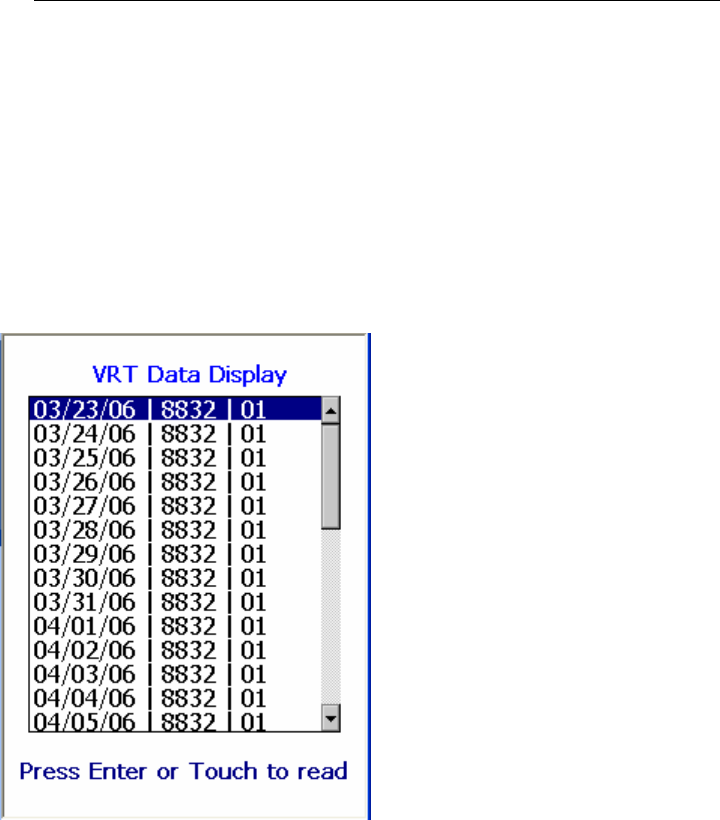
Single History / TOU RF Read
If a “D” appears in the lower left corner of the data entry display, the
account contains one or more History and or TOU requests.
Press the “D” key to display a pop-up list of all requests.
Use the Up / Down arrow keys or a stylus to select the History/TOU
request to read.
Press the <ENTER> key to start the interrogation.
An RF communications window will open and RF interrogation will
start. The user will be able to watch commands issued and replies
returned from the target transponder. Once the interrogation is
completed the account record will be updated. The pop-up list will
be updated with the information obtained from the transponder for
the chosen VRT request.
If a valid index read does not exist, one will be added to any single
History requests.
A new index read will be added to any Single TOU request.
Pressing the <ESC> key will close the Pop-Up display.
General Index RF Read
Hot Key: G
X has no effect
TRACE
INTERROGATOR
VRT
(CE)
O
PERATIONS
Trace Interrogator VRT (CE) - User Guide
AMCO Automated Systems P/N 52808T510 Rev. E, April 28, 2006
33
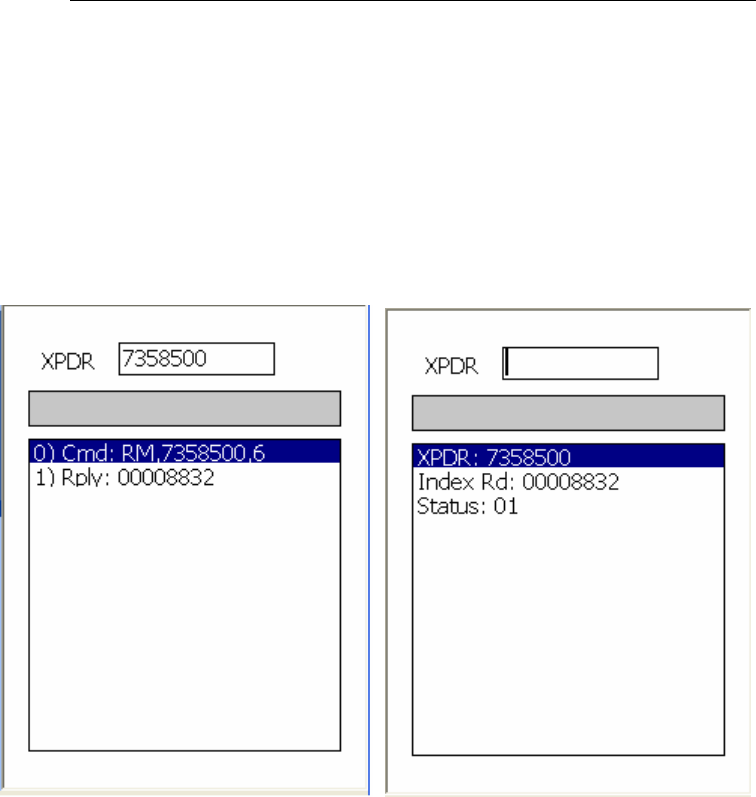
After pressing the “G” key the popup display will open. Enter the
desired transponder number and press <ENTER>. An RF
communications window will open and RF interrogation will start.
The user will be able to watch commands issued and replies
returned from the target transponder. When the interrogation is
completed, the communications commands will be replaced with
read results. Data is NOT added to the database.
VersaProbe
Jump to VersaProbe connection
Hot Key: V
This is a jump to the VersaProbe connection screen.
X has no effect.
Click <Ok> to close popup.
VersaProbe Communication Modes
The VersaProbe works only in the Sensus I/O Mode.
Serial Communication Mode
To communicate in serial mode,
1. Connect the lemo end of the lemo cable to the handheld’s lemo
port and the other end to the 6 pin connector of the VersaProbe.
TRACE
INTERROGATOR
VRT
(CE)
O
PERATIONS
Trace Interrogator VRT (CE) - User Guide
AMCO Automated Systems P/N 52808T510 Rev. E, April 28, 2006
34
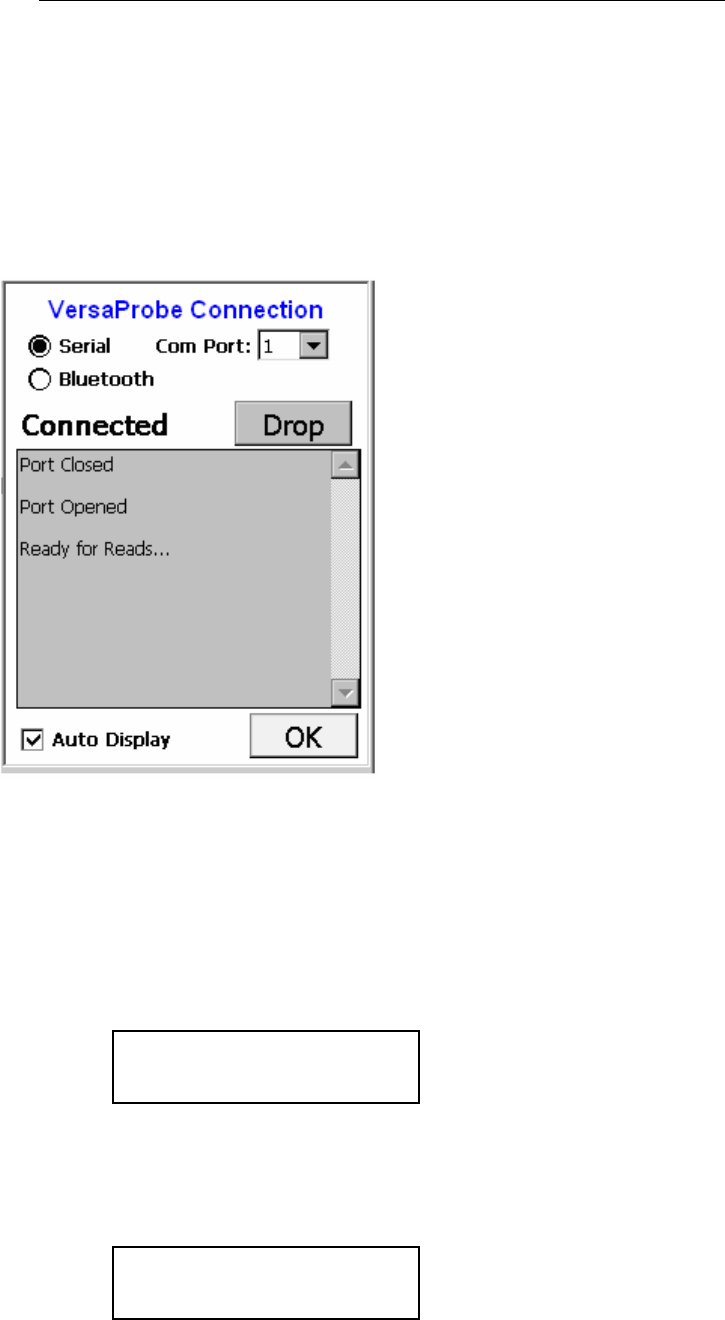
2. On the handheld’s VersaProbe connection screen (use <V> key to
view this screen from either main screen/ data entry screen), make
sure that Serial is selected and com port is Com1.
3. Hit the Connect button. Once the connection is established
Connect button will change to Drop, which is used to cancel the
connection. The screen will be as follows:
Bluetooth Communication Mode
To activate the Bluetooth radio, press and hold the trigger button for
about 12 seconds. During this time the display will progress through
several steps.
1. Initially asterisks begin to appear on the display, from left to right.
2. As you continue to hold the trigger button, a blinking * will appear in
the right corner of the protocol list display to indicate that Bluetooth
radio is installed.
0……………….45
PROTOCOL LIST *
+ 100 ELSTER / AMCO
*********************
TRACE
INTERROGATOR
VRT
(CE)
O
PERATIONS
Trace Interrogator VRT (CE) - User Guide
AMCO Automated Systems P/N 52808T510 Rev. E, April 28, 2006
35
3. Continue holding the trigger button, until the display changes to:
4. Release the trigger button and the display will change to:
5. The VersaProbe will perform a short radio module test and then
display the Bluetooth device address of radio module. Enter this
address into the handheld by updating the handheld’s configuration
file using Route Manager VRT.
6. On the handheld’s VersaProbe connection screen (use <V> key to
view this screen from either main screen/ data entry screen), make
sure that the Bluetooth is selected and Com Port is Com8. Hit the
Connect button and the screen will be as follows:
RELEASE BUTTON
NOW
INITIALIZING
BLUETOOTH RADIO
BDA=006057FD4736
CONNECT VTCE NOW
TRACE
INTERROGATOR
VRT
(CE)
O
PERATIONS
Trace Interrogator VRT (CE) - User Guide
AMCO Automated Systems P/N 52808T510 Rev. E, April 28, 2006
36
Data Entry with VersaProbe
Rt: Route ID
Xp: Probe Encoder Number
TT: Transponder Type of Probe
Mn: Meter Number
LC: Location Code
MT: Meter Type
IC: Instruction Code
Rd: Index Read
: Direction of Data Entry
TC: Trouble Code
St: Account Status
AM-off/on AutoMove enabled
Msg-0 There are 0 messages in the
alarm category.
AC / BT shows the type of power: AC
from cradle or BT from battery
Hi100% shows that the battery is
charged at 100%
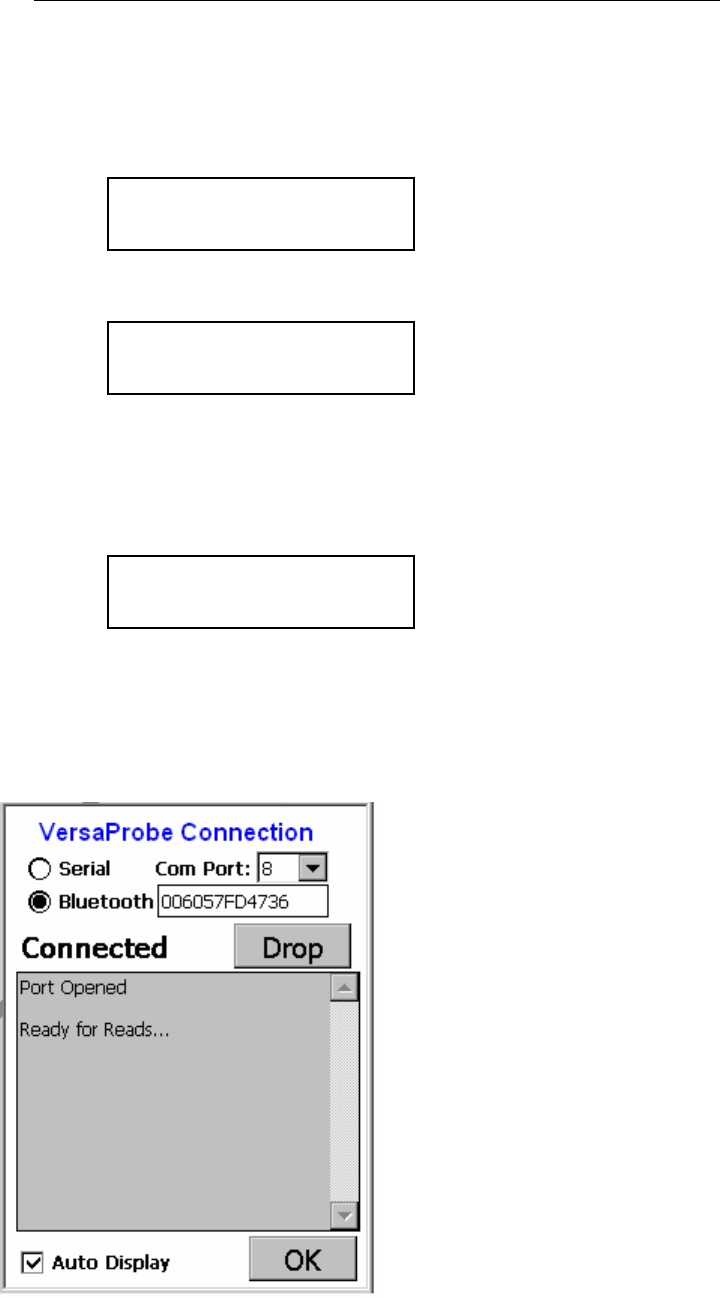
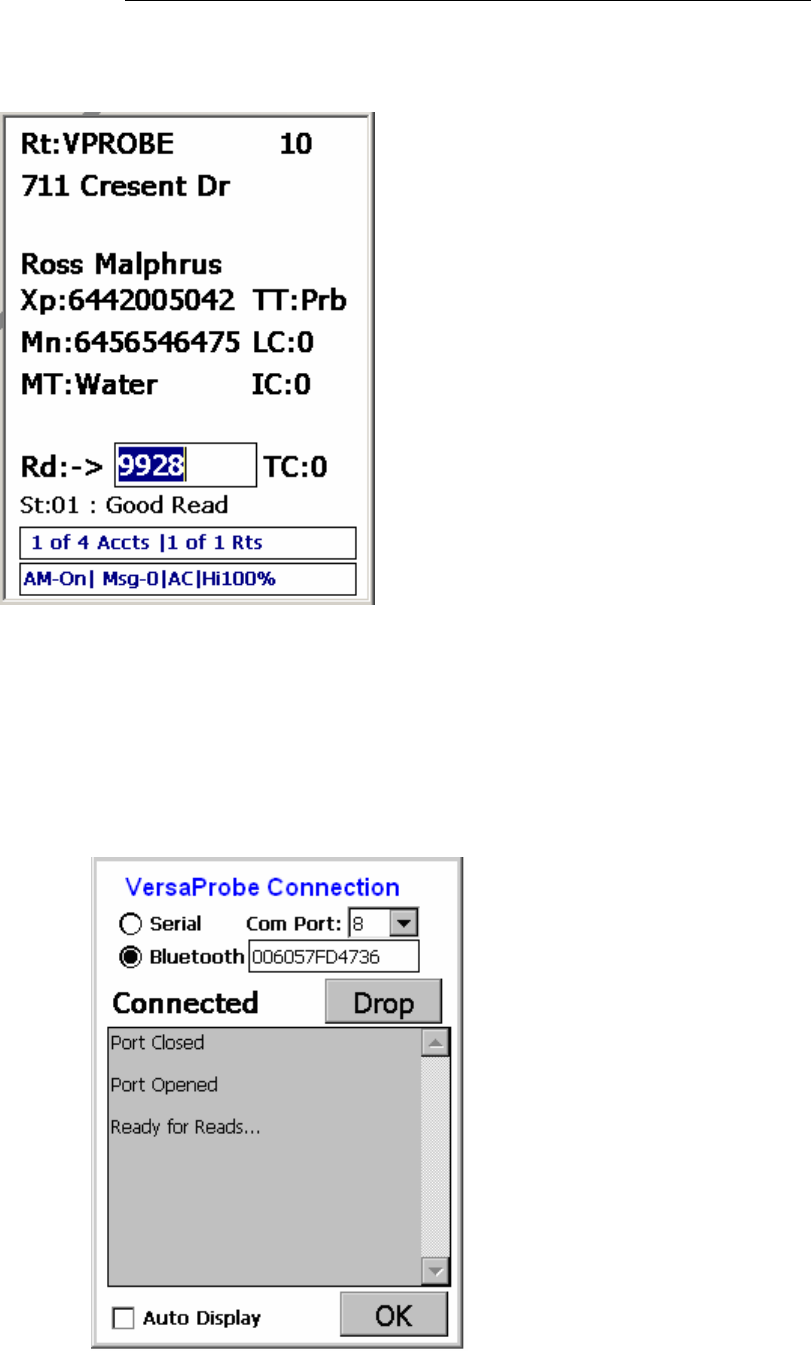
Read with VersaProbe
Press <V> key at main screen/ data entry screen, to show
VersaProbe connection screen. Make sure the connection settings
are correct and then hit the Connect button. Once the connection
is established, the status changes to the Connected and the
“Ready for Reads…” message displayed.
TRACE
INTERROGATOR
VRT
(CE)
O
PERATIONS
Trace Interrogator VRT (CE) - User Guide
AMCO Automated Systems P/N 52808T510 Rev. E, April 28, 2006
37
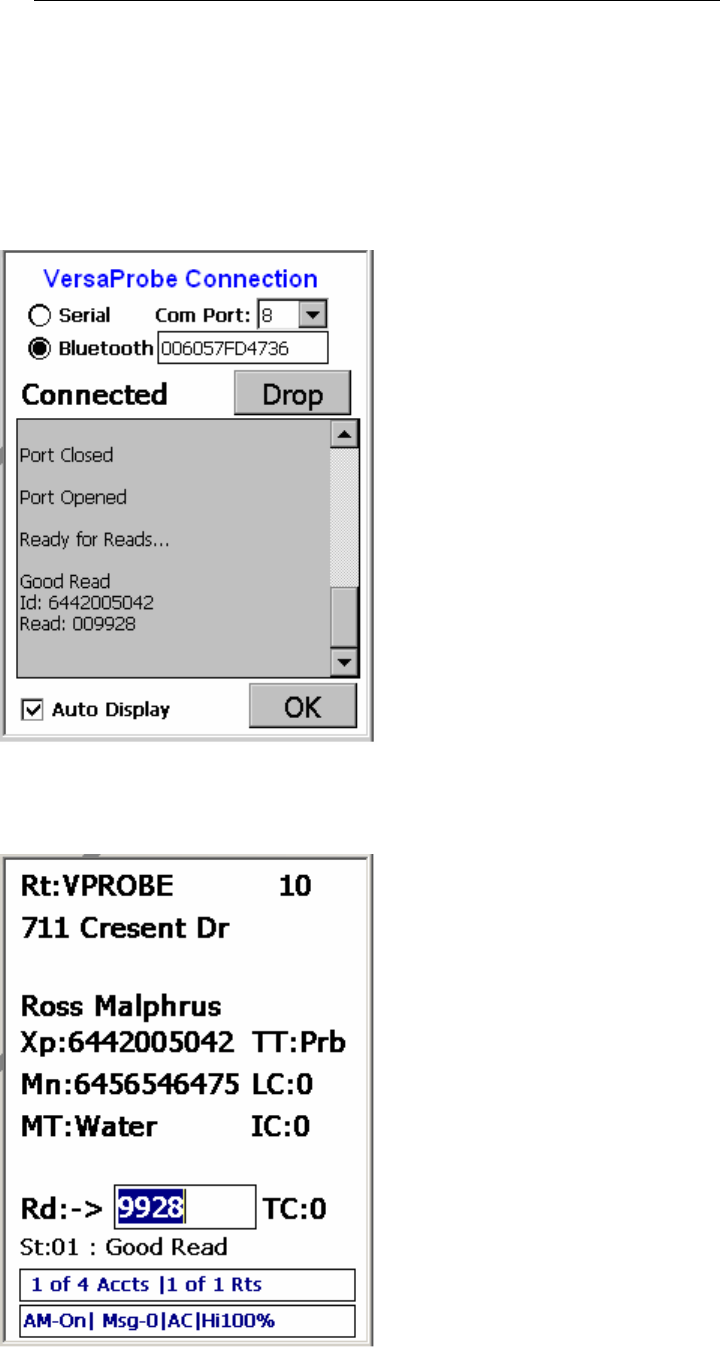
Since the VersaProbe is ready for the reads, simply hold the
VersaProbe up to the meter, press the trigger button, and then
release it within less than four seconds. A success/fail sound will
alert the meter reader about the result of reading if the option
“Enable sound “is on. The screen will be as shown below.
Click on the OK button to view the data entry screen. Read will be
updated in the account as shown below.
TRACE
INTERROGATOR
VRT
(CE)
O
PERATIONS
Trace Interrogator VRT (CE) - User Guide
AMCO Automated Systems P/N 52808T510 Rev. E, April 28, 2006
38
Transponder Installation
Change Out
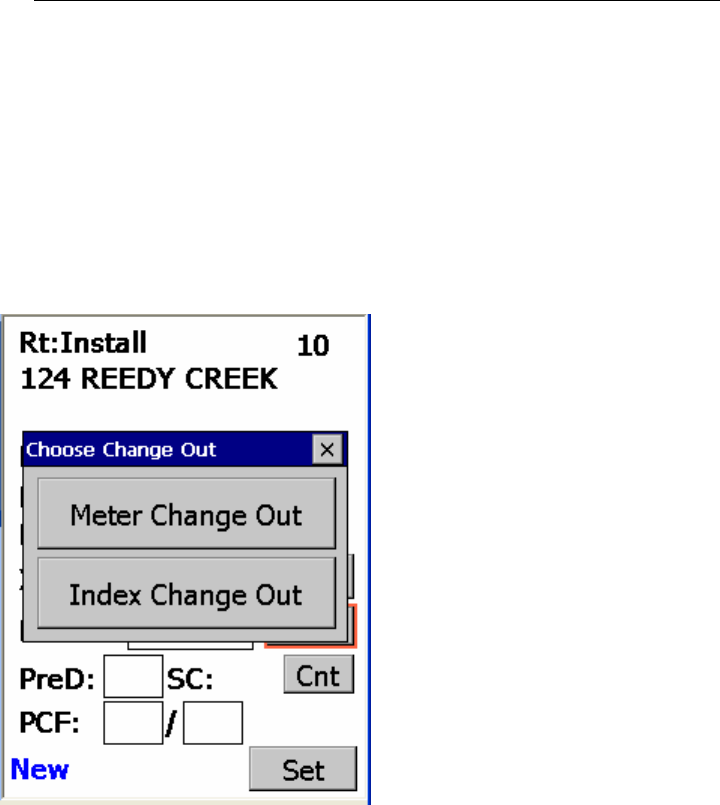
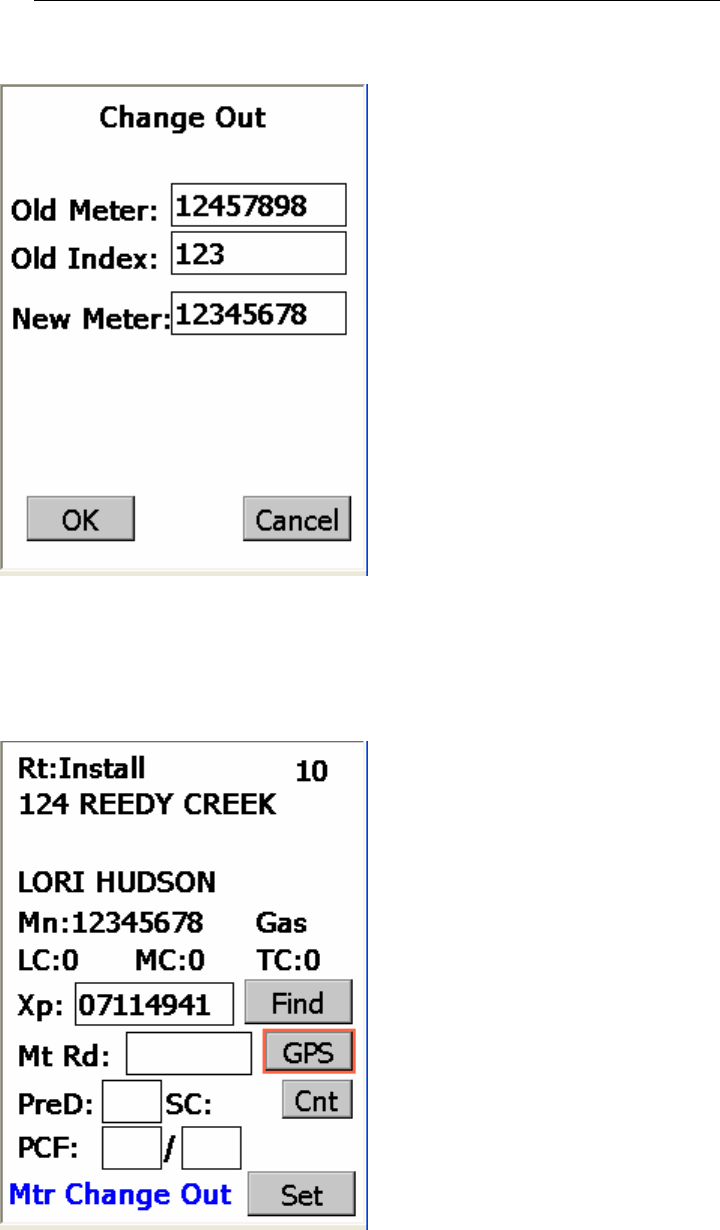
In the installation route, hit F4 to view Change Out screen and choose
from Meter Change Out and Index Change Out. The Change Out screen
will be as follows:
Meter Change Out
Click on Meter Change Out button and enter the values of Old Index and
New Meter number. Click OK. Screen will be as follows:
TRACE
INTERROGATOR
VRT
(CE)
O
PERATIONS
Trace Interrogator VRT (CE) - User Guide
AMCO Automated Systems P/N 52808T510 Rev. E, April 28, 2006
39
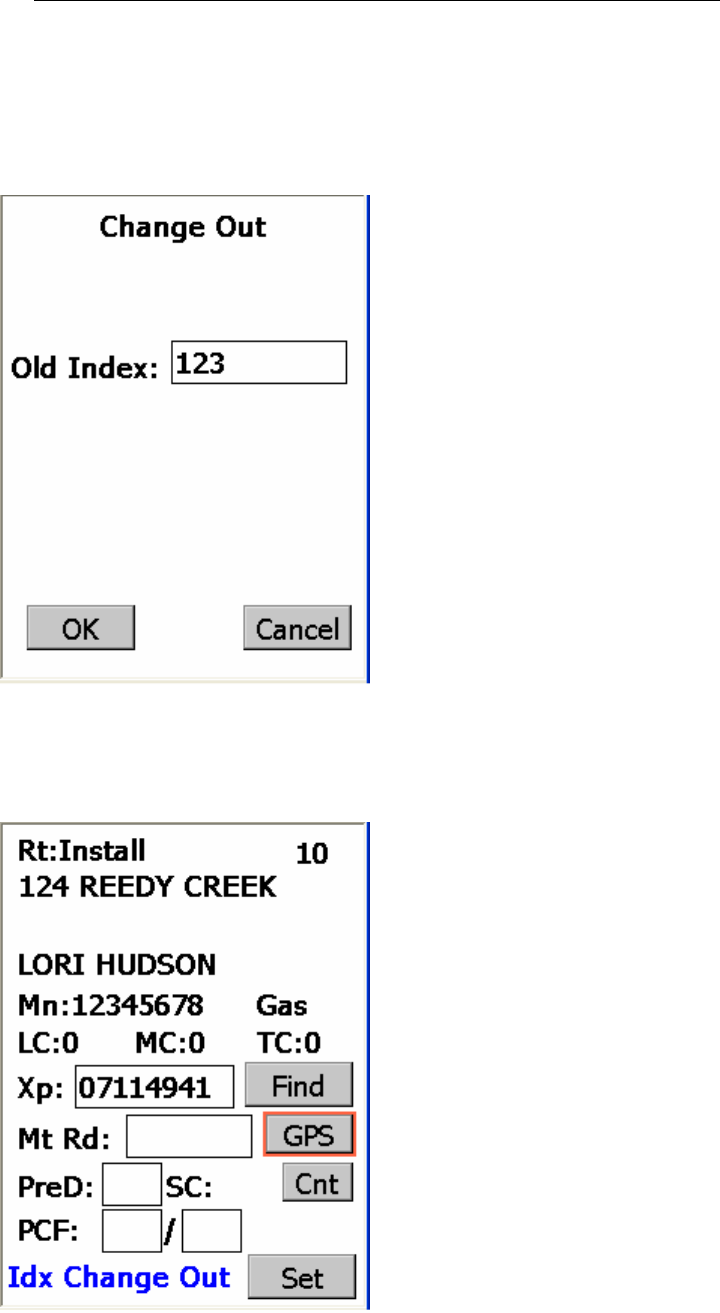
After successful change out you can see the status as “Mtr Change Out”.
You can check “Change Out Report” for all the meter changes.
TRACE
INTERROGATOR
VRT
(CE)
O
PERATIONS
Trace Interrogator VRT (CE) - User Guide
AMCO Automated Systems P/N 52808T510 Rev. E, April 28, 2006
40
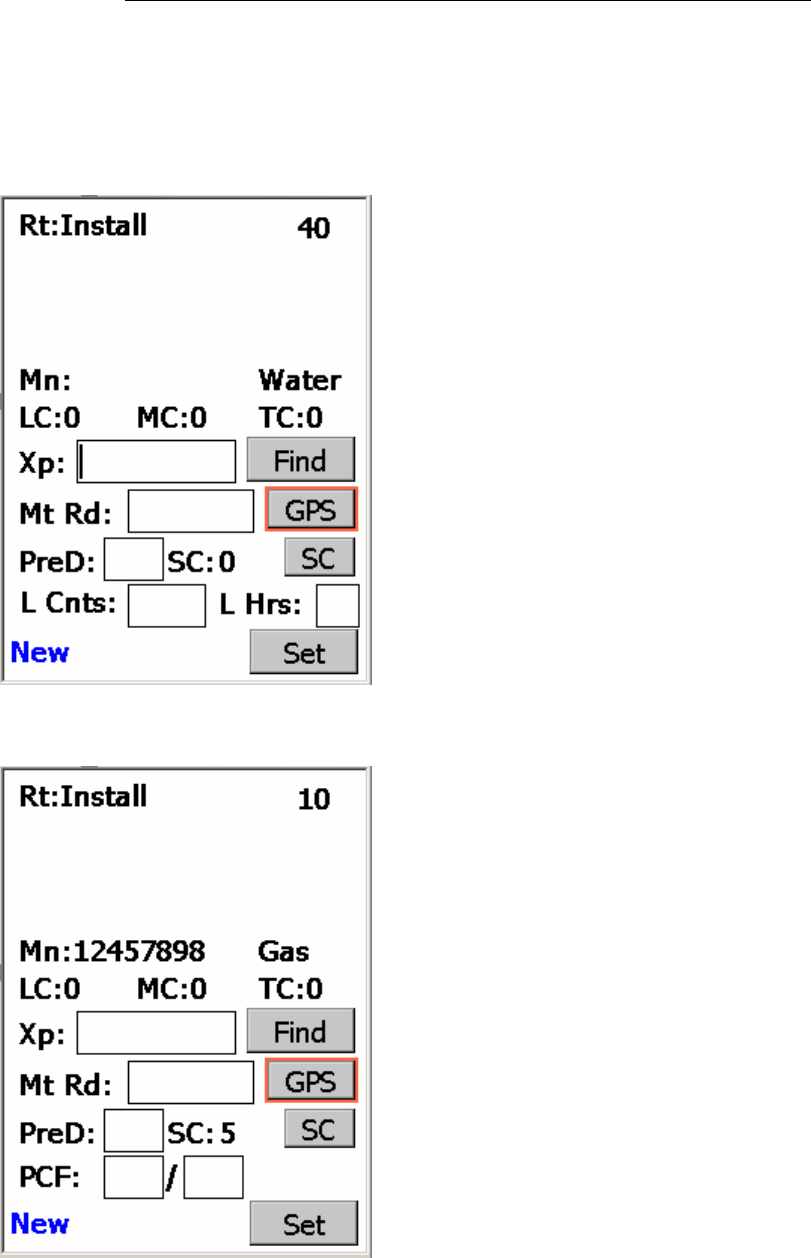
Index Change Out
Enter the value of the index which you want to change. Click OK.
After successful change out you can see the status as “Idx Change Out”.
You can check “Change Out Report” for all the index changes.
TRACE
INTERROGATOR
VRT
(CE)
O
PERATIONS
Trace Interrogator VRT (CE) - User Guide
AMCO Automated Systems P/N 52808T510 Rev. E, April 28, 2006
41
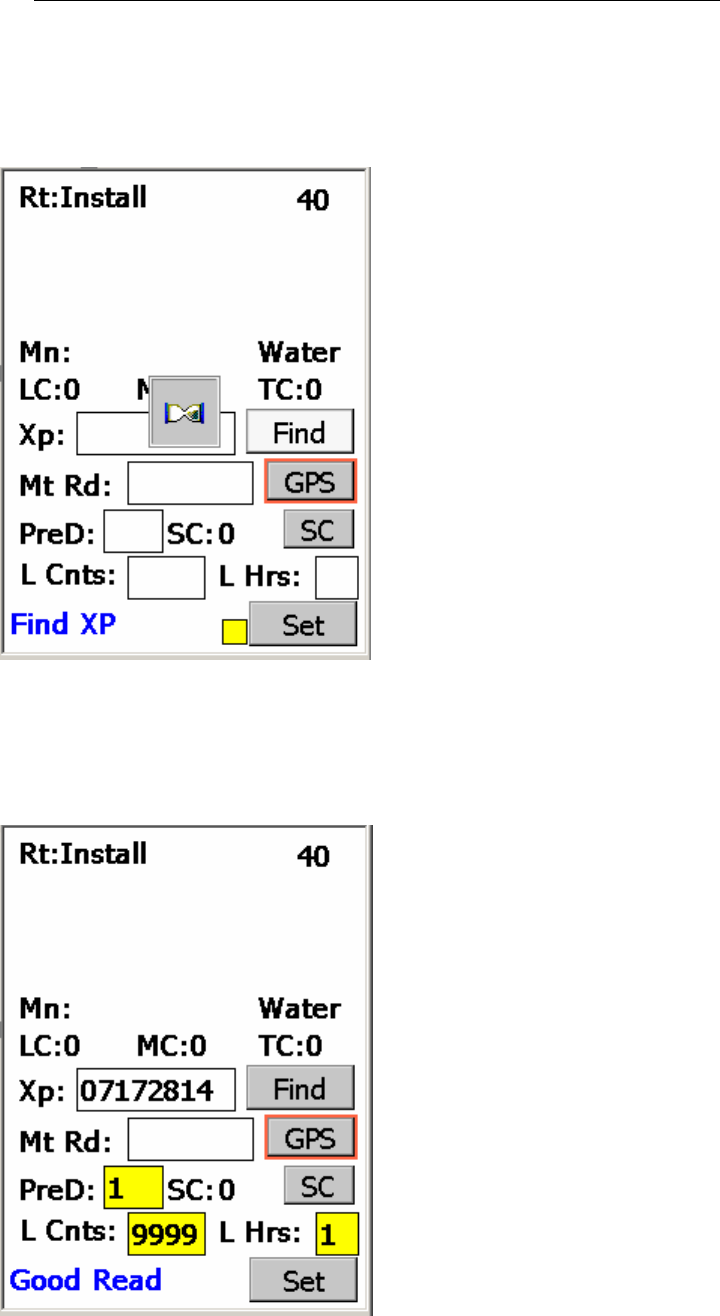
Data Entry with Installation
Water
Rt: Route ID
Mn: Meter Number
LC: Location Code
MC: Meter Location Code
TC: Trouble Code
Mt Rd: Index Read
Xp: Transponder Serial Number
PreD: PreDivider
SC: Sub-Counts
L Cnts: Leak Counts
L Hrs: Leak Hours
Find
: Used to find the transponder
Serial Number
GPS: It will show GPS screen
Set: To set entered parameter
values
Gas
Rt: Route ID
Mn: Meter Number
LC: Location Code
MC: Meter Location Code
TC: Trouble Code
Mt Rd: Index Read
Xp: Transponder Serial Number
PreD: PreDivider
SC: Sub-Counts
PCF: Pressure Compensation
Factor
Find
: Used to find the transponder
Number
GPS: It will show GPS screen
Set: To set entered parameter
values
The Installation feature works with High/Low power RF card.
TRACE
INTERROGATOR
VRT
(CE)
O
PERATIONS
Trace Interrogator VRT (CE) - User Guide
AMCO Automated Systems P/N 52808T510 Rev. E, April 28, 2006
42
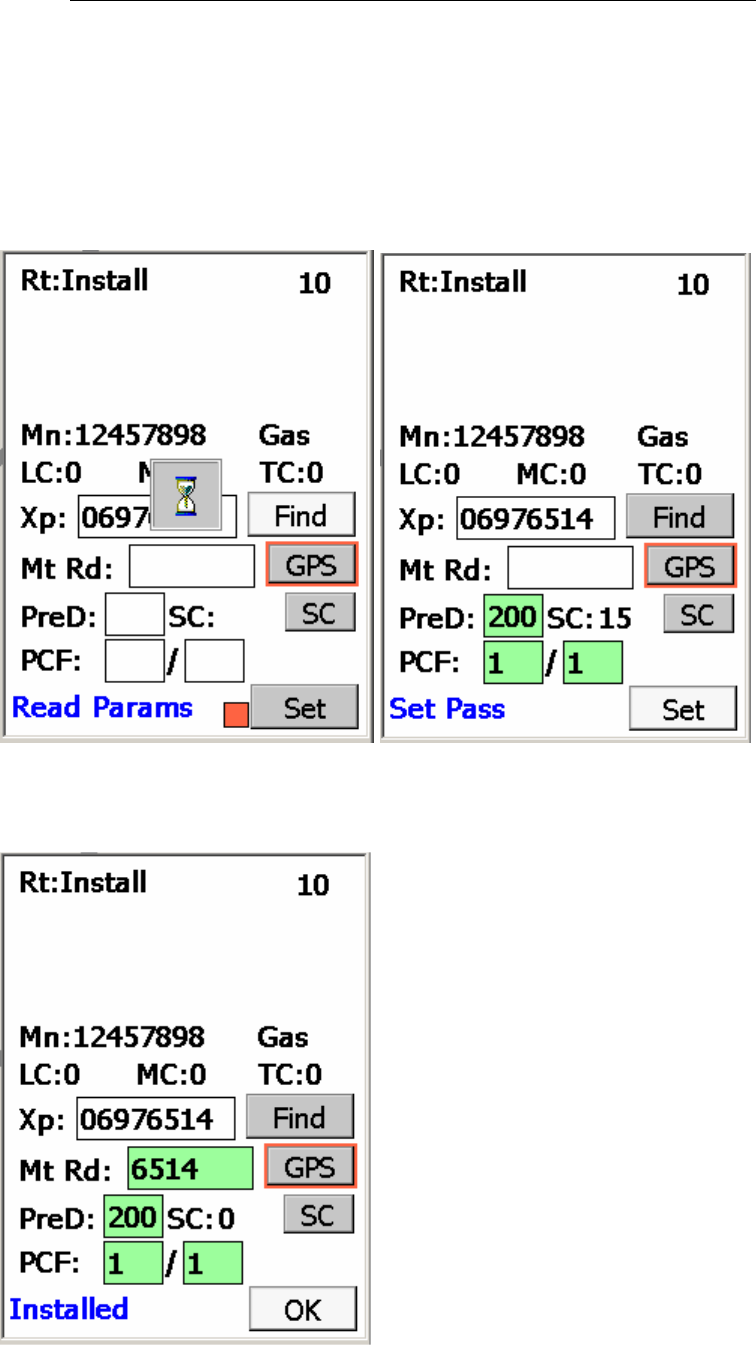
Manually enter transponder serial number or just press Find button to
read the transponder serial number. Current status is given in lower left
corner of the screen.
Once the transponder is found, it will display the transponder serial
number and its parameter values as shown below. A success/fail
sound will alert the meter readers about the result of reading if the
“Enable sound “option is on.
TRACE
INTERROGATOR
VRT
(CE)
O
PERATIONS
Trace Interrogator VRT (CE) - User Guide
AMCO Automated Systems P/N 52808T510 Rev. E, April 28, 2006
43
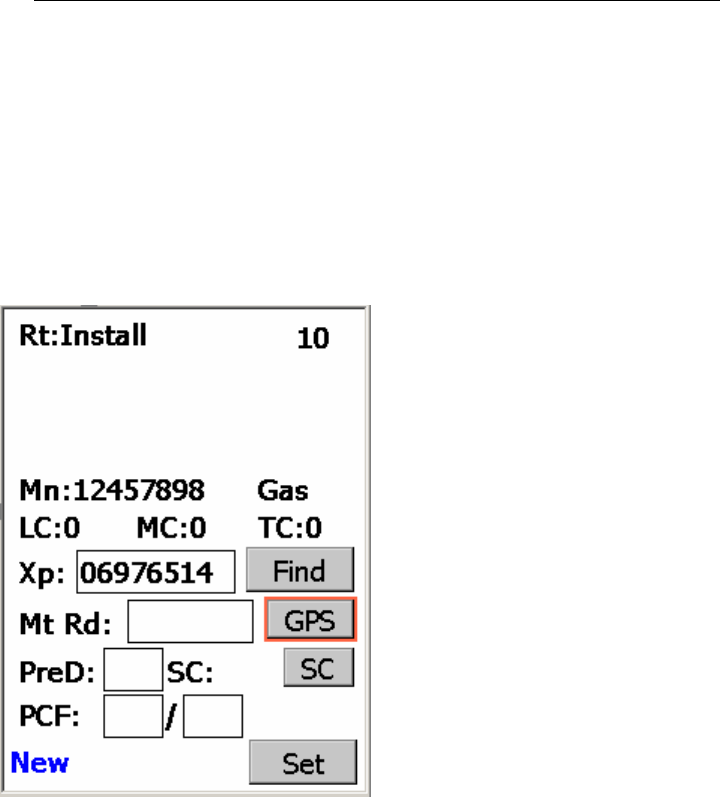
The PCF (Gas), PreDivider (Water, Gas) and SC values can be set.
Valid values for the PCF are from 1 to 255 and for the PreDivider
values are :1,2,4,5,7,9,10,20,50,100, 200, 250. Enter the desired
values and then click on the Set button. It will read, check and set the
parameters values. Finally the status will be either Set Pass or Failed
This feature also allows setting desired meter index. After a successful
installation, it will reset the sub-count value to zero and the status as
Installed.
TRACE
INTERROGATOR
VRT
(CE)
O
PERATIONS
Trace Interrogator VRT (CE) - User Guide
AMCO Automated Systems P/N 52808T510 Rev. E, April 28, 2006
44
Using the Scanner
Scanner feature is available with Install Route( Read type of
route). It will scan the transponder serial number and will be
displayed on the current account as shown below. A successful
scan will give sound on the handheld and as well as two beeps
sound on the scanner.
Using the GPS
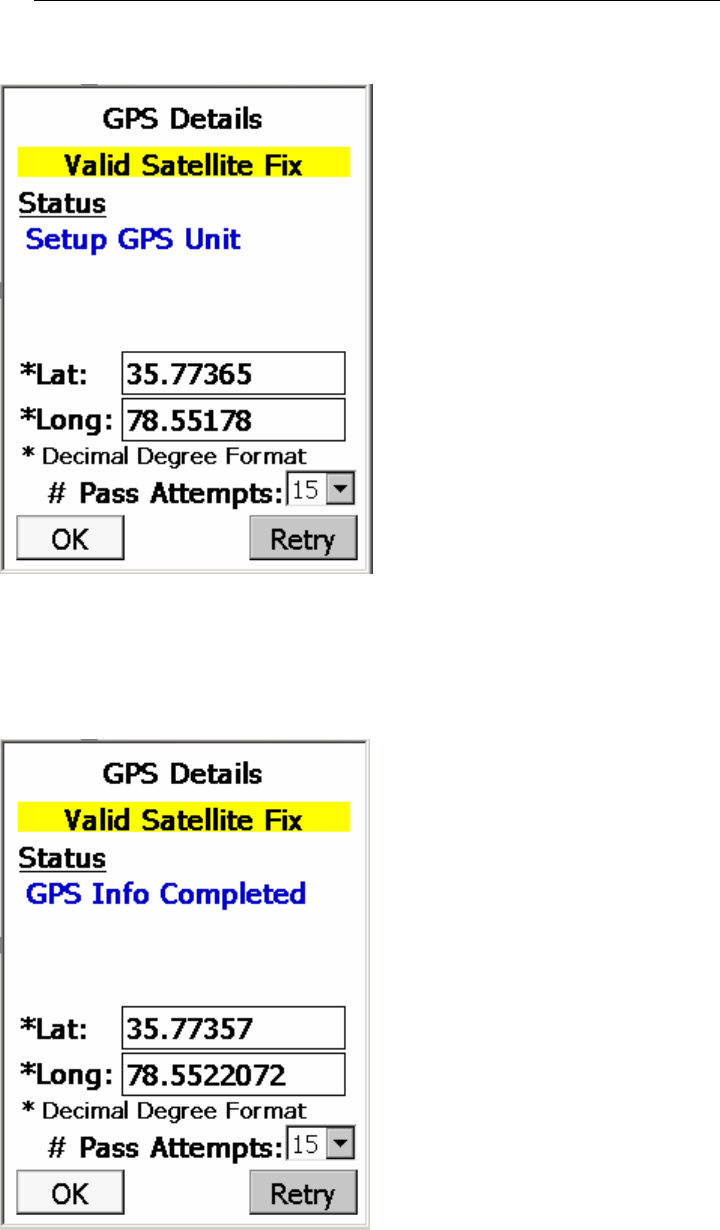
At the install route screen, by clicking on the GPS button you can
view GPS Details screen which is as shown in the picture. GPS is
used to find transponder location. It provides Latitude & Longitude
values in decimal format. Refer to the configuration section for GPS
ComPort settings.
TRACE
INTERROGATOR
VRT
(CE)
O
PERATIONS
Trace Interrogator VRT (CE) - User Guide
AMCO Automated Systems P/N 52808T510 Rev. E, April 28, 2006
45
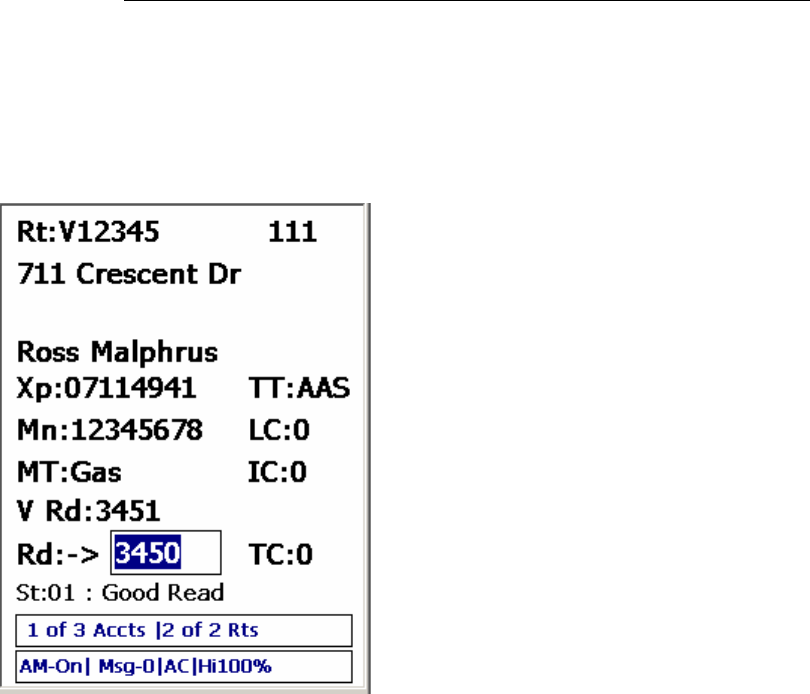
Status describes various phases of the process. First it tries to
open port, Setup GPS unit. Once the device is setup, it gives
transponder location in Latitude, Longitude values and status as
GPS Info Completed.
Click Ok to close popup.
TRACE
INTERROGATOR
VRT
(CE)
O
PERATIONS
Trace Interrogator VRT (CE) - User Guide
AMCO Automated Systems P/N 52808T510 Rev. E, April 28, 2006
46
Verification
Data Entry with Verification
Rt: Route ID
Xp: Transponder Serial Number
TT: Transponder Type
Mn: Meter Number
LC: Location Code
MT: Meter Type
V Rd: Visual Read
IC: Instruction Code
Rd: Index Read
: Direction of Data Entry
TC: Trouble Code
St: Account Status
AM-off/on AutoMove enabled
Msg-0 There are 0 messages in the
alarm category.
AC / BT shows the type of power: AC
from cradle or BT from battery
Hi100% shows that the battery is
charged at 100%
Read with Transponder Verification
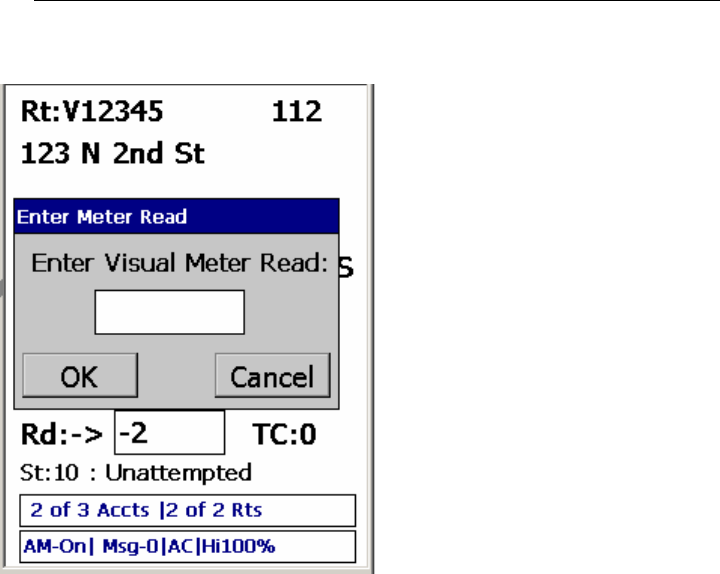
If the current read value is -2 and the transponder number is not
blank, then pressing the <ENTER> key will trigger an RF read of
the transponder along with verification of the transponder reading
against a visual meter reading.
After pressing <ENTER>, the screen shown below will appear.
TRACE
INTERROGATOR
VRT
(CE)
O
PERATIONS
Trace Interrogator VRT (CE) - User Guide
AMCO Automated Systems P/N 52808T510 Rev. E, April 28, 2006
47
Enter the meter read obtained by visually reading the dials
associated with the meter and press <ENTER> or tap OK to
continue.
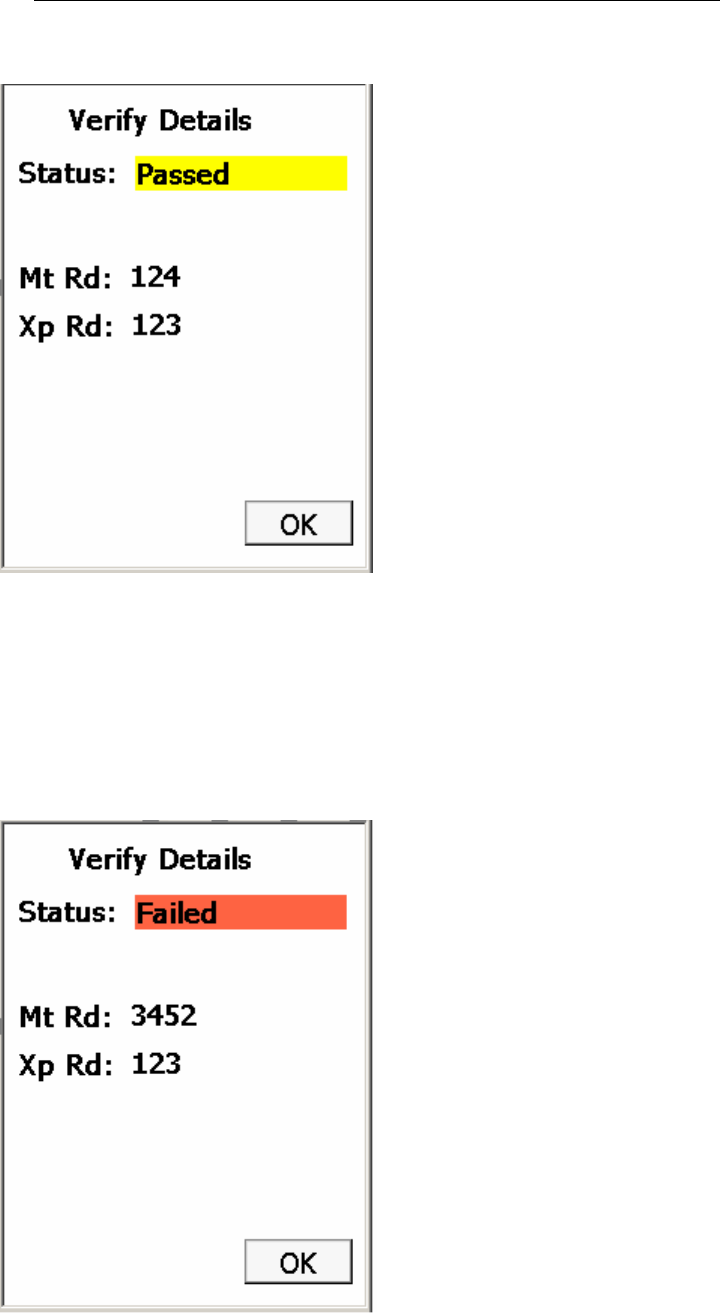
If the difference between the visual meter read and the transponder
read is less than or equal to the allowed tolerance as set through
Route Manager VRT, then the verification will pass. Press
<ENTER> or tap OK to return to the data entry screen. The
verification information will be returned back to Route Manager
VRT.
TRACE
INTERROGATOR
VRT
(CE)
O
PERATIONS
Trace Interrogator VRT (CE) - User Guide
AMCO Automated Systems P/N 52808T510 Rev. E, April 28, 2006
48
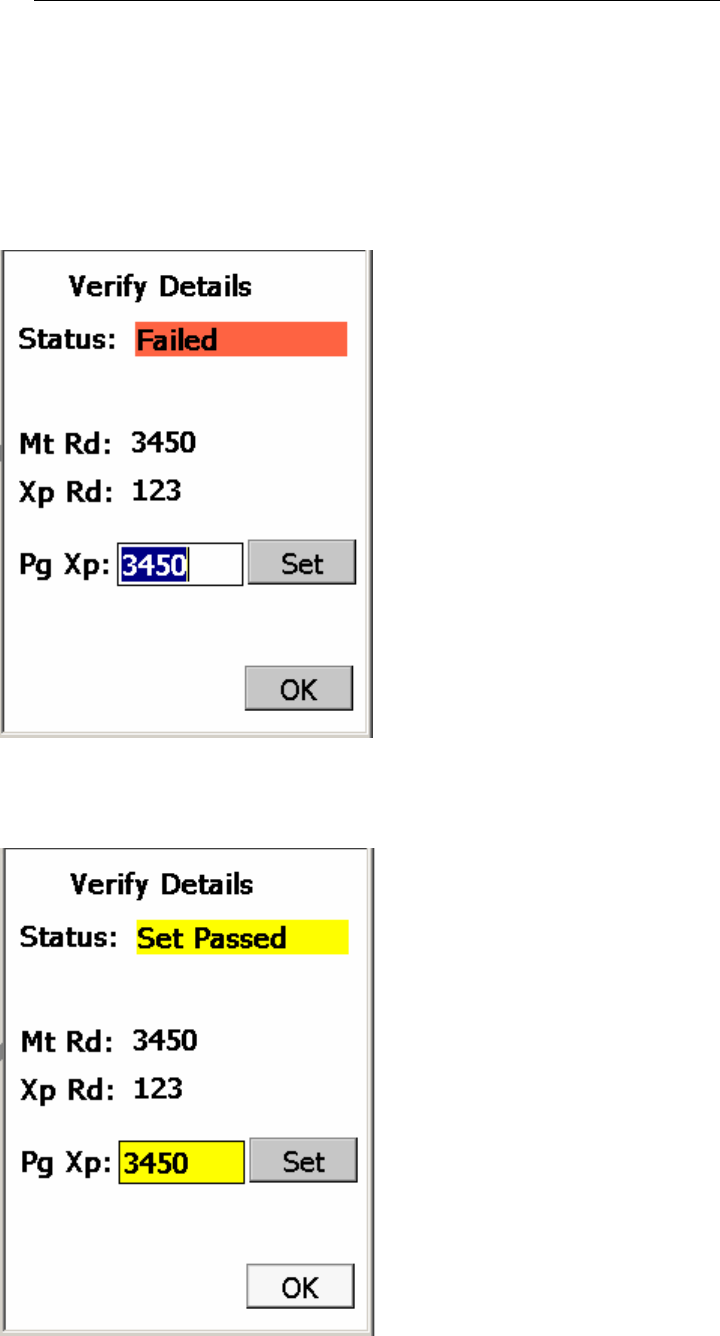
If the difference between the visual meter read and the transponder
read is greater than the allowed tolerance as set through Route
Manager VRT, then the verification will fail. Press <ENTER> or tap
OK to return to the data entry screen. The failed verification
information will be returned back to Route Manager VRT.
TRACE
INTERROGATOR
VRT
(CE)
O
PERATIONS
Trace Interrogator VRT (CE) - User Guide
AMCO Automated Systems P/N 52808T510 Rev. E, April 28, 2006
49
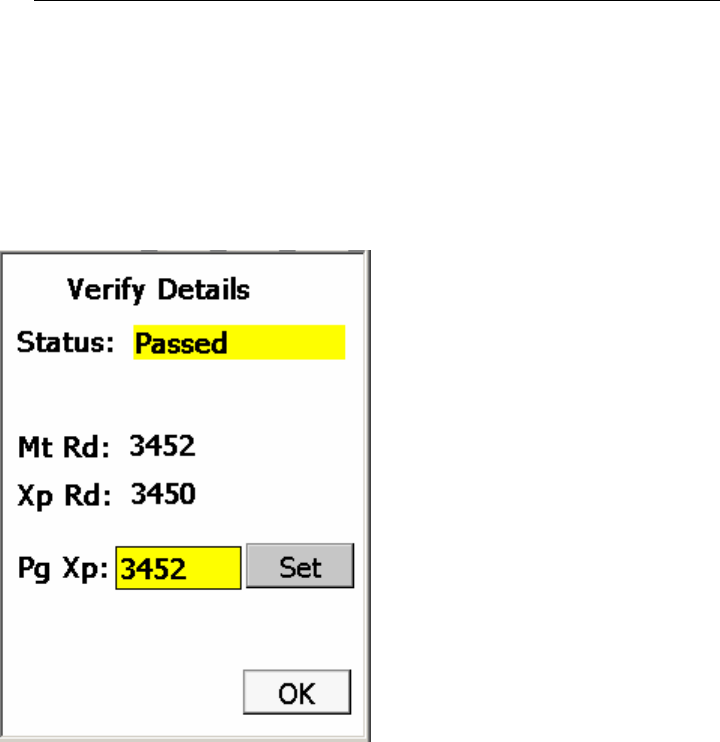
If the route has the Allow Programming for Verification flag set, then
you will be able to reprogram the transponder with a new index
value after a failed verification. The screen displayed below shows
a failed verification. Enter the new index value into the Pg Xp box
and touch Set or press <ENTER> to continue with programming.
After a successful program operation, the screen below will appear.
Press <ENTER> or touch OK to continue.
TRACE
INTERROGATOR
VRT
(CE)
O
PERATIONS
Trace Interrogator VRT (CE) - User Guide
AMCO Automated Systems P/N 52808T510 Rev. E, April 28, 2006
50
You also have the option of reprogramming the index after a
successful read verification. After the verification test passes, the
screen below will be displayed. Touch Set to program the
transponder with the value shown in the Pg Xp box, or press
<ENTER> to continue without programming.
TI VRT CE Communication with Route Manager
VRT
Establishing communications
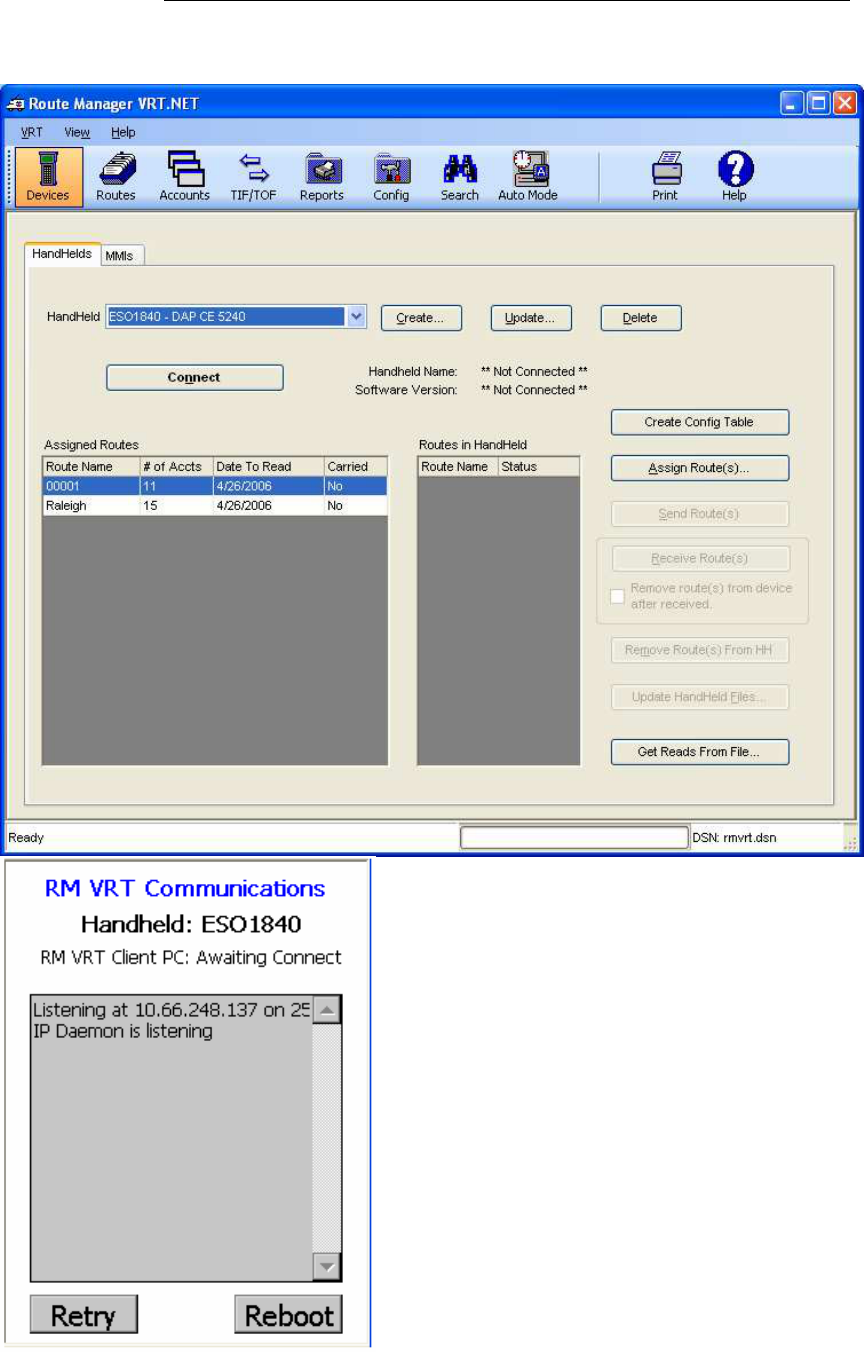
1. Using the Devices section of Route Manager VRT, select the desired
Handheld from the Handheld Selection drop-down list.
2. Ensure that the handheld device’s cradle and the computer with RM
VRT are connected with the proper cable (Ethernet).
3. Ensure that the handheld is turned on and properly seated in its cradle.
4. Make sure the Handheld is in communications mode. (F3 from the
Main Menu)
5. Click the Connect button in RM VRT.
TRACE
INTERROGATOR
VRT
(CE)
O
PERATIONS
Trace Interrogator VRT (CE) - User Guide
AMCO Automated Systems P/N 52808T510 Rev. E, April 28, 2006
51
TRACE
INTERROGATOR
VRT
(CE)
O
PERATIONS
Trace Interrogator VRT (CE) - User Guide
AMCO Automated Systems P/N 52808T510 Rev. E, April 28, 2006
52
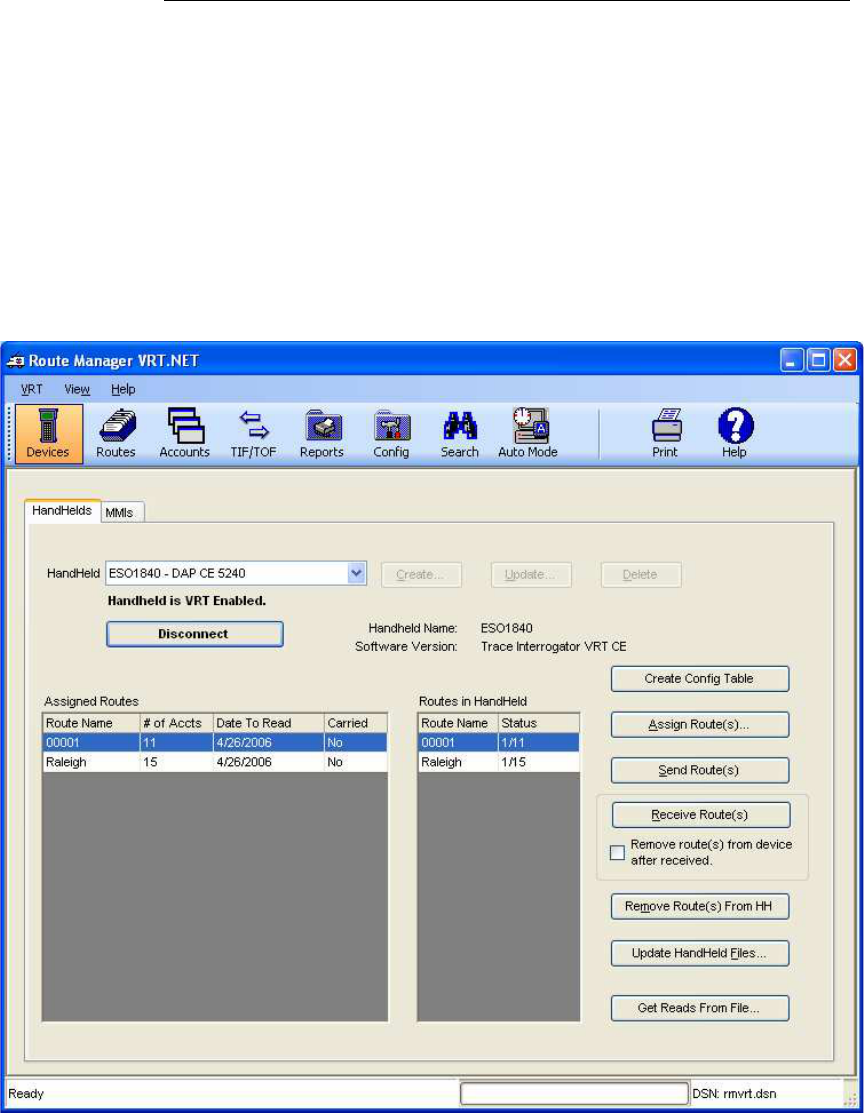
Upon Successful connection:
• The Connect button will display ‘Disconnect’
• The Serial Number and Handheld Software Version will be displayed
directly beneath the Disconnect button.
• The Handheld function buttons will be disabled.
• The Handheld Communication buttons will be enabled.
• If Routes exist in the Handheld they would be displayed in the “Routes
in Handheld” display grid.
Uploading Routes from RM VRT to TI VRT (CE)
1. Follow the Connection steps outlined earlier.
2. Ensure that the desired Route is assigned to the connected handheld.
3. Highlight the desired route(s) in the Assigned Routes display grid.
4. Click the Send Route button to send the route to the Handheld Device.
TRACE
INTERROGATOR
VRT
(CE)
O
PERATIONS
Trace Interrogator VRT (CE) - User Guide
AMCO Automated Systems P/N 52808T510 Rev. E, April 28, 2006
53
After the Route has been sent successfully to the Handheld device, the
Routes in Handheld display grid will be updated to display the sent
route and the Handheld will be automatically rebooted .
Note: Uploading Route(s) will overwrite any existing data on the hand
held. It is the user’s responsibility to make sure all data is downloaded
from the hand held PRIOR to uploading new routes.
Downloading data From TI VRT (CE) to RM VRT
1. Ensure that the Handheld is connected via the steps outlined earlier.
2. Select the desired Route(s) to receive from the Routes in Handheld
display grid.
3. Click the Receive Route Button to start the process.
4. Upon successful completion the Route Status will change to
‘Transferred’ and the Handheld will disconnect from the application.
Removing Route From TI VRT (CE)
To Remove Routes From Hand Held after receive:
1. Follow the Steps outlined earlier for Transferring and Connecting to the
Handheld device
2. Select the Remove Route(s) from device after received check box
3. Click the Receive Route(s) button
To Remove Routes from HH without receiving the Route from HH:
1. Follow the Steps outlined earlier for Connecting to the Handheld.
2. Once connected, select the Route to remove from the Routes in
Handheld display grid.
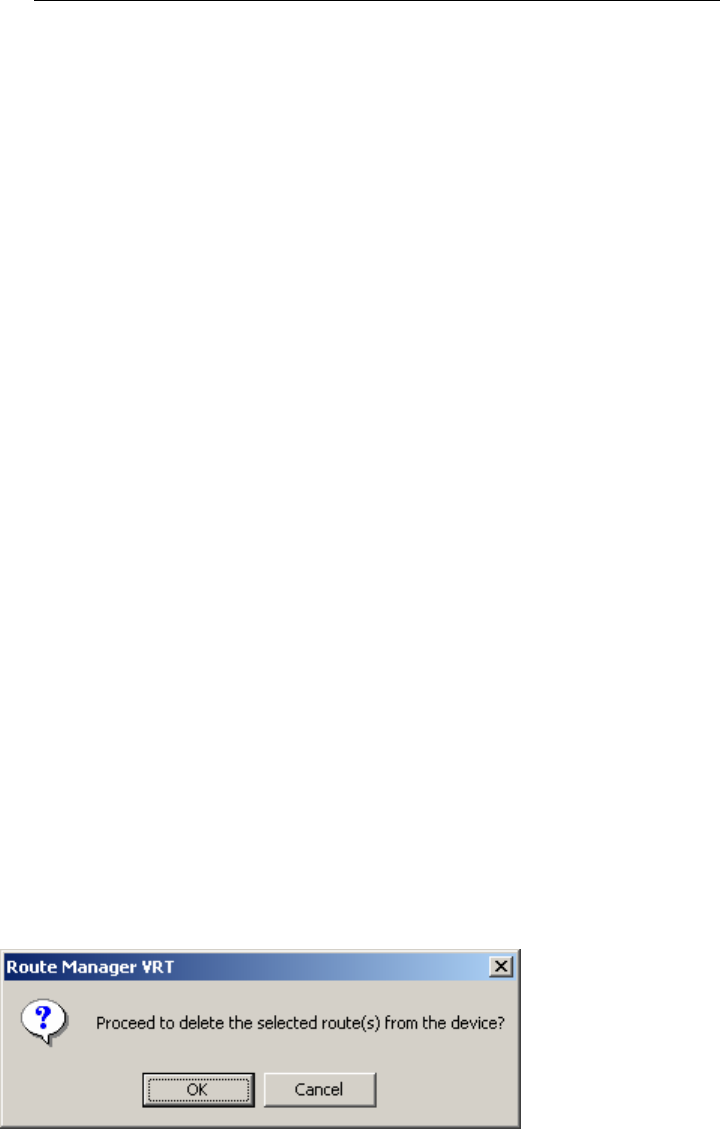
3. Click the Remove Route(s) from HH button.
4. Click OK on the message box.
Updating Handheld files
1. Follow the Steps outlined earlier for Connecting to the Hand Held
device.
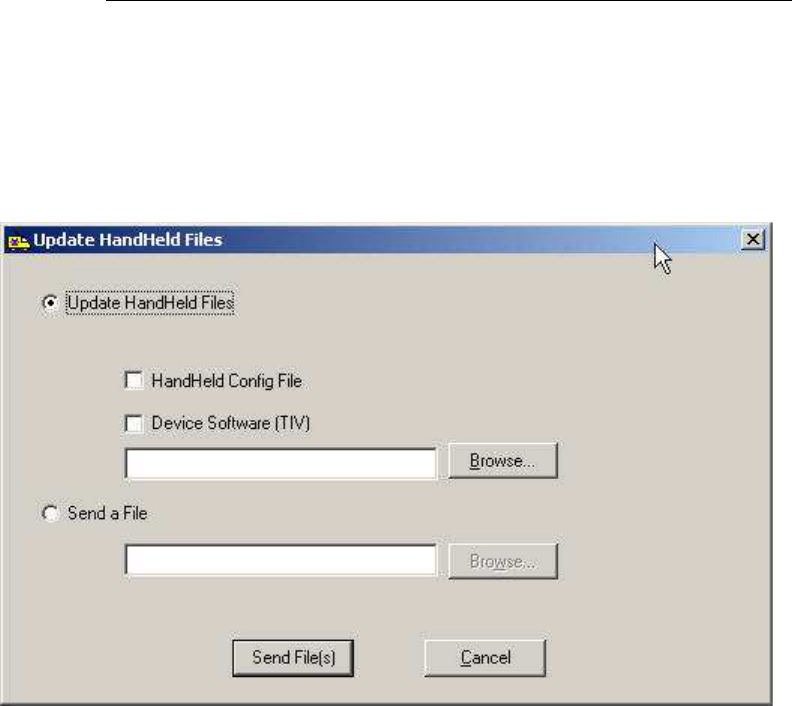
2. Click the Update Handheld File button. You are presented with the
Update Handheld Files form (see picture below)
3. Select one of the two options: Update Handheld Files or Send a File.
TRACE
INTERROGATOR
VRT
(CE)
O
PERATIONS
Trace Interrogator VRT (CE) - User Guide
AMCO Automated Systems P/N 52808T510 Rev. E, April 28, 2006
54
a. Update Handheld Files – Select the check boxes for the files you
wish to update and then click button “Send File(s)”, or
b. Send a File – Input or Browse to the name and location of a file to
send to the Handheld and then click button “Send File(s)”

TRACE
INTERROGATOR
VRT
(CE)
O
PERATIONS
Trace Interrogator VRT (CE) - User Guide
AMCO Automated Systems P/N 52808T510 Rev. E, April 28, 2006
55
Hot Keys
Hot
Keys
Action
A Account Details
B Jump to Beginning of current route
C Clear Reading
D Detail History / TOU for Current Account. Pressing <Enter> key
initiates RF interrogation for the selected item
E Jump to End of current route
F Set account as Unattempted (only for manual read)
G General Interrogation of the entered transponder.
H Search menu
I Instruction code.
J Jump (by sequence)
L Location code.
M Message (Comments). Messages can be added or edited if allowed.
N Jump to Next route
O ErrOr log
P Jump to Previous route
Q Set the Re-Sequence flag for upload
R RF Read Index and all VRT requests for current account. Pressing
<Enter> key initiates RF interrogation for the selected Account
S Single index read for current account
T Trouble code. Allows selection of trouble code for current account.
U Jump to next Unread account
V Jump to VersaProbe connection screen
X Jump to record displayed prior to the jump (Only available for
B,E,H,J,U hot keys)
F1 Displays key list with description. When an item is selected the
choice is executed (if appropriate).
F2 Route Selection / Load
F3 Current Route Summary or Communication on the main screen
F4 Configuration Settings
TRACE
INTERROGATOR
VRT
(CE)
O
PERATIONS
Trace Interrogator VRT (CE) - User Guide
AMCO Automated Systems P/N 52808T510 Rev. E, April 28, 2006
56
Configuration
General
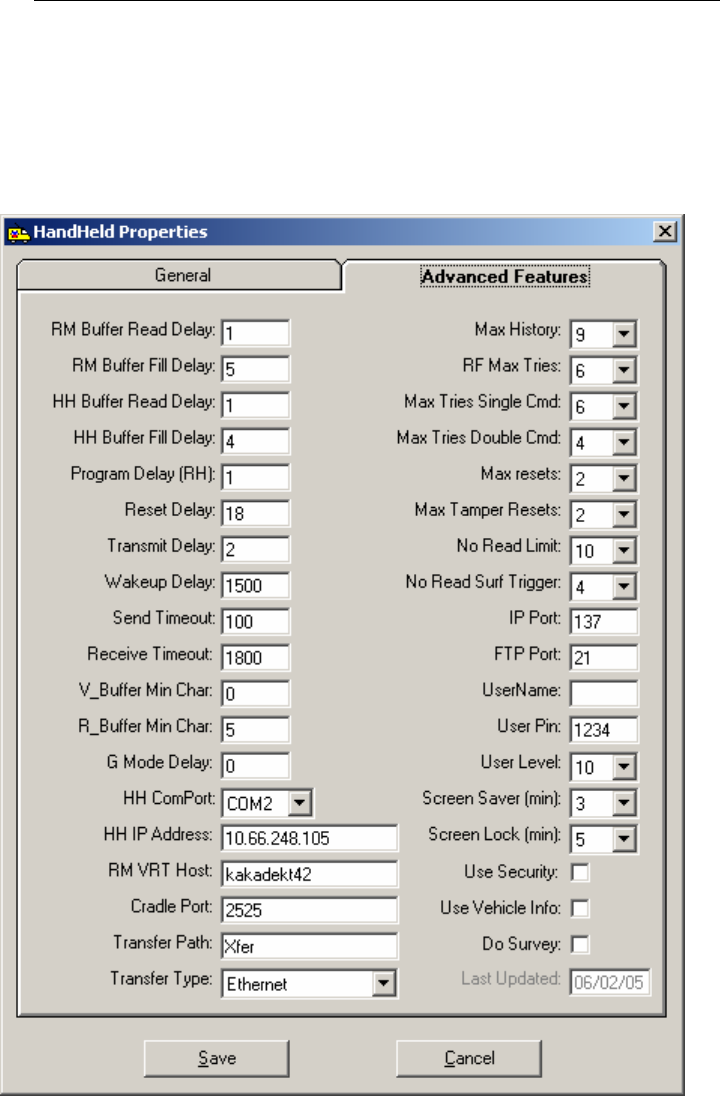
Make sure the following values are added correctly.
Handheld IP Address: IP address of Handheld
RM VRT Host: Name of the computer with RM VRT installed
Transfer Type: Ethernet
HH ComPort: ComPort 2
Send Timeout: 100
Receive Timeout: 1800
Max History: 9
TRACE
INTERROGATOR
VRT
(CE)
O
PERATIONS
Trace Interrogator VRT (CE) - User Guide
AMCO Automated Systems P/N 52808T510 Rev. E, April 28, 2006
57
VersaProbe
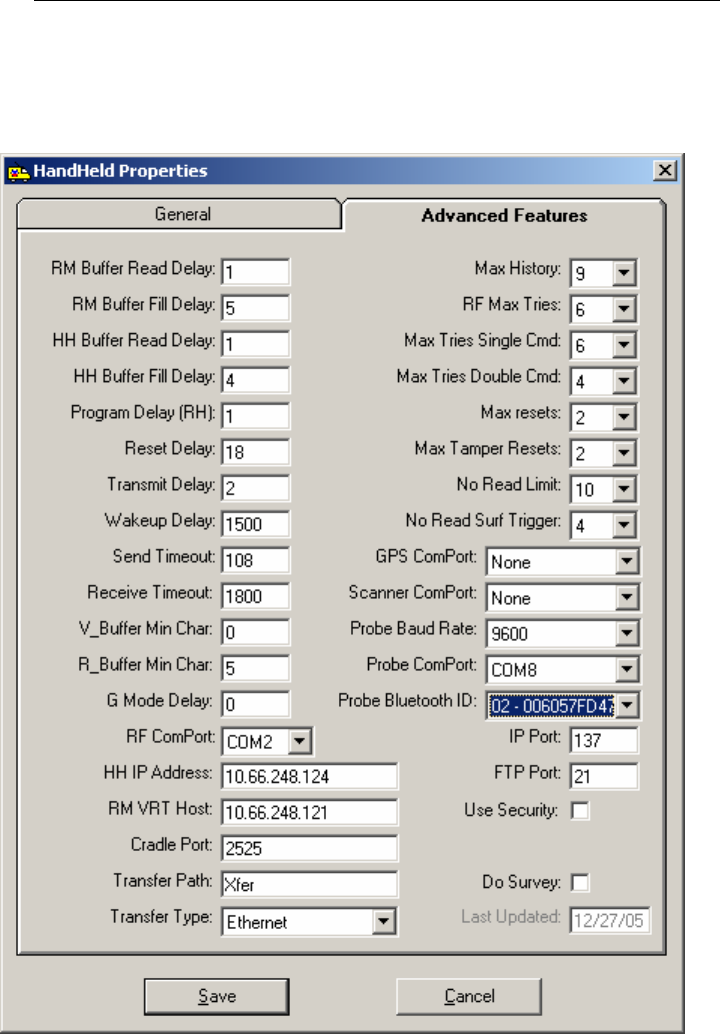
Make sure the following values are added correctly.
Probe Baud Rate: 9600
Probe ComPort: Com8 for Bluetooth Communication
Com1 for Serial Communication
Probe Bluetooth ID: Select appropriate Bluetooth ID of the device
Note: You will find this ID in the VersaProbe communication mode
and It is created in Route Manager under Config\ Misc Codes\
VersaProbe Bluetooth ID\ create.
TRACE
INTERROGATOR
VRT
(CE)
O
PERATIONS
Trace Interrogator VRT (CE) - User Guide
AMCO Automated Systems P/N 52808T510 Rev. E, April 28, 2006
58
Scanner & GPS
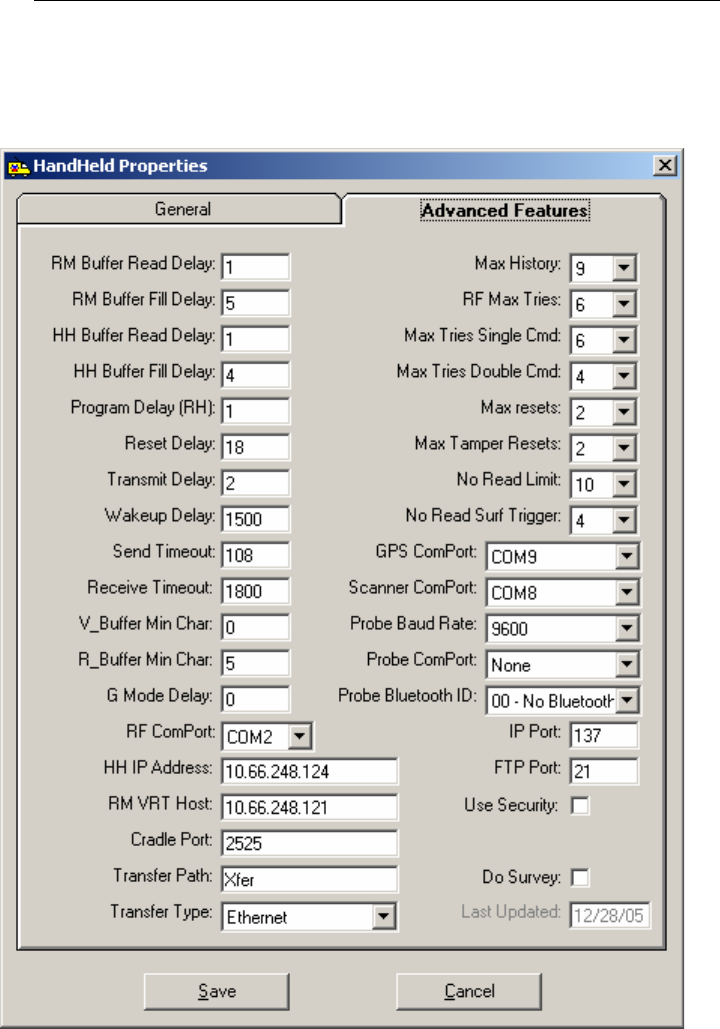
Make sure the following values are added correctly.
GPS ComPort: COM9
Scanner ComPort: COM8

TRACE
INTERROGATOR
VRT
(CE)
O
PERATIONS
Trace Interrogator VRT (CE) - User Guide
AMCO Automated Systems P/N 52808T510 Rev. E, April 28, 2006
59
Troubleshooting
1. General troubleshooting.
a. Click on the screen with the stylus if the navigation using device
keys does not produce expected results.
b. Try to reboot handheld by holding F1+ 0 +9 keys together for few
seconds.
2. Trouble in connecting Handheld with host PC.
a. Make sure that the Handheld is correctly seated in the cradle and
there is not any contaminated material in between the cradle and
handheld’s contacts.
b. If using router (instead of Company’s Network connections) for
handheld and host PC communication, make sure that the firewall
on the host PC is disabled. (To disable firewall, go to “Start Menu”
-> “Settings” -> “Control Panel” -> “windows firewall” and select
option “OFF” )
c. Check if the Handheld’s LED is glowing either green or red. If not
then may be AC charger is faulty.
3. For RF card error message or for further information, please contact
Customer Service
AMCO Automated Systems
208 South Rogers Lane
Raleigh, NC 27610
Phone: 1-800-786-2215
Fax: 919-250-5439

TRACE
INTERROGATOR
VRT
(CE)
O
PERATIONS
Trace Interrogator VRT (CE) - User Guide
AMCO Automated Systems P/N 52808T510 Rev. E, April 28, 2006
60