Emerson Radio ER1002 Alarm Clock Radio with USB Charging and Bluetooth Speaker User Manual
Emerson Radio Corp. Alarm Clock Radio with USB Charging and Bluetooth Speaker
User Manual
OWNER'S MANUAL
CKS1708
Visit our web site at www.emersonradio.com
SmartSet Clock Radio,
With Auto-Time Setting System,
Jumbo Display, Dual Alarms,
Sure Alarm,
PLL FM Radio,
USB Charging
(U.S. Patent No. 6,567,344)
®
TO PREVENT FIRE OR SHOCK HAZARD, DO NOT USE THIS PLUG WITH AN
EXTENSION CORD, RECEPTACLE OR OTHER OUTLET UNLESS THE BLADES
CAN BE FULLY INSERTED TO PREVENT BLADE EXPOSURE. TO PREVENT FIRE
OR SHOCK HAZARD, DO NOT EXPOSE THIS APPLIANCE TO RAIN OR MOISTURE.
1.) Read these instructions. Keep these instructions. Follow all instructions. Heed all warnings.
2.) Do not use this apparatus near water.
3.) Clean only with dry cloth.
4.) Do not block any ventilation openings. Install in accordance with the manufacturer's instructions.
5.) Do not install near any heat sources such as radiators, heat registers, stoves, or other apparatus
(including amplifiers) that produce heat.
6.) Do not defeat the safety purpose of the polarized or grounding-type plug. A polarized plug has two
blades with one wider than the other. A grounding type plug has two blades and a third grounding
prong. The wide blade or the third prong is provided for your safety. If the provided plug does not
fit into your outlet, consult an electrician for replacement of the obsolete outlet.
7.) Protect the power cord from being walked on or pinched particularly at plugs, convenience
receptacles, and the point where they exit from the apparatus.
8.) Only use attachments / accessories specified by the manufacturer.
9.) Unplug this apparatus during lightning storms or when unused for long periods of time.
10.) Refer all servicing to qualified service personnel. Servicing is required when the apparatus has
been damaged in any way, such as power-supply cord or plug is damaged, liquid has been spilled
or objects have fallen into the apparatus, the apparatus has been exposed to rain or moisture,
does not operate normally, or has been dropped.
11.) Use only with the cart, stand, tripod, bracket, or table specified by the
manufacturer, or sold with the apparatus. When a cart is used, use caution
when moving the cart/apparatus combination to avoid injury from tip-over.
12.) The AC adaptor shall not be exposed to dripping or splashing and that no
objects filled with liquids, such as vases, shall be placed on apparatus.
13.) Adaptor is used as disconnect device and it should remain readily operable during intended use.
In order to disconnect the apparatus from the mains completely, adaptor should be disconnected
from the mains socket outlet completely.
14.) Battery shall not be exposed to excessive heat such as sunshine, fire or the like.
CAUTION: Danger of explosion if battery is incorrectly replaced. Replace only with the same or
equivalent type.
IMPORTANTSAFETY INSTRUCTIONS
Th i s is CLAS S II apparat u s wi t h do u ble i nsula tion, and no p rote ctive ea r th provi d ed.
The Caution Marking located at the bottom enclosure of the apparatus.
The lightning flash with arrow-
he ad sym b ol, wi t hin an equi-
la teral t riangle is int ended t o
alert the user to the presence
of uninsulated 'dangerous voltage'
within the product's enclosure
t h a t m a y b e o f s u f f i c i e n t
magnitude to constitute a risk
of ele c t ric sho c k to per s o ns.
The ex c l amatio n p oint w i t hin
an eq u il at e ra l t ri a ng l e i s i n-
t e n d e d t o a l e r t t h e u s e r t o
t h e p r e s e n c e o f i m p o r t a n t
o p e r a t i n g a n d m a i n te n a n ce
( s e r v i c i n g ) i n s t r u c t i o n s i n
t h e l i t e r a t u r e a c c o m p a n y -
i n g t h e a p p l i a n c e .
WAR NIN G: TO R EDU CE TH E RIS K
OF E LEC TRIC SH OOK D O NO T
REM OVE COVER (OR BACK),NO
USER SERVICEABLE PA RT S
IN SI D E R E FE R SE RV IC IN G T O
QUALIFIED SERVICE PERSONNEL.
AVIS:R I S QUE D E CHO C
ELE C TRIQ U E-NE PAS OU V RIR
Setting the Time Zone
Setting The Time
The first time you connect your new SmartSet clock radio to the AC outlet the
internal computer will automatically set the time correctly for the Eastern Time
Zone, which is the initial default setting.The display will scan for a few seconds and
then show the correct Day and Time in the Eastern zone. If you live in the Eastern
Time zone, there’s nothing else to do. Your clock is set correctly and running.
If you do not live in the Eastern Time zone you must change the default zone
display to your own zone. You only do this one time and the SmartSet will
remember the new default zone setting and will always return to that setting after a
power interruption.
®
1
2
2
NOTE: If you manually adjust the time, your new setting is entered into the
SmartSet memory. If the power is interrupted, the display will return to your new
setting, not the original setting, when the power is restored.
®
Adjusting The Wake Up Times and
Alarm Week Mode
1
23
A
Everyday
The alarm will
turn on all 7 days.
Weekdays only
B
The alarm will only
turn on Monday
through Friday.
Weekends only
C
The alarm will only
turn on Saturday
and Sunday.
Alarm Week Mode
Date and Year Display
1
2
Tuning to The FM Radio
Listening to The Radio
132
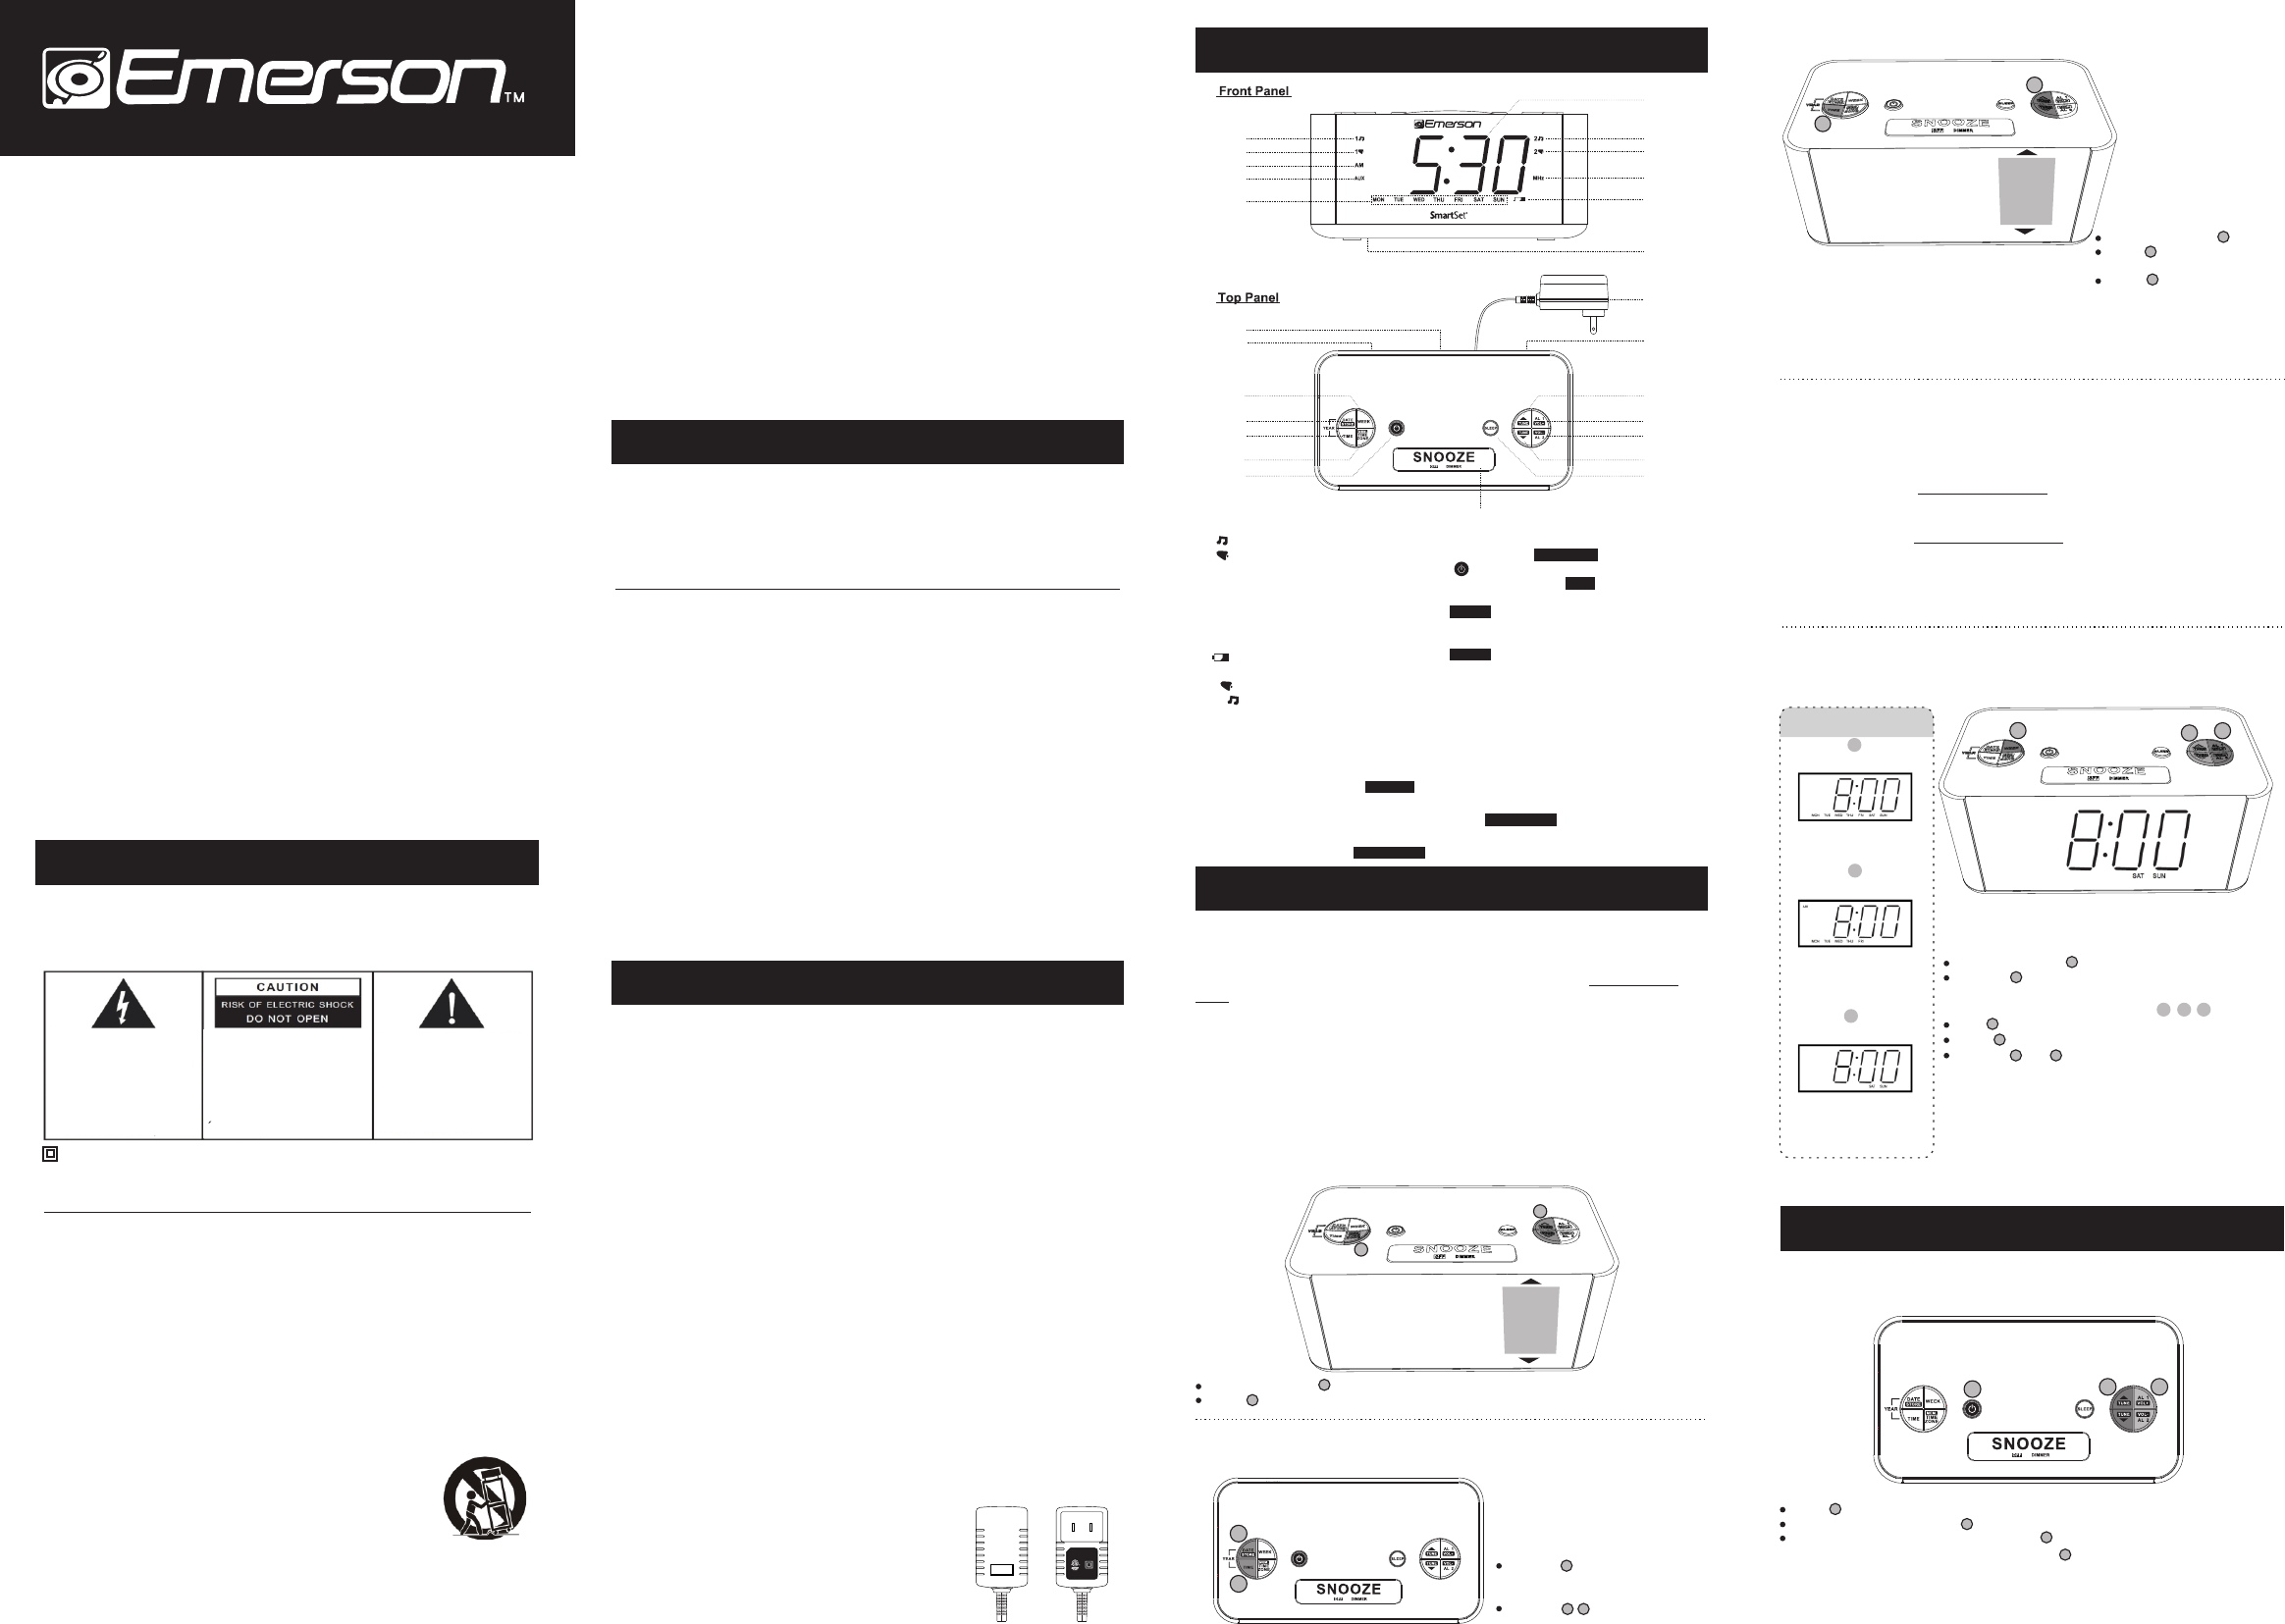
16. TIME Setting / FM Frequency Display.
17. TIME ZONE / Button.MEMORY
18. RADIO ON / OFF Button.
19. SNOOZE / SLEEP / DIMMER Button.OFF
20. SLEEP Button(Sleep To Music Timer).
21. / SET ▼ Button. TUNE
22. ALARM 2 Setting / VOLUME- Button.
23. ALARM 1 Setting / VOLUME+ Button.
24. / SET ▲ Button. TUNE
25. AUX IN Jack.
26. AC adapter(Back Cabinet).
2
2
1. (AL 1'Radio')Alarm Indicator.
2. (AL 1'Buzzer')Alarm Indicator.
3. AM Indicator.('On'=AM;'Off'=PM)
4. AUX Indicator.
5. DAY OF WEEK Indicators.(MON,
TUE,WED,THU,FRI,SAT,SUN)
6. Back Up Battery Compartment
(Bottom Cabinet).
7. LOW BATT. Indicator.
8. FM Radio Indicator.
9. (AL 2 ‘Buzzer’) Alarm Indicator.
10. (AL 2 ‘Radio’) Alarm Indicator.
11. Time/Date Display.
12. Speaker (Back Cabinet).
13. USB Charging.
14. WEEK MODE Button.
abc(Weekdays/Weekends/Everyday Alarm)
15. MONTH/DATE Setting / Radio STORE
abcStation .
1
1
Note: For buttons displayed with additional font or icons, INVERSED
they have multiple function at different operation mode. Generally, the
functions displayed in font are for operation when Radio is ON.INVERSED
13
12
14
15
16
17
18
19
20
21
22
23
24
25
26
Manual Time Adjustments
1
2
5 : 3 0
Depress and hold .
Press to adjust the time
(hr:mm 12-hour time format).
If hold ,the display will
continue to change rapidly.
1
2
2
1
2
DATE DISPLAY(MM.DD):
Depress .
YEAR DISPLAY(YYYY):
Depress together.
1
Depress and hold (AL 1 or AL 2).
Depress to set desired wake up time.
Adjusting The Wake Up Times
1
3
NOTE: For better reception, fully extend and adjust the position and direction
of the AC adapter cord that acts as an FM antenna.
Press to turn the radio 'On' or'Off' .
Set the volume by pressing .
Tune to your desired station by pressing slightly to increase or decrease the
receiving frequency by one step, or holding for one second and release to
engage Auto Station Seeking until a station with acceptable reception is found.
1
2
3
3
Depress and hold .
Press until your own time zone appears on the display,then release the buttons.
1
2
1
2
3
4
5
6
7
8
9
10
11
5
Hold (AL 1 or AL 2).
Press until the indicators show the desired mode.
Release and ,the display will return to the
correct time.
1
2
1 2
Selecting The Alarm Week Mode( / / )
A B C
6
FCC Information
This equipment has been tested and found to comply with the limits for a Class B digital
device, pursuant to Part 15 of the FCC Rules. These limits are designed to p r o v i d e
reasonabl e protection against harmful interference in a residential installation. This
equipment generates, uses, and can radiate radio frequency energy and, if not installed and
used in accordance with the instructions, may cause harmful i n t e r f e r e n c e t o r a d i o
commun ic at io ns . H ow ev er, t he re is no guarantee th at interference will not occur in a
particular installation. If this equipment does cause harmful interference to radio or television
reception, which can be determined by turning the equipme nt off and on, t he user is
encourage d to try to correct the interference by one or more of the following measures:
• Reorient or relocate the receiving antenna.
• Increase the separation between the equipment and receiver.
• Connect the equipment into an outlet on a circuit different from that to which the
receiver is connected.
• Consult the dealer or an experienced radio/TV technician for help.
• O p e r a t e c o n t r o l s a n d s w i t c he s a s
described in the manual.
• Be f o re tur n i ng on the po w e r, ma k e
c e r t a i n t h a t t h e A C a d a p t e r i s
properly installed.
• When moving the set, be sure to first
disconnect the AC adapter.
• Av oid ins t a lli n g t h is uni t i n p l ace s
exposed to direct sunlight or close to
h e a t r a d i a t i n g a p p li an c es s u ch a s
electric heaters, on top of other stereo
eq u i pme n t t h at r adi a t es too m uch
heat, places lacking ventilation or dusty
a r e a s , p l a c e s s u bj e c t t o c o n s t an t
vibration and/or humid or moist areas.
Unpacking And Set Up
• Remove the radio from the carton and remove all packing material from the
radio. We suggest that you save the packing material, if possible, in the unlikely
event that your radio ever needs to be returned for service. The original carton
and packing material is the only safe way to pack your radio to protect it from
damage in transit.
• Remove any descriptive labels or stickers on the front or top of the cabinet. Do
not remove any labels or stickers from the back or bottom of the cabinet.
• Note the serial number on the bottom of your radio and write this number in the
space provided on the Warranty page of this manual.
• Place your radio on a level surface such as a table, desk or shelf, convenient
to an AC outlet, out of direct sunlight, and away from sources of excess heat,
dirt, dust, moisture, humidity, or vibration.
• Unwind the Line cord connecting the AC adapter and extend it to its full length.
The FM antenna is built in to this cord. It must be fully extended to provide the
best FM reception.
Protect Your Furniture
This model is equipped with non-skid rubber 'feet' to prevent the product from
moving when you operate the controls. These 'feet' are made from non-migrating
rubber material specially formulated to avoid leaving any marks or stains on your
furniture. However certain types of oil based furniture polishes, wood preservatives,
or cleaning sprays may cause the rubber 'feet' to dissolve and leave marks or a
rubber residue on the furniture. To prevent any damage to your furniture we strongly
recommend that you purchase small self-adhesive felt pads, available at hardware
stores and home improvement centers everywhere, and apply these pads to the
bottom of the rubber 'feet' before you place the product on fine wooden furniture.
Power Source
This radio is designed to operate on normal 120V 60Hz AC power only. Do not
attempt to operate the radio on any other power source. You could cause damage
to the radio that will void your warranty.
This radio should be connected to an AC outlet that
is always 'live'. Do not connect it to an outlet that is
controlled by a wall switch. When the power to the
radio is interrupted, the built in lithium battery takes
over to maintain the time and alarm settings. To
maximize the life of the lithium battery keep the radio
connected to a 'live' AC outlet at all times.
This device complies with Part 15 of the FCC Rules. Operation is subject to the
following two conditions:
(1) This device may not cause harmful interference;
(2) This device must accept any interference received, including interference
that may cause undesired operation.
Changes or modifications not expressly approved by the party responsible for
compliance could void the user's authority to operate the equipment.
Thank you for purchasing this Emerson SmartSet Dual Alarm Clock Radio.
This clock radio uses Emerson's patented SmartSet Automatic Time Setting System.
The first time you connect this clock radio to yo ur AC outlet, and after every power
interruption, within seconds the clock will automatically set itself t o t he co rrect Ye a r,
Month, Date, Day, and Time. In addition all ch an ge s from Standard Time to Daylight
Saving Time, and back to Standard Time, are made automatically.
There are dual alarms that can be set and used independently, and both of the alarms
can be programmed for everyday operation, weekdays only, or weekends only.
There is a long life lithium battery installed in this clock radio when you buy it.
This battery can maintain the time and alarm settings for 3 to 5 years, or even longer.
We have taken every precaution to make sure this radio was in perfect working order
when it left our factory. If you encounter any problems with the set up or operation of this
item, please call the Emerson Consumer Products Corp.,
Customer Service Hotline, toll free, at 1 -800-898-9020.
®
®
AVERTISSEMENT: AFIN DE PRÉVENIR TOUT RISQUE D'INCENDIE OU D'ÉLECTROCUTION
N'EXPOSEZ PAS CET APPAREIL Á LA PLUIE NI À L'HUMIDITÉ.
La prise du secteur ne doit pas ētre obstruée ou doit ētre facilement accessible pendant son
utilisation. Pour étre complètement déconnecté de l'alimentation d'entrée, la prise doit ētre
débranchée du secteur.
Les piles ne doivent pas ētre exposées à de forte chaleur, tel qu'á la lumière du soleil, au
feu ou autres choses de semblable.
L'appareil ne doit pas être exposé aux écoulements ou aux éclaboussures et aucun objet
ne contenant de liquide, tel qu'un vase, ne doit être placé sur l'objet.
PRÉCAUTION: Danger d’explosion s i les piles sont remplacées de facon incorrect.
Remplacer les piles seulement par le méme type de pile ou l’équivalent.
Preparation for Use
√
IMPORTANT NOTES
2
3
POWER CONSUMPTION: 9.5W
INPUT: 120V AC ~ 60Hz
AC/DC ADAPTER
CONFORMS TO ANSI/UL STD.60065
CERTIFIED TO CAN/CSA
STD.C22.2 NO.60065
MADE IN CHINA
NOTE: Be sure that you have set the wake up time
by observing the AM indicator. If the AM indicator is
'On ' the wake up time is "AM". Otherwise the wake
up time is "PM".
There are 7 time zones programmed into your SmartSet clock radio as follows:
ZONE 1 — Atlantic Time ZONE 2 — Eastern Time (Default Setting)
ZONE 3 — Central Time ZONE 4 — Mountain Time
ZONE 5 — Pacific Time ZONE 6 — Yukon Time
ZONE 7 — Hawaiian Time
®
Daylight Saving and Leap Year Adjustments
Al l Day lig ht S avin g an d Lea p Year adjustm ent s are made aut omatica lly b y
the SmartSet internal computer as follows:
• Start of Daylight Saving Time:
At "2:00 AM" on the 2nd Sunday in March, the clock will automatically
advance to "3:00 AM".
• End of Daylight Saving Time:
At '3:00 AM' on the 1st Sunday in November, the clock will automatically
reset to "2:00 AM".
• Leap Year:
At "12:00 Midnight" on February 28th, the calendar display will change
to "2.29".
®
®
WARNING
!
1
Location of Controls and Indicators
4
Recalling Station from the Memory
1 hour
Radio gradually
• Alarm 1 →Single beep" sound
• Alarm 2 →Double beep" sound
1 hour
Buzzer gradually
9 minutes
Radio And Buzzer Operation
You may also set one alarm for wake to RADIO and the other for wake to BUZZER.
Just press the AL 1 and AL 2 buttons to the desired status as shown on the ALARM
indicators.
If you find the clock display is too bright in a darkened room,set the DIMMER by
pressing SNOOZE/SLEEP OFF button,when Radio is ‘Off’.
5 : 3 0
Storing Station to the Memory
2
P 0 3
13
1
2
P 0 3
5 : 3 01
NEGATIVE(-)
2~5 years battery life
CR2032(3V)
NEGATIVE(-)POSITIVE(+)
2-90 min ,
shut off automatically
2
31
1
2
3
AUX IN
USB FOR
CHARGI NG
2
3.5mm stereo
audio plug
AUX 5 : 3 0
3
1
PLAY
4
Wake To Radio and Radio Alarm Volume Setting
Setting The Alarm
Wake To Buzzer
Sleep to Music Timer
3-Level Dimmer Control
Changing The Lithium Battery
Resetting after Total Memory Loss
Lithium Battery Precautions
• Dispose of the old battery properly. Do not leave it lying around where a young
child or pet could play with, or swallow it. If the battery is swallowed, contact a
physician immediately.
• Battery may explode if mistreated. Do not attempt to recharge it or disassemble
it. Do not dispose of the old battery in a fire.
Model Number: CKS1708
Serial Number:
The serial number can be found on the back cabinet. We suggest that you record
the serial number of your unit in the space below for future reference.
10-90-1402A
Care Of Cabinets
If the cabinet becomes dusty, wipe it with a soft cloth. If the cabinet becomes
smudged or dirty, clean it with a soft, slightly dampened cloth .
Ne ver a llow w ater o r a ny liq uid t o g et ins ide th e cabi net . Neve r use an y
abrasive cleaners or cleaning pads as these will damage the finish of your radio.
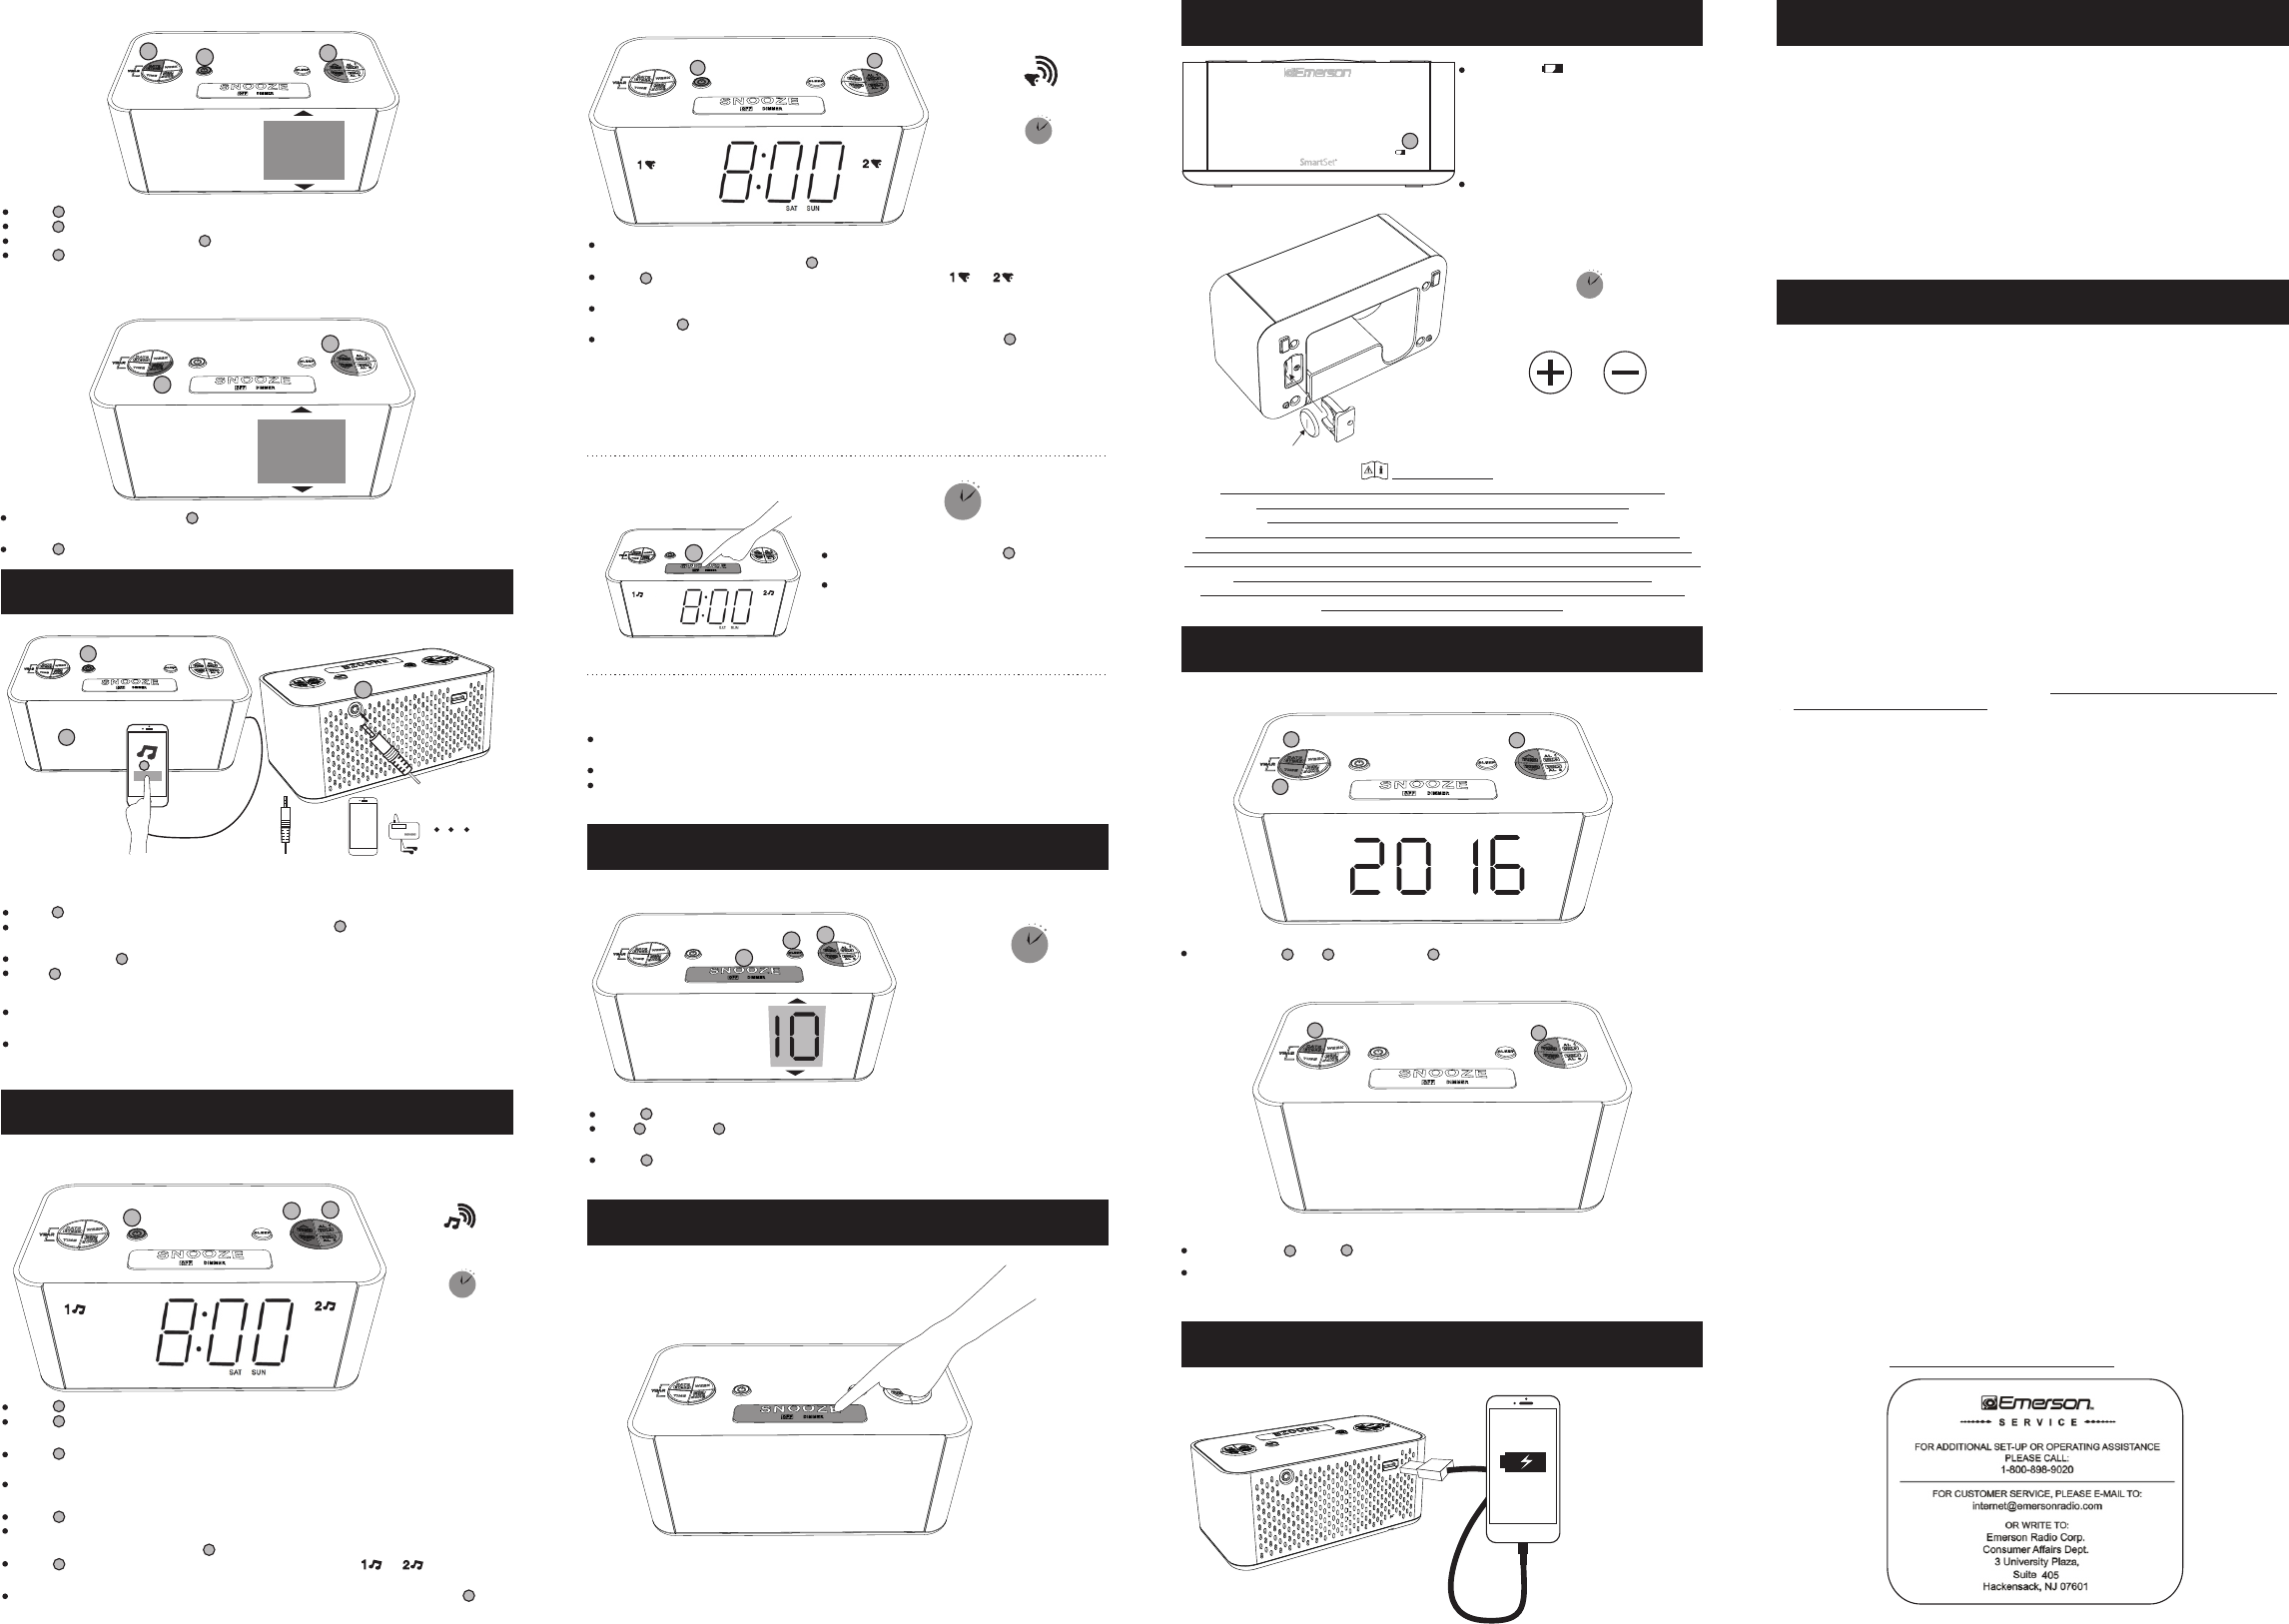
AUX IN
USB F OR
CHARGING
USB Charging
Output 5V 1A for charging
mobile phone or portable
digital audio player.
Press to turn the radio ‘On'and tune to the desired station as described.
Press indicating the memory location to store the currently listening station.
While ‘P XX’ is blinking, press can change the memory location(P01~P10).
Press again, the currently listening station is stroed.
1
2
3
2
After the radio is ‘On’ ,press , ‘P XX’ shows on the display and the station
according to the memory location is tuned.
Press can change the memory location(P01~P10) .
1
2
Enjoying Audio Sources with AUX IN Jack
Press to turn the radio ‘On’ .
Press or recall station from the Memory to select the station that you wish to
hear when the alarm comes ‘On’.
Press to set the maximum radio volume at which the alarm will reach
gradually at wake up time.
To have a softer radio volume (U07) at wake up time, select radio volume
between U00 and U07.
Press again to turn the radio ‘Off’ .
Reconfirm the wake up time and alarm mode settings for the alarm you are
using by pressing and holding (either AL 1 or AL 2) when the radio is ‘Off’.
Press slightly, and repeat doing so if necessary, until or indicator is lit
on the display.
If you do not want the alarm to turn the radio on the following day , press until
the ALARM indicator on the display is ‘Off’.
1
3
2
1
2
2
2
Reconfirm the wake up time and alarm mode settings for the alarm you are
using by pressing and holding (either AL 1 or AL 2 )when the radio is ‘Off’.
Press slightly, and repeat doing so if necessary, until or indicator is lit
on the display.
At the selected wake up time the buzzer will sound gradually and continue for 1
hour, press to stop the buzzer sooner.
If you do not want the alarm to buzzer on the following day,press until the
ALARM indicator on the display is ‘Off’.
2
2
1
2
Snooze Alarm
When alarm sounds, press to snooze
the alarm that will repeat nine minutes later.
The Snooze operation may be repeated
several times if desired but after one hour
the alarm will not come on again.
4
Press to turn on the sleep timer to play radio.
Hold and press to change the display to the desired sleep time(2~90
minutes,default is 10 minutes).
Press to cancel the sleep timer and shut the radio ‘Off’.
1
2
3
1
When the LOW BATT
indicator 'Flashes', you should
change the battery that is used for
backup clock and alarm setting as
well as for the Sure Alarm that can
wake you up even if the power is 'Off'
at the selected wake up time.
It will be ‘Off ’ when you have
changed the battery in correct
instructions.
While holding and buttons,press to set the display to the correct year, then
release the buttons.
1 2 3
Resetting the time and alarm please follow the instructions on Setting The
Time and Setting The Alarm.
While holding ,press to set the display to the correct Month and Date.
12
7
8
2
13
AM
12
AM
4
AM
12
5 : 3 0
10
9
11
12
13
14
15
Emerson Part No. CKS1708-20151231-02 Printed in China
CARE AND MAINTENANCE
LIMITED WARRANTY
WARNING
DANGER OF EXPLOSION IF BATTERY IS INCORRECTLY REPLACED.
REPLACE ONLY WITH THE SAME OR EQUIVALENT TYPE.
DO NOT INGEST BATTERY,CHEMICAL BURN HAZARD
This product contains a coin/button cell battery.If the coin/button cell battery is
swallowed,it can cause severe internal burns in just 2 hours and can lead to death.
Keep new and used batteries away from children.If the battery compartment does not
close securely,stop using the product and keep it away from children.
If you think batteries might have been swallowed or placed inside any part of the
body,seek immediate medical attention.
Sure Alarm
Sure Alarm is a battery back-up buzzer alarm that can wake you up even if the
power is interrupted at the selected wake up time.
This Sure Alarm will sound for 30 seconds and then shut off automatically.
To stop the Sure Alarm sooner, press the RADIO ON/OFF button (Snooze button
has no effect durring Sure Alarm operation).
Remark:
Once the AUX IN jack is plugged in, the alarm sound will be buzzer sound
only while the alarm function is activated.
The AUX volume can only be adjusted through your audio players.
Press to turn the radio ‘On’.
Connect the audio source from its earphone jack to with a 3.5mm Male to Male
stereo AUX cable (not included).
"AUX" indicator will light on while AUX IN jack is plugged in.
Start to play the audio source
1
2
3
4
Emerson Radio Corp. warrants this product to be free from manufacturing defects
in original material, including original parts, and workmanship under normal home
use and conditions (“manufacturing defect”) for a period of ninety (90) days from
date of original purchase in, and if used in the United States. Should service be
necessary under this warranty, Emerson will provide the following at our Return
Repair Facility provided the manufacturing defect is verified along with the date of
purchase:
* Repair service for ninety (90) days from date of original purchase at no charge
abfor labor and parts.
To Receive Authorization to Return a Defective Item, please contact Emerson
Customer Service at 1-800-898-9020. Have your Model number, Serial Number
and dated Proof of Purchase with you when you call.
In the event the product must be returned to Emerson:
* Pack the unit in a well-padded heavy corrugated box. Please insure the item is
abwell padded to avoid damage while in transit back to our facility. If the item
abincurs damage, it will NOT be replaced and the consumer will be responsible
abfor return freight costs to receive their same unit back.
* Enclose your check or money order payable to Emerson Radio in the amount of
ab$10 to cover return shipping and handling costs.
* Enclose a note with your name, address, phone number, Return Authorization
number and brief reason for returning the unit.
* Enclose a copy of your proof of purchase (warranty service will not be provided
without dated proof of purchase).
* Ship the unit prepaid via UPS or parcel post (SHIP INSURED and obtain a
abtracking number).
NOTE: This warranty does not cover:
(a) Damage to equipment not properly connected to the product.
(b) Cost incurred in the shipping of the product to and from Emerson's Return
abcFacility.
(c) Damage or improper operation of unit caused by customer abuse, misuse,
negligence or failure to follow operating instructions (including cleaning
abcinstructions) provided with the product.
(d) Ordinary adjustments to the product which can be performed by customer as
outlined in the owner's manual.
(e) Signal reception problems caused by external antenna or cable systems.
(f ) Products not purchased in the United States.
(g) Damage to product if used outside the United States.
THIS WARRANTY IS NON-TRANSFERABLE AND APPLIES ONLY TO THE ORIGINAL
PURCHASER AND DOES NOT EXTEND TO SUBSEQUENT OWNERS OF THE
PRODUCT. ANY APPLICABLE IMPLIED WARRANTIES, INCLUDING THE WARRANTY
OF MERCHANTABILITY, ARE LIMITED IN DURATION TO A PERIOD OF THE
EXPRESSED WARRANTY AS PROVIDED HEREIN BEGINNING WITH THE DATE OF
ORIGINAL PURCHASE AT RETAIL AND NO WARRANTIES, WHETHER EXPRESSED
OR IMPLIED, SHALL APPLY TO THE PRODUCT THEREAFTER. EMERSON MAKES NO
WARRANTY AS TO THE FITNESS OF THE PRODUCT FOR ANY PARTICULAR
PURPOSE OR USE.THE EXTENT OF EMERSON RADIO CORP'S LIABILITY UNDER
THIS LIMITED WARRANTY IS THE REPAIR OR REPLACEMENT PROVIDED ABOVE
AND, IN NO EVENT, SHALL EMERSON RADIO CORP'S LIABILITY EXCEED THE
PURCHASE PRICE PAID BY THE PURCHASER OF THE PRODUCT. UNDER NO
CIRCUMSTANCES SHALL EMERSON RADIO CORP. BE LIABLE FOR ANY LOSS,
DIRECT, INDIRECT, INCIDENTAL, SPECIAL, OR CONSEQUENTIAL DAMAGE ARISING
OUT OF OR IN CONNECTION WITH THE USE OF THIS PRODUCT. THIS WARRANTY
IS VALID ONLY IN THE UNITED STATES OF AMERICA.THIS WARRANTY GIVES YOU
SPECIFIC LEGAL RIGHTS. HOWEVER, YOU MAY HAVE OTHER RIGHTS WHICH MAY
VARY FROM STATE TO STATE. SOME STATES DO NOT ALLOW LIMITATIONS ON
IMPLIED WARRANTIES OR EXCLUSION OF CONSEQUENTIAL DAMAGE,
THEREFORE THESE RESTRICTIONS MAY NOT APPLY TO YOU.