Emerson 848L Users Manual Logic Transmitter With FOUNDATION Fieldbus
2015-01-05
: Emerson Emerson-848L-Users-Manual-165686 emerson-848l-users-manual-165686 emerson pdf
Open the PDF directly: View PDF ![]() .
.
Page Count: 105 [warning: Documents this large are best viewed by clicking the View PDF Link!]
- Rosemount 848L Logic Transmitterwith FOUNDATION™ Fieldbus
- Table of Contents
- Section 1 Introduction
- Section 2 Installation
- Section 3 Configuration
- Section 4 Operation and Maintenance
- Appendix A Reference Data
- Appendix B Product Certifications
- Appendix C Function Blocks
- Appendix D Logic Equation Syntax
- Appendix E Motor Control
- Appendix F Valve Control
- Index
www.rosemount.com
Reference Manual
00809-0100-4696, Rev AA
September 2004
Rosemount 848L Logic Transmitter
with FOUNDATION™ Fieldbus
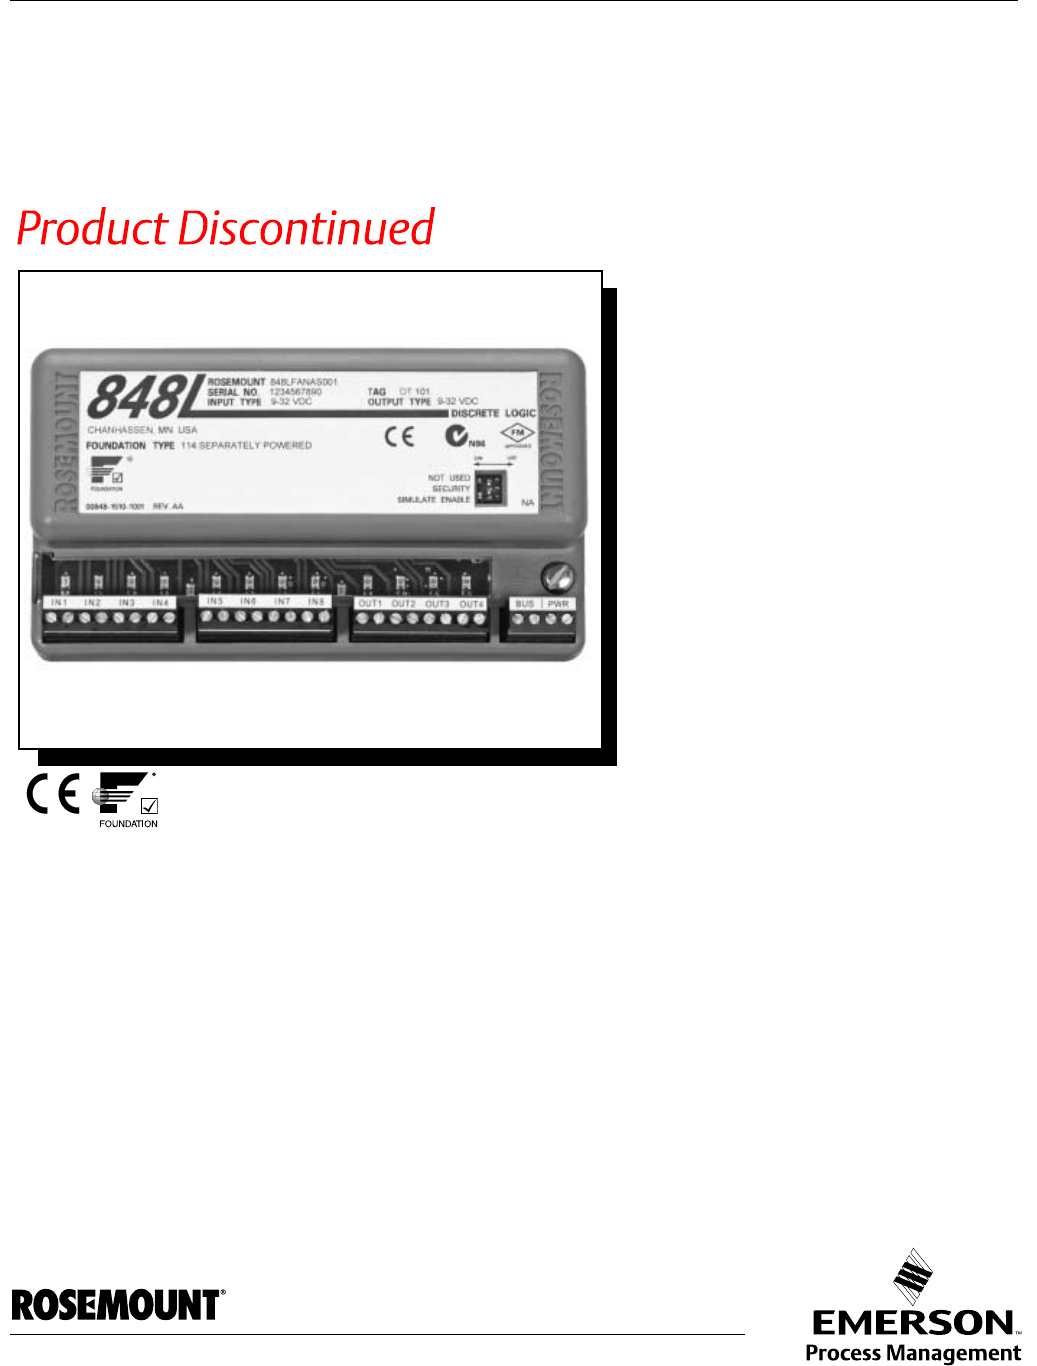
Product Discontinued

Reference Manual
00809-0100-4696, Rev AA
September 2004 Rosemount 848L
www.rosemount.com
Rosemount 848L Discrete Logic
Temperature Transmitter with
FOUNDATION Fieldbus
Cover photo: 848-848C004
NOTICE
Read this manual before working with the product. For personal and system safety, and for
optimum product performance, make sure to thoroughly understand the contents before
installing, using, or maintaining this product.
The United States has two toll-free assistance numbers and one international number.
Customer Central
1-800-999-9307 (7:00 a.m. to 7:00 P.M. CST)
National Response Center
1-800-654-7768 (24 hours a day)
Equipment service needs
International
1-(952) 906-8888
The products described in this document are NOT designed for nuclear-qualified
applications.
Using non-nuclear qualified products in applications that require nuclear-qualified hardware
or products may cause inaccurate readings.
For information on Rosemount nuclear-qualified products, contact a Emerson Process
Management Sales Representative.

Reference Manual
00809-0100-4696, Rev AA
September 2004 Rosemount 848L
www.rosemount.com
Table of Contents
SECTION 1
Introduction
Safety Messages . . . . . . . . . . . . . . . . . . . . . . . . . . . . . . . . . . . . . . . . . . . . . 1-1
Warnings . . . . . . . . . . . . . . . . . . . . . . . . . . . . . . . . . . . . . . . . . . . . . . . . . 1-1
Overview . . . . . . . . . . . . . . . . . . . . . . . . . . . . . . . . . . . . . . . . . . . . . . . . . . . 1-2
Transmitter . . . . . . . . . . . . . . . . . . . . . . . . . . . . . . . . . . . . . . . . . . . . . . . 1-2
Manual . . . . . . . . . . . . . . . . . . . . . . . . . . . . . . . . . . . . . . . . . . . . . . . . . . 1-2
Return of Materials . . . . . . . . . . . . . . . . . . . . . . . . . . . . . . . . . . . . . . . . . . . 1-3
SECTION 2
Installation
Safety Messages . . . . . . . . . . . . . . . . . . . . . . . . . . . . . . . . . . . . . . . . . . . . . 2-1
Warnings . . . . . . . . . . . . . . . . . . . . . . . . . . . . . . . . . . . . . . . . . . . . . . . . . 2-1
Mounting . . . . . . . . . . . . . . . . . . . . . . . . . . . . . . . . . . . . . . . . . . . . . . . . . . . 2-1
Mounting to a DIN Rail Without an Enclosure. . . . . . . . . . . . . . . . . . . . . 2-2
Mounting to a Panel with a Junction Box . . . . . . . . . . . . . . . . . . . . . . . . 2-2
Mounting to a 2-Inch Pipe Stand. . . . . . . . . . . . . . . . . . . . . . . . . . . . . . . 2-3
Wiring. . . . . . . . . . . . . . . . . . . . . . . . . . . . . . . . . . . . . . . . . . . . . . . . . . . . . . 2-4
Power Supply Connections . . . . . . . . . . . . . . . . . . . . . . . . . . . . . . . . . . . 2-4
Surges/Transients . . . . . . . . . . . . . . . . . . . . . . . . . . . . . . . . . . . . . . . . . . 2-5
Grounding . . . . . . . . . . . . . . . . . . . . . . . . . . . . . . . . . . . . . . . . . . . . . . . . . . 2-5
Switches . . . . . . . . . . . . . . . . . . . . . . . . . . . . . . . . . . . . . . . . . . . . . . . . . . . 2-5
I/O Wiring. . . . . . . . . . . . . . . . . . . . . . . . . . . . . . . . . . . . . . . . . . . . . . . . . . . 2-7
Tagging . . . . . . . . . . . . . . . . . . . . . . . . . . . . . . . . . . . . . . . . . . . . . . . . . . . . 2-8
Transmitter Label. . . . . . . . . . . . . . . . . . . . . . . . . . . . . . . . . . . . . . . . . . . . . 2-9
Installation . . . . . . . . . . . . . . . . . . . . . . . . . . . . . . . . . . . . . . . . . . . . . . . . . . 2-9
Using Cable Glands . . . . . . . . . . . . . . . . . . . . . . . . . . . . . . . . . . . . . . . . 2-9
Using Conduit Entries . . . . . . . . . . . . . . . . . . . . . . . . . . . . . . . . . . . . . . 2-10
SECTION 3
Configuration
Overview . . . . . . . . . . . . . . . . . . . . . . . . . . . . . . . . . . . . . . . . . . . . . . . . . . . 3-1
Safety Messages . . . . . . . . . . . . . . . . . . . . . . . . . . . . . . . . . . . . . . . . . . . . . 3-1
Warnings . . . . . . . . . . . . . . . . . . . . . . . . . . . . . . . . . . . . . . . . . . . . . . . . . 3-1
General Block Information . . . . . . . . . . . . . . . . . . . . . . . . . . . . . . . . . . . . . . 3-2
Modes . . . . . . . . . . . . . . . . . . . . . . . . . . . . . . . . . . . . . . . . . . . . . . . . . . . 3-2
Link Active Scheduler . . . . . . . . . . . . . . . . . . . . . . . . . . . . . . . . . . . . . . . 3-3
Block Instantiation . . . . . . . . . . . . . . . . . . . . . . . . . . . . . . . . . . . . . . . . . . 3-3
Capabilities . . . . . . . . . . . . . . . . . . . . . . . . . . . . . . . . . . . . . . . . . . . . . . . 3-4
Resource Block . . . . . . . . . . . . . . . . . . . . . . . . . . . . . . . . . . . . . . . . . . . . . . 3-4
FEATURES and FEATURES_SEL . . . . . . . . . . . . . . . . . . . . . . . . . . . . . 3-4
MAX_NOTIFY . . . . . . . . . . . . . . . . . . . . . . . . . . . . . . . . . . . . . . . . . . . . . 3-5
PlantWeb™ Alarms . . . . . . . . . . . . . . . . . . . . . . . . . . . . . . . . . . . . . . . . . 3-6
Alarms . . . . . . . . . . . . . . . . . . . . . . . . . . . . . . . . . . . . . . . . . . . . . . . . . . . 3-9
I/O Transducer Block . . . . . . . . . . . . . . . . . . . . . . . . . . . . . . . . . . . . . . . . . . 3-9
Logic Transducer Block . . . . . . . . . . . . . . . . . . . . . . . . . . . . . . . . . . . . . . . 3-10
Discrete Input Blocks . . . . . . . . . . . . . . . . . . . . . . . . . . . . . . . . . . . . . . . . . 3-20
Discrete Output Blocks . . . . . . . . . . . . . . . . . . . . . . . . . . . . . . . . . . . . . . . 3-21
Multiple Discrete Input Block . . . . . . . . . . . . . . . . . . . . . . . . . . . . . . . . . . . 3-21
Multiple Discrete Output Block. . . . . . . . . . . . . . . . . . . . . . . . . . . . . . . . . . 3-21

Reference Manual
00809-0100-4696, Rev AA
September 2004
Rosemount 848L
TOC-2
SECTION 4
Operation and
Maintenance
Safety Messages . . . . . . . . . . . . . . . . . . . . . . . . . . . . . . . . . . . . . . . . . . . . . 4-1
Warnings . . . . . . . . . . . . . . . . . . . . . . . . . . . . . . . . . . . . . . . . . . . . . . . . . 4-1
Foundation Fieldbus Information . . . . . . . . . . . . . . . . . . . . . . . . . . . . . . . . . 4-1
Commissioning (Addressing) . . . . . . . . . . . . . . . . . . . . . . . . . . . . . . . . . 4-2
Hardware Maintenance . . . . . . . . . . . . . . . . . . . . . . . . . . . . . . . . . . . . . . . . 4-2
Sensor Check . . . . . . . . . . . . . . . . . . . . . . . . . . . . . . . . . . . . . . . . . . . . . 4-2
Communication/Power Check. . . . . . . . . . . . . . . . . . . . . . . . . . . . . . . . . 4-2
Resetting the Configuration (RESTART) . . . . . . . . . . . . . . . . . . . . . . . . 4-2
Troubleshooting . . . . . . . . . . . . . . . . . . . . . . . . . . . . . . . . . . . . . . . . . . . . . . 4-3
Foundation Fieldbus . . . . . . . . . . . . . . . . . . . . . . . . . . . . . . . . . . . . . . . . 4-3
Resource Block . . . . . . . . . . . . . . . . . . . . . . . . . . . . . . . . . . . . . . . . . . . . 4-3
I/O Transducer and Logic Block Troubleshooting . . . . . . . . . . . . . . . . . . 4-3
NAMUR Sensors. . . . . . . . . . . . . . . . . . . . . . . . . . . . . . . . . . . . . . . . . . . 4-3
APPENDIX A
Reference Data
Specifications. . . . . . . . . . . . . . . . . . . . . . . . . . . . . . . . . . . . . . . . . . . . . . . .A-1
Functional Specifications . . . . . . . . . . . . . . . . . . . . . . . . . . . . . . . . . . . .A-1
Physical Specifications . . . . . . . . . . . . . . . . . . . . . . . . . . . . . . . . . . . . . .A-4
Function Blocks Specification . . . . . . . . . . . . . . . . . . . . . . . . . . . . . . . .A-4
Dimensional Drawings . . . . . . . . . . . . . . . . . . . . . . . . . . . . . . . . . . . . . . . .A-5
Ordering Information . . . . . . . . . . . . . . . . . . . . . . . . . . . . . . . . . . . . . . . . . .A-7
APPENDIX B
Product Certifications
Approved Manufacturing Locations . . . . . . . . . . . . . . . . . . . . . . . . . . . . . .B-1
European Directive Information . . . . . . . . . . . . . . . . . . . . . . . . . . . . . . . . .B-1
Hazardous Locations Certificates . . . . . . . . . . . . . . . . . . . . . . . . . . . . . . . .B-1
North American Approvals . . . . . . . . . . . . . . . . . . . . . . . . . . . . . . . . . . .B-1
European Approvals . . . . . . . . . . . . . . . . . . . . . . . . . . . . . . . . . . . . . . . .B-2
APPENDIX C
Function Blocks
Resource Block Parameters . . . . . . . . . . . . . . . . . . . . . . . . . . . . . . . . . . . .C-1
I/O Transducer Parameters . . . . . . . . . . . . . . . . . . . . . . . . . . . . . . . . . . . .C-5
Logic Transducer Parameters . . . . . . . . . . . . . . . . . . . . . . . . . . . . . . . . . . .C-8
Discrete Input Block. . . . . . . . . . . . . . . . . . . . . . . . . . . . . . . . . . . . . . . . . . .C-9
Discrete Output Block . . . . . . . . . . . . . . . . . . . . . . . . . . . . . . . . . . . . . . . .C-11
Supported Modes . . . . . . . . . . . . . . . . . . . . . . . . . . . . . . . . . . . . . . . . .C-11
Multiple Discrete Input Blocks . . . . . . . . . . . . . . . . . . . . . . . . . . . . . . . . . .C-12
Multiple Discrete Output Block. . . . . . . . . . . . . . . . . . . . . . . . . . . . . . . . . .C-13

Reference Manual
00809-0100-4696, Rev AA
September 2004
TOC-3
Rosemount 848L
APPENDIX D
Logic Equation Syntax
Error Handling . . . . . . . . . . . . . . . . . . . . . . . . . . . . . . . . . . . . . . . . . . . . . . .D-4
Examples . . . . . . . . . . . . . . . . . . . . . . . . . . . . . . . . . . . . . . . . . . . . . . . . . . .D-5
APPENDIX E
Motor Control
Introduction to Motor Control . . . . . . . . . . . . . . . . . . . . . . . . . . . . . . . . . . . .E-1
Variations on Motor Control . . . . . . . . . . . . . . . . . . . . . . . . . . . . . . . . . . . . .E-2
Writing 848L Equations . . . . . . . . . . . . . . . . . . . . . . . . . . . . . . . . . . . . . . . .E-4
Basic Motor Control. . . . . . . . . . . . . . . . . . . . . . . . . . . . . . . . . . . . . . . . .E-4
Interlock. . . . . . . . . . . . . . . . . . . . . . . . . . . . . . . . . . . . . . . . . . . . . . . . . .E-5
Permissive. . . . . . . . . . . . . . . . . . . . . . . . . . . . . . . . . . . . . . . . . . . . . . . .E-5
Emergency Shutdown . . . . . . . . . . . . . . . . . . . . . . . . . . . . . . . . . . . . . . .E-5
Restart Delay . . . . . . . . . . . . . . . . . . . . . . . . . . . . . . . . . . . . . . . . . . . . .E-6
Maximum Restarts . . . . . . . . . . . . . . . . . . . . . . . . . . . . . . . . . . . . . . . . .E-7
Winding Temperature . . . . . . . . . . . . . . . . . . . . . . . . . . . . . . . . . . . . . . .E-8
Hand-Off-Auto . . . . . . . . . . . . . . . . . . . . . . . . . . . . . . . . . . . . . . . . . . . . .E-9
Intermediate Stop . . . . . . . . . . . . . . . . . . . . . . . . . . . . . . . . . . . . . . . . .E-10
Redundant Motors - Alternate Start . . . . . . . . . . . . . . . . . . . . . . . . . . .E-11
Redundant Motors - Timed Switch . . . . . . . . . . . . . . . . . . . . . . . . . . . .E-12
Redundant Motors - Switch on Failure . . . . . . . . . . . . . . . . . . . . . . . . .E-14
APPENDIX F
Valve Control
Introduction to Valve Control . . . . . . . . . . . . . . . . . . . . . . . . . . . . . . . . . . . . F-1
Alarms . . . . . . . . . . . . . . . . . . . . . . . . . . . . . . . . . . . . . . . . . . . . . . . . . . . F-2
Variations on Valve Control. . . . . . . . . . . . . . . . . . . . . . . . . . . . . . . . . . . F-2
Boolean Expressions . . . . . . . . . . . . . . . . . . . . . . . . . . . . . . . . . . . . . . . F-3
Basic Valve Control. . . . . . . . . . . . . . . . . . . . . . . . . . . . . . . . . . . . . . . . . F-3
Open-Auto-Close . . . . . . . . . . . . . . . . . . . . . . . . . . . . . . . . . . . . . . . . . . F-4
Alarm Variations . . . . . . . . . . . . . . . . . . . . . . . . . . . . . . . . . . . . . . . . . . . F-4
Output Variations . . . . . . . . . . . . . . . . . . . . . . . . . . . . . . . . . . . . . . . . . .F-4
Output with Interlock . . . . . . . . . . . . . . . . . . . . . . . . . . . . . . . . . . . . . . . . F-4
Simple Valve Variations . . . . . . . . . . . . . . . . . . . . . . . . . . . . . . . . . . . . . F-5
Permissive. . . . . . . . . . . . . . . . . . . . . . . . . . . . . . . . . . . . . . . . . . . . . . . . F-5
Double Block and Bleed . . . . . . . . . . . . . . . . . . . . . . . . . . . . . . . . . . . . . F-6
Motorized Valve . . . . . . . . . . . . . . . . . . . . . . . . . . . . . . . . . . . . . . . . . . . F-7
Heat Exchange Medium Selection . . . . . . . . . . . . . . . . . . . . . . . . . . . . . F-7

Reference Manual
00809-0100-4696, Rev AA
September 2004
Rosemount 848L
TOC-4

Reference Manual
00809-0100-4696, Rev AA
September 2004 Rosemount 848L
www.rosemount.com
Section 1 Introduction
Safety Messages . . . . . . . . . . . . . . . . . . . . . . . . . . . . . . . . . page 1-1
Overview . . . . . . . . . . . . . . . . . . . . . . . . . . . . . . . . . . . . . . . page 1-2
Return of Materials . . . . . . . . . . . . . . . . . . . . . . . . . . . . . . . page 1-3
SAFETY MESSAGES Instructions and procedures in this section may require special precautions to
ensure the safety of the personnel performing the operations. Information that
potentially raises safety issues is indicated by a warning symbol ( ). Please
refer to the following safety messages before performing an operation
preceded by this symbol.
Warnings
Failure to follow these installation guidelines could result in death or
serious injury.
• Make sure only qualified personnel perform the installation.
Electrical shock could cause death or serious injury.
• If the device or senors are installed in a high voltage environment and a fault
condition or installation error occurs, high voltage may be present on transmitter
leads and terminals.
• Use extreme caution when making contact with the leads and terminals.

Reference Manual
00809-0100-4696, Rev AA
September 2004
Rosemount 848L
1-2
OVERVIEW
Transmitter The 848L provides a cost effective field mounted interface for discrete inputs
and outputs on a Foundation Fieldbus H1 network. The 848L allows you to
leverage the fieldbus network to reduce discrete input and output wiring and
eliminate the need for a separate bus for discrete inputs and outputs. The
848L can communicate with other devices on the segment to provide logic
interactions independent of any upper level controller.
The 848L also has logic capability allowing it to independently control outputs
based on the state of one or more of it's inputs or discrete signals from other
devices on the network. A Logic Block allows for up to 20 Boolean equations,
8 Inputs, and 4 Outputs.
Manual This manual is designed to assist in the installation, operation, and
maintenance of the Rosemount 848L Logic Transmitter.
Section 1: Introduction
• Overview
• Considerations
• Return of Materials
Section 2: Installation
• Mounting
• Installation
• Wiring
• Power Supply
• Commissioning
Section 3: Configuration
•F
OUNDATION fieldbus Technology
• Configuration
• Function Block Configuration
Section 4: Operation and Maintenance
• Hardware Maintenance
• Troubleshooting

Reference Manual
00809-0100-4696, Rev AA
September 2004
1-3
Rosemount 848L
Appendix A: Specification and Reference Data
• Specifications
• Dimensional Drawings
• Ordering Information
Appendix B: Product Certificates
• Hazardous Locations Certificates
• Intrinsically Safe and Non-Incendive Installations
• Installation Drawings
Appendix C: Function Blocks
• Device Descriptions
• Block Operation
Appendix D: Logic Equation Syntax
• Error Handling
• Examples
Appendix E: Motor Control
• Variations of Motor Control
• Writing 848L Equations
Appendix F: Valve Control
RETURN OF MATERIALS To expedite the return process in North America, call the Emerson Process
Management National Response Center toll-free at 800-654-7768. This
center, available 24 hours a day, will assist with any needed information or
materials.
The center will ask for the following information:
• Product model
• Serial numbers
• The last process material to which the product was exposed
The center will provide
• A Return Material Authorization (RMA) number
• Instructions and procedures that are necessary to return goods that
were exposed to hazardous substances
For other locations, please contact an Emerson Process Management sales
representative.
NOTE
If a hazardous substance is identified, a Material Safety Data Sheet (MSDS),
required by law to be available to people exposed to specific hazardous
substances, must be included with the returned materials.

Reference Manual
00809-0100-4696, Rev AA
September 2004
Rosemount 848L
1-4

Reference Manual
00809-0100-4696, Rev AA
September 2004 Rosemount 848L
www.rosemount.com
Section 2 Installation
Safety Messages . . . . . . . . . . . . . . . . . . . . . . . . . . . . . . . . . page 2-1
Mounting . . . . . . . . . . . . . . . . . . . . . . . . . . . . . . . . . . . . . . . page 2-1
Wiring . . . . . . . . . . . . . . . . . . . . . . . . . . . . . . . . . . . . . . . . . . page 2-4
Grounding . . . . . . . . . . . . . . . . . . . . . . . . . . . . . . . . . . . . . . page 2-5
Switches . . . . . . . . . . . . . . . . . . . . . . . . . . . . . . . . . . . . . . . page 2-5
I/O Wiring . . . . . . . . . . . . . . . . . . . . . . . . . . . . . . . . . . . . . . . page 2-7
Tagging . . . . . . . . . . . . . . . . . . . . . . . . . . . . . . . . . . . . . . . . page 2-8
Transmitter Label . . . . . . . . . . . . . . . . . . . . . . . . . . . . . . . . page 2-9
Installation . . . . . . . . . . . . . . . . . . . . . . . . . . . . . . . . . . . . . . page 2-9
SAFETY MESSAGES Instructions and procedures in this section may require special precautions to
ensure the safety of the personnel performing the operations. Information that
potentially raises safety issues is indicated by a warning symbol ( ). Please
refer to the following safety messages before performing an operation
preceded by this symbol.
Warnings
MOUNTING The 848L is always mounted remote from the sensors and output devices.
There are three mounting configurations:
• To a DIN rail without an enclosure
• To a panel with an enclosure
• To a 2-in pipe stand with an enclosure using a pipe mounting kit
Failure to follow these installation guidelines could result in death or
serious injury.
• Make sure only qualified personnel perform the installation.
Electrical shock could cause death or serious injury.
• If the device or sensors are installed in a high voltage environment and a fault
condition or installation error occurs, high voltage may be present on transmitter
leads and terminals.
• Use extreme caution when making contact with the leads and terminals.
Reference Manual
00809-0100-4696, Rev AA
September 2004
Rosemount 848L
2-2
Mounting to a DIN Rail
Without an Enclosure
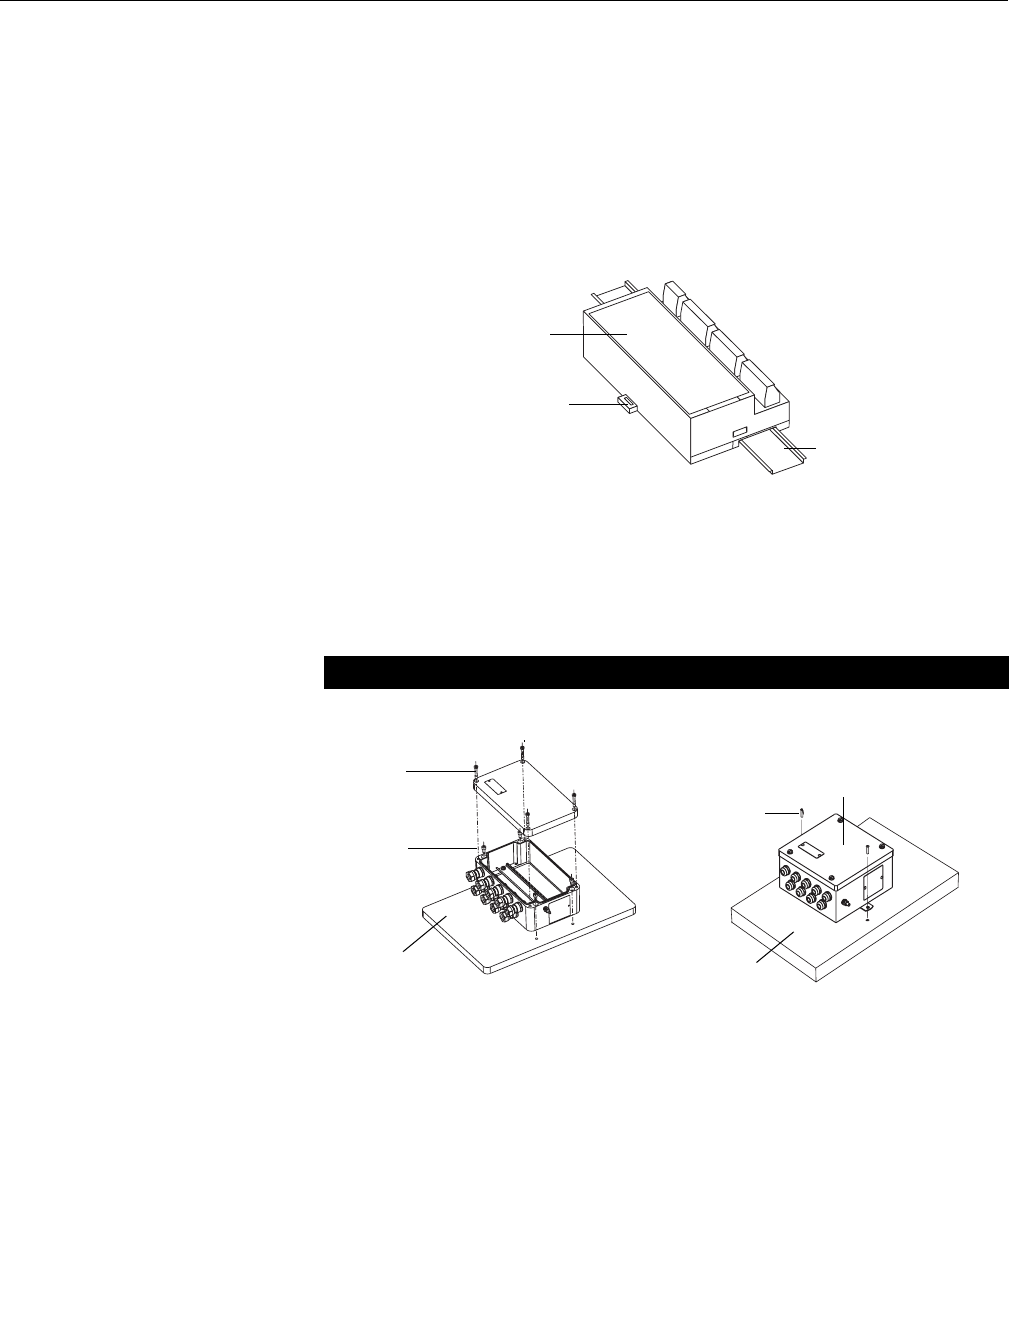
To mount the 848L to a DIN rail without an enclosure, follow these steps:
1. Pull up the DIN rail mounting clip located on the top back side of the
transmitter.
2. Hinge the DIN rail into the slots on the bottom of the transmitter.
3. Tilt the 848L and place onto the DIN rail. Release the mounting clip.
The transmitter should be securely fastened to the DIN rail.
Figure 2-1. Mounting the 848L to
a DIN Rail
Mounting to a Panel with
a Junction Box
When inside of a plastic or aluminum junction box, the 848L mounts to a panel
using four 1/4-20 x 1.25-in. screws.
When inside of a stainless steel junction box, the 848L mounts to a panel
using two 1/4-20 x 1/2-in. screws.
Figure 2-2. Mounting the 848L
junction box to a panel
DIN Rail Mounting Clip
848L without
enclosure
DIN Rail
Aluminum/Plastic Stainless Steel
848L with aluminum or plastic box
Panel
Mounting
Screws (4)
Cover
Screws (4) 848L with a stainless steel box
Panel
Mounting
Screws (2)

Reference Manual
00809-0100-4696, Rev AA
September 2004
2-3
Rosemount 848L
Mounting to a 2-Inch
Pipe Stand
Use the optional mounting bracket (option code B6) to mount the 848L to a
2-inch pipe stand when using a junction box.
Aluminum/Plastic Junction Box
(styles JA and JP)
Stainless Steel Junction Box
(style JS)
Front View Side View Front View Side View
Dimensions are in inches (millimeters)
Aluminum/Plastic Junction Box
Mounted on a Vertical Pipe
Stainless Steel Junction Box
Mounted on a Vertical Pipe
5.1
(130)
10.2
(260)
6.6 (167)
fully
assembled
4.5
(114)
848_848A52A, B, 53A, B
7.5 (190)
fully
assembled
848_848A54A, 55A
Reference Manual
00809-0100-4696, Rev AA
September 2004
Rosemount 848L
2-4
WIRING If the device or sensors are installed in a high-voltage environment and a fault
condition or installation error occurs, the sensor leads and transmitter
terminals could carry lethal voltages. Use extreme caution when making
contact with the leads and terminals.
NOTE
Do not apply high voltage (e.g. AC line voltage) to the transmitter bus or I/O
power terminals. Abnormally high voltage can damage the unit (bus and I/O
power terminals are rated to 42.4 VDC).
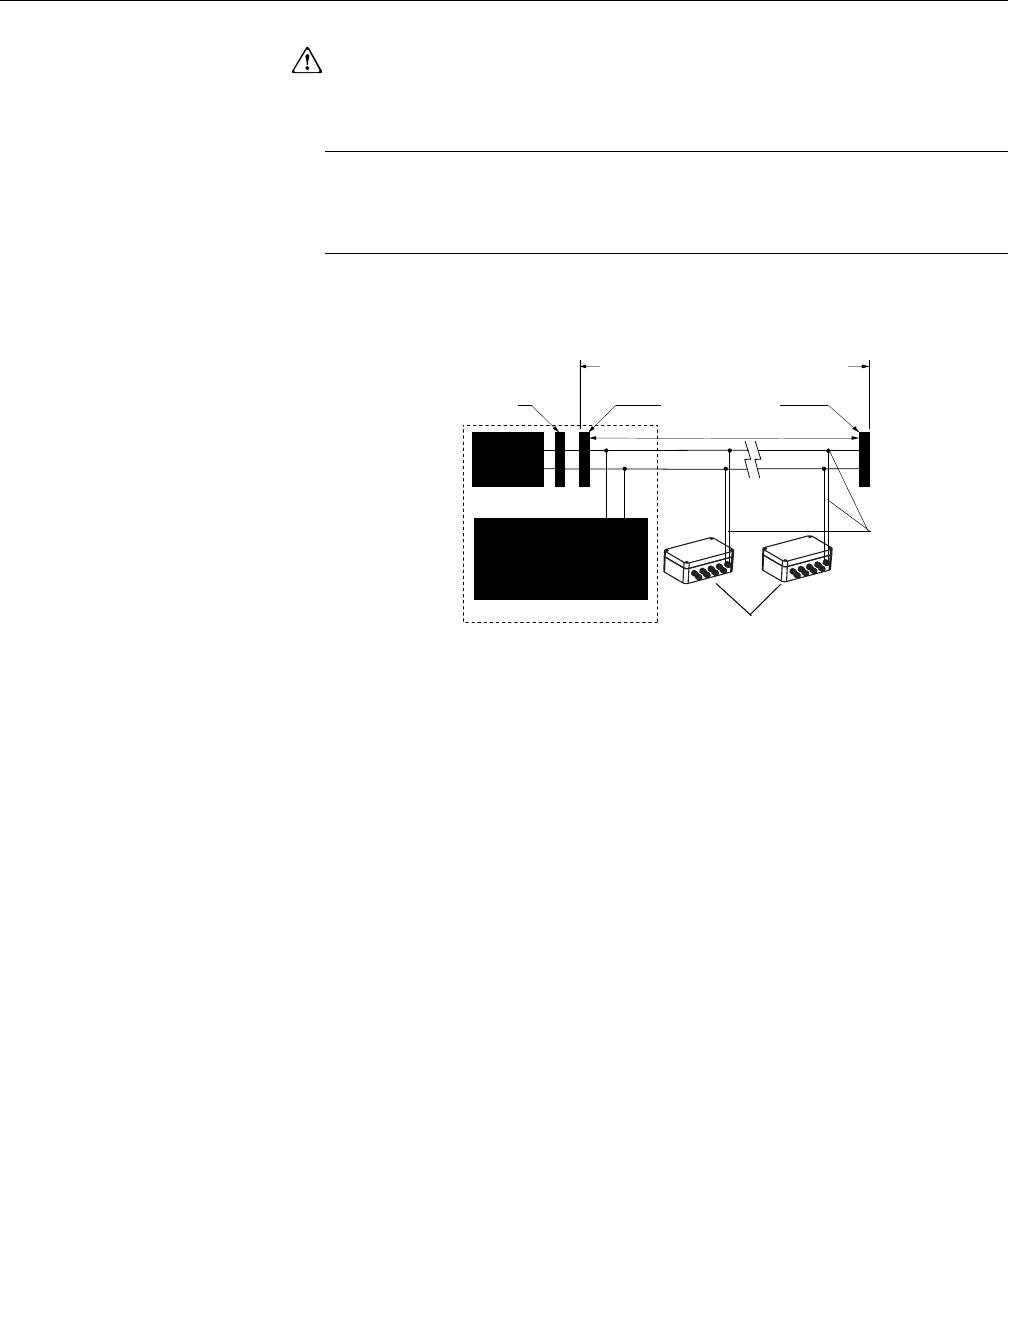
Figure 2-3. 848L Transmitter
Fieldbus Wiring
Power Supply
Connections
The transmitter requires both a fieldbus connection and power for the discrete
I/O channels.
Fieldbus Connection
The fieldbus connection requires between 9 and 32VDC to operate the
electronics. The dc power supply should provide power with less than 2%
ripple. A fieldbus segment requires a power conditioner to isolate the power
supply filter and decouple the segment from other segments attached to the
same power supply. Signal wiring should be shielded, twisted pair for best
results in electrically noisy environments. Do not use unshielded signal wiring
in open trays with power wiring or near heavy electrical equipment. Use
ordinary copper wire of sufficient size to ensure that the voltage across the
bus terminals does not go below 9 VDC. The power terminals are not polarity
sensitive. To power the electronics and establish communications:
1. Connect the fieldbus wires to the terminals marked "Bus" as shown in
Figure 2-4 on page 2-5.
2. Tighten the terminal screws to ensure adequate contact.
Power
Supply
Terminators
Devices 1 through 16*
Integrated Power
Conditioner
and Filter
(Spur)
(Spur)
Signal
Wiring
FOUNDATION
fieldbus Host or
configuration tool
6234 ft (1900 m) max
(depending upon cable
characteristics)
848-848_01A
(Trunk)

Reference Manual
00809-0100-4696, Rev AA
September 2004
2-5
Rosemount 848L
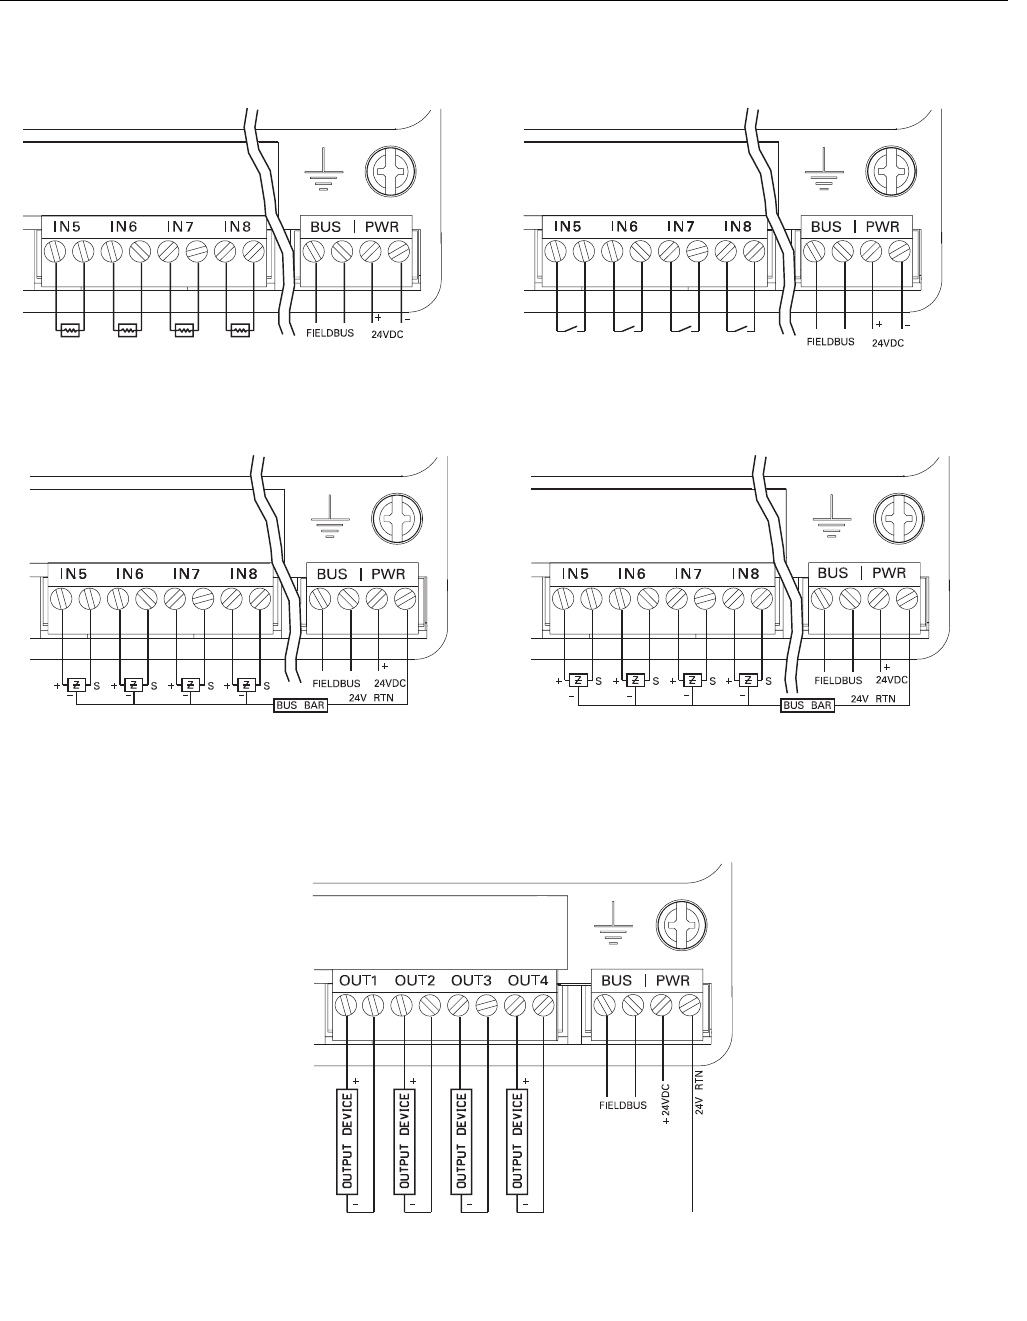
Figure 2-4. “Bus” location on the
Rosemount 848L
Input/Output Power:
The discrete I/O requires a 9-32VDC power supply that is separate from the
fieldbus power. The voltage level will depend on the type of sensors being
used and outputs being driven. To power the I/O:
1. Connect the positive lead from the power supply to the (+) terminal
marked "PWR".
2. Connect the return lead to the (-) terminal marked "PWR"
3. Tighten the terminal screws to ensure adequate contact.
Surges/Transients The transmitter will withstand electrical transients encountered through static
discharges or induced switching transients. However, a transient protection
option (option code T1) is available to protect the 848L against high-energy
transients. The device must be properly grounded using the ground terminal.
GROUNDING Although not required, a ground terminal is provided that can be connected to
earth ground for optimal EMC performance. A wire of 14AWG or larger is
recommend using appropriate terminal connectors at both ends.
Transmitter Enclosure (optional)
Ground the transmitter in accordance with local electrical requirements.
SWITCHES
Figure 2-5. Switch Location on
the Rosemount 848L
848/848L/848L_19_AA.EPS
NOT USED
SECURITY
SIMULATE ENABLE
848/848L/848L_17_AA.EPS

Reference Manual
00809-0100-4696, Rev AA
September 2004
Rosemount 848L
2-6
Security
After configuring the transmitter, the data can be protected from unwarranted
changes. Each 848L is equipped with a security switch that can be positioned
“ON” to prevent the accidental or deliberate change of configuration data.
This switch is located on the front side of the electronics module and
is labeled SECURITY.
See Figure 2-5 on page 2-5 for switch location on the transmitter label. Refer
to Section 3: Configuration, “SOFT WRITE LOCK and HARD WRITE LOCK”
on page 3-5.
Simulate Enable
The switch labeled SIMULATE ENABLE is used in conjunction with the with
the Discrete Input (DI) and Discrete Output (DO) function blocks. This switch
is used to simulate input status. As a lock-out feature, the switch must
transition from “OFF” to “ON” after power is applied to the transmitter. This
feature prevents the transmitter from being left in simulator mode.
NOT USED
The switch labeled NOT USED is only used for product engineering and
development purposes and should always remain in the “OFF” position. If the
switch is turned to the “ON” position and power is applied, the 848L will not be
present on the fieldbus segment.
Reference Manual
00809-0100-4696, Rev AA
September 2004
2-7
Rosemount 848L
I/O WIRING
848/848L/848L_10_AA, 848L_11_AA, 848L_12_AA, 848L_13_AA, 848L_14_AA.EPS
DISCRETE INPUT WIRING CONFIGURATION
2-Wire NAMUR Sensors
1 of 2 Input Connectors Dry Contact Switches
1 of 2 Input Connectors
3-Wire NAMUR Sensors
1 of 2 Input Connectors
9-32 VDC Sensors
1 of 2 Input Connectors
DISCRETE OUTPUT WIRING CONFIGURATION
9-32 VDC Outputs

Reference Manual
00809-0100-4696, Rev AA
September 2004
Rosemount 848L
2-8
TAGGING Commissioning Tag
The 848L is supplied with a removable commissioning tag that contains both
the Device ID (the unique code that identifies a particular device in the
absence of a device tag) and a space to record the device tag (the operational
identification for the device as defined by the Piping and Instrumentation
Diagram (P&ID)).
When commissioning more than one device on a fieldbus segment, it can be
difficult to identify which device is at a particular location. The removable tag,
provided with the transmitter, can aid in this process by linking the Device ID
to its physical location. The installer should note the physical location of the
transmitter on both the upper and lower location of the commissioning tag.
The bottom portion should be torn off for each device on the segment and
used for commissioning the segment in the control system.
Figure 2-6. Commissioning Tag
Transmitter Tag
Hardware
• tagged in accordance with customer requirements
• permanently attached to the transmitter
Software
• the transmitter can store up to 30 characters
• if no characters are specified, the first 30 characters of the hardware tag
will be used
Sensor Tag
Hardware
• a plastic tag is provided to record identification of the I/O
• in the field, the tag can be removed, printed on, and reattached to the
transmitter
Software
• the I/O Transducer Block provides the ability to record the I/O tags.
Device ID
Device Tag
to denote
physical
location
Reference Manual
00809-0100-4696, Rev AA
September 2004
2-9
Rosemount 848L
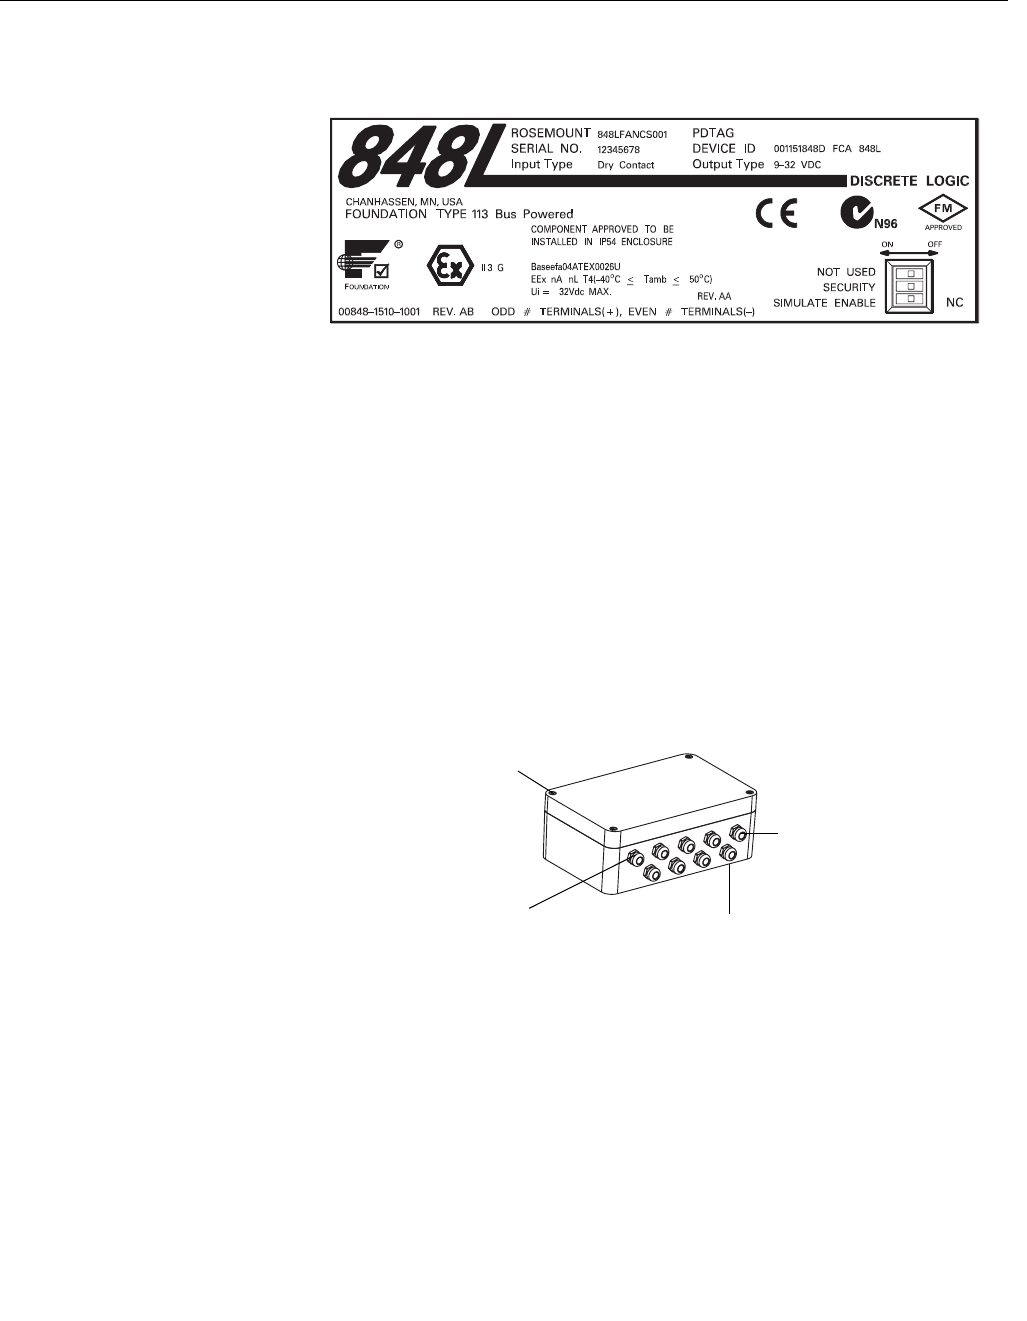
TRANSMITTER LABEL
Figure 2-7. Transmitter Label
INSTALLATION
Using Cable Glands Use the following steps to install the 848L with Cable Glands:
1. Remove the junction box cover by unscrewing the four cover screws.
2. Run the sensor and power/signal wires through the appropriate cable
glands using the pre-installed cable glands (see Figure 2-8).
3. Install the I/O wires into the correct screw terminals.
4. Install the power/signal wires onto the correct screw terminals. Bus
power is polarity insensitive, allowing the user to connect positive (+)
or negative (–) to either Fieldbus wiring terminal labeled “Bus.” I/O
power is polarity sensitive and must be connected correctly to avoid
damage to the transmitter. See Figure 2-4 on page 2-5.
5. Replace the enclosure cover and securely tighten all cover screws.
Figure 2-8. Installing the 848L
with Cable Glands
848/848_21_AA.EPS
Cable Gland
Power/Signal
I /O
848_848A19A
Enclosure Cover
Screw (4)
Reference Manual
00809-0100-4696, Rev AA
September 2004
Rosemount 848L
2-10
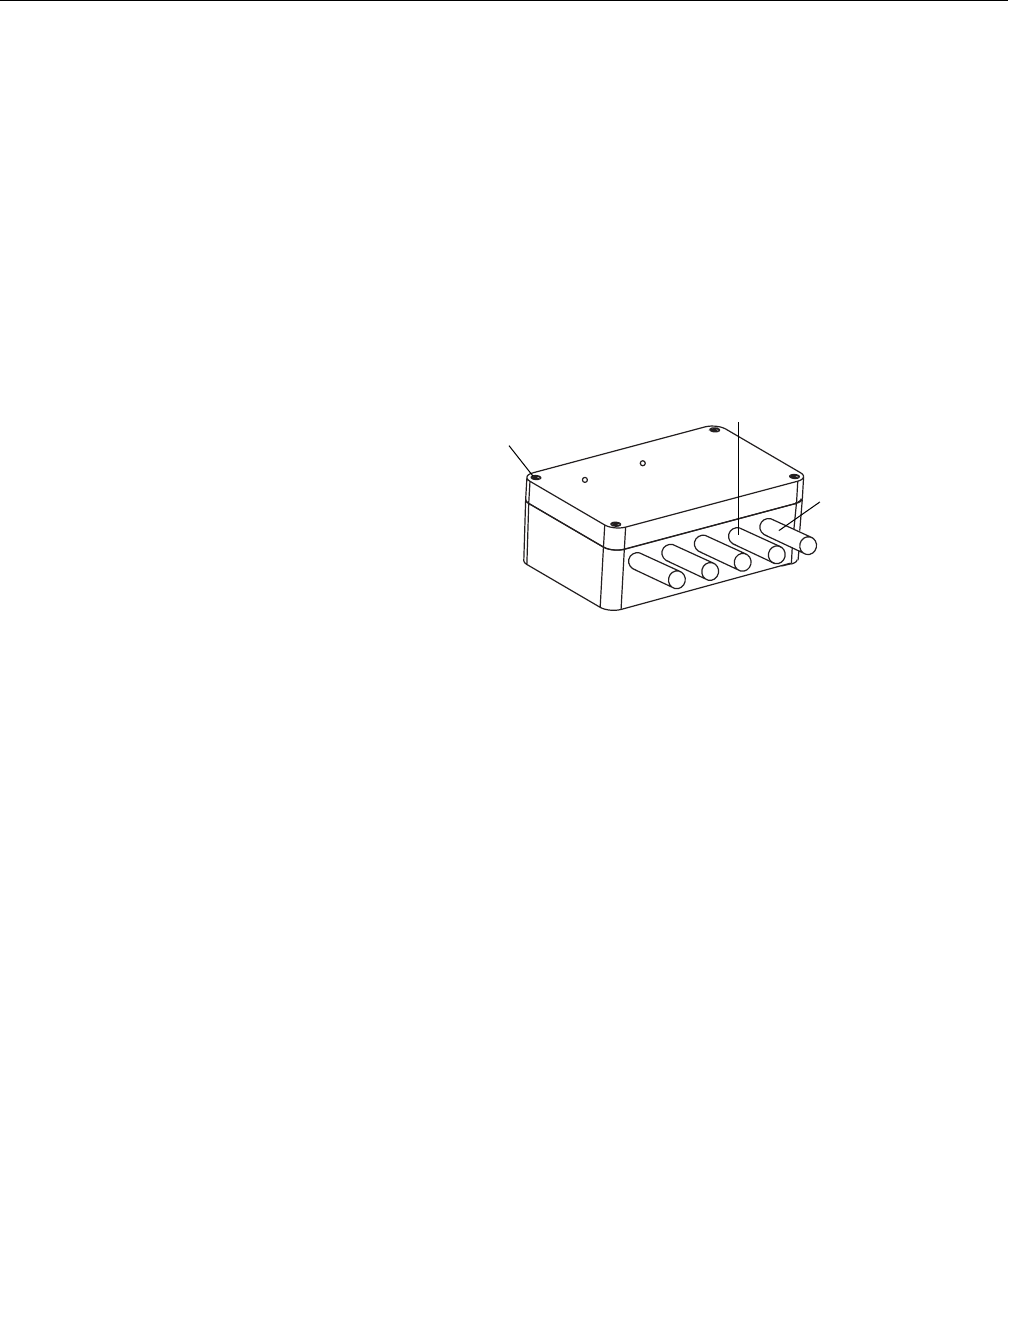
Using Conduit Entries Use the following steps to install the 848L with Conduit Entries:
1. Remove the junction box cover by unscrewing the four cover screws.
2. Remove the five conduit plugs and install five conduit fittings
(supplied by the installer).
3. Run sensor and output wires through each conduit fitting.
4. Install the I/O wires into the correct screw terminals.
5. Install the power/signal wires into the correct screw terminals. Bus
power is polarity insensitive, allowing the user to connect positive (+)
or negative (–) to either Fieldbus wiring terminal labeled “Bus.” I/O
power is polarity sensitive and must be connected correctly to avoid
damage to the transmitter. See Figure 2-4 on page 2-5.
6. Replace the junction box cover and securely tighten all cover screws.
Figure 2-9. Installing the 848L
with Conduit Entries
Enclosure
Cover Screw
Power/Signal
Conduit
I /O
848_848A09A

Reference Manual
00809-0100-4696, Rev AA
September 2004 Rosemount 848L
www.rosemount.com
Section 3 Configuration
Overview . . . . . . . . . . . . . . . . . . . . . . . . . . . . . . . . . . . . . . . page 3-1
Safety Messages . . . . . . . . . . . . . . . . . . . . . . . . . . . . . . . . . page 3-1
General Block Information . . . . . . . . . . . . . . . . . . . . . . . . . page 3-2
Resource Block . . . . . . . . . . . . . . . . . . . . . . . . . . . . . . . . . . page 3-4
I/O Transducer Block . . . . . . . . . . . . . . . . . . . . . . . . . . . . . page 3-9
Logic Transducer Block . . . . . . . . . . . . . . . . . . . . . . . . . . . page 3-10
Discrete Input Blocks . . . . . . . . . . . . . . . . . . . . . . . . . . . . . page 3-20
Discrete Output Blocks . . . . . . . . . . . . . . . . . . . . . . . . . . . page 3-21
Multiple Discrete Input Block . . . . . . . . . . . . . . . . . . . . . . page 3-21
Multiple Discrete Output Block . . . . . . . . . . . . . . . . . . . . . page 3-21
OVERVIEW This section covers basic operation, software functionality, and basic
configuration procedures for the Rosemount 848L transmitter with
FOUNDATION fieldbus. This section is organized by block information. For
detailed information about the function blocks used in the Rosemount 848L
logic transmitter, refer to “Foundation Fieldbus Block Information” on page A-1
and the Foundation Fieldbus Function Block manual (00809-0100-4783).
SAFETY MESSAGES Procedures and instructions in this section may require special precautions to
ensure the safety of the personnel performing the operations. Information that
raises potential safety issues is indicated by a warning symbol ( ). Refer to
the following safety messages before performing an operation preceded by
this symbol.
Warnings
Explosions can result in death or serious injury.
Before connecting a configuration tool in an explosive atmosphere, make sure the
instruments in the loop are installed in accordance with nonincendive field wiring
practices.
Electrical shock can result in death or serious injury.
• Avoid contact with the leads and terminals. High voltage that may be present
on leads can cause electrical shock.

Reference Manual
00809-0100-4696, Rev AA
September 2004
Rosemount 848L
3-2
GENERAL BLOCK
INFORMATION
Modes The Resource, Transducer, and all function blocks in the device have modes
of operation. These modes govern the operation of the block. Every block
supports both automatic (AUTO) and out of service (OOS) modes. Other
modes may also be supported.
Changing Modes
To change the operating mode, set the MODE_BLK.TARGET to the desired
mode. After a short delay, the parameter MODE_BLOCK.ACTUAL should
reflect the mode change if the block is operating properly.
Permitted Modes
It is possible to prevent unauthorized changes to the operating mode of a
block. To do this, configure MODE_BLOCK.PERMITTED to allow only the
desired operating modes. It is recommended to always select OOS as one of
the permitted modes.
Types of Modes
For the procedures described in this manual, it will be helpful to understand
the following modes:
AUTO
The functions performed by the block will execute. If the block has any
outputs, these will continue to update. This is typically the normal
operating mode.
Out of Service (OOS)
The functions performed by the block will not execute. If the block has any
outputs, these will typically not update and the status of any values passed
to downstream blocks will be “BAD”. To make some changes to the
configuration of the block, change the mode of the block to OOS. When
the changes are complete, change the mode back to AUTO.
MAN
In this mode, variables that are passed out of the block can be manually
set for testing or override purposes.
Other Types of Modes
Other types of modes are Cas, RCas, ROut, IMan and LO. Some of these
may be supported by different function blocks in the Rosemount 848L. For
more information, see the Function Block manual, document
00809-0100-4783.
NOTE
When an upstream block is set to OOS, this will impact the output status of all
downstream blocks. The figure below depicts the hierarchy of blocks:
Resource
Block
Transducer
Block
Discrete Input
(DI Block)
Other
function
blocks

Reference Manual
00809-0100-4696, Rev AA
September 2004
3-3
Rosemount 848L
Link Active Scheduler The Rosemount 848L can be designated to act as the backup Link Active
Scheduler (LAS) in the event that the LAS is disconnected from the segment.
As the backup LAS, the Rosemount 848L will take over the management of
communications until the host is restored.
The host system may provide a configuration tool specifically designed to
designate a particular device as a backup LAS. Otherwise, this can be
configured manually as follows:
1. Access the Management Information Base (MIB) for the Rosemount
848L.
2. To activate the LAS capability, write 0x02 to the
BOOT_OPERAT_FUNCTIONAL_CLASS object (Index 605). To
deactivate, write 0x01.
3. Restart the processor.
Block Instantiation Rosemount devices are pre-configured with function blocks at the factory, the
default permanent configuration for the Rosemount 848L is listed below. The
Rosemount 848L can have one additional instantiated function block.
• 8 Discrete Input Blocks
• 4 Discrete Output Blocks
• Multiple Discrete Input Block
• Multiple Discrete Output Block
The Rosemount 848L supports the use of Function Block Instantiation. When
a device supports block instantiation, the number of blocks and block types
can be defined to match specific application needs.The number of blocks that
can be instantiated is only limited by the amount of memory within the device
and the block types that are supported by the device. Instantiation does not
apply to standard device blocks like the Resource, I/O Transducer, and Logic
Transducer Block.
Block instantiation is done by the host control system or configuration tool, but
not all hosts are required to implement this functionality. Please refer to your
specific host or configuration tool manual for more information.

Reference Manual
00809-0100-4696, Rev AA
September 2004
Rosemount 848L
3-4
Capabilities Virtual Communication Relationship (VCRs)
There are a total of 20 VCRs. Two are permanent and 18 are fully
configurable by the host system. 25 link objects are available.
Host timer recommendations
T1 = 96000
T2 = 1920000
T3 = 480000
Block Execution times
Discrete Input = 40 ms
Discrete Output = 40 ms
Multiple Discrete Input = 40 ms
Multiple Discrete Output = 40 ms
RESOURCE BLOCK
FEATURES and
FEATURES_SEL
The parameters FEATURES and FEATURE_SEL determine optional
behavior of the Rosemount 848L.
FEATURES
The FEATURES parameter is read only and defines which features are
supported by the Rosemount 848L. Below is a list of the FEATURES the
Rosemount 848L supports.
UNICODE
All configurable string variables in the Rosemount 848L, except tag names,
are octet strings. Either ASCII or Unicode may be used. If the configuration
device is generating Unicode octet strings, you must set the Unicode option
bit.
REPORTS
The Rosemount 848L supports alert reports. The Reports option bit must be
set in the features bit string to use this feature. If it is not set, the host must
poll for alerts.
Network Parameter Value
Slot Time 8
Maximum Response Delay 4
Maximum Inactivity to Claim LAS Delay 60
Minimum Inter DLPDU Delay 7
Time Sync class 4 (1ms)
Maximum Scheduling Overhead 21
Per DLPDU PhL Overhead 4
Maximum Inter-channel Signal Skew 0
Required Number of Post-transmission-gap-ext Units 0
Required Number of Preamble-extension Units 1

Reference Manual
00809-0100-4696, Rev AA
September 2004
3-5
Rosemount 848L
SOFT WRITE LOCK and HARD WRITE LOCK
Inputs to the security and write lock functions include the hardware security
switch, the hardware and software write lock bits of the FEATURE_SEL
parameter, the WRITE_LOCK parameter, and the DEFINE_WRITE_LOCK
parameter.
The WRITE_LOCK parameter prevents modification of parameters within the
device except to clear the WRITE_LOCK parameter. During this time, the
block will function normally updating inputs and outputs and executing
algorithms. When the WRITE_LOCK condition is cleared, a WRITE_ALM
alert is generated with a priority that corresponds to the WRITE_PRI
parameter.
The FEATURE_SEL parameter enables the user to select a hardware or
software write lock or no write lock capability. To enable the hardware security
function, enable the HW_SEL bit in the FEATURE_SEL parameter. When this
bit has been enabled the WRITE_LOCK parameter becomes read only and
will reflect the state of the hardware switch. In order to enable the software
write lock, the SW_SEL bit must be set in the FEATURE_SEL parameter.
Once this bit is set, the WRITE_LOCK parameter may be set to “Locked” or
“Not Locked.” Once the WRITE_LOCK parameter is set to “Locked” by either
the software or the hardware lock, all user requested writes as determined by
the DEFINE_WRITE_LOCK parameter shall be rejected.
The DEFINE_WRITE_LOCK parameter allows the user to configure whether
the write lock functions (both software and hardware) will control writing to all
blocks, or only to the resource and transducer blocks. Internally updated data
such as process variables and diagnostics will not be restricted by the
security switch.
The following table displays all possible configurations of the WRITE_LOCK
parameter.
FEATURE_SEL
FEATURE_SEL is used to turn on any of the supported features. The default
setting of the Rosemount 848L does not select any of these features. Choose
one of the supported features if any.
MAX_NOTIFY The MAX_NOTIFY parameter value is the maximum number of alert reports
that the resource can have sent without getting a confirmation, corresponding
to the amount of buffer space available for alert messages. The number can
be set lower, to control alert flooding, by adjusting the LIM_NOTIFY
parameter value. If LIM_NOTIFY is set to zero, then no alerts are reported.
FEATURE_SEL
HW_SEL bit
FEATURE_SEL
SW_SEL bit SECURITY SWITCH WRITE_LOCK
WRITE_LOCK
Read/Write DEFINE_WRITE_LOCK
Write access
to blocks
0 (off) 0 (off) NA 1 (unlocked) Read only NA All
0 (off) 1 (on) NA 1 (unlocked) Read/Write NA All
0 (off) 1 (on) NA 2 (locked) Read/Write Physical Function
Blocks only
0 (off) 1 (on) NA 2 (locked) Read/Write Everything None
1 (on) 0 (off)(1) 0 (unlocked) 1 (unlocked) Read only NA All
1 (on) 0 (off) 1 (locked) 2 (locked) Read only Physical Function
Blocks only
1 (on) 0 (off) 1 (locked) 2 (locked) Read only Everything None
(1) The hardware and software write lock select bits are mutually exclusive and the hardware select has the highest priority. When the HW_SEL bit if set to 1
(on), the SW_SEL bit is automatically set to 0 (off) and is read only.

Reference Manual
00809-0100-4696, Rev AA
September 2004
Rosemount 848L
3-6
PlantWeb™ Alarms The Resource Block will act as a coordinator for PlantWeb alarms. There will
be three alarm parameters (FAILED_ALARM, MAINT_ALARM, and
ADVISE_ALARM) which will contain information regarding some of the device
errors which are detected by the transmitter software. There will be a
RECOMMENDED_ACTION parameter which will be used to display the
recommended action text for the highest priority alarm. FAILED_ALARM will
have the highest priority followed by MAINT_ALARM and ADVISE_ALARM
will be the lowest priority.
FAILED_ALARMS
A failure alarm indicates a failure within a device that will make the device or
some part of the device non-operational. This implies that the device is in
need of repair and must be fixed immediately. There are five parameters
associated with FAILED_ALARMS specifically, they are described below.
FAILED_ENABLED
This parameter contains a list of failures in the device which makes the
device non-operational that will cause an alarm to be sent. Below is a list
of the failures with the highest priority first.
1. Electronics Failure
2. NV Memory Failure
3. No I/O Power
4. Primary Value Failure
5. Secondary Value Failure
FAILED_MASK
This parameter will mask any of the failed conditions listed in
FAILED_ENABLED. A bit on means that the condition is masked out from
alarming and will not be reported.
FAILED_PRI
Designates the alarming priority of the FAILED_ALM. The default is 0 and
the recommended value is between 8 and 15.
FAILED_ACTIVE
This parameter displays which of the alarms is active. Only the alarm with
the highest priority will be displayed. This priority is not the same as the
FAILED_PRI parameter described above. This priority is not user
configurable.
FAILED_ALM
Alarm indicating a failure within a device which makes the device
non-operational.

Reference Manual
00809-0100-4696, Rev AA
September 2004
3-7
Rosemount 848L
MAINT_ALARMS
A maintenance alarm indicates the device or some part of the device needs
maintenance soon. If the condition is ignored, the device will eventually fail.
There are five parameters associated with MAINT_ALARMS, they are
described below.
MAINT_ENABLED
The MAINT_ENABLED parameter contains a list of conditions indicating
the device or some part of the device needs maintenance soon. If the
condition is ignored, the device will eventually fail.
Below is a list of the conditions with the highest priority first.
1. Secondary Value Degraded
2. Configuration Error
MAINT_MASK
The MAINT_MASK parameter will mask any of the failed conditions listed
in MAINT_ENABLED. A bit on means that the condition is masked out
from alarming and will not be reported.
MAINT_PRI
MAINT_PRI designates the alarming priority of the MAINT_ALM. The
default is 0 and the recommended value is 3 to 7.
MAINT_ACTIVE
The MAINT_ACTIVE parameter displays which of the alarms is active.
Only the condition with the highest priority will be displayed. This priority is
not the same as the MAINT_PRI parameter described above. This priority
is not user configurable.
MAINT_ALM
An alarm indicating the device needs maintenance soon. If the condition is
ignored, the device will eventually fail.
Advisory Alarms
An advisory alarm indicates informative conditions that do not have a direct
impact on the device's primary functions There are five parameters
associated with ADVISE_ALARMS, they are described below.
ADVISE_ENABLED
The ADVISE_ENABLED parameter contains a list of informative
conditions that do not have a direct impact on the device's primary
functions. Below is a list of the advisories with the highest priority first.
1. Prescaler Overflow
2. NV Write Deferred
3. PWA Simulate Active
ADVISE_MASK
The ADVISE_MASK parameter will mask any of the failed conditions listed
in ADVISE_ENABLED. A bit on means the condition is masked out from
alarming and will not be reported.
ADVISE_PRI
ADVISE_PRI designates the alarming priority of the ADVISE_ALM. The
default is 0 and the recommended value is 1 or 2.

Reference Manual
00809-0100-4696, Rev AA
September 2004
Rosemount 848L
3-8
ADVISE_ACTIVE
The ADVISE_ACTIVE parameter displays which of the advisories is
active. Only the advisory with the highest priority will be displayed. This
priority is not the same as the ADVISE_PRI parameter described above.
This priority is not user configurable.
ADVISE_ALM
ADVISE_ALM is an alarm indicating advisory alarms. These conditions do
not have a direct impact on the process or device integrity.
Recommended Actions for PlantWeb Alarms
RECOMMENDED_ACTION
The RECOMMENDED_ACTION parameter displays a text string that will
give a recommended course of action to take based on which type and
which specific event of the PlantWeb alarms is active.
Table 3-1.
RB.RECOMMENDED_ATION
Alarm Type
Failed/Maint/Advise
Active Event
Recommended Action
Text String
NONE None No action required
ADVISORY
Prescaler Overflow Check the Divisor parameter of all PS function
calls in the logic equations
NV Write Deferred Reduce the frequency in which applications
write to NV Memory
PWA Simulate Active Disable PWA_SIMULATE parameter in the
Resource Block
MAINTENANCE
Secondary Value
Degraded
Ensure that the transmitter is not too close to
extreme hot or cold environments
Configuration Error Verify that the Logic equations are correct in
the Logic transducer block
FAILED
Electronics Failure Replace the electronics
NV Memory Failure Replace the electronics
No I/O Power Check the IO Power supply, polarity, wiring,
and connections.
Primary Value Failure Check the sensor, configuration, wiring, and
connection for open or shorted sensors.
Secondary Value
Failure
Verify that the body temperature is within the
operating limits of this device.

Reference Manual
00809-0100-4696, Rev AA
September 2004
3-9
Rosemount 848L
Alarms Use the following steps to configure the alarms, which are located in the
Resource Block.
1. Set the resource block to OOS.
2. Set WRITE_PRI to the appropriate alarm level (WRITE_PRI has a
selectable range of priorities from 0 to 15. Set the other block alarm
parameters at this time.
3. Set CONFIRM_TIME to the time, in 1/32 of a millisecond, that the
device will wait for confirmation of receiving a report before trying
again (the device does not retry if CONFIRM_TIME is 0).
4. Set LIM_NOTIFY to a value between zero and MAX_NOTIFY.
LIM_NOTIFY is the maximum number of alert reports allowed before
the operator needs to acknowledge an alarm condition.
5. Enable the reports bit in FEATURE_SEL.
6. Set the resource block to AUTO.
I/O TRANSDUCER
BLOCK
The 848L is ordered with either Dry Contact, VDC or NAMUR Inputs. Each
input can have a filter which determines the minimum time a contact needs to
be at a given state to be acknowledged as a state change.
The following procedure allows the sensors to be configured:
1. Set MODE_BLK.TARGET to OOS
2. For each Input “n” select the parameter IN_n_CONFIG.FILTER
a. Select the desired filter time in the range of 0 to 128msec
3. Set MODE_BLK.TARGET to AUTO

Reference Manual
00809-0100-4696, Rev AA
September 2004
Rosemount 848L
3-10
The 848L can force the outputs to a predetermined state in the event of a
device malfunction.
The following procedure can be used to set the fail safe condition for each
output:
1. Set MODE_BLK.TARGET to OOS
2. For each Output "n" select the parameter
OUT_n_CONFIG.FAIL_SAFE
3. Select False, True or Last Good Value
4. Set MODE_BLK.TARGET to AUTO
Latching
Most often the inputs are scanned and the logic equations processed at a rate
greater than the macrocycle frequency. To be certain that positive or negative
transitions are communicated, the inputs, equation results, and output values
can be latched until read by the function blocks.
The following procedure is used to set the latching state of each input,
equation or output:
1. Set MODE_BLK.TARGET to OOS
2. Select the appropriate parameter for either inputs, equations, or
outputs:
a. Inputs use parameter MACRO_IN_LATCH
b. Outputs use parameter MACRO_OUT_LATCH
c. Equations use parameter MACRO_EQ_LATCH
For each input, output or equation select either "Latch Positive Pulses" or
"Latch Negative Pulses" or “disabled”.
LOGIC TRANSDUCER
BLOCK
Logic Equations
The 848L provides for 16 Logic Equations and 4 Output Equations. The
Output Equations drive the hardware outputs. Each logic equation consists of
up to 80 characters with a semicolon as the last character. The equations are
evaluated at a nominal rate of 100msec. However this will vary based on the
number and complexity of the equations used. The logic block consists of
variables that are connected to the hardware I/O, obtain values or send
values over the bus and internally calculated variables as shown in
Figure 3-1.
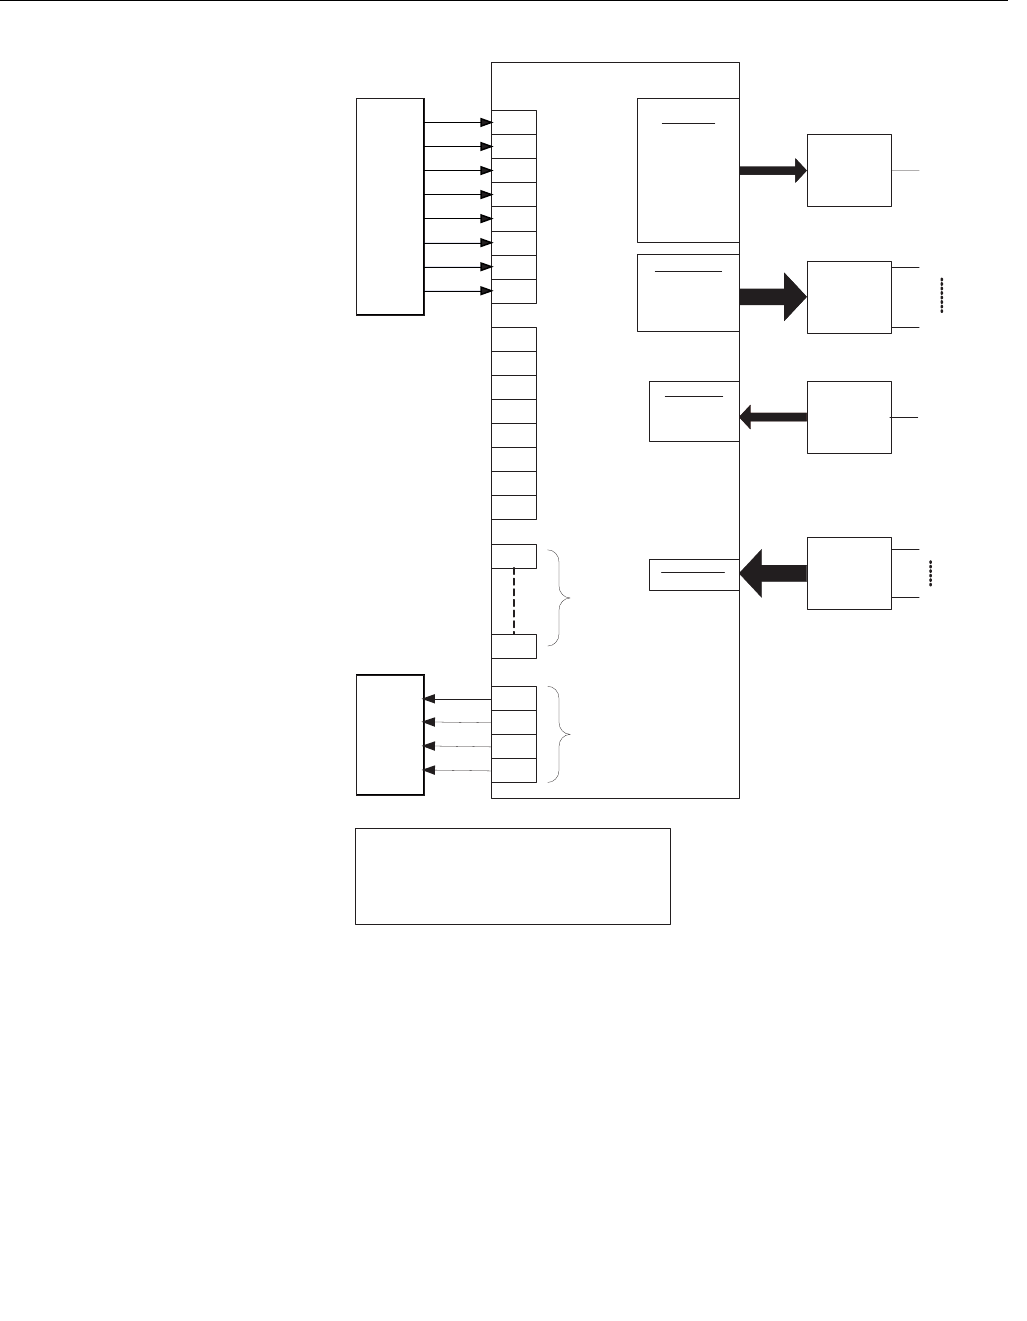
The value or state of the logic block variables can be communicated on the
bus by assigning the appropriate channel number of a DI or MDI block. The
DO variables can be set externally by assigning the appropriate channel
number in a DO or MDO function block. The DO function blocks do not drive
the outputs directly. The DO function block can drive the output by referencing
the appropriate DO variable in the output equations.
Reference Manual
00809-0100-4696, Rev AA
September 2004
3-11
Rosemount 848L
Figure 3-1. 848L Logic
Transmitter Data Flow
Logic Transducer Block
Hardware
Inputs
Hardware
Outputs
IN_1
IN_2
IN_3
IN_4
IN_5
IN_6
IN_7
IN_8
OUT_1
OUT_2
OUT_3
OUT_4
16 Logic
Equations
4 Output
Equations
EQ_1
EQ_16
DI Block
DO Block
DO Channel
Any DO
-----------------
8 Packed DOs
DI Channel
Any IN
Any EQ
Any OUT
---------------
8 Packed INs
First 8 Packed EQs
Last 8 Packed EQs
4 Packed OUTs
Sensor Transducer Block
Sensor & Output Configuration
MDI Block
8 Inputs
MDI Channels
ALL INs
First EQs
Last EQs
All OUTs
MDO Block
8 Outputs
MDO Channel
All DOs
OUT
OUT_1
OUT_8
IN
IN_1
IN_8
DO_1
DO_2
DO_3
DO_4
DO_5
DO_6
DO_7
DO_8

Reference Manual
00809-0100-4696, Rev AA
September 2004
Rosemount 848L
3-12
The following characters are allowed in a logic equation:
• Uppercase and lowercase alphabet, case insensitive, used to specify
functions
• Digits 0-9, used to specify channel numbers and unsigned integer
constants
• Comma, used to separate parameters in a function parameter list
• Parentheses() used to define the extent of the parameter list of a
function
• Semicolon; used to terminate an equation
• Space (not tab), ignored by parser, may be used to make an equation
more readable but counts as a character
The following characters are specifically not allowed in a logic:
• The period (dot) character is not allowed. There are no decimal
numbers.
• The unary minus (-) character is not allowed. There are no negative
integers.
• The math operators (+, -, *, /, **) are not allowed, nor are symbols for
any logic operators (&, |, <, >, ...).
Functions must be from the list of Logic Functions below, and must have the
specified number of parameters.
Channel Functions
The following functions read channel value and status. The number of
instances of these functions is unlimited, except for PS. A channel value and
status is set by the I/O processor at the beginning of an equation evaluation
cycle, by the equations as they complete evaluation, or by macrocycle
evaluations of any DO blocks attached to channels 9 through 16. The status
of channels 9-16 is always good, even if the DO block has a bad status.
IN - The input hardware sets the values of channels 1-8. Configured DI blocks
may specify these channels in order to read the specified hardware input. The
value of an input may be referenced in an equation by the IN (i) function,
where the channel number is placed between the parentheses. The range of
‘i’ is 1 to 8. Multiple references to any channel are allowed.
ICR, ICF - I/O samples are taken every millisecond, which is considerably
faster than equation executions. It is possible for an input to turn on and turn
off during an equation evaluation cycle, so that it would not be seen by an
IN (i) function. Each input has a counter for transitions (rise or fall). A
transition is based on the output of the debounce filter, not the raw input.
Filtering can be set to zero. The counter is read and cleared at the beginning
of each evaluation cycle. The method relies completely on the counter and
does not use the latch configuration. The ICR (i) function is true for one
evaluation cycle if a rising transition occurred, and its opposite ICF (i) is true
for a falling transition.

Reference Manual
00809-0100-4696, Rev AA
September 2004
3-13
Rosemount 848L
PS - When the hardware input consists of a continuous train of pulses at a
rate less than 500 PPS, a prescaler can be used to reduce the pulse rate to
something that does not change faster than the equation evaluation rate. The
function is PS (i, divisor) where ‘i’ is the channel number (1-8) and ‘divisor’ is
the number of pulses to count before setting its output true for one equation
evaluation cycle. The counter rolls over at ‘divisor’ and keeps counting. The
user must assure that there is always at least one execution cycle with a false
value from PS for every true value. If the pulse rate exceeds the divisor times
two, then the function returns Bad status and optionally a PlantWeb alert can
be sent. Only ten of these functions are available because they require
storage for previous values.
DO - Channels 9-16 are zero unless set by configured DO or MDO function
blocks. This allows a function block link to set the value from a remote
function block output or HMI screen switch. The values may be referenced in
equations by the DO (d) function. The range of ‘d’ is 1 to 8. To directly drive an
output from an external device the Output Equation would reference DO(d).
NOTE
The value of DO can change during an evaluation cycle if the macrocycle
evaluates the DO block. This may require referencing the DO value in a single
equation to “save” its state.

Reference Manual
00809-0100-4696, Rev AA
September 2004
Rosemount 848L
3-14
EQ - Channels 17-32 are set by the result of an equation specified by up to 80
characters and stored in parameter EQx, where x is the equation number. The
equation results are available as a discrete value and status in parameter
EQx_VALUE. They may be referenced by the EQ (u) function. The range of
‘u’ is 1 to 16. These are intended to be intermediate values that are used
because the value is used in other equations or because the equation text
was too long. A configured DI block may use an equation channel (range 17
to 36) in order to make the result available to other devices.
OUT – The value will be the same as the requested output.
Additional Channels
The ten channels that are used for connecting multiple in or out function
blocks can not be referred to by equation functions. Each has a status that is
Bad if any Input status is Bad. Channels 37 to 41 pack the values into one
byte so that a DI or DO function block can read or write them. Any block linked
to a DI block with packed data must be capable of handling the packed
boolean values. Channels 42 to 46 may be used with standard MDI or MDO
blocks.
Reading a channel value will reset all of the channel latches that are
configured. Channels 38 and 43 do not have latches. If a DI and a MDI are
both used they will interfere with the latches, but the user is expected to use
one or the other, never both.
Channel Type FB
37 All IN DI
38 All DO DO
39 First 8 EQ DI
40 Last 8 EQ DI
41 All OUT DO
42 All IN MDI
43 All DO MDO
44 First 8 EQ MDI
45 Last 8 EQ MDI
46 All Out MDO

Reference Manual
00809-0100-4696, Rev AA
September 2004
3-15
Rosemount 848L
Logic Functions
A function has a name and a set of one or more arguments contained within a
closed set of parentheses. The seven channel reference functions (IN, ICF,
ICR, PS, DO, EQ, and OUT) have been described above. These are the only
functions that take a channel number as an argument. The other functions
require functions for all arguments unless the last argument is a constant
number.
When a function is evaluated, it leaves its true or false value behind to be
evaluated by the next function or used as the result of evaluating the
equation. This is the result of using a simple and fast evaluation method
known as Reverse Polish Notation (RPN). The RPN method requires nesting
the functions like OR(IN(1),IN(2)) rather than using operator notation like
IN(1) | IN(2). This can lead to the following:
AND(IN(1),OR(IN(2),AND(IN(3),OR(IN(4),AND(IN(5),OR(IN(6),AND(IN(7),
(IN(8))))))));
The equation is evaluated by evaluating the deepest functions first, IN(7) and
(IN(8). If they are both true then the AND function evaluates to true. Then
IN(6) is evaluated, then the OR evaluates to true, and so on working up from
the deepest level in reverse order until the first (and top level) AND can be
evaluated. The result is stored in the channel specified by EQx, which
contains the text of the equation as explained above.
Drawn as a ladder logic, the equation would look like the figure below:
848L/LOGIC_FUNC_EXAMPLE.JPG

Reference Manual
00809-0100-4696, Rev AA
September 2004
Rosemount 848L
3-16
Logic Operator Functions
The following combinatorial operators require a minimum of 2 and a maximum
of 10 functions between the parentheses, each separated by a comma.
AND ( ) - Performs the logical ‘and’ of the argument functions.
OR ( ) - Performs the logical ‘or’ of the argument functions.
XOR ( ) - Performs the logical exclusive ‘or’ of the argument functions. An
XOR function is false if all of the arguments are the same value, either all true
or all false. Otherwise it is true.
The following unary operator requires just one argument:
NOT ( ) - Performs the logical inversion of the argument function.
Limits on Functions
There is no limit to the number of functions described above, as long as they
fit within the 20 equations described by 80 character strings. The following
functions are limited to 10 of each within the entire set of 20 equations. This is
because the functions require memory to store constants or last values. The
size of a memory element is 16 bits, so the maximum size of a constant value
is 65535. There are no signed numbers.
Edge Detection Functions
RISE ( ) - This function evaluates as false unless the previous value of the
argument was false and now the argument evaluates to true. This function is
true for only one equation evaluation cycle. It will always be false on the
following cycle.
FALL( ) - This function evaluates as false unless the previous value of the
argument was true and now the argument evaluates to false. This function is
true for only one equation evaluation cycle. It will always be false on the
following cycle.
Clock Function
NOTE
All arguments of time are in tenths of a second.
CLOCK (onTime,offTime) - The parameters onTime and offTime are
constants. This function does not take other functions. CLOCK runs
unconditionally with a period determined by onTime plus offTime. Time is
specified in tenths of a second. The function will be true for onTime tenths of a
second. On the first evaluation cycle after the device starts up, the onTime
interval will start because all of the dynamic values are zero. Use the NOT
function to invert this behavior, and swap the on and off times.

Reference Manual
00809-0100-4696, Rev AA
September 2004
3-17
Rosemount 848L
Counter Functions
CTU (clock, reset, target)- The parameters clock and reset are functions. The
target is a 16 bit constant. Whenever reset is true, the internal counter is set to
zero and the value of the function is false. The value of clock is ignored while
reset is true. If reset is false, the internal counter will increment once for each
rise of the clock parameter. When the internal counter equals the target value,
the value of the function is true and the counter stops counting in order to
avoid rollover. The value of the function is false if the internal counter does not
equal the target.
The internal counter is not visible from Fieldbus and is not available to any
other function. The value of the internal counter is not retained during a device
restart. This function is not suitable for a totalizer, but can be used as a
prescaler to adjust the external mechanical counter rate. The pulse rate must
be less than five per second.
The following expression increments the counter whenever hardware input 1
turns on. The counter is reset whenever hardware input 2 is on. If input one is
from a mechanical displacement flowmeter that delivers 76.54 pulses per
gallon, then the highest flow rate is 3.5 gallons per minute. The following
equation will deliver one 0.1 second pulse per 100 gallons:
OUT1_EQ contains CTU(IN(1),OUT(1),7654);
Starting at zero, 7653 pulses go by and then pulse 7654 turns on the output.
On the next evaluation cycle, the counter is reset because Output 1 is on.
This is a result of the order of execution of equations. Output 1 becomes true
because the count is reached, but the OUT(1) function has already been
evaluated as false. The counter must reset before the next pulse comes in.
The output pulse may be extended with a TP function.
TON (power, target) - Whenever power is false, the value of the internal timer
is set to zero and the value of the function is false. When power is true then
the value of the function will become true after the target amount f time has
elapsed. This condition persists as long as power is true. The timer resets
when power is false.
The following equation filters the level switch in a stirred tank so that high
level bouncing of the float does not create nuisance alarms for the operator.
Hardware input 1 senses the level switch and hardware output 1 drives the
alarm annunciator with its big horn. The level switch must stay closed for 5
minutes before the alarm is energized and the operator is startled by the horn.
OUT1_EQ contains: TON(IN(1),3000);
TOF (power, target) - Whenever power is true, the value of the internal timer is
set to the target and the value of the function is true. The value of the function
will become false after the target amount of time has elapsed. This condition
persists as long as power is false.
The following equation keeps the outlet valve open for about 5 seconds after
the pump is shut off, so that the pressure across the pump can equalize.
Hardware output 1 runs the pump and hardware output 2 opens the valve
OUT1_EQ contains: <something that controls the pump>;
OUT2_EQ contains: TOF(OUT(1),50);

Reference Manual
00809-0100-4696, Rev AA
September 2004
Rosemount 848L
3-18
TP (power, target) - Whenever power transitions from false to true, the value
of the internal timer is set to the target and the value of the function is true.
The value of the function will become false after the target amount of time has
elapsed. This function is similar to TOF except that a timing cycle is only
initiated by the rise of power. Power may go false or stay true without affecting
the timing cycle. The cycle is restarted anytime that power goes true after the
function has had at least one evaluation cycle as false.
Latching Functions
A latch is a two state device that can be set to true or reset to false. It will
retain its state when both commands are false. It will not retain its state
through a device restart. The initial state is Reset. Two latch functions are
required to define the behavior when both commands are true, depending on
which state should be dominant. The result of the function is the state of the
latch.
SR (set, reset) - The parameters set and reset are functions. If both are true
then set wins and the result of the function is true.
RS (set, reset) - The parameters set and reset are functions. If both are true
then reset wins and the result of the function is false.
Shifting Functions
A shift register is a set of bits that moves each bit to the next bit position when
the command to shift is given. The vacant bit is filled with the value of the
input. The 848L shift functions contain 8 bit registers. The bit parameter
selects the bit in the register to test. The value of the function is the value of
the tested bit. The shift may be to the left or the right. The following table
shows the state of the register for three shifts after the register has been
reset. The input is true during the first shift evaluation and false thereafter.
The right most bit is bit 1 and the left most bit is bit 8.
The reset parameter clears the register, overriding both input and shift. Reset
is an optional parameter, but the function can be written with three parameters
or four. Do not use an extra comma if reset is omitted.
The register data will be cleared on a processor restart (i.e. power cycle).
SHL (input, shift, reset, testbit) - The parameters input, shift, and reset are
functions. The parameter testbit is a constant that is constrained to be in the
range of 1 to 8. The reset function is optional. If reset is present and true, the
8 bit register is cleared to zero and the result of the function is false.
Otherwise, if shift is true then bit 7 will be moved to bit 8, bit 6 to bit 7, bit 5 to
bit 6, bit 4 to bit 5, bit 3 to bit 4, bit 2 to bit 3, bit 1 to bit 2, and the value of input
will become the value of bit 1. Then the bit specified by testbit will be tested to
determine the value of the function.
Direction Reset Shift 1 Shift 2 Shift 3
Left 00000000 00000001 00000010 00000100
Right 00000000 10000000 01000000 00100000

Reference Manual
00809-0100-4696, Rev AA
September 2004
3-19
Rosemount 848L
SHR (input, shift, reset, testbit) - The parameters input, shift and reset are
functions. The parameter testbit is a constant that is constrained to be in the
range of 1 to 8. The reset function is optional. If reset is present and true, the
8 bit register is cleared to zero and the result of the function is false.
Otherwise, if shift is true then bit 2 will be moved to bit 1, bit 3 to bit 2, bit 4 to
bit 3, bit 5 to bit 4, bit 6 to bit 5, bit 7 to bit 6, bit 8 to bit 7, and the value of input
will become the value of bit 8. Then the bit specified by testbit will be tested to
determine the value of the function.
The following procedure is used to enter the logic equations.
1. Set MODE_BLK.TARGET to OOS
2. Enter the equations in parameters EQn where n=1 to 16 or
OUT1_EQ, OUT2_EQ, OUT3_EQ or OUT4_EQ. Each equation
ending with a semicolon.
3. Set the MODE_BLK.TARGET to AUTO
The equations will then be evaluated and the status of the evaluation shown
in the parameter PARSE_RESULT. If any errors were found the block will
remain in the OOS mode.
Status Propagation
The contact and Boolean value has a binary value and a good/bad status.
A status is applied to a channel value in one of the following ways:
The hardware input device maybe able to tell if it is shorted or open, in
addition to on or off. If the hardware cannot tell then the status is always
good, unless a device failure prevents reading the I/O data.
The evaluation of an equation propagates either Good Non-cascade or
Bad, both Non-specific.
Each function that is evaluated determines both a value and a status of either
good or bad. The functions that provide status are the functions that test a
channel number - IN, ICF, ICR, OUT, DO, PS and EQ. If any of the function’s
parameters have a Bad or Uncertain status with any sub-status then the
function terminates and returns a bad status, otherwise it returns a good value
and status.
When an equation (set of functions) is evaluated, if a function returns a bad
status then evaluation of that equation stops, and the equation channel status
is set to Bad, Non-specific. If evaluation goes to completion, the channel
status will be set to Good Process, Non-specific, not limited.
Status propagates forward, in the direction of the last output equation. If a
function references an equation that is the equation being evaluated or a later
equation, then the status of that equation will be ignored. The function will use
the last good value of the referenced equation and call its status Good. This
prevents forward references to equations that reference this equation from
locking both equations into Bad status if either ever sets Bad status.
During initialization of the logic transducer block, before the first execution,
each equation channel status is set to Bad, Non-specific, constant and the
value is set to False.

Reference Manual
00809-0100-4696, Rev AA
September 2004
Rosemount 848L
3-20
Logic Execution Timing
The Logic transducer block reads the hardware inputs, processes the
equations and drives the outputs on a continuous cycle. The cycle time or
frequency of execution will vary depending on the number and type of logic
functions used in the equations.
DISCRETE INPUT
BLOCKS
The DI blocks are used to communicate the current value of a contact, the
state of one of the Boolean equations, or the state of an output. The DI block
chooses the value through the Channel parameter. Alternatively, the DI block
can be configured to pass 8 values in a packed format to the host system
(DeltaV) by using channels 7 to 41. To set the channel number use the
following procedure for each DI block.
1. Set MODE_BLK.TARGET to OOS
2. Select the Channel parameter
3. Select the desired channel number
4. Set MODE_BLK.TARGET to AUTO
Channel 1= “Input 1” Channel 24= “EQ 8”
Channel 2= “Input 2” Channel 25= “EQ 9”
Channel 3= “Input 3” Channel 26= “EQ 10”
Channel 4= “Input 4” Channel 27= “EQ 11”
Channel 5= “Input 5” Channel 28= “EQ 12”
Channel 6= “Input 6” Channel 29= “EQ 13”
Channel 7= “Input 7” Channel 30= “EQ 14”
Channel 8= “Input 8” Channel 31= “EQ 15”
Channel 9= “DO 1” Channel 32= “EQ 16”
Channel 10= “DO 2” Channel 33= “Output 1”
Channel 11= “DO 3” Channel 34= “Output 2”
Channel 12= “DO 4” Channel 35= “Output 3”
Channel 13= “DO 5” Channel 36= “Output 4”
Channel 14= “DO 6” Channel 37= “Packed Inputs”
Channel 15= “DO 7” Channel 38= “Packed DO”
Channel 16= “DO 8” Channel 39= “Packed EQ1”
Channel 17= “EQ 1” Channel 40= “Packed EQ2”
Channel 18= “EQ 2” Channel 41= “Packed Outputs”
Channel 19= “EQ 3” Channel 42= “Array Inputs” (MDI Only)
Channel 20= “EQ 4” Channel 43= “Array DO” (MDI Only)
Channel 21= “EQ 5” Channel 44= “Array EQ1” (MDI Only)
Channel 22= “EQ 6” Channel 45= “Array EQ2” (MDI Only)
Channel 23= “EQ 7” Channel 46= “Array Outputs” (MDI Only)

Reference Manual
00809-0100-4696, Rev AA
September 2004
3-21
Rosemount 848L
Simulation
Simulation replaces the channel value coming from the transducer block for
testing purposes.
The following procedure is used to simulate a DI output.
To change the output value place the Target Mode of the block to Manual
and then change the OUT_D.VALUE to the desired value.
To simulate both the value and status do the following:
1. If the Simulate Switch is in the OFF position, move it to ON. If the
Simulate switch is already in the ON position, you must move it to Off
an place it back in to the ON position.
NOTE
As a safety measure, the switch must be reset every time power is interrupted
to the device in order to enable SIMULATE. This prevents a device that is
tested on the bench from getting installed in the process with SIMULATE still
active.
2. To change both the OUT_D.VALUE and OUT_D.STATUS of the DI
Block, set the TARGET MODE to AUTO.
3. Set SIMULATE_D.ENABLE_DISABLE to ‘Active’.
4. Enter the desired values for SIMULATE_D. SIMULATE_VALUE and
SIMULATE_D. SIMULATE_STATUS.
If errors occur when performing the above steps, be sure that the SIMULATE
switch has been reset after powering up the device.
DISCRETE OUTPUT
BLOCKS
The digital output blocks are used to receive a value from another device to
be used to either drive a contact output or to use in the logic equations. The
DO blocks make their values available to the 848L by placing the value in a
variable called DO (n) where n=1 to 8. Like the DI block, all eight outputs can
be communicated in a packed format by selecting the appropriate channel
number. The DO block does not drive the outputs directly but sets the state of
the internal variables DO(n). To drive an output from the DO block, the DO(n)
variable is placed in one of the output equations.
OUT1_EQ = DO(1);
MULTIPLE DISCRETE
INPUT BLOCK
The MDI block allows 8 values with their status in one block with 8 individual
outputs. The 8 values are selected by one of the “Array” channel numbers.
MULTIPLE DISCRETE
OUTPUT BLOCK
The MDO block allows 8 output values with their status in one block with 8
individual inputs. The 8 values are selected by the “Array Outputs” channel
number.

Reference Manual
00809-0100-4696, Rev AA
September 2004
Rosemount 848L
3-22
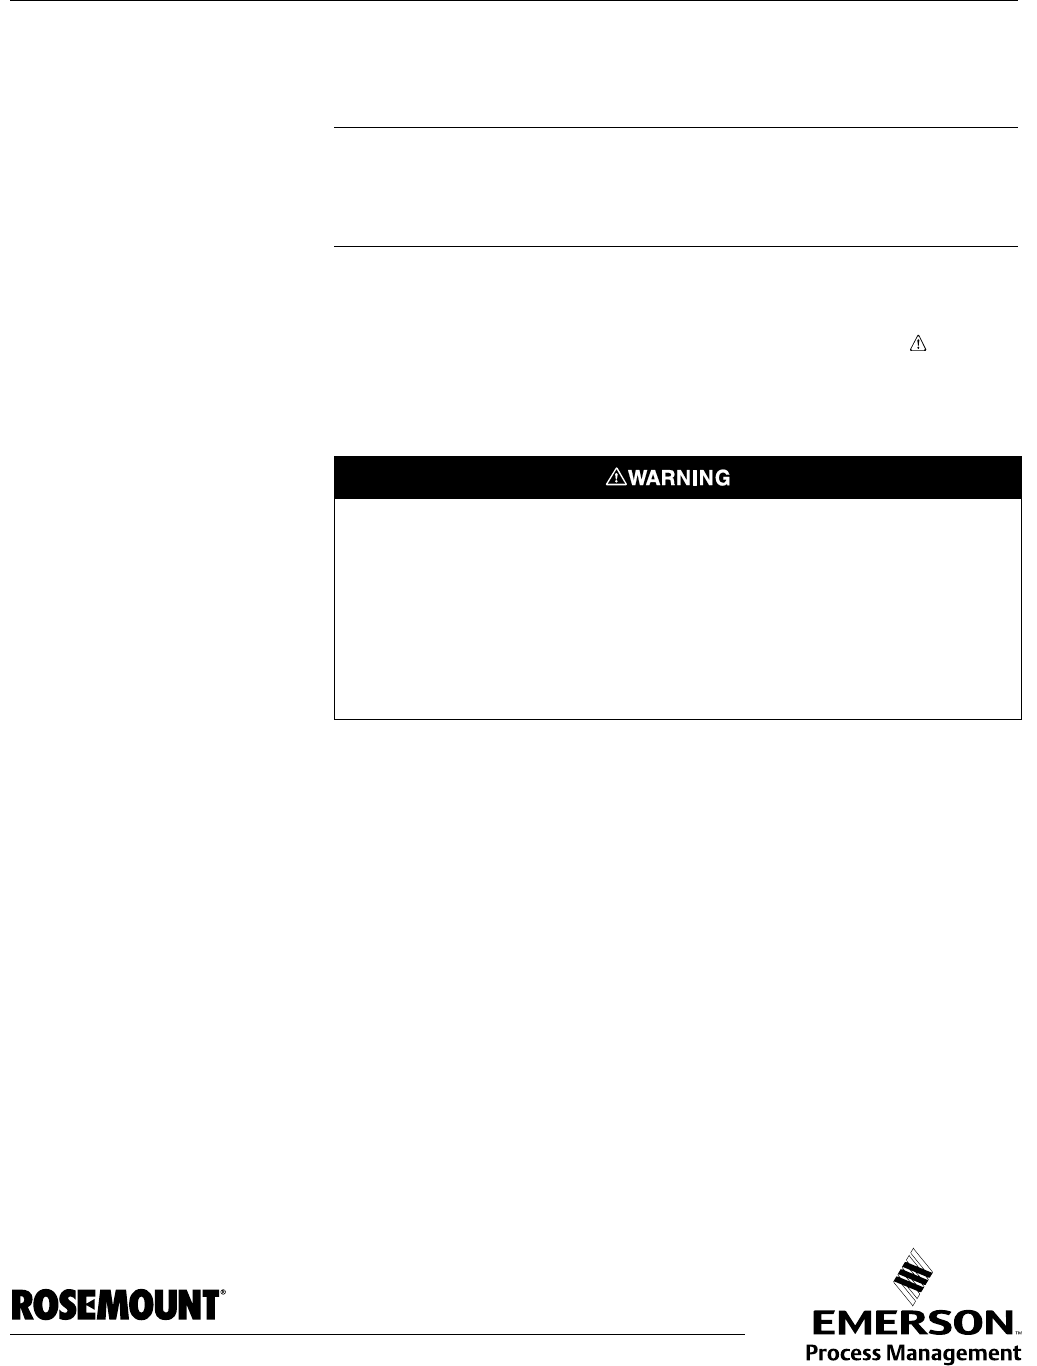
Reference Manual
00809-0100-4696, Rev AA
September 2004 Rosemount 848L
www.rosemount.com
Section 4 Operation and Maintenance
Safety Messages . . . . . . . . . . . . . . . . . . . . . . . . . . . . . . . . . page 4-1
Foundation Fieldbus Information . . . . . . . . . . . . . . . . . . . page 4-1
Hardware Maintenance . . . . . . . . . . . . . . . . . . . . . . . . . . . . page 4-2
Troubleshooting . . . . . . . . . . . . . . . . . . . . . . . . . . . . . . . . . page 4-3
SAFETY MESSAGES Instructions and procedures in this section may require special precautions to
ensure the safety of the personnel performing the operations. Information that
potentially raises safety issues is indicated by a warning symbol ( ). Please
refer to the following safety messages before performing an operation
preceded by this symbol.
Warnings
FOUNDATION FIELDBUS
INFORMATION
FOUNDATION fieldbus is an all-digital, serial, two-way, multidrop
communication protocol that interconnects devices such as transmitters and
valve controllers. It is a local area network (LAN) for instruments that enables
basic control and I/O to be moved to the field devices. The Rosemount 848L
uses FOUNDATION fieldbus technology developed and supported by Emerson
Process Management and the other members of the independent Fieldbus
Foundation.
Failure to follow these installation guidelines could result in death or
serious injury.
• Make sure only qualified personnel perform the installation.
Electrical shock could cause death or serious injury.
• If the device or sensors are installed in a high voltage environment and a fault
condition or installation error occurs, high voltage may be present on transmitter
leads and terminals.
• Use extreme caution when making contact with the leads and terminals.

Reference Manual
000809-0100-4696, Rev AA
September 2004
Rosemount 848L
4-2
Commissioning
(Addressing)
To be able to setup, configure, and have a device communicate with other
devices on a segment, a device must be assigned a permanent address.
Unless requested otherwise, it is assigned a temporary address when
shipped from the factory.
If there are two or more devices on a segment with the same address, the first
device to start up will use the assigned address (ex. Address 20). Each of the
other devices will be given one of the four available temporary addresses. If a
temporary address is not available, the device will be unavailable until a
temporary address becomes available.
Use the host system documentation to commission a device and assign a
permanent address.
HARDWARE
MAINTENANCE
The 848L has no moving parts and requires a minimal amount of scheduled
maintenance. If a malfunction is suspected, check for an external cause
before performing the diagnostics presented below. The 848L has a green
LED which indicates that the device has both DC I/O power and power from
the bus. Once powered the green LED will remain illuminated as long as the
I/O power is available even if bus power is lost.
The red LED indicates that the Resource block is Out of Service. Any
hardware fault detected except open or shorted sensors will place the
Resource block in the Out of Service mode.
Sensor Check The amber LEDs indicate if the 848L is detecting the sensor as open or
closed. To check the input circuit you can connect a working sensor at the
transmitter and check it's operation. Consult an Emerson Process
Management representative for additional assistance.
It is possible that the sensor LEDs do not reflect the actual state of a sensor
since they are activated by the electronics and not directly by the sensor. Use
appropriate electrical test equipment to verify actual sensor states.
Communication/Power
Check
If the transmitter does not communicate or provides an erratic output, check
for adequate voltage to the transmitter. The transmitter requires between 9.0
and 32.0 VDC at the bus terminals to operate with complete functionality.
Check for wire shorts, open circuits, and multiple grounds.
Resetting the
Configuration
(RESTART)
There are two types of restarts available in the Resource Block. The following
section outlines the usage for each of these.
Restart Processor (cycling)
Performing a Restart Processor has the same effect as removing power from
the device and reapplying power.
Restart with Defaults
Performing a Restart with Defaults resets the static parameters for all of the
blocks to their initial state. This is commonly used to change the configuration
and/or control strategy of the device, including any custom configurations
done at the Rosemount factory.

Reference Manual
00809-0100-4696, Rev AA
September 2004
4-3
Rosemount 848L
TROUBLESHOOTING
FOUNDATION Fieldbus
Resource Block
I/O Transducer and Logic Block Troubleshooting
NAMUR Sensors
Symptom Possible Cause Corrective Action
Device does not show
up in the live list
Network configuration parameters
are incorrect
Set the network parameters of the LAS (host system) according to the FF
Communications Profile
ST: 8
MRD: 10
DLPDU PhLO: 4
MID: 7
TSC: 4 (1 ms)
T1: 1920000 (60 s)
T2: 5760000 (180 s)
T3: 480000 (15 s)
Network address is not in polled
range
Set first Unpolled Node and Number of UnPolled Nodes so that the device
address is within range
Power to the device is below the
9 VDC minimum
Increase the power to at least 9V
Noise on the power /
communication is too high
Verify terminators and power conditioners are within specification
Verify that the shield is properly terminated and not grounded at both ends. It is
best to ground the shield at the power conditioner
Device that is acting as
a LAS does not send
out CD
LAS Scheduler was not
downloaded to the Backup LAS
device
Ensure that all of the devices that are intended to be a Backup LAS are
marked to receive the LAS schedule
All devices go off live
list and then return
Live list must be reconstructed by
Backup LAS device
Current link setting and configured links settings are different. Set the current
link setting equal to the configured settings.
Symptom Possible Causes Corrective Action
Mode will not leave
OOS
Target mode not set Set target mode to something other than OOS.
Memory Failure, Communication
Failure, Body Temperature
Failure
BLOCK_ERR will show the lost NV Data or Lost Static Data bit set. Restart the
device by setting RESTART to Processor. If the block error does not clear, call
the factory.
No I/O Power Ensure power at I/O Power Terminals are between 9-32 VDC.
Block Alarms Will not
work
Features FEATURE_SEL does not have Alerts enabled. Enable the report bit.
Notification LIM_NOTIFY is not high enough. Set equal to MAX_NOTIFY.
Symptom Possible Causes Corrective Action
Mode will not leave
OOS
Target mode not set Set target mode to something other than OOS.
Resource block The actual mode of the Resource block is in OOS. See Resource Block
Diagnostics for corrective action.
i/O Transducer Block The actual mode of the Transducer Block is OOS, set it to Auto
Symptom Possible Causes Corrective Action
I/O Failure Open or shorted sensor Check sensor and wiring

Reference Manual
00809-0100-4696, Rev AA
September 2004
4-4
Rosemount 848L

Reference Manual
00809-0100-4696, Rev AA
September 2004 Rosemount 848L
www.rosemount.com
Appendix A Reference Data
Specifications . . . . . . . . . . . . . . . . . . . . . . . . . . . . . . . . . . . page A-1
Dimensional Drawings . . . . . . . . . . . . . . . . . . . . . . . . . . . . page A-5
Ordering Information . . . . . . . . . . . . . . . . . . . . . . . . . . . . . page A-7
SPECIFICATIONS
Functional
Specifications
Inputs
8 Discrete Inputs suitable for NAMUR specification sensors, 9-32VDC
sourcing sensors or general switch inputs (dry contact)
NAMUR Sensors:
On state: > 2.1 mA
Off state: < 1.2 mA
9-32 VDC Sourcing Sensors:
On state: > 50% of I/O voltage
Off state: < 20% of I/O voltage
General Switch Inputs:
On state: < 500 Ohms
Off state: > 5k Ohms
Minimum Pulse Width: 1ms
Maximum Pulse Input Frequency: 500Hz
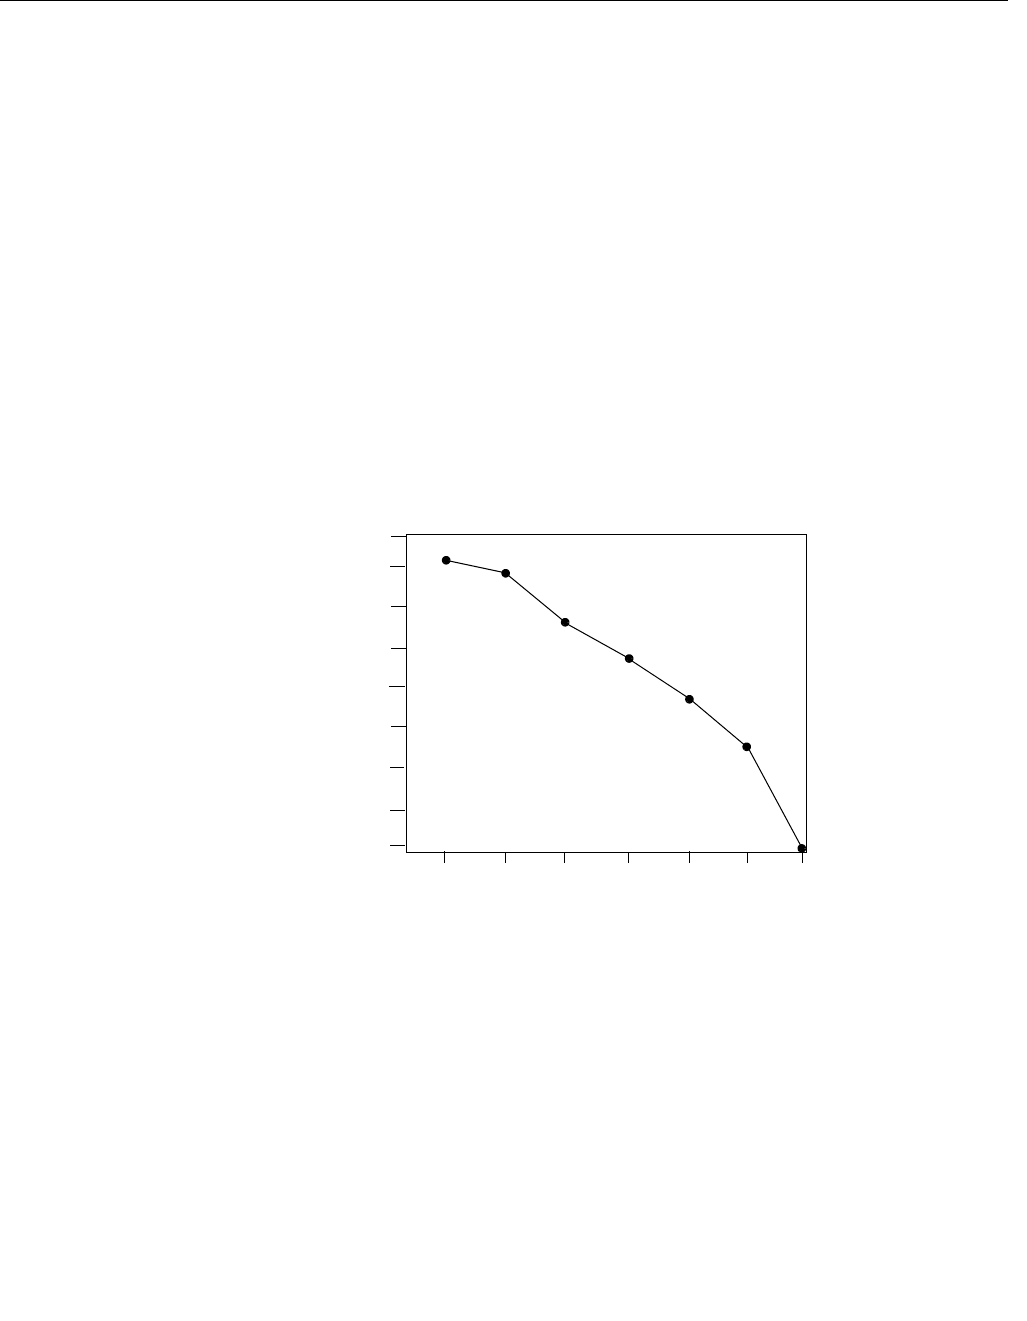
Reference Manual
00809-0100-4696, Rev AA
September 2004
Rosemount 848L
A-2
Outputs
4 Discrete Outputs
9-32 VDC loads
Maximum load inductance 300 mH
Current Ratings: 1.0 A maximum for single channel on, 4.0 A maximum per
device.
Output devices must be selected as follows:
1. Designed to use the same DC voltage as supplied to the 848L I/O
power terminals.
2. The DC resistance must be large enough that they consume no more
than 1 amp of current steady state. The internal impedance of the
848L is negligible, therefore the Output device’s current is simply
calculated as: I/O power / DC resistance.
3. The inductance of the output device must be less than 300 mH.
The maximum total output current for the device will depend on the ambient
temperature as shown in Figure A-1.
Figure A-1. Temperature vs.
Output Current
Thermal Shutdown Protection prevents damage to the device if temperature
specifications are exceeded.
Ambient Temperature (DegC)
45
Total Output Current (Amps)
2.0
1.5
1.0
0
3.5
3
2.5
4
0.5
50 55 60 65 70 75

Reference Manual
00809-0100-4696, Rev AA
September 2004
A-3
Rosemount 848L
Isolation
Input-Output
1200 VDC; 600 V rms 50/60 Hz for dry
and 2-wire NAMUR contact inputs
No isolation when using 3-wire sensors
Input- Foundation Fieldbus
1200 VDC; 600 V rms 50/60 Hz
Output- Foundation Fieldbus
1200 VDC; 600 V rms 50/60 Hz
Input power- Foundation Fieldbus
1200 VDC; 600 V rms 50/60 Hz
Input / Output Power Requirements
24 VDC nominal, 9 VDC minimum, 32 VDC maximum
Supply Current Rating 0.5 amps at 24 VDC plus output load
Fieldbus Segment Power
Powered over the H1 Foundation fieldbus with standard fieldbus power
supplies. The logic transmitter operates between 9.0 and 32.0 VDC at 22
milliamps.
Transient Protection (consult factory for availability)
The transient protector (option code T1) helps to prevent damage to the
transmitter from transients induced on the bus/power wiring by lightening,
welding, heavy electrical equipment, or switch gears. This option is installed
at the factory for the Model 848L and is not intended for field installation.
ASME B 16.5 (ANSI)/IEEE C62.41-1991
(IEEE 587), Location Categories A2, B3.
1 kV peak (10 x 1000 S Wave)
6 kV / 3 kA peak (1.2 x 50 S Wave 8 x 20 S Combination Wave)
6 kV / 0.5 kA peak (100 kHz Ring Wave)
4 kV peak EFT (5 x 50 nS Electrical Fast Transient)

Reference Manual
00809-0100-4696, Rev AA
September 2004
Rosemount 848L
A-4
Physical Specifications Environmental Ratings
Electronics (no enclosure)
-40°C to +85°C
99% non-condensing humidity
IP20
Unit (electronics and enclosure)
-40°C to +85°C
100% condensing humidity
IP66
Function Blocks
Specification
H1 Segment Device
Back-up LAS
Resource Block
I/O Transducer Block
All inputs can optionally be latched for the duration necessary for each input
to be read during a macrocycle
Logic Transducer Block (20 Boolean Equations)
The processing cycle of the 848L logic equations from sampling the inputs to
driving the outputs will vary depending upon the number and type of functions
used in the 20 equations. Processing time can vary in the range of 50 to
150ms.
Logic Functions
AND, OR, XOR, NOT
Rising Edge Trigger
Falling Edge Trigger
Turn On Delay
Turn Off Delay
Pulse Counter
Reset
Set Latch
Shift Register Right
Shift Register Left
Function Blocks
8 DI blocks, 4 DO blocks, 1 MDI block,
and 1 MDO block are provided.
Foundation Fieldbus:
• Links 25
•VCR 20

Reference Manual
00809-0100-4696, Rev AA
September 2004
A-5
Rosemount 848L
EXAMPLE FOR THE LOGIC EXECUTION:
This diagram shows motor starter logic with start and stop buttons and an
auxiliary contact which maintains current after the start button is pressed.
Which would translate to a Boolean equation of:
AND(IN(1),OR(IN(2),IN(3)))
DIMENSIONAL
DRAWINGS
Figure A-2. Rosemount 848L
Dimensional Drawings
MOTOR_STARTER_LOGIC.TIF
Top View 3-D View
Front View Side View
6.7 (170)
3.7 (93)
848/848L/848L_06_AA, 848L_07_AA, 848L_08_AA, 848L_09_AA.EPS
1.7 (43)
Ground
Screw
Input Input Output Power
Connector
Dimensions are in inches (millimeters)
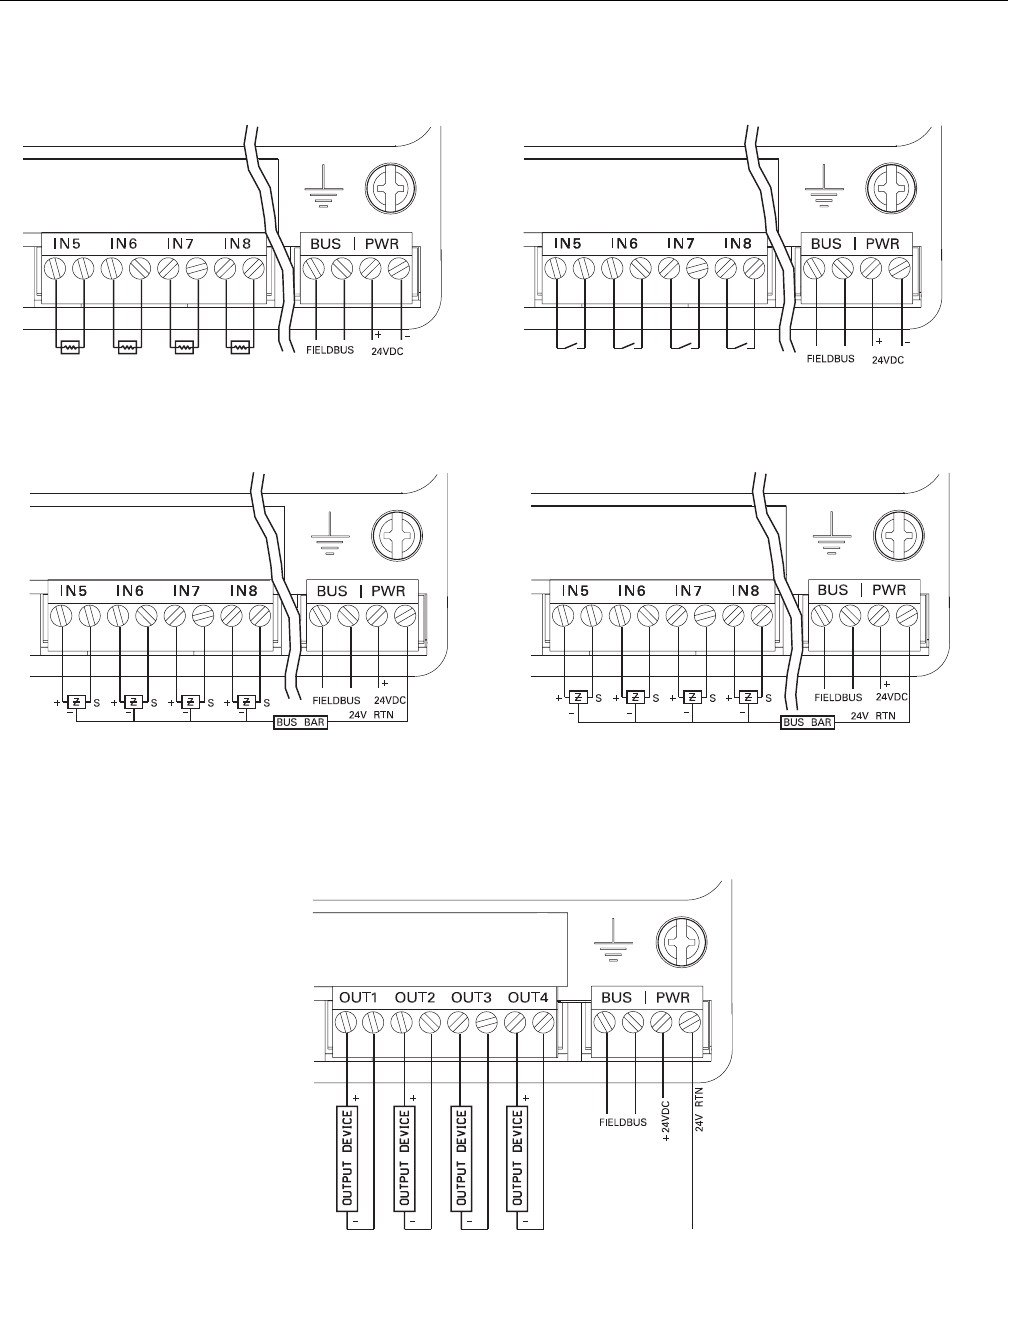
Reference Manual
00809-0100-4696, Rev AA
September 2004
Rosemount 848L
A-6
Figure A-3. Rosemount 848L
Wiring Diagram
848/848L/848L_10_AA, 848L_11_AA, 848L_12_AA, 848L_13_AA, 848L_14_AA.EPS
DISCRETE INPUT WIRING CONFIGURATION
2-Wire NAMUR Sensors
1 of 2 Input Connectors Dry Contact Switches
1 of 2 Input Connectors
3-Wire NAMUR Sensors
1 of 2 Input Connectors
9-32 VDC Sensors
1 of 2 Input Connectors
DISCRETE OUTPUT WIRING CONFIGURATION
9-32 VDC Outputs

Reference Manual
00809-0100-4696, Rev AA
September 2004
A-7
Rosemount 848L
ORDERING
INFORMATION
Model Product Description (Includes One Fieldbus H1 Segment)
848L Fieldbus Logic Transmitter
Code Communications Protocol
F FOUNDATION™ fieldbus digital signal
(includes 8 DI, 4 DO, 1 MDI, and 1 MDO function blocks, and Backup Link Active Scheduler)
Code Power Input
ABus and I/O Power (4-wire)
Code Product Certifications
Rosemount Junction
Box required?
NA No Approval No
N1 CENELEC ATEX Type n (enclosure required) Yes
NC CENELEC ATEX Type n Component No(1)
ND CENELEC ATEX Dust Ignition Proof Yes
N5 FM Non-Incendive for Class 1, Division 2, Groups A, B, C, D Yes
N6 CSA Non-Incendive for Class 1, Division 2, Groups A, B, C, D Yes
N7 IECEx Type n Approval (consult factory for availability) (enclosure required)
Code Discrete Inputs and Outputs Types
S001 8 - Dry Contact Inputs / 4 - 9 to 32 VDC Outputs
S002 8 - 2-wire NAMUR Sensor Inputs / 4 - 9 to 32 VDC Outputs
S003 8 - 3-wire NAMUR Sensor Inputs / 4 - 9 to 32 VDC Outputs
S004 8 - 9 to 32 VDC Inputs / 4 - 9 to 32 VDC Outputs
Code Options
Transient Protection
T1 Transient Protection (Consult factory for availability)
Mounting Kit Options
B6 Mounting Kit to a 2 in. pipe
Non Explosion-Proof Junction Box Options
JP1 Plastic Junction Box; No Entries
JP2 Plastic Junction Box; Cable Glands (9 X M20 nickel-plated brass glands for 7.5-11.9 mm unarmored cable)
JP3 Plastic Junction Box; Conduit Entries (5 Plugged Holes, suitable for installing 1/2-in. NPT fittings)
JA1 Aluminum Junction Box; No Entries
JA2 Aluminum Cable Glands (9 X M20 nickel-plated brass glands for 7.5-11.9 mm unarmored cable)
JA3 Aluminum Conduit Entries (5 Plugged Holes, suitable for installing 1/2-in. NPT fittings)
JS1 Stainless Steel Junction Box; No Entries
JS2 SST Box; Cable Glands (9 X M20 nickel-plated brass glands for 7.5-11.9 mm unarmored cable)
JS3 Stainless Steel Box, Conduit Entries (5 Plugged Holes, suitable for installing 1/2-in. NPT fittings)
Conduit Electrical Connector
GE(2) M12, 4-pin, Male Connector (eurofast®)
GM(2) A size Mini, 4-pin, Male Connector (minifast®)
Software Options
CT Disable Local Logic Function
Typical Model Number: 848L F A NA S001 T1 JP1
(1) The Rosemount 848L ordered with option code NC is not approved as a stand-alone unit. Additional system certification is required.
(2) Not available with certain hazardous location certifications. Contact a Rosemount representative for details.

Reference Manual
00809-0100-4696, Rev AA
September 2004
Rosemount 848L
A-8

Reference Manual
00809-0100-4696, Rev AA
September 2004 Rosemount 848L
www.rosemount.com
Appendix B Product Certifications
Approved Manufacturing Locations . . . . . . . . . . . . . . . . . page B-1
European Directive Information . . . . . . . . . . . . . . . . . . . . page B-1
Hazardous Locations Certificates . . . . . . . . . . . . . . . . . . . page B-1
APPROVED
MANUFACTURING
LOCATIONS
Rosemount Inc. — Chanhassen, Minnesota USA
Emerson Process Management Asia Pacific
Private Limited — Singapore
Rosemount Temperature GmbH - Karlstein, Germany
EUROPEAN DIRECTIVE
INFORMATION
The EC declaration of conformity for all applicable European directives for this
product can be found on the Rosemount website at www.rosemount.com. A
hard copy may be obtained by contacting our local sales office.
HAZARDOUS
LOCATIONS
CERTIFICATES
North American
Approvals
Factory Mutual (FM) Approvals
N5 Nonincendive for Class I, Division 2, Groups A, B, C, D
when installed per Rosemount drawing 00848-1035.
Temperature code: T4 (Tamb = –40°C to 60°C)
Canadian Standards Association (CSA) Approvals
N6 Suitable for Class I, Division 2, Groups A, B, C, D
when installed per Rosemount drawing 00848-1036.
Temperature code: T4 (Tamb = –40°C to 60°C)

Reference Manual
00809-0100-4696, Rev AA
September 2004
Rosemount 848L
B-2
European Approvals CENELEC Approvals
N1 CENELEC Type n
Certification Number: Baseefa04ATEX0027X
ATEX Marking II 3 G
EEx nA nL IIC T4 (Tamb = –40°C to 50°C)
Power/Bus
Max Supply Voltage = 32.0 V
Special Conditions for Safe Use (x):
1. The ambient temperature range of use shall be the most restrictive of
the apparatus, cable gland or blanking plug.
2. The apparatus is not capable of withstanding the 500V insulation test
required by Clause 9.4 of EN 50021:1999 or Clause 8.1 of EN
60079:2003. This must be taken into account when installing the
apparatus.
3. Component approved EEx e cable entries must be used so as to
maintain the ingress protection of the enclosure to at least IP54.
4. Any unused cable entry holes must be filled with component
approved EEx e blanking plugs.
NC CENELEC Type n Component
Certification Number: Baseefa04ATEX0026U
ATEX Marking II 3 G
EEx nA nL IIC T4 (Tamb = -40°C to 50°C)
Special Conditions for Safe Use (x):
1. The component must be installed in a suitable certified enclosure
capable of withstanding an impact of 7.0J.
2. The apparatus is not capable of withstanding the 500V insulation test
required by Clause 9.4 of EN 50021:1999 or Clause 8.1 of EN
60079:2003. This must be taken into account when installing the
apparatus.
ND CENELEC Dust Ignition Proof
Certification Number: Baseefa04ATEX0028X
ATEX Marking II 1 D
T90°C (Tamb = – 20°C to 65°C)
1180
Special Conditions for Safe Use (x):
1. Component approved EEx e cable entries must be used so as to
maintain the ingress protection of the enclosure to at least IP66.
2. Any unused cable entry hole must be filled with component approved
EEx e blanking plugs.
3. The ambient temperature range of use shall be the most restrictive of
the apparatus, cable gland or blanking plug.

Reference Manual
00809-0100-4696, Rev AA
September 2004 Rosemount 848L
www.rosemount.com
Appendix C Function Blocks
Resource Block Parameters . . . . . . . . . . . . . . . . . . . . . . . page C-1
I/O Transducer Parameters . . . . . . . . . . . . . . . . . . . . . . . . page C-5
Logic Transducer Parameters . . . . . . . . . . . . . . . . . . . . . . page C-8
Discrete Input Block . . . . . . . . . . . . . . . . . . . . . . . . . . . . . . page C-9
Discrete Output Block . . . . . . . . . . . . . . . . . . . . . . . . . . . . page C-11
Multiple Discrete Input Blocks . . . . . . . . . . . . . . . . . . . . . page C-12
Multiple Discrete Output Block . . . . . . . . . . . . . . . . . . . . . page C-13
RESOURCE BLOCK
PARAMETERS
Table C-1. Resource Block Parameters
Number Parameter Description
1 ST_ REV The revision level of the static data associated with the function block.
2TAG_ DESC The user description of the intended application of the block.
3 STRATEGY The strategy field can be used to identify grouping of blocks.
4ALERT_ KEY The identification number of the plant unit.
5 MODE_ BLK The actual, target, permitted, and normal modes of the block. For further description, see the Mode
parameter formal model in FF-890.
6BLOCK_ ERR This parameter reflects the error status associated with the hardware or software components associated
with a block. Multiple errors may be shown. For a list of enumeration values, see FF-890, Block_ Err
formal model.
7 RS_ STATE State of the function block application state machine. For a list of enumeration values, see FF-890.
8TEST_ RW Read/write test parameter - used only for conformance testing.
9 DD_ RESOURCE String identifying the tag of the resource which contains the Device Description for the resource.
10 MANUFAC_ ID Manufacturer identification number - used by an interface device to locate the DD file for the resource.
11 DEV_ TYPE Manufacturer's model number associated with the resource - used by interface devices to locate the DD
file for the resource.
12 DEV_ REV Manufacturer revision number associated with the resource - used by an interface device to locate the DD
file for the resource.
13 DD_ REV Revision of the DD associated with the resource - used by the interface device to locate the DD file for the
resource.
14 GRANT_ DENY Options for controlling access of host computer and local control panels to operating, tuning and alarm
parameters of the block.
15 HARD_ TYPES The types of hardware available as channel numbers. The supported hardware type is: SCALAR_ INPUT
16 RESTART Allows a manual restart to be initiated.
17 FEATURES Used to show supported resource block options. The supported features are: SOFT_ WRITE_ LOCK_
SUPPORT, HARD_ WRITE_ LOCK_ SUPPORT, REPORTS, and UNICODE
18 FEATURE_ SEL Used to select resource block options.
19 CYCLE_ TYPE Identifies the block execution methods available for this resource. The supported cycle types are:
SCHEDULED, and COMPLETION_ OF_ BLOCK_ EXECUTION
20 CYCLE_ SEL Used to select the block execution method for this resource.
21 MIN_ CYCLE_T Time duration of the shortest cycle interval of which the resource is capable.
22 MEMORY_ SIZE Available configuration memory in the empty resource. To be checked before attempting a download.

Reference Manual
00809-0100-4696, Rev AA
September 2004
Rosemount 848L
C-2
23 NV_ CYCLE_T Minimum time interval specified by the manufacturer for writing copies of NV parameters to non-volatile
memory. Zero means it will never be automatically copied. At the end of NV_ CYCLE_T, only those
parameters which have changed need to be updated in NVRAM.
24 FREE_ SPACE Percent of memory available for further configuration. Zero in preconfigured resource.
25 FREE_ TIME Percent of the block processing time that is free to process additional blocks.
26 SHED_ RCAS Time duration at which to give up on computer writes to function block RCas locations. Shed from RCas
will never happen when SHED_ RCAS = 0.
27 SHED_ ROUT Time duration at which to give up on computer writes to function block ROut locations. Shed from ROut will
never happen when SHED_ ROUT = 0.
28 FAULT_ STATE Condition set by loss of communication to an output block, fault promoted to an output block or physical
contact. When FAULT_ STATE condition is set, then output function blocks will perform their FAULT_
STATE actions.
29 SET_ FSTATE Allows the FAULT_ STATE condition to be manually initiated by selecting Set.
30 CLR_ FSTATE Writing a Clear to this parameter will clear the device FAULT_ STATE if the field condition has cleared.
31 MAX_ NOTIFY Maximum number of unconfirmed notify messages possible.
32 LIM_ NOTIFY Maximum number of unconfirmed alert notify messages allowed.
33 CONFIRM_ TIME The time the resource will wait for confirmation of receipt of a report before trying again. Retry will not
happen when CONFIRM_ TIME = 0.
34 WRITE_ LOCK If set, no writes from anywhere are allowed, except to clear WRITE_ LOCK. Block inputs will continue to
be updated.
35 UPDATE_ EVT This alert is generated by any change to the static data.
36 BLOCK_ ALM The BLOCK_ ALM is used for all configuration, hardware, connection failure or system problems in the
block. The cause of the alert is entered in the subcode field. The first alert to become active will set the
Active status in the Status attribute. As soon as the Unreported status is cleared by the alert reporting task,
another block alert may be reported without clearing the Active status, if the subcode has changed.
37 ALARM_ SUM The current alert status, unacknowledged states, unreported states, and disabled states of the alarms
associated with the function block.
38 ACK_ OPTION Selection of whether alarms associated with the block will be automatically acknowledged.
39 WRITE_ PRI Priority of the alarm generated by clearing the write lock.
40 WRITE_ ALM This alert is generated if the write lock parameter is cleared.
41 ITK_ VER Major revision number of the interoperability test case used in certifying this device as interoperable. The
format and range are controlled by the Fieldbus Foundation.
42 DISTRIBUTOR Reserved for use as distributor ID. No Foundation enumerations defined at this time.
43 DEV_STRING This is used to load new licensing into the device. The value can be written but will always read back with
a value of 0.
44 XD_ OPTIONS Indicates which transducer block licensing options are enabled.
45 FB_ OPTIONS Indicates which function block licensing options are enabled.
46 DIAG_ OPTIONS Indicates which diagnostics licensing options are enabled.
47 MISC_ OPTIONS Indicates which miscellaneous licensing options are enabled.
48 RB_ SFTWR_
REV_ MAJOR
Major revision of software that the resource block was created with.
49 RB_ SFTWR_
REV_ MINOR
Minor revision of software that the resource block was created with.
50 RB_ SFTWR_
REV_ BUILD
Build of software that the resource block was created with.
51 RB_SFTWR_REV_
ALL
The string contains the following fields:
Major rev: 1-3 characters, decimal number 0-255
Minor rev: 1-3 characters, decimal number 0-255
Build rev: 1-3 characters, decimal number 0-255
Time of build: 8 characters, xx:xx:xx, military time
Day of week of build: 3 characters, Sun, Mon,
Month of build: 3 characters, Jan, Feb.
Day of month of build: 1-2 characters, decimal number 1-31
Year of build: 4 characters, decimal
Builder: 7 characters, login name of builder
52 HARDWARE_ REV Hardware revision of that hardware that has the resource block in it.
Table C-1. Resource Block Parameters
Number Parameter Description

Reference Manual
00809-0100-4696, Rev AA
September 2004
C-3
Rosemount 848L
53 OUTPUT_
BOARD_ SN
Output board serial number.
54 FINAL_ ASSY_
NUM
The same final assembly number specified or set by the customer.
55 DETAILED_
STATUS
Indicates the state of the transmitter.
56 SUMMARY_
STATUS
An enumerated value of repair analysis.
57 MESSAGE_ DATE Date associated with the MESSAGE_ TEXT parameter
58 MESSAGE_ TEXT Used to indicate changes made by the user to the device installation, configuration, or calibration.
59 SELF_ TEST Used to self test the device. Tests are device specific.
60 DEFINE_ WRITE_
LOCK
Allows the operator to select how WRITE_ LOCK behaves. The initial value is "lock everything". If the
value is set to "lock only physical device" then the resource and transducer blocks of the device will be
locked but changes to function blocks will be allowed.
61 SAVE_ CONFIG_
NOW
Allows the user to optionally save all non-volatile information immediately.
62 SAVE_ CONFIG_
BLOCKS
Number of EEPROM blocks that have been modified since last burn. This value will count down to zero
when the configuration is saved.
63 START_ WITH_
DEFAULTS
0 = Uninitialized
1 = do not power-up with NV defaults
2 = power-up with default node address
3 = power-up with default pd_ tag and node address
4 = power-up with default data for the entire communications stack (no application data)
64 SIMULATE_ IO Status of Simulate jumper/switch
65 SECURITY_ IO Status of Security jumper/switch
66 SIMULATE_ STATE The state of the simulate jumper
0 = Uninitialized
1 = Jumper/switch off, simulation not allowed
2 = Jumper/switch on, simulation not allowed (need to cycle jumper/switch)
3 = Jumper/switch on, simulation allowed
67 DOWNLOAD_
MODE
Gives access to the boot block code for over the wire downloads
0 = Uninitialized
1 = Run Mode
2 = Download Mode
68 RECOMMENDED_
ACTION
Enumerated list of recommended actions displayed with a device alert.
69 FAILED_ PRI Designates the alarming priority of the FAILED_ ALM.
70 FAILED_ ENABLE Enabled FAILED_ ALM alarm conditions. Corresponds bit for bit to the FAILED_ ACTIVE. A bit on means
that the corresponding alarm condition is enabled and will be detected. A bit off means the corresponding
alarm condition is disabled and will not be detected.
71 FAILED_ MASK Mask of FAILED_ ALM. Corresponds bit for bit to FAILED_ ACTIVE. A bit on means that the condition is
masked out from alarming.
72 FAILED_ ACTIVE Enumerated list of failure conditions within a device.
73 FAILED_ ALM Alarm indicating a failure within a device which makes the device non-operational.
74 MAINT_ PRI Designates the alarming priority of the MAINT_ ALM
75 MAINT_ ENABLE Enabled MAINT_ ALM alarm conditions. Corresponds bit for bit to the MAINT_ ACTIVE. A bit on means
that the corresponding alarm condition is enabled and will be detected. A bit off means the corresponding
alarm condition is disabled and will not be detected.
76 MAINT_ MASK Mask of MAINT_ ALM. Corresponds bit for bit to MAINT_ ACTIVE. A bit on means that the condition is
masked out from alarming.
77 MAINT_ ACTIVE Enumerated list of maintenance conditions within a device.
78 MAINT_ ALM Alarm indicating the device needs maintenance soon. If the condition is ignored, the device will eventually
fail.
79 ADVISE_ PRI Designates the alarming priority of the ADVISE_ ALM
Table C-1. Resource Block Parameters
Number Parameter Description

Reference Manual
00809-0100-4696, Rev AA
September 2004
Rosemount 848L
C-4
80 ADVISE_ ENABLE Enabled ADVISE_ ALM alarm conditions. Corresponds bit for bit to ADVISE_ ACTIVE. A bit on means that
the corresponding alarm condition is enabled and will be detected. A bit off means the corresponding
alarm condition is disabled and will not be detected.
81 ADVISE_ MASK Mask of ADVISE_ ALM. Corresponds bit for bit to ADVISE_ ACTIVE. A bit on means that the condition is
masked out from alarming.
82 ADVISE_ ACTIVE Enumerated list of advisory conditions within a device.
83 HEALTH_ INDEX Alarm indicating advisory alarms. These conditions do not have a direct impact on the process or device
integrity.
84 PWA_ SIMULATE Parameter representing the overall health of the device, 100 being perfect and 1 being non-functioning.
The value will be set based on the active PWA alarms in accordance with the requirements stated in
"Device Alerts and Health Index PlantWeb Implementation Rules". Each device may implement its own
unique mapping between the PWA parameters and HEALTH_ INDEX although a default mapping will be
available based on the following rules.
HEALTH_ INDEX will be set based on the highest priority PWA *_ ACTIVE bit as follows:
FAILED_ ACTIVE: 0 to 31 - HEALTH_ INDEX = 10
MAINT_ ACTIVE: 27 to 31 - HEALTH_ INDEX = 20
MAINT_ ACTIVE: 22 to 26 - HEALTH_ INDEX = 30
MAINT_ ACTIVE: 16 to 21 - HEALTH_ INDEX = 40
MAINT_ ACTIVE: 10 to 15 - HEALTH_ INDEX = 50
MAINT_ ACTIVE: 5 to 9 - HEALTH_ INDEX = 60
MAINT_ ACTIVE: 0 to 4 - HEALTH_ INDEX = 70
ADVISE_ ACTIVE: 16 to 31 - HEALTH_ INDEX = 80
ADVISE_ ACTIVE: 0 to 15 - HEALTH_ INDEX = 90
NONE - HEALTH_ INDEX = 100
85 ADVISE_ ACTIVE Allows direct writes to the PlantWeb Alert "ACTIVE" parameters and RB.DETAILED_STATUS. The
simulate switch must be "ON' and the SIMULATE_STATE must be "Switch on, simulation allowed" before
PWA_SIMULATE can be active.
Table C-1. Resource Block Parameters
Number Parameter Description

Reference Manual
00809-0100-4696, Rev AA
September 2004
C-5
Rosemount 848L
I/O TRANSDUCER
PARAMETERS
Table C-2. I/O Transducer Parameters
Numbe
rParameter Description
1 ST_ REV The revision level of the static data associated with the function block.
2TAG_ DESC The user description of the intended application of the block.
3 STRATEGY The strategy field can be used to identify grouping of blocks.
4ALERT_ KEY The identification number of the plant unit.
5 MODE_ BLK The actual, target, permitted, and normal modes of the block. For further description, see the Mode
parameter formal model in FF-890.
6BLOCK_ ERR This parameter reflects the error status associated with the hardware or software components
associated with a block. Multiple errors may be shown. For a list of enumeration values, see FF-890,
Block_ Err formal model.
7 UPDATE_ EVT This alert is generated by any change to the static data.
8BLOCK_ ALM The block alarm is used for all configuration, hardware, connection failure, or system problems in the
block. The cause of the alert is entered in the subcode field. The first alert to become active will set the
Active status in the Status attribute. As soon as the Unreported status is cleared by the alert reporting
task, another block alert may be reported without clearing the Active status, if the subcode has
changed.
9 TRANSDUCER_
DIRECTORY
A directory that specifies the number and starting indices of the transducers in the transducer block. For
further information, please refer to the Transducer Block Application Process - Part 1 (FF-902)
specification.
10 TRANSDUCER_ TYPE Identifies the transducer that follows.
11 XD_ ERROR One of the error codes defined in FF-903 XD_ ERROR and Block Alarm Subcodes.
12 COLLECTION_
DIRECTORY
A directory that specifies the number, starting indices, and DD item IDs of the data collections in each
transducer within a transducer block. For further information, please refer FF-902.
13 IN_ 1_ TAG An identifier associated with discrete input 1.
14 IN1 The value and status of discrete input 1.
15 PULSE_ COUNT_ 1 The number of pulses that have occurred on IN1 since last reset.
16 IN_ 1_ CONFIG.IO_TYPE The transducer type of discrete sensor 1.
16 IN_ 1_ CONFIG.FILTER Any state change on IN1 that lasts for a duration less than this filter value, will be ignored by the device.
16 IN_ 1_ CONFIG.FAIL_
SAFE
When the device detects a failure, IO1 will have its value set to this value.
17 IN_ 2_ TAG An identifier associated with discrete input 2.
18 IN2 The value and status of discrete input 2.
19 PULSE_ COUNT_ 2 The number of pulses that have occurred on IN2 since last reset.
20 IN_ 2_ CONFIG.IO_TYPE The transducer type of discrete sensor 2.
20 IN_ 2_ CONFIG.FILTER Any state change on IN2 that lasts for a duration less than this filter value, will be ignored by the device.
20 IN_ 2_ CONFIG.FAIL_
SAFE
When the device detects a failure, IO2 will have its value set to this value.
21 IN_ 3_ TAG An identifier associated with discrete input 3.
22 IN3 The value and status of discrete input 3.
23 PULSE_ COUNT_ 3 The number of pulses that have occurred on IN3 since last reset.
24 IN_ 3_ CONFIG.IO_TYPE The transducer type of discrete sensor 3.
24 IN_ 3_ CONFIG.FILTER Any state change on IN3 that lasts for a duration less than this filter value, will be ignored by the device.
24 IN_ 3_ CONFIG.FAIL_
SAFE
When the device detects a failure, IO3 will have its value set to this value.
25 IN_ 4_ TAG An identifier associated with discrete input 4.
26 IN4 The value and status of discrete input 4.
27 PULSE_ COUNT_ 4 The number of pulses that have occurred on IN4 since last reset.
28 IN_ 4_ CONFIG.IO_TYPE The transducer type of discrete sensor 4.
28 IN_ 4_ CONFIG.FILTER Any state change on IN4 that lasts for a duration less than this filter value, will be ignored by the device.
28 IN_ 4_ CONFIG.FAIL_
SAFE
When the device detects a failure, IO4 will have its value set to this value.

Reference Manual
00809-0100-4696, Rev AA
September 2004
Rosemount 848L
C-6
29 TRANSDUCER_ TYPE_
2
Identifies the transducer that follows.
30 XD_ ERROR_ 2 One of the error codes defined in FF-903 XD_ ERROR and Block Alarm Subcodes.
31 COLLECTION_
DIRECTORY_ 2
A directory that specifies the number, starting indices, and DD item IDs of the data collections in each
transducer within a transducer block. For further information, please refer FF-902.
32 IN_ 5_ TAG An identifier associated with discrete input 5.
33 IN5 The value and status of discrete input 5.
34 PULSE_ COUNT_ 5 The number of pulses that have occurred on IN5 since last reset.
35 IN_ 5_ CONFIG.IO_TYPE The transducer type of discrete sensor 5.
35 IN_ 5_ CONFIG.FILTER Any state change on IN5 that lasts for a duration less than this filter value, will be ignored by the device.
35 IN_ 5_ CONFIG.FAIL_
SAFE
When the device detects a failure, IO5 will have its value set to this value.
36 IN_ 6_ TAG An identifier associated with discrete input 6.
37 IN6 The value and status of discrete input 6.
38 PULSE_ COUNT_ 6 The number of pulses that have occurred on IN6 since last reset.
39 IN_ 6_ CONFIG.IO_TYPE The transducer type of discrete sensor 6.
39 IN_ 6_ CONFIG.FILTER Any state change on IN6 that lasts for a duration less than this filter value, will be ignored by the device.
39 IN_ 6_ CONFIG.FAIL_
SAFE
When the device detects a failure, IO6 will have its value set to this value.
40 IN_ 7_ TAG An identifier associated with discrete input 7.
41 IN7 The value and status of discrete input 7.
42 PULSE_ COUNT_ 7 The number of pulses that have occurred on IN7 since last reset.
43 IN_ 7_ CONFIG.IO_TYPE The transducer type of discrete sensor 7.
43 IN_ 7_ CONFIG.FILTER Any state change on IN7 that lasts for a duration less than this filter value, will be ignored by the device.
43 IN_ 7_ CONFIG.FAIL_
SAFE
When the device detects a failure, IO7 will have its value set to this value.
44 IN_ 8_ TAG An identifier associated with discrete input 8.
45 IN8 The value and status of discrete input 8.
46 PULSE_ COUNT_ 8 The number of pulses that have occurred on IN8 since last reset.
47 IN_ 8_ CONFIG.IO_TYPE The transducer type of discrete sensor 8.
47 IN_ 8_ CONFIG.FILTER Any state change on IN8 that lasts for a duration less than this filter value, will be ignored by the device.
47 IN_ 8_ CONFIG.FAIL_
SAFE
When the device detects a failure, IO8 will have its value set to this value.
48 TRANSDUCER_ TYPE_
3
Identifies the transducer that follows.
49 XD_ ERROR_ 3 One of the error codes defined in FF-903 XD_ ERROR and Block Alarm Subcodes.
50 COLLECTION_
DIRECTORY_ 3
A directory that specifies the number, starting indices, and DD item IDs of the data collections in each
transducer within a transducer block. For further information, please refer FF-902.
51 OUT_ 1_ TAG An identifier associated with discrete output 1.
52 OUT1 The value and status of discrete Output 1.
53 OUT_ 1_
CONFIG.IO_TYPE
The transducer type of discrete sensor 9.
53 OUT_ 1_
CONFIG.FILTER
Any state change that lasts for a duration less than this filter value, will be ignored by the device.
53 OUT_ 1_ CONFIG.FAIL_
SAFE
When the device detects a failure, OUT1 will be set to this value.
54 OUT_ 2_ TAG An identifier associated with discrete output 2.
55 OUT2 The value and status of discrete Output 2.
56 OUT_2_CONFIG.IO_TYP
E
The transducer type of discrete sensor 10.
56 OUT_ 2_
CONFIG.FILTER
Any state change that lasts for a duration less than this filter value, will be ignored by the device.
56 OUT_2_CONFIG.FAIL_
SAFE
When the device detects a failure, OUT2 will be set to this value.
Table C-2. I/O Transducer Parameters
Numbe
rParameter Description

Reference Manual
00809-0100-4696, Rev AA
September 2004
C-7
Rosemount 848L
57 OUT_ 3_ TAG An identifier associated with discrete output 3.
58 OUT3 The value and status of discrete Output 3.
59 OUT_ 3_
CONFIG.IO_TYPE
The transducer type of discrete sensor 11.
59 OUT_3_CONFIG.FILTER Any state change that lasts for a duration less than this filter value, will be ignored by the device.
59 OUT_3_CONFIG.FAIL_S
AFE
When the device detects a failure, OUT3 will be set to this value.
60 OUT_ 4_TAG An identifier associated with discrete output 4.
61 OUT4 The value and status of discrete Output 4.
62 OUT_ 4_
CONFIG.IO_TYPE
The transducer type of discrete sensor 12.
62 OUT_ 4_
CONFIG.FILTER
Any state change that lasts for a duration less than this filter value, will be ignored by the device.
62 OUT_ 4_ CONFIG.FAIL_
SAFE
When the device detects a failure, OUT4 will be set to this value.
63 BODY_ TEMP The value and status of electronics temperature.
64 IO_ SOFT_ REV The string contains the following fields: Major rev: 1-3 characters, decimal number 0-255 Minor rev: 1-3
characters, decimal number 0-255Build rev: 1-3 characters, decimal number 0-255 Time of build: 8
characters, xx:xx:xx, military time Day of week of build: 3 characters, Sun, Mon, Month of build: 3
characters, Jan, Feb. Day of month of build: 1-2 characters, decimal number 1-31 Year of build: 4
characters, decimal Builder: 7 characters, login name of builder
65 CLEAR_COUNTS Each bit can be written to in order to reset PULSE_ COUNT_ X. The bits numbered from 1 (LSB) to
8(MSB) will reset PULSE_ COUNT_ 1 to PULSE_ COUNT_ 8 respectively.
66 DETAILED_ STATUS Indicates the state of the transmitter.
67 MACRO_ IN_ LATCH Allows transitions of transducer block channels to be held in a specified state until the macrocycle reads
the value at least once.
68 MACRO_ EQ_ LATCH Allows transitions of transducer block channels to be held in a specified state until the macrocycle reads
the value at least once.
69 MACRO_ OUT_ LATCH Allows transitions of transducer block channels to be held in a specified state until the macrocycle reads
the value at least once.
Table C-2. I/O Transducer Parameters
Numbe
rParameter Description

Reference Manual
00809-0100-4696, Rev AA
September 2004
Rosemount 848L
C-8
LOGIC TRANSDUCER
PARAMETERS
Table C-3. Logic Transducer Parameters and Descriptions
Number Parameter Description
1 ST_ REV The revision level of the static data associated with the function block.
2TAG_ DESC The user description of the intended application of the block.
3 STRATEGY The strategy field can be used to identify grouping of blocks.
4ALERT_ KEY The identification number of the plant unit.
5 MODE_ BLK The actual, target, permitted, and normal modes of the block. For further description, see the Mode
parameter formal model in FF-890.
6BLOCK_ ERR This parameter reflects the error status associated with the hardware or software components associated
with a block. Multiple errors may be shown. For a list of enumeration values, see FF-890, Block_ Err
formal model.
7 UPDATE_ EVT This alert is generated by any change to the static data.
8BLOCK_ ALM The block alarm is used for all configuration, hardware, connection failure, or system problems in the
block. The cause of the alert is entered in the subcode field. The first alert to become active will set the
Active status in the Status attribute. As soon as the Unreported status is cleared by the alert reporting task,
another block alert may be reported without clearing the Active status, if the subcode has changed.
9 TRANSDUCER_
DIRECTORY
A directory that specifies the number and starting indices of the transducers in the transducer block. For
further information, please refer to the Transducer Block Application Process - Part 1 (FF-902)
specification.
10 TRANSDUCER_
TYPE
Identifies the transducer that follows.
11 XD_ ERROR One of the error codes defined in FF-903 XD_ ERROR and Block Alarm Subcodes.
12 COLLECTION_
DIRECTORY
A directory that specifies the number, starting indices, and DD item IDs of the data collections in each
transducer within a transducer block. For further information, please refer FF-902.
13 EQ1 A boolean equation used to define the computation of EQ1_ VALUE.
14 EQ2 A boolean equation used to define the computation of EQ2_ VALUE.
15 EQ3 A boolean equation used to define the computation of EQ3_ VALUE.
16 EQ4 A boolean equation used to define the computation of EQ4_ VALUE.
17 EQ5 A boolean equation used to define the computation of EQ5_ VALUE.
18 EQ6 A boolean equation used to define the computation of EQ6_ VALUE.
19 EQ7 A boolean equation used to define the computation of EQ7_ VALUE.
20 EQ8 A boolean equation used to define the computation of EQ8_ VALUE.
21 EQ9 A boolean equation used to define the computation of EQ9_ VALUE.
22 EQ10 A boolean equation used to define the computation of EQ10_ VALUE.
23 EQ11 A boolean equation used to define the computation of EQ11_ VALUE.
24 EQ12 A boolean equation used to define the computation of EQ12_ VALUE.
25 EQ13 A boolean equation used to define the computation of EQ13_ VALUE.
26 EQ14 A boolean equation used to define the computation of EQ14_ VALUE.
27 EQ15 A boolean equation used to define the computation of EQ15_ VALUE.
28 EQ16 A boolean equation used to define the computation of EQ16_ VALUE.
29 OUT1_ EQ A boolean equation used to define the computation of OUT1_ VALUE.
30 OUT2_ EQ A boolean equation used to define the computation of OUT2_ VALUE.
31 OUT3_ EQ A boolean equation used to define the computation of OUT3_ VALUE.
32 OUT4_ EQ A boolean equation used to define the computation of OUT4_ VALUE.
33 PARSE_ RESULT A feedback string that displays the result of parsing EQ1 - EQ16, and OUT1_ EQ - OUT4_ EQ.
34 EQ1_ VALUE The value and status of the result of computing EQ1.
35 EQ2_ VALUE The value and status of the result of computing EQ2.
36 EQ3_ VALUE The value and status of the result of computing EQ3.
37 EQ4_ VALUE The value and status of the result of computing EQ4.
38 EQ5_ VALUE The value and status of the result of computing EQ5.
39 EQ6_ VALUE The value and status of the result of computing EQ6.
40 EQ7_ VALUE The value and status of the result of computing EQ7.
41 EQ8_ VALUE The value and status of the result of computing EQ8.
42 EQ9_ VALUE The value and status of the result of computing EQ9.
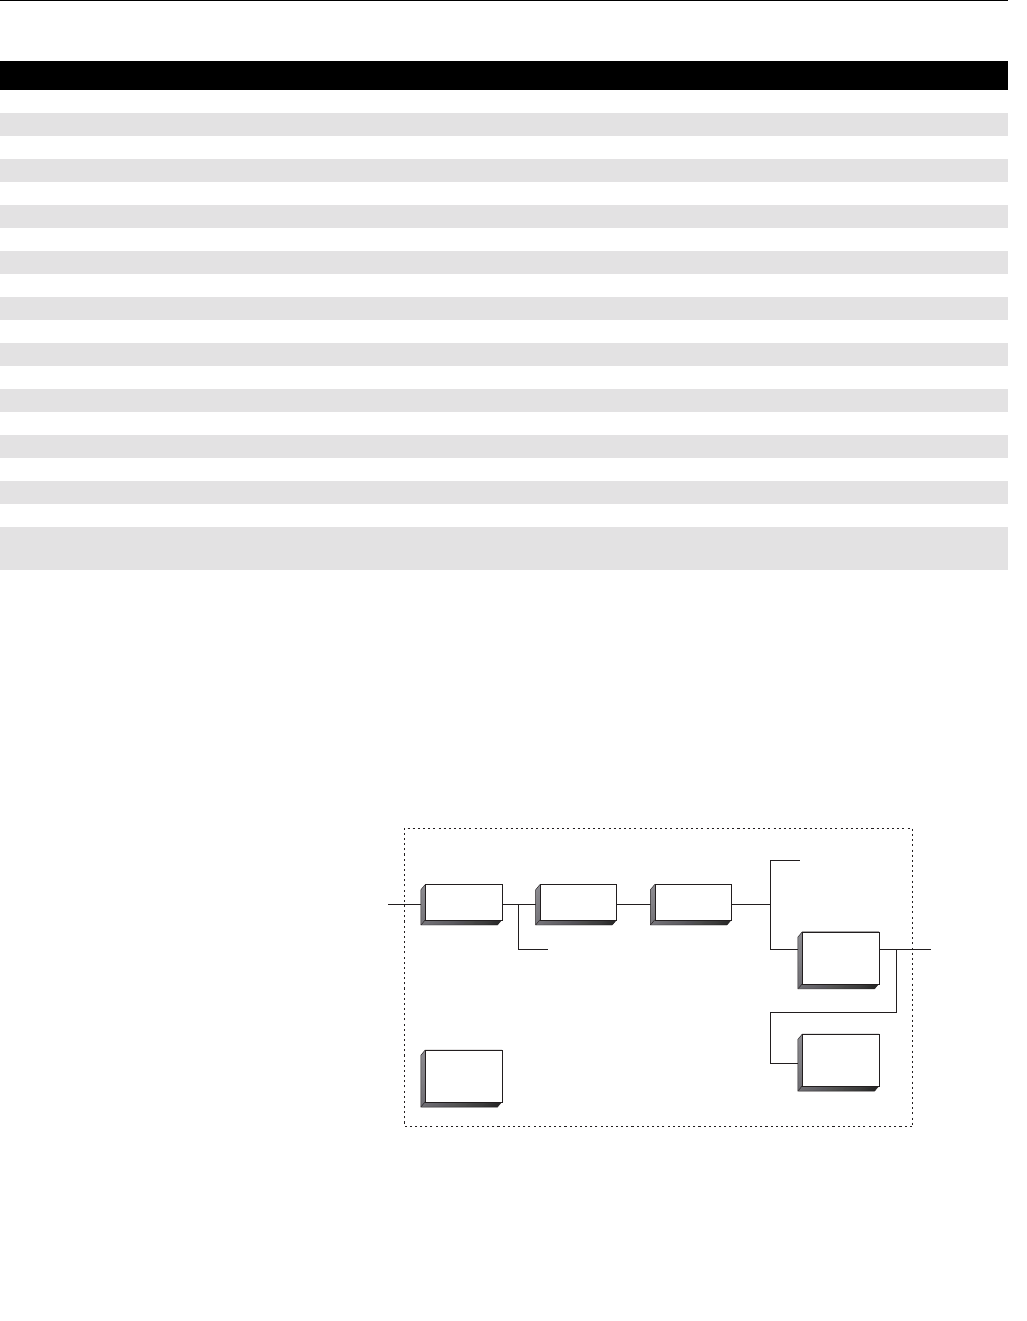
Reference Manual
00809-0100-4696, Rev AA
September 2004
C-9
Rosemount 848L
DISCRETE INPUT
BLOCK
The DI takes the manufacturer’s discrete input data, selected by channel
number, and makes it available to other function blocks as its output. The
output will have a value of either true or false along with the status of the
output. A custom feature of the DI block in the 848L is the ability to pack 8
status bits into the single output of a DI block. This is accomplished by
selecting the appropriate channel number for packed data. This feature is
used in custom applications implemented in control systems such as DeltaV.
The DI block supports a function to invert the input and alarming.
43 EQ10_ VALUE The value and status of the result of computing EQ10.
44 EQ11_ VALUE The value and status of the result of computing EQ11.
45 EQ12_ VALUE The value and status of the result of computing EQ12.
46 EQ13_ VALUE The value and status of the result of computing EQ13.
47 EQ14_ VALUE The value and status of the result of computing EQ14.
48 EQ15_ VALUE The value and status of the result of computing EQ15.
49 EQ16_ VALUE The value and status of the result of computing EQ16.
50 OUT1_ VALUE The value and status of the result of computing OUT1_ EQ.
51 OUT2_ VALUE The value and status of the result of computing OUT2_ EQ.
52 OUT3_ VALUE The value and status of the result of computing OUT3_ EQ.
53 OUT4_ VALUE The value and status of the result of computing OUT4_ EQ.
54 DO1_ VALUE The value and status of value coming from channel DO1.
55 DO2_ VALUE The value and status of value coming from channel DO2.
56 DO3_ VALUE The value and status of value coming from channel DO3.
57 DO4_ VALUE The value and status of value coming from channel DO4.
58 DO5_ VALUE The value and status of value coming from channel DO5.
59 DO6_ VALUE The value and status of value coming from channel DO6.
60 DO7_ VALUE The value and status of value coming from channel DO7.
61 DO8_ VALUE The value and status of value coming from channel DO8.
62 DETAILED_
STATUS
Indicates the state of the transmitter.
Table C-3. Logic Transducer Parameters and Descriptions
Number Parameter Description
CHANNEL
MODE
Simulate
SIMULATE_D
Optional
Invert
Filter
PV_FTIME
PV_D
Output OUT_D
Alarms
DISC
FIELD_VAL_D
848/848L/DISCRETE1.EPS

Reference Manual
00809-0100-4696, Rev AA
September 2004
Rosemount 848L
C-10
Table C-4. Parameters
Index Parameter
1ST_REV
2TAG_DESC
3STRATEGY
4ALERT_KEY
5 MODE_BLK
6BLOCK_ERR
7PV_D
8OUT_D
9 SIMULATE_D
10 XD_STATE
11 OUT_STATE
12 GRANT_DENY
13 IO_OPTS
14 STATUS_OPTS
15 CHANNEL
16 PV_FTIME
17 FIELD_VAL_D
18 UPDATE_EVT
19 BLOCK_ALM
20 ALARM_SUM
21 ACK_OPTION
22 DISC_PRI
23 DISC_LIM
24 DISC_ALM
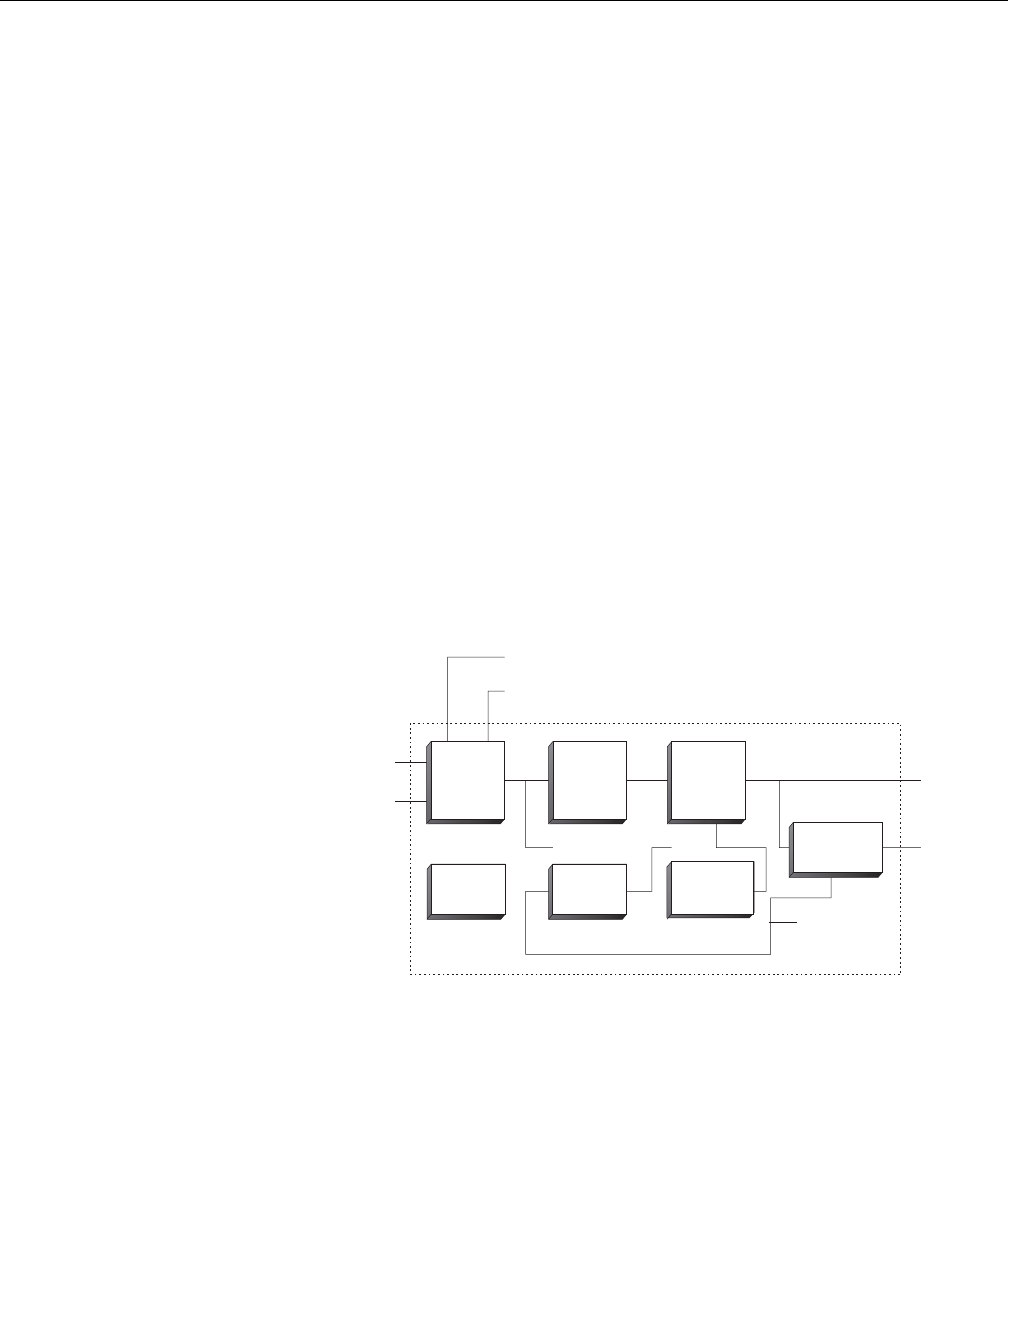
Reference Manual
00809-0100-4696, Rev AA
September 2004
C-11
Rosemount 848L
DISCRETE OUTPUT
BLOCK The DO block makes the value sent in SP_D, CAS_IN_D, or RCAS_IN_D
available for processing by the device. The CHANNEL selection determines
where the value is stored in the 848L. A custom feature of the DO block in the
848L is the ability to accept 8 status bits packed into the single setpoint of a
DO block. This is accomplished by selecting the appropriate channel number
for packed data. This feature is used in custom applications implemented in
control systems such as DeltaV.
The Invert I/O option can be used to do a Boolean NOT function on the
setpoint value.
The SP_D supports the full cascade sub-function. Cas mode must be used to
transfer the output of another block to the SP_D of the DO.
There are additional I/O options which will cause the SP_D value to track the
PV_D value when the block is in an actual mode of LO or Man.
The 848L does not support a readback value in which case READBACK_D is
generated from OUT_D. The OUT_D and READBACK_D parameters both
use XD_STATE. The PV_D and SP_D use PV_STATE.
Supported Modes O/S, LO, Iman, Man, Auto, Cas, and RCas. The Man mode can be used to
force the output, in a PLC sense. It may be that Man mode is not permitted,
but it must be supported so that Man mode may be entered when leaving
O/S. The IMan mode is used to indicated that there is no path to the final
element. IMAN is not used in the 848L.
Setpoint Optional
Invert
Output
Simulate
SIMULATE_D CHANNEL
OUT_D
READBACK_D
PV_D
Fault State
FSTATE_TIME
FSTATE_VAL_D
SP_D
Optional
Invert
MODE
SHED_OPT
BKCAL_OUT_D
RCAS_OUT_D
CAS_IN_D
RCAS_IN_D
848/848L/DISCRETE2.EPS

Reference Manual
00809-0100-4696, Rev AA
September 2004
Rosemount 848L
C-12
Table C-5. Parameters
MULTIPLE DISCRETE
INPUT BLOCKS
The MDI block makes available for the FF network eight discrete variables of
the I/O subsystem through its eight output parameters OUT_D1/8 Status
indication in the OUT_Dx output parameters depends on the I/O subsystem
and the transducer block, that is manufacturer specific.
For example, if there is individual detection of sensor failure, it can be
indicated in the status of related OUT_Dx parameter. A problem in the
interface to the I/O subsystem can be indicated in the status of all OUT_Dx as
BAD – Device Failure.
Index Parameter
1ST_REV
2TAG_DESC
3STRATEGY
4ALERT_KEY
5 MODE_BLK
6BLOCK_ERR
7PV_D
8SP_D
9OUT_D
10 SIMULATE_D
11 PV_STATE
12 XD_STATE
13 GRANT_DENY
14 IO_OPTS
15 STATUS_OPTS
16 READBACK_D
17 CAS_IN_D
18 CHANNEL
19 FSTATE_TIME
20 FSTATE_VAL_D
21 BKCAL_OUT_D
22 RCAS_OUT_D
23 SHED_OPT
24 RCAS_OUT_D
25 UPDATE_EVT
26 BLOCK_ALM
OUT_D1
OUT_D2
OUT_D3
OUT_D4
OUT_D5
OUT_D6
OUT_D7
OUT_D8
BLOCK
ALGORITHM
INPUT SNAP OF
TRANSDUCER
BLOCK OUTPUTS
CHANNEL
848/848L/DISCRETE3.EPS

Reference Manual
00809-0100-4696, Rev AA
September 2004
C-13
Rosemount 848L
Table C-6. Parameters and
Description
MULTIPLE DISCRETE
OUTPUT BLOCK
The MDO block makes available to the I/O subsystem its eight input
parameters IN_D1/8.
This function block keeps the fault state features specified for the DO block. It
includes option to hold the last value or a preset value when in Fault State,
individual preset values for each point, and a delay time to go into the Fault
State.
The actual mode will be LO only due to the resource block (SET_FSTATE
parameter). If an input parameter has a bad status, that parameter will be in
Fault State, but the mode calculation of the block will not be affected.
The parameter FSTATE_STATUS shows that points are in Fault State.
The MDO block does not support back calculation, or the Cas mode.
Index Parameter Description
1 ST_REV The revision level of the static data associated with the function block.
2TAG_DESC The user description of the intended application of the block.
3 STRATEGY The strategy field can be used to identify grouping of blocks.
4ALERT_KEY The identification number of the plant unit.
5 MODE_BLK The actual, target, permitted, and normal modes of the block:
Target: The mode to .go to.
Actual: The mode the .block is currently in.
Permitted: Allowed modes that target may take on
Normal: Most common mode for actual
6BLOCK_ERR This parameter reflects the error status associated with the hardware or software components
associated with a block. It is a bit string, so that multiple errors may be shown.
7 CHANNEL The CHANNEL value is used to select the measurement value. Refer to the appropriate device
manual for information about the specific channels available in each device. You must configure the
CHANNEL parameter before you can configure the XD_SCALE parameter.
8OUT_D1 Discrete output to indicate a selected alarm condition.
9 OUT_D2 Discrete output to indicate a selected alarm condition.
10 OUT_D3 Discrete output to indicate a selected alarm condition.
11 OUT_D4 Discrete output to indicate a selected alarm condition.
12 OUT_D5 Discrete output to indicate a selected alarm condition.
13 OUT_D6 Discrete output to indicate a selected alarm condition.
14 OUT_D7 Discrete output to indicate a selected alarm condition.
15 OUT_D8 Discrete output to indicate a selected alarm condition.
16 UPDATE_EVT This alert is generated by any change to the static data.
17 BLOCK_ALM The block alarm is used for all configuration, hardware, connection failure or system problems in the
block. The cause of the alert is entered in the subcode field. The first alert to become active will set the
Active status in the Status parameter. As soon as the Unreported status is cleared by the alert
reporting task, another block alert may be reported without clearing the Active status, if the subcode
has changed.

Reference Manual
00809-0100-4696, Rev AA
September 2004
Rosemount 848L
C-14
Table C-7. Parameters and
Description
IN_D3
BLOCK
ALGORITHM CHANNEL
OUTPUT SNAP OF
TRANSDUCER
BLOCK INPUTS
IN_D4
IN_D5
IN_D6
IN_D7
IN_D8
IN_D1
IN_D2
848/848L/DISCRETE3.EPS
Index Parameter
1ST_REV
2TAG_DESC
3STRATEGY
4ALERT_KEY
5 MODE_BLK
6BLOCK_ERR
7 CHANNEL
8IN_D1
9IN_D2
10 IN_D3
11 IN_D4
12 IN_D5
13 IN_D6
14 IN_D7
15 IN_D8
16 MO_OPTS
17 FSTATE_TIME
18 FSTATE_VAL_D1
19 FSTATE_VAL_D2
20 FSTATE_VAL_D3
21 FSTATE_VAL_D4
22 FSTATE_VAL_D5
23 FSTATE_VAL_D6
24 FSTATE_VAL_D7
25 FSTATE_VAL_D8
26 FSTATE_STATUS
27 UPDATE_EVT
28 BLOCK_ALM

Reference Manual
00809-0100-4696, Rev AA
September 2004 Rosemount 848L
www.rosemount.com
Appendix D Logic Equation Syntax
Error Handling . . . . . . . . . . . . . . . . . . . . . . . . . . . . . . . . . . . page D-4
Examples . . . . . . . . . . . . . . . . . . . . . . . . . . . . . . . . . . . . . . . page D-5
1. All lines shall end with a semi-colon.
2. Accepted characters shall be standard 7-bit ASCII characters from
the list below:
•A-Z
•a-z
•0-9
• , (comma)
• ( ) (parenthesis)
• (space)
• ; (semicolon)
• _ (underscore)
3. The maximum number of characters per equation shall be 80.
4. Function calls are in the form FUNC(PARAM1,PARAM2,...PARAMN)
where FUNC is one of the supported functions in Table D-1 on
page D-2, and PARAMx are expressions to be input to the function.
5. Function names must be one of the names listed in the table below.
6. All spaces shall be ignored except within function names and function
parameters.
7. The parameters in a function call shall contain at least the required
parameters shown in table 2, but no more than the maximum.
8. The number of times a function is used (totaled in all equations) must
be less than or equal to the maximum number of instances allowed
shown in Table D-1 on page D-2.
9. Each equation must evaluate to a single boolean value.

Reference Manual
00809-0100-4696, Rev AA
September 2004
Rosemount 848L
D-2
Table D-1. Supported Functions
Function Name
Required number
of parameters
Maximum number
of parameters Function Description
Maximum
Instances
AND 2 10 AND (a, b,...);
This function's result will be the logical and of a, b,...
NO LIMIT
CLOCK 2 2 CLOCK (onTime, offTime);
This function is a periodic clock. The result of this
function will be true for 'onTime' * 100 milliseconds,
then false for 'offTime' * 100 milliseconds, and repeats
forever.
10
CTU 3 3 CTU (clock, reset, count);
This function is an UP COUNTER. When 'reset' is true,
this function will set its' internal counter to 0. When
'reset' is false, this function will increment its' internal
counter each time 'clock' has a rising edge, until the
counter reaches 'count'. The result of this function will
be true when the counter reaches 'count', and false
otherwise.
20
DO 1 1 DO (channel number);
This function's result will be the value of the requested
external channel value coming into this device via a DO
function block.
NO LIMIT
EQ 1 1 EQ (channel number);
This function's result will be the value of the requested
equation result.
Note: The equation values are processed in order from
the first equation to the last, so if equation 4 asks for
equation 20 value, the equation 20 value will be the
value calculated in the previous run time cycle.
NO LIMIT
FALL 1 1 FALL (a);
This function is a falling edge trigger. When 'a'
transitions from true to false, this function's result is
true, otherwise it is false.
10
ICF 1 1 ICF (channel number);
This function's result will be true for one execution
cycle, if the value of the requested device input has had
at least one falling transition since the last execution
cycle. This is ideal for capturing events that occur faster
then the logic execution cycle.
NO LIMIT
ICR 1 1 ICR (channel number);
This function's result will be true for one execution
cycle, if the value of the requested device input has had
at least one rising transition since the last execution
cycle. This is ideal for capturing events that occur faster
then the logic execution cycle.
NO LIMIT
IN 1 1 IN (channel number);
This function's result will be the value of the requested
device input.
NO LIMIT
NOT 1 1 NOT (a);
This function's result will be the logical not of a.
NO LIMIT
OR 2 10 OR (a, b,...);
This function's result will be the logical or of a, b,...
NO LIMIT
OUT 1 1 OUT (channel number);
This function's result will be the value of the requested
device output.
NO LIMIT

Reference Manual
00809-0100-4696, Rev AA
September 2004
D-3
Rosemount 848L
PS 2 2 PS (channel number, divisor);
This function is a frequency prescaler. This function's
value will be true for 1 execution cycle each time the
requested device input has had 'divisor' pulses. This is
ideal for a scaling fast pulse inputs to a rate suitable for
the logic execution cycle.
10
RISE 1 1 RISE (a);
This function is a rising edge trigger. When 'a'
transitions from false to true, this function's result is
true, otherwise it is false.
10
RS 2 2 RS (set, reset);
This function is a reset dominant latch. When 'reset' is
true, this function will reset its' state to false regardless
of the value of 'set'. When 'reset' is false, the function's
state will have a false value until 'set' has had at least 1
true reading, after which the state will remain true. The
result of this function is the function's state.
10
SHL 3 4 SHL (a, clock, reset, bit);
This function is an 8 bit left shift register. When 'clock'
transitions from false to true, the value of 'a' is shifted
into the least significant bit of this function's register.
The remaining bits are shifted left by 1 bit position.
When 'reset' is true, all 8 bits in this function's register
will be cleared to zero. 'reset' is an optional parameter
and will always be considered false if it is not present.
The result of this function is the value of bit number 'bit'
in the register.
10
SHR 3 4 SHR (a, clock, reset, bit);
This function is an 8 bit right shift register. When 'clock'
transitions from false to true, the value of 'a' is shifted
into the most significant bit of this function's register.
The remaining bits are shifted right by 1 bit position.
When 'reset' is true, all 8 bits in this function's register
will be cleared to zero. 'reset' is an optional parameter
and will always be considered false if it is not present.
The result of this function is the value of bit number 'bit'
in the register.
10
SR 2 2 SR (set, reset);
This function is a set dominant latch. When 'set' is true,
this function will set its' state to true regardless of the
value of 'reset'. When 'reset' is false, the function's state
will have a false value until 'set' has had at least 1 true
reading, after which the state will remain true. When
reset is true, the function's state will be set to the value
of 'set'. The result of this function is the function's state.
10
TOF 2 2 TOF (a, time);
This function is an off delay. When 'a' is true, this
function will set its' output to true. When 'a' transitions to
false, the function's output will remain true for 'time' *
100 milliseconds before going false.
10
Table D-1. Supported Functions
Function Name
Required number
of parameters
Maximum number
of parameters Function Description
Maximum
Instances

Reference Manual
00809-0100-4696, Rev AA
September 2004
Rosemount 848L
D-4
ERROR HANDLING The syntax of the entered equation is parsed when the target mode transitions
from OOS to AUTO. Each equation is checked in order, and when an error is
encountered in an equation, the parsing is suspended for the remaining
equations, and the target mode is set back to OOS. The equation where the
problem was encountered is indicated along with a message as shown in the
table below.
Bounds checking on the values of parameters used in the functions are
checked during run-time when ACTUAL MODE is AUTO. Errors of this type
will be indicated by a bad status in the equations computed value.
TON 2 2 TON (a, time);
This function is an on delay. When 'a' is false, this
function will set its' output to false. When 'a' transitions
to true, the function's output will remain false for 'time' *
100 milliseconds before going true.
10
TP 2 2 TP (a, time);
This function is a pulse timer. When 'a' transitions to
true, this function will set its' output to true for 'time' *
100 milliseconds, and then return false.
10
XOR 210 XOR(a, b,...);
This function is false if all parameters are in the same
state, either all true or all false. Otherwise the function
is true.
NO LIMIT
Table D-1. Supported Functions
Function Name
Required number
of parameters
Maximum number
of parameters Function Description
Maximum
Instances
Table D-2. Error Handling
Conditions Status response
No semi-colon appears in the equation. Missing semi-colon.
More left parenthesis than right parenthesis. Un-matched (.
More right parenthesis than left parenthesis. Un-matched ).
A comma placed without a preceding function parameter. Badly placed comma.
Open and Closed parenthesis without a parameter or
statement contained.
Empty ().
A semicolon is contained prior to finishing an expression. Badly placed semicolon.
A function call is missing one or more parameters. Too few parameters in function.
A bad character is present, or a parameter appears outside
of a function call.
Syntax error.
An unknown function is called out. Unknown function.
An opening parenthesis is located after the closing
parenthesis of a function call.
Badly placed (.
A function call contains too many parameters. Too many parameters in
function.
A decimal number was found where an integer was
expected.
Invalid number.
A function result was used as a function parameter where a
literal integer number was expected.
Invalid parameters in function.
A function has been used more than the maximum allowed
instances.
Insufficient resources.
All equations were parsed successfully. Equation completed.

Reference Manual
00809-0100-4696, Rev AA
September 2004
D-5
Rosemount 848L
EXAMPLES Take value of input 1 and put it on output 3.... Set OUT3_EQ to:
IN(1);
For every transition (in both directions) on input 5, send a 200 msec pulse out
on output 2, but only if input 2 is low.... Set OUT2_EQ to:
AND(OR(TP(IN(5),2),TP(NOT(IN(5)),2)),NOT(IN(2)));
Turn on output 1 only after input 8 has gone high 10 times, start over counting
when input 6 is set high.... Set OUT1_EQ to:
CTU(IN(8),IN(6),10);

Reference Manual
00809-0100-4696, Rev AA
September 2004
Rosemount 848L
D-6

Reference Manual
00809-0100-4696, Rev AA
September 2004 Rosemount 848L
www.rosemount.com
Appendix E Motor Control
Introduction to Motor Control . . . . . . . . . . . . . . . . . . . . . . page E-1
Variations on Motor Control . . . . . . . . . . . . . . . . . . . . . . . page E-2
Writing 848L Equations . . . . . . . . . . . . . . . . . . . . . . . . . . . page E-4
INTRODUCTION TO
MOTOR CONTROL
Industrial motors require about a kilowatt per horsepower, usually delivered
as three phase AC at 440 volts or higher. This requires a special switch to turn
them on and off. The switch is called a contactor, in which a solenoid is
energized to pull a set of three power contacts to close the circuit to turn the
motor on. The contacts are large enough to carry the starting current without
welding. They are separated by insulation suitable for the supply voltage. The
solenoid is de-energized to turn the motor off. Springs quickly separate the
contacts to prevent arc damage, which can be severe at higher voltages. A
contactor for a 400 HP 2500 VAC motor may be housed in a steel box that is
two feet square and five feet high.
The three phase wires to the motor go through three overload heaters. There
are no contacts in this wiring, just heaters that mount on screw terminals. The
same contactor may be used for different motor sizes by changing the heater
overload rating. When an overload occurs, the heaters cause a contact to
open that is in series with the contactor’s solenoid, which removes power from
the motor. (This action is called a “trip” because it is mechanically like tripping
an alarm mechanism. Alarms are said to trip because the early electric bank
alarms used a trip wire to detect a robber.) The trip is supposed to happen
before the motor windings overheat and destroy their insulation. After things
have cooled off and someone has removed the cause of the overload, a reset
button must be pressed to close the heat triggered mechanical latch for the
overload contact. This allows power to flow in the solenoid circuit again.
The solenoid runs at a lower voltage than the motor, called the control
voltage. This voltage is taken from a transformer within the contactor
enclosure that is connected to two of the supply wires. The circuit breaker for
the contactor may be in another box somewhere. When the breaker is turned
off (or trips) the contactor enclosure is electrically dead, even for the control
voltage. The contactor’s solenoid may run at a higher voltage to get enough
power to move the contact assembly against its springs. A pilot relay is used
to switch that voltage within the enclosure. The control voltage seldom
exceeds 120 VAC or is less than 24 VAC. One side of the control voltage is
always grounded. Both the overload mechanism and the pilot relays are now
available in solid state form.
The enclosure containing the contactor, overload mechanism and control
power supply may be called a motor starter. The contactor’s solenoid or that
of the pilot relay carrying control voltage may be called a coil, as in relay coil.
A group of motor starters may be called a Motor Control Center (MCC).

Reference Manual
00809-0100-4696, Rev AA
September 2004
Rosemount 848L
E-2
The contactor is never controlled with a toggle switch, because that would
leave one side of the solenoid electrically hot when the motor overload trips.
Standard procedure calls for start and stop push buttons in combination with
an auxiliary contact on the contactor. This contact closes when the solenoid is
energized and the motor contacts close. The auxiliary contact is rated for the
control voltage and current, and is far away from the high voltage motor
contacts. The stop button is normally closed and is in series with the control
power. The start button is normally open and is also in series with the control
power. The auxiliary contact is normally open and in parallel with the start
button. When the start button is pushed, the solenoid is powered and the
motor and auxiliary contacts eventually close. The start button can be
released and control power will continue to flow in the auxiliary contact. Two
things can stop the motor. Pressing the stop button removes power to the
solenoid, causing the auxiliary contact to eventually open along with the motor
power contacts. The stop button can then be released because there is no
complete circuit to the solenoid. The same thing happens if an overload trip
opens the circuit to the solenoid. When the overload is reset, no power will be
applied to the solenoid until the start button is pushed.
| ___ ___ Over |
| \_/STOP \_/START load |
| | | M | |
+--O|O-----+--O O--+------------( )---O|O--+ Contactor M
| | | |
| | M | |
| +--| |--+ |
VARIATIONS ON MOTOR
CONTROL
Interlock
There may be a process condition where it is not safe to run the motor. If this
condition can be detected and transformed into the change of state of a
contact, then the normally closed contact may be inserted in series with the
control voltage. If the interlocked condition occurs then the motor will not run
or start. An example is a low level condition in a tank feeding the suction of a
pump. The pump will be damaged if the suction goes dry, so a low level switch
is put in series with the control voltage for the pump’s motor starter.
Permissive
There may be a process condition that is required to be present when a motor
is started, but is not required once the motor is running. A contact that is
closed when the permissive condition is true is placed in series with the start
button. An example is auxiliary lubrication for a large motor that is required to
flood the bearing housings to prevent contact between the motor shaft and the
bearing material (not ball bearings). Once the motor is turning, lubrication is
maintained by shaft rotation and the auxiliary pump can be shut off.
Emergency Shutdown
A process may have an emergency shutdown requirement for all motors. This
requires a contact or logic input for all affected motor controls. For example,
there is an emergency stop button for a natural gas processing plant located
near the exit, so that the operator can hit it while running away.

Reference Manual
00809-0100-4696, Rev AA
September 2004
E-3
Rosemount 848L
Restart Delay
A motor may be used in a condition where starting is difficult, causing the
motor to heat rapidly until it gets running. That heat must be allowed to
dissipate before the motor is started again. A simple time delay prevents the
start button from working until a fixed delay time expires. Another example is
the time required for compressor head pressure to bleed off after the
compressor motor stops.
Maximum Restarts
Another way of handling difficult starts is to count the number of starts in a
given time and lock out the start button if the count is exceeded. Locking it out
means that the start button will not function until a latching relay has been
manually reset by an operator who has verified the safety of the situation.
Winding temperature
The above restart limiters may not be necessary if the winding temperature
can be measured and used as a permissive for starting. The winding
temperature sensor may be a ten ohm length of copper wire that is wound into
the motor along with the power windings.
Hand-Off-Auto
An operator may be required to perform some function near the motor, such
as clean a pump strainer or jog the motor to get its load into the right position.
The motor is normally controlled by the central system but must have a local
station to allow the local operator to control the motor. The local station has
buttons for Stop and Start, and a three position switch for Hand-Off-Auto
(HOA) selection. The control room has control when the switch is in the Auto
position. The motor will not run when the switch is in the Off position. The
Hand position allows the local start and stop buttons to control the motor. The
Off position is not as secure as the lockout procedure required when the
equipment or the operator would be damaged if the motor started. This
requires all concerned people to physically put a padlock on the Off position of
the main circuit breaker for the motor. The motor may be started after the last
person removes their lock.
Intermediate Stop
A reversible motor may be required to come to a complete stop before starting
to run in the other direction. This may be done with a timer or a motion sensor
on the motor (or driven load) shaft.
Redundant Motors
The process may require redundant motors for reliability. Usually this applies
to pumps, so that there is no mechanical connection between the two motors.
One pump may be shut off to replace seals (or the entire pump and motor)
while the redundant pump maintains flow in the line. There are three ways to
control redundant pumps:
Alternate Start
When the start button is pressed the pump that was not in use is started. Not
in use refers to now or since the last time start was pressed.

Reference Manual
00809-0100-4696, Rev AA
September 2004
Rosemount 848L
E-4
Timed Switch
The pumps have a known life time within an acceptable risk, so one pump is
allowed to run until that time expires. The other pump automatically takes
over at that time.
Switch on Failure
If a process condition can be sensed that says the running pump failed, then
the other pump is started regardless of the starting protocol.
WRITING 848L
EQUATIONS
Basic Motor Control It is not easy to convert a functional diagram to an 848L equation because all
of the functions must be nested in the proper order. One way to begin the
process is to draw the functional diagram in ladder logic. The following is a
basic two button and auxiliary contact motor control that is drawn with channel
numbers.
| |
| 1 2 Out1 |
+--| |--+--||--+----------------------( )--+ OUT1_EQ
| | | |
| | 3 | |
| +--||--+ |
| |
Input 1 is from a normally closed stop button, which does not have to be
inverted in the equation. This is true for all stop buttons in the following
examples.
Input 2 is from the normally open start button and Input 3 is from the
contactor’s auxiliary contact.
The ladder coil shown is at Out1, which is the value of output equation 1.
Wires from output 1 will switch power from the control voltage to the
contactor’s solenoid or pilot relay.
Since the 848L uses RPN, begin from the lowest line in the ladder diagram
and work upwards.
The first expression is OR(IN(2),IN(3)) from “2 or 3” in the ladder diagram.
This is one term in an AND function, so build the function around it.
The top and final expression is AND(IN(1),OR(IN(2),IN(3))) from “1 and (2 or
3)” in the ladder diagram.
Enter the expression as the contents of parameter OUT1_EQ in the logic
transducer block. Do not forget to append the terminating semicolon.
Connect the buttons, auxiliary contact and contactor (a small relay will do) in
order to test the operation.

Reference Manual
00809-0100-4696, Rev AA
September 2004
E-5
Rosemount 848L
Interlock An interlock switch is easily added as follows, where input 4 is the normally
closed interlock:
| |
| 1 2 4 Out1 |
+--| |--+--||--+--|/|-----------------( )--+ OUT1_EQ
| | | |
| | 3 | |
| +--||--+ |
| |
• The first expression is still OR(IN(2),IN(3))
• The top and final expression is now AND(IN(1),OR(IN(2),IN(3)),IN(4));
Enter the expression and test as above.
Permissive A permissive switch may be added, with or without the interlock, as shown,
where 5 is the permissive:
| |
| 1 2 5 4 Out1 |
+--| |--+--||----||--+--|/|-----------( )--+ OUT1_EQ
| | | |
| | 3 | |
| +--||--------+ |
| |
• The first expression is now AND(IN(2),IN(5))
• The second expression is OR(AND(IN(2),IN(5)),IN(3))
• The final expression is AND(IN(1),OR(AND(IN(2),IN(5)),IN(3)),IN(4));
Emergency Shutdown In ladder logic, this would be shown as a switch for power to a section of the
ladder if there was more than one thing to be turned off. In the 848L, one
contact must be shown for each rung but only one input is required. The
shutdown contact is input 8 in the drawing below:
| |
| 1 2 5 4 8 Out1 |
+--| |--+--||----||--+--|/|----|/|----( )--+ OUT1_EQ
| | | |
| | 3 | |
| +--||--------+ |
| |
• The first expression is still AND(IN(2),IN(5))
• The second expression is OR(AND(IN(2),IN(5)),IN(3))
• The final expression is
AND(IN(1),OR(AND(IN(2),IN(5)),IN(3)),IN(4),IN(8));

Reference Manual
00809-0100-4696, Rev AA
September 2004
Rosemount 848L
E-6
Restart Delay An off delay timer is required as a permissive for starting the motor. When the
motor is started, the off delay contact opens the circuit for the start button and
keeps it open for a specified time. The motor will be cooled as it runs, so the
delay is only applied to the start. Motors that require this are usually large and
have long cooling times, like 30 to 100 minutes.
| |
| 3 T |
+--||---------------------------------( )--+ EQ1
| |
| 1 2 T Out1 |
+--| |--+--||----|/|--+---------------( )--+ OUT1_EQ
| | | |
| | 3 | |
| +--||---------+ |
| |
Channels 1, 2, and 3 are the same as for basic motor control. T is the off
timer. Notice that this diagram depends on the order of execution of ladder
rungs. EQ1 is executed before OUT1_EQ. The value of EQ1 is initially false
because the motor is not running. The start button starts the motor. When the
confirm contact closes, EQ1 becomes true and breaks the start circuit, but the
confirm contact has closed and the motor stays running.
Each rung requires a separate equation in the 848L so that the execution
order can be preserved. Note that the output equations are always executed
last, so it is good practice to arrange the ladder diagram in execution order.
Rung T is equation 1. It generates a 60 minute pulse when the confirm
contact is true.
• The expression is TP(IN(3), 36000);
For rung Out1, the expression is basic motor control with input 2 in
series with T:
• The expression is AND(IN(1),OR(AND(IN(2),NOT(EQ(1)),IN(3)));

Reference Manual
00809-0100-4696, Rev AA
September 2004
E-7
Rosemount 848L
Maximum Restarts A large motor is too expensive to replace if it burns up because the operator
wanted to give it another try, when in fact the pump was jammed. The life of
the contactor is also shortened when it has to interrupt locked rotor current. In
this case, it is normally possible for the motor to clear the jam on the second
or third try. A counter limits the number of starts to 3, for example, within a
preset time since the first attempt.
Notice that C1 in EQ1 and T2 in EQ2 are forward references that cannot have
a bad status. A Bad status at channel 2 (the start button) will propagate to all
of the equations and make the output Bad. A bad stop button or confirm
contact will only make the output Bad. The I/O transducer block parameter
OUT_1_CONFIG.FAIL_SAFE defaults to Fail False, which will stop the motor
on any bad input status, or it may be set to Fail Last Good, which will not allow
the stop button to turn it off. You probably don’t want to uses input devices
with status for this application.
| |
| 2 C1 T1 |
+--||------|/|------------------------( )--+ EQ1
| |
| T1 +-----+ C |
+--||--------------------|Count|------( )--+ EQ2
| T2 | | |
+--||--------------------|Reset| |
| +-----+ |
| |
| C T2 |
+--||---------------------------------( )--+ EQ3
| |
| 1 T1 Out1 |
+--| |--+--||--+----------------------( )--+ OUT1_EQ
| | | |
| | 3 | |
| +--||--+ |
| |
Rung T1 is equation 1. The pulse time must be set to the allowable on time for
the locked rotor condition to prevent tripping the overloads, in this case 2.5
seconds.
• The expression is TP(AND(IN(2),NOT(EQ(2))), 25);
Rung C is equation 2, which counts the attempts to start, and holds at the
count until the 30 minute timer expires.
• The expression is CTU(RISE(EQ(1)),EQ(5), 3);
Rung T2 is equation 3, the 30 minute timer:
• The expression is TON(EQ(2),18000);
Rung Out1 is output equation 1:
• The expression is AND(IN(1),OR(EQ(1),IN(3)));

Reference Manual
00809-0100-4696, Rev AA
September 2004
Rosemount 848L
E-8
Winding Temperature The multi-rung delay mechanism above may be replaced if the motor has a
winding temperature sensor and a convertor that opens a contact when the
motor is too hot and closes when it is sufficiently cool. The following drawing
applies such a contact (as input 4) to the Restart Delay diagram, which
reduces it to a permissive circuit.
| |
| 1 2 4 Out1 |
+--| |--+--||----||--+----------------( )--+ OUT1_EQ
| | | |
| | 3 | |
| +--||--------+ |
| |
The equations for a permissive circuit have already been described.
• The expression is AND(IN(1),OR(AND(IN(2),IN(4)),IN(3));
NOTE
This is not an interlock for high winding temperature. That is taken care of by
the overloads. The purpose of this circuit is to prevent starting if the motor is
too hot, such that the heat generated by starting would exceed the
temperature rating of the motor. When the motor starts, the temperature will
rise and open the safe temperature contact. This will happen after the
auxiliary contact has closed, so the motor will continue to run. As it runs, it is
cooled by an internal fan and eventually the safe temperature contact closes.
An interlock could be added, but the temperature would have to be set much
higher than the safe restart temperature.

Reference Manual
00809-0100-4696, Rev AA
September 2004
E-9
Rosemount 848L
Hand-Off-Auto The HOA switch has one contact that is closed in the Hand position (input 1)
and one contact that is closed in the Auto position (input 2). Both contacts are
open in the Off position. The local hand controls are Stop (input 3) and Start
(input 4). These require the auxiliary contact on the starter (input 5). Auto
control is done in some DCS function blocks that generate a Run signal which
is linked over an H1 fieldbus to a DO block in the 848L. This is the equivalent
of a toggle switch, so the 848L logic breaks it up into start and stop signals. A
pulse timer is required to extend the rise of the DCS Run signal until the
confirm contact can pull in. An operator will hold the start button in until
something happens. The DCS logic needs to know when the HOA switch is in
the Auto position and also the state of the auxiliary contact, so DI blocks are
configured for them. The ladder diagram looks like this:
| |
| DO1 5 T |
+--|^|-----|/|------------------------( )--+ EQ1
| |
| |
| 1 3 4 Out1 |
+--||-----| |--+--||--+------+--------( )--+ OUT1_EQ
| | | | |
| | 5 | | |
| +--||--+ | |
| | |
| | |
| 2 DO1 T | |
+--||------||--+--||--+------+ |
| | | |
| | 5 | |
| +--||--+ |
| |
First, instantiate two DI blocks and a DO block. Set the DO channel to 9. Set
the Auto DI channel to 2 and the Contactor DI channel to 5. Use appropriate
configuration for the other data in the blocks, such as Tag.
Rung T is equation 1. This is necessary because the Out1 equation has 70
characters, not because it is needed in two or more equations.
• The expression is TP(AND(RISE(DO(1)), NOT(IN(5))),30);
Rung Out1 is output equation 1. The first expression and the second are basic
motor control expressions with an additional selector contact.
• The expression is
OR(AND(IN(1),IN(3),OR(IN(4),IN(5))),AND(IN(2),DO(1),
OR(EQ(4),IN(5))));
To test this, use the usual buttons and relay along with a selector switch and
manual operation of the DO block.

Reference Manual
00809-0100-4696, Rev AA
September 2004
Rosemount 848L
E-10
Intermediate Stop A reversible motor requires two contactors. One of them swaps two of the
motor wires so that it will run in the opposite direction. The contactors must
never be closed at the same time, because that would place a short circuit
across one of the three phases. Furthermore, motors with lots of attached or
internal inertia can be damaged if the shaft does not come to rest before
starting up in the other direction. Sometimes a brake is used to reduce the
stopping time. The Forward/Reverse selector switch has one contact that is
closed in the Forward position (input 1) and one contact that is closed in the
Reverse position (input 2). The center of the three position selector is Off. The
push button controls are Stop (input 3) and Start (input 4). These require the
auxiliary contact on each starter (input 5 and 6). A 30 second off delay timer is
used. The following ladder diagram shows one way of doing this:
| |
| 5 T |
+--||--+------------------------------( )--+ EQ1
| | |
| 6 | |
+--||--+ |
| |
| 1 3 4 T Out2 Out1 |
+--||-----| |--+--||---|/|--+--|/|----( )--+ OUT1_EQ
| | | |
| | 5 | |
| +--||--------+ |
| |
| |
| 2 3 4 T Out1 Out2 |
+--||-----| |--+--||---|/|--+--|/|----( )--+ OUT2_EQ
| | | |
| | 6 | |
| +--||--------+ |
| |
| |
Rung T is equation 1. It is necessary because it is needed in two equations
and because the equations would be 80 characters long without the
semicolon.
• The expression is TOF(OR(IN(5),IN(6)),300);
Rung Out1 is output equation 1. This is basic motor control with additional
contacts.
• The expression is
AND(IN(1),IN(3),OR(AND(IN(4),NOT(EQ(1)),IN(5)),NOT(OUT(2));
Rung Out2 is output equation 2. This is also basic motor control with
additional contacts.
• The expression is
AND(IN(2),IN(3),OR(AND(IN(4),NOT(EQ(1)),IN(6)),NOT(OUT(1));
If a brake was required, it could be controlled by output equation 3:
• The expression is AND(EQ(1), NOT(IN(5)),NOT(IN(6)));
This simulation requires two relays in addition to the switches.

Reference Manual
00809-0100-4696, Rev AA
September 2004
E-11
Rosemount 848L
Redundant Motors -
Alternate Start
Two motors drive two pumps in a redundant configuration. The control valve
that follows the pumps will just waste the energy of the second pump, possibly
damaging the valve, if both pumps on at the same time. There are times when
neither pump is required. When a pump is required, the pump that was not in
use last time should be started to equalize the wear on the pumps. The push
button controls are Stop (input 1) and Start (input 2). An auxiliary contact is
required from each starter (inputs 3 and 4).
| |
| 3 4 2 P |
+--|/|----|/|-----|^|-----------------( )--+ EQ1
| |
| P L +-----+ L |
+--||-----|/|------------|Set |------( )--+ EQ2
| P L | | |
+--||-----| |------------|Reset| |
| +-----+ |
| |
| 1 2 L Out2 Out1 |
+---------| |--+--||--+--|/|---|/|----( )--+ OUT1_EQ
| | 3 | |
| +--||--+ |
| |
| |
| 1 2 L Out1 Out2 |
+---------| |--+--||--+--| |---|/|----( )--+ OUT2_EQ
| | 4 | |
| +--||--+ |
| |
Rung P is equation 1. It generates the pulse that will toggle the latch. The
pulse comes from the RISE function.
• The expression is AND(NOT(IN(3)),NOT(IN(4)),RISE(IN(2)));
Rung L is equation 2. It latches on when L was false and unlatches when L
was true.
• The expression is RS(AND(EQ(1),NOT(EQ(2)),AND(EQ(1),EQ(2)));
Rung Out1 is output equation 1. This is basic motor control with additional
contacts.
• The expression is
AND(IN(1),OR(IN(2),IN(3)),NOT(EQ(2)),NOT(OUT(2)));
Rung Out2 is output equation 2. This is also basic motor control with
additional contacts.
• The expression is AND(IN(1),OR(IN(2),IN(4)),EQ(2),NOT(OUT(1)));

Reference Manual
00809-0100-4696, Rev AA
September 2004
Rosemount 848L
E-12
Redundant Motors -
Timed Switch
Again, redundant pumps are used but only one pump runs at a time. The
process runs for years without being shut down. The switch between pumps
occurs at a time near the end of the useful life of the pump, usually several
thousand hours. Stopping the old pump is delayed by a TOF while the other
pump comes up to speed, which the control valve can handle. The push
button controls are Stop (input 1) and Start (input 2). An auxiliary contact is
required from each starter (inputs 3 and 4). The life time is measured in
thousands of hours, so an external retentive timer with a display is used.
Timing power comes from Out2, reset power from Out1 and the timed out
contact comes in at channel 5.
Actually, this scheme is not practical unless the latches are non-volatile.
| |
| 2 +-----+ L1 |
+--| |-------------------|Set |------( )--+ EQ1
| 1 | | |
+--|/|-------------------|Reset| |
| +-----+ |
| 5 P1 |
+--|^|--------------------------------( )--+ EQ2
| |
| P1 L2 +-----+ L2 |
+--| |----|/|------------|Set |------( )--+ EQ3
| P1 L2 | | |
+--| |----| |------------|Reset| |
| +-----+ |
| L1 Out1 |
+--|^|--+-----------------------------( )--+ OUT1_EQ
| | |
| P1 | |
+--| |--+ |
| |
| 3 Out1 Out2 |
+--| |--+--|/|------------------------( )--+ OUT2_EQ
| | |
| 4 | |
+--| |--+ |
| |
| L1 L2 Out1 Out3 |
+--| |----|/|--+--| |--+--------------( )--+ OUT3_EQ
| | | |
| | 3 | |
| +--| |--+ |
| |
| L1 L2 Out1 Out4 |
+--| |----| |--+--| |--+--------------( )--+ OUT4_EQ
| | | |
| | 4 | |
| +--| |--+ |
| |

Reference Manual
00809-0100-4696, Rev AA
September 2004
E-13
Rosemount 848L
Rung L1 is equation 1. It latches on when the start button is true and
unlatches when the NC stop button is pushed. The latch remembers start and
stop commands to simplify the logic.
• The expression is RS(IN(2),NOT(IN(1)));
Rung P1 is equation 2, which generates a pulse from one read of channel 5:
• The expression is TON(AND(OR(IN(3),IN(4)),NOT(EQ(2))),30000);
Rung L2 is equation 3. The latch determines which motor to start and run. It
toggles when the life time is reached. That stops the running motor (after its
off delay) and enables the other motor to be started.
• The expression is RS(AND(EQ(2),NOT(EQ(3)),AND(EQ(2),EQ(3)));
Rung Out1 is output equation 1. A timed start pulse is delivered to both motor
circuits when either the start button is pressed to set the Run latch or the end
of the hour count toggles the selector latch. Only the enabled circuit will start.
The output resets the external timer.
• The expression is TP(OR(RISE(EQ(1)),EQ(2)),20);
Rung Out2 is output equation 2. Power goes to the external timer while either
confirm is true, but not during reset.
• The expression is AND(OR(IN(3),IN(4)),NOT(OUT(1)));
Rung Out3 is output equation 3. This is basic motor control with an off delay of
5 seconds to maintain flow.
• The expression is
TOF(AND(EQ(1),NOT(EQ(3)),OR(OUT(1),IN(3)),50);
Rung Out4 is output equation 4. This is also basic motor control with an off
delay.
• The expression is TOF(AND(EQ(1),EQ(3),OR(OUT(1),IN(4)),50);

Reference Manual
00809-0100-4696, Rev AA
September 2004
Rosemount 848L
E-14
Redundant Motors -
Switch on Failure
Again, there are redundant pumps. There is a pressure switch in the common
discharge line. If the pressure falls then the other pump is started. If the
pressure does not recover, possibly because a flammable liquid is pouring on
the ground from a broken pump housing, then the alternate pump is stopped.
The push button controls are Stop (input 1) and Start (input 2). An auxiliary
contact is required from each starter (inputs 3 and 4). The pressure switch is
linked into a DO that is true when the pressure is low.
| |
| 3 4 2 +-----+ L1 |
+--|/|-----|/|-----| |---|Set |------( )--+ EQ1
| 1 | | |
+--|/|--+----------------|Reset| |
| T | +-----+ |
+--| |--+ |
| |
| DO P |
+--|^|--+-----------------------------( )--+ EQ2
| L1 | |
+--|^|--+ |
| |
| DO L1 T |
+--| |-----| |------------------------( )--+ EQ4
| |
| P L2 +-----+ L2 |
+--|^|----|/|------------|Set |------( )--+ EQ4
| P L2 | | |
+--|^|----| |------------|Reset| |
| +-----+ |
| |
| L1 P L2 Out2 Out1 |
+---------| |--+--||--+--|/|---|/|----( )--+ OUT1_EQ
| | 3 | |
| +--||--+ |
| |
| L1 P L2 Out1 Out2 |
+---------| |--+--||--+--| |---|/|----( )--+ OUT2_EQ
| | 4 | |
| +--||--+ |
| |
Instantiate a DO block and set the channel number to 9.

Reference Manual
00809-0100-4696, Rev AA
September 2004
E-15
Rosemount 848L
Rung L1 is equation 1. It latches on when the start button is true and neither
motor is running. It unlatches when the NC stop button is pushed or the
pressure stays low for too long.
• The expression is RS(AND(NOT(IN(3)),
NOT(IN(4)),IN(2)),OR(NOT(IN(1)),EQ(3));
Rung P is equation 2, which generates a 2 second start pulse from the rise of
the run latch or the rise of the low pressure condition. This pulse toggles the
latch and starts the selected motor.
• The expression is TP(OR(RISE(DO(1)),RISE(EQ(1))),20);
Rung T is equation 3, which is a TON that is run by the on state of the low
pressure and the run latch.
• The expression is TON(AND(DO(1),EQ(1)),100);
Rung L2 is equation 4. The latch determines which motor to start and run. It
toggles when equation 2 generates a pulse. The pulse duration is more than
one evaluation cycle, so rise functions are required.
• The expression is
RS(AND(RISE(EQ(2)),NOT(EQ(4))),AND(RISE(EQ(2)),EQ(4)));
Rung Out1 is output equation 1. This is basic alternate motor control.
• The expression is
AND(EQ(1),OR(EQ(2),IN(3)),NOT(EQ(4)),NOT(OUT(2)));
Rung Out2 is output equation 2. This is also basic alternate motor control.
• The expression is AND(EQ(1),OR(EQ(2),IN(4)),EQ(4),NOT(OUT(1)));

Reference Manual
00809-0100-4696, Rev AA
September 2004
Rosemount 848L
E-16

Reference Manual
00809-0100-4696, Rev AA
September 2004 Rosemount 848L
www.rosemount.com
Appendix F Valve Control
Introduction to Valve Control . . . . . . . . . . . . . . . . . . . . . . page F-1
INTRODUCTION TO
VALVE CONTROL
Industrial valves have two general classifications, regulating and block. A
regulating valve is designed to be stable at any one of a nearly infinite set of
positions between open and closed. They are mostly used in control loops so
that nonlinearity and friction are corrected by feedback control. A block valve
is designed to be either tight shut or wide open. They are mostly used to
change the configuration of process equipment, such as a heat exchanger
that can be used to heat or cool, but not both at the same time. Block valves
configure steam in and condensate out for heating or chilled brine in and
return for cooling. Regulating valves are being used as block valves when the
actual position of the valve must be known, but analog outputs are used.
Block valves generally have some kind of switch that is closed in the open
position and another switch for the closed position. These are called confirm
contacts even if they are proximity switches. The valve position is unknown
when neither switch is closed. If the valve actuator has adequate power then it
is rare to find both switches open, except for a period of time known as the
travel time when the valve is moving from one position to the other. Actuators
can be hydraulic pistons, pneumatic pistons or diaphragms, or motor driven
screws, in order of increasing travel time. More than 80% of the actuators use
compressed, oil and water free air for power. Valves are referred to as air to
open or air to close.
A block valve may be controlled by push buttons or by a toggle switch. There
is no contactor as there is for a motor. Permissive and interlock circuits may
be applied. The actuator may require power to be applied to open it, with a
spring to return it to the closed position, or vice-versa. A block valve may be
required to stay in its last position on air or power failure, so there is one pilot
actuator to open it and another pilot actuator to close it. The pilot actuator is
not usually designed for continuous power, so a few second pulse may be all
that is required. The actuator is called a pilot because it just directs the flow of
fluid power, as by pushing a spool valve from one side to the other. The spool
valve directs the main flow to one side of the main actuator or the other, like
the pilot valve in a power steering system. Two pilot solenoid valves are
required if the spool latches in position, or one if the spool has a spring return.

Reference Manual
00809-0100-4696, Rev AA
September 2004
Rosemount 848L
F-2
There are at least three permutations of any valve circuit:
1. Steady or pulse output to the pilot solenoid (or whatever, piezoelectric
bars are in use). Steady requires one output, pulse requires two.
2. Confirmed position switches for open, closed or both, using one or
two inputs.
3. Automatic control or a local selector for Open-Auto-Close using no or
two inputs (these are not common).
Interlock and permissive may be additional permutations.
Alarms If a valve has one or both position switches then it is possible to alert the
operator to the fact that the valve is not where it should be. This is not a
permuted choice because the main reason for having position switches is to
alarm this condition. It is not a simple alarm because time must be allowed for
the valve to complete its stroke after it receives a command. An On Delay
timer set for the travel time is required.
All numbers in 848L equations are examples. The user will want to change
them.
Variations on Valve
Control
Interlock
There may be a process condition where it is not safe to open the valve. If this
condition can be detected and transformed into the change of state of a
contact, then the normally closed contact may be inserted in series with the
control output. If the interlocked condition occurs then the valve will close if
open or stay closed. An example is the drain valve of a batch reactor, which
may have two interlocks. One prevents opening the drain if any feed valve is
open. The other will not let material in the reactor drain into a tank that isn’t
ready for it.
Permissive
There may be a process condition that is required to be present when a valve
is opened, but is not required once it has been opened. A contact that is
closed when the permissive condition is true is placed in series with the open
command. A latch is required because the permissive may go false after the
valve is opened. One application for a permissive involves a gas storage tank.
The pressure must be above a certain amount to allow the valve to be
opened, but once opened, the pressure will fall below the permissive level.
Open-Auto-Close
An operator may be required to perform some function near the valve, such
as unplugging a pipe or locally directing material flow. The valve is normally
controlled by the central system but must have a local station to allow the
local operator to control it. The local station has a three position switch for
Open-Auto-Close selection. The control room has control when the switch is
in the Auto position. If the switch is turned to Open then the valve will open,
possibly bypassing interlocks, and the same for Close. There is no bump
going through Auto because the command is either Open or Close.
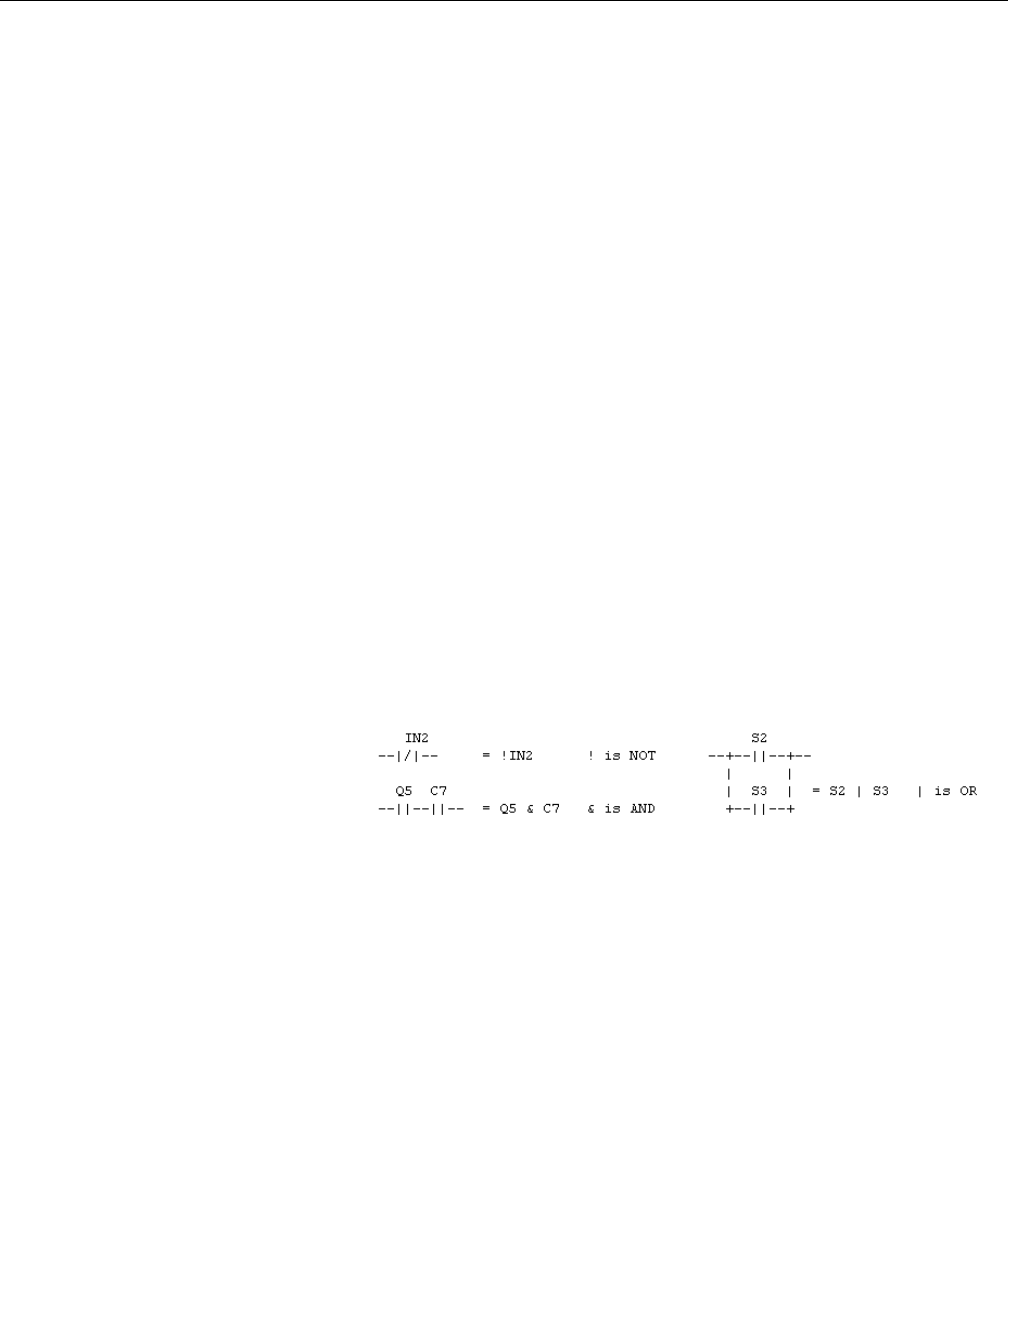
Reference Manual
00809-0100-4696, Rev AA
September 2004
F-3
Rosemount 848L
Double Block and Bleed
If the valve absolutely must not leak into the process, then two valves are put
in series and the short pipe between them is vented (bled) to an appropriate
place. The bleed valve must be shut before the main valves can be opened,
and the main valves must both be closed before the bleed valve can be
opened.
Motorized Valve
The actuator is a reversible motor that turns a lead screw that moves the
valve stem. Two confirms are required because the motor is only free to turn
while the valve stem is travelling. Outputs are required for the Forward and
Reverse motor directions. If a big motor-driven valve takes a minute to
change position, that’s a long time to find out that it didn’t move. The crack
time is a period of time in which the previously closed contact must open, to
confirm that the actuator is moving and the valve is not stuck or powerless.
Heat Exchange Medium Selection
Batch heat exchangers have to use different media to heat and cool. If the
media are compatible, like steam and chilled water, then a simple four valve
manifold can handle the selection. The four valves are independent because
it is necessary to drain one medium from the exchanger before using the
other. There are many variations on this theme, for incompatible media or
more than two choices.
Boolean Expressions The motor control descriptions used ladder logic. Another method that takes
less room on the back of an envelope is the Boolean expression. The
following is a comparison of Boolean and ladder operators (math operators
are +,-,*,/). Only three operators are used in the examples:
Functions are the same as 848L functions. The examples use TON, TOF and
TP.
Basic Valve Control Since very few applications exist for local valve control that are more than a
simple toggle switch (electric or pneumatic), all examples use a DO block to
take a command from Fieldbus. The DO point is on for open and off for close
in all cases.

Reference Manual
00809-0100-4696, Rev AA
September 2004
Rosemount 848L
F-4
Open-Auto-Close Those applications that use a local switch with automatic control have a three
position switch arranged as Open-Auto-Close. Inputs 1 and 2 are used for
confirms, so input 3 is used for Open and input 4 for Closed. No input is
required for Auto.
• The Boolean expression is:
• The 848L expression is:
• EQ1 contains OR(AND(NOT(IN(4)),DO(1)),IN(3));
Alarm Variations If there is just one close confirm on input 2, then the Boolean expression is:
ALARM = TON ( ( !DO1 & !IN2 ) | ( DO1 & IN2 ), TravelTime)
If there is just one open confirm on input 1, then the Boolean expression is:
ALARM = TON ( ( DO1 & !IN1 ) | ( !DO1 & IN1 ), TravelTime)
It both confirms are used, then the Boolean expression is:
ALARM = TON ( ( !DO1 & !IN2 ) | ( DO1 & !IN1 ) | ( IN1 & IN2 ),
TravelTime)
The equivalent 848L expressions are:
TON(OR(AND(NOT(DO(1)),NOT(IN(2))),AND(DO(1),IN(2))),100);
TON(OR(AND(DO(1),NOT(IN(1)),AND(NOT(DO(1)),IN(1))),110);
TON(OR(AND(NOT(DO(1)),NOT(IN(2))),AND(DO(1),NOT(IN(1)),AND(IN(
1),IN(2))),120);
The chosen expression goes in the last expression used, which must be
linked to a DI to generate an alarm.
Output Variations A valve actuator may be spring return, requiring one output, or bistable,
requiring two outputs. Output 1 is used for Open and output 2 for Close.
Bistable valves often require a short pulse instead of maintained power. The
848L expressions for spring return are:
OUT1 contains DO(1);
or bistable has:
OUT1 contains TP(DO(1),30);
OUT2 contains TP(NOT(DO(1)),30);
Output with Interlock The interlock may be wired, or internal, or from the bus.
The example uses a DO from the bus:
OUT1 contains TP(AND(DO(1),DO(3)),30); spring return is
AND(DO(1),DO(3));
OUT2 contains TP(OR(NOT(DO(1)),NOT(DO(3))),30);

Reference Manual
00809-0100-4696, Rev AA
September 2004
F-5
Rosemount 848L
Simple Valve Variations A spring return valve with one close confirm:
EQ1 contains
TON(OR(AND(NOT(DO(1)),NOT(IN(2))),AND(DO(1),IN(2))),100);
OUT1 contains DO(1);
The fourth similar spring return valve in the same 848L:
EQ4 contains
TON(OR(AND(NOT(DO(4),NOT(IN(8))),AND(DO(4),IN(8))),100);
OUT4 contains DO(4);
A bistable valve with both confirms and a local station:
EQ1 contains OR(AND(NOT(IN(4)),DO(1)),IN(3));
EQ2 contains
TON(OR(AND(NOT(DO(1)),NOT(IN(2))),AND(DO(1),NOT(IN(1)),AND(IN(
1),IN(2))),120);
OUT1 contains TP(DO(1),30);
OUT2 contains TP(NOT(DO(1)),30);
The second similar bistable valve in the same 848L:
EQ3 contains OR(AND(NOT(IN(8)),DO(2)),IN(7));
EQ4 contains
TON(OR(AND(NOT(DO(2)),NOT(IN(6))),AND(DO(2),NOT(IN(5)),AND(IN(
5),IN(6))),120);
OUT3 contains TP(DO(2),30);
OUT4 contains TP(NOT(DO(2)),30);
Permissive The permissive may be wired, or internal, or from the bus. The example uses
DO3 from the bus. The confirmed open switch is used to hold the valve open
if the permissive goes away. If the valve is spring return:
OUT1 contains AND(DO(1),OR(DO(3),IN(1)));
A bistable valve does not need a latch:
OUT1 contains TP(AND(DO(1),DO(3)),30);
OUT2 contains TP(NOT(DO(1)),30);
Either way, the alarm equation for just the open confirm is:
TON(OR(AND(DO(1),NOT(IN(1)),AND(NOT(DO(1)),IN(1))),110);
The alarm equation for both confirms is:
TON(OR(AND(NOT(DO(1)),NOT(IN(2))),AND(DO(1),NOT(IN(1)),AND(IN(
1),IN(2))),120);

Reference Manual
00809-0100-4696, Rev AA
September 2004
Rosemount 848L
F-6
Double Block and Bleed Certain materials must not leak through a valve that is supposed to be shut.
Three valves are arranged in a leak-proof configuration as shown:
All three valves are spring return. V1 and V2 return to closed, V3 returns to
open. All 3 valves must have closed confirm switches, which allows two
instances per 848L. If open confirms are also used, the alarm logic is different
and only one instance per 848L is possible. V1 and V2 must both confirm
closed in order to open the bleed valve by removing power to it. V3 must be
closed (powered) to allow V1 and V2 to open. Since V1 and V2 operate
together, they are both powered by the same output. The second output
operates V3. The close confirms take inputs of the same number as the valve.
A second instance takes inputs of the same number as the valve plus four.
Open confirms take inputs of the same number as the valve plus three. DO1
is still the open/close command.
The outputs are the same whether or not there are open confirms.
OUT1 contains AND(DO(1),IN(3));
OUT2 contains NOT(AND(NOT(DO(1)),IN(1),IN(2)));
For single closed confirms, the valve assembly is confirmed open if V1 and V2
do not confirm closed and V3 confirms closed. The assembly is confirmed
closed if V1 and V2 confirm closed and V3 does not confirm closed. The
alarm is true if any of these conditions is false after the travel time has
expired. The equation will not fit on one line, so two must be used:
EQ1 contains AND(NOT(DO(1)),OR(NOT(IN(1)),NOT(IN(2)),IN(3)));
EQ2 contains
TON(OR(AND(DO(1),OR(IN(1),IN(2),NOT(IN(3))),EQ(1)),110);
For both confirms, the valve assembly is confirmed closed if V1 and V2
confirm closed and V3 confirms open. The assembly is confirmed open if V1
and V2 confirm open and V3 confirms closed.
EQ1 contains AND(NOT(DO(1)),NOT(AND(IN(1),IN(2),IN(6))));
EQ2 contains
TON(OR(AND(DO(1),NOT(AND(IN(4),IN(5),IN(3)))),EQ(1)),140);
848L/DOUBLEBLOCK.TIF

Reference Manual
00809-0100-4696, Rev AA
September 2004
F-7
Rosemount 848L
Motorized Valve The motor runs forward to open the valve and reverse to close it. When the
motor is off, the valve cannot move. Both confirms are required. Output 1
causes the motor to run forward, Output 2 is reverse. Only one output must be
active at a time. Input 1 confirms that the valve is open and input 2 confirms
closed.
OUT1 contains AND(DO(1),NOT(IN(1)),NOT(EQ(2)));
OUT2 contains AND(NOT(DO(1)),NOT(IN(2)),NOT(EQ(2)));
The alarm interacts with the motor drive so that power is not applied after the
travel time expires. This prevents burnout of small motors that do not have a
motor starter. A crack time alarm is also used in case the valve is stuck. Since
this works even for small motors, there is no point to making it optional. The
crack time is 5 seconds in this example and the travel time is 30 seconds.
EQ1 contains
TON(OR(AND(IN(1),IN(2)),AND(DO(1),IN(2)),AND(NOT(DO(1)),IN(2))),5
0);
EQ2 contains
OR(TON(OR(AND(NOT(DO(1)),NOT(IN(2))),AND(DO(1),NOT(IN(1))),300
),EQ(1));
Heat Exchange Medium
Selection
The media are steam and chilled water. DO1 is on to select heating with
steam and off to select cooling with water. All four valves have both confirms,
as follows:
Steam condensate must drain and both steam valves be closed before the
water valves are opened. The water must drain and both water valves be
closed before the steam valves are opened. There is a steam trap after the
steam outlet valve to prevent steam from blowing through the heat exchanger.
The opening of the steam outlet valve is delayed to allow some condensate to
form in the exchanger for proper operation of the trap.
OUT1 contains AND(DO(1),IN(7),IN(8));
OUT2 contains TOF(TON(OUT(1), 1200),1800);
OUT3 contains AND(NOT(DO(1)),IN(5),IN(6));
OUT4 contains TOF(OUT(3),1600);
Heating is confirmed if In1 and In2 and In7 and In8 are on. Travel time must
include the water drain delay time and the steam outlet opening delay.
Cooling is confirmed if In3 and In4 and In5 and In6 are on. Travel time must
include the steam drain delay time.
EQ1 contains
TON(AND(NOT(DO(1)),NOT(AND(IN(3),IN(4),IN(5),IN(6)))),1900);
EQ2 contains
OR(TON(AND(DO(1),NOT(AND(IN(1),IN(2),IN(7),IN(8))),2900),EQ(1));
Valve Output Opened Closed
Steam In Out1 In1 In5
Steam Out Out2 In2 In6
Water In Out3 In3 In7
Water Out Out4 In4 In8

Reference Manual
00809-0100-4696, Rev AA
September 2004
Rosemount 848L
F-8

Reference Manual
00809-0100-4696, Rev AA
9/17/04 Rosemount 848L
www.rosemount.com
Index
Numerics
2-Inch Pipe Stand
Mounting . . . . . . . . . . . . . . . . . . 2-3
A
ADVISE_ACTIVE . . . . . . . . . . . . . 3-8
ADVISE_ALM . . . . . . . . . . . . . . . . 3-8
ADVISE_ENABLED . . . . . . . . . . . 3-7
ADVISE_MASK . . . . . . . . . . . . . . 3-7
ADVISE_PRI . . . . . . . . . . . . . . . . 3-7
Advisory Alarms . . . . . . . . . . . . . . 3-7
ADVISE_ACTIVE . . . . . . . . . . . 3-8
ADVISE_ALM . . . . . . . . . . . . . . 3-8
ADVISE_MASK . . . . . . . . . . . . 3-7
ADVISE_PRI . . . . . . . . . . . . . . 3-7
Alarms
ADVISE_ACTIVE . . . . . . . . . . . 3-8
ADVISE_ALM . . . . . . . . . . . . . . 3-8
ADVISE_MASKParameter
ADVISE_MASK . . . . . . . . . 3-7
ADVISE_PRI . . . . . . . . . . . . . . 3-7
Advisory . . . . . . . . . . . . . . . . . . 3-7
Configuration . . . . . . . . . . . . . . 3-9
FAILED_ACTIVE . . . . . . . . . . . 3-6
FAILED_ALARMS . . . . . . . . . . 3-6
FAILED_ALM . . . . . . . . . . . . . . 3-6
FAILED_ENABLED . . . . . . . . . 3-6
FAILED_MASK . . . . . . . . . . . . . 3-6
FAILED_PRI . . . . . . . . . . . . . . . 3-6
MAINT_ACTIVE . . . . . . . . . . . . 3-7
MAINT_ALARMS . . . . . . . . . . . 3-7
MAINT_ALM . . . . . . . . . . . . . . . 3-7
MAINT_ENABLED . . . . . . . . . . 3-7
MAINT_MASK . . . . . . . . . . . . . 3-7
MAINT_PRI . . . . . . . . . . . . . . . 3-7
PlantWeb . . . . . . . . . . . . . 3-6, 3-8
Valve Control . . . . . . . . . . . . . . F-2
Analog Input
Ground . . . . . . . . . . . . . . . . . . . 2-5
Analog Input Function Block
Parameters . . . . . . . .C-1, C-5, C-8
Approvals
European . . . . . . . . . . . . . . . . . B-2
North American . . . . . . . . . . . . B-1
Approved Manufacturing Locations B-1
B
Boolean Expressions
Valve Control . . . . . . . . . . . . . . F-3
C
Cable Glands
Installation . . . . . . . . . . . . . . . . . 2-9
Capabilities . . . . . . . . . . . . . . . . . . 3-4
Block Execution Times . . . . . . . 3-4
Host Timer . . . . . . . . . . . . . . . . 3-4
VCRs . . . . . . . . . . . . . . . . . . . . 3-4
Changing Modes . . . . . . . . . . . . . . 3-2
Commissioning . . . . . . . . . . . . . . . 4-2
Tag . . . . . . . . . . . . . . . . . . . . . . 2-8
Conduit Entries . . . . . . . . . . . . . . 2-10
Configuration
Alarms . . . . . . . . . . . . . . . . . . . . 3-9
Reset . . . . . . . . . . . . . . . . . . . . 4-2
Restart Processor . . . . . . . . 4-2
Restart with Defaults . . . . . . 4-2
Resource Block . . . . . . . . . . . . . 3-4
D
DIN Rail
Mounting . . . . . . . . . . . . . . . . . . 2-2
Discrete Input Block . . . . . . . . . . .C-9
Parameters . . . . . . . . . . . . . . .C-10
Discrete Input Blocks
Multipule . . . . . . . . . . . . . . . . .C-12
Discrete Output Block . . . . . . . . . C-11
Parameters . . . . . . . . . . . . . . .C-12
Discrete Output Blocks
Multipule . . . . . . . . . . . . . . . . .C-13
Drawing
Switch Location . . . . . . . . . . . . . 2-5
Drawings
Block Diagram . . . . . . . . . . . . . 4-1
Cable Gland Installation . . . . . . 2-9
Commissioning Tag . . . . . . . . . 2-8
Conduit Entries Installation . . . 2-10
Dimensional . . . . . . . . . . . . . . . A-5
E
Error Handling
Logic Equation Syntax . . . . . . .D-4
European Directive . . . . . . . . . . . .B-1
Execution Times . . . . . . . . . . . . . . 3-4
F
FAILED_ACTIVE alarms . . . . . . . . 3-6
FAILED_ALARMS . . . . . . . . . . . . . 3-6
FAILED_ACTIVE . . . . . . . . . . . . 3-6
FAILED_ALM . . . . . . . . . . . . . . 3-6
FAILED_ENABLED . . . . . . . . . . 3-6
FAILED_MASK . . . . . . . . . . . . . 3-6
FAILED_PRI . . . . . . . . . . . . . . . 3-6
FAILED_ALM . . . . . . . . . . . . . . . . . 3-6
FAILED_ENABLED alarms . . . . . . 3-6
FAILED_MASK alarms . . . . . . . . . 3-6
FAILED_PRI alarms . . . . . . . . . . . 3-6
FEATURES
FEATURES_SEL . . . . . . . . . . . 3-5
Features . . . . . . . . . . . . . . . . . . . . 3-4
FEATURES, FEATURES_SEL . . . 3-4
Features . . . . . . . . . . . . . . . . . . 3-4
Reports . . . . . . . . . . . . . . . . . . . 3-4
Soft W Lock, Hard W Lock . . . . 3-5
Unicode . . . . . . . . . . . . . . . . . . . 3-4
Foundation Fieldbus . . . . . . . . . . . 4-1
Check . . . . . . . . . . . . . . . . . . . . 4-2
Troubleshooting . . . . . . . . . . . . 4-3
Function Block
Specifications . . . . . . . . . . . . . .A-4
Functional
Specifications . . . . . . . . . . . . . .A-1
G
General Block Information
Block Instantiation . . . . . . . . . . . 3-2
Capabilities . . . . . . . . . . . . . . . . 3-2
Link Active Scheduler . . . . . . . . 3-2
Modes . . . . . . . . . . . . . . . . . . . . 3-2
Grounding . . . . . . . . . . . . . . . . . . . 2-5
Analog Device . . . . . . . . . . . . . . 2-5
Grounded Thermocouple . . . . . 2-5
Transmitter Enclosure . . . . . . . . 2-5

Reference Manual
00809-0100-4696, Rev AA
9/17/04
Rosemount 848L
Index-2
H
Hardware
Maintenance . . . . . . . . . . . . . . . 4-2
Communication Check . . . . 4-2
Power Check . . . . . . . . . . . 4-2
Reset Configuration . . . . . . 4-2
Sensor Check . . . . . . . . . . . 4-2
I
I/O Transducer
Parameters . . . . . . . . . . . . . . . . C-5
Installation . . . . . . . . . . . . . . . . . . . 2-9
Using Cable Glands . . . . . . . . . 2-9
Using Conduit Entries . . . . . . . 2-10
Instantiation, Block . . . . . . . . . . . . 3-3
J
Junction Box
Mounting . . . . . . . . . . . . . . . . . . 2-2
L
LIM_NOTIFY . . . . . . . . . . . . . . . . 3-5
Link Active Scheduler . . . . . . . . . . 3-3
Logic Equation Syntax . . . . . . . . . D-1
Error Handling . . . . . . . . . . . . . D-4
Logic Transducer
Parameters . . . . . . . . . . . . . . . . C-8
M
MAINT_ACTIVE . . . . . . . . . . . . . . 3-7
MAINT_ALARMS . . . . . . . . . . . . . 3-7
MAINT_ACTIVE . . . . . . . . . . . . 3-7
MAINT_ALM . . . . . . . . . . . . . . . 3-7
MAINT_ENABLED . . . . . . . . . . 3-7
MAINT_MASK . . . . . . . . . . . . . 3-7
MAINT_PRI . . . . . . . . . . . . . . . 3-7
MAINT_ALM . . . . . . . . . . . . . . . . . 3-7
MAINT_ENABLED . . . . . . . . . . . . 3-7
MAINT_MASK . . . . . . . . . . . . . . . 3-7
MAINT_PRI . . . . . . . . . . . . . . . . . 3-7
Maintenance
Hardware . . . . . . . . . . . . . . . . . 4-2
Communication Check . . . . 4-2
Power Check . . . . . . . . . . . 4-2
Reset Configuration . . . . . . 4-2
Sensor Check . . . . . . . . . . . 4-2
Material Return . . . . . . . . . . . . . . . 1-3
MAX_NOTIFY . . . . . . . . . . . . . . . . 3-5
LIM_NOTIFY . . . . . . . . . . . . . . 3-5
MODE_BLK.TARGET . . . . . . . . . . 3-2
MODE_BLOCK.ACTUAL . . . . . . . 3-2
Modes
Changing Modes . . . . . . . . . . . . 3-2
Permitted Modes . . . . . . . . . . . . 3-2
Types of Modes . . . . . . . . . . . . 3-2
Auto . . . . . . . . . . . . . . . . . . . 3-2
Man . . . . . . . . . . . . . . . . . . . 3-2
Other . . . . . . . . . . . . . . . . . . 3-2
Out of Service . . . . . . . . . . . 3-2
Motor Control . . . . . . . . . . . . . . . . E-1
Mounting . . . . . . . . . . . . . . . . . . . . 2-1
2-Inch Pipe Stand . . . . . . . . . . . 2-3
DIN Rail Without an Enclosure . 2-2
Panel with a Junction Box . . . . . 2-2
Multiple Discrete Input Blocks . . C-12,
C-13
Multiple Discrete Output Blocks .C-13
Parameters . . . . . . . . . . . . . . .C-14
N
Network Parameters . . . . . . . . . . . 3-4
O
Operation . . . . . . . . . . . . . . . . . . . 3-1
Ordering Information . . . . . . . . . . . A-7
Overview . . . . . . . . . . . . . . . . . . . . 1-2
Manual . . . . . . . . . . . . . . . . . . . 1-2
Transmitter . . . . . . . . . . . . . . . . 1-2
P
Parameter
ADVISE_ACTIVE . . . . . . . . . . . 3-8
ADVISE_ALM . . . . . . . . . . . . . . 3-8
ADVISE_ENABLED . . . . . . . . . 3-7
ADVISE_PRI . . . . . . . . . . . . . . . 3-7
DEFINE_WRITE_LOCK . . . . . . 3-5
FAILED_ACTIVE . . . . . . . . . . . 3-6
FAILED_ALARMS . . . . . . . . . . . 3-6
FAILED_ALM . . . . . . . . . . . . . . 3-6
FAILED_ENABLED . . . . . . . . . . 3-6
FAILED_MASK . . . . . . . . . . . . . 3-6
FAILED_PRI . . . . . . . . . . . . . . . 3-6
FEATURES . . . . . . . . . . . . . . . . 3-4
FEATURES_SEL . . . . . . . . . . . 3-5
LIM_NOTIFY . . . . . . . . . . . . . . . 3-5
MAINT_ACTIVE . . . . . . . . . . . . 3-7
MAINT_ALARMS . . . . . . . . . . . 3-7
MAINT_ALM . . . . . . . . . . . . . . . 3-7
MAINT_ENABLED . . . . . . . . . . 3-7
MAINT_MASK . . . . . . . . . . . . . 3-7
MAINT_PRI . . . . . . . . . . . . . . . . 3-7
MAX_NOTIFY . . . . . . . . . . . . . . 3-5
MODE_BLK.TARGET . . . . . . . . 3-2
MODE_BLOCK_ACTUAL . . . . . 3-2
Network . . . . . . . . . . . . . . . . . . . 3-4
RECOMMENDED_ACTION . . . 3-8
REPORTS . . . . . . . . . . . . . . . . 3-4
UNICODE . . . . . . . . . . . . . . . . . 3-4
WRITE_LOCK . . . . . . . . . . . . . . 3-5
Parameters . . . . . . . . . . . . . . . . .C-13
Discrete Input . . . . . . . . . . . . .C-10
Discrete Output . . . . . . . . . . . .C-12
I/O Transducer . . . . . . . . C-1, C-5
Logic Transducer . . . . . . . . . . .C-8
Multiple Discrete Input . . . . . .C-13
Multiple Discrete Output . . . . .C-14
Permitted Modes . . . . . . . . . . . . . . 3-2
Physical
Specifications . . . . . . . . . . . . . .A-4
PlantWeb Alarms . . . . . . . . . . 3-6, 3-8
Advisory . . . . . . . . . . . . . . . . . . 3-7
FAILED_ALARMS . . . . . . . . . . . 3-6
MAINT_ALARMS . . . . . . . . . . . 3-7
R
Recommended Actions . . . . . . . . . 3-8
PlantWeb Alarms . . . . . . . . . . . 3-8
RECOMMENDED_ACTION . . . . . 3-8
Reports . . . . . . . . . . . . . . . . . . . . . 3-4
Resource Block . . . . . . . . . . . . . . . 3-4
Configuration . . . . . . . . . . . . . . . 3-4
FEATURES, FEATURES_SEL .3-4
Parameters . . . . . . . . . . . . . . . .C-1
Troubleshooting . . . . . . . . . . . . 4-3
Return of Materials . . . . . . . . . . . . 1-3
S
Security . . . . . . . . . . . . . . . . . . . . . 3-5
Security Switch . . . . . . . . . . . . . . . 2-6
Senor
Connection Check . . . . . . . . . . . 4-2
Sensor
Tag . . . . . . . . . . . . . . . . . . . . . . 2-8
Simulate Enable Switch . . . . . . . . . 2-6
Soft W Lock, Hard W Lock . . . . . . 3-5
Specifications
Function Block . . . . . . . . . . . . .A-4
Functional . . . . . . . . . . . . . . . . .A-1
Physical . . . . . . . . . . . . . . . . . . .A-4
Surges . . . . . . . . . . . . . . . . . . . . . . 2-5
Switches . . . . . . . . . . . . . . . . . . . . 2-5
Security . . . . . . . . . . . . . . . . . . . 2-6
Simulate Enable . . . . . . . . . . . . 2-6

Reference Manual
00809-0100-4696, Rev AA
9/17/04
Index-3
Rosemount 848L
T
Tagging . . . . . . . . . . . . . . . . . . . . . 2-8
Commissioning . . . . . . . . . . . . . 2-8
Sensor . . . . . . . . . . . . . . . . . . . 2-8
Transmitter . . . . . . . . . . . . . . . . 2-8
Timer Recommendations, Host . . 3-4
Transients . . . . . . . . . . . . . . . . . . . 2-5
Transmitter
Tag . . . . . . . . . . . . . . . . . . . . . . 2-8
Troubleshooting . . . . . . . . . . . . . . 4-3
Foundation Fieldbus . . . . . . . . . 4-3
Resource Block . . . . . . . . . . . . 4-3
Types of Modes
Auto . . . . . . . . . . . . . . . . . . . . . 3-2
Man . . . . . . . . . . . . . . . . . . . . . 3-2
Other Types of Modes . . . . . . . 3-2
Out of Service . . . . . . . . . . . . . . 3-2
U
Unicode . . . . . . . . . . . . . . . . . . . . 3-4
V
Valve Control . . . . . . . . . . . . . . . . F-1
Alarms . . . . . . . . . . . . . . . . . . . F-2
Boolean Expressions . . . . . . . . F-3
Virtual Communication Relationship
(VCRs) . . . . . . . . . . . . . . . . . . . . . 3-4
Network Parameters . . . . . . . . . 3-4
W
Wiring . . . . . . . . . . . . . . . . . . . . . . 2-4
Communication Check . . . . . . . 4-2
Diagram . . . . . . . . . . . . . . . . . . A-6
Power Check . . . . . . . . . . . . . . 4-2

Reference Manual
00809-0100-4696, Rev AA
9/17/04
Rosemount 848L
Index-4

Emerson Process Management
© 2004 Rosemount Inc. All rights reserved.
¢00809-0100-4697F¤
Rosemount and the Rosemount logotype are registered trademarks of Rosemount Inc.
PlantWeb is a registered trademark of one of the Emerson Process Management group of companies.
All other marks are the property of their respective owners.
Reference Manual
00809-0100-4696, Rev AA
September 2004
Rosemount Temperature GmbH
Frankenstrasse 21
63791 Karlstein
Germany
T 49 (6188) 992 0
F 49 (6188) 992 112
Emerson Process Management Asia
Pacific Private Limited
1 Pandan Crescent
Singapore 128461
T (65) 6777 8211
F (65) 6777 0947
AP.RMT-Specialist@emersonprocess.com
Rosemount Inc.
8200 Market Boulevard
Chanhassen, MN 55317 USA
T (U.S.) 1-800-999-9307
T (International) (952) 906-8888
F (952) 949-7001
www.rosemount.com
