Emerson Lc320Em2 Owners Manual ManualsLib Makes It Easy To Find Manuals Online!
2014-12-12
: Emerson Emerson-Lc320Em2-Owners-Manual-119798 emerson-lc320em2-owners-manual-119798 emerson pdf
Open the PDF directly: View PDF ![]() .
.
Page Count: 33
sono
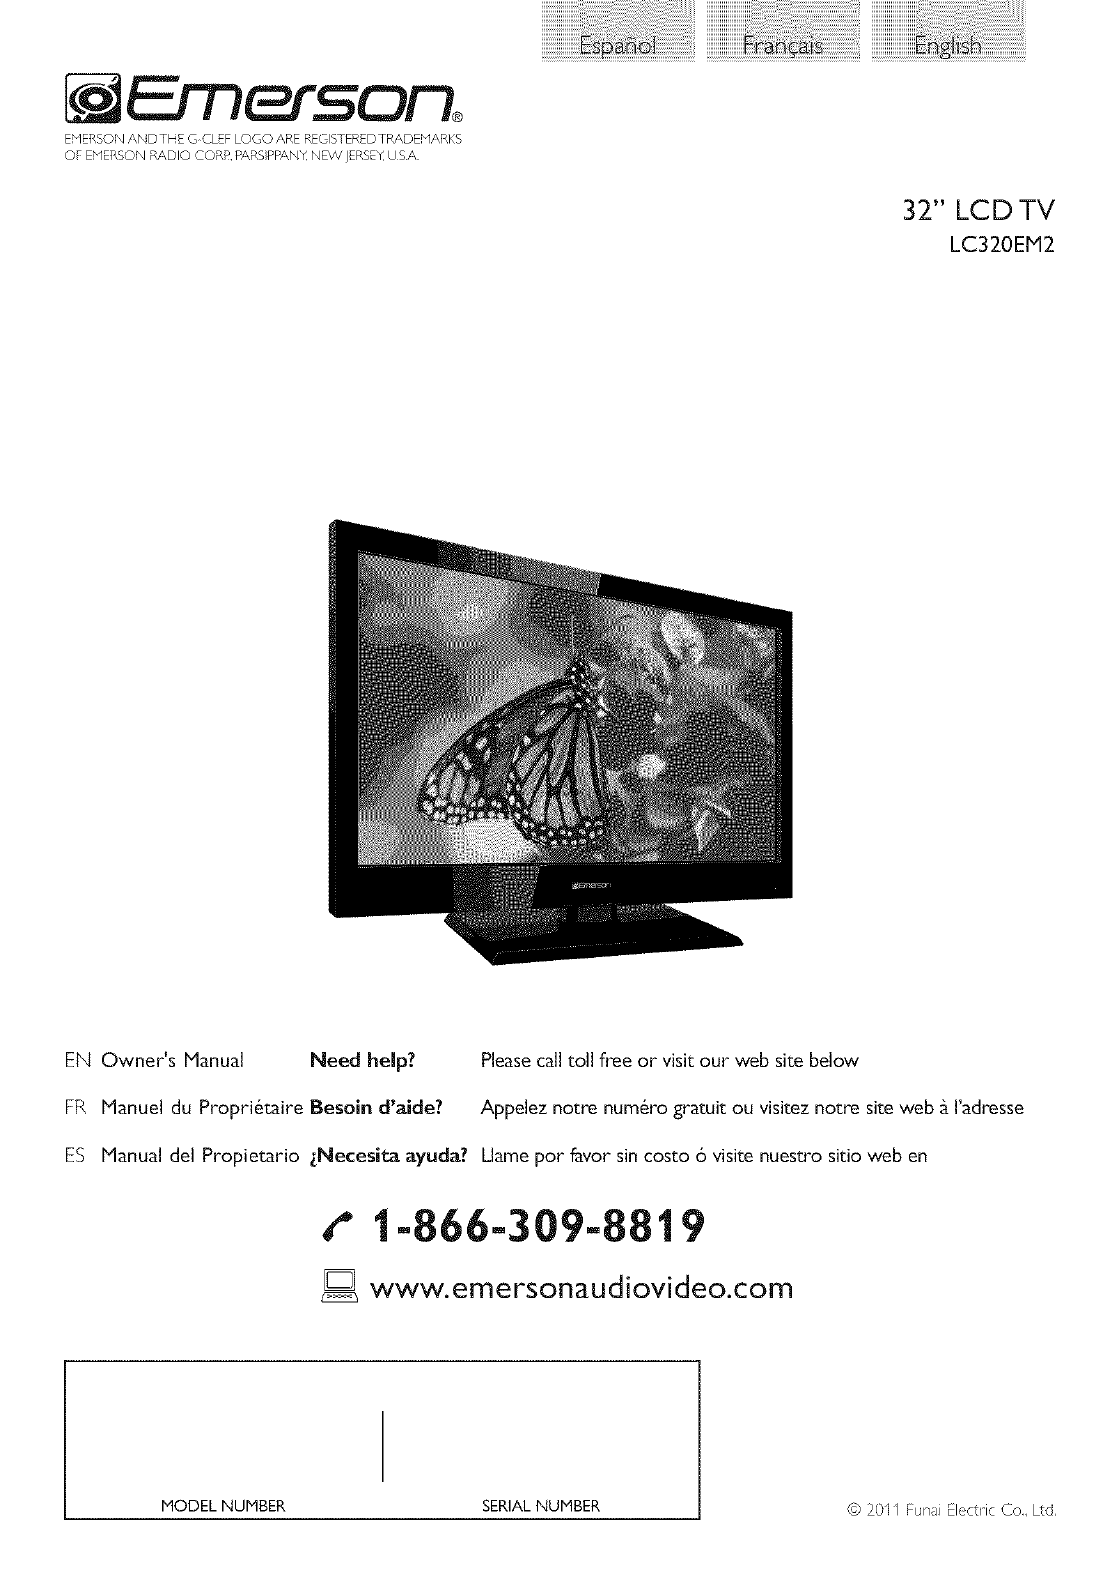
EHERSON ANDTHE GCLEF LOGO ARE REGISTEREDTFMxDENARKS
OF E'_IERSON RADIO CORR. PARS PBZ\NX NEW JERSEy USA
iiiiiiiiiiiiiiiiiiiiiii
32" LCD TV
LC320EM2
EN Owner's Manual Need help? Please call toll free or visit our web site below
FR Manuel du Propri6taire Besoin d'aide? Appelez notre num6ro gratuit ou visitez notre site web _ I'adresse
ES Manual del Propietario LNecesita ayuda? Llame pot favor sin costo 6 visite nuestro sitio web en
t" t-866-309-8819
D www.emersonaudiovideo.com
MODEL NUMBER SERIAL NUMBER © 20II Funa Electric Co., Ltd,
2
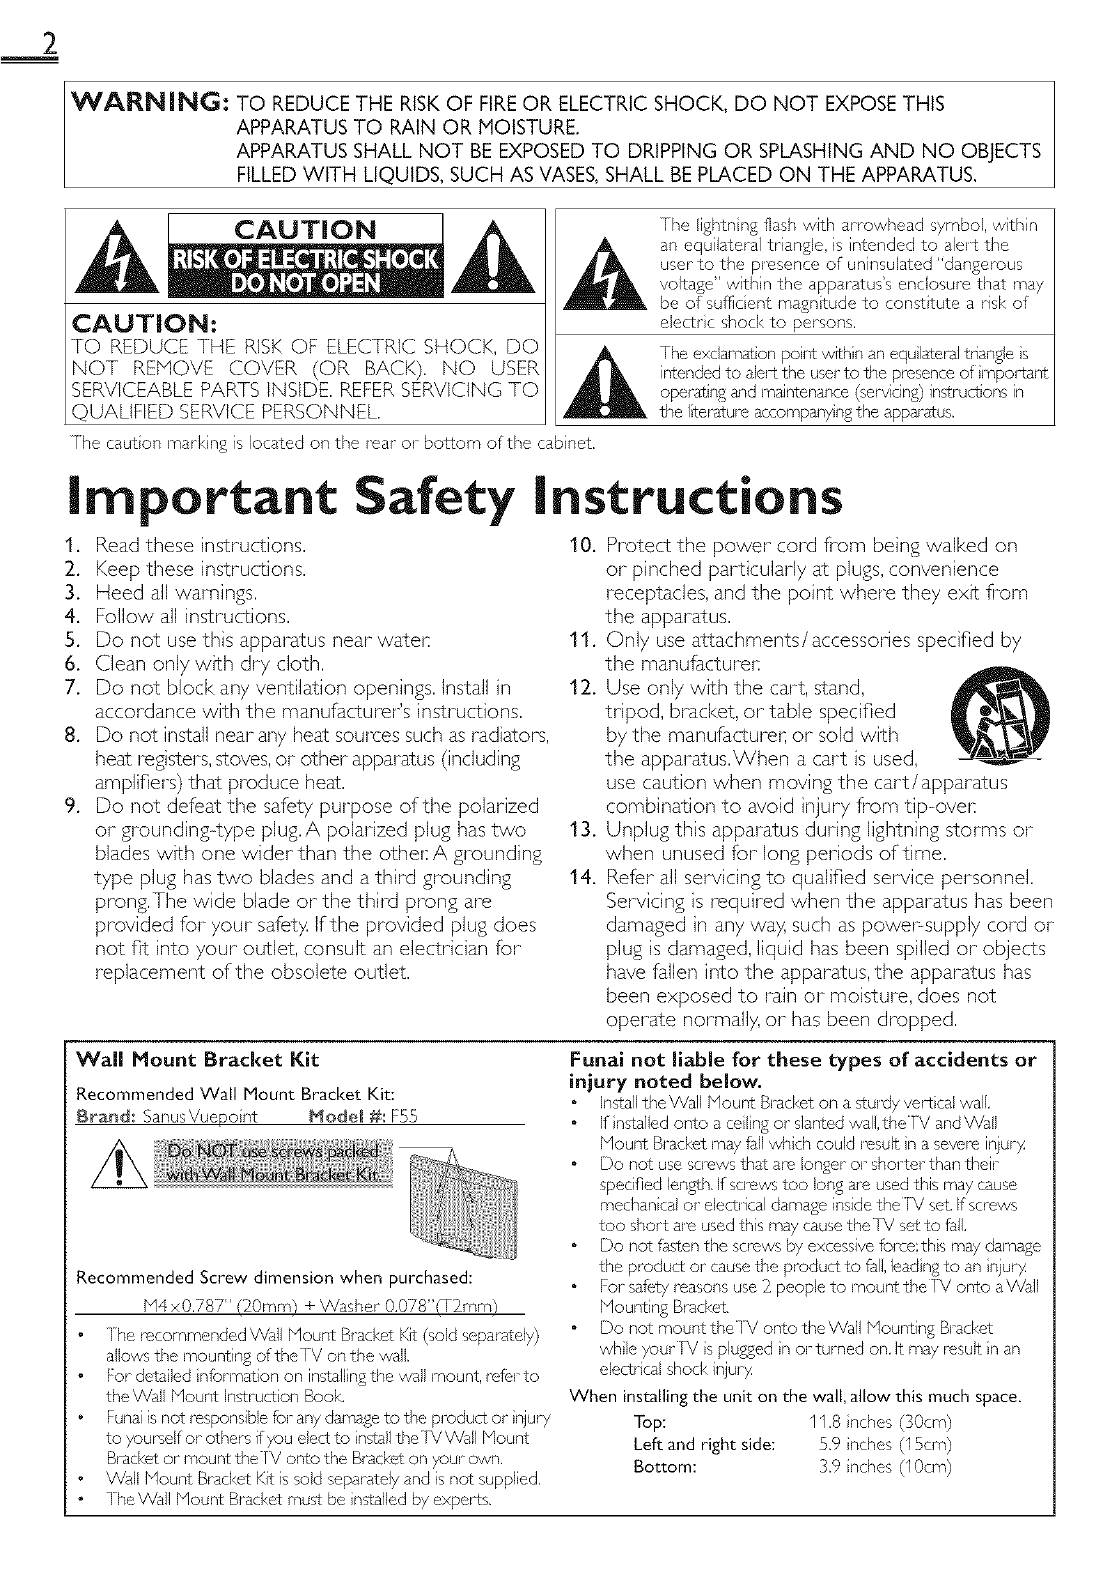
WARNING: TO REDUCE THE RISKOF FIREOR ELECTRIC SHOCK, DO NOT EXPOSETHIS
APPARATUS TO RAIN OR MOISTURE.
APPARATUS SHALL NOT BE EXPOSED TO DRIPPING OR SPLASHING AND NO OBJECTS
FILLEDWITH LIQUIDS, SUCH AS VASES,SHALL BE PLACED ON THE APPARATUS.
CAUTION:
TO REDUCE THE RISK OF ELECTRIC SHOCK, DO
NOT REMOVE COVER (OR BACK}. NO USER
SERVICEABLE PARTS INSIDE. REFER SERVICING TO
qUALIFIED SERVICE PERSONNEL.
]-he lightn ng flash with arrowhead symbol, withn
an equilateral triangle, is intended to alert the
user to the presence of uninsulated "dangerous
voltage" withn the apparatus's enclosure that may
be of sufficient magntude to consltute a risk of
electrc shock to persons.
Ihe exclamation pont w_hin an equ lateral triangle s
intended to alert the user to the presence of mportant
operat ng and maintenance (servicing) instructions in
the I_erature accompanyng the appar£us.
7he caut on marking is lock,ted on the rear or bolcom of the cab net.
Important
!, Read these instructions.
2.
3.
4.
5.
6.
7.
8,
9,
Safety instructions
10.
Keep these instructions.
Heed all warnings.
Follow all instructions.
Do not use this apparatus near water: 11,
Clean onl7 with dry cloth.
Do not block any ventilation openings. Install in 12,
accordance with the manufacturer's instructions.
Do not install near any heat sources such as radiators,
heat registers, stoves,or other apparatus (including
amplifiers) that produce heat.
Do not defeat the safety purpose of the polarized
or grounding--type plug.A polarized pluS has two 13.
blades with one wider than the other: A grounding
type pluShas two blades and a third grounding 14.
prong, The wide blade or the third prong are
provided for your safer)4If the provided pluSdoes
not fit into your outlet, consult an electrician for
replacement of the obsolete outlet.
Protect the power cord fiom being walked on
or pinched particularly at plugs, convenience
receptacles, and the point where they exit fiom
the apparatus.
Only use attachments/accessories specified by
the manufacturel:
Use only with the cart, stand,
tripod, bracket, or table specified
by the manufacturer, or sold with
the apparatus.When a cart is used,
use caution when moving the cart/apparatus
combination to avoid injury fiom tip--ovel:
Unplug this apparatus during lightning storms or
when unused for long periods of time.
Refer all servicing to qualified service personnel.
Servicing is required when the apparatus has been
damaged in any way, such as poweF supply cord or
plug is damaged, liquid has been spilled or objects
have fallen into the apparatus, the apparatus has
been exposed to rain or moisture, does not
operate normally, or has been dropped.
Wall Mount Bracket Kit
Recommended Wall Mount Bracket Kit:
Bra_d: ganusVuepo nt Mode_ #: F55
N@
@;Ni NN_:_NN
Recommended Screw dimension when purchased:
N4x0.787" (20ram) + V{asher 0.078"(T2mm}
•Jhe recommended Wall Mount Brad<et Kit (sold separately)
allows the mounti% of the IV on the wall
For detailed nformation on instsll ng the wail mount, refer to
the _Vall Mount instruction Book.
Funai is not responsibb for any damage to the product or njury
to yourself or others if you eject to ns¢.sllthe ]V Wail Mount
Bracket or mount thefV onto the Bracket on your own.
•Wall Mount Brad<et Kit is sold separatel 7 and is not supplied.
• Ihe Wall Mount Bracket must be nssalled b7 experts.
Funai not liable for these types of accidents or
injury noted below.
Install the Wall Mount Bracket on asturdy vertical wall.
If nstalled onto a celng or slanted wall.the TV and Wall
Mount Bracket may fb_llwhch could result n a severe in/ur}z
Do not use screws that are longer or shorter than their
specified length. If screws too long are used this may cause
mechan cal or electrical damage inside the set. If screws
too short a'e used this may cause the IV set to fall.
Do not fasten the screws by excessive fo_e;this may damage
the product or cause the product to fall. lead ng to an n/ur}z
For safety reasons use }_people to mount the TV onto aWall
Mounting Bracket,
Do not mount the]V onto the Wall Mounting Bracket
whle yourIV s plumed n or turned on, It may result n an
elecCr cal shock injur)4
When installing the unit on the wall, allow this much space.
Top: 11.8 riches (}0cm)
Left and right side: 5.9 riches (15cm)
Bottom: 3.9 riches (10cm)

FCCWARNING
This apparatus may generate or use radio frequency energy. Changes or modifications to this apparatus may cause harmful interference
unless the modifications are expressly approved in the manual. The user could lose the authority to operate this apparatus if an
unauthorized change or modification is made.
RADIO-TV INTERFERENCE
This apparatus has been tested and found to comply with the limits for a Class B digital device, pursuant to Part 15 of the FCC Rules.
These limits are designed to provide reasonable protection against harmful interference in a residential installation. This apparatus
generates, uses, and can radiate radio frequency energy and, if not installed and used in accordance with the instructions, may cause
harmful interference to radio communications. However, there is no guarantee that interference wilt not occur in a particular installation.
If this apparatus does cause harmful interference to radio or television reception, which can be determined by turning the apparatus off
and on, the user is encouraged to try to correct the interference by one or more of the following measures:
1) Reorient or relocate the receiving antenna.
2) Increase the separation between the apparatus and receiver.
3) Connect the apparatus into an outlet on a circuit different from that to which the receiver is connected.
4) Consult the dealer or an experienced radio/TV technician for help.
DECLARATION OF CONFORMITY
Trade Name: mers°n Responsible Party: FUNAI CORPORATION. Inc
Nodeh LC320EM2 Address: 19900 Van Ness Avenue, Tomance, CA 90501 USA,
Telephone Number: 1-866-309-8819
This Class B digital apparatus complies with Canadian ICES-003. StandardTelevision ReceivingApparatus, Canada BETS.7/NTHR.7
CAUTION: Danger of explosion if battery is incorrectly replaced. Replace only with the same or equivalent type.
WARNING :Batteries (battery pack or battery installed) shall not be exposed to excessive heat such as sunshine, fire or the like.
Disconnect the mains plug to shut off when find trouble or not in use.The mains plug shall remain readily operable.
This apparatus should not be placed in a built-in installation such as a bookcase or rack unless proper ventilation is provided.
Make sure to leave a space of 4 inches (10cm) or more around this apparatus.
WARNING: To prevent injury, this apparatus must be securely attached to the wall in accordance with the instructions.
Do not place the unit on the furniture that is capable of being tilted by a child and an adult leaning, pulling, standing or
climbing on it. A falling unit can cause serious injury or even death.
_) LANP IN LCD CONTAINS HERCURY, DISPOSEACCORDINGTO LOCAL, STATE OR FEDERAL LAW,
NOTE ABOUT RECYCLING Trademark Information
• [hs unit's pdcka£in£ rr,ater_ s aJ-erecyclablo i,d
can be reused. Please dispose of any mate@as n
......-d........_thyou,-ocar_,cycr,_,-e_u,,t..... l_llli::llTlll °
Battel-es shoud never be thrown away or ncinel-ated .,_,o_,_,_,o_,_,_,_o,,, ......
but disposed of n dccocdance with your Iocd
regu ations concern ng chemical wastes,
WHEN CARRYING THIS UNIT _> 3_ £
• At east 2 peope are requ red when
can yng this unt
• Mak, sure to hold the upper and bottom
frames of the unit firmly as illustrated,
TO AVOID THE HAZARDS OF
ELECTRICAL SHOCK AND FIRE
• Do pot handle the, AC power cord with wet I'_!nds,
• Do not pu on the AC power cold when disconnect n£ it fl-om an
AC outlr, t Gl_sp it by the pu&
• Do not put your fingel-s or obiects into the unit
/J
///
• HDMI, the HDMI Lop, and Hish Definiton Muir media Intel4ace
al_ trademal I<sor re£istel c,d trademarks of HDMI Licensing LLC n
the Unted States and other countNes,
[]:] DOLBY
D|GITAL ]
• Nanufactul_d under license fl_m Dolby Laboratories, Dolby and
the doube_D symbo are trademarks of Doby Labo/dtor es,
LOCATION AND HANDLING
• Do not nstall the unit n direct suNigl,t or il_ a pace subiect to dust
or stron£ vib/_tion,
• Avod a place wth drastic ternperatule chan£es,
• Install the unit n a horizontal nd stable postion, Do not place
anything direct y on top or bottom of the unit, Depending on your
external devices, noise or disturbance of the picture and/o1 sound
may be generated if the unit is placed too close to them. In this
case, please ensure enough space between the external dev ces and
the unit.
• Depend ng on the environmept the tempel ature of this unt mdy
increase sight y, [his is not a ma function,
• Be sure to unpug the AC power cord fl-om the AC outet before
moving or can y ng the unit
• ENERGY S]AR '"_is a ioint program of the U,S, Envil_nmental
Protection Agency and the U,S, Departmept of Energy help n£ us all
SalVemoney and pl otect the env ronment through energy efficient
products and practices.
Consumer Notice:
ThsTV has been sc,tto max m ze enersy eff'ciency whe deliver n£
the best possibe p cture usn£ the fJctocy nstalled home mode
setthgs,
Changing or enabling other fl, atures n thisTV (e,g, bri_qhtened
bacl<ightin8) wi possibly nclease energy consumption beyond the
onsna ENERGY SI?\R ® qualified Imira,
• The Amer can Acaderny of Pediatr cs d scourages telev son vewng
for ch dren younger than two years of age,

4
CongratuJafions on your purchase! As you enjoy your new product, pJease
keep these safety tips in mind:
THE iSSUE
*[t'e t,or*;etheaer en_e a n ent experence s a growing rend and larger
flal panel displays are popular purchases However, flal panel displays
are not always supported on the prope stands or installed accord ng to the
manufacturer'srecommendations
Flat panel displays that are inappropriately stuated on dressers,bookcases,
shelves,desks, speakers, chestsor carts may fall over and cause injury
THIS MANUFACTURER CARES!
®The consumerelectroncs industry iscommitted to making home entera nrnent
enjoyable and safe
TUHE |HTO SAFETY
©he size daes N©T ft all Fallow the manufadurer's ecomr_'endations
for the saf_ nstallotian ar'd useof your flat panel display
•Carefully read ar,d ur,dersfar,d all er,closed instructionsfor ero_er useof
this product
• Don't allow children to clmb on or play with furniture and relevsion sets
• Don't place flat panel displays o_"furnture that can easily be used as steps,
such as a chest of drawers
® Remembertha children can become excited while watd:ing a program,
espec ally on a "larger than life" flat panel display Care should be taken Io
place or install_hedisplay where it cannol be pushed, pulled over,
or knockeddown
Care should be taken to routeall cords and cables conr'ected to theflat
panel display so that they cannot be pulled or grabbed by curiouschildren
WALL MOUHTIHG: IFYOU DECID[TOWALLMOLINT
YOLIRFLATPAHIELDISPLAY,ALWAYS:
_, Use o mountthat has been recommer*dedby he display _anufacturer
and/or Ised by an ndependent laboratory (suchas UI, CSA, [I)
Follow all inslructionssupplied by thedisplay and wall mount manufacturers
If you have any doubts about your ability 1osafely installyour flal panel
d splay, contact your retailer about professanal installaton
Make sure that the wall where you are mounting thedisplay s appropriate
Some wall mountsare not designed to be mountedto walls with steel
studsor old cnder block construction If you are unsure, contact a
professional nstaller
•, A minimumof lvvo people are required for installaton Flat panel displays
ca__be heavy
INTRODUCTION
Contents
Important %fety hqstruct ons
T_rademark Information
Child Safety
INTRODUCTION
Featul es
Supplied Accessories
Symbols Used in this Manual
Attachin 8 the Bse
Mountin8 the Unit on YOUrFurniture
Remote Col,t_l Function
Insta lin8 the Batter es
Control Panel
]brminaB
2
3
4
5
6
6
6
6
7
7
8
9
PREPARATION
Antenna Connection I 0
Connection to Cable Receiver or Sate te Box I0
Pug In tl_e AC Power Cord I0
Intal Setup 11
WATCHING TV
Swtchin£ Each Input Mode I2
Sleep Xrnel I2
Sound Functions I2
Freeze Mode 13
TV Screen Disp sy Mode I3
CI,dnnel Select on 13
TV Screen Informdtion I4
ECO I4
USING FUNCTIONS
Pcture 16
Sound 16
Setup 17
Featulss 18
Ldn£ua£e 23
USB 24
CONNECTING DEVICES
External Device Connect on 25
USEFULTIPS
FAQ 28
h oub eshoot n£ Gude 28
INFORMATION
Glossary 30
M,dnten_mce 30
Genel N Spec ficat ons 3I
Eectdcd Specification 3I
ethel Specifications 3I
Limited W_I rarity 33
Features
DTV/TV/CATV
You can use your remote centre to seect channels whch are
broadca£ in d £ital fen-nat and convent ona anaog formatAIso,
cabe subscribel s can access ther cable IV cl_anne s,
Information Display (ATSC only)
You cdn disp ay the tte, contents dnd ethel nfol mation of the
current DTV progl dm on the[V screen,
Autoprogram
This un}t utomaticaly scans and memorzes channels _va abe in
your al_a, e m natng d fficut setup procedures,
Child Loci<
5
iilil
>
This fl, ature allows you to block ch Idren's access to inappropr ate l
programs,
Closed Caption Decoder
Built n cosed caption decoder disp ays text for closed capt on
supported pro%ams.
P1TS /SAP Tuner
Audo can be selected fl-om the remote centre.
Auto Standby
If there s no input ssnal and no operation for I5 minutes, the
unit wl go into standby mode automat ca y,
Sleep Timer
Yo ........ t the unt to gO nto standby mode dfter a specific
amount of time,
Choices for On-screen Language
Select your on screen }anguase:
En8 sh, Span sh or French,
Stereo Sound Function
PLL Frequency Synthesized Tuning
Prov des fl_ee and easy channe se ection and ets you tune :
directytoa, ych........,usn th.......b ,randdecma,poi ,t"."
buttons on the remote centre.
Various Adjustment for Picture and Sound
Customizes mase quaty suitabe for your room and sets your
sound pref_,rence,
fun-Link via HDMI Link ;:
(HDMI Cable not Included)
fumLhk alows your other HDMI link dev ces to be centre ed by
the HDH cable connected to yourTX4
HDMI Input
HDMI-DVl Input
ComponentVideo Input
PC Input
AV Input
USB Terminal
The jPEG picture files stored on a USB storase device can be
played back on ths unit,
Digital Audio Output
i}i:,i
i:_!ili
(11',!
© 2011 Funai Electric Co,, Ltd,
All rghts reserved, No part o_this manual may be replx_duced, copied, transmitted, disseminated, transcribed, downloaded or stored n any storsg.o
medium, n any form or for any purpose without the express prior wr tten consent of Funa, Furtfiel more, any unauthorized commerc al distribution of
ths manua or any mvis on helc'to s strict y prohibited.
Information in this document s subject to chanse without notice. Funai reserves the risht to chan£e the content heron w thout the obli%ton to notfy
any pel son or or%nization of such chanses,
F'UNAIIwith the _'_ desisn s a registered trademark of Funai E ectr c Co., Ltd, and may not be used n any w_y w thout the express wr tten consent
of Funa. All ethel trademarks used heren reman the exclusive propel ty of ther respect ve owners, Nothing contained n ths manua shoud be
construed as £1_nt ns, by replication or ethel wse, any license or rght to use any of the trademarks displayed hel_in. Msuse o_ any trademarks ol
any other content in this manua is strict y prohibited, Funai shall a£sressive y enforce ts nte ectua property rghts to the fullest extent of the law.
6
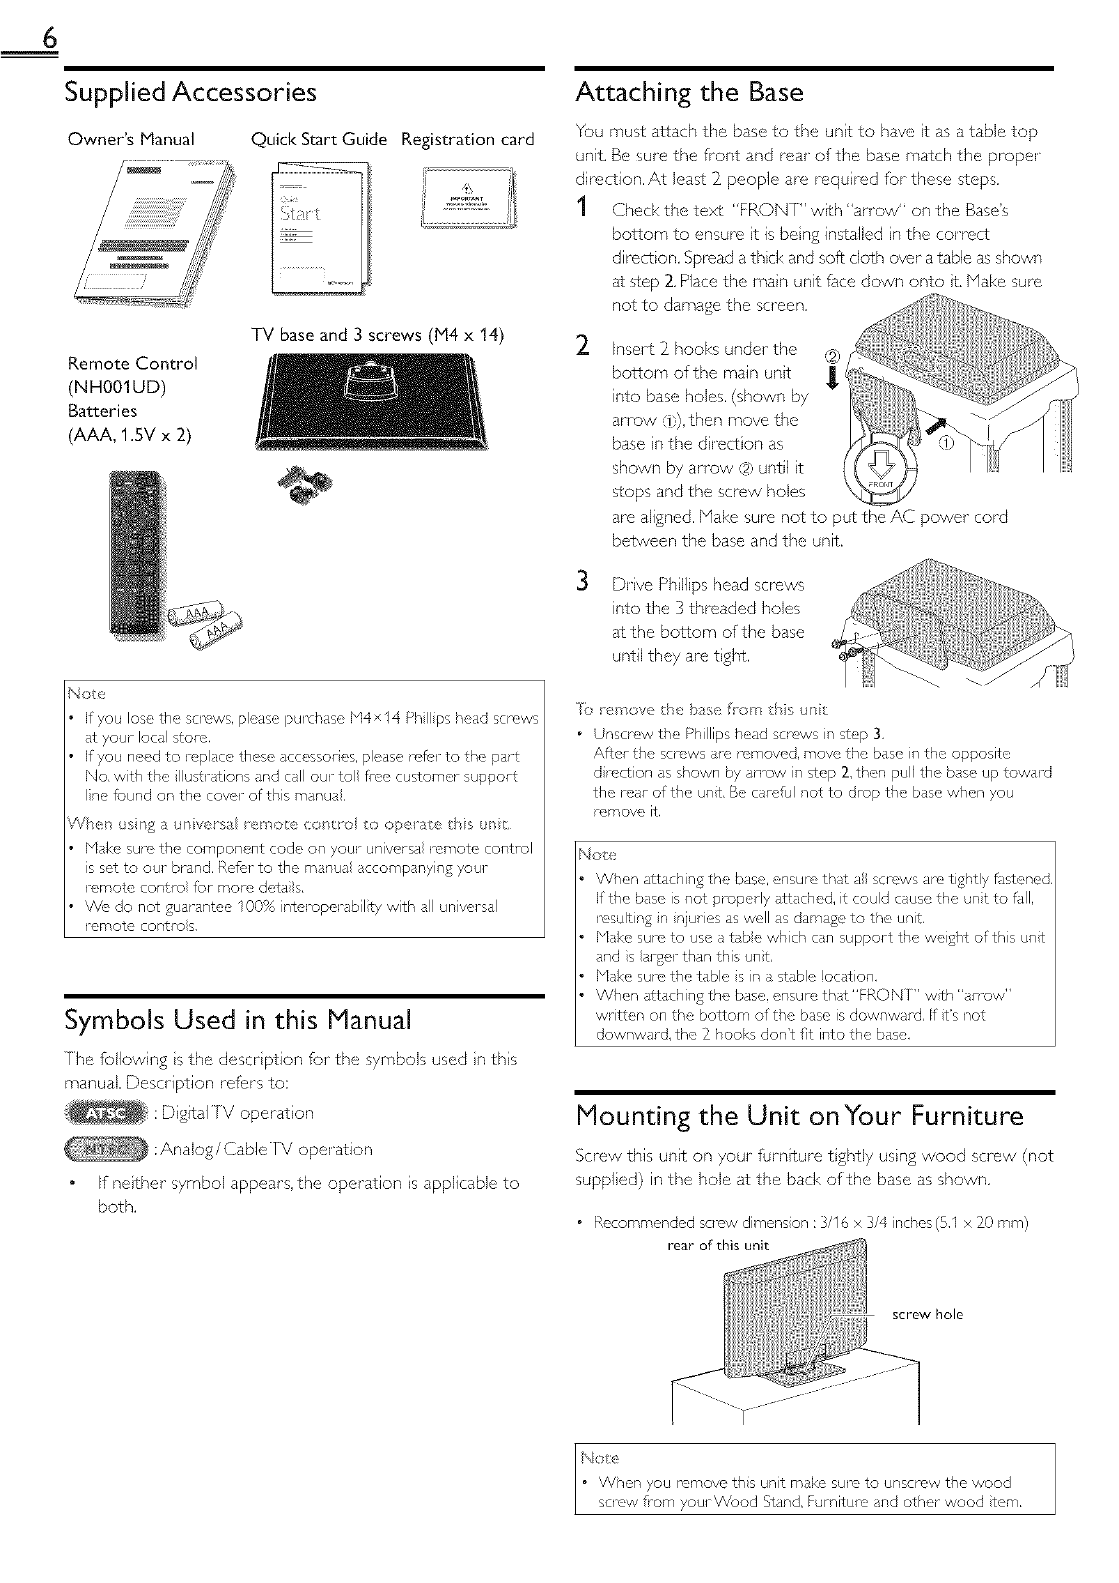
Supplied Accessories
Owner's Manual Quick Start Guide Registration card
Remote Control
(NHO01UD)
Batteries
(AAA, 1.SV x 2)
TV base and 3 screws (M4 x 14)
If you lose the scrcws, please purchase M4 x 14 Ph IIps head screws
at your Iota store,
If you need to rep ace these accessor es, please rotor to the part
No, wth the ustrations and call our to free customer support
Ine found on the covor of this manua,
Vhm csrl _ unversa e so/;e con _'h to (pel_te ths un
Make sure the component code on your universa i_mote control
is set to our brand, Refer to the manual accompanying your
remote contl_l for more detaiB,
We do not guarantee 100% interopel abilty with all universal
romote contro s,
Symbols Used in this Manual
7he following s the descr ption forthe symbols used n ths
manual, Description refers to:
:D g]tal]V operat on
:Analog /Cable TV operation
If nether symbol appears, the operation s applicable to
both.
Attaching the Base
You must attach the base to the unt to have t as a table top
unit, Be sure the front and real" of the base match the propel"
direction, At least 2_people are requ red for these steps.
1 Check the text "FRONT" with "an'ow" on the Base's
bottom to ensure t is beng installed n the correct
direction, Spread a thick and soft cloth over a table as shown
at step 2, Place the main unit face down onto t. Make sure
not to damage the screen,
2. Insert 2_hooks under the
bottom of the main unt
into base holes. {shown by
an'ow 71)),then move the
base n the d tect on as
shown by an'ow @ until t
stops and the screw holes
are aligned, Make sure not to put the AC power cord
between the base and the unit.
Drve Ph Ilips head screws
into the 3 threaded holes
at the bottom of the base
until they are tight.
Io _ , hove the b;!se from hs ul
• Unscrew the Phillips head screws in step 3,
After the scrcws Is removed, move the base in the opposite
d rcction as shown by an ow in step 2, then pul the base up toward
the rear of the unt Be careful not to drop the base when you
remove It,
Note
When attaching the base, ensure that a screws are tightly fJstened,
Iftlqe base is not propel ly attached, it could cause the unt to fJII,
result ng n njuries as well as damsge to the unt
Mal<e sure to use a tabe vvl_ch can support the weight ofths unt
and s argot titan this unt
Make sum tl_e table s n s stable location,
When attaching the base, epsure that"FRONT" wth "arrow"
written on the bottom of the base is downwaJd, If t's not
downward, the Z hooks don't qt into the base,
Mounting the Unit onYour Furniture
Screw this unt on your futnture t ghtly using wood screw (not
supplied) in the hole at the bad< of the base as shown.
• Recommended sc_svvdimens on :3/16 x 3/4 nches(5,1 x Z0 ram)
rear of this unit
hole
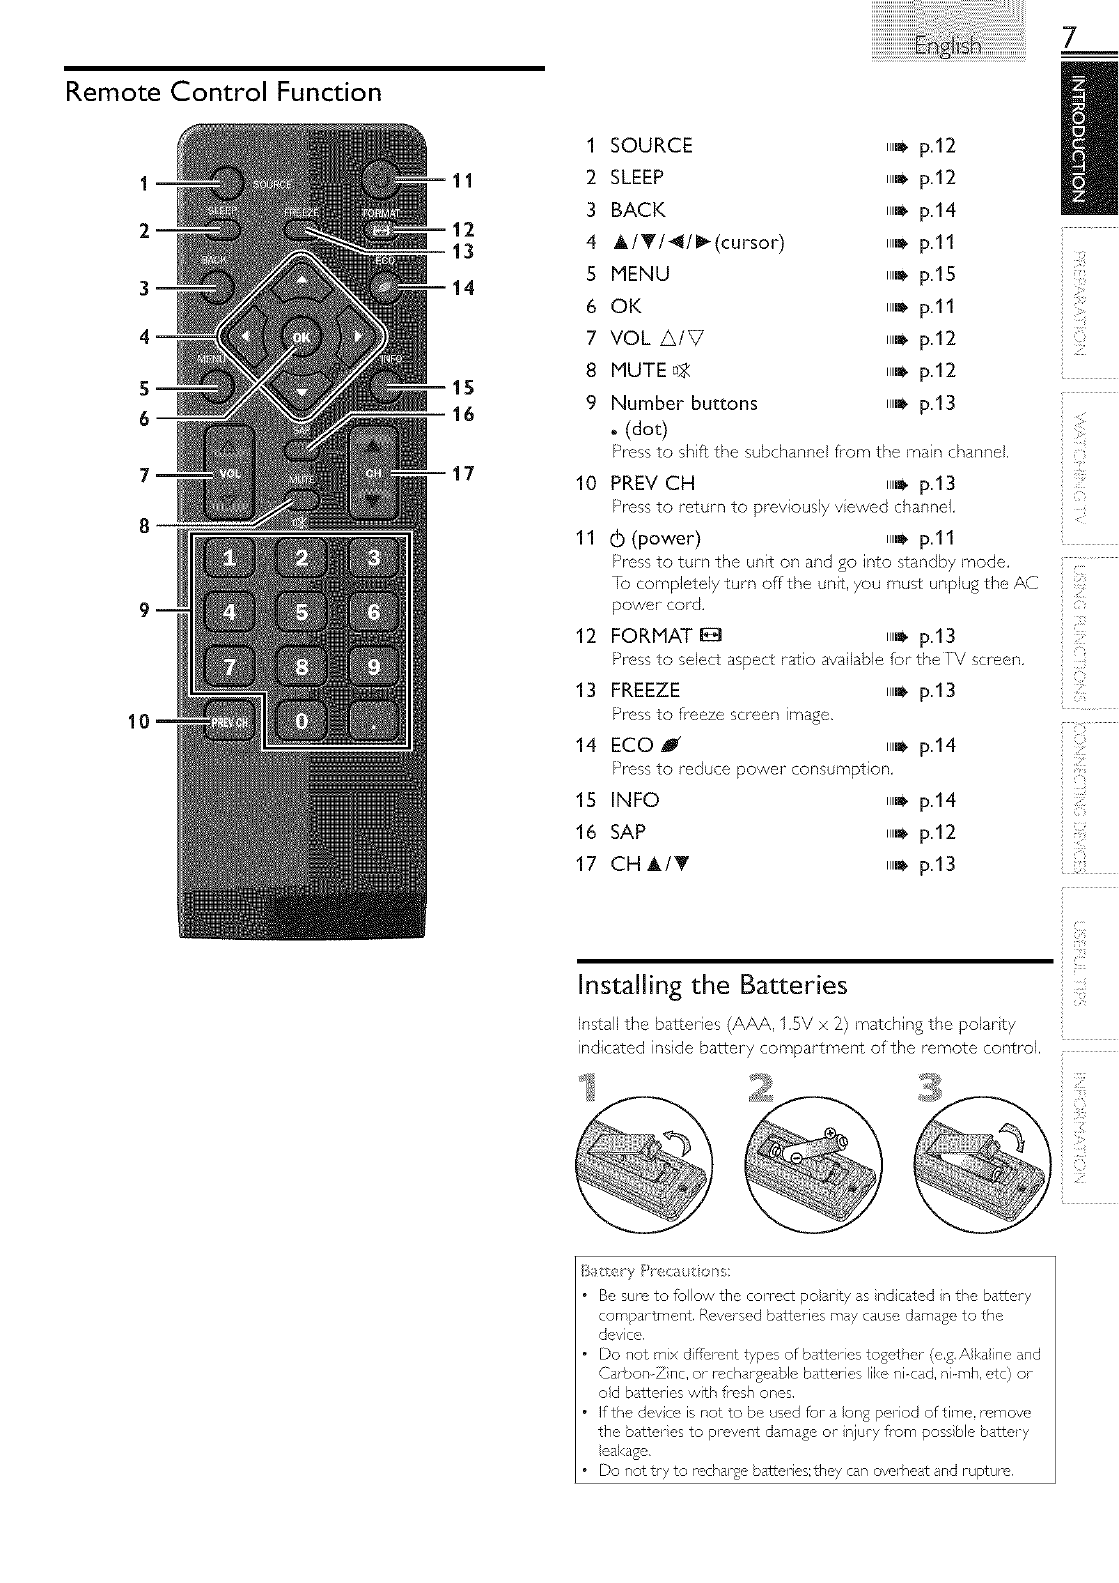
Remote Control Function
1 SOURCE 11,_ p.12
11 2 SLEEP 11,_ p.12
3 BACK iiii_p.14
12
13 4 h_/_/_/_ (cursor) iiill_ pi11
5 MENU IIII. p115
14
6 OK iiii_p111
7 VOL A/V ii,_ p.12
8 MUTE_>Z ii,_ p.12
1S
9 Number buttons ii,_ p.13
16 .(dot)
17
Press to shft the subchannei from the main channel
10 PREVCH ,,J p.13
Press to return to previous17 vewed channel.
11 (b (power) ,,J p.ll
Press to turn the unit on and go into standby mode.
[o comp4etely turn offthe unit, you must unplug the AC
power cord.
12 FORMAT I_ ,,J p.13
Press to select aspect ratio ava labie for theFV screen.
13 FREEZE IIII_p113
Press to freeze screen image.
14 ECO J ,,_ p.14
Press to reduce power consumption.
15 INFO ,,_ p.14
16 SAP ,,_ p.12
17 CH A/T ,,_ p.13
Installing the Batteries
Install the batteries (AAA. 1.5V x 2) matching the polar ty
indicated inside battery compartment of the remote control.
Be sure to follow the con_ct polar ty as nd cated n the barrel y
compartmel,t Roversed battel-ies may cause damage to the
device.
Do not mix d fi_,l ont types of batteries together (e.g. Akane and
Carbon Zno. or rochal geable batteries like ni<ad, n-mh. etc) or
od batteries with fi_csh ones.
If the devce is not to be used for _ ong period of time. rcmow
the batte_-es to prevel_t damage or njury fl_m poss hie batte_-y
eakage.
Do not t_y to re,charge batter es;they can ovodseat and rupture.
7
<(
iii!i!_i!_
i?ii
i[il
i}i:.i
8
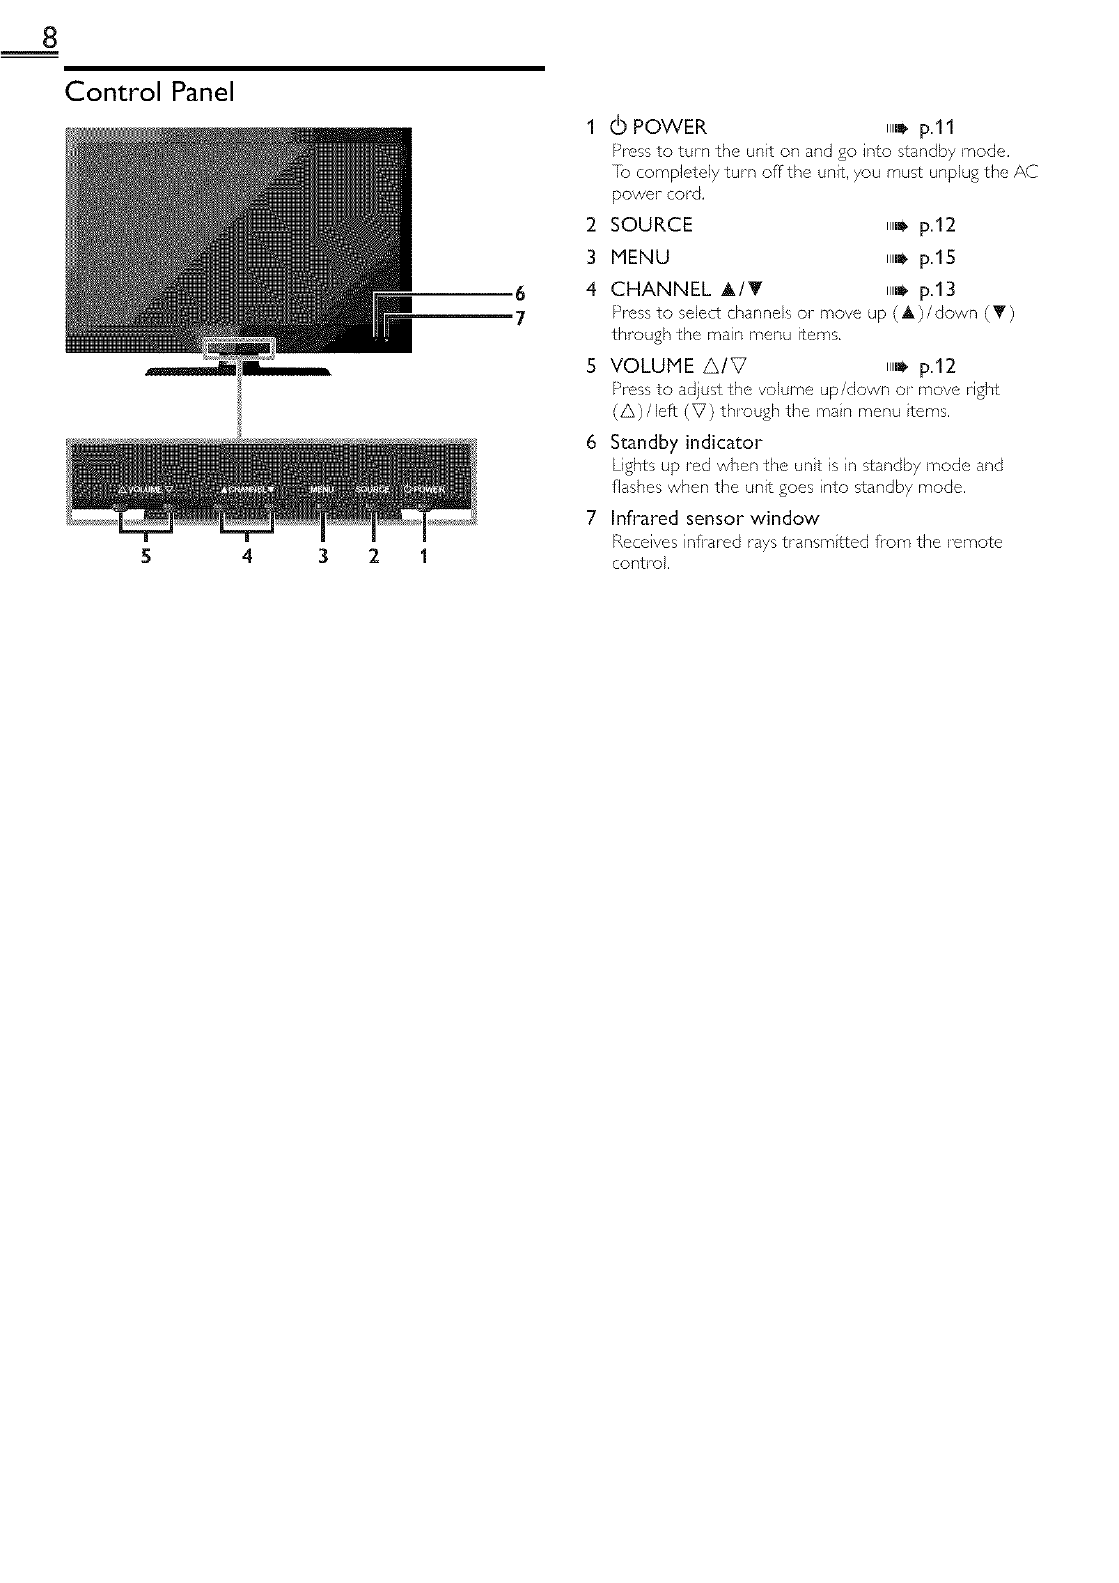
Control Panel
6
7
4321
1 (_ POWER ,,Jp.11
Press to turn the unit on and go into standby mode.
]b completely turn off the unit, you must unplug the AC
power cord,
2 SOURCE ,,_ p.12
3MENU ,,_ p.15
4 CHANNEL A/T ,,J p.13
Press to select channels or move up (A)/down (Y)
through the main menu items,
S VOLUME A/V ,,J p.12
Press to adjust the volume up/down o1"move right
(A)/left (V) through the main menu tems,
6 Standby indicator
Lights up red when the unt is n standby mode and
flashes when the unit goes nto standby mode.
7 Infrared sensor window
Receives infl'ared rays transmtted from the remote
control.
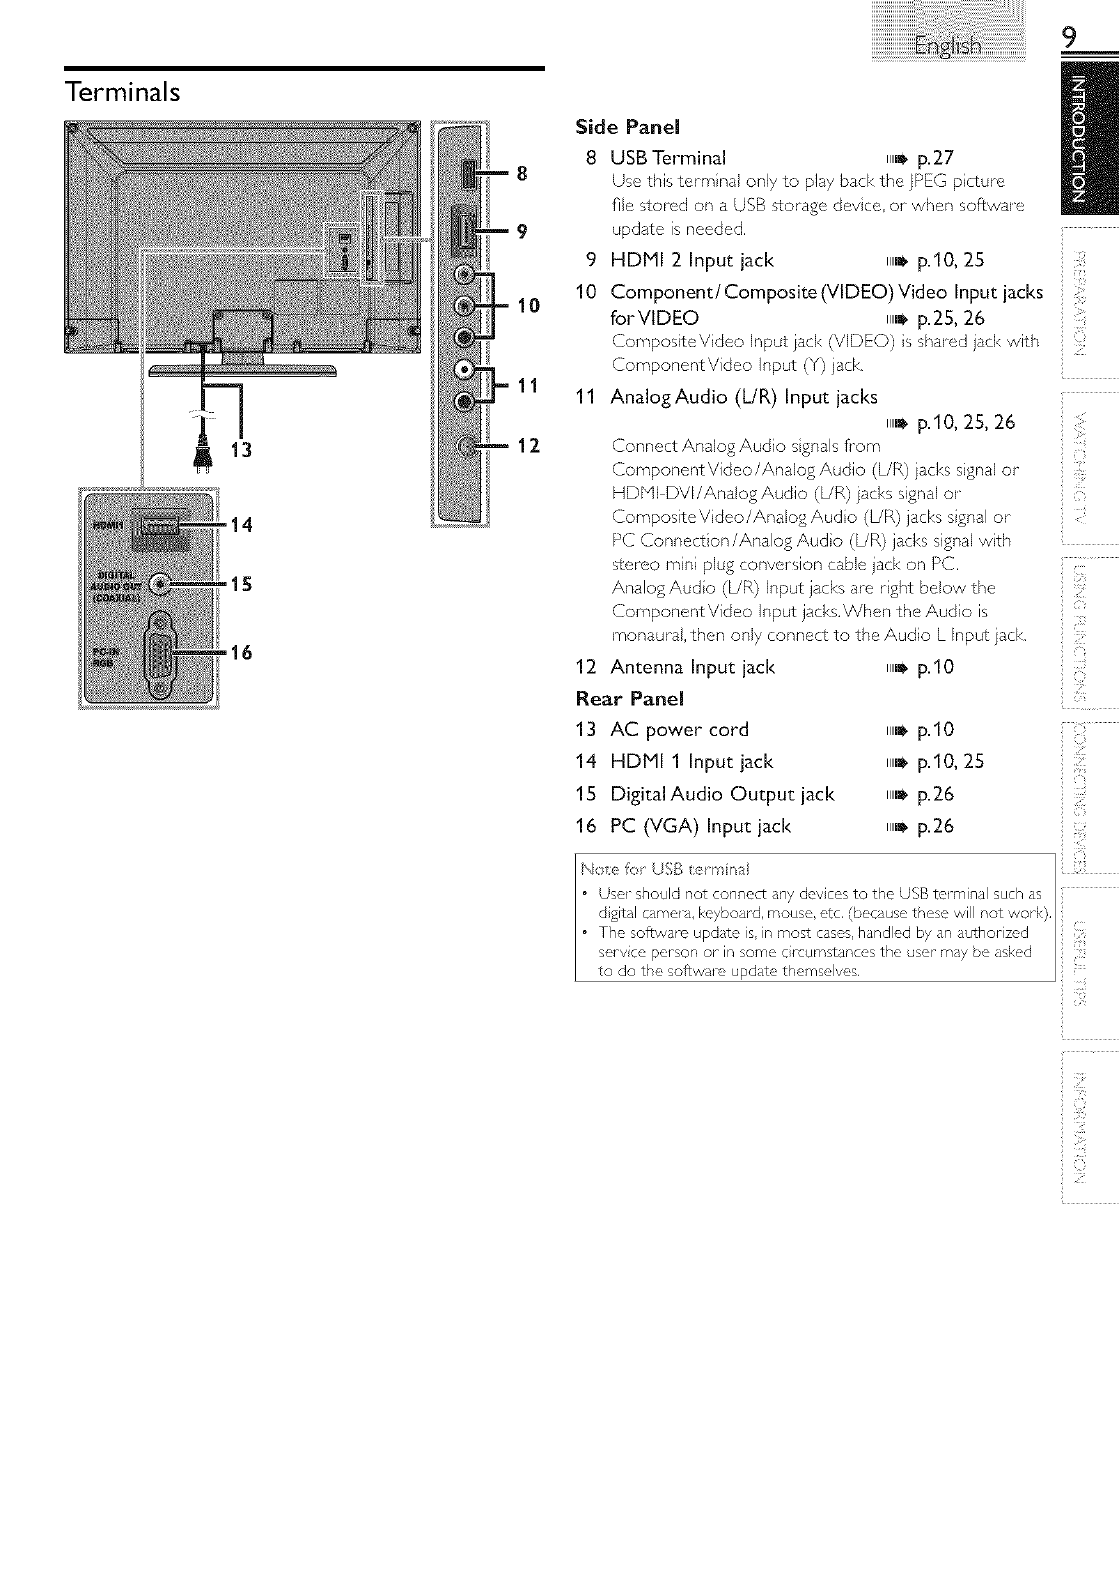
Terminals
13
8
9
10
11
12
Side Panel
8 USB Terminal
9
10
11
,,_* p.27
Use this term naJ only to play back the IPEG p cture
rJe stored on a USB s¢orage devce, or when software
update is needed.
HDMI 2 Input jack ,,J p.10, 25
Component/Composite(VLDEO)Video Input jacks
forVIDEO ,,J p.25, 26
CompositeV deo input jack {VIDEO) s shared jack with
ComponentVideo Input (Y} jack,
AnalogAudio (UR) Input jacks
,,_ p.10, 25, 26
Connect Analog Audio sgnals fl'om
Component Video/Analog Audio (L/R) jacks signal o1"
HDb'H DVI/Analog Audio (L/R) jacks signal o1"
CompositeV deo/Analog Audo {L/R) jacks sgnal or
PC Connection/Analog Audo (L!R) jacks signal wth
stereo mni plug conversion cable jack on PC.
Analog Audo (L!R) Input jacks are rght below the
ComponentVideo Input jacks.When the Audio is
monaural, then only connect to the Audio L Input }ack
9
iii!i!_i!_
12 Antenna Input jack ,,Irap.10
Rear PaneJ
13ACpoworcore ..... p,0
14 HDMI 1 Input jack ,,_ p.10, 25 =
15 DigitalAudio Outputjac[< ,,J p.26
16 PC (VGA) Input jack ,,_ p.26
ii:;ll!
i]£
i:_!ili
(i/'.!

10
PREPARATION
'£_..... _ ......
Before you connect:
Be sure your antenna or other device is connected properly
before piu&ling in the AC power cord.
Antenna Connection
_onnect the Ri coaxial cable o ,our home oudet to the
:_riTenna IRDUT _(K OTl_lls unit
Connection to Cable Receiver or
Satellite Box
Use an HDbql or ComponentV dee cables to connect the
HDMI or the ComponentV dee Input jacks of the unit to the
HDMI or the ComponentV dee output }acks of the cable
rece vet/satellite box.
If you connect to the unit's ComponentVideo Input jacks,
connect Analog Audio cables to the Analog Audo UR Input
}acl<s right below the ComponentVideo connector jacks.
satellite dish cable TV signal
including PPV
iiiiiiii
VHF/UHF
analogor
DTV antenna
¢
@
RF coaxia(cable
cable TV signal
Once connections are completed.turn on the unt and begn
nitia) setup. Channel scann ng s necessary for the unit to
memorize all ava )able channels n your area. [Initial Setup]
i1._ p.11
Not:r,
If you have any quest)on about the DTV's antel, na, VSlt
www.antennaweb.org for furthel nformation.
Depending on your antenna systern, you may need d fic,_nt types
of comb hers (mixers) or separators (sp ittel s) fur HD [V sgna
the rain mum RF bandpass on these devces is 2,000blHz or 2OHz.
re1 your safety and to dyed damage to this unit, please unpug the
RF coaxa cable fl_m the antenna input jack before movng the
unit
If you did use an antenna to mceve anaog I\/, t should aso
wolk for DTV mcept on. Outdoor or attc al,tennas w be more
efi_,ct vc than a sot top or inside antenna.
]b switch your mcept on source easily botween antenna and cabe,
nstall an antel_na selectols
If you a#e not roceiv ng a sgna fl-om your cable serv ce, contact the
(-abe prov det:
cable receiver/satellite box
You can also connect this unit to the cable receiver or sate)lte
box other than the HDM( or the Component V dee output jacks
or CompositeVideo output jack (ii,_p.25, 26) because they
might have diffWent output jacks.
Requ red cables and connecting methods of the cable receiver/
satellite box, or the ava labi]ity channel for the dear QAbq may
dffer depend ng on the cable/satellite provider or local lV
broadcastelc
For more nformation, please contact your cable/satellite provider
or IocalTV broadcaster
• Use an HDPll cabe w£h the HDPll logo (a ce_SifiedHDb_I cable).
Hgh Speed HDMI cable s recommer_ded for the better compat bi it}4
Plug In theAC Power Cord
Make sure that the AC power cord must be plugged to an AC
outlet after all the necessary connections are made.
Caution:
Do not connect the AC powe_- cold to a power suppy outs de
the nd cated votage ofths unit (AC 120V).
Connect)ng the AC power cord to a power suppy outs de of this
range may resut in fire or eectr ca shocks.
Note
Each time you pug n the AC powel cold, no operations will be
performed fol afr, w seconds.This is not a malfunct on.
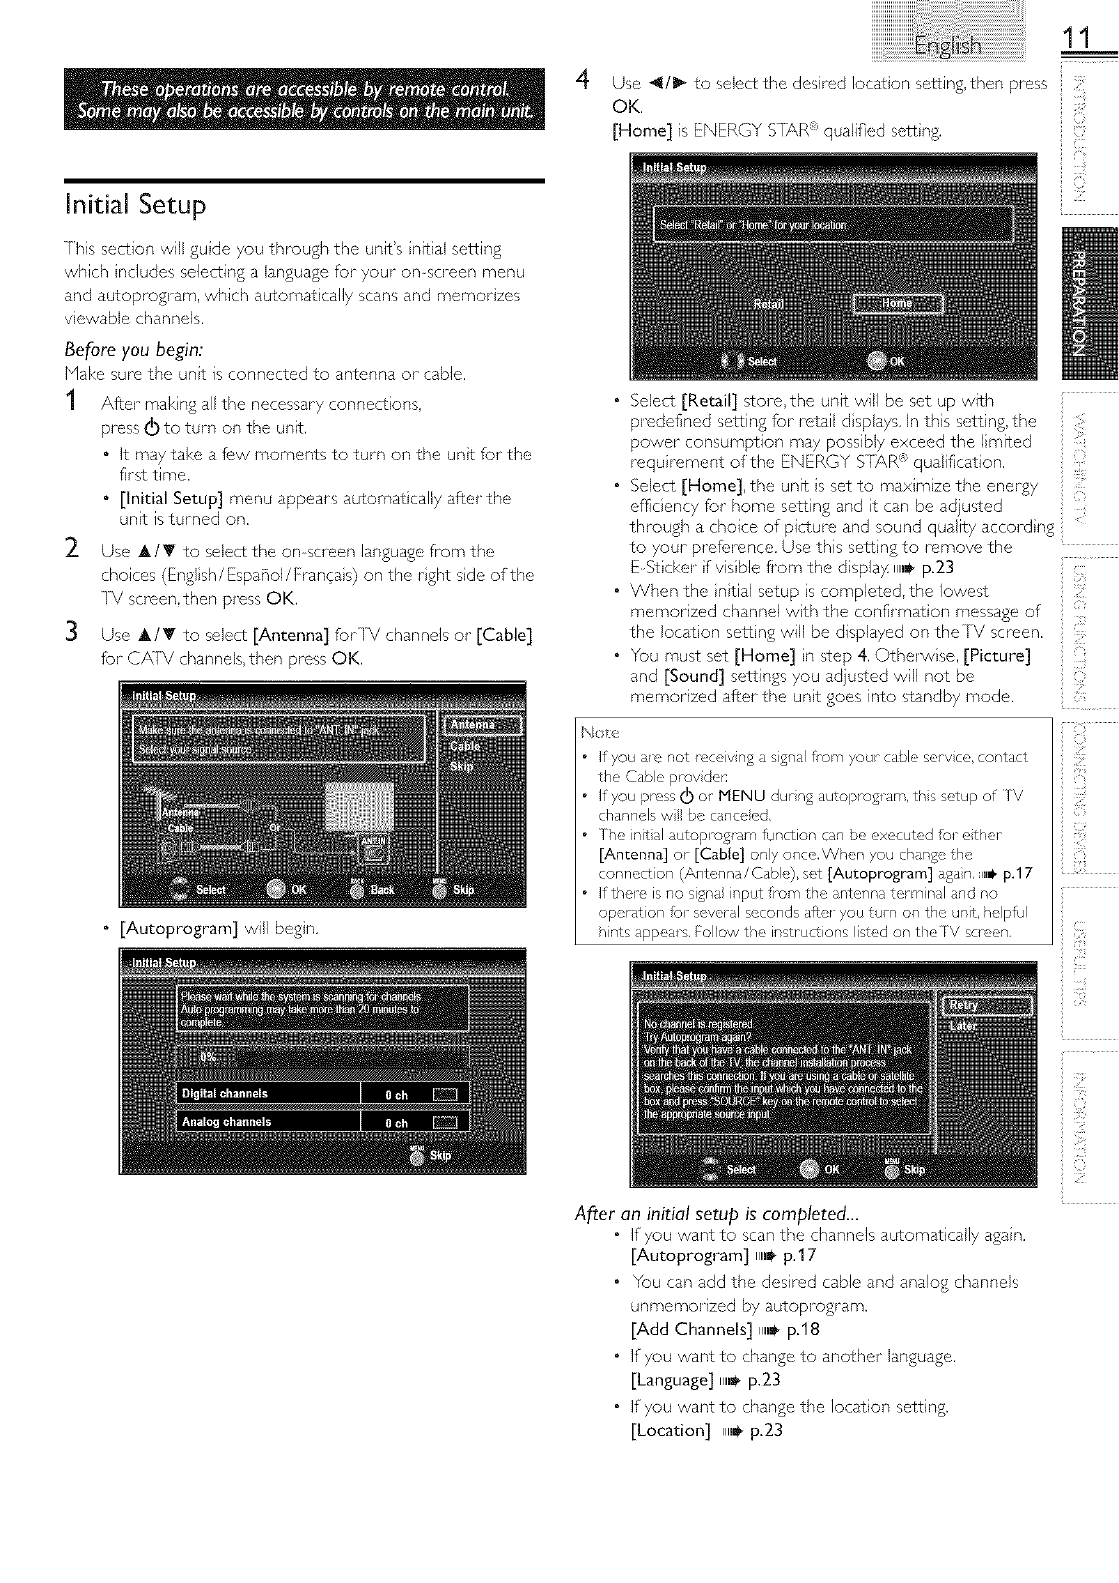
Initial Setup
7his section will guide you through the unit's nitial setting
which ndudes selecting a language for your on screen menu
and autoprogram, which automat tally scans and memor zes
v ewabie channels.
Be[ore you begin:
Make sure the unt is connected to antenna or cable.
1After makng all the necessary connect ons,
press 6 to turn on the unit.
• It may take a few moments to turn on the unt for the
first time.
• [Initial Setup] menu appears automat tally after the
unt is turned on.
2 Use _t,/T to select the on screen language from the
choices (Engl sh /EspaBol /Franc a s) on the rght sde of the
[V screen, then press OK.
3 Use A,/Y to select [Antenna] forIV channels o1" [Cable]
for CATV channels, then press OK.
•[Autoprogram] will begn.
4
11
Use 4/1_ to select the desired Iocat on setting, then press
OK.
[Home] is ENERGY STh,Ru_qualified sett ng.
Select [Retail] s_ore,the unit will be set up with
predefined setting for retail d splays. In this setting, the
power consumption may possibly exceed the limited
requirement of the ENERGY S[_R _'_qualification.
Select [Home], the unit is set to maxmze the energy
efl]c ency for home setting and t can be adjusted
through a choice of picture and sound quality accord ng
to 7our pref;arence. Use this setting to remove the
E St cker f vis hie fi'om the displa)4 ma_ p.23
When the ntial setup s completed,the lowest
memorized channel w+th the confirmat on message of
the location setLing will be displayed on theTV screen.
You must set [Home] n step 4. Othe+wise, [Picture]
and [Sound] settings you adjusted will not be
memorized after the unt goes into sq"andby mode.
No_2
If you a_e not _ece,v ng a sgnal fl-om your cable serv ce, contact
the Cabe prov dens
If you press (_ or iViENU durng autoproglam, ths setup of TV
channels w! be canceedL
The init al autoprog_m function can be executed re1 ethel-
[Antenna] or [Cable] ony once.When you change the
connect on [Antenna/Cab e), set [Autoprogram] aganL m_-p.17
If them is no signa input fi-om the at_tenna terminal and no
operat on for several seconds after you turn on the unit, he pful
hints appeal SLFOIow the instruct ons listed on theTV screen.
Z}
}:_!ii
_iiili
After an initial setup is completed...
• If you want to scan the channels automatically again.
[Autoprogram] ma_ p.17
• You can add the desired cable and analog channels
unmemorized by autoprogram.
[Add Channels] ma_ p.18
° IfTou want to change to another language.
[Language] ma_ p.23
• IfTou want to change the location setting.
[Location] ,m_ p.23
12
WATCHING TV
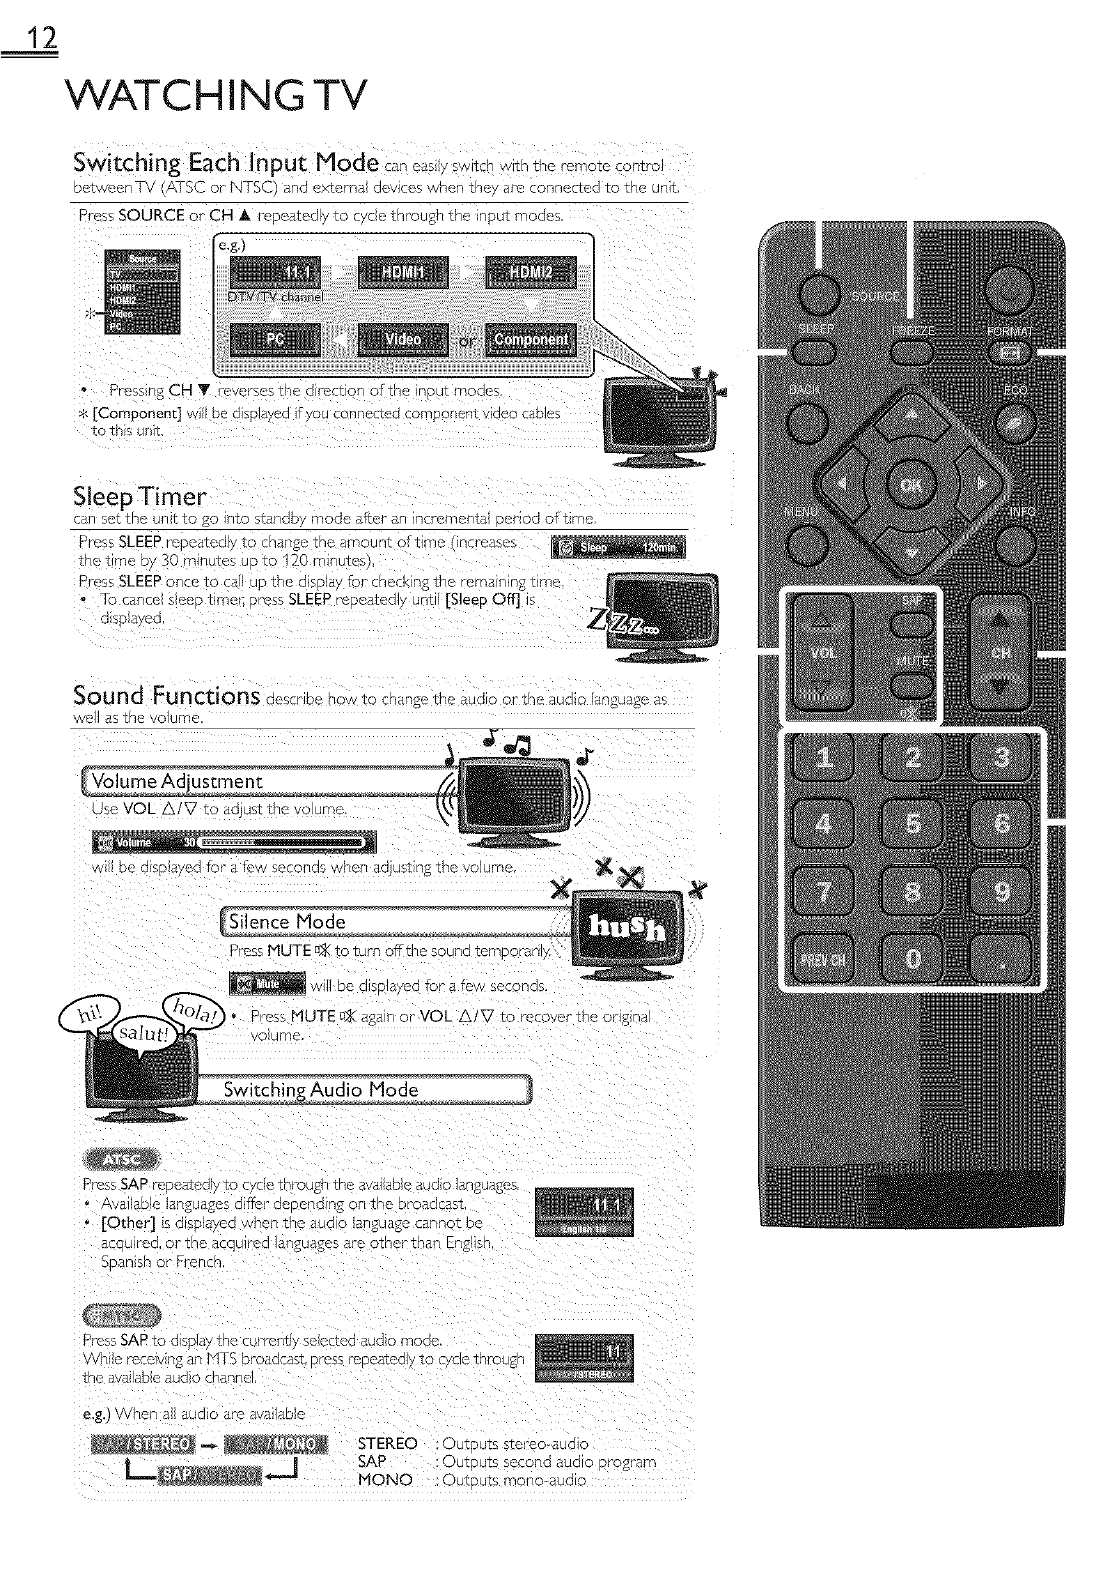
Switching Each Input Mode ........................................
betweenTV A] SC or N [SC Jnc] externa aev£es wnen _ne are connec[eq _o me unl_
_ress SOURCE or CH A FeDe2_eGv _o cyce ]"nrougn the inpu]" moae_
Press r _ CH Y reve "ses the d rection of the qOUT moaes
$ [Component] wi[ De c]lsDJaved if YOU connec_en COt _onen] v_aeo Cable!
Sleep Timer
:an SeT _ne un T _C _0 Into s_anac /mode after an incmmenta r _r_od of time
Press SLEEP I'GDC _ICCJiy 1:0 change t le arNotJnt ottlme qcl-eases
Tn{] _lme bY 30 minutes uo to 120 m_nutes
_ress SLEEP once to c, up the display for ched< ng the rema nng _lmc
* To canoe seeo _mec oress SLEEP repcatedly until [Sleep Off] Is
3 SD avec
Sound Functions describe how to change _ne aua _ or tne aua_o language a<
/ell as the Volume
use VOL A/V to a( Js__ne vo urne
De qlSn aved fop a fnw seconds when _djus]" n2 the volume
Silence Mode
Press MUTE u._to turn off the so
(11SDI<led for a few secc
re recover The orlg o_
dio Mode
Press SAP reDeaTeo;v TO cvqe TDI-OUgn ].Re avauaole auoo languages,
Available languages aTTOC aopeRgINg OR IRe Droaocast,
• [Other] 5 al5Dle'zeo When IRe ?2U(]0 Dr _uage cannoT De
_cau roe, or tne ac ]ulrea _Bnguages are c0ther than E ig/is0
5 3ansh or Fpenck
Press SAP to display The currenT1 _, _ ] ecTea auao mc so
vnlle receiving _N M IS br'oadca_, Dress reDea_eClly ]"o cycle tn/-ougr
the _/a_aD_e _ua_o cnanne
e,g.) When all audio arc avadab c
_ STEREO Out F J_s s_ereo auc
.... _ SAP :Out F JtS second aua o r _og _'
[l__.--.I NONe : OUtDUTSmono-aua_c

13
Freeze Mode can freeze the mage shown on theTV screen for 5 minutes,
Press FREEZE to freeze tne image,
. r, o sauna OUIDU_ VVI_ ROt De oausec
]o canoe lreeze mode, Dress any DUlTOr SeXCeDt O
TV Screen Display Mode
5 tvnes of disoL /modes can be sec :ted wnnn zne Droaacast n_ station _ssena ng 6:9 or 4:3 video sgna,And 3 types of d spla
modes ran be se erred for PC nDUTSBna
Press FORMAT E_ reheated v to •/dtch theTV asoecT ra_ :
For 16:9 video signal
Normal 4:3 Movie exoand
Wide
For 4:3 video signal
Zoom
Normal displays a 1 6:9 p cturc e:_its orig qa size
4:3 d sD avs a I6:9 )mturo at a 4:3 sze: The DICTUI'O
Ssno_enea no_-17on_H_ Scleba_s _ODeaFon DO_n
cages )fthe screer
Movie expand @splays a 1 6:9 pctc -c _nat is
verTca stretched to fi _ne screen n s only scar
out the TeD OTThe Dc_uro
Zoom disc avs a 16:9 91C_L°e a%Its max mum s_zc
wl_nou_ cnanglRg _b nonzontm ann vcl]lcaJ r2_lo
Wide disD_avsa nonzon_;_ ws_-c_cnea E -ture rhls
CrODS OUT %Re Jt_]T _Da rlgn]i slats OT q_lqC DICTUrC,
Normal disolavs adP DJc_urea_JzsoDg nal sze,
Sdebars aooear on both edges o#the street
16:9 disDlavs a 4:3 Dczure at a 1 6:9 sz_: the n cTui-c
s strctcnea norlzonTa Wto _ill the screL
Norma 16:9 Movie e> 3ana the screen, ] his CroDs OUl:tnn too ottk 2 ClOTure
Nide Zoom
For PC input signal
Normal
Channel Selection
Seect channels by using CH _/_" or the Number bul:Lons
re seect the ]emorlzea cnanne_ use CH A/_ or the Number buE[ons,
* _ scect the non--mcmo/]zcq cnannc_s, use Ehe Number bu!:tons
To use the Number buttons
_7_hen se_' 41ng Qg¢;)l channel I I
Be sur_ _c o_Pss• before erflerir __ne sur_cn,_nne]n_ sider:
Press PREV CH to return ¢o the urewousv ewea cnanne
\h/h_ se_ecl.mgcaole or ana_o{ channel 1
• ]No Signal] w appear on _nc screen dT_Cl_De Subcn4nne broaatdst s OVOL
• [Audio only program] messdge w apped_ on theTV screw,n, when you rece ve any sound sgna,

14
TV Screen Information
You can d splaythe currently selected channel or other
nformation such as the audio mode on theTV screen,
in the digtal mode. the detaled broadcast ng nformation
for the current offthe air channel such as program ttie and
program gudes are displayed.
1PressINFO.
1 2
ECO
You can turn on ECO Node to conserve powen
ECO mode: ON s ENERGY S]}<R *° qualified sett ng.
Press ECOJ once to turn on ECO Node and reduce
power consumption.
Press ECOJ again to turn off ECO Mode.
N£:!
• You must set [Home] in [Location].u,_, p.23
OthenMse, the sett}ngs you adjusted will not be saved when the
unit goes into standby mode.
1 program tale
:2 program guide
(Ihe program guide added to broadcasting
infom]ation is d spJayed to a max mum of 4 lines,)
:3 broadcast station
4 channeJ number
5audio language (AISC)/audo mode (N]SC)
[SwitchingAudio Node] ,,_ p.12
6effiective scanning lines and scan mode
7IV format
8program's image aspect rato
9 CC (not avalable if dosed caption is set to [Off])
10 chld Iockratng
2. Press INFO or BACK to hde the nformat on.
Note
When the program gude cons sts of more than 4 nes, use A/1t'
to scl_ to the next/prcvious Ines.
[No description provided.] is displayed when the proglam gude
is not provided.
While the program gude is d splayed, the closed caption function
is intcwupted.
In externa input mode, the follow n£ screen is disp}ayed;
e.g.) When an externa devce is connected toVideo Input jad<.
The infermat on d splay will automatica y disappeal n I m nute.

USING FUNCTIONS
This section describes the overview of the man menu
displayed when you press MENU.
[he main menu consists of the rune€ion setting items below.
1 PressMENU to d splay
the main menu,
15
S
Use _,/T to select a des red menu and an tern, then
press OK to determine the setting,
iiii_il
Page 16
Adjusting the p cture mode, o1" custom ze the
picture quality as your preference.
Page 16
Adjusting the sound mode, equalizer and some
other sound functions.
Page 17
Scann ng the channels avalable n your area and
see what the antenna levels are,
Page 18
Adjusting the Closed Caption, parental guide and
some other useful funct ons.
Page 23
You can choose English, Spanish, or French
as your on screen language.
Page 24
You can view jPEG p cture files stored on a USB
storage device.
3 When the setting s completed, press MENU to exit.
16
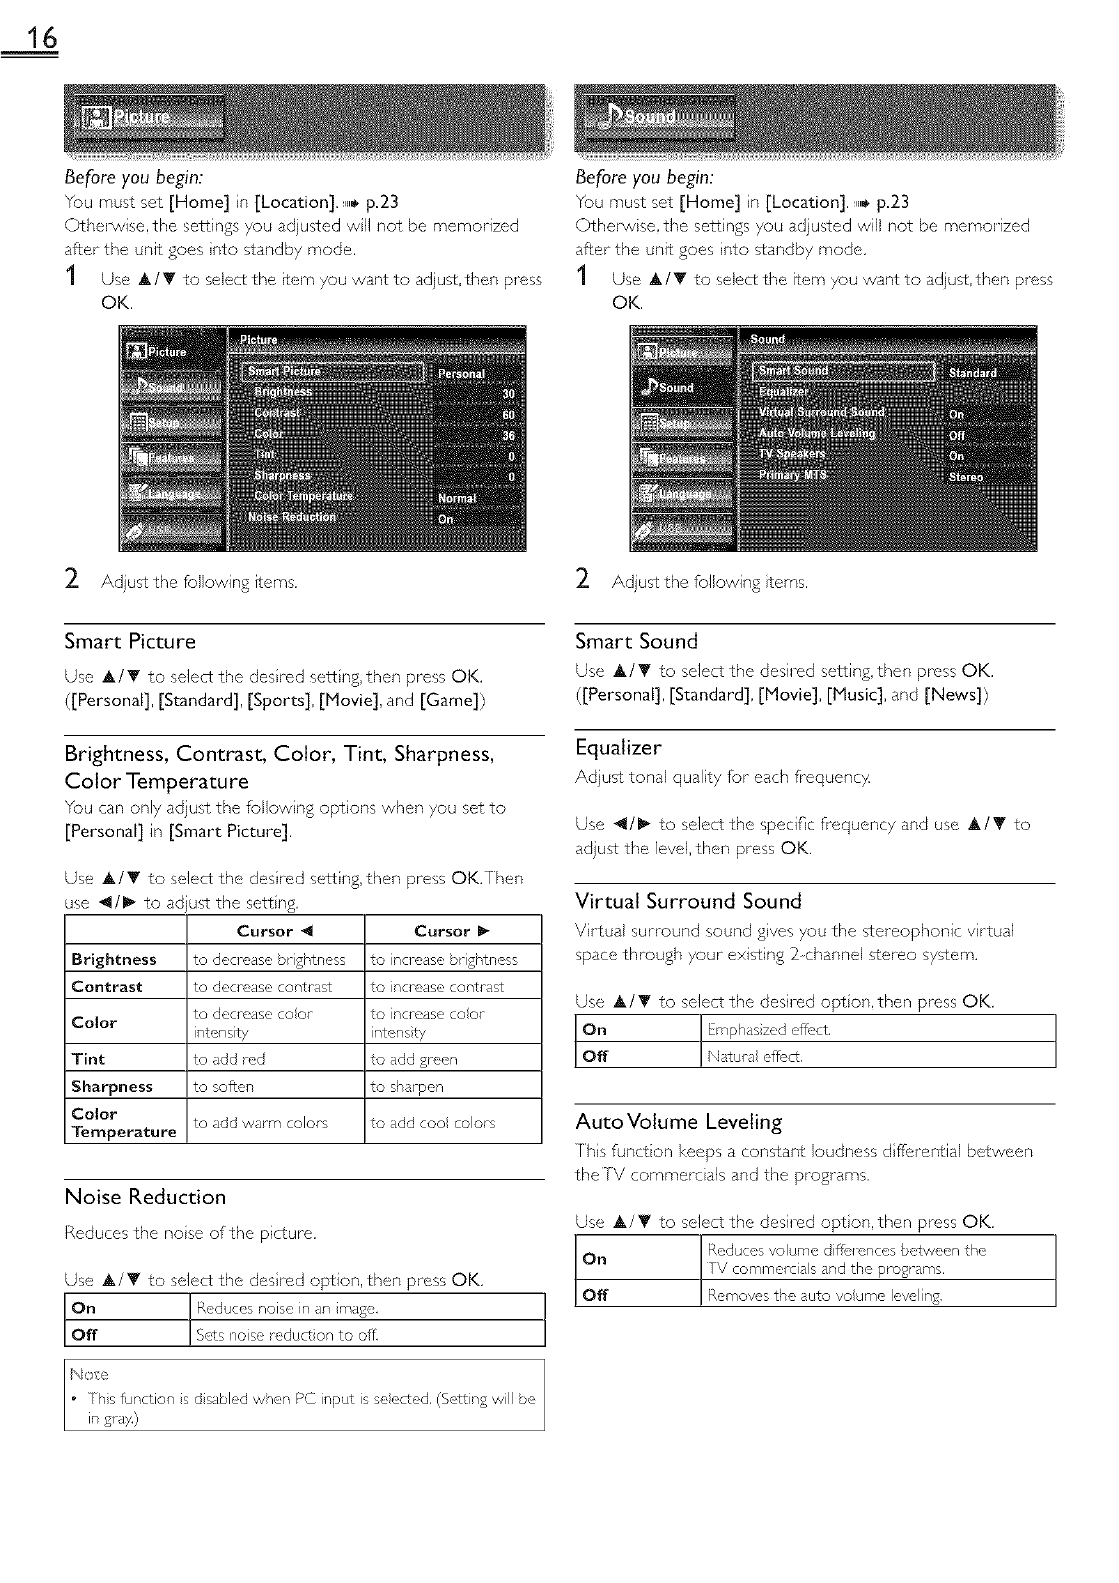
Before you begin:
You must set [Home] n [Location]. ,,_ p.23
Othe_wise, the settings you adjusted wll not be memorized
after the unit goes nto standby mode.
1 Use &/Y to select the _tem you want to adjus%then press
OK.
Before you begin:
You must set [Home] n [Location]. ,,_ p.23
Othelwise, the settings you adjusted will not be memorized
after the unit goes nto standby mode,
1 Use &/Y to select the item you want to adjus%then press
OK,
2. Adjust the following items.
Smart Picture
Use A/T to select the des red sett ng, then press OK.
([Personal], [Standard], [Sports], [Movie], and [Game])
Brightness, Contrast, Color, Tint, Sharpness,
Color Temperature
You can only adjust the following opt ons when you set to
[Personal] in [Smart Picture].
Use A/T to select the des red sett ng, then press OK,Then
use _/1_ to adjust the sett ng.
Cursor _ Cursor
Brightness to decredse brightness to ncredse brightness
Contrast to decrease contrast to ncrease contrast
to decrease coot to ncrease coot
Color w_tensty ntensty
Tint to add rod to add green
Sharpness to soften to shal pen
Color to dcid wdrm colors to add coo colors
Temperature
Noise Reduction
Reduces the nose of the picSure.
Use A/Y to select the des red option, then press OK.
t°n
Off
b_o/e ]
• Ths function s d sdbled when PC input is seected. (Sort ng will be
in gray,)
Adjust the following terns.
Smart Sound
Use A/T to select the desired setting, then press OK,
([Personal], [Standard], [blovie], [Music], and [News])
Equalizer
Adjust tonal quality for each frequenc}4
Use _1/1_ to select the specific frequency and use A/T to
adjust the level,then press OK.
Virtual Surround Sound
V rtual surround sound gves you the stereophonic v rtual
space through your existing 2 channel sCereo system.
Use A/T to select the desired opt on, then press OK.
Auto Votume Leveling
Ths function keeps a constant loudness d fferential between
the IV commercials and the programs.
Use A/Y to select the desired opt on, then press OK,
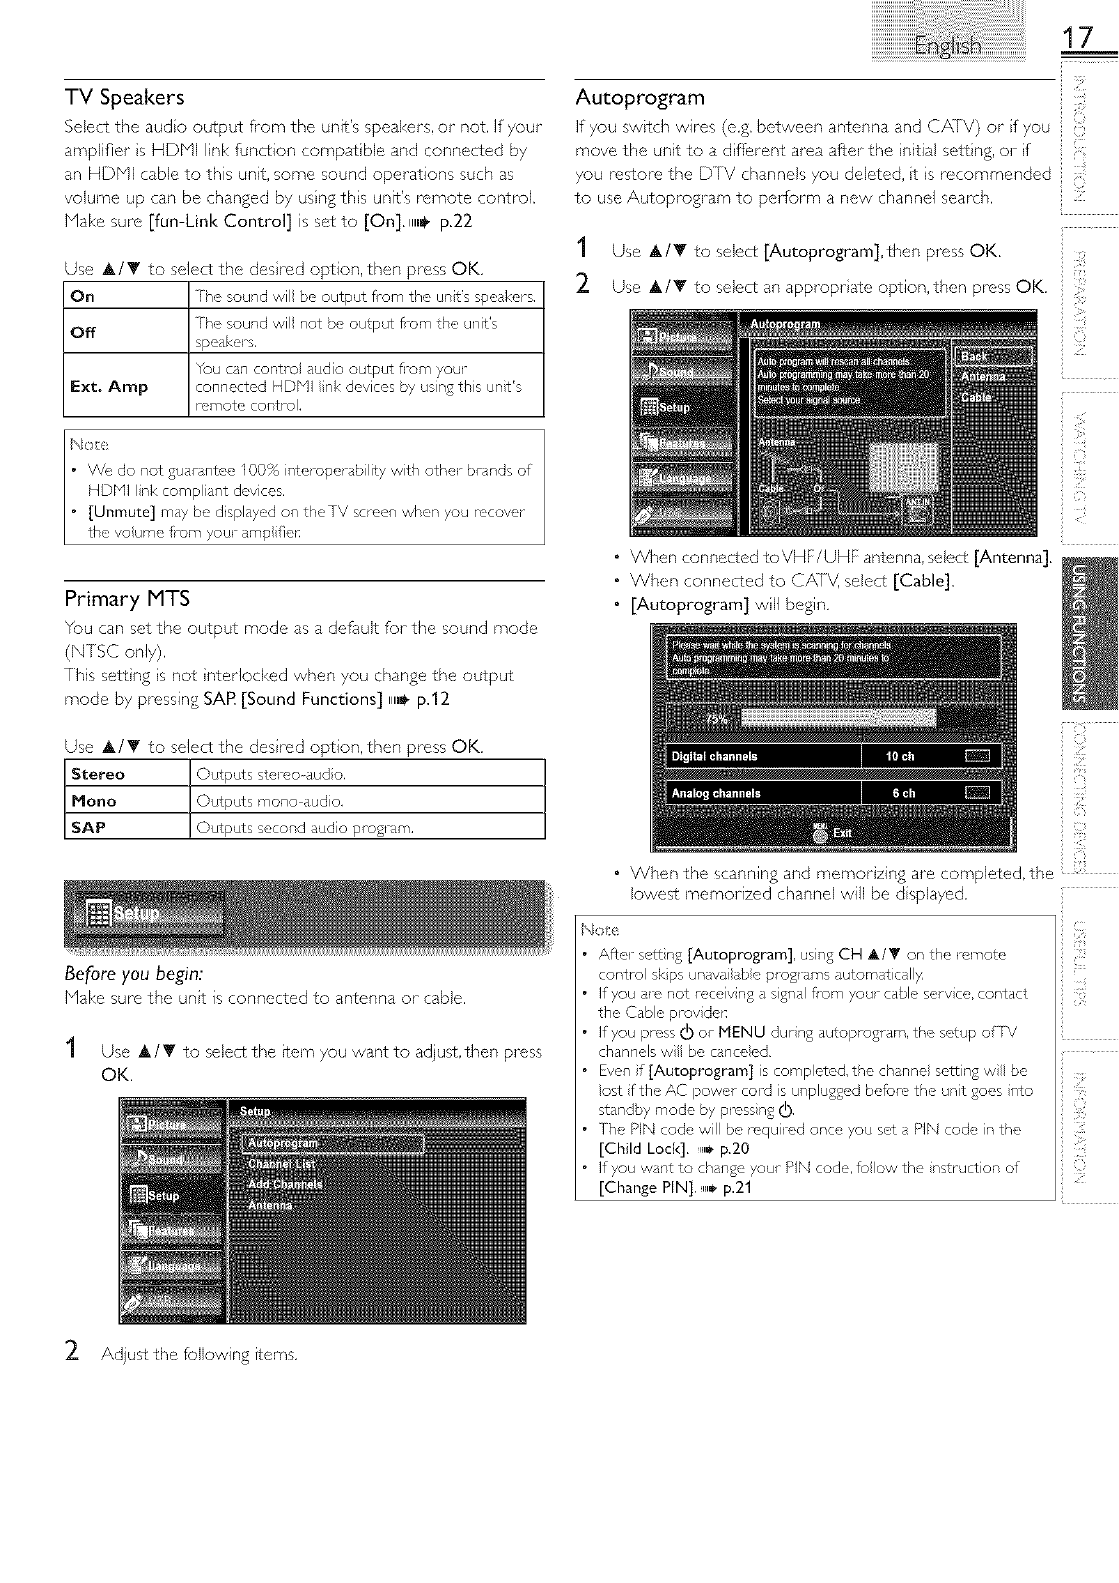
TV Speakers
Select the audo output frorn the unit's speakers, o1" not, If your
amplifier s HDbql link function compat ble and connected by
an HDNI cable to this unit, some sound operations such as
volume up can be changed by using this unit's remote control.
Hake sure [fun-Link Control] is set to [On]. ,,_ p.22
Use &/T to select the des red option, then press OK,
On The sound wil be output fl_om the unt's speakers,
Off The sound wil not be output fi-om the unit's
speakers.
You can centre audio output fl-om your
Ext. Amp connected HDNI nk devices by usng this unt's
remote control,
17
Autoprogram
if you switch wires (e,g. between antenna and C/XiV) or f you
move the unit to a d ftSerent area after the nitial setting, or f
you restore the D]V channels you deleted, t s recommended
to use Autoprogram to perform a new channel search .....
1Use &/T to select [Autoprogram],then press OK. if
2. Use &/_' to select an approprate option, then press OK.
Primary MTS
You can set the output mode as a default for the sound mode
(NISC only).
This sett ngs not nterlocked when you change the output
mode by pressing SAR [Sound Functions] ,,_ p.12
Use &/Y to select the des red option, then press OK,
Stereo Outputs stereo dud o,
Hono Outputs mono aud o,
SAP Outputs second audio program,
Before you begin:
Hake sure the unt is connected to antenna or cable,
1Use &/Y to select the _temyou want to adjus¢,then press
OK.
• When connected toVHF/UHF antenna, select [Antenna].
• When connected to CATV, select [Cable].
• [Autoprogram] will begin.
i'¸i:
ili!_{
•When the scanning and memorzing are completed, the ;:
lowest memorized channel will be d splayed.
Note
After sctt n£ [Autoprogram], using CH _i,/_r on the _rnote
centre skps unavailabe p1_£_ ms automatically.
If you _e not receiv n£ a sgnal fl_m your cable sol v co, contact
the Cabe prey de_:
If you press (]) or MENU durng autoproglam, the setup of TV
channels w be canceed.
Even if [Autoprogram] s competed, the ch_nne se_in£ w be
oat fthe AC powel cord s unplugged before the unit goes I_to
standby mode by prcss n£ _),
The PIN code will be requ red once you sot a PIN code n the
[Child Lock]. ,,,_ p.20
If you want to change youc PIN code, foow the nstruction of
[Change PIN]. u,_,p.21
2. Adjust the following items.
18
Channel List
The channels selected here can be skipped when selecting the
channels using CH A/V.
Those channels can sell be selected with the Number buttons.
Antenna Confirmation
7hs funct on lets you check the digital sgnal strength of each
channek
1Use &IT to select [Channel List],then press OK. 1
2 Use A /Y to select the channel you want to remove, then 2
press OK.
Use A/T to select [Antenna], then press OK.
Use the Number buttons or CH A /T to select the
channel for which you want to check the digital signal
strength.
• The channel d splay for the removed channel darkens.
You will not be able to select the channel again using
CH A/T.
•Tb reactivate a removed channel, use A/T and press
OK[he reg stered channels are highl ghted.
• When you remove a main channel, its subchannels are
removed as well.
• The channe with the [DTV] nd cared on the d splay is,dlSCm
Otherwse the channe s N1SC,
N;+e
• If the channe is set to analog (cable) channel or external nput,
you cannot confirm the antenna condt on,
Add Channels
This funct on lets you add the offthe air along NTSC or analog
Cable channels that were not added by the autoprogram due
to reception conditions at the intal setting.
1
2
Use &IT to select [Add Channels],then press OK.
Use the Number buttons to enter the number of the
channel you want to add, then press OK.
1 Use &/T to select the item you want to adius¢,then press
OK.
2 Adjustthe following terns.
Closed Caption
You can yew closed captioning (CC) fbriV programs,
moves and news. Closed caption refers to text of dialog or
descr ptions displayed on screen.
Use A/T to select [Closed Caption], then press OK,
See the following description for sett ng each item.
19
A
B
C
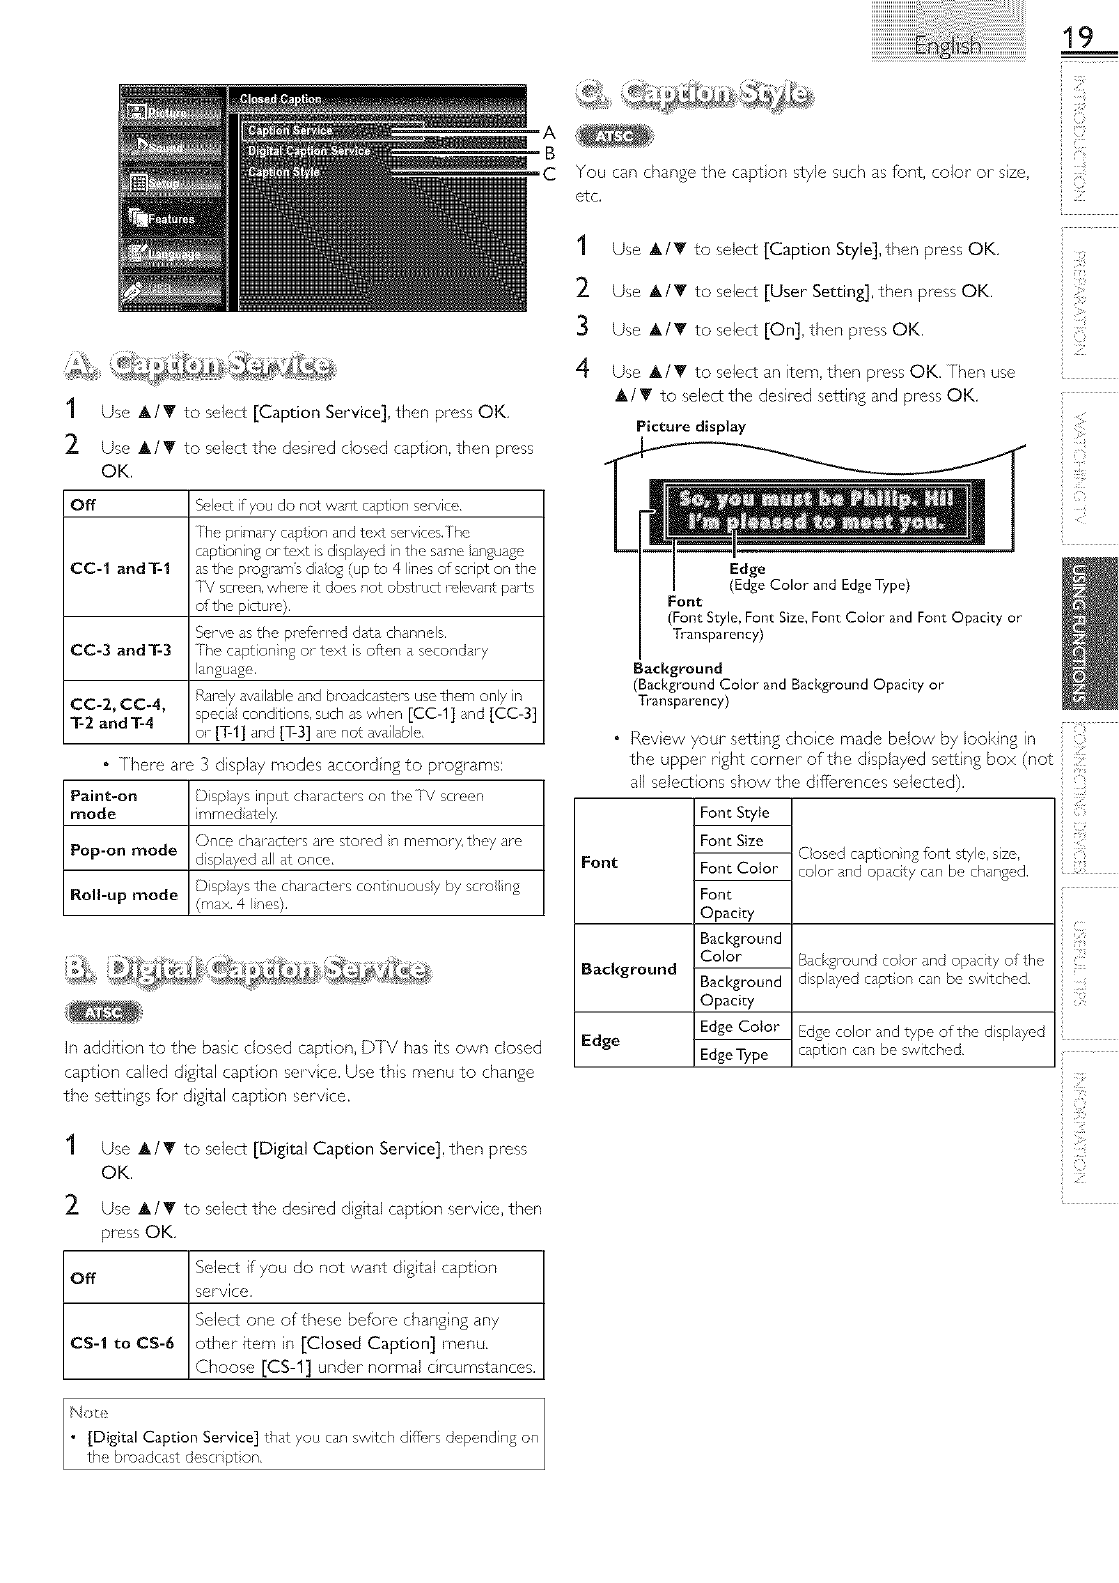
1 Use A/V to select [Caption Service], then press OK.
2. Use A/T to select the desh'ed closed capton, then press
OK.
Off Seect f you do not want caption service.
The pr mary capt on and tc,xt sel-vcesi/he
capt onin£ or t_,xt s dispbyed in the same angusge
CO-1 and T-1 asthe program's diao£ (up to 4 Ines of scnpt on the
[V scrcen, where rLdoes not obstruct roloval¢ parts
of the picture).
Serve as the prefl, lrod dat channels.
CC-3 and T-3 The caption n£ or text is often a secondal y
language.
CC-2, CC-4, Rarely _va labe and broadcasters use them ony in
T-2 and T-4 specie conditions, such aswhen [CC-1] and [CC-3]
or [T-I] and [T-3] are not availab e,
" [here are 3 display modes accord ng to programs:
Paint-on Disp ays input characters on theTV screen
mode irnmed ately.
Once characters are stored n memory, they are
Pop-on mode dsplayed all at once.
Disp ys the characters cent nuousy by sere n£
Roll-up mode (max, 4 nes).
in addition to the basic closed caption, DTV has its own closed
caption called d gital capt on servce. Use ths menu to change
the sett ngs for d gital capt on servce.
1Use A/T to select [Digital Caption Service], then press
OK.
2. Use A/_" to select the desh'ed dgtal capton service, then
press OK.
Select if you do not want digtal caption
Off service.
Select one of these before chang ng any
ca-1 to ca-6 other item n [Closed Caption] menu.
Choose [CS-1] under normal c rcumstances.
You can change the capt on style such as font, color or sze,
etc.
1Use A/T to select [Caption Style], then press OK.
2. Use A/T to select [User Setting], then press OK.
Use A/T to select [On], then press OK.
Use A/V to select an item, then press OK. [hen use
A/T to select the desired setting and press OK.
Picture display
Font
S
i?':_
Edge
(Edge Color and EdgeType)
Font
(Font Style, Font Size, Font Color and Font Opacity or
Transparency]
Background
(Background Color and Background Opacity or
Transparency]
•Revew your set¢ ng choce made below by looking in
the upper rght comer of the d splayed setting box (not
all selections show the differences selected).
Font Style
Font Size
Background
Edge
-- Closed cspt oning font style, size,
Font Color color and opacty can be changed,
Font
Opacity
Background
Color
Background
Opacity
Edge Color
Edge Type
__ Background coot and opacity of the
disp ayed capt on can be switched.
__ Edge color and type of the disp eyed
caption can be switched.
iiil!_il
(i/',!
Not
[Digital Caption Service] that you can swtch diffr, rs depending on
the broadcast descr pt on.
2O
Note
Closed capt on will not be displayed when you are using an HDNI
connect on.
re show the dosed caption on youi-TV screen, broadcast signal
must contain the cosed caption dat,
Not all TV ply%ares and comrnerciaB hdve the closed caption ol
all types of the closed caption,
Captions and texts may not exactly match theTV voice.
Changing channels may delay the closed c ption for a few seconds.
Adjusting or muting the volume may deldy the closed caption for
a fi, vv seconds.
Abbrev atiops, symbols and other grammat ca shortcuts may be
used in order to keep pace wth the on screel, action.Th s is pot
a malfunct on.
The caption or text chaJ,_cters will not be displayed while the
main menu ol functions display is shown.
If,_ black, box appears on theTV screen, this means that the closed
caption is sct to the text mode, Io dear the box, select [CC-1],
[CC-2], [CC-3], [CC-4] or [Oft].
If the unt rote ves poor qu_dit), telev sion signa s,the captions may
contain en_rs, or the_e might be no captions at all,Some possible
causes of poor qu_dity sign Is al_:
Automobile ignition nose
Electric motor nose
W_,ak signal reception
Multiplex signa leception (ghosts or screen flutter)
Data dropout and Pixelation (for DTV only)
The unit _t,t ins the closed capt on setting if the power f_ils,
When the unit race ves special effects pbyback signal (e,g, Search,
Sow and St) from aVCR's video output channel (oh3 or oh4),
the unit may not disp ay the con-oct caption or text,
Note
A
B
C
D
When you select a/atn£ and sot it to [Block], the hgher/stngs
will be blod<ed automatca }4T/_e owor ratn% w be ava abe for
wevv ng,
When you set the h ghest ratipg to [View], a ratn% turn to
[View] automat ca y,
1o block any inappropl%te programs, sot youl-limits in [US Movie
Ratings Loci<I, [US TV Raungs Locl<] and [Region Ratings Loci<I,
lhe chd lock sort ng will be retaned aftel power failure or after
tl_e powel s removcd for longer- than I0 seconds (except the PIN
code revel ts to 0000). [Child Locl<] _,_ p,20
If the rat% is becked, @ w appeal
[Region Raungs Locl<] w be _!vashe when tl,e upit receives a
d £ital b_adcs£ using the i_ovvrating system,
Fol tPe Unted States, the ul_t malt dowNoad the Regon Ratil_gs
Lock bbe, f rcqu rod,
The Canadian rati% sy£ems on this unit al_ based on CEA_766 A
and CRIC pocy.
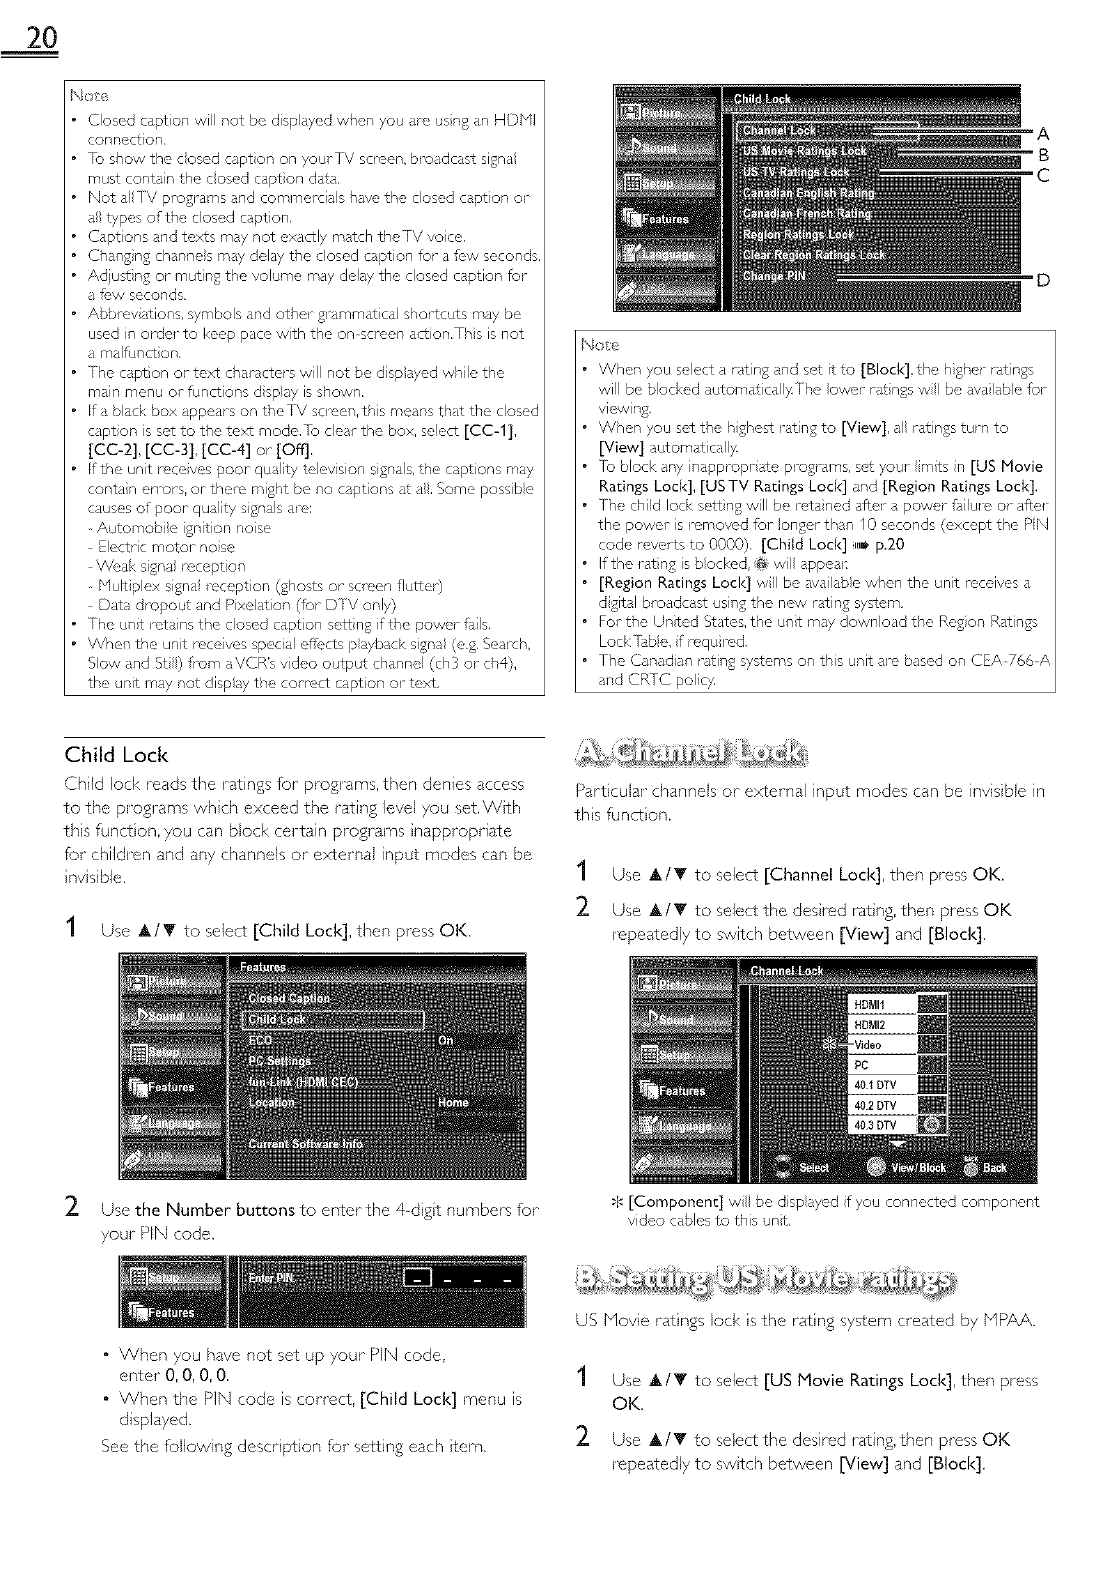
Child Lock
Child loci< reads the ratings for programs, then denies access
to the programs whch exceed the rating level you set, Wth
ths funct on, you can block certain progl'ams napproprJate
for children and any channels or external input modes can be
nv sible,
1Use A/T to select [Child Lock], then press OK.
Particular channels or external input modes can be invisible in
ths funct on.
1Use A/T to select [Channel Lock], then press OK.
2. Use A/T to select the desred ratng, then press OK
repeatedly to switch between [View] and [Block].
2. Use the Number buttons to enter the 4dgt numbers for
your PIN code.
$ [Component] wll be displayed f you connected component
video cables to this unt,
•When you have not set up your PIN code,
enter 0, 0, 0, 0.
• When the PIN code is comect, [Child Lock] menu is
displayed,
See the following descr ption for setting each tern,
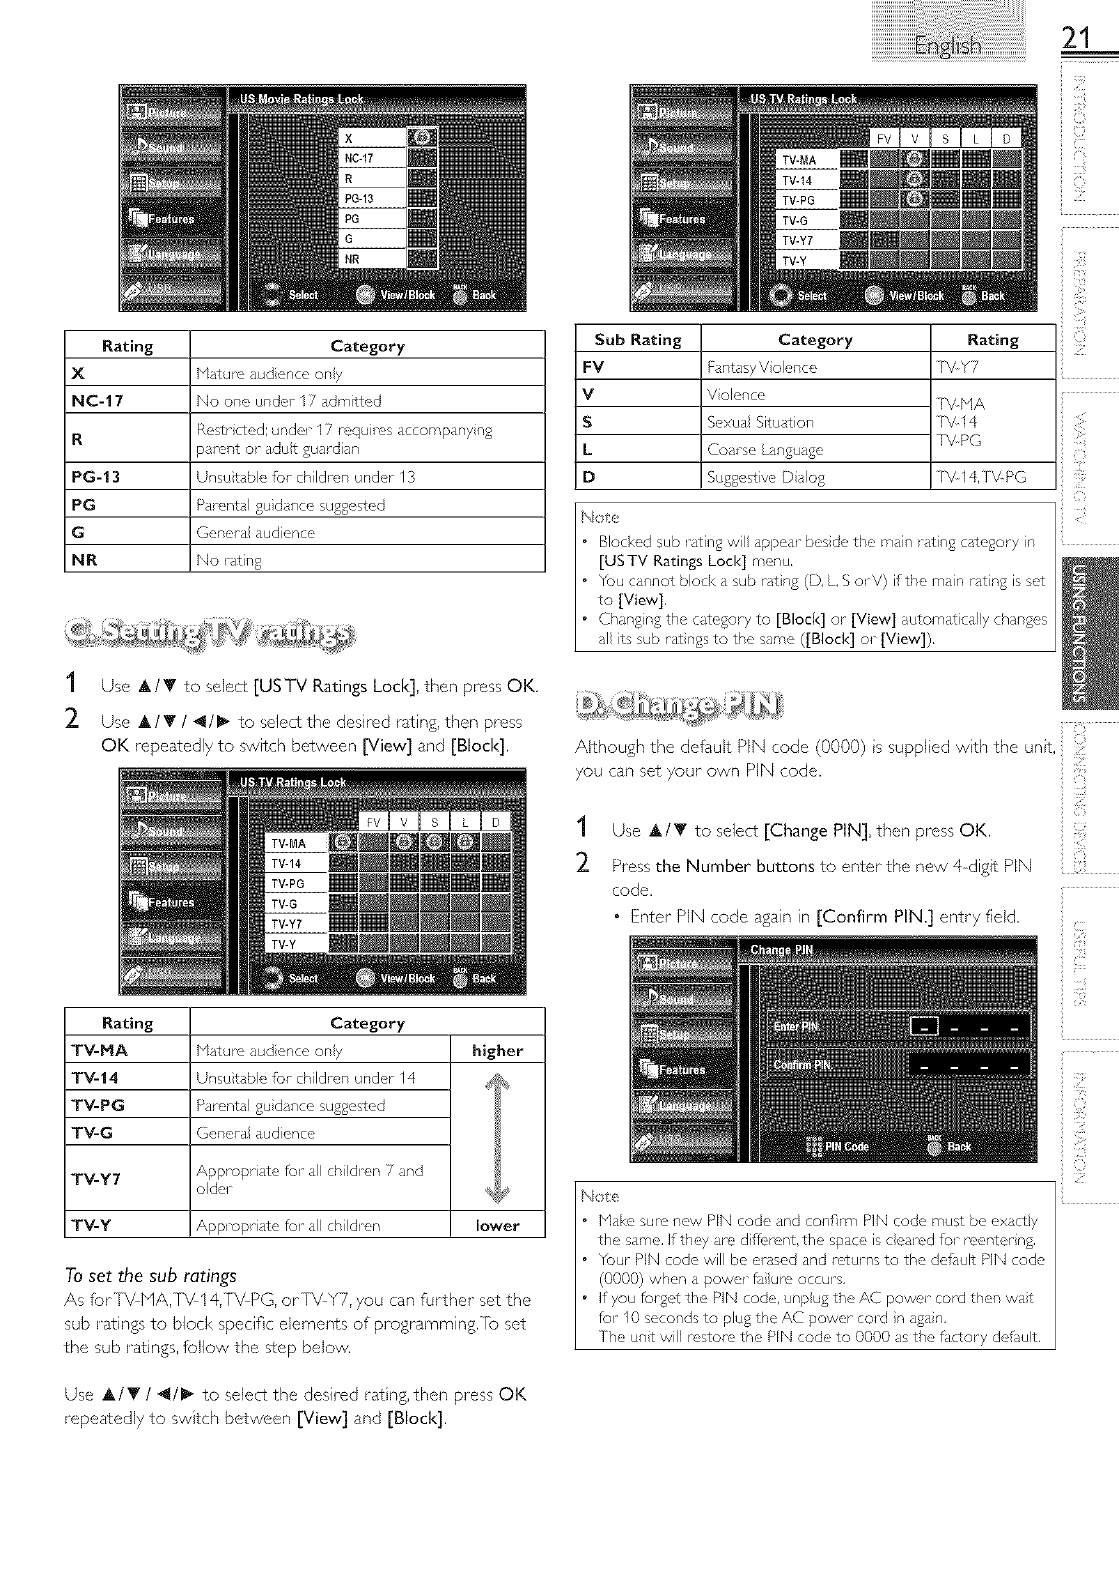
US Movie rat ngs loci< is the ratng system created by MPAA.
1
2
Use A/T to select [US Movie Ratings Lock], then press
OK.
Use A/_t" to select the desired rating, then press OK
repeatedly to swtch between [View] and [Block].
21
Rating Category
X Nature aud ence ony
NC-17 No one under 17 admitted
RRestr cted; ur,del 17 rc'quu_s accompany %
pal_nt or adut guardian
PG-13 Unsutabe for children under 13
PG Parental gu dance suggested
GGenera aud ence
NR No rating
1 Use A/T to select [USTV Ratings Lock], then press OK.
2 Use A/T /4/_- to select the desired rating, then press
QK repeatedly to switch between [View] and [Block].
Sub Rating Category
FV Fantasy V olence
VV olence
SSexua Situation
LCoal se Language
D Suggestive Daog
T%NA
T%14
T%PG
T%14,T_PG
N£!
• Blocked sub rating vvll appear beside the main rating category in
[US TV Ratings Lock] menu.
• You car,not block a sub ratn£ (D, L, SorV) if the man ratn£ is set
to [View],
• Chang ng the category to [Block] or [View] automatca y changes
al its sub rat ngs to the same ([Block] ol- [View]),
Althoughthedefau,tPiNcode 0000>issuppl+edwiththeunit+iii!ii!
you can set your own PiN code.
1 Use ,IT to select [Change PIN], then press OK,
2 Press the Number buttons to enter the new 4 digit PIN {::
code.
• Enter PIN code again in [Confirm PIN.] entry field.
Rating Category
TV-HA Nature aud ence only higher
TV-14 Unsutabe for children under 14
TV-PG Parental gu dance suggested
TV-G Genera aud ence
TV-Y7 Appropriate for a ch dren 7 and
older _
TV-Y Appropriate f_r d ch dren lower
To set the sub ratings
As foriV NA,TV 14,T%PG, or]V Y7, you can further set the
sub ratings to block specific elements of programming, re set
the sub ratings, follow the step below.
Use A/T /_1/_ to select the desired rat rig, then press OK
repeatedly to switch between [View] and [Block].
22
ECO
You can turn on ECO Mode to conserve powec
ECO mode', ON s ENERGY S[TXR _'_qualified sett ng.
1 Use _,/T to select [ECO],then press OK.
2 Use _,/T to select the desired mode, then press OK.
On _sun_pt o_
IPowel tor_sun'pt ol_ may exceed ENERGY SIAR ®
Off !q_ m ts.
Note
• You must sct [Home] in [Location]. ,,_ p.23
Othet_/se, the sc,l¢}ngs you adjusted vvil not be saved when the
un}t goes into standby mode.
• You can also press ECOJ directly to switch the desired setting.
,,_, p.14
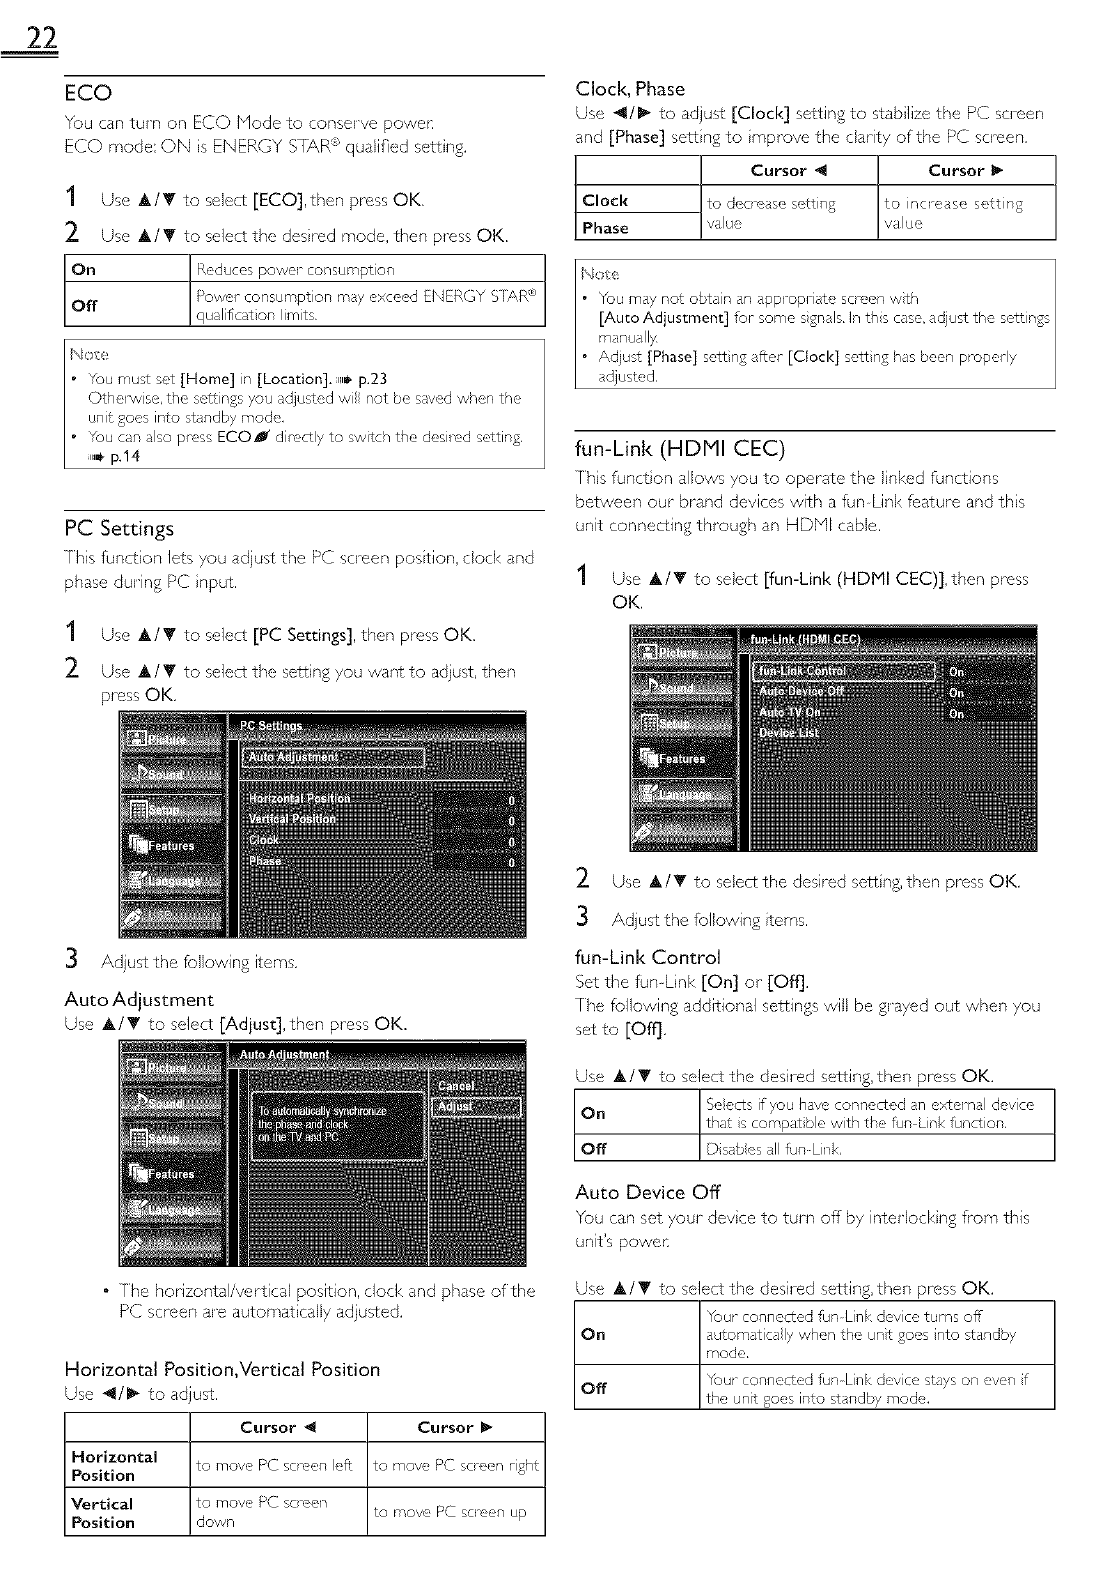
PC Settings
This funct on lets you adjust the PC screen postion, dock and
phase during PC nput.
1Use &/V to select [PC Settings], then press OK.
2 Use A/_" to select the setting you want to adjust, then
press OK.
Clock, Phase
Use 4/_" to adjust [Clock] setting to stab lize the PC screen
and [Phase] sett ng to reprove the clarity of the PC screen.
Cursor 4Cursor l_
Clock Ito decrease setting to inclease sett ng
Phase vaue vaue
fun-Link (HDMI CEC)
[hs funct on allows you to operate the inked functions
between our brand devices with a fian Link feature and ths
unit connecting through an HDbql cable.
1Use A/_' to select [fun-Link (HDMI CEC)],then press
OK.
3Adjust the following items.
Auto Adjustment
Use A/T to select [Adjust], then press OK.
• 7he horizontal/vertical position, clock and phase of the
PC screen are automat tally adjusted.
Horizontal Position,Vertical Position
Use 4/1_ to adjust.
Cursor _1 Cursor
Horizontal to move PC screen eft to move PC scre_,n rght
Position
Vertical to mow, PC screen to move PC screen up
Position down
2 Use _,/_' to select the desired sel¢ rig, then press OK.
3Adjust the following terns.
fun-Link Control
Set the fun Link [On] or [Off].
[he following additional seiCings will be grayed out when you
set to [Off].
Use A/T to select the desired setting, then press OK.
that s compat ble wth the fun-Lnk function.
D sabes all fun-Lnk
Auto Device Off
You can set your devce to turn off by interlock ng from this
unit's power
Use &/Y to select the desired setting, then press OK.
Your connected fun Link devce turns off
On automatica ly when the unt goes nto standby
mode.
Off Your connected fun Link devce stays on even f
the unit goes into standby mode.
AutoTVOn
7hisuntwillturnonwhenthepoweronsgnalissentfi'om
yourconnectedfunLinkdevice.
Use&/_'toselectthedesredsettng,thenpressOK.
On Thisunitturnsonautomatcaywhenyouturnon
yourconnectedfunLinkdevce.
Off Ths unit stays in standby mode even if you turn on
your connected fun Lnk device.
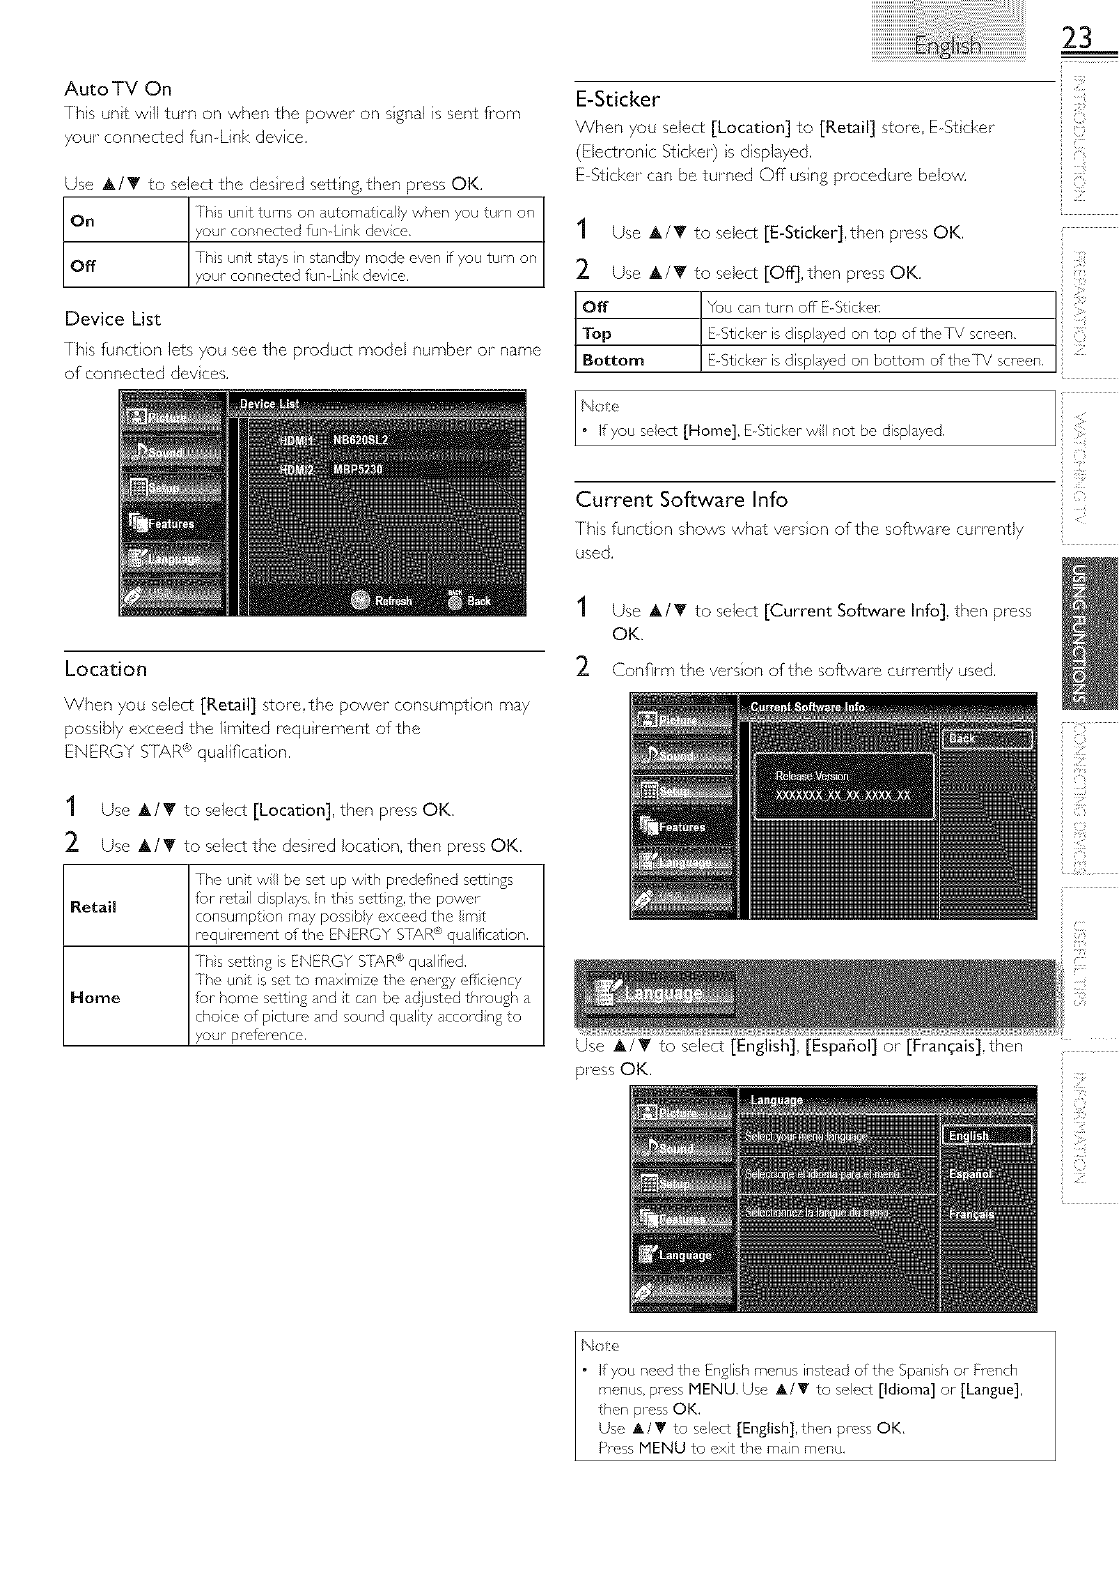
Device List
This func¢ on lets you see the product model number or name
of connected dev ces.
23
E-Sticker
When you select [Location] to [Retail] store, E St cker
(Electronic Sticker) s displayed,
E St£ker can be turned Of[ using procedure below.
S
i'{i?
1Use ,A/'T to select [E-Sticker],then press OK,
2. Use A/IF to select [Off],then press OK.
Off You can turn off E_Stcl<el_
Top E Sticker is disp ayed on top oftheTV screen.
Bottom E Sticker is disp ayed on bottom ofitheTV screen,
N£e
• If you seect [Home], £ Sticker w not be displayed.
ii!iii!_
Current Software Info
Ths runes on shows what vers on of the software currently
used.
Location
When you select [Retail] store,the power consumption may
possibly exceed the limited requ rement of the
ENERGY S[AR ® qualification.
1Use &/T to select [Current Software Info], then press
OK.
2. Confirm the verson of the software currently used.
1Use &/T to select [Location], then press OK.
2. Use &/_' to select the desh'ed location, then press OK.
The unt w be set up with pmdefined scl1 ngs
Retail for retail d sp dys. In ths sctt ng, the powel
consumpton mdy possiby exceed the m}t
requil_rnent of the ENERGY S[/\R ® qualification,
This se_ng is ENERGY S[7\R ® qualified,
The unt is set to maximize the energy efl'c ency
Home for home setting and t can be adjusted through a
choice of picture and sound quality accord ng to
your prc,f_,rence, Use A/IY to select [English], [EspaSol] or [Franqais],then
press OK.
24
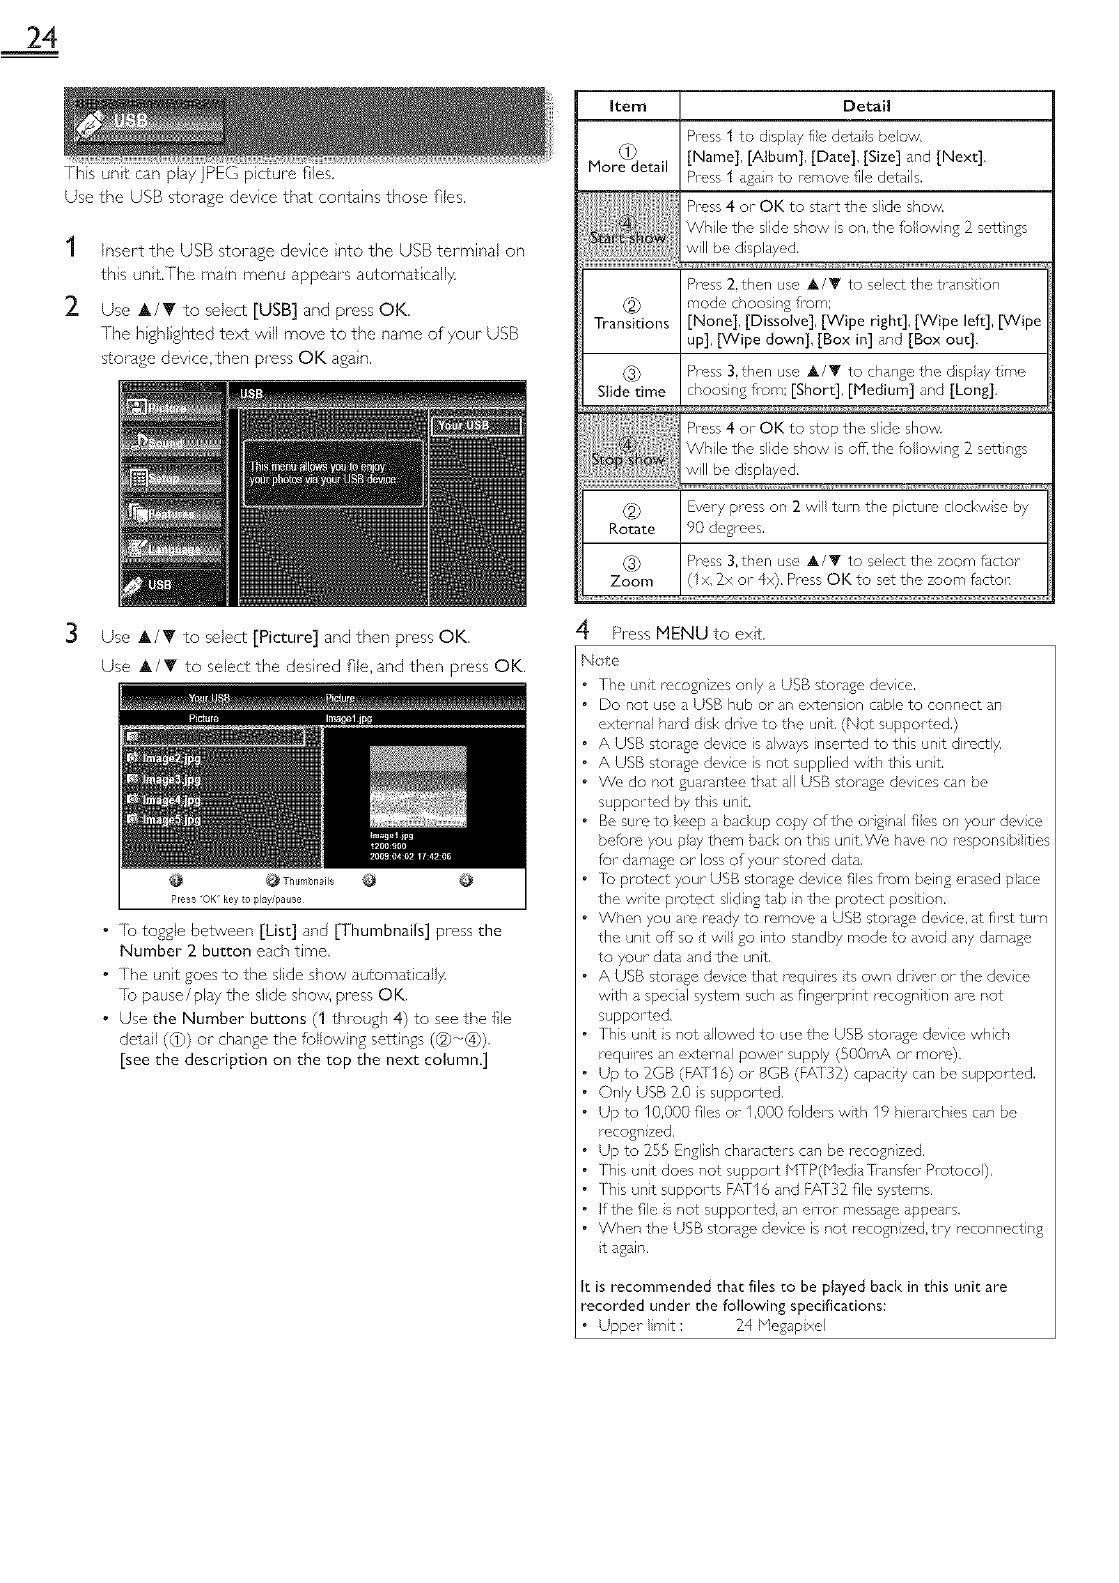
This unit can playjPEG picture flies,
Use the USB storage device that contains those flies.
1 Insert the USB storage device nto the USB terminal on
this unt,The main menu appears automat call}4
2 Use A/Y to select [USB] and press OK,
]he h ghlghted text will move to the name of your USB
storage device,then press OK agan,
3 Use A/T to select [Picture] and then press OK.
Use A/T to select the desired file, and then press OK.
•/o toggle between [List] and [Thumbnails] press the
Number 2 button each time,
• The unit goes to the slide show automatically
1o pause/play the slide show, pr-ess OK.
•Use the Number buttons (1 through 4} to see the file
detail (d}) or change the following settings (_}-+(4)),
[see the description on the top the next column.]
Item Detail
Press I to disp ay fe detas beow,
(1) [Name], [Album], [Date], [Size] and [Next],
More detail Press 1 agan to remove file details.
Prcss 2, then use ,tk/T to select the transtion
(2) mode choos ng fi_om;
Transitions [None], [Dissolve], [Wipe right], [Wipe left], [Wipe
up], [Wipe down], [Box in] and [Box out],
(3_ Press 3,then use A/V to change the disp ay time
Slide time choosing from; [Short], [Medium] and [Long],
Pressor tostopth+,s,deshow
S_O_':s_ia While the slide show is off, the fu owing 2 settw_gs
will be d splayed,
_2_ Evely press on 2 w turn the pctum clockw se by
Rotate 90 degrees.
(3} Press 3,then use _it,/Y to select the zoom factor
Zoom (Ix, Zx ol 4×), Press OK to set the zoom factor:
4 Press MENU to exit.
Note
The unt recogn zes only a USB storage dev ce,
Do t_ot use a USB hub or an extenson cabe to coFnect al_
extcrnal hard dsk drve to the unit, (Not suppol ted,)
A USB stol _ge devce is aways inserted to this unt direct y
A USB storage devce is not supplied wth this unt,
We do not guarantee that all USB storage dev ces can be
supported by ths unt,
Be surc to keep a backup copy of the ol gnal ties on your devce
before you pay them back on ths unit.We have I_o I_spol%ib ities
for damage or loss of your stored data.
]e protect your USB storage device ties Pore being el ased place
the wrte protect sliding tab in the protect post on.
When you ale rcady to removc a USB stor_ge dev ce, at f'rst tul-n
the unit offsot w go into standby mode to avod al_ydamage
to your data al_d the unit,
A USB storage devce that mqu rcsts own dryer or the devce
with a spec al system such as f'nger-pr nt recognitiof al_ not
supported.
T/_s upit s not allowed to use the USB storage devce which
requ rcs an extel na power suppy (500rr,A or morc),
Up to IGB (FA+T16) or 8GB (FA+[32) capacity cat_ be suppol ted,
OI_Iy USB Z0 s supported.
Up to 10,000 files or 1,000 feldels with 19 hieraJ_ches can be
recogn zed,
Up to 255 English chdracters can be recogn zed,
Ths unit does not support NTP(bled a [r_msfc,r Protocol).
Ths unit supports F_(fl 6 dnd F/\132 file systems,
If the file s not supported, an error messdge ppeaJ-s,
When the USB storage devce is not recogn zeG try reconnecting
t again.
: is recommended that files to be played back in this unit are
recorded under the following specifications:
• Upper mt : _4 Negapxel
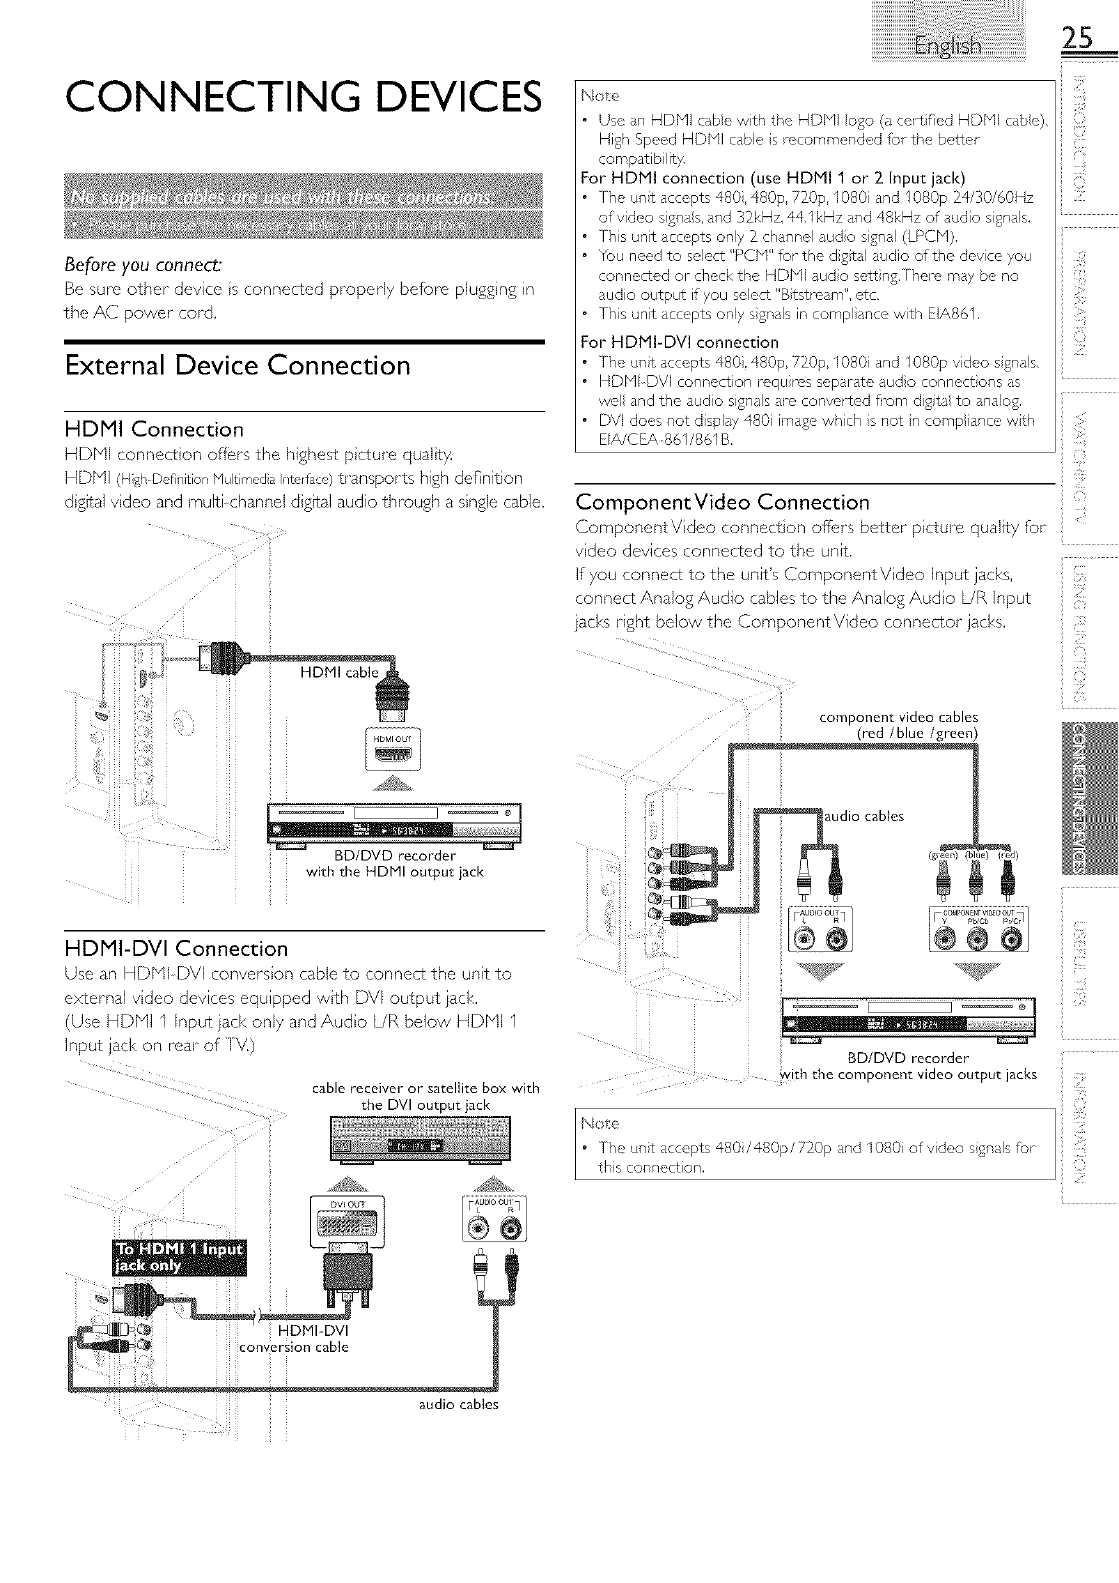
CONNECTING DEVICES
Before you connect:
Be sure other device s connected properly before plugg ng n
the AC power cord.
External Device Connection
HDMI Connection
HDN (c qnect_on offers the nlgne_ p_<ure quu,_y
_D_ v] 1£r Def]lqltop _/tJ [l/"/ed a f/L_llace) transpor% h@_ de_ntlon
slg_al vlaeo ana mu • <nannel algffal aud o throu£h a single cable.
BD/DVD recorder
with the HDMI output jack
HDMI-DVI Connection
alSO ar HDNPDVI onverslc q Cable to connect the unit to
2xcerna vlaec aevl_es eoUiDDea wl_n DVI output jack,
Use HDN r/DUT laCK Or/I_, _nd Au@c L/R below HDNI I
nDU• a,K ot reaF oT
cable receiver or satellite box with
the DVI output jack
Nole
25
The unit accepts 480,480p, 720p, I080 and 1080p 24/30/60Hz
of video sgna s, and 32kHz, 44,1kHz ,_nd 48kHz of audio signals.
Th}s unit accepts only 2 channe} audo s}gnal (LPCN),
You need to select "PCbI" for the dgtal audio of the device you
connected or check the HDbll audo sett}ng,Thel_ may be no
audio output if you select "Btstroam", etc,
Ths unit accepts ony sgnals in comp ante with EIA861,
or HDMI-DVI connecuon
The ul_t accepts 480,480p, 720£ I080 and I080p video sgna s,
HDNI DVI connection raqu}ms separate audo connect}ons ,_s
we and the audo signas are convortc, d from digta to naog,
DV] does not d splay 480 image whch s not n comp ante wth
EIA/CEA_S61/861 B,
&
ComponentVideo Connection
ComponentV dee connect on off;ers better p cture quality for
vdeo devices connected to the unit.
If you connect to the unit's ComponentVideo Input jacks,
connect Analog Audio cables to the Analog Audo L/R input
}ad<s right below the ComponentVideo connector iad<s.
iiii
component video cables
(red /blue /green)
cables
BD/DVD recorder
......... with th ...... p........ id..... put jacks
audio cables

26
Composite Video Connection
Composte Vdeo connection offers standard p cture quality
for vdeo devices connected to the unit. if you connect to the
unt's Compos te Vdeo input jack (VIDEO), connect audo
cables to the Audo L/R Input jacks be+ow the Composte
Vdeo connector jack.When the Audio is monaural, then only
connect to the Audo L input jack.
camcorder video game
VCR
oL+:o;l
audio cables
Digital Audio Output Connection
(for digital broadcasting only)
If you connect this unit to an external digtal audio dev re, you
can enjoy multi channel audio Ike 5.1ch digtal broadcast ng
sound.
Use a d gital audo coax al cable to connect the unt to
external digtal audio dev ces.
+
Oolbyo+gita,
decoder
PC Connection
Ths unt s equ pped with a PC nput jack. If you connect ths
unit to your PC, you can use ths unt as a PC mon to1:
Use aVGA cable for th sVideo connection and t requ res a
stereo rain plug conversion cable for Analog Audo signal as
well.
personal computer
mini audio cable
VGA cable should be
The following video signals can be displayed:
VGA 640 x 480
SV(SA 800 x 600
}{CA 1,024 x 768 60Hz
1,280 x 768
WXGA 1,360 x 768
Other formats or nonstandard s gnals will not be displayed
correctly.
I No e
+ Pease purch,_se theVGA cable that has a f+,rr te core.
+ The folowing operations may reduce nose,
Attach a re,trite core to the AC powel- cord of your PC.
Unpug the AC power cord and use the butn battery of your
PC.
digital aUdi6 Coaxial cable

27
USB Storage Device
This unt offiers easy playback ofjPEG p cture Fles.
Insert the USB storage devce into the USB term nal shown
below. [USB] u,_ p.24
S
+i!iii!_
i
No_ (:}
The unit recognizes only a USB storage dev ce,
Do not use a USB hub or an extension cabe to connect an
extelnal hard dsk drve to the unit, (Not supported.)
A USB storage devce is alwdys nselted to this unit drectly.
A USB stol,_ge devce is not supplied wth this unt,
We do not £uar,_ntc,e that all USB storage devices can be
supported by this unit.
Be sure to keep a backup copy of the ol iginal ties on your devce
before you pdy them back on ths unit.We, have no responsibilities
for damage or loss of your storcd data.
[o protect your USB stol-age devce files fi-om being erased place
the wrte protc,ct sliding tab n the protect post on.
When you ale ready to remove a USB storage dev ce, at first turn
the unit off so t w go into standby mode to dyed any damage
to your data and the unit.
A USB storage devce that roqu ros its own @_ver or the devce
with a spec al system such as fingerpr nt recognit on are not
supported,
Ths unit is not allowed to use the USB storage device which
requires an extel na power suppy (500mA or more).
Up to 2GB (F/\TI6) or 8GB (FA+f32) capacty can be supported,
Ony USB 2.0 s supported.
Up to I0,000 files or 1,000 fe de_-swth I9 hiel_u-ch es cdn be
rccogn zed,
Up to 255 Engl sh chdracters Q!n be _cogn zed,
Ths unit does not support blTP(Ned a+[/ansfl,iPl_toco).
Ths unit supports F/X116 and h/\q 32 file systems.
If the file s i_ot supported, an error rr,esssge appears.
When the USB £ora£e devce s not recogn zed, try reconnectir_g
it again.
It is recommended tha_ files to be played back in this unit are
recorded under the following specifications:
Uppel_ mt : _4 Ne£apxel
i}i:,i
(i/',!

28
USEFULTIPS
FAQ
e- 0_
Check the antenna or cabe connect on to the man unt,
Check the batteries of the remote controk
Check if there is an obstacle between the inPared sensor window and the remote control,
%st the signal output use [IR Signal Check], ,_ p,30
If okay, then possible nfrared sensor trouble,
My remote control does not work, •Aim the remote control directly at the infrared sensor window on the fl-ont of the unit,
What should I do_ Reduce the dist nee to the unit,
Re insert tt-e bdtteres with their poldrtes (+/- sgns) s indicated,
When there s dn infr,_red equipped device such as PC nedr ths unit, t may i_,terrupt the remote
control signal of this unt,
Move the pfrared equipped device away from ths unit, change the angle of the irffrared sensor or
turn offthe intimated commun eaton _unct on,
unit?
Make sure [Autoprogram I hs been completed. ,_i- p.17
Autoprogrdm must be completed when you set up the unt for the first time or move t to a Iocat on
where previous y unava abe chalme s are broadcast,
Why can I not watch some RF The selected channel may not be broadcasting,
signalTV programs. Wt,en [Autoprogram] s interrupted sl,d not competed, some d_alme s w pot be received, Make
sure to complete the Autoprogram, ,_i- pA 7
[he selected chdnnel cannot be vewed by the [Child Lock] sett ng. ,_i- p.20
[he uNt requ res some knd of antenna input.An indoor dntenna (VHF/UHF), n external dntenm_
(VHF/UHF) or an RF coaxal cable fi-om your wa cdbe/satelte box needs to be plugged nto the unit,
•Checl¢ if the co! r'ect input mode is se acted by pressing SOURCE or usng CH A/'IY; [Switching Each
Input Mode] ,,i, p.12
Hew come _here is no image from ,Chad< the antenna or cabe connect on to tlne unt,
the connected external devices? •When usng the ComponentVideo Connection Ched< that the Green (Y), Bue (Pb/Cb) and Red (Rr/
' CF) connectors are connected to their corresponding colored jacks on the unit.
When I enter achannel number, it
changes automatically.
Why are captions not displayed
entirely? Or, captions a_e delayed
behind the dialog.
How can [ set the clock ?
I Cannot Change the [Child L0ck]
setting because my pIN code no
longer works,
Many dista channeB have Iternate channel numbers.The unit changes the numbers automaticaly to
the ones signifying the broadcasting station channel numbe_sThese basic numbers used for previous
analog broadcasts, (e,£. input ch#30 auto changes to ch#6A)
the currentTV screen d alog,
There is no clock M]ct on on ths unit.
Troubleshooting Guide
If the unit does not pe_ffbrrn properly when operated as nstruc¢ed n this manual,
check the followin 2 chart and all connections once before callin_ for service.
e
blake sure the AC power cord is pugged n,
Make sure thdt the AC outlet supplies the proper votage, pug another electricdl app ante into tl_e
No power AC outlet to ensure that AC outer operates norrr, dlly.
If d power Mlure occurs, unpu£ the AC power cord for I mnute to dow the unt to reset itse f,
Contro button's do not work. Press o_y one button dt d time, Do NO[ press more thn one button at the sdme time.
Ensure that no buttons on the remote control are depressed dnd move freely.
Check whether the connect on of the antennd, cabe rece vet or satel te box s connected connect y,
Check whether d the cabes to tt_e unit are connected to the connect output Jdck of your devce ke
BD /DVD recordel:
Power s ON but no screen mdge, Mke sure thdt the seacted nput mode is conpected to the working nput jack,
Check if your computer is NOI n sleep mode when the nput mode ofths unit s ir, PC mode, l@
any key on the keyboard to wake up your computen

29
No p cture or sound
Check if the power is on,
Ched< if the correct input mode is selected,
Check vvhr,ther a the cabes to the unit are connected to the correct output iack of your devce ke
BD /DVD rccordel:
Vew ethel TV channels.The problem might be limited to the broadcast n£ station or weak sgnal
strength,
Unplug the AC povve_ cold and wait for about 1 minute, then plug the AC power cold and turn on
the unt again,
-,eckw ,ot,ert,.........tor,ofthe,,,-t..........ble,-oceverors to,tebox........ctedcorrecty.
b1_l<e sure that the seected input mode is connected to the working nput jack,
O,eckifyourcomput .rs.OIns, 'epmode, putmode'o"l sur,its mode.apy key op the keyboard to wake up your compute_
Make sure that the sound is not muted. Press MUTE D_( so that the volume bal- al_d current voume
eva will appear on the[V selden,
Make sure that the volume s NOI set to [0] or [Mute]. If so, use VOL A/V to adiust the des red
volume,
Vew otherTV channels.The problem might be lira ted to the broadcast ng station or weal< sgnal
No coor stren£th,
Adjust [Color] n the man menu.
Adjusted [Picture] or [Sound]
sect ngs aJ-enot effect ve every time You must set [Home] n [Location]. ,,B p.23
the unit s turned on, Othel_vise, the settings you adiusted wll not be memorized after the unt goes nto standby mode.
Sound OK, picture poor
Electr ca intetfference fl_m nearby ,_ppliances may affr,ct picture quality,
Adjust [Contrast] and [Brightness] n the map menu,
Vew otherTV channels.The problem might be limited to the broadcast n£ station or weal< sgnal
strength,
For the best picture qua ty, watch "High Definition" wide soleen programs,
If the HD content s not ava abe, watch "Standard Definition" plug1 ares nstead.
Vew otherTV channels.The problem might be limited to the broadcast ng station or weal< sgnal
stren_h,
Check if the audo cable s connected n correctly.
P cture OK, sound poor
You may be gett ng ntel4erence fi-om eectr cal appliances, automob es, motorcycles or fluorescent
Y_u see a d stetted p cture or hear Ights,
an unusua sound, lry moving the unit to another location to see if this is the cause of the problem,
You see "noise" ol "trash" on the
screen,
D fiel_nt color marks on theTV
screen
You switch to a diffr, rent nput and
the volume changes,
You swtch to a different nput and
the screen sze changes.
Electr cal inte_@,rence fl-om nearby appl ances may ftc'ct picture quality,
Vew othel_TV channels,The problem might be limited to the broadcast n£ station or weal< sgnal
stren_h,
Ghosts, Ines or streaks n picture
When the capabilities of the unit exceed the capabilities of the digital bloadcasting, the signal will be
increased to match the capabilities of the display of the un t.This may cause noise or trash,
View ethel TV channels.The problem might be limited to the broadcastMg station, missing data ol
pixelation,
This unt w memorize the voume level fl-om the last time you adiustc,d it,
If the voume of the sound fl-om another devce is hghel or Iovvel]then the oudness will change,
This unt wll memorize the view ng mode fl_om the last tree you used the pal-t cular input modes,
If you are using the unit as a PC montoq make sure that [Horizontal Position] and [Vertical Position]
The d splay image does not cover- n [PC Settings] _l-e set correct }4
the entire screen, If you are watch _[V or usng the ComposteV dee, Component Video or HDNI wth 480i Input,
press FORMAT _ repeatedly to swtch val-ous screen modes.
Capt ons are displayed _s a whte
box. No caption s displayed in
the Cosed Caption supported
program.
Inter4c,_-encefi-om bui dings or weather condit ons may cause capt on ng to be ncomplete,
Bros dcastin£ station may shorten the program to insert advertisement,
The cosed caption decoder- cannot read the infermat on of the shortened program.
Black box is displayed on theTV The text mode is selected fur caption, Select [CC-1], [CC-2], [CC-3], [CC-4] or [Off],
screen,
{-i
{%
y'i
i,ii::il

3O
INFORMATION
Glossary
ATSC
Acronym that stands for Adw/nced 7u evision Systems Committer, dnd
the name of the dig tal broadcast ng standards.
Aspect Ratio
The width ofaTV screen relative to its height. ConventionalTVs
are 4:3 (in other words, the IV screen is amost square); widescreen
models are 16:9 (theTV screen is almost twice aswide as its height),
CEC (Consumer Electronics Control)
This dows you to opt, rate the nkc,d funct ons between our brnd
dev ces with CEC f_,ature and this un t.W_, do not guarantee 100%
interoperability with other brands of CEC compliant dev ces.
ComponentVideo
This is a vdeo signal format that conveys each of 3 princ pa colors
of ight (red, bue and green) through d fi_,rent s}gnal nes.Th s allows
the vewers to exper ence p cture coors s origina as it s,There are
several signa furmats, ncludingY/Pb/Pr andY/Cb/G:
Dolby Digital
The system developed by Dolby Laboratories to compress digtal
sound. It offers stereo sound (2ch) or mult -channel audo.
E-Sticker
E Sticker s showing set fr,stures, techn ca information, etc on this TV
set that is d splayed on the/V screen. Prey ously the nfurmat on was
on a printed st cker that was put on the disp ay.
HDMI (High-Definition Multimedia Interface)
Intel_ace that supports all uncompressed, dgita audio/v deo formats
il_cud ng set top box, BD/DVD recorder or digta telev son, over a
snge cdble,
HDTV (High Definition TV)
Ultimate digta furmat that produces high reso ution and hgh p cture
qud ty,
NTSC
Acronym that stnds for Nationa leevis on Systems Committee and
the name of nalog broadc sting standards,
Offthe air NqSC signals are no longer being sent by maior
broadcast ng stations in the USA,
PIN code
A stored 4_digt number that aows access to parental contro features.
SAP(Secondary Audio Program)
Second aud o channel de vered separately fl-om main aud o ch nnel.
This audo channel s used as an alternate n bilingua broadcast ng.
SDTV (Standard Definition TV)
Standard digta furmat that is smar to the NTSC p cture qualit)4
Maintenance
Wpe the fi'ont panel and other exter or surfaces of the
unit with a soft cloth.
Never use a solvent or alcohol. Do not spray nsect cide
liquid near the unt. Such chem cais may cause damage and
d scolor_t on to the exposed sud*_ces.
Wpe the panel of the unit with a soft cloth. Before cleaning
the panel, disconnect the AC power cord.
Should your unt become inoperative, do not try to correct
the problem yourself.] here are no user serviceable parts
nside. Call our toll fi'ee customer support line found on the
cover of this manual to lock,re an author zed servce center:
If the remote control is not working properly, you can use a
digital camera ( ncluding a cellular phone with bu It in camera)
to see if it s sending out an nfrared sgnal.
With a digital camera
(including built-in cell phone cameras):
Pont the D gital Camera towards the remote
control infi'ared diode at the front of the
remote control. Press any button on the
remote control and look through the camera
d spla% If the infi'ared pulsar ng light appears
through the camera, the remote control s
sending out an IR signal

CATV
Tuning system
Channel access
General Specifications
TV format r_[SC/NfSCN IV standard
Closed Caption system
§15,127_/FCC (d gital CC)
§fl5,119 /FCC (analog CC)
Channel coverage (ATSC/NTSC)
Terrestrial DTV (ATSC)
VHF 2-13
UHF 14-51 (each channel has e,g.
2,1 °-,2.9, 3,1 _,3,9, etc,)
Terrestrial Analog (NTSC)
VHF 2-13
UHF 14-69
2-I 3, A_W,
W+I-'W+94 (analogW+l-,W+84),
A 5-A 1,5A
Channel frequency synthes zed tuning
system
Direct access keyboard,
Programmable scan, and up/down
Electrical Specification
Audio Output 5W, 8 Q x 2
31
Other Specifications
Terminals
Antenna Input VHF/UHF/CA]V 750 unbaanced (F type)
Audio Input RCA jack (L/R) x 2 500mV rms
Component/Composite (VIDEO) Video Input jacks forVIDEO
RCA jack x 3 Y/VIDEO IV p p(750)
HDMI Input HDN119pn x 2
USB Input USB x I
PC Input DSub I5 pn x I (RGB)
Digital Audio Output (coaxial)
RCA jack x I
i!::i
Pb/Cb
Pr/Cr
700 mV p-p (750)
700mV pp(750)
500mV p.p (75_)
Remote control
Dgtal encoded nfi-arodlight system
Operating temperature
41 °F (5°C) to 104°F (40 C)
Power requirements
1_ov + AC+/ 10%60Hz+/ 0,5%
Power consumption (maximum)
IIOW
LCD 3_ir, ches (31,5 ncl, es measured dagonally)
Dimensions <without base> <with base>
Width 30,0nches (760,0mm) 30,0nches (760,0mm)
Height 1%6nches (497,0mm) 21.4nches (543,0mm)
Depth 3,8 nches (95,0mm) 9,5 nches (240,4mm)
Weight 1658 bs, (7,70 kg) 1830 bs, (830 kg)
<(
ill!i!l
i i"il
:Li
i}i:,i
Designs and spedficat ons are sublet€ to change without
notice and without our legal obligat on.
If there is a discrepancy between languages, the default
language will be English.

32
WARRANTY COVERAGE:
This warranty obligation is limited to the terms as set forth
below.
WHO IS COVERED:
This product warranty is issued to the original purchaser or the
person receiving the product as a gift against defects in materials
and workmanship as based on the date of original purchase
("Warranty Period") from an Authorized Dealer. The original
sales receipt showing the product name and the purchase date
from an authorized retailer is considered such proof.
WHAT IS COVERED:
This warranty covers new products if a defect in material or
workmanship occurs and a valid claim is received within the
Warranty Period. At its option, the company will either (1)
repair the product at no charge, using new or refurbished
replacement parts, or (2) exchange the product with a product
that is new or which has been manufactured from new, or ser-
viceable used parts and is at least functionally equivalent or most
comparable to the original product in current inventory, or (3)
refund the original purchase price of the product.
Replacement products or parts provided under this warranty are
covered against defects in materials and workmanship from the
date of the replacement or repair for ninety (90) days or for the
remaining portion of the original product's warranty, whichever
provides longer coverage for you. When a product or part is
exchanged, any replacement item becomes your property and the
replaced item becomes company property. When a refund is
given, your product becomes company property.
Note: Any product sold and identified as refurbished or
renewed carries aninety (90) day limited warranty.
Replacement product can only be sent if all warranty
requirements are met. Failure to follow all requirements
can result in delay.
WHAT IS NOT COVERED - EXCLUSIONS AND LIMI-
TATIONS:
This Limited Warranty applies only to new company manufac-
tured products that can be identified by the trademark, trade
name, or logo affixed to it. This Limited Warranty does not apply
to any hardware product or any software, even if packaged or
sold with the product, as manufacturers, suppliers, or publishers
may provide a separate warranty for their own products pack-
aged with the bundled product.
The company is not liable for any damage to or loss of any pro-
grams, data, or other information stored on any media contained
within the product, or other additional product or part not cov-
ered by this warranty. Recovery or reinstallation of programs,
data or other information is not covered under this Limited
Warranty.
This warranty does not apply (a) to damage caused by accident,
abuse, misuse, neglect, misapplication, or non-supplied product,
(b) to damage caused by service performed by anyone other than
company approved Authorized Service Location, (c) to a product
or a part that has been modified without written company per-
mission, or (d) if any serial number has been removed or defaced,
or (e) product, accessories or consumables sold "AS IS" without
warranty of any kind by including refurbished product sold "AS
IS" by some retailers.
This Limited Warranty does not cover:
• Shipping charges to return defective product.
• Labor charges for installation or setup of the product, adjust-
ment of customer controls on the product, and installation or
repair of antenna/signal source systems outside of the product.
• Product repair and/or part replacement because of improper
installation or maintenance, connections to improper voltage
supply, power line surge, lightning damage, retained images or
screen markings resulting from viewing fixed stationary con-
tent for extended periods, product cosmetic appearance items
due to normal wear and tear, unauthorized repair or other
cause not within the control of the company.
• Damage or claims for products not being available for use, or
for lost data or lost software.
• Damage from mishandled shipments or transit accidents when
returning product.
• A product that requires modification or adaptation to enable
it to operate in any country other than the country for which
it was designed, manufactured, approved and/or authorized, or
repair of products damaged by these modifications.
• A product used for commercial or institutional purposes
(including but not limited to rental purposes).
• Product lost in shipment and no signature verification receipt
can be provided.
• Failure to operate per Owner's Manual.
TO OBTAIN ASSISTANCE...
Contact the Customer Care Center at:
1-866-309-8819
REPAIR OR REPLACEMENT AS PROVIDED UNDER THIS
WARRANTY IS THE EXCLUSIVE REMEDY FOR THE CON-
SUMER, WITH THE ISSUING COMPANY NOT LIABLE FOR
ANY INCIDENTAL OR CONSEQUENTIAL DAMAGES FOR
BREACH OF ANY EXPRESS OR IMPLIED WARRANTY ON
THIS PRODUCT. EXCEPT TO THE EXTENT PROHIBITED BY
APPLICABLE LAW, ANY IMPLIED WARRANTY OF MER-
CHANTABILITY OR FITNESS FOR A PARTICULAR PURPOSE
ON THIS PRODUCT IS LIMITED IN DURATION TO THE
DURATION OF THIS WARRANTY.
Some states do not allow the exclusions or limitation of inciden-
tal or consequential damages, or allow limitations on how long an
implied warranty lasts, so the above limitations or exclusions may
not apply to you.
This warrantv g_'es you specific legal nghts. You may have other nghts which vary [rom state/pmwnce to state/pmwnce.
33
Z!
c_
i-i
Printed n China
