Emerson File
User Manual: Emerson s - Owner's Manuals | Emerson Radio
Open the PDF directly: View PDF ![]() .
.
Page Count: 26
\VITROWAVEOVEN
OWNER'S
MANUAL
MINB67SW/S/D
Visit
our
Web
site at www.emersonradio.com
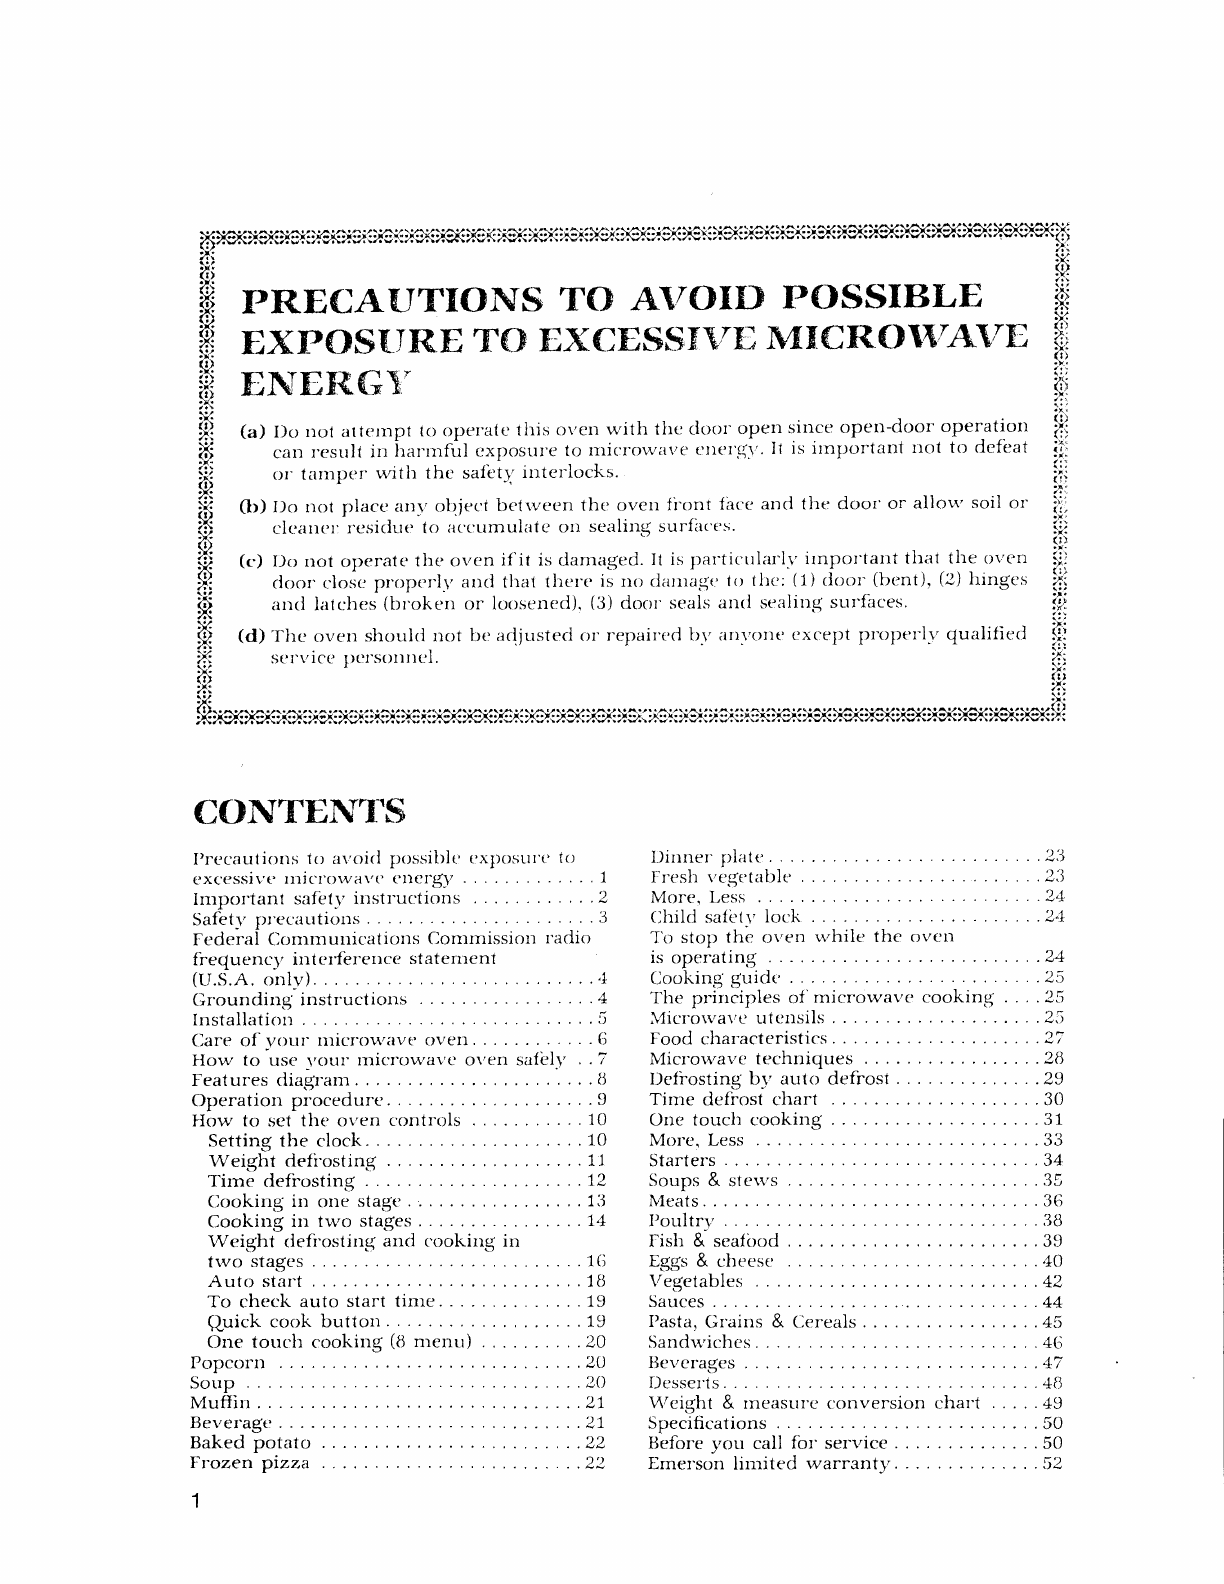
(a)
PR.ECAU']TTONS TO A\/OIT} P
EXr,OSIII{ E']T'fi
EXCESS \IH MTC}t-OT4/41,'tr
ENER.G}'
I)o nol atteu-rpt
to opel'ate
this ovell with the cloot'opel')slrlce opell-door operatiott
can result in harmful cxrlosttl'e to lrli(:I'ou'lt\'€rClreI'q1/'
J1is irnl-rol'tatlt
llot to defi:at
or tampe'r' u'ith the sa{bt}'interlocks.
(b) I)o not Jrlacc:
anv objec't betrveen the orren fi.ont {hce
and t}re door or allou' soil or
clcattt'l re.sicfi:t: to at'cumulnte ort seillinq surfitc't's.
(c) I)o not operate the o\/en if it is damaqed. I1 is partictrliu-l-r'itnportant tiral the orren
dr;or closc pl.operl.t'ancl
thal there is no clanragt.'to
thc: (1)rloor- (bent), (2) hinges
ancl latches (broken or loosenr:d),
(3) dool seals
alrtl sealitr.q
sttl'faces,
(d)'rhe oven shoulrl not be acljustecl or-
r'epairc'd tlt' ar)\/c)It('
cxceJ;t pr.ollt'r-lv qualified
service llct'sotrncl.
salel_\'
ln
/ l\
. Lt)
. . .
.
. . .18
..19
..19
')n
',...,.pv ')r)
.... ..pw
')o
)1
)1
..22
. . . .
.
..22
CONTE]VTS
I)recaulions to avoirl possiitlt' cxllosttt't' t<-r
cxcessir,'t'
mict'orva\'(' ('l)erg\/ . . . . . . . . 1
inrportant safetl' iustt'uctiotls . . . . .. .2
Safetv
pt.ecrttttiorts. .....3
Federal Conrtnuuicatiolrs Clomtnission l'adio
frequenct, inter{brel}ce statentent
(U.S.A.
only)
Grounding instructions
Installation
Care of'1r1vp1'
aria.rl,r*'nr'" ,rr'"r, . . . .
How to use _\'oul'tnict'owa\'(t
ovelt
Features ciiagrarn
Operation pr.ocedure.
How to set the oven controls
Setting the clock
weight defi'osting .
Tirne clefi"osting .
Cooking in one stasc
Cooking in tr,vo
stages
Weight <iefi.osting
and cooking
Quick cook button
C)ne touch cooking (f) nrentr) . . .
Popcortr
Sotrp
Muflin
Beverage
Baked potato
Frozen pizza
.'l
...'t
A
..,5
...6
r.l
...(_,
q
..10
..10
11
.lt
. -I.J
1A
..ra
Dirrrrer-Jilate ... ...2:)
Fresh
vegetablt ...2:J
More, Less . .24
(llrildsa{btylock. ......2-1
T'o stop the oven ',1'hile
the ovet't
is operating .. . . . .24
Cookin.q
guidc . ...25
Tlre principles of'
microwave cooking . . . .25
Microrvave
utcnsils ...... .Zit
Food
characteristics .....27
Nlicrourave
techniques .... .
..28
I)efiosting b-1. auto defrost . . . .29
Time defrost chart .....30
One touch cooking.. .......31
Mr>re, Less .,.....33
Starters .....34
Soups & steu,s ....i5
Meats .......36
I)opltrr, .....:18
Fish&seafbod ....39
Eggs & cheese .. ..4O
\/e4etables . ....42
Sauces ......44
Pasta.
Grains & Cereals .
......45
Sandr.r'iches. .....4t)
IJeveraqes
... ......{7
I)esserts .....4tJ
Mrcight
& rneastrre conversion ciralt .....49
Soecifications, ....50
gbfore you call for service . . . . . . . . .50
Emerson limited warrantlr. .. . .
.
. . .52
I}IPOItT}{1{T SAFETY TNSTI'R.'UC,-ilTSNS
\I'lrrrr rrsirrq
elet'tl'ic:tl lrppli:rrrces,
llasic sal-etv
irre<'iirrtiorrs
slrorrlrl
llt'filllon.t<1, ittt'ltrrlilrfv
the firllorving:
11'ARIIING-To reduce the risk of btu'ns, electric shock, fire, injury to persons or exposure to
excessive microwave enerpS/:
I Reacl
all instructiotrs befbre usitrq the ap-
I oliance.
) Read ancl follor.v the specific '(PRECAU-
L TIoNS To AvoID POSSIBIJ ExPoSURE
TCI EXCESSTVE MICROW,dVE ENERGY''
founcl on page 1.
? This appliance must be glounded. Connect
v only to properly gtounded outlet. See
"GROUNDING INSTRUCTIONS" fbund
on pa.qe 4.
A Install or locate this appliance only in ac-
- cordancc w-ith the provided installation
lnstructrons.
q Some prclriucts such as r.vhole eggs anrl
v sealecl containers-fbr exarnpie, closed
elassjar-s-rrxry explorle ancl shotrld not be
heatecl
in this oven.
LIse this appliance onl_y fbr its intendecl
Llse
as described in this rnanual,
r\s rvith any appliance, close supervision
is trecr:ssary
when used by children.
Do not operate this appliance if it has a
darnaged cord or plr_rg,
if it is not r,vorking
pr-operly, or if it has been clarnaged oil
rlropped.
O This
appliance
shor_rlci
be
ser-r,icecl
onll,by
/ rltralified
serr,'ic(,
I)ersonnel.
(jorrtact
the
nearest
authorized ser-vice'facility
fbr ex_
arnination, repair or adjustrnent.
lO ?" rrot
covcr or block anv openin.qs
on
rv the
applianr:e
-t -t
| | I)o not rrse oLrtdools.
1/1
ll Oo not ilrunerse corcl or plu( itr rvater.
-r r'r
lJ Keep
cord arva\r
liorn heatecl surfhces.
lA O" not let corcl harrg
over edge
of' table
' ' oI' coullter'.
I { tvhen cleaning surfhces of'rloor ancl oven
lv that conte toqether u'hen clminq the cloor.,
ruse
only'milcl, nonabrasivc soaps
or deter-
qents applie<l with a sponqe or soft cloth.
lA f" r'educe the risk <tf'fire in the oven
lv cAvitr,:
(a) Do not over.cook fbod. (larellrll-y attend
appliance if'paper-. ltlastic. or- othel.
combtutible mater-ials
ar-e plir:ecl insicle
the oven to facilitate crxlkinq.
(b) Remove rvire trvist-ties fion'r paper or
ltlastic ba.qs
bclore placine- baq in o\/en.
(c) If rnatelials irrsirle the ovcn shoulci ig-
nite, keep oven cloclr-
closerl.
tur-n oren
ofI. and ciisconnect the [x)\r/er.corcl. ctr
shut off ln\ver. at tlre firse or. circtrit
breaker panel.
17 I)o rrot rr.sc
this tniclow'ave oven to heat
'
t c't-rrrosive
chemic:ais
(fbr exarnple. sr_rlfides
anci chlor-icles).
Vapor.s finn'r such corrosive
chemicals lrta-\/
inter.act w.ith the contacts
and spring of'the saft.tv
intcrlock s,,r.itchcs
therdb-1'
r-enclerinq thi'rn irroperable.
6
7
B
SAVE THESE INSTItLI#ilTOruS

SAFETY PRECAT]TTOTIf;
(;FlliEI{./\L, tIliE
1 I)O NO'f attempt to titmper r'vith or rnake
I any ailjustmenti or repairu to cloor. control
paiel ",r.
"tty other part of-the oven' tlo
NOT remove outer case
from oven' I{epairs
shoulcl only be rlone by a clualifiecl service
peI'son.
a DO NOT oprrate the oven empty' The rnicro-
Z \vave "t ".gv ',vill reflect contitrttouslv
throughout the oven if'ntl fbtltl or rv;rter is
present to absorb enerqv.
n lf'a fire occul's
irl the oven. touch the STOP/
\) (LEAR pd and t-EArvT'rHE D(xlR cl{lsED'
Disconnect the polver ctlnl, or shut off pow-
er at the fuse or circuit breaker panel'
A IX) NO'f atternpt to clrt'clothes, llervspape-r
L+ .r.ther rnaterials
i1 ovel.'I'hev Inav catch
on fire.
tr, DO NOT use recvclecl paper proclucts' as
U thel' ma1' clontain imptrrities 'uvhich rnav
.ntr" sparks ltncl or fires rvherl ttsecl'
A IX) NOT hit tlr str-ike control p;tnel' clamit{e
\J to controls nraY occuI"
-l r\VOID inserting nails, rvit'e, etc' throtrqh
/ ,,nv ltoles in the"unit while operating the
,,"".. Never insetl a wire, nail or any Other
metal objec't throu$h the holes on the cavi-
ty or any other hoies or gaps' because such
i{ects mav cause electric shtxk ancl micro-
wilve leakage.
U'['EFJSIL,S
lX,IE'IAL(ION'I.'\lNE'Itsorclishesrvithtnet-
| ,,llic t'ilns shoultl trot be trscrl' i\l'citl$ rna-\'
()ccur.
) NIET,,\L'I\VIST-TIES rntrst not be usecl
irr
l- the rnicro\vilve ov('n'
a DO NOT trse SEALED .JT\RS
or N"\RROIV
-) NECK bottles for cg6kitr( or leheittitl{'
'I'hel' mav sltatter'
A DO NOT use CONVE'NTIONAL "|I{FIRNIO-
L+ irErEns in tire tnicrowave o\/(:n"fhev may
t'atlse arcinq.
tr Remove PLr\STIC STORE IVRAI'S befbre
J cooking or tle{i'osting in the oven'
LFoTFURTHERINF()Rrv.II\TION()Ilpr()per
o .n"ti"g trtensils,
r.efbr
to the Introtltrction
irt tlie lvlicrorv;rv'e
cookin$ utrirle'
3
FOOI)
1 Never use
your microwave oven
fbr HOME
I clrtxNtlc;.-rhe oven
is not designed
to per-
rnit proper canning. Improperly canned
foocl^ rniy spoil trnd be dangerous to
consulne.
a (JOOKING
TIlvlES siven in the cooking gqtl"
L are APPROXIIvIATE. Factorc
that may affect
cooking are:
stafiing temperature' altitude,
volumi, size
and shape
of foods and uten-
sils
usecl.
As yott become familiar with the
' oven, yo., ..*till
be able to adjust for these
fhctors.
E It is bCttCT
tO
UNDERCOOK
RATHER T}IAN
\) ()vERCOOK foocls.
If food is undercooked'
it can alr'vays
be returned to the oven for
firrther cooking. If' fooct is overcooked'
nothing can bJ clone' Ahvays start rvith
tninirnum cooking times'
A SIVIALL OUANTI'|IES of fbocl
or {bods
'"vith
4 Low vIo-ISTtlrtE
content can
burn, dry otrt
ttr catch on fire i{'cooked too lon$'
tr DO NOT boil eges
in their shell' Pressure
U rnrv t '-,ikl up ,ii t tn" eggs
r'vill explode'
A Potatoes,
apples,
e$$ ,voiks,
"vhole ac'orl
O rq.;rir ,,,r.i .r".rraqe
are exarnples of food
r"vith
NONI)OROUS
SKINS'
'Ihese must be
pierce<l
betbre
cooking to prevent bursting'
-7 POP(IORN
tnust
be llopped in a
microwave
/ corn proper. lvlicrowave popped ^,tTl
ltrcrtlui'es
n l,,t"er viekl than collventlonal
iroppin$. l)rl trtlt [)op popcorn unless
;,";b",iin rt microrv^ve
'pproved popcorn
trtensil
or rrnltss
it's commercially packaged
Itnci I'ecolrlnended especiallv fbr tnicro-
lvii\'e Ovens.
f)o trot use
oil '-..'1"'' specified
ltv the mantrlhcturer'
.q t)O NOT ittternpt to deep fat fry in vour
\'
) ()\'ell.
{^) tlErYfI-D LI(IUIDS can EI(UI'}T if not rnixecl
-/ w'ittt air. t)o nclt hcat liqtrirls in your lTrlcro-
wave oven rvithout first stirring'
FEDEI{TLL ilOP{PIUNICAJilIOI{S COtoItot{SSION
R/ttlIO FI{DQtIEtrIilY IF,ITEILFEI{'EtrICE
ST?LTEBIilNT (tl .
Ii
".rL.
Ohr{,
Y)
r- --l
WI\RMNG:
'I'his equiprnent (enerates and uses
LSiVt
frequency ener{y and if'not installed aml used proper-
ly, that is in strict accurrlance rvith the manulircttrrer's instructions, rnay cause interfbrence
to raclio ancl television reception.
It has been type-testetl and fbund to comply with limits for an ISM Equipment pursuant to
part 18 clf
FCC Rules, rvhich are ciesigned to provide reasonable protection against such inter-
fbrence in a residential installation.
llowever, there is no {uarantee that interfbrence will not occtu in a particular installation.
If'this equipment cloes
cause interfbrence to radio on television reception, r.vhich can be de-
termined by turning the equipment off and on, the user is encouraged to trv to correct the
interfbrence by one or rnor€ of the fbllowings:
r Reorient the receivin{ untenna of radio or television.
o Relocate the microwave o\/en rvith respect to the receil,er.
o Vlove the microwave ov€'n away fiom the receiver.
o Pltrg the rnicrotvave oven into a different outlet so that rnicrorvave oven and receiver are
on different branch circuits.
'fI{E LIANUFACTUREIT is not responsible fbr anv rarlio or "fV interfbrence clused by UN-
.\I/'II{ORIZED VIODIFICT\TION to this nricror,vave oven. It is the responsibility of the user
Lto con'ect such interfi:r'ence. i
I
--4
GI{O t/Nt)IhIG {r'a{S'tF{
u ryffi
OHS
'l'his allpliance nrust llt' .q:'ounclerl.
In the cvent of an e
lectric;rl shoft circuit, qt'otrntlin.q
pltrg rerluces
the lisk of'electlic shock br'provi<lingan esc{rpe
w'ire firr tht'electric'cttrrent. This appliance is
crltrippecl
*,ith a c'onl havinq ir
grounrling w,ire w,ith a
gl'oulr(ling pltrg.'fhe pltrg trlttst
be plu.44ed
ipto irp tltrtlet thlt is prgprl_V instirlletl lttrtl
{rotrltlerl.
r- --1
L
1Vr\RNING: InrJrroper use ot'the gr-ountling pltrg citrt I't'sttlt
in ;r I'isk rlf'eleclric shock.
:,:ll':lli:,lill:.',l"::iil,::Hi:':,:';i:':,",[:':ii:ij
::",;T;H][:rli]:':;;i'::ili:
proJrerlv,grouncleri.
If-it
is ne('cssilry
to Llse ar] extensiort
corti, use
only a
lJ-rvire
extension cor-d
that
lr;rs
a .i-blacle
{rotrnrlin.q
plug, itnrl
a li-slot
receptacle
that rvill accept
the plug
on the allpliance.
-fhe markerl r-ating
of'the extension
cord shall be equal to
or'
{l-eitter
than tlie t'ler:trir-al lirting of'the altpliallcre. J
2
If'ISTALLTLTION
I Stearlv, tlitt location
I t-1.,i,
nricr.o.vave oven sl-rotrlrl
be set on a steady, fiat surfhce.
Ventilation
Do not blcrck
air vents. If thev are blocked during operation, the oven may overheat and even-
ttrally cause oven fhiltrre.
ror proper ventilation, keep 3 inche; of'space betrveen the oven's top, sides, rear and the area
where the unit is to t;e installed.
r\r.v:ry f'rom raclio and TV sets
lroor. television r.eception and raclio interference rnay result if the oven is located close to a
-i'V, Raclio,,
antenna, fL'etl.
etc.
I'iac'e the oven as far froln thern as pclssible'
,\rvav from he:rtin$ appliances and w:rter taps
Ke ep the oven awav lronr hot air, steam or splashing liqulds when choosing a place to position
it. other-wise the insulation might be aclversely affected and breakdowns may occur'
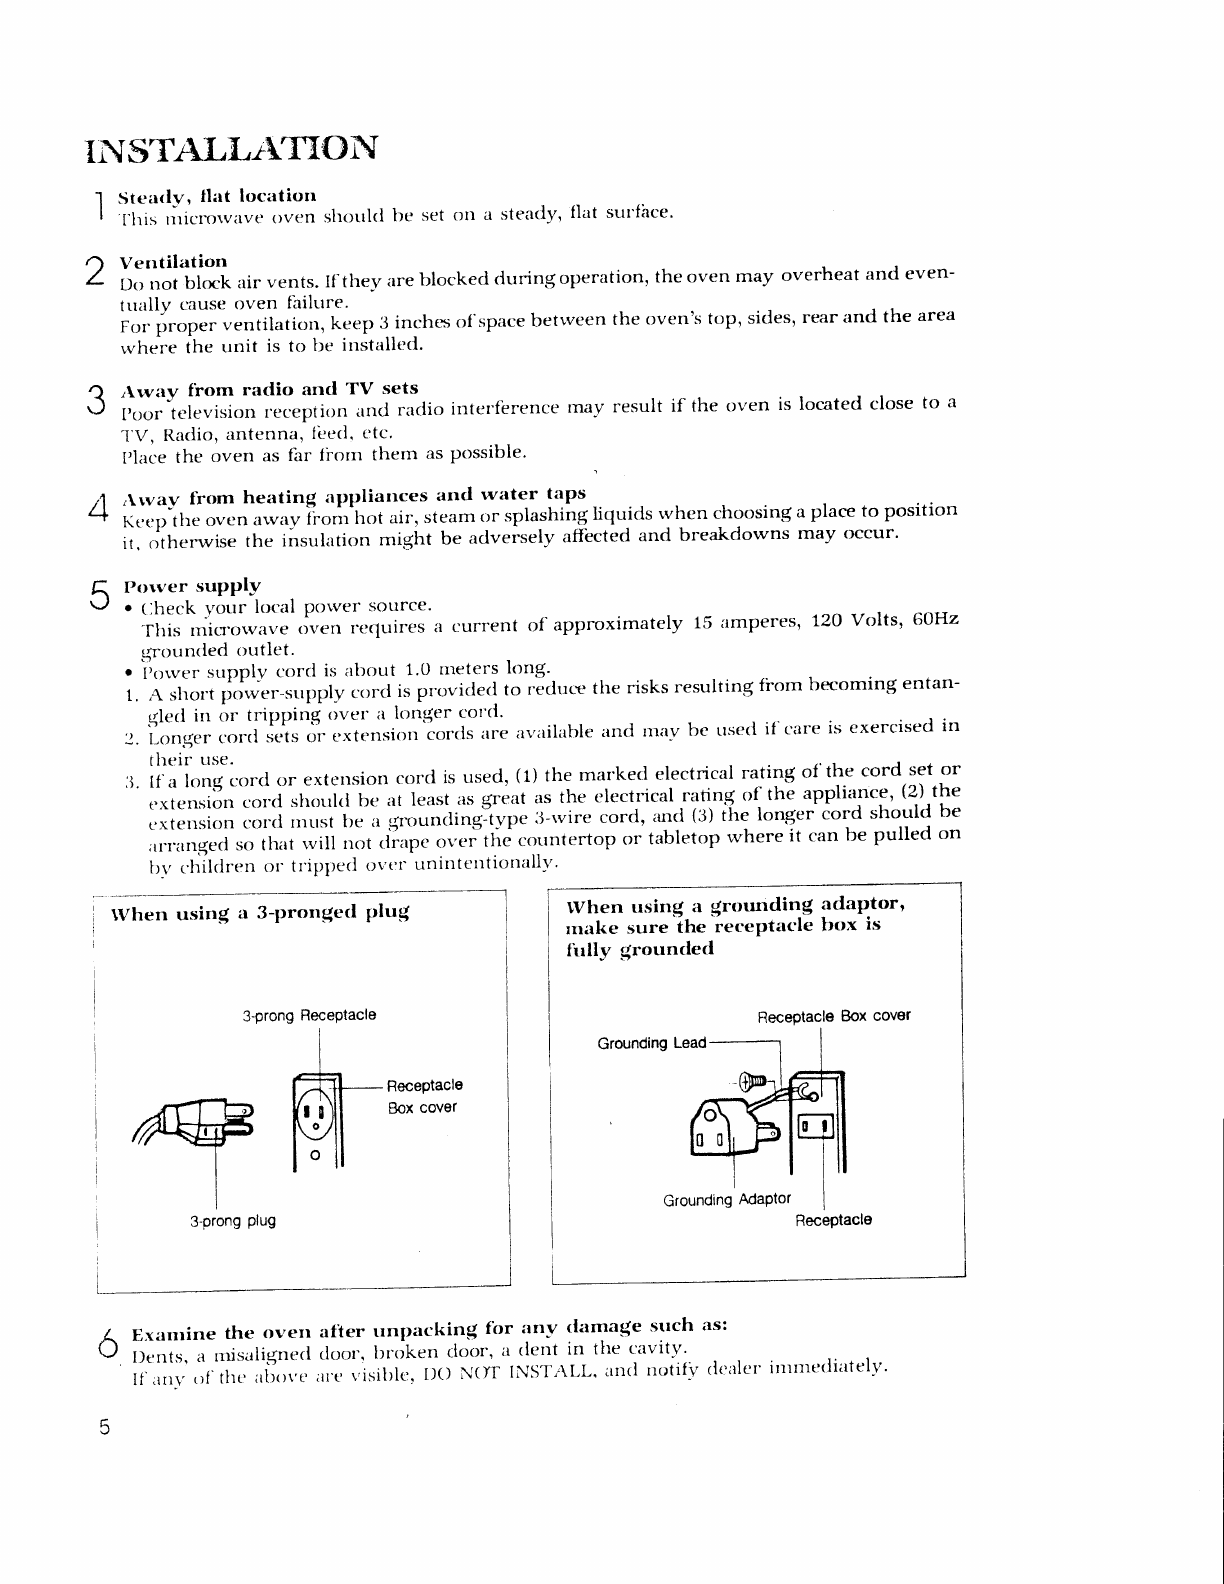
Pr)rver supplv
o (.heck -\/our local power source'
-flris rnicr.orvav" ,r.,,*n recluires a current of'approximately 15 amperes, 120 Volts, 6oHz
r{rountled tlutlet.
. ii.rr*r". supplv cord is about 1.0 nreters long'.
1. A s6or.t por,ver-strpply corcl is proviclerl to ."drt.= the risks resulting fiorn be''coming entan-
glerl in or tripping over it lon(er cord'
.J.
l-on.{er corrl i"i, ,ri extensior-r'lords are ar.ailahrle
and mav be ttsetl if'ciire is exercised in
their ttse.
lj. tf a lcln.{
c'r6 gr extension cord is used, (1) the markecl electrical ratin$ of'the cord set or
t,.xtension cord shoultl be at least as great as the electrical rating of the appliance, (2)-the
cxte'sion co16 rltrst be a qrouncling-tvpe .J-rvire cord, rurd (3) ihe longer cord should be
rrr-r..nqed so that rvill not clrapc over"the countertop or tabletop ',vhere it can be pulled on
tr-r,
.'l-tilrlren
oI' tripllerl o\"trr
unintentionallv'
3-prong
RecePtacle
3
4
5
6
A-Receptacre
ffiF l(l4 Boxcover
llotl
I
I
I
3-prong
Plug
Exanrine the oven
I)ents, a rrrisalit{necl
If'unl' of'
tltc ltllove
after trnp:rckin( fbr :rnv tl:rma{e sttch as:
cloor'.
bniken cloor-,
a tlent in the cavitv'
;r|e
r.,isilllc.
t)o N()T INST,.\LL.
un(l notify rlcalel'irtrtnetliittelv.
lVhen 3pron(ed trVhen u.singl
a {roundin$ adaptor'
rnake sureIh*'i*.*ptacle trox is
firlly (rounrled
o
2
3
7
I
4
5
II
2
3
4
Cr\RE Gf' Y{]LIT"{
to{I{lF{{}WrtVtr OVEItrI
Trrrn the oven <lfI'be{irr-e clt'itnitrq.
Keep the inside <lf'the oven cleatr. l\/hen
firorl spatters ot' sllillerl licltritls arlhe're to
()\'en rvalls,
lvilte rvith a rlanrp t'loth. NIilrl
cletergent rrny be used if-the oven gets veIJ'
rlirty. The trse o1-
harsh rletergent or itbra-
sives is not recommendetl.
The outsicle oven surfhce should be cleanecl
rvith soap and r"vater,
rinsed and clried rvith
a soft cloth. To prevent tlarniEe to the opel'-
ating parts insicle the oven, rvater shotrlcl
not tre allor,ved
to scep ir-rto
the vt'ntiliation
openings.
If'the Control I'anel becomes r,vct,
clean
rvith a soft, dry cloth. [Jo trot use harsh rle-
tergents or abrasives on Control Panel.
If'steanr acr:umtrlates
insitle or ill'ound tl-re
outsicie of the o\,'erl
tloor, rr.,ipe
rvith tt sttft
cloth. 'fhis rnay occur r.vhen the tnicrowave
oven is operaterl ttncler hi.qh htrmirlitV con-
rlitions ancl
itr
no wily intlicrtttts
nrtlfitttc'tiott
of-the unit.
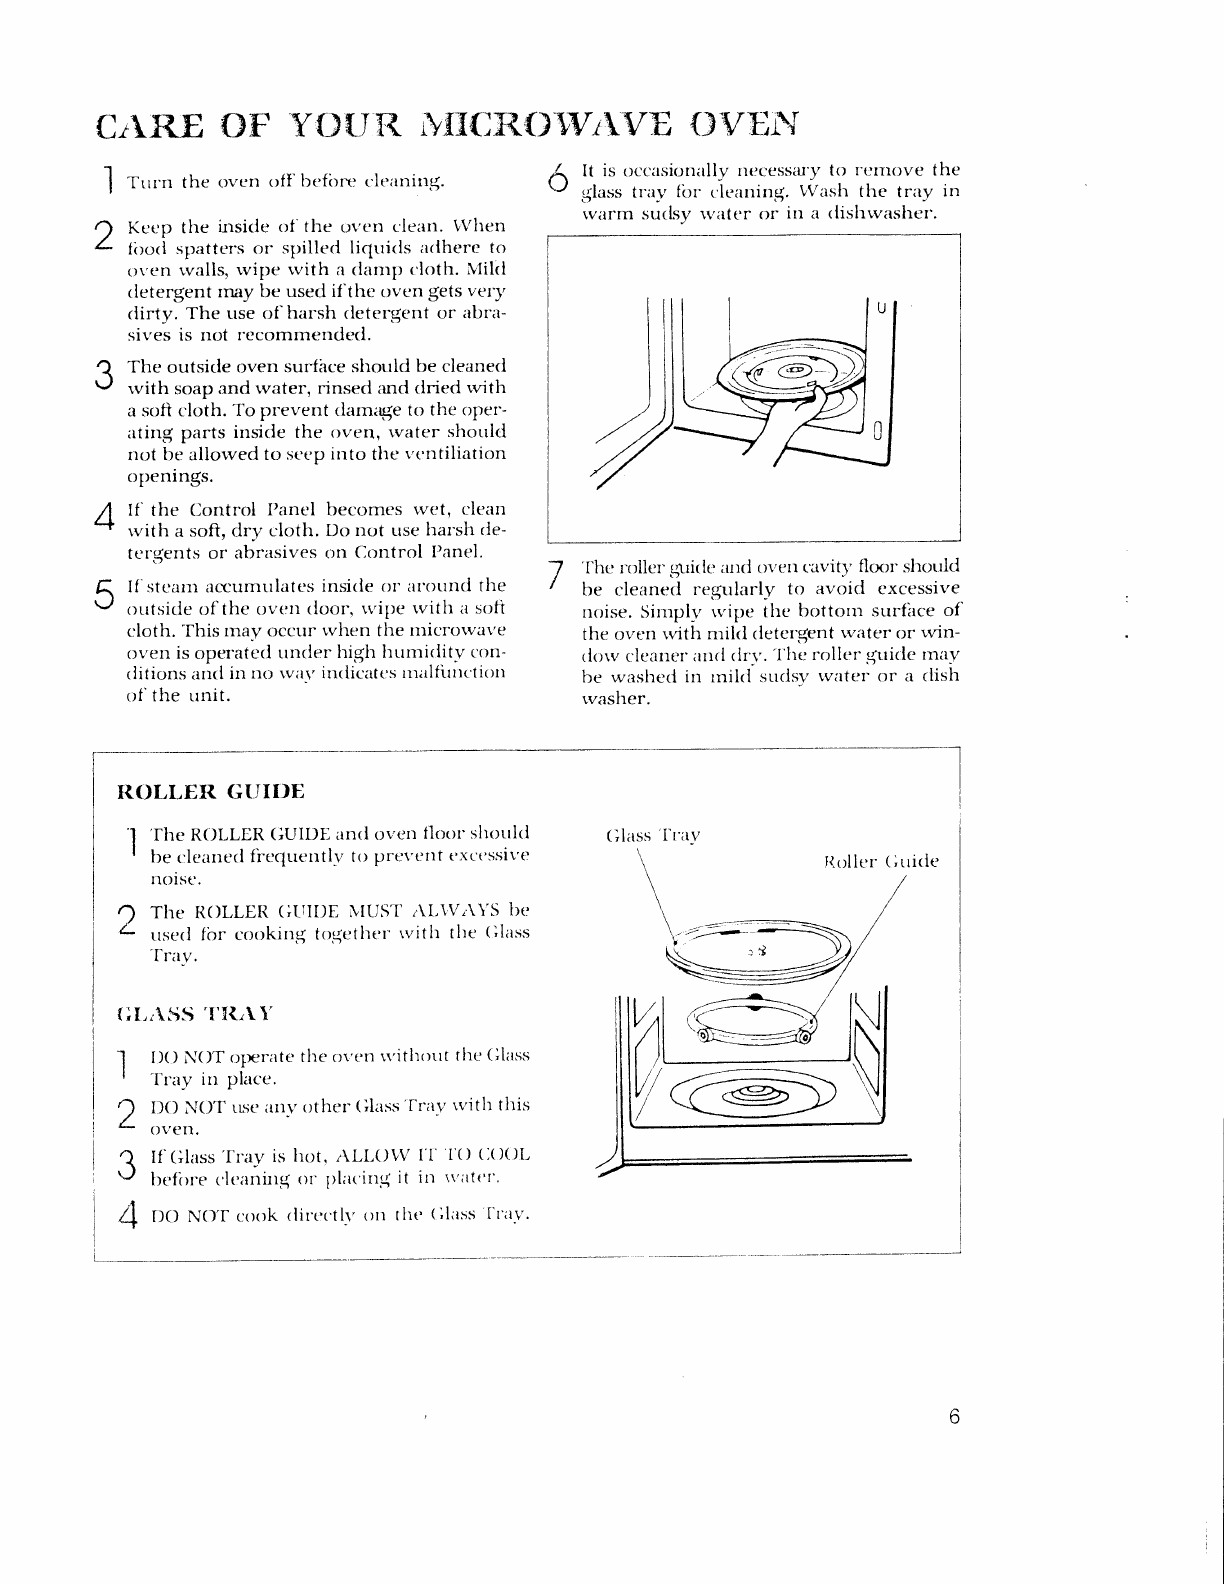
ITOLLEII. GTIIDE
'fhe ROLLER (]UIDE antl ovell floot'slrotrltl
be c:leatre<l
frcqtrerttl-v ttl prevettt t'.rct'ssivt.
noise.
I The ROLLEIT
(;trll)E N'ltIST'
.'\L\Vr\\'S bt:
/- trserl
fbr corlkirl.q
togethet'
rvith the (llass
'f
rav.
IX) NOT operttte
the rn'en
w'itlltlttt the
(il:rss
'fr.a-y
in place.
DO NOT L$t'
an-r,, other (illtss'frii-V rvith this
OVCN.
If'(ilrrss'fray is hot, ,'\Ll,O!V I'l' I'O
(.(X)L
befirre t'lt'itnirtq
ot- llllrt'ittq it iIl rvlttt'r"
DO NOT ctlok <lilt:t'tlv
otr tllt' (lllrss.['t'itv'
It is occasionally rlecessiu'y
to t-ernove the
(lass tray firr c'lt'atrin{. VVash the trav in
rvarm suclsy u,ilter or in a <lishr,vtrshet'.
'l'hc r-oller
gritlc art(l ovett c'avit1'
flcxrr shotrlcl
be cleaned res{trlarl-y to avoicl excessive
noise. Siniplv r'"'i1le the bottom surfhce of'
the or.,en
u,'ith milrl rleter.qent witter rtr r,rrin-
rlorv cleatlc'r
artrl <irr'.
'i'he roller 5-ritle Inay
be washecl in rniltl strdsv rvltter or a tlish
rvasher.
I{oller (
)tritie
HOTV TO USE YOUR IYTICROIMAYE
OVEN S;TFELY
,\ltSorrgh your oven is providecl r,vith safety fbatures, it is important to observe the follolving:
ii) It is important not to defbat
or tamper with safety
interlocks'
b) Do ,ot place
any object between the oven front face
and the door or allow residue to accumu-
lirt., on sealing
,Lr-r"!"r. wipe the searing
area
fiequently with a mild detergent, rinse and wipe
rlry. Nev"t .,t" abrasive
porvders or pads'
c) \,Vhen openecl,
the door must not be subjected to strain, for example' a child hanging on an
.pe.ed cloor or any load could cause
the oven to fall forward to cause
injury and also
dama$e
the door. Ilo .oi Jperote the oven if it is damaged,
until it has
been repairedby-"Qualified
service engineer. It is pzu-ticularly
important thal the oven door closes
properly and that there
is no damage
to the:
i) I)oor (bent)
ii) Flinges
and Latches fbroken or loosened)
iii) Dotlr seals
and Sealing
surfhces
rl)
The oven should not be a{usted or repaired by anyone except properly qualified service per-
sotrnel.
----- ------ ---------------------tl
I
i uore : It is quite normal for steam
to be emitted around the door during the cooking"cycle' I
| ^'---' irr" aoo,-
is not intended to seal
the oven cavity completely, but its special
design I
! "ontritrutes to the complete safety
of the appliance -----J
L_ t-__ ---- -------
-- --- ------------- ---1
I
i crturroNr r. Ilo not attempt to operate the oven while empty as this will cause
dama$e' 1
| - - - z. As an "*hausi is located in the rear of the oven, install the oven so as not i
I to block the outlet. -J
L_ --
c
)€ 3) (a
)5
RI
tt
Dl
li
rl
?l
itl
\-..--1'-
-------'1-
:,._-:_,-----\
i
a'A;0.0.1
,l
---:.:::. I
i:'.,
),
--| " ,
't!it--rri
)' l.:rlsl I
--::*! |
, .." rt.t l_?_l_rl l
.,-.,t{
516il
-' I i-r a-Tc I I
tr;oEl I
'----: I
,-ifr--*-r]
(\
-- t
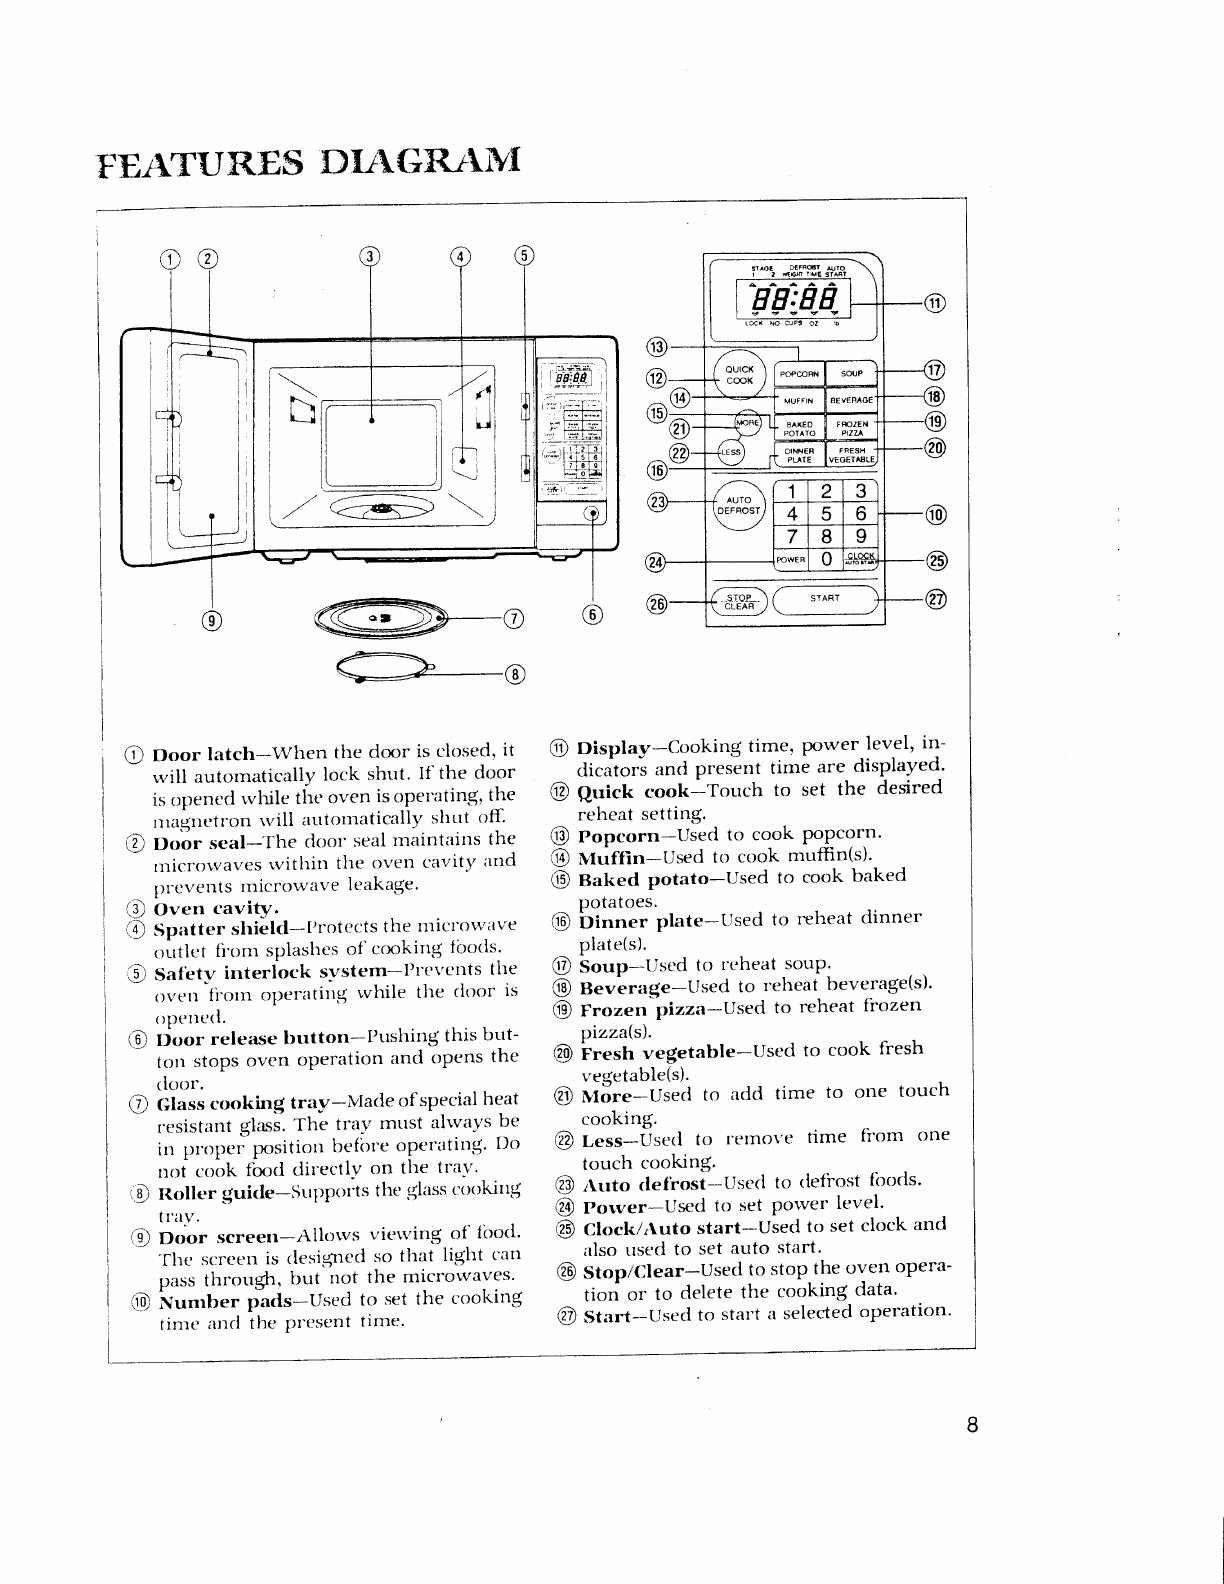
FErIT{II{ES DXAGI{A'.}YI
@o
O Door latch-lVhen the door is closed'
it
r.vill
autornatically
lock shut. If the door
is r;pened
r.vhile
the oven is
operatin$, the
ntaqtrett'on
rvill ittttornatically
shtrt clff'
(D noor seal-The doot'seal rnaintaitrs
the
nricror,vaves
rvithin the oven cavity and
prevetrts
lnicrowave leaka$e.
(C Oven cavity.
(D Spatter shielcl-['rotects the ntict'ov"itve
oirtle
t fi'onl splashes
o1'cooking
fbocls'
C Saf'etv interlock svstem-Pt'evct'tts the
overt fi-orn
operatitrg r'vhile
the rloor is
ooetretl.
@ ff,rtt release
button-I'trshing this but-
totr stops
oven operation and opens
the
cloor.
O Class
cooking tra;z-Nlacle of special
l-reat
resistatrt
glasJ.
The trav mttst alrvays
be
in prtlller position bef<lre
operatin$' [)o
n,,ri
co.rk fbod dir-ectl-v
on the tra\"
,e Roller guide-strpports the glass cookirtr{
t|av.
(g Door screen-r\llorvs vier'ving of-
lborl'
-fhe scrceu
is rlesigrled
so that light can
pass
throtrgh, but not the micror'vaves'
@ ^xuntbo" pr,.l"-Used to set the cooking
tinre
atrd the Pt'esent
time.
@
o
@
@ nisplay-Cooking time, power level, in-
- clicators
and present time are clisplayed'
@ Quict cook-Touch to set the desired
reheat setting.
@ nopcorn-Used to cook PoPCorn'
@ n.ttin-Used to cook mufffin(s)'
@ gaked potato-Used to cook baked
potatoes.
@ bitttrer plate-Llsed to reheat dinner
plate(s).
@ bo.tp_-Used
to rcheat souP'
@ n".r".zr{e-Llsed to reheat
beverage(s)'
@ Froren pizza-Used to reheat frozen
przza(s).
@ ^fresh ve$etable-Used to cook fresh
r,'eqetable(s).
@ uii.*-Used to aclcl
time to oue touch
cooking.
@ t ess-Usetl to I'elnove time from one
touch cooking.
@ r\uto def'rosi-Used to tie{rost fbods'
@ Porver-Usecl to set po\'ver level'
@ Clock/rluto start-Used to set
clock and
itlso ttsed
to set auto start.
@ Stop/(llear-Usecl to stop
the
oven opera-
tion or to delete
the cooking data'
@ St"tt-Usecl to start a selected
operation'
"EE:EE
OPER.ATION PR.OCEX}T]H.E
This section inclutles useful inforrnation erbout oven operation.
1. PIug
power supply cord
into a
standard
3-pron$ed
15
Amp,720v AC 60Hz
power outlet socket'
2. After placing th""food in a suitable contairer, op"r the oven door and put it on the glass tray'
fhe giass triy must always_be
in.place during cooking.
3. Shut"the door. Make sure that it is firmly closed.
1 When the oven rloor is opened, the light
I turns off.
O The oven door can tre opened
at any time
L cluring operation by pressing the door
release
button on the control panel' The
oven will automatically shut off. To restart
the oven, close
the cloor and then touch
START.
2 Each time a pad is touched' a tsEEP
rvill
\,) souncl
to acknowledge the touch'
A 'fhe oven automatically cooks
on lull power
L+ unless
set to a lower power level'
K The clisplav
w.ill show " :0" when the oven
\'' is plu.qged
in.
A Time clock returns to the present time
\'' rvhen the or,'en
turns off.
-7 When the STOPiCLEAR pad is touched
/ during the oven operation, the oven stops
cooking and all information retained' To
'erase all information (except the present
time), touch the STOP/CLEAR Pad once
,rro.". If'the oven door is opened during
oven operation, all information is retained'
A If the START
pad is touched and the oven
U does not operate, check the area between
the door and door seal
for obstructions and
make sure the door is closed securely'
'fhe oven will not start cooking until the
door is completely closed or the program
has been reset.
I *t" sure the oven is properly installed i
| "ttd plugged into the electrical outlet' i
the POWER pad. The chart shows the display, the porffer
Watta$e outPut chart
o The power-level is set bY
level and the Percentaee
pressrng
of power.
'fouch Porver Pad,
then nurnber Pacl Power Level (DisPlaY) Approximate Percentage
of Power
I'OWER P-HI roo%
P-90 so%
9
{l P-BO 80%
n
;
3
P-70 70%
P-60 60%
P-50 50%
P*10 10%
4
P-30 30%
)
P-20 20%
,)
P-10 ro%
1
P-0 ooh
0
HO1V TO TiET THE $Irfrhl CDNTI{OLS
SE'TTING '[TIE CLOCK
\t/lren the overt is first 1)ltr$.{etl
in. t}rc tlisplir,v
'()\\'el' g1r111-
{ocs 'tI, tlic tlis'lltrr *'ilI s5'w '' r,vill shttrr"' :()" lttrti
:()" rvhett tlrt: lltlu'et'
;r tone rvill sotrncl.
11'ttre
'\(l
conles ttitc'k
rltr.
This is a 12 hotrr clock sYstern'
1. 'fouch CLOCK/
.\UTO START Pacl'
;DEFROST-1 AU.TO
wErcxr rrile sTART
l,: H
6-
STAGEl
2. 'fouch clocK/
i\UTO START Pad
once more.
6- STAGEI ;DEFFOSTI AU^T.O.
i z *EIGHT TIME r IAn
I
#'1
H
LOCK NO
'fhis is a 24 hour clock sYstem'
NOTE: This oven has a rnul-
tiple clock sYstem. If
-you utant to use the
12
hour clock sYstem,
omit this steP. J
tratrtr
.J.
tlnter the correct time ot'
clal,,
bV touching the
utttnbers in secluence'
The displaY will then begining
blinking.
;- STAGEI ;DEFFOST--1 AUJp
i z WEIGHT TIME r
rAn
I
if,:1N
'fhe disPla-Y
stoPs
blinki;rq'
If'yott seleited 12
hor'rr
clock
to set fion'r 1:00
to IZ:59'
If'r'ott
selected
24
hour clock
to set
fi'om
0:00
to 2ll:59'
and the colon starts
blinking'
system,
this digital clock allorvs
1'ott
svstetn,
this rligital
clock allorvs
you
-1.
'i'ottch CL0CK/
,\UTO START llacl'
r_____ ---,- ------------------e---tl
i XOfn: If you atternpt trr
enter an incort'ect
time, the time rvill not be set
and a
error sigral I
i tone will souncl.
'fouch the CLOCK/AUTO
START pad re-enter
the time' J
i---
frff--€--
10
IVEIGHT DEFIIOSTING
\\'LI(]llT I)|'IFROS'I'
lets,\,ou easily rlt'frost
firo<l
bv elirninating
guesswork
in determining clefi.ost-
itr.g
tirrre.'fhe rninirnunr rveight fbr \,Vt,ltill'f DEI-ROSI is 0.5 pounds.
The maximurn rveight fbr
\!1f.1(;fl'f DEFITOS'f is 6.(.)
potrnrls.
tollorv the steps
trelorv
fbr easy
defrosting.
l-_ STAGE--.I lDEFFOSTI
WEIGHI TIME AIJTO
START
.4.
nn
U.Ll v
The WEIGHT DEFROST
indica-
tor lights, "0.0" is
displayed and
the lb indicator starts blinking.
1. Trtuch r\flTo
DEFROST pad.
trtr
2. Touch number pads for
the desired defrosting
',veight.
The clisplay
will show the num-
bers you pressed in the order
vou touched them.
-STAGET TDEFROSTT AUTO
t Z WEIGHT rtue START
A.
,
It 5v
LOCK
lJ.
Touch START pad.
WEIGHT DEFROSTING
begins. The defrosting time is automati-
cally determined by the weight entered.
'fhe lb indicator goes
ofl WEIGHT DEFROST
indicator blinks and
the defrosting tirie counts down in the display window. The oven
lleeps cluring the clefrosting
rycle to signal that the food needs to
be turned or rearranged.
\,Vhen the defrosting time ends, you will hear 3 beeps.
11
]|INIE DEFROSTIN{;
\\'lrcn 'I'lN.ltl
t)t.F
ltOS'f is selcc'tt'rl,
thc ;ttttoltrittic
cryt'lc
rlf irlternatitrg
clefiost an(l
stan(l timcs ll,t' cyclirt{ otr rtntl
rlir.'irlcs
thc tlcf'rostirtg
tirne into pt'r'iocls
ofl. See
pa.qe
29 fcrr time clefrostin$ char1.
The WEIGHT DEFROST
indica-
tor lights,
"0.0" is displayed
and
the lb indicator starts
blinking.
t. Totrch
AUTO
DEFROST Pad.
r STAGET ;DEFFOSTI AU.T9
1 2 WEIGHT TIME b
rAFrl
,A
nn
L{
Ll' 'v
The TIME IIEFROST indicator
lights and " :0" is disPlaYed.
2. Touch AUTO
DEFROST Pad once
more.
AUTO
START
,^.
on
'u
50EFR0ST1
WEIGHT TIME
f- STAGE-]
trtrntr
lJ.
Touch number Pads
for
the tlesired defrosting
tirne.
The display will show the num-
bers you pressed in the order
yor-r touched them.
r- --*1
[OTE: Your oven can be
progammed for 59
minutes 99 seconds.
(59:99)
LJ
T STAGE-'1 ;-DEFH0ST1 AU.Tp
WEIGHT TIVE ) IAh I
f,rl
:Atn
IN
CUPS
-t. 'l'ouch START Pad.
when _you
touch START pad, the TIME DEFROST
indicator starts
blinking to show the oven is in the TIIVIE
DEFROST
mode.
fhe ciispiay
counts
dor,vn
the tirne to show you-how much defrost-
-g ti-L is
teR
in the TIME DEFROST
mode.
The oven beeps
dur-
ing the defiostin.q
c.vcle-to
signal
that the {bod needs
to be turned
,r."."orro.gecl. Whln the dlfrosting time ends, you rvill hear 3
beeps.
12

COOKING IN ONE STAGE
The STA(iE1 indicator lights and
"P- " is displayed.
l. 'fotrch POIVER pad.
TSTAGE- TDEFFOSTT AUTO
\ Z WEIGHT l[,te STABT
,4.
F-
2.
Touch t
for the
level.
tr
he number pads
clesired power
The display will show what You
touched. This example shows
power level 3.
r- -r ---l
I t{orEr If steps 1 and 2 are I
I omitted, the oven will cook at I
I fLll power. I
L-:-- -)
r SrAGE-t ;DEFROSr1 At{p.
1 2 W€IGHT TIME 5
rAn I
^^.
F- fl{l
NO CUPS
trtrtr
il. Touch number Pads
for
the cooking time.
- STAGET ;-DEFRoST-1 AUJ^o-
1 2 WEIGHT TIME ) I AN I
-l 5:3
iJ
LOCK NO CUPS
The display will show the num-
bers you pressed in the order
you touched them.
f- ---1
I NorP: Your oven can b" !
I prograrnmed for 59 minutes I
| 99 seconds.
(59:99) |
L_ --d
4. 'fouch START Pad.
tVhen you tonch STAITT
pad, the STAGE1
indicator starts
blink-
i"g i; Jh"w the oven is moking. The displaycounts down the time
to-show horv much cookinq time is left. When the cookin$ time
ends. \,ou r,vill
hear l3 beePs'
---- --- ----1
l
i xorn : using lower tx;wer levels
inrreases
the cooking time which is recomtnended for foods I
| ^,,,.L"^.. ^l.,oi* ,-,rilk enrl slow cooking tneats. I
I t.r.li", cheese.
nrilk and slorv cooking t1"ntt:- - -- - J
l-- --- <- -- -- --
r- - -F*-- ----- ----'l
I tltnn . . tr .r- -- ..r^-^ ^L^.,^ avnonr onrp,. c6ot' ;rs rrru/t'r level I
I T.o
use
the microwave
as
a timer, follorv
the steps
above,
except
enter "0" as
power level I
! trstep2. ----J
t---- -- --
13
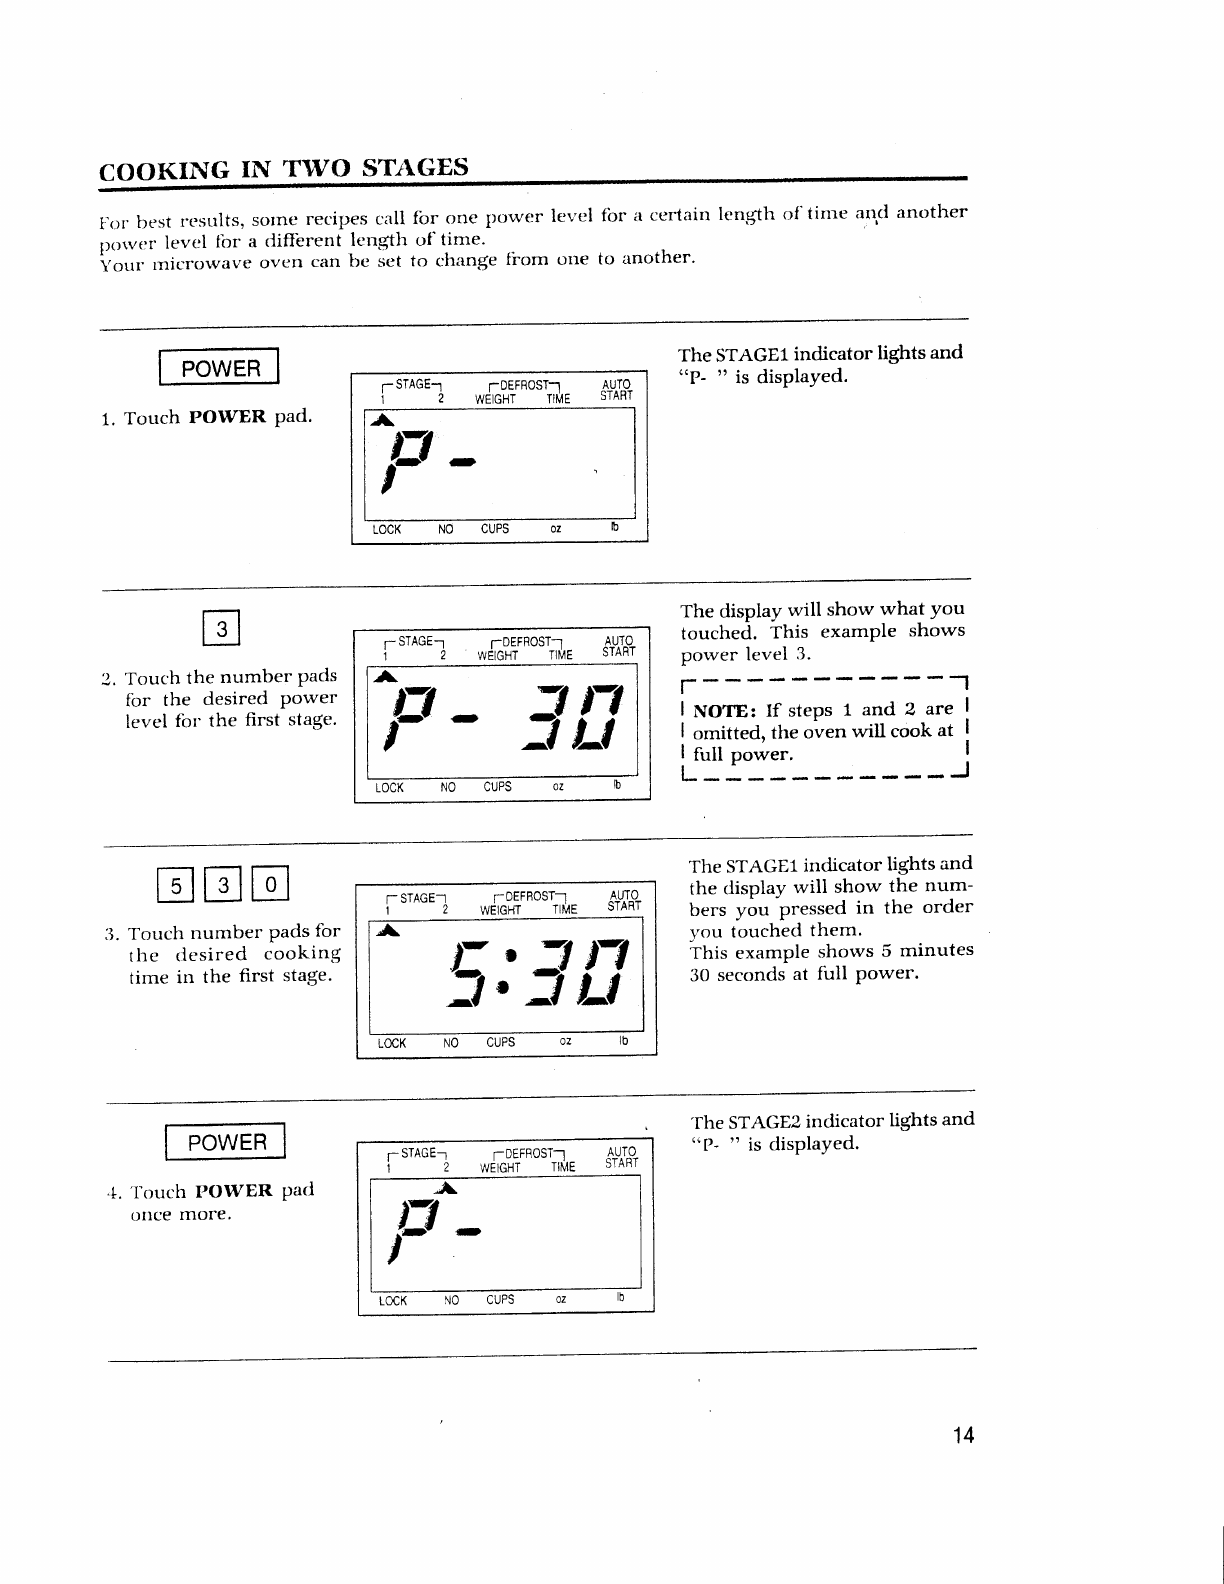
COOKING IhI TIVO STTGES
For best results, solne recipes call
Ilower level fbr a diffbrent length
Yo.,a tnicrorvave oven can lre set
fbr one l)olver level
of time.
to chan{e fiom one
for a certain length
to another.
of'time atrd another
The STAGE1 indicator lights and
c(P-
" is displayed.
1. Touch POWER Pad.
TSTAGEI TDEFR9ST-r AUTO
1 2 WEIGHT rtl,te START
^|,
F-
LOCK NO CUPS
lil
2. Touch the number Pacls
lor the desired Polver
level fol the first sta$e.
The display will show what You
touched. This examPle shows
power level 3.
r-- ---1
NOTE: If steps 1 and 2 are
omitted. the oven will cook at
I full power.
L_ - --J
;- sTAGE-1
/A
F
- 1{l
;DEFROST-1 IU.TO-
wEtGHT frt.le START
CUPS
trtrtr
.1. Touch number Pads
for
the tlesired cooking
time in the first sta$e.
T STAGE-] ;DEFROSTI
1 2 WEIGHT TIME AUTO
START
A5:l{l
The STAGE1
indicator lights and
the display will show the num-
bers you pressed in the order
you touched them.
This example shows 5 minutes
30 seconds
at full Power.
'fhe STAGE2
indicator lights and
((P-
)''
is displaYed.
.t. 'fouch POWER Pacl
olrce
more.
1-
STAGE-1 ;DEFBOST1 AU^T"q
1 2 WEIGHT TIME )
IAN I
-4.
13-
,
CUPS
14
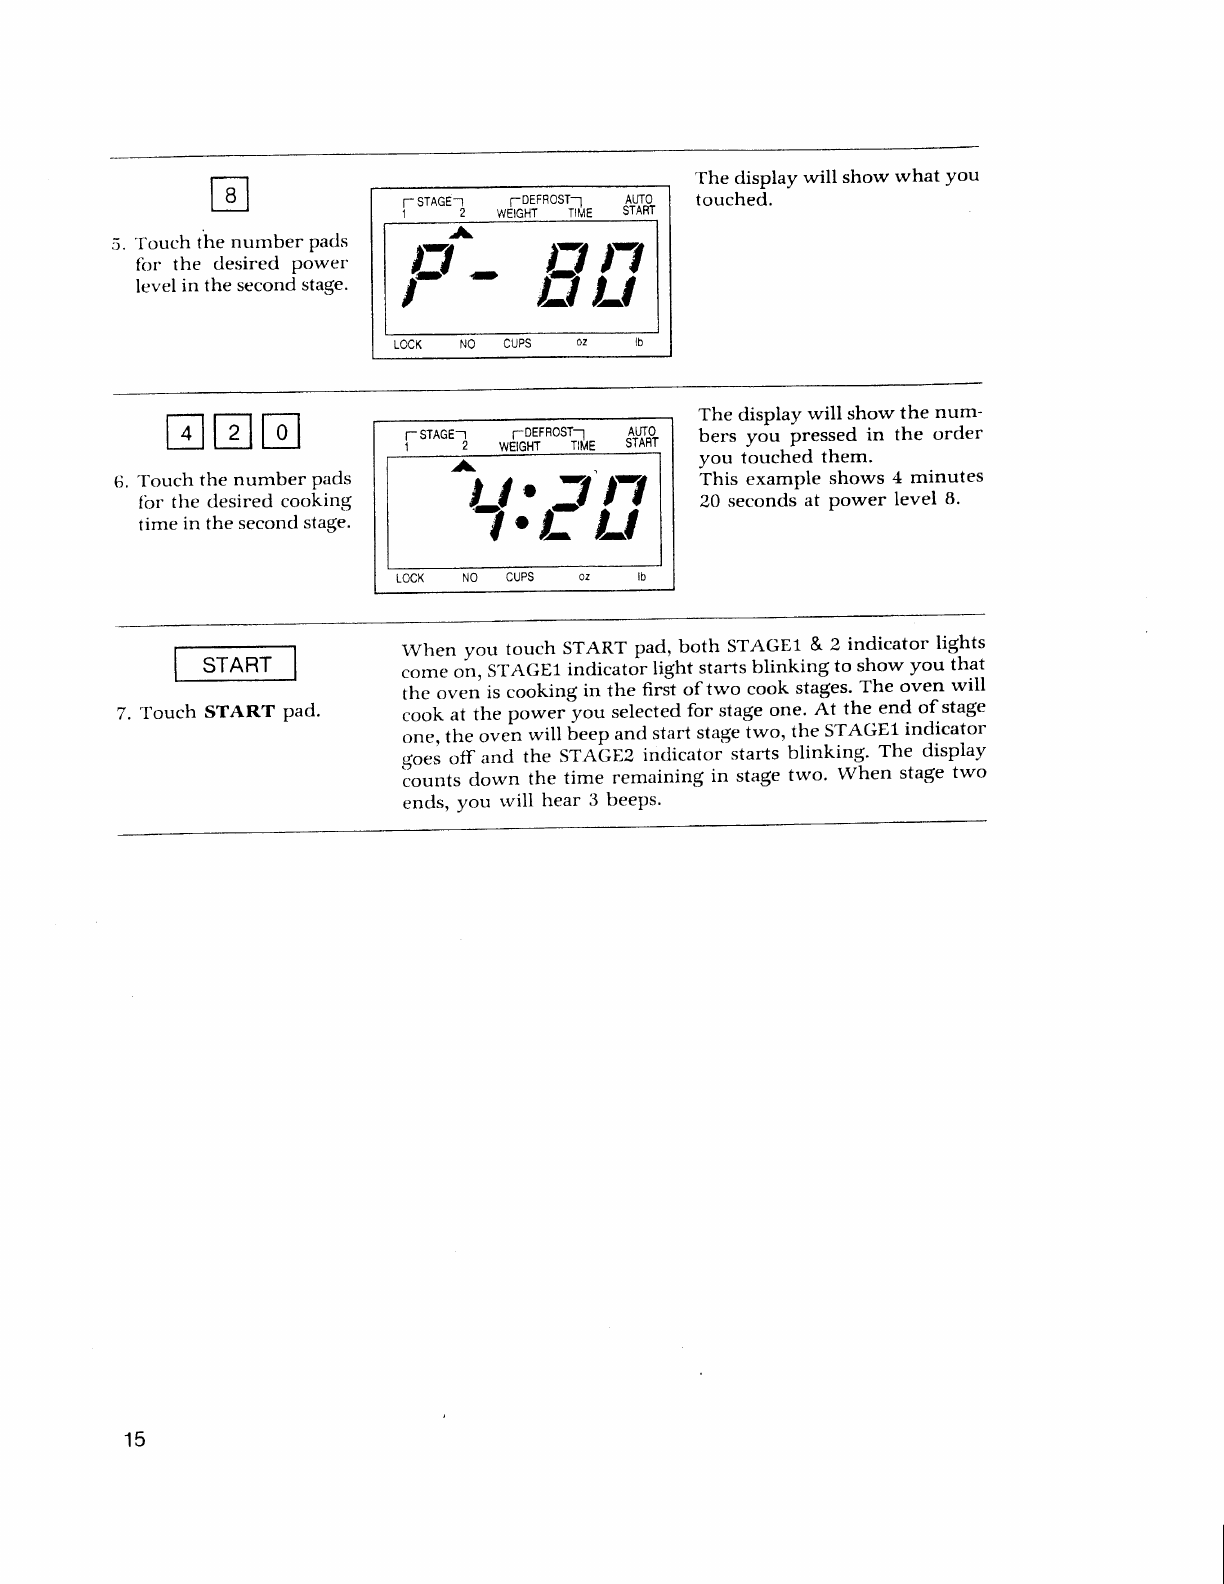
The display w-ill show what You
touched.
5. -I'ouch
the number pads
for the desired Power
level in the second
stage.
AUTO
START
T STAGET IDEFFOST-1
1 2 WEIGHT TIME
LOCK NO CUPS
^4.
F- #i]
trtrtr
6. Touch the number Pacls
{br t}re
clesired
cooking
time in the second
stage.
The display will show the num-
bers you pressed in the order
you touched them.
This example shows 4 minutes
20 seconds
at power level B.
TSTAGEI ;-DEFR0ST-1
WEIGHT TIME AUIO
START
LOCK
an
IL'
.4.,1
:
7. Touch START Pad.
when you touch START pad, both sTAGEl & z indicator lights
come on, STAGE1
indicator light starts
blinking to show you that
the oven is cooking in the first of two cook stages-
The oven will
cook at the po*..-you selected
for stage
one. At the end of stage
one,
the oven will beep and
start
stage
two,-the
STAGE1
indicator
.g;"r off and the STAtlE2 indicator starts blinking. The display
counts clown the time remaining in sta$e
two' When stage
two
ends. you r'vill hear 3 beePs.
15
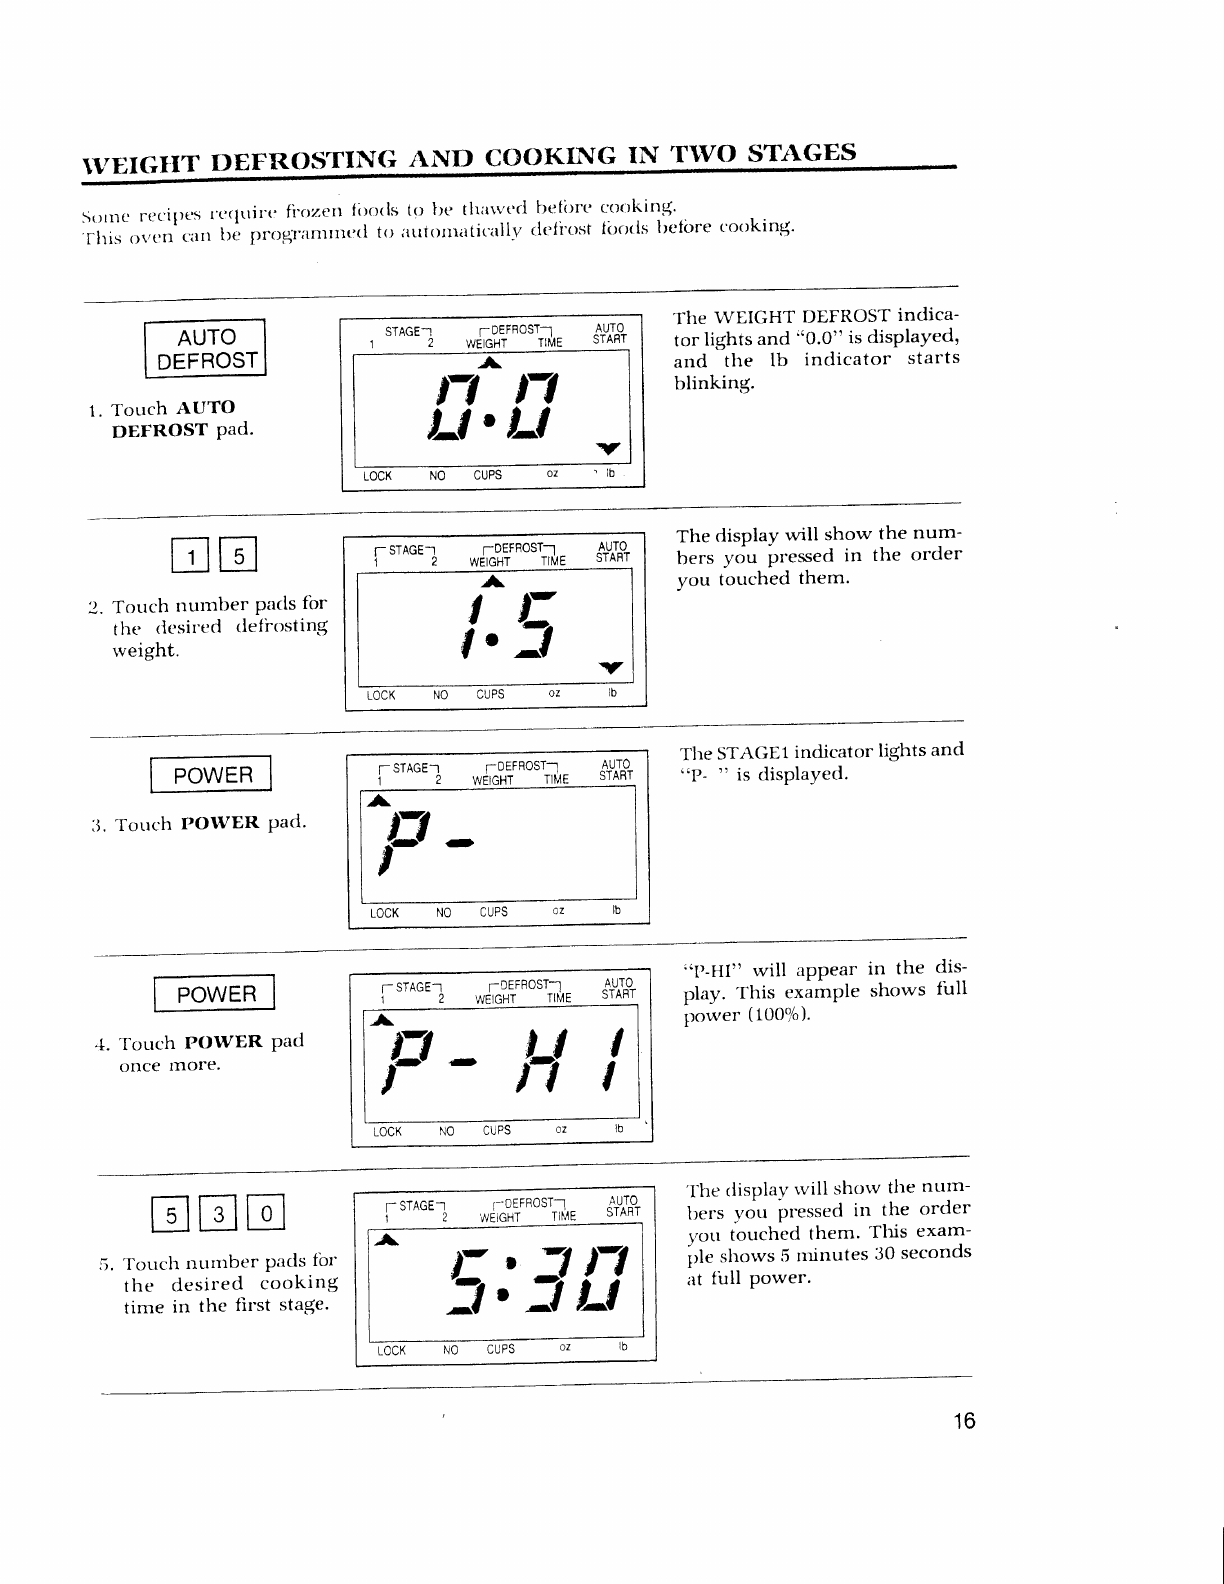
1VEIGTIT DEFROSTING ANJD COOKING IN T1VO STAGES
Sorne rec:i1les
t'tlrlttil'tr fi'ozetl filorls
'this ()\/t:rl criltt lle progl';lnrtntltl to
to tre thitr'r't'd
trefilrc ctlokinq.
;rtrtOnrtrtically clefi'ost lt-rorls
llefbre c'ooking.
STAGE.I ;DEFROST-1 AU.T^O-
1 2 WEIGHT TIME r rAn
I
,4.
nn
U'Ll v
'lb
The IVEIGHT
tor lights
and
and the lb
blinkin.g.
DEFROST
indica-
"o.o" is
displayed,
indicator starts
1.
Touch AUTO
DEFROST Pad.
AUTO
STAFT
/l
1.5v
LocK No cuPs oz lb
TDEFFOSTI
WEIGHT TIME
; STAGET
trtr
2. Touch number Pa(ls
for
the rlesired tlefiosting
rveight.
The display will show
trers you pressed in
you touched them.
the nurn-
the order
AUTO
STABT
lDEFFOST--1
WEIGHT TIME
I STAGET
,al
F-
The
STAGE1
indicator lights and
(cP-
" is displayecl.
.J.
Totrch POWER Pacl'
i- STAGE-I ;DEFFOSTI AU.LO-
1 2 WEIGHT TIME )
IAN
I
,A
,ry-
H i
"P-HI" "vill appear
play. 'fhis examPle
porver (10096).
in the dis-
shows full
-1.
Touch POWER Pad
once Inore.
T STAGE..l ;0EFB0ST-1
WE}GHT TIME AUTO
START
"4. 5:JiJ
LOCK NO CUPS OI
trtrtr
5, Touch uunlber Pacls
lbr
the desired cooking
time in the first sta$e.
'I'he
tlisplav
will shorv
the nutn-
trers vou Pressed
in the order
yotr tottched
them. 'fhis exam-
ille shor.vs
5 minutes 30
seconds
at firll power.
16
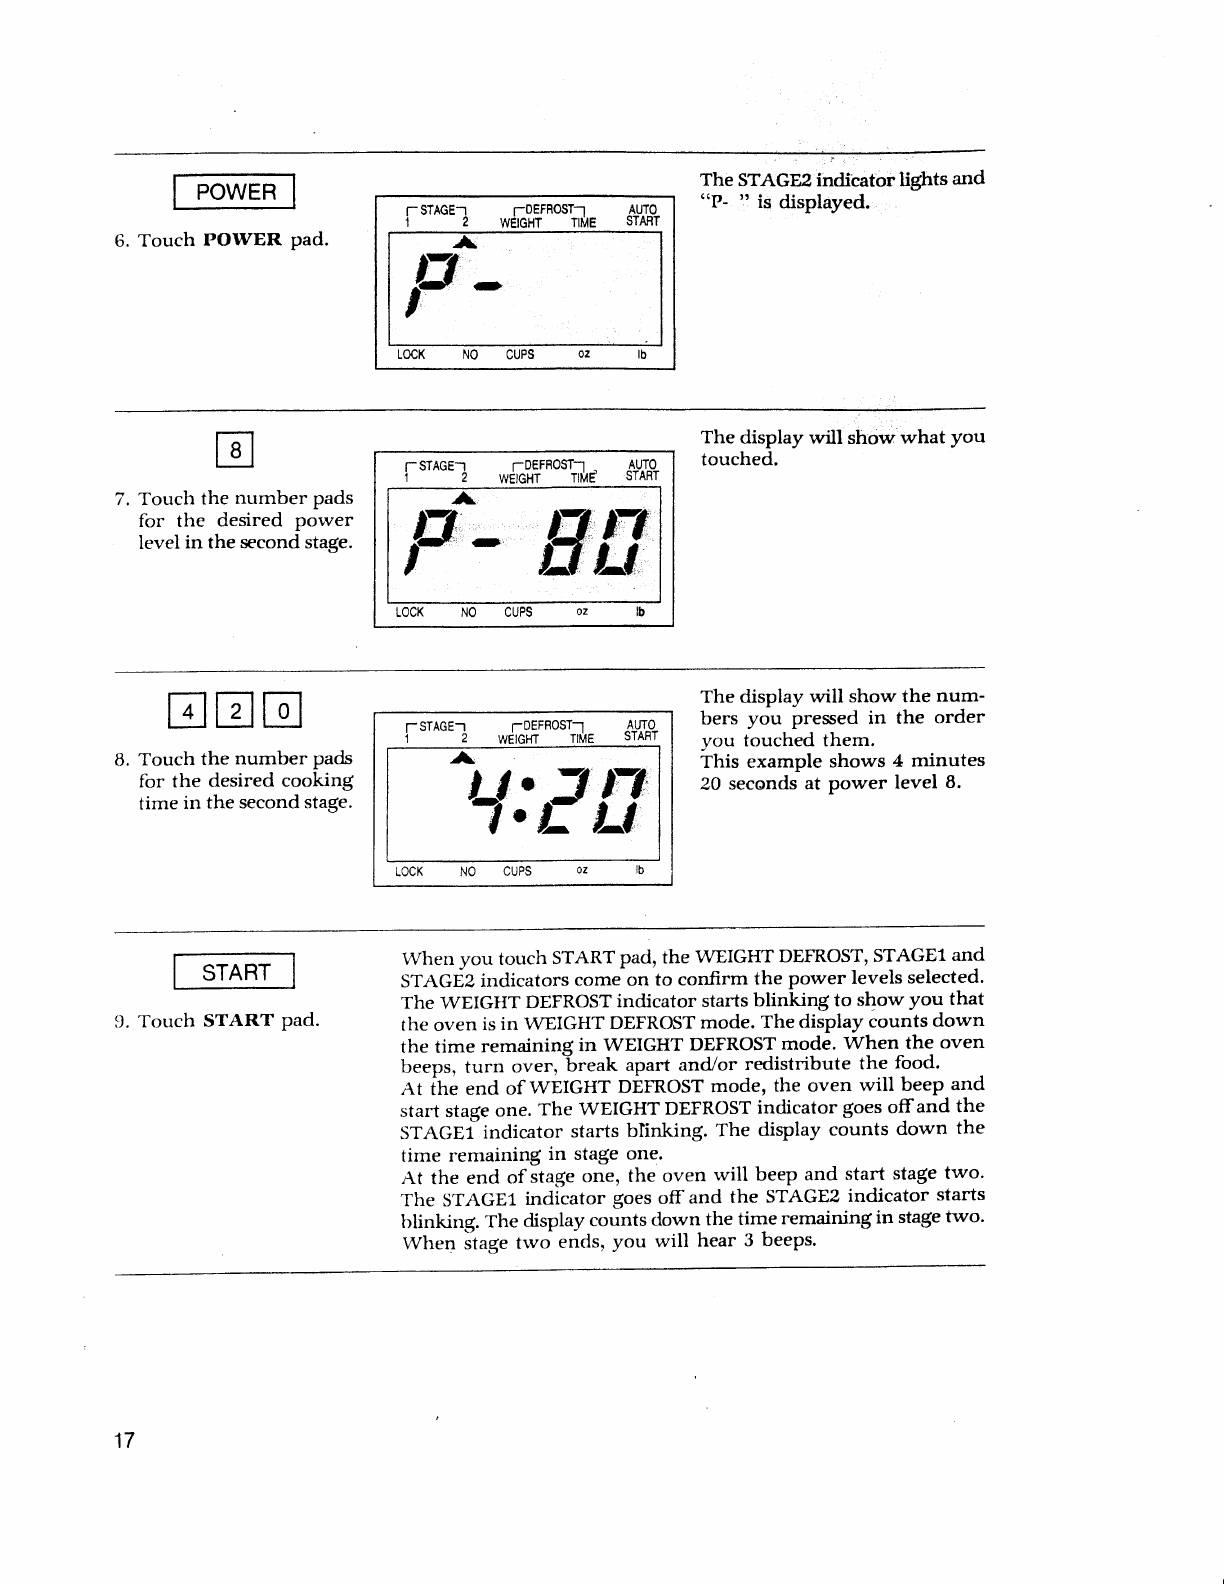
fPo\
/ERl
Touch POWER pad
6.
,1.,.
The STAGE2 indicator lights and
"P- 1?
is displayed.
r-STAGET T0EFRO$Ir AUTO
WETGHT fttte STAFT
LOCK
7. Touch the number pads
for the desired power
level in the second stage.
TsrAGEr *frorfto*nJ,d $TT&
The display will show'what you
touched.
trtrtr
B. Touch the number pads
for the desired cooking
time in the second stage.
r STAGE-'I ;DEFFOST-1 -[t{rg
1 2 WEIGHT TIME s lAfl
I
^^r '1
:f#
LOCK
The display will show the num-
bers you pressed in the order
you touched them.
This example shows 4 minutes
20 seconds
at power level B.
I srAR'r
1
Touch START pad
!).
When you touch START pad, the WEIGHT DEFROST,
STAGE1
and
STAGi2 indicators come on to confirm the power levels selected.
The WEIGHT DEFROST
indicator starts
blinking to show you that
the oven is
in WEIGHT DEFROST
mode. The display counts down
the time remaining in WEIGHT DEFROST
mode. When the oven
beeps, turn over, break apart and/or redistribute the food.
at fhe end of WEIGHT DEFROST
mode, the oven will beep and
start stage
one.
The WEIGHT DEFROST
indicator goes
offand the
STAGEi indicator starts blinking. The diqplay counts down the
time remaining in sta$e
one.
At the end of stage
one, the oven will beep and start stage
two.
'fhe STAGE1 indicator goes off and the STAGE2 indicator starts
blinking. The display counts down the time remaining in sta$e
two.
When Jtage
tr.vo
ends, You will hear 3 beeps.
17
r\U'fO ST?\IIT
.\tttct stltt't t'lttr lle
.'\ tt to stitrt c'ilI1
ll0t [)r'(x$'ilrllnle(I fbl'
bc llroglatrllntt(l
trp t0 t$'tl cookine, stit.{cs.
fix' atrtrl rleliost.
1. l)rograrn the rlesired power level and cooking time.
The AUTO START indicator
lights and " :0" is disPlaYed.
2. 'fouch CLOCK
I\UTO START Pad.
T STAGE-.I ;DEFB0ST-1
WEIGI-TI TIME AUTO
STAST
.A
on
'Ll
trtrtrtr
Enter the clesirecl
start
tinre by pressing the
nunrber pacls.
The clisplay
will show the num-
bers vou pressed in the order
vou tottched
them.
'fhis exrtrnple
shows 11:110.
TSTAGE-r
*floiftott,l,, $tol?
A.
l#
{o
lo
I
I
.{.
'fouch START Pacl.
When vou touch START
pad,
the present
time appears
in the dis-
play and the cooking program indicators come on'
The AUTO START indicator and the colon start blinking. When
the selected
start
time arrives,
the oven begins
operating and the
oven light turns on. The AUTO START indicator $oes
offand the
,r"*t rtige indicator.begins
to blink. lVhen the
cooking
is cornplet-
ecl
vou Julll h"n. lJ
beeps.
T[e ovep turns offanri the present
time
iippears
in the tlisplav.
NOTE: AUTO START can
be used
fbr time cooking, if'the clock is set.
If the oven door is
opened after programming AUTO S';ART,lt is .ebessary to touch the START pad
for the time "f d;y to appJar in the readout so that the oven will automatically be-
gin programmed
cookiqq
at the chosen
ful? START
lt:"
Itefbre setting, check to inake sure the clock is showin$ the-
correct ^t1":-:fiT
l/Lrvr L lrLrrrr{ir, \
O'ce the Auto Start time has
been
set,
no other buttonJcan be pressed,
except
for
the STOP/CLEAR
keY. J
L
1B
TO CHECI( ATJTO START TIME
()n1e yorr lur.e c6r'r'r,ctly
l)r'ogt'eunnretl
the ovetl for AU'I'O ST,,\It'i', the prestlnt tinle will appear
in tht' rlispla-r'.
The programtned AUTO START time u'ill appear in the display
fbr 3 seconds.
1. Touch CLOCK
AUTO START pad.
QUrCK COOK BU'rTONJ
Otll(lK (,(X)K ltllttn,s,\,ort
1o ht'at
lirotl
firr'30
set'onrls
at 1(X)'li,
(.)LII(lK
O(X)h.
pirtl.
Ily t'ellcatt:til-r' torrc'ltinil.'
tht' (]tll(jli (l(X)K ltitcl,
.t'ort
t'ittt
ttist'r
in 30 seconrl inlt't"r';tls.
(Iirli ltou.er) bl' sintpll' touchin.q the
t.'x1c'nc,l
reheating titne ttl 5 minutes
T STAGE-I TDEFFOST-r AUTO
WEIGHT TIUE START
:lll
When you touch QUICK COOK'
'c :30" is displaYed.
After 1.5
seconds,
the oven starts
reheating.
1.
Touch QIIICK COOK
patl.
19
OI{E
TOT]I-II
COOKII{G (NIEIIJLI,
sCC fbr chart and exact
arnounts)
firorls
[rv totrt'lring
just
is
sarne
as
desiretl
qtran-
(
)rr. t,rrClr rrrclkirrr:.
;rlltlvu's
,\'Otr
t()
C',tlk ttt' r't'lrCltt
Illllll\/ tif'\'rlLtt'
firr,'Orittl
,'t, lxrr-1,
'I'' i.cr-e,ir.' ,1.,,,,ttiir'-
trltrt'h ch.sen P,tl trrltil ttttt'ber i' tlispla'1'
ri5, t,, r,ook (exc'cirt
fir' NILri'f'tX & tltXi.'it,li t'L,'\I't'-)'
AUTO
STABT
;DEFFOSTI
WEIGHT TIME
3,5
,/
T STAGE-
LOCK
1. Tottch I'OPCORN Pad
once fbr a il.S oz bag or
trvict' tbI'a 1.75 oz bag'
rvVhen
vou touch POPCORN
Pad
orrce,
'i3.5" is displaYed.
r\fter 1.5 secortds,
the clisPlaY
shor.vs
the cooking time and the
oven starts
cooking.
* POPCORN *
o 3.5 oz: Tottch POPUORN otrce'
. 7.75 oz: Touch POPCORN twice within 1'5 seconds'
NOTE: 1.
2.
n
J.
4.
5.
6.
Cr\LITION:
Useprepacka$edr.oom-temperaturetnicrowavepopcorn.
lrlace
bag in ,r-,r"n
accorcling to -"ttufacturer's directions'
Pop ortly one btg at a time'
;"f.ru'ip;;;s;';il; ;;;'en-rllv, pop'orl Td steam
ar."
extremelv
hot'
Do noi t"il"ni unpoppecl kernels or reuse ba.q'
Do not leave o'u..t tinattended while popping popcorn'
I f
p
r e
p
a c
k a
ge
d
p o
p c
o
r
n
i s
o
f
'
a
l t
* :"t Y-::ry
"t
| * J 1"^ :":?T T:: *l"T:fll :
:iJ;Yi\}.:?;; fift;;-;",t ;. ail popco,'i'''uy not
pop
or a
fire mav
occur'
Follow the rnanufacturer's instructions'
a dJ
L
AUTO
STABT
.D#
Y
lDEFROSTl
WEIGHT TIME
NO CUPS
T STAGE-1
LOCK
l. 'fotrch SOUP Pad once
fil' ;r B oz souP or tlvice
fbr a 1) oz sotlP'
\,Vtren you touch SOUP Pad
once, "{J" is disPlaYecl'
Alter 1.5 seconds,
the disPlaY
shows
the cookin$
time and the
oven starts
cooking'
* SOUP *
o tJ <'tzi
Touch S()UP once.
. l2 ()zi'fouch SOUP trvice r'vithirl
-----.|
[- not": For best
results,
consult
the
cookbook -- -J
1-
- --
seconds.
20
1.
Touch MUFFIN Pad
once to ctrck 5 muffins.
r STAGET IDEFRoSTI AU.T9
| 2 WEIGHT TIME b
rAfr
I
5
v
NO CUPS
When you touch MUFFIN Pad,
"5" is displayed.
After 1.5 seconds, the disPlaY
shows the cooking time and the
oven starts cooking.
1. "fouch BEVERAGE
pad once for 1 cuP,
twice for 2 cups
or three
times for il cllps.
When you touch BEVERAGE
pad once, "7" is displaYed.
After 1.5 seconds,
the disPlaY
shows the cooking time and the
oven starts cooking.
r- srAcF-r TDEFFOSTT AUTO
i - '-- 2 wetcnt rrlte START
{
{
v
LOCK NO CUPS
*
a
a
a
BEVERAGE * (250m1/cup)
1 cup (mug): Touch BEVERAGE once'
z cups (.".igs)t Touch BEVERAGE twice within 1.5 seconds.
ll cups (mu!s): Touch BEVERAGE three times within 1'5 seconds'
F_ .!- ---- ------ ---------J
I
I xorn, r. This setting
is
good
fbr restoringcooled
beverages
to a better
drinking temperature' I
L--i t":I:t*i"g -- -- -----.--J
21
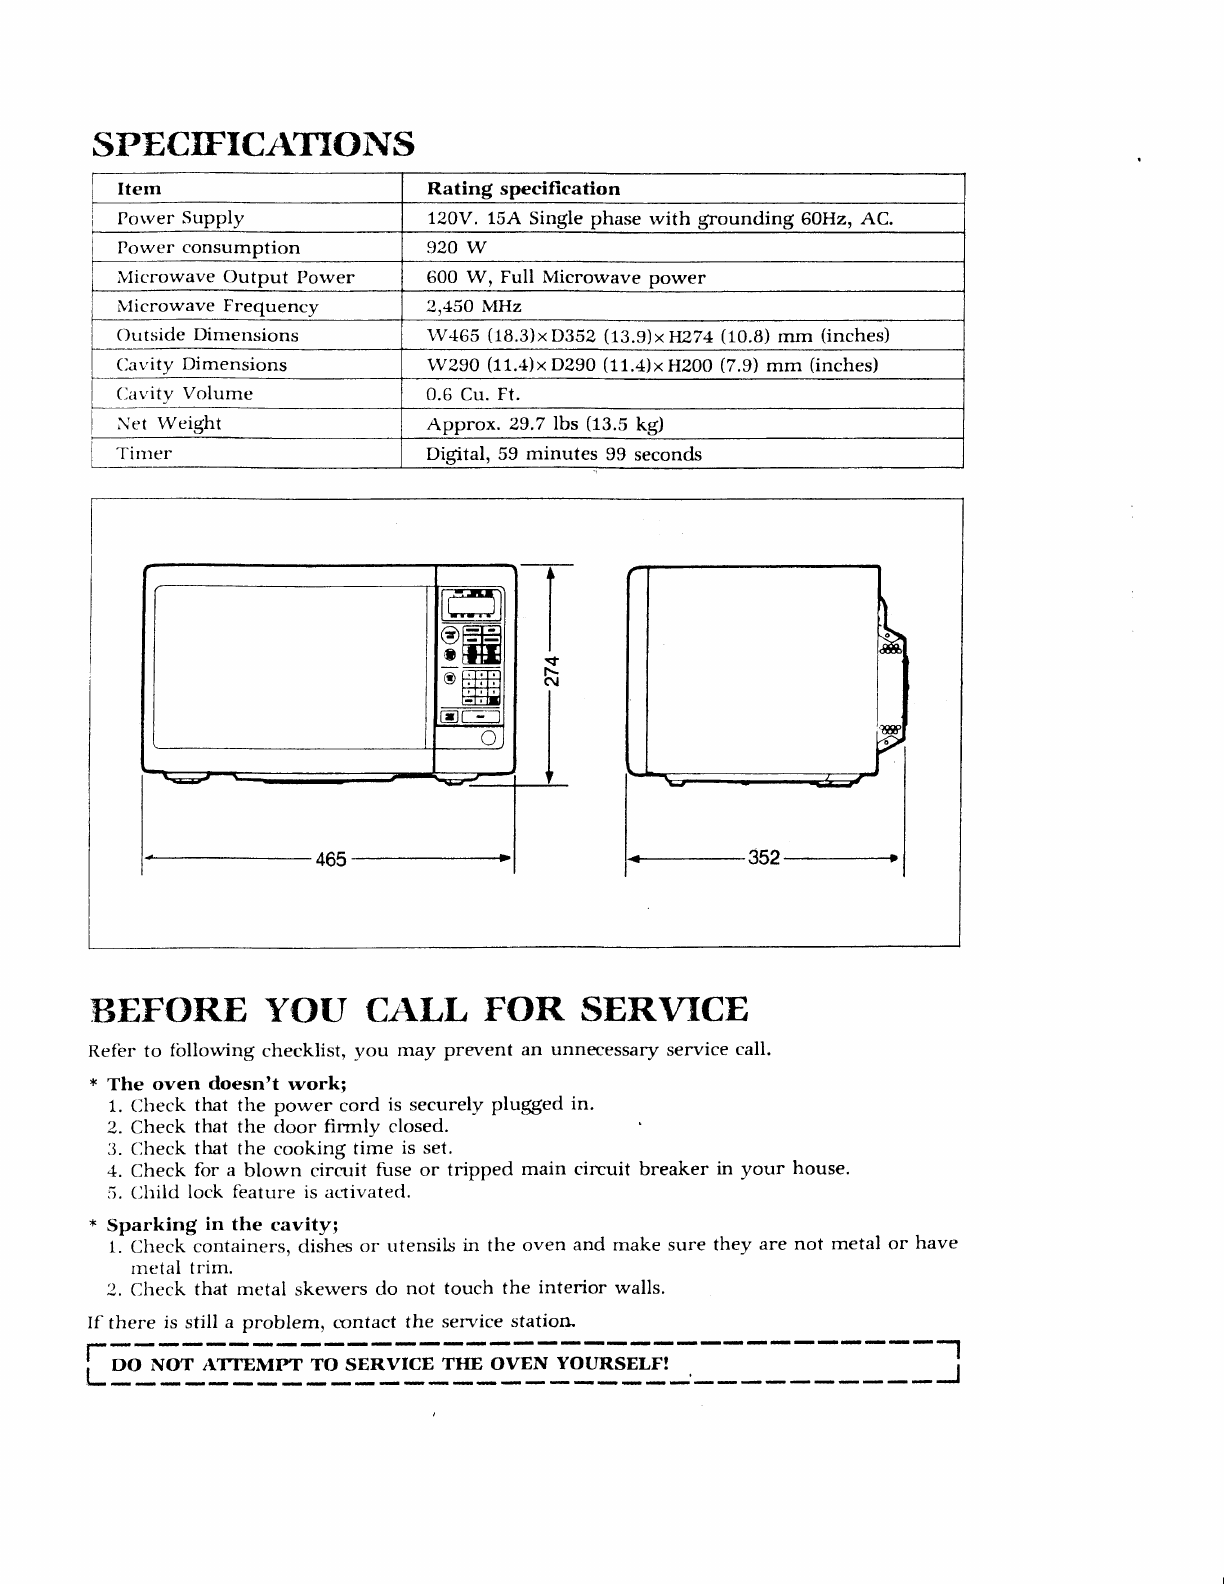
Itern Rating specification
Porver
Supply 72OV. 15A Single phase with gfounding 6OHz, AC.
Power consumption 920 W
Microwave Output Power 600 w, Full lvlicrowave power
lvlicrowave Frequency 2,450 M}Iz
Outside Dmensions vV465
(1S.3)x
D352
(13.9)xH274 (10.S)
mm (inches)
Cav'ity Dimensions \,V290
(11.4)x
D290
(11.4)xHZOO (7.9)
mm (inches)
(lavity Volume 0.6 Cu. Ft.
Net Weight Approx. 29.7
lbs (13.5
kg)
Tinrer Digital, 59 minutes gg seconds
SPECIFICATTOiTS
tsEFORE YOTJ CALL FOR SER\IICE
Refer to fbllowing checklist, you may prevent an unnecessary
service call.
* The oven doesntt rvorki
1. Check that the power cord is securely
plugged in.
2. Check that the door firmly closed.
3. Check that the cooking time is set.
4. Check for a blown cirmit fuse or tripped
5. Child lock feature is activatecl.
* Sparking in the cavity;
1. Check containers,
dishes
or utensils
in the oven and make sure they
rnetal trim.
2. Cl-reck
that metal skewers do not touch the interior walls.
main circuit breaker in your house.
are not metal or have
If there is still a problem, cxrntact
the service station-
r:_-_:::--- --- ------------ --J
; DO NOT ATTEMPT TO SERVICE THE OVEN YOURSELF!
l--
@W€rso{t.
SERVICE
TO FIND
THE LOCATION
AND
PHONE
NUMBER OF
YOUR
NEAREST SERVICE
CENTER
PERMITTED TO
PERFORM
WARRANTY SERVICE...
CALL
TOLL
FREE:
1'800'695'0098
FOR
ADDITIONAL
SET.UP OR
OPERATING
A$SISIANCE
PLEASE
CALL:
1'800-898-9020
FOR CUSTOMER
SERVICE,
PLEASE
WRITE
TO:
Emerson
Radio
Corp.
Consumer
Affairs
Dept.
I Entin
Road,
ParsipP?nY,
NJ
07054-0430
LIMITtrD WARRANTY
MICROWAVE
OYEF{S
Emerson
Radio
Corp. warrants
this
product
to be free from manufacturing defects
in original
material,
including
original
parts, and
workmanship
under
normal
use
and
conditions
("manufacturing
defect")
for a period
of one
(l) year
from date
of original
purchase in, and if used
in, the
United States
("warranty").
Should
scrvice
be
necessary under
this
warranty,
Emerson
will provide
the
following
at an Independent
Service Center
or Regional
Repair
Facility
permitted
by Emerson
to perform repairs,
provided
the
manufacturing
defect
is
verified
along
with the
date
of purchase:
* Repair
service
for one
(l) year
from date of original
purchase
at no charge for labor and parts.
* Replacement
of a defective magnetron
for seven
(7)
years
from date
of original
purchase
(labor not included
after
initial twelve
(12)
months)
There are
Independent
Service
Centers
and Regional
Repair
Facilities
located
throughout
the
country.
For one
nearest
you, DIAL TOLL FREE:
l-800-695-0098.
In the
event
the
product
must
be
mailed
to a Regional
Repair
Facility
which is
permitted
by Emerson
to perform
repairs:
* Pack
the unit in a well-padded
heavy corrugated
box.
* Enclose
your
check or money
order
payable
to the
REGIONAL REPAIR FACILITY in the amount
of
$15.00
to cover
return shipping
and handling costs.
* Enclose
a copy
of your proof of purchase
(warranty
service
will not be
provided without dated
proof
of purchase)
* Ship
the
unit prepaid
via UPS or parcel
post
(insured).
NOTE: This warranty does
not cover:
(a) Damage
to equipment
not properly
connected
to the
product'
(b)
Cost
incurred
in
the shipping
of the
product
to and
from a Regional
son to perform
warranty rePairs.
Repair
Facility
permitted
by Emer-
(c) Damage
or improper
operation
of unit caused
by customer
abuse, misuse,
negligence,
or
low operating
instructions
provided
with the
product.
(d)
Ordinary
adjustmenrs
to the
product
which can
be
performed
by customer
as
outlined
manual.
(e)
Signal
reception
problems
caused
by external
antenna
or cable
Systems.
(l) Products
not purchased
in the United
States'
(g) Damage
to product
if used outside
the United
States.
THIS WARRANTY IS NON-TRANSFERABLE
AND APPLIES
ONLY TO THE ORIGINAL PURCHASER
AND
DOES
NOT EXTEND TO SUBSEQUENT
OWNERS
OF
THE PRODUCT.
ANY APPLICABLE IMPLIED WAR-
RANTIES,
INCLUDINC THE WARRANTY OF MERCHANTABILITY, ARE LIMITED IN DURATION TO
A PERIOD OF THE EXPRESSED
WARRANTY AS PROVIDED HEREIN BECINNING WITH THE DATE
OF ORIGINAL PURCHASE
AT RETAIL AND NO
WARRANTIES,
WHETHER EXPRESSED
OR IMPLIED,
SHALL APPLY TO
THE PRODUCT
THEREAFTER.
EMERSON
MAKES NO WARRANTY AS
TO THE FIT-
NESS OF THE PRODUCT FOR ANY PARTICULAR PURPOSE
OR USE.
HE EXTENT OF EMERSON
RADIO CORP'S
LIABILITY UNDER THIS LIMITED WARRANTY IS THE
REPAIR
OR REPLACEMENT PROVIDED ABOVE AND, IN NO EVENT,
SHALL EMERSON
RADIO CORP'S
LIABILITY EXCEED
THE PURCHASE
PRICE
PAID BY
THE PURCHASER
OF
THE PRODUCT.
UNDER
NO CIRCUMSTANCES
SHALL EMERSON
RADIO CORP,
BE
LIABLE FOR
ANY LOSS,
DIRECT,
INDIRECT'
INCIDENTAL, SPECIAL,
OR CONSEQUENTIAL
DAMAGE ARISING OUT OF
OR
IN CONNECTION
WITH
THE USE
OF THIS PRODUCT.
THIS wARRANTY IS
VALID ONLY IN THE UNITED STATES
OF AIVIERICA.
THIS WARRANTY CTVES
YOU SPECIFIC
LEGAL RIGHTS. HOWEVER, YOU MAY HAVE OTHER RIGHTS
WHICH MAY VARY
FROM STATE TO STATE. SOME STATES DO NOT ALLOW LIMITATION ON IMPLIED WARRANTIES
OR EXCLUSION
OF CONSEQUENTIAL
DAMACE, THEREFORE
THESE RESTRICTIONS
MAY NOT AP'
PLY TO YOU.
PRINTED IN KOREA
504-01
failure to fol-
in the owner's
lv'lV 1094F
@fuerson,
EMERSON
Printed
in
China
