Emerson File
User Manual: Emerson s - Owner's Manuals | Emerson Radio
Open the PDF directly: View PDF ![]() .
.
Page Count: 39
MICROWAVEOVEN
OWNER'S
MANUAL
MODEL
MW8168B/MW8158W
Visit our web site at
"www.emersonradio.com"
UNAUTHORIZED
MODIFICA
IONS TO THIS DEVICE COULD
VOID MANUFACTURER'S
WARRANTY
PRECAUTIONS
TO AVOID
POSSIBLE
EXPOSURE
TO
EXCESSIVE
MICROWAVE
ENERGY
(a) Do not attemp!
to oporstc
thlg oven
wlth
the door
open
since
opendoor ope-
ration
can result
in
harmfulexposurB
to microwave
energy.
lt is
important
not to
defeat
or
tamper
with the
safety interlocks.
(b) Do
not place
any obfect
betwesn
the oven front
face
and
the
door or allow
soil
or cleaner
residue
to accumulate
on sealing
surfaces.
(c)
Do not op€rete
lhg ovon if it is
damaged.
h is
particularty
important
that the
oven
dool close
properly
and that
there
is
no
damage
to the:
(ry
ooor
(bent),(2)
hinges
and latches (broken
or loosened),
(3)door
seais
and
sealing
surtices.
.
' '
(d)
fhe oven
should not be adluttcd or rcpalred
by
anyone
except
properly
quali-
fied
service
personnel.
CONTENTS
Precautions
to Avoid Possible
Exposuro
to
Excassive
Microwave
Energry,.............................
l
lrnportsnt
Safety Instructions. ..........2
Safety
Precautions ....,.....................3
Grounding
Inetructions ...........,...,....4
Instolhtion ,..................4
Care
of Your
Microwavs
Oven,..............,............s
How
to Use Your
Microwave
Oven
Salely
..,....,..s
Feature
Locations.... ......,..,,.............6
Operation
Procodure... ..,......,..,,,.....7
Controls...... .,....,...,....,.9
Setting tho
Clock ...............,.,....8
Auto
Weight
Defrosting ............9
Time
Cooking
in
One
Staga
............,.....,....
I
O
2 Stagc
or 3 Stage Time
Cooking
.............,10
Popcom ...,.......,.,11
Baverages ......,...11
Potatoes .........,...12
P122a......,..,. ........12
Dinner
P|ate........,.. ...........,.....19
Mutfins...... ...........14
Soup .... .........14
Fresh
Vegetables
..... ......
.,........
1S
Hold
Warm ,..,.....16
Child
Lock... ..,....,12
To
Stop
the
Oven Whils h
is
Operating......,,,...17
Cooking
Guide.......... ..........,.,.,.....18
The
Principles
of Microwave
Cooking
..............
18
Food
Characteristics ................,..,1g

IMPORTANT
SAFETY
INSTRUCTIONS
When uslng electrical appliances, baslc safety
precautions
should be followed,
including the following:
WARNING -To reduce
the risk of burns, electric shock, fire, injury to persons
or exposure
to excessive
microwave
energy:
I Read
all
instructions
before using this
I appliance.
) Read and follow the
specific
"PRECAU-
I- TIONS TO AVOID POSSIBLE EX-
POSURE
TO E)(CESSIVE
MICROWAV
E
ENERGY"
found
on
page
1.
Q This appliance
must be grounded.
v Connect
only
to a properly
grounded
outlet.
See
"GROUNDING
INSTRUC-
TIONS" found
on page
4,
/ Install
or locate
this appliance only in
T accordance with the provided
installa-
tion
instructions.
{ Some
products
such
as
whole
eggs and
v sealed containers-for
example,
closed
glass
jars-may
explode and should
not
be heated in this oven.
L Use this appliance
only
for
its intended
v use
as described in
this manual. Do not
use conosive
chemicals or vapors in
this
appliance.
This
type
of oven
is
specifi-
cally
designed to heat,
cook, or dry
food.
It is not designed for industrial or labor-
atory use.
7 As
wilh any appliance,
close
superuision
' is necessary
when used by children.
Q Do not operate
this appliance if it has
v a damaged
cord or plug, if it is not work-
ing properly,
or if it has
been
damaged
or dropped.
Q This
appliance
should
be serviced
only
' by qualified
serviced
personnel.
Cont-
act the nearest
authorized
service fac-
ility for examination,
repair
or adjust-
ment.
I n Do
not
cover
or block
any openings
on
I
lr this
appliance.
SAVE THESE
1 'l Do not
store
this
appliance
outdoors,
t I Do
not
use this
product
near water-for
example, near
a
kitchen
sink,
in
a wet
basement,
or
near
a swimming
pool,
and the tike.
Do
not
use outdoors.
11 Do
not immerse
cord or
plug
in
water.
tz-
1 ? Keep
cord
away
from
heated
surfaces.
tv
1 A Do
not let
cord
hang
over
edge of table
or counter.
1 5 When
cleaning
surfaces
of door
and
|
\' oven that
come
together
when closing
the
door, use
only
mild, non
- abrasive
soaps or detergents
applied with a
sponge
or soft
cloth
1A To
reduce
the risk
of
fire
in the r,ven
I v' cavity:
(a) Do not overcook food. Carefutly
attend
appliance if paper,
plastic,
or other combustible materials
are
placed
inside
the
oven to facilitate
cooking.
(b) Remove
wire twist
- ties from paper
or plastic
bags
before
placing
bag
in
oven.
(c) lf materials
inside
the oven
should
ignite,
keep
oven
door
closed,
turn
oven off, and disconnec,t
the power
cord,
or shut off
power
at the fuse
or circuit breaker
panel.
(d) Do not use
the cavity
for storage
purposes.
Do
not leave
paper
pro-
ducts, cooking
utensils,
or food in
the cavity when
not in
uss.
17 Do not use this microwave
oven to heat
| / corrosive
chemicals
(for
example,
sul-
fides
and
chlorides). Vapors
from such
corrosive chemicals
may
interact
with
the
contact and
springs
of the
safety
interlock
switches thereby rendering
them inoperable.
INSTRUCTIONS
2
SAFETY
PRECAUTIONS
General
Use
'l Do NOTattempttotamperwith
ormake
, any
adjustments
or repairs
to door,
control
panel
or
any
other
part
of the
oven.
Do
NOT
remove
outer
panel
from
oven.
Repairs
shoutd
only be
done
by
qualified
service
personnel.
) Do
NOT
operate
the
oven
empty.
The
& microwave
energy
will reflect
continu-
ously
throughout
the oven
if no
food
or
water
is
present
to absorb
energy.
Q lf a fire
occurs
in the
oven, touch
the
\"' CLEAR
/ PAUSE
pad
and
LEAVE
THE
DOOR
CLOSED.Disconnect
the
power
cord,
orshut
off
poweratthe
fuse
or
circuit
breaker
panel.
A Do NOT attempt to dry ctothes,
T newspapers
or other
materials
in
the
oven.
They may
catch
on fire.
5 Do
NOT
use
'ecycled
pap€r
products,
- as they
may
contain impurities
which
maycaus€
sparks
and/or
fi
res
when
used.
A Do NOT
hit
or
strike
controt
panel.
v Damage
to
controls
may
occur.
/ Avoid
inserting
nails,
wire,
etc. through
t any holes
in the
unit
during
operation.
Never
insert
a wire,
nail
or
any other
metal
objects
through
the
holes
on the
cavity
or any
other
holes
or
gaps,
be-
caus€
such
objects
may
cause
electric
shock
and microwave
leakage.
Utensllr
'f MEfAL
CONTAINERS
or
dishes
with
' metallic
rims
should not
be used.
Arc-
ing may
occur.
? MFIAL
TWIST-TIES
may
not
be
used
! in the
microwave
oven.
? Do NOT
use
SEALED
JARS
or MRROW
r./ NECK
bottles
for
cooking
or
reheating.
They
may
shatter.
A Do
NOT
use CONVENTIONALTHER-
+ MOMETERS
in
the microwave
oven.
They
may
cause arcing.
{ Remove
PLASTIC
STORE
WMpS be-
v fore
cooking
or
defrosting
food
in
the
oven.
ft For FURTHER
INFORMATION
on proper
v cooking
utensils, refer
to the
microwave
cooking
guide.
Food
I Never use
your
microwave
oven
for HOME
' CANNING.
The
oven
is
not dasigned
to
permit
proper
canning.
lmproperly
canned
food may spoil and be dangerous
to
consume.
? COOKING
TIMES given
in
the cooking
& guide
are
approximate.
Factors
that may
affect
cooking
are
starting
temperature,
altitude,
volume,
size
and
shape
of food
and utensils
used. As you become
familiar
with
the oven,
you
wilt
be able
to ad.iust
for
these
factors.
Q tt
is betterto
uNDERcooK RATHER
THAN
v OVERCOOK
foods.
lf food is undercooked,
it can always
be returned
to the oven for
fufther
cooking.
lf food is overcooked,
nothing
can
be
done.
Always
start
with
minimum
cooking
times.
/ SMALL
QUANTITIES
of food or foods
'+ with
LOW
MOISTURE
content
can burn,
dry
out or catch
on fire
if cooked
too long.
{ Do
NOT
boil
eggs in
their
shell.
pressure
- may
build
up
and the
eggs
will
explode.
A Potatoes,
apptes,
egg
yolks,
whole
acorn
v squash
and sausage
are examples
of food
with NONPOROUS
SKtNS.These
must be
pierced
before cooking
to prevent
bursting,
7 POPCORN
must
be
popped
in
a microw-
/ ave
corn
popper.
Microwave popped corn
produces
a lower
yield
than
conventional
popping.
Do
not
use
oven
for
popcorn
unless
popped
in
a microwave
approved
popcorn
utensil
or unless
it's
commercially
packaged
and
recommended
especially
for
microwave
ovens.
Do not
use
oil unless
specified
by the
manufacturer.
R DO
NOT
attempt
to deep tat
lry in
your
- oven.
g HEATED
UQUIDS
can ERUPT
if not mixed
' with air.
Do
not heat
liquids
in
your
micro-
wave oven
without
first
stirring.
3
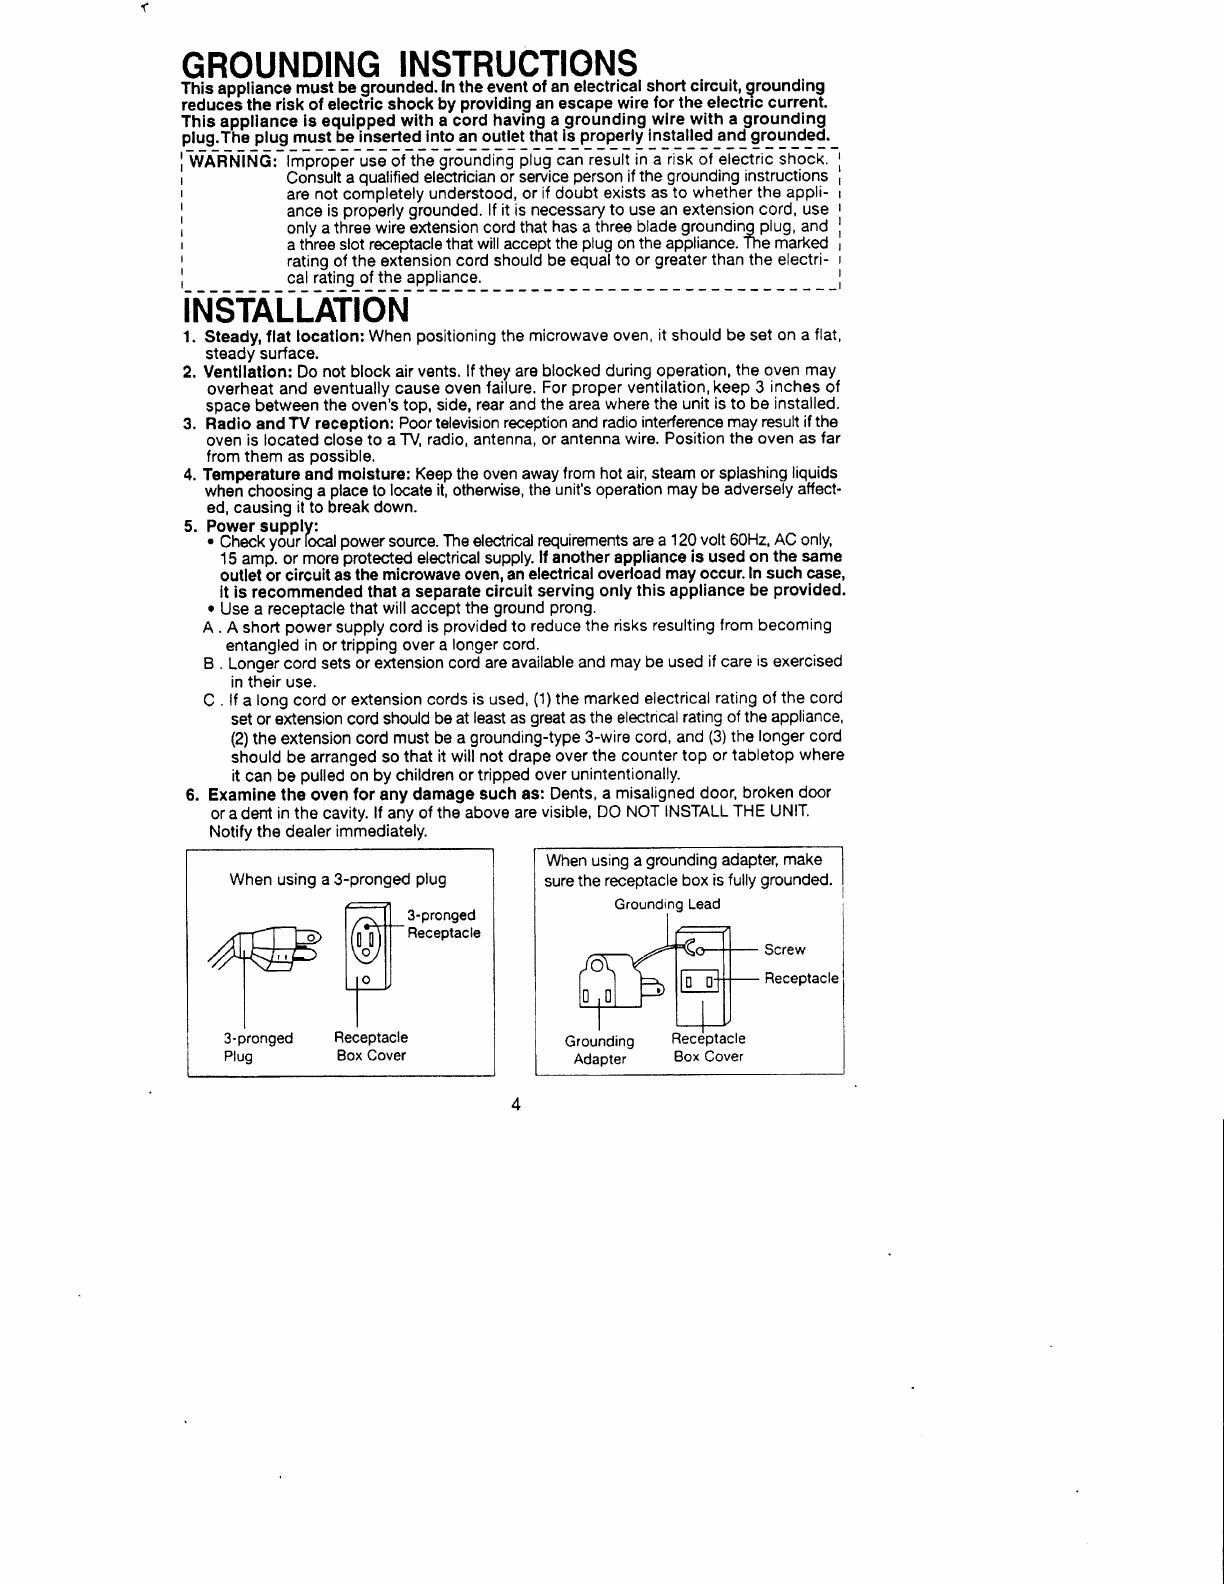
GROUNDING
INSTRUCTIONS
This
appliance
must be
grounded.In
the event
of an electrical
short
circuit,
grounding
reduc6i the risk of electiic
shock by providing
an escape
wire
for the electric current.
This apptlance
is equlpped
with a cbrd having
a grounding
wlre with a grounding
ptug.Thb plug must be inserted
into an outlet
that
is properly
installed and grounded.
WABNING: lmproper
use
of
the
grounding
plug
can
result in a risk of electric shock. I
Consrjlti quiriieo ete"ctriiian
o-r ieruice
person
if
the grounding
instructions I
are
not
completely
understood, or if doubt exists as
to whether
the appli-
ance
is
properly
grounded.
lf it is necessary
to use an eltension
cord, use
only a three wire extension
cord
that
has
a
three blade
grounding plug,
and
a
three slot
receptacle
that will accept
the
plug
on
the appliance. The marked
rating of the extension
cord
should
be
equal to or greater
than the electri-
cal
rating of
the appliance.
INSTALLATION
1. Steady, flat
locatlon:
When
positioning
the
microwave
oven,
it
should
be
set
on a
flat,
steady surface.
2.
Ventllatlon: Do
not
block
air
vents.
lf they are blocked
during operation,
the oven may
overheat
and eventually
cause
oven
faiiure.
For
proper
ventilation, keep 3 inches
of
space between
the oven's top, side,
rear
and
the
area
where the
unit is to be
installed.
3. Radio and
TV
reception:
Poor television
reception and radio
interference may result if
the
oven
is located close
to a TV,
radio,
antenna,
or antenna
wire.
Position
the oven as
far
from them as
possible.
4. Temperature
and molsture:
Keep the oven
away
lrom hot air,
steam or splashing
liquids
wheir
choosing
a
place
to
locate
it,
otherwise,
the
unit's operation may
be adversely
aflect.
ed, causing
il
to break
down.
5. Power
supply:
. Check
your
local
power
source.
The electrical
requirements are
a 120
volt
60H2,
AC
only,
15
amf. or
more'protected electrical
supply.lt
another
appliance
is used on
the
same
outlet br circuit
as
the microwave
oven, an
electrical
overload
may occur.
In
such
case,
it is recommended
that a separate
circuit
serving
only
this appliance
be
provided.
. Use
a receptacle
that
will accept
the
ground
prong.
A . A
short
power
supply
cord
is
provided
to
reduce the
risks
resulting
from
becoming
entangled
in
or
tripping over a
longer
cord.
B .
Longer
cord sets
or extension
cord are
available
and
may
be
used
if
care
is
exercised
in
their use.
C
. lf
a
long
cord
or extension
cords
is used,
(1)the
marked
electrical
rating
of
the
cord
set
or extension cord should
be
at
least as
great
as the electncal
rating of
the appliance,
(2)the
extension cord
must
be
a
grounding-type
3-wire cord,
and
(3)the
longer cord
should be
arranged so
that
it will not drape
over
the
counter
top or
tabletop
where
it
can be
pulled
on
by
children
or tripped
over
unintentionally.
6. Examlne the oven
for any damage
such as: Dents,
a
misaligned dooc
broken
door
or a dent
in the cavity.
lf any of
the above are
visible, DO
NOT
INSTALL THE UNIT.
Notify the dealer
immediately.
When using
a
3-pronged
plug
:l
| ^. ll 3-pronged
,ffi l(0^[rReceptacre
4W l\yll
l1-
tl
i 3-pronged Receptacle
I Plug Box Cover
When using
a
grounding
adapter,
make I
sure
the receptacle box is fully
grounded.
I
Grounding Lead i
Screw
Receptacle
Grounding
Adapter
CARE
OFYOUR MICROWAVE
OVEN
Disconnect
the
AC
plug
from the
outlet
before
cleaning.
Keep
the
inside
of the
oven clean,
\{hen
food
spatters or spilled
liquids
adhere to
oven walls, wipe
with a damp
cloth. Mild
detergent may
be
used
if
the
oven
gets
very
dirty. The
use of harsh
detergent
or
abrasives
is not
recommended.
The
outside
oven
surface should
be
cleaned
with
soap and water,
nnsed
and
dried with a soft cloth.
To
orevent dam-
age
to the
operating
parts
inside
the
oven, water
should not
be allowed
to
seep into the ventilation
slots.
lf the
Control
Panel
becomes
wet.
clean
with a soft, dry cloth.
Do not
use harsh
detergents
or abrasives
on Control Panel.
lf
steam
accumulates
on both
sides ot
the
oven
door, wipe
with
a soft
cloth.
This
may occur when
the microwave
oven
HOWTO
USEYOUR
MICROWAVE
OVEN SAFELY
Allhough
your
oven ls
provlded
with
safety
features,
lt ls important
to observe the
following:
a)
lt
is important
not
to defeat
or tamper with
safety
interlocks.
b)
Do not
place
any objeci
between
the
oven
face
and the
door or allow residue
to accum-
ulate
on sealing surfaces.
Wipe
the
sealing
area
frequently
with
a mild
detergent, rinse
and
wipe
dry. Never
use
abrasive
powders
or
pads.
c) When
opened,
the
door must
not be
subjected to
strain,
for
example,
a
child
hanging
on
an open
door
or any load which
could
cause
the oven
to
fall
foruard
and cause injury
and
damage the
door. Do not
operate the
oven
it it
is
damaged,
until it has
been repaired
by a
qualified
person.
lt is
particularly
important
that the
oven door close
properly
and that
there
is
no
damage
to the: i )
Door
(bent),
ii
)
Hinges
and Latches
(broken
or
loosened),
ii)
Door
seals
and
sealing surfaces.
d) The
oven should not
be
adjusted or
vice
personnel.
I
2
is
operated
under
high
humidity
conditions
and this is not an indication
of a mal-
function
in
the unit.
It
is
occasionally necessary
to remove
the
glass
tray
for
cleaning.
Wash
the
tray in
warm,
sudsy
water
or in
a dishwasher.
.--- \
/ Q--zz
The roller
guide
and oven
cavity
floor
should
be cleaned regularly
to avoid ex-
cessive noise.
Simply wipe
the bottom sur-
face
of the
oven
with
mild detergent
water
or window
cleaner and
dry. The
roller
guide
may
be washed in
mild, sudsy
water
or
dishwater.
3
6
7
4
5
Roller
Guide
1 The ROLLER
GUIDE and
oven
floor
should
I be cleaned frequently
to prevent
excessive
noise.
) The
ROLLER
GUIDE MUSTALWAYS
be
used
L for
cooking
together
with the
Glass Tray.
Glass Tray
I Do NOT operate
the oven
without
the
Glass
' Trav in olace.
n
Z Do NOT use any other
Glass Tray with this oven.
? lf
the
Glass
Tiay
is
hot,
ALLOW
ITTO COOL
: before cleaning
it or placing
in
in
water.
.
4 Do NOT
cook direclly
on the Glass Tray.
Glass
Tray Roller
Guide
repaired
by anyone
except
properly qualified
ser-
5
FEATURE
LOCATIONS
1.
Door
latch
- When
the
door
is closed,
it
will
zutomatically
lock
shut.
lf
the
door
is opened
while
the oven
is operating,
the
magnetron
will automaticallY
shut
ofi'
2.
tloor
seal
- The door
seal
maintains
the
microwaves
within
tha
oven
cavity
and
prevents
microwave
leakage.
3.
Oven
cavitY.
4.
Spatter
shield
- Protects
the microwave
outlet
from
splashes
of cooking
foods'
5. Safety
interlock
system
- Prevents
the
oven from operating
while
the door is
opened.
6. Door release
button - Pushing
this
button
stops
oven
operalion
and
opons
the
door'
7. Glass cooklng tray - Made
of
specialheat
resistant
glass. The
tray
must
always
be in
proper
position
before
operating
the
oven'
Do
not
cook
food directly
on
the
tray'
8. Roller
gulde
- Supports
the
glass
cooking
tray. Must always
be in proper
position
before
oPerating
the oven'
9. Door screen - Allows
viewing
of
food'
The
screen
is designed
so
that
light
can
pass
through,
but
not
the
microwaves'
f 0. LED display - Cooking
tirne,
power level,
function
indicators
and
the
present time
are
displayed.
11.
Auto Weight
Delrost
pads
- Used
lo set
the
desired
defrosting
category,
12.
Popcom
pad
- Used
to cook
popcom'
13.
Muffin
Pad
- Touch
to cook
muffins'
14.
SouP
Pad
- Touch
to heat soup.
15.
Fresh
Vegetable
- Touch
to cook
fresh
vegetables.
16.
10 key pad
- Used
to set the desired
power
level,
cool<ing
time
etc.
17.
Ckcck
pads
- Touch
to set
the
present time'
18. Clear/Pause
pad
- Use
to stop
the oven
operation
or
to delete
lhe cooking
data'
19.
Beverage
pad
- Use
to hsat
beverages'
20.
Potato
pad - Touch
to cook potatoes'
21.Pfuspad - Touch
to reheat
precooked
pit:.a.
22.
Hold
Warm
pad
- Used
to keep
the food
warm
atter
cooking
is comPleted'
23.
Dinner
Plate
pad
- Used
to
reheat
plated
foods.
24.
Cook
pads
-Touch
to set
arry
desired
cook
setting.
25.
Power Level Pad
- Used to set the
desired
cooking
Power
level.
26.
Start
pads
- Used to start a selected
oPeration.
@@@
@@
6
OPERATION
PROCEDURE
This
Section
Includes
Useful Information About Oven
Operation
1.
Plug the power
eupply cord into
a standerd 3-pronged 15 Amp or moru 120V AC 60Hz
power
outlet.
2.
After placing
the food in a suitable container, open the oven door and put lt on lhe
glass
tray.The
glass
tray and roller
gulde
must always be in place
durlng cooklng.
3. Shut the door. Make
sura
that it is firmly
closed.
'l When
the oven
door
is
opened,
the light O
I turns otf.
This
is standard
procedure
for /
the
oven.There are
no microwaves
be-
rng
produced
when
the door
is
open.
a The
oven door can be openad at any
4 trme during
operation
by
pressing
the
DOOR
OPEN btrtton on the control
pan-
el.
The
oven will automatically
shut off.
To restart
the
oven, close
the door and
then press
the START
pad.
Q Each
time
a pad
is
touched, a beep will
v sound to acknowledge
the tor.rch
(except 1 O
Child Lock feature).
One of
the function I v
pads
must betouched beforethe number
pads.
Therefore,
no beep
will
sound if a
number
pad
is touched
before the fun-
ction pad.
tr The
oven automatically
cooks on high
+ power (PL
10)
unless
set to a
lower level.
{ The
display will flash
"0:00"
when
the
v oven
is first
plugged
in.
A The
display shows
"End"
when the
oven I I
v turns off. To return
to tha
time
of day,
touch
the CLEAR/PAUSE
pad
or open
the oven door.
/ When the
CLEAF/
PAUSE
pad
is
touch-
/ ed during
oven
operation,
the oven stops
operating and
all
information
is
retained.
To
erase all
information
(except
the
present
time and
memory
data), touch
the
oLEAR / PAUSE
pad
once
more,lf
the oven door is
opened during
operation,
all
information
is retained.
Q lf
the
STARTpad
is
touched
and
the
oven
t. does
not
operate,
check the area
be-
tween
the
door and the door sealfor
ob-
struction and make sure the door is
closed securely. The
oven will not
start
cooking
until the door is completely
closed or the program
has
been
reset.
Make
sure
the
Child Lock
feature is
not
turned
on,
CHILD
LOCK
This safety
feature
prevents
unwanted
or unauthorized
use
by small children
or other
prople.
1.
To
lock
the oven, touch
the
numberpad
"0"
onceand
then
presstheSTARTpad
five
times.The
display will
show
"L OC"
and
the oven will
not operate.
2.
To
unlock the
oven,
repeat
the above
procedure.The
oven
display
will
return
to the
present
time.
BEEPTONE
When a conect pad is
touched, a beep
tone (0.2
seconds long) will
be heard
(except
with Child Lock feature).
lf a pad
is
touched
and
no beep tone is
heard,the
unit
has not,
or cannot
accept the instruc-
tion(s).
At the
end
of the last
cook cycle,
the oven
beeps
5
times,
turns off auto-
matically
and
"End"appears
in
the display
window,
DOOR
RELEASE
Opening the
doorduring
cooking willstop
any cooking
proc€ss
without
cancelling
any
program.
Cooking
resumes
as soon
as the door
is
closed and
the START
pad
is touched.
1 O TO CORRECT ANY
IMPROPER
PRO'
I z cRRu ENTRTES
A)Touch
the CLEAR/PAUSE
pad.
B) Repeat the desired
program
entry
from
the
beginning.
C)
Any
erroneous entries will cause the
display
to show
"Err" (enor)
when the
START
pad
is
touched.
: lurare
srra in" o"un ii piopeii11
iniiiiieJ
,
, 119
plt9999
i"l9 !19
9199l,si1.:919J: ..
;
ADDITIONAL
INFORMATION
1. You
cannot
program
more
than 99
minutes and
99 ssconds
in
each
stage.
2.
you
cannot
program
for more
than 6
lbs
of
poultry,
4
lbs
of meat
or 3
lbs
of
fish
in the
Auto
Weight
Defrost
stage.
3. lf
you
oien the
oven
d6or
during
cooking,
be
sure
to touch
the
START
pad
to begin
cooking
again.
4. The oven
door can be opened
at any
time
while
the oven
is operating.
lf the door is
opened,
the oven
will
stop and
the
display
will stop
co.u.nting
down
the.coo.king
time'
5, lf'a
function or program
is
selected,
but
not started
within
one
minute,
the display
re-
turns
to the
present
tims
and
the
program
is erased.
CONTROLS
SETTING
THE
CLOCK
When
the
oven
ig
first
plugged In,
the
diaplay
wlll
llash
"0:00"
and a
tone
wlll
sound'
tf
ths AC
pourer
every
goes
ott,
the dlsplay
tt lll llash
"0:00"
when
the
power
comes
baclr
on.
The display will flash
"0:00" and a tone will
sound.
1, Touch
the
Number
pads
to set
the
correct
present
time.
EXAMPLE:
To set
thetime
to
"10:12",
touch
"1","0",
L1",('2'r
in sequence.
The display
will show
the
numbers
pressed
in the or-
der
you
pressed
them.
@l This
display
will show
the
present
time and
the
colon
will stop blinking.
The
12
hour digitalclock
allows
You
to set
it from
"'l:00" to
"12:59".
2. Touch
the CLOCK
pad.
NOTE: lf the oven
is
used
before
the
present
time
is set, the display
will show
"0"
atter
the cooking
is completed
and
the door
is
opened'
To reset
presentlime
in the display
window
when the
oven
is
off,
touch
the
CLOCK
pad.
The colon
starts
blinking.
Enter
the correct
present
time
by
fotlowing
the above Procedures,
x.)'-lx
,.|.LI).|
l,=
lno
l)Jo
lil: lt

AUTO WEIGHT DEFROSTING
AUTO
WEIGHT
DEFROST bta you
emlly delroct
loodr by ollmlnrUng
gucrwort In drtcrmlnlng
delrorUng
tlmc. Thc mlnlmum
wclght for Auto
Wclght Orlroat
lr 0.llb. The
mrxlmum wclght
depcndr
on the iood cetegory.
Up to 8.0lbe
lor poultry,
4.0 lbr lor mcet
end
3.0
lbs for llch.
Follow
th. 3t.p3 below
for resy defroetlng.
AUTO
DEFHOST
EXAMPLET
To
selecl POULTBY,
torJch
'1' :
thc display will show
.dEF
I' ANd thE AUTO DEFROST
ndicalor will light.
1, Enter
lhe desired auto
weight
category. dE F !
EXAMPLE: To seloct 0.8 lbs.
touch
'8'.
2. Enter
the food weight.
:
(( START )
-=/
3. Touch
the START pad.
AUTO
r{.1{El
W}ten
he START
pad
is torrched,
the
AUTO DEFROST indicator
will
blink, the display will
count down
the
rernaining
defrosting time
in
minutes
and
secords and
will
beep
5 times
when
defrosting is
completed.
Crtegory
1
2
3
Display
dEF 1
dEF 2
dEF
3
Food
Poullry
Mctt, Ground
Flsh
Rangr
0.1
lb
to 8.0 lb
0.1
lb
to
4.0
lb
0.1 lb to
3.0lb
[ .El
WATTAGE
OUTPUT
CHART
Prras Powcr Lcvcl Wanaoe Outolrt
non. lo 1100
I I 990
E8880
7 7 770
s6880
55550
44 4AO
33330
2 2 220
1 1 110
tcoo^l
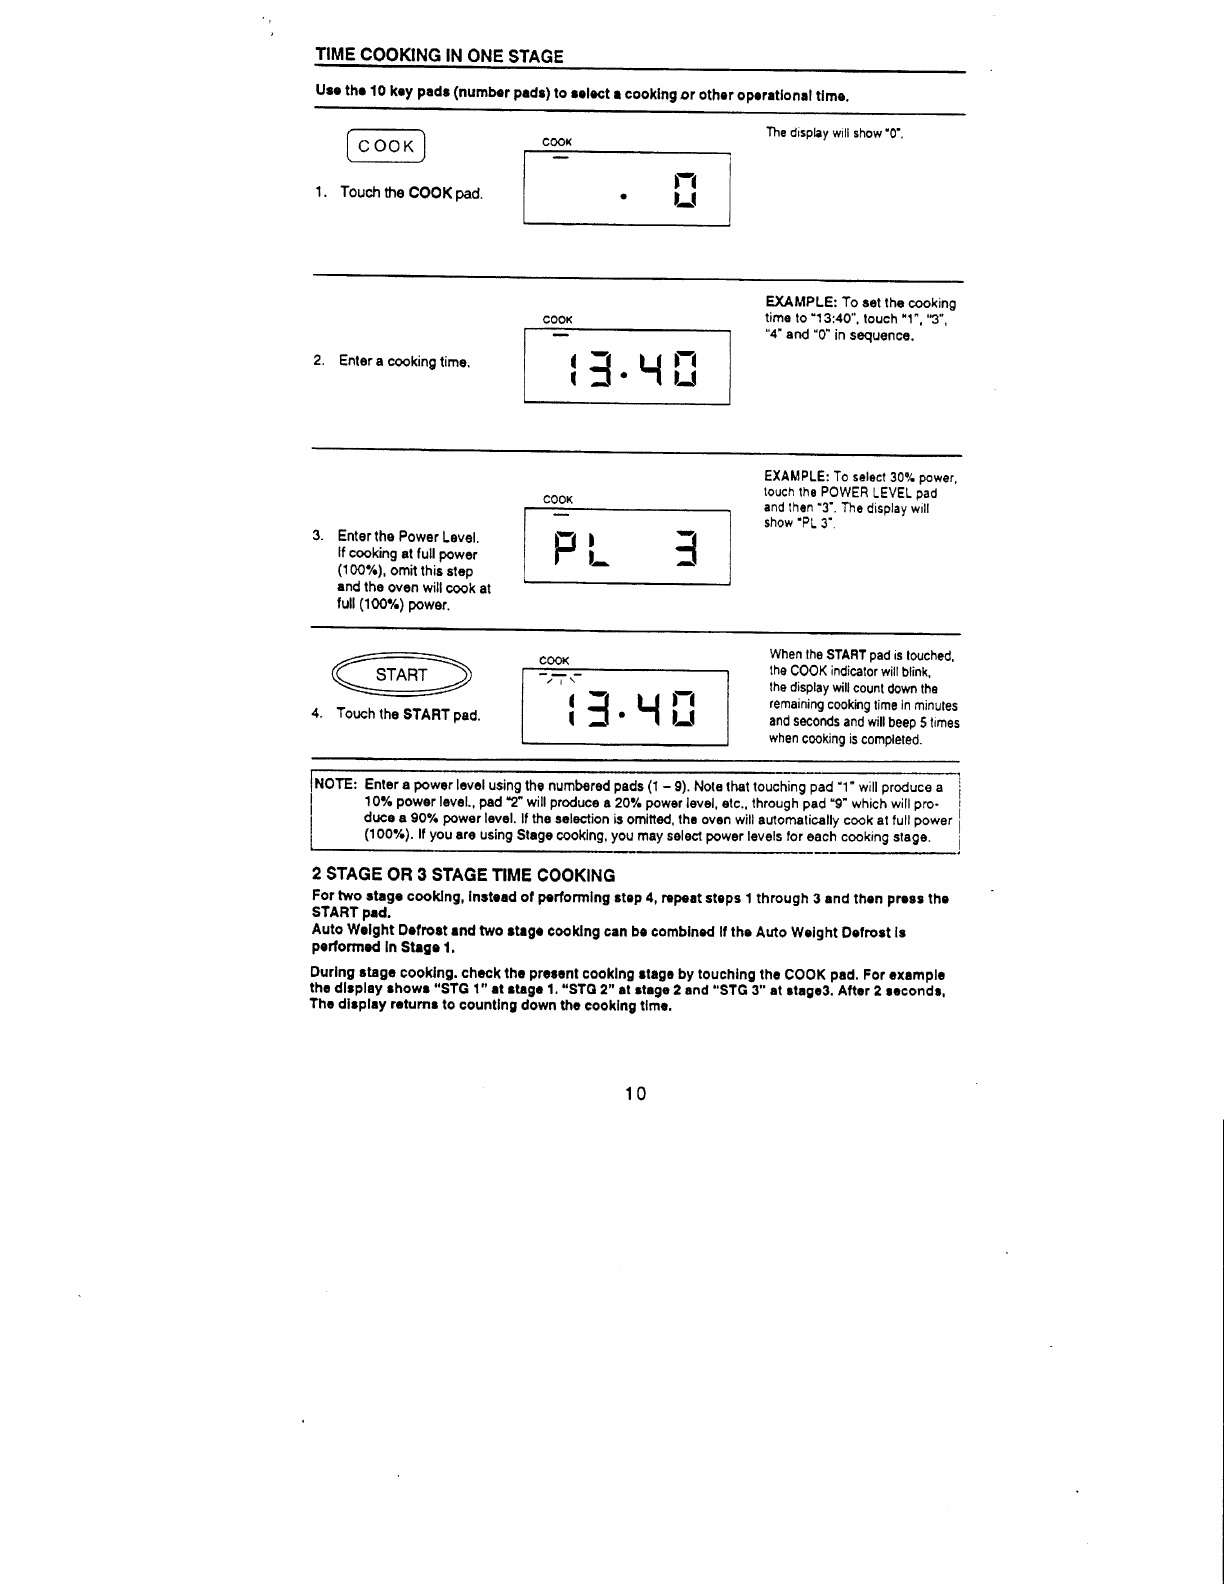
Touch
the
cooK pad.
't.
NME
COOKING
IN ONE
STAGE
ure thr 10
kcy
padr
(number
padr)
to rclcct
r cooklng
or othcr
op*rilonrl ilme.
The
disphy
witl
show'0'.
DGMPLE: To get
the
cooking
time
to'13:40",
touch
"'tn,
"3",
"4'end
"0"
in sequence.
2. Enter
a cooking
time,
EXAMPLE:
To select
30cA
power,
touch
the POWER
LEVEL
pad
and
thsn
"3'.
The
display
will
show'PL
3'.
3. Enter
the Power
Level.
lf
cooking
at full power
(100%),
omit
this
stop
and
the
oven
willcook
at
lull(100%)
power.
4. Touch
the
START
oad.
When
lhe
START
pad
is
louched,
the
COOK indicator
wiil
blink,
lhe display
willcount
down the
remaining
cooking
lims in
minutes
and
seconds
and willbeep
5limes
when
cooking is
completed.
NOTE: Enter a Power
levcl
using
the numbsred
pads
(1
- 9). Note
that louching
pad
"1"
will
produce
a
10%
power
level.,
pad
2" will
produce
a 20%
power
lEvel, etc., lhrough
pad
"9' which will
pro.
dtrce
a 90%
power
level.
lf
the selection
is
omined, lhs oven will
aulomatically
cook at full
power
(100%).
lf
you
are using
Stage
cooking,
you
msy selecl
power
levels for
aach
cooking stage.
2 STAGE
OR 3 STAGE TIME
COOKING
!9r two
rtrge cooklng,
Instcod of
performlng
step 4,
repert steps
1 through
3
and
thcn
prcet
the
START pad.
Auto
Welght
Oolrort
lnd two rtrgo cooklng can
bc comblned lf the
Auto Welght
Defrost
ls
performcd
In Strge
1.
Durlng rtagc
cooklng. chcclt
thc
prcrcnt
cooklng
rtegc
by
touchlng
thc
COOK
prd.
For cxamplc
thc
dbplay
lhowr "STG
1" !t.trg.1. "STO
2" at rtage
2
snd
"STG 3" at
rtagcS: Aftcr
2 rccondr,
Thc
dltplay
rctumt to
countlng
down thc
cooklng ilmc.
10
cooK
I
l.L{ il
cooK
FL ]
cooK
/I\ i
I.r{ !l
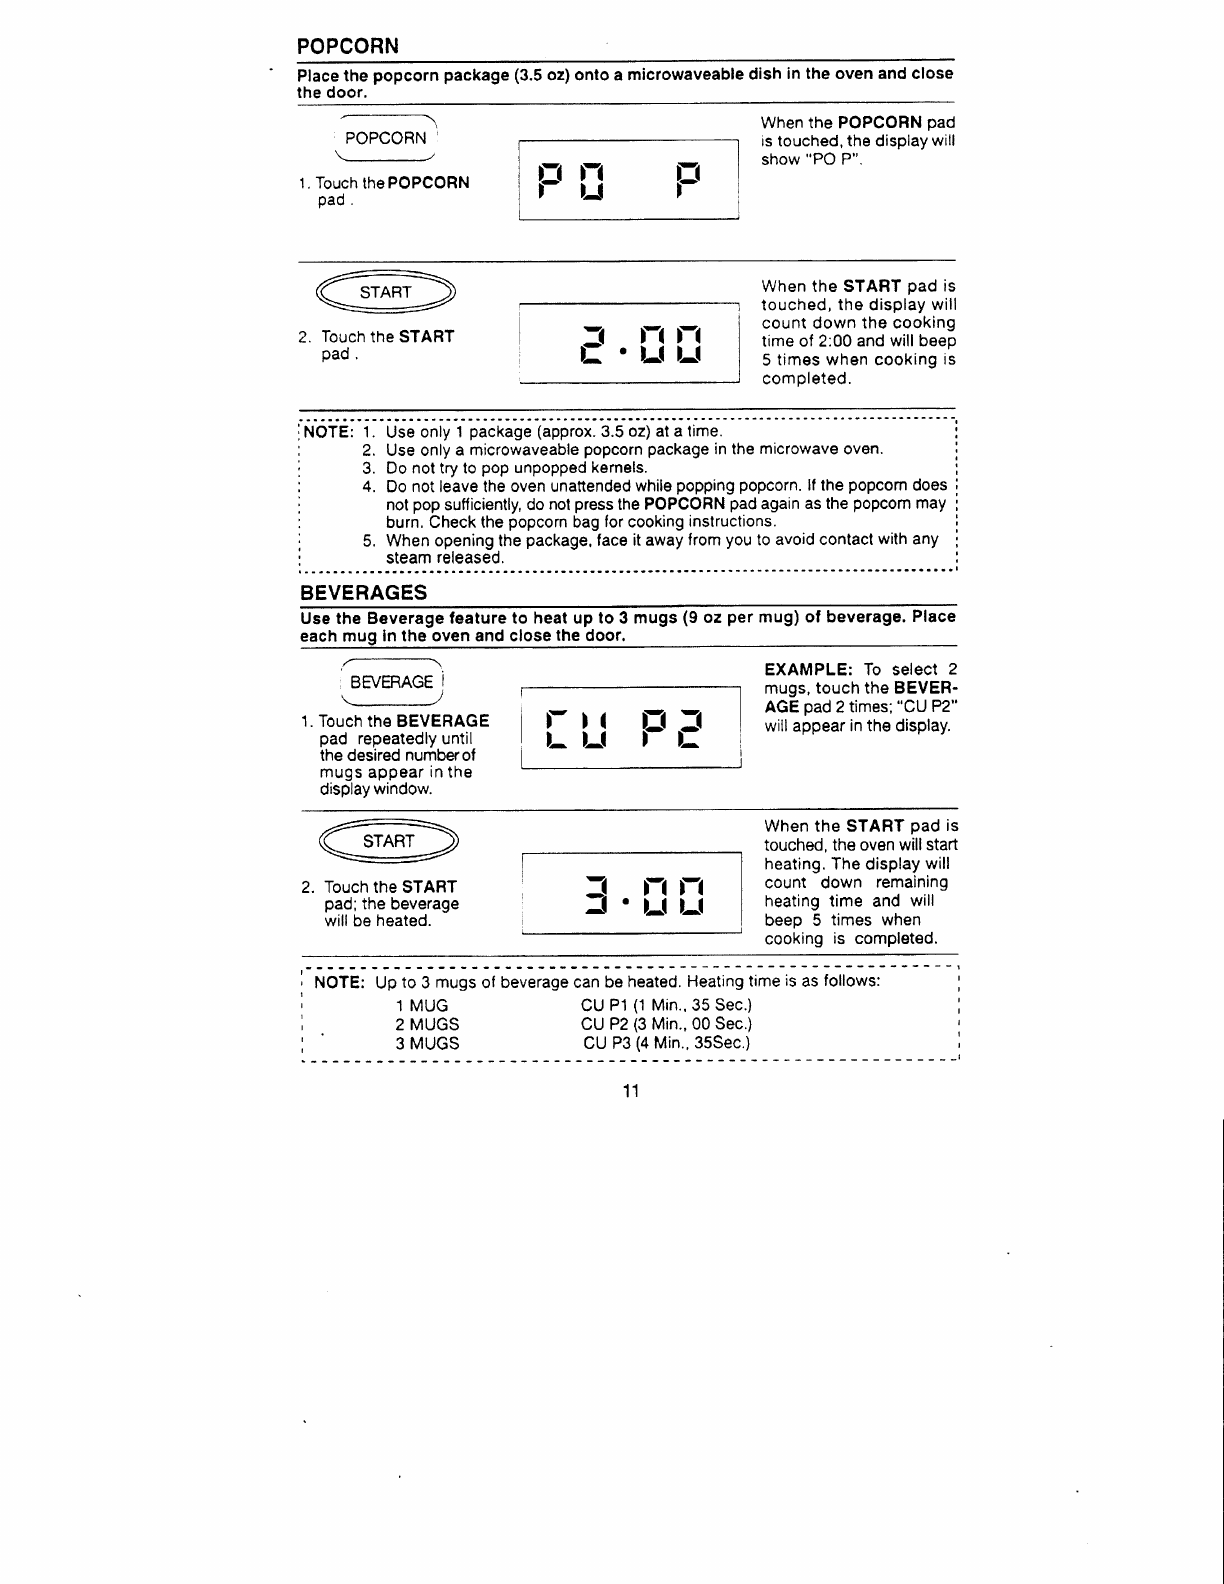
POPCORN
Place
the popcorn package (3.5
oz) onto a microwaveable
dish in the oven and close
the door.
POPCORN
1. Touch
th€
POPCORN
pao
.
When the POPCOHN
pad
is touched, the display
will
show
"PO
P".
2. Touch
the START
oad .
When the START
pad is
touched, the display
will
count down the cooking
time of 2:00 and
will beep
5
times when cooking
is
completed.
3. Do
not try lo
pop
unpopped kemels.
4. Do not leave the
oven unattended
while
popping
popcorn.
lf
the
popcom
does
not
pop
sutficiently, do
nol
press
the
POPCORN
pad
again
as the
poPcom
may
burn. Check the
popcorn
bag
for
cooking
inslructions.
5. When
opening the
package,
face
it away
from
you
to avoid contact
with any
steam
released.
BEVERAGES
Use the Beverage feature
to heat up to 3 mugs
(9
oz
per
mug) of beverage.
Place
each mug
in thE oven and close
the
door.
, BEVERAGE
I
1.
Touch the BEVERAGE
pad repeatedly until
the desired
numberof
mugs
appear
in
the
display
window.
EXAMPLE: To select
2
mugs, touch the BEVER-
AGE
pad
2
times;"CU
P2"
will appear
in the
display.
2. TOUCh thE START
pad;
the beverage
will be
heated.
When
the START
pad
is
touched,
the oven willstart
heating. The
display
will
count down remaining
heating
time and
will
beep 5 times when
cooking
is completed.
, ttOtE: Up
to 3 mugs
of
beverage can be
heated.
Heating
time
is
as
follows:
I1 MUG
2 MUGS
3 MUGS
CU
Pl
(1
Min.,35
Sec.)
CU P2
(3
Min., 00 Sec.)
CU P3
(4
Min.,35Sec.)
11
iNOTE:
1. Use
only 1
package
(approx.
3.5
oz) at a time.
', 2. Use only
a microwaveable
popcorn package
in the
microwave
oven.
POTATOES
Pfacr 1
- 3 medlum slze potrtoea In
thc ovrn rnd clon thr door.
1. TouchthePOTATOpad
once for each potato.
@
Touch
the
START
pad.
2.
"PO
13'
3.10 5.20 6.50
PIz?A,
When
the POTATO
pad
is louched,
lhe
display will
show'PO
1'
Vrhen
the START
prd is touched,
tha disphy will
count dovrn the
remaining
cooking
timc
h mhutas
and
scconds and will
beep
5
times
when cooking is
complated
Uee
the Plzr festure
to reheet refrlge
rrted pEzr
(1
- 3
cllccr).
1. Touch
the PI2ZA
pad
once for each
slice.
@
Touch
the START
pad.
2.
rcr 2 Sltcrt
1' 'Pt
0.25 0.50 1.40
Whcn
tha P1221pad
is touched,
lhe display will
show'P 1'.
.15
When
the START
pad
is
loudrad,
thr
display willcount
tlown
the
remaining
coohng
tima
in minutes
and
seconds
and willboep 5 times
whcn
cooking is
complctcd.
12
J. lrl
(t-|
FI
I
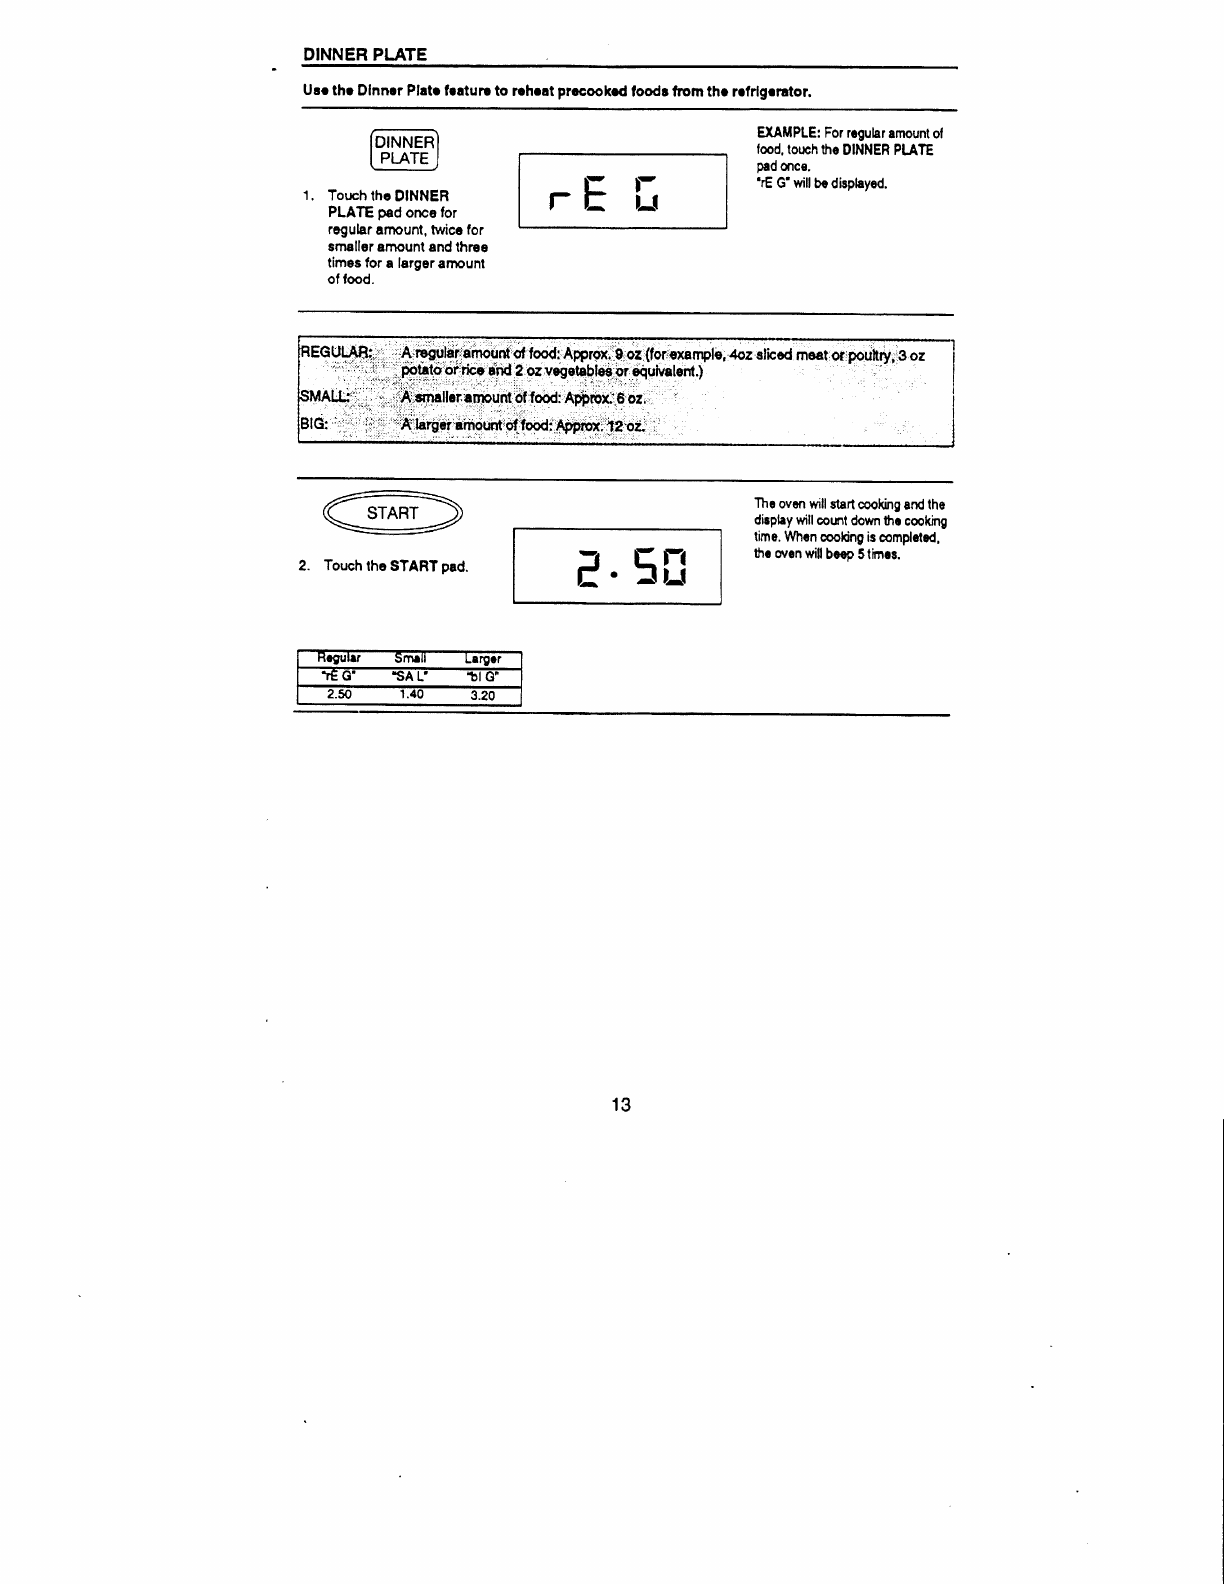
DINNER PLATE
Uae
thr Dlnncr Platr fraturr to rohoat
procookrd
fooda from tht rrfrlgrrator.
EXAMPLE: For
rcgular
amount of
food,
torrch the
DINNER PLATE
pad
once.
'rE
G'will
be disphyed.
1. Touch
thc
DINNER
PLAIE ped orca for
ragular
arnounl,
twice for
ernsller
arnounl end throe
timee
for a larger
anrount
of food.
@
Toush
the START
pad.
2.
23.20
Thc
ovcn
will slsrt
cooking
and lhe
dirphy
willcomt
down
trc cooking
time.
Whcn
moking is
complctod,
tn orcn will
bcep
5timm.
rE l:
7.-
5il
13
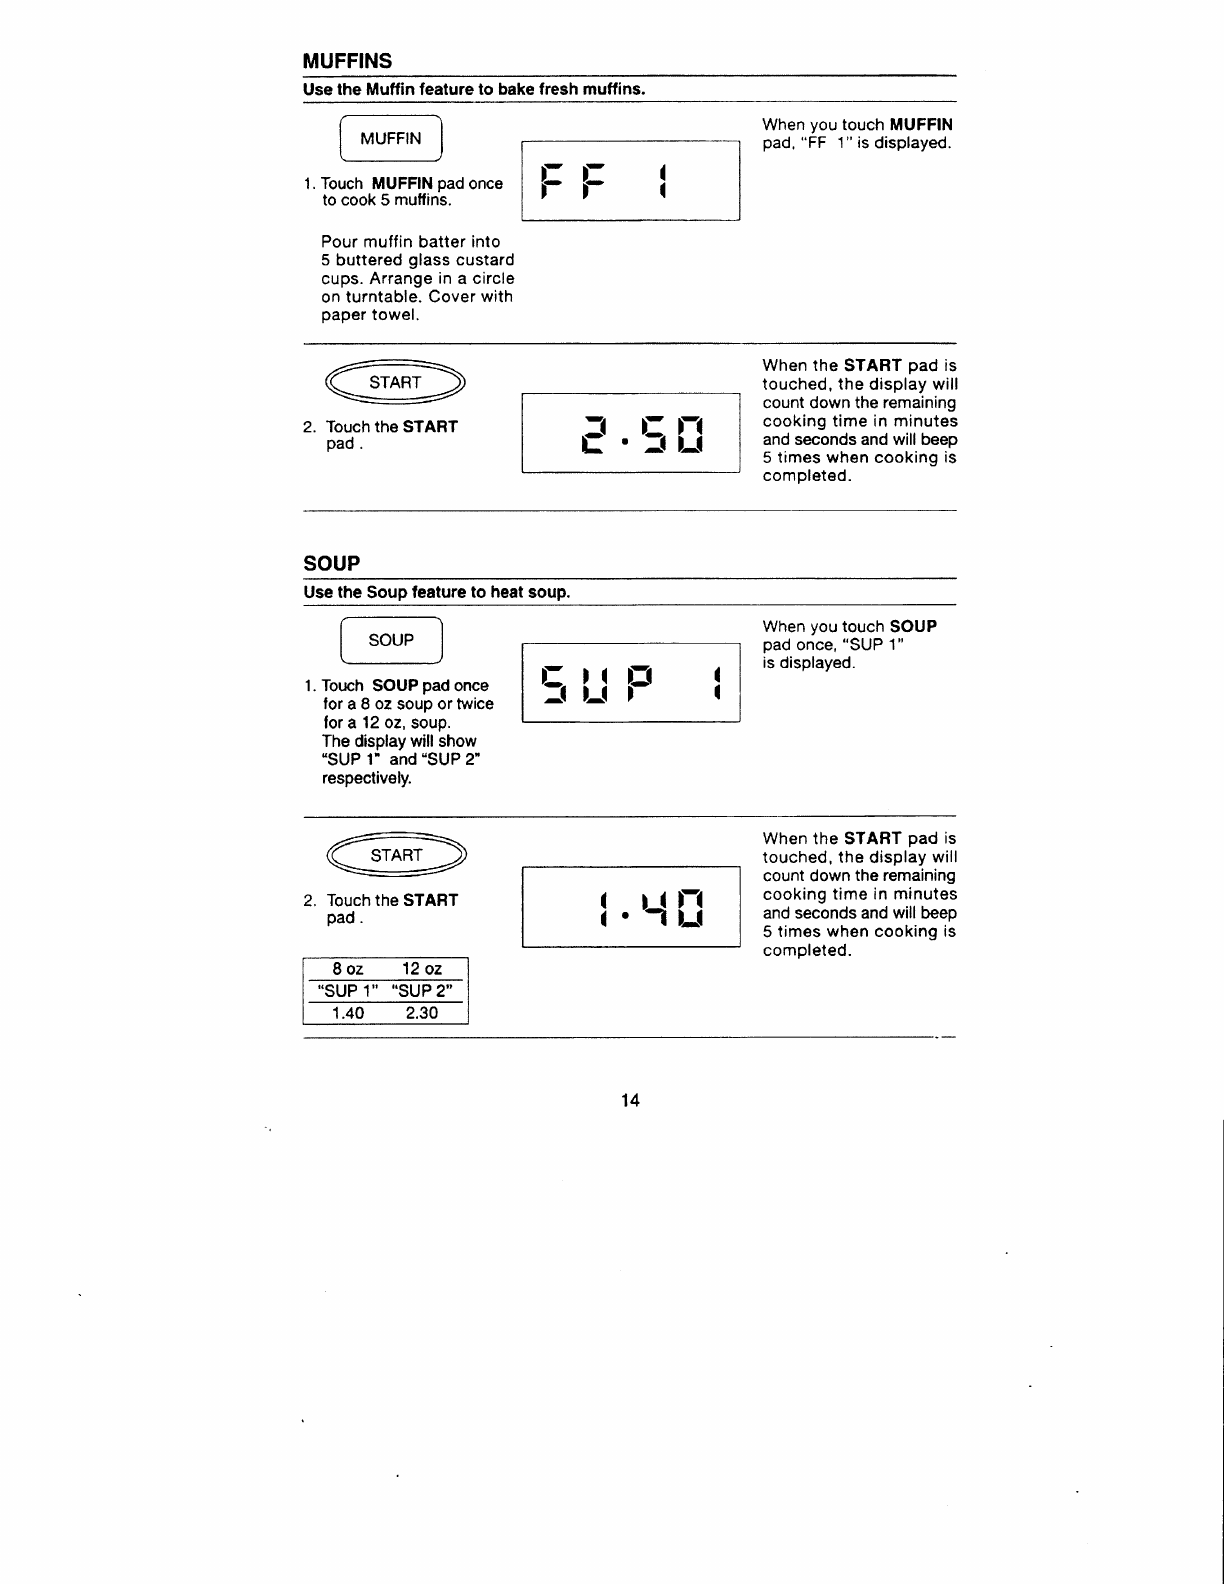
MUFFINS
Use
the
Mutfin feature
to bake fresh
muffins.
When
you
touch MUFFIN
pad, "FF 1" is
displayed.
1.
Touch
MUFFIN
pad
once
to cook 5 mutfins.
Pour
muflin batter into
5 buttered
glass
custard
cups. Arrange
in
a
circle
on turntable.
Cover
with
paper
towel.
FF i
2. Touch the START
pad. ;.5[l
When the
START
pad is
touched, the
display will
count down the remaining
cooking time in minutes
and seconds and will beep
5
times
when cooking
is
completed.
SOUP
Use
the
Soup feature
to heat
soup.
Il-l F i
When
you
touch
SOUP
pad
once,
"SUP
1"
is displayed.
1. Touch SOUP
pad
once
for
a
8 oz
soup
or twice
lor a 12 oz,
soup,
The
display
will show
"SUP
1' and "SUP 2"
respectively.
Touch the START
pad.
8oz 12oz
"SUP 1'' "SUP
2"
1.40 2.30
When the START pad is
touched, the
display
will
count down
the remaining
cooking
time
in minutes
and seconds and will beep
5
times when cooking
is
completed.
1.,{il
14

FRESH VEGETABLE
(BY
WEtcHT)
Use the Fresh
Vegetable
feature
for
great
vegetables.
F)-f I
I
When
you
touch
FRESH
VEGETABLE
pad
once,
"FrE
1" is
displayed.
1.
Touch
FRESH
VEGETABLE
pad
once
for a 8 oz of fresh
vegetables
or twice for
16 oz
of
lresh
vegetables.
The
display
will show
"FrE
1"
and
'FrE 2"
respeclively.
Touch the
START
pad.
8oz 16oz
"FrE
1" "FIEZ"
3.40 4.40
I .,{
!l
When
the START pad is
touched,
the display
will
count
down the
remaining
cooking
time
in minutes
and
seconds
and
willbeep
5 times
whsn
cooking
is
completed.
NOTE: Fresh
vegetable
retain nutrients
when
cooked in the microwave.
use
the
convenient
FRESH VEGFTABLE
pad
to
cook
vegetables
easily
according
to the
preparation
details
on
page
27.
After cooking.
let
stand, for
3 to 5
minutes.
lf more time is
needed to finish
cooking.
add
time
slowly
to
prevent
overcooking.
15
HOLD
WARM
Tho
Hold
Wrrm lorturr cen
br umd to krp lood
werm
rft$ mlcrowtvr or convrntlond cooklng
lr complotrd.
EXAIIPLE:
Sclc{ r cooking
tinc ol
25:10'.
1. Program
the
deslred
cooking
timo and Power
level as PreviouslY
inetruclgd.
/5. I I'l
tlJ
EXAMPLE:
TO
rCbCI20
mlnut63,
toudt the
HoLD
WARM
pact
2
tlmes. ?0:00'
willbc displaycd.
2. Totrch
thc HOLD
WARII
prd for
orcry
10
mlnutct
of
Hold
Wam
timc dedrcd
(up
to 30
minutcr).
EXAIIPLE:
Thc
COOK
irdhrtor
will
light, Sto
ovrn
will
brgin
cooking
rnd thc
dirPlrY
will
count
dovrn lhr rcmrining
cooking
tim..
Tqrh thr START
pad:
thr ovrn
willbogin
cooHng
es
programmed
in
step
1.
When thc cooking it
conplstcd, thc ovcn will
bogin thc Hdd Wcrm modc
as pro0rammed
in steP
2.
When cooHng
b corpblod,
the
dlphy w{l
ounl dovm
hc
refiElthg
lloE Wamtmo'
When
he Hold
Warm Ume
cnds,
Pu
wlil hcr 5
beops.
coot(
-l fi )'l l-l
tr lJ' ,J lJ
coof(
"),8. iI
-tril rtn
tr u'lJ lJ
16

CHILD LOCK
Tho Chlld Lock
prevenls
unwanted oven
operatlon
by amall
chlldren.
The oven can bo ret so thal the control
pancl
b deactlvated
or locked.
TO SET CHILD LOCK
1. Touchths
"0"
pad
once.
The
display
willshow
"Lo
c".
2. Touch
the
START
pad
5 times.
TO CANCEL THE
CHILD LOCK
1. Touch the "0"
pad
once.
The
display will return
to
the
present
time.
2. Toucfr the
START
pad
5
tlmes.
rd;_;;;-;;;f yll?._1._"gygl*:i:l:":::tli'f
-"llg_.::L,--:-
j
TO
STOP
THE
OVEN WHILE
IT
IS OPERATING
1. Pregs
the CLEAR/PAUSE
pad.
. TIE PAUSE
Indlcator wlll ltlrt bllnklng.
. Thc ovln crn bc rertartcd by prcrslng the START
ped.
. Touch the
CLEAR/PAUSE
prd one more tlme to cralre all Instructlons.
. You mutt enter
new
lnrtructlong.
2, Opcn the door.
. You
can reetarl tho
oven by closlng
ths door and
touchlng the
START
pad.
17
t)-ar
LLI L
t: JLI
a
I
COOKING GUIDE
THE PRINCIPLES
OF MICROWAVE
COOKING
Mlcrowaves are a form of hlgh frequency radio waves slmilar to those used by a radlo
including AM, FM
and CB.
Electrlcity
ls converted
into microwave energy by the mag-
netron tube. From the magnetron tube, microwave
energy is transmitted to the oven
where lt ls reflected, transmitted, and absorbed by the food.
Reflection
Microwaves are
reflected
by metal
just
as a ball
is
bounced
off a wall.
For this reason,
metal
utensils are
not
suitable
for use
in
the
microwave.
A combination of stationary
walls
and a rotating metal turntable
or
stirrer
fan
helps assure
that the
microwaves
are
well
dis-
tributed within the oven
cavity to produce even cooking
Transmisslon
Microwaves
pass
through some
materials such as
paper, glass
and
plastic
much like sun-
light
shining
through
a window.
Because these substances do not
absorb or reflect the microwave energy, they are
ideal
materials for microwave oven
cooking containers.
Absorption
During cooking,
microwaves will
be
absorbed
by
food.
They
penetrate
to a depth of about
3/4 to 1 1/2
inches.
Microwave energy activates the molecules
in
the food (especially
water,
fat and sugar),
and heat is produced.
lf you
vigorously
rub
your hands
together,
you
will
feel
heat
produced
by friclion.
The internal cooking of larger
foods
is
done by conduction
as
the heat which
is
produced
by
friction is
conducted
to the
middle
of
the
food.
Foods
also
continue
to cook by conduction
during standing
time.
FOOD CHARACTERISTICS
Quantity:
The amount
of
food
placed
in
a
microwave
oven
has
a direct
effect on
the
cooking
time.
Small
amount's of
food
or
liquid require
less
cooking time than
larger
amounts of
the same substance.
As
quantity
increases, concentration
decreases.
Size: Small
pieces
cook faster than
large ones.
To
speed
cooking,
cut
pieces
smaller
than
2-inches, so
microwaves can
penetrate
to the middle
from all sides.
Pieces which are
similar
in
size and
shape cook
more evenly.
Shape: Many
foods are uneven, like a chicken,
ribs or
broccoli.
The
thin
parts
will cook
faster than the thick
parts,
while
uniformly thick
foods
cook
evenly. To compensate
for
inegular
shapes,
place
thin
pieces
toward
the center
of
the dish and thicker
pieces
to-
ward the edge of the dish.
Startlng Temperature:
Frozen
or
refrigerated foods
take longer to cook
than foods
at
room temperature.
Bone and Fat: Because bones conduct
heat,
the side of
meat
the
bone
is
on will cook
first,
while boneless cuts
cook slower but
more evenly.
Fat attracts
microwaves.
The
middle
of these are
cooked by
heat
conduction,
Molsture
Content: Microwaves are
attracted by
moisture.
Naturally
moist
foods
absorb
microwaves better than dry ones.
Add a
minimum of
liquid
to
moist foods,
as excess
water
slows cooking.
Denslty: The density of
food
determines
how
easily
the
microwaves can
penetrate
and
how
quickly
it
will cook.
Porous
foods,
like chopped
beef or
potatoes,
microwave
faster than
dense ones
like
steak
or whole
potatoes.
Piercing:
Steam
builds
up
pressure
in
foods which
are tightly
covered by a skin
or mem-
brane.
Pierce
potatoes,
egg
yolks
and
chicken
livers to prevent
bursting.
18
MICROWAVE
TECHN]QUES
Stirrlng: Stir
foods from
outside
to center
of dish
once or twice during cooking
to equalize
heat
and speed microwaving.
Foods will not burn or stick,
so there's
no need to stir
constantly
as
you
do in
convention cooking.
Arrangement: Arrange foods
with thin or
delicate
ends,
like
drumsticks
or asparagus with
the
thick
or
tougher
portions
to the outside of the dish. The
parts
which need
more
cooking will
receive
more
snergy,
so food will microwave
evenly.
Spaclng: Individual
foods,
such
as baked
potatoes
and
cupcakes
will
cook more
evenly
if placed_in
the
oven an
equal
distance apart. When
possible,
arrange
foods in a circular
pattern.
Similady, when
placing
fqgds
in
a baking dish, anange around the outside of dish,
not lined
up next to each other.
Food
should not be stacked
on top of each
other.
Rearrangement:
Rearrange
overlapping
arsas,
like
tails
of long fish
fillets, from
top to bo-
ttom,
and closely
packaged
pieces,
like
meatballs,
from
the outside to
the center
of the
dish.
Standing Time: Standing time is
especially
important in microwave
cooking.
Microwave
energy
creates heat in the outer
layers
of the food. As a result of normal
conduction,
the
food continues
to cook for a few minutes
after removal from
the oven.
Letting roasts,
large
whole vegetables,
casseroles
and cakes
stand
to finish
cooking
allows
the mid-
dles to cook completely
without
overcooking,
drying or toughening
the outsides.
Covering:
Covering
speeds cooking time,
retains morsture,
tenderizes,
insures
even
cooking
and prevents
spattering.
Casserole
lids
or plastic
wrap are used for a tighter
seal. Vent
plastic
by turning
back one
edge
at
the side of dish
to form a narrow
slot
where
excess steam
can escape.
Various
degrees
of moisture retention
are also
obtained by using wa( paper
or paper
towels.
Browning: Microwave
€nergy cooks some
foods
so
quickly
that the fats
and
sugars
within
the food do not have time
to caramelize
and
give
a "browned" appearance,
Browning
agents do not
atfect the
quality
of microwaved foods, but
can
add color
and
flavor.
For
msats
and
poultry,
use bouquet sauce diluted with water
or melted
butter;
soy, Worce-
stershire,
barbecue
or steak
saucer a sprinking
of paprika
or dry
gravy
mix;
jelly
glaze
or
crumb
coating.
Frosting
and
topping finish
cakes and breads.
Top
casseroles at the
end
of microwaving with grated
cheese or crumbs.
Some
Foods do not Microwave
Well
Eggs In Shells
and shelled
boiled eggs can
burst,
Pancakes
do
not
crush,
but they
reheat
well. Fully-prepared, frozen
pancakes
are
available
for
microwaving.
Deep
Fat
Frying
can cause
burns.
Bottles with narrow
necks may
shatter
if heated.
Popcorn
only
in
special microwave
poppers.
Do not
use oil unless specified
by the
manufacturer, or
heat
longer than recommended. Never
pop pocorn
in
paper
bags or
glass
utensils.
19
AUTO
WEIGHT
DEFROSTING
Defrosting
frozen
food
is
one of
the benefits
of
a microwave
oven.
Microwave
defrosting
is
much fasier
than refrigerator
defrosting
and
safer
than room temperature
defrosting,
since
it does not promote
the growth
of harmful bacteria.
Furthermore,
your oven
does program
defrosting
for foods listed
below.
See
page
9 for more
information.
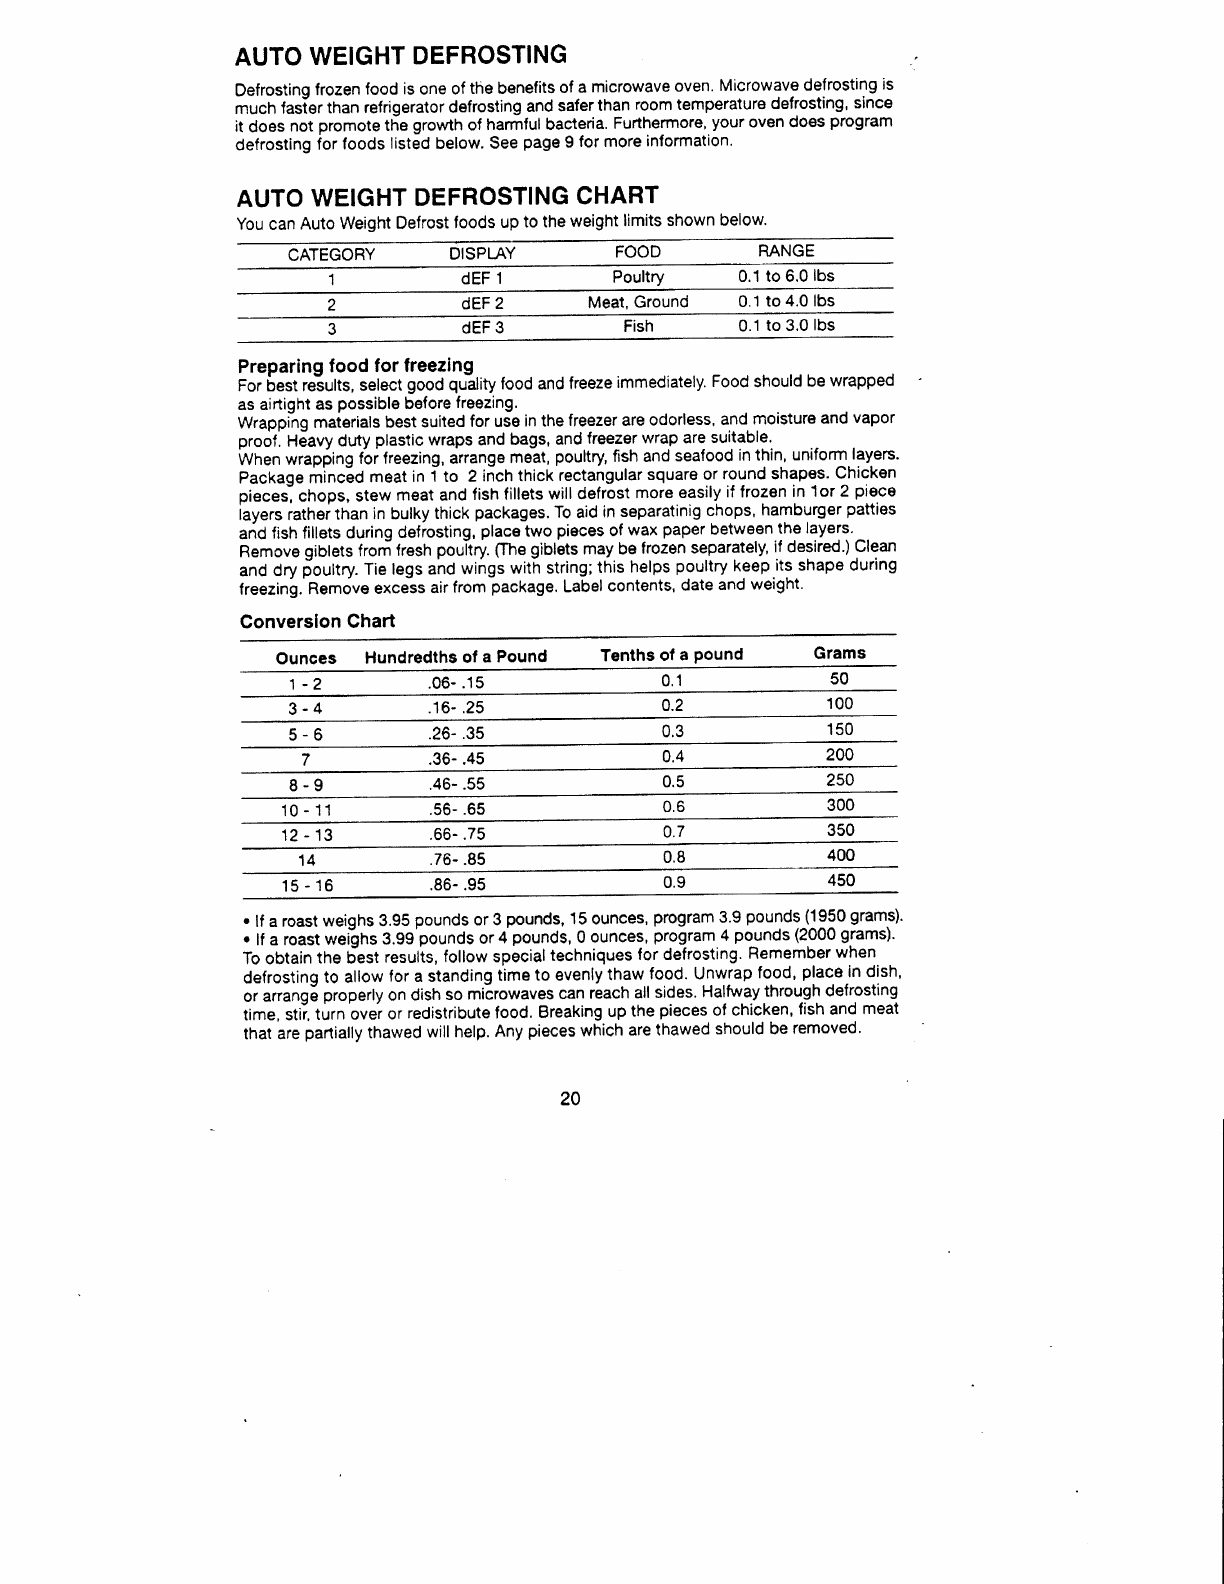
AUTO
WEIGHT
DEFROSTING
CHART
You
can
Auto
Weight
Defrost
foods
up
to the
weight
limits
shown
below'
CATEGORY DISPLAY FOOD RANGE
dEF
1Poultry 0.1 to 6.0
lbs
dEF 2Meat.
Ground 0.1
to
4.0 lbs
dEF
3Fish 0.1
to 3.0
lbs
Preparing
food
for freezing
For
best
reiults,
select
good
quility
food
and freeze
immediately.
Food
should
be
wrapped
as airtight as
possible
before
freezing.
Wrapping
maierials
best
suited
for use
in the
freezer are
odorless,
and
moisture
and
vapor
prodt.
Heavy
duty
plastic
wraps and
bags,
and
freezer
wrap are
suitable.
Wnen
wrapfing
fbi freezing, arrange
me-at,
poultry,
fish and
seafood
in
thin,
uniform
layers.
package
minc6a
meat
in i to e inch thick
rectangular
square or
round shapes.
Chicken
piecesl
chops, stew
meat
and
fish
fillets
will defrost
more
easily
if frozen
in
1or 2
piece
iayers rathei
than
in bulky
thick
packages.
To
aid
in
separatinig
chops,
hamburger
patties
and
tsn fillets
during
deirosting,
place
two
pieces
of
wax
paper
between
the
layers.
Remove
giblets frori lresh
pouttry
ffhe
giblets
may be
frozen
separately,
if desired.)
Clean
and
dry
ioultry.
Tie
tegs ahd
wings
with
string;this
helps
poultry
keep
its shape during
freezing.'Remove
excels
air
from
package,
Label
contents,
date
and
weight.
Converslon Chart
Ounces Hundredths
of
a Pound Tenths of a pound Grams
1-? .06-.15
3-4 .16- ,25 100
5-6 .26-
.35
.36-.45 0.4 200
8-9 .46- .55 0.5 250
10-11 .56-.65 300
12-13 .66- .75 350
.76-.85
15
-
16 .86-.95 450
50
0,1
0.2
0.3 150
0.6
0.7
0.8
14
0.9
400
. lf a
roast weighs
3.95
pounds
or
3
pounds,
15 ounces,
program
3.9
pounds
(1950
grams).
r lf a roast
wefins
3.g9
pounds
or
4
pounds,
0
ounces,
program
4
po_unds
(2000
grams)'
To obtain
the best
resulis,
follow specialtechniques
for defrosting.
Remember
when
defrosting
to allow
for
a standing
time
to evenly
thaw
food. Unwrap
food,
place
in dish'
or
arrang6
properly
on
dish
so
microwaves
can
reach
all
sides.
Halfway
through
defrosting
time,
stii
turn
over or
redistribute
food.
Breaking
up
the
pieces
of chicken,
fish
and
meat
that are
partiaily
thawed
will help.
Any
pieces
which
are thawed
should be
removed'
20
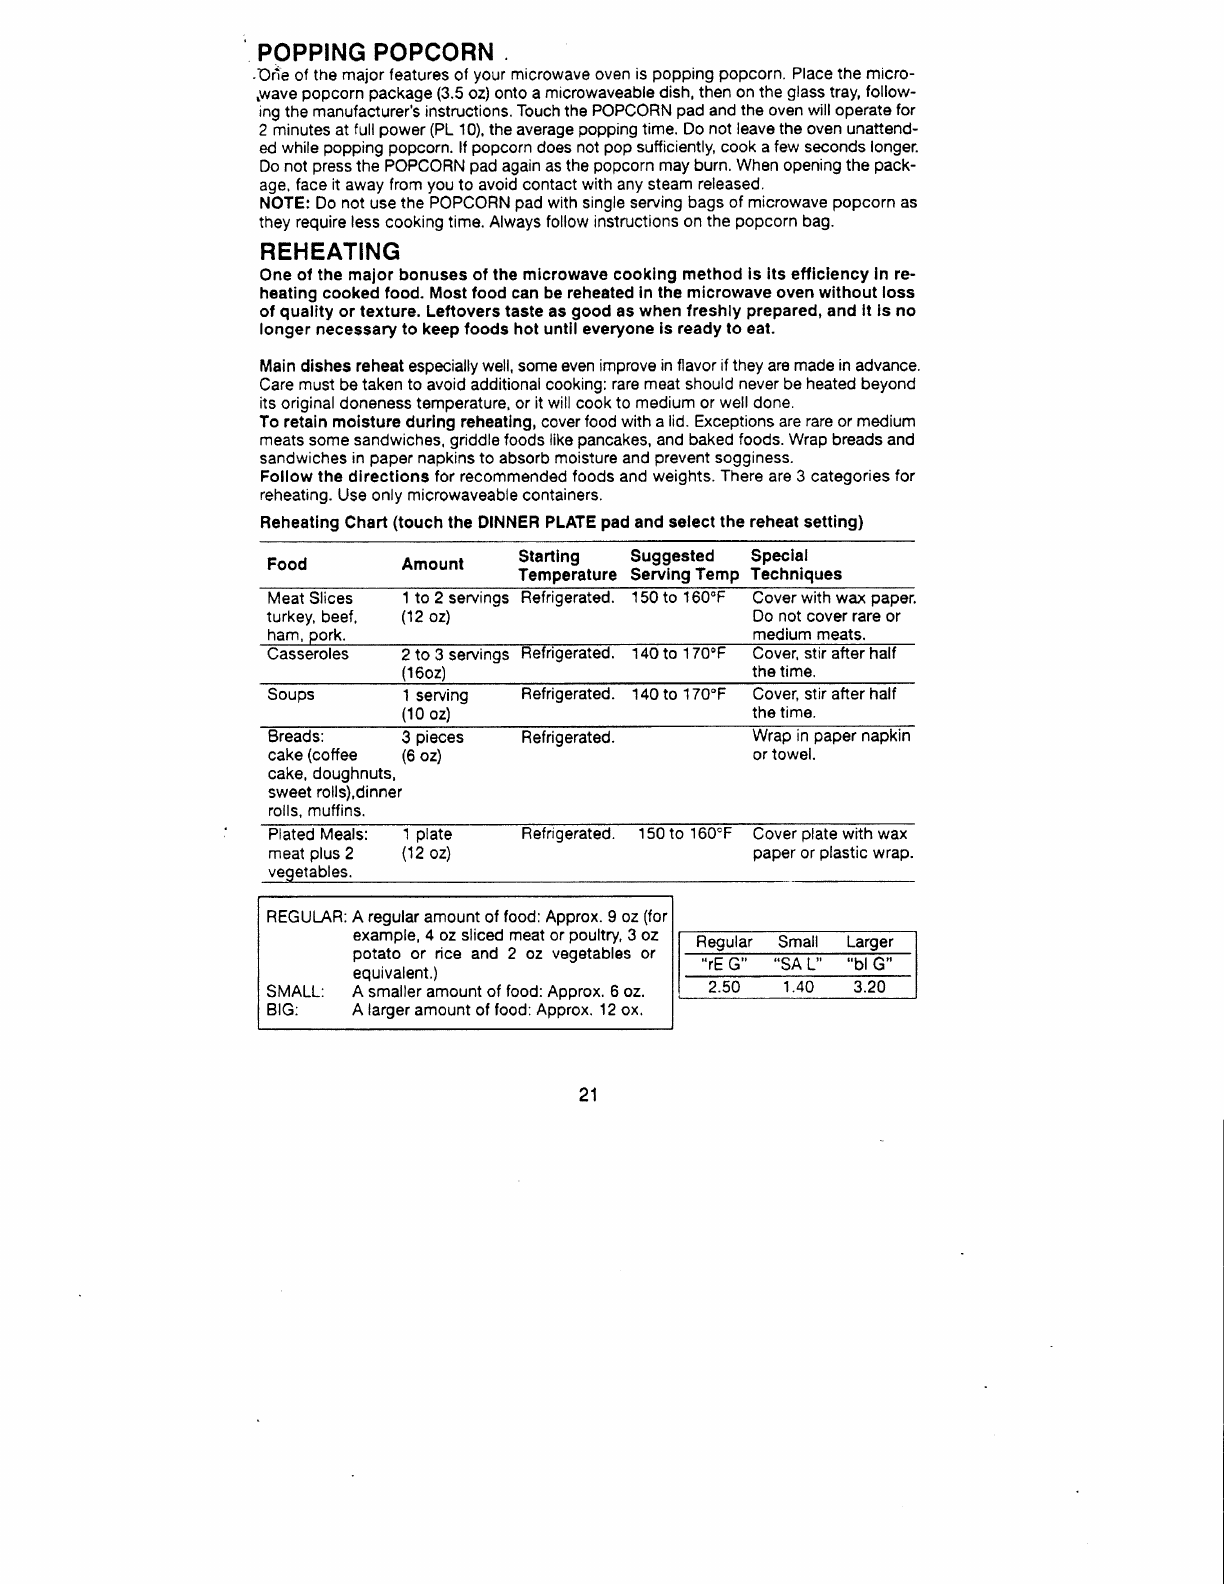
POPPING
POPCORN
.Ori'e
of the major
features
of your
microwave oven
is
popping
popcorn.
Place the micro-
J
/ave
popcorn package
(3.5
oz) onto a
microwaveable
dish,
then on the
glass
tray,
follow-
ing
the manufacturer's instrucitions.
Touch
the POPCORN
pad and
the oven
will operate
for
2 minutes
at full
power
(PL
10), the average
popping
time.
Do
not leave the oven unattend-
ed while
popping popcorn. lf popcorn
does
not pop sufficiently,
cook a few seconds longer.
Do
not
press
the POPCORN
pad
again
as the
popcorn
may burn. When opening the paclt-
age,
face
it away from
you
to avoid contact
with any steam
released.
NOTE: Do
not
use
the POPCORN
pad
with single serving
bags
of microwave
popcorn
as
they require
less
cooking
time. Always follow instructions
on
the popcorn
bag.
REHEATING
One
of the major bonuses of the
microwave
cooking
method
ls
lts
efficiency
In re-
heating cooked food. Most
food
can be
reheated
In the microwave oven without loss
of quality
or texture. Leftovers taste as
good
as
when lreshly
prepared,
and
lt ls no
longer
necessary
to keep foods hot untll everyone
ls ready
to eat.
Main dishes reheat
especially
well,
some
even
improve
in
flavor
if they
are
made
in
advance.
Care
must
be
taken
to
avoid
additional cooking:
rare meat
should
never
be
heated
beyond
its
original
doneness temperature, or
it will cook
to medium or
well
done.
To
retain moisture during reheatlng, cover
food with a
lid.
Exceptions
are
rare
or
medium
meats
some sandwiches,
griddle
foods like
pancakes,
and baked
foods. Wrap
breads and
sandwiches
in
paper
napkins to
absorb moisture
and
prevent
sogginess.
Follow the dlrectlons
for recommended foods
and
weights.
There
are
3 categories
for
reheating.
Use only microwaveable containers.
Reheating Chart
(touch
the DINNER
PLATE
pad
and select
the reheat
setting)
Food Amount Starting Suggested Speclal
Temperature
Servlng
Temp Techniques
Meat
Slices 1 to 2 seruings Refrigerated. 150 to 160"F Cover
with
wax paper.
turkey,
beef. (12
oz) Do not
cover
rare
or
ham,
pork. medium meats.
(16o2) the time,
Soups 1 serving
(10
oz)
Befrigerated. 140 to 170"F Cover, stir after half
the time.
Breads: 3 pieces
cake
(coffee (6
oz)
cake, doughnuts,
sweet
rolls),dinner
rolls,
muffins.
Refrigerated. Wrap in
paper
napkin
or
towel.
Plated Meals: 1
plate
meat
plus
2 112
oz)
vegetables.
Refrigerated. 150
to 160"F Cover
plate
with wax
paper
or plastic
wrap.
REGULAR:
A
regular
amount
of
food:
Approx.
9 oz
(for
example, 4 oz sliced meat or
poultry,
3 oz
potato
or rice and 2 oz vegetables
or
equivalent.)
SMALL: A
smaller
amount
of food:
Approx.
6 oz.
BIG: A
larger
amount of
food:
Approx. 12
ox.
21

BEVERAGE
REHEATING
You
can
reheat leftover
beverages
easily
and
quickly
in
your
oven.
lfttpSilg_
can
be
from
one
cup
to three
cups.
Place cups
(mugs)
in
the oven
and
press
tha
BEVERAGE pad
once for
each mug.
When
pressing,
consultlne
tist
betow.
(Do
not
use
-
mugs
with metaltrim.)
1
mug
(1
min,,
35 sec.)
2
mugs
(3
min.,
00
sec.)
3 mugs
(4
min.,
35 sec.)
Anange
cups in
a
ring
with
space between
them when
reheating
more
than
two cups.
Leave the
csnter
empty.
After reheating,
remove cups
carefully:1hey
may
be
quite
hot.
HOLD
WARM
When not
serving food immediately
after
cooking,
it can
be kept
warrn
by using
the Hold
Warm
function.
lt keeps food warm
by heating
at tne lowest
power
constanflylThe
Hold
W"rr mode
operates with
Stagel cooking
or independenfly,
Set
the cooking
times and power
level,
then press
the HOLD
WARM
pad. Thereafter. foods
can
be kept
warm properly
until serving.
To
keep foods
warm
after
conventional
cooking,
cook food in
conventional
oven, then
press
the HOLD WAHM
pad.
See
page 14 for deti-
iled
instructions.
HOT
SNACKS
AND
APPETIZERS
Hot
hors
d'oeuvres
and
appetizers
can be
prepared
very
quickly
in
the oven
by the host-
ess,
or individual
servings
may
be
prepared
by
guests.
Many
appetizers
may
be
cooked
on the
serving
platter,
provided
the
platter
does not have
metal
trim.
A time
saver tip
- prepare
these foods
ahead
of time, refiigerate
or
freeze
and
refresh
in
the
oven
at
serving time.
A
plate
of
appetizers will
take
onlyieconds
to
prepare
or refresh.
Cheese melts
very
rapidly
and willtoughen
if
overcooked,
so watch foods
com-
bined
with
cheese
closely
so
that
overcooking
will not
occur.
As
soon as
cheese
starts to
bubble,
cooking
is
completed.
Appetizers
that
have
a crisp
pastry
exterior
are
best
prepared
in
a
conventional
oven.To
prepare
appetizers
wrapped
in
baCon, it
will
be
necessary
to
precook
the bacon
and then wrap
around
the
foods.
Oysters wrapped
in
bacon
are easier to
prepare
in
the broiler
of
your
conventional
range.
Seafood mixtures
can
be
prepare
in
serving
shells
as microwave
energy will
pass
through
the
seafood
shells
without
heating.
Aluminum
foil
should
not
be
used for
shells.
lf
spreads
are
placed
on
crackers,
care should
be taken
not
to overcook
as
moisture
from the food
will
cause
crackers
to become soggy.
Crackers
used
for spreads
should
be very
dry
and crispy. This helps
avoid
sogginess,
HLli
only until
spread
is
at
serving temperature.
The time
required
to freat
atl appetilers
will de-
pend
on
the amount
of
food,
and
the
number
and the
type of
dish
selecied.
Remember
the
food
will
become
very
hot
even
if
the
dish is
cool,
Cheese mixtures
retain
heat
longer
when
heated
with microwave
energy.
MEATS
Guide
for
Auto
Weight
Defrosting
Meats
You
may defrost
meat
within
its
original
plastic
wrappings.
Remove
all
metal
rings,
wire
twist-ties
and
foil wrapping.
Place
meat
in
a microwaveable
dish.
Defrost
in microwave
oven
only as long
as necessary,
since
standing
time
will complete
the
thawing
process.
1
MUG
2 MUGS
3 MUGS
CUP 1
CUP
2
CUP
3
22

Item Standing Time SpecialTechniques
(minutes
per
lb)
.BEEF
Minced 5-7min. Break apart and remove
thawed
portions
with a fork.
Stew
Meat 5-7min. Separate
and
remove
thawed
portions.
Loin
Roast 5-7min. Turn over
after
half the
time.
Patties 5-7min. Turn over after
half the time.
PORK
Loin
Roast 5-7min, Turn
over after
half the
time.
Spare
Ribs 5-7min. Separate
and
rearrange
once.
Chops 5-7min, Separate and turn over once.
Minced 5-7min. Break apart and remove
thawed
portions
with
a fork.
Guide for
Cooking
Meats
Roasts, chops,
hamburgers and
small cuts
of tender
meat
cook beautifully
in
the micro-
wave
oven. Most roasts can
be cooked
rare,
medium
rare
or even well done in less
than
one
hour.
Less tender
cuts of meat
such as
pot roast can be simmered fork tender in
a
sauce or gravy.
Touch
cuts that require slow
cooking
will do better
in
the conventional
range
or oven. A large
piece
of meat,
especially
if the shape
is uneven, should
be turned
over
occasionally
for
uniform
roasting.
Meat Power Cooklng
Tlme Standlng Special Notes
Level (per
lb) Time
Beef Roast
Rare 6 6-71/2min. 5-7min.
Medium 6 g
_
g 1/2 min. 10
- 15
min. Turn over after half
the time.
Well 6 g
1/2
- 11
1/2
min.10
-
15
min.
Pork Boast
Bone-in 6 11
- '14
min. 10
min. Cover with
plastic
wrap.
Boneless 6 15
- 17
min. i 0
- 15
min. Turn over after
half
the
time.
Lamb Roast
Bone-in Medium 6 7
- I 1/2 min. 10
- 12
rnin.
Well 6 g
- 1
1 min. 10
- 15 min. Turn over after
half
the
time.
Boneless
Medium 6 9
- 10
1/2 min. 10
- 12 min.
well 6 11
- 13 min. 10
- 15
min.
Beef Patties
(3
112
oz) each
2patties g Z1l2-3min. S-7min. Turnoverandreanange
3patties I 31/2-41/2min. 5-7min. afterhalfthetime.
Meat Loal
(Zlbs) I 14
- 16
min. 10
- 12
min. Cover
with
wax
paper,
Bacon
Slices(4strips) 10 2-3min.
(1
slice;weight:
1oz,
length:1
1
in.)
Cover
with
a paper
towel.
Ham
Slices(1
in.thick) 10 61/2
-7 1/2min. 5- 7min. Coverwith
plasticwrap.
4
slices
23
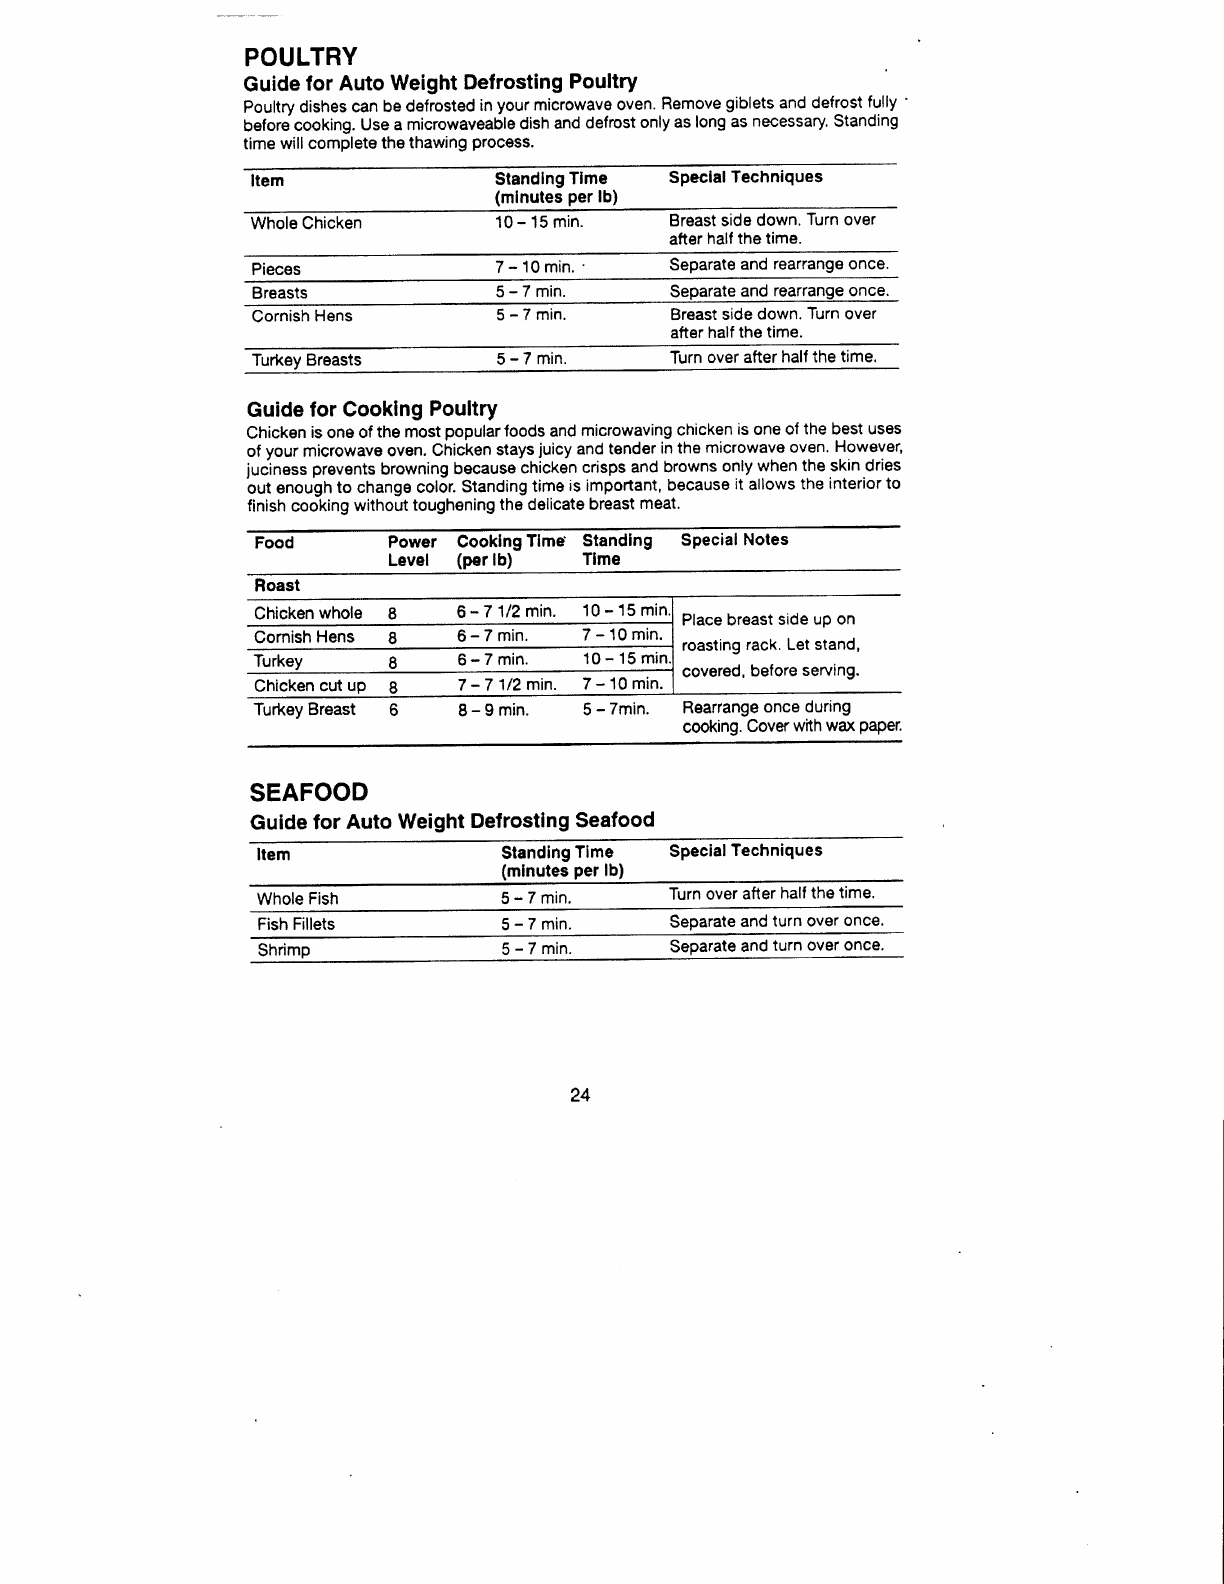
POULTRY
Guide
for Auto
Weight
Defrosting
Poultry
Poultry dishes
can ba
defrosted
in
your
microwave
oven.
Bemove
giblets
and defrost
fully
'
befors
cooking.
Use a microwaveable
dish
and
defrost
only
as long
as
necessary,
Standing
time will complete
the thawing
process.
Item Standlng
Tlme
(mlnutes
per
lb) Speclal
Techniques
Whole Chicken 10
- 15 min, Breast side
down.
Turn
over
after
half
the time.
Pieces 7
- 10 min, Separate
and
rearrange once.
Br€asts 5-7min. Separate
and once.
Cornish
Hens 5-7min. Breast
side
down.
after
half the
time.Turn
over
Turkey
Breasts 5-7min. Turn
over after
half the
time.
Guide
for Cooklng
Poultry
Chicken
is
one
of
the most
popular
foods and
microwaving
chicken
is one
of the
best uses
of your
microwave
oven.
Chicken
stays
juicy
and
tender
in the microwave
oven.
However,
juciness
prevents
browning
because
chicken
crisps
and
browns
only
when the
skin dries
out enough
to change color.
Standing
time
is important,
because
it allows
the interior to
finish
cooking
without
toughening
the
delicate
breast
meat.
Food Power
Level Cooklng
Tlme'
(per
lb) Standlng
Tlme Special
Notes
Chicken
whole I6-71/2min. 10-15mi
Comish
Hens 6-7min. 7-10min.
Turkey 6-7min. 10-15
Chicken
cut
up I7
-7 1/2min. 7
- 10
min.
Place breast
side
up on
roasting
rack.
Let
stand,
covered,
before
serving.
5
- 7min. Rearrange
once
during
cooking.
Cover
with
wat Paper.
Turkey
Breast 8-9min.
SEAFOOD
Guide
for Auto
Weight
Defrosting
Seafood
Item Standing
Tlme
(minutes
per
lb) Special
Techniques
Whole
Fish 5-7min. Turn over after
half
the
time.
Fish Fillets 5-7min. Separate
and
turn over
once.
Shrimp 5-7min. Separate
and
turn
over once.
24
Roast
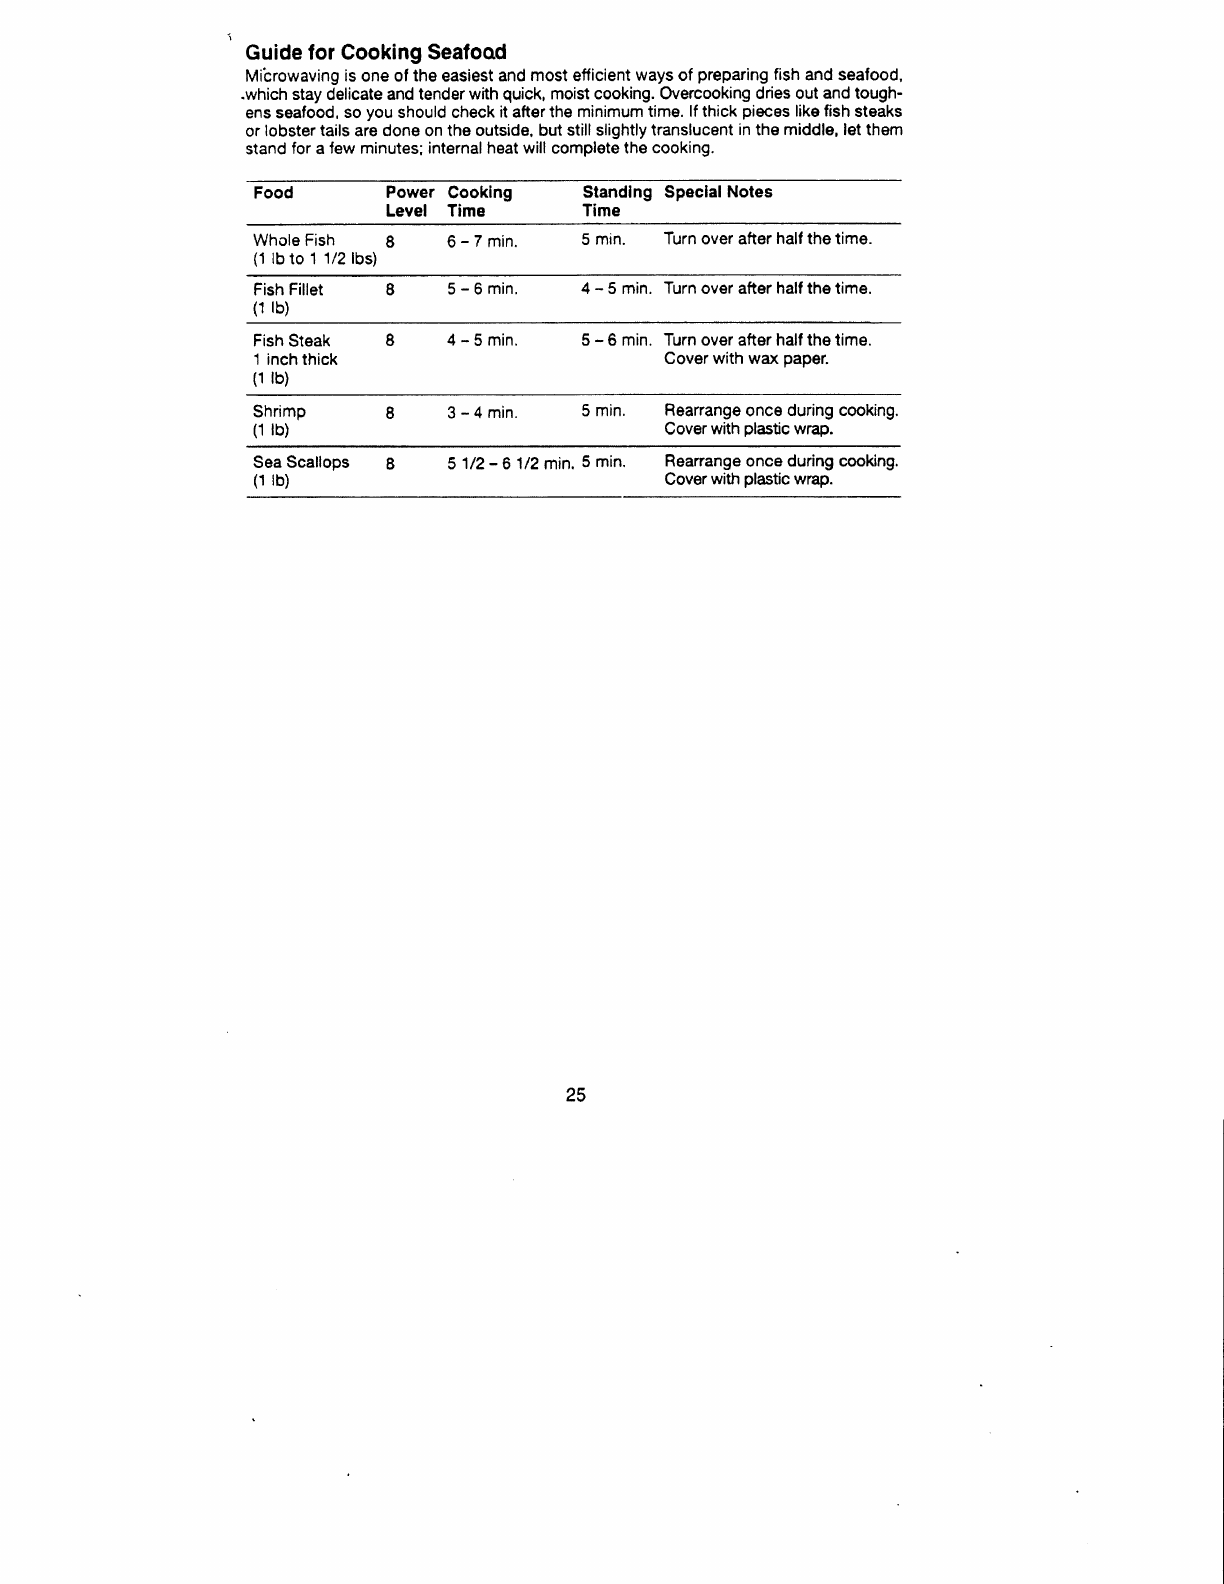
Guide for Cooking Seafood
Mibrowaving
is one of the easiest
and most etficient
ways of
preparing
fish
and seafood,
.which
stay delicate and tender
with
quick,
moist cooking.
Overcooking
dries out and tough-
ens saafood,
so
you
should check
it after
the minimum
time. lf thick
pieces
like fish
steaks
or
lobster
tails
are done on the
outside, but
still slightly translucent
in
the middle, let them
stand
for
a
few minutes; internal
heat
will complete the
cooking.
Food Power Cooklng Standlng Speclal
Notes
Level Time Time
Whole Fish I 6 - 7 min. 5 min. Turn
over
after
half
the time.
(1
lb
to 1
1/2 lbs)
FishFillet I 5-6min. 4-5min. Turnoverafterhalfthetime.
(1 rb)
FishSteak 8 4-5min. 5-6min. Turnoverafterhalfthetime,
1 inch thick Cover with wax
Paper.
(1
tb)
Shrimp I 3
- 4
min. 5 min. Rearrange
once
during cooking.
(1
lb) Cover
with
Plastic
wftlp.
Sea Scallops I 5 112
- 6 1/2 min. 5 min. Reanange once during cooking.
(1 lb) Coverwith
Plastic
wrap.
25

EGGS & CHEESE
Guide
for
Cooking Eggs &
Cheese
. CHEESE
Cheese melts
quickly
and smoothly.
When
serving cheese
as an appetizer,
flavor is
at
peak
when
served
at room
temperature.
Use a low power
level
for melting.
Cheese
melts
best
when
shredded and heated
with milk
or other liquids.
Stir cheese mixturas
severaltimes for
even
heating.
. EGGS
Eggs cook differently
by microwave.
The high
fat
content of egg
yolks
absorb
energy,
so
yolks
cook
faster
than whites. lt's
easy
to poach
eggs
in
a microwave
oven, but if
you
want
soft
yolks,
remove
eggs
from
the
oven
before whites
are
completely
cooked.
A brief
standing time allows whites
to set without overcooking
yolks.
Check
eggs
for
completion
of cooking early, they toughen
when overcooked.
When
eggs and
yolks
are mixed together
for
omelets, scrambled
eggs, or custards,
they
cook
evenly and need
less
stirring
than the
conventional
cooking methods.
Do
not
try
to cook eggs
in
the shell.
Steam can build up
inside
the
shells, causing them
to burst.
Scrambled Eggs
Eggs Butter Mllk or
Water Cook
on
Power 10
1 Tbsp 2 Tbsp 1-2
2 Tbsp 2-3
2
Tbsp 4
Tbsp 3-4
Procedure
Place
butter
in
small casserole
and
melt. Add
eggs and milk,
scrambling
with fork.
Cook as directed in
chaft,
breaking up and
stirnng
eggs twice.
Let
stand, covered,
before servi
Poached
Eggs
Eggs Water
1 1/2 4-6min. 1
min. 2 min
11/2 4-6min. 1-2min.
4 2
cups 6-7min. 2-3
Cook Water Cook Eggs Standing Procedure
on Power 10 on Power
I Time
Place Water into
medium casserole.
Cook
at
High
untilboiling.
Breakeggs,
one at a time,
into separate dish,
pierce
yolk
once
wrth wooden
pick
and
slip egg carelully
into
hot water.
cook as
directed
in
chart.
26
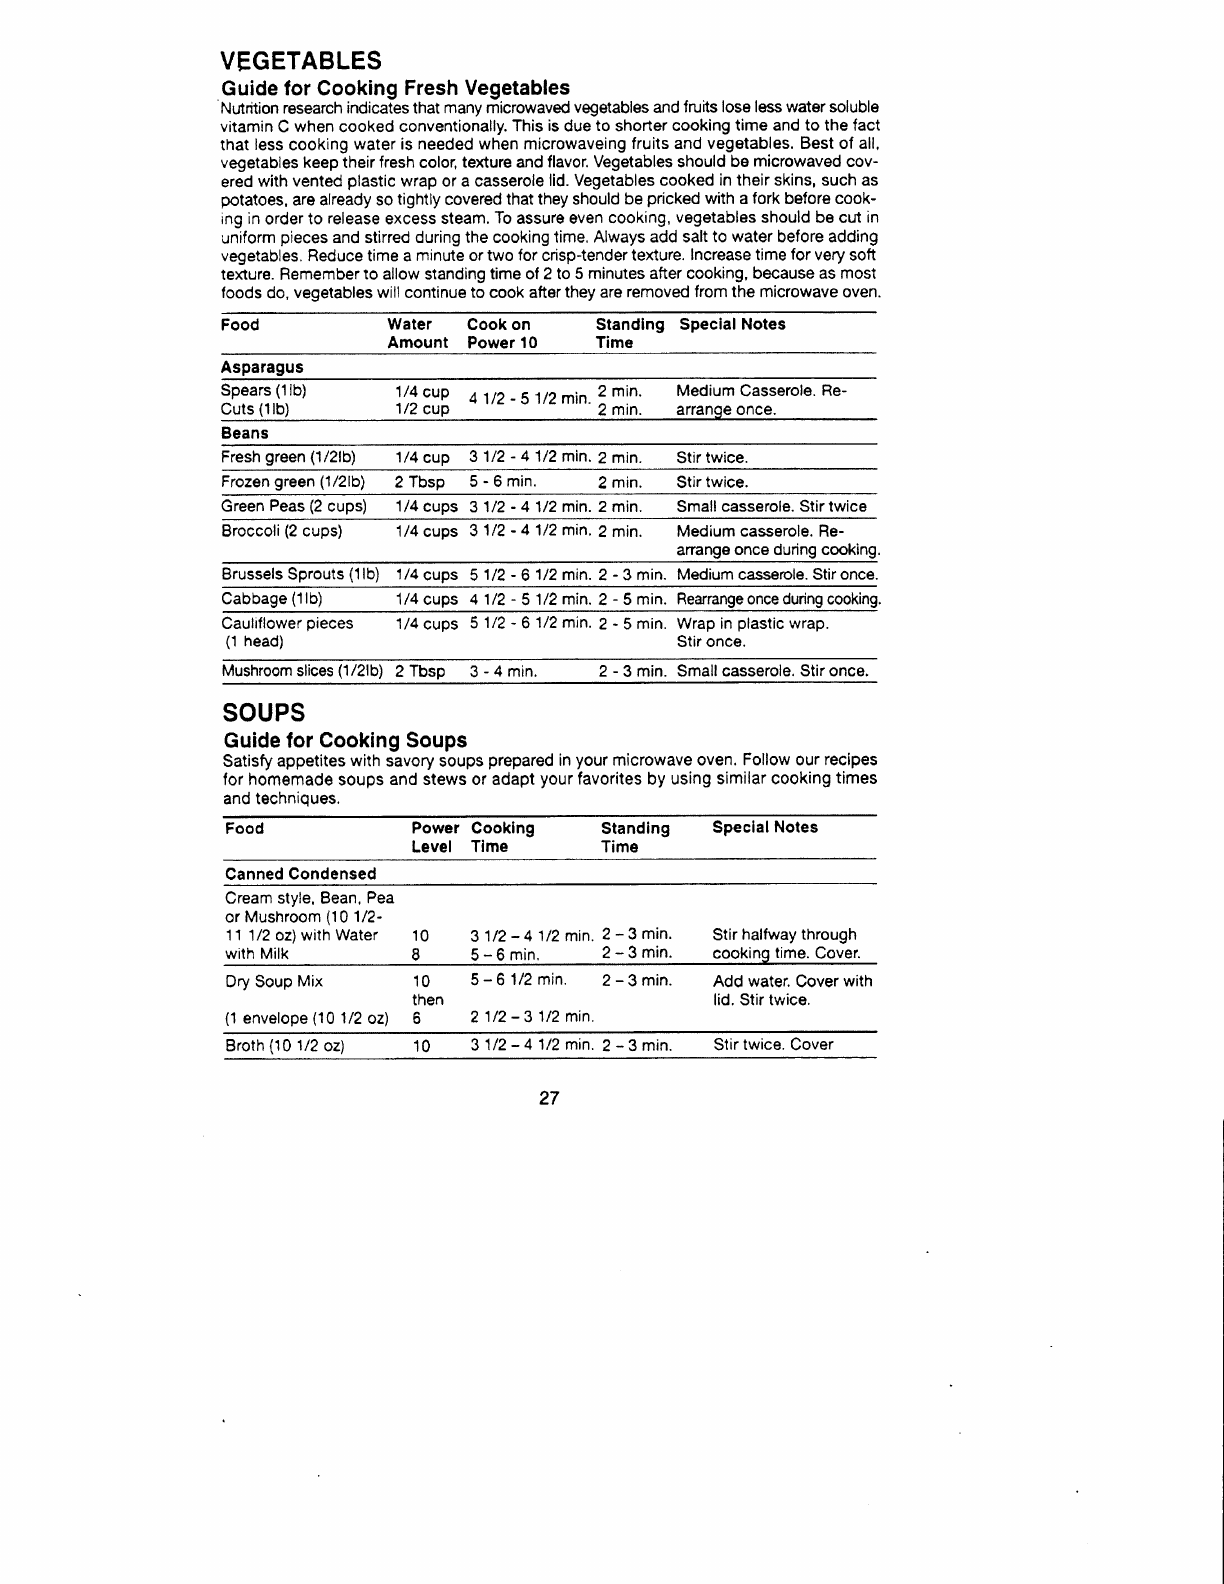
VEGETABLES
Guide
for Gooking
Fresh Vegetables
Ndrition research
indicates
that many microwaved
vegetables
and fruits
lose legs water
soluble
vitamin
C when
cooked
conventionally.
This
is
due
to shorter
cooking
time and to the fact
that less
cooking
water is needed
when microwaveing
fruits and vegetables. Best of all,
vegetables keep their
fresh
color,
texture
and
flavor. Vegetables should
be microwaved
cov-
ered
with
vented
plastic
wrap or a casserole
lid. Vegetables cooked
in their skins, such as
potatoes,
are already so
tightly covered
that they should be pricked
with a fork before cook-
ing
in
order
to release
excess steam,
To
assure even
cooking,
vegetables
should be cut in
uniform
pieces
and
stirred
during the cooking
time. Always add salt
to water
before adding
vegetables, Reduce time a minute or two for crisp-tender
texlure.
Increase time
for very
soft
teliture. Remember
to allow standing
time of 2 to
5 minutes after cooking, because as most
foods do,
vegetables will continue to cook after
they are
removed from the microwave
oven.
Food Standing Special
Notes
Time
Asparagus
Spears
(1lb)
Cuts
(1lb)
Beans
Fresh
green (1/2lb) 1/4
cuo 31/2 - 41/2 min.
2 min. Stir
twice.
Frozen
green
(1/2lb) 2 Tbsp 5 - 6 min. 2
min. Stir
twice.
Green
Peas
(2
cups) 1/4
cups 31/2 - 41/2 min.2 min. Small
casserole. Stir twice
Broccoli(2
cups) 1/4
cups 31/2 - 4 1/2 min.
2
min. Medium
casserole. Re-
arange once during cooking.
Brussels Sprouts
(1lb) 1/4
cups 5 1/2
- 6 1/2 min.
2 - 3 min. Medium
casserole. Stir
once.
Cabbage
(1lb) 1/4
cups 41/? - 5 'll2 min.
2 - 5 min. Rearrange
once
during
cooking.
Water Cook on
Amount Power
10
1/4 cup
1/2 cup 41/2
- 51/2min.
?
tin' Medium Casserole'
Re-
z mrn. arrange once.
Cauliflower
pieces
(1
head)
Mushroom
slices
(1/Zlb) 2 Tbsp 3 - 4 min. 2 - 3 min. Small casserole.
Stir once.
SOUPS
Guide for
Cooking Soups
Satisty
appetites
with
savory soups
prepared
in
your
microwave oven.
Follow our recipes
for homemade soups
and stews or adapt
your
favorites by using
similar cooking
times
and technioues.
1/4
cups 51/2
- 6 1/2
min.
2
- 5
min. Wrap in
plastic
wrap.
Stir once.
Food Power Cooklng
Level Time Standing Special
Noles
Time
Canned
Condensed
Cream
style, Bean,
Pea
or
Mushroom
(10
1/2-
11 1/2 oz)with
Water
with Milk 10
I31/2-41/2
5-6min. min.
2
- 3 min. Stir
haltway through
2
- 3 min. cooking
time.
Cover.
Dry Soup
Mix
(1
envelope
(10
1/2
oz)
10 5-61/2min. 2-3min.
then
6 21/2-31/2min.
Add water.
Cover
with
lid. Stir twice.
Broth
(10
1/2
oz) 10 31/2
- 41/2 min.
2
- 3 min. Stir
twice.
Cover
27

SAUCES
Guide
for Cooking
Sauces
Sauces
boil over
npidly,
especially
thos€
that contain
milk.
As soon as
the
door
is opened,
cooking
stops. lf ingredients are
not taken
directly
from the refrigerator,
cooking
time will be
less
thin given
in the
recipe.
Stir
sauce
quickly,
about
every
30 seconds
to eliminate
lumps.
Be sure
to use a container
twice
the size
of the amount
of liquid to prevent
boiling
over.
A wooden spoon may be
left in the dish
while sauce
is cooking
for
easy
stirring.
lf sauce is
stined slowly,
cooking
time may
require about
15 seconds
longer.
lf deslred, a 1 quaft glass
measure
may
be used to prepare
some
sauces.
White Sauce
Amount Butter Flour Milk Cook Cook
Butter Sauce
1
cup,thin 1 Tbsp 1 Tbsp 1
cup 30 sec. 2
-3
min.
med. 2
Tbsp 2 Tbsp 1
cup 40 sec. 21/2'31/2
min
thick 3Tbsp 3Tbsp
lcuP 1min. 3-4
Special
Notes
Cook
on Full
power
as
direcled
or until
thickened.
stirring once. Let
stand,
covered. before
servi
Brown Gravy
Amount Special Noles
thick 1 Tbsp 3
Tbsp 1 cup 3-4min.
Cook
on Full
power
as
directed or urrtil
thickened,
stirring
once.
Let stand,
covered,
before serving.
CASSEROLES
Casseroles
may
require occasional
stirring
to distribute
heat. They cook
more evenly
when
made
with ingredients of similar
size and
shape.
Because
of their shorter
cool<ing
time,
casseroles
cooked
in
the
microwave ov€n
generally
need
less
liquid.
Casseroles
with cream
and cheese
sauces,
or
meats
which
need slower
cooking
to
tenderize,
cook best on
power
level4.
When cooking a
favorite casserole,
make
two and
freeze
the second
for future use.
Line a
casserolo or baking
dish
with
plastic
wrap.
Transfer
the
cooked
food to
the
lined container
and
freeze. As soon
as
the food is
frozen
in the shape
ol
the dish,
remove
it
and
wrap
with
freezer
paper.
Later
it can unwrapped
and
returned
to the container
for
defrosting
and
heating.
Dry Casserole
Mixtures
Many
prcpared
box
type casseroles
are available
on
the
grocery
shelves.
Many
have
freeze
dried
foods or evaporated
foods
included.
Cooking
periods
are
so short
there
maylot be
time for the
foods
to absorb
the
moisture
sufliciently
and
reconstitute
the foods.
To
pre-
pare
this type, boil
lhe amount
of
water
recommended
on
the
package.
Add
the
noodles
(when
inciudedl, cover
and cook
for approximately
10 minutes.
Allow
noodles
to
stand
covered
for
an additional
10 minutes,
rinse
with warm
water and
drain.
Then
follow
package
directions
for
preparing
the mix.
Reheat
4 to 6
minutes
before
serving.
Fat from Flour
Dripplngs Llquld or Cook
on
Drlpplngs Power
10
28
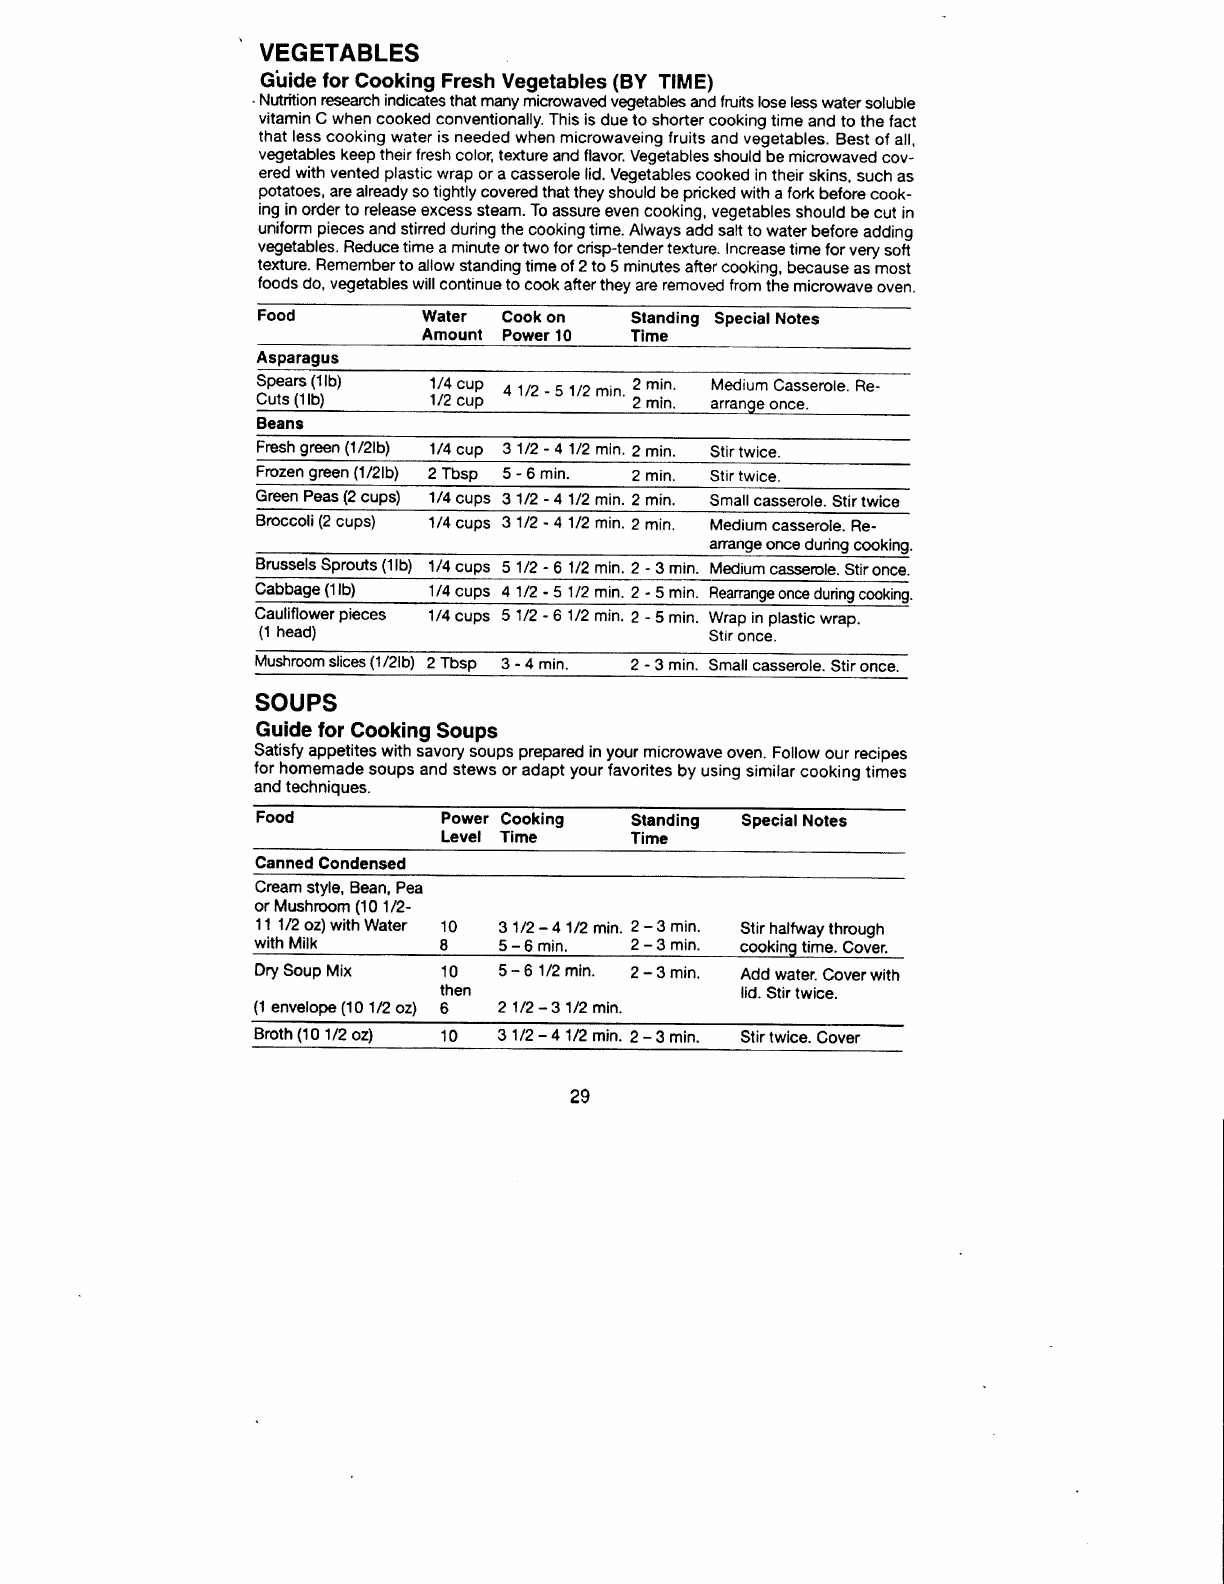
VEGETABLES
Guide
for Cooking
Fresh
Vegetables
(BY TIME)
-Nttttition
research
indicates
that many
microwaved
vegetables
and fruits lose les water soluble
vitamin
C when
cooked conventionally.
This is
due to shorter
cooking
time
and
to the fact
that less
cooking
water is needed
when microwaveing fruits
and vegetables.
Best
of all,
vegetables
keep their fresh
color,
telfture
and
flavor.
Vegetables
should
be microwaved
cov-
ered
with vented
plastic
wrap or a casserole lid.
Vegetables
cooked in
their skins,
such as
potatoes,
are already
so
tightly
covered that
they
should be pricked
with
a fork
before
cook-
ing in order to release
excess steam. To
assure
even
cooking,
vegetables
should be cut in
uniform
pieces
and stirred
during
the cooking time.
Always
add salt to water
before
adding
vegetables.
Reduce time
a minute
or two for crisptender texture.
Increase
time
for very
soft
te)dure.
Remember
to allow
standing
time of 2 to 5 minutes
after cooking,
because
as most
foods
do, vegetables
will
continue
to cook after they
are
removed from
the microwave
oven.
Food Water Cook on
Amount Power
10 Standing Special
Notes
Time
Asparagus
Spears
(1lb) |AZ[B 41/z's
1/z min'
2
min.
2 min. Medium
Casserole.
Re-
arranoe
once.
Cuts
('1
Frcsh
green
(1/2lbl 1/4
cup 3'l/2 - 4 112
min.
2 min. Stir twice.
Frozen
green
(1/2lb) 2Tbsp 5-6min. 2
min. Stir
twice.
Green
Peas
{2
cups) 1/4
cups 3112
- 41/2 min.2
min. Small
casserole.
Stir twice
Broccoli(2
cups) 1/4 cups 31/2' 41/2
min.2
min. Medium
casserole.
Re-
arrange
once during cooking.
Brussels
Sprouts
(1lb) 1/4
cups 51/2 - 6 1/2
min. 2 - 3 min. Medium
casserole.
Stironce.
Gabbage
(1
lb) 'll4 cups 4 1/?
- 5 1/2
min. 2 - 5 min. Reanange
once
during
coorinj.
cauliflower
pieces 1/4
cups 51/2 - 6 1/2
min.
2 - 5 min. wrap in
plastic
wrap.
(1
head) stir once.
Mushroom
slices
(1/2lb) 2 Tbsp 3 - 4 min" 2 - 3 min. Small
casserole.
Stir
once.
SOUPS
Guide
for Cooking
Soups
patisfu
appetites
with savory
soups
prepared
in
your
microwave
oven.
Follow
our recipes
for
homemade
soups
and
stews
or adapt
your
favorites
by using
similar
cooking
times
and
techniques.
Food Power Cooking
Level Time Standing Special
Notes
Time
Canned
Condensed
Cream
style, Bean,
Pea
or Mushroom
{101/2-
11
112
oz)with
Water
with
Milk 3 1/2
- 41/2 min.
5-6min.
5-61/2min. 2-3min.
2
1/2
-31/2 min.
Stir haltway
through
cookinq time. Cover.
Add water.
Cover with
lid.
Stir
twice.
10
82-3min.
2-3min.
Dry
Soup
Mix
(1
envelope
(10
10
then
112
oz) 6
Broth
(10
1/2
oz) 10 3112-41/2min.2-3min. Stir
twice.
Cover
2g
Beans
CONVENIENCE
FOODS
Frozen
Foods
A large variety of frozen
foods,
special dishes
and dinners
are available
and
the selections'
confnue to increase.
The
market
is changing
rapidly, therefore
it is impossible
to list
the
foods and
types available
and
recommend
cooking
procedures.
In
this book
we can only
give
general
directions
to assist
you.
T.V.Dinners
Io prepare
a T.V. dinner,
follow the maker's
instructions
for use
with microwave
ovens.
To
cook
a
T.V. dinner
will
require approximately
5
to 7 minutes
for
the food to thaw and
heat
to serving
temperature
(depending
on the types of food). Allow plastic
wrap to remain over
the dish
lor 2 minutes to allow
heat to equalize.
Dinners
that
contain
mashed
potatoes
have
presented a bit of a problem
due
to the large
compact
mass of
this
particular
food.
You
may want to remove about half
the mashed
potatoes
after defrosting
is started, then
spread
the remaining
potatoes
over
tha individual section
of the tray.
Heat
the removed
mashed
potatoes
in-an
individual
dish.
For foods
that
should
be crisp
when cooking
is
completed,
remove the plastic
wrap
and use
the broiler
of a conventional
range
to crisp
the food.
Individual
Frozen
Foods
These may be commercially
prepared
or frozen at home.
Place
the container
of frozen food
in the oven
and heat only untilthe food starts
to defrost
and can be removed
easily. Empty
contents
into
a casserole
or serving
dish
and
continue
to defrost
and heat. Do not heat
foods
in
deep
foil containers.
To ciisp
and
brown
special
toppings,
use the broiler
of a
conventional
range.
lf allowed
to heat
to serving
temperature
in a plastic
container,
the
container
will
warp or melt
from the
high heat of
food.
Frozen
Foods
in Cooking
Pouches
or
Boilable
Bags
To
prepare
these
foods,
slit the plastic
bag.
An X-type
cut
will
help
remove the
food at
the
end of cooking
time.
Place the cut side
down
on a serving
dish
(with
no metal trim)'
Heat
foods other
than vegetables
lor about
3 minutes.
Frozen
vegetables
require
about 8 - I 1/2
minutes of cooking
iime.lUlow
the
pouch
bag
to remain over
the
food for about 2 minutes
to allow
time
for the
heat to equalize.
Foods
prepared
in cheese or white
sauce
should
be
removed from
the pouch
and
placed
in
a
glass
casserole
dish
and stirred
to prevent
overcooking
of the sauce around
the
edges of
the dish.
Complete
Meals
from
Table
Leftovers
Compiete
meals
from
laftov€rs
can
be
prepared
in advance.
Foods can be
frozen and
ready for
quick
heating
in the oven
at any
time. Ghoose
foods
suitable
for freezing and
put
serving
portions
on
plper, glass
or china
(no
metaltrim)
plate.
Wrap
with recommended
treezeiiaper
and
freeze
quickly.
When apportioning
the servings
of
food
9l tle plate,
use
approximately
the same
amount
of
each
kind
of
food for
more even
heating.
Mashed
potatoes
wiit
freat
qui6ker
if
spread
stightly
and
hollowed,
with a
pat
of
butter
in
the center.
To
pre-
vent
small
pieces
of vegetables,
corn,
p€as,
etc.,
from
dehydrating during
heating, mound
well near
the center
of the
Plate.
BEVERAGES
Beverages
can
be
quickly
heated or
reheated
in
the
microwave
oven,
Individual
servings
can
be f,eated
directly
in 6ups or
mugs,
so
you
avoid
washing
sticky
pans.
Handles
of cups
and
mugs stay cool,
even
though
th€ beverage
gets
hot.
Beverages
can be
quickly
reheated.
Save
lefrover
coffee
in
a glass
measuring
cup or serving
cup and
refrigerate.
Later,
reheat
it in
the microwave
oven.
The cotfee
willtaste
as
if it had
just
been
freshly brewed.
Remember,
however,
to always
vigorously stir
a beverage
before
it
is reheated. Chocolate
squares
may
be
melted
in theii original
paper
wrapper,
in a
glass mixing
bowl,
in
custard
cups or
glass
measuring
cups.
lf milk
is
to be
added
to
melted chocolate
squares,
add
water to
the
melted
chocolate
for
easier blending.
30
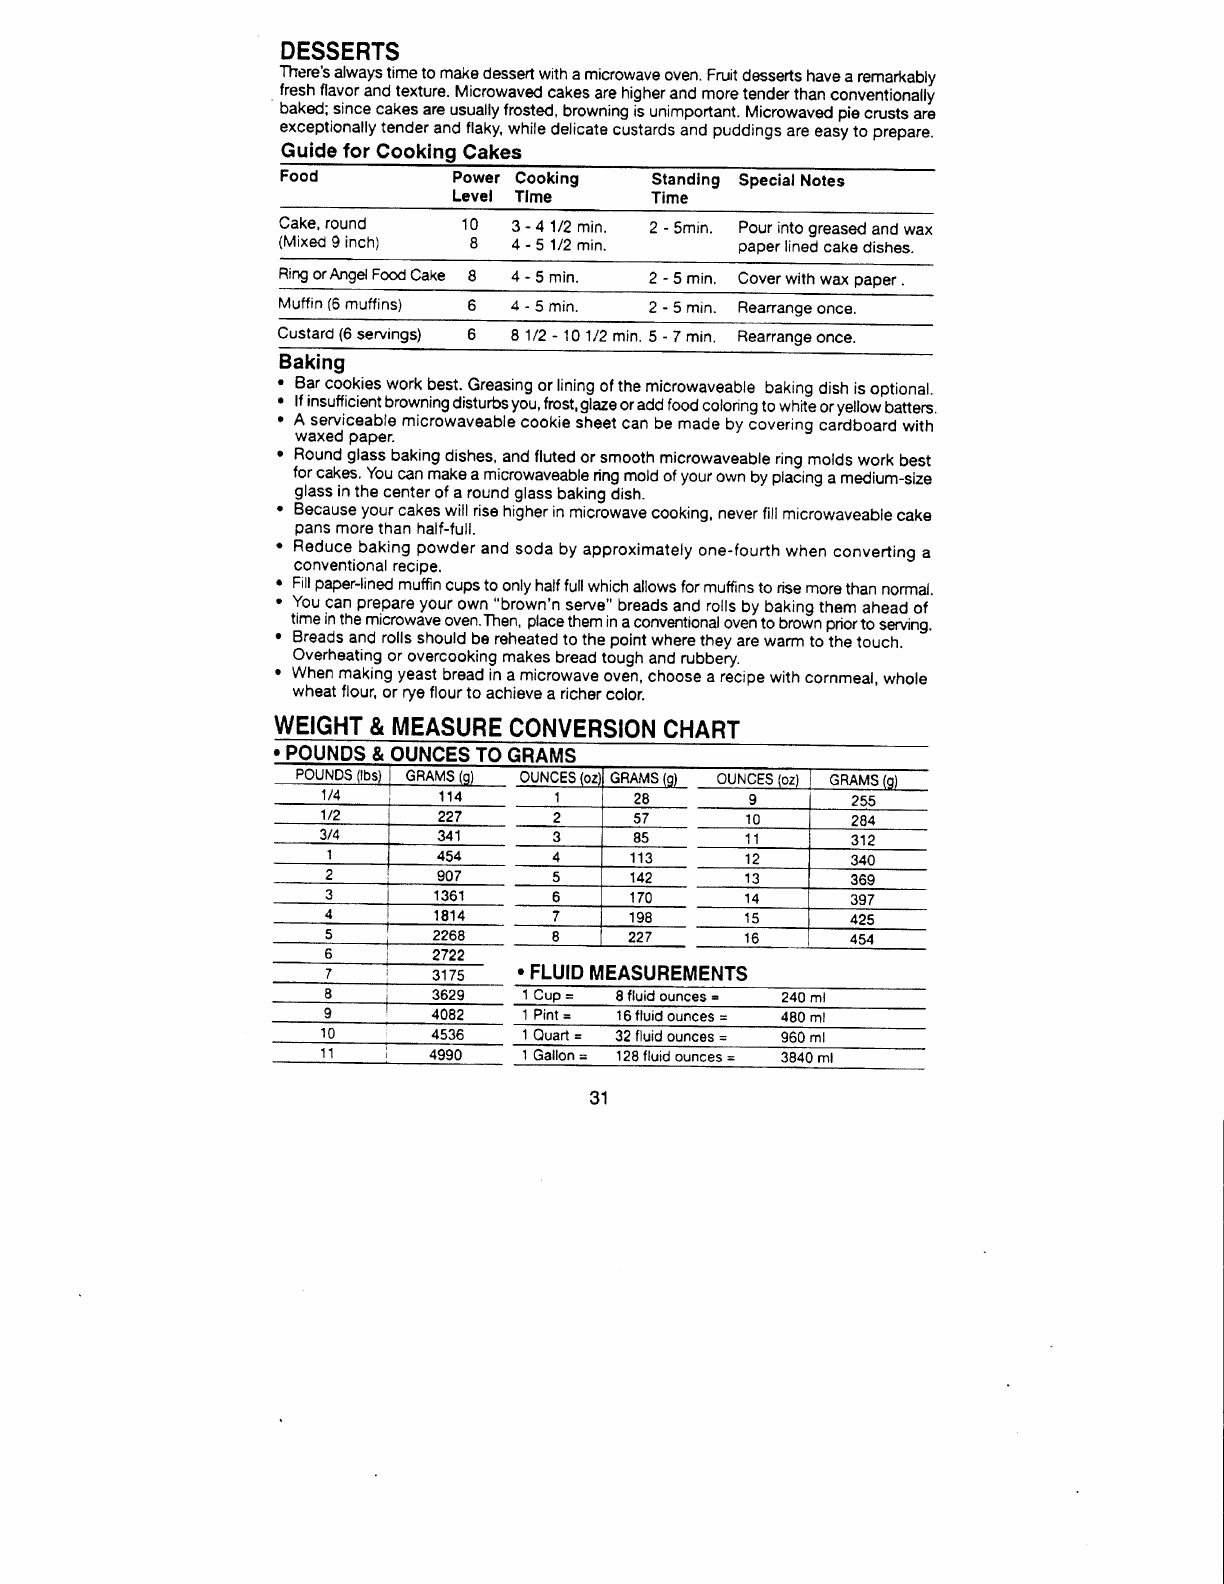
Cake,
round
(Mixed
9
inch) 10 3
-
8 4- 41/2
min.
5 1/2 min.
DESSERTS
I.F-: always
time
to make
dessert
wlth a microwave
oven.
Fruit
desserts
have
a remarkably
fresh
flavor
and texture.
Microwaved
cakes
are higher
and more
tender than conventionally
baked:
since
cakes
are
usually frosted,
browning
is unimportant.
Microwaved pie
crusts
are
exceptionally
tender
and flaky,
while
delicate
custards
and
puddings
are
easy
to prepare.
Guide
for Cooking
Cakes
Food Power Cooking Standlng Special
Notes
Level Tlme Time
2 - Smin. Pour
into
greased
and wax
paper
lined
cake
dishes.
Ring
orAngelFood
Cai<e I4-5min. 2 - 5 min. Cover
with wax
paper
Mutfin
(6
muffins) 4-5min. 2
- 5 min. Reanange
once.
Custard
(6
servings) 81/2 - 10
1/2
min,
5 - 7
min. Rearrange
once.
Baking
' Bar
cookies
work best.
Greasing
or lining
of the
microwaveable
baking
dish
is optional.
r lf insufficient
browning
disturlcs
you,
frost,
glaze
or add food
coloring
to whiti or
yellow
batters.
r A serviceable
microwaveable
cookie sheet
can
be
made
by
dovering
cardboard
with
waxed
paper.
r Round glass
baking
dishes,
and
fluted
or smooth
microwaveable
ring
molds
work best
for
cakes. You
can make
a microwaveable
ring mold
of your
own by plaEing
a medium-size
glass
in
the center
of a round
glass
baking
dish.
' Because your
cakes will
rise
higher
in
microwave
cooking, never
fill microwaveable
cake
pans
more
than half-full.
' Reduce
baking
powder
and soda
by approximately
one-fourth
when converting
a
conventional
recipe.
r Fill
paper-lined
muffin
cups to only half full
which allows
for muffins
to rise
more
than
normal.
' You
can
prepare
your
own "brown'n
serye"
breads
and rolls
by bakino
them ahead
of
time in
the microwave
oven.
Then,
place
them
in
a conventional
oven to brofin prior
to serving.
r Breads
and rolls
should
be reheated
to the
point
where
they
are warm
to the
touch.
O. verheating
or overcooking
makes
bread tough
and rubbery.
' W.hen making yeast
bread in
a microwave
oven,
choose
a recipe
with
cornmeal,
whole
wheat
flour,
or rye
flour
to achieve
a richer
color.
WEIGHT
& MEASURE
CONVERSION
CHART
fquNDs &
ouNcES
TO
GRAMS
POUNDS GRAMS OUNCES GRAMS
1/4 114
1/2 227
3/4 341
I454
907
1361
1814
2268 227
. FLUID
MEASUREMENTS
1
Cup= 8
tluid
ounces
B240 ml
1
Pint
=16
fluid
ounces
=480
ml
'l Ouart
=32
fluid
ouncss
=960 ml
1
Gallon
=128
fluid
ounces
=3840
ml
57
113
170
198
4
q
10
11
31
OUNCES
o2722
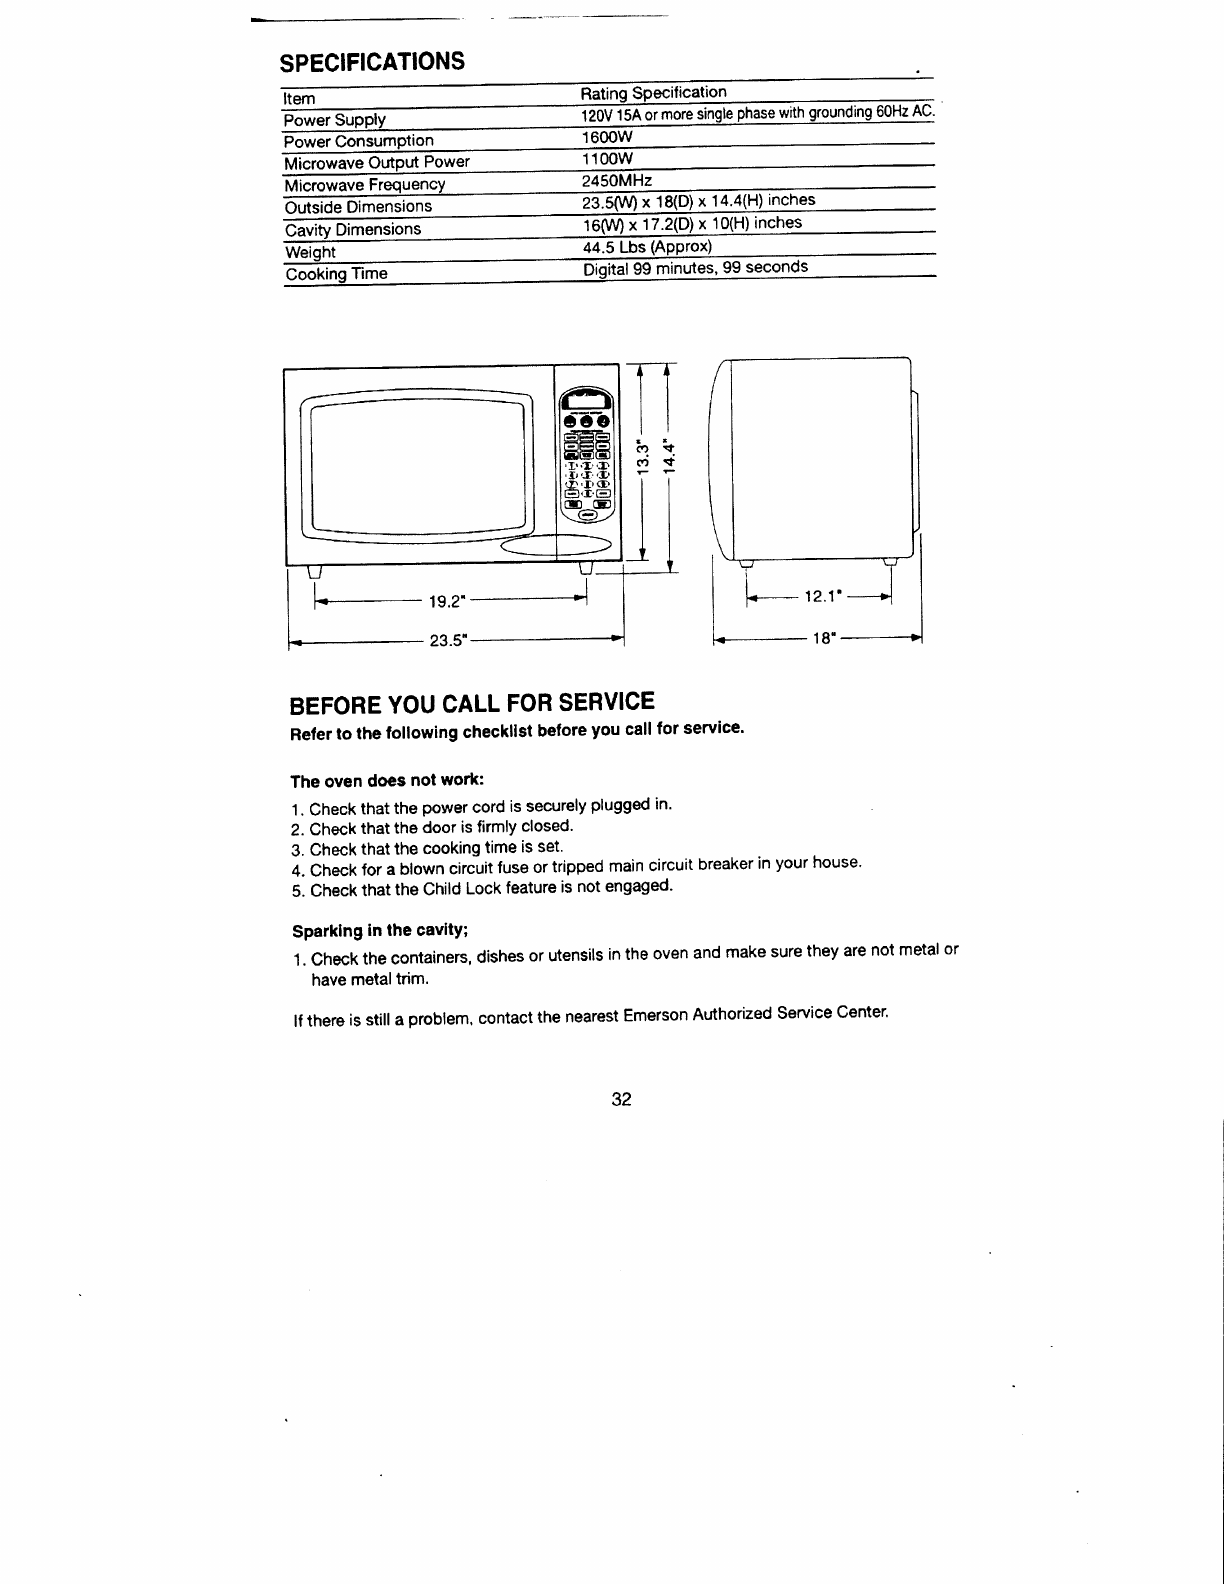
SPECIFICATIONS
Item Rating
Power 120V
lSAormore 60Hz
AC.
Power 1
600w
Microwave
OutPut
Power 1100w
Microwave 24SOMHz
Outside
Dimensions 23.5(VV)x
1S(D)x
14.4(H)
inches
Dimensions 16Mn
x
17.2(D)x
10(H)
inches
44.5
Lbs (APprox)
E6;mm:- Dgital
99
minutes,
gg
seconds
BEFORE
YOU
CALL
FOR
SERVICE
Refer
to the
following
checkllst
before
you
call
for service.
The
oven
does not work:
1. Check
that
the
power
cord
is securely
plugged
in'
2.
Check
that
the
door
is firmly
closed.
3.
Check
that
the
cooking
time
is set.
4. Check
for
a blown
circuit
fuse
or
tripped
main
circuit
breaker
in
your
house'
5.
Check
that
the Child
Lock
feature
is not
engaged'
Sparklng
in the cavitY;
1.
check
the
containers,
dishes
or
utensils
in
the
oven
and
make
sure
they
are
not metal
or
have
metaltrim.
lf there
is still
a problem,
contact
the
nearest
Emerson
Authorized
Service
Center'
32
@
Wer.son.
SERVICE
TO FIND
THE
LOCATION AND
PHONE
NUMBER
OF
YOUR
NEAREST SERVICE CENTER
PERI/ITTED
TO
PERFORM
WARRANTY SERVICE,..
{
l"J CALL
TOLL
FREE:
1-800-695-0098 !l
)tI
__--__<
i FOR
ADDITIONAL
STT-UP OR
OPERATING
ASSISTANCE
PLEASE CALL:
1-800-898-9020
FOR CUSTOMER
SERVICE,
PLEASE WRITE TO:
Emerson
Radio
Corp.
Consumer
Affairs Dept.
1gO1 DIPLOMAT DRIVE
,.ARMERS
BRANCH,
TX 75234
33

OUNCES
(oz) GRAMS
(o)
128
257
385
4113
5142
6170
7198
8227
OUNCES
(oz)l GRAMS
1
Cup = g
fluid
ounces = 240 ml
1 Pint = 16
fluid
ounces = 480 ml
1 Quart = 32 fluid ounces = 960 ml
Hundredths of a Pound Tenths of a
.16
-
.25
26-35
.36
- .45
,46
- .55
.56
- .65
RATING SPECIFICATION
120V 60Hz AC
1600w
16
W x 17.21gjlq_(Uucleg
1.6
Cu.
Ft.
99 minutes,
99 seconds
34
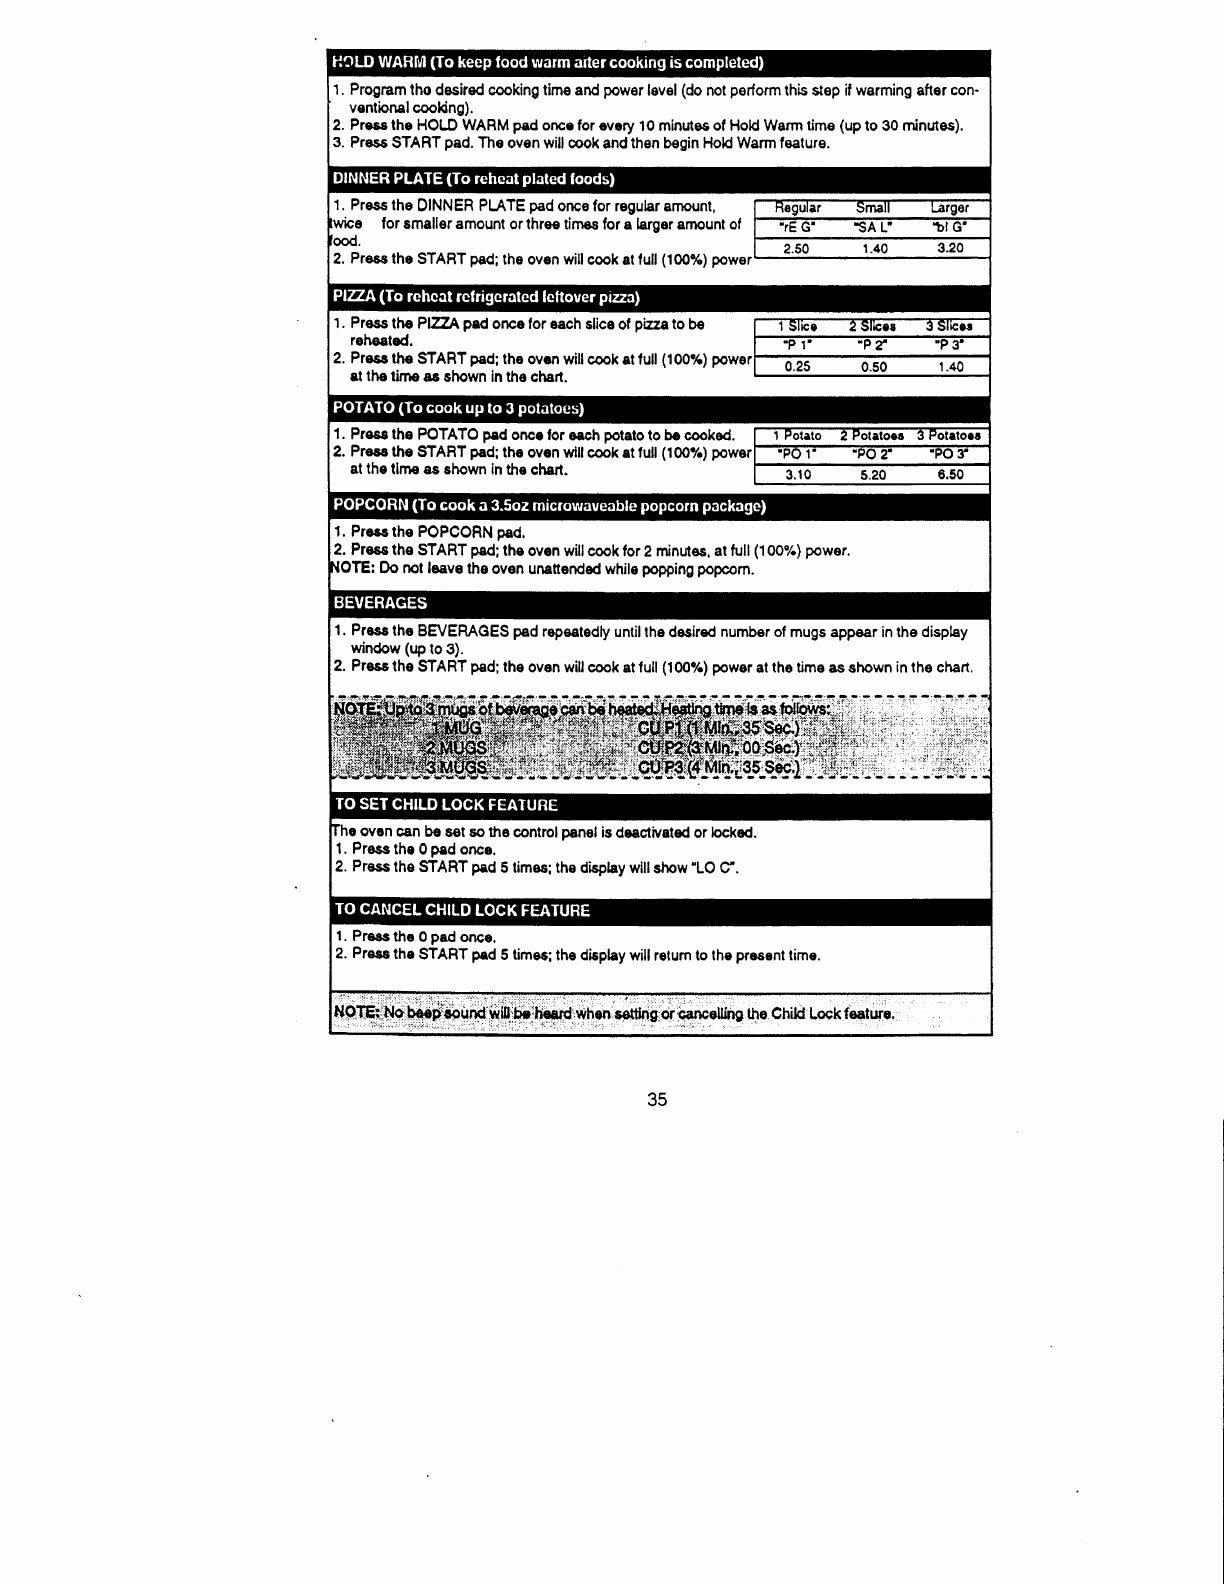
35
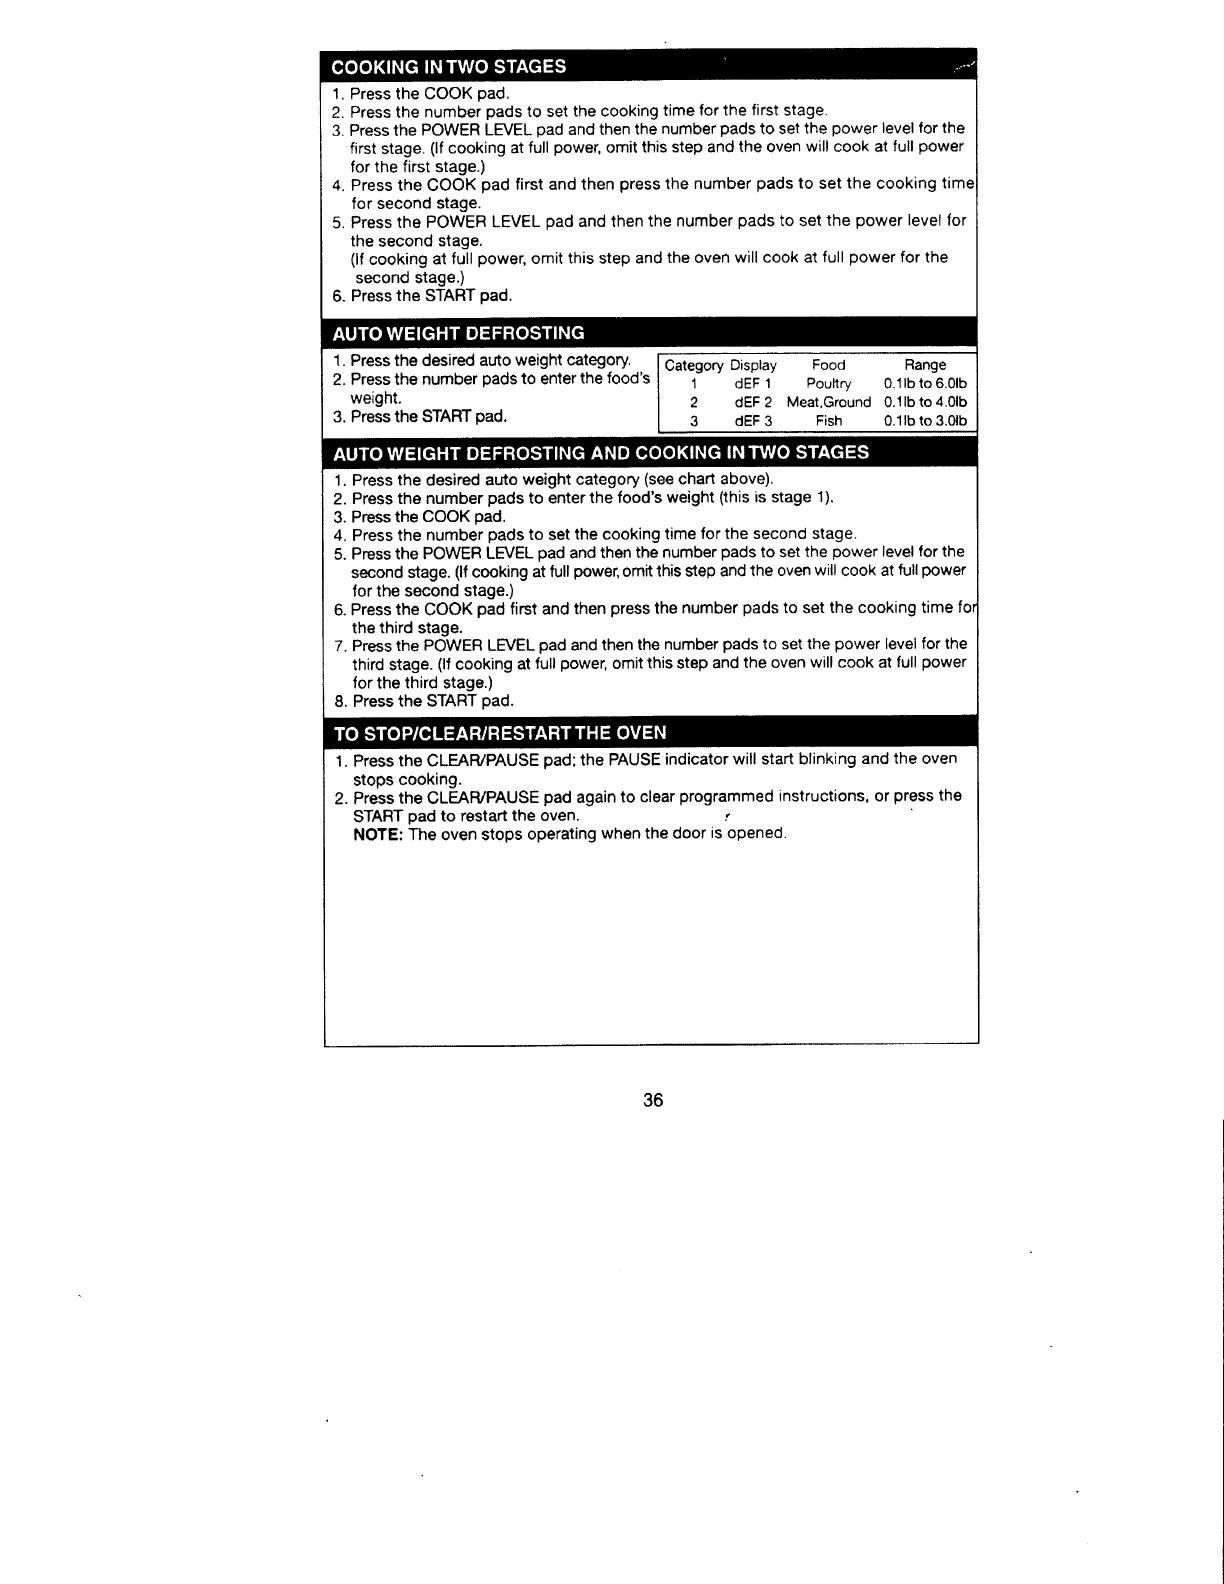
1.
Press the COOK
pad.
2. Press
the number
pads
to set
the
cooking
time
for
the first
stage.
3. Press the POWER
LEVEL
pad and then
the number
pads
to set
the power level for
the
first
stage.
(lf
cooking
at
full
power,
omit
this
step and the oven
will cook
at
full
power
for the first stage.)
4. Press the COOK
pad
first and
then
press
the number
pads
to set
the
cooking
time
for second
stage.
5. Press
the POWER
LEVEL
pad
and then
the number
pads
to set
the power level lor
the second stage.
(lf
cooking
at full
power,
omit
this
step
and
the oven
will cook at full
power
for the
second stage.)
6. Press
the START
pad.
1. Press the desired auto
weight category,
2. Press the number
pads
to enter
the food's
weight.
3. Press the START
pad.
Category Display Food Range
1 dEF 1 Pouftry 0.11b to 6.01b
2 dEF 2 Meat,Ground 0.1Ib
to 4.01b
3 dEF 3 Fish 0.1Ib
to 3.01b
1. Press
the desired
auto
weight category
(see
chart above).
2. Press the number
pads
to enter
the
food's
weight
(this
is stage 1).
3. Press the COOK
pad.
4" Press the number
pads
to set
the cooking
time
for the second stage.
5. Press
the POWER LEVEL
pad and then
the number
pads
to set
the power
level
for the
second
stage.
(lf
cooking
at full
power,
omit
this step and
the oven
will
cook at fullpower
for the second stage.)
6.
Press
the COOK
pad
first and
then
press
the
number
pads
to set
the
cooking
time
fo
the third stage.
7. Press
the POWER
LEVEL
pad and
then
the number
pads
to set the power level
for
the
third stage.
(lf
cooking
at full
power,
omit
this step and
the oven will
cook at full
power
for the third stage.)
8. Press
the START
pad.
1. Press
the
CLEAR/PAUSE
pad;
the PAUSE
indicator
will
start
blinking and
the oven
stops
cooking.
2. Press
the CLEAR/PAUSE
pad
again
to clear
programmed
instructions, or
press
the
START
pad
to restart
the oven. r
NOTE:
The oven stops
operating
when the door
is
opened.
36
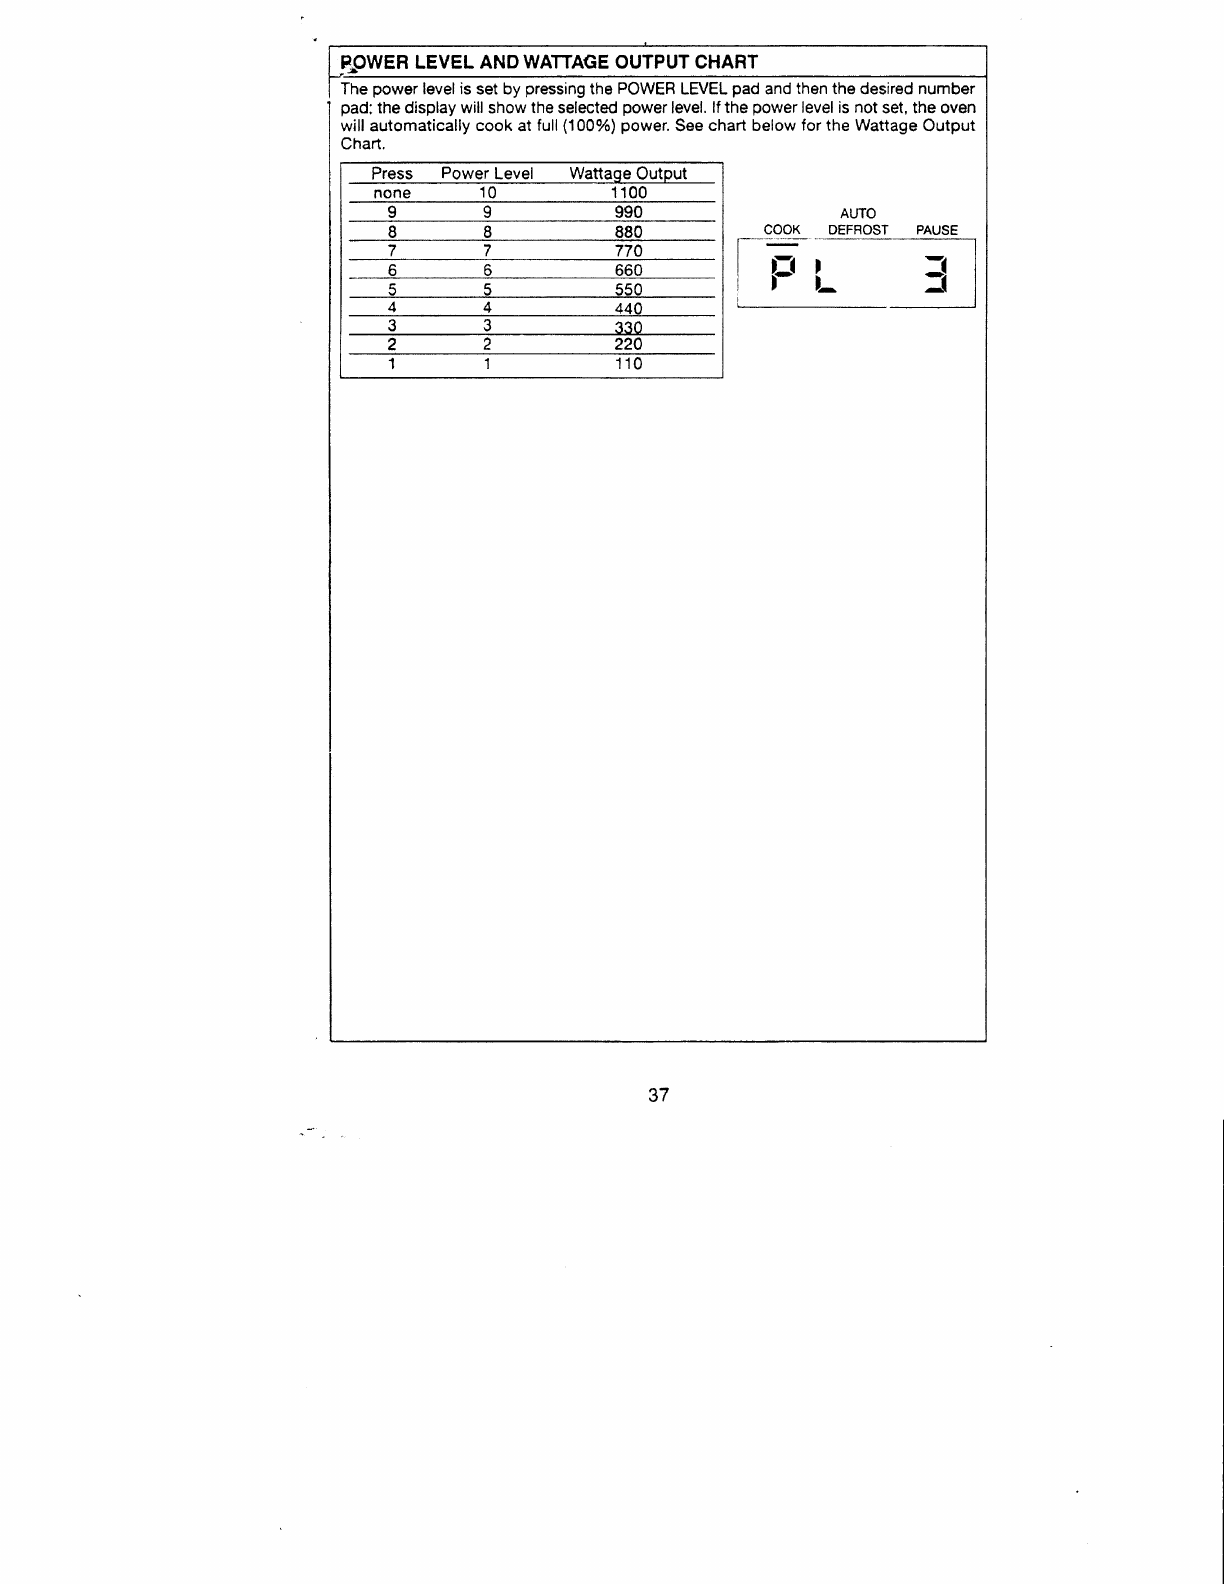
EOWER
LEVEL
AND WATTAGE OUTPUT CHART
The
power
level is
set by pressing
the
POWER
LEVEL
pad
and
then
the desired number
pad:
the display will
show
the selected
power
level.
lf
the power
level is not set, the oven
will automatically
cook at full
(100%) power.
See
chart below for
the Wattage
Output
Chad.
Press Power
Level Wattaqe
Output
none 10 1100
770
560
550
440
110
AUTO
DEFROST PAUSE
37

MICROWAVE
OVEN
COOKING
CHART
THIS
CHART
PROVIDES
A QUICK
REFERENCE
FOR OPERATING
YOUR
MICROWAVE
OVEN. REFER
TO
THE
OWNER'S
MANUAL
FOR DETAILED
INSTRUCTIONS.
BEFORE USING
THE MICROWAVE
OVEN,
READ
AND
FOLLOW ALL SAFETY
INSTRUCTIONS
AND PRECAUTIONS OUTLINED
IN
THE
OWNER'S
MANUAL,
3.5 oz.
(4
stri
3 1/2 to 4 1/2
Hamburger
Meatloaf
Beef Roast
gwbalri
141/2to
161/2 10
to
12
21 to
24 10 to 15
3.5
to 4 lbs
26
to 3'1 10 to 15
Chicken
- whole 2.5 lb. 11 to
14 10
to
'15
Fresh Vegetables 1 lb. ,qle|-
3to4
Frozen Vegetables
1 lb. 4 1/2
ro 5
1/2
1to11/2
4to5
W- style Dinner 1
dinner
(11
oz.)
1. Press the CLOCK
pad.
2.
Press
the number
pads
to set
the time.
3.
Press the CLOCK
pad.
1. Press the COOK
pad.
2. Press
the number
pads
to set
the cooking
time.
3. Press the POWER LEVEL
pad
and then
the number
pads
to set
the power
level.
(lf
cooking
at
full
power,
omil this step
and
the oven
will cook at
full
(100%)
power.
4. Press the START
oad.
@
Emerson
EMERSON
RADIO
CORP.
MODEL MW8168B/MW8168W
38
