EnGenius Technologies EMR3000 Mesh Router User Manual
EnGenius Technologies Mesh Router
Contents
- 1. Users Manual
- 2. User Manual
User Manual

1
User Manual
AC1200 Dual Band Mesh Router
EMR3000
version 1.0

2
IMPORTANT
To install this router, please refer to the Quick Start Guide
included in the product packaging.
To activate and use EnShare™ refer to the document
“Using EnShare” also in the product packaging.
3
Chapter 1 Product Overview..............................................................5
Key Features....................................................................................................6
Technical Specications/Software Features...................................8
Physical Interface..........................................................................................9
Chapter 2 Controlling the Router Through Its
Web Conguration Interface...........................................................10
Logging In.....................................................................................................11
ViewingtheWebCongurationDashBoard..................................12
Home Page...................................................................................................13
WebMenusOverview...............................................................................14
Internet.................................................................................................15
Wireless2.4GHz..........................................................................................16
Wireless5GHz...............................................................................................17
Parental Controls.......................................................................................18
GuestNetwork.............................................................................................19
IPv6.....................................................................................20
Firewall...................................................................................21
VPN.....................................................................................22
USBPort..........................................................................................................23
Advanced.......................................................................................................24
Tools................................................................................................................26
Chapter 3 Installation Setup Wizard..............................................27
InternetSetupWizard...............................................................................28
SettingUpYourInternetConnection.................................................29
SettingYourWirelessSecurity..............................................................30
SettingyourRouter’sAdministratorPassword.............................31
Setting your Router’s Time Zone........................................................32
StatusandSaveSettings.......................................................................34
Chapter 4 Basic Network Settings.................................................35
NetworkSettings.......................................................................................36
Status.............................................................................................................37
WANSettings...............................................................................................38
LANSettings................................................................................................39
WLANSettings............................................................................................40
GuestNetwork............................................................................................41
ConguringtheLAN(LocalAreaNetwork).....................................42
DHCPServer.................................................................................................43
ConguringDynamicHostCongurationProtocol.......................44
EnableStaticDHCPIP..............................................................................45
CurrentStaticDHCPTable......................................................................46
ConguringEventLogging.....................................................................47
MonitoringBandwidthUsage................................................................48
ConguringtheSystemLanguage.....................................................49
ConguringIPCameras............................................................................50
ConguringInternetSettings...............................................................51
ConguringDynamicIP...........................................................................52
DNSServers..................................................................................................53
ConguringStaticIP.................................................................................54
ConguringPPPoE.....................................................................................55
ConguringPPTP.......................................................................................56
PPTPSettings..............................................................................................57
Conguring L2TP.......................................................................................58
L2TP Settings..............................................................................................59
ConguringDS-Lite...................................................................................60
WirelessLANSetup...................................................................................61
AccessPointMode....................................................................................62
WirelessDistributionSystemMode....................................................63
WDSSecuritySettingsScreen...............................................................64
Table of Contents
4
Chapter 5 Wireless Encryption.....................................................65
Wi-FiProtectAccess(WPA)Pre-SharedKey..................................66
ConguringSecurity.................................................................................67
Encryption Type.........................................................................................68
WPA Radius..................................................................................................69
WiredEquivalentPrivacy(WEP)...........................................................70
ConguringFilters......................................................................................71
MACAddressFilteringTable.................................................................72
ConguringWi-FiProtected Setup....................................................73
ConguringClientList.............................................................................74
Chapter 6 Advanced Settings...........................................................75
ConguringAdvancedSettings............................................................76
SettingUpParentalControls.................................................................78
AddingaControlPolicy............................................................................79
ViewingParentalPolicies.......................................................................82
GuestNetwork............................................................................................83
ConguringtheDHCPServerSetting...............................................84
ViewingtheDHCPClientListontheGuestNetwork.................85
IPv6.................................................................................................................86
ViewingtheIPv6ConnectionStatus.................................................87
ConguringStaticIPv6............................................................................88
Setting Autoconguration.....................................................................89
Conguring PPPoE....................................................................................90
Conguring6to4........................................................................................92
ViewinglocalConnections.....................................................................93
Firewall Setup.............................................................................................94
ConguringAdvancedSettings...........................................................95
ConguringDemilitarizedZone...........................................................97
ConguringDenialofService................................................................98
VirtualPrivateNetworkSetup..............................................................99
ConguringaVPNTunnelProle.......................................................100
General........................................................................................................101
SA(SecurityAssociation)......................................................................102
Network.......................................................................................................103
Advanced.....................................................................................................104
ConguringaUserSetting...................................................................105
USBPort/Enshare..................................................................................106
ViewingFileServer.................................................................................107
ViewingDLNA...........................................................................................108
AdvancedNetworkSettings................................................................109
PortMappingSetup................................................................................110
CurrentPortMappingTable................................................................111
PortForwardingSetup...........................................................................112
CurrentPortForwardingTable..........................................................113
PortTriggeringSetup............................................................................114
ApplicationLayerGetawaySetup....................................................116
UniversalPlugandPlaySetup...........................................................117
InternetGroupMulticastProtocolSetup.......................................118
Quality of Service Setup.......................................................................119
Priority Queue...........................................................................................120
BandwidthAllocation.............................................................................121
Routing Setup...........................................................................................122
WakeonLANSetup................................................................................123
ToolsSetup................................................................................................124
System Time Setting..............................................................................125
SynchronizingTimewithaComputer.............................................126
DynamicDomainNameService(DDNS)Setup............................127
DiagnoseThatClientDevicesAreConnected.............................128
UpgradingtheRouter’sFirmware....................................................129
BackingUptheRouter’sSettings.....................................................130
RebootingtheRouter............................................................................131
Appendix..........................................................................................132
WallMountingtheRouter....................................................................133
ProfessionalInstallationInstruction(English/French).............134
FCCInterferenceStatement...............................................................136

5
Chapter1
Product Overview

6
MaximumdataratesarebasedondraftIEEE802.11acandIEEE802.11standards.Actualthroughputandrangemayvarydependingonmanyfactorsincludingenvironmentalconditions,distancebetweendevices,radiointerferenceinthe
operatingenvironment,andmixofdevicesinthenetwork.EnGeniusTechnologies,Inc.EnShare™supportsbothFAT32andNTFSUSBformats.Transferspeedsofdatafromyourrouter-attachedUSBstoragedevicetoaremote/mobiledevice
mayvarybasedonInternetuplinkanddownlinkspeeds,bandwidthtrafcateithersendorreceivelocations,thedataretrievalperformanceoftheattachedstoragedeviceorotherfactors.EnGeniusdoesnotguaranteecompatibilitywith
allUSBdrives.EnGeniusdoesnotwarrantitsproductsorEnSharefromlossofdataorlossofproductivitytime.Featuresandspecicationssubjecttochangewithoutnotice.Trademarksandregisteredtrademarksarethepropertyoftheir
respectiveowners.ForUnitedStatesofAmerica:Copyright©2015EnGeniusTechnologies,Inc.Allrightsreserved.
Product Overview
Key Features
• DualBandWirelessAC1200DraftIEEE802.11acandIEEE802.11
a/b/g/n
• Upto300Mbpsinthe2.4GHzfrequencybandandupto867Mbps
in5GHz
• Built-in4-PortGigabitSwitchforoptimalaudio/visualstreaming
• USBPorttoshareandaccessmediacontentinthehomeorwhen
you’reawayfromhomewithEnShare™
• NextGenerationIPv6Compliant
• ParentalControls
• Upto8GuestAccesssettings(4perfrequencyband)
• Industry-standardWirelessEncryptionandSecurity
• VPNServerSupportLite-BusinessApplications
• EasySetupWizard
Robust and Reliable Wireless Performance
TheEMR3000isaAC1200Dual-BandMeshRouterwitha
built-in4-portGigabitEthernetswitch.Thiscosteffective
routercanconnecttoDSLorcablemodemstoprovide
high performance Internet access for desktop or laptop
computers,tablets,smartphonesandawidevarietyofhome
entertainmentdevices,likeHDTVs,settopboxes,Blu-ray
players and game consoles.
Therouter’sconcurrentdualbanddesignenablesusersto
connectnumerouswirelessdevicestoit,givingthemthe
optiontoleverageQuantumBeamandtheACspeedbooston
thelesscongested5GHzfrequencyforbandwidthintensive
applicationslikestreamingHDvideo.
7
Product Overview
A Media Sharing Platform
TheEMR3000isdesignedtoaccessandsharemediafor
devicesonthehomenetwork.Inadditiontoconnectinghome
entertainmentcomponentstoanyofitsavailableGigabit
Ethernetports,theEMR3000alsoincludesaUSBportfor
attachingaUSBstoragedevicesowirelessdevicesinthe
homeorawayfromthehomecanaccessoruploadmedia
contentwhereverthereisanavailableInternetconnection
throughEnShare™-YourPersonalCloud.
EnShareisavailableasanInternetportalforaccessingstored
mediaconnectedtotheUSBportoftherouter(Seethe
UsingEnSharedocumentintheproductpackaging).EnShare
willalsobeavailableasanappforAppleiOSdevices(iPads,
iPodsandiPhones)andAndroid-baseddevices(smartphones,
tabletPCs,Kindleandothermobilereaders)soon.Theapps
willbeavailablethroughAppleiTunesStoreandGooglePlay
respectively.
Industry-standard Wireless Security
The router supports a variety of security features and
mechanismsincludingindustry-standardWPA/WPA2wireless
encryptiontopreventunauthorizedaccesstoyournetwork.It
alsoincludesabuilt-inSPI(StatefulPacketInspection)rewall
tohelppreventattacksfrommalicioussoftware(malware)
from the Internet. The router also supports IPv6.
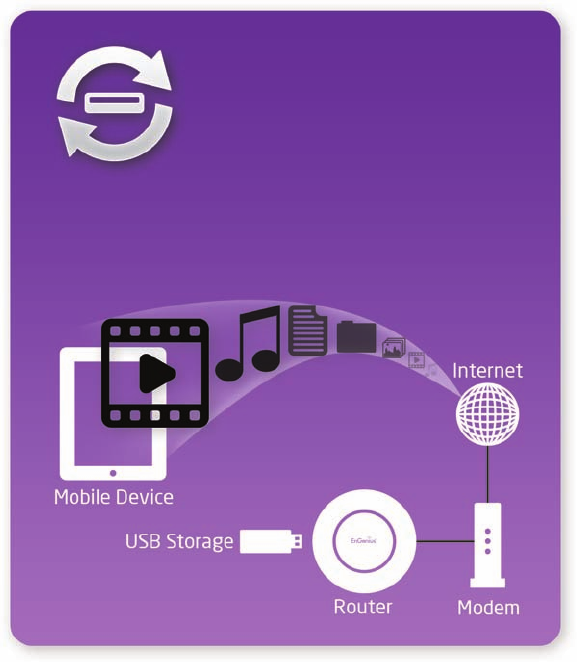
Attach USB storage to the EMR3000 and
access or upload video, music, and other
media throughout your home or away from
home from your smartphone, tablet, or
laptop.
USBMediaAnywhere
with EnShareTM
More Guest Access Options
TheEMR3000alsoincludesuptoeight(8)separate
anddiscreteGuestAccessoptionsallowingtherouter’s
administratortoassigndifferentnames(SSIDs-ServiceSet
Identiers)foreachlogintothehomenetworksofriendsor
visitorscanaccesstheuser’sInternetconnectionwithout
accessingpersonaldatastoredonnetworkedcomputersin
the home.
8
Technical Specications
Device Interface
GigabitWANPort
4GigabitLANPorts
USB2.0Port
PushButtonforWPS
ResetButton
IEEE Standards
802.11ac(draft)
802.11a/b/g/n
Upto300Mbpswirelessspeedon2.4GHzfrequency
bandand867Mbpson5GHzfrequencyband
802.3i/u/ab
LED Indicators
Power
WLAN(WirelessConnection)
Internet
Package Contents
EMR3000Router
PowerAdapter(12V1.5A)
QuickStartGuide
RJ45EthernetCable
Power Specication
ExternalPowerAdapter
DCIn,12V1.5A
Certications
FCC/CE/IC
Physical/Environmental Conditions
OperatingTemperature:0º~40ºCelsius
Humidity:90%orless(non-condensing)
StorageTemperature:-20º~60ºCelsius
Humidity:95%orless(non-condensing)
Software Features
Frequency Bands
2.400~2.484GHz(11b/11g/11n)
5.18~5.24GHz(11a/11n)
Operating Mode
APRouter/WDS
Wireless Features
AutoChannelSelection
OutputPowerControl
WMM(WirelessMultimedia)
MSSID(MultipleSSID)
Security
WEP/WPA-PSK/WPA2-PSK
TKIP/AES
HiddenSSID
MACAddressFiltering
802.1XAuthentication
DDoS
DHCPServer/Client
SPI(StatefulPacketInspection)
NAT
PortForwarding
DMZ
PortMapping/Triggering
VPNServer(PPTP/L2TP)
VPNClient(PPTP/L2TP)
VPNPass-through(PPTP/L2TP/IPSec)
RuleBased(IPAddressRanges,PortBlockICMP
VPNTunnel(Maximum5)
QoS
IP Filtering
Port Filtering
DDNS
IPv6Pass-through
MACClone
TrafcMonitor
WANType:PPPoE/DHCP/StaticIP
USBFeatures:SAMBA
9
Physical Interface
Dimensions and Weights
Weight:0.5lbs.
Diameter:6.36”
Height:1.64”
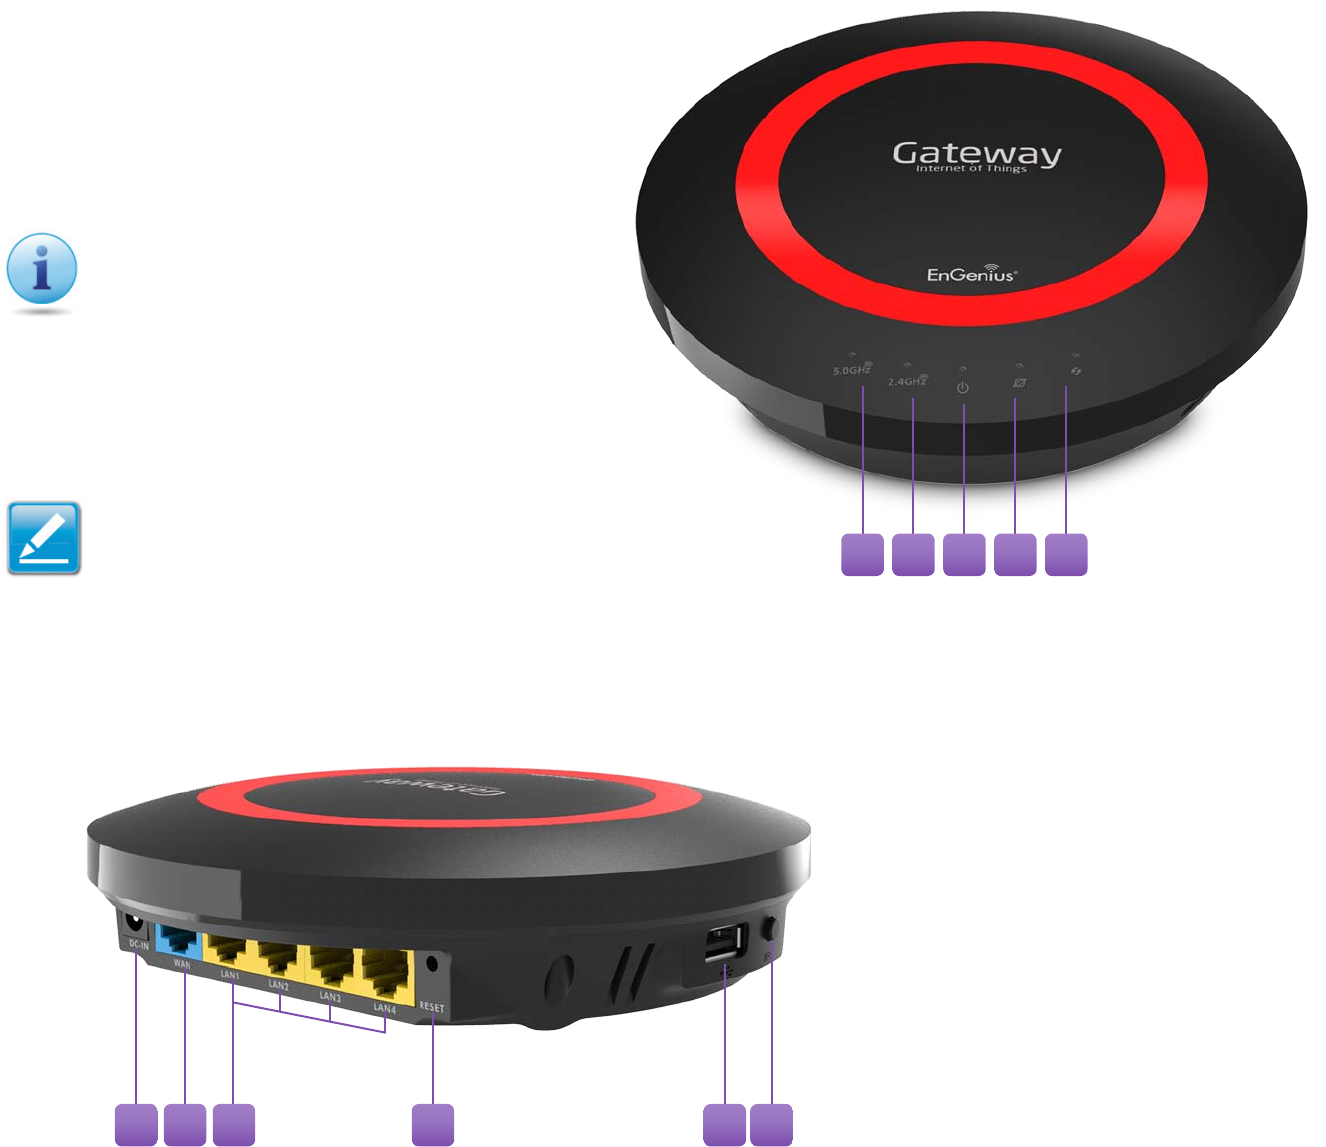
1 WLAN 5 GHz LED
2 WLAN 2.4 GHz LED
3 Power LED
4WAN Port/(Internet)
Status LED
5 WPS(WirelessProtected
Setup)LED
6 DC Power Jack—connectstheESRSeriesRoutertoitsDC
poweradapter
7 WAN Port—connectstheESRRoutertoacableorDSLmodem
toaccesstheuser’sbroadband(Internet)connection
8 LAN Ports (1 – 4) — for connecting home entertainment
components,computersorotherEthernet-enableddevices
usingEthernetcables
9 Reset Button — For resetting the router to its factory default
settingsbypressingbuttonformorethan11secondsoruntil
thePowerLEDstartsashing.
10 USB PortforconnectingaUSBStorageDevice
11 WPS Button—Wi-FiProtectedSetupbutton.Toassociate
anotherWPS-enabledclientdevice(computer,wirelessmedia
bridge,USBadapter,etc.)presstheWPSbuttonfor2to5
secondsontherouterwhilealsopressingtheWPSbuttonon
the end device.
Whenconsideringtheplacementofthe
router
rememberthefollowing:
• Itmustbeclosetoanelectrical
outlet.
• Foroptimalwirelessconnectivity,
place the router near the center of
theroomifpossible,atahighlevel
Otherelectronicdevicesandsome
architectural construction materials
orimpedimentsmayinterferewith
thewirelesssignal(s)oftherouter
and reduce its range or coverage. Try
tominimizethenumberofwallsor
oorsthattherouter’ssignalneedsto
penetratetoconnecttootherwireless
devices.
1 2 3 4 5
6 7 8 9 10 11

10
Chapter2
Controlling the Router Through
Its Web Conguration Interface
11
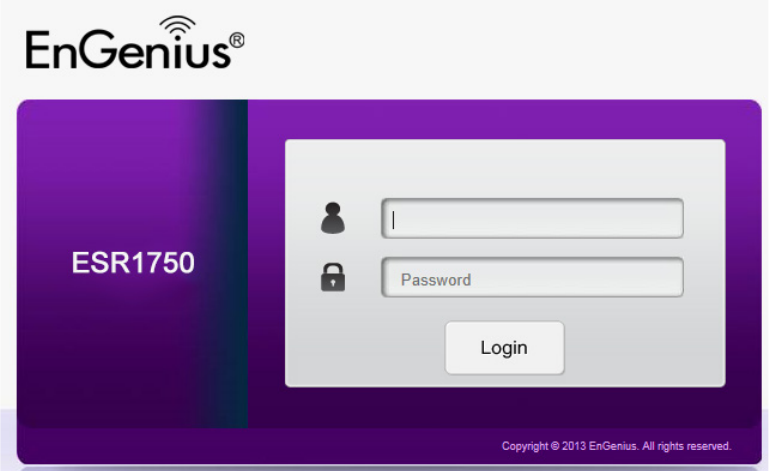
Logging In
DuringtheQuick Start Guide procedure, you should have
successfully logged into the router’s Web Conguration user
interface (essentiallytherouter’soperatingsystemthat
controlshowitoperates)andestablishedsomeinitialsettings
and controls for the router.
Ifyouwishtochangetherouter’ssettings (establisha
newusernameandpasswordforthepersonwhomanages
andmaintainstherouter,setParentalControls,establish
aGuestAccess-SSIDsettingforvisitors,oranynumberof
othersettings)youcanlogintotheWebCongurationagain
throughthewebbrowser(InternetExplorer,Safari,Chrome,
Firefox)onyourcomputerortabletdevice.
To do this, enter the router’s default IP address of
192.168.0.1intoyourbrowser’saddresswindow.
1.Attheloginscreenenteryourusernameandapassword
2.ClickLogintocontinue.
Thedefaultloginsettingsare:
username:admin
password:admin
It’s highly recommended that, if you haven’t done so already,
to change these default names, so your router and the devices
connectedtoitonyourhomenetworkaremoresecure.
12
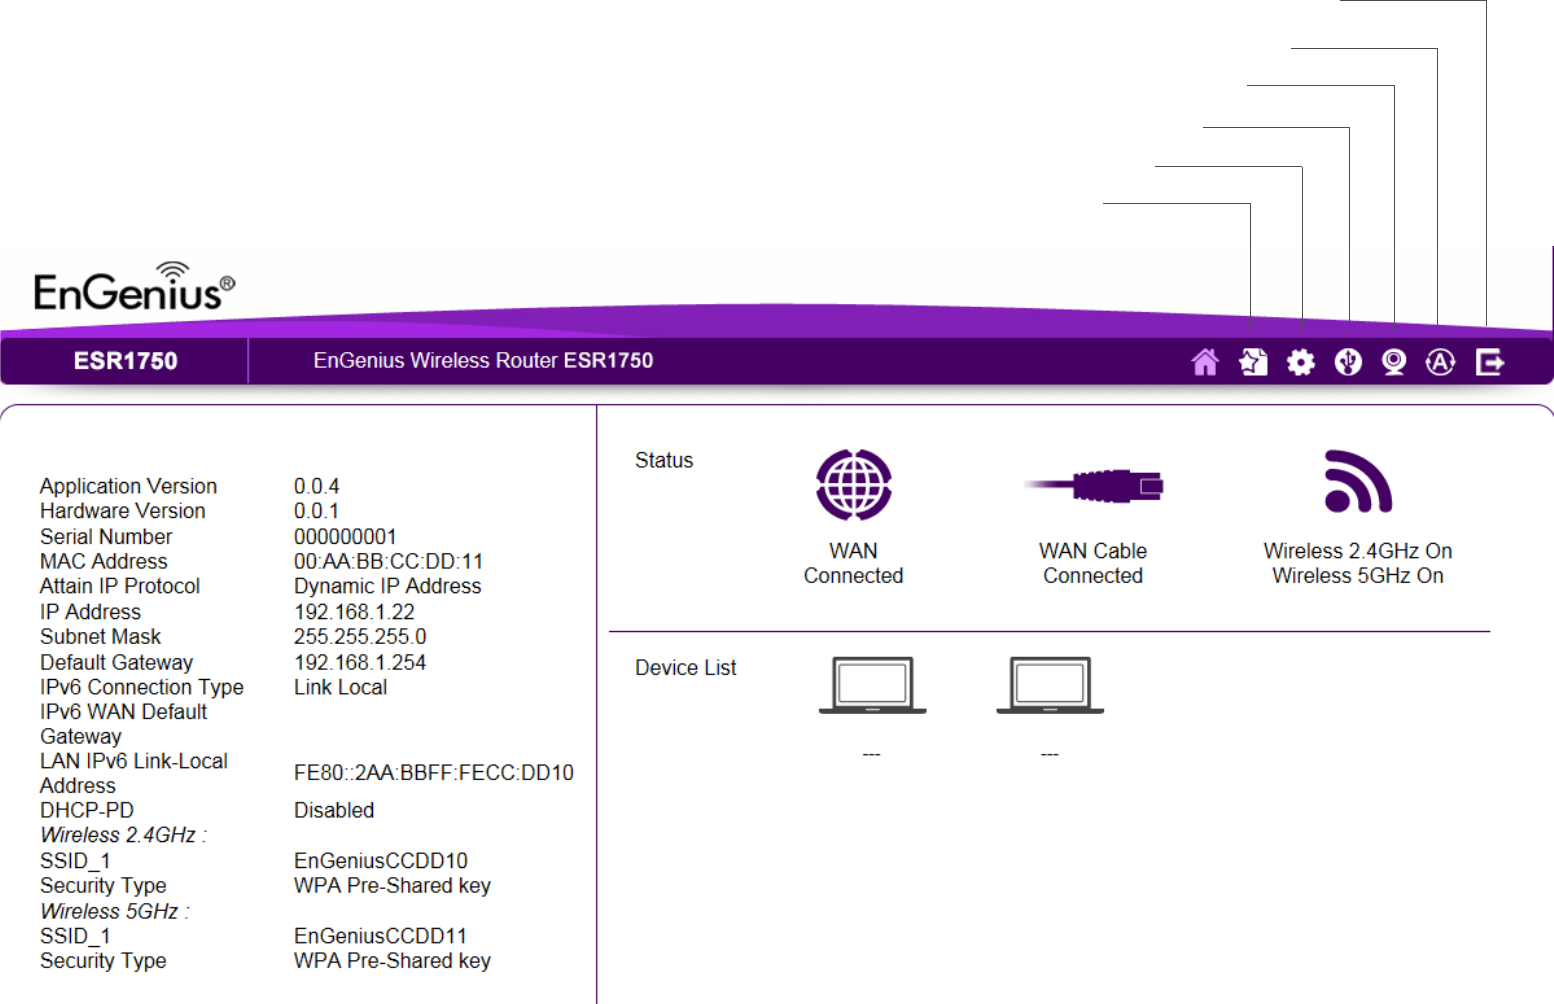
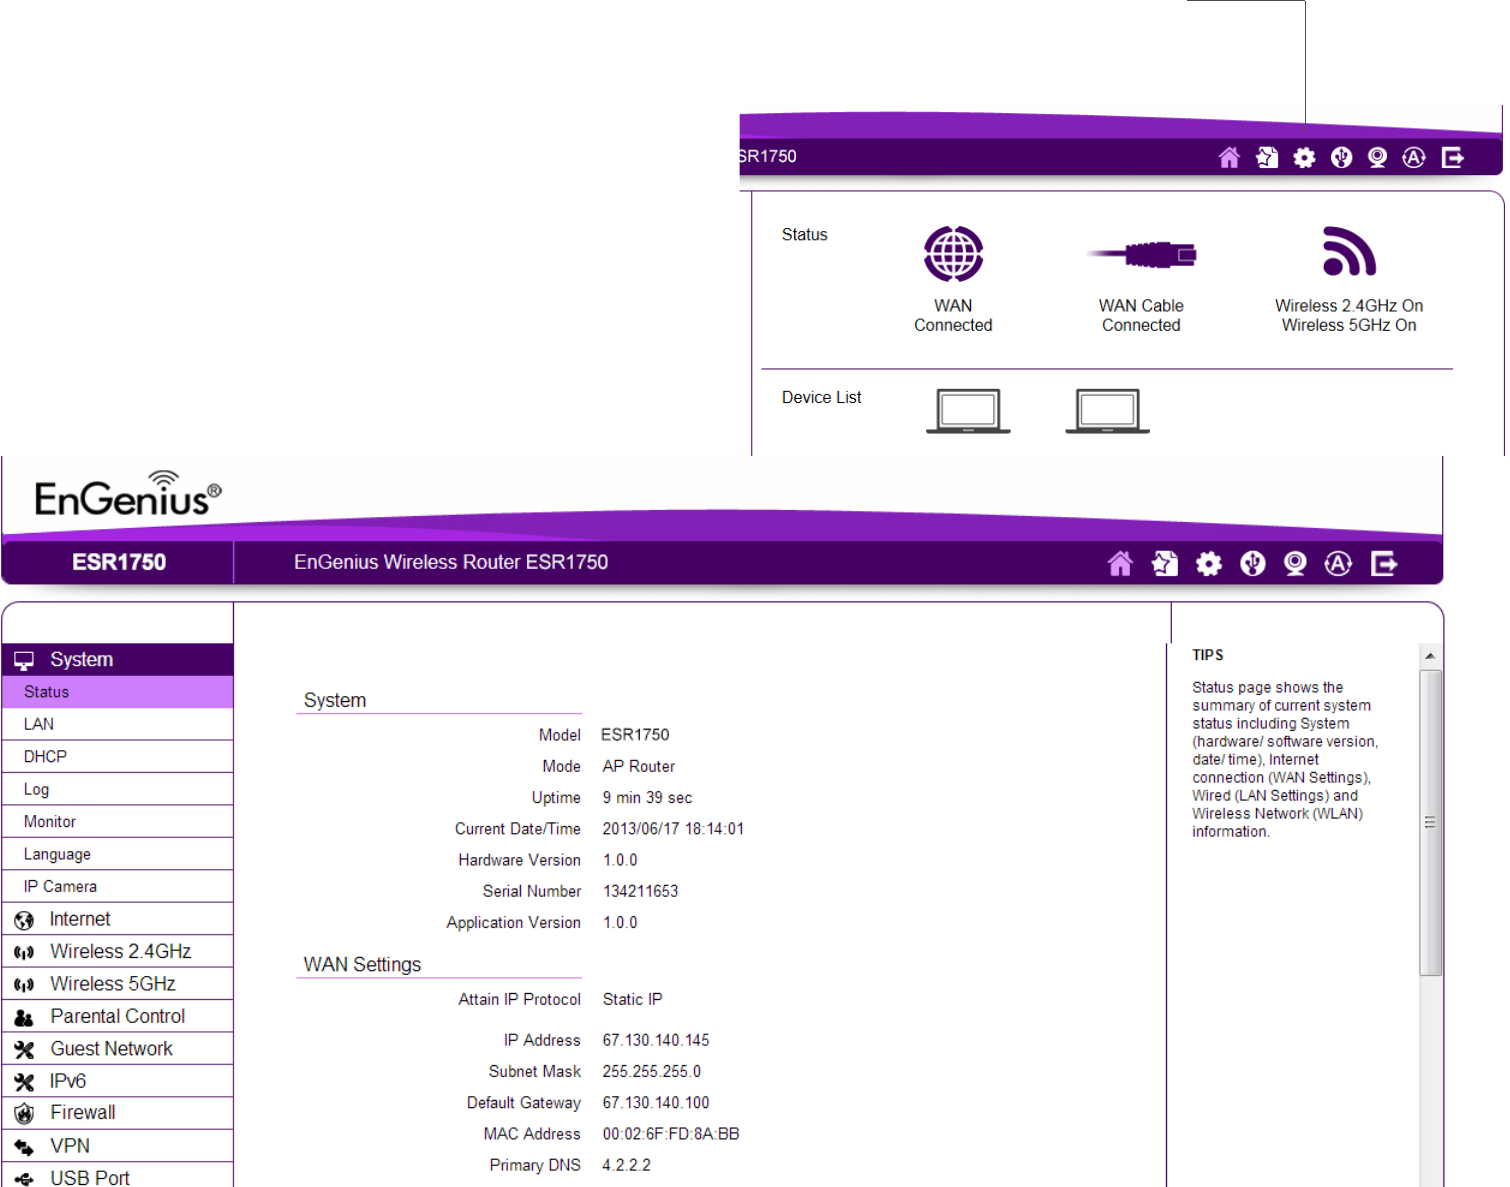
Viewing the Web Conguration Dash Board
TheHomePagescreenoftheWebCongurationinterface,ordashboard,providesaccesstotherouter’ssettingsandcontrols.
Home Page
Home
SetupWizard
NetworkSettings
USBStorageSharing
IPCamViewer
Language
Logout
13
Home Page
The Home PagedisplaystheareaswithintheWeb
Congurationtowhichyoucannavigate:Setup Wizard,
Network Settings, USB Storage Sharing, IP Cam Viewer,
Language, and Logout
Home
TheHomelinktakesyoubacktothedashboardscreenno
matterwhereyouareintheWebCongurationinterface.
Setup Wizard
TheSetupWizardlinkstartsthewizardthatautomatically
congurestherouter.
Network Settings
TheNetworkSettingslinkdisplaysthemenustomanually
conguretherouter.
USB Storage Sharing
TheUSBStorageSharinglinkdisplaysthemenustoaccess
shared storage devices connected to the router.
IP Cam Viewer
TheIPCamViewerlinkdisplaysthemenustoviewanIP
cameraconnectedtothenetwork.
Language
TheLanguagelinkdisplaysthemenutosettheOSDlanguage.
Logout
TheLogoutlinkclosestherouter’sWebConguration
interface from any screen.
14
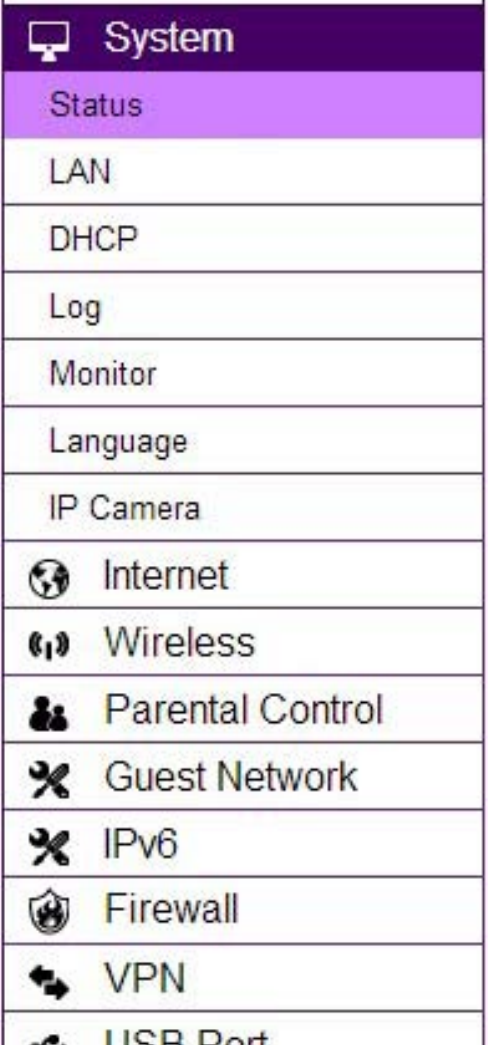
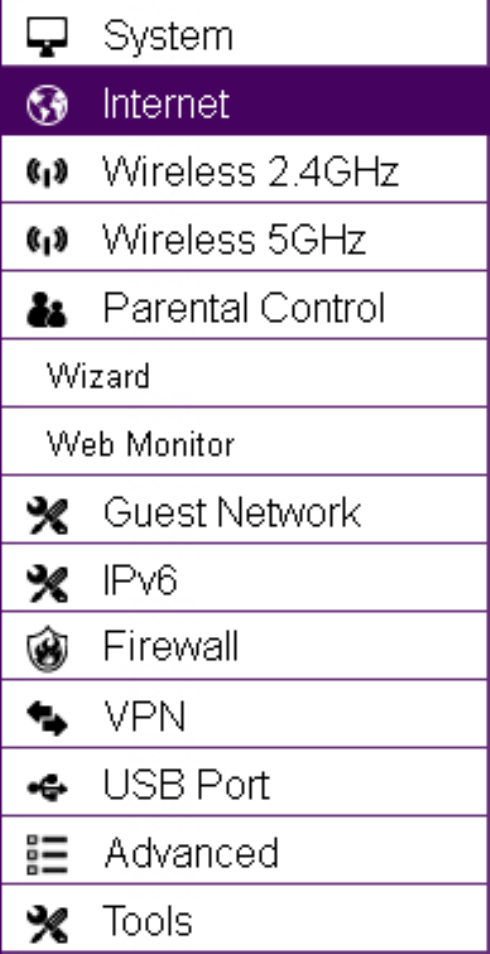
Web Menus Overview
System
Viewandeditsettingsthataffectsystemfunctionality.
Operation Mode
CongurethedevicetobearouterorWDSaccesspoint.
Status
Displaysthesummaryofthecurrentsystemstatus.
Schedule
Scheduleservicestostartandstopatspecictimesorintervals.
Event Log
Viewrecordedsystemoperationsandnetworkactivityevents.
Monitor
Viewthecurrentnetworktrafcbandwidthusage.
Language
ConguretheapplicationmenuandGUIlanguage.
IP Camera
ViewtheIPcamerasconnectedtotheESRSeriesRouter.
15
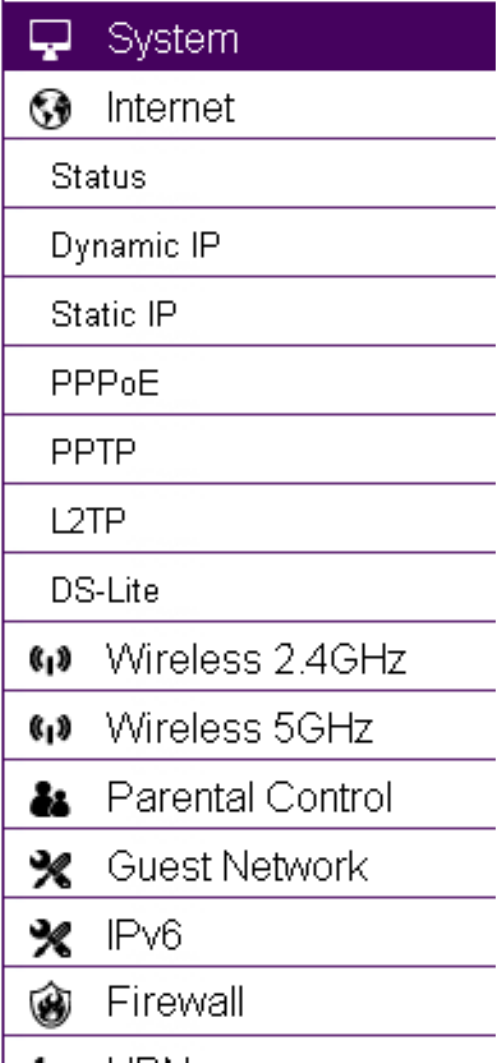
Internet
Viewandeditsettingsthataffectnetworkconnectivity.
Status
DisplaysasummaryoftheInternetstatusandtypeofconnection.
Dynamic IP
SetupadynamicIPconnectiontoanISP(InternetServiceProvider).
Static IP
Setup a static IP connection to an ISP.
PPPoE
Setup a PPPoE connection to an ISP.
PPTP
Setup a PPTP connection to an ISP.
L2TP
Setup an L2TP connection to an ISP.
16
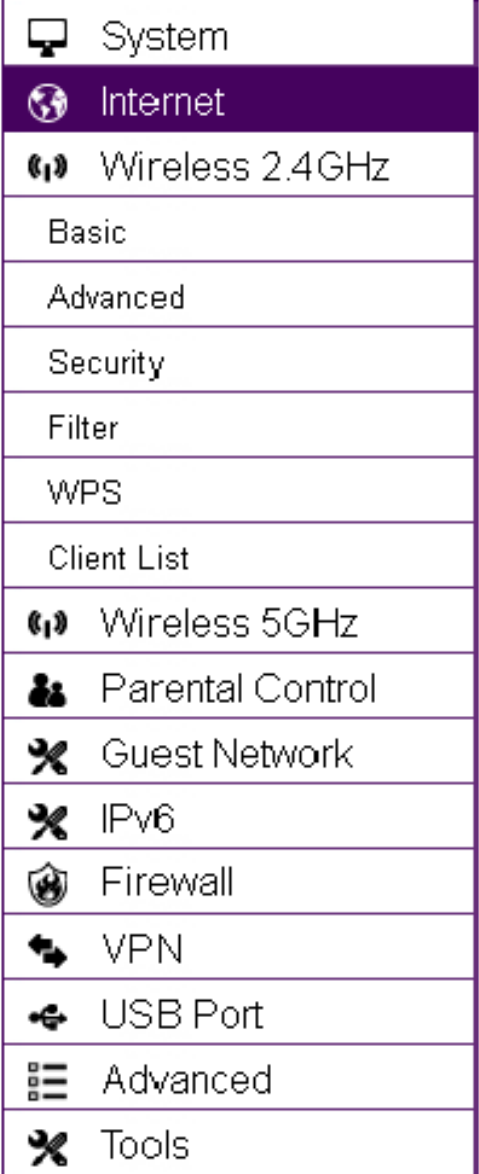
Wireless 2.4 GHz
Viewandeditsettingsfor2.4GHzwirelessnetworkconnectivity.
Status
Viewthecurrentwirelessconnectionstatusandrelatedinformation.
Basic
Conguretheminimumsettingsrequiredtosetupawirelessnetworkconnection.
Advanced
Conguretheadvancednetworksettings.
Security
Congurethewirelessnetworksecuritysettings.
Filter
Establishalistofclientdevices(computer,tablets,smartphones,printers,etc.)
basedontheirMAC(MediaAccessControl)numbersthatareallowedtowirelessly
connecttothe2.4GHznetwork.
WPS
Automatestheconnectionbetweenawirelessdeviceandyourencryptedrouter
usingan8-digitPIN.
Client List
Viewthe2.4GHzwirelessdevicescurrentlyconnectedtothenetwork.
17
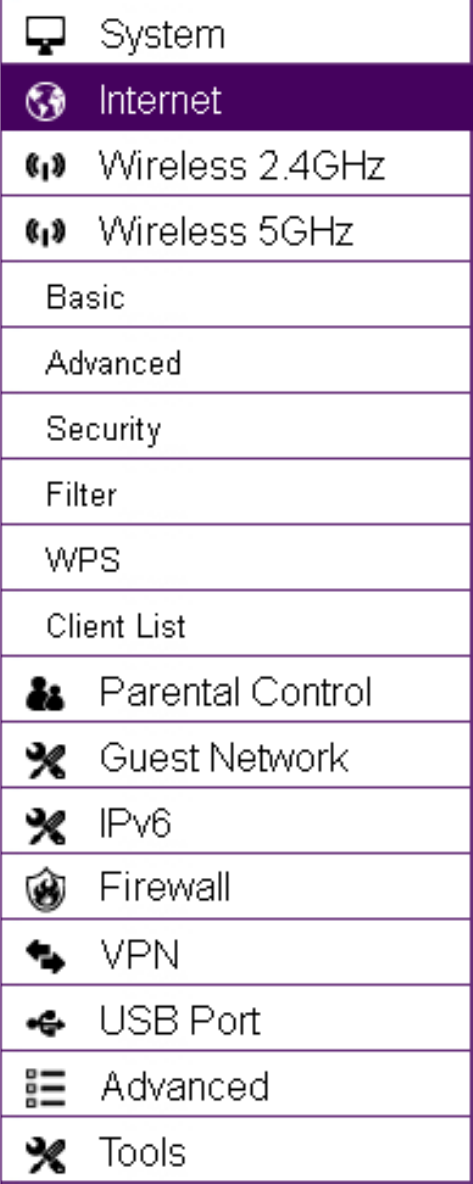
Wireless 5 GHz
Viewandeditsettingsfor5GHzwirelessnetworkconnectivity.
Status
Viewthecurrentwirelessconnectionstatusandrelatedinformation.
Basic
Conguretheminimumsettingsrequiredtosetupawirelessnetworkconnection.
Advanced
Conguretheadvancednetworksettings.
Security
Congurethewirelessnetworksecuritysettings.
Filter
Establishalistofclientdevices(computer,tablets,smartphones,printers,etc.)
basedontheirMAC(MediaAccessControl)numbersthatareallowedtowirelessly
connecttothe5GHznetwork.
WPS
Automatestheconnectionbetweenawirelessdeviceandyourencryptedrouter
usingan8-digitPIN.
Client List
Viewthe5GHzwirelessdevicescurrentlyconnectedtothenetwork.
18
Parental Controls
Viewandeditsettingsforparentalcontrols.
Wizard
EnableordisabletheParentalControlsfunction.Themenualsoprovidesinforma-
tionforconguringparentalcontrolpolicies.
Web Monitor
Themenuprovidesalogoftheeventsfordenedparentalcontrolpolicies.
19
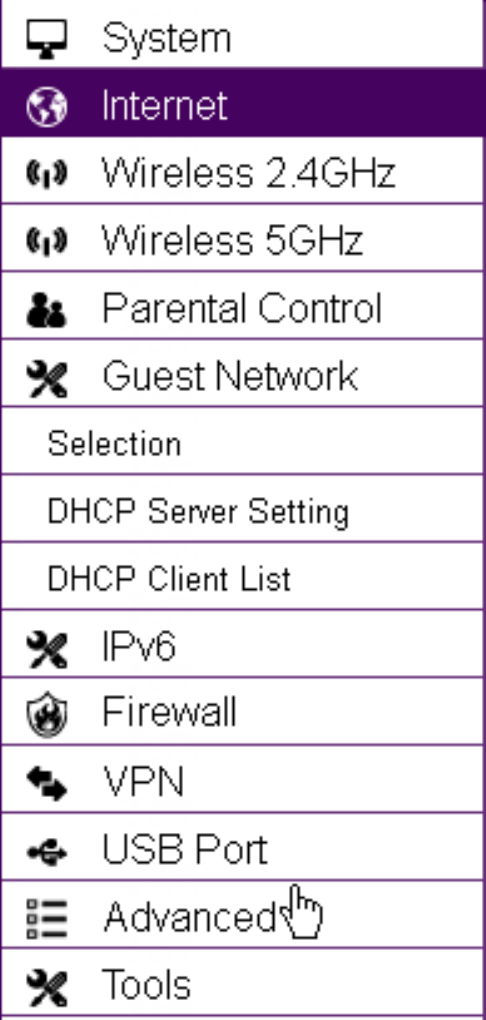
Guest Network
Viewandeditsettingsforaguestnetwork.
Selection
EnableordisabletheGuestNetworkfunction.
DHCP Server Setting
ConguretheGuestNetworkDHCPserversettings.
DHCP Client List
ConguretheGuestNetworkclientlist.
20
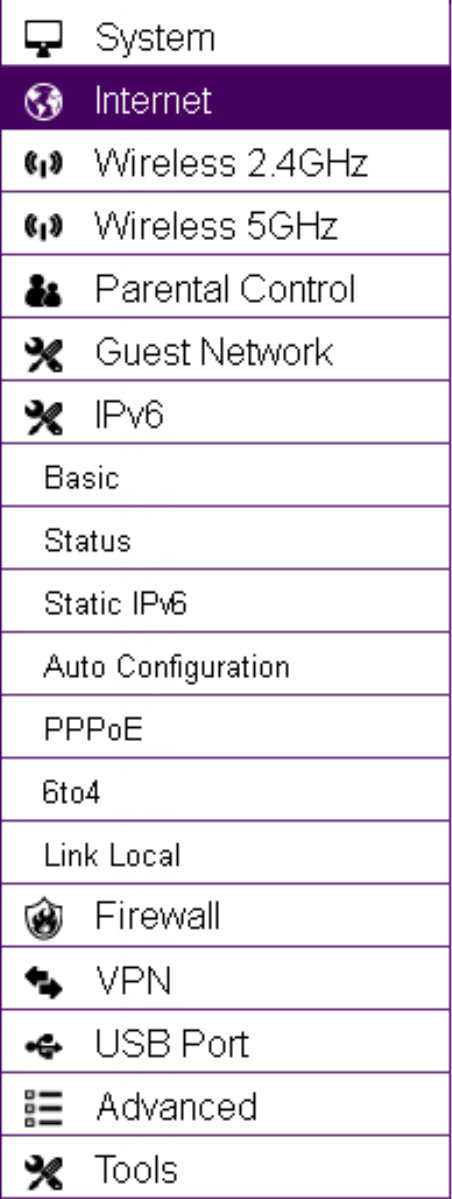
IPv6
ViewandeditsettingsfortheIPv6protocol.
Basic
AllowsyoutoenableordisabletheIPv6andIPv6Pass-throughfunctions.
Status
ShowsIPv6LANconnectiondetails.
Static IPv6
ConguretheIPv6protocol.
Auto Conguration
ConguretheIPv6byobtainingtheinformationthroughtheISPprovider.
PPPoE
CongurethePPPoEnetworkprotocol,obtaininformationfromyourISP(Internet
ServiceProvider).
6to4
AllowsIPv6packetstobetransmittedoveranIPv4network.
Link Local
ConguretheIPv6linklocaladdress.

21
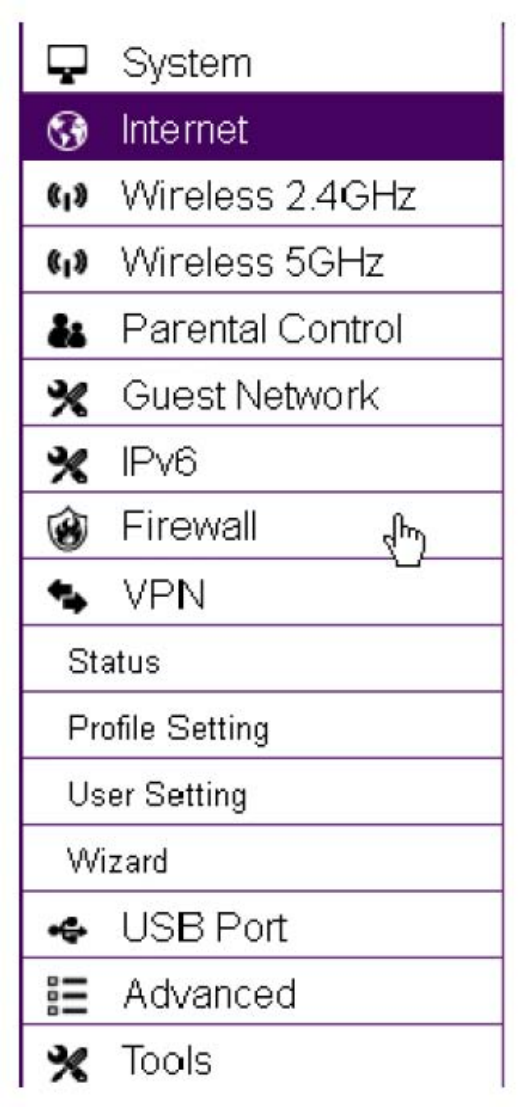
Firewall
Viewandeditsettingsforthenetworkrewall.
Basic
Enableordisablethenetworkrewall.
Advanced
Congurevirtualprivatenetwork(VPN)packets.
DMZ
RedirectpacketsfromtheWANportIPaddresstoaparticularIPaddressonthe
LAN.
DoS
EnableordisableblockingofDoS(DenialofService)attacks.
ACL
Congureaccesscontrollists.
22
VPN
ViewandeditsettingsforVPNtunnelling.
Status
ViewthestatusofcurrentVPNtunnels.
Prole Setting
ManuallycongureVPNtunnels.
User Setting
Congureusers,userIDandpasswordcombinations,andassignaccesstospecic
VPNtunnels.
Wizard
AutomaticallycongureVPNtunnelswithguidancefromthesoftware.
23
USB Port
Forviewingandeditingsettingsforstoragesharing.
EnShare™
EnablesordisablestheEnShareremoteaccessfunction.
File Sharing
EnablesordisablestheSambasharingfunction.
File Server
EnablesandcongurestheFileServerfunction.
DLNA
EnablesthediscoveryofDLNAdevices(someHDTVs,gameconsoles,somesettop
boxes/mediaplayers,Blu-rayplayers,somesmartphones,andnetworkattached
storage)onthehomenetwork.
24
Advanced
Viewandcongureadvancedsystemandnetworksettings.
NAT
EnableordisableNetworkAddressTranslation(NAT).
Port Mapping
Re-directarangeofserviceportnumberstoaspeciedLANIPaddress.
Port Forwarding
Congureserverapplicationstosendandreceivedatafromspecicportsonthe
network.
Port Triggering
Congureapplicationsthatrequiremultipleconnectionsanddifferentinboundand
outboundconnections.
ALG
Conguretheapplicationlayergateway(ALG).
UPnP
EnableordisableUniversalPlugandPlay(UPnP)functionality.
IGMP
EnableordisabletheInternetGroupMulticastProtocol(IGMP).
25
QoS
Conguresthenetworkqualityofservice(QoS)settingbyprioritizingtheuplink
anddownlinkbandwidth.
Routing
Congurestaticrouting.
WOL(WakeOnLAN)
CongureWakeonLANtoturnonacomputeroverthenetwork.
26
Tools
Forviewingandconguringtherouter’soperatingsystemandnetworktools
settings.
Admin
Forsettingtheadministrator’spasswordusedtologintotherouter.
Time
Forconguringthesystemtimeontherouter.
DDNS
MapsastaticdomainnametoadynamicIPaddress.
Diagnosis
ToperformaPingtesttoverifywhetheraspecicdeviceisconnectedtotheLAN.
Firmware
Forupdatingtherouter’srmware.
Backup
Forloadingorsavingthecongurationsettingstoorfromabackupleorto
restore the router to its factory default settings.
Reset
Rebootstherouter.

27
Chapter3
Installation Setup Wizard
28
Internet Setup Wizard
UsetheWizardtodetectandsetupthe
type of Internet connection you need,
tosetupasecurewirelessconnection,
tocreateanadministratorpasswordto
secure the device, or set the router’s date
and time properties.
TousetheInternetSetupWizard,follow
thesesteps:
1. Click the Wizard buttontoshowthe
Wizardstartscreen.
2.ClickNexttocontinuewiththesetup
procedure.
Home
SetupWizard
29
1.DecidehowtosetuptheInternetconnection.
Note:It is recommended to let the device setup the Internet
connection automatically.
• Select Auto DetecttolettheWizardsetuptheInternet
connection.
• Select Manual Setup to set the properties yourself.
2.ClickNext to continue or Prev to return to the previous
screen.
If you selected Manual Setup,followthesesteps:
3. Select the Internet connection type and enter the
connection properties.
Setting Up Your Internet Connection
Note:TheconnectiontypesavailablearestaticIP,PPPoE,
DynamicIP,PPTP,andL2TP.
4.ClickNext to continue, Prev to return to the previous
screen, or Cancel to stop the procedure.
30
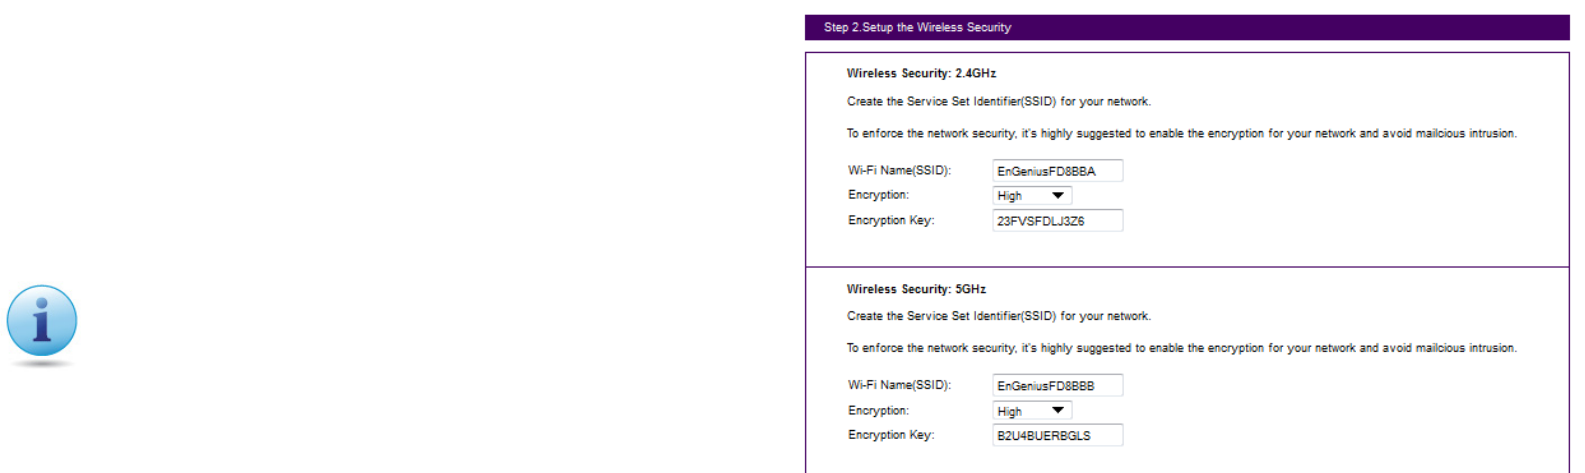
Settingwirelessencryptionfor2.4GHzand5GHznetworks.
Toencryptthewirelesssignalsforeitherorbothofthefrequency
bandsintheEMR3000router,followthesesteps:
1.EntertherouternameinthewirelessName(SSID)texteld.
2.SelectthesecuritylevelfromtheEncryptiondropdownlist.
3.EnterapasswordintheEncryptionKeytexteld.
4.Repeatsteps1through3toencryptthe5GHzband
5.ClickNext to continue, Prev to return to the previous screen, or
Cancel to stop the procedure.
Setting Your Wireless Security
Important:Toensurethenetworkissecure,itis
recommended to select High for an encryption level.

31
Setting Your Router’s Administrator Password
SetupapasswordtologintotheESRSeriesRouter.
1.EnterapasswordintheNew Passwordtexteld.
2.EnterthesamepasswordintheRepeat New Passwordtexteld.
3.ClickPrev to return to the previous screen, Skip to skip this procedure, Next to
continue, or Cancel to stop the procedure.
32
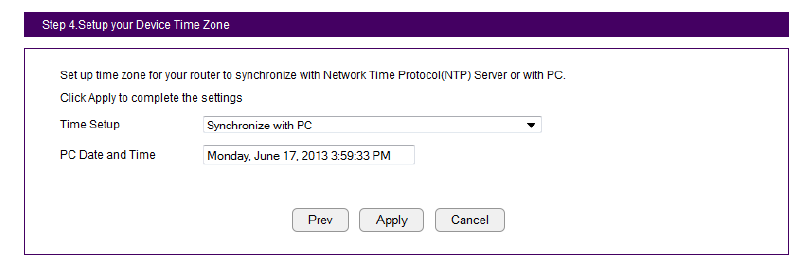
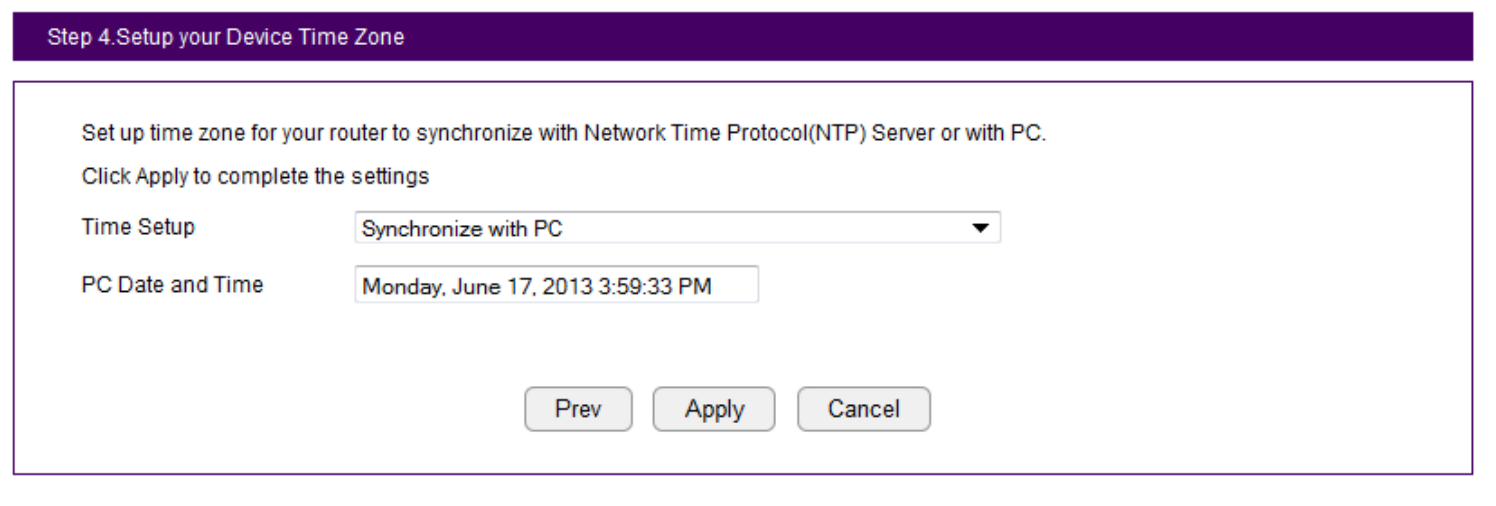
Setting Your Router’s Time Zone
SetupdateandtimesyncronizationontheESRSeriesRouter
withacomputeroranNetworkTimeProtocol(NTP)server.
Tosynchronizedateandtimesettingswithacomputer,follow
thesesteps:
1.SelectSynchronizewithPC(computer)fromtheTime Setup
dropdownlist.ThedateandtimevaluesareshowninthePC
Date and Timetexteld.
2.ClickPrev to return to the previous screen, Apply to save the
settings, or Cancel to stop the procedure.
TosynchronizethedateandtimesettingswithanNTPserver,
followthesesteps:
1. Select SynchronizewithNTPServerfromtheTime Setup
dropdownlist.
2.SelectatimezonevaluefromtheTime Zonedropdownlist.
3.EnteranIPaddressordomainnameofanNTPserverinthe
NTP Servertexteld.
4.ClicktheEnable Daylight Savingscheckboxtoenableor
disabledaylightsavingstime.
5.Selectthedateandtimevalueswhendaylightssavings
time starts in the Start Timedropdownlists.
33
6.Selectthedateandtimevalueswhendaylightssavings
time ends in the End Timedropdownlists.
7.ClickPrev to return to the previous screen, Apply to
save the settings, or Cancel to stop the procedure.
34
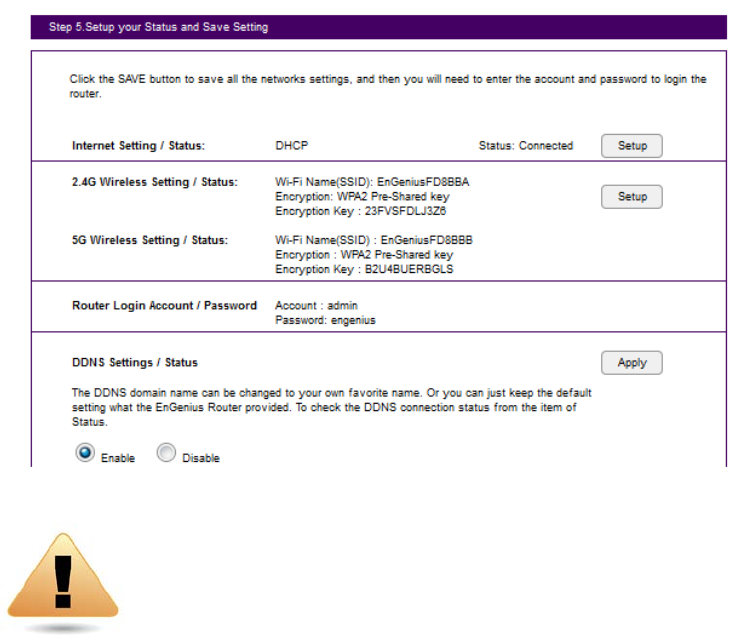
Status and Save Settings
Thisscreenletsyoureview,changeandsaveyourInternet
connection,savewirelesssecuritysettingsorsetupupauser-
speciednameforthedefaultEnGeniusDDNSservice.
Toreviewormodifythedevicesettings,followthesesteps:
1.ReviewthesettingsshownonthescreenfortheInternet
connection,2.4GHzand5GHznetworks,andtherouter
administrator login.
2. You can change settings to the Internet connection and
wirelessnetworksettingsbyclickingtheSetupbutton.
Youmaywishtouseadifferentnamethat’seasiertoremember
forthedefaultEnGeniusDDNSserviceusedfortheEnShare™
feature.TospecifyyourownDDNSname,followthesesteps:
3. The Enableoptionshouldbeselectedbydefault.
a. Enter the name in the Domain Nametexteld.
b.SelectatimeintervaltorefreshtheDNSrecordsfromthe
Refreshdropdownlist.
c.ClickApplytosavetheDDNSnameyouhaveentered.
4.ClickSavetoexittheWebCongurationinterface.Therouter
willreboot(restart)toapplyallthesettingsyou’vespecied.
Devicesconnectedtotherouterwilltemporarilylosetheir
Internetconnection.Therebootmaytakeseveralseconds
beforetherouterandyourInternetconnectionareonceagain
available.
WARNING! Selecting DisableintheDDNSSettings/
Statuseldwilldisconnecttherouter’sconnection
tothedefaultEnGeniusDDNSserverandasaresult
willdisabletheEnSharefeaturewhichletsyouaccess
mediafromaUSBstoragedeviceconnectedtoyour
ESRpodrouterwhenyou’reawayfromyourhome.

35
Chapter4
Basic Network Settings
36
Note:
If a feature or function does not apply to all modes, a note indicates
whichmodesareapplicable.Otherwise,itisassumedthefeature
or function applies to all modes.
Network Settings
Viewing System Status
Toseeamoredetailedviewoftherouter’sstatusthan
theinformationdisplayedontheHomepageoftheWeb
Congurationinterface,fromtheHomePageclickonNetwork
Settings buttonintheuppernavigationbar.
Home
NetworkSettings

37
Status
ToviewtheStatussettings,clickSystem then click Status.
OntheStatuspage,youcanviewasummaryofthecurrent
routersystemstatusincludingtherouter’s(hardware/software
version,date/time),wirednetwork(LAN)andwirelessnetwork
(WLAN)information.
Model
The model name of the ESR Series Router.
Mode
The operating mode of the ESR Series Router.
Uptime
TheamountoftimetheESRSeriesRouterhasbeenconnected
for the current session.
Current Date/Time
The current system date and time.
Hardware Version
Thehardwareversionnumberoftherouter.
Serial Number
Theserialnumberoftherouter(requiredforcustomerserviceor
support).
Application Version
Theversionoftherouter’srmware.
Note:Toupdatetherouter’srmware,visitwww.engeniustech.
com and go to the product page for your router, then select the
Downloadstabatthebottomofthewebpagetoseeifanewer
versionofthermwareisavailable.
38
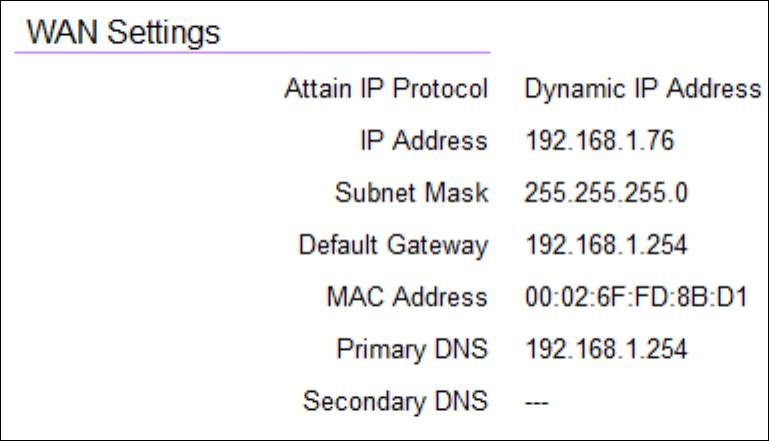
WAN Settings
Attain IP Protocol
DisplaystheIPprotocolinusefortherouter.Itcanbea
dynamic or static IP address.
IP Address
Therouter’sIPaddressasdesignatedbyanISP(InternetService
Provider).
Subnet Mask
Therouter’sWANsubnetmaskasdesignatedbyanISPprovider.
Default Gateway
Therouter’sgatewayaddressasdesignatedbyanISPprovider.
MAC Address
Therouter’sWANMAC(MediaAddressControl)address.The
router’sMACaddressislocatedonthelabelonthebottompanel
oftherouterandisuniqueforeachrouter.
Primary DNS
TheprimaryDNSofanISPprovider.
Secondary DNS
ThesecondaryDNSofanISPprovider.

39
LAN Settings
IP Address
Therouter’slocalIPaddress.ThedefaultLANIPaddressis
http://192.168.0.1
ToaccesstheWebCongurationinterfacefortherouter,type
thisaddressintotheaddress(URL)eldofyourwebbrowser.
Thiscanonlybedoneinthesamephysicallocationwherethe
routerresides(yourhomenetwork).
Subnet Mask
Therouter’slocalSubnetMask.
DHCP Server
TheDHCPsettingstatus(Default:Enabled).TheDHCP(Dynamic
HostControlProtocol)isasoftwaremechanisminyourrouter
thatassignsIPaddressestowiredandwirelessdevicesonyour
network,forexample,acomputer,printer,tabletorHDTVonyour
networkmaybeassignedanIPaddressofhttp://192.168.0.104.
Notehowtheaddressisessentiallyanextensionoradditionof
your router’s IP address.
MAC Address
Therouter’suniqueMACaddress.
40
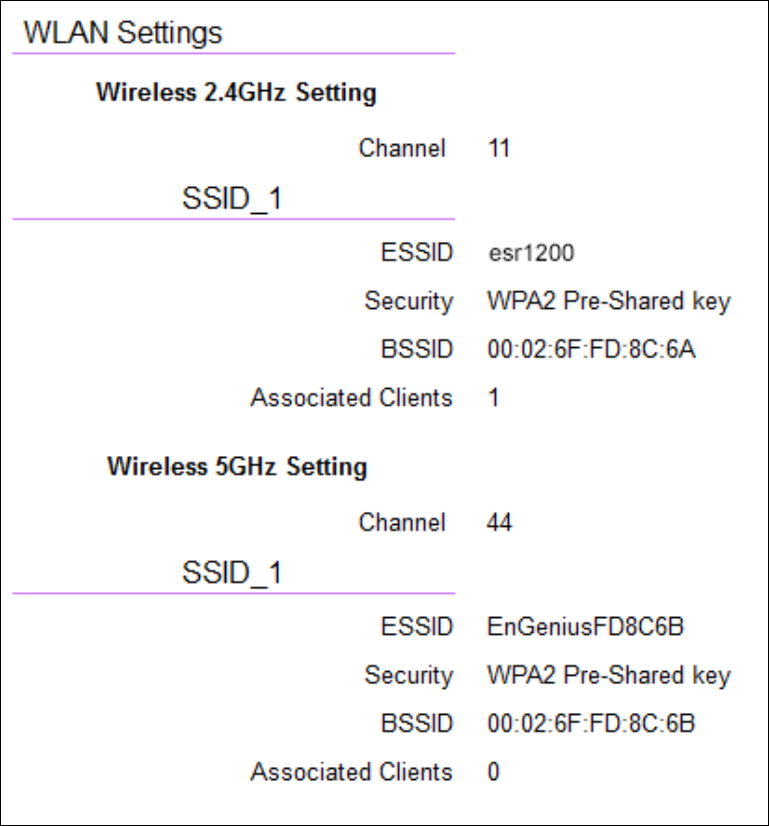
WLAN Settings
Channel
Thecommunicationschannelusedbyallstations,orcomputing
devices,onthenetwork.
ESSID
TheIDvalueofasetofoneormoreinterconnectedbasicservice
sets(BSSs).
Security
Thesecuritysettingstatus(Default:Disabled).
BSSID
TheuniqueIDoftheBSSusingtheabovechannelvalueonthis
router.TheIDistheMACaddressoftheBSSsaccesspoint.
Associated Clients
Thenumberofclientsassociated(activelylinkedtotheroutervia
awirelessorwired/Ethernetconnection)withthisSSID.
41
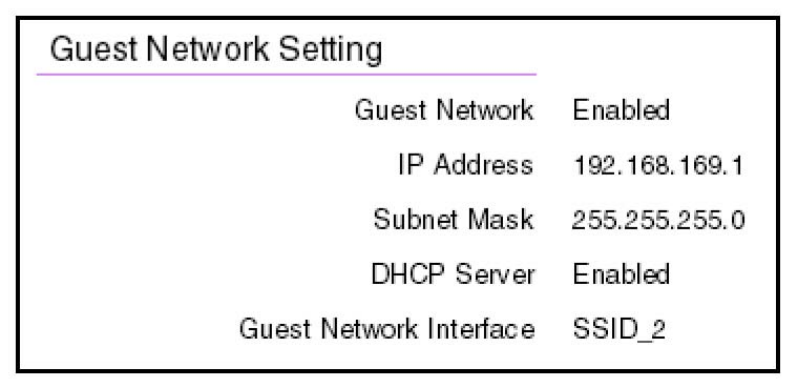
Guest Network
Guest Network
Theguestnetworkstatus.(Default:Disabled)
IP Address
TheGuestNetwork’sLANIPaddress.
Subnet Mask
TheGuestNetwork’slocalsubnetmask.
DHCP Server
TheGuestNetworkDHCPsettingstatus(Default:Enabled).
Guest Network Interface
TheSSID(ServiceSetIdentier)oftheGuestNetwork.
42
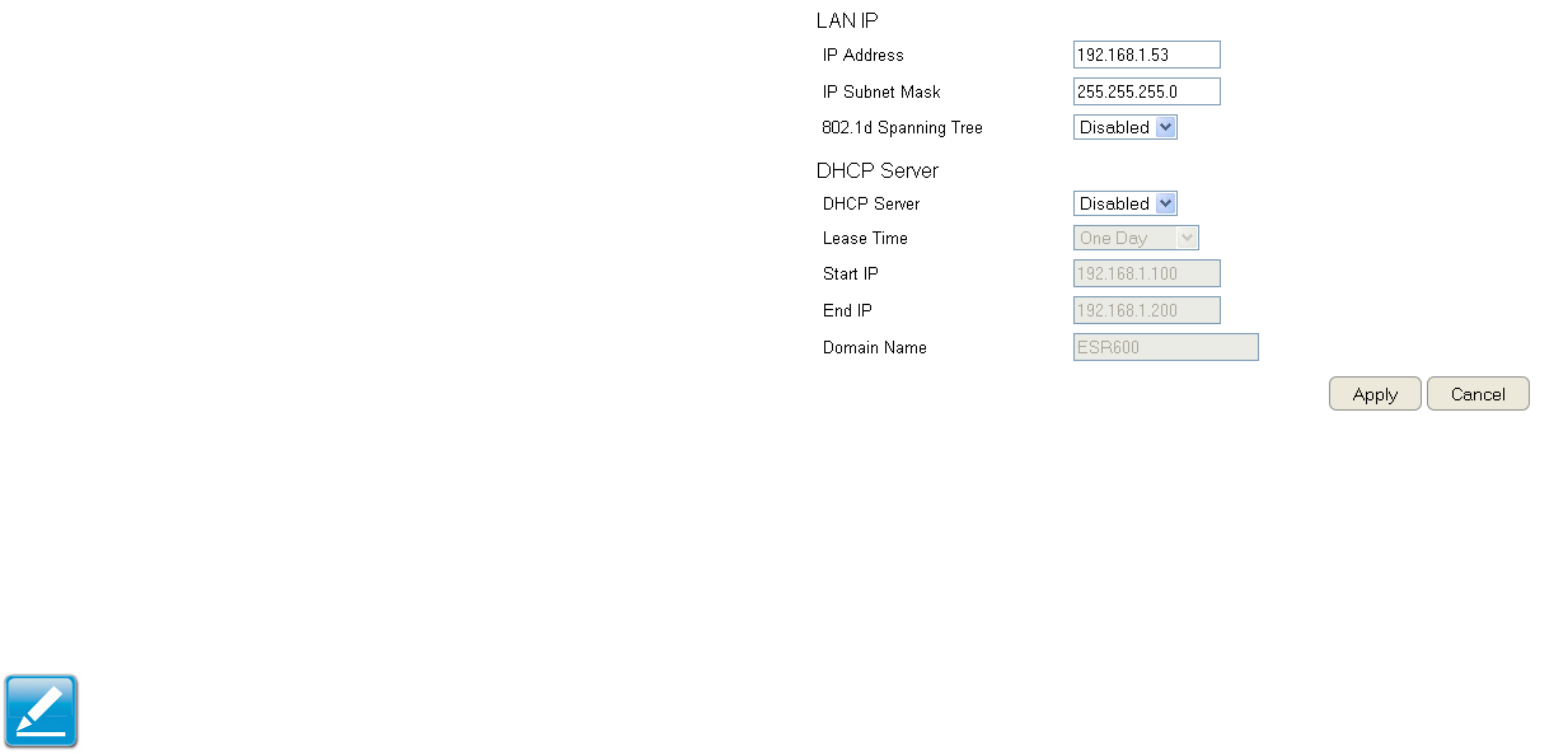
Conguring the LAN
(Local Area Network)
Thesettingsonthispageallowyoutocongurethewired
networksettings.Devicesconnectedtotherouter’sEthernet
portscompriseitsLAN.Therouter’sIPisdenedintheIP
Addresseld.ThedefaultsettingoftheDHCPserverisset
to Enabledsothatnetworkedclients(computers,home
entertainmentcomponents,printers,etc.)willautomaticallybe
assignedIPaddressesbytherouter.
MoreadvancedusersmaywishtoconguretheDNSserver
settingstomeettheirspecicrequirements.Changingthe
settings in this section are not necessary for most situations.
ToviewtheLANsettings,clickSystem, then click LAN.
Note: Keep the router’s default values if you are uncertain of
the settings values.
LAN IP
IP Address
Forconguringtherouter’sLANIPaddress.
IP Subnet Mask
Forconguringtherouter’sLANSubnetMask
802.1d Spanning Tree
SpanningTreeisdisabledbydefault.Whenenabled,Spanning
Treepreventsnetworkloops(transmissionswon’tpassthe
samenodetwiceorseveraltimestoreachthedestination).
Note:
ThedefaultdeviceIPaddressis192.168.0.1.
43
DHCP Server
TheDHCPserverassignsIPaddressestothedevicesontheLAN.
DHCP Server
EnableordisabletheDHCPserver(Default:Enabled).
Lease Time
ConguretheamountoftimeeachallocatedIPaddresscanbe
usedbyaclient.
Start IP
TherstIPaddressintherangeofaddressesassignedbythe
router.
End IP
ThelastIPaddressintherangeofaddressesassignedbythe
router.
Domain Name
The domain name of the router.

44
Conguring Dynamic Host Conguration Protocol
ThiswindowallowsyoutoviewandcongureDynamicHostCongurationProtocol(DHCP)addresses.
WARNING! Donotmodifythesettingsinthissectionwithoutathoroughunderstandingoftheparameters.
ToviewtheDHCPsettings,clickSystem then click DHCP.
DHCP Client Table
DisplaystheconnectedDHCPclientswhoseIPaddressesare
assignedbytheDHCPserveroftherouter.
IP Address
DisplaystheIPaddressofthestaticDHCPclientdevice
inthetable.
MAC Address
DisplaystheMACaddressofthestaticDHCPclientdevice
inthetable.
Expiration Time
ThedateandtimewhenthecurrentDHCPaddress
is no longer valid.
ClickRefreshtoupdatethetable.
45
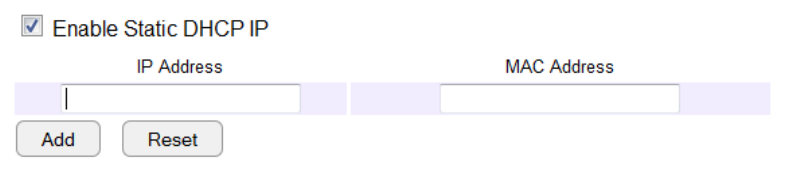
Enable Static DHCP IP
TherearereasonswhyyoumaywanttoenableastaticIP
addressonaclientdeviceonyourESRrouter’snetwork.
Onoccasion,iftherearepoweroutagesorifyou’verecongured
thesettingsonyourESRrouterandreboot(restart)ittoapply
thenewsettings,thepreviousIPaddressthattherouter’sDHCP
serverassignedtooneormoredevicesonthenetworkmayhave
changed.Someclientdevicesonyournetworkmayalsohave
webcongurationinterfaces(settopboxes,NetworkAttached
Storage,etc.)thatareaccessiblefromtherouter’sassigned
IPaddressfromitsDHCPserver,sotheclientdevicecanbe
managed. Thus if the client device’s IP address changes from
timetotime,itmaybedifcultlinkingtoitunlessyoundits
newaddressthroughtheESRrouter’sDHCPClientTable.
Ifyouwishtoavoidthis,thentheEnableStaticDHCPIPoption
allowsyousetastatic(essentiallyapermanent)addressfor
givenclientdevicesonyournetwork.
To do so, select the Enable Static DHCP IP option.
IP Address
EntertheIPaddressofthedevicetoaddasastaticDHCPclient.
MAC Address
EntertheMACaddressofthedevicetoaddasastaticDHCP
client.
ClickAddtoaddthedevicetothestaticDHCPclienttableor
Reset toreturnthetabletoitspreviousstate.
46
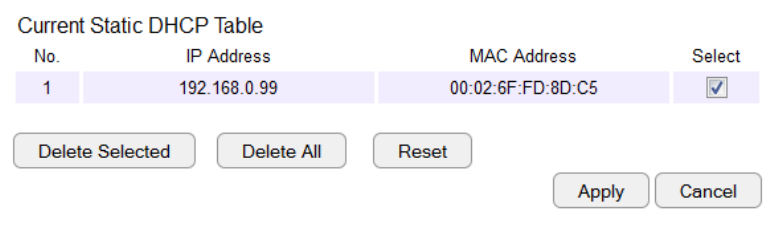
Current Static DHCP Table
AllowsyoutoviewtheactivestaticDHCPIPaddressesthat
havebeenmanuallyassignedtoclientdeviceswiththeir
correspondingMACaddresses.
No. (Number)
DisplaystheIDofthestaticDHCPclientdeviceinthetable.
IP Address
DisplaystheIPaddressofthestaticDHCPclientdeviceinthe
table.
MAC Address
DisplaystheMACaddressofthestaticDHCPclientdeviceinthe
table.
Select
ClicktoselectstaticDHCPclientdevicestobedeleted.
ClickDelete Selectedtoremoveaselectedaddress.ClickDelete
All toremovealladdressesfromthetable.ClickReset to return
thetabletoitspreviousstate.ClickApply to save the settings or
Cancel to discard changes.
47
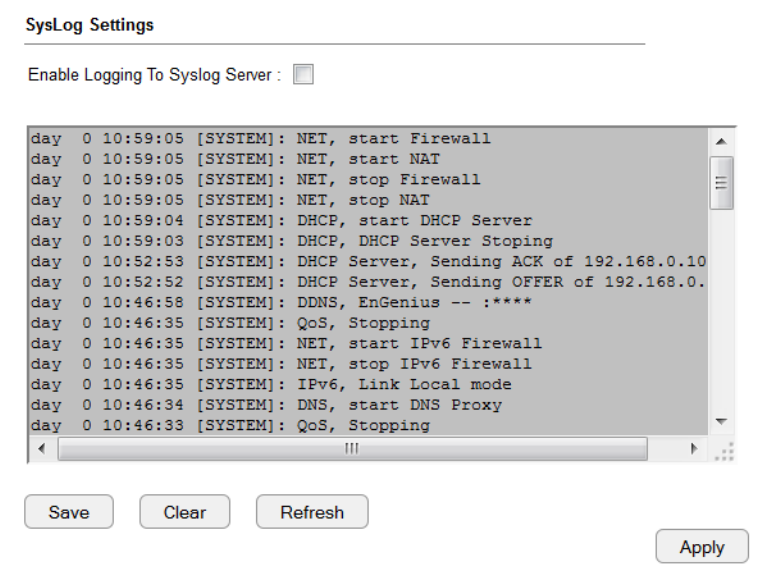
Conguring Event Logging
The logging service records and displays important system
informationandactivityonthenetwork.Theeventsarestoredin
amemorybufferwitholderdataoverwrittenbynewerwhenthe
bufferisfull.
ToviewtheLogsettings,clickSystem then click Log.
Log Message List
Select Enable Logging to Syslog Server
ClickSave to start logging information to the system.
Log Message window
Showsthecurrentsystemoperationsandnetworkactivity.
ClickSavetosavethemessagelisttoatextle,Clear to discard
messagefromthememorybuffer,orRefresh to clear previous
messagesandwritenewmessagestothememorybuffer.
ClickApply to save changes.
48
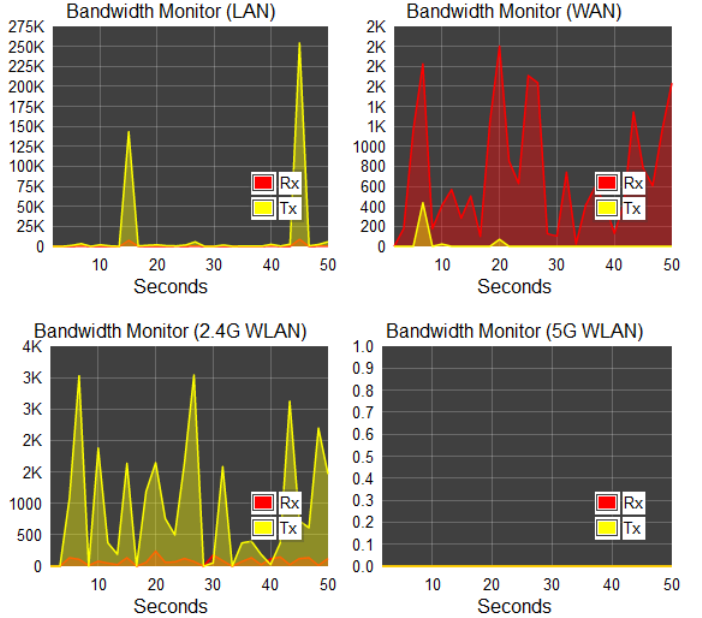
Monitoring Bandwidth Usage
Thistoolallowsyoutoviewreal-timebandwidthusageforWAN
(WideAreaNetwork-orInternet),LAN(LocalAreaNetwork)and
WLAN(WirelessLocalAreaNetwork)trafc.FortheEMR3000,
itshowsboththebandwidthtrafcinboththe2.4and5GHz
frequencybands.
ToviewtheBandwidthMonitorsettings,clickSystem, then click
Monitor.
ThescreensdisplaytheactivebandwidthusageforboththeLAN
andWLANnetworksaswellasthebandwidthbeingusedonthe
WANconnection.

49
Conguring the System Language
TheESRrouter’sWebCongurationinterfacesupportsmultiple
languages.
ToviewtheLanguagesettings,clickSystem, then click
Language.
Selectthesystemlanguageyouwishtousefromthedrop-down
menu.
50
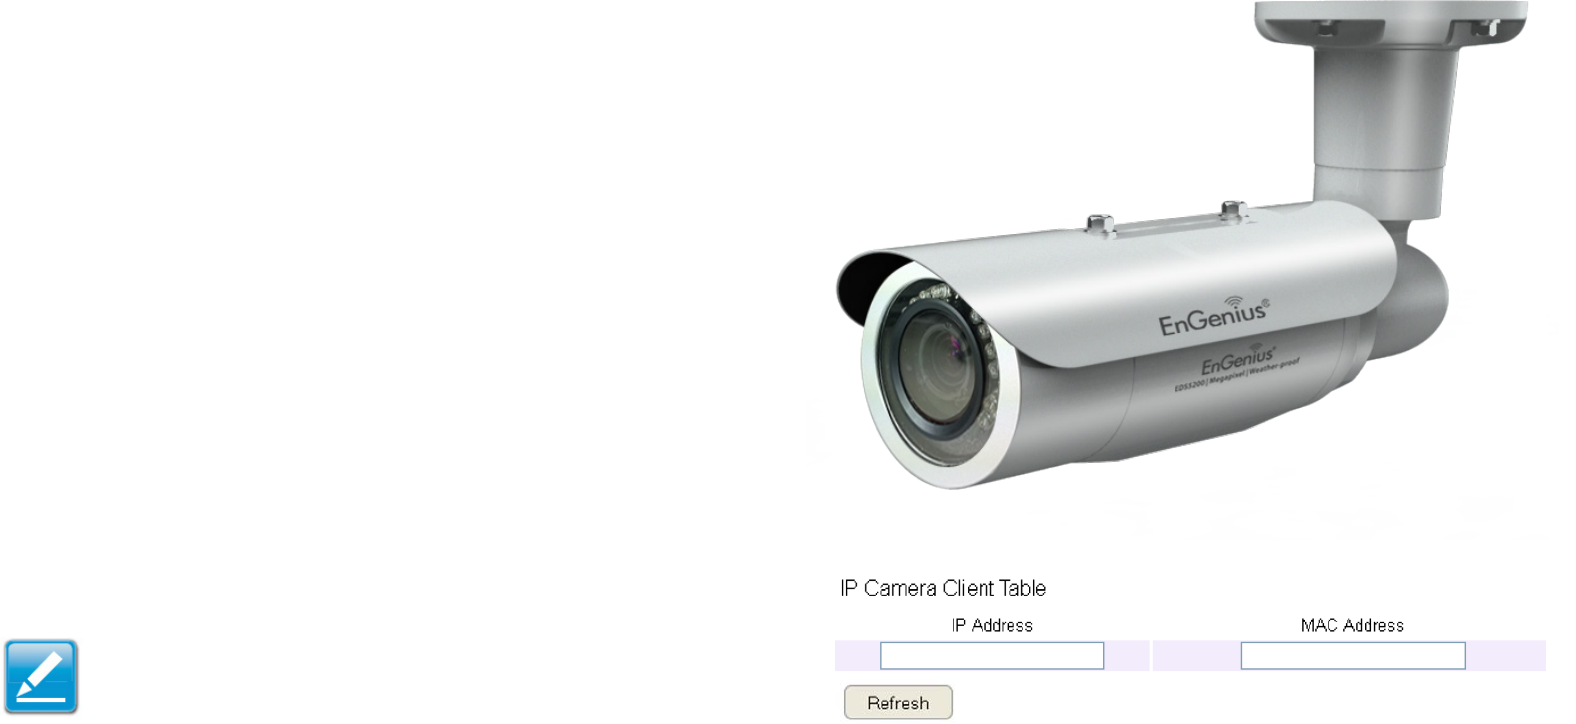
Conguring IP Cameras
ThisESRroutersupportsuptofour(4)EnGeniusIPCameras
simultaneously.IfnoIPCameraisdetected,pleasecheckthatthe
IPCamera’sIPaddressandUPnPclientareconguredcorrectly.
ToviewtheIPCamerasettings,clickSystem, then click IP
Camera.
Beforestartingthisprocedure,youmustconnectyourEnGenius
IPcameratothenetwork.
Makesurethecameraispoweredon.
ClicktheRefreshbuttontoviewalistingofavailabledevices.
Note:The"IPCamera"functionsupportsEnGeniusIP
Cameraproductsonly.
51
Conguring Internet Settings
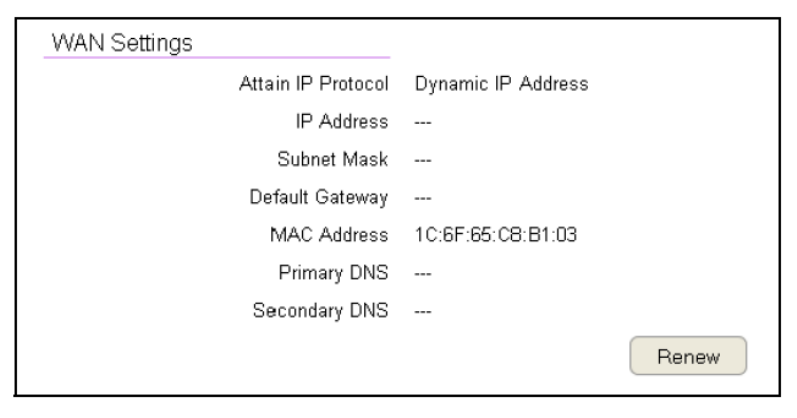
View Internet Status
TheWANSettings,orInternetStatus,pageshowsasummaryof
the current Internet connection information. This section is also
shownontheSystemStatuspage.
ToviewtheStatussettings,clickInternet, then click Status.
WAN Settings
ToviewtheWANSettings,clickInternetthenselectStatus.
Attain IP Protocol
DisplaytheIPProtocoltypeusedfortheESRSeriesRouter
(DynamicIPAddressorStaticIPAddress).
IP Address
Therouter’sWANIPaddress.
Subnet Mask
Therouter’sWANsubnetmask.
Default Gateway
TheISP’sgatewayIPaddress.
MAC Address
Therouter’sWANMACaddress.Therouter’sMACaddressis
locatedonthelabelonthebacksideoftherouter.
Primary DNS
TheprimaryDNSaddressofanISPprovider.
Secondary DNS
ThesecondaryDNSaddressofanISPprovider.

52
Conguring Dynamic IP
DynamicIPaddressingassignsadifferentIPaddresseachtime
adeviceconnectstoanISP(InternetServiceProvider)andmost
commonlyusedbycableISPs.
ToviewtheDynamicIP,clickInternet then select Dynamic IP.
Dynamic IP
Hostname
AssignanamefortheInternetconnectiontype.Thiseldcanbe
blank.
MTU (Maximum Transmission Unit)
AllowsyoutoconguretheMTU.TheMTUspeciesthelargest
packetsizepermittedforaninternettransmission.Thefactory
defaultMTUsizeforDynamicIP(DHCP)is1500.TheMTUsize
canbesetbetween512and1500.
Clone MAC
EntertheMACaddressofyourcomputer’s(ortablet’s)network
embeddedNetworkInterfaceCard(NIC)intheMACaddresseld
and click Clone MAC.
Note:SomeISPprovidersrequireregisteringtheMACaddressof
theNetworkInterfaceCard(NIC)connecteddirectlytothecableor
DSLmodem.CloneMACmaskstherouter'sMACaddresswiththe
MACaddressofthecomputer’sNIC.
53
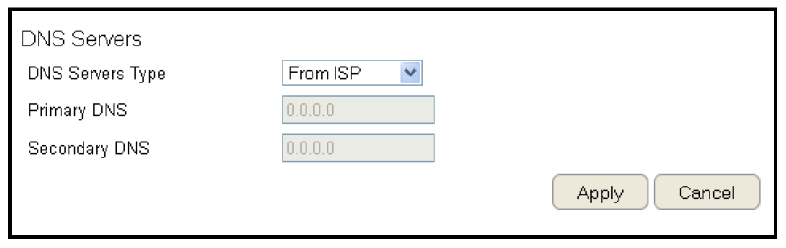
DNS Servers
TheDNSservertranslatesadomainorwebsitenameintoaURL
(UniformResourceLocator),orInternetaddress.Therearetwo
optionstochoosefrom:FromISPorUser-Dened.SelectFromISPto
retrievetheDNSaddressvaluefromtheISP;selectUser-Denedto
assignacustomDNSserveraddress.
DNS Server
CongurethetypeofDNSserver.(Default=FromISP)
First DNS Server
Conguretherst,orprimary,DNSserver.
Second DNS Server
Congurethesecond,orsecondary,DNSserver.
ClickApply to save the settings or Cancel to discard the changes.
54
Conguring Static IP
SettingastaticIPaddressallowsanadministratortoseta
specicIPaddressfortherouterandguaranteesthatitcannot
beassignedadifferentaddress.
ToviewtheStaticIPsettings,clickInternet, then click Static
IP.
Static IP
IP Address
Therouter’sWANIPaddress.
Subnet Mask
Therouter’sWANsubnetmask.
Default Gateway
TheWANgatewayaddress.
Primary DNS
TheprimaryDNSserveraddress.
Secondary DNS
ThesecondaryDNSserveraddress.
MTU (Maximum Transmission Unit)
TheMTUspeciesthelargestpacketsizepermittedforan
internettransmission.ThefactorydefaultMTUsizeforstaticIP
is1500.TheMTUsizecanbesetbetween512and1500.
MAC Address
Therouter’sMACaddress.
ClickApply to save the settings or Cancel to discard the
changes.
55
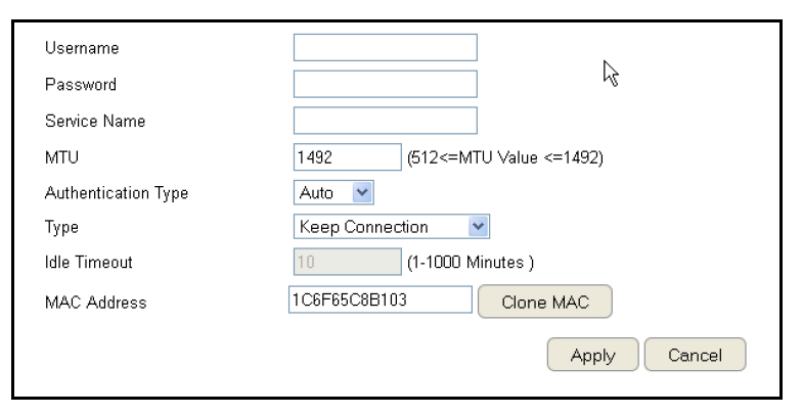
Conguring PPPoE
Point-to-PointProtocoloverEthernet(PPPoE)isusedmainlyby
ISPsthatprovideDSLmodemstoconnecttotheInternet.
ToviewthePPPoEsettings,clickInternet, then click PPPoE.
Username
EntertheusernameassignedbyanISP.
Password
EnterthepasswordassignedbyanISP.
Service Name
EntertheservicenameofanISP(optional).
MTU (Maximum Transmission Unit)
Enterthe(MTU).TheMTUspeciesthelargestpacketsize
permittedforaninternettransmission(PPPoEdefault:1492).
TheMTUsizecanbesetbetween512and1492.
Authentication Type
SelectthetypeofauthenticationprovidedbytheISP:Auto,PAP,
orCHAP.Ifunsureofthebestsetting,selectAutoorcheckwith
your Internet Service Provider.
Type
Conguretheconnectiontypebetweentherouterandthe
ISP.Selectoneofthefollowing:Keep Connection, Automatic
Connection or Manual Connection.
Idle Timeout
Congurethemaximumidletime(1to1,000minutes)allowed
for an inactive connection.
Clone MAC
EntertheMACaddressofthedevices’networkinterface
card(NIC)intheMACaddresseldandclickCloneMAC.
Note: SomeISPprovidersrequireregisteringtheMACaddress
ofthenetworkinterfacecard(NIC)connecteddirectlyto
thecableorDSLmodem.CloneMACmaskstherouter’s
MACaddresswiththeMACaddressofthecomputer’sNIC.
ClickApply to save the settings or Cancel to discard the
changes.
56
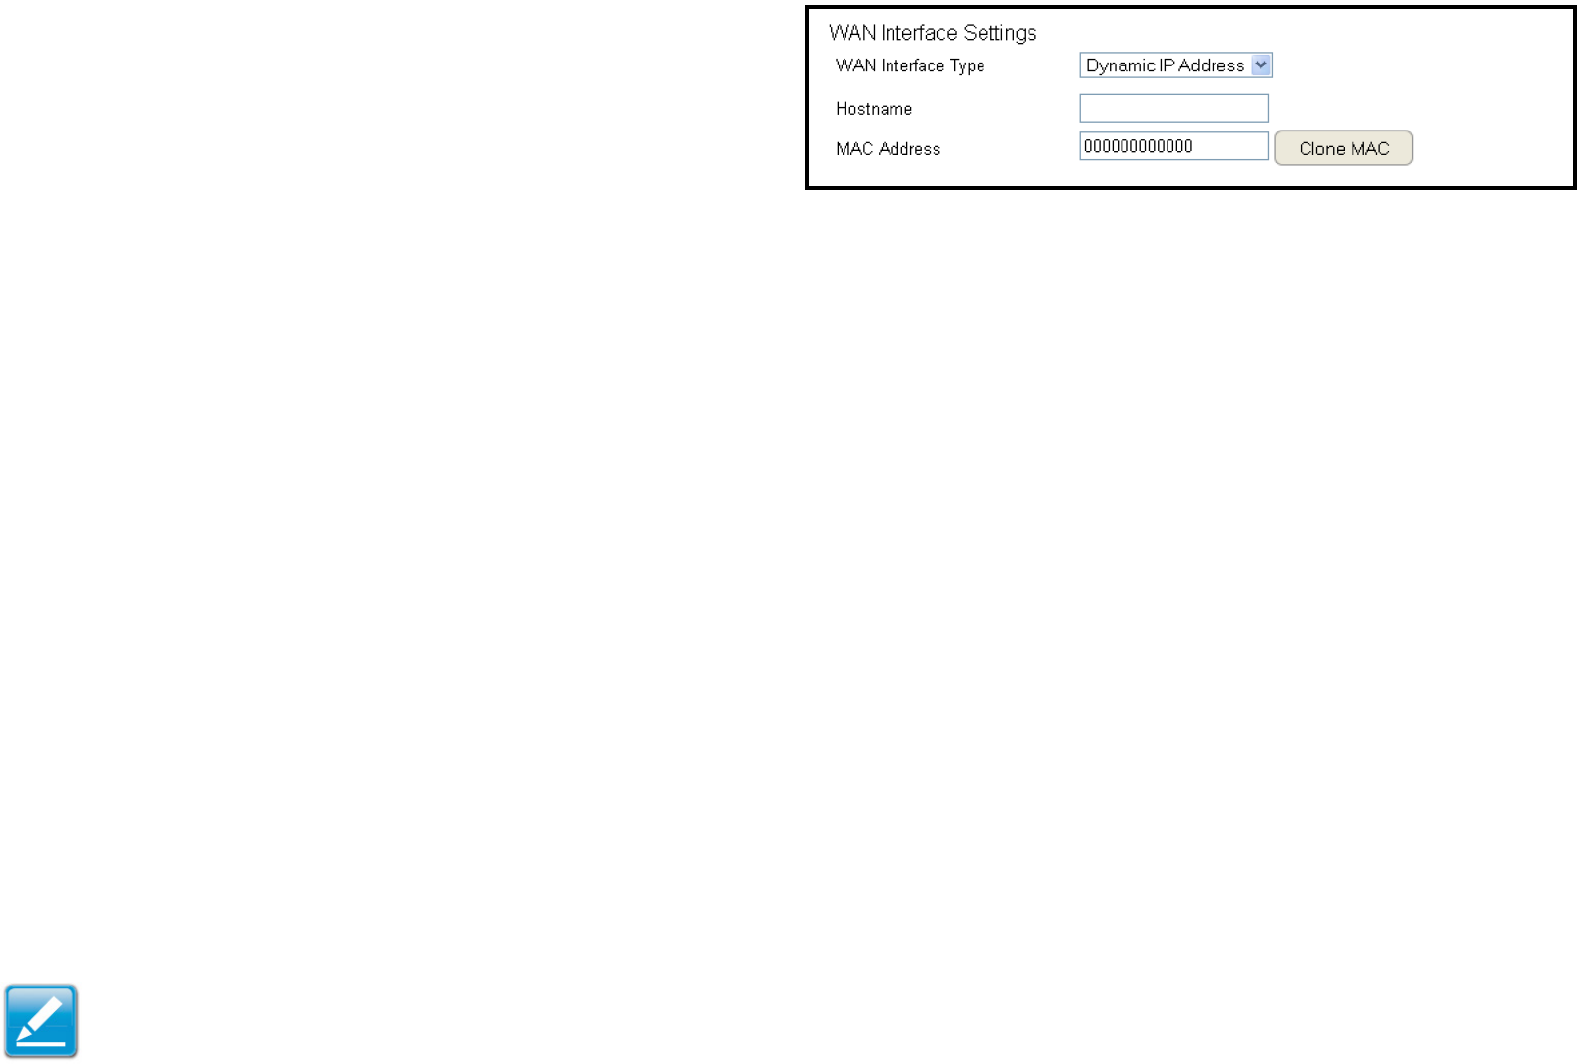
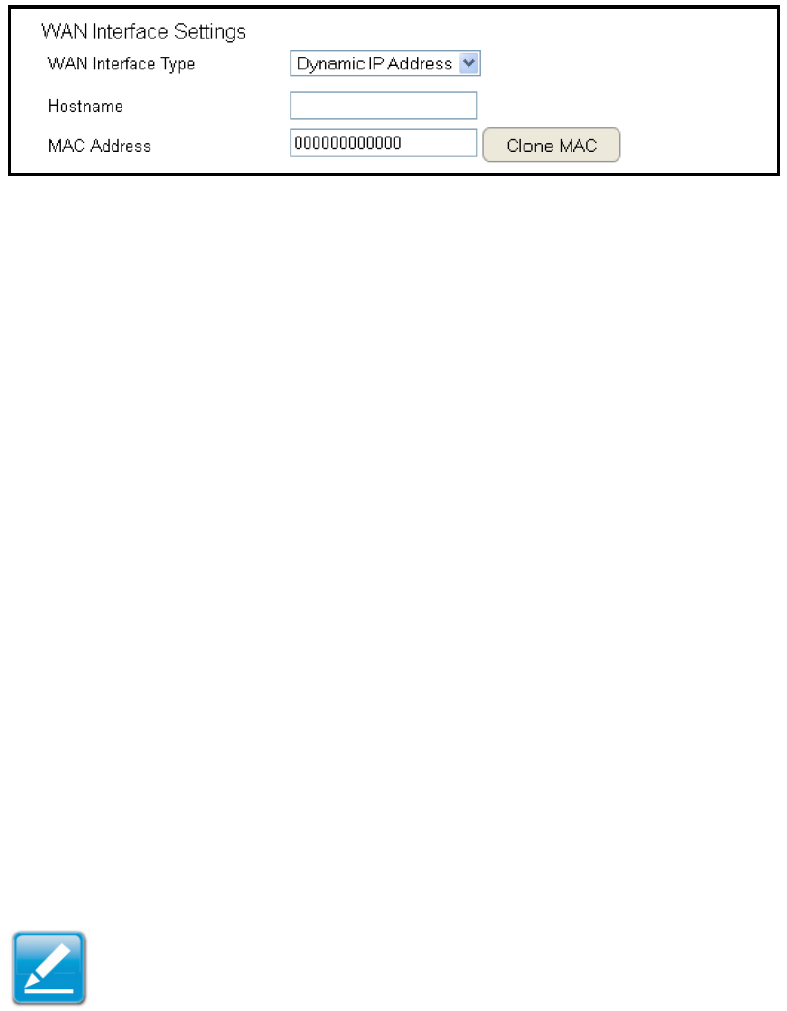
Conguring PPTP
PPTP(Point-to-PointTunnellingProtocol)isusedinassociation
withvirtualprivatenetworks(VPNs).Therearetwopartsto
aPPTPconnection:theWANinterfacesettingsandthePPTP
settings.
ToviewthePPTPsettings,clickInternet, then click PPTP.
WAN Interface Settings
Dynamic IP Address
WAN Interface Type
SelectDynamicIPAddresstoassignanIPaddressprovidedbyan
ISP.
Hostname
EnterahostnameofanISP.(optional).
Clone MAC
EntertheMACaddressofthecomputer’s(ortablet’s)embedded
NetworkInterfaceCard(NIC)intheMACaddresseldandclick
Clone MAC.
Note: SomeISPprovidersrequireregisteringtheMACaddressof
thenetworkinterfacecard(NIC)connecteddirectlytothecableor
DSLmodem.CloneMACmaskstherouter’sMACaddresswiththe
MACaddressofthecomputer’sNIC.
57
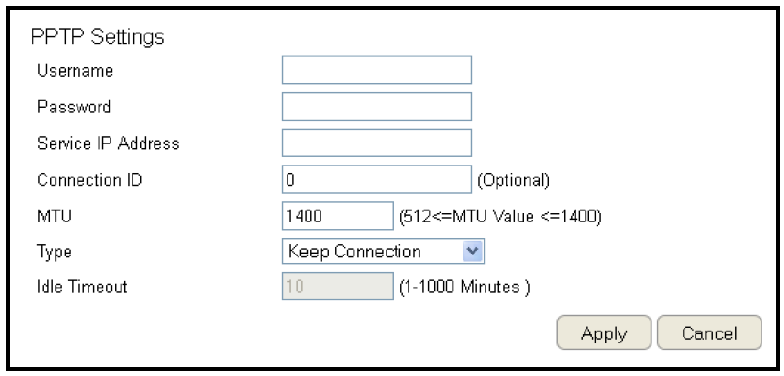
PPTP Settings
User Name
EntertheusernameassignedbyyourISP.
Password
EnterthepasswordassignedbyyourISP.
Service IP Address
EnterthePPTPserverIPaddressprovidedbyyourISP.
Connection ID
EntertheconnectionIDprovidedbyyourISP(optional).
MTU (Maximum Transmission Unit)
EnterMTU.TheMTUspeciesthelargestpacketsize(Default:
1462)permittedforanInternettransmission.TheMTUsizecan
besetbetween512and1492.
Type
Conguretheconnectiontypebetweentherouterandthe
ISP.Selectoneofthefollowing:Keep Connection, Automatic
Connection or Manual Connection.
Idle Timeout
Congurethemaximumamountoftime,inminutes,allowedfor
inactiveInternetconnection.TheInternetconnectionwillbe
droppedwhenthemaximumidletimeisreached.Validvaluesare
betweenoneandonethousand.
ClickApply to save the settings or Cancel to discard the changes.
58
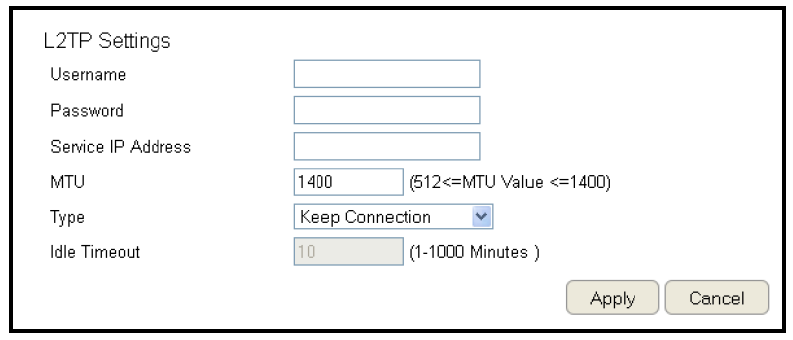
Conguring L2TP
L2TP(Layer2TunnelingProtocol)isusedinassociationwith
VPNs(VirtualPrivateNetworks).TherearetwopartstoaL2TP
connection:
1.TheWANinterfacesettings
and
2. The L2TP settings.
ToviewtheL2TPsettings,clickInternet, then click L2TP.
WAN Interface Settings
Dynamic IP Address
WAN Interface Type
SelectDynamicIPAddresstoassignanIPaddressprovidedbyan
ISP.
Hostname
EnterahostnameofanISP(optional).
Clone MAC
EntertheMACaddressofyourcomputer’sembeddedNetwork
InterfaceCard(NIC)intheMACaddresseldandclickClone MAC.
Note: SomeISPprovidersrequireregisteringtheMACaddress
ofthenetworkinterfacecard(NIC)connecteddirectlyto
thecableorDSLmodem.CloneMACmaskstherouter’sMAC
addresswiththeMACaddressofthecomputer’sNIC.
59
L2TP Settings
Username
EntertheusernameassignedbyanISP.
Password
EnterthepasswordassignedbyanISP.
Service IP Address
EntertheL2TPserverIPaddressprovidedbyanISP.
Connection ID
EntertheconnectionIDprovidedbyanISP(optional).
MTU (Maximum Transmission Unit)
EnterMTU.TheMTUspeciesthelargestpacketsize(Default:
1460)permittedforanInternettransmission.TheMTUsizecan
besetbetween512and1492.
Type
Conguretheconnectiontypebetweentherouterandthe
ISP.Selectoneofthefollowing:Keep Connection, Automatic
Connection or Manual Connection.
Idle Timeout
Congurethemaximumamountoftime,inminutes,allowedfor
inactiveInternetconnection.TheInternetconnectionwillbe
droppedwhenthemaximumidletimeisreached.Validvaluesare
betweenoneandonethousand.
ClickApply to save the settings or Cancel to discard the changes.
60
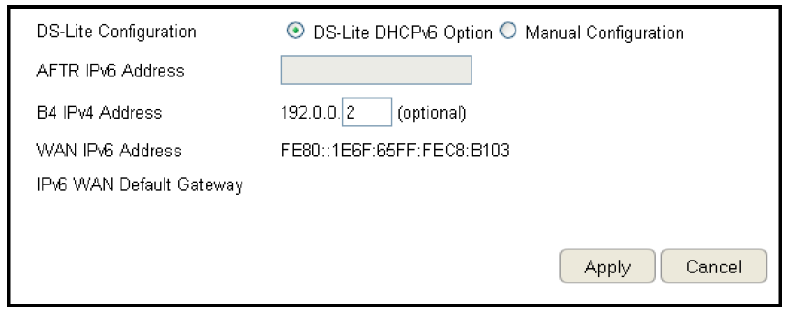
Conguring DS-Lite
Dual-StackLite,orDS-Lite,allowsISPstostopIPv4addresses
fromreachingacustomer’snetworkdevicesandonlyuseIPv6.
ToviewtheDS-Litesettings,clickInternet, then click DS-Lite.
DS-Lite Conguration
SelectDS-LiteDHCPv6OptionorManualConguration
AFTR IPv6 Address
Enter the AFTR IPv6 connection type
B4 IPv4 Address
EnteranOptionalB4IPv4address.
WAN IPv6 Address
EntertheWANIPv6address.
IPv6 WAN Default Gateway
EntertheIPv6WANdefaultgatewayaddress.
ClickApply to save the settings or Cancel to discard the changes.
61
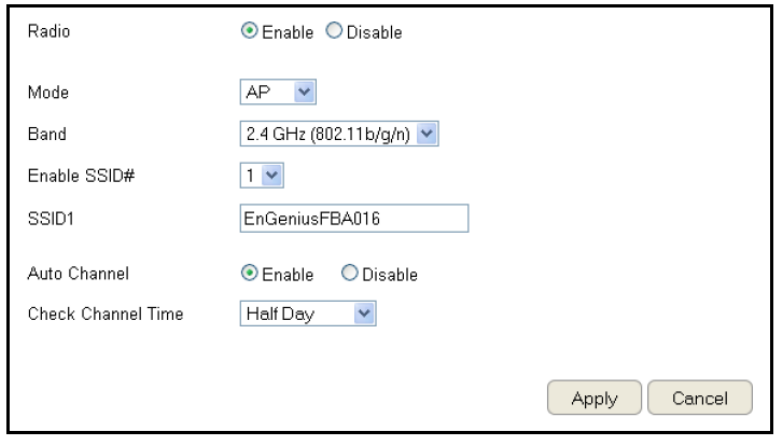
Wireless LAN Setup
ToviewtheWirelessBasicsettings,clickWireless then select
Basic.
Radio
Enableordisablethewirelessradio.Ifthewirelessradiois
disabled,wirelessaccesspointsarenotavailable.
Mode
Selectthewirelessoperatingmodefortherouter.Twomodes
areavailable:AccessPointorWirelessDistributionSystem(WDS)
mode.
AP (Access Point)
Providesaconnectionaccesspointforwirelessdevices.
WDS (Wireless Distribution System)
Allowsthewirelessnetworktobeexpandedusingmultiple
accesspointswithoutwiredconnections.
ClickApply to save the settings or Cancel to discard changes.
62
Access Point Mode
Theseinstructionsapplytoboththe2.4GHzand5GHzfrequencybands.
TherouterbydefaultisalreadyconguredinAccessPointMode.Foroptimumconnectivitytoanumberofdifferentwirelessclient
devices,it’srecommendedthatyoukeeptherouterinitsdefaultwirelesssettings.Youcanchoosetohavetherouterassociate
onlywithcertainiterations(IEEEstandards)andbydoingsothiswilleitherpositivelyornegativelyaffecttherouter’sspeedand
throughput performance.
Band
Selectawirelessstandardforthenetworkfromthefollowing
options:
• 2.4GHz(IEEE802.11b)
• 2.4GHz(IEEE802.11n)
• 2.4GHz(IEEE802.11b/g)
• 2.4GHz(IEEE802.11g)
• 2.4GHz(IEEE802.11b/g/n)
• 5GHz(IEEE802.11a)
• 5GHz(IEEE802.11n)
• 5GHz(IEEE802.11a/n)
• 5GHz(IEEE802.11draftac)
Enable SSID#
Selectthenumberofwirelessgroups,betweenoneandfour,
availableonthenetwork.
SSID[#]
Enterthenameofthewirelessnetwork(s).
Auto Channel
Enableordisablehavingtherouterautomaticallyselecta
channelforthewirelessnetwork.AutoChannelisenabledby
default.Selectdisabletomanuallyassignaspecicchannel.
(Default=Disable)
Check Channel Time
WhenAutoChannelisenabled,selectatimeperiodthatthe
system checks the appropriate channel for the router.
Channel
WhenAutoChannelisdisabled,selectachanneltoassignto
thewirelessnetwork.Validvaluesarefromonetoelevenin
the US and one to thirteen in the EU.
63
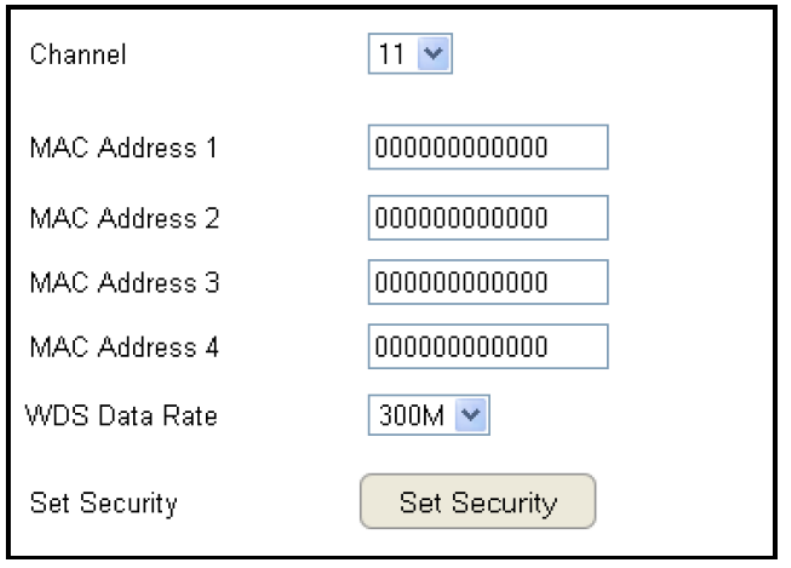
Wireless Distribution System Mode
Conguringtherouter’swirelesssettingsforWDS(WirelessDistributionSystem)mode.
Channel
Selectachanneltoassigntothewirelessnetwork.Validvalues
are from one to eleven in the US and one to thirteen in the EU.
MAC Address [#]
EntertheMACaddress(es)forthewirelessaccesspoint(s)
thatarepartoftheWDS.
WDS Data Rate
SelectthedataratefortheWDS.
Set Security
ClickSetSecuritytosetuptheWDSsecuritysettingsscreen.
64
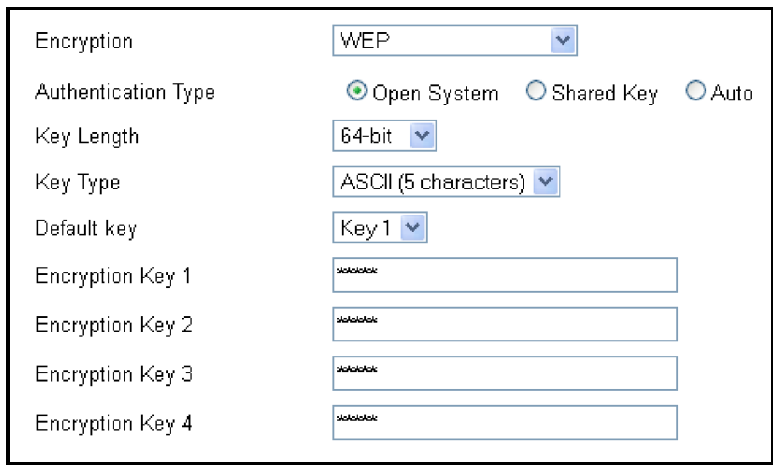
WDS Security Settings Screen
SelectingthetypeofWDSencryption(Disable,WEPorWPAPre-
SharedKey)forthewirelessnetwork.
Wired Equivalent Privacy (WEP)
Key Length
Selectbetween64-bitand128-encryption.
Key Format
SelectthetypeofcharactersusedfortheWEPKey:ASCII
(5characters)orHexadecimal(10characters).
Default Key
Selectthedefaultencryptionkeyforwirelesstransactions.
Encryption Key [#]
Entertheencryptionkey(s)usedtoencryptthedatapackets
during data transmission.

65
Chapter5
Wireless Encryption
66
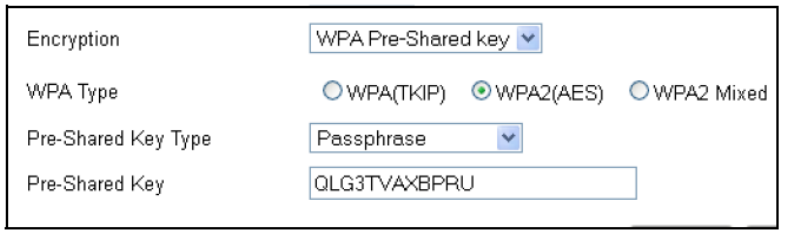
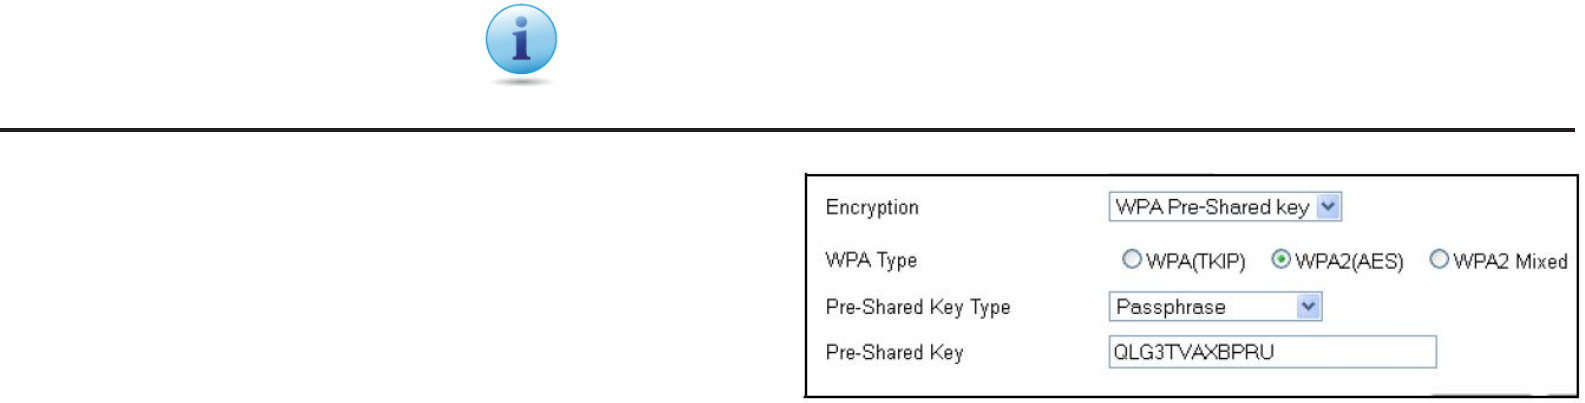
Wi-Fi Protected Access (WPA) Pre-Shared Key
WPA Type
SelectthetypeofWPA.
• WPATemporalKeyIntegrityProtocol(TKIP):Generates
a128-bitkeyforeachpacket.
• WPA2AdvancedEncryptionStandard(AES):
Governmentstandardpacketencryptionwhichis
stronger than TKIP.
Pre-Shared Key Type
Selectthetypeofpre-sharedkeyasPassphrase(ASCII)orHexadecimal.
Pre-Shared Key
Enterthepre-sharedKeyvalue.
67
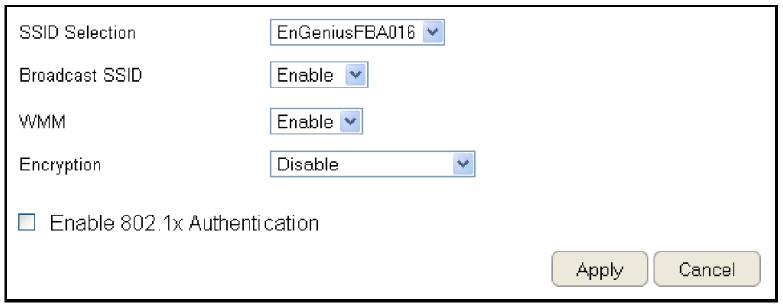
Conguring Security
Enablingsecurityoptionsonthewirelessnetworktoprevent
intrusionstosystemsonthewirelessnetwork.
ToviewtheSecuritysettings,clickWireless then select
Security.
SSID Selection
Selectthewirelessnetworkgroupinwhichyouwishtochange
itswirelesssecuritysettings.
Broadcast SSID
EnableordisablebroadcastSSID.Choosewhetherornotthe
wirelessgroupisvisibletoothermembers.
Wi-Fi Multimedia (WMM)
Enableordisablequalityofserver(QoS)tooptimizethe
streamingforbandwidthsensitivedatasuchasHDTVvideo
streaming, online gaming, VoIP, videoconferencing, and etc.
Encryption
Select the encryption type for the router.
Enable802.1xAuthentication
Enableordisable802.1xauthentication.
68
ClickApply to save the settings or Cancel to discard the changes.
Wi-Fi Protected Access (WPA)
Pre-Shared Key
WPA Type
SelectthetypeofWPAfromthefollowing:
• WPA2 Advanced Encryption Standard (AES):
RECOMMENDED—Governmentstandardpacketencryption
whichisstrongerthanTKIP.
• WPA Temporal Key Integrity Protocol(TKIP):Generatesa
128-bitkeyforeachpacket.
• WPA2 Mixed: Mixedmodeallowsclientdevicestorst
associatetotherouterusingWPA2,andiftheyfailto
connect,thentheyareconnectedviaWPA(TKIP).
Encryption Type
Enablingencryptionisstronglyencouragedbecauseunauthorizedpartieswithinrangeofyourrouter’swirelesssignalmayattempt
toaccessyourwirelessnetworkandthengainaccesstoprivateinformationondevicesonyournetwork.It’shighlyrecommended
thatyouencryptyourrouterwithWPA2(AES)foroptimalsecurityandthroughputperformance.Alwaysselectastrongpassphrase
greaterthan8characterslongandcomprisedofletters,numbers,andsymbols.Pleasemakenoteofthepassphraseandkeepitina
securelocationsomewhereinyourhomeincaseyouneedtoretrieveit.
Pre-Shared Key Type
Selectthetypeofpre-sharedkeyasPassphrase(ASCII)or
Hexadecimal.
Pre-Shared Key
EnterthePre-sSharedKeyvalue.
IMPORTANT! WPA2(AES)offersmuchstrongersecuritythanWEP(Wired
EquivalentPrivacy)whichhasbeenandcanbecomprimised.

69
WPA RADIUS
UsingaRADIUSservertoauthenticatewirelessstationsand
provide a session key to encrypt data during communications.
WPA Type
Select the type of Wireless Protected Access (WPA) from the
following:
• WPA2 Advanced Encryption Standard (AES):
RECOMMENDED—Governmentstandardpacketencryption
whichisstrongerthanTKIP.
• WPA Temporal Key Integrity Protocol(TKIP):Generatesa
128-bitkeyforeachpacket.
• WPA2 Mixed: Mixedmodeallowsclientdevicestorst
associatetotherouterusingWPA2,andiftheyfailto
connect,thentheyareconnectedviaWPA(TKIP).
RADIUS Server IP Address
Enter the IP address of the server.
RADIUS Server Port
Entertheportnumberoftheserver.
RADIUS Server Password
Enterthepasswordoftheserver.
70
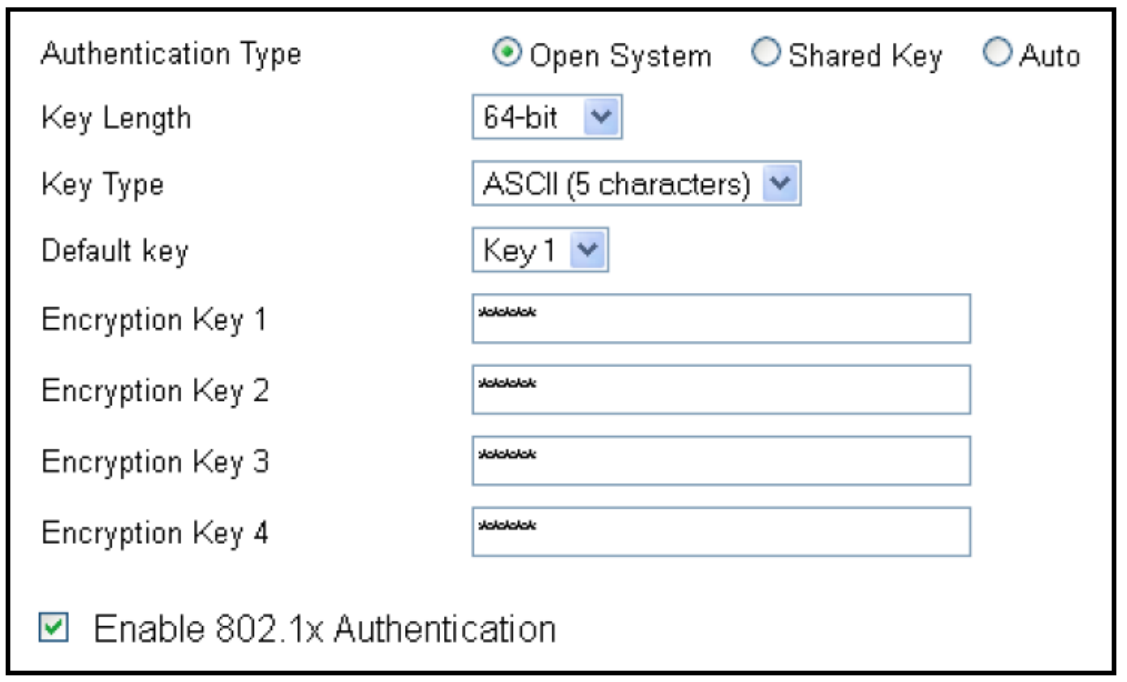
Wired Equivalent Privacy (WEP)
Authentication Type
Selectthetypeofauthenticationfromthefollowing:
• Open System: Wirelessstationscanassociatewiththerouter
withoutWEPencryption
• Shared Key: DevicesmustprovidethecorrespondingWEP
key(s)whenconnectingtotherouter
• Auto: TherouterautomaticallydetectswhetherOpenSystem
orSharedKeyisbeingused
Key Length
Selectbetween64-bitand128-encryption.
Key Type
SelectthetypeofcharactersusedfortheWEPKey:ASCII
(5characters)orHexadecimal(10characters).
Encryption Key [#]
Entertheencryptionkey(s)usedtoencryptthedatapackets
during data transmission.
Enable 802.1x Authentication
Enableordisable802.1xauthentication.
71
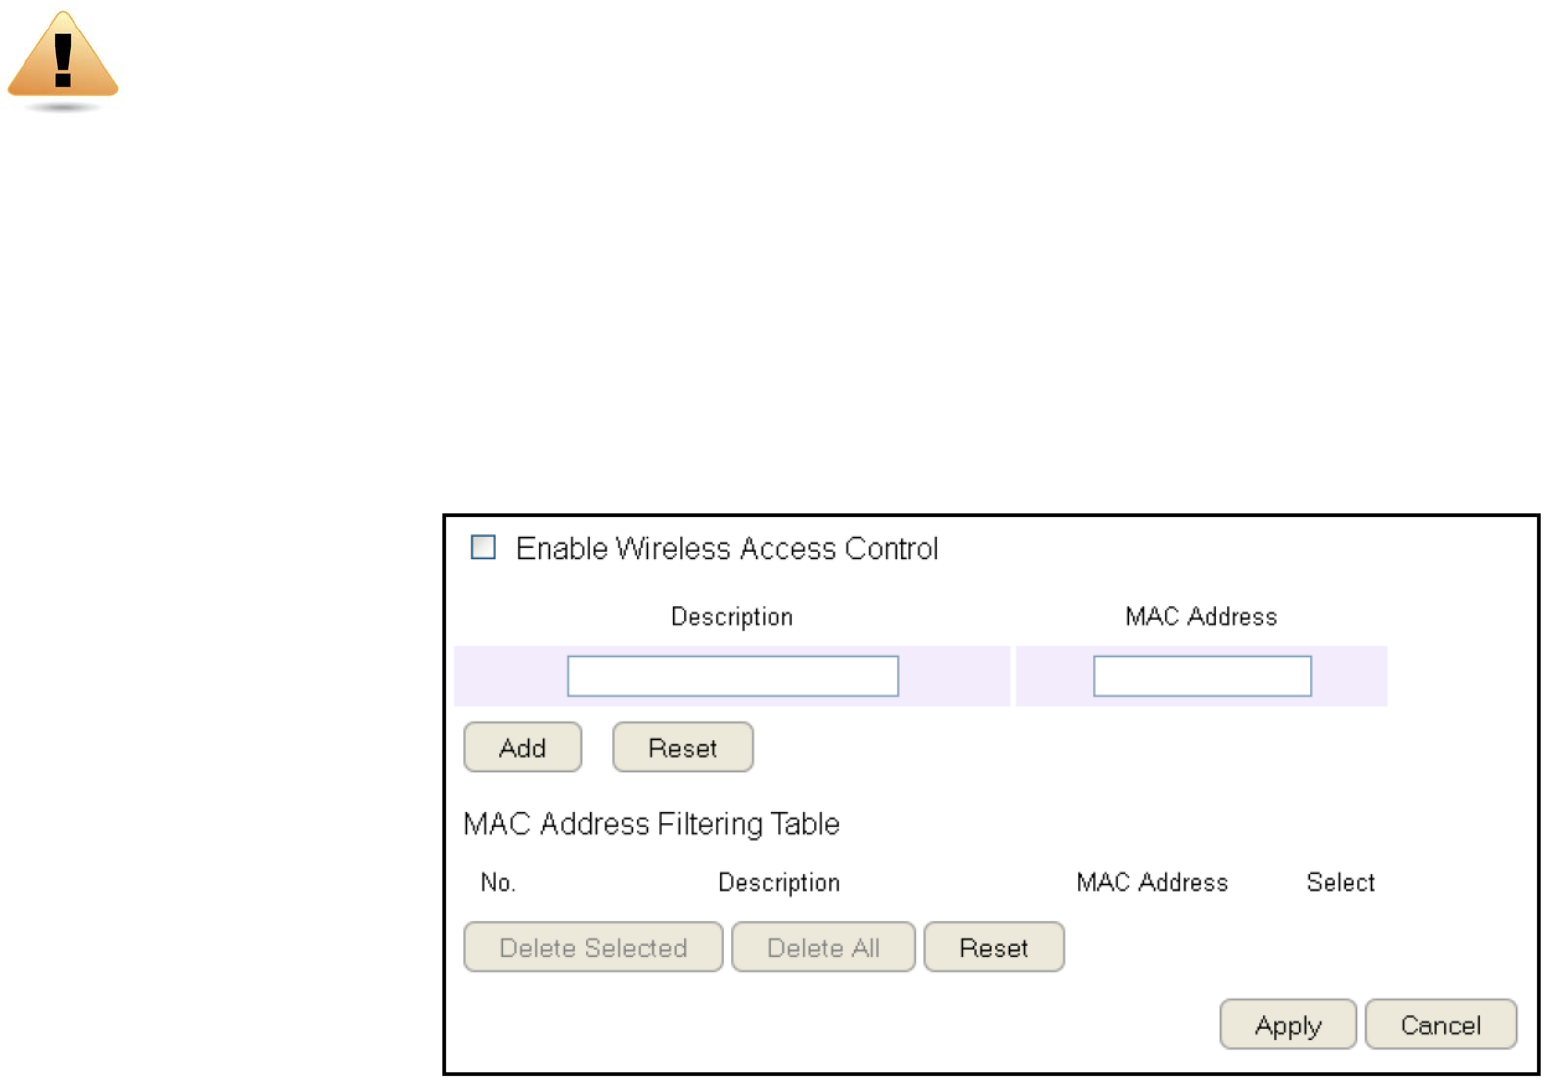
Conguring Filters
WhenEnableWirelessAccessControlisselected,onlywirelessclientswithMACaddresseslistedinthetableareallowedtoconnect
tothewirelessnetwork.
ToviewtheFiltersettings,clickWireless then select Filter.
Enabling Wireless Access Control
Select“EnableWirelessAccessControl”
Description
Enter a description of the device
allowedtoconnecttothenetwork.
MAC Address
EntertheMACAddressofthe
wirelessdevice.
ClickAdd toappendanewdevice
to the list or Reset to discard changes.
WARNING! Incorrectlychangingthesesettingsmaycausethedevicetostopfunctioning.Do
notmodifythesettingsinthissectionwithoutathoroughunderstandingoftheparameters.
72
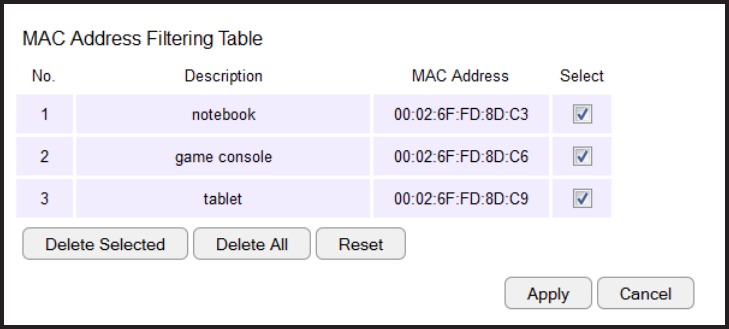
MAC Address Filtering Table
No. (Number)
Thesequencenumberofthedevice.
Description
The description of the device.
MAC Address
TheMACaddressofthedevice.
Select
Indicatesthedevice(s)thatcanhaveactionsperformedon
them.
ClickDelete Selected to remove selected devices from the
list.
ClickDelete All to remove all devices from the list.
ClickResettodiscardchanges.ClickApply to save the settings
or Cancel to discard changes.
73
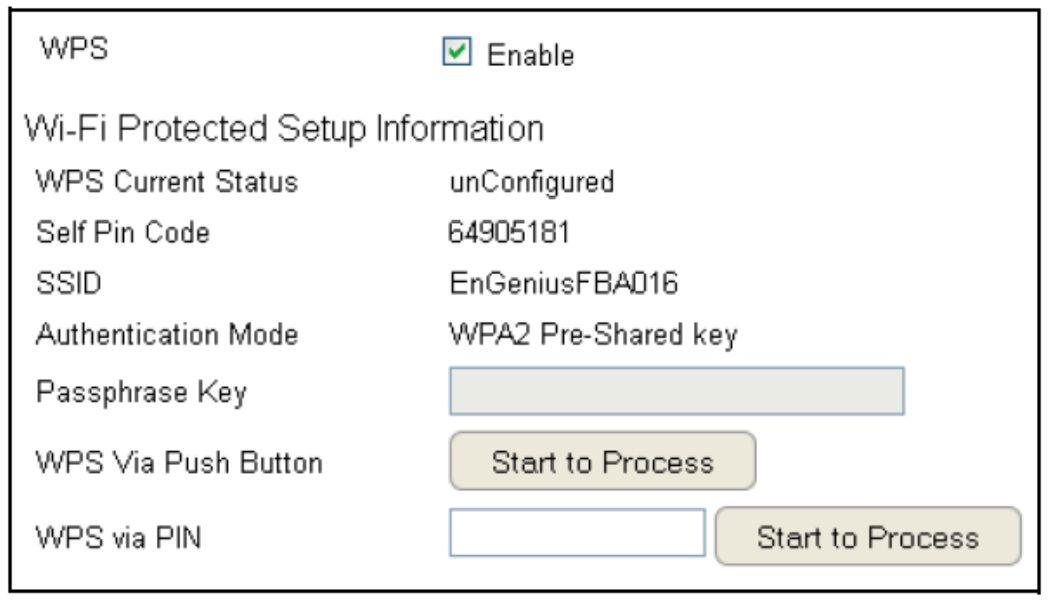
Conguring Wi-Fi Protected Setup
Wi-FiProtectedSetup(WPS)isanquickandeasywaytoassociateanewwirelessclientdevicetotheencryptedrouterusingaPINor
theWPSbuttonsoneachdevice.
ToviewtheWPSsettings,clickWireless then select WPS.
WPS
EnableordisableWPS.
WPS Current Status
Displayswhetherornotthe
wirelesssecurityiscongured.
Self Pin Code
An8-digitPINwhichisrequired
whenconguringtherouter
forthersttimeinWindows7orVista.
SSID
Thenameofthewirelessnetwork.
Authentication Mode
The current security settings for the
correspondingSSID(wirelessnetwork).
Passphrase Key
Arandomlygeneratedkeycreatedby
therouterduringtheWPSprocess.
WPS via Push Button
Click“Start to Process”toactivateWPS.
WPS via PIN
Enter the PINofawirelessdeviceclick“Start to Process” to
activateWPS.
74
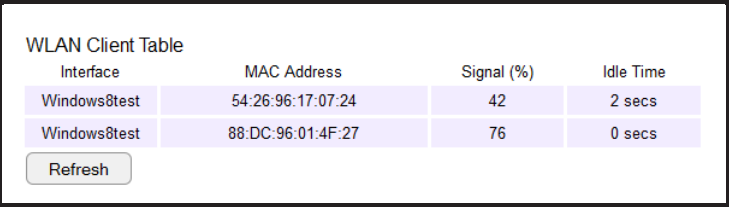
Conguring Client List
Viewthewirelessdevicescurrentlyconnectedtotherouter.
ToviewtheClientListsettings,clickWirelessthenselectClient
List.
Interface
Thetypeofnetworkconnectedtothedevice.
MAC Address
TheMACaddressofdeviceconnectedtonetwork.
Signal
Thesignalstrengthofthedeviceconnectedtothenetwork.
Idle Time
Theamountoftimetheconnecteddevicehasnotbeenactiveon
thenetwork.
ClickRefreshtorellthelistwithcurrentlyconnecteddevices.

75
Chapter6
Advanced Settings
76
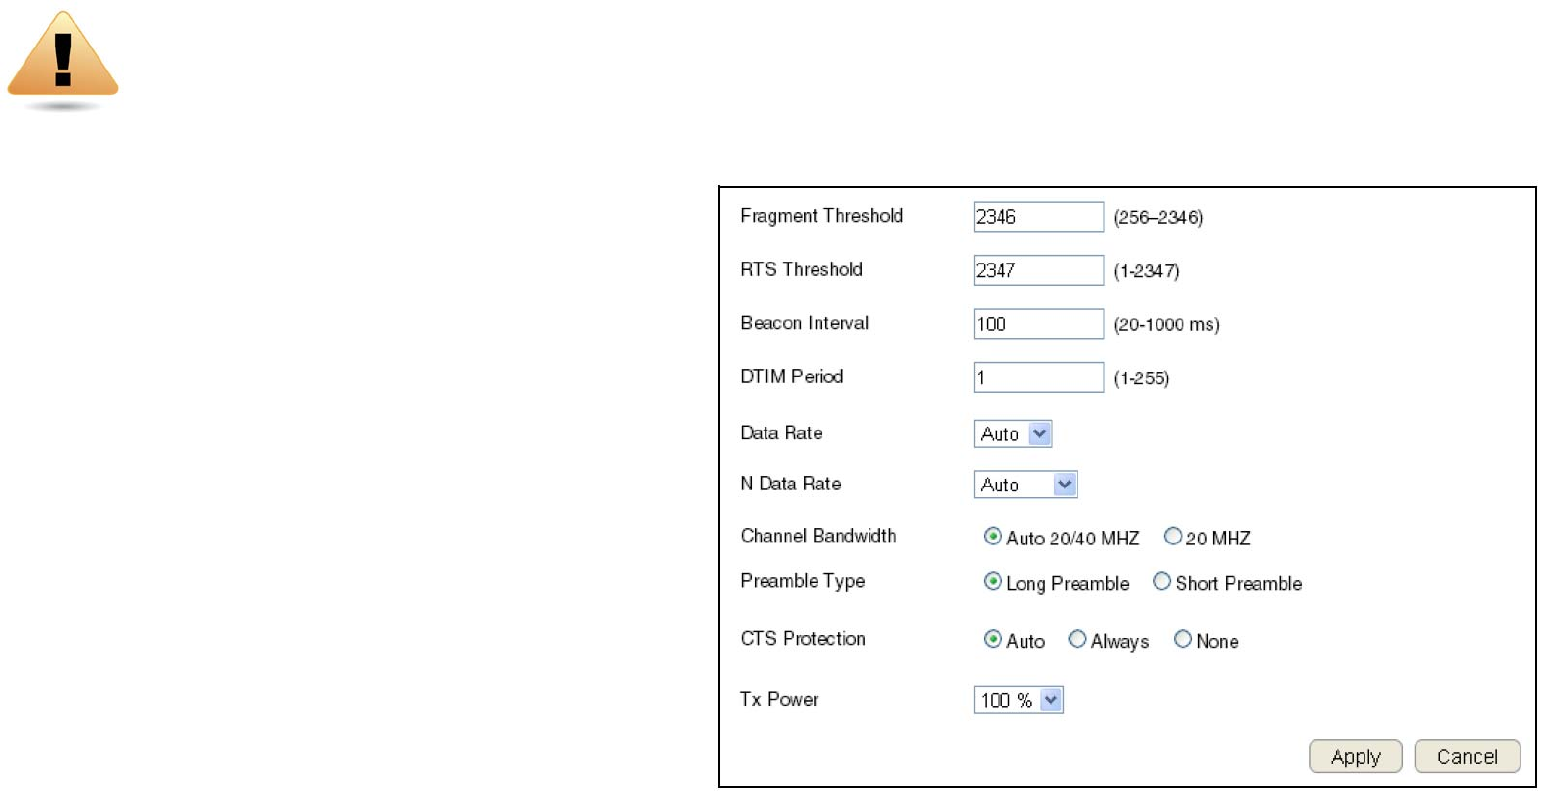
Conguring Advanced Settings
AllowsyoutodenetheAdvancedSettingsavailableontherouter.
ToviewtheAdvancedsettings,clickWireless then select Advanced.
Fragment Threshold
Enterthemaximumsizeofapacketduringdatatransmission.
Avaluetoolowcouldleadtolowperformance.
RTS Threshold
EntertheRTSthreshold.Ifthepacketsizeissmallerthanthe
RTSthreshold,therouterdoesnotuseRTS/CTStosendthe
data packet.
Beacon Interval
Enterthebeaconinterval.Thisistheamountoftimethatthe
routersetstosynchronizethenetwork.
Delivery Trafc Indication Message (DTIM) Period
EntertheDTIMperiod.TheDTIMisacountdownperiodinformingclientsofthenextpoint
ofbroadcastandmulticastofmessagesoverthenetwork.Validvaluesarebetween1and255.
N Data Rate
SelecttheNdatarate.ThisistherateinwhichtheESRSeriesRouterwilltransmitdatapacketstowirelessNcompatibledevices.
WARNING!Incorrectlychangingthesesettingsmaycausethedevicetostopfunctioning.Donotmodify
thesettingsinthissectionwithoutathoroughunderstandingoftheparameters.
77
Channel Bandwidth
Selectthechannelbandwidth.ThefactorydefaultisAuto20/40MHz.Thedefaultsettingprovidesthebestperformancebyauto
selectingchannelbandwidth.
Preamble Type
Selectthepreambletype.LongPreambleprovidesbetterLANcompatibilityandShortPreambleprovidesbetterwirelessperformance.
CTS Protection
SelectthetypeofCTSprotection.UsingCTSProtectioncanlowerthedatacollisionsbetweenWirelessB(802.11b)andWirelessG
(802.11g)devicesandlowerdatathroughput.
Tx Power
Selectthewirelesssignalstrengthlevel.Validvaluesarebetween25%and100%.
ClickApply to save the settings or Cancel to discard changes.
78
Setting Up Parental Controls
Offensivewebcontentcanbeblockedwhenaparentspecieskeywords.ParentscanalsolimitInternetaccesswithinaspecied
timeandday,withaSchedule. A PolicyisaruleprolewhichdescribesthekeywordlterandInternetaccessschedule.Parentscan
apply the policy to multiple users or Policy Members.TheParentalControlstoolwillscreenpolicymembersbasedonappliedpolicies.
Conguring the Access Control List
ToviewtheACLsettings,clickFirewall then select ACL.
Viewing the Access Control List
Tolearnhowtoviewexistingaccesscontrollist,refertoViewing Parental Policies.
Adding a Control Policy
Tolearnhowtocreateandaddapolicytotheaccess
control list, refer to Adding a Control Policy.
ToviewtheWizard settings,
click Parental Control then select Wizard.
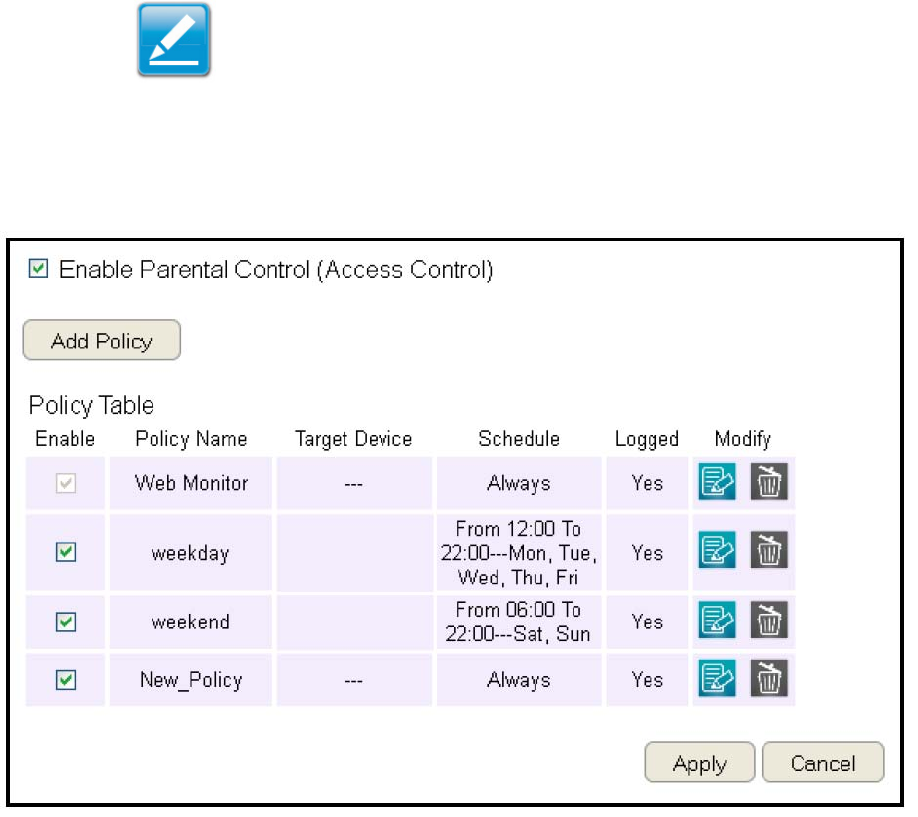
Enable Parental Control (Access Control)
ClicktoenableParentalControl.
Add Policy
Clickthebuttontoaddanewcontrolpolicytothe
network.
Policy Table
Showsthecontrolpoliciesavailableonthenetwork.
ClickApply to save changes or Cancel to discard them.
Note:Bydefault,everyoneisallowedtoviewallthecontents
withoutanylimitationandlter.
79
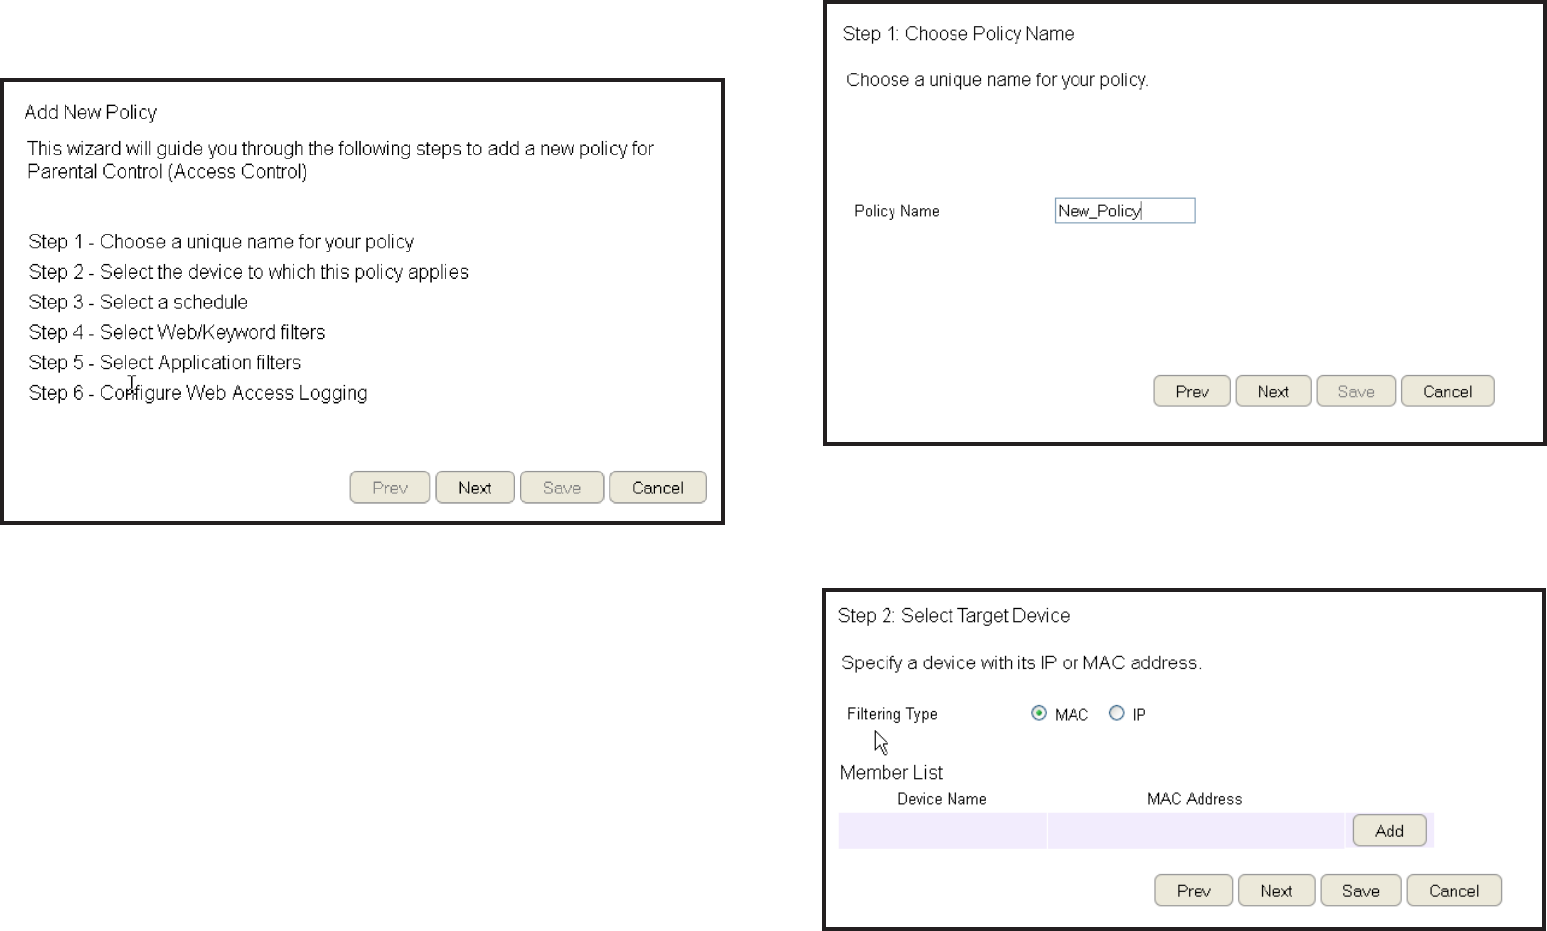
Adding a Control Policy
Therouterprovidesawizardtoguideyouthroughsettingupa
newAccessControlPolicy.
To start the procedure, click the Add Policybutton.
ClickNext to continue the procedure or Cancel to stop the
procedure.
Theprocedureconsistsofthefollowingsteps:
1.EnterauniquenameforyourpolicyinthePolicyName
texteld.
2.ClickPrevtoreturntothepreviousscreen,Nexttocontinue
theprocedure,orCanceltostoptheprocedure.
3. Add target devices to the access control policy.
80
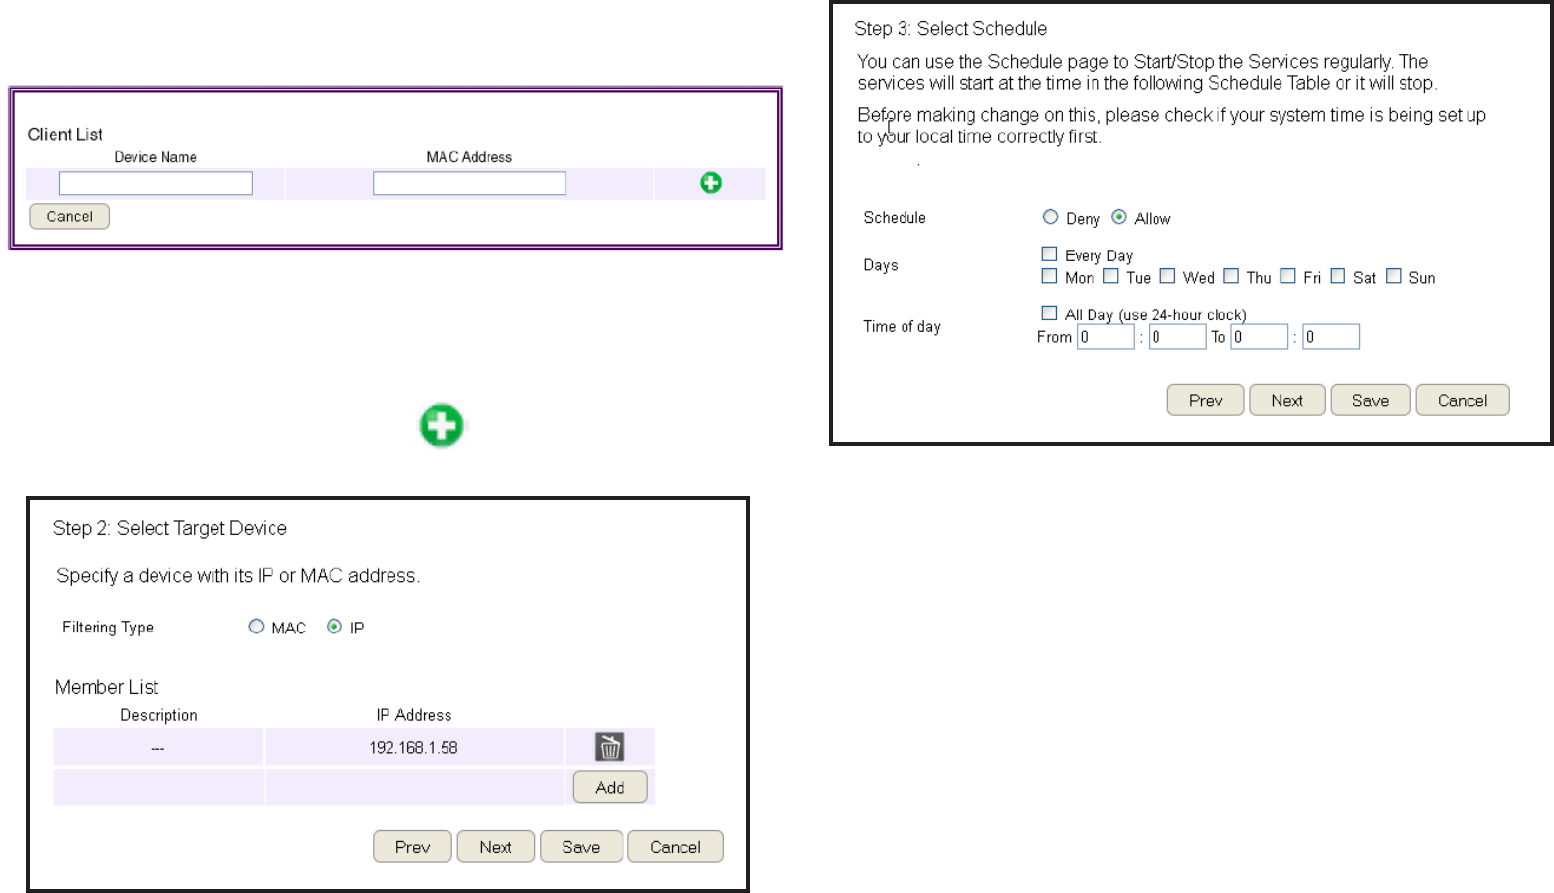
5. Setting up a schedule for the router services.
To set up a Service Schedule,followthesesteps:
a. Select Allow from the Schedule option.
b.Clickthedaysthattheschedulewillbeactive.
c.Enterthetimeperiodthattheschedulewillbeactive.
6.ClickPrev to return to the previous screen, Next to continue
the procedure, Save to save the changes, or Cancel to stop
the procedure.
To add a device to the Member List, follow these steps:
a.ClickMAC or IP from the Filter Type option.
b.ClickAddtoshowtheaddclientdialog.
c. Enter the name of the device in the Device Nametexteld.
d.EntereitheraMACaddressoranIPaddressintheAddress
elddependinguponwhichltertypeyouchose.
e.ClicktheAdd Device Button to close the screen and
addthedevicetotheMemberList.
4.ClickPrev to return to the previous screen, Next to continue
the procedure, Save to save the changes, or Cancel to stop
the procedure.
81
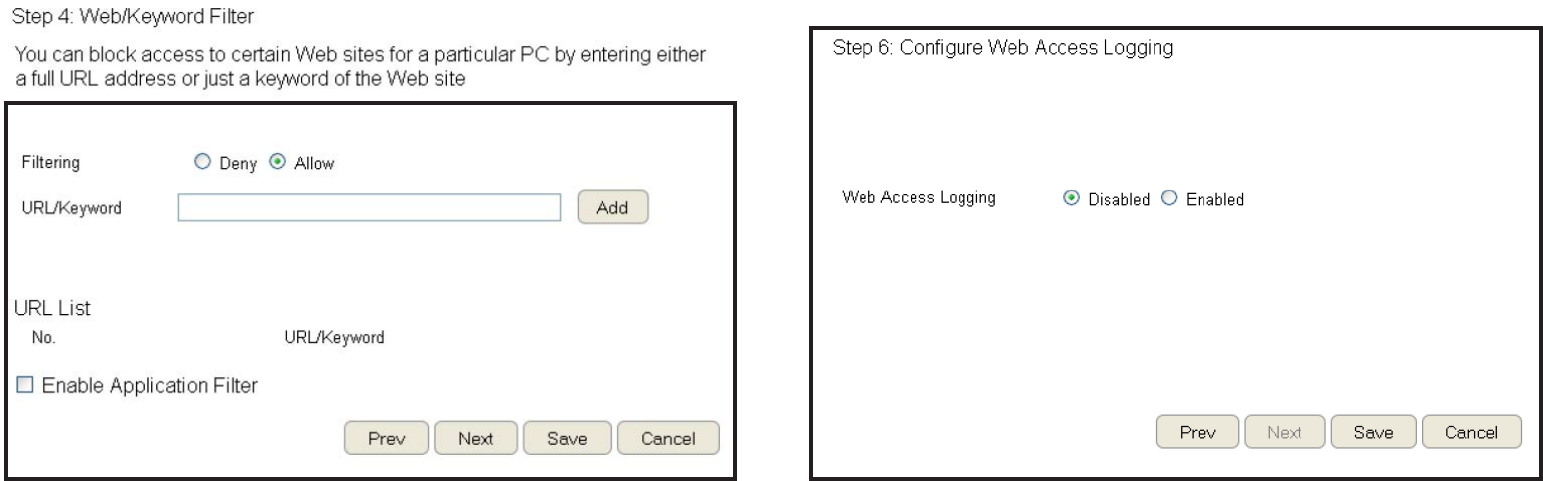
7.SetupakeywordandURLlterlist.
Tosetupakeyword/URLlterlist,followthesesteps:
a. Select Allow from the Filtering option.
b.EnterakeywordorURLintheURL/Keyword text eld.
c.ClicktheAddbuttontoaddtheltertothelist.
d. Repeat steps a through cforeachlter.
8.ClickEnable Application Filtertoltersoftwareapplications.
9.ClickPrev to return to the previous screen, Next to continue
the procedure, Save to save the changes, or Cancel to stop
the procedure.
10.Select Enabletosavewebaccessinformationtoalogleor
Disable to ignore the information.
11.ClickPrev to return to the previous screen, Save to save the
changes, or Cancel to stop the procedure.
82
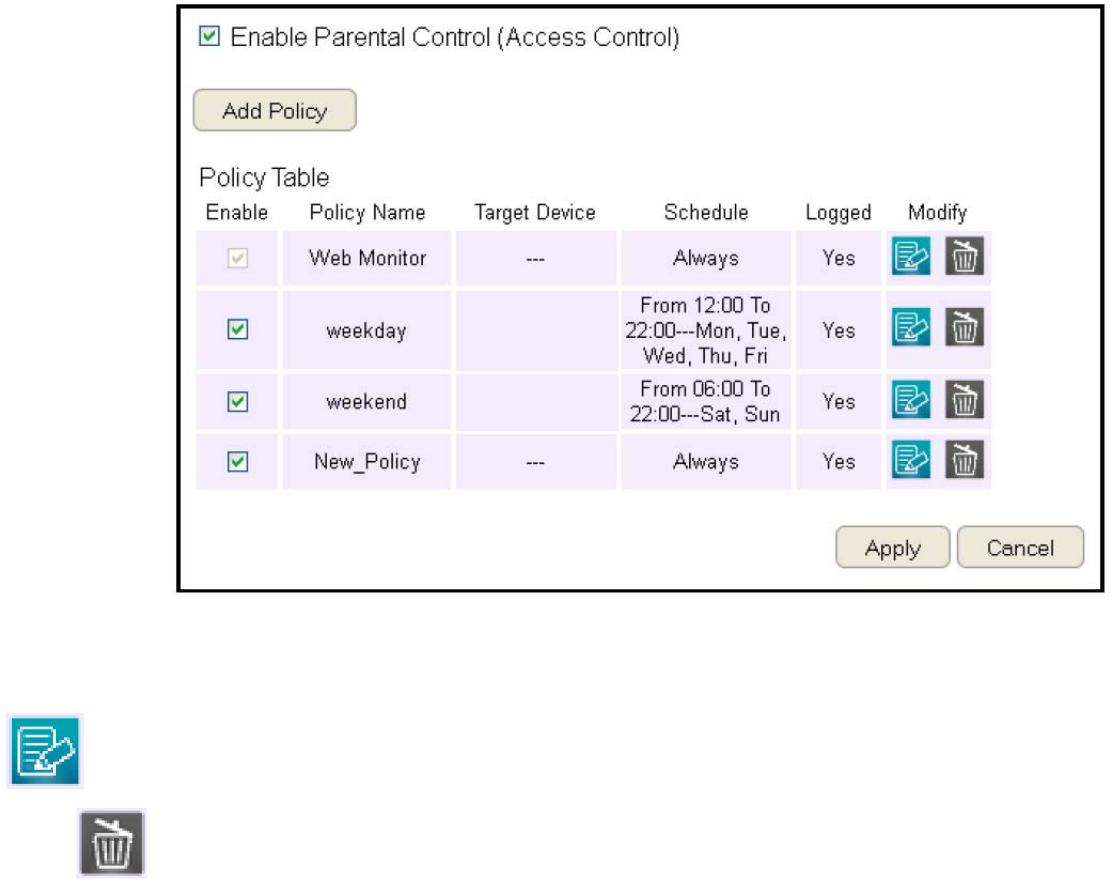
Viewing Parental Policies
Availableparentalcontrolpoliciesareshowninatableandeachpolicycanbeenabledordisabled,edited,anddeleted.
ToviewtheWebsettings,clickParental Control then select Web Monitor.
Enable
Clicktoenableordisablethecontrolpolicy.
Policy Name
Showsthecontrolpolicyname.
Target Device
ShowsthetargetdeviceMACaddressorIPaddress.
Schedule
Showsthecontrolpolicyschedule.
Logged
Showswhetherthecontrolpolicyisstoring
log information.
Modify
EditapolicybyclickingtheEdit Button.
DeleteapolicybyclickingtheDelete Button.
83
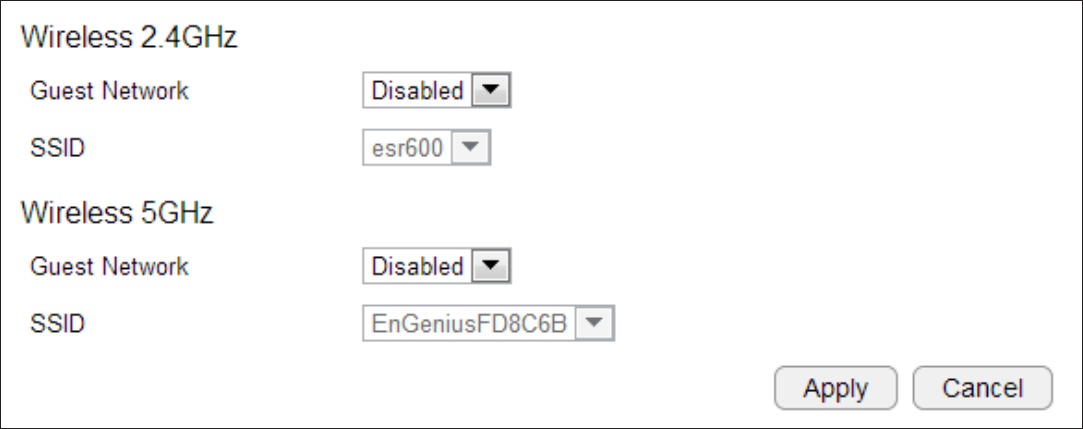
Guest Network
TheGuestNetworkfunctionenablesyoutoofferInternetconnectivitytovisitorsorguestswhilekeepingothernetworkeddevices
(computersandharddrives)andsensitivepersonalorcompanyinformationprivateandsecure.
TheGuestNetworkiscontrolledbytheWirelessSSIDfunction.WhentheGuestNetworkfunctionisenabled,theGuestSSIDcan
onlygettheinternetconnectionfromWAN,butcannotreachtheclientfromtheLANport.
Enabling the Guest Network
ToviewtheSelectionsettings,clickGuest Network then select Selection.
Guest Network
EnableorDisabletheGuestNetwork
function
Client Isolation
Guestclientsareisolatedandcannot
communicatewitheachother.
SSID
ChooseaSSIDfortheGuestNetwork
used.TheSSIDcanbedenedfromtheWirelesssettingpage.
ClickApply to save the settings or Cancel to discard changes.
84
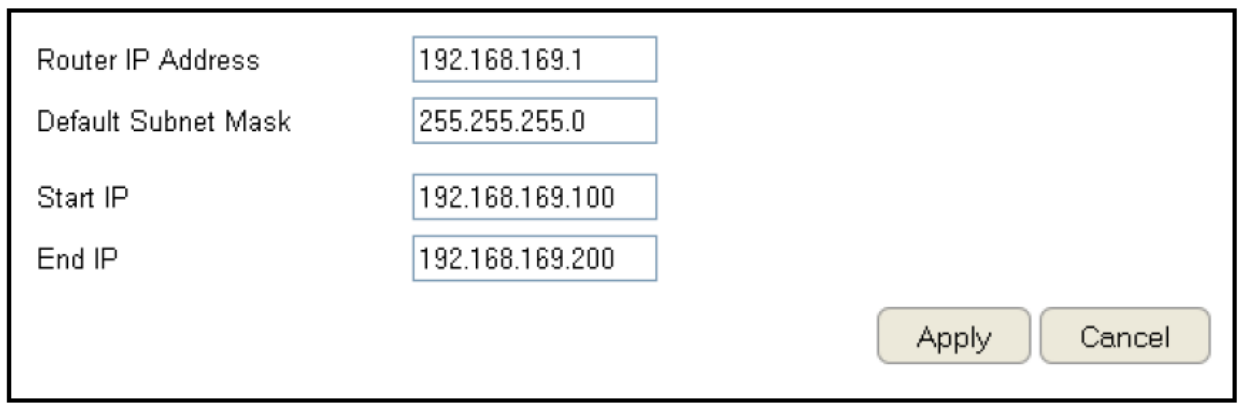
Conguring the DHCP Server Setting
TheGuestNetworkSSIDshouldbeonadifferentsubnetfromtherouter’sDHCPserver.
ToviewtheDHCPServerSettings,clickGuest Network then select DHCP Server Setting.
Router IP address
DenetherouterIPaddress
fortheGuestnetwork.
Default Subnet Mask
DenetheSubnetMaskIP
addressfortheGuest
network.
Start IP
TodenetheGuestnetworkDHCPserverstartIP.
End IP
TodenetheGuestnetworkDHCPserverendIP.
ClickApply to save the settings or Cancel to discard changes.
85
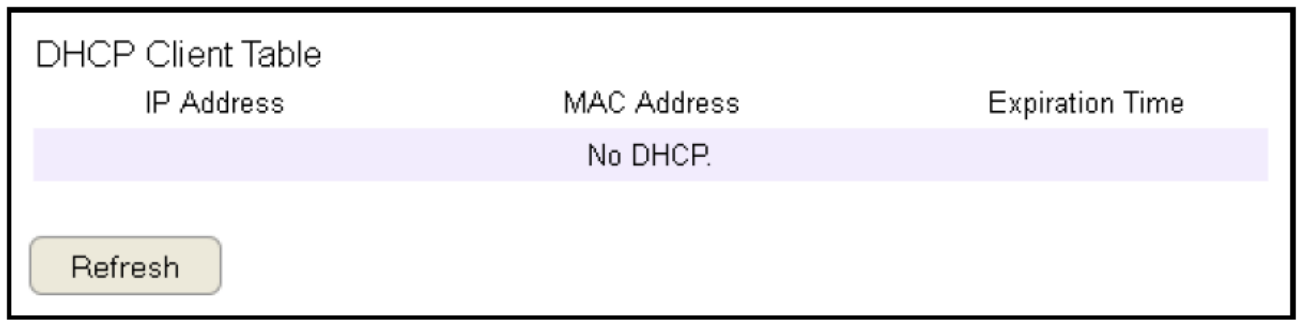
Viewing the DHCP Client List on the Guest Network
Showsthelistofguestclientsregisteredonthenetwork.
ToviewtheDHCPClientListsettings,clickGuest Network then select DHCP Client List.
DHCP Client Table
ShowstheIPaddress,
MACaddress,and
expirationtimeofeach
of the registered clients
on the list.
IP Address
The IP address of the guest client.
MAC Address
TheMACaddressoftheguestclient.
Expiration Time
Thetimethattheguestclient’sDHCPaddresswillexpireandmustberenewed.
ClickRefreshtorefreshtheviewofthelist.
86
IPv6
Thereareseveralconnectiontypestochoosefrom:AutoDetection,StaticIPv6,Autoconguration(SLAAC/DHCPv6),PPPoE,IPv6
inIPv4Tunnel,6to4,andLink-local.Ifyouareunsureofyourconnectionmethod,pleasecontactyourIPv6InternetServiceProvider.
Enabling IPv6 Settings
ToviewtheBasicsettings,clickIPv6thenselectBasic.
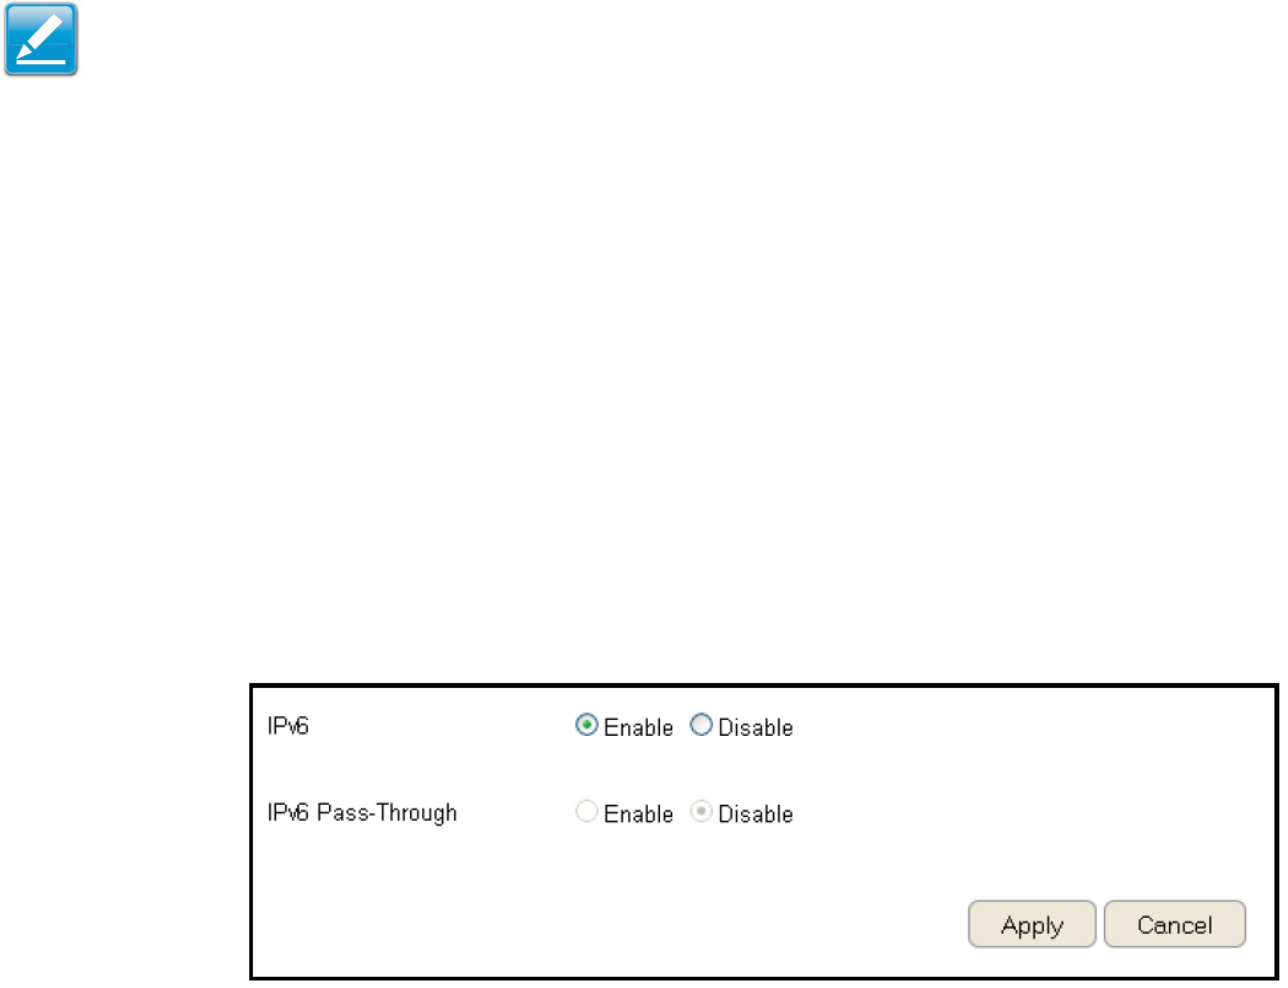
BeforeusingorconguringtheIPv6protocol,orIPv6passthrough,onanESRSeriesRouteryoumustenableit.
IPv6
SelectenabletoconguretheIPv6protocolontherouter.
IPv6 Passthrough
SelectenabletoallowIPv6passthroughfunctionality.
IPv6mustbedisabledtoenablethisfeature.
ClickApply to save the settings or Cancel to discard changes.
Note:IfyouareusingthePPPoEoption,youwillneedtoensurethatanyPPPoEclientsoftwareonyourcomputershasbeenremovedor
disabled.
87
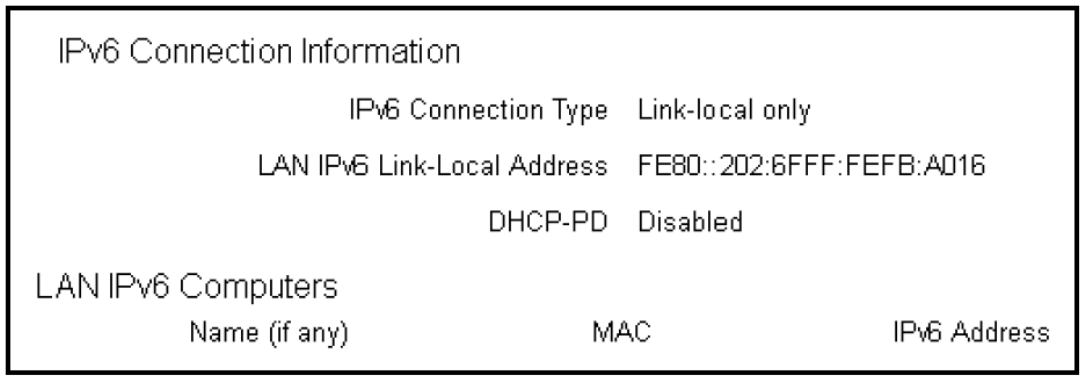
Viewing the IPv6 Connection Status
ToviewtheStatusinformation,clickIPv6thenselectStatus.
IPv6 Connection Information
ShowstheIPv6connectiontype,theLANIPv6link-localaddressandtheDHCP-PD.
LAN IPv6 Computers List
ShowsalistofnetworkcomputersandtheirIPv6connectioninformation.
88
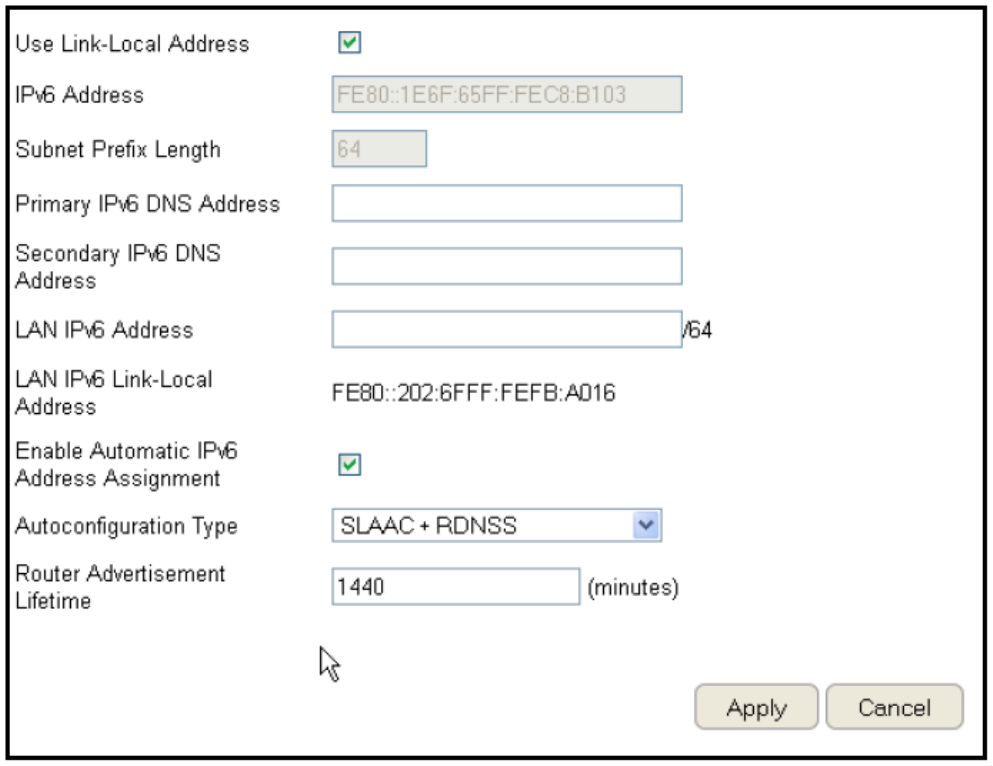
Conguring Static IPv6
ToviewtheStaticIPv6settings,clickIPv6 then select Static IPv6.
Use Link-Local Address
EnableordisableLANlink-localaddress.
IPv6 Address
EntertheLAN(local)IPv6addressfortherouter.
Subnet Prex Length
Enterthesubnetprexlength.
Default Gateway
Enterthedefaultgateway.
Primary IPv6 DNS Address
EntertheprimaryIPv6DNSaddress.
Secondary IPv6 DNS Address
EnterthesecondaryIPv6DNSaddress.
LAN IPv6 Address
EntertheLANIPv6address.
LAN IPv6 Link-Local Address
EntertheLANIPv6link-localaddress.
Enable Automatic IPv6 Address Assignment
EnableordisableautomaticIPv6addressassignment.
Autoconguration Type
Entertheautocongurationtype.(Default:SLAAC+RDNSS).
Router Advertisement Lifetime
EntertheIPv6AddressLifetime(inminutes).
ClickApply to save the settings or Cancel to discard changes.
89
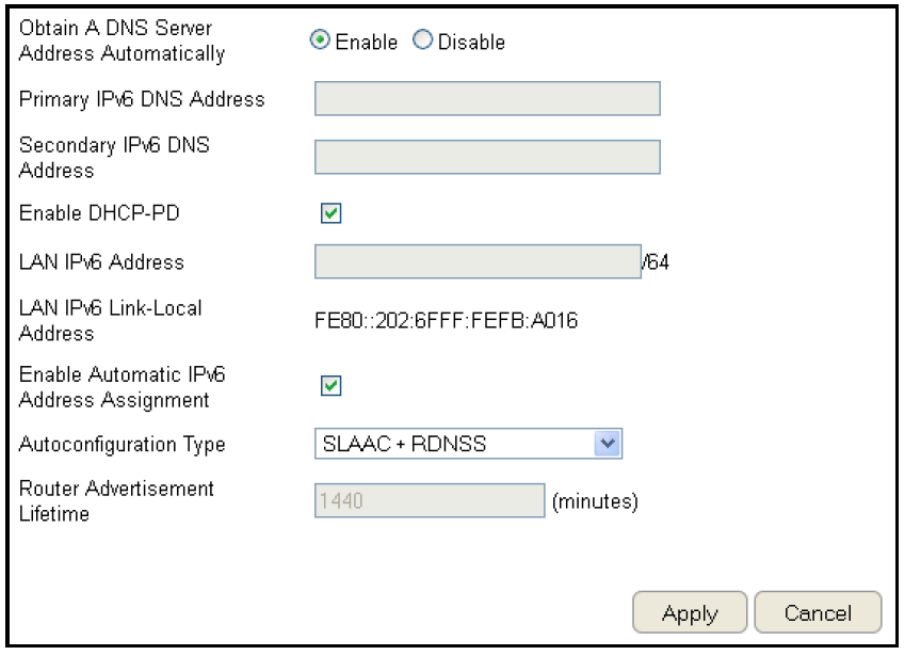
Setting Autoconguration
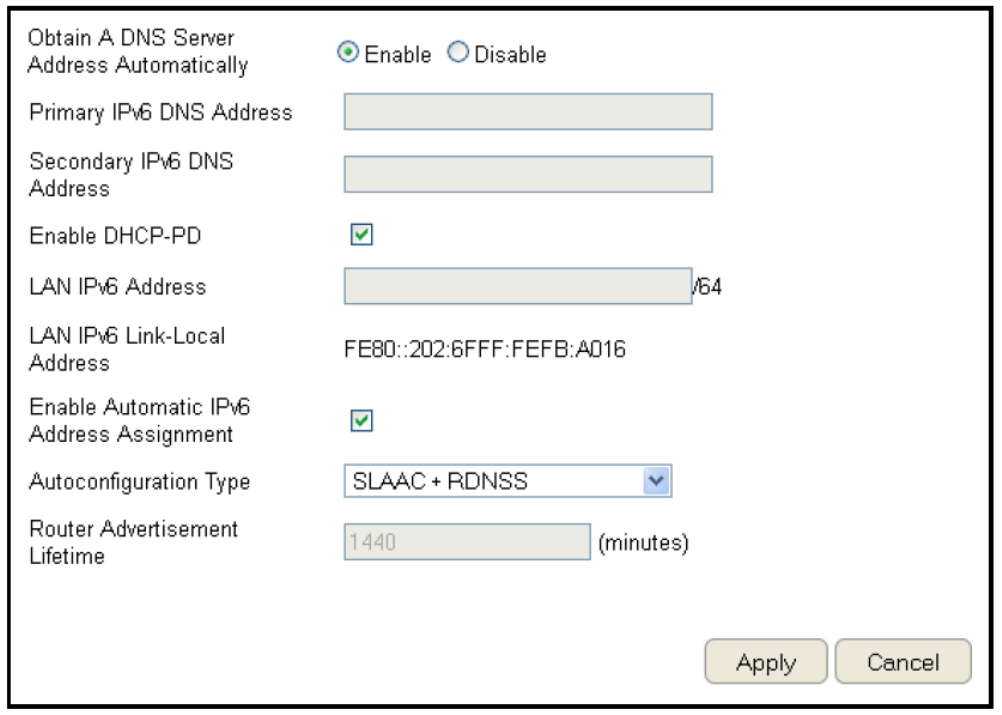
ToviewtheAutoCongurationsettings,clickIPv6 then select Auto Conguration.
Obtain A DNS Server Address Automatically
EnableordisableobtainingaDNSserver
automatically.
Primary IPv6 DNS Address
EntertheprimaryIPv6DNSaddress.
Secondary IPv6 DNS Address
EnterthesecondaryIPv6DNSaddress.
Enable DHCP-PD
EnableordisableDHCP-prexdelegation(PD).
LAN IPv6 Address
EntertheLANIPv6address.
LAN IPv6 Link-Local Address
EntertheLANIPv6link-localaddress.
Enable Automatic IPv6 Address Assignment
EnableordisableautomaticIPv6addressassignment.
Autoconguration Type
Entertheautocongurationtype.(Default:SLAAC+RDNSS)
Router Advertisement Lifetime
EntertheIPv6AddressLifetime(inminutes).
ClickApply to save the settings or Cancel to discard changes.
90
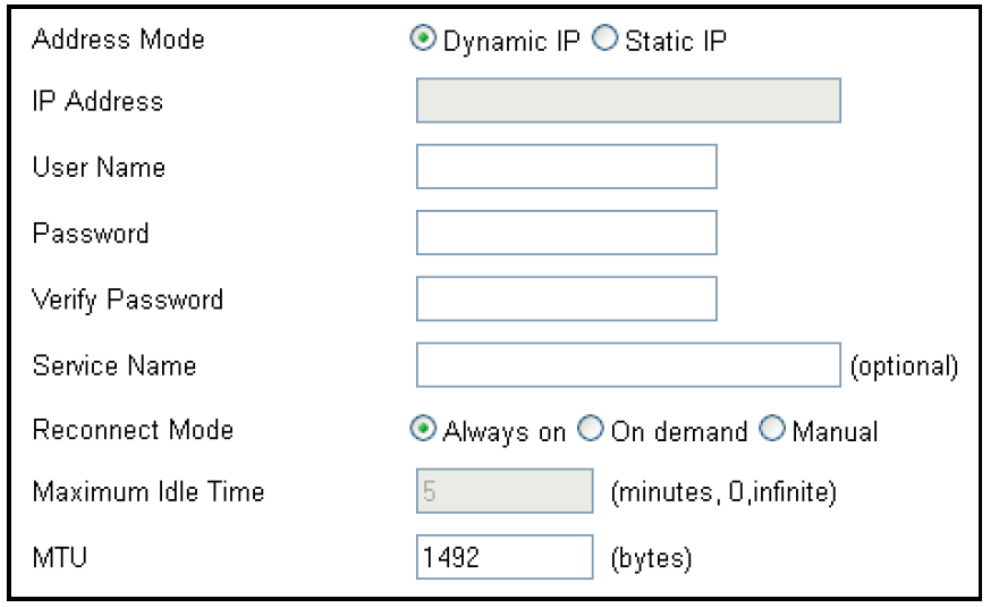
Conguring PPPoE
ToviewthePPPoEsettings,clickIPv6 then select PPPoE.
Address Mode
SelectStaticifyourISPassignedyoutheIPaddress,subnet
mask,gateway,andDNSserveraddresses.Inmostcases,select
Dynamic.
IP Address
EntertheIPaddress(StaticPPPoEonly).
User Name
Enter your PPPoE user name.
Password
EnteryourPPPoEpassword.
Verify Password
RetypetheyourPPPoEpassword.
Service Name
EntertheISPServiceName(optional).
Reconnect Mode
SelecteitherAlways-on,On-Demand,orManual.
Maximum Idle Time
Enteramaximumidletimeduringwhichthe
Internet connection is maintained during inactivity.
Todisablethisfeature,enableAuto-reconnect.
MTU
MaximumTransmissionUnit-youmayneedtochangetheMTU
foroptimalperformancewithyourspecicISP.1492isthe
defaultMTU.
91
Obtain A DNS Server Address Automatically
EnableordisableobtainingaDNSserverautomatically.
Primary IPv6 DNS Address
EntertheprimaryIPv6DNSaddress.
Secondary IPv6 DNS Address
EnterthesecondaryIPv6DNSaddress.
Enable DHCP-PD
EnableordisableDHCP-prexdelegation(PD).
LAN IPv6 Address
EntertheLANIPv6address.
LAN IPv6 Link-Local Address
EntertheLANIPv6link-localaddress.
Enable Automatic IPv6 Address Assignment
EnableordisableautomaticIPv6addressassignment.
Autoconguration Type
Entertheautocongurationtype.(Default:SLAAC+RDNSS)
Router Advertisement Lifetime
EntertheIPv6AddressLifetime(inminutes).
ClickApply to save the settings or Cancel to discard changes.
92
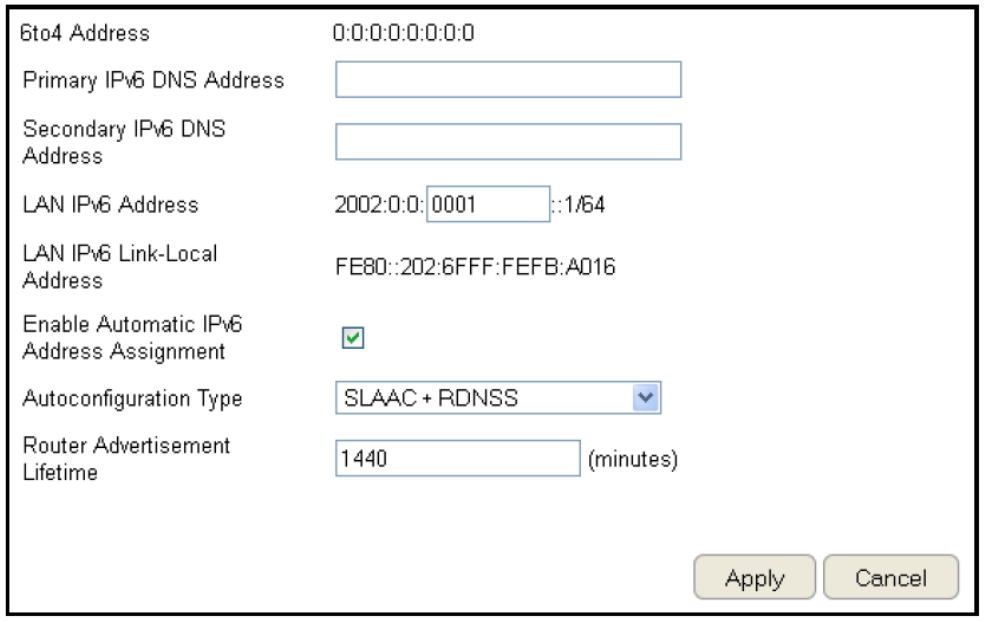
Conguring 6to4
Toviewthe6to4settings,clickIPv6 then select 6to4.
6to4 Address
Enterthe6to4IPaddress.
Primary IPv6 DNS Address
EntertheprimaryIPv6DNSaddress.
Secondary IPv6 DNS Address
EnterthesecondaryIPv6DNSaddress.
LAN IPv6 Address
EntertheLANIPv6address.
LAN IPv6 Link-Local Address
EntertheLANIPv6link-localaddress.
Enable Automatic IPv6 Address Assignment
EnableordisableautomaticIPv6address
assignment.
Autoconguration Type
Entertheautocongurationtype.(Default:SLAAC+RDNSS)
Router Advertisement Lifetime
EntertheIPv6AddressLifetime(inminutes).
ClickApply to save the settings or Cancel to discard changes.
93
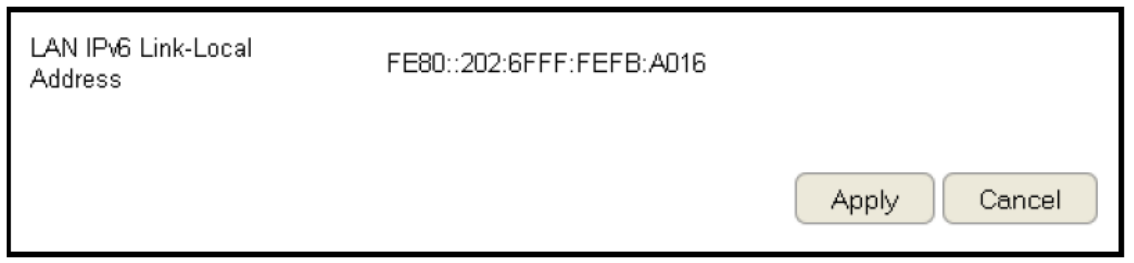
Viewing Local Connections
ToviewtheLinkLocalsettings,clickIPv6 then select Link Local.
LAN IPv6 Link-Local Address
EntertheLANIPv6link-localaddress.
ClickApply to save the settings or Cancel to discard changes.
94
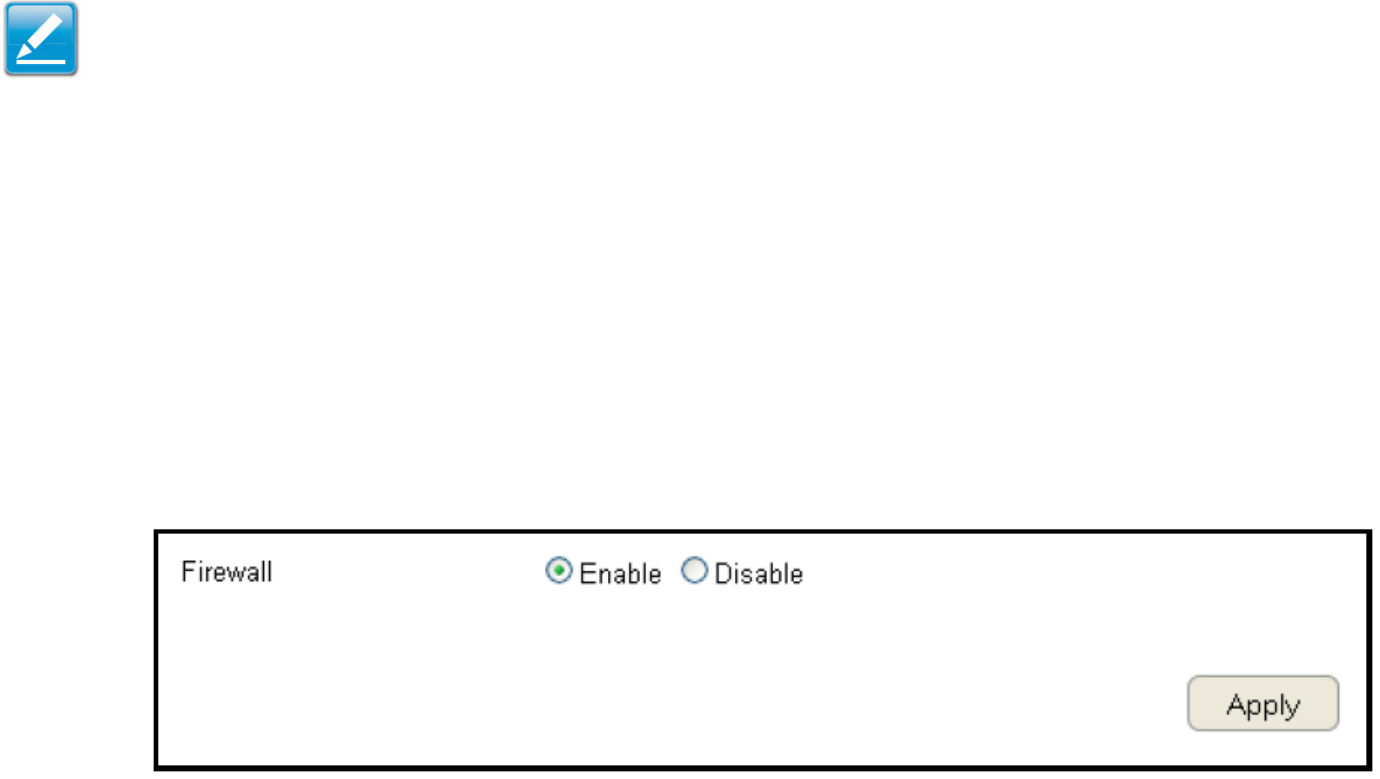
Firewall Setup
Conguring Basic Settings
ToviewtheBasicsettings,clickFirewallthenselectBasic.
TheESRSeriesRouterrewallautomaticallydetectsandblocksDenialofService(DoS)attacks.URLblocking,packetlteringand
statefulpacketinspection(SPI)arealsosupported.Thedetailsoftheattackandthetimestamparerecordedinthesecuritylog.
Firewall
EnableordisabletherewalloftheESRSeriesRouter.
ClickApply to save the settings or Cancel to discard changes.
Note:ThissectionappliestoClientRoutermode.

95
Conguring Advanced Settings
TheroutersupportsVPNpass-throughwhichallowsvirtualprivatenetworking(VPN)packetstopassthroughtherewall.
ToviewtheAdvancedsettings,clickFirewallthenselectAdvanced.
VPN L2TP Pass-through
ClickSelecttoallowanL2TPconnectionmethod
overaVPN.
VPN PPTP Pass-through
ClickSelecttoallowaPPTPconnectionmethod
overaVPN.
VPN IPSec Pass-through
ClickSelecttoallowanIPSecconnectionmethodoveraVPN.
IPv6 Pass-through
ClickSelecttoallowIPv6packetstopassthroughtherewall.
PPPoE Pass-through
ClickSelecttoallowaPPPoEpacketstopassthroughtherewall.
ClickApply to save the settings or Cancel to discard changes.
Note: VPNL2TPPass-through,VPNPPTPPass-through,and
VPNIPSecPass-throughareenabledbyfactorydefault.

96
VPN L2TP Pass-throughClickSelecttoallow
anL2TPconnectionmethodoveraVPN.
VPN PPTP Pass-throughClickSelecttoallowa
PPTPconnectionmethodoveraVPN.
VPN IPSec Pass-throughClickSelecttoallow
anIPSecconnectionmethodoveraVPN.
IPv6 Pass-throughClickSelecttoallowIPv6
packetstopassthroughtherewall.
PPPoE Pass-throughClickSelecttoallow
PPPoEpacketstopassthroughtherewall.
ClickApply to save the settings or Cancel to discard changes.
Note: VPNL2TPPass-through,VPNPPTPPass-through,andVPN
IPSecPass-throughareenabledbyfactorydefault.

97
Conguring Demilitarized Zone
ConguringadeviceontheLANasaDemilitarizedZone(DMZ)hostallowsunrestrictedtwo-wayInternetaccessforInternet
applications,suchasonlinevideogames,torunfrombehindtheNATrewall.TheDMZfunctionallowstheroutertoredirectall
packetsgoingtotheWANportIPaddresstoaparticularIPaddressontheLAN.Thedifferencebetweenthevirtualserverandthe
DMZfunctionisthatavirtualserverredirectsaparticularserviceorInternetapplication,suchasFTP,toaparticularLANclientor
server,whereasaDMZredirectsallpackets,regardlessoftheservice,goingtotheWANIPaddresstoaparticularLANclientorserver.
ADMZhostallowsacomputertohaveallitsconnectionsandportscompletelyopenduringdatatransmission.
ToviewtheDMZsettings,clickFirewall then select DMZ.
Enabling DMZ
ClickEnableDMZtoactivateDMZfunctionality.
Local IP Address
EnteranIPaddressofadeviceontheLAN.
ClickApply to save the settings or Cancel to discard changes.
WARNING!ThePCdenedasaDMZhostisnotprotectedbytherewallandisvulnerabletomaliciousnetworkattacks.
DonotstoreormanagesensitiveinformationontheDMZhost.

98
Conguring Denial of Service
Toenableblockingofdenialofservice(DoS)attacks,selecttheDoSoptionintheFirewallsection.DoSattackscanoodtheInternet
connectionwiththecontinuoustransmissionofdata.BlockingtheseattacksensuresthattheInternetconnectionisalwaysavailable.
ToviewtheDoSsettings,clickFirewall then select DoS.
Block DoS
EnableordisableblockingDoSattacks.
Discard Ping on WAN
ICMP(ping)packagesareblocked
whileBlockDoSisenabled.
EnableDiscardPingonWANiftheWANportisrequired.
ClickApply to save the settings or Cancel to discard changes.

99
Virtual Private Network Setup
AVirtualPrivateNetwork(VPN)providesasecureconnectionbetweentworemotelocationsortwousersovertheInternet.It
providesauthenticationtosecurelyencryptdatacommunicatedbetweenthetworemoteendpoints.TheShortModelNamesupports
upto5VPNtunnels,makingitidealforsmall-ofce/home-ofceusersoremployeeswhoworkfromhomebutneedtocommunicate
securelybacktothemainofce.
Viewing Status
ToviewtheStatussettings,clickVPN then select Status.
No. (Number)
ThesequencenumberoftheVPNtunnel.
Name
ThenameoftheVPNtunnel.
Type
ThetypeofVPNtunnel.
Gateway/Peer IP Address
TheVPNgatewayorpeerIPaddress.
Transmit Packets
Thenumberofpacketstransmitted.
Received Packets
Thenumberofpacketsreceived.
Uptime
TheamountoftimetheVPNhasbeenactive.
Select
Indicatesthedevice(s)thatcanhaveactionsperformedonthem.
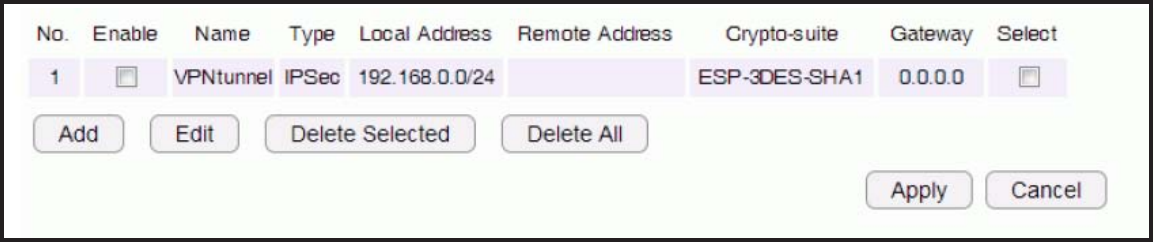
100
Conguring a VPN Tunnel Prole
ToviewtheStatussettings,clickVPNthenselectStatus.
ManuallycongureaVPNtunnelprole.
Creating a Prole
• ClickAdd tocreateanewVPNtunnelprole.
• ClickEdittoeditthesettingsoftheselectedprole.
• ClickDelete Selectedtodeletetheselectedprole.
• ClickDelete All todeleteallcurrentproles.
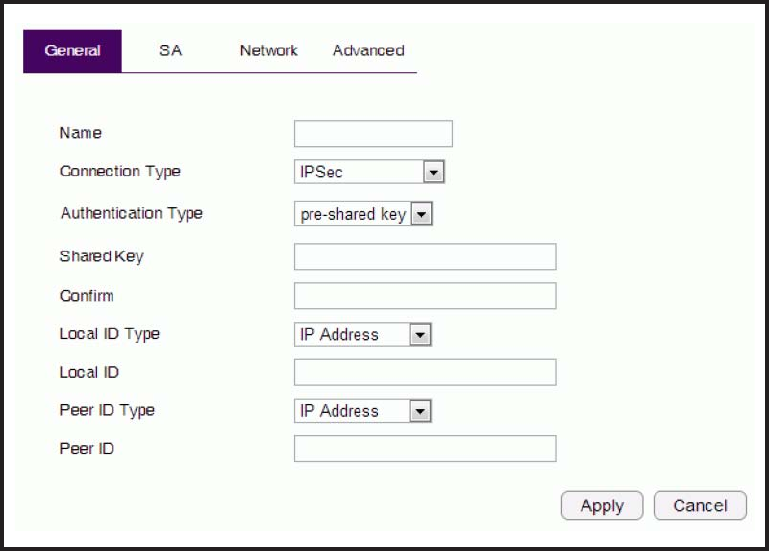
101
General
FormanuallyconguringaVPNtunnelprole.
Name: Enterthenameforthisprole.
Connection Type: Clickthedrop-downmenutoselectthe
connectiontype(PPTP,L2TP,IPSec,L2TPoverIPSec).
Authentication Type:Clickthedrop-downmenutoselectthe
authentication type.
Shared Key:Enterthesharedkeytobeusedforthisprole.
Conrm: Enterthesharedkeyasecondtimetoconrmthe
shared key.
Local ID Type:Clickthedrop-downmenutoselectthetypeof
IDusedforthisprole(IPaddress,DomainName,Email
Address).
Local ID: EnterthelocalIDdesignationbasedondenitiontype
fromLocalIDType,previouseld.
Peer ID type: Clickthedrop-downmenutoselectthetypeof
PeerIDforthisprole(IPaddress,DomainName,Email
Address).
Peer ID: EnterthePeerIDdesignationbasedondenitiontype
fromPeerIDType,previouseld.
Apply: ClickApply to save the changes.
Cancel: ClickCancel to delete the changes.
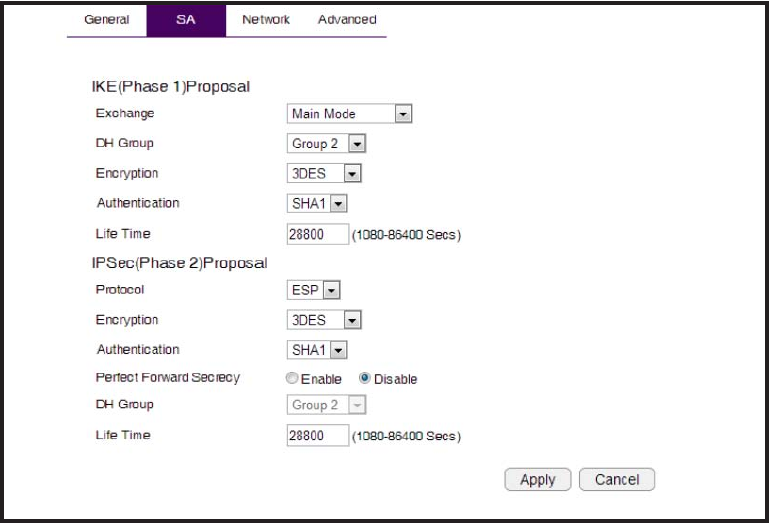
102
SA (Security Association)
IKE(InternetKeyExchange)isconguredintwonegotiations.
Phase1authenticatestheVPNClientstoeachotherby
conrmingthematchingPre-SharedKeywiththetwogateways.
IPSecisthePhase2oftheVPNprocess.
Manually conguring a VPN tunnel prole.
IKE (Phase 1) Proposal
Exchange:Clickthedrop-downmenutoselectthetypeof
exchange(MainMode,AggressiveMode).
DH Group:Clickthedrop-downmenutoselecttheDHgroup
(group1,group2,group5,group14).
Encryption: Clickthedrop-downmenutoselectthetypeof
encryption(DES,3DES,AES128,AES192,AES256).
Authentication: Clickthedrop-downmenutoselectthe
authenticationprotocol(MD5,SHA1).
Life Time: Enter the life time value for Phase 1. The life time
valueshouldbegreaterthanPhase2(IPSec).86400sec.(1day)
is a common default and is a normal value for Phase 1.
IPSec (Phase 2) Proposal
Protocol: Clickthedrop-downmenutoselecttheprotocoltype
(ESP,AH)
Encryption: Clickthedrop-downmenutoselectthetypeof
encryption(DES,3DES,AES128,AES192,AES256).
Authentication: Clickthedrop-downmenutoselectthe
authenticationprotocol(MD5,SHA1).
Perfect Forward Secrecy (PFS):SelectenabletoenablePFS.A
freshDHkeyisgeneratedduringIKEphaseIIandrenewedfor
eachkeyexchangetoeliminatedependenciesbetweenthe
keys.
DH Group: Clickthedrop-downmenutoselecttheDHgroup
(group1,group2,group5,group14).
Life Time: Enter the life time value for Phase 2. The life time
valueshouldbesmallerthanPhase1(IKE).3600sec.(1hour)
is a common value for Phase 2.
Apply: ClickApply to save the changes.
Cancel:ClickCancel to delete the changes.
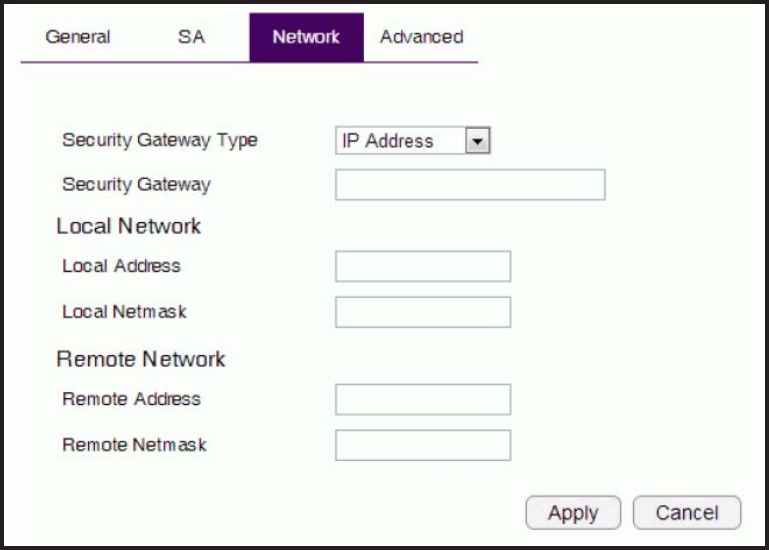
103
Network
Manually conguring a VPN tunnel prole.
Security Gateway Type:Clickthedrop-downmenutoselectthe
SecurityGatewayType(IPAddress,DomainName)
Security Gateway: Enterthegatewayvalueasdenedin
SecurityGatewayType.
Local Network
Local Address: EntertheIPaddressofthelocalPC.
Local Netmask: EnterthenetmaksofthelocalPC.
Remote Network
Remote Address: EntertheIPaddressoftheremotePC.
Remote Netmask: EnterthenetmaskoftheremotePC.
Apply: ClickApplytosavethechanges.
Cancel: ClickCanceltodeletethechanges.

104
Advanced
Manually conguring a VPN tunnel prole.
NAT Traversal: SelectenabletoenabletheNATTraversal
functioninordertohidetheprivateIPaddressfrompublicview.
Note: ServicessuchasVoIPrequiretheuseofaprivate
IP address.
Dead Peer Detection:
Apply: ClickApplytosavethechanges.
Cancel: ClickCanceltodeletethechanges.
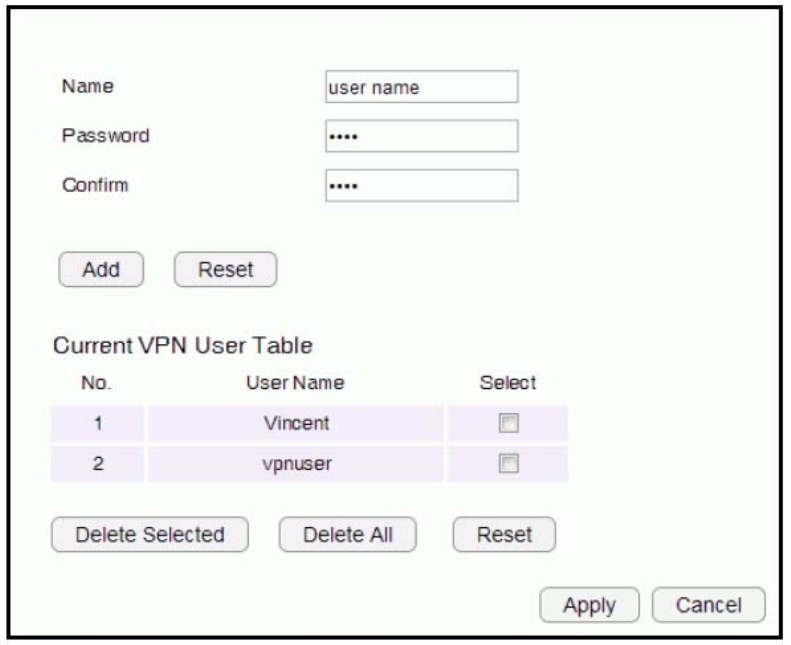
105
Conguring a User Setting
TheUserSettingfunctionallowsyoutocreateuserproles
inordertosetuploginaccesstotheVPNservice.
Name
Enterthenameofthenewuserprole.
Password
Enterthepasswordfortheusername.
Conrm
Enterthepasswordasecondtimetoconrmthesetting.
Add
ClickAddtoaccepttheproleandaddittotheCurrentVPNUser
Table.
Reset
ClickResettoclearthenewsettings.
Current VPN User Table
DisplaystheUserID,UserNameandSelectionstatus.
Delete Selected
Clicktodeletetheselecteduserprole.
Delete All
Clicktodeleteallthecurrentuserproles.
Reset
ClicktocleartheselectionsfromtheCurrentVPNUserTable.
Apply
Clicktoacceptsavethenewsettings.
Cancel
Clicktoclearthenewchanges.
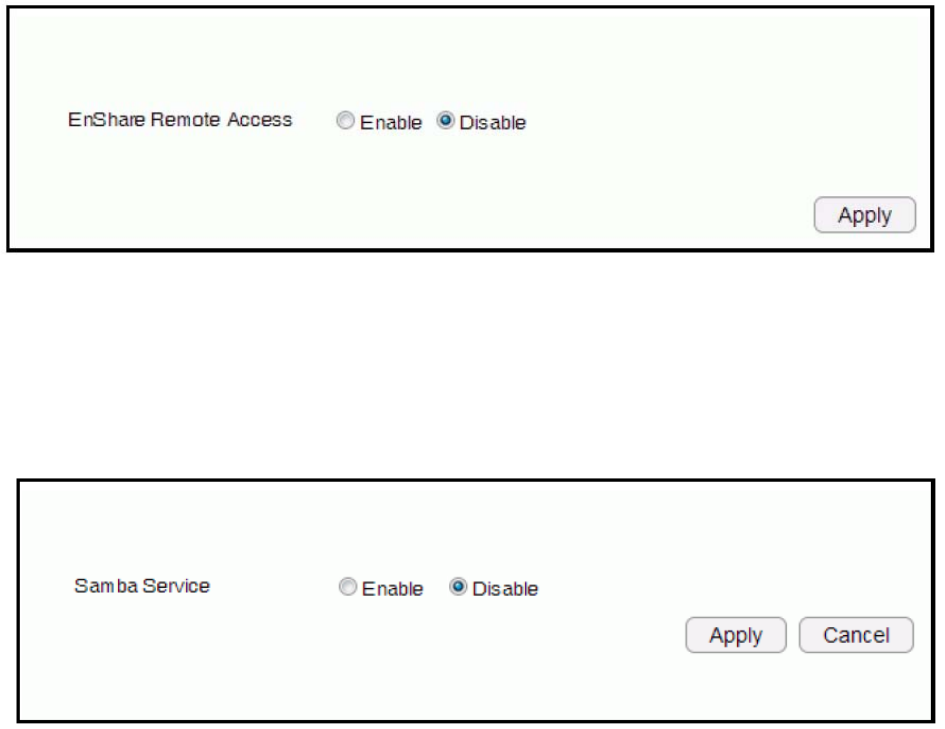
106
USB Port
TheEMR3000routerisequippedwithaUSBportforconnectingaharddrivesomediacontentcanbeaccessedortransferredto
otherdevicesinthehomeordevicesawayfromhome.
Viewing EnShare
TheEnSharefeatureallowsyoutoaccessmedia
contentstoredonaUSBharddriveconnectedtothe
router’sUSBportinthehomeandwhenyouareaway
fromhomewhenyouhaveaccesstotheInternet.
By default the EnShare feature is enabled.
To view the EnShare settings or disable EnShare, click USB Port then select EnShare.
1. Select DisabletodisabletheEnSharefeature.
2.ClickApplytosavethenewsettings.
File Sharing
TheFileSharingfunctionallowsyoutoprovideusers
theabilitytosharelesoverthenetworkthroughthe
Sambaservice.By default the EnShare feature is
enabled.
ToviewtheFileSharingsettings,clickUSB Port then select File Sharing.
1. Select EnabletoenabletheSambaServicefunction.
2.ClickApplytosavethenewsettings,orclickCancel to delete the changes.
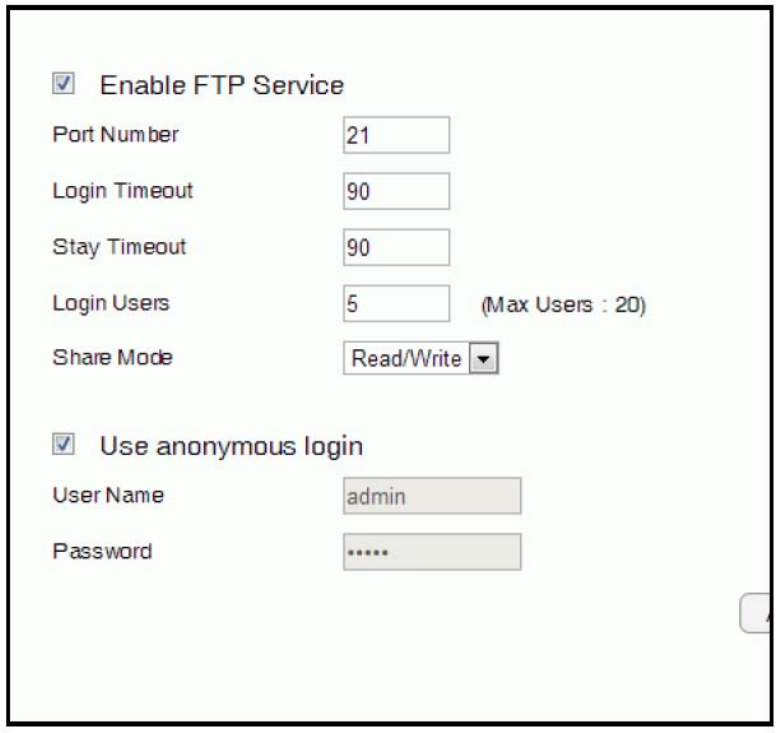
107
Viewing File Server
TheFileServerfunctionallowsyoutoprovidenetworkusersFTPaccesstosharedUSBstoredles.
ToviewtheFileServersettings,clickUSB Port then select File Server.
Enable FTP Service
SelectthistoenabletheFTPservicetosharelesontheUSB
device
Port Number
Denetheportnumber(default:21)toopenfortheFTPservice.
Login Timeout
Denetheperiodofinactivity(default:90)beforeauseris
logged out.
Stay Timeout
Denethelockoutperiod(default:90)beforeauserisallowed
to attempt a login.
Login User
Denethenumberofconcurrentuserstoaccesstheservice
(Max:20users)
Share Mode
Denethetypeofsharepriviledge:Read/Write,Readonly.
Use Anonymous Login
Selectthistoallowanonymoususerlogin.
User Name
Enter the user name to login to the FTP service.
Password
EnterthepasswordtologintotheFTPservice.
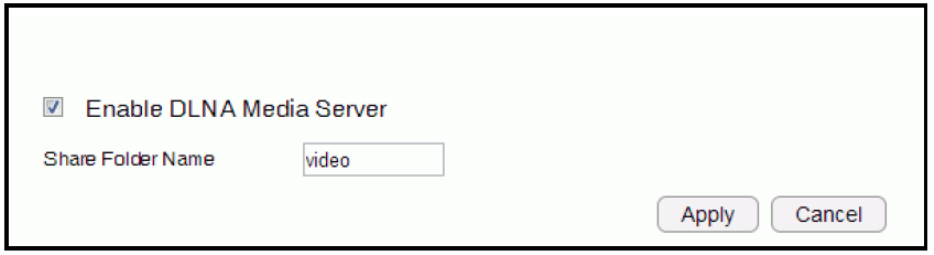
108
Viewing DLNA
TheDLNAMediaServerfunctionallowsyoutotransferphotos,musicandvideobetweennetworkeddevicesthroughtheESRSeries
Router.
ToviewtheDLNAsettings,clickUSB Port then select DLNA.
1. Select EnabletoenabletheDLNAMediaServerfunction.
2.IntheShareFolderName,enterthenameofthesharedfolder.
3.ClickApplytosavethenewsettings,orCancel to clear the changes.

109
Advanced Network Settings
NAT Setup
NetworkAddressTranslation(NAT)allowsusersontheLANtoaccesstheInternetthroughasinglePublicIPAddressormultiple
PublicIPAddresses.NATprovidesrewallprotectionfromhackerattacksandallowsformappingLANIPaddressestoWANIP
addresseswithkeyservicessuchaswebsites,FTP,andvideogameservers.
ToviewtheNATsettings,clickAdvanced then select NAT.
NAT
EnableorDisabletheNAT.
Network Turbine
EnableorDisablethenetworkturbine.
Note: Thenetworkturbineisdesignedtoimprovetherouter’sperformance.Thereisabout20~30%improvementwhenthe
networkturbineisenabled.
Note: ThenetworkturbinemaycauseproblemswiththeInternetconnection.Disablethenetworkturbinefunctionifyouexperience
connection issues.
ClickApply to save the settings or Cancel to discard changes.
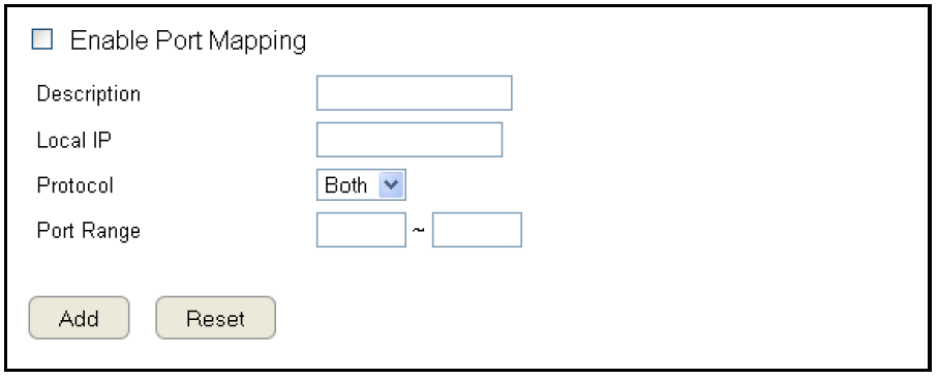
110
Port Mapping Setup
PortMappingallowsyoutoredirectaparticularrangeofserviceportnumbersfromtheWANtoaparticularLANIPaddress.
ToviewthePortMappingsettings,clickAdvanced then select Port Mapping.
Enable Port Mapping
ClickEnablePortMappingtoactivateportmapping.
Description
Enternotesordetailsaboutthemappedportrange
conguration.
Local IP
EnterthelocalIPaddressoftheserverbehindthe
NATrewall.
Protocol
Selecttheprotocoltouseformappingfromthefollowing:TCP,UDPorBoth.
Port Range
Entertherangeofportstobeforwarded.
ClickAddtoappendanewdevicetothelistorReset to discard changes.
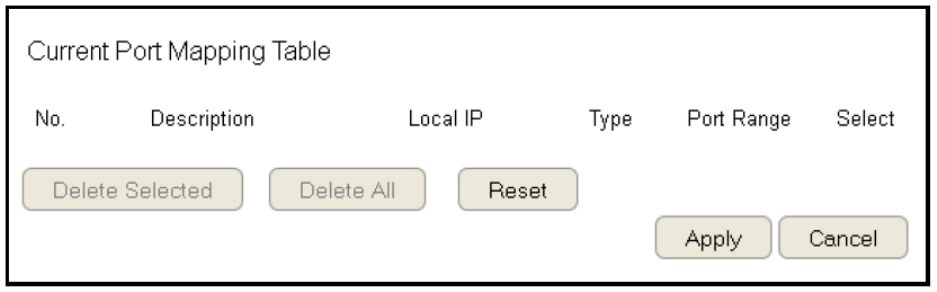
111
Current Port Mapping Table
Displaysalistofmappedportrangesinuseonthenetwork.
No. (Number)
Thesequencenumberofthemappedportrange.
Description
Notesordetailsaboutthemappedportrange.
Local IP
IP address of the server for the mapped port range.
Type
TheprotocolusedtocommunicatewiththeWANportsandLAN
server.
Port Range
The range of mapped ports.
Select
Indicatesthedevice(s)thatcanhaveactionsperformedonthem.
ClickDelete Selected to remove selected devices from the list.
ClickDelete All to remove all devices form the list.
ClickReset the discard changes.
ClickApply to save the settings or Cancel to discard changes.

112
Port Forwarding Setup
PortforwardingenablesmultipleserverapplicationsonaLANtoserveclientsonaWANoverasingleWANIPaddress.Therouter
acceptsincomingclientpackets,ltersthembasedonthedestinationWAN,orpublic,portandprotocolandforwardsthepacketsto
theappropriateLAN,orlocal,port.UnliketheDMZfeature,portforwardingprotectsLANdevicesbehindtherewall.
ToviewthePortForwardungsettings,clickAdvanced then select Port Forwarding.
Enable Port Forwarding
ClickEnablePortForwardingtoactiveportforwarding.
Description
Enternotesordetailsabouttheforwardedportconguration.
Local IP
EnterthelocalIPaddressoftheserverbehindtheNATrewall.
Protocol
Selecttheprotocoltouseformappingfromthefollowing:TCP,
UDPorBoth.
Local Port
EntertheLANportnumberthatWANclientpacketswillbe
forwardto.
Public Port
EntertheWANportnumberthatclientswillsendtheirpackets
to.
ClickAddtoappendanewcongurationtothetableorReset
to discard changes.
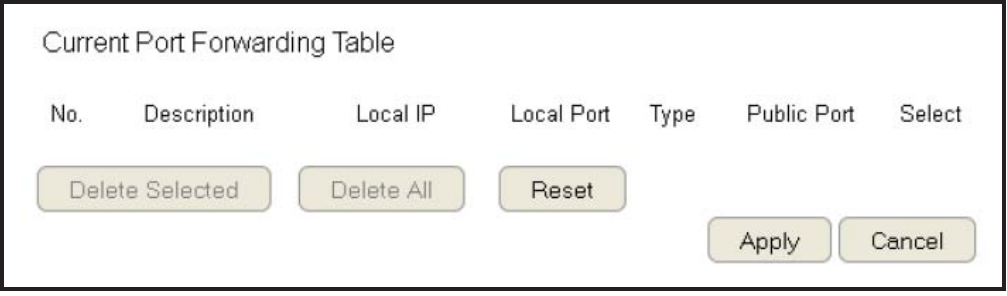
113
Current Port Forwarding Table
Thetableofcurrentportforwardingcongurations.
ClickDelete Selected to remove selected devices from the list.
ClickDelete All to remove all devices form the list.
ClickReset the discard changes.
ClickApply to save the settings or Cancel to discard changes.
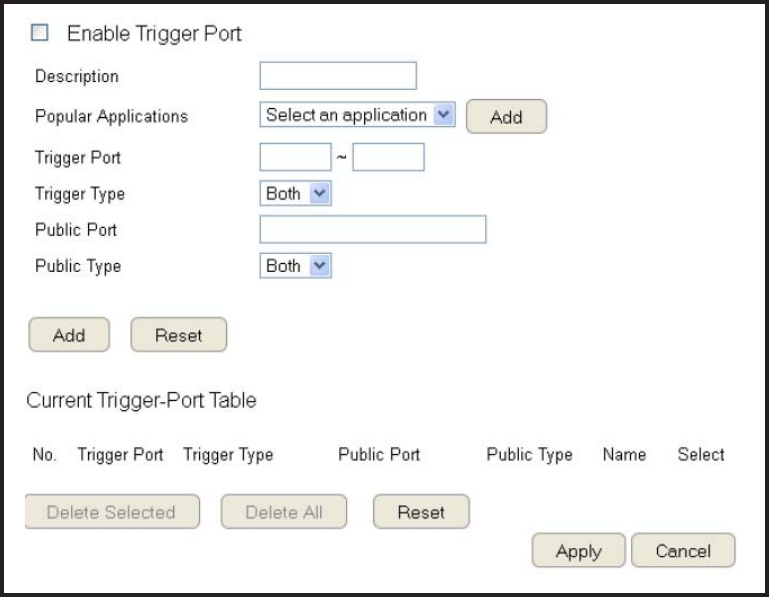
114
Port Triggering Setup
Someapplications,suchasonlinegames,videoconferencingandVoIPtelephony,requiremultipleportsforinboundandoutbound
trafc.Ifanapplicationrequiressimultaneoususeofincomingandanoutgoingports,congureporttriggeringtomapalocalportor
rangeofportstoaspecicpublicport.Sendingpacketsoutoverthelocalporttriggerstheroutertoopenanincominglocalportthat
ismappedtothesamepublicportandapplicationastheoutgoinglocalport(s).Thelocalapplicationcancommunicateoverthe
incomingandoutgoingportswithouttheneedforcreatingaxedaddress.
ToviewthePortTriggeringsettings,clickAdvanced then select Port Triggering.
Enable Port Triggering
ClickEnableTriggerPorttoactivateporttriggering.
Description
Enternotesordetailsabouttheporttriggeredconguration.
Popular Applications
Selectadefaultapplicationoraddanewone.
Trigger Port
Entertheapplication’soutboundportnumber(s).
Trigger Type
Selecttheprotocoltouseforporttriggeringfromthefollowing:
TCP,UDPorBoth.
Public Port
Entertheinboundport(s)fortheapplicationinthefollowing
format:2300-2400or47624.
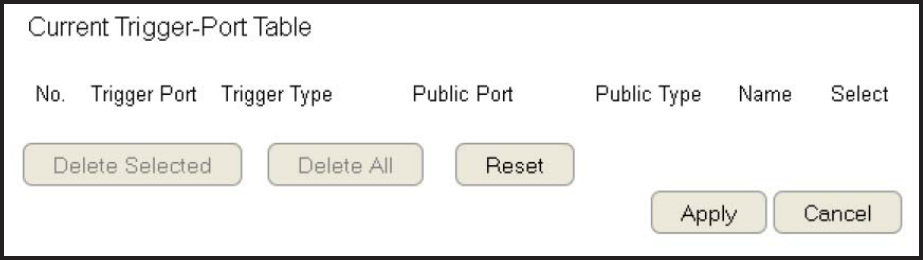
115
Public Type
Selecttheprotocoltousefortheinboundportfromthefollowing:TCP,UDPorBoth.
ClickAdd toappendanewcongurationtothetableorReset to discard changes.
Current Port Triggering Table
Thelistofcurrentporttriggeringcongurations.
ClickDeleteSelectedtoremoveselecteddevices
from the list.
ClickDelete All to remove all devices form the list.
ClickReset the discard changes.
ClickApplytosavethesettingsorCanceltodiscardchanges.
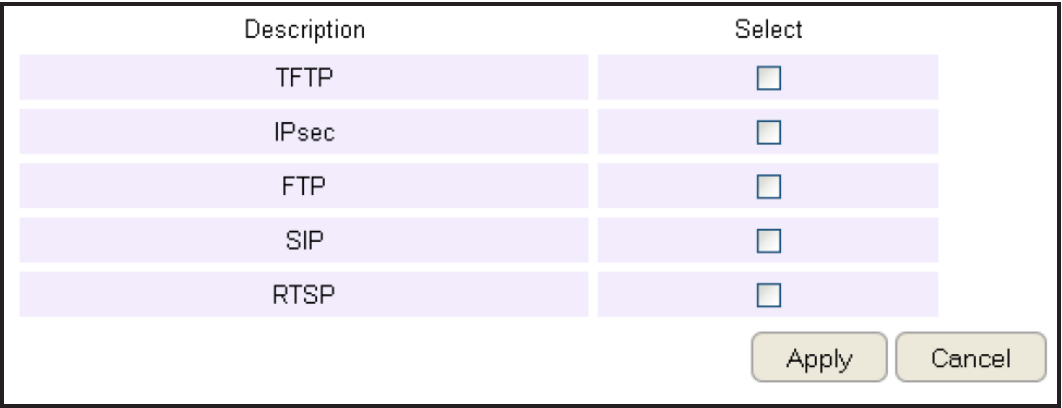
116
Application Layer Gateway Setup
TheALG(ApplicationLayerGateway)servesasawindowbetweencorrespondentapplicationprocessessothattheymayexchange
information on an open environment.
ToviewtheALGsettings,clickAdvanced then select ALG.
SelectthelistedapplicationsthatneedALGsupportandthentherouterwillauthorizethemtopassthroughtheNATgateway.
ClickApply to save the settings or Cancel to discard changes.

117
Universal Plug and Play Setup
UPnPhelpsinternetdevices,suchasgamingandvideoconferencing,toaccessthenetworkandconnecttootherregisteredUPnP
devices.
ToviewtheUPnPsettings,clickAdvanced then select UPnP.
ClickEnable or Disable to activate or deactivate UPnP.
ClickApply to save the settings or Cancel to discard changes.

118
Internet Group Multicast Protocol Setup
InternetGroupMulticastProtocol(IGMP)isanetwork-layerprotocolusedtoestablishmembershipinamulticastgroup.
ToviewtheIGMPsettings,clickAdvanced then select IGMP.
ClickEnable or Disable toactivateordeactivateIGMP.
ClickApply to save the settings or Cancel to discard changes.
Note: DisablingtheMulticastfunctionmaycauseIPbasedmultimediadevices,suchasanIP-STBorOTTbox,maylose
connectivitywiththemediastreamingserver.
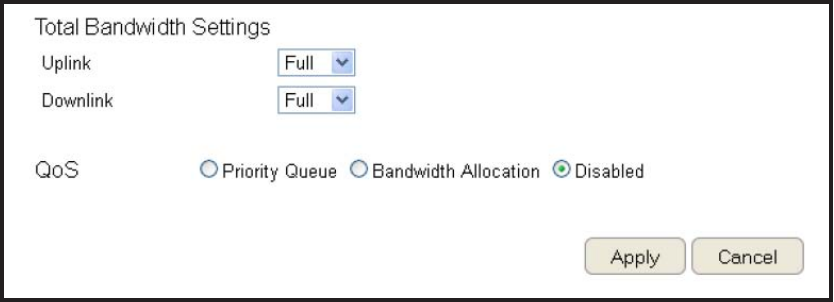
119
Quality of Service Setup
QoScanprioritizebandwidthusesuchasvideostreaming,onlinegaming,VoIPtelephonyandvideoconferencingtoensurestable
andefcientnetworkperformance.
ToviewtheQoSsettings,clickAdvanced then select QoS.
Total Bandwidth Settings
UplinkSelectthemaximumbandwidthspeedforoutbound
trafc.
DownlinkSelectthemaximumbandwidthspeedforinbound
trafc.
Note:ClickDisabled ifyoudonotwanttoprioritizeanydataorprotocol.
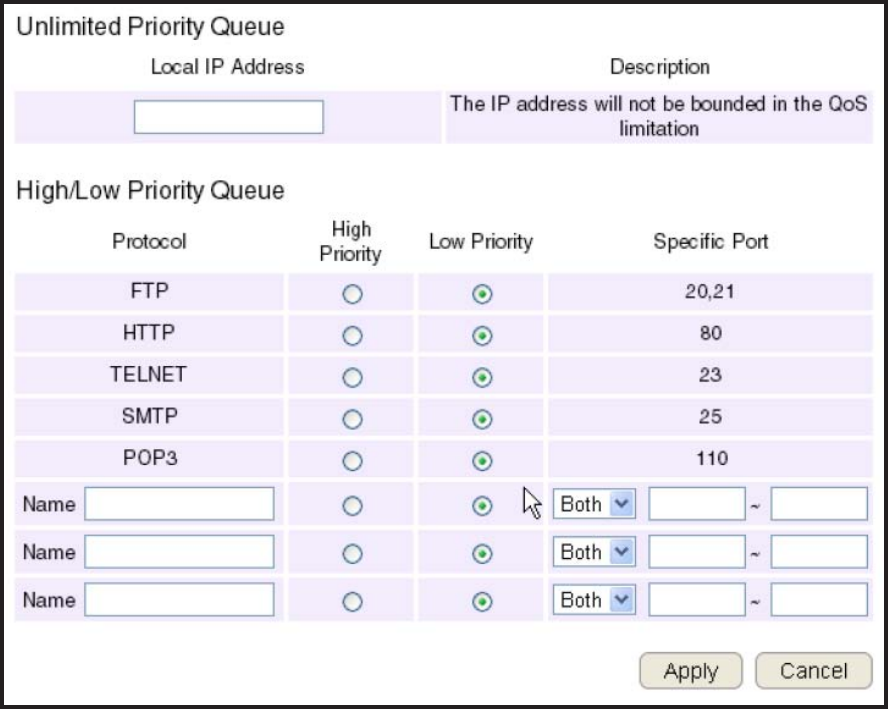
120
Priority Queue
Setnetworkresourceusagebasedonspecicprotocolsorportranges.Incomingpacketsareprocessedbasedontheprotocols’
positionwithinthequeue.
Unlimited Priority Queue
Local IP Address
EnterthelocalIPaddressofadeviceonthenetwork.
Thisdevice’sactivityisnotrestrictedbytheQoSfeature.
High/Low Priority Queue
Specify the priority for different protocols. Additional
protocolsandportrangescanbeadded.
ClickApply to save the settings or Cancel to discard
changes.
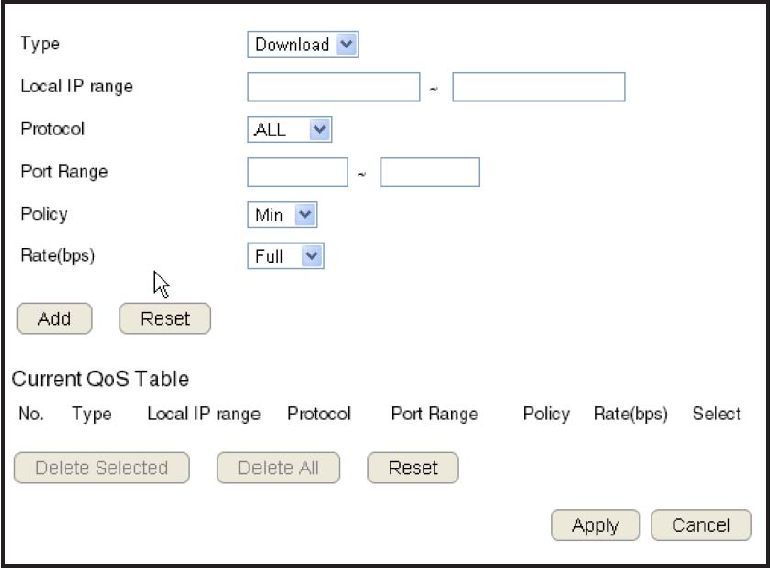
121
Bandwidth Allocation
Setnetworkresourceusage,forinboundandoutboundtrafc,basedonlocalIPandportranges.
Type
SelectDownloadorUploadtospecicthedirectionofpacket
trafc.
Local IP Range
EnterthelocalIPrangeofthecurrentconguration.
Protocol
Selecttheprotocoltomanageforthecurrentconguration.
Port Range
Enterthelocalportrangeofthecurrentconguration.
Policy
SelectMinorMaxtospecifythetypeofcongurationpolicy.
Rate (bps)
Selectthebandwidthrate,inbitspersecond(bps),ofthecurrentconguration.
ClickAdd tosavethesettingsandlistthecongurationinthe
CurrentQoStableorReset the discard changes.
ClickApply to save the settings or Cancel to discard changes.
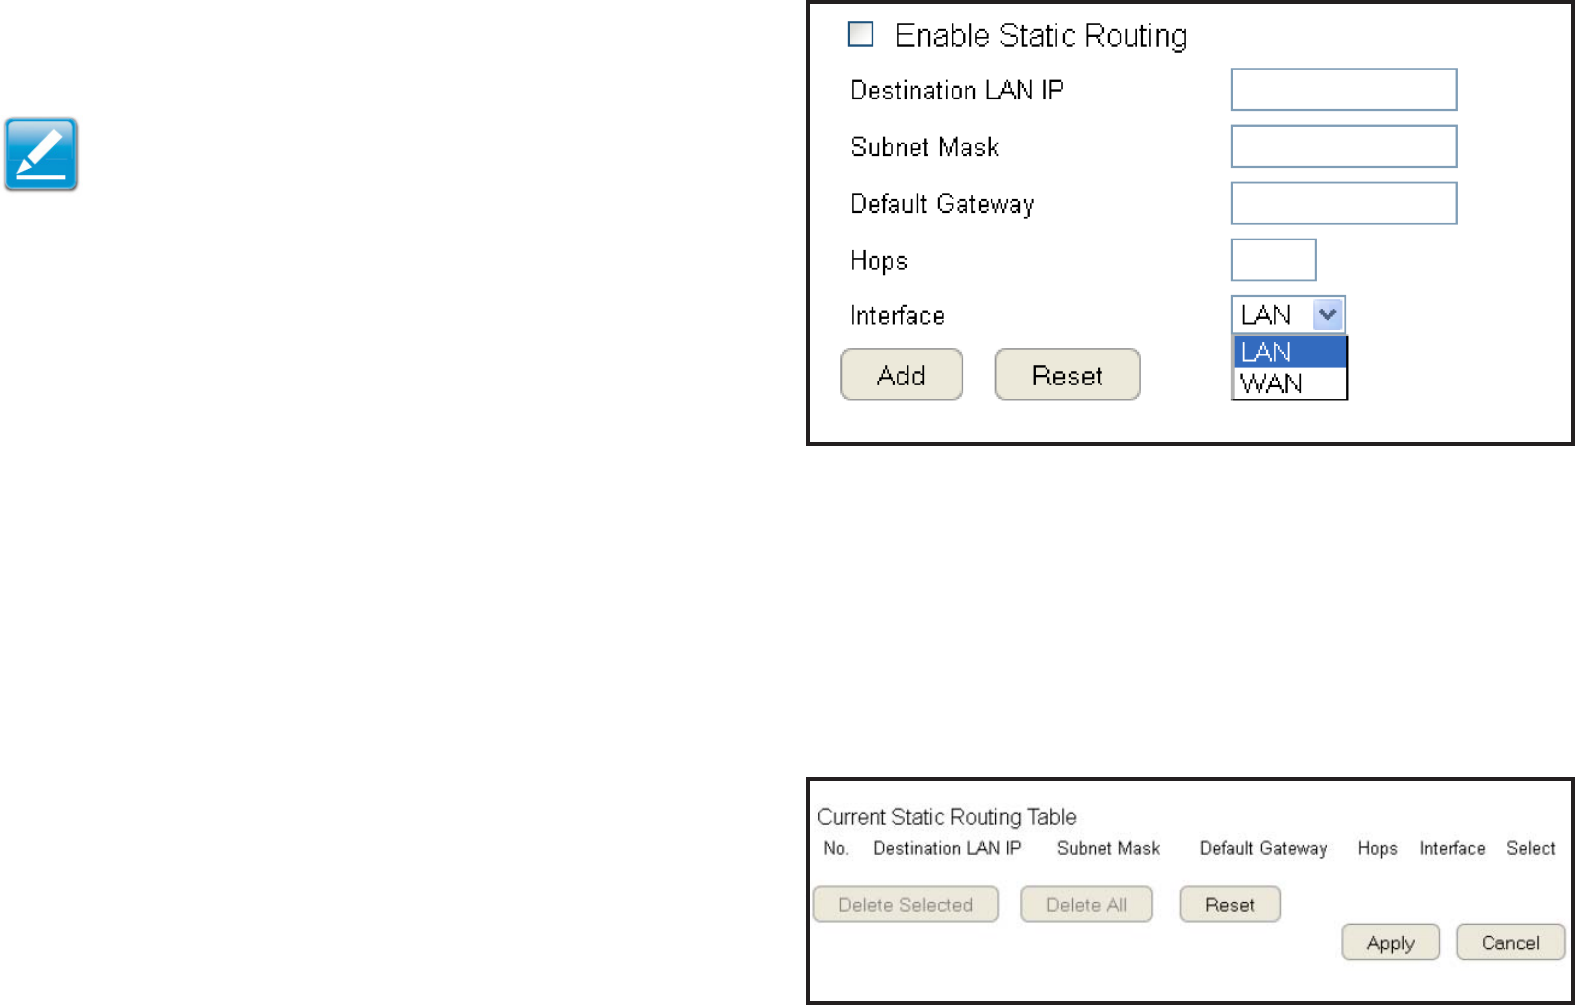
122
Routing Setup
Typicallystaticroutingdoesnotneedtobesetupbecausetherouterhasadequateroutinginformationafterithasbeencongured
forInternetaccess.Staticroutingisonlynecessaryiftherouterisconnectedtonetworkunderadifferentsubnets.
ToviewtheRoutingsettings,clickAdvanced then select Routing.
Note: Toenableastaticrouting,NATmustbedisabled.
Iftherouterisconnectedwithanetworkunderthedifferent
subnet,theroutingsetupallowsthenetworkconnectionwithin
twodifferentsubnets.
Enable Static Routing
ClickEnableStaticRoutingtoactivatethefeature.
Destination LAN IP
EntertheLANIPaddressofthedestinationdevice.
Subnet Mask
EntertheSubnetMaskofthedestinationdevice.
Default Gateway
EnterthedefaultgatewayIPaddressforthedestinationdevice.
Hops
Enterthemaximumnumberofhopswithinthestaticrouting
thatapacketisallowedtotravel.
Interface
SelectLANorWANastheinterface.
ClickAddtosavethesettingsandlistthecongurationinthe
CurrentStaticRoutingtableorReset the discard changes.
View and select devices in the Current Static Routing Table.
ClickDelete Selected or Delete All to remove devices
fromthetable.ClickReset to stop.
ClickApply to save the settings or Cancel to discard changes.
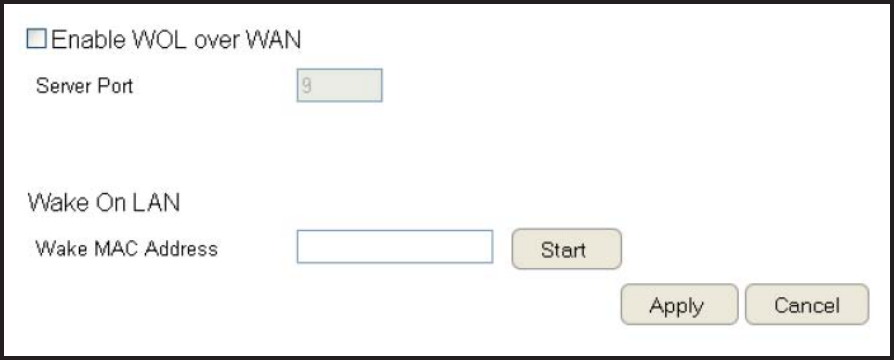
123
Wake on LAN Setup
WakeonLANsetup(WOL)allowstheadministratortoactivateacomputeroverthenetwork.
ToviewtheWOLsettings,clickAdvanced then select WOL.
Enabling WOL over WAN
ClickEnable WOL over WAN to activate the feature.
Server Port
Enter the server port of the device to activate.
Wake MAC Address
EntertheMACaddressofthedevicetoactivate.
ClickStart to activate the device.
ClickApply to save the settings or Cancel to discard changes.
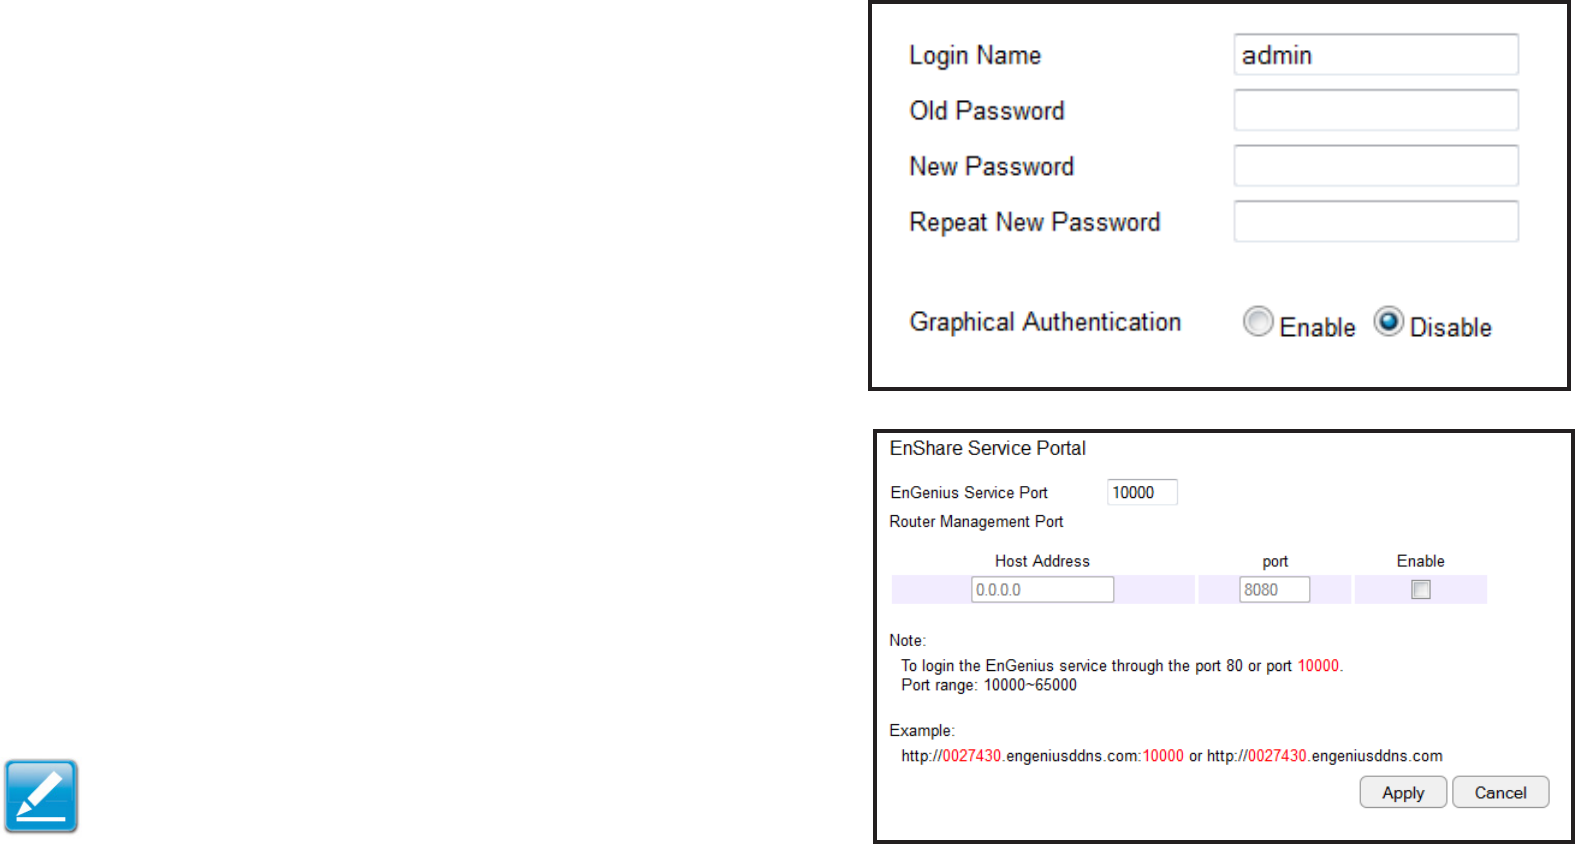
124
Tools Setup
Conguring the Administrator Account
Changetherouter’ssystempasswordaswellassetupadevice
toremotelycongurethesettings.
ToviewtheAdminsettings,clickTools then select Admin.
• Login Name:Keeporchangeexistingloginname
• Old Password:Entertheexistingadministratorpassword
• New Password:Enterthenewadministratorpassword
• Repeat New Password: Re-typethenewadministratorpassword
• Graphical Authentication: ToenableordisableCAPTCHA
Remote Management
• Host Address: Enter the designated host IP Address.
• Port: Entertheportnumber(Default:8080)forremoteaccessing
managementwebinterface.
• Enable:Selecttoenableremotemanagement.
ClickApply to save the settings or Cancel to discard changes.
Note: To access the settings of the ESR Series Router remotely,
entertherouter’sWANIPaddressandportnumber.
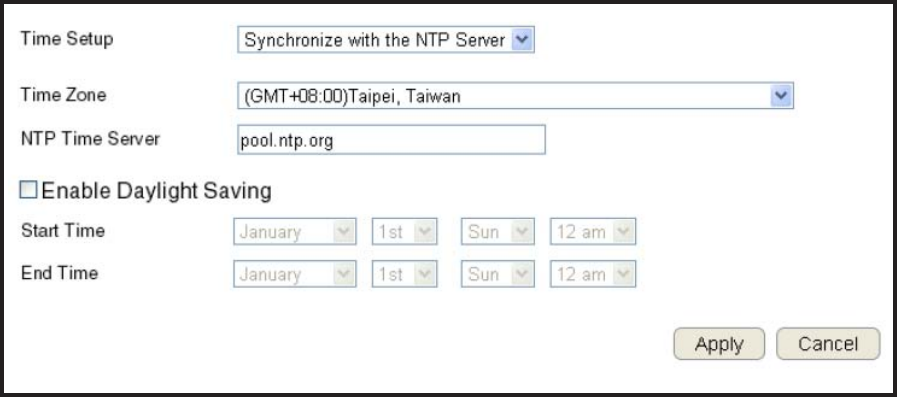
125
System Time Setting
ChangethesystemtimeoftheESRSeriesRouterandsetupautomaticupdatesthroughanetworktime(NTP)protocolserveror
through a computer.
ToviewtheTimesettings,clickTools then select Time.
Synchronizing with an NTP Server
Time Setup
SelecthowtheESRSeriesRouterobtains
the current time.
Time Zone
SelectthetimezonefortheESRSeriesRouter.
NTP Time Server
EnterthedomainnameorIPaddressofanNTPserver.
Enabling Daylight Savings
Clicktoenableordisabledaylightsavingstime.
Start Time
Selectthedateandtimewhendaylightsavingstimestarts.
End Time
Selectthedateandtimewhendaylightsavingstimeends.
ClickApply to save the settings or Cancel to discard changes.
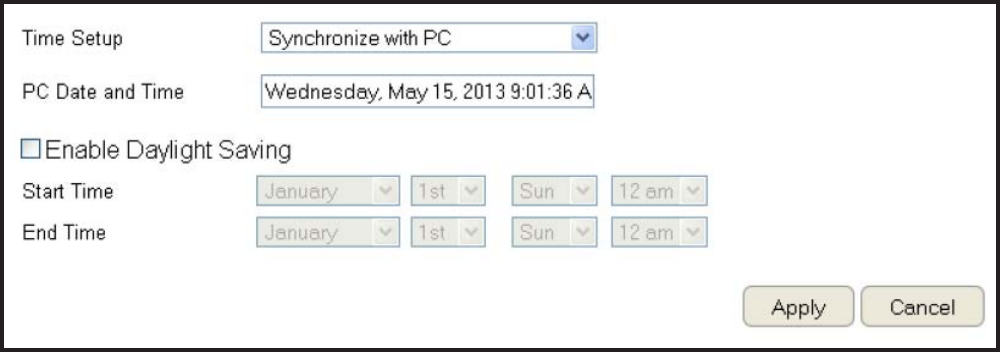
126
Synchronizing Time with a Computer
Time Setup
SelecthowtheESRSeriesRouterobtainsthecurrenttime.
Computer Date and Time
Displayssystemdateandtimefromacomputer.
Enable Daylight Saving
Clicktoenableordisabledaylightsavingstime.
Start Time
Selectthedateandtimewhendaylights
savings time starts.
End Time
Selectthedateandtimewhendaylightssavingstimeends.
ClickApply to save the settings or Cancel to discard changes.
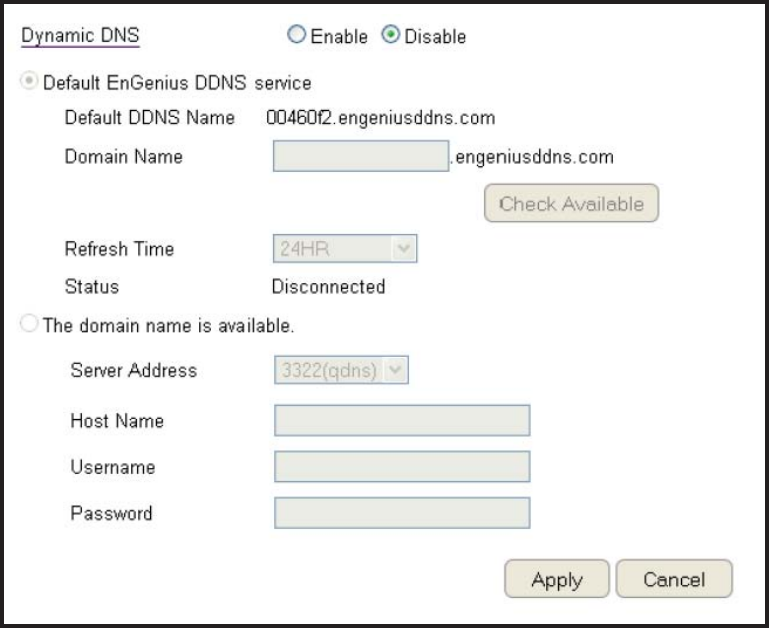
127
Dynamic Domain Name Service (DDNS) Setup
ThemostcommonuseforDDNSisinallowinganInternetdomainnametobeassignedtoacomputerwithavarying(dynamic)IP
address.ThismakesitpossibleforothersitesontheInternettoestablishconnectionstothemachinewithoutneedingtotracktheIP
address themselves.
ToviewtheDDNSsettings,clickTools then select DDNS.
Dynamic DNS
ClicktoenableordisableDDNS.
Server Address
Select the server address.
Host Name
Enter the host name.
Username
Enter a username for the host service.
Password
Enterapasswordforthehostservice.
ClickApply to save the settings or Cancel to discard changes.

128
Diagnosis that Client Devices Are Connected to the Router
Thediagnosisfeatureallowstheadministratortoverifythataclientdeviceisavailableonthenetworkandisacceptingrequest
packets.Ifthepingresultreturnsalive,itmeansadeviceisconnected.Thisfeaturedoesnotworkifthetargetdeviceisbehinda
rewallorhassecuritysoftwareinstalled.
ToviewtheDiagnosissettings,clickTools then select Diagnosis.
Diagnosing a Network Connection Problem
Address to Ping
Enter IP address of the device to ping.
Ping Frequency
Select the interval, in seconds, that the ping message is sent out.
ClickStarttobeginthediagnosis.
129
Upgrading The Router’s Firmware
Firmwareistherouter’ssystemsoftwarethatoperatesandallowstheadministratortointeractwithit.
ToviewtheFirmwaresettings,clickTools then select Firmware.
WARNING! Upgradingrmwarethroughawirelessconnectionisnotrecommended.Firmwareupgradingmustbeperformedwhileconnected
toanEthernet(LANport)withallotherclientsdisconnected.
Toupdatethermwareversion,followthesesteps:
1.DownloadtheappropriatermwareapprovedbyEnGeniusfromanEnGeniuswebsite.SeetheDownloads tab on the product
page for this product.Fornewproducts,newrmwaremaynotbereadilyavailable.
2.ClickChoose File.
3.Browsethelesystemandselectthermwarele.
4.ClickApply.
130
Backing Up The Router’s Settings
Savethemasacongurationleonyourcomputer.
ToviewtheBack-upsettings,clickTools then select Back-up.
Restoring to the router’s Factory Default settings
ClickResettorestoretheESRSeriesRoutertofactorydefaults.
Backup Settings
ClickSave tosavethecurrentcongurationontheroutertoa*.dlfle.
Restore Settings
Torestoresavedsettings,dothefollowing:
a.ClickChoose File.
b.Browsethelesystemforlocationofthesettingsle(*.dlf).
c.ClickUpload.

131
Rebooting the Router
Thisfeatureallowsyoutoreboottherouterintheeventofasystemhanguporotherdisruptiontothenetwork.
ToviewtheResetsettings,clickTools then select Reset.
ClickApply to reset the device.

132
Appendix

133
Wall Mounting The Router
Thefollowingareinstructionsifyouchoosetomounttherouterona
wall.
Note: Choosealocationthatiswithinreachofanelectrical
outletfortheACadapterandtheDSLorCablemodem.
Tomountthedeviceonthewalldothefollowing:
1.Measurethedistancefromthemiddleofeachmountingscrewhole.
2.Markthelocationsofthescrewholesonthewall.
3.Drillaholeforeachmarkedlocationandinsertascrewineach.
Note: Makesuretoleaveenoughofthescrewheadabove
thewallsurfacetosecuretherouter.
4.Installandsecurethemountsontotherouter.
5.Installtherouteronthewall.

134
Federal Communication Commission Interference Statement
ThisequipmenthasbeentestedandfoundtocomplywiththelimitsforaClassBdigitaldevice,pursuanttoPart15ofthe
FCCRules.Theselimitsaredesignedtoprovidereasonableprotectionagainstharmfulinterferenceinaresidentialinstallation.
Thisequipmentgenerates,usesandcanradiateradiofrequencyenergyand,ifnotinstalledandusedinaccordancewiththe
instructions,maycauseharmfulinterferencetoradiocommunications.However,thereisnoguaranteethatinterferencewillnot
occurinaparticularinstallation.Ifthisequipmentdoescauseharmfulinterferencetoradioortelevisionreception,whichcanbe
determinedbyturningtheequipmentoffandon,theuserisencouragedtotrytocorrecttheinterferencebyoneofthefollowing
measures:
• Reorient or relocate the receiving antenna.
• Increasetheseparationbetweentheequipmentandreceiver.
• Connecttheequipmentintoanoutletonacircuitdifferentfromthattowhichthereceiverisconnected.
• Consultthedealeroranexperiencedradio/TVtechnicianforhelp.
FCC Caution: Any changes or modications not expressly approved by the party responsible for compliance could void the user’s
authority to operate this equipment.
ThisdevicecomplieswithPart15oftheFCCRules.Operationissubjecttothefollowingtwoconditions:(1)Thisdevicemaynotcauseharmful
interference,and(2)thisdevicemustacceptanyinterferencereceived,includinginterferencethatmaycauseundesiredoperation.
Thistransmittermustnotbeco-locatedoroperatinginconjunctionwithanyotherantennaortransmitter.
Operationsinthe5.15-5.25GHzbandarerestrictedtoindoorusageonly.
FCC Radiation Exposure Statement
Important:ThisequipmentcomplieswithFCCradiationexposurelimitssetforthforanuncontrolledenvironment.Thisequipment
shouldbeinstalledandoperatedwithminimumdistance23cmbetweentheradiator&yourbody.
135
Europe – EU Declaration of Conformity
ThisdevicecomplieswiththeessentialrequirementsoftheR&TTEDirective1999/5/EC.Thefollowingtestmethodshavebeen
appliedinordertoprovepresumptionofconformitywiththeessentialrequirementsoftheR&TTEDirective1999/5/EC:
• EN60950-1
SafetyofInformationTechnologyEquipment
• EN50385
Genericstandardtodemonstratethecomplianceofelectronicandelectricalapparatuswiththebasicrestrictionsrelatedto
humanexposuretoelectromagneticelds(0Hz-300GHz)
• EN300328
ElectromagneticcompatibilityandRadiospectrumMatters(ERM);WidebandTransmissionsystems;Datatransmission
equipmentoperatinginthe2,4GHzISMbandandusingspreadspectrummodulationtechniques;HarmonizedENcovering
essentialrequirementsunderarticle3.2oftheR&TTEDirective
• EN301893
BroadbandRadioAccessNetworks(BRAN);5GHzhighperformanceRLAN;HarmonizedENcoveringessentialrequirementsof
article3.2oftheR&TTEDirective
• EN301489-1
ElectromagneticcompatibilityandRadioSpectrumMatters(ERM);ElectroMagneticCompatibility(EMC)standardforradio
equipmentandservices;Part1:Commontechnicalrequirements
• EN301489-17
ElectromagneticcompatibilityandRadiospectrumMatters(ERM);ElectroMagneticCompatibility(EMC)standardforradio
equipmentandservices;Part17:Specicconditionsfor2,4GHzwidebandtransmissionsystemsand5GHzhighperformance
RLANequipment
Thisdeviceisa5GHzwidebandtransmissionsystem(transceiver),intendedforuseinallEUmemberstatesandEFTAcountries,exceptin
FranceandItalywhererestrictiveuseapplies.

136
InItalytheend-usershouldapplyforalicenseatthenationalspectrumauthoritiesinordertoobtainauthorizationtousethedevicefor
settingupoutdoorradiolinksand/orforsupplyingpublicaccesstotelecommunicationsand/ornetworkservices.
ThisdevicemaynotbeusedforsettingupoutdoorradiolinksinFranceandinsomeareastheRFoutputpowermaybelimitedto10mWEIRP
inthefrequencyrangeof2454–2483.5MHz.Fordetailedinformationtheend-usershouldcontactthenationalspectrumauthorityinFrance.
Česky [Czech] [Jméno výrobce] tímto prohlašuje, že tento [typ zařízení] je ve shodě se základními požadavky a dalšími příslušnými
ustanoveními směrnice 1999/5/ES.
Dansk [Danish] Undertegnede [fabrikantens navn] erklærer herved, at følgende udstyr [udstyrets typebetegnelse] overholder de væsen-
tlige krav og øvrige relevante krav i direktiv 1999/5/EF.
Deutsch [German] Hiermit erklärt [Name des Herstellers], dass sich das Gerät [Gerätetyp] in Übereinstimmung mit den grundlegenden An-
forderungen und den übrigen einschlägigen Bestimmungen der Richtlinie 1999/5/EG bendet.
Eesti [Estonian] Käesolevaga kinnitab [tootja nimi = name of manufacturer] seadme [seadme tüüp = type of equipment] vastavust direk-
tiivi 1999/5/EÜ põhinõuetele ja nimetatud direktiivist tulenevatele teistele asjakohastele sätetele.
English Hereby, [name of manufacturer], declares that this [type of equipment] is in compliance with the essential requirements
and other relevant provisions of Directive 1999/5/EC.
Español [Spanish] Por medio de la presente [nombre del fabricante] declara que el [clase de equipo] cumple con los requisitos esenciales y
cualesquiera otras disposiciones aplicables o exigibles de la Directiva 1999/5/CE.
Ελληνική [Greek] ΜΕ ΤΗΝ ΠΑΡΟΥΣΑ [name of manufacturer] ΔΗΛΩΝΕΙ ΟΤΙ [type of equipment] ΣΥΜΜΟΡΦΩΝΕΤΑΙ ΠΡΟΣ ΤΙΣ ΟΥΣΙΩΔΕΙΣ
ΑΠΑΙΤΗΣΕΙΣ ΚΑΙ ΤΙΣ ΛΟΙΠΕΣ ΣΧΕΤΙΚΕΣ ΔΙΑΤΑΞΕΙΣ ΤΗΣ ΟΔΗΓΙΑΣ 1999/5/ΕΚ.
Français [French] Par la présente [nom du fabricant] déclare que l'appareil [type d'appareil] est conforme aux exigences essentielles et aux
autres dispositions pertinentes de la directive 1999/5/CE.
Italiano [Italian] Con la presente [nome del costruttore] dichiara che questo [tipo di apparecchio] è conforme ai requisiti essenziali ed alle
altre disposizioni pertinenti stabilite dalla direttiva 1999/5/CE.
Latviski [Latvian] Ar šo [name of manufacturer / izgatavotāja nosaukums] deklarē, ka [type of equipment / iekārtas tips] atbilst Direktīvas
1999/5/EK būtiskajām prasībām un citiem ar to saistītajiem noteikumiem.
Lietuvių [Lithuanian] Šiuo [manufacturer name] deklaruoja, kad šis [equipment type] atitinka esminius reikalavimus ir kitas 1999/5/EB Direk-
tyvos nuostatas.
Nederlands [Dutch] Hierbij verklaart [naam van de fabrikant] dat het toestel [type van toestel] in overeenstemming is met de essentiële
eisen en de andere relevante bepalingen van richtlijn 1999/5/EG.
0560

137
Malti [Maltese] Hawnhekk, [isem tal-manifattur], jiddikjara li dan [il-mudel tal-prodott] jikkonforma mal-ħtiġijiet essenzjali u ma provved-
imenti oħrajn relevanti li hemm d-Dirrettiva 1999/5/EC.
Magyar [Hungarian] Alulírott, [gyártó neve] nyilatkozom, hogy a [... típus] megfelel a vonatkozó alapvetõ követelményeknek és az 1999/5/EC
irányelv egyéb elõírásainak.
Polski [Polish] Niniejszym [nazwa producenta] oświadcza, że [nazwa wyrobu] jest zgodny z zasadniczymi wymogami oraz pozostałymi
stosownymi postanowieniami Dyrektywy 1999/5/EC.
Português [Portuguese] [Nome do fabricante] declara que este [tipo de equipamento] está conforme com os requisitos essenciais e outras dis-
posições da Directiva 1999/5/CE.
Slovensko [Slovenian] [Ime proizvajalca] izjavlja, da je ta [tip opreme] v skladu z bistvenimi zahtevami in ostalimi relevantnimi določili direktive
1999/5/ES.
Slovensky [Slovak] [Meno výrobcu] týmto vyhlasuje, že [typ zariadenia] spĺňa základné požiadavky a všetky príslušné ustanovenia Smernice
1999/5/ES.
Suomi [Finnish] [Valmistaja = manufacturer] vakuuttaa täten että [type of equipment = laitteen tyyppimerkintä] tyyppinen laite on direk-
tiivin 1999/5/EY oleellisten vaatimusten ja sitä koskevien direktiivin muiden ehtojen mukainen.
Svenska [Swedish] Härmed intygar [företag] att denna [utrustningstyp] står I överensstämmelse med de väsentliga egenskapskrav och övri-
ga relevanta bestämmelser som framgår av direktiv 1999/5/EG.