EnGenius Technologies ESR900 Wireless Device User Manual ESR600H UM
EnGenius Technologies Wireless Device ESR600H UM
User Manual.pdf

EnGenius® X-TRA RANGE®
ESR Series Router
Wireless N DBDC Gigabit App Router
User Guide V1.0
TABLE OF CONTENTS
I
TABLE OF CONTENTS
Product Overview
Product Overview 1-1
Key Features . . . . . . . . . . . . . . . . . . . . . . . . . . . . . . . . . . . . . . . . . . . . . . . . . . . . . . .1-1
Robust and Reliable Wireless Performance. . . . . . . . . . . . . . . . . . . . . . . . . . . . . . . . . .1-1
Support the Next Generation IPv6 Application . . . . . . . . . . . . . . . . . . . . . . . . . . . . . . .1-1
Industry-Standard Wireless Security & Firewall . . . . . . . . . . . . . . . . . . . . . . . . . . . . . .1-1
Individual Wireless SSID for Guest Access. . . . . . . . . . . . . . . . . . . . . . . . . . . . . . . . . .1-1
USB Storages and File Sharing through the Mobile APPs . . . . . . . . . . . . . . . . . . . . . . . .1-2
Technical Specification. . . . . . . . . . . . . . . . . . . . . . . . . . . . . . . . . . . . . . . . . . . . . . . . .1-2
Physical Interface. . . . . . . . . . . . . . . . . . . . . . . . . . . . . . . . . . . . . . . . . . . . . . . . . . .1-2
LED Indicator. . . . . . . . . . . . . . . . . . . . . . . . . . . . . . . . . . . . . . . . . . . . . . . . . . . . . .1-2
Hardware Specification . . . . . . . . . . . . . . . . . . . . . . . . . . . . . . . . . . . . . . . . . . . . . . .1-2
Certification. . . . . . . . . . . . . . . . . . . . . . . . . . . . . . . . . . . . . . . . . . . . . . . . . . . . . . .1-2
Physical/Environment Condition . . . . . . . . . . . . . . . . . . . . . . . . . . . . . . . . . . . . . . . . .1-3
Wireless Specification . . . . . . . . . . . . . . . . . . . . . . . . . . . . . . . . . . . . . . . . . . . . . . . .1-3
Software Features . . . . . . . . . . . . . . . . . . . . . . . . . . . . . . . . . . . . . . . . . . . . . . . . . . . . . . . . . . . . . . . . . . .1-3
TABLE OF CONTENTS
II
Wireless N DBDC Gigabit App Router Series Comparison . . . . . . . . . . . . . . . . . . . . . . . . .1-5
Package Contents 1-7
Product Layout 1-8
Installation
System Requirements 2-1
Wall Mounting 2-2
EnGenius Quick Start
Installing the Software 3-1
Setup Notes . . . . . . . . . . . . . . . . . . . . . . . . . . . . . . . . . . . . . . . . . . . . . . . . . . . . . . . .3-1
Installation. . . . . . . . . . . . . . . . . . . . . . . . . . . . . . . . . . . . . . . . . . . . . . . . . . . . . . . . .3-1
Connecting Network Cables 3-2
Web Configuration
Logging In 4-1
Viewing the Dash Board 4-2
TABLE OF CONTENTS
III
Main Menu . . . . . . . . . . . . . . . . . . . . . . . . . . . . . . . . . . . . . . . . . . . . . . . . . . . . . . . . .4-3
Home . . . . . . . . . . . . . . . . . . . . . . . . . . . . . . . . . . . . . . . . . . . . . . . . . . . . . . . . . . .4-3
Setup Wizard . . . . . . . . . . . . . . . . . . . . . . . . . . . . . . . . . . . . . . . . . . . . . . . . . . . . . .4-3
Network Settings . . . . . . . . . . . . . . . . . . . . . . . . . . . . . . . . . . . . . . . . . . . . . . . . . . .4-3
USB Storage Sharing . . . . . . . . . . . . . . . . . . . . . . . . . . . . . . . . . . . . . . . . . . . . . . . .4-3
IP Cam Viewer . . . . . . . . . . . . . . . . . . . . . . . . . . . . . . . . . . . . . . . . . . . . . . . . . . . . .4-3
Language . . . . . . . . . . . . . . . . . . . . . . . . . . . . . . . . . . . . . . . . . . . . . . . . . . . . . . . .4-3
Logout . . . . . . . . . . . . . . . . . . . . . . . . . . . . . . . . . . . . . . . . . . . . . . . . . . . . . . . . . .4-3
Web Menus Overview 4-4
System . . . . . . . . . . . . . . . . . . . . . . . . . . . . . . . . . . . . . . . . . . . . . . . . . . . . . . . . . .4-4
Internet . . . . . . . . . . . . . . . . . . . . . . . . . . . . . . . . . . . . . . . . . . . . . . . . . . . . . . . . .4-5
Wireless 2.4G . . . . . . . . . . . . . . . . . . . . . . . . . . . . . . . . . . . . . . . . . . . . . . . . . . . . .4-6
Wireless 5G . . . . . . . . . . . . . . . . . . . . . . . . . . . . . . . . . . . . . . . . . . . . . . . . . . . . . . .4-7
Parental Control . . . . . . . . . . . . . . . . . . . . . . . . . . . . . . . . . . . . . . . . . . . . . . . . . . . .4-8
Guest Network. . . . . . . . . . . . . . . . . . . . . . . . . . . . . . . . . . . . . . . . . . . . . . . . . . . . .4-9
IPv6 . . . . . . . . . . . . . . . . . . . . . . . . . . . . . . . . . . . . . . . . . . . . . . . . . . . . . . . . . . .4-10
Firewall . . . . . . . . . . . . . . . . . . . . . . . . . . . . . . . . . . . . . . . . . . . . . . . . . . . . . . . . .4-11
VPN . . . . . . . . . . . . . . . . . . . . . . . . . . . . . . . . . . . . . . . . . . . . . . . . . . . . . . . . . . .4-12
USB Port . . . . . . . . . . . . . . . . . . . . . . . . . . . . . . . . . . . . . . . . . . . . . . . . . . . . . . . .4-13
Advanced . . . . . . . . . . . . . . . . . . . . . . . . . . . . . . . . . . . . . . . . . . . . . . . . . . . . . . .4-14
TABLE OF CONTENTS
IV
Tools. . . . . . . . . . . . . . . . . . . . . . . . . . . . . . . . . . . . . . . . . . . . . . . . . . . . . . . . . . .4-16
Installation Setup Wizard
Internet Setup Wizard 5-1
Setting Up Your Internet Connection 5-2
Setting Up Your Wireless Connection 5-3
Setup Your Device Password 5-4
Setup Your Device Time Zone 5-5
Setup Your Status and Save Setting 5-7
Basic Network Settings
System Setup 6-1
Viewing System Status 6-1
System . . . . . . . . . . . . . . . . . . . . . . . . . . . . . . . . . . . . . . . . . . . . . . . . . . . . . . . . . . .6-1
WAN Settings . . . . . . . . . . . . . . . . . . . . . . . . . . . . . . . . . . . . . . . . . . . . . . . . . . . . . . .6-3
LAN Settings. . . . . . . . . . . . . . . . . . . . . . . . . . . . . . . . . . . . . . . . . . . . . . . . . . . . . . . .6-4
WLAN Settings . . . . . . . . . . . . . . . . . . . . . . . . . . . . . . . . . . . . . . . . . . . . . . . . . . . . . .6-5
Guest Network . . . . . . . . . . . . . . . . . . . . . . . . . . . . . . . . . . . . . . . . . . . . . . . . . . . . . .6-6
Configuring LAN 6-7
TABLE OF CONTENTS
V
LAN IP . . . . . . . . . . . . . . . . . . . . . . . . . . . . . . . . . . . . . . . . . . . . . . . . . . . . . . . . . . . .6-7
DHCP Server. . . . . . . . . . . . . . . . . . . . . . . . . . . . . . . . . . . . . . . . . . . . . . . . . . . . . . . .6-8
Configuring Dynamic Host Configuration Protocol 6-9
DHCP Client Table . . . . . . . . . . . . . . . . . . . . . . . . . . . . . . . . . . . . . . . . . . . . . . . . . . . .6-9
Enable Static DHCP IP . . . . . . . . . . . . . . . . . . . . . . . . . . . . . . . . . . . . . . . . . . . . . . . .6-10
Current Static DHCP Table . . . . . . . . . . . . . . . . . . . . . . . . . . . . . . . . . . . . . . . . . . . . .6-11
Configuring Event Logging 6-12
Log Message List. . . . . . . . . . . . . . . . . . . . . . . . . . . . . . . . . . . . . . . . . . . . . . . . . . . .6-12
Monitoring Bandwidth Usage 6-13
Configuring the System Language 6-14
Configuring IP Cameras 6-15
Configuring Internet Settings 6-16
View Internet Status 6-16
WAN Settings . . . . . . . . . . . . . . . . . . . . . . . . . . . . . . . . . . . . . . . . . . . . . . . . . . . . . .6-16
Configuring Dynamic IP 6-18
Dynamic IP. . . . . . . . . . . . . . . . . . . . . . . . . . . . . . . . . . . . . . . . . . . . . . . . . . . . . . . .6-18
DNS Servers . . . . . . . . . . . . . . . . . . . . . . . . . . . . . . . . . . . . . . . . . . . . . . . . . . . . .6-19
Configuring Static IP 6-20
Static IP. . . . . . . . . . . . . . . . . . . . . . . . . . . . . . . . . . . . . . . . . . . . . . . . . . . . . . . . . .6-20
Configuring PPPoE 6-22
TABLE OF CONTENTS
VI
Configuring PPTP 6-24
WAN Interface Settings . . . . . . . . . . . . . . . . . . . . . . . . . . . . . . . . . . . . . . . . . . . . . . .6-24
Dynamic IP Address . . . . . . . . . . . . . . . . . . . . . . . . . . . . . . . . . . . . . . . . . . . . . . . .6-24
PPTP Settings . . . . . . . . . . . . . . . . . . . . . . . . . . . . . . . . . . . . . . . . . . . . . . . . . . . . . .6-25
Configuring L2TP 6-26
WAN Interface Settings . . . . . . . . . . . . . . . . . . . . . . . . . . . . . . . . . . . . . . . . . . . . . . .6-26
Dynamic IP Address . . . . . . . . . . . . . . . . . . . . . . . . . . . . . . . . . . . . . . . . . . . . . . . .6-26
L2TP Settings . . . . . . . . . . . . . . . . . . . . . . . . . . . . . . . . . . . . . . . . . . . . . . . . . . . . . .6-27
Configuring DS-Lite 6-28
Wireless 2.4G LAN Setup 6-29
Configuring Basic Settings 6-29
Access Point Mode . . . . . . . . . . . . . . . . . . . . . . . . . . . . . . . . . . . . . . . . . . . . . . . . .6-30
Wireless Distribution System Mode. . . . . . . . . . . . . . . . . . . . . . . . . . . . . . . . . . . . . .6-31
Configuring Advanced Settings 6-34
Configuring Security 6-36
Encryption Type . . . . . . . . . . . . . . . . . . . . . . . . . . . . . . . . . . . . . . . . . . . . . . . . . . . .6-37
Wired Equivalent Privacy (WEP) . . . . . . . . . . . . . . . . . . . . . . . . . . . . . . . . . . . . . . . .6-37
Wi-Fi Protected Access (WPA) Pre-Shared Key . . . . . . . . . . . . . . . . . . . . . . . . . . . . . .6-38
WPA RADIUS . . . . . . . . . . . . . . . . . . . . . . . . . . . . . . . . . . . . . . . . . . . . . . . . . . . . .6-39
Configuring Filters 6-40
TABLE OF CONTENTS
VII
To view the Filter settings, click Wireless -> Filter. . . . . . . . . . . . . . . . . . . . . . . . . . . . .6-40
Enabling Wireless Access Control . . . . . . . . . . . . . . . . . . . . . . . . . . . . . . . . . . . . . . . .6-40
MAC Address Filtering Table . . . . . . . . . . . . . . . . . . . . . . . . . . . . . . . . . . . . . . . . . . . .6-41
Configuring Wi-Fi Protected Setup 6-42
Configuring Client List 6-43
Wireless 5G LAN Setup 6-44
Configuring Basic Settings 6-44
Access Point Mode . . . . . . . . . . . . . . . . . . . . . . . . . . . . . . . . . . . . . . . . . . . . . . . . .6-45
Wireless Distribution System Mode. . . . . . . . . . . . . . . . . . . . . . . . . . . . . . . . . . . . . .6-46
Configuring Advanced Settings 6-49
Configuring Security 6-51
Encryption Type . . . . . . . . . . . . . . . . . . . . . . . . . . . . . . . . . . . . . . . . . . . . . . . . . . . .6-52
Wired Equivalent Privacy (WEP) . . . . . . . . . . . . . . . . . . . . . . . . . . . . . . . . . . . . . . . .6-52
Wi-Fi Protected Access (WPA) Pre-Shared Key . . . . . . . . . . . . . . . . . . . . . . . . . . . . . .6-53
WPA RADIUS . . . . . . . . . . . . . . . . . . . . . . . . . . . . . . . . . . . . . . . . . . . . . . . . . . . . .6-54
Configuring Filters 6-55
Enabling Wireless Access Control . . . . . . . . . . . . . . . . . . . . . . . . . . . . . . . . . . . . . . . .6-55
MAC Address Filtering Table . . . . . . . . . . . . . . . . . . . . . . . . . . . . . . . . . . . . . . . . . . . .6-56
Configuring Wi-Fi Protected Setup 6-57
Configuring Client List 6-58
TABLE OF CONTENTS
VIII
Setting Up Parental Control 6-59
Adding a Control Policy . . . . . . . . . . . . . . . . . . . . . . . . . . . . . . . . . . . . . . . . . . . . . . .6-60
Viewing Parental Policies 6-63
Guest Network 6-64
Enabling the Guest Network 6-64
Configuring the DHCP Server Setting 6-65
Viewing the Client List 6-66
DHCP Client Table . . . . . . . . . . . . . . . . . . . . . . . . . . . . . . . . . . . . . . . . . . . . . . . . . . .6-66
IPv6 6-67
Enabling IPv6 Settings 6-67
Viewing the IPv6 Connection Status 6-68
Configuring Static IPv6 6-69
Configuring Autoconfiguration 6-70
Configuring PPPoE 6-71
Configuring 6to4 6-73
Viewing Local Connections 6-74
Firewall Setup 6-75
Configuring Basic Settings 6-75
Configuring Advanced Settings 6-76
Configuring Demilitarized Zone 6-101
TABLE OF CONTENTS
IX
Configuring Denial of Service 6-102
Configuring the Access Control List 6-103
Viewing the Access Control List. . . . . . . . . . . . . . . . . . . . . . . . . . . . . . . . . . . . . . . . .6-103
Adding a Control Policy . . . . . . . . . . . . . . . . . . . . . . . . . . . . . . . . . . . . . . . . . . . . . .6-103
Virtual Private Network Setup 6-104
Viewing Status 6-104
Configuring a VPN Tunnel Profile 6-105
Creating a Profile . . . . . . . . . . . . . . . . . . . . . . . . . . . . . . . . . . . . . . . . . . . . . . . . . .6-105
General. . . . . . . . . . . . . . . . . . . . . . . . . . . . . . . . . . . . . . . . . . . . . . . . . . . . . . . .6-106
SA . . . . . . . . . . . . . . . . . . . . . . . . . . . . . . . . . . . . . . . . . . . . . . . . . . . . . . . . . . .6-107
Network . . . . . . . . . . . . . . . . . . . . . . . . . . . . . . . . . . . . . . . . . . . . . . . . . . . . . . .6-109
Advanced . . . . . . . . . . . . . . . . . . . . . . . . . . . . . . . . . . . . . . . . . . . . . . . . . . . . . .6-110
Configuring a User Setting 6-111
USB Port 6-1
Viewing EnShare 6-1
File Sharing 6-2
Viewing File Server 6-3
Viewing DLNA 6-4
Advanced Network Settings 6-5
NAT Setup 6-5
TABLE OF CONTENTS
X
Port Mapping Setup 6-6
Current Port Mapping Table . . . . . . . . . . . . . . . . . . . . . . . . . . . . . . . . . . . . . . . . . . .6-7
Port Forwarding Setup 6-8
Port Triggering Setup 6-10
Application Layer Gateway Setup 6-12
Universal Plug and Play Setup 6-13
Internet Group Multicast Protocol Setup 6-14
Quality of Service Setup 6-15
Priority Queue. . . . . . . . . . . . . . . . . . . . . . . . . . . . . . . . . . . . . . . . . . . . . . . . . . . . . .6-16
Bandwidth Allocation . . . . . . . . . . . . . . . . . . . . . . . . . . . . . . . . . . . . . . . . . . . . . . . . .6-17
Routing Setup 6-18
Wake on LAN Setup 6-20
Tools Setup 6-21
Configuring the Administrator Account 6-21
System Time Setting 6-22
Synchronize with an NTP Server . . . . . . . . . . . . . . . . . . . . . . . . . . . . . . . . . . . . . . . . .6-22
Synchronize with a PC . . . . . . . . . . . . . . . . . . . . . . . . . . . . . . . . . . . . . . . . . . . . . . . .6-23
Dynamic Domain Name Service (DDNS) Setup 6-24
Diagnosis the Device 6-25
Diagnosing a Network Connection Problem. . . . . . . . . . . . . . . . . . . . . . . . . . . . . . . . . .6-25

CONVENTIONS
XIII
Conventions
The following conventions are used to give the user additional
information about specific procedures or content. It is important
to pay attention to these conventions as they provide informa-
tion to prevent damage to equipment or personal injury.
General Conventions
The following general conventions are used in this document.
N/A:
Indicates that a component or a procedure is not applica-
ble to this model.
Prerequisite:
Indicates a requirement that must be addressed before
proceeding with the current function or procedure.
CAUTION!
CAUTIONS APPEAR BEFORE THE TEXT IT REFERENCES. CAU-
TIONS APPEAR IN CAPITAL LETTERS TO EMPHASIZE THAT THE
MESSAGE CONTAINS VITAL HEALTH AND SAFETY INFORMATION.
WARNING!
Warning information appears before the text it references
to emphasize that the content may prevent damage to the
device or equipment.
Important:
Indicates information that is important to know for the
proper completion of a procedure, choice of an option, or
completing a task.
Note:
Indicates additional information that is relevant to the cur-
rent process or procedure.
!
!
Example:
Indicates information used to demonstrate or explain an
associated concept.
CONVENTIONS
XIV
Typographical Conventions
The following typographical conventions are used in this docu-
ment:
Italics
Indicates book titles, directory names, file names, path names,
and program/process names.
Constant width
Indicates computer output shown on a computer screen, includ-
ing menus, prompts, responses to input, and error messages.
Constant width bold
Indicates commands lines as entered on the computer. Vari-
ables contained within user input are shown in angle
brackets (< >).
Bold
Indicates keyboard keys that are pressed by the user.
COPYRIGHT
XV
Copyright
This user guide and its content is copyright of © EnGenius Net-
works, 2013. All rights reserved.
Any redistribution or reproduction in part or in whole in any form
is prohibited.
Do not distribute, transmit, store in any form of electronic
retrieval system or commercially exploit the content without the
expressed written permission of EnGenius Networks.
Product Overview
Chapter 1

PRODUCT OVERVIEW PRODUCT OVERVIEW
1-1
1.1 Product Overview
Key Features
IEEE802.11a/b/g/n, Dual-Band & Dual Concurrent
Up to 300Mbps on both 2.4G & 5GHz band
Gigabits Port Connect to High AV Performance
External Wireless Coverage
Next Generation IPv6 Compliant
Parental Control & Guest Network
VPN Server Support Lite-Business Applications
Advanced Firewall / Network Security
USB file sharing through Mobile App.
Easy Setup Wizard
Robust and Reliable Wireless
Performance
The ESR Series Router is a Dual-Band-Dual-Concurrent
Router, equipped with Wireless-N technology and four Gigabit
LAN port switch. This cost effective router can connect to DSL
or cable modems to provide high performance Internet access
to your computer, mobile, laptop and home entertainment
devices. Dual-Band-Dual-Concurrent design to protect your
wireless multi-media data quality. Use the 5GHz band to protect
sensitive multi-media data, while PC and mobile devices are
assigned a 2.4GHz band for Internet surfing. ESR Series
Router models support the latest EnGenius X-TRA RANGE
technology to increase wireless coverage throughout the
house.
Support the Next Generation IPv6
Application
The EnGenius ESR Series Router supports the latest IPv6
standard application for all your current and future require-
ments.
Industry-Standard Wireless Security
& Firewall
The ESR Series Router supports various security features
including industry-standard WPA/WPA2 wireless encryption to
prevent unauthorized access to your network. SPI firmware and
MAC/IP address filtering are supported for greater network
security for WAN and LAN ports.
Individual Wireless SSID for Guest
Access
Up to four separate and discrete Wireless SSIDs for friend or
visitor Internet access without sacrificing privacy to networked
computers or data within your home.
PRODUCT OVERVIEW TECHNICAL SPECIFICATION
1-2
USB Storages and File Sharing
through the Mobile APPs
The ESR Series Router can function as a Network Storage
Server (NAS) while the USB storage device is connected.
Users can download, upload and even watch video through
their PC/Mobile/Pad through the use of the ESR Series Router
router.
Technical Specification
Physical Interface
1x 10/100/1000Mbps WAN Port
4x 10/100/1000Mbps LAN Ports
1x USB Host Port
1x WPS Button
1x Reset Button
LED Indicator
5GHz Wireless (ESR600 & ESR 900 models only)
2.4GHz Wireless
Power LED
WAN LED (Internet connection)
WPS LED (Green/Orange)
Hardware Specification
Dimension: 161.5 x 41.5mm (Diameter x Height)
Weight:
Power Adapter: 12V / 1.25A
Certification
FCC/CE/IC
PRODUCT OVERVIEW TECHNICAL SPECIFICATION
1-3
Physical/Environment Condition
Operation Temp.: 0˚C ~ 40˚C
Humidty 90% or less (Non-Condensing)
Storage Temp.: -20˚C ~ 60˚C
Humidty 95% or less (Non-condensing)
Wireless Specification
IEEE802.11/a/b/g/n
Wireless Band: 2.4GHz / 5GHz
4x Internal High Performance PIFA antennas
Tx Output Power: 20±2dBm (MAX.)
Rx Sensibility: -92dBm (MAX.)
(MAX. power may differ depending on local regulations)
Software Features
Operation mode: AP Router / WDS
Wi-Fi ON / OFF
Wireless Output Power Control
Wireless QoS (WMM)
Multi-SSIDs for both 2.4GHz & 5GHz
Guest Network by Wireless SSIDs
WPS (PIN / Bottom)
Encryption: WEP / WPA / WPA2 / TKIP /AES
WAN: PPPoE / Static IP / DHCP / PPTP/ L2TP
IPv6 WAN / IPv6 LAN
DHCP Server
Port Forwarding / Mapping / Tagging
ALG (Application Layer Gateway)
VPN Passthrough: PPTP / L2TP / IPSec
Lite VPN Server: PPTP / L2TP / IPSec
QoS: MAC / IP / Port based
URL / IP / Port / ICMP Filtering
Clone MAC
DMZ
SPI Firewall / Anti-DoS Attack
PRODUCT OVERVIEW TECHNICAL SPECIFICATION
1-4
DNS / DDNS / EnGenius DDNS Service
NTP / Sync. with PC
UPnP / UPnP NAT Traversal
IGMP Proxy
DLNA
Remote Control / Firmware Upgrade
Emergency Recovery Page (System failure)
Backup / Restore Setting
Auto Power Saving
USB: FTP Server / SAMBA / File Sharing
Web Based File Server (USB sharing)
EnShare Mobile APP* (IOS/Android) Supported
*Not yet available. Firmware upgrading is required when
support is available.
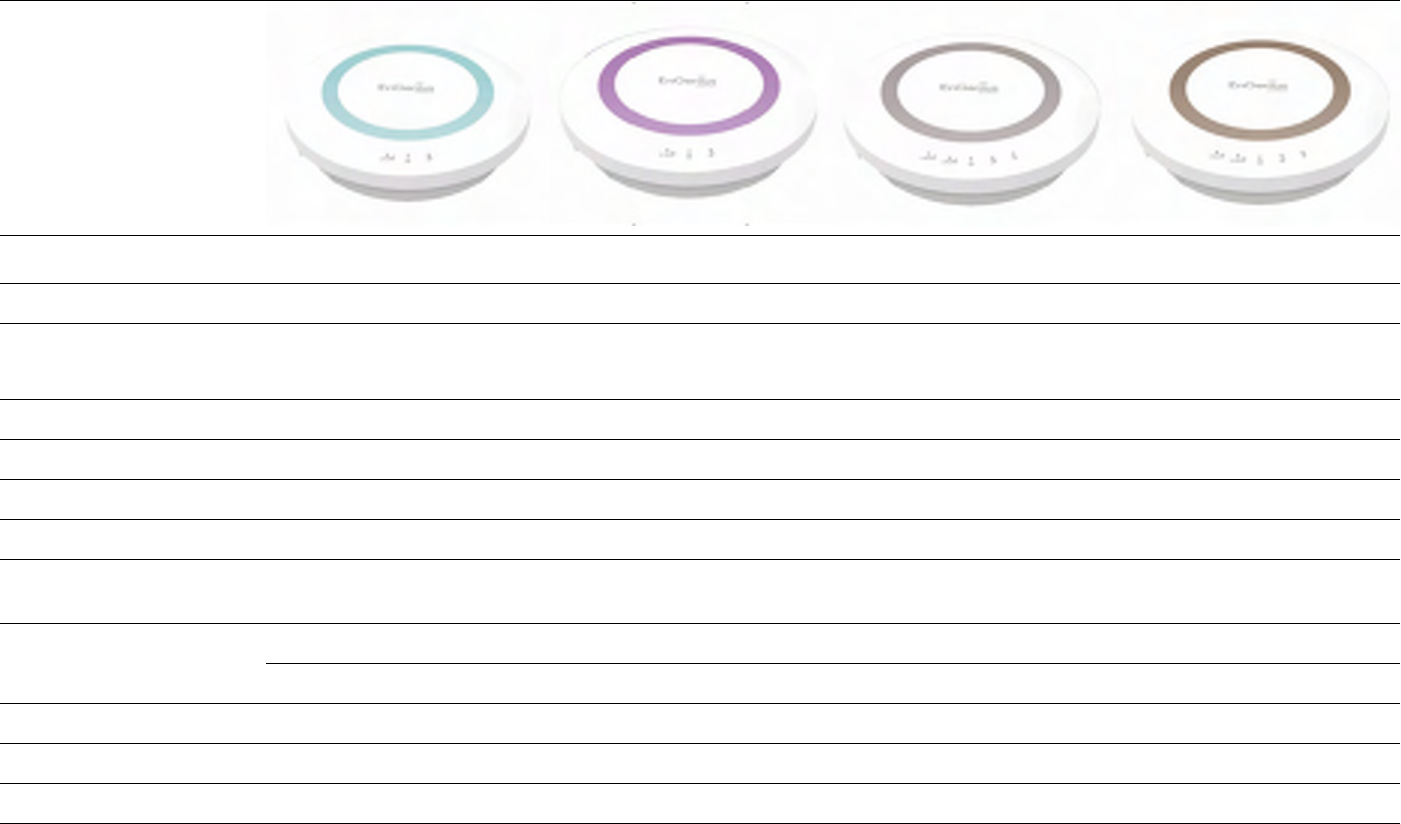
PRODUCT OVERVIEW WIRELESS N DBDC GIGABIT APP ROUTER SERIES COMPARISON
1-5
Wireless N DBDC Gigabit App Router Series Comparison
MODEL NAME ESR300 ESR350 ESR600 ESR900
Wireless BAND 2.4 GHz, 802.11b/g/n 2.4 GHz, 802.11b/g/n 2.4 / 5G GHz802.11 a/b/g/n 2.4 / 5G GHz802.11 a/b/g/n
WiFiDATA RATE 300Mbps 300Mbps 2.4G: 300Mbps
5G: 300Mbps
2.4G: 450Mbps
5G: 450Mbps
Operation Mode Router Router Router Router
WAN INTERFACE 1 x 10/100Mbps 1 x 10/100/1000Mbps 1 x 10/100/1000Mbps 1 x 10/100/1000Mbps
LAN INTERFACE 4 x 10/100Mbps 4 x 10/100/1000Mbps 4 x 10/100/1000Mbps 4 x 10/100/1000Mbps
Max. Output Power 22dBm 22dBm 22dBm 19dBm
LED PWR/WiFi/WAN PWR/WiFi/WAN PWR/2.4G WiFi/5G WiFi/
WAN/WPS PWR/2.4G WiFi/5G WiFi/
WAN/WPS
Antenna 2.4G internal x 2 2.4G internal x 2 2.4G 3.5dBi internal x 2 2.4G 3.5dBi internal x 3
3.5dBi 3.5dBi 5G 3.5dBi internal x 2 5G 3.5dBi internal x 3
USB port 1x USB2.0 1x USB2.0 1x USB2.0 1x USB2.0
DLNA Y Y Y Y
Mobile APP support iOS/Android iOS/Android iOS/Android iOS/Android
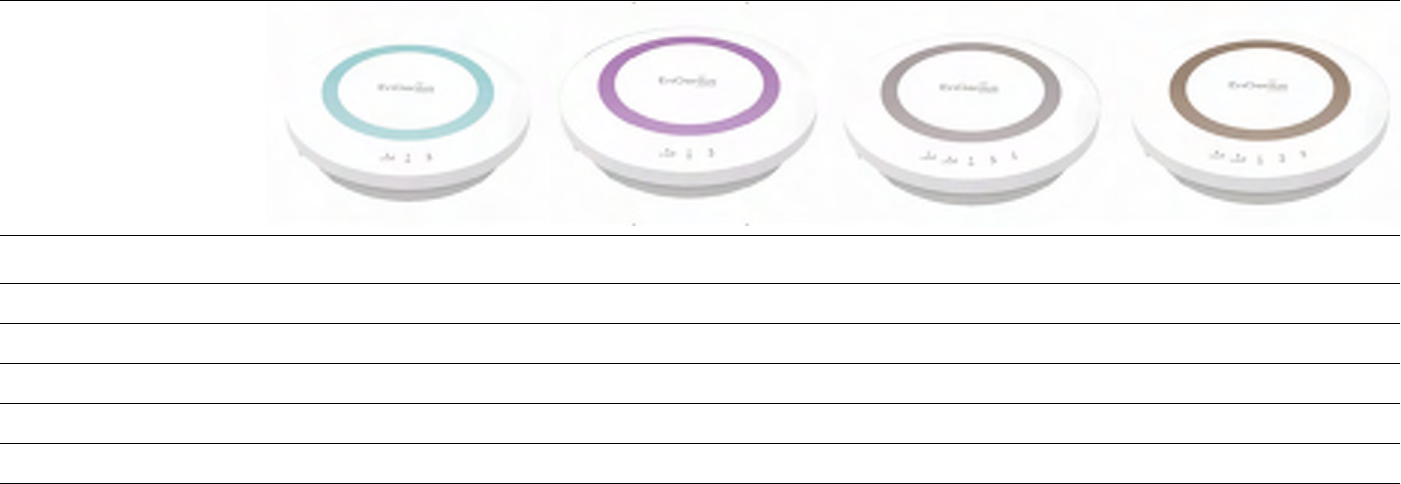
PRODUCT OVERVIEW WIRELESS N DBDC GIGABIT APP ROUTER SERIES COMPARISON
1-6
WPS / Reset Y Y Y Y
Parental Control Y Y Y Y
IPv6 Compliance Y Y Y Y
Guest Network Y Y Y Y
Multi-Language Y / 5 Countries Y / 5 Countries Y / 5 Countries Y / 5 Countries
MODEL NAME ESR300 ESR350 ESR600 ESR900

PRODUCT OVERVIEW PACKAGE CONTENTS
1-7
1.2 Package Contents
ITEM QUANTITY
ESR Series Router Wireless N DBDC Gigabit App Router 1
Quick Start Guide 1
12V/1A Power Adaptor 1
Rj-45 Ethernet Cable 1
PRODUCT OVERVIEW PRODUCT LAYOUT
1-8
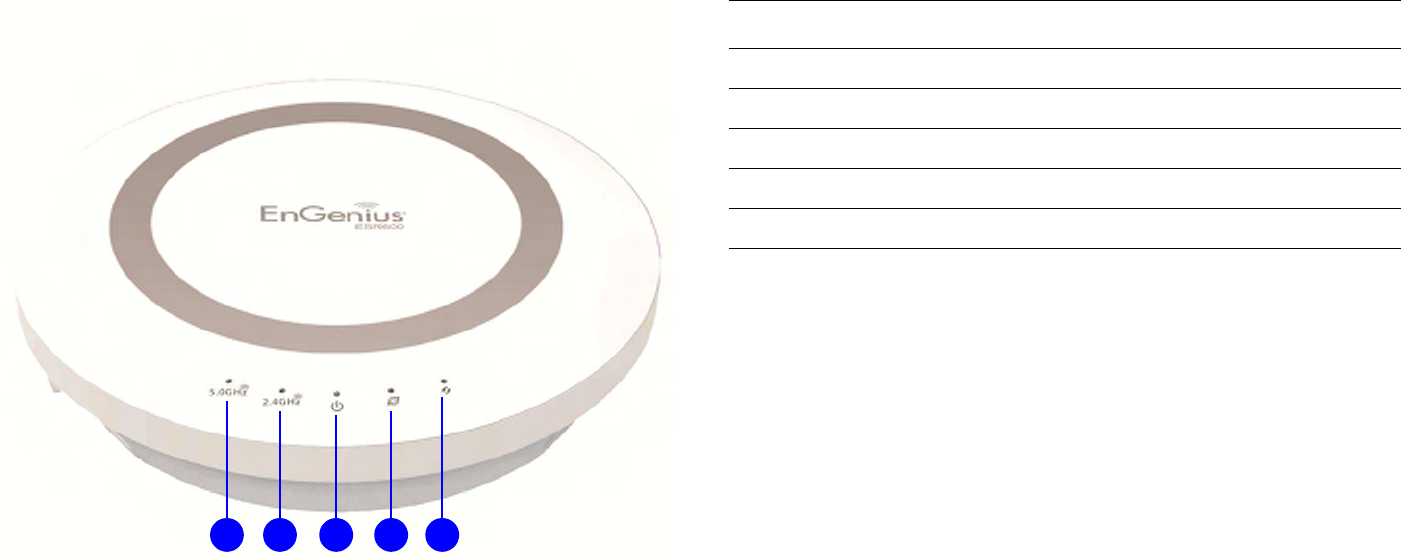
1.3 Product Layout
AB C D E
ITEM DESCRIPTION
A WLAN 5GHz LED Wireless 5GHz LED
B WLAN 2.4GHz LED Wireless 2.4GHz LED
B Power LED Power status LED
D WAN Port LED WAN status LED
E WPA LED WPA status LED
PRODUCT OVERVIEW PRODUCT LAYOUT
1-9
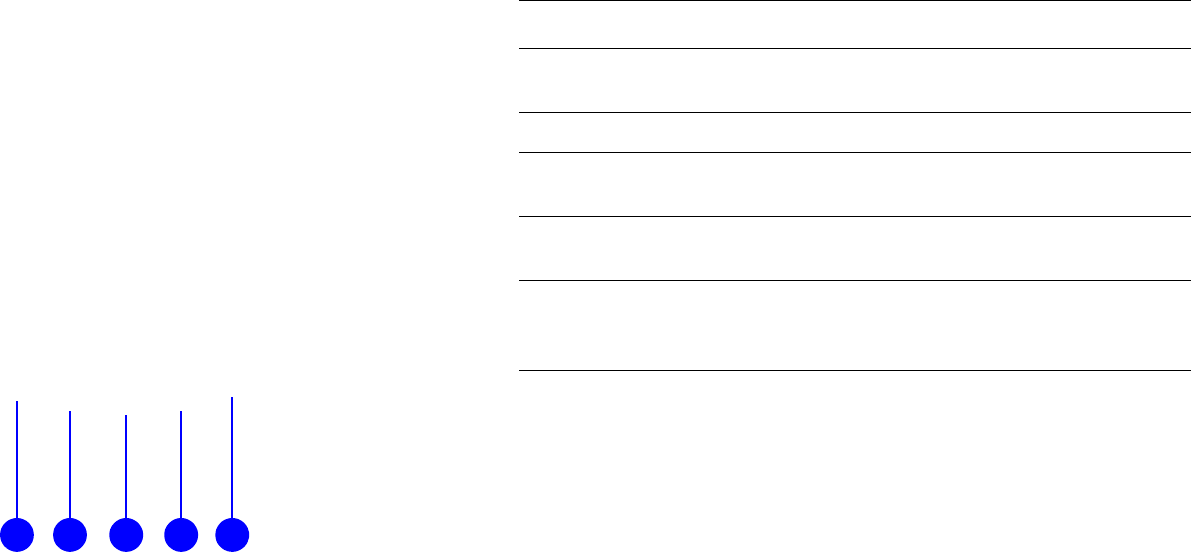
12 3 4 5
ITEM DESCRIPTION
1 DC Power Jack Connects the ESR Series Router to a DC
power adapter source.
2 WAN Port Connects the ESR Series Router to a modem.
3 LAN Ports (1 – 4) Connects up to four computers (4) to a local
area network (LAN) using Ethernet cable.
4 Reset Button To reset to factory settings, press button for >
11 seconds.
5 WPS Button
Wi-Fi Protected Setup button.
To activate WPS, press button for 1~5
seconds.
Installation
Chapter 2
INSTALLATION SYSTEM REQUIREMENTS
2-1
2.1 System Requirements
To install an ESR600 Series Router, you need the following:
Computer (Windows, Linux, OSX Operating System)
Web Browser (Internet Explorer, FireFox, Chrome, Safari)
Network Interface Card with an open RJ-45 Ethernet Port
Wi-Fi Card or USB Wi-Fi Dongle (802.11 B/G/N) **
An existing router or access point (AP) with SSID broad-
cast
CAT5 Ethernet Cables
** Optional

INSTALLATION WALL MOUNTING
2-2
2.2 Wall Mounting
Mounting the ESR600 Series Router on a wall optimizes the
wireless access range.
To mount the device on the wall do the following:
1. Measure the distance from the middle of each mounting
screw hole.
2. Mark the locations of the screw holes on the wall.
3. Drill a hole for each marked location and insert a screw in
each.
4. Install and secure the mounts onto the ESR600 Series
Router.
5. Install the ESR600 Series Router on the wall.
Note:
Choose a location that is within reach of an electrical
outlet for the AC adapter and the DSL or Cable modem.
Note:
Make sure to leave enough of the screw head above the
wall surface to secure the ESR600 Series Router.
EnGenius Quick Start
Chapter 3

ENGENIUS QUICK START INSTALLING THE SOFTWARE
3-1
3.1 Installing the Software
Setup Notes
When considering the placement of the ESR600 Series Router
remember the following:
It must be close to an electrical outlet.
Upon first setup, it must be close to the computer that is
used to set up and configure the ESR600 Series Router.
For optimal wireless access place the ESR600 Series
Router in the center of the room, at a high altitude and
with an unobstructed view of the other wireless devices.
Other electronic devices can interfere with the wireless
frequency of the ESR600 Series Router and reduce the
wireless access range.
Installation
No software installation required.
Note:
Before getting started, please power off the cable or
DSL modem.

ENGENIUS QUICK START CONNECTING NETWORK CABLES
3-2
3.2 Connecting Network Cables
CAUTION!
UNPLUG ALL PERIPHERALS AND THE ADAPTER BEFORE STARTING WITH THIS PROCEDURE.
1. Connect the adapter cable to an electrical outlet.
Note:
The Power LED lights up to show the device is active.
2. Plug one end of an Ethernet cable into the LAN port on
the back panel of the device. Plug the other end of the
cable into the Ethernet port of the computer.
Note:
Make sure the network cables and power adapter are
firmly connected.
!
Web Configuration
Chapter 4
WEB CONFIGURATION LOGGING IN
4-1
4.1 Logging In
Note:
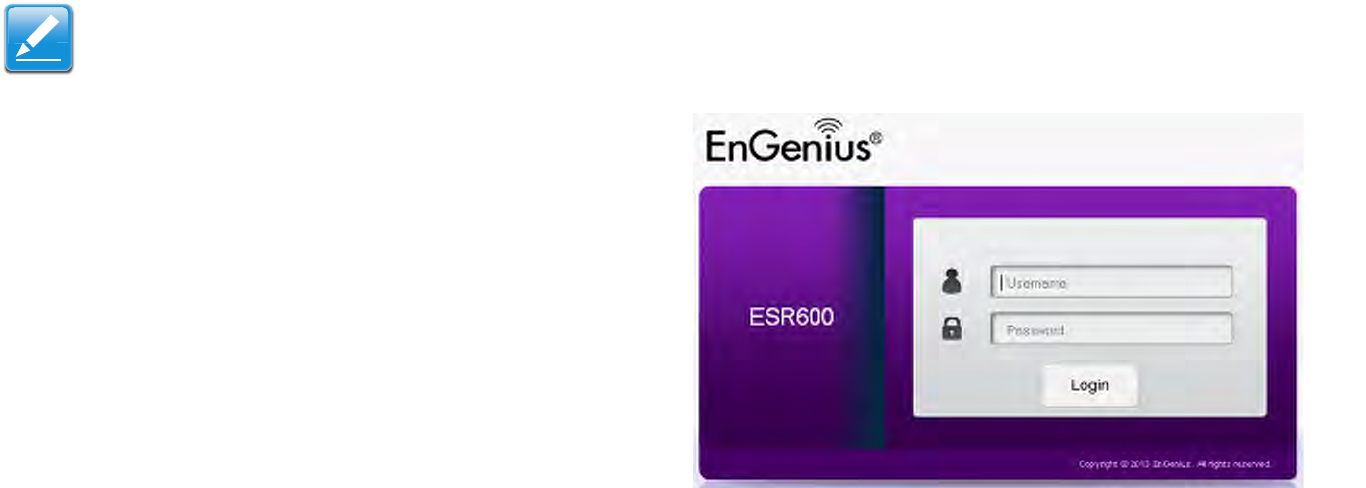
If the login screen does not display, enter the default IP address of 192.168.0.1.
1. At the login screen enter a user name and a pass-
word.
2. Click Login to continue.
Default settings
user name: admin
password: admin.
WEB CONFIGURATION VIEWING THE DASH BOARD
4-2
4.2 Viewing the Dash Board
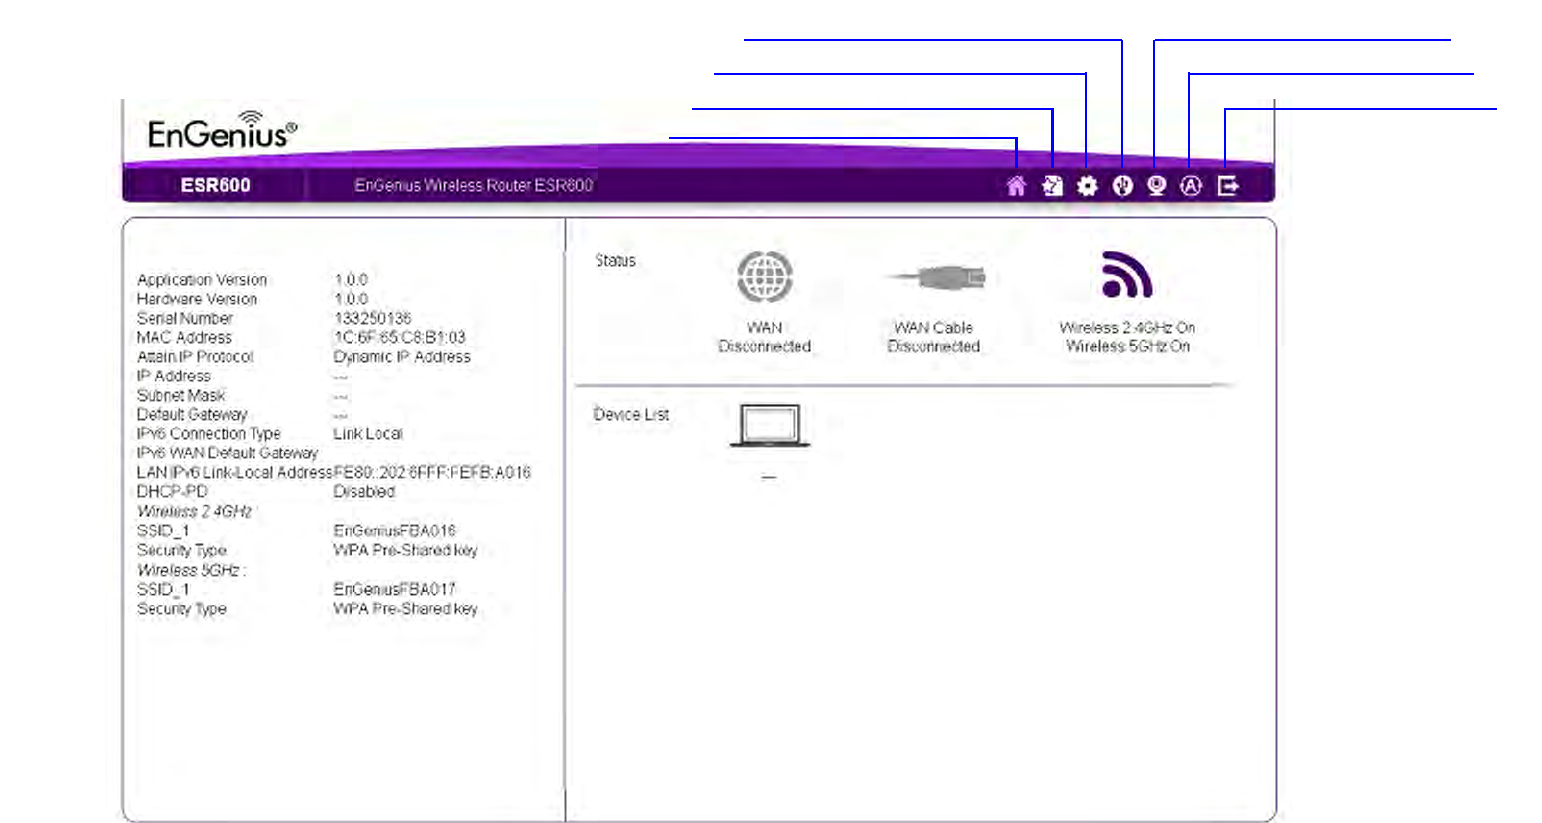
The main screen, or dashboard, provides access to all of the ESR Series Router’s services.
Setup Wizard
Network Settings
IP Cam Viewer
Logout
Language
USB Storage Sharing
Home
WEB CONFIGURATION MAIN MENU
4-3
Main Menu
The Home, Setup Wizard, Network Settings, USB Storage
Sharing, IP Cam Viewer, Language, and Logout links available
from the main menu.
Home
The Home link displays the dashboard screen.
Setup Wizard
The Setup Wizard link starts the wizard that automatically con-
figures the ESR Series Router. Refer to “Internet Setup Wizard”
on page 5-1.
Network Settings
The Network Settings link displays the menus to manually con-
figure the ESR Series Router. Refer to “Web Menus Overview”
on page 4-4.
USB Storage Sharing
The USB Storage Sharing link displays the menus to access
shared storage devices connected to the ESR Series Router.
Refer to “Web Menus Overview” on page 4-4.
IP Cam Viewer
The IP Cam Viewer link displays the menus to view an IP cam-
era connected to the network. Refer to “Web Menus Overview”
on page 4-4.
Language
The Language link displays the menu to set the OSD language.
Refer to “Configuring the System Language” on page 6-14.
Logout
The Logout link closes the ESR Series Router configuration
software.
WEB CONFIGURATION WEB MENUS OVERVIEW
4-4
4.3 Web Menus Overview
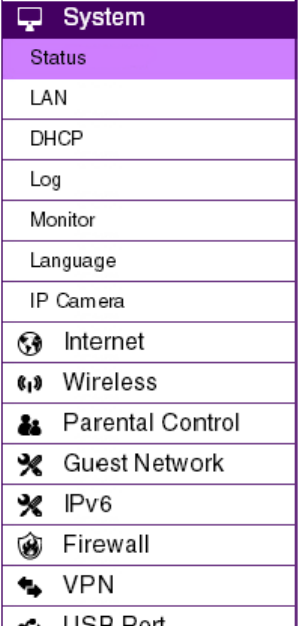
System
View and edit settings that affect system functionality.
Operation Mode
Configure the device to be a universal repeater or a client bridge.
Status
Display the summary of the current system status.
Schedule
Schedule services to start and stop at specific times or intervals.
Event Log
View recorded system operations and network activity events.
Monitor
View the current network traffic bandwidth usage.
Language
Configure the application menu and GUI language.
IP Camera
View the IP cameras connected to the ESR Series Router.
WEB CONFIGURATION WEB MENUS OVERVIEW
4-5
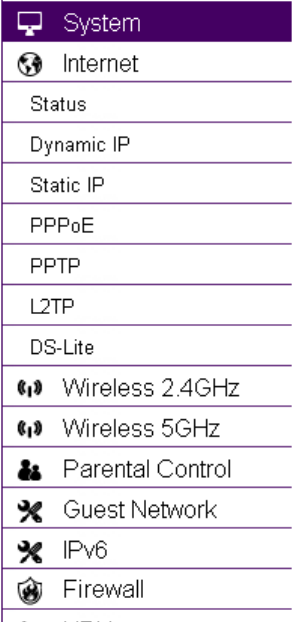
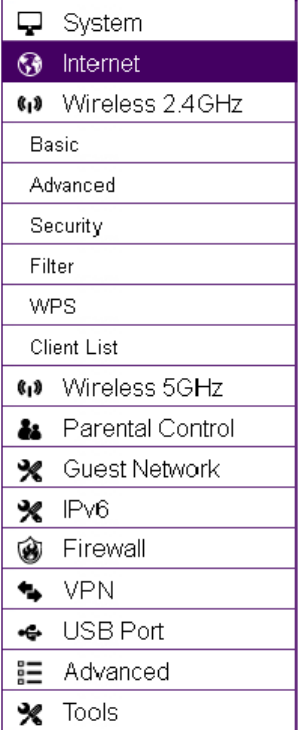
Internet
View and edit settings that affect network connectivity.
Status
Display the summary of the Internet status and type of connection.
Dynamic IP
Setup a dynamic IP connection to an Internet service provider (ISP).
Static IP
Setup a static IP connection to an ISP.
PPPoE
Setup a PPPoE connection to an ISP.
PPTP
Setup a PPTP connection to an ISP.
L2TP
Setup an L2TP connection to an ISP.
WEB CONFIGURATION WEB MENUS OVERVIEW
4-6
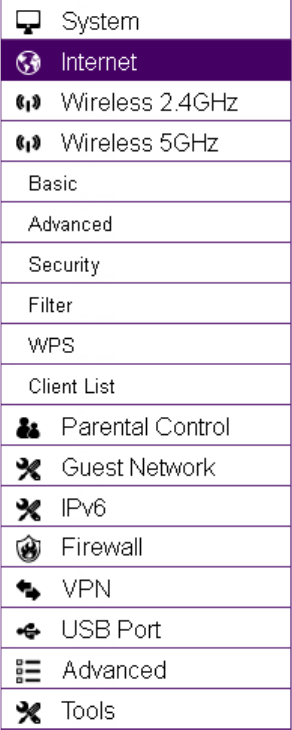
Wireless 2.4G
View and edit settings for 2.4G wireless network connectivity.
Status
View the current wireless connection status and related information.
Basic
Configure the minimum settings required to setup a wireless network connection.
Advanced
Configure the advanced network settings.
Security
Configure the wireless network security settings.
Filter
Configure a list of clients that are allowed to wirelessly connect to the network.
WPS
Automate the connection between the a wireless device and the ESR Series Router using an 8-
digit PIN.
Client List
View the 2.4G wireless devices currently connected to the network.
WEB CONFIGURATION WEB MENUS OVERVIEW
4-7
Wireless 5G
View and edit settings for 5G wireless network connectivity.
Status
View the current wireless connection status and related information.
Basic
Configure the minimum settings required to setup a wireless network connection.
Advanced
Configure the advanced network settings.
Security
Configure the wireless network security settings.
Filter
Configure a list of clients that are allowed to wirelessly connect to the network.
WPS
Automate the connection between the a wireless device and the ESR Series Router using an 8-
digit PIN.
Client List
View the 5G wireless devices currently connected to the network.
WEB CONFIGURATION WEB MENUS OVERVIEW
4-8
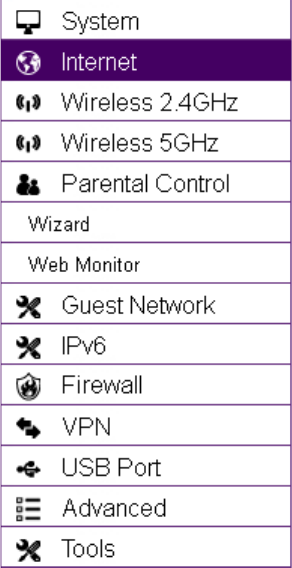
Parental Control
View and edit settings for parental control.
Wizard
Enable or disable the Parental Control function. The menu also provides information for config-
uring parental control policies.
Web Monitor
The menu provides a log of the events for defined parental control policies.
WEB CONFIGURATION WEB MENUS OVERVIEW
4-9
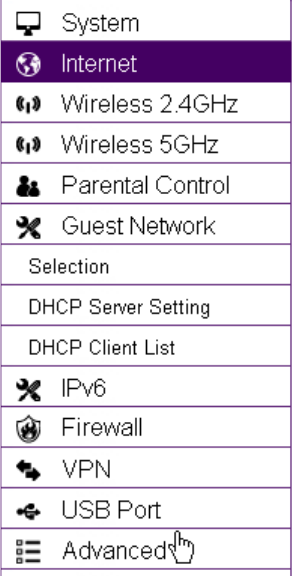
Guest Network
View and edit settings for a guest network.
Selection
Enable or disable the Guest Network function.
DHCP Server Setting
Configure the Guest Network DHCP server settings.
DHCP Client List
Configure the Guest Network client list.
WEB CONFIGURATION WEB MENUS OVERVIEW
4-10
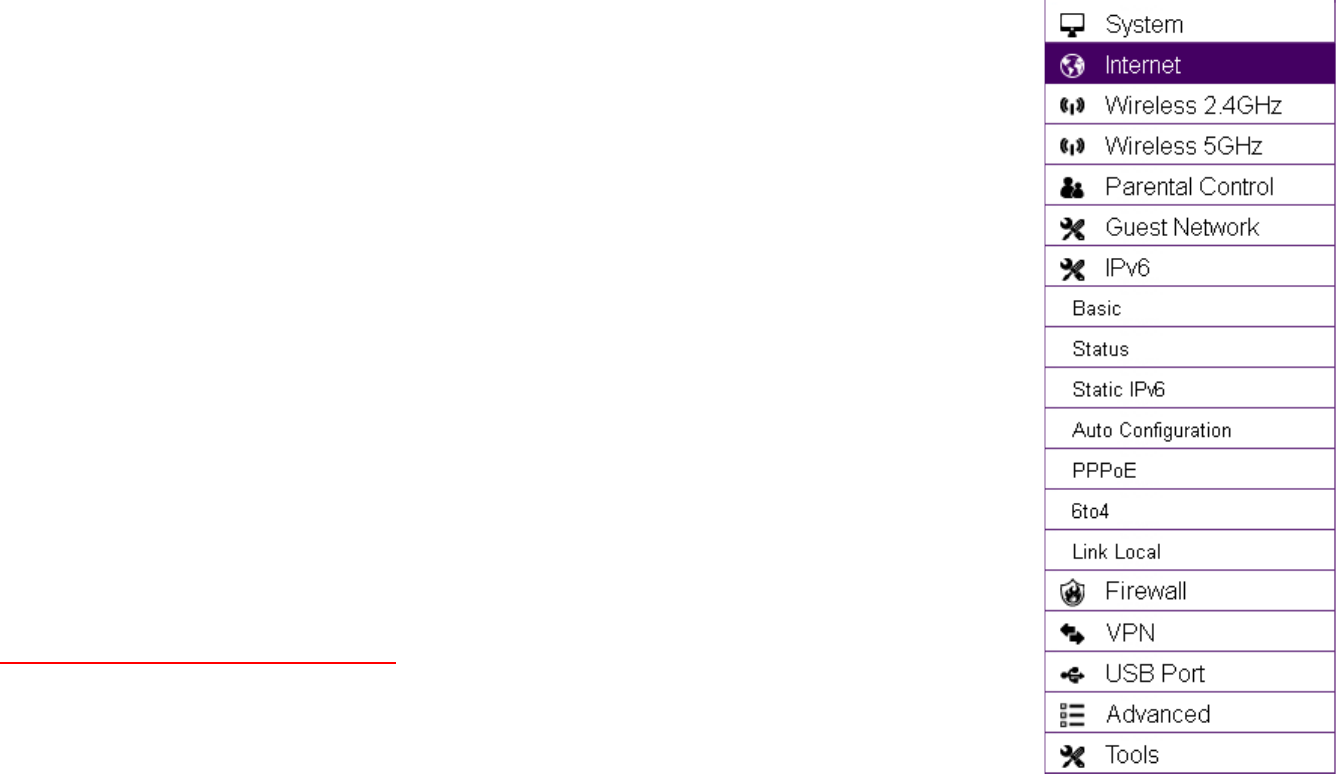
IPv6
View and edit settings for the IPv6 protocol.
Basic
Allows you to enable or disable the IPv6 and IPv6 Pass-through functions.
Status
Shows IPv6 LAN connection details.
Static IPv6
Configure the IPv6 protocol.
Auto Configuration
Configure the IPv6 by obtaining the information through the ISP provider.
PPPoE
Configure the PPPoE network protocol, obtain information from you Internet Service Provider
(ISP).
6to4
Configure the IPv6 to IPv4 transition mechanism to migrate IPv4 to allow IPv6 packets to be
transmitted over the IPv4 protocol.
Link Local
Configure the IPv6 link local address.
WEB CONFIGURATION WEB MENUS OVERVIEW
4-11
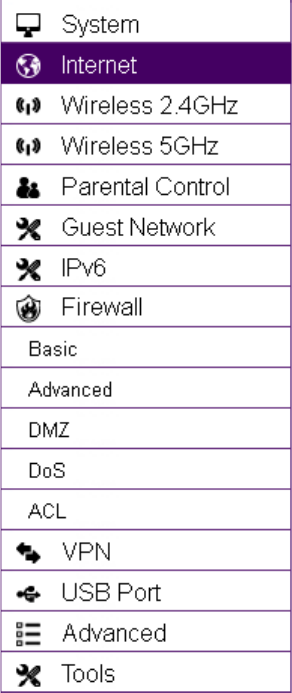
Firewall
View and edit settings for the network firewall.
Basic
Enable or disable the network firewall.
Advanced
Configure virtual private network (VPN) packets.
DMZ
Redirect packets from the WAN port IP address to a particular IP address on the LAN.
DoS
Enable or disable blocking of denial of service (DoS) attacks.
ACL
Configure access control lists.
WEB CONFIGURATION WEB MENUS OVERVIEW
4-12
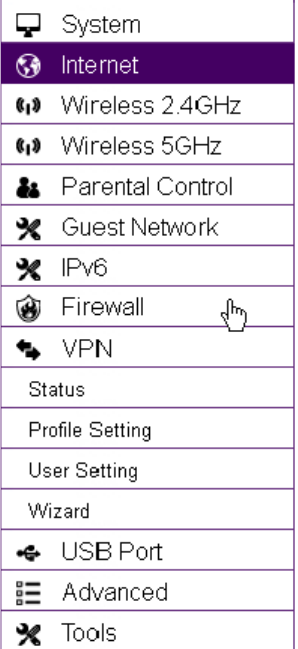
VPN
View and edit settings for VPN tunnelling.
Status
View the status of current VPN tunnels.
Profile Setting
Manually configure VPN tunnels.
User Setting
Configure users, user ID and password combinations, and assign access to specific VPN tun-
nels.
Wizard
Automatically configure VPN tunnels with guidance from the software.
WEB CONFIGURATION WEB MENUS OVERVIEW
4-13
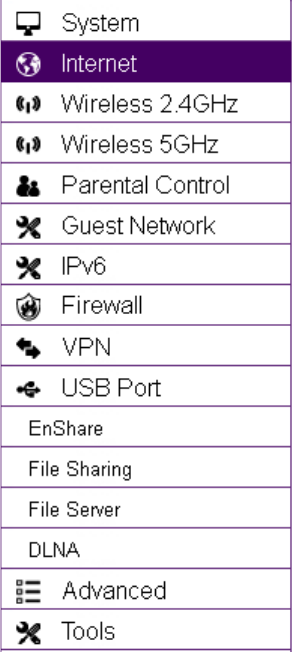
USB Port
View and edit settings for storage sharing.
Enshare
Enable or disable the EnShare remote access function.
File Sharing
Enable or disable the Samba sharing function.
File Server
Enable and configure the File Server function.
DLNA
Enable the DLNA server software to turn your PC into a server. By enabling the DLNA server
you can provide access to compatible devices to use your media libraries.
WEB CONFIGURATION WEB MENUS OVERVIEW
4-14
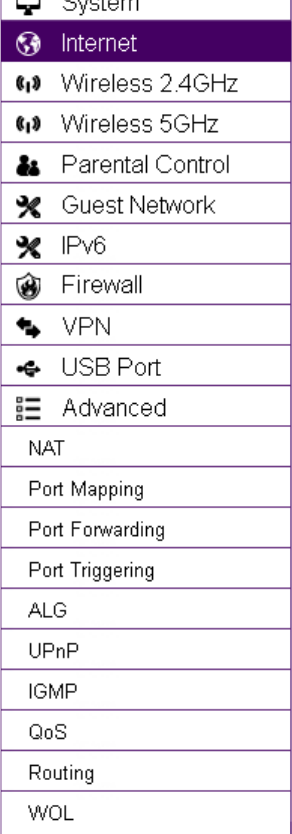
Advanced
View and configure advanced system and network settings.
NAT
Enable or disable Network Address Translation (NAT).
Port Mapping
Re-direct a range of service port numbers to a specified LAN IP address.
Port Forwarding
Configure server applications to send and receive data from specific ports on the network.
Port Triggering
Configure applications that require multiple connections and different inbound and outbound
connections.
ALG
Configure the application layer gateway (ALG).
UPnP
Enable or disable Universal Plug and Play (UPnP) functionality.
IGMP
Enable or disable the Internet Group Multicast Protocol (IGMP).
WEB CONFIGURATION WEB MENUS OVERVIEW
4-15
QoS
Configure the network quality of service (QoS) setting by prioritizing the uplink and downlink
bandwidth.
Routing
Configure static routing.
WOL
Configure wake on LAN (WOL) to turn on a computer over the network.
WEB CONFIGURATION WEB MENUS OVERVIEW
4-16
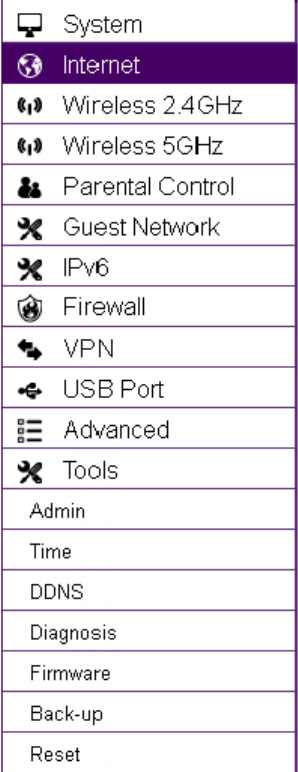
Tools
View and configure system and network tools settings.
Admin
Configure the administrator password used to login to the router.
Time
Configure the system time on the router.
DDNS
Map a static domain name to a dynamic IP address.
Diagnosis
Check if a specific computer is connected to the LAN.
Firmware
Update the router’s firmware.
Backup
Load or save configuration settings from a backup file or restore the factory default settings.
Reset
Manually reset the router.
Installation Setup Wizard
Chapter 5
INSTALLATION SETUP WIZARD INTERNET SETUP WIZARD
5-1
5.1 Internet Setup Wizard
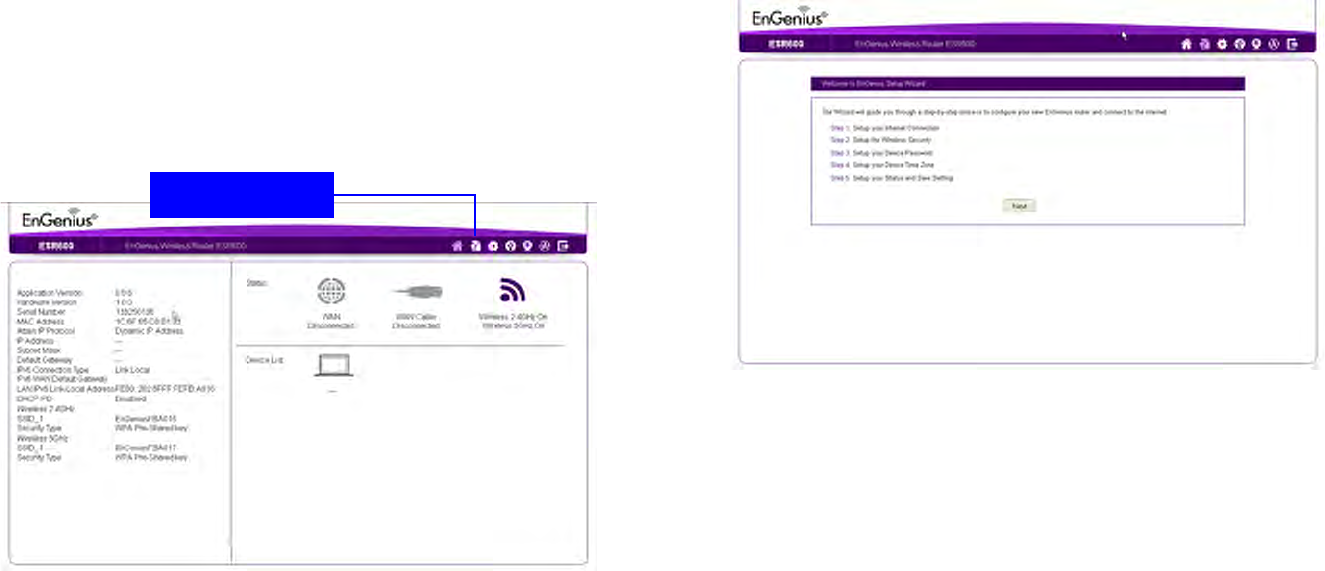
Use the Wizard to detect and setup the type of internet connec-
tion, setup a secure Wi-Fi connection, create an administrator
password to secure the device, and set the date and time prop-
erties.
To use the Internet setup wizard, follow these steps:
1. Click the Wizard button to show the Wizard start screen.
2. Click Next to continue with the setup procedure.
Wizard Button
INSTALLATION SETUP WIZARD SETTING UP YOUR INTERNET CONNECTION
5-2
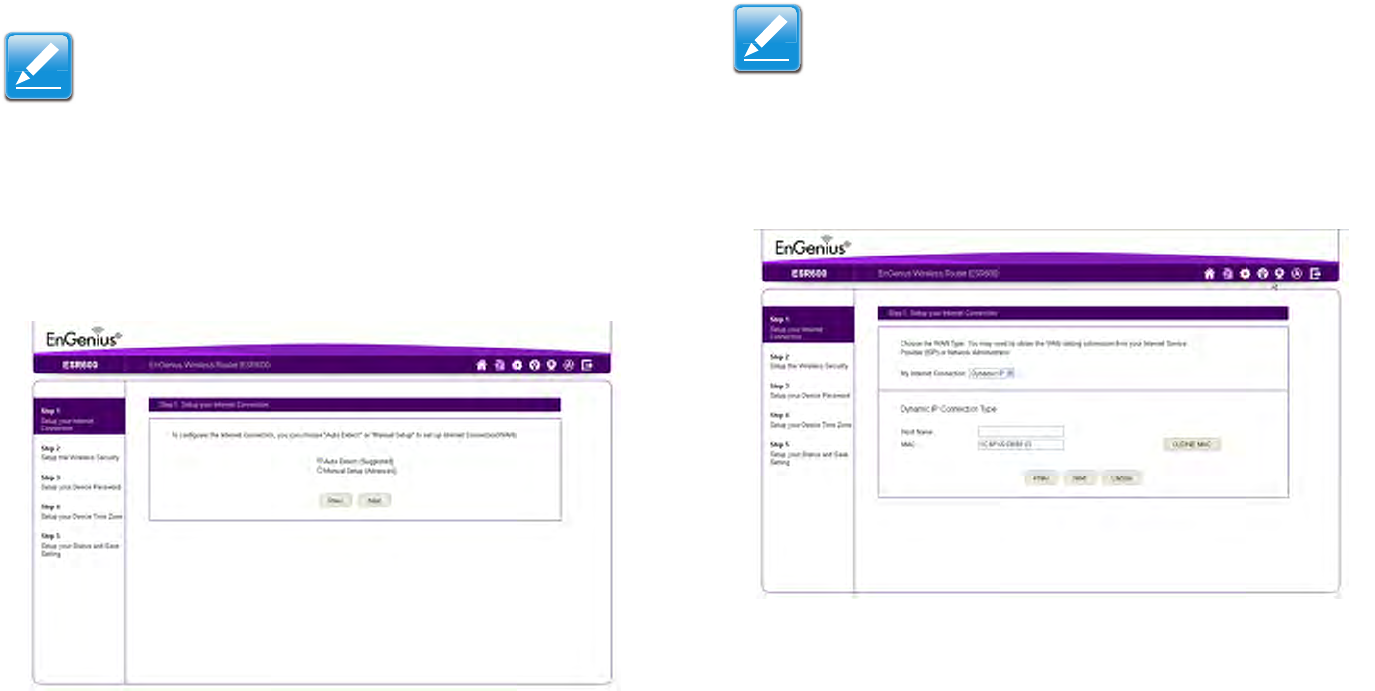
5.1.1 Setting Up Your Internet Connection
1. Decide how to setup the Internet connection.
Select Auto Detect to let the wizard setup the Inter-
net connection.
Select Manual Setup to set the properties yourself.
2. Click Next to continue or Prev to return to the previous
screen.
If you selected Manual Setup, follow these steps:
3. Select the Internet connection type and enter the connec-
tion properties.
4. Click Next to continue, Prev to return to the previous
screen, or Cancel to abort the procedure.
Note:
It is recommended to let the device setup the Internet
connection automatically.
Note:
The connection types available are static IP, PPPoE,
Dynamic IP, PPTP, and L2TP. For a description of the
properties for the different connection types, refer to
“WAN Settings” on page 6-39.

INSTALLATION SETUP WIZARD SETTING UP YOUR WIRELESS CONNECTION
5-3
5.1.1 Setting Up Your Wireless Connection
Setup secure connections to 2.4G and 5G Wi-Fi networks.
To setup a secure 2.4G Wi-Fi network, follow these steps:
1. Enter a router name in the Wi-Fi Name (SSID) text
field.
2. Select the security level from the Encryption dropdown
list.
3. Enter a password in the Encryption Key text field.
4. Repeat steps 1 to 3 to setup a secure 5G Wi-Fi network.
5. Click Next to continue, Prev to return to the previous
screen, or Cancel to abort the procedure.
Important:
To ensure the network is secure, it is recommended to
select High for an encryption level.
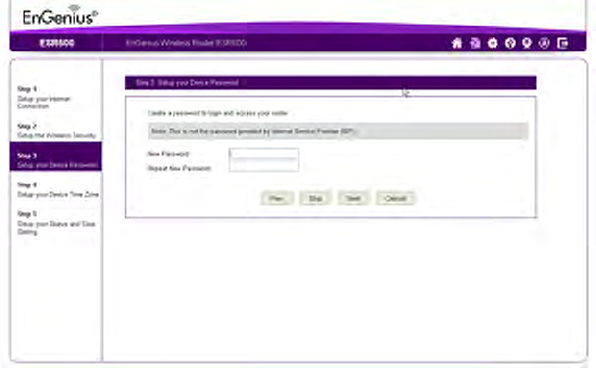
INSTALLATION SETUP WIZARD SETUP YOUR DEVICE PASSWORD
5-4
5.1.1 Setup Your Device Password
Setup a password to login to the ESR Series Router.
1. Enter a password in the New Password text field.
2. Enter the same password in the Repeat New Pass-
word text field.
3. Click Prev to return to the previous screen, Skip to skip
this procedure, Next to continue, or Cancel to abort the
procedure.
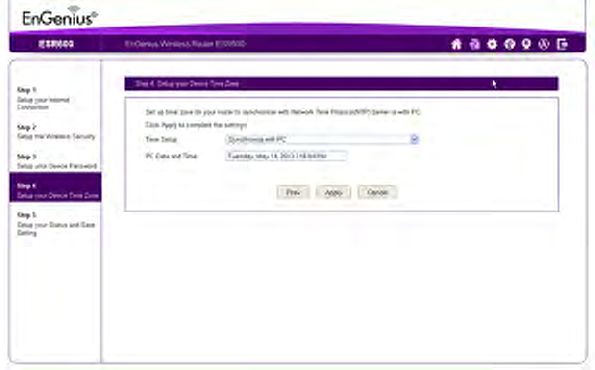
INSTALLATION SETUP WIZARD SETUP YOUR DEVICE TIME ZONE
5-5
5.1.1 Setup Your Device Time Zone
Setup date and time syncronization on the ESR Series Router
with a PC or an Network Time Protocol (NTP) server.
To syncronize date and time settings with a PC, follow these
steps:
1. Select Syncronize with PC from the Time Setup
dropdown list. The date and time values are shown in the
PC Date and Time text field.
2. Click Prev to return to the previous screen, Apply to
save the settings, or Cancel to abort the procedure.
To syncronize the date and time settings with an NTP server,
follow these steps:
1. Select Syncronize with NTP Server from the Time
Setup dropdown list.
2. Select a time zone value from the Time Zone dropdown
list.
3. Enter an IP address or domain name of an NTP server in
the NTP Server text field.
4. Click the Enable Daylight Saving check box to
enable or disable daylight savings time.
5. Select the date and time values when daylights savings
time starts in the Start Time dropdown lists.
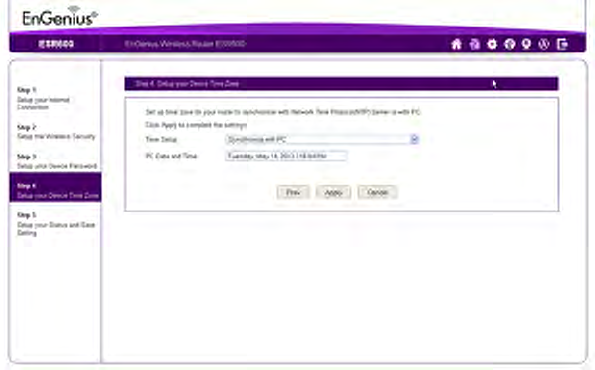
INSTALLATION SETUP WIZARD SETUP YOUR DEVICE TIME ZONE
5-6
6. Select the date and time values when daylights savings
time ends in the End Time dropdown lists.
7. Click Prev to return to the previous screen, Apply to
save the settings, or Cancel to abort the procedure.
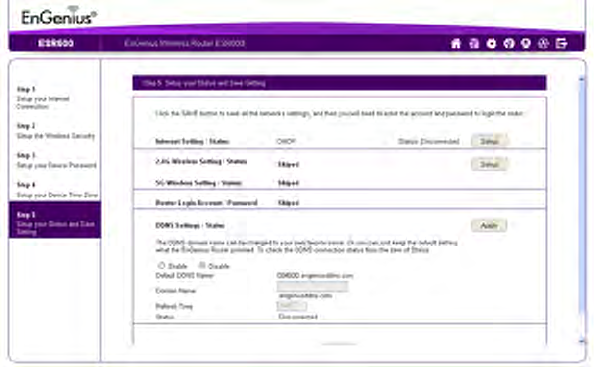
INSTALLATION SETUP WIZARD SETUP YOUR STATUS AND SAVE SETTING
5-7
5.1.1 Setup Your Status and Save Setting
Save the connection and security settings and setup up a cus-
tom DDNS domain name to use with the ESR Series Router.
To review or modify the device settings, follow these steps:
1. Review the settings shown on the screen for the Internet
connection, 2.4G and 5G Wi-Fi networks, and the ESR
Series Router administrator login.
2. Change settings to the Internet connection and Wi-Fi net-
work settings by clicking the Setup button.
3. Click Enable to setup a custom DDNS domain name for
the ESR Series Router or Disable to use the default
name.
To setup as custom DDNS domain name, follow these
steps:
a. Enter a domain name in the Domain Name text field.
b. Select a time interval to refresh the DNS records from
the Refresh dropdown list.
c. Click Apply to save the DDNS settings.
4. Click Save to save the settings and close the wizard.
Basic Network Settings
Chapter 6
Wireless Services
Chapter 7
WIRELESS SERVICES IP CAMERA CLIENT
7-1
7.2 IP Camera Client
The EnGenius IP cam feature is only available to the EnGenius IP cam

APPENDIX A APPENDIX A
A-1
Appendix A
Federal Communication Commission Interference
Statement
This equipment has been tested and found to comply with the limits for a Class B digital device, pursuant to Part 15 of the FCC
Rules. These limits are designed to provide reasonable protection against harmful interference in a residential installation. This
equipment generates, uses and can radiate radio frequency energy and, if not installed and used in accordance with the instructions,
may cause harmful interference to radio communications. However, there is no guarantee that interference will not occur in a partic-
ular installation. If this equipment does cause harmful interference to radio or television reception, which can be determined by turn-
ing the equipment off and on, the user is encouraged to try to correct the interference by one of the following measures:
Reorient or relocate the receiving antenna.
Increase the separation between the equipment and receiver.
Connect the equipment into an outlet on a circuit different from that to which the receiver is connected.
Consult the dealer or an experienced radio/TV technician for help.
This device complies with Part 15 of the FCC Rules. Operation is subject to the following two conditions: (1) This device may not
cause harmful interference, and (2) this device must accept any interference received, including interference that may cause unde-
sired operation.
This transmitter must not be co-located or operating in conjunction with any other antenna or transmitter.
Operations in the 5.15-5.25GHz band are restricted to indoor usage only.
WARNING!
Any changes or modifications not expressly approved by the party responsible for compliance could void the user's authority to
operate this equipment.
!

APPENDIX A FEDERAL COMMUNICATION COMMISSION INTERFERENCE STATEMENT
A-2
FCC Radiation Exposure Statement:
Industry Canada statement:
Avertissement:
Radiation Exposure Statement:
Important:
This equipment complies with FCC radiation exposure limits set forth for an uncontrolled environment. This equipment should be
installed and operated with minimum distance 35cm between the radiator & your body.
Important:
This device complies with RSS-210 of the Industry Canada Rules. Operation is subject to the following two conditions: (1) This
device may not cause harmful interference, and (2) this device must accept any interference received, including interference that
may cause undesired operation.
Ce dispositif est conforme à la norme CNR-210 d'Industrie Canada applicable aux appareils radio exempts de licence. Son fonctionnement est
sujet aux deux conditions suivantes: (1) le dispositif ne doit pas produire de brouillage préjudiciable, et (2) ce dispositif doit accepter tout
brouillage reçu, y compris un brouillage susceptible de provoquer un fonctionnement indésirable.
WARNING!
(i) the device for operation in the band 5150-5250 MHz is only for indoor use to reduce the potential for harmful interference to co-
channel mobile satellite systems;
(ii) high-power radars are allocated as primary users (i.e. priority users) of the bands 5250-5350 MHz and 5650-5850 MHz and that these
radars could cause interference and/or damage to LE-LAN devices.
Important:
(i) les dispositifs fonctionnant dans la bande 5150-5250 MHz sont réservés uniquement pour une utilisation à l’intérieur afin de
réduire les risques de brouillage préjudiciable aux systèmes de satellites mobiles utilisant les mêmes canaux;
(ii) De plus, les utilisateurs devraient aussi être avisés que les utilisateurs de radars de haute puissance sont désignés utilisateurs principaux
(c.-à-d., qu’ils ont la priorité) pour les bandes 5250-5350 MHz et 5650-5850 MHz et que ces radars pourraient causer du brouillage et/ou des
dommages aux dispositifs LAN-EL.
Important:
Cet équipement est conforme aux limites d'exposition aux rayonnements IC établies pour un environnement non contrôlé. Cet
équipement doit être installé et utilisé avec un minimum de 35cm de distance entre la source de rayonnement et votre corps.
!

APPENDIX B APPENDIX B
B-1
Appendix B
Industry Canada Statement
This device complies with RSS-210 of the Industry Canada Rules. Operation is subject to the following two conditions: (1) This
device may not cause harmful interference, and (2) this device must accept any interference received, including interference that
may cause undesired operation.
Ce dispositif est conforme à la norme CNR-210 d'Industrie Canada applicable aux appareils radio exempts de licence. Son fonc-
tionnement est sujet aux deux conditions suivantes: (1) le dispositif ne doit pas produire de brouillage préjudiciable, et (2) ce disposi-
tif doit accepter tout brouillage reçu, y compris un brouillage susceptible de provoquer un fonctionnement indésirable.
Important:
Radiation Exposure Statement:
This equipment complies with IC radiation exposure limits set forth for an uncontrolled environment. This equipment should be
installed and operated with minimum distance 35cm between the radiator & your body.
Déclaration d'exposition aux radiations:
Cet équipement est conforme aux limites d'exposition aux rayonnements IC établies pour un environnement non contrôlé. Cet équipement doit
être installé et utilisé avec un minimum de 35 cm de distance entre la source de rayonnement et votre corps.
APPENDIX C APPENDIX C
C-1
Appendix C
Link Layers
There are different ways of connecting your personal computer (PC) or mobile computing device to the Internet. Here are four of the
most common ways and how to connect to the Internet using them.
Dynamic IP Address (DHCP)
A DHCP of connection is where your internet connection is usually always on and your internet service provider automatically pro-
vides you with an IP address. A DHCP connection is usually from a Cable internet service.
Static IP
To set up a Static IP connection, enter the following: IP Address of the Internet Connection, Subnet Mask, Default Gateway, and both
DNS Servers. This information can be obtained by either your Internet Service provider or Network Administrator. If your internet ser-
vice provider requires a username and password to connect, you will then be prompted to enter the correct information.
MTU: Maximum Transmission Unit. It specifies the largest packet size permitted for internet transmission. The factory default MTU
size of Static IP is 1500. If you wish to manually change the MTU size, set it between 512 and 1500.
Point-to-Point Protocol over Ethernet (PPPoE)
Point-to-Point Protocol over Ethernet (PPPoE): To set up a PPPoE connection, enter the Username, Password, and Service (name)
of the internet connection provided by your ISP. Click Next and the ERB300H/150H should connect to the internet successfully. A
PPPoE connection is usually from a DSL internet service.
1. Login: The username or e-mail address that the internet connection uses to access internet connectivity.
2. Password: The password that corresponds to the username or e-mail address used to connect to the internet in the PPPoE.
3. Service Name: The Service Name is optional. This is to signify the name of the Internet Service Provider.
APPENDIX C LINK LAYERS
C-2
4. MTU: Maximum Transmission Unit. It specifies the largest packet size permitted for internet transmission. The factory default
MTU size of Static IP is 1500. If you wish to manually change the MTU size, set it between 512 and 1500.
5. Point-to-Point Tunneling Protocol (PPTP)
To set up a PPTP connection, enter the type of WAN connection (Static IP or DHCP). After, depending on the type of WAN, follow
the instructions of DHCP or Static IP to fill out the corresponding information. Then, proceed to enter the Username, Password, Ser-
vice, and Connection ID of the PPTP internet connection. Once completed, click Next. Once configured, the internet connection will
successfully connect.
Layer 2 Tunneling Protocol (L2TP)
To set up an L2TP connection, enter the type of WAN connection (Static IP or DHCP). After, depending on the type of WAN, follow
the instructions of DHCP or Static IP to fill out the corresponding information. Then, proceed to enter the Username, Password, and
Service. Click next when completed. Once configured, the internet connection will successfully connect.
MTU: Maximum Transmission Unit. It specifies the largest packet size permitted for internet transmission. The factory default MTU
size of Static IP is 1500. If you wish to manually change the MTU size, set it between 512 and 1500.

APPENDIX D APPENDIX D
D-1
Appendix D
WorldWide Technical Support
REGION/COUNTRY OF PURCHASE SERVICE CENTRE SERVICE INFORMATION
Canada
CANADA web site www.engeniuscanada.com
email rma@engeniuscanada.com
contact numbers Toll Free: (+1) 888-397-2788
Local: (+1) 905-940-8181
hours of operation Monday - Friday
9:00AM to 5:30PM EST (GMT-5)
USA
LOS ANGELES, USA web site www.engeniustech.com
email support@engeniustech.com
contact numbers Toll Free: (+1) 888-735-7888
Local: (+1) 714-432-8668
hours of operation Monday - Friday
8:00 AM to 4:30 PM PST (GMT-8)
Mexico, Central and Southern America MIAMI, USA web site [ES] es.engeniustech.com
[PT] pg.engeniustech.com
email miamisupport@engeniustech.com
contact numbers
Miami: (+1) 305-887-7378
Sao Paulo, Brazil: (+55)11-3957-0303
D.F., Mexico:(+52)55-1163-8894
hours of operation Monday - Friday
8:00 AM to 5:30PM EST (GMT-5)

APPENDIX D WORLDWIDE TECHNICAL SUPPORT
D-2
Europe
NETHERLANDS web site www.engeniusnetworks.eu
email support@engeniusnetworks.eu
contact numbers (+31) 40-8200-887
hours of operation Monday - Friday
9:00 AM - 5:00 PM (GMT+1)
Africa
Middle East
Russia
CIS / Armenia, Azerbaijan, Belarus,
Georgia, Kazakhstan, Kyrgyzstan,
Moldova, Tajikistan,
Turkmenistan, Ukraine,
Uzbekistan
Turkey
Afghanistan
Pakistan
Bangladesh, Maldives,
Nepal, Bhutan, Sri Lanka
DUBAI, UAE web site www.engenius-me.com
email support@engenius-me.com
contact numbers
Toll Free:
U.A.E.: 800-EnGenius
800-364-364-87
General:
(+971) 4357-5599
hours of operation Sunday - Thursday
9:00 AM - 6:00 PM (GMT+4)
Singapore, Cambodia,
Indonesia, Malaysia,
Thailand, Philippines,
Vietnam
China, Hong Kong, Korea
India
South Africa
Oceania
SINGAPORE web site www.engeniustech.com.sg/e_warranty_form
email techsupport@engeniustech.com.sg
contact numbers Toll Free:
Singapore: 1800-364-3648
hours of operation Monday - Friday
9:00 AM - 6:00 PM (GMT+8)
Others TAIWAN, R.O.C. web site www.engeniusnetworks.com
email technology@senao.com
REGION/COUNTRY OF PURCHASE SERVICE CENTRE SERVICE INFORMATION

APPENDIX D WORLDWIDE TECHNICAL SUPPORT
D-3
Note:
* Service hours are based on the local time of the service center.
* Please visit the website for the latest information about customer service.
REGION/COUNTRY OF PURCHASE SERVICE CENTRE SERVICE INFORMATION