EnGenius Technologies EUB1200AC-1 Dual Band Wireless-AC USB Adapter User Manual EUB1200AC UM
EnGenius Technologies Dual Band Wireless-AC USB Adapter EUB1200AC UM
User Manual.pdf
EnGenius®
EUB1200AC Dual Band Wireless AC1200 USB Adapter
User Manual
V1.0.0
TABLE OF CONTENTS
I
TABLE OF CONTENTS
Introduction
Introduction 1-1
Features. . . . . . . . . . . . . . . . . . . . . . . . . . . . . . . . . . . . . . . . . . . . . . . . . . . . . . . . . . .1-1
Package contents . . . . . . . . . . . . . . . . . . . . . . . . . . . . . . . . . . . . . . . . . . . . . . . . . . . .1-1
USB Adapter Description . . . . . . . . . . . . . . . . . . . . . . . . . . . . . . . . . . . . . . . . . . . . . . .1-1
System Requirements . . . . . . . . . . . . . . . . . . . . . . . . . . . . . . . . . . . . . . . . . . . . . . . . .1-2
Applications . . . . . . . . . . . . . . . . . . . . . . . . . . . . . . . . . . . . . . . . . . . . . . . . . . . . . . . .1-2
Network Configuration . . . . . . . . . . . . . . . . . . . . . . . . . . . . . . . . . . . . . . . . . . . . . . . . .1-2
Ad-hoc (peer-to-peer) Mode . . . . . . . . . . . . . . . . . . . . . . . . . . . . . . . . . . . . . . . . . . .1-2
Infrastructure Mode . . . . . . . . . . . . . . . . . . . . . . . . . . . . . . . . . . . . . . . . . . . . . . . . .1-2
WPS Setup 1-3
TABLE OF CONTENTS
II
Windows
USB Adapter 2-1
Before you Begin 2-1
Installing and Uninstalling the Driver 2-1
Installing the Driver. . . . . . . . . . . . . . . . . . . . . . . . . . . . . . . . . . . . . . . . . . . . . . . . . . .2-1
Uninstalling the Driver . . . . . . . . . . . . . . . . . . . . . . . . . . . . . . . . . . . . . . . . . . . . . . . . .2-3
Wireless LAN Utility 2-4
General . . . . . . . . . . . . . . . . . . . . . . . . . . . . . . . . . . . . . . . . . . . . . . . . . . . . . . . . . . .2-4
Profile . . . . . . . . . . . . . . . . . . . . . . . . . . . . . . . . . . . . . . . . . . . . . . . . . . . . . . . . . . . .2-5
Wireless Network Properties Dialog. . . . . . . . . . . . . . . . . . . . . . . . . . . . . . . . . . . . . . .2-5
Adding a Profile. . . . . . . . . . . . . . . . . . . . . . . . . . . . . . . . . . . . . . . . . . . . . . . . . . . . . .2-6
Editing a Profile . . . . . . . . . . . . . . . . . . . . . . . . . . . . . . . . . . . . . . . . . . . . . . . . . . . .2-8
Available Network . . . . . . . . . . . . . . . . . . . . . . . . . . . . . . . . . . . . . . . . . . . . . . . . . . .2-10
Status . . . . . . . . . . . . . . . . . . . . . . . . . . . . . . . . . . . . . . . . . . . . . . . . . . . . . . . . . . .2-11
Wi-Fi Protected Setup . . . . . . . . . . . . . . . . . . . . . . . . . . . . . . . . . . . . . . . . . . . . . . . .2-12
TABLE OF CONTENTS
III
MAC OS X
USB Adapter 3-1
Installing and Uninstalling the Driver 3-1
Installing the Driver. . . . . . . . . . . . . . . . . . . . . . . . . . . . . . . . . . . . . . . . . . . . . . . . . . .3-1
Uninstalling the Driver . . . . . . . . . . . . . . . . . . . . . . . . . . . . . . . . . . . . . . . . . . . . . . . . .3-3
Wireless LAN Utility 3-4
Link Status . . . . . . . . . . . . . . . . . . . . . . . . . . . . . . . . . . . . . . . . . . . . . . . . . . . . . . . . .3-4
Profile . . . . . . . . . . . . . . . . . . . . . . . . . . . . . . . . . . . . . . . . . . . . . . . . . . . . . . . . . . . .3-4
Wireless Network Properties Dialog. . . . . . . . . . . . . . . . . . . . . . . . . . . . . . . . . . . . . . .3-5
Adding a Profile . . . . . . . . . . . . . . . . . . . . . . . . . . . . . . . . . . . . . . . . . . . . . . . . . . . .3-6
Editing a Profile . . . . . . . . . . . . . . . . . . . . . . . . . . . . . . . . . . . . . . . . . . . . . . . . . . . .3-8
Available Network . . . . . . . . . . . . . . . . . . . . . . . . . . . . . . . . . . . . . . . . . . . . . . . . . . . .3-9
Advanced Settings. . . . . . . . . . . . . . . . . . . . . . . . . . . . . . . . . . . . . . . . . . . . . . . . . . .3-10
Wi-Fi Protected Setup . . . . . . . . . . . . . . . . . . . . . . . . . . . . . . . . . . . . . . . . . . . . . . . .3-11
Information . . . . . . . . . . . . . . . . . . . . . . . . . . . . . . . . . . . . . . . . . . . . . . . . . . . . . . .3-12
Appendix A
Federal Communication Commission Interference Statement A-1
Radiation Exposure Statement . . . . . . . . . . . . . . . . . . . . . . . . . . . . . . . . . . . . . . . . .A-2
Introduction
Chapter 1
INTRODUCTION INTRODUCTION
1-1
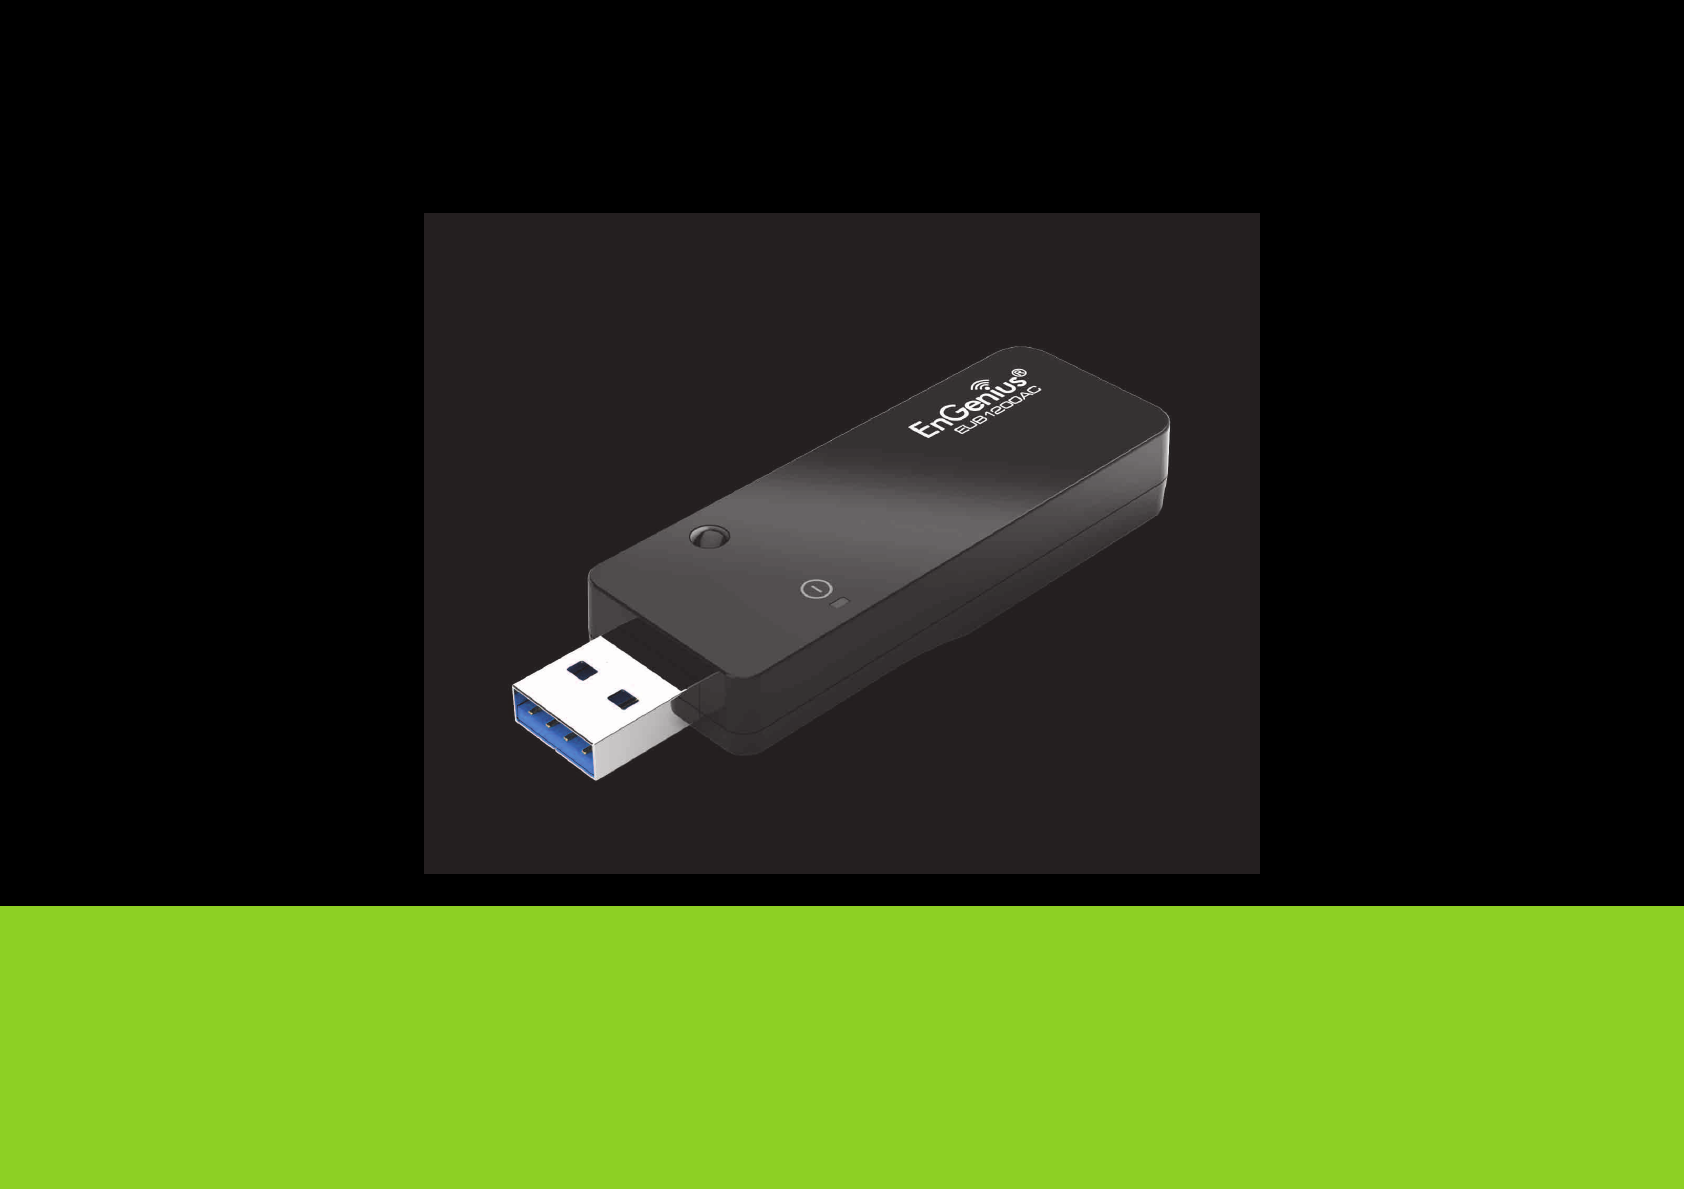
1.1 Introduction
The EnGenius EUB1200AC delivers the next generation of
802.11ac wireless technology and makes your wireless connec-
tivity faster and wider to meet the growing demand for stream-
ing high-bandwidth video and other multimedia applications.
It supports the 2T2R MIMO architecture with fully forward com-
patibility with IEEE802.11n. With up to 300 or 867 Mbps speed
and dual band technology, the EUB1200AC can avoid Wi-Fi
signal interference and ensure top Wi-Fi speeds and reliable
connections. The incredible speed of the EUB1200AC USB
adapter makes heavy traffic networking activities more flexible
and takes the wireless into practical road.
Features
Up to 300 or 867 Mbps Wireless Speed
Backward compatible with IEEE 802.11a/b/g/n
Dual-Frequency Band (2.4GHz/5GHz)
High Speed USB 3.0 Interface
WPS Button for Wireless Easy Setup
Support WEP/WPA and WPA2 Security Encryption
Package contents
Open the package carefully, and make sure that none of the
items listed below are missing. Do not discard the packing
materials, in case of return; the unit must be shipped in its origi-
nal package.
1x EUB1200AC
1x Quick Start Guide
1x CD Manual/Utility
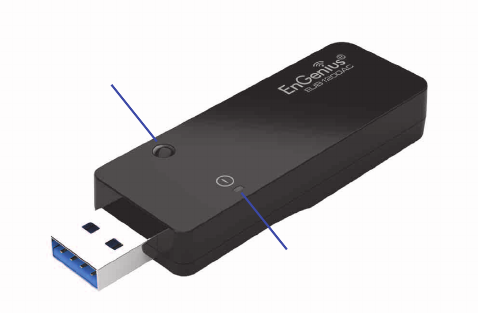
USB Adapter Description
The LED shows the Power and Link (traffic) status. The WPS
button is located on the opposite side of the LED.
WPS
LED
INTRODUCTION SYSTEM REQUIREMENTS
1-2
System Requirements
The following are the minimum system requirements in order to
use the USB adapter.
PC/AT compatible computer with a USB interface.
Windows 2000/XP/Vista or MAC OS operating system.
30 MB of free disk space for installing the USB adapter
driver and utility program.
Applications
EnGenius wireless LAN products are easy to install and easy to
use. The following list describes some of the many applications
made possible through the EnGenius wireless LAN products:
Difficult-to-wire environments
Temporary workgroups
Accessing real-time information
Frequently changing environments
Small Office and Home Office (SOHO) networks
Wireless extensions to Ethernet networks
Wired LAN backup
Training and Educational facilities
Network Configuration
To better understand how the wireless LAN products work
together to create a wireless network, it might be helpful to
depict some of the possible wireless LAN PC card network con-
figurations.
EnGenius wireless LAN products can be configured as:
Ad-hoc (or peer-to-peer) for departmental or SOHO LANs.
Infrastructure for enterprise LANs.
Ad-hoc (peer-to-peer) Mode
This is the simplest network configuration with several comput-
ers equipped with the PC Cards that form a wireless network
whenever they are within range of one another. In ad-hoc
mode, each client is peer-to-peer, would only have access to
the resources of the other client and does not require an access
point. This is the easiest and least expensive way for the SOHO
to set up a wireless network. The image below depicts a net-
work in ad-hoc mode.
Infrastructure Mode
The infrastructure mode requires the use of an Access Point
(AP). In this mode, all wireless communication between two
computers has to be via the AP. It doesn’t matter if the AP is
stand-alone or wired to an Ethernet network. If used in stand-
alone, the AP can extend the range of independent wireless
LANs by acting as a repeater, which effectively doubles the dis-
tance between wireless stations.
INTRODUCTION WPS SETUP
1-3
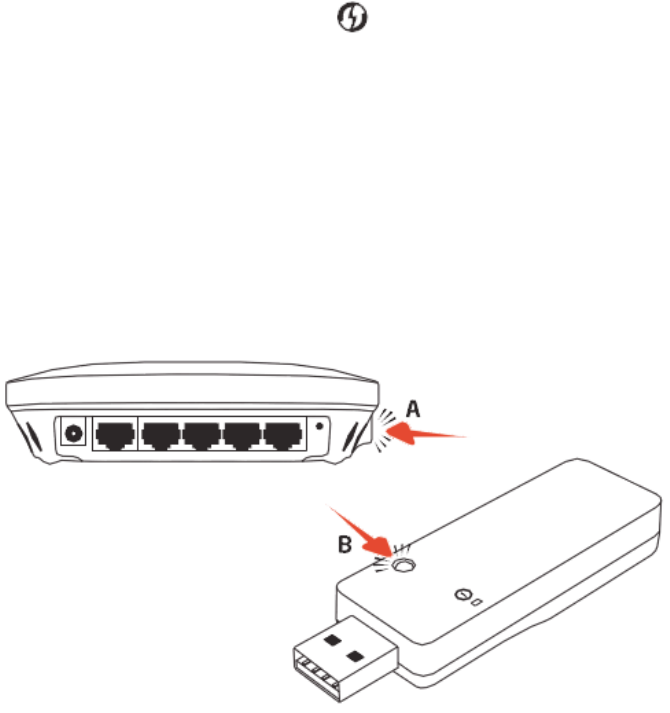
1.2 WPS Setup
1. Press and hold down the WPS button on your router
(check with the User Manual that came with your router
for any further instructions if necessary).
2. Within 2 minutes, press and hold down the WPS button
on the EUB1200AC for 2 seconds. The LED should start
to blink.
3. Wait for 2 minutes.
4. Confirm that the connection was successful by opening a
web browser or checking the wireless signal indicator
icon.
Windows
Chapter 2
WINDOWS USB ADAPTER
2-1
2.1 USB Adapter
2.1.1 Before you Begin
During the installation, XP may need to copy systems files from its installation CD. Therefore, you may need a copy of the Windows
installation CD at hand before installing the drivers. On many systems, instead of a CD, the necessary installation files are archived
on the hard disk in C:\WINDOWS\OPTIONS\CABS directory.
2.1.1 Installing and Uninstalling the Driver
Installing the Driver
Before you can use the EUB1200AC Dual Band USB Adapter
you must install the device driver.
To install the USB adapter drivers, follow these steps:
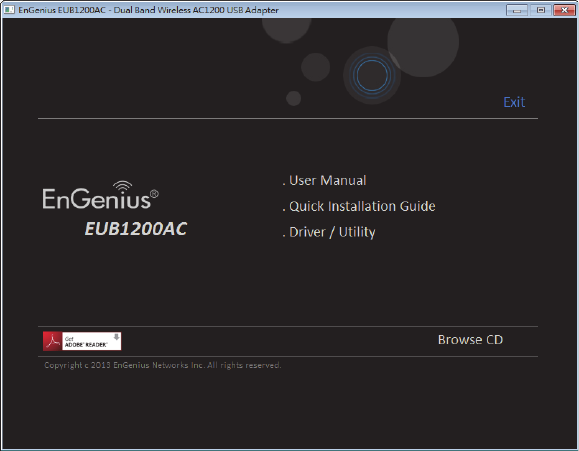
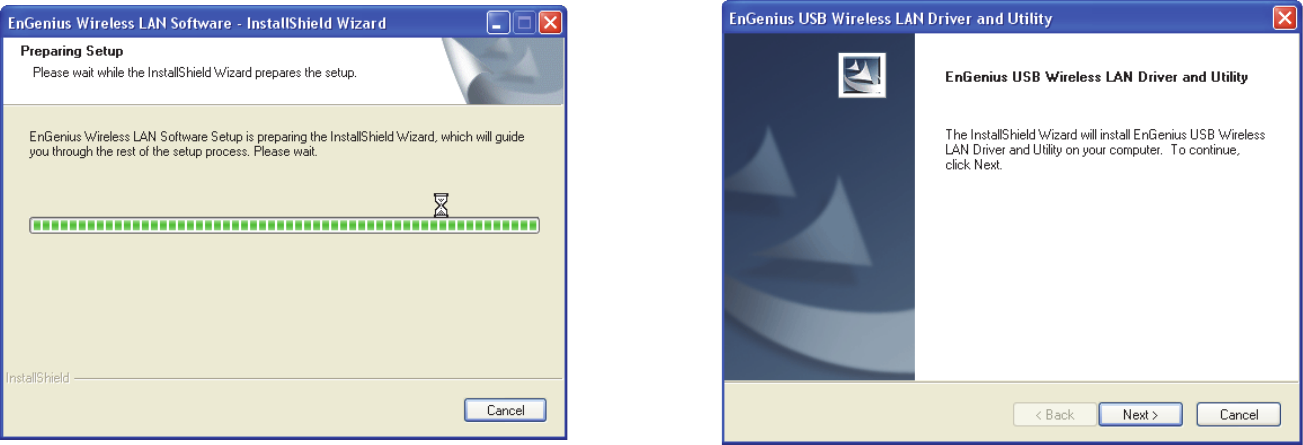
1. Insert the CD-ROM that was provided to you in this pack-
age. The setup should run automatically. If the setup does
not run automatically, then the setup.exe file must be
selected manually from the CD-ROM drive.
WINDOWS INSTALLING THE DRIVER
2-2
2. Click on Windows Driver to start the install process. 3. Click on the Next button to begin the driver installation.
WINDOWS UNINSTALLING THE DRIVER
2-3
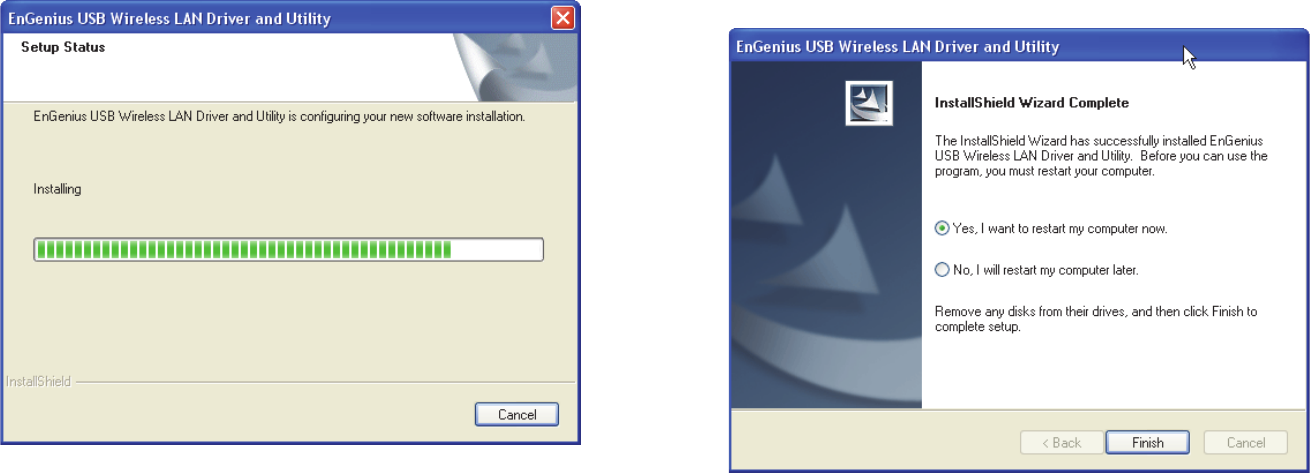
4. Wait until the driver and client utility is installed. 5. When installation is complete click on the Finish button to
restart your computer.
Uninstalling the Driver
If you want to remove the EUB1200AC EUB1200AC Dual Band
USB Adapter from your system, use device’s uninstall applica-
tion or the Windows uninstall process.
WINDOWS WIRELESS LAN UTILITY
2-4
2.2 Wireless LAN Utility
There are five sections that allow the user to configure and
monitor the device: general, profile, available networks, status,
and Wi-Fi protected setup.
Additional configuration options located at the bottom of the
window that define the behavior of the utility. The available
options are as follows:
Show Tray Icon: Show/hide the Utility icon in the system tray.
Radio Off: Temporarily turn off wireless radio.
Disable Adapter: Temporarily disable the wireless adapter
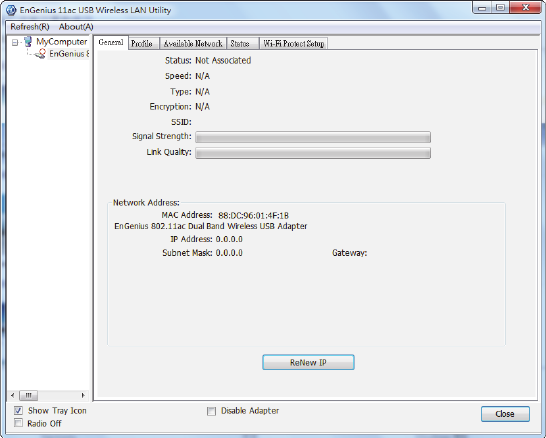
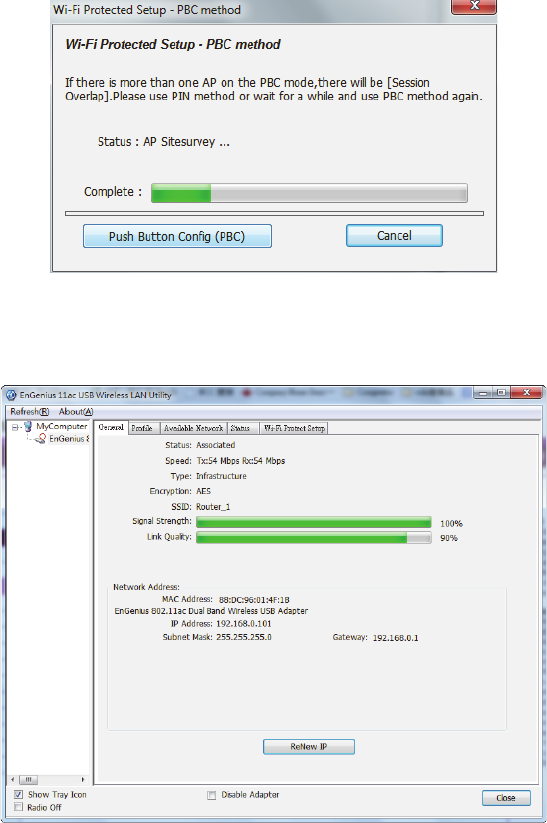
General
The General section shows the connection status, speed, type,
encryption, SSID, signal strength, and link quality of the
AC1200 Dual Band USB Adapter.
Click on the Renew IP button to re-initiate the wireless connec-
tion with the AP.
WINDOWS PROFILE
2-5
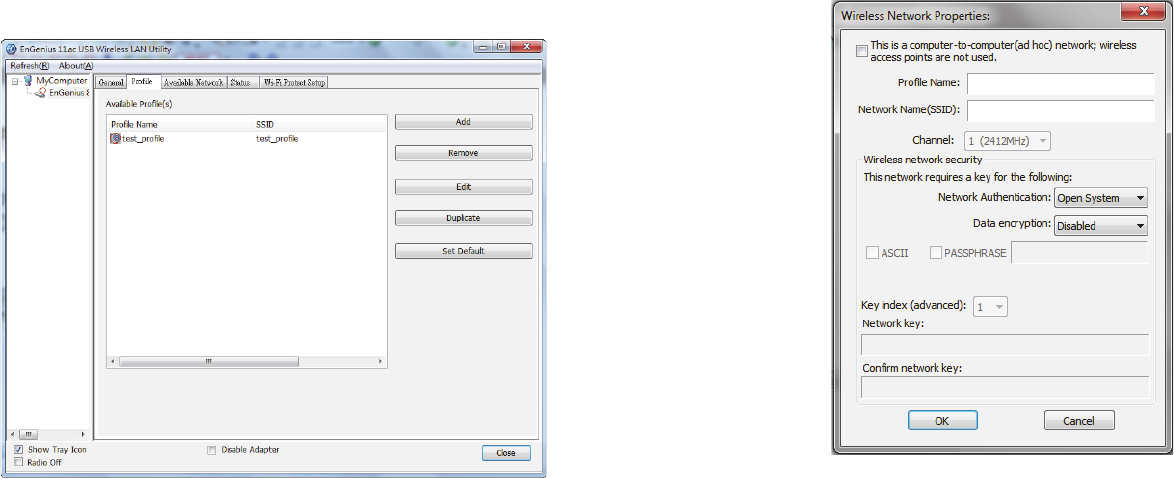
Profile
The Profile section is used to create and modify profiles that the
AC1200 Dual Band USB Adapter uses to connect to access
points.
To create or modify an access point profile, use the following
buttons:
Add: Manually enter an access point’s configuration settings.
Edit: Modify an access point’s configuration settings.
Remove: Delete the configuration settings of an access point.
Duplicate: Clone an access point’s profile.
Set Default: Reset all saved settings.
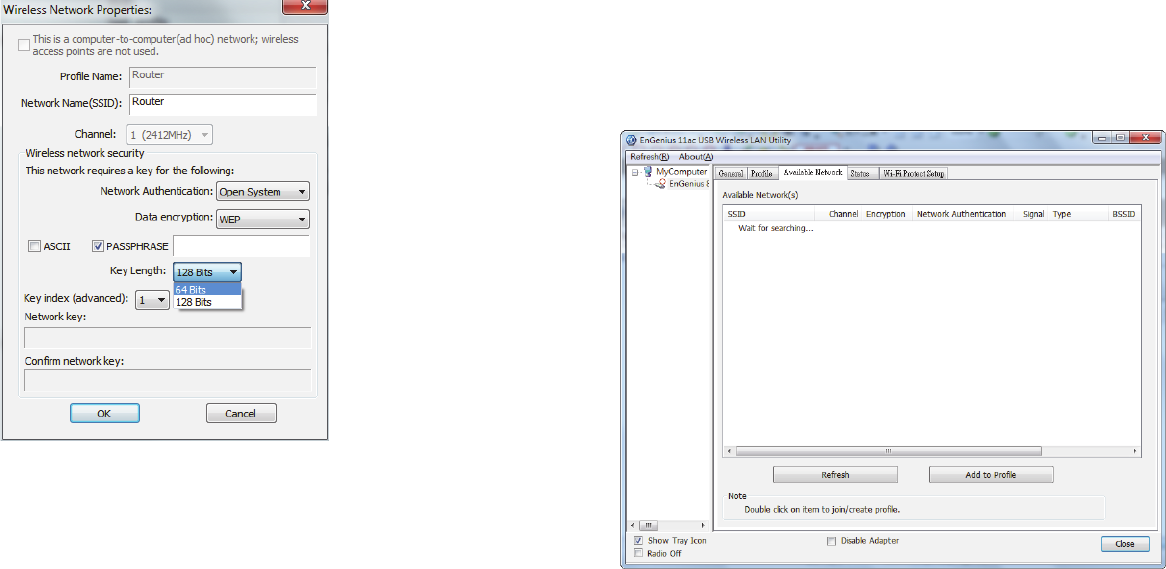
Wireless Network Properties Dialog
Use the wireless network properties dialog to enter the connec-
tion properties for an access point.
Fill in the following wireless network properties to create an
access point profile:
Ad hoc Enables the adapter to operate in ad hoc or infrastruc-
ture mode.
Profile Name The name of the access point that is shown in
the profile list.
Network Name (SSID) The name of the access point as
shown on the network.
Channel The channel that the access point is broadcasting on.
WINDOWS ADDING A PROFILE
2-6
Network Authentication The protocol used for network
authentication.
Data Encryption The protocol used for data encryption.
ASCII Enables use of ASCII characters in the passphrase.
Passphrase Enables the use of hexadecimal characters pass-
phrase.
Key Index (advanced) User has to specify which of the four
keys will be active. Please make sure that both the AP/Router
you are connected to and the EUB1200AC use the same key.
Network Key The encryption key used to encrypt the data
packets during data transmission.
Adding a Profile
Note:
When using the ASCII or PASSPHRASE feature the
password must be obtained from the router.
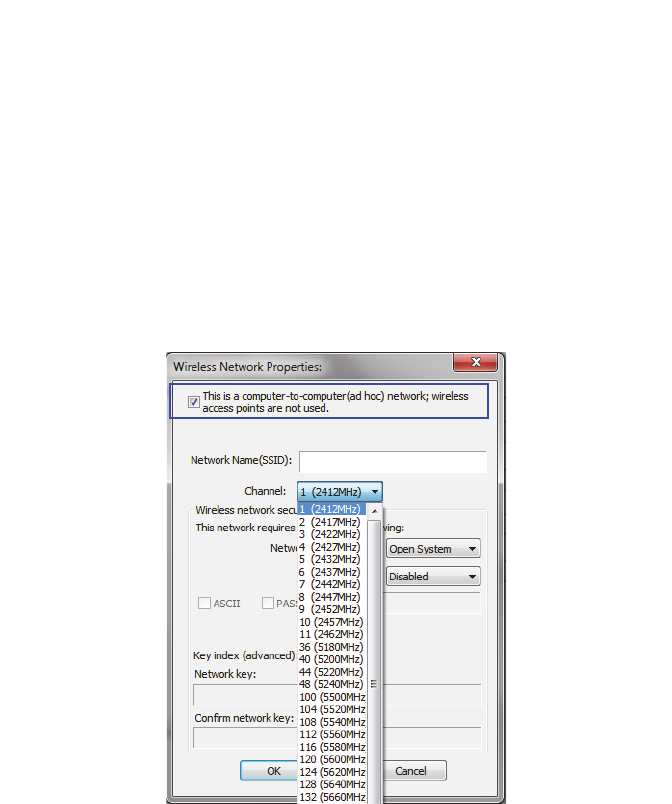
To add a profile, follow these steps:
1. Click the Add button.
2. Select the checkbox to specify an ad hoc network.
Note:
If the ad hoc checkbox is selected, Profile Name is not
available.
WINDOWS ADDING A PROFILE
2-7
3. Enter the profile name in Profile Name.
4. Enter the SSID in the Network Name (SSID).
Note:
The list of channels is only available if the ad hoc check-
box is selected.
5. Select a channel from the Channel list. Available chan-
nels are from 1 to 161.
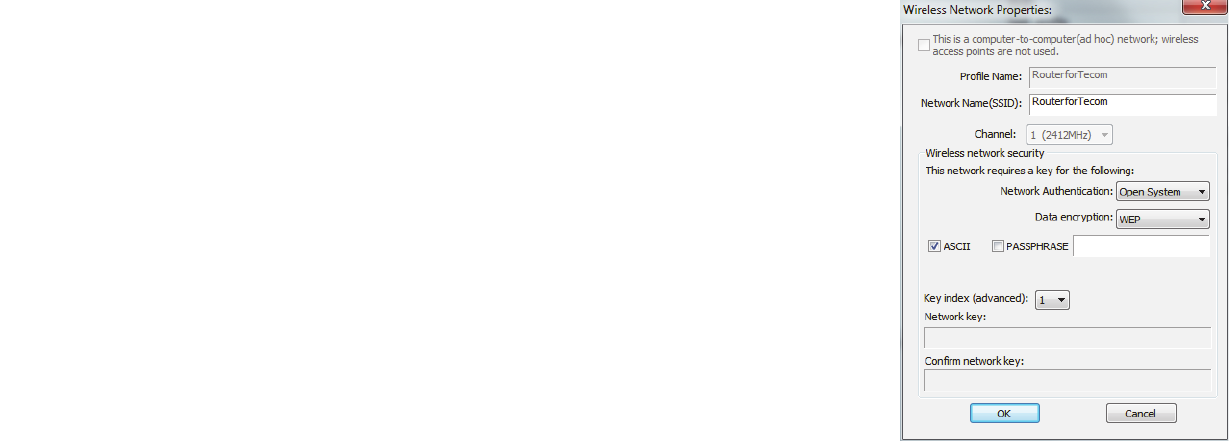
6. Select a network authentication protocol from the Net-
work Authentication protocol list. The following proto-
cols can be selected:
Open System
Shared Key
WPA-PSK
WPA2-PSK
WPA 802.1X
WPA2 802.1X
WEP 802.1X
7. Select the ASCII checkbox to enter a password using
ASCII characters.
WINDOWS ADDING A PROFILE
2-8
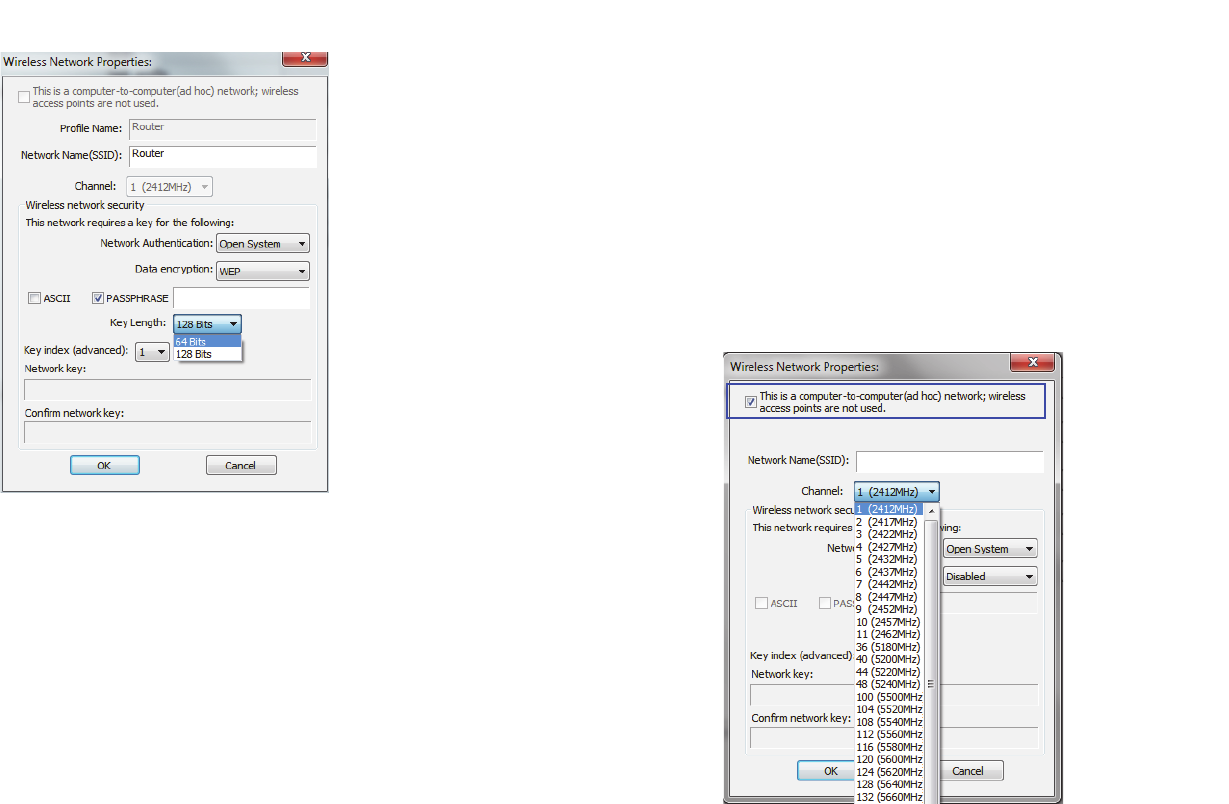
8. Select the PASSPHRASE checkbox to enter a password
using hexadecimal characters. The passphrase key
length can be either 64 or 128 bits.
9. Select the key index from the Key index list.
10.Enter the network key value in Network key.
11.Enter the same network key value again in Confirm net-
work key.
12.Click the OK button to save the profile settings or the
Cancel button to discard settings.
Editing a Profile
Note:
When using the ASCII or PASSPHRASE feature the
password must be obtained from the router.
To edit a profile, follow these steps:
1. Click the Edit button.
2. Select the checkbox to specify an ad hoc network.
Note:
If the ad hoc checkbox is selected, Profile Name is not
available.
3. Enter the profile name in Profile Name.
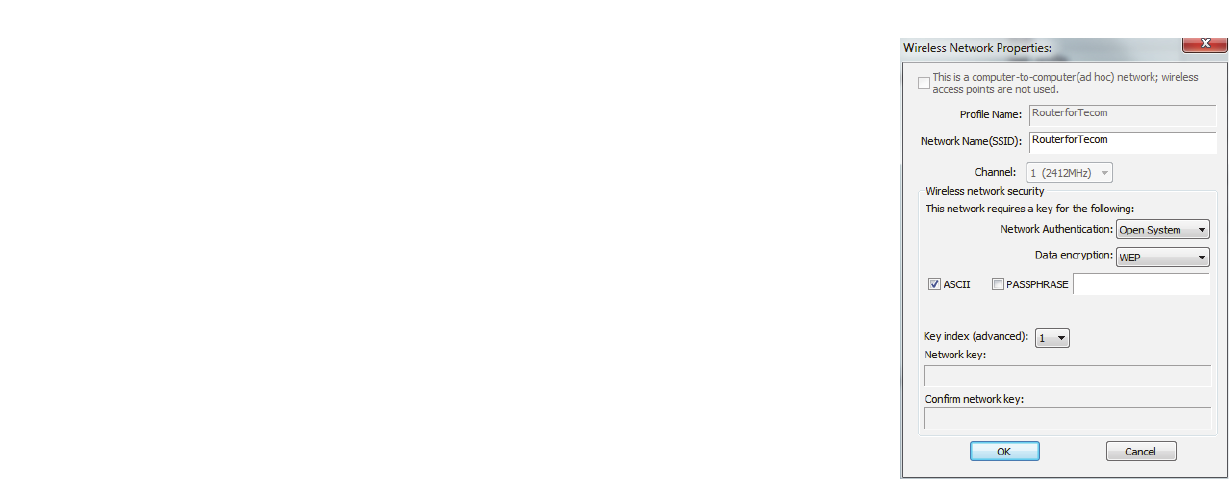
WINDOWS ADDING A PROFILE
2-9
4. Enter the SSID in the Network Name (SSID).
Note:
The list of channels is only available if the ad hoc check-
box is selected.
5. Select a channel from the Channel list. Available chan-
nels are from 1 to 161.
6. Select a network authentication protocol from the Net-
work Authentication protocol list. The following proto-
cols can be selected:
Open System
Shared Key
WPA-PSK
WPA2-PSK
WPA 802.1X
WPA2 802.1X
WEP 802.1X
7. Select the ASCII checkbox to enter a password using
ASCII characters.
WINDOWS AVAILABLE NETWORK
2-10
8. Select the PASSPHRASE checkbox to enter a password
using hexadecimal characters. The passphrase key
length can be either 64 or 128 bits.
9. Select the key index from the Key index list.
10.Enter the network key value in Network key.
11.Enter the same network key value again in Confirm net-
work key.
12.Click the OK button to save the profile settings or the
Cancel button to discard settings.
Available Network
You can find access points that are within the proximity of your
adapter by using the device to scan for them.
The information returned by the adapter is shown in a list and
includes the SSID, channel, encryption type, authentication
type and signal strength.
If you want to view available access points, click the Refresh
button.
If you want to add an access point to your list of profiles, click
on the Add to Profile button.

WINDOWS STATUS
2-11
Status
The Status section shows a more detailed view of the informa-
tion about the status of the adapter and the network connection.
The following information is displayed in the section:
Manufacturer
NDIS Driver Version
Short Radio Header
Encryption type
Authenticate type
Channel Set
MAC Address
Data Rate
Channel used
Status
SSID
Network Type
Power Save Mode
Associated AP MAC
Up Time (hh:mm:ss)
WINDOWS WI-FI PROTECTED SETUP
2-12
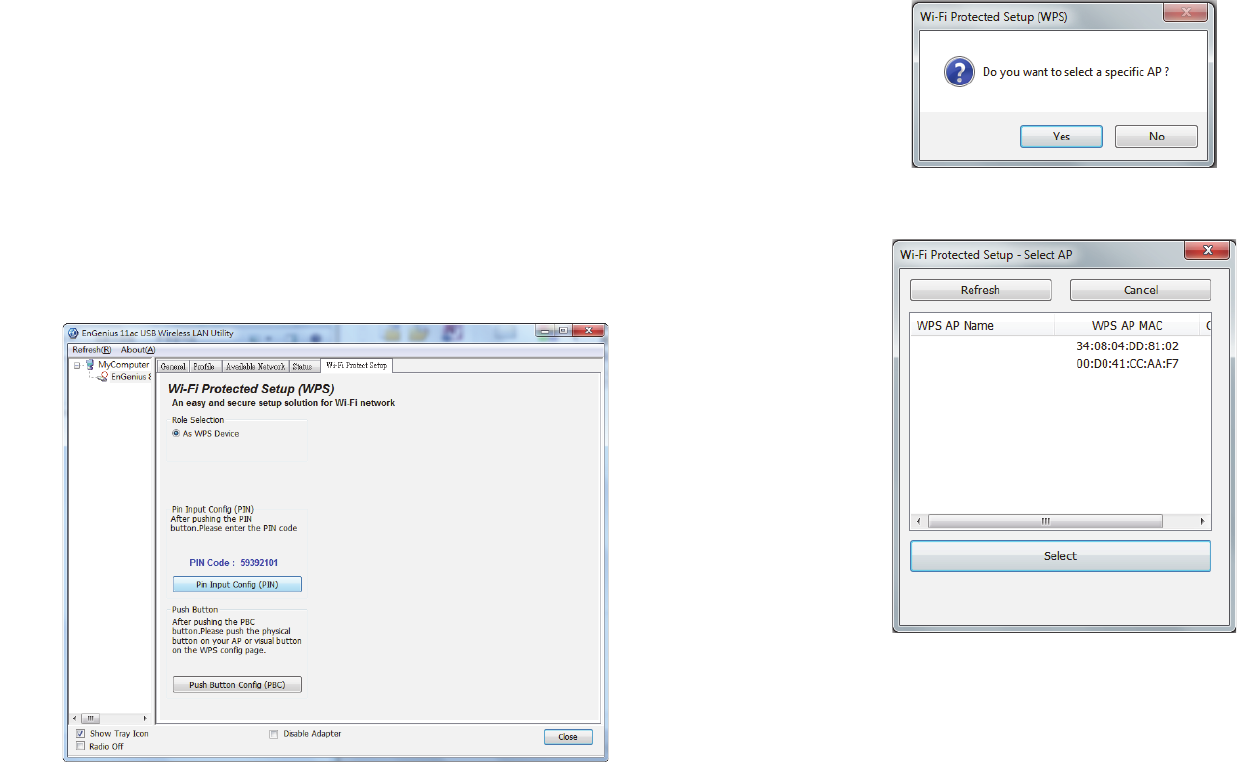
Wi-Fi Protected Setup
Use the Wi-Fi protected setup function to setup a connection
between the adapter and a WPS enabled router.
There are two ways to create a WPS connection: pin input con-
fig (PIN) or push button config (PBC).
PIN Input Config
Note:
You must enter the PIN code in your router’s configura-
tion dialog before establishing a connection.
1. Click on the PIN Input Config button to start the PIN
code process.
2. Select Yes to start scanning for access points.
3. Select the target AP and click the Select button.
Router_1
Router_2

WINDOWS WI-FI PROTECTED SETUP
2-13
The following dialog is shown while the router is accept-
ing the connection.
When the dialog disappears the connection is estab-
lished.
Push Button Config
1. Click on the Push Button Config button to start the pro-
cess.
Note:
The Push Button Config button and the WPS button on
the access point must be pushed within ten seconds of
each other.
WINDOWS WI-FI PROTECTED SETUP
2-14
2. Click on the Push Button Config in the following dialog.
3. Press the WPS button on the access point.
The connection is established within a few seconds.
MAC OS X
Chapter 3
MAC OS X USB ADAPTER
3-1
3.1 USB Adapter
3.1.1 Installing and Uninstalling the Driver
Installing the Driver
Before you can use the AC1200 Dual Band USB Adapter you
must install the device driver.
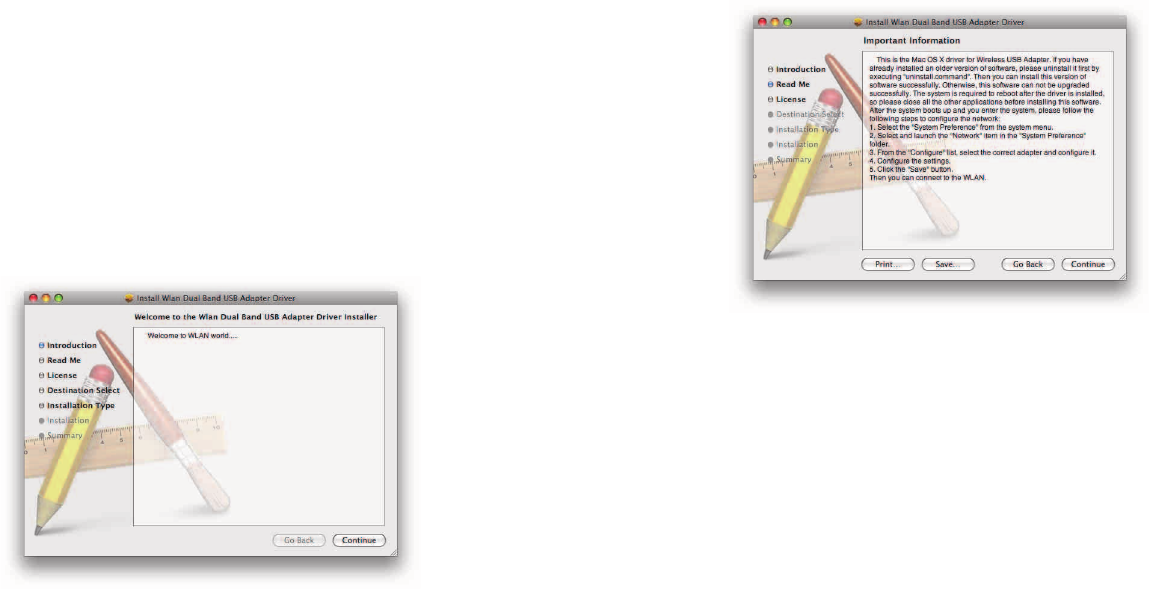
To install the USB adapter drivers, follow these steps:
1. Insert the CD-ROM that was provided to you in this pack-
age. The setup should run automatically. If the setup does
not run automatically, then you must locate the setup file
manually from the CD-ROM under the /Drivers/ folder.
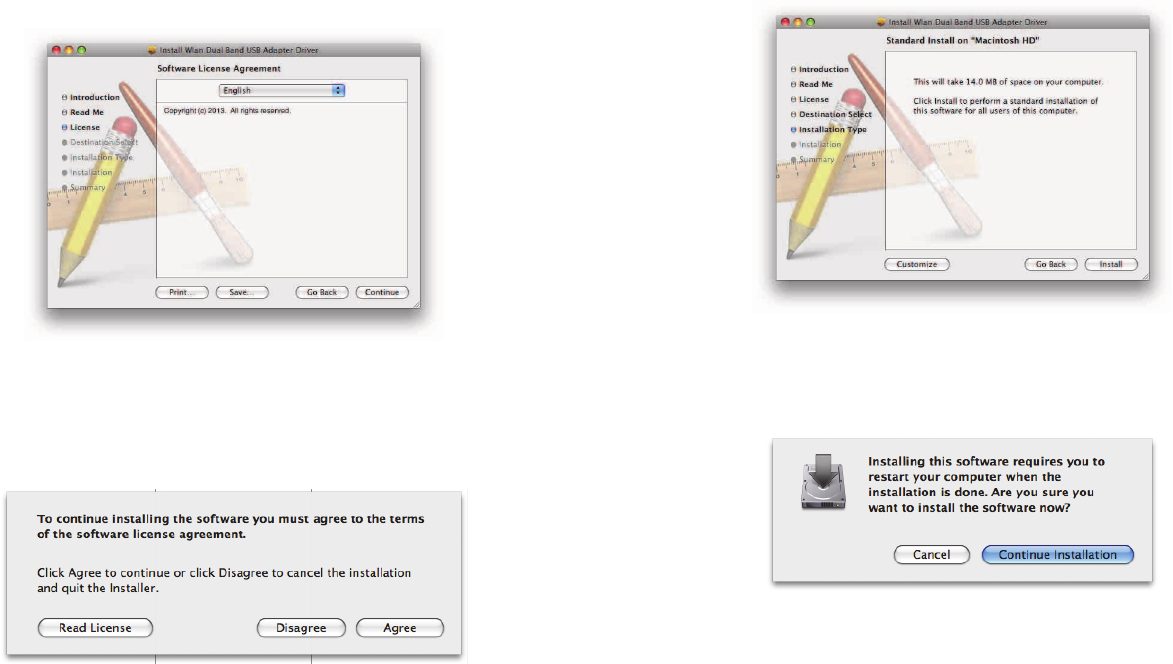
2. Click on the Continue button to configure the next step.
3. Read the Important Information and then click on the
Install button.
MAC OS X INSTALLING THE DRIVER
3-2
4. Select a language to read the software license agreement
and then click on the Continue button to display the
license dialog.
5. Click on the Read License button to read the license
agreement. After you have read the agreement click on
the Agree button to continue or Disagree to cancel the
installation.
6. Click on the Install button to begin the installation pro-
cess or Go Back to return to the previous step.
7. When the installation warning dialog is shown click the
Continue Installation button to continue or the Cancel
button to abort the process.
MAC OS X UNINSTALLING THE DRIVER
3-3
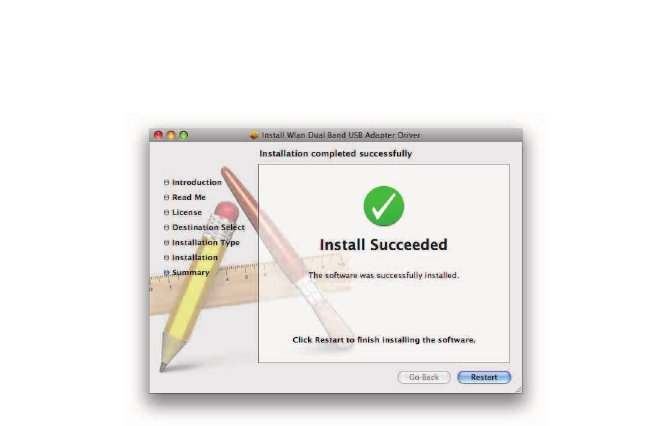
8. Click the Restart button to restart your system.
Note:
The adapter may not function properly if you do not
restart the system.
9. Insert the USB adapter into the USB port. MAC OS X will
detect and install the new hardware.
10.The client utility is installed in the Applications folder.
Uninstalling the Driver
If you want to remove the AC1200 Dual Band USB Adapter
from your system, use device’s uninstall application or the Win-
dows uninstall process.
MAC OS X WIRELESS LAN UTILITY
3-4
3.2 Wireless LAN Utility
There are six sections that allow the user to configure and mon-
itor the device: link status, profiles, available network, advanced
setting, WPS and information.
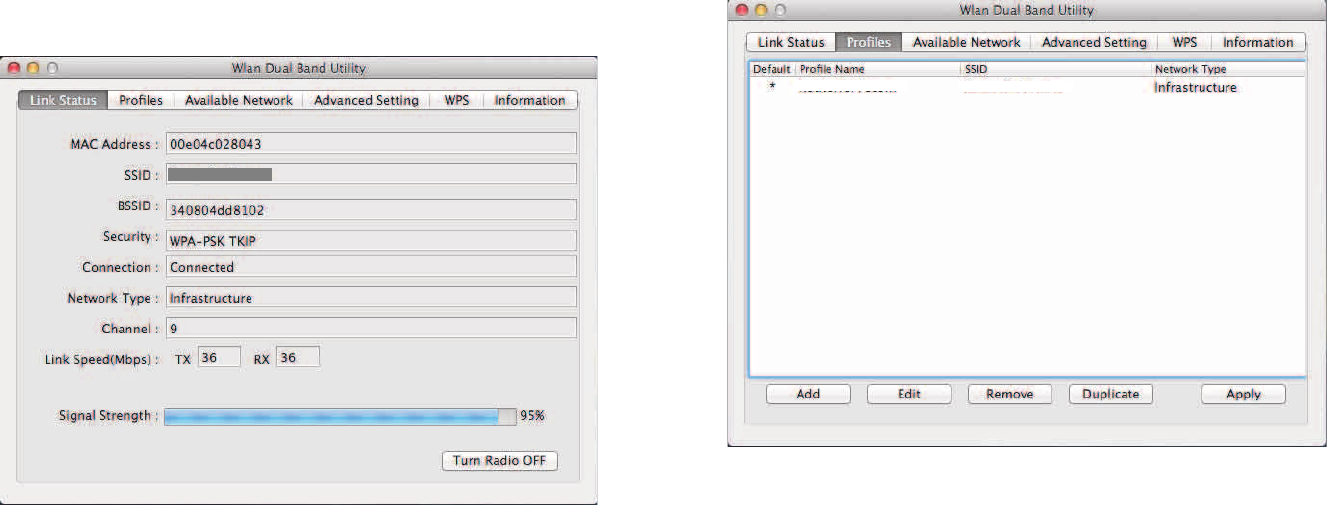
Link Status
The Link Status section shows the MAC address, SSID,
BSSID, security type, connection status, network type, channel,
link speed, and signal strength of the AC1200 Dual Band USB
Adapter.
Click on the Turn Radio OFF button to deactivate the adapter.
Click on the Turn Radio ON button to activate the adapter.
Profile
The Profile section is used to create and modify profiles that the
AC1200 Dual Band USB Adapter uses to connect to access
points.
To create or modify an access point profile, use the following
buttons:
Router_1
Router_1 Router_1

MAC OS X PROFILE
3-5
Add: Manually enter an access point’s configuration settings.
Edit: Modify an access point’s configuration settings.
Remove: Delete the configuration settings of an access point.
Duplicate: Clone an access point’s profile.
Set Default: Reset all saved settings.
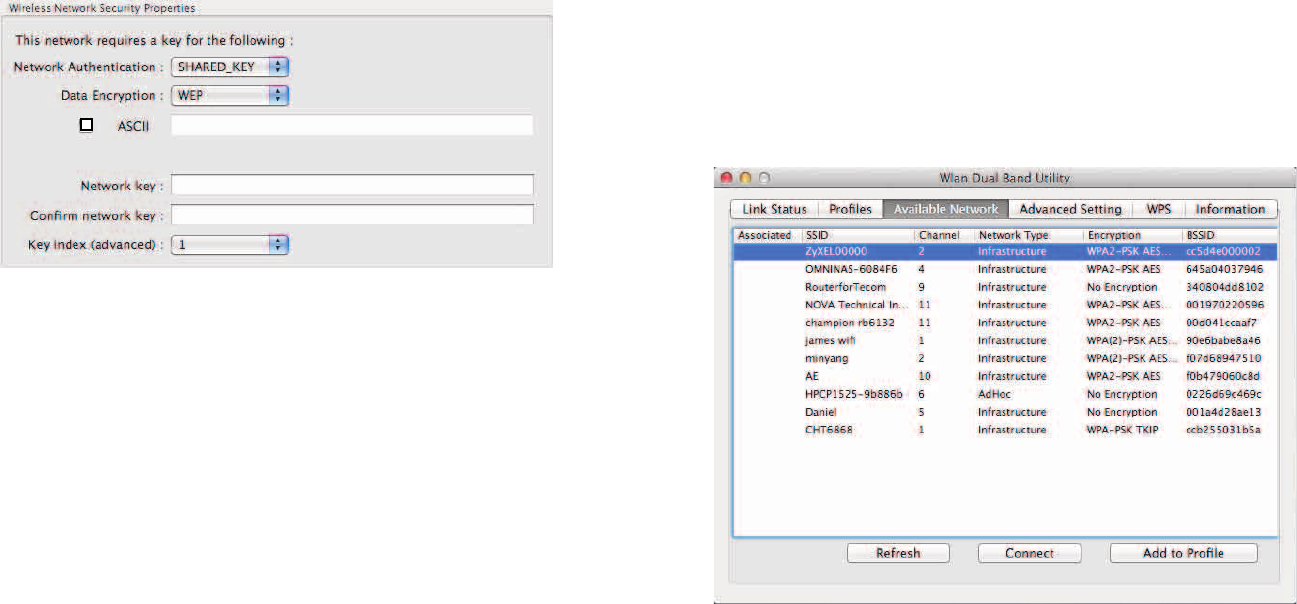
Wireless Network Properties Dialog
Use the wireless network properties dialog to enter the connec-
tion properties for an access point.
Fill in the following wireless network properties to create an
access point profile:
Profile Name The name of the access point that is shown in
the profile list.
SSID The name of the access point as shown on the network.
Ad hoc Enables the adapter to operate in ad hoc or infrastruc-
ture mode.
Channel The channel that the access point is broadcasting on.
Router_1
Router_1

MAC OS X PROFILE
3-6
Network Authentication The protocol used for network
authentication.
Data Encryption The protocol used for data encryption.
ASCII Enables use of ASCII characters in the passphrase.
Key Index (advanced) User has to specify which of the four
keys will be active. Please make sure that both the AP/Router
you are connected to and the EUB1200AC use the same key.
Network Key The encryption key used to encrypt the data
packets during data transmission.
Adding a Profile
Note:
When using the ASCII or Network key feature the pass-
word must be obtained from the router.
To add a profile, follow these steps:
1. Click the Add button.
2. Select the checkbox to specify an ad hoc network.
Note:
If the ad hoc checkbox is selected, Profile Name is not
available.
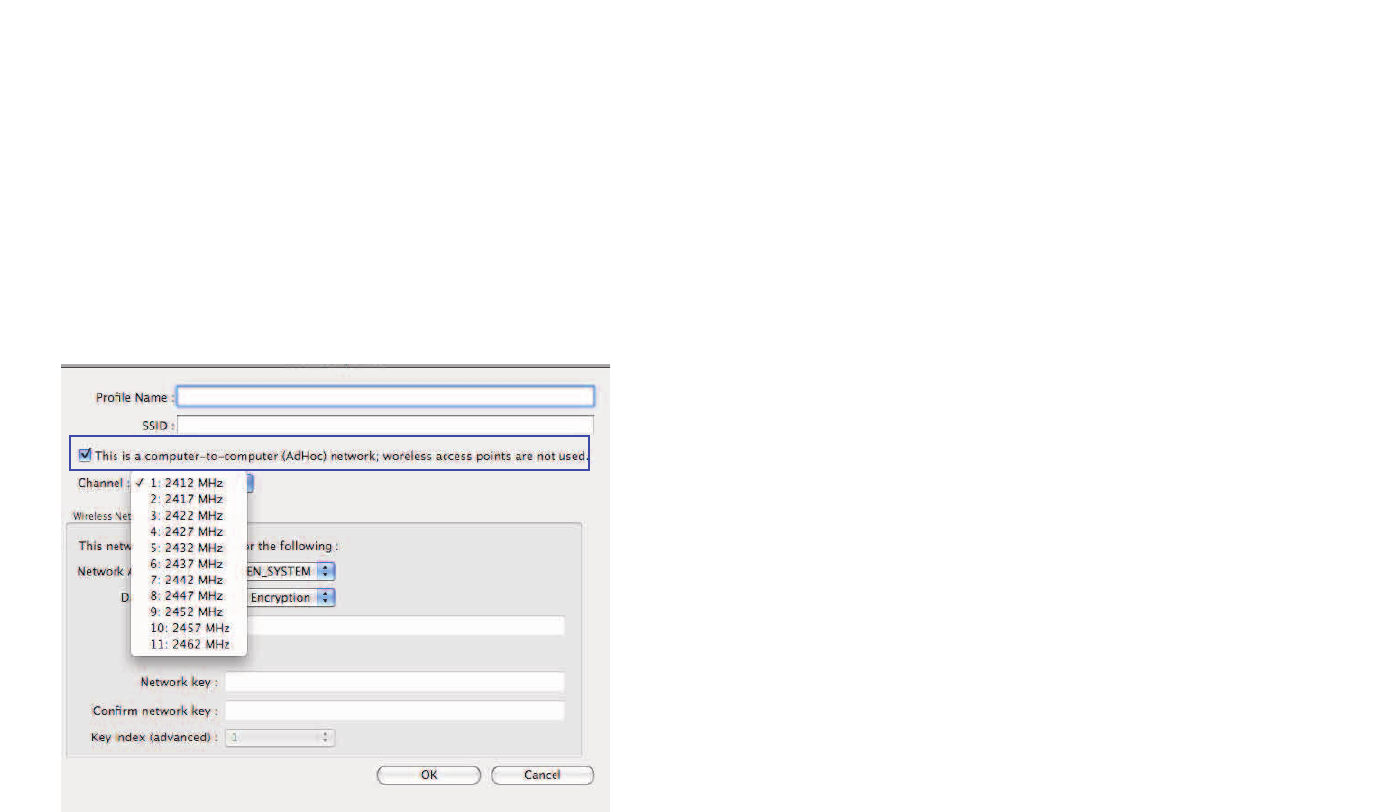
3. Enter the profile name in Profile Name.

MAC OS X PROFILE
3-7
4. Enter the SSID in SSID.
Note:
The list of channels is only available if the ad hoc check-
box is selected.
5. Select a channel from the Channel list. Available chan-
nels are from 1 to 11.
6. Select a network authentication protocol from the Net-
work Authentication protocol list. The following proto-
cols can be selected:
Open System
Shared Key
WPA-PSK
WPA2-PSK
WPA 802.1X
WPA2 802.1X
WEP 802.1X
7. Select the ASCII checkbox to enter a five or thirteen char-
acter password using the WEP protocol.
8. Enter the network key value in Network key. For 64-bit
key length enter 10 hexadecimal characters. For 128-bit
key length enter 26 hexadecimal characters.
9. Enter the same network key value again in Confirm net-
work key.
10.Select the key index from the Key index list.
11.Click the OK button to save the profile settings or the
Cancel button to discard settings.
X
MAC OS X PROFILE
3-8
Editing a Profile
Note:
When using the ASCII or Network key feature the pass-
word must be obtained from the router.
To edit a profile, follow these steps:
1. Click the Add button.
2. Select the checkbox to specify an ad hoc network.
Note:
If the ad hoc checkbox is selected, Profile Name is not
available.
3. Enter the profile name in Profile Name.
4. Enter the SSID in SSID.
Note:
The list of channels is only available if the ad hoc check-
box is selected.
5. Select a channel from the Channel list. Available chan-
nels are from 1 to 11.
6. Select a network authentication protocol from the Net-
work Authentication protocol list. The following proto-
cols can be selected:
Open System
Shared Key
WPA-PSK
WPA2-PSK
WPA 802.1X
WPA2 802.1X
WEP 802.1X
MAC OS X AVAILABLE NETWORK
3-9
7. Select the ASCII checkbox to enter a five or thirteen char-
acter password when using the WEP protocol.
8. Enter the network key value in Network key. For 64-bit
key length enter 10 hexadecimal characters. For 128-bit
key length enter 26 hexadecimal characters.
9. Enter the same network key value again in Confirm net-
work key.
10.Select the key index from the Key index list.
11.Click the OK button to save the profile settings or the
Cancel button to discard settings.
Available Network
You can find access points that are within the proximity of your
adapter by using the device to scan for them.
The information returned by the adapter is shown in a list and
includes the SSID, channel, authentication type, encryption
type and BSSID (MAC address).
Click the Refresh button to view available access points.
Click the Connect button to connect to an access point without
setting up a profile.
Click on the Add to Profile button to add an access point to
your list of profiles.
X
MAC OS X ADVANCED SETTINGS
3-10
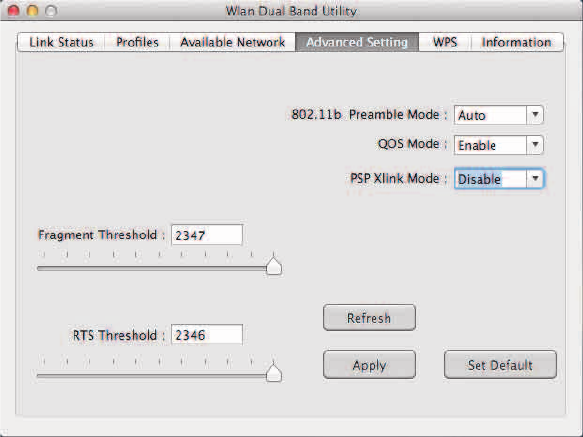
Advanced Settings
In the Advanced Settings section you can modify the 802.11b
preamble mode, QoS mode, and PSP Xlink mode.
1. Set the preamble mode setting from the 802.11b Pream-
ble Mode list. Choose Auto to let the device make the
selection, Long for better device compatibility, and Short
for better network efficiency.
2. Set the QOS mode from the QOS Mode list. The options
are Enabled or Disabled.
3. Set the PSP gaming mode from the PSP Xlink Mode list.
The options are Enabled or Disabled.
4. Set the Fragment Threshold by moving the slider control
or manually entering a value in the text box. The fragment
threshold specifies the maximum size of a packet during
data transmission. A value too low could lead to low per-
formance.
5. Set the RTS Threshold by moving the slider control or
manually entering a value in the text box. If the packet
size is smaller than the RTS threshold, the device will not
use RTS/CTS to send the data packet.
6. Click the Refresh button to refresh the settings. Click the
Apply button to save changes settings. Click Set Default
button to change the current settings back to their default
values.
MAC OS X WI-FI PROTECTED SETUP
3-11
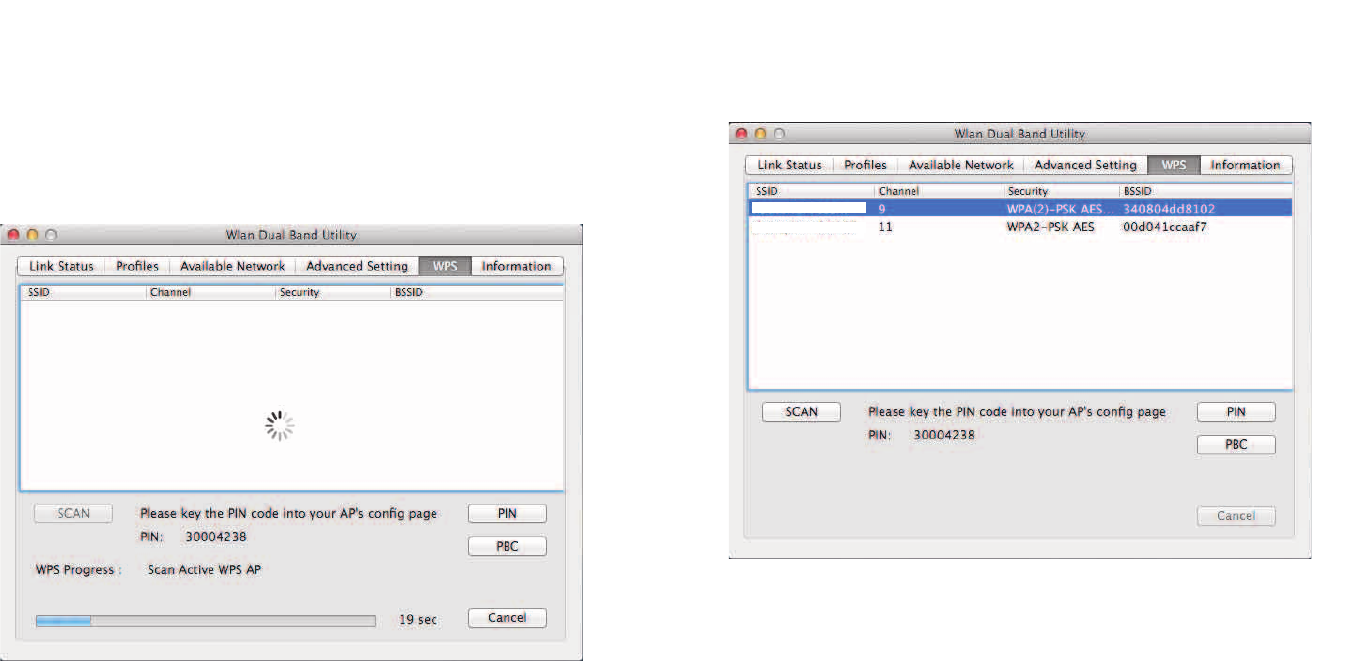
Wi-Fi Protected Setup
If you do not want to set up a protected connection manually,
you can use the Wi-Fi protected setup function.
There are two ways to create a WPS connection: pin input con-
fig (PIN) or push button config (PBC). Before selecting either
method, click the SCAN button to locate the access points
within the proximity of the adapter.
PIN Input Config
Note:
You must enter the PIN code in your router’s configura-
tion dialog before establishing a connection.
1. Select the target access point.
2. Click the PIN button.
When the connection is established the Link Status sec-
tion will show the connection information. See Link Status
for more details.
Router_1
Router_2

MAC OS X INFORMATION
3-12
Push Button Config
1. Select the target access point.
2. Click the PBC button.
Note:
The PBC button and the WPS button on the access point
must be pushed within ten seconds of each other.
3. Press the WPS button on the access point.
When the connection is established the Link Status sec-
tion will show the connection information. See Link Status
for more details.
Information
The Information tab displays information about the network
driver version and date.

APPENDIX A FEDERAL COMMUNICATION COMMISSION INTERFERENCE STATEMENT
A-1
Appendix A
Federal Communication Commission Interference
Statement
This device complies with Part 15 of the FCC Rules. Operation is subject to the following two conditions: (1) This device may not
cause harmful interference, and (2) this device must accept any interference received, including interference that may cause unde-
sired operation.
This equipment has been tested and found to comply with the limits for a Class B digital device, pursuant to Part 15 of the FCC
Rules. These limits are designed to provide reasonable protection against harmful interference in a residential installation. This
equipment generates, uses and can radiate radio frequency energy and, if not installed and used in accordance with the instructions,
may cause harmful interference to radio communications. However, there is no guarantee that interference will not occur in a partic-
ular installation. If this equipment does cause harmful interference to radio or television reception, which can be determined by turn-
ing the equipment off and on, the user is encouraged to try to correct the interference by one of the following measures:
Reorient or relocate the receiving antenna.
Increase the separation between the equipment and receiver.
Connect the equipment into an outlet on a circuit different from that to which the receiver is connected.
Consult the dealer or an experienced radio/TV technician for help
This transmitter must not be co-located or operating in conjunction with any other antenna or transmitter.
Operations in the 5.15-5.25GHz band are restricted to indoor usage only.
WARNING!
Any changes or modifications not expressly approved by the party responsible for compliance could void the user's authority to oper-
ate this equipment.
!

APPENDIX A RADIATION EXPOSURE STATEMENT
A-2
Radiation Exposure Statement
The product comply with the FCC portable RF exposure limit set forth for an uncontrolled environment and are safe for intended
operation as described in this manual. The further RF exposure reduction can be achieved if the product can be kept as far as possi-
ble from the user body or set the device to lower output power if such function is available.
The USB dongle transmitter is approved for use in typical laptop computers.To comply with FCC RF exposure requirements, it
should not be used in other devices or certain laptop and tablet computer configurations where the USB connectors on the host com-
puter are unable to provide or ensure the necessary operating configurations intended for the device and its users or bystanders to
satisfy RF exposure compliance requirements.
WARNING!
For body-worn operating conditions please use belt-clips, holsters, and/or accessories that have no metallic component in the assem-
bly and must provide at least 0.5 cm separation between the device and the user's body.
!

APPENDIX B INDUSTRY CANADA STATEMENT
B-1
Appendix B
Industry Canada Statement
This device complies with RSS-210 of the Industry Canada Rules. Operation is subject to the following two conditions: (1) This
device may not cause harmful interference, and (2) this device must accept any interference received, including interference that
may cause undesired operation.
Ce dispositif est conforme à la norme CNR-210 d'Industrie Canada applicable aux appareils radio exempts de licence. Son fonction-
nement est sujet aux deux conditions suivantes: (1) le dispositif ne doit pas produire de brouillage préjudiciable, et (2) ce dispositif
doit accepter tout brouillage reçu, y compris un brouillage susceptible de provoquer un fonctionnement indésirable.
WARNING!
(i) the device for operation in the band 5150-5250 MHz is only for indoor use to reduce the potential for harmful interference to co-channel mobile
satellite systems;
(ii) high-power radars are allocated as primary users (i.e. priority users) of the bands 5250-5350 MHz and 5650-5850 MHz and that these radars
could cause interference and/or damage to LE-LAN devices.
Avertissement!
(i) Les dispositifs fonctionnant dans la bande 5 150-5 250 MHz sont réservés uniquement pour une utilisation à l’intérieur afin de réduire les ris-
ques de brouillage préjudiciable aux systèmes de satellites mobiles utilisant les mêmes canaux;
(ii) De plus, les utilisateurs devraient aussi être avisés que les utilisateurs de radars de haute puissance sont désignés utilisateurs principaux (c.-
à-d., qu’ils ont la priorité) pour les bandes 5 250-5 350 MHz et 5 650-5 850 MHz et que ces radars pourraient causer du brouillage et/ou des
dommages aux dispositifs LAN-EL.
!
!

APPENDIX B RADIATION EXPOSURE STATEMENT
B-2
Radiation Exposure Statement
The product comply with the Canada portable RF exposure limit set forth for an uncontrolled environment and are safe for intended
operation as described in this manual. The further RF exposure reduction can be achieved if the product can be kept as far as possi-
ble from the user body or set the device to lower output power if such function is available.
Déclaration d'exposition aux radiations:
Le produit est conforme aux limites d'exposition pour les appareils portables RF pour les États-Unis et le Canada établies pour un
environnement non contrôlé.
Le produit est sûr pour un fonctionnement tel que décrit dans ce manuel. La réduction aux expositions RF peut être augmentée si
l'appareil peut être conservé aussi loin que possible du corps de l'utilisateur ou que le dispositif est réglé sur la puissance de sortie la
plus faible si une telle fonction est disponible.
WARNING!
For body-worn operating conditions please use belt-clips, holsters, and/or accessories that have no metallic component in the assem-
bly and must provide at least 0.5 cm separation between the device and the user's body.
!
APPENDIX C EUROPE – EU DECLARATION OF CONFORMITY
C-1
Appendix C
Europe – EU Declaration of Conformity
This device complies with the essential requirements of the R&TTE Directive 1999/5/EC. The following test methods have been
applied in order to prove presumption of conformity with the essential requirements of the R&TTE Directive 1999/5/EC:
EN60950-1
Safety of Information Technology Equipment
EN 62479:
Assessment of electronic and electrical equipment related to human exposure restrictions for electromagnetic fields (0 Hz-300
GHz)
EN 300 328
Electromagnetic compatibility and Radio spectrum Matters (ERM); Wideband Transmission systems; Data transmission equip-
ment operating in the 2,4 GHz ISM band and using spread spectrum modulation techniques; Harmonized EN covering essen-
tial requirements under article 3.2 of the R&TTE Directive
EN 301 893
Broadband Radio Access Networks (BRAN); 5 GHz high performance RLAN; Harmonized EN covering essential requirements
of article 3.2 of the R&TTE Directive
EN 301 489-1
Electromagnetic compatibility and Radio Spectrum Matters (ERM); ElectroMagnetic Compatibility (EMC) standard for radio
equipment and services; Part 1: Common technical requirements

APPENDIX C EUROPE – EU DECLARATION OF CONFORMITY
C-2
EN 301 489-17
Electromagnetic compatibility and Radio spectrum Matters (ERM); ElectroMagnetic Compatibility (EMC) standard for radio
equipment and services; Part 17: Specific conditions for 2,4 GHz wideband transmission systems and 5 GHz high performance
RLAN equipment
This device is a 5GHz wideband transmission system (transceiver), intended for use in all EU member states and EFTA countries,
except in France and Italy where restrictive use applies.
In Italy the end-user should apply for a license at the national spectrum authorities in order to obtain authorization to use the device
for setting up outdoor radio links and/or for supplying public access to telecommunications and/or network services.
This device may not be used for setting up outdoor radio links in France and in some areas the RF output power may be limited to 10
mW EIRP in the frequency range of 2454 – 2483.5 MHz. For detailed information the end-user should contact the national spectrum
authority in France.
Česky [Czech] [Jméno výrobce] tímto prohlašuje, že tento [typ zařízení] je ve shodě se základními požadavky a dalšími příslušnými
ustanoveními směrnice 1999/5/ES.
Dansk [Danish] Undertegnede [fabrikantens navn] erklærer herved, at følgende udstyr [udstyrets typebetegnelse] overholder de væsentlige
krav og øvrige relevante krav i direktiv 1999/5/EF.
Deutsch [German] Hiermit erklärt [Name des Herstellers], dass sich das Gerät [Gerätetyp] in Übereinstimmung mit den grundlegenden
Anforderungen und den übrigen einschlägigen Bestimmungen der Richtlinie 1999/5/EG befindet.
Eesti [Estonian] Käesolevaga kinnitab [tootja nimi = name of manufacturer] seadme [seadme tüüp = type of equipment] vastavust direktiivi
1999/5/EÜ põhinõuetele ja nimetatud direktiivist tulenevatele teistele asjakohastele sätetele.
English Hereby, [name of manufacturer], declares that this [type of equipment] is in compliance with the essential requirements and
other relevant provisions of Directive 1999/5/EC.
Español [Spanish] Por medio de la presente [nombre del fabricante] declara que el [clase de equipo] cumple con los requisitos esenciales y
cualesquiera otras disposiciones aplicables o exigibles de la Directiva 1999/5/CE.

APPENDIX C EUROPE – EU DECLARATION OF CONFORMITY
C-3
Ελληνική [Greek] ΜΕ ΤΗΝ ΠΑΡΟΥΣΑ [name of manufacturer] ΔΗΛΩΝΕΙ ΟΤΙ [type of equipment] ΣΥΜΜΟΡΦΩΝΕΤΑΙ ΠΡΟΣ ΤΙΣ ΟΥΣΙΩΔΕΙΣ
ΑΠΑΙΤΗΣΕΙΣ ΚΑΙ ΤΙΣ ΛΟΙΠΕΣ ΣΧΕΤΙΚΕΣ ΔΙΑΤΑΞΕΙΣ ΤΗΣ ΟΔΗΓΙΑΣ 1999/5/ΕΚ.
Français [French] Par la présente [nom du fabricant] déclare que l'appareil [type d'appareil] est conforme aux exigences essentielles et aux
autres dispositions pertinentes de la directive 1999/5/CE.
Italiano [Italian] Con la presente [nome del costruttore] dichiara che questo [tipo di apparecchio] è conforme ai requisiti essenziali ed alle altre
disposizioni pertinenti stabilite dalla direttiva 1999/5/CE.
Latviski [Latvian] Ar šo [name of manufacturer / izgatavotāja nosaukums] deklarē, ka [type of equipment / iekārtas tips] atbilst Direktīvas 1999/
5/EK būtiskajām prasībām un citiem ar to saistītajiem noteikumiem.
Lietuvių [Lithuanian] Šiuo [manufacturer name] deklaruoja, kad šis [equipment type] atitinka esminius reikalavimus ir kitas 1999/5/EB Direktyvos
nuostatas.
Nederlands [Dutch] Hierbij verklaart [naam van de fabrikant] dat het toestel [type van toestel] in overeenstemming is met de essentiële eisen en de
andere relevante bepalingen van richtlijn 1999/5/EG.
Malti [Maltese] Hawnhekk, [isem tal-manifattur], jiddikjara li dan [il-mudel tal-prodott] jikkonforma mal-ħtiġijiet essenzjali u ma provvedimenti
oħrajn relevanti li hemm fid-Dirrettiva 1999/5/EC.
Magyar [Hungarian] Alulírott, [gyártó neve] nyilatkozom, hogy a [... típus] megfelel a vonatkozó alapvetõ követelményeknek és az 1999/5/EC
irányelv egyéb elõírásainak.
Polski [Polish] Niniejszym [nazwa producenta] oświadcza, że [nazwa wyrobu] jest zgodny z zasadniczymi wymogami oraz pozostałymi
stosownymi postanowieniami Dyrektywy 1999/5/EC.
Português [Portuguese] [Nome do fabricante] declara que este [tipo de equipamento] está conforme com os requisitos essenciais e outras disposições
da Directiva 1999/5/CE.
Slovensko [Slovenian] [Ime proizvajalca] izjavlja, da je ta [tip opreme] v skladu z bistvenimi zahtevami in ostalimi relevantnimi določili direktive 1999/
5/ES.
Slovensky [Slovak] [Meno výrobcu] týmto vyhlasuje, že [typ zariadenia] spĺňa základné požiadavky a všetky príslušné ustanovenia Smernice
1999/5/ES.
Suomi [Finnish] [Valmistaja = manufacturer] vakuuttaa täten että [type of equipment = laitteen tyyppimerkintä] tyyppinen laite on direktiivin
1999/5/EY oleellisten vaatimusten ja sitä koskevien direktiivin muiden ehtojen mukainen.
Svenska [Swedish] Härmed intygar [företag] att denna [utrustningstyp] står I överensstämmelse med de väsentliga egenskapskrav och övriga
relevanta bestämmelser som framgår av direktiv 1999/5/EG.

APPENDIX D WORLDWIDE TECHNICAL SUPPORT
D-1
Appendix D
WorldWide Technical Support
REGION/COUNTRY OF PURCHASE SERVICE CENTRE SERVICE INFORMATION
Canada
CANADA web site www.engeniuscanada.com
email rma@engeniuscanada.com
contact numbers Toll Free: (+1) 888-397-2788
Local: (+1) 905-940-8181
hours of operation Monday - Friday
9:00AM to 5:30PM EST (GMT-5)
USA
LOS ANGELES, USA web site www.engeniustech.com
email support@engeniustech.com
contact numbers Toll Free: (+1) 888-735-7888
Local: (+1) 714-432-8668
hours of operation Monday - Friday
8:00 AM to 4:30 PM PST (GMT-8)

APPENDIX D WORLDWIDE TECHNICAL SUPPORT
D-2
Mexico, Central and Southern America
MIAMI, USA web site [ES] es.engeniustech.com
[PT] pg.engeniustech.com
email miamisupport@engeniustech.com
contact numbers
Miami: (+1) 305-887-7378
Sao Paulo, Brazil: (+55)11-3957-0303
D.F., Mexico:(+52)55-1163-8894
hours of operation Monday - Friday
8:00 AM to 5:30PM EST (GMT-5)
Europe
NETHERLANDS web site www.engeniusnetworks.eu
email support@engeniusnetworks.eu
contact numbers (+31) 40-8200-887
hours of operation Monday - Friday
9:00 AM - 5:00 PM (GMT+1)
Africa
Middle East
Russia
CIS / Armenia, Azerbaijan, Belarus,
Georgia, Kazakhstan, Kyrgyzstan,
Moldova, Tajikistan,
Turkmenistan, Ukraine,
Uzbekistan
Turkey
Afghanistan
Pakistan
Bangladesh, Maldives,
Nepal, Bhutan, Sri Lanka
DUBAI, UAE web site www.engenius-me.com
email support@engenius-me.com
contact numbers
Toll Free:
U.A.E.: 800-EnGenius
800-364-364-87
General:
(+971) 4357-5599
hours of operation Sunday - Thursday
9:00 AM - 6:00 PM (GMT+4)
REGION/COUNTRY OF PURCHASE SERVICE CENTRE SERVICE INFORMATION

APPENDIX D WORLDWIDE TECHNICAL SUPPORT
D-3
Singapore, Cambodia,
Indonesia, Malaysia,
Thailand, Philippines,
Vietnam
China, Hong Kong, Korea
India
South Africa
Oceania
SINGAPORE web site www.engeniustech.com.sg/e_warranty_form
email techsupport@engeniustech.com.sg
contact numbers Toll Free:
Singapore: 1800-364-3648
hours of operation Monday - Friday
9:00 AM - 6:00 PM (GMT+8)
Others TAIWAN, R.O.C. web site www.engeniusnetworks.com
email technology@senao.com
Note:
* Service hours are based on the local time of the service center.
* Please visit the website for the latest information about customer service.
REGION/COUNTRY OF PURCHASE SERVICE CENTRE SERVICE INFORMATION