EnGenius Technologies SPR922U1 Long Range Dual Mode Radio Phone with UHF 2-Way Radio Handset User Manual SPR 922U1 EN Jul062016
EnGenius Technologies Long Range Dual Mode Radio Phone with UHF 2-Way Radio Handset SPR 922U1 EN Jul062016
UserManual.wiki
>
EnGenius Technologies
>
SPR922U1 User Manual
User Manual
Navigation menu
Upload a User Manual
Namespaces
Wiki Guide
HTML
PDF
Info
Views
User Manual
Discussion / Help
Navigation

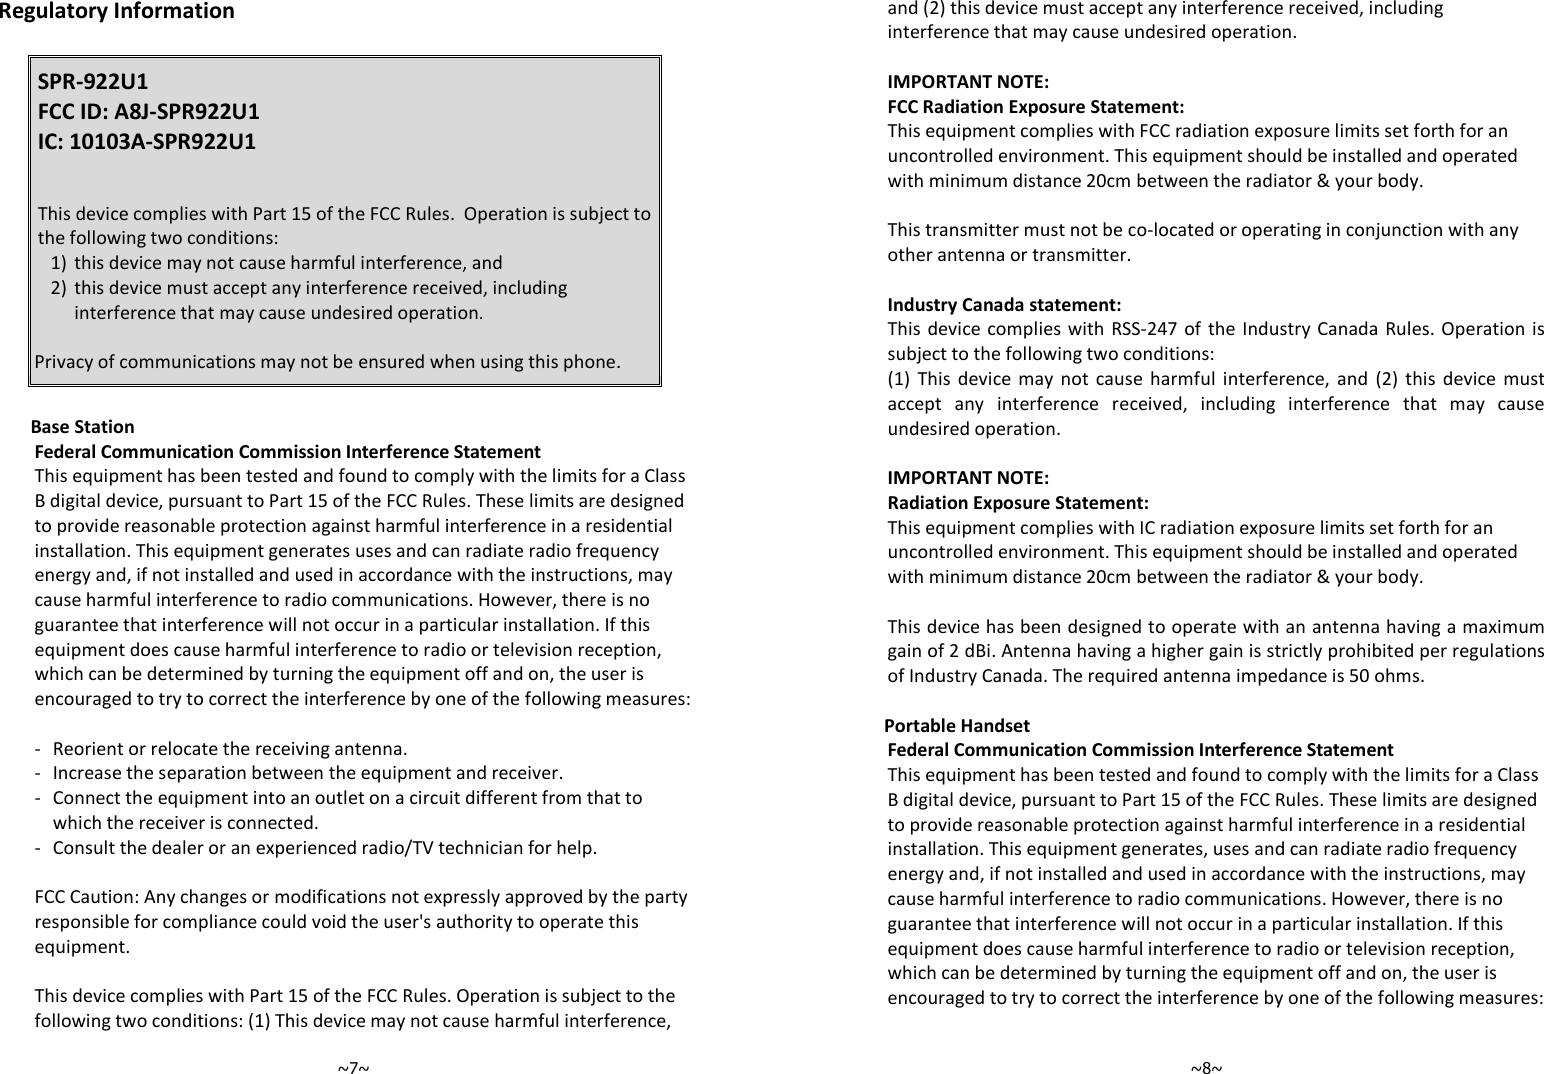
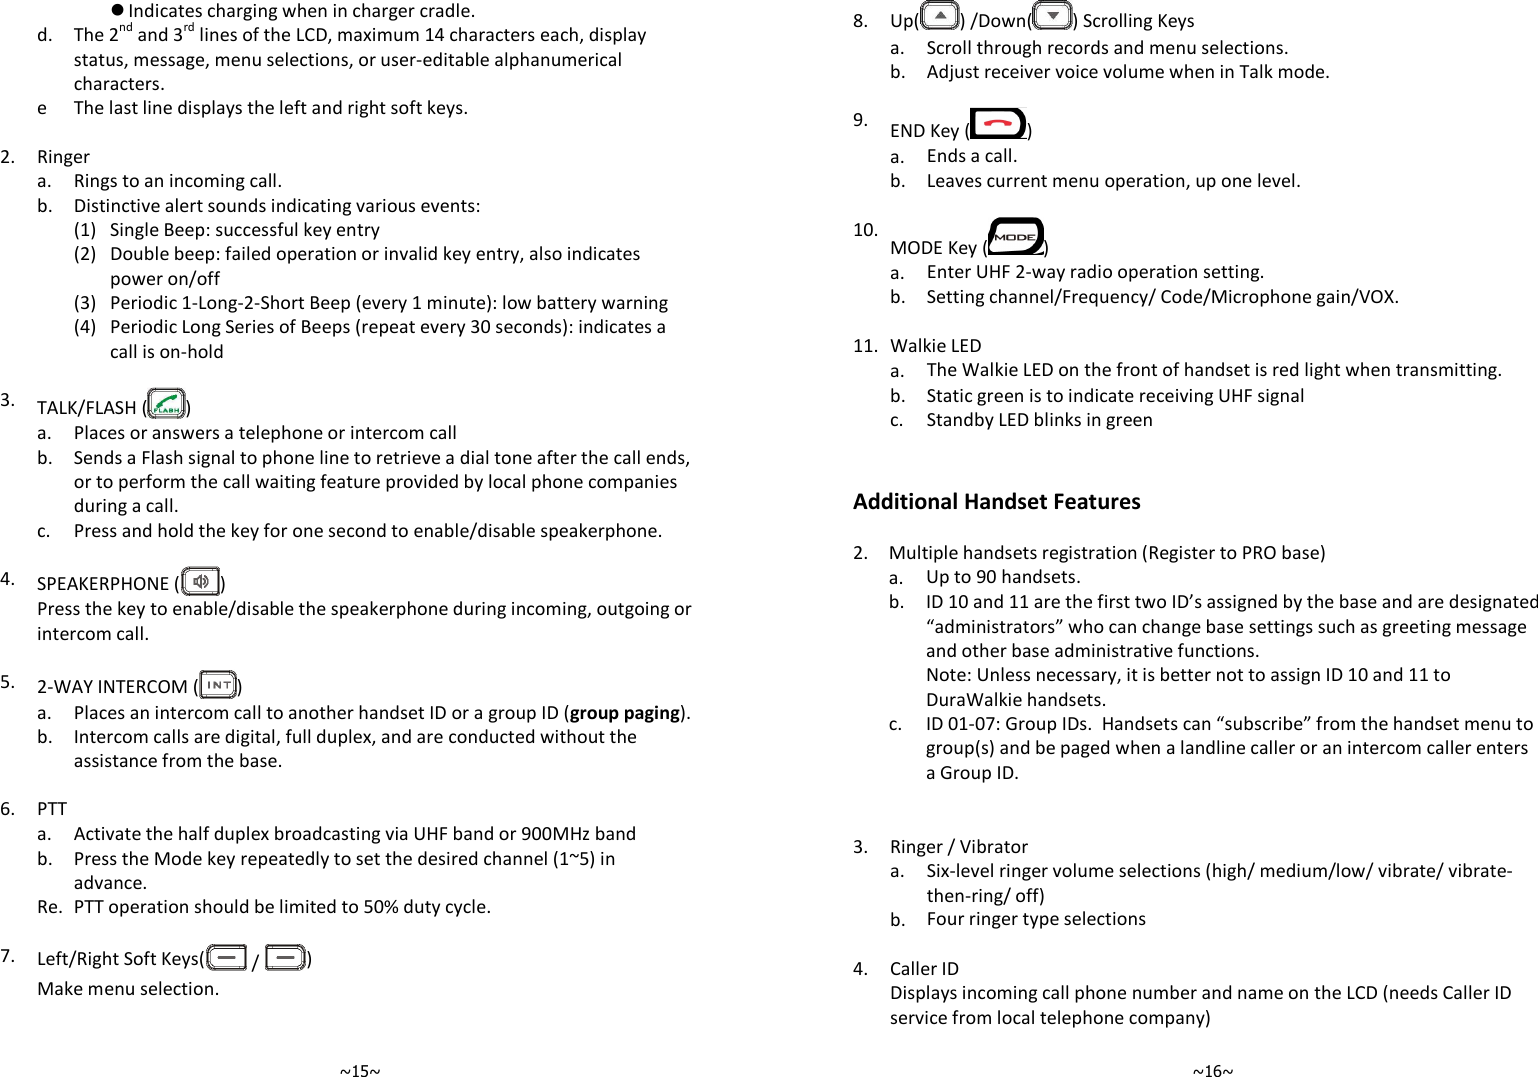
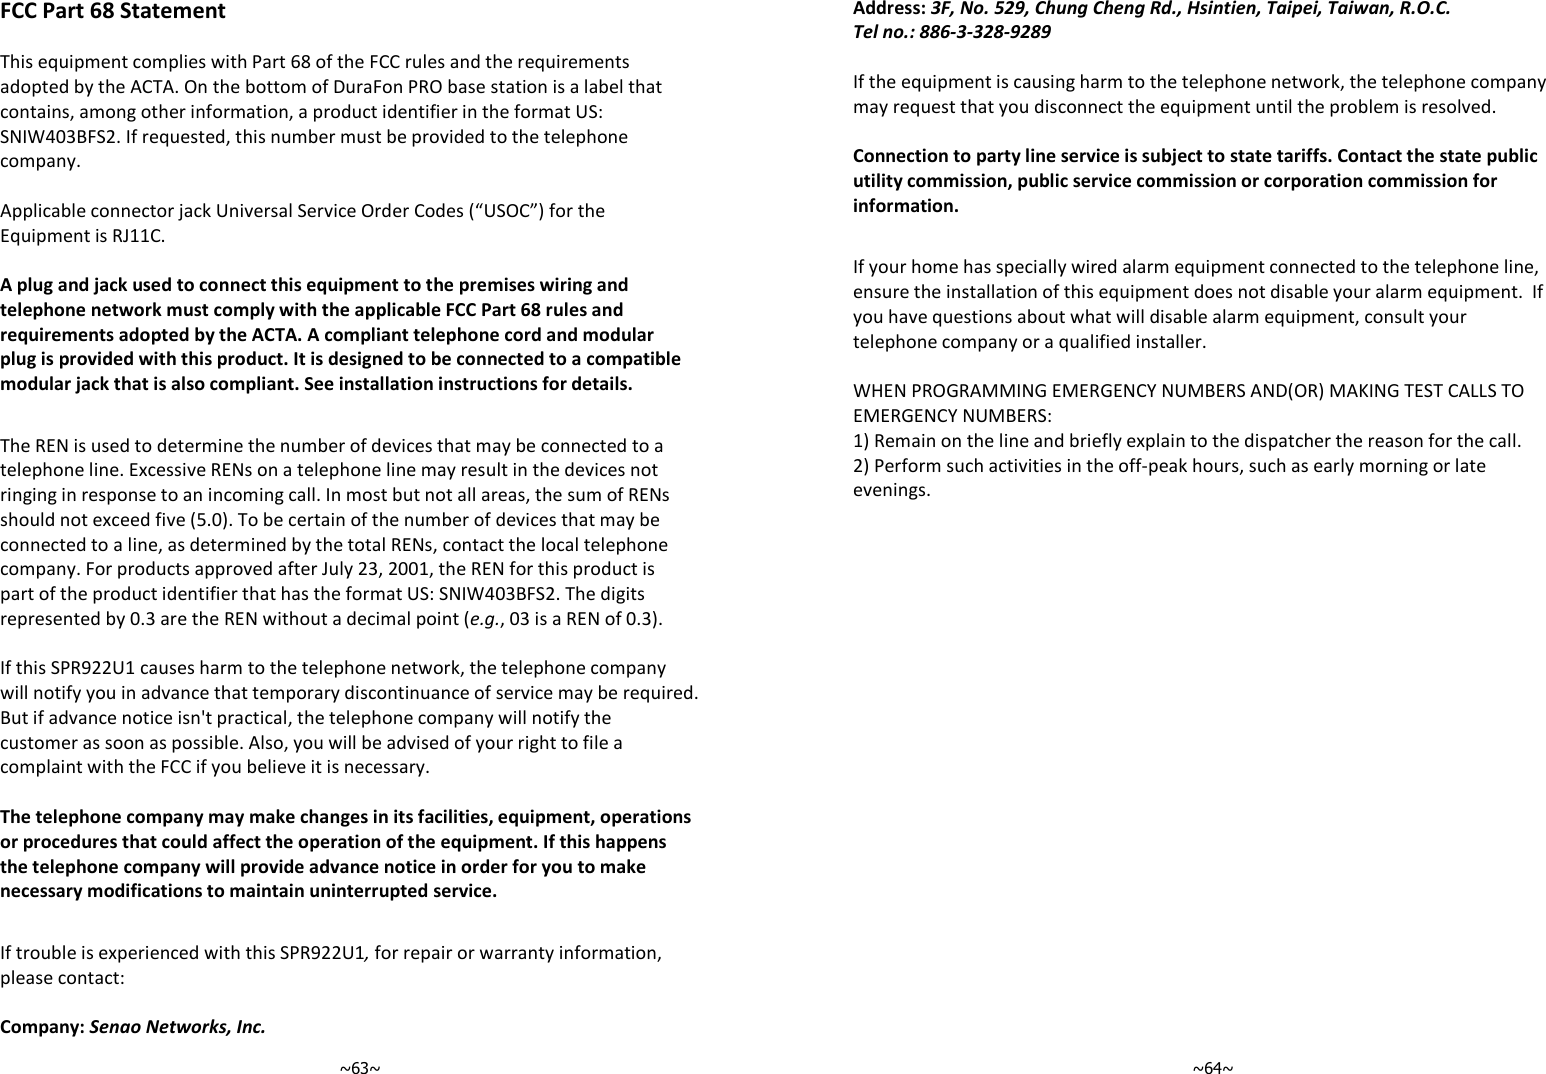
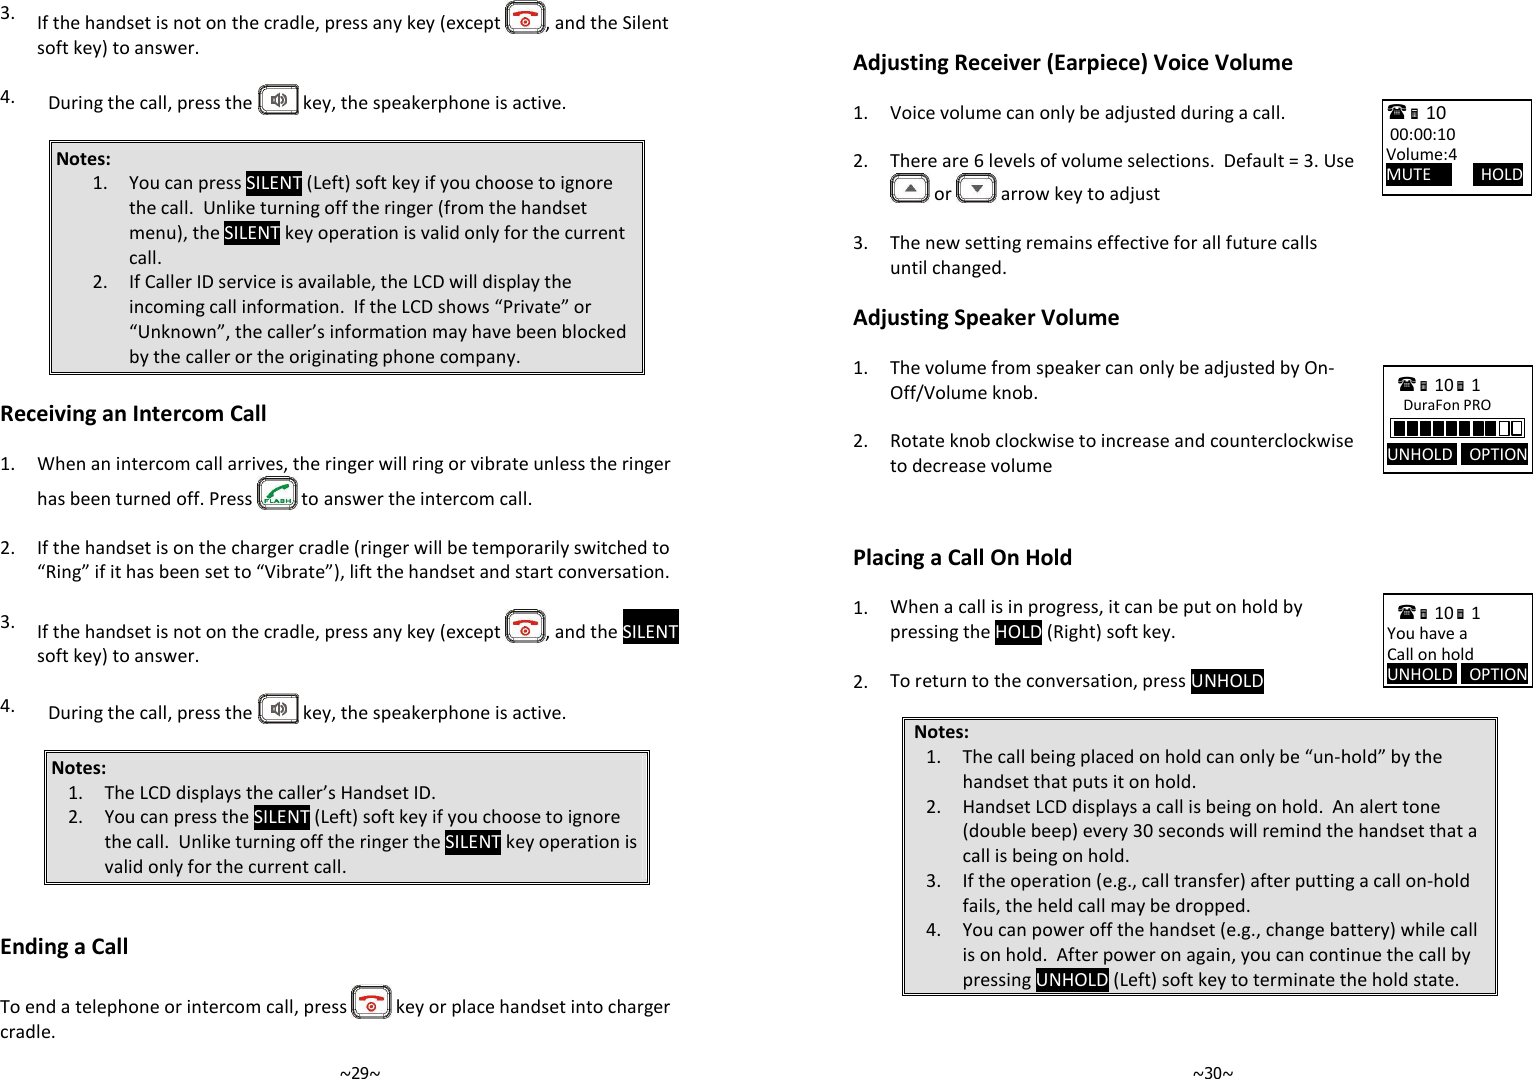
![~27~ c. Start to speak the message to be broadcasted once you hear the “beep” sound; the speakerphone of destination handsets will be opened up d. Release “PTT” key to end the broadcasting 3. Broadcasting an individual handset a. Enter the Handset ID and then press "PTT” key b. Hear bi-bi-beep while the initiating handset broadcast all handsets within communication coverage c. Start to speak the message to be broadcasted once you hear the “beep” sound; the speakerphone of destination handsets will be opened up d. Release “PTT” key to end the broadcasting Making a Broadcast via UHF A. Handset to UHF walkie-talkie 1. Activate walkie-talkie mode a. Enter the key sequence MENU - 5 - # - 1, then select “ON” to enable the WT mode in analog UHF band. After press “End” to back idle mode. You can see the display with a walkie icon. 2. Broadcasting all UHF walkie-talkie handsets a. Ensure the same setting for channel/ Frequency/Code before doing the broadcast b. Press “PTT” key, the display will show channel and transmitting a broadcast to all handsets within communication coverage c. Start to speak the message to be broadcasted immediately; the speakerphone of destination handsets will be opened up d. Release “PTT” key to end the broadcasting Scanning via UHF The Scan feature is to check continuously for activity on the channels. You should activate which channels desired to scan in UHF mode setting. You can scan up to 5 channels as settings. When the radio detects activity, it stops scanning and locks it on the active channel. 11 PA paging to Ext. # 12 10 PA paging to Ext. # 12 10 1 DuraFon PRO REDIAL MENU ~28~1. Press “MODE” key 6 times to enter the scan channel setting. You can use “Up” or “Down” key to select which channel to be scanned 2. Press “Left” soft key to enable/disable this channel scanning 3. Press “MODE” or “END” key to exist the setting. After 10 seconds, the radio begins to scan the channel. You can see the scan icon and rolling channel number. When the radio detects activity, it stops scanning till without signal. 4. If you want to stop scanning, you need to enter the setting as above step 1,2 to disable all the activated scanning channel. Redial 1. Press REDIAL (Left) soft key. 2. The LCD shows the last phone number dialed. To dial this number, press DIAL (Left) soft key. 3. Use or Arrow Key to scroll through the last 10 phone numbers dialed. Select and press DIAL soft key. [Note] Intercom numbers (Handset ID) are not stored in the last 10 numbers dialed log. Receiving a Telephone Call 1. When an incoming call arrives, the ringer will ring or vibrate unless the ringer has been turned off. 2. If the handset is on the charger cradle (ringer will be temporarily switched to “Ring” if it has been set to “Vibrate”), lift the handset and start conversation. 10 4 Scan Channel Off 1 10 DuraFon PRO REDIAL MENU Z 4 10 4 Scan Channel On 1](https://usermanual.wiki/EnGenius-Technologies/SPR922U1/User-Guide-3113782-Page-14.png)
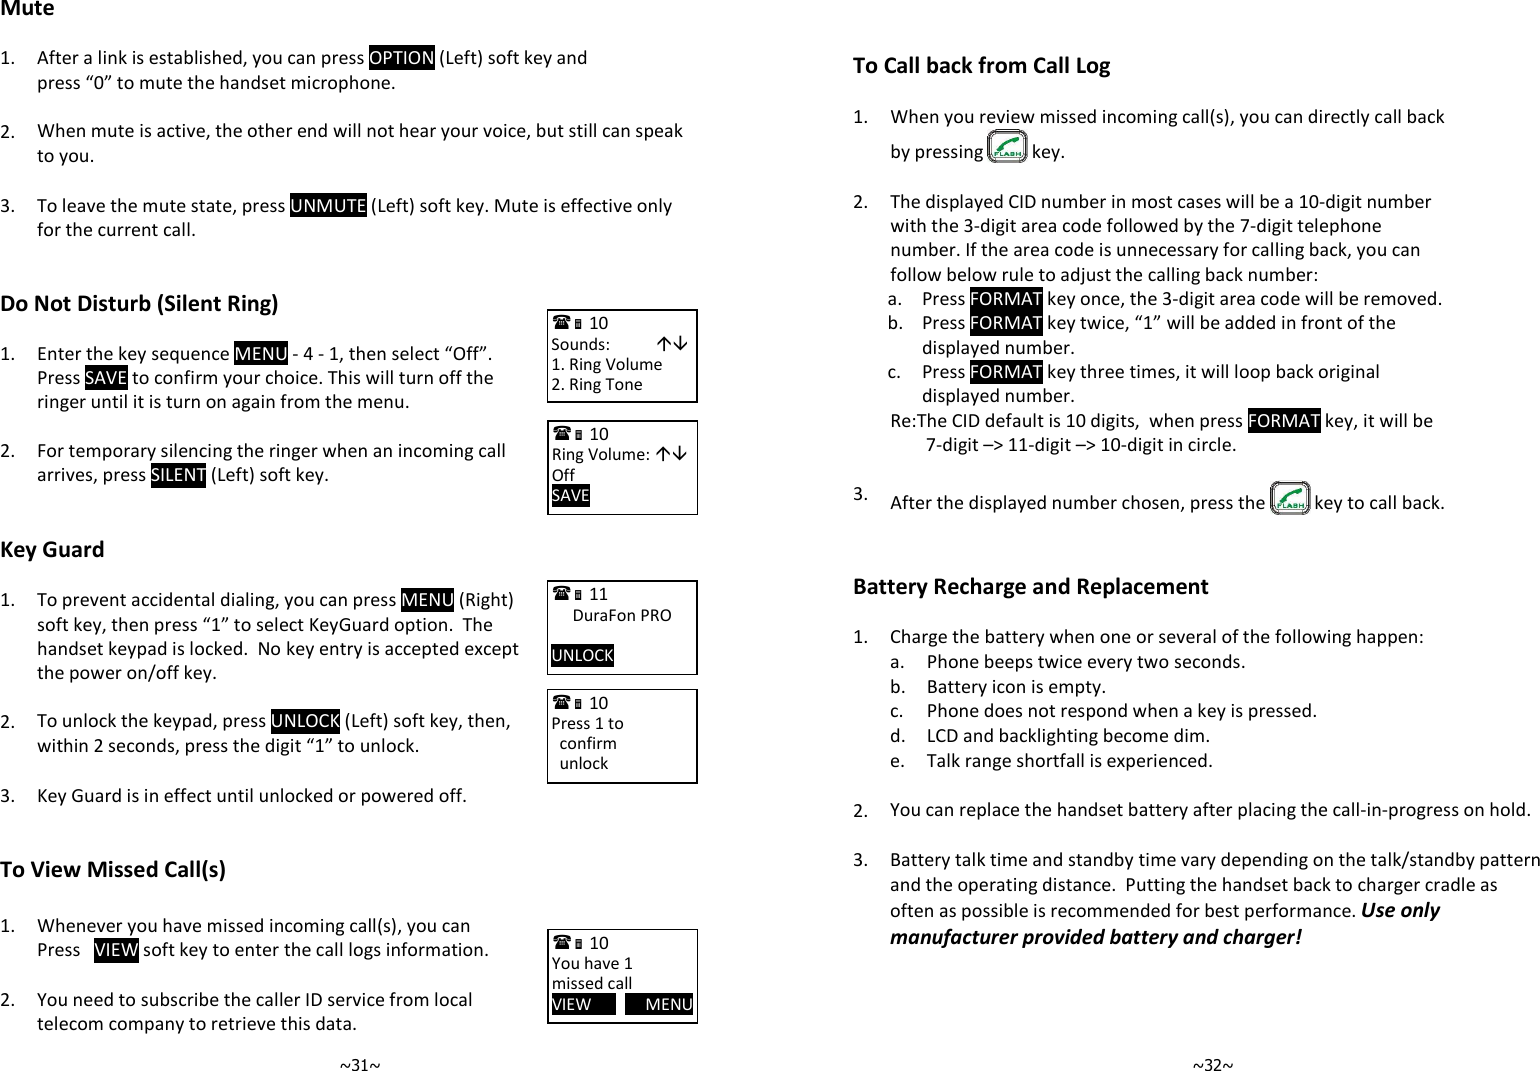

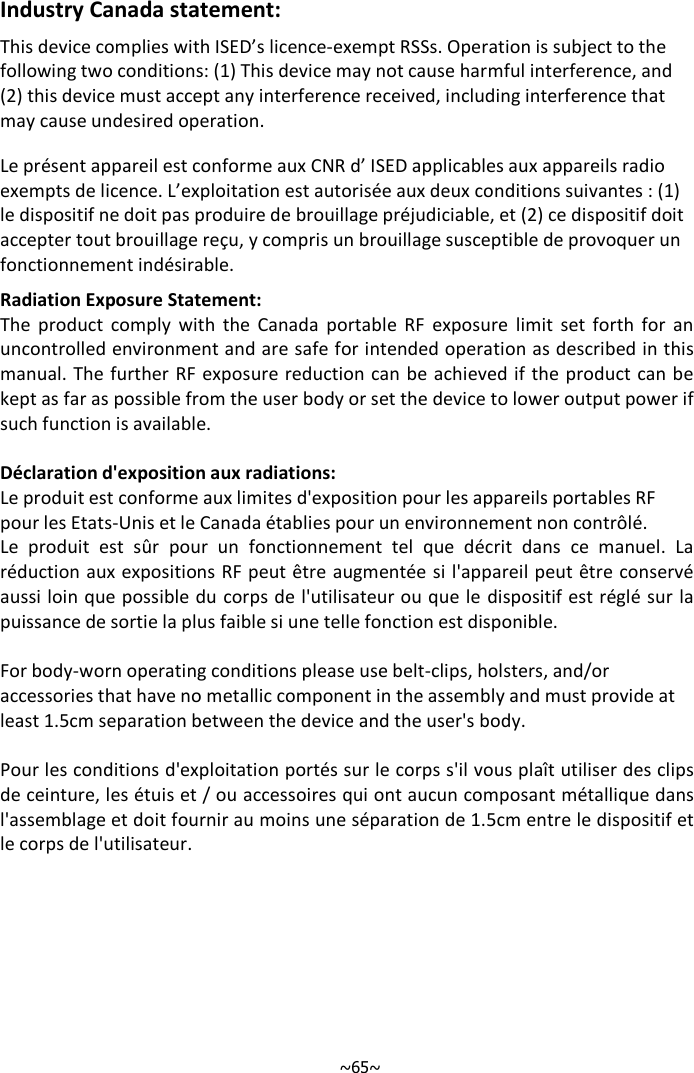
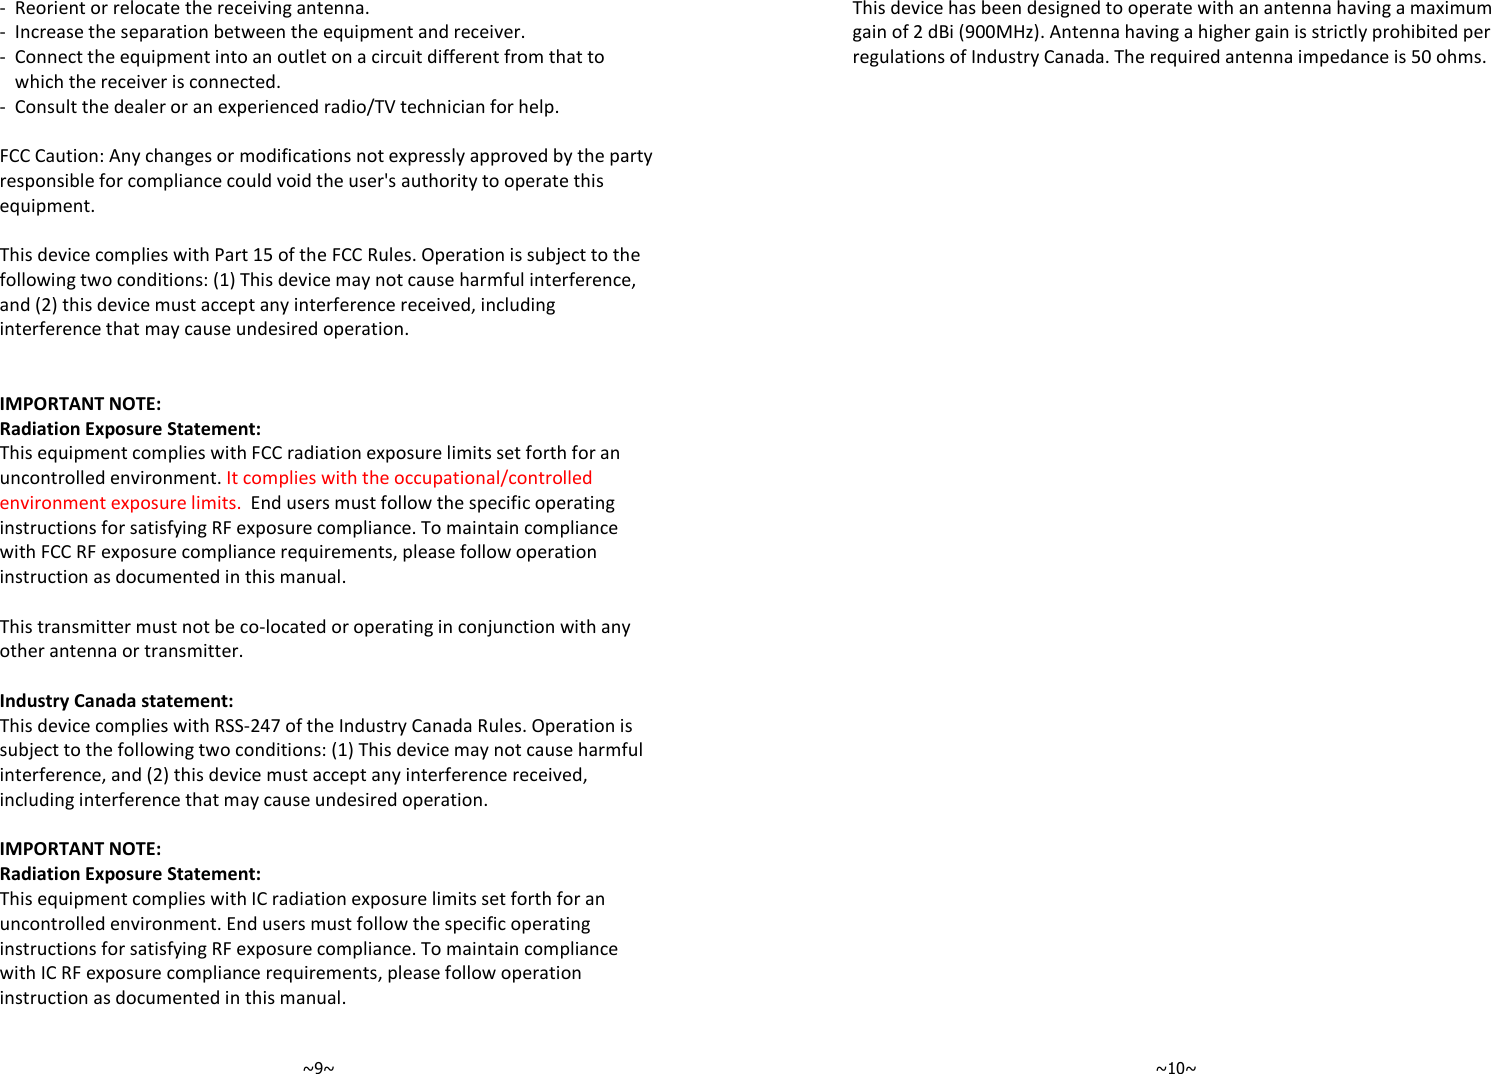
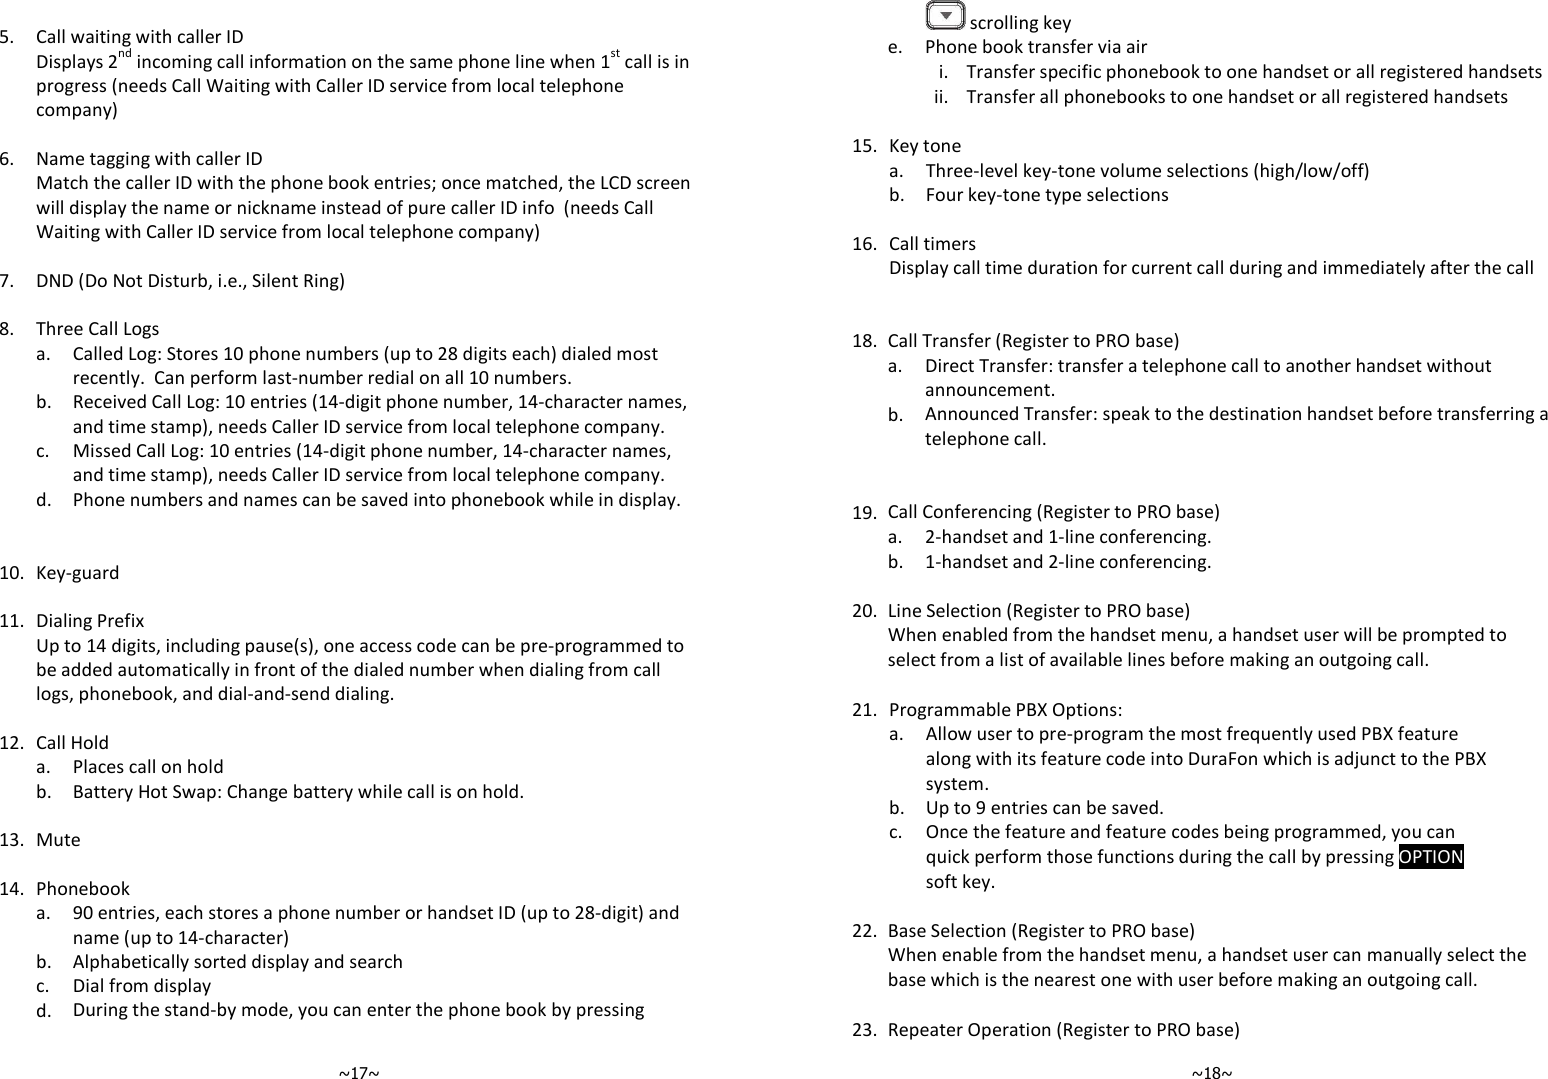
![~49~Programmable PBX Options (Register to PRO base only) 1. When DuraFon PRO base unit installed behind the PBX system, it is feasible to pre-program some PBX features along with their feature codes into the system. 2. Up to 9 most frequently used PBX feature codes can be pre-programmed. 3. Name and enter PBX feature codes: a. Press MENU (Right) soft key while the handset is in standby. b. Press “5” following by “9” to enter “PBX Options” menu. c. Press ADD soft key to edit a PBX feature to be memorized. d. Key in the name of the PBX features just like editing a phonebook entry i.e. PBX Transfer. Press SAVE to confirm your entries. e. Key in the feature code of the correspondence PBX feature i.e. Flash*70. Press SAVE to confirm your entries. f. The first PBX feature and the correspondence feature code you enter will appear on the LCD screen. [note] “F” represents the Flash signal g. Press OPTION soft key to Erase or Edit the PBX feature you program into the system. h. Repeat the same operation to edit the second and even the third PBX feature that you will use frequently. 4. Using pre-programmed PBX feature during the call. a. Press OPTION soft key while the handset is in talk mode . b. Press the correspondence number of the function you want to perform i.e. press 1 to perform “PBX Transfer” function. c. Press when you finish the desired function and back to standby mode. 10 Settings: 8. Line Select 9. PBX Options 10 Empty ADD 10 Feature Name? Caps = * SAVE DELETE 10 Feature Code? SAVE DELETE 10 PBX Transfer F*70 ADD OPTION 10 00:00:16 Volume:4 OPTION HOLD 11 1. PBX Transfer 0. Mute ~50~Notes: 1. This feature would be useful if the DuraFon PRO base unit is adjunct to a PBX system. 2. Only “Mute” function will be displayed if you have not preprogrammed any PBX features into the system. 3. The DuraFon PRO’s Programmable PBX Options may not function with all PBX / Key systems due to the diversity of various proprietary systems. Broadcast through PBX (Register to PRO base only) 1. DuraFon PRO and DuraWalkie both have the broadcast function, each can broadcast another handset without going through the base station, as long as the handsets are connecting. However, when setting up the multi-base, the broadcast feature may not be available due to the coverage range. In that case, you can use the function of “Broadcast through PBX” to broadcast. 2. From an administrator handset (Handset 10 or 11), press MENU(Right) soft key. 3. Press number 9 , this will enter administration menu. 4. Press number 2 , handset enters Line setting menu. a. Enter Base ID(00~07) to access base. b. Press 1 to enter Broadcast setting i. Press or to select L3 or L4 (the status of setting will be displayed on LCD) ii. Press CHANGE to enter the setting mode, and the base ID will be displayed on LCD. iii. Press On (Left softkey) to enable the broadcast function. Press Off (Right softkey) to disable the broadcast function. iv. After setting broadcast, press On (Left softkey) to enable the AA. Press Off (Right softkey) to disable the AA. Re: L3 and L4 can be setting as two broadcast lines, repeated above items for setting 2nd broadcast line. 5. When calling through the line 3 or 4, the caller will be prompt ed by the greeting message to enter a two-digit extension number](https://usermanual.wiki/EnGenius-Technologies/SPR922U1/User-Guide-3113782-Page-25.png)