Entone Technologies 99-990120-00 RF/IR Remote Control User Manual
Entone Technologies (HK) Limited RF/IR Remote Control Users Manual
Users Manual
V2.3 for URC Plus v3.8
Universal Remote Control
URC PLUS (v3)
User’s Guide

V2.3 for URC Plus v3.8
COPYRIGHT
©2009 Entone, Inc. All rights reserved. This document contains proprietary
information protected by copyright. No part of this publication may be reproduced,
stored in a retrieval system, or transmitted in any form or by any means,
electronic, mechanical, photocopying, recording or otherwise, without the prior
written consent of Entone, Inc., 2755 Campus Drive, Suite 235, San Mateo, CA
94403. U.S.A.
DISCLAIMER
IF THIS PRODUCT DIRECTS YOU TO COPY MATERIALS, YOU MUST HAVE
PERMISSION FROM THE COPYRIGHT OWNER OF THE MATERIALS TO AVOID
VIOLATING THE LAW WHICH COULD RESULT IN DAMAGES OR OTHER REMEDIES.
TRADEMARKS
Entone and the tagline “Connecting the Home” are trademarks of Entone, Inc. All
other trademarks or registered trademarks belong to their respective owners.
CHANGES
The material in this document is for information only and is subject to change
without notice. While reasonable efforts have been made in the preparation of this
document to assure its accuracy, Entone, Inc. assumes no liability resulting from
the use of the information contained herein.
Entone, Inc. reserves the right to make changes in the product design without
reservation and without notification to its users.
P/N: HYDRA_UG 1.0
CUSTOMER SUPPORT AND CONTACT INFORMATION
For Customer Support please call: 650.572.7000
Customer Contact Information:
Entone, Inc.
2755 Campus Drive
Suite 235
San Mateo, CA 94403
U.S.A.
Tel: 650.572.7000
www.entone.com

Copyright
2009 Entone, Inc. All rights reserved
2
V2.3 for URC Plus v3.8
Table of Contents
FCC Information...................................................................................................................................................................3
1.1 Introduction ...............................................................................................................................................................4
Loading Batteries..............................................................................................................................................................5
2.1 Controlling the Hydra................................................................................................................................................6
Attach the RF Remote Control Antenna..........................................................................................................................7
URC PLUS Registration with Hydra ................................................................................................................................8
URC PLUS Registration with Hydra having URC PLUS logo........................................................................................9
URC PLUS Registration with Hydra without URC PLUS logo.................................................................................... 11
3.1 Controlling the Amulet ........................................................................................................................................... 12
IR Reception Range ...................................................................................................................................................... 13
4.1 Controlling Your Television and other A/V Devices.............................................................................................. 14
To Program a TV or AUX device .................................................................................................................................. 15
Toggle Power Key Punch-through Functionality.......................................................................................................... 16
Auto Search Procedures ............................................................................................................................................... 16
Appendix A – Device Code............................................................................................................................................... 17
Appendix B – Other Features........................................................................................................................................... 22
Showing URC PLUS Firmware Version....................................................................................................................... 22
Showing Programmed Device Code ............................................................................................................................ 23

URC PLUS User’s Guide
Copyright
2009 Entone, Inc. All rights reserved
.
3
V2.3 for URC Plus v3.8
FCC Information
FCC ID S4A99-990120-00
This device complies with Part 15 of the FCC Rules.
Operation is subject to the following two conditions:
(1) this device may not cause harmful interference, and
(2) this device must accept any interference received,
including interference that may cause undesired operation
NOTE: This equipment has been tested and found to comply with the limits
for a Class B digital device, pursuant to Part 15 of the FCC Rules. These
limits are designed to provide reasonable protection against harmful
interference in a residential installation. This equipment generates, uses and
can radiate radio frequency energy and, if not installed and used in
accordance with the instructions, may cause harmful interference to radio
communications. However, there is no guarantee that interference will not
occur in a particular installation. If this equipment does cause harmful
interference to radio or television reception, which can be determined by
turning the equipment off and on, the user is encouraged to try to correct the
interference by one or more of the following measures:
-- Reorient or relocate the receiving antenna.
-- Increase the separation between the equipment and receiver.
-- Connect the equipment into an outlet on a circuit different from that to
which the receiver is connected.
-- Consult the dealer or an experienced radio/TV technician for help.
Caution – any changes or modifications not expressly approved by Entone
Incorporated could void the user's authority to operate this equipment.

URC PLUS User’s Guide
Copyright
2009 Entone, Inc. All rights reserved
.
4
V2.3 for URC Plus v3.8
Chapter
1.1 Introduction
The Entone Universal Remote Control Plus (URC PLUS) is designed to work either on Radio Signals (RF) or InfraRed
(IR). It can control Hydra Multi-Television Gateway using RF from another room where is not at direct sight distance
from the Hydra. Or, it can use IR to control Amulet Video Receiver at direct sight distance. The URC PLUS can also be
used to control other A/V devices such as TV, DVD player and audio equipment using IR.
The URC PLUS differs from the old URC on the followings :
The old URC can only support old Hydra hardware. URC PLUS supports both the old Hydra and new Hydra
hardware (with URC PLUS logo printed on the front panel).
URC PLUS supports Amulet
URC PLUS supports more A/V devices
URC PLUS User’s Guide
Copyright
2009 Entone, Inc. All rights reserved
.
5
V2.3 for URC Plus v3.8
Loading Batteries
The URC PLUS comes with AA-size batteries, which need to be installed when you first receive your system.
When you replace old batteries, you should replace all of the batteries. Use batteries of the same kind, for
example alkaline or carbon zinc, and do not mix batteries of different kinds. Alkaline batteries last longer than
carbon zinc.
Warning: Mixing old and new batteries or different types of batteries poses a fire hazard.
To load batteries to URC PLUS:
1. Press down on the battery cover’s top latch and slide the cover off.
2. If you are changing out batteries, take out all of the old batteries.
3. Put the new batteries in. Make sure you match the plus ( “+” ) ends with the plus markings on the battery
case.
4. Slide the cover back into place.
Figure 1-1 Loading Batteries to URC PLUS
URC PLUS User’s Guide
Copyright
2009 Entone, Inc. All rights reserved
.
6
V2.3 for URC Plus v3.8
Chapter
2.1 Controlling the Hydra
Hydra is a multi-television gateway. It can support multiple TVs in multiple rooms viewing different channels
or TV programs. You can use URC PLUS to control Hydra using radio signals (RF). These radio signals
travel over long distances and go though walls and other solid objects. You must connect the RF Remote
Control Antenna to the rear panel of the Hydra.
Your Hydra comes with 3 URC PLUS. (Additional URC PLUS can be purchased separately.) Your URC
PLUS must be registered to one of the 3 decoders before it can be used. One URC PLUS can only be
registered to one decoder. However, you can register at most 3 URC PLUS to a decoder. After registration,
you need to use the corresponding URC PLUS to control the decoders.
Figure 2-1 Controlling Hydra using RF URC PLUS
URC PLUS User’s Guide
Copyright
2009 Entone, Inc. All rights reserved
.
7
V2.3 for URC Plus v3.8
Here are some principles of the remote registration method:
Each decoder allows a maximum of 3 URC PLUS to be registered and a registration list is maintained.
If the user has registered 3 URC PLUS and tries to register another URC PLUS, the first registered
URC PLUS will be removed from the registration list. This works as a first-in-first-out fashion.
Each URC PLUS can only be registered for one decoder. If user tries to register a URC PLUS which is
already registered to another decoder, that remote registration will be removed from the original
registration list.
The registration list is maintained in order. If the secondly registered URC PLUS is removed from the
list, the third entry will move forth to the second and the third will be blank for a new URC PLUS to be
registered.
You must install the RF Remote Control antenna before doing the registration. Please refer to the previous
section for installing the RF Remote Control Antenna.
Attach the RF Remote Control Antenna
You need to attach the RF Remote Control Antenna to the Hydra’s rear panel “REMOTE ANTENNA” input
in order to use the radio control remotes.
Figure 2-2 Attaching RF Remote Control Antenna
NOTE: Be sure to set the antenna straight up so that you can use the URC PLUS from as far away as
possible. Don’t let the antenna touch anything.
ATTENTION: If your URC PLUS isn’t working very well from far away, you may be experiencing
interference from objects near your receiver. To improve your URC PLUS’s reception range, try any or all of
the followings:
1. Place the receiver higher than all of the other equipment in your entertainment center.
2. Provide room above the receiver so that the antenna can be installed straight up. If this is not possible,
tilt the RF Antenna at about a 30° angle.
3. Place the RF antenna outside the entertainment center by using a coaxial cable to connect the antenna
to the Hydra.
4. Try moving the Hydra to other locations.
URC PLUS User’s Guide
Copyright
2009 Entone, Inc. All rights reserved
.
8
V2.3 for URC Plus v3.8
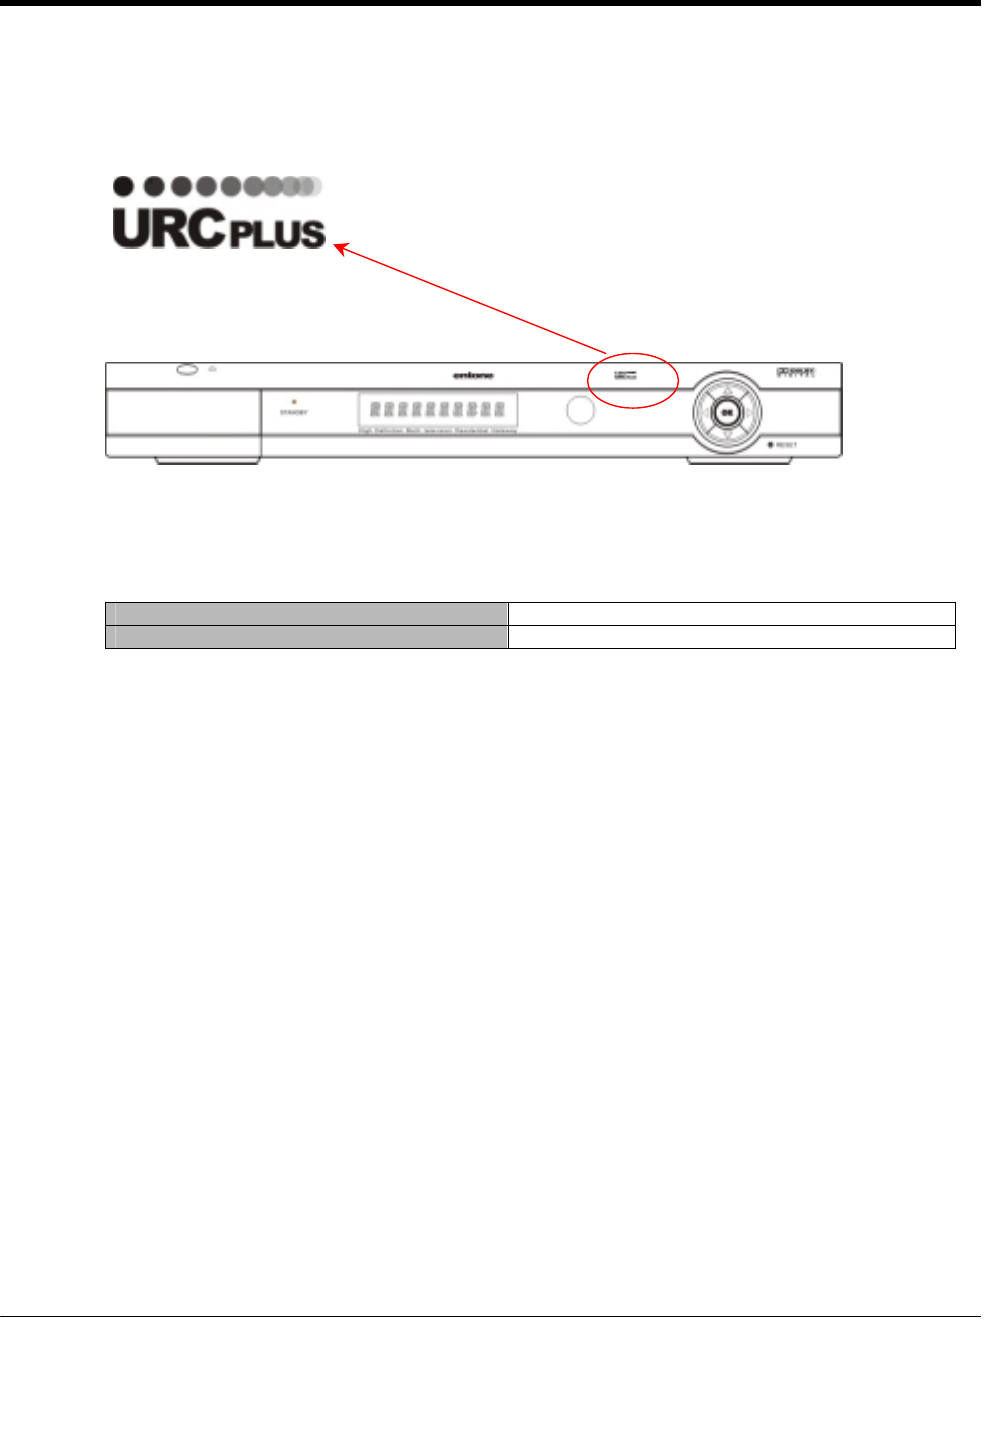
URC PLUS Registration with Hydra
There are 2 types of Hydra boxes, the new one with the URC PLUS logo on top of the front panel and the
old one without the URC PLUS logo. The registration method for the new box and the old box is different.
Figure 2-3 URC PLUS Logo
Figure 2-4 New Hydra with URC PLUS logo
The following table lists the new and old Hydra box type :
New Hydra with URC PLUS logo Hydra HD B Series, Amulet HD
Old Hydra without URC PLUS logo Hydra II, Hydra HD A Series
Check your Hydra box type and use the corresponding registration method.
URC PLUS User’s Guide
Copyright
2009 Entone, Inc. All rights reserved
.
9
V2.3 for URC Plus v3.8
URC PLUS Registration with Hydra having URC PLUS logo
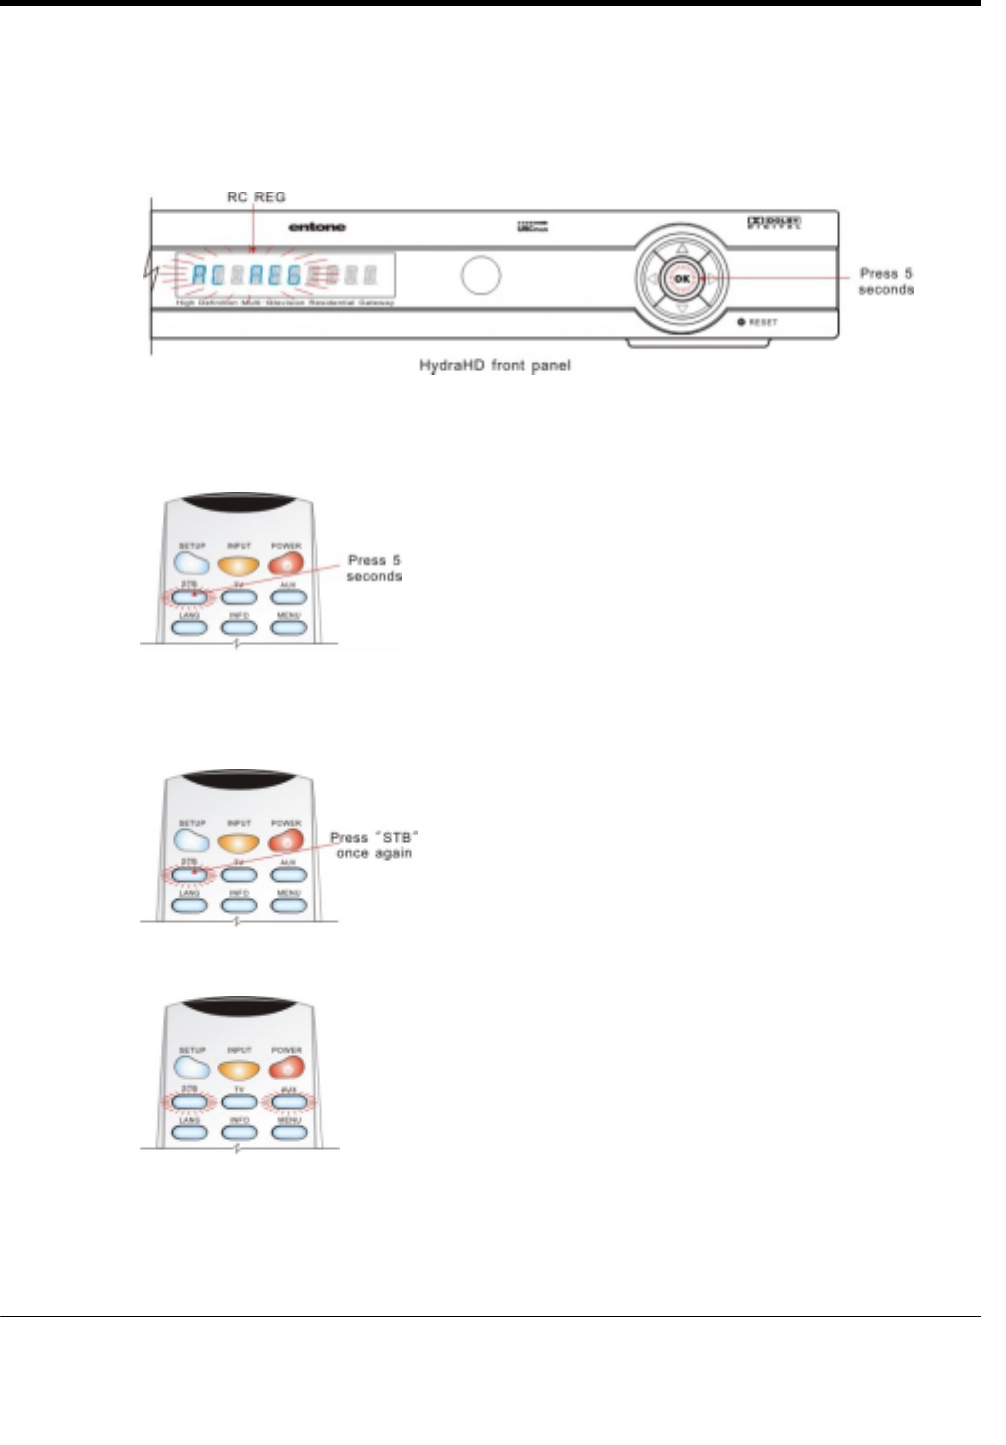
1. Press and hold the “OK” button on the Hydra front panel for approx. 5 seconds. When releasing the
“OK” button, the Hydra front panel will display “RC REG”. The Hydra is now in remote registration
mode.
Figure 2-5 Hydra in Remote Registration Mode
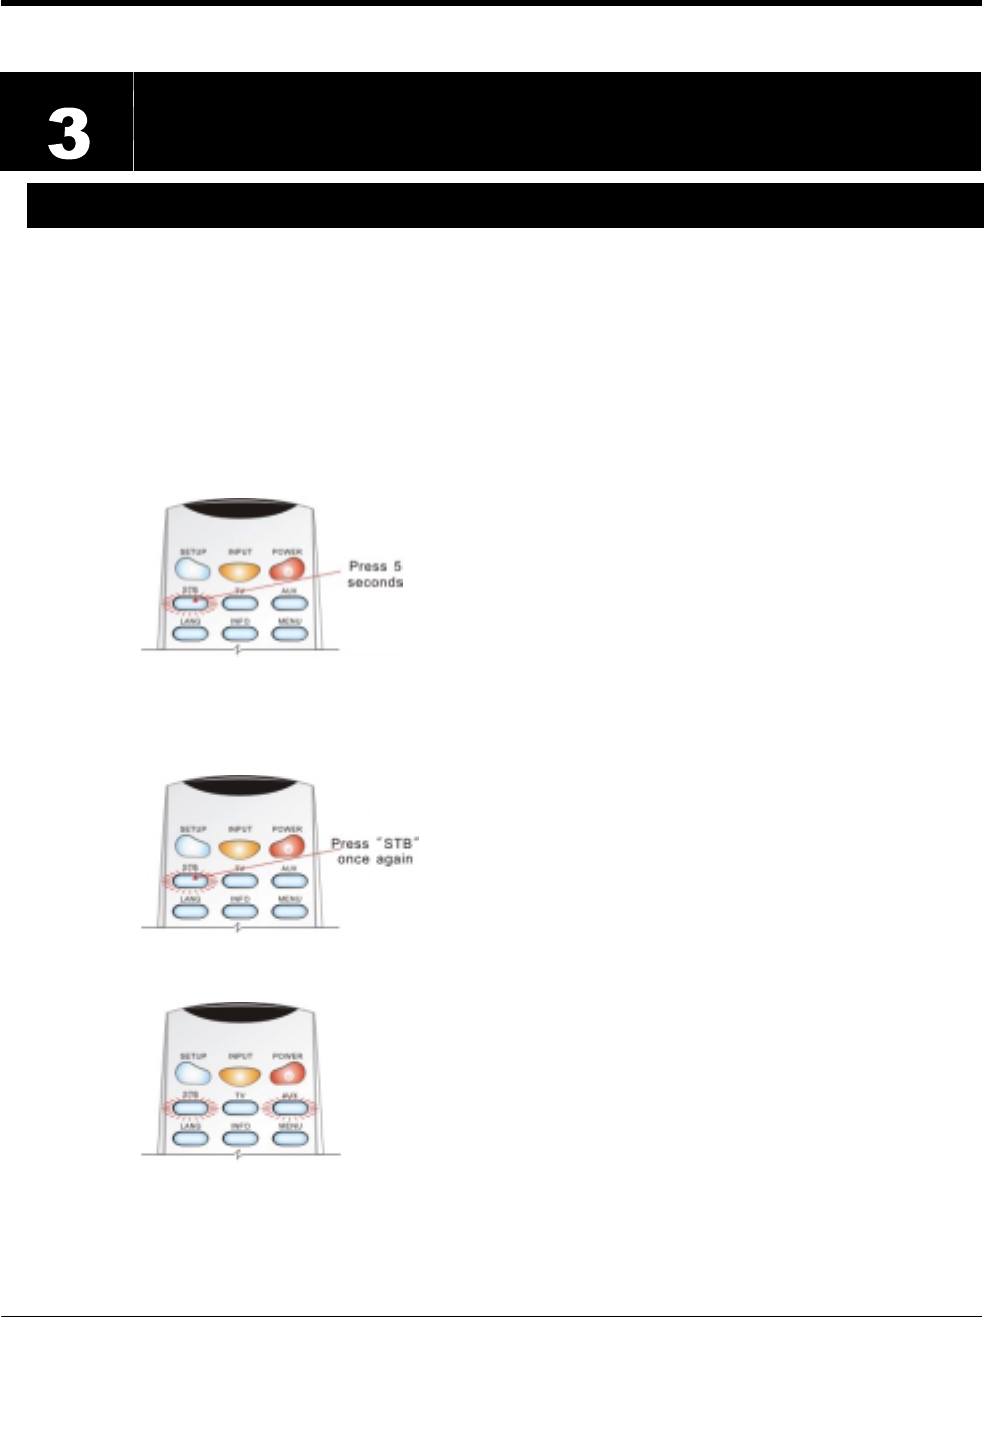
2. On the URC PLUS, press and hold the “STB” button for approx. 5 seconds. The “STB” button backlight
will illuminate.
Figure 2-6 URC PLUS in Remote Registration Mode – Step 1 (for box with URC PLUS logo)
On the URC PLUS, press “STB” once again. Both the “STB” and “AUX” button backlight will illuminate.
Figure 2-7 URC PLUS in Remote Registration Mode – Step 2 (for box with URC PLUS logo)
Figure 2-8 URC PLUS in Remote Registration Mode – Step 3 (for box with URC PLUS logo)
Now the URC PLUS is in registration mode.
URC PLUS User’s Guide
Copyright
2009 Entone, Inc. All rights reserved
.
10
V2.3 for URC Plus v3.8
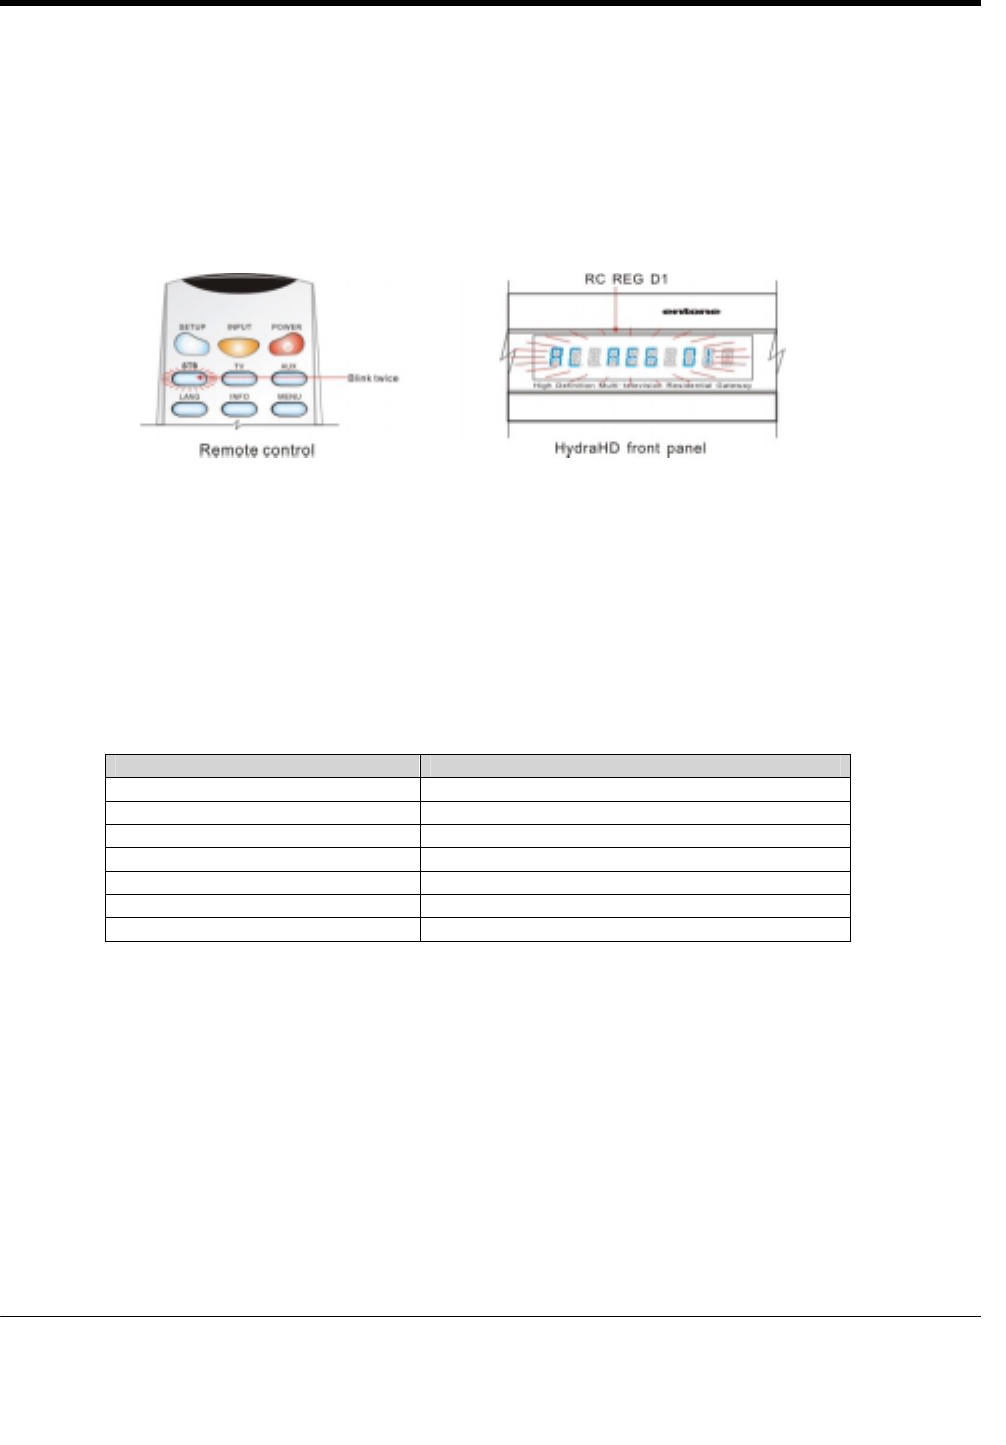
3. Select the decoder to register by:
Press “1” to register URC PLUS to decoder 1.
Press “2” to register URC PLUS to decoder 2.
Press “3” to register URC PLUS to decoder 3.
After you enter a registration event, the “STB” button backlight on the URC PLUS will blink twice to
indicate that the registration process was successful.
The Hydra front panel will display “RC REG Dx” to indicate that the registration process was successful.
Figure 2-9 Remote Registration Successful
Pressing a key other than “0”, “1”, “2”, “3” or a button is not pressed within 10 seconds, the “STB”
backlight will extinguish and the URC PLUS registration process will be terminated.
4. If the Hydra does not receive any URC PLUS registration event within 30 seconds, the process will be
terminated.
The Hydra front panel displays the following messages during remote control registration:
Front Panel Message Description
RC REG TO Registration times out
RC REGERR Registration error
RC REG In registration mode
RC REGEND Registered to IR only mode
RC REG D1 Registered to decoder 1
RC REG D2 Registered to decoder 2
RC REG D3 Registered to decoder 3
Table 2-1 Remote Registration Messages
NOTE:
While the URC PLUS is in “STB” mode, the volume +/- and MUTE key signal will be sent to the TV.
By Default, if the URC PLUS is in “STB” mode, the POWER key signal will be sent to the STB ONLY.
If the URC PLUS is in “TV” mode, the “POWER” key signal will be sent to the TV ONLY.
However, the POWER key can be configured to control both the STB and TV while the URC PLUS is
in “STB” mode, please refer to the section “Toggle Power Key Punch Through Functionality” in Chapter
4 for details.
URC PLUS User’s Guide
Copyright
2009 Entone, Inc. All rights reserved
.
11
V2.3 for URC Plus v3.8
URC PLUS Registration with Hydra without URC PLUS logo
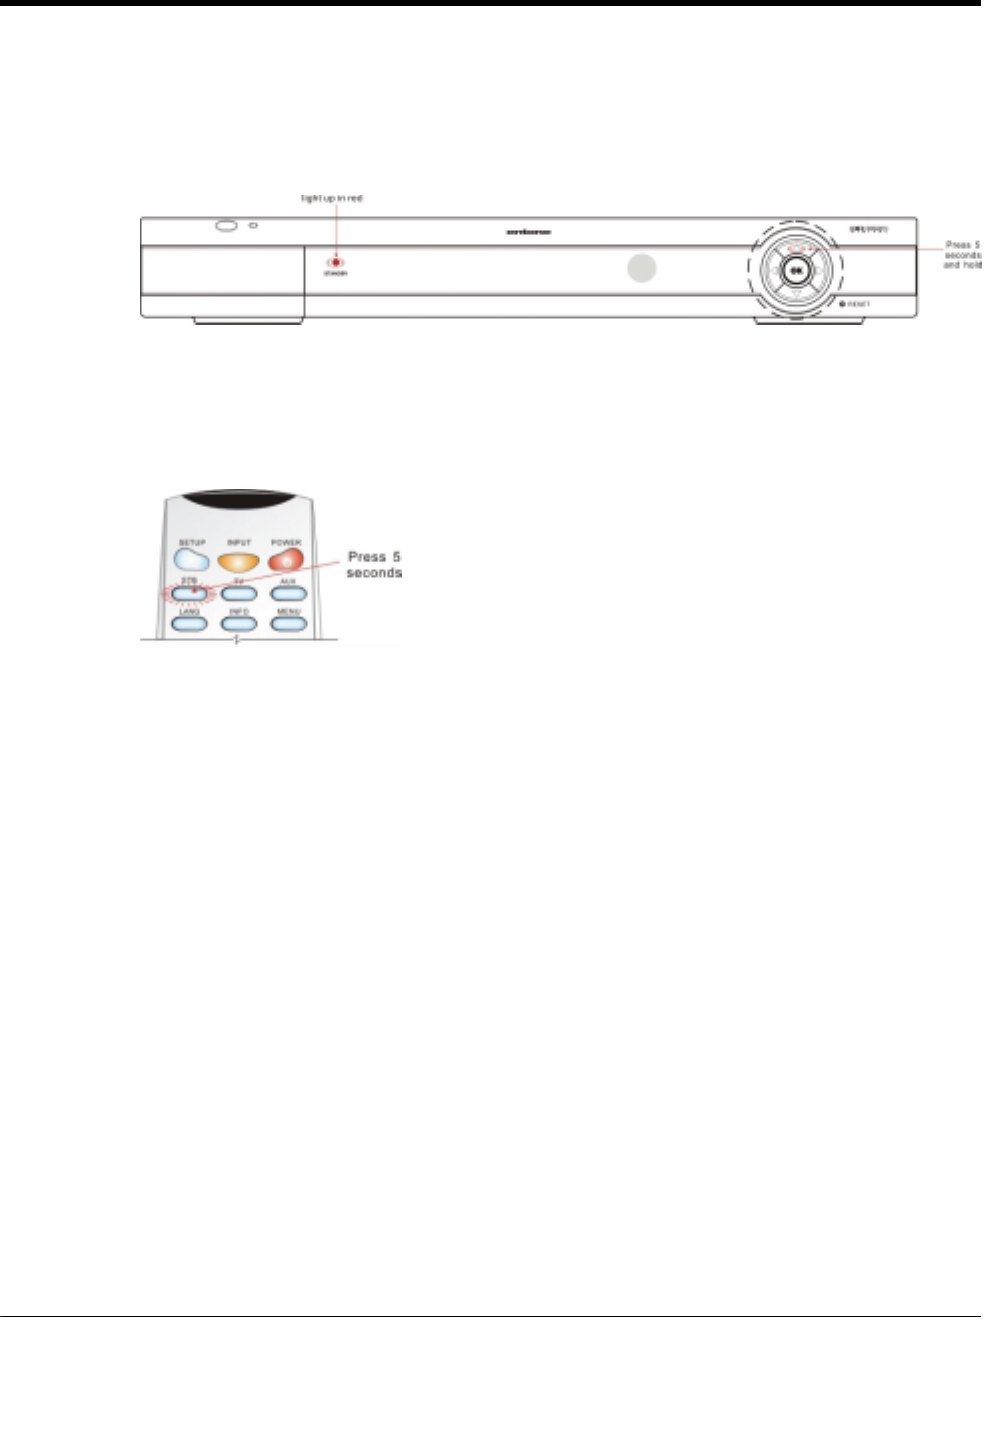
1. Press and hold the OK button on the Hydra front panel for about 5 seconds. When the OK button is
released, the Hydra front panel Standby/On indicator blinks twice (alternates red and green), then stays
lit red to indicate that the Hydra is now in remote registration mode.
Figure 2-8 Hydra in Remote Registration Mode
2. On the URC PLUS, press and hold the “STB” button for approx. 5 seconds. The “STB” button backlight
will illuminate. Now the URC PLUS is in registration mode.
Figure 2-9 URC PLUS in Remote Registration Mode (for box without URC PLUS logo)
3. Select the decoder to register by:
Press “1” to register URC PLUS to decoder 1.
Press “2” to register URC PLUS to decoder 2.
Press “3” to register URC PLUS to decoder 3.
After you enter a registration event, the “STB” button backlight on the URC PLUS and the Hydra front
panel Standby/On indicator will blink twice to indicate that the registration process was successful.
Pressing a key other than “0”, “1”, “2”, “3” or a button is not pressed within 10 seconds, the “STB”
backlight will extinguish and the URC PLUS registration process will be terminated.
4. If the Hydra does not receive any URC PLUS registration event within 30 seconds, the process will be
terminated.
NOTE:
While the URC PLUS is in “STB” mode, the volume +/- and MUTE key signal will be sent to the TV.
By Default, if the URC PLUS is in “STB” mode, the POWER key signal will be sent to the STB ONLY.
If the URC PLUS is in “TV” mode, the “POWER” key signal will be sent to the TV ONLY.
However, the POWER key can be configured to control both the STB and TV while the URC PLUS is
in “STB” mode, please refer to the section “Toggle Power Key Punch Through Functionality” in Chapter
4 for details.
URC PLUS User’s Guide
Copyright
2009 Entone, Inc. All rights reserved
.
12
V2.3 for URC Plus v3.8
Chapter
3.1 Controlling the Amulet
Amulet is a single television video receiver. You can connect Amulet to a primary TV only. Amulet only uses
InfraRed (IR) to receive remote control signals.
Unlike Hydra, you do not need to do remote registration in order to use URC PLUS to control Amulet.
However, you have to program the URC PLUS to use IR.
To set the URC PLUS to use IR to control Amulet:
1. On the URC PLUS, press and hold the “STB” button for approx. 5 seconds. The “STB” button backlight
will illuminate. Now the URC PLUS is in registration mode.
Figure 3-1 URC PLUS in Remote Registration Mode – Step 1 (for Amulet using IR mode)
2. On the URC PLUS, press “STB” once again. Both the “STB” and “AUX” button backlight will illuminate.
Figure 3-2 URC PLUS in Remote Registration Mode – Step 2 (for Amulet using IR mode)
Figure 3-3 URC PLUS in Remote Registration Mode – Step 3 (for Amulet using IR mode)

URC PLUS User’s Guide
Copyright
2009 Entone, Inc. All rights reserved
.
13
V2.3 for URC Plus v3.8
3. Press “0” to set URC PLUS to IR mode only. The URC PLUS will not send any RF signal.
The “STB” button backlight on the URC PLUS will blink twice to indicate that the setting was successful.
Pressing a key other than “0”, “1”, “2”, “3” or a button is not pressed within 10 seconds, the “STB”
backlight will extinguish and the URC PLUS registration process will be terminated.
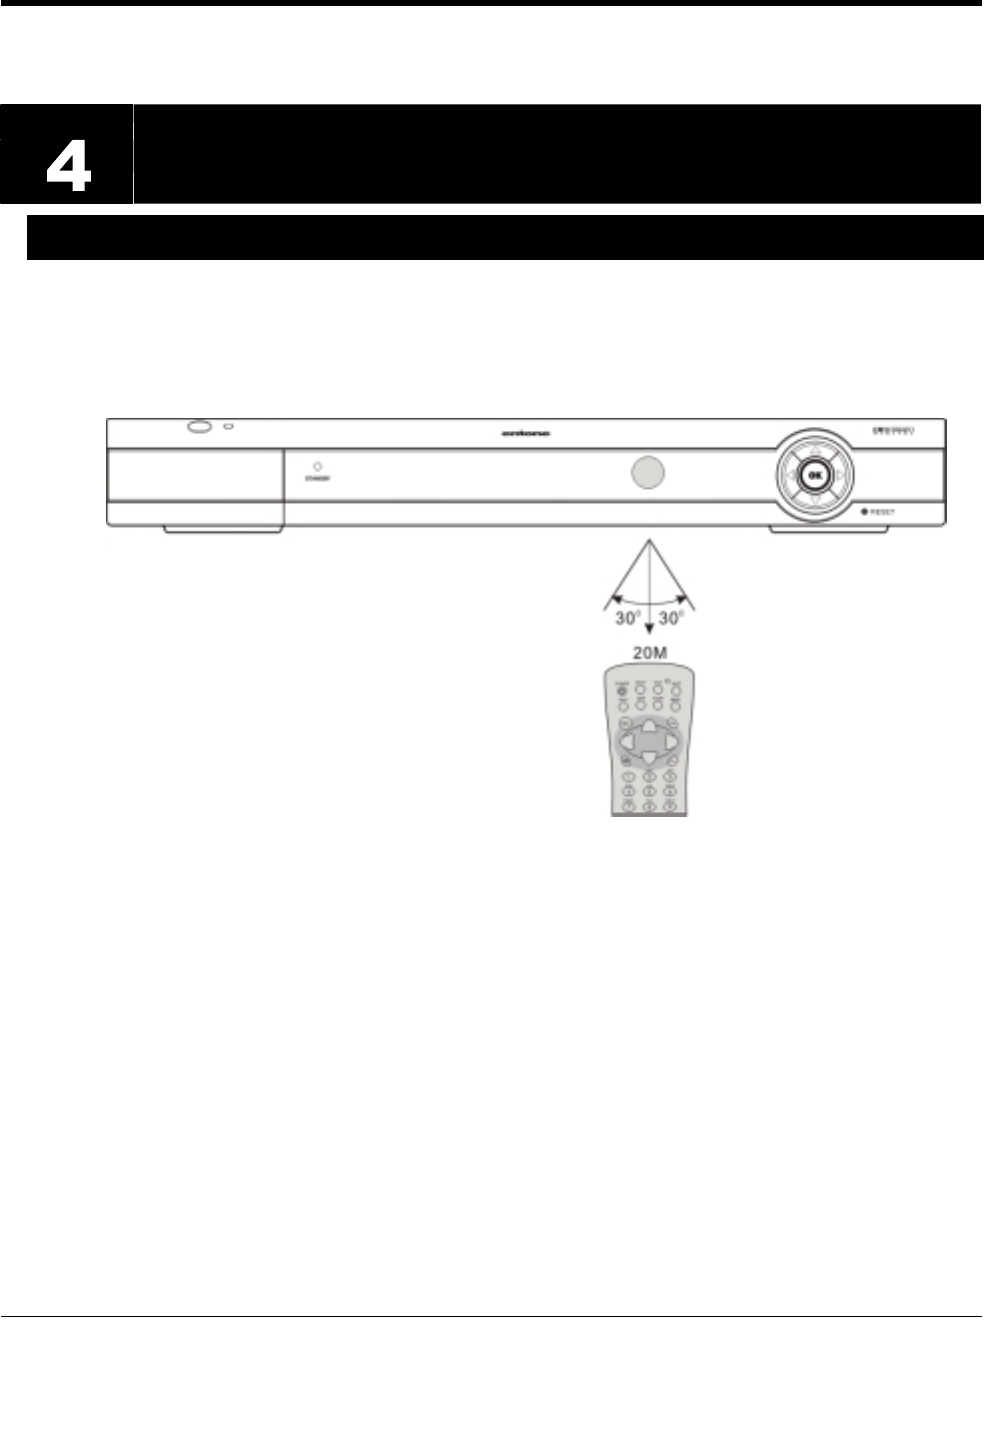
IR Reception Range
IR signals travel only short distances (40 feet or less), and cannot go through walls or other solid
objects. You must point the URC PLUS to the Amulet, with no objects blocking the line of sight.
Figure 3-4 IR Reception Range
URC PLUS User’s Guide
Copyright
2009 Entone, Inc. All rights reserved
.
14
V2.3 for URC Plus v3.8
Chapter
4.1 Controlling Your Television and other A/V Devices
The URC PLUS can also be used to control TVs and other A/V devices such as DVD players and
recorders. The URC PLUS uses InfraRed (IR) light signals to control other devices that the remote is
programmed to control. IR signals travel only short distances (40 feet or less), and cannot go through walls
or other solid objects. You must point the URC PLUS directly at these devices, with no objects blocking the
line of sight.
Figure 4-1 Controlling Devices using IR URC PLUS
You can program URC PLUS to control one TV and one AUX device. Use the remote control’s mode keys
(i.e., “STB”, “TV”, or “AUX”) to control a specific device. When pressed, the selected mode key will light up
confirming your choice. Then you can use the URC PLUS to control your STB, TV or AUX device.
You have to program the URC PLUS what TV and AUX devices you are using by either 1) entering the 4-
digit device code 2) doing an auto search.
NOTE:
While the URC PLUS is in “STB” mode, the volume +/- and MUTE key signal will be sent to the TV.
By Default, if the URC PLUS is in “STB” mode, the POWER key signal will be sent to the STB ONLY.
If the URC PLUS is in “TV” mode, the “POWER” key signal will be sent to the TV ONLY.
However, the POWER key can be configured to control both the STB and TV while the URC PLUS is
in “STB” mode, please refer to the section “Toggle Power Key Punch Through Functionality” in Chapter
4 for details.
URC PLUS User’s Guide
Copyright
2009 Entone, Inc. All rights reserved
.
15
V2.3 for URC Plus v3.8
To Program a TV or AUX device
1. Locate the device code for your desired device in the device code table provided in the Appendix. If you
could not find the device code for your device or it does not work after trying the listed device codes for
your device brand, then you can go to the next section to try the auto search procedures.
2. Turn on your device and with media inserted (if applicable).
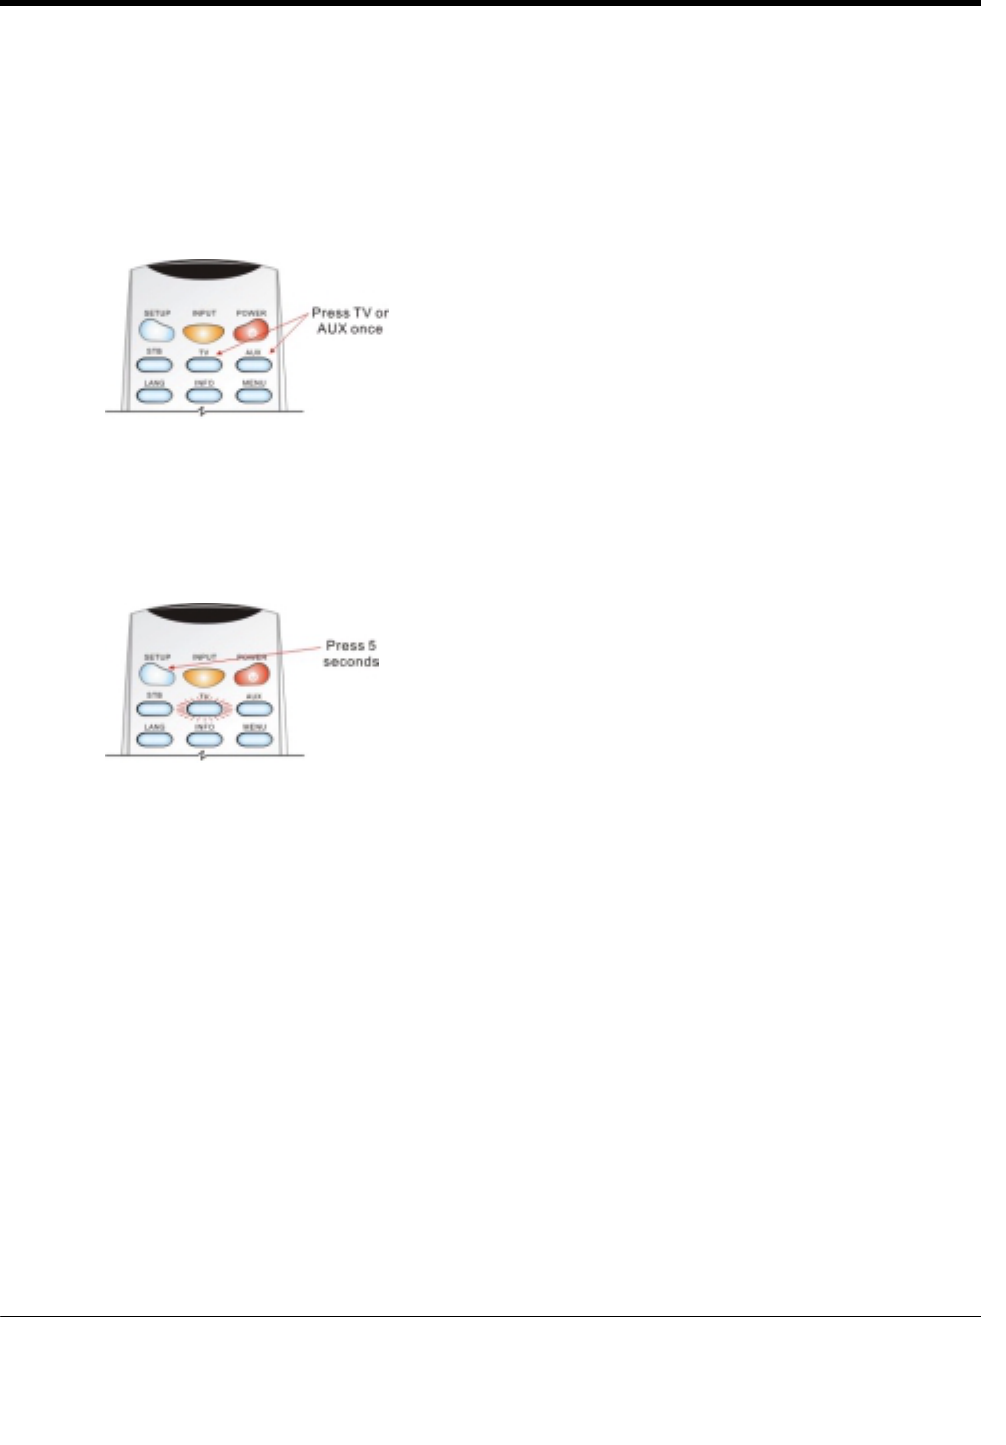
3. On the remote control, press a device mode key once (i.e., “TV” or “AUX”).
Figure 4-2 Select the device mode
NOTE: Use the “AUX” mode key to program control of VCR, DVD player, cable box, satellite set-top-
box and audio device.
4. Press and hold the “Setup” key until the selected mode key backlight blinks twice, then release “Setup”.
The device mode key will light up.
Figure 4-3 Press SETUP for 5 seconds to enter device setup mode
5. Enter the four-digit device code for you device. If you perform this procedure correctly, the selected
device mode key backlight will blink twice.
NOTE: If you enter an invalid device code, the selected device mode key will fast blink 7 times. Device
program mode will be terminated.
6. Aim the remote control at your device and press the “Power” once. The device should be turn off. If it
does not respond, repeat the above steps.

URC PLUS User’s Guide
Copyright
2009 Entone, Inc. All rights reserved
.
16
V2.3 for URC Plus v3.8
Toggle Power Key Punch-through Functionality
By default, if the remote control is in STB mode, the URC Power button switches STB off ONLY. To control
the URC Power button functionality to switch off either both the TV and/or STB, do the following:
1. On the remote control, press “STB” once to ensure it is in STB mode.
2. Press and hold the “Setup” key until the “STB” mode key backlight blinks twice, then release “Setup”.
The “STB” device mode key backlight will light up.
3. Press “POWER” key once.
4. Either do the following:
a. Press 1 to control both the STB and TV, OR
b. Press 0 to control the STB ONLY
Auto Search Procedures
If your device does not respond to the remote control after trying all devices codes listed for you brand, or if
your brand is not listed at all, try searching for your device code as follows:
1. Turn on your TV or your A/V device.
2. On the remote control, press a device mode key once (i.e., TV or AUX).
NOTE: Use the AUX mode key to program control of VCR, DVD player, cable box, satellite set-top-box
and audio device.
3. Press and hold the “Setup” key until the selected device mode key blinks twice, then release “Setup”.
The device mode key will light up.
4. Press the “POWER” key once.
5. Aim the remote control at the TV. Press either the “CHANNEL UP” key or “CHANNEL DOWN” key to
do device auto-scan:
a. Press the “CHANNEL UP” key to start searching upward at an approx. 5 seconds interval for each
device code. The TV/AUX mode key will be on and blink every 5 seconds while in the device scan
mode.
NOTE: In this search mode, the remote control will send IR codes from the library starting from the
lowest code set number to the end of code set for that device; OR
b. Press the “CHANNEL DOWN” key to start searching downward at an approx. 5 seconds interval
for each code set. The TV mode key will be on and blink every 5 seconds while in the device scan
mode.
NOTE: In this search mode, the remote control will send IR codes from the highest code set number to
the beginning of code set of that device.
6. If the TV turns off, a working code has been found. Press OK once to lock in the code. The selected
mode key will blink twice
7. If all code sets of that device is exhausted in the search and the OK is not pressed, the selected device
key will fast blink 7 times and the search mode will be terminated.
NOTE: During the auto-scan, you can press “UP” arrow or “DOWN” arrow to advance to the next device
code immediately without waiting for 5 seconds. You can also use “UP” arrow or “DOWN” arrow to change
the direction of the search.
URC PLUS User’s Guide
Copyright
2009 Entone, Inc. All rights reserved
.
17
V2.3 for URC Plus v3.8
Appendix A – Device Code
Your URC Plus can control many brands and models of television, VCR, DVD and other types of audio-visual
equipment. The following pages list device codes for many categories and brands of equipment. You may need to test
several codes to find the best match for your equipment. Your equipment may be supported even if your brand is not
shown in the list below. If you cannot locate your brand, or none of the listed device codes works, then you may still use
the Auto-Search feature to try to locate a suitable device code. Instructions for using the Auto-Search feature is located
on page 15 of this guide.
TV
Admiral 0001, 0020
Adventura 0012
Aiwa 0071
Akai 0002, 0018, 0053
Albatron 0013
Alleron 0009
America Action 0023
Amtron 0008
Anam 0023
Anam National 0003, 0008
AOC 0004, 0005, 0006,
0018, 0080
Apex 0021, 0025, 0041
Audiovox 0008, 0023
Aventura 0022
Bang & Olufsen 0031
Belcor 0004
Bell & Howell 0001
Benq 0015, 0083
Bradford 0008, 0023
Brillian 0028
Brockwood 0004
Broksonic 0023, 0075
Candle 0004, 0006, 0012, 0018
Carnivale 0018
Carver 0019
CCE 0029
Celebrity 0002
Celera 0025
Changhong 0025
Citizen 0004, 0006, 0008, 0018
Clarion 0023
Coby 0076
Colortyme 0004, 0006
Concerto 0004, 0006
Contec 0023
Contec/Cony 0007, 0008
Craig 0008, 0023
Crosley 0019
Crown 0008, 0023
CTX 0082
Curtis Mathes 0000, 0004, 0006,
0018, 0019, 0020, 0053
CXC 0008, 0023
Cytron 0085
Daewoo 0004, 0005, 0006, 0043
Daytron 0004, 0006
Dell 0065
DiamondVision 0032
Dimensia 0000
Dumont 0004, 0011, 0017
Durabrand 0016, 0022, 0023, 0045
Dwin 0020
Electroband 0002
Electrograph 0026
Electrohome 0002, 0003, 0004, 0006
Emerson 0004, 0006, 0007,
0008, 0009, 0022,
0023, 0043
Envision 0004, 0006, 0018
Epson 0081
ESA 0022
Fujitsu 0009
Funai 0008, 0009, 0022, 0023
Futuretech 0008, 0023
Gateway 0026, 0027
GE 0000, 0003, 0004,
0006, 0010, 0034,
0037, 0061
Gibralter 0004, 0011, 0017, 0018
Goldstar 0004, 0005, 0006,
0007, 0018
Gradiente 0087
Grunpy 0008, 0009, 0023
Haier 0016, 0030
Hallmark 0004, 0006
Harman/Kardon 0019
Harvard 0008, 0023
Havermy 0020
Hewlett Packard 0072
Hisense 0091
Hitachi 0004, 0006, 0007
Hyundai 0014
IMA 0008
Infinity 0019
Insignia 0045, 0084
Inteq 0017
Janeil 0012
JBL 0019
JC Penney 0000, 0004, 0005,
0006, 0010
JCB 0002
Jensen 0004, 0006
JVC 0007, 0010, 0067
Kawasho 0002, 0004, 0006
KEC 0023
Kenwood 0004, 0006, 0018
KLH 0025
Kloss Novabeam 0008, 0012
KTV 0008, 0018, 0023, 0029
LG 0004, 0005, 0013
Logik 0001
Luxman 0004, 0006
LXI 0000, 0006, 0019, 0021
Magnavox 0004, 0006, 0018,
0019, 0038, 0040,
0059, 0064, 0065
Majestic 0001
Marantz 0004, 0006, 0018,
0019, 0040
Matsushita 0024
Maxent 0026

URC PLUS User’s Guide
Copyright
2009 Entone, Inc. All rights reserved
.
18
V2.3 for URC Plus v3.8
Megapower 0013
Megatron 0006
Memorex 0001, 0005, 0006, 0063
MGA 0004, 0005, 0006, 0018
Midland 0010, 0011, 0017
Mitsubishi 0004, 0005, 0006, 0020
Monivision 0013
Montgomery Ward 0001
Motorola 0003, 0020
MTC 0004, 0005, 0006, 0018
Multitech 0008, 0023, 0029
NAD 0006, 0021
NEC 0003, 0004, 0005,
0006, 0018
Net-TV 0026
Nikko 0006, 0018
Norcent 0080
Olevia 0073, 0079
Onwa 0008, 0023
Optimus 0024
Optonica 0020
Orion 0045
Panasonic 0003, 0010, 0024,
0035, 0047
Penney 0018, 0021
Philco 0003, 0004, 0005,
0006, 0007, 0018, 0019
Philips 0003, 0004, 0007,
0019, 0038, 0040, 0065
Philips Magnavox 0038
Pilot 0004, 0018
Pioneer 0004, 0006
Polaroid 0025, 0077
Portland 0004, 0005, 0006
Prima 0086
Princeton 0013
Prism 0010
Proscan 0000
Proton 0004, 0006, 0007
Protron 0074
Proview 0090
Pulsar 0004, 0011, 0017
Quasar 0003, 0010, 0024
Radio Shack 0018, 0023
Radio
Shack/Realistic 0000, 0004, 0006,
0007, 0008
RCA 0000, 0003, 0004,
0005, 0006, 0033,
0037, 0044, 0057
Realistic 0018, 0023
Runco 0011, 0017, 0018
Sampo 0004, 0006, 0018, 0026
Samsung 0004, 0005, 0006,
0007, 0018, 0029,
0042, 0053, 0054
Sansui 0045
Sanyo 0004, 0070
Scotch 0006
Scott 0004, 0006, 0007,
0008, 0009, 0023
Sears 0000, 0004, 0006,
0009, 0019, 0021, 0022
Sharp 0004, 0006, 0007,
0020, 0055
Sheng Chia 0020
Shogun 0004
Signature 0001
Sony 0002, 0036, 0039,
0050, 0051, 0052, 0056
Soundesign 0004, 0006, 0008,
0009, 0023
Squareview 0022
SSS 0004, 0008, 0023
Starlite 0008, 0023
Superscan 0020
Supre-Macy 0012
Supreme 0002
SVA 0030
Sylvania 0004, 0006, 0018,
0019, 0022
Symphonic 0008, 0022, 0023, 0063
Syntax 0073
Syntax-Brillian 0073
Tandy 0020
Tatung 0003, 0027
Technics 0010, 0024
Techwood 0004, 0006, 0010
Teknika 0001, 0004, 0005,
0006, 0007, 0008,
0009, 0019, 0023
Telefunken 0053
TMK 0004, 0006
TNCi 0017
Toshiba 0021, 0046, 0048,
0049, 0058, 0060,
0062, 0066
Vector Research 0018
Vidikron 0019
Vidtech 0004, 0005, 0006
Viewsonic 0026, 0078
Viking 0012
Vizio 0027, 0089
Wards 0000, 0001, 0004,
0005, 0006, 0009,
0018, 0019
Waycon 0021
Westinghouse 0069
White
Westinghouse 0043
Yamaha 0004, 0005, 0006, 0018
Zenith 0001, 0004, 0011, 0017
DVD
Accurian 2027
Advent 2006
Aiwa 2074
Akai 2000
Alco 2004
Allegro 2022
Amphion
MediaWorks 2085
AMW 2085
Apex 2013, 2014, 2031,
2059
Arrgo 2023
Aspire 2007
Audiovox 2004
Bang & Olufsen 2016
Blaupunkt 2014
Blue Parade 2012
Broksonic 2000, 2069
California Audio
Labs 2002
CineVision 2022
Coby 2060
Curtis Mathes 2024
CyberHome 2023, 2029
Daewoo 2022, 2066
Denon 2002, 2056, 2073
Disney 2062
Durabrand 2025
Emerson 2001, 2017, 2026
Enterprise 2017
ESA 2026
Fisher 2018
Funai 2026
GE 2011, 2014, 2063
Go Video 2022, 2067
Gradiente 2002
Greenhill 2014
Harman/Kardon 2019, 2077
Hitachi 2046
Hiteker 2013
Initial 2014, 2049
Insignia 2026, 2084
Integra 2012
JBL 2019
JVC 2048
Kawasaki 2004
Kenwood 2002, 2076
KLH 2004, 2014
Koss 2003, 2009,
2070
Landel 2028

URC PLUS User’s Guide
Copyright
2009 Entone, Inc. All rights reserved
.
19
V2.3 for URC Plus v3.8
Lasonic 2020
Lenoxx 2008, 2025
LG 2017, 2022, 2064, 2082
Liquid Video 2009
Liteon 2027, 2071
Magnavox 2001, 2010, 2026, 2057
Memorex 2000, 2062
Microsoft 2011
Mintek 2014, 2021
Mitsubishi 2065
Nesa 2014
Next Base 2028
Onkyo 2010
Oppo 2015
Oritron 2003, 2009
Panasonic 2002, 2010, 2034,
2036, 2053, 2056,
2079, 2080, 2081
Philips 2010, 2057
Pioneer 2012, 2051, 2083
Polaroid 2043
Proceed 2013
Proscan 2011, 2055
Qwestar 2003
RCA 2004, 2011, 2012,
2014, 2038, 2055
Regent 2008
Rio 2022
Rowa 2005
Samsung 2002, 2039, 2041,
2046, 2050, 2052,
2058, 2067, 2078
Sansui 2000
Sanyo 2000, 2018
Sharp 2068
Shinsonic 2021
Sonic Blue 2022
Sony 2032, 2033, 2037,
2042, 2044, 2045,
2047, 2054, 2075
Superscan 2001
Sylvania 2001, 2026
Teac 2004
Technics 2002
Theta Digital 2012
Toshiba 2000, 2010, 2030,
2035, 2040, 2061, 2072
Urban Concepts 2010
US Logic 2021
Venturer 2004
Xbox 2011
Yamaha 2002, 2034
Zenith 2010, 2017, 2022, 2064
VCR
ABS 1008
Adventura 1005
Aiwa 1005
Alienware 1008
American High 1004
Asha 1002
Audio Dynamics 1000
Audiovox 1003
Beaumark 1002
Bell & Howell 1001
Calix 1003
Candle 1002, 1003
Canon 1004
Citizen 1002, 1003
Colortyme 1000
Craig 1002, 1003
Curtis Mathes 1000, 1002, 1004
Cybernex 1002
CyberPower 1008
Daewoo 1005
DBX 1000
Dell 1008
DIRECTV 1007
Durabrand 1009
Dynatech 1005
Electrohome 1003
Electrophonic 1003
Emerson 1003, 1004, 1005
Fisher 1001
Fuji 1004
Funai 1005
Garrard 1005
Gateway 1008
GE 1002, 1004
Goldstar 1000, 1003
Gradiente 1005
Harley Davidson 1005
Harman/Kardon 1000
Headquarter 1001
Hewlett Packard 1008
HNS 1007
Howard Computers 1008
HP 1008
Hughes Network
Systems 1007
Humax 1007
Hush 1008
iBUYPOWER 1008
Instant Replay 1004
JC Penney 1000, 1001, 1002, 1003,
1004
JCL 1004
JVC 1000, 1001, 1014
Kenwood 1000, 1001
Kodak 1003, 1004
LG 1003
Linksys 1008
Lloyd's 1005
LXI 1003
Magnavox 1004, 1009, 1016
Magnin 1003
Marantz 1000, 1001, 1004
Marta 1003
Matsushita 1004
Media Center PC 1008
MEI 1004
Memorex 1001, 1002, 1003,
1004, 1005, 1009, 1010
MGN Technology 1002
Microsoft 1008
Mind 1008
Mitsubishi 1015
Motorola 1004
MTC 1002
Multitech 1002, 1005
NEC 1000, 1001
Nikko 1003
Niveus Media 1008
Noblex 1002
Northgate 1008
Olympus 1004
Optimus 1003
Orion 1010, 1018
Panasonic 1004, 1006, 1012
Philco 1004
Philips 1004, 1007, 1016
Philips Magnavox 1016
Pilot 1003
Pulsar 1009
Quarter 1001
Quartz 1001
Quasar 1004
Radio Shack 1003
Radio
Shack/Realistic 1001, 1002, 1003,
1004, 1005
Radix 1003
Randex 1003
RCA 1002, 1004, 1007, 1011
Realistic 1001, 1002, 1003,
1004, 1005
ReplayTV 1006
Ricavision 1008
Runco 1009
Samsung 1002, 1007
Sanky 1009
Sansui 1010, 1018
Sanyo 1001, 1002
URC PLUS User’s Guide
Copyright
2009 Entone, Inc. All rights reserved
.
20
V2.3 for URC Plus v3.8
Sears 1001, 1003, 1004
Sharp 1017
Shogun 1002
Singer 1004
Sonic Blue 1006
Sony 1008, 1013
Stack 1008
STS 1004
Sylvania 1004, 1005
Symphonic 1005
Systemax 1008
Tagar Systems 1008
Tandy 1001
Tashiko 1003
Teac 1005
Technics 1004
Teknika 1003, 1004, 1005
Tivo 1007
TMK 1002
Toshiba 1008, 1019
Totevision 1002, 1003
Touch 1008
Unitech 1002
Vector Research 1000
Video Concepts 1000
Videosonic 1002
Viewsonic 1008
Voodoo 1008
Wards 1002, 1003, 1004, 1005
XR-1000 1004, 1005
Yamaha 1000, 1001
Zenith 1009
ZT Group 1008
Cable Box
ABC 3000, 3001, 3002,
3004, 3024, 3025
Americast 3033
Antronix 3006, 3007
Archer 3007
AT&T 3041
Bell South 3033
Cable Vision 3036
Cabletenna 3006
Cableview 3005
Clearmaster 3032
ClearMax 3032
Colour Voice 3009
Comcast 3037, 3038
Comtronics 3010
Contec 3011
Coolmax 3032
COX 3039
Director 3031
Eastern 3012
Everquest 3026
Focus 3030
GC Electronics 3007
GE 3000, 3001
Gemini 3013, 3026
General Instrument 3001, 3029, 3031, 3037
Goldstar 3027
Hamlin 3014, 3015
Hitachi 3001
Jasco 3026
Jerrold 3001, 3013, 3024,
3026, 3029, 3031
Magnavox 3016
Memorex 3017, 3025
Motorola 3029, 3031, 3038,
3039, 3041
Movie Time 3018
Multitech 3032
NEC 3003
NET Brazil 3042
NSC 3018
Oak 3011
Pace 3028
Panasonic 3021, 3023, 3025
Paragon 3025
Philips 3008, 3009, 3016
Pioneer 3019, 3027, 3035
Popular Mechanics 3030
Proscan 3000, 3001
Pulsar 3025
Quasar 3025
Radio Shack 3026, 3032
RCA 3005, 3023
Realistic 3007
Recoton 3030
Regal 3015
Regency 3012
Rembrandt 3001
Runco 3025
Samsung 3019, 3027
Scientific Atlanta 3004, 3041
Signal 3013, 3026
Signature 3001
Sony 3034, 3036
Sprucer 3023
Standard
Component 3020
Starcom 3013, 3024, 3026
Stargate 3013, 3026
Starquest 3013, 3026
Supercable 3029
Supermax 3032
TIME WARNER 3040
Tocom 3002
Toshiba 3025
Tristar 3032
Tusa 3013, 3026
TV86 3018
Unika 3006, 3007
United Cable 3024
Universal 3006, 3007
V2 3032
View Star 3011, 3016, 3018
Viewmaster 3032
Vision 3032
Vortex View 3032
Zenith 3022, 3025, 3033
Zentek 3030
Satellite
Alphastar 4010
CaptiveWorks 4053
Chaparral 4004
Coolsat 4054
DIRECTV
4013, 4015, 4016,
4019, 4021, 4022,
4028, 4029, 4031,
4035, 4036, 4041,
4042, 4043, 4046, 4047
Dish Network 4000, 4001, 4002,
4003, 4014, 4020,
4023, 4033, 4044, 4045
Dishpro 4000, 4014
Drake 4005
Echostar 4000, 4014, 4033,
4044, 4045
Expressvu 4000
General Instrument 4006, 4017
GOI 4000
Hisense 4018
Hitachi 4011
HTS 4000
Hughes Network
Systems 4013, 4019, 4022,
4024, 4041
Humax 4055
Ilo 4018
Jerrold 4017
JVC 4000, 4033, 4044, 4045
LG 4048
Magnavox 4016
Memorex 4016
Mitsubishi 4022
Motorola 4017
Next Level 4017
Panasonic 4043, 4047, 4049

URC PLUS User’s Guide
Copyright
2009 Entone, Inc. All rights reserved
.
21
V2.3 for URC Plus v3.8
Pansat 4051
Paysat 4016
Philips 4013, 4016, 4024,
4031, 4042
Pioneer 4013
Primestar 4009
Proton 4018
Radio Shack 4017
RCA 4024, 4025, 4026,
4028, 4029, 4030, 4034
Realistic 4007
Samsung 4013, 4024, 4036, 4038
Sharp 4050
Sony 4015, 4021, 4027,
4032, 4035, 4037,
4039, 4040
Star Choice 4017
STS 4012
Tivo 4013, 4024
Toshiba 4041
UltimateTV 4015
Uniden 4008, 4016
US Digital 4018
USDTV 4018
Viewsat 4052
Voom 4017
Zenith 4046
Audio
ADC 5005
Adcom 5067
Aiwa 5055
Alco 5011
Amphion Media
Works 5012
AMW 5012
Anam 5007
Apex 5064
Audiotronic 5008
Audiovox 5011, 5063
B & K 5068
Bang & Olufsen 5017
BOSE 5028, 5046
Capetronic 5005
Carver 5008
Coby 5059
Curtis Mathes 5001
Denon 5052, 5053, 5054
Fisher 5013
GE 5000
GPX 5065
Harman/Kardon 5002, 5060
Hitachi 5013
Integra 5004
JVC 5056
Kenwood 5009, 5031
KLH 5011
Koss 5010
Left Coast 5002
Magnavox 5005, 5008, 5033
Marantz 5002, 5008
Mitsubishi 5062
NAD 5016
Nakamichi 5015
NEC 5003
Onkyo 5034, 5037, 5038,
5045, 5049, 5051
Optimus 5001, 5005, 5006, 5007
Oritron 5010
Panasonic 5027, 5035, 5047
Philips 5002, 5008, 5061
Pioneer 5001, 5005, 5006,
5021, 5026, 5029
Polk Audio 5002
RCA 5001, 5005, 5006,
5007, 5011, 5057
Rio 5014
Samsung 5041
Sanyo 5013
Sharp 5066
Sherwood 5058
Shure 5003
Sonic Blue 5014
Sony
5018, 5019, 5020,
5022, 5023, 5024,
5025, 5030, 5032,
5042, 5043
Soundesign 5000
Stereophonics 5006
Sunfire 5009
Teac 5007, 5011
Technics 5044
Thorens 5008
Venturer 5011
Wards 5000
Yamaha 5004, 5036, 5040,
5048, 5050
URC PLUS User’s Guide
Copyright
2009 Entone, Inc. All rights reserved
.
22
V2.3 for URC Plus v3.8
Appendix B – Other Features
Showing URC PLUS Firmware Version
The URC PLUS firmware version is in the format of x.y.z, where x, y and z is digit 0-9. Use the following
procedures to show the URC PLUS firmware version:
1. Press “STB”.
2. Press and hold “SETUP” for 5 seconds.
3. The “STB” backlight will illuminate.
4. Press “INFO” once.
5. The 3 digits of the firmware version (x, y and z as described above) will be displayed in the following
manner.
a. The “STB” backlight blinks to indicate the digit. One blink indicates 1, 2 blinks indicates 2, etc
until 9 blinks indicates 9. A 0 is indicates by a shot, long, short, long, short, long blink.
b. In between each digit, the “STB” backlight will be off for 1 second.
c. For example, the following blink pattern shows a firmware version of 2.0.4.
. . .-.-.- ....
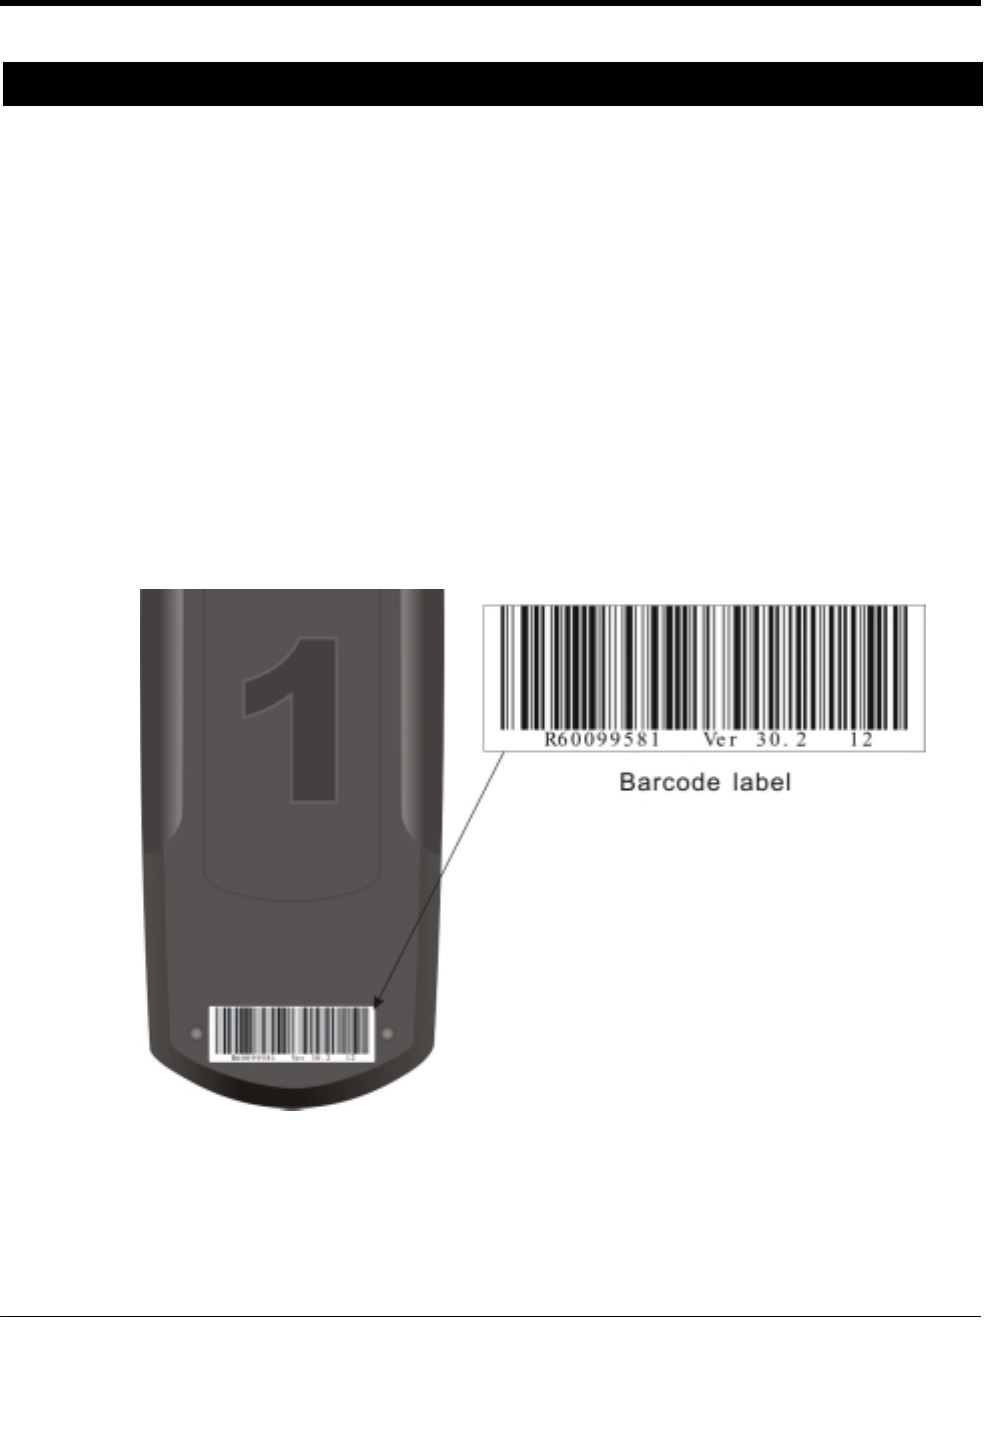
In addition, the URC PLUS Firmware version will also be shown on the sticker at the back of the remote
control.

URC PLUS User’s Guide
Copyright
2009 Entone, Inc. All rights reserved
.
23
V2.3 for URC Plus v3.8
Showing Programmed Device Code
You can display the 4-digit device code by the following procedures:
1. Press “TV” to display the TV device code or “AUX” to display the AUX device code.
2. Press and hold “SETUP” for 5 seconds.
3. The “TV” or “AUX” backlight will illuminate.
4. Press “INFO” once.
5. The 4-digits device code will be displayed in the following manner.
a. The “TV”/”AUX” backlight blinks to indicate the digit. One blink indicates 1, 2 blinks indicates 2,
etc until 9 blinks indicates 9. A 0 is indicates by a shot, long, short, long, short, long blink.
b. In between each digit, the “TV”/”AUX” backlight will be off for 1 second.
c. For example, the following blink pattern shows a device code of 0123.
.-.-.- . .. ...