Entrust Q10035 SP35 Printer User Manual SP Troubleshooting e guide
Entrust Datacard Corporation SP35 Printer SP Troubleshooting e guide
Entrust >
Contents
manual5

Troubleshooting 1
SP35 Info Central
Troubleshooting
This e-Guide helps you to understand problems you might have when using the SP35 printer and how to
address those problems.
Is it really trouble?
The following table provides a quick guide to help you get started troubleshooting. Pick the problem that is
most like yours (or use the Contents to locate the section you are interested in).
How do I troubleshoot a problem?
When you experience problems using the printer, follow these guidelines:
Problem Is it trouble? Why? What do I do?
A message appears. No. Messages don’t mean trouble--messages are
expected during normal operation. See help for the
message to address the problem.
The printer beeps and the status
light flashes, but no message
appears.
Probably not. This is problem can be the result of:
•Changing the printer name or the printer
port (restart Windows to fix the problem).
•Pausing the printer when making a printer
test card (power-on test card). Press the
Ready button to resume printing.
•Communication problems. See Locating
the problem for steps to follow.
The same message (or series of
messages) appears repeatedly,
and the solutions listed in help do
not fix it.
Yes, part of the
printer might be
broken.
You should call your service provider after you have
tried all the solutions listed in help.
I send a card to print from the
PC, but it does not print. Maybe. Communication problems can usually be fixed.
Rarely, they are the result of a printer problem. See
Locating the problem for steps to follow.
I installed the driver, but the
printer does not print cards. Probably not. This is usually a result of communication problems
and can often be fixed. See Locating the problem
for steps to follow.
Cards are scratchy. Probably not. You can fix this problem, because it is probably due
to the card stock, the environment in which you
print, or how you handle cards and supplies. See
Card appearance problems for guidance.
The color on the cards is not
right. Probably not. This is usually a setup problem. See Card
appearance problems for guidance.
When I power on the printer,
nothing happens, not even after
5 minutes!
Maybe. See Locating the problem, which gives you
steps to follow to locate the problem.
2 Troubleshooting
SP35 Info Central
•Keep notes on the problem, including the message text or message number and the solutions you
attempt.
•Communication method used to connect the printer and PC
•Obtain information about the supplies used, including:
– Card stock and type (such as composite or PVC, three-track magnetic stripe, manufacturer, and so
on). This information is located on the packaging for cards.
– Type of ribbon (such as YMCKT) and the lot number used for personalizing cards. This information
is located on the package of the ribbon.
If you need to call for service, this information will help your service provider address your concerns.
3
SP35 Info Central
Locating the problem
When you think the printer is not working correctly, use the following procedure to locate the source of the
problem.
The printer, printer driver, and card creation application work together to produce cards. If the system is not
working as you expect and does not display messages, follow these steps to isolate the source of the
problem before contacting your service provider.
1 Make a printer test card, following the steps in Making Test Cards.
– If the printer does not make a test card, make sure the printer is connected to a functioning power
source. (Remove the printer power cord from the output and connect another device such as a light
to the same outlet, to verify that the power source functions correctly.)
– If the power source works but you cannot create a printer test card, the printer is likely not working
properly.
2 Print a sample card from the Printer Toolbox. As an alternative, you can print a Windows test page,
following the steps in Windows test page.
– If the sample card or Windows test page does not print, but the printer test card prints, the printer
driver or the PC are not set or operating properly, or there is a communication problem. See
Communication problems.
3 Make sure the printer is the selected printer in the card creation application.
4 Use the card creation application to print a card.
– If the card creation application does not print the card as expected, but the test card and sample
card print, the card creation application is likely not set or operating properly.
4
SP35 Info Central
5
SP35 Info Central
Making Test Cards
You can make the following types of test cards.
•Printer test cards verify the function of the printer. You print them using controls on the printer. The
personalization of the card is determined by the printer, the print ribbon, and modules (such as
magnetic stripe) installed in the printer.
•The Windows test page, which you can print on a card, verifies that the PC and printer work together.
You print them using the printer Properties dialog box on the PC. The appearance of the card is
determined by Windows.
•Printer magnetic stripe test cards, which verify that the driver sends magnetic stripe information to the
printer and verifies that it is encoded. Use controls in the Printer Toolbox to print magnetic stripe test
cards. See Magnetic stripe test card for steps to follow.
•Sample cards, which are made using files provided with the driver. Sample cards are made at
installation to verify that the printer produces the same result at the factory and at your site. See “Print a
sample card” in Install the Driver for steps to follow.
•You can also make sample cards using the card creation application to test print quality and card
design. Do not make sample cards until you are sure the printer and driver work properly (by printing a
printer test card and Windows test page).
Making a printer test card
The SP35 printer does not need to be connected to a PC to print this card.
1 Power off the printer.
2 Confirm that cards and print ribbon are loaded in the printer. See the Printer Guide if needed.
– If the printer has a magnetic stripe module, the cards for a printer test card must have a magnetic
stripe.
– If it is a three-track module, be sure to use high coercivity blank cards (which are shipped in the
Starter Kit).
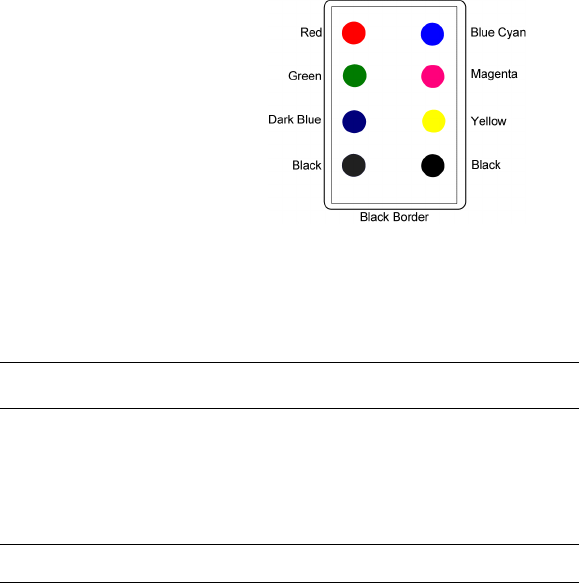
3 Power on the printer (1). Within 5 seconds, press and hold the Ready button (2), as shown in the
following illustration. Hold the Ready button until the printer sounds three tones, usually about 15
seconds.
4 Release the Ready button and observe the printer. You hear the internal components initialize and the
printer starts processing the card.
5 After it is printed, remove the card from the card output tray. A printer test card is shown in Printer test
card.
6
SP35 Info Central
Tips for success
•The Ready button must be pressed firmly. You might need to hold the printer in place as you
keep the Ready button pressed.
•Allow 30 to 60 seconds for the printer to begin printing the test card.
•If the status light flashes amber and the printer beeps, the printer is paused. Press the Ready
button once to unpause the printer.
•The status light will flash green while the printer is processing the data.
•If the printer test card did not print successfully, try the procedure again making sure you follow
the instructions. If the test card does not print, or if the printer does not initialize, it contact your
service provider for assistance.
Printer test card
The printer test card is designed to perform most functions available in the printer.
Check the following:
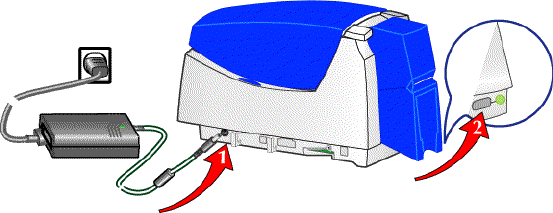
•The test card has the pattern shown on the front of the card. (The pattern will be black, not colored, dots
if the printer is using a monochrome ribbon.)
•If a magnetic stripe module is installed in the printer, the following data is encoded on the card:
•The tracks available depend on the type of module installed.
•The magnetic stripe data on the printer test card is generated by the printer and does not test driver-to-
printer communication.
Windows test page
Follow these steps to print a Windows test page on all supported operating systems.This card will print
across a network and can confirm that the driver and printer are communicating correctly.
Track Format Data
Track 1 (IATA) TEST PATTERN IATA CHARACTER
SUBSET 0123456789
Track 2 (ABA) 012345678012345678990123456789
Track 3 (TTS) 0123456789=9876543210
Track 3 (NTT) 0123456789=9876543210
7
SP35 Info Central
The printer must be connected to the PC with the driver installed, and both printer and PC must be
running.
1 Select Start from the Windows taskbar.
2 Select Settings and then Printers (Printers and Faxes on Windows XP) from the Windows Start menu.
The Printers (and Faxes) window appears.
3 Click once on the printer icon.
4 Select File from the Printers menu bar, and then select Properties. The Properties dialog box appears.
5 Select the Print Test Page button on the General tab. Wait while Windows creates a test page image.
The card will print when the PC and printer are connected, and the printer and driver are working
together.
– After you select the Print Test Page button, Windows displays a wizard asking if the page printed
correctly. Click “Yes” on this dialog box to end the Wizard. This guide provides the information you
need to address problems with PC to printer communication.
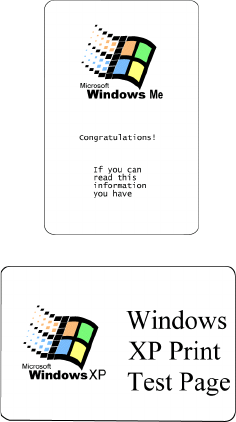
6 Remove the card from the printer. The card should look similar to the cards shown below.
Tips for Success
•The exact appearance depends on the operating system and selections made on the PC
(some cards have more characters printed while others have fewer characters).
•If the card does not print, troubleshoot a communication problem. See Communication
problems for steps to follow.
•The Windows test page can have a very different appearance, depending on the operating
system and how the printer is connected to the PC.
•The Windows test page is generated by Microsoft Windows. The small size of the card,
compared to printer paper, means that some of the text is not printed on the card.
8
SP35 Info Central

9
SP35 Info Central
Card appearance problems
Problems with card appearance can be the result of the following:
•Image capture tools, such as the camera
•The card creation application, which displays the image
•Limitations in technology, such as differences between how an image looks on the PC monitor and how
it looks after it is printed
•Printer maintenance or settings
This section describes possible problems you might observe with the quality of cards you produce with the
SP35 printer. To diagnose and fix card quality problems, find the symptom in the tables that follow. For
each possible cause, attempt the solutions listed. Find the procedure for solutions shown in italic in the
contents list for SP35 Info Central.
The following describes problems that can occur when printing a card.
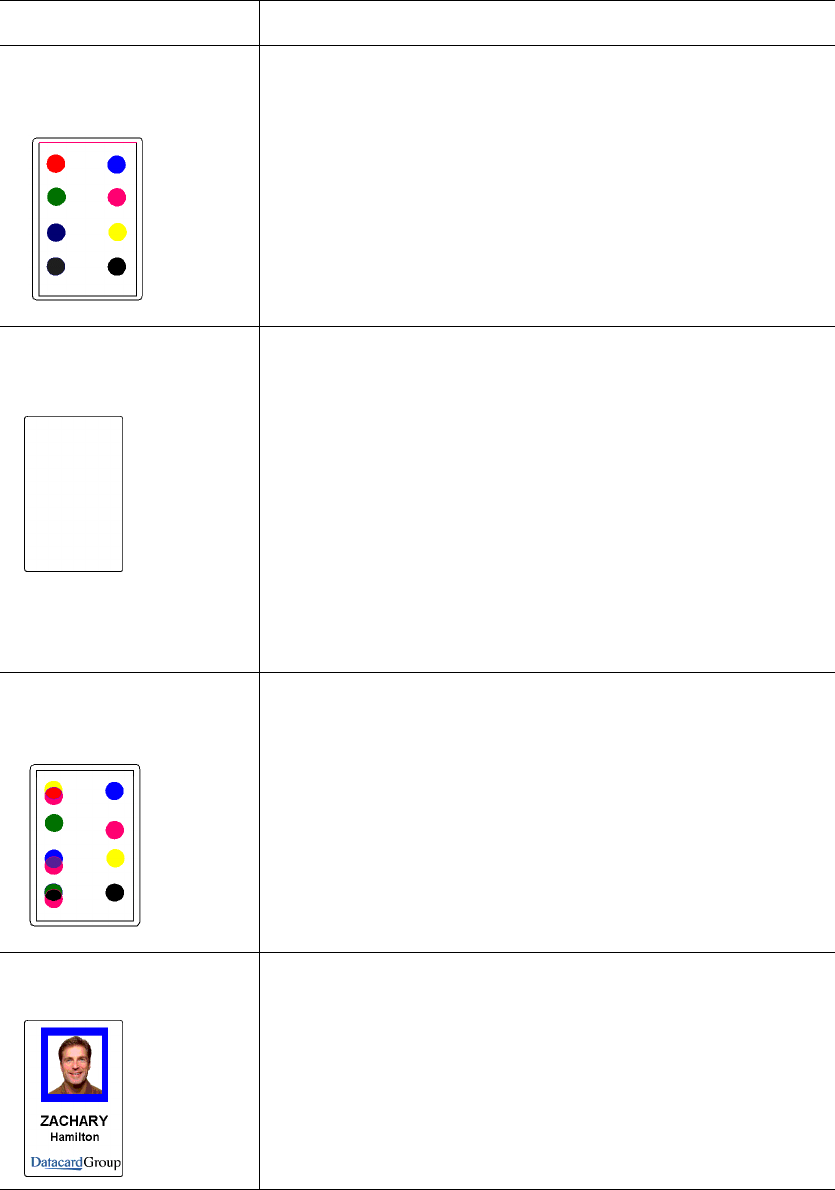
What you see Possible causes Solutions
One or more unprinted lines
run the entire length of the
card.
The printhead might be dirty or
damaged.
The printer is positioned next to a
device that emits radio waves in
excess of regulations.
Clean the printhead.
Print a sample card to confirm
that the problem is fixed.
Move the printer away from the
source of radio waves.
If cleaning the printhead or
moving the printer does not solve
the problem, contact your service
provider
Part of the printed card is
blank. Cards might not meet
specifications.
Cards might be dirty.
The printhead cartridge might not
be installed properly.
Obtain and use a different supply
of cards.
Clean the printer more often.
Remove and reinstall the
printhead cartridge.
Text is missing from the
printed card. Text to print on the card was
formatted using a non-TrueType
font.
Format text to print using only
TrueType fonts (does not apply
to magnetic stripe text).
10
SP35 Info Central
The leading or trailing edge
of the printed card is not the
expected color.
Cards might be slipping in the
card track.
Two cards might have been
picked.
The card might be shorter or
longer than specifications, or the
ribbon registration might be
incorrect.
Clean the printer, as described in
the Printer Guide.
Fan cards before inserting them
in the card cartridge.
Change ribbon settings with the
guidance of your service
provider.
No image is printed on the
card or the printing is very
light.
The ribbon is loaded incorrectly.
The printhead cable might be
loose.
The printhead cable or printhead
cartridge might be damaged.
The driver or printer settings
might not be correct.
Remove and replace the ribbon.
Power off the printer. Make sure
the printhead cable is securely
connected.
Replace the printhead.
Change values on the Color
Settings tab of the Printer
Toolbox. If needed, change
printhead intensity.
If the problem persists, contact
your service provider.
One color panel is not
aligned correctly with other
panels.
Cards might be slipping in the
card track.
The card registration might be
incorrect.
Clean the printer, as described in
the Printer Guide.
Clean the printer rollers.
Set the position of printing.
If the problem persists, contact
your service provider.
Printed images (photos) are
blurry. The image capture system needs
adjustment.
The image needs sharpening.
See the information for the image
capture system.
Change the Sharpness setting
on the Color Settings tab of the
Printer Toolbox.
What you see Possible causes Solutions

11
SP35 Info Central
Printed cards, including text,
are blurry. The rollers may be dirty.
The cards may not meet
specifications.
The printhead may be dirty.
Clean the printer, as described in
the Printer Guide.
Clean the printer rollers.
Obtain and use a different supply
of cards.
Clean the printhead.
If the problem persists, contact
your service provider.
All card data is positioned
unevenly on the card. The card registration might be
incorrect. Set the position of printing.
If the problem persists, contact
your service provider.
One margin (on a long edge)
is larger than the other. This
might appear as one edge of
the card being unprinted.
The print ribbon spools are not
pushed completely onto the
cartridge spindles.
Push each print ribbon spool
onto its spindle until it clicks into
place.
If the problem persists, contact
your service provider.
Card is printed upside down
(the image is rotated 180
degrees).
The card creation application has
rotated the card.
The card rotation setting might
be incorrect.
See the information for the card
creation application.
Set the card rotation using the
Properties (98 and Me) or
Printing Preferences (2000 or
XP) dialog box.
What you see Possible causes Solutions

12
SP35 Info Central
Printed images (photos) look
faded. The image capture system needs
adjustment.
Color settings might not be
optimal for the card design.
See the information for the image
capture system.
Change color settings.
Printed cards, including text,
look faded. Print ribbon may have been
stored improperly or damaged.
Color settings might not be
optimal for the card design.
The cards may not meet
specifications.
The printhead may be dirty.
Change the print ribbon and then
print a sample card.
Change color settings.
Obtain and use a different supply
of cards.
Clean the printhead.
If the problem persists, contact
your service provider.
Part of the printed image is
discolored.
Cards might have fingerprints or
other dirt on them.
The cards might be
contaminated or otherwise not
meet specifications.
The rollers might be dirty.
A signature panel is located on
the other side of the card.
Handle cards without touching
the surface to be printed. Wear
gloves when handling unprinted
cards.
Obtain and use a different supply
of cards.
Clean the printer, as described in
the Printer Guide.
Clean the printer rollers.
Redesign the card to avoid
printing photos over signature
panel residue.
What you see Possible causes Solutions

13
SP35 Info Central
The printed card shows small
unprinted spots.
Unprinted cards include
scratches or embedded particles,
the card surface is uneven, or the
card edge has burrs.
The rollers might be dirty.
If the problem occurs frequently,
obtain and use a different supply
of cards.
Clean the printer, as described in
the Printer Guide.
Clean the printer rollers.
The printed card shows wavy
lines along the length of the
card (woodgrain or orange
peel texture).
The print ribbon is not loaded
correctly.
The printhead topcoat intensity is
too high.
The printhead is not aligned
correctly.
Load the print ribbon again.
Make sure the cartridge is firmly
seated.
Lower the printhead intensity
setting for topcoat.
Contact your service provider.
The card shows irregular
lighter or darker spots. The topcoat panel of print ribbon
is wrinkling because the intensity
setting is too high.
The printhead is not aligned
correctly.
Lower the printhead intensity
setting for topcoat.
Contact your service provider.
The card shows wrinkles in
dark areas of printing. The printhead intensity is too
high.
The printhead is not aligned
correctly.
Decrease the printhead intensity
setting.
Contact your service
representative.
What you see Possible causes Solutions

14
SP35 Info Central
A short edge of the topcoat
does not stick to the card. The printhead intensity is too low.
The printhead is not aligned
correctly.
Increase the printhead intensity
setting for topcoat.
Contact your service provider.
Random scratches appear in
the topcoat of the printed
card.
The inside of the printer might be
dirty.
Supplies were mishandled.
Clean the printer, as described in
the Printer Guide.
Store supplies in a clean
environment. Keep supplies in
their packaging until loaded in
the cartridge.
Fine lines appear in the
topcoat, usually on one long
side of the card.
The printhead intensity for
topcoat is too low.
The printhead is not aligned
correctly.
Lower the printhead intensity
setting for topcoat.
Contact your service provider.
Part or all of the printed
image is expanded. The printhead is not installed
properly. Remove and reinstall the
printhead cartridge.
If the problem persists, contact
your service provider.
What you see Possible causes Solutions
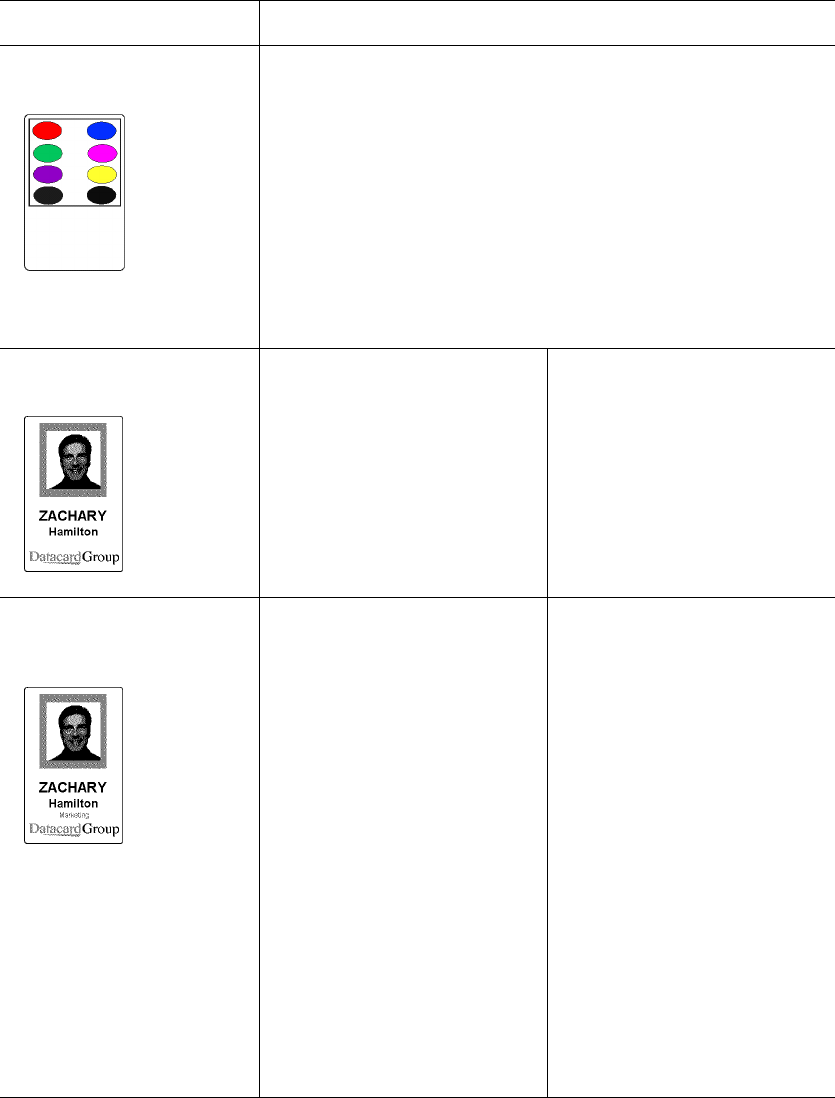
15
SP35 Info Central
Part or all of the printed
image is compressed. The card path may be
obstructed.
The rollers might be dirty.
The cards might not meet
specifications.
Check the card track inside the
printer.
Clean the printer, as described in
the Printer Guide.
Clean the printer rollers.
Obtain and use a different supply
of cards.
If the problem persists, contact
your service provider.
Black-and-white images are
poorly dithered. The image capture system needs
adjustment.
Brightness, contrast, or
sharpness might not be set for
the card design.
See the information for the image
capture system.
Change settings on the Color
Settings tab in the Printer
Toolbox.
Text printed on the card has
broken (partly printed)
characters.
The intensity setting is balanced
to print both bar codes and fine
text.
The text is formatted to print in
color and the card is being
printed with monochrome ribbon.
If the card does not include a bar
code, increase the intensity for K
printing.
If the card includes a bar code,
do one or more of the following to
change the text:
-Increase the font size
-Make the text bold
-Remove italic formatting
-Change the font (Arial usually
prints well)
If the card is printed with color
ribbon, and the card does not
include a colored background,
change the text to use a dark
color, such as purple or navy
blue.
Format the text to print black so
the text is not dithered.
What you see Possible causes Solutions
16
SP35 Info Central

17
SP35 Info Central
Communication problems
Communication between the printer and PC can be disrupted for many reasons. This section describes
causes and possible solutions.
For locally attached printers:
Problem Solution
The data cable is loose. Reconnect the data cable to the ports on the PC and the printer.
Restart the printer. If the PC and printer still do not communicate,
restart Windows.
The data cable is damaged or
frayed. Power off the printer. Replace the cable if you have a spare. Contact
your service provider to order a new data cable.
Another electrical device is
causing radio interference. Move the printer away from the source of interference, such as a TV
or PC monitor. Use the printer in an environment free of
electromagnetic interference.
Another USB device is attached
to the PC and the printer and
other device do not work
together.
Remove the other device and restart the printer and PC. If PC to
printer communication resumes, use separate PCs for the printer and
the other device. You will need to install the device that gets moved to
another PC.
The data cable is too long, or
unpowered USB hubs are used
between the printer and PC.
See Troubleshooting installation problems for specific troubleshooting
steps.
The printer was not installed as
recommended and now is not
connected to the original port.
If you do not allow the Windows Add/Detect New Hardware Wizard to
install the printer, the PC can lose track of the printer if it is moved to a
different USB connection. Connect the PC end of the USB cable to
the same USB port it was originally attached OR remove the driver
and install the printer again.
The system has a temporary
communication problem. Click Retry to attempt to print the card data again.
Windows USB components on
the PC are not functioning
properly.
On Windows 2000 and XP, begin with the printer connected to the PC
and powered on. Open the Printers window and observe the printer
icon; it should be dark blue when selected. Now, unplug the printer;
the icon should change to light gray. If this occurs, the printer USB
components and Windows components are operating correctly.
On Windows 98 or ME, this test is not as reliable. Also, operating
system USB components are not as robust.
Suggestions: Service packs and Windows Update, available from
Microsoft, often include fixes for USB communication problems. Make
sure the PC has the latest service pack installed and that Windows
Update is current. If these changes do not fix the problem, consider
upgrading the operating system to Windows 2000 or XP.
The PC port does not
communicate reliably with the
printer port.
Replace the PC port or the PC. Contact your PC or port vendor if you
need assistance.

18
SP35 Info Central
For local or network-connected printers:
For network-connected printers:
Problem Solution
Other applications on the PC
might interfere with data
communications.
Many applications that might run on a PC can interfere with
communications, often by using all (or most) PC resources. For
example, network-connected mail applications can poll a server to
send or retrieve items. Depending on the application, network setup,
and PC resources, polling can use all PC resources and prevent data
transmission either locally or over the network.
Suggestions: Close other applications that are not needed. Consider
opening network-connected applications several times daily rather
than keeping applications open at all times. Consider increasing PC
resources or using a separate PC for purposes other than printing
cards.
Other hardware connected to the
PC can interfere with
communication.
An application on the PC, such as a card creation application, might
use other equipment, such as a camera or a security key. The
application must communicate with the device, such as when
capturing a photo to be printed on the card. Depending on the
application, equipment setup, and PC resources, communication with
the device can use all PC resources and prevent data transmission
either locally or over the network.
Suggestions: Adjust the timing for sending the card to print. Often, a
second or two of waiting can correct the problem. Consider increasing
PC resources.
You have selected another
printer in the application. Many PCs have more than one printer installed. In the application you
use, make sure that SmartDriver is the selected printer.
Problem Solution
The network is not working
properly Follow your network troubleshooting procedures to isolate and test
each component of the PC-to-printer communication link.
The printer is not configured
with the correct network
address.
Make sure that you have entered the server name in the Port Settings
or Configure Port dialog box on the PC. (If your network uses DHCP,
the IP address changes and cannot be used when configuring the
port.) See “Direct Network Printing” in the Installation e-Guide for
details.
Cards sent from a client PC are
not printing. The host PC used for shared printing can be disconnected or
powered off. An authorized used must be logged on to the host PC for
cards to print. Messages might be displayed on the host PC and need
to be cleared before printing can resume.
Suggestions: Implement procedures to permit all users who need to
print to do so. Consider attaching the printer to the network using a
print server to enable direct network printing.

19
SP35 Info Central
Also consider the following problems, which can seem similar to communication problems:
Problem Solution
The printer is shared with
another PC, and an interactive
mode (smart card or read
magnetic stripe) job was sent
from the host PC.
Interactive mode jobs, including smart card jobs and read magnetic
stripe jobs, are not supported for shared printers. Do not send
interactive mode jobs to a shared printer.
On Windows XP and Windows
2000, the user does not have
permission to the folder used to
temporarily store the card data.
Show this topic to the Windows administrator and ask for assistance.
The Windows Print Manager is
not operating correctly. Close all applications and restart the PC. On Windows 2000 or XP,
restart the Print spooler. See Windows 2000 or XP help for more
information.
20
SP35 Info Central

21
SP35 Info Central
Magnetic stripe problems
This section helps you to troubleshoot magnetic stripe problems.
Magnetic stripe test card
If the printer includes a magnetic stripe module, you can print a magnetic stripe test card. The card uses
the magnetic stripe settings in the Properties or Printing Preferences dialog box.
Use this card to verify that the printer encodes a card correctly.
Tips for success
•If the printer is set to print a custom magnetic stripe format, it will not print this test card
successfully. The driver will display a message indicating that the data does not meet the
requirements for the magnetic stripe track or that it cannot read the data.
•The printer must be connected to the PC with the driver installed, and both printer and PC must
be running.
1 Make sure that the printer toolbox is open. If needed, double-click the printer icon in the system tray to
open the Printer Toolbox.
2 Make sure that magnetic stripe cards are loaded in the card cartridge. The magnetic stripe must be
oriented with the stripe down and toward the right side of the printer (toward the name label).
3 Click once on the Print Mag Stripe Card button in the Printer Toolbox. The printer driver formats card
data for the type of module installed, as follows:
– Three-track: IAT formatted data (IATA data on track 1, ABA data on track 2, and TTS data on track
3).
– NTT track: NTT formatted data on the track.
– See Magnetic Stripe Setup in the Setup e-Guide for more magnetic stripe information.
4 Remove the card from the card output tray.
5 Test the card by passing it through a card reader that will display the data encoded on the card. The
encoded data should match the data printed on the test card.
Common magnetic stripe problems
This section lists some common problems that can occur when encoding magnetic stripe data and
provides solutions.
Problem Solution
Cards are not oriented
correctly in the card tray.
Load cards correctly in the card tray.
Cards do not have a magnetic
stripe.
Load magnetic stripe cards in the card cartridge. If the cards have a
magnetic stripe, check the quality of the cards. Change card stock if
needed.
The card has dirt or damage
on the magnetic stripe.
Encode and print the card again. If the message appears again, run a
cleaning card to clean the magnetic stripe head.

22
SP35 Info Central
How to identify the track format
An authorized user can use SmartDriver Diagnostics to identify the track format. On the Mag Stripe
Configuration page, the track format is displayed for each track. If the format is Custom, your service
provider should tell you what the track length and allowed characters are. If the format is Binary, your
application controls the data. See information for the application for allowed characters and track length.
The magnetic stripe on the
card is low coercivity material
and the High Coercivity setting
is selected.
To use the cards you have, select low coercivity encoding. To encode
with high coercivity, obtain cards manufactured for high coercivity
encoding.
The magnetic stripe on the
card is high coercivity material
and the Low Coercivity setting
is selected.
To use the cards you have, select high coercivity encoding. To encode
with low coercivity, obtain cards manufactured for low coercivity
encoding.
The magnetic stripe module
did not read the data encoded
on the card successfully.
Run a cleaning card to clean the magnetic stripe head. If the message
appears often, contact your service provider and inform them of the
problem.
The data for this job has more
characters than allowed by the
magnetic stripe format
selected for the track.
Cancel the current print job.
Make sure you know what data is allowed on the track. (See the
Administrator for your system to obtain information about the data
allowed for each track.)
Change the data to be encoded, and resend the print job.
The data for this job includes
characters not allowed by the
magnetic stripe format
selected for the track.
Cancel the current print job.
Make sure you know what data is allowed on the track.
Change the data to be encoded, and resend the print job.
The magnetic stripe data was
sent in an encoding format not
supported by the track.
This problem most often occurs when the driver is set to “Use Printer
Setting” for the Encoding Format. Check the encoding format setting
for the tracks by using SmartDriver Diagnostics.
Make sure the application is using the selected encoding format for
the track.
If the application and track are set to the same format, and the
message appears repeatedly, contact the application provider for
assistance.
The card creation
application sent track data
for a track not supported by the
magnetic stripe module.
Check the type of magnetic stripe module in the printer. If the printer
label indicates an IAT module, you can send data for tracks 1, 2, and
3. If the printer label indicates an NTT module, you can send data for
track 3. The magnetic stripe module and cards must be capable of
accepting and encoding each track of data the card creation program
sends.
Problem Solution
23
SP35 Info Central
Obtaining service
For repair assistance, contact your service provider. Place the service call from a telephone close to the
printer so that you can access the printer and the PC running the driver while talking to the customer
support representative.
Your service provider should record information about how to contact them on the back cover of the Printer
Guide shipped with the printer. If you do not know how to contact your service provider, contact Datacard,
who can direct you to your service provider. See the inside of the front cover of the Printer Guide.
Before you call for service, make sure you have the information recorded during troubleshooting, as
described in this e-Guide. Also, make sure you have the serial number of the printer. It is located on a label
that is visible when you open the top cover of the printer.
When to obtain service
Perform the steps at the beginning of this chapter before obtaining service. Call for service if:
•A troubleshooting process instructs you to call service
•A troubleshooting process does not produce the expected result
•You experience a problem repeatedly
Packing the printer for shipping
When service asks you return the printer to a service center for repair, pack the printer for shipping. You
might also need to pack the printer to send it to another location.
1 Turn off power to the printer.
2 Remove the power cord from the printer and power receptacle. Remove the data cable and any other
cables attached to the printer.
– If you are shipping the printer to use at another location, pack the power supply, power cord, data
cable, and any other cables in the accessories tray.
– If you are shipping the printer for service, do not ship cables with the printer unless asked to do so.
– Service might ask you to ship cards or additional samples of your current supplies. If service
requests cards or supply samples, place them in the accessory tray to prevent damage to the
printer.
3 Remove all cards from the card tray, card output tray, and printer. Do not ship cards unless asked to do
so.
4 Remove the continuous cleaning roller from the printer unless asked to return it. Put the spindle with
other accessories, such as the Printer Guide.
5 Make sure the card tray door is firmly closed.
6 Close the cover.
7 Use the original shipping carton, plastic bag, and foam shipping supports.
8 Place the plastic bag around the printer.
9 Make sure the bottom shipping support is in place.
10 Place the printer in the shipping carton, resting in the shipping supports.
11 Place the top shipping support in place.
24
SP35 Info Central
12 Place the accessories tray in the shipping carton, on the top.
13 Close the shipping carton.
14 Secure the carton with shipping tape. Be sure to wrap around the shipping carton several times to
secure it.
15 Put a shipping label on the carton. If you are returning the printer for service, use the address provided
by service.