Enttec Pro Mk2 Manual Web DMX USB User
2017-06-20
User Manual: Enttec Pro Mk2 Manual Web Pro_Mk2_Manual_web pro_mk2
Open the PDF directly: View PDF ![]() .
.
Page Count: 28


Package Contents
Your DMX USB PRO Mk2 package contains these items:
•DMX USB PRO Mk2 (Part No. 70314)
•Driver for Windows™ software on the Enttec CD-ROM (Part No. 79106)
•Micro USB Cable (Part No. 50282)
•Breakout cable 0.1M - DB15 to 3DMX (Part No. 79146)
•This user manual
If any item is missing or damaged, please contact your supplier immediately.
To be sure that you are using the latest revision of the Driver software
with your PRO Mk2 Mk2, please visit the Downloads section of the Enttec
website at www.enttec.com to get the current version.
2

DMX USB PRO Mk2
User Manual
v1.1
Table of Contents
Accessories (sold separately) ....................................................................................... 5
Warranty ........................................................................................................................ 7
Contacting ENTTEC ...................................................................................................... 8
Getting Support ............................................................................................................. 8
Typographic conventions used in this manual .............................................................. 9
Getting to know your PRO Mk2 .................................................................................... 9
Features ..................................................................................................................... 9
Layout ...................................................................................................................... 10
Fast track guide to the PRO Mk2 ............................................................................... 13
Installing PRO Mk2 ...................................................................................................... 14
Installing Driver ........................................................................................................ 14
Connecting the PRO Mk2 ........................................................................................ 17
USB ...................................................................................................................... 17
Power supply ........................................................................................................ 17
DMX Out (DMX 1 and DMX 2) ............................................................................. 18
DMX In (DMX 1 and DMX 2) ................................................................................ 18
Setting up PRO Mk2 ................................................................................................ 19
3

Selecting a COM port ........................................................................................... 19
Device Manager ................................................................................................... 19
ENTTEC DMX-PRO Manager .................................................................................... 21
Test and Update PRO Mk2 ..................................................................................... 21
Firmware Update .................................................................................................... 23
Standalone Mode ..................................................................................................... 24
Appendix 1 - DMX Connector Pin-outs .................................................................... 27
DMX OUT ................................................................................................................ 27
DMX IN ..................................................................................................................... 27
Appendix 2 - MIDI Connector Pin-outs .................................................................... 28
MIDI OUT ................................................................................................................. 28
MIDI IN ..................................................................................................................... 28
4

Accessories (sold separately)
79147 PRO Mk2 3DMX + 2MIDI breakout Cable (0.1m)
2 x DMX Output (DMX 1 and DMX 2)
1 x DMX Input (DMX1)
1 x MIDI IN
1 x MIDI OUT
70317 PRO MK2 Zip Case
Allows you to safely transport PRO Mk2 with the
breakout cable and the usb cable all in one case
70029 3P FEMALE TO 5P MALE Converter
5

70030 3P MALE TO 5P FEMALE Converter
70023 5P MALE TO MALE Converter
79149 5W USB Power Supply
Useful to support standalone mode
Comes with US,UK,EU and AU plug adaptors
6

Warranty
ENTTEC warrants that the product that it manufactures will be free from defects in materials
and workmanship for a period of one year from the date of shipment from an authorised
ENTTEC wholesaler. If the device proves defective within the warranty period, ENTTEC will
repair or replace at its sole discretion, the defective hardware. If the failure is due to an
operator error, the user accepts the responsibility to pay any costs incurred in the diagnosis
of the hardware, parts or shipping from our service facility.
ENTTEC makes no warranty of any kind, express or implied, including without
limitation the implied warranties of merchantability and fitness for a particular
purpose. In no event shall ENTTEC be liable for indirect, special or consequential
damages.
Opening the case of the unit voids the warranty as described above.
7

Contacting ENTTEC
Email: contact@enttec.com
Telephone: +61 3 9763 5755 GMT+10
Facsimile: +61 3 9763 5688
Write to us: ENTTEC Pty Ltd
PO Box 4051
Ringwood
Vic 3134 Australia
Getting Support
If you require support for the PRO Mk2 or the Driver software, please visit the Support area
of our website at www.enttec.com/support. There you can fill out a support request ticket for
prompt assistance with your enquiry.
8

Typographic conventions used in this manual
PRO Mk2: Short name used to mention DMX USB PRO Mk2 throughout this manual
Memory: inbuilt memory of PRO Mk2 that is used to store the DMX show and supports the
standalone mode
Data boxes: The names of the boxes where data is entered appear in a different typeface.
Eg. The name of the "Delay" entry box is printed as Delay.
Getting to know your PRO Mk2
Thank you for purchasing the PRO Mk2. At ENTTEC we are proud of our products and we
hope you will enjoy using them as much as we enjoy designing and building them.
The PRO Mk2 is a USB hardware interface which sends DMX when connected to a
computer, by plugging it into a Universal Serial Bus (USB) and various types of lighting
equipment, via the industry standard DMX512 protocol. It provides Two, fully independent,
DMX ports each with full RDM capability.
The accompanying Driver software allows the computer to control and configure the PRO
Mk2.
Features
The PRO Mk2 provides:
9

•Dual 512 channel universes of input or output (one per DMX port)
•Full RDM capability on both ports
•Standalone mode: playback a single recorded DMX show on powerup
•Midi input & output ports (DMX + Midi cable sold separately)
•Adjustable Frame Rates and empty frames to accommodate non-standard equipment
•True 1500V isolation
Layout
PRO Mk2 sits in an aesthetically slim-profile, machined aluminium box with dimensions: 0.9”
(22mm) in height, 2.6” (66mm) wide and 4.1” (105mm) deep. It is easily stored on a tabletop
next to the computer to which it is attached, and can slip conveniently into a zip case if
desired (Pro2 Zip Case sold separately)
10

ENTTEC DMX PRO Mk2 interface
11

LED status display indicates operational status
white PRO Mk2 is powered on and idle
green DMX1 send or receive (DMX Port 1)
yellow DMX2 send or receive (DMX Port 2)
blue standalone mode (show playback)
purple Midi in or out
red error
LED will blink between the mentioned colors to signify the status of PRO Mk2
re plug the usb cable if PRO Mk2 is in error state (red) to reset it
USB 2.0
Micro USB connector for connection to computer.
DMX Breakout
DB15 connector To connect the DB15 DMX breakout cable. Compatible with both DMX
only and DMX + MIDI breakout cables.
Only ENTTEC supplied or sold cables should be used for DMX or MIDI Breakout.
12

Fast track guide to the PRO Mk2
Install and configure the Driver software on your Windows™, Linux™or Mac™
computer.
(see Installing Driver on page 12)
Connect the PRO Mk2 to your computer and the DMX512 control network.
(see Connecting the PRO Mk2 on page 15)
Load the control software of your choice onto the computer.
Control and Manage DMX and setup DMX universe with a PRO Mk2 compatible
software package
Run the software and create your show.
13

Installing PRO Mk2
Installing Driver
The PRO Mk2 is supported by drivers for the following Operating Systems:
•Windows XP, Windows Server 2003, Windows Vista, Windows Server 2008,
Windows 7, Windows Server 2008 R2. (32 bit and 64 bit versions)
•Mac OS X (Mac OS X 10.4 (Tiger) or later )
•Linux
•Free BSD
This manual will cover the Windows 7™ installation process, by way of example. Others will
be similar, but the particulars of how each operating system works in terms of screen shots
have been omitted for brevity.
Before plugging in your PRO Mk2 to your computer, please install the driver.
To do this, you need the driver setup file, which is available from :
•the CD which came in the package, or
•download the latest driver direct from the ENTTEC website
(www.enttec.com/promk2)
•for latest drivers and OS support, please check ftdi website
(http://www.ftdichip.com/Drivers/D2XX.htm)
14

The illustration above shows the opening splash screen menu of the ENTTEC Products &
Documents CD, from which you will want to choose Drivers. That will take you to the next
screen.
15

It is recommended that you choose the first option to download the “Driver Auto Installer”.
The manual zip is provided for advanced users, who know how to install the driver manually.
A dialogue box will open asking if you want to
run, save or cancel this file. Select Run.
This will be followed by a command line window,
which will install the driver based on your system.
Let it finish
16

Connecting the PRO Mk2
USB
Once the driver has finished installing, you may now plug in the micro usb cable to connect
the PRO Mk2 device to your computer. One end, the micro usb (smaller connector) plug,
will fit the USB port in the PRO Mk2. The other end, which is wider and almost flat in
comparison, goes to any available USB port in your computer. You may also plug it into a
USB hub, but when doing so be sure that enough power exists on that hub to provide for the
device and all other power-over-USB devices plugged there as well.
When you make the connection to your computer, the LED on the PRO Mk2 will start
blinking white, notifying the user that it's powered up and ready. After that, a message
should appear (usually a few seconds later in Windows) saying your computer has detected
new hardware.
It will be correctly identified as ENTTEC USB PRO Mk2 by your computer.
Power supply
The PRO Mk2 draws its power from the USB connection.
You can also use a 5v USB Power adaptor (Part No. 50327) to power the PRO Mk2 and use
it in standalone mode only.
However to use a software application to talk to PRO MK2 you will need to plug it into the
USB port of the computer.
17

DMX Out (DMX 1 and DMX 2)
The DMX Out socket(s) should be connected to the network of DMX512 devices that are to
be controlled by the PRO Mk2. Both ports can be used to output at the same time (allowing
2 universe of DMX together). Please refer to the software support to confirm whether it
supports both outputs with PRO Mk2 or not.
It is not necessary to have any connection to the DMX Out socket while
programming the PRO Mk2.
DMX In (DMX 1 and DMX 2)
The DMX In socket(s) should be connected to the DMX512 controller whose output is to be
captured by the PRO Mk2. Input is captured and sent to the software interfacing with the
PRO Mk2.
Although there is only one DMX Input (DMX1) socket in the breakout cable, the
other socket (DMX2) can also be used as an input by using a Gender Changer
Each port can only be used as input or output at any single time.
Both ports are isolated and separated, so one can be used to receive DMX input,
and the other to output DMX, as long as the software supports this operation.
18

Setting up PRO Mk2
Selecting a COM port
In most cases the USB port you plug the PRO Mk2 into will automatically fall into an
acceptable range with respect to the other elements of your computer’s communications
ports, but if you are having problems or conflicts between the ports, here is what you can do
to change the COM port. Before making any changes. it is advisable to keep a record of
which serial port has been used in each attempt to configure the hardware and drivers. That
way you will be able to retrace your steps should you decide to go back and try something
again but with different settings elsewhere.
Device Manager
Open Device Manager on your Windows machine. (Control Panel → Device Manager)
Expand the “Ports” section, and identify the PRO Mk2 Port, which usually is “USB Serial
Port”
Right click on it and select Properties.
This will bring up a box where you can
change communications settings for the
port.
19

Under “Port Settings”, click on “Advanced”, and you can then change the COM Port No.
under this screen:
20

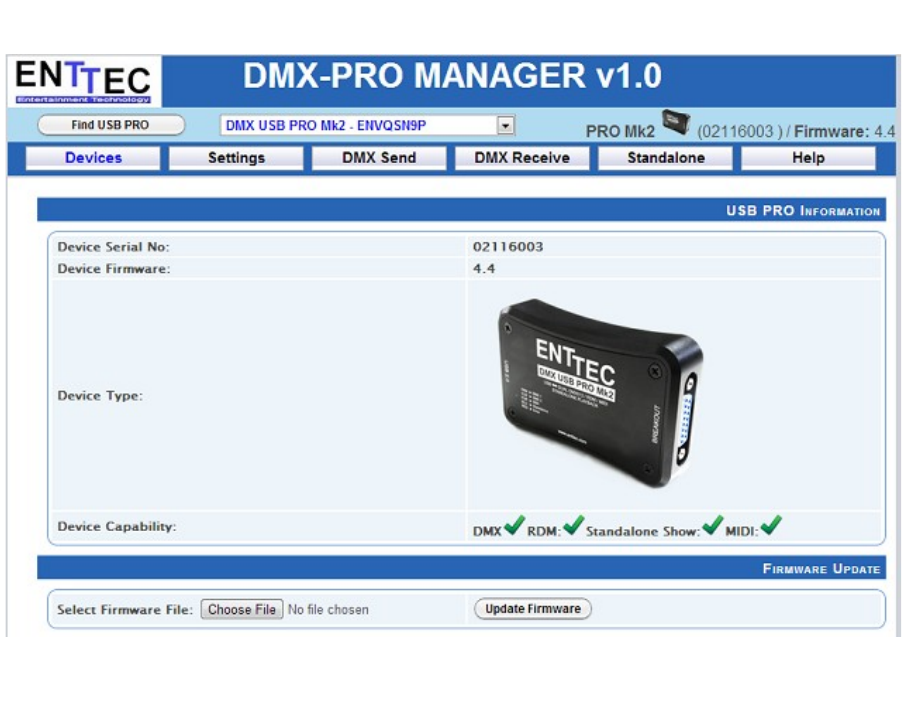
ENTTEC DMX-PRO Manager
ENTTEC provides a free cross-platform app to configure, test and update the PRO Mk2. It
also allows the user to record a DMX show into the memory and setup the standalone mode
on the PRO Mk2. The App is available for Windows on the CD or you can download the
latest version for Windows or Mac from the ENTTEC website (www.enttec.com/promk2).
Use this App to test your PRO Mk2, change default parameters (Refresh rates,
Break Time), test DMX Send and Receive on both ports, and setup Standalone
show playback.
This App is merely a troubleshooting tool and not Lighting Control software
The App runs inside a browser, and it opens up the page by default, however you
can also use this address in your browser (http://localhost:55555/ )
Test and Update PRO Mk2
From the DMX-PRO Manager Home page, you can click the button (Find USB PRO) to
search for USB-PRO's connected to your computer. Once it finds it, please select it from the
selection box to talk to it.
Once selected, you will see all the device information on the Home Page , and you can
update the firmware on the PRO Mk2 using the Firmware Update box. The following steps
will guide you on how to update the firmware, use this procedure to reset the PRO Mk2 if it
ever gets stuck or stops responding:
21
22

Firmware Update
Use the firmware file meant for PRO Mk2 (available on the website;
www.enttec.com/promk2), and upload it using the upload button (“Choose File” - as per
Chrome browser).
After selecting the correct file, click on the Update Firmware button and let the update
proceed.
Once Finished, the page will automatically refresh, and device information will be updated to
reflect the updated firmware.
23

Standalone Mode
Standalone mode allows you to record and playback a DMX sequence or show via DMX
input onto PRO Mk2 Memory. The duration of the recording depends on the Standalone
configuration done before the recording. The recorder is smart enough to only record the
changing frames, so as to accommodate as many frames as possible.
Click on “Read Memory” to access Standalone configuration. You can change the following
values that will affect how the DMX is recorded:
Show Name Name to identify the show being recorded
DMX Channels No. of channels to record per DMX Frame
Loop Count Total times the show is played back (from 1 to Forever)
Loop Delay Delay in no. of seconds, between each Loop playback
DMX Output Port The Port to play the show on. Can only select one
Play on powerup If selected as “Yes”, recorded show plays on powerup
24

Once the configuration is set, you can select the input port and click on “Record DMX” to
start DMX recording. The recording is saved onto a file, and is only transferred to the PRO
Mk2 memory when recording is stopped using the “Stop Recording” button.
The recording can now be transferred to memory using “Write to Memory” button.
Let the upload to memory finish, the upload progress is shown as it happens.
25

Once the show is uploaded to memory successfully, the page is automatically refreshed to
allow Show Control on the recorded show.
You can now play or stop the show using the controls on this page. These controls will only
be available, if there is a show written to memory.
You can also export the recorded show from the PRO Mk2 to a binary file using “Export
Show to File”, and this file can then be imported back to the PRO Mk2 memory using
“Import Show” button.
26

Appendix 1 - DMX Connector Pin-outs
DMX OUT
Pin 1 Ground
Pin 2 Data -
Pin 3 Data +
Pin 4 NC
Pin 5 NC
DMX IN
Pin 1 Ground
Pin 2 Data -
Pin 3 Data +
Pin 4 NC
Pin 5 NC
27

Appendix 2 - MIDI Connector Pin-outs
MIDI OUT
Pin 1 NC
Pin 2 Ground
Pin 3 NC
Pin 4 Data +
Pin 5 Data -
MIDI IN
Pin 1 NC
Pin 2 NC
Pin 3 NC
Pin 4 Data +
Pin 5 Data -
28
