EpiCom SEC-7089 CDMA 1X EvDo USB Modem User Manual SEC 7089 User Manual rev 1
EpiCom Co., Ltd. CDMA 1X EvDo USB Modem SEC 7089 User Manual rev 1
EpiCom >
Users Manual
SEC-7089 User Manual
Rev 0.1
EpiValley
January 17, 2008

2
Revision History
Rev 0.1
2008. 01. 16
First issue
ycs

3
Contents
1. Installation & Setup ........................................................................................................................... 4
2. Getting Started................................................................................................................................... 6
3. Web ..................................................................................................................................................... 7
4. Voice.................................................................................................................................................... 9
1. Call placing/receiving buttons....................................................................................................... 9
2. Call placing/receiving display ..................................................................................................... 10
5. SMS................................................................................................................................................... 11
1. Send ........................................................................................................................................... 11
3. Sent ............................................................................................................................................ 14
4. Draft............................................................................................................................................ 15
5. Spam .......................................................................................................................................... 16
6. Voice........................................................................................................................................... 17
6. Address............................................................................................................................................. 18
1. List.............................................................................................................................................. 18
2. Search ........................................................................................................................................ 19
3. Group.......................................................................................................................................... 19
7.Log ..................................................................................................................................................... 20
1. Call Log ...................................................................................................................................... 20
2. Internet Log ................................................................................................................................ 21
8.Settings.............................................................................................................................................. 22
1. General Settings......................................................................................................................... 22
2. Call Settings ............................................................................................................................... 22
3. SMS Settings.............................................................................................................................. 23
6. UIM Settings............................................................................................................................... 24
7. Lock Settings.............................................................................................................................. 24
8. Information.................................................................................................................................. 25
9. Internet.............................................................................................................................................. 26
10. Email ............................................................................................................................................... 26
11. Others ............................................................................................................................................. 27
1. File.............................................................................................................................................. 27
2. View............................................................................................................................................ 27
3. Help ............................................................................................................................................ 27
4. Internet access status icon on the top right of the program emulator........................................ 28
5. Tray Icon..................................................................................................................................... 28
12. Part of the USB Modem................................................................................................................. 29
13. Specification .................................................................................................................................. 30

4
1. Installation & Setup
1. SAM Installation
1.1 Insert the Installation CD to the CD-ROM Drive. If the installation process does not start automatically,
run Setup.exe file in the CD-ROM Drive. Select a language and click “OK”. (Do not plug the USB
modem in the USB port before you finish installing SAM.)
1.2 To continue installation, click “Next”.
1.3 Click “I Agree”.
5
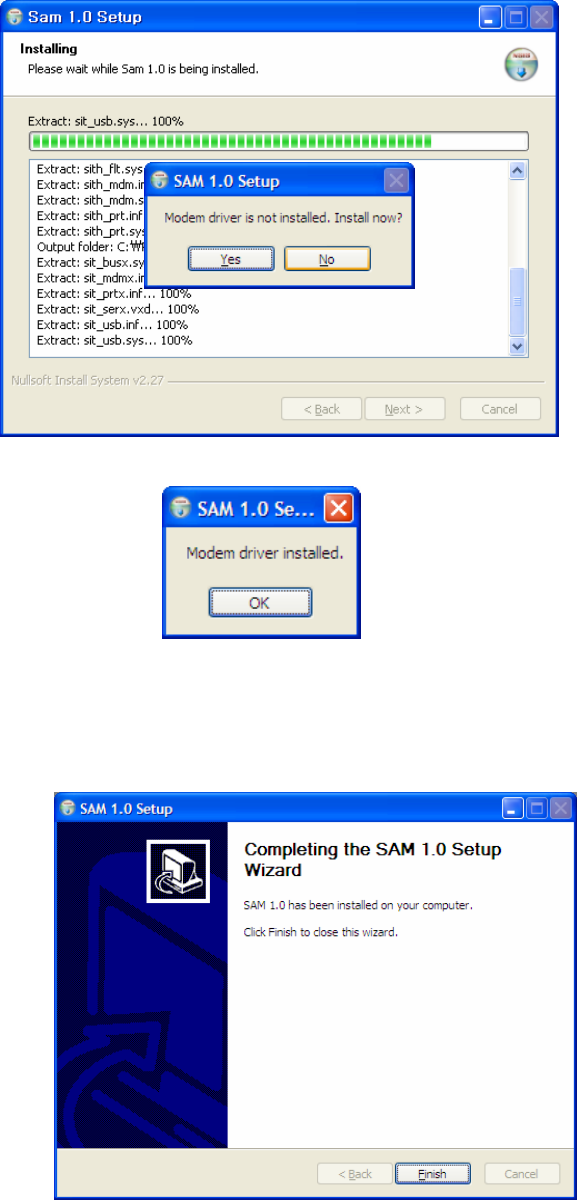
1.4 In order to use the modem for the first time, you need to install the device driver.
If the device driver is installed, click “OK” and wait until installation process is completed.
1.6 If SAM is installed successfully, click “Finish”.
1.7 After installation of SAM, plug the modem in the USB port. Then, the modem will be recognized
automatically.
6
2. Getting Started
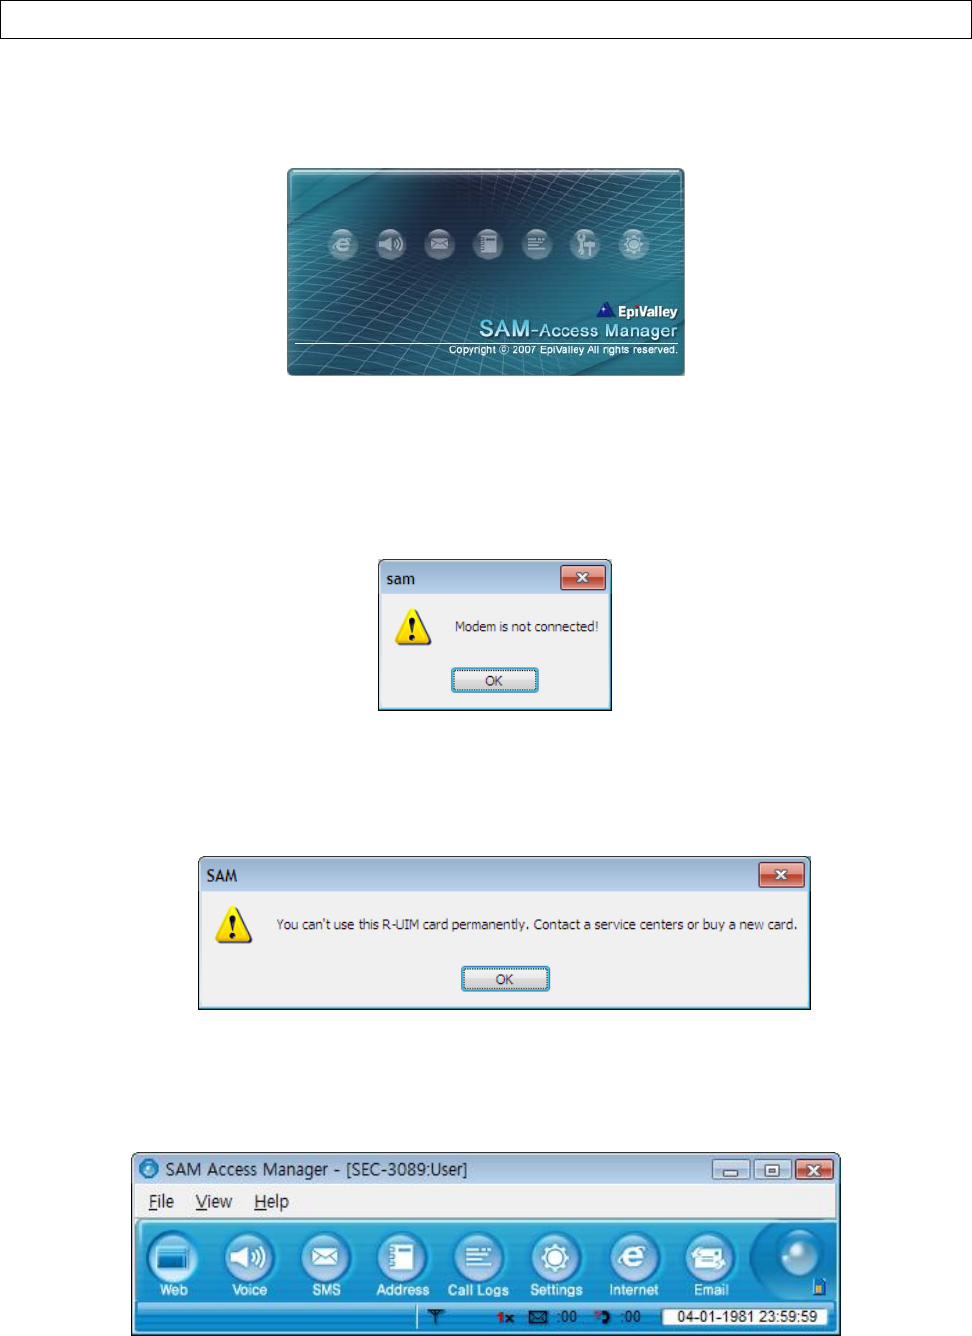
1. Plug the modem in the USB port, and select “sam.exe”. Then the following initial window appears.
2. If the modem is not properly plugged in, the following message appears.
3. If UIM is not installed normally in the modem, the following message is displayed.
4. If the system finds the modem, SAM is started as in the following figure.
7
3. Web
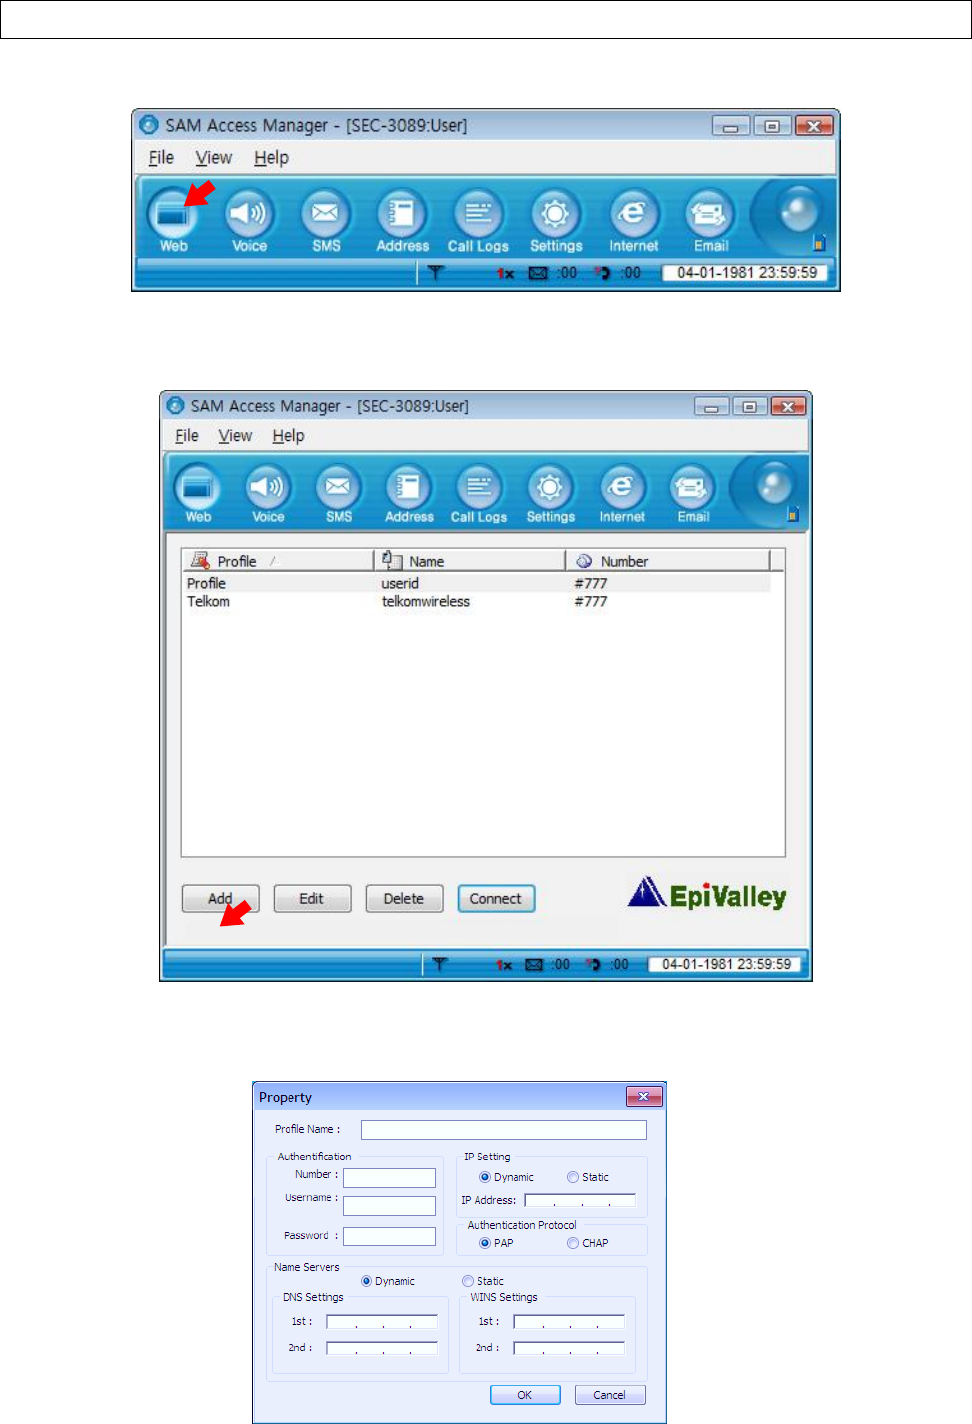
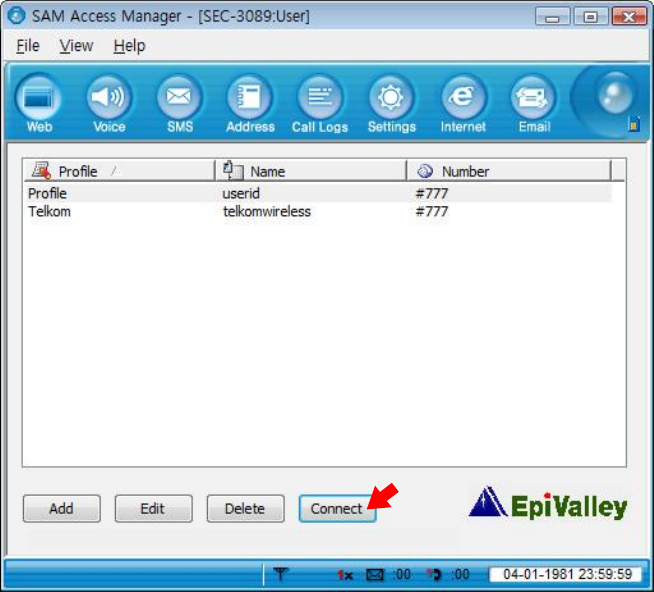
1. To access Internet, click “web”.
2. Click “Add” to create a connection profile or Click “Edit” to edit existing profile.
3. Set the profile for connection.
8
4. Select a profile from the list, and click “Connect”.
5. If Internet is accessed, “Hybrid Modem Connected” is displayed in the Status bar (bottom of the
program window). Rx or Tx status appears, and the Internet connection icon appears in the top right
of the program window.
6. If you click “Web” after the system is connected to Internet, the Internet browser appears. If you click
“Email”, the Email Client or the web mail selected by the service provider is started.
7. In order to disconnect from Internet, click “Disconnect”, and if the confirmation window appears, click
“Yes”.

9
4. Voice
1. Call placing/receiving buttons ____________________________________________
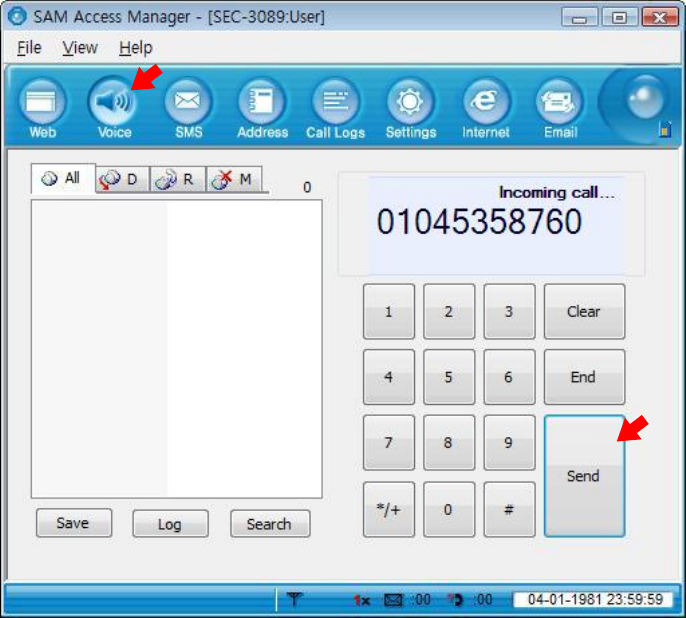
1.1 Enter the phone number with the number pad or the keyboard, and click “Send”. Click “End” to finish the
call.
1.2 To receive a call, click “Send”, and to end a call, click “End”.
1.3 You can control the volume using the control button during a
call.
1.4 If you click “Mute”, your voice is muted. If “Mute” is selected, the button is changed to “Unmute”. Click
“Unmute” if you wish to clear Mute.
1.5 To save the phone number you have entered or that of the caller in the Address book, click “Add”.
1.6 To view the call history, click “Log”. Refer to “1. Call Log” in chapter “8. Log”.
1.7 To search a number in the Address book, click “Search”. Refer to chapter “6. Address”.
10
2. Call placing/receiving display _____________________________________________
2.1 The caller ID of the incoming call is displayed.
2.2 The current call status is displayed. “Incoming call” is displayed if a call is incoming. After connected, the
call time is displayed.
11
5. SMS
1. Send __________________________________________________________________
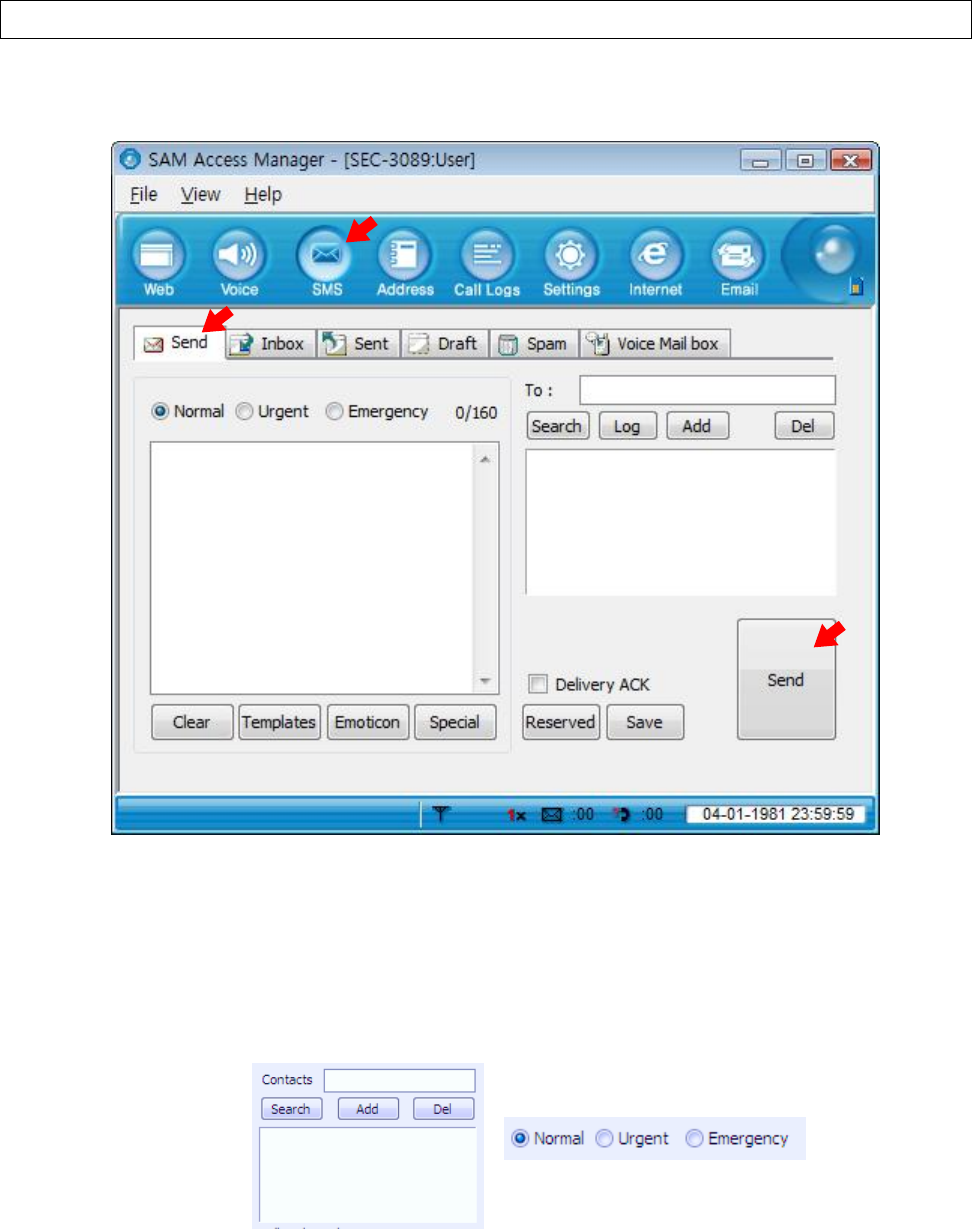
1.1 To send a message, click “SMS”, and select “Send”.
1.2 Write a message, enter the numbers of the receivers one by one, and click “Add”. To delete a number
from the list, select the number and click “Del”.
12
1.3 Select “Normal”, “Urgent” or “Emergency” for the priority of the message, and click “Send”.
1.4 To send a message to numbers of users, the window shows the current number of receivers.
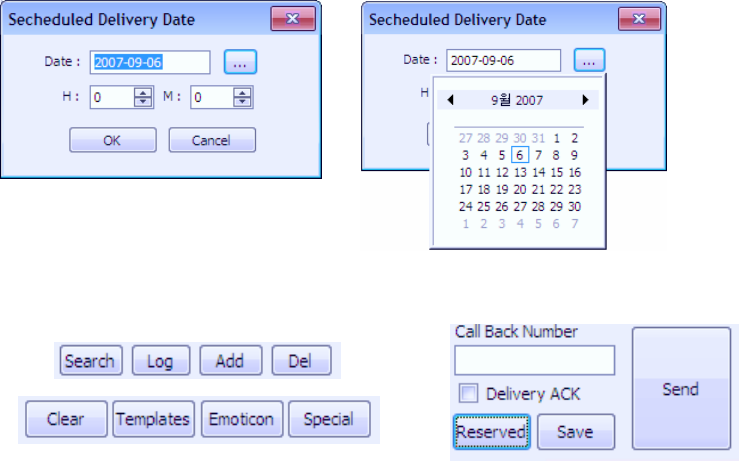
1.5 To send a message at the designated date and time, click “Reserved”. Select Year, Month, Day, Hour and
Minute, and click “OK”. The reserved message is saved in the Temporary Box.
1.6
▶ You can use the following functions with the buttons provided under the list or by right-clicking the
mouse button on an entry in the list.
- Search : You can search numbers in the Address Book.
- Log : You can add numbers searched in Call Log.
- Add : You can add addresses in the sender list.
- Del : You can delete entries from the sender list.
- Clear : The message you have written is all cleared.
- Emoticon : You can select/edit emoticons and insert them in the message. To insert an
emoticon, double-click the emoticon, or select and click the “Insert” button. To edit
an emoticon, click “Edit”, edit the emoticon, and click “Save”.
- Templates : You can select/edit templates to enter a message.
- Special Characters : You can select special characters to enter a message.
- Reserved : You can set the date and time for a reserved message.
- Save : The message is saved in the “Temporary” box.
- Send : The message is transmitted.
13
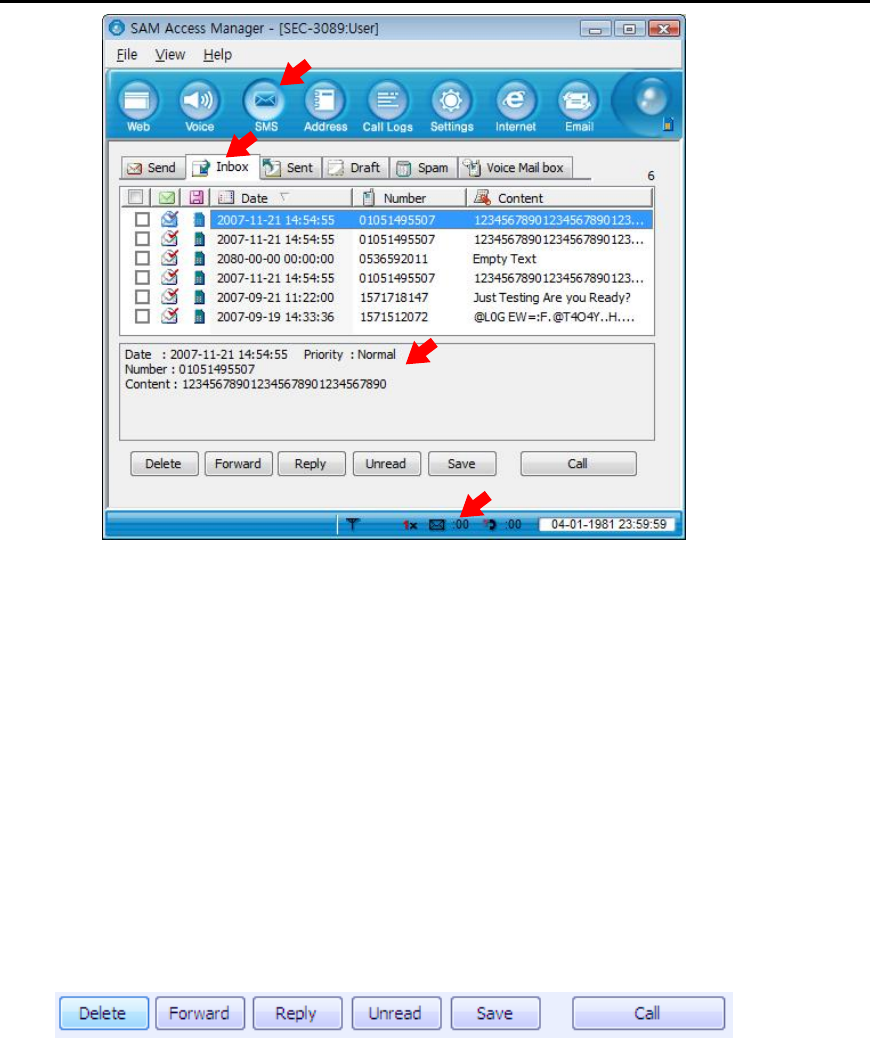
2. Inbox
2.1 If a message is incoming, an auto popup message appears, or the tray icon blinks, or the alert is
sounded depending on your selection in “Incoming SMS Alert”. The received message is automatically
saved in Inbox.
To set the “Incoming SMS Alert” option, press the “SMS” tab in the “Settings” menu, and set “Incoming
SMS Alert” option. Refer to “9. Settings” for details.
2.2 If there are messages you have not read, the count is indicated in the Status bar (in the bottom of the
window).
2.3 The messages are sorted by Number, Name, Date and Content in the “Inbox” menu. The icon indicates
if the message is read or unread, and if it is in the PC, UIM or Modem.
2.4 If you select a message, the content of the message is displayed under the list.
▶ You can use the following functions with the buttons provided under the list or by right-clicking the
mouse button on an entry in the list.
- Delete : The selected messages are deleted from the list.
- Forward : Select this button to forward a message to other persons. The "Send” menu is
automatically selected, and the content is automatically entered.
- Reply : Select this button to send a reply. The "Send” menu is automatically selected, and
the number of receiver is added to the “Contacts” list.
- Unread : You can change message status from “Read” to “Unread”.
- Save : You can add the message senders in the Address book. Enter data, select location
(PC, Modem or UIM), and click “OK”.
- Call : Select this button to make a call to the sender of a message. The “Voice” menu is
automatically selected, and the number of receiver is automatically entered.
14
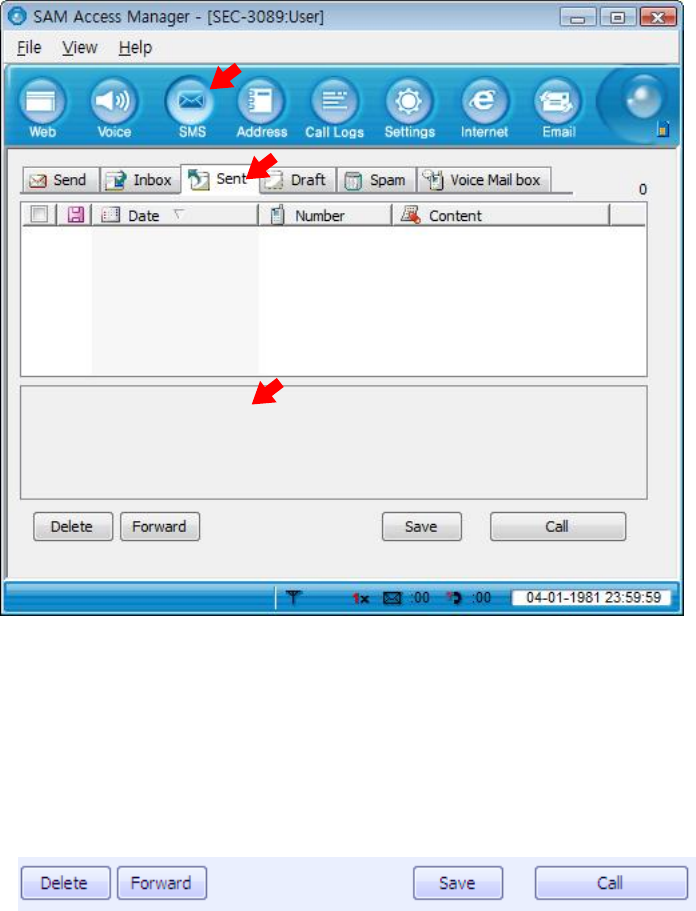
3. Sent __________________________________________________________________
3.1 In the “Sent” menu, the sent messages are sorted by Number, Name, Date and Content. You can
identify the location of the messages (PC, UIM or Modem) with the icons.
▶ You can use the following functions with the buttons provided under the list or by right-clicking the
mouse button on an entry in the list.
- Delete : The selected messages are deleted from the list.
- Forward : Select this button to forward a message to other persons. The "Send” menu is
automatically selected, and the content is automatically entered.
- Save : You can add the message senders in the Address book. Enter data, select location
(PC, Modem or UIM), and click “OK”.
- Call : Select this button to make a call to the sender of a message. The “Voice” menu is
automatically selected, and the number of receiver is automatically entered.
15
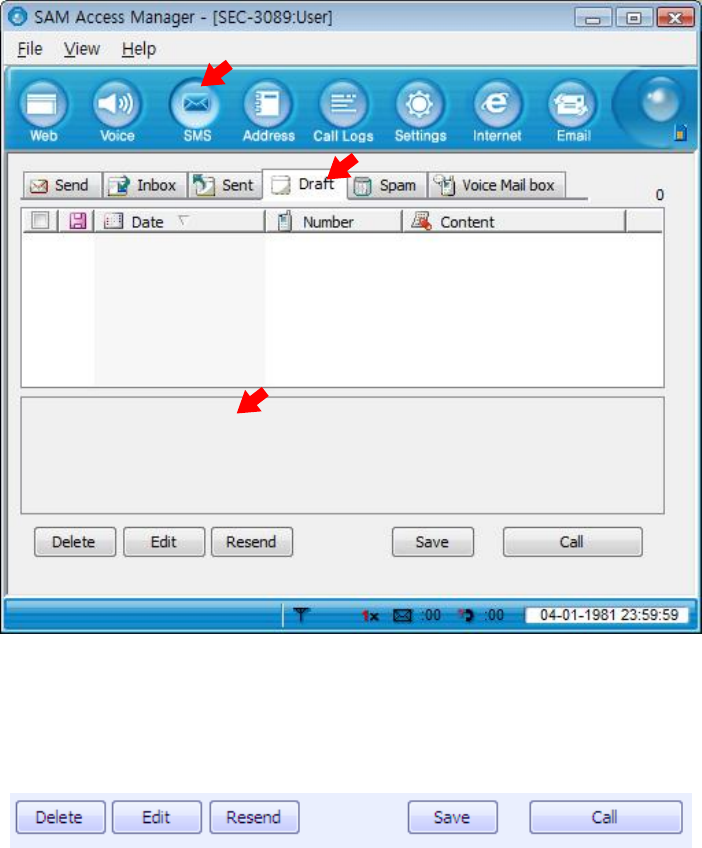
4. Draft __________________________________________________________________
4.1 In the “Draft” menu, the failed messages or unsent messages are listed.
▶ You can use the following functions with the buttons provided under the list or by right-clicking the
mouse button on an entry in the list.
- Delete : The selected messages are deleted from the list.
- Edit : Select this button to edit and send the messages selected in the list. The "Send”
menu is automatically selected, and the content is automatically entered.
- Resend : The selected messages are retransmitted.
- Save : You can add the message senders in the Address book. Enter data, select location
(PC, Modem or UIM), and click “OK”.
- Call : Select this button to make a call to an entry in the list. The “Voice” menu is
automatically selected, and the number of receiver is automatically entered.
16
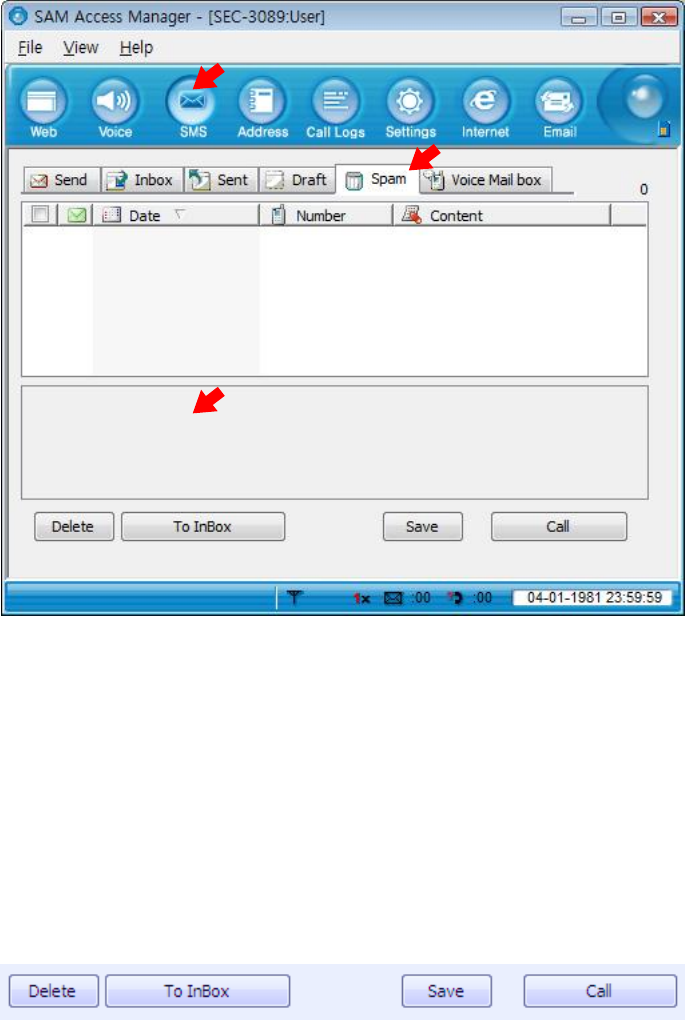
5. Spam ________________________________________________________________
5.1 In the “Spam” menu, the filtered messages containing specific numbers or words are listed. The
messages are sorted by Date, Number, and Content.
5.2 You can select the numbers or words you wish to filter as spam message in the “SMS” tab of the
“Settings” menu. You can select “Use” or “Not Use” in “Spam Message Settings”, and add/edit/delete the
Spam numbers with the “Add”, “Edit” or “Delete” button in the Number list. You can also add/edit/delete
the Spam words with the “Add”, “Edit” or “Delete” button in the Word list.
▶ You can use the following functions with the buttons provided under the list or by right-clicking the
mouse button on an entry in the list.
- Delete : The selected messages are deleted from the list.
- To Inbox : The received messages are moved to “Inbox”.
- Save : You can add the message senders in the Address book. Enter data, select location
(PC, Modem or UIM), and click “OK”.
- Call : Select this button to make a call to an entry in the list. The “Voice” menu is
automatically selected, and the number of receiver is automatically entered.
17
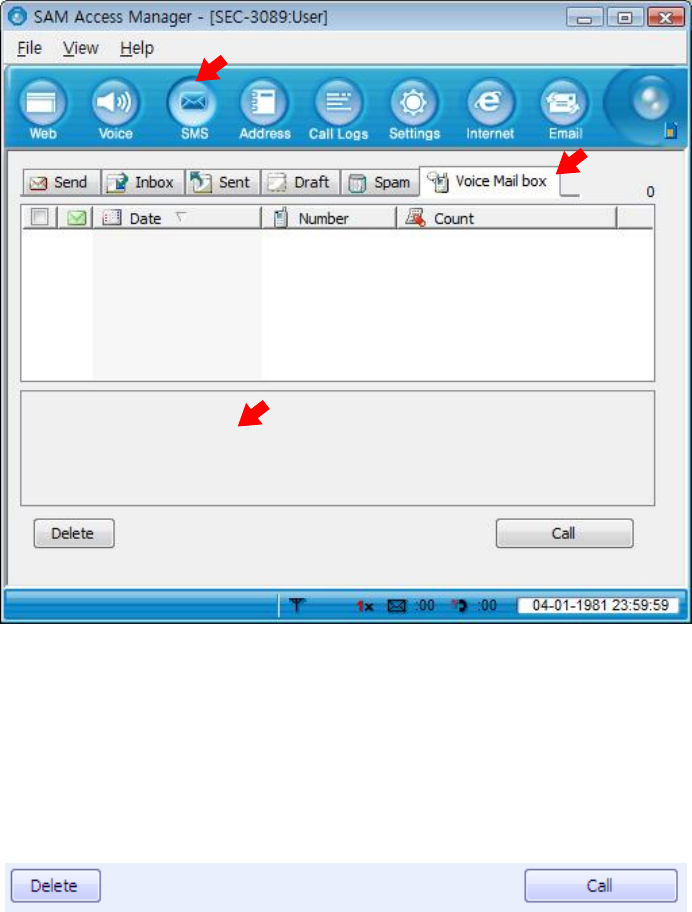
6. Voice ________________________________________________________________
6.1 The voice mail messages from BTS are displayed in the “Voice” menu. You can sort the messages by
Number, Data and Content.
▶ You can use the following functions by right-clicking the mouse or with the buttons at the bottom of
the list.
- Delete : The selected messages are deleted from the list.
- Call : If you wish to make a call to “Voice Mail Center” from BTS or there is no number
from BTS, make a call to “Voice Mail Center” set in “SMS Settings”, and check the
voice mails. Refer to “9. Settings” for details.
18
6. Address
1. List ___________________________________________________________________
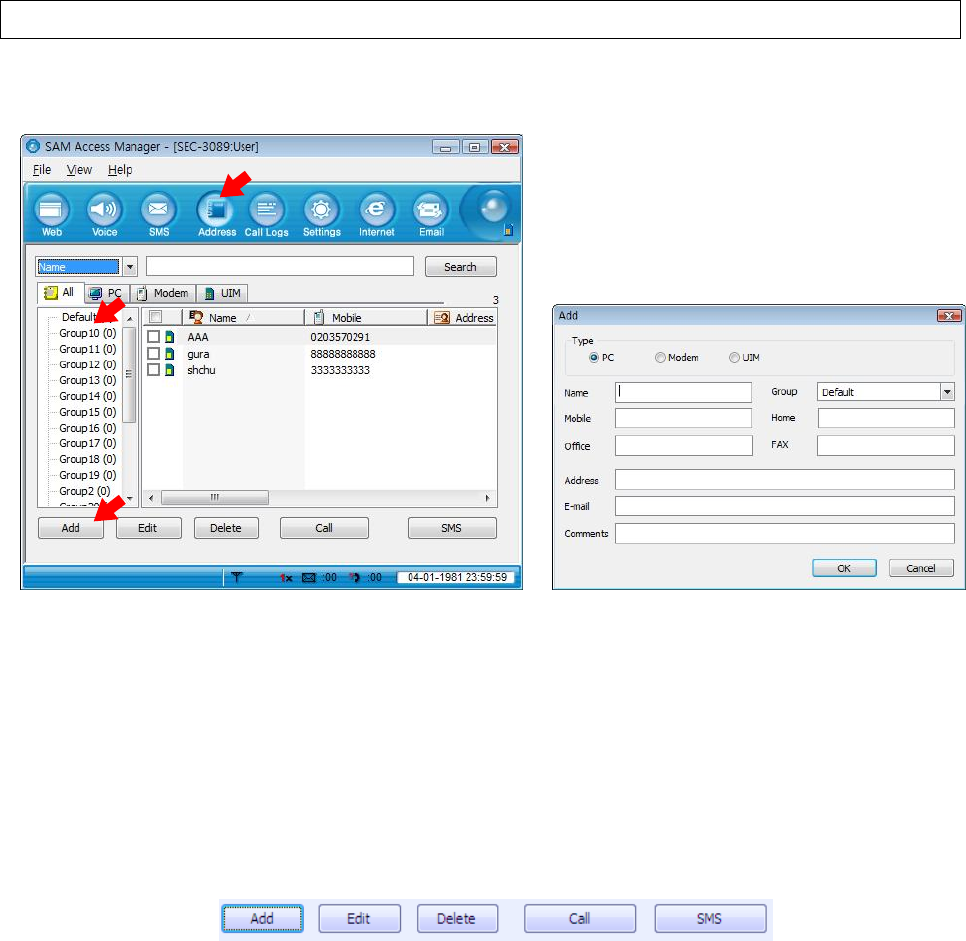
1.1 To save a phone number in the Address book, click “Add” under the phone numbers list. Select the
location between “PC”, “Modem” and “UIM”, enter Name, Mobile, Group, Home, Office, FAX, Address,
E-mail and Comment, and then, click “OK”.
▶ You can use the following functions with the buttons provided under the list or by right-clicking the
mouse button on an entry in the list.
- Add: Add a new number in the Address book.
- Edit : To modify a number or other data, click “Edit”, modify contents, and then, click “OK”.
- Delete : To delete a number, select the checkbox of the entry in the list, and click “Delete”. To
delete all the entries in the list, select the checkbox on the top of the list, and click
“Delete”.
- Call : If you click “Call” after selecting a number in the list, the “Voice” menu is selected. If
a default is selected between Mobile, Home and Office number, a call is attempted to
the default number. If you drag and drop “Call” to Mobile, Home or Office number a
call is attempted to the selected number.
- SMS : If you click “SMS” after selecting a number in the list, the “SMS” menu is selected.
19
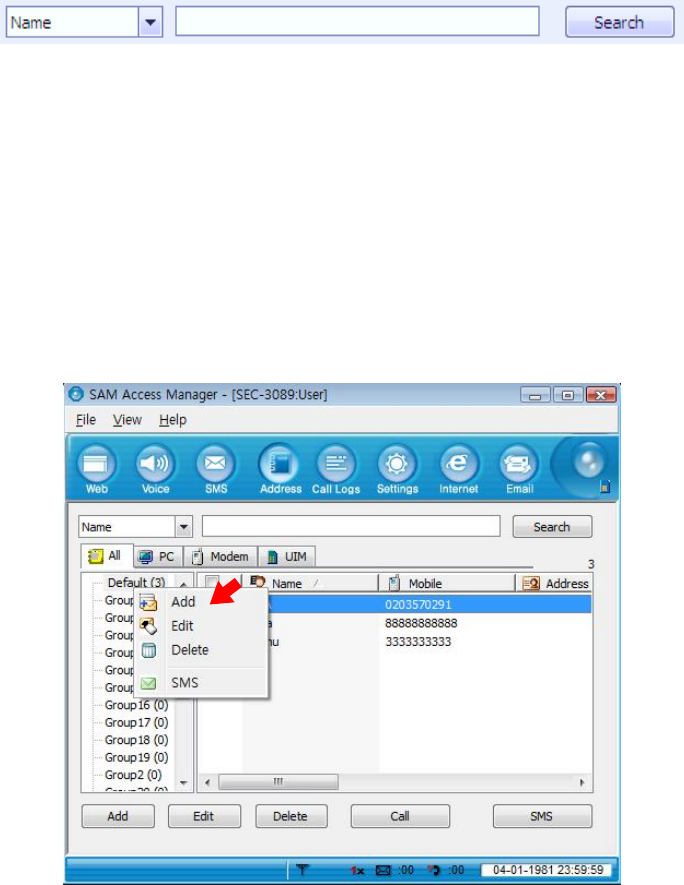
2. Search _______________________________________________________________
2.1 To search an entry in the list, select a field (Name, All no, Mobile, Group, Address, Home, Office, FAX,
Email, or Comments) in the top left of the list, enter a name or number, and then, click “Search”. Then,
the entries containing the name or number are listed.
2.2 You can search entries in a specific storage (PC, Modem, UIM, or All) by clicking the concerned button
under the search field.
3. Group ________________________________________________________________
3.1 There are 20 groups (Group1 ~ Group20), and you can only rename the groups.
3.2 To move a member between groups, click the member in the list, and drag and drop to the target group
folder.
▶ You can use the following functions with the buttons provided under the group list or by right-
clicking the mouse button on an entry in the list.
- Add : Add groups.
- Edit : To change the names, select the groups and click “Edit”.
- Delete : You can delete groups with all the members in the groups.
- SMS : To send an SMS to all the members in a group, click “SMS”. The “SMS” window is
displayed, and the numbers of all the members of the group are automatically
entered in “Contacts”.
20
7.Log
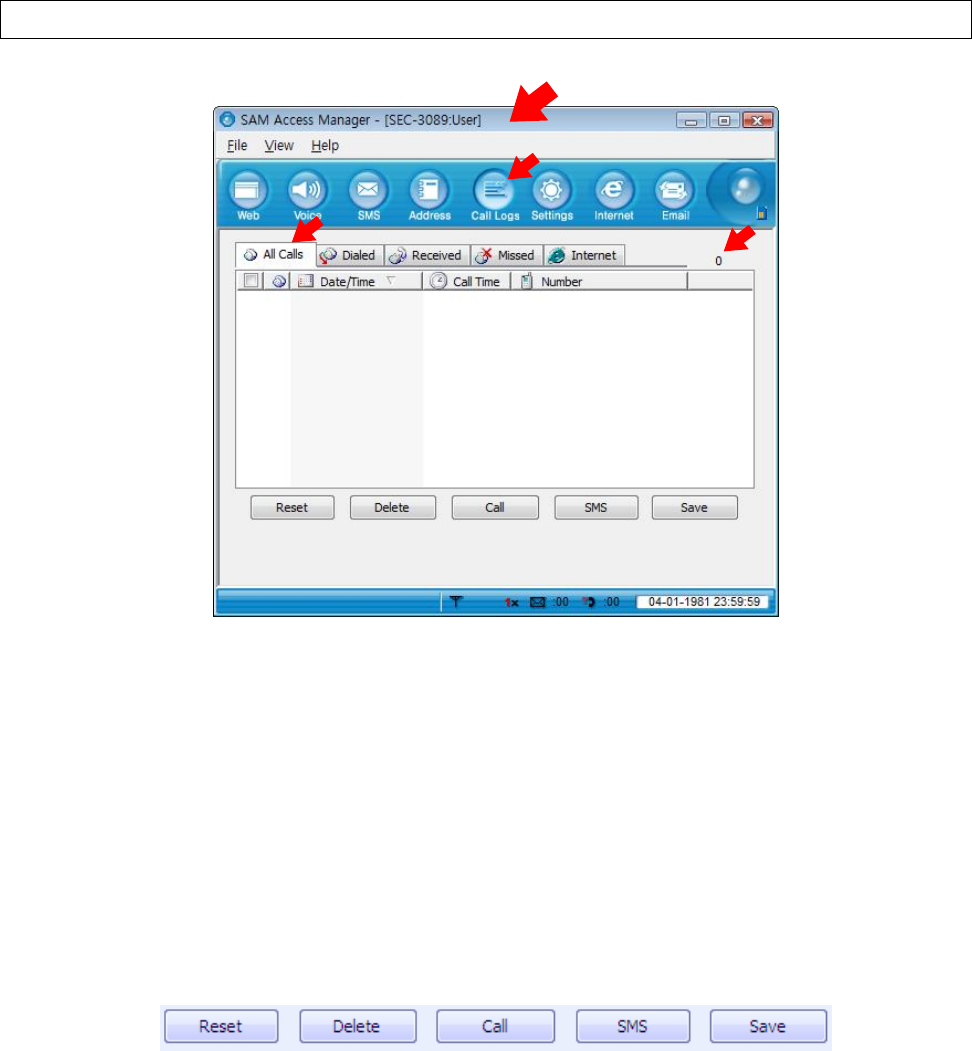
1. Call Log ______________________________________________________________
1.1 You can see All Calls, Dialed Numbers, Received Calls and Missed Calls. The number of entries stored
in the list is displayed in the right of the window.
1.2 “All Calls” shows Dialed Numbers, Received Calls and Missed Calls which can be identified by the icons.
The entries can be sorted by Date, Time and Number.
1.3 “Dialed Numbers” shows the numbers you have dialed.
1.4 “Received Calls” shows the numbers from which you have received calls.
1.5 “Missed Calls” shows the numbers from which you have missed calls.
▶ You can use the following functions with the buttons provided under the list or by right-clicking the
mouse button on an entry in the list.
- Reset : You can delete all the entries of the list, and reset all the values in “Total” field to 0.
- Delete : The selected logs are deleted from the list.
- Call : If you click “Call” after selecting an entry in the list, the “Voice” menu is displayed,
and the phone number is automatically entered.
- SMS : Select this button to forward a message to the numbers selected in the list. The
"Send” menu is automatically selected in “SMS”, and the numbers are entered
automatically in “Contacts”.
- Save : Select the numbers to add in the Address book, select the location (PC, Modem or
UIM), and click “OK”.
21
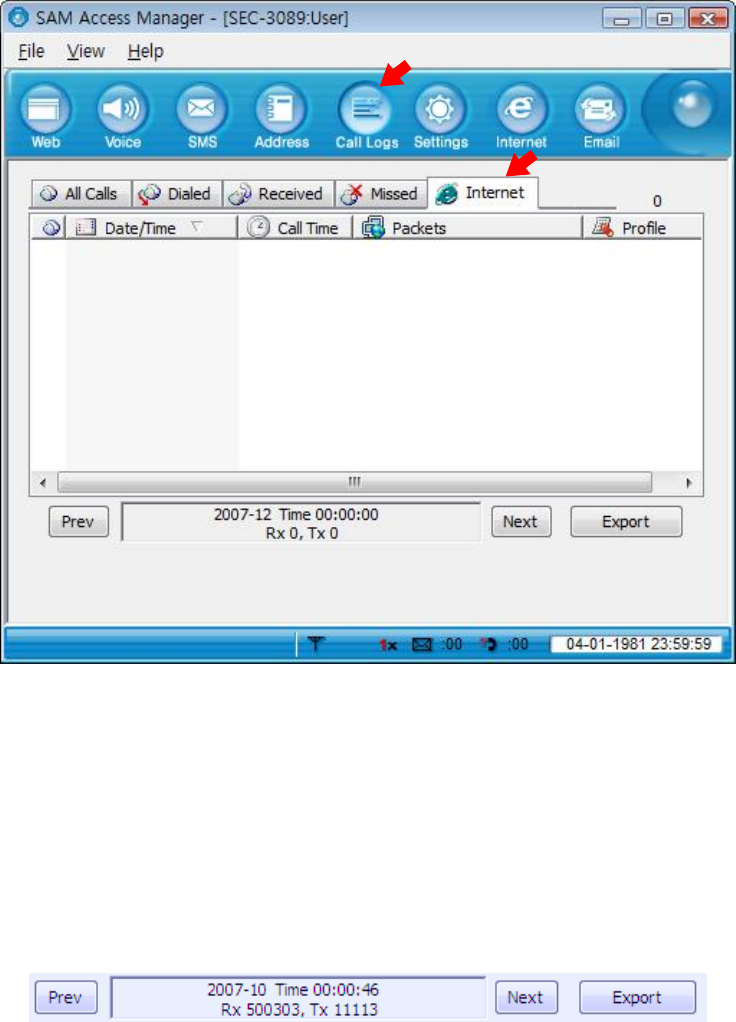
2. Internet Log ___________________________________________________________
2.1 If you click “Internet Log” in the Call Log List, you can check the internet logs. “Total” shows the total time
used, and Kbytes of the sent data and received data.
2.2 The Internet Log list displays information on Internet usages such as dates, time, Tx and Rx.
2.3 On the top of the Internet Log list are the total log count available and the current log count.
▶ You can use the following functions with the buttons provided under the list or by right-clicking the
mouse button on an entry in the list.
- Prev : You can move to the previous month.
- Next : You can move to the next month.
- Export : You can save the internet log list of the current month as the CSV files.
22
8.Settings
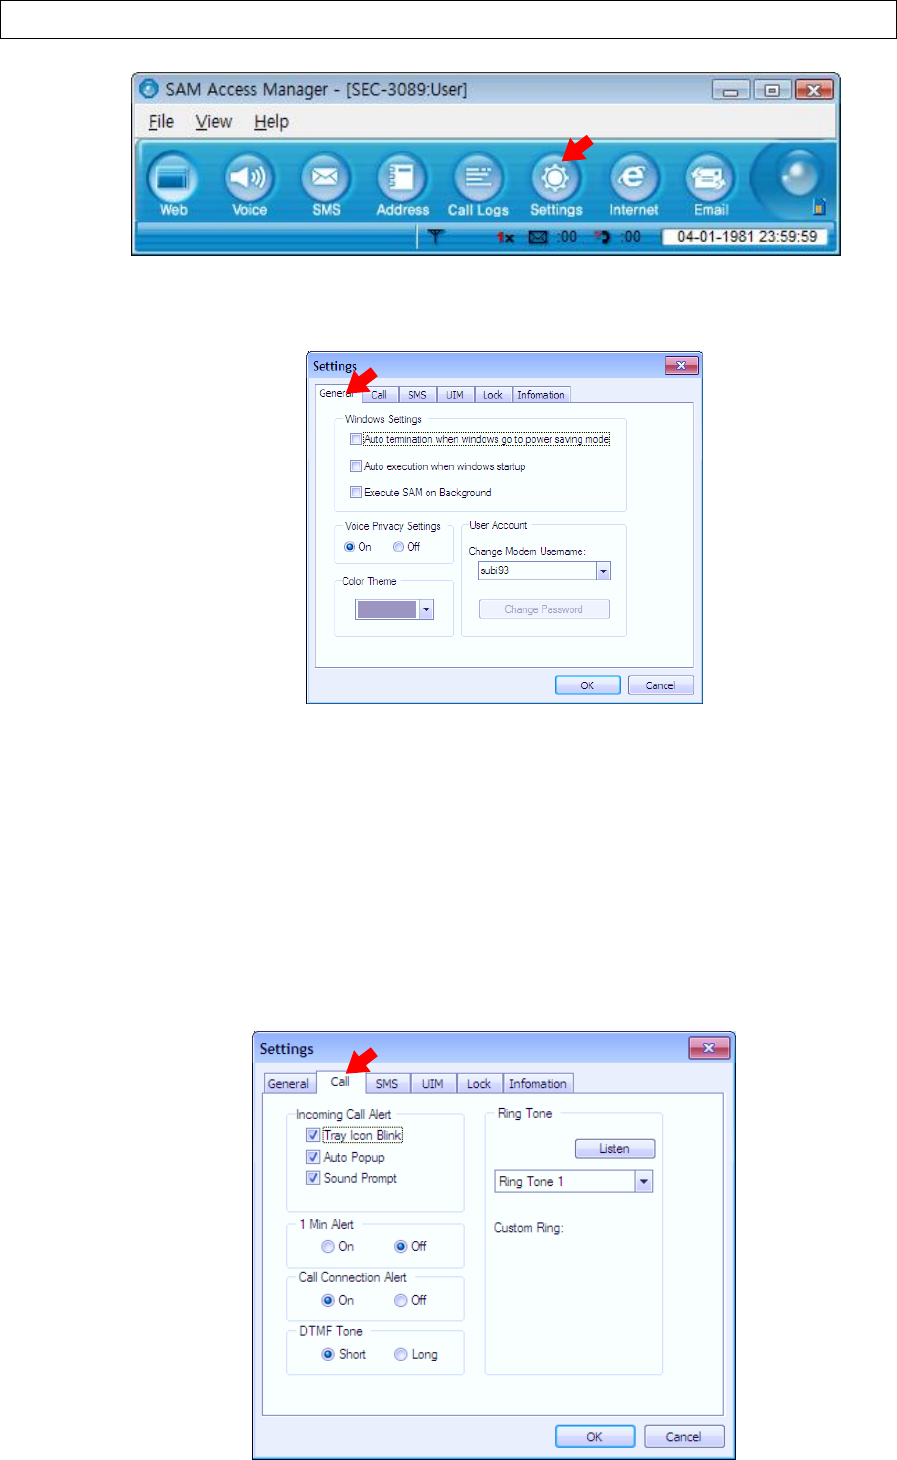
1. General Settings _______________________________________________________
4.1 If you select “Auto termination when windows go to power saving mode” in “Windows Settings”. the
program is automatically exited when the PC is switched to the power saving mode. If you select “Auto
execution when windows start”, the program is automatically started when the Windows is booted. If you
select “Execute SAM Access Manager on Background”. when you click “Exit”, the program is reduced to
a tray icon and runs on the background.
4.2 If you select “On” in “Voice Privacy Settings”, the voice data is encoded before transmitted.
4.3 You can change the background color of SAM with “Color Theme”.
2. Call Settings __________________________________________________________
23
2.1 You can select the incoming call alert method. If you select “Blinking Tray Icon”, the tray icon flickers.
The notice pops up if you select “Auto Pop-up”, or an alert tone sounds if you select “Sound prompt”. Or,
you can select all the options.
2.2 If “1 Min Alert” is “On”, you will hear an alert at every 1 min during a call.
2.3 If “Call Connection Alert” is “On”, you will hear an alert when the outgoing/incoming call is connected.
2.4 You can select “Long” or “Short” for “DTMF Tone”.
2.5 You can select “Ring Tone” for incoming calls. You can select the default ring tone from the “Ring Tone”
list. If you click “Browser…” in the list, the file search window pops up. You can select a ring tone (wav,
mid file only) from the files in memory. You can listen to the selected ring tone if you click “Listen” in the
top right of the “Ring Tone” list. The path of the selected file is displayed under the list.
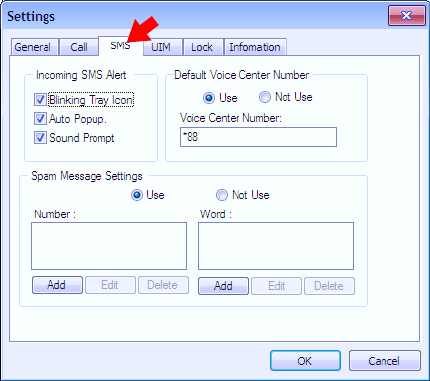
3. SMS Settings __________________________________________________________
3.1 You can select the incoming call alert method. If you select “Blinking Tray Icon”, the tray icon flickers.
The notice pops up if you select “Auto Pop-up”, or an alert tone sounds if you select “Sound prompt”. Or,
you can select all the options.
3.2. You can designate the access number to the Voice Mail Center.
3.3 If you select “Use” in “Spam Message Settings”, the messages containing the specific number and word
are automatically saved in the “Spam message” box. You can add, edit or delete the numbers to be
filtered with the “Add”, “Edit” or “Delete” button under the “Number” list. You can also add/edit/delete
words to the filtered in the same manner.

24
6. UIM Settings ___________________________________________________________
6.1 In “Current PIN Code”, enter the current UIM PIN Lock Code.
6.2 If “Pin Lock Option” is “On”, you need to enter the UIM PIN Code. If it is “Off”, you don’t need to enter the
PIN Code to access UIM and reset the data.
6.3 With “New PIN Code”, you can enter a new Pin Code.
7. Lock Settings __________________________________________________________
7.1 If “General Lock” is “On”, you need to enter the lock code every time you start the program.
7.2 If “Internet Lock” is “On”, you need to enter the lock code every time you access Internet.
7.3 If “Outgoing Call Lock” is “On”, you need to enter the lock code every time you place a call except an
emergency call.
7.4 If “International Call Lock” is “On”, you need to enter the lock code every time you place an international
call.
7.5 If “Incoming Call Lock” is “On”, you need to enter the lock code every time you receive a call.
25
7.6 If “SMS Lock” is “On”, you need to enter the lock code every time you access the “SMS” menu.
7.7 With “New Lock Code”, you can change the lock code. First, you must enter the current lock code in
“Current Lock Code”, enter the new lock code in “New Lock Code”, retype the new lock code in “Confirm
Lock Code”, and then, click “Save”.
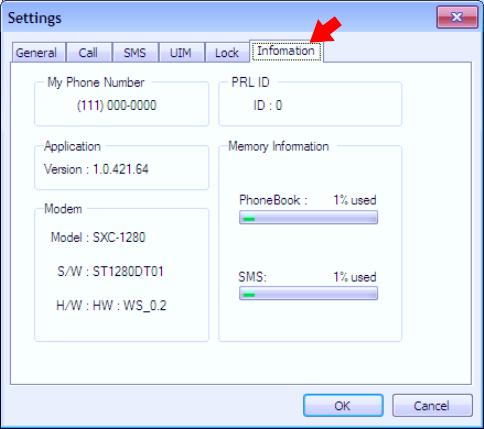
8. Information ____________________________________________________________
8.1 “My Phone Number” shows your phone number.
8.2 “Version” shows the SAM version, and the S/W and H/W version of the modem.
8.3 “PRL ID” shows the PRL ID of the modem.
8.4 “Memory Information” shows the used space in the modem for Address book and SMS in percentage.

26
9. Internet
1. If you click “Internet”, the Internet browser is started, moving to a specific URL.
10. Email
1. The Email client or the web mail selected by the service provider is started.
27
11. Others
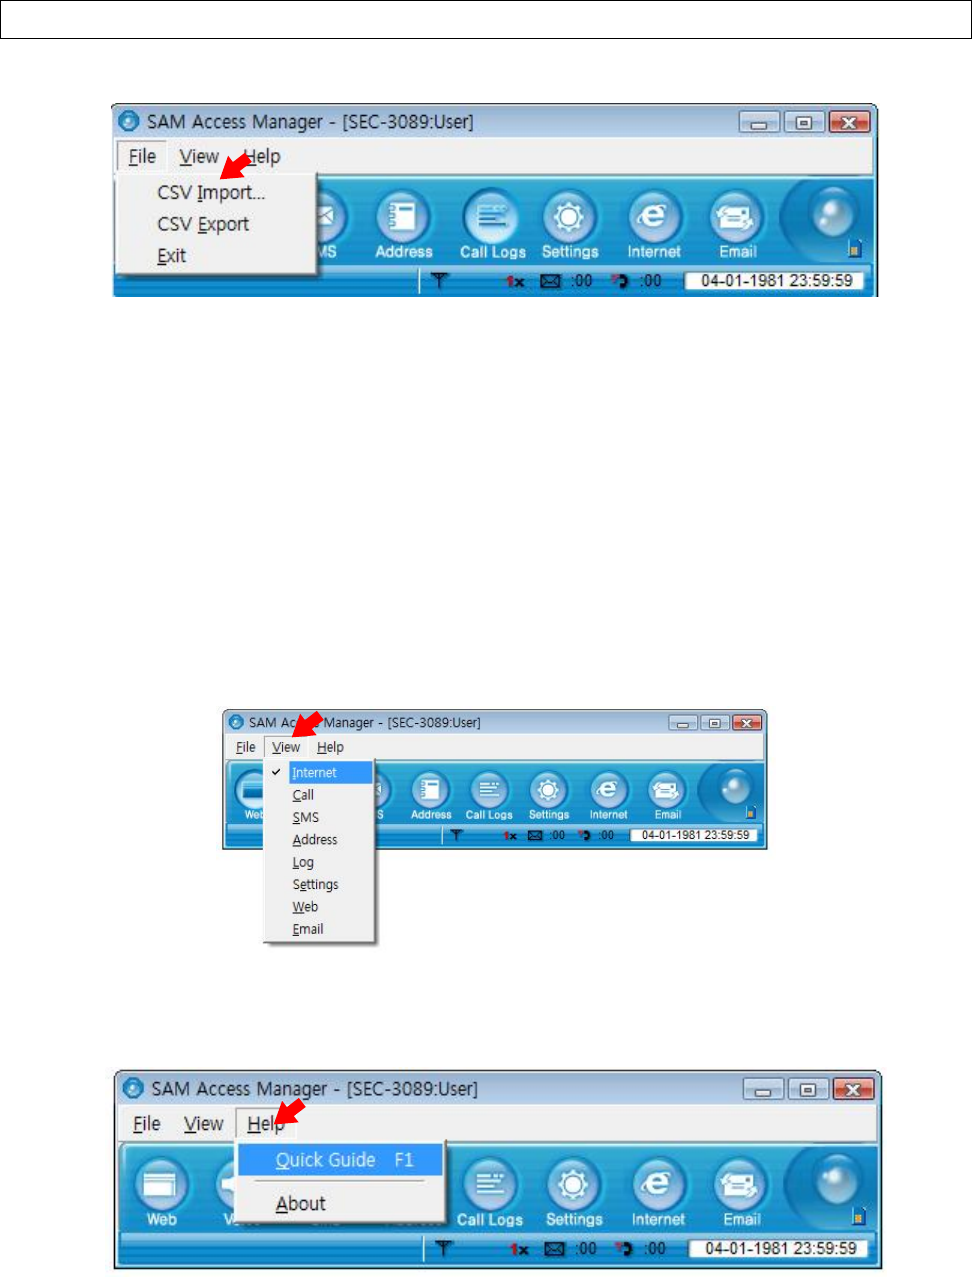
1. File __________________________________________________________________
1.1 With the “CSV Import” menu, you can import an address book to SAM. Click “CSV Import”, select a csv
file in the search window, and click “Open”. If the “Field Mapping” window pops up, select the matching
items, and click “OK”. If import is successful, the success message is displayed.
1.2 With “CSV Export”, you can export the Address book in SAM to the PC. Select a folder and a file name,
and click “Save”.
1.3 Click “Exit” to exit SAM. If you have selected “Execute SAM Access Manager on Background” in
“General” in “Settings”, SAM is not exited but reduced into a tray icon.
2. View _________________________________________________________________
2.1 You can select any submenu from the “View” menu on the menu bar.
3. Help __________________________________________________________________
3.1 You can view description on a function with “Quick Guide”.
3.2 If you select “About”, the SAM version and the Home address of Epivalley are displayed.
28
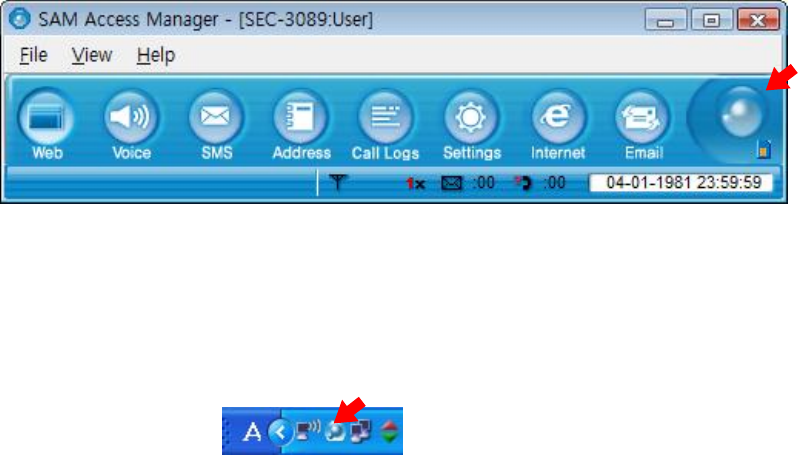
4. Internet access status icon on the top right of the program emulator ___________
4.1 The Internet Access Icon is activated if the system is accessed to Internet. If you click the icon, the
customer site is displayed.
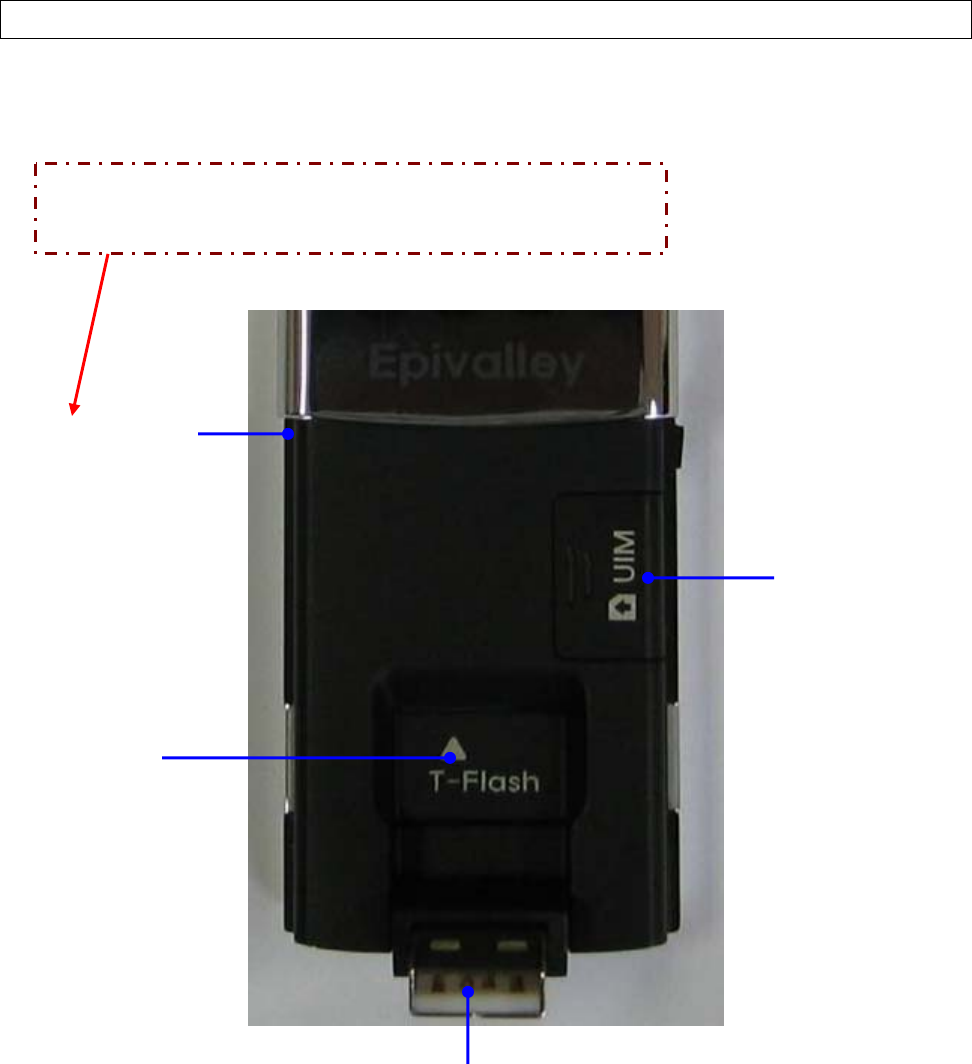
5. Tray Icon _____________________________________________________________
5.1 The tray icon indicates if the modem is plugged in. Right-click the tray icon and select “Restore” to
enlarge the SAM window. Select “Connect” to access Internet, or ‘Exit” to exit the SAM program.
29
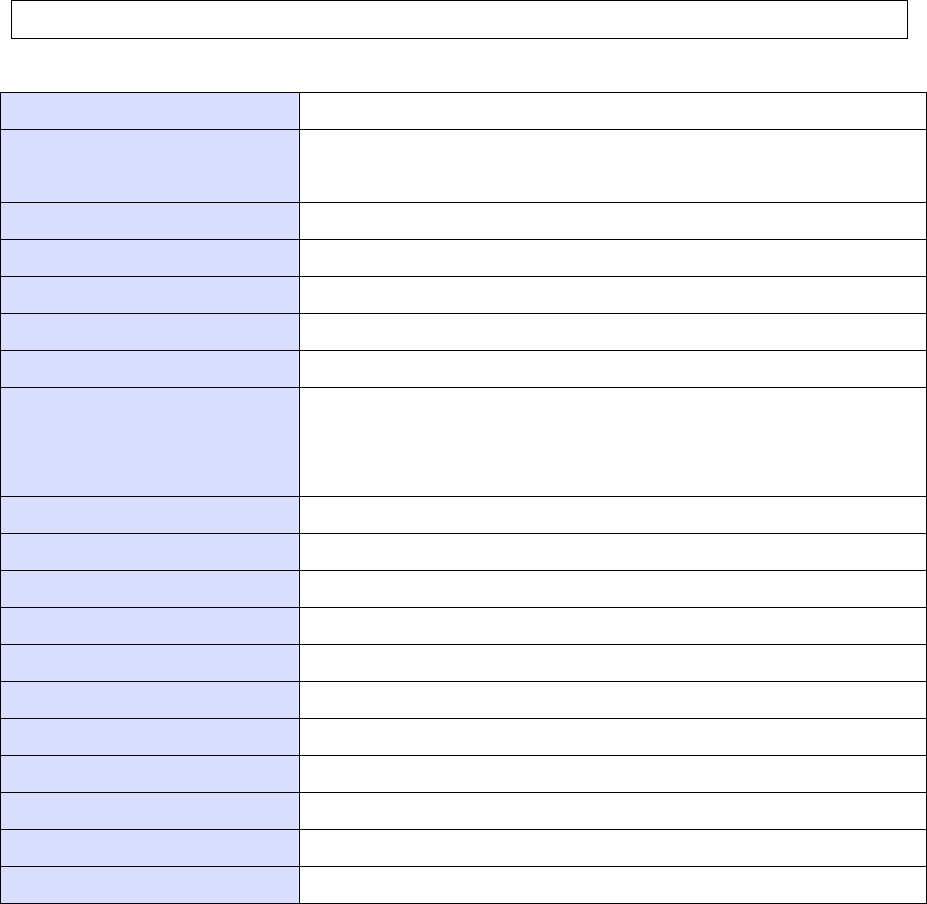
12. Part of the USB Modem
R-UIM Socket
T-Flash Socket
USB Connector
Slide Switch
Move Up : First run to the Auto-installation after run to EVDO Modem.
Move Down : Directly Run to EVDO mode.
30
13. Specification
Main Operation Chip MSM6800A
CDMA Standard IS-856A(1xEVDO Rev.A), TIA/EIA/IS-2000, IS-98E,
Backwards compatibility with IS-95 A/B
Band Designation 1X/EV-DO Rev.A : 800/1900 MHz
Transmit Band 824 ~ 849 MHz / 1850 ~ 1910 MHz
Receive Band 869 ~ 894 MHz / 1930 ~ 1990 MHz
Data Rate Download: Max 3.1Mbps, Upload: Max 1.8Mbps
SMS Support MO & MT
Transmit Power
Typical Data Call Current(Talk Mode)
: 550mA(1x), 550mA(1xEV-DO)
Standby : 50mA (1xEV-DO/IS2000 Hybrid Mode)
LED 2 LED(Power)
Power Supply 5.0V DC (USB Power)
Interface Type USB
Hardware Interface USB 1.1 (&2.0) Compatible
Software Interface IS-707.3 AT Commend , Diag protocol
Dimension Length: 73, Width: 36, Depth: 13 (mm)
Weight Net(TBD g),Gift box( TBD kg)
Operating Temperature -20°C to +60°C
Storage temperature -30°C to +85°C
Humidity 5% to 95%(non-condensing)
External Memory Micro SD (Max 2GB)

31
14. RF EXPOSURE INFORMATION
RF EXPOSURE INFORMATION
THIS CDMA USB DONGLE MEETS THE GOVERNMENT ’S REQUIREMENTS FOR EXPOSURE TO RADIO WAVES.
Your CDMA USB DONGLE is a radio transmitter and receiver. It is designed and manufactured not to exceed the emission limits for exposure to
radio frequency (RF) energy set by the Federal Communications Commission of the U.S.Government. These limits are part of comprehensive
guidelines and establish permitted levels of RF energy for the general population. The guidelines are based on standards that were developed by
independent scientific organizations through periodic and thorough evaluate on of scientific studies. The standards include a substantial safety margin
designed to assure the safety of all persons, regardless of age and health.
The exposure standard for wireless devices employs a unit of measurement known as the Specific Absorption Rate, or SAR. The SAR limit set by the
FCC is 1.6 W/kg.*Tests for SAR are conducted with the device transmitting at its highest certified power level in all tested frequency bands. Although
the SAR is determined at the highest certified power level, the actual SAR level of the device while operating can be well below the maximum value.
This is because the phone is designed to operate at multiple power levels so as to use only the power required to reach the network. In general, the
closer you are to a wireless base station antenna, the lower the power output. Before a wireless device is available for sale to the public, it must be
tested and certified to the FCC that it does not exceed the limit established by the government adopted requirement for safe exposure.
The highest SAR value for this CDMA USB Dongle is 0.820 W/kg (CDMA CELLULAR) & 0.605 W/kg (CDMA PCS). The FCC has granted an
Equipment Authorization for this CDMA USB Dongle with all reported SAR levels evaluated as in compliance with the FCC RF exposure guidelines.
SAR information on this model phone is on file with the FCC and can be found under the Display Grant section of http://www.fcc.gov /oet / fcc id after
searching on FCC ID: R2NSEC-7089.
Additional information on Specific Absorption Rates (SAR)can be found on the Cellular Telecommunications &Internet Association (CTIA) web-site
at http://phonefacts.net.*In the United States and Canada, the SAR limit for mobile phones used by the public is 1.6watts/kg (W/kg)averaged over one
gram of tissue. The standard incorporates a substantial margin of safety to give additional protection for the public and to account for any agitations in
measurements.
In August 1996 the Federal Communications Commission (FCC) of the United States with its action in Report and Order FCC 96-326 adopted an
updated safety standard for human exposure to radio frequency (RF) electromagnetic energy emitted by FCC regulated transmitters. Those guidelines
are consistent with the safety standard previously set by both U.S. and international standards bodies. The design of this phone complies with the FCC
guidelines and these international standards.
For more information about RF exposure, please visit the FCC website at www.fcc.gov
32
WARNING! Read this information before use
Caution
Modifications not expressly approved by the party responsible for compliance could void the user’s authority to operate the equipment.
FCC Compliance Information
This device complies with Part 15 of FCC Rules. Operation is subject to the following two conditions: (1) This device may not cause harmful
interference, and (2) This device must accept any interference received. Including interference that may cause undesired operation.
Information to User
This equipment has been tested and found to comply with the limits for a Class B digital device, pursuant to part 15 of the FCC Rules. These limits are
designed to provide reasonable protection against harmful interference in a residential installation. This equipment generates, uses and can radiate radio
frequency energy and, if not installed and used in accordance with the instructions, may cause harmful interference to radio communications. However,
there is no guarantee that interference will not occur in a particular installation. If this equipment does cause harmful interference to radio or television
reception, which can be determined by turning the equipment off and on, the user is encouraged to try to correct the interference by one or more of the
following measures:
- Reorient or relocate the receiving antenna.- Increase the separation between the equipment and receiver.
- Connect the equipment into an outlet on a circuit different from that to which the receiver is connected.
- Consult the dealer or an experienced radio/ tv technician for help.