Equitrac 10551001 RFID READER User Manual PageCounter Usage Guide
Equitrac Corporation RFID READER PageCounter Usage Guide
Equitrac >
USERS MANUAL

Usage Guide
December 14, 2011
Copyright © 2006 by Equitrac Corporation
All rights to this document, domestic and international, are reserved by Equitrac Corporation. No part of this publication may be reproduced, stored in a
retrieval system, or transmitted in any form or by any means (electronic, mechanical, photocopying, recording, or otherwise) without prior written
permission of Equitrac.
Trademarks
Equitrac is a registered trademark of Equitrac Corporation.
Equitrac Professional Enterprise Edition, EPEE, PageCounter, PageCounter Professional, PrintLog, and Web Exception Editing are trademarks of Equitrac
Corporation.
All other brands and their products are trademarks or registered trademarks of their respective holders, and should be noted as such.
FCC/IC Statements
FCC: Any changes or modifications not expressly approved by the party responsible for compliance could void the user's authority to operate the
equipment.
IC : This device complies with Industry Canada license-exempt RSS standard(s). Operation is subject to the following two conditions: (1) this device may
not cause interference, and (2) this device must accept any interference, including interference that may cause undesired operation of the device.

Overview . . . . . . . . . . . . . . . . . . . . . . . . . . . . . . . . . . . . . . . . . . . . . . . . . . . . . . . . . . . . . . . . . . 1-1
Terminal Keyboard Layout . . . . . . . . . . . . . . . . . . . . . . . . . . . . . . . . . . . . . . . . . . . . . . . . . . 1-2
Standard Terminal Features . . . . . . . . . . . . . . . . . . . . . . . . . . . . . . . . . . . . . . . . . . . . . . . . . 1-3
Optional Terminal Features . . . . . . . . . . . . . . . . . . . . . . . . . . . . . . . . . . . . . . . . . . . . . . . . . 1-4
Terminal Modes . . . . . . . . . . . . . . . . . . . . . . . . . . . . . . . . . . . . . . . . . . . . . . . . . . . . . . . . . . 1-5
Entering Accounting Data . . . . . . . . . . . . . . . . . . . . . . . . . . . . . . . . . . . . . . . . . . . . . . . . . . . . 2-1
Terminal States . . . . . . . . . . . . . . . . . . . . . . . . . . . . . . . . . . . . . . . . . . . . . . . . . . . . . . . . . . . 2-2
Functional Modes . . . . . . . . . . . . . . . . . . . . . . . . . . . . . . . . . . . . . . . . . . . . . . . . . . . . . . . 2-2
Idle Mode . . . . . . . . . . . . . . . . . . . . . . . . . . . . . . . . . . . . . . . . . . . . . . . . . . . . . . . . . . . 2-2
Data Entry Mode . . . . . . . . . . . . . . . . . . . . . . . . . . . . . . . . . . . . . . . . . . . . . . . . . . . . . 2-2
Ready Mode . . . . . . . . . . . . . . . . . . . . . . . . . . . . . . . . . . . . . . . . . . . . . . . . . . . . . . . . . 2-3
Operational Modes . . . . . . . . . . . . . . . . . . . . . . . . . . . . . . . . . . . . . . . . . . . . . . . . . . . . . . 2-3
Mode 1 Operational Modes . . . . . . . . . . . . . . . . . . . . . . . . . . . . . . . . . . . . . . . . . . . . . 2-3
Mode 2 Operational Modes . . . . . . . . . . . . . . . . . . . . . . . . . . . . . . . . . . . . . . . . . . . . . 2-4
Data Entry Options . . . . . . . . . . . . . . . . . . . . . . . . . . . . . . . . . . . . . . . . . . . . . . . . . . . . . . . . 2-5
Manual Entry . . . . . . . . . . . . . . . . . . . . . . . . . . . . . . . . . . . . . . . . . . . . . . . . . . . . . . . . . . 2-5
Search and Scan . . . . . . . . . . . . . . . . . . . . . . . . . . . . . . . . . . . . . . . . . . . . . . . . . . . . . . . . 2-6
Search and Scan Options . . . . . . . . . . . . . . . . . . . . . . . . . . . . . . . . . . . . . . . . . . . . . . . 2-6
Search or Scan Screen Display . . . . . . . . . . . . . . . . . . . . . . . . . . . . . . . . . . . . . . . . . . 2-7
Performing a Manual Search or Scan . . . . . . . . . . . . . . . . . . . . . . . . . . . . . . . . . . . . . 2-8
Recall . . . . . . . . . . . . . . . . . . . . . . . . . . . . . . . . . . . . . . . . . . . . . . . . . . . . . . . . . . . . . . . . 2-9
Global Recall . . . . . . . . . . . . . . . . . . . . . . . . . . . . . . . . . . . . . . . . . . . . . . . . . . . . . . . . . . 2-9
Speed Codes . . . . . . . . . . . . . . . . . . . . . . . . . . . . . . . . . . . . . . . . . . . . . . . . . . . . . . . . . . 2-10
Creating an Individual Speed Code . . . . . . . . . . . . . . . . . . . . . . . . . . . . . . . . . . . . . . 2-11
Creating a Terminal-wide Speed Code . . . . . . . . . . . . . . . . . . . . . . . . . . . . . . . . . . . 2-11
Stopping Speed Code Recording . . . . . . . . . . . . . . . . . . . . . . . . . . . . . . . . . . . . . . . . 2-12
Using a Speed Code . . . . . . . . . . . . . . . . . . . . . . . . . . . . . . . . . . . . . . . . . . . . . . . . . . 2-12
Deleting a Speed Code . . . . . . . . . . . . . . . . . . . . . . . . . . . . . . . . . . . . . . . . . . . . . . . 2-13
Swiping a Magstripe Card . . . . . . . . . . . . . . . . . . . . . . . . . . . . . . . . . . . . . . . . . . . . . . . 2-13
Swiping a Proximity Card . . . . . . . . . . . . . . . . . . . . . . . . . . . . . . . . . . . . . . . . . . . . . . . 2-14
Data Entry Error Messages . . . . . . . . . . . . . . . . . . . . . . . . . . . . . . . . . . . . . . . . . . . . . . . . . 2-15
Performing Transactions . . . . . . . . . . . . . . . . . . . . . . . . . . . . . . . . . . . . . . . . . . . . . . . . . . . . 3-1
In Mode 1 . . . . . . . . . . . . . . . . . . . . . . . . . . . . . . . . . . . . . . . . . . . . . . . . . . . . . . . . . . . . . . . 3-2
Making Photocopies . . . . . . . . . . . . . . . . . . . . . . . . . . . . . . . . . . . . . . . . . . . . . . . . . . . . . 3-2
Scanning Documents . . . . . . . . . . . . . . . . . . . . . . . . . . . . . . . . . . . . . . . . . . . . . . . . . . . . 3-2
Entering Disbursements . . . . . . . . . . . . . . . . . . . . . . . . . . . . . . . . . . . . . . . . . . . . . . . . . . 3-3
Releasing MyPrint Documents . . . . . . . . . . . . . . . . . . . . . . . . . . . . . . . . . . . . . . . . . . . . . 3-4
Interrupting a Transaction . . . . . . . . . . . . . . . . . . . . . . . . . . . . . . . . . . . . . . . . . . . . . . . . 3-5
In Mode 2 . . . . . . . . . . . . . . . . . . . . . . . . . . . . . . . . . . . . . . . . . . . . . . . . . . . . . . . . . . . . . . . 3-7
Making Photocopies . . . . . . . . . . . . . . . . . . . . . . . . . . . . . . . . . . . . . . . . . . . . . . . . . . . . . 3-7
Releasing Documents . . . . . . . . . . . . . . . . . . . . . . . . . . . . . . . . . . . . . . . . . . . . . . . . . . . . 3-8

PageCounter Usage Guide Overview
1 - 1
1
Overview
Equitrac PageCounter terminals are expense recovery devices used with Equitrac's Document
Accounting Solutions including Equitrac Professional Enterprise Edition, System 4, Equitrac
Professional, Equitrac Office, Equitrac Express, PrintLog Accounting Server, and Print Release
System (PRS).
PageCounter terminals supply expense management and device control for your business
environment. The terminals enable your organization to authorize and track transactions
made at office machines.
At a Glance...
Terminal Keyboard Layout
Standard Terminal Features
Optional Terminal Features
Terminal Modes
Overview:
Terminal Keyboard Layout
1 - 2
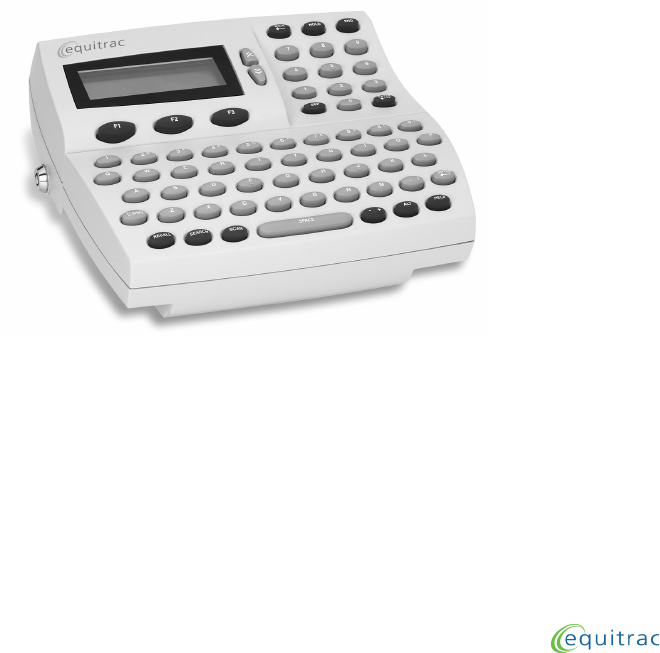
Terminal Keyboard Layout
The PageCounter supports an optional QWERTY keyboard. The keys on the terminal and
the keyboard are color-coded. Gray keys labeled in white provide standard alphabetic
function, and number keys. Blue function keys labeled in white include:
•F1, F2, F3—Selects corresponding options from the screen.
•HOLD—Extends the timeout value during Ready mode.
•BACK—Deletes characters to the left of the cursor.
•END—Ends the current transaction and returns to Idle mode.
•SEP—Enters special delimited code values.
•ENTER—Submits an entry at a data entry field (required if AutoEnter is not enabled).
•RECALL—Displays a list of previously entered accounting information.
•SEARCH—Searches for accounting data based on the first set of characters in a code or a
code's description (when configured).
•SCAN—Scans for accounting data based on a set of characters found anywhere in a code
or a code's description (when configured).
•- + —A Separator Key.
•ALT—Not configured for the PageCounter terminal.
•HELP—Displays terminal information.

Overview:
Standard Terminal Features
1 - 3
Standard Terminal Features
All PageCounter terminals provide the following features and functionality:
• Terminal display—4 line x 20 character LCD display.
•Numeric keypad
in calculator format.
•Dual Ethernet
—enables the use of the terminal as a mini-hub when connecting
multifunction devices. Eliminates the need for new wiring or multiple network drops.
• Copy support—enables access to the copier device only after you enter accounting data.
• Scan support—enables access to select eCopy or specific Xerox multi-function devices
for scan transactions.
• Metal bypass key—bypasses accounting data entry to access the controlled device.
• Storage capacity—128 MB hard disk that can store up to 200,000 validation codes and up
to 20,000 transactions at the terminal.

Overview:
Optional Terminal Features
1 - 4
Optional Terminal Features
All PageCounter terminals provide the following optional features:
• QWERTY keyboard—Standard keys and additional Equitrac function keys used to enter
information into the terminal for completing transactions.
• Magstripe reader device —Magnetic card reader that uses Track 2 encoded magnetic
cards, in place of the keyboard, to enter transaction data or user identification.
• Proximity card reader device—Internal card reader that uses encoded radio frequency
sensitive cards, in place of the keyboard, to enter user identification data on the
terminal.
• Cost recovery software—Terminal software that includes search, scan, recall, global
recall, and SmartPrompt functionality.

Overview:
Terminal Modes
1 - 5
Terminal Modes
Depending on the system, Equitrac equips the PageCounter with one of two modes: MODE 1 or
MODE 2.
Mode 1 is exclusively for Equitrac Professional Enterprise Edition, System 4, and Equitrac
Professional.
Mode 2 is exclusively for Equitrac Office, Equitrac Express, PrintLog Accounting Server, and Print
Release System (PRS).
The terminal’s behavior and available functionality depends on the mode. Depending on the mode,
not all features and functions are available on the terminal.

Overview:
Terminal Modes
1 - 6

PageCounter Usage Guide Entering Accounting Data
2 - 1
2
Entering Accounting Data
Before using the PageCounter Professional terminal, become familiar with its terminal states,
data entry procedures, and standards.
PageCounter terminals provide several methods for entering accounting data. The methods
available differ whether you are using Mode 1 communication or Mode 2 communication. In
either case, the terminals exist in various states and provide various error messages.
When you enter accounting data at the terminal, the terminal verifies your entry against
database validation values and notifies you if you enter incorrect information.
At a Glance...
Terminal States
Data Entry Options
Data Entry Error Messages

Entering Accounting Data:
Terminal States
Functional Modes
2 - 2
Terminal States
PageCounter terminal states include functional modes and operational
modes. Functional modes describe how the terminal works,
independently of the operation you perform on it. Operational modes
describe the usage choice or the operation you perform on the terminal,
such as photocopy.
Functional Modes
The PageCounter operates in three functional modes:
• Idle mode—The terminal is not in use; data entry fields are ready to accept entries. The
terminal returns to Idle mode after a specified period of inactivity.
• Data Entry mode—The terminal is in use; data entry fields are receiving entries.
• Ready mode—The terminal, after receiving all data entries, is functioning in the
selected mode of operation (counting printed pages, counting scans, and so on).
Idle Mode
A PageCounter terminal that is ready for use is in Idle mode. When you press any key
(unless that key has a special function), the terminal enters Data Entry mode.
The PageCounter returns to Idle mode when you complete a transaction or after a
configurable period of keyboard inactivity in Data Entry mode or Ready mode.
Idle mode enables the following terminal keys:
•F1, F2, F3—Select a corresponding option from the screen.
•HELP—Open the help topic associated with the current mode or function.
Data Entry Mode
When you begin entering data in the first data entry field, the terminal enters Data Entry
mode. The terminal transitions to Data Entry mode seamlessly, so it treats the first
character you enter as the initial character in the first data entry field. In this mode, the
terminal displays the Data Entry screen.
You can enter accounting data into the fields displayed on the Data Entry screen. Use the
arrow keys as needed to scroll through the data entry fields. You can enter the accounting
data directly into the data entry fields, use data entry tools such as swipe cards or, for
Mode 1 terminals, use any of the configured data entry options such as SEARCH, SCAN, or
RECALL.
The PageCounter returns to Idle mode when you complete a transaction or after a
configurable period of keyboard inactivity in either Data Entry or Ready mode.
At a Glance...
Functional Modes
Operational Modes

Entering Accounting Data:
Terminal States
Operational Modes
2 - 3
Ready Mode
After you complete all required accounting entries at the Data Entry screen, the terminal
enters Ready mode, and displays the Ready screen. At this point, you can begin using the
controlled device to make a transaction.
The Ready screen displays an accumulator for page count and a timer for device timeout.
In addition to the page count and device timer, other information may include billable/
non-billable information or the total charge for the transaction. Ready mode enables the
following terminal keys:
•F1, F2, F3—Select a corresponding option from the screen.
•END—End the current transaction and return to Idle mode.
•HOLD—Extend the timeout value. See your system administrator for details.
The PageCounter returns to Idle mode when you complete a transaction or after a
configurable period of keyboard inactivity in either Data Entry or Ready mode.
Operational Modes
A PageCounter’s operational mode determines the type of operation the PageCounter
controls. When a terminal is in Photocopy mode, for example, it controls access to the
connected copier and tracks copy transactions users perform on the copier. Both Mode 1
and Mode 2 support different operational modes.
Mode 1 Operational Modes
When your PageCounter terminal uses Mode 1 communication, it can support up to four
operational modes, including:
• Photocopy mode—The terminal tracks copies made at a photocopier.
• Disbursements mode—The terminal tracks disbursements made at the terminal.
• Job Code mode—The terminal records job codes used for fax transactions made at the
terminal. (Not available).
• MyPrint mode—The terminal holds printed documents in a queue until an authorized
user releases or deletes them.
Note: The names and appearances of all operational modes are configurable and can differ
from terminal to terminal.
To switch from one operational mode to another, perform the following procedure:
1Press the corresponding function key (F1, F2, or F3) for MODE on the screen.
2Select the mode you want to use by selecting the mode’s corresponding number key.

Entering Accounting Data:
Terminal States
Operational Modes
2 - 4
3Enter accounting data.
4Perform your transaction using the controlled device.
5Press the corresponding function key for NEXT on the screen to remain in the current
mode and begin another transaction.
6Press the corresponding function key for END to finish your transaction. The terminal
returns to its default operational mode (typically Photocopy mode).
Mode 2 Operational Modes
When your PageCounter terminal uses Mode 2 communication, it can support one of three
different modes:
• Photocopy Mode—The terminal tracks copies made at a photocopier.
• Print Release Mode—The terminal holds printed documents in a queue until an
authorized user releases or deletes them.
• Photocopy and Print Release Mode—The terminal tracks copies made at a photocopier
and holds printed documents in a queue until an authorized user releases or deletes
them.
Your system administrator determines which terminals will use which operational modes
and configures those modes using your Equitrac software.

Entering Accounting Data:
Data Entry Options
Manual Entry
2 - 5
Data Entry Options
The data entry options available depend on the terminal’s
configuration and its current mode of operation. Data entry
options include the following:
•Manual Entry
• Search or Scan
• Recall and Global Recall
• Speed Codes
• Magnetic Stripe Card (Magstripe) Reader Device
• Proximity Card Reader Device
Manual Entry
Manual entry is available on terminals using Mode 1 communication and on terminals
using Mode 2 communication.
To manually enter data at a PageCounter terminal, perform the following procedure:
1Enter accounting data for each field prompt using the PageCounter numeric keypad or
optional alphabetic keyboard. If you terminal uses Mode 2 communication, press and
hold ALT to enter an uppercase character.
Note: Press BACK to delete characters to the left of the cursor.
When a field is configured with the text description display option, the corresponding
description for a valid field entry displays after you make the entry.
2Press ENTER to accept a field entry and advance to the next prompt or to advance the
terminal to Ready mode.
Note: If a field is configured with AutoEnter, the terminal automatically advances to the next
prompt after the last character of the fixed-length entry is typed. See your System
Administrator for details.
3Press END on the keyboard to end the transaction and return the terminal to Idle mode.
At a Glance...
Manual Entry
Search and Scan
Recall
Global Recall
Speed Codes
Swiping a Magstripe Card
Swiping a Proximity Card

Entering Accounting Data:
Data Entry Options
Search and Scan
2 - 6
Search and Scan
The SEARCH and SCAN options are available only on terminals using Mode 1 communication.
The SEARCH and SCAN options look up accounting information for configured accounting
fields such as user or client. You can search or scan for data at the terminal and then select
the necessary accounting information.
• Searches are based on either the initial characters in a code or in a code’s description but
not both. Press the SEARCH key to toggle between search fields. For example, a code
search for 123 finds 12345 and 123-999 as possible matches.
• Scans are based on either any combination of characters found anywhere in a code or in
a code’s description, but not both. Press the SCAN key to toggle between scan fields. For
example, a name scan for AB finds ABC Pools, John’s Cab Company, and Van
Abramson as possible matches.
Search and Scan Options
The kinds of searches and scans you can perform on the terminal depends on the terminal’s
configuration. Each data entry field can be configured to support searches and scans.
You may not have to manually initiate a search or scan if the current data entry field is
configured to automatically search or scan (auto search or scan), or configured to search or
scan on the first key entered (first-key search or scan). See your System Administrator for
details on how your PageCounter terminal is configured.
Auto Search or Scan
When you reach a field configured to automatically search or scan, the terminal displays a
list of matching codes or descriptions.
First-Key Search or Scan
When you reach a field configured for first-key search or scan, the terminal displays a list
of matching codes or descriptions when you first enter a character in the field.
Search and Scan Configurations
PageCounter terminals provide the following SEARCH and SCAN options.
Search and Scan Option Description
Auto Code Search
Auto Code Scan
The terminal automatically displays a list of matching codes as
soon as it advances to the configured data entry field (after
the code in the previous field is verified).
The terminal defaults to Auto Code Searches. Press the
corresponding function key for SCAN to switch to Auto Code
Scans.

Entering Accounting Data:
Data Entry Options
Search and Scan
2 - 7
Note: When using combined validation, both SEARCH and SCAN work differently for the
second combined field entry. The terminal uses the text string and code entered in the
first combined field to search for matching codes for the second field.
A code can exist without an associated text description. For such codes, the
Description column remains blank during a SEARCH or SCAN BY CODE.
Search or Scan Screen Display
When you initiate a SEARCH or SCAN, the PageCounter terminal begins searching for all exact
matches to the characters you type. The terminal displays the following message:
Executing Search
Please Wait
This message is replaced with the first matching entry found. If no matches are found, it is
replaced with the message:
No Matches Found
Auto Description Search
Auto Description Scan
The terminal automatically displays a list of matching
descriptions as soon as it advances to the configured data
entry field (after the code in the previous field is verified).
The terminal defaults to Auto Description Searches. Press the
corresponding function key for SCAN to switch to Auto
Description Scans.
First-Key Code Search
First-Key Code Scan
The terminal displays a list of matching codes after the first
character is typed in the configured data entry field.
The terminal defaults to First-Key Code Searches. Press the
corresponding function key for SCAN to switch to First-Key
Code Scans.
First-Key Description Search
First-Key Description Scan
The terminal displays a list of matching descriptions after the
first character is typed in the configured data entry field.
The terminal defaults to First-Key Description Searches. Press
the corresponding function key for SCAN to switch to First-Key
Description Scans.
Manual Code Search
Manual Code Scan
The terminal displays a list of matching codes after you press
the corresponding function key for SEARCH or SCAN.
Manual Description Search
Manual Description Scan
The terminal displays a list of matching descriptions after you
press the corresponding function key for SEARCH or SCAN.
Search and Scan Option Description

Entering Accounting Data:
Data Entry Options
Search and Scan
2 - 8
As more matching entries are found, the terminal displays them on the screen. As you type
additional characters in the look-up field, the PageCounter terminal narrows its search and
updates the list of matching information displayed on the screen.
Note: If the SEARCH and SCAN functions are disabled for a particular field, see your system
administrator to have them enabled.
Performing a Manual Search or Scan
When you reach an entry field that has SEARCH or SCAN functionality enabled, the terminal
displays SEARCH or SCAN options on the screen. To search or scan for accounting data,
perform the following procedure:
1Select a SEARCH or SCAN option.
• Press the corresponding function key (F1, F2, OR F3) for SEARCH or SCAN.
—Or—
•Press
SEARCH or SCAN on the optional keyboard.
2If the terminal is configured for multiple SEARCH or SCAN types, select the type you want
to perform such as SEARCH BY CODE or SCAN BY DESC.
•BY CODE searches or scans the User, Client, and Matter fields.
•BY DESCRIPTION searches or scans the description fields associated with the User,
Client, and Matter fields.
Note: During a SEARCH or SCAN, press the arrow keys to switch between code and
description look-up functions.
3Enter the first few characters of the code or description you want to find. The terminal
displays the first matching entries and updates the display as you enter more
characters.
• When searching, the terminal finds data where the first part of the entry matches the
look-up characters.
• When scanning, the terminal finds data where any part of the entry matches the
look-up characters.
4Use the arrow keys to browse the matching entries, or enter additional characters to
refine the matching entries list.
5When you select the desired entry, press ENTER. The accounting information is inserted
in the field where you initiated the search or scan. Proceed to the next data entry field or
continue with your transaction as needed.

Entering Accounting Data:
Data Entry Options
Recall
2 - 9
Recall
The RECALL option is available only on terminals using Mode 1 communication.
For configured fields, the RECALL option retrieves a list of previously entered accounting
information from the local terminal, and displays the data on the screen. The recalled
information is based on the accounting codes you entered in the previous data entry fields.
The terminal displays the most recent transactions first. Only transactions made from the
current Data Entry mode are recalled because different Data Entry modes might not have
the same uses for a field.
Consider an example in which the terminal is configured with three fields: User, Client,
and Matter. The Recall feature on the terminal is configured so that the:
• Client field recalls are based on User data.
• Matter field recalls are based on Client and User data.
When you press the corresponding function key (F1, F2, or F3) for RECALL, or press RECALL
on the optional keyboard:
At the Client Field—the terminal displays recalled data based on the last entry in the User
field. Use the arrow keys to scroll through other recalled entries.
At the Matter Field—the terminal displays recalled data based on the last entry in the
Client and User fields. Use the arrow keys to scroll through other recalled entries.
To recall previously entered accounting data for a particular field on the local terminal,
perform the following procedure:
1Press the corresponding function key for RECALL. The terminal retrieves a list of
previous entries for the current field.
2Use the arrow keys to select the desired entry on the screen, and press ENTER.
3Continue with your transaction as needed.
Note: Press the corresponding function key for CANCEL to abandon Recall and return to the
Data Entry screen.
Global Recall
The GLOBAL RECALL option is available only on terminals using Mode 1 communication.
After pressing RECALL, you may select GLOBAL to retrieve accounting data from the local
terminal as well as all other terminals that are in communication with the host system over
the network.

Entering Accounting Data:
Data Entry Options
Speed Codes
2 - 10
To recall previously entered accounting data, for a particular field, from all terminals
connected to the host system, perform the following procedure:
1Press the corresponding function key for RECALL.
Note: Press the corresponding function key for MORE if the RECALL option is not visible on
the terminal screen.
2Press the corresponding function key for GLOBAL. The terminal retrieves, from all
terminals connected to the host system, a list of previous entries for the current field.
Note: You can press RECALL twice to select GLOBAL RECALL.
3Use the arrow keys to select the desired entry on the screen and press ENTER.
Note: Press the corresponding function key for CANCEL to abandon global recall and return
to the Data Entry screen.
4Continue with your transaction as needed.
Speed Codes
The Speed Code option is available only on terminals using Mode 1 communication.
The Speed Code option functions like a speed dial on a telephone. Speed codes enable you
to replace an accounting code, including optional fields you have skipped or left blank,
with your own short, alphanumeric code.
When you use a speed code, the terminal automatically enters the accounting information
previously assigned to that code. For example, you can enter a short speed code at the
Client field that replaces both the client code and the matter code.
Each terminal can have one type of speed code only—Individual or Terminal-wide:
• Individual—Individual speed codes are based on a specific field, and are typically
based on the user code. However, you can configure individual speed codes to use any
previous data entry field as the key field.
• Terminal-wide—Terminal-wide speed codes are not associated with a specific field and
often represent descriptions, such as accounting transactions, research, or distribution.
Authorized users designated by the system administrator can create terminal-wide
speed codes. Any user can use terminal-wide speed codes.

Entering Accounting Data:
Data Entry Options
Speed Codes
2 - 11
Creating an Individual Speed Code
To create an individual speed code, perform the following procedure:
1Enter your User ID (if the speed code is not configured for the User field).
2Press the corresponding function key (F1, F2, or F3) for MORE options.
3Press the corresponding function key for SPCODE.
Note: Press the corresponding function key for MORE if the SPCODE option is not visible on
the terminal screen.
4Press the corresponding function key for CREATE.
5Enter a unique speed code and press ENTER.
6Enter a description for the speed code and press ENTER.
Note: If the speed code you entered already exists, the terminal asks you if you want to
replace the existing code.
Select the corresponding function key for NO to enter a different speed code.
Select the corresponding function key for YES to replace the existing speed code and
description with the new speed code and description.
7In the appropriate fields of the Data Entry screen, enter the desired accounting
information to assign to the speed code.
8Recording continues until all accounting data has been entered or until you press the
corresponding function key to stop recording. See Stopping Speed Code Recording on
page 2 - 12 for details.
Creating a Terminal-wide Speed Code
When your administrator configures the terminal to accept terminal-wide speed codes, the
speed codes you create are available to all terminal users. To create the speed codes,
however, you must provide a valid password.
To create a terminal-wide speed code, perform the following procedure:
1Enter your User ID.
2Press the corresponding function key (F1, F2, or F3) for MORE options.
3Press the corresponding function key for SPCODE.
Note: Press the corresponding function key for MORE if the SPCODE option is not visible on
the terminal screen.

Entering Accounting Data:
Data Entry Options
Speed Codes
2 - 12
4Press the corresponding function key for CREATE.
5Enter an authorized user password and press ENTER.
6Enter a unique speed code and press ENTER.
7Enter a description for the speed code and press ENTER.
Note: If the speed code you entered already exists, the terminal asks you if you want to
replace the existing code.
Select the corresponding function key for NO to enter a different speed code.
Select the corresponding function key for YES to replace the existing code and
description with the new code and description.
8In the appropriate fields of the Data Entry screen, enter the desired accounting
information to assign to the speed code (such as Client and Matter data).
9Recording continues until all accounting data has been entered or until you press the
corresponding function key to stop recording. See Stopping Speed Code Recording on
page 2 - 12 for details.
Stopping Speed Code Recording
To stop recording a speed code at the terminal, use one of the following options:
• Press the corresponding function key for STOP. The terminal creates the speed code
successfully, provided you have entered valid data for required fields.
• Press the corresponding function key for CANCEL. The terminal does not create the
speed code.
• Finish entering data for all data entry fields. The terminal creates the speed code and
displays the Ready screen.
Using a Speed Code
To use a speed code at the terminal, perform the following procedure:
1Enter your User ID (if the speed code is not configured for the User field).
2Press the corresponding function key (F1, F2, or F3) for MORE options.
3Press the corresponding function key for SPCODE.
Note: Press the corresponding function key for MORE if the SPCODE option is not visible on
the terminal screen.
4Use the arrow keys to select a speed code from the list and press ENTER.

Entering Accounting Data:
Data Entry Options
Swiping a Magstripe Card
2 - 13
The terminal automatically enters the information associated with the speed code and
advances to the next data entry field. If the speed code contains all field entries, the
terminal automatically advances to the Ready screen.
5If necessary, enter the information for the remaining fields to advance the terminal to
the Ready screen.
Deleting a Speed Code
To delete a speed code stored at the terminal, perform the following procedure:
1Enter your User ID (if the speed code is not configured for the User field).
2Press the corresponding function key (F1, F2, or F3) for MORE options.
3Press the corresponding function key for SPCODE.
Note: Press the corresponding function key for MORE if the SPCODE option is not visible on
the terminal screen.
4Use the arrow keys to select a speed code to delete from the list.
5Press the corresponding function key for DELETE.
6Select the corresponding function key for YES to confirm the deletion, then press ENTER.
Note: You may be prompted to enter a password before you can delete a speed code. If you
are authorized to delete speed codes, type your password and press ENTER.
Swiping a Magstripe Card
The magnetic card reader is available on terminals using Mode 1 communication and on
terminals using Mode 2 communication.
When the terminal includes a magnetic card reader device, you can enter data by swiping
an encoded magnetic card (magstripe card) instead of using the keyboard.
To operate the magnetic card device reader, perform the following procedure:
1Insert the card into the guide track with the magnetic stripe facing away from the
terminal. Make sure the card is pressed firmly against the guide.
2Pull the card down through the guide track and remove the card.
Note: Do not run the card through at an angle or the data will not be entered.
If the terminal cannot read the entry, reinsert the card into the guide track and run the
card through the reader again.

Entering Accounting Data:
Data Entry Options
Swiping a Proximity Card
2 - 14
3Press ENTER at the PageCounter terminal for any field that is not configured for
AutoEnter.
Swiping a Proximity Card
The radio frequency card reader is available only on terminals using Mode 2
communication.
When the terminal includes a radio frequency card reader device, you can enter data by
swiping an encoded card (proximity card) instead of using the keyboard. Perform the
following to operate the internal proximity card device reader.
Pass the proximity card in front of the internal proximity card reader, located to the right of
the PageCounter. You can identify the card reader by its symbol:
Ensure that you pass the card within 1 inch of the symbol. Press ENTER at the PageCounter
terminal for any field that is not configured for AutoEnter.

Entering Accounting Data:
Data Entry Error Messages
2 - 15
Data Entry Error Messages
The terminal may display various error messages. These error messages usually indicate
that the data you entered was not the type of data the terminal expected.
When the terminal displays an error message, press the corresponding function key for
CANCEL to return to the previous screen. Reentering the correct data in the proper format
should eliminate the error.
See the System Administrator for additional details on terminal error messages.

Entering Accounting Data:
Data Entry Error Messages
2 - 16

PageCounter Usage Guide Performing Transactions
3 - 1
3
Performing Transactions
Now that you are familiar with PageCounter data entry, you can begin performing
transactions. This chapter provides instructions on performing transactions such as copying,
scanning, entering disbursements, and releasing MyPrint documents using the PageCounter.
The procedures for completing transactions differ depending on whether your terminal is
configured for Mode 1 communication or Mode 2 communication. Recall that terminals
communicating with System 4, Equitrac Professional Enterprise Edition, and Equitrac
Professional use Mode 1. Terminals communicating with Equitrac Office, Equitrac Express,
PrintLog Accounting Server, and Print Release System (PRS) use Mode 2.
At a Glance...
In Mode 1
In Mode 2

Performing Transactions:
In Mode 1
Making Photocopies
3 - 2
In Mode 1
PageCounter terminals use Mode 1 communication exclusively
with Equitrac Professional Enterprise Edition, System 4, and
Equitrac Professional.
Depending on your Mode 1 terminal configuration, you can use the
PageCounter to make photocopies, scan documents, enter
disbursements, release MyPrint documents, and interrupt
transactions in progress.
Making Photocopies
To complete a photocopy transaction, perform the following procedure:
1Ensure that the terminal is in Copy mode.
aPress the corresponding function key (F1, F2, or F3) for MODE on the screen.
bPress the corresponding number key for COPY.
2Use the desired data entry method to enter accounting data in the required fields. See
Data Entry Options on page 2 - 5 for details.
Note: Edit data using the BACK key, as needed. Press ENTER after editing the code.
When all accounting information has been entered and verified, the terminal unlocks
the photocopy device and displays the Ready screen.
3Use the photocopier to make your photocopies.
4If you want to start another transaction using the same User ID, press the
corresponding key for NEXT and enter accounting codes as required.
5Repeat steps 2 through 4 as needed.
6Press END when you finish your transaction at the copier.
Scanning Documents
PageCounter terminals support eCopy ScanStation devices, eCopy ShareScan OP, or
specific Xerox multi-function devices with scan enabled. To complete a scan transaction,
perform the following procedure:
1Ensure that the terminal is in Copy mode.
aPress the corresponding function key (F1, F2, or F3) for MODE on the screen.
bPress the corresponding number key for COPY.
At a Glance...
Making Photocopies
Scanning Documents
Entering Disbursements
Releasing MyPrint
Documents
Interrupting a Transaction

Performing Transactions:
In Mode 1
Entering Disbursements
3 - 3
2Use the desired data entry method to enter accounting data in the required fields. See
Data Entry Options on page 2 - 5 for details.
Note: Edit data using the BACK key, as needed. Press ENTER after editing the code.
When all accounting information has been entered and verified, the terminal unlocks
the scan device and displays the Ready screen.
3Use the scan device to complete your scan transaction.
Note: Certain scan interfaces do not communicate transaction information until the entire
scan transaction is complete. The Ready screen does not necessarily display
accurate scan transaction values while the scan transaction is in progress.
4If you want to start another transaction using the same User ID, press the
corresponding function key for NEXT and enter accounting codes as required.
5Repeat steps 2 through 4 as needed.
6When you have completed scanning documents:
• For eCopy version 7.1, end the transaction at the eCopy ScanStation device.
• For eCopy version 8.01, eCopy ShareScan OP, and Xerox scan devices, press END on
the PageCounter terminal.
Entering Disbursements
To enter a disbursement at a PageCounter terminal, perform the following procedure:
1Ensure that the terminal is in Disbursements mode.
aPress the corresponding function key (F1, F2, or F3) for MODE on the screen.
bPress the corresponding number key for DISB.
2Use the desired data entry method to enter accounting data in the required fields. See
Data Entry Options on page 2 - 5 for details.
Note: Edit data using the BACK key, as needed. Press ENTER after editing the code.
When all accounting information has been entered and verified, the terminal displays
the Ready screen.
3At the terminal, enter disbursement transaction information.
4To start another transaction using the same User ID, press the corresponding function
key for NEXT and enter accounting codes as required.

Performing Transactions:
In Mode 1
Releasing MyPrint Documents
3 - 4
5Repeat steps 2 through 4 as needed.
6Press END when you finish your transaction.
Releasing MyPrint Documents
To release a document to a printer, perform the following procedure:
1Ensure that the terminal is in MyPrint mode.
aPress the corresponding function key (F1, F2, or F3) for MODE on the screen.
bPress the corresponding number key for MYPRINT.
2Enter a user password. User passwords are configured and managed in the control
system software. The most recent print job in the queue displays on the terminal screen.
3Use the arrow keys to scroll through the print job list.
4Press the corresponding function key for OPTION to display the secure document
release menu screen.
5Press the corresponding number key to perform one of the following operations:
0:RELEASE ALL
1:RELEASE
2:DELETE
3:REFRESH
4:BACK TO PREV MODE
The following table describes each secure document release option.
6Press END to finish your transaction, if necessary.
Secure Document
Release Option Description
Release All Releases all listed print jobs to the printer.
Release Releases the selected print job to the printer.
Delete Deletes the selected print job from the terminal.
Refresh Updates the list of print jobs.
Back to Prev Mode Returns the terminal to Idle mode.

Performing Transactions:
In Mode 1
Interrupting a Transaction
3 - 5
Interrupting a Transaction
While a transaction is in progress (a lengthy copy job, for example), you can interrupt the
current transaction to perform another transaction. The terminal suspends the current
transaction until you return to it. The current transaction remains active while it is
interrupted. The terminal continues to track the device output.
Note: The interrupted transaction can time out if your subsequent transactions take
considerable time to complete and the terminal reaches its configured device time out
value. See your system administrator for details.
Interrupt is not supported when using MyPrint mode.
There are four levels of interrupt available which enable the terminal to store information
for up to five transactions at a time.
To interrupt a current transaction with another transaction, perform the following
procedure:
1With a transaction in progress, press the corresponding function key for INT.
Note: You can interrupt the current transaction to perform a different kind of transaction.
Press OPTN, select the Select Mode option, then select a mode of operation. See
Operational Modes on page 2 - 3 for details.
2Press the corresponding number key for the transaction type you want.
3Enter the appropriate accounting information for each field by performing one of the
following:
• Enter the accounting data. If necessary, press ENTER after each field entry.
—Or—
• Enter accounting data at a field using a speed code, or by using the SEARCH, SCAN, or
RECALL options. See Data Entry Options on page 2 - 5 for details.
Note: Use the BACK key to edit accounting data entries as needed.
When the Ready screen displays, one of the following interrupt level indicators display
at the bottom of the screen. When you interrupt the terminal for the first time, the level
indicator displays
INT-1
You can interrupt the terminal four times at most. The interrupt level indicator changes
to correspond with the level of interrupt, in the following order:

Performing Transactions:
In Mode 1
Interrupting a Transaction
3 - 6
INT-1
INT-2
INT-3
INT-4
4Perform the transaction.
5Press END to end the current transaction and return to the previously interrupted
transaction.
When you interrupt multiple transactions, you must complete the most recent transaction
before you can access previous ones. For example, if you are doing a transaction and the
interrupt level indicator is INT-4 you cannot access the transaction whose interrupt level
indicator is INT-1 until you have completed all the other transactions.
If you attempt to interrupt the terminal more than four times, the terminal displays the
message "Interrupt level exceeded" at the bottom of the screen. Complete a transaction
before proceeding with another transaction.

Performing Transactions:
In Mode 2
Making Photocopies
3 - 7
In Mode 2
PageCounter terminals use Mode 2 communication exclusively with
Equitrac Office, Equitrac Express, PrintLog Accounting Server, and
Print Release System (PRS).
Your system administrator can configure PageCounter terminals to
support secure document release and copy control. When configured,
your prints or copies are tracked by an Equitrac System.
Secure printing uses an Equitrac system’s queuing feature in conjunction with the
PageCounter terminal for user-controlled release. The Equitrac system holds documents
sent to registered devices in the secure print queue. Using the terminal, you can view,
select, delete, or release documents to the printer. You can also walk to a different
compatible printer and redirect documents to the new printer.
Copy control provides copy device control that can authorize and track transactions made
at copy devices.
Making Photocopies
To access the copier device to make photocopies, the terminal prompts you to either swipe
a card (magnetic stripe or proximity) or enter a PIN using the keypad or optional
QWERTY keyboard and press ENTER. When entering a PIN using the keyboard, press and
hold ALT to enter an uppercase character. See the control system documentation for
complete details on terminal prompts and messages.
Note: Use the corresponding function keys (F1, F2, F3) below the terminal screen, as well
as the number pad keys, to complete your transactions.
If prompted, enter a secondary PIN and press ENTER.
The terminal processes your entry and verifies your primary and optional secondary PIN.
When prompted on the terminal screen, press the corresponding function key to copy
documents.
If prompted, enter the numeric billing code to which the copier usage should be charged.
When the terminal displays the account name, make the copies you need and press END to
close your copying session. PageCounter displays the total number of copies you made.
The terminal notifies you when:
• Your copying session has been closed and the PageCounter terminal is now ready for
the next user.
At a Glance...
Making Photocopies
Releasing
Documents

Performing Transactions:
In Mode 2
Releasing Documents
3 - 8
• Your copying session has been terminated because the account is either out of funds or
is locked.
Releasing Documents
To release documents for printing, the terminal prompts you to either swipe a card or enter
a PIN using the numeric keypad and press ENTER. See the control system documentation for
complete details on terminal prompts and messages.
Note: Use the corresponding function keys (F1, F2, F3) below the terminal screen, as well
as the number pad keys, to complete your transactions.
If prompted, enter a secondary PIN and press ENTER.
The terminal processes your entry and verifies your primary and optional secondary PIN.
When prompted on the terminal screen, press the corresponding function key to print
documents.
When prompted on the terminal screen, press the corresponding function key to release all
documents, select a specific document sent to this specific printer, or to browse documents
you have sent to all compatible printers in the group. See the control system
documentation for details on pull group functionality.
When you select a document, press the corresponding function key to print or delete the
document, or to stop browsing documents.
The terminal notifies you when:
• Your document has been released for printing.
• Your document has been deleted.
• You have no documents waiting to be printed.
• Your printing session has been closed and the terminal is ready for the next user.