Eratech Co EVR-500 Portable Digital Audio Player User Manual Eratech FCC EVR 500
Eratech Co, Ltd Portable Digital Audio Player Eratech FCC EVR 500
User Manual

Report No: BWS-03-EF-0022
FCC ID : QNJEVR-500
Date of Test : May 26, 2003
Eratech Co., Ltd.
Portable Digital Audio Player EVR-500
Appendix 6. User Manual
Refer to the following pages
User Guide(EVR-500)
Multi-functional Digital Audio Recorder

Contents
2
Before Use
Introduction ------------------------------------------ 4
Caution ------------------------------------------------ 5
Characteristics --------------------------------------- 6~7
Components ----------------------------------------- 8
Player controls -------------------------------------- 9~10
Inserting Battery ------------------------------------ 11
Hold On/Off of Recorder -------------------------- 12
Basic Use
Power On/Off ---------------------------------------- 13
File Play/Stop ---------------------------------------- 14
Playback Speed Adjustment --------------------- 15
Move and Search
- File Search ------------------------------------------ 16
- Part Search ----------------------------------------- 17
- Navigation ------------------------------------------ 17~18
Volume Control -------------------------------------- 18
Mode Switching ------------------------------------------ 19
Descriptions
Audio Mode ------------------------------------------- 20~22
Voice Mode ------------------------------------------- 23~24
Menu Setting ----------------------------------------------- 25
Play List ----------------------------------------------- 26
Equalizer ---------------------------------------------- 26
Repetitive Playback --------------------------------- 27
A-B Repeat Function ------------------------------- 27
Internal/External Microphone --------------------- 28
Mono/Stereo ----------------------------------------- 28
Recording Quality ----------------------------------- 29
System Setting
- Backlight -------------------------------------------- 29
- LCD Brightness ------------------------------------ 30
- VOR Recording ------------------------------------ 30
- FM BAND -------------------------------------------- 31

- Font Download ------------------------------------ 31
- Language ------------------------------------------- 32
- CD SYNC -------------------------------------------- 32
- Format ---------------------------------------------- 33
- File Erase ------------------------------------------- 33
- Power Timer --------------------------------------- 34
- Date and Time ------------------------------------- 3 4
Voice Recording and Play
- Mike -------------------------------------------------- 35~36
- Line-in ----------------------------------------------- 36~37
Listening to FM Broadcast
Listening to FM Broadcast ------------------------ 38
Channel Saving -------------------------------------- 38
Channel Update ------------------------------------- 39
Listening to Recorded Channel ----------------- 3 9
Broadcast Recording ------------------------------- 4 0
Listening to Recorded Broadcast Contents --- 4 1
Installation of Beatsounds Config Software ---------- 4 2
Use of Beatsounds Config
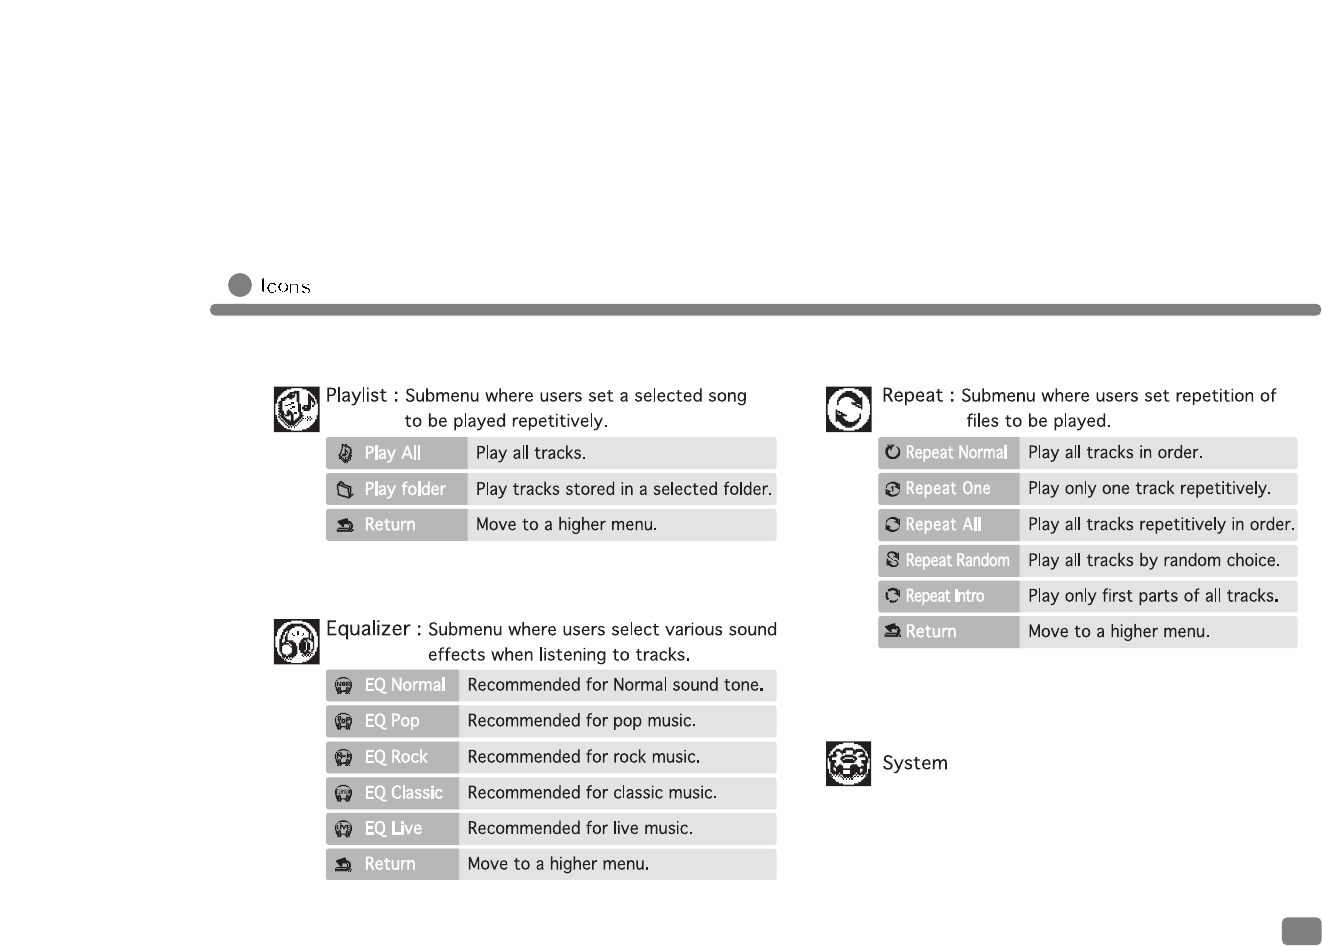
Icons ----------------------------------------------------- 43
Saving of logo ------------------------------------------ 43~45
Installation of Mass Storage Driver (for Win 98) ------- 46~47
Connection to and Use with PC
Download ------------------------------------------------ 48
Upload --------------------------------------------------- 4 9
Deletion of Files ---------------------------------------- 49
Connection to and Use with Mac ------------------- 50
Others
Troubleshooting --------------------------------------- 51
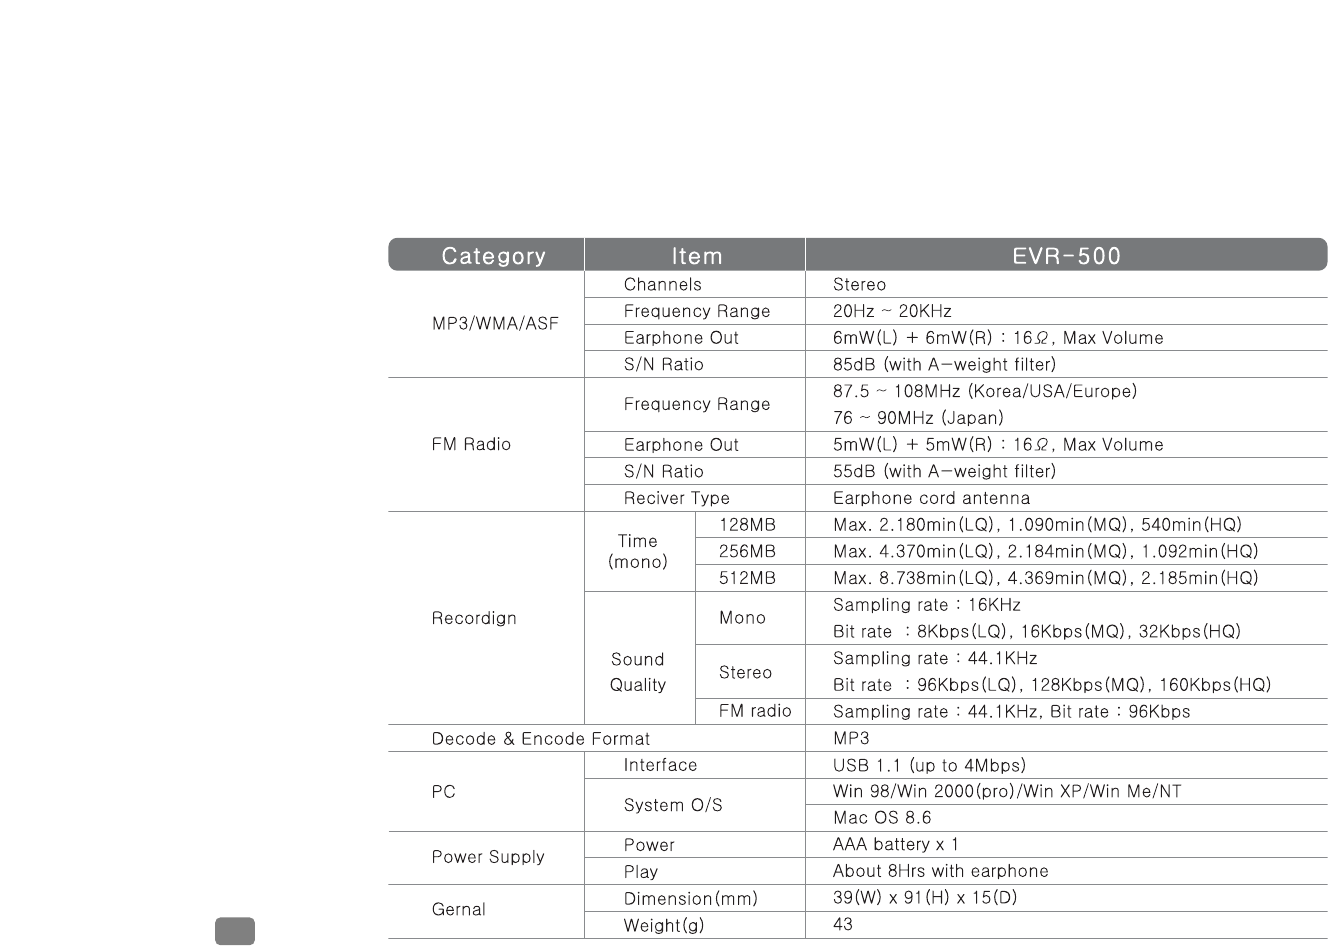
Specifications ------------------------------------------ 52
3

Introduction
Thank you for choosing our Digital Audio Recorder.
Please read this manual carefully before using the recorder.
Please be informed that this manual is subject to change without notice for improvement of the product.
4

Safety Cautions
Please read and comply with these instructions for information about using the product correctly and safely to
prevent any possible danger or damage to properties.
5
1. Safety
Do not keep the product in such places:
- Hot environment (above 60 )
- Closed automobile
- Humid place like a bathroom
- Exposed direct to the sun or near a heating apparatus
- Areas of excessive dust
Do not fall or give a shock to the product.
Users are prohibited to disassemble, repair, or rebuild it at
your discretion.
Do not use the product in such areas like airplanes where
the use of electrical utilities is prohibited.
Do not put your ID cards, credit cards, and other magnetic
cards near the speaker, or you cannot use them because
their magnetic information is likely to be
lost due to the force of the speaker.
Do not apply excessive force to the liquid crystal display,
or it may be destroyed or damaged.
2. Handling of Battery
Do not short, disassemble, heat, or throw used
batteries into fire; its electrolyte may come into your
eyes, or it may be exploded by fire.
If its electrolyte contacts skin or clothes, wash it
immediately with flushing water. If it come into your
eyes, wash them with flushing water and go see a
doctor immediately..
Remove and put aside batteries out of Digital Voice
Recorder, when you do not use it for a long time.
3. If the product gives off smoke or is transformed in form
due to heat, remove batteries from the product immediately
4. You must check the remaining power of battery before
starting record, because recording process will stop as
soon as it is dead.

Characteristics of Product
Digital Audio Recorder is a Multi Codec Player that can play various formats including MP3, WMA, and ASF.
MPEG3, the Moving Picture Experts Group Layer 3, is one of standards for digital compression
files. It can reduce a WAV file up to less than 10% of its original size, maintaining its sound
quality close to its CD sound.
WMA, Windows Media Audio, is developed by Microsoft as a multimedia compression tool,
exclusively for music data. It has the same sound quality as MP3, while its compression is about
half (1/22) of that of MP3.
ASF, Advanced Streaming Format, is also developed by Microsoft as a multimedia file transfer data
format, which comes to be used in more applications.
6
MP3
WMA
ASF

FM Radio Broadcast - Receiving & Recording
Users can enjoy both receiving and recording real time FM
stereo radio signals.
Firmware Upgrade
The product enables the play of future multimedia formats
through firmware upgrade and provides functional improvement
and development for the use of up-to-date functions
Successive 8-hour Play
You can play the recorder 8 hours successively with one AAA
battery.
Multi Languages Support
The product supports multi languages like Korean, Chinese and
Chinese characters, English, Japanese, and special European
characters.
High Capacity USB mobile storage
You can use the product easily and safely without the USB cable
because it has a slide type USB connector.
Navigation
You can search, select, and play a required file simply and
easily using Navigation function.
Five Equalizers
When listening to music, you may select its tone among
Normal/Pop/Rock/Classic/Live.
Easy File Management Using Folders
It has Voice and Radio folders users may manage easily and
simply by generating and deleting them.
MP3 Voice Recording
Voice is recorded in MP3 file, which may be stored
permanently in PC and played repetitively without the loss of
its quality.
7
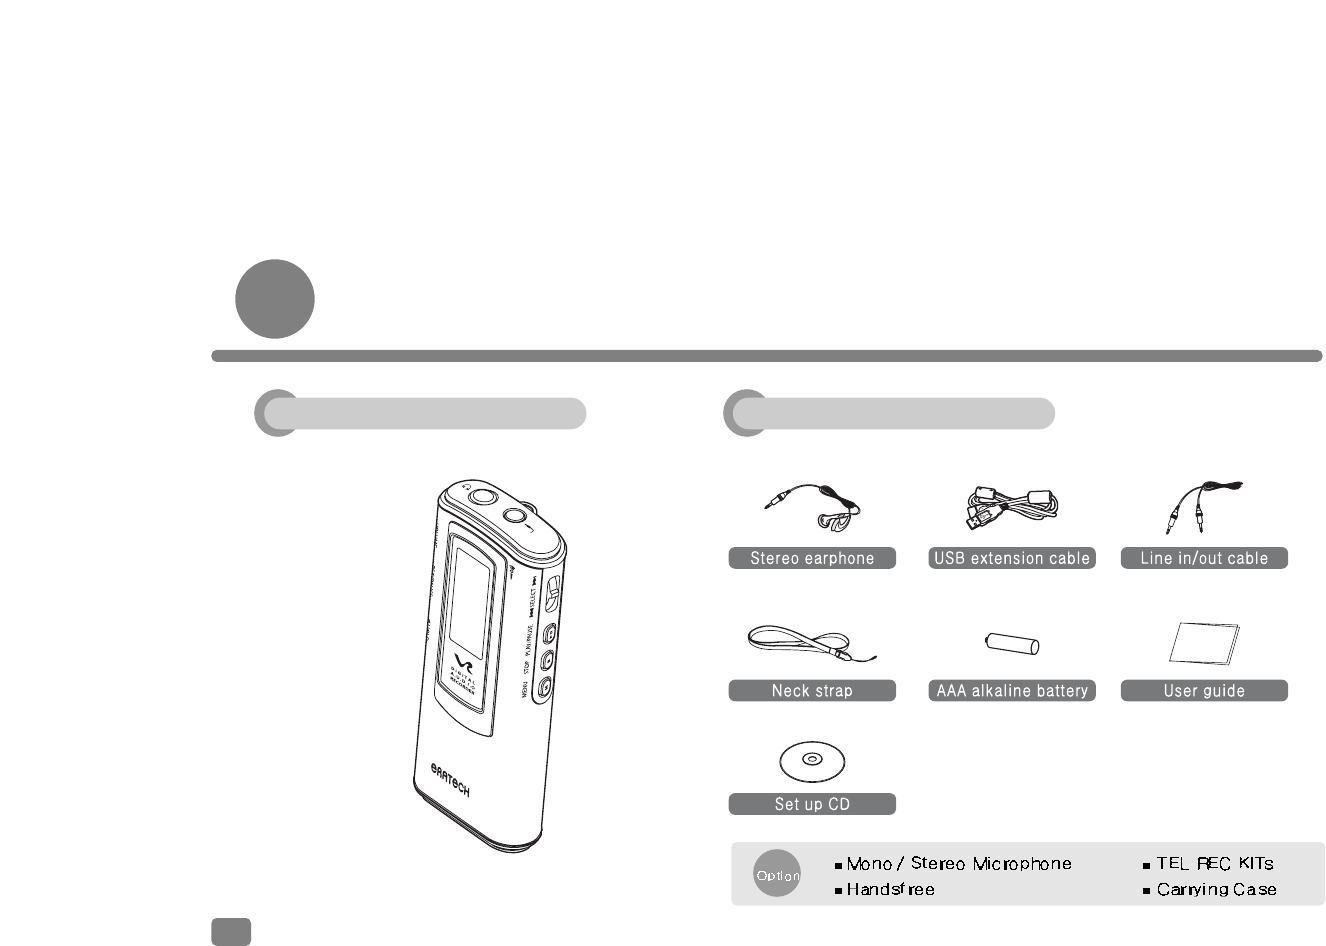
Product Components
8
AccessoriesPrimary settings
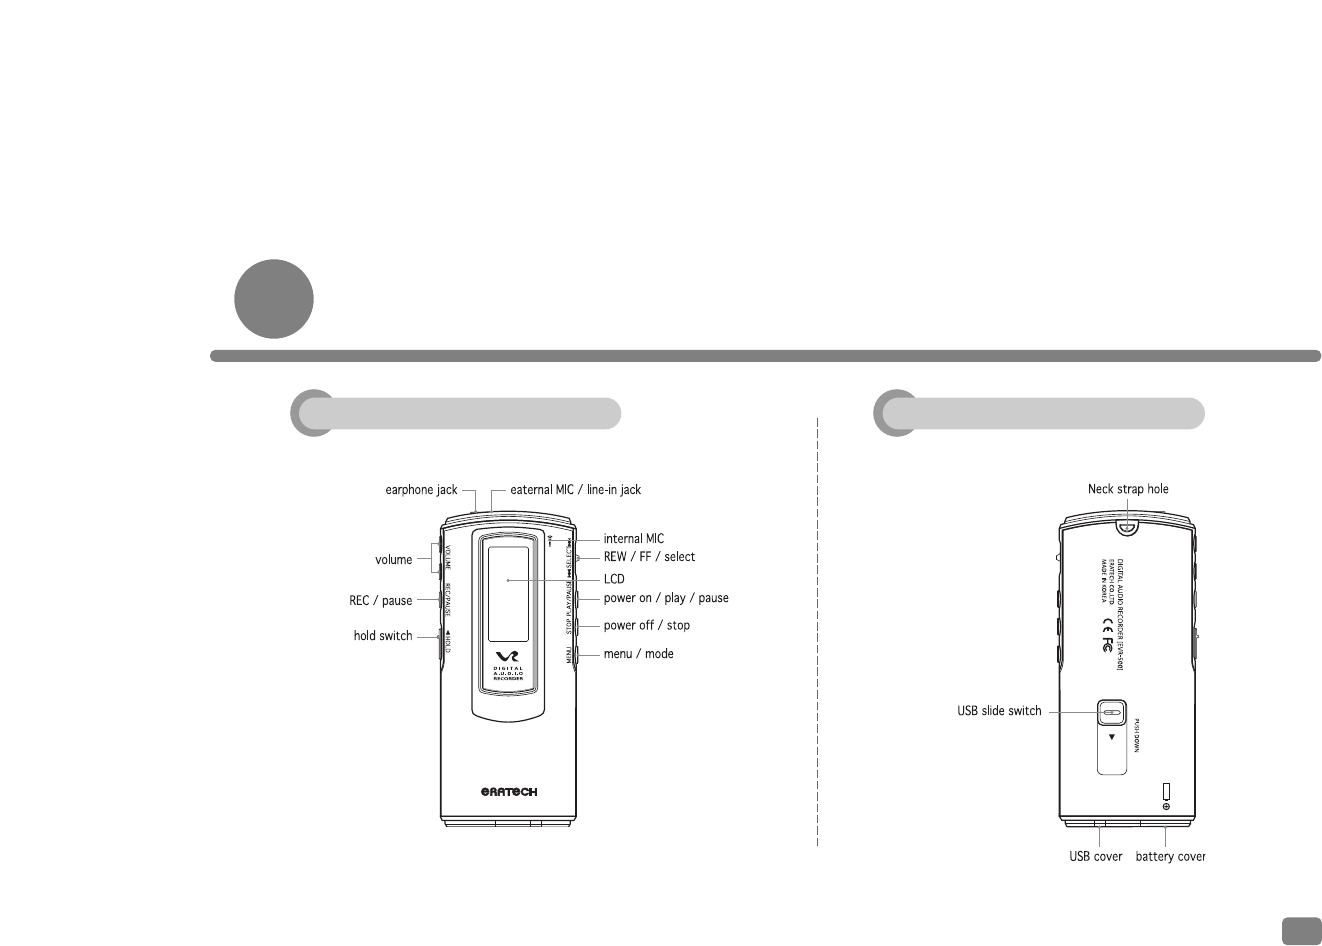
Player controls
9
Front Rear
Player controls
10
LCD
Inserting Batteries
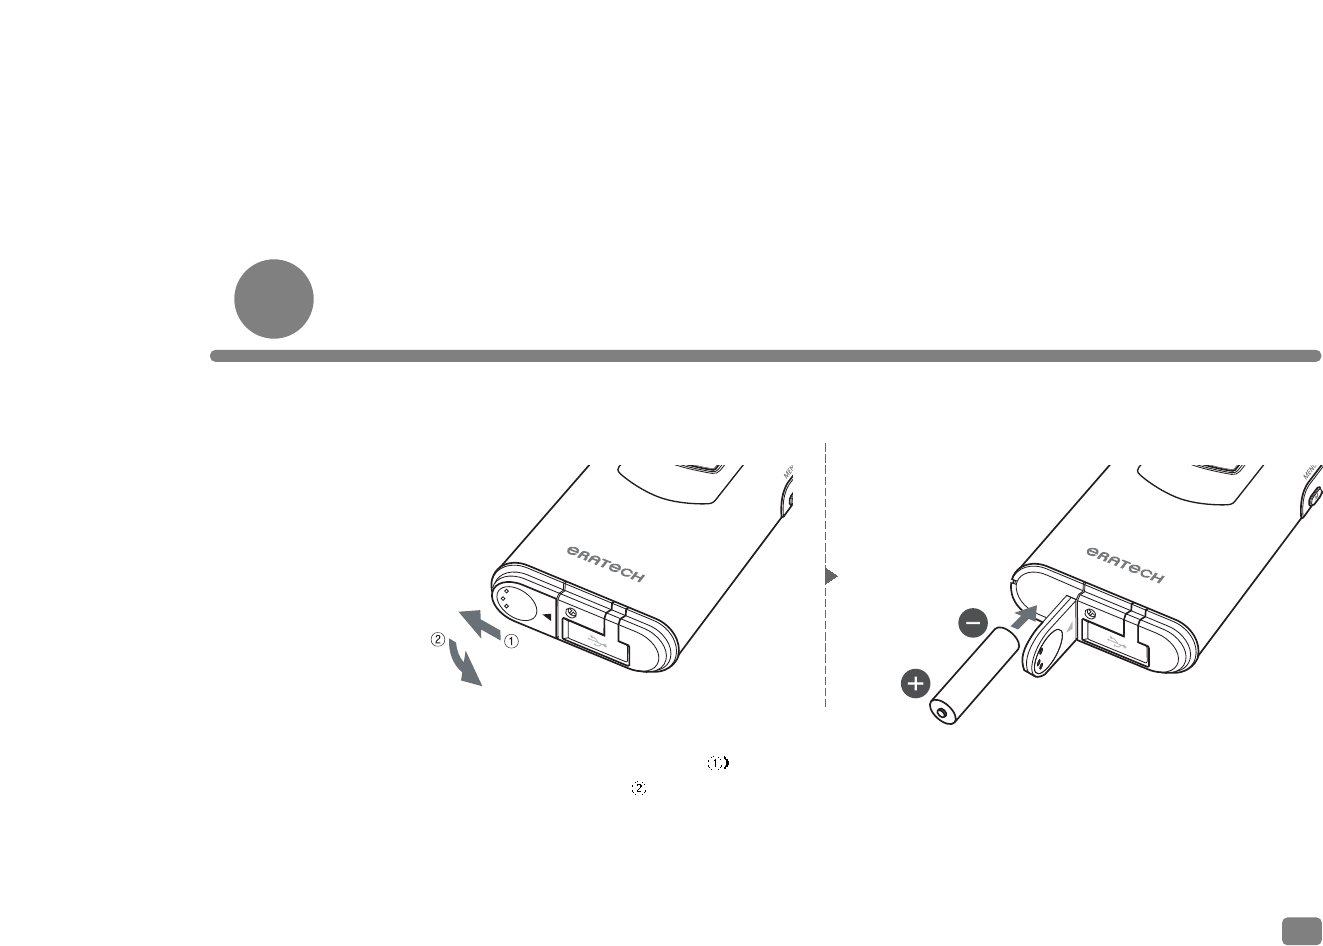
11
1. Lightly press down on the arrow( and
slide the battery cover( ) open.
2. Insert a size-AAA alkaline battery, observing
the correct polarity (+)/(-) as shown in the
picture.
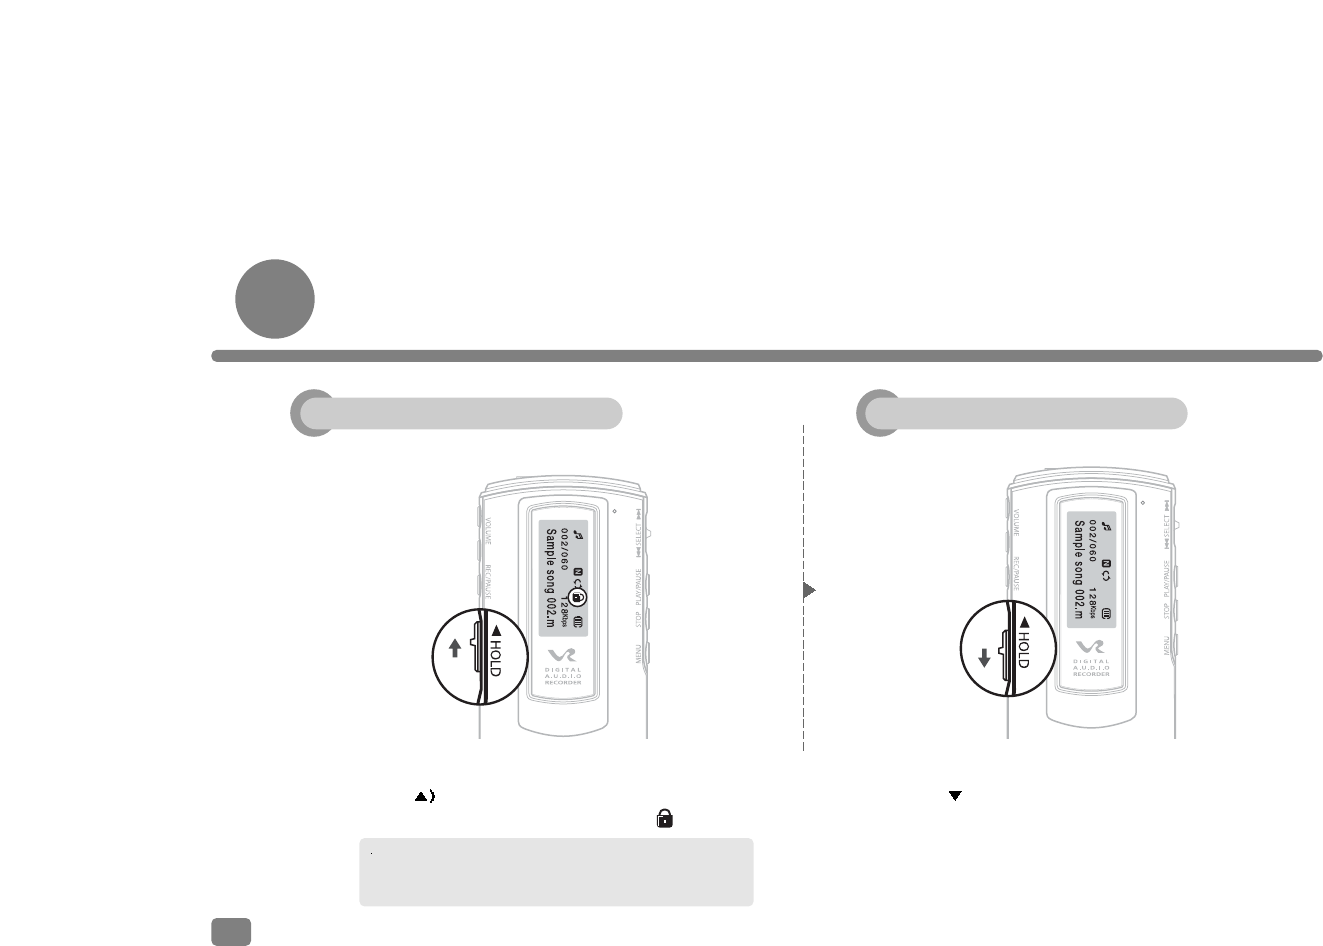
Hold On/Off
Set the HOLD switch to the HOLD position, and all operation buttons are disabled.
1. Slide up the HOLD switch in such direction
as( indicates.
2. LCD screen displays the icon like .
1. Slide down the HOLD switch in such direction
as ( ) indicates.
12
LCD screen will display the HOLD ON message, if you
press a button with the HOLD switch set to the HOLD
position.
Hold ON Hold OFF
Power On/Off
1. Press button more than two seconds,
and power will be turned on.
When Power is on, the recorder is set to the last mode
of the previous session.
13
2. Press button more than two seconds,
and power will be turned off.
Power will be turned off automatically, if no button is pressed
without operation for three minutes. -Auto Power Off function
Power ON Power OFF

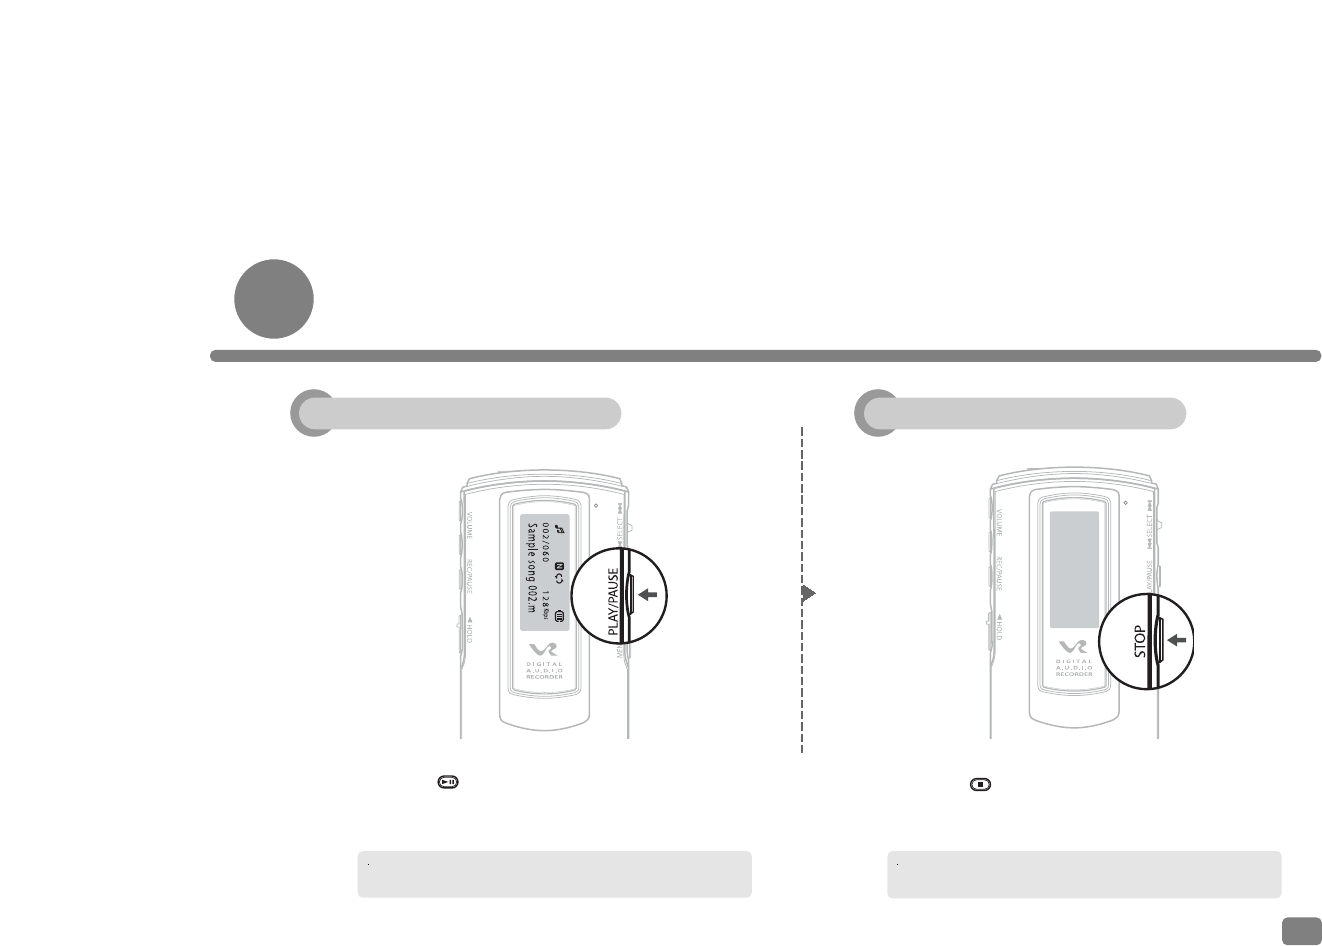
Playing and Stopping File
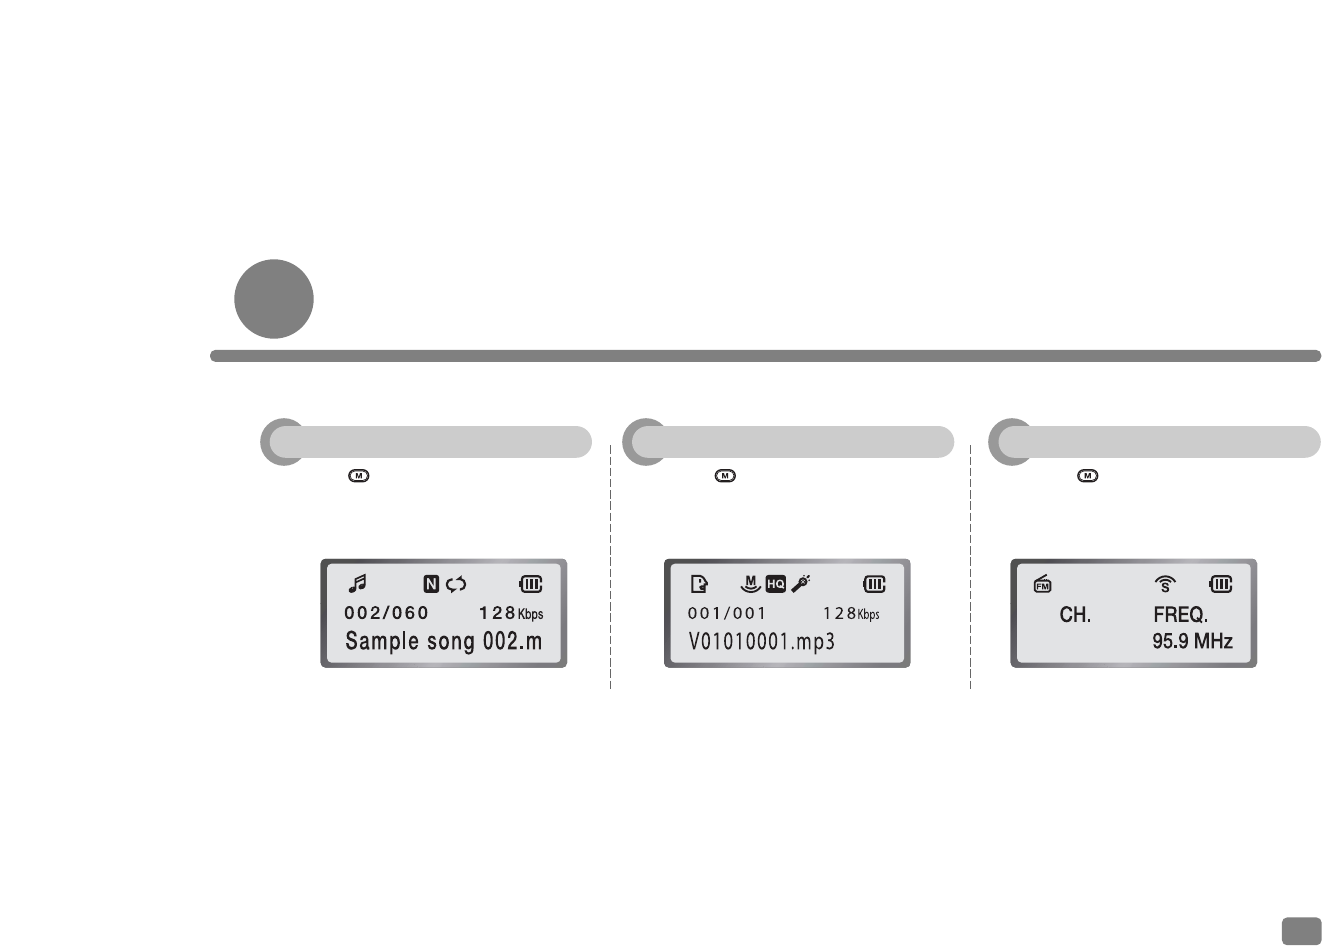
Audio (MP3/WMA/ASF) Mode & Voice Mode
1. After turning on power, press button
to play a file.
2. Press button during playback to stop
the recorder.
Press button during playback to pause the recorder,
and press it again to resume.
14
Play Stop
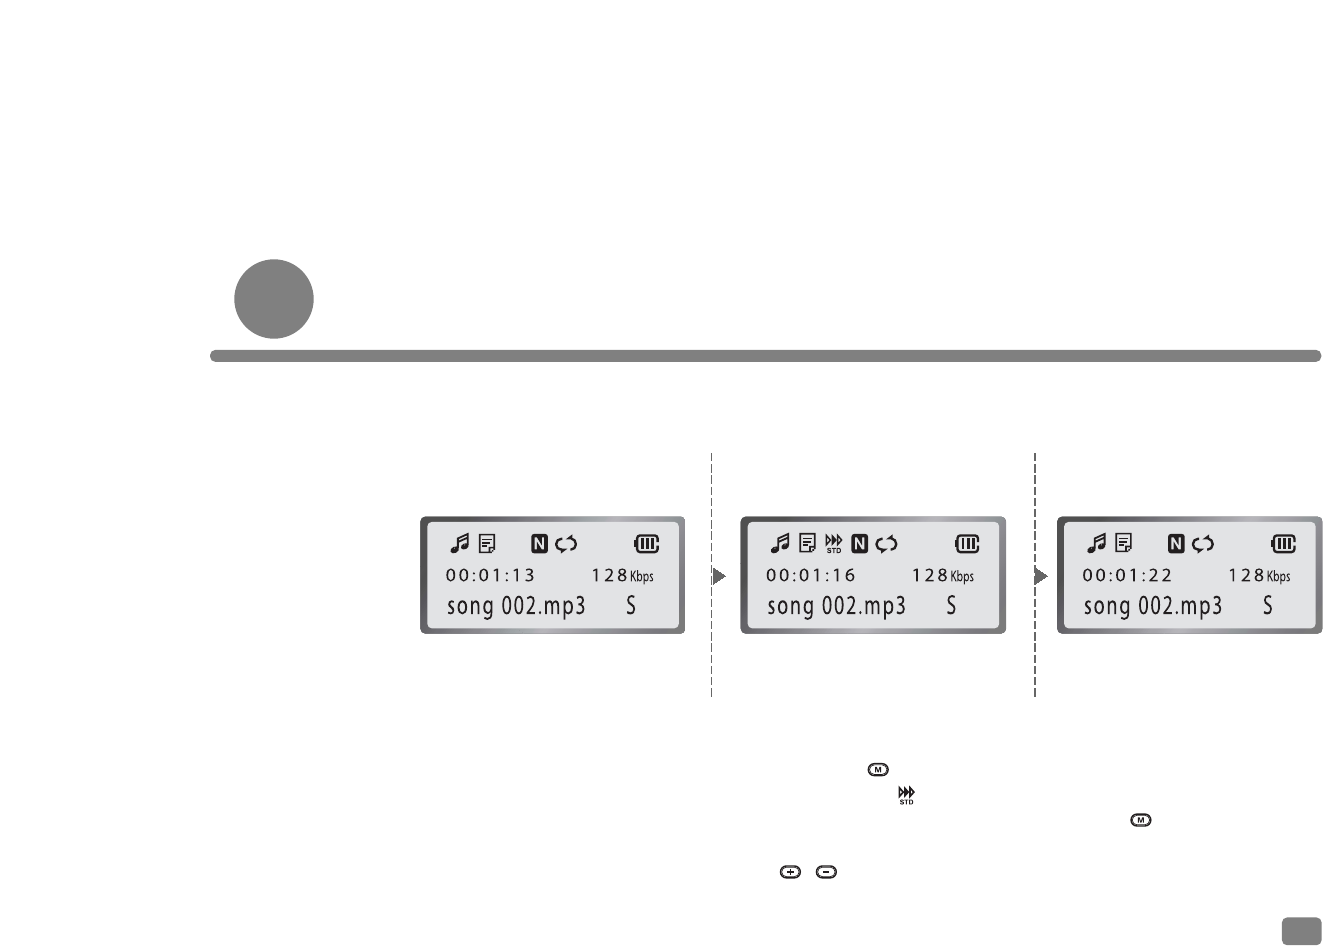
Playback Speed Adjustment
You may adjust playback speed during playback.
It can be performed during playback in any mode (Audio or Voice).
1. Play a desired file in the Audio
or Voice mode.
2. Press and button for 2
seconds, and icon will
appear on LCD. Then you can
adjust playback speed with
, button.
3. You can cancel the adjustment
of playback speed by pressing
and button for more
than 2 seconds again.
15
Move and Search
For Audio Voice Modes
1. Press button during playback or
pause.
2. Move the Jogdial in the direction of ,
to find a desired file and select the file with
button.
16
File Search
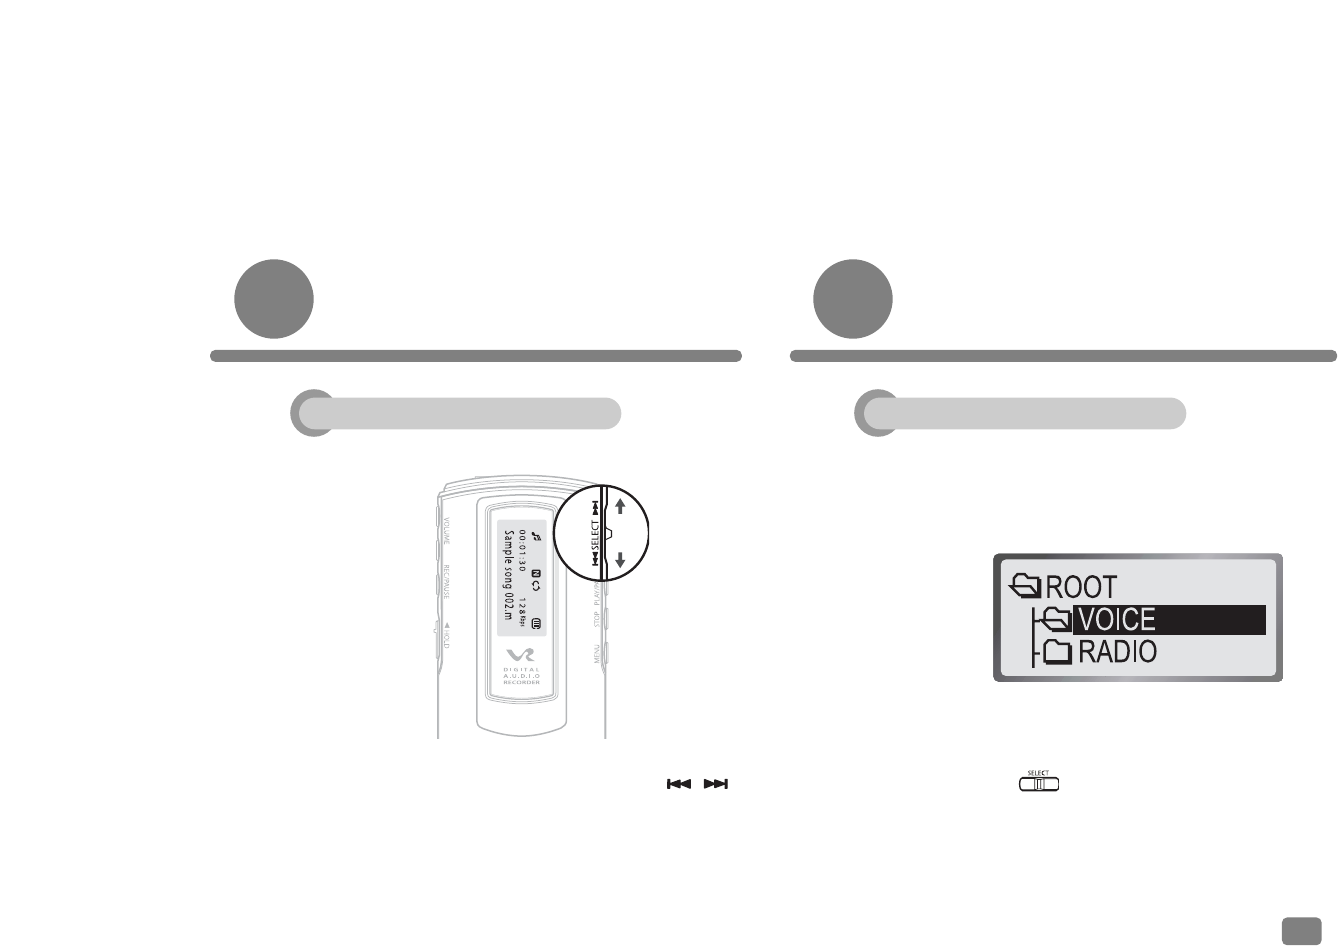
1. Press button to display a directory on
LCD during playback or pause in Audio mode.
Part Search
For Audio Voice Modes Navigation
(Only for Audio Mode)
1. Move the Jogdial in the direction of ,
during playback to find a part where desired
files are recorded and release the Jogdial, and
the recorder starts to play the part forward.
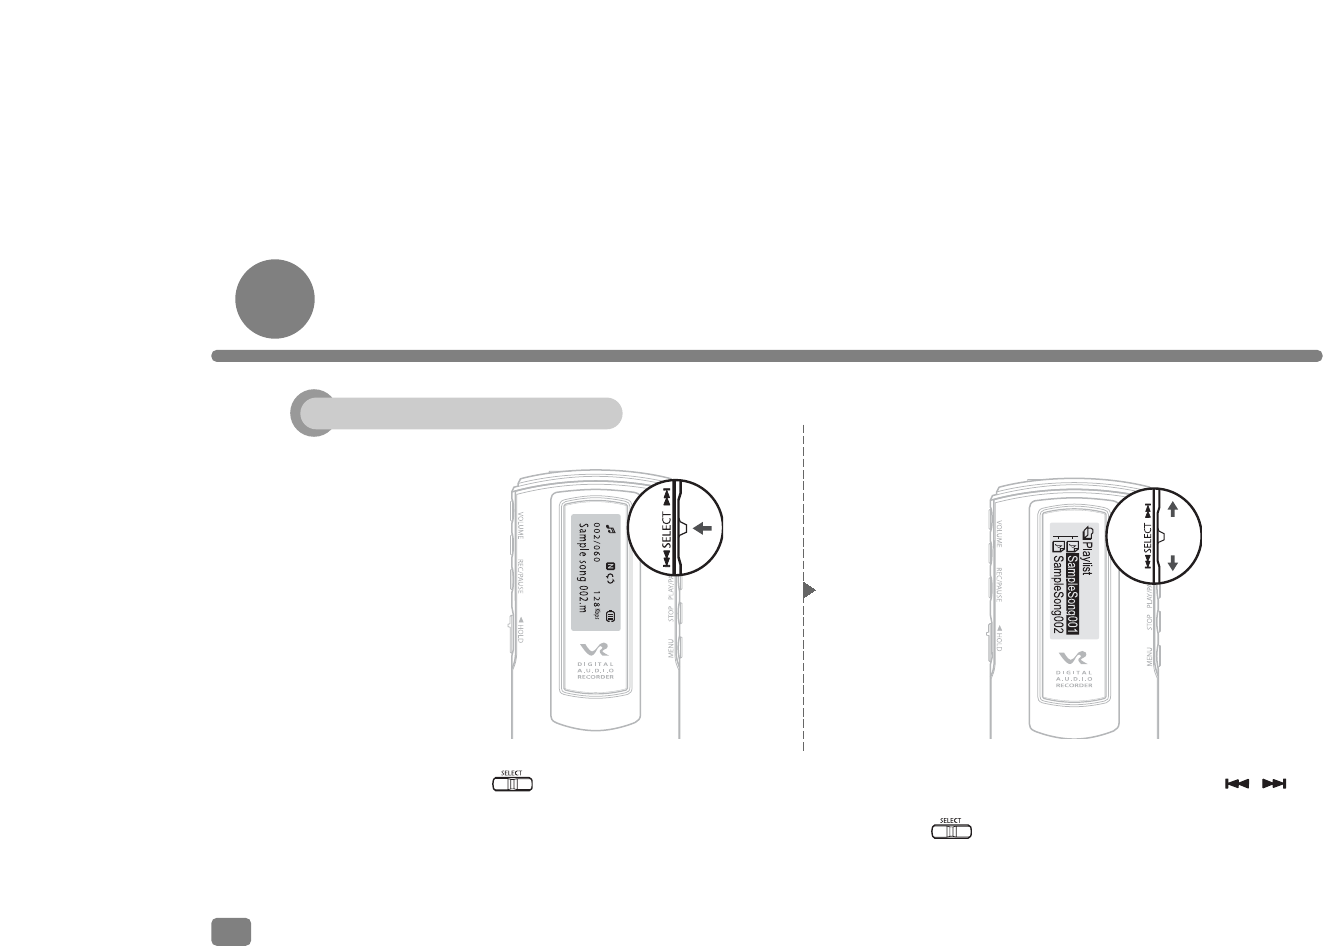
You may use the navigation function to select a file easily
and simply.
17
Part Search Search Function
2. Move to a desired folder or file with ,
button and press button.
3. Press button to switch to Audio mode
and press button to play the selected
file.
You may select another file in the directory to play by
selecting it during playback in Audio mode.
You may play a file stored in FM Receiving mode or
Voice mode when the recorder is in Audio mode.
Volume level is adjustable from 0 to 30.
1. You may adjust the volume during playback
or pause with , button. Press button
for a second to turn up or down the volume
by level, or press and hold it to turn it up or
down consecutively.
Volume Control
18
Volume +/-
Mode Switching
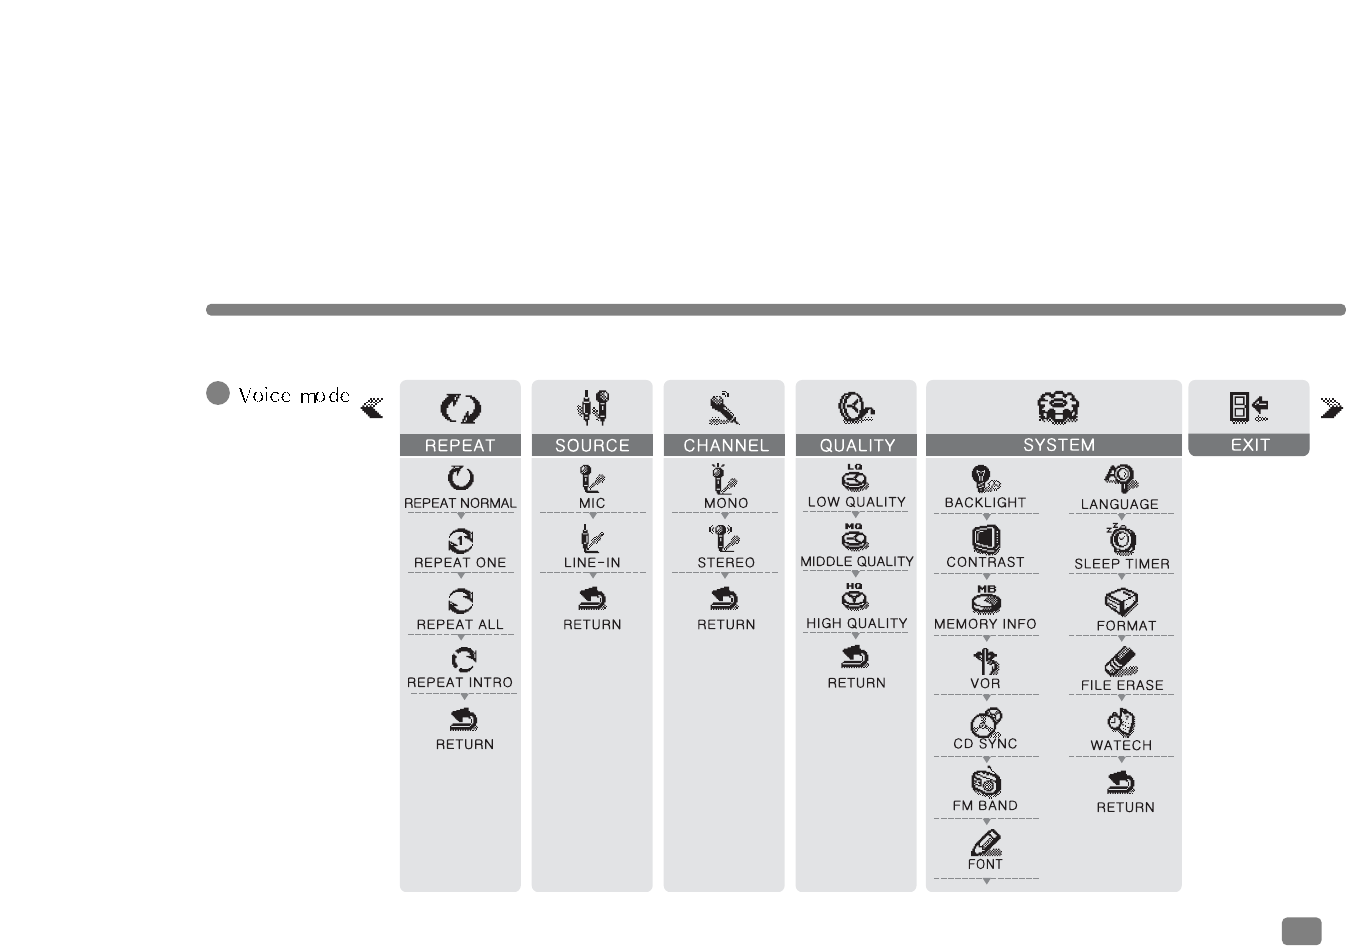
The recorder has three main modes such as Audio, Voice, and FM Radio.
MP3, WMA, and ASF files and
recorded FM radio broadcast file
are played.
Press button for two seconds or
longer.
Voice can be recorded and played.
Press button for two seconds or
longer.
Press button for two seconds or
longer.
You may listen to and record
FM radio broadcast, save radio
stations, and play recorded
broadcast contents.
19
Audio Mode Voice Mode FM Radio Mode
Descriptions
20
21
22
23
24
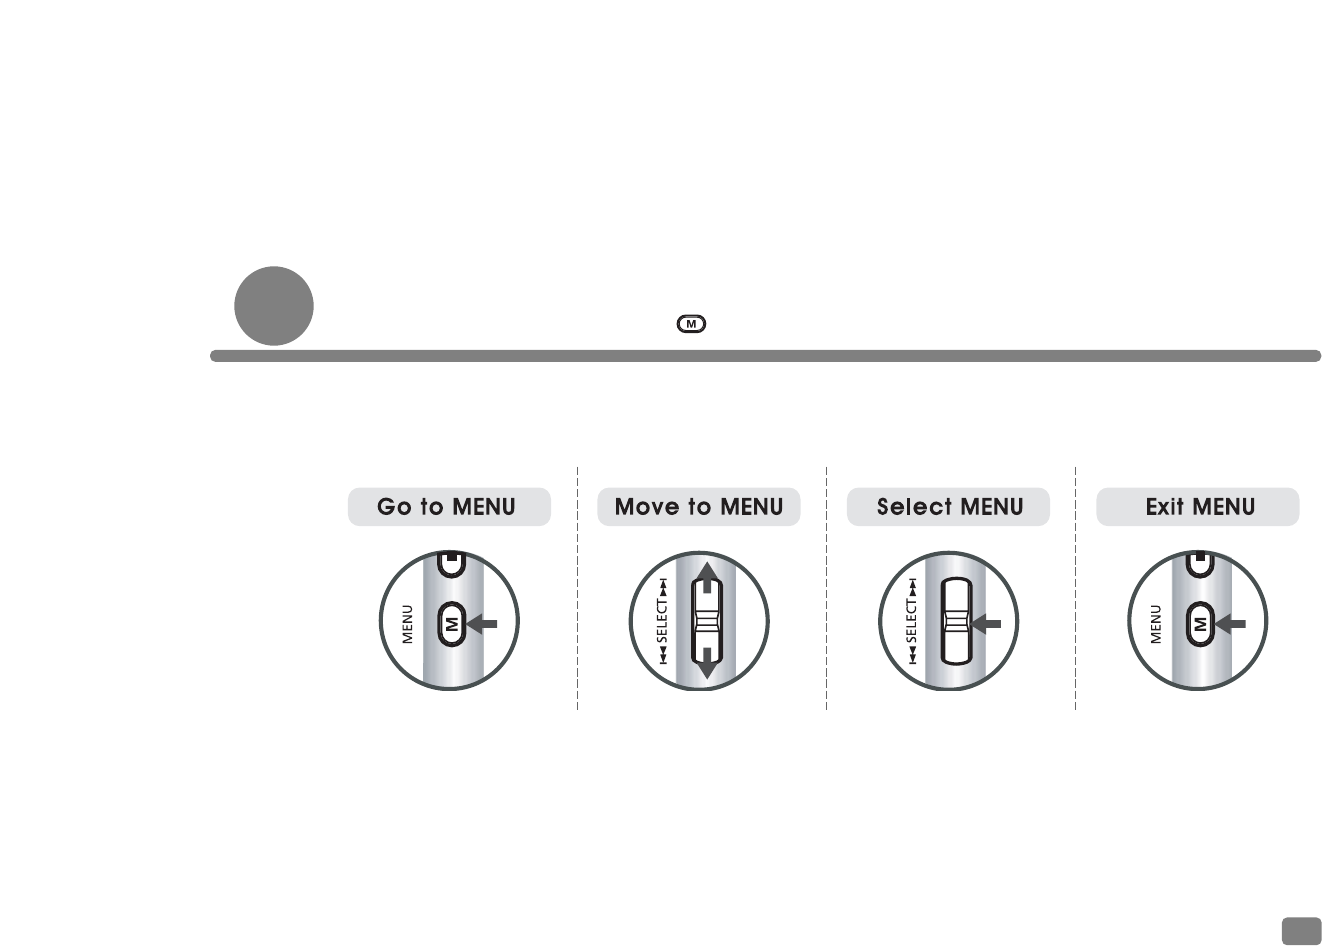
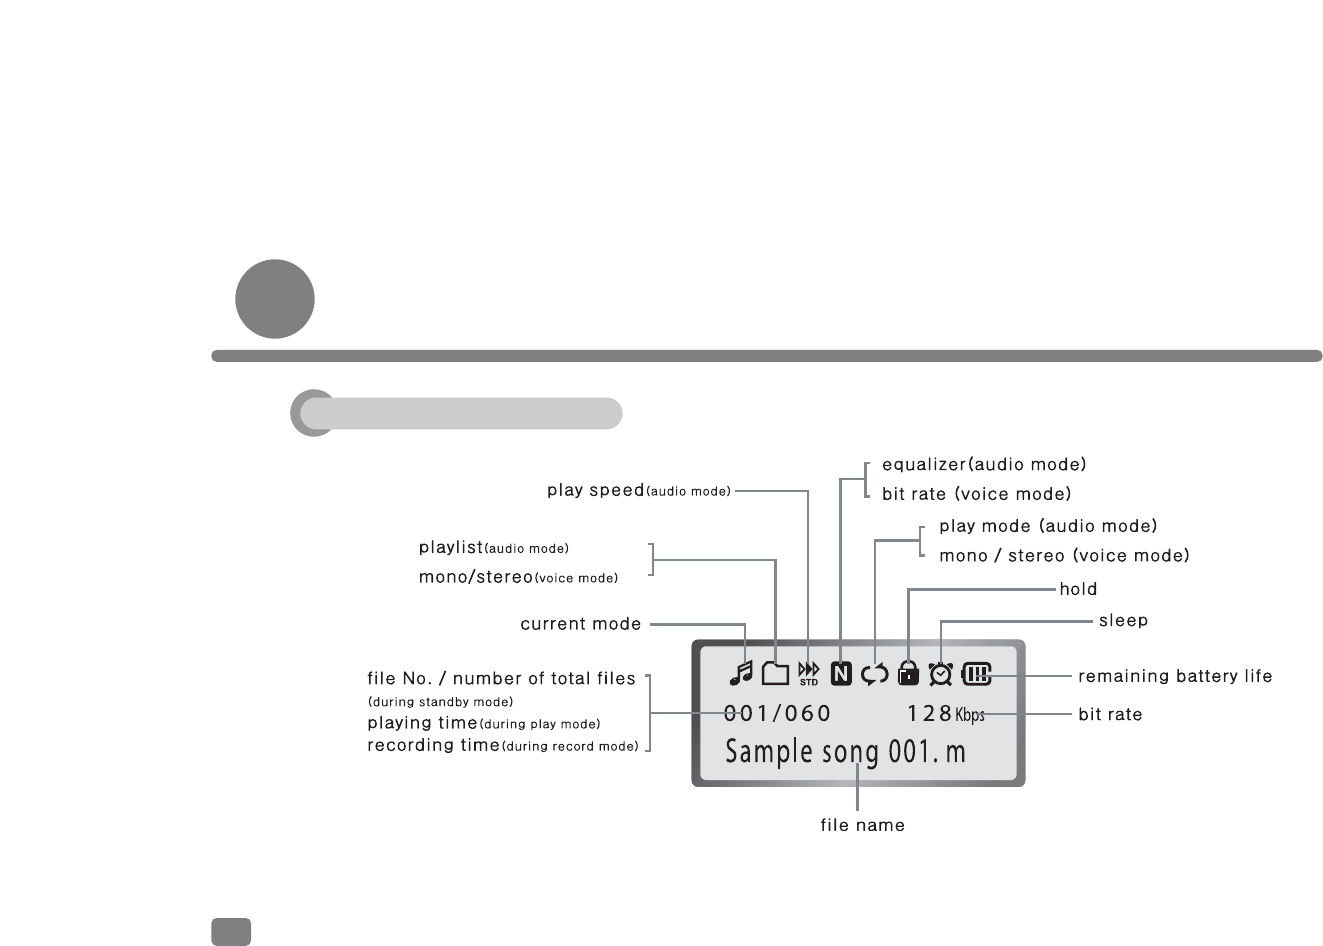
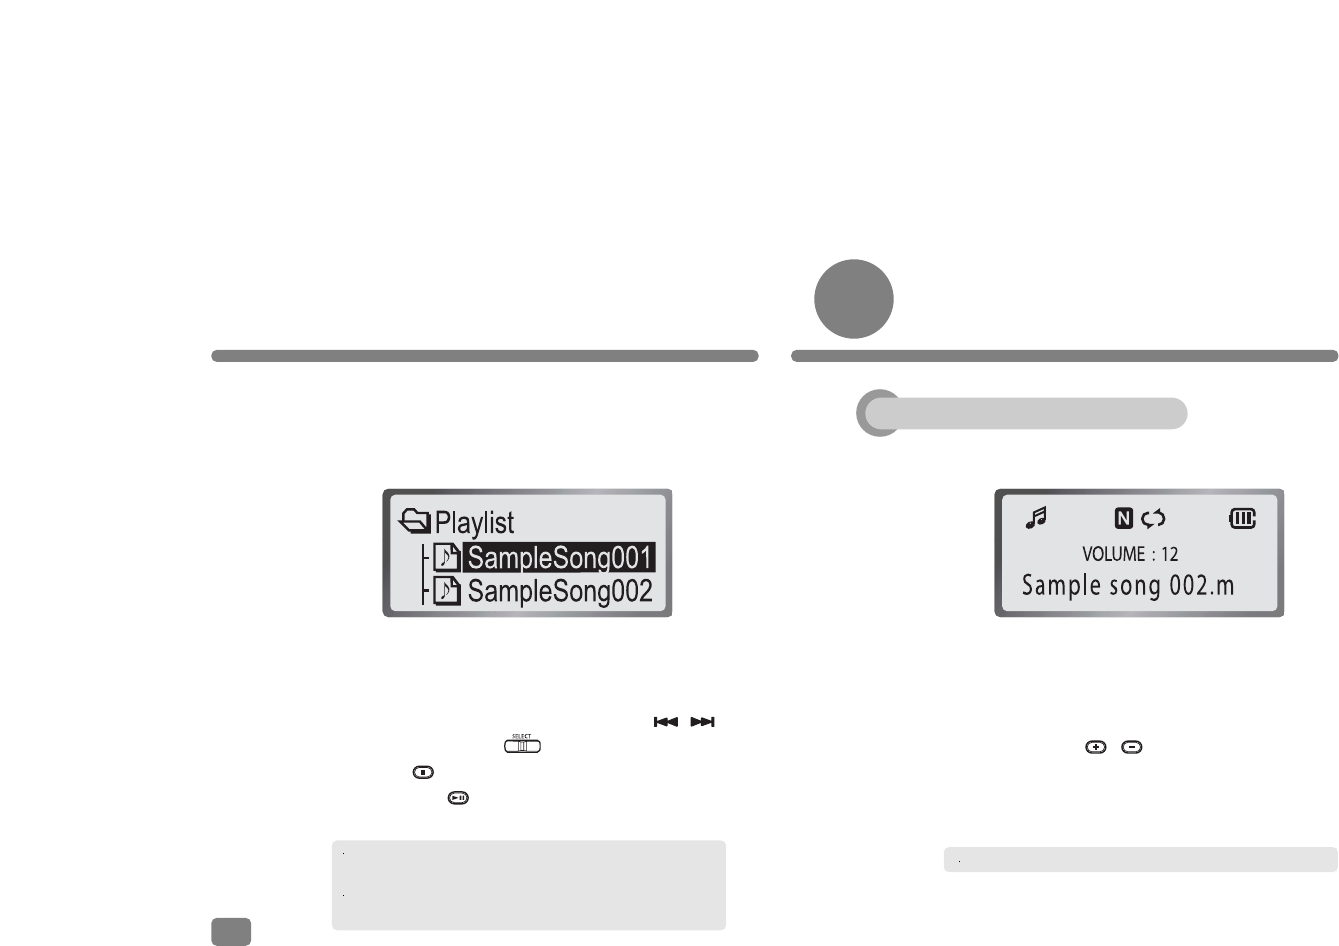
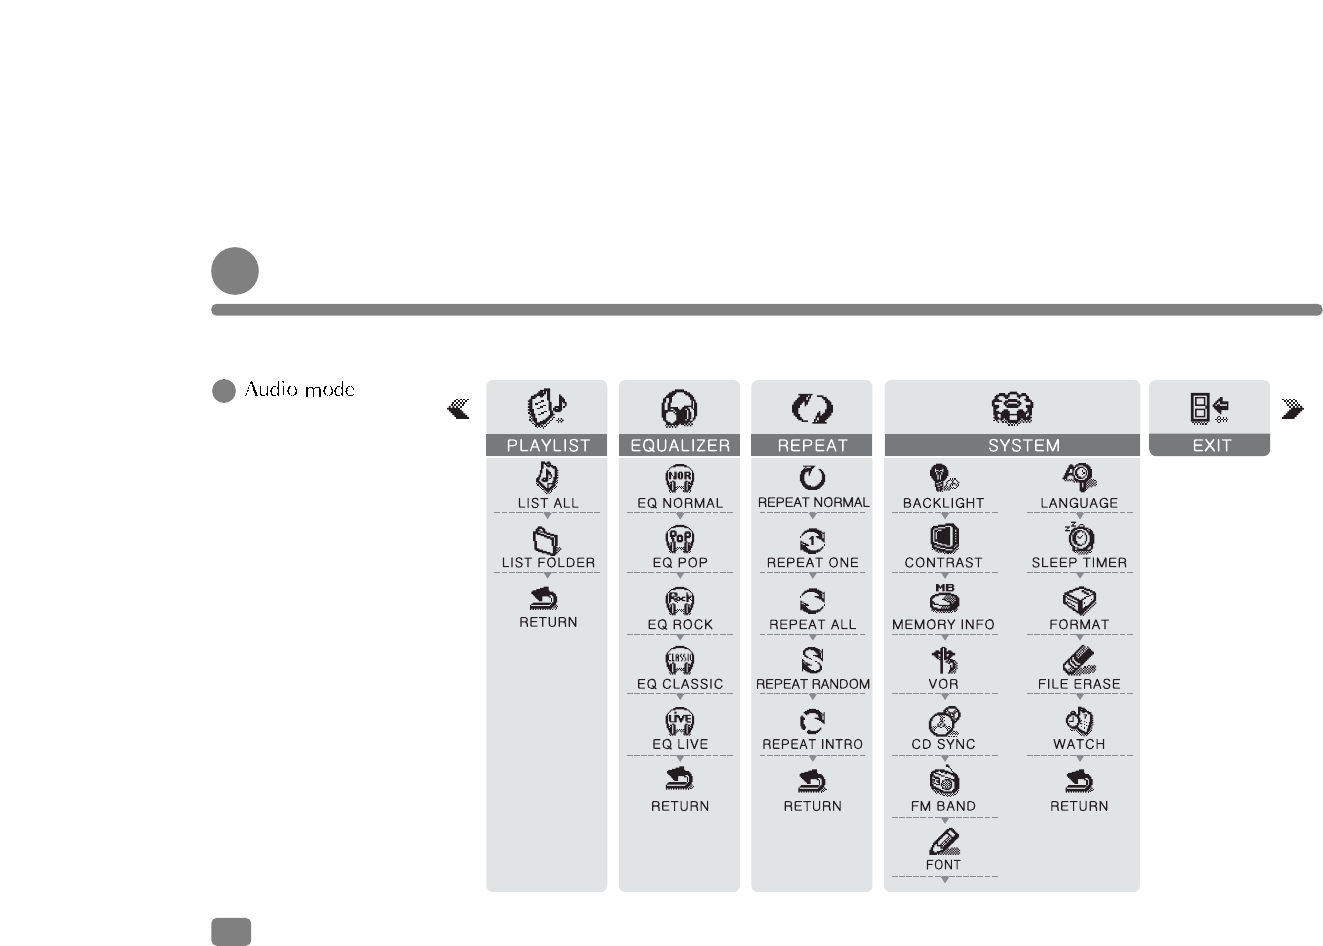
Menu Screen
You may enter into Menu mode by pressing button for a second during playback or pause.
25
Setting of Equalizer
(Only possible for Audio mode)
1. Select from
menu screen.
Setting of Playlist
Press Play button to play a file selected in the
Playlist.
2. Move to a desired item
with , button
and select it by
pressing button.
1. Select from
menu screen.
2. Move to a desired
sound effect with
, button and
select it by pressing
button.
26
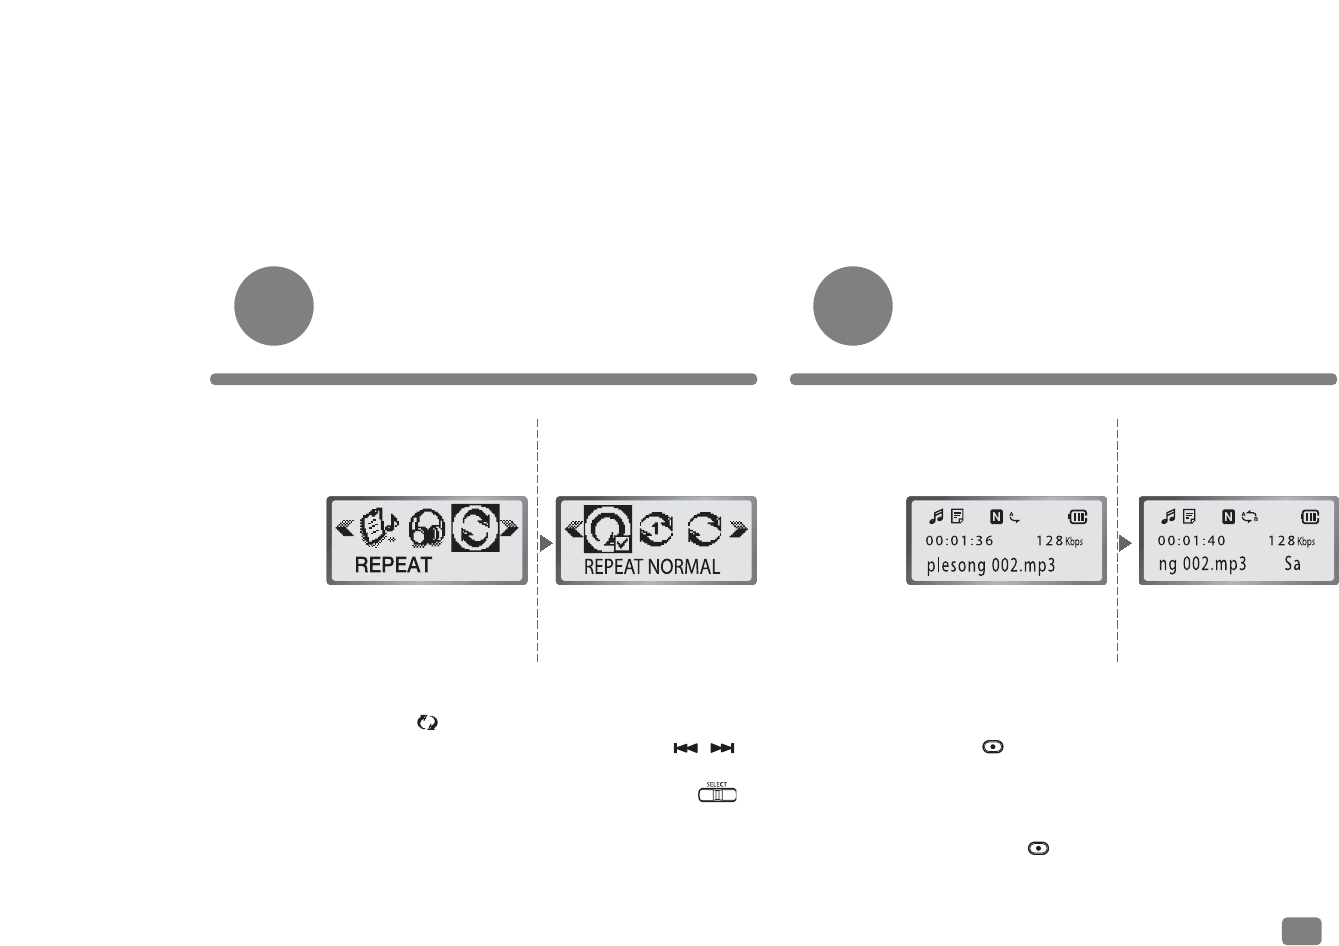
Setting of A-B Repeat Function
You may choose the intervals between two parts
that you want to listen repetitively.
1. Select from
menu screen.
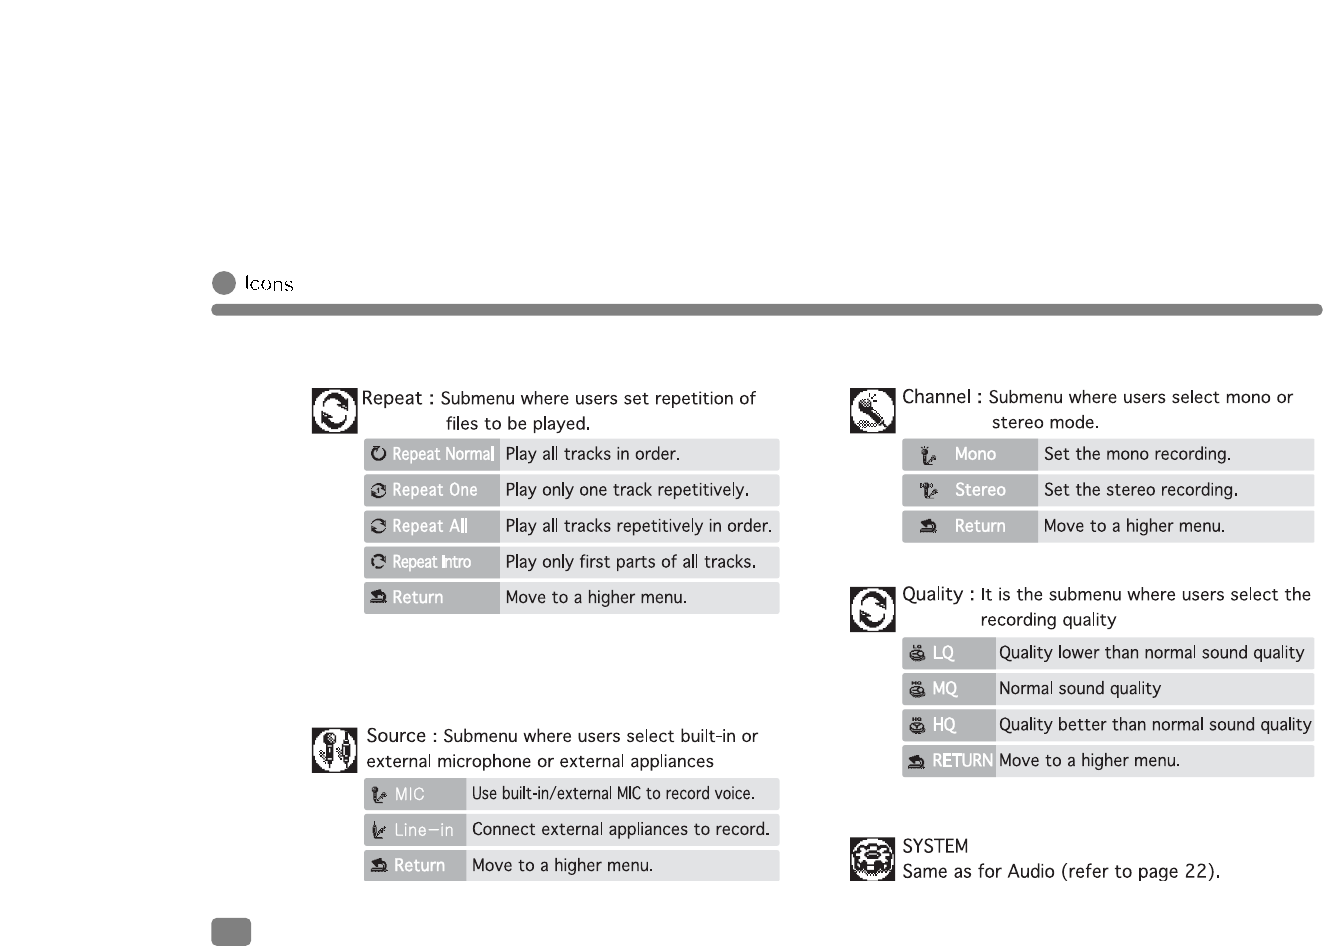
Setting of Repetitive Playback
You may play repetitively tracks which are selected
with bookmarks or in directory of the playlist.
2. Move to a desired
item with ,
button and select it
by pressing
button.
1. Play a file in the Voice mode.
2. Press button to set a start point of the part
that you choose for repetitive playback. Press the
button again to set its end point. Now selected part
can be played repetitively.
3. By pressing button again, the A-B repeat
function stops.
27
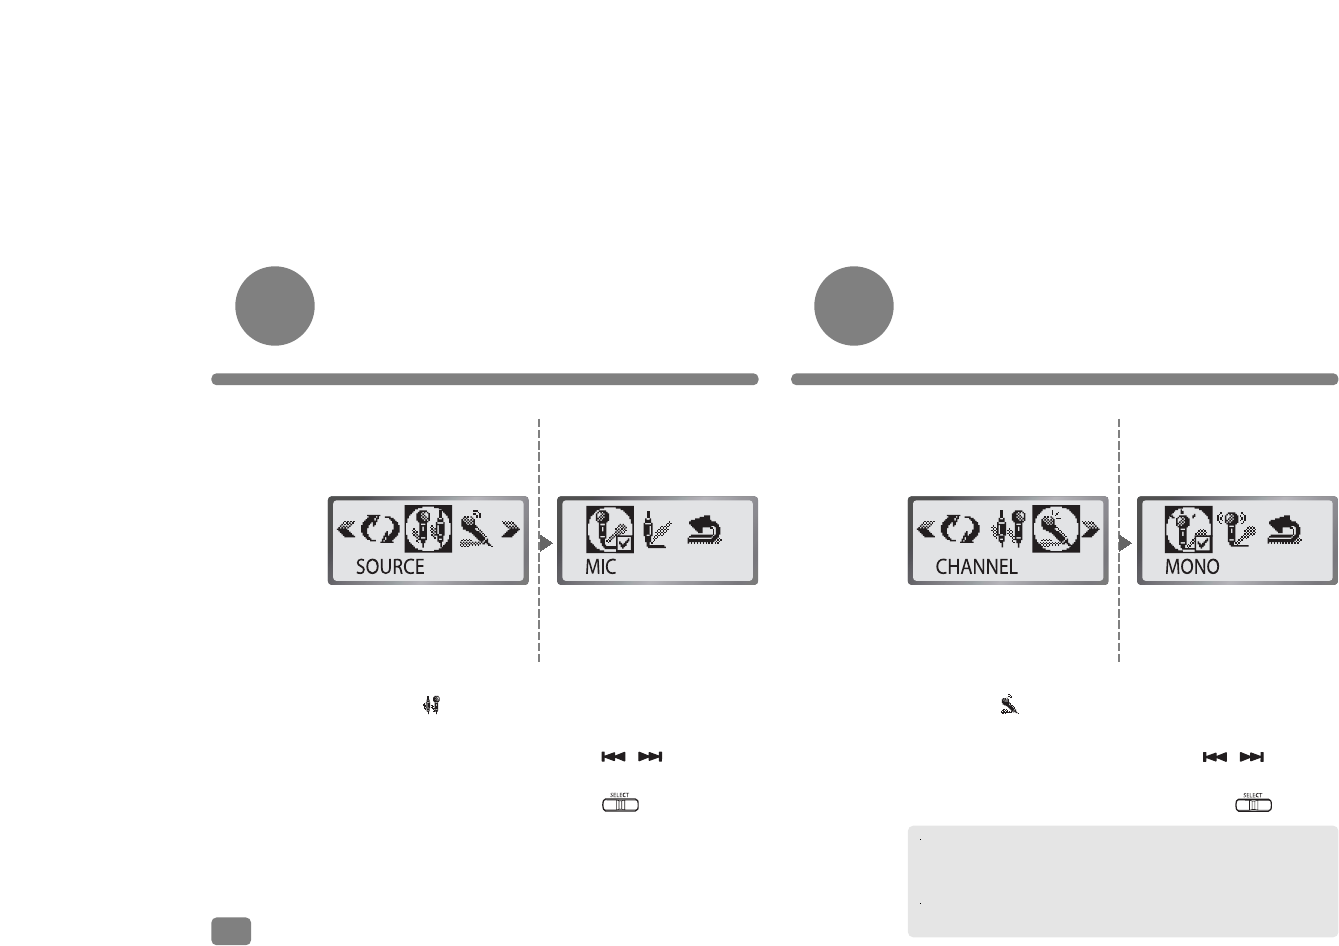
Setting of Mono/Stereo Sound
(Only for Voice Mode)
1. Select from
menu screen.
Setting of Internal/External
Microphone
(Only for Voice Mode)
2. Move to either Mike
or Line In item with
, button and
select one by pressing
button.
1. Select from
menu screen.
2. Move to either sound
item, Mono or Stereo,
with , button
and select one by
pressing button.
Stereo can be selected only when an external appliance
was connected and [LINE IN] item selected in [MENU] –
[SOURCE] window.
Mono mode is a default setting when [MIC] item is selected
in [MENU] – [SOURCE] window.
28
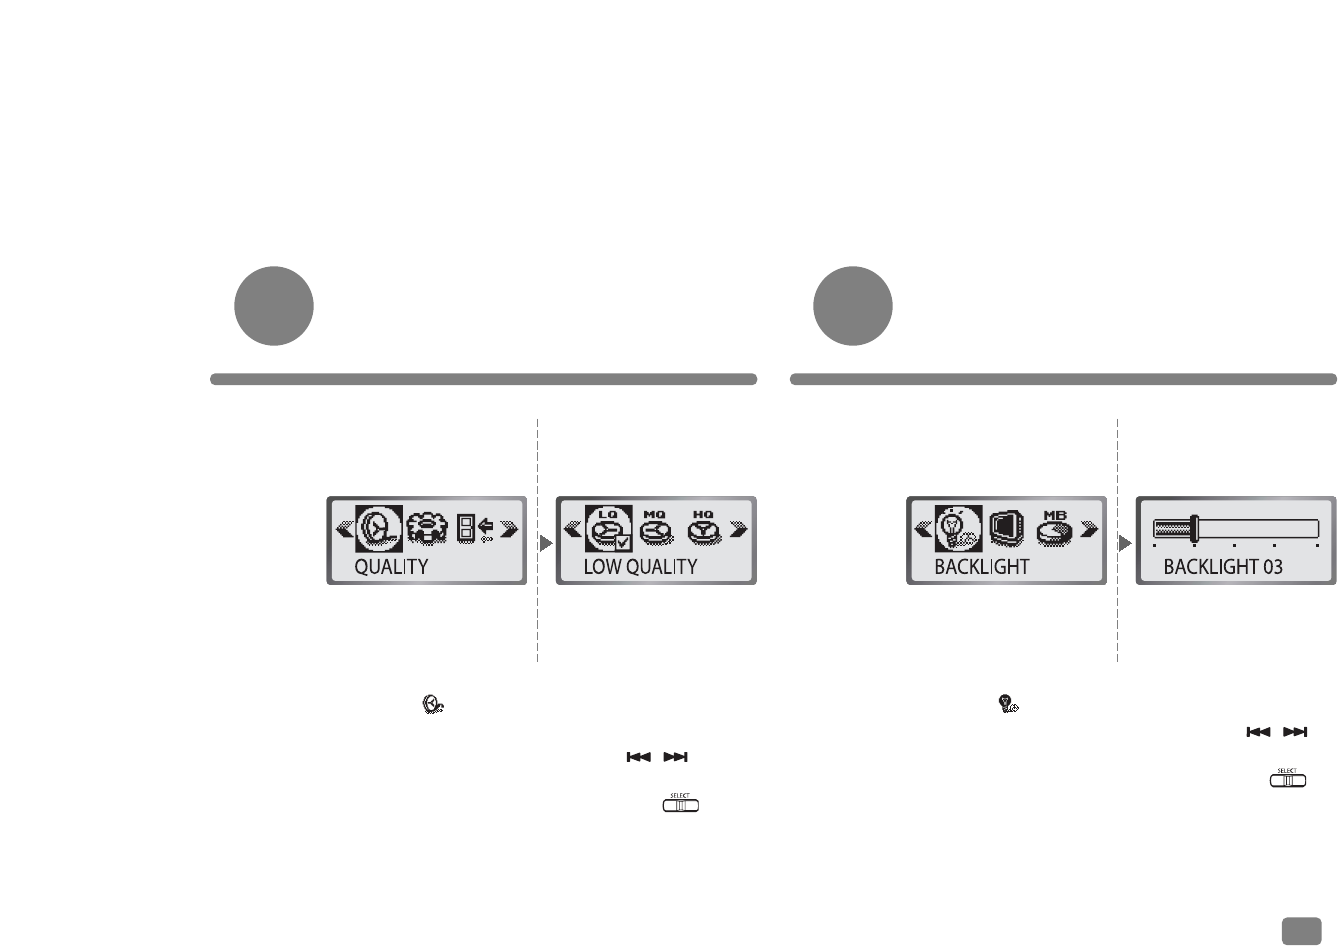
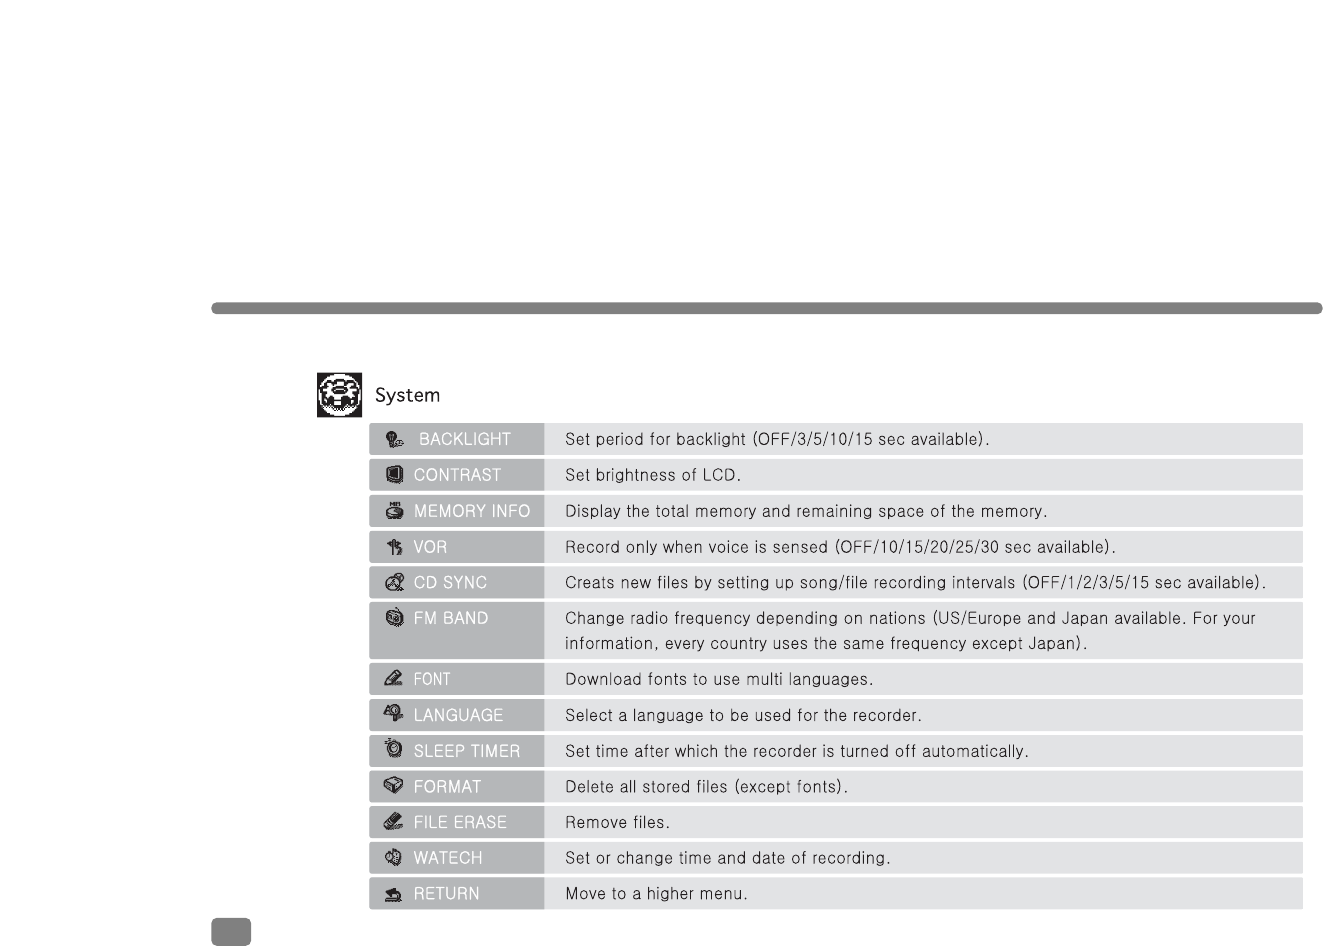
Setting of Backlight
Backlight shall be set from [MENU] – [SYSTEM]
window of each mode.
1. Select from
menu screen.
Setting of Recording Quality
(Only for Voice Mode)
2. Move to a desired
recording quality level
with , button
and select one by
pressing button.
1. Select from
[MENU] – [SYSTEM]
window.
2. Move to a desired
item with ,
button and select it
by pressing
button.
29
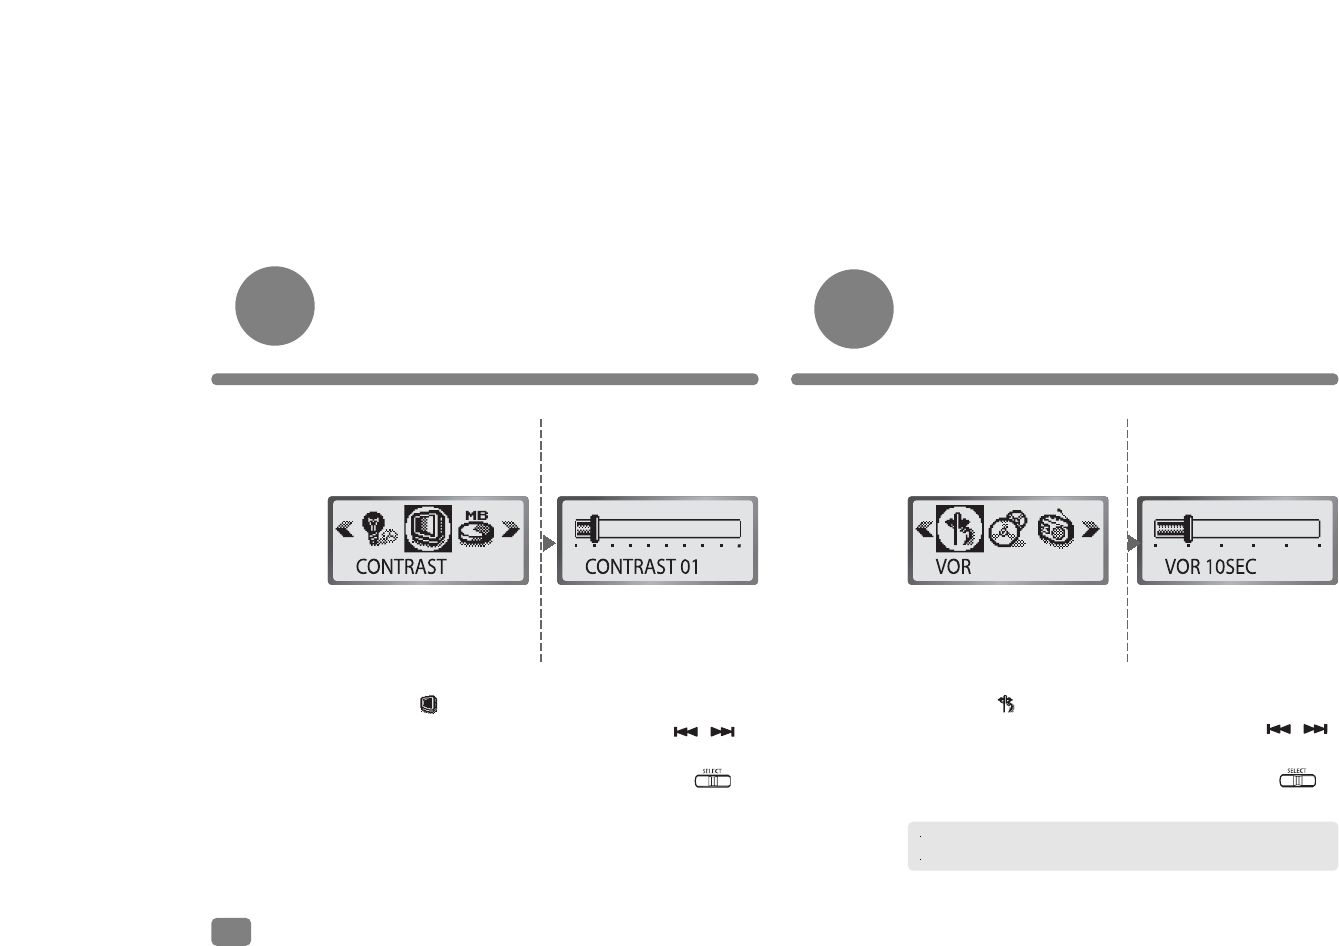
Setting of VOR
Users may set a period after the lapse of which
recording is prohibited until there is a voice. This
function is possible only for Voice mode.
1. Select from
[MENU] – [SYSTEM]
window.
Setting of LCD Brightness
LCD Brightness shall be set from [MENU] –
[SYSTEM] window of each mode.
2. Move to a desired
level with ,
button and select it
by pressing
button.
1. Select from
[MENU] – [SYSTEM]
window.
2. Move to a desired
value with ,
button and select it
by pressing
button.
Available values are 10 s, 15 s, 20 s, 25 s, and 30 s.
This function may not be performed in noisy surroundings.
30
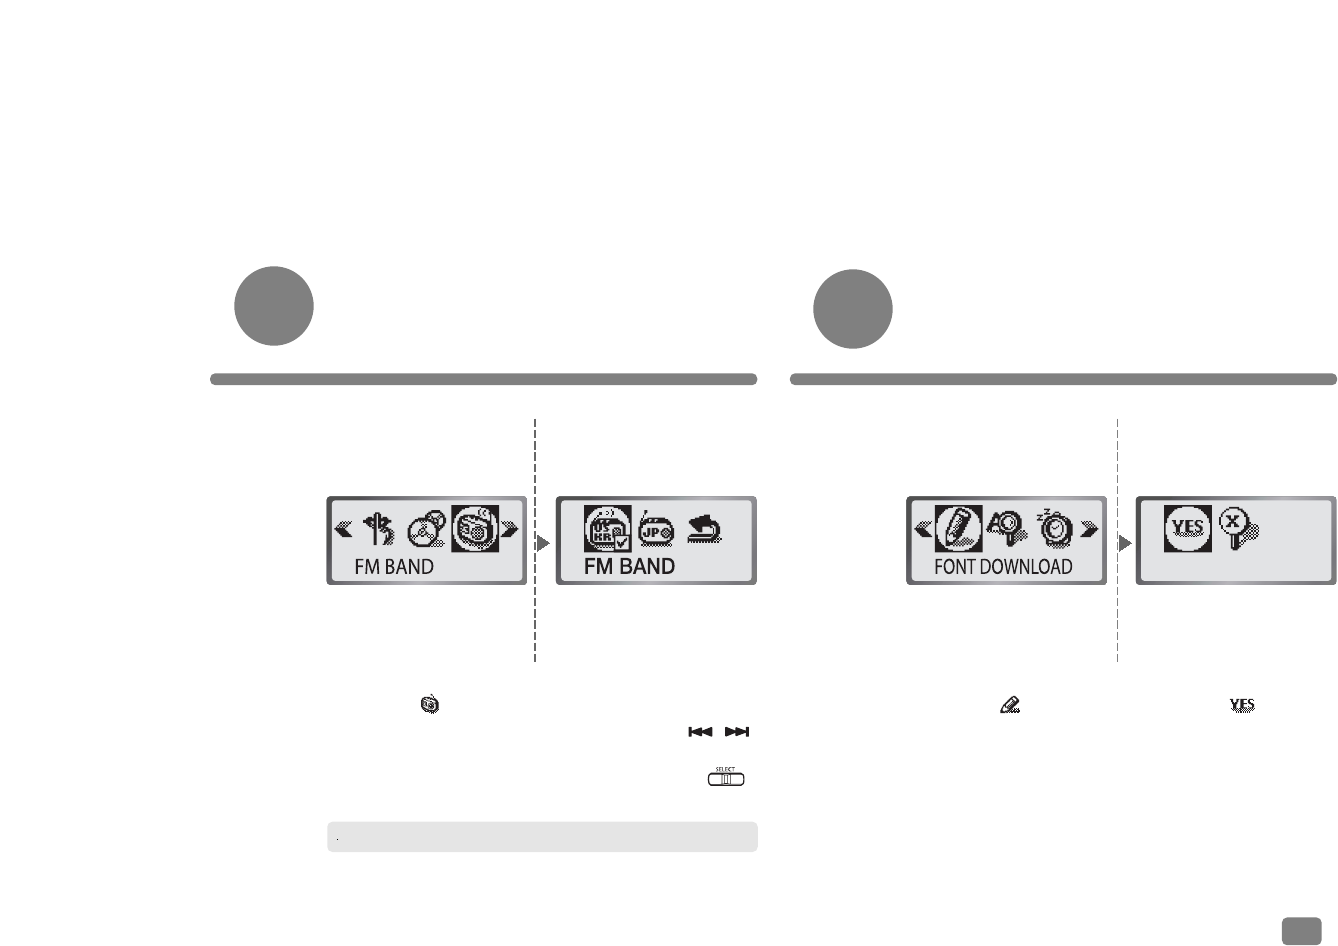
Download of Fonts
It is possible only when users install supplied
software in the recorder. Connect the built-in USB
connector to USB jack of PC.
1. Select from
[MENU] – [SYSTEM]
window.
FM Bands
Users may select FM bands for radio broadcasts in
Korea, U.S.A., EC, and Japan.
2. Move to a desired
band with ,
button and select it
by pressing
button.
1. Select from
[MENU] – [SYSTEM]
window.
2. Select .
Every country uses the same frequency except Japan.
31
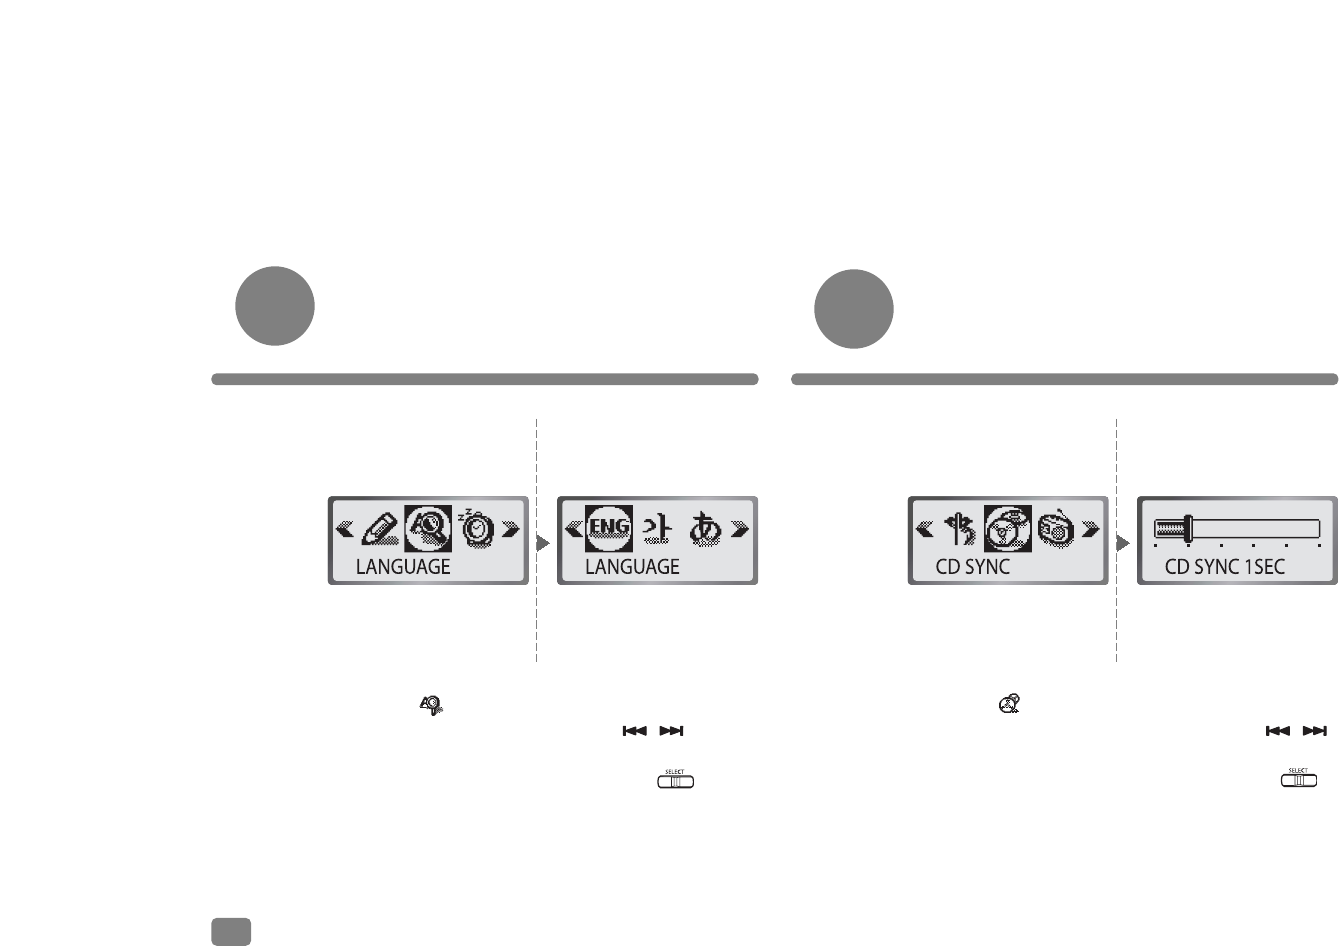
Setting of CD Sync
Users may create a new file during intervals
between tracks.
1. Select from
[MENU] – [SYSTEM]
window.
Language Setting
2. Choose a language
with , button
and select it by
pressing button.
1. Select from
[MENU] – [SYSTEM]
window.
2. Move to a desired
value with ,
button and select it
by pressing
button.
32
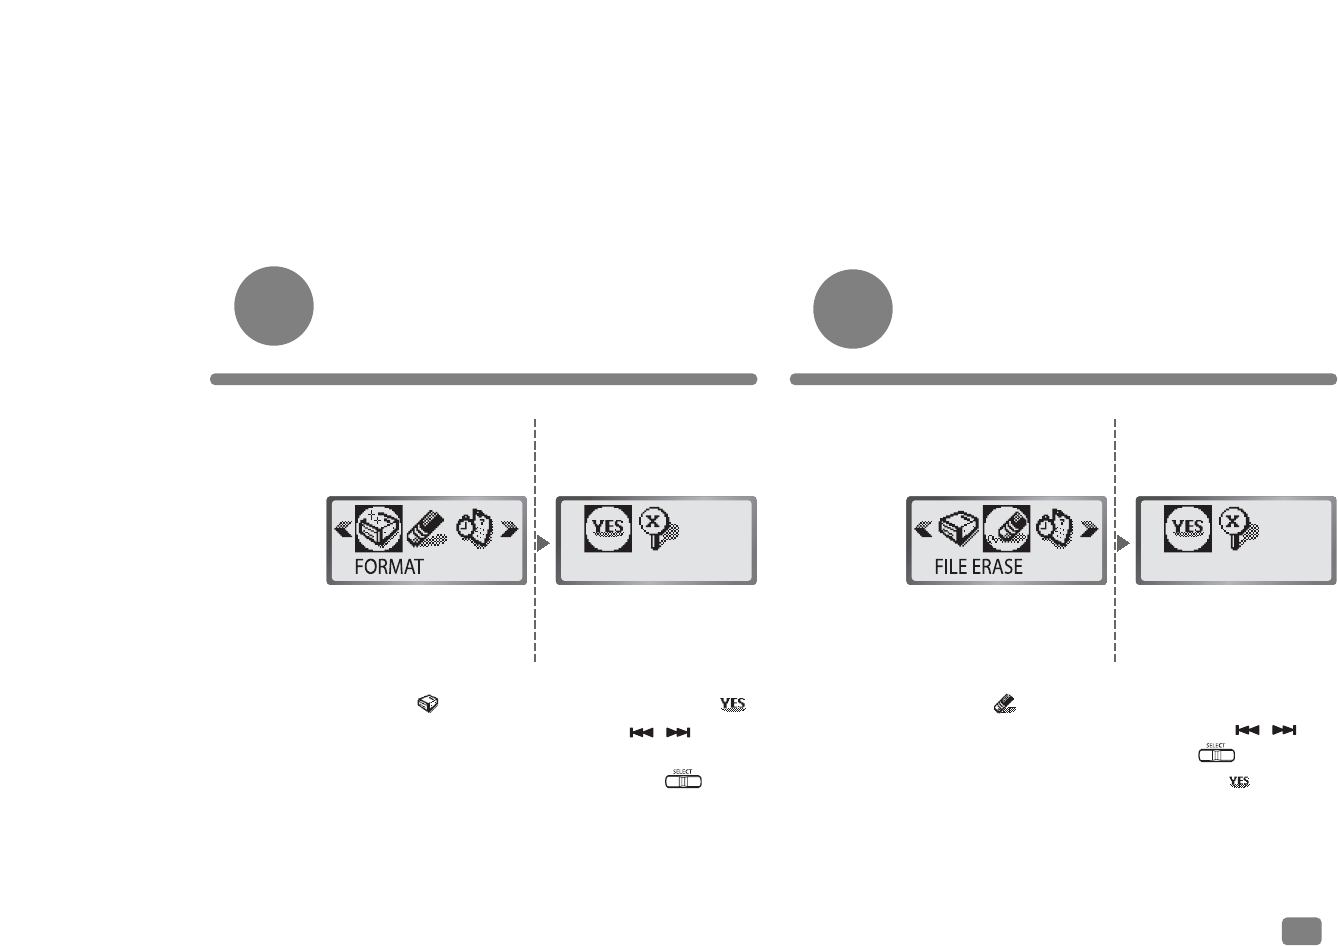
File Erase
1. Select from
[MENU] – [SYSTEM]
window.
Format
2. Choose an item
with , button
and select it by
pressing button.
1. Select from [MENU] – [SYSTEM] window.
2. Choose a file or folder to delete with ,
button and select it by pressing button.
3. Delete the selected file by pressing button,
or cancel File Erase function.
33
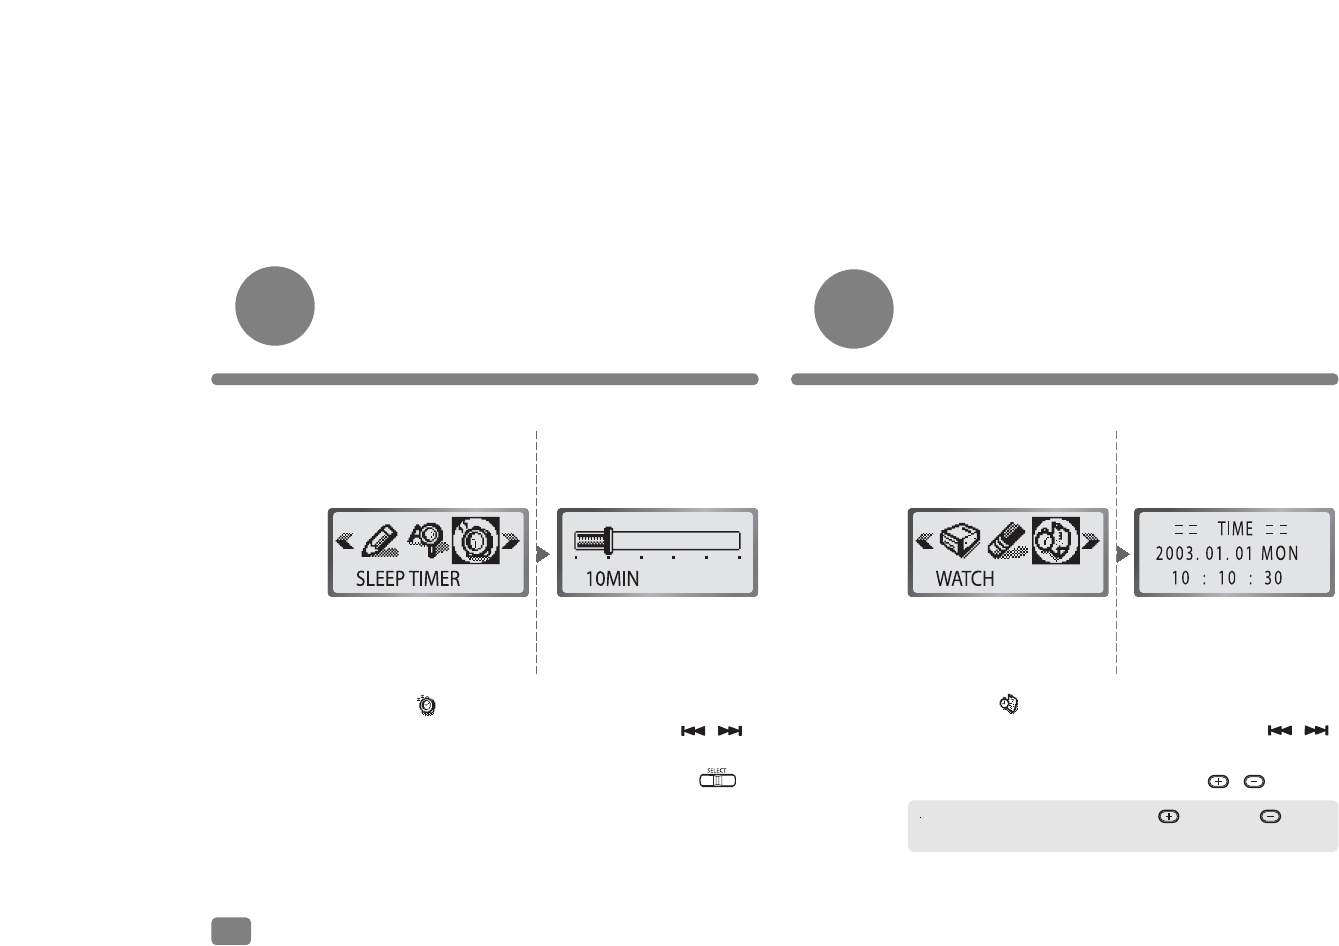
Setting of Time and Date
It enables to set or change time and date.
1. Select from
[MENU] – [SYSTEM]
window.
Power Timer
It enables to put off power automatically after the
lapse of period set.
2. Move to a desired
time with ,
button and select it
by pressing
button.
1. Select from
[MENU] – [SYSTEM]
window.
2. Move to a desired
setting with ,
button and reset it
with , button.
Numbers go up and down by pressing button and button,
respectively.
34
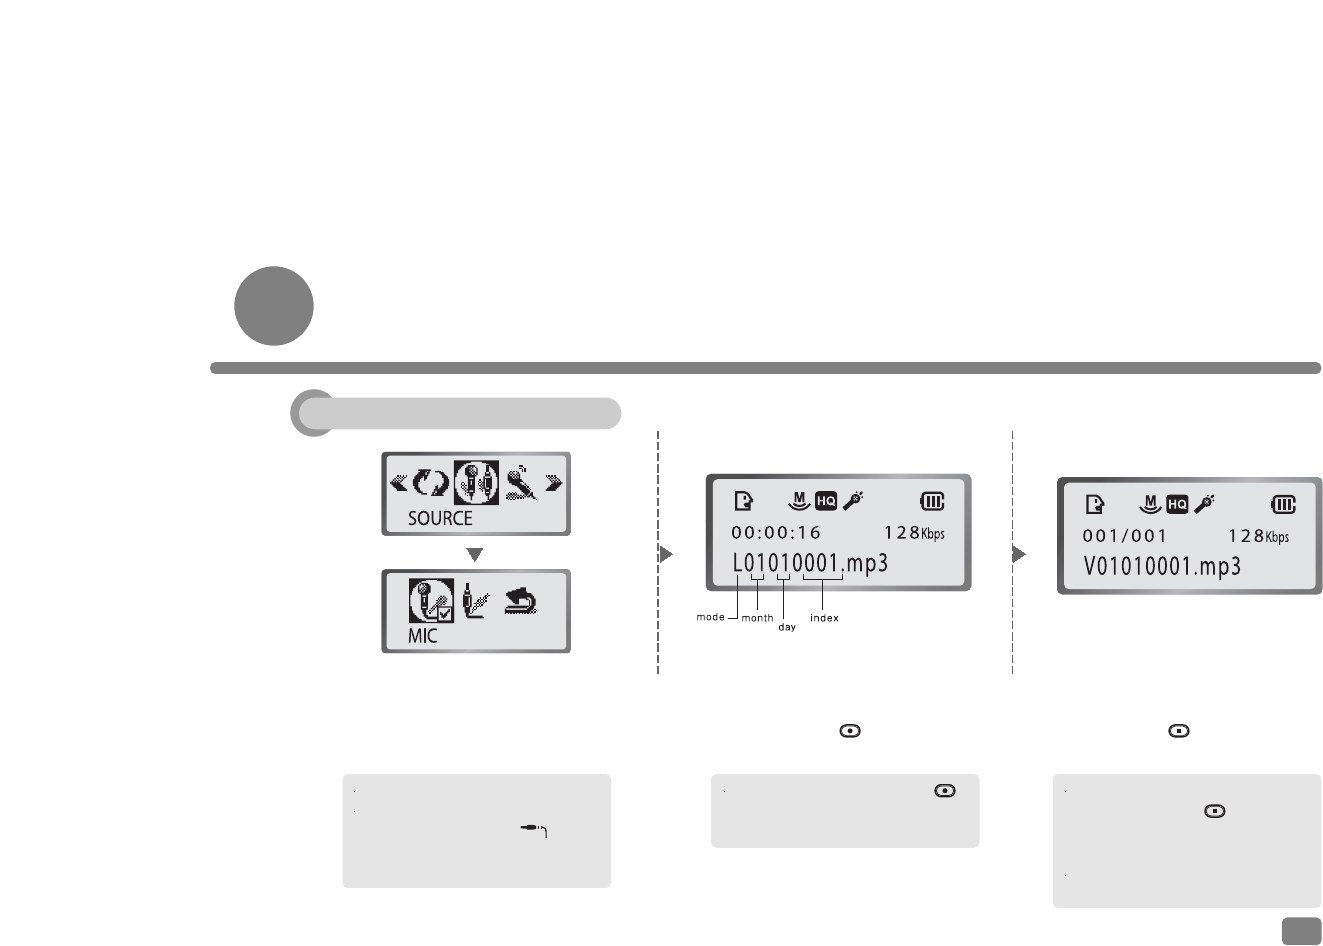
Voice Recording
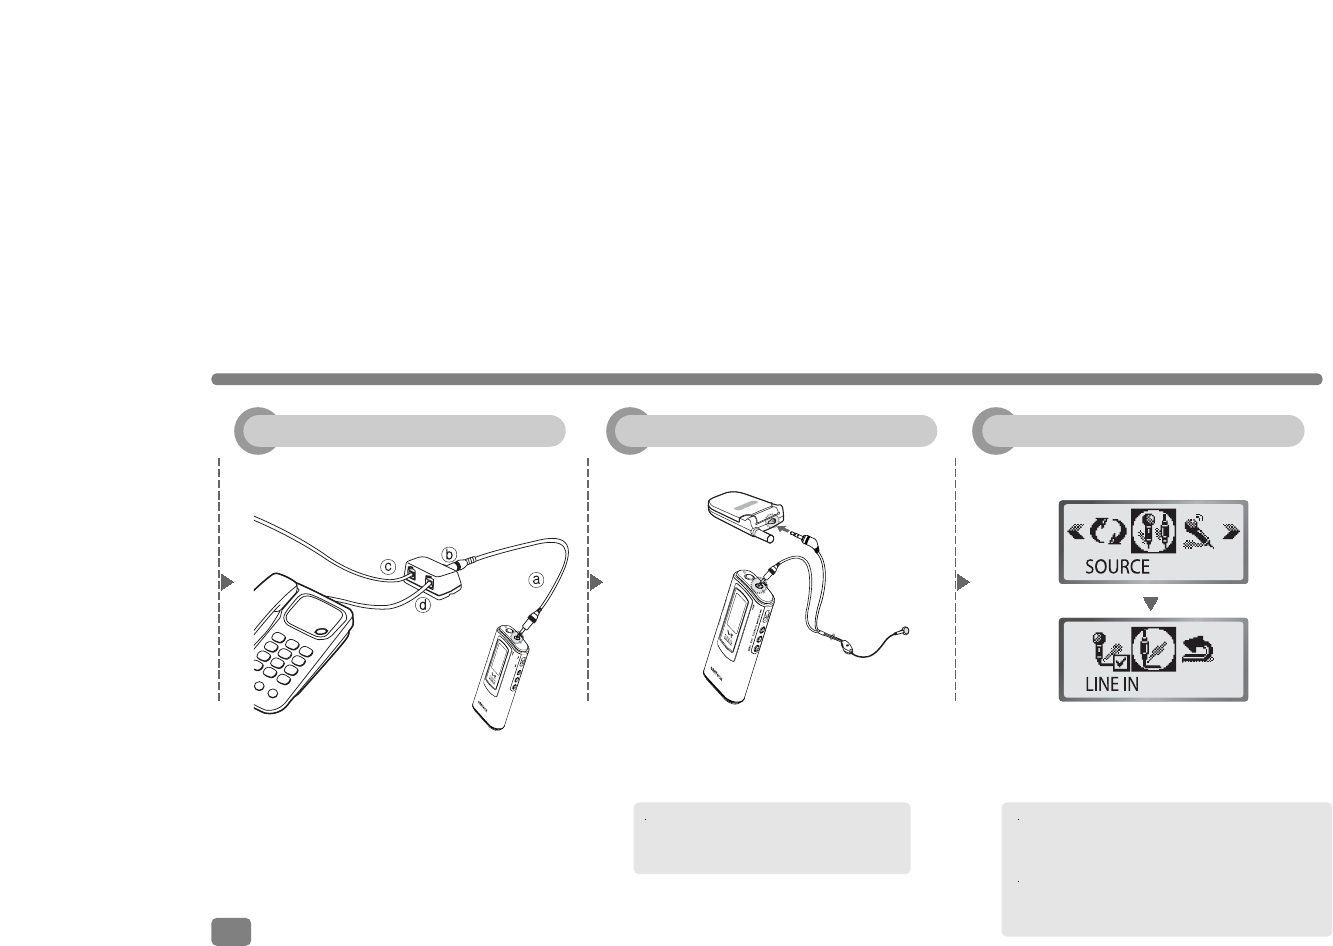
You need to set Mike or Line In, Mono or Stereo, and VOR function before starting recording.
Setting of functions is allowed only in Voice mode. Please refer to pages 28 to 30.
1. Go to [MENU] – [SOURCE]
window and set [MIC] window.
2. Voice starts to be recorded
by pressing button in
Pause mode.
3. Recording is stopped by
pressing button, and a
new voice file is generated.
The default setting of Mike is Mono.
You have to connect the cord of an
external appliance to the jack
when recording with an external
microphone.
Recording is paused by pressing
button during playback and resumed by
pressing it again.
When you resume recording after
stopping by pressing button, the
content of recording will be saved
behind the last taken number.
Recording stops automatically if memory
is full.
35
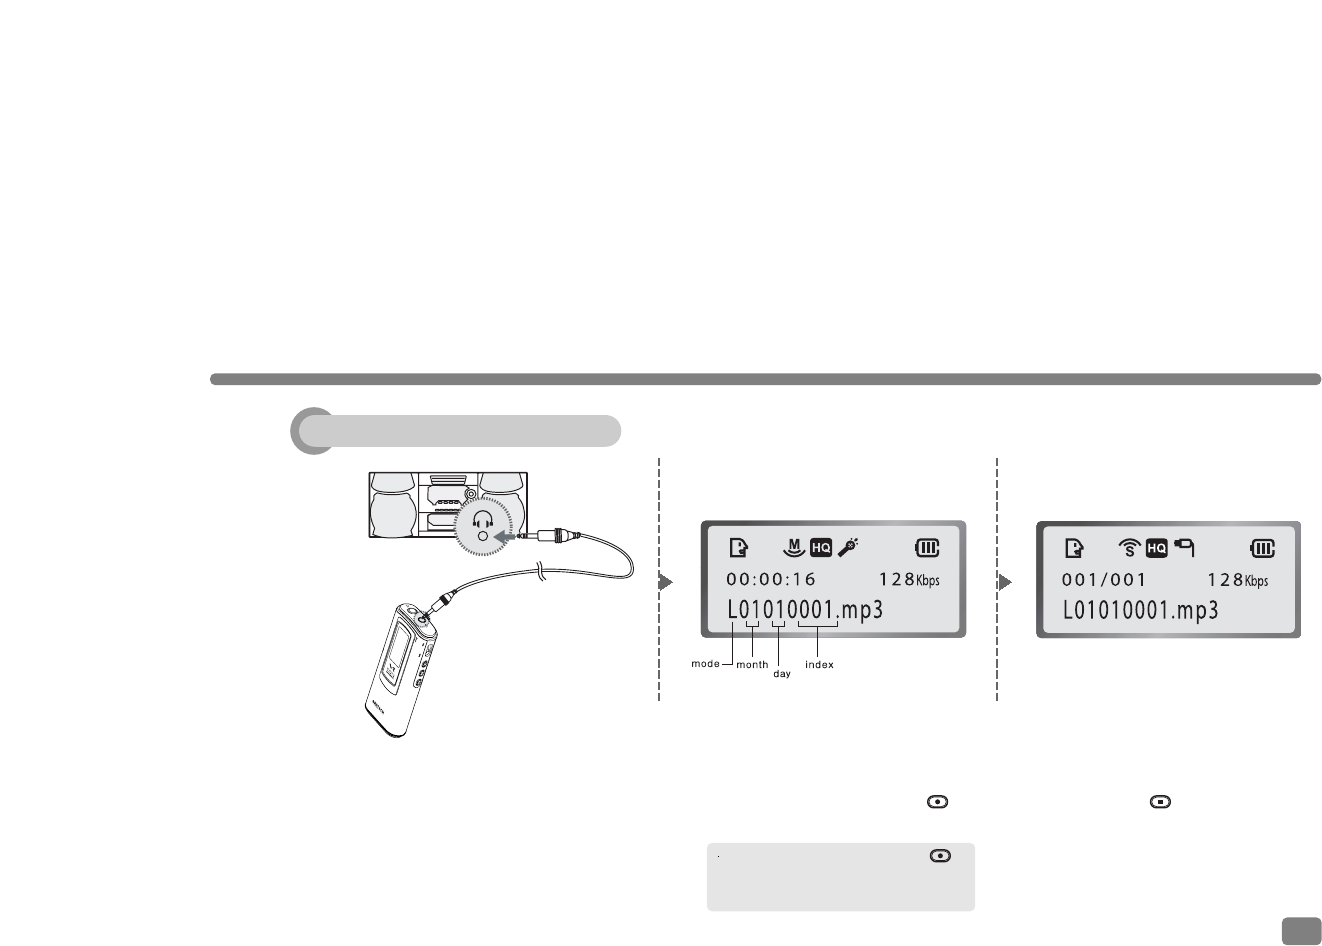
Microphone
VOLUME REC/PAUSE HOLD
SELECT
PLAY/PAUSE
STOP
MENU
When recording through an external appliance (PC or
audio), turn down the volume of the appliance lest it
should distort recorded sound.
You may get high quality recording from external
appliances, if you record in Stereo/HQ mode. The
recording time, however, comes to be shorter.
Recording is possible only for Mobile
phone with an earphone jack. Some
models do not assist this function.
1. Go to [MENU] – [SOURCE] and set
[LINE IN] window.
4. Connect the Line-in cable as
shown in the picture.
Go to [MENU] – [SOURCE] window and set
[MIC] window as for the recording with an
external mike.
5. Connect the Line-in cable as
shown in the picture.
36
Connection with Telephone (Option) Connection with MobilePhone(Option) LINE-IN
VOLUME REC/PAUSE HOLD
SELECT
PLAY/PAUSE
STOP
MENU
3. Voice starts to be recorded in
Stop mode by pressing
button.
Recording is paused by pressing
button twice during recording and resumed
by pressing it again.
4. Recording is stopped by
pressing button, and a
new voice file is generated.
2. Connect the line-in cable as shown
in the picture.
37
External Appliances
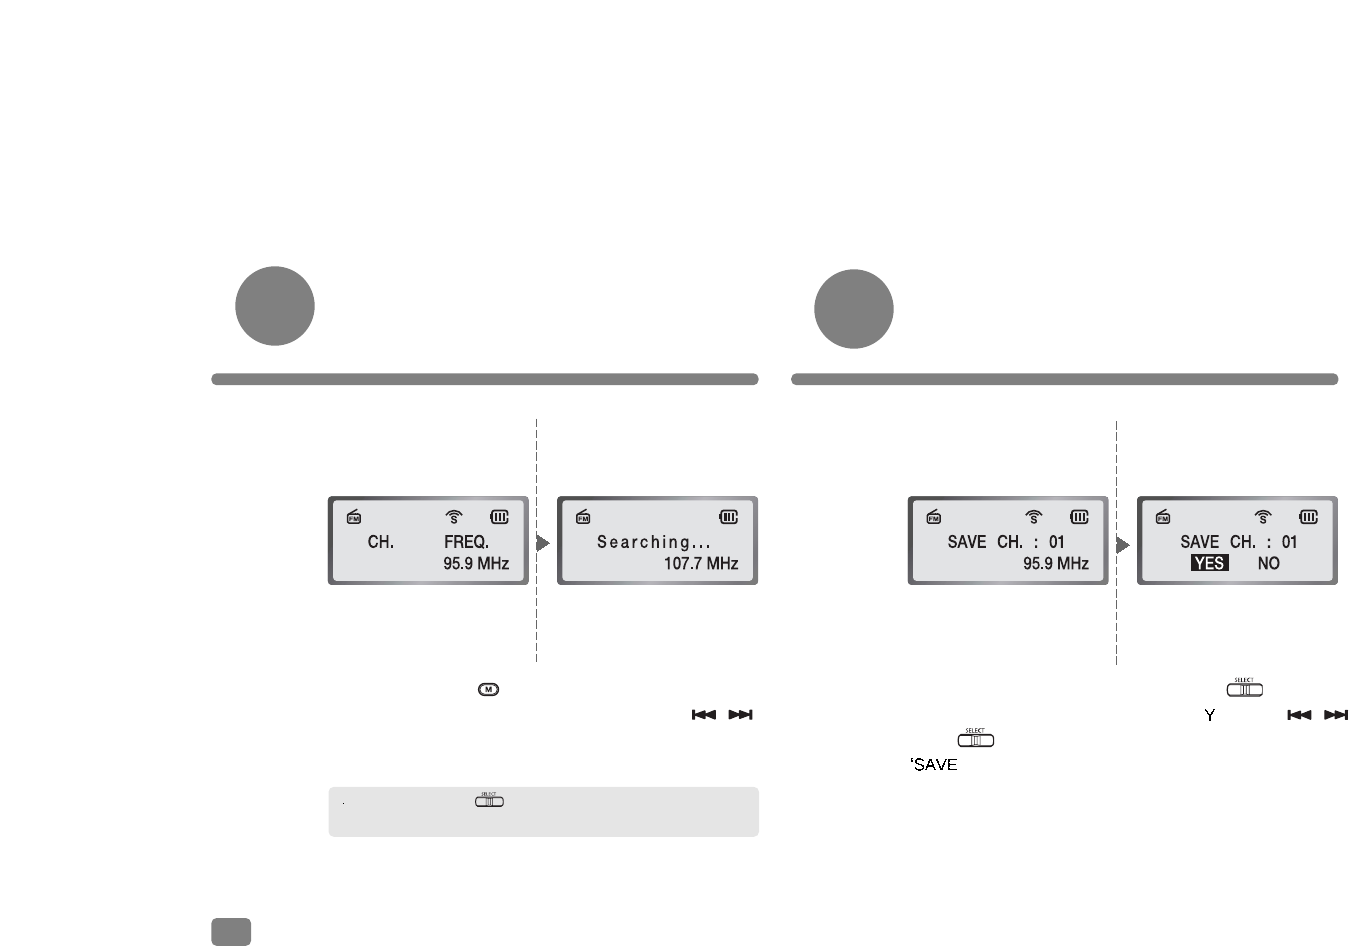
FM Channel Saving Function
1. Press and hold
button for two seconds
and longer to set the
recorder in FM Radio
mode.
FM Signal Receiving Function
2. Search for a desired
station with ,
button.
1. Select the station that
you want to listen to and
press button and
CHXX’ message
displays on the screen.
2. Press button, go
to ‘ ES’ with ,
button, and select it.
If you press and hold button for two seconds and longer, the
recorder will tune to the stations automatically – AUTO SEEK function.
38
Numbers go up and down by pressing button and button,
respectively.
Listening to Saved Channel
1. It is performed in the same way as for saving
channels except that you have to move to and
select a desired number with button when
AVE CHXX’ message displays.
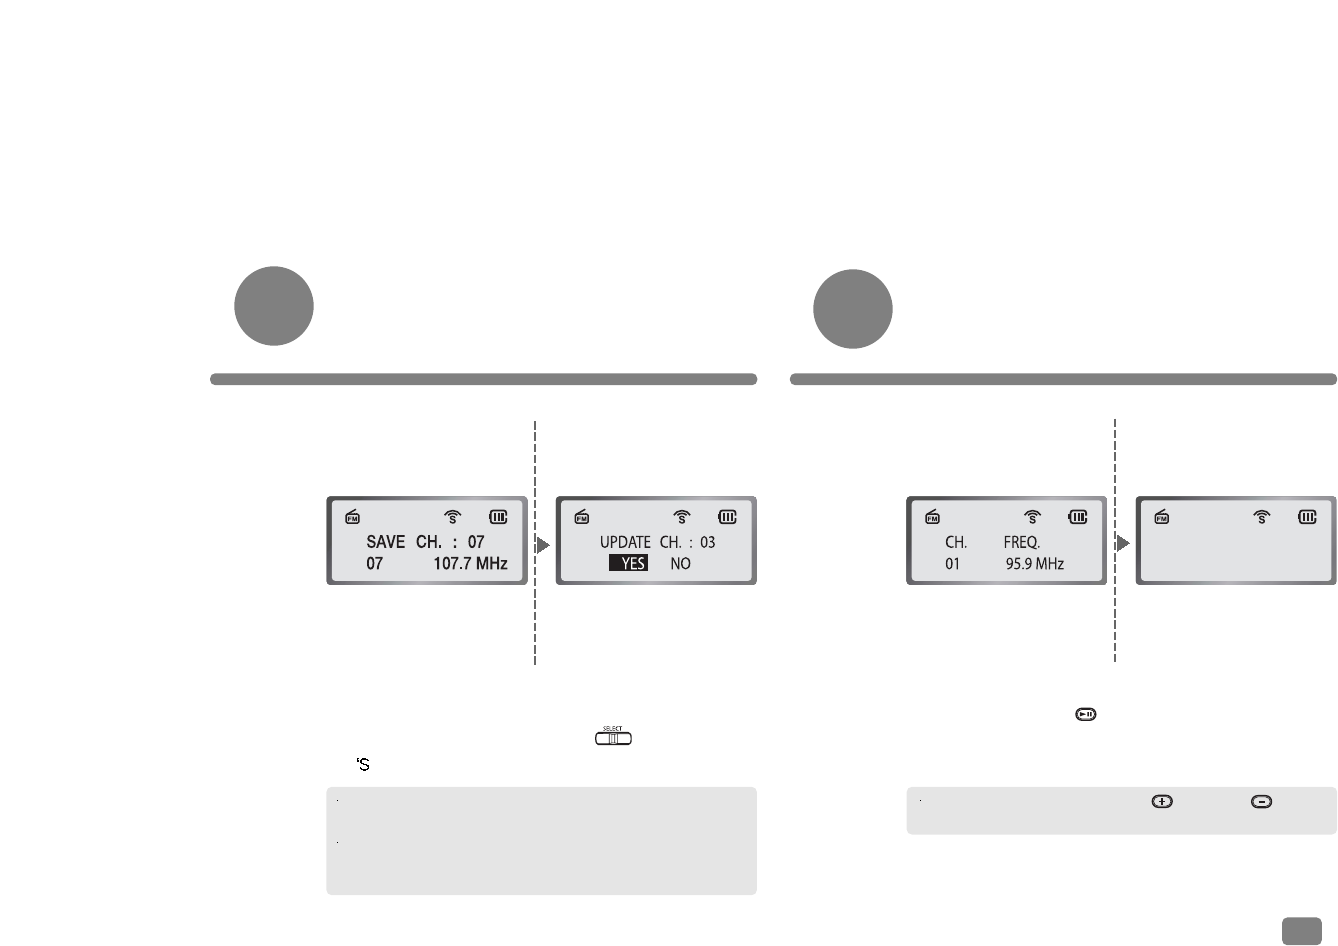
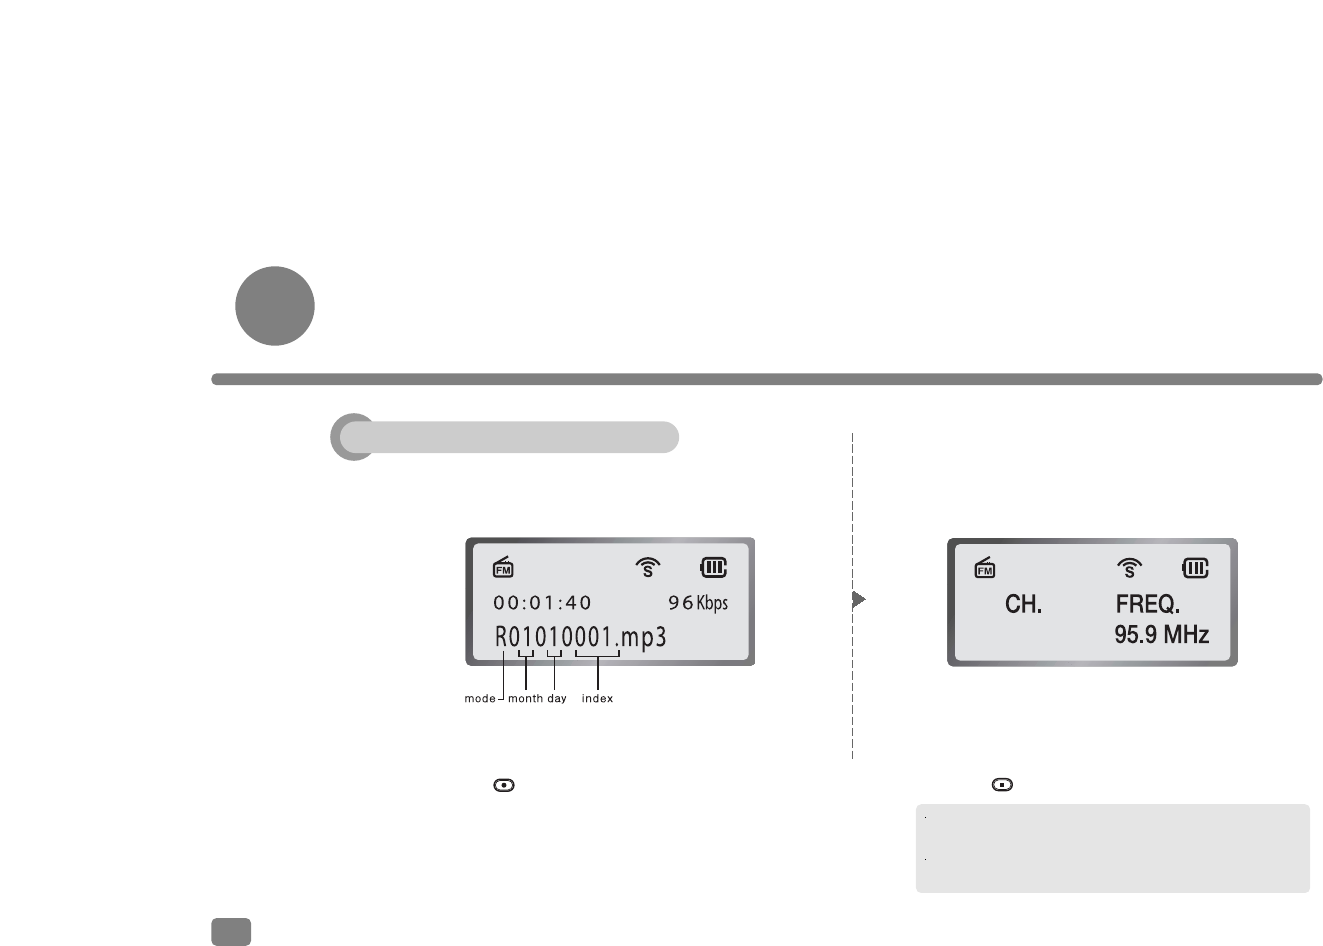
Channel Update
1. Select and listen to a FM channel recorded in FM
Radio mode with button.
CH. FREQ.
07 107.7 MHz
You may receive uneven signals in weak electric field areas with poor
transmission sensitivity.
Straighten the line of earphone as longer as possible and/or turn it
horizontally until you get clearer sound quality, since earphone works
as an antenna.
39
Recording Radio Broadcast
1. Press button and start recording while
listening to a channel. Press the same
button during recording and recording
pauses; press it again to resume recording.
2. Press button to stop recording.
The recorded broadcast contents files are stored in the
order of recording.
You cannot adjust the volume when recording radio broadcast.
So you need to adjust the volume before starting recording.
40
Recording Broadcast Contents
Listening to Recorded Broadcast Contents
Press button for a second in FM Radio mode to enable FM Record Play mode. Press button again for a
second to switch to FM Radio Broadcast mode. You also can listen to recorded broadcast contents in Audio mode.
1. Press button for two seconds and
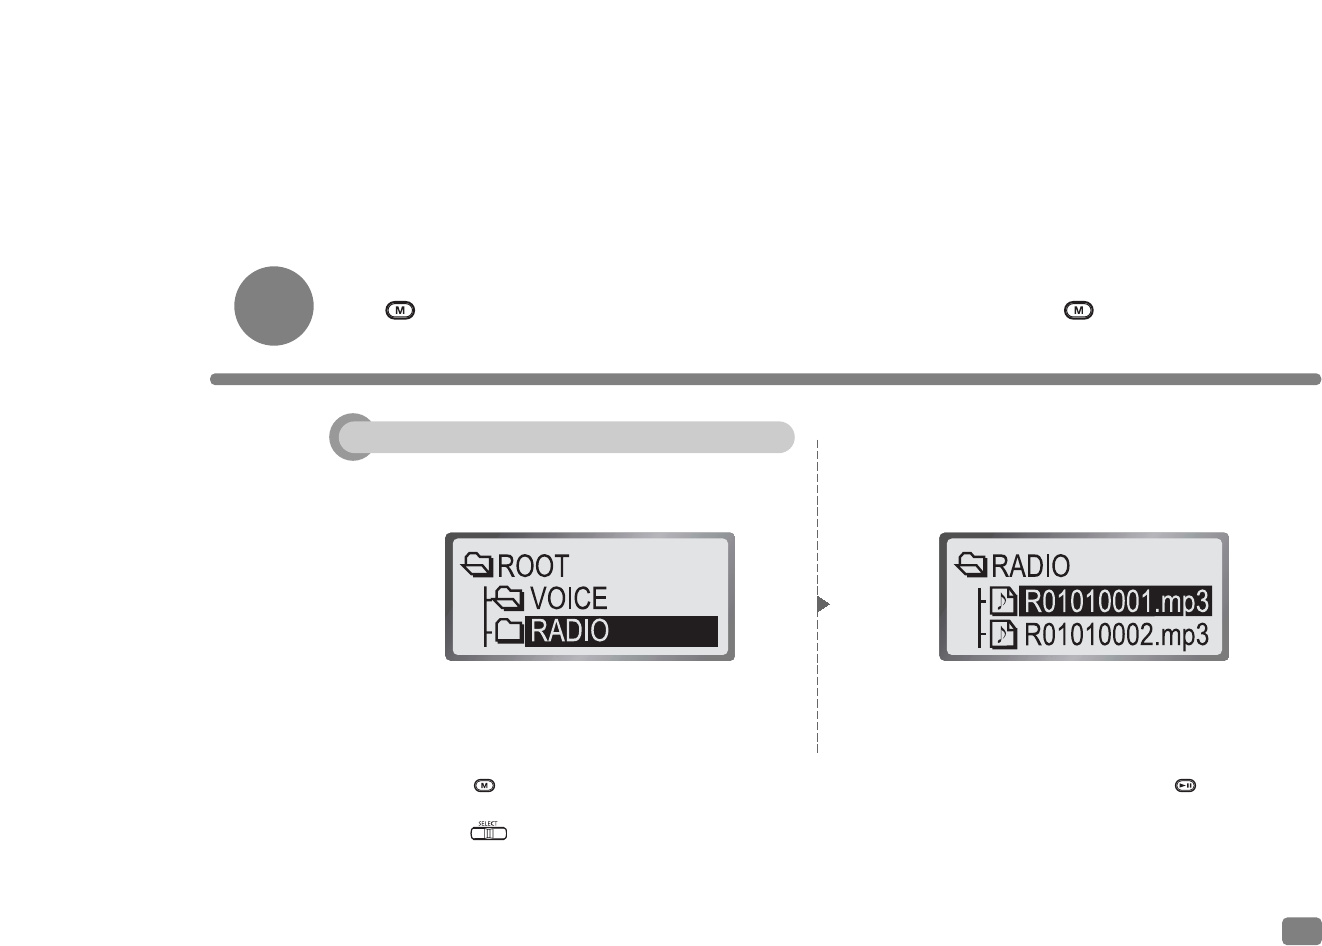
longer to switch to Audio mode.
2. Press button to select a Radio folder
in the directory.
3. Select a desired file and press button.
41
Listening to Recorded Broadcast Contents
Installation of Beatsounds Config Software
42
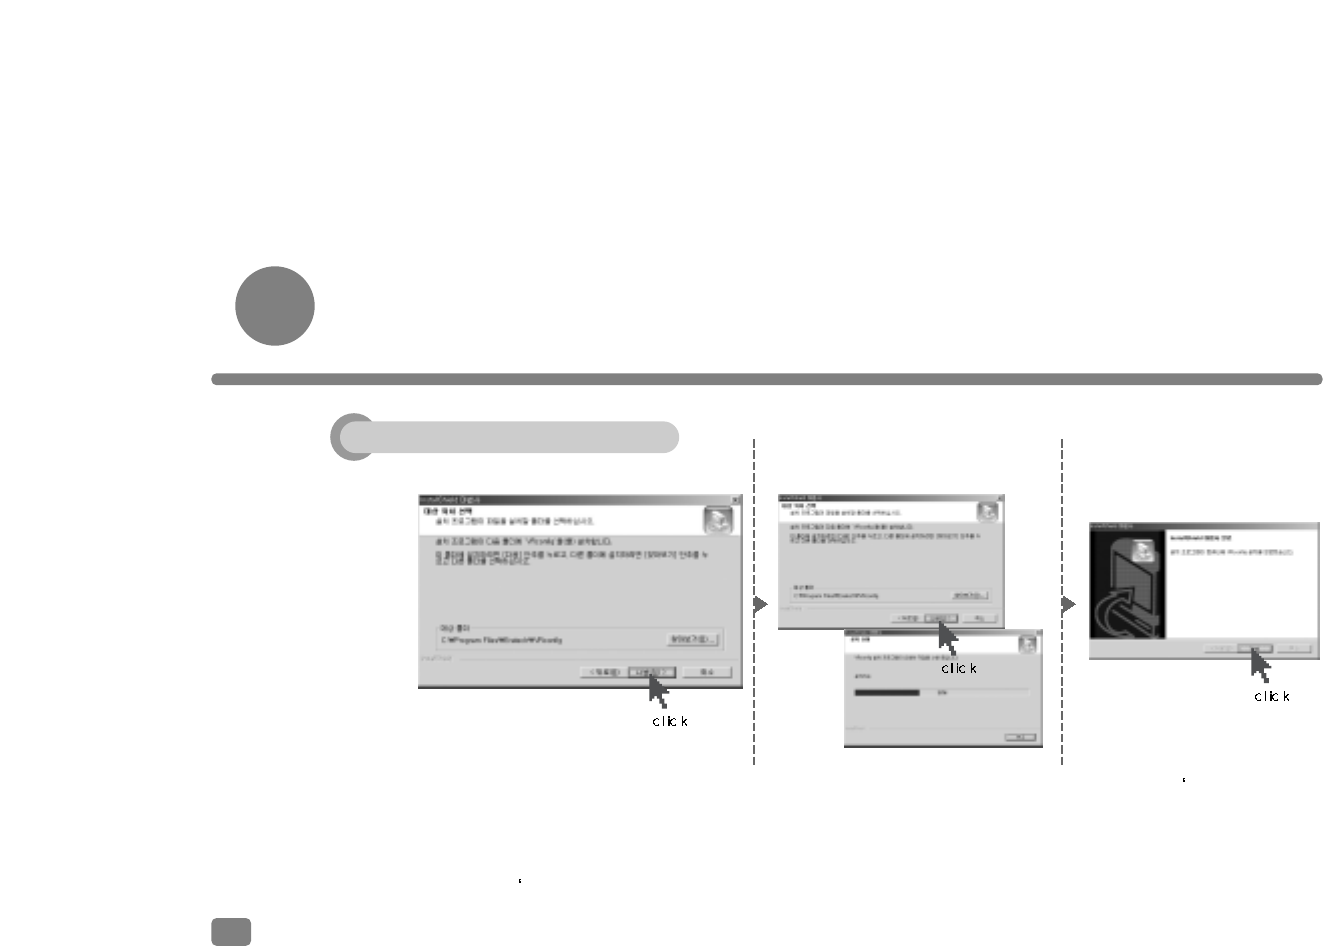
1. Insert the supplied CD into the CD-
ROM drive of personal computer and
a window pops up as shown in the
picture.
2. Click on NEXT’ button.
3. Installation wizard starts to run. 4. Click on Finish’ button.
Installation
43
Use of Beatsounds Config
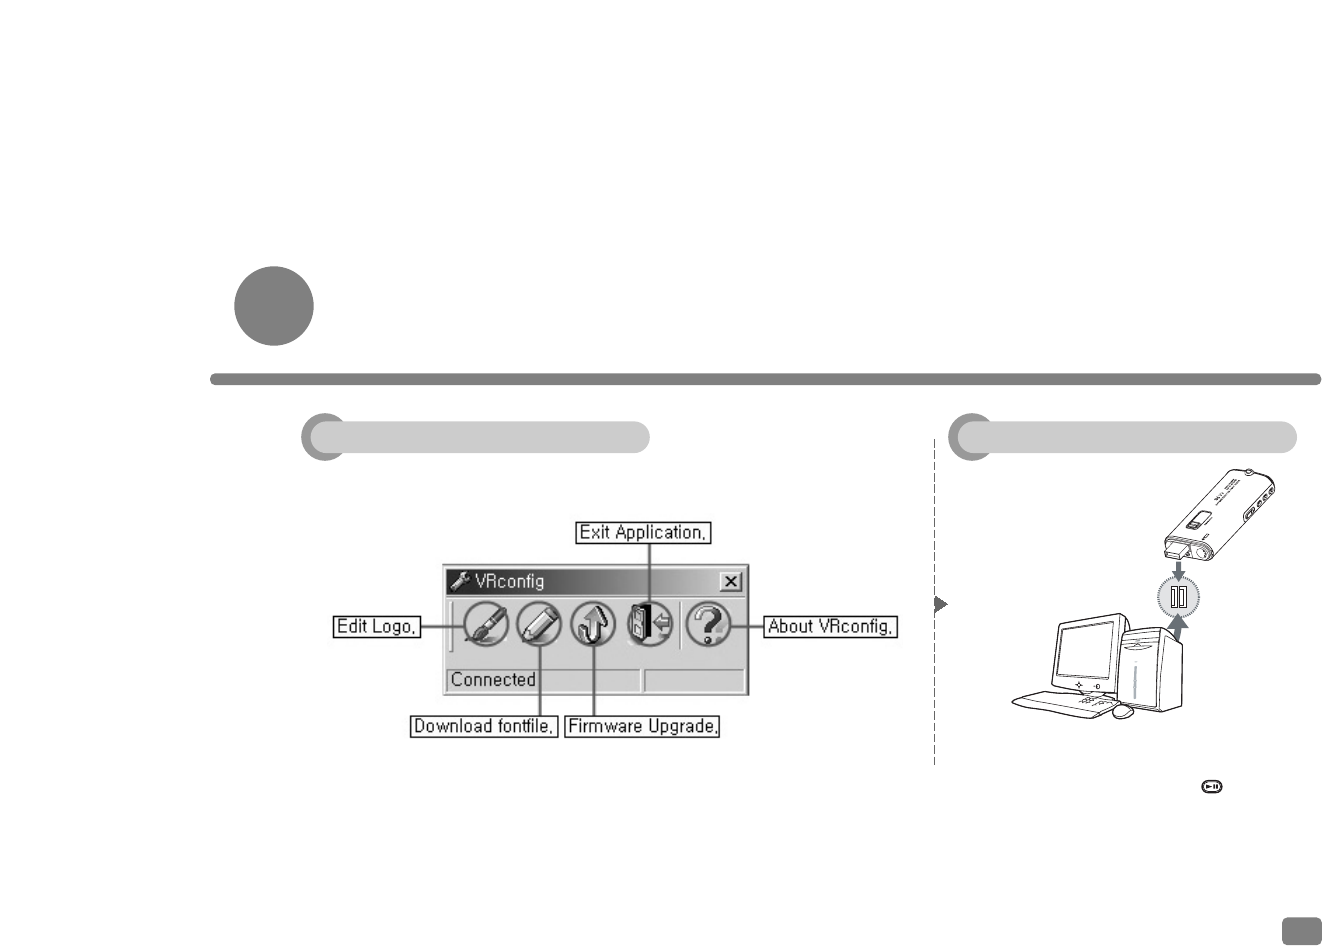
1. Turn on PC by pressing button.
2. Connect the USB port terminal on the
recorder to USB port on the computer.
Icons Saving of Logo
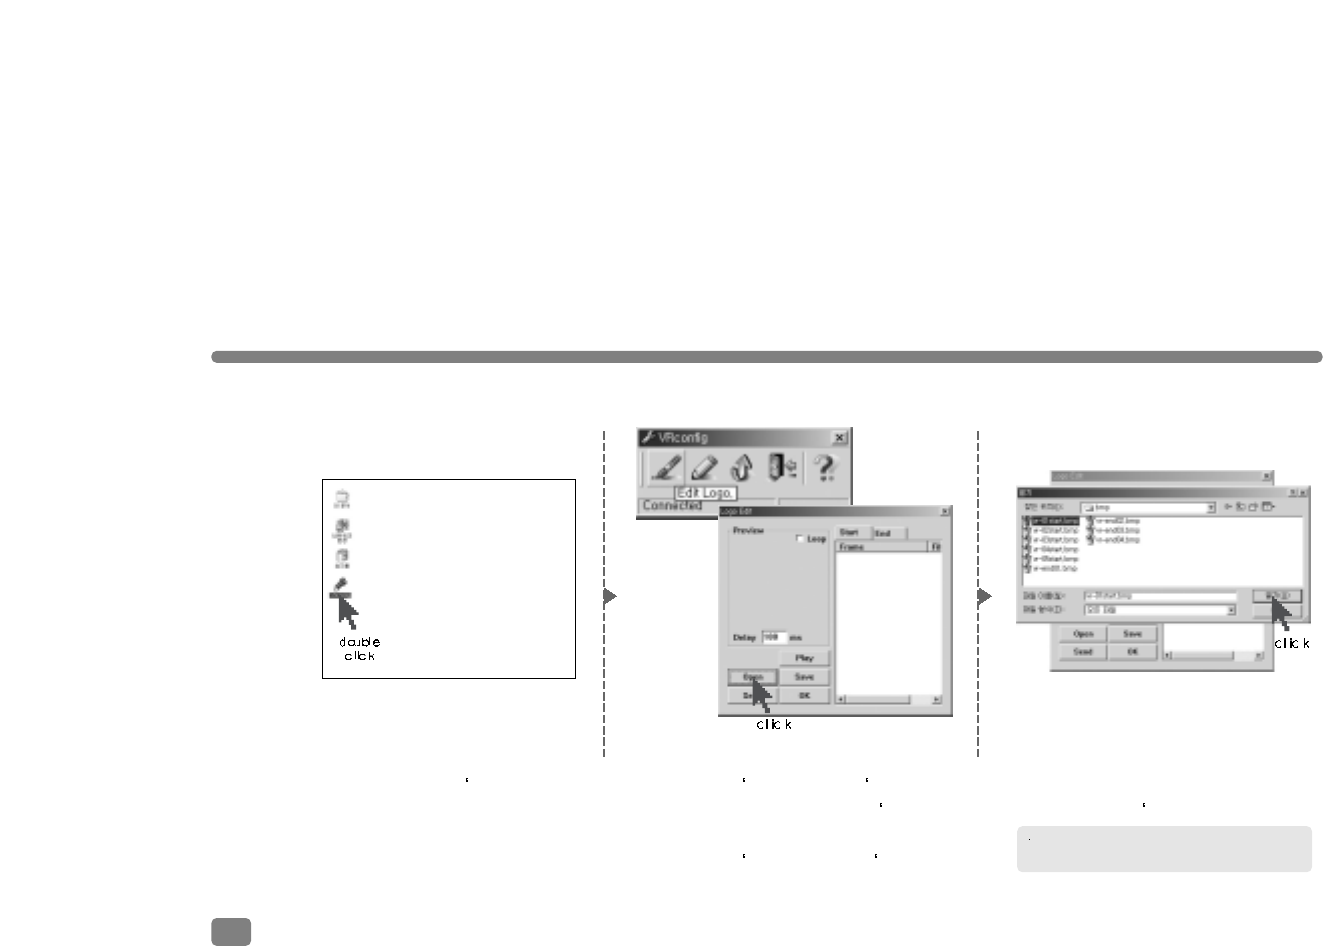
44
4. Click on Edit log’ in the Beatsounds
Config’ window to pop up Logo Edit’
window.
5. Click on Open’ button in Logo Edit’
window.
6. Select an image to be used on PC
and click on Open’.
Digital Audio Recorder uses only .bmp file for
its logo image.
3. Double click on Beatsounds
Config’ icon on the screen.
The animation file will be saved with a .DAT
extension.
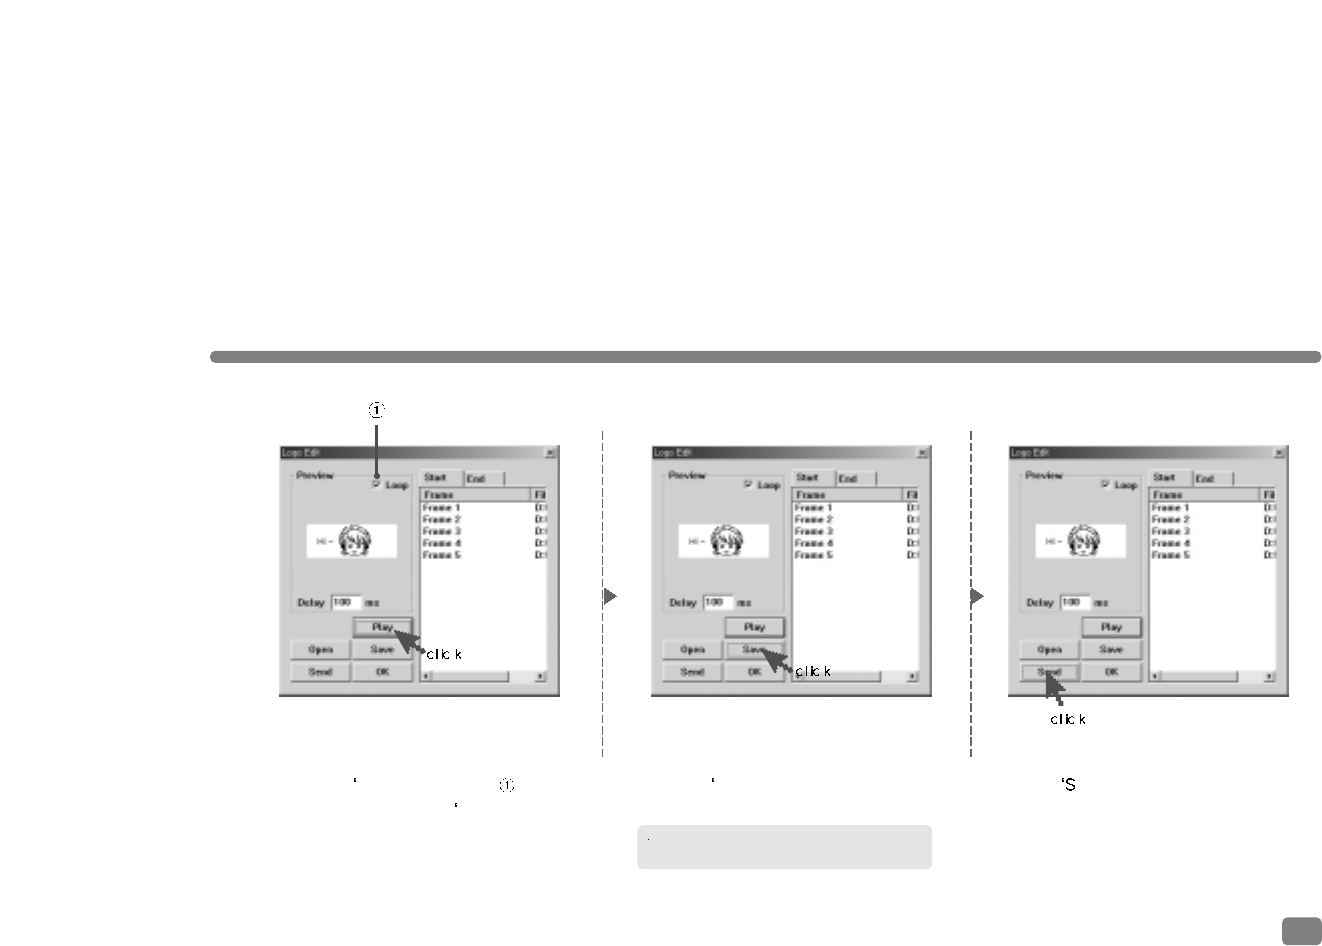
7. Check Loop’ indicated by in the
picture and click on Play’ button
to preview image animation process.
8. Press Save’ button to save the
animation file on PC.
9. Press end’ button to download
the saved file to Digital Audio Recorder.
10. Put off and on the power of Digital
Audio Recorder and the saved file is
animated.
45
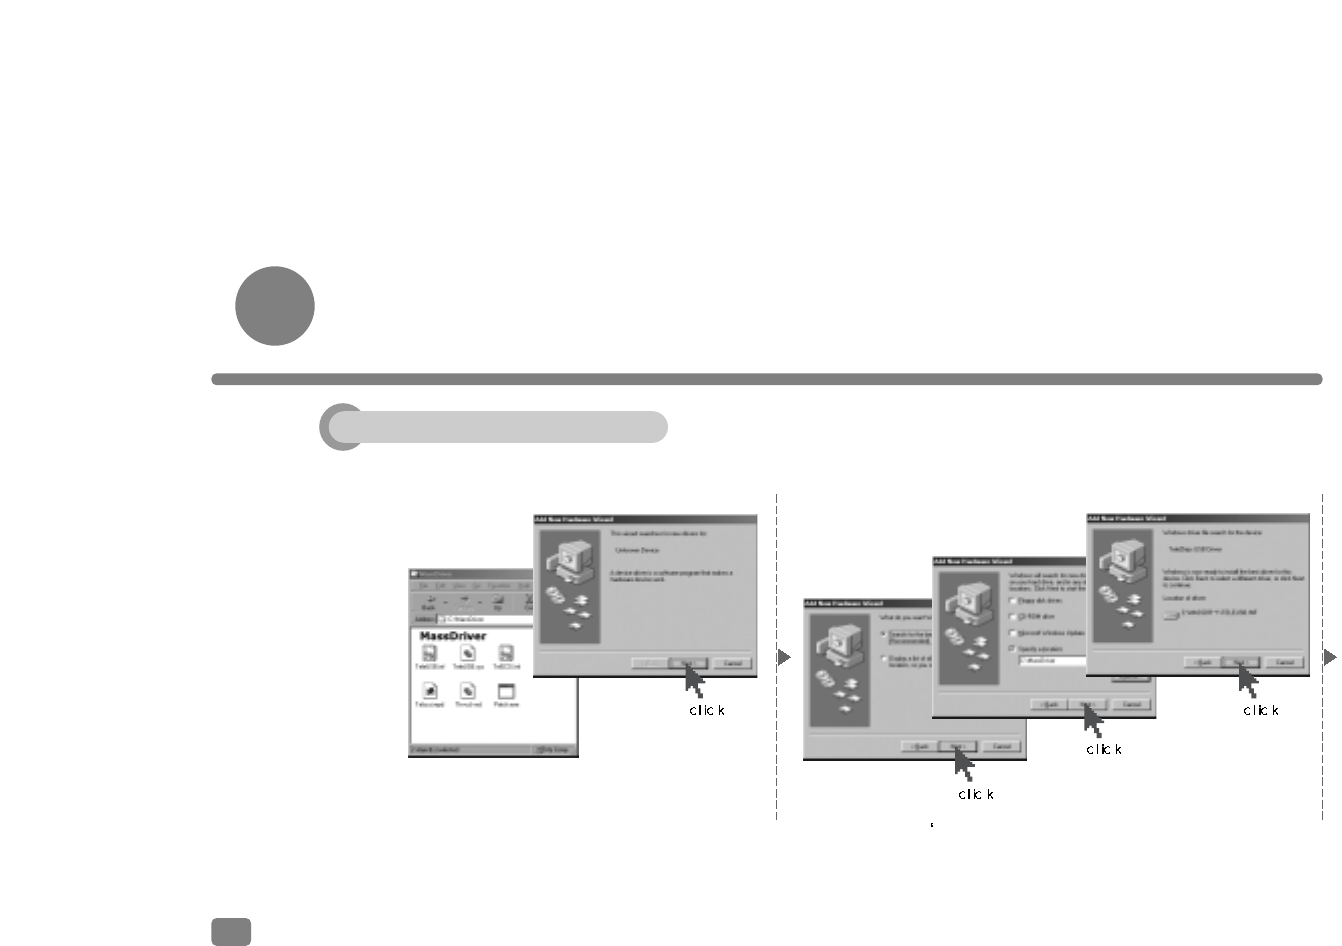
Installation of Mass Storage Driver (for Win 98)
You have to install Mass Storage Driver supplied in your CD in order to use Digital Audio Recorder in Win 98.
The following are procedures to install USB driver.
1. Insert the Installation CD into the CD-
ROM drive of PC.
2. Press Next’ button in every consecutive window.
46
Win98
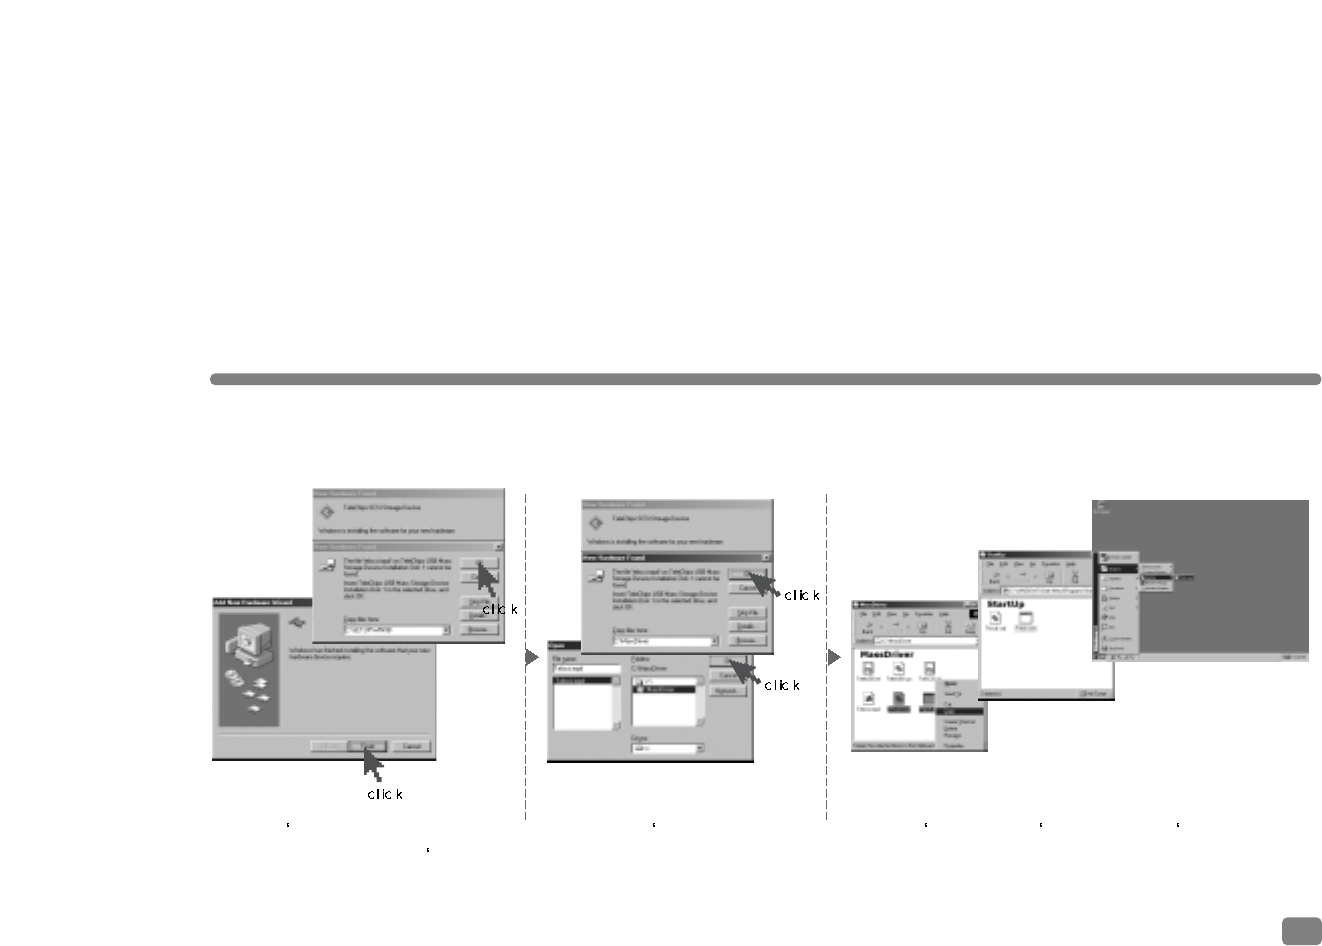
4. Press OK’ button.3. Press Finish’ button in the last
window, and then press OK’
button in the next window.
5. Copy Patch.exe’ and thvcd.vxd’ files to Start Program’,
and reboot the computer.
47
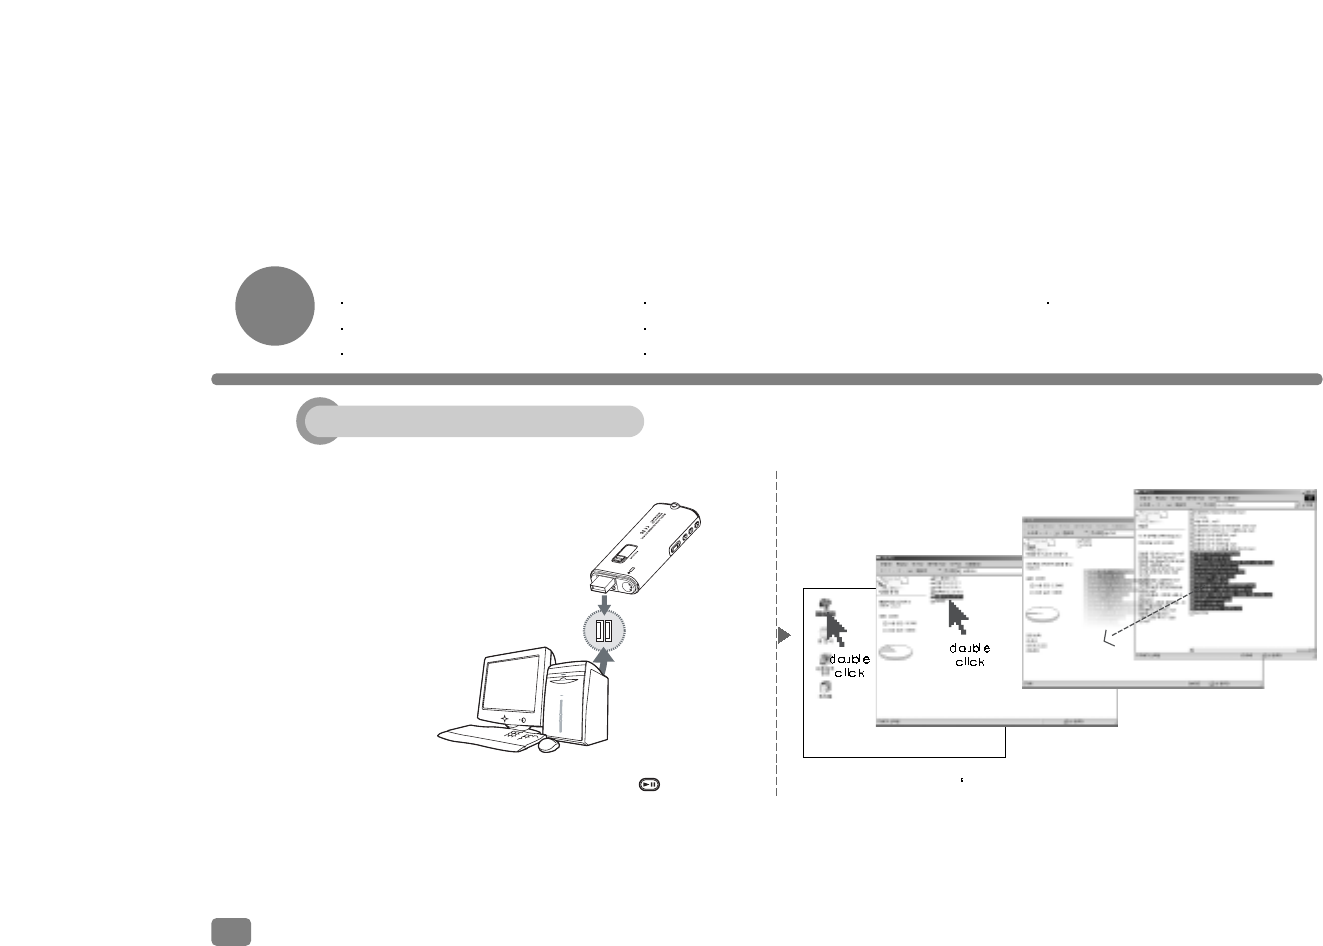
Connection to and Use with PC
Pentium 133MHz or faster Win 98/ME/2000 (PRO)/XP CD-ROM Drive
RAM. 64 MB or higher Hard Disk 20MB or more
USB port Sound Blast card or other compatible card
48
1. Put On power of PC by pressing button.
2. Connect the USB port terminal on the
recorder to USB port on the computer.
3. Double click on My Computer’ icon on PC screen.
4. Double click on Portable Drive.
5. Select files to be transferred from PC and drag and drop them
to Digital Audio Recorder.
Transfer of files from Digital Audio Recorder to PC
Download
49
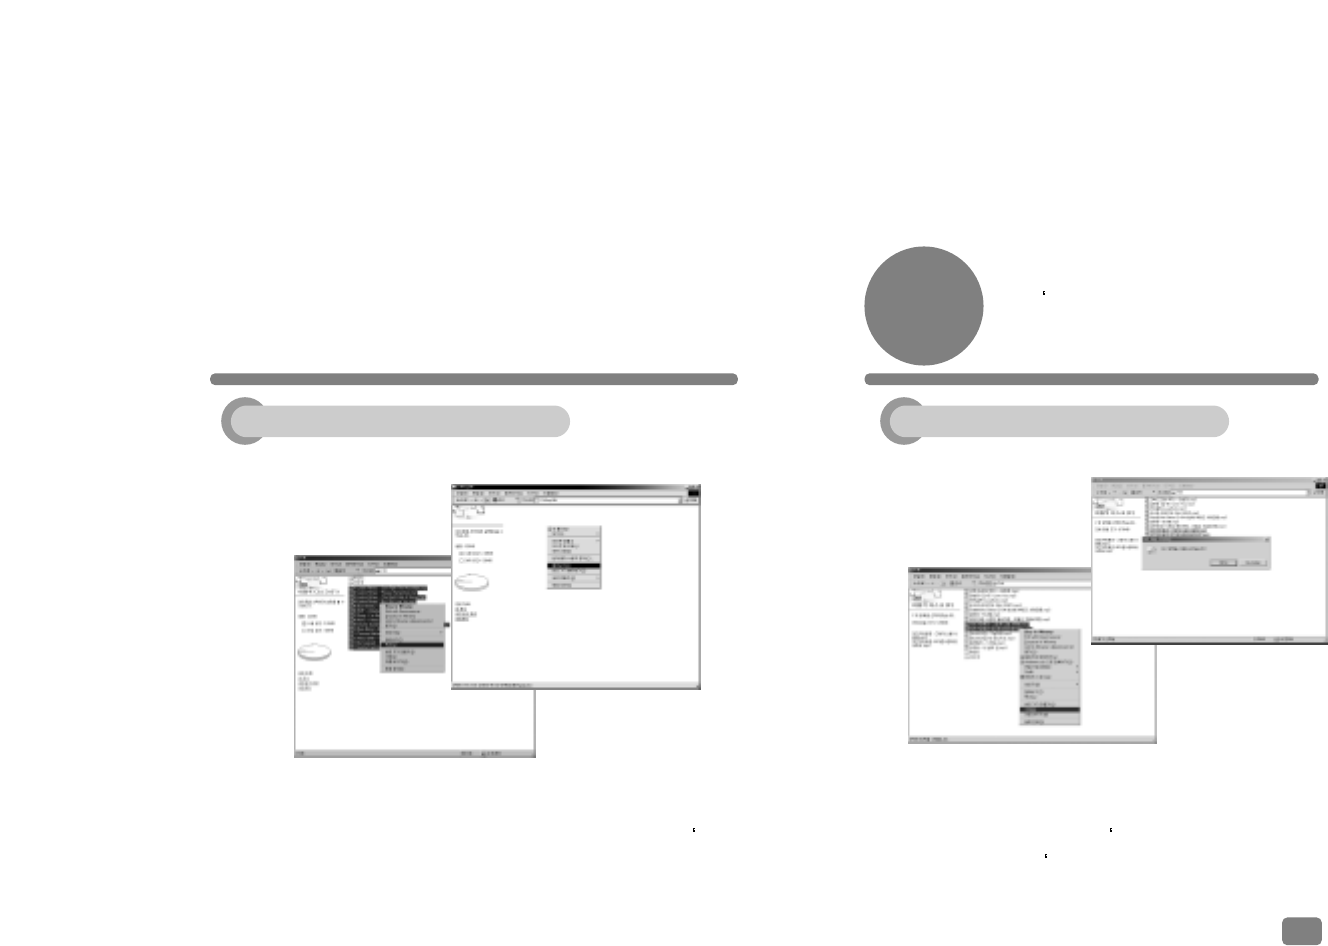
1. Connect Digital Audio Recorder to PC.
2. Select Portable Drive in My Computer folder.
3. Select files to be transferred to PC and select Copy’
using the right mouse button.
4. Drag and drop selected files to a folder in PC.
Deletion of Files in PC
The VOICE RADIO’ folder in Digital Audio
Recorder is created automatically, though
it is deleted.
1. Select files to be deleted in Digital Audio
Recorder and click on the right mouse
button to select Delete’.
2. Click on Yes’ button and deletion process
begins.
Transfer of files from Digital Audio Recorder to PC
Upload
Deletion of files in PC
Deletion of Files
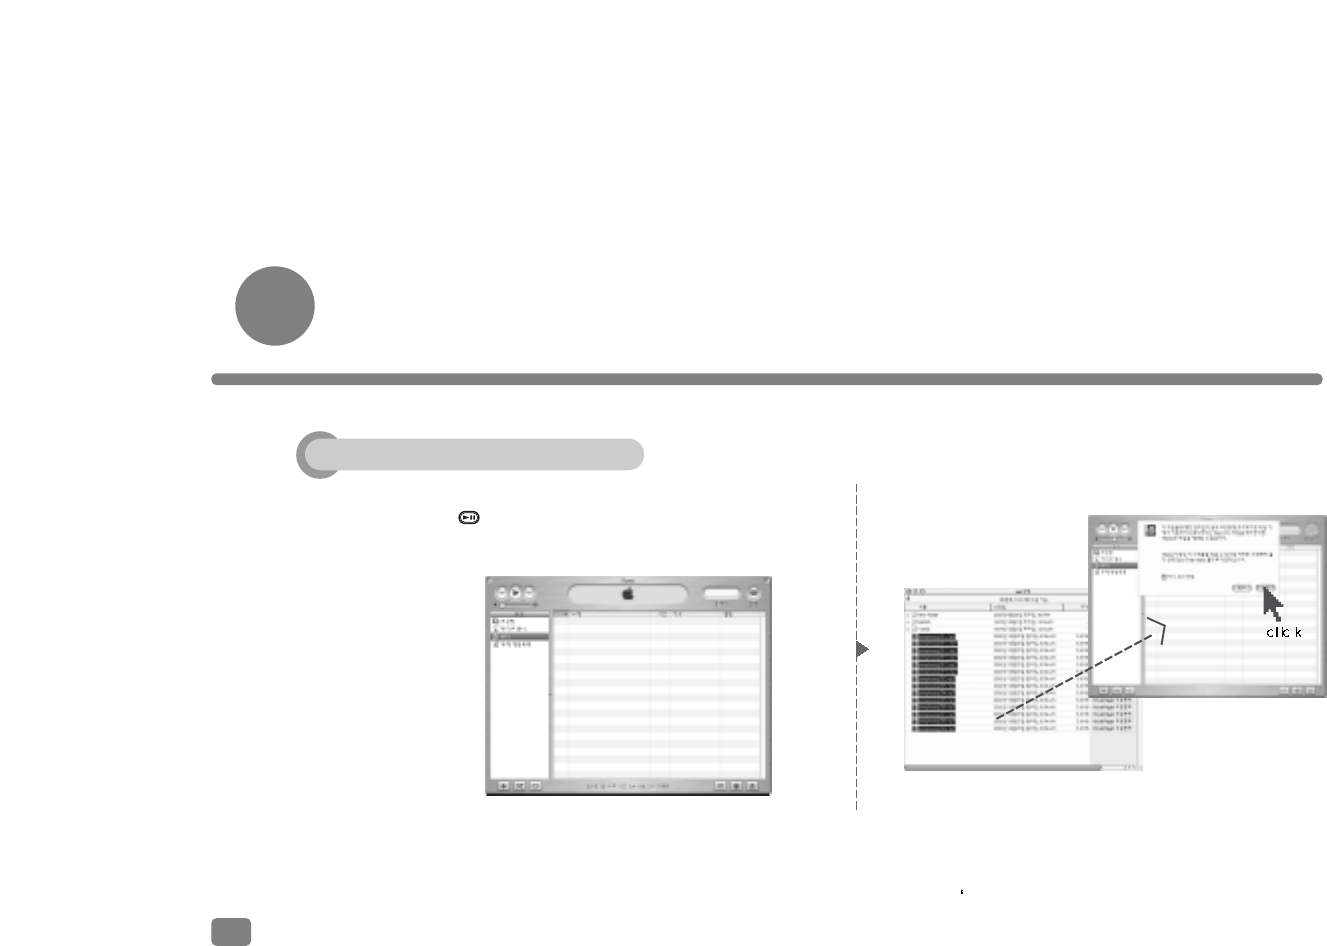
Connection to and Use with Mac
You have to execute iTunes before uploading files to Mac.
3. Make a folder in iTunes to keep files. 4. Select files to be transferred from Digital Voice Recorder
and drag and drop them to the folder in iTunes.
5. Press OK’ button.
1. Put On the power of the recorder by pressing
button.
2. Connect the recorder to USB port on Mac.
50
Downloading

Others
Troubleshooting
If you experience problems with the recorder, refer to the following instructions before calling for customer service.
Nothing appears on LCD screen:
1. Check the remaining power of battery.
2. Check if battery is inserted properly observing the
correct polarity (+)(-).
3. Check if battery cover is closed completely.
Recording is not possible:
1. Check if the HOLD switch is set to the HOLD position.
2. Available memory may be too short due to current
recording and/or audio files.
3. Check if volume is set to 0 .
No sound is heard:
1. Check if the HOLD switch is set to the HOLD position.
2. Check if there is a recording file.
3. Check if battery is used up.
No sound is heard from earphone:
1. Check if volume is set to 0 .
2. Check if the earphone plug is inserted properly.
51
52


www.eratech.co.kr / www.beatsounds.co.kr / www.beatsounds.com