Ericsson LG LDP-7000BTU KEY TELEPHONE UNIT User Manual Microsoft PowerPoint LDP 7024LD
Ericsson-LG Co., Ltd. KEY TELEPHONE UNIT Microsoft PowerPoint LDP 7024LD
Contents
- 1. Users Manual 1
- 2. Users Manual 2
Users Manual 2
Important Safety Information
To prevent the unexpected danger or damage please read this information before installing and
repairing the phone. There are “Warning”, it means as follows;
Warning: To reduce the possibility of electric shock, do not expose your phone to high humidity areas,
such as a bathroom, swimming area, etc.
1. Only trained and qualified service personnel shall install, replace or service the phone.
2. Do not spill liquid like water on the phone. If so, call for the service center as this may result in
a fire or an electric shock.
3. If you see smoke or smell something during, unplug the phone line. Call for service centre
immediately.
4. Do not tug the power cord or the phone line. This may result in a fire, an electric shock or
equipment damage.
5. Do not use the phone during a thunderstorm. Lightning strike may result in a fire, severe electrical or
acoustic shock.
6. Ensure that children do not pull on phone cords. This may injure children or result in equipment
damage.
7. The ear-piece houses a magnetic device which may attract pins or small metal objects. Keep handset
clear of such objects and check before use.
8. Avoid placing the phone in an area that is dusty, damp or subject to vibration.
9. Choose a site that is dry and well ventilated.
10. Do not put the heavy things on the phone.
11. Do not drop or throw the phone.
12. Static electricity discharge will damage electronic components.
13. Keep out of direct sunlight and away from heat.
14. No user serviceable parts inside. No not insert a screw driver or any metal objects into the phone.
This may cause electric shock or damage the equipment and will render the warranty void.
15. Clean the phone with a soft, dry cloth only. Do not use volatile liquids such as petrol, alcohol or
acetone as this may cause a fire or result in discoloration or damage to plastics. Do not clean with
wax or silicon products as these may enter the equipment and cause operation to become unreliable.
Disposal of your old appliance
1. When this crossed-out wheeled bin symbol is attached to a product it means the product
is covered by the European Directive 2002/96/EC.
2. All electrical and electronic products should be disposed of separately from the municipal
waste stream via designated collection facilities appointed by the government or the local
authorities.
3. The correct disposal of your old appliance will help prevent potential negative
consequences for the environment and human health.
4. For more detailed information about disposal of your old appliance, please contact your
city office, waste disposal service or the shop where you purchased the product.
Warning
STG
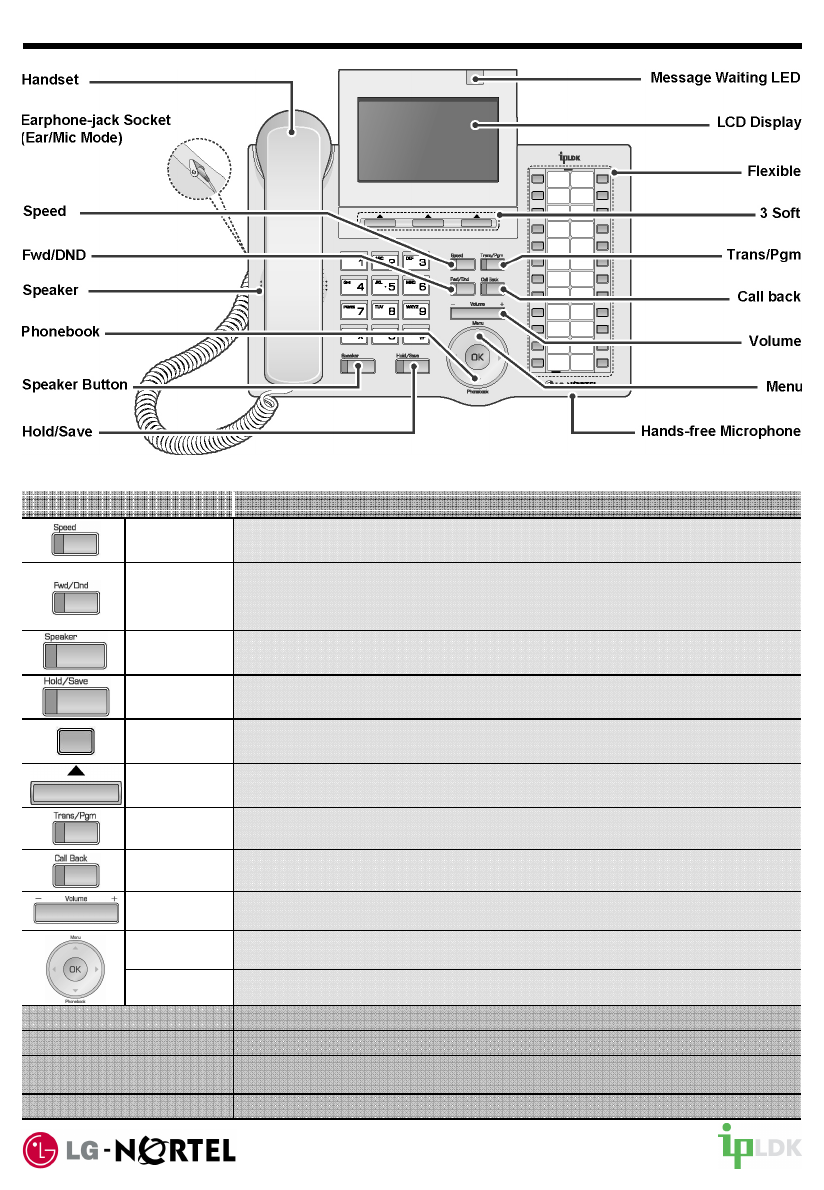
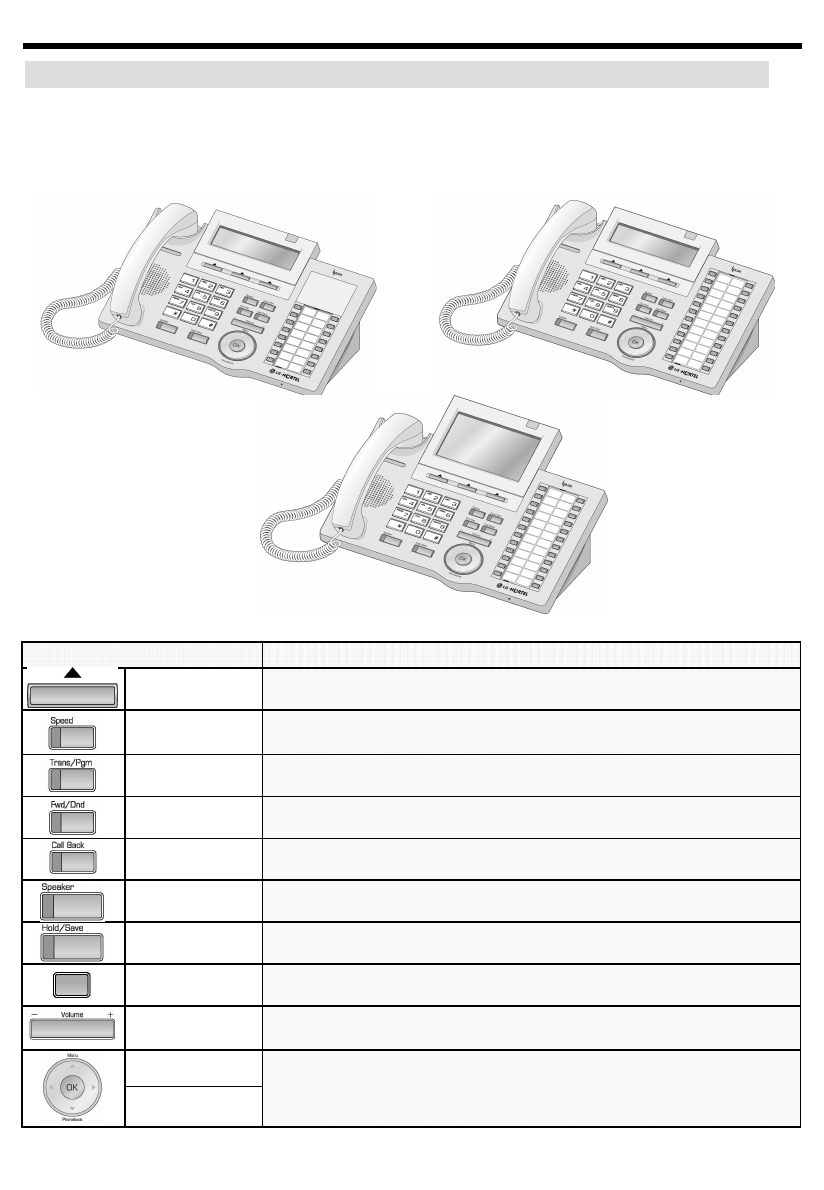
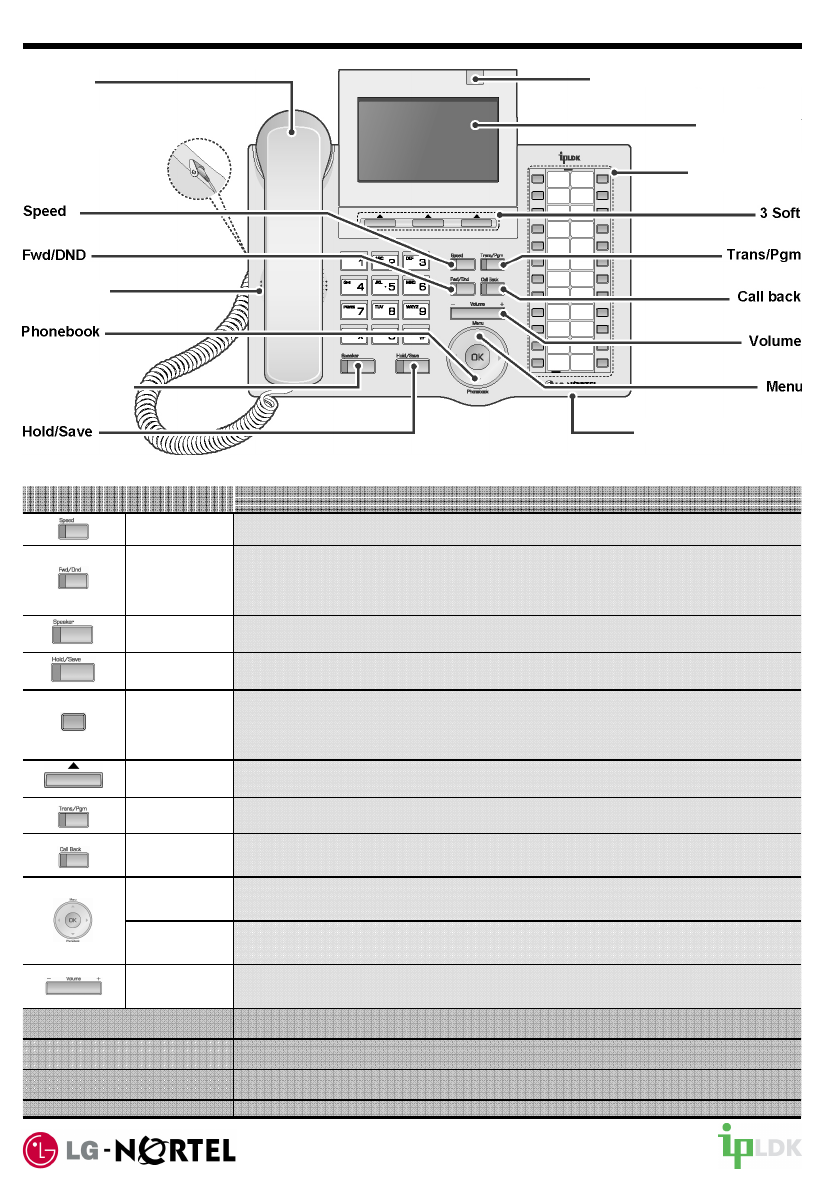
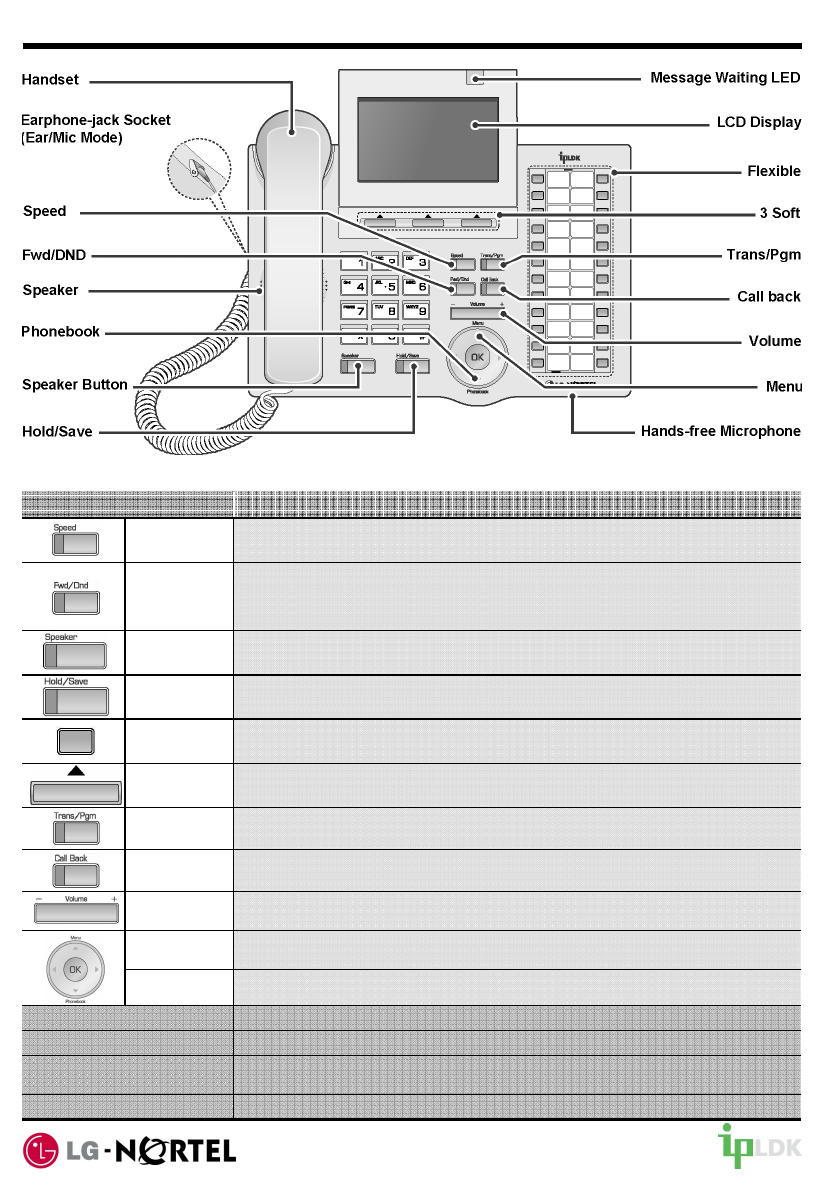
Fixed Feature button definition
DescriptionButton
The menu button is used to move to the desired option (Dial, MSG, Program),
and to select the next screen when indicated by an arrow on the LCD display.
Menu
Used to connect optional headset to the phone.Earphone-Jack Socket
Some flexible buttons are pre-programmed in the system for line appearances,
loop functions etc. The remaining flexible buttons can be user-programmed.
Flexible
Used to access speed dialing, speed programming, save number redial, and last
number redial.
Speed
The DND (Do Not Disturb) feature blocks all incoming calls. When DND is active,
the red LED in this button is illuminated.
It is also used to activate call forward, e.g. to another station or voicemail. When
call forward is activated, the red LED flashes.
DND/Fwd
Speaker toggles the speakerphone state, and the red LED is illuminated when
the speakerphone is active.
Speaker
This button is used to put a call on hold or save information when programming.Hold/Save
Used in conjunction with fixed and flexible features, and the function changes in
relation to call progress, as indicated on the LCD display.
3 Soft
Buttons
This button is used to initiate a call transfer (TRS) or to enter programming mode
(PGM)
Trans/PGM
A station can initiate a call back request to a busy station. Once that station
becomes idle, the initiating station is signaled.
Call back
The volume button adjusts the audio levels for ringing, handset and
speakerphone functions.
Volume
Used to edit phonebook and make a call to searched destination.Phonebook
Illuminates when the phone is ringing.Visual Ringing LED
Displays information about telephone status, dialing directories, and test
message information.
LCD Display
Microphone is used for hands-free speakerphone function.Hands-free Microphone
LDP-7024LD Digital Telephone Description Quick Guide

LDP Keyset User Operation
Receiving calls _ Answering a Call While Idle :
1. Lift the handset and press the flashing Flex button (as
needed), the call will be connected.
Responding to a Call While Busy
1. Press Hold/save and/or
2. Press the flashing CO line button.
Answering Calls to Other Stations
To answer a call ringing at another station:
1. Lift the handset,
2. Dial 7 (Directed Call Pick-Up code),
3. Dial the Intercom Number of the ringing station; the
call will be connected.
To answer a call ringing at a station in your
group:
1. Lift the handset,
2. Dial 566 (Group Call Pick-Up code), the call is
connected.
Using Do-Not-Disturb (DND) to Block Incoming
Calls
To toggle DND ON and OFF:
1. Press the DND button.
Forwarding calls to another Station or Voice
Mail
To activate Call Forward from your phone to
another phone or internal system resource:
1. Lift the handset,
2. Press the Fwd Soft button,
3. Dial the type of forward code 1-9 (iPECS: 1-5)
4. Dial the destination number.
Placing Intercom calls
To place an Intercom call:
1. Lift the handset,
2. Dial the Intercom number of the desired station,
3. On answer or Splash tone, speak to the called party.
Using Camp-On when calling a busy station
To Camp-On (wait off-hook) for a busy station:
1. Press * and wait an answer.
Using Last Number Redial (LNR)
To dial the Last Number for an external call:
1. Lift the handset,
2. Select the Redial Soft button,
3. Press ▼volume ▲to select from the last 10
numbers dialed,
4. Press the Send Soft button or hold/save.
Using System Speed Dial Numbers
To place a call using System Speed Dial:
1. Lift the handset,
2. Press the Speed button,
3. Dial the desired System Speed Dial bin number
Using and Entering Station Speed Dial
Numbers
To place a call using Station Speed Dial:
1. Lift the handset,
2. Press Speed,
3. Dial the desired Station Speed Dial bin number
To enter a Station Speed Dial number with CO
Line and Name:
1. Press Trans/Pgm,
2. Press speed,
3. Dial the desired Station Speed Dial bin number,
4. Select/dial the CO line/group,
5. Dial the desired number to be stored,
6. Press hold/Save,
7. Enter the associated name if desired, using the
alpha-numeric entry chart,
8. Press hold/Save.
To assign a Station Speed Dial number directly
to a Flex button:
1. Press Trans/pgm,
2. Press the desired Flex button,
3. Select the Tel Num Soft button,
4. Select/dial the CO line/group,
5. Dial the desired number,
6. Press hold/Save,
7. Enter the associated name if desired, using the
Character Entry chart,
8. Press hold/Save.
ACNR: To retry a busy external number until
answered
To set up an ACNR, while on an outgoing call:
1. Use the Navigation button to display the next menu
and select the ACNR Soft button,
2. Hang-up handset.
To cancel the ACNR request:
1. Press the ACNR Soft button.
Call Transfer: Sending a call to a different
destination
To Transfer an active call:
1. Press Trans/pgm,
2. Call receiving party,
3. Hang-up with or without announcement.
Call Hold: Placing a call in a waiting state
To place a call on Hold:
1. Press Hold/save.
Joining Multiple People in a Conference
To establish a Conference:
1. Establish call with one of the desired conference
parties,
2. Select the Conf Soft button,
3. Establish call with the other conference party,
4. Select the Conf Soft button,
5. Select the Conf Soft button again to establish the
conference.
To place a Conference on Hold:
1. Press the hold/save button.
To retrieve the Conference:
1. Select the Conf Soft button.
To make an External-parties-only Conference:
1. Establish conference with two external parties,
2. Select the Conf Soft button to exit.
To enter pre-opened Conference Room:
1. Dial 5 7 X (iPECS: 5 9 X) when X is the conference
room number.

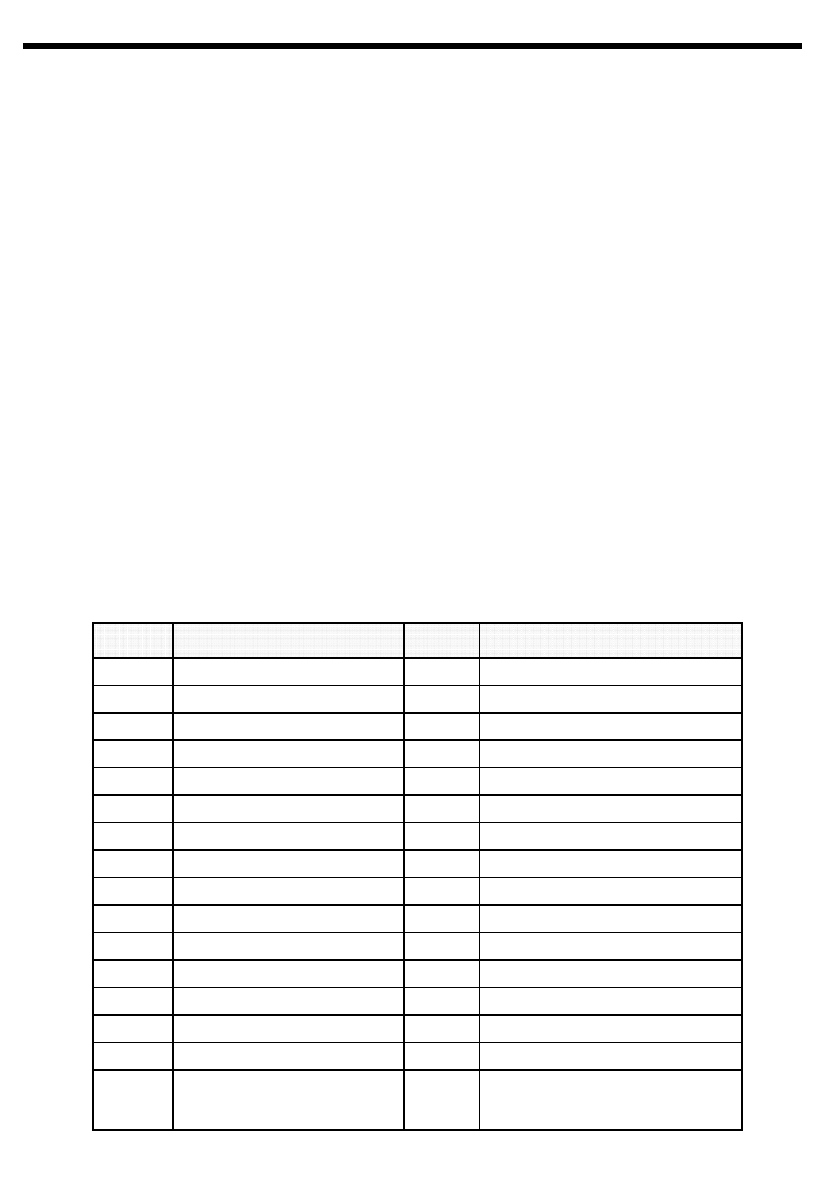
User Program Codes
http://www.LG-Nortel.com
•Press the [TRANS/PGM] button ▶Press the flexible button to be programmed
•▶Press [Trans/Pgm] button again ▶Enter the desired feature code below table
•▶Press the [HOLD/SAVE] button to save.
PTT Button9 9-Erase User Greeting-6 6
Register Bluetooth* 8* 3Erase Page MSG-6 7
Bluetooth Usage* 9* 4LCD Display Language7 17 1
Background Music7 37 3
FWD Button9 8-Record Page MSG-6 5
-
-
-
-
-
-
-
* *
* 0
9 *
9 9
9 8
9 7
9 6
9 5
9 4
-
9 1
8 *
8 9
8 7
8 6
8 5
8 4
8 1
8 0
7 6
7 5
7 4
LDK
Code
-
-
-
-
5 7
8 0
5 2
5 1
-
1 4
5 4
5 3
4 2
4 1
-
3 9
3 8
3 7
-
3 3
-
2 3
2 2
2 1
1 2
1 1
1 9
1 0
-
iPECS
Code
Register Station Name7 4Ring Type1 1
Speakerphone / Headset6 1Enblock mode1 4
Headset Ring Mode6 2Ear-Mic Headset1 7
Account Code8 4ICM Ring1 8
7 9
7 7
7 6
7 5
3 5
3 2
3 1
* *
* 0
-
-
-
9 7
9 6
9 5
9 4
9 3
9 1
-
8 9
-
8 6
8 8
8 5
3 4
iPECS
Code
Display Phone VersionListen Station Status6 4
Display Phone MAC IP AddressListen Station Number6 3
Change Phone IP Address Listen Time & Date6 2
Display Phone IP Address Record User Greeting6 1
Msg. Wait in Exec/Sec pairCall Log5 7
CLI/IP Msg. Wait RetrieveTwo Way Record5 4
STA Msg. Wait Retrieve
Set Customer MSG5 2
HOTDESK Agent LogoutSet Pre-Selected MSG5 1
HOTDESK Agent LoginCall Coverage For STA XXX4 6
USB CALL RECORDCall Coverage4 5
DISA RESTRICTIONConf-Room Deactivate4 4
DID RESTRICTIONConf-Room Activate4 3
REDIAL ButtonWake-Up Erase4 2
MON ButtonSet Wake-up Time4 1
MUTE ButtonMobile Ext Hunt Call3 6
FLASH ButtonRegister Mobile Ext CLI-
DND ButtonMobile Ext Activation3 4
CONF ButtonRegister Mobile Extension-
ACD STATUS (supervisor only)
Auth. Code Change
3 2
KEY PAD FACILITY
Auth. Code Register
3 1
HUNT DND (group only)
COS Change
2 4
INTURSION
Walking COS
2 3
Camp-onCOS Restore2 2
LOOP ButtonCOS Down2 1
DID Call WaitCO Ring1 9
FunctionFunction
LDK
Code
Önemli Güvenlik Bilgileri
Beklenmedik tehlike veya hasarlarıönlemek için, lütfen telefonu bağlamadan ve onarmadan önce bu bilgileri
okuyunuz. Bundan sonra verilen "Uyarı“ikazlarının anlamlarıaşağıda yer almaktadır:
Uyarı: Elektrik şokuna maruz kalınmamasıicin telefonunuzu banyo, havuz kenarıve benzeri rutubetli
ortamlarda kullanmayınız.
1. Telefonun montajı, değişimi veya servise verilmesi sadece eğitimli ve uzman servis personeli tarafından
yapılmalıdır.
2. Telefonun üzerine su ve benzeri sıvımaddeleri sıçratmayınız. Böyle bir durumda, servis merkezini
arayınız. Yangın veya elektrik şoku riski bulunmaktadır.
3. Duman veya yanma kokusu aldığınızda enerji kablosunu veya telefon hattıkablosunu prizden çekiniz.
Servis Merkezini arayınız. Arızalıolarak uzun süre bırakılan cihazın yangın veya elektrik şoku riski
bulunmaktadır.
4. Telefonun enerji kablosunu veya telefon hattınışiddetle çekmeyiniz. Bu işlem ile yangına, elektrik
şoku veya teçhizatın hasar görmesine sebep olabilirsiniz.
5. Gök gürültülü yağmur esnasında telefonunuzu kullanmayın. Yıldırım düşmesi durumunda yangın veya
şiddetli elektrik şoku riski bulunmaktadır
6. Telefonu çocukların erişemeyecekleri bir alana bağlayınız. Çocukların yaralanmasına veya cihazın
arızalanmasına sebep olabilirsiniz.
7. Telefonu tozlu ve sarsıntıya maruz kalabilen alanlara koymamaya özen gösteriniz..
8. Kuru ve havadar bir alan seçiniz.
9. Çoklu fişi tek bir pirize takmayın ısınma yapabilir, dolayısıyla yangın ve cihaz arızalanmasıriski vardır.
10. Telefonu yere düşürmeyiniz veya atmayınız.
11. Telefonu yere düşürmeyiniz veya atmayınız.
12. Telefonuzu statik elektriğe maruz kalacak şekilde yerleştirmeyiniz. Aksi halde arızalanabilir.
13. Direk güneşışınlarından veya herhangi bir ısıtıcıdan uzak tutunuz.
14. İçerisinde kullanıcıtarafından tamir edilebilecek bir parça yoktur.Tornavida veya metal bir cisim sokmak
suretiyle kısa devreye sebep olarak telefonunuzun bozulmasına dolayısıyla garantinin geçersiz olmasına
sebebiyet verebilirsiniz.
15. Telefonu sadece yumuşak ve kuru bir bez ile temizleyin. Benzin, alkol veya aseton gibi uçucu sıvıları
asla kullanmayınız, aksi halinde yangına, şekil bozukluklarına veya plastik kısma hasar verebilirsiniz.
Parlatıcıveya silikon bazlıürünler kullanmayınız aksi halde cihazınızın içine kaçarak cıhazın sağlıksız
çalışmasına sebep olabilirsiniz
Eski cihazınızın atılması
1. Üzerinde çarpıişaretli çöp tenekesi bulunan ürünler, o ürünün European Directive
2002/96/EC kapsamında olduğunu göstermektedir.
2. Tüm elektrikli ve elektronik cihazlar devlet ya da yerel yönetimlerce belirlenen alanlarda
ayrıayrıtoplanarak atılıp, geri dönüşümü sağlanamıyorsa gerekirse imha edilmeli.
3. Doğru bir şekilde toplanıp yok edilen ya da geri dönüşümü sağlanan eski cihazlar çevre ve
insan sağlığına zarar vermemişolurlar.
4. Eski cihazların atılmasıya da geri dönüşümü konusunda ayrıntılıbilgiyi bulunduğunuz
bölgenin yerel yönetim ofislerinden ya da cihazıaldığınız yerden alabilirsiniz.
Uyarı
TUR
LDP-7024LD Sayısal Telefon Kolay Kullanım Kılavuzu
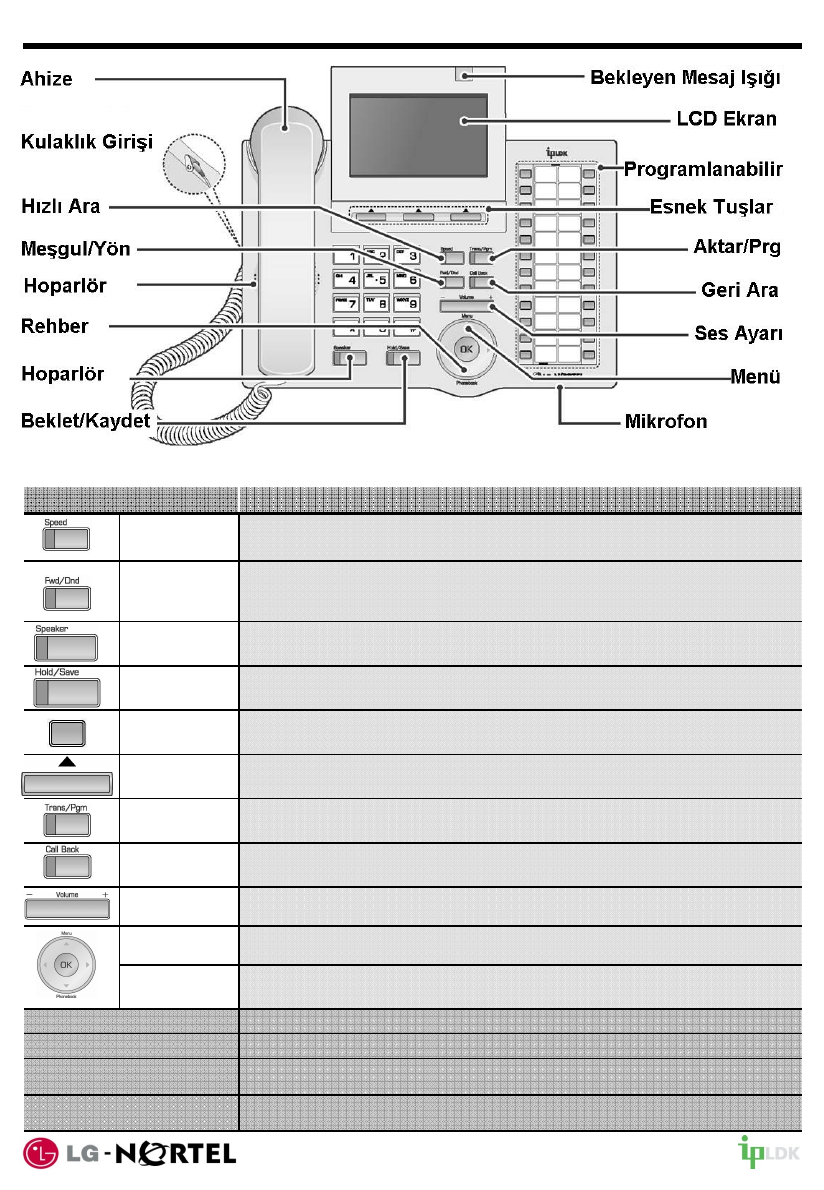
Önceden TanımlıÖzellik Tuşları
TuşAçıklama
HızlıAra Hızlıarama, hızlıarama programlama, aranan en son numaranın kaydıve
en son aranan numaranın tekrar aranmasıiçin kullanılır.
Megul/Yön
Meşgul Gösterme (Do Not Disturb - Rahatsız Etmeyin) özelliği ile "bu telefonu
çaldırmayın" modu aktif edilir. Meşgul Gösterme özelliği aktif olduğunda, tuş
kırmızıolarak yanar. Ayrıca bu tuşçağrılarıbaşka bir telefona veya sesli mesaja
yönlendirmek için de kullanılır.
Hoparlör Hoparlör tuşu, telefon setinin hoparlörünüdevreye sokar. Hoparlör devrede
olduğunda, tuşkırmızıolarak yanar.
Beklet/Kaydet Bu tuşile çağrıbeklemeye alınır veya programlama işlemi yapılırken bilgi
kaydedilir.
Programl. TuşProgramlanabilir tuşların bir kısmıönceden programlanmış olabilir. Geri kalan tuşlar
kullanıcıisteğine göre programlanabilir.
3 Esnek TuşKullanım esnasında yapılan işlemlere göre fonksiyon ekranda belirir, kullanıcıisteğine
göre özellik seçilir.
Aktar/Prg Bu tuşbir çağrının başka bir aboneye aktarılmasını, transferini başlatmak için veya
programlama moduna (PGM) girmek için kullanılır.
Geri Ara Bir abone, meşgul olan diğer bir aboneye geri arama talebinde bulunabilir. Meşgul olan
istasyonun boşalmasıhalinde, geri arama talebinde bulunan istasyon bir sinyal sesi alır.
Ses AyarıSes Ayarıtuşu çalma zili, ahize ve hoparlör seslerini ayarlamak için kullanılır.
Menü Menü tuşu ile istenen özelliğe göre hareket ettirilir(Ara, Mesaj, Program), ve LCD
ekranında beliren ok işaretine göre bir sonraki menüye geçişsağlar.
Rehber Hızlıarama, kayıtlınumara tekrar arama, son numarayıtekrar arama ve değişken tuş
programlanmasına girmek için kullanılır.
Kulaklık GirişiOpsiyonel mikrofonlu kulaklık bağlantısıiçin kullanılır.
Gelen ÇağrıIşığı Çağrıve sesli mesaj geldiğinde yanıp sönmeye başlar.
LCD Ekran Telefonun durumunu gösteren bilgiler, arama rehberi, ve diğer özellikleri gösterir.
Ahizesiz Konuşma Mikrofonu Ahizesiz görüşme mikrofonu.

ÇağrıKarşılama ve Cevaplama :
1. Ahizeyi kaldırın ve gerekirse yanıp sönen esnek
(Programlanabilir) tuşa basarak çağrıyıcevaplayın.
Meşgulde ÇağrıCevaplama
1. Beklet/Kaydet tuşuna basınızve/veya
2. Yanıp sönen harici abone tuşuna basın.
Başka Bir Dahilide Çalan ÇağrıyıCevaplama:
1. Telefon ahizesini kaldırınız,
2. 7 Tuşlayın (YönlendirilmişÇağrıAlma Kodu),
3. Çalan dahilinin numarasınıtuşlayın.
AynıGrup İçersinde Çalan Bir Çağrıyı
Cevaplama:
1. Telefon ahizesini kaldırınız
2. 566 tuşlayınız (Group Call Pick-Up code), the call is
connected.
Meşgul/ Yön Tuşu İle Gelen ÇağrılarıEngellme:
1. Meşgul/ Yön tuşuna basınız.
ÇağrılarıBaşka Bir Dahili Ya da Sesli Mesaja
Yönlendirme:
1. Telefon ahizesini kaldırınız,
2. Meşgul/Yön tuşuna basınız,
3. Yönlendirme kodunu giriniz 1-9 (iPECS: 1-5)
4. Yönlendireceğiniz dahili numarasınıgiririniz.
Dahiliden Dahiliye Arama:
1. Telefon ahizesini kaldırınız,
2. Aramak istediğiniz dahili numarayıçeviriniz.
Meşguliyette ÇağrıBekletme Özelliği Kullanarak
Arama yapma:
1. * Tuşuna basarak karşı tarafın cevaplamasını
bekleyiniz.
Son Numara TekrarıÖzelliğini Kullanarak Harici
Arama Yapma:
1. Telefon ahizesini kaldırınız,
2. Geri Ara esnek tuşuna basınız
3. Ses Ayarıtuşuna basarak en son yapılan 10
aramadan istenilen numarayıseçiniz,
4. Gönder esnek tuşuna veya Beklet/Kaydet tuşuna
basınız.
Sistem HızlıArama Listesini Kullanarak Arama
Yapma:
1. Telefon ahizesini kaldırınız,
2. HızlıAra tuşuna basınız,
3. İstenilen sistem hızlıarama numarasınıtuşlayınız.
Dahili HızlıArama NumarasınıKullanarak
Arama Yapma:
1 . Telefon ahizesini kaldırınız,
2. HızlıAra tuşuna basınız,
3. İstenilen dahili hızlıarama numarasınıtuşlayınız
ÇağrıTransferi:
1. Aktar/Prg tuşuna basınız
2. Transfer etmek istediğiniz numarayıtuşlayınız,
3. Karşı tarafıduyunca ya da duymadan telefonu
kapatınız.
LDP Sayısal Set KullanıcıOperasyonları
Dahili HızlıArama Numaralarının Harici Hat ve
İsimle Birlikte Kaydedilmesi:
1. Aktar/Prg tuşuna basınız,
2. HızlıAra tuşuna basınız,
3. İstediğiniz dahili hızlıarama numarasınıtuşlayınız,
4. Çıkış yapacağınız harici hat grubunu seçiniz,
5. Kaydetmek istediğiniz numarayıgiriniz,
6. Beklet/Kaydet tuşuna basınız,
7. Numaraya ait ismi tuşlar üzerindeki sıralıharfleri
kullanarak giriniz,
8. Beklet/Kaydet tuşuna basarak kayıt işlemini bitiriniz.
Programlanabilir Tuşlara Dahili HızlıArama
Numarasının Tanımlaması:
1. Aktar/Prg tuşuna basınız,
2. Kayıtetmek istediğiniz Programlanabilir Tuşa Basınız
3. Telefon numara Esnek tuşunu seçiniz,
4. Çıkış yapacağınız harici hat grubunu seçiniz,
5. Kayıtmek istediğiniz numarayıgiriniz,
6. Beklet/Kaydet tuşuna basınız,
7. Numaraya ait ismi tuşlar üzerindeki sıralıharfleri
kullarak giriniz,
8. Beklet/Kaydet tuşuna basarak kayıt işlemini bitiriniz.
ACNR: Harici Bir Numaranın Cevaplanıncaya
Kadar Aranması. Harici Bir Arama
Esnasında ACNR Özelliğinin Kullanılması:
1. Navigasyon tuşunu kullanarak bir sonraki
menülerden ACNR esnek tuşunu seçiniz,
2. Ahizeyi yerine koyunuz.
ACNR Aramasının İptali:
1. ACNR esnek tuşuna basınız.
Bir Çağrının Beklemeye Alınması
1. Beklet/Kaydet tuşuna basınız
Çoklu Konferans Yapma:
1. Konferans yapmak istediğiniz kişiyi arayınız,
2. Esnek tuşlarlarda Konf tuşuna basınız,
3. Konferansa almak istediğniz diğer kişiyi arayınız,
4. Esnek tuşlarladan Konf tuşuna basınız,
5. Konf tuşuna tekrar basarak konferansıbaşlatınız.
KonferansıBeklemeye Alma:
1. Beklet/Kaydet tuşuna basınız.
Konferansa Devat Etmek İçin:
1. Esnek tuşlarladan Konf tuşuna basınız.
Sadece Harici Konferans Yapma:
1. İki harici numara ile konferansıgerçekleştirin,
2. Konf tuşuna basarak konferansıbitiriniz.
Daha Önceden Açılmış Koferans Odasına
Girme:
1. 5 7 X tuşlayınız (iPECS: 5 9 X), buradaki X
konferans odasınumarasıdır.

KullanıcıProgramlama Kodları
http://www.LG-Nortel.com | http://www.MNiletisim.com.tr
•[AKTAR/PRG] tuşuna basınız ▶Programlanabilir bir tuşa basınız
•▶[Aktar/Prg] tuşuna tekrar basınız▶Aşağıdaki tablodan istenilen özellik kodunu giriniz
•▶[BEKLET/KAYDET] tuşuna basınız.
Abone KullanıcıAdıKaydı7 47 4
FLASH Tuşu9 49 4Register Mobile Ext CLI39-
Geri Ara Tuşu9 29 2Register Mobile Extension37-
IPLDK
Kodu iPECS
Kodu Özellik IPLDK
Kodu iPECS
Kodu Özellik
1 1 - Zil Tipi 7 5 6 1 Hoparlör / Kulaklık
1 4 1 0 Engelleme Modu 7 6 6 2 Kulaklık Zil Modu
1 7 1 9 Mikrofonlu Kulaklık 8 0 8 4 Hesap Kodu
1 8 1 1 Dahili Zil 8 1 3 4 DID ÇağrıBekletme
1 9 1 2 Harici Zil 8 4 8 5 Döngü (LOOP) Tuşu
2 1 2 1 Yetki Kapama 8 5 8 8 Bekletme
2 2 2 2 Yetki Açma 8 6 8 6 Araya Girrme
2 3 2 3 Yetki Aktarma 8 7 - Grup Rahatsız Etme
2 4 -Yetki Değiştirme 8 9 8 9 TuşTakımıÖzelliği
3 1 3 3 Yetkilendirme Kodu Kaydı8 * - ACD Durumu (Sadece Grup)
3 2 -Yetkilendirme Kodu
Değiştirme 9 1 9 1 Konferans Tuşu
3 6 - Mobil Dahili Grup Çağrı9 5 9 5 Sessizlik (MUTE) Tuşu
4 1 4 1 Uyandırma Zamanı9 6 9 6 Hoparlör (MON) Tuşu
4 2 4 2 Uyandırma Saati İptali 9 7 9 7 Tekrar Arama Tuşu
4 3 5 3 Konferans OdasıTanımlama 9 8 - DID Kısıtlama
4 4 5 4 Konferans Odasıİptali 9 9 - DISA Kısıtlama
4 5 1 4 ÇağrıKapsama Alanı9 * - USB ÇağrıKaydetme
4 6 - ÇağrıKapsama Dahili XXX * 0 * 0 Özgür Masa MT(Agent) Kaydı
5 1 5 1 Önceden SeçilmişMesaj Etkin * * * * Özgür Masa MT(Agent) Çıkışı
5 2 5 2 Özel Mesaja Ayarla - 3 1 Dahili Numarasıyla Mesaja Erişim
5 4 8 0 İki Yönlü Kayıt-3 2
CLI/IP Numarasıyla Mesaja Erişim
5 7 5 7 ÇağrıKaydı- 3 5 Yönetici/Sekreter Mesaj Erişimi
6 1 - Kişisel Karşılama Mesajı- 7 5 Telefonun IP Adresini Göster
6 2 - Saat ve Tarihi Dinle - 7 6 Telefonun IP Adresini Değiştir
6 3 - Abone NumarasınıDinle - 7 7 Telefonun MAC IP Adresini Göster
6 4 - Abone Durumunu Dinle - 7 9 Telefonun Versiyonunu Göster
6 5 - Anons MesajınıKaydet - 9 3 Meşgul /Rahatsız Etme Tuşu
6 6 - Kişisel Karşılama MesajınıSil - 9 8 Yönlendirme Tuşu
6 7 - Anons MesajınıSilin - 9 9 Bas-Konuş(PTT) Tuşu
7 1 7 1 LCD Ekran Dilini Seçin * 3 * 8 Register Bluetooth
7 3 7 3 Arka Plan Müziği* 4 * 9 Bluetooth Usage
Viktig sikkerhetsinformasjon
For å unngå skade eller uventet fare, vennligst les denne sikkerhetsinformasjonen før telefonen tas i bruk.
Symbolene Advarsel og Forsiktig betyr følgende:
NW
Advarsel: For å redusere faren for elektrisk støt, benytt ikke telefonen i fuktige miljøer eller i nærheten
av rennende vann som f. eks på et kjøkken i et baderom eller i en svømmehall etc.
1. Kun opplært og kvalifisert servicepersonell kan
installere, bytte ut eller utføre service på telefonen.
2. Ikke søl væske, som f. eks vann på telefonen
dette kan resultere i brann eller elektrisk støt.
3. Hvis du oppdager røyk fra telefonen eller at det lukter brent, trekk ut strøm og apparatledning.
4. Ikke dra eller rykk i strøm eller apparatledningen.
Dette kan føre til brann, elektrisk støt eller skade på utstyret.
5. Ikke benytt telefonen eller berør apparatledningene under tordenvær.
6. Pass på at barn ikke leker med utstyret eller trekker i strøm og apparatledning. Dette kan føre til skade
på barnet eller feil med utstyret.
7. Før du benytter telefonen må du kontrollere at ikke magnetismen i telefonrøret har tiltrukket seg skarpe
metallgjenstander.
8. Unngå å plassere telefonen i et miljø med mye støv, damp eller hvor det blir utsatt for vibrasjoner.
9. Telefonen er tilpasset et normalt kontormiljø med tanke på temperatur og fuktighet.
10. Ikke plasser tunge gjenstander på telefonen.
11. Unngå at telefonen faller i gulvet eller utsettes for støt. Dette kan ødelegge telefonen.
12. Unngå statisk elektrisitet da dette kan ødelegge elektroniske komponenter.
13. Ikke plasser telefonen i direkte sollys eller i nærheten av varmekilder.
14. Ikke stikk metallgjenstander inn i telefonen, dette kan resultere i brann eller elektrisk støt.
15. Vedlikehold og rengjøring.
Rengjør telefonen med en tørr klut. Ikke benytt væsker som fordamper lett da dette kan føre til brann og
misfarging av telefonen.
Håndtering og retur av gammelt og defekt utstyr.
1. Når utstyret har dette symbolet betyr det at produktet er underlagt
European Directive 2002/96/EC.
2. Alle elektriske og elektroniske produkter skal kastes i godkjente returpunkter.
3. Riktig gjenvinning av gammelt utstyr vil sikre miljøet og minske forurensningen.
4. For mer informasjon om riktig gjenvinning, kontakt din lokale leverandør eller det offentlige
oppnevnte returpunkt.
Advarsel
LDP-7000 serien, modell 7016D / 7024D og 7024LD
LDP-7000 serien består av 6 digitale systemapparater med avanserte og brukervennlige funksjoner.
- Display på 3 eller 12 linjer á 24 tegn.
- 3 aktive displayknapper.
- 16 eller 24 fleksible knapper med tofargede indikatorlamper.
Benyttes for å sette over samtaler når man ikke har en internlinjeknapp.
Benyttes også i forbindelse med programmering av telefonen.
[OVERF/PROG]
TELEFONBOK
Benyttes for å regulere lyden i telefonrøret, høyttalende telefon og når det
ringer.
[VOLUM]
Apparatet har 3 aktive displayknapper som forandre funksjon avhengig av
apparatets status (apparatet er ledig eller i bruk).
Displayknapp
Beskrivelse
Knapper
Benyttes for å sette samtaler på vent, samt for å lagre programmering.
Benyttes også for å ringe fra samtalelogg og kortnummerliste.
[VENT/LAGRE]
Benyttes til å programmere og ringe lagrede telefonnummer (kortnummer).
[KORTNR.]
Benyttes til å sette apparatet i opptatt/ ikke forstyrr.
Knappen lyser rødt når den er aktivert.
[OPPTATT]
Benyttes til å legge igjen interne beskjeder eller aktivere tilbakering funksjon
og for å avlese tapte anrop og andre beskjeder.
[OPPKALL]
Benyttes for å svare og legge på høyttalende samtaler.
Benyttes også sammen med hodesett.
[HØYTTALER]
Benyttes for å programmere tjenester og funksjoner direkte på en knapp.
Kan benyttes til internnummer, viderekobling, fravær, Mobile extension etc.
Fleksible
knapper
Benyttes til å gå inn i apparatets programmeringsmeny eller for å søke i den
alfabetiske telefonboken (ringe internt, personlige eller fellese kortnummer).
Navigasjonsknappen benyttes også til å bla seg frem og tilbake i displayet.
MENY
Introduksjon
LDP-7016D LDP-7024D
LDP-7024LD

1. Besvare anrop
Løft av telefonrøret, eller trykk på [HØYTTALER].
2. Ringe en samtale
Tast ”0” for ekstern linje og ønsket telefonnummer.
Repetisjon – Trykk på [REDIAL] (displayknapp).
3. Hente opp en samtale fra et apparat
Trykk på internlinjeknapp som blinker eller
tast *7 + internnummeret til telefonen som ringer.
Hente opp samtale fra en programmert gruppe.
Trykk på [HENTE] (displayknapp).
4. Sette over en samtale
Trykk på [OVERF/PROG] og tast internnummer eller
trykk direkte på programmert internlinjeknapp.
Sette over en samtale eksternt
Trykk på [OVERF/PROG], tast 0 og telefonnummer
(obs du må høre at det ringer før du setter over).
5. Veksle mellom flere samtaler
Trykk på [VENT/LAGRE] (en linjeknapp vil nå blinke).
- Svar ny samtale ved å trykke på gaffelbryteren eller
- Ring en ny intern eller ekstern samtale.
Trykk på blinkende knapp for å hente tilbake samtalen.
6. Samtalevarsling for å gi viktig melding
Når du ringer et internnummer og får opptatt.
Tast * (varseltone sendes).
Besvare samtalevarsling
Trykk på [VENT/LAGRE] (samtalen settes på vent).
Det opprettes nå kontakt med den som kaller opp.
Når oppkaller avslutter får du første samtale tilbake.
7. Viderekople telefonen
Trykk på [HØYTTALER] og [OPPT/VK], velg:
Tast 1 + internnummer (vk. med en gang).
Tast 2 + internnummer (vk. ved opptatt).
Tast 3 + internnummer (vk. ved ikke svar).
Tast 4 + internnummer (vk. ved ikke svar og opptatt).
Tast 5 + kortnummerplass (vk. til eksternt nr.).
Slå av viderekopling.
Trykk på [OPPT/VK].
8. Henvise telefonen til fraværsbeskjeder
Trykk på [OVERF/PROG] og tast 51, velg fraværsårsak.
Tast 01 – Lunsj til kl, tast klokkeslett.
Tast 02 – Ferie til dato, tast dato (dag/ mnd).
Tast 03 – Ute til kl, tast klokkeslett.
Tast 04 – Ute til dato, tast dato (dag/ mnd).
Tast 05 – Ute (ukjent tid tilbake).
Tast 06 – Ring, tast telefonnummer.
Tast 07 – Ring internnummer, tast internnummer.
Tast 08 – I møte til kl, tast klokkeslett.
Tast 09 – Hjemmekontor.
Tast 10 – Syk.
Tast # for å slå av beskjedene.
Trykk på [KORTNR] hvis du ønsker opplesing av fravær.
Trykk på [VENT/LAGRE] når en av beskjedene er valgt.
9. Opptatt/ Ikke forstyrr – Trykk på [OPPT/VK].
10. Mobil Extension
Mobiltelefonen knyttes sammen med din kontortelefon.
Programmere mobilnummer.
Trykk på [OVERF/PROG] og tast 33.
Tast inn mobil nr. og trykk på [OK].
Aktivere/ deaktivere Mobil Extension.
Trykk på [OVERF/PROG] og tast 34.
Tast 1 for På eller 0 for Av, trykk på [OK].
Samtale via Mobil Extension til mobilen.
Sette over – trykk * og tast internnummer, legg på.
11. Kortnummer
Programmere kortnummer.
Trykk på [OVERF/PROG] og [KORTNR.].
Trykk på [OK] og tast telefonnummer.
Trykk på [OK] og tast inn navn.
Trykk på [OK] for å lagre kortnummeret.
Ringe med personlige kortnummer.
Trykk på [TELEFONBOK] og tast 2.
Søk alfabetisk og/ eller bla deg frem med [MENY].
Trykk [OK] for å ringe markert nummer.
12. Voice mail
Personlige beskjed.
Løft av telefonrøret og trykk på [OVERF/PROG].
Tast 61 og tast # hvis du ønsker å lese inn ny beskjed.
Trykk [OK] for å lagre innspillingen.
Viderekopling til Voice mail.
Trykk på [HØYTTALER] og [OPPT/VK], velg:
Tast 1# (vk. med en gang).
Tast 2# (vk. ved opptatt).
Tast 3# (vk. ved ikke svar).
Tast 4# (vk. ved ikke svar eller opptatt).
Slå av viderekopling til Voice mail.
Trykk på [OPPT/VK].
Avspilling av mottatte beskjeder.
Trykk på [OPPKALL].
Benytt aktive displayknapper for flere valg.
Fjernstyring av Voice Mail.
Ring ditt eget direktenummer, din beskjed avspilles.
Tast * du må nå taste ditt passord og #.
(passord må allerede være programmert, 3-5 siffer).
13. Tapte anrop (BESKJED: TLF X)
Trykk på [OPPKALL] bla med [MENY] knappen
Trykk på [OK] for å ringe tilbake.
14. Mottatte og ringte samtaler
Det må programmeres en [CALL LOGG] knapp.
Trykk på [OVERF/PROG] og en ledig fleksibel knapp.
Trykk på [OVERF/PROG] og tast 57.
Trykk på [OK] og [HØYTTALER].
Samtalelogg.
Trykk på [CALL LOGG].
Tast 1 for Mottatte eller 2 for Ringte samtaler.
Bla gjennom numrene med [MENY] knappen.
Trykk på [OK] knappen for å ringe ut.
Oppsett og programmering av telefonen
Oppsett og programmering av telefonen
5 3
-
-
9 8
9 7
9 5
9 3
9 2
9 1
8 7
8 1
7 4
7 3
7 1
5 7
IP LDK
Samtalelogg (*)Hodesett7 5
Skifte Norsk/ Engelsk tekstHodesett utgang (minijack)1 7
Bakgrunns musikkRingestilling for hodesett7 6
Aktivere fraværsbeskjed
- Lunsj til kl.
- Møte til kl.
5 1
01
08
Slå av og på visning av eget nr. (*)Slette personlig talebeskjed6 6
Lese av tapte anrop (4/8 taster) (*)Personlig talebeskjed6 1
Lese av beskjeder (4/8 taster) (*)
Slette konferanserom4 4
Oppheve direkte innvalg (*)Opprette konferanserom4 3
[REPETISJON] knapp (8 taster) (*)Slette alarm og vekking4 2
[MIKROFON] knapp (8 taster) (*)Sett alarm og vekking4 1
[OPPTATT] knapp (8 taster) (*)Aktivere Mobile Ext. funksjon3 4
[OPPKALL] knapp (8 taster) (*)
Programmere Mobile Ext nr.
3 3
[KONFER] knapp (8 taster) (*)
Endre passord
3 2
Utmelding av gruppe (*)
Registrere passord
3 1
Samtale venter (*)Eksterne ringetoner1 9
ApparatnavnInterne ringetoner1 8
FunksjonFunksjonIP LDK
Tabellen under har 2 forskjellige bruksmønster, enten ved å taste kodene direkte eller ved å programmere
funksjonen under en fleksibel knapp slik at bruken av en tjeneste blir tilgjengelig ved ett taste trykk.
Merk at enkelt funksjoner, markert med (*), må programmeres under en knapp for å kunne benyttes.
Svarstilling for interne anrop.
Trykk på [OVERF/PROG] og tast 12.
Tast 1 for høyttalende calling (H).
Tast 2 for ringetone (T).
Tast 3 for calling uten mikrofon (P).
Trykk på [OK] når ett av valgene er gjort.
Ringesignal og ringevolum.
Intern ring – Trykk på [OVERF/PROG] og tast 18.
Ekstern ring – Trykk på [OVERF/PROG] og tast 19.
Tast fra 01 til 15 for de forskjellige ringetoner.
Trykk på [OK] når et av valgene er gjort.
Programmere apparatnavn.
Trykk på [OVERF/PROG] og tast 74.
Tast inn navn og trykk på [OK].
Programmere internnummer på en fleksibel knapp.
Trykk på [OVERF/PROG] og en ledig fleksibel knapp.
Tast ønsket internnummer, 2-4 siffer.
Trykk på [OK] for å lagre programmeringen.
Hodesett koblet sammen med telefonrøret
Trykk på [OVERF/PROG] og tast 75.
Tast 0 for hodesett.
Tast 1 for normal høyttalende.
Trykk på [OK] når ett av valgene er gjort.
Samtaler besvares nå med [HØYTTALER] knappen.
Hodesett utgang (minijack)
Trykk på [OVERF/PROG] og tast 17
Tast 1 for å aktivere hodesett utgang.
Tast 0 for å slå av hodesett utgang.
Trykk på [OK] når et av valgene er gjort.
Samtaler besvares nå med [HØYTTALER] knappen.
Volumknappen.
Volumknappen regulerer lyden i telefonrøret,
høyttalende telefon og ringestyrke når det ringer.
Programmering av bokstaver.
Trykk på knappen som har den bokstaven du ønsker.
Tast så siffer 1 til 4 for ønsket bokstav.
Eks. P=71, Q=72, R=73 og S=74
(Mellomrom=*1, Ø=00 og Punktum=13).
Programmering av en fleksibel knapp.
Trykk på [OVERF/PROG] og en ledig fleksibel knapp.
Trykk på [OVERF/PROG] og tast funksjonskode (se tabell).
Trykk på [OK] for å lagre programmeringen.
Bruk av en funksjon.
Trykk på [OVERF/PROG] knappen.
Se tabell, tast funksjonskode og velg innstilling.
Trykk på [OK] når innstillingene er gjort.
Меры безопасности RS
Во избежание травм или повреждения оборудования, пожалуйста, внимательно
прочтите о мерах безопасности перед установкой или ремонтом телефонного
аппарата (ТА).
Внимание: Для предотвращения поражения электрическим током, не эксплуатируйте
ТА в помещениях с повышенной влажностью, таких как ванная комната,
бассейн и т.д.
1. Только квалифицированный и специально подготовленный персонал может производить
установку и ремонт телефонного оборудования производства LG-Nortel. Для осуществления
ремонта обращайтесь в специализированные сервис –центры.
2. Избегайте попадания жидкости внутрь ТА. Если это произошло, немедленно отключите ТА от
телефонной линии и поместите его в сухое место. Обратитесь в сервис-центр. В противном
случае это может привести к пожару или поражению электрическим током.
3. Если Вы ощутили запах гари или обнаружили дым из вашего ТА, немедленно отключите его
от телефонной линии. Обратитесь в сервис-центр. В противном случае это может привести
к пожару или поражению электрическим током.
4. Не используйте ТА во время грозы! В противном случае это может привести к пожару или
поражению электрическим током.
5. При подключении ТА не используйте поврежденные шнуры и телефонные розетки. В
противном случае это может привести к пожару или поражению электрическим током.
6. Устанавливайте ТА в места, недоступные для детей. В противном случае это может
привести к травмам и/или поломке ТА.
7. Будьте осторожны при использовании телефонной трубки, т.к. к ней могут
примагничиваться иголки, булавки и др. металлические предметы, что может привести к
травмам.
8. Не устанавливайте ваш ТА в местах с повышенным содержанием пыли, с повышенной
влажностью и вибрацией. Это может негативно повлиять на его работу и сократить срок
его службы.
9. Для установки ТА выбирайте сухие помещения с хорошей вентиляцией. В противном случае
это может привести к поломке ТА.
10. Не кладите на ТА тяжелые предметы. ЭтоможетпривестикполомкеТА. Если это
произошло и работа ТА нарушена обратитесь в сервис-центр.
11. Не роняйте и не кидайте ТА. Это может привести к поломке ТА. Если это произошло и
работа ТА нарушена обратитесь в сервис-центр.
12. Избегайте воздействия электромагнитного излучения на ТА. В противном случае это может
привести к поломке ТА.
13. Не устанавливайте ТА в местах попадания прямых солнечных лучей и рядом с
нагревательными приборами. В противном случае это может привести к пожару или
поломке ТА.
14. Не позволяйте металлическим или другим инородным предметам попадать внутрь вашего
ТА. Это может привести к травмам и/или поломке ТА и прекращении гарантийного
обслуживания.
15. Для удаления загрязнений с ТА используйте только сухую и мягкую материю.Не
используйте легкоиспаряющиеся жидкости, такие как бензин, спирт, ацетон. Это может
привести к пожару, деформации корпуса или его выцветанию.
Утилизация старого оборудования
1. Данный продукт был разработан и произведен из материалов и компонентов
высшего качества, которые могут использоваться повторно.
2. Символ на устройстве, изображающий перечеркнутое мусорное ведро,
означает, что данное устройство должно утилизовываться отдельно от
бытового мусора, в специальном месте, указанном правительственными или
местными органами власти.
3. Правильная утилизация старого оборудования позволит предотвратить
негативное влияние на окружающую среду и здоровье человека.
4. Для получения подробных сведений об утилизации старого оборудования
обратитесь в службу, занимающуюся утилизацией или в магазин, где был
приобретен продукт.
Внимание
LDP-7024LD Краткое руководство
Описание клавиш
Программируемы
еклавиши
Индикатор поступления
вызовов
ЖК Дисплей
Телефонна
я трубка
Разъем для проводной
гарнитуры
Hands-free микрофон
Клавиша
спикерфона
Динамик
На дисплее отображаются набираемые номера и входящие номера, статус
абонентской линии и различные сообщения.
ЖК Дисплей
Сектор Меню клавиши навигации -Используется для выбора пунктов меню и
опций (Набор, Сообщение, Программирование) и для выбора следующего
экрана в соответствии со стрелкой на дисплее.
Menu
Сектор выбора Телефонной книги -Используется для быстрого набора
номера, сохранения последнего набранного номера и других номеров, в
процессе программирования программируемых клавиш.
Phonebook
Интерактивные клавиши -Используются для выбора функций, отображаемых
на дисплее прямо над этими кнопками.
3 Soft
ОписаниеКлавиша
Используется для подключения гарнитуры к телефонному аппарату для
режима Hands-free.
Разъем для проводной
гарнитуры
Некоторые из программируемых кнопок предварительно
запрограммированы как кнопки резервирования соединительной линии
(группы линий) или для выхода в город (кнопки Loop). Программируемые
кнопки, могут быть запрограммированы пользователем в соответствии с
его предпочтениями.
Программи-
руемые
клавиши
Клавиша быстрого доступа –используется для быстрого набора номера, для
программирования и для сохранения последнего набранного номера.
Speed
Используется для блокировки всех входящих вызовов. Если функция
блокировки активна (DND), индикатор этой кнопки горит красным цветом.
Также, используется для переадресации вызовов на другой номер или на
голосовой ящик (FWD). Если функция переадресации активна, индикатор
этой кнопки мерцает
DND/FWD
Клавиша спикерфона -Активизирует режим громкой связи, очем
свидетельствует красный цвет индикатора.
Speaker
Клавиша удержания/сохранения -Используется для удержания вызова или
для сохранения информации во время программирования.
Hold/Save
Клавиша перевода вызовов/программирования -Используется для перевода
вызовов (TRANS) или для выхода в режим программирования (PGM).
Trans/PGM
Клавиша обратного вызова -Используется для обратного вызова номера,
исходящий звонок с которого не был принят по причине занятости
телефонной линии.
Call back
Клавиша регулирования громкости -Используется для регулирования
громкости сигнала вызова, громкости трубки и громкости режима громкой
связи.
Volume
Горит во время поступления вызова на телефонный аппарат.
Индикатор поступления
вызовов
Используется при активном режиме громкой связи.Hands-free микрофон

Ответ на входящий вызов в исходном
состоянии:
1. Поднимите трубку и при необходимости
нажмите мерцающую программируемую
клавишу, произойдет автоматическое
соединение с вызывающим абонентом.
Ответнавходящийвызов, поступивший во
время разговора:
1. Нажмите Hold/Save и/или
2. Нажмите мерцающую клавишу СO линии.
Перехват входящего вызова:
1. Поднимите трубку,
2. Нажмите 7 (Код прямого перехвата),
3. Наберите номер внутреннего абонента, на чей
аппарат поступает вызов; произойдет
автоматическое соединение с вызывающим
абонентом.
Перехват вызова в группе:
1. Поднимите трубку,
2. Наберите 566 (Код перехвата в группе),
произойдет автоматическое соединение с
вызывающим абонентом.
Установка и сброс режима «Не беспокоить»
(DND):
1. Нажмите DND.
Переадресация вызовов на другого
внутреннего абонента или на голосовую
почту:
1. Поднимите трубку,
2. Нажмите интерактивную клавишу ПЕРЕАДР,
3. Нажмите код от 1 до 9 (iPECS: 1-5), в
соответствии с которым будет
осуществляться переадресация
4. Если выбрана переадресация на абонента,
наберите номер этого абонента.
Исходящий внутренний вызов:
1. Поднимите трубку,
2. Наберите желаемый номер внутреннего
абонента,
3. После ответа вызываемого абонента говорите.
Ожидание ответа на вызов (Camp-On):
1. Если при вызове абонента Вы получили сигнал
«занято», нажмите ‘*’.
2. Вызываемому вами абоненту поступит сигнал,
уведомляющий о поступившем вызове.
3. После ответа вызываемого абонента говорите.
Набор последнего набранного номера
внешнего абонента:
1. Поднимите трубку,
2. Нажмите интерактивную клавишу ПОВТОР,
3. Нажимая ▼volume ▲выберите нужный номер
из списка последних 10 исходящих вызовов,
4. Нажмите интерактивную клавишу НАБРАТЬ или
Hold/Save.
Системные ячейки сокращенного набора
Исходящий вызов:
1.Поднимите трубку,
2.Нажмите Speed,
3. Наберите номер системной ячейки,
соответствующий желаемому номеру
Индивидуальные ячейки сокращенного набора
Исходящий вызов :
1. Поднимите трубку,
2.Нажмите Speed,
3. Наберите номер индивидуальной ячейки,
соответствующей желаемому номеру
Основные функции
Сохранение номеров в индивидуальные ячейки
сокращенного набора:
1. Нажмите Trans/Pgm,
2. Нажмите Speed,
3. Наберите номер индивидуальной ячейки,
4. При необходимости нажмите клавишу СО линии или
группы СО линий,
5. Наберите телефонный номер, который Вы хотите
сохранить для последующего сокращенного набора,
6. Нажмите Hold/Save ,
7. Введите имя, соответствующее сохраняемому
номеру,
8. Нажмите Hold/Save .
Назначение на программируемую клавишу номера
внешнего абонента (с резервированием
индивидуальной ячейки сокращенного набора):
1. Нажмите Trans/Pgm,
2. Нажмите программируемую кнопку,
3. Нажмите интерактивную клавишу ТЕЛ НО,
4. При необходимости нажмите клавишу СО линии или
группы СО линий,
5. Наберите телефонный номер, который Вы хотите
сохранить для последующего сокращенного набора,
6. Нажмите Hold/Save ,
7. Введите имя, соответствующее сохраняемому
номеру,
8. Нажмите Hold/Save .
Автодозвон внешнему абоненту :
Если вызываемый абонент не берет трубку или
занят, то не кладя трубку:
1. Нажмите правый сектор клавиши навигации и
нажмите интерактивную клавишу ДОЗВОН,
2. Положите трубку.
Для отмены автодозвона:
1. Нажмите интерактивную клавишу ДОЗВОН.
Перевод вызова:
1. Во время разговора нажмите Trans/pgm,
2. Наберите номер абонента, на которого нужно
перевести вызов,
3. Положите трубку, либо дождитесь ответа абонента,
на которого переводите вызов и после этого
положите трубку.
Удержание вызова:
1. Во время разговора с внешним абонентом нажмите
Hold/save.
Многосторонняя конференция
Для организации конференции:
1. В процессе разговора с первым участником,
нажмите интерактивную клавишу КОНФЕР,
2. Наберите номер второго участника,
3. После того, как он ответит, нажмите
интерактивную клавишу КОНФЕР,
4. При необходимости повторяйте п.п.2-3 для
присоединения других участников,
5. После вызова последнего абонента нажмите
клавишу КОНФЕР еще раз –все участники смогут
вести разговор.
Для выхода из конференции с сохранением
конференции для внешних абонентов:
1. Организуйте конференцию с двумя или более
внешними абонентами,
2. Для выхода нажмите интерактивную клавишу
КОНФЕР.
Для возврата в конференцию:
1. Нажмите интерактивную клавишу КОНФЕР.
Для входа в открытую конференцию (Conference
Room):
1. Наберите 5 7 X (iPECS: 5 9 X) где X - номер зоны
открытой конференции. (Прим.: При входе может
потребоваться ввод пароля, если он был
предварительно установлен.)
Коды программируемых функций
http://www.LG-Nortel.com
•Программирование : Нажмите [TRANS/PGM] ▶ Нажмите одну из программируемых клавиш
•▶Нажмите [Trans/Pgm] ▶Наберите код программируемой функции
•▶Для сохранения нажмите [HOLD/SAVE].
«Не беспокоить»/ «Переадресация»
(DND / FWD)
-9 3
Регистрация CLI мобильного
абонента
39-
Конференция
9 19 1Регистрация мобильного абонента37-
Назначение клавиши {PTT}9 9-Выбор языка отображения7 17 1
Регистрация Bluetooth*8*3Музыкальное сопровождение7 37 3
Использование Bluetooth*9*4Регистрация имени абонента7 47 4
Спикерфон / гарнитура6 17 5
«Переадресация»(FWD)9 8-Удаление поискового сообщения-6 7
-
-
-
-
-
-
-
-
* *
* 0
9 *
9 9
9 8
9 7
9 6
9 5
9 4
9 2
8 *
8 9
8 7
8 6
8 5
8 4
8 1
8 0
7 *
7 8
7 6
LDK
код
-
-
-
-
-
-
5 7
8 0
5 2
5 1
-
1 4
5 4
5 3
4 2
4 1
-
3 8
3 3
-
2 3
2 2
2 1
1 2
1 1
1 9
1 0
-
iPECS
код
Режим звонка при работе с гарнитурой6 2Тон звонка1 1
Отображение серийного номера системы/
номера открытой лицензии
(Display Serial number/Package for SMEMU)
7 *Блочная передача номера1 4
Запись всех разговоров через USB порт
(USB Always Record)
-Выбор режима работы с гарнитурой1 7
Доступ к функции Код учета8 4Выбор типа внутреннего вызова1 8
9 3
7 9
7 7
7 6
7 5
3 5
3 2
3 1
* *
* 0
-
-
-
9 7
9 6
9 5
9 4
9 2
-
8 9
-
8 6
8 8
8 5
3 4
iPECS
код
«Не беспокоить» (DND)Удаление приветствия6 6
Отображение версии телефонаЗапись поискового сообщения6 5
Отображение MAC IPадреса телефона
Прослушивание абонентского
статуса
6 4
Изменение IP адреса телефона
Прослушивание абонентского
номера
6 3
Отображение IP адреса телефонаПрослушивание времени и даты6 2
Доступ к сообщениям пары
Директор/секретарь
(Msg. Wait in Exec/Sec pair)
Запись приветствия6 1
Доступ к ожидающим сообщениям
внешних и IP абонентов (CLI/IP Msg. Wait
Retrieve)
Журнал вызовов5 7
Доступ к ожидающим сообщениям
внутренних абонентов
(STA Msg. Wait Retrieve )
Запись разговора5 4
Процедура выхода Виртуального
внутреннего абонента
Создание сообщения при отсутствии5 2
Процедура входа Виртуального
внутреннего абонента
Выбор сообщения при отсутствии (из
имеющихся)
5 1
Запись разговора через USB порт
(USB CALL RECORD)
Дублирование приема вызовов (Call
Coverage For STA XXX)
4 6
Запрет прямого доступа в систему
(DISA RESTRICTION)
Разрешение на дублирование приема
вызовов (Call Coverage)
4 5
Запрет прямого входящего набора номера
(DID RESTRICTION)
Деактивация Conf-Room4 4
Повторный набор номера (REDIAL)Активация Conf-Room4 3
Спикерфон
Сброс будильника4 2
Отключение микрофона (MUTE)Установка будильника4 1
FLASH
Сервис мобильного абонента в
группе поиска
3 6
Обратный вызовАктивизация мобильного абонента3 4
Назначение клавиши {ACD Group} (только
для супервизора)
Смена пароля3 2
Передача абонентского набора (KEY PAD
FACILITY)
Регистрация пароля3 1
Режим «Не беспокоить»для группы (HUNT
DND)
Изменение COS2 4
Принудительное соединение с занятым
внутр. абонентом (NTURSION)
Удаленное изменение СOS
2 3
Ожидание ответа на вызов (Camp-on)Восстановление COS2 2
Резервирование СО линии или группы СО
линий
Понижение COS2 1
Ожидающий вызов при прямом входящем
наборе номера
Выбор типа внешнего вызова1 9
ФункцияФункция
LDK
код
Importante información de seguridad
Para prevenir peligros o daños inesperados, por favor lea esta información antes de instalar o reparar
el teléfono.
SP
1. Sólo personal cualificado debe instalar, sustituir o
reparar el teléfono..
2. No derramar líquido sobre el teléfono, ya que se
puede producir fuego o descargas eléctricas.
3. Si ve humo, desenchufe el cable de alimentación y
la línea telefónica. Llame inmediatamente al
servicio técnico.
4. No tire del cable de alimentación o del de línea
analógica, ya que se puede producir fuego o
descargas eléctricas.
5. No use el teléfono durante una tormenta eléctrica.
6. No use el adaptador si el cable de alimentación o
la toma de corriente están dañados ya que se
puede producir fuego o descargas eléctricas.
1. Asegúrese de que los niños no tiren de los cables
del teléfono. Puede herirles o causar daños en
el equipo.
2. El auricular contiene un dispositivo magnético que
puede atraer pequeños objetos metálicos.
Mantenga el auricular alejado de este tipo de
objetos.
3. Evite instalar el teléfono en zonas con mucho
polvo, húmedas o con vibraciones.
4. Elija un sitio seco y con buena ventilación.
5. No ponga objetos pesados sobre el teléfono.
6. No deje caer ni lance el teléfono.
7. Las descargas de electricidad estática pueden
dañar los componentes electrónicos.
8. Mantenga el teléfono alejado de la luz directa del
sol y de fuentes de calor.
9. No inserte destornilladores ni objetos metálicos en
el teléfono. Puede causar descargas eléctricas o
daños en el equipo y anulará la garantía de su
teléfono.
10.Limpie el teléfono con paños secos y suaves. No
use líquidos volátiles, como alcohol o acetona, ya
que puede causar fuego y la decoloración y daño
de los plásticos. No limpie con productos que
tengan siliconas o ceras, ya que pueden entrar en
el interior del equipo y causar daños irreversibles.
Reciclaje medioambiental
1. No tire nunca el teléfono con los desechos domésticos. Pida información a su ayunta
miento sobre las posibilidades de una correcta eliminación que no arruine el medio
ambiente.
2. Respete siempre las normas vigentes en la materia. Los transgresores están sujetos a
sanciones y a las medidas que establece la ley.
3. El símbolo del contenedor con la cruz, que se encuentra en el aparato, significa que
cuando el equipo haya llegado al final de su vida útil, deberá ser llevado a los centros
de recogida previstos, y que su tratamiento debe estar separado del de los residuos
urbanos.
Aviso Precaución
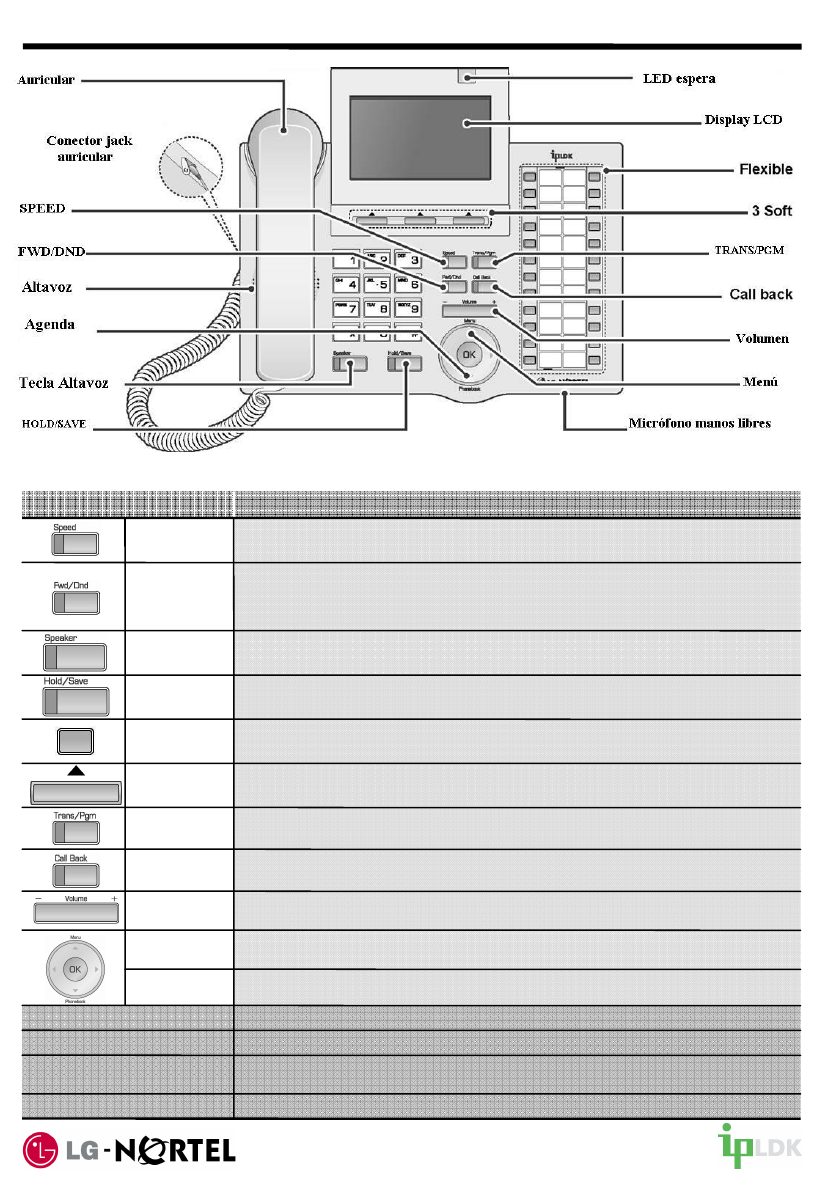
Definición de las teclas de función fija
DescripciónTecla
Esta tecla se usa para desplazarse por la opción deseada (marcar, MSJ …), y
para seleccionar la siguiente pantalla cuando así se indica mediante una flecha
en el display.
Menu
Utilizado para conectar opcionalmente un auricular al teléfono.Conector jack auricular
Algunas teclas flexibles están preprogramadas para poder coger línea, loop …
El resto de teclas pueden ser programadas por el usuario.
Flexible
Tecla usada para acceder a la marcación abreviada, programación rápida,
guardar número rellamado y rellamada último número.
Speed
La prestación DND (No Molesten) bloquea las llamadas entrantes. Cuando está
activada, el LED de la tecla está encendido.
También se usa para activar desvíos (por ejemplo, a otra extensión o al buzón
de voz). Cuando un desvío está activado, el LED de la tecla parpadea.
DND/Fwd
Esta tecla alterna el estado del altavoz. El LED de la tecla se ilumina cuando el
altavoz está activo.
Speaker
Esta tecla se usa para retener una llamada o para guardar información durante
la programación.
Hold/Save
Su función cambia con el estado del teléfono (en reposo, durante una llamada
…). La función en cada momento se indica en el display.
3 Teclas
Soft
Tecla usada para iniciar una transferencia o para entrar en programación.Trans/PGM
Una extensión puede iniciar una solicitud de retrollamada a una extensión
ocupada. Cuando la extensión quede en reposo, la extensión que inició la
solicitud recibirá la señalización.
Call back
La tecla de volumen ajusta el nivel de audio para el timbre, auricular y manos
libres.
Volumen
Permite realizar llamadas desde la agenda, la cual permite buscar la información
almacenada, los nombres de la marcación abreviada …
Phonebook
(agenda)
Se ilumina cuando el teléfono suena.LED espera
Información en el display sobre estado del teléfono, directorios de marcación, y
la información de mensaje de prueba.
Display LCD
El micrófono se usa para la función de manos libres.Micrófono manos libres
LDP-7024LD Digital Telephone Description Quick Guide

Responder a una llamada estando en reposo:
1. Levante el auricular y pulse la tecla flexible, si es
necesario.
Responder a una llamada mientras está
ocupado:
1. Pulse la tecla Hold/save y/o
2. Pulse la tecla de línea, que estará parpadeando.
Captura de llamadas:
1. Levante el auricular.
2. Marque 7 (Código de Captura directa de Llamadas),
3. Marque el número de extensión que está sonando.
Automáticamente tendrá conectado al llamante.
Captura de llamada de grupo:
1. Levante el auricular,
2. Marque 566 (Código de Captura de Grupo) y
automáticamente tendrá conectado al llamante.
La función DND bloquea las llamadas entrantes.
Para alternar entre DND a ON y OFF:
1. Pulse la tecla DND.
Para activar el desvío de llamadas a otro
teléfono o grupo::
1. Levante el auricular
2. Pulse la tecla Soft Fwd
3. Marque el tipo de desvío 1-9 (iPECS: 1-5)
4. Marque el destino del desvío.
Realizar llamadas internas:
1. Levante el auricular,
2. Marque el número de extensión deseado.
Llamada en espera (Camp-On):
1. Tras llamar a una extensión que está ocupada, pulse
‘* ‘.
2. En la extensión a la que ha llamado se escuchará el
tono de Camp-on.
3. Cuando la extensión a la que ha llamado responda,
hable.
Rellamada Último Número (LNR)
1. Levante el auricular.
2. Seleccione la tecla Soft Rellama.
3. Pulse la teclas ▼volume ▲para seleccionar uno de
los 10 últimos números marcados.
4. Pulse la tecla Hold/Save.
Realizar una llamada usando la marcación
abreviada:
1. Levante el auricular.
2. Pulse la tecla Speed.
3. Marque el número de marcación abreviada deseado.
Funciones de usuario
Introducir un número de marcación abreviada
con línea y nombre:
1. Pulse la tecla Trans/Pgm,
2. Pulse la tecla Speed.
3. Pulse el número de marcación abreviada que desee.
4. Seleccione la línea/grupo de líneas.
5. Marque el número de teléfono que desea almacenar.
6. Pulse la tecla Hold/Save.
7. Introduzca el nombre asociado si lo desea.
8. Pulse la tecla Hold/Save.
Para asignar un número de marcación
abreviada en una tecla flexible:
1. Pulse la tecla Trans/Pgm.
2. Pulse la tecla flexible deseada.
3. Pulse la tecla Soft Num Tel.
4. Seleccione/marque la línea o grupo de líneas.
5. Marque el número de teléfono deseado.
6. Pulse la tecla Hold/Save,
7. Introduzca el nombre asociado si lo desea,
8. Pulse la tecla Hold/Save.
Para activar el ACNR (Rellamada Automática al
Último Número) durante una llamada saliente:
1. Use las teclas de navegación para mostrar el
siguiente menú y seleccione la tecla Soft ACNR.
2. Cuelgue.
Cancelar la petición de ACNR :
1. Pulse la tecla Soft ACNR.
Transferir una llamada en curso:
1. Durante una conversación, pulse la tecla Trans/pgm,
2. Si desea anunciar la transferencia, hágalo cuando le
contesten, y después cuelgue para completar la
transferencia. En caso contrario, simplemente cuelgue
antes de que le contesten.
Retener una llamada:
1. Durante una conversación, pulse la tecla Hold/save.
Para establecer una conferencia:
1. Durante una conversación, pulse la tecla Soft Conf.
2. Llame a la otra parte con la que desea establecer la
conferencia.
3. Seleccione la tecla Soft Conf.
4. Seleccione de nuevo la tecla Soft Conf para
establecer la conferencia.

Códigos de programación de las teclas flexibles
Tecla FLASH9 49 4Register Mobile Ext CLI3 9-
Tecla CALLBK9 29 2Register Mobile Extension3 7-
Tecla PTT9 9-Idioma display LCD7 17 1
Register Bluetooth* 8* 3Música de fondo7 37 3
Bluetooth Usage* 9* 4Registrar nombre de extensión7 47 4
Tecla FWD9 8-Borrar mensaje de megafonía-6 7
-
-
-
-
-
-
-
-
* *
* 0
9 *
9 9
9 8
9 7
9 6
9 5
9 3
9 1
8 *
8 9
8 7
8 6
8 5
8 4
8 1
8 0
7 6
7 5
Código
LDK
-
-
-
-
-
-
5 7
8 0
5 2
5 1
-
1 4
5 4
5 3
4 2
4 1
-
3 8
-
3 3
-
2 3
2 2
2 1
1 2
1 1
1 9
1 0
-
Código
iPECS
Auriculares / Altavoz6 1Tipo de timbre1 1
Modo timbre auriculares6 2Modo Enblock1 4
Código de cuenta8 4Auricular1 7
Llamada en espera DID3 4Timbre llamadas internas1 8
9 3
7 9
7 7
7 6
7 5
3 5
3 2
3 1
* *
* 0
-
-
-
9 7
9 6
9 5
-
9 1
-
8 9
-
8 6
8 8
8 5
Código
iPECS
Tecla DNDBorrar mensaje de bienvenida6 6
Mostrar versión teléfonoGrabar mensaje de megafonía6 5
Escuchar estado de extensión6 4
Mostrar dirección MACEscuchar número de extensión6 3
Cambiar dirección IP teléfonoEscuchar fecha y hora6 2
Mostrar dirección IP teléfonoGrabar mensaje de buzón6 1
Mensaje espera
jefe/secretaria
Registro de llamadas5 7
Recuperar mensaje espera
CLI/IP
Grabación bidireccional5 4
Recuperar mensaje espera
EXT
Fijar mensaje personalizado5 2
Logout agente HOTDESKFijar mensaje preseleccionado5 1
Login agente HOTDESKCall Coverage para EXT XXX4 6
GRABACIÓN LLAMADA USBCall Coverage4 5
Restricción DISADesactivar sala conferencias4 4
Restricción DIDActivar sala conferencias4 3
Tecla REDIALBorrar hora de despertador4 2
Tecla MONFijar hora de despertador4 1
Tecla MUTEExtensión móvil a grupo3 6
Tecla DND / FWDActivación extensión móvil3 4
Tecla CONF
Cambio código autorización
3 2
ESTADO ACD (sólo grupo)
Registro código autorización
3 1
PRESTACIÓN KEYPAD
Cambiar COS
2 4
DND DE GRUPO
Walking COS
2 3
INTRUSIÓNRestaurar COS2 2
Camp-onRestringir COS2 1
Tecla LOOPTimbre llamadas externas1 9
FunciónFunción
Código
LDK
• Pulse la tecla [TRANS/PGM] ▶Pulse la tecla flexible que desea programar
▶Pulse la tecla [TRANS/PGM] otra vez ▶Marque el código de función deseado, según la siguiente tabla
▶Pulse la tecla [HOLD/SAVE] para guardar los cambios.

Important Safety Information UK
To prevent unexpected danger or damage please read this information before installing and repairing
the phone. There are “Caution” and “Warning”, it means as follows;
Warning: To reduce the possibility of electric shock, do not expose your phone to high humidity areas,
such as a bathroom, swimming area, etc.
1. Only trained and qualified service personnel shall install, replace or service the phone.
2. Do not spill liquid on the phone. If so, call your service center as this may result in
a fire or an electric shock.
3. If you see smoke or smell burning, unplug the power cord and the phone line. Call your service centre
immediately.
4. Do not tug the power cord or the phone line. This may result in a fire, an electric shock or
equipment damage.
5. Do not use the phone during a thunderstorm. Lightning strike may result in a fire, severe electrical or
acoustic shock.
6. Ensure that children do not pull on phone cords. This may injure children or result in equipment
damage.
7. The ear-piece houses a magnetic device which may attract pins or small metal objects. Keep handset
clear of such objects and check before use.
8. Avoid placing the phone in an area that is dusty, damp or subject to vibration.
9. Choose a site that is dry and well ventilated.
10. Do not put the heavy items on the phone.
11. Do not drop or throw the phone.
12. Static electricity discharge will damage electronic components.
13. Keep out of direct sunlight and away from heat.
14. No user serviceable parts inside. No not insert a screw driver or any metal objects into the phone.
This may cause electric shock or damage the equipment and will render the warranty void.
15. Clean the phone with a soft, dry cloth only. Do not use volatile liquids such as petrol, alcohol or
acetone as this may cause a fire or result in discoloration or damage to plastics. Do not clean with
wax or silicon products as these may enter the equipment and cause operation to become unreliable.
Disposal of your old appliance
1. When this crossed-out wheeled bin symbol is attached to a product it means the product
is covered by the European Directive 2002/96/EC.
2. All electrical and electronic products should be disposed of separately from the municipal
waste stream via designated collection facilities appointed by the government or the local
authorities.
3. The correct disposal of your old appliance will help prevent potential negative
consequences for the environment and human health.
4. For more detailed information about disposal of your old appliance, please contact your
city office, waste disposal service or the shop where you purchased the product.
Warning
Fixed Feature button definition
Button Description
Speed Used to access speed dialing, speed programming, save number redial, and last
number redial.
Dnd/Fwd
The DND (Do Not Disturb) feature blocks all incoming calls. When DND is active,
the red LED in this button is illuminated.
It is also used to activate call forward, e.g. to another station or voicemail. When
call forward is activated, the red LED flashes.
Speaker Speaker toggles the speakerphone state, and the red LED is illuminated when
the speakerphone is active.
Hold/Save This button is used to put a call on hold or save information when programming.
Flexible Some flexible buttons are pre-programmed in the system for line appearances,
loop functions etc. The remaining flexible buttons can be user-programmed.
3 Soft
Buttons Used in conjunction with fixed and flexible features, and the function changes in
relation to call progress, as indicated on the LCD display.
Trans/Pgm This button is used to initiate a call transfer (TRS) or to enter programming mode
(PGM)
Call back A station can initiate a call back request to a busy station. Once that station
becomes idle, the initiating station is signaled.
Volume The volume button adjusts the audio levels for ringing, handset and
speakerphone functions.
Menu The menu button is used to move to the desired option (Dial, MSG, Program),
and to select the next screen when indicated by an arrow on the LCD display.
Phonebook Used to edit phonebook and make a call to searched destination.
Earphone-Jack Socket Used to connect optional headset to the phone.
Visual Ringing LED Illuminates when the phone is ringing.
LCD Display Displays information about telephone status, dialing directories, and test
message information.
Hands-free Microphone Microphone is used for hands-free speakerphone function.
LDP-7024LD Digital Telephone Description Quick Guide

LDP Keyset User Operation
Receiving calls _ Answering a Call While Idle :
1. Lift the handset and press the flashing Flex button (as
needed), the call will be connected.
Responding to a Call While Busy
1. Press Hold/Save and/or
2. Press the flashing CO line button.
Answering Calls to Other Stations
To answer a call ringing at another station:
1. Lift the handset,
2. Dial 7 (Directed Call Pick-Up code),
3. Dial the extension Number of the ringing station; the
call will be connected.
To answer a call ringing at a station in your
group:
1. Lift the handset,
2. Dial 566 (Group Call Pick-Up code), the call is
connected.
Using Do-Not-Disturb (DND) to Block Incoming
Calls
To toggle DND ON and OFF:
1. Press the DND button.
Forwarding calls to another Station or Voice
Mail
To activate Call Forward from your phone to
another phone or internal system resource:
1. Lift the handset,
2. Press the Fwd Soft button,
3. Dial the type of forward code 1-9 (iPECS: 1-5)
4. Dial the destination number.
Placing Intercom calls
To place an Intercom call:
1. Lift the handset,
2. Dial the extension number of the desired station,
3. On answer or Splash tone, speak to the called party.
Using Camp-On when calling a busy station.
To Camp-On (wait off-hook) for a busy station:
1. Press * and wait for the extension to answer.
Using Last Number Redial (LNR)
To dial the Last Number for an external call:
1. Lift the handset,
2. Select the Redial Soft button,
3. Press ▼volume ▲to select from the last 10
numbers dialed,
4. Press the Send Soft button or hold/save.
Using System Speed Dial Numbers.
To place a call using System Speed Dial:
1. Lift the handset,
2. Press the Speed button,
3. Dial the desired System Speed Dial bin number
Using and Entering Station Speed Dial
Numbers.
To place a call using Station Speed Dial:
1. Lift the handset,
2. Press Speed,
3. Dial the desired Station Speed Dial bin number
To enter a Station Speed Dial number with CO
Line and Name:
1. Press Trans/Pgm,
2. Press Speed,
3. Dial the desired Station Speed Dial bin number,
4. Select/dial the CO line/group,
5. Dial the desired number to be stored,
6. Press Hold/Save,
7. Enter the associated name if desired, using the
alpha-numeric entry chart,
8. Press Hold/Save.
To assign a Station Speed Dial number directly
to a Flex button:
1. Press Trans/Pgm,
2. Press the desired Flex button,
3. Select the Tel Num Soft button,
4. Select/dial the CO line/group,
5. Dial the desired number,
6. Press Hold/Save,
7. Enter the associated name if desired, using the
Character Entry chart,
8. Press Hold/Save.
ACNR: To retry a busy external number until
answered
To set up an ACNR, while on an outgoing call:
1. Use the Navigation button to display the next menu
and select the ACNR Soft button,
2. Hang-up handset.
To cancel the ACNR request:
1. Press the ACNR Soft button.
Call Transfer: Sending a call to a different
destination
To Transfer an active call:
1. Press Trans/Pgm,
2. Call receiving party,
3. Hang-up with or without announcement.
Call Hold: Placing a call in a waiting state
To place a call on Hold:
1. Press Hold/Save.
Joining Multiple People in a Conference
To establish a Conference:
1. Establish call with one of the desired conference
parties,
2. Select the Conf Soft button,
3. Establish call with the other conference party,
4. Select the Conf Soft button,
5. Select the Conf Soft button again to establish the
conference.
To place a Conference on Hold:
1. Press the Hold/Save button.
To retrieve the Conference:
1. Select the Conf Soft button.
To make an External-parties-only Conference:
1. Establish conference with two external parties,
2. Select the Conf Soft button to exit.
To enter pre-opened Conference Room:
1. Dial 5 7 X (iPECS: 5 9 X) where X is the conference
room number.

User Program Codes
http://www.LG-Nortel.com
•Press the [TRANS/PGM] button ▶Press the flexible button to be programmed
•▶Press [Trans/Pgm] button again ▶Enter the desired feature code below table
•▶Press the [HOLD/SAVE] button to save.
DND Button9 3-Erase User Greeting-6 6
FWD Button9 8-Erase Page MSG-6 7
PTT Button9 9-LCD Display Language7 17 1
Background Music7 37 3
Display Phone Version7 9-Record Page MSG-6 5
-
-
-
-
-
-
* *
* 0
9 *
9 9
9 8
9 7
9 6
9 5
9 4
9 3
9 2
9 1
8 *
8 9
8 7
8 6
8 5
8 4
8 1
8 0
7 6
7 5
7 4
LDK
Code
-
-
-
-
5 7
8 0
5 2
5 1
-
1 4
5 4
5 3
4 2
4 1
-
3 9
3 8
3 7
-
3 3
-
2 3
2 2
2 1
1 2
1 1
1 9
1 0
-
iPECS
Code
Register Station Name7 4Ring Type1 1
Speakerphone / Headset6 1Enblock mode1 4
Headset Ring Mode6 2Ear-Mic Headset1 7
Account Code8 4ICM Ring1 8
7 7
7 6
7 5
3 5
3 2
3 1
* *
* 0
-
-
-
9 7
9 6
9 5
9 4
-
9 2
9 1
-
8 9
-
8 6
8 8
8 5
3 4
iPECS
Code
Display Phone MAC IP AddressListen Station Status6 4
Change Phone IP Address Listen Station Number6 3
Display Phone IP Address Listen Time & Date6 2
Msg. Wait in Exec/Sec pairRecord User Greeting6 1
CLI/IP Msg. Wait RetrieveCall Log5 7
STA Msg. Wait Retrieve
Two Way Record5 4
HOTDESK Agent LogoutSet Customer MSG5 2
HOTDESK Agent LoginSet Pre-Selected MSG5 1
USB CALL RECORDCall Coverage For STA XXX4 6
DISA RESTRICTIONCall Coverage4 5
DID RESTRICTIONConf-Room Deactivate4 4
REDIAL ButtonConf-Room Activate4 3
MON ButtonWake-Up Erase4 2
MUTE ButtonSet Wake-up Time4 1
FLASH ButtonMobile Ext Hunt Call3 6
DND / FWD ButtonRegister Mobile Ext CLI-
CALLBK ButtonMobile Ext Activation3 4
CONF ButtonRegister Mobile Extension-
ACD STATUS (supervisor only)
Auth. Code Change
3 2
KEY PAD FACILITY
Auth. Code Register
3 1
HUNT DND (group only)
COS Change
2 4
INTURSION
Walking COS
2 3
Camp-onCOS Restore2 2
LOOP ButtonCOS Down2 1
DID Call WaitCO Ring1 9
FunctionFunction
LDK
Code
Regulatory Information and Disclaimers
“Privacy of communications may not be ensured when us-
ing this telephone”.
Any changes or modifications made to this device that are
not expressly approved by the manufacturer may void the
user’s authority to operate the equipment. The Manufactur-
er is not responsible for any radio or television interference
caused by unauthorized modification of this device, or the
substitution or attachment of connecting cables and equip-
ment other than those specified by the manufacturer. It is
the responsibility for the user to correct any interference
caused by such unauthorized modification, substitution or
attachment.
The manufacturer and its authorized resellers or distribu-
tors will assume no liability for any damage or violation of
government regulations arising from failure to comply with
these guideline.
Pursuant to Part 15 of the Federal Communications
Commission(FCC) Rules, the user is cautioned that chang-
es or modifications not expressly approved by LG-Nortel.
Could void the user’s authority to operate this equipment.
Important Safety Instructions
USA-FCC (Federal Communications Commission)
Statement
This device complies with Part 15 of the FCC Rules. Op-
eration is subject to the following two conditions:
FCC Interference Statement
Note: This equipment has been tested and found to com-
ply with the limits for a Class B Device, pursuant to Part
15 of the FCC Rules. These limits are designed to provide
reasonable protection against harmful interference in a
residential installation. This equipment generates, uses
and can radiate radio frequency and, if not installed and
used in accordance with the instructions, may cause harm-
ful interference to radio communications. However, there
is no guarantee that interference will not occur in a par-
ticular installation. If this equipment does cause harmful
interference to radio or television reception, which can be
determined by turning the equipment off and on, the user
is encouraged to try to correct the interference by one or
more of the following measures:
Compliance Statement for Canada
This Class B digital apparatus complies with Canadian
ICES-003.
Cet appareil numérique de la classe B est conforme à la
norme NMB-003 du Canada.
This device complies with Class B Limits of Industry Cana-
da. Operation is subject to the following two conditions;
European Union Declarations of Conformity
LG-Nortel Co. Ltd. declares that the equipment specified in
this document, which bears the “CE” mark, conforms to the
European Union Radio and Telecommunications Terminal
Equipment Directive (R&TTE 1999/5/EC), including Elec-
tromagnetic Compatibility Directive (2004/108/EC) and
Low Voltage Directive (2006/95/EC).
The product fulfills the essential requirements of the har-
monized standards shown above.
Product Safety Instructions
This product complies with and conforms to the following
international Product Safety standards as applicable:
Safety of Information Technology Equipment, IEC 60950-1,
including Relevant national deviations as listed in Compli-
ance with IEC for Electrical Equipment (IECEE) Safety of
Information Technology Equipment, CAN/CSA-C22.2 No.
60950-1/UL 60950-1
Regulatory and Safety Information
Please save these instructions and read carefully
Printed In Thailand. Copyright © 2008 LG-Nortel Co.Ltd. All rights reserved.
P/NO: MMBB1234567,1.0
This device may not cause harmful interference, and
This device must accept any interference received, in-
cluding interference that may cause undesired opera-
tion.
1
2
Reorient or relocate the receiving antenna.
Increase the separation between the equipment and
receiver.
Connect the equipment into an outlet on a circuit differ-
ent from that to which the receiver is connected.
Consult the dealer or an experienced radio/TV techni-
cian for help.
1
2
3
4
This device may not cause harmful interference, and
This device must accept any interference received, in-
cluding interference that may cause undesired opera-
tion.
1
2
Before connecting or using your new phone, take a
moment to consider safety and reliability. Use common
sense when locating, connecting and using you Phone.
Locate on a dry level surface away. Keep the phone away
from the edges of the surface to avoid the potential of
a fall.
Locate cables to avoid potential for damage. For exam-
ple, do not locate under rugs or carpet as damage may
result from foot traffic or heavy objects. Also, do not lo-
cate cables between the desktop and walls where they
may be crushed, damaging the insulation.
Check the cables regularly and, if damage is noted, dis-
connect your phone. Contact your local representa-tive
for a replacement.
Should liquid spill on the phone, disconnect the unit from
power and the network.
Do not use during lightning storms. Lightning presents a
potentially lethal shock hazard.
Clean the phone with a soft dry cloth; do not use liquid
cleaners.
Always use caution when connecting to AC power. Use
only with a properly grounded standard AC power outlet.
•
•
•
•
•
•
•
•
Regulatory and Safety Information 1.0.indd 1Regulatory and Safety Information 1.0.indd 1 2008-01-24 오후 3:14:552008-01-24 오후 3:14:55
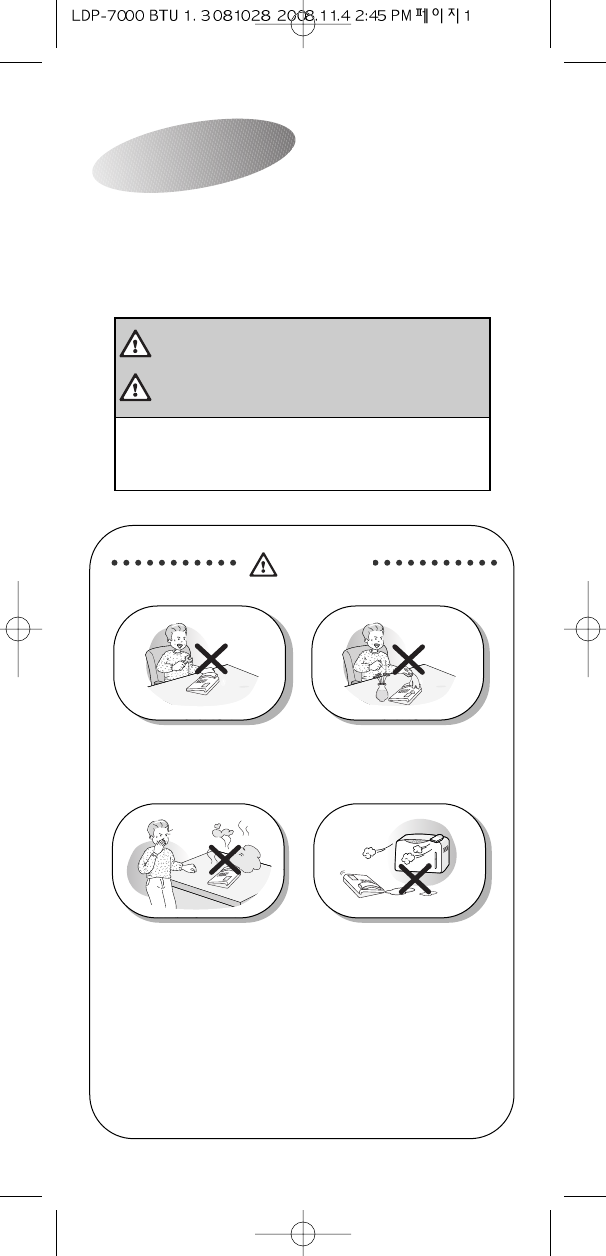
To prevent the unexpected danger or damage, please
read this information before installing and repairing the
phone. There are "Caution" and "Warning", it means
as follows;
Important Safety Information
Warning
This means danger. It means that the
action could cause bodily injury or death.
Warning
Caution
You are capable of doing something
that could result in physical injury to
you or equipment damage.
Only trained and qualified service
personnel shall install, replace or
service the phone.
Do not spill liquid like water on the
phone. If so, call for the service
center as this may result in a fire or
an electric shock.
If you see smoke or smell something
burning, unplug the phone line. Call
for service center immediately.
Choose a site that is dry and well
ventilated.
ƃAfter reading the manual, please keep it ready
for the next user.
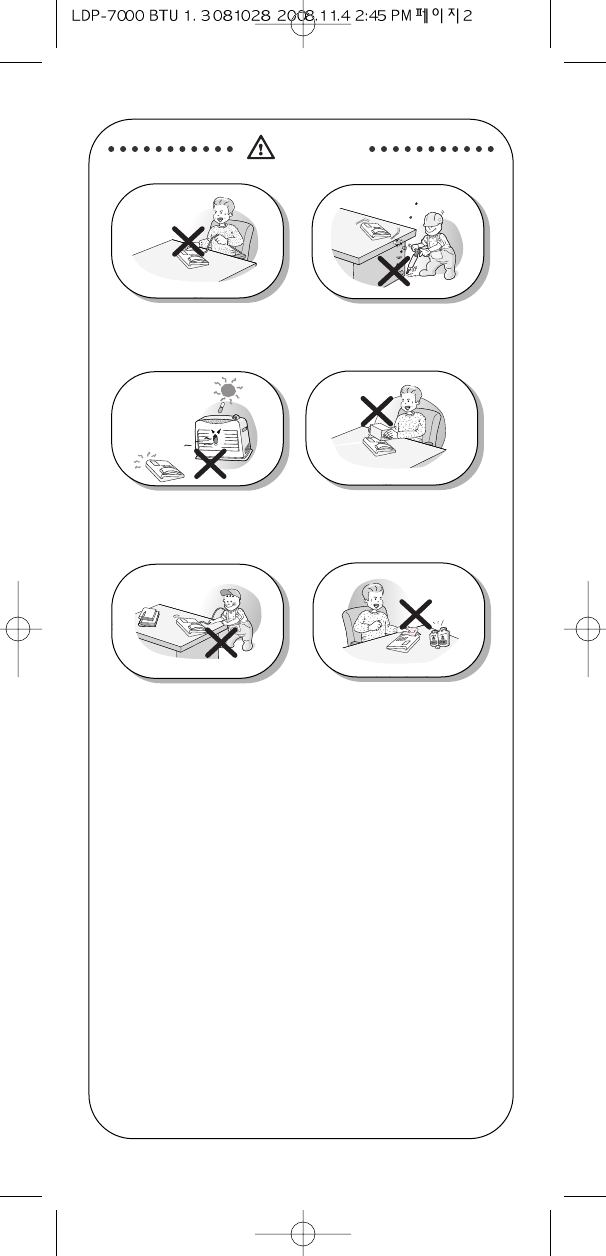
Caution
Do not tug the power cord or the
phone line. This may result in a fire,
an electric shock or equipment
damage.
Avoid placing the phone in an area
that is dusty, damp or subject to
vibration.
Do not put the heavy things on the
phone.
Keep out of direct sunlight and
away from heat.
Ensure that children do not pull on
phone cords. This may injure
children or result in equipment
damage.
Clean the phone with a soft, dry cloth
only. Do not use volatile liquids such as
petrol, alcohol or acetone as this may
cause a fire or result in discoloration or
damage to plastics. Do not clean with
wax or silicon products as these may
enter the equipment and cause
operation to become unreliable.

1
BTU
1. Introduction
The LDP-7000BTU can be connected to a compatible
Bluetooth headset that supports Bluetooth technology.
(version 1.1 or higher)
This allows you freedom to make and receive calls while
on the move or in the office.
Read this user's guide carefully before using the The
LDP-7000BTU.
2. Bluetooth wireless technology
Bluetooth headset is specially designed for special
phones(such as GSM, CDMA mobile phone)may be not
compatible with the LDP-7000 BTU.
The LDP-7000 BTU can be used with any compatible
Bluetooth devices that support the Handsfree or Headset
profiles. (Profile is a set of Bluetooth commands that the
phone uses to control the headset).
The LDP-7000BTU is compliant with and adopts the
Bluetooth Specification V2.0+EDR.
However, interoperability between the LDP-7000BTU and
other Bluetooth headset is not guaranteed because it
depends on compatibility.
A followed list is Bluetooth headset model supported by
The LDP-7000BTU.
- Jabra BT-250
- Jabra BT-135
- Jabra BT-620S
- Plantronics M3500
- Plantronics Voyager 510
- Plantronics Voyager 520
- Motorola H700
- Motorola HS810
- Sony Ericsson HBH-970
- SamSung WEP500
- LG Innotek BMX-200
- MOVON TP1
- DREAMTECH DT100V
- SEECODE SCM-711
3. Installation of Option Modules
A BTU(BLUETOOTH Unit) module must be connected
to the LDP-7024D/24LD Digital Key telephones.
You can set up the phone to send and receive a call
through Bluetooth.
In the Bluetooth menu, you can manage connections and
define settings.
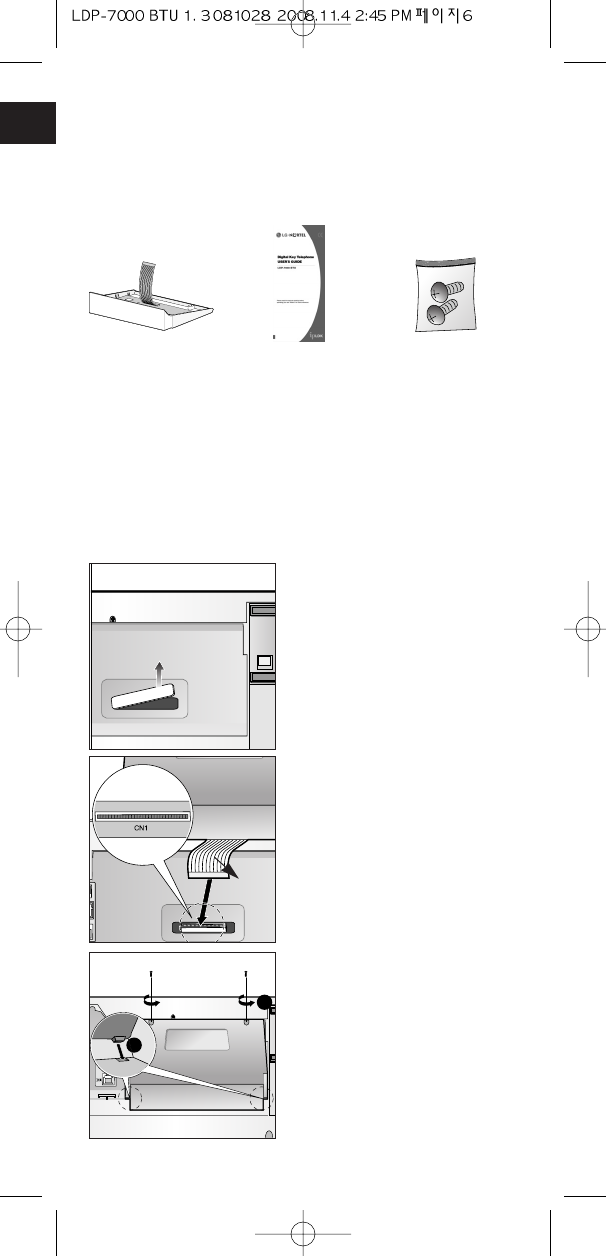
2
3-1. Unpacking
Unpack the box and check the items below :
3-2. Installation.
when installing or removing the option module the Line
power must be stopped.
If not, in the worst case, will damage the option module
or Keyset.
ſCaution
The Optional Unit connection should make earlier
and break later than the line cord.
ŋAfter disconnecting the line,
unlatch the dummy cover.
(on the bottom of the keyset)
ȵCaution:
Please do not inserting the
dummy cover into Keyset
when unlatching.
ŋConnect the flat cable into the
optional connector on the
keyset, making sure that it is
connected securely.
ſThe connector number is
different according to the
keyset.
- LDP-7024D: CN1
- LDP-7024LD: CN6
ŋHook the option module cover
onto the Keyset base (line up
the protrusions on the cover
with the receptacles on the
keyset base).
And then turn the screw
clockwise to tighten.
BTU Installation guide
(1ea)
Screw
(2ea)
2
1
Flat
cable
3
4. Before you use the LDP-7000 BTU
1. Make sure that the bluetooth headset is charged.
2. Enable the Bluetooth Usage. ( PGM + Ҭ+ 4 )
For more information, see the user's guide of the LDP-
7024D/24LD.
In case of CS1000 system. ( MENU + 3 + 2 )
3. You must first pair LDP-7000 BTU with the headset
you want to use.
The Bluetooth connection between the headset and
LDP-7000 BTU can be established by setting up a
paired link.
With a paired link, the LDP-7000 BTU remembers the
headset's ID, and these 2 items are then ‘paired’
together - eliminating the need to repeat the set up
process with future use.
4. If you want to use another headset, you can erase
paired information and pair LDP-7000 BTU with new
headset.

4
5. Using Bluetooth menu [ PGM+ Ҭ+ 3 ]
In case of CS1000 system [ MENU + 3 + 1 ]
5-1. When Blutooth Usage is enable.
5-2. When Blutooth Usage is disable.
[ USING BUTTON ]
EXIT EXIT BLUETOOTH MENU
NEXT or Ɗ,ƌScroll the menu
SELECT, Save, OK Select the menu
[LDP-7024LD] [LDP-7024D]
[LDP-7024LD] [LDP-7024D]
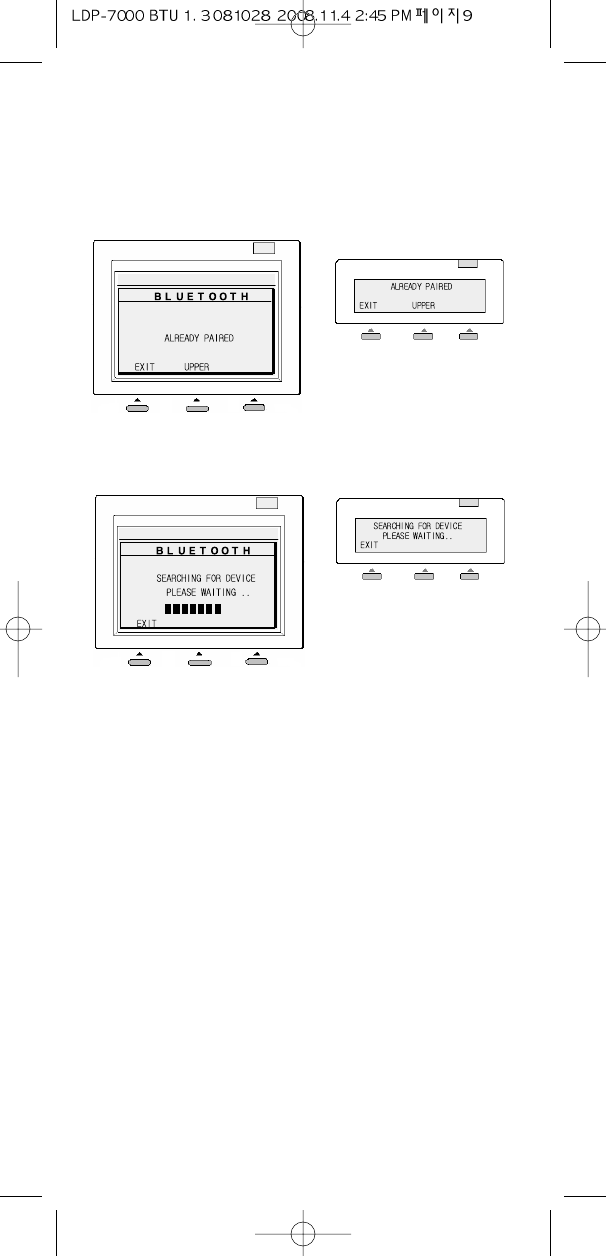
5
6. PAIRING
6.1 When already paired
6.2 Searching for Device
1. Before you can pair your headset you need to put it
into pairing mode.
(Note: Pairing must be done every time the Headset
establishes a link with LDP-7000BTU.
Refer to headset’s user guide for more detail
information.)
2. During pairing it is recommended that the headset and
LDP-7000BTU are not more than 1 metre apart - with
no solid objects in between.
3. LDP-7000BTU starts searching for audio enabled
devices and accessories.
[LDP-7024LD] [LDP-7024D]
[LDP-7024LD] [LDP-7024D]
ſNote.
it may take about 15
seconds to finish
searching for devices.
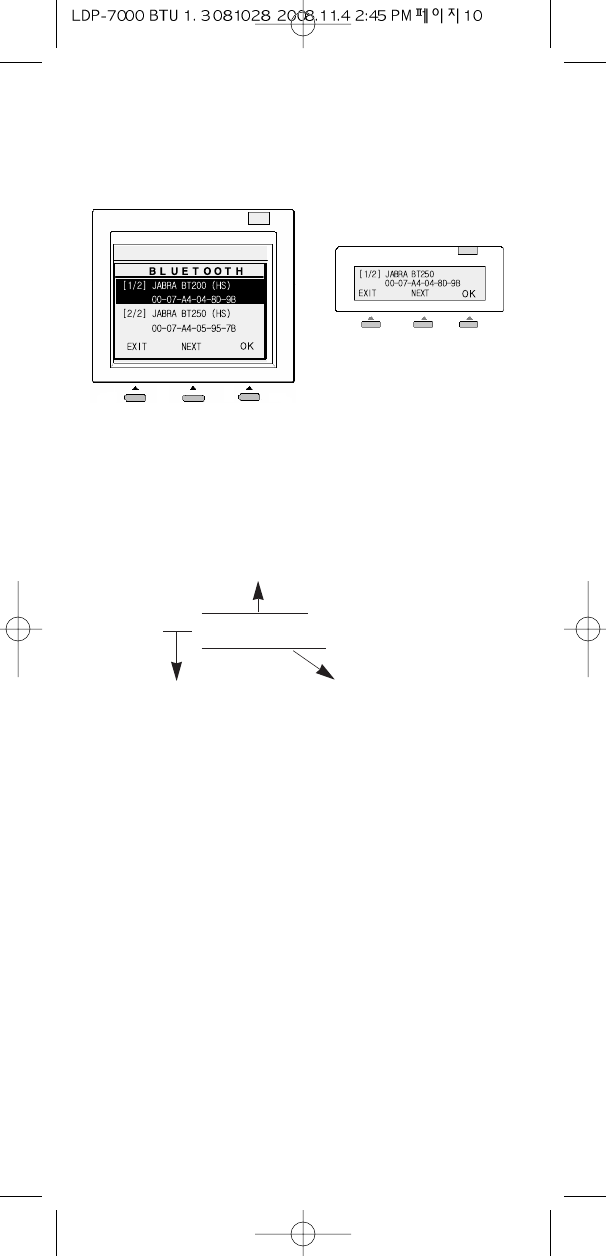
6
6.3 Select device
1. Devices responding to the inquiry appear on a list of
Bluetooth device starting from the device found first
after 15 seconds.
2. Scroll to the device you want and press OK or Save.
Note : Device information
DEVICE NAME (PROFILE NAME)
[2/2] : JABRA 250 (HS)
00-07-A4-05-95-7B
[ DEVICE NO / TOTAL NO ] DEVICE ADDRESS
[LDP-7024LD] [LDP-7024D]

7
6.4 Enter device PIN CODE(PASSWORD)
1. The desired bluetooth device requests to enter the
pincode of it.
(The Bluetooth Passcode is a 1 to 16 character-long
numeric code. )
2. Enter the pincode and send to headset by pressing
OK.
3. When the connection has been established, the device
shows connected to followed by the device's name
and address.
( Note that you can have only one active connection at
a time. )
4. If the connection is failed, you can try to connect
device again.
5. Once the headset and LDP-7000BTU have
successfully paired, you are ready to place and receive
calls. (see section 9, 10.)
[LDP-7024LD] [LDP-7024D]
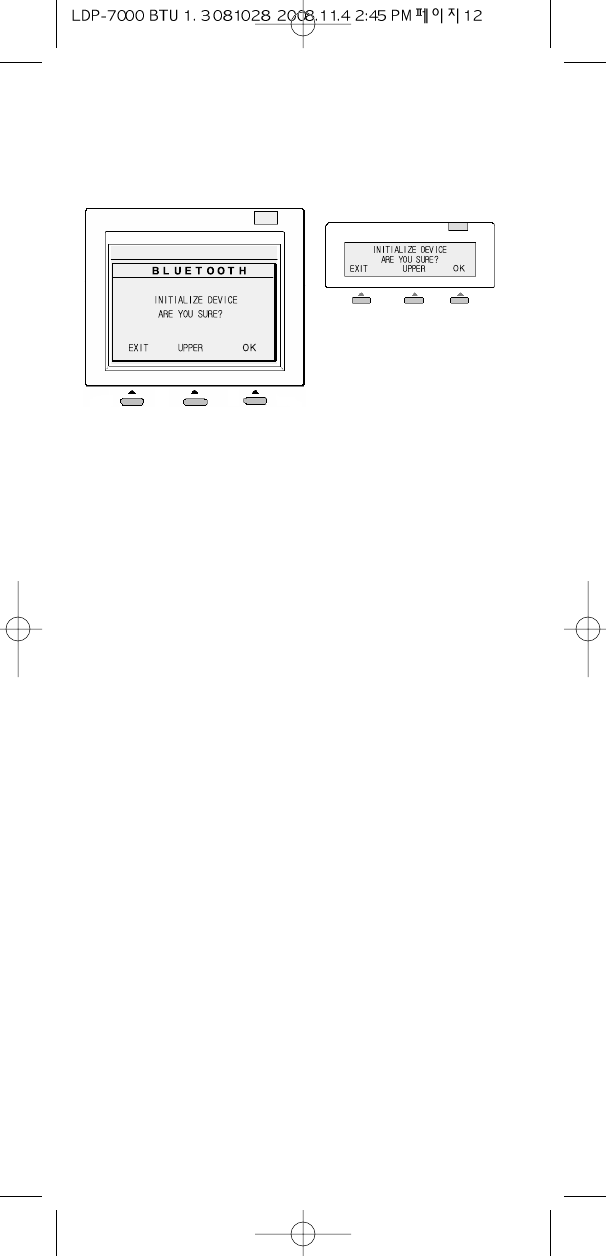
8
7. UNPAIRING
1. If you want use another headset, you can erase paired
information and pair with the another headset desired
2. It will take a few seconds to erase paired information.
3. If it is unpaired already, it will display “UNPAIRING
FAILED”
[LDP-7024LD] [LDP-7024D]
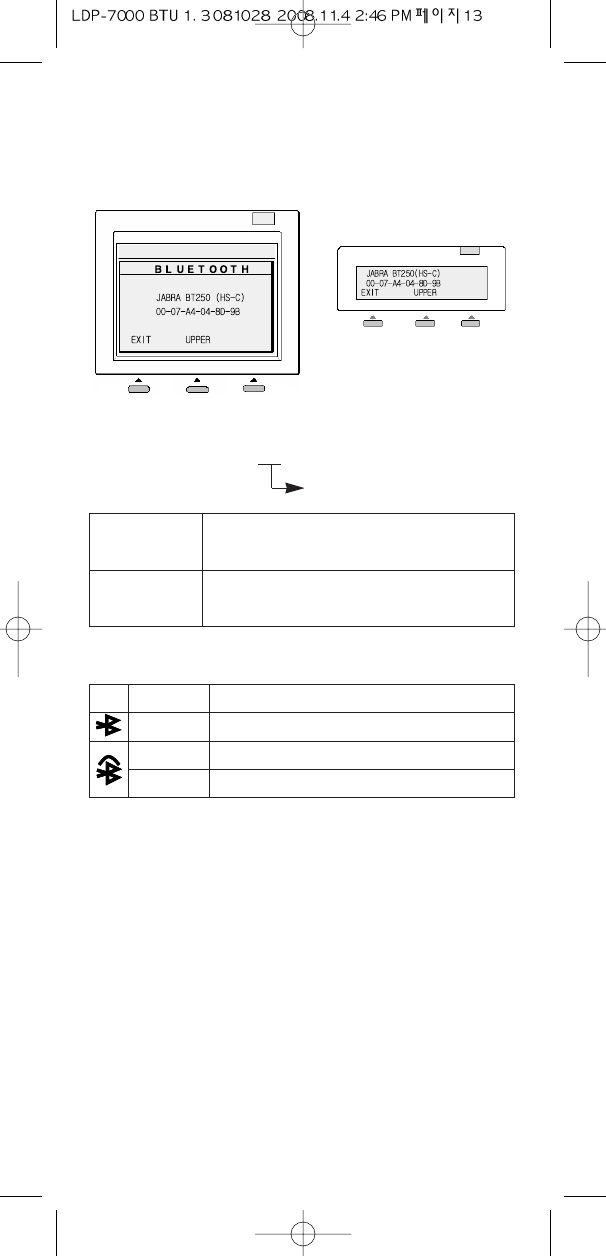
9
8. PAIRED INFORMATION
NAME:JABRA BT ( HS - C )
DEVICE STATUS
D
(DISCONNECT) Already paired but not linked-radio with headset
C
(CONNECT) Ready to make and answer a call
9. ICON ( only in the LDP-7024LD )
OFF not paired or Bluetooth Usage disable state
ON Already paired but not linked-radio with headset
STADY ON Ready to make and answer a call
BLINK ongoing communication via bluetooth headset
10. Using your LDP-7000BTU
You will need to make sure that you pair / link your
headset and LDP-7000BTU.
10.1 Answer a call
1. If there is an incoming call while you are wearing the
headset a ring tone will sound in your headset.
2. Just press the headset's function button to answer the
call.
[LDP-7024LD] [LDP-7024D]

10
10.2 Make a call from the phone
1. Using the phone’s keypad, dial the phone number in
speakerphone mode of the phone.
2. Press headset’s function button.
3. The call will then transfer to the headset.
10.3 Make a call from the headset
1. Press headset’s function button.
2. You will hear dial tone.
3. Dial the phone number.
10.4 Ending a call from the headset
1. Press headset’s function button.
2. Or press the speaker button of phone
10.5 Transferring a call from phone to headset
1. If the phone is in speakerphone, just press the
headset’s function button.
2. If the phone is in Handset mode, press the headset’s
function button and replace the handset of the phone.
10.6 Transferring a call from headset to phone
1. Lift the handset
2. The call will be transferred to the phone.
10.7 Performance range
1. Optimal performance range : up to 3m.
2. Limited performance range : up to 5m.
3. Performance range may be decrease in case of the
collision with the wireless LAN (802.11b)
10.8 Restriction of the LDP-7000BTU
1. If the phone goes to the speaker disable state, then
Buetooth Usage will be disabled automatically.
2. If the headset’s battery is running out of power while a
call is inprogress, then the phone will terminate a
current call automatically.

NOV/2008/ISSUE 1.3
Made in Thailand
P/NO : MMBB0133001
ST
Digital Key Telephone
USER’S GUIDE
LDP-7000 BTU
Please read this manual carefully before
operating your set. Retain it for future reference.