Estone Technology F10B Control Panel User Manual 2
Estone Technology Inc. Control Panel 2
Contents
- 1. User Manual 1
- 2. User Manual 2
User Manual 2
19
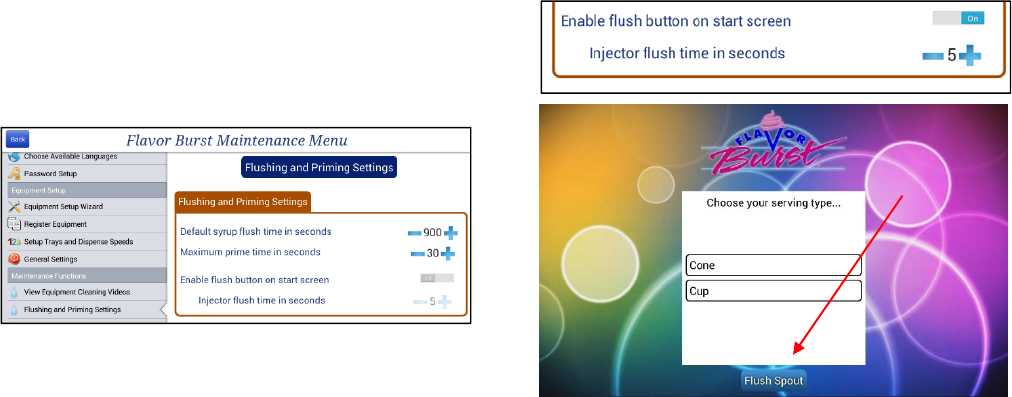
Flushing and Priming Settings
In this section, you can adjust how long the
pumps will run during the Flush and Prime
functions, how long the “Flush Spout” function
flushes and whether or not the FLUSH SPOUT
button appears on the main screen. You can
also set the spout flush settings for a second
spout if you have two spouts dispensing Flavor
Burst product.
4. Press the “Flushing and Priming Settings”
section in the Maintenance Menu.
5. Set the “Default Syrup Flush Time.” This is
how long the system pumps sanitizer
solution through the syrup lines during
routine maintenance or replacing flavors.
In order to comply with sanitation
guidelines, a minimum of 900 seconds is
required to fully clean and sanitize a syrup
line and pump.
6. Set the maximum time you wish to have
syrup flow when priming a syrup line. When
the priming function is activated, it will
automatically shut off after this time unless
the function is stopped or cancelled.
7. If you wish to have easy access to flushing
the spout with sanitizer solution, you can
enable a FLUSH SPOUT button on the
main screen. You can also adjust how long
the spout flushes when activated. If you
find the spout is not clearing product during
the flushing function, increase the Injector
Flush Time.
NOTE: IT IS NOT RECOMMENDED THE
“FLUSH SPOUT” BUTTON BE ACTIVATED IN
SELF-SERVE ENVIRONMENTS. THOSE NOT
FAMILIAR WITH THE EQUIPMENT MAY
ACCIDENTLY ACTIVATE THE FLUSHING
FUNCTION WITHOUT REALIZING WHAT IT
DOES OR HAVE A CONTAINER TO CATCH
THE SANITIZER SOLUTION.
NOTE: THIS OPTION IS NOT AVAILABLE
FOR FCB SYSTEMS.
20
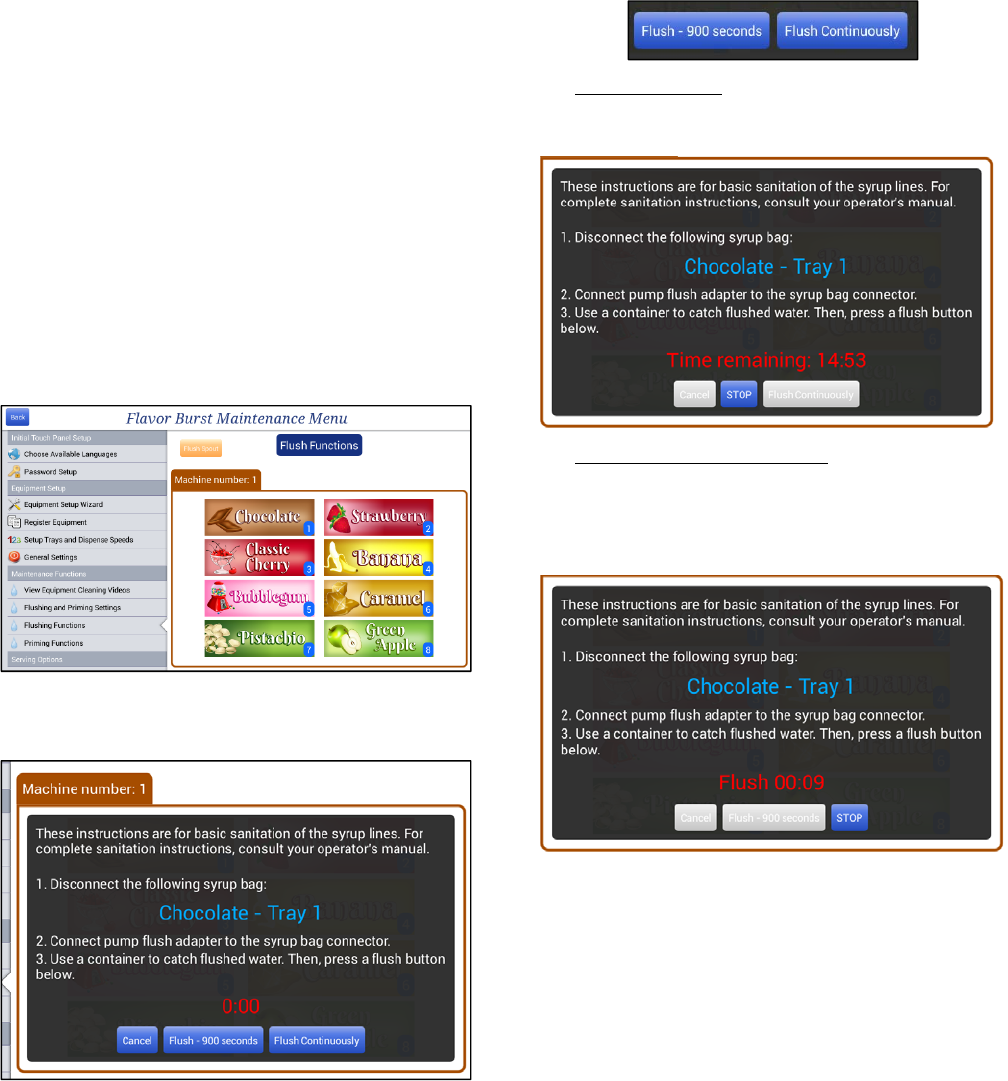
Flushing Functions
Flushing functions are used to clean and
sanitize the syrup lines, syrup pumps, and
spout. This is done whenever a syrup bag is
switched with a different flavor, during the 30-
day routine maintenance of the Clean-In-Place
procedure, and when winterizing the unit. By
connecting each syrup line to a special adapter,
the system purges and sanitizes the line with
sanitizer solution.
The Pump Flush Adapter for a soft-serve
system has two connectors. One end connects
to the flavor line and is used to pump sanitizer
solution through the line and its pump. The
other end is used to clean the Syrup Bag
Adapter. The beverage Pump Flush Adapter
only has a connection for the flavor line.
Always use fresh approved sanitizer solution
according to manufacturer’s instructions (no
more than 2 days old. Use hot water for best
sanitizing results.
1. Press the “Flushing Functions” section in
the Maintenance Menu.
2. Select the flavor of the syrup line you are
flushing.
3. Disconnect the Syrup Bag Connector from
the syrup bag.
4. Locate the Pump Flush Adapter under the
bottom tray and connect it to the Syrup Bag
Connector.
5. Place a container under the spout, or end of
the syrup line.
6. Press one of the Flush buttons.
FLUSH – XXX SECONDS button will flush
the line for predetermined time. The timer
here counts down.
FLUSH CONTINUOUSLY button will
continue indefinitely until you press the
CANCEL button. There is a timer on the
screen that will show how much time has
passed.
NOTE: YOU MAY CANCEL THE FLUSH
PROCEDURE AT ANY TIME BY TOUCHING
THE CANCEL KEY. HOWEVER, THE
SYSTEM MUST COMPLETE A FULL 15
MINUTE FLUSH PROCESS FOR EACH
SYRUP LINE IN ORDER TO COMPLY WITH
SANITATION GUIDELINES.
21
NOTE: WHILE THE FLUSH FUNCTION IS
ACTIVE, YOU WILL NOT BE ABLE TO
PERFORM OTHER FUNCTIONS ON THE
TOUCH PANEL.
NOTE: TO CHANGE THE LENGTH OF TIME
THE FLUSH PROCEDURES RUN, SEE
“FLUSHING AND PRIMING SETTINGS” OF
THE MAINTENANCE MENU.
7. Repeat these steps for other lines that need
to be flushed, or disconnect the Pump Flush
Adapter.
8. Clean and sanitize the Syrup Bag Adapter,
Syrup Bag Connector and syrup bag fitment
before reconnecting the syrup bag to the
syrup line. For full cleaning instructions of
the connectors and other related parts, see
section SCHEDULED MAINTENANCE
“Clean-In-Place Procedure”.
9. If there is more than one cabinet installed
on this system, press the CHANGE
MACHINE button to access that machine’s
syrup lines.
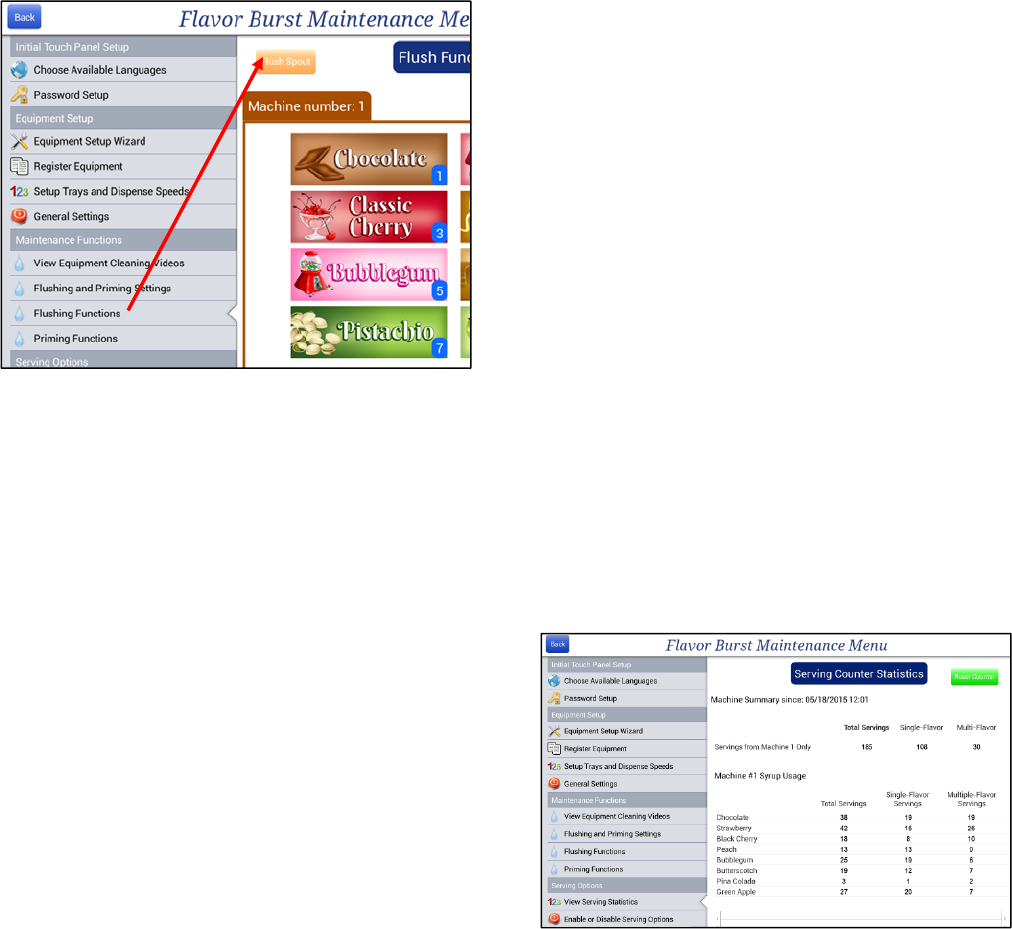
10. To simply flush the spout with sanitizer
solution, place a container under the spout
and press and hold FLUSH SPOUT until the
spout is clear.
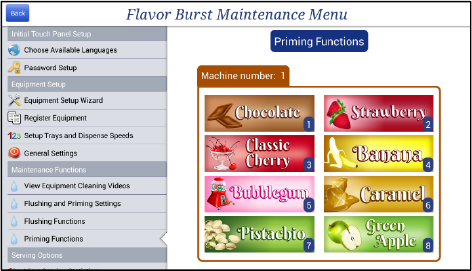
Priming Functions
The priming functions fills the syrup line with
new or fresh syrup. This is typically done when
switching flavors and after the syrup line has
been flushed with sanitizer solution (see
“Flushing Functions” above). It is also done to
prime the lines with fresh syrup, since syrup
can lose its flavor if it has been sitting in the
syrup line for a few days without use.
1. Press the “Priming Functions” section in the
Maintenance Menu.
2. Place a container under the spout to catch
the purged syrup.
3. Select the flavor of the syrup line you are
priming.
4. The syrup will start to pump through the line
and shut off automatically after a preset
time. If you need to stop the prime function
early, or if the syrup is running fresh and
undiluted, you can press the flavor button
again to cancel the function.
NOTE: WHILE THE PRIME FUNCTION IS
ACTIVE, YOU WILL NOT BE ABLE TO
PERFORM OTHER FUNCTIONS ON THE
TOUCH PANEL.
NOTE: TO CHANGE THE LENGTH OF TIME
THE PRIMING PROCEDURE RUNS, SEE
“FLUSHING AND PRIMING SETTINGS” OF
THE MAINTENANCE MENU.
22
5. Flush the spout with sanitizer solution, by
selecting the “Flushing Functions” section of
the Maintenance Menu. Press and hold the
FLUSH SPOUT button until the spout is
clear of syrup.
NOTE: THE FLUSH SPOUT FEATURE IS NOT
AVAILABLE ON FCB SYSTEMS.
6. If there is more than one cabinet installed
on this system, press the CHANGE
MACHINE button to access that machine’s
syrup lines.
View Serving Statistics
The Color Touch Panel records the serving
counts for each freezer it is connected to. It
also organizes those serving counts by flavors,
so that you can see which flavors have been
most popular and which have not been
requested as often. Within the syrup-usage
count, it further breaks down the flavor requests
by whether it was used in a single-flavor serving
or a multi-flavor serving. For example, Banana
may be more popular when used with other
flavors such as chocolate and banana, whereas
Butter Pecan may have more servings as a
single-flavor serving.
With this information, the operator can keep
track of how many servings are dispensed
since the date shown. The operator can better
predict what flavors he or she may need and
which ones to substitute out for a more popular
flavor. The operator may also notice a pattern
with the flavors being used for multi-flavored
servings, and which to create “recipes”, or pre-
programmed multi-flavored combinations so the
customers can more easily access their favorite
combinations.
1. Press the “View Serving Statistics” section
in the Maintenance Menu.
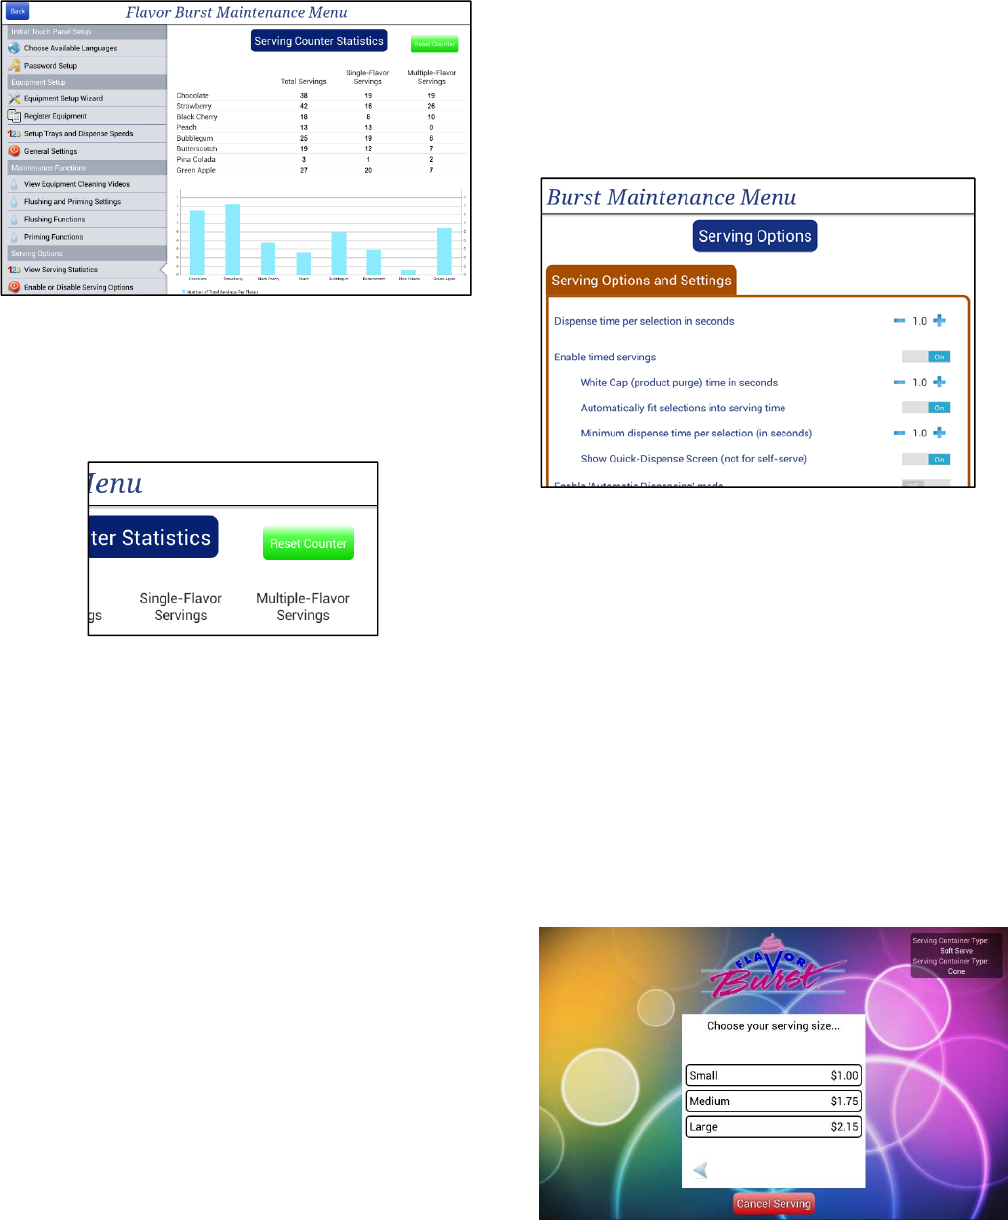
23
2. Total serving count, serving count by single
and multi-flavored servings, and serving
count according to the different flavors are
recorded on this screen. Scroll down to see
the syrup usage graph.
3. To reset the count, touch the RESET
COUNTER button in the top corner. All the
counter values will reset to “0” and the
date/time will reset to the current date and
time.
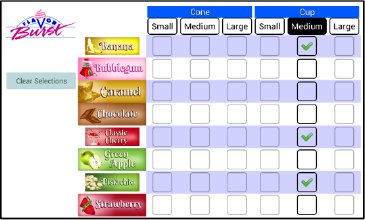
Enable or Disable Serving Options –
Dispense Time & Timed Serving Options
In the Enable or Disable Serving Options, the
operator can set serving-specific options.
This section covers only the first few options
relating to selection (or flavor) time and timed
serving features. The rest of the serving options
are detailed in the next section.
1. Press the “Enable or Disable Serving
Options” section in the Maintenance Menu.
2. “Dispense Time Per Selection” refers to the
amount of time in seconds that each flavor
will dispense in a multi-flavored serving. A
higher the number results in wider, more
distinct layers of flavors.
3. When the “Enabled Timed Servings” is set
to ON, the operator will be asked to select a
serving size when drawing a serving. The
system will shut off syrup flow at a specific
time during that serving based on the
serving size selected. A beep sounds when
this happens and the screen notifies the
operator to finish the serving. This option
helps keep consistent serving sizes and is
helpful in the self-service environment.
24
4. When “White Cap” is enabled with Timed
Servings, the system shuts off syrup flow at
a preset time before the serving is finished.
A beep will sound and the screen will notify
the operator to stop drawing product. The
time between when the syrup stops flowing
and that beep allows the spout to clear out
residual syrup flavor. This results in a
“white cap” of unflavored product on top of
the serving and is an effective way to
eliminate flavor carryover to the next
serving. The White Cap time is how long
the system dispenses the unflavored
product before the beep sounds.
NOTE: IF NO WHITE CAP IS DESIRED, SET
THE TIMING TO “0.0”
5. When the “Automatically Fit Selection Into
Serving Time” (or “Auto-Fit”) option is OFF,
the system can only fit a certain amount of
flavors into each serving, depending on how
long the serving dispenses and how long
each flavor is set to dispense. With
“Automatically Fit Selection” ON, the system
will squeeze in an extra flavor selection or
two into a serving by lowering the Dispense
Selection Time as low as the “Minimum
Dispense Time Per Serving”.
6. “Minimal Dispense Selection Time Per
Serving” option is only available when the
Auto-Fit is ON. This is the shortest amount
of time each flavor will dispense when the
Auto-Fit is active. It ensures that the Auto-
Fit doesn’t allow too many flavors in one
serving or make the dispense time of each
flavor too short, which would result in
blending flavors instead of layering them.
7. “Show Quick-Dispense Screen” places all of
your serving options on one screen. Not
recommended for self-service environment.
NOTE: FUNCTIONAL FOR 8-FLAVOR
SYSTEMS ONLY.
25
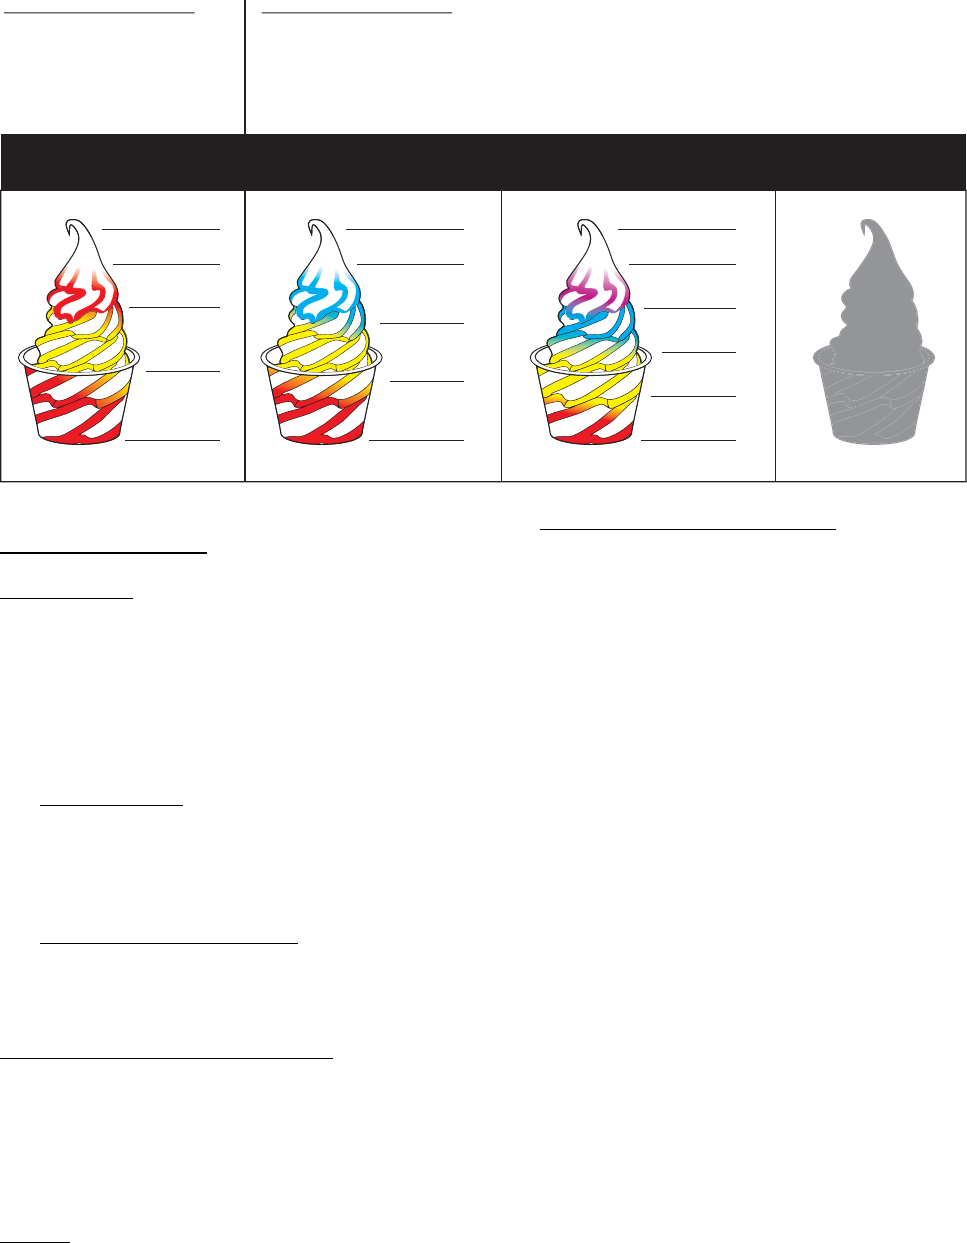
8. The following example and table below show how all of these settings affect the serving.
EXAMPLE SETTINGS:
Enable Timed Servings is set to ON.
Dispense Time for this particular serving size is
set to 5.8 seconds. This means the operator
draws the serving for 5.8 seconds. A beep then
sounds, the screen notifies the operator to stop
the serving. More information about this feature
and how to adjust the time is detailed in the next
section “Adjust Dispense Time Limits” of the
Maintenance Menu.
The White Cap Time is set to 1 seconds. This
means one second before the beep sounds
(after 4.8 seconds into the serving), the Flavor
Burst system will stop the flow of flavor and
dispense unflavored product for 1 second.
The Dispense Time Per Selection is set to 1.8
seconds in this example. This means each
flavor selected will dispense for 1.8 seconds,
unless Auto-Fit is enabled.
Automatically Fit Selections (Auto-Fit) is shown
OFF in the example’s first serving. With this
option OFF, the system will only dispense each
flavor at the full Dispense Select Time (1.8
seconds in this example); if there is not at least
1.8 seconds left after the first flavors, the Touch
Panel will not allow more flavors to be added.
Auto-Fit is shown ON in the rest of the example
servings to illustrate how more flavors can be
added and how the layers are adjusted to fit into
the serving.
Minimal Dispense Selection Time is set to 1.2
seconds in this example. This means that Auto-
Fit will only let enough flavors be selected to
produce no less than 1.2 seconds of each flavor.
EXAMPLE EXPLANATION:
In the first serving of this example, only 2 flavors
can be selected since there is not enough time
in the serving for a third flavor. Each of the two
flavors dispenses for 1.8 seconds. There is a
little bit of time (1.2 seconds) before the White
Cap kicks in, so the system dispense the first
flavor again for that short layer.
In the 2nd serving, Auto-Fit is enabled. If only
two flavors are selected, the serving will look just
like the first example. Auto-Fit allows a 3rd
flavor to be selected. It evenly divides the time
that syrup is dispensed into thirds, dispensing
each of the three flavors for 1.6 seconds.
In the 3rd serving, there is enough serving time
to allow a 4th flavor selected. Auto-Fit
decreases the selection dispense time even
further, so that each flavor dispenses for 1.2
seconds.
In this example, 5 flavors cannot be selected for
this serving size, since the Minimum Dispense
Time is set to 1.2 seconds. Splitting the
dispense time five ways would be less than 1.2
seconds for each flavor. If you wish to have a
5th flavor, you would need to decrease the
Minimum Dispense Time or increase your
serving size Dispense Time.
26476
NO AUTO-FIT AUTO-FIT 3 FLAVORS AUTO-FIT 4 FLAVORS 5 FLAVORS
(only 2 flavors) (too many flavors
)
Cherry
1.2 seconds
Banana
1.2 seconds
Blue Goo
1.2 seconds
Grape
1.2 seconds
White Cap
1 second
Cherry
1.6 seconds
Banana
1.6 seconds
Blue Goo
1.6 seconds
White Cap
1 second
SERVING OPTION SETTINGS
Total Serving Size Time: 5.8 seconds
White Cap Time: 1 second
Dispense Selection Time: 1.8 seconds
Auto-Fit: ON
Min. Dispense Selection Time: 1.2 sec.
Cherry
1.8 seconds
Banana
1.8 seconds
Cherry
1.2 seconds
White Cap
1 second
SERVING OPTION SETTINGS
Total Serving Size Time: 5.8 seconds
White Cap Time: 1 second
Dispense Selection Time: 1.8 seconds
Auto-Fit: OFF
Min. Dispense Selection Time: N/A
26
Enable or Disable Serving Options –
continued
1. Press the “Enable or Disable Serving
Options” section in the Maintenance Menu.
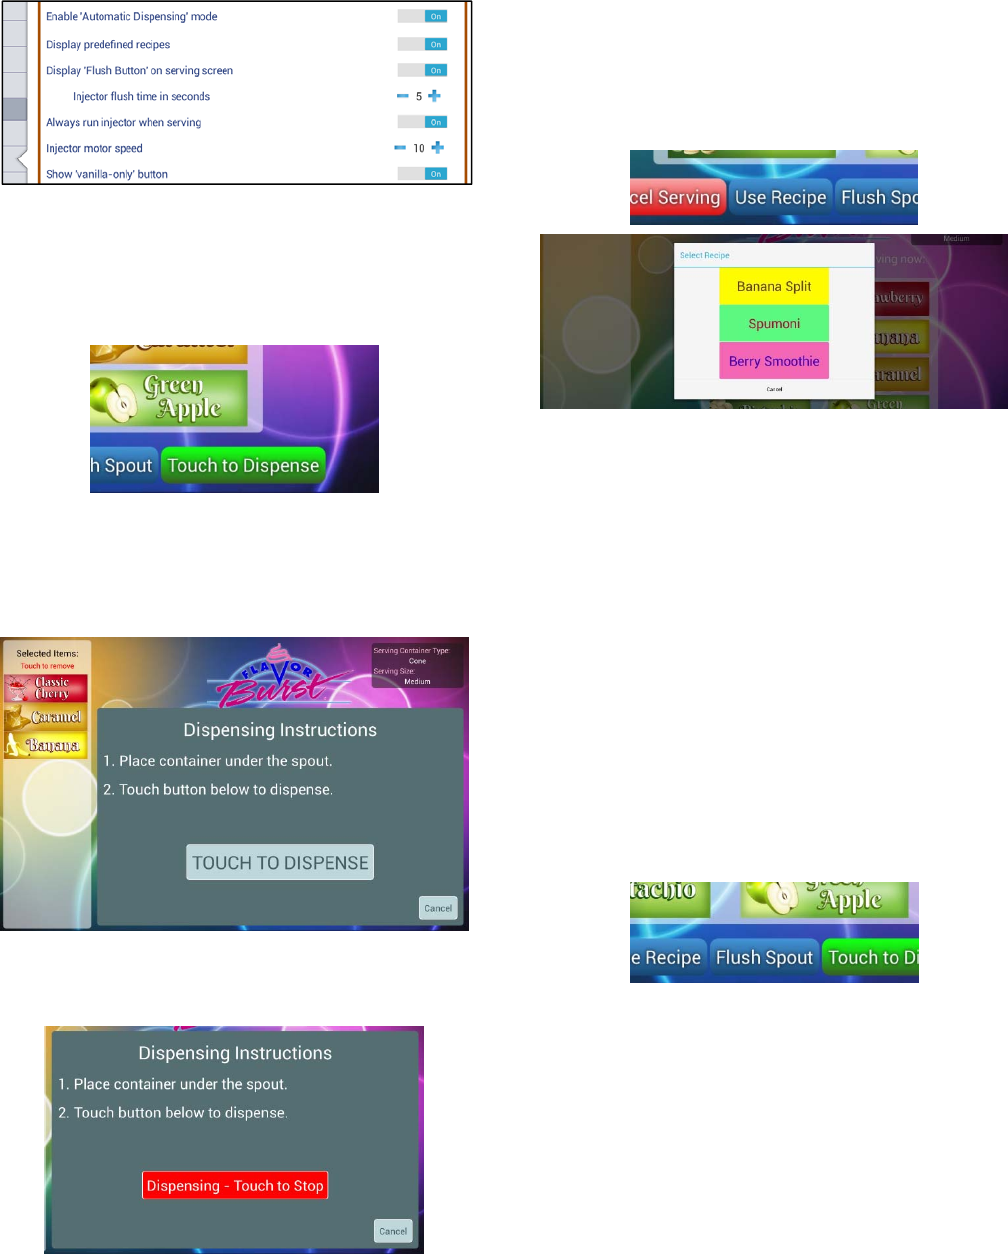
2. Currently, the “Enable Automatic
Dispensing Mode” is only available for FCB
systems with an Automatic Draw system
installed. This mode adds a TOUCH TO
DISPENSE button to the selection screen.
After the operator selects the desired
flavor(s), they touch this button and receive
detailed instructions on how to draw the
serving. Another button is displayed for
when they are ready to dispense.
The serving will automatically dispense until
the stop button is touched, or until the
serving size is reached.
3. Sets of flavors can be combined into one
custom recipe for faster selection. For
example, you can create a button for
Banana Split, which would automatically
select Chocolate, Banana and Strawberry.
“Display Predefined Recipes” creates a
USE RECIPE button on the flavor selection
screen, so the operator can select these
recipes. Recipes can be created and
adjusted in the “Edit Recipes” section of the
Maintenance Menu.
4. “Display Flush Button on Serving Screen”
will create a button named FLUSH SPOUT
on the main screen. This button allows the
operator to flush the spout with sanitizer
solution between servings. This clears out
residual product and reduced carry-over to
the next serving. The FLUSH SPOUT
button can also be found under the
“Flushing and Priming Settings” section.
The “Display ‘Flush Button’” option is not
recommended for the self-service
environment.
You can also adjust how long the spout
flushes when activated using the “Injector
Flush Time”. If the spout is not clearing
product during the flushing function,
increase the time.
NOTE: IT IS NOT RECOMMENDED THE
“FLUSH SPOUT” BUTTON BE ACTIVATED IN
SELF-SERVE ENVIRONMENTS. THOSE NOT
FAMILIAR WITH THE EQUIPMENT MAY
ACCIDENTLY ACTIVATE THE FLUSHING
FUNCTION WITHOUT REALIZING WHAT IT
DOES OR HAVE A CONTAINER TO CATCH
THE SANITIZER SOLUTION.
NOTE: THIS OPTION IS NOT AVAILABLE
FOR FCB SYSTEMS.
27
5. “Always Run Injector When Serving” option
allows the Flavor Burst motor and gears to
run even when syrup is not being dispensed
(such as when serving a vanilla cone). It is
required for CrunchiCreme systems, but it
can also be helpful to create a more
consistent serving experience between
flavored and unflavored servings.
NOTE: THIS OPTION IS NOT AVAILABLE
FOR FCB SYSTEMS.
6. “Injector Motor Speed” can be adjusted to
increase or decrease the motor speed.
NOTE: THIS OPTION IS NOT AVAILABLE
FOR FCB SYSTEMS.
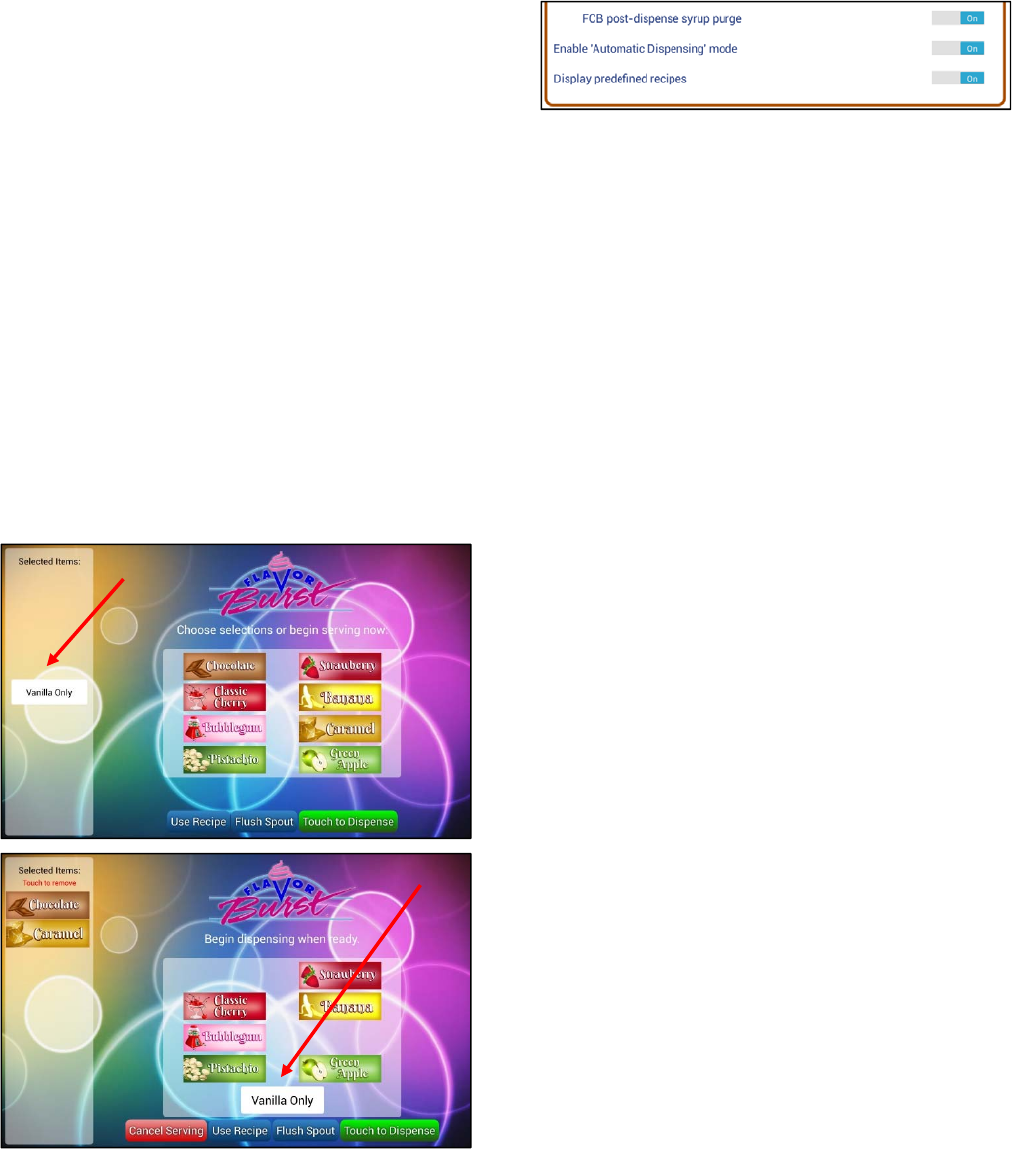
7. “Show ‘vanilla-only’ button” option will
display a Vanilla Only text in the “Selected
Items” box on the left when no flavors are
selected. When flavors are selected, a
Vanilla Only button will appear under the
flavors. When touched, this button will clear
out the selected flavors, returning the
serving selection back to vanilla.
8. If your Color Touch Panel is set up for FCB,
a couple of FCB-specific options will be
displayed in this section.
9. If you wish your FCB system to clear the
spout of product at the end of each serving,
tap the “FCB Post-Dispense Syrup Purge”
option ON. The pump will push a small
burst of air at the end of the serving to clear
the spout. This will help reduce flavor
carry-over and dripping between servings.
NOTE: THE “FCB POST-DISPENSE SYRUP
PURGE” OPTION IS ONLY AVAILABLE WHEN
TIMED SERVING SIZES IS ACTIVATED AND
THE WHITE CAP OPTION IS USED.
10. If your FCB system has the Auto Draw
Valve Upgrade, tap the “Enable ‘Automatic
Dispensing’ Mode” option to ON.
28
Enter Calorie Information
The Color Touch Panel’s newest update has
the option to display calorie information per
serving. In this section, you will need to input
your base mix’s calorie information and the
volume of product per each serving size. Also,
if you are serving product in edible containers,
such as cones, waffle bowls, etc, you will need
to enter the calorie information of those items
as well. If you add product after the serving,
such as sprinkles, whipped cream, candy, etc,
the calorie information will also need to be
added in this section.
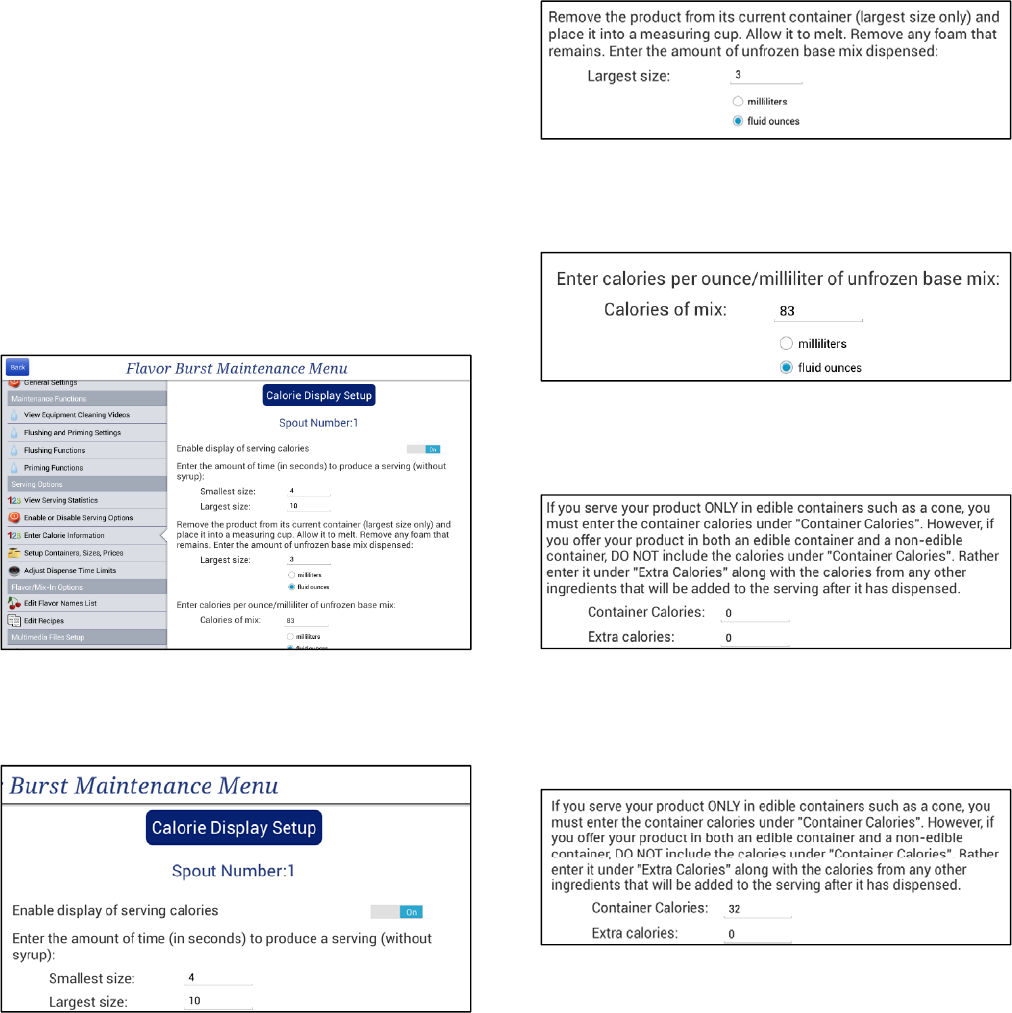
1. Press the “Enter Calorie Information”
section in the Maintenance Menu. Enable
the display of serving calories by sliding the
toggle button “ON”.
2. Using a timer, calculate how many seconds
it takes to draw the smallest serving size
and the largest serving size.
3. Take the large serving and place the
product in a measuring cup. When it has
completely melted, remove any foam and
measure the unfrozen product. Input that
volume measurement into the next section.
4. Find your base mix’s nutritional statement
and enter the calories per ounce/millileter of
unfrozen base mix into the next section.
5. If you are only serving product in cups or
inedible containers, enter 0 for “Container
Calories.”
6. If you are serving product in only one type
of container and it is edible, such as a cone,
enter the calorie count of that container in
the “Container Calories” line.
29
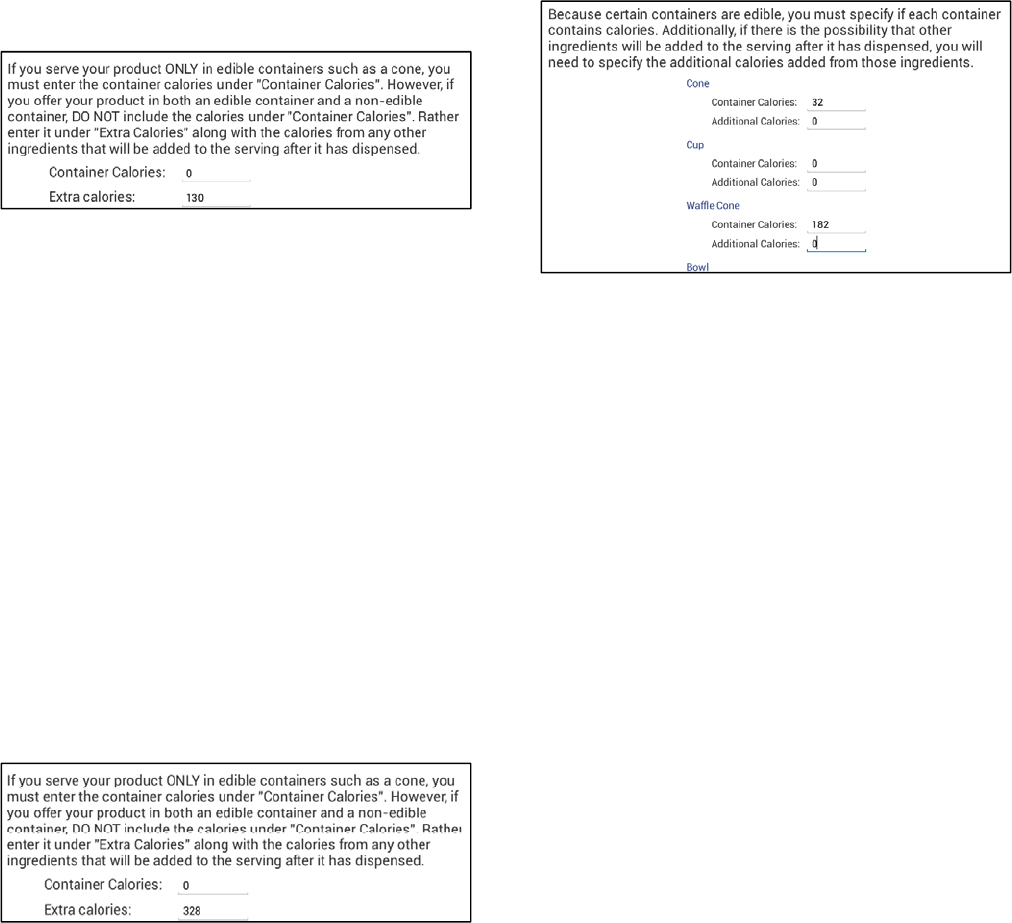
7. If you are offering additional toppings, such
as whipped cream, nuts, sprinkles, calculate
the total maximum calories from these
toppings that could possibly be added to
your largest serving. Put this amount in the
“Extra Calories” line. If you are not offering
additional toppings, enter 0.
NOTE: REFER TO THE PRODUCTS’
MANUFACTURERS NUTRITIONAL
INFORMATION TO CALCULATE THE
CALORIE COUNT OF THE EDIBLE
CONTAINERS AND ADDITIONAL TOPPINGS.
8. If Timed Servings is disabled and you are
serving product in multiple containers (such
as cups and sugar cones), enter the calorie
count for the container with the lowest
calories in the section “Container Calories.”
Enter 0 if one of the container options is a
cup.
Then, calculate the total maximum calories
from your highest-calorie edible container
(ie, chocolate dipped waffle bowl) plus any
additional toppings (whipped cream, candy,
sprinkles, nuts) that might be served with
your largest serving. Put this total in the
“Extra Calories” line.
NOTE: REFER TO THE PRODUCTS’
MANUFACTURERS NUTRITIONAL
INFORMATION TO CALCULATE THE
CALORIE COUNT OF THE EDIBLE
CONTAINERS AND ADDITIONAL TOPPINGS.
9. If Timed Servings is enabled, you will need
to fill in each container type’s calorie
information, and any additional calories that
could be added to the largest serving in
each container type.
NOTE: REFER TO THE PRODUCTS’
MANUFACTURERS NUTRITIONAL
INFORMATION TO CALCULATE THE
CALORIE COUNT OF EACH EDIBLE
CONTAINER.
30
Setup Containers, Sizes, Prices
The Color Touch Panel has the option to ask
the operator to choose from preset containers
and sizes before they draw a serving. It can
also display pricing for those options. In this
section of the Maintenance Menu, the different
sizes and/or containers can be chosen for the
selection page and they can also be edited if
you have special names you would like to use.
The “Enable Timed Servings” setting must be
ON in order to make these container, size and
price selections. At least one size and
container must be selected if the “Enable Timed
Servings” is ON.
Serving containers, sizes and/or pricing can be
displayed on the product selection screens as
well as the video time-out screen with side
panel enabled.
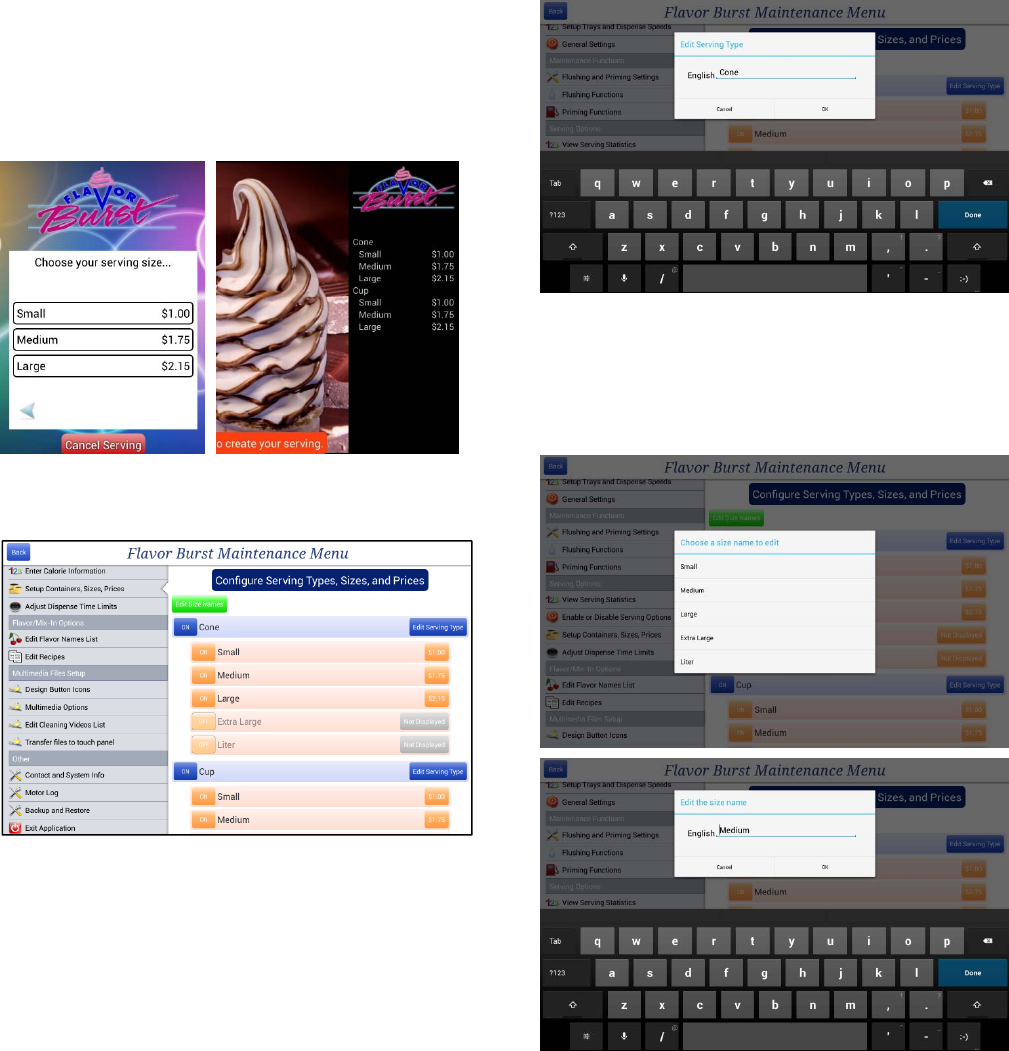
10. Press the “Setup Containers, Sizes, Prices”
section in the Maintenance Menu.
11. Enable the container types you wish to
display by touching the button next to the
container names to show ON. To disable
the container types you do not want to
show, press the button again to show OFF.
12. Touch the button next to each serving size
you wish to display for each container type
so that they show ON. When only one
container type and one size is used, the
product screen goes directly to the flavor
selection screen. Otherwise, a container
type and/or sizes are shown on screens for
the operator to select before selecting
flavors.
13. If you wish to change the container type
name, press the EDIT SERVING TYPE
button for each container.
14. To change the names for the different sizes,
press the EDIT SIZE NAMES button at the
top left. Select a size to rename and then
enter a new name.

31
15. To change the pricing for each size, press
the “Not Displayed” or pricing button on the
right of each size and enter the new price.
16. If you do not want to display pricing on the
selection screen, touch the price button, and
then select the “Do Not Display” button or
set the pricing to 0.00. The screen will
show the sizes, but not prices.
NOTE: IF ONLY ONE CONTAINER AND ONE
PRICE IS SELECTED, THE SYSTEM WILL
NOT SHOW A SELECTION SCREEN SINCE
THERE ISN’T MORE THAN ONE OPTION TO
CHOOSE FROM.
17. If the Flavor Burst is installed on more than
one freezer spout, press the CHANGE
MACHINE button to access that spout’s
settings.
Adjust Dispense Time Limits
This screen allows the operator to define how
long the system dispenses for each container
type and serving size. These options are only
visible if the “Enabled Timed Servings” is ON.
When setting the serving sizes for the first time,
it might be helpful to use a stopwatch to time
your servings first. Set “Enabled Time
Servings” to OFF, draw all the different sized
servings with their different containers, and
make notes on how long it took to draw each
one. Then, perform follow these instructions to
set al the serving size times at once.
1. Press the “Adjust Dispense Time Limits”
section in the Maintenance Menu.
2. Press the “+” or “-“ key next to each serving
size to increase or decrease the serving
size timing in seconds.
NOTE: IF YOU HAVE THE “WHITE CAP”
FUNCTION ENABLED, YOU MAY WISH TO
ADD THE WHITE CAP TIME TO THE
SERVING SIZE TIMES.
3. If there are containers and/or sizes listed
that you do not wish to use, press the EDIT
SERVING CONTAINERS OR SIZES button.
This will direct you back to the “Setup
Containers, Sizes, Prices” section. Follow
instructions in the previous section to make
changes.
32
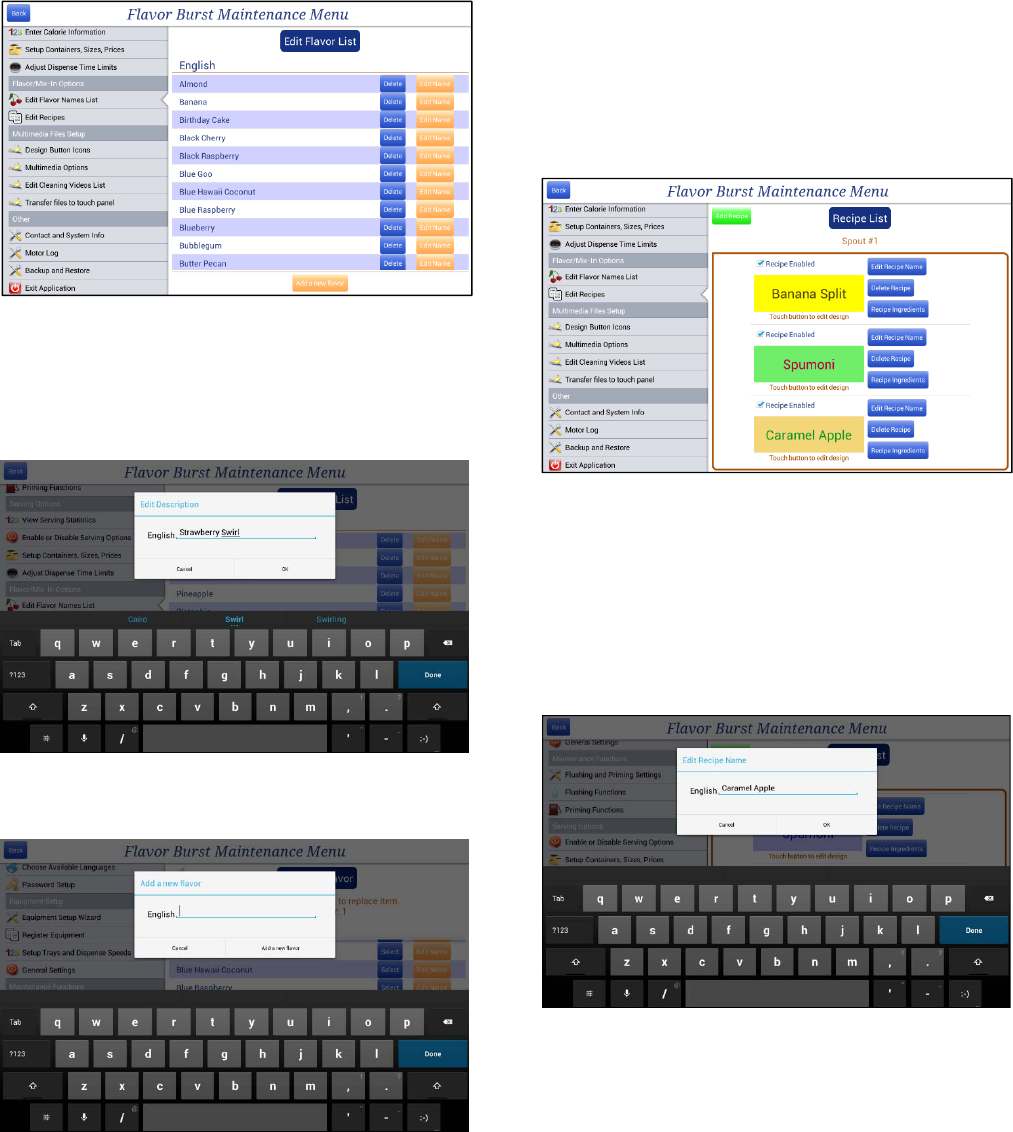
Edit Flavor Names List
The Flavor Names List includes all flavors, not
just the ones currently installed in the trays.
Add, change, or delete flavors from the master
flavor list using this section.
1. Press the “Edit Flavor Names List” section
in the Maintenance Menu.
2. To delete a flavor from the menu, press the
DELETE button next to the flavor name.
3. To change the flavor name, press the EDIT
NAME button next to the flavor name.
4. To create your own flavor name, press the
ADD A NEW FLAVOR button at the bottom.
Edit Recipes
This screen allows the operator to create,
change, or delete recipes from the flavor button
list. A recipe is a single name and button that is
created that combines 2 or more flavors. This
is used to simplify the flavor selection process
for popular multi-flavor selections, or to create a
special name for the multi-flavored serving.
For example, the operator can create a Banana
Split flavor button. When it is selected, it will
flavor the serving with chocolate, banana and
strawberry flavors.
1. Press the “Edit Recipes” section in the
Maintenance Menu.
2. To show the recipe button on the flavor
selection screen, check the box next to
“Recipe Enabled”. To remove it from the
selection screen, touch and uncheck the
box.
3. To change a recipe name, press EDIT
RECIPE NAME and change the name.
33
4. Touch the ADD RECIPE button at the top
left. Type in a name for your recipe. The
recipe will appear in the recipe list.
5. To add or change the ingredients in a
recipe, touch the RECIPE INGREDIENTS
button of the recipe. Then, select the
flavors that go with the recipe.
6. To change the button design, touch the
recipe button. The next screen allows you to
edit background colors, change the text
color, and display a graphic. See the next
section “Design Buttons” to adjust these
features.
7. To delete a recipe, press the DELETE
RECIPE button.
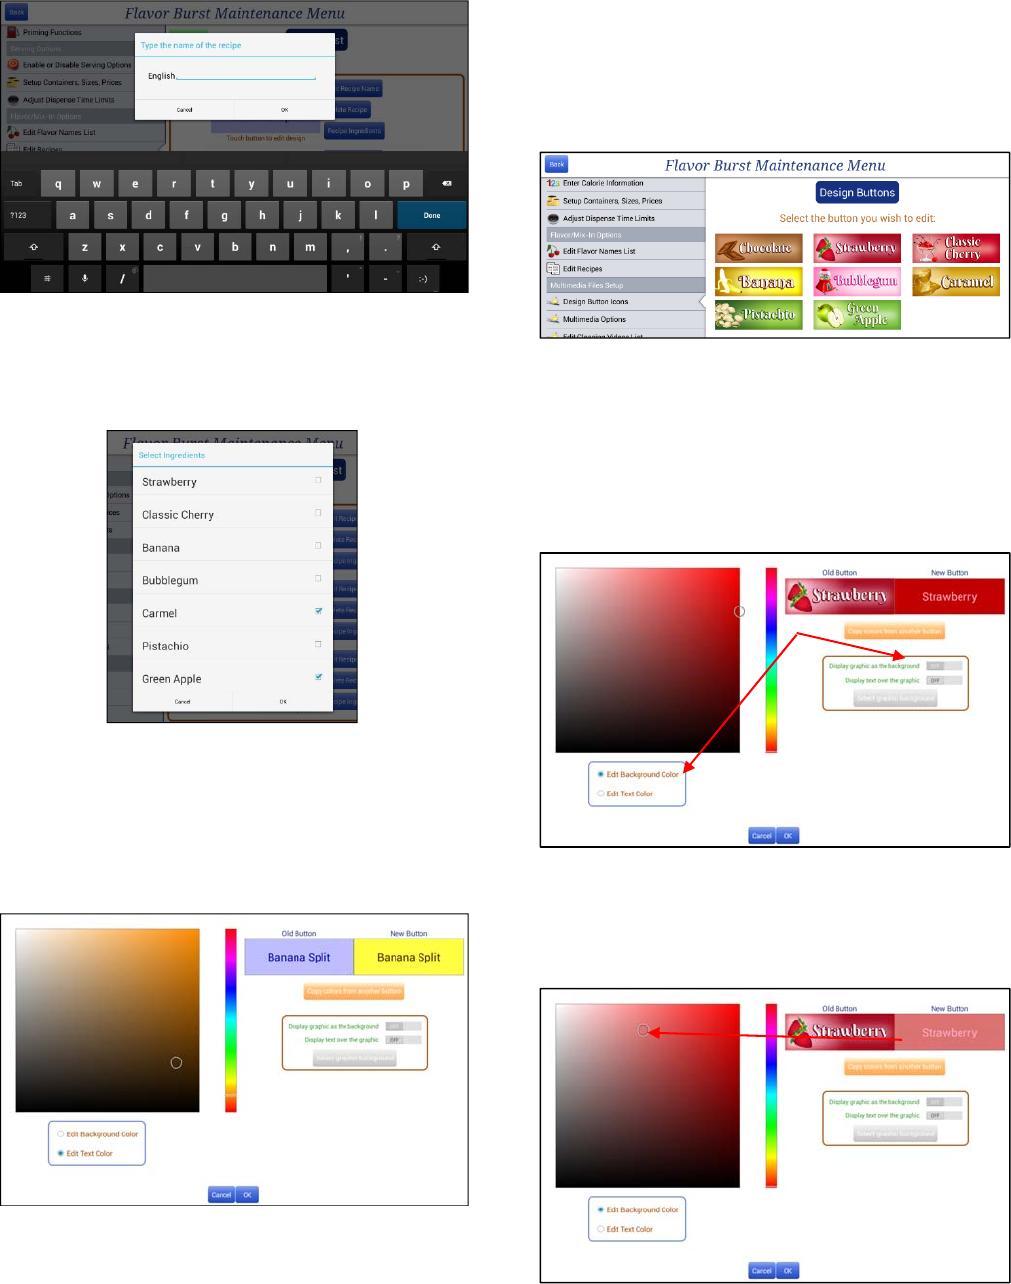
Design Button Icons
All the flavor buttons displayed on the Touch
Panel are customizable. The “Design Button
Icons” program allows the operator to change
colors, text and graphics of a flavor button.
1. Press the “Design Button Icons” section in
the Maintenance Menu.
2. Select the flavor button you wish to edit.
3. To change the background to a simple solid
color, tap the bar next to “Display Graphic
as the Background” to OFF. Then select
the “Edit Background Color” point under the
color spectrum box.
4. Select a general color from the color
spectrum slide in the middle of screen.
Then, select a shade of that color by
touching an area within the box to the left.
34
5. To display the flavor name in text over the
background, tap the bar next to “Display
Text over the Graphic” to ON.
6. Edit the text color by selecting the “Edit Text
Color” point and selecting a color from the
color spectrum slide.
7. To change the flavor name in the text, go to
“Edit Flavor Names List” in the Maintenance
Menu, find the flavor name you wish to
change, touch EDIT NAME, and then type
in the new name. When you return to the
button icons, the new name should appear.
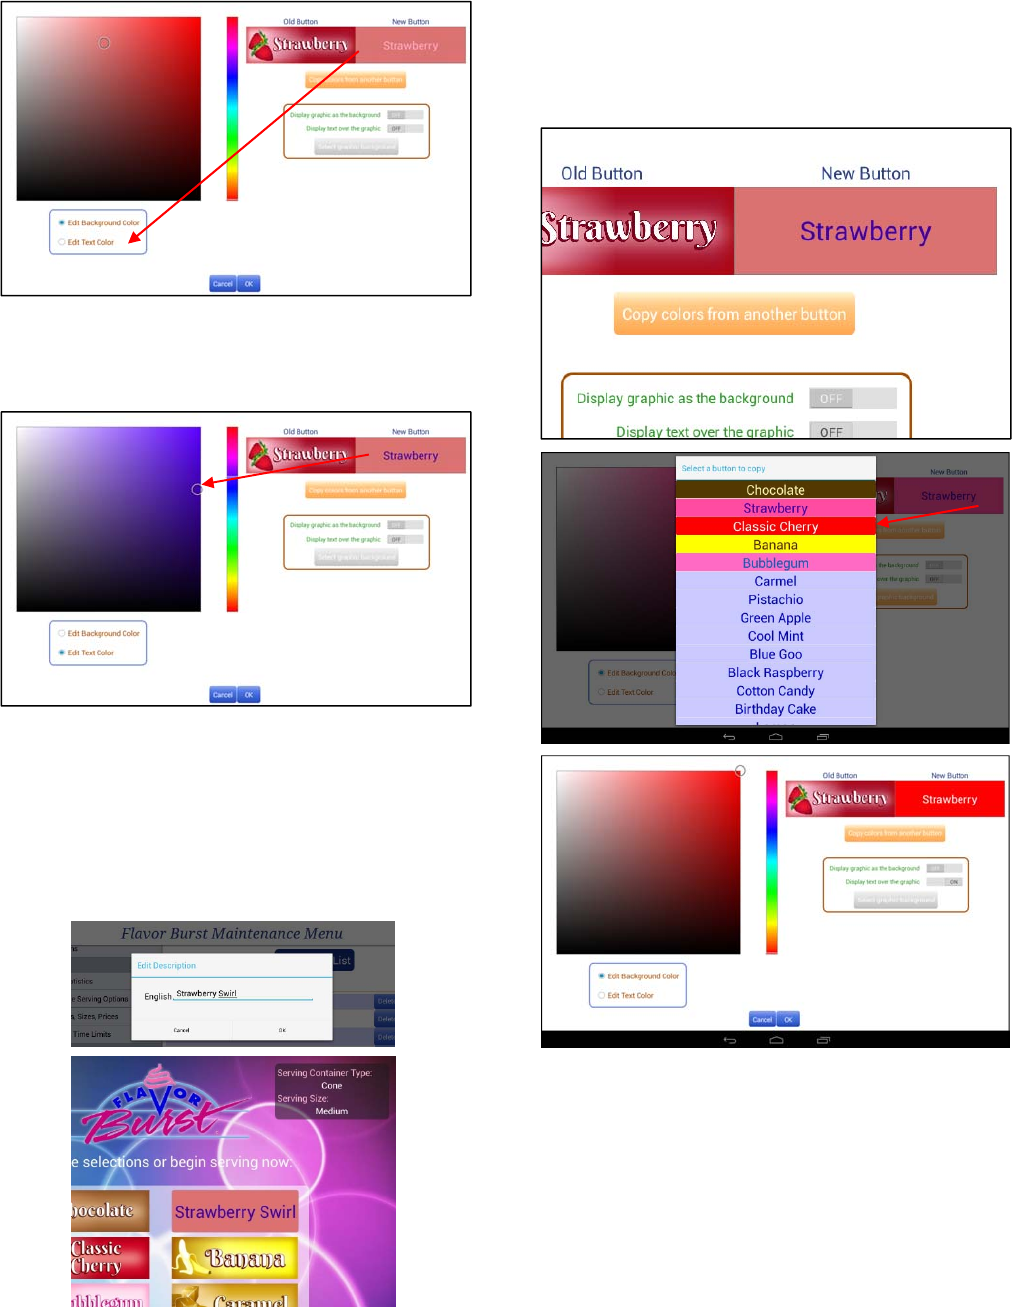
8. If you have already designed background
and text colors of other flavors and would
like to use them for the current flavor, press
COPY COLORS FROM ANOTHER
BUTTON. Make your selection from the
buttons shown. Your current flavor button
will display these background and text
colors.

35
9. The Touch Panel contains graphics for most
flavors. To select a graphic, tap the
“Display Graphic as the Background” option
to ON.
10. Press the SELECT GRAPHIC
BACKGROUND button, locate the Items
folder with the graphics and select the
graphic you wish to assign to the button.
You can choose a graphic with the flavor
name already embedded, or you can
choose a graphic that is blank and add text
to it later.
NOTE: MORE GRAPHICS CAN BE
UPLOADED TO THE TOUCH PANEL. SEE
“TRANSFER FILES TO TOUCH PANEL” FOR
MORE INFORMATION.
11. If you are using a background graphic
without a flavor name, you can display text
on top of the graphic, edit the text color, and
change the text flavor name. Ensure the
“Display Graphic as the Background” and
the “Display Text Over the Graphic” options
are both ON. Then, refer to Steps 5-7 to
customize the text.
12. When you are satisfied with the design of
the flavor button, press the OK button at the
bottom.
13. To enable the recipes button on the flavor
selection screen, go to the “Enable or
Disable Serving Options” of the
Maintenance Menu and activate the
“Display Predefined Recipes” option.
36
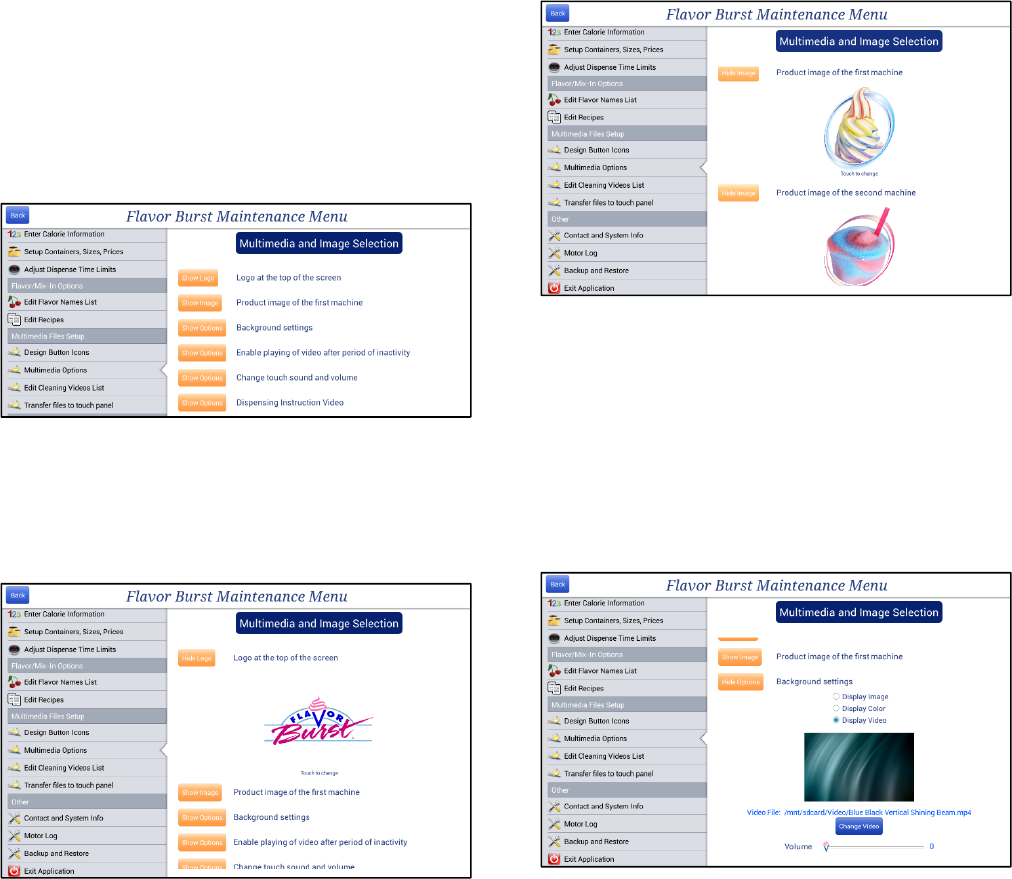
Multimedia Options
This screen allows the operator to display
different colors, images, and videos shown in
various areas of the Touch Panel’s
programming. This option is used when
changing product images, logos, and even
video on the main screen. You can also select
advertising screens and videos to run while the
freezer is not being used. If you wish to upload
your own designs and videos, see section
“Transfer Files to Touch Panel”.
1. Press the “Multimedia Options” section in
the Maintenance Menu. Enter the
Administrator Password if prompted.
2. To change the logo at the top of the main
screen, press the button SHOW LOGO.
Touch the logo image to access the gallery
and select the new logo.
3. If your system dispenses two different kinds
of products, the main screen will ask the
operator to choose which product to
dispense. To change the product image on
the main screen, press the button SHOW
IMAGE of the first and second machines.
Touch the product image to access the
gallery and select the new image for each
spout.
NOTE: SYSTEMS DISPENSING ONLY ONE
PRODUCT TYPE WILL NOT SHOW A
PRODUCT IMAGE ON THE MAIN SCREEN.
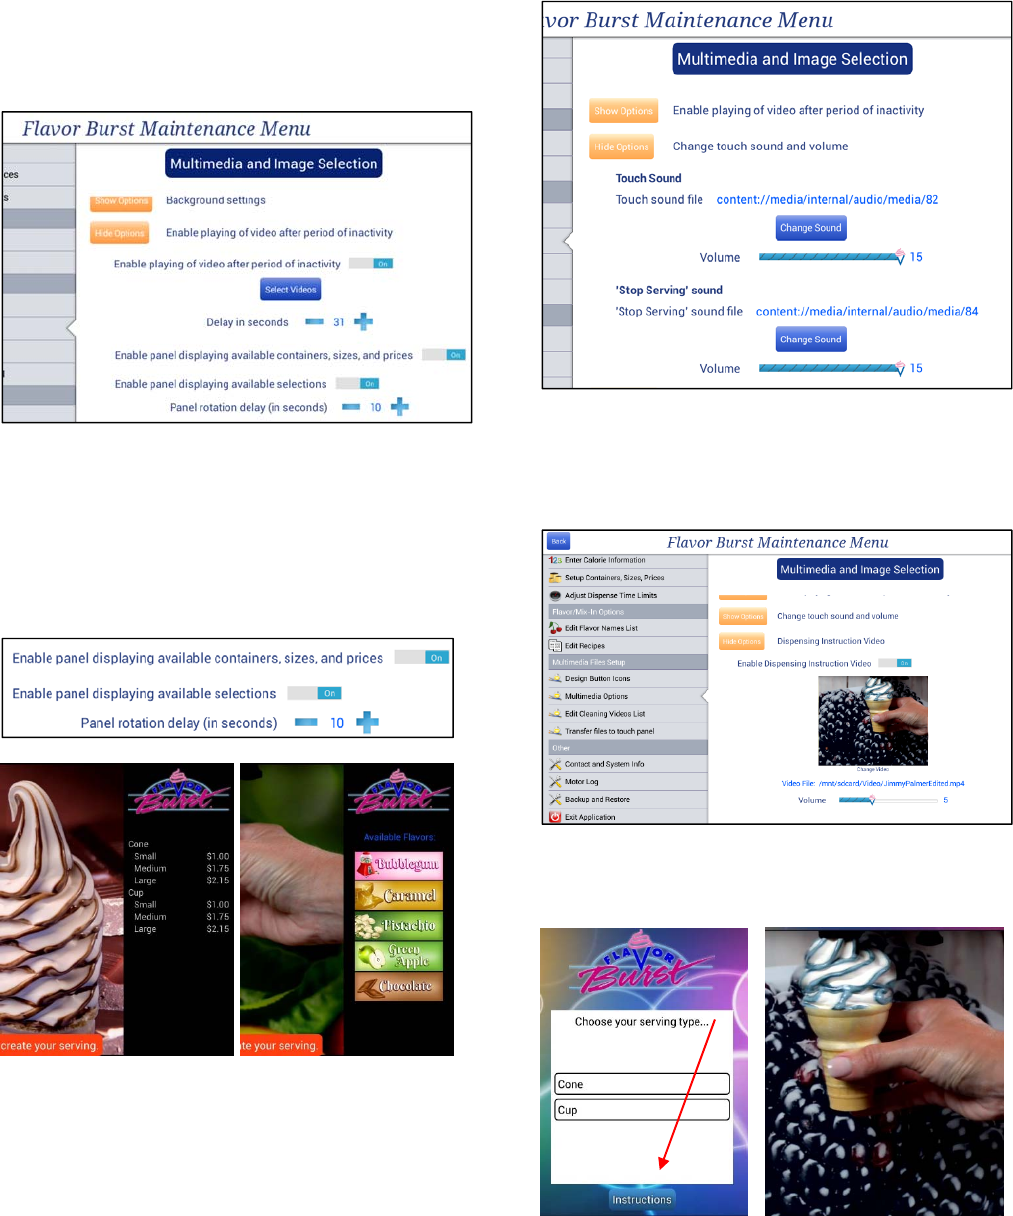
4. To change the background of the main
screen, select SHOW OPTIONS next to
“Background Settings. You can change the
background color, select a graphical
background, or display a video on the
product and flavor selection screens.
NOTE: IF A VIDEO IS SELECTED, IT IS
RECOMMENDED THAT THE VIDEO LOOP
AND BE RELATIVELY SHORT.
37
5. To display a video on the screen during
periods of inactivity, select the SHOW
OPTIONS button next to “Enable Playing of
Video” and tap the bar to ON. Under these
options you can choose your video from the
gallery as well as select how long of a delay
you want before the video activates. You
can also enable the panel to display
available containers, sizes and prices, and
selections in a bar to the right of your video.
6. You can also enable the panel to display
available containers, sizes and prices, along
with flavor selections in a bar to the right of
your video. When both options are enabled,
each set will display for a designated
amount of time. Change that timing under
“Panel Rotation Delay”.
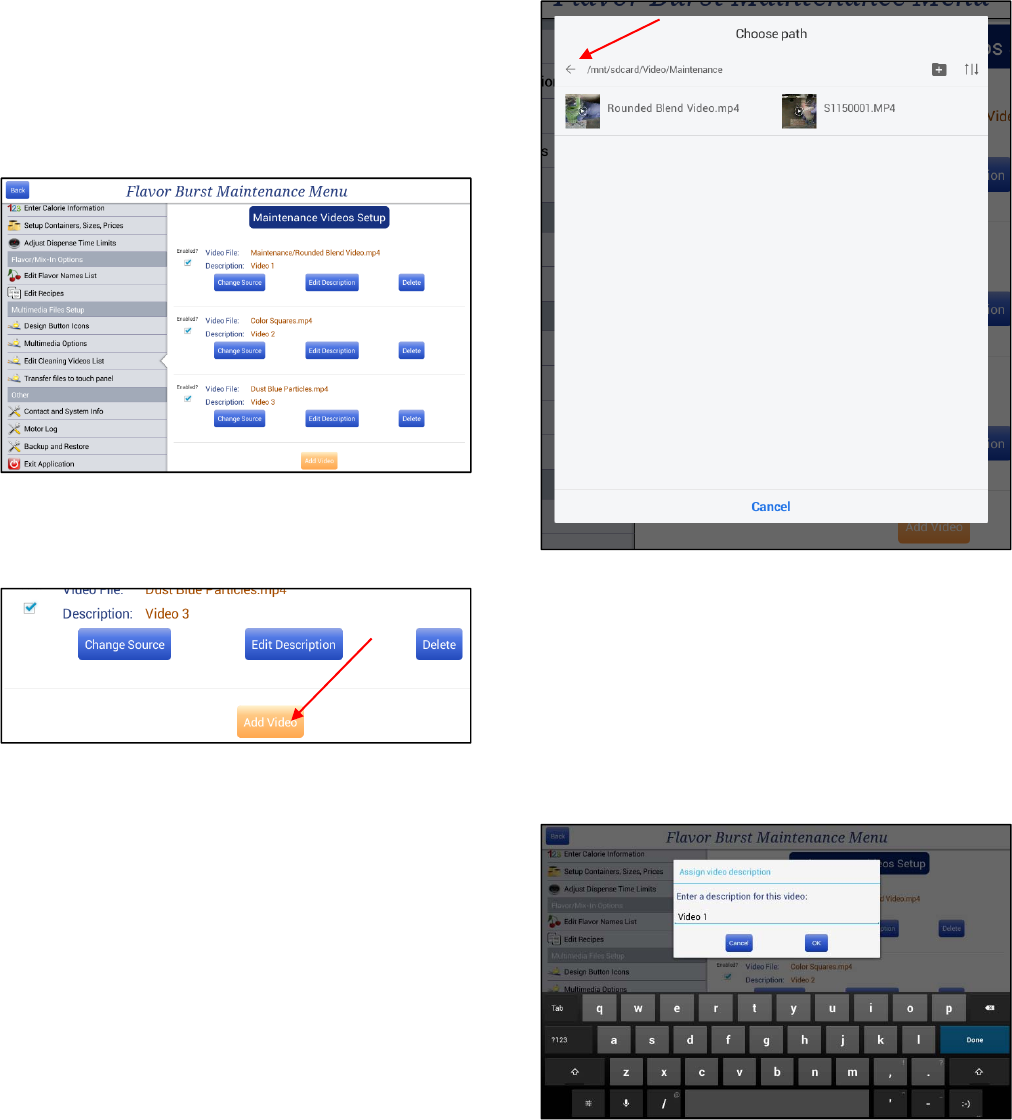
7. To adjust the sound and volume the Touch
Panel makes when it is touched and when it
alerts the operator to stop serving product,
touch the SHOW OPTIONS button next to
“Change Touch Sound and Volume” and
make your adjustments.
8. Touch the SHOW OPTIONS button next to
“Dispensing Instruction Video” to enable or
disable the instructional video, change the
video, and adjust the volume.
When enabled, an INSTRUCTIONS button
is added to the selection screens. When
touched, it will display the video.
38
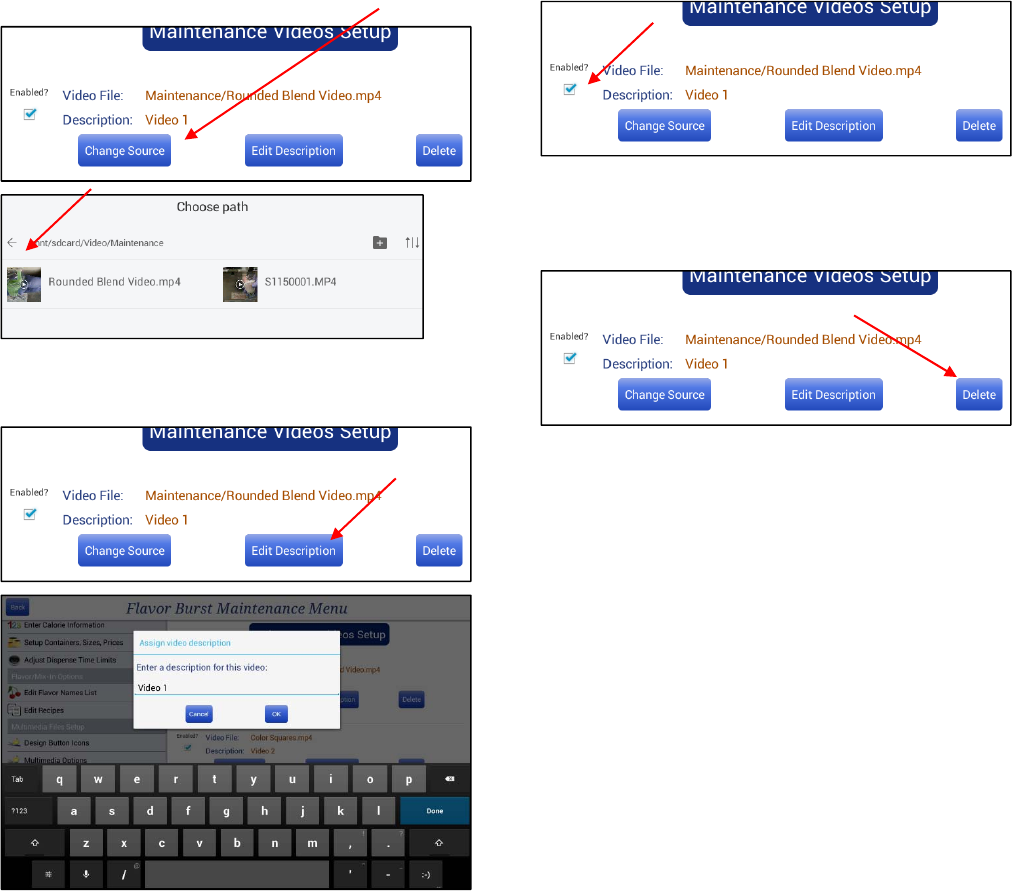
Edit Cleaning Videos List
This section allows the operator to add, delete,
enable, disable, or rename the videos available
in the Equipment Cleaning Videos section.
The videos must first have been uploaded to
the Color Touch Panel, which is outlined in the
next section “Transfer Files to Touch Panel.”
1. Press the “Edit Cleaning Videos List”
section in the Maintenance Menu. Enter the
Administrator Password if prompted.
2. To add a new video to the list, touch the
“Add Video” at the bottom of the screen.
3. Select the video you wish to add to the list.
If you cannot find the video, back out of the
folder and choose a different folder patch by
touching the small arrow at the upper left
until you find the video you wish to use.
NOTE: IF THE VIDEO HAS NOT BEEN
LOADED ONTO THE COLOR TOUCH PANEL,
SEE SECTION “TRANSFER FILES TO
TOUCH PANEL” FOR INSTRUCTIONS ON
HOW TO UPLOAD NEW VIDEOS TO THIS
DEVICE.
4. Create a description or name for the new
video. The Equipment Cleaning Videos
List will display this name.
39
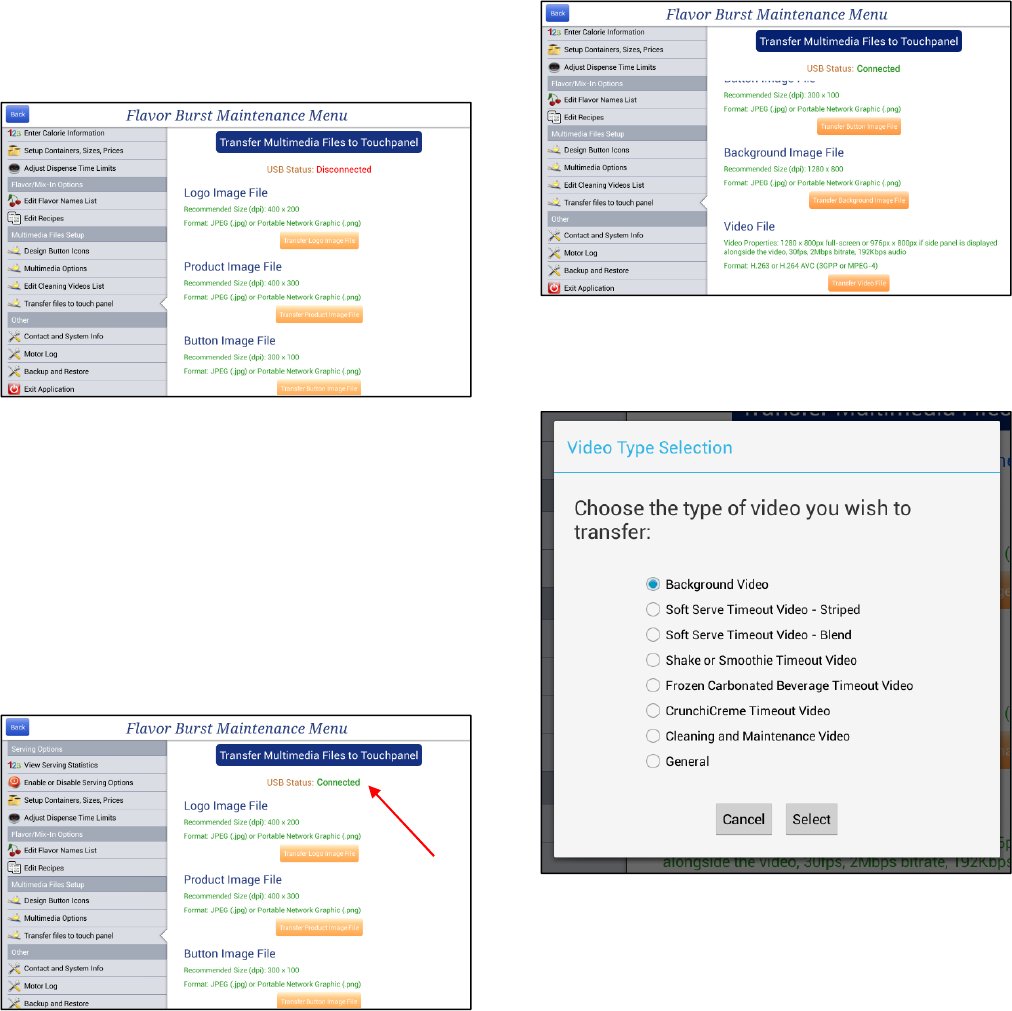
5. To change a video in the list to a different
video, touch the CHANGE SOURCE button.
Then, select the video you wish to use. If
you cannot find the video, back out of the
folder and choose a different folder patch by
touching the small arrow at the upper left
until you find the correct video.
6. To edit the video description, touch the
EDIT DESCRIPTION button.
7. To keep the video in the setup list, but hide
it from the Equipment Cleaning Videos list,
touch the box under the “Enabled?” section
next to the Video File so that it is
unchecked. To add it back to the Videos
list, touch it again to check the box.
8. To delete the video from the Maintenance
Videos Setup list, press the DELETE button.
NOTE: DELETING THE VIDEO FROM THE
SETUP LIST DOES NOT DELETE THE VIDEO
FROM THE COLOR TOUCH PANEL. YOU
CAN ADD THE VIDEO BACK TO THE LIST BY
PRESSING “ADD VIDEO” AND SEARCHING
THE FILE.
40
Transfer Files to Touch Panel
New files can be uploaded directly to the Touch
Panel via USB drive, making the Touch Panel
very customizable. Store or brand logos,
custom photos and graphics, and even videos
can be used to attract the attention of your
customers and seamlessly integrate Flavor
Burst system into your store’s environment.
1. Press the “Transfer Files to Touch Panel”
section in the Maintenance Menu. Enter the
Administrator Password if prompted.
2. Ensure the files on your USB drive are PNG
files or JPG files, and are the correct size
for their purpose. Size (dpi) requirements
are outlined on the screen.
3. Insert the thumb drive with your new files
into the USB port underneath the Touch
Panel. The USB Status at the top should
read “Connected.”
4. The five different TRANSFER buttons
ensure the new files are uploaded from the
thumb drive to the correct gallery folders.
There are five different types of files you
can upload: logos, product images, button
images, background images, and videos.
Upload each of your new files to the
appropriate folders by selecting the
corresponding TRANSFER button.
5. When uploading a video file, select the type
of video you are uploading so that the file is
saved in the appropriate folder.
41
6. A window will appear displaying the files
and folders on the USB drive. Select the file
you wish to upload.
7. When all the files have been uploaded,
remove your USB device. The new images
should appear in their gallery folders when
you search for them.
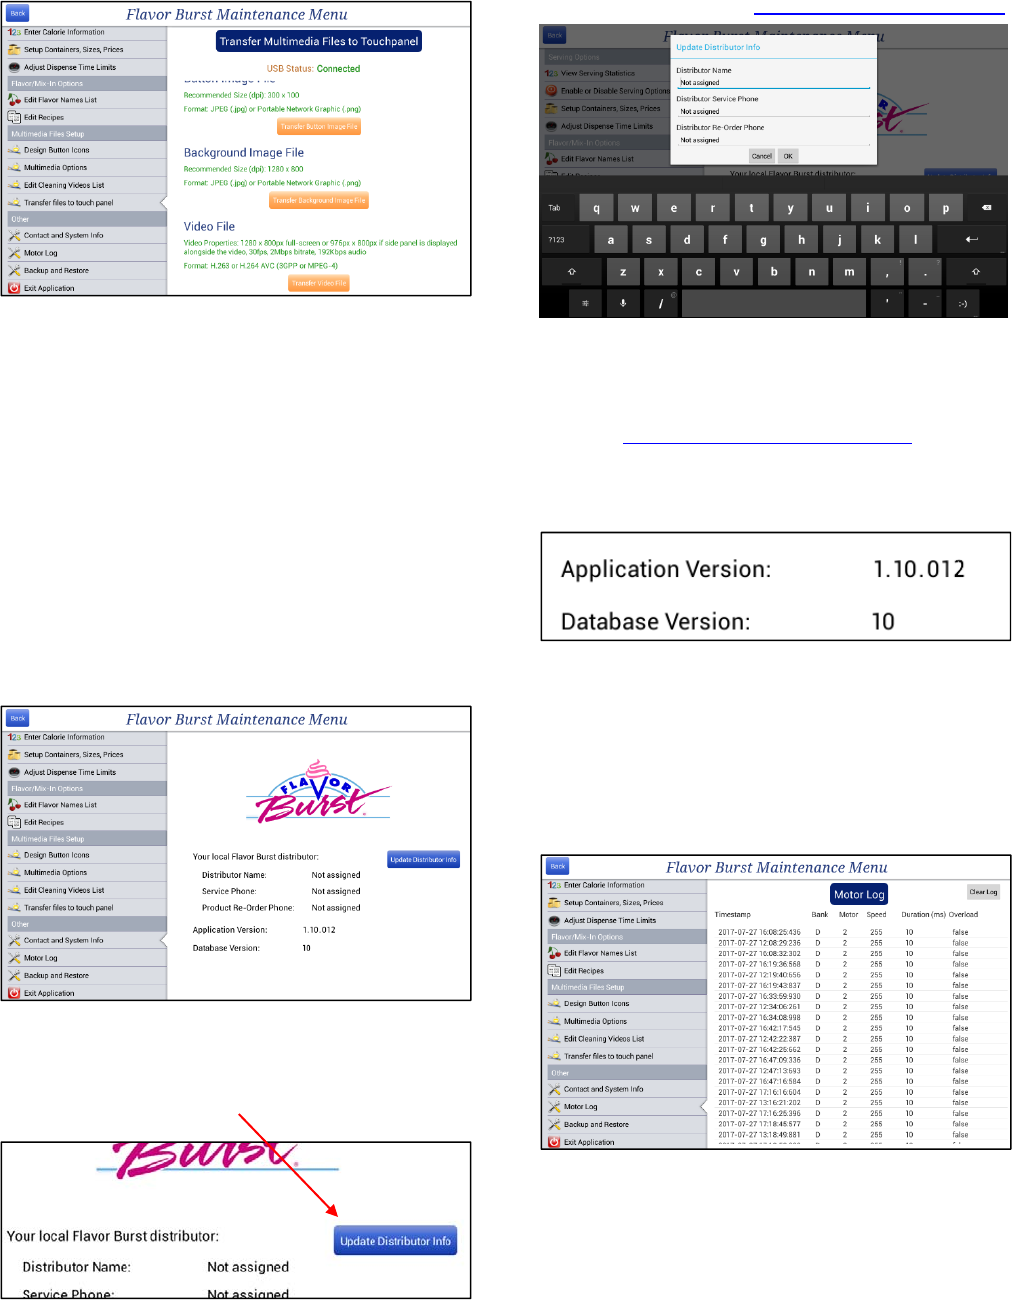
Contact Information
This screen shows the name, the service
number and the product re-order number of
your local distributor. It also shows information
on the Flavor Burst App Version and Database
Version, which may help in troubleshooting in
the future.
1. To add or update your distributor’s
information for easy access to their phone
number, touch the UPDATE DISTIBUTOR
INFO button.
2. Add or change your distributor’s name and
contact information in the spaces provided.
If you don’t know this information, find your
local distributor at www.taylor-company.com
3. The Application Version will be shown here
also. Compare this program version to the
most recent file on Flavor Burst’s website.
Visit www.flavorburst.com/support/
and touch “Color Touch Panel Files” to find
instructions on how to update your panel to
the most current program.
Motor Log
This screen shows all the commands sent to
the pumps and Injector Motors. It should be
cleared periodically.
1. Press the “Motor Log” section in the
Maintenance Menu.
2. If you wish to clear the Motor Log, press the
CLEAR LOG button in the right corner.
42
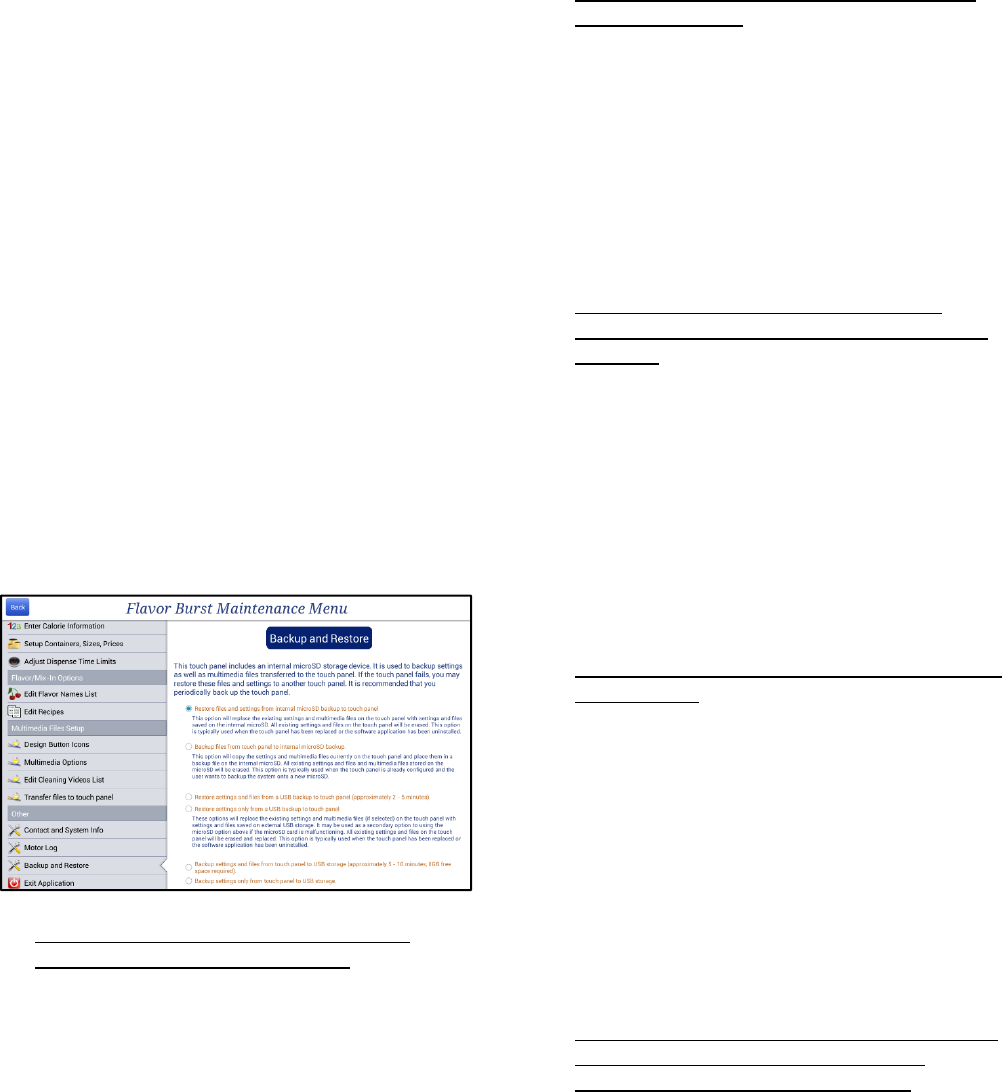
Backup and Restore
When a microSD card is installed into the inside
of the Touch Panel, the system continuously
copies files and settings to the card. In the
event of a Touch Panel failure, the files can be
transferred over to a new Touch Panel, saving
your settings and data.
1. Always back up your files on a regular
basis, especially after all the settings have
been made in the previous Maintenance
Menu sections. There are a few different
options to back up your files and restore
them. Please read through the options
below.
2. Access the “Backup and Restore” section in
the Maintenance Menu and make your
selection to either backup files to a microSD
card or USB device, or restore files from a
microSD card or USB device. See steps
below for detailed explanations of each
option.
3. Restore files and settings from internal
microSD backup to Touch Panel
This option erases the existing setting and
multimedia files on your Touch Panel and
replaces them with ones saved on the
internal microSD. This restore option is
typically used when the Touch Panel has
been replaced or the software application
has been uninstalled.
4. Backup files from Touch Panel to internal
microSD backup.
This option copies settings and multimedia
files currently on the Touch Panel to a
backup file on the internal microSD. It will
erase any files that were on the microSD
card and replace them with the files on your
Touch Panel. This option is typically used
when the user has configured the Touch
Panel to their liking and wants to back up
the new settings onto a new microSD card.
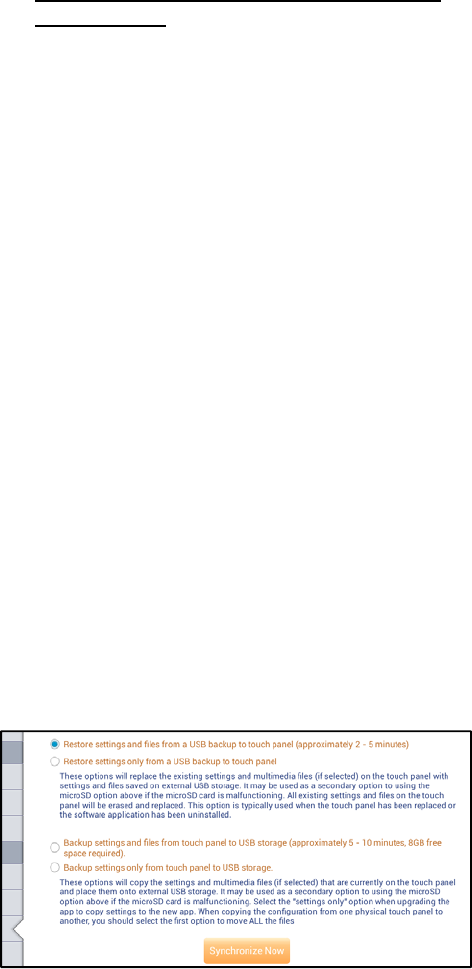
5. Restore settings and files from a USB
backup to Touch Panel (approximately 2-5
minutes)
This option erases current settings and
multimedia files on the Touch Panel and
replaces them with ones saved on an
external USB storage. It may be used as a
secondary option to using the microSD
option above if the microSD card is
malfunctioning. This option is typically
used when the Touch Panel has been
replace or the software application has been
uninstalled.
6. Restore settings only from a USB backup to
Touch Panel
This option erases current settings on the
Touch Panel and replaces them with ones
saved on an external USB storage. This
option maintains the multimedia files on
your Touch Panel. It may be used as a
secondary option to using the microSD
option above if the microSD card is
malfunctioning. This option is typically used
when the Touch Panel has been replaced or
the software application has been
uninstalled.
7. Backup settings and files from Touch Panel
to USB storage (approximately 5-10
minutes, 8GB free space required)
This option copies settings and multimedia
files currently on the Touch Panel to
external USB storage. It may be used as a
secondary option to using the microSD
option above if the microSD card is
malfunctioning. This option is typically used
when copying all the files of one Touch
Panel to another panel.
43
8. Backup settings only from Touch Panel to
USB storage.
This option copies settings (but not
multimedia files) currently on the Touch
Panel to external USB storage. It may be
used as a secondary option to using the
microSD option above if the microSD card is
malfunctioning. This option is typically used
when upgrading the app and copying
settings to the new app.
9. When restoring files and/or settings from a
microSD card or USB storage device, insert
the card or device into the Touch Panel first.
The microSD card slot is inside the panel,
on the electronics board and requires
removing the back cover. The USB port is
on the underside of the panel and can be
accessed externally.
10. With the card or device inserted, and a
backup or restore option selected, a
SYNCHRONIZE NOW button will appear at
the bottom of this screen. Touch the button
to either replace the current Touch Panel
files / settings with the ones on the microSD
card or USB storage device, or to copy
Touch Panel files / settings to a card or
device.
Exit Application, Sleep Mode, Shut Down
When the Touch Panel is not in use for long
periods of time, you may wish to put the screen
in sleep mode or shut down the program to help
preserve the life of the Touch Panel. You may
also wish to exit the Flavor Burst App entirely,
and access the Touch Panel’s Android system.
1. To exit the Maintenance Menu and return to
the product screen, press the BACK button
in the top left corner.
2. To close the whole Flavor Burst application,
press the “Exit Application” section in the
Maintenance Menu. Enter the Administrator
Password if prompted.
3. The Flavor Burst program should close and
the Android’s operating system should
appear.
4. To open the Flavor Burst program, search
the app section for the program, touch the
icon, and if you agree to the “Terms of Use”,
touch the ACCEPT TERMS button.
5. To put the screen in sleep mode without
closing the application, simply press the
power button once behind the screen. The
screen will go dark. To wake the screen up,
press the power button again.
6. To totally shut down the screen, press and
hold the power button until you are
prompted to shut down the screen. Press
the button again to turn it on. It may take a
few seconds for the screen to wake.
44
PAGE INTENTIONALLY
LEFT BLANK
45
Once the system is enabled to dispense flavors,
test each flavor to ensure they all dispense
properly and that the Injector/Blending
Assembly operates correctly. Draw several
servings choosing all the different options
available for your setup to verify the Color
Touch Panel settings are acceptable.
NOTE: EQUIPMENT AND PRODUCT
IMAGES MAY DIFFER FROM YOUR SETUP.
HOWEVER, THE INFORMATION AND
INSTRUCTIONS STILL APPLY.
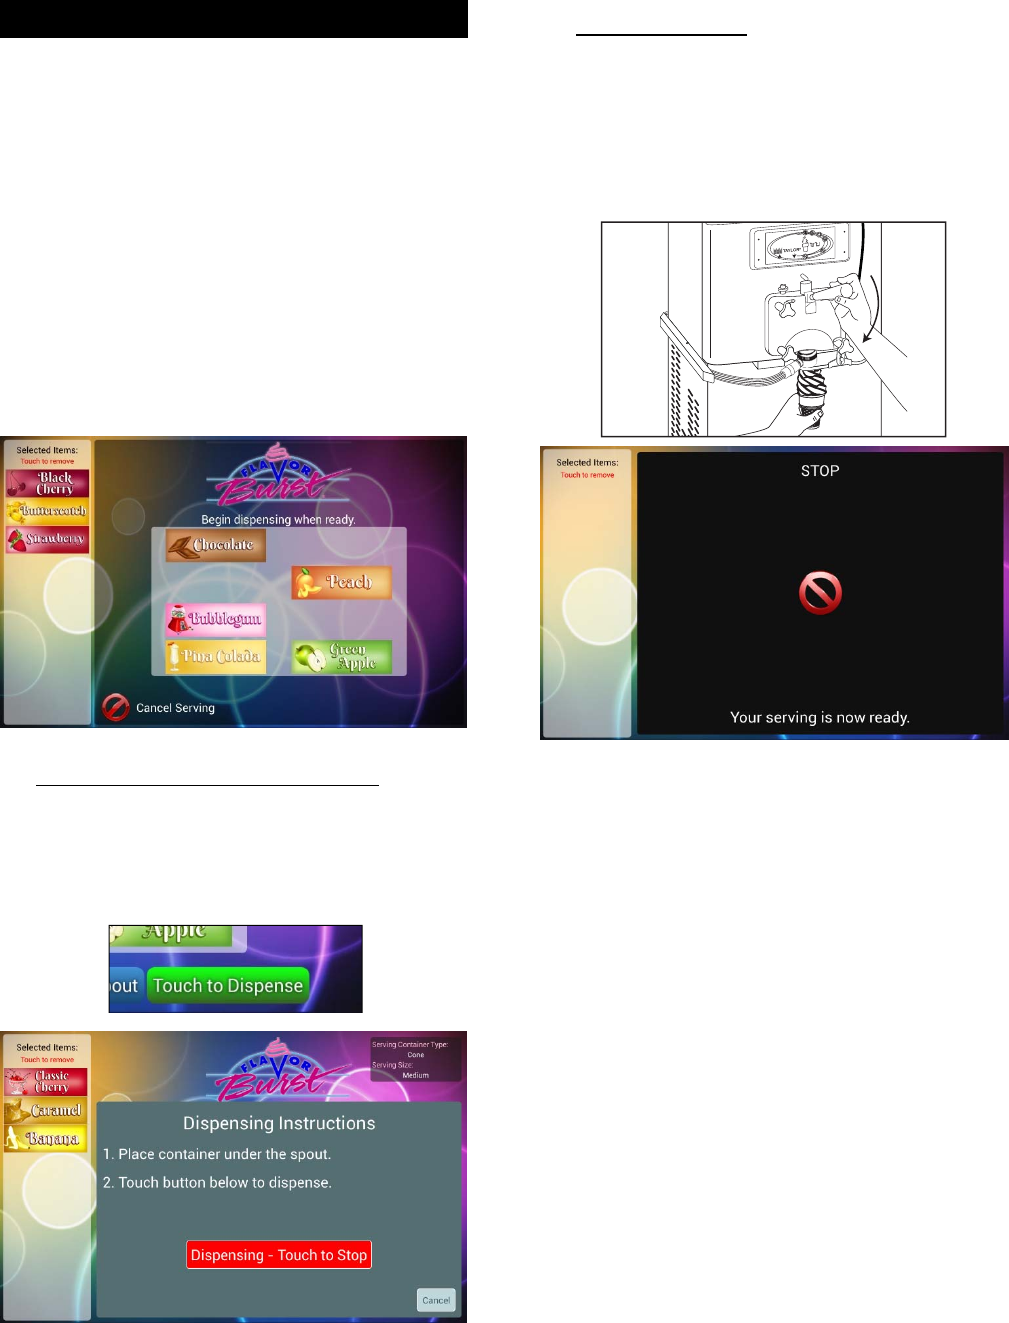
1. Make your serving selections on the serving
screen(s).
2. AUTOMATIC DISPENSING MODE: If your
screen shows a TOUCH TO DISPENSE
button (typically only on FCB systems), tap
this button to dispense rather than using the
draw handle. Touch it again when you are
nearly finished serving.
3. MANUAL DRAW: Hold a container under
the spout to catch flavor product. Pull the
draw handle down to dispense product. If
you have the timed servings enabled, draw
the serving until the system sounds a beep
and the screen notifies you to stop drawing
product. Return the handle to the closed
position at the end of the serving.
NOTE: IF YOUR SYSTEM HAS A DRAW
HANDLE SWITCH, PRESS THE SWITCH
AGAINST THE DRAW HANDLE WHILE
MOVING THE DRAW HANDLE INTO THE
FULL “OPEN” POSITION. THIS ACTIVATES
THE FLOW OF SYRUP TO THE SPOUT.
NOTE: IF THE FREEZER IS EQUIPPED
WITH A DRAW HANDLE SWITCH, RELEASE
THE SWITCH ONE SECOND BEFORE
CLOSING THE SERVING. THIS WILL STOP
THE FLOW OF SYRUP WHILE GIVING THE
UNFLAVORED PRODUCT ENOUGH TIME TO
CLEAR THE INJECTOR HEAD OF EXTRA
FLAVORING AND REDUCE CARRYOVER.
NOTE: THE SYSTEM DISPENSES THE
FLAVORS IN THE ORDER THEY WERE
SELECTED. ALLOW ENOUGH TIME FOR
EACH OF THE FLAVORS TO CYCLE
THROUGH. IF THE SERVING IS CUT OFF
TOO SOON THE SYSTEM MAY NOT
DISPENSE ALL THE CHOSEN FLAVORS IN
YOUR SERVING.
26211
TESTING THE CTP SYSTEM
46
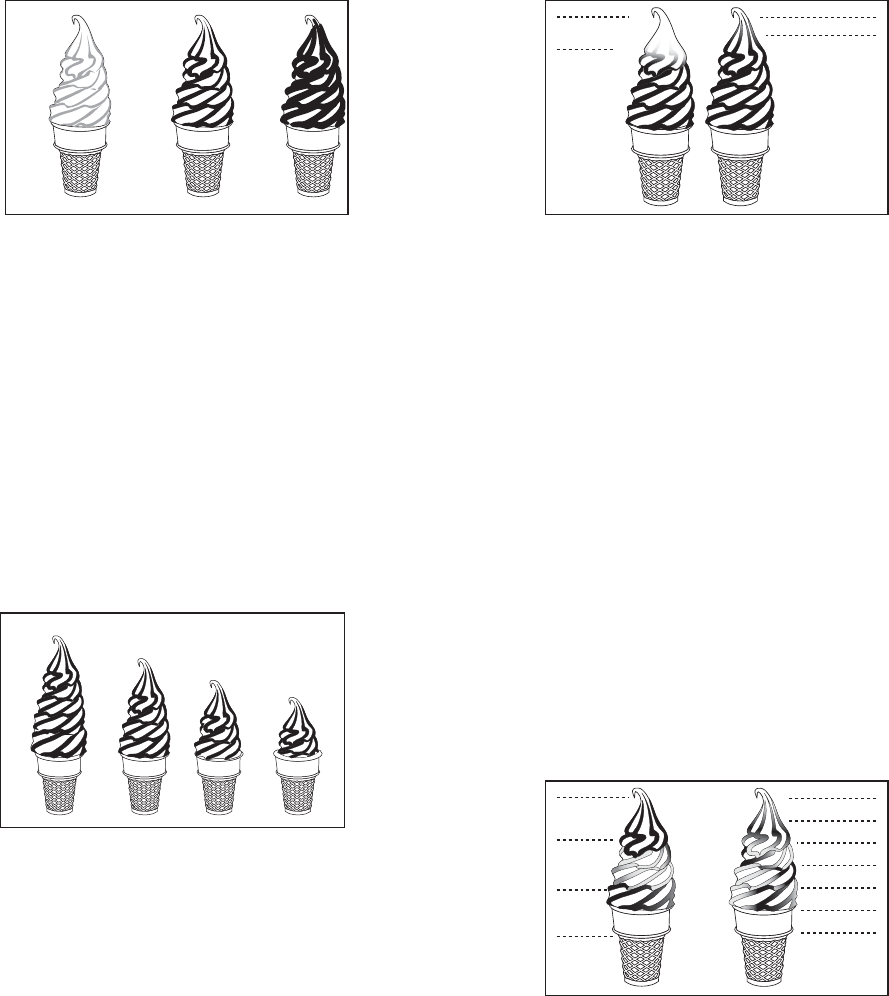
4. Evaluate your serving for both appearance
and taste. Look and taste the serving to
ensure the syrup level is acceptable. Draw
servings of the other flavors to evaluate
their syrup dispensing levels.
NOTE: ADJUST THE DISPENSE SPEEDS OF
THE FLAVORS IN THE “SETUP TRAYS AND
DISPENSE SPEEDS” SECTION OF THE
MAINTENANCE MENU.
NOTE: YOU CAN ALSO ADJUST THE
FLAVOR STRENGTH IN A SERVING BY
SLOWING OR SPEEDING UP THE
FREEZER’S DRAW RATE.
5. If the timed servings setting is enabled,
draw different serving sizes and compare
them to see if the size of each serving is
what you expected.
NOTE: CHANGE THE SERVING SIZE TIMES
IN THE “ADJUST DISPENSE TIME LIMITS”
SECTION OF THE MAINTENANCE MENU.
6. If the white cap option is enabled, see if
syrup product has cleared the Injector
Head. Make sure there is not too much
unflavored product at the top of your
serving.
NOTE: ADJUST THE WHITE CAP TIME IN
THE “ENABLE OR DISABLE SERVING
OPTIONS” SECTION OF THE
MAINTENANCE MENU.
NOTE: THE WHITE CAP OPTION IS
ONLY AVAILABLE WHEN TIMED
SERVING SIZES IS ACTIVATED.
7. Draw multi-flavored servings to evaluate if
the layer timing is what you expected. A
shorter dispense time results in narrower
layers; a longer dispense time results in
wider layers. You can fit more flavor
selections in a serving with narrow layers,
however, the layers may blend together.
Wider layers will show a more distinct color
and flavor difference between layers, but
will have limitations on how many flavors
can be dispensed in one serving.
NOTE: ADJUST THE FLAVOR SELECTION
TIME IN THE “ENABLE OR DISABLE
SERVING OPTIONS” SECTION OF THE
MAINTENANCE MENU.
26284
NEEDS
LESS
AVERAGE
NEEDS
MORE
26289
SMALL
MEDIUM
EXTRA LARGE
LARGE
26576
TOO
MUCH
TIME -
Too much
unflavored
product
NOT
ENOUGH
TIME -
May result in
carryover
issues with
next serving
26292
WIDER
LAYERS NARROWER
LAYERS
47
8. Make any other adjustments to settings in
the Maintenance Menu settings as needed.
9. If a syrup line fails to operate when tested,
select that flavor on the Touch Panel and
draw the serving again to verify the syrup
pump is malfunctioning. Contact your local
distributor for help.
10. On occasion it may be desirable to sanitize
the Injector Head between servings. Simply
hold a container under the dispensing spout
and press FLUSH SPOUT.
NOTE: IF NO “FLUSH SPOUT” KEY IS
SHOWN ON THE SCREEN, YOU CAN FLUSH
THE SPOUT BY ACCESSING THE
MAINTENANCE MENU AND SELECTING THE
“FLUSHING FUNCTIONS” SECTION.
NOTE: FLUSHING OPTION NOT AVAILABLE
ON FCB SYSTEMS.
© 2018 Flavor Burst is a registered trademark of the Flavor Burst Company. Taylor is a registered
trademark of the Taylor Company. All rights reserved.
Flush Spout
26250