Euro Communication EquipementS BTSUPER2P Bluetooth Handsfree Car Kit User Manual Manual
Euro Communication Equipement SAS Bluetooth Handsfree Car Kit Manual
Manual
1
User Guide
Supertooth II
Universal Bluetooth Handsfree Kit with DSP
Contents
____________________________________________________________
Product Overview . . . . . . . . . . . . . . . . . . . . . . . . . . .1
Switching On/Off. . . . . . . . . . . . . . . . . . . . . . . . . . . .2
Charging . . . . . . . . . . . . . . . . . . . . . . . . . . . . . . . .2
Installation. . . . . . . . . . . . . . . . . . . . . . . . . . . . . . .2
Pairing to a Mobile Phone . . . . . . . . . . . . . . . . . . . . . . .3
Indicator Status. . . . . . . . . . . . . . . . . . . . . . . . . . . . .4
Hands-free Profile . . . . . . . . . . . . . . . . . . . . . . . . . . .4
SuperTooth II Operations. . . . . . . . . . . . . . . . . . . . . .4
Button Functions Matrix . . . . . . . . . . . . . . . . . . . . . .5
Headset Profile. . . . . . . . . . . . . . . . . . . . . . . . . .6
SuperTooth II Operations. . . . . . . . . . . . . . . . . . . . . .6
Button Functions Matrix . . . . . . . . . . . . . . . . . . . . . .7
SuperTooth II is equipped with Bluetooth and Digital Signal Processor
which allow wireless communications on devices such as cellular phones.
This is designed to be a totally portable wireless handsfree kit which will
enable the user to communicate freely without holding the phone. This will
work on any Bluetooth cellular phones available provided that they respect
the Bluetooth protocol.
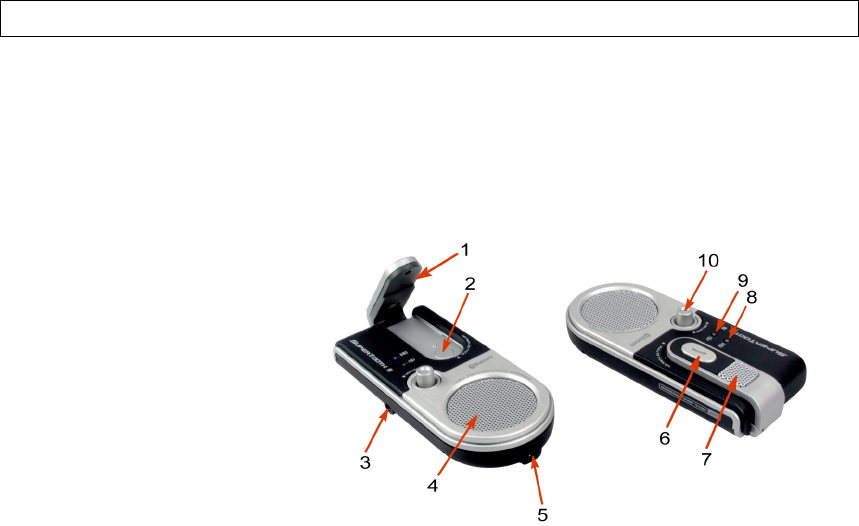
1 Swivel Arm
2 Reject Button
3 Headphone Jack
4 Speaker
5 Charger Input
6 Accept / End Button
7 Microphone
8 Bluetooth Indicator
9 Charge Indicator
10 Volume Control
A. PRODUCT OVERVIEW
2
Note: The Swivel Arm[1] can be adjusted to 0º , 55º and 210º orientations.
Power on: Flip up the Swivel Arm [1] from 0º to 55º to 210º
positions. The Bluetooth indicator[8] will glow (blue blink). This
indicates that the kit is ready (standby mode). Note: At first use, the
user has to pair SuperTooth II with his phone (refer to Section E
PAIRING TO A MOBILE PHONE.)
Power off: Flip down the Swivel Arm to 0º position. The Bluetooth
Indicator will become red then turns off after a second.
1. Plug the battery charger connector into the Charger Input [5] of
SuperTooth II.
2. Plug the other end of the charger into the electrical outlet.
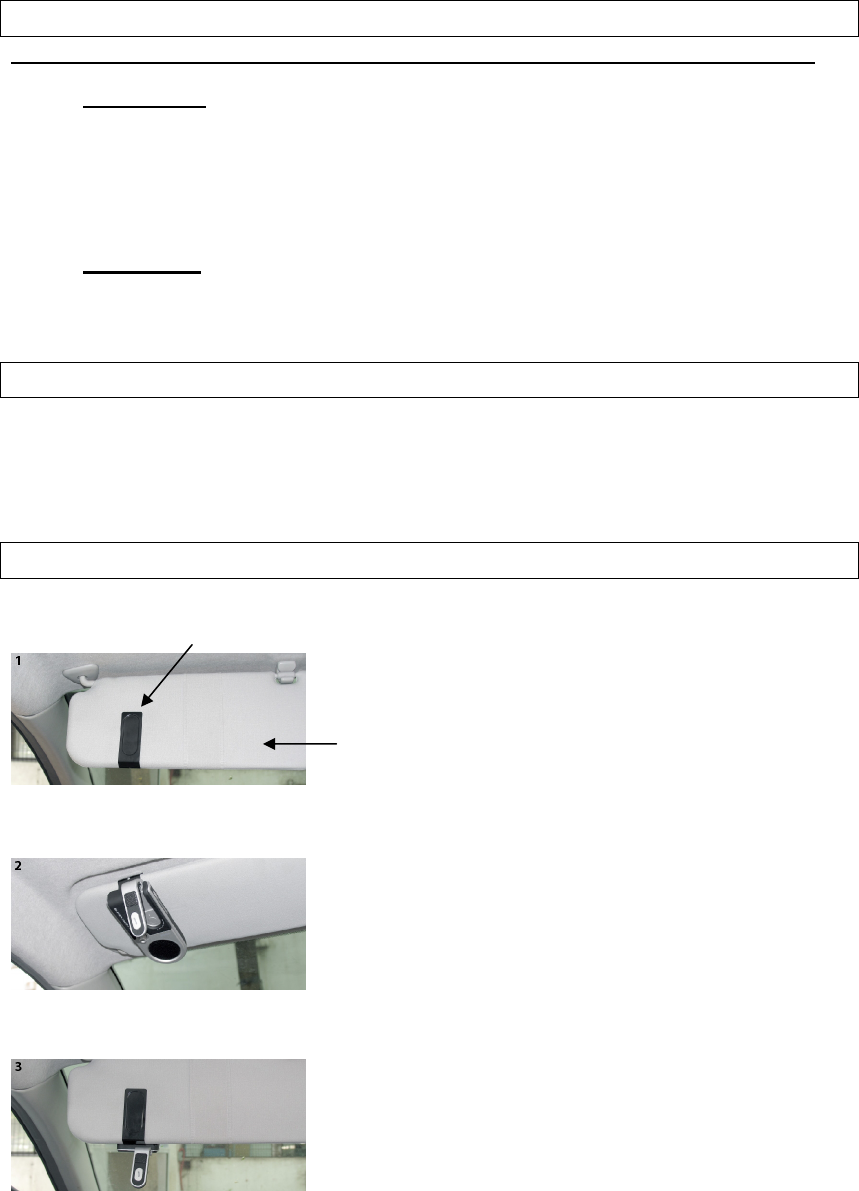
Fixing of Clip
Fix the metal clip of SuperTooth II on the sun
visor.
Sun visor
Attach the magnetic back of SuperTooth II to
the fixed metal clip. The SuperTooth must be
placed wherein its microphone will be directed
to the mouth of the user.
The position of the SuperTooth II can vary
according to the position of the sun visor. The
Swivel Arm(1) can be adjusted to 0º, 55º
and 210 º orientations.
B. SWITCHING ON/OFF
C. CHARGING
D. INSTALLATION

3
Pairing will create a link or connection between the two Bluetooth devices,
the SuperTooth II and your phone.
1. Bring the mobile phone at about 20cm from the SuperTooth II.
2. The SuperTooth II is initially off; Turn it on by flipping
up the Swivel Arm[1] to 55º position. The Bluetooth
Indicator[8] will glow (blue blink).
3. Simultaneously press the Reject Button[2] and
Accept/End Button[6] for about 5 seconds. A
distinctive tone will be heard and the Bluetooth
Indicator LED will change from blinking blue to
alternate blinking red and blue. The SuperTooth II
is now in Pairing Mode.
4. While the kit is at pairing mode, access the Bluetooth menu of your
phone. (Kindly refer to your phone’s manual.) Turn on its Bluetooth
function then execute a Bluetooth search so that it will be able to search
and find your SuperTooth II.
5. When the phone displays the list of the Bluetooth devices it found,
select the name of this kit (SuperTooth II).
6. When the phone asks for the passcode, enter 0000. Pairing is
successful if the alternating red/blue lights of Bluetooth Indicator
changes to plain blinking blue. Note : Normally, the phone would also
show briefly on its display if it’s already paired and connected to
the SuperTooth II or if pairing with it failed.
Important Note: Some phones do not connect directly after entering
0000. To connect, you need to short press the Accept / End Button[6].
Or,
(In your phone) Go back to Bluetooth> Paired devices> highlight the
name of this kit (SuperTooth II) > press Options > then press
Connect).
If pairing has been successful, the SuperTooth II is now ready to use.
E. PAIRING TO A MOBILE PHONE (not possible while charging the SuperTooth II)

4
STATUS Bluetooth Indicator [8] Charge Indicator [9]
Pairing Mode Alternate Blinking - Red / Blue
Standby mode Blinking Blue
On Call Steady Blue
Low Batt Blinking Red
Charging Alternate Red / Green
Fully Charged Steady Green
Ringing Fast Blinking Blue
Supertooth II
OPERATIONS
Make a Call (Normal dial): Dial the number using your phone. Normally,
audio will be on the SuperTooth II.
Note: With some phones like Siemens S55; Panasonic X70, audio is
always on the phone during an outgoing call. You will need to short
press Accept / End Button[6] to transfer the audio to your kit.
Make a Call (Voice dial):
1. First, you have to access the voice dialing function of your phone,
turn it on and record for a voice tag. (Kindly refer to the procedure in
your phone’s manual.) Note: Voice dialing entries must be stored
in the phone’s memory, not on the SIM card!
When done, execute voice dialing in your kit by proceeding with the
instructions.
2. Execute Voice dial: Short press Accept/ End Button[6].
3. A beep/short tone will then be heard on the SuperTooth II prompting
the user to say the voice tag of a contact to call.
4. Say the voice tag. The voice will be played back to you (audio on kit)
then the phone will dial the number automatically.
Make a Call (Redial):
Long press the Accept/ End Button[6]. Audio will be on the SuperTooth II.
End a Call (2 options for Hands-free Profile):
Short press the Accept/ End Button[6] or short press Reject Button[2].
F. Indicator Status
G. HANDS-FREE PROFILE

5
Answer a Call: When the phone receives a call, ring tone will be on the
SuperTooth II alone, or both on the SuperTooth II and on the phone
(depending on your phone model). Just short press Accept/End
Button[6] to answer the call.
Reject a Call: Short press Reject Button[2] to reject an incoming call.
Set the Volume: Set the volume using the Volume Control[10].
1. Turn it clockwise to increase the volume.
2. Turn it counterclockwise to decrease.
Note: If the volume set is too high, it can cause feedback (whistling
sound), echo, or background noise during calls on some cell phones.
Audio Transfer:
from Phone to SuperTooth II (SuperTooth II initiated):
Short press the Accept/ End Button[6].
from SuperTooth II to Phone (SuperTooth II initiated):
Long press Reject Button[2].
Accept / End
Button
(Short press)
Accept / End
Button
(Long press)
Reject Button
(Short press)
Reject Button
(Long press)
Connected / Standby Initiates voice dial Redials last dialled
number
Disconnected /
Standby
Creates
reconnection
and initiates
voice dial
Creates
reconnection and
redials last dialled
number
Incoming call (ring
being generated) Accepts the call Rejects the call Rejects the call
Removes the
ring audio from
SuperTooth II
Active call at
SuperTooth II Ends the call Redials last dialled
number Ends the call Transfers audio
to Phone
Active call at Phone
Transfers the
audioto
SuperTooth
Activates the
SuperTooth II and
creates another
redial of the last
dialled number
Outgoing call being
set-up Ends the call Ends the call Transfers audio
to Phone
H. Button Functions Matrix (Hands-free Profile)

6
Supertooth II
OPERATIONS
Make a Call (Normal dial): Dial the number using your phone. Normally,
audio will be on the kit.
Note: With some phones like Siemens S55; Panasonic X70, audio is
always on the phone during an outgoing call. You will need to short
press Accept / End Button[6] to transfer the audio to your kit.
Make a Call (Voice dial):
1. First, you have to access the voice dialing function of your phone,
turn it on and record for a voice tag. (Kindly refer to the procedure
in your phone’s manual.) Note: Voice dialing entries must be
stored in the phone’s memory, not on the SIM card!
When done, execute voice dialing in your kit by proceeding with the
instructions.
2. Execute Voice dial: Short press Accept/ End Button[6].
3. A beep/short tone will then be heard on the SuperTooth II prompting
the user to say a voice tag of a contact to call.
4. Say the voice tag. The voice will be played back to you (audio on
kit) then the phone will dial the number automatically.
End a Call (only 1 procedure for Headset Profile):
Short press the Accept/ End Button[6].
Answer a Call: When the phone receives a call, ring tone will be on the
SuperTooth II alone, or both on the SuperTooth II and on the phone
(depending on your phone model). Just short press Accept/ End
Button[6] to answer the call.
Set the Volume: Set the volume using the Volume Control[10].
1. Turn it clockwise to increase the volume.
2. Turn it counterclockwise to decrease.
Note: If the volume set is too high, it can cause feedback (whistling
sound), echo, or background noise during calls on some cell phones.
I. HEADSET PROFILE

7
Audio Transfer :
from Phone to SuperTooth II (SuperTooth II initiated):
Short press the Accept/ End Button[6].
Accept / End
Button
(Short press)
Accept / End
Button
(Long press)
Reject Button
(Short press)
Reject Button
(Long press)
Connected / Standby Initiates voice dial
Disconnected /
Standby
Creates
reconnection
and initiates
voice dial
Incoming call (ring
being generated) Accepts the call
Active call at
SuperTooth II Ends the call
Active call at Phone Transfers the call
to SuperTooth II
Outgoing call being
set-up Ends the call
J. Button Functions Matrix (Headset Profile)
FCC Notices
This device complies with part 15 of the FCC rules. Operation is subject to the
following two conditions: (1) This device may not cause harmful interference, and (2)
This device must accept any interference received, including interference
that may
cause undesired operation.
You are cautioned that changes or modifications not expressly approved by the part
responsible for compliance could void the user’s authority to operate the equipment.
FCC RF Exposure requirements:
“This device and its antenna(s) must not be co-
located or operating in conjunction with
any other antenna or transmitter.”