Everspring Industry Co AC124-1 U-NET SERIES User Manual AC124 A501111256R
Everspring Industry Co Ltd U-NET SERIES AC124 A501111256R
USERS MANUAL
1
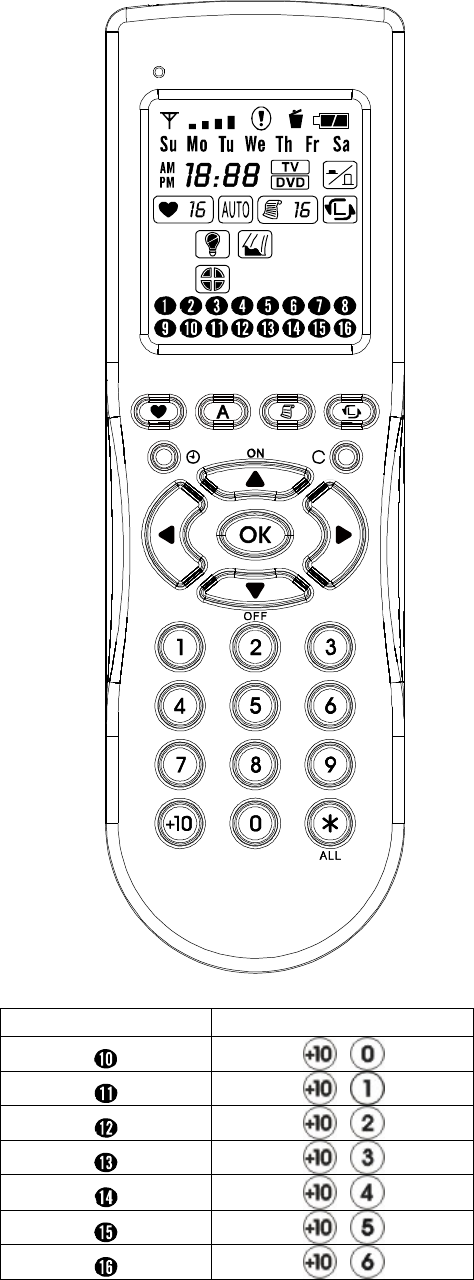
AC124 REMOTE CONTROLLER WITH LCD
(compatible with U-net series)
Device Number Keypad Button
2
SYMBOL ON LCD SCREEN
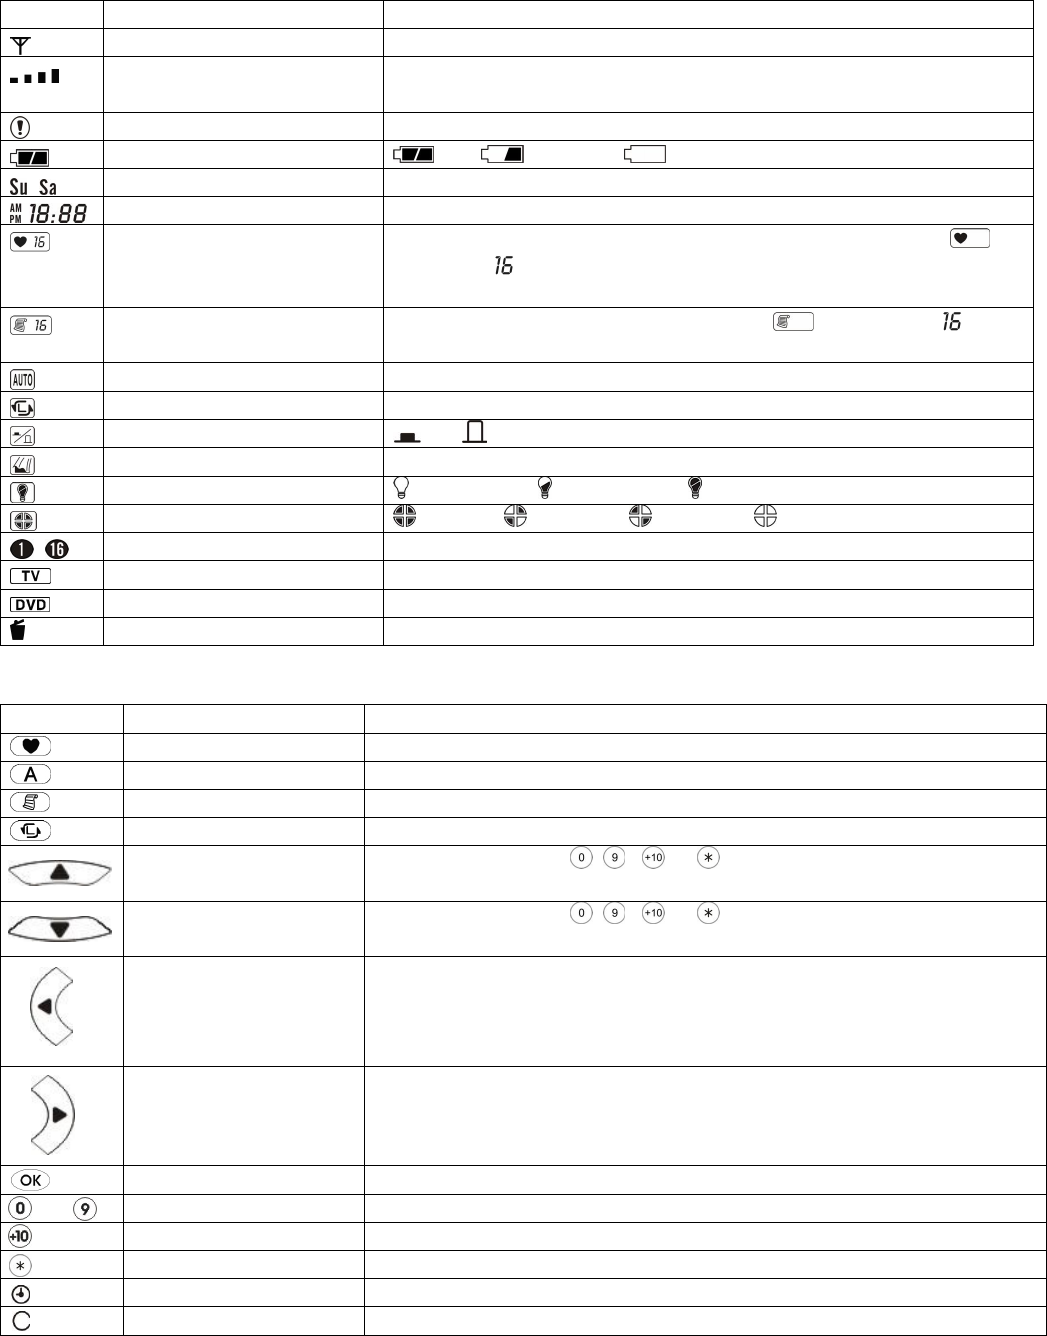
Symbol Name of Symbol Significance
Antenna The remote controller is being communicated with other device.
Signal The strength of RF signal in communication; it means communication failure if the
symbol hasn¡t been shown.
Not Applicable The setup made by the remote controller generates conflict.
Battery Indicator full half to full low
~ Day of Week Sunday, Monday, Tuesday, Wednesday, Thursday, Friday, Saturday
Real Time Time indication, AM means morning, PM means afternoon
Scene Mode When execute scene settings or select preset scenes, an indication of will
be shown. means the setup is being undertaken or 16th setting is being
executed.
Schedule Mode When it is in schedule setting, an indication of will be shown. means
the setup is being undertaken.
Auto Mode In auto mode; actions set in schedule can only be executed in auto mode.
Learning Mode In learning mode
On/Off Status on, off
Curtain Device An indication of curtain device being applied.
Incandescent Lamp Status full brightness, half brightness, darkness
Arm Status fully arm, part-arm 1, part-arm 2, disarm
~ Device Number Devices to be controlled
TV TV controllable status
DVD DVD controllable status
Delete Upon deletion is taken
KEYPAD BUTTON
Symbol Name of Symbol Significance
Scene Button Used for setting or executing scene
Auto Button Used for entering or leaving the auto mode
Schedule Button Used for setting schedule
Learning Button Used for entering learning mode (RF/TV/DVD)
On Button To operate together with ~ 、 or (all) button, let the memorized individual
or all devices to be activated; for time setting, it is regarded as UP.
Off Button To operate together with ~ 、 or (all) button, let the memorized individual
or all devices to be off; for time setting, it is regarded as DOWN.
Leftward Towards the left
Rightward Towards the right
OK Button Used for confirmation while setting or saving
~ Single Digit Button Used for entering single digit
Tens Digit Button Used for entering tens digit
*Button Used for controlling all devices
Time Setup Button Keep pressing 3 seconds will enter present time setting
Mode Switching Button Used for selecting mode type (RF/TV/DVD/Power Setting Mode)
3
INTRODUCTION
With this multipurpose remote controller, you can easily and affordably enhance the comfort and security of your home
or office. You¡ll see how easy it is to create a full custom system quickly that can remotely control lamps and
appliances, without costly professional installation ¡ a system that any do-it-yourself can easily handle.
You can create up to 16 scenes, every of which is controllable to numerous devices. When getting up, simply at a press
of a button, the lamps in the porch and corridor will be turned off, a coffee maker will be turned on, the curtain in your
bedroom will be rolled up and alarm system will be disarmed.
QUICK GUIDE
The following instructions can help you get started with the unit quickly.
1-1 Battery Indicator
In the right upper corner of LCD screen, a battery indicator is revealed. When battery level drops, it will show low
battery.
1-2 Battery Monitoring
When battery level drops to half, watch out the battery and replace it depending on actual condition.
After replacing the batteries, all of the settings made are still in existence.
An adoption of alkaline battery is highly recommended. Different types of batteries or new and used batteries
should not be mixed.
Do not expose the battery to heat sources or sunlight.
Put the battery out of children reach.
When using depleted batteries, it will reduce the effectiveness of operating distance.
Take out its batteries if it will not be used for a long period of time.
To avoid the risk of battery leakage, remove the batteries which have been used for more than 1 year.
1-3 LCD Screen
Do not use a sharp object to touch the screen, because it will hurt the surface of LCD screen.
Place the unit in a dry location. If any splashing liquid apply to the LCD screen, wipe it immediately. Do not soak
it in liquid.
Do not place the unit in an extreme cold and hot environment. Keep the unit away from heat sources (e.g. fire,
radiator, boiler, etc.)
Avoid dropping the unit.
Prevent any objects from falling on to LCD screen.
Clean it only with a soft cloth or sponge moistened lightly with water. The use of abrasives solvents of any kind is
strictly forbidden.
1-4 Operating Notice
After replacing new batteries, the time clock will re-set. The time for operation set in schedule depends on the
preset value of time clock.
4
1-5 Learning Mode
To enable the unit to control target devices, the prerequisite is to have it learned with each target device.
Because the way of entering learning mode for each target device varies, refer to the instructions for each target
device.
Up to 16 device ID can be emitted and received. Device number ranges from to .
1-6 Scene Setup
The unit can control each single device, in addition several devices can be configured all together as a scene for
simultaneous operation which is regarded as scene setup. The scene devices will be operated simultaneously
after pressing scene and single/tens digit buttons.
Up to 16 set of scene setup can be made.
When entering scene setting, 180-second countdown will start. If the actions of scene setting have not been
completed before 180-second countdown is out, will disappear and scene setting will stop.
(During setting process, 180-second countdown will re-start upon pressing any of , , , , ,
~)
If the unit enters scene setting without learning the ID code with any target device, an indication of will be
revealed which implies that the setting is failed.
1-7 Schedule Setup
Only when the unit is set in auto mode, the devices grouped to the schedule and/or to the scene can periodical
execute automatically when the time for operation is up.
Up to 16 set of schedule setup can be made.
When entering schedule setting, 180-second countdown will start. If the actions of schedule setting have not
been completed before 180-second countdown is out, will disappear and schedule setting will stop.
(During setting process, 180-second countdown will re-start upon pressing any of , , , , ,
~)
If the unit enters schedule setup without learning the ID code with any target device, an indication of will be
revealed which implies that the setting is failed.
While undertaking schedule setup, appears accidentally. It may be ascribed to time conflict between current
and other schedule setup. Check out if time overlap exists among schedule setups or fail to group any devices or
scene numbers to the schedule setup.
1-8 RF/TV/DVD/Power Setting Mode Selection
Press to switch among RF, TV, DVD and power setting mode. Four mode types are provided for selections.
RF Mode: U-net enabled devices can be controlled in RF mode, including devices such as Lamp Module, ON/OFF
Module, Curtain Switch and Alarm System.
TV Mode: To enable the unit to control TV, the prerequisite is to have the unit learned with TV controller via
infrared.
Note: A total of 18 buttons can be used for button learning in TV mode, including , , , ,
, ~ , , and .
DVD Mode: To enable the unit to control DVD, the prerequisite is to have the unit learned with DVD controller via
infrared.
Note: A total of 18 buttons can be used for button learning in DVD mode, including , , , ,
, ~ , , and .
1-9 Power Setting Mode Selection
Two mode types are provided for selections -- Normal Power Mode and Power Saving Mode. Normal Power
Mode is default setting.
Normal Power Mode: The LCD is always on, for the easy of user to monitor time and other relevant information.
Power Saving Mode: The LCD will turn off two minutes after use. Press a button (this button is for awaking the
unit only) to turn on the LCD.
5
1-10 USB Interface
The built-in USB interface is compatible with Everspring PC software. Scene and Schedule editing, RF device code
learning, TV & DVD button learning, and time setting can be done via PC software.
Note: Please switch the unit to RF mode before entering USB interface. Avoid the unit entering time setup, learning
mode or scene/schedule setup while connecting USB interface to PC.
OPERATING INSTRUCTIONS
To control on/up and off/down status of each target device, follow the below steps for operation:
1. It is of great importance to proceed with 2-2 learning mode as prerequisite.
2. To display device status (e.g. implies fully arm), press single/tens digit button ( , and ).
3. Press single/tens digit button and for on/up; while pressing single/tens digit button and for off/down (please
refer to table 1 on page 11 for more operating instructions).
4. Using (All) and will turn on all of the devices; whereas (All) and will turn off all of the devices at a
time.
Note: When using (All) feature, it is only suitable for use with and type of products, while and
type of products cannot be applied.
PROGRAMMING INSTRUCTIONS
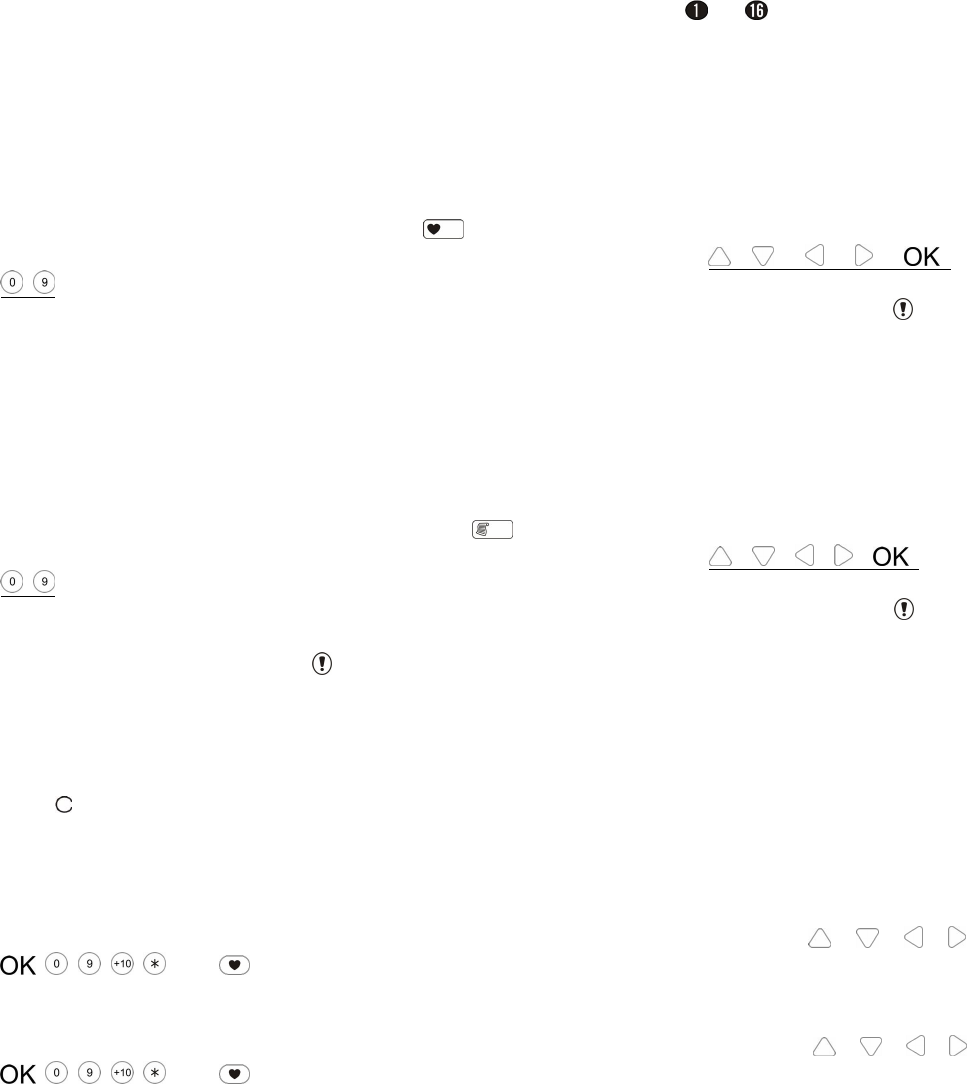
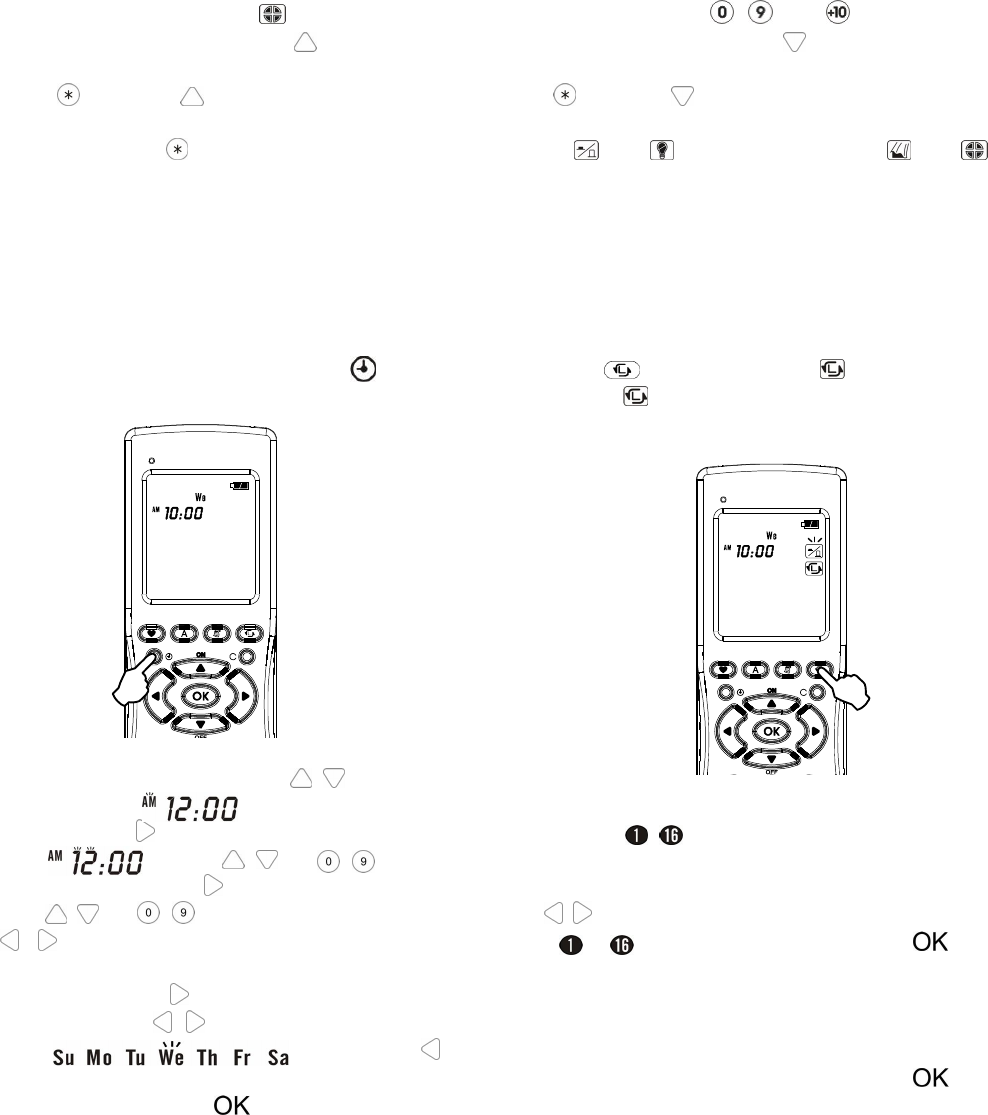
2-1 Time Setup
Set the present time as desired.
1. Press and hold the button next to for 3
seconds.
2. Either AM or PM is flashing. Use to choose
AM or PM (e.g. ).
3. After pressing , HH of HH:MM starts flashing
(e.g. ). Use or ~ to set
HH. Further pressing offers MM adjustment.
Use or ~ to adjust MM. (Note: Use
to choose the item that needs to be
adjusted)
4. Further pressing will enter day of week
selection. Use to choose day of week
(e.g. ). Press
continuously will return to step 2 for edition.
5. Upon completion, press to save and exit.
2-2 Learning Mode (RF)
To be compatible with U-net devices:
1. Press for 3 seconds until is flashing then
release. is on steadily, which implies that the
unit enters learning mode. Learning timeout period
is 30 seconds.
2. The unit will distribute an undistributed device
number ( ~) automatically, which will flash as
an indication. While if a device number has been
allocated, it will be on steadily. Alternatively, press
or single/tens digit button to choose a device
(~) as desired, then press as
confirmation.
3. The unit will emit its ID code to target device and
resume 30 seconds countdown.
(Note: To terminate 30 seconds countdown before
timeout and return to step 2, please press ).
4. Once the unit receives ID code of target device, the
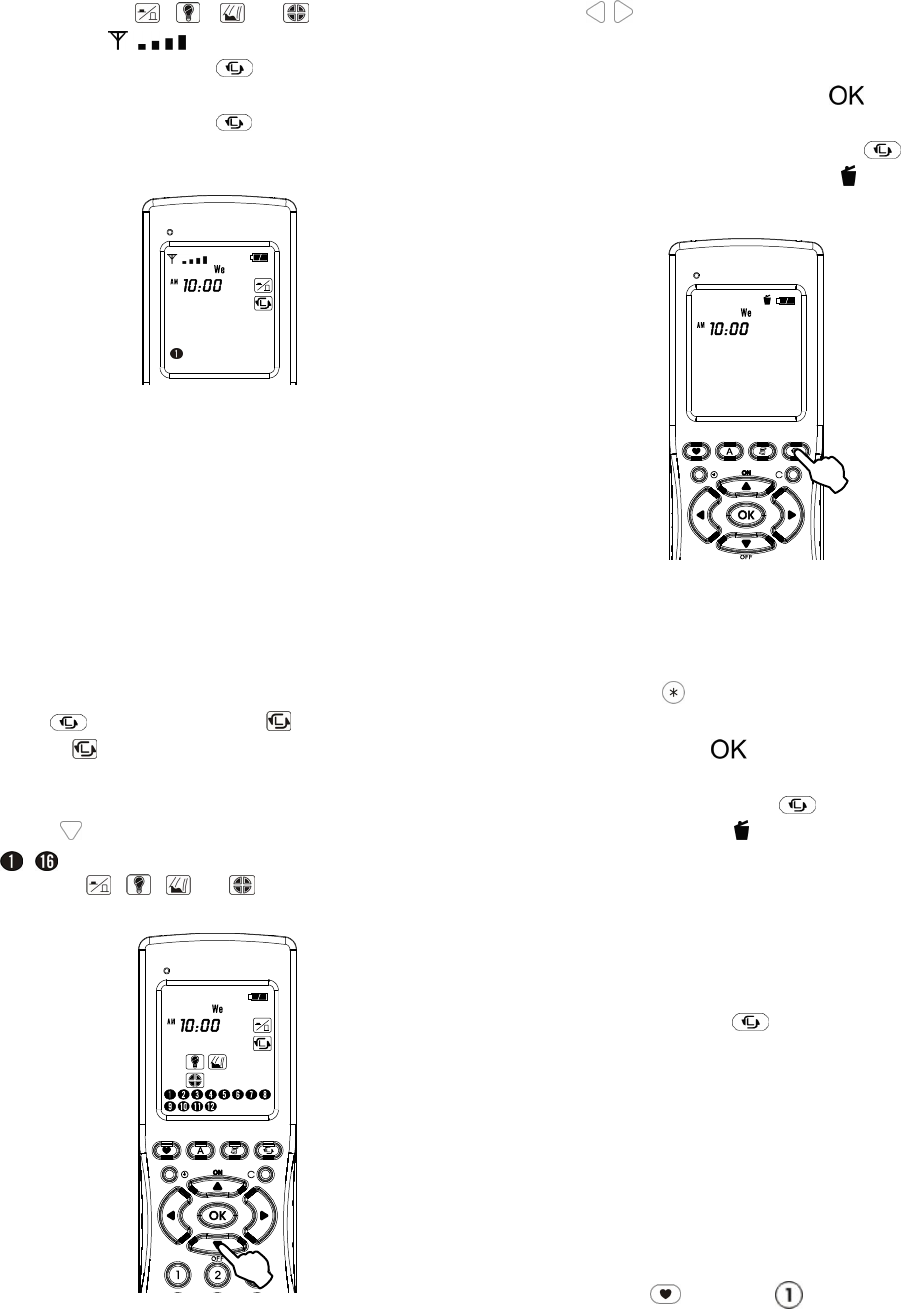
6
device type -- , or and strength
of RF signal will be shown; the unit will
return to step 2. Press to exit the learning
mode. If the unit exits the learning mode due to
timeout without pressing , the setting will still
be saved.
5. Check whether the learned device also shows an
indication of successful learning. Repeat step 1-4
if learning fails.
Note: The remote controller can only learn one set
of Alarm System ID code. If there is second Alarm
System ID code needs to be learned, the ID code
of first will be replaced by second.
2-3 Clearing Mode
1. Press for 3 seconds until is flashing then
release. is on steadily, which implies that the
unit enters learning mode. Learning timeout period
is 30 seconds.
2. Press for 3 seconds, the device numbers
(~) allocated and their corresponding type of
product -- , , or will be on steadily.
3. If only some of the device numbers need to be
cleared, follow steps 1,2,3. The clearing should
be done within a time period of 30 seconds.
Use or single/tens digit button to select the
device number that is to be cleared. The chosen
device number and its corresponding type of
product will be flashing. Press , the chosen
device number and its corresponding type of
product will be turned off. Press to save
and exit. Wait for a while until is shown. It
implies that the clearance is completed.
4. If you plan to clear all of the device number at a
time, follow steps 1.2.4. The clearing should be
done within a time period of 30 seconds.
Simply press (All). All of the device numbers
and their corresponding type of products will be
flashing. Press , all of chosen device
numbers and their corresponding type of products
will be turned off. Press to save and exit.
Wait for a while until is shown. It implies that
the clearance is completed.
5. Make sure the target device also clears off the ID
code of remote controller.
Note: If the unit exits the learning mode due to time
out without pressing , the setting will not be
saved.
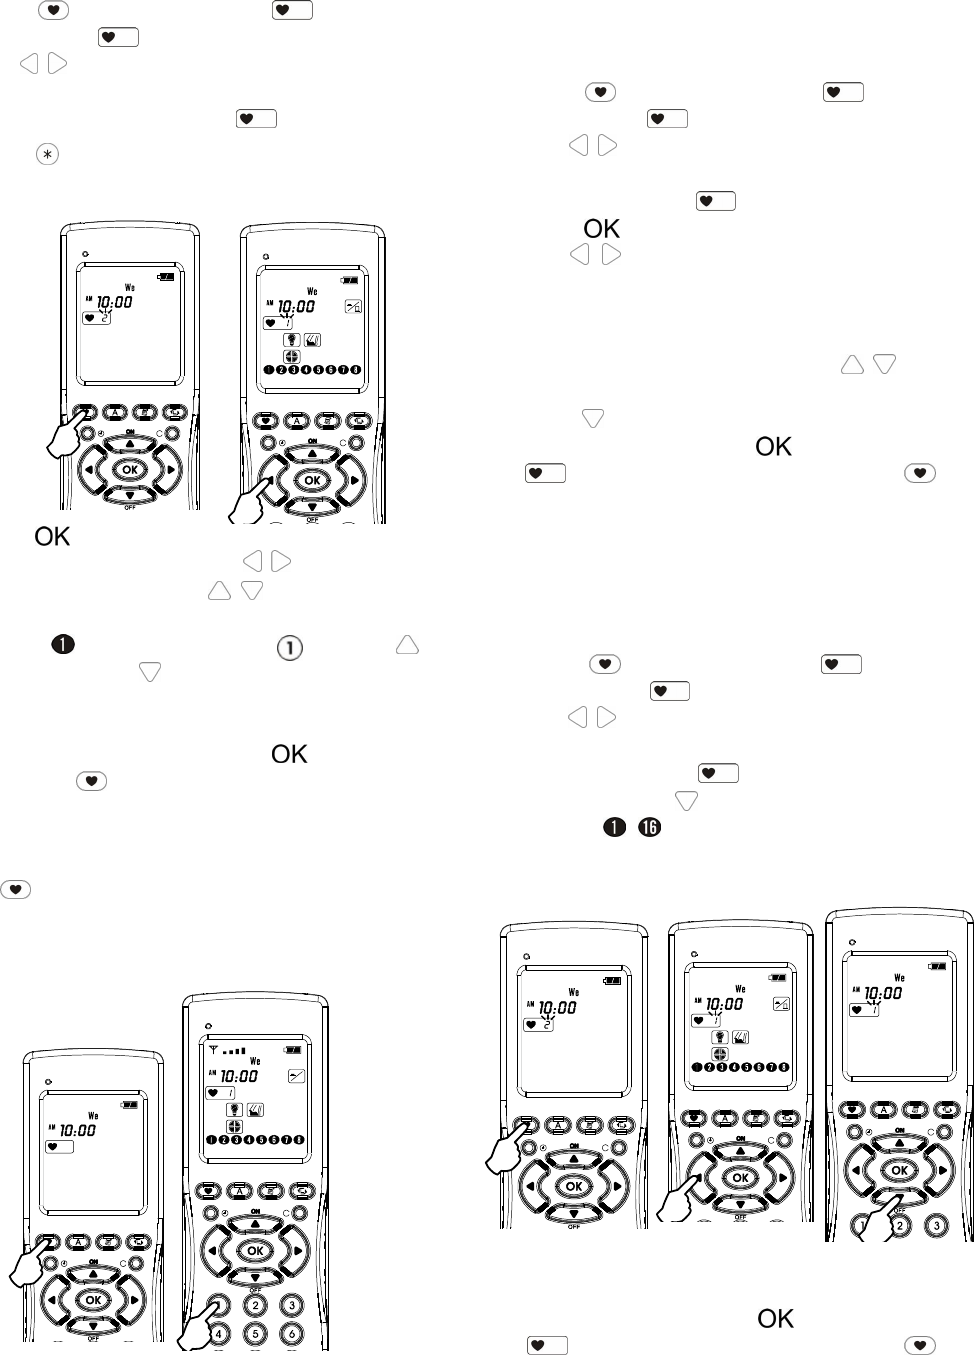
3-1 Scene Setup
When getting up, turn off the lights in the porch and
corridor, turn on a coffee maker to make a cup of coffee,
and roll up the curtain in your bed room. These three
scenarios are set all together as a group which for
instance has been configured for scene number 1.
Simply pressing and then will take the actions
as you wish. In short, when you plan to control several
devices all at a time, make use of scene setting as the
best and quickest solution.
7
1. Press for 3 seconds until is flashing
then release. is on steadily.
2. Use or single/tens digit button to select the
scene number for which you plan to configure.
The scene number inside the is flashing.
Note: (ALL) button is not suitable for use in
scene setup.
3. Press to enter scene setup.
4. Choose device number using or single/tens
digit button, and then use to control ¡on¡ or
¡off¡ status directly for each device (e.g. for device
number to be turned on, press and then
for on or up; while for off or down. Repeat this
procedure until designated devices are all set.
5. If all of the device numbers under the designated
scene number are well set, press to save and
exit. Press to exit without saving.
3-2 Operating Scene Command
Press and the scene number.
3-3 Editing Scene Setup
If modification is required, follow the below steps for
revision.
1. Press for 3 seconds until is flashing
then release. is on steadily.
2. Use or single/tens digit button to select one
of the preset scene numbers. The scene number
selected inside the starts flashing.
3. Press to enter scene setup.
4. Use or single/tens digit button to choose
one of the preset devices. The chosen device
whose corresponding device number will be
flashing and type of product will be on steadily.
5. Modify its ¡on¡ or ¡off¡ status using one by
one. If any preset device needs to be cleared,
press for 3 seconds.
6. Upon completion, press to save and exit.
disappear simultaneously. Press to
exit without saving.
3-4 Clearing Scene Command
If you would like to disregard preset scene command,
clear the setup according to the following instructions:
1. Press for 3 seconds until is flashing
then release. is on steadily.
2. Use or single /tens digit button to select one
of the preset scene numbers. The scene number
selected inside the starts flashing.
3. Keep pressing for 3 seconds, the device
number ~ shown on the LCD screen will be
extinguished. It means the chosen scene number
has been cleared.
4. If other scene number needs to be cleared, repeat
step 2 and 3.
5. Upon completion, press to save and exit.
disappears simultaneously. Press to
exit without saving.

8
4-1 Schedule Setup
Turn on the dim light and radio with soft music while
going to bed at 9:00pm. When you fall asleep usually
at 10:00pm, the dim light and radio will be turned off
automatically when 10:00pm is due using schedule
setup. In short, besides the devices included to the
schedule function, this feature also allows the devices
which are grouped to one of the scene numbers take
actions automatically when preset time for operation is
up.
1. Press for 3 seconds until is flashing
then release. is on steadily, which implies
that the unit enters schedule setting.
2. Use or single /tens digit button to select one
of the schedule numbers. Press .
3. Either AM or PM starts flashing. Select AM or PM
using .
4. Pressing enables HH of HH:MM to flash.
Further pressing enables MM of HH:MM to
flash.
5. Use or ~ to adjust HH and MM.
(Note: use to choose the item that needs to
be modified)
6. Press again to enter day of week selection. Use
to choose day of week as needed.
(Note: Keep pressing will return to step 3 for
edition.)
7. Selection for day of week can be single or multiple
choices. Use to confirm or to delete.
(If planned schedule will be taken actions from
Monday to Friday regularly, use to confirm one
by one; while among fixed day of week - Monday to
Friday, if you want to delete Monday, use to
delete.)
8. Press . If the chosen time and day have been
set prior with other schedule, will be shown.
Please reselect a day.
9. Use or single/tens digit button to select the
devices which have been fixed. (The chosen device
whose corresponding device number will be
flashing and its corresponding symbol -- , ,
or will be on steadily.)
9
10. If including a scene number to schedule setup is
needed, press and will start flashing.
The scene number will be on steadily if it is already
included in the schedule, else scene number will be
flashing. Use or single/tens digit button to
choose one of the scene numbers.
Note: In schedule setup, only one scene can be
included.
11. Press to confirm which scene number will be
included to the schedule setup.
12. Press for 3 seconds, the device number/scene
number will be excluded from schedule setup if
needed.
13. Upon completion, press to save and exit. Or
press to exit without saving.
Note: (ALL) button is not suitable for use in
schedule setup.
4-2 Auto Mode
This feature enables automatic execution of devices
which have been included to schedule setup. By
pressing button to enter auto mode, will be
indicated on the LCD screen and the devices grouped
to the schedule function will execute their preset status
automatically when the preset time for operation is up.
Press button again to exit the auto mode and
will not be shown on the LCD screen. Beware is
extinguished after replacing batteries, press
button again to enable auto execution. In short, only
when is appeared on the LCD screen, the schedule
function would become effective.
4-3 Clearing Schedule Command
1. Press for 3 seconds until is flashing
then release. is on steadily, which implies
that the unit enters schedule setting.
2. Use or single/tens digit button to select one
of the schedule numbers that needs to be cleared.
3. Press for 3 seconds. The time for execution,
day of week and will be off. It means the
particular schedule number is cleared.
4. Repeat step 2 and 3 to clear the rest of schedule
numbers one by one.
5. Upon completion, press to save and exit. Or
press to exit without saving.
Note: Press any of setting buttons (e.g. ), the set up
mode will remain for 3 seconds. If no command is
given within this period of time, the set up will be
extinguished automatically.
5-1 TV Mode
To learn the functions of TV Remote Controller (IR):
1. Press the button next to once to switch the unit
from RF mode to TV mode. is on.
2. Press for 3 seconds until is on steadily
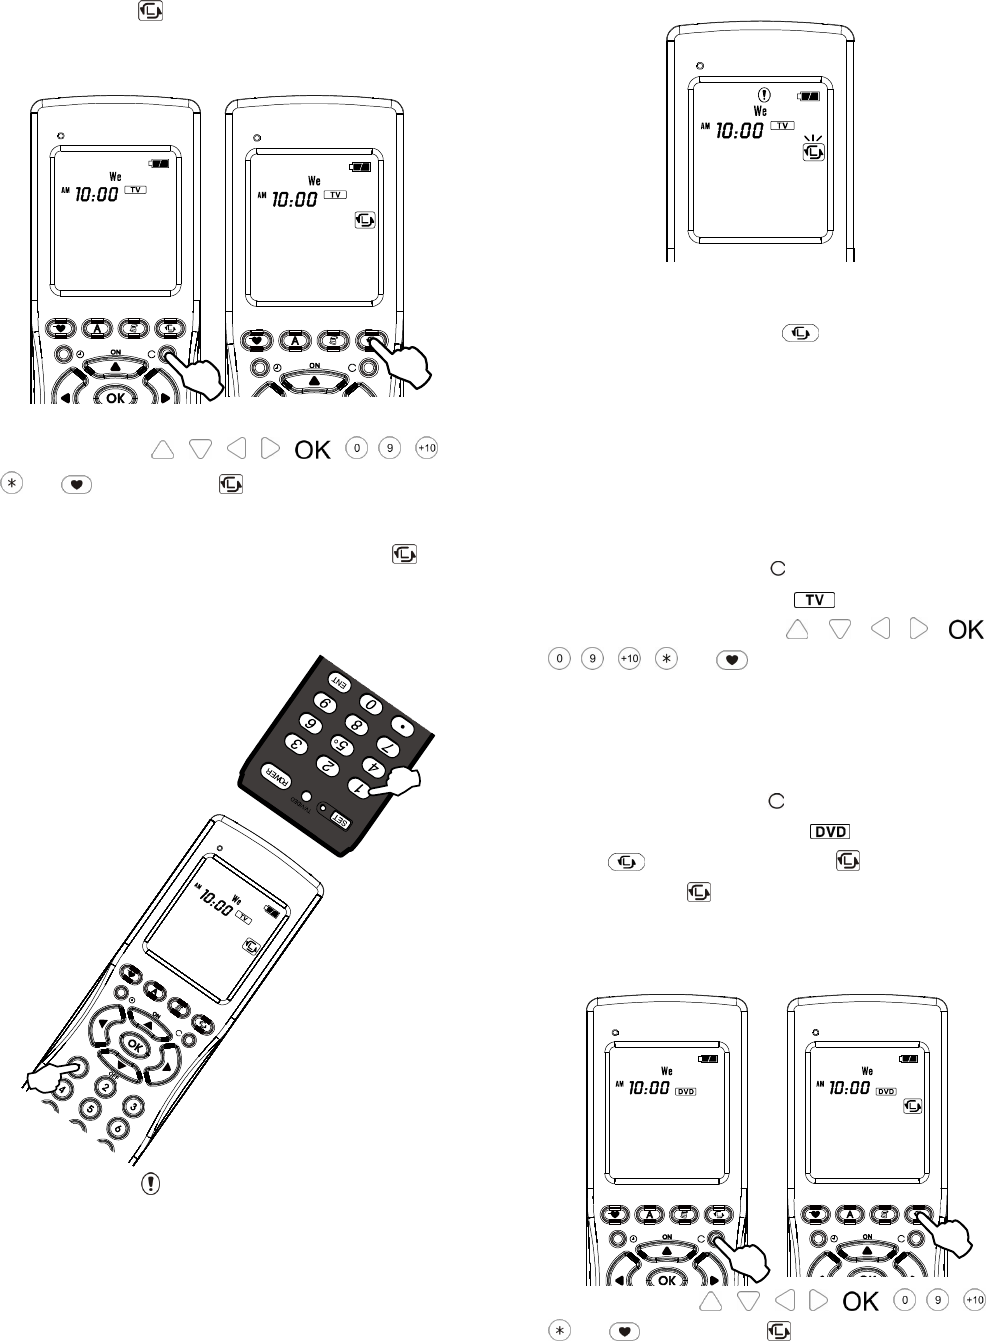
10
then release. is flashing, which implies that
the unit enters learning mode. Learning timeout
period is 30 seconds.
3. Press a button ( , , , , , ~, ,
or ) on the unit, is on steadily, hold the
button while pressing a corresponding button of TV
remote controller. Release both buttons, is
flashing, which implies that the unit is ready for
learning next button and resumes 30 seconds
countdown.
4. If learning fails, will be shown.
Note: If button pressing is too long during learning
process, IR signal will be repeated when using the
unit to control TV (e.g. press button 2 on the unit,
the TV received 22).
5. To learn next button, repeat step 1-4.
6. Upon completion, press to save and exit
learning mode.
Note: The unit cannot replace all the functions of
TV remote controller.
5-2 TV Mode Operating Instructions
1. Press the button next to once to switch the unit
from RF mode to TV mode, is on.
2. Press a learned button ( , , , , ,
~, , or ) on the unit to control TV.
6-1 DVD Mode
To learn the functions of DVD Remote Controller (IR):
1. Press the button next to twice to switch the unit
from RF mode to DVD mode. is on.
2. Press for 3 seconds until is on steadily
then release. is flashing, which implies that
the unit enters learning mode. Learning timeout
period is 30 seconds.
3. Press a button ( , , , , , ~, ,
or ) on the unit, is on steadily, hold the
button while pressing a corresponding button of
AC124
TV Remote
Control
ler
Within 5cm
in
line of sight
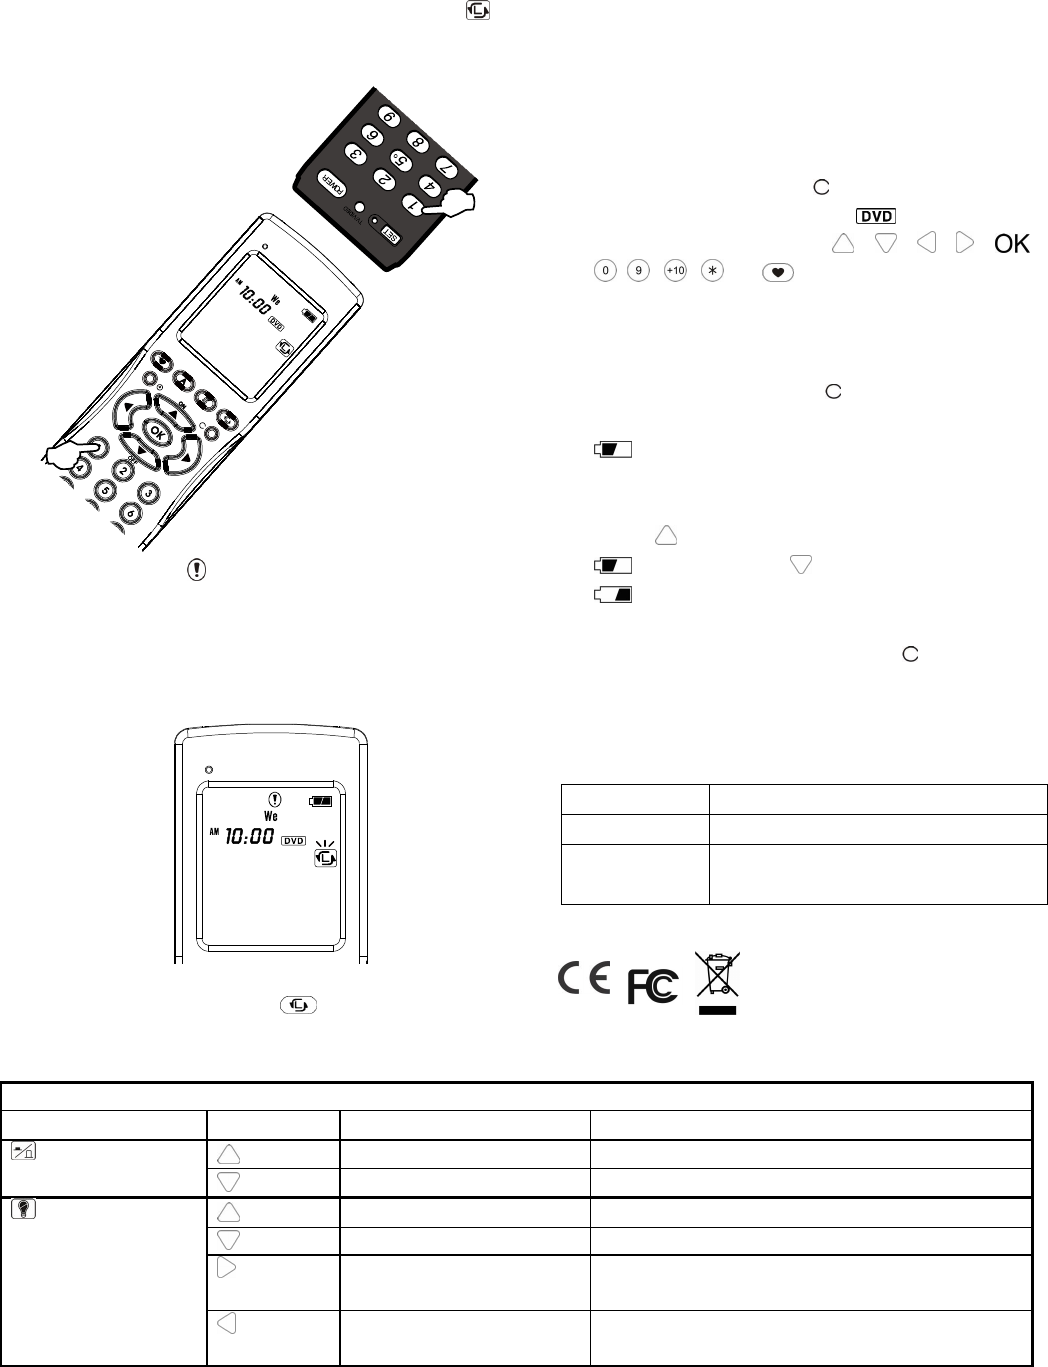
11
DV
D
Remote
Controller
DVD remote controller. Release both buttons,
is flashing, which implies that the unit is ready for
learning next button and resumes 30 seconds
countdown.
4. If learning fails, will be shown.
Note: If button pressing is too long during learning
process, IR signal will be repeated when using the
unit to control DVD (e.g. press button 2 on the unit,
the DVD received 22).
5. To learn next button, repeat step 1-4.
6. Upon completion, press to save and exit
learning mode.
Note: The unit cannot replace all the functions of
DVD remote controller.
6-2 DVD Mode Operating Instructions
1. Press the button next to twice to switch the unit
from RF mode to DVD mode, is on.
2. Press a learned button ( , , , , ,
~, , or ) on the unit to control DVD.
7-1 Power Setting Mode
1. Press the button next to three times to switch
the unit from RF mode to power setting mode.
flashing implies that the unit is in power
setting mode.
Note: Normal power mode is default setting.
2. Press to set the unit in normal power mode
; while pressing for power saving mode
.
3. Wait 30 seconds to return to RF mode
automatically or alternatively press to exit power
setting mode.
SPECIFICATIONS
Battery Type 1.5V AAA alkaline battery x 4 pieces
Battery Life About 12 months, @25¢C standby mode
Operating
Frequency
868.30MHz or 923.00MHz
*Specifications are subject to change without prior notice.
A501111256R
Operation Reference
Normal operation
Type of Product Operation Command Action of Device
Remote on On
On/Off Module
Remote off Off
Remote on On
Remote off Off
Dimmer level up Upgrade one degree of brightness
(Only applicable for lamp module at ON status)
Lamp Module
Dimmer level down Reduce one degree of brightness
(Only applicable for lamp module at ON status)
Within 5cm
in
line of sight
AC124
12
Up Rolling up
Down Rolling down
Curtain Switch
Stop Stop rolling
+ Arm Enter fully arm
+ Part-arm 1 Enter part-arm 1
+ Disarm Disarm
+ Part-arm 2 Enter part-arm 2
Alarm System
Note: After the first button ( , , or ) is pressed, then press .
Scene and schedule setup
Type of Product Operation Command Action of Device
Remote on On
On/Off Module
Remote off Off
Lamp Module Use to choose on/off action or brightness of lighting
Up Rolling up
Curtain Switch
Down Rolling down
Arm Fully arm
Part-arm 1 Part-arm 1
Disarm Disarm
Alarm System Use
to choose
mode
Part-arm 2 Part-arm 2
Federal Communication Commission Interference Statement
This equipment has been tested and found to comply with the limits for a Class B digital device, pursuant to Part 15 of
the FCC Rules. These limits are designed to provide reasonable protection against harmful interference in a
residential installation. This equipment generates, uses and can radiate radio frequency energy and, if not installed
and used in accordance with the instructions, may cause harmful interference to radio communications. However,
there is no guarantee that interference will not occur in a particular installation. If this equipment does cause harmful
interference to radio or television reception, which can be determined by turning the equipment off and on, the user is
encouraged to try to correct the interference by one of the following measures:
- Reorient or relocate the receiving antenna.
- Increase the separation between the equipment and receiver.
- Connect the equipment into an outlet on a circuit different from that to which the receiver is connected.
- Consult the dealer or an experienced radio/TV technician for help.
This device complies with Part 15 of the FCC Rules. Operation is subject to the following two conditions: (1) This device
may not cause harmful interference, and (2) this device must accept any interference received, including interference
that may cause undesired operation.
FCC Caution: Any changes or modifications not expressly approved by the party responsible for compliance could void
the user's authority to operate this equipment.
This transmitter must not be co-located or operating in conjunction with any other antenna or transmitter.
WARNING:
Do not dispose of electrical appliances as unsorted municipal waste, use separate collection facilities.
Contact your local government for information regarding the collection systems available.
If electrical appliances are disposed of in landfills or dumps, hazardous substances can leak into the groundwater and
get into the food chain, damaging your health and well-being.
When replacing old appliances with new once, the retailer is legally obligated to take back your old appliance for
disposal at least for free of charge.