Everspring Industry Co AC134-2 Wireless IR Controller User Manual
Everspring Industry Co Ltd Wireless IR Controller
User Manual
1
AC134
IR Controller
General Introduction
The AC134 is an IR Controller based on U-Net wireless technology to control home
appliances such as TV, audio equipment and air conditioner that are typically
operated by a handheld IR remote control. Through a U-Net compatible gateway
and Homesys cloud platform, the AC134 can be programmed to substitute this
handheld remote control. This allows the user to operate home appliances from a
smartphone App even when they are not at home.
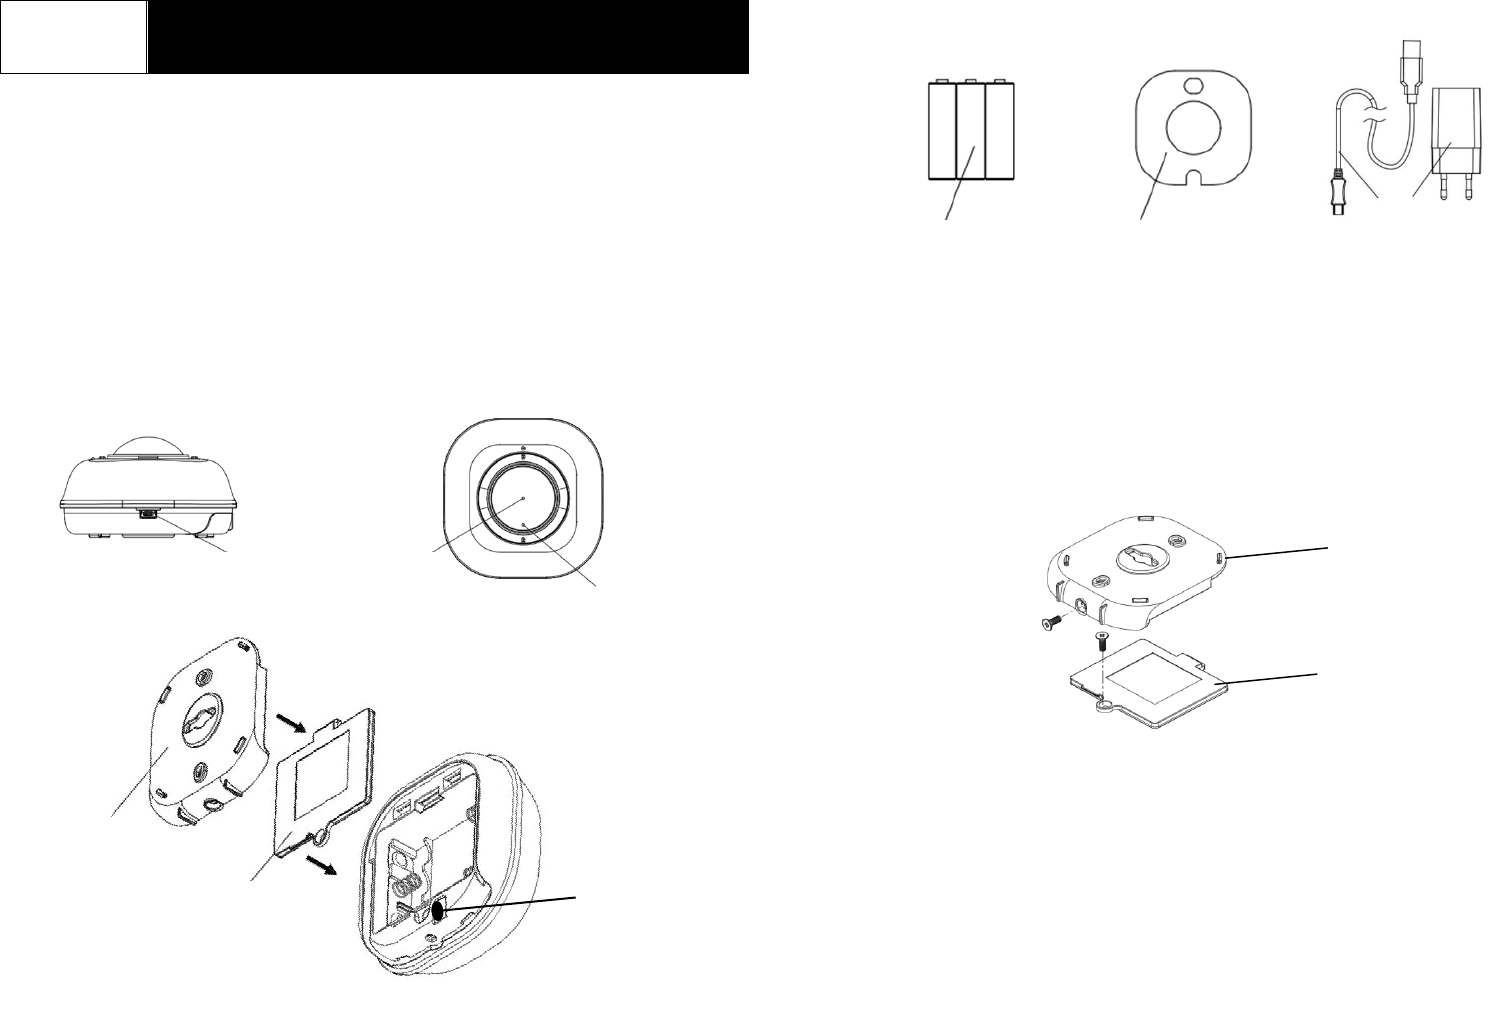
Product Layout
Accessories :
Binding with Homesys
AC134 will start pairing to the U-Net gateway when batteries are inserted into the
device.
1. First remove the back plate by undoing the screw at the side.
2. Unscrew the battery cover to expose the battery slots. Do not insert the
batteries just yet
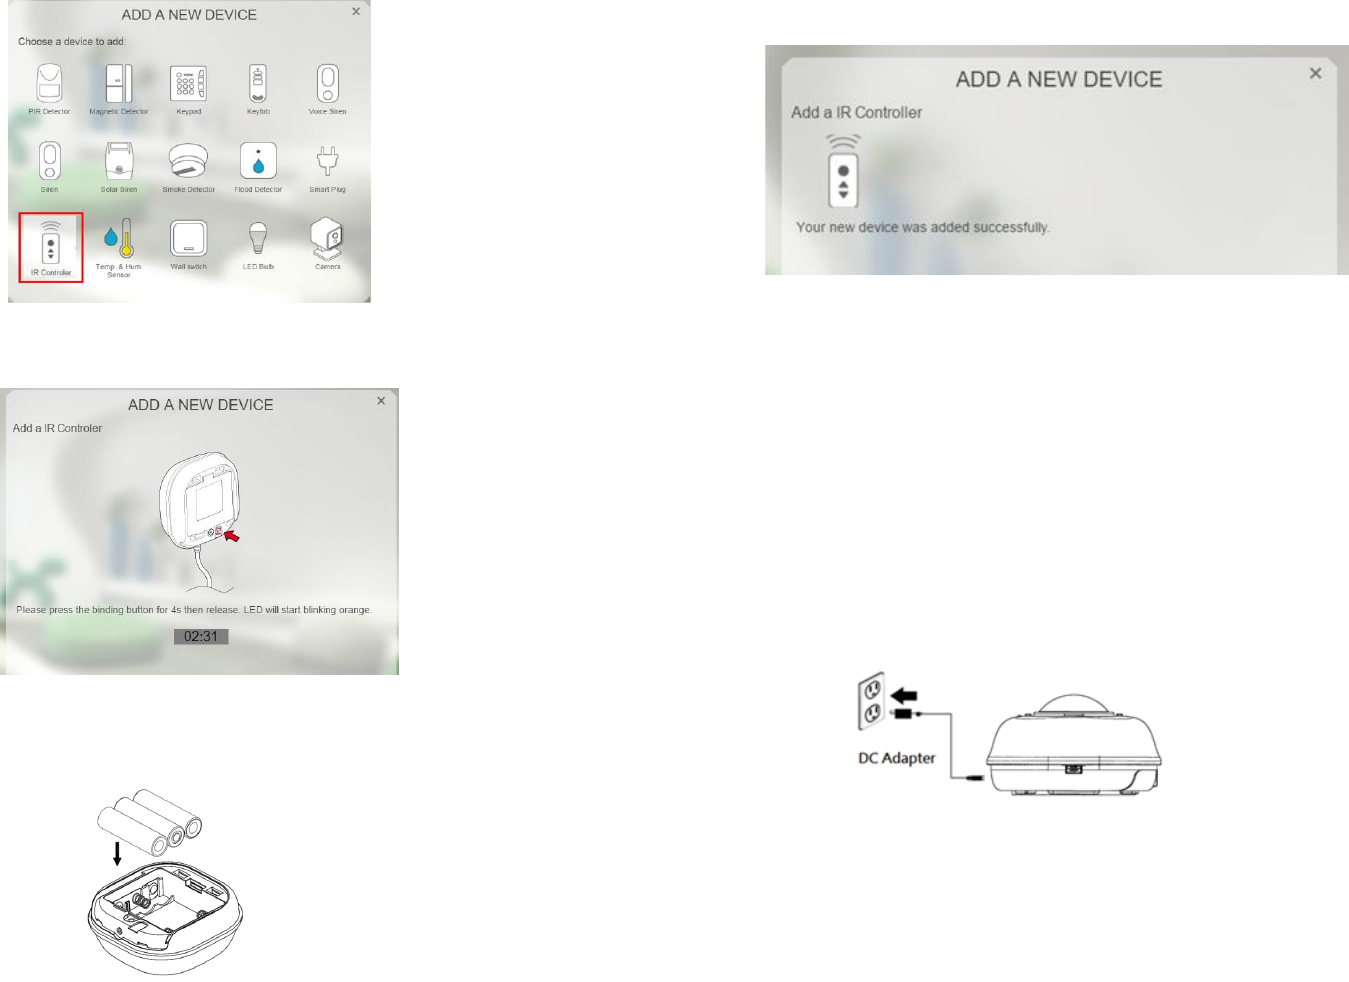
3. Log into the Homesys account from a web browser.
4. Select “System”.
5. Select “Add a New Device”, then “IR Controller”.
Backup batteries
3 x AA
Power cable
and DC adaptor
Rubber pad
Back plate
Battery
cover
Back plate
Battery
cover
Link
button
DC power
input
IR lens
LED
indicator
2
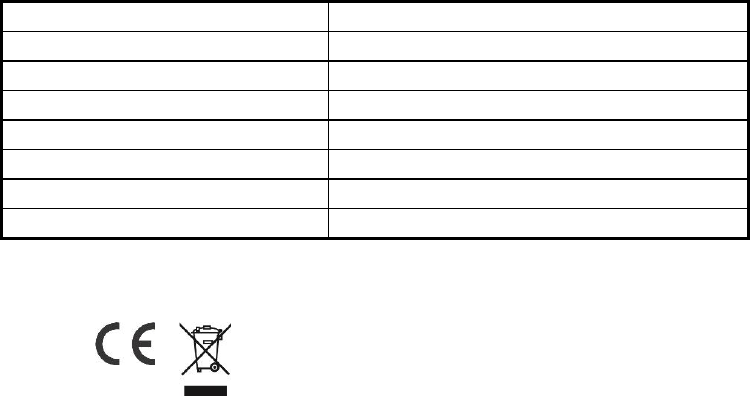
6. The following screen will appear. This means the gateway is entering binding
mode.
7. At this point, insert the batteries into the AC134 and it will automatically bind
with the gateway.
8. The screen below will appear in 10 seconds if the process is successful.
Note: Time-out will occur if the binding process was unsuccessful. Please refer
to the “Manual Binding” in the Troubleshooting section.
IR Code Learning
The AC134 can now be programmed to learn the IR codes from the appliance’s
remote control.
1. Plug the device to the AC mains using the DC adaptor and power cable
provided while still leaving the batteries inside.
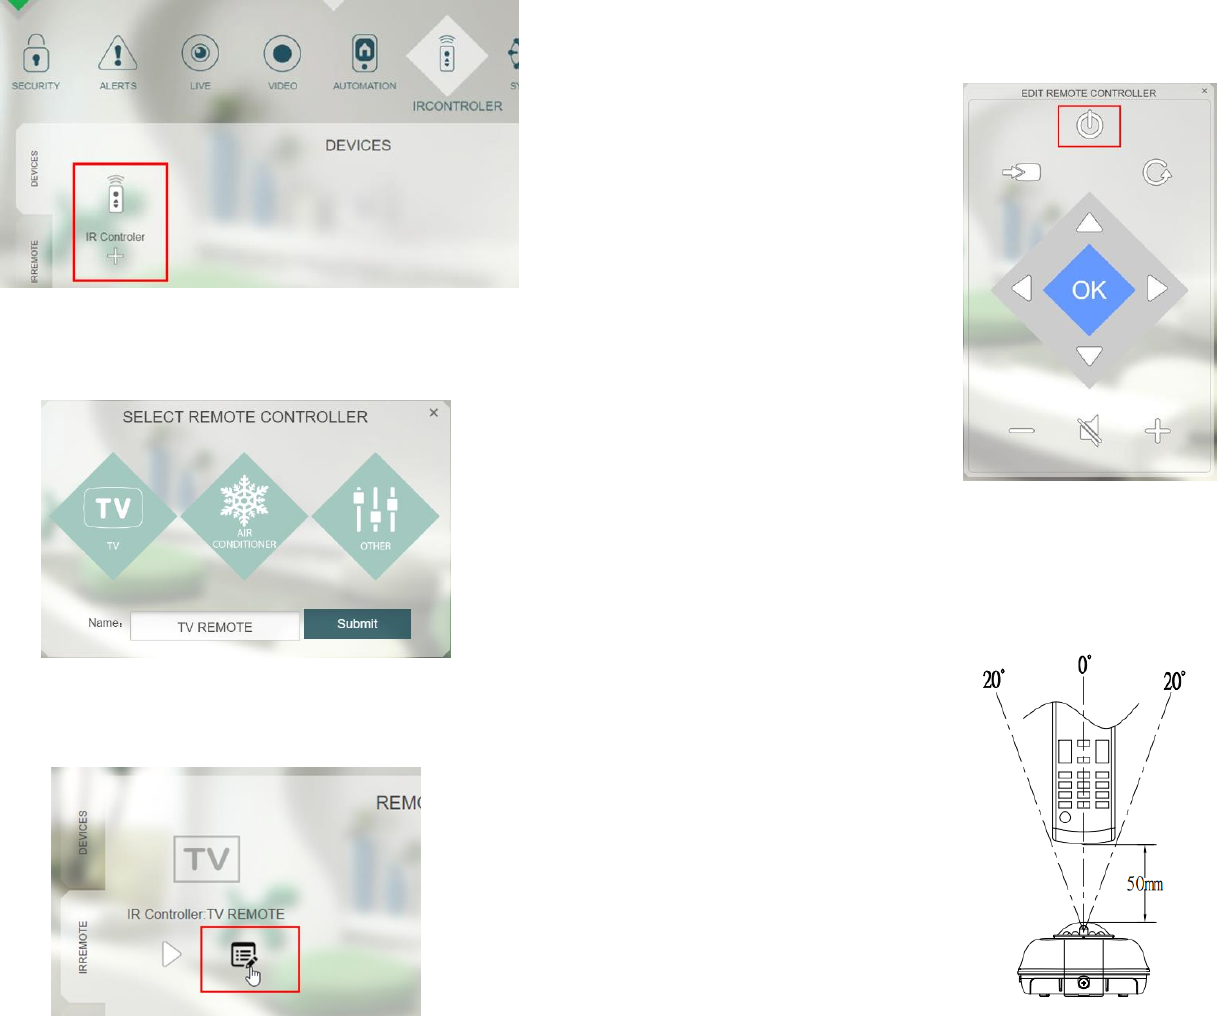
2. On the Homesys main page, select “IR controller” icon at the top.
3. In the “DEVICES” tab, click the “+” under “IR Controller”.
3
4. Then select the appliance type to learn its remote control from.
5. In this example, selecting “TV” will create an icon in the “IRREMOTE” tab for the
TV’s remote control. Click on the edit icon as shown below.
6. This brings up a virtual remote control page with icon buttons representing the
actual buttons on the remote control. To start leaning the IR code, click on a
button, for example the Power On button.
7. The red LED on AC134 will start to flash, implying that it is ready to receive up
any IR code.
8. Hold the appliance’s remote control vertically over the AC134’s lens at a close
distance of <5cm as shown below and press a button to be learned such as the
Power ON button.
4
9. The red LED will turn off if AC134 has successfully learned the button within 30
seconds. If learning was unsuccessful, it will flash three times rapidly.
10. If more buttons to be learned for the same remote control, repeat again from
step 6.
11. If a different remote control type needs to be learned (e.g. switching from TV
remote to air conditioning remote), repeat from step 3 to first select the
appliance type.
Note: A total maximum of 64 IR codes (buttons) can be learned for each AC134.
Operation & Testing
Once the IR code learning has completed, conduct a quick test using the Homesys
App or web interface.
1. Unplug the power cable from AC134 and bring the AC134 close to the
appliance (under 2m).
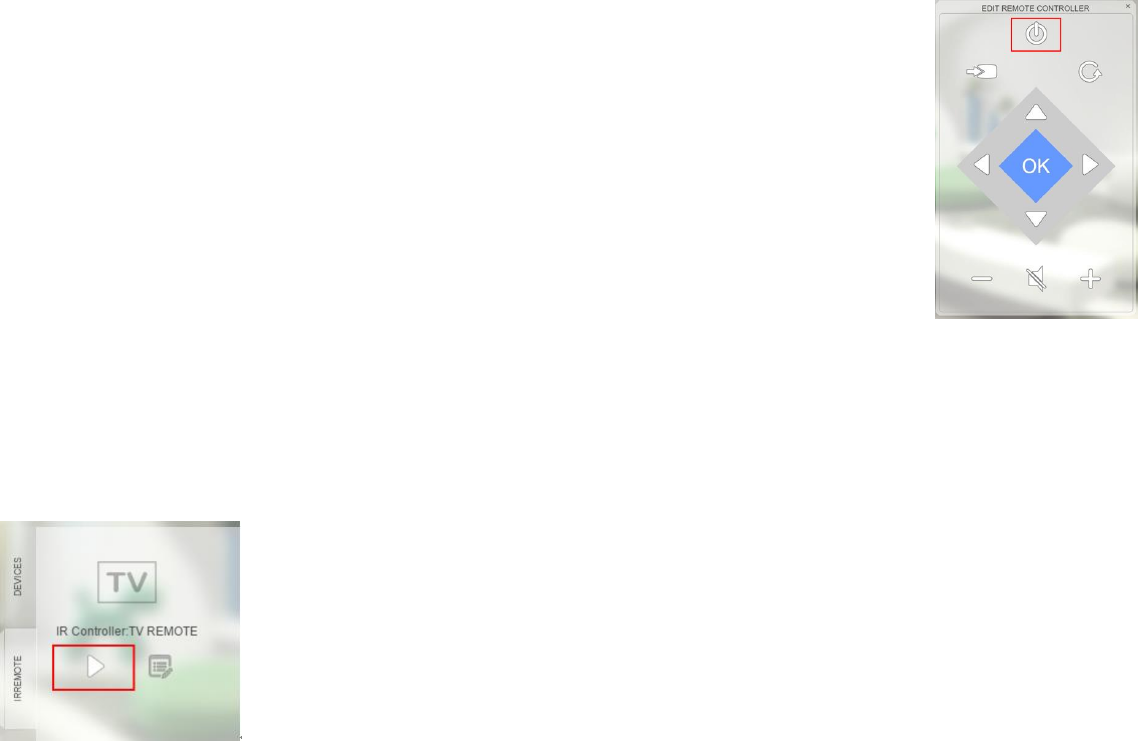
2. From the “IRREMOTE” tab, click on the play icon.
3. The virtual remote control will appear. Tap a button on the virtual remote (for
example Power ON button) and AC134 will start emitting the IR code, indicated
by its blinking LED.
4. The appliance should be activated and respond exactly the same as when
controlled by its handheld remote control. If there is no response from the
appliance, check the IR code learning procedure again.
Note: The AC134 can operate from its backup battery for up to 1 year. When
running on battery the response time will be slower and not suitable for certain
applications which require immediate response such as switching channels on
the TV. For such applications the AC134 should be powered by the provided DC
adaptor for faster response.
Location & Placement
1. The AC134 should be placed on a flat surface, preferably on a table, at a height
lower than the appliance to control.
2. For best results the target appliance should be not more than 5m away from
AC134 and at an elevation angle of anywhere between 10° to 70° around its
lens. This is shown in the shaded area below.
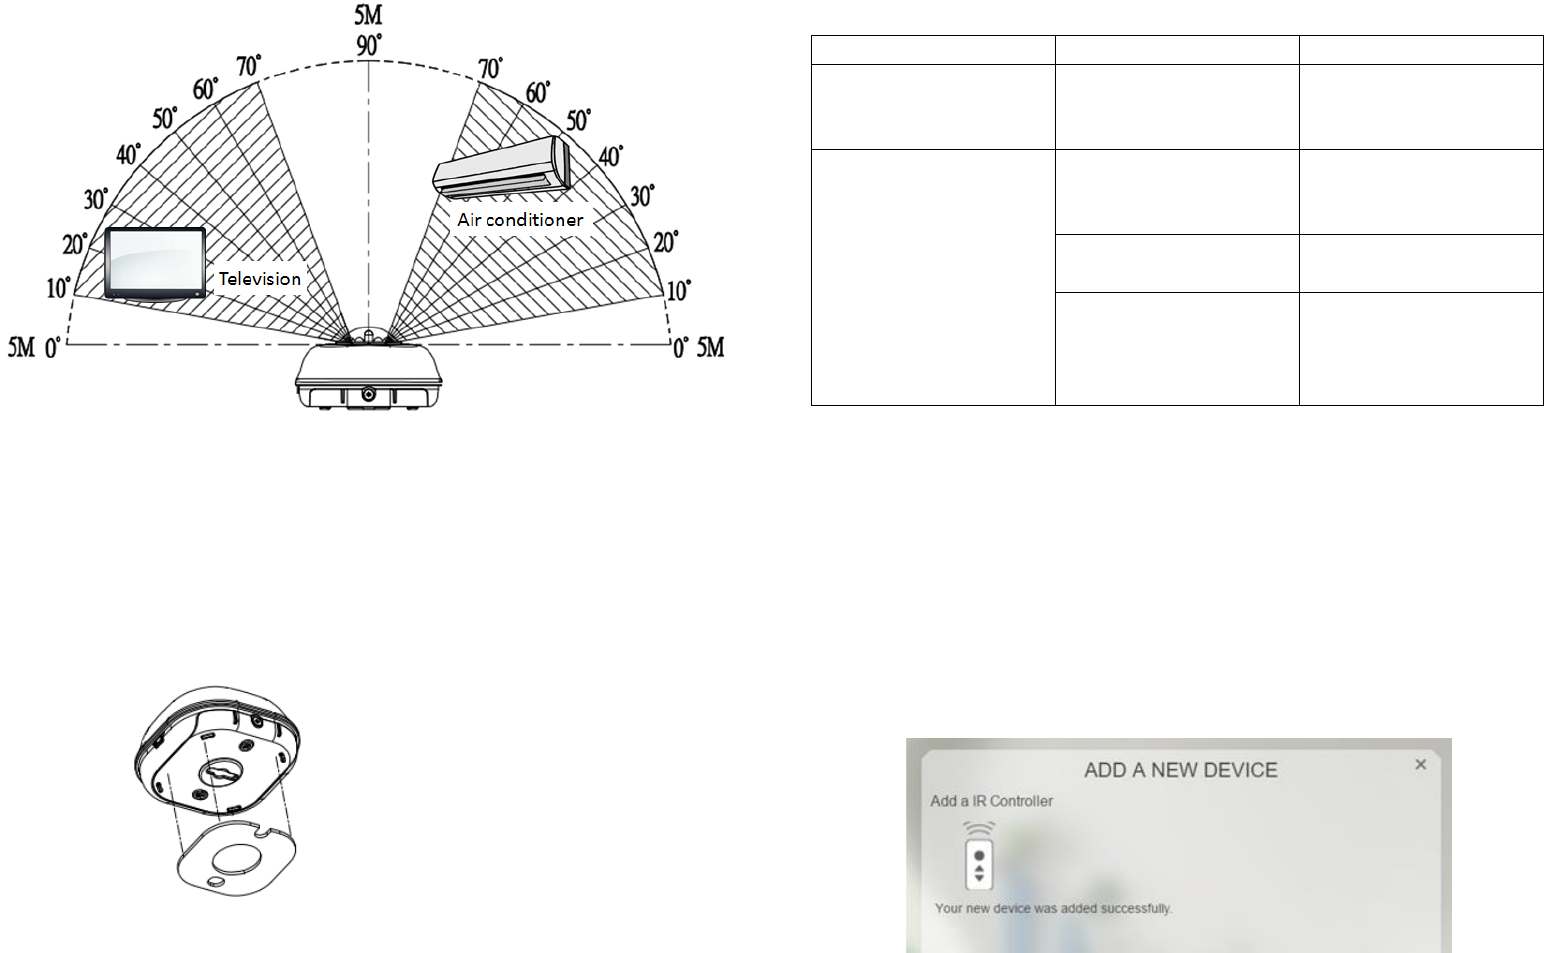
5
Note: Avoid the vertical angle between 70° to 90° as this is reserved for
learning IR code.
3. For longer range beyond 5m and up to 8m, the target appliance should be
located at a narrower elevation angle between 30° to 40° of AC134.
4. Once a location has been identified, stick the provided anti-slip rubber pad
below the base plate for better surface grip.
Trouble Shooting
Symptoms
Possible Cause
Recommendation
Device does not work,
LED does not illuminate.
No batteries attached or
no power.
Check if batteries are
attached or replace with
new ones.
LED does illuminate,
appliance does not
respond
Binding with gateway did
not complete
successfully.
Bind again using manual
binding (see next
chapter)
IR code learning did not
complete successfully.
Redo IR code learning
again.
The device is too far
from the gateway and
cannot communicate
with it.
Place the device nearer
to the gateway.
Manual Binding
1. Repeat steps 3 to 5 of the Binding with Homesys section.
2. Press and hold the Link button for 3 seconds until the LED flashes moderately
(on for 0.5 second; off for 0.5 second). This implies AC134 has now entered
the binding mode and is waiting to receive binding signals from the gateway.
3. Within 5 seconds, the LED indicator will stop flashing and turn off, indicating
the learning procedure is completed. The screen below will appear indicating
the process is successful.
6
4. If after 30 seconds the LED flashes rapidly for 3 times, it means the AC134
failed the binding process.
Reset to Factory Settings
To reset AC134 back to factory default state:
1. Press and hold the link button for 3 seconds until the LED flashes moderately
then release the button.
2. Within 30 seconds, press and hold the link button again, this time for more than
6 seconds until the LED turns off then release the button.
3. Unplug the DC adapter and remove the batteries.
4. Re-insert the batteries, if the LED blinks repeatedly once every 30 seconds this
implies the device is reset back to factory mode.
Specifications
Operating temperature range
0°C to 40°C
Operating humidity
85% RH at 30°C
Adapter
DC 5V 1A
Battery type
AA alkaline 1.5V *3
IR transmission range
Up to 8m
IR compatible bitrates
32.0 - 50.0 KHz
RF Frequency
868.30 MHz(EU)/923.00MHz(US)
RF transmission range
Outdoors >150m (Open space)
*Specifications are subject to change without notice.
WARNING:
Do not dispose of electrical appliances as unsorted municipal waste, use separate
collection facilities. Contact your local government for information regarding the
collection systems available.
If electrical appliances are disposed of in landfills or dumps, hazardous substances
can leak into the groundwater and get into the food chain, damaging your health
and well-being.
When replacing old appliances with new ones, the retailer is legally obligated to take
back your old appliance for disposal free of charge.
CAUTION:
RISK OF EXPLOSION IF BATTERY IS REPLACED BY AN INCORRECT TYPE.
DISPOSE OF USED BATTERIES ACCORDING TO THE INSTRUCTIONS
Federal Communication Commission Interference Statement
This equipment has been tested and found to comply with the limits for a Class B
digital device, pursuant to Part 15 of the FCC Rules. These limits are designed to
provide reasonable protection against harmful interference in a residential
installation. This equipment generates, uses and can
radiate radio frequency energy and, if not installed and used in accordance with the
instructions, may cause harmful interference to radio communications. However,
there is no guarantee that interference will not occur in a particular installation. If this
equipment does cause harmful interference to radio or television reception, which
can be determined by turning the equipment off and on, the user is encouraged to
try to correct the interference by one of the following measures:
- Reorient or relocate the receiving antenna.
- Increase the separation between the equipment and receiver.
- Connect the equipment into an outlet on a circuit different from that to which the
receiver is connected.
- Consult the dealer or an experienced radio/TV technician for help.
This device complies with Part 15 of the FCC Rules. Operation is subject to the
following two conditions: (1) This device may not cause harmful interference, and (2)
this device must accept any interference received, including interference that may
cause undesired operation.
7
FCC Caution: Any changes or modifications not expressly approved by the party
responsible for compliance could void the user's authority to operate this
equipment.
This transmitter must not be co-located or operating in conjunction with any other
antenna or transmitter.
FCC RF Radiation Exposure Statement:
1. This Transmitter must not be co-located or operating in conjunction with any
other antenna or transmitter.
2. This equipment complies with FCC RF radiation exposure limits set forth for an
uncontrolled environment. This equipment should be installed and operated
with a minimum distance of 20 centimeters between the radiator and your body.