Everspring Industry Co TAC35 Wireless remote control User Manual Manual TAC35 0 20150326
Everspring Industry Co Ltd Wireless remote control Manual TAC35 0 20150326
User manual

Wireless Remote Controller TAC35-0
Installation and Operating Instructions
TAC35-0 Remote
Overview:
TAC35-0 Remote—each of your customer service stations has one of these remote
units to signal that the station is ready for the next customer. Wireless
communication allows them to be installed and moved from location to location with
no wiring hassles. The remote comes in a kit of:
1. One of USB dongle
2. Five of TAC35-0 Remotes
3. One of Configuration application software
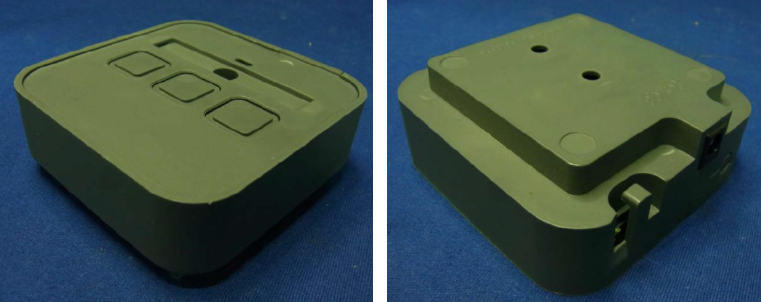
The TAC35-0 Remote consists of:
Range: 30 ft / 10m indoors; 100 ft / 30m outdoors
Frequency: 908.42 MHz (US / Canada)
or 868.42 MHz (Europe)
or 921.42 MHz (Australia / New Zealand)
Power: AC adapter or 4 AA batteries
Queue control capacity: 3
Available Functions: Next, Repeat, Unavailable
Setting Up TAC35-0 Remote
1. Open the configuration application in the computer.
2. Go Station Window to start setting for TAC35-0 Remote
3. This window sets the major characteristics of each Remote—it pairs the serial
number of the TAC35-0 Remote with a station entry and sets the name of the
TAC35-0 Remote, sets the action of each of the remote’s buttons, and sets the
voice files that say the remote’s name. This page manages the following settings
for each remote using three tabs:

A. The Learn Tab allows you to create and name a station entry for each
remote in the primary and secondary languages, and pair the serial
number of the remote.
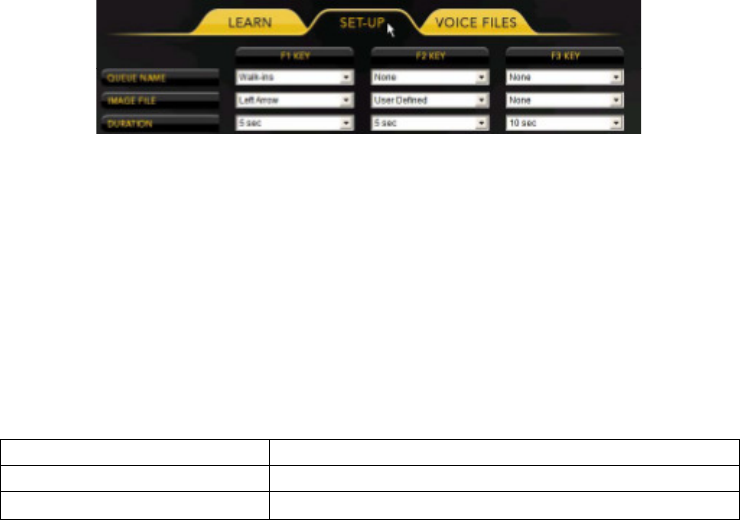
B. The Set-Up Tab sets up the action performed by the remote’s buttons.
C. The Voice Files Tab sets up voice files to say a remote’s name in the primary
and secondary languages. You may also enter Dual Voice files. These allow
the application to use two voices for customer messages. For example,
using a male voice and a female voice reduces the monotony of hearing
just one voice. The secondary language and dual voice options must be
enabled in the Basic Window, otherwise these fields will not be displayed
for configuration.
4. Click the Station tab at the top of the Configurator window to display the Station
window, and select the Learn tab.
5. Select Station list—from this list of stations, select the remote that you wish to
configure if it is in the list. To create a new station entry for a remote, select New
or click the green Add button. A name like Station Name 1 or Station Name 2 is
automatically assigned. We will change the name in the next step.
If the selected station in the list has an asterisk in front of it, then the station has
not yet been paired. We will perform the pairing in Step 4 below.
6. Station Name and Station Name (in Second Language)—edit the name of the
remote to the desired name in the primary language, for example “Window 2”.
You should change the automatically generated name to a name that is
meaningful to you and your staff. The changed name may not show up in the
Select Station list right away. The new name will be shown if you select a different
remote from the list, or navigate to another window and return to this window.
If you are using a secondary language, edit the Station Name (in Second
Language) to change it to a meaningful name in the secondary language. Again,
the changed name may not show up in the Select Station list right away.
7. Serial No.—You will not need to pair (learn) the serial numbers of the remotes
that are furnished as part of the application.
8. Click the browse button for the Serial No. field to start the pairing process.
9. Press the Learn button on the remote with a pen or pencil. The Learn button is
located on the remote’s left side towards the front.
* - If the remote has not been paired with any USB dongle before, press the Learn
button a second time to pair the remote with the USB dongle.
* - If the remote has previously been paired with another USB dongle, press the
Learn button second time to reset the remote. Then press the Learn button a
third time to pair the remote.

10. Select the Set-up tab. For 3-button and 6-button remotes, this tab allows you to
associate each Fn key (F1, F2, or F3) with a queue. For a 1-button remote,
program F1 key settings only.
If you entered 1 in the Number of Queues on the Basic Window, you may
only set up the F1 key.
If you entered 2 in the Number of Queues on the Basic Window, you may
set up two of the Fn keys.
If you entered 3 or more in the Number of Queues on the Basic Window,
you may set up all of the Fn keys.
11. Queue Name—Associate the F1 key with a queue.
For three-button remotes, this will program the remote so that when its F1
key is pressed, it will signal the selected queue.
12. You may use the Preview button at the bottom of the window to check your
configuration. Click the Save button to save your changes on the computer and
download them to the USB dongle.
Specifications
Rating DC12V 1A from adapter, DC1.5V *4 Batteries
Operating Frequency 908.42 MHz (US) / 868.42 MHz (EU)
FCC ID FU5TAC35
*Specifications are subject to change without notice
Federal Communication Commission Interference Statement
This equipment has been tested and found to comply with the limits for a Class B digital device,
pursuant to Part 15 of the FCC Rules. These limits are designed to provide reasonable
protection against harmful interference in a residential installation. This equipment generates,
uses and can radiate radio frequency energy and, if not installed and used in accordance with
the instructions, may cause harmful interference to radio communications. However, there is
no guarantee that interference will not occur in a particular installation. If this equipment does
cause harmful interference to radio or television reception, which can be determined by turning
the equipment off and on, the user is encouraged to try to correct the interference by one of
the following measures:
- Reorient or relocate the receiving antenna.
- Increase the separation between the equipment and receiver.
- Connect the equipment into an outlet on a circuit different from that to which the receiver
is connected.
- Consult the dealer or an experienced radio/TV technician for help.
This device complies with Part 15 of the FCC Rules. Operation is subject to the following two
conditions: (1) This device may not cause harmful interference, and (2) this device must accept
any interference received, including interference that may cause undesired operation.
FCC Caution: Any changes or modifications not expressly approved by the party responsible
for compliance could void the user's authority to operate this equipment.
This transmitter must not be co-located or operating in conjunction with any other antenna or
transmitter.
Warning:
Do not dispose of electrical appliances as unsorted municipal waste, use separate
collection facilities.
Contact your local government for information regarding the collection systems
available.
If electrical appliances are disposed of in landfills or dumps, hazardous substances
can leak into the groundwater and get into the food chain, damaging your health and
well-being.
When replacing old appliances with new ones, the retailer is legally obligated to take
back your old appliance for disposal at least for free of charge.