Everspring Industry Co TSM04 Magnetic Contact Detector User Manual
Everspring Industry Co Ltd Magnetic Contact Detector
User manual
1
TSM04
Magnetic Contact Detector
General Introduction
The TSM04 Magnetic Detector is used in security or home automation applications
to detect opening or closing of doors/windows. It consists of two parts; a Detector
and a Magnet. Opening the protected doors/ windows will remove the magnetic field,
sending an alarm signal to the gateway. Its great compatibility with our U-Net family
security products makes it suitable for smart home cloud based platforms such as
Homesys.
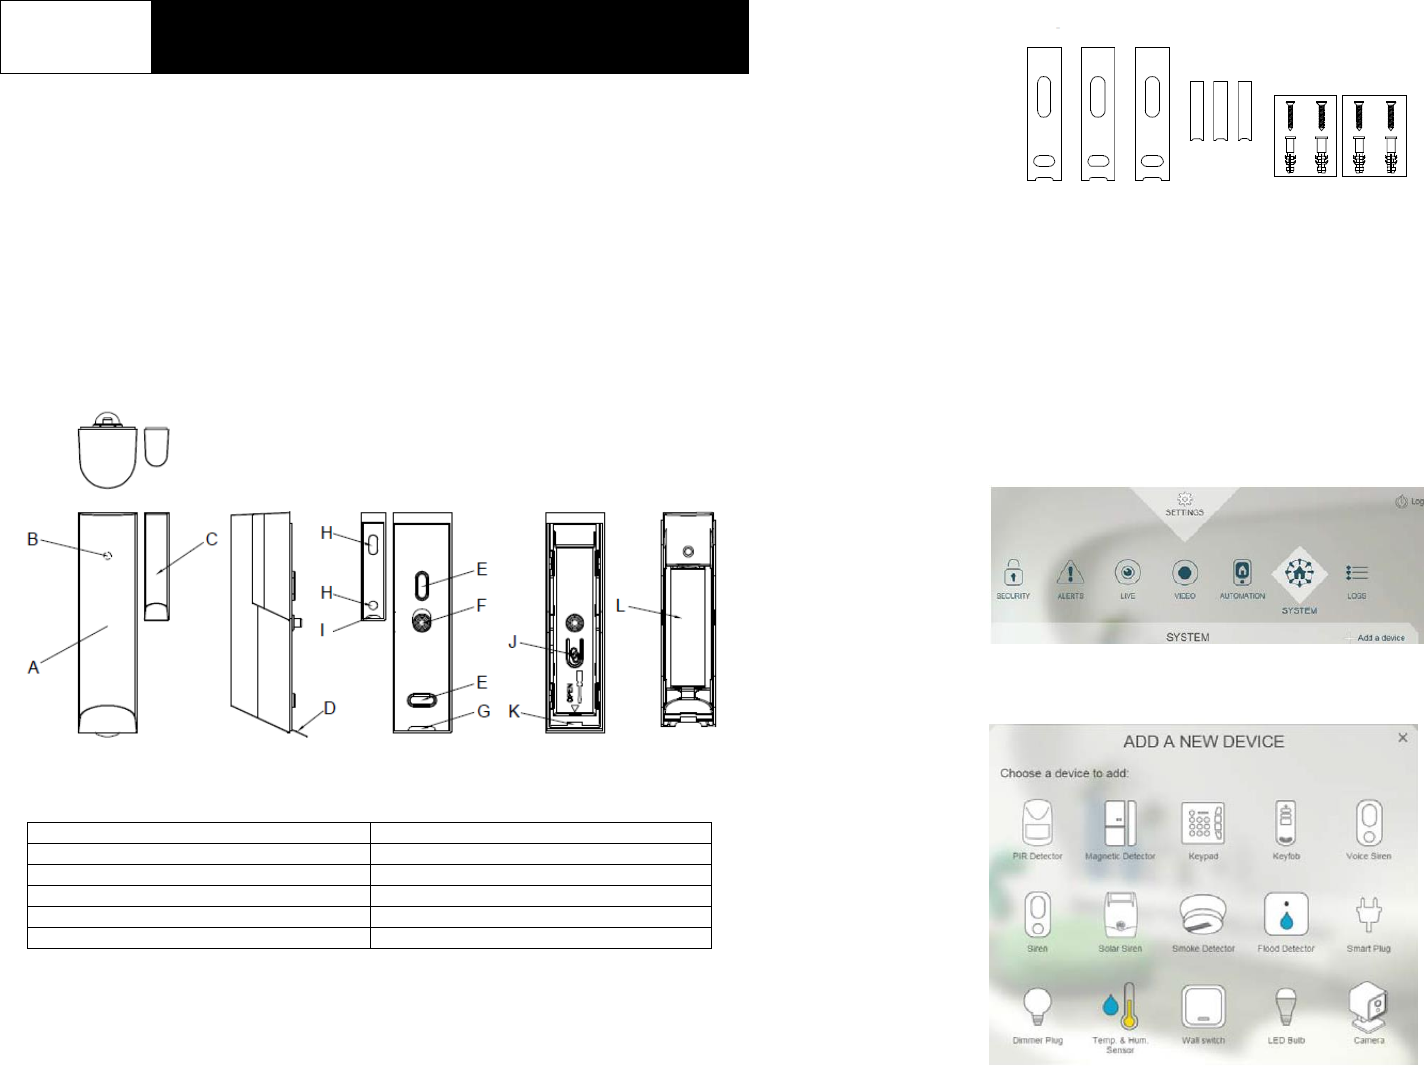
Product Layout
A. Detector
G. Mylar hole
B. LED indicator
H. Screw mounting hole
C. Magnet
I Slot
D. Battery mylar
J Learning button
E. Screw mounting hole
K Mylar hole
F. Tamper
L Battery
Accessories :
Binding with Homesys
1. Device with battery included. The battery is isolated by a mylar. Don’t remove
the mylar yet.
2. Log into the Homesys account from a web browser.
3. Select “System”, then ”Add a Device”
4. Select “Magnetic Detector”
.
3M rubber
Screws
2
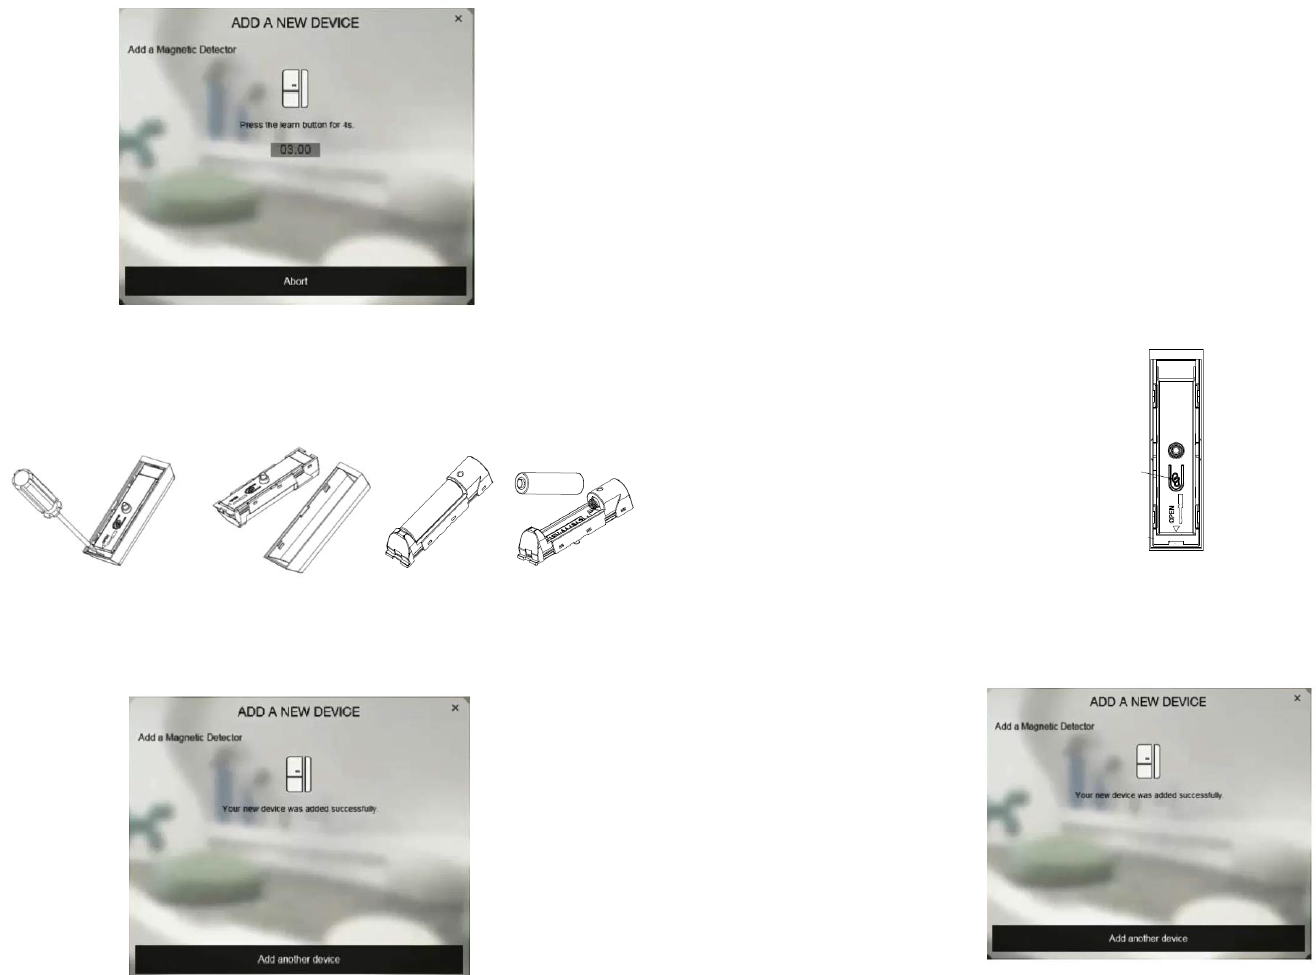
5. The following screen will appear. This means the gateway is entering binding
mode.
6. Devices with battery included : Pull out the mylar, and the LED should turn on.
Devices without battery included : Open the backplate and use a screwdriver to
open the battery cover as below to insert the battery
7. The screen below will appear in 10 seconds if the process is successful.
Note: Time-out will occur if the binding process was unsuccessful. Please refer
to the “Manual Binding”.
Manual Binding
1. Remove the backplate of the detector and leaving the battery inside the
detector
2. Repeat steps 4 to 5 of the Binding with Homesys section
3. Press the Learning button for about 3 seconds and release. The LED will flash
repeatedly. This implies detector has now entered the binding mode and is
waiting to receive binding signals from the gateway.
4. Within 5 seconds, the LED indicator will flash rapidly and turn off, indicating the
learning procedure is completed. The screen below will appear indicating the
process is successful..
Learning
button
3
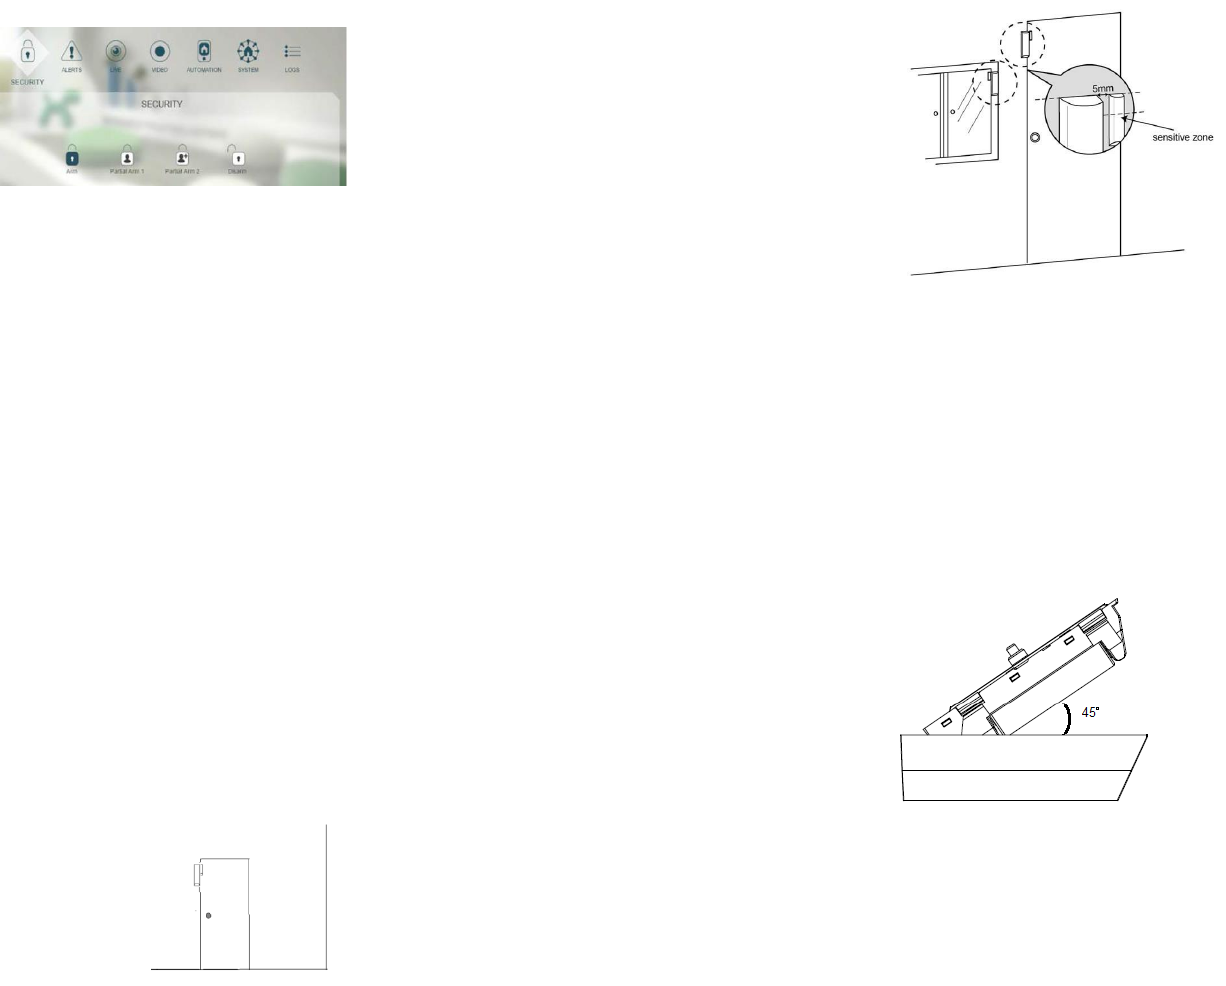
Operation & Testing
1. Go to System, and select ARM
2. Wait for 30 secs, then separate the detector from the magnet ( at least 3.5 cm
distance apart)
3. If the test is successful, the system will trigger an alarm ( alarms are listed
“Events”)
Notes : It is necessary that the gateway Homesys is powered and connected to
internet.
4. If the test is unsuccessful, please check the troubleshooting section.
Location & Placement
1. Mount the Magnetics Detector in dry interior locations only.
2. Don’t place the unit near combustible substances or any source of heat, e.g.
fires, radiators, boilers etc.
Note: Mounting the detector to a metal frame or within 1 meter of metalwork
(e.g. radiators, water pipes) may affect radio range of the device. Please use
plastic or wooden spacers to separate the detector and metal surface when
required.
3. Fit the magnet on the moving part of the door/window, and vice versa if
necessary. The magnet could be in the detector both side. Use the provided
self-adhesives tape to secure them in place.
4. Make sure the parallel gap between the magnet and detector is less than 20mm
and that they are aligned from the top. An alarm will be triggered if the gap is
greater than 35mm.
5. Perform the test using the same steps described in Operation & Testing section
above to ensure the unit is working properly.
Maintenance
1. Low Battery: When the battery becomes low. The detector will report back to the
gateway. If the door or window is poen the LED will flash to indicate low battery
condition to the user.
2. If the battery needs to be changed. Please insert the batteries at a 45° angle as
shown below.
4
Software reporting commands
Auto report
When battery is inserted, it will report to gateway
after 2 minutes. It will report the condition every
hour.
Status change
1. Tamper switch is on: It will report to gateway
and LED won’t flash
2. Tamper switch is release: It will report to
gateway and LED will flash
Trouble Shooting
Symptoms
Possible Cause
Recommendation
Device does not work,
LED does not illuminate.
No batteries attached or
no power.
Check if batteries are
attached or replace with
new ones.
LED does illuminate,
appliance does not
respond
Binding with gateway did
not complete
successfully.
Bind again using manual
binding
Disturbed by other radio
waves
Please operate later
Reset to Factory Settings
To reset TSM04 back to factory default state:
1. Press and hold the Learning button for 3 seconds until the LED flashes
moderately then release the button.
2. Within 30 seconds, press and hold the Learning button again, this time for more
than 6 seconds then release the button.
3. Re-insert the batteries, if the LED blinks slowly for 30 seconds this implies the
device is reset back to factory mode.
Specifications
Operating temperature range
0°C to 40°C
Operating humidity
85% RH at 30°C
Battery type
AA alkaline 1.5V *1
RF Frequency
868.30 MHz/923.00MHz
RF transmission range
Outdoors >200m (Open space)
*Specifications are subject to change without notice.
WARNING:
Do not dispose of electrical appliances as unsorted municipal waste, use separate
collection facilities. Contact your local government for information regarding the
collection systems available.
If electrical appliances are disposed of in landfills or dumps, hazardous substances
can leak into the groundwater and get into the food chain, damaging your health
and well-being.
When replacing old appliances with new ones, the retailer is legally obligated to take
back your old appliance for disposal free of charge.
CAUTION:
RISK OF EXPLOSION IF BATTERY IS REPLACED BY AN INCORRECT TYPE.
DISPOSE OF USED BATTERIES ACCORDING TO THE INSTRUCTIONS
5
Federal Communication Commission Interference Statement
This equipment has been tested and found to comply with the limits for a Class B
digital device, pursuant to Part 15 of the FCC Rules. These limits are designed to
provide reasonable protection against harmful interference in a residential
installation. This equipment generates, uses and can
radiate radio frequency energy and, if not installed and used in accordance with the
instructions, may cause harmful interference to radio communications. However,
there is no guarantee that interference will not occur in a particular installation. If this
equipment does cause harmful interference to radio or television reception, which
can be determined by turning the equipment off and on, the user is encouraged to
try to correct the interference by one of the following measures:
- Reorient or relocate the receiving antenna.
- Increase the separation between the equipment and receiver.
- Connect the equipment into an outlet on a circuit different from that to which the
receiver is connected.
- Consult the dealer or an experienced radio/TV technician for help.
This device complies with Part 15 of the FCC Rules. Operation is subject to the
following two conditions: (1) This device may not cause harmful interference, and (2)
this device must accept any interference received, including interference that may
cause undesired operation.
FCC Caution: Any changes or modifications not expressly approved by the party
responsible for compliance could void the user's authority to operate this
equipment.
This transmitter must not be co-located or operating in conjunction with any other
antenna or transmitter.
NCC 警語:
♦ 根據 NCC 低功率電波輻射性電機管理辦法規定:
第十二條 經型式認證合格之低功率射頻電機,非經許可,公司、商號或使用者均不
得擅自變更頻率、加大功率或變更原設計之特性及功能。
第十四條 低功率射頻電機之使用不得影響飛航安全及干擾合法通信;經發現有干擾
現象時,應立即停用,並改善至無干擾時方得繼續使用。前項合法通信,指依電信法
規定作業之無線電通信。低功率射頻電機須忍受合法通信或工業、科學及醫療用電波
輻射性電機設備之干擾。
♦ 減少電磁波影響,請妥適使用。