Evoko Un ERM2001 Evoko Liso Room Manager /Evoko Liso User Manual
Evoko Unlimited AB Evoko Liso Room Manager /Evoko Liso Users Manual
Evoko Un >
Users Manual
Evoko Liso Room Manager
User Manual
May 2016

2
Contents
Preface ................................................................................................................. 4
Installing Evoko Service on Windows ............................................................... 6
Required programs ...................................................................................................... 6
NodeJS .....................................................................................................................................6
7zip (7z) ...................................................................................................................................6
MongoDB .................................................................................................................................8
.NET Framework ......................................................................................................................9
Installation process .................................................................................................................10
Evoko Service Panel instructions ...........................................................................................12
Log files .................................................................................................................................17
Uninstall / Re-install service for Windows .............................................................. 18
Installing Evoko Service on Linux ................................................................... 21
Download .................................................................................................................... 21
Installation .................................................................................................................. 21
Uninstallation ............................................................................................................. 24
Evoko Service setup ......................................................................................... 25
Evoko Service setup wizard ...................................................................................... 25
Office 365 ..............................................................................................................................25
Exchange 2010 .......................................................................................................................29
IBM Domino ..........................................................................................................................31
Google ....................................................................................................................................34
Evoko Booking ......................................................................................................................37
Download and install image on Evoko Room Manager ................................. 40
Download and write firmware image using Windows ............................................ 40
Download image write tool - Win32DiskImager ...................................................................40
Download and uncompress the image ....................................................................................40
Write the image to USB memory card ...................................................................................40
Download and write firmware image using Linux .................................................. 42
Download and uncompress the image ....................................................................................42
Write the image to USB memory ...........................................................................................42
Boot from USB and install firmware on Device ...................................................... 44
Boot and install firmware .......................................................................................................44
Evoko Device setup with Evoko Server .......................................................... 46
Firmware upgrades ........................................................................................... 53
Upgrade firmware on device side ............................................................................ 53
Device monitoring ...................................................................................................... 53
Logs and error reports ...................................................................................... 58
3

4
Preface
The Evoko Liso Room Manager manual contains the full descriptions of some of the
main features of the system, how to use those features and how to set them up.
The manual consists of several sections which describe the main actions that need to be
undertaken in order to have the Evoko Service and Evoko Liso Room Manager up and
running.
This is the first draft of the user manual and is prone to later changes and modifications.
5
6
Installing Evoko Service on Windows
In order to install Evoko Service on Windows the following instructions need to be
followed with care.
Required programs
In order to complete the installation, several prerequisite programs need to be installed
first.
Those programs in chronological order are:
1. NodeJS version 0.10.40 for 32-bit computer. Available at https://nodejs.org/en/blog/
release/v0.10.40/
2. 7z archiving software available at http://www.7-zip.org/download.html
3. MongoDb available at https://www.mongodb.org/downloads#production
4. .NET Framework 4.5.2 available at http://dotnetsocial.cloudapp.net/GetDotnet?
tfm=.NETFramework
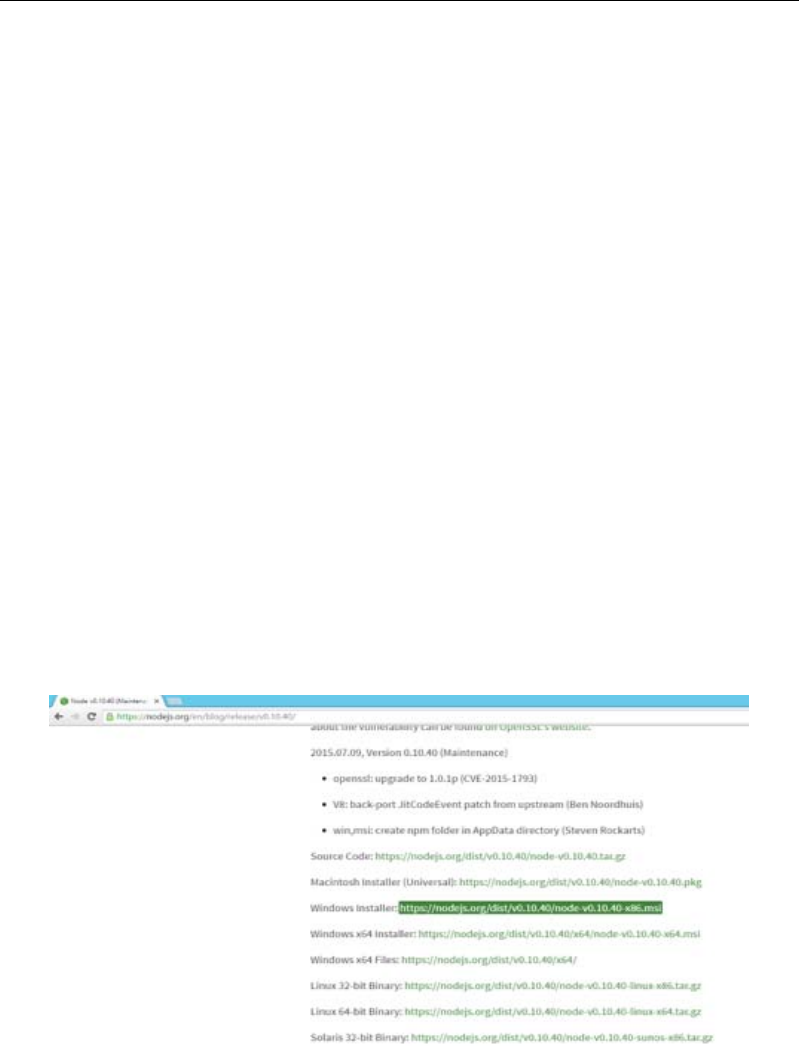
NodeJS
Download nodejs version 0.10.40 40 for 32-bit computer from
https://nodejs.org/en/blog/release/v0.10.40/. Link for download is marked in the
image below.
During the installation, default setup will be to add nodejs to environment path,
that step should not be changed, and left as is.
7zip (7z)
Download and install 7z archiving software available at http://www.7-zip.org/
download.html. Link for download is marked in the image below.

7
During the installation, 7z path to executable will not be added to system path, thus it will
have to be added manually.
Open System Properties window. If you are not able to find the System Properties, open
command prompt and type the following command: sysdm.cpl. It will open the System
Properties window.
Go to the Advanced tab and press button environment variables. Under section System
variables find variable “path”, select it and click button Edit.

8
Concatenate; C:\Program Files (x86)\7-Zip\ to existing value of system “path"
environment variable. If previous value of system "path" environment variable, does not
end with \ then add \;C:\Program Files (x86)\7-Zip\
Note: Path C:\Program Files (x86)\7-Zip\ is just used as an example it is not strict, you
can install 7z on any location on your computer.
After you are done with editing, press OK button to exit Edit System variable and another
OK button to exit Environment Variables.
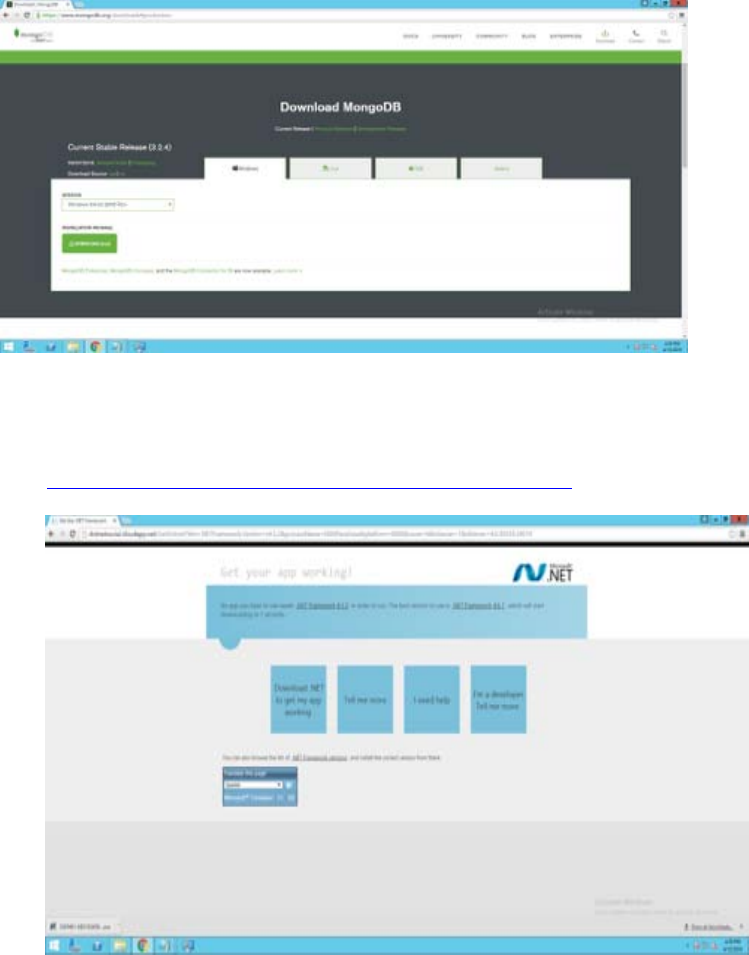
MongoDB
Download and install MongoDb from https://www.mongodb.org downloads#production

10
Installation process
After the prerequisite programs have been installed the Evoko Service can be downloaded
and installed. Download and install EvokoRoomManager.msi from Evoko Download
Website.
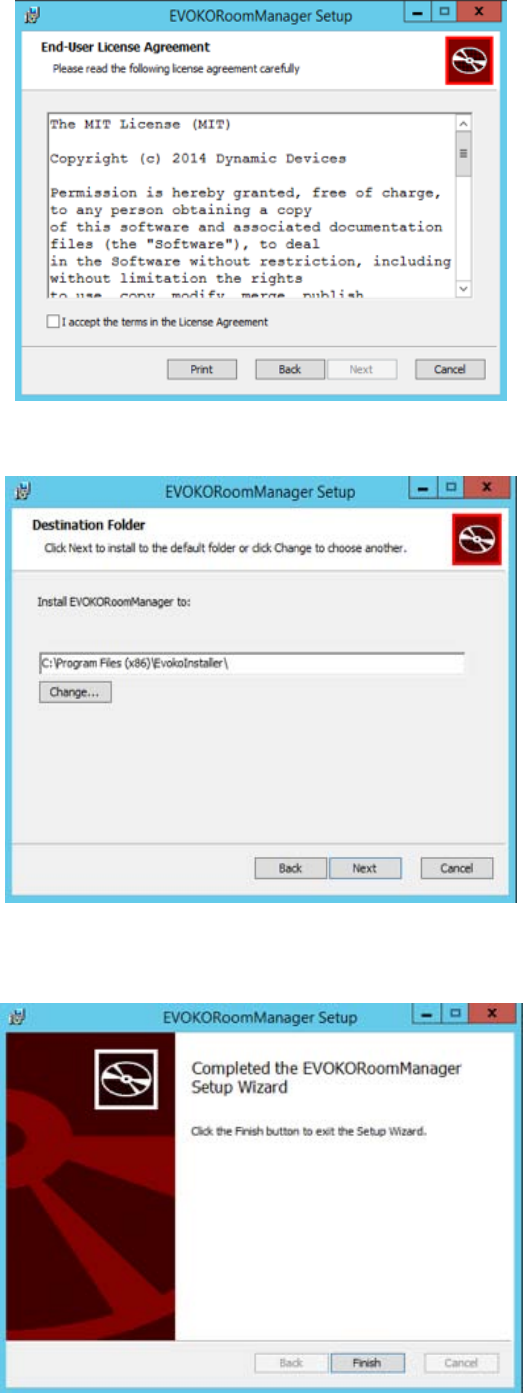
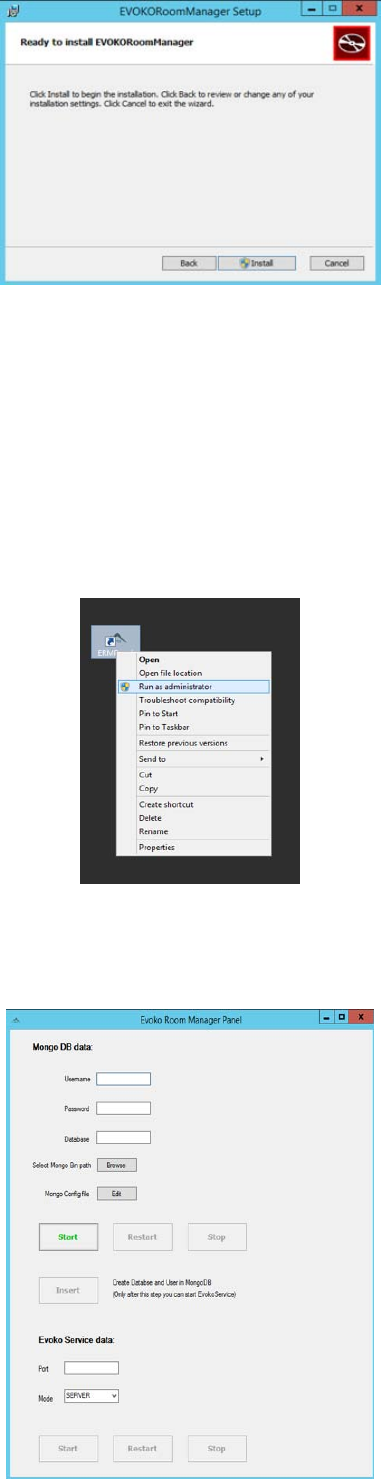
This is the initial installation step, just click button Next to continue with installation.
This is the installation license step where you need to accept the term in order to proceed
with installation.
11
This is installation step, where you choose installation destination folder.
Once you have accepted the terms and choose the destination, you are left to perform
actual installation. Please click OK if windows prompts you with question, do you allow
this action.
This is the final step of installation. Just click Finish and you are ready to use the product.
12
Run ERMPanel (Evoko Liso Room Manager Panel) as Administrator (Shortcut will be on
Desktop). Admin rights are necessary because Evoko Liso Room Manager will
programmatically do some this that require Admin rights. For example: Adding
Environment variables.
Evoko Service Panel instructions
After a successful installation, the ERMPanel needs to be run. The shortcut for the
ERMPanel is located on the Desktop. The ERMPanel should be run as the Administrator
since it requires additional permissions to execute certain functions, such as adding
environment variables.
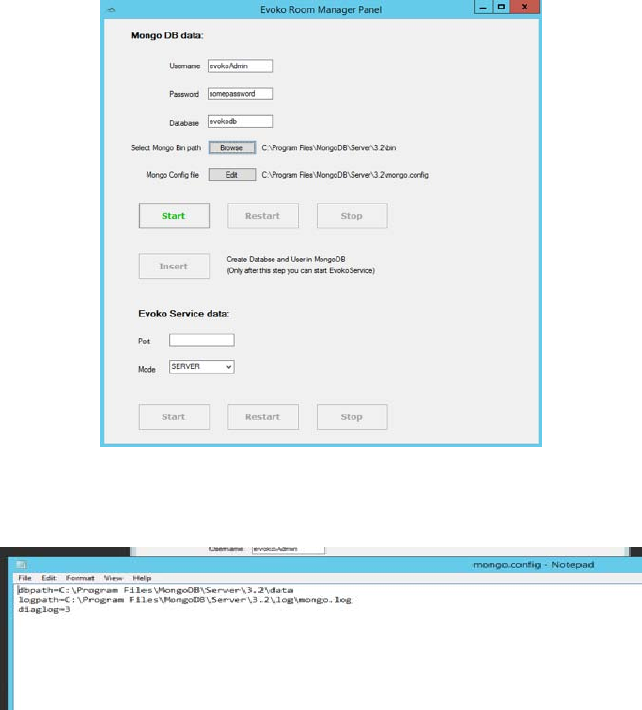
This is the Evoko Service Main window. From here you can configure its Mongo
database and application port. Also you can start and stop both database server and Evoko
service.

13
In section Mongo DB data, you need to enter username and password for new MongoDb
user and database name. Both username and database will be used only for Evoko Service
purposes.
You will need to select MongoDB bin path. It is path to the MongoDB executable under
MongoDB installation folder.
14
After you select MongoDB bin path, application will automatically create mongo.config
file with some default values.
You are always free to edit mongo.config file by clicking on Edit button. Here are
mongo.config default values opened in default text editor.
15
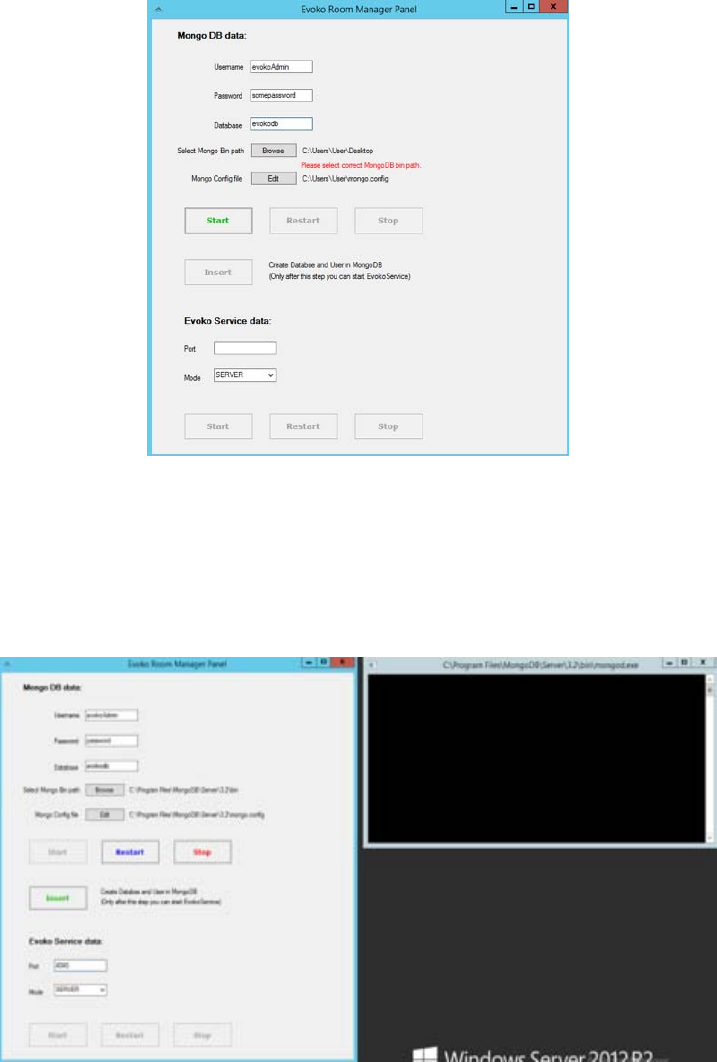
If you select wrong MongoDB bin path, as on the image below. You will be notified on
attempt to start MongoDB service.
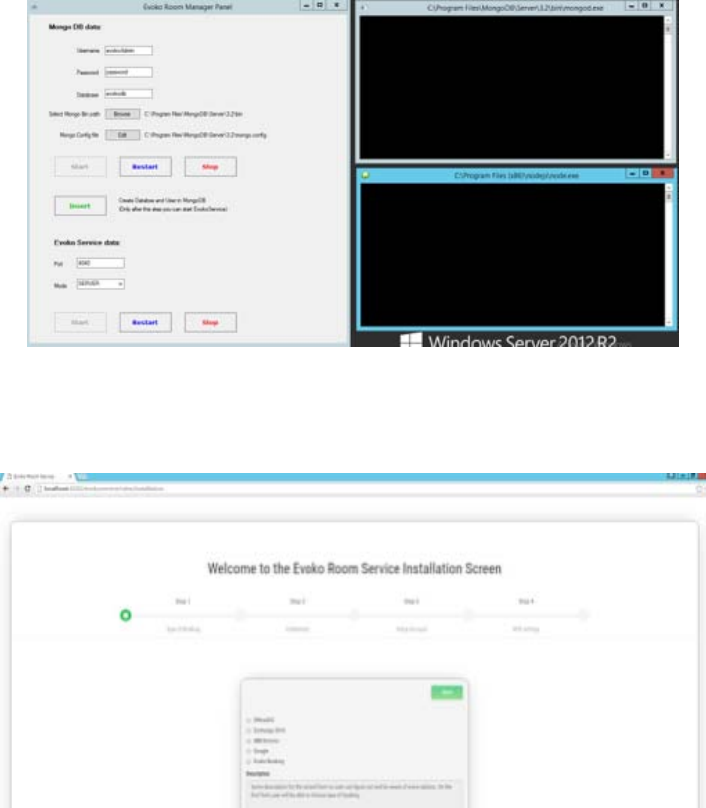
Clicking on the Start button will start MongoDB server. Console window for MongoDb
service will pop up. You can monitor any MongoDB activity there.
After you start MongoDb server you need to press Insert button in order to insert
MongoDb data into the running MongoDB service. Just after that step, Evoko Service
Start button will be enabled.
You will not be able to start Evoko Service before you enter port under which the
application will run.

16
Another setting for Evoko Service is Service mode. It is set to SERVER by default.
17
If all mandatory fields are entered you can start Evoko Service by clicking on Start
button. This will pop up nodejs console where you can monitor all Evoko Service
activity.
Ultimate test of Evoko Service installation is opening Evoko Service homepage in web
browser. You can do that by accessing http://localhost:4040 (4040 is not strict value) on
your local machine. You should have the same view as on the image below.
Log files
During application usage all activity will be logged into text log files in Log directory.
The directory is placed in root installation folder. There is a log file for each day, and all
files older than a month will be erased automatically.

18
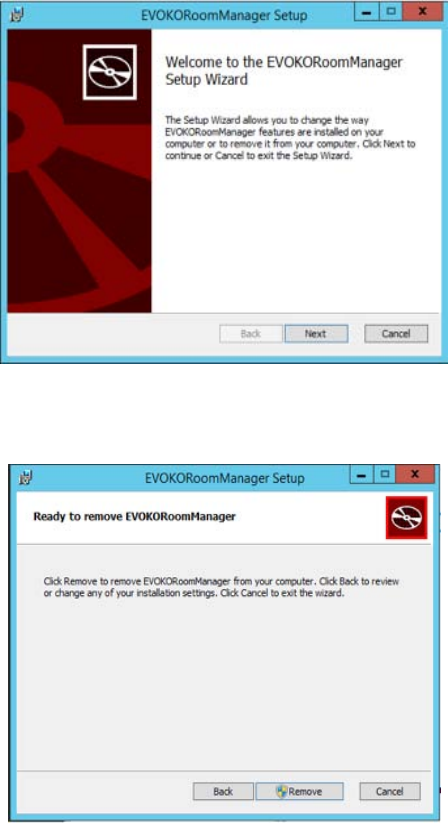
Uninstall / Re-install service for Windows
Reinstallation of device can happen in two cases. First is manually uninstalling the device
via control panel. It is standard Windows program management. Please see image below.
After installation is finished, just install EvokoRoomManager again.
The second option is to run the same installation setup again. For example: if we have
EvokoRoomManager version 1.0 installed, and we run its installation setup, we will see
the following screen.
From here we can choose option Repair that is equivalent to one step reinstall. Or we can
choose Remove that will do the same as removing the program from control panel.
Repair option will open the following screen.
Just click Repair to go on the next screen.
19
Proceeding with Next button will Finish the installation. Remove option will apparently
remove the installation. Just click Remove button.
Note:
If we have for example Evoko Liso Room Manager version 1.0 installed. And we try to
install a different version for instance 1.1. The installation will appear as it is installing
for the first time. This is allowing us to have two versions of Evoko Service, running on
the same server. We should just be careful not to install another version in the same
directory destination.
20

21
Installing Evoko Service on Linux
Download
In order to download the installation file for Linux it’s necessary to go to the download
page and download "installation.tar.gz" file that contains all the necessary sources to
install the Evoko Service application on Linux.
Link to the Evoko Service installation is available and can be found below:
http://31.192.228.56:7070/
Installation
First of all the downloaded file has to be uncompressed using the following command via
terminal: sudo tar xzf installation.tar.gz
If the file has been successfully uncompressed there will be shown a few files that serve
to install Evoko Service.
In order to run the installation, open the terminal and navigate to the folder where the
files are and then type the following command: sudo bash install.sh
After running the previous command just follow the instructions. There will be a few
steps that are necessary to be executed. In the text below each step that needs to be
executed will be described:
Step 1:
At the start, the installation script will automatically recognize all tools that it needs in
order to run Evoko Service and it will install them. If some of tools are not installed the
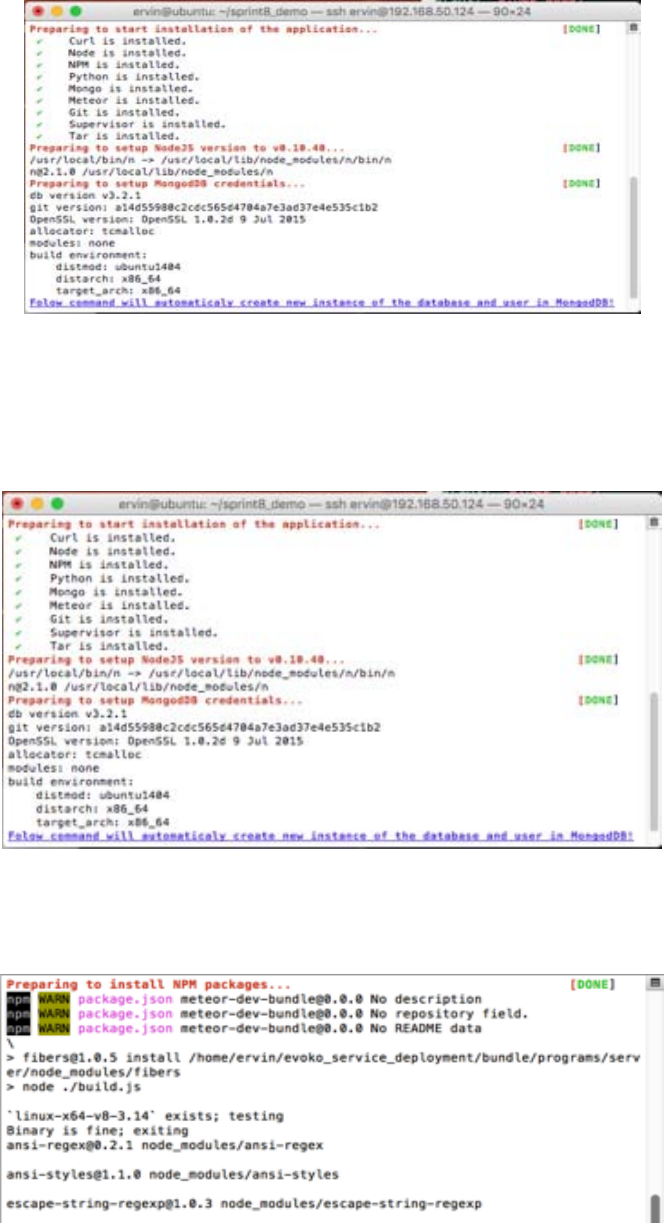
22
user will get a notification after which he has to allow access so all tools can be installed
successfully.
Step 2:
This step serves to setup MongoDB credentials. The user has to type username and
password which are used so that Evoko Service would be able to communicate with the
database. Username has to be unique and user has to type a minimum of six characters for
both of these fields.
Step 3:
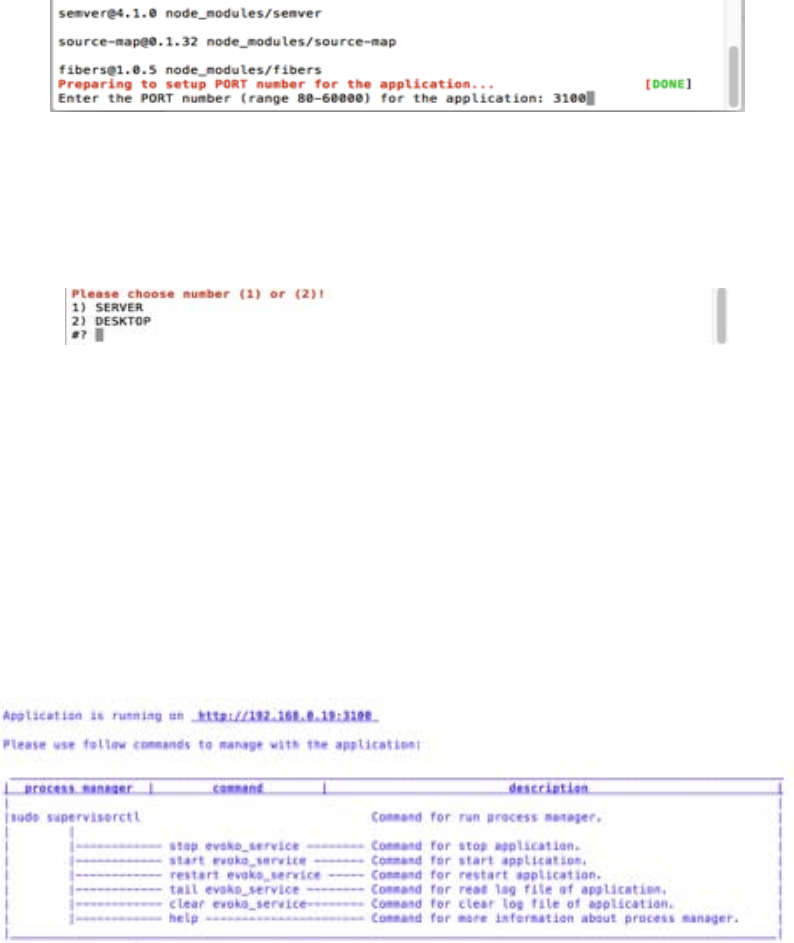
This step serves to automatically install all NPM packages with a specific version that
Evoko Service needs. The installed packages will be shown on the user’s console so that
the user would be able to get details about each package.
Step 4:
This step serves to setup the PORT number for application. This PORT number has to be
available from the outside so that the Evoko Liso Room Manager can communicate with
Evoko Service without any restrictions. This is necessary if you are trying to install
Evoko Service outside of your private network otherwise it will be available if both of
them are in the same private network and you don’t need to do any additional steps.
23
Notice:
The PORT number has to be available only for the Evoko Service application. Before it is
chosen, please check if it is available because there will be no option to change it after.
Step 5:
This step serves so the user can decide which version of Evoko Service he wants to
install. There will be a SERVER and a DESKTOP version. In order to choose any of
them the user has to type numbers one or two so that the script would be able to continue
with a next step.
Step 6:
In this step installation script will automatically create ”evoko_service_run_script.conf”
file and put it to the location ”/etc/supervisor/conf.d/”. This file is used by Supervisor
process manager and contains parameters such as path to the application, commands for
running application and path where log files are. Purpose of it is that, after installation,
user is able to start, stop or restart application via Supervisor process manager or he can
read log files whether the application is running or not.
Step 7:
This step serves to finish installation and run Evoko Service. On the console will be
shown all details about the application such as the IP address, path of installation and port
number. There are also shown all commands for maintaining of Evoko Service.
Notice:
If the user wants to see the log files for the Evoko Service either Desktop or Service
mode, he will locate them in the following folder:
/var/log/long.err.log
/var/log/long.out.log
If the user wants to see logs even when the application is working, he has to run the
“Supervisor” process manager with the following command:
sudo supervisorctl
In the console of the Supervisor process, the user has to type the following command:
24
tail evoko_service
After this command all the logs from the Evoko Service application will be shown on the
user’s console.
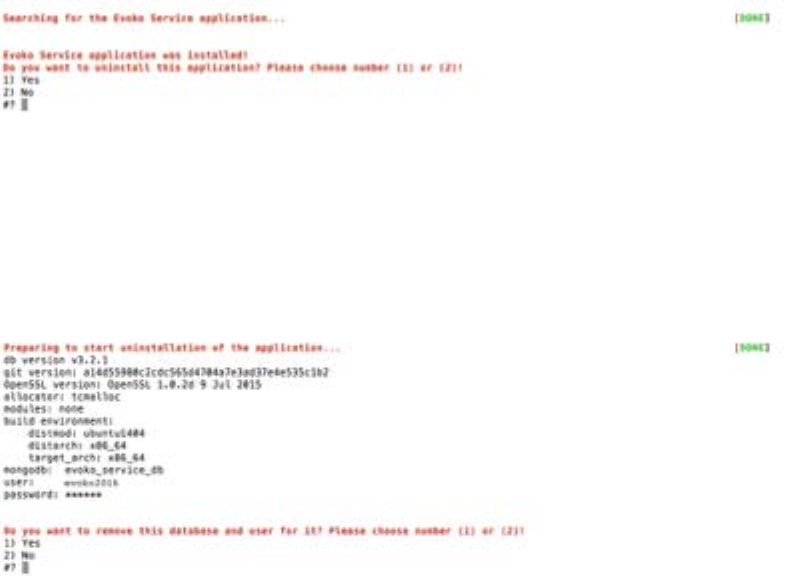
Uninstallation
In order to remove Evoko Service it's necessary to go in the folder where it is installed
(/home/{user}evoko_service_deployment) and there will be a file with the
name ”uninstall.sh”. To run this file just type the following command in the console:
sudo bash uninstall.sh
If the script is runs successfully the user will get a notification about removing an
application and he should have to confirm this action like on the image below.
If you confirm action for removing this application you will get another question where
you have to decide whether remove database together with the application or remove only
the application.
Notice:
If you confirm this option, you will lose all data from database so when next time install
Evoko Service, database will be empty.
25
Evoko Service setup
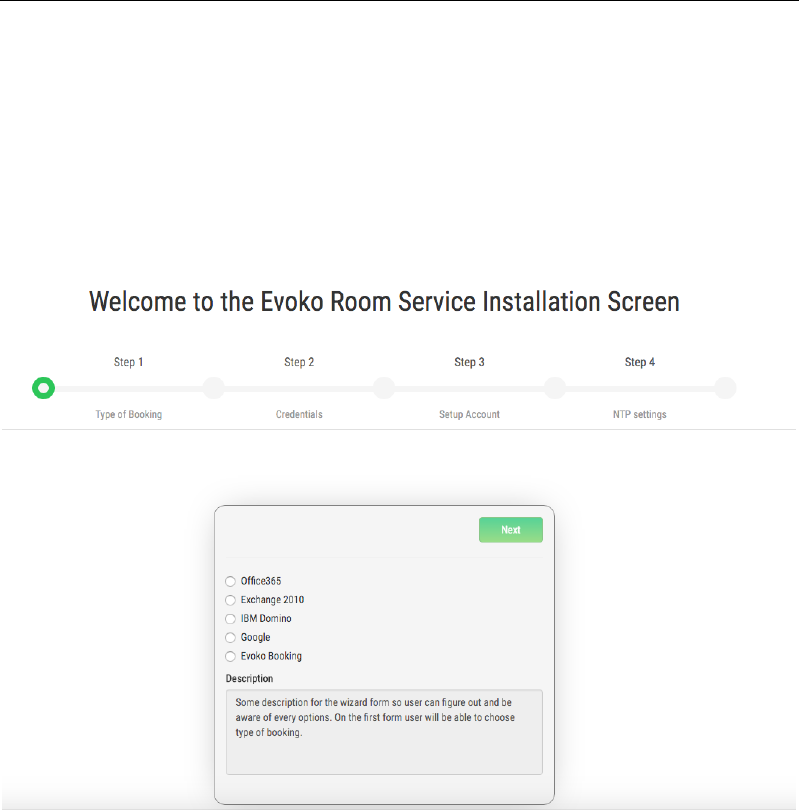
Evoko Service setup wizard
In order to install the Evoko Service system a wizard installation process needs to be
completed. The installation process is composed out of several steps for each of the
available integrations. All steps need to be completed in order for the installation to be
successful.
The initial screen of the installation wizard process is the following:
From this point the setup varies based on the chosen integration system. A walkthrough
for setup of each of the integration systems is described below.
Office 365
At Step 1 choose the Office 365 integration from the radio button list

26
At Step 2 it is necessary to enter the server URL for Office365 then valid Office365
credentials, email and password. If all necessary fields are entered correctly proceed to
the next step.
At Step 3 it is necessary to enter NTP server data to synchronize the device time with an
appropriate NTP server time. For example, one of the valid NTP server for Europe
is europe.pool.ntp.org.

27
At Step 4, a subscription endpoint can be entered. The subscription endpoint is the
external endpoint of the system where the service will be running. The endpoint is the
external access point through which Office 365 will push notifications. When a
subscription endpoint is applied the push notification system is used. Which means that
real-time updates of events will be activated. If the subscription endpoint is omitted then
a poll based notification system will be used where the check for new or updated events is
done based on a 10 second interval.
At Step 5 the user needs to agree with all the supplied conditions after which the
installation process for Office 365 is successfully completed.

28
After the final step, by clicking the next button, the user is navigated to a page which
displays the newly created username and password.

29
Exchange 2010
At Step 1 choose the Office 365 integration from the radio button list
At Step 2 it is necessary to enter the server URL for Exchange 2010 then valid Exchange
2010 credentials, email and password. If all necessary fields are entered correctly proceed
to the next step.
At Step 3 it is necessary to enter NTP server data to synchronize the device time with an
appropriate NTP server time. For example, one of the valid NTP server for Europe
is europe.pool.ntp.org.

30
At Step 4 the user needs to agree with all the supplied conditions after which the
installation process for Office 365 is successfully completed.
After the final step, by clicking the next button, the user is navigated to a page which
displays the newly created username and password.

31
IBM Domino
To install IBM Domino booking type, it is necessary to choose the appropriate option
from the main installation screen.
At Step 2 it is necessary to enter the server URL for IBM Domino then valid IBM
Domino credentials, email and password. If all necessary fields are entered correctly
proceed to the next step.
At Step 3 it is necessary to enter valid user email address. Password will be generated
automatically and send to entered email address. Received data will be used for operation
on device (PIN), and for enter to Evoko Service page (password).

32
At Step 4 it is necessary to enter NTP server data to synchronize the device time with an
appropriate NTP server time. For example, one of the valid NTP server for Europe
is europe.pool.ntp.org.
At Step 5 user need to check options for agree with all conditions and installation process
for IBM Domino is done.

33
After the final step, by clicking the next button, the user is navigated to a page which
displays the newly created username and password.

34
Google
To install Google booking type, it is necessary to choose an option from the main
installation screen.
At Step 2 it is necessary to enter the server URL for Google then valid Google
credentials, (email). Also, user need to upload .p12 file. This file (.p12) is the combined
format that holds the private key and certificate and is the format most modern signing
utilities use. If all necessary fields are entered correctly proceed to the next step.
At Step 3 it is necessary to enter valid user email address. Password will be generated
automatically and send to entered email address. Received data will be used for operation
on device (PIN), and for enter to Evoko Service page (password).
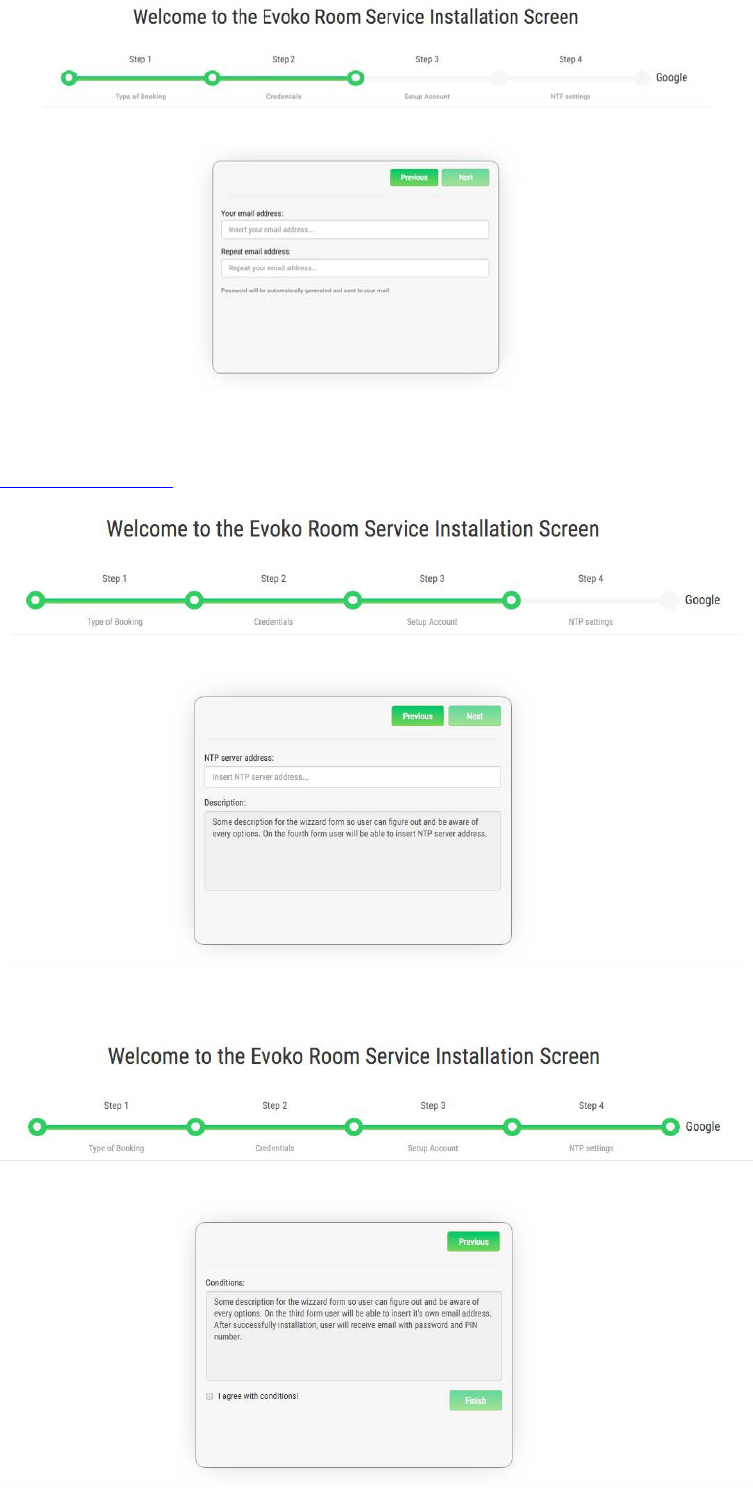
35
At Step 4 it is necessary to enter NTP server data to synchronize the device time with an
appropriate NTP server time. For example, one of the valid NTP server for Europe
is europe.pool.ntp.org.
At Step 5 user need to check options for agree with all conditions and installation process
for Google is done.
36
After the final step, by clicking the next button, the user is navigated to a page which
displays the newly created username and password.
37
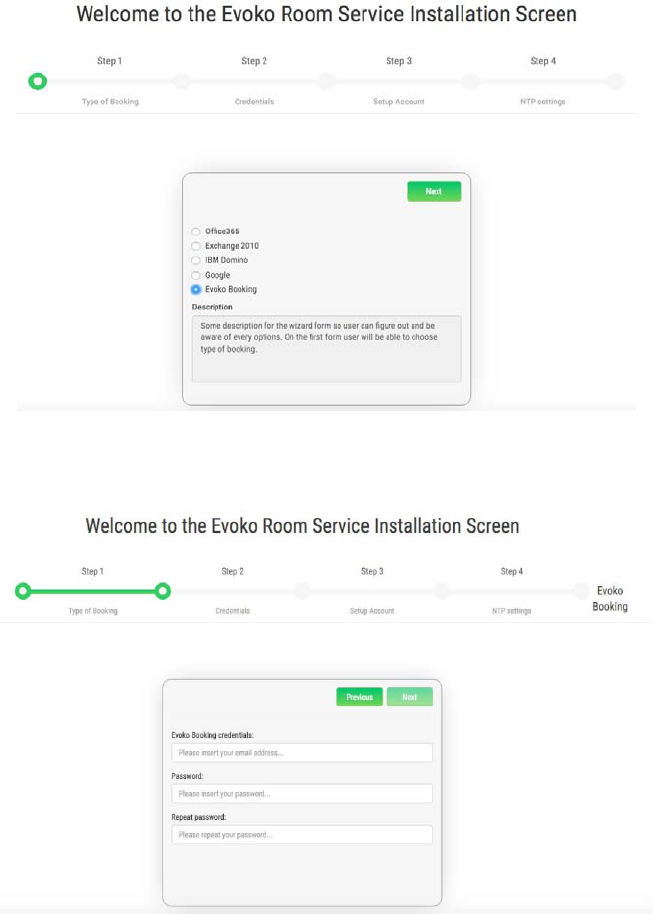
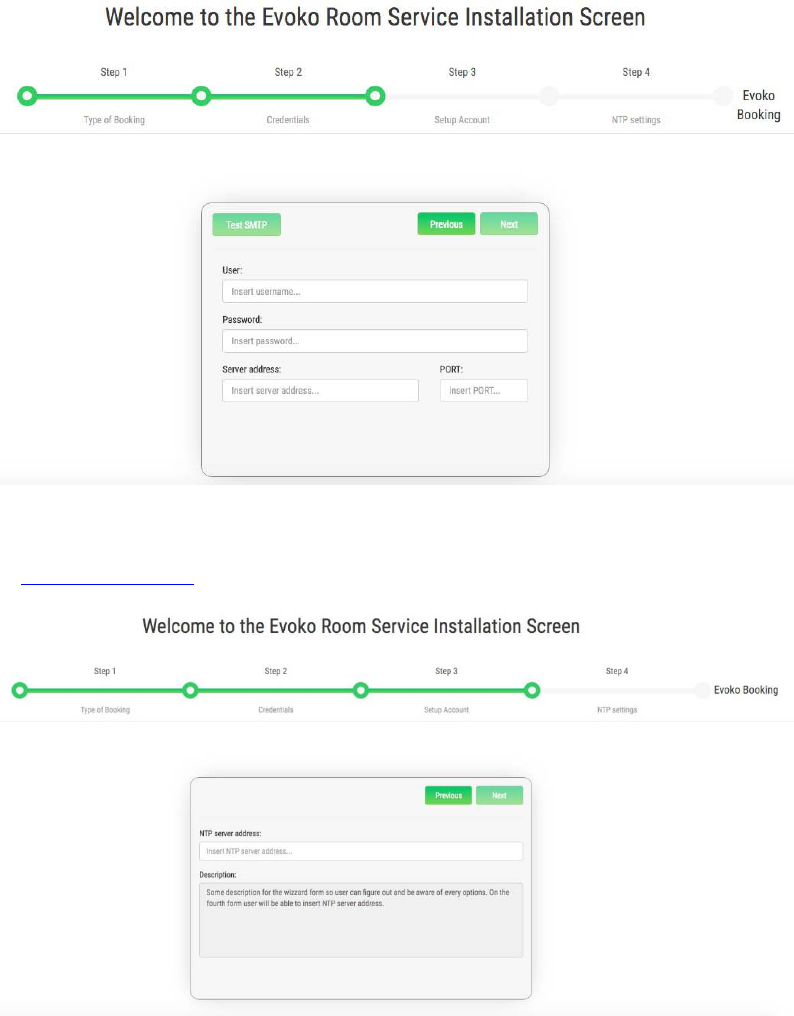
Evoko Booking
To install Evoko Booking booking type, it is necessary to choose an option from the main
installation screen.
At Step 2 it is necessary to enter the valid Evoko Booking credentials, email and
password. If all necessary fields are entered correctly proceed to the next step.
At Step 3 it is necessary to enter valid SMTP connection credentials. For example user
can enter valid gmail address (firstname.lastname@gmail.com) and password. In field
server address user enter smtp.gmail.com and in field port, enter 587. After that the
SMTP connection can be checked by clicking on the Test SMTP button and if all entered
data is valid proceed to the next step.
38
At Step 4 it is necessary to enter NTP server data to synchronize the device time with an
appropriate NTP server time. For example, one of the valid NTP server for Europe
is europe.pool.ntp.org.
At Step 5 user need to check options for agree with all conditions and installation process
for Evoko Booking is done.

39
40
Download and install image on Evoko Room
Manager
Download and write firmware image using Windows
In order to write the image on to the device using Windows there are a few steps to
complete and one prerequisite step.
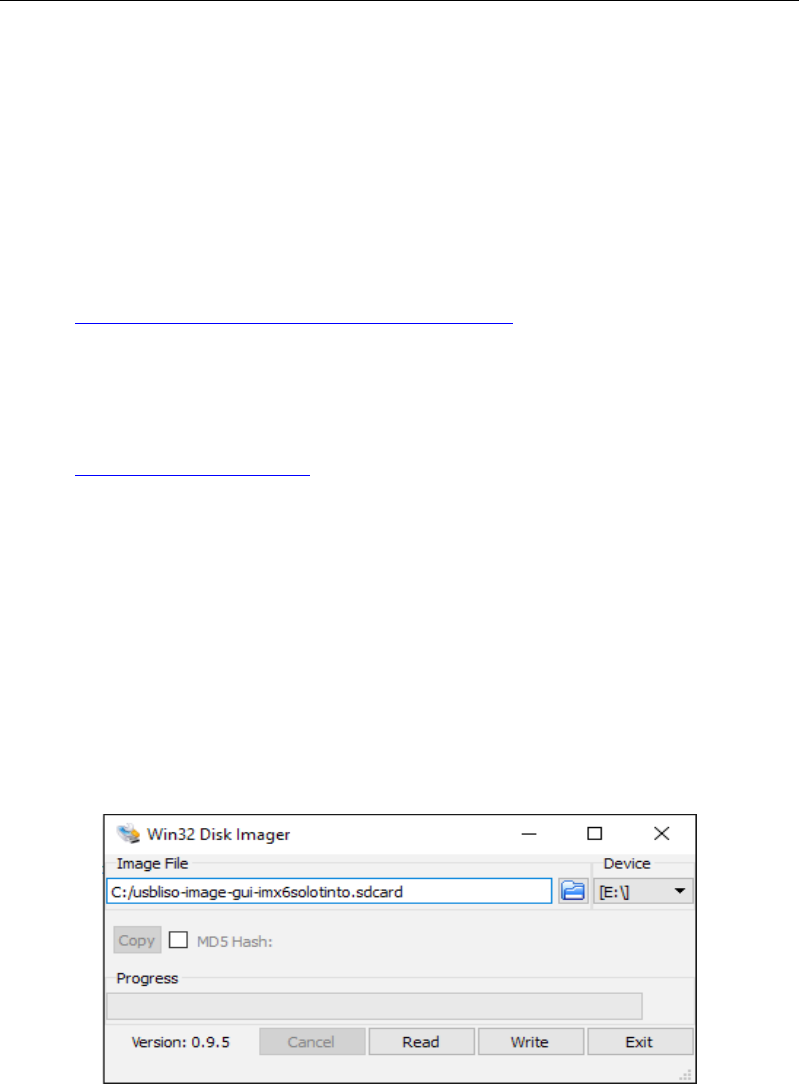
Download image write tool - Win32DiskImager
Win32DiskImager is a tool that is used to write images onto USB or SD cards.
• Go to https://sourceforge.net/projects/win32diskimager/ and download the tool
• Install the tool
Download and uncompress the image
• Go to http://31.192.228.56:7070/ and download the appropriate USB image
• Uncompress the image with your favorite zip tool (e.g. open source tool 7-zip is good)
You should now have an image file on your hard drive with extension sdcard, e.g.
usbliso-image-gui-imx6xxx_date_vx.y.sdcard.
Write the image to USB memory card
Recommended size for memory card is 8 Gbyte, but larger should also work.
• Start Win32DiskImager and select image and device to write to
• Press Write
Warning: Writing image will overwrite and destroy everything on selected device
with content of this image.
• Wait a few minutes until writing is complete and then you can remove the USB
memory card from PC

41
42
Download and write firmware image using Linux
Download and uncompress the image
• Go to page http://31.192.228.56:7070/ and download USB image
• Uncompress image using this command gunzip usbliso-image-gui-
imx6xxx_date_vx.y.sdcard.gz
You should now have an image file on your hard drive with extension sdcard, e.g.
usbliso-image-gui-imx6xxx_date_vx.y.sdcard.
Write the image to USB memory
After inserting the memory card, make sure that the memory card is not mounted since it
might disturb content during writing or before removing USB memory card. This can be
done with one of the following ways depending on the Linux installation.
• Select “Eject card” if it is visible on the Desktop
• Use these commands
Find which device USB has: sudo fdisk -l
Find out where USB is mounted (if at all): df
Unmount any partitions with: sudo umount /media/xxx/xxx
• Write image to device with commands (where ? is to be replaced with device
found using fdisk -l according to above)
sudo dd if=./usbliso-image-gui-imx6solotinto.sdcard
of=/dev/sd? bs=1M && sync
• Wait a few minutes until image is write is ready and remove USB memory card
Warning: Writing image will overwrite and destroy everything on selected device
with content of this image.

43
Example of commands used here:
Note in this case, the memory card is /dev/sdb and has two partitions mounted that needs
unmount before writing image.

44
Boot from USB and install firmware on Device
Boot and install firmware
• Insert USB memory card with firmware image written to it into device
• Power on the device by inserting power cable
• When desktop appears, there is an icon called “Flash”
§
• Press “Flash” and wait approx. 3-4 minutes
• When desktop re-appear, go to “Utilities” by pressing the menu at top of desktop and
select “Utilities”
• Press Shutdown icon and wait for device to turn off
• Remove USB stick
• Remove power and insert Power again after a few seconds
• Device boots from internal memory and can now be installed
45

46
Evoko Device setup with Evoko Server
After installing the latest device firmware from USB memory stick, remove the USB and
restart the device by
• Press “Shutdown” icon on utilities desktop
• Unplug the power and plugin power again
After boot the first time, the desktop looks this.
If you want to use WiFi you need to configure it before starting the application.
Press the Evoko icon to start the application the first time.
After approximately 20 seconds, you get this screen. Select “Server” installation.

47
You are now requested to enter the IP number to the EvokoServer. To enter this
information, you first need to check this IP number on the computer where Evoko Server
is installed. Default port for application is 3000, however if you selected a different port
during installation of Evoko Server you need to enter this port instead.
• Enter the 4 IP numbers with a between each number.
• Then press followed by the port number
• Finally press to go to next step
You now come to the final setup step where you select the room that this device should
handle. The rooms listed here are the activated rooms inside Evoko Server. If you see no
rooms, please check that you have activated rooms in Evoko Server first.

48
Press the room you want to setup and then press Done.
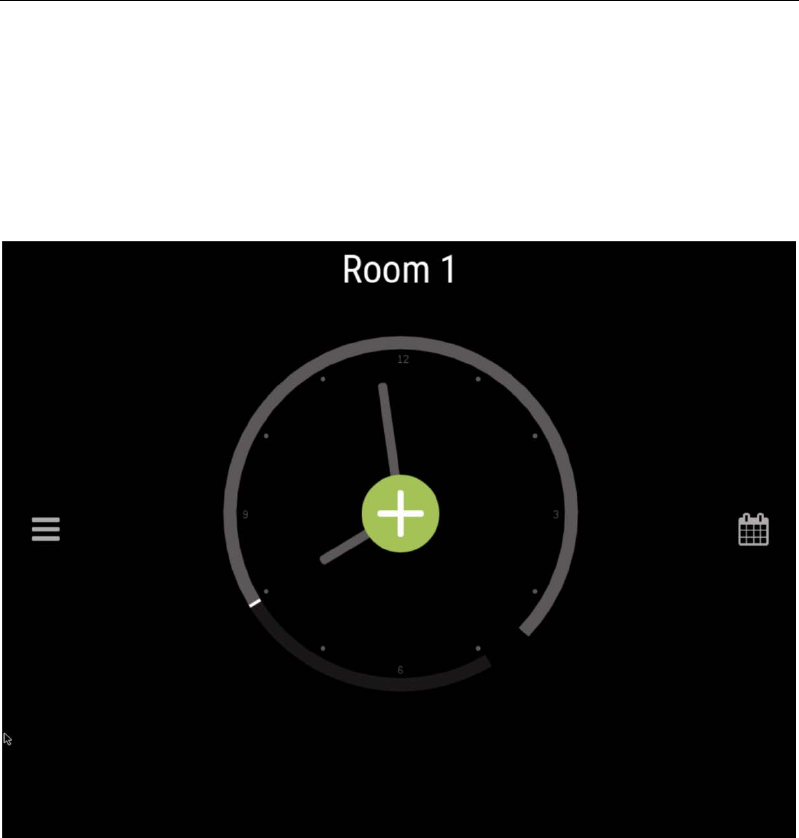
You now enter the application and should see the room name and clock for the selected
room.
49
Booking
To make a booking you have 3 options, all starts with clicking the room name.
Depending on your settings some of the actions may require authentication by PIN or
RFID. Just follow the on screen instruction.
From clock
Click then the green “+” button.to book
Then you can drag the slider handle to adjust the length of the meeting.

50
To end an ongoing booking press
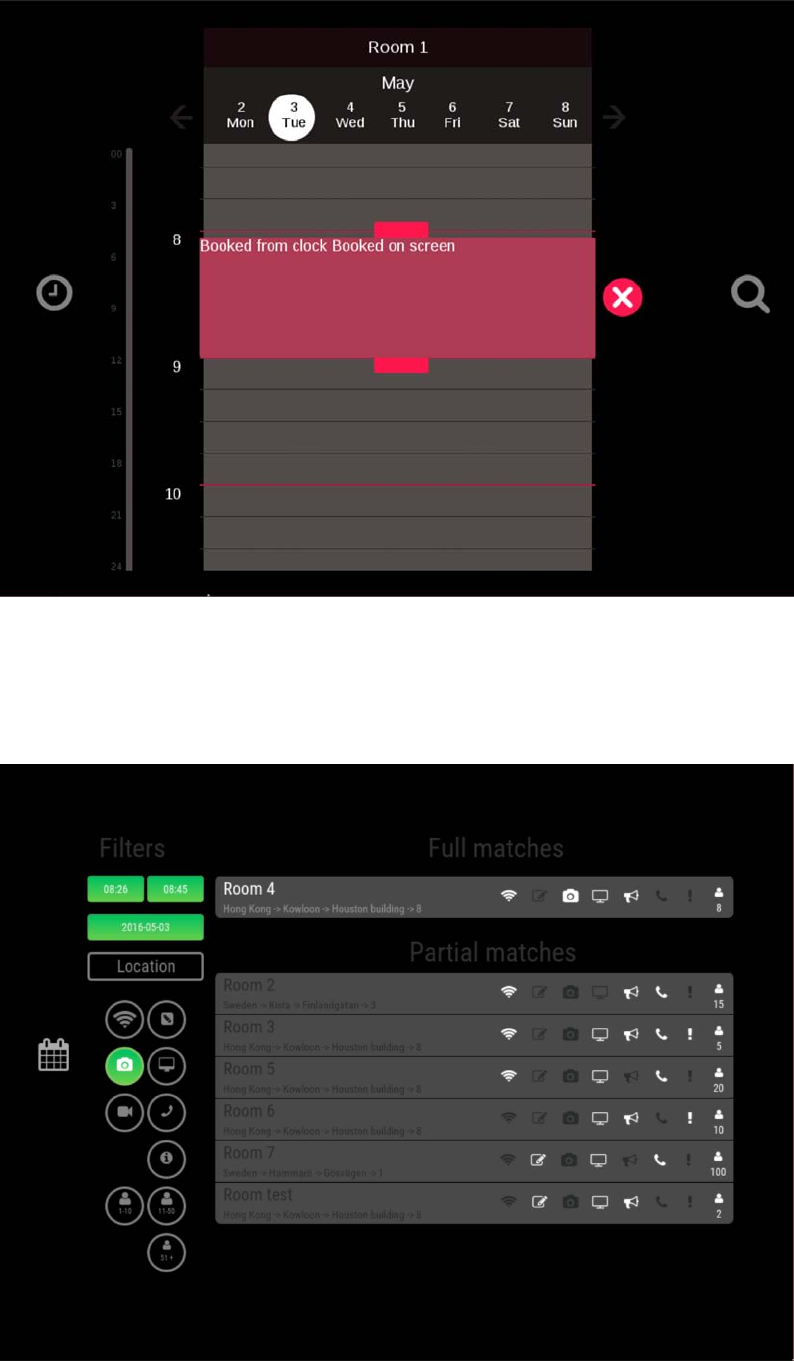
From calendar
It is also possible to book from the calendar view. You reach it by clicking the calendar
icon on the clock view.
Clicking in the calendar will create a booking.
51
To edit any meeting from this screen, just select the meeting by tapping on it and dragger
handles will appear to change duration of the meeting. Pressing the red “X” will cancel
the meeting.
From filter view
From the calendar view click the magnifying glass icon
52
In the filter view you can book any room available. And you can use the filters to find a
suitable room at a convenient date and time with the equipment you need for the meeting.
53
Firmware upgrades
Upgrade firmware on device side
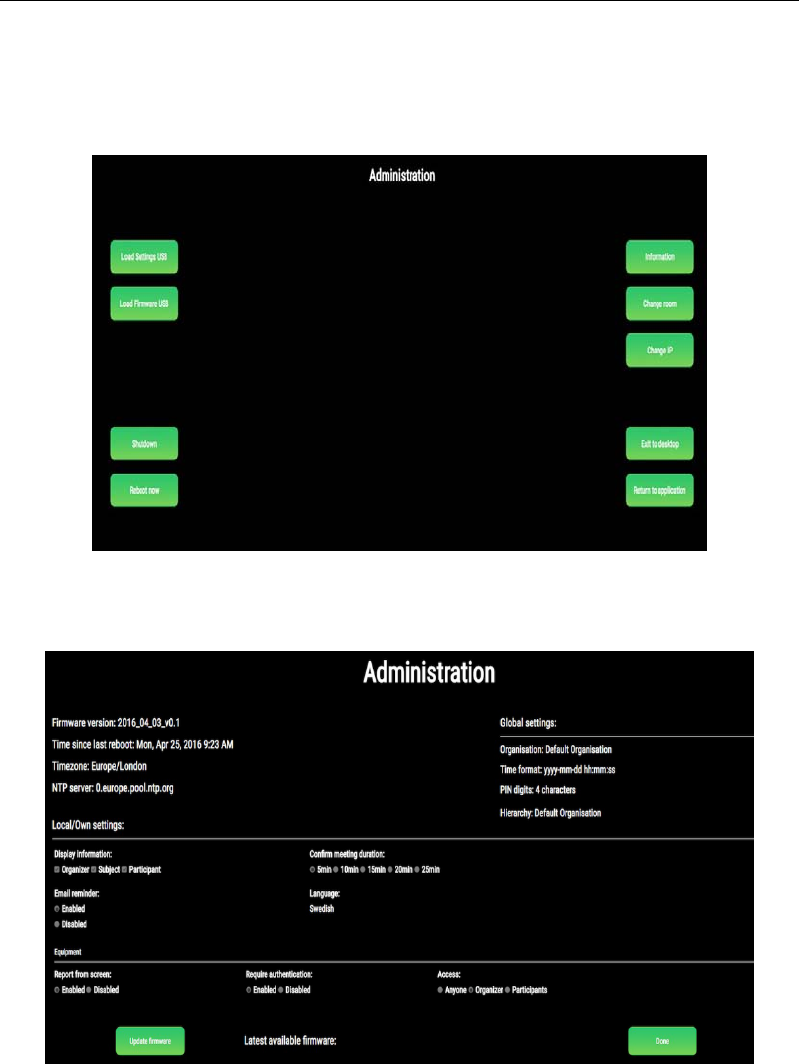
Navigate to the administrator page on the device. Following options should be available:
At the top right corner of the screen click on the information button. The device
information screen should open, like in the following picture.
On the information screen, the current and latest available firmware versions are
specified. To update firmware on the device, click on the “Update firmware” button on
the same page. The device will then check if a new firmware image is available and if it
does, download it from the service to the device. After that, the device will begin with the
firmware update.
Device monitoring
Login to the Evoko service. On the service dashboard menu go to the “Monitoring” page
and the device monitoring page will open. The monitoring page shows a preview of all
devices that are or were connected to the service.
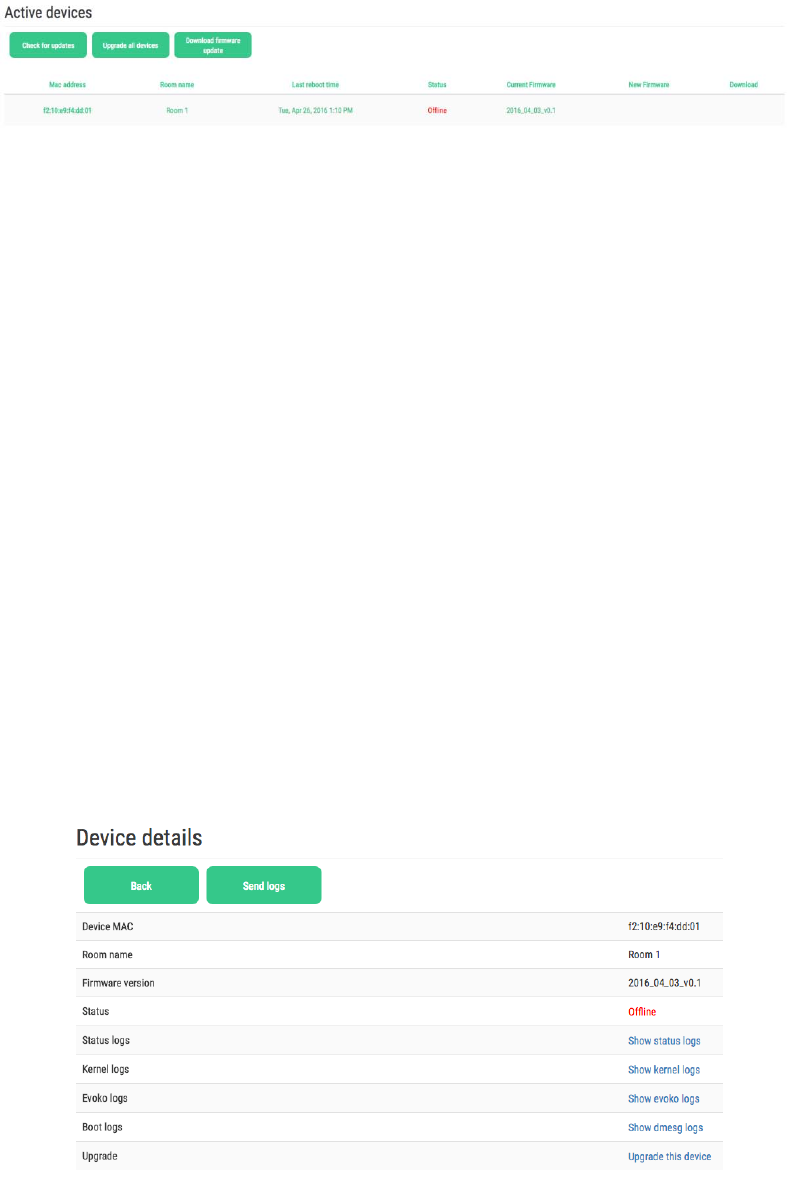
54
The devices are identified by their MAC address. For every device, following information
or statuses are given:
1. MAC address – Stands for Media Access Control and represents the device unique id.
2. Room name – Room on which the device is registered.
3. Last reboot time – How long the device is active.
4. Status – The device status, can be “Online” or “Offline”.
5. Current firmware – Current firmware version installed on the device.
6. New firmware - New firmware version that is available to upgrade devices (if any).
7. Download – Status flag indicating that new firmware is downloaded to the service
from release server.
Above the device list there are three buttons: Check for updates, Upgrade all devices and
Download firmware update. The button “Check for updates” checks on the release server
if new a firmware version is available and updates the “New firmware” column in the
device list if new firmware was found.
The button “Download firmware update” downloads firmware from the release server to
the service and when the download is finished, updates the “Download” flag on the
device list to signal user that firmware has been successfully downloaded.
The last button, “Upgrade all devices”, sends a message to the all active devices,
signaling them to start firmware upgrade at once. All active devices will then download
new firmware from the service and perform an upgrade operation of its firmware. By
clicking on any device at the device list, a “Device details” page will open that contains
various data about the selected device.
Following data about the selected device is available:
1. Device MAC – Stands for Media Access Control and represents device unique id.
2. Room name – Room on which the device is registered.
3. Firmware version – Current firmware version installed on the device.
4. Status – The device status, can be “Online” or “Offline”.
5. Status logs – Shows device monit (monitoring tool) logs.
6. Kernel logs – Shows device kernel logs.
7. Evoko logs – Shows device application logs.
8. Boot logs – Shows device boot (or dmesg) logs.

55
9. Upgrade – Opens a dialog that allows the user to perform firmware upgrade on the
selected device.
Above the device information list there are two buttons: “Back” button returns the user
back to the monitoring page and “Send logs” button opens a dialog that allows the user to
send mail to the support with all logs and allows the user to enter a reason why the logs
are being sent or a step by step instruction on how to replicate the potential problem (This
functionality is described in detail in the “Send error and logs” section). If the user clicks
to see any of the logs, a new page will open containing data of the selected logs. The
following picture shows the look of the log page when “Show status logs” are clicked:
If the user clicks on the Upgrade button on the Device details page, a dialog will open up
where the user can initiate immediate or delayed device upgrade. For delayed upgrade,
the user needs to enter the date and time in his own time zone which will be converted to
the corresponding time zone on the device.
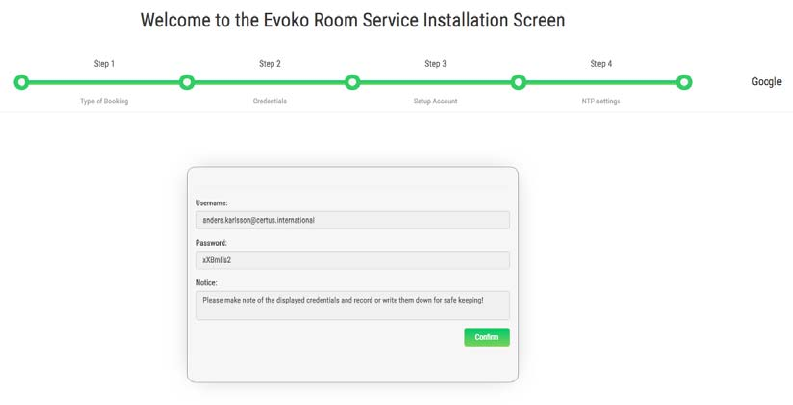
Google Drive will be used as a release server and the administrator needs to ensure the
connection between Evoko service and the release server. On the global settings page he
needs to enter Google Drive credentials which are already predefined:
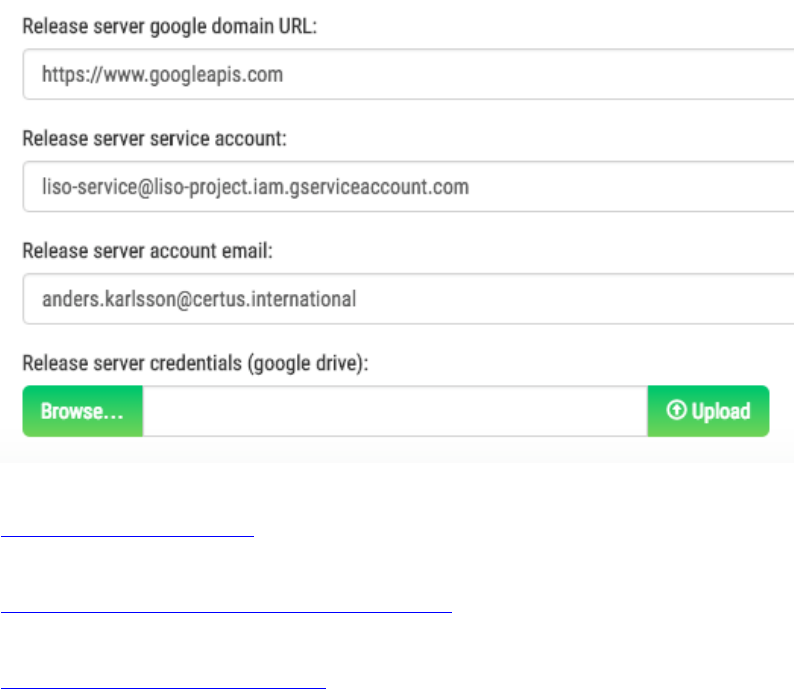
56
Release server google domain URL:
https://www.googleapis.com
Release server service account:
liso-service@liso-project.iam.gserviceaccount.com
Release server account email:
anders.karlsson@certus.international
As part of the release server connection settings, a P12 key file needs to be uploaded only
once.
57

58
Logs and error reports
In order to manage error reports and logs the user needs to navigate to the monitoring
page on the Evoko Service. On the monitoring page, a list of active devices will be
shown.
Then by clicking on one of the active devices from the list a new page called Device
details will be shown with information for the selected device. On that page a user can
choose to see four different types of logs (monitoring program logs, kernel logs,
application logs and boot logs).
There is also a button for sending logs and reports to support email address. By clicking
on that button a popup dialog will be shown for inserting description and step by step
instructions.

59
In the field called description the user can write a description of the problem (reason why
logs are sent to the support) and in the field called step by step instructions, information
which can help support to reproduce the problem.
All device logs are retrieved directly from a selected device and sent over email to the
support. Figure below shows the logs received by e-mail.
60
FEDERAL COMMUNICATIONS COMMISSION INTERFERENCE STATEMENT
This equipment has been tested and found to comply with the limits for a Class B digital
device, pursuant to part 15 of the FCC Rules. These limits are designed to provide
reasonable protection against harmful interference in a residential installation. This
equipment generates, uses and can radiate radio frequency energy and, if not installed
and used in accordance with the instructions, may cause harmful interference to radio
communications. However, there is no guarantee that interference will not occur in a
particular installation. If this equipment does cause harmful interference to radio or
television reception, which can be determined by turning the equipment off and on, the
user is encouraged to try to correct the interference by one or more of the following
measures:
-Reorient or relocate the receiving antenna.
-Increase the separation between the equipment and receiver.
-Connect the equipment into an outlet on a circuit different from that to which the
receiver is connected.
-Consult the dealer or an experienced radio/ TV technician for help.
CAUTION:
Any changes or modifications not expressly approved by the grantee of this device could
void the user's authority to operate the equipment.
RF exposure warning
This equipment must be installed and operated in accordance with provided instructions
and the antenna(s) used for this transmitter must be installed to provide a separation
distance of at least 20 cm from all persons and must not be co-located or operating in
conjunction with any other antenna or transmitter. End-users and installers must be
provide with antenna installation instructions and transmitter operating conditions for
satisfying RF exposure compliance.
Canada, Industry Canada (IC) Notices
This device complies with Canada licence-exempt RSS standard(s).
Operation is subject to the following two conditions: (1) this device may not cause
interference, and (2) this device must accept any interference, including
interference that may cause undesired operation of the device.
Canada, avis d'Industry Canada (IC)
Cet appareil est conforme avec Industrie Canada exemptes de licence RSS
standard(s).
Son fonctionnement est soumis aux deux conditions suivantes : (1) cet appareil ne doit
pas causer d'interférence et (2) cet appareil doit accepter toute interférence,
notamment les interférences qui peuvent affecter son fonctionnement.
Users should also be advised that high-power radars are allocated as primary users
(i.e. priority users) of the bands 5250-5350 MHz and 5650-5850 MHz and that
these radars could cause interference and/or damage to LE-LAN devices.
Devraient également être informés les utilisateurs que les radars à haute puissance
sont désignés comme utilisateurs principaux (c.-à-utilisateurs prioritaires) des
bandes 5250-5350 MHz et 5650-5850 MHz et que ces radars pourraient provoquer
des interférences et / ou endommager les appareils LE-LAN.
Radio Frequency (RF) Exposure Information
The radiated output power of the Wireless Device is below the Industry Canada
(IC) radio frequency exposure limits. The Wireless Device should be used in such a
61
manner such that the potential for human contact during normal operation is
minimized.
This device has also been evaluated and shown compliant with the IC RF Exposure
limits under mobile exposure conditions. (antennas are greater than 20cm from a
person's body).
Informations concernant l'exposition aux fréquences radio (RF)
La puissance de sortie émise par l’appareil de sans fil est inférieure à la limite
d'exposition aux fréquences radio d'Industry Canada (IC). Utilisez l’appareil de sans
fil de façon à minimiser les contacts humains lors du fonctionnement normal.
Ce périphérique a également été évalué et démontré conforme aux limites d'exposition
aux RF d'IC dans des conditions d'exposition à des appareils mobiles (antennes sont
supérieures à 20 cm à partir du corps d'une personne).