Ewig Macao Commercial Offshore 001U21 Ultraviolet Sensor User Manual 328P01
Ewig Industries Macao Commercial Offshore Limited Ultraviolet Sensor 328P01
users manaul

433 MHz Ultraviolet (UV) Senor
Model: 001U21
USER’S MANUAL
Congratulations on your purchasing this New UV sensor. This unique product was designed for everyday
use at home or office and it is a definite asset of great use. To fully benefit from all the features and
understand the correct operation of this product, please read this manual thoroughly.
FUNCTIONS OF THE WIRELESS UV SENSOR
This UV sensor is a precision instrument that detects Ultraviolet (UV) radiation at wavelengths of 260 to
400 nanometers and transmit the data continuously to bring you the latest weather information
displayed on the LCD of the receiving unit. This product adopts wireless 433 MHz technology, which can
transmit data below a distance of 30 meters (100 feet) in open space.
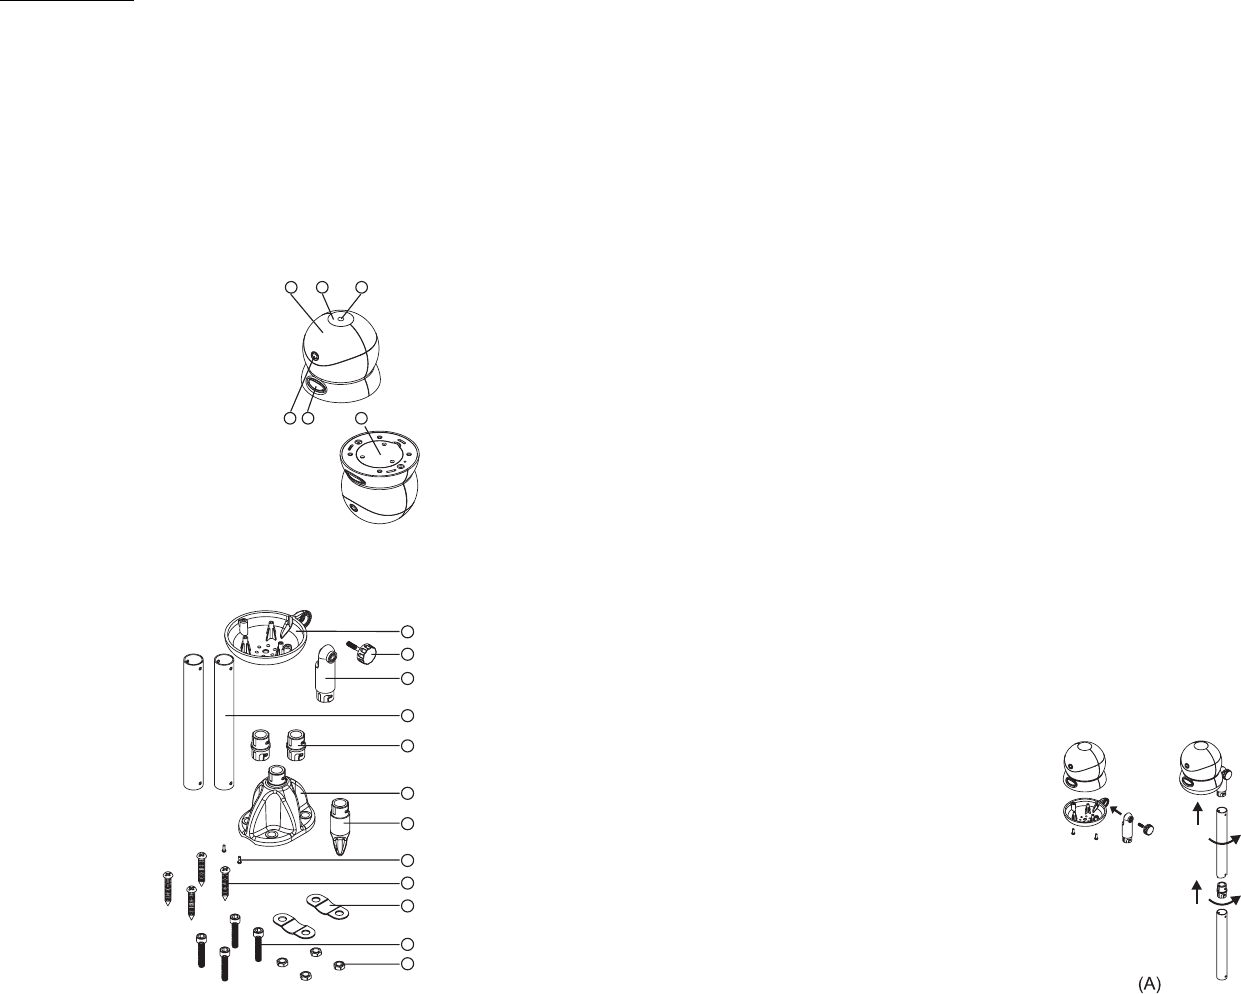
FEATURES: WIRELESS UV SENSOR
A. Main sensor casing
The white colored UV-resistant casing with ventilation slots shields the
sensor unit from thermal radiation and provides a path for convection
cooling of the body, minimizing heating of the sensor internally.
B. LENS
Provides a weather-tight seal and excellent cosine response.
C. DETECTOR
The semiconductor diode, with the filter, responds only to radiation in the
region of interest.
D. LED INDICATOR
Flashes when data transmission is made.
E. TX Button
Press once to transmit data manually. Hold for about 3 seconds to clear the
original ID code and start Re-registration with the receiving unit.
F. BATTERY COMPARTMENT
Accommodates 3 AA-size batteries.
MOUNTING HARDWARE
Please make sure you have all components listed below before
mounting.
A. Detachable bracket for the UV sensor.
B. One plastic screw nut for hinge installation
C. One plastic pole which enables the installation and leveling
of the sensor.
D. Two Aluminium poles.
E. Two plastic connectors.
F. One plastic stand.
G. One plastic tip.
H. Two screws for fixing the UV sensor onto the bracket
I. Four stainless steel screws for stand.
J. Two metal mounting plates.
K. Four stainless steel screws for mounting plates.
L. Four hex nuts for mounting plates
A
B
C
D
E
F
G
H
I
J
K
L
ABC
DEF
TOOLS AND MATERIALS NEEDED
You may need some of the following tools and materials in order to complete your installation. Please be
sure you have everything required before beginning.
1. Medium Phillips screwdriver
2. Center punch or nail (if mounting on wood surface)
GETTING STARTED
This wireless UV sensor was designed for easy set up. For best operation, the following steps are
required to be done in the proper sequence.
1. INSERT BATTERIES FOR THE MAIN RECEIVING UNIT BEFORE DOING SO FOR THE UV SENSOR.
2. THE RECEIVING UNIT CANNOT BE PROGRAMMED MANUALLY UNTIL THE WIRELESS REMOTE SENSOR
UNIT REGISTRATION PROCEDURE HAS BEEN COMPLETED.
3. POSITION THE WIRELESS UV SENSOR AND THE MAIN RECEIVING UNIT WITHIN EFFECTIVE TRANS
MISSION RANGE, WHICH IN USUAL CIRCUMSTANCES, IS 100 FEET/30 METERS.
BATTERY INSTALLATION FOR THE RECEIVING UNIT
Please refer to the user’s manual supplied with your receiving unit.
WIRELESS REMOTE UNIT REGISTRATION PROCEDURE
Within 3 minutes of setting up the main units actuates the sensor as follows:
1. Click open the battery cover located at the back of the sensor unit.
2. Insert 3 pieces AA-size batteries according to the + and - polarity marks inside the battery compart
ment.
3. After the batteries are inserted, the light will blink, indicating that the sensor unit is automatically
transmitting readings to the receiving unit.
4. If the transmission is successful, the display of the receiving unit will show a new channel number, the
UV index and face icon. If not, you can also press once “TX” button on the UV sensor to send the
signal manually to the receiving unit.
Note:
When the low battery indicator of the UV channel appears on the receiving unit, hold the CHANNEL
button for 3 seconds to clear the old channel ID and enter new RF registration mode, the dash icon “---”
will flash and follow the above 4 steps to replace the batteries. (The battery replacement methods varies
with different receiving units, please refer to the user manual supplied with your purchased unit for final
procedure).
5. At normal mode, if there is no change on the UV index, the transmission time is between 1.5~4.0
minutes. And if the UV index change equals or is more than 1, then it would automatically transmit in
30 seconds later.
6. Important note that once a channel is assigned to UV sensor, you can only change it by removing the
batteries or resetting the unit.
NOTE ON WIRELESS UV SENSOR LOCATION
1. Locate UV sensor in an open area to attain a maximum of 100 feet (30 meters) transmission distance.
Actual transmission distance can be reduced by interference from
building, obstruction or a screen between the UV sensor and the
receiving unit.
2. Select an appropriate location where you desire to measure the UV
intensity.
Note:
To get the maximum mid-day sunlight, you should avoid placing the UV
sensor in the shades. For measuring where the immediate effect on human
health is healthful, this is recommended to mount the UV sensor such that
its axis is aligned with the sun’s rays at solar noon. This maximizes the mid-
day readings and provides what is probably a more accurate measurement
of the UV that people are exposed to. The angle-adjustable bracket was
designed for this purpose.

TYPICAL STANDARD INSTALLATION
The illustration (A) shows typical standard UV installation.
WARNING
Before mounting the device to any wall or ground
surface, double check with your local government or
construction agents to avoid drilling to any hidden
electricity cables or gas pipes. The damage might be
dangerous.
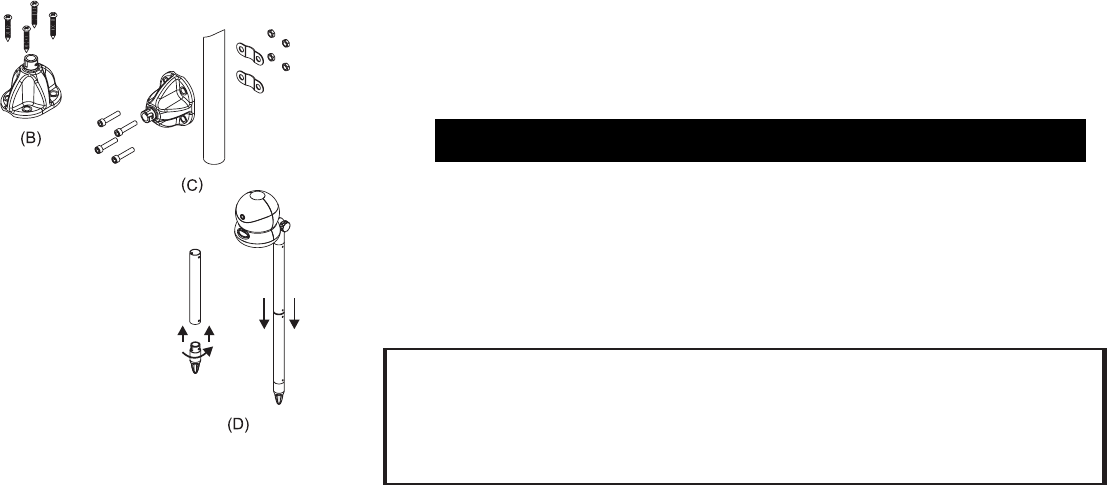
MOUNTING THE STAND ON A WOOD SURFACE
(Before attaching to the aluminum pole)
Secure the stand to the mounting surface by driving the
screws into the appropriate holes. Please refer to the illustration (B).
MOUNTING THE STAND TO THE POLE
(Before attaching to the aluminum pole)
Secure the stand to the mounting object (Such as metal pole) by driving the
screws through the stand’s holes to the metal plates
and then attach with hex nuts. Please refer to the illustration (C).
MOUNTING TO THE SOIL
First attach the plastic tip to the aluminum pole by rotating clockwise and then
insert into the soil. Please refer to the illustration (D).
TROUBLE SHOOTING FOR LOSTING SIGNALS (If the receiving unit is
available)
If without obvious reasons the display for UV channel suddenly goes (---) dash check:
1. The wireless UV sensor is still in place
2. The batteries of both the receiving and the remote unit. Replace them as necessary.
3. The transmission is within range and the path is clear of obstacles and interferences. Shorten the
distance when necessary.
4. Signal from other household devices, such as bell, home security system and entry controls, which
may cause interference and temporary reception failure. This is normal and it doesn’t affect the
general performance of the product. The transmission and reception of UV reading will resume once
the interference recedes.
MAINTENANCE
1. In view of safe operation, alterations to this device are strictly prohibited.
2. Avoid touching the small transparent lens on the top of this UV sensor. Any oil on this surface will
degrade the sensitivity of the sensor. To remove any oil present, clean the lens with a clean swab
and ethyl (denatured) alcohol. Do not use rubbing alcohol.
3. Do not immerse the unit into water. If the unit comes in contact with water, dry it immediately with a
soft lint-free cloth.
4. Do not clean the unit with abrasive or corrosive materials. Abrasive cleaning may scratch the plastic
parts and corrode the electronic circuit.
5. Do not subject the unit to excessive force, shock, dust, temperature or humidity. Such treatment
may result in malfunction, a shorter electronic life span, damaged batteries, or distorted parts.
6. Do not tamper with the unit’s internal components. Doing so will terminate the unit’s warranty and
may cause damage. The unit contains no user-serviceable parts.
7. Do not leave used-up batteries in the units (even leak proof batteries) as these may corrode and
release chemicals, which may damage this product and also be dangerous to health.
8. Inserting batteries in an incorrect polarity will cause damage to this product. Do not mix new and old
batteries, as old ones may leak.
9. Do not dispose of new or used batteries to fire due to dangers of explosion or release of dangerous
chemicals.
10.This product is not to be use for medical purposes or for public information.
11.Read this instruction manual thoroughly before operating the unit.
CAUTION
1. The above content is subject to change without prior notice.
2. The information printed in this manual may be different from the actual results because of printing
limitations.
3. The manufacturer and its suppliers hold no responsibility to you or no any other person for any
damage expenses, lost profits, or any other claim arisen by improper handling, misuse or failure to
comply with the correct use of this product as described in this instruction manual.
MEASURING SPECTRAL RESPONSE: 260nm to 400nm
RF TRANSMISSION FREQUENCY: 433MHz
OPERATION TEMPERATURE: 14°F to 140°F ( -10°C to 60°C)
OUTPUT INFORMATION (UV INDEX)
RANGE: 0 TO 11 (DISPLAYED IN RECEIVING UNITS)
RESOLUTION: 1 INDEX
“Modifications not authorized by the manufacturer may void users authority to operate this device”
Operation is subject to the following two conditions: (1) this device may not cause interference, and (2)
this device must accept any interference, including interference that may cause undesired operation of
the device.
071-510320-001900
NOTE: During the electrostatic discharge, the device may malfunction.
Please press the RESET key to return to normal operation.
NOTE: This equipment has been tested and found to comply with the limits for a Class B digital device, pursuant to part 15 of the FCC Rules. These limits
are designed to provide reasonable protection against harmful interference in a residential installation. This equipment generates, uses and can radiate radio
frequency energy and, if not installed and used in accordance with the instructions, may cause harmful interference to radio communications. However, there
is no guarantee that interference will not occur in a particular installation. If this equipment does not cause harmful interference to radio television reception,
which can be determined by turning the equipment off and on, the user is encouraged to try to correct the interference by one or more of the following
measures;
-- Reorient or relocate the receiving antenna.
-- Increase the separation between the equipment and receiver.
-- Connect the equipment into an outlet on a circuit different from that to which the receiver is connected.
-- Consult the dealer or an experienced radio/TV technician for help.