Excera Technology EP3120U1 Digital Portable Radio User Manual
Shenzhen Excera Technology Co., Ltd. Digital Portable Radio
UserManual.wiki
>
Excera Technology
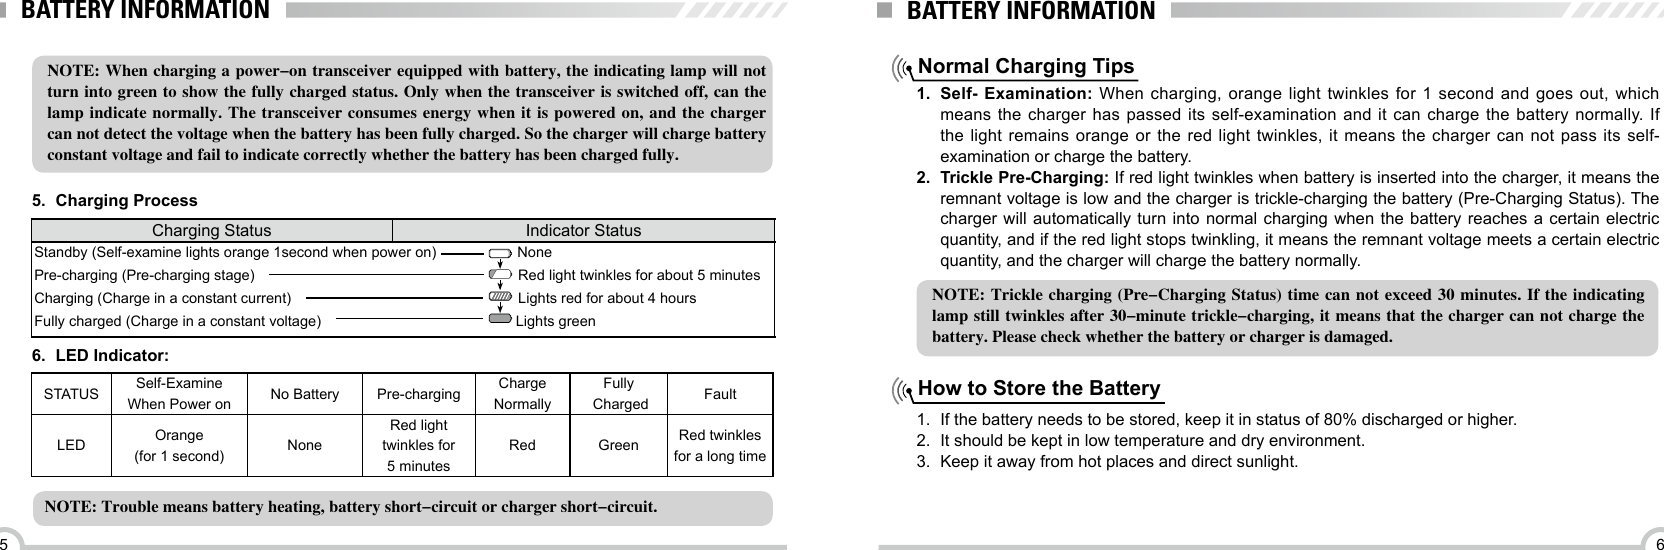
>
EP3120U1 User Manual
user manual
Navigation menu
Upload a User Manual
Namespaces
Wiki Guide
HTML
PDF
Info
Views
User Manual
Discussion / Help
Navigation

![1615FUNCTION INTRODUCTIONReceive and make a digital callFUNCTION INTRODUCTION1.Selecting a zone2.Selecting a Radio Channel, Subscriber ID, or Group ID 3.Receiving and Responding to a Radio Call4.Receiving and Responding to a Group CallA zone is a group of channels. Your radio supports 2 zones, with a maximum of 16 channels per zone, total 32 channels.1. Press zone key.2. You can hear a conrmed alert tone, that means the radio switches from zone 1 to zone 2, or you can hear an unconrmed alert tone, that means the radio switches from zone 2 to zone 1.Once the required zone is preset, turn the channel knob to select the channel, subscriber ID, or group ID.Once the channel, subscriber ID or group ID is preset, you can proceed to receive and respond to calls.When the radio in TX, the red LED turns on. When the radio in RX, then green LED turns on. ●Analogue RX: Receive same carrier and matched signalling to turn on the SQ. ●Digital RX: When receive correct call with matched ID, the radio will turn on the speaker to receive and hear the voice from other parties.To receive a Group Call, your radio must be congured as member of that group.1. The green LED turns on.2. Hold the radio vertically 1 to 2 inches ( 2.5 to 5.0cm) from your mouth. If the channel Free Indication feature is enabled, you will hear a short alert tone the moment the transmitting radio releases the [PTT] key, indicating the channel is free for you to respond. 3. Press [PTT] key to respond to the call, the red LED turns on.4. Wait for the Talk Permit Tone to nish (if enabled) and speak clearly into the microphone.5. Release [PTT] key to listen.6. If there is no voice activity for a predetermined period of time, the call ends.A Private Call is a call from an individual radio to another individual radio. There are two types of Private Calls. The rst type is where a radio presence check is performed prior to setting up the call. The other type sets up the call immediately.Procedure:1. The green LED turns on.2. Hold the radio vertically 1 to 2 inches ( 2.5 to 5.0cm) from your mouth. If the channel Free Indication feature is enabled, you will hear a short alert tone the moment the transmitting radio releases the [PTT] key, indicating the channel is free for you to respond. 3. Press [PTT] key to respond to the call, the red LED turns on.4. Wait for the Talk Permit Tone to nish (if enabled) and speak clearly into the microphone.5. Release [PTT] key to listen.6. If there is no voice activity for a predetermined period of time, the call ends.5.Receiving and Responding to a Private Call](https://usermanual.wiki/Excera-Technology/EP3120U1/User-Guide-2965246-Page-12.png)
![1817FUNCTION INTRODUCTIONFUNCTION INTRODUCTION6.Receiving an All Call7.Making a Radio Call8.Making a Group CallAn All Call is a call from an individual radio to every radio on the channel. It is used to make important announcements requiring the user's full attention.When you receive an All Call:1. A tone sounds and the green LED turns on.2. If there is no voice activity for predetermined period of time, the call ends. If the Channel Free Indication feature is enabled, you will hear a short alert tone the moment the transmitting radio releases the [PTT] button, indicating the channel is now available for use. You can not respond to an All Call.NOTE: The radio stops receiving the All Call if you switch to a different channel while receiving the call. During an All Call, you will not be able to use any key functions until the call ends.To make a call to a group of users, your radio must be congured as member of that group.1. Turn the Channel Selector Knob to select the channel with the active group name or ID.2. Hold the radio vertically 1 to 2 inches (2.5 to 5.0 cm) from your mouth.You can select a channel, subscriber ID, or group by using: ●The Channel Selector Knob ●One Touch Call key3. Press the [PTT] key to make the call. The red LED turns on. 4. Wait for the Talk permit Tone to nish (if enabled) and speak clearly into the microphone.5. Release the [PTT] key to listen. When the target radio responds, the green LED turns on. 6. If the Channel Free Indication feature is enabled, you will hear a short alert tone the moment the target radio releases the [PTT] key, indicating the channel is free for you to respond. Press the [PTT] key to respond. Or if there is no voice activity for a predetermined period of time, the call ends.1. Turn the Channel Selector Knob to select the channel with the active subscriber ID.2. Hold the radio vertically 1 to 2 inches (2.5 to 5.0 cm) from your mouth.3. Press the [PTT] key to make the call. The red LED turns on. 4. Wait for the Talk Permit Tone to nish (if enabled) and speak clearly into the microphone.5. Release the [PTT] key to listen. When the target radio responds, the green LED turn on.6. If the Channel Free Indication feature is enabled, you will hear a short alert tone the moment the target radio releases the [PTT] key, indicating the channel is free for you to respond. Press the [PTT] key to respond. Or if there is no voice activity for a predetermined period of time, the call ends.9.Making a Private Call10.Making an All CallThis feature allows you to transmit to all users on the channel. 1. Turn the channel selector Knob to select the channel with the active All Call group ID.](https://usermanual.wiki/Excera-Technology/EP3120U1/User-Guide-2965246-Page-13.png)
![2019FUNCTION INTRODUCTION FUNCTION INTRODUCTION11.Making a Group or Private Call with the One Touch Call keyThe one Touch Call feature allows you to make a Group or Private call to a predened ID easily. This feature can be assigned to a short or long key press. You can only have one ID assigned to a One Touch Call key. Your radio can have multiple One Touch Call buttons.1. Press the One Touch Call key to make a Group or Private Call to the predeined ID.2. Hold the radio vertically 1 to 2 inches (2.5 to 5.0 cm) from your mouth.3. Press the [PTT] key to make the call. The red LED turns on. 4. Wait for the Talk Permit Tone to nish (if enabled) and speak clearly into the microphone.5. Release the [PTT] key to listen. When the target radio responds, the green LED turns on.6. If the channel Free Indication feature is enabled, you will hear a short alert tone the moment the target radio releases the [PTT] key, indicating the channel is free for you to respond. Press the [PTT] key to respond. Or if there is no voice activity for a predetermined period of time, the call ends.Text Message setup Sending preset Text Message2. Hold the radio verticaly 1 to 2 inches (2.5 to 5.0 cm) from your mouth.3. Press the [PTT] key to make the call. The red LED turns on.4. Wait for the Talk Permit Tone to nish (if enabled) and speak clearly into the microphone. Users on the channel can not respond to an All Call.You can send a predeined Text Message by the key. A maximum of 50 Text messages are supported.1. Press the One Touch Call key to send a predeined Text message to a predeined ID.2. Red LED turns on.3. If the message is sent, two "click" sounds. If the message is not sent, a low tone sounds.Under standby mode, press "Encryption On/Off " key, and it will switch the transceiver to encryption mode. Other transceivers on the same frequency can not understand the call. Repeat the operation to turn off the encryption function. Encryption On/OffNOTE:This operation is only valid in digital mode and only transceivers using the same secret key can communicate with each other. The transceiver can support 16 groups of 4-byte secrete keysAlarm typeDisabled: Radio can not transmit an emergency alarm, but it can receive the emergency alarm signal from other radios.Regular: Radio transmits an alarm signal with audio.Silent: Radio transmits an alarm signal without any audio, the receiver radio starts an alarm. There Digital Emergency Alarm](https://usermanual.wiki/Excera-Technology/EP3120U1/User-Guide-2965246-Page-14.png)
![2221FUNCTION INTRODUCTION FUNCTION INTRODUCTIONTurn on/off by "Lone Work On/Off" key, in order to make sure the holder is safe when the radio in lone work mode. While transceiver in lone work state, the transceiver will send alert tone to remind the user when the predetermined working time is reached, and you need to press "Lone Work" key to state in a safe condition, otherwise the transceiver will enter automatic alarm mode.Scan (Turn on/ off this function by "Scan on/off" key) ScanLone WorkScan lists are created and assigned to individual channels/groups. Your radio scans for voice activity by cycling through the channel/group sequence specied in the scan list for the current channel/group. Your radio can support up to 250 scan lists, with a maximum of 16 members in a list.1.Scan listsWhen you start a scan, your radio cycles through the scan list looking for voice activity. The LED blinks orange while in scan mode. 2.Starting and stopping Scan1. Press thescan key, or turn channel selector knob to select an automatic activity channel. 2. The LED blinks orange when Scan is enabled, you can hear a conrmed sound.Or the LED turns off when Scan is disabled, you will hear an unconrmed sound.will be no response (call) from the target radio unless you press the PTT button to initiate the call.Silent w/Voice: Radio transmits an alarm signal and is able to receive an incoming call without any audio until you press PTT button to initiate or respond to the call.Turn on/off Emergency mode by "Emergency On/Off " key.There are two ways of initiating scan: ●Main Channel Scan (Manual): Your radio scans all the channels/groups in your scan list. On entering scan, your radio may depending on the settings, automatically start on the last scanned "active" channel/group or on the channel where scan was initiated. ●Auto Scan (Automatic): Your radio automatically starts scanning when you select a channel/group that has Auto Scan enabled.3.Priority ScanWhen radio set with the priority channels, it allows to enable the priority scan function, the priority scan mode is cycle scan method, it will scan the priority channel each time after scan a common channel. During scan, your radio stays at activity channel/communication group.The radio stays on that channel for a time period knows as "hang time".1. Hold the radio vertically 1 to 2 inches (2.5 to 5.0 cm) from your mouth. If the channel Free Indication feature is enabled, you will hear a short alert tone the moment the target radio releases the [PTT] key, indicating the channel is free for you to respond. 4.Responding to a call during scan](https://usermanual.wiki/Excera-Technology/EP3120U1/User-Guide-2965246-Page-15.png)
![2423FUNCTION INTRODUCTION FUNCTION INTRODUCTIONYou can adjust your radio's squelch level to filter out unwanted calls with low signal strength or signals with high background noise.Settings: Normal is the default. Tight lters out (unwanted) calls and/ or background noise. However, calls from remote locations may also be ltered out.1. Press "Tight/Normal squelch" key.2. The radio is in deep squelch when you hear a short confirmed alert tone, or you will hear an unconrmed alert tone that means the radio in Normal squelch. Setting1.Setting the Squelch Level 2.Turning the VOX Feature On or OffThis feature allows you to initiate a hands-free voice activated call on a channel. The radio automatically transmits for a period, whenever the microphone detects voice.Pressing the PTT key during radio operation will disable VOX. To re-enable VOX, do one of the following:Turn the radio off and power it on again. Or change the channel via the Channel Selector Knob, or follow the procedure below.NOTE: Turn this feature on or off limited to radios with this function enabled. Check with your dealer or system administrator for more information.1. Press " VOX On/Off" key, turn on or off this function.2. If the permission call alert tone is active, you can use the touch key to send the call. Wait for the Talk Permit Tone to nish (if enabled) and speak clearly into the microphone. 2. Press [PTT] key during hang time, red LED turns on.3. Wait for the Talk Permit Tone to nish (if enabled) and speak clearly into the microphone.4. Release [PTT] key to listen.5. If you do not respond within hang time, the radio returns to scanning other channels/Setting group.You can enable or disable all radio's tune and alert tone (except for incoming emergency alert tone)1. Press "All Alert Tone On/Off" key.2. You will hear a conrmed alert tone, that means turning on all tune and alert tone function, or you will hear an unconrmed alert tone, that means turning off all tone and alert tone. 3. Turn on/ off radio tune/ alert tone](https://usermanual.wiki/Excera-Technology/EP3120U1/User-Guide-2965246-Page-16.png)