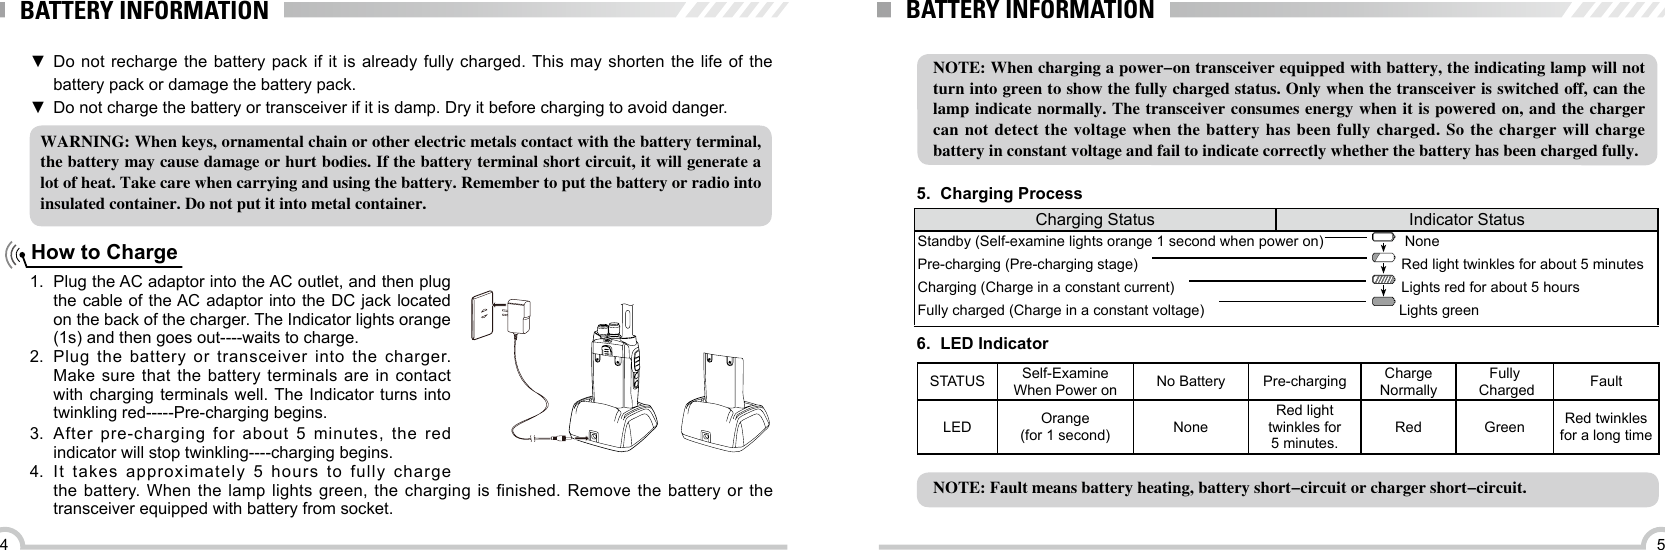
Excera Technology EP3620U1 Digital Portable Radio User Manual
Shenzhen Excera Technology Co., Ltd. Digital Portable Radio
UserManual.wiki
>
Excera Technology
>
EP3620U1 User Manual
user manual
Navigation menu
Upload a User Manual
Namespaces
Wiki Guide
HTML
PDF
Info
Views
User Manual
Discussion / Help
Navigation

![1514SUMMARYNOTE: If all LED lights have set off, then the screen will not light up when power on. The transceiver sounds beep to indicate radio is successfully powered on. If the user disable volume/voice prompt function, no voice for power on. Power on the radioAdjust VolumeTurn on the radio by turning the Volume switch clockwise till a “click” is heard, and you will hear a Power up beep if the dealer has set it. Then the screen displays DMR and the radio name you have edited. LED lights green, if the backlight have been set auto open, then the screen lights up.Rotate the Power/Volume knob to adjust the volume. Turn clockwise to increase the volume and counterclockwise to decrease the volume.BASIC OPERATIONSReceiving or Making a CallA zone is a group of channels. Your radio supports up to 250 zones, with a maximum of 16 channels per zone. This transceiver has 1000 channels by software. Use the following procedure to select a zone.Once the required zone is displayed, if you have multiple zones in your radio, turn the channel selector knob to select the channel, subscriber alias or ID,or group alias or ID.To receive a call from a group of users, your radio must be congured as member of that group.1.Selecting a Zone2.Selecting a Radio Channel, Subscriber lD, or Group ID 3.Receiving and Responding to a Group Call1. Press [ MENU ] to access menu mode.2. Press [ / ] to zone, then press [ MENU ] to select.3. The current zone is displayed the name of the zone.4. Press [ / ] to the required zone and press [ MENU ] key to select.5. The display shows <Zone> Selected momentarily, then back to the zone.ZoneZone1Procedure:When you receive a Group Call (while in the home screen);1. The green LED lights.2. The rst line of the display shows the caller alias and the RSSI icon. The second line displays the](https://usermanual.wiki/Excera-Technology/EP3620U1/User-Guide-2967150-Page-13.png)
![1716BASIC OPERATIONS4.Receiving and Responding to a Private Call1. The green LED turns on.2. The rst line of the display shows the subscriber alias or ID, and the RSSI icon. The second line displays Private Call and the Private Call icon.3. Press the [PTT] button to respond to the call, and the red LED turns on.4. Release the [PTT] button to listen. 5. If there is no voice activity for a predetermined period of time, the call ends.A Private call is a call from an individual radio to another individual radio.There are two types of Private Calls. The rst type is where a radio presence check is performed prior to setting up the call. The other type sets up the call immediately.Procedure:NOTE: The radio stops receiving the All Call if you switch to a different channel while receiving the call.BASIC OPERATIONS5.Receiving an All Call6.Making a Radio Call1.Making a Group Call1. The green LED turns on.2. The first line of the display shows the caller alias or ID, and the RSSI icon. The second line displays All Call and the All Call icon.An All Call is a call from an individual radio to every radio on the channel. It is used to make important announcements requiring the user's full attention.Procedure:When you receive an All Call:You can select a channel, subscriber ID, or group by using: ●The Channel Selector Knob ● One Touch Call button ●The Contacts list ● Manual Dial (via Contacts)--This method is for Private Calls only and is dialled using the keypad.Making a Call by the Channel Selector Knobgroup alias and the Group Call icon (in digital mode only).3. Press the [PTT] button to respond to the call and the red LED turns on.4. Release the [PTT] button to listen.5. If there is no voice activity for a predetermined period of time, the call ends.To make a call to a group of users, your radio must be congured as member of that group.Procedure:1. Turn the Channel Selector Knob to select the channel with the active group alias or ID.2. Press the [PTT] button to make the call. The green LED turns on when the target radio responds. The display shows the group call icon, the group alias or ID and transmitting radio alias or ID.](https://usermanual.wiki/Excera-Technology/EP3620U1/User-Guide-2967150-Page-14.png)
![1918BASIC OPERATIONS2.Making a Private Call3.Making an All CallProcedure:1. Turn the Channel Selector Knob to select the channel with the active subscriber alias or ID.2. Press the [PTT] button to make the call. The rst line displays the subscriber alias or ID. The second line displays Private Call and the private Call icon.3. Release the [PTT] button to listen. When the target radio responds, the screen displays subscriber alias or ID, and private call and private call icon.4. If there is no voice activity for a predetermined period of time, the call ends. Radio returns to the previous screen you were on priority.This feature allows you to transmit to all users on the channel.Procedure:1. Turn the Channel Selector Knob to select the channel with the active All Call group alias or ID.2. Press the [PTT] button to make the call. The display shows the All Call group alias or ID and the All Call icon. Users on the channel cannot respond to an All Call.BASIC OPERATIONS4.Making a Group or Private Call with the One Touch Call Button5.Emergency Alarm This feature allows you to transmit to all users on the channel.Procedure:An Emergency Alarm is used to indicate a critical situation. You are able to initiate an emergency at any time on any screen display even when there is activity on the current channel.Your radio supports below types:The One Touch Call feature allows you to make a Group or Private Call to a predened alias or ID easily. This feature can be assigned to a short or long button press.Procedure:1. Press the One Touch Call button to make a Group or Private Call to the predeined alias or ID.2. Press the [PTT] button to make the call. The display shows the group/subscriber alias or ID, and the Group/Private Call icon.3. Release the [PTT] button to listen. When the target radio responds, the green LED turns on.4. If there is no voice activity for a predetermined period of time, the call ends. Radio returns to the previous screen you were on priority.3. If there is no voice activity for a predetermined period of time, the call ends. Radio returns to the previous screen you were on priority. ●Disable: This radio can not send emergency alarm, but can receive the emergency call from other radios.](https://usermanual.wiki/Excera-Technology/EP3620U1/User-Guide-2967150-Page-15.png)
![2120BASIC OPERATIONS6.Exiting an Emergency ModeYour radio exits Emergency mode when one of the following occurs: ●Emergency Alarm acknowledgement is received. (for Emergency Alarm only) ●All retries to send the alarm have been exhausted. ●Press the button for emergency off. ●Press the [PTT] button.NOTE: If your radio is powered off, it exits the Emergency mode. The radio will not reinitiate the Emergency mode automatically when it is turned on again.FUNCTION MENU INTRODUCTIONCharacter InputYou can check the radio features by 3*4 alphabet button. Use the buttons to input the subscriber alias or ID and message. You need to press the buttons few times for many characters. Below sheet shows the press times to get the required character.Key 1 2 3 4 5 6 7 8 9 10 11 12 13 11 , ? @ & : % : * #2 A B C 2 3D E F 3 4 G H I 4 5 J K L 56 M N O 6 7 P Q R S 78 T U V 89W X Y Z 9 00 note: press and input “0”, long press active capital, long press again inactive capital.* Press this button to delete the character.#Press this button for a space. ●Regular: The radio sends an emergency alarm with audio or visual indicator. ●Silent: The radio sends an emergency alarm without any audio or visual indicator. ●Silent with Voice: In the state of emergency alarm, press the [PTT] button to send the call and voice.](https://usermanual.wiki/Excera-Technology/EP3620U1/User-Guide-2967150-Page-16.png)
![2322FUNCTION MENU INTRODUCTIONMenu Manual1. Press [ MENU ] to access menu mode, then press [ / ] to visit menu function;2. Press [ MENU ] to select or access the sub-menu;3. Press [ BACK ] to back to priority menu.NOTE: The radio will auto exit the menu and back to the home screen after a period without any activityCall Log and Text Message only valid for digital channels. Or else the above operation is invalid.Radio CheckFUNCTION MENU SETUPIf enabled, this feature allows you to determine if another radio is active in a system without disturbing the user of that radio. No audible or visual notication is shown on the target radio.This feature is only applicable to subscriber aliases or IDs.Sending a Radio Check.Procedure: Use the menu.1. Press [ MENU ] to access the menu.2. Press [ / ] to Contacts and press [ MENU ] to select.3. Press [ / ] to the required subscriber alias or ID and press [ MENU ] to select. Or press [ / ] to Manual Dial and press [ MENU ] twice. Input the subscriber alias or ID and then press [ MENU ].4. Press [ / ] to Radio Check and press [ MENU ] to select.5. Screen displays radio checking: < subscriber alias or ID>, indicating that the radio is on checking, LED turns red.6. If the target radio is active in the system, a tone sounds and the display briey shows Target Radio Available.Or if the target radio is not active in the system, a tone sounds to show Target Radio Not Available.7. Radio returns to the subscriber alias or ID screen. If the transceiver is waiting for acknowledgement, it stops all retries and exits the checking mode. Call 1Radio Check:](https://usermanual.wiki/Excera-Technology/EP3620U1/User-Guide-2967150-Page-17.png)
![2524Remote MonitorInitiating Remote MonitorFUNCTION MENU SETUPUse the Remote Monitor feature to turn on the microphone of a target radio (subscriber alias or ID only). No audible or visual indication is given to the target radio. You can use this feature to monitor, remotely, any audible activity surrounding the target radio. Procedure:1. Press [ MENU ] to access the menu.2. Press [ / ] to Contacts and press [ MENU ] to select.3. Press [ / ] to the required subscriber alias or ID and Press [ MENU ] to select or press [ / ] to Manual Dial and press [ MENU ] twice to select. Input the subscriber alias or ID and press [ MENU ] to select.4. Press [ / ] to Remote Monitor and press [ MENU ] to select.5. Screen displays Remote Monitor :< subscriber Alias or ID>, indicating that is on Remote Monitor. LED turns red. 6. The display shows Remote Monitor Successful. Or the display shows Remote Monitor Failed.7. If successful, the radio starts receiving audio from the monitored radio for a duration.Once the timer expires, LED lights out. Call 1Remote Monitor:FUNCTION MENU SETUPContacts SettingsMaking a Group Call from ContactsMaking a Private Call from ContactsContacts provides "address-book" capabilities on your radio. Each entry corresponds to an alias or ID that you use to initiate a call.Each entry within Contacts displays the following information:Procedure:1. Press [ MENU ] to access the menu.2. Press [ / ] to Contacts and press [ MENU ] to select. 3. Press [ / ] to the required group alias or ID.4. Press the [PTT] button to make the call, release the [PTT], if any of the radios in the group responds, LED turns green, and the group call icon displays in the screen.Procedure: ●Call Type ●Call Alias ●Call IDNOTE: You can add, delete, or edit subscriber IDs for the Digital Contacts list. This transceiver can save at most 1000 contacts.Contact 1/12](https://usermanual.wiki/Excera-Technology/EP3620U1/User-Guide-2967150-Page-18.png)
![2726FUNCTION MENU SETUPCall Log FeaturesViewing Recent Calls1. Press [ MENU ] to access the menu.2. Press [ / ]to Contacts and press [ MENU ] to select. 3. Press [ / ] to the required subscriber alias or ID. Or press [ / ] to Manual Dial and press [ MENU ] twice to select. Use the keypad to enter a new subscriber ID.4. Press the [PTT] button to make the call. The rst line displays subscriber alias or ID. The second line displays private call or private call icon.5. Release [PTT] button to listen, when the target radio responds, LED turns green and screen displays target ID.6. If there is no audio activity in duration, the call ends.Your radio keeps track of all recent outgoing, answered, and missed Private Calls. Use the Call log feature to view and manage recent calls.The lists are Missed, Answered, and Outgoing.Procedure:1. Press [ MENU ] to access the menu.2. Press [ / ] to Call Log and press [ MENU ] to select.3. Press [ / ] to preferred list and press [ MENU ] to select.4. The display shows the most recent entry at the top of the list.5. Press [ / ] to view the list.FUNCTION MENU SETUPStoring an Alias or ID from the Missed Call ListDeleting a Call from a Call ListProcedure:1. Press [ / ] to access the menu.2. Press [ / ] to Call Log and press [ MENU ] to select.3. Press [ / ] to Missed call and press [ MENU ] to select.4. Press [ / ] to the required missed call alias or ID and press [ MENU ] to select. 5. Press [ / ] to Store and press [ MENU ] to select.6. A blinking cursor appears. If needed, input the alias for that ID and press [ MENU ] .7. The display shows Contact Saved. You can also store an ID without an alias.Procedure:1. Press [ MENU ] to access the menu.2. Press [ / ] to Call Log and press [ MENU ] to select.3. Press [ / ] to the required list and press [ MENU ] to select.4. Press [ / ] to the required alias or ID and press [ MENU ] to select.5. Press [ / ] to Delete Entry, and press [ MENU ] to select “Yes” or “No”.6. Select “Yes”, press [ MENU ] to delete the entry and screen displays the entry deleted.Or select “No”, press [ MENU ] to back to previous screen. When you select a call list and it contains no entries, the display shows List Empty.Delete EntriesCall 1](https://usermanual.wiki/Excera-Technology/EP3620U1/User-Guide-2967150-Page-19.png)
![2928FUNCTION MENU SETUPCall Alert OperationReceiving and Acknowledging a Call AlertMaking a Call Alert from the Contacts ListCall Alert paging enables you to alert a specic radio user to call you back when they are able to do so. This feature is applicable to subscriber aliases or IDs only and is accessible through the menu via Contacts or manual Dial.Procedure:1. LED blinks red light.2. Press and release the [PTT] button to acknowledge the alert. Or press [ MENU ] to select Ignore and to exit the Call Alert.1. Press [ MENU ] to access the menu.2. Press [ / ] to Contacts and press [ MENU ] to select.3. Press [ / ] to the required subscriber alias or ID and press [ MENU ] to select. Or press [ / ] to Manual Dial and press [ MENU ] twice to select. A blinking cursor appears. Enter the subscriber ID you want to page and press [ MENU ] .4. Press [ / ] to Call Alert and press [ MENU ] to select. The display shows Call Alert: <SubscriberAlias or ID>, indicating that the Call Alert has been sent.5. The red LED turns on when your radio is sending the Call Alert.Call Alert:Call 4FUNCTION MENU SETUPNOTE: Press [ BACK ] at any time to return to the previous screen.6. If the Call Alert acknowledgement is received, a tone sounds and the display shows Call Alert Successful. Or if the Call Alert acknowledgement is not received, a tone sounds and the display shows Call Alert Failed.Text Message FeaturesWriting and Sending a Text MessageYour radio is able to receive data, for example a text message, from another radio or an e-mail application. The maximum length of characters for a text message, including the subject line is 164.Procedure:1. Press [ MENU ] to access the menu.2. Press [ / ] to Messages and press [ MENU ] to select.3. Press [ / ] to Write and press [ MENU ] to select.4. A blinking cursor appears. Use the keypad to type your message. Press [ ] to move one space to the left. Press [ ] or the [ # ] key to move one space to the right. Press the [ ELD ] key to delete any unwanted characters.5. Press [ MENU ] once message is completed to select send or save.6. Press [ / ] to the required alias or ID and press [ MENU ] to send. Or press [ / ] to Manual Dial and press [ MENU ] to key in the subscriber ID and press [ MENU ] .](https://usermanual.wiki/Excera-Technology/EP3620U1/User-Guide-2967150-Page-20.png)
![3130FUNCTION MENU SETUPSending a Quick Text MessageYour radio supports a maximum of 50 Quick Text messagesQuick Text messages are predened, you can edit each message before sending it.7. The display shows Text Message: <Subscriber/Group Alias or ID>, conrming your message is being sent.8. If the message is sent, a tone sounds and the display shows Message Sent. Or if the message is not sent, a high tone sounds and the display shows Message Send Failed. If the message fails to be sent, the radio returns to the Resend option screen.1. Press [ MENU ] to access the menu.2. Press [ / ] to Messages and press [ MENU ] to select.3. Press [ / ] to Quick Text and press [ MENU ] to select.4. Press [ / ] to the required Quick Text and press [ MENU ] to select.5. A blinking cursor appears. Use the keypad to edit the message, if required. Press [ ] to move one space to the left. Press [ ] or the [ # ] key to move one space to the right. Press the [ ELD ] key to delete any unwanted characters.6. Press [ MENU ] once message is composed to send or save.7. Press [ / ] to the required alias or ID and press [ MENU ] to select. Or press [ / ] to Manual Dial and press [ MENU ] to select. Input the subscriber ID and press [ MENU ] .8. The display shows Text Message: <Subscriber/Group Alias or ID>, conrming your message is being sent.SendaFUNCTION MENU SETUP9. If the message is sent, a tone sounds and the display shows Message Sent. Or if the message is not sent, a high tone sounds and the display shows Message Send Failed. If the message fails to be sent, the radio returns to the Resend option screen. You can also press a call button to send a quick message to a subscriber alias or ID.Managing Fail-to-Send Text MessagesResending a Text MessageForwarding a Text MessageYou can select one of the following options while at theResend Option screen: ●Resend ● Forward ●EditProcedure:1. Press [ MENU ] to resend the same message to the same subscriber/group alias or ID.2. If the message is sent, a tone sounds and the display shows Message Sent. Or if the message is not sent, the display shows Message Send Failed.Select Forward to send the message to another subscriber/group alias or ID.Procedure:](https://usermanual.wiki/Excera-Technology/EP3620U1/User-Guide-2967150-Page-21.png)
![3332FUNCTION MENU SETUPEditing a Text Message1. Press [ / ] to Forward and press [ MENU ] to select.2. Press [ / ] to the required alias or ID and press [ MENU ] to select. Or press [ / ] to Manual Dial and press [ MENU ] button, input the subscriber ID and press [ MENU ] .3. The display shows Text Message: <Subscriber/Group Alias or ID>, conrming your message is being sent.4. If the message is sent, a tone sounds and the display shows Message Sent. Or if the message is not sent, a high tone sounds and the display shows Message Send Failed.Select edit to edit the message before sending.1. Press [ / ] to edit and press [ MENU ] to select.2. A blinking cursor appears. Use the keypad to type your message. Press [ ] to move one space to the left. Press [ ] or the [ # ] key to move one space to the right. Press the [ ELD ] key to delete any unwanted characters.3. Press [ MENU ] once message is completed to select send or save.4. Press [ / ] to the required alias or ID and press [ MENU ] to send. Or press [ / ] to Manual Dial and press [ MENU ] to key in the subscriber ID and press [ MENU ].5. The display shows Text Message: <Subscriber/Group Alias or ID>, conrming your message is being sent.6. If the message is sent, a tone sounds and the display shows Message Sent. If the message is not sent, a high tone sounds and the display shows Message Send Failed.FUNCTION MENU SETUPManaging Sent Text MessagesViewing a Sent Text MessageSending a Sent Text MessageOnce a message is sent to another radio, it is saved in Sent Items. The most recent sent text message is always added to the top of the Sent Items list. The Sent Items folder is capable of storing a maximum of 50 last sent messages. When the folder is full, the next sent text message automatically replaces the oldest text message in the folder.Procedure:1. Press [ MENU ] to access the menu.2. Press [ / ] to Messages and press [ MENU ] to select.3. Press [ / ] to Sent Items and press [ MENU ] to select.4. Press [ / ] to the required Message and press [ MENU ] to select.You can select one of the following options while viewinga sent text message: ●Resend ● Forward ●Edit ●DeleteNOTE: Press [ BACK ] anytime can back to the priority screen.](https://usermanual.wiki/Excera-Technology/EP3620U1/User-Guide-2967150-Page-22.png)
![3534FUNCTION MENU SETUPDeleting all Sent Text Messages from Inbox1. Review the text message, press [ MENU ] again.2. Press [ / ] to resend, then press [ MENU ] to resend again.3. The display shows Text Message: <Subscriber/Group Alias or ID>, conrming your message is being sent to correct target radio. If the message is sent, a tone sounds and the display shows Message Sent. If the message is not sent, a high tone sounds and the display shows Message Send Failed. The radio back to the resend screen, press [ MENU ] to resend the message to the same subscriber/group alias or ID. ● Forward, send the text message to other group/subscriber alias or ID. ●Edit, rewrite the selected message before sending. ●Delete, delete the selected message.Procedure:1. Press [ MENU ] to access the menu.2. Press [ / ] to Messages and press [ MENU ] to select.3. Press [ / ] to Inbox and press [ MENU ] to select.4. Press [ / ] to Delete All and press [ MENU ] to select.5. At Delete Message press [ MENU ] to select “Yes”. The display shows Inbox Cleared. Or at Delete Message Press [ / ] to No and press [ MENU ] to return to the previous screen. When you select inbox and it contains no text messages, the display shows List Empty.Delete AllInbox FUNCTION MENU SETUPReceiving a Text MessageReading a Text MessageManaging Received Text MessagesWhen your radio receives a message, the display shows the alias or ID of the sender and the message icon at the far left of the screen.You can select one of the following options when receiving a text message: ●Read? ●Read Later ●DeleteProcedure:1. Press [ / ] to Read? and press [ MENU ] to select.2. The text message is open, and press [ MENU ] back to the main screen. Or press [ / ] to access the Read Later or Delete option screen: ●Select Read Later to return to the screen you were in previously. ●Select Delete to delete the text message.Use the Inbox to manage your text messages. The Inbox is capable of storing a maximum of 50 messages. Your radio supports the following options for text messages: ●Reply ● Forward](https://usermanual.wiki/Excera-Technology/EP3620U1/User-Guide-2967150-Page-23.png)
![3736FUNCTION MENU SETUPViewing a Text Message from the InboxReplying a Text Message from the Inbox ●Delete ●Delete All Text messages in the Inbox are sorted according to the most recently received.NOTE: Press [ BACK ] anytime to back to priority screen.Procedure:1. Press [ MENU ] to access menu.2. Press [ / ] to Messages and press [ MENU ] to select.3. Press [ / ] to Inbox and press [ MENU ] to select.4. Press [ / ] to view the messages.5. Press [ MENU ] to select the current message, and press [ MENU ] again to reply, delete, or forward that message. Unread messages are indicated with an exclamation mark (!)Procedure:1. Press [ MENU ] to access menu.2. Press [ / ] to Messages and press [ MENU ] to select.3. Press [ / ] to Inbox and press [ MENU ] to select.FUNCTION MENU SETUPDeleting a Text Message from the Inbox4. Press [ / ] to the required message and press [ MENU ] to select.5. Press [ MENU ] once more to access the sub-menu.6. Press [ / ] to Reply and press [ MENU ] to select.7. Press [ / ] to Write and press [ MENU ] to select. A blinking cursor appears. Use the keypad to write your message. Or press [ / ] to Quick Text and press [ MENU ] to select. A blinking cursor appears. Use the keypad to edit your message, if required.8. Press [ MENU ] to select and again for sending once message is composed.9. The display shows Text Message: <Subscriber/Group Alias or ID>, conrming your message is being sent.10. If the message is sent, a tone sounds and the display shows Message Sent. Or if the message is not sent, the display shows Message Send Failed and back to resend screen.Procedure:1. Press [ MENU ] to access menu.2. Press [ / ] to Messages and press [ MENU ] to select.3. Press [ / ] to Inbox and press [ MENU ] to select.4. Press [ / ] to the required message and press [ MENU ] to select.5. Press [ MENU ] once more to access the sub-menu.6. Press [ / ] to Delete and press [ MENU ] to select.7. At Delete Message? Press [ / ] to Yes and press [ MENU ] to select delete message.Delete AllInbox](https://usermanual.wiki/Excera-Technology/EP3620U1/User-Guide-2967150-Page-24.png)
![3938FUNCTION MENU SETUPDeleting All Text Messages from the InboxPrivacyProcedure:1. Press [ MENU ] to access menu.2. Press [ / ] to Messages and press [ MENU ] to select.3. Press [ / ] to Inbox and press [ MENU ] to select.4. Press [ / ] to Delete All and press [ MENU ] to select.5. At Delete Message? Press [ / ] to Yes and press [ MENU ] to select.6. The Display shows Inbox Cleared. When you select the Inbox and it contains no text messages, the display shows List Empty.If enabled, this feature helps to prevent eavesdropping by unauthorized users on a channel by the use of a software based scrambling solution.Your radio must have privacy enabled on the channel to send a privacy-enabled transmission. To unscramble a privacy-enabled call or data transmission, your radio must have the same Privacy Key (for Basic Privacy), the same key value and key ID (for Enhanced Privacy) as the transmitting radio.If your radio receives a scrambled call that is of a different Privacy Key, you will either hear a garbled transmission. You can preset at most 16 privacy groups, privacy key (4 Bytes), press the privacy button to turn on/off scramble .If the radio with privacy type, the main display shows scramble or none scramble icon.FUNCTION MENU SETUPNOTE: Performing Radio Disable and Enable is limited to radios with these functions enabled.Dual Tone Multi Frequency (DTMF) (Analog)Disable/ EnableRadio DisableThe Dual Tone Multi Frequency (DTMF) have four received/transmit systems, you can set 32 groups encode, every group with 30 characters.The called party: the called party can set below decode respond by software:Disable: When the radio receives disable code, then the radio is forbidden to receive/transmit.Enable: In disable state the radio receives an enable code and back to normal. You can enable or disable any radio in the system. For example, you might want to disable a stolen radio, to prevent the thief from using it, and enable that radio, when it is recovered.Procedure:1. Press [ MENU ] to access menu.2. Press [ / ] to Contacts and press [ MENU ] to select. 3. Press [ / ] to the required alias or ID and press [ MENU ] to select. Or press [ / ] to Manual Dial and press [ MENU ] twice to select. Input the subscriber alias or ID and press [ MENU ] .4. Press [ / ] to Radio Disable and press [ MENU ] to select.Call 1Radio Disable:](https://usermanual.wiki/Excera-Technology/EP3620U1/User-Guide-2967150-Page-25.png)
![4140FUNCTION MENU SETUPRadio EnableScan Lists 5. The display shows Radio Disable: <Subscriber Alias or ID> and the LED turns red.6. If successful, a tone sounds and the display shows Radio Disable Successful. Or if not successful, a tone sounds and the display shows Radio Disable Failed. When disabling the radio, do not press [ BACK ] , because you will not get the acknowledge info.Procedure:1. Press [ MENU ] to access menu.2. Press [ / ] to Contacts and press [ MENU ] to select. 3. Press [ / ] to the required alias or ID and press [ MENU ] to select. Or press [ / ] to Manual Dial and press [ MENU ] twice to select. Input the subscriber alias or ID and press [ MENU ] .4. Press [ / ] to Radio Enable and press [ MENU ] to select.5. The display shows Radio Enable: <Subscriber Alias or ID>.6. If successful, a tone sounds and the display shows Radio Enable Successful. Or if not successful, a tone sounds and the display shows Radio Enable Failed. When enabling the radio, do not press [ BACK ] , because you will not get the acknowledge info.Scan lists are created and assigned to individual channels/groups. Your radio can support up to 250 scan lists, with a maximum of 16 members in a list. Each scan list supports a mixture of both analog and digital entries. You can add, delete, or prioritize channels by editing a scan list.Call 1Radio Enable:FUNCTION MENU SETUPView the scan listScan instructions1. Select a channel with scan list by channel selector knob;2. Press [ / ] to access the menu.3. Press [ / ] to Scan and press [ MENU ] to select.4. Press [ / ] to View List and press [ MENU ] to select.5. Press [ / ] to view each member in the list.If you set priority scan, the priority icon will appear on the left of the member alias, meaning this member is priority channel 1 or 2. In the scan list, you can only have one priority channel 1 or priority channel 2.If non priority scan, then will not show the priority icon.When you start a scan, your radio cycles through the scan list looking for voice activity. The LED blinks red , and scan icon shows in the screen while in scan mode.There are two ways of initiating scan: ●Manual Dial (Manual): Your radio scans all the channels/groups in your scan list. On entering scan, you may use, depending on the settings, the can on/off button or by the menu function to start scan. ● Auto Scan (Automatic): Your radio automatically starts scanning when you select a channel/group that has Auto Scan enabled.](https://usermanual.wiki/Excera-Technology/EP3620U1/User-Guide-2967150-Page-26.png)
![4342FUNCTION MENU SETUPStarting and Stopping ScanResponding to a Transmission During a ScanPress the Scan button or follow the scan menu.1. Use the Channel Selector Knob to select a channel with a scan list.2. Press [ MENU ] to access the menu.3. Press [ / ] to Scan and press [ MENU ] to select.4. The display shows Turn Off if scan is disabled. Or the display shows Turn On if scan is enabled.5. Press [ MENU ] to select. 6. The LED blinks red and shows scan icon when Scan is enabled. Or the LED turns off and without scan icon when Scan is disabled.During scanning, your radio stops on a channel/group where activity is detected. The radio stays on that channel for a time period known as "hang time".Procedure:1. Hold the radio vertically 1 to 2 inches (2.5 to 5.0 cm) from your mouth. If digital channel and the Channel Free Indication feature is enabled, you will hear a short alert tone the moment the transmitting radio releases the [PTT] button, indicating the channe is free for you to respond.2. Press the [PTT] button during hang time. The red LED turns on.3. Release the [PTT] button to listen.4. If you do not respond within the hang time, the radio returns to scanning other channels/groups.Locking and Unlocking the KeypadTurning Keypad Tones On or OffYou can lock your radio's keypad to avoid inadvertent key entry.Procedure:1. Press [ MENU ] to access menu.2. Press [ / ] to Utilities and press [ MENU ] to select.3. Press [ / ] to Radio Settings and press [ MENU ] to select.4. Press [ / ] to Keypad Lock and press [ MENU ] to select.5. The display shows Keypad Locked and returns to the Home screen.6. To unlock the keypad, press [ MENU ], then press [ ELD ] .7. The display shows Keypad Unlocked and returns to the Home screen.You can enable and disable keypad tones if needed.Procedure:1. Press [ MENU ] to access menu.2. Press [ / ] to Utilities and press [ MENU ] to select.3. Press [ / ] to Radio Settings and press [ MENU ] to select.4. Press [ / ] to Tones/Alerts and press [ MENU ] to select.5. Press [ / ] to Keypad Tones and press [ MENU ] to select.ADVANCED OPERATIONS](https://usermanual.wiki/Excera-Technology/EP3620U1/User-Guide-2967150-Page-27.png)
![4544Setting the Squelch Level (Analog) 6. The display shows Turn On. Press [ MENU ] to enable keypad tones. The display shows Keypad Tone On. Or the display shows Turn Off. Press [ MENU ] to disable keypad tones. The display shows Keypad Tone Off.You can adjust your radio's squelch level to filter out unwanted calls with low signal strength or channels that have a higher than normal background noise.Settings: Normal is the default. Tight lters out (unwanted) calls and/or background noise. However, calls from remote locations may also be ltered out.Press the Squelch button to toggle squelch level between normal and tight.1.Press [ MENU ] to access menu.2 .Press [ / ] to Utilities and press [ MENU ] to select.3. Press [ / ] to Radio Settings and press [ MENU ] to select.4. Press [ / ] to Squelch and press [ MENU ] to select and access sub-menu.ADVANCED OPERATIONSTurning the VOX Feature On or OffThis feature allows you to initiate a hands-free voice activated call on a channel.NOTE: Turning this feature on or off is limited to radios with this function enabled. Press the VOX button to toggle the feature on or off.Procedure:1. Press [ MENU ] to access menu.2. Press [ / ] to Utilities and press [ MENU ] to select.3. Press [ / ] to Radio Settings and press [ MENU ] to select.4. Press [ / ] to VOX and press [ MENU ] to select.5. The display shows VOX On. Press [ MENU ] to enable VOX, and screen shows VOX transmit application. The display shows VOX Off. Press [ MENU ] to disable VOX, and screen shows VOX transmit cancel.ADVANCED OPERATIONS](https://usermanual.wiki/Excera-Technology/EP3620U1/User-Guide-2967150-Page-28.png)
![4746Controlling the Display BacklightTurning the Radio Tones / Alerts On or OffYou can enable or disable the radio's display backlight as needed. The setting also affects menu and keypad backlight accordingly.Procedure:You can enable or disable the radio tones and alerts (except for the incoming Emergency alert tone) if needed.Procedure:1. Press [ MENU ] to access menu.2. Press [ / ] to Utilities and press [ MENU ] to select.3. Press [ / ] to Radio Settings and press [ MENU ] to select.1. Press [ MENU ] to access menu.2. Press [ / ] to Utilities and press [ MENU ] to select.3. Press [ / ] to Radio Settings and press [ MENU ] to select.4. Press [ / ] to Backlight and press [ MENU ] to select.5. The display shows Auto On. Press [ MENU ] to enable the display backlight. The display shows Backlight Auto On. Or the display shows Turn Off. Press [ MENU ] to disable the display backlight. The display shows Backlight Turn Off. The display backlight and keypad backlight are automatically turned off if the LED indicator is disabled.ADVANCED OPERATIONS4. Press [ / ] to Tones/Alerts and press [ MENU ] to select and access sub-menu.5. Press [ / ] to All Tones and press [ MENU ] to select.6. The display shows Turn On. Press [ MENU ] to enable all tones and alerts. The display shows All Tones On. Or the display shows Turn Off. Press [ MENU ] to disable all tones and alerts. The display shows All Tones Off.Switch Chinese and EnglishTurning the LED Indicator On or OffYou can switch Chinese or English language if needed.1. Press [ MENU ] to access menu.2. Press [ / ] to Utilities and press [ MENU ] to select.3. Press [ / ] to radio setting and press [ MENU ] to select.4. Press [ / ] to language selection and press [ MENU ] to sub-menu.5. Press [ / ] to select Chinese or English, then press [ MENU ] to select .You can enable or disable the LED Indicator if needed.Procedure:1. Press [ MENU ] to access menu.2. Press [ / ] to Utilities and press [ MENU ] to select.3. Press [ / ] to Radio Settings and press [ MENU ] to select.4. Press [ / ] to LED Indicator and press [ MENU ] to select.ADVANCED OPERATIONS](https://usermanual.wiki/Excera-Technology/EP3620U1/User-Guide-2967150-Page-29.png)
![4948Turning the Introduction Screen On or OffAccessing General Radio Information5. The display shows Turn On. Press [ MENU ] to enable the LED Indicator. The display shows All LEDs On. Or the display shows Turn Off. Press [ MENU ] to disable the LED Indicator. The display shows All LEDs Off. The display backlight, buttons, and keypad backlight are automatically turned off if the LED indicator is disabled.You can enable or disable the Introduction Screen if needed.Procedure:1. Press [ MENU ] to access menu.2. Press [ / ] to Utilities and press [ MENU ] to select.3. Press [ / ] to Radio Settings and press [ MENU ] to select.4. Press [ MENU ] to Intro Screen and press [ MENU ] to select.5. The display shows Turn On. Press [ MENU ] to enable the Introduction Screen. The display shows Intro Screen On. Or the display shows Turn Off. Press [ MENU ] to disable the Introduction Screen. The display shows Introduction Screen Off.Your radio contains information on the following: ●Radio ID ● Software Version ●Codeplug VersionADVANCED OPERATIONSNOTE: Press [ BACK ] at anytime to back to priority screen.Check radio IDCheck Software VersionCheck Codeplug Version1. Press [ MENU ] to access menu.2. Press [ / ] to Utilities and press [ MENU ] to select.3. Press [ / ] to Radio info, then press [ MENU ] to select.4. Press [ / ] to Self Number and press [ MENU ] to select.5. Screen shows radio alias and ID.Display radio software version1. Press [ MENU ] to access menu.2. Press [ / ] to Utilities and press [ MENU ] to select.3. Press [ / ] to Radio info, then press [ MENU ] to select.4. Press [ / ] to Software version and press [ MENU ] to select.5. Screen shows current software version.Display radio Codeplug version.1. Press [ MENU ] to access menu.ADVANCED OPERATIONS](https://usermanual.wiki/Excera-Technology/EP3620U1/User-Guide-2967150-Page-30.png)
![5150Voice Recording (Optional) Man Down (Optional)2. Press [ / ] to Utilities and press [ MENU ] to select.3. Press [ / ] to Radio info, then press [ MENU ] to selct.4. Press [ / ] to CP version and press [ MENU ] to selct.5. Screen shows current Codeplug version.When enable recording, you can record in communication or remote monitoring. This radio supports 18 hours recording. You can play and delete the recording, etc. See attachment for details.With this function enabled, if the angle of redio inclination is bigger than angle, the radio will alarm. If lift the radio up and the angle bigger than recover angle, the radio stop alarm. See attachment for details.ADVANCED OPERATIONSPhenomena SolutionThe radio cannot be switched on or no display after being switched on.A. Battery pack may not be installed properly. Remove the battery pack and install it again.B. Battery power may be insufficient. Recharge or replace the battery pack. The battery doesn't last for long after being charged. The battery life is over. Please replace it with a new battery pack.Cannot talk to or hear other members in your group. Voices fromnon-group members are heard on the channel. Analog: Change the CTCSS/DCStone and then change all radios' tones in your group. 1. Make sure the frequency and CTCSS are the same as those of other members. 2. Make sure you are in the efciency range, cannot too far away from other members.3. Make sure you are set in correct digital mode, and frequency.4. In digital mode, make sure set correct code and encrypt group in current channel. 5. In digital mode, make sure set correct receiving contacts and receiving group.TROUBLESHOOTING](https://usermanual.wiki/Excera-Technology/EP3620U1/User-Guide-2967150-Page-31.png)