Excera Technology EP3620VHF Digital Portable Radio User Manual
Shenzhen Excera Technology Co., Ltd. Digital Portable Radio
User Manual

MIC
MENU
1
2
5
8
6
9
4
7
3
ABC
GHI
PQRS
WXYZ
JKL
MNO
TUV
,.?
DEF
BACK
SHENZHEN EXCERA TECHNOLOGY CO.,LTD.
Address: 3rd Floor, Block B,Jiada R&D Building, No.5 Songpingshan
Road, Hi-Tech Park North, Nanshan District , Shenzhen
Postal Code: 518057
Web: www.excera.com.cn
Tel: +86-755-33010298
EP3620 VHF
Digital Portable Radio
User Manual
FCC ID:2AE6CEP3620VHF to gain further

I
UNPACKING ........................................................................................................................................1
Supplied Accessories .......................................................................................................................... 1
STANDARD/OPTIONAL ACCESSORIES ............................................................................................2
Standard Accessories .........................................................................................................................2
BATTERY INFORMATION .................................................................................................................... 3
Charging Operation .............................................................................................................................3
Charger Applied ..................................................................................................................................3
Notice for Charging Battery .................................................................................................................3
How to Charge .................................................................................................................................... 4
Normal Charging Tips .........................................................................................................................6
How to Store the Battery ..................................................................................................................... 6
PREPARATION ..................................................................................................................................... 8
Installing / Removing the Battery ........................................................................................................8
Installing / Removing the Antenna ...................................................................................................... 8
Installing / Removing the Belt Clip ......................................................................................................9
Installing the Additional Speaker/ Microphone (Optional) .................................................................. 9
Installing / Removing the Hand Strap ................................................................................................10
CONTENTS
SAFETY INFORMATION
transceiver is excellently designed with advanced technology. Please observe the following
precautions to perform your obligation, prevent personal injury and ensure the safety of transceiver
usage.
1. Keep the transceiver and accessories away from children.
2. Please do not try to open or modify the transceiver without permission, non-professional process
may also cause damage.
3. Please use assorted battery and charger to avoid damage.
4. Please use assorted antenna to ensure the communication distance.
5. Please do not expose the transceiver to long period of direct sunlight, nor place it close to heat
sources.
6. Please do not put the transceiver in excessively dusty or humid areas.
7. Do not use harsh chemicals, cleaning solvents to clean the transceiver.
8. Do not transmit without antenna.
9. When using this transceiver, we recommend transmitting for 1 minute then receiving for 4 minutes.
Continuous transmitting for long time or working in high power will heat the back of the transceiver.
Do not place the transceiver’s hot back close to any plastic surface.
10. If any abnormal odor or smoke detected coming from the transceiver, turn off the power and take off
the battery pack and its case. Then contact local dealers.
ATTENTION:
All tips above apply to accessories of your transceiver. If any device can not work normally,
please contact local dealers.
If you use any accessories made by other companies, Company does not guarantee the
operability and safety of the transceiver.

IIIII
Exiting an Emergency Mode ............................................................................................................20
FUNCTION MENU INTRODUCTION ....................................................................................................21
Character Input ...................................................................................................................................21
Menu Manual ......................................................................................................................................22
FUNCTION MENU SETUP ...................................................................................................................23
Radio Check .......................................................................................................................................23
Remote Monitor ..................................................................................................................................24
Initiating Remote Monitor .................................................................................................................... 24
Contacts Settings ................................................................................................................................ 25
Making a Group Call from Contacts ....................................................................................................25
Making a Private Call from Contacts ...................................................................................................25
Call Log Features ................................................................................................................................26
Viewing Recent Calls ..........................................................................................................................26
Storing an Alias or ID from the Missed Call List .................................................................................. 27
Deleting a Call from a Call List ............................................................................................................27
Call Alert Operation ............................................................................................................................. 28
Receiving and Acknowledging a Call Alert ..........................................................................................28
Making a Call Alert from the Contacts List .......................................................................................... 28
CONTENTS
PRODUCT OVERVIEW ........................................................................................................................11
SUMMARY ............................................................................................................................................14
Power on the radio .............................................................................................................................. 14
Adjust Volume ..................................................................................................................................... 14
BASIC OPERATIONS ........................................................................................................................... 15
Receiving or Making a Call .................................................................................................................15
Selecting a Zone ..............................................................................................................................15
Selecting a Radio Channel, Subscriber lD, or Group ID Procedure .................................................15
Receiving and Responding to a Group Call .....................................................................................15
Receiving and Responding to a Private Call .................................................................................... 16
Receiving an All Call .........................................................................................................................16
Making a Radio Call .........................................................................................................................17
Making a Call by the Channel Selector Knob .....................................................................................17
Making a Group Call .........................................................................................................................17
Making a Private Call .......................................................................................................................18
Making an All Call ............................................................................................................................. 18
Making a Group or Private Call with the One Touch Call Button ...................................................... 19
Emergency Alarm .............................................................................................................................19
CONTENTS

VIV
CONTENTS CONTENTS
Text Message Features .......................................................................................................................29
Writing and Sending a Text Message..................................................................................................29
Sending a Quick Text Message ..........................................................................................................30
Managing Fail-to-Send Text Messages ...............................................................................................31
Resending a Text Message .................................................................................................................31
Forwarding a Text Message ................................................................................................................ 31
Editing a Text Message .......................................................................................................................32
Managing Sent Text Messages ........................................................................................................... 33
Viewing a Sent Text Message ............................................................................................................. 33
Sending a Sent Text Message ............................................................................................................33
Deleting all Sent Text Messages from Inbox ....................................................................................... 34
Receiving a Text Message ..................................................................................................................35
Reading a Text Message ....................................................................................................................35
Managing Received Text Messages ...................................................................................................35
Viewing a Text Message from the Inbox .............................................................................................36
Replying a Text Message from the Inbox ............................................................................................ 36
Deleting a Text Message from the Inbox .............................................................................................37
Deleting All Text Messages from the Inbox .........................................................................................38
Privacy ................................................................................................................................................38
Dual Tone Multi Frequency (DTMF) (Analog) .....................................................................................39
Disable / Enable .................................................................................................................................. 39
Radio Disable ......................................................................................................................................39
Radio Enable ......................................................................................................................................40
Scan Lists ..........................................................................................................................................40
View the scan list ................................................................................................................................41
Scan instructions .................................................................................................................................41
Starting and Stopping Scan ................................................................................................................42
Responding to a Transmission During a Scan .................................................................................... 42
ADVANCED OPERATIONS .................................................................................................................. 43
Locking and Unlocking the Keypad .....................................................................................................43
Turning Keypad Tones On or Off ........................................................................................................43
Setting the Squelch Level (Analog) ....................................................................................................44
Setting the Power Level ...................................................................................................................... 44
Turning the VOX Feature On or Off ....................................................................................................45
Controlling the Display Backlight ........................................................................................................46
Turning the Radio Tones / Alerts On or Off .........................................................................................46

1VI
Switch Chinese and English ...............................................................................................................47
Turning the LED Indicator On or Off ...................................................................................................47
Turning the Introduction Screen On or Off .......................................................................................... 48
Accessing General Radio Information ................................................................................................48
Check radio ID ....................................................................................................................................49
Check Software Version ......................................................................................................................49
Check Codeplug Version .................................................................................................................... 49
Voice Recording (Optional) ................................................................................................................. 50
Man Down (Optional) .......................................................................................................................... 50
TROUBLESHOOTING .......................................................................................................................... 51
TECHNICAL SPECIFICATIONS ........................................................................................................... 52
UNPACKING
Carefully unpack the transceiver. We recommend you to identify the items listed in the following
table before discarding the packing material. If any items are missing or have been damaged during
shipment, please contact dealers immediately.
Supplied Accessories
Item Number Quantity
Antenna QA13V(136-174MHz) 1
Li-ion Battery Pack QB-44L 1
Battery Charger QBC-44L 1
AC Adaptor QPS-01 1
Belt Clip BC09 1
Hand Strap GS01 1
User Manual 1
CONTENTS

32
STANDARD/OPTIONAL ACCESSORIES
Standard Accessories
Antenna* 1
QA13V (136-174MHz)
Li-ion Battery Pack
(2000mAh) QB-44L
Charger
QBC-44L
AC Adaptor
(12V/500mA) QPS-01
Belt Clip
BC09
User Manual
Hand Strap
GS01
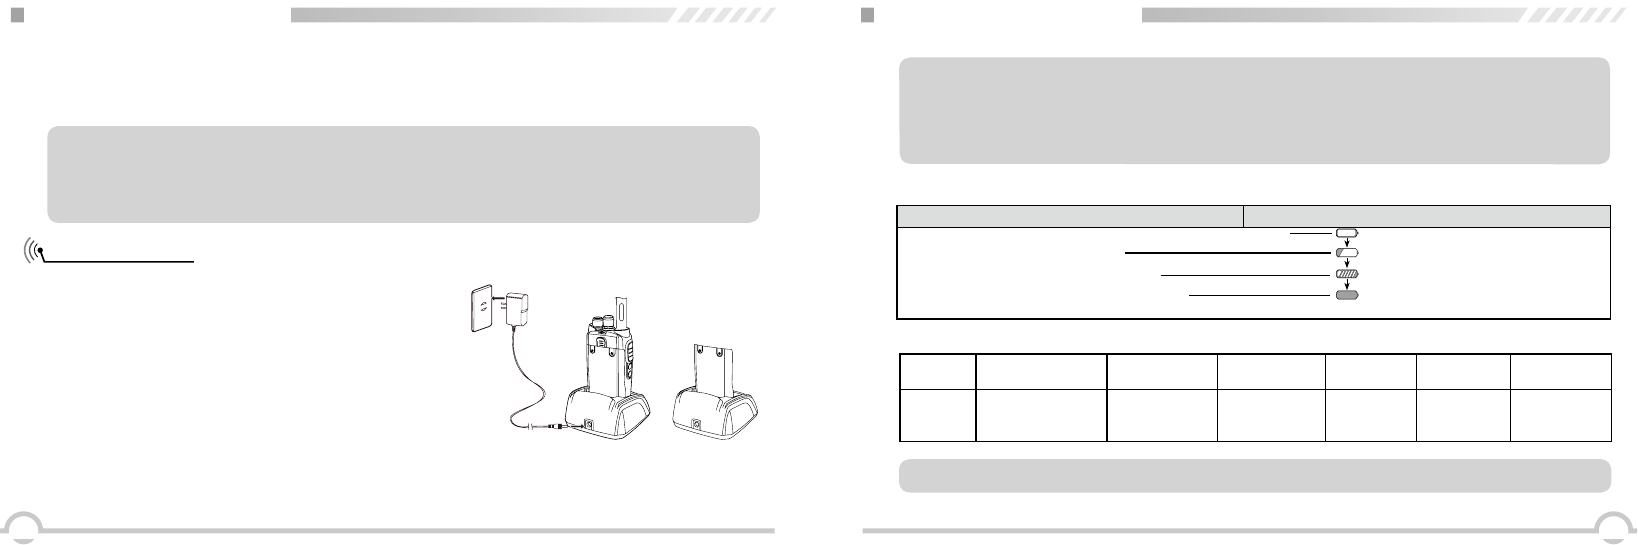
BATTERY INFORMATION
Charging Operation
The battery pack is not charged at the factory; please charge it before use.
Charging the battery pack for the rst time after purchase or extended storage (more than 2 moths)
may not bring the battery pack to its normal operating capacity. After fully charging / discharging
cycle for two or three times, the operating capacity will reach its best performance. The battery pack
life is over when its operating time decreases even though it is fully and correctly charged. Replace
the battery pack.
Charger Applied
Please use the specic charger appointed by our company. Other models may cause explosion and
personal injury. After installing the battery pack, if the radio displays low battery with red ashing
lamp or voice prompt, please charge the battery.
Notice for Charging Battery
▼Do not short circuit the battery terminals or throw the battery into re. Never attempt to remove
the casing from the battery pack, we show no responsibility for any results caused by modifying
freely without permission of our factory.
▼The ambient temperature should be between 5℃and 40℃while charging is in progress. Charging
outside this range may not fully charge the battery.
▼Always switch OFF the transceiver equipped with a battery pack before charging. Otherwise, it
will interfere with correct charging.
▼To avoid interfering the charging, please do not cut off the power or take out the battery during
charging.
54
BATTERY INFORMATION
WARNING: When keys, ornamental chain or other electric metals contact with the battery terminal,
the battery may cause damage or hurt bodies. If the battery terminal short circuit, it will generate a
lot of heat. Take care when carrying and using the battery. Remember to put the battery or radio into
insulated container. Do not put it into metal container.
How to Charge
1. Plug the AC adaptor into the AC outlet, and then plug
the cable of the AC adaptor into the DC jack located
on the back of the charger. The Indicator lights orange
(1s) and then goes out----waits to charge.
2. Plug the battery or transceiver into the charger.
Make sure that the battery terminals are in contact
with charging terminals well. The Indicator turns into
twinkling red-----Pre-charging begins.
3. After pre-charging for about 5 minutes, the red
indicator will stop twinkling----charging begins.
4. It takes approximately 5 hours to fully charge
the battery. When the lamp lights green, the charging is finished. Remove the battery or the
transceiver equipped with battery from socket.
▼Do not recharge the battery pack if it is already fully charged. This may shorten the life of the
battery pack or damage the battery pack.
▼Do not charge the battery or transceiver if it is damp. Dry it before charging to avoid danger.
BATTERY INFORMATION
NOTE: When charging a power-on transceiver equipped with battery, the indicating lamp will not
turn into green to show the fully charged status. Only when the transceiver is switched off, can the
lamp indicate normally. The transceiver consumes energy when it is powered on, and the charger
can not detect the voltage when the battery has been fully charged. So the charger will charge
battery in constant voltage and fail to indicate correctly whether the battery has been charged fully.
Charging Status Indicator Status
Standby (Self-examine lights orange 1 second when power on) None
Pre-charging (Pre-charging stage) Red light twinkles for about 5 minutes
Charging (Charge in a constant current) Lights red for about 5 hours
Fully charged (Charge in a constant voltage) Lights green
STATUS Self-Examine
When Power on No Battery Pre-charging Charge
Normally
Fully
Charged Fault
LED Orange
(for 1 second) None
Red light
twinkles for
5 minutes.
Red Green Red twinkles
for a long time
NOTE: Fault means battery heating, battery short-circuit or charger short-circuit.
5. Charging Process
6. LED Indicator

76
BATTERY INFORMATION
Normal Charging Tips
1. Self- Examination: When charging, orange light twinkles for 1 second and goes out, which means
the charger has passed its self-examination and it can charge the battery normally. If the light
remains orange or the red light twinkles, it means the charger can not pass its self-examination or
charge the battery.
2. Trickle Pre-Charging: If red light twinkles when battery is inserted into the charger, it means the
remnant voltage is low and the charger is trickle-charging the battery (Pre-Charging Status). The
charger will automatically turn into normal charging when the battery reaches a certain electric
quantity. If the red light stops twinkling, it means the remnant voltage meets a certain electric quantity,
the charger will charge the battery normally.
NOTE: Trickle charging (Pre-Charging Status) time can not exceed 30 minutes. If the indicating
lamp still twinkles after 30-minute trickle-charging, it means that the charger can not charge the
battery. Please check whether the battery or charger is damaged.
How to Store the Battery
1. If the battery needs to be stored, keep it in status of 80% discharged.
2. It should be kept in low temperature and dry environment.
3. Keep it away from hot places and direct sunlight.
BATTERY INFORMATION
WARNING:
▼Do not short circuit battery terminals.
▼Never attempt to remove the casing from the battery pack.
▼Never assemble the battery in dangerous surroundings, spark may cause explosion.
▼ Do not put the battery in hot environment or throw it into re, it may cause explosion.
98
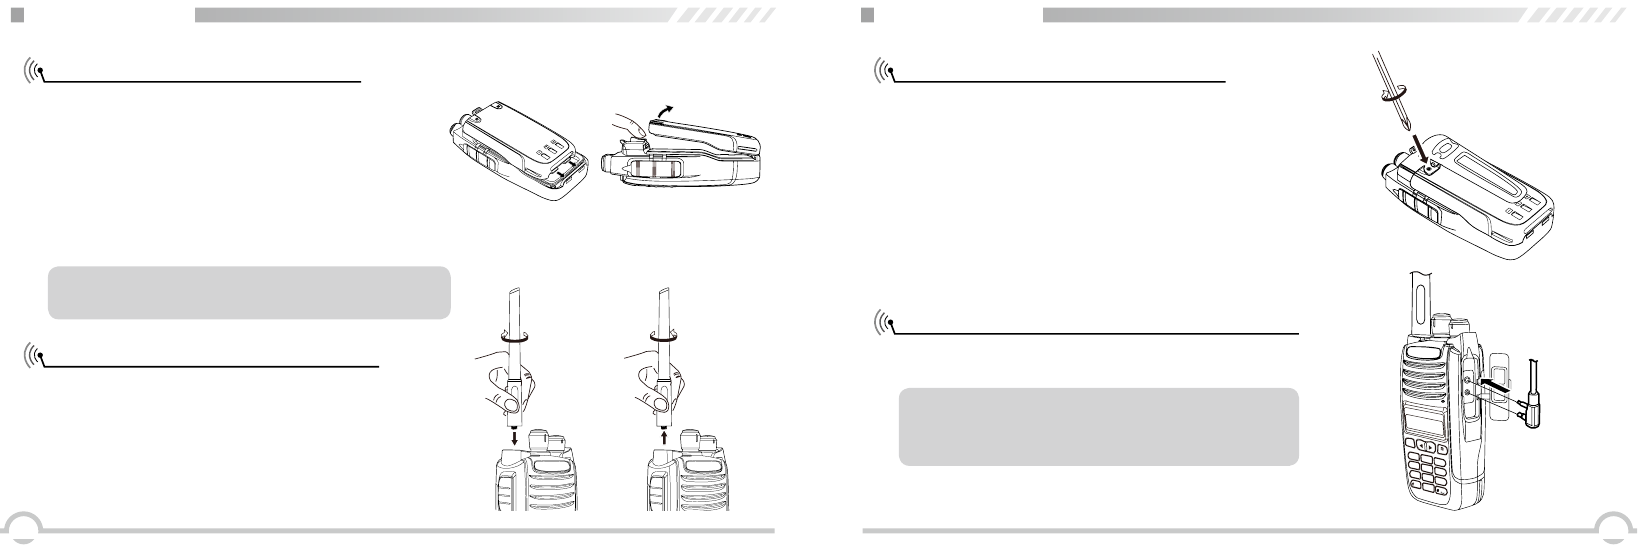
PREPARATION
Installing / Removing the Battery
1. Match the two grooves of the battery pack with the
corresponding guides on the back of the transceiver,
and then push it.
2. Press the battery pack until the release latch on the top
of the transceiver locks. After hearing a “click” sound,
the battery has been locked.
3. To remove the battery pack, slide up the release latch
and remove the pack away from the transceiver.
Installing / Removing the Antenna
■ Installing the Antenna:
Screw the antenna into the connector on the top of
the transceiver by holding the antenna at its base
and turning it clockwise to secure it.
■ Removing the Antenna:
Turn the antenna anticlockwise to remove it.
NOTE: Please turn off the transceiver before removing
the battery.
PREPARATION
Installing / Removing the Belt Clip
■ Installing the Belt Clip:
Place the belt clip to the corresponding grooves on the
back of the transceiver, and then clockwise screw it.
■ Removing the Belt Clip:
Turn anticlockwise the screws to remove the belt
clip.
Installing the Additional Speaker/ Microphone
Unveil the MIC-SP jack cover and then insert the
Speaker/Microphone plug into MIC-SP jack.
NOTE: Using the additional speaker/ microphone
will influence the waterproof performance of the
transceiver.
MENU
,.?
ABC
DEF
JKL
TUV
CAPS
GHI
PQRS
DEL
BACK
4
2
3
5
8
0
7
1
MNO
6
WXYZ
9
MIC
1110
PREPARATION
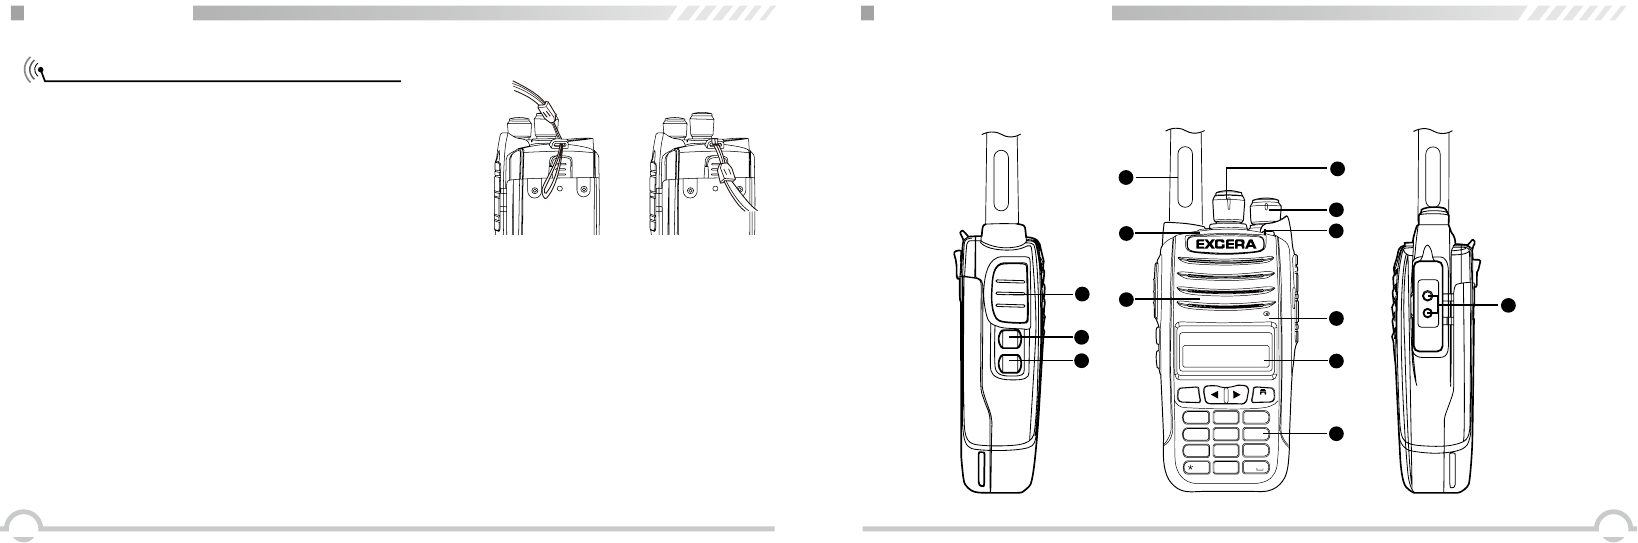
Installing / Removing the Hand Strap
Slide the loop of the hand strap through the eyelet on the
upper rear of the transceiver, then pull the entire hand
strap through the loop to secure the hand strap in place
and tighten the hand strap.
PRODUCT OVERVIEW
1
2
6
7
5
3
13
11
12
10
4
8
9
MIC
MENU
1
2
5
8
0
6
9
4
7
#
3
ABC
GHI
PQRS
CAPS
WXYZ
JKL
MNO
TUV
DEL
,.?
DEF
BACK
EP3260

1312
PRODUCT OVERVIEW
1 Antenna
2 POWER / VOLUME Switch:
Turn clockwise to switch on the transceiver, and turn anticlockwise till hearing “click” to switch
off the transceiver. After switching on the transceiver, turn clockwise to increase the volume and
anticlockwise to decrease the volume.
3 Channel Selector Knob
Turn the selector knob to select desired channel. Turn clockwise to increase channel, anticlockwise
to decrease channel.
4 Indicator
Indicate different working status
5 Top Key
It can realize different functions
6 MIC
7 Speaker
8 Display
9 Keypad
10 PTT Key
When you are making a call, please press and hold this key to speak into the microphone, release
the key to receive.
11 PF1 Key
It can realize different functions
12 PF2 Key
It can realize different functions
13 Additional Microphone / Speaker Jack
PRODUCT OVERVIEW
NOTE: The PF1 and PF2 key's function can be defined functions as below:
Side key:
1. Unassigned
2. All Alert Tones On/Off
3.
4. Monitor
5. One Touch Access 1
6. One Touch Access 2
7. One Touch Access 3
8. One Touch Access 4
9. One Touch Access 5
10. One Touch Access 6
11. Scan On/Off
12. Tight/ Normal Squelch
13. Privacy On/Off
14. VOX On/Off
15. Zone Toggle
16. Low Battery Indicator
17. Private Work On/Off
Emergency Call
1514
SUMMARY
NOTE: If all LED lights have set off, then the screen will not light up when power on. The
transceiver sounds beep to indicate radio is successfully powered on. If the user disable volume/voice
prompt function, no voice for power on.
Power on the radio
Adjust Volume
Turn on the radio by turning the Volume switch clockwise till a “click” is heard, and you will hear a
Power up beep if the dealer has set it. Then the screen displays DMR and the radio name you have
edited. LED lights green, if the backlight have been set auto open, then the screen lights up.
Rotate the Power/Volume knob to adjust the volume. Turn clockwise to increase the volume and
counterclockwise to decrease the volume.
BASIC OPERATIONS
Receiving or Making a Call
A zone is a group of channels. Your radio supports up to 250 zones, with a maximum of 16 channels
per zone. This transceiver has 1000 channels by software. Use the following procedure
to select a zone.
Once the required zone is displayed, if you have multiple zones in your radio, turn the
channel selector knob to select the channel, subscriber alias or ID,or group alias or ID.
To receive a call from a group of users, your radio must be congured as member of that group.
1.Selecting a Zone
2.Selecting a Radio Channel, Subscriber lD, or Group ID
3.Receiving and Responding to a Group Call
1. Press [
MENU
] to access menu mode.
2. Press [ / ] to zone, then press [
MENU
] to select.
3. The current zone is displayed the name of the zone.
4. Press [ / ] to the required zone and press [
MENU
] key to select.
5. The display shows <Zone> Selected momentarily, then back to the zone.
Zone
Zone1
Procedure:
When you receive a Group Call (while in the home screen);
1. The green LED lights.
2. The rst line of the display shows the caller alias and the RSSI icon. The second line displays the

1716
BASIC OPERATIONS
4.Receiving and Responding to a Private Call
1. The green LED turns on.
2. The rst line of the display shows the subscriber alias or ID, and the RSSI icon. The second line
displays Private Call and the Private Call icon.
3. Press the [PTT] button to respond to the call, and the red LED turns on.
4. Release the [PTT] button to listen.
5. If there is no voice activity for a predetermined period of time, the call ends.
A Private call is a call from an individual radio to another individual radio.There are two types of
Private Calls. The rst type is where a radio presence check is performed prior to setting up the call.
The other type sets up the call immediately.
Procedure:
NOTE: The radio stops receiving the All Call if you switch to a different channel while receiving the
call.
BASIC OPERATIONS
5.Receiving an All Call
6.Making a Radio Call
1.Making a Group Call
1. The green LED turns on.
2. The first line of the display shows the caller alias or ID, and the RSSI icon. The second line
displays All Call and the All Call icon.
An All Call is a call from an individual radio to every radio on the channel. It is used to make
important announcements requiring the user's full attention.
Procedure:
When you receive an All Call:
You can select a channel, subscriber ID, or group by using:
●The Channel Selector Knob
● One Touch Call button
●The Contacts list
● Manual Dial (via Contacts)--This method is for Private Calls only and is dialled using the keypad.
Making a Call by the Channel Selector Knob
group alias and the Group Call icon (in digital mode only).
3. Press the [PTT] button to respond to the call and the red LED turns on.
4. Release the [PTT] button to listen.
5. If there is no voice activity for a predetermined period of time, the call ends.
To make a call to a group of users, your radio must be congured as member of that group.
Procedure:
1. Turn the Channel Selector Knob to select the channel with the active group alias or ID.
2. Press the [PTT] button to make the call. The green LED turns on when the target radio responds.
The display shows the group call icon, the group alias or ID and transmitting radio alias or ID.

1918
BASIC OPERATIONS
2.Making a Private Call
3.Making an All Call
Procedure:
1. Turn the Channel Selector Knob to select the channel with the active subscriber alias or ID.
2. Press the [PTT] button to make the call. The rst line displays the subscriber alias or ID. The
second line displays Private Call and the private Call icon.
3. Release the [PTT] button to listen. When the target radio responds, the screen displays
subscriber alias or ID, and private call and private call icon.
4. If there is no voice activity for a predetermined period of time, the call ends. Radio returns to the
previous screen you were on priority.
This feature allows you to transmit to all users on the channel.
Procedure:
1. Turn the Channel Selector Knob to select the channel with the active All Call group alias or ID.
2. Press the [PTT] button to make the call. The display shows the All Call group alias or ID and the
All Call icon. Users on the channel cannot respond to an All Call.
BASIC OPERATIONS
4.Making a Group or Private Call with the One Touch Call Button
5.Emergency Alarm
This feature allows you to transmit to all users on the channel.
Procedure:
An Emergency Alarm is used to indicate a critical situation. You are able to initiate an emergency at
any time on any screen display even when there is activity on the current channel.
Your radio supports below types:
The One Touch Call feature allows you to make a Group or Private Call to a predened alias or ID
easily. This feature can be assigned to a short or long button press.
Procedure:
1. Press the One Touch Call button to make a Group or Private Call to the predeined
alias or ID.
2. Press the [PTT] button to make the call. The display shows the group/subscriber alias or ID, and
the Group/Private Call icon.
3. Release the [PTT] button to listen. When the target radio responds, the green LED turns on.
4. If there is no voice activity for a predetermined period of time, the call ends. Radio returns to the
previous screen you were on priority.
3. If there is no voice activity for a predetermined period of time, the call ends. Radio returns to the
previous screen you were on priority.
●Disable: This radio can not send emergency alarm, but can receive the emergency call from other
radios.

2120
BASIC OPERATIONS
6.Exiting an Emergency Mode
Your radio exits Emergency mode when one of the following occurs:
●Emergency Alarm acknowledgement is received. (for Emergency Alarm only)
●All retries to send the alarm have been exhausted.
●Press the button for emergency off.
●Press the [PTT] button.
NOTE: If your radio is powered off, it exits the Emergency mode. The radio will not reinitiate the
Emergency mode automatically when it is turned on again.
FUNCTION MENU INTRODUCTION
Character Input
You can check the radio features by 3*4 alphabet button. Use the buttons to input the subscriber
alias or ID and message. You need to press the buttons few times for many characters. Below sheet
shows the press times to get the required character.
Key 1 2 3 4 5 6 7 8 9 10 11 12 13
11 , ? @ & : % : * #
2 A B C 2
3D E F 3
4 G H I 4
5 J K L 5
6 M N O 6
7 P Q R S 7
8 T U V 8
9W X Y Z 9
00 note: press and input “0”, long press active capital, long press again inactive
capital.
* Press this button to delete the character.
#Press this button for a space.
●Regular: The radio sends an emergency alarm with audio or visual indicator.
●Silent: The radio sends an emergency alarm without any audio or visual indicator.
●Silent with Voice: In the state of emergency alarm, press the [PTT] button to send the call and
voice.
2322
FUNCTION MENU INTRODUCTION
Menu Manual
1. Press [
MENU
] to access menu mode, then press [ / ] to visit menu function;
2. Press [
MENU
] to select or access the sub-menu;
3. Press [
BACK
] to back to priority menu.
NOTE: The radio will auto exit the menu and back to the home screen after a period without any
activity
Call Log and Text Message only valid for digital channels. Or else the above operation is invalid.
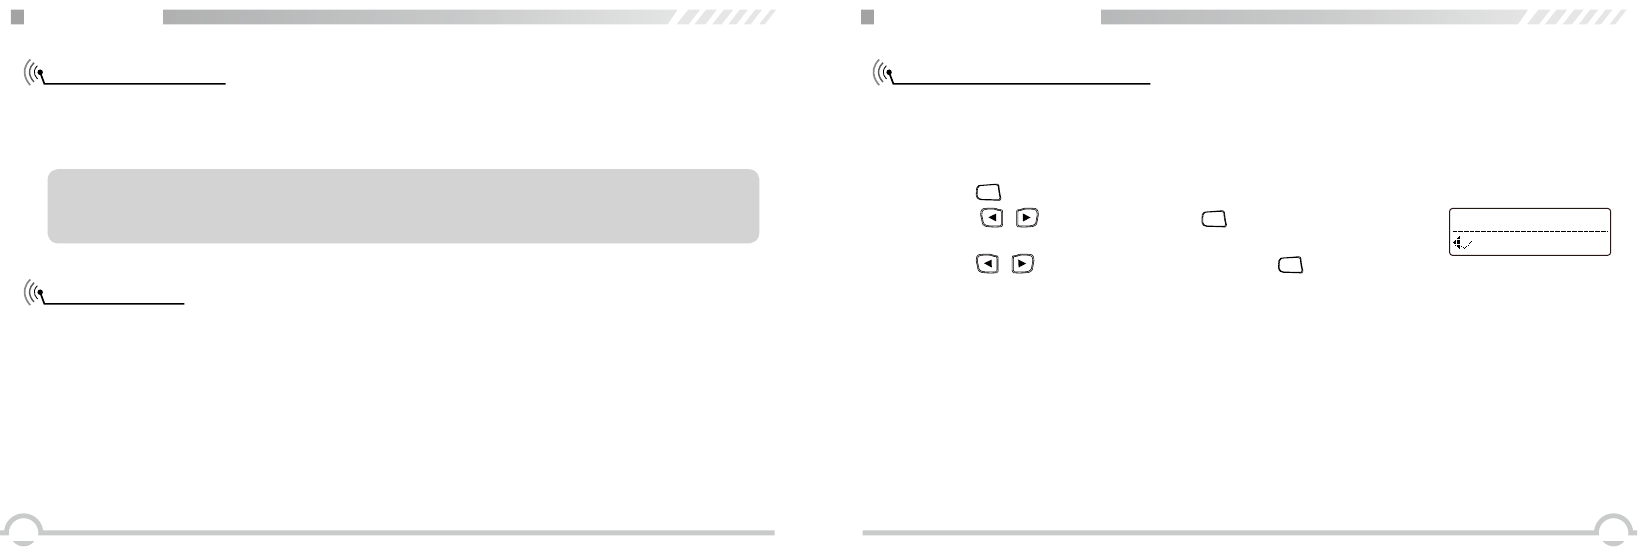
Radio Check
FUNCTION MENU SETUP
If enabled, this feature allows you to determine if another radio is active in a system without
disturbing the user of that radio. No audible or visual notication is shown on the target radio.
This feature is only applicable to subscriber aliases or IDs.
Sending a Radio Check.
Procedure: Use the menu.
1. Press [
MENU
] to access the menu.
2. Press [ / ] to Contacts and press [
MENU
] to select.
3. Press [ / ] to the required subscriber alias or ID and press [
MENU
] to select. Or press [
/ ] to Manual Dial and press [
MENU
] twice. Input the subscriber alias or ID and then press [
MENU
].
4. Press [ / ] to Radio Check and press [
MENU
] to select.
5. Screen displays radio checking: < subscriber alias or ID>, indicating that the radio is on checking,
LED turns red.
6. If the target radio is active in the system, a tone sounds and the display briey shows Target
Radio Available.
Or if the target radio is not active in the system, a tone sounds to show Target Radio Not
Available.
7. Radio returns to the subscriber alias or ID screen. If the transceiver is waiting for
acknowledgement, it stops all retries and exits the checking mode.
Call 1
Radio Check:
2524
Remote Monitor
Initiating Remote Monitor
FUNCTION MENU SETUP
Use the Remote Monitor feature to turn on the microphone of a target
radio (subscriber alias or ID only). No audible or visual indication is given
to the target radio. You can use this feature to monitor, remotely, any audible
activity surrounding the target radio.
Procedure:
1. Press [
MENU
] to access the menu.
2. Press [ / ] to Contacts and press [
MENU
] to select.
3. Press [ / ] to the required subscriber alias or ID and Press [
MENU
] to select or press [
/ ] to Manual Dial and press [
MENU
] twice to select. Input the subscriber alias or ID and press
[
MENU
] to select.
4. Press [ / ] to Remote Monitor and press [
MENU
] to select.
5. Screen displays Remote Monitor :< subscriber Alias or ID>, indicating that is on Remote Monitor.
LED turns red.
6. The display shows Remote Monitor Successful. Or the display shows Remote Monitor Failed.
7. If successful, the radio starts receiving audio from the monitored radio for a duration.
Once the timer expires, LED lights out.
Call 1
Remote Monitor:
FUNCTION MENU SETUP
Contacts Settings
Making a Group Call from Contacts
Making a Private Call from Contacts
Contacts provides "address-book" capabilities on your radio. Each entry corresponds to an alias or
ID that you use to initiate a call.
Each entry within Contacts displays the following information:
Procedure:
1. Press [
MENU
] to access the menu.
2. Press [ / ] to Contacts and press [
MENU
] to select.
3. Press [ / ] to the required group alias or ID.
4. Press the [PTT] button to make the call, release the [PTT], if any of the radios in the group
responds, LED turns green, and the group call icon displays in the screen.
Procedure:
●Call Type
●Call Alias
●Call ID
NOTE: You can add, delete, or edit subscriber IDs for the Digital Contacts list. This transceiver
can save at most 1000 contacts.
Contact 1/12
2726
FUNCTION MENU SETUP
Call Log Features
Viewing Recent Calls
1. Press [
MENU
] to access the menu.
2. Press [ / ]to Contacts and press [
MENU
] to select.
3. Press [ / ] to the required subscriber alias or ID. Or press [ / ] to Manual Dial and
press [
MENU
] twice to select. Use the keypad to enter a new subscriber ID.
4. Press the [PTT] button to make the call. The rst line displays subscriber alias or ID. The second
line displays private call or private call icon.
5. Release [PTT] button to listen, when the target radio responds, LED turns green and screen
displays target ID.
6. If there is no audio activity in duration, the call ends.
Your radio keeps track of all recent outgoing, answered, and missed Private Calls. Use the Call log
feature to view and manage recent calls.
The lists are Missed, Answered, and Outgoing.
Procedure:
1. Press [
MENU
] to access the menu.
2. Press [ / ] to Call Log and press [
MENU
] to select.
3. Press [ / ] to preferred list and press [
MENU
] to select.
4. The display shows the most recent entry at the top of the list.
5. Press [ / ] to view the list.
FUNCTION MENU SETUP
Storing an Alias or ID from the Missed Call List
Deleting a Call from a Call List
Procedure:
1. Press [ / ] to access the menu.
2. Press [ / ] to Call Log and press [
MENU
] to select.
3. Press [ / ] to Missed call and press [
MENU
] to select.
4. Press [ / ] to the required missed call alias or ID and press [
MENU
] to select.
5. Press [ / ] to Store and press [
MENU
] to select.
6. A blinking cursor appears. If needed, input the alias for that ID and press [
MENU
] .
7. The display shows Contact Saved. You can also store an ID without an alias.
Procedure:
1. Press [
MENU
] to access the menu.
2. Press [ / ] to Call Log and press [
MENU
] to select.
3. Press [ / ] to the required list and press [
MENU
] to select.
4. Press [ / ] to the required alias or ID and press [
MENU
] to select.
5. Press [ / ] to Delete Entry, and press [
MENU
] to select “Yes” or “No”.
6. Select “Yes”, press [
MENU
] to delete the entry and screen displays the entry deleted.
Or select “No”, press [
MENU
] to back to previous screen. When you select a call list and it contains
no entries, the display shows List Empty.
Delete Entries
Call 1
2928
FUNCTION MENU SETUP
Call Alert Operation
Receiving and Acknowledging a Call Alert
Making a Call Alert from the Contacts List
Call Alert paging enables you to alert a specic radio user to call you back when they are able to do
so. This feature is applicable to subscriber aliases or IDs only and is accessible through the menu
via Contacts or manual Dial.
Procedure:
1. LED blinks red light.
2. Press and release the [PTT] button to acknowledge the alert. Or press [
MENU
] to select Ignore and
to exit the Call Alert.
1. Press [
MENU
] to access the menu.
2. Press [ / ] to Contacts and press [
MENU
] to select.
3. Press [ / ] to the required subscriber alias or ID and press [
MENU
] to select. Or press [ / ] to Manual Dial and press [
MENU
] twice to select. A blinking cursor
appears. Enter the subscriber ID you want to page and press [
MENU
] .
4. Press [ / ] to Call Alert and press [
MENU
] to select. The display shows Call Alert:
<SubscriberAlias or ID>, indicating that the Call Alert has been sent.
5. The red LED turns on when your radio is sending the Call Alert.
Call Alert:
Call 4
FUNCTION MENU SETUP
NOTE: Press [
BACK
] at any time to return to the previous screen.
6. If the Call Alert acknowledgement is received, a tone sounds and the display shows Call Alert
Successful.
Or if the Call Alert acknowledgement is not received, a tone sounds and the display shows Call
Alert Failed.
Text Message Features
Writing and Sending a Text Message
Your radio is able to receive data, for example a text message, from another radio or an e-mail
application. The maximum length of characters for a text message, including the subject line is 164.
Procedure:
1. Press [
MENU
] to access the menu.
2. Press [ / ] to Messages and press [
MENU
] to select.
3. Press [ / ] to Write and press [
MENU
] to select.
4. A blinking cursor appears. Use the keypad to type your message. Press [ ] to move one space
to the left. Press [ ] or the [
#
] key to move one space to the right. Press the [
EL
D
] key to
delete any unwanted characters.
5. Press [
MENU
] once message is completed to select send or save.
6. Press [ / ] to the required alias or ID and press [
MENU
] to send. Or press [ / ] to
Manual Dial and press [
MENU
] to key in the subscriber ID and press [
MENU
] .
3130
FUNCTION MENU SETUP
Sending a Quick Text Message
Your radio supports a maximum of 50 Quick Text messages
Quick Text messages are predened, you can edit each message before sending it.
7. The display shows Text Message: <Subscriber/Group Alias or ID>, conrming your message is
being sent.
8. If the message is sent, a tone sounds and the display shows Message Sent. Or if the message is
not sent, a high tone sounds and the display shows Message Send Failed. If the message fails to
be sent, the radio returns to the Resend option screen.
1. Press [
MENU
] to access the menu.
2. Press [ / ] to Messages and press [
MENU
] to select.
3. Press [ / ] to Quick Text and press [
MENU
] to select.
4. Press [ / ] to the required Quick Text and press [
MENU
] to select.
5. A blinking cursor appears. Use the keypad to edit the message, if required. Press [ ] to move
one space to the left. Press [ ] or the [
#
] key to move one space to the right. Press the
[
EL
D
] key to delete any unwanted characters.
6. Press [
MENU
] once message is composed to send or save.
7. Press [ / ] to the required alias or ID and press [
MENU
] to select. Or press [ / ] to
Manual Dial and press [
MENU
] to select. Input the subscriber ID and press [
MENU
] .
8. The display shows Text Message: <Subscriber/Group Alias or ID>, conrming your message is
being sent.
Send
a
FUNCTION MENU SETUP
9. If the message is sent, a tone sounds and the display shows Message Sent. Or if the message is
not sent, a high tone sounds and the display shows Message Send Failed. If the message fails
to be sent, the radio returns to the Resend option screen. You can also press a call
button to send a quick message to a subscriber alias or ID.
Managing Fail-to-Send Text Messages
Resending a Text Message
Forwarding a Text Message
You can select one of the following options while at the
Resend Option screen:
●Resend
● Forward
●Edit
Procedure:
1. Press [
MENU
] to resend the same message to the same subscriber/group alias or ID.
2. If the message is sent, a tone sounds and the display shows Message Sent. Or if the message is
not sent, the display shows Message Send Failed.
Select Forward to send the message to another subscriber/group alias or ID.
Procedure:
3332
FUNCTION MENU SETUP
Editing a Text Message
1. Press [ / ] to Forward and press [
MENU
] to select.
2. Press [ / ] to the required alias or ID and press [
MENU
] to select. Or press [ / ] to
Manual Dial and press [
MENU
] button, input the subscriber ID and press [
MENU
] .
3. The display shows Text Message: <Subscriber/Group Alias or ID>, conrming your message is
being sent.
4. If the message is sent, a tone sounds and the display shows Message Sent. Or if the message is
not sent, a high tone sounds and the display shows Message Send Failed.
Select edit to edit the message before sending.
1. Press [ / ] to edit and press [
MENU
] to select.
2. A blinking cursor appears. Use the keypad to type your message. Press [ ] to move one space
to the left. Press [ ] or the [
#
] key to move one space to the right. Press the [
EL
D
] key to
delete any unwanted characters.
3. Press [
MENU
] once message is completed to select send or save.
4. Press [ / ] to the required alias or ID and press [
MENU
] to send. Or press [ / ] to
Manual Dial and press [
MENU
] to key in the subscriber ID and press [
MENU
].
5. The display shows Text Message: <Subscriber/Group Alias or ID>, conrming your message is
being sent.
6. If the message is sent, a tone sounds and the display shows Message Sent. If the message is not
sent, a high tone sounds and the display shows Message Send Failed.
FUNCTION MENU SETUP
Managing Sent Text Messages
Viewing a Sent Text Message
Sending a Sent Text Message
Once a message is sent to another radio, it is saved in Sent Items. The most recent sent text
message is always added to the top of the Sent Items list. The Sent Items folder is capable of
storing a maximum of 50 last sent messages. When the folder is full, the next sent text message
automatically replaces the oldest text message in the folder.
Procedure:
1. Press [
MENU
] to access the menu.
2. Press [ / ] to Messages and press [
MENU
] to select.
3. Press [ / ] to Sent Items and press [
MENU
] to select.
4. Press [ / ] to the required Message and press [
MENU
] to select.
You can select one of the following options while viewing
a sent text message:
●Resend
● Forward
●Edit
●Delete
NOTE: Press [
BACK
] anytime can back to the priority screen.
3534
FUNCTION MENU SETUP
Deleting all Sent Text Messages from Inbox
1. Review the text message, press [
MENU
] again.
2. Press [ / ] to resend, then press [
MENU
] to resend again.
3. The display shows Text Message: <Subscriber/Group Alias or ID>, conrming your message is
being sent to correct target radio. If the message is sent, a tone sounds and the display shows
Message Sent. If the message is not sent, a high tone sounds and the display shows Message
Send Failed. The radio back to the resend screen, press [
MENU
] to resend the message to the
same subscriber/group alias or ID.
● Forward, send the text message to other group/subscriber alias or ID.
●Edit, rewrite the selected message before sending.
●Delete, delete the selected message.
Procedure:
1. Press [
MENU
] to access the menu.
2. Press [ / ] to Messages and press [
MENU
] to select.
3. Press [ / ] to Inbox and press [
MENU
] to select.
4. Press [ / ] to Delete All and press [
MENU
] to select.
5. At Delete Message press [
MENU
] to select “Yes”. The display shows Inbox Cleared. Or at Delete
Message Press [ / ] to No and press [
MENU
] to return to the previous screen. When you
select inbox and it contains no text messages, the display shows List Empty.
Delete All
Inbox
FUNCTION MENU SETUP
Receiving a Text Message
Reading a Text Message
Managing Received Text Messages
When your radio receives a message, the display shows the alias or ID of the sender and the
message icon at the far left of the screen.
You can select one of the following options when receiving a text message:
●Read?
●Read Later
●Delete
Procedure:
1. Press [ / ] to Read? and press [
MENU
] to select.
2. The text message is open, and press [
MENU
] back to the main screen. Or press [ / ] to
access the Read Later or Delete option screen:
●Select Read Later to return to the screen you were in previously.
●Select Delete to delete the text message.
Use the Inbox to manage your text messages. The Inbox is capable of storing a maximum of 50
messages. Your radio supports the following options for text messages:
●Reply
● Forward
3736
FUNCTION MENU SETUP
Viewing a Text Message from the Inbox
Replying a Text Message from the Inbox
●Delete
●Delete All
Text messages in the Inbox are sorted according to the most recently received.
NOTE: Press [
BACK
] anytime to back to priority screen.
Procedure:
1. Press [
MENU
] to access menu.
2. Press [ / ] to Messages and press [
MENU
] to select.
3. Press [ / ] to Inbox and press [
MENU
] to select.
4. Press [ / ] to view the messages.
5. Press [
MENU
] to select the current message, and press [
MENU
] again to reply, delete, or forward
that message. Unread messages are indicated with an exclamation mark (!)
Procedure:
1. Press [
MENU
] to access menu.
2. Press [ / ] to Messages and press [
MENU
] to select.
3. Press [ / ] to Inbox and press [
MENU
] to select.
FUNCTION MENU SETUP
Deleting a Text Message from the Inbox
4. Press [ / ] to the required message and press [
MENU
] to select.
5. Press [
MENU
] once more to access the sub-menu.
6. Press [ / ] to Reply and press [
MENU
] to select.
7. Press [ / ] to Write and press [
MENU
] to select. A blinking cursor appears. Use the keypad
to write your message. Or press [ / ] to Quick Text and press [
MENU
] to select. A blinking
cursor appears. Use the keypad to edit your message, if required.
8. Press [
MENU
] to select and again for sending once message is composed.
9. The display shows Text Message: <Subscriber/Group Alias or ID>, conrming your message is
being sent.
10. If the message is sent, a tone sounds and the display shows Message Sent. Or if the message
is not sent, the display shows Message Send Failed and back to resend screen.
Procedure:
1. Press [
MENU
] to access menu.
2. Press [ / ] to Messages and press [
MENU
] to select.
3. Press [ / ] to Inbox and press [
MENU
] to select.
4. Press [ / ] to the required message and press [
MENU
] to select.
5. Press [
MENU
] once more to access the sub-menu.
6. Press [ / ] to Delete and press [
MENU
] to select.
7. At Delete Message? Press [ / ] to Yes and press [
MENU
] to select delete message.
Delete All
Inbox
3938
FUNCTION MENU SETUP
Deleting All Text Messages from the Inbox
Privacy
Procedure:
1. Press [
MENU
] to access menu.
2. Press [ / ] to Messages and press [
MENU
] to select.
3. Press [ / ] to Inbox and press [
MENU
] to select.
4. Press [ / ] to Delete All and press [
MENU
] to select.
5. At Delete Message? Press [ / ] to Yes and press [
MENU
] to select.
6. The Display shows Inbox Cleared. When you select the Inbox and it contains no text messages,
the display shows List Empty.
If enabled, this feature helps to prevent eavesdropping by unauthorized users on a channel by the
use of a software based scrambling solution.
Your radio must have privacy enabled on the channel to send a privacy-enabled transmission.
To unscramble a privacy-enabled call or data transmission, your radio must
have the same Privacy Key (for Basic Privacy), the same key value and key ID (for Enhanced
Privacy) as the transmitting radio.
If your radio receives a scrambled call that is of a different Privacy Key, you will either hear a
garbled transmission. You can preset at most 16 privacy groups, privacy key (4 Bytes), press the
privacy button to turn on/off scramble .
If the radio with privacy type, the main display shows scramble or none scramble icon.
FUNCTION MENU SETUP
NOTE: Performing Radio Disable and Enable is limited to radios with these functions enabled.
Dual Tone Multi Frequency (DTMF) (Analog)
Disable/ Enable
Radio Disable
The Dual Tone Multi Frequency (DTMF) have four received/transmit systems, you can set 32 groups
encode, every group with 30 characters.
The called party: the called party can set below decode respond by software:
Disable: When the radio receives disable code, then the radio is forbidden to receive/transmit.
Enable: In disable state the radio receives an enable code and back to normal.
You can enable or disable any radio in the system. For example, you might want to disable a stolen
radio, to prevent the thief from using it, and enable that radio, when it is recovered.
Procedure:
1. Press [
MENU
] to access menu.
2. Press [ / ] to Contacts and press [
MENU
] to select.
3. Press [ / ] to the required alias or ID and press [
MENU
] to select. Or press [ / ] to
Manual Dial and press [
MENU
] twice to select. Input the subscriber alias or ID and press [
MENU
] .
4. Press [ / ] to Radio Disable and press [
MENU
] to select.
Call 1
Radio Disable:
4140
FUNCTION MENU SETUP
Radio Enable
Scan Lists
5. The display shows Radio Disable: <Subscriber Alias or ID> and the LED turns red.
6. If successful, a tone sounds and the display shows Radio Disable Successful. Or if not
successful, a tone sounds and the display shows Radio Disable Failed. When disabling the radio,
do not press [
BACK
] , because you will not get the acknowledge info.
Procedure:
1. Press [
MENU
] to access menu.
2. Press [ / ] to Contacts and press [
MENU
] to select.
3. Press [ / ] to the required alias or ID and press [
MENU
] to select. Or press [ / ] to
Manual Dial and press [
MENU
] twice to select. Input the subscriber alias or ID and press [
MENU
] .
4. Press [ / ] to Radio Enable and press [
MENU
] to select.
5. The display shows Radio Enable: <Subscriber Alias or ID>.
6. If successful, a tone sounds and the display shows Radio Enable Successful. Or if not successful,
a tone sounds and the display shows Radio Enable Failed. When enabling the radio, do not press
[
BACK
] , because you will not get the acknowledge info.
Scan lists are created and assigned to individual channels/groups. Your radio can support up to
250 scan lists, with a maximum of 16 members in a list. Each scan list supports a mixture of both
analog and digital entries. You can add, delete, or prioritize channels by editing a scan list.
Call 1
Radio Enable:
FUNCTION MENU SETUP
View the scan list
Scan instructions
1. Select a channel with scan list by channel selector knob;
2. Press [ / ] to access the menu.
3. Press [ / ] to Scan and press [
MENU
] to select.
4. Press [ / ] to View List and press [
MENU
] to select.
5. Press [ / ] to view each member in the list.
If you set priority scan, the priority icon will appear on the left of the member alias, meaning this
member is priority channel 1 or 2. In the scan list, you can only have one priority channel 1 or
priority channel 2.
If non priority scan, then will not show the priority icon.
When you start a scan, your radio cycles through the scan list looking for voice activity.
The LED blinks red , and scan icon shows in the screen while in scan mode.
There are two ways of initiating scan:
●Manual Dial (Manual): Your radio scans all the channels/groups in your scan list. On entering
scan, you may use, depending on the settings, the can on/off button or by the
menu function to start scan.
● Auto Scan (Automatic): Your radio automatically starts scanning when you select a channel/group
that has Auto Scan enabled.
4342
FUNCTION MENU SETUP
Starting and Stopping Scan
Responding to a Transmission During a Scan
Press the Scan button or follow the scan menu.
1. Use the Channel Selector Knob to select a channel with a scan list.
2. Press [
MENU
] to access the menu.
3. Press [ / ] to Scan and press [
MENU
] to select.
4. The display shows Turn Off if scan is disabled. Or the display shows Turn On if scan is enabled.
5. Press [
MENU
] to select.
6. The LED blinks red and shows scan icon when Scan is enabled. Or the LED turns off and without
scan icon when Scan is disabled.
During scanning, your radio stops on a channel/group where activity is detected. The radio stays
on that channel for a time period known as "hang time".
Procedure:
1. Hold the radio vertically 1 to 2 inches (2.5 to 5.0 cm) from your mouth. If digital channel and
the Channel Free Indication feature is enabled, you will hear a short alert tone the moment the
transmitting radio releases the [PTT] button, indicating the channe is free for you to respond.
2. Press the [PTT] button during hang time. The red LED turns on.
3. Release the [PTT] button to listen.
4. If you do not respond within the hang time, the radio returns to scanning other channels/groups.
Locking and Unlocking the Keypad
Turning Keypad Tones On or Off
You can lock your radio's keypad to avoid inadvertent key entry.
Procedure:
1. Press [
MENU
] to access menu.
2. Press [ / ] to Utilities and press [
MENU
] to select.
3. Press [ / ] to Radio Settings and press [
MENU
] to select.
4. Press [ / ] to Keypad Lock and press [
MENU
] to select.
5. The display shows Keypad Locked and returns to the Home screen.
6. To unlock the keypad, press [
MENU
], then press [
EL
D
] .
7. The display shows Keypad Unlocked and returns to the Home screen.
You can enable and disable keypad tones if needed.
Procedure:
1. Press [
MENU
] to access menu.
2. Press [ / ] to Utilities and press [
MENU
] to select.
3. Press [ / ] to Radio Settings and press [
MENU
] to select.
4. Press [ / ] to Tones/Alerts and press [
MENU
] to select.
5. Press [ / ] to Keypad Tones and press [
MENU
] to select.
ADVANCED OPERATIONS
4544
Setting the Squelch Level (Analog)
Setting the Power Level
6. The display shows Turn On. Press [
MENU
] to enable keypad tones. The display shows Keypad
Tone On. Or the display shows Turn Off. Press [
MENU
] to disable keypad tones. The display shows
Keypad Tone Off.
You can adjust your radio's squelch level to filter out unwanted calls with low signal strength or
channels that have a higher than normal background noise.
Settings: Normal is the default. Tight lters out (unwanted) calls and/or background noise.
However, calls from remote locations may also be ltered out.
Press the Squelch button to toggle squelch level between normal and tight.
1.Press [
MENU
] to access menu.
2 .Press [ / ] to Utilities and press [
MENU
] to select.
3. Press [ / ] to Radio Settings and press [
MENU
] to select.
4. Press [ / ] to Squelch and press [
MENU
] to select and access sub-menu.
5. Choose either Tight or Normal and press [
MENU
] to select, screen returns to the previous menu.
You can customize your radio's power setting to high or low for each channel.
Settings: High enables communication with radios located at a considerable distance from you.
Low enables communication with radios in closer proximity.
Press the Power Level button to toggle transmit power level between high and low.
ADVANCED OPERATIONS
1. Press [
MENU
] to access menu.
2. Press [ / ] to Utilities and press [
MENU
] to select.
3. Press [ / ] to Radio Settings and press [
MENU
] to select.
4. Press [ / ] to Power and press [
MENU
] to select.
5. Change your current setting as prompted on the display.
6. Press [
MENU
] to select a new power level.
Press [
BACK
] Screen returns to the main menu, screen displays power level icon.
Turning the VOX Feature On or Off
This feature allows you to initiate a hands-free voice activated call on a channel.
NOTE: Turning this feature on or off is limited to radios with this function enabled.
Press the VOX button to toggle the feature on or off.
Procedure:
1. Press [
MENU
] to access menu.
2. Press [ / ] to Utilities and press [
MENU
] to select.
3. Press [ / ] to Radio Settings and press [
MENU
] to select.
4. Press [ / ] to VOX and press [
MENU
] to select.
5. The display shows VOX On. Press [
MENU
] to enable VOX, and screen shows VOX transmit
application. The display shows VOX Off. Press [
MENU
] to disable VOX, and screen shows VOX
transmit cancel.
ADVANCED OPERATIONS
4746
Controlling the Display Backlight
Turning the Radio Tones / Alerts On or Off
You can enable or disable the radio's display backlight as needed. The setting also affects menu
and keypad
backlight accordingly.
Procedure:
You can enable or disable the radio tones and alerts (except for the incoming Emergency alert
tone) if needed.
Procedure:
1. Press [
MENU
] to access menu.
2. Press [ / ] to Utilities and press [
MENU
] to select.
3. Press [ / ] to Radio Settings and press [
MENU
] to select.
1. Press [
MENU
] to access menu.
2. Press [ / ] to Utilities and press [
MENU
] to select.
3. Press [ / ] to Radio Settings and press [
MENU
] to select.
4. Press [ / ] to Backlight and press [
MENU
] to select.
5. The display shows Auto On. Press [
MENU
] to enable the display backlight. The display shows
Backlight Auto On.
Or the display shows Turn Off. Press [
MENU
] to disable the display backlight.
The display shows Backlight Turn Off. The display backlight and keypad
backlight are
automatically turned off if the LED indicator is disabled.
ADVANCED OPERATIONS
4. Press [ / ] to Tones/Alerts and press [
MENU
] to select and access sub-menu.
5. Press [ / ] to All Tones and press [
MENU
] to select.
6. The display shows Turn On. Press [
MENU
] to enable all tones and alerts. The display shows All
Tones On. Or the display shows Turn Off. Press [
MENU
] to disable all tones and alerts. The display
shows All Tones Off.
Switch Chinese and English
Turning the LED Indicator On or Off
You can switch Chinese or English language if needed.
1. Press [
MENU
] to access menu.
2. Press [ / ] to Utilities and press [
MENU
] to select.
3. Press [ / ] to radio setting and press [
MENU
] to select.
4. Press [ / ] to language selection and press [
MENU
] to sub-menu.
5. Press [ / ] to select Chinese or English, then press [
MENU
] to
select .
You can enable or disable the LED Indicator if needed.
Procedure:
1. Press [
MENU
] to access menu.
2. Press [ / ] to Utilities and press [
MENU
] to select.
3. Press [ / ] to Radio Settings and press [
MENU
] to select.
4. Press [ / ] to LED Indicator and press [
MENU
] to select.
ADVANCED OPERATIONS
4948
Turning the Introduction Screen On or Off
Accessing General Radio Information
5. The display shows Turn On. Press [
MENU
] to enable the LED Indicator. The display shows All
LEDs On.
Or the display shows Turn Off. Press [
MENU
] to disable the LED Indicator. The display shows All
LEDs Off. The display backlight, buttons, and keypad backlight are automatically turned off if the
LED indicator is disabled.
You can enable or disable the Introduction Screen if needed.
Procedure:
1. Press [
MENU
] to access menu.
2. Press [ / ] to Utilities and press [
MENU
] to select.
3. Press [ / ] to Radio Settings and press [
MENU
] to select.
4. Press [
MENU
] to Intro Screen and press [
MENU
] to select.
5. The display shows Turn On. Press [
MENU
] to enable the Introduction Screen. The display shows
Intro Screen On. Or the display shows Turn Off. Press [
MENU
] to disable the Introduction Screen.
The display shows Introduction Screen Off.
Your radio contains information on the following:
●Radio ID
● Software Version
●Codeplug Version
ADVANCED OPERATIONS
NOTE: Press [
BACK
] at anytime to back to priority screen.
Check radio ID
Check Software Version
Check Codeplug Version
1. Press [
MENU
] to access menu.
2. Press [ / ] to Utilities and press [
MENU
] to select.
3. Press [ / ] to Radio info, then press [
MENU
] to select.
4. Press [ / ] to Self Number and press [
MENU
] to select.
5. Screen shows radio alias and ID.
Display radio software version
1. Press [
MENU
] to access menu.
2. Press [ / ] to Utilities and press [
MENU
] to select.
3. Press [ / ] to Radio info, then press [
MENU
] to select.
4. Press [ / ] to Software version and press [
MENU
] to select.
5. Screen shows current software version.
Display radio Codeplug version.
1. Press [
MENU
] to access menu.
ADVANCED OPERATIONS

5150
Voice Recording (Optional)
Man Down (Optional)
2. Press [ / ] to Utilities and press [
MENU
] to select.
3. Press [ / ] to Radio info, then press [
MENU
] to selct.
4. Press [ / ] to CP version and press [
MENU
] to selct.
5. Screen shows current Codeplug version.
When enable recording, you can record in communication or remote monitoring. This radio supports
18 hours recording. You can play and delete the recording, etc. See attachment for details.
With this function enabled, if the angle of redio inclination is bigger than angle, the radio
will alarm. If lift the radio up and the angle bigger than recover angle, the radio stop
alarm. See attachment for details.
ADVANCED OPERATIONS
Phenomena Solution
The radio cannot be switched on or no
display after being switched on.
A. Battery pack may not be installed properly.
Remove the battery pack and install it again.
B. Battery power may be insufficient. Recharge or
replace the battery pack.
The battery doesn't last for long after being
charged.
The battery life is over. Please replace it with a new
battery pack.
Cannot talk to or hear other members in
your group.
Voices from
non-group members are heard on the
channel.
Analog: Change the CTCSS/DCS
tone and then change all radios' tones in your group.
1. Make sure the frequency and CTCSS are the
same as those of other members.
2. Make sure you are in the efciency range, cannot
too far away from other members.
3. Make sure you are set in correct digital mode, and
frequency.
4. In digital mode, make sure set correct code and
encrypt group in current channel.
5. In digital mode, make sure set correct receiving
contacts and receiving group.
TROUBLESHOOTING
27
General
Frequency Range Digital: 136-174MHzÿÿ
Analog: 136-174MHz
Channel Capacity 32 channels
Channel Spacing 25KHz (Wide Band)
12.5KHz (Narrow Band)
Phase-locked Step 5KHz, 6.25KHz
Operating Voltage 7.4V DC ±20% /(2000mAh)
Frequency Stability ±2.5ppm
Operating Temperature -20℃~ +55℃
Size 111×61×40 mm (with battery pack)
Weight 247g (with battery pack, antenna)
Receiving Part
Wide band Narrow band
Sensitivity(12dB SINAD) ≤0.25μV ≤0.35μV
Digital Sensitivity 0.3uV/-117.4dBm (BER 5%)
0.7uV/-110dBm (BER 1%)
Adjacent Channel
Selectivity ≥70dB ≥60dB
Intermodulation ≥60dB ≥60dB
Spurious Rejection ≥70dB ≥70dB
Blocking 84db
Hum & Noise ≥45dB ≥40dB
Audio Distortion ≤5%
Audio Power Output 1000mW/16Ω
Transmitting Part
Wide band Narrow band
Power Output 5W/1W
Modulation ±5.0KHz@
25KHz
±2.5KHz@
12.5KHz
Adjacent Channel Power ≥70dB ≥60dB
Hum & Noise ≥40dB ≥36dB
Spurious Emission ≤-36dB ≤-36dB
4FSK Digital Modulation 12.5KHz(data)7K60FXD
Audio Distortion ≤5%
Error Rate ≤3%
TECHNICAL SPECIFICATIONS
What This Warranty Covers and for How Long
Shenzhen Excera Technology Co., Ltd. warrants the Excera manufactured products listed below against defects in material and
workmanship under normal use and service for a period of time from the date of purchase as scheduled below:
Six Months
Accessories
How to Get Warranty Service
You must provide a completely filled warranty card, purchase invoice, and receipt in order to get warranty services. The purchase
invoice or receipt should indicate the radio, accessories, radio serial number, purchase date, and purchase amount.
What This Warranty Does Not Cover
1. Defect or damage resulting from use of the product in other than its normal and customary manner
2. Defect or damage caused by unauthorized product disassembly, repair, or modification
3. Damage due to force majeure, such as flood, lightning strike, earthquake, tsunami, fire, and abnormal voltage
4. Product that does not have a valid warranty certificate, such as warranty card, purchase invoice, or receipt
5. Product which has had the serial number and the tamper-proof label removed or made illegible
6. Normal and customary wear and tear
7. Rechargeable batteries if:
(1) any of the seals on the battery enclosure of cells is broken or shows evidence of tampering.
(2) the damage or defect is caused by charging or using the battery in equipment or service other than the product for which
it is specified.
One Year
Limited Warrarty
Modulation Limits
1000 channels EP3620 Digital Portable Radio
12.5KHz(data+voice)7K60FXW
Note:25KHz wideband not used for FCC

Customer Name:
Customer Phone:
Customer Address:
Purchase Date:
Warranty Card
Purchase Information
Model Number:
Serial Number:
Radio Information
Note:
● This warranty card applies to after-sale and maintenance services for the product and accessories described above.
● You must provide this warranty card and purchase invoice in order to get warranty services.
● The Company does not assume liability for damages caused by human factors. For more details, contact your local dealer.
Please tear from the Dotted line
Any Changes or modifications not expressly approved by the party responsible
for compliance could void the user's authority to operate the equipment.
This device complies with part 15 of the FCC Rules. Operation is subject to the following
two conditions: (1) This device may not cause harmful interference, and (2) this device
must accept any interference received, including interference that may cause undesired
operation.
Note: This equipment has been tested and found to comply with the limits for a Class B digital
device, pursuant to part 15 of the FCC Rules. These limits are designed to provide
reasonable protection against harmful interference in a residential installation. This
equipment generates, uses and can radiate radio frequency energy and, if not installed and
used in accordance with the instructions, may cause harmful interference to radio
communications. However, there is no guarantee that interference will not occur in a
particular installation. If this equipment does cause harmful interference to radio or television
reception, which can be determined by turning the equipment off and on, the user is
encouraged to try to correct the interference by one or more of the following measures:
—Reorient or relocate the receiving antenna.
—Increase the separation between the equipment and receiver.
—Connect the equipment into an outlet on a circuit different from that to which the receiver is
connected.
—Consult the dealer or an experienced radio/TV technician for help.
Privacy of communications may not be ensured when using this telephone!

Please tear from the Dotted line
This device complies with Industry Canada licence-exempt RSS standard(s). Operation is subject to the
following two conditions:
(1) this device may not cause interference, and
(2) this device must accept any interference, including interference that may cause undesired operation
of the device.
Le présent appareil est conforme aux CNR d'Industrie Canada applicables aux
appareils radio exempts de licence. L'exploitation est autorisée aux deux conditions
suivantes : (1) l'appareil ne
doit pas produire de brouillage, et (2) l'utilisateur de l'appareil doit accepter tout
brouillage radioélectrique subi, même si le brouillage est susceptible d'en
compromettre le fonctionnement